glossary - learning research & development center ... · web viewthe prime word will be either...
TRANSCRIPT
E-Prime: Getting Started Guide – Beta 3 Application: E-Studio Beta Version – Document in Progress
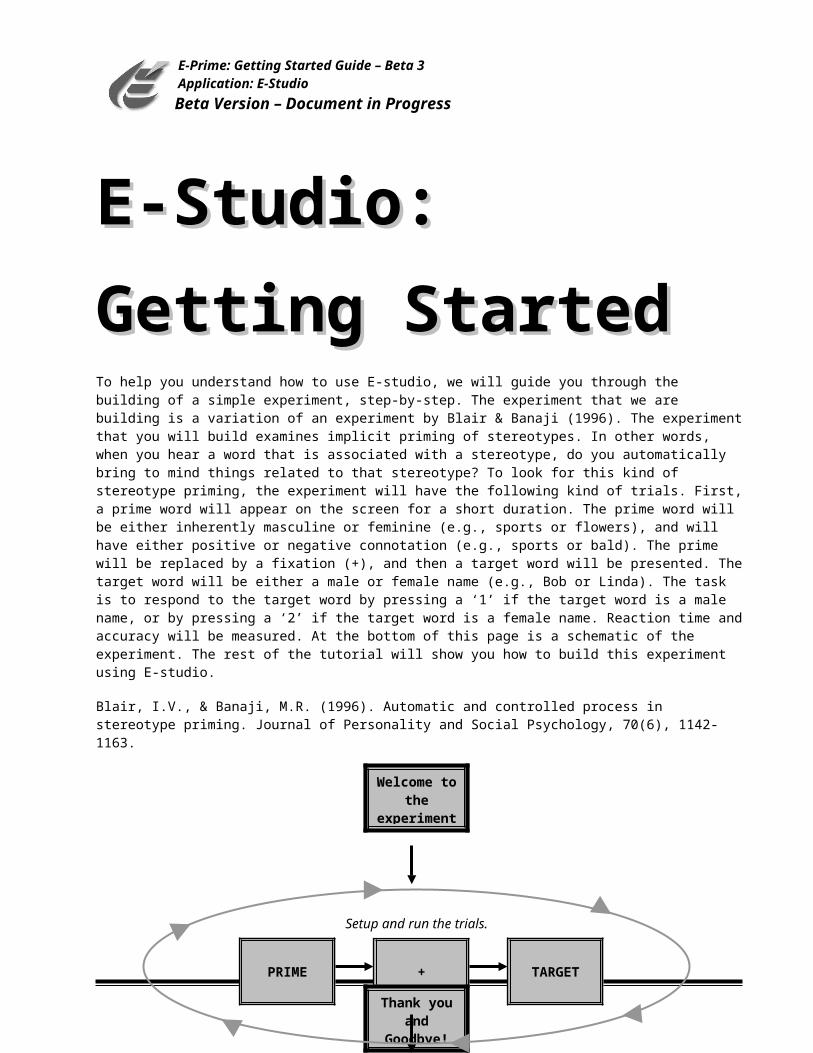
E-Studio: E-Studio: Getting StartedGetting StartedTo help you understand how to use E-studio, we will guide you through the building of a simple experiment, step-by-step. The experiment that we are building is a variation of an experiment by Blair & Banaji (1996). The experiment that you will build examines implicit priming of stereotypes. In other words, when you hear a word that is associated with a stereotype, do you automatically bring to mind things related to that stereotype? To look for this kind of stereotype priming, the experiment will have the following kind of trials. First, a prime word will appear on the screen for a short duration. The prime word will be either inherently masculine or feminine (e.g., sports or flowers), and will have either positive or negative connotation (e.g., sports or bald). The prime will be replaced by a fixation (+), and then a target word will be presented. The target word will be either a male or female name (e.g., Bob or Linda). The task is to respond to the target word by pressing a ‘1’ if the target word is a male name, or by pressing a ‘2’ if the target word is a female name. Reaction time and accuracy will be measured. At the bottom of this page is a schematic of the experiment. The rest of the tutorial will show you how to build this experiment using E-studio.
Blair, I.V., & Banaji, M.R. (1996). Automatic and controlled process in stereotype priming. Journal of Personality and Social Psychology, 70(6), 1142-1163.
- 1 -
Welcome to the
experiment!
PRIME + TARGET
Thank you and
Goodbye!
Setup and run the trials.

E-Prime: Getting Started Guide – Beta 3 Application: E-Studio Beta Version – Document in Progress
In this tutorial, using both text and pictures, we will be showing you what steps to do, where to click, what options to change, etc. Below are definitions of the different words, lines, and arrow-types that we will be using in showing you what to do. You may want to refer back to this glossary if you are unsure of what is required in a step.
Click or double click on this object
Drag the object
Double click Press the left mouse button twice in quick succession
Right click Press and release the right mouse button
Drag Press the left mouse button down and hold it as you move the mouse to drag the object to a new location on the screen, then release the left mouse button
Drop After a drag action as described above, release the left mouse button to place the object in its new location
Resize window To resize a window, position the mouse over the edge until the cursor changes to a double pointed arrow, then drag the window to the desired sizeAs an alternative, you can use the Window Menu for quick standardized arrangements
Select/Highlight Click on the object once or until it is highlighted (reverse video)
Tab Press the ‘Tab’ key on the keyboard
The left button with the line will minimize a windowThe middle button with the box will maximize a windowThe right button with the X will close the window
- 2 -

E-Prime: Getting Started Guide – Beta 3 Application: E-Studio Beta Version – Document in Progress
Task 1: Start the E-Studio application and name the experiment Task 1: Start the E-Studio application and name the experiment
The goal of this task is to open the E-Studio application and begin creating a new experiment.
1) Click the Start Menu, select Programs, and then select E-Prime. From the E-Prime menu, click the E-Studio application.This will launch the E-Studio application.
2) Select the Blank Experiment option and click OK.A dialog box is presented each time E-Studio is launched. Create a new experiment with E-Studio (Blank Experiment) or with the Paradigm Wizard. Another option is to open an existing experiment.
- 3 -

Task 2: Preview the E-Studio InterfaceTask 2: Preview the E-Studio Interface
This task will introduce you to the major components and features of the E-Studio interface. Note that you may resize the various windows to reveal more of the Workspace.
1) Locate the Toolbox, which contains objects that are dragged to procedural timelines. The objects are the basic building blocks of your E-Studio experiments.You can remove the captions on the objects by right clicking inside the Toolbox and removing the check next to the Captions option.
2) Locate the Structure window, which contains an outline or hierarchical representation of your experiment. This window features a tree view similar to that in Windows Explorer.
3) Locate the Properties window, which contains the list of associated properties
for each object. Each object has a set of associated properties which are displayed in the Properties window when the object has the focus (is highlighted).
4) Locate the Workspace, which contains the window representations of the various objects. You can open a window representation of an object by double clicking on it in the Structure window.

Task 3: Create your first objectTask 3: Create your first object
The next few steps will create a new text display object. All the properties related to this object will be explained in detail. Later, you will be expected to recall the steps necessary to set object properties.
1) Double click on the SessionProc object in the Structure window. This will open a window version of the object in the Workspace. The Procedure objects feature a timeline. This SessionProc object was created for you by E-Studio. As you work through this tutorial, resize the various windows to fit in the Workspace.
2) Drag the TextDisplay object from the Toolbox to the beginning of the SessionProc timeline. This is also reflected in the Structure window. Notice changes in the experiment representation in the Structure window as this tutorial continues.
3) Highlight the newly placed TextDisplay object (by clicking on it) to view its properties in the Properties window. Highlight the object in either the Structure View or in the procedural timeline of SessionProc. Every object has a set of associated properties which are displayed in the Properties window when the object has the focus (is highlighted).

Task 4: Name the TextDisplay objectTask 4: Name the TextDisplay object
In this step, you will learn how to name the objects in your experiment by using the Properties window.
1) In the Properties window, locate the (Name) property.This feature is similar to that in Visual Basic. The highlighted object’s associated properties are listed in alphabetical order. However, the most frequently used properties are located at the top of the list.
2) Click in the box to the right of (Name) and change the value to Instructions<Enter>. Notice that the object’s name has changed in both the Structure window and in the SessionProc timeline. These displays are updated when you press Enter. Remember: you may resize the windows in the Workspace.