gideros mobile game development - packt publishing | … · · 2013-11-08gideros mobile game...
TRANSCRIPT

Gideros Mobile Game Development
Arturs Sosins
Chapter No. 1 "Setting Up the Environment"
In this package, you will find: A Biography of the author of the book
A preview chapter from the book, Chapter NO.1 "Setting Up the Environment"
A synopsis of the book’s content
Information on where to buy this book
About the Author Arturs Sosins is a developer living with his wife Anna and son Tomass. He has a Master's degree in Computer Science and even though he is working as a developer full time, he still loves coding and shares his knowledge with others in his spare time.
In his last years at the university, he started chasing the dream of creating his own mobile games for fun and personal satisfaction in his spare time. After trying out lots of different cross-platform frameworks for mobile game development, he found Gideros SDK in January 2012 and liked it so much that he decided to stick with it when developing his games.
In the summer of 2012, he founded a group of like-minded developers/designers who go under the indie label Jenots.com (http://jenots.com/). They released Mashballs (http://jenots.com/mashballs), their first game, in September 2012 and are currently working on a couple of bigger game projects.
For More Information: www.packtpub.com/gideros-mobile-game-development/book

As there was a lack of learning materials and tutorials for Gideros and writing was one of the his favorite hobbies, he started creating different tutorials on how to accomplish simple things in Gideros. This led him to create his new blog http://appcodingeasy.com. Due to popularity of his tutorials and the support he provided on the Gideros community forum, he became the most active community member.
In February 2013, the Gideros team offered him the position in the Gideros developers' team, where he has been working since then, while continuing to work on games in his spare time.
I would like to thank my family, my wife Anna and my son Tomass, for helping me by giving me the time to work on this book. I would also like to thank Atilim and Deniz Cetins for giving me the great opportunity to work with them and get all the inside information on Gideros and the awesomely supportive Gideros community.
For More Information: www.packtpub.com/gideros-mobile-game-development/book

Gideros Mobile Game Development With the popularity of mobile app/game markets, there are also a lot of new development tools, especially cross-platform ones, that allow you to re-use the same code on multiple platforms. Gideros is a great example of such a tool.
Based on the Lua language, Gideros provides an easy way to create 2D games for both iOS and Android. With the one click on device testing an d completely free of charge development, it should be one of the first choices to try out for all mobile developers.
This book provides an easy way to start developing with Gideros, explaining all its basics and how you can apply them in creating your own cross-platform game.
What This Book Covers Chapter 1, Setting Up the Environment, provides information on how to prepare everything to start developing using Gideros.
Chapter 2, Managing Scenes and Gideros OOP, provides an introduction to Gideros OOP and scene management using your own classes.
Chapter 3, Implementing Game Logic, describes the main game implementation, from the game elements to level and progression logic.
Chapter 4, Polishing the Game, helps you spice up your game to make it more appealing and alive by learning different Gideros features.
For More Information: www.packtpub.com/gideros-mobile-game-development/book

Setting Up the EnvironmentThe fi rst thing we will do before building our application using Gideros is, setting up the environment and trying it out. We will need to download the latest version of Gideros designed specifi cally for your operating system, install it, create a project with some test code, and run it on both a computer and your mobile device.
As Gideros operates separately from Android or iOS SDKs and does not need them (context: Android or iOS SDKs) for testing or exporting apps, it is assumed that the user already has those SDKs installed; thus, it will not be covered in this chapter.
This chapter will guide you step by step on how to install Gideros on your operating system and prepare everything so you will be ready to develop your mobile game. This chapter will also introduce you to some of the basics of using Gideros Studio, managing your project, and running simple code.
Here is a list of links that might help you resolve any problems you might encounter with Gideros:
• Gideros Developer Guide: http://giderosmobile.com/guide
• Gideros API Reference: http://docs.giderosmobile.com/reference/
• Gideros Documentation: http://docs.giderosmobile.com/• Gideros Developer Wiki: http://www.giderosmobile.com/
DevCenter/• Gideros Knowledgebase (FAQ): http://members.
giderosmobile.com/knowledgebase.php• Gideros Community Forum : http://giderosmobile.com/
forum/
For More Information: www.packtpub.com/gideros-mobile-game-development/book
Setting Up the Environment
[ 6 ]
The following topics will be covered in this chapter:
• Explaining what is Gideros and why you should use it• Installing Gideros on Windows/Mac OS X/Linux• Installing Gideros Player for on-device testing (Android, iOS)• Creating a new project and running it on both, the desktop and device• Providing the basics of coding in Gideros• Managing the project fi les• Managing the project settings• Exporting a Gideros project to Android or Xcode projects
About GiderosGideros is a set of software packages created and managed by a company named Gideros Mobile. It provides developers with the ability to create 2D games for multiple platforms by reusing the same code. Games created with Gideros run as native applications, thus having all the benefi ts of high performance and the utilization of the hardware power of a mobile device.
Gideros uses Lua as its programming language, which is a lightweight scripting language with an easy learning curve and it is quite popular in the context of game development.
A few of the greatest Gideros features are as follows:
• Its rapid prototyping and fast development time by providing a single-click on-device testing that enables you to compile and run your game from your computer to device in an instant
• A clean object-oriented approach that enables you to write clean and reusable code
• Additionally, Gideros is not limited to its provided API and can be extended to offer virtually any native platform features through its plugin system
• You can use all of these to create and even publish your game for free, if you don't mind a small Gideros splash screen being shown before your game starts
For More Information: www.packtpub.com/gideros-mobile-game-development/book
Chapter 1
[ 7 ]
Installing GiderosCurrently, Gideros has no registration requirements for downloading its SDK, so you can easily navigate to their download page (http://giderosmobile.com/download) and download the version that is suitable for your operating system. As Gideros can be used on Linux only using the WINE emulator, it means that even for Linux you have to download the Windows version of Gideros.
So, to sum it up:
• Download the Windows version for Windows and Linux OS• Download the Mac version for OS X
Gideros consists of multiple programs providing you with a basic package needed to develop your own mobile games.
This software packag e includes the following features:
• Gideros Studio: It is a lightweight IDE to manage Gideros projects• Gideros Player: It is a fast and lightweight desktop; iOS and Android players
can run their apps with one click when testing• Gideros Texture Packer: It is used to pack multiple textures in one texture
for faster texture rendering• Gideros Font Creator: It is used to create Bitmap fonts from different font
formats for faster font rendering• Gideros License Manager: It is used to license your downloaded copy of
Gideros before exporting a project (required even for free accounts)• An offl ine copy of the Gideros documentation and Reference API to get
you started
RequirementsThe minimum system requirements to run Gideros are as follows:
• 1 GHz processor• 1 GB RAM• 210 MB disk space for MS Windows• 340 MB disk space for Mac OS X• 64-bit Snow Leopard version or later for Mac OS X
For More Information: www.packtpub.com/gideros-mobile-game-development/book

Setting Up the Environment
[ 8 ]
Gideros does not require the Android or iOS SDK's to develop, run, and export your app projects, thus you could build your app on Windows for both iOS and Android platforms. But you will require those SDKs after exporting, when you will want to build and submit your apps to the proper market.
Although installing and setting up those SDKs is not part of this chapter, let's examine what you need for each platform to build an exported project and submit them to the markets.
To build your app for an iOS platform you will need the following:
• iOS SDK• Xcode• Apple Developer License
To build your app for the Android platform you will need the following:
• Java JDK compatible with Android• Android SDK 2.2 or higher• Android compatible IDE (as Eclipse + ADT or Android Studio)
Installing Gideros on WindowsTo install Gideros on your Windows operating system, download the Windows version of Gideros from http://giderosmobile.com/download. Then double-click on the downloaded .exe fi le to launch the installation wizard.
The fi rst dialog will allow you to select the components we are going to install. You can leave all the components as selected by default and proceed by clicking on the Next button.
The next dialog will allow you to choose the directory where you want to install Gideros. You may provide any directory you want by clicking on the Browse button and navigating to your desired directory, or leave the default value and proceed by clicking on the Install button.
After that, the Gideros installation will start copying all the needed fi les and you will see the progress bar fi lling. When it completes, there will be a Completed message displayed and you may click on the Close button to fi nish the installation.
After that, you may launch Gideros Studio from your provided install location or from the Start menu, if you had chosen the default option to create shortcut there.
For More Information: www.packtpub.com/gideros-mobile-game-development/book

Chapter 1
[ 9 ]
Installing Gideros on Mac OS XTo install Gideros on your Mac OS X, download the Mac version of Gideros from http://giderosmobile.com/download. Then double-click on the downloaded .dmg fi le to mount it.
After that, all you have to do is to drag-and-drop the Gideros folder into your Applications directory. It will create a Gideros folder inside your Applications folder, where you will be able to access all Gideros-related fi les and programs.
Installing Gideros on LinuxThere is no Linux-specifi c version of Gideros, but it is possible to use a WINE emulator to run the Windows version of Gideros on Linux. If you don't have WINE already, you can install it using the apt-get install wine command or if you are using the Software Center, you can simply do the following:
• Open Software Center• Type wine• Install WINE
After that, you can download the Windows version of Gideros from http://giderosmobile.com/download.
Then, in the command line, navigate to the folder where you downloaded Windows installer and type wine installer_name.exe:
wine gideros_2013.06.1.exe
Then, to launch a specifi c Gideros application, for example, Gideros Studio, you need to navigate to the directory where Gideros was installed (typically, /home/USER/.wine/drive_c/Program Files/Gideros/) and type the following command:
wine GiderosStudio.exe
Creating your fi rst projectAfter you have downloaded and installed Gideros, you can try to create your fi rst Gideros project. Although Gideros is IDE independent, and lot of other IDE's such as LuaGlider, ZeroBrane, IntelliJ IDEA , and even Sublime can support Gideros, I would recommend that fi rst-time users choose the provided Gideros Studio. That is what we will be using in this book.
For More Information: www.packtpub.com/gideros-mobile-game-development/book

Setting Up the Environment
[ 10 ]
Trying out Gideros StudioYou should note that I will be using the Windows version for screenshots and explanations, but Gideros Studio on other operating systems is quite similar, if not exactly the same. Therefore, it should not cause any confusion if you are using other versions of Gideros.
When you open Gideros Studio, you will see a lot of different sections or what we will call panes. The largest pane will be the Start Page, which will provide you with the following options:
• Create New Project• Access offl ine the Getting Started guide• Access offl ine the Reference Manual• Browse and try out Gideros Example Projects
Go ahead and click on Create New Project, a New Project dialog will open.
Now enter the name of your project, for example, New Project. Change the location of the project if you want to or leave it set to the default value, and click on OK when you are ready.
Note that the Start Page is automatically closed and the space occupied by the Start Page is now free. This will be your coding pane, where all the code will be displayed.
But fi rst let's draw our attention to the Project pane, where you can see your chosen project name inside. In this pane, you will manage all the fi les used by your app.
For More Information: www.packtpub.com/gideros-mobile-game-development/book

Chapter 1
[ 11 ]
One important thing to note is that fi le/folder structure in Gideros Project pane is completely independent from your fi lesystem. This means that you will have to add fi les manually to the Gideros Studio Project pane. They won't show up automatically when you copy them into the project folder.
And in your fi lesystem, fi les and folders may be organized completely different than those in Gideros Studio.
This feature gives you the fl exibility of managing multiple projects with the same code or asset base. When you, for example, want to include specifi c things in the iOS version of the game, which Android won't have, you can create two different projects in the same project directory, which could reuse the same fi les and simultaneously have their own independent, platform-specifi c fi les.
So let's see how it actually works. Right-click on your project name inside the Project pane and select Add New File.... It will pop up the Add New File dialog .
Like in many Lua development environments, an application should start with a main.lua fi le; so name your fi le main.lua and click on OK. You will now see that main.lua was added to your Project pane. And if you check the directory of your project in your fi lesystem, you will see that it also contains the main.lua fi le.
Now double-click on main.lua inside the Project pane and it will open this fi le inside the code pane, where you can write a code for it.
So let's try it out. Write a simple line of code:
print("Hello world!")
What this line will do is simply print out the provided string (Hello world!) inside the output console.
Now save the project by either using the File menu or a diskette icon on the toolbar and let's run this project on a local desktop player.
For More Information: www.packtpub.com/gideros-mobile-game-development/book

Setting Up the Environment
[ 12 ]
Using the Gideros desktop playerTo run our app, we fi rst need to launch Gideros Player by clicking on a small joystick icon on the toolbar.
This will open up the Gideros desktop player. The default screen of Gideros Player shows the current version of Gideros used and the IP address the player is bound to.
Additionally, the desktop player provides different customizations:
• You can make it appear on the top of every window by navigating to View | Always on Top.
• You can change the zoom by navigating to View | Zoom. It is helpful when running the player in high resolutions, which might not fi t the screen.
• You can select the orientation (portrait or landscape) of the player by navigating to Hardware | Orientation, to suit the needs of your app.
• You can provide the resolution you want to test your app in by navigating to Hardware | Resolution. It provides the most popular resolution templates to choose from.
• You can also set the frame rate of your app by navigating to Hardware | Frame Rate.
Resolution selected in Gideros Player settings corresponds to the physical device you want to test your application on.
All these options give you the fl exibility to test your app across different device confi gurations from within one single desktop player.
Now when the player is launched, you should see that the start and stop buttons of Gideros Studio are now enabled. And to run your project, all you need to do is click on the start button.
For More Information: www.packtpub.com/gideros-mobile-game-development/book
Chapter 1
[ 13 ]
You might need to launch Gideros Player and Gideros Studio with proper permissions and even add them to your Antivirus or Firewall's exceptions list to allow them to connect.
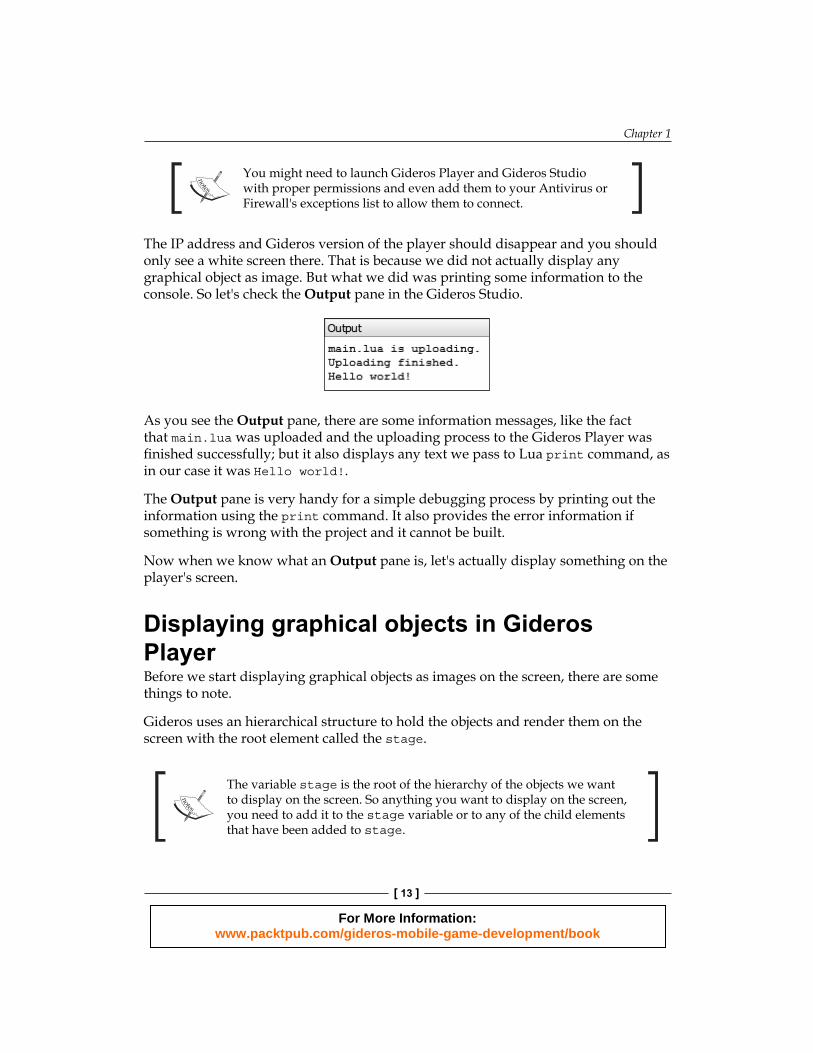
The IP address and Gideros version of the player should disappear and you should only see a white screen there. That is because we did not actually display any graphical object as image. But what we did was printing some information to the console. So let's check the Output pane in the Gideros Studio.
As you see the Output pane, there are some information messages, like the fact that main.lua was uploaded and the uploading process to the Gideros Player was fi nished successfully; but it also displays any text we pass to Lua print command, as in our case it was Hello world!.
The Output pane is very handy for a simple debugging process by printing out the information using the print command. It also provides the error information if something is wrong with the project and it cannot be built.
Now when we know what an Output pane is, let's actually display something on the player's screen.
Displaying graphical objects in Gideros PlayerBefore we start displaying graphical objects as images on the screen, there are some things to note.
Gideros uses an hierarchical structure to hold the objects and render them on the screen with the root element called the stage.
The variable stage is the root of the hierarchy of the objects we want to display on the screen. So anything you want to display on the screen, you need to add it to the stage variable or to any of the child elements that have been added to stage.
For More Information: www.packtpub.com/gideros-mobile-game-development/book

Setting Up the Environment
[ 14 ]
This hierarchy also determines the Z-ordering of the objects. For example, children always appear above their parents and, when the objects are at the same level, the later added ones appear on top.
Another thing to note is the coordinate system used by Gideros. It is the Cartesian coordinate system with (0, 0) coordinate in the top-left corner. And objects with higher y-axis value will be placed lower.
Gideros uses the Cartesian coordinate system, where the values of the y axis increase downward, thus making (0, 0) coordinate appear in the top-left corner, and (0, 100) coordinate appears below it.
Since this chapter will include more coding examples, every time you get lost and don't know how to use any specifi c class (what method the class has, which parameters it takes, and what is the purpose of the class), you can get more information in the reference manual provided with the copy of Gideros. You can easily locate it under the Help menu by selecting API Documentation. It should open a webpage with the list of all Gideros classes, and also their methods, properties, and events for each class, to show you what it does and how to use it.
Displaying textThe fi rst thing we will display is simple text. To do that, we need to create an instance of the TextField class, which would represent our text on the screen. Usually, we need to provide a font and text to the TextField class, but in this situation, we will simply provide nil instead of font. This is because we don't have any fonts yet and nil will tell Gideros that there is nothing we want to provide as font, and TextField would use the internal Gideros system font.
local text = TextField.new(nil, "This is a simple text")text:setPosition(10, 20)text:setScale(2)stage:addChild(text)
After that we store the instance of TextField in the local variable named text.
We then set the position of the text we want to display. By default, the position coordinate is (0, 0), which is in the upper-left corner. But we provide a small (10, 20) coordinate offset because text is positioned by the baseline and it won't appear whole at (0, 0) coordinates, but rather be a little outside the screen.
For More Information: www.packtpub.com/gideros-mobile-game-development/book

Chapter 1
[ 15 ]
Once the position is set, we scale the text twice as large as it is in the original, because the default font in Gideros is quite small.
In the end, we add the text to the stage variable, which will render this text on the screen.
Now let's try and run this modifi ed project again by clicking on the start button inside Gideros Studio. If everything is right, you will see in the Output pane that main.lua is being uploaded again and the provided text should appear on the screen of Gideros Player.
The next thing we will try to display on the screen is a simple image. For that purpose, you can use any image you have (or use the one provided in code examples); I will be using ball.png, which is an image of a simple football.
Displaying imagesThe fi rst thing to do is to copy the image in your Gideros project folder. After you have copied the image, go back to Gideros Studio. You should see that your image did not automatically appear in the Project pane and you need to add it manually. So just to emphasize this difference between Gideros Project fi les and your fi lesystem, let's create a folder inside the Project pane, where we will store our images.
To do that, right-click the mouse button on your project name in the Project pane and select New Folder. This should create a folder in the Project pane fi le hierarchy. Now name it images.
After it is done, let's add our image to this folder by right-clicking on the images folder, selecting Add Existing Files, and selecting our copied image in the opened fi le dialog. Our image should now have been added to the Project pane.
For More Information: www.packtpub.com/gideros-mobile-game-development/book

Setting Up the Environment
[ 16 ]
You can also click on your image in the Project pane and see a preview of it in the Preview pane.
Just to sum it up and emphasize the difference between Gideros project's fi le management and what actually happens on your fi lesystem, you can see that in Gideros Studio, your image is in the images folder. But if you open the directory of your project in your fi lesystem, you will see that there is no images directory and your image is where you copied it to.
This is an important difference that you need to understand and take advantage of when managing multiple projects that share the same codebase and assets.
So, our image is already in the project; now let's modify our project and display this image on the Gideros Player's screen.
local texture = Texture.new("images/ball.png")local image = Bitmap.new(texture)image:setPosition(40, 40)stage:addChild(image)
First, we need to create a texture representation of the image using the Texture class. After that, we can create the image object by providing our texture to the Bitmap class.
Then, we set it's position to (40, 40) coordinate and add it to the stage variable to render. If you run the project, you should see that the image is positioned at (40, 40) coordinate at its top-left corner. But Bitmap objects also have an option to position themselves using different internal points as positioning anchors, called anchor points.
For example, what if we want an image's center to be at (40, 40) coordinate. Of course we could calculate that! If we take a 80 x 80 image and want to position its center at (40,40), we need to position its left corner at (0, 0) coordinate.
But we also could simply change its anchor point to the relative center using (0.5, 0.5) as the anchor point like this: image:setAnchorPoint(0.5, 0.5).
For More Information: www.packtpub.com/gideros-mobile-game-development/book

Chapter 1
[ 17 ]
Anchor points provide an easy way to position an image relative to the provided origin point from 0 (image's top or left-side) to 1 (image's bottom or right-hand side). By default, the anchor point is (0, 0), which means that image will be positioned by its top-left corner. But when we set the anchor point to (0.5, 0.5), we say that we want to position the image by its center.
Thus in our case, the image's center will be on (40, 40) coordinate and not at the top-left corner.
And in the end, as usual, we must add the image to the stage variable for it to be rendered.
The separation between simple image object as the Bitmap class and texture representation as the Texture class in Gideros provides great fl exibility:
• Effi ciently reusing textures• Easily changing the textures of an existing Bitmap without changing the
Bitmap object itself• Allowing us to use textures for other purposes such as, for example, fi lling
the shapes
And again we can try and run this modifi ed project by clicking on the start button in Gideros Studio. If everything is ok it should display the image on top of the previously added text.
I made the image to overlay the text deliberately, just to show you how Z-ordering works in Gideros. Text was added to the stage as a fi rst element, and the image was added after it. Thus, if we position text and an image in the way they would overlay, the image would be on top of the text (only because it was added to the stage after the text).
For More Information: www.packtpub.com/gideros-mobile-game-development/book

Setting Up the Environment
[ 18 ]
Drawing shapesAnother thing we will try to display on the screen would be our drawn shape. For that purpose, there is a Shape class in Gideros, which could draw any shape from the provided coordinates that can have line style and fi ll style of a solid color image.
local shape = Shape.new()shape:setLineStyle(5, 0xff0000, 1)shape:setFillStyle(Shape.SOLID, 0x0000ff, 0.5)
First we create the Shape instance and store it in the shape variable. After that, we set the style of the lines used in the shape. In the example, by calling shape:setLineStyle(5, 0xff0000, 1), we use red lines that are 5 px wide and with full opacity. An opacity or alpha channel can be provided as values between 0 (fully transparent) and 1 (not transparent).
After we set our line styles, we also provide a fi ll style using the shape:setFillStyle(Shape.SOLID, 0x0000ff, 0.5) method call. Here, Shape.SOLID specifi es that we will be using a solid color to fi ll the shape (we could also use texture to fi ll the shape by providing Shape.TEXTURE). Then, similar to what we did before, we provide a fi ll color and an alpha value. In our case, blue and semi-transparent alpha value.
shape:beginPath()shape:moveTo(0,0)shape:lineTo(0, 100)shape:lineTo(100, 100)shape:lineTo(100, 0)shape:closePath()shape:endPath()
After we have set the style of our shape, we can draw something with that. To let the shape object know we want to start drawing, we need to call the shape:beginPath() method. After that, we can imagine that we have a pencil and we need to move it using shape:moveTo to some relative coordinate; in our case, (0, 0) coordinate. Then we can draw a line to another coordinate using the shape:lineTo method. In our case, we are drawing a square with 100 px wide sides.
When we've fi nished drawing, we can call the shape:closePath() method, which would automatically draw the line from a last and fi rst point in the shape. Then, we tell the shape object that we've fi nished drawing by calling the shape:endPath() method.
shape:setPosition(40, 40)stage:addChild(shape)
For More Information: www.packtpub.com/gideros-mobile-game-development/book

Chapter 1
[ 19 ]
And the last thing we should do is to position the shape and add it to the stage variable, so it would be rendered.
Let's again run the project by clicking on the start button in Gideros Studio.
Now, on the Gideros Player screen you should see some text and an image positioned over the text, because it was added to the stage variable after it. And you should see a square with red line and a blue semi-transparent fi lling over the image (because it was added to the stage variable after the image). As the fi lling of the square is semi-transparent, you should also see the image underneath it.
There is also an alternative to Shape, which is called the Mesh class, and it allows you to draw in triangles and provide much wider functionality, such as setting separate colors for vertices and creating gradients.
Additionally, meshes are more effi cient than shapes, but they are also much more complex to use (you would have to represent all shapes in triangles to use meshes) and have their own limitations, for example, mesh triangles can't be transformed (rotated, scaled) as Shapes.
Using the Sprite class for groups and layersBy now, we should have three objects positioned in the way they overlay each other. But what if we want to position them somewhere else on the screen while maintaining their relative positions (they would still overlay in exactly the same way)?
The fi rst thought would be to move them separately by the same amount of coordinates. It might be ok to do so while there are three objects, but imagine if we had hundreds of objects to move; it might not be so easy or effi cient to move them separately.
For More Information: www.packtpub.com/gideros-mobile-game-development/book

Setting Up the Environment
[ 20 ]
For that purpose we can use the Sprite class, which is actually just a dummy holder (without anything to render) and is meant to group other objects. So instead of adding our text, image, and shape straight to the stage variable, we fi rst create a Sprite object to group them and store it in the variable named group. Then we add our objects to group and in the end, add this group to the stage variable.
local group = Sprite.new()group:addChild(text)group:addChild(image)group:addChild(shape)stage:addChild(group)
After this modifi cation, we can move the whole group; so for example, if we call the group:setPosition(100, 100) method, the whole group would be moved to (100, 100) coordinates, maintaining their relative positions to each other.
This is one of the most common usages of the Sprite class, but there is another one, which is meant for dividing groups of objects into layers.
Now, for example, we have a need to add and remove objects in our game, but we want to add each new object underneath our current three objects, so that our text, image, and shape objects would always be on top overlaying any newly added object.
Of course, it may seem hard to achieve because Gideros uses a Z index based on an object's position in the rendering hierarchy, so all new elements will always be on top. But actually, it can be done very easily by using the Sprite object as a layer.
First, we will create a new group using the Sprite class and store it in the bottomLayer variable. Then we will add this layer below our group by using the stage:addChildAt method and providing index 1, which means fi rst. It will add bottomLayer before group, thus making it appear overlapped.
local bottomLayer = Sprite.new()stage:addChildAt(bottomLayer, 1)
After that, there is no need to use stage:addChildAt anymore, because every object you add to bottomLayer will automatically be underneath the group (because this layer by itself is underneath the group).
This example perfectly demonstrates how the rendering hierarchy works in Gideros, and you can experiment more with it to understand it better and use it to your advantage.
For More Information: www.packtpub.com/gideros-mobile-game-development/book

Chapter 1
[ 21 ]
Managing project settingsNow when we have something to see in our Gideros Player, let's experiment more with a player's customizations and change its resolution to something higher, such as an iPad's resolution (768 x 1024). When you have done this, hit the start button in our Gideros Studio to refresh the project.
Previously, our group, when set to (100, 100) coordinates, was almost at the center of the app, but now it's in the top-left corner. Why is that?
Well, previously we ran our app in the default (320 x 480) resolution, but now there is a higher resolution (768 x 1024), and relatively, our positioned group is still at the (100, 100) coordinate.
But does this mean you will have to create a different app layout for each resolution? Of course not, Gideros can handle the automatic scaling for you. Let's try it out.
Automatic scalingRight-click on your project name inside the Project pane in Gideros Studio and select Properties. The Project Properties dialog should pop up.
For More Information: www.packtpub.com/gideros-mobile-game-development/book
Setting Up the Environment
[ 22 ]
In the Project Properties dialog you can perform the following tasks:
• Select a scaling mode• Provide logical dimensions in which you will develop the application• Set application orientation• Set project FPS
While Orientation and FPS are self-explanatory, Logical Dimensions and Scale Mode may seem confusing at fi rst.
Let's try selecting Letterbox as Scale Mode and clicking on OK. Then click on the start button to reload the project in Gideros Player. If you did not have the iPad resolution selected in Gideros Player, then select it and reload the project again.
You should now see the same effect that was at the default resolution—our group is now at similar position.
So what happened? Gideros took our logical dimensions and automatically scaled it up to the iPad resolution, maximally without cropping it and maintaining the aspect ratio. That's awesome, isn't it?
I try to use the Letterbox scale mode in all my projects as it provides the most resistance to all resolutions, but let's see what the other options are:
• No Scale – Top Left: This mode does not scale the project• No Scale – Center: This mode does not scale the project, but centers it• Pixel Perfect: This mode centers the app and scales it with scale increments
such as 1/3, 1/2, 1, 2, or 3• Letterbox: This mode scales the project maximally preserving the aspect ratio
and without cropping the screen• Crop: This mode fi lls the screen completely by cropping all the content if
needed and preserving the aspect ratio• Stretch: This mode stretches the app on both dimensions without preserving
the aspect ratio• Fit Width/Height: This mode fi ts only one dimension preserving the
aspect ratio
To learn more about scale modes, check out the Gideros documentation here: http://docs.giderosmobile.com/automatic_screen_scaling.html.
So the Letterbox scaling does what we need; but if you look at the image closely, you will note that it is quite pixelated and appears in poor quality.
For More Information: www.packtpub.com/gideros-mobile-game-development/book

Chapter 1
[ 23 ]
There are two ways to handle this problem. The fi rst one would be by applying anti-aliasing to the image. You can do that by providing the second parameter true when creating texture like this: local texture = Texture.new("images/ball.png", true). Try it out and reload the project in the player by clicking on the start button inside Gideros Studio. You will see it looks better.
While this works great for small scaling, it is better to use larger images, for example, twice as large images for iPad retina resolution than used in iPhone. And again, Gideros comes to aid on this problem.
Automatic image resolutionAnother killer feature of Gideros is the automatic image resolution selection. Basically, it allows you to provide the same image in different (higher and lower) resolutions. Gideros will automatically select the image that suits the current screen resolution best, based on your logical dimensions and the scaling mode.
To do that, you need to specify the scaling ratios you will be using in your images. This can be done by navigating to the Project Properties and clicking the + button in the Graphics tab under Image Scales.
You can specify any suffi x you want together with the ratio, for example, let's specify three ratios such as:
• suffix: @small, ratio: 0.5
• suffix: @medium, ratio: 1
• suffix: @big, ratio: 2
Then create images with resolutions in these ratios and name them accordingly:
• [email protected] with 40 x 40 resolution• [email protected] with 80 x 80 resolution• [email protected] with 160 x 160 resolution
For More Information: www.packtpub.com/gideros-mobile-game-development/book

Setting Up the Environment
[ 24 ]
If you add all those images to Gideros Studio, then while running the app in different resolutions, Gideros will automatically choose the image that suits the device best. Thus for example, in Letterbox scaling, the image won't be so upscaled anymore, because the larger version of it will be used automatically.
All the example setting provided here could be interpreted as default or recommended. But you will need to experiment with your own combination of image sizes, logical dimensions, and scaling modes to achieve results most suitable for your game needs and device-resolution coverage.
Input settingsThat's all about the Graphics tab . Now let's move on to the next one, the Input tab.
Apart from the key inputs, there are two types of input events in Gideros:
• Mouse events meant for desktops• Touch events meant for mobile devices
For More Information: www.packtpub.com/gideros-mobile-game-development/book

Chapter 1
[ 25 ]
The settings on the Input tab allow you to generate mouse events on mobile devices and touch events (with single touch) on a desktop player. So both of the events would be compatible with any platform. Also for example, you could use mouse events to handle single touches more easier and touch events for multiple touches. Thus, it is recommended to enable generation of both events.
iOS-specifi c settingsOn the last tab, there are some iOS-specifi c settings allowing you to enable or disable the retina support and autorotation for a specifi c set of iOS devices. Due to the Apple policy, when reviewing apps, it is recommended to enable retina and autorotation either for both iPad and iPhone (if you are creating a universal project) or for the specifi c device you will be supporting in your app.
Installing the device playerTo test your Gideros project on the device, you must fi rst install the Gideros Player app (specifi c to each platform), then it will work similar to the Gideros desktop player, but without all the customization options, it will simply use your device settings.
Installing the Android playerInstalling Gideros Player for Android is quite easy. There is a GiderosAndroidPlayer.apk fi le provided inside the Gideros installation folder, which can be installed like any .apk fi le:
• By uploading to a memory card on the phone• By using your phone's data transfer cable• By uploading .apk fi le to the server and accessing it there from the phone
Additionally, Gideros provides a way to easily install and update your Gideros Android player from this address: http://giderosmobile.com/player/. You can simply bookmark it on your phone and access it with every new Gideros version.
Installing the iOS playerUnfortunately, due to Apple restrictions, it is not that easy to install the Gideros iOS player to your device and it is possible only using Mac. To do that, you will have to:
• Copy GiderosiOSPlayer.zip from the Gideros installation folder• Unzip and open it inside Xcode
For More Information: www.packtpub.com/gideros-mobile-game-development/book

Setting Up the Environment
[ 26 ]
• Connect your iOS device to your Mac (assuming you have already certifi ed your device)
• And run the project on your device
Similar to Android, you can also get the latest Gideros iOS player project from: http://giderosmobile.com/player/
Running the project on a device playerNow when you have Gideros Player installed on your device, let's try to run our project on it.
To do that, fi rst we need to launch the player on the device. Then take a note of the IP address the device player is displaying. This is the IP address we will input in Gideros Studio so it could connect to the device.
Inside Gideros Studio, you need to access the Player menu and select Player Settings....
It will pop up the Player Settings dialog. There you need to uncheck the Localhost checkbox and enter the IP address displayed on the device. After that, you can click on OK.
For More Information: www.packtpub.com/gideros-mobile-game-development/book

Chapter 1
[ 27 ]
The start button inside Gideros Studio should become inactive for some time and then again reactivate when Studio fi nally connects to the device. After that, you can simply click on the start button and the project you previously saw on the desktop player will appear on your device screen within seconds.
If the start button does not become active, ensure the following:
• Both the phone and computer are in the same LAN (connected to the same router)
• Gideros Studio is added to fi rewall and any antivirus exceptions you might have
• No other Gideros Studio is connected to your Gideros player (or vice versa)• Gideros Studio uses the TCP protocol with 15000 port, make sure no other
program blocks it
Exporting Gideros projectLast thing you may want to do with your project is to export it, so you could build an Android or iOS app and submit it to the market.
This can be easily done by accessing the File menu and selecting Export Project. If this is the fi rst time you are exporting an app, you may see a message: You do not have a license installed. Please run Gideros License Manager.
It means you need to license your copy of Gideros (even free accounts have to license it). To do that, you must have an account with Gideros (you can register one here: http://giderosmobile.com/members/register, if you haven't done so already).
Once registered, go to your Gideros installation folder and run GiderosLicenseManager.exe.
Enter the username and the password you used when registering with the Gideros website and click on Login.
For More Information: www.packtpub.com/gideros-mobile-game-development/book

Setting Up the Environment
[ 28 ]
If everything goes well, you should see a message with your license information.
If, for some reason, Gideros License Manager can't install a license, you can do it manually by logging into your Gideros account and accessing this page, http://giderosmobile.com/members/license, which allows you to get the license fi le and also provides detailed information on how to install it.
Now you can try accessing the Export Project option again in Gideros Studio. This time the Export Project dialog should pop up.
In the Export Project dialog, you can chose the platform to which you want to export with an option to provide some platform-specifi c settings. Additionally, you can select exporting a full project or checking Export assets only.
A full export should be done the fi rst time you are exporting your Gideros project. It will create a platform-specifi c (Android or Xcode) project with all your fi les inside.
After that, you may select to Export assets only, especially if you did some modifi cations to the exported Android or Xcode project (for example, installed some platform specifi c plugins).
When exporting assets only, Gideros will only export your fi les (images, code, and so on) that come from the Gideros Studio Project pane and will not override previously exported Xcode or Android project and its settings.
For More Information: www.packtpub.com/gideros-mobile-game-development/book

Chapter 1
[ 29 ]
After that, you may import the exported project in the platform-specifi c IDE and build or run it as you would when developing the app natively for this specifi c platform.
SummaryWe have successfully installed Gideros and tried it out. In this chapter, we created our fi rst project and added text, images, and shapes to it. We also ran it on Gideros desktop and our installed device player. We discussed the settings provided for each app and how to use them to your advantage.
In the next chapter, we will start building our game with the basics we learned here by creating separate scenes each game should require, such as start screen and settings screens. We will achieve this by using the Gideros OOP approach and creating our own Gideros classes.
For More Information: www.packtpub.com/gideros-mobile-game-development/book
Where to buy this book You can buy Gideros Mobile Game Development from the Packt Publishing website: http://www.packtpub.com/gideros-mobile-game-development/book. Free shipping to the US, UK, Europe and selected Asian countries. For more information, please read our shipping policy.
Alternatively, you can buy the book from Amazon, BN.com, Computer Manuals and most internet book retailers.
www.PacktPub.com
For More Information: www.packtpub.com/gideros-mobile-game-development/book