ggeeooss uusseerr gguuiiddee - georgia · once the results are displayed, the user can check their...
TRANSCRIPT

GEOS – User Guide for the Regulated Community
Page 1 of 42
GGEEOOSS UUSSEERR GGUUIIDDEE
FFOORR TTHHEE RREEGGUULLAATTEEDD CCOOMMMMUUNNIITTYY
Issued By:
Georgia Department of Natural Resources
Environmental Protection Division (EPD)
Prepared By: enfoTech & Consulting, Inc.
Revision: 2.0
Date: Feb 25, 2016

GEOS – User Guide for the Regulated Community
Page 2 of 42
TABLE OF CONTENTS
1 OVERVIEW OF GEOS .......................................................................................................................... 3
1.1 DEFINITIONS, ACRONYMS, AND ABBREVIATIONS ................................................................................ 3
1.2 PREREQUISITES .............................................................................................................................. 4
2 PUBLIC SITE ACCOUNT MANAGEMENT .......................................................................................... 5
2.1 ACCOUNT TYPES IN GEOS PUBLIC PORTAL ..................................................................................... 5
2.2 ACCOUNT CREATION PROCESS ........................................................................................................ 5
2.3 MANAGING ACCOUNT SETTINGS ....................................................................................................... 8
2.3.1 Manage Account General Information ...................................................................................... 9
2.3.2 Protect Account Security ........................................................................................................... 9
2.3.3 Managing Associated Consultants and Preparers .................................................................. 10
3 HOME PAGE (THE “DASHBOARD”) ................................................................................................ 11
4 APPLICATION SUBMISSION AND MANAGEMENT ........................................................................ 12
4.1 OVERVIEW OF APPLICATION SUBMISSION PROCESS ........................................................................ 12
4.2 APPLYING AND SUBMITTING SUBMISSIONS ...................................................................................... 13
4.2.1 Select a Submittal ................................................................................................................... 13
4.2.2 Start a Submittal ........................................................................................................................ 14
4.2.3 Online Form Data Entry .......................................................................................................... 15
4.2.4 Upload Attachment .................................................................................................................. 15
4.2.5 Online form validation ............................................................................................................. 15
4.2.6 Submittal Fee .......................................................................................................................... 16
4.2.7 Submit a submission ............................................................................................................... 16
4.3 TRACKING SUBMITTED APPLICATIONS ............................................................................................. 16
4.3.1 Review Submission Copy-of-Record ...................................................................................... 17
4.3.2 Tracking Submission Status – Work Activities ........................................................................ 18
4.3.3 Tracking Issuances from EPD ................................................................................................. 18
4.3.4 Tracking Correspondences with EPD ..................................................................................... 18
4.3.5 Tracking Emails Sent by GEOS .............................................................................................. 19
4.4 REQUEST FOR APPLICATION WITHDRAWAL ..................................................................................... 19
4.5 REQUEST FOR APPLICATION REVISION ........................................................................................... 19
4.6 REQUEST FOR PERMIT TERMINATION .............................................................................................. 19
5 PERMIT AND ISSUANCE MANAGEMENT........................................................................................ 20
5.1 AMEND PERMIT ............................................................................................................................. 20
5.2 RENEW PERMIT ............................................................................................................................. 21
6 APPENDIX ........................................................................................................................................... 22
6.1.1 Submit NPDES Municipal Permit Application ......................................................................... 22
6.1.2 Submit for Title V Application .................................................................................................. 30
6.1.3 Submit Land Branch Applications ........................................................................................... 38
6.1.4 Submit Online Fee Payment ................................................................................................... 40

GEOS – User Guide for the Regulated Community
Page 3 of 42
1 Overview of GEOS GEOS is an EPD Portal that provides the one-stop interface the ability to allow the regulated community to submit information to EPD, and also to support the general public to query environmental data of their interests. (A) For the Regulated Community: GEOS will serve as a central platform for the facility to manage permit applications, permits, reporting requirements, and compliance reports. The GEOS offers online options for a wide spectrum of submittals, including:
Environmental Permitting o Apply new permits o Amend permits o Renew permits
Environmental Reporting o Submit compliance reports o Submit monitoring data
The initial launch will offer air permit options regulated under the Clean Air Act Title V Operation permit program, and surface water permit options required under the Clean Water Act Georgia Pollution Elimination System. EPD will continue to enhance the GEOS and offer additional online submittal features in the future.
GEOS offers the following functions for the regulated community:
Establish a user account and manage all submittals online
Apply environmental permits, certificates, licenses, and other environmental issuances online
Submit environmental compliance reports
Monitor the processing status of all online submittals and allows correspondence with EPD Staff
Keep track of all submission history
Manage past and current environmental issuances for record keeping, amendment, renewal, and termination
(B) For the General Public: The GEOS offers an online tool for the general public to:
Participate in obtaining public notices, and provide comment on draft permits proposed by EPD
Query environmental permits
Submit complaints
1.1 Definitions, Acronyms, and Abbreviations
This subsection provides the definitions of all terms, acronyms, and abbreviations required to properly interpret the System Design Document.
Term Definition
GEOS Georgia EPD Online System: Online submittal system for environmental data
FIS Facility Identification System
FIMS Fee Information Management System
LEMIR Land Environmental Management Information Repository
GIS Geographic Information System: Utility that allows for online mapping.
NPDES National Pollutant Discharge Elimination System: Application for a permit to allow a POTW to discharge treated wastewater to the environment.
WLA Waste Load Application: General information application submitted alongside the NPDES application.
Title V Title V of 1990 Clean Air Act, the environmental law for the operation permits mandated under the 40CFR Part 70 regulations
LEAD Lead-based Paint

GEOS – User Guide for the Regulated Community
Page 4 of 42
Term Definition
GUST GUST – GA Underground Storage Tank Trust Fund
STC Scrap Tire Complaint
UTD Used Tire Dealer
STP Scrap Tire Processor
STGN Scrap Tire Generator
BFP Brownfield Program
HRN HSRA Release Notification
STS Scrap Tire Sorter
ST-CR Tire Carrier
STR Scrap Tire Re-treader
STBR Scrap Tire Beneficial Reuse
ST-TD Tire Dump
SWTF SWTF – Solid Waste Trust Fund
HWTF HWTF – Hazardous Waste Trust Fund
RRP LBP Renovation Repair & Painting
SW-LEAD Solid Waste Violation - Lead-based Paint
HSI Hazardous Site Inventory
ASB Asbestos
AHERA Asbestos Hazard Emergency Response Act of 1986
VRP Voluntary Remediation Program
UEC Uniform Environmental Covenant
CAA Corrective Action Agreement
PAF Project Assignment Form
PP Prospective Purchaser
PPCAP Prospective Purchaser Corrective Action Plan
PPCSR Prospective Purchaser Corrective Status Report
GIS Geographic Information System: Utility that allows for online mapping.
1.2 Prerequisites
In order to use the GEOS system, the user will need the following:
Internet connection
IE 7.0 or higher
PDF file Viewer (for viewing PDF files only)

GEOS – User Guide for the Regulated Community
Page 5 of 42
2 Public Site Account Management If you plan to submit data through GEOS, you will need to establish a user account. This section explains the types of users and details on how to create and manage an account.
If you do not plan to make any online submittal, you do not need an account. You could query data or submit an anonymous complaint without a user account.
2.1 Account Types in GEOS Public Portal
Currently, GEOS has two types of public accounts – Responsible Official and Preparer. It is important for the user to identify their role because each account has different access privileges. The table below explains in detail the difference between the two account types.
User Type Purpose Account Privileges
Responsible Official (RO)
Only the RO account can certify and submit applications in GEOS.
An RO can only maintain one User Account, but have this account to have the RO privileges for certain facilities and have the preparer rights for other facilities. If the RO plans to certify a submittal, the RO must get your account approved by EPD as the RO for that facility.
Will be issued a PIN once their account privileges are approved by EPD
View and prepare an electronic data entry form in GEOS
Certify and submit an electronic data entry form in GEOS
View submitted data in GEOS
Keep track of the status of submitted records
Keep track of issuances
Associate a consultant to their account to prepare applications
Preparer A preparer is someone who is assigned by a RO to create and prepare applications for their facility.
The preparer has no right to actually submit an application but can prepare applications for a single or multiple ROs that have he/she associate with. The types of application and the facilities that the preparer can prepare applications for are all defined by the RO. An RO can be associated as a preparer for another RO.
View and prepare an electronic data entry form in GEOS
View submitted data in GEOS
Keep track of the status of submitted records
Keep track of issuances
Fee Payment Fee Payment Account Type is designed for user who only wants to user GEOS to make payments.
View and submit Online Payment – FIMS
Track Account Transaction
2.2 Account Creation Process
Anyone who has access to the GEOS Public Site will be able to create a Public User Account. Without an account, the user cannot access the GEOS system and have access to the features provided by GEOS. Follow these steps below to obtain a public user account.

GEOS – User Guide for the Regulated Community
Page 6 of 42
Step 1: Click the “Create a New Account” link in the login page.
Step 2: The user will need to enter in their personal identification information (Business, Name, Username, Title, etc.) along with their contact information (address, e-mail, phone number).
Any field that contains an icon is required and must be filled in in order to continue. If these fields are not filled, the system will display a validation error that fields are missing. Once complete, the user should click the ‘Next’ button.
By placing the mouse over the icon, a help box will be displayed to provide additional information.
Step 3a: The user will have to select their role associated to the facility. If the user is a ‘Preparer’, then the ‘Preparer’ account type should be selected.
Step 3b (for Responsible Official Only): If the user is a Responsible Official, then they will need to select which application type he/she is responsible for and for which facilities. The ‘Associate New’ button will allow the user to search through a list of facilities to add to their profile.

GEOS – User Guide for the Regulated Community
Page 7 of 42
The RO will need to associate a facility to his/her account in order to create and submit applications for the selected facility. The facility search feature allows the user to search the master facilities by name. Once the results are displayed, the user can check their facility(s) and the application they are responsible for. If the user searches and cannot find their facility(s) listed, the system will provide methods of how to contact the EPD to have EPD add the new facility(s).
Step 4: Once the selections have been saved, the user should move to the next section. The next section will require the user to provide answers to a few security questions. These questions will be used later on to retrieve a lost password and used to submit applications.
Step 5: To finalize the application, a CAPTCHA needs to be verified. Once verified, the account will be created.
Step 6: The system will display a message with instructions on how to activate the account so that all features can be opened.
Step 6a (for Responsible Offical Only): The RO is required to print out, sign and mail an Electronic Signature Agreement (also known as the “Subscriber Agreement”) to EPD for “Certify & Sign” privilege. This form is needed by the EPD so that the EPD can approve of the account association to the facility and activate the facility in GEOS for the applicant. By clicking the “Print Subscriber Agreement” link, GEOS will auto-fill the subscriber agreement form for the user. As a ‘Responsible Official’, the ‘Subscriber Agreement’ will need to be printed, signed, and sent back to the agency. The mailing address will be contained in the ‘Subscriber Agreement’ form.

GEOS – User Guide for the Regulated Community
Page 8 of 42
Step 7: The user will receive an e-mail notifying them of their account creation with their login name and randomly generated password. After receiving the login/password information, the user can now use this information to log into GEOS Public Portal.
Step 8 (Optional): If the user forgot their password, he/she can simply click on the ‘Forgot Password’ link on the main login screen.
Step 8a (Optional): The user will need to enter a valid e-mail address to prompt a security question before their password will be sent to them via e-mail. After the system validates the account based on the email and security question response, the system will reset the user’s password and send the system generated password to the user’s registered email address.
Step 9: To make sure the user account is secured, when the user first logs in, GEOS will inform the user that they will have to change their password to a new password with the described criteria.
2.3 Managing Account Settings
After creating an account, the user has the option to go back and modify his/her information. Having the ability to edit the user account information is important because GEOS contains several functions that rely on the information that was entered in the fields. For example, GEOS will pull and auto-populate certain fieds based on the user account information. If the user has an incorrect e-mail, e-mail notifications will not be received by the user. The user is able to manage his/her account security settings and his/her associations. Poor configuration in this section can lead to hinderance in creating and submitting applications in GEOS. This is why it is imperative for the user to keep their information up to date and entered correctly.
The user can manage their account settings by clicking on ‘My Account’.
In the “My Account” module, the user can select from the following options:

GEOS – User Guide for the Regulated Community
Page 9 of 42
1) In ‘Basic Information’, the user can change their name and contact information. This section provides tabs along the top so that the user can also change his/her address information.
2) The ‘Password’ and ‘Security Questions’ options allow the user to edit/change their password or security questions, which prevents unauthorized access to their account and prevents unauthorized users to submit applications.
3) The ‘Managing Associated Consultants and Preparers’ section allows the user to manage his consultants/preparers.
2.3.1 Manage Account General Information
This section details how the user can manage their acccount information. In ‘Basic Information’, the user will be able to see three tabs: ‘General Information’, ‘Address Information’, and ‘Attachments’.
In the ‘General Information’ tab, the user can specify a different billing address from their mailing address and vice versa.
The ‘Attachment’ tab will allow users to upload documents for identity proofing; such as the ‘Subscriber Agreement’ or other documents that they would like the agency to be able to view. This can range from the ‘Subscriber Agreement’ to ‘Testing Data’.
2.3.2 Protect Account Security
GEOS provides three layers of protection over the user’s account: password, PIN, and Security Question. The Password is the credential the user uses for login; whereas, PIN and security questions are the credential for certification and submission, which serves as an electronic signature of the Responsible Official. The ‘Password’ and ‘Security Questions’ options allow the user to prevent unauthorized access to their account and preventing unauthorized users to submit applications.
By clicking ‘Password’, the user can go to the ‘My Password Information’ tab to change their password by entering their old password and then entering their new password.
The second security layer GEOS has is the PIN number. By clicking on the ‘My PIN information’ tab, the user will be able to request a PIN number and then change it in the future. The PIN number will be required to submit an application.
GEOS – User Guide for the Regulated Community
Page 10 of 42
Once a PIN number is requested, the user will receive an e-mail of a new PIN. The user will need to click ‘Save PIN’ to make sure the changes have been stored. As a part of security measurements, GEOS requires the Certifier to answer a security question challenge correctly before it will accept each online submittal. If the user is creating a RO account, they will also need to setup a pool of security Q/A so that GEOS can use their answers to authenticate their identity during the submission certification process. Clicking on the ‘Security Question’ tab, the user can change their security question(s) and response(s). The security questions will be needed when retrieving a lost password and when submitting an application.
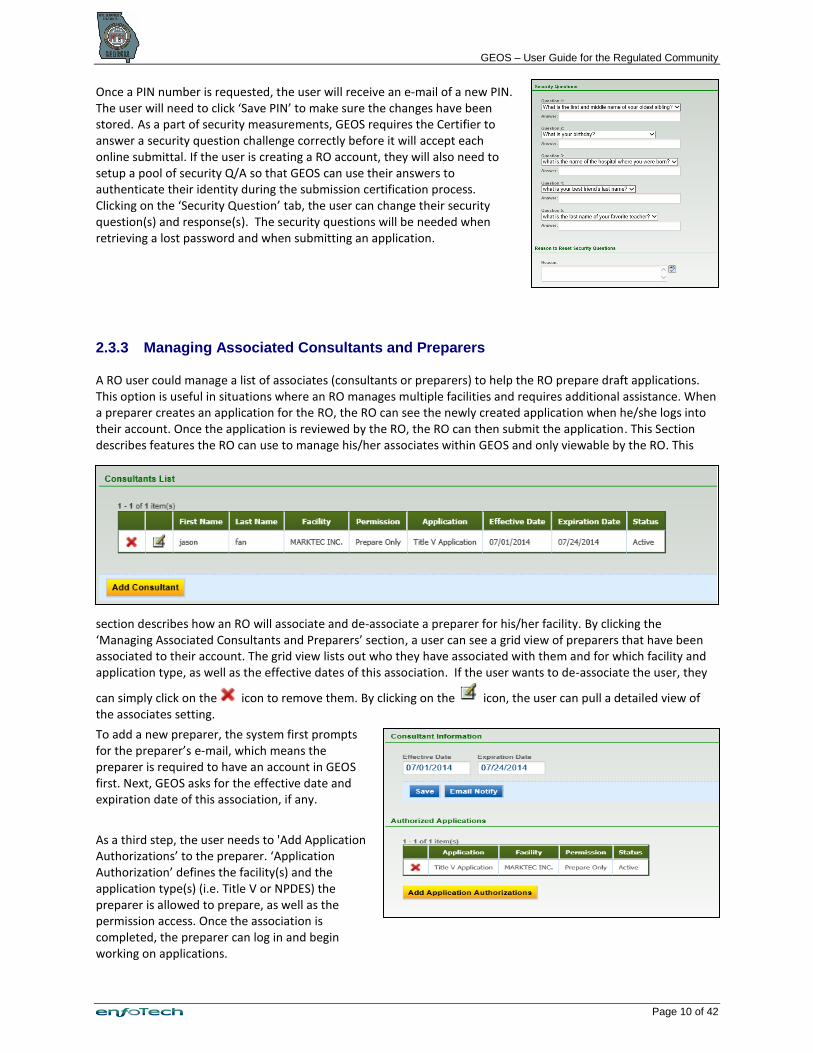
2.3.3 Managing Associated Consultants and Preparers
A RO user could manage a list of associates (consultants or preparers) to help the RO prepare draft applications. This option is useful in situations where an RO manages multiple facilities and requires additional assistance. When a preparer creates an application for the RO, the RO can see the newly created application when he/she logs into their account. Once the application is reviewed by the RO, the RO can then submit the application. This Section describes features the RO can use to manage his/her associates within GEOS and only viewable by the RO. This
section describes how an RO will associate and de-associate a preparer for his/her facility. By clicking the ‘Managing Associated Consultants and Preparers’ section, a user can see a grid view of preparers that have been associated to their account. The grid view lists out who they have associated with them and for which facility and application type, as well as the effective dates of this association. If the user wants to de-associate the user, they
can simply click on the icon to remove them. By clicking on the icon, the user can pull a detailed view of the associates setting.
To add a new preparer, the system first prompts for the preparer’s e-mail, which means the preparer is required to have an account in GEOS first. Next, GEOS asks for the effective date and expiration date of this association, if any.
As a third step, the user needs to 'Add Application Authorizations’ to the preparer. ‘Application Authorization’ defines the facility(s) and the application type(s) (i.e. Title V or NPDES) the preparer is allowed to prepare, as well as the permission access. Once the association is completed, the preparer can log in and begin working on applications.

GEOS – User Guide for the Regulated Community
Page 11 of 42
3 Home Page (the “Dashboard”) The home page of GEOS is also called the ‘Dashboard’, which gives the user visibility of key features that GEOS has to offer. The dashboard provides access to applications that have to be created, applications that need to be finished, and applications that have already been submitted while being organized by the applications latest activity.
1 The ‘Start a New Application’ allows the user to start a new application from the dashboard. It will only display four types of submittals that the user can submit from GEOS.
2 The ‘Upcoming Submittal Obligations’ is specifically prepared for site to submit obligation report. Under monitoring period, the site can see all obligation reports under this section. When the date passes report start date, the “Edit” button will be enabled.
3 The ‘Search Account Transaction’ allows user to search all transactions in FIMS by searching account ID. The user will be required to type in the pin number to access account information.
4 The ‘Message Center’ provides information that needed the user’s attention. Information includes link to any communication done via GEOS. This provides a shortcut for the user to see e-mails or correspondence messages that were sent to them.
5 Under the section of ‘Permit/Licenses’, the user can view all permit/licenses/issuance that have been issued to the user. Information of Permit number, related application, Issued date, effective date, and expiration data are also displayed in the grid view. The user can access related submittal form by clicking through the link of submission name.

GEOS – User Guide for the Regulated Community
Page 12 of 42
4 Application Submission and Management Once an account is established, the user could begin online submittals. Currently GEOS provides the ability to submit a Title V and NPDES Municipal permit applications. This Section provides generic features applicable to all online submittals. For data entry forms specific to each submittal (e.g., Title V or NPDES), please see the Appendix section.
4.1 Overview of Application Submission Process
To better understand how to use GEOS, it is important for the user to understand the submission process. The below diagram displays the flow for completing a submission.
Major steps of submitting an application in GEOS are listed in the following table.
Step # Name Highlights of System Functions & Description
1. Select an submittal type
Based on the selection of submittal category, department (Air/Land/Water), Environmental Interest and submittal type name, the user can search the type of submittal to prepare.
2. Select a facility At the start of each submittal (i.e., application or report), the user needs to specify a facility by selecting from a drop-down list. The list is based on:
For RO: the facilities identified on the Electronic Signature Agreement and approved by EPD;
For Preparer: the facilities authorized by the associated RO.
Once a facility is selected, the general information and FIS ID of that facility will be populated from the FIS database into the submittal form automatically. Please note that if an RO user cannot find a facility from the drop-down list, he/she needs to
Go to ‘My Account’ ‘Manage Account Type’ To associate new facility
If he/she cannot find the facility from the search, he/she needs to contact EPD.
If a preparer cannot find a facility from the drop-down list, he/she needs to contact their associated RO for authorization.
3. Enter necessary information on the application form
GEOS will conduct data validation along with the preparation of an application form, and display warning/error messages to the user if the data validation fails.
4. Insert attachment(s) GEOS supports uploading of required and optional attachments. The file format of the attachments include: WORD (doc, docx), EXCEL (xls, xlsx, and csv), PDF, image (JPEG, PNG, GIF, etc.)
5. Data validation and completeness check
At the end of preparation, GEOS will present a tree view summary of the data validation result of each section with a hyperlink to the corresponding section to
Submitting an Application in GEOS
Ap
pli
ca
nt
(Pre
pare
r/R
O)
GEOS
Phase
Initiate New
Application Process
Enter Necessary
Data on
Application Form
Insert Attachment
Perform Data
Validation &
Completeness
Check
RO Certifies &
Submits Application
in GEOS
End New Application
Process
Backend Task will be
triggered to save a
copy of the submission
GEOS Database
Select an
application type
Display successful
submission receipt
page & email the
receipt to RO
No

GEOS – User Guide for the Regulated Community
Page 13 of 42
Step # Name Highlights of System Functions & Description
ease the correction process.
6. Pay Submittal Fee
(If needed)
If the submittal requires a fee to be paid along with the form, the user can pay the fee through ACH/Check/Money order. Different submittal types may allow different payment methods.
7. Certification and submission
For all submissions, the user will need to certify that they are a qualified individual, answer a security question, and then enter their PIN before a submission can be submitted. Currently, only ‘Responsible Official’ can submit submittals. The user can refer to section 2.3.2 for more information on how to receive a PIN or reset security question.
8. Acknowledgement Receipt and confirmation email
For each successful submission, GEOS will present an acknowledgement receipt on screen. The receipt can then be printed by the user if they wish. The receipt contains the following information:
Unique Submission ID
Date and Time of submission
IP address from which submission was made
Name, Address, and contact information of RO
Facility Name and (if applicable) Permit Number of submission
Indication of (and details for) any attachments provided along with the submission
GEOS will also send a confirmation email to the user with similar information as the receipt.
4.2 Applying and Submitting submissions
Currently, the GEOS system allows submittals:
Air Branch:
o Title V Application
o SIP Application
Water Branch:
o NPDES Application
Land Branch
o 36 submittal forms serving for 5 units (Please refer to appendix 6.1.3 for submittal list)
Other
o Fee Payment
Being able to submit applications online provides a way for both public and agency users to electronically organize submissions, track, and share progress from anywhere and anytime as long as the user can access the internet. This section will describe the standard process of preparing submittals in GEOS system, different submittal type may have slightly varies, to view the guide in completing title V and NPDES application, please refer to appendix 6.1.1 & 6.1.2.
4.2.1 Select a Submittal
The submittal type list is determined by the user’s account type, Responsible official for title V allows user to access Title V application, Responsible official for NPDES allows user to NPDES application, for accessible applications of RO/Owner for Brownfield, RO/Owner for Scrap Tire and other land environmental Interests, please refer appendix 6.1.3

GEOS – User Guide for the Regulated Community
Page 14 of 42
Submittal List
The list is defaulted to show submittals under permit/license. The user can see other submittal by change category filter:
Category Category description
Report Obligation reports
Permit/license Application for permit/license/certification and any other kind of approval
Grant Applications for Trust Fund Reimbursement Request
Fee/Invoice Make Online Payment Only
Other Any other type of submittals to be implemented into GEOS
To quickly find desired submittal type, the user can also filter by
Department
Program (Environmental Interest)
Submittal Types
4.2.2 Start a Submittal
By clicking “ ” of selected submittal’s icon, the user can start to fill the online form.
icon provides extra information on selected submittal (e.g, submittal description/department etc.)
icon allows user to add selected submittal to “My Favorite Submittals”. After marked, the user can go “My Favorite Submittals” to quickly access this type of submittal
icon allows user to open an blank form in pdf version. The user can print our the form and submit it in paper.
Some submittals have this icon, which allow user to download the specific guidancde on how to prepare and submit this submittal.

GEOS – User Guide for the Regulated Community
Page 15 of 42
4.2.3 Online Form Data Entry
“*” on online form indicates the field is required. The user needs to at least fill in all required fields to continue to next page.
Online Form
4.2.4 Upload Attachment
Along with the online form, some submittals may require certain attachment to be submitted together.
If select to submit online, the user can
upload file using button.
If select to submit through mail, the system will provide mail-to address
If selected other, the user will have to fill in reason/explanation to continue.
Only optional attachments can be selected N/A
4.2.5 Online form validation
GEOS will automatically validate the online form. Only all pages’ required fields have been filled, all required attachments have been submitted can the user submit this submittal.
GEOS – User Guide for the Regulated Community
Page 16 of 42
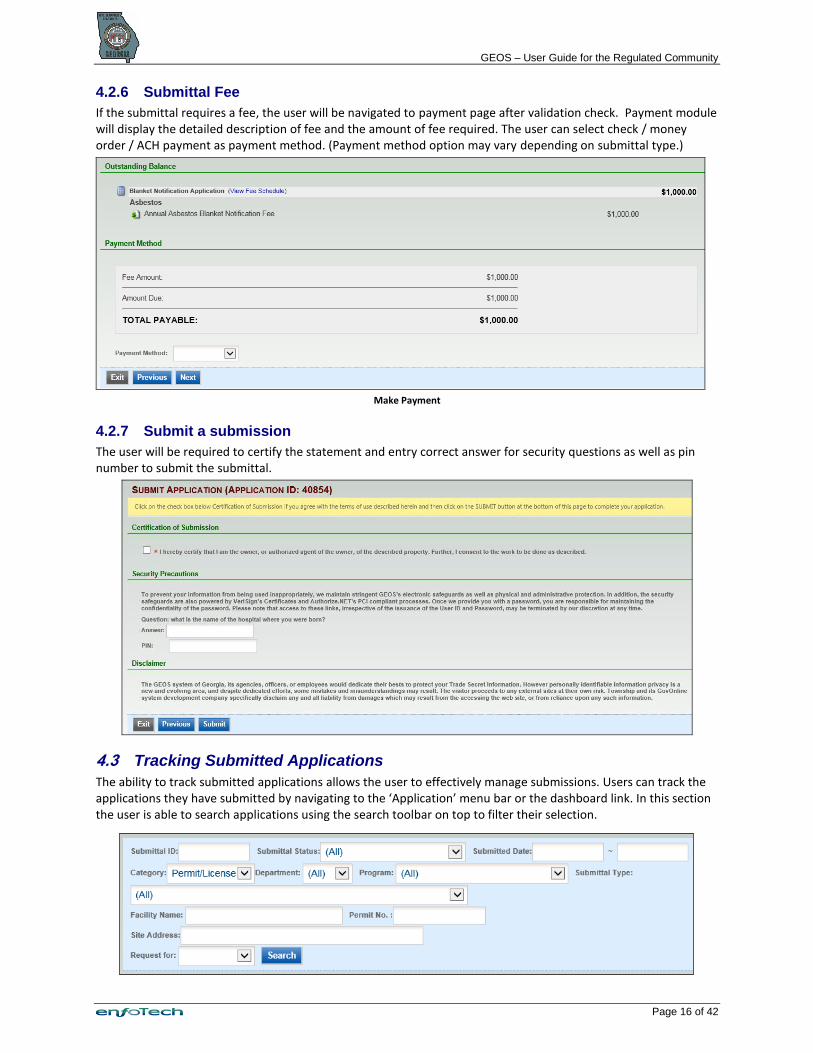
4.2.6 Submittal Fee
If the submittal requires a fee, the user will be navigated to payment page after validation check. Payment module will display the detailed description of fee and the amount of fee required. The user can select check / money order / ACH payment as payment method. (Payment method option may vary depending on submittal type.)
Make Payment
4.2.7 Submit a submission
The user will be required to certify the statement and entry correct answer for security questions as well as pin number to submit the submittal.
4.3 Tracking Submitted Applications
The ability to track submitted applications allows the user to effectively manage submissions. Users can track the applications they have submitted by navigating to the ‘Application’ menu bar or the dashboard link. In this section the user is able to search applications using the search toolbar on top to filter their selection.

GEOS – User Guide for the Regulated Community
Page 17 of 42
The user can also filter out submissions that they have withdrawn, amended, or terminated for those that require additional attention. GEOS provides an advanced search option, giving the user more search parameters to use.
GEOS provides the following features for the user to keep track of their submission:
Ability to review submission detail
Track EPD work status regarding the submission
Viewing issuances related to the submission
Communicating with the EPD regarding the submission
E-mail tracking of notifications sent by the EPD
4.3.1 Review Submission Copy-of-Record
A public user may have several submissions for their facility(s) so it is important for them to be able to have a tool to review their submissions. By clicking on the ‘View’ tab from the grid view in ‘Track Submitted Applications’, the user will be brought to the screen below. The user can see the review status on this page and the most current
review task. The user can also view his submission by clicking the icon.
The ‘Track Submitted Application’ tabs can be broken down into the following:
a. Submittal: user can view information related to the submission and status - GEOS displays: Submission ID, Application Type, Submission Date, Submitter details (Name, Address, Phone and Email), Most Recent Application Status, Application Status History with Comments and Most Recent Application Form.
b. Attachments: displays any attachments that have been uploaded to GEOS during submission process; if attachments were uploaded during submission process, the applicant can upload additional sets of attachments in this page.
c. Payment: displays total application fee, payment made and fee balance; user is able to make additional payments via credit card or electronic check if there are any pending balances on the application fee.
d. Issuance: displays all permits that have been issued for the submission in question. e. Work Activities: display the review process for this application f. Correspondence: allows applicant to initiate correspondence with agency users, but is visible to third-
party users as well. g. Email History: displays a list of emails that have been manually sent by agency users, and are not system-
automated.
If the user needed to copy his/her submission because of the similarities of a new submission, the ‘Copy Application’ function will create a new application and transpose all the data that was filled in on the previous application.

GEOS – User Guide for the Regulated Community
Page 18 of 42
4.3.2 Tracking Submission Status – Work Activities
The current work activities can be seen by the user by clicking on the ‘Work Activities’ tab. This will show each task’s complete date and status. This allows the public user to keep track of the submission review process progress so that if a work task was overdue, that the applicant can address the reason why.
4.3.3 Tracking Issuances from EPD
The user can also keep track of documents that have been issued so that he/she can see if any additional steps still need to be taken. In some cases, the EPD will issue multiple draft permits that will be displayed in this section so that the applicant may see which draft permit should be used in moving on to the final permit. In issuance, the user will show the permit type, permit number, and the type of permit issued. The user can also view
the document by clicking on the icon. Please make sure that a PDF viewer is installed prior to viewing the document.
4.3.4 Tracking Correspondences with EPD
GEOS provides an additional feature for allowing the applicant to notify the EPD. Being able to contact the EPD is necessary to resolve any issues that require attention and effectively lessen the time needed to resolve any issues. The user can access this section if there is any new correspondence through the message center. The correspondence tab within the submission will only display correspondence regarding the selected submission.
Correspondence Tab
By clicking on the icon, the user can open the correspondence history so that the applicant.
The correspondence history will contain time stamps of the conversations, when the correspondence was created, and the subject.
If no correspondence exists, the user can select the new button to start a new correspondence.

GEOS – User Guide for the Regulated Community
Page 19 of 42
4.3.5 Tracking Emails Sent by GEOS
GEOS maintains a history of all emails pertaining to each submittal. This provides an easy method of record keeping of when they were notified by the GEOS system and the details of the e-mail. Only e-mails generated by GEOS are stored in this section. This may prove to be useful in situations where the applicant did not receive an e-mail due to several reasons but can use this tool to check on e-mails regarding their submission.
By clicking on the icon, the user can see the message that was contained in the e-mail sent by the system.
4.4 Request for Application Withdrawal
In some cases, an applicant will want to withdraw his submission. GEOS currently only allows the user to request for a withdrawal. The request for withdrawal option is located in the ‘Track Submitted Application Application’ tab. This allows the user to request a withdrawal of their current submission. By doing so, the EPD will make a decision of whether or not to approve or deny the request. If the withdrawal was approved, the status will mark the submission as withdrawn and no further action can be taken.
4.5 Request for Application Revision
An applicant might notice an error in their submission and would like to revise their submissions. In such cases, the applicant would need to request for revision in order to notify the EPD first. The request for revision option is located in the ‘Track Submitted Application Application’ tab. This allows the user to request a revision of their current submission. By doing so, the EPD will make a decision of whether or not to approve or deny the request.
If the submission is approved for revision, a new application will be created with the status set as ‘Revision’. This will let the user revise their past submission and the old submission will be marked as ‘Revised Archived’. No further action can be taken on the old submission.
4.6 Request for Permit Termination
If a final permit has been issued by the EPD through a GEOS submission and the applicant decides that the permit is no longer needed, the applicant can request for termination of the permit. The request for termination option is located in the ‘Track Submitted Application Application’ tab and can also navigate to this section through the ‘Manage Permit/Certification’ module. This allows the user to request to terminate of their current permit. By doing so, the EPD will make a decision of whether or not to approve or deny the request. If the agency approves of the termination, the submission will then be terminated and no longer be modified.

GEOS – User Guide for the Regulated Community
Page 20 of 42
5 Permit and Issuance Management The permit and issuance management module offers the Applicant the following features:
Track EPD review status for their permit submissions
Manage permits issued by EPD
Renewal existing permits
Amend permits
Submit permit termination request
Upon login into the GEOS, the System will present a list of active permits associated with the facilities which the user is associated with. At this time, GEOS will provide air and water permits and the list will grow as the System integrates with additional EPD data systems in the future. If the user applies a permit via GEOS, the permit record will contain submission data and final permit. Otherwise, the permit record will contain permit meta data only (no submission data). GEOS allows the user to amend, renew, and terminate their issuances. When renewing or amending a permit, please follow the GEOS screen Wizard to complete required forms and submit them for EPD’s review. The following sections will provide more details on how to manage issuances.
The ‘Manage Permit/Certification’ module under ‘Applications’ allows the user to view all issuance associated to the facility that they are associated with. Similar to the ‘Issuance’ feature in the ‘Track Submitted Application’, the
user can view the permit by clicking the icon. The user can filter the permits by the tool bar above the grid view and filter by ‘Application ID’, ‘Permit Number’, ‘Site Address’, and/or ‘Facility Name’. The user can click on the submission hyperlink in ‘Issuance Info’ to navigate to the application submission to view the details if the permit is associated to a GEOS submission.
5.1 Amend Permit
Since facilities can often times change in the way they operate, their existing permit will need to be amended to remain in compliance. User can amend a permit anytime when the permit is effective. The process of amending a permit is as follows:
1. Search and select a permit that needs to be amended
2. Click “Amend”
3. The page will be directed to a new application form based on the permit type.
4. If submission history doesn’t exist in GEOS, the application form will not have any previous submission data pre-populated. But GEOS will pre-populate the facility data into the application form.
5. If submission history exists in GEOS, the application form will have all previous submission data pre-populated.
GEOS – User Guide for the Regulated Community
Page 21 of 42
6. Applicant is able to revise the data in the application form. Details on how to fill out an online application form are in Section 4.2.
7. Applicant can save and exit the application form any time before submission
8. After the new application form passes GEOS validation check, the application can be submitted
9. RO needs to go through the same submission process as Section 4.2 to submit an amendment application
10. RO can withdraw the amendment submission before a permit revision is issued. For details, please refer to Section 4.4.
11. The submission status of the amendment submission can be tracked the same way as described in Section 4.2.3.
5.2 Renew Permit
To remain in compliance, applicants will need to renew their permits prior to permit expiration date. If the permit is near to expiration or expired, the user will see a ‘Renew’ button in addition to an ‘Amend’ button. The process of renewing a permit is as follows:
1. Search and select a permit that needs to be renewed
2. Click “Renew”
3. The page will be directed to a new application form based on the permit type.
4. If submission history doesn’t exist in GEOS, the application form will not have any previous submission data pre-populated, but GEOS will pre-populate the facility data into the application form
5. If submission history exists in GEOS, the application form will have all previous submission data pre-populated.
6. Applicant is able to revise the data in the application form. Details on how to fill out an online application form are in Section 4.2.
7. Applicant can save and exit the application form any time before submission
8. After the new application form passes GEOS validation check, the application can be submitted
9. RO needs to go through the same submission process as Section 4.2 to submit an amendment application
10. RO can withdraw the amendment submission before a permit revision is issued. For details, please refer to Section 4.4.
11. The submission status of the amendment application can be tracked the same way as described in Section 4.2.3.

GEOS – User Guide for the Regulated Community
Page 22 of 42
6 Appendix
6.1.1 Submit NPDES Municipal Permit Application
The NPDES application allows the user to apply for the different types of NPDES permits. The NPDES contains a pre-application form (also known as the ‘Waste Load Application’) and the NPDES 2A Form. Since in some cases the pre-application form is not necessary to be submitted, the applicant can select to choose either the WLA with the NPDES form, or just a single form.
6.1.1.1 WLA
The Waste Load Application, or pre-application, is combined with the NPDES process. To access the WLA form, the user will need to select the NPDES application form from the application list and then select the WLA form.
Pre-Application Form Selection
There are three request types for the WLA application – expansion, relocation, and new discharge. The WLA requires the applicant to enter
any fields that contain an icon. The facility list will populate based on the users right to prepare the application for their associated facilities.
WLA General Application Information
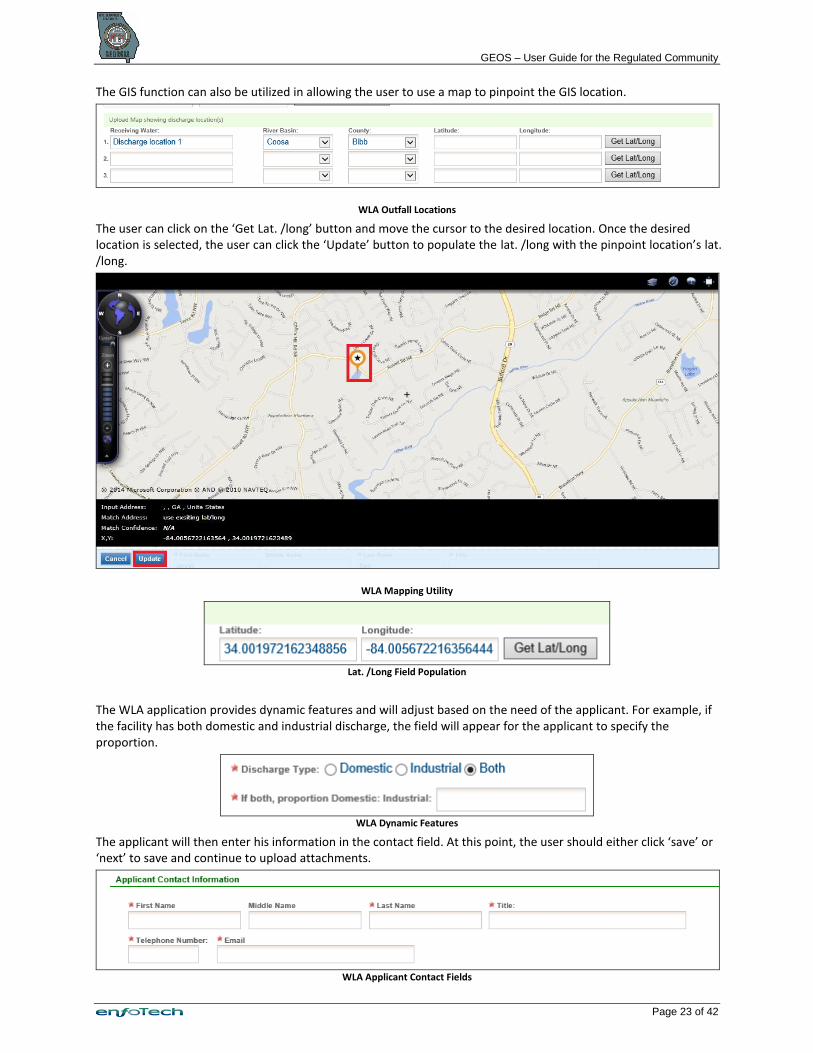
GEOS provides a GIS function so that the applicant can view the location of the facility selected in order to verify that the facility selected is correct.
GEOS – User Guide for the Regulated Community
Page 23 of 42
The GIS function can also be utilized in allowing the user to use a map to pinpoint the GIS location.
WLA Outfall Locations
The user can click on the ‘Get Lat. /long’ button and move the cursor to the desired location. Once the desired location is selected, the user can click the ‘Update’ button to populate the lat. /long with the pinpoint location’s lat. /long.
WLA Mapping Utility
Lat. /Long Field Population
The WLA application provides dynamic features and will adjust based on the need of the applicant. For example, if the facility has both domestic and industrial discharge, the field will appear for the applicant to specify the proportion.
WLA Dynamic Features
The applicant will then enter his information in the contact field. At this point, the user should either click ‘save’ or ‘next’ to save and continue to upload attachments.
WLA Applicant Contact Fields
GEOS – User Guide for the Regulated Community
Page 24 of 42
6.1.1.1.1 Attachment
Before submitting, the user can upload files such as a map of the discharge location and so on to supplement their application with any additional/required documents.
6.1.1.1.2 Submission
In the final step, GEOS will validate that all required inputs and sections were completed based on the validation rules set in place. If the system passes the application, the user can then submit the application. However, if any section fails to pass, GEOS will alert the user that a section was not completed properly by marking the section with an ‘X’ and with a description of the reason why. After the application is submitted, the user will receive a receipt confirming the submission and providing the user IP address.
6.1.1.2 NPDES
The NPDES application can be accessed through the application list. Once the NPDES form is selected, the user can decide if the application requires a WLA and NPDES, or just the NPDES form.
The application list provides the type of NPDES options available in the NPDES section. In this section, the NPDES new permit will be demonstrated with NPDES Minor Modification and NPDES Major Modification w/o WLA following a slightly different application process. By clicking next, the user can access the NPDES form.
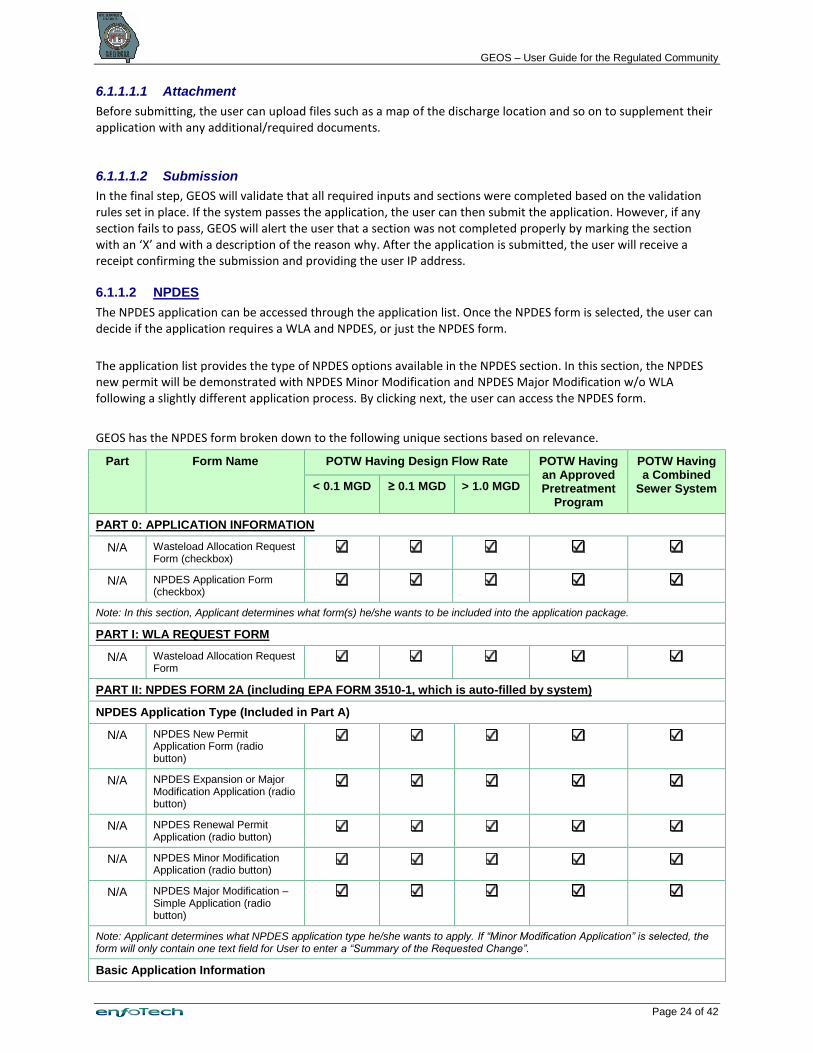
GEOS has the NPDES form broken down to the following unique sections based on relevance.
Part Form Name POTW Having Design Flow Rate POTW Having an Approved Pretreatment
Program
POTW Having a Combined
Sewer System < 0.1 MGD ≥ 0.1 MGD > 1.0 MGD
PART 0: APPLICATION INFORMATION
N/A Wasteload Allocation Request Form (checkbox)
N/A NPDES Application Form (checkbox)
Note: In this section, Applicant determines what form(s) he/she wants to be included into the application package.
PART I: WLA REQUEST FORM
N/A Wasteload Allocation Request Form
PART II: NPDES FORM 2A (including EPA FORM 3510-1, which is auto-filled by system)
NPDES Application Type (Included in Part A)
N/A NPDES New Permit Application Form (radio button)
N/A NPDES Expansion or Major Modification Application (radio button)
N/A NPDES Renewal Permit Application (radio button)
N/A NPDES Minor Modification Application (radio button)
N/A NPDES Major Modification – Simple Application (radio button)
Note: Applicant determines what NPDES application type he/she wants to apply. If “Minor Modification Application” is selected, the form will only contain one text field for User to enter a “Summary of the Requested Change”.
Basic Application Information

GEOS – User Guide for the Regulated Community
Page 25 of 42
Part Form Name POTW Having Design Flow Rate POTW Having an Approved Pretreatment
Program
POTW Having a Combined
Sewer System < 0.1 MGD ≥ 0.1 MGD > 1.0 MGD
A NPDES Form 2A (Basic Application Information for all Applicants)
B Additional Application Information for Applicants with a Design Flow ≥ 0.1 MGD
C Certification
Note: Part C ‘Certification’ is incorporated into the ‘Submission’ module on the Navigation Wizard.
Supplemental Application Information
D Expanded Effluent Testing Data
E Toxicity Testing Data
F Industrial User Dischargers and RCRA/CERCLA Wastes
G Combined Sewer Systems
Sludge Addendum
H Sludge Addendum
Note:
(1) For detailed validation rules please refer to Section 8: Appendix A.
(2) For Minor Modification Application, the form is only one text field for a “Summary of the Requested Change”.
6.1.1.2.1 A. NPDES Form Part A
The first step in the NPDES form requires the applicant to select the type of permit they are applying for, which includes:
NPDES New Permit Application Form
NPDES Expansion or Major Modification Application
NPDES Renewal Permit Application
NPDES Minor Modification Application
NPDES Major Modification – Simple Application
The user then selects the facility that the application pertains to. The user will then continue to enter in the facility contact information. Similarly to the WLA, GEOS provides the user the ability to view the facility on a map via the GIS tool by clicking the ‘Display Lat. /Long’ button.
Since the applicant can be different than the contact of the facility, the user can either ‘check here’ to populate the contact from the top if the applicant is the same. The system will copy the information from the above section and populate it in the appropriate field. If the applicant is different, then this section requires the user to fill out the correct individual. The user will then have to indicate his/her relationship to the facility and who should be contacted in the future regarding the permit.

GEOS – User Guide for the Regulated Community
Page 26 of 42
The NPDES application provides dynamic features to ease in the application process. In section A.3, if existing environmental permits are not applicable, the user should check the checkbox. If the checkbox is checked, the input fields become hidden.
NPDES Dynamic Form Feature
If the application type selected was NPDES minor modification or NPDES major modification simple, then the application would end here.
Additional features to assist the users through the application process can be seen in section A.8. As the user selects the options provided, input parameters will alter based on the selection.
In section A.9, if an outfall location is required because the user selected ‘yes’ for the question ‘Does the treatment works discharge effluent to waters of the U.S.?’ in A.8, a description of the outfall is necessary. In this prompt for additional detail, the GIS function can be used. Be sure to click ‘save’ and/or ‘next’ to save the entered data and move onto the next section once section A is completed.
The cursor can be moved to pinpoint the exact location of the outfall. By clicking the ‘Update’ button, the location will be transposed back to the form.
6.1.1.2.2 B. Additional Application Information
Due to the complex nature of the NPDES form, certain sections explain in detail what needs to be provided and if the section applies to the applicant. If the section does not apply, the ‘Not Applicable’ checkbox can be selected and the section input parameters will be hidden.
NPDES Message Box

GEOS – User Guide for the Regulated Community
Page 27 of 42
If the section is required to be filled, the user can either click the icon or the button provided. Once selected, a new screen will prompt with the required fields that need to be filled.
NPDES Schedule Detail Form
Throughout the NPDES form, testing data is required by the agency. GEOS gives the user the option of either filling out the testing data or bypassing the entry by selecting the ‘Please check the checkbox if you would like to upload the test result’ checkbox. If this option has been checked, the user can move on but will be required to upload the testing results in the attachment section of the application.
NPDES Message Box and Bypass Function
6.1.1.2.3 D. Expanded Affluent Testing Data & Toxicity Testing Data
In part D, the user can either input the testing data electronically or choose to upload a completed document at the end of the application by selecting the Please check the checkbox if you would like to upload the test result’ checkbox.
NPDES Message Box and Bypass Function
The next section contains additional toxicity testing data and will be necessary to be filled similarly to the previous sections.

GEOS – User Guide for the Regulated Community
Page 28 of 42
6.1.1.2.4 E. Industrial User Discharge
When the user reaches section F, the user is given the question 'If the treatment works has an approved pretreatment program?’ If the user enters ‘yes’, then the user will be given a chance to enter additional information detailing the pre-treatment program.
NPDES Dynamic Form Feature
6.1.1.2.5 F. Combined Sewer Systems
Similarly, part G asks a single question ‘If the treatment works has a combined sewer system?’ If the user selects ‘yes’, the user will be required to enter the CSO outfalls associated with combined sewer system.
NPDES Section G Form
When adding the CSO outfall, the user can utilize the GIS function to pinpoint the exact CSO outfall location.
6.1.1.2.6 G. Sewage Sludge Management
The final section of the NPDES contains triggers dependent on sewer sludge management. Each individual selection may open additional fields related to the selection. More than one option can be selected. Once all the required fields have been entered, the user can move onto the attachment portion of the NPDES. The user should again confirm that the application has been saved and/or the ‘button’ has been clicked to store all entered fields and move on to the next section.

GEOS – User Guide for the Regulated Community
Page 29 of 42
6.1.1.2.7 Attachment
As mentioned previously, the user can provide attachments that are required to be submitted with the application. GEOS provides the user to either digitally upload documents or provides information if the user rather mail their documents to the agency.
NPDES Supplemental Attachment Section
6.1.1.2.8 Submission
In the final step, GEOS will validate that all required inputs and sections were completed based on the validation rules set in place. If the system passes the application, the user can then submit the application. However, if any section fails to pass, GEOS will alert the user that a section was not completed properly by marking the section with an ‘X’ and presenting them with a description of the reason why.
After the application is submitted, the user will receive a receipt confirming the submission and providing the user’s IP address.

GEOS – User Guide for the Regulated Community
Page 30 of 42
6.1.2 Submit for Title V Application
The main purpose for Title V application is to initiate the first step for a user to apply, renew, and amend air permits. GEOS has broken down the Title V Application Form into multiple sections. The sections are described as the following:
General Information: This section contains the basic facility information such as rules/regulations and pollutants that are associated with the facility.
Contact Information: This section allows the user to input contacts for the facility.
Miscellaneous: This section provides the user to enter in generic equipment information, insignificant activities, and other optional fields.
Control Device: This section details the control units relevant to the permit and allows the user to select the associated pollutants.
Release Point: This section lets the user define in the detail the release points associated with the application.
Emission Source: The emission source lists the emission and allows the user to associate the release point, control device, and rule.
Emission Group: This section allows the user to define if testing and monitoring are needed for the group and define the group by type.
Emission & Activity: Emission and activity lets the user describe the emission path group in further detail.
Monitoring & Testing: Monitoring and testing defines the process in which each emission source is handled.
CAM Plan: The Compliance Assurance Monitoring is an optional section in which facilities that require a CAM plan can specify the details in this section. Attachments can later be added in the attachments section.
6.1.2.1 General Information
In this section, the standard Title V application will be used as the base and does not completely reflect how all other types are handled.
Any fields that contain a as an icon is required to be filled or the system will generate a validation error.
In ‘General Information’, the user will begin by describing the project followed by selecting the application type and selecting the facility.
Title V General Information
Title V Navigation Wizard

GEOS – User Guide for the Regulated Community
Page 31 of 42
By selecting the different application reasons, the form will alter based on the application needs. In the instance of selecting ‘Modification of Existing Title V Permit’, the previous description box was altered to a drop down menu for ‘Application Type’ and a ‘Summary of all the Modifications being made’ field box.
Title V Application Reason Selection
Selecting the right SIC Code is extremely important since this will determine the unit that will receive the application.
Title V Application Description
The applicable regulation and the pollutant section play an intricate part of the application process. The regulations have been designed by using a search tool. In this utility, the user can search by description, rule, or filter by rule type. Once selected, the rule will populate in a grid view.
Title V Rule Search Tool
Title V Rule Grid view

GEOS – User Guide for the Regulated Community
Page 32 of 42
The other type of input GEOS provides for the Title V application is a direct input to the grid view. As in the case of Criteria Air Pollutants, the user will be able to select a choice from the drop down menu. The user can then proceed to answer and input questions associated to the pollutant.
Title V CAP Grid View
In future sections, the regulations and pollutants will be limited to those that were entered in this section.
The Title V section contains another logic control implemented to assist in the user in filling out the application. By selecting the checkbox ‘Does any air conditioner…’ the system will realize that additional data must be entered and provide a section that previously did not exist so that the user may provide the information needed.
Title VI Options
At this stage, the user should click either the ‘save’ button or the ‘next’ button to prevent loss of information. If the user tries to navigate away from the menu by using the navigation bar on the left, a warning message will be displayed informing the applicant that data will be lost and that they should save the page before navigating to a different screen.
6.1.2.2 Contact
After the next button is clicked, the user is brought to the ‘Contact Information’ section of the application. In this section, the user can select the contact individual(s) and declare their responsibility.
6.1.2.3 Miscellaneous Application Details
The next section contains insignificant activities. The parts in this section are not required and follow similar inputs described in the ‘General Information’ section. Information to be entered in each category is described in the light green box.
GEOS – User Guide for the Regulated Community
Page 33 of 42
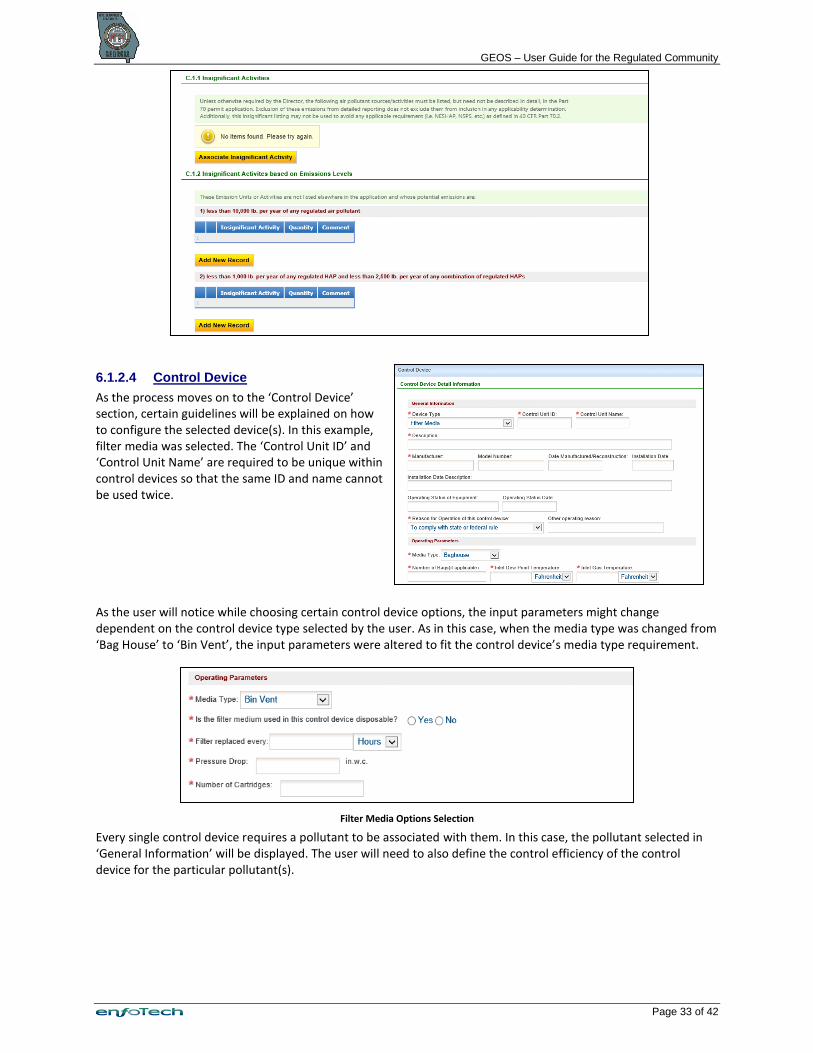
6.1.2.4 Control Device
As the process moves on to the ‘Control Device’ section, certain guidelines will be explained on how to configure the selected device(s). In this example, filter media was selected. The ‘Control Unit ID’ and ‘Control Unit Name’ are required to be unique within control devices so that the same ID and name cannot be used twice.
As the user will notice while choosing certain control device options, the input parameters might change dependent on the control device type selected by the user. As in this case, when the media type was changed from ‘Bag House’ to ‘Bin Vent’, the input parameters were altered to fit the control device’s media type requirement.
Filter Media Options Selection
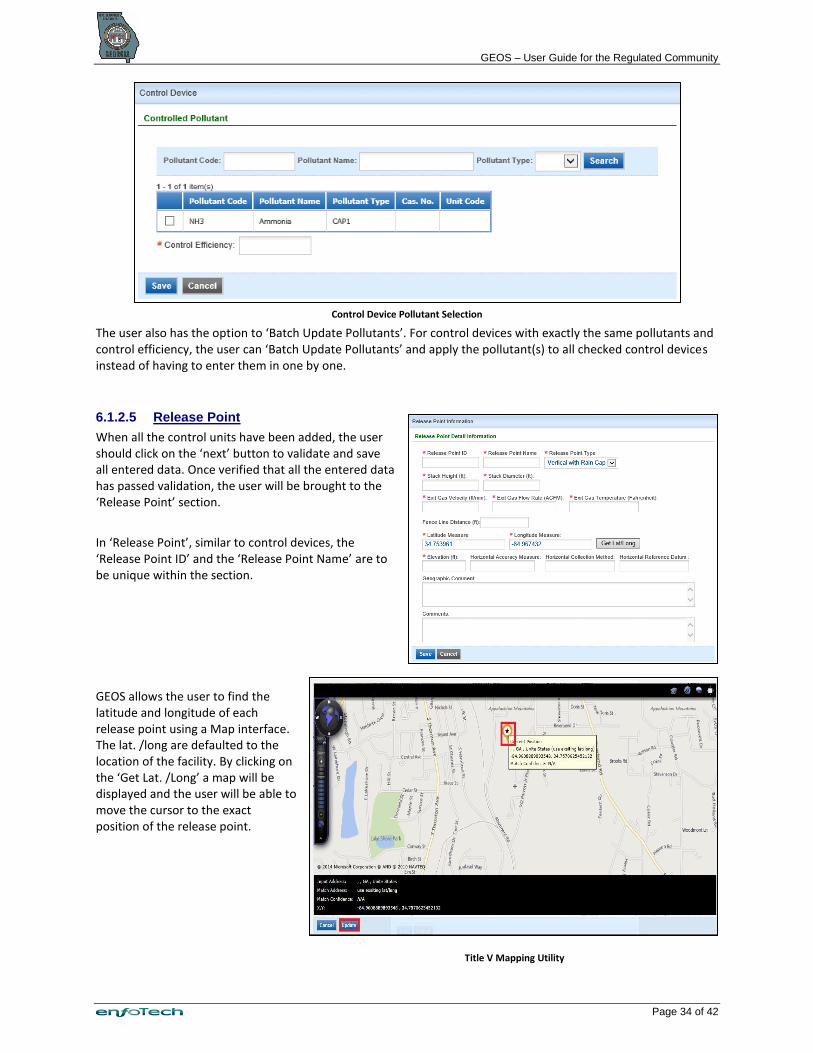
Every single control device requires a pollutant to be associated with them. In this case, the pollutant selected in ‘General Information’ will be displayed. The user will need to also define the control efficiency of the control device for the particular pollutant(s).
GEOS – User Guide for the Regulated Community
Page 34 of 42
Control Device Pollutant Selection
The user also has the option to ‘Batch Update Pollutants’. For control devices with exactly the same pollutants and control efficiency, the user can ‘Batch Update Pollutants’ and apply the pollutant(s) to all checked control devices instead of having to enter them in one by one.
6.1.2.5 Release Point
When all the control units have been added, the user should click on the ‘next’ button to validate and save all entered data. Once verified that all the entered data has passed validation, the user will be brought to the ‘Release Point’ section.
In ‘Release Point’, similar to control devices, the ‘Release Point ID’ and the ‘Release Point Name’ are to be unique within the section.
GEOS allows the user to find the latitude and longitude of each release point using a Map interface. The lat. /long are defaulted to the location of the facility. By clicking on the ‘Get Lat. /Long’ a map will be displayed and the user will be able to move the cursor to the exact position of the release point.
Title V Mapping Utility

GEOS – User Guide for the Regulated Community
Page 35 of 42
Once the desired position is selected, the user can then click on the ‘Update’ button to replace the original lat. /long fields.
Lat. /Long Display
When all desired release points are entered, the user should either click on ‘Save’ or ‘Next’ to store the data and move on to ‘Emission Source’.
6.1.2.6 Emission Source
The ‘Emission Source’ is extremely dynamic and similar to the control devices where the form will alter based on the emission unit type selected. Also similar to the control device section, the ‘Emission Source Identifier’ and the ‘Emission Source Name’ are unique and cannot be repeated.
Once the basic emission source information is filled, a new section will open up where the user will need to ‘Add New Fuel Burned Component’, ‘Associated Control Device’, ‘Associate Release Point’, and ‘Associate Rule’. Dependent on the emission source selected, the ‘Add New Fuel Burned Component’ will not display if not needed. In some cases, this portion is optional. However, the ‘Associated Control Device’, ‘Associated Release Point’, and ‘Associated Rule’ will always be displayed and the user can associate both the control devices and rules that were entered in the previous sections to the emission source.
Like control devices, GEOS provides features for the user to batch update rules to all checked emission sources. The user can also copy a previously entered emission source by checking on an emission source and clicking on the ‘Copy Emission Source’ button. The user will then be prompted to enter a new emission source ID and name. Again, the user should save and/or click the ‘next’ button to store all data before moving on.
6.1.2.7 Emission Path Group
The next section ‘Emission Path Group’ allows the user to associate emission sources that have the same emissions path. This section also allows the user to specify if testing and monitoring are needed for the particular emissions path. The checked boxes indicate that either the testing and/or the monitoring can be omitted in ‘Monitoring and Testing’.

GEOS – User Guide for the Regulated Community
Page 36 of 42
For facilities that have several ‘Single Emissions Path’, GEOS provides a feature in which the user can check the entire remaining unassociated emissions source and set them as ‘Single Emissions Path’.
Emission Path Group Unassociated Emission Source
6.1.2.8 Emission and Activity
Each emissions path group in ‘Emissions and Activity’ can be opened for the user to enter further detail. By clicking
on the next to the emissions path group, the user is prompted to a screen to select the pollutants associated with the emissions path group and fill in additional information.
Emission & Activity Grid View
The system allows for the same pollutant to be entered in more than once in situations where the emissions path may have different results for the same pollutant. The user can ‘Batch Update’ the groups if more than one have matching criteria.
6.1.2.9 Monitoring and Testing
Based on the emission path group, some groups will be required to complete additional information in the ‘Monitoring and Testing’. If the indicator states ‘Yes’ in either of the ‘No Specified Monitoring/Testing?’ field, then no further action is required.
Monitoring and Testing Grid View

GEOS – User Guide for the Regulated Community
Page 37 of 42
If the indicator displays ‘No’, then the user must
click on the icon to enter in the required data. The user will have a prompt that will allow the user to specify the testing and monitoring method separately for each emission path group.
Monitoring and Testing Form Display
6.1.2.10 CAM Plan
The last module that will be discussed is the CAM Plan. The CAM plan is an optional module dependent on if the facility requires a CAM plan. The emission source selected will populate the available control devices and pollutant based on the control device. This allows the user to accurately select the correct information without having to back track.
CAM Plan Form
6.1.2.11 Attachment
The user can provide attachments that are required to be submitted with the application. GEOS provides the user to either digitally upload or provides information if the user rather mail their documents to the agency.
Title V Supplement Attachments
GEOS – User Guide for the Regulated Community
Page 38 of 42
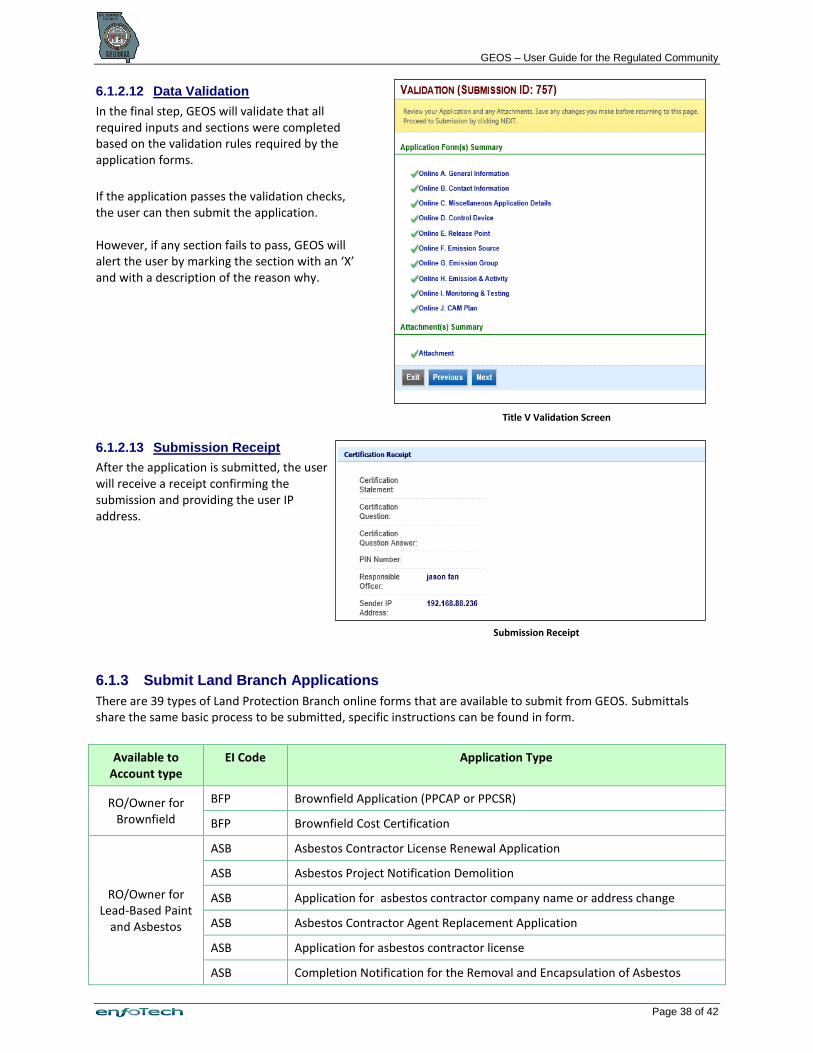
6.1.2.12 Data Validation
In the final step, GEOS will validate that all required inputs and sections were completed based on the validation rules required by the application forms.
If the application passes the validation checks, the user can then submit the application. However, if any section fails to pass, GEOS will alert the user by marking the section with an ‘X’ and with a description of the reason why.
Title V Validation Screen
6.1.2.13 Submission Receipt
After the application is submitted, the user will receive a receipt confirming the submission and providing the user IP address.
Submission Receipt
6.1.3 Submit Land Branch Applications
There are 39 types of Land Protection Branch online forms that are available to submit from GEOS. Submittals share the same basic process to be submitted, specific instructions can be found in form.
Available to Account type
EI Code Application Type
RO/Owner for Brownfield
BFP Brownfield Application (PPCAP or PPCSR)
BFP Brownfield Cost Certification
RO/Owner for Lead-Based Paint
and Asbestos
ASB Asbestos Contractor License Renewal Application
ASB Asbestos Project Notification Demolition
ASB Application for asbestos contractor company name or address change
ASB Asbestos Contractor Agent Replacement Application
ASB Application for asbestos contractor license
ASB Completion Notification for the Removal and Encapsulation of Asbestos

GEOS – User Guide for the Regulated Community
Page 39 of 42
ASB Blanket Notification Application
ASB Asbestos Project Notification Courtesy
ASB Asbestos Project Notification Abatement
ASB Asbestos Project Notification Live Fire Training
LEAD Application for Lead Abatement Project Notice to Proceed
LEAD Application for Lead Services Firm Certification
LEAD Application for Lead-Based Paint Discipline Certification
LEAD Application for Lead-Based Paint Discipline Certification(Spanish worker)
LEAD Lead Discipline Training Provider
LEAD Pre-Post Training Notification
LEAD Completion of Notification For Abatement Lead-Based Paint
RRP Application for Renovation Firm Certification
RRP Application for Renovator Certification
RRP RRP Training Provider Application
RRP Dust Sampling Technician Application for Certification
RO/Owner for Scrap Tire
ST-CR Tire Carrier Permit
ST-CR Tire Carrier Quarterly Report
STGN Retail Tire Dealer / Scrap Tire Generator ID Number Application
STGN Tire Fee Report
STP Scrap Tire Processor Quarterly Report
STP Scrap Tire Processor Permit Application
STP Scrap Tire Processor Pre-Application
STR Tire Re-treader Registration
STS Scrap Tire Sorter Permit
STS Scrap Tire Sorter Quarterly Report
RO/Owner for Trust Fund Reimbursement Request
SWTF Local Government Scrap Tire Abatement Reimbursement Report
SWTF Local Government Scrap Tire Abatement Reimbursement Application
GUST GUST Trust Fund - Request for Reimbursement
GUST GUST Trust Fund - Application
HWTF Hazardous Waste Trust Fund - Request for Reimbursement
HWTF Hazardous Waste Trust Fund - Request for Advance

GEOS – User Guide for the Regulated Community
Page 40 of 42
6.1.4 Submit Online Fee Payment
To submit an online payment, the user needs to register ‘Fee Payment’ as the Account Group and the Account Type. Then click ‘Next’. If the User is also a “Responsible Official”, they can also select the “Responsible Official” as the Account Group and check the “Fee Payment” checkbox. The User does not need to associate them to a facility, so click “Next” to continue.
Register as Fee Payment Account
1. Using the login credentials in the email, the User can login and view their GEOS Dashboard. Click on the “Make Online Payment” button to submit a Payment.
2. Click the ‘Start’ button to begin an online payment/

GEOS – User Guide for the Regulated Community
Page 41 of 42
3. Click next to continue to the next part of the wizard.
4. The User must enter their FIMS Account ID and the Invoice Number. Once they do, they will be able to see the general invoice information and how much they have remaining on the invoice. Click ‘Next’ to continue.
5. Click ‘Next’ to continue.
6. User must select a Payment Method. A User that is making an Online Payment for their invoice will select the eCheck option.

GEOS – User Guide for the Regulated Community
Page 42 of 42
7. For the final step, the User will need to certify the submission and enter an answer to one of their security questions and enter their GEOS Account PIN Number.
Once the Public User has submitted a payment online, the ACH payment will be transmitted to Wells Fargo. From there, the payment will either be posted, returned, or rejected. If the payment is return or rejected, GAEPD must notify the GEOS User that their payment failed. The User can then return to Step 7-12 if they wish to resubmit their payment by eCheck.
6.1.4.1 Verify Account Balance
The Public User can verify that their payment was accepted by GAEPD.
1. From the GEOS Public Portal Dashboard, the User can view their current FIMS Account Balance by clicking
on the ‘Search for Transactions’ button.
2. The User will be prompted for their FIMS Account Number and their FIMS Account Key (or PIN).
If you do not have your FIMS Account Key, please contact the relevant GAEPD authority to have your PIN resent.