getting to know outlook 2007 - nist · q u i c k r e f e r e n c e g u i d e microsoftoutlook® ™...
TRANSCRIPT
Q U I C K R E F E R E N C E G U I D E
Microsoft®
Outlook™ 2007with Exchange Server
Getting to Know Outlook 2007
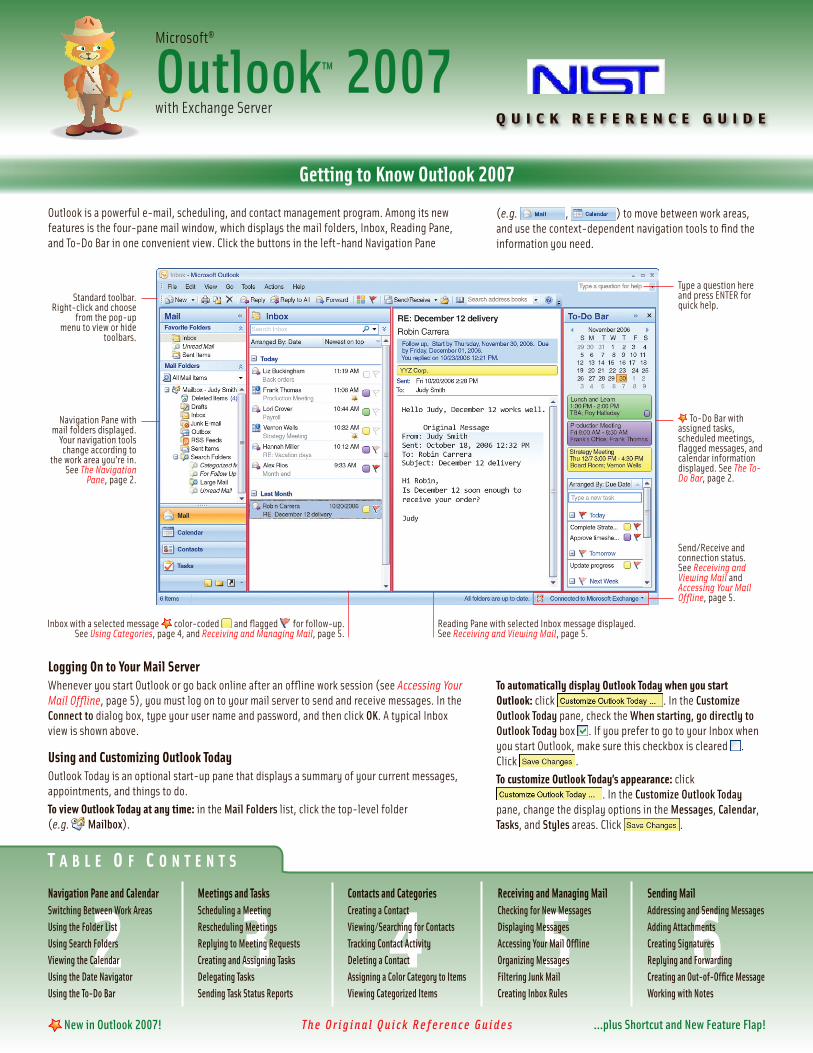
Outlook is a powerful e-mail, scheduling, and contact management program. Among its new features is the four-pane mail window, which displays the mail folders, Inbox, Reading Pane, and To-Do Bar in one convenient view. Click the buttons in the left-hand Navigation Pane
(e.g. , ) to move between work areas, and use the context-dependent navigation tools to find the information you need.
Logging On to Your Mail ServerWhenever you start Outlook or go back online after an offline work session (see Accessing Your Mail Offline, page 5), you must log on to your mail server to send and receive messages. In the Connect to dialog box, type your user name and password, and then click OK. A typical Inbox view is shown above.
Using and Customizing Outlook TodayOutlook Today is an optional start-up pane that displays a summary of your current messages, appointments, and things to do.To view Outlook Today at any time: in the Mail Folders list, click the top-level folder (e.g. Mailbox).
To automatically display Outlook Today when you start Outlook: click . In the Customize Outlook Today pane, check the When starting, go directly to Outlook Today box . If you prefer to go to your Inbox when you start Outlook, make sure this checkbox is cleared . Click .To customize Outlook Today’s appearance: click
. In the Customize Outlook Today pane, change the display options in the Messages, Calendar, Tasks, and Styles areas. Click .
T A B L E O F C O N T E N T S
2 3 4 6T A B L E O F C O N T E N T S
2 3 4 5 6 New in Outlook 2007!
Navigation Pane and CalendarSwitching Between Work AreasUsing the Folder ListUsing Search FoldersViewing the CalendarUsing the Date NavigatorUsing the To-Do Bar
Meetings and TasksScheduling a MeetingRescheduling MeetingsReplying to Meeting RequestsCreating and Assigning TasksDelegating TasksSending Task Status Reports
Contacts and CategoriesCreating a ContactViewing/Searching for ContactsTracking Contact ActivityDeleting a ContactAssigning a Color Category to ItemsViewing Categorized Items
Receiving and Managing MailChecking for New MessagesDisplaying MessagesAccessing Your Mail OfflineOrganizing MessagesFiltering Junk MailCreating Inbox Rules
Sending MailAddressing and Sending MessagesAdding AttachmentsCreating SignaturesReplying and ForwardingCreating an Out-of-Office MessageWorking with Notes
T h e O r i g i n a l Q u i c k R e f e r e n c e G u i d e s ...plus Shortcut and New Feature Flap!
Navigation Pane with mail folders displayed.
Your navigation tools change according to
the work area you’re in.See The Navigation
Pane, page 2.
To-Do Bar with assigned tasks, scheduled meetings, flagged messages, and calendar information displayed. See The To-Do Bar, page 2.
Inbox with a selected message color-coded and flagged for follow-up.See Using Categories, page 4, and Receiving and Managing Mail, page 5.
Type a question here and press ENTER for quick help.
Standard toolbar. Right-click and choose
from the pop-up menu to view or hide
toolbars.
Send/Receive and connection status.See Receiving and Viewing Mail and Accessing Your Mail Offline, page 5.
Reading Pane with selected Inbox message displayed.See Receiving and Viewing Mail, page 5.

The Navigation PaneThe Navigation Pane appears on the left side of the Outlook window and enables you to easily move between work areas, folders, and views.
Displaying the Navigation PaneChoose ViewNavigation PaneNormal or Minimized, or press ALT+F1.
Switching Between Work AreasNavigation buttons appear at the bottom of the Navigation Pane, and enable you to move between work areas.
or ...................CTRL+1 or ..................CTRL+5 or ...................CTRL+2 or ..................CTRL+6 or ...................CTRL+3 or ..................CTRL+7 or ...................CTRL+4 or .................... NoNe
Displaying Navigation ButtonsTo add or remove a button: at the bottom right of the Navigation Pane, click , choose Add or Remove Buttons, and then choose the button.To change how buttons are displayed: at the bottom right of the Navigation Pane, click and choose Show More Buttons or Show Fewer Buttons.To change the button order: click and choose Navigation Pane Options. In the Navigation Pane Options dialog box, check the box beside each button you want displayed. Select any button, and then click or . Click OK to close the dialog box.
Using the Folder ListThe Folder List displays your outlook folder structure. To display it, click
on the Navigation Pane or press CTRL+6.To view folder contents: click a folder.To add a new folder: choose FileNewFolder or press CTRL+ShIFT+e. In the Create New Folder dialog box, type a name in the Name box (e.g. Saved Mail). From the Folder contains list, choose what items the folder will contain (e.g. Mail and Post Items). In the Select where to place the folder list, select a location for the new folder and click OK.To remove a folder: right-click it and choose Delete. Click Yes to confirm deletion.To rename a folder: right-click it and choose Rename. Type the new name and press eNTeR.To move a folder into another folder: click and drag it on top of an existing folder.
Using Search FoldersSearch Folders contain copies of messages that meet specified criteria. There are three default Search Folders: For Follow Up, which shows messages that have been flagged; Large Mail, which shows messages that are larger than 100 kilobytes; and Unread Mail, which shows unopened messages.To find messages that meet Search Folder criteria: click or press CTRL+1. In the Folder List, click beside Search Folders, and then click a Search Folder (e.g. Unread Mail).To add Search Folders: click , and then choose FileNewSearch Folder or press CTRL+ShIFT+P. In the New Search Folder dialog box, click a Search Folder type (e.g. Mail with attachments). Click OK.Note: When you delete a Search Folder, only the folder is deleted. The items it contained are still available in their original locations.
The CalendarThe Calendar displays your appointments, meetings, and current tasks (see Scheduling Meetings and Events and Creating and Assigning Tasks, page 3).
Viewing the CalendarClick and choose ViewCurrent View. Choose an option (e.g. Day/ Week/Month, All Appointments) from the menu to view appointments and events.To choose views from the Navigation Pane: choose ViewNavigation PaneCurrent View Pane, and then choose the view option (e.g. Day/Week/Month, All Appointments) from the Current View list.To view multiple calendars: on the Calendar Navigation Pane, check the boxes
of all the calendars you want to view. The calendars will be displayed side-by-side. To overlay the calendars, click the icon on each Calendar tab (e.g. ).
Using the Date NavigatorIn Day/Week/Month view, the Date Navigator is displayed in the To-Do Bar (see The To-Do Bar, below). The current date is outlined in red, and all dates with meetings or appointments appear in bold.To go to a different month: click or on either side of the Date Navigator; alternatively, click the month name (e.g. ) and choose another month from the pop-up list.To view a specific date: click the date in the Date Navigator, or click and drag to view a set of consecutive dates. Press CTRL and click to view non-consecutive dates.To view an entire week: position the pointer to the left of the week you want to view. Click when the pointer changes to .To show two or more months in the Date Navigator: click and drag the divider bar to widen the Date Navigator panel until two calendar months appear.
The To-Do BarThe To-Do Bar appears on the right side of the Outlook window and helps you keep track of your assigned tasks, scheduled meetings, and flagged messages.
Viewing the To-Do BarTo turn the To-Do Bar on or off: choose ViewTo-Do Bar and choose Normal or Off; alternatively, press ALT+F2.To minimize the To-Do Bar: choose ViewTo-Do BarMinimized.To display more appointments in the To-Do Bar: choose ViewTo-Do BarOptions. In the To-Do Bar Options dialog box, check the Show Appointments box and type a number from 0 to 25.To display more calendars in the To-Do Bar: in the To-Do Bar Options dialog box, check the Show Date Navigator box and type a number from 0 to 9.
Creating To-Do ItemsTo create a To-Do item from a message: above the task list in the To-Do Bar, click and choose Start Date or Due Date. Click and drag the message from your Inbox or folder to the task list section of the To-Do Bar. When the pointer is placed where you want the task to appear, release the mouse button.To create a To-Do item from a contact: click , right-click a contact and choose Follow Up. Choose a due date (e.g. Next Week), or choose Custom to specify the follow up action and to add a start date, due date, or reminder.To create a task in the To-Do Bar: in the Type a new task box above the task list in the To-Do Bar, type a descriptive task name and press eNTeR. To provide additional information about the task, right-click the task on the task list, choose Open, and then follow steps 1-3 of Creating a New Task, page 3.
Copyright © 2007 Nevada Learning Series Inc.
Navigation Pane, Calendar, and To-Do Bar
New in Outlook 2007!
2
Scheduling Meetings and EventsMeetings are scheduled appointments that you can request one or more other people to attend. You can reserve additional resources such as meeting rooms when you schedule the meeting.Click on the Navigation Pane and choose ViewCurrent ViewDay/Week/Month.
Scheduling a Meeting1. In Day/Week/Month view, choose ActionsPlan a Meeting.2. In the Plan a Meeting window, click and choose Add from
Address Book.3. In the Select Attendees and Resources dialog box, choose an address list
from the Address Book drop-down list.4. Type an attendee’s name in the Search text box or select a name from the
displayed list. As you select each name, click or to add the person to the invitation list. Click to reserve resources. Click OK to close the dialog box.
5. In the Plan a Meeting window, use the scroll bars to find times when your invitees are available, and then click a time slot. Free time appears as
and busy time slots contain colored bands (e.g. ) depending on whether the time is scheduled busy, tentative, or out of office.
Tip: Click to highlight the next time slot in which all attendees and resources are available. For additional Autopick options, click
, choose AutoPick, then choose a command (e.g. Required People).6. Click . In the Meeting window, type meeting details in the
Subject and Location boxes, and then click Send . Click to close the Plan a Meeting window.
Rescheduling or Canceling MeetingsTo reschedule a meeting you requested: use the Calendar to locate the meeting (see The Calendar, page 2). Drag it to a new date and, when prompted, choose Save changes and send update and click OK. Alternatively, double-click the meeting, enter a new meeting time, and then click Send Update to notify attendees of the change.Tip: To avoid time conflicts when you reschedule the meeting, click Scheduling Assistant in the tab to check your attendees’ free time.To cancel a meeting you requested: use the Calendar to find the meeting you want to cancel (see The Calendar, page 2). Right-click the meeting and choose Delete. In the Meeting window, click Send Cancellation to notify attendees of the cancellation.
Replying to a Meeting RequestWhen you receive a meeting request from someone else, it shows up as a message in your Inbox. See Receiving and Viewing Mail, page 5.1. Click , and, if necessary, click Inbox in the folder list to show your
new messages. Double-click the meeting request (shown with a icon).2. Click Calendar to see if the meeting conflicts with your schedule, and
then close the calendar. Click Accept , Tentative , Decline , or Propose New Time .
3. Choose a response option and click OK.
Scheduling an All Day Event1. Click and choose ViewCurrent ViewDay/Week/Month. Choose
ActionsNew All Day Event.2. Type the event details in the Event window. From the Show As list in the Event
tab, choose how you want the event to appear in your calendar (e.g. Busy).3. Click Save & Close to record the event.
Creating and Assigning TasksTasks are “to-do” items you can create for yourself or assign to others.
Creating a New Task1. Click and double-click a blank space on the Tasks list or press
CTRl+N.2. In the Task window, name the task in the Subject box. If applicable, enter
start and completion dates by clicking the arrow beside Start date and Due date and then clicking a date in the pop-up calendar. If desired, make Status, Priority, and % Complete entries.
To be reminded of your task’s due dates: check the Reminder box . Use the reminder date and time lists to schedule when the reminder will occur.To create a recurring task: click Recurrence . In the Task Recurrence dialog box, choose a recurrence pattern and specify start and end dates. Click OK.3. Click Save & Close . The task appears in Tasks, in the To-Do Bar (see The
To-Do Bar, page 2), and in the Calendar on the Daily Task list. Overdue tasks appear in red (e.g. ).
Assigning a Task to Someone Else1. Click and choose ActionsNew Task Request or press
CTRl+ShIFT+U.2. In the Task window, click . In the Select Task Recipient dialog box,
type the assignee’s name in the text box or select a name from the list. Click for each assignee, and then click OK to close the dialog box.
Note: To choose names from other contact or address lists, choose a list from the Address Book.3. Complete the task details (see step 2 of Creating a New Task, above). If you
don’t want to receive a message each time the assignee makes a change to the task, clear the Keep an updated copy of this task on my task list box .
4. Click Send to send the task assignment.
Responding to a Task Assigned to You1. Click and double-click the task assignment (indicated with an
assigned task icon ).2. Click either Accept or Decline . If you want to include personal
comments with your notification, click Edit the response before sending; otherwise, click OK to immediately send the notification.
Delegating a Task Assigned to You1. Click and double-click the task assignment.2. Click Assign Task , and then click .3. In the Select Task Recipient dialog box, select the name of the person to
whom you want to delegate the task, click , and then click OK. Click Send to send the task assignment.
Sending Status Reports About a Task Assigned to You1. Click and double-click an assigned task that you’ve accepted .2. Click Send Status Report and, in the body of the message under Original
Task, update the task information as necessary (e.g. % Complete).3. Type additional comments if necessary — these comments appear in blue
text. Click Send to send the status report.
Marking a Task CompleteClick and check the box beside the task name (in Simple List view); alternatively, double-click the task and click Mark Complete .Note: If the task was assigned to you and you mark it complete, the task owner may overwrite your changes. You only have full control of personal tasks.
Copyright © 2007 Nevada Learning Series Inc.
Meetings and Tasks
New in Outlook 2007!
3

Copyright © 2007 Nevada Learning Series Inc.
Contact Management and Categories
New in Outlook 2007!
4Creating and Managing ContactsThe Contacts list stores e-mail and postal addresses of your colleagues and clients. You can manually create contacts, base them on e-mail you receive, or copy them from your company’s address book.
Creating a Contact Manually1. With displayed,click orpressctrl+n.theContactwindow
opens.2. Enterthenewcontact’sname,e-mail,telephone,andaddressinformation
inthetextboxes.tospecifyhowthecontact’snameislisted(e.g.lastnamefirst),chooseanoptionfromtheFile aslist.
To record multiple e-mail addresses:clickthearrow belowInternetandchooseE-mail,E-mail 2,orE-mail 3.typetheaddress.To record multiple telephone numbers:clickanyarrow belowPhone numbersandchooseaphonenumbertype(e.g.Mobile,Pager).typethephonenumber.To record multiple postal addresses:clickthearrow belowAddressesandchooseanaddresstype(e.g.Business,Home).typetheaddress.3. Ifdesired,clickDetails andtypeadditionalcontactinformation.click
Save & Close tosavethecontact;alternatively,clickSave & New tosaveitandautomaticallycreateanothernewcontact.
Creating a Contact Based on Your Company’s Address List1. click orpressctrl+shIft+b.theGlobal Address Listwindowopens.2. chooseGlobal Address ListfromtheAddress Bookdrop-downlist.3. Double-clickanamefromthelist,andthenclickAdd to Contacts.4. followsteps2–3ofCreating a Contact Manually,above.
Creating a Contact Based on a Received Electronic Business Card1. Openthemessage(seeReceiving and Viewing Mail,page5).thecardcan
befoundasanattachmentinthemessageheaderoraspartofthesignatureinthebodyofthemessage.
2. right-clicktheattachedorinsertedcard,andthenclickAdd to Contacts.theContactwindowopenswiththecontact’sElectronicbusinesscardinformationalreadyentered.
3. followsteps2–3ofCreating a Contact Manually,above,tocompleteentry.
Creating a Contact Based on a Received Message1. Openthemessage(seeReceiving and Viewing Mail,page5).You’llseea
headeronthemessagethatlookslikethis.
2. right-clickanye-mailaddressintheFrom,To,orCcfield,andthenchooseAdd to Outlook Contacts.theContactwindowopenswiththecontact’snameande-mailaddressalreadyentered.
3. followsteps2–3ofCreating a Contact Manually,left,tocompleteentry.
Viewing and Searching Your Contact Listherearesometipsforsortingandsearchingyourcontacts:To change the contact list view:with displayed,chooseaviewstyleunderCurrent ViewinthenavigationPane(e.g.By Company).To search for a contact:with displayed,typethecontact’snameorotherinformation(e.g.streetname,companyname)intheSearch Contactsbox.Allcontactrecordscontainingthesearchwordarelisted.Double-clickanyofthematchingcontactstoopenit,or,ifnomatchesarefound,clickTry searching again in All Contact Itemstosearchthecompletecontactlist.
Tracking Contact Activity Automatically1. chooseToolsOptions.IntheOptionsdialogbox,click .2. IntheJournal Optionsdialogbox,checktheOutlookactivitiesyouwant
tobeautomaticallyrecorded(e.g.E-mail Message),andthencheckthecontacts(e.g.Jimhenry)forwhomyouwanttheactivitiesrecorded.
3. clickOKtoclosetheJournal OptionsandOptionsdialogboxes.To view your contact activity:click .click or ontheJournaltimelinetoexpandorcollapselistsforspecifickindsofentries.To stop tracking contact activity:re-opentheJournal Optionsdialogboxandcleartheactivityandcontactcheckboxes(steps1and2above).
Deleting a ContactWith displayed,clickthecontact,andthenclick orpressDelete.
Viewing Categorized ItemsTo view a complete list of all Outlook items by category:1. chooseToolsInstant SearchSearch All Mail Itemsorpressctrl+Alt+A.2. IntheAll Mail Itemsview,clickthearrow besidetheSearch All Mail Items
textbox.
3. clickthearrow besideCategoriesandchooseacategory(e.g.Sales Project).Outlooklistsallitems(messages,meetings,tasks,etc.)thatbelongtothecategoryyouspecified.
To view specific work areas by category:1. clickaworkarea(e.g. , ,or ),andthen
clicktheBy CategoryoptionunderCurrent ViewonthenavigationPane;alternatively,clickaworkareaandchooseViewArrange ByCategories.
2. click or toexpandorcollapseacategorylist.Atriangleontheheaderindicatesascending ordescending order.
Using CategoriesA Color Category is a colored label that you assign to related Outlook items. This colored label can help you locate and manage all messages, tasks, and meeting notices for a specific project — regardless of where they are stored.
Assigning a Color Category to Any Outlook ItemTo assign a default color category:1. right-clickanOutlookitem(ane-mailmessage,meeting,contact,task,or
note),chooseCategorize,andthenchooseadefaultcolorcategory(e.g. Red Category).
2. Enteranameforthecategory(e.g.Finance Project)intheRename CategorydialogboxandclickYes.
To create and assign a new color category:1. right-clickanOutlookitem(ane-mailmessage,meeting,contact,task,or
note)andchooseCategorizeAll Categories.2. IntheColor Categoriesdialogbox,clickNew.3. IntheAdd New Categorydialogbox,enteranameforthecategory(e.g.Sales Project),andthenclickthearrow belowColorandchooseacolor.clickOK.

Receiving and Viewing MailBy default, incoming messages are delivered to your Inbox where you can group and sort them for easy viewing.
Checking for New MessagesOpen your Inbox (see Switching Between Work Areas, page 2) and click
or press f9. New messages appear in the Inbox pane. Click a message once to display it in the Reading Pane (see page 1), or double-click a message to open it in a new window. Here are some common message icons.
........................ unread message ........................... declined meeting ........................meeting request .......................... accepted meeting .............................. task request .......... tentatively accepted meeting
Note: When Outlook is running, an alert box appears on your desktop every time you receive a new message.
Displaying MessagesTo change message grouping: choose ViewArrange By and choose an option (Date, Conversation, etc.) from the sub-menu; alternatively, click the Arranged By button in the Inbox pane and choose an option (e.g. ). If your messages are grouped, click to expand or to collapse them.To change sorting order: click an Inbox header (e.g. ). A triangle on the header indicates ascending or descending order.To change the message view: choose ViewCurrent View, and then choose an option (e.g. Last Seven Days) from the sub-menu. If you unintentionally close the Reading Pane, choose ViewReading PaneRight to restore it.To flag a message for follow-up: click the flag button beside the message. Clear the flag by right-clicking it and choosing Clear Flag. If you want to choose another flag color or change the default color, right-click the flag button and choose from the list.
Accessing Your Mail OfflineIf your company uses Exchange Server, you can read and compose mail normally even when your computer is disconnected from the network. Your Inbox and Outbox are automatically updated when you reconnect.
Preparing to Work Offline1. Connect to your mail system as usual. Contact your system administrator for
more information about using a cable or dial-up connection.2. Choose ToolsAccount Settings. In the Account Settings dialog box, double-
click the account name (e.g. Microsoft Exchange).3. In the Change E-mail Account dialog box, check the Use Cached Exchange
Mode box and click . Click to close the Change E-mail Account dialog box, and then click Close.
To use address books offline: choose ToolsSend/ReceiveDownload Address Book. In the Download Offline Address Book dialog box, click Full Details and OK.4. Exit and restart Outlook. Outlook copies your mailbox contents to your hard
drive so that you can work normally regardless of your connection status.
Working with Mail While OfflineChoose FileWork Offline. Read and respond to messages as you normally do. All outgoing messages are temporarily stored in your Outbox.
Getting New Mail and Sending Queued MessagesReconnect to your mail system, and then click or press f9.To automatically download new mail before exiting Outlook: choose ToolsSend/ReceiveSend/Receive SettingsDefine Send/Receive Groups and check the Perform an automatic send/receive when exiting box . Click Close.
Managing Your MessagesYou can manually organize your messages, or use filters and rules to automatically block junk mail and file messages.
Organizing Messages ManuallyTo move a message: click and drag the message from one folder to another (see Using the Folder List, page 2); alternatively, click the message and press CtRl+sHIft+v. In the Move Items dialog box, choose a folder and click OK.To save an attached file: view the message and double-click the attachment (e.g. ). In the Opening Mail Attachment dialog box, click Save. Choose a folder and click Save.Important: Attachments can contain viruses that damage data. scan attachments with anti-virus software before opening.To delete a message: view the message, and then click or press dElEtE.To retrieve a deleted item: click Deleted Items. Click and drag the deleted message to the folder of your choice; alternatively, select the message and press CtRl+sHIft+v. In the Move Items dialog box, select a folder and click OK.
Organizing Messages with Inbox Organizerthe Inbox Organizer can file mail and automatically color code specific types of messages. Choose ToolsOrganize to open the Organize pane, shown here.
To move a message: click a message. Click and choose the destination folder (if the folder doesn’t appear in the list, choose Other folder, choose from the Select Folder dialog box and click OK). Click .To color code messages from specific senders: click a message from the sender, click , and choose a color option. Click to activate the color option.To use mail views: click and see Displaying Messages, left column.
Filtering Junk MailOutlook identifies and filters junk mail by analyzing its content and structure. By default, junk mail filtering is switched on using a low protection setting.To increase automatic junk mail protection: choose ToolsOptions. In the Options dialog box, click the tab and click . In the Junk E-mail Options dialog box, click a protection option (e.g. High, Safe Lists Only) and click OK to close the dialog boxes. the stronger the setting you choose, the more likely it is that legitimate messages will be filtered.To add senders to your junk or trusted senders list: in your Inbox list, right-click a message, choose Junk E-mail, and then choose Add Sender to Blocked Senders List or Add Sender to Safe Senders List. When you specify blocked or safe senders, these settings override Outlook’s built-in filtering.
Advanced Mail Sorting and Filtering with Inbox Rules1. Choose ToolsRules and Alerts. In the Rules and Alerts dialog box, click
.2. In the Rules Wizard dialog box under Step 1: Select a template, choose an
option from the Stay Organized, Stay Up to Date, or Start from a blank rule area. Under Step 2: Edit the rule description, specify what you want the rule to do, the conditions under which it applies, and its exceptions. Click
to complete each step of the wizard.3. On the last step of the wizard, name the rule. If you want the rule to be
applied retroactively, check the Run this rule now on messages already in “<your mailbox>” box . Click to activate the rule, and then click OK.
Copyright © 2007 Nevada Learning Series Inc.
Receiving and Managing Mail
New in Outlook 2007!
5

Copyright © 2007 Nevada Learning Series Inc.
Sending Mail
New in Outlook 2007!
6Creating New MessagesYou can address a new message manually or choose recipients from your address books. Messages can include file attachments and a customized signature.
Addressing and Sending a Message1. With selected,click ;alternatively,pressctrl+shift+m.2. inthenewmessagewindow,addressyourmessageusingoneofthe
followingmethods: typetherecipients’e-mailaddresses([email protected]),
separatedbysemicolons,intheToandCcboxes.todisplaytheBccbox,clickthe tab,andthen,intheFieldsgroup,clickShow Bcc .
Begintypingtherecipient’snameintheTo,Cc,orBccbox.Asyoutype,matchingnamesoraddressesyou’vepreviouslywrittentoappearinapop-upbox.chooseanoptionandpressENtEr.ifyou’rewritingtorecipientsforthefirsttime,addressyourmessageasdescribedaboveandtheAutocompleteboxwillappearthenexttimeyouwritetothem.
clickToor,intheNamesgroup,clickAddress Book .intheSelect Namesdialogbox,chooseanameandclick , ,or
.tochoosenamesfromotheraddressorcontactlists,choosefromtheAddress Booklist(seeCreating and Managing Contacts,page4).clickOKtoclosetheSelect Namesdialogbox.
3. typeadescriptivephraseintheSubjectbox,andthentypeyourmessagetextinthecompositionarea.seeFormatting Message Text,rightcolumn.
4. Whenyourmessageiscomplete,clickSend .YourmessageistransferredtotheOutboxuntildelivery,andthencopiedtotheSent Itemsfolder.
Attaching Files and Outlook Items to Your Message1. createandaddressamessageasdescribedinsteps1–3above,andthendo
oneofthefollowing.To attach a file:onthe or tab,clickAttach File .intheInsert Filewindow,selectthefileandclick .To insert file contents directly into your message:onthe or tab,clickAttach File .intheInsert Filewindow,selectthefileyouwanttoattach,andthenclick on andchooseInsert as Text.To attach an Outlook item:onthe or tab,clickAttach Item
.intheInsert Itemdialogbox,selecttheitemtype(e.g.CalendarorNotes)intheLook inarea,andthendouble-clicktheitemintheItemsarea.2. thefileoritemnameappearsintheAttachedboxinthemessagewindow.
completeyourmessageandclickSend .
Creating Signatures and Electronic Business Cards1. Withyourinboxopen,chooseToolsOptions.intheOptionsdialogbox,
clickthe tab,andthenclick .2. intheSignatures and Stationerydialogbox,click .3. intheNew Signaturedialogbox,typeadescriptivenameforyoursignature
andclickOK.4. intheEdit SignatureareaoftheSignatures and Stationerydialogbox,type
thesignaturetext.5. toincludeanelectronicbusinesscard,click .selectyour
namefromtheaddressbookandclickOK.6. Whenthesignaturetextiscomplete,clickOKtoclosetheremainingdialog
boxes.Yournewsignaturefileisautomaticallyaddedtoyouroutgoingmail.To remove or change signatures:chooseToolsOptions.intheOptionsdialogbox,clickthe tab,clickSignatures,andchoose<none>fromtheNew messageslist;alternatively,chooseanothersignaturefileorcreateanewone(steps1–6,above).
Replying and ForwardingYou can reply to a message using its return address or forward the message to other recipients. You can also set up automatic replies for messages that arrive when you’re out of the office.1. inyourinbox,selectoropenthemessageanddooneofthefollowing.To reply to the sender only:clickReply orpressctrl+r.theToandSubjectboxesareautomaticallyfilledin.To reply to the sender and all original recipients:clickReply to All orpressctrl+shift+r.theToandSubjectboxesareautomaticallyfilledin.To forward the message to other recipients:clickForward orpressctrl+f,andthenaddressthemessage.seeAddressing and Sending a Message,leftcolumn.2. typeyourreplyabovetheoriginalmessagetextandclickSend .
Creating an Out-of-Office MessageAnout-of-officemessageisaresponsethatisautomaticallysenttoeveryonewhosendsyoumailwhileyou’reawayonvacationorbusiness.1. With selected,chooseToolsOut of Office Assistant.2. intheOut of Office Assistantdialogbox,clicktheI am currently Out of the
Officeoptionandtypeyourautoreplymessageinthetextbox.To specify a response rule for incoming messages from specific people:click
.intheEdit Ruledialogbox,typetheaddressesofpeopletowhomyouwanttheresponsetoapply(orclick ,choosenamesfromtheChoose Senderdialogbox,andthenclickOK).checkanyboxes tochoosetheresponsetypeandsetthenecessaryresponseactions.clickOKtosavetheruleandtoclosetheEdit Ruledialogbox.3. clickOKtoactivatethenoticeandtoclosetheOut of Office Assistantdialog
box.Whenyouwanttoswitchthenoticeoffagain,reopentheOut of Office AssistantdialogboxandclicktheI am currently In the Officeoption.
Formatting Message TextWhilecomposingamessage,usetheformattingicons(e.g. , , ,etc.)onthe tabtosetthetextstyle,font,size,color,andalignment.touseOutlook’sformattingoptions,clickthe tabwhenyou’recomposingamessageandchooseHTMLorRich TextfromtheFormatgroup.
Additional Message OptionsWhilecomposingamessage,youcanspecifyitsimportanceandsensitivityorrequestareceiptnotice.To set message importance and sensitivity:onthe tab,click atthebottom-rightoftheMore Optionsgroup.intheMessage Optionsdialogbox,chooseasettingfromtheImportanceandSensitivitylists(e.g.High).clickClose.Whenrecipientsreceivethemessage,itwillhaveanimportanceandsensitivitystamp.To request a notice of receipt:onthe tab,checktheRequest a Delivery Receiptand/orRequest a Read Receipt box .Whenyourmessageisopened,youwillreceiveadeliveryand/orreadnotification.
Working with NotesUse notes to record thoughts and to organize your ideas. You can easily convert a note to any other Outlook item, such as a task.To create a new note:click orpressctrl+N.typeyournote,andthenclick orpressEsctoaddittoyourNoteslist.To view a note:with selected,double-clickthenote.To convert a note to another Outlook item:withtheNoteslistdisplayed,clickanddraganotetoanybuttonontheNavigationPane(e.g. ),andthenclickSave & Close .
In addition to the shortcuts below, you can use KeyTips within open items (e.g. Mail and Calendar) to quickly execute commands. Press AlT to reveal the available KeyTips (shown as letters and numbers in square boxes), then press the applicable letter or number to execute the command.
Creating New Items Create a message ..................................................... CTrl+shIfT+M
Create a meeting request ....................................................... CTrl+shIfT+q Create a personal appointment ................................... CTrl+shIfT+A Create a personal task ................................................ CTrl+shIfT+K
Create a task for somebody else .............................................. CTrl+shIfT+u Create a note............................................................. CTrl+shIfT+n Create a contact ........................................................ CTrl+shIfT+C
Create a folder ...................................................................... CTrl+shIfT+eCreate a search folder ............................................................ CTrl+shIfT+P
Working in Any ViewCreate new item in current view ........................................................CTrl+nOpen the selected item ....................................................................CTrl+Oforward the selected item as a new message ...................................... CTrl+fMove the selected item to another folder ................................. CTrl+shIfT+vCopy the selected item to another folder ................................. CTrl+shIfT+ysave the current item ....................................................................... CTrl+ssave the selected item as a file .............................................................. f12Do a basic search in current folder ............................................. f3 or CTrl+eDo an advanced search in any folder ........................................ CTrl+shIfT+fsearch for text in the current item ............................................................ f4flag the selected item for follow-up ........................................ CTrl+shIfT+g
Print the current item or view ..................................................... CTrl+Pspell-check the current message ............................................................. f7
Working with Mailview Inbox/Outbox contents .............................. CTrl+shIfT+I/CTrl+shIfT+Oreply to the selected message ..........................................................CTrl+rreply to the message’s sender and all original recipients .......... CTrl+shIfT+rforward the selected message .......................................................... CTrl+fOpen the selected message ..............................................................CTrl+O
Check for new messages ..................................... f9 or CTrl+MMark the selected message read .......................................................CTrl+qMark the selected message unread ....................................................CTrl+u
Open the Address Book .................................................... CTrl+shIfT+BAccept the meeting/task request ........................................................ AlT+CDecline the meeting/task request .......................................................AlT+D
Editing and Formatting Text Copy selected text ..................................................................... CTrl+C
Copy and cut selected text ............................................................ CTrl+x Paste copied text at cursor location .............................................. CTrl+v
undo edit ........................................................................................ CTrl+z Bold, italicize, underline selected text ..... CTrl+B, CTrl+I, CTrl+u
Shortcuts
For information on customization, visit our Web site at www.nlearnseries.com/customTo order other guides in our series, please contact us by fax at 416-487-3121 or by e-mail at [email protected]
Microsoft® Outlook® 2007: quick reference guide copyright ©2007 nevada learning series Inc. We assume no responsibility for errors or omissions in this guide. Outlook® is a registered trademark of Microsoft®.
IsBn: 978-1-55374-801-4 Printed in Canada

Outlook 2007 | What’s New?
Creating New Items with the Ribbon
The Ribbon (shown below), which can be found in open items such as Mail, Contacts, and Appointments, displays groups of command buttons and icons under a set of tabs. To minimize the Ribbon so that just the tabs are revealed, right-click anywhere on the Ribbon and choose Minimize the Ribbon. The commands remain hidden until you activate them by clicking a tab.
The To-Do Bar
The To-Do Bar displays the Date Navigator and lists all your upcoming tasks and appointments. You can use the To-Do Bar to accept and decline meetings, add and edit tasks, flag messages for follow-up, and access your full Calendar. See The To-Do Bar, page 2.
The Daily Task List
The Daily Task List now also appears at the bottom of the Day/Week/Month calendar view. You can assign time to work on tasks by dragging them from the Daily Task List to a time slot on the Calendar. Tasks that aren’t marked complete roll over to the next day. See Marking a Task Complete, page 3.
Color Categories
Color categories can be assigned to messages, appointments, contacts, tasks, and notes so that you can easily sort and search related Outlook items. Use a default color category or create a new color category. See Assigning a Color Category to Any Outlook Item, page 4.
Attachment Preview
You can now view attachments in the Reading Pane rather than having to open another program. Open the message and, in the Reading Pane below the message header, click the attachment. To return to the message, click
.
Electronic Business Cards
You can add your contact information, company logo, and personal photo to an Electronic Business Card and share it as an attachment or as part of your signature. See Creating Signatures and Electronic Business Cards, page 6, and Creating a Contact Based on a Received Electronic Business Card, page 4.To create an Electronic Business Card: click and click . Click Business Card in the Options group. In the Edit Business Card dialog box, specify the card’s design and text, and then click OK. Click Save & Close .To view your saved Electronic Business Cards: click on the Navigation Pane and choose ViewCurrent ViewBusiness Cards.
Office Button. The Office button contains commonly used commands such as Save, Move, and Print.
Quick Access Toolbar. To customize, right-click a command icon and choose Add to Quick Access Toolbar.