getting started-with-oracle-so a-vii
DESCRIPTION
TRANSCRIPT

Getting Started with Oracle SoA
Oracle SOA Project III Identify Top Students Lab#7
Description: BISP is committed to provide BEST learning material to the beginners and advance learners. In the same series, we have prepared a complete end-to end Hands-on Beginner’s Guide for Oracle SoA. The document focuses on steps involved in complete Oracle SoA “Top Student Project”. Join our professional training program and learn from experts.
History:Version Description Change Author Publish Date0.1 Initial Draft Shiva Kant Pandey 21st Aug 20120.1 Review#1 Amit Sharma 29th Aug 2012
www.bispsolutions.com www.bisptrainigs.com www.hyperionguru.com Page 1

TOP STUDENT PROJECT
Introduction to following Activities:
While Activity
Invoke Activity
OVERVIEW OF THE PROJECT:
We are going to select a top student from a list of students so we have to provide input as student detail & invoking a third party service ProcessStudentProcess which is discussed in previous DOC VI. This service process topper student request & provide response as a top students.
STEP W ISE PROCEDURE OF PROJECT TOPPER STUDENT PROJECT
Step 1: Create new project New --->All Technologies--->SOA Tier --->SOA project --->OK ---> Project Name (TopperStudentProject) ---> ADF Business Component---> SOA--->Next -->Empty Composite ---> Finish.Now you can see your project on left pane with all its contents so as we need to start our project with XSD .
Step 2: Create a new xsd file under project
Right click on xsd--> file name(StudentList.xsd) --> Target Namespace(http://www.bispsolutions.com/training/soa/schema/StudentList)-->
prefix (slobj) -->ok
www.bispsolutions.com www.bisptrainigs.com www.hyperionguru.com Page 2

now created successfully StudentList.xsd
Step 3: Design xsd as according to SCA i.e with the help of components or in design mode :
Click on element & rename it as TopperStudentRequest & press Enter key.
Step 4: Right Click on target namespace & click complex type
www.bispsolutions.com www.bisptrainigs.com www.hyperionguru.com Page 3

Step 5: Click on complex Type1 & rename it as StudentListType & hit Enter.
www.bispsolutions.com www.bisptrainigs.com www.hyperionguru.com Page 4

Step 6: Right click on StudentListType ---> insert inside complex Type-->sequence
Step 7: Click on element1 & rename it as Student & hit Enter
www.bispsolutions.com www.bisptrainigs.com www.hyperionguru.com Page 5

Step 8: Give Student element minoccur =1 & maxoccur =unbounded
Step 9: To import Student.xsd inside TopperStudentProject have two ways :
• Reuse xsd or wsdl by copying xsd or wsdl file physically from source project to target project directory
• Reuse xsd or wsdl by uploading from oramds repository
Now Right Click on target namespace & click import
www.bispsolutions.com www.bisptrainigs.com www.hyperionguru.com Page 6

Step 10: view on source mode & complete xsd import but before doing this copy Student.xsd from ProcessStudent Project ---> xsd ---> Student.xsd file to TopperStudentproject ---> xsd as shown below in sequence :
www.bispsolutions.com www.bisptrainigs.com www.hyperionguru.com Page 7

www.bispsolutions.com www.bisptrainigs.com www.hyperionguru.com Page 8

Now Successfully pasted Student.xsd inside TopperStudentProject --> xsd
www.bispsolutions.com www.bisptrainigs.com www.hyperionguru.com Page 9

Step 11: Click on Refresh twice or thrice
Student.xsd is now visible above StudentList.xsd
www.bispsolutions.com www.bisptrainigs.com www.hyperionguru.com Page 10

Step 12: Open StudentList.xsd & view on source mode & edit xsd import by writing namespace & schemalocation also register its namespace as shown below :
Step 13: View imported student xsd on Design mode as shown below:
www.bispsolutions.com www.bisptrainigs.com www.hyperionguru.com Page 11
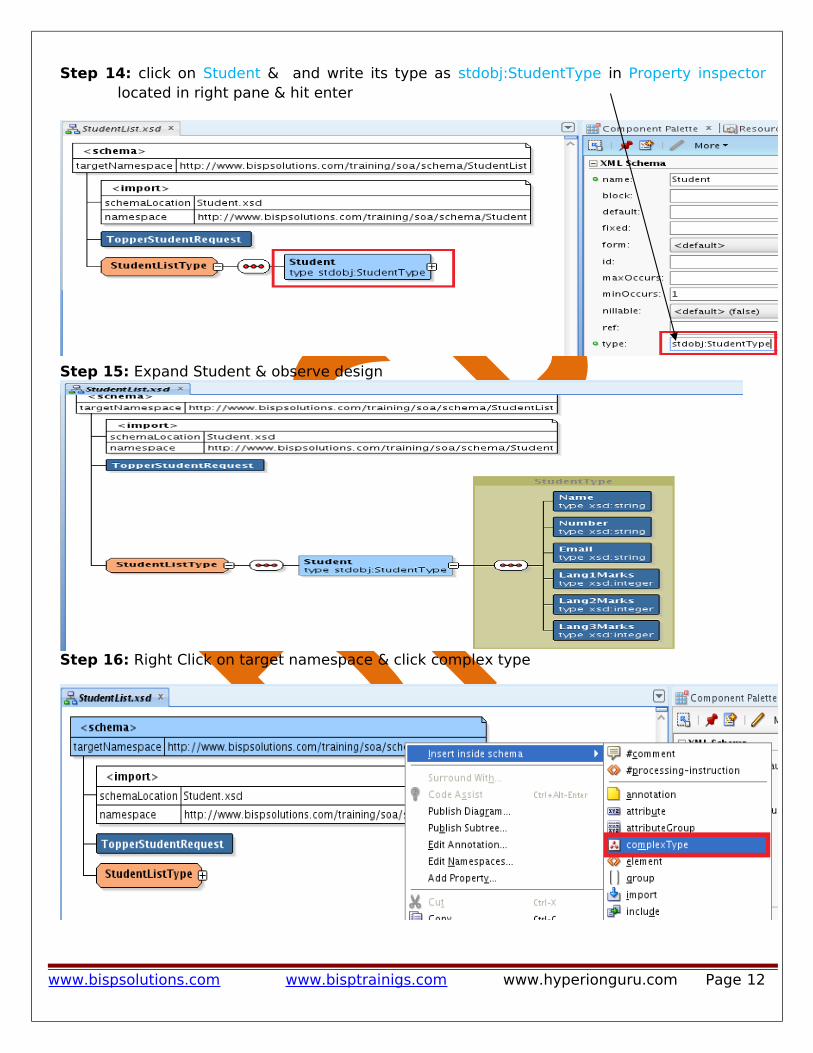
Step 14: click on Student & and write its type as stdobj:StudentType in Property inspector located in right pane & hit enter
Step 15: Expand Student & observe design
Step 16: Right Click on target namespace & click complex type
www.bispsolutions.com www.bisptrainigs.com www.hyperionguru.com Page 12

Step 17: click on complex Type1 & rename it as StudentListResultType & hit Enter
then Right click on StudentListResultType ---> insert inside complex Type-->sequence
Step 18: : Right Click on sequence --->insert inside sequence--->element
www.bispsolutions.com www.bisptrainigs.com www.hyperionguru.com Page 13

Step 19: Click on element1 & rename it as TopperStudent & hit Enter
Step 20: click on TopperStudent & and write its type as stdobj:StudentResultType in
Property inspector located in right pane & hit enter
Step 21: : Expand Student & observe design
www.bispsolutions.com www.bisptrainigs.com www.hyperionguru.com Page 14

www.bispsolutions.com www.bisptrainigs.com www.hyperionguru.com Page 15

Step 22: Give Student element minoccur =1 & maxoccur =unbounded
Step 23: Similarly create another element TopperStudentResponse as shown below :
Step 24: : click on TopperStudentRequest & and write its type as slobj:StudentListType in
Property inspector located in right pane & hit enter
www.bispsolutions.com www.bisptrainigs.com www.hyperionguru.com Page 16

www.bispsolutions.com www.bisptrainigs.com www.hyperionguru.com Page 17

Step 25: Similarly click on TopperStudentResponse & and write its type as
slobj:StudentListResultType in Property inspector located in right pane & hit enter
www.bispsolutions.com www.bisptrainigs.com www.hyperionguru.com Page 18

Step 26: View Source mode :
www.bispsolutions.com www.bisptrainigs.com www.hyperionguru.com Page 19

Step 27: Right click on Composite.xml & click on open
Step 28: Create BPEL Process This composite .xml is partitioned into three sections
1. Exposed Services2. Components3. External refrences
Now right click on component section and choose BPEL Process
www.bispsolutions.com www.bisptrainigs.com www.hyperionguru.com Page 20
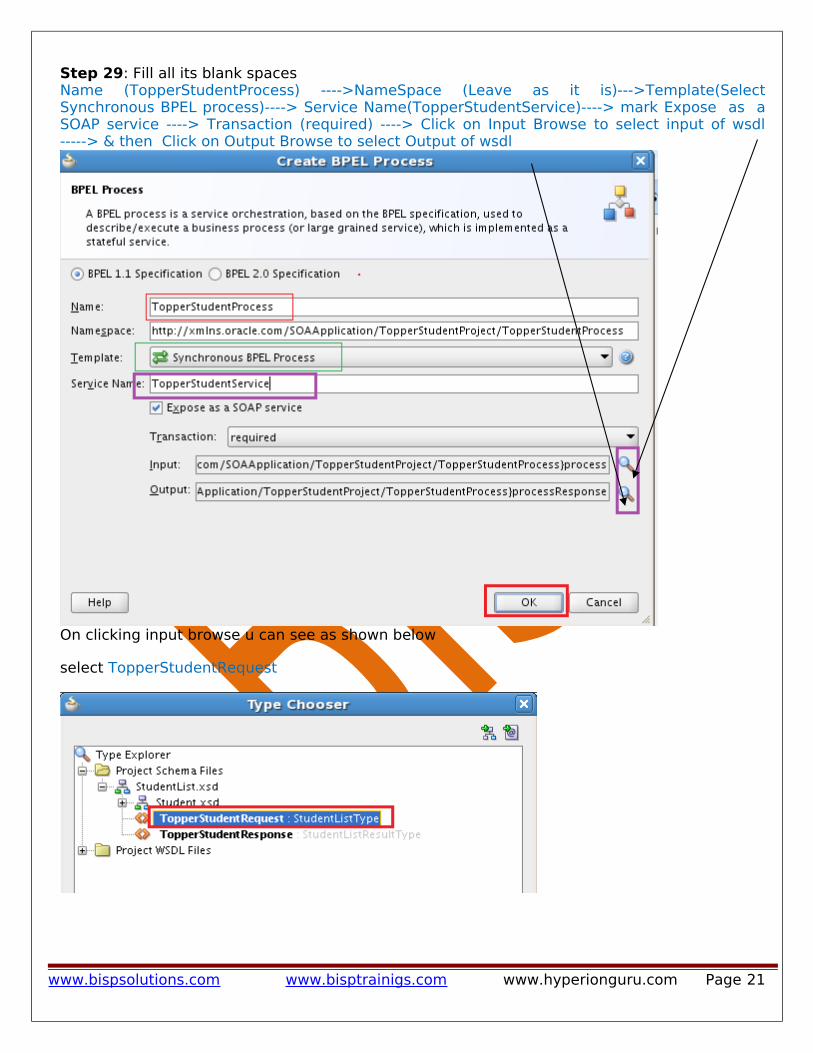
Step 29: Fill all its blank spaces Name (TopperStudentProcess) ---->NameSpace (Leave as it is)--->Template(Select Synchronous BPEL process)----> Service Name(TopperStudentService)----> mark Expose as a SOAP service ----> Transaction (required) ----> Click on Input Browse to select input of wsdl -----> & then Click on Output Browse to select Output of wsdl
On clicking input browse u can see as shown below
select TopperStudentRequest
www.bispsolutions.com www.bisptrainigs.com www.hyperionguru.com Page 21

On clicking Output browse u can see as shown below
select TopperStudentResponse
www.bispsolutions.com www.bisptrainigs.com www.hyperionguru.com Page 22

www.bispsolutions.com www.bisptrainigs.com www.hyperionguru.com Page 23

Step 30: Now we have created BPEL Process as shown below
Step 31 : Click on Source mode
www.bispsolutions.com www.bisptrainigs.com www.hyperionguru.com Page 24

www.bispsolutions.com www.bisptrainigs.com www.hyperionguru.com Page 25

Step 32: Since we have already created BPEL Process click on Composite on left pane
To create TopperStudentProcess.bpel click on TopperStudentProcess
www.bispsolutions.com www.bisptrainigs.com www.hyperionguru.com Page 26

NOTE: Since here we need to invoke third party service & so we have to create concrete ProcessStudent wsdl inside Topper Student Project
www.bispsolutions.com www.bisptrainigs.com www.hyperionguru.com Page 27
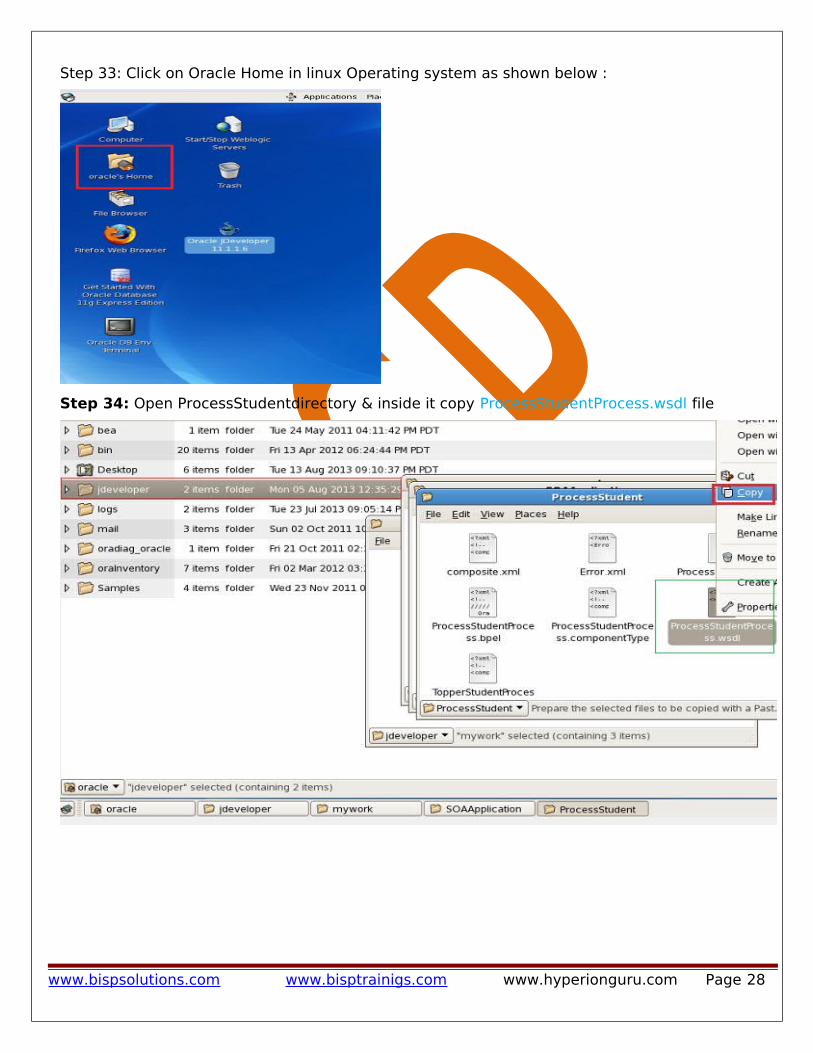
Step 33: Click on Oracle Home in linux Operating system as shown below :
Step 34: Open ProcessStudentdirectory & inside it copy ProcessStudentProcess.wsdl file
www.bispsolutions.com www.bisptrainigs.com www.hyperionguru.com Page 28

Step 35: Open Topper Student Project directory
Step 36: Paste wsdl file inside Topper Student Project :
www.bispsolutions.com www.bisptrainigs.com www.hyperionguru.com Page 29

Step 37: Open this wsdl file with Text Editor as shown below:
Visualization of wsdl file in Text editor
www.bispsolutions.com www.bisptrainigs.com www.hyperionguru.com Page 30

Step 38: Start Weblogic Admin server & deploy ProcessStudent Project because in above diagram wsdl is abstract & it contains only type, message type, port type, 7 partner link type so our motive is to make it concrete wsdl by adding information like binding ,services, etc.
Deployment Finished.
www.bispsolutions.com www.bisptrainigs.com www.hyperionguru.com Page 31

Step 39 : Click on Browser icon shown below:
Step 40: Start your enterprise manager by writing url http: //localhost:7001/em/
Note : Here localhost is application server & 7001 is a port in which enterprise manager is running.
Step 41 : Login using credentials User Name :weblogicPassword : welcome1click on login
www.bispsolutions.com www.bisptrainigs.com www.hyperionguru.com Page 32
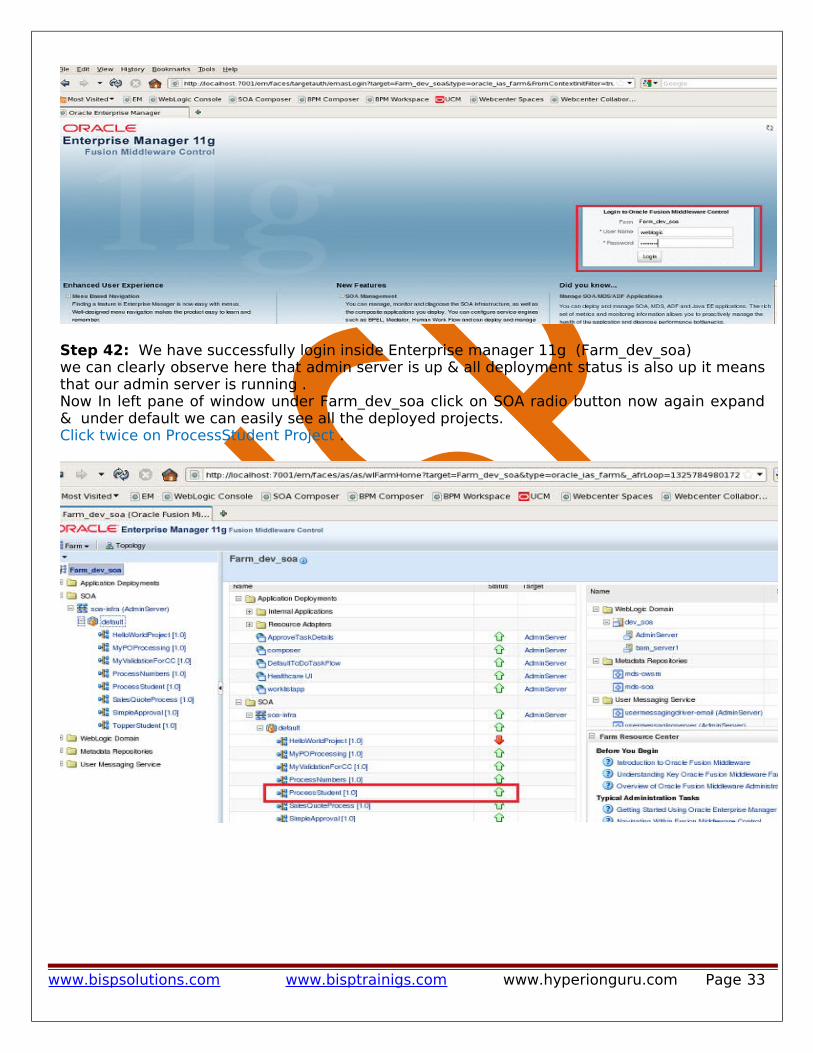
Step 42: We have successfully login inside Enterprise manager 11g (Farm_dev_soa)we can clearly observe here that admin server is up & all deployment status is also up it means that our admin server is running .Now In left pane of window under Farm_dev_soa click on SOA radio button now again expand & under default we can easily see all the deployed projects. Click twice on ProcessStudent Project .
www.bispsolutions.com www.bisptrainigs.com www.hyperionguru.com Page 33

Step 43: Observe that all information regarding to ProcessStudent Project is given Running instances 0 means that yet we have not tested any instance.Total 0Project Status Active Now click on Browser tab
Step 44: Click on WSDL URL
Step 45: Now it is a Concrete WSDL , Right click on page & select View Page Source
www.bispsolutions.com www.bisptrainigs.com www.hyperionguru.com Page 34

Step 46: Copy namespace from here
Step 47: Paste namespace here in Text Editor
www.bispsolutions.com www.bisptrainigs.com www.hyperionguru.com Page 35

Step 48: Copy wsdl binding & service
www.bispsolutions.com www.bisptrainigs.com www.hyperionguru.com Page 36

Step 49: Paste here in Text Editor below wsdl port type as shown below :
Step 50: Click on Refresh twice or thrice
ProcessStudentProcess.wsdl is now visible above TopperStudentProcess.bpel
www.bispsolutions.com www.bisptrainigs.com www.hyperionguru.com Page 37

Step 51: Click on ProcessStudentProcess.wsdl in left hand pane & On clicking ProcessStudentProcess.wsdl we can see automatic generated wsdl file
Step 52: Click on Design Mode & design of service is shown below:
Step 53: To create third party service ProcessStudentProcess as Reference, right Click on External references & click on web service
www.bispsolutions.com www.bisptrainigs.com www.hyperionguru.com Page 38

Step 54: fill all relevant blank as shown below then click ok.
Step 55: Right click on partner links & click on Create partner link
www.bispsolutions.com www.bisptrainigs.com www.hyperionguru.com Page 39

Step 56: Name as ProcessStudent Reference & click on browse for wsdl URL
Step 57: Select Process StudentReference & click ok
Step 58:Now as we select wsdl url all other field will auto fill then click okas shown below:
www.bispsolutions.com www.bisptrainigs.com www.hyperionguru.com Page 40

Successfully created Partner links & references
View composite BPEL Processweb service consumer & web service provider is wired with BPEL process as shown below
www.bispsolutions.com www.bisptrainigs.com www.hyperionguru.com Page 41

Step 59: View TopperStudentProcess.bpel in source mode & observe all important components :
www.bispsolutions.com www.bisptrainigs.com www.hyperionguru.com Page 42

Step 60: Click on Variable icon & create new variables IndexVar ,CountVar &
TopMarks
then CountVar
www.bispsolutions.com www.bisptrainigs.com www.hyperionguru.com Page 43
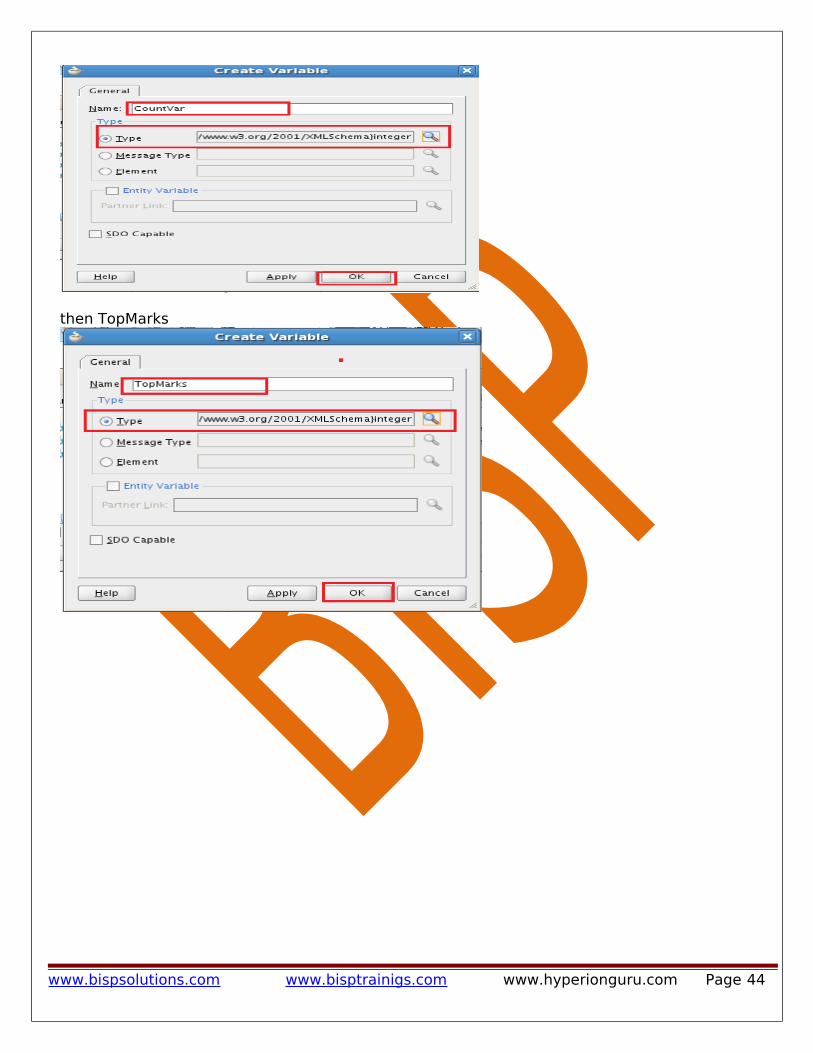
then TopMarks
www.bispsolutions.com www.bisptrainigs.com www.hyperionguru.com Page 44

Finally check assigned variables & click ok .
Step 61: Drag & drop While Activity between receive input & reply Output .
NOTE: While Activity is used for looping purpose .
www.bispsolutions.com www.bisptrainigs.com www.hyperionguru.com Page 45

Step 62: Drag & drop assign activity & click twice on it as shown below:
Step 63: Explore Functions ----> BPEL XPath Extension Functions ----> CountNodes--->Insert Into Expression--->select Student under Input Variable---> Insert into expression .Delete bpws:getVariabledata which is shown by green box
www.bispsolutions.com www.bisptrainigs.com www.hyperionguru.com Page 46
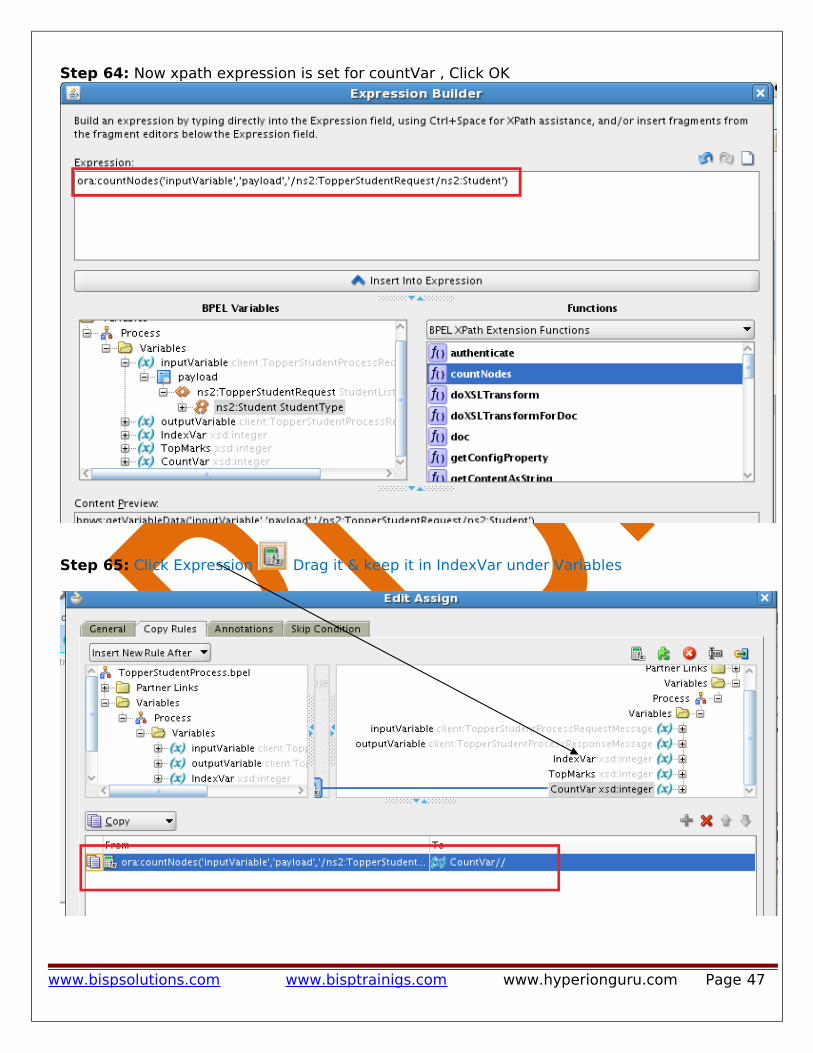
Step 64: Now xpath expression is set for countVar , Click OK
Step 65: Click Expression Drag it & keep it in IndexVar under Variables
www.bispsolutions.com www.bisptrainigs.com www.hyperionguru.com Page 47

Step 66:Initialize index as 1
Step 67: 66:Initialize TopMarks as 0.
www.bispsolutions.com www.bisptrainigs.com www.hyperionguru.com Page 48

Step 68: Assigned varibles are shown below then click Ok
Step 69: Now we have assigned all variables & rename it as AssignTemp.
www.bispsolutions.com www.bisptrainigs.com www.hyperionguru.com Page 49

Step 70: Click on Expression icon
Step 71: Assign looping condition here Click IndexVar ---> insert into expression ---> Less equals --> insert into expression ---> CountVar---> insert into expression---> Click Ok
www.bispsolutions.com www.bisptrainigs.com www.hyperionguru.com Page 50

Step 72: Click OK
Step 73: Drag & drop Invoke activity & click twice on it as shown below:
Step 74: Fill Name (InvokeProcessStudent) then browse for Partner link
www.bispsolutions.com www.bisptrainigs.com www.hyperionguru.com Page 51

Step 75: Select ProcessStudentReference & click OK
Step 76: To select Input & Output to invoke ProcessStudentReference Click on first green plus sign for input & likewise for Output
Step 77: After Selecting Input & output click ok .
www.bispsolutions.com www.bisptrainigs.com www.hyperionguru.com Page 52

Step 78: Check all filled entries & click OK
On clicking Ok this window will appear & a wiring established between InvokeProcessStudent & ProcessStudent Reference
Step 79: Drag & drop Assign Activity & Rename It as AssignInvokeInput & then Click it twice :
www.bispsolutions.com www.bisptrainigs.com www.hyperionguru.com Page 53

Step 80: Assign input elements from Input variable to ProcessStudent_inputVariable then click Ok as shown below :
www.bispsolutions.com www.bisptrainigs.com www.hyperionguru.com Page 54

Step 81:Click on BPEL source mode & insert [$IndexVar] after Student so as index changes student changes & so easily we can input infinite number of students
www.bispsolutions.com www.bisptrainigs.com www.hyperionguru.com Page 55
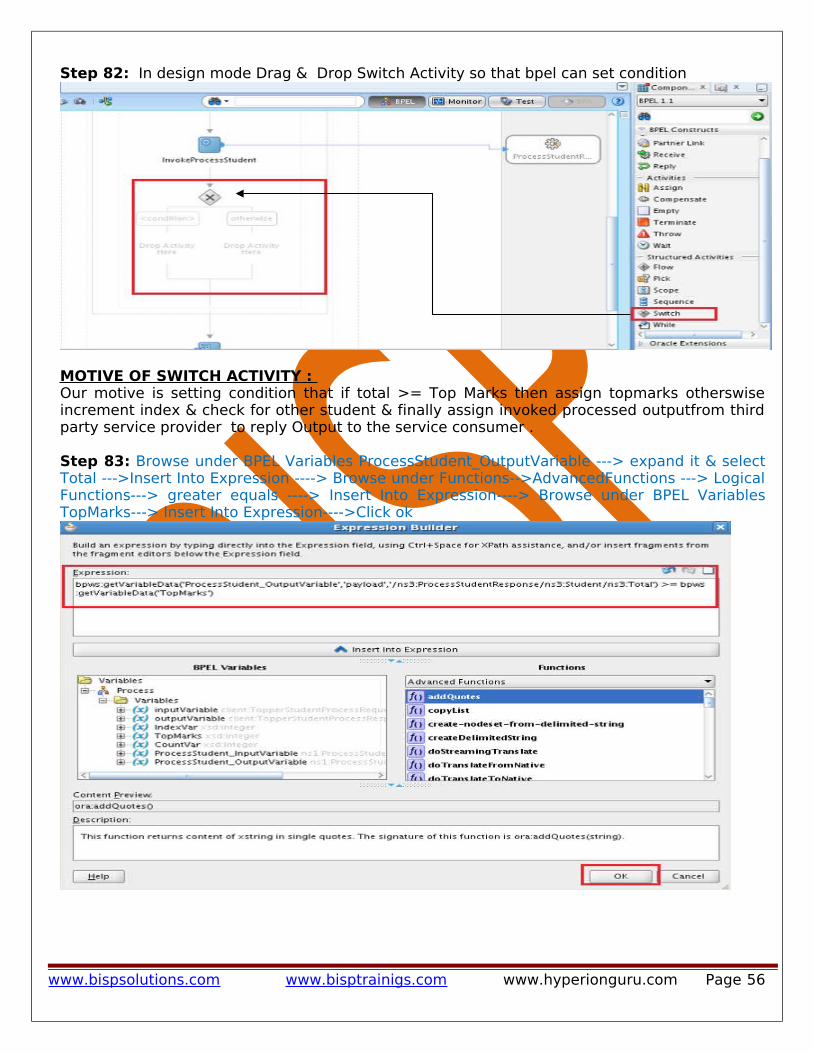
Step 82: In design mode Drag & Drop Switch Activity so that bpel can set condition
MOTIVE OF SWITCH ACTIVITY : Our motive is setting condition that if total >= Top Marks then assign topmarks otherswise increment index & check for other student & finally assign invoked processed outputfrom third party service provider to reply Output to the service consumer .
Step 83: Browse under BPEL Variables ProcessStudent_OutputVariable ---> expand it & select Total --->Insert Into Expression ----> Browse under Functions-->AdvancedFunctions ---> Logical Functions---> greater equals ----> Insert Into Expression----> Browse under BPEL Variables TopMarks---> Insert Into Expression---->Click ok
www.bispsolutions.com www.bisptrainigs.com www.hyperionguru.com Page 56

Step 84: Click ok
Step 85: Drag & drop Assign Activity & Rename It as AssignTopMarks & then Click it twice :
Step 86: Assign from ProcessStudent_OutputVariable then Total To TopMarks & click OK
www.bispsolutions.com www.bisptrainigs.com www.hyperionguru.com Page 57

Step 87: Drag & drop Assign Activity & Rename It as AssignOutput & then Click it twice :
Step 88: Assign Output elements from ProcessStudent_OutputVariable to Reply OutputVariables then click Ok as shown below :
www.bispsolutions.com www.bisptrainigs.com www.hyperionguru.com Page 58

Step 89: Drag & drop Assign Activity & Rename It as AssignIncrement & then Click it twice:
Step 90: : Click Expression Drag it & keep it in IndexVar under VariablesNow click on index Var under BPEL Variables ----> Insert Into Expression ---> +1 --> Ok
Step 91: Click Ok
www.bispsolutions.com www.bisptrainigs.com www.hyperionguru.com Page 59

Step 92: Assign out put completed & also BPEL process completed Now Click on Complile Icon shown below:
Build SuccessfulSuccessful compilation with 0 errors & 0 warnings
www.bispsolutions.com www.bisptrainigs.com www.hyperionguru.com Page 60

Step 93: Deploy project by clicking TopperStudentProject.
Deployment Finished.
www.bispsolutions.com www.bisptrainigs.com www.hyperionguru.com Page 61

Note: Before Deployment Start Weblogic Admin Server as discussed in my previous document Oracle Soa Part IV Doc. Step 94 : Click on Browser icon shown below:
Step 95: Start your enterprise manager by writing url http: //localhost:7001/em/
Note : Here localhost is application server & 7001 is a port in which enterprise manager is running.
Step 96 : Login using credentials User Name :weblogicPassword : welcome1click on login
Step 97: We have successfully login inside Enterprise manager 11g (Farm_dev_soa)we can clearly observe here that admin server is up & all deployment status is also up it means that our admin server is running .
www.bispsolutions.com www.bisptrainigs.com www.hyperionguru.com Page 62

Now In left pane of window under Farm_dev_soa click on SOA radio button now again expand & under default we can easily see all the deployed projects. Click twice on TopperStudentProject .
Step 98: Observe that all information regarding to TopperStudentProject is given Running instances 0 means that yet we have not tested any instance.Total 0Project Status Active Now click on Browser tab
www.bispsolutions.com www.bisptrainigs.com www.hyperionguru.com Page 63

Step 99: Click on WSDL URL
Step 100 : Copy location address & paste in browser URL & now get the ABSTRACT WSDL & observe it .
Abstract wsdl shown below
www.bispsolutions.com www.bisptrainigs.com www.hyperionguru.com Page 64

Step 101 : Copy location address & paste in browser URL & now get the imported xsd & observe it .
XSD shown below :
www.bispsolutions.com www.bisptrainigs.com www.hyperionguru.com Page 65

Step 102 : Copy soap: address location
www.bispsolutions.com www.bisptrainigs.com www.hyperionguru.com Page 66

Click on Xml source
www.bispsolutions.com www.bisptrainigs.com www.hyperionguru.com Page 67

Step 103: Click on TEST & create instance
Step 104: Scroll down page & Provide required input of a students
www.bispsolutions.com www.bisptrainigs.com www.hyperionguru.com Page 68
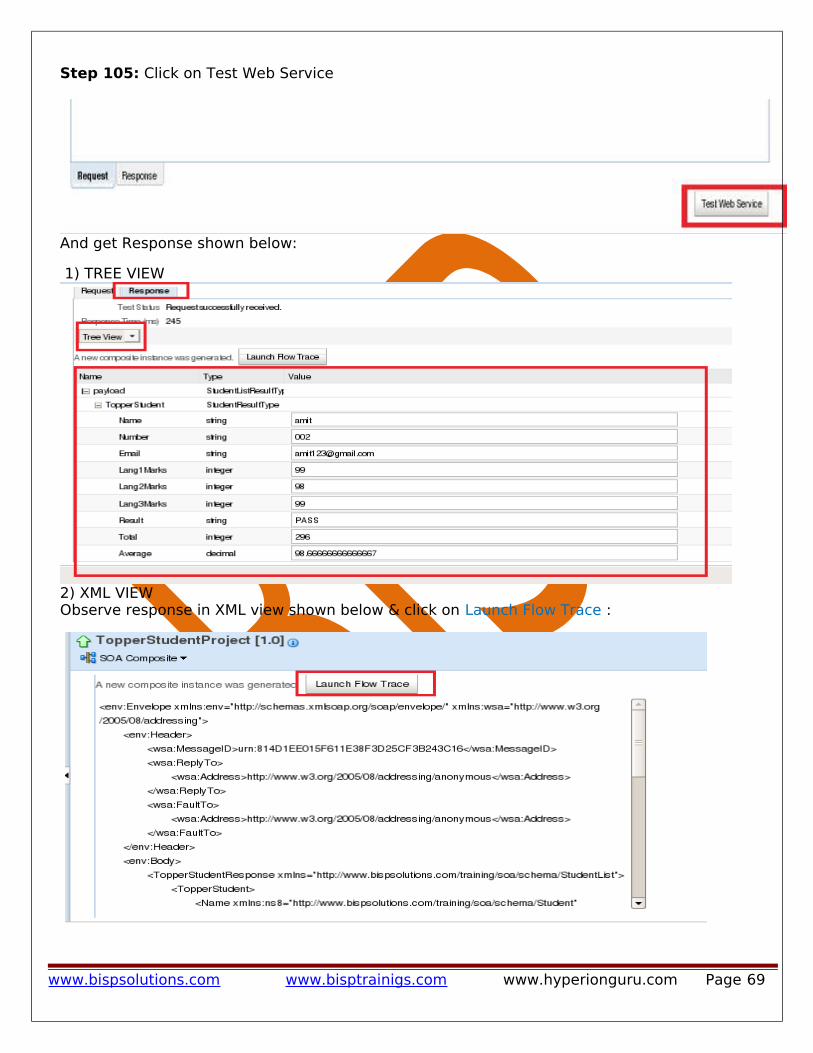
Step 105: Click on Test Web Service
And get Response shown below:
1) TREE VIEW
2) XML VIEWObserve response in XML view shown below & click on Launch Flow Trace :
www.bispsolutions.com www.bisptrainigs.com www.hyperionguru.com Page 69

Step 106: Faults : 0
State : completed
Double Click TopperStudentProcess & see the instance
Step 107: Click on Flow shown below
fig(1)
fig(2) fig(3)
www.bispsolutions.com www.bisptrainigs.com www.hyperionguru.com Page 70

f
f
fig(4) fig(5)
www.bispsolutions.com www.bisptrainigs.com www.hyperionguru.com Page 71

fig(6) fig(7)
f
fig(8)
Step 108: Now again double click on TopperStudentProject on left pane & observe that after first test it created Instance with its instance id 210001 &210004 & instance state completed.
www.bispsolutions.com www.bisptrainigs.com www.hyperionguru.com Page 72

Now since we have completed our test & wanted to exit from enterprise manager , Click on ShutDown Tab & then LogOut.
www.bispsolutions.com www.bisptrainigs.com www.hyperionguru.com Page 73