getting started with infiniteinsight ... - websmp204.sap … · getting started with...
TRANSCRIPT

Getting Started with InfiniteInsight® 6.5 SP4 Data Manipulation
End User Documentation Document Version: 1.0 – 2013-11-19
CUSTOMER

CUSTOMER Getting Started with InfiniteInsight® 6.5 SP4 II © 2013 SAP AG or an SAP affiliate company. All rights reserved- About this Document
Table of Contents
1 About this Document ..................................................................................................................................... 3 1.1 Who Should Read this Document .......................................................................................................................... 3 1.2 Prerequisites for Use of this Document ................................................................................................................ 3 1.3 What this Document Covers ................................................................................................................................... 3 1.4 How to Use this Document ..................................................................................................................................... 4
1.4.1 Organization of this Document .............................................................................................................. 4 1.4.2 Conventions Used in this Document ..................................................................................................... 4
2 Before Beginning ............................................................................................................................................ 5 2.1 Definitions ................................................................................................................................................................ 5 2.2 Technical Requirements ......................................................................................................................................... 5
3 Creating a Data Manipulation ....................................................................................................................... 6 3.1 Data Source Selection ............................................................................................................................................. 6
3.1.1 To define a metadata repository ........................................................................................................... 8 3.2 Data Manipulation Editor ........................................................................................................................................ 8
3.2.1 Expression Editor .................................................................................................................................... 8 3.2.2 Fields ......................................................................................................................................................20 3.2.3 Merge ..................................................................................................................................................... 39 3.2.4 Filters...................................................................................................................................................... 41 3.2.5 Prompts ................................................................................................................................................. 42 3.2.6 View Data ............................................................................................................................................... 44 3.2.7 SQL Statements .................................................................................................................................... 46 3.2.8 Documentation...................................................................................................................................... 47
4 Saving a Data Manipulation ....................................................................................................................... 48 4.1 Save a Data Manipulation ..................................................................................................................................... 48 4.2 Save as a Standard Data Manipulation ................................................................................................................ 49 4.3 Save as a Table or View ......................................................................................................................................... 49 4.4 Export as a KxShell Script ..................................................................................................................................... 49
5 Using a Data Manipulation ......................................................................................................................... 50 5.1 Use a Saved Data Manipulation............................................................................................................................50 5.2 Use Case Scenarios ............................................................................................................................................... 52
5.2.1 Decoration (Star Schema Use Case) .................................................................................................. 52 5.2.2 Filtering .................................................................................................................................................. 52 5.2.3 Variable Creation .................................................................................................................................. 53
6 Performing a Data Manipulation Transfer ................................................................................................ 55 6.1 Create a Data Manipulation .................................................................................................................................. 55 6.2 Transfer a Data Manipulation ............................................................................................................................... 57 6.3 Use the Transferred Data Manipulation in a New Database .............................................................................. 63
7 Annex ............................................................................................................................................................ 66 7.1 Functions of the Expression Editor ...................................................................................................................... 66
7.1.1 Arithmetic Operators ............................................................................................................................ 66 7.1.2 Boolean Operators ................................................................................................................................ 68 7.1.3 Date Operators ...................................................................................................................................... 70 7.1.4 Miscellaneous Operators ..................................................................................................................... 71 7.1.5 String Operators ................................................................................................................................... 72 7.1.6 Conversion Operators .......................................................................................................................... 74

Getting Started with InfiniteInsight® 6.5 SP4 CUSTOMER About this Document © 2013 SAP AG or an SAP affiliate company. All rights reserved- 3
1 About this Document
IN THIS CHAPTER
Who Should Read this Document ........................................................................................................................... 3 Prerequisites for Use of this Document ................................................................................................................... 3 What this Document Covers ................................................................................................................................... 3 How to Use this Document ..................................................................................................................................... 4
1.1 Who Should Read this Document
This document is addressed to people who want to evaluate or use the InfiniteInsight® and in particular the InfiniteInsight® Explorer - Semantic Layer feature.
1.2 Prerequisites for Use of this Document
Before reading this guide, you should read chapters 2 and 3 of the InfiniteInsight® - User Guide that present respectively:
An introduction to InfiniteInsight® The essential concepts related to the use of InfiniteInsight® features
No prior knowledge of SQL is required to use Data Manipulation - only knowledge about how to work with tables and columns accessed through ODBC sources. Furthermore, users must have “read” access on these ODBC sources.
To use the Java graphical interface, users need write access on the tables KXADMIN and CONNECTORSTABLE, which are used to store representations of data manipulations.
For more technical details regarding InfiniteInsight®, please contact us. We will be happy to provide you with more technical information and documentation.
1.3 What this Document Covers
This document introduces you to the main functionalities of the Data Manipulation feature.
One of the useful features of Data Manipulation is the ability to declare arguments. Arguments are symbols with associated values that can be changed before executing the data manipulations. They can be used anywhere within Data Manipulation.
KXEN has not built a special engine to execute these data manipulations, since they can all be performed by standard SQL engines embedded with all major relational databases. Instead, the KXEN Data Manipulation module can be seen as an object oriented layer that is used to generate data manipulation statements in SQL, which are processed, in turn, by the database server.

CUSTOMER Getting Started with InfiniteInsight® 6.5 SP4 4 © 2013 SAP AG or an SAP affiliate company. All rights reserved- About this Document
1.4 How to Use this Document
1.4.1 Organization of this Document
This document is subdivided into five chapters.
The current chapter, About this Document, serves as an introduction to the rest of the guide. This is where you find information pertaining to the reading of this guide, and information that allows you to contact us.
Chapter 2, Before Beginning, provides definitions relative to the Data Manipulations that gives you a better understanding of the feature functionalities and states the technical requirements.
Chapter 3, Creating a Data Manipulation, details how to create an analytical data set with the Data Manipulation feature.
Chapter 4, Saving a Data Manipulation, explains how to save the current data set so that you can use it with the other InfiniteInsight® features.
Chapter 5, Using a Data Manipulation, describes how a data set created with the Data Manipulation feature can be used in the other features of InfiniteInsight® and gives examples in the form of use case scenarios.
Chapter 6, Performing a Data Transfer, describes how a Data Manipulation can be transferred from one database to another.
A detailed table of contents located at the beginning of the guide and cross-references throughout the document allow you to find the information that you need, quickly and easily.
If you want more information on the InfiniteInsight® and on the essential concepts of modelling data, read the InfiniteInsight® - User Guide provided with InfiniteInsight® software.
1.4.2 Conventions Used in this Document
To facilitate reading, certain publishing conventions are applied throughout this guide. These are presented in the following table.
The following information items... Are presented using... For example...
Graphical interface features and file names Arial bold Click Next The titles of particularly useful sections Garamond italicized bold See Operations
The titles of procedures To Select the Target Variable
The titles of sections specific to the scenario presented in this guide
For this Scenario

Getting Started with InfiniteInsight® 6.5 SP4 CUSTOMER Before Beginning © 2013 SAP AG or an SAP affiliate company. All rights reserved- 5
2 Before Beginning
This section provides you with some useful definitions and details the technical requirements to the use of the InfiniteInsight® Explorer - Semantic Layer feature.
IN THIS CHAPTER
Definitions ............................................................................................................................................................... 5 Technical Requirements ......................................................................................................................................... 5
2.1 Definitions
Data Manipulation Tabular representation of data made of lines and columns. Each Line represents an “observation”. Roles can be assigned to columns such as “input”, “skip”, “target” or “weight”.
Data Preparation Set of operations needed to create a Data Manipulation. It can be broken up into two separate phases: InfiniteInsight® Explorer - Semantic Layer and Data Encoding.
InfiniteInsight® Explorer - Semantic Layer Business intended data transformations, such as target definition or data set filtering.
Data Encoding Technically driven data transformations, that are automatically handled by InfiniteInsight® Platform.
2.2 Technical Requirements
InfiniteInsight® Version 7.0.0 Any ODBC that is InfiniteInsight® compliant The Kernel generates the SQL code, the computing itself is done by the ODBC. Each store is its own repository and holds the InfiniteInsight® Explorer - Semantic Layers associated with it. You need Read and Write access to the ODBC.

CUSTOMER Getting Started with InfiniteInsight® 6.5 SP4 6 © 2013 SAP AG or an SAP affiliate company. All rights reserved- Creating a Data Manipulation
3 Creating a Data Manipulation
IN THIS CHAPTER
Data Source Selection ............................................................................................................................................ 6 Data Manipulation Editor......................................................................................................................................... 8
3.1 Data Source Selection
A data manipulation is based on existing database tables. The first step to create it is to select the data base and the table you want to work with.
To Select a Data Source 1 On InfiniteInsight® main menu, click the option Conduct Data Manipulation in the Explorer section. The panel
Define New Data Manipulation is displayed.
2 Click the Browse button corresponding to the field Database Source. The window Data Source Selection
opens. 3 Select the data base from which you want to create a new data manipulation.

Getting Started with InfiniteInsight® 6.5 SP4 CUSTOMER Creating a Data Manipulation © 2013 SAP AG or an SAP affiliate company. All rights reserved- 7
4 If the data base you want to access is password protected, enter the user name in the User field and the password in the Password field.
Note - If you fail to enter the correct login/password, an error message is displayed when you try to select a table.
5 Click the OK button to validate your selection. 6 Click the Browse button corresponding to the Table field. The window Data Source Selection opens.
Two types of tables can be displayed in the window Data Source Selection: data manipulations created with InfiniteInsight®, standard database tables.
7 Select in the list the table you want to use in the new data manipulation. 8 Click the OK button to validate your selection. 9 In the field New Table Alias, enter the name you want to use to refer to the selected table. By default the alias
is based on the selected table name.
10 Click the Next button to display the Data Manipulation Editor.

CUSTOMER Getting Started with InfiniteInsight® 6.5 SP4 8 © 2013 SAP AG or an SAP affiliate company. All rights reserved- Creating a Data Manipulation
3.1.1 To define a metadata repository
The metadata repository allows you to specify the location where the metadata should be stored.
To Define a Metadata Repository 1 Choose between storing the metadata in the same place as the data or in a single place by checking the option
of your choice. 2 In the list Data Type, select the type of data you want to access. For some type of data, you will need a specific
license. 3 Use the Browse button corresponding to the Folder field to select the folder or database containing the data.
In case of a protected database, you will need to enter the user name and the password in the fields User and Password.
4 Click the button Edit Variable Pool Content to edit the parameters of the variables stored in the variable pool. 5 Click OK to validate.
3.2 Data Manipulation Editor
The Data Manipulation Editor provides you with seven tabs allowing you to create new fields, merge tables, filter the data, view the data, the SQL query and the Documentation corresponding to the current data manipulation. You can go back and forth between those tabs to define the new data set.
3.2.1 Expression Editor
The expression editor allows you to create fields (one by one or several at a time) and to edit filter conditions as you would do with a calculator.
To build your expression, you have at your disposal:
Functions: they allow to build complex expressions with one or more fields. Variables and their values: the Fields of your database the Field sets you have defined in your data manipulation the Prompts you have defined in your data manipulation the defined Categories for the existing fields/variables.
Field Association Messages

Getting Started with InfiniteInsight® 6.5 SP4 CUSTOMER Creating a Data Manipulation © 2013 SAP AG or an SAP affiliate company. All rights reserved- 9
Creating a Field
To Create a Field 1 Enter an expression in the text area located in the upper part of the panel.
You can use the following entry help functions: Double-click the name of a function in the Functions frame or of a variable (field or pre-defined fields set,
prompt and category) in the Variables frame to insert them at the prompt location. In case of a function, a pattern is inserted giving information on the parameters to use.
Note - To know more about every function, an explanation label is available when moving the mouse over it as shown in the above screenshot as an example for the Arithmetic Operator "Absolute".
You can also insert these elements in a chosen position by drag-and-dropping them from one of the trees to the text area.

CUSTOMER Getting Started with InfiniteInsight® 6.5 SP4 10 © 2013 SAP AG or an SAP affiliate company. All rights reserved- Creating a Data Manipulation
When entering a variable name (field, prompt or set), press simultaneously the Ctrl and Space keys to display a list of variable names beginning with the entered text.
The color of the indicator located above the Messages area indicates the state of the formula. For further
details, go to section Messages. 2 To validate the formula, click the OK button. 3 A pop-up appears to name the new computed field. Enter a name in the Name field.
4 Click the OK button.
Field Sets
Creating several fields by applying the same calculation to various existing fields is a frequent need. The expression editor allows you to do that thanks to the use of field sets.
For example, the use of field sets allows you to sum up a large number of fields, or to compute their maximum.
Named Field Sets
To Create a Named Field Set 1 In the Variables section, double-click the option Field Sets. A sub-tree is displayed listing the existing field
sets.

Getting Started with InfiniteInsight® 6.5 SP4 CUSTOMER Creating a Data Manipulation © 2013 SAP AG or an SAP affiliate company. All rights reserved- 11
2 Double-click the option Create Field Set... A new window opens listing all available fields.
3 In the field Alias Mask, enter a mask allowing filtering the fields by their name. A mask is made of a part
common to the name of all the fields you want to see displayed, and of the star character (*) allowing to complete the parts which differ in the field names. The star can be used anywhere in the mask and as many times as needed.
4 Uncheck the fields you do not want to keep in the field set. 5 In the field Set Name, enter a name for the new field set. 6 Click the OK button. The window closes and the new field set is displayed in the list under the item Field Sets.
To Edit a Named Field Set 1 Select the field set you want to edit. 2 Right-click the selected field set. A contextual menu is displayed.
3 Click the Edit option. The field set edition window opens.
Note - To change the name of a field set amounts to duplicating it.

CUSTOMER Getting Started with InfiniteInsight® 6.5 SP4 12 © 2013 SAP AG or an SAP affiliate company. All rights reserved- Creating a Data Manipulation
To Delete a Named Field Set 1 Select the field set you want to delete. 2 Right-click the selected field set. A contextual menu is displayed. 3 Click the Remove option.
Field Sets Created on the Fly
When you want to apply a calculation to fields whose names have a common root, you can create a field set on the fly in the formula text field.
A field set created on the fly is defined by a mask, that is a fixed part common to the name of all the wanted fields and a wildcard character representing the part of the names that changes for each field. Three wildcard characters can be used to define the field sets: the at sign (@), the hash sign (#) and the dollar sign ($). Only one wildcard can be used for each field set, and a same wildcard cannot be used twice in the same formula.
To Create a Field Set on the Fly In the formula text field, enter the mask corresponding to the fields you want to apply the calculation to, for example INCOME_@ and use it as a standard field.
To Use Several Field Sets 1 Enter a formula using the field sets as explained above. The Messages area located in the lower part of the
panel, indicates the number of fields that will be created. 2 When using several field sets in the same formula, you must select in the drop-down list Field Association how
the fields from these sets will be associated. Note - to select an option in Field Association, refer to section Field Association for further explanations and examples.
3 Click the OK button to validate the fields creation. A dialog box requesting you to name the new fields opens. 4 Enter a root common to all the newly created fields. 5 If the formula only uses named field sets, or if you do not need to further control the naming, go to the next
step. If you have used one or more wildcard characters, you can use them in the alias to create a naming pattern. The wildcard characters are replaced by the corresponding name parts.
6 To create new fields, go back to the panel Expression Editor.
Using a Field Set as a List of Variables
A field set can be used to define a list of arguments for n-ary functions, that is, functions with an undefined number of arguments. When a field set is used as argument of a n-ary function, and in this case only, you need to frame the set name with braces { } to force its interpretation as an argument list.
As an example, let's consider a database table whose fields INCOME_APRIL, INCOME_MAY, INCOME_JUNE contain the monthly income. If you want to create a field containing the highest monthly income for the quarter, you need to use the following formula GREATESTN({INCOME_@}) which uses the INCOME_@ field set as a list of variables and thus amounts to the formula GREATESTN(INCOME_APRIL ,INCOME_MAY ,INCOME_JUNE). However when using the field set as is in the formula GREATESTN(INCOME_@), three fields are created by the three following formulas: GREATESTN(INCOME_APRIL), GREATESTN(INCOME_MAY) and GREATESTN(INCOME_JUNE), which cannot be used.
To Use a Field Set as a Variable List 1 Create a field set (named or on the fly) as explained above. 2 In the formula text field, enter the formula containing a n-ary function. 3 As argument for the function, enter the field set name between braces { }. For example, the formula
GREATESTN({INCOMES}) will create a field whose value is the highest value of the fields contained in the field set named INCOMES.

Getting Started with InfiniteInsight® 6.5 SP4 CUSTOMER Creating a Data Manipulation © 2013 SAP AG or an SAP affiliate company. All rights reserved- 13
Prompts
A prompt allows you to require a value from the user when using the data manipulation in any feature of InfiniteInsight®.
To create a Prompt, refer to section Prompts > Creating a Prompt (see "Creating a Prompt" on page 43).
Categories
Using the existing variable categories to create conditions with interval, equality or inequality relations is a frequent need. The expression editor allows doing that through the category extraction feature.
Extracting Categories
To Extract Categories To extract categories from the variables of your database:
1 In the Variables section, double-click the option Categories. A sub-tree is displayed with the mention Extract Categories... .
2 Double-click the option Extract Categories... A new window that lists all available fields opens.

CUSTOMER Getting Started with InfiniteInsight® 6.5 SP4 14 © 2013 SAP AG or an SAP affiliate company. All rights reserved- Creating a Data Manipulation
3 In the field Alias Mask, you can enter a mask allowing filtering the fields by their name. A mask is made of a part common to the name of all the fields you want to see displayed, and of the star character (*) allowing to complete the parts which differ in the field names. The star can be used anywhere in the mask and as many times as needed.
4 Check the fields you want to extract categories from. 5 In the Sample Size section, check the option Compute statistics over the xxxx first lines and specify the
number of first lines in case you do not want to extract categories from the whole data set. Keep the default option otherwise. Note - Some categories of the data set may be missing in the expression editor in case you choose to perform category extraction over the xxxx first lines.
6 Click the Extract button. A progress bar is displayed. 7 When the progress bar closes, click the Close button. Two tree items have been added in the Categories
section: Nominal Variables and Other Variables.
8 Choose the type of variable, the variable and the category that you want to use. In the example below,
Nominal, client_type and OWNER have been chosen respectively.

Getting Started with InfiniteInsight® 6.5 SP4 CUSTOMER Creating a Data Manipulation © 2013 SAP AG or an SAP affiliate company. All rights reserved- 15
Using Advanced Settings for Category Extraction
To Use Advanced Settings for Category Extraction The advanced settings let you choose the way categories are extracted from the data set in a finer way.
To use advanced settings for category extraction:
1 In the Variables section, double-click the option Categories. A sub-tree is displayed with the mention Extract Categories... .
2 Double-click the option Extract Categories... A new window that lists all available fields opens.

CUSTOMER Getting Started with InfiniteInsight® 6.5 SP4 16 © 2013 SAP AG or an SAP affiliate company. All rights reserved- Creating a Data Manipulation
3 In the field Alias Mask, you can enter a mask allowing filtering the fields by their name. A mask is made of a part common to the name of all the fields you want to see displayed, and of the star character (*) allowing to complete the parts which differ in the field names. The star can be used anywhere in the mask and as many times as needed.
4 Check the fields you want to extract categories from. 5 Check the Advanced Settings box. Depending on the selected options, one of the following screen is
displayed:
Note - The Sub-sampling mode replaces the Sample size mode available in case the box Advanced Settings is not checked. Please refer to the procedure To Extract Categories (see "Extracting Categories" on page 13) for details about the Sample size mode.

Getting Started with InfiniteInsight® 6.5 SP4 CUSTOMER Creating a Data Manipulation © 2013 SAP AG or an SAP affiliate company. All rights reserved- 17
6 Check the right combination of options in the Define Sub-sampling section, depending on how category extraction must be performed. The table below describes how the category extraction is processed for each of possible combinations.
Combination of options Description of category extraction process
Line Selection The categories are extracted in the range of lines in the data set defined by the values typed in the First Line and Last Line fields.
Random Selection The categories are extracted from lines picked up randomly in the data set.
The number of lines used to extract categories equals to the proportion of the total number of lines in the data set, defined using the Proportion slider.
Random Selection - Advanced Mode
The categories are extracted from lines picked up randomly in the data set.
A random value between 0 and 1 is attributed to each line. Lines with a value in the Selected Range (value / 100) are used for category extraction. Other lines are skipped.
Line Selection + Random Selection
The categories are extracted in the range of lines in the data set defined by the values typed in the First Line and Last Line fields.
The categories are extracted from lines picked up randomly within this range of the data set.
The number of lines used to extract categories equals to the proportion of the total number of lines within the defined range, defined using the Proportion slider.
Line Selection + Random Selection - Advanced Mode
The categories are extracted in the range of lines in the data set defined by the values typed in the First Line and Last Line fields.
The categories are extracted from lines picked up randomly within this range of the data set.
A random value between 0 and 1 is attributed to each line in the defined range. Lines with a value in the Selected Range (value / 100) are used for category extraction. Other lines are skipped.
Note - Whatever the chosen combination, some categories of the data set may be missing in the expression editor in case you choose to perform category extraction on a small portion of the data set.
7 Click the Extract button. A progress bar is displayed. 8 When the progress bar closes, click the Close button. Two tree items have been added in the Categories
section: Nominal Variables and Other Variables.
9 Choose the Type of variable, the variable and the category that you want to use. In the example below,
Nominal, Occupation and Adm-clerical have been chosen respectively.

CUSTOMER Getting Started with InfiniteInsight® 6.5 SP4 18 © 2013 SAP AG or an SAP affiliate company. All rights reserved- Creating a Data Manipulation
Field Association
When using several field sets in the same formula, you must select in the drop-down list Fields Association how the fields from these sets will be associated:
Associate by Position: the fields from each set are associated depending on their position in the database table.
Associate by Value: the fields from each set are associated depending on the value represented by the wildcard characters used to define the field sets.
Do Cartesian Product: all the fields from one set are associated to all the fields from the other set.
Examples:
Let's consider a database table containing the following fields ordered as displayed:
income_january
income_april
income_february
income_march
expenses_march
expenses_january
expenses_april
The following formula INCOME_@ - EXPENSES_# uses two field sets, one grouping all the fields starting with INCOME_, and the other all the fields starting with EXPENSES_ :
INCOME_@ EXPENSES_#
income_january expenses_march
income_april expenses_january
income_february expenses_april
income_march
1. The option Associate by Position results in the following calculations:
Calculation Position
income_january - expenses_march 1
income_april - expenses_january 2
income_february - expenses_april 3
2. If the option Associate by Value is selected, the InfiniteInsight® will try to match the value represented by @ and the value represented by #, resulting in the following calculations:
Caculation @ and # Values
income_january - expenses_january january
income_april - expenses_april april
income_march - expenses_march march
3. The option Do Cartesian Product results in the following calculations:

Getting Started with InfiniteInsight® 6.5 SP4 CUSTOMER Creating a Data Manipulation © 2013 SAP AG or an SAP affiliate company. All rights reserved- 19
Caculation
income_january - expenses_march
income_january - expenses_january
income_january - expenses_april
income_april- expenses_march
income_april - expenses_january
income_april - expenses_april
income_february - expenses_march
income_february - expenses_january
income_february - expenses_april
income_march - expenses_march
income_march - expenses_january
income_march - expenses_april
Messages
The color of the indicator located above the Messages area indicates the state of the formula.
If the indicator is... the formula...
red contains an error, which is reported in the message area. It is not possible to validate
it (the Next button is disabled).
yellow can be validated but some inconsistencies may occur and are reported in the
message area.
green is valid.
In the case of an error or a warning, the Messages area located in the lower part of the panel provides details to help you understand the problem.

CUSTOMER Getting Started with InfiniteInsight® 6.5 SP4 20 © 2013 SAP AG or an SAP affiliate company. All rights reserved- Creating a Data Manipulation
3.2.2 Fields
The Fields tab displays the fields from the source table and allows you to add your own fields.
You can modify the way this table is displayed by:
selecting the columns to be displayed, sorting the fields by column, changing the column order.
To Select the Columns to be Displayed 1 Right-click the table heading. A contextual menu is displayed.

Getting Started with InfiniteInsight® 6.5 SP4 CUSTOMER Creating a Data Manipulation © 2013 SAP AG or an SAP affiliate company. All rights reserved- 21
2 Check the column you want to display or uncheck it if you want to hide it. 3 Repeat step 2. until the table displays the information you want.
To Sort the Fields Click the heading of the column you want to use as the sorting parameter. One click sorts it in ascending order, two clicks in descending order, three clicks unselect the column as the sorting parameter. A sign in the column heading indicates the sorting order that is applied.
To Modify the Columns Order Click the heading of the column you want to move and drag it to its new place.
Operations on Existing Fields
The following operations are available on existing fields:
Modify a field alias. Set a field visibility, that is select if the field will be added to the data manipulation or not. Fields that are set
to non visible do not appear in the tab View Data but can be used for a merge or a filter, for example. Add a description to a field Edit a field information (only for computed fields created by the user). Non-editable fields appear grayed.
Modifying a Field Alias
Each field can be referred to by an alias. Aliases are usually used to differentiate fields having the same name but coming from different tables. By default, a field alias is the field name but you can change it.
To Modify a Field Alias 1 Double-click the alias you want to modify.

CUSTOMER Getting Started with InfiniteInsight® 6.5 SP4 22 © 2013 SAP AG or an SAP affiliate company. All rights reserved- Creating a Data Manipulation
2 Enter the new alias. 3 Click another cell to validate your change.
Setting a Field Visibility
Field visibility allows you to choose which fields will appear in the data set.
To Set a Field Visibility There are two ways to set a field visibility:
Click the Visibility check box corresponding to the selected field.
or
1 Right-click the line corresponding to the selected field. A contextual menu is displayed.
2 Select the option Set Visibility. 3 Select the option you want to apply to the field.
Getting Started with InfiniteInsight® 6.5 SP4 CUSTOMER Creating a Data Manipulation © 2013 SAP AG or an SAP affiliate company. All rights reserved- 23
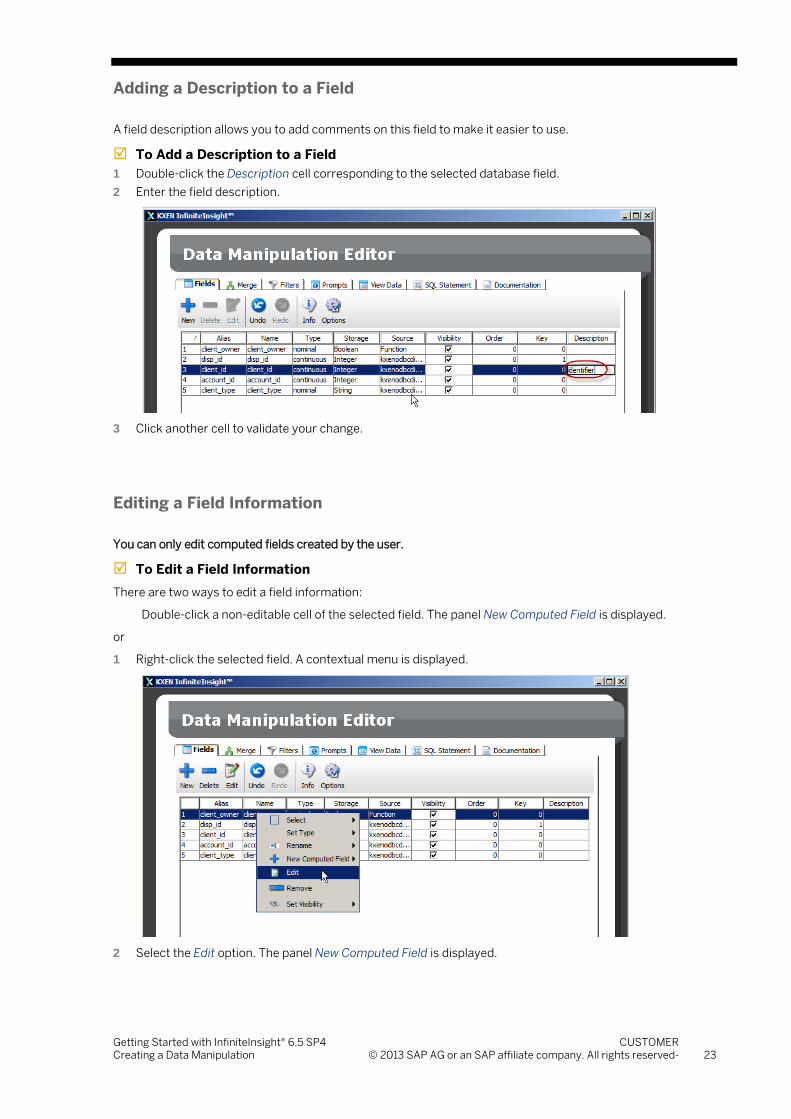
Adding a Description to a Field
A field description allows you to add comments on this field to make it easier to use.
To Add a Description to a Field 1 Double-click the Description cell corresponding to the selected database field. 2 Enter the field description.
3 Click another cell to validate your change.
Editing a Field Information
You can only edit computed fields created by the user.
To Edit a Field Information There are two ways to edit a field information:
Double-click a non-editable cell of the selected field. The panel New Computed Field is displayed.
or
1 Right-click the selected field. A contextual menu is displayed.
2 Select the Edit option. The panel New Computed Field is displayed.

CUSTOMER Getting Started with InfiniteInsight® 6.5 SP4 24 © 2013 SAP AG or an SAP affiliate company. All rights reserved- Creating a Data Manipulation
Creating a New Computed Field
New computed fields are useful when you want to add new variables that are not saved in any table but can be derived from other data on demand. You should add variables when you think doing so can render more information available to a predictive or descriptive model. For example, a ratio between two variables that has business meaning or the conversion of a birth date to an age are useful transformations that would be very difficult for modeling software to infer automatically.
Technically, this can be decomposed into six types of variable creation:
Aggregate, Condition, Lookup Table, Normalization, SQL Expression Function.
You can also use the Expression Editor provided by InfiniteInsight® to define new fields as you want (see section Expression Editor (on page 8)).
To Create a New Computed Field There are two ways to create a new computed field:
1 Click the button + New. The list of available field types is displayed.
2 Select the type of field you want to create. The corresponding edition panel is displayed.
or Right-click anywhere in the field list. A contextual menu is displayed.

Getting Started with InfiniteInsight® 6.5 SP4 CUSTOMER Creating a Data Manipulation © 2013 SAP AG or an SAP affiliate company. All rights reserved- 25
3 In the displayed list, select the option New Computed Field. A sub-menu is displayed. 4 Select the type of field you want to create. The corresponding edition panel is displayed.
5
Aggregates
The Aggregate option allows you to create aggregates similar to those automatically created by the InfiniteInsight® Explorer - Event Logging feature. You can use InfiniteInsight® Explorer - Event Logging to automatically generate a lot of different aggregates, next use a InfiniteInsight® Modeler - Regression/Classification model to identify the important ones for your business issue. You can then create a new data set containing only the most relevant aggregates.
To Create a New Aggregate In the New list, select the option New Aggregate. The panel Define an Aggregate is displayed.

CUSTOMER Getting Started with InfiniteInsight® 6.5 SP4 26 © 2013 SAP AG or an SAP affiliate company. All rights reserved- Creating a Data Manipulation
Getting Started with InfiniteInsight® 6.5 SP4 CUSTOMER Creating a Data Manipulation © 2013 SAP AG or an SAP affiliate company. All rights reserved- 27
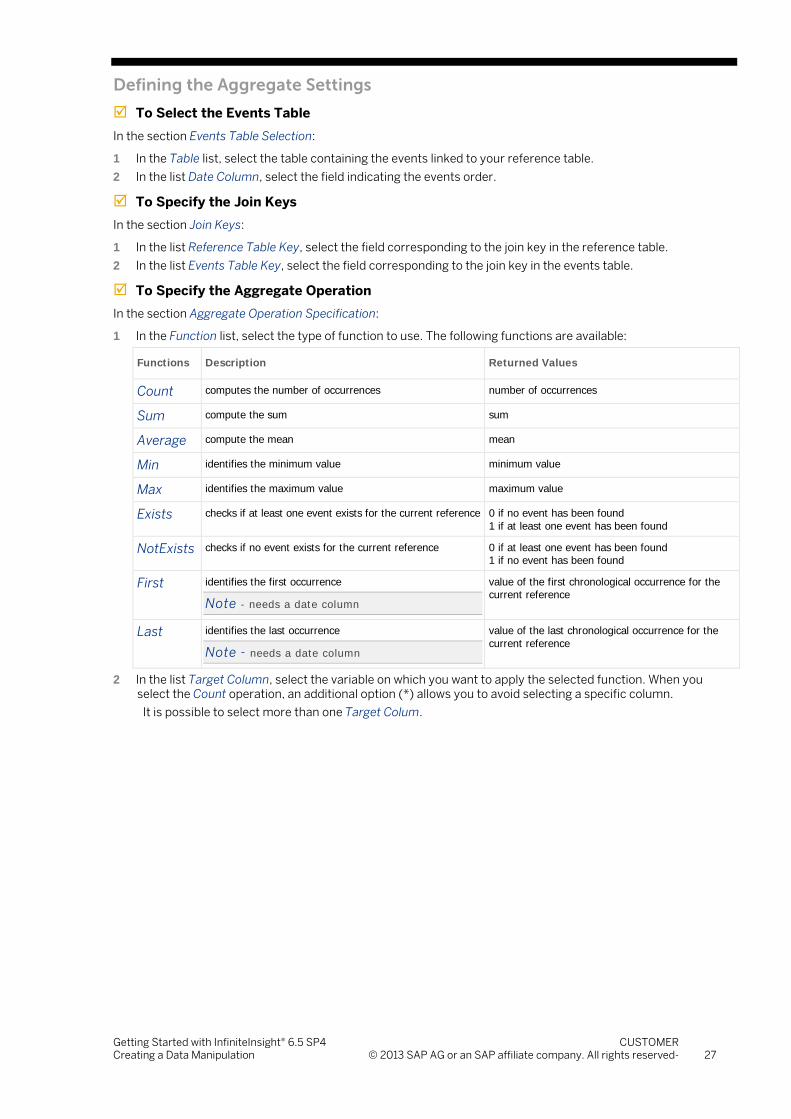
Defining the Aggregate Settings
To Select the Events Table In the section Events Table Selection:
1 In the Table list, select the table containing the events linked to your reference table. 2 In the list Date Column, select the field indicating the events order.
To Specify the Join Keys In the section Join Keys:
1 In the list Reference Table Key, select the field corresponding to the join key in the reference table. 2 In the list Events Table Key, select the field corresponding to the join key in the events table.
To Specify the Aggregate Operation In the section Aggregate Operation Specification:
1 In the Function list, select the type of function to use. The following functions are available:
Functions Description Returned Values
Count computes the number of occurrences number of occurrences
Sum compute the sum sum
Average compute the mean mean
Min identifies the minimum value minimum value
Max identifies the maximum value maximum value
Exists checks if at least one event exists for the current reference 0 if no event has been found 1 if at least one event has been found
NotExists checks if no event exists for the current reference 0 if at least one event has been found 1 if no event has been found
First identifies the first occurrence
Note - needs a date column
value of the first chronological occurrence for the current reference
Last identifies the last occurrence
Note - needs a date column
value of the last chronological occurrence for the current reference
2 In the list Target Column, select the variable on which you want to apply the selected function. When you select the Count operation, an additional option (*) allows you to avoid selecting a specific column. It is possible to select more than one Target Colum.

CUSTOMER Getting Started with InfiniteInsight® 6.5 SP4 28 © 2013 SAP AG or an SAP affiliate company. All rights reserved- Creating a Data Manipulation
Defining the Period Settings You can create aggregates on the whole data set, or filter it by date. As in InfiniteInsight® Explorer - Event Logging, dates used as filter can be constants, variables, or prompts.
To Define the Period Settings 1 Select the tab Period Settings. 2 Check the box Define Periods to select the start and end dates of the time window used to filter the events.
3 Select if you want to define a Single Period or several Successive Periods.
For a Single Period: 1. Select the type of input to use as start date. Three types are available:
the Field type allows you to use a date stored in the database and thus proper to each customer (such as a date of first purchase or a date of churn).
the Constant type allows you to select a fixed date (such as a marketing campaign launch date). the Prompt type allows asking the user to fill the information when the model is generated.
2. Select the storage format to use (DateTime or Date). If you have selected the Field type, only the fields corresponding to the selected storage format are displayed in the list.
3. Select the value to use as the start date. Note that the start date is included in the defined period. In case of a field, select the field in the displayed list. In case of a constant, enter the constant value or use the calendar button located to the right. In case of a prompt, select the prompt to use or click the + button to create a new prompt.
4. Repeat steps 2 to 4 for the end date. Note that the end date is excluded from the defined period.
For Successive Periods:

Getting Started with InfiniteInsight® 6.5 SP4 CUSTOMER Creating a Data Manipulation © 2013 SAP AG or an SAP affiliate company. All rights reserved- 29
Define the number of successive periods you want, their length and the starting date by using the hyperlinks (underlined in blue or green). The start date is included in the periods.
Defining the Filters and Pivots The option Filter allows you to filter your data depending on the variables values. Each defined filter generates a variable.
The option Pivot allows you to create one variable for each selected value. Creating a pivot amounts to creating a filter on one category for each selected categories. The pivot is always applied to the Event Table.
Both options can be complementary.
To Define a Filter Two types are available:
Filter Event Table shows the list of the filter(s) performed on the Event Table; Filter Reference Table shows the list of the filter(s) performed on the Reference Table.
1 Click the Add button ( ) to define a complex condition using the expression editor. 2 Select and Click the Edit button ( ) to amend the previously defined condition. 3 Click the Remove button ( ) to delete the previously defined condition.
To Define a Pivot 1 Select the variable to filter by in the Variables drop-down list. 2 To add categories to the table, you can:
automatically extract the variable categories by clicking the magnifier button ( ) located next to the list and then select the values to keep or exclude by checking the corresponding Selection box.
or enter a value in the field New Category and click the + button.
load a list of categories from files by clicking the open file button ( ) located at the right of the Categories table list and then select the values to keep or exclude by checking the corresponding Selection box.
Note - The number of created variables is indicated at the bottom of the panel. This number grows exponentially when filtering by pivot. The higher the number of variables, the longer the model learning.
CUSTOMER Getting Started with InfiniteInsight® 6.5 SP4 30 © 2013 SAP AG or an SAP affiliate company. All rights reserved- Creating a Data Manipulation
3 Save the selected categories by clicking the save button ( ) located at the right of the Categories table list.
Note - As mentioned above, the Save button only saves the selected categories that are the ones with the Selection box checked.
4 Check the box Also create aggregates without filtering to create an unfiltered aggregate variable.
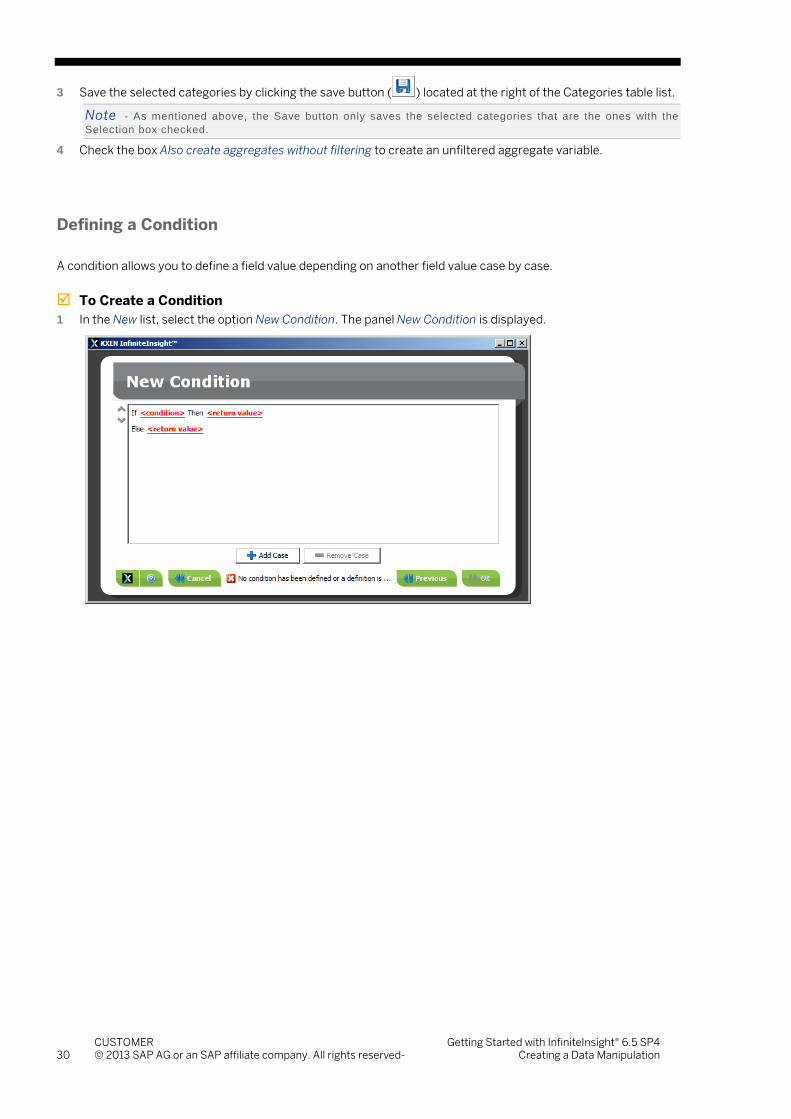
Defining a Condition
A condition allows you to define a field value depending on another field value case by case.
To Create a Condition 1 In the New list, select the option New Condition. The panel New Condition is displayed.

Getting Started with InfiniteInsight® 6.5 SP4 CUSTOMER Creating a Data Manipulation © 2013 SAP AG or an SAP affiliate company. All rights reserved- 31
2 In the text field, click <condition>. The expression editor opens.
3 Set the condition parameters as detailed in the section Expression Editor (on page 8). 4 Click the OK button. <condition> is replaced by the condition you have defined.

CUSTOMER Getting Started with InfiniteInsight® 6.5 SP4 32 © 2013 SAP AG or an SAP affiliate company. All rights reserved- Creating a Data Manipulation
5 Click <return value> to define the value the new computed field will take when the condition is true. 6 Click the button Add Case to add the new case to the list.
7 Repeat steps 4 and 5 for each new case. The order in which the cases are listed is important since the first
true condition will determine the computed field value. 8 Use the buttons and located on the left to order the cases.
You can delete a case from the list by selecting it and clicking the button Remove Case. 9 On the line Else, click <return value> to define the value to be used when none of the defined cases are true. 10 Click the Next button. The pop-up Enter the Computed Field Name opens.
11 Enter the new field name in the Name field.
Note - If you enter an existing name, a message is displayed and the OK button is deactivated.
12 Click the OK button. The Fields list is displayed containing the newly created field.
Defining a Lookup Table
The user specifies cases, each of which is made up of a list of discrete values and a corresponding label. A classic example is a “look-up table” that is used as a dictionary to translate values from identifiers into strings, or to group values representing fine distinctions into a smaller number of more general bins
To Create a Lookup Table 1 In the New list, select the option New Lookup Table.
Getting Started with InfiniteInsight® 6.5 SP4 CUSTOMER Creating a Data Manipulation © 2013 SAP AG or an SAP affiliate company. All rights reserved- 33
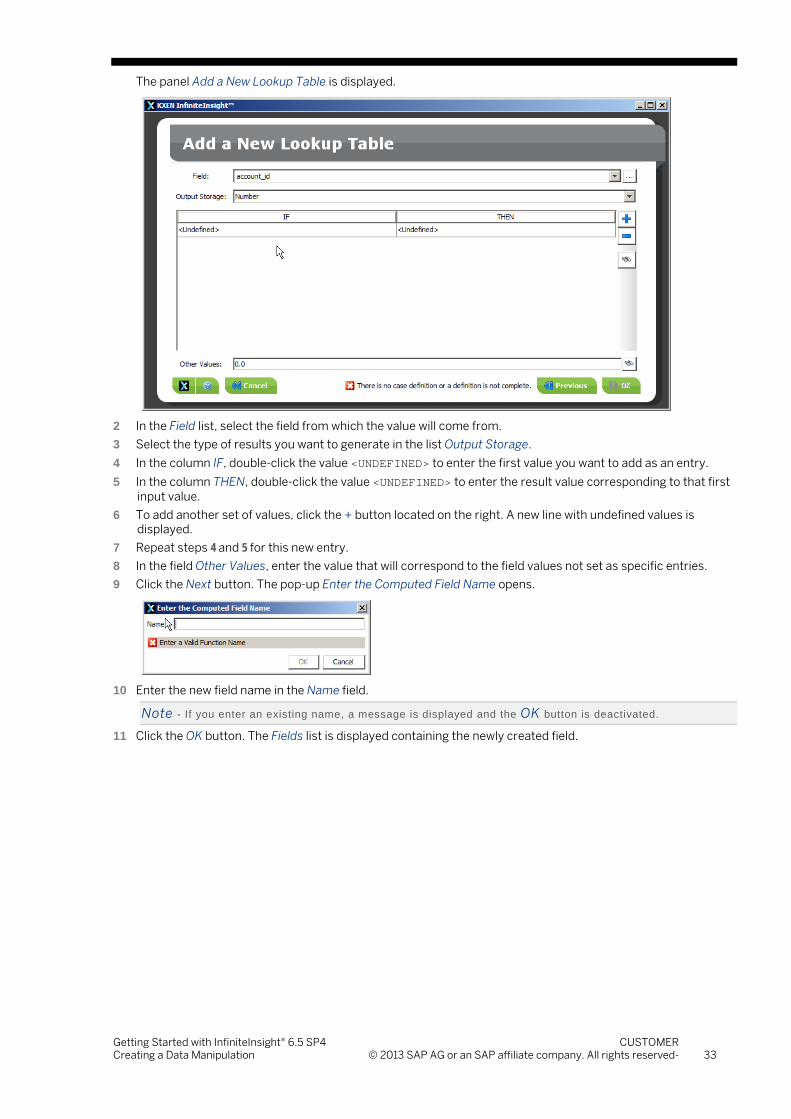
The panel Add a New Lookup Table is displayed.
2 In the Field list, select the field from which the value will come from. 3 Select the type of results you want to generate in the list Output Storage. 4 In the column IF, double-click the value <UNDEFINED> to enter the first value you want to add as an entry. 5 In the column THEN, double-click the value <UNDEFINED> to enter the result value corresponding to that first
input value. 6 To add another set of values, click the + button located on the right. A new line with undefined values is
displayed. 7 Repeat steps 4 and 5 for this new entry. 8 In the field Other Values, enter the value that will correspond to the field values not set as specific entries. 9 Click the Next button. The pop-up Enter the Computed Field Name opens.
10 Enter the new field name in the Name field.
Note - If you enter an existing name, a message is displayed and the OK button is deactivated.
11 Click the OK button. The Fields list is displayed containing the newly created field.

CUSTOMER Getting Started with InfiniteInsight® 6.5 SP4 34 © 2013 SAP AG or an SAP affiliate company. All rights reserved- Creating a Data Manipulation
To Delete Entries from the Lookup Table 1 In the list of entries, select the one you want to delete.
2 Click the - button located on the right. The selected entry is deleted.
Using Variable Categories to Fill the Lookup Table You can extract the categories from a nominal variable to fill the lookup table. Be aware that extracting categories can be lengthy if the number of categories is high.
WARNING - If the nominal variable you have selected contains too many categories (for example an Id variable), the categories will not be extracted.
To Fill the Lookup Table with Variable Categories
1 Click the binoculars button ( ). A contextual menu is displayed.
2 If you have already extracted once the categories from the selected variable, select the option Select
Reference Variable. 3 Else, select the option Extract values and fill. The pop-up window Extract Field Values opens.

Getting Started with InfiniteInsight® 6.5 SP4 CUSTOMER Creating a Data Manipulation © 2013 SAP AG or an SAP affiliate company. All rights reserved- 35
4 Use the tab Extraction Settings to define the extraction parameters: Fields: the fields for which you want to extract the categories, Sample size: the size of the data set sample from which you want to extract the categories.
5 Click the Extract button. The list of values in the lookup table is filled. 6 Click the Close button. 7 Define for each value the corresponding output value.
Defining a Normalization
Normalization is a standard InfiniteInsight® Explorer - Semantic Layer primitive that appears in PMML (Predictive Model Markup Language), a data mining specification language defined by the Data Mining Group (DMG). Normalization is frequently applied to numeric variables prior to data mining and consists of a piece-wise linear transform with the resultant variable typically ranging from 0 to 1. This can be used for rank transformations, where the output represents magnitude in terms of the approximate proportion (percentile) of values below the input value. Alternatively, a field may be converted based on how many standard deviations a value is from the field's mean. Part of normalization is also specification of what value to use when a numeric input value is unknown or out of the range seen in the training data.

CUSTOMER Getting Started with InfiniteInsight® 6.5 SP4 36 © 2013 SAP AG or an SAP affiliate company. All rights reserved- Creating a Data Manipulation
To Create a New Normalization 1 In the New list, select the option New Normalization. The panel New Normalization is displayed.
2 Select a field in the list Select a Field to Normalize. Only integer or number fields are displayed. 3 In the section Normalization Points, click the + button to add a normalization point.

Getting Started with InfiniteInsight® 6.5 SP4 CUSTOMER Creating a Data Manipulation © 2013 SAP AG or an SAP affiliate company. All rights reserved- 37
4 Double-click the cell in the the Inputs column to define the lowest value of the range. 5 Double-click the cell in the Outputs column to define the corresponding output value. 6 Repeat steps 3 to 5 to create the highest point of the normalization. The corresponding plot is displayed in the
Overview section at the bottom of the panel.
You need to define at least two points, but you can add more if needed by repeating steps 3 to 5 for each new point.
7 In the list Minimum Values of the section Define Out of Range Behavior, select the behavior that should be applied to values lower than the lowest point previously set. The available values are detailed in the following table:
Behavior Out of Range Values Correspond to... Corresponding Plot
Saturation the value of the range bounds
Slope the continuation towards infinity of the straight line leading to the last bound.
User Defined
a user defined value. To set a user defined value, enter the value in the text field and click the Refresh button to actualize the plot.
Null Value the Null value. Meaning that they are not displayed on the plot.
8 Click the Next button. The pop-up Enter the Computed Field Name opens.

CUSTOMER Getting Started with InfiniteInsight® 6.5 SP4 38 © 2013 SAP AG or an SAP affiliate company. All rights reserved- Creating a Data Manipulation
9 Enter the new field name in the Name field.
Note - If you enter an existing name, a message is displayed and the OK button is deactivated.
10 Click the OK button. The Fields list is displayed containing the newly created field.
Defining an SQL Expression
An SQL expression field allows you to use predefined SQL queries.
To Create an SQL Expression 1 In the +New list, select the option New SQL Expression.
The panel New SQL Expression is displayed.
2 Enter a valid SQL expression in the text field. If the expression is not correct, an error will be displayed when
displaying the tab View Data. 3 Select the type of result the SQL expression will return in the list Result Type. 4 In the Type list, select the value type of the result. 5 Click the OK button. The pop-up Enter the Computed Field Name opens.

Getting Started with InfiniteInsight® 6.5 SP4 CUSTOMER Creating a Data Manipulation © 2013 SAP AG or an SAP affiliate company. All rights reserved- 39
6 Enter the new field name in the Name field.
Note - If you enter an existing name, a message is displayed and the OK button is deactivated.
Back to the Data Manipulation Editor panel, the Fields list is displayed containing the newly created field. 7 Click the Next button to continue or repeat steps 1 to 6 to create a new SQL expression.
3.2.3 Merge
The Merge tab allows you to create a merge between the source table and another table in your data base, that is to add information contained in another table when the selected field from the source table is equal to the selected field of the target table.
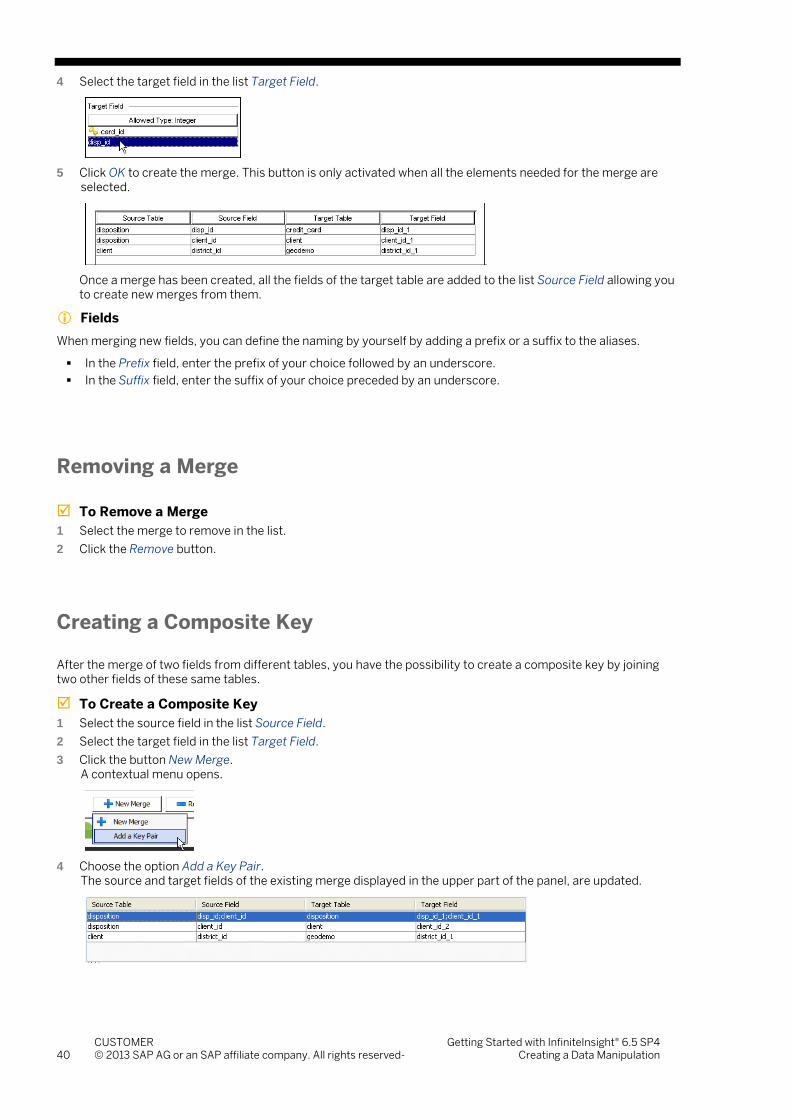
Creating a Merge
To Create a Merge Table 1 Select the table to be joined in the list Target Table. 2 Click the + button. 3 Select the source field in the list Source Field.
If the selected table contains fields corresponding to the source field, they are displayed in the list Target Field, else the message No Fields Available is displayed.
CUSTOMER Getting Started with InfiniteInsight® 6.5 SP4 40 © 2013 SAP AG or an SAP affiliate company. All rights reserved- Creating a Data Manipulation
4 Select the target field in the list Target Field.
5 Click OK to create the merge. This button is only activated when all the elements needed for the merge are
selected.
Once a merge has been created, all the fields of the target table are added to the list Source Field allowing you to create new merges from them.
Fields When merging new fields, you can define the naming by yourself by adding a prefix or a suffix to the aliases.
In the Prefix field, enter the prefix of your choice followed by an underscore. In the Suffix field, enter the suffix of your choice preceded by an underscore.
Removing a Merge
To Remove a Merge 1 Select the merge to remove in the list. 2 Click the Remove button.
Creating a Composite Key
After the merge of two fields from different tables, you have the possibility to create a composite key by joining two other fields of these same tables.
To Create a Composite Key 1 Select the source field in the list Source Field. 2 Select the target field in the list Target Field. 3 Click the button New Merge.
A contextual menu opens.
4 Choose the option Add a Key Pair.
The source and target fields of the existing merge displayed in the upper part of the panel, are updated.

Getting Started with InfiniteInsight® 6.5 SP4 CUSTOMER Creating a Data Manipulation © 2013 SAP AG or an SAP affiliate company. All rights reserved- 41
Removing a Composite Key
To Remove a Composite Key 1 Select the merge with the composite key to remove in the list. 2 Click the Remove button.
A contextual menu opens.
3 Choose the option Remove Key Pairs.
A pop-up window is displayed.
4 Select the key pair you want to remove. 5 Click OK.
The source and target fields of the persisting merge, displayed in the upper part of the panel, are updated.
3.2.4 Filters
The Filters tab allows you to select only the records of interest to answering your business question. You can compare a field value to another field, a constant or a prompt and keep only the corresponding observations.
To display the Filters List 1 Click the Filters tab. The Filters panel is displayed.

CUSTOMER Getting Started with InfiniteInsight® 6.5 SP4 42 © 2013 SAP AG or an SAP affiliate company. All rights reserved- Creating a Data Manipulation
Applying the Filters
You can choose if you want the selected records to match all the filters (which corresponds to the logical operator AND) or at least one of the listed filters (which corresponds to the logical operator OR).
To Select How to Apply the Filters In the section Keep Only Records that, check the radio button corresponding to the option you want to apply.
Operations on Existing Filters
To Create a Filter 1 Click the button New Condition. The Expression Editor opens. 2 Set the parameters as detailed in the section Expression Editor (on page 8).
Removing a Filter
To Remove a Filter 1 Select the filter you want to remove in the list. 2 Click the Remove button.
3.2.5 Prompts
A prompt allows you to require a value from the user when using the data manipulation in any feature of InfiniteInsight®.

Getting Started with InfiniteInsight® 6.5 SP4 CUSTOMER Creating a Data Manipulation © 2013 SAP AG or an SAP affiliate company. All rights reserved- 43
Creating a Prompt
There are two ways to set a prompt, either in the Prompt tab or when creating a new field or filter.
To Create a Prompt 1 On the Prompt tab, click the button New Prompt. The Prompt Editor opens.
2 Enter a name for the prompt in the Name field. This name will allow you to select the prompt as a value when
creating a field or filter. Select the type in the Type list. 3 Enter the default value in the Value field. When prompting the user, this value will be suggested by default. 4 Enter the sentence that will ask the user for a value in the Description field. For example: "What is the
minimum age required?". 5 Click the OK button to create the new prompt.
Notes - The prompts do not appear in the tab View Data. Prompts that are not used in the data set are deleted when you save the data set. - Prompts that are not used (for example in a field or a filter) are deleted when you save the data manipulation.
Editing a Prompt
All existing prompts can be edited and modified.
To Edit a Prompt 1 On the Prompt tab, click the Edit button. The Prompt Editor is displayed.

CUSTOMER Getting Started with InfiniteInsight® 6.5 SP4 44 © 2013 SAP AG or an SAP affiliate company. All rights reserved- Creating a Data Manipulation
2 Modify the information as needed. To prevent errors only the default value and the description can be modified. If you want to modify a prompt name or type, you need to create a new prompt.
3 Click the OK button to validate the modifications. A message box is displayed asking you to confirm the modifications.
4 Click the Yes button.
Removing a Prompt
You can only delete prompts that are not used in a field or a filter.
To Remove a Prompt 1 In the Prompt tab, select the prompt you want to delete. 2 Click the Remove button. If the prompt is used somewhere in the data set, the following message box is
displayed.
3.2.6 View Data
The tab View Data displays the data manipulation content. It allows you to verify if the results correspond to what you expect. In this panel you can sort the data by column and select the rows to display.

Getting Started with InfiniteInsight® 6.5 SP4 CUSTOMER Creating a Data Manipulation © 2013 SAP AG or an SAP affiliate company. All rights reserved- 45
Sorting the Data
To Sort the Data 1 A first click on a column heading sorts the data by ascending order. 2 A second click on the same column heading sorts the data by descending order. 3 A third click deactivates the sort option.
Selecting the Number of Rows to Display
To Select the Rows to Display 1 In the field First Row Index, enter the number of the row above which you want to start displaying the data.
2 In the field Last Row Index, enter the number of the last row you want to display. 3 Click the Refresh button to display the selected rows in the table above.
Searching a Variable
When your data set contains a great number of variables you can search and display a specific variable thanks to the Search button located in the lower part of the panel View Data.
To Search a Variable 1 Click the Search button. The Search window is displayed.
2 Select the tab corresponding to the type of search you want to do.
The Index tab allows you to find a variable thanks to its index number. This number can be found in the first column of the Fields tab.
The Variable tab allows you to find a variable by its name thanks to a list.

CUSTOMER Getting Started with InfiniteInsight® 6.5 SP4 46 © 2013 SAP AG or an SAP affiliate company. All rights reserved- Creating a Data Manipulation
3 Click the OK button when you have entered the index number or selected the variable name. The selected variable column is highlighted.
3.2.7 SQL Statements
The tab SQL Statements displays the SQL query corresponding to the data manipulation being built.

Getting Started with InfiniteInsight® 6.5 SP4 CUSTOMER Creating a Data Manipulation © 2013 SAP AG or an SAP affiliate company. All rights reserved- 47
3.2.8 Documentation
The Documentation tab allows you to get an overview of your data manipulation. It contains all the options selected for your data manipulation like Filters, Merge, Prompts or Expressions.
This screen shows:
Graphic Summary Visible / Invisible Fields Prompt Expressions Filters
In the below screenshot, the Graphic Summary displays:
the list of tables included in your data manipulation and how they were processed - with merge or aggregates for example;
and the fields kept for your data manipulation known as the Visible Fields .
The Visible Fields displays in a table the ordering columns of the Visible Fields.
This overview can be customized with the Settings option:
Section Settings Field Settings
The Overview Settings allows you choosing how the overview will be formatted both for viewing and exporting (
). The generated file can be saved in .txt, .htm and .rtf file formats .

CUSTOMER Getting Started with InfiniteInsight® 6.5 SP4 48 © 2013 SAP AG or an SAP affiliate company. All rights reserved- Saving a Data Manipulation
4 Saving a Data Manipulation
InfiniteInsight® provides three ways to save a data manipulation that can be used concurrently:
as an InfiniteInsight® Data Manipulation , as a table or a view, as a KxShell script.
IN THIS CHAPTER
Save a Data Manipulation ..................................................................................................................................... 48 Save as a Standard Data Manipulation ................................................................................................................. 49 Save as a Table or View ....................................................................................................................................... 49 Export as a KxShell Script ..................................................................................................................................... 49
4.1 Save a Data Manipulation
1 When you have set all the parameters for the new data manipulation, click the Next button. The panel Save and Export is displayed.
2 Set the parameters as described below. 3 Click the Save button. A dialog box is displayed confirming that the data set has been saved. 4 Click the Cancel button to go back to the main menu.

Getting Started with InfiniteInsight® 6.5 SP4 CUSTOMER Saving a Data Manipulation © 2013 SAP AG or an SAP affiliate company. All rights reserved- 49
4.2 Save as a Standard Data Manipulation
1 Check the Save box.
2 In the field Data Manipulation Name, enter a name for the newly created data set. This name allows you to
recognize and select the data set in your database. 3 You can enter additional information in the Description field.
4.3 Save as a Table or View
1 Check the box Save as table or view.
2 Choose if you want to Save as a Table or to Save as a View by selecting the appropriate option. 3 Enter the name of the new table or view in the field Name of the Table/View.
4.4 Export as a KxShell Script
1 Check the box KxShell Script Export.
2 Use the Browse button corresponding to the Folder field to indicate where the script is to be saved. 3 In the field KxShell Script, enter the name of the script file.
CUSTOMER Getting Started with InfiniteInsight® 6.5 SP4 50 © 2013 SAP AG or an SAP affiliate company. All rights reserved- Using a Data Manipulation
5 Using a Data Manipulation
Now that you have saved your data manipulation, it can be used in another InfiniteInsight® feature.
IN THIS CHAPTER
Use a Saved Data Manipulation ........................................................................................................................... 50 Use Case Scenarios ............................................................................................................................................. 52
5.1 Use a Saved Data Manipulation
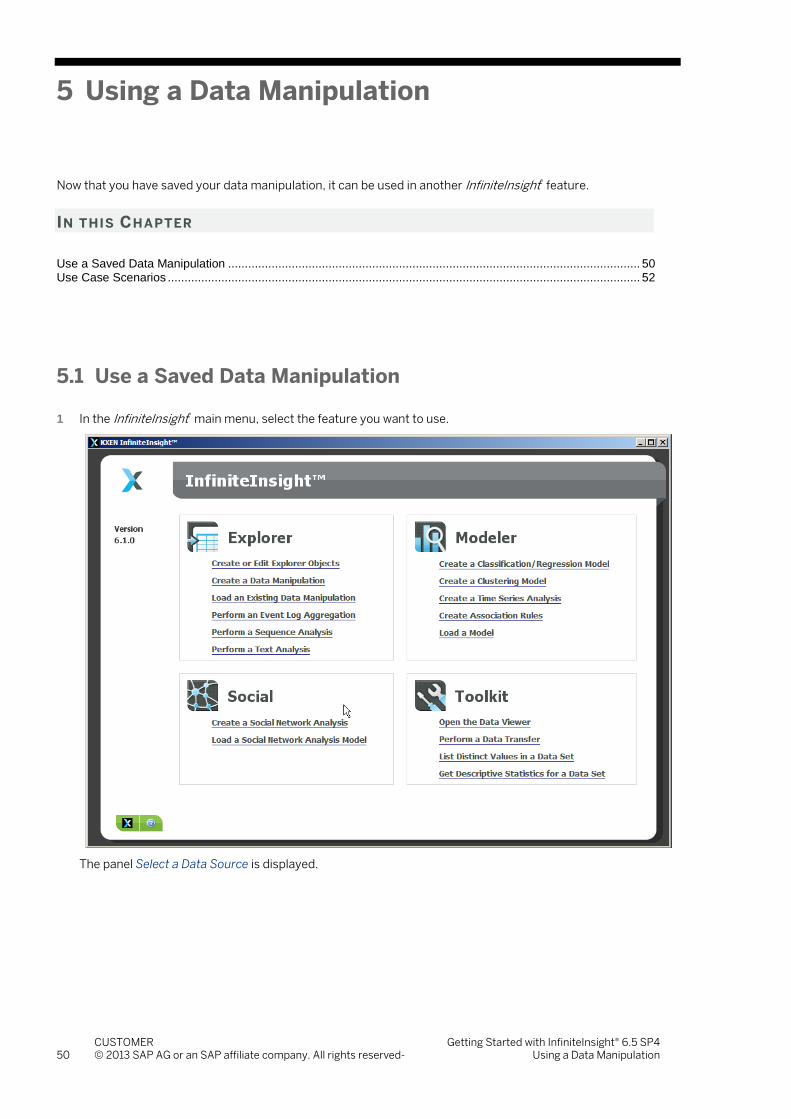
1 In the InfiniteInsight® main menu, select the feature you want to use.
The panel Select a Data Source is displayed.

Getting Started with InfiniteInsight® 6.5 SP4 CUSTOMER Using a Data Manipulation © 2013 SAP AG or an SAP affiliate company. All rights reserved- 51
2 In the list Data Type, select the option Database.
3 With the Browse button of the Folder field, select the database where you have saved the data manipulation
created with the corresponding feature. If necessary, enter the login and password granting you access to the database.
4 With the Browse button of the Estimation field, select the data manipulation.
In the database, the data manipulations created with the InfiniteInsight® Explorer - Semantic Layer feature are represented by the following icon: .
5 Click the Next button. If the data manipulation uses prompts, they are displayed at this time.
You can either keep the default value, or enter a new value corresponding to your needs.
6 Click the Save button to validate the change. The Cancel button automatically keeps the default value. 7 Once all the prompts have been validated, the description panel is displayed.
You can now use the feature as you would with a standard data source.

CUSTOMER Getting Started with InfiniteInsight® 6.5 SP4 52 © 2013 SAP AG or an SAP affiliate company. All rights reserved- Using a Data Manipulation
5.2 Use Case Scenarios
There are three types of use cases:
Decoration Filtering Variable Creation
In each, the term “user” denotes a user of InfiniteInsight® technology who wants to use InfiniteInsight® modeling techniques.
5.2.1 Decoration (Star Schema Use Case)
The user wants to create a model on “customer” to predict the response to a mailing campaign, but the information on “customer” is spread over several tables. One table contains reference information about the customer. One field in this table represents the region, which is in fact an identifier (foreign key) that links to another table containing demographic information about the region. A second field in the customer reference table contains an identifier that links to another table describing the associated contract. The user would like to complete the customer data set with demographics about the customer's region and characteristics of the contract in order to see if this information can help to predict the customer response.
Technically, if the two tables can be accessed through the same database, this operation is a join. More specifically, we are interested here in “outer left” joins, where the number of lines of the reference table is not changed by the fact that information exists in the “decoration” table. If the information does not exist, then the extra fields should be brought back empty.
A different type of use case is that of aggregation, where there may be more than one line in the decoration table that can be associated with each “event” in the reference table. This situation occurs when dealing with “transactions”. An example is a “fact table” that consists of records indicating that a given customer bought a certain product on a specific date for a specified price. Of course, there can be several of such occurrences per customer. Accordingly, there is necessary to summarize them in one or more ways (for example into fields that extend a customer table) if the data is to be used in predictive modeling or segmentation. This is accomplished via aggregation (sometimes called pivoting, or transposition) and is addressed via InfiniteInsight® aggregation modules, Event Logging and Sequence Coding.
5.2.2 Filtering
The user wants to create a model predicting churn only for customers associated with a prepaid agreement. In this case, one table contains reference information about the customer; one field contains an identifier that links to another table containing information about his contract and the contract type. The user would like to keep only customers with prepaid contracts to train the model.
Technically, this can be seen as a “where” clause in an SQL “select” statement. Sometimes, the same “where” clause needs to be used for both training and apply data sets, and sometimes, the “where” clause can be used to separate the training data set from the apply data set. In the latter case, it is important to be able to set the value of an argument at runtime.
Getting Started with InfiniteInsight® 6.5 SP4 CUSTOMER Using a Data Manipulation © 2013 SAP AG or an SAP affiliate company. All rights reserved- 53
5.2.3 Variable Creation
The user wants to add new variables that are not saved in any table but can be derived from other data on demand. When using InfiniteInsight® Platform, variable creation should be primarily business-driven since the software already knows how to transform data to accommodate its algorithms. Users should add variables when they think this could provide more information for a predictive or descriptive model. For example, a ratio between two variables that has business meaning or the conversion of a birth date to an age are useful transformations that would be very difficult to infer automatically with a modeling software.
Technically, this can be decomposed into several types of variable creation:
Using a predefined function Normalization Case-based processing
Using a Predefined Function
A very wide range of potential functions could interest users. However, most of these functions are built using one or more of the following elements:
Mathematical operators: such as +, *, -, /, % Logical operators: AND, OR String manipulations: LIKE, SUB-STRING, TRIM, LEFT-TRIM, RIGHT-TRIM, UPPER-CASE, LOWER-CASE. Mathematical functions: LOG, EXP Date manipulations: YEAR, MONTH, DAY, TIME, MINUTE, SECOND, DATE ADDITION, DATE DIFFERENCE
Note - The DayOfTheWeek function returns an integer that varies from 1 to 7 where 1 stands for Sunday, 2 for Monday, ... and 7 for Saturday. This is the standard behavior of major RDBMS (including DB2, ORACLE, SQLServer, ACCESS).
A list of basic InfiniteInsight® Explorer - Semantic Layers is provided by SQL.

CUSTOMER Getting Started with InfiniteInsight® 6.5 SP4 54 © 2013 SAP AG or an SAP affiliate company. All rights reserved- Using a Data Manipulation
Normalization
Normalization is a standard InfiniteInsight® Explorer - Semantic Layer primitive that appears in PMML (Predictive Model Markup Language), a data mining specification language defined by the Data Mining Group (DMG). Normalization is frequently applied to numeric variables prior to data mining and consists of a piece-wise linear transform with the resultant variable typically ranging from 0 to 1. This can be used for rank transformations, where the output represents a magnitude in terms of the approximate proportion (percentile) of values below the input value. Alternatively, a field may be converted based on how many standard deviations a value is from the fields mean. Part of normalization is also the specification of what value to use when a numeric input value is unknown or out of the range seen in the training data.
An example of normalization is graphed below. The X-axis represents the original data, the Y-axis the normalized value. The minimum and maximum X values correspond to the 0 and 1 values on the Y-axis, respectively. Each point is defined based on the normalization method. Normalization values corresponding to data values falling inbetween normalization points on the X-axis are calculated using straight-line interpolation. The graph is shaped like a S, indicating that the normalization method is designed to enhance (spread out) differences between values close to the mean while diminishing the magnitude of extreme (very high or very low) values.
Case-based Processing
This can be decomposed into sub-operations. A lot of user-defined manipulations are based on “cases”. A classic example is a “look-up table” that is used as a dictionary to translate values from identifiers into strings, or to group values representing fine distinctions into a smaller number of more general bins. A different example is the application of complex conditions to generate outcome indicators or to segment a continuous value into sub-ranges with corresponding segment identifiers. Sometimes, such manipulations can be done through joins with a decoration table, but often it is easier to define them directly. In InfiniteInsight® platform, we have focused on the following cases:
Look-up table The user specifies cases, each of which is made up of a list of discrete values and a corresponding label.
Numeric case The user specifies ranges (minimum and maximum values) and corresponding labels.
Generic case The user specifies different cases, where each is defined through a possibly-complex Boolean expression. The result of each expression is associated with either a user-defined variable, a field from the database, a constant or a prompt.

Getting Started with InfiniteInsight® 6.5 SP4 CUSTOMER Performing a Data Manipulation Transfer © 2013 SAP AG or an SAP affiliate company. All rights reserved- 55
6 Performing a Data Manipulation Transfer
It is possible to migrate a Data Manipulation while performing a data transfer. This option is available via the InfiniteInsight® Toolkit feature.
The data transfer process encompasses various steps starting from the Data Manipulation creation in InfiniteInsight® Explorer to performing its transfer in the InfiniteInsight® Toolkit.
6.1 Create a Data Manipulation
To Create a Data Manipulation 1 In the InfiniteInsight® Start Panel, select the feature Create a Data Manipulation in the Explorer section.
CUSTOMER Getting Started with InfiniteInsight® 6.5 SP4 56 © 2013 SAP AG or an SAP affiliate company. All rights reserved- Performing a Data Manipulation Transfer
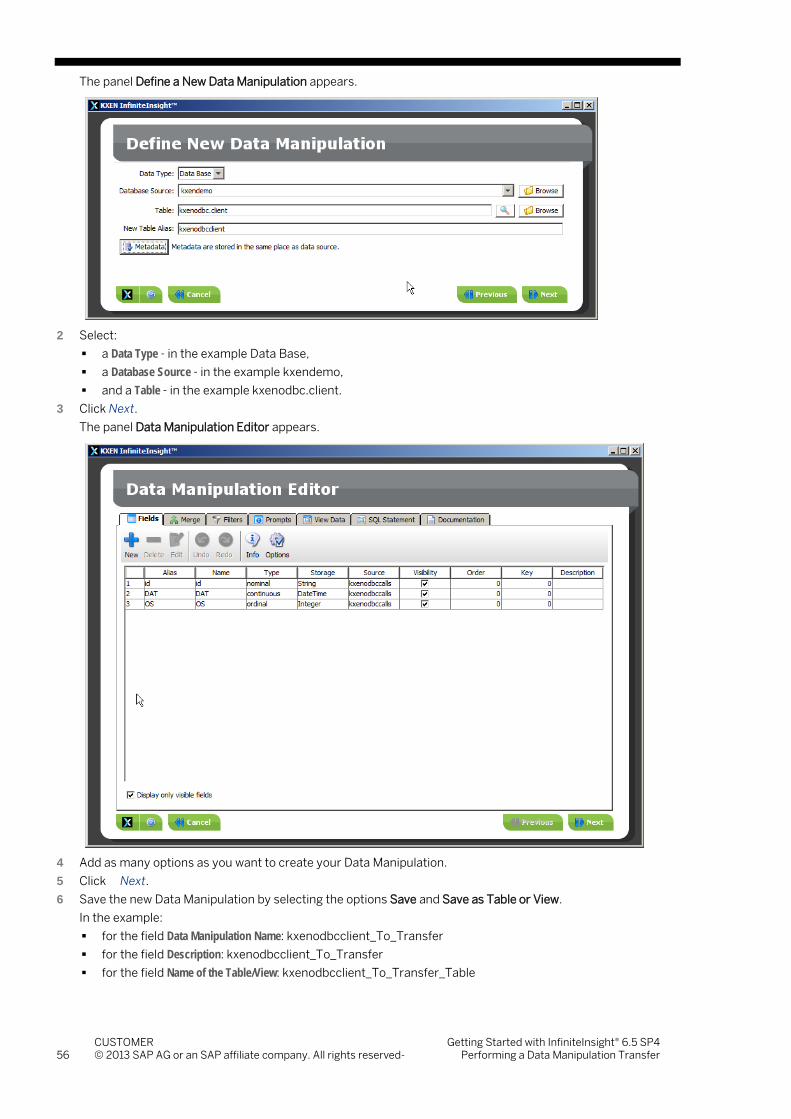
The panel Define a New Data Manipulation appears.
2 Select:
a Data Type - in the example Data Base, a Database Source - in the example kxendemo, and a Table - in the example kxenodbc.client.
3 Click Next. The panel Data Manipulation Editor appears.
4 Add as many options as you want to create your Data Manipulation. 5 Click Next. 6 Save the new Data Manipulation by selecting the options Save and Save as Table or View.
In the example: for the field Data Manipulation Name: kxenodbcclient_To_Transfer for the field Description: kxenodbcclient_To_Transfer for the field Name of the Table/View: kxenodbcclient_To_Transfer_Table

Getting Started with InfiniteInsight® 6.5 SP4 CUSTOMER Performing a Data Manipulation Transfer © 2013 SAP AG or an SAP affiliate company. All rights reserved- 57
7 Click Save.
The Data Manipulation is now ready to be transferred to another database.
For further details to perform this step, Creating a Data Manipulation (on page 6).
6.2 Transfer a Data Manipulation
To Transfer a Data Manipulation 1 In the InfiniteInsight® Start Panel, select the feature Conduct Data Transfer in the Toolkit section.
The panel Select Data Set Source is displayed.
2 Select: a Data Type - in the example Data Base, a Folder - in the example, the existing Database kxendemo, and a Data Set that is an existing data manipulation previously created - in the example
kxenodbcclient_To_Transfer, the Data Manipulation to be transferred to a new Database (it is preceded by the icon with a green arrow in the middle.)

CUSTOMER Getting Started with InfiniteInsight® 6.5 SP4 58 © 2013 SAP AG or an SAP affiliate company. All rights reserved- Performing a Data Manipulation Transfer
3 Click Next. 4 In the pop-up window Transfer a Data Manipulation, select the transfer option Transfer Definition.
The screen Data Manipulation Transfer is displayed.
5 In the area Target Settings, specify: the Target Database (the database where you want to transfer your Data Manipulation) - in the example
kxsrvmulti2_sqlserver2005. the Data Manipulation in the field Transfer as - in the example KXENODBCCLIENT_TO_TRANSFER (you can
give a new name to the Data Manipulation in the Target Database, instead of using the old one).

Getting Started with InfiniteInsight® 6.5 SP4 CUSTOMER Performing a Data Manipulation Transfer © 2013 SAP AG or an SAP affiliate company. All rights reserved- 59
6 To define the Data Manipulation source in the Table Mapping area, click Guess.
If the new database has a similar table with a similar name, the application automatically shows the correct Target Table.
Important! The new database must have the similar source table(s) as the existing database, that is, if the Data Manipulation is derived from sources TableA and TableB, both TableA and TableB must be migrated to the new database before performing the Data Manipulation transfer.
7 Edit the correct field mapping for the Target by clicking on the Edit Field Mapping icon. The Edit Field Mapping screen appears. By default, there is no mapping defined.

CUSTOMER Getting Started with InfiniteInsight® 6.5 SP4 60 © 2013 SAP AG or an SAP affiliate company. All rights reserved- Performing a Data Manipulation Transfer
8 If you have selected a correct Target Table in the previous step, click Guess.
The Target Fields are automatically filled in.

Getting Started with InfiniteInsight® 6.5 SP4 CUSTOMER Performing a Data Manipulation Transfer © 2013 SAP AG or an SAP affiliate company. All rights reserved- 61
9 Click OK. The green arrow on the Edit Field Mapping icon indicate that the mapping is done.
10 Click Check.
A pop-window indicates that the mapping for the transfer is correct.
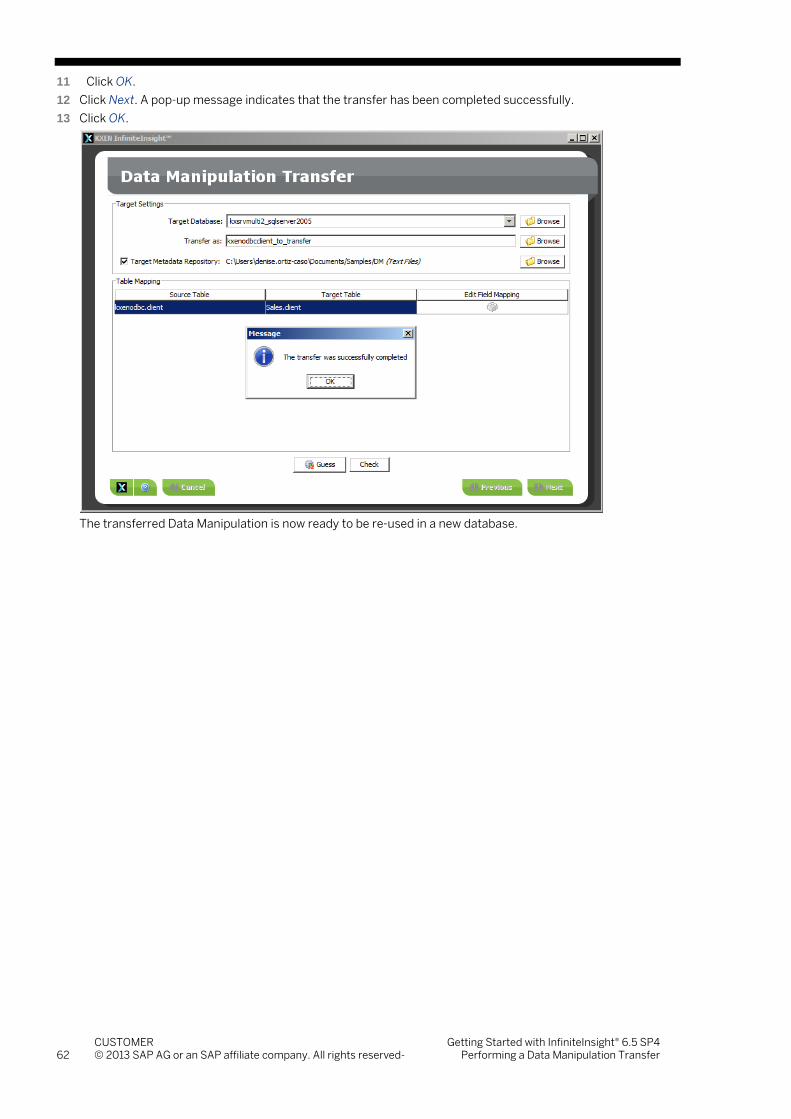
CUSTOMER Getting Started with InfiniteInsight® 6.5 SP4 62 © 2013 SAP AG or an SAP affiliate company. All rights reserved- Performing a Data Manipulation Transfer
11 Click OK. 12 Click Next. A pop-up message indicates that the transfer has been completed successfully. 13 Click OK.
The transferred Data Manipulation is now ready to be re-used in a new database.

Getting Started with InfiniteInsight® 6.5 SP4 CUSTOMER Performing a Data Manipulation Transfer © 2013 SAP AG or an SAP affiliate company. All rights reserved- 63
6.3 Use the Transferred Data Manipulation in a New Database
To Use the Transferred Data Manipulation in a New Database 1 In the InfiniteInsight® Start Page, click on the option Load an Existing Data Manipulation in the Explorer section.
The panel Opening a Data Manipulation appears.
2 Select: Data Base in the field Data Type, and in the field Database Source, the new database (where the Data Manipulation has been transferred) - in
this example, the new database is kxsrvmulti2_sqlserver2005.

CUSTOMER Getting Started with InfiniteInsight® 6.5 SP4 64 © 2013 SAP AG or an SAP affiliate company. All rights reserved- Performing a Data Manipulation Transfer
The transferred data manipulation is automatically displayed.
3 Select the transferred Data Manipulation and click Open. The Data Manipulation loads.

Getting Started with InfiniteInsight® 6.5 SP4 CUSTOMER Performing a Data Manipulation Transfer © 2013 SAP AG or an SAP affiliate company. All rights reserved- 65
4 Automatically the Data Manipulation interface opens with the previously defined data manipulation.

CUSTOMER Getting Started with InfiniteInsight® 6.5 SP4 66 © 2013 SAP AG or an SAP affiliate company. All rights reserved- Annex
7 Annex
7.1 Functions of the Expression Editor
7.1.1 Arithmetic Operators
Function Syntax/Example
Absolute Returns the numerical value regardless of its sign
absolute(numeric)
Example: absolute(1) => 1
Add add(numeric)
Example: add(1,2,3) => 6
Division divide(numeric, numeric)
Example: divide(64,2) => 32
Exponential exp(numeric)
Example: exp(16) => 8886110
Logarithm ln(numeric)
Example: ln(13) => 2,56495
Max. greatest2(numeric, numeric)
Example: greatest2(12,13) => 13
Maximum of a List of Values
greatestN(list of numerics)
Example: greatestN(15,78,96,53,46,105) => 105
Min least2(numeric, numeric)
Example: least2(12,125) => 12
Minimum of a List of Values leastN(list of numerics) Example: leastN(15,78,96,53,46,105) => 15
Modulo Returns the remainder of an integer division
modulo(ModRightOperand:integer, ModLeftOperand:integer)
Example: modulo(117,17) => 15
Multiply multiply(numeric)
Example: multiply(2,4) => 8
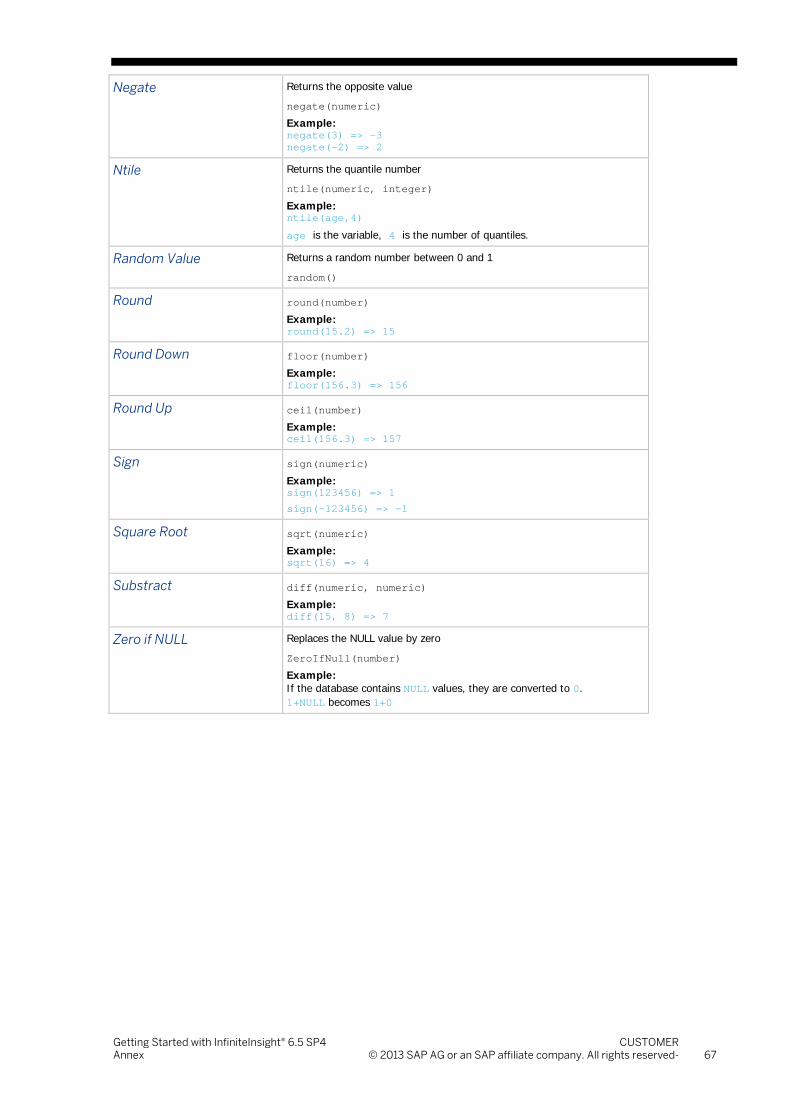
Getting Started with InfiniteInsight® 6.5 SP4 CUSTOMER Annex © 2013 SAP AG or an SAP affiliate company. All rights reserved- 67
Negate Returns the opposite value
negate(numeric)
Example: negate(3) => -3 negate(-2) => 2
Ntile Returns the quantile number
ntile(numeric, integer)
Example: ntile(age,4)
age is the variable, 4 is the number of quantiles.
Random Value Returns a random number between 0 and 1
random()
Round round(number)
Example: round(15.2) => 15
Round Down floor(number)
Example: floor(156.3) => 156
Round Up ceil(number)
Example: ceil(156.3) => 157
Sign sign(numeric)
Example: sign(123456) => 1 sign(-123456) => -1
Square Root sqrt(numeric)
Example: sqrt(16) => 4
Substract diff(numeric, numeric)
Example: diff(15, 8) => 7
Zero if NULL Replaces the NULL value by zero
ZeroIfNull(number)
Example: If the database contains NULL values, they are converted to 0. 1+NULL becomes 1+0

CUSTOMER Getting Started with InfiniteInsight® 6.5 SP4 68 © 2013 SAP AG or an SAP affiliate company. All rights reserved- Annex
7.1.2 Boolean Operators
Function Syntax/Example
And Returns "1" if all the operands are true, otherwise returns "0"
and(<boolean>)
Example: and(age > 18)
Does not Start with Returns "1" if the first string does not start with the second one
notStartsWith(Test:string, Candidate:string)
Example: notStartsWith("KxTimestamp","Kx") => 0
Equal equal(LeftOperand:any, RightOperand:any)
Example: equal(15,15) => 1
Greater than Returns "1"if the left operand is greater than the right one
greater(LeftOperand:any, RightOperand:any)
Example: greater(15,16) => 0 greater(16,15) => 1
Greater than or Equal to
greaterOrEqual(any, any)
Is Null isNull(any)
Example: isNull("or") => 0
Is True isTrue(boolean)
Example: isTrue(age<30)
Checks if age < 30 is true.
If true, it returns "1" otherwise it returns "0".
Is in List Returns "1" if the selected field is in the selected values
isInList(Field:any, <Values:any>)
Is in Range Checks if a numeric operand is between two numeric values
isInRange(Value Operand:numeric, Low Border Operand:numeric, High Border
Operand:numeric)
Is not Null isNotNull(any)
Is not in List Returns "1" if the selected field is not in the selected values
notIsInList(Field:any, <Values:any>)
Example: notIsInList(disp_id, 12, 16)
if disp_id = 1 the result is true; if disp_id = 12 or disp_id = 16 the result is false.
Is not in Range notIsInRange(Value Operand:numeric, Low Border Operand:numeric, High
Border Operand:numeric)

Getting Started with InfiniteInsight® 6.5 SP4 CUSTOMER Annex © 2013 SAP AG or an SAP affiliate company. All rights reserved- 69
Like Indicates whether the given string matches the given pattern
Use % to determine the place of the pattern in the string. For example, if the pattern ends with %, you are looking for a string that starts with the pattern. If the pattern starts with %, you are looking for a string that ends with the pattern. You can use more than one % in the pattern.
like(string, pattern)
Example: like(my_variable,'kxen%')
if my_variable = "kxen_model" the result is true; if my_variable = "model_kxen" the result is false.
Not not(boolean)
Not Equal Returns "1" if the operands are different
different(Left Operand:any, Right Operand:any)
Not Like Returns "1" if the given string does not match the given pattern
Use % to determine the place of the pattern in the string. For example, if the pattern ends with %, you are looking for a string that starts with the pattern. If the pattern starts with %, you are looking for a string that ends with the pattern. You can use more than one % in the pattern.
notLike(Test Operand:string, Candidate Operand:string)
Or Returns "0" if all operands are false, otherwise returns "1"
or(<boolean>)
Smaller than less(Left Operand:any, Right Operand:any)
Smaller than or Equal to
lessOrEqual(any, any)
Start with Returns "1" if the first string starts with the second one
startsWith(Test:string, Candidate:string)

CUSTOMER Getting Started with InfiniteInsight® 6.5 SP4 70 © 2013 SAP AG or an SAP affiliate company. All rights reserved- Annex
7.1.3 Date Operators
Function Syntax/Example
Builds Date Builds a date from a day, a month and a year
dateToImplode(y,m,d)
Example: dateToImplode(1,6,8) => 2001-06-08
Current Date Returns the current DateTime
now()
Example: now() => 2012-09-28 10:17:12
Day Extraction datePartDay(yyyy-mm-dd)
Example: datePartDay(2012-02-08) => 8
Days Difference dateDiffNbDays(yyyy-mm-dd, yyyy-mm-dd')
Example: dateDiffNbDays(2012-02-09, 2012-02-02) => 7
Hour Extraction datePartHour("hh:mm:ss")
Example: datePartHour("10:05:30") => 10
Minutes Extraction datePartMinute("hh:mm:ss")
Example: datePartMinute("10:05:30") => 5
Month Extraction datePartMonth(yyyy-mm-dd)
Example: datePartMonth(2010-02-05) => 2
Seconds Extraction datePartSecond("hh:mm:ss")
Example: datePartSecond("10:05:30") => 30
Shifts Date by Day Adds/substracts n days to/from a given date
dateAddDay(yyyy-mm-dd, integer)
Example: dateAddDay(2010-03-02,20) => 2010-03-22
Shifts Date by Hour Adds/substracts n hours to/from a given date
dateAddHour(yyyy-mm-dd, integer)
Example: dateAddHour(2012-02-05,35) => 2012-02-06 23:00:00
Shifts Date by Minutes
Adds/substracts n minutes to/from a given date
dateAddMinute(yyyy-mm-dd, integer)
Example: dateAddMinute(2012-02-05, 35) => 2012-02-5 12:35:00
Shifts Date by Month Adds/substracts n months to/from a given date
dateAddMonth(yyyy-mm-dd, integer)
Example: dateAddMonth(2012-02-05,2) => 2012-04-05
Shifts Date by Seconds
Adds/substracts n seconds to/from a given date
dateAddSecond(yyyy-mm-dd, integer)
Example: dateAddSecond(2012-02-05, 3) => 2012-02-05 12:00:03

Getting Started with InfiniteInsight® 6.5 SP4 CUSTOMER Annex © 2013 SAP AG or an SAP affiliate company. All rights reserved- 71
Shifts Date by Year Adds/substracts n years to/from a given date
dateAddYear(yyyy-mm-dd, integer)
Example: dateAddYear(2012-02-05, 3) => 2015-02-05
Weekdays Extraction datePartWeekDay(yyyy-mm-dd)
Example: datePartWeekDay(2012-02-05) => 1
Year Extraction datePartYear(yyyy-mm-dd)
Example: datePartYear(2012-02-05) => 2012
7.1.4 Miscellaneous Operators
Function Syntax/Example
Coalesce Returns the first non null value in a list
coalesce(<any>)
Example: coalesce("","",2,3) => 2
Constant Creates a new constant
litteral(any)
Void Date Returns an empty column of date storage type
nullAsDate()
Void DateTime Returns an empty column of DateTime storage type
nullAsDateTime()
Void Integer Returns an empty column of DateTime storage type
nullAsInteger()
Void Number Returns an empty column of number storage type
nullAsNumber()
Void String Returns an empty column of string storage type
nullAsString()
If Valid Returns the value of the second argument if the first argument is true, otherwise returns null
ifValid(boolean, any)
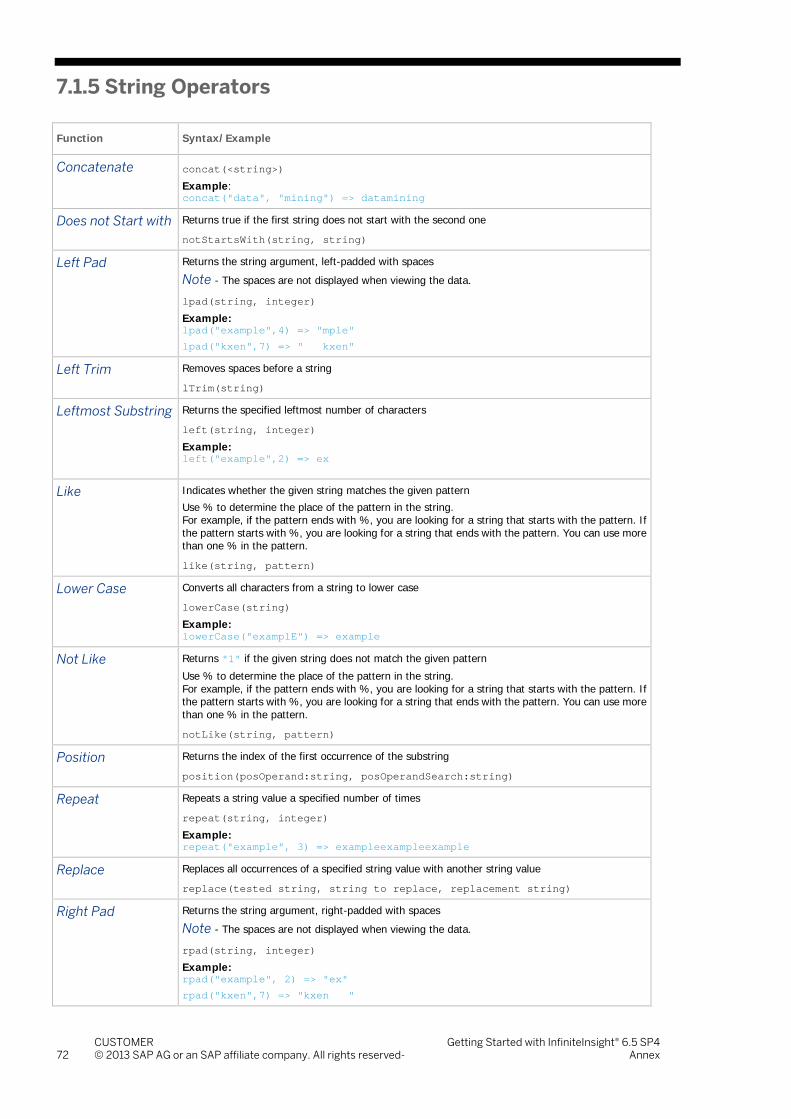
CUSTOMER Getting Started with InfiniteInsight® 6.5 SP4 72 © 2013 SAP AG or an SAP affiliate company. All rights reserved- Annex
7.1.5 String Operators
Function Syntax/Example
Concatenate concat(<string>)
Example: concat("data", "mining") => datamining
Does not Start with Returns true if the first string does not start with the second one
notStartsWith(string, string)
Left Pad Returns the string argument, left-padded with spaces
Note - The spaces are not displayed when viewing the data.
lpad(string, integer)
Example: lpad("example",4) => "mple" lpad("kxen",7) => " kxen"
Left Trim Removes spaces before a string
lTrim(string)
Leftmost Substring Returns the specified leftmost number of characters
left(string, integer)
Example: left("example",2) => ex
Like Indicates whether the given string matches the given pattern
Use % to determine the place of the pattern in the string. For example, if the pattern ends with %, you are looking for a string that starts with the pattern. If the pattern starts with %, you are looking for a string that ends with the pattern. You can use more than one % in the pattern.
like(string, pattern)
Lower Case Converts all characters from a string to lower case
lowerCase(string)
Example: lowerCase("examplE") => example
Not Like Returns "1" if the given string does not match the given pattern
Use % to determine the place of the pattern in the string. For example, if the pattern ends with %, you are looking for a string that starts with the pattern. If the pattern starts with %, you are looking for a string that ends with the pattern. You can use more than one % in the pattern.
notLike(string, pattern)
Position Returns the index of the first occurrence of the substring
position(posOperand:string, posOperandSearch:string)
Repeat Repeats a string value a specified number of times
repeat(string, integer)
Example: repeat("example", 3) => exampleexampleexample
Replace Replaces all occurrences of a specified string value with another string value
replace(tested string, string to replace, replacement string)
Right Pad Returns the string argument, right-padded with spaces
Note - The spaces are not displayed when viewing the data.
rpad(string, integer)
Example: rpad("example", 2) => "ex" rpad("kxen",7) => "kxen "

Getting Started with InfiniteInsight® 6.5 SP4 CUSTOMER Annex © 2013 SAP AG or an SAP affiliate company. All rights reserved- 73
Right Trim Removes spaces after a string
rTrim(string)
Rightmost Substring
Returns the specified rightmost number of characters
right(string, integer)
Example: right("example",2) => "le"
Start with Returns true if the first string starts with the second one
startsWith(StartWithStringTest:string, StartWithStringCandidate:string)
String Length Returns the number of characters in a string
stringLength(string)
Substring Selects the n characters of a string from a selected character
subStr(string, SubStrIntegerStart:integer, SubStrIntegerLength:integer)
Example: subStr("example", 2,3) => xam
Trim Removes spaces around a string
trim(string)
Upper Case Converts all characters from a string to upper case
upperCase(string)
Example: upperCase("example") => EXAMPLE

CUSTOMER Getting Started with InfiniteInsight® 6.5 SP4 74 © 2013 SAP AG or an SAP affiliate company. All rights reserved- Annex
7.1.6 Conversion Operators
Function Syntax/Example
Converts Boolean into an Integer
booleanToInt(boolean)
Example: booleanToInt("True") => 1 booleanToInt("False") => 0
Converts Boolean to String booleanToString(boolean)
Example: booleanToString(1) => true
Converts Date to DateTime dateToDateTime(yyyy-mm-dd)
Example: dateToDateTime(1900-01-01) => 1900-01-01 00:00:00
Converts Date to Integer Returns the number of days elapsed since 1900-01-01
dateToInteger(yyyy-mm-dd)
Example: dateToInteger(2010-01-01) => 40177
Converts Date to String dateToString(yyyy-mm-dd)
Converts DateTime to Date dateTimeToDate(yyyy-mm-ss hh:mm:ss)
Example: dateTimeToDate(1900-01-01 00:00:00) => 1900-01-01
Converts DateTime to String dateTimeToString(yyyy-mm-dd hh:mm:ss)
Converts Integer to Boolean
Note - If inToBoolean(0) => 0, else => 1
intToBoolean(integer)
Converts Integer to Number
intToNumber(integer)
Converts Integer to String intToString(integer)
Converts Number to Integer Note - The values are rounded down.
numberToInt(number)
Example: numberToInt(56.3) => 56 numberToInt(56,9) => 56
Converts Number to String numberToString(number)
Converts String to Boolean Note - If "true" => 1, else => 0
stringToBoolean(string)
Converts String to Date Note - If the content of the string does not correspond to a date, it leads to an error.
stringToDate(string)
Converts String to DateTime Note - If the content of the string does not correspond to a DateTime, it leads to an error.
stringToDateTime(string)
Converts String to Integer Note - If the content of the string does not correspond to an integer, it leads to an error.
stringToInt(string)
Converts String to Number Note - If the content of the string does not correspond to a number, it leads to an error.
stringToNumber(string)


www.sap.com/contactsap
© 2013 SAP AG or an SAP affiliate company. All rights reserved. No part of this publication may be reproduced or transmitted in any form or for any purpose without the express permission of SAP AG. The information contained herein may be changed without prior notice. Some software products marketed by SAP AG and its distributors contain proprietary software components of other software vendors. National product specifications may vary. These materials are provided by SAP AG and its affiliated companies (“SAP Group”) for informational purposes only, without representation or warranty of any kind, and SAP Group shall not be liable for errors or omissions with respect to the materials. The only warranties for SAP Group products and services are those that are set forth in the express warranty statements accompanying such products and services, if any. Nothing herein should be construed as constituting an additional warranty. SAP and other SAP products and services mentioned herein as well as their respective logos are trademarks or registered trademarks of SAP AG in Germany and other countries. Please see www.sap.com/corporate-en/legal/copyright/index.epx#trademark for additional trademark information and notices.