getting started guide v1.2 for use with the websense v10000 appliance
TRANSCRIPT
Getting Started
v1.2
Websense® V10000 Appl iance

©1996–2009, Websense, Inc.10240 Sorrento Valley Rd., San Diego, CA 92121, USAAll rights reserved.Published 2009 Revision C Printed in the United States of America and IrelandThe products and/or methods of use described in this document are covered by U.S. Patent Numbers 5,983,270; 6,606,659; 6,947,985; 7,185,015; 7,194,464 and RE40,187 and other patents pending.This document may not, in whole or in part, be copied, photocopied, reproduced, translated, or reduced to any electronic medium or machine-readable form without prior consent in writing from Websense, Inc.Every effort has been made to ensure the accuracy of this manual. However, Websense, Inc., makes no warranties with respect to this documentation and disclaims any implied warranties of merchantability and fitness for a particular purpose. Websense, Inc., shall not be liable for any error or for incidental or consequential damages in connection with the furnishing, performance, or use of this manual or the examples herein. The information in this documentation is subject to change without notice.
TrademarksWebsense is a registered trademark of Websense, Inc., in the United States and certain international markets. Websense has numerous other unregistered trademarks in the United States and internationally. All other trademarks are the property of their respective owners.Microsoft, Windows, Windows NT, Windows Server, Windows Vista and Active Directory are either registered trademarks or trademarks of Microsoft Corporation in the United States and/or other countries.Novell, Novell Directory Services, eDirectory, and ZENworks are trademarks or registered trademarks of Novell, Inc., in the United States and other countries.Pentium and Xeon are registered trademarks of Intel Corporation.This product includes software developed by the Apache Software Foundation (www.apache.org).Copyright (c) 2000 The Apache Software Foundation. All rights reserved.Other product names mentioned in this manual may be trademarks or registered trademarks of their respective companies and are the sole property of their respective manufacturers.
WinPcapCopyright (c) 1999 - 2009 NetGroup, Politecnico di Torino (Italy).Copyright (c) 2009 CACE Technologies, Davis (California).All rights reserved.Redistribution and use in source and binary forms, with or without modification, are permitted provided that the following conditions are met:• Redistributions of source code must retain the above copyright notice, this list of conditions and the following disclaimer.• Redistributions in binary form must reproduce the above copyright notice, this list of conditions and the following disclaimer in the documentation
and/or other materials provided with the distribution.• Neither the name of the Politecnico di Torino, CACE Technologies nor the names of its contributors may be used to endorse or promote products
derived from this software without specific prior written permission.THIS SOFTWARE IS PROVIDED BY THE COPYRIGHT HOLDERS AND CONTRIBUTORS "AS IS" AND ANY EXPRESS OR IMPLIED WARRANTIES, INCLUDING, BUT NOT LIMITED TO, THE IMPLIED WARRANTIES OF MERCHANTABILITY AND FITNESS FOR A PARTICULAR PURPOSE ARE DISCLAIMED. IN NO EVENT SHALL THE COPYRIGHT OWNER OR CONTRIBUTORS BE LIABLE FOR ANY DIRECT, INDIRECT, INCIDENTAL, SPECIAL, EXEMPLARY, OR CONSEQUENTIAL DAMAGES (INCLUDING, BUT NOT LIMITED TO, PROCUREMENT OF SUBSTITUTE GOODS OR SERVICES; LOSS OF USE, DATA, OR PROFITS; OR BUSINESS INTERRUPTION) HOWEVER CAUSED AND ON ANY THEORY OF LIABILITY, WHETHER IN CONTRACT, STRICT LIABILITY, OR TORT (INCLUDING NEGLIGENCE OR OTHERWISE) ARISING IN ANY WAY OUT OF THE USE OF THIS SOFTWARE, EVEN IF ADVISED OF THE POSSIBILITY OF SUCH DAMAGE.
Contents
Topic 1 Introducing the Websense V10000 . . . . . . . . . . . . . . . . . . . . . . . . . . . . 5
Websense V10000 environment. . . . . . . . . . . . . . . . . . . . . . . . . . . . . . . . 5Windows Server 2003 or 2008 . . . . . . . . . . . . . . . . . . . . . . . . . . . . . . 6Hardware . . . . . . . . . . . . . . . . . . . . . . . . . . . . . . . . . . . . . . . . . . . . . . 6Operating System . . . . . . . . . . . . . . . . . . . . . . . . . . . . . . . . . . . . . . . . 6Additional Software . . . . . . . . . . . . . . . . . . . . . . . . . . . . . . . . . . . . . . 6Database Engine . . . . . . . . . . . . . . . . . . . . . . . . . . . . . . . . . . . . . . . . . 6Directory Service. . . . . . . . . . . . . . . . . . . . . . . . . . . . . . . . . . . . . . . . . 7Other . . . . . . . . . . . . . . . . . . . . . . . . . . . . . . . . . . . . . . . . . . . . . . . . . . 8
Deployment scenarios . . . . . . . . . . . . . . . . . . . . . . . . . . . . . . . . . . . . . . . 8Single appliance deployment . . . . . . . . . . . . . . . . . . . . . . . . . . . . . . . 9Multiple appliance deployment. . . . . . . . . . . . . . . . . . . . . . . . . . . . . 10
Implementing clustering . . . . . . . . . . . . . . . . . . . . . . . . . . . . . . . 11Topic 2 Setting up the Websense V10000. . . . . . . . . . . . . . . . . . . . . . . . . . . . . 13
Set up the appliance hardware . . . . . . . . . . . . . . . . . . . . . . . . . . . . . . . . 13Clustering . . . . . . . . . . . . . . . . . . . . . . . . . . . . . . . . . . . . . . . . . . . . . 13
Perform initial command line configuration . . . . . . . . . . . . . . . . . . . . . 14Configure the V10000 . . . . . . . . . . . . . . . . . . . . . . . . . . . . . . . . . . . . . . 15Install Websense Manager and Log Server . . . . . . . . . . . . . . . . . . . . . . 18
Add or install optional components . . . . . . . . . . . . . . . . . . . . . . . . . 22Configure Websense Manager . . . . . . . . . . . . . . . . . . . . . . . . . . . . . . . . 23
Special directory service considerations . . . . . . . . . . . . . . . . . . . . . . 25Configure Websense Content Gateway . . . . . . . . . . . . . . . . . . . . . . . . . 27Test and refine your policies . . . . . . . . . . . . . . . . . . . . . . . . . . . . . . . . . 28Recovering the V10000 appliance . . . . . . . . . . . . . . . . . . . . . . . . . . . . . 29Logon Portal . . . . . . . . . . . . . . . . . . . . . . . . . . . . . . . . . . . . . . . . . . . . . . 30Online Help . . . . . . . . . . . . . . . . . . . . . . . . . . . . . . . . . . . . . . . . . . . . . . 31Technical Support. . . . . . . . . . . . . . . . . . . . . . . . . . . . . . . . . . . . . . . . . . 31
Getting Started 3

Contents
4 Websense V10000

1
Introducing the Websense V10000
The Websense V10000 appliance is a high-performance platform for Websense Web Security Gateway, combining Websense Web Security filtering and Websense Content Gateway proxy cache on a single, high-powered machine. The V10000 solution also uses a separate Windows 2003 or 2008 Server in the network, which houses Websense Manager (the configuration interface for Websense Web Security) and Log Server (which processes filtering log records into a separate Microsoft SQL Server database).
This security solution offers:
V10000 Console, a Web-based configuration interface that offers appliance management features like:
System dashboard, with up-to-the-minute status of the software modules and system resourcesAppliance configuration and network settingsSystem administration, including patch management and backup and restore
Events related to appliance configuration and patching are logged. The log entries can be viewed in the V10000 Console, or the entire log file can be downloaded for viewing.Command line interface for basic appliance settings, available through a USB keyboard and monitor or a serial port connection, that provides basic appliance control commandsBasic proxy caching and Web filtering after minimal initial configurationFull customization of proxy caching and Web filtering available through these separate Web-based configuration interfaces:
Websense Content Manager — proxy cachingWebsense Manager — Web filtering
Websense V10000 environment
The V10000 solution uses additional hardware and software in your network. Some elements are required, such as the Windows 2003 (or 2008) server. Others are optional, such as a directory service, which allows you to apply Web filtering policy to individual users and groups in your organization.
Getting Started 5
Introducing the Websense V10000
Windows Server 2003 or 2008
In addition to the V10000 appliance, you must have a separate server machine that meets the requirements listed below. This is the machine where you install Websense Manager (the configuration interface for Web filtering) and Log Server (the component that receives Internet activity information and processes it into the Log Database.)
Hardware
Quad-Core Intel Xeon processor, 2.5 GHz or higher4-16 GB RAM100 GB free disk space utilizing a disk arrayHigh speed disk access
Operating System
Windows Server 2008 (Standard, Enterprise, and Datacenter) installed in 32-bit native mode Windows Server 2003, R2 (Standard or Enterprise)Windows Server 2003, SP1 or SP2 (Standard or Enterprise)Windows Server 2003 (Standard or Enterprise)
Additional Software
Internet Explorer 7 or Firefox 2 or 3Common Desktop Environment (CDE)Apache Tomcat 6.0.13 (installed automatically with Websense Manager)Adobe Flash Player 8 or later
Database Engine
One of the following supported database engines is required to store log data for reporting. Although this software can run on the same Windows server machine that runs Websense Manager and Log Server, better performance is achieved when it runs on a dedicated server.
ImportantSelf-signed certificates are created to secure communications between Websense components. In order for these certificates to be valid, and for communication to succeed, all the machines running Websense components must have the same date.
Please set the appliance time and the time on the Windows server machine before installing Websense Manager and Log Server.
6 Websense V10000

Introducing the Websense V10000
One of these databases:
Microsoft SQL Server 2005 SP2 or SP 3 (Workgroup, Standard, Enterprise, or 64-bit edition) (recommended)Microsoft SQL Server 2000 SP4MSDE 2000 SP4 - suitable for smaller networks
The following recommendations apply to the machine running the database engine, especially if it runs on the same Windows server as Websense Manager and Log Server.
You can improve I/O performance by installing the Log Database on a disk array running RAID level 1+0.The amount of required RAM depends on the total number of requests being stored and the number of requests per second being processed. To optimize RAM usage, use the Enterprise Edition of Microsoft SQL Server on a machine running Windows Server 2003 Enterprise Edition or Windows Server 2008 Enterprise Edition or Datacenter.
Directory Service
If your network includes one of the supported directory services listed below, you can apply Web filtering to individual users, groups, and domains (OUs). Additionally, you can install an optional transparent identification agent to ensure clients in a supported directory service are filtered without being prompted to log on when they open a browser. (If no directory service is installed, Websense Web Security uses IP addresses for Web filtering.)
For organizations where multiple administrators may access Websense Content Manager or Websense Manager, the Web-based configuration interfaces for Websense Content Gateway and Websense Web Security, administrators with accounts in most supported directory services can log on with their network credentials.
Windows Active DirectoryWindows NT DirectoryNovell eDirectory 8.51 or later
NMAS authentication is supported.Recommend Novell Client v4.83 or v4.9 (v4.81 and later are supported)
Other LDAP-based directory services
NoteIf your network uses a Windows NTLM directory service, or Active Directory in mixed mode, you must create Websense accounts for any administrators who must log on to Websense Manager (see Websense Manager Help for instructions). This configuration does not support logging on to Websense Manager with network credentials.
Getting Started 7

Introducing the Websense V10000
Most standard RADIUS servers The following RADIUS servers have been tested:
Livingston (Lucent) 2.xCistron RADIUS serverMerit AAAMicrosoft IAS
Other
In some networks, additional machines may be used to deploy additional instances of Network Agent or other, optional components. For example, in a large, segmented network, you may need a separate Network Agent for each segment, and a separate Filtering Service for these Network Agents. Or, you might deploy the Remote Filtering Server to enable filtering of laptops and other computers that are outside the organization’s network.
For information about system requirements and appropriate placement of machines for additional or optional components, see the Websense Deployment Guide.
Deployment scenarios
One or more Websense V10000 appliances can be deployed in a network, depending on the traffic volume and security goals. Review the diagrams and information for these deployment scenarios before implementing the V10000 in your network.
All deployments should be well planned. Please contact your Websense Sales Engineer, or your authorized Websense reseller, for assistance in planning your deployment.
B ImportantIf you change the policy source (machine running Policy Broker and Policy Server) after deploying components on additional machines, you must reconfigure those components to communicate with the new policy source.
Go to the Websense Knowledge Base, and search for the article titled v7: Changing the Policy Server (or Policy Broker) IP address.
8 Websense V10000
Introducing the Websense V10000
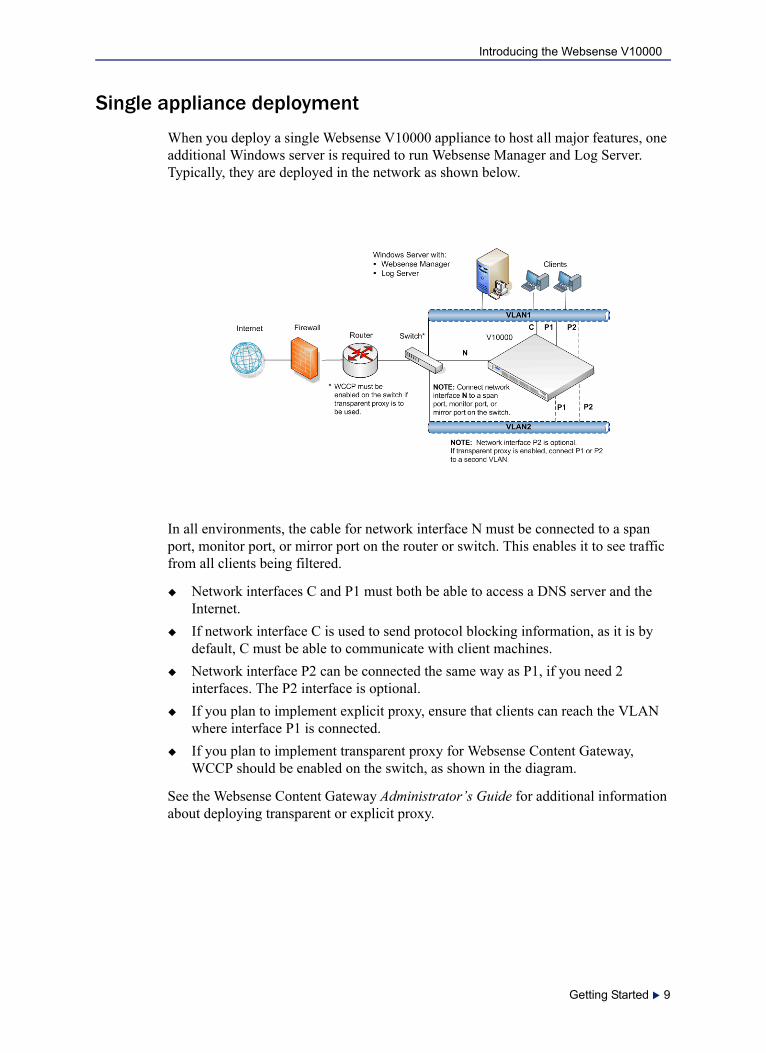
Single appliance deployment
When you deploy a single Websense V10000 appliance to host all major features, one additional Windows server is required to run Websense Manager and Log Server. Typically, they are deployed in the network as shown below.
In all environments, the cable for network interface N must be connected to a span port, monitor port, or mirror port on the router or switch. This enables it to see traffic from all clients being filtered.
Network interfaces C and P1 must both be able to access a DNS server and the Internet.If network interface C is used to send protocol blocking information, as it is by default, C must be able to communicate with client machines.Network interface P2 can be connected the same way as P1, if you need 2 interfaces. The P2 interface is optional.If you plan to implement explicit proxy, ensure that clients can reach the VLAN where interface P1 is connected.If you plan to implement transparent proxy for Websense Content Gateway, WCCP should be enabled on the switch, as shown in the diagram.
See the Websense Content Gateway Administrator’s Guide for additional information about deploying transparent or explicit proxy.
Getting Started 9

Introducing the Websense V10000
Multiple appliance deployment
Organizations that need to filter more users or a larger volume of Internet traffic may deploy multiple Websense V10000 appliances. One appliance is designated as primary, and the others point to the primary appliance for policy and configuration settings.
The cable for network interface N must be connected to a span port, monitor port, or mirror port on the router or switch. This enables it to see traffic from all clients being filtered.
Network interfaces C and P1 must both be able to access a DNS server and the Internet.If network interface C is used to send protocol blocking information, as it is by default, C must be able to communicate with client machines.Network interface P2 can be connected the same way as P1, if you need 2 interfaces. Interface P2 is optional.If you plan to implement explicit proxy, ensure that clients can reach the VLAN where interface P1 is connected.If you plan to implement transparent proxy for Websense Content Gateway, WCCP should be enabled on the router.
See the Websense Content Gateway Administrator’s Guide for additional information about deploying transparent or explicit proxy.
When you deploy multiple V10000 appliances, one appliance is designated as primary (that is, the policy source). It becomes the centralized source for policy and configuration information for the other appliances.
To implement a multiple appliance deployment, configure the primary V10000 to use itself as the policy source. Then, configure all other V10000 appliances to use the
10 Websense V10000

Introducing the Websense V10000
primary appliance as their policy source by entering the IP address assigned to network interface C on the primary appliance. See Configure the V10000, page 15, for more information.
Implementing clustering
To implement clustering with V10000 appliances, choose a dedicated clustering interface, and then add a route rule to specify that communications between Websense Content Gateway and the Clustering Multicast Group Address will go through the dedicated clustering interface. This process is described in detail in the Websense Knowledge Base in an article titled: V10000 Clustering.
B ImportantIf you change the policy source (machine running Policy Broker and Policy Server) after deploying components on additional machines, you must reconfigure those components to communicate with the new policy source.
Go to the Websense Knowledge Base, and search for the article titled v7: Changing the Policy Server (or Policy Broker) IP address.
Getting Started 11

Introducing the Websense V10000
12 Websense V10000

2
Setting up the Websense V10000
Setting up the Websense V10000 involves the following tasks, which are detailed in this chapter.
1. Set up the appliance hardware, page 132. Perform initial command line configuration, page 14.3. Configure the V10000, page 15.4. Install Websense Manager and Log Server, page 18.5. Configure Websense Manager, page 23.6. Configure Websense Content Gateway, page 27.7. Test and refine your policies, page 28.
When setup is complete, you can use the Logon Portal to log on to any of the three related management consoles.
Set up the appliance hardware
The Quick Start guide, which comes in the shipping box with your appliance, provides information on the contents of the Websense V10000 shipping box; explains how to set up the hardware; and shows how to connect the cables to the appliance and to your network.
Network interface C and the proxy interface (typically P1) must be able to access a DNS server and must have continuous access to the Internet. Essential databases are downloaded from Websense servers through these interfaces. Ensure that C and P1 are able to access the download servers at download.websense.com.
Make sure that this address is permitted by all firewalls, proxy servers, routers, or host files that control the URLs that the C and P1 interfaces can access.
Clustering
Refer to the Websense Knowledge Base on the Websense Support Portal, www.websense.com/kb for instructions on setting up the V10000 appliance as part of a proxy cluster. Search for the exact phrase: V10000 clustering.
Getting Started 13
Setting up the Websense V10000
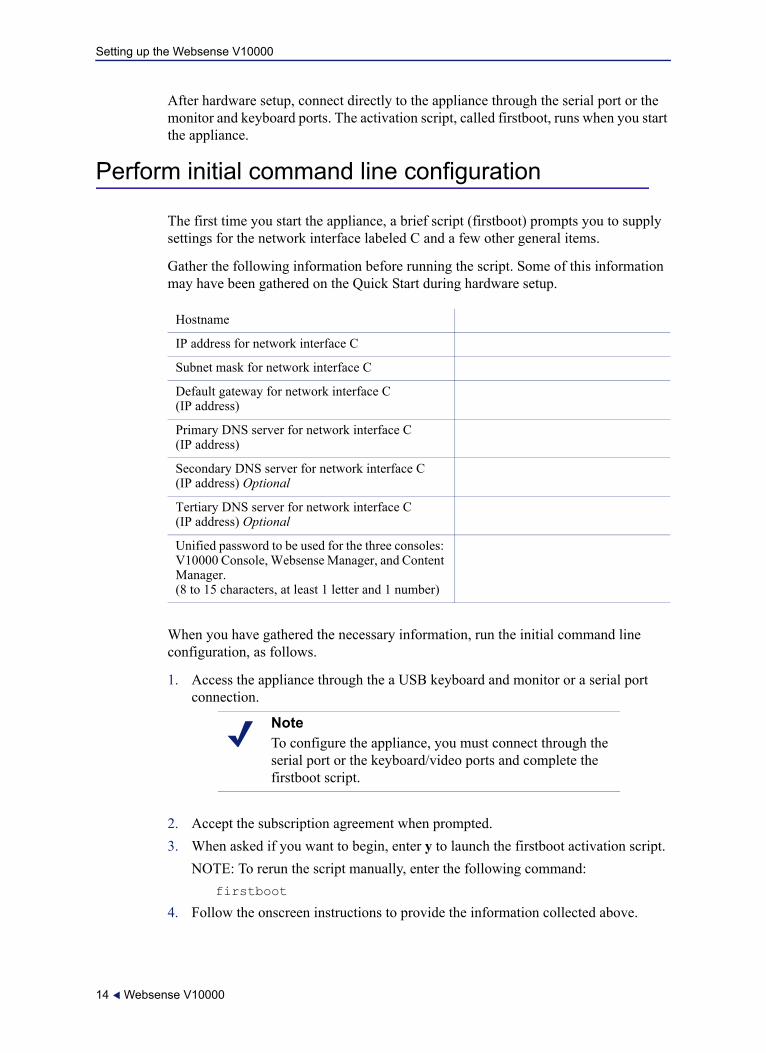
After hardware setup, connect directly to the appliance through the serial port or the monitor and keyboard ports. The activation script, called firstboot, runs when you start the appliance.
Perform initial command line configuration
The first time you start the appliance, a brief script (firstboot) prompts you to supply settings for the network interface labeled C and a few other general items.
Gather the following information before running the script. Some of this information may have been gathered on the Quick Start during hardware setup.
When you have gathered the necessary information, run the initial command line configuration, as follows.
1. Access the appliance through the a USB keyboard and monitor or a serial port connection.
2. Accept the subscription agreement when prompted.3. When asked if you want to begin, enter y to launch the firstboot activation script.
NOTE: To rerun the script manually, enter the following command: firstboot
4. Follow the onscreen instructions to provide the information collected above.
Hostname
IP address for network interface C
Subnet mask for network interface C
Default gateway for network interface C (IP address)
Primary DNS server for network interface C (IP address)
Secondary DNS server for network interface C (IP address) Optional
Tertiary DNS server for network interface C (IP address) Optional
Unified password to be used for the three consoles: V10000 Console, Websense Manager, and Content Manager. (8 to 15 characters, at least 1 letter and 1 number)
NoteTo configure the appliance, you must connect through the serial port or the keyboard/video ports and complete the firstboot script.
14 Websense V10000

Setting up the Websense V10000
5. After the activation script has been completed successfully, go to a different machine and use a supported Web browser to access the V10000 Console.
Configure the V10000
The V10000 Console is the Web-based configuration interface for the appliance. Through it you can view system status, configure network and communication settings, and perform general V10000 administration tasks.
After completing the initial configuration required by the firstboot script, use the V10000 Console to configure important settings for network interfaces N and P1 (and optionally P2), which are used for communications by Network Agent and Websense Content Gateway.
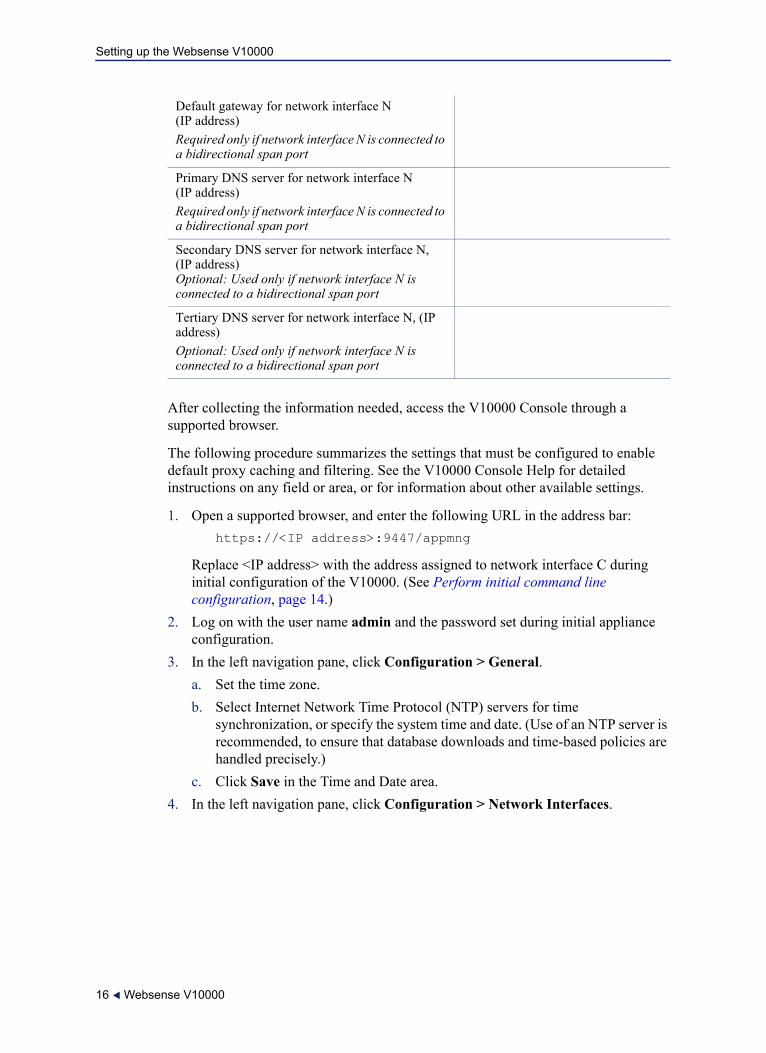
Gather the following information before running the V10000 Console. Some of this information may have been gathered on the Quick Start during hardware setup.
Primary NTP server, (domain) Optional
Secondary NTP server, (domain) Optional
Tertiary NTP server, (domain) Optional
IP address for network interface P1
Subnet mask for network interface P1
IP address for network interface P2 Required only if P2 is enabled
Subnet mask for network interface P2 Required only if P2 is enabled
Default gateway for network interfaces P1 (and P2); (IP address)
Primary DNS server for network interfaces P1 (and P2); (IP address)
Secondary DNS server for network interfaces P1 (and P2); (IP address) Optional
Tertiary DNS server for network interfaces P1 (and P2); (IP address) Optional
Is network interface N connected to a bidirectional span port?
YES or NO
IP address for network interface NRequired only if network interface N is connected to a bidirectional span port
Subnet mask for network interface N Required only if network interface N is connected to a bidirectional span port
Getting Started 15
Setting up the Websense V10000
After collecting the information needed, access the V10000 Console through a supported browser.
The following procedure summarizes the settings that must be configured to enable default proxy caching and filtering. See the V10000 Console Help for detailed instructions on any field or area, or for information about other available settings.
1. Open a supported browser, and enter the following URL in the address bar:https://<IP address>:9447/appmng
Replace <IP address> with the address assigned to network interface C during initial configuration of the V10000. (See Perform initial command line configuration, page 14.)
2. Log on with the user name admin and the password set during initial appliance configuration.
3. In the left navigation pane, click Configuration > General.a. Set the time zone. b. Select Internet Network Time Protocol (NTP) servers for time
synchronization, or specify the system time and date. (Use of an NTP server is recommended, to ensure that database downloads and time-based policies are handled precisely.)
c. Click Save in the Time and Date area.4. In the left navigation pane, click Configuration > Network Interfaces.
Default gateway for network interface N(IP address)Required only if network interface N is connected to a bidirectional span port
Primary DNS server for network interface N (IP address)Required only if network interface N is connected to a bidirectional span port
Secondary DNS server for network interface N, (IP address) Optional: Used only if network interface N is connected to a bidirectional span port
Tertiary DNS server for network interface N, (IP address) Optional: Used only if network interface N is connected to a bidirectional span port
16 Websense V10000

Setting up the Websense V10000
a. Configure network interfaces P1 (and optionally P2) for Websense Content Gateway. Then, click Save in the Websense Content Gateway Interface area.
These network interfaces can accept users’ Internet requests (inbound traffic) and communicate with Web servers (outbound traffic).One common configuration is to use P1 for traffic into and out of the proxy module. Another common configuration uses P1 for inbound traffic and P2 for outbound traffic. To enable this configuration, be sure to set appropriate routing rules for P1 and P2 on the Configuration > Routing page. For example, you might set outbound traffic to go through P2.Additionally, you can use P2 as a communication channel for multiple proxy servers in a cluster. In this scenario, P2 cannot be used for outbound traffic. For additional information on clusters, see the Websense Content Gateway Administrator’s Guide.
b. Configure network interface N for Network Agent. Then, click Save in the Network Agent Interface area.Network interface N monitors all Internet requests, and enforces policy for protocols other than HTTP and HTTPS.
5. In the left navigation pane, click Configuration > Routing.a. Use the Add Route button to specify customized, static routes.b. Use the Edit and Delete buttons to modify existing routes, as needed.
6. In the left navigation pane, click Configuration > Policy Source.a. Specify the location of Websense Web Security policy information.
• Choose This V10000 appliance if the policy for your deployment is located on the V10000 being configured.
ImportantWhen you use the P2 interface, the P1 interface is bound to eth0, and the P2 interface is bound to eth1. Keep this in mind when you configure Websense Content Gateway.
For example, suppose you are using transparent proxy, and the P1 interface is connected to the WCCP router. In this case, you must configure Websense Content Gateway to use eth0 for WCCP communications (in Content Manager, see Configure > Networking > WCCP, WCCP version tab).
NoteThe V10000 appliance does not send block messages to users who are blocked from non-HTTP and non-HTTPS protocols.
Getting Started 17

Setting up the Websense V10000
• Choose Another V10000 appliance or server on your network if the V10000 currently being configured is not the location of the policy information. Then, enter the IP address of the server that is used as the policy source. (If the policy source is another V10000 appliance that is configured as primary, enter the IP address of its network interface C.)
b. Click Save.7. Click Log Off, at the top right, to log off the Websense V10000 Console.8. Configure Websense Content Gateway for default operation. See Configure
Websense Content Gateway, page 27.
Install Websense Manager and Log Server
Deploying the Websense V10000 appliance also requires installing a database engine; Websense Manager; and Log Server on a separate Windows server machine in the network. A supported database engine must also be installed, either on the same Windows server machine or a different machine in the network.
Websense Manager is the interface for Websense Web Security configuration and policy management.
Log Server receives records of Internet filtering activity and sends them to the Log Database, which is installed on a database engine.
If you do not have a supported database engine, you can download and install MSDE for free. Refer to the Websense Knowledge Base on the Websense Support Portal, www.websense.com/kb for a download link and further instructions. Search for the exact phrase: Installing MSDE with Websense software, version 7.
See the Websense Installation Guide for more details on configuring the database engine, including prerequisites such as setting up user roles, and the database rights needed for the account specified during Log Server installation.
Before installing the policy and reporting components, be sure your server machine meets the hardware and software requirements. See Websense V10000 environment, page 5.
ImportantThe database engine must be installed and running before you install Log Server.
18 Websense V10000
Setting up the Websense V10000
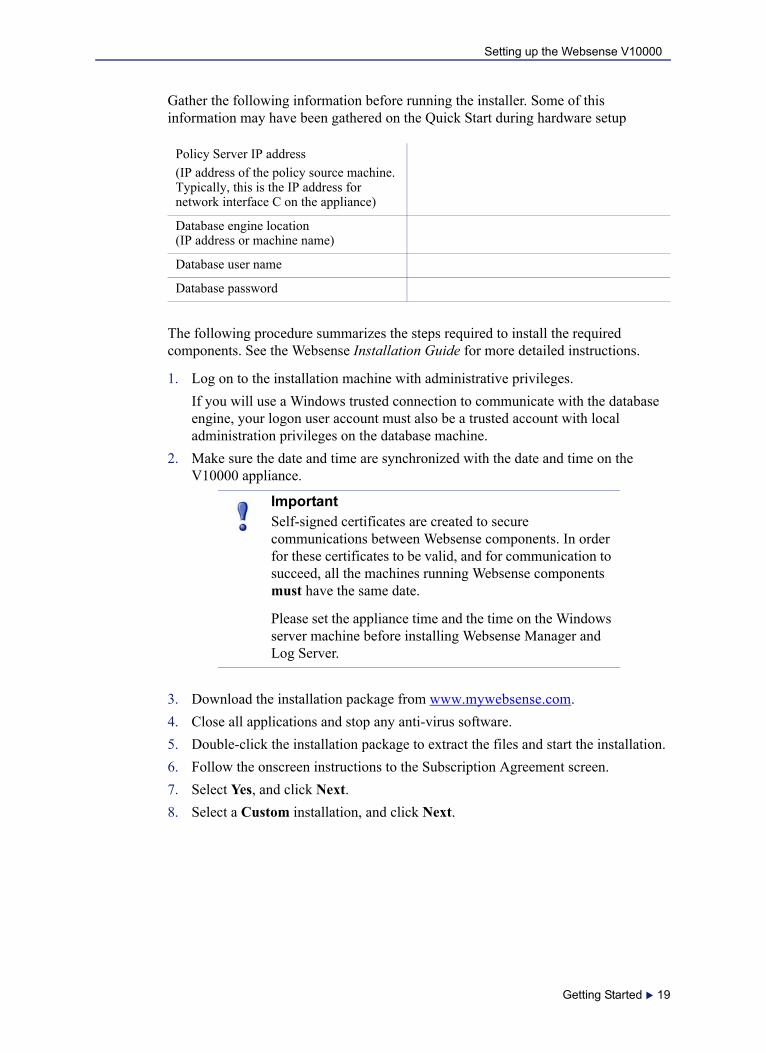
Gather the following information before running the installer. Some of this information may have been gathered on the Quick Start during hardware setup
The following procedure summarizes the steps required to install the required components. See the Websense Installation Guide for more detailed instructions.
1. Log on to the installation machine with administrative privileges.If you will use a Windows trusted connection to communicate with the database engine, your logon user account must also be a trusted account with local administration privileges on the database machine.
2. Make sure the date and time are synchronized with the date and time on the V10000 appliance.
3. Download the installation package from www.mywebsense.com.4. Close all applications and stop any anti-virus software.5. Double-click the installation package to extract the files and start the installation.6. Follow the onscreen instructions to the Subscription Agreement screen.7. Select Yes, and click Next.8. Select a Custom installation, and click Next.
Policy Server IP address(IP address of the policy source machine. Typically, this is the IP address for network interface C on the appliance)
Database engine location(IP address or machine name)
Database user name
Database password
ImportantSelf-signed certificates are created to secure communications between Websense components. In order for these certificates to be valid, and for communication to succeed, all the machines running Websense components must have the same date.
Please set the appliance time and the time on the Windows server machine before installing Websense Manager and Log Server.
Getting Started 19
Setting up the Websense V10000
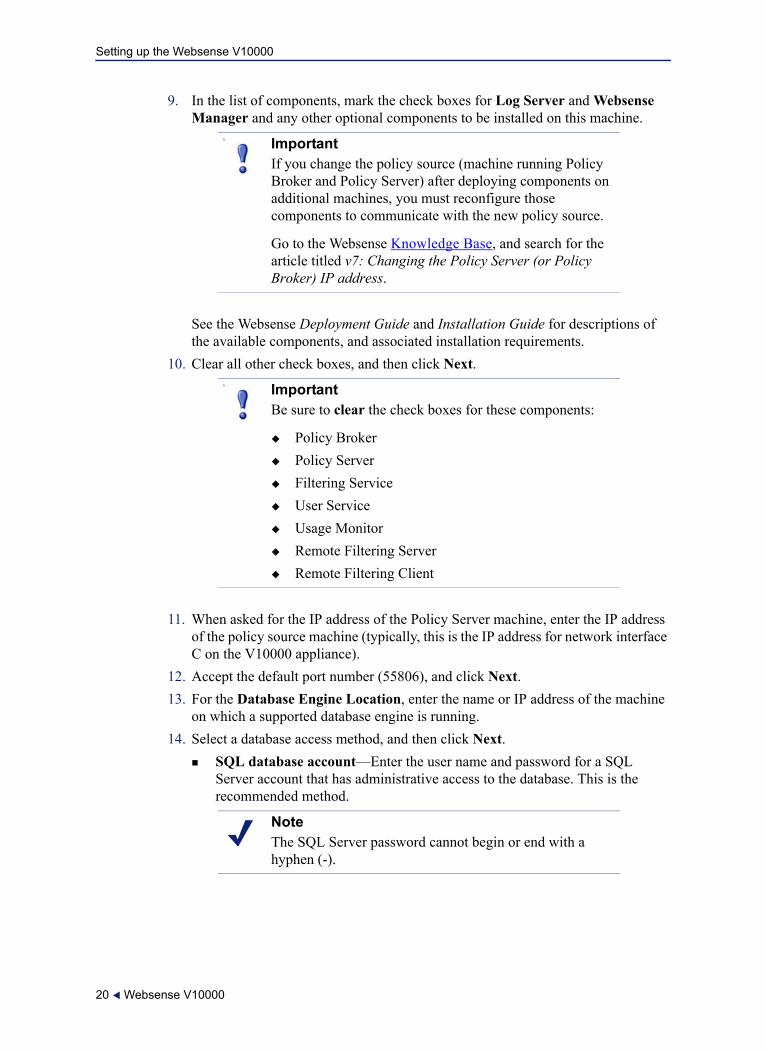
9. In the list of components, mark the check boxes for Log Server and Websense Manager and any other optional components to be installed on this machine.
See the Websense Deployment Guide and Installation Guide for descriptions of the available components, and associated installation requirements.
10. Clear all other check boxes, and then click Next.
11. When asked for the IP address of the Policy Server machine, enter the IP address of the policy source machine (typically, this is the IP address for network interface C on the V10000 appliance).
12. Accept the default port number (55806), and click Next.13. For the Database Engine Location, enter the name or IP address of the machine
on which a supported database engine is running.14. Select a database access method, and then click Next.
SQL database account—Enter the user name and password for a SQL Server account that has administrative access to the database. This is the recommended method.
B ImportantIf you change the policy source (machine running Policy Broker and Policy Server) after deploying components on additional machines, you must reconfigure those components to communicate with the new policy source.
Go to the Websense Knowledge Base, and search for the article titled v7: Changing the Policy Server (or Policy Broker) IP address.
B ImportantBe sure to clear the check boxes for these components:
Policy BrokerPolicy ServerFiltering ServiceUser ServiceUsage MonitorRemote Filtering ServerRemote Filtering Client
NoteThe SQL Server password cannot begin or end with a hyphen (-).
20 Websense V10000

Setting up the Websense V10000
Windows trusted connection—Uses the Windows account that is currently logged on to access the database. This account must have administrative access to the database. Websense, Inc., recommends against using a trusted connection if you run MSDE.
15. On the Log Database Location screen, confirm the directory that stores the Websense Log Database (wslogdb70). The default value is C:\Program Files\Websense.
16. On the Minimizing Database Management screen, select options that affect the size of the Log Database used to generate reports.
Logging Web Page Visits—Select this option to log a record of each Web page requested. This selection creates a smaller database and faster reporting.Deselect this option to log a record of each separate file that is part of a Web page request, including graphic images and advertisements. This selection results in more precise reports, but creates a much larger database and causes reports to generate more slowly.Consolidating Log Records—Select this option to combine multiple visits by the same user to the same Internet domain (see Websense Manager Help for details about how records are combined). This selection creates a smaller database, but decreases reporting precision.Deselect this option to record each visit or hit separately. This selection provides greater reporting precision, and a larger database.
17. Provide other information requested if you are installing optional components. The information requested depends on the components being installed. See the Websense Installation Guide for details on optional components.
18. Accept the default installation path or click Browse to locate another path, and then click Next. The default installation path is:
C:\Program Files\WebsenseThe installer creates this directory if it does not exist.
The installer compares the system requirements for the selected components with the machine’s resources.
Insufficient disk space prompts an error message. The installer quits when you click OK.Insufficient RAM prompts a warning message. The installation continues when you click OK. To ensure optimal performance, increase the machine’s memory to the recommended amount after installation.
19. On the summary screen, click Next.20. In the message stating that features like protocol management and Bandwidth
Optimizer cannot be used unless Network Agent is installed, click Next.
ImportantThe full installation path must use only ASCII characters. Do not use extended ASCII or double-byte characters.
Getting Started 21

Setting up the Websense V10000
After installation, use Websense Manager to configure the Network Agent running on the V10000 appliance to use these features. See Configure Websense Manager, page 23.
21. Click Next in the Installation Complete screen.When the installer finishes running, a Web page provides instructions for launching Websense Manager.
22. If you stopped your anti-virus software, restart it.
Add or install optional componentsIn addition to the Websense V10000 appliance and the separate Windows server that runs Websense Manager and Log Server, you may choose to install individual Websense Web Security components on separate machines in your network.
Multiple instances of some components may be needed, depending on the network’s configuration and volume of Internet traffic. Other components may be better suited to a different location in the network.
If you install one or more instances of Network Agent on separate, non-appliance machines, you must install a separate Filtering Service off the appliance, too. Keep in mind that multiple Network Agents can communicate with the same Filtering Service. Both Network Agent and Filtering Service on non-appliance machines can use Policy Broker and Policy Server on the V10000 appliance.
Be sure to configure each separate Network Agent to communicate with the separate Filtering Service on the Settings >Network Agent > Local Settings page in Websense Manager. See Websense Manager Help for additional information.
Check the Websense Deployment Guide and associated Deployment Guide Supplements for component distribution options. Contact your Websense Sales Engineer, or your authorized Websense reseller, for assistance in planning a more complex deployment.
When you are ready to install individual components, refer to the Websense Installation Guide for instructions.
B ImportantIf you change the policy source (machine running Policy Broker and Policy Server) after deploying components on additional machines, you must reconfigure those components to communicate with the new policy source.
Go to the Websense Knowledge Base, and search for the article titled v7: Changing the Policy Server (or Policy Broker) IP address.
22 Websense V10000

Setting up the Websense V10000
Configure Websense Manager
Websense Manager is the central configuration and management interface for Websense Web Security. Use it to customize filtering behavior, monitor Internet usage, generate Internet usage reports, and manage Websense software configuration and settings. This Web-based tool runs on Microsoft Internet Explorer 7 and Mozilla Firefox 2 and 3.
Gather the following information before configuring Websense Manager. Some of this information may have been gathered on the Quick Start during hardware setup.
Use the following steps to configure default filtering.
1. On the installation machine, launch Websense Manager by double-clicking the Websense Manager desktop icon, or going to Start > Programs > Websense > Websense Manager.Access to Websense Manager is secured with an SSL security certificate issued by Websense, Inc. Because the browser does not recognize Websense, Inc., as a known Certificate Authority (CA), a security warning is displayed.For instructions on launching Websense Manager from a remote machine, see Websense Manager Help.
2. To access Websense Manager, do one of the following:Select the option to ignore the warning and continue. (The exact phrasing of this option varies among browsers.)Permanently accept or install the certificate. (See Accepting the Websense Manager security certificate in the Websense Knowledge base for instructions).
3. Log on with the following credentials: User name: WebsenseAdministratorPassword: (enter the unified password set up during V10000 configuration)
4. You are offered the option of launching a Quick Start tutorial. Quick Start tutorials provide an excellent method for becoming familiar with Websense software. To continue following the steps in this guide, click Skip to continue to Websense Manager.Websense Manager opens, showing the Status > Today page. Because you have not yet entered a subscription key, the Health Alert Summary at the top of the page shows a series of errors and warnings.
User name WebsenseAdministrator (default)
Password Unified password created when you configured the V10000 (during firstboot)
Subscription key
Proxy server IP or name
Proxy server port
Getting Started 23

Setting up the Websense V10000
5. Click the Settings tab of the left navigation pane. The Settings > Account page is displayed.
6. Enter your Subscription key exactly as you received it.7. Create a new, secure password in the Change Password area, and then click OK.8. Click Save All at the top of the right shortcut pane to save the key and the new
password, and start downloading the Websense Master Database.No filtering occurs until you enter a subscription key. Downloading the database ensures full and accurate filtering.The Master Database, which contains the category and protocol definitions that provide the basis for Internet filtering, begins to download automatically. If Websense software must go through a proxy to perform the download, also use the Settings > Database Download page to configure proxy settings (see Websense Manager Help for instructions).The process of downloading the full database may take a few minutes or more than 60 minutes, depending on factors such as Internet connection speed, bandwidth, available memory, and free disk space.For more information about Master Database downloads, see Websense Manager Help.
9. If you plan to apply filtering policies to individual users, groups, and domains in your network:a. Go to Settings > Directory Service. b. Select the directory service used in your network, and configure its settings.
See Websense Manager Help for assistance.
10. Go to Settings > Network Agent > Global. After making any changes, click OK, and then click Save All.Initially, Websense Network Agent uses these guidelines to identify the machines in your network and start filtering requests.
Machines in the following IP address ranges are assumed to be internal machines. Requests sent to these machines, and messages sent between these machines, are ignored.
10.0.0.0 - 10.255.255.255172.16.0.0 - 172.31.255.255192.168.0.0 - 192.168.255.255224.0.0.0 - 239.255.255.255
Requests sent to the Internet from all internal machines visible to Network Agent are monitored.
ImportantIf your network uses a Windows NT directory or Active Directory (Mixed Mode), or you use Logon Agent to transparently identify users in Active Directory (Native Mode), see Special directory service considerations, page 25, for important configuration steps.
24 Websense V10000

Setting up the Websense V10000
If this basic configuration is adequate for your network, no additional configuration is necessary.If, however, you want to configure Network Agent to monitor requests sent to some internal machines (like an internal Web server), or to ignore Internet requests sent from certain machines, you can make those changes in Websense Manager, under Settings > Network Agent > Global. See Websense Manager Help for details.
11. If you are using explicit proxy, click the IP address under Settings >Network Agent in the left navigation pane.
12. Click Add in the Proxies and Caches area. 13. Enter the IP address assigned to the network interface used for inbound traffic on
the V10000 appliance (usually P1, but some organizations use P2 for inbound traffic).
14. Click OK to cache your changes. Changes are not implemented until you click Save All.
These are the steps required to configure Websense Web Security so that the Websense V10000 is ready for default operations. See the Websense Manager Help for details on the variety of features and options available for Websense Web Security.
Special directory service considerations
If you plan to apply filtering policies to individual users and groups in your network, special configuration steps are required to assure that the Websense V10000 can identify users successfully in networks that:
Use Windows NT Directory or Active Directory (Mixed Mode)Plan to use Websense Logon Agent to transparently identify users in Active Directory (Native Mode),
In these environments, the Websense V10000 appliance must be configured to communicate with a Windows Internet Name Server (WINS) to resolve domain names to domain controller IP addresses. The precise steps vary, depending on your environment.
NoteOn the V10000 appliance, Websense sends blocking information for non-HTTP protocols through the N network interface if it is connected to a bidirectional span port, and that port is identified and configured in the V10000 console. Otherwise, blocking information is sent through the C interface.
Configuration settings or changes for the blocking NIC in Websense Manager are disregarded by the V10000. (See the Websense Manager Help topic on Configuring NIC settings for information about the blocking NIC.)
Getting Started 25

Setting up the Websense V10000
If your network uses Windows NT Directory or Active Directory (Mixed Mode):
1. In Websense Manager, go to the Settings > Directory Service page.2. Select Windows NT Directory / Active Directory (Mixed Mode), which is the
default.3. Enter the name and password for the administrative user.4. Enter the Domain name.
If your organization uses multiple domains, enter the name of a domain that is trusted by all domains that authenticate your users.
5. Enter the IP address of a Windows Internet Name Server (WINS) that can resolve the domain name entered above to a domain controller IP address.
6. Click OK to cache your changes. Changes are not implemented until you click Save All.
If your network uses Active Directory (Native Mode), and uses Logon Agent to transparently identify users for filtering:
1. In Websense Manager, go to the Settings > Directory Service page.2. Provide administrative credentials and identify the Windows Internet Name
Server (WINS), as follows.a. Select Windows NT Directory / Active Directory (Mixed Mode), which is
the default.b. Enter the name and password for the administrative user.c. Enter the Domain name.
If your organization uses multiple domains, enter the name of a domain that is trusted by all domains that authenticate your users.
d. Enter the IP address of a Windows Internet Name Server (WINS) that can resolve the domain name entered above to a domain controller IP address.
e. Click OK to cache your changes. f. Click Save All to implement these changes.
3. On the Directory Service page, select Active Directory (Native Mode).4. Configure the global catalog servers and other settings for your directory service.
See Websense Manager Help for assistance.5. Click OK to cache your changes. Changes are not implemented until you click
Save All.
26 Websense V10000

Setting up the Websense V10000
Configure Websense Content Gateway
Content Manager is the Web-based configuration interface for Websense Content Gateway. Use it to enter the subscription key and download associated databases as part of your initial setup for the Websense V10000 appliance.
Gather the following information before configuring Websense Content Gateway. Some of this information may have been gathered on the Quick Start during hardware setup.
Use the following steps to enter the configuration that enables default proxy caching.
1. Browse to:https://<IP address>:8081
Replace <IP address> with the address for network interface C, configured during firstboot (visible in the V10000 Console).An SSL connection is used for secure, browser-based communication with Content Manager. This connection uses a security certificate issued by Websense, Inc. Because the supported browsers do not recognize Websense, Inc., as a known Certificate Authority, a certificate error is displayed when you launch Content Manager in a new browser session.
2. To access Content Manager, do one of the following:Select the option to ignore the warning and continue. (The exact phrasing of this option varies among browsers.)Permanently accept or install the certificate by using procedures appropriate for your browser.
3. Log on with the following credentials:User name: adminPassword: (unified password set up during V10000 configuration)
4. Click the Configure tab in the left navigation pane.
NoteEnsure that you have configured at least one interface (P1 or P2) for the Content Gateway. See Configure the V10000.
User name admin (default)
Password Unified password specified when you configured the V10000 (during firstboot)
Subscription key (same as entered in Websense Manager)
New password
Getting Started 27

Setting up the Websense V10000
5. Click My Proxy > Subscription > Subscription Management.6. Enter your Subscription key, then click Apply.7. Click My Proxy > UI Setup > Login.8. Set a new password for the administrator account, then click Apply.9. Still on the Configure tab, go to My Proxy > Basic, and click the Restart button.
The databases that support Websense Content Gateway functionality begin downloading after the restart.
These are the steps required to configure Websense Content Gateway so that the Websense V10000 is ready for default operations. See the Content Manager Help for details about the features and options available for Websense Content Gateway.
Test and refine your policies
After performing the procedures outlined in this document, run the following tests to verify that the system is configured and operating properly.
1. Go to another computer in the network that is monitored by the Websense V10000 appliance.
2. Open a Web browser, and browse to several different sites to generate Internet traffic.If possible, browse to sites that would likely fall into several different categories; for example, Games, Education, Entertainment, Sports, Shopping, Travel, and Vehicles.
3. Access Websense Manager by entering the following address:https://<IP address>:9443/mng
Replace <IP address> with the IP address of the Websense Manager machine.4. Log on as WebsenseAdministrator, with the password you set during installation.5. Observe the charts on the Today page to verify that they reflect the traffic you just
generated.
NoteBecause the Default policy enforces the Monitor Only category filter, all sites are permitted.
NoteCharts on the Today page are refreshed every 2 minutes. If they reflect the sites that you browsed to after the next refresh, your configuration is correct.
If the correct data is not shown, verify that you have correctly entered the configuration information, as described in this document.
28 Websense V10000
Setting up the Websense V10000
After you verify that the system is operating according to the default settings:
1. In Websense Manager, go to Help > Quick Start Tutorials > New User.Work through the lessons to become familiar with the Websense Manager interface, and learn to configure and manage Web filtering policies.
2. Configure policies suitable to your organization’s specific needs, and assign them to the appropriate clients. See Websense Manager Help for detailed instructions.
3. Open Content Manager, and customize proxy caching to meet your organization’s specific needs.See Websense Content Manager Help for detailed instructions.
4. Open the V10000 Console to view system status, modify the configuration, or manage the appliance.See the V10000 Console Help for detailed instructions.
Recovering the V10000 appliance
The Websense V10000 appliance comes with a recovery disk that can be used to restore the appliance to its factory image, in the event of a serious problem. Be sure to use the Websense recovery disk shipped with the appliance model you are recovering.
1. If possible, back up any information you want preserve.a. Log on to the V10000 Console for the primary V10000 appliance.b. Make a note of the settings on the Configuration > Network Settings and
Configuration > Routing pages.c. Go to Administration > Backup Utility, and create a backup for Websense
Web Security. See online Help for assistance.d. Contact Technical Support for assistance in creating a backup of your
Websense Content Gateway configuration. For additional information about creating a snapshot (backup) of your Content Gateway configuration, see the Websense Content Gateway Administrator’s Guide.
2. Insert the recovery disk into the drive. Be sure to use the Websense recovery disk shipped with the appliance model you are recovering.
3. Reboot the V10000. (An alternative is to turn off the power, and then turn it on again.)
4. When the list of function keys appears during reboot, press F11, and then select Boot from IDE CD-ROM device.
5. When asked whether you want to continue, enter YES.Restoring the image can take 20 minutes or more.
6. Enter YES to accept the subscription agreement, and then enter y to begin firstboot.
Getting Started 29

Setting up the Websense V10000
This begins the firstboot script. 7. Follow the onscreen instructions to provide the necessary information.
See Perform initial command line configuration, page 14, for details of what information is requested.
8. Restore the backed up configuration.a. Log on to the V10000 Console for the primary V10000 appliance.b. Go to Administration > Backup Utility.c. Restore the Websense Web Security configuration from the backup created
earlier. See online Help for assistance.d. Contact Technical Support for assistance in restoring the backup of your
Websense Content Gateway configuration.
Logon Portal
The Logon Portal provides V10000 administrators with access to the three management consoles from a central Web page.
Websense V10000 consoleWebsense Manager (for Websense Web Security) Content Manager (for Websense Content Gateway)
To reach the Logon Portal, open a supported browser, and enter this URL in the address bar:
http://<IP address>Replace <IP address> with the address assigned to network interface C during initial configuration of the V10000.
NoteThe following (similar) URL does not provide access to the Logon Portal:
https://<IP address>
30 Websense V10000

Setting up the Websense V10000
Online Help
Select the Help option within the program to display detailed information about using the product.
Technical Support
Technical information about Websense software and services is available 24 hours a day at:
www.websense.com/support/
the latest release informationthe searchable Websense Knowledge BaseCustomer ForumsSupport Webinarsshow-me tutorialsproduct documentsanswers to frequently asked questionsTop Customer Issuesin-depth technical papers
For additional questions, click the Contact Support tab at the top of the page.
If your issue is urgent, please call one of the offices listed below. You will be routed to the first available technician, who will gladly assist you.
For less urgent cases, use our online Support Request Portal at ask.websense.com.
For faster phone response, please use your Support Account ID, which you can find in the Profile section at MyWebsense.
IMPORTANTDefault Microsoft Internet Explorer settings may block operation of the Help system. If a security alert appears, select Allow Blocked Content to display Help.
If your organization’s security standards permit, you can permanently disable the warning message on the Advanced tab of the Tools > Internet Options interface. (Check Allow active content to run in files on My Computer under Security options.)
Getting Started 31
Setting up the Websense V10000
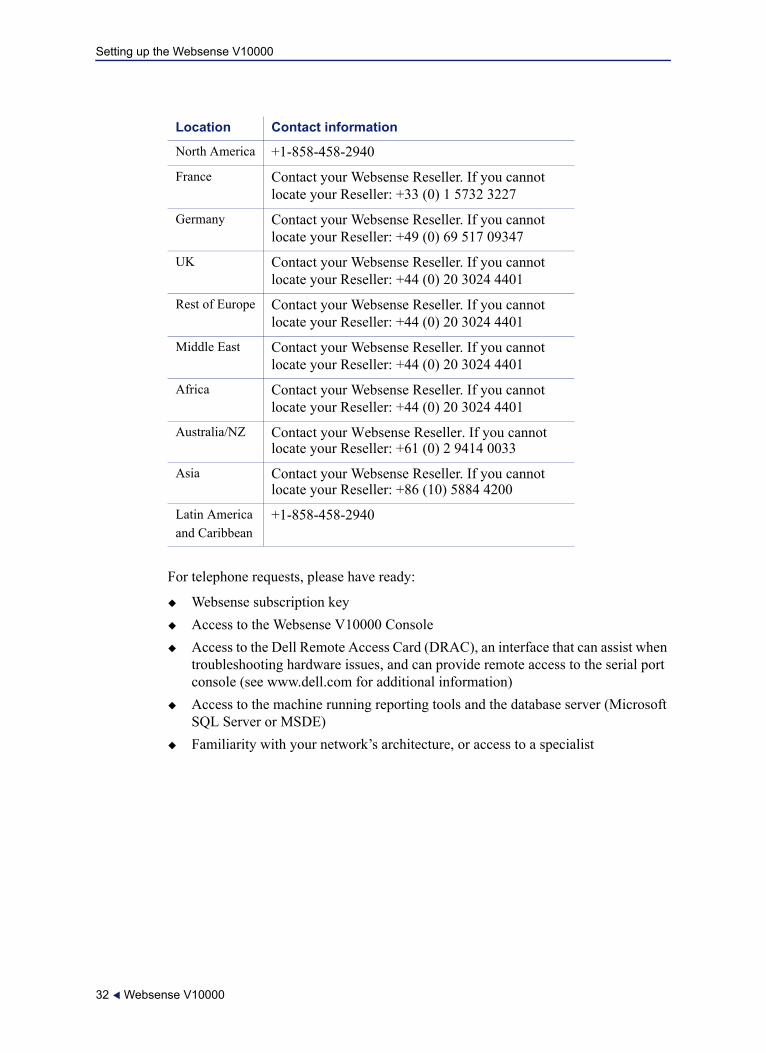
For telephone requests, please have ready:
Websense subscription keyAccess to the Websense V10000 ConsoleAccess to the Dell Remote Access Card (DRAC), an interface that can assist when troubleshooting hardware issues, and can provide remote access to the serial port console (see www.dell.com for additional information)Access to the machine running reporting tools and the database server (Microsoft SQL Server or MSDE)Familiarity with your network’s architecture, or access to a specialist
Location Contact information
North America +1-858-458-2940
France Contact your Websense Reseller. If you cannot locate your Reseller: +33 (0) 1 5732 3227
Germany Contact your Websense Reseller. If you cannot locate your Reseller: +49 (0) 69 517 09347
UK Contact your Websense Reseller. If you cannot locate your Reseller: +44 (0) 20 3024 4401
Rest of Europe Contact your Websense Reseller. If you cannot locate your Reseller: +44 (0) 20 3024 4401
Middle East Contact your Websense Reseller. If you cannot locate your Reseller: +44 (0) 20 3024 4401
Africa Contact your Websense Reseller. If you cannot locate your Reseller: +44 (0) 20 3024 4401
Australia/NZ Contact your Websense Reseller. If you cannot locate your Reseller: +61 (0) 2 9414 0033
Asia Contact your Websense Reseller. If you cannot locate your Reseller: +86 (10) 5884 4200
Latin Americaand Caribbean
+1-858-458-2940
32 Websense V10000