getting started guide - designingfire.com · propane installation...
TRANSCRIPT
©201 Designing Fire, Inc. All rights reserved.
(800) 445-4559 | www.designingfire.comFax: 651-305-6347 | @designingfire.com
Assembly Instructions
User Guide
Table Top Maintenance
Warranty Information
Getting Started Guide
®
Installers: Please leave the instruction manual with the consumer for future reference.
#253915-2528907


This appliance can produce carbon monoxide which has no odor.
Using it in an enclosed space can kill you.
Never use this appliance in an enclosed space such as a camper, tent, car or home.
FOR OUTDOOR USE ONLY.
3

PROPANE Installation
11.0 inches water column to 13.0 inches
PROPANE Operation
surfaces.
Proper Maintenance
NATURAL GAS Installation
4
7 inches10.5 inches
the pipe is too small or the run is too long.
provides for convenient maintenance and repair.

DISCOVER THE ORIGINAL DESIGNED FIRE
Designing Fire, Inc.
Pierre, SD 57501
uniquely designed fire for an exceptional outdoor experience
5
6
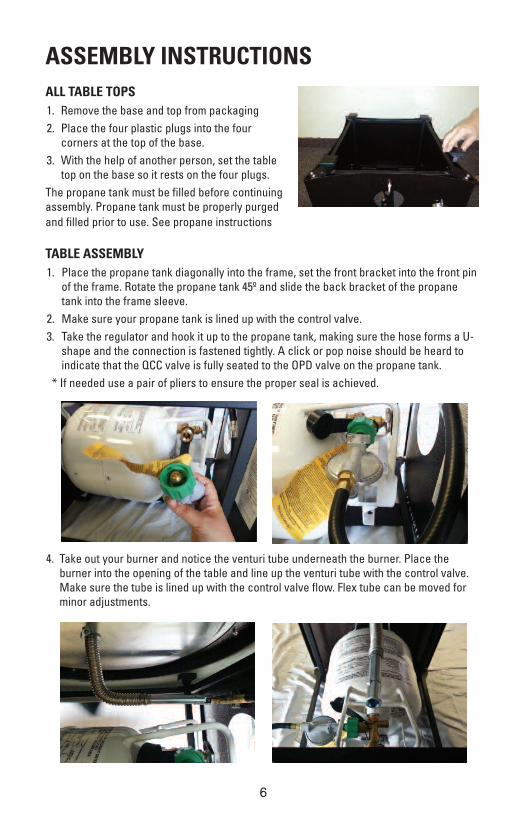
ASSEMBLY INSTRUCTIONSALL TABLE TOPS1. Remove the base and top from packaging2. Place the four plastic plugs into the four
corners at the top of the base.3. With the help of another person, set the table
top on the base so it rests on the four plugs.The propane tank must be filled before continuingassembly. Propane tank must be properly purgedand filled prior to use. See propane instructions
TABLE ASSEMBLY1. Place the propane tank diagonally into the frame, set the front bracket into the front pin
of the frame. Rotate the propane tank 45º and slide the back bracket of the propanetank into the frame sleeve.
2. Make sure your propane tank is lined up with the control valve.3. Take the regulator and hook it up to the propane tank, making sure the hose forms a U-
shape and the connection is fastened tightly. A click or pop noise should be heard toindicate that the QCC valve is fully seated to the OPD valve on the propane tank.
* If needed use a pair of pliers to ensure the proper seal is achieved.
4. Take out your burner and notice the venturi tube underneath the burner. Place theburner into the opening of the table and line up the venturi tube with the control valve.Make sure the tube is lined up with the control valve flow. Flex tube can be moved forminor adjustments.

7
5. Reach your hand through the opening under the control valve and pull the venturi tubeover the end cap of the control valve. The tube fits loosely on the end cap for safety andoxygen flow. Simply sliding the venturi tube either direction on the orifice will adjustair/fuel mixture. No need to use the set screw to adjust vents.
6. Open the bags of glass. For design burners, pour the glass into the center for Section Auntil that is full. Continue to pour glass in Sections B & C until design pattern iscomplete.
7. To ignite your Oriflamme Fire Table reach underneath and turn the propane tank valveON. Push the control knob in and turn it to the left to the ON position. You will hear alight click on the high position. After turning the knob a quarter turn at the 9 o’clockposition propane will begin flowing into the burner.
8. Take your igniter and light it on top of glass. NEVER light your table from underneath.
Congratulations! Your Oriflamme Fire Table is now assembled and ready for use.Replacement parts including: Propane Tank, Control Valve, Regulator and Burner areavailable at your local Oriflamme Fire Table dealer, or contact the manufacturerdirectly at www.designingfire.com.
<—>

8
ADDITIONAL INSTRUCTIONSTo access your propane tank table you must remove the burner by using the burner pullerand place burner onto the provided burner stand. Instructions provided.1. First slide your Venturi tube off the end cap. Find the first burner clip which is located
above the control valve. 2. Once you have fastened all three burner clips lift the burner off the table top.3. Place the ice bucket into the Oriflamme Fire Table, pour your ice into the ice bucket to
keep your beverages cool.4. When your Oriflamme Fire Table is not in use, cover the burner and glass with the
included protective lid to keep out debris, children, and pets.

9
NATURAL GAS INSTALATIONCAUTION: NATURAL GAS INSTALATIONS, OTHER MODIFICATIONS ANDREPAIRS MUST BE DONE BY A QUALIFIED PROFESSIONAL INSTALLER.Inline to the Fire table needs to be an easily accessible ball valve that will need to be usedfor the operation of the fire table. Due to the excessive amount of volume and pressure thenatural gas system requires, it is hard on the control valve to leave a constant amount ofline pressure on the valve.Depending on the distance that the natural gas line will to be ran it may need to be eithera ½” or ¾” hard line it will need to have a ball valve in line that will be easily accessible tobe used before and after operation of the unit FAILURE TO DUE SO WILL RESULT INFAILURE OF THE CONTROL VALVE FROM PROLONG EXCESSIVE PRESSURE. Failure of thecontrol valve will result in a gas leak from the unit, and can cause serious injury ordeath.
From the Ball to the control valve on the side panel of the unit a flex line will need to beused to allow the base to have some movement in case it is bumped into. The flex line willneed to be rated for natural gas. Now included is an 18” flex hose that is already attachedto the convertor that has a 3/8 fitting (ball valve not included). See pictures below forrecommended install method.

PROBLEM POSSIBLE CAUSE
Excessive PropaneSmell
Bleed valve.
or obstructed with possible spide nest, dirt and or debris. Occassional propane odors are to be expected when utilizing any propane burning appliance.
or obstructed with possible spide nest, dirt and or debris
short period of time.
Flame setting too low
CHECKING FOR POSSIBLE LEAKS table top from
and
USER GUIDE
10

SOLUTION NOTES
that all air is removed from the
device which is activated when
it to the right.The far left position on the control valve lowest burn
.
The vents are on the end of the
not wide open.
You can also see a video at www.designingfire.com
Brand new component may need additional tools to tighten.
11
WARNINGIf propane is leaking from the fire table, turnoff propane tank valve. Use caution as liquidpropane can cause frost burn on bare skin.Liquid propane leaks are caused by overfilledpropane tanks. Remove tank and return topropane dealer for proper re-filling. Seepropane instruction sheet on hoe to solve

TUSCAN STONE & SAVANNA MAINTENANCE
MAINTAINING THE TUSCAN STONE:
12
TABLE TOP MAINTENANCEGRANITE TABLE MAINTENANCEGranite is a dense, coarse-grained stone and one of the hardest materials on earth. Itsluster, hardness, colors and variations are all indications of the stone’s mineralcomposition and origin. Most have pits and fissures that are inherent to the stone and arepart of its rich natural texture and beauty.
GENERAL FACTS ABOUT GRANITE:• The granite table top is hard and durable and is resistant to scratching when properlysealed and maintained.
• The granite table top is heat resistant and can withstand temperatures upwards of1800 degrees Fahrenheit.
• To prevent staining and scratches, use a granite sealer as per the MFGrecommendations. Be sure to wipe up spills immediately.
• The pits and fissures are random pronounced markings common to some stones andcannot be removed during fabrication.
MAINTAINING THE GRANITE:
UPON RECEIVING YOUR NEW GRANITE TABLE YOU WILL WANT TO SEAL IT WITH A GRANITESEALER FOUND AT YOUR LOCAL HARDWARE STORE. IT IS RECOMMENDED THAT IT BE SEALED AT THE BEGGINGING AND END OF THE SEASON THEREAFTER.
• Use a mild soap and water or a professional natural stone cleaner for daily use.• Do not use abrasive cleaners.• To ensure the beauty of your granite table top, it should be sealed twice a year.
MAINTAINING THE GRANITE:UPON RECEIVING YOUR NEW TABLE YOU WILL WANT TO SEAL IT WITH A STONE SEALERFOUND AT YOUR LOCAL HARDWARE STORE. IT IS RECOMMENDED THAT IT BE SEALED AT THEBEGINNING AND END OF THE SEASON THEREAFTER.

MOSAIC STONE “SANTA FE”GENERAL FACTS ABOUT NATURAL SLATE:
13
MAINTAINING THE NATURAL SLATE:
MARBLE STONE “VENETIAN” GENERAL FACTS ABOUT MARBLE STONE:
MAINTAINING THE MARBLE STONE:
MAINTAINING THE GRANITE:UPON RECEIVING YOUR NEW TABLE YOU WILL WANT TO SEAL IT WITH A STONE SEALERFOUND AT YOUR LOCAL HARDWARE STORE. IT IS RECOMMENDED THAT IT BE SEALED AT THEBEGINNING AND END OF THE SEASON THEREAFTER.
MAINTAINING THE GRANITE:UPON RECEIVING YOUR NEW TABLE YOU WILL WANT TO SEAL IT WITH A STONE SEALERFOUND AT YOUR LOCAL HARDWARE STORE. IT IS RECOMMENDED THAT IT BE SEALED AT THEBEGINNING AND END OF THE SEASON THEREAFTER.

HAMMERED COPPER GENERAL FACTS ABOUT HAMMERED COPPER:
MAINTAINING THE HAMMERED COPPER:
14
• Acid food and contaminates will cause the table to become brighter but will correct itself throughout timein the elements.
MOSAIC STONE “SAHARA”GENERAL FACTS ABOUT TRAVERTINE:
MAINTAINING THE TRAVERTINE:
M
MAINTAINING THE GRANITE:UPON RECEIVING YOUR NEW TABLE YOU WILL WANT TO SEAL IT WITH A STONE SEALERFOUND AT YOUR LOCAL HARDWARE STORE. IT IS RECOMMENDED THAT IT BE SEALED AT THEBEGINNING AND END OF THE SEASON THEREAFTER.

WARRANTYTABLE TOP
natural weathering, misuse, alterations or repairs.
COMPONENTS
FRAME
maintenance.
FINISH
which are 1) Cover when not in use 2) Wipe down with a mild solution regularly. 3) If you can, store out of the elements when not in use NOT COVERED UNDER WARRANTY
listed in the care instructions
MAINTENANCE INSTRUCTIONS
TABLE RETURN GUIDELINES the original purchase order.
15

For more product information, visit our website:www.designingfire.com
©2013 Designing Fire, Inc. All rights reserved.