getting started guide - genesis bluetooth
TRANSCRIPT

GETTING STARTED GUIDEGenesis GV80
Thank you for joining the Genesis family. This easy-to-follow guide will show you how to use various Genesis GV80 features and how to adjust their settings to your preferences. We hope you enjoy the distinctive luxury of a customized and convenient ownership experience.
GETTING STARTED GUIDEAudio, ConneCtivity, And nAvigAtion
TABLE OF CONTENTS
PHONE PROJECTION 3
PHONE PAIRING 4
CUSTOM BUTTON 6
MAKING A CALL 7
NAVIGATION 10
DyNAMIC VOICE RECOGNITION 13
DUAL VOICE RECOGNITION 14
MAP DISPLAyS 15
ADVANCED DRIVER ASSISTANCE SySTEMS 17
TABLE OF CONTENTS
PHONE PROJECTION 3
PHONE PAIRING 4
CUSTOM BUTTON 6
MAKING A CALL 7
NAVIGATION 10
DyNAMIC VOICE RECOGNITION 13
DUAL VOICE RECOGNITION 14
MAP DISPLAyS 15
ADVANCED DRIVER ASSISTANCE SySTEMS 17

O N L I N E R E S O U R C E S A N D I N F O R M AT I O N AT M Y G E N E S I S . C O M3
Main menu
2.
3.
1.
*USB data port will typically be located in or near the front in-dash console. Check your vehicle’s owner’s manual for specific location. Data cable for iOS device is required for Apple CarPlay. OEM data cables are recommended. Apple CarPlay is a registered trademark of Apple Inc. Android Auto is a trademark of Google LLC.
ANDROID AUTO APPLE CARPLAy
ANDROID AUTO APPLE CARPLAy
ANDROID AUTO APPLE CARPLAy
Android AutoTM and Apple CarPlay® allow you to access the most commonly used smartphone features, including calling, navigation, text messaging, and playing music all from your driver’s seat.
Enjoy using the applications displayed on your vehicle’s multimedia screen.
Note
Android Auto users will be prompted to view a tutorial. Select your option and proceed.
‘Allow permission’ from your phone to connect to your vehicle. Please note that your phone must be unlocked.
‘Connect’ a USB data cable from your phone to the vehicle’s USB port.*
PHONE PROJECTION

O N L I N E R E S O U R C E S A N D I N F O R M AT I O N AT M Y G E N E S I S . C O M4
Main menu
1.
3.
2.
Note
Bluetooth settings can be found in the ‘Settings’ app on most smartphones. Refer to your phone’s owner’s manual or click here for more information.
Select ‘Bluetooth Connections.’
Select ‘Device Connection’ on the screen.
Then press ‘Bluetooth®.’
The vehicle’s shifter must be in ‘Park.’
Then press the ‘Setup’ button.
Press ‘Add.’4.
PHONE PAIRING

O N L I N E R E S O U R C E S A N D I N F O R M AT I O N AT M Y G E N E S I S . C O M5
Main menu
5. Select your ‘Bluetooth Preference’ and select ‘OK.’
Note
If your phone is supported, then your contact list may be transferred to your vehicle automatically.
— Some phones may request approval to download contacts;
this process will take a few minutes
— Contact list may start with First or Last Name,
depending on phone models
— Some phones may require additional confirmation
to allow contacts to sync
Depending on the phone manufacturer and model:
6. Turn on your phone’s ‘Bluetooth,’ select the device (GV80) found by your phone, and follow any additional prompts on your phone.
PHONE PAIRING

O N L I N E R E S O U R C E S A N D I N F O R M AT I O N AT M Y G E N E S I S . C O M6
Main menu
Press the ‘Custom Button.’*
Select from the listed options** to set as your custom button.
For example, select ‘Phone.’
*Button location may differ from the image shown. **Listed options may differ from the image shown.
1.
2.
The Custom Button ( ) is easy to set up and use so that you can enjoy your favorite features with just a touch of a button. Learn how to set up your Custom Button by reviewing the steps below.
CUSTOM BUTTONINITIAL SETUP

O N L I N E R E S O U R C E S A N D I N F O R M AT I O N AT M Y G E N E S I S . C O M7
Main menu
BEFORE YOU START
Make sure your phone is connected to your vehicle and your phone contacts have been downloaded to the vehicle. If this has not been done, please follow the instructions on page 4.
After the beep, say the command “Call” followed by the name of the desired contact.
Example: “Call Alex”
If the contact has multiple phone numbers, you can select the phone number you would like to call by saying “One” or “Two.”
Press the ‘Push to Talk’ button on the steering wheel. You will hear “Please say a command,” followed by a beep.
1.
3.
2.
BY VOICE COMMANDS USING BLUETOOTH
MAKING A CALL
O N L I N E R E S O U R C E S A N D I N F O R M AT I O N AT M Y G E N E S I S . C O M8
Main menu
5.
4.
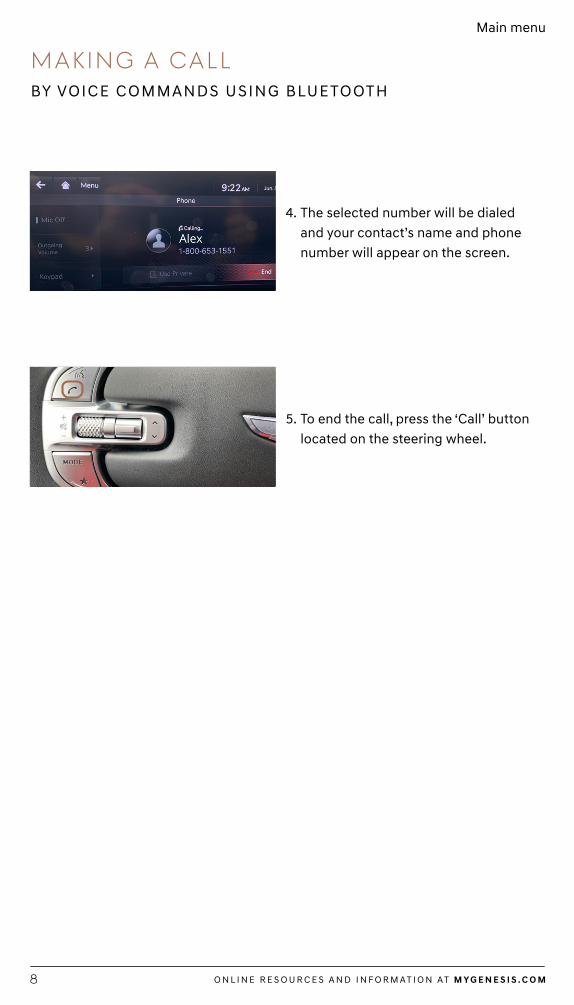
To end the call, press the ‘Call’ button located on the steering wheel.
The selected number will be dialed and your contact’s name and phone number will appear on the screen.
BY VOICE COMMANDS USING BLUETOOTH
MAKING A CALL
O N L I N E R E S O U R C E S A N D I N F O R M AT I O N AT M Y G E N E S I S . C O M9
Main menu
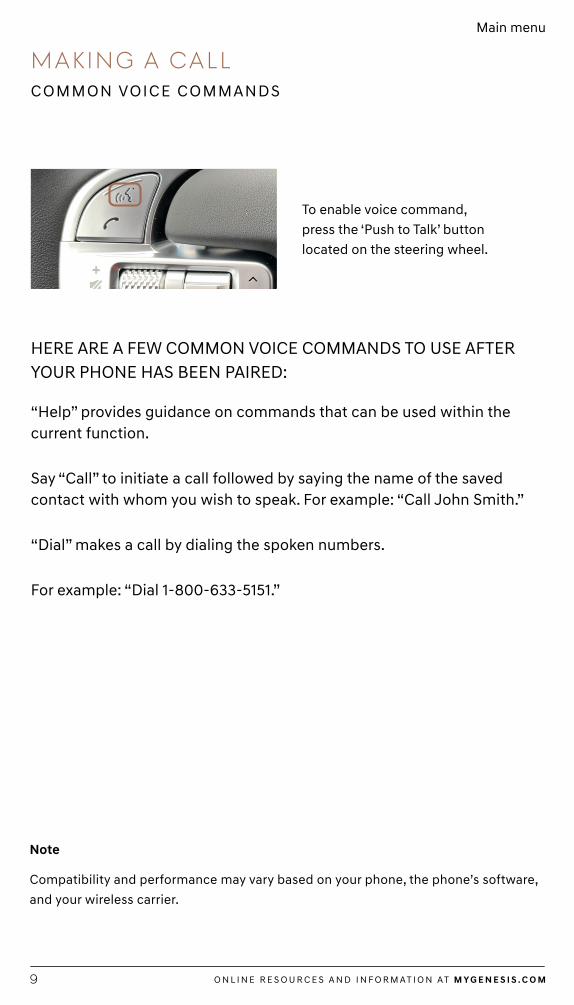
HERE ARE A FEW COMMON VOICE COMMANDS TO USE AFTER YOUR PHONE HAS BEEN PAIRED:
“Help” provides guidance on commands that can be used within the current function.
Say “Call” to initiate a call followed by saying the name of the saved contact with whom you wish to speak. For example: “Call John Smith.”
“Dial” makes a call by dialing the spoken numbers.
For example: “Dial 1-800-633-5151.”
To enable voice command, press the ‘Push to Talk’ button located on the steering wheel.
Note
Compatibility and performance may vary based on your phone, the phone’s software, and your wireless carrier.
COMMON VOICE COMMANDS
MAKING A CALL

O N L I N E R E S O U R C E S A N D I N F O R M AT I O N AT M Y G E N E S I S . C O M10
Main menu
2.
1.
4.
3. Select either the recommended or alternate route. The destination route will display on the screen and route guidance will begin.
The results will be listed on the screen.
Say the line item number (for example: “Three”) to make your selection.
Press the ‘Push to Talk’ button located on the steering wheel.
You will hear “Please say a command,” followed by a beep. After the beep, say the command “Find Coffee Shop.”
Press the ‘Push to Talk’ button located on the steering wheel and say “Cancel Route” to stop route guidance.
FINDING A DESTINATION USING VOICE COMMANDS
NAVIGATION

O N L I N E R E S O U R C E S A N D I N F O R M AT I O N AT M Y G E N E S I S . C O M11
Main menu
The vehicle must be in ‘Park.’*
Press the ‘Nav’ button.**
*Manual destination input is only available when the vehicle is in ‘Park.’**Button location may differ from the image shown.
4.
3.
2.
1.
Select ‘Search.’
Enter the address of your destination or the name of your POI and press the ‘Search’ icon.
The route to your destination will be displayed on the map.
Select ‘Set as Destination’ to begin your route.
5. Press the ‘Push to Talk’ button located on the steering wheel and say “Cancel Route” after the prompt to stop route guidance.
INPUTTING A DESTINATION
NAVIGATION

O N L I N E R E S O U R C E S A N D I N F O R M AT I O N AT M Y G E N E S I S . C O M12
Main menu
*The display, button, and/or icon locations may differ from the images shown.
HERE ARE A FEW COMMON VOICE COMMANDS AVAILABLE TO USE:
“Help” provides guidance on commands that can be used within the current function.
Say “Find <Address>” to search for an address and set it as a destination. For example: “300 (Three-Zero-Zero) Main Street, Fountain Valley.”
“Find <POI>” searches for the point of interest specified. For example: “Find Banks.”
“Go Home/To Work” sets the destination to your home or work/office. Your home or work address must be set in the navigation system.
“Cancel Route” cancels the route to the set destination and exits guidance.
“Police Station/Hospital” displays a list of the nearest police stations or hospitals.
To start voice command, press the ‘Push to Talk’* button located on the steering wheel.
COMMON VOICE COMMANDS
NAVIGATION

O N L I N E R E S O U R C E S A N D I N F O R M AT I O N AT M Y G E N E S I S . C O M13
Main menu
Select a category to see a list of commands that are available to use.
3.
Press the ‘Push to Talk’ button.
Select ‘Help’ on the lower left corner of the screen.
1.
2.
DyNAMIC VOICE RECOGNITION
Your Genesis is equipped with Dynamic Voice Control, which allows you to use voice commands to control your vehicle’s windows, climate, radio, navigation, and more. Additional POI and Internet search functions are available with a GCS subscription. To explore these commands, follow the instructions below.

O N L I N E R E S O U R C E S A N D I N F O R M AT I O N AT M Y G E N E S I S . C O M14
Main menu
Genesis Voice Recognition: Press the ‘Push to Talk’ button and say a command.
Follow these simple instructions to toggle between your vehicle’s voice recognition and Android Auto’s or Apple CarPlay’s voice recognition.
Android Auto or Apple CarPlay: First, make sure your phone is connected to Android Auto or Apple CarPlay. Then hold down the ‘Push to Talk’ button until prompted by Android Auto or Apple CarPlay to provide a command.
DUAL VOICE RECOGNITION
ANDROID AUTO APPLE CARPLAy

O N L I N E R E S O U R C E S A N D I N F O R M AT I O N AT M Y G E N E S I S . C O M15
Main menu
2.
1.
4.
3. Checking ‘Display Traffic’ will show traffic conditions on your map .
Tap ‘Menu’ in the lower left corner.
Press the ‘Map’ button.
Select ‘Navigation Settings’ to modify additional settings.
MAP DISPLAyS
Customize the way that your Genesis displays maps by following the steps below.

O N L I N E R E S O U R C E S A N D I N F O R M AT I O N AT M Y G E N E S I S . C O M16
Main menu
6.
5. Select ‘Display,’ then select ‘Map.’
Select each category on the menu to set your map preferences.
MAP DISPLAyS

O N L I N E R E S O U R C E S A N D I N F O R M AT I O N AT M Y G E N E S I S . C O M17
Main menu
Your Genesis is equipped with Advanced Driver Assistance Systems* to help you along the way. To access the settings for these features, follow the instructions below.
Select ‘Vehicle.’ Then select ‘Driver Assistance.’
Select a feature on the menu to set its properties.
Press the ‘Setup’ button.1.
3.
2.
ADVANCED DRIVER ASSISTANCE SYSTEMS INCLUDE:
– Smart Cruise Control – Driving Convenience – Warning Timing – Warning Volume – Haptic Warning
– Driver Attention Warning – Forward Safety – Lane Safety – Blind-Spot Safety – Parking Safety
ADVANCED DRIVER ASSISTANCE SySTEMS
*The Advanced Driver Assistance System warning and alerts only serve to inform the driver of potential hazards. They do not detect and provide an alert in every situation. It is the driver’s responsibility to remain alert at all times. See Owner’s Manual for details and limitations.