getting started - citrix docs · when using desktopplayer, consider that mac os x requires...
TRANSCRIPT

Getting Started
Version 2.2
August 2016

2
Table of Contents
About this Release .................................................................................................................2
About the Citrix DesktopPlayer for Mac Solution ....................................................................3
About system memory usage .................................................................................................3
DesktopPlayer Components ...................................................................................................3
About DesktopPlayer .............................................................................................................4
System Requirements ............................................................................................................6
Platform and Hardware Requirements ...................................................................................7
Preparing for Installation .......................................................................................................7
Installing DesktopPlayer .........................................................................................................9
Registering DesktopPlayer to Synchronizer ............................................................................... 13
Using DesktopPlayer .................................................................................................................. 14
DesktopPlayer Preferences ..................................................................................................... 17
Using your Windows Virtual Machine ................................................................................... 22
Managing USB Devices ............................................................................................................... 23
Using an External Monitor ......................................................................................................... 23
Synchronizing with ShareFile ..................................................................................................... 25
Starting and stopping your virtual machine............................................................................... 25
Copyright © 2015 Citrix All Rights Reserved. Version: 2.1 Citrix, Inc. 851 West Cypress Creek Road Fort Lauderdale, FL 33309 United States of America This document is furnished "AS IS." Citrix, Inc. disclaims all warranties regarding the contents of this document, including, but not limited to, implied warranties of merchantability and fitness for any particular purpose. This document may contain technical or other inaccuracies or typographical errors. Citrix, Inc. reserves the right to revise the information in this document at any time without notice. This document and the software described in this document constitute confidential information of Citrix, Inc. and its licensors, and are furnished under a license from Citrix, Inc. Citrix Systems, Inc., the Citrix logo, Citrix DesktopPlayer for Mac, are trademarks of Citrix Systems, Inc. in the United States and other countries. All other products or services mentioned in this document are trademarks or registered trademarks of their respective companies. Citrix Systems, Inc. acknowledges all trademarks used in this document. Linux is a registered trademark of Linus Torvalds and Ubuntu is registered trademark of Canonical Ltd. Windows is a registered trademarks of Microsoft Corporation. All trademarks are the property of their respective owners.
About this Release
This document provides information about DesktopPlayer for Mac; it includes an overview of the
functionality available at this release, installation information, and general usage guidelines.
Back up your data prior to installing this release. Consider saving your data to Citrix ShareFile or any cloud-based backup service to access your data from other devices or locations.

3
About the Citrix DesktopPlayer for Mac Solution
Citrix DesktopPlayer for Mac extends the benefits of desktop virtualization to mobile MacBook users,
enabling you to work on your Windows business apps in virtual machines (VMs) whether you are online,
offline, or on an intermittent network connection. DesktopPlayer end users gain freedom while IT
Administrators gain control and centrally managed Windows VMs deployed to corporate and BYO
MacBooks.
Sharing the same backend Synchronizer management infrastructure with DesktopPlayer for Windows,
DesktopPlayer for Mac is a distributed solution that makes managing Windows VMs on thousands of
Mac laptops as easy as managing one.
DesktopPlayer for Mac combines centralized VM management with distributed execution of managed
Windows VMs on a client endpoint. DesktopPlayer offers IT professionals and Mac end users with a
single, unified product that extends the benefits and convenience of local desktop virtualization with the
efficiency and control of central, policy-driven management – providing the best of both worlds.
About system memory usage
System memory is shared between the host operating system (Mac OS X) and the guest operating
system in the virtual machine (Windows). Operating a virtual machine on a Mac with 4 GB of memory
limits memory allocation to the Windows OS (guest). When using DesktopPlayer, consider that Mac OS X
requires approximately 2-2.5 GB of memory for normal operation; a Windows 7 32-bit guest virtual
machine requires approximately 1.5 GB of memory to perform reasonably. Running a 64-bit Windows
OS will require additional memory (8 GB RAM or higher) and is not feasible on a Mac with 4 GB RAM.
Citrix recommends MacBooks with 8 GB RAM or higher.
DesktopPlayer Components
The DesktopPlayer for Mac solution uses two key components to provide Windows VMs on Macs:
DesktopPlayer for Mac, a virtualization-based client application that enables Windows VMs to
run on top of the Mac host computer and communicates with a management server
Synchronizer, a centralized management server that controls multiple DesktopPlayer machines

4
The image below illustrates these components:
About DesktopPlayer
DesktopPlayer is installed on individual Mac computers, and provides a virtualized platform to run each
Windows VM image. An image contains a virtualized representation of an operating system plus any
included applications. DesktopPlayer may have more than one virtual machine image running on top of
a Mac computer, and is dependent on the available hardware resources (i.e., CPU, storage, memory) to
support the multiple images.
The image definition includes its own specific RAM and storage requirements; memory management is performed by DesktopPlayer.
DesktopPlayer is comprised of a client endpoint, plus value-added functionalities wrapped around the
endpoint, including:
a single installer for quick and simple installation
in-guest tools for the virtual machine OS
the management engine that facilitates communication with Synchronizer for VM/Engine
provisioning, updates and policy management

5
DesktopPlayer also performs the management tasks on the computer:
Establishes network connections for the VM via the Mac platform (wireless and/or wired).
Communicates securely (through SSL) with Synchronizer and checks for updates to VMs.
Downloads and prepares updates and new versions of VMs.

6
System Requirements
Prior to installing DesktopPlayer for Mac, check and ensure that your machine can support the system
requirements, as outlined below. You can find information about your Mac by clicking the Apple icon
and then selecting About This Mac:
Click More Info to display additional hardware information:

7
Platform and Hardware Requirements
DesktopPlayer supports the following Mac platforms:
MacBook Pro, with or without Retina display
MacBook Air
iMac
Hardware requirements include:
CPU: Intel Core i5 processor, or better. (Third or Fourth generation)
Physical memory: 8 GB RAM or higher
Storage: Drive with 100 GB or more free disk space
Software requirements include:
Host OS: Mac OS X 10.8, 10.9, 10.10
Guest OS: Windows 7 and Windows 8.1 both 32-bit or 64-bit
Hardware and software not currently on the support list will be evaluated for future support. Please contact your Citrix representative for support requests.
Language: English
Preparing for Installation
Use the information in this section to prepare your Mac for DesktopPlayer. To prepare for installation:
1. Install Synchronizer to take advantage of the management capabilities that are part of the
solution.
Refer to Synchronizer Installation Guide for explicit instructions.

8
2. To install and run DesktopPlayer and the guest operating system successfully, the Mac user
account must have local administrator rights. To check an account’s user rights, select the Apple
icon ( ), then click System Preferences > Users and Groups (in the System section of the
screen).

9
The current user account is displayed; it should indicate Admin (for Administrative rights). If the
current user account does not have this privilege, select the Allow user to administer this
computer option:
After enabling application installations from sources other than the Apple Store and verifying the user’s
privileges, continue with the DesktopPlayer installation.
Installing DesktopPlayer
After preparing your Mac, follow the information in this section to install DesktopPlayer:
1. Double click the DesktopPlayer.dmg installer icon. Contact your IT administrator if you do not
have this installation package:
The installer is a compressed file; after double clicking the icon, the DesktopPlayer installation
directory appears:
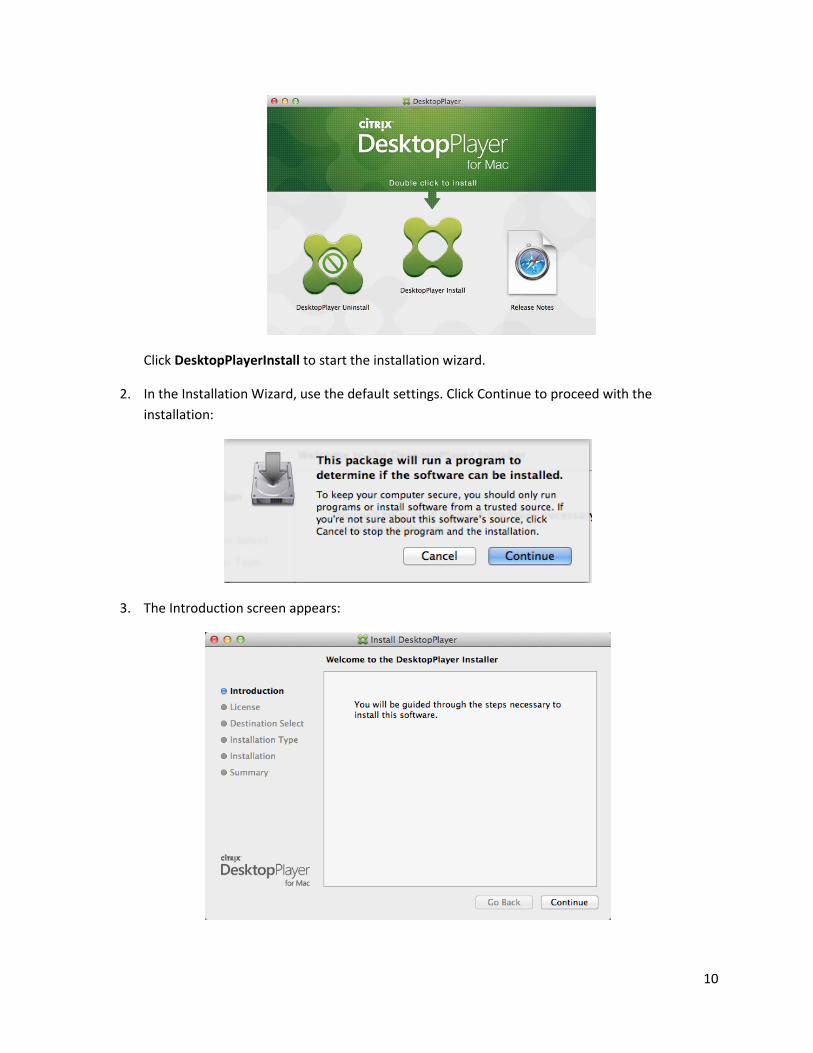
10
Click DesktopPlayerInstall to start the installation wizard.
2. In the Installation Wizard, use the default settings. Click Continue to proceed with the
installation:
3. The Introduction screen appears:

11
4. Review the terms of the software license agreement for the software. Click Agree, then
Continue to proceed with the installation:
5. Specify the installation location, click Continue.
6. In the Standard Install screen the default disk drive is chosen for installation. Click Change Install
Location to alter the installation path, or click Install to continue:

12
7. If your computer required administrative privileges when installing programs, you may be
required to verify the username and password associated with the computer. Enter an
Administrative user ID (name and password). Click Install Software.
8. The installation progress screen appears:
9. An screen appears confirming the installation:

13
After installing DesktopPlayer, restart your Mac to complete the process.
DesktopPlayer simplifies the way a user uses a VM. The controls for DesktopPlayer are located in the Mac's system settings extra menu, located at the upper-right side of the Mac desktop. Choose the Windows VM that you want to work with.
Registering DesktopPlayer to Synchronizer
After installing DesktopPlayer, register it to the Synchronizer management server; after registering,
download a Windows VM that has been assigned to you.
1. Select the Register option from the menu bar to associate DesktopPlayer with Synchronizer and
to download any assigned VMs:
If DesktopPlayer has not been registered with Synchronizer an error icon appears in the menu bar.
Error icon indicates that
DesktopPlayer has not
registered with Synchronizer.

14
2. In the Register screen, enter the Synchronizer information that your IT administrator provided;
use this login information to gain access to a Windows VM that has been assigned to you. Click
Register:
Once you have successfully registered with Synchronizer, DesktopPlayer begins downloading your assigned VM. Download times vary depending on a number of factors, including available bandwidth. You can only register a single Mac with Synchronizer.
Using DesktopPlayer
After registering your computer with Synchronizer, you can start DesktopPlayer. After starting, sign in to
use DesktopPlayer:
1. In the guest, click the DesktopPlayer icon in the Launchpad:
2. After launching, select the DesktopPlayer icon in the menu bar at the top of the screen to sign
in. Enter the login credentials provided by the IT administrator, and click Sign In:

15
3. After signing in, you can start your assigned Windows VM. In the menu bar, click the
DesktopPlayer icon to display a drop down menu. The Citrix DesktopPlayer menu includes a
number of options, including:
o Start your VM by clicking the grey shaded area.
o Click the USB icon to select USB devices accessible to the VM.
o Select Preferences to access information about DesktopPlayer.
o Click About for information about this version.
o Click Quit exit DesktopPlayer.
Click the grey shaded area to start your assigned Windows VM:
After starting your VM, DesktopPlayer starts your assigned Windows VM:
After starting the VM, Windows launches and goes through the startup process:
Displays the state of the VM.
Click the shaded area to
start the VM.
Select the devices drop-down
menu to display USB devices
accessible to the VM.

16
After going through the Windows startup process, the login screen appears; the VM is now ready for
use. Use your Active Directory (AD) account credentials provided by the IT administrator to log you’re
your Windows VM (commonly referred to as the guest VM):
Consider the following when logging in to the guest Windows VM:
To gain access to the Windows guest VM login screen, use the keystroke command+fn+delete
while the VM screen is in focus; this effectively initiates the Ctrl+Alt+Delete command in the
guest VM. Alternately, choose the Machine>Insert Ctrl+Alt+Del menu item to automatically add
the command:
Use your AD credentials at
the Windows login screen.

17
The Windows keyboard layout for ctrl+alt+del resembles:
Use your AD credentials when logging in to the Windows guest VM. This information should be
provided by the IT administrator.
When logging in, you may need to switch users; for the username, enter <domain>\<your AD username> and <your AD password>. This username/password combination may not be the credentials used to register with Synchronizer.
DesktopPlayer Preferences
To access DesktopPlayer Preferences, select the DesktopPlayer icon in the menu bar at the top of the
screen, and click Preferences:
Options in the Preferences panel include:

18
Updates – Displays information about recent updates, available networks, and current and
pending activities. You can also use this panel to check for updates, or to specify a list of
acceptable networks (networks that are permitted to transfer updates between Synchronizer
and DesktopPlayer; select the Allow Transfer checkbox).
VM images are typically large; Citrix recommends that you allow transfers on reliable networks capable of supporting the extraneous load on network resources when downloading VMs.
To add a network to the list, click the + symbol; enter a name for the new network, and click OK:
Updates will only occur when DesktopPlayer is connected to a named network and the Allow Transfer checkbox is selected in the Updates screen.
Registration – The Registration screen displays information about the Synchronizer server to
which DesktopPlayer is registered, and name of the registered user. Click Unregister to
disconnect from Synchronizer:
Add a network to the
preferred list.
Check for an
updated VM.

19
The DesktopPlayer endpoint must be registered to Synchronizer to receive updates, or to save changes to the VM.
Help & Feedback – Use the Help & Feedback screen to report problems to Citrix Support,
suggest improvements, access the Help system or view the system log:
To report a problem with DesktopPlayer, click Report Problem and submit additional
information to help Citrix resolve the issue:
Report a problem

20
Virtual Machines – Use this preference panel to display information about the assigned
Windows VM. A number of options are provided to provide additional control, including
changing the allocated memory, backing up the VM, or snapback to the previous configuration:
To change the allocated memory for a Windows VM, click the Change button in the Hardware
section of the VM preference panel. Memory available for the VM is displayed; additionally,
Provide a short, descriptive subject
that describes the problem.
Include an email address so
Citrix Support can contact you,
if necessary.
Provide a description of the
problem, click Submit.
Change the allocated memory for
the Windows VM.
Configure security policies for the
assigned VM. If no policies are
assigned, this option is not accessible.

21
current memory configured for all assigned VMs is also displayed. Use the slider to the desired
amount of memory, or manually enter a value:
You must restart the VM after changing the memory setting.
If the assigned VM possesses security policies, the Virtual Machine preference screen displays
information about them (encryption, clipboard sharing, and file sharing). If any of these policies
have been assigned by the IT administrator, click Change to modify them:
After clicking Change, DesktopPlayer displays additional information for any security policies
assigned to the Windows VM. For example, if the File Sharing policy (controls the VMs ability to
share files between the guest VM and a specified host) is enabled, the File Sharing screen is
displayed. Configure the policy by clicking + to share a file between the host (Mac OSX) and
guest VM:
For additional information on configuring policies for DesktopPlayer, refer to the Synchronizer Administration Guide.
Click + to share a file between
the host (Mac OSX) and the
guest Windows VM.

22
Using your Windows Virtual Machine
This section provides information about using your Windows VM for the first time. When using it,
consider the following:
The Windows guest VM initially displays as a DesktopPlayer window inside of the Mac OSX
operating system (commonly referred to as the host vm).
You can use the VM within a minimized window, or, you can display it in full screen mode.
When first starting, the VM launches in windowed mode by default. To go to full screen mode,
make sure the VM has focus and hit the keystroke: Command + F (the Command key is also
known as the ‘Apple key’). The image below illustrate this keyboard sequence:
There are additional ways to manage the guest VM window size:
1. While the guest VM is in focus, select View in the DesktopPlayer menu bar:
2. In the drop down menu, select Switch to Fullscreen (Host+F) to maximize the guest VM.
3. Or, you can alternately use the corners of the guest Windows VM to manually size the window
to the desired size.

23
Managing USB Devices
Use the procedures in this section to manage USB devices in the guest Windows VM:
1. Click the DesktopPlayer icon in the menu bar, and then click the USB icon:
2. In the drop down menu, click the USB device that you would like to use in the guest Windows
VM; ensure that a check mark appears next to the name of the selected USB device.
The guest Windows VM takes a few moments to recognize the device. Once recognized, DesktopPlayer remembers the device the next time it’s plugged in.
Using an External Monitor
DesktopPlayer supports the ability to connect to an external monitor. Consider the following when
connecting an external display:
Use the Mini Display Port/Thunderbolt to VGA Adapter cable to connect to an external monitor,
or, alternately use a USB dongle to establish the connection between the Mac and the monitor.
When you first connect a new monitor to the Mac, it configures it in mirror mode; the Windows
display manager shows only a single monitor.
Once you disable mirror mode on the Mac, the Windows display manager now sees two
displays; because it is the first time Windows has detected two displays, it configures the
monitors in mirror mode (the default behavior for the Windows 7 guest VM). You can then
configure Windows to extend to the second monitor.
The Mac remembers monitor configurations for next time use.
Select the USB icon to display a
list of available devices.
24
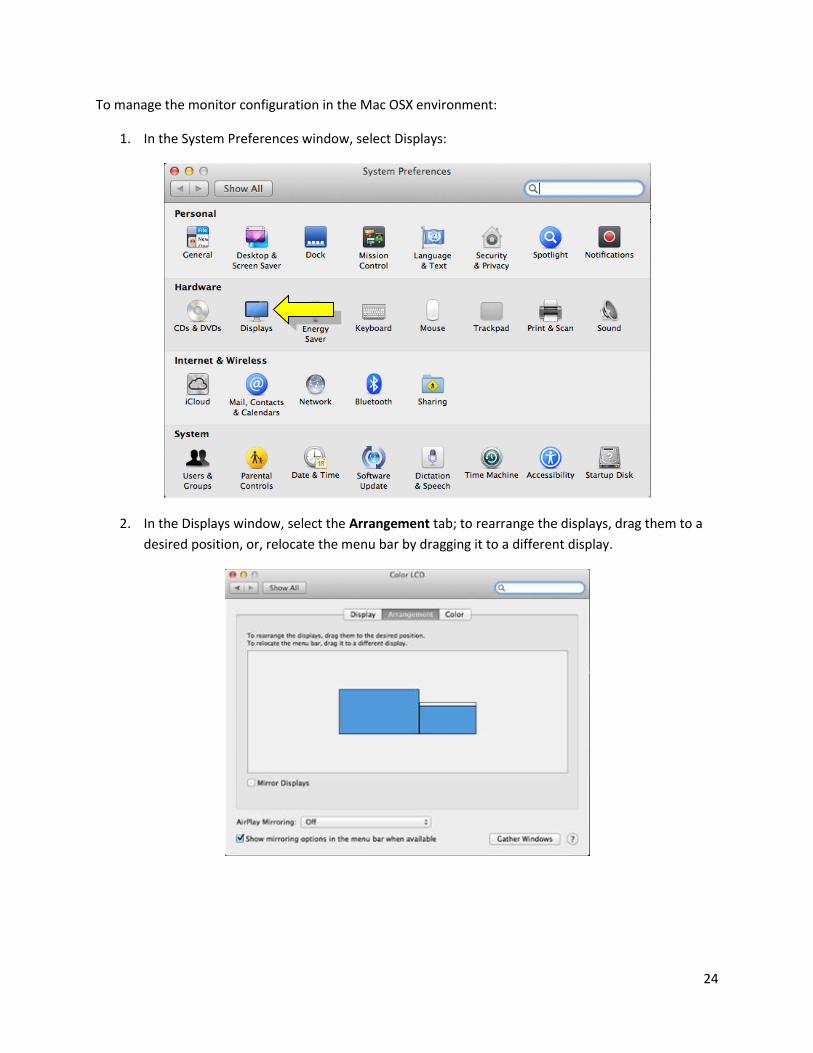
To manage the monitor configuration in the Mac OSX environment:
1. In the System Preferences window, select Displays:
2. In the Displays window, select the Arrangement tab; to rearrange the displays, drag them to a
desired position, or, relocate the menu bar by dragging it to a different display.

25
Synchronizing with ShareFile
DesktopPlayer provides a seamless vehicle to experience client virtualization. One such example is using
ShareFile to synchronize your files. Whether you’re on the phone, tablet, a hosted desktop, or using
DesktopPlayer, you’ll have full access to all of your company files.
After launching your Windows Guest VM, open Windows Explorer. If you have it configured properly,
and posses a ShareFile account, Windows Explorer displays your home directory:
Starting and stopping your virtual machine
To start a VM, select it from the DesktopPlayer icon:
Click the grey shaded to
start the VM.

26
A VM can be stopped in a number of different ways. To stop a VM use the Windows shutdown
command accessible from the guest Windows VM start menu. The Windows Start menu provides the
same functionality as a native machine: use it to stop, switch users, or lock the VM
You can also stop a VM by clicking the (X) icon in the upper left portion of the VM window, this will
prompt an icon to let you chose to send shutdown signal to VM or forcefully shutdown the VM