getting started/ basic display p.1-15 basic...
TRANSCRIPT

1-1
1Getting Started/Basic KnowledgeBasic Display ............................. P.1-15
Standby........................................................P.1-15CheckingInformation...............................P.1-15MainMenu...................................................P.1-16DisplaySaving...........................................P.1-16MainNotificationIcons/Status...........P.1-17
Manner ......................................... P.1-18SettingMannerMode/DriveMode/OriginalMode..............................................................P.1-18
Airplane Mode ............................ P.1-20Security Codes ......................... P.1-20PIN Code...................................... P.1-21EnablingPINCode....................................P.1-21
Handset Parts .............................. P.1-2Softkeys..........................................................P.1-3
Key Operations in Standby ..... P.1-4Handling USIM Card ................... P.1-5BeforeUsingUSIMCard...........................P.1-5Inserting/RemovingUSIMCard..............P.1-6SIMUnlocking...............................................P.1-7
Handling SD Card ........................ P.1-7BeforeUsingSDCard................................P.1-7Inserting/RemovingSDCard...................P.1-8
Handling Battery and Charger ......................................................... P.1-10BeforeUsingBatteryandCharger.....P.1-10Installing/RemovingBattery.................P.1-11ChargingwithACAdapter.....................P.1-13
Powering On/Off ....................... P.1-14PowerOn......................................................P.1-14TurningthePowerOFF...........................P.1-14

1-2
1
Getting S
tarted/Basic K
nowledge
Handset Parts
①
②
③
⑦
⑮
㉑
㉓
⑧
⑨
⑯
⑰
⑱
⑲
④⑤⑥
⑩⑪⑫
⑭
⑬
⑲
⑳
㉒
① Straphole② Receiver③ Display④ Mail Key⑤ Character Key⑥ Call Key⑦ Dial Keys⑧ Notification LED⑨ Up, Down, Left, Right Key/
Enter Key⑩ Browser Key⑪ Camera Key⑫ Power/End Key⑬ Clear/Back/
Answering Machine Setting Key
⑭ Mouthpiece⑮ External Connection Terminal⑯ Speaker⑰ Battery Cover⑱ Camera⑲ Internal Communications
Antennas⑳ USIM Card Slot� GPS Antenna� Infrared Port� SD Card Slot
CAUTION
Internal Communications Antennas/GPS Antenna•Donotcoveroverwithstickers,oryourhands,sincesensitivitymaybeaf-fected.

1-3
1G
etting Started/B
asic Know
ledge
⹅ Softkeys
Correspondingkeyoperationsappearforsoftkeys.
Softkeys
⹅ Notations for Pressing Keys
Thenotationsareasfollowsinthisguide.①
②③④
⑤ ⑥⑦⑧
⑩⑪
⑨
⑫
Key Key Illustra-tions
Description
① w PressUpkey.
② s PressLeftkey.
③ d PressEnterkey.
④ x PressDownkey.
⑤ f PressRightkey.
①④ h PressUporDownkey.
②⑤ j PressLeftorRightkey.
①②④⑤ k PressUp,Down,LeftorRightkey.
⑥ e PressMailkey.
⑦ t PressCharacterkey.
⑧ m PressCallkey.
⑨ b PressBrowserkey.
⑩ c PressCamerakey.
⑪ . PressPower/Endkey.
⑫ , PressClear/Back/AnsweringMa-chineSettingKey.
1-4
1
Getting S
tarted/Basic K
nowledge
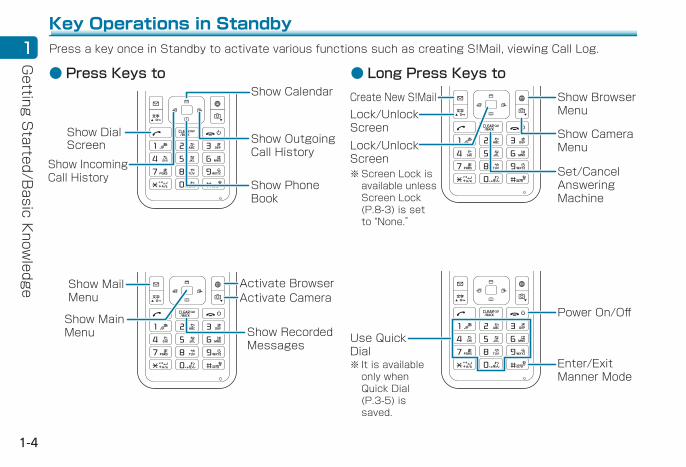
Key Operations in StandbyPressakeyonceinStandbytoactivatevariousfunctionssuchascreatingS!Mail,viewingCallLog.
● Long Press Keys toCreate New S!MailLock/Unlock Screen
Show Browser Menu
Show Camera Menu
Set/Cancel Answering Machine
Lock/Unlock Screen※ScreenLockisavailableunlessScreenLock(P.8-3)issetto"None.”
Use Quick Dial
Enter/Exit Manner Mode
Power On/Off
※ItisavailableonlywhenQuickDial(P.3-5)issaved.
● Press Keys to
Show Dial Screen
Show Incoming Call History
Show Calendar
Show Outgoing Call History
Show Phone Book
Show Main Menu
Show Mail Menu
Activate BrowserActivate Camera
Show Recorded Messages

1-5
1G
etting Started/B
asic Know
ledgeHandling USIM CardUSIMCardisanICCardcontainingcustomerphonenumber,information,etc.•ForhandlingUSIMCard,seethemanualprovidedwithUSIMCard.
⹅ Before Using USIM Card
WhenusingUSIMCard,becarefulofthefollowing.•Donotputlabels,etc.onUSIMCard.Maycausemalfunction.
•USIMCardwillbereissuedforafeeiflostordam-aged.
•CleanUSIMCardwithadrysoftcloth.•KeeptheIC(metal)partclean.
IC (metal) part
USIM Card•DonottouchIC(metal)partwithhandormetal.•IfUSIMCard/handsetwithUSIMCard insertedis lostorstolen,alwaysfollowemergencyproce-durestosuspendservice. Fordetails,contactInquiries.
•SoftBankCorp.isnotliableforanydamagesarisingfrominsertingUSIMCardintoICCardreaders,etc.ofotherthirdpartydevices.
•KeepaseparatecopyofdatasavedonUSIMCard.SoftBankCorp. isnot liableforany lossofdatayouhavesaved.
•USIMCardspecificationsandperformancearesubjecttochangewithoutnotice.
•ReturnUSIMCardtoSoftBankCorp.uponcancellation.
•USIMCardisthepropertyofSoftBankCorp.•TheUSIMCardreturnedfromyou isrecycledforenvironmentalpreservation.
1-6
1
Getting S
tarted/Basic K
nowledge
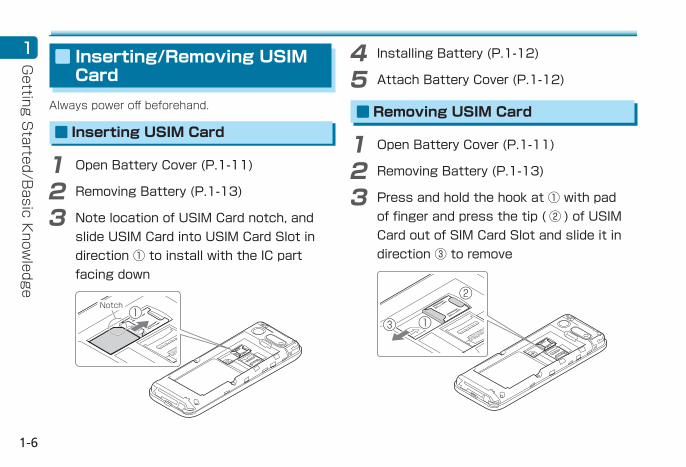
⹅ Inserting/Removing USIM Card
Alwayspoweroffbeforehand.
⹅ Inserting USIM Card
1 Open Battery Cover (P.1-11)
2 Removing Battery (P.1-13)
3 Note location of USIM Card notch, and slide USIM Card into USIM Card Slot in direction ① to install with the IC part facing down
Notch①
4 Installing Battery (P.1-12)
5 Attach Battery Cover (P.1-12)
⹅ Removing USIM Card
1 Open Battery Cover (P.1-11)
2 Removing Battery (P.1-13)
3 Press and hold the hook at ① with pad of finger and press the tip ( ② ) of USIM Card out of SIM Card Slot and slide it in direction ③ to remove
②
③ ①

1-7
1G
etting Started/B
asic Know
ledge
4 Installing Battery (P.1-12)
5 Attach Battery Cover (P.1-12)
⹅ SIM Unlocking
HandsetsupportsSIMunlocking.AfterSIM-unlock-inghandset,othercompanies'SIMCardscanalsobeusedonhandset.•WhenusinganothercompanySIMCard,availableservicesandfunctionsmayberestricted.SoftBankCorp.makesnoguaranteeswhatsoeverregardingtheproperoperationofhandset.
•FordetailsonSIMunlocking,seeSoftBankWeb-site.
Handling SD CardLikeDataFolder inhandset,datacanbesaved inSDCard.•HandsetsupportsmicroSD™Cardsup to2GBandmicroSDHC™Cardsupto32GB.(asofSep-tember2017) Notethatnotalloperationsareguaranteed.
⹅ Before Using SD Card
WhenusingSDCard,becarefulofthefollowing.•SDCarddatamaybelostoralteredduetoanaccidentormalfunction.Keepacopyofyourdatainaseparateplace.NotethatSoftBankCorp.isnotliableforanydamagesarisingfromlost/changeddata.
•DonotinsertorremoveSDCardforcefully.•Donottouchterminalswithhandormetal.•DonotremoveBatteryorpoweroffhandsetwhilereading/writingdatainSDCard.
•Becarefulnot todeleteoroverwritedataacci-dentally.
CAUTION
•StoreoruseSDCardoutof reachofsmallchildren.Failuretodosomaycauseaccidentalswallow,leadingtosuffocation.

1-8
1
Getting S
tarted/Basic K
nowledge
⹅ Inserting/Removing SD Card
Alwayspoweroffbeforehand.
⹅ Inserting SD Card
1 Open Battery Cover (P.1-11)
2 Removing Battery (P.1-13)
3 Press and hold SD Card Slot Cover with pad of finger and slide it in direction ① until it clicks unlocked. Lift SD Card Slot Cover in direction ②
②①
4 Note orientation and insert SD Card into SD Card Slot with the terminal part facing down

1-9
1G
etting Started/B
asic Know
ledge
5 Lower SD Card Slot Cover in direction ① and press and hold it with pad of finger and slide it in direction ② until it clicks locked
①②
6 Installing Battery (P.1-12)
7 Attach Battery Cover (P.1-12)
⹅ Removing SD Card
1 Open Battery Cover (P.1-11)
2 Removing Battery (P.1-13)
3 Press and hold SD Card Slot Cover with pad of finger and slide it in direction ① until it clicks unlocked. Lift SD Card Slot Cover in direction ②
②①
4 Remove SD Card
5 Lock SD Card Slot Cover (P.1-9)
6 Installing Battery (P.1-12)
7 Attach Battery Cover (P.1-12)

1-10
1
Getting S
tarted/Basic K
nowledge
Handling Battery and Charger
⹅ Before Using Battery and Charger
Whenpurchased,Batteryisnotsufficientlycharged.Besuretochargebeforeinitiallyusing.•For charging time and battery usage time:(P.11-5)
⹅ About Battery
•SoiledBattery,handsetormetalpartofCharger(ChargingTerminals)maycausepoorcontact,resulting inpowerfailureor insufficientcharging.Cleanhandset,BatteryandChargerwithaclean,dryswab.
•Battery isaconsumable item.ReplaceBatterywithanewone if theoperation timebecomesextremelyshortevenafteritisfullycharged.Pur-chaseanewBattery.
•TohelpmaintainperformanceandlifeofBattery,donotstore inthefollowingconditions(batterylevelshouldbeatapproximately40%foroptimalstorage).•Full(immediatelyafterchargingiscomplete)•Exhausted(toolowtopoweronhandset)
•CarryBatteryinabag,etc.whencarryingitsepa-rately.
⹅ Charging
•Batterycannotbechargedwithouthandset.InstallBatteryinhandsettochargeit.
•Chargingmaytake longerwhenhandset ispow-eredon.
•MoveChargerawayfromTV/radio if interferenceoccurs.
⹅ Battery Life
•Usinghandset in the followingconditionsmayshortenBatterylife:•Extremelyhighorlowtemperatures•Handset,BatteryorChargingTerminalsofChar-gerissoiled
•Weaksignal/nosignal•Handsetisleftpoweredoninmid-operation(notinStandby)
•ToextendBatterylife:•SetBacklightTimetoashortertime:(P.10-3)•SetKeySoundtoOFF:(P.10-6)

1-11
1G
etting Started/B
asic Know
ledge
⹅ Recycling
Lithium-ionbatteriesare recyclable.To recycleausedlithium-ionbattery,takeittoanyshopdisplay-ingtherecyclingsymbol.
⹅ Installing/Removing Battery
Alwayspoweroffbeforehand.
⹅ Installing Battery
1 Place a fingertip on the notch of handset and hold the center of Battery cover and gently lift Battery Cover in direction shown to remove•Becarefulnottohurtyourfingerornail.
Notch
1-12
1
Getting S
tarted/Basic K
nowledge
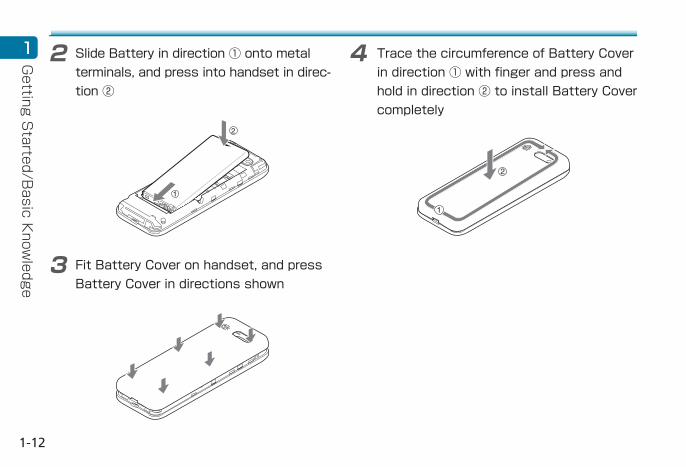
2 Slide Battery in direction ① onto metal terminals, and press into handset in direc-tion ②
3 Fit Battery Cover on handset, and press Battery Cover in directions shown
4 Trace the circumference of Battery Cover in direction ① with finger and press and hold in direction ② to install Battery Cover completely

1-13
1G
etting Started/B
asic Know
ledge
⹅ Removing Battery
1 Open Battery Cover (P.1-11)
2 Place a fingertip on the removing hook of Battery, and gently lift Battery in direction shown•Becarefulnottohurtyourfingerornail.
3 Attach Battery Cover (P.1-12)
⹅ Charging with AC Adapter
ACAdapterisanoptionalaccessory.After installingBattery,chargehandsetusingACAdapter(soldseparately).•UseoptionalACAdapter(microUSBQuickChargeTM2.0compatible)[ZSDBA4]*1,orACAdapter(microUSB1.0A)[ZSDBA6]*2.
•FordetailsonACAdaptersandotherperipheralequipment,seeSoftBankWebsite.
•SeeUserGuideforyourACAdapter.•ThefollowingoperationsaredescribedwithusingACAdapter(microUSB1.0A)[ZSDBA6].
*1 SoftBankSELECTIONQualcomm®QuickChargeTM2.0compatibleACAdapter [SB-AC12-HDQC]forsmart-phones
*2 SoftBankSELECTIONmicroUSBChargingACAdapter1.0A[SB-AC13-HDMU]forsmartphones

1-14
1
Getting S
tarted/Basic K
nowledge
microUSB plug
AC outlet
AC adapter
Plug
External connection terminal
1 Insert microUSB plug on External Connec-tion Terminal
2 Extend blades and plug AC Adapter into AC outletWhenchargingstarts, icon( )appearsandnotificationLEDlights inred.NotificationLEDgoesoutoncechargingcompletes.
3 After changing completes, unplug AC Adapter•RemovetheplugofACAdapterfromACout-letandremovemicroUSBplugfromhandset.
Powering On/Off
⹅ Power On
1 Long Press ..Handsetpowerson.ThenStandbyappearsafterawhile.
⹅ Turning the Power OFF
1 Long Press ..
2 "Yes"Thescreenturnsoffandhandsetpowersoff.

1-15
1G
etting Started/B
asic Know
ledgeBasic DisplayBasicDisplayofhandsetsuchasStandby,mainmenuisdescribed.
⹅ Standby
Statusicons,date/time,information,etc.appearinStandby.
①
②
Standby(Without Information)
①
③
Standby(With Information)
① Status barSignal,battery,handsetstatus,time,etc.appear. (P.1-17)
② Date/timeTime,dateanddayoftheweekappear.
③ InformationInformation formissedcalls,newmail,etc.ap-pears.(P.1-15)
⹅ Checking Information
An informationmessageappearswhenyoumisscallsorreceivemessages.•Typeof informationandthenumberof itemsareshown.
① ②
① Information Type② Number
1 Select Information type → dActivateeachfunctiontocheckthecontentofInformation.
⹅ Hiding Information
1 ,, while information is shownInformationisnotshowntemporarily.

1-16
1
Getting S
tarted/Basic K
nowledge
⹅ Main Menu
Iconsareshowntoactivatevarious functions inmainmenu.
Main Menu
⹅ Viewing Main Menu
1 d in StandbyMainmenuappears.
⹅ Dial Keys Operations
MainmenucanbeselectedwithDialKeys.Thecor-respondingkeysareasfollows:1:Mail2:Browser3:Infrared4:Tool5:Camera
6:DataFolder7:Alarm8:Phone9:Settings
⹅ Display Saving
Displaygoescompletelydarkafteracertainperiodofnooperationtosavepower.•Pressanykey(exceptDialKeys)toreilluminateDisplay.
•Alternatively,inStandby,press.tohaveDisplaygodark.

1-17
1G
etting Started/B
asic Know
ledge
⹅ Main Notification Icons/Status
Notification iconssuchasnewmails,status iconsforhandsetstatusappear inStatusBarattopofscreen.
① ②
Status Bar① Notification Icon
:UrgentNews:CallArriving/Call-ing/inProgress
:CallonHold:MissedCall:NewAnswerMemo:NewMessage:NewS!Mail/SMS
:AlarmRinging
:TimerRinging:CalendarNotifica-tion
:BirthdayNotifica-tion
:DataDownloading:SDCardUnmount-ed
:ReadyingSDCard:ScreenshotCap-tured
:SoftwareUpdates:HiddenNotification
② Status Icon:BatteryStrength:Charging:SignalStrength:NoSignal:NoUSIMCard:DataConnectable(4G)
:DataConnectable(3G)
:AirplaneModeisset
:MannerMode:DriveMode:OriginalMode:SecretofPhoneBookDisplayedTemporarily
:SecretofMailDis-playedTemporarily
:SecretofMailDis-played
:AnsweringMachineSet
:AnsweringMachineFull
:CallSetto"SpeakerON"
:CallSetto"MicOFF"
:AlarmSet:TimerCountingDown
:PointerON:PointerOFF:RingtoneVolume0

1-18
1
Getting S
tarted/Basic K
nowledge
MannerPleasebeconsiderateofpeoplearoundyouanduseyourhandsetresponsibly.On AirplanesUsinghandsetmayaffectsafeoperationofaircraft(Followairlineinstructionsforproperuseonanair-plane).In HospitalsIfusingorbringinghandsetisprohibitedbymedicalinstitutionssuchashospitals,followinstructionsofeachmedicalinstitutionforuseinahospital.Congested PlacesPersonswithanimplantedpacemaker,defibrillator,etc.maybearoundyou.Electronicsignalsmayaffectoperationofimplantedpacemakers,defibrillators.Turnoffhandset.Public Places such as Cinemas, Theaters, Muse-umsUsinghandset inpublicplacesmayannoyotherpeoplearoundyou.
⹅ Setting Manner Mode/Drive Mode/Original Mode
Three typesofmannermodessuchasMannerMode/DriveMode/OriginalModeareavailable forhandset.
•Thefollowingtonessoundineachmode.•Shuttersoundforphotoshooting•Movierecordstart/stop•Alarmringtones•RingtonesforUrgentNews
⹅ Setting Manner Mode
Mutenotificationsoundssuchas incomingcalls,newmailsandotherhandsetsoundssuchasKeySound.Handsetvibratesforincomingcallsandno-tifications.•AfterMannerModeisset," "appearsinStatusBar.
•VibrationandLEDworkatinitialvaluesettingsinMannerMode.
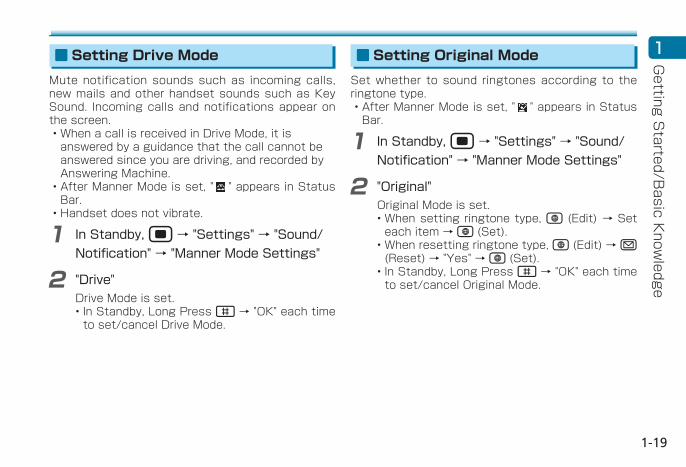
1 In Standby, Long Press ^ → "OK"MannerModeisset.•InStandby,LongPress^→"OK"eachtimetoset/cancelMannerMode.
•Alternatively, inStandby,d →"Settings" →"Sound/Notification" →"MannerModeSet-tings"→"Manner"/"OFF"toset/cancelMannerMode.
1-19
1G
etting Started/B
asic Know
ledge
⹅ Setting Drive Mode
Mutenotificationsoundssuchas incomingcalls,newmailsandotherhandsetsoundssuchasKeySound. Incomingcallsandnotificationsappearonthescreen.•WhenacallisreceivedinDriveMode,itisansweredbyaguidancethatthecallcannotbeansweredsinceyouaredriving,andrecordedbyAnsweringMachine.
•AfterMannerModeisset," "appearsinStatusBar.
•Handsetdoesnotvibrate.
1 In Standby, d → "Settings" → "Sound/Notification" → "Manner Mode Settings"
2 "Drive"DriveModeisset.•InStandby,LongPress^→"OK"eachtimetoset/cancelDriveMode.
⹅ Setting Original Mode
Setwhether tosound ringtonesaccordingtotheringtonetype.•AfterMannerModeisset," "appearsinStatusBar.
1 In Standby, d → "Settings" → "Sound/Notification" → "Manner Mode Settings"
2 "Original"OriginalModeisset.•Whensettingringtonetype,b (Edit)→Seteachitem→b(Set).
•Whenresettingringtonetype,b(Edit)→e(Reset)→"Yes"→b(Set).
•InStandby,LongPress^→"OK"eachtimetoset/cancelOriginalMode.

1-20
1
Getting S
tarted/Basic K
nowledge
Airplane ModeSuspendsignal-transmittingfunctionsanddisablefunctionssuchasmaking/receivingcalls,sending/receivingmails.•AfterMannerModeisset," "appearsinStatusBar.
1 In Standby, d → "Settings" → "Network"
2 Check "Airplane Mode" ( )AirplaneModeisset.•Tocancel,uncheck"AirplaneMode"( ).
Security CodesWhenusinghandset, thefollowingsecuritycodesarerequired.
HandsetCode Coderequiredforusingeachfunction.Itisnotsetbydefault.
LockNo./ Password
Code forunlockingscreen. It isnotsetbydefault.
SecurityCode4-digitcodeincontract.Requiredforchangingdetailsofcontract,usingoptionalservicesfromlandlines,etc.
•Donot forgetSecurityCode. If you forget thecode,servicing is required.Fordetails,contactInquiries(P.11-25).
•Becarefulnottorevealsecuritycodestoothers.Ifmisusedbyothers,SoftBankCorp.isnotliableforanyresultingdamages.

1-21
1G
etting Started/B
asic Know
ledgePIN CodePINCodeisacodeforUSIMCard.It isusedtopreventunauthorizedusebyothers. Itissetto9999bydefault.
⹅ Enabling PIN Code
WhenPINcodeisenabled,settoshowthescreenwherePINentryisrequiredforhandsetuseeachtimehandsetispoweredonwithUSIMCardinstalled.
1 In Standby, d → "Settings"
2 "Security" → "USIM Card Lock Settings" → Check "Lock USIM Card" ( )
3 Enter PIN code → dPINcodeisenabled.
⹅ Changing PIN Code
ChangingPINcodeisavailableonlywhenPINcodeisenabled.
1 In Standby, d → "Settings"
2 "Security" → "USIM Card Lock Settings" → "Change USIM PIN"
3 Enter current PIN code → d
4 Enter new PIN code → d
5 Enter new PIN code → dPINcodeischanged.
CAUTION
Wrong PIN Code Input•IfwrongPIN is input three times in a row,PIN islocked,andhandsetusageisrestricted. EnterPersonalUnblockingKey(PUKcode)toreleasePINlock.(P.1-22)

1-22
1
Getting S
tarted/Basic K
nowledge
⹅ Canceling PIN Lock (PUK Code)
•ForPersonalUnblockingKey(PUKcode),contactInquiries(P.11-25).
1 Enter PUK code → d
2 Enter PIN code → d
3 Enter PIN code again → dPINlockiscanceled.
CAUTION
Wrong PUK Code Input•IfwrongPUKisinputtentimesinarow,USIMCardislocked,andhandsetisnolongeroperable. Inputcare-fully;alockedUSIMCardwillneedtobereissued(feesapply)ataSoftBankshop.