usermanual.wiki ·...
TRANSCRIPT

EMC® VNX® SeriesVersion 5.33
Command Line Interface Reference forBlockP/N 300-015-135 REV. 06

Copyright © 2013-2016 EMC Corporation. All rights reserved. Published in the USA.
Published September 2016
EMC believes the information in this publication is accurate as of its publication date. The information is subject to changewithout notice.
The information in this publication is provided as is. EMC Corporation makes no representations or warranties of any kind withrespect to the information in this publication, and specifically disclaims implied warranties of merchantability or fitness for aparticular purpose. Use, copying, and distribution of any EMC software described in this publication requires an applicablesoftware license.
EMC², EMC, and the EMC logo are registered trademarks or trademarks of EMC Corporation in the United States and othercountries. All other trademarks used herein are the property of their respective owners.
For the most up-to-date regulatory document for your product line, go to EMC Online Support (https://support.emc.com).
EMC CorporationHopkinton, Massachusetts 01748-91031-508-435-1000 In North America 1-866-464-7381www.EMC.com
2 EMC VNX Series 5.33 Command Line Interface Reference for Block

15
About CLI Commands 19
naviseccli......................................................................................................20
VNX CLI for Block 23
Basic commands...........................................................................................24Storage setup and management overview........................................ 24Shared storage setup and management overview.............................25alpa -get...........................................................................................26alpa -set...........................................................................................27arraycommpath................................................................................28arrayconfig -capture......................................................................... 29arrayconfig -duplicate...................................................................... 30arrayname........................................................................................32backendbus -analyze....................................................................... 32backendbus -get -connstate.............................................................35backendbus -get -physical............................................................... 36backendbus -get -prominfo.............................................................. 36backendbus -get -sfpstate................................................................37backendbus -get -speeds................................................................. 38backendbus -get -all........................................................................ 38backendbus -resetspeed..................................................................41baseuuid......................................................................................... 42bind................................................................................................. 43cachecard -list................................................................................. 47cachecard -initialize......................................................................... 48cache -sp -info................................................................................. 49cache -sp -modify.............................................................................50chglun..............................................................................................50chgrg............................................................................................... 52clearlog............................................................................................53clearstats.........................................................................................54cmdtime.......................................................................................... 54copytodisk....................................................................................... 55createrg........................................................................................... 56emconfiguration...............................................................................58environment.................................................................................... 58failovermode....................................................................................61faults -list.........................................................................................62flash -ioport..................................................................................... 63flash -iomodule................................................................................64flashleds..........................................................................................65getagent.......................................................................................... 66getall............................................................................................... 68getarrayuid...................................................................................... 71getconfig..........................................................................................72getcontrol........................................................................................ 73
Preface
Chapter 1
Chapter 2
CONTENTS
EMC VNX Series 5.33 Command Line Interface Reference for Block 3
getcrus.............................................................................................74getdisk.............................................................................................78getlog.............................................................................................. 84getloop............................................................................................ 85getlun.............................................................................................. 85getresume........................................................................................92getrg................................................................................................ 95getsniffer......................................................................................... 97getsp............................................................................................. 100getsptime.......................................................................................101getspuptime.................................................................................. 101getunusedluns...............................................................................102hotsparepolicy -list........................................................................ 103hotsparepolicy -set........................................................................ 103inserttestevent...............................................................................104ioportconfig -config -maxvlans....................................................... 104ioportconfig -list.............................................................................105ioportconfig -list -maxvlans............................................................ 112ioportconfig -persist.......................................................................112luncache -clear.............................................................................. 113luncache -list................................................................................. 114managedby....................................................................................114managefiles -delete....................................................................... 115managefiles -list............................................................................ 116managefiles -retrieve..................................................................... 116ndu -list......................................................................................... 117ndu -install.................................................................................... 119ndu -runrules................................................................................. 122ndu -commit.................................................................................. 123ndu -status.................................................................................... 124ndu -revert..................................................................................... 124networkadmin -get......................................................................... 125networkadmin -mib........................................................................129networkadmin -route......................................................................130networkadmin -set......................................................................... 131port................................................................................................134powersaving.................................................................................. 145rebootSP........................................................................................146rebootpeerSP.................................................................................147remoteconfig -getconfig................................................................. 147remoteconfig -setconfig................................................................. 148removerg........................................................................................150resetandhold................................................................................. 150responsetest..................................................................................151sc_off.............................................................................................153setfeature...................................................................................... 154setsniffer....................................................................................... 154setsniffverify.................................................................................. 155setspstime.....................................................................................156setsptime.......................................................................................156setstats..........................................................................................157shutdown.......................................................................................158shutdownsp...................................................................................159shutdownpeersp............................................................................159spcollect -info................................................................................ 160spcollect -set................................................................................. 160
CONTENTS
4 EMC VNX Series 5.33 Command Line Interface Reference for Block

spcollect........................................................................................ 161spportspeed.................................................................................. 162storagegroup................................................................................. 168systemtype.................................................................................... 179trespass.........................................................................................180unbind........................................................................................... 181unitserialnumber........................................................................... 181
LUN Expansion (metaLUN) commands.........................................................182MetaLUNs overview........................................................................182CLI metaLUN command functions...................................................183metalun -destroy............................................................................184metalun -expand............................................................................184metalun -info................................................................................. 190metalun -list...................................................................................191metalun -modify.............................................................................196Using the added capacity of an expanded SnapView, MirrorView orSAN Copy LUN................................................................................197
Reserved LUN Pool commands.................................................................... 198reserved -lunpool -addlun.............................................................. 199reserved -lunpool -list.................................................................... 200reserved -lunpool -rmlun................................................................ 201
iSCSI and FCoE commands.......................................................................... 202iSCSI commands overview............................................................. 202connection -adduser...................................................................... 203connection -deleteuser.................................................................. 204connection -getuser....................................................................... 205connection -getport........................................................................206connection -setport........................................................................217connection -delport........................................................................219connection -route...........................................................................220connection -pingnode.................................................................... 221connection -traceroute................................................................... 222connection -setsharedauth............................................................ 223connection -delsharedauth............................................................ 224connection -getsharedauth............................................................ 224connection -addset........................................................................ 225connection -delset......................................................................... 226connection -modifyset....................................................................226connection -getset......................................................................... 228connection -addpath......................................................................228connection -delpath.......................................................................229connection -modifypath................................................................. 230connection -verifypath................................................................... 231isns -addserver.............................................................................. 232isns -deleteserver...........................................................................232isns -listserver................................................................................233isns -setprimary............................................................................. 234
LUN Migration commands........................................................................... 235migrate -start................................................................................. 235migrate -cancel.............................................................................. 236migrate -modify..............................................................................237migrate -list....................................................................................238
Domain and Security commands................................................................. 239About domains and user accounts................................................. 239Domain and security commands overview......................................242domain -add.................................................................................. 243
CONTENTS
EMC VNX Series 5.33 Command Line Interface Reference for Block 5

domain -list....................................................................................245domain -remove.............................................................................246domain -uninitialize....................................................................... 247domain -setmaster.........................................................................248ntp -list.......................................................................................... 248ntp -set.......................................................................................... 250security -adduser........................................................................... 251security -changeuserinfo................................................................ 253security -list................................................................................... 254security -listrole............................................................................. 254security -rmuser............................................................................. 255security -ldap -addserver................................................................255security -ldap -modifyserver........................................................... 257security -ldap -removeserver.......................................................... 259security -ldap -listserver................................................................. 260security -ldap -addrolemapping......................................................261security -ldap -modifyrolemapping.................................................261security -ldap -removerolemapping................................................ 262security -ldap -listrolemapping.......................................................263security -ldap -synchronize............................................................ 263security -certificate -add.................................................................264security -certificate -remove........................................................... 264security -certificate -list.................................................................. 265security -certificate -alertBeforeExpiration...................................... 266security -pkcs12upload..................................................................266security -SPcertificate -generate..................................................... 267security -fipsmode -set...................................................................267security -fipsmode -get...................................................................268security -setport............................................................................. 268security -trustedclient -enable........................................................268security -trustedclient -add............................................................ 269security -trustedclient -list..............................................................270security -trustedclient -remove....................................................... 270
Event Monitor commands............................................................................271Event Monitoring overview............................................................. 271-portal -create................................................................................ 272-portal -list..................................................................................... 272-portal -migrate.............................................................................. 273-portal -destroy.............................................................................. 273-template -list................................................................................ 274-template -import........................................................................... 274-template -export........................................................................... 275-template -destroy..........................................................................275-template -findconflict....................................................................276-template -swap............................................................................. 276-monitor -addsystem...................................................................... 277-monitor -removesystem................................................................ 277-monitor -listmapping.................................................................... 278-monitor -applytemplate.................................................................278-monitor -stoptemplate.................................................................. 279-monitor -getlog............................................................................. 280-monitor -enableresponse.............................................................. 280-monitor -disableresponse............................................................. 281-monitor -getlogsize....................................................................... 282-monitor -setlogsize....................................................................... 282-monitor -inserttestevent................................................................283
CONTENTS
6 EMC VNX Series 5.33 Command Line Interface Reference for Block

-monitor -responsetest...................................................................283-monitor -reloadconfig....................................................................285
Virtual server commands.............................................................................285Virtual server overview................................................................... 285server -volmap............................................................................... 286server -update................................................................................288server -getagent............................................................................. 288server -remoteconfig...................................................................... 289server -register............................................................................... 290hypervisor -addvirtualcenter.......................................................... 290hypervisor -modifyvirtualcenter......................................................291hypervisor -removevirtualcenter..................................................... 292hypervisor -addesx.........................................................................292hypervisor -modifyesx.................................................................... 293hypervisor -removeesx................................................................... 293hypervisor -listesx..........................................................................294hypervisor -bypassCert -set............................................................ 294hypervisor -bypassCert -get............................................................294
Host Agent commands................................................................................ 295server -volmap............................................................................... 295server -update................................................................................297server -getagent............................................................................. 297server -remoteconfig...................................................................... 298server -register............................................................................... 299
Unisphere Server Utility...............................................................................299Using the server utility command line to generate a high-availabilityreport.............................................................................................299
Unisphere Initialization Utility..................................................................... 302Using the command line initialization utility...................................302
Virtual Pools Commands 305
Virtual Pools overview................................................................................. 306storagepool -create..................................................................................... 307storagepool -list.......................................................................................... 310storagepool -destroy................................................................................... 316storagepool -modify.................................................................................... 316storagepool -expand................................................................................... 318storagepool -cancelexpand......................................................................... 319storagepool -feature -info............................................................................319storagepool -resumeharvesting................................................................... 321lun -create...................................................................................................321lun -modify..................................................................................................323lun -expand.................................................................................................325lun -destroy.................................................................................................326lun -list........................................................................................................326deduplication -feature -pause..................................................................... 330deduplication -feature -resume................................................................... 330deduplication -feature -info.........................................................................330
Auto-tiering Commands 333
About tiered storage....................................................................................334autotiering -schedule -modify......................................................................335autotiering -schedule -enable|-disable........................................................ 336autotiering -relocation -start........................................................................336
Chapter 3
Chapter 4
CONTENTS
EMC VNX Series 5.33 Command Line Interface Reference for Block 7

autotiering -relocation -setrate.................................................................... 337autotiering -relocation -pause|-resume........................................................338autotiering -relocation -stop........................................................................ 338autotiering -info.......................................................................................... 339
Compression Commands 341
About LUN Compression..............................................................................342compression -on......................................................................................... 342compression -pause....................................................................................343compression -feature -pause.......................................................................344compression -resume..................................................................................344compression -feature -resume.....................................................................345compression -feature -info.......................................................................... 345compression -modify...................................................................................345compression -off......................................................................................... 346compression -list........................................................................................ 346
FAST Cache Commands 349
Introduction to caching............................................................................... 350cache -fast -create.......................................................................................351cache -fast -destroy.....................................................................................352cache -fast -info.......................................................................................... 352
EMC Unisphere QoS Manager 355
About Unisphere Quality of Service Manager............................................... 356QoS Manager prerequisites............................................................356
QoS Manager CLI commands.......................................................................356nqm -getlatestperf......................................................................... 357nqm -info....................................................................................... 357nqm -ioclass -create.......................................................................358nqm -ioclass -destroy.....................................................................359nqm -ioclass -list............................................................................360nqm -ioclass -modify......................................................................362nqm -measure................................................................................364nqm -off......................................................................................... 364nqm -policy -create........................................................................ 365nqm -policy -destroy...................................................................... 366nqm -policy -list............................................................................. 366nqm -policy -modify....................................................................... 367nqm -run........................................................................................ 368nqm -schedule -create................................................................... 369nqm -schedule -destroy..................................................................370nqm -schedule -list........................................................................ 370nqm -schedule -modify.................................................................. 372nqm -schedule -resume..................................................................373nqm -schedule -suspend................................................................373nqm -setfallback............................................................................ 374nqm -setoptions.............................................................................374nqm -stop...................................................................................... 375
Client tools..................................................................................................375nqm -archive -dump....................................................................... 375nqm -archive -retrieve.................................................................... 382
Chapter 5
Chapter 6
Chapter 7
CONTENTS
8 EMC VNX Series 5.33 Command Line Interface Reference for Block

EMC Unisphere Analyzer 385
About Unisphere Analyzer........................................................................... 386Prerequisites..................................................................................386
Analyzer CLI commands.............................................................................. 386analyzer -set.................................................................................. 387analyzer -get.................................................................................. 388analyzer -logging............................................................................388analyzer -start................................................................................ 389analyzer -stop................................................................................ 389analyzer -status............................................................................. 390analyzer -archive............................................................................390
Client tools..................................................................................................392analyzer -archivedump...................................................................392analyzer -archiveretrieve................................................................ 405analyzer -archivemerge.................................................................. 406
EMC VNX MirrorView/A CLI 409
MirrorView/A remote mirroring commands.................................................. 410MirrorView/A operations overview..................................................410MirrorView/A CLI functions.............................................................412mirror -async -addimage................................................................ 413mirror -async -change.....................................................................415mirror -async -changeimage........................................................... 416mirror -async -create...................................................................... 418mirror -async -destroy.................................................................... 419mirror -disablepath........................................................................ 420mirror -enablepath......................................................................... 421mirror -async -fractureimage...........................................................422mirror -async -info.......................................................................... 423mirror -async -list........................................................................... 425mirror -async -promoteimage......................................................... 427mirror -async -removeimage........................................................... 428mirror -async -setfeature................................................................ 429mirror -async -syncimage............................................................... 430
MirrorView/A consistency group commands................................................431mirror -async -creategroup............................................................. 431mirror -async -destroygroup........................................................... 433mirror -async -addtogroup..............................................................434mirror -async -removefromgroup.................................................... 434mirror -async -changegroup............................................................435mirror -async -syncgroup................................................................ 437mirror -async -fracturegroup........................................................... 437mirror -async -promotegroup.......................................................... 438mirror -async -listgroups.................................................................439
EMC VNX MirrorView/S CLI 443
MirrorView/S Remote Mirroring commands................................................. 444MirrorView/S operations overview..................................................444MirrorView/S CLI functions.............................................................446mirror -sync -addimage.................................................................. 447mirror -sync -allocatelog.................................................................450mirror -sync -change.......................................................................450mirror -sync -changeimage............................................................. 452
Chapter 8
Chapter 9
Chapter 10
CONTENTS
EMC VNX Series 5.33 Command Line Interface Reference for Block 9

mirror -sync -create........................................................................ 453mirror -sync -deallocatelog.............................................................455mirror -sync -destroy...................................................................... 455mirror -disablepath........................................................................ 457mirror -enablepath......................................................................... 458mirror -sync -fractureimage............................................................ 459mirror -sync -info............................................................................460mirror -sync -list............................................................................. 462mirror -sync -listsyncprogress.........................................................464mirror -sync -listlog........................................................................ 465mirror -sync -promoteimage........................................................... 465mirror -sync -removeimage............................................................. 467mirror -sync -setfeature.................................................................. 469mirror -sync -syncimage................................................................. 470
MirrorView/S consistency group commands................................................471mirror -sync -creategroup............................................................... 471mirror -sync -destroygroup............................................................. 472mirror -sync -addtogroup................................................................473mirror -sync -removefromgroup...................................................... 474mirror -sync -changegroup..............................................................475mirror -sync -syncgroup..................................................................476mirror -sync -fracturegroup............................................................. 477mirror -sync -promotegroup............................................................478mirror -sync -listgroups.................................................................. 479
SAN Copy and its command line utilities 481
Introducing SAN Copy software................................................................... 482Preparing a Block system for a copy session................................................482
Connecting SAN Copy ports to storage groups................................483Preparing a Symmetrix system for a copy session........................................485
Preparing a Symmetrix system using EMC ControlCenter SAN Manager...................................................................................................... 486Preparing a Symmetrix system using ESN Manager.........................487
About admhost for SAN Copy...................................................................... 488admhost SAN Copy command functions......................................................488Preparing logical units for a SAN Copy session............................................ 490
Preparing source and destination logical units for full and incrementalsessions........................................................................................ 491
SAN Copy CLI commands.............................................................................492SAN Copy command functions.................................................................... 492sancopy -create...........................................................................................494sancopy -destinfo........................................................................................498sancopy -duplicate......................................................................................501sancopy -info.............................................................................................. 502sancopy -mark............................................................................................ 506sancopy -modify..........................................................................................507sancopy -pause...........................................................................................512sancopy -remove.........................................................................................513sancopy -resume.........................................................................................514sancopy -settings........................................................................................ 515sancopy -start............................................................................................. 516sancopy -stop............................................................................................. 518sancopy -throttle......................................................................................... 519sancopy -transfer........................................................................................ 520sancopy -unmark........................................................................................ 521
Chapter 11
CONTENTS
10 EMC VNX Series 5.33 Command Line Interface Reference for Block

sancopy -updateconnections...................................................................... 521sancopy -verify............................................................................................ 522
EMC SnapView Software 525
SnapView clone CLI commands................................................................... 526Setting up SnapView to use clones.................................................526CLI clone command functions........................................................ 527clone | snapview -addclone............................................................ 528clone | snapview -allocatecpl......................................................... 531clone | snapview -changeclone.......................................................532clone | snapview -changeclonefeature............................................534clone | snapview -changeclonegroup..............................................535clone | snapview -consistentfractureclones.................................... 536clone | snapview -createclonegroup............................................... 537clone | snapview -deallocatecpl......................................................538clone | snapview -destroyclonegroup............................................. 539clone | snapview -fractureclone...................................................... 540clone | snapview -listclone............................................................. 542clone | snapview -listclonefeature.................................................. 544clone | snapview -listclonegroup.................................................... 546clone | snapview -removeclone...................................................... 548clone | snapview -resetfracturelog.................................................. 549clone | snapview -reversesyncclone................................................550clone | snapview -syncclone........................................................... 552
Admsnap commands for clones.................................................................. 554About admsnap software and clones............................................. 554Requirements for admsnap and clones.......................................... 554admsnap clone_activate................................................................ 555admsnap clone_deactivate............................................................ 556admsnap flush...............................................................................558admsnap list..................................................................................559
SnapView Snapshot CLI commands.............................................................560Setting up SnapView to use snapshots.......................................... 560SnapView command functions....................................................... 562snapview -activatesnapshot...........................................................563snapview -chgrollback................................................................... 565snapview -chgsnapshot................................................................. 566snapview -createsnapshot............................................................. 566snapview -deactivatesnapshot.......................................................568snapview -listrollback.................................................................... 569snapview -listsessions................................................................... 571snapview -listsnapshots................................................................ 573snapview -listsnapableluns............................................................574snapview -lunpool..........................................................................575snapview -rmsnapshot...................................................................576snapview -startrollback.................................................................. 577snapview -startsession.................................................................. 579snapview -stopsession...................................................................582
Admsnap commands for snapshots............................................................ 583About admsnap software and snapshots....................................... 583Requirements for snapshots.......................................................... 584admsnap activate.......................................................................... 584admsnap deactivate...................................................................... 588admsnap flush...............................................................................591admsnap list..................................................................................593
Chapter 12
CONTENTS
EMC VNX Series 5.33 Command Line Interface Reference for Block 11

admsnap start................................................................................594admsnap stop................................................................................598
EMC VNX Snapshots Software 601
VNX Snapshots CLI commands....................................................................602snap -feature................................................................................. 602snap -create...................................................................................602snap -destroy.................................................................................604snap -list........................................................................................604snap -modify ................................................................................. 606snap -copy..................................................................................... 607snap -restore..................................................................................608snap -attach...................................................................................609snap -detach..................................................................................609snap -group -create........................................................................ 609snap -group -destroy ..................................................................... 610snap -group -modify....................................................................... 610snap -group -list.............................................................................611snap -group -addmember...............................................................612snap -group -rmmember.................................................................612snap -group -replmember...............................................................613lun -create......................................................................................613lun -create......................................................................................614lun -destroy....................................................................................614lun -modify.....................................................................................615lun -expand....................................................................................616lun -attach..................................................................................... 616lun -detach.................................................................................... 617storagepool -create........................................................................ 617storagepool -modify....................................................................... 618storagepool -list.............................................................................619storagepool -resumeAutoDelete..................................................... 621getlun............................................................................................ 621
SnapCLI commands for VNX Snapshots.......................................................623snapcli create ............................................................................... 623snapcli destroy.............................................................................. 624snapcli copy...................................................................................625snapcli attach................................................................................ 626snapcli detach............................................................................... 627
EMC Secure Remote Support on the Storage Processor 629
ESRS Device Client on Storage Processor.....................................................630esrsconfig -agentprovision.......................................................................... 630esrsconfig -agentstatus............................................................................... 631esrsconfig -configproxy -addproxy............................................................... 632esrsconfig -configproxy -list.........................................................................632esrsconfig -configproxy -removeproxy......................................................... 633esrsconfig -configpolicymanager -addpm.................................................... 633esrsconfig -configpolicymanager -list.......................................................... 634esrsconfig -configpolicymanager -addpolicyproxy....................................... 634esrsconfig -configpolicymanager -removepolicyproxy.................................. 635esrsconfig -configpolicymanager -removePM...............................................635
Chapter 13
Chapter 14
CONTENTS
12 EMC VNX Series 5.33 Command Line Interface Reference for Block

Data at Rest Encryption 637
Data at Rest Encryption overview.................................................................638securedata -feature -activate.......................................................................639securedata -feature -info............................................................................. 640securedata -backupkeys -status.................................................................. 641securedata -backupkeys -retrieve................................................................642securedata -auditlog -retrieve......................................................................643securedata -auditlog -cksum....................................................................... 644
Chapter 15
CONTENTS
EMC VNX Series 5.33 Command Line Interface Reference for Block 13

CONTENTS
14 EMC VNX Series 5.33 Command Line Interface Reference for Block
Preface
As part of an effort to improve and enhance the performance and capabilities of itsproduct lines, EMC periodically releases revisions of its hardware and software.Therefore, some functions described in this document may not be supported by allversions of the software or hardware currently in use. For the most up-to-date informationon product features, refer to your product release notes.
If a product does not function properly or does not function as described in thisdocument, please contact your EMC representative.
AudienceThis guide is part of the EMC VNX documentation set, and is intended for use by thosewho will use CLI commands to configure, manage, or obtain the status of EMC systems.
This version of the manual covers up to VNX systems running release 1.3 of Unisphere.
Readers of this guide are expected to be familiar with the following topics:
l The operating system running on the servers you will manage.
l System components and configurations.
For introductory information, refer to the appropriate configuration planning guide foryour system.
Special notice conventions used in this documentEMC uses the following conventions for special notices:
DANGER
Indicates a hazardous situation which, if not avoided, will result in death or seriousinjury.
WARNING
Indicates a hazardous situation which, if not avoided, could result in death or seriousinjury.
CAUTION
Indicates a hazardous situation which, if not avoided, could result in minor or moderateinjury.
NOTICE
Addresses practices not related to personal injury.
Note
Presents information that is important, but not hazard-related.
Systems no longer covered in this documentThe table below lists the systems that are no longer covered in this document and thelast revision of this document that included the systems.
EMC VNX Series 5.33 Command Line Interface Reference for Block 15

System removed Last revision including the system
CX200, CX400, and CX600 300-003-628 Rev. A07069001184 Rev. A11
300-001-335 Rev. A11
300-004-210 Rev. A02
069001181 Rev. A14
FC series; C series 069001038 Rev. A14300-001-335 Rev. A11
069001184 Rev. A11
FC4700 069001184 Rev. A08
Related documentationRelated documentation for EMC Navisphere CLI reference includes:
We recommend that you download the latest information before you run the CLIcommands. Platform-specific limitations and requirements are provided in theappropriate release note documents.
l EMC Unisphere Release Notes
l EMC MirrorView/Asynchronous and MirrorView/Synchronous for VNX OE for Block ReleaseNotes
l The version of this manual that is applicable to your software revision
The most up-to-date information about the EMC SAN Copy software is posted on EMCOnline Support. We recommend that you download the latest information before you startthe SAN Copy software. If you purchased this product from an EMC reseller and youcannot access EMC Online Support, the latest product information should be availablefrom your reseller.
To access EMC Online Support, use the following link:
http://Support.EMC.com
Where to get helpEMC support, product, and licensing information can be obtained as follows:
Product information—For documentation, release notes, software updates, or forinformation about EMC products, licensing, and service, go to EMC Online Support(registration required) at http://Support.EMC.com.Troubleshooting—Go to EMC Online Support at http://Support.EMC.com. After loggingin, locate the applicable Support by Product page.Technical support—For technical support and service requests, go to EMC CustomerService on EMC Online Support at http://Support.EMC.com. After logging in, locatethe applicable Support by Product page, and choose either Live Chat or Create aservice request. To open a service request through EMC Online Support, you musthave a valid support agreement. Contact your EMC sales representative for detailsabout obtaining a valid support agreement or with questions about your account.
Note
Do not request a specific support representative unless one has already been assigned toyour particular system problem.
Preface
16 EMC VNX Series 5.33 Command Line Interface Reference for Block
Your commentsYour suggestions will help us continue to improve the accuracy, organization, and overallquality of the user publications.
Please send your opinion of this document to:
Preface
EMC VNX Series 5.33 Command Line Interface Reference for Block 17

Preface
18 EMC VNX Series 5.33 Command Line Interface Reference for Block

CHAPTER 1
About CLI Commands
This chapter explains the EMC VNX CLI for Block commands.
Major topic include:
l naviseccli..............................................................................................................20
About CLI Commands 19

naviseccliSends status or configuration requests to a system through the command line.
PREREQUISITESAnyone that can log in to the server running VNX CLI for Block 4.30 or later.
DESCRIPTIONThe naviseccli command sends system management and configuration requests to asystem through the Internet.
SYNTAX
naviseccli -help
naviseccli [-addressIPAddress | NetworkName | -h IPAddress |NetworkName][-AddUserSecurity][-f filename][-nopoll | -np][-parse | -p][-password password][-port port][-q][-RemoveUserSecurity][-scope 0 | 1 | 2][-secfilepath][security -certificate][-timeout | -t timeout][-user username][-v][-xml]CMD <optional command switches>
OPTIONS
-helpDisplays the help screen and does not start the naviseccli process. To start thenaviseccli process, use one or more of the switches that follows instead.
-address IPAddress | NetworkName | -h IPAddress | NetworkNameSpecifies the IP address or network name of the targeted SP on the desired system.The default, if you omit this switch, is localhost.
-AddUserSecurityDirects the CLI to add user security information to the security file on this server. Youmust use the -scope switch to add scope information to the security file. You canuse the -password switch or enter your password into the password prompt, tosupply the required password information to the security file. The -user and -secfilepath switches are optional with this command.
About CLI Commands
20 EMC VNX Series 5.33 Command Line Interface Reference for Block

Note
If you specify the -user switch, you can create an alternative username to your
server login name in the security file you create on this server. If you use the -secfilepath switch, you can specify an alternative location to your default home
directory, for the security file on this server. You must then use the -secfilepathswitch in each subsequent command that you issue.
-f filenameStores the data in a file.
-nopoll | -npDirects the feature provider not to issue a poll request. This switch significantlyincreases performance when dealing with large or multiple systems. The featureprovider automatically issues a poll request unless this switch is specified.
Note
When the -nopoll switch is set, get commands may return stale data and setcommands may erase previously changed settings. Use caution when the -nopollswitch is set.
-parse | -pDirects the CLI to validate the command. The CLI verifies the command syntax anddisplays a message stating whether the command was valid. The CLI takes no otheraction.
-password passwordSpecifies the password on the system you want to log in to. The password is visiblein the command line. Passwords are case-sensitive. If you want to mask thepassword, and you are not using a security file, you can omit this switch from thecommand line. The CLI then prompts you to enter a password. The information youenter into the password prompt is concealed.
Note
You can omit this switch if you are using a security file. See -AddUserSecurity.
-port portnumberSets the port number (type) of the system. The default is 443. If you choose tochange the default port number, management port 2163 will be supported; however,you will need to specify the -port switch and number 2163 in every subsequentcommand you issue.
-qSuppresses error messages. This switch is useful when included as part of a script.
-RemoveUserSecurityDirects the CLI to remove user security information about the current user from thesecurity file on this server.
-scope 0 | 1 | 2Specifies whether the user account on the system you want to log in to is local,global, or lightweight directory access protocol (LDAP). A 0 (default) indicates global,1 indicates local, and 2 indicates LDAP. A global account is effective throughout thedomain. When the administrator creates a global account, the software copies thedefinition of this account to the domain directory, which makes it accessible on allsystems in the domain. A local account is effective only on the systems for which theadministrator creates the account. You can log in only to those systems on whichyou have a local account. LDAP maps the username or password entries to an
About CLI Commands
naviseccli 21

external LDAP or active directory server for authentication. Username or passwordpairs whose roles are not mapped to the external directory will be denied access.
-secfilepath filenameStores the security file in a file path location you specify. When you create a securityfile on a server using the -addusersecurity command, the security file is savedto your default home directory. If you want to store the security file in an alternativelocation, you can use the optional -secfilepath switch with the -addusersecurity command.
Note
If you use the -secfilepath switch to set up an alternative path for your security
file, you must use this switch in every subsequent CLI command you issue, to ensurethe CLI locates the security file.
security -certificateSaves the certificates to the certificate store. It also provides options like -list, -remove, -add to manage the certificate store.
-timeout | -t timeoutSets the timeout value in seconds. The default is 600 seconds.
-user usernameSpecifies the username on the system you want to log in to. Username is case-sensitive. You can omit this if you have added the username to the security file.
Note
You can use this switch when establishing a security file, to specify an alternativeusername. See -AddUserSecurity.
-vEnables verbose error descriptions. This is the default unless -q is specified.
-xmlSpecifies command output in XML format. Use the -o (override switch) whenspecifying -xml with commands that require confirmation. Otherwise, the XMLoutput will contain your confirmation string.
CMDOne of the set of commands used with the naviseccli command.
About CLI Commands
22 EMC VNX Series 5.33 Command Line Interface Reference for Block

CHAPTER 2
VNX CLI for Block
This chapter includes content for VNX series systems.
Major topics include:
l Basic commands...................................................................................................24l LUN Expansion (metaLUN) commands.................................................................182l Reserved LUN Pool commands............................................................................ 198l iSCSI and FCoE commands.................................................................................. 202l LUN Migration commands................................................................................... 235l Domain and Security commands......................................................................... 239l Event Monitor commands....................................................................................271l Virtual server commands.....................................................................................285l Host Agent commands........................................................................................ 295l Unisphere Server Utility.......................................................................................299l Unisphere Initialization Utility............................................................................. 302
VNX CLI for Block 23

Basic commandsThis section explains each of the basic variations, that is, the CLI commands that arecommon to all systems. Command variations for Storage Groups (Access Logix) areexplained in the following chapter.
Storage setup and management overviewThis section shows how to configure and monitor a system using the navisecclicommand. It shows commands with UNIX device names. The Windows device nameswould be drive letters. In this system, in which each SP is a host. For an overview showingsystems with storage groups, see the section Shared storage setup and managementoverview on page 25. For systems without storage groups:
Procedure
1. Create three RAID groups.
naviseccli -h ss1_spa createrg 0 0_0_4 0_0_5 0_0_6 0_0_7 0_0_8 -raidtype r5
Creates RAID group 0 from disks 4 through 8 in the DPE enclosure.
naviseccli -h ss1_spa createrg 1 0_0_9 0_0_10 -raidtype r1
Creates RAID group 1 from disks 9 and 10 in the DPE enclosure.
naviseccli -h ss1_spa createrg 2 0_0_11 0_0_12 -raidtype r1
Creates RAID group 2 from disks 11 and 12 in the DPE enclosure.
2. Bind a LUN on each RAID group.
naviseccli -h ss1_spa bind 0 -rg 0
This command binds a LUN of type RAID 5 with LUN ID 0 on RAID group 0. The LUNoccupies all space on RAID group 0, since the bind command did not include the -cap switch. By default, read and write caching are enabled on the new LUN.
naviseccli -h ss1_spa bind 1 -rg 1
This command binds a LUN of type RAID 1 (mirrored pair) with LUN ID 1 on RAID group1. The LUN occupies all space on RAID group 1 and caching is enabled by default.
naviseccli -h ss1_spa bind 2 -rg 2
This command binds a LUN of type RAID 1 (mirrored pair) with LUN ID 2 on RAID group2. The LUN occupies all space on RAID group 2, and caching is enabled by default.
3. Get SP memory information to prepare to set up the system cache.
naviseccli -h ss1_spa getsp -memSP AMemory Size For The SP: 12288SP BMemory Size For The SP: 12288
VNX CLI for Block
24 EMC VNX Series 5.33 Command Line Interface Reference for Block

4. For easy identification in the future, name the system.
naviseccli -h ss1_spa arrayname users11Change the arrayname from xxx to users11? (y/n) y
This command changes the name of the system to users11.
Results
At this point, you can create file systems on the LUNs from the operating system andstore data on them.
You can learn LUN device names using the getagent command and check statusperiodically using the getsp, getdisk, and getlun commands.
Shared storage setup and management overviewStorage groups provide a simple means of managing which hosts can access definedgroups of LUNs. Specify host-storage group access using the unique ID (also called theworld wide name, WWN) of each HBA and LUN.
Generally, you may find it easier to use Unisphere than the CLI to create and manipulatestorage groups. However, the following is a sequence of tasks you can perform using onlythe CLI:
Procedure
1. Plan the LUNs that each host will use: RAID group type, capacity, SP owner, storagegroup, and so on.
2. Create the RAID groups, bind the LUNs, and assign the LUNs to RAID groups usingmanager or the CLI. See the unshared storage overview in Storage setup andmanagement overview on page 24 for example use of the CLI.
Note
If you are running VMware ESX Server, you can bind LUNs from ESX Server or a virtualmachine (VM).
3. Create the storage groups you want using Unisphere or the CLI commandstoragegroup -create.
4. Connect the hosts to storage groups using Unisphere or the CLI. Use the CLI commandstoragegroup -connecthost to assign a storage group to all HBAs in a host, orthe command storagegroup -setpath to assign a storage group to a specificHBA in a host.
Note
If you are running VMware ESX Server, assign ESX Server to the storage group.
5. Assign LUNs to the storage groups using Unisphere or the CLI storagegroup -addhlu command. You can assign more than one LUN to a storage group and letmore than one host access a storage group.
VNX CLI for Block
Shared storage setup and management overview 25

Note
If you are running VMware ESX Server, rescan the bus at the ESX Server level. If youare running ESX Server 2.5.x, you must then power down any virtual machine to whichyou will assign LUNs. If you are running ESX Server 3.x, you do not need to powerdown the virtual machine. At the ESX Server level, assign the LUNs to the virtualmachines. When you have finished, if you are running ESX Server 2.5.x, power up theVM. If you are running ESX Server 3.x, you do not need to power up the VM.
6. As needed, reconfigure host-storage group connections using Unisphere or the CLIcommand storagegroup -sethost. If you need to disconnect a host from astorage group, use storagegroup -disconnecthost.
alpa -getDisplays the SCSI ID associated with an SP port.
PREREQUISITESFor naviseccli, you must have a user account on the system on which you want toexecute the command.
DESCRIPTIONThe CLI alpa commands (Arbitrated Loop Physical Address) get and set the port ID SCSIIDs on an SP. These IDs are required for I/O to the SP.
We suggest you use a unique SCSI ID for each SP port in your installation. For example,on the first system, for ports 0 and 1, you can specify SCSI IDs 0 and 1, respectively. Onthe second system, for the ports you can specify IDs 2 and 3 respectively, and so on.
The naviseccli command -get function lists ALPA information. The informationincludes the port ID, the SP ID (A or B), and the SCSI ID associated with the port. Issue thecommand to the SP for which this information is needed.
If you really need to change an SP port ID, you can do so with the alpa -set function.
SYNTAXalpa -getEXAMPLEFor SP A (SP hostname payroll_storage_spa), this command lists the SCSI IDassociated with port 0.
naviseccli -h payroll_storage_spa alpa -get
Storage Processor: SP APort ID: 0ALPA Value: 0
OUTPUTSee above. If the version of VNX Operating Environment (OE) for Block software runningon the SP does not support this command, a Not supported error message is printedto stderr. Other errors:
VALID_VALUES_0_3
VNX CLI for Block
26 EMC VNX Series 5.33 Command Line Interface Reference for Block
alpa -setUpdates the SCSI ID associated with an SP port.
PREREQUISITESFor naviseccli, you must have a user account on the system on which you want toexecute the command.
DESCRIPTIONThe naviseccli alpa command with the -set switch updates the SCSI ID value forthe given port on an SP.
CAUTION
The SP port ID SCSI IDs are initially set by EMC service personnel to work at your site. Donot change any value unless you are installing a new SP and need to change its SCSI IDsfrom the SP ship values of 0 and 1.
If you change any value, after you confirm, the SP will restart and use the new values.
The software will not let you select a SCSI ID out of range (0-126) or a duplicate ID on asystem. If you omit the -o (override) switch, then the CLI prompts for confirmation:
Changing the ALPA value of port port-id from old-SCSI-ID to new-SCSI-ID (y/n)
To confirm, answer y; to take no action, answer n.
SYNTAX
alpa -set-sp a|b -portid portid SCSI-ID [-o]
OPTIONS
-sp a | bSpecifies the SP: A or B.
-portid portid SCSI-IDSpecifies the new SCSI ID to associate with the port. Valid port SCSI IDs range from 0through 126.
-oExecutes the command without prompting for confirmation.
EXAMPLEFor SP A, this command changes the SCSI ID associated with port 1 to 1.
naviseccli -h ss1_SPA alpa -set -sp a -portid 1 1
Changing the ALPA value of port 1, SP A to 1WARNING: This operation will reboot the target SP.Verify that the SPS on the surviving SP is operating correctly.Otherwise write cache must be disabled:naviseccli -h IPAddress cache -sp -modify -wc off.Failure to disable write cache may result in the loss of data.DO YOU WISH TO CONTINUE? (y/n)
VNX CLI for Block
alpa -set 27

OUTPUTSee above. If the version of VNX OE for Block software running on the SP does not supportthis command, a Not supported error message is printed to stderr. Other errors:
VALID_VALUES_0_126VALID_VALUES_0_3
arraycommpathSets a communication path to a system that has no LUNs bound, or removes such a path(non-storage group only).
PREREQUISITESFor naviseccli, you must have a user account on the system on which you want toexecute the command.
DESCRIPTIONThe naviseccli arraycommpath command creates or removes a communicationpath between the server and system. Generally this command is needed when you wantto configure a system that has no LUNs bound.
This command works only for systems without storage groups. For systems with storagegroups, use the command storagegroup sethost -arraycommpath (refer storagegroup on page 168.)
The CLI will not issue a confirmation request first if you include the -o switch.
CAUTION
Do not issue this command unless you know the appropriate value for the type offailover software running on the attached servers. The command is designed fortransition from one type of failover software to another. Changing the arraycommpathmode to the wrong value will make the system inaccessible.
To discover the current setting of arraycommpath, use the command without anargument.
SYNTAXarraycommpath [0 | 1] [-o]OPTIONS
0Disables a communication path.
1Enables a communication path.
-oExecutes the command without prompting for confirmation.
EXAMPLEThis command disables the communication path between server and system. In thisexample, the confirmation message shows that the change, if confirmed, will cause theprevious setting to be lost.
naviseccli -h ss1_spa arraycommpath 0
WARNING: Previous arraycommpath setting will be lost!DO YOU WISH TO CONTINUE? (y/n) y
VNX CLI for Block
28 EMC VNX Series 5.33 Command Line Interface Reference for Block

OUTPUTIf the version of VNX OE for Block software running on the SP does not support thiscommand, a Not supported error message is printed to stderr. Other errors:
Valid values are 0 or 1
arrayconfig -captureQueries the system for configuration information.
PREREQUISITESA user role of administrator is required to execute this command.
DESCRIPTIONThe arrayconfig -capture command queries the system for its configuration alongwith I/O port configuration information. When issued, the command will capture asystem’s essential configuration data. The information is formatted and stored on theclient workstation.
This generated file can be used as a template to configure other systems or rebuild thesame system if the previous configuration is destroyed. The information captured mayinclude:
l Software installed in the system (name of the software, revision, and so on).
l Physical configuration of the system (storage processors, disks, enclosures, and soon.)
l Logical configuration of the system (RAID groups, LUNs, storage groups, clones,SnapView, and mirrors).
l I/O port configuration information (hardware and logical configuration information) ofa VNX series system.
SYNTAXarrayconfig -capture [-format XML|CSV] [output path to localfile name] [-logprogress] [-o]OPTIONS
-format XML|CSVDefaults to XML if -format is not specified.
-logfileRetrieves and outputs the log file stored on the targeted system.
-oExecutes the command without prompting for confirmation.
-output path to local file nameAn XML file in the specified path and name will be created. If the indicated outputfile already exists, you will be asked if you wish to overwrite it.
-logprogressDisplays the detailed information. If this option is not specified, displays only errorinformation.
EXAMPLE
naviseccli -h ss1_spa arrayconfig -capture -output c:\Capture158.xml-format xml
VNX CLI for Block
arrayconfig -capture 29

OUTPUTIf the command succeeds, the XML file will be generated. There will be no messagedisplayed in the command line.
arrayconfig -duplicateCreates the components in the indicated configuration file on the targeted system.
PREREQUISITESManager privileges are required to execute the arrayconfig -duplicate command.
DESCRIPTIONIssuing the arrayconfig -duplicate command creates the logical componentslisted in the configuration file (generated from issuing the arrayconfig -capturecommand) for the indicated system. You can view both the status of the duplicationoperation and the log file.
Before starting the duplication process, the following will be checked to ensure thetargeted system qualifies for duplication.
Physical components:
l The model number on the targeted system must be exactly the same as the source.
l The targeted system must have at least the same number of disks as the source(includes all RAID groups).
l The disk enclosure numbers and slot numbers should exactly match the source(includes all RAID groups).
l Drive types must match.
l The size of the targeted disks must be equal to or greater than the size of the sourcedisks.
Software availability:
l The targeted system must have all the system and Unisphere software packagesavailable in the source system.
Logical components:
The target system must be in a logically clean state. If any of the following componentsare available, the target is not considered clean and the command will fail:
l RAID groups
l LUNs
l User-created storage groups
Note
Duplication will not create the following logical components on the target system(s):SnapView sessions, SAN Copy information, synchronous/asynchronous mirror secondaryinformation. If the XML captured from a mirror secondary system is used for duplication,then no mirror information will be created in the target system.
Note
While the -capture command supports both XML and CSV file formats, the -duplicate command processes information only in the XML format.
VNX CLI for Block
30 EMC VNX Series 5.33 Command Line Interface Reference for Block

CAUTION
This command creates a new configuration in the system; use it only after completelyunderstanding the command’s behavior.
SYNTAX
arrayconfig -duplicate [-input path to local file name][-recover] [-stop] [-rollback] [-status] [-logfile] [-o]
OPTIONS
-input path to local file nameThis is the filename of the captured information (captured from issuing theconfiguration -capture command).
-logfileRetrieves and outputs the duplication log file stored on the targeted system.
-oExecutes the command without prompting for confirmation.
-recoverUsed in a disaster recovery situation (if the system in trouble needs to bereconfigured from scratch using a configuration captured from the same systemwhen it was healthy).
This assumes that the host connectivity and everything pertaining to the system willbe the same. The initiators, the host objects and their associations with storagegroups will be duplicated.
-rollbackAttempts to back out of the changes that are added to the configuration during thelast duplication operation.
Changes made to the configuration after the duplication operation will not beaccounted for, and may affect the rollback operation. For example, after a successfulduplication, if you destroy a RAID group and create another RAID group with thesame ID, the rollback will destroy the newly created RAID group as well. The rollbackoperates based on the object IDs stored in an internal context file. If the IDs are thesame, it will not differentiate between the objects created by the previousduplication and the user-created objects.
-statusProvides a brief description of the current status of the duplication operation.
-stopTerminates the currently running duplication operation, leaving the configurationintact at the point that the duplication ended.
Note
The -logfile and -status commands can be run with monitor privileges. All
other -duplicate commands require manager privileges.
EXAMPLEnaviseccli -h ss1_spa arrayconfig -duplicate -input c:\Capture158.xml
VNX CLI for Block
arrayconfig -duplicate 31
arraynameRenames a system.
PREREQUISITESFor naviseccli, you must have a user account on the system on which you want toexecute the command.
DESCRIPTIONThe naviseccli arrayname command changes the name of a system. If you omit asystem name, the command returns the current system name (in the format host-deviceor system name).
The CLI prompts for confirmation as follows.
SYNTAXarrayname NewArrayNameOPTIONS
arrayname NewArrayNameSpecifies the new name for the system.
EXAMPLEThis command changes the name of the system to users11.
naviseccli -h ss1_spa arrayname users11
Change the arrayname from ss1 to users11? (y/n) y
OUTPUTIf the version of VNX OE for Block software running on the SP does not support thiscommand, a Not Supported error message is printed to stderr.
backendbus -analyzeDisplays speed and state information for each back-end bus and the devices on the back-end bus.
PREREQUISITESYou must have a user account on the system on which you want to execute the command.
DESCRIPTIONThe naviseccli backendbus command with the -analyze function, displays thecurrent and maximum back-end bus speeds for each back-end bus on the system, andeach device (enclosures, disks, and link control cards (LCCs)) on the back-end bus. It alsolists state information that includes whether a device on the bus is limiting and whetherthe system meets conditions required for a reset (see the list of conditions later in thissection).
The current speed indicates the speed at which a bus or device is currently running; themaximum speed indicates the highest speed at which a bus or device is capable ofrunning. If a device is limiting, it has a maximum speed lower than the maximum speedof the back-end bus. If you have a limiting device, a reset will not occur when you issuebackendbus-resetspeed.
When you run backendbus -analyze, a summary analysis appears for each back-endbus to indicate whether a reset operation will be successful for the back-end bus. One ofthe following summary results will appear for each back-end bus.
VNX CLI for Block
32 EMC VNX Series 5.33 Command Line Interface Reference for Block

Table 1 backendbus -analyze summary analysis
Summary analysisa Description
Speed may change on rescan A speed-related fault exists on the back-end bus (seeDescription section). The CLI cannot determine whether a resetwill occur.
Speed will change on rescan A reset will occur.
Speed will not change on rescan There are limiting devices on the back-end bus. A reset will notoccur.
a. If a limiting device or speed-related fault exists on the back-end bus, a listing of the limitingdevices and speed-related faults appears before the summary analysis. Devices with speed-related faults appear as Devices Requesting Bypass.
A speed-related fault can occur when you add a device to a back-end bus that has amaximum speed lower than the current speed of the bus. A device with a speed-relatedfault appears with unknown speed values; therefore, the CLI cannot determine if a resetwill occur.
Note
If you issue the backendbus -resetspeed command, and a device with a speed-
related fault exists on the bus, the reset could decrease the back-end bus speed(downgrade).
Your system must meet required conditions before you can issue a reset. The followingtable shows the list of conditions.
Table 2 Conditions
Condition Description (pass criteria)
Analyze Speed Rule The summary analysis for the back-end bus, displayed in backendbus -analyze, indicates that a reset will or may occur.
System Faults Rule No system faults can exist.
Active Sessions Rule No active SnapView, MirrorView, or SAN Copy sessions.
Transitions Rule No active transitions such as, LUN binds, LUN expansions, RAID groupexpansions, disk equalization.
I/O Rate Rule No active I/O.
Note
Run backendbus -analyze before you issue backendbus -resetspeed.
SYNTAXbackendbus -analyzeEXAMPLEThe following example displays current and maximum back-end bus speeds for eachback-end bus on the specified system and the devices on the back-end bus:
naviseccli -h ss1_spa -user user11 –password pswd11 -scope 0backendbus -analyze
VNX CLI for Block
backendbus -analyze 33

OUTPUT
Bus 0 - Current Speed: 6Gbps. Maximum speed: 6Gbps. Device Current Max Limiting Type- Speed Speed--------------------------------------------------------------Bus 0 Enclosure 0 6 6 No DAE6S--------------------------------------------------------------LCC A 6 6 NoLCC B 6 6 No--------------------------------------------------------------Disk 0 6 6 No SASDisk 1 6 6 No SASDisk 2 6 6 No SASDisk 3 6 6 No SASDisk 4 6 6 No SASDisk 5 6 6 No SASDisk 6 6 6 No SASDisk 7 6 6 No SASDisk 8 6 6 No SASDisk 9 6 6 No SASDisk 10 6 6 No SASDisk 11 6 6 No SASDisk 12 6 6 No SASDisk 13 6 6 No SASDisk 14 6 6 No SAS--------------------------------------------------------------
Bus 0 Enclosure 1 6 6 Maybe DAE7S--------------------------------------------------------------ICM A 6 6 MaybeICM B 6 6 MaybeLCC C 6 6 MaybeLCC D 6 6 Maybe--------------------------------------------------------------Disk A0 6 6 No SASDisk A1 6 3 No SATADisk A2 6 6 No SASDisk A3 6 3 No SATADisk A4 6 3 No SATADisk A5 6 3 No SATADisk A6 Unknown Unknown No UnknownDisk A7 Unknown Unknown No UnknownDisk A8 Unknown Unknown No UnknownDisk A9 Unknown Unknown No UnknownDisk A10 Unknown Unknown No UnknownDisk A11 Unknown Unknown No UnknownDisk B0 6 3 No SATADisk B1 6 6 No SASDisk B2 6 3 No SATADisk B3 6 3 No SATADisk B4 6 3 No SATADisk B5 6 3 No SATADisk B6 Unknown Unknown No UnknownDisk B7 Unknown Unknown No UnknownDisk B8 Unknown Unknown No UnknownDisk B9 Unknown Unknown No UnknownDisk B10 Unknown Unknown No UnknownDisk B11 Unknown Unknown No UnknownDisk C0 6 3 No SATADisk C1 6 3 No SATADisk C2 6 3 No SATADisk C3 6 3 No SATADisk C4 6 3 No SATADisk C5 6 3 No SATADisk C6 Unknown Unknown No Unknown
VNX CLI for Block
34 EMC VNX Series 5.33 Command Line Interface Reference for Block
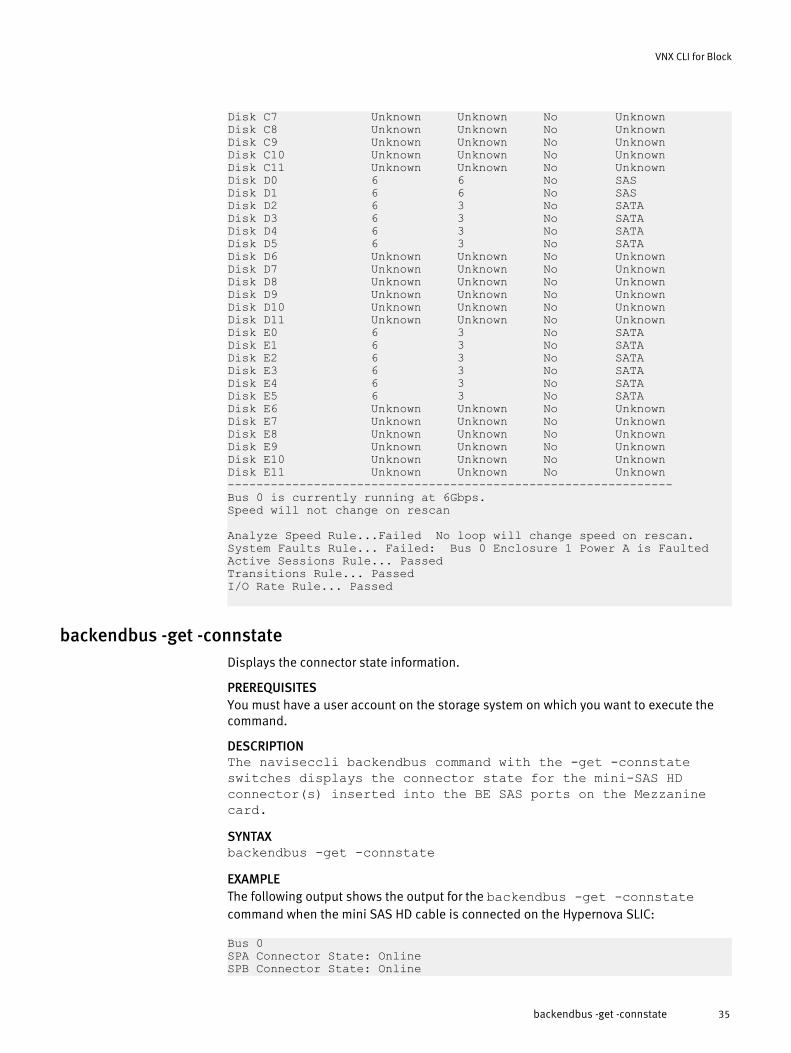
Disk C7 Unknown Unknown No UnknownDisk C8 Unknown Unknown No UnknownDisk C9 Unknown Unknown No UnknownDisk C10 Unknown Unknown No UnknownDisk C11 Unknown Unknown No UnknownDisk D0 6 6 No SASDisk D1 6 6 No SASDisk D2 6 3 No SATADisk D3 6 3 No SATADisk D4 6 3 No SATADisk D5 6 3 No SATADisk D6 Unknown Unknown No UnknownDisk D7 Unknown Unknown No UnknownDisk D8 Unknown Unknown No UnknownDisk D9 Unknown Unknown No UnknownDisk D10 Unknown Unknown No UnknownDisk D11 Unknown Unknown No UnknownDisk E0 6 3 No SATADisk E1 6 3 No SATADisk E2 6 3 No SATADisk E3 6 3 No SATADisk E4 6 3 No SATADisk E5 6 3 No SATADisk E6 Unknown Unknown No UnknownDisk E7 Unknown Unknown No UnknownDisk E8 Unknown Unknown No UnknownDisk E9 Unknown Unknown No UnknownDisk E10 Unknown Unknown No UnknownDisk E11 Unknown Unknown No Unknown--------------------------------------------------------------Bus 0 is currently running at 6Gbps.Speed will not change on rescan Analyze Speed Rule...Failed No loop will change speed on rescan.System Faults Rule... Failed: Bus 0 Enclosure 1 Power A is FaultedActive Sessions Rule... PassedTransitions Rule... PassedI/O Rate Rule... Passed
backendbus -get -connstateDisplays the connector state information.
PREREQUISITESYou must have a user account on the storage system on which you want to execute thecommand.
DESCRIPTIONThe naviseccli backendbus command with the -get -connstateswitches displays the connector state for the mini-SAS HDconnector(s) inserted into the BE SAS ports on the Mezzaninecard.SYNTAXbackendbus -get -connstateEXAMPLEThe following output shows the output for the backendbus -get -connstatecommand when the mini SAS HD cable is connected on the Hypernova SLIC:
Bus 0SPA Connector State: OnlineSPB Connector State: Online
VNX CLI for Block
backendbus -get -connstate 35

backendbus -get -physicalDisplays physical slot and physical port ID information.
PREREQUISITESYou must have a user account on the system on which you want to execute the command.
DESCRIPTIONThe naviseccli backendbus command with the -get -physical switchesdisplays the physical location of the back-end bus on the VNX series system. Thephysical location information includes I/O module and the physical port ID.
The backendbus -get -all command also displays the physical locationinformation.
SYNTAXbackendbus -get -physical [backend bus number]OPTIONS
backend bus numberSpecifies the back-end bus for which you want to display bus information.
EXAMPLEnaviseccli -h ss1_spa backendbus -get -physical
OUTPUT
Bus 0I/O Module Slot: 0Physical Port ID: 0Port Combination in Use: YES
Bus 0I/O Module Slot: 0Physical Port ID: 1Port Combination in Use: YES
Bus 2I/O Module Slot: 0Physical Port ID: 2Port Combination in Use: NO
backendbus -get -prominfoDisplays information returned from the resume prom in the connectors.
PREREQUISITESYou must have a user account on the storage system on which you want to execute thecommand.
DESCRIPTIONThe naviseccli backendbus command with the -get -prominfo switch displaysthe new information returned from the resume prom in the SFP+ and mini-SAS HDconnectors.
SYNTAXbackendbus -get -prominfo
VNX CLI for Block
36 EMC VNX Series 5.33 Command Line Interface Reference for Block

EXAMPLEThe following output shows the output for the backendbus –get –prominfocommand when the mini-SAS HD cable is connected on the Hypernova SLIC:
Bus 0SPA SFP/Connector EMC Part Number: TBDSPB SFP/Connector EMC Part Number: TBD
SPA SFP/Connector EMC Serial Number: TBDSPB SFP/Connector EMC Serial Number: TBD
SPA SFP/Connector Vendor Part Number: TBDSPB SFP/Connector Vendor Part Number: TBD
SPA SFP/Connector Vendor Serial Number: TBDSPB SFP/Connector Vendor Serial Number: TBD
SPA SFP/Connector Supported Speeds:3Gbps.6Gbps.SPB SFP/Connector Supported Speeds:3Gbps.6Gbps.
backendbus -get -sfpstateDisplays the current condition of each back-end SFP.
PREREQUISITESYou must have a user account on the system on which you want to execute the command.
DESCRIPTIONThe naviseccli backendbus command with the -get -sfpstate functiondisplays the current condition of each back-end SFP, which is a small form-factorpluggable (SFP) optical modular transceiver. You can target a specific back-end bus anddisplay information for only that bus, or you can display back-end bus information for allbuses on the system.
The SFP states are Online, Faulted, and Removed. Online indicates that the back-end SFPis functioning normally; Faulted indicates an unsupported or faulted SFP; and Removedindicates that it does not exist.
Use backendbus -analyze to display speed information for each device on a back-end bus.
SYNTAXbackendbus -get -sfpstate [backend bus number]OPTIONS
backend bus numberSpecifies the back-end bus for which you want to display bus information.
EXAMPLEThe following example displays the current condition for each back-end SFP:
naviseccli -h ss1_spa backendbus -get -sfpstate
OUTPUT
Bus 0:
VNX CLI for Block
backendbus -get -sfpstate 37

SPA SFP State: Faulted SPB SFP State: Online
backendbus -get -speedsDisplays back-end bus speed information for the back-end buses on a system.
PREREQUISITESYou must have a user account on the system on which you want to execute the command.
DESCRIPTIONThe naviseccli backendbus command with the -get -speeds function displaysthe current and available back-end bus speeds, for the back-end buses on a system. Youcan target a specific back-end bus and display only information for that bus, or you candisplay back-end bus speed information for all buses on the system.
The current speed indicates the speed the bus is currently running at; the availablespeed(s) indicates the speed(s) available to the back-end bus. If the current speed is lessthan the maximum available speed, you can run the backendbus -analyzecommand to verify if there are limiting devices on the back-end bus. If a device is limiting,it has a maximum speed lower than the maximum speed of the back-end bus. If you havea limiting device, a reset will not occur when you issue backendbus -resetspeed.
Use backendbus -analyze to display speed information for each device on a back-end bus.
SYNTAXbackendbus -get -speeds [backend bus number]OPTIONS
backend bus numberSpecifies the back-end bus for which you want to display bus speed information.
EXAMPLEThe following example displays current and available bus speed information for back-endbus number 2:
naviseccli -h ss1_spa backendbus -get -speeds 2
OUTPUT
Bus 2:
Current Speed: 6Gbps. Available Speeds: 3Gbps. 6Gbps.
backendbus -get -allDisplays the bus speeds, SFP state, and physical location of the bus.
PREREQUISITESYou must have a user account on the system on which you want to execute the command.
DESCRIPTIONThe naviseccli backendbus command with the -get -all function displays thebus speeds and the current condition of each back-end SFP, which is a small form-factorpluggable (SFP) optical modular transceiver for the back-end buses on a system. Itdisplays the physical location of the back-end bus (I/O module and the physical port ID)
VNX CLI for Block
38 EMC VNX Series 5.33 Command Line Interface Reference for Block

only for the VNX series system. You can target a specific back-end bus and displayinformation for only that bus, or you can display back-end bus information for all buseson the system.
The current speed indicates the speed the bus is currently running at; the availablespeed(s) indicates the speed(s) available to the back-end bus. If the current speed is lessthan the maximum available speed, you can run the backendbus -analyzecommand to verify if limiting devices exist on the back-end bus. If a device is limiting, ithas a maximum speed lower than the maximum speed of the back-end bus. If you have alimiting device, a reset will not occur when you issue backendbus -resetspeed.
The SFP states are Online, Faulted, and Removed. Online indicates that the back-end SFPis functioning normally; Faulted indicates an unsupported or faulted SFP; and Removedindicates that it does not exist.
Use backendbus -analyze to display speed information for each device on a back-end bus.
SYNTAXbackendbus -get -all [backend bus number]OPTIONSbackend bus number
Specifies the back-end bus for which you want to display bus information.
EXAMPLEThe following example displays the bus speed, current condition, and physical locationfor each back-end SFP:
naviseccli -h ss1_spa backendbus -get -all
OUTPUT
Bus 0
Current Speed: 6Gbps.Available Speeds:0Gbps.3Gbps.6Gbps.SPA SFP State: N/ASPB SFP State: N/AI/O Module Slot: Base ModulePhysical Port ID: 0Port Combination In Use: No
SPA Connector State: NoneSPB Connector State: None
SPA SFP/Connector EMC Part Number: N/ASPB SFP/Connector EMC Part Number: N/A
SPA SFP/Connector EMC Serial Number: N/ASPB SFP/Connector EMC Serial Number: N/A
SPA SFP/Connector Vendor Part Number: N/ASPB SFP/Connector Vendor Part Number: N/A
SPA SFP/Connector Vendor Serial Number: N/ASPB SFP/Connector Vendor Serial Number: N/A
SPA SFP/Connector Supported Speeds:N/A
VNX CLI for Block
backendbus -get -all 39
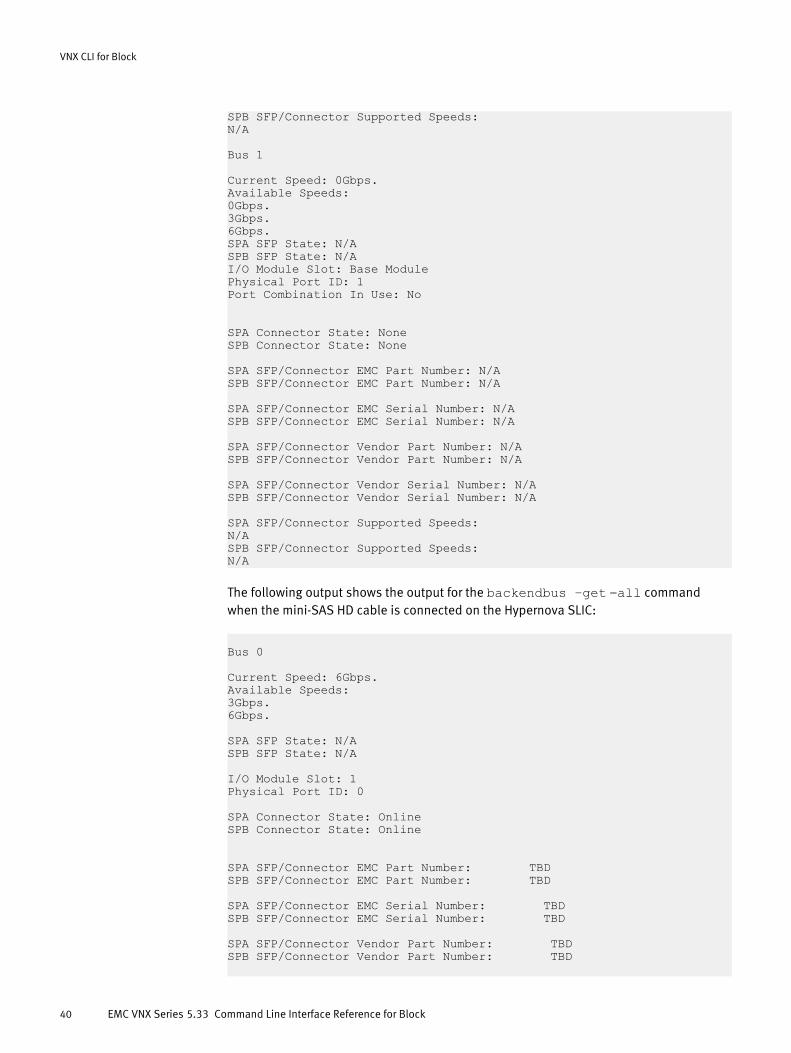
SPB SFP/Connector Supported Speeds:N/A
Bus 1
Current Speed: 0Gbps.Available Speeds:0Gbps.3Gbps.6Gbps.SPA SFP State: N/ASPB SFP State: N/AI/O Module Slot: Base ModulePhysical Port ID: 1Port Combination In Use: No
SPA Connector State: NoneSPB Connector State: None
SPA SFP/Connector EMC Part Number: N/ASPB SFP/Connector EMC Part Number: N/A
SPA SFP/Connector EMC Serial Number: N/ASPB SFP/Connector EMC Serial Number: N/A
SPA SFP/Connector Vendor Part Number: N/ASPB SFP/Connector Vendor Part Number: N/A
SPA SFP/Connector Vendor Serial Number: N/ASPB SFP/Connector Vendor Serial Number: N/A
SPA SFP/Connector Supported Speeds:N/ASPB SFP/Connector Supported Speeds:N/A
The following output shows the output for the backendbus –get –all commandwhen the mini-SAS HD cable is connected on the Hypernova SLIC:
Bus 0
Current Speed: 6Gbps.Available Speeds:3Gbps.6Gbps.
SPA SFP State: N/ASPB SFP State: N/A
I/O Module Slot: 1Physical Port ID: 0
SPA Connector State: OnlineSPB Connector State: Online
SPA SFP/Connector EMC Part Number: TBDSPB SFP/Connector EMC Part Number: TBD
SPA SFP/Connector EMC Serial Number: TBDSPB SFP/Connector EMC Serial Number: TBD
SPA SFP/Connector Vendor Part Number: TBDSPB SFP/Connector Vendor Part Number: TBD
VNX CLI for Block
40 EMC VNX Series 5.33 Command Line Interface Reference for Block

SPA SFP/Connector Vendor Serial Number: TBDSPB SFP/Connector Vendor Serial Number: TBD
SPA SFP/Connector Supported Speeds:3Gbps.6Gbps.SPB SFP/Connector Supported Speeds:3Gbps.6Gbps.
The following example shows the output for the backendbus –get –all commandwhen the mini-SAS HD cable is connected:
Bus 0
Current Speed: 6Gbps.Available Speeds:3Gbps.6Gbps.
SPA SFP State: N/ASPB SFP State: N/A
I/O Module Slot: OnboardPhysical Port ID: 0
SPA Connector State: OnlineSPB Connector State: Online
SPA SFP/Connector EMC Part Number: N/ASPB SFP/Connector EMC Part Number: N/A
SPA SFP/Connector EMC Serial Number: N/ASPB SFP/Connector EMC Serial Number: N/A
SPA SFP/Connector Vendor Part Number: N/ASPB SFP/Connector Vendor Part Number: N/A
SPA SFP/Connector Vendor Serial Number: N/ASPB SFP/Connector Vendor Serial Number: N/A
SPA SFP/Connector Supported Speeds:N/ASPB SFP/Connector Supported Speeds:N/A
backendbus -resetspeedResets the back-end bus speeds for a system.
PREREQUISITESYou must have a user account on the system on which you want to execute the command.
DESCRIPTIONThe naviseccli backendbus command with the -resetspeed function, resets theback-end bus speed for the buses on the system. When you execute backendbus -resetspeed, if the back-end bus is eligible for a reset and the system meets theconditions required for a back-end bus speed reset, the reset occurs. See the table belowfor the steps you should take before issuing backendbus -resetspeed.
VNX CLI for Block
backendbus -resetspeed 41

Note
This is a disruptive operation and can take several minutes to complete. During this timethe system will be offline and no I/O will be performed.
Before you execute a reset, run backendbus -analyze to verify the current andmaximum speeds of each back-end bus and device to determine if limiting devices exist,which will prevent a reset, and to verify that your system meets the conditions requiredfor a reset.
To verify whether the back-end bus speed reset occurs, capture the output frombackendbus -analyze or backendbus -get -speeds before you execute thereset, to compare to the reset back-end bus speed values after you issue the reset.
Steps to take before issuing a reset:
1. Run backendbus -analyze to verify the following:
l back-end bus and device speed informationl no limiting devices exist on the back-end busl system meets required conditions
2. Save the output from backendbus -analyze or backendbus -get -speeds,to compare the bus speed in the saved output to the bus speed after you initiatebackendbus -resetspeed.
SYNTAXbackendbus -resetspeedEXAMPLEThe following example resets the the back-end bus speeds for the specified system:
naviseccli -h ss1_spa backendbus -resetspeed
WARNING: the command you are about to execute requires that the system be completely shutdown. During this period of time all IO to attached application hosts will be suspended. All affected applications must be quiesced before proceeding to avoid data unavailability and possible data loss. This operation will take several minutes to complete.
Are you sure you want to proceed? (y/n)?
OUTPUTNone if the command succeeds; status or error information if it fails.
baseuuidGets or sets the system unique unit identifier (UUID) base for use by a server runningTru64.
PREREQUISITESFor naviseccli, you must have a user account on the system on which you want toexecute the command.
DESCRIPTIONThe naviseccli baseuuid command gets or sets the base of the unique unit ID asrequired for servers in a Tru64 cluster. The Tru64 operating system uses the UUID (whichit creates by combining the base and an offset, which is the system LUN ID) to managethe LUNs in a cluster. You can also use the UUID to manage the LUN.
VNX CLI for Block
42 EMC VNX Series 5.33 Command Line Interface Reference for Block

To discover the UUID base, use the command without an argument.
SYNTAXbaseuuid [uuid-base-value]OPTIONS
uuid-base-valueSpecifies the UUID base.
EXAMPLEThese commands get, then set the UUID base of the system containing the SP ss1_spa.
naviseccli -h ss1_spa baseuuid
Base UUID of the system: 12345
naviseccli -h ss1_spa baseuuid 34
Base UUID of the system is set to 34.
OUTPUTIf the version of VNX OE for Block software running on the SP does not support thiscommand, a Not Supported error message is printed to stderr.
bindCreates a LUN within an existing RAID group.
PREREQUISITESFor naviseccli, you must have a user account on the system on which you want toexecute the command.
DESCRIPTIONThe naviseccli bind command binds a LUN within an existing RAID group. You cancreate a RAID group with the createrg command (see createrg on page 56).
Ensure that you address the bind command to the SP that you want to own the LUN.
The following table identifies the parameters you must configure for each RAID type youbind.
Table 3 LUN parameters for different RAID types
RAID type Bind parameters
RAID 6, RAID 5, RAID 1/0 LUN number
Write caching
RAID 3 LUN number
RAID 1 LUN number
Write caching
RAID 0 LUN number
Write caching
Disk (individual disk unit) LUN number
Write caching
VNX CLI for Block
bind 43

Table 3 LUN parameters for different RAID types (continued)
To allow for good choices of available disk modules, bind LUNs in this order:
1. First - RAID 1/0
2. Second - RAID 6, RAID 5, RAID 3, and RAID 0
3. Third - RAID 1
4. Fourth - Individual units
Before you start binding disk modules, read the restrictions and recommendations in thefollowing table.
Table 4 Restrictions and recommendations for binding disks into LUNs
LUN to bind Restrictions and recommendations
Any LUN You can bind only unbound disk modules. All disk modules in a LUNmust have the same capacity to fully use the modules’ storage space.
RAID 6 A RAID 6 group has an even number of disks. You must bind aminimum of 4 disk modules and no more than 16 disk modules. Werecommend that you bind 6 or 12 modules for more efficient use ofdisk space. Write caching is highly recommended for RAID 6.
RAID 5 You must bind a minimum of 3 disk modules and no more than 16 diskmodules. We recommend you bind 5 modules for more efficient use ofdisk space.
RAID 3 You must bind exactly 5 or 9 disk modules. Select 5 drives for quickerrebuild times or 9 drives for more efficient use of space.
RAID 1 You must bind exactly 2 disk modules.
RAID 0 You must bind a minimum of 3 disk modules, and no more than 16 diskmodules.
RAID 1/0 You must bind a minimum of 2 disk modules, and an even number ofmodules, but no more than 16 modules. Unisphere pairs modules intomirrored images in the order in which you select them. The first andsecond modules you select are a pair of mirrored images; the third andfourth modules you select are another pair of mirrored images; and soon. The first module you select in each pair is the primary image, andthe second module is the secondary image.
Individual disk unit None
Whether you should use caching for a specific LUN depends on the RAID type.Recommendations for caching with different RAID types follow.
Table 5 Caching recommendations for different RAID types
RAID type Write caching
RAID 0 Acceptable
RAID 1 Acceptable
RAID 1/0 Acceptable
VNX CLI for Block
44 EMC VNX Series 5.33 Command Line Interface Reference for Block

Table 5 Caching recommendations for different RAID types (continued)
RAID type Write caching
RAID 3 Recommended
RAID 5 Highly recommended
RAID 6 Highly recommended
Disk Acceptable
Note
When binding RAID 1/0 LUNs, the order in which you select modules is important. Thefirst module you select is the first part of the mirror’s primary image and the secondmodule is the first part of the mirror’s secondary image; the third module is the secondpart of the primary image, the fourth module is the second part of the secondary image;and so on for any other modules in the LUN. In other words, the first and second modulesselected are a pair of peer image parts, the third and fourth modules are another pair ofpeer image parts, and so on.
If you need to change the description (RAID type), you must unbind the LUN (unbind onpage 181), and then rebind it with the correct parameters. If you need to change thewrite cache state, use the chglun command ( chglun on page 50).
SYNTAX
bind [raidtype] [lun] -rg rgID [-cnt count_luns_to_create][-aa auto_assignment] [-cap capacity] [-fastcache 0|1][-noinitialverify][-pl placement][-sp a|b] [-sq size-qualifier][-wc writecache]
OPTIONS
raid-typeSpecifies the RAID type for the LUN.
r0
= RAID 0
r1
= RAID 1
r3
= RAID 3
r5
= RAID 5
r6
= RAID 6
r1_0
= RAID 1/0
VNX CLI for Block
bind 45

id
= individual disk
Note
All RAID types are not supported on all systems.
lunSpecifies a decimal number to assign to the LUN valid range as shown in VNX forBlock Concepts guide, in section LUN IDs, unique IDs and disk IDs. If a valid range isnot specified, the lowest available number (the default value) is assigned to theLUN.
-rg rgIDThe RAID group identification number. The RAID group must already exist. You cancreate a RAID group with the createrg command (createrg on page 56).
rgID specifies a number between 0 and the maximum number of RAID groupssupported by the RAID group system.
-cntSpecifies the number of LUNs to create.
-aa auto_assignment (CX series only)Enables or disables autoassignment functionality for the LUN. auto_assignmentspecifies functionality as follows:
0
Disables auto-assignment
1
Enables auto-assignment (the default)
-cap capacitySets the capacity of usable space in the LUN. (The default is full space available.)
-fastcache 0|1Enables or disables FAST Cache on the LUN.
-noinitialverifyDoes not perform an initial background verification. When this switch is not present,the bind performs an initial background verification on the newly bound LUN andeliminates any latent soft media errors.
-pl placementPlaces a LUN in a RAID group; placement specifies which algorithm to use as follows:
bf
best fit algorithm (the default)
ff
first fit algorithm
-sp a|bSets the default owner of the LUN: SP A or SP B. The default is the current SP.
-sq size-qualifierSets the default size qualifier. size-qualifier specifies the qualifier as follows:
mb
megabytes
gb
gigabytes (the default)
VNX CLI for Block
46 EMC VNX Series 5.33 Command Line Interface Reference for Block

tb
terabytes
bc
block count
-wc write-cacheEnables or disables the system write cache for this specific LUN. writecache values:
0
Disables write cache
1
Enables write cache (the default).
EXAMPLE
naviseccli bind 10 -rg 0 -sq gb -cap 1
OUTPUTThere is no output. Errors are printed to stderr.
cachecard -listLists the state information of the cache memory card.
PREREQUISITESFor naviseccli, you must have a user account on the system on which you want toexecute the command.
DESCRIPTIONThe naviseccli cachecard command with the -list function lists the stateinformation of the cache memory card. The memory size and hardware state of the cachememory card is displayed.
You can choose to display only the memory size by specifying the -size switch ordisplay only the hardware state by specifying the -hwstate switch. Without theseswitches, the memory size and hardware state are displayed.
The possible hardware states are listed in the following table:
Table 6 Hardware states
Hardware state Meaning
OK The power on the main SP is on and the cache memory card battery isfully charged. The cache memory card is in normal operation.
Not present The cache memory card is not present.
Faulted The cache memory card has hardware faults.
Battery charging The power on the main SP is on and the battery is charging on thecache memory card.
In wrong array The cache memory card is from the wrong system.
SYNTAXcachecard -list [-size] [-hwstate]
VNX CLI for Block
cachecard -list 47

OPTIONS
-sizeSpecifies that only the total memory size of the cache memory card (MB) bedisplayed.
-hwstateSpecifies that only the hardware state of the cache memory card be displayed.
EXAMPLEThis command displays all state information (memory size and hardware state) of thecache memory card.
naviseccli -h ss1_spa cachecard -list
OUTPUT
Total Memory: 512MB Hardware State: Ok
cachecard -initializeInitializes the cache memory card.
PREREQUISITESFor naviseccli, you must have a user account on the system on which you want toexecute the command.
DESCRIPTIONThe naviseccli cachecard command with the -initialize function lets youinitialize the cache memory card.
The cachecard -initialize command can be issued under any of the followingcircumstances:
l a different cache memory card is installed on the system
l live data is on the cache memory card
l a LUN with an offline (cache dirty) condition exists on the system
SYNTAXcachecard -initialize [-o]OPTIONS
-oExecutes the command without prompting for confirmation.
EXAMPLEFor this example, a different cache memory card is installed on the system.
naviseccli -h ss1_spa cachecard -initialize
The cache memory card currently installed in this system is not the same as the one previously installed in this system. In order for this system to function properly, the current cache memory card must be initialized on this system.
Do you want to initialize Cache Memory Card now? (y/n)?
OUTPUTNone if the command succeeds; status or error information if it fails.
VNX CLI for Block
48 EMC VNX Series 5.33 Command Line Interface Reference for Block

cache -sp -infoLists the SP Cache properties.
PREREQUISITESFor naviseccli, you must have a user account on the system on which you want toexecute the command.
DESCRIPTIONThe naviseccli cache –sp -infocommand lists all SP cache properties, stateinformation, and performance statistics.
SYNTAXcache -sp -info [-state][-perfdata]OPTIONS
-stateDisplays SP Cache state, which may be one of the following:
l Enabled
l Disabled
l Disabling
l Enabled with dirty data for unwritable LUNs
l Disabling with dirty data for unwritable LUNs
-perfdataDisplays SP Cache performance statistics.
EXAMPLE #1This example displays SP Cache state.
naviseccli -h ss1_spa cache -sp -info -state
SP Read Cache State: EnabledSP Write Cache State: Enabled
EXAMPLE #2This example displays SP Cache performance statistics.
naviseccli –h ss1_spa cache -sp -info -perfdata
Cache Page size (KB) : 8Read Hit Ratio : 100Write Hit Ratio : 100Dirty Cache Pages (MB): 0
EXAMPLE #3This example displays SP Cache properties and statistics.
naviseccli –h ss1_spa cache -sp –info
Cache Information------------------------SP Read Cache State: EnabledSP Write Cache State: EnabledCache Page size (KB): 8Read Hit Ratio: 100Write Hit Ratio: 100Dirty Cache Pages (MB): 0
VNX CLI for Block
cache -sp -info 49
SPA Read Cache State: EnabledSPB Read Cache State: EnabledSPA Write Cache State: EnabledSPB Write Cache State: EnabledSPS Test Day: SaturdaySPS Test Time: 20:00SPA Physical Memory Size (MB): 65536SPB Physical Memory Size (MB): 65536
cache -sp -modifyModifies the SP Cache properties.
PREREQUISITESFor naviseccli, you must have a user account on the system on which you want toexecute the command.
DESCRIPTIONThe naviseccli cache –sp -modify command modifies the SP cache properties.
SYNTAXcache –sp –modify-wc [on|off] [-o]OPTIONS
-wc [on | off]Enables or disables write cache.
on Enable write cache
off Disable write cache
-oExecutes the command without prompting for confirmation.
EXAMPLEThis example disables write cache.
naviseccli –h ss1_spa cache -sp –modify -wc off
Warning! Disabling write cache at the system level may seriously degrade system performance and is not recommended.Continue disabling system write cache? (y/n)?
OUTPUTThere is no output. Errors are printed to stderr.
chglunChanges parameters on a currently bound LUN.
PREREQUISITESFor naviseccli, you must have a user account on the system on which you want toexecute the command.
DESCRIPTIONThe naviseccli chglun command changes parameters on a currently bound LUN.You must use at least two switches with chglun and one of the switches must be theLUN number -l lun.
VNX CLI for Block
50 EMC VNX Series 5.33 Command Line Interface Reference for Block

Note
The chglun command does not support thin LUNs.
To change a metaLUN, use the naviseccli command with the-modify switch, asdescribed in metalun -modify on page 196.
Table 7 Caching recommendations for different RAID types
RAID type Write caching
RAID 0 Acceptable
RAID 1 Acceptable
RAID 1/0 Acceptable
RAID 3 Recommended
RAID 5 Highly recommended
RAID 6 Highly recommended
Disk Acceptable
Note
When binding RAID 1/0 LUNs, the order in which you select modules is important. Thefirst module you select is the first part of the mirror’s primary image and the secondmodule is the first part of the mirror’s secondary image; the third module is the secondpart of the primary image, the fourth module is the second part of the secondary image;and so on for any other modules in the LUN. In other words, the first and second modulesselected are a pair of peer image parts, the third and fourth modules are another pair ofpeer image parts, and so on. Any change to the rebuild time takes effect as soon as theoperation completes.
SYNTAX
chglun -l lun [-a autoassign] [-c cachetype] [-d defaultowner][-fastcache 0|1] [-namenewname] [-w writeaside]
OPTIONS
-l lunSpecifies which LUN to change. lun specifies the LUN number. This switch isrequired.
-a auto-assignEnables or disables automatic reassignment of LUN ownership to an active SP if anSP failure occurs.
auto_assign specifies functionality as follows:
0
Disables autoassignment for specified LUN
1
Enables autoassignment for specified LUN
-c cache-type
VNX CLI for Block
chglun 51
Enables read caching, or both read and write caching. For caching to occur, systemcaching must also be enabled. Whether or not you should use caching for a specificLUN depends on the RAID type. See the caching recommendations for different RAIDtypes on page 51.
cache-type specifies the type of caching used as follows:
read
read caching
rw
read and write caching
-d default-ownerChanges the default owner of the LUN. default-owner specifies ownership as follows:
0
Changes ownership of the LUN to SP A
1
Changes ownership of the LUN to SP B
-fastcache 0|1Modifies the FAST Cache configuration of the LUN.
-name newnameSets the LUN name. newname specifies the new name for the LUN. This switchapplies only to systems running a version of VNX OE for Block software that supportsstorage group commands. The LUN name is displayed in the UI and has no otherpurpose. You cannot use the LUN name as a CLI command argument. You can assignthe same name to multiple LUNs.
Note
The -name switch applies only to shared systems.
-w write-aside (Dual-SP AX4-5 series running Unisphere and CX series only)write-aside specifies, in blocks, the largest write request size that will be written tocache. Write requests greater than the write-aside value are written directly to disk,bypassing write cache. Valid values are 0 through 65536. The default value '0'indicates that all writes will be cached.
EXAMPLEChange LUN 3 to enable read and write caching.
naviseccli -h ss1_spa chglun -l 3 -c rw
OUTPUTThere is no output. Errors are printed to stderr.
chgrgChanges properties of a RAID group.
PREREQUISITESFor naviseccli, you must have a user account on the system on which you want toexecute the command.
VNX CLI for Block
52 EMC VNX Series 5.33 Command Line Interface Reference for Block

DESCRIPTIONThe naviseccli chgrg command changes the properties of a specified RAID group.You must use only one of the optional switches with chgrg and must specify the RAIDgroup identification number, rgID.
Note
The chgrg command does not support private RAID groups used in thin pools.
SYNTAX
chgrg rgID[-powersavings on|off]
OPTIONS
rgIDIs the RAID group identification number. rgID specifies a number between 0 and themaximum number of RAID groups supported by the RAID group system.
-powersavings on|offConfigures the power savings settings. If the selected disks are not eligible for powersavings settings, the system displays an error message.
EXAMPLEThis command turns the power savings settings ON in RAID group 2.
naviseccli -h ss1_spa chgrg 2 -powersavings on
OUTPUTThere is no output. Errors are printed to stderr.
clearlogClears the SP’s error log.
PREREQUISITESFor naviseccli, you must have a user account on the system on which you want toexecute the command.
DESCRIPTIONThe naviseccli clearlog command deletes the contents of the SP’s unsolicitederror log.
The command clears only the log of the SP you specify with the -h switch in thecommand.
SYNTAXclearlogEXAMPLEThis command deletes the SP logs of the system.
naviseccli -h ss1_spa clearlog
unsolicited error log cleared
OUTPUTConfirmation message.
VNX CLI for Block
clearlog 53

clearstatsResets the SP’s statistics logging.
PREREQUISITESFor naviseccli, you must have a user account on the system on which you want toexecute the command.
DESCRIPTIONThe naviseccli clearstats command resets statistics logging on the SP. Ifstatistics logging is on, it is turned off, and then back on. If statistics logging is off, it isturned on, and then off.
The command affects only the log of the SP you specify with the -h switch in thecommand.
SYNTAXclearstatsEXAMPLEnaviseccli -h ss1_spa clearstats
Statistics successfully cleared, statistics logging disabled.
OUTPUTConfirmation message.
cmdtimeDisplays the date and endtime of command execution.
PREREQUISITESFor naviseccli, you must have a user account on the system on which you want toexecute the command.
DESCRIPTIONThis is a global command switch used to display the date and time at the end of eachcommand execution. The time is displayed at the end of command output. This is anoptional switch supported on all CLI commands. This switch cannot work independently.
cmdtime switch is used with the CLI commands. You must add the -cmdtime switch foreach command to get the time information.
SYNTAXcmdtimeOPTIONS
-cmdtimeDisplays the date and end time of command execution.
EXAMPLEnaviseccli -h ss1_spa -cmdtime getagent
Agent Rev: 6.28.0 (1.83)Name: K10Desc:Node: A-CF2VH072500004Physical Node: K10
VNX CLI for Block
54 EMC VNX Series 5.33 Command Line Interface Reference for Block

Signature: 1962014Peer Signature: 0Revision: 4.28.40.1.093SCSI Id: 0Model: CX4-40Model Type: RackmountProm Rev: 0.47.00SP Memory: 5120Serial No: CF2VH072500004SP Identifier: ACabinet: SPECmdTime: 10/11/07 07:46:44
copytodiskCopies data from a configured drive (part of a RAID Group) to an unbound drive.
PREREQUISITESFor naviseccli, you must have a user account on the system on which you want toexecute the command.
DESCRIPTIONThe naviseccli copytodisk command initiates the copying of data from aconfigured drive (part of a RAID Group) to an unbound drive. The user can use thiscommand to copy data from any bound disk to any unbound disk, not just from apermanent spare to a replacement drive.
SYNTAXcopytodisk sourcedisk [destdisk] [-o]OPTIONS
sourcediskSpecifies the source disk.
destdiskSpecifies the destination disk.
Note
The destination disk must be the same type as the source disk, and the same size orlarger than the source disk. If the destination disk is not specified, the system willchoose an appropriate disk to copy to.
-oExecutes the command without prompting for confirmation.
EXAMPLE #1This example initiates the copying of data from a bound disk 0_1_5 to an unbound disk0_1_6.
naviseccli copytodisk 0_1_5 0_1_6
WARNING: The data from disk 0_1_5 will be copied to disk 0_1_6. This process cannot be aborted and may take a long time to complete.Also current selection of disks will break the hot spare policy; would you like to continue the copy? (y/n) y
EXAMPLE #2This example initiates the copying of data from disk 0_1_5 to disk 0_1_6 which is part ofan active copytodisk operation or is a bound drive.
VNX CLI for Block
copytodisk 55

naviseccli copytodisk 0_1_5 0_1_6
WARNING: The data from disk 0_1_5 will be copied to disk 0_1_6. This process cannot be aborted and may take a long time to complete. Do you wish to continue? (y/n) y
Error: copytodisk command failedError returned from AgentSP A: The destination drive is busy processing a copy or is being used by another RAID group. Please wait for the drive operation to complete or copy to another drive. (0x717f8007)
EXAMPLE #3This example initiates a proactive copy. A user may proactively initiate a copy and allowthe system to pick the drive that it will use to copy the data to. This might be done if theuser saw errors on the disk and wanted to copy the data before the drive actually failed.For VNX, the source disk is not taken off-line after the copy. A user could also initiate aproactive copy and supply the destination drive.
naviseccli copytodisk 0_0_7
WARNING: The disk 0_0_7 is selected for hot sparing. Its serialnumber is 6SE4LHZE.The proactive sparing process cannot be aborted and may take a longtime to complete. This disk will still be available after theproactive copy is complete, and its state will change to Unbound.Do you wish to continue? (y/n) y
creatergCreates a RAID group.
PREREQUISITESFor naviseccli, you must have a user account on the system on which you want toexecute the command.
DESCRIPTIONThe naviseccli createrg command creates a RAID group on the specified disks.
To create RAID groups on a systems running Navisphere Express, you must define the –raidtype switch.
Note
You cannot create private RAID groups using the createrg command.
SYNTAX
createrg rgID disks-raidtype type [-powersavings on|off][-elementsize elementsize] [-o]
OPTIONS
rgIDIs the RAID group identification number. rgID specifies a number between 0 and themaximum number of RAID groups supported by the RAID group system.
disksSpecifies the physical disks included in this RAID group. In a RAID 1/0 or RAID 1configuration, you can manually select the disks for the RAID group in an order thatdetermines the primary and secondary image. For example, for a 1/0 RAID group, the
VNX CLI for Block
56 EMC VNX Series 5.33 Command Line Interface Reference for Block

first two disks you list in the command form a pair of mirrored images, and the nexttwo disks form another pair of mirrored images, and so on.
Refer to the VNX for Block Concepts guide for more information about disk IDs toverify the format for specifying disks.
Note
The disks in a RAID group must be SAS, NL-SAS, or different types of Flash drives. Ingeneral, you must use the same type of drive in the RAID Group for all the disks.
-raidtype typeSets the RAID type of the RAID group during the time of creation. The supported RAIDtypes are r6, r5, r3, r1_0, r0 and disk.
NOTICE
The -raidtype is a mandatory switch for VNX series systems.
-powersavings on|offTurns the power savings settings ON or OFF on a RAID group. If -powersavingsoption is not specified, then RAID group is created with power savings off by default.If you specify disks that are not eligible for power savings settings, the systemdisplays an error message.
-elementsize elementsizeEnables the createrg command to accept an element size for RAID groups.However, only the 4+1 RAID5 unit type, on non-Flash drives, accepts an element sizeas large as 1024 sectors or blocks. If a size of 1024 is requested for RAID groupsother than 4+1 RAID5, the system displays the following error message:
Invalid RAID type for element size requestedValid RAID types: r5 (with five disks)
If Flash drives are chosen for the RAID Group, with an element size of 1024, thesystem displays the following error message:
Invalid drive type for element size requestedValid drive types: non-Flash drive types
Note
If no element size if specified, an element size of 128 sectors or blocks will beconsidered as the default value.
-oExecutes the command without prompting for confirmation. Skips hotspare policychecking.
EXAMPLEThis command creates RAID group 0 from the five specified disks and sets raidtype r5 asthe RAID group.
naviseccli -h ss1_spa createrg 0 0_1 0_2 0_3 0_4 0_5 –raidtype r5
VNX CLI for Block
createrg 57
emconfigurationConfigures event monitor.
PREREQUISITESFor naviseccli, you must have a user account on the system on which you want toexecute the command.
DESCRIPTIONThe naviseccli emconfiguration command can be used to disable eventmonitoring of an SP, for a specified amount of time. It will then re-enable the responseafter the specified time is up.
SYNTAX
emconfiguration [-reloadconfig] [-disableresponse time][-enableresponse]
OPTIONS
-disableresponse timeThis switch disables event monitoring of the SP for the amount of time specified.Time is indicated in minutes, with a maximum of four hours.
-enableresponseThis switch re-enables the response.
-reloadconfigThis switch will reload a template file.
EXAMPLEnaviseccli -h ss1_spa emconfiguration -reloadconfig -disableresponsetime -enableresponse
environmentReports inlet air temperature and input power.
PREREQUISITESFor naviseccli, you must have a user account on the system on which you want toexecute the command.
DESCRIPTIONThe environment command displays the inlet air temperature and input power of thesystem, disk-array enclosures, and standby power supply through the CLI and UnisphereGUI.
SYNTAX
environment -list -array [-power] [-present]|[-average]-enclosure [bus_enc|spe] [-power|-intemp [f|c]][-present]|[-average]-sps [-sp a|b] [-power] [-present]|[-average]-all
OPTIONS
-arrayDisplays the present or average input power information on the system.
-powerDisplays the input power information.
VNX CLI for Block
58 EMC VNX Series 5.33 Command Line Interface Reference for Block

-presentDisplays the current value, which is a sum of the present input power of allsupported systems. The current value is computed as the 30-second average of thepower consumption sampled every 3 seconds.
-averageDisplays the average value. The average value is computed as the 60-minute rollingaverage of the present power consumption values.It requires an hour to calculate thecorrect value. N/A is displayed if duration of data is less than an hour.
-enclosureDisplays the present or average inlet air temperature or input power information on aspecified disk-array enclosure.
bus_enc|speSpecifies either the bus enclosure or SPE enclosure.
-intemp f|cDisplays the inlet air temperature information. The f flag indicates Fahrenheit andthe c flag indicates Celsius. The default value is c.
-spsDisplays the present or average input power information on a specified standbypower supply.
-sp a|bSpecifies the standby power supply ID on which to display the information.
-allDisplays the following:
l System input power information
l Data Mover enclosure inlet air temperatures and input power information
l Array input power information
l Disk-array enclosure inlet air temperatures and input power information
l Storage processor enclosure inlet air temperatures and input power information
l Standby power supply input power information
EXAMPLE #1The following example shows the output for the environment -list -allcommand for the DPE9
environment –list –all
ArrayInput PowerStatus: ValidPresent(watts): 180Rolling Average(watts): 180DPE9 Bus 0 Enclosure 0Input PowerStatus: ValidPresent(watts): 180Rolling Average(watts): 180
Air Inlet TemperatureStatus: ValidPresent(degree C): 28Rolling Average(degree C): 28Bus 0 Enclosure 0 BBU AInput PowerStatus: InvalidPresent(watts): Not AvailableRolling Average(watts): Not AvailableBus 0 Enclosure 0 BBU BInput Power
VNX CLI for Block
environment 59

Status: InvalidPresent(watts): Not AvailableRolling Average(watts): Not Available
EXAMPLE #2The following example shows the output for the environment -list -allcommand for the SPE9.
environment -list -all
ArrayInput PowerStatus: ValidPresent(watts): 114Rolling Average(watts): 114SPE9 Enclosure SPEInput PowerStatus: ValidPresent(watts): 114Rolling Average(watts): 114Air Inlet TemperatureStatus: ValidPresent(degree C): 24Rolling Average(degree C): 24DAE5S Bus 0 Enclosure 0Input PowerStatus: ValidPresent(watts): 163Rolling Average(watts): 163Air Inlet TemperatureStatus: ValidPresent(degree C): 36Rolling Average(degree C): 36Enclosure SPE SPS Module AInput PowerStatus: ValidPresent(watts): 0Rolling Average(watts): 0Enclosure SPE SPS Battery AInput PowerStatus: ValidPresent(watts): 0Rolling Average(watts): 0Enclosure SPE SPS Module BInput PowerStatus: ValidPresent(watts): 0Rolling Average(watts): 0Enclosure SPE SPS Battery BInput PowerStatus: ValidPresent(watts): 0Rolling Average(watts): 0Bus 0 Enclosure 0 SPS Module AInput PowerStatus: ValidPresent(watts): 0Rolling Average(watts): 0Bus 0 Enclosure 0 SPS Battery AInput PowerStatus: ValidPresent(watts): 0Rolling Average(watts): 0Bus 0 Enclosure 0 SPS Module BInput PowerStatus: Valid
VNX CLI for Block
60 EMC VNX Series 5.33 Command Line Interface Reference for Block

Present(watts): 0Rolling Average(watts): 0Bus 0 Enclosure 0 SPS Battery BInput PowerStatus: ValidPresent(watts): 0Rolling Average(watts): 0
failovermodeChanges the type of trespass needed for failover software (non-storage group only).
PREREQUISITESFor naviseccli, you must have a user account on the system on which you want toexecute the command.
DESCRIPTIONThe naviseccli failovermode command enables or disables the type of trespassneeded for failover software. Use this command with certain types of failover software assuggested in What are the Initiator, Arraycommpath, and Failovermode settings forPowerPath, DMP, PVLinks, and native failover software, which is on EMC Online Support.
The CLI may prompt for confirmation of some changes you specify unless you use the -o(override). To change the setting, enter y.
This command works for systems without storage groups only. For systems with storagegroups, use the command storagegroup sethost -failovermode (see storagegroup on page 168 ).
Changing the failover mode setting will ask for confirmation unless you include the -oswitch.
CAUTION
Do not issue this command unless you know the appropriate value for the type offailover software running on the attached servers. The command is designed fortransition from one type of failover software to another. Changing the failover mode tothe wrong value will make the system inaccessible.
To discover the current setting of failovermode, use the command without anargument.
SYNTAXfailovermode [0|1|2|3|4] [-o]OPTIONS
-oExecutes the command without prompting for confirmation.
EXAMPLEFor ss1_spa, this command enables failover mode 0.
naviseccli -h ss1_spa failovermode 0
WARNING: Previous Failovermode setting will be lost!DO YOU WISH TO CONTINUE? (y/n) y
VNX CLI for Block
failovermode 61
OUTPUTIf the version of VNX OE for Block software running on the SP does not support thiscommand, a Not supported error message is printed to stderr. Other errors:
Command not supported Valid values are 0 to 3
faults -listLists status information for faulted components on the system.
PREREQUISITESYou must have a user account on the system on which you want to execute the command.
DESCRIPTIONThe naviseccli faults command with the -list function, provides statusinformation for faulted hardware components, such as enclosures, disks, power supplies,storage processors, standby power supplies, as well as MirrorView/Asynchronousreplication software sessions.
SYNTAXfaults -listEXAMPLEThe following example lists the faulted hardware components and MirrorView softwaresessions on the system:
naviseccli -h ss1_spa faults -list
OUTPUT
Faulted Subsystem: APM00043806491Enclosure SPE : FaultedEnclosure SPE Power B : FaultedBus 0 Enclosure 0 : FaultedBus 0 Enclosure 0 Disk 7 : RemovedBus 0 Enclosure 0 Disk 8 : RemovedBus 0 Enclosure 0 Disk 9 : RemovedBus 0 Enclosure 0 Power B : Faulted
FAR Mirror Faults Status Report50:06:01:60:90:60:00:14:09:00:00:00:00:00:00:00: Asynchronous mirror is faulted 50:06:01:60:90:60:00:14:06:00:00:00:00:00:00:0050:06:01:60:90:60:03:99:Asynchronous mirror image is fractured 50:06:01:60:90:60:00:14:0B:00:00:00:00:00:00:00: Asynchronous mirror is faulted 50:06:01:60:90:60:00:14:07:00:00:00:00:00:00:00: Asynchronous mirror is faulted 50:06:01:60:90:60:00:14:08:00:00:00:00:00:00:0050:06:01:60:90:60:03:99:Asynchronous mirror image is fractured 50:06:01:60:90:60:00:14:01:00:00:00:00:00:00:00: Asynchronous mirror is faulted 50:06:01:60:90:60:00:14:11:00:00:00:00:00:00:00: Asynchronous mirror is faulted 50:06:01:60:90:60:00:14:12:00:00:00:00:00:00:0050:06:01:
VNX CLI for Block
62 EMC VNX Series 5.33 Command Line Interface Reference for Block

60:90:60:03:99:Asynchronous mirror image is fractured
flash -ioportFlashes the LEDs on I/O ports.
PREREQUISITESFor naviseccli, you must have a user account on the system on which you want toexecute the command.
DESCRIPTIONThe naviseccli flash -ioport command flashes the I/O ports on VNX systems.Flashes only the targeted SP owned I/O ports.
SYNTAX
flash -ioport [-fe logicalportID | -be logicalportID | [-pslotid"onboard"|"basemodule"|physicalslotID -pport physicalportID] |-byusage [mirrorview]] on|off
OPTIONS
-ioportControls flashing of I/O ports on the target SP I/O modules.
-fe logicalportIDTurns flashing on/off for the front-end port with the logical ID specified on the targetSP.
-be logicalportIDTurns flashing on/off for the back-end port with the logical ID specified on the targetSP.
-pslotid "onboard"|physicalslotID -pport physicalportIDTurns flashing on/off for an physical slot/port located on the targeted SP’s I/Omodule. The physical slot ID refers to the I/O module slot.
Note
"basemodule" is not supported on VNX8000 Block systems.
-byusage mirrorviewTurns flashing on/off for an I/O port depending on how the I/O port is being used.The only option is mirrorview.
on|offIndicates whether flashing is turned on or off.
EXAMPLE #1This example turns flashing on for a specified physical port on the onboard I/O module:
naviseccli -h 10.244.211.36 flash -ioport -pslotid onboard -pportid 3on
Slot Onboard, Physical Port 3 (Uninitialized): ON
EXAMPLE #2This example turns flashing on by specifying a logical port ID on the onboard I/O module:
VNX CLI for Block
flash -ioport 63
naviseccli -h 10.244.211.36 flash -ioport -be 3 on
Slot Onboard, Physical Port 1 (BE 3): ON
EXAMPLE #3This example turns flashing on by specifying the use of an I/O port on the onboard I/Omodule:
naviseccli -h 10.244.211.36 flash -ioport -fe 1 on
Slot Onboard, Physical Port 3 (FE 1): ON
EXAMPLE #4This example turns flashing on by specifying the use of an I/O port on the removable I/Omodules:
naviseccli -h 10.244.211.36 flash -ioport -fe 4 off
Slot 0, Physical Port 0 (FE 4): OFF
EXAMPLE #5This example turns flashing on for a specified physical port on the removable I/Omodules:
naviseccli -h 10.244.211.36 flash -ioport -pslotid 1 -pportid 0 on
Slot 1, Physical Port 0 (FE 8): ON
EXAMPLE #6This example turns flashing on for a specified physical port on the base module:
naviseccli -h 10.244.211.36 flash -ioport -pslotid basemodule -pportid0 on
Slot basemodule, Physical Port 0 (BE 0):ON
flash -iomoduleTurns the LEDs for the I/O ports on an I/O module on or off.
PREREQUISITESFor naviseccli, you must have a user account on the system on which you want toexecute the command.
DESCRIPTIONThe naviseccli flash -iomodule command turns the flashing LEDs on/off for allthe I/O ports on a specified module on the VNX system.
SYNTAXflash -iomodule ["onboard"|"basemodule"|slotid] [on|off]OPTIONS
"onboard"|"basemodule"|slotidIf the slotID is not specified, an error message is displayed.
Note
"basemodule" is not supported on VNX8000 Block systems.
on|off
VNX CLI for Block
64 EMC VNX Series 5.33 Command Line Interface Reference for Block

Indicates whether flashing is turned on or off.
EXAMPLE #1naviseccli -h 10.244.211.36 flash -iomodule onboard on
I/O Module Onboard: ON
EXAMPLE #2naviseccli -h 10.244.211.36 flash -iomodule onboard off
I/O Module Onboard: OFF
EXAMPLE #3naviseccli -h 10.244.211.36 flash -iomodule basemodule 0 on
I/O Module Basemodule: ON
flashledsTurns the LEDs for disks in a specific enclosure or bus on or off.
PREREQUISITESFor naviseccli, you must have a user account on the system on which you want toexecute the command.
DESCRIPTIONThe naviseccli flashleds command turns on the LEDs in a specific disk-arrayenclosure (DPE, iDAE, or DPE) or Fibre Channel bus. The command can help you identifydisks in an enclosure or bus.
SYNTAXflashleds -e enclosure-number [-b bus-number] [on|off]OPTIONS
-e enclosure-numberSpecifies the disk-array enclosure. In each system, if there is a DPE or iDAE, it isenclosure 0. DAEs are numbered sequentially on each bus ascending from 1 (forDPE/iDAE systems) or ascending from 0 (for other system types).
-b bus-numberSpecifies the bus-number.
on|offTurns the LEDs on or off. If you omit this switch, the command turns the LEDs on.
EXAMPLEThese commands turn on the LEDs for the system that holds SP ss1_spa and then turnsthem off. For that system, it specifies enclosure 1, bus 0.
naviseccli -h ss1_sp1 flashleds -e 1 -b 0 onnaviseccli -h ss1_sp1 flashleds -e 1 -b 0 off
OUTPUTThere is no output. Errors are printed to stderr.
VNX CLI for Block
flashleds 65

getagentGets device names and configurations.
PREREQUISITESFor naviseccli, you must have a user account on the system on which you want toexecute the command.
DESCRIPTIONThe naviseccli getagent command returns the names of devices that thedestination Unisphere agent controls. The command also displays descriptions of eachdevice with which the Unisphere agent is configured to communicate. If you type thegetagent command without switches, the CLI displays all values. With switches, the CLIdisplays only the values.
Each SP is a host (-h switch) to which you address the command. The command displaysinformation for the agent running in the SP (the SP agent). Values for irrelevant displayfields appear as NA.
Note
If you are running VMware ESX Server and issuing this command to a virtual machine(VM), it cannot target the host agent because the Unisphere Host Agent is supported onlyon ESX Server.
SYNTAX
getagent [-cabinet] [-desc] [-mem] [-model] [-name] [-node][-peersig] [-prom] [-rev] [-scsiid] [-serial] [-sig][-type] [-ver] [-os] [-spid]
OPTIONS
-cabinetReturns a description of the cabinet type.
-descReturns an ASCII description of the device (taken from the Unisphere agentconfiguration file).
-memReturns, in MB, the size of the SP’s memory. Each SP in the system must have thesame amount of memory to make full use of the memory. Total memory can be 8, 16,32, or 64 MB.
-modelReturns the model number of the SP.
-nameReturns the name of the device (taken from the Unisphere agent configuration file).
-nodeReturns the device’s location in the file system.
Note
Use the returned device name when you specify the device in a command line.
-osDisplays the operating system.
-peersigReturns the signature of the peer SP.
-prom
VNX CLI for Block
66 EMC VNX Series 5.33 Command Line Interface Reference for Block
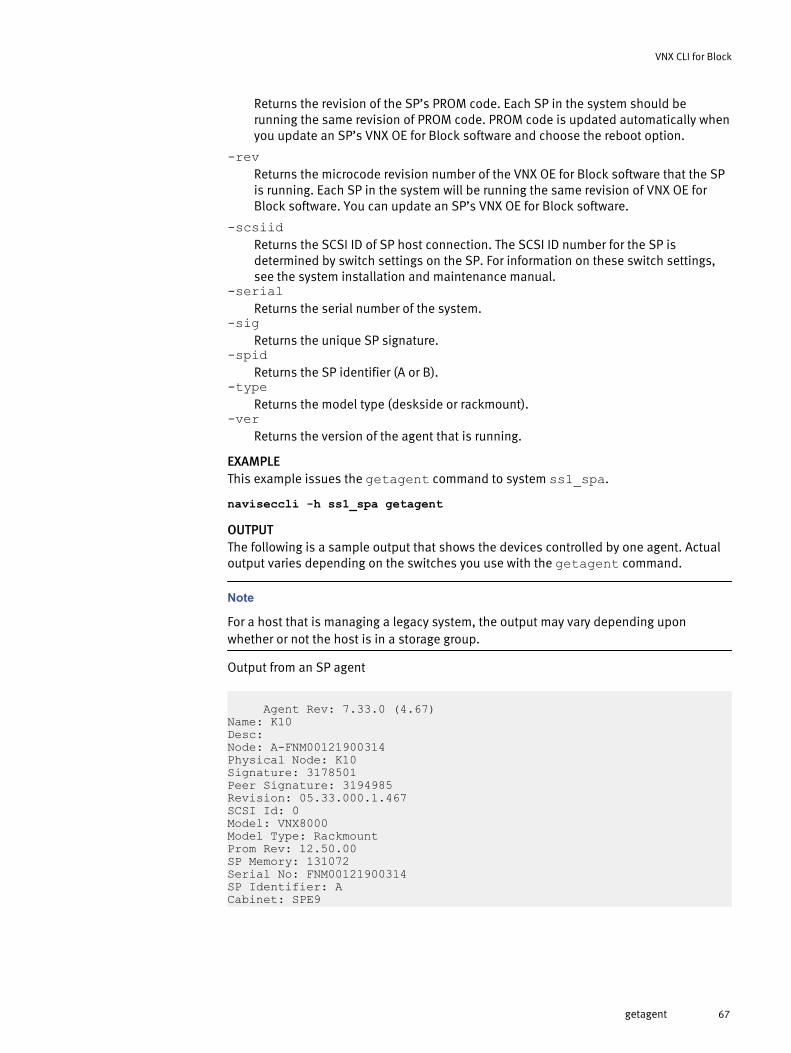
Returns the revision of the SP’s PROM code. Each SP in the system should berunning the same revision of PROM code. PROM code is updated automatically whenyou update an SP’s VNX OE for Block software and choose the reboot option.
-revReturns the microcode revision number of the VNX OE for Block software that the SPis running. Each SP in the system will be running the same revision of VNX OE forBlock software. You can update an SP’s VNX OE for Block software.
-scsiidReturns the SCSI ID of SP host connection. The SCSI ID number for the SP isdetermined by switch settings on the SP. For information on these switch settings,see the system installation and maintenance manual.
-serialReturns the serial number of the system.
-sigReturns the unique SP signature.
-spidReturns the SP identifier (A or B).
-typeReturns the model type (deskside or rackmount).
-verReturns the version of the agent that is running.
EXAMPLEThis example issues the getagent command to system ss1_spa.
naviseccli -h ss1_spa getagent
OUTPUTThe following is a sample output that shows the devices controlled by one agent. Actualoutput varies depending on the switches you use with the getagent command.
Note
For a host that is managing a legacy system, the output may vary depending uponwhether or not the host is in a storage group.
Output from an SP agent
Agent Rev: 7.33.0 (4.67)Name: K10Desc:Node: A-FNM00121900314Physical Node: K10Signature: 3178501Peer Signature: 3194985Revision: 05.33.000.1.467SCSI Id: 0Model: VNX8000Model Type: RackmountProm Rev: 12.50.00SP Memory: 131072Serial No: FNM00121900314SP Identifier: ACabinet: SPE9
VNX CLI for Block
getagent 67

The following output shows the enclosure type for Model VNX5400/VNX5600/VNX5800/VNX7600 Block systems:
Cabinet: DPE9
The following output shows the enclosure type for a Model VNX8000 Block system:
Cabinet: SPE9
getallGets comprehensive system information.
PREREQUISITESFor naviseccli, you must have a user account on the system on which you want toexecute the command.
DESCRIPTIONThe naviseccli getall command returns an extensive list of system information,including:
l Agent and host information
l System information
l HBA or switch information
l SP information
l Cache information
l Disk information
l LUN information
l RAID group information
l Storage group information
l SnapView information
l SAN Copy information
l Drive type for enclosures, disks, RAID groups, and LUNs
The getall command is a superset of the getagent command. If you type the getallcommand without switches, the CLI displays all values. With switches, the CLI displaysonly the values specified.
Note that the getall command and any of its arguments return all information pertinentto the current Unisphere release. The amount of this information may change (usually itincreases) with each new Unisphere release. This may affect your custom commandscripts that use getall.
The command displays information for the agent running in the SP (the SP agent). Valuesfor irrelevant display fields appear as NA.
Some information is not displayed if the feature is not activated or not supported. Forexample, SAN Copy items are displayed only if SAN Copy software is installed andactivated.
SYNTAX
getall [-host] [-array] [-hba] [-sp] [-cache] [-disk][-drivetype] [-fastcache] [-lun] [-reserved] [-rg] [-sg][-snapviews] [-sancopy]
VNX CLI for Block
68 EMC VNX Series 5.33 Command Line Interface Reference for Block

OPTIONS
-hostDisplays only information about the host and the agent that manage the system.This is a composite of information displayed by the getagent, remoteconfig,and ndu commands.
-arrayDisplays only information about the system and its hardware components such asfan and link control card (LCC). This is a composite of information displayed by thegetarrayuid, arrayname, getcrus, and initialiazearray commands.
-hbaDisplays information about each switch, HBA and port. It also displays the physicallocation of the port for a VNX series system. This combines the information that thealpa, port, register, and getloop commands display.
-spDisplays information about this SP only. This is a composite of information displayedby the getsp, getcontrol, networkadmin, and getsptime commands.
-cacheDisplays information about the cache. This is the same information displayed by thecache -sp -info command.
-diskDisplays information about disks and enclosures in the system and new disk spin-down statistics. This is the same information that the getdisk command displays.
-drivetypeDisplays the drive type of the LUN.
-fastcacheDisplays the FAST Cache information.
-lunDisplays only information about each logical unit (host and system) in the system.This is a composite of information displayed by getsniffer, storagegroup,and getlun commands.
-reservedDisplays the reserved LUN pool information.
-rgDisplays only information about RAID groups. This is the same information displayedby getrg command.
Note
The -rg switch does not display the private RAID group used in thin pools.
-sgDisplays only information about storage groups. This is the same informationdisplayed by the storagegroup command.
-snapviewsDisplays only information about snapview. This is the same information displayedby the snapview command.
-sancopyDisplays only information about sancopy. This is the same information displayedby the sancopy command.
EXAMPLEThis example displays the information about the host and the agent that manage thesystem.
naviseccli getall -host
VNX CLI for Block
getall 69
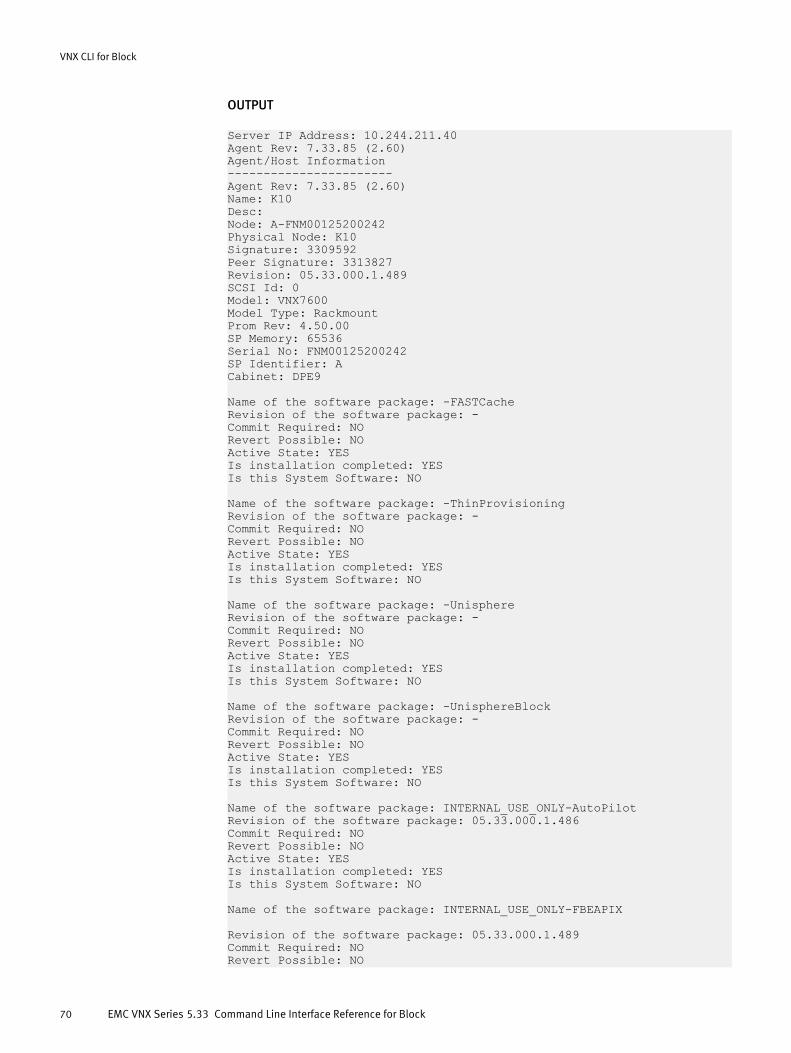
OUTPUT
Server IP Address: 10.244.211.40Agent Rev: 7.33.85 (2.60)Agent/Host Information-----------------------Agent Rev: 7.33.85 (2.60)Name: K10Desc:Node: A-FNM00125200242Physical Node: K10Signature: 3309592Peer Signature: 3313827Revision: 05.33.000.1.489SCSI Id: 0Model: VNX7600Model Type: RackmountProm Rev: 4.50.00SP Memory: 65536Serial No: FNM00125200242SP Identifier: ACabinet: DPE9
Name of the software package: -FASTCacheRevision of the software package: -Commit Required: NORevert Possible: NOActive State: YESIs installation completed: YESIs this System Software: NO
Name of the software package: -ThinProvisioningRevision of the software package: -Commit Required: NORevert Possible: NOActive State: YESIs installation completed: YESIs this System Software: NO
Name of the software package: -UnisphereRevision of the software package: -Commit Required: NORevert Possible: NOActive State: YESIs installation completed: YESIs this System Software: NO
Name of the software package: -UnisphereBlockRevision of the software package: -Commit Required: NORevert Possible: NOActive State: YESIs installation completed: YESIs this System Software: NO
Name of the software package: INTERNAL_USE_ONLY-AutoPilotRevision of the software package: 05.33.000.1.486Commit Required: NORevert Possible: NOActive State: YESIs installation completed: YESIs this System Software: NO
Name of the software package: INTERNAL_USE_ONLY-FBEAPIX
Revision of the software package: 05.33.000.1.489Commit Required: NORevert Possible: NO
VNX CLI for Block
70 EMC VNX Series 5.33 Command Line Interface Reference for Block
Active State: YESIs installation completed: YESIs this System Software: NO
Name of the software package: INTERNAL_USE_ONLY-RALabHostsRevision of the software package: 05.33.000.1.489Commit Required: NORevert Possible: NOActive State: YESIs installation completed: YESIs this System Software: NO
Name of the software package: VNX-Block-Operating-EnvironmentRevision of the software package: 05.33.000.1.489Commit Required: NORevert Possible: NOActive State: YESIs installation completed: YESIs this System Software: NO
getarrayuidGets the system unique ID.
PREREQUISITESFor naviseccli, you must have a user account on the system on which you want toexecute the command.
DESCRIPTIONThe naviseccli getarrayuid command displays the unique ID (UID) of the systemthat contains the current SP. For a Fibre Channel system this is the system WWN. For aniSCSI system this is also the WWN, but iSCSI also has a target name, the iqn identifier,which is a unique identifier. A system with an iSCSI and Fibre Channel combinationcontroller shows both types of IDs.
The SP, HBA, and switch ports also have unique IDs. If you specify one or more SPs, thenthe CLI displays the unique ID of the systems containing those SPs. Knowing the UID ofan SP’s system is useful with MirrorView mirroring commands and for other operations.
SYNTAXgetarrayuid [-iscsi|-all] [sphostnames]OPTIONS
sphostnamesAre the hostnames of one or more SPs, separated by spaces or commas. If you omitsphostnames, then the CLI displays the UID of the SP specified with the -h switch.
-iscsiReturns the iSCSI target name (iqn) for the system on a combo system.
-allReturns both the system WWN and the iSCSI target name (iqn).
Note
If you do not specify any switches, getarrayuid returns the system WWN on a
system with an iSCSI and Fibre Channel combination controller, as well as on aniSCSI-only system.
VNX CLI for Block
getarrayuid 71

EXAMPLEnaviseccli -h ss1_spa getarrayuid -all
Host name Array UIDCps42199 50:06:01:60:77:02:C7:A71.2.3.4 iqn. 1992-04.com.emc:cx.hk192200422
OUTPUTThe UID of the system that holds the SP (see above).
getconfigReturns system type configuration information.
PREREQUISITESFor naviseccli, you must have a user account on the system on which you want toexecute the command.
DESCRIPTIONThe naviseccli getconfigcommand displays system type configurationinformation. If you omit switches, it displays all configuration type information. You canset configuration information with setconfig.
Use the getsp command to display SP revision and signature information.
SYNTAXgetconfig [-ptype] [-que] [-rer] [-tn] [-pg8] [-rep]OPTIONS
-ptypeDisplays the system package type.
-queDisplays the setting on how queue full status is handled. Yes means that the VNXOE for Block software will return device status to the operating system as busy,instead of queue full, when the device queue is full.
-rerDisplays the number of recovered errors.
-tnDisplays the state of the Target Negotiate bit.
-pg8Displays SCSI mode page 8 information.
-repDisplays periodic error report information: the number of reported errors or N/A.
EXAMPLEnaviseccli -h ss1_spa getconfig
Sub-System Package Type: 20Queue Full Status: DISABLEDRecovered Errors: DISABLEDTarget Negotiate: UnknownMode Page 8: DISABLEDPeriodic Error Report: N/A
VNX CLI for Block
72 EMC VNX Series 5.33 Command Line Interface Reference for Block

getcontrolGets SP performance information.
PREREQUISITESFor naviseccli, you must have a user account on the system on which you want toexecute the command.
DESCRIPTIONThe naviseccli getcontrol command returns information about the SPperformance.
SYNTAX
getcontrol [-allib] [-arv] [-busy] [-cbt] [-date] [-day][-flush] [-idle] [-read] [-rw] [-sc] [-sf] [-sl] [-time][-write] [-all]
OPTIONS-allib
Returns the idle and busy ticks for all buses.-arv
Returns the number of times a user request arrived while at least one other requestwas being processed.
-busyReturns the percentage of time the SP is busy.
-cbtReturns the controller idle and busy ticks.
-dateReturns the SP’s system date.
-dayReturns the SP’s system day.
-flushReturns the number of requests to flush the write cache, and the number of writecache blocks flushed.
-idleReturns the percentage of time the SP is idle.
-readReturns the number of reads received by the SP.
-rwReturns the following:
Host read requests
The number of read requests made by the host to the LUN
Host write requests
The number of write requests made by the host to the LUN
Host blocks read
The number of blocks the host read from the LUN
Host blocks written
The number of blocks written from the host to the LUN
-scReturns the status of the system cache (on/off).
-sf
VNX CLI for Block
getcontrol 73
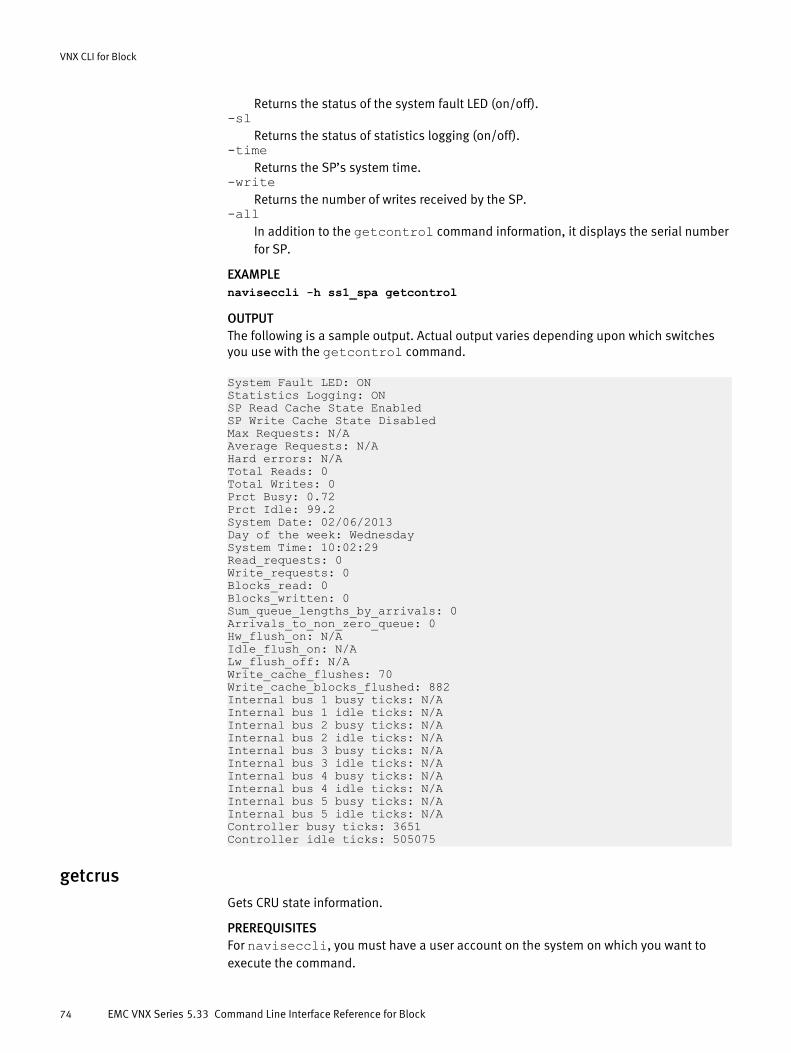
Returns the status of the system fault LED (on/off).-sl
Returns the status of statistics logging (on/off).-time
Returns the SP’s system time.-write
Returns the number of writes received by the SP.-all
In addition to the getcontrol command information, it displays the serial numberfor SP.
EXAMPLEnaviseccli -h ss1_spa getcontrol
OUTPUTThe following is a sample output. Actual output varies depending upon which switchesyou use with the getcontrol command.
System Fault LED: ONStatistics Logging: ONSP Read Cache State EnabledSP Write Cache State DisabledMax Requests: N/AAverage Requests: N/AHard errors: N/ATotal Reads: 0Total Writes: 0Prct Busy: 0.72Prct Idle: 99.2System Date: 02/06/2013Day of the week: WednesdaySystem Time: 10:02:29Read_requests: 0Write_requests: 0Blocks_read: 0Blocks_written: 0Sum_queue_lengths_by_arrivals: 0Arrivals_to_non_zero_queue: 0Hw_flush_on: N/AIdle_flush_on: N/ALw_flush_off: N/AWrite_cache_flushes: 70Write_cache_blocks_flushed: 882Internal bus 1 busy ticks: N/AInternal bus 1 idle ticks: N/AInternal bus 2 busy ticks: N/AInternal bus 2 idle ticks: N/AInternal bus 3 busy ticks: N/AInternal bus 3 idle ticks: N/AInternal bus 4 busy ticks: N/AInternal bus 4 idle ticks: N/AInternal bus 5 busy ticks: N/AInternal bus 5 idle ticks: N/AController busy ticks: 3651Controller idle ticks: 505075
getcrusGets CRU state information.
PREREQUISITESFor naviseccli, you must have a user account on the system on which you want toexecute the command.
VNX CLI for Block
74 EMC VNX Series 5.33 Command Line Interface Reference for Block

DESCRIPTIONThe naviseccli getcrus command returns state information on all or selected CRUs(customer replaceable units) in the system except for disks (see the getdisk command)and selected FRUs/sub FRUs in the system. The getcrus command displays the state ofthe following CRUs: fans, link controller cards (LCCs), storage processors (SPs), batterybackup units (referred to as standby power supplies or SPSs), and power supplies (PSs orVSCs). You can use getcrus without any switches to get the state information for everyCRU (except disks). The getcrus command displays the state of management module ofFRUs and state of I/O module, CPU module, and DIMM of sub FRUs.
Note
If one of the LCCs is pulled from Bus x, Enclosure x, all data along that bus (after the LCCwas pulled) appears as faulted since the agent cannot gather any information along thatpath. If this occurs, issue the getcrus command to the peer SP. The CLI lists the faulted
components.
Note
Command switches -cpua, -cpub, -dimma, -dimmb, -ioa, -iob, -mgmta, and -mgmtb are supported only on Secure CLI.
SYNTAX
getcrus [-fana] [-fanb] [-fanc] [-lcca][-lccb] [-spa] [-spb][-lccrevb] [-lccsnb] [-spsa] [-spsb][-lccreva] [-lccsna] [-cablingspsa] [-cablingspsb][-encdrivetype] [-speeds] [-cpua] [-cpub] [-ioa] [-iob] [-dimma][-dimmb] [-mgmta] [-mgmtb] [-bma] [-bmb][bbua] [bbub] [-all]
OPTIONS-bbua
Returns the status of Battery Backup Unit on SP A.-bbub
Returns status of Battery Backup Unit on SP B.-bma
Returns status of Base Module on SP A.-bmb
Returns status of Base Module on SP B.-cablingspsa
Returns the cabling status for SPS A (standby power supply A).-cablingspsb
Returns the cabling status for SPS B (standby power supply B).-cpua
Returns the state of the CPU module on SP A.-cpub
Returns the state of the CPU module on SP B.-dimma
Returns the state of the DIMM module on SP A.-dimmb
Returns the state of the DIMM module on SP B.-encdrivetype
Displays the type(s) of drives that are currently allowed to run in the enclosure.
VNX CLI for Block
getcrus 75
-fanaReturns the state information for fan A.
-fanbReturns the state information for fan B.
-fancReturns the state information for fan C.
-ioaReturns the state of the I/O modules on SP A.
-iobReturns the state of the I/O modules on SP B.
-lccaReturns the state information of the LCC for SP A.
-lccbReturns the state information of the LCC for SP B.
-lccreva|-lccrevbReturns the revision of the DPE LCC A, LCC B, or both if you specify both switches.
-lccsna|-lccsnbReturns the serial number of the DPE LCC A, LCC B, or both if you specify bothswitches.
-mgmtaReturns the state of management module A.
-mgmtbReturns the state of management module B.
-spaReturns the current operational state of SP A. It can be in any of the following states:
Present
The SP is the communication channel you are using to communicate with thechassis.
Empty
Agent cannot talk to the SP because a communication channel specifying theSP is not in the agent’s configuration file for the selected host. For example, theSP is connected to a different host than the SP in the communications channelfor the chassis.
Not Present
SP that is in the communication channel to the selected chassis has failed orbeen removed.
Removed
SP was not present when the agent was started.
-spbReturns the state information for SP B. See -spa description (above).
-spsaReturns the state information for SPS (standby power supply, backup battery) A.
-spsbReturns the state information for standby power supply B.
-speedsDisplays the current and maximum speed of enclosures and LCCs within theenclosures. The current speed indicates the speed an enclosure or LCC is currentlyrunning at; the maximum speed indicates the highest speed an enclosure or LCC iscapable of running at.
-allDisplays the state of all devices.
VNX CLI for Block
76 EMC VNX Series 5.33 Command Line Interface Reference for Block

EXAMPLEThis command gets the information about CRU state.
naviseccli -h ss1_spa getcrus
OUTPUTThe following example shows the output from the getcrus -all command for theVNX5400/VNX5600/VNX5800/VNX7600 Block systems.
DPE9 Bus 0 Enclosure 0Enclosure Drive Type: SAS, NL SASCurrent Speed: 6GbpsMaximum Speed: 6GbpsSP A State: PresentSP B State: PresentBus 0 Enclosure 0 Fan A0 State: PresentBus 0 Enclosure 0 Fan A1 State: PresentBus 0 Enclosure 0 Fan B0 State: PresentBus 0 Enclosure 0 Fan B1 State: PresentBus 0 Enclosure 0 Power A State: PresentBus 0 Enclosure 0 Power B State: PresentBus 0 Enclosure 0 BBU A State: PresentBus 0 Enclosure 0 BBU B State: PresentBus 0 Enclosure 0 CPU Module A State: PresentBus 0 Enclosure 0 CPU Module B State: PresentBus 0 Enclosure 0 SP A I/O Module 0 State: PresentBus 0 Enclosure 0 SP A I/O Module 1 State: EmptyBus 0 Enclosure 0 SP A I/O Module 2 State: EmptyBus 0 Enclosure 0 SP A I/O Module 3 State: EmptyBus 0 Enclosure 0 SP A I/O Module 4 State: EmptyBus 0 Enclosure 0 SP B I/O Module 0 State: PresentBus 0 Enclosure 0 SP B I/O Module 1 State: EmptyBus 0 Enclosure 0 SP B I/O Module 2 State: EmptyBus 0 Enclosure 0 SP B I/O Module 3 State: EmptyBus 0 Enclosure 0 SP B I/O Module 4 State: EmptyBus 0 Enclosure 0 DIMM Module A State: PresentBus 0 Enclosure 0 DIMM Module B State: PresentBus 0 Enclosure 0 Management Module A State: PresentBus 0 Enclosure 0 Management Module B State: PresentBus 0 Enclosure 0 Base Module A State: PresentBus 0 Enclosure 0 Base Module B State: Present
The following example shows the output from the getcrus -all command for aVNX8000 Block system.
SPE9 Enclosure SPEEnclosure Drive Type: N/ACurrent Speed: N/AMaximum Speed: N/ASP A State: PresentSP B State: PresentEnclosure SPE Fan A0 State: PresentEnclosure SPE Fan A1 State: PresentEnclosure SPE Fan A2 State: PresentEnclosure SPE Fan A3 State: PresentEnclosure SPE Fan A4 State: PresentEnclosure SPE Fan B0 State: PresentEnclosure SPE Fan B1 State: PresentEnclosure SPE Fan B2 State: PresentEnclosure SPE Fan B3 State: PresentEnclosure SPE Fan B4 State: PresentEnclosure SPE Power A0 State: PresentEnclosure SPE Power A1 State: PresentEnclosure SPE Power B0 State: PresentEnclosure SPE Power B1 State: PresentEnclosure SPE SPS Module A State: Present
VNX CLI for Block
getcrus 77
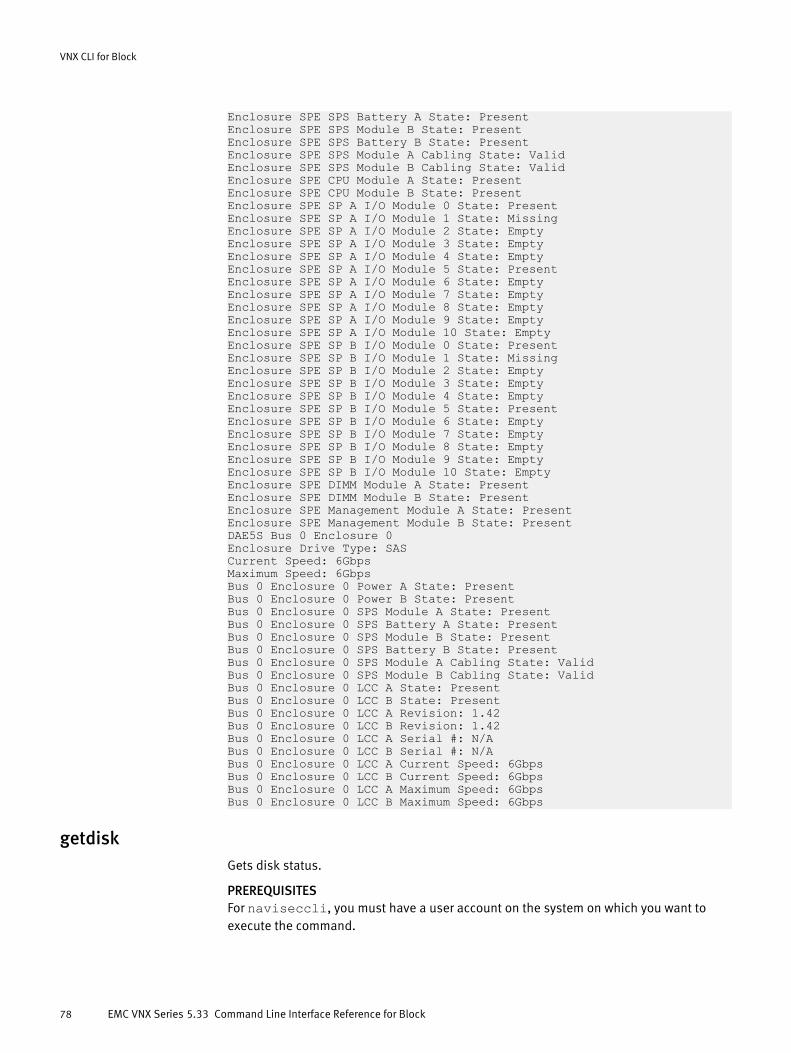
Enclosure SPE SPS Battery A State: PresentEnclosure SPE SPS Module B State: PresentEnclosure SPE SPS Battery B State: PresentEnclosure SPE SPS Module A Cabling State: ValidEnclosure SPE SPS Module B Cabling State: ValidEnclosure SPE CPU Module A State: PresentEnclosure SPE CPU Module B State: PresentEnclosure SPE SP A I/O Module 0 State: PresentEnclosure SPE SP A I/O Module 1 State: MissingEnclosure SPE SP A I/O Module 2 State: EmptyEnclosure SPE SP A I/O Module 3 State: EmptyEnclosure SPE SP A I/O Module 4 State: EmptyEnclosure SPE SP A I/O Module 5 State: PresentEnclosure SPE SP A I/O Module 6 State: EmptyEnclosure SPE SP A I/O Module 7 State: EmptyEnclosure SPE SP A I/O Module 8 State: EmptyEnclosure SPE SP A I/O Module 9 State: EmptyEnclosure SPE SP A I/O Module 10 State: EmptyEnclosure SPE SP B I/O Module 0 State: PresentEnclosure SPE SP B I/O Module 1 State: MissingEnclosure SPE SP B I/O Module 2 State: EmptyEnclosure SPE SP B I/O Module 3 State: EmptyEnclosure SPE SP B I/O Module 4 State: EmptyEnclosure SPE SP B I/O Module 5 State: PresentEnclosure SPE SP B I/O Module 6 State: EmptyEnclosure SPE SP B I/O Module 7 State: EmptyEnclosure SPE SP B I/O Module 8 State: EmptyEnclosure SPE SP B I/O Module 9 State: EmptyEnclosure SPE SP B I/O Module 10 State: EmptyEnclosure SPE DIMM Module A State: PresentEnclosure SPE DIMM Module B State: PresentEnclosure SPE Management Module A State: PresentEnclosure SPE Management Module B State: PresentDAE5S Bus 0 Enclosure 0Enclosure Drive Type: SASCurrent Speed: 6GbpsMaximum Speed: 6GbpsBus 0 Enclosure 0 Power A State: PresentBus 0 Enclosure 0 Power B State: PresentBus 0 Enclosure 0 SPS Module A State: PresentBus 0 Enclosure 0 SPS Battery A State: PresentBus 0 Enclosure 0 SPS Module B State: PresentBus 0 Enclosure 0 SPS Battery B State: PresentBus 0 Enclosure 0 SPS Module A Cabling State: ValidBus 0 Enclosure 0 SPS Module B Cabling State: ValidBus 0 Enclosure 0 LCC A State: PresentBus 0 Enclosure 0 LCC B State: PresentBus 0 Enclosure 0 LCC A Revision: 1.42Bus 0 Enclosure 0 LCC B Revision: 1.42Bus 0 Enclosure 0 LCC A Serial #: N/ABus 0 Enclosure 0 LCC B Serial #: N/ABus 0 Enclosure 0 LCC A Current Speed: 6GbpsBus 0 Enclosure 0 LCC B Current Speed: 6GbpsBus 0 Enclosure 0 LCC A Maximum Speed: 6GbpsBus 0 Enclosure 0 LCC B Maximum Speed: 6Gbps
getdiskGets disk status.
PREREQUISITESFor naviseccli, you must have a user account on the system on which you want toexecute the command.
VNX CLI for Block
78 EMC VNX Series 5.33 Command Line Interface Reference for Block

DESCRIPTIONThe naviseccli getdisk command returns detailed status information about all orselected disks in the system.
A disk module can be in any of the following operational states:
Table 8 Operational states
State Meaning
Binding Being bound into a LUN.
Empty Failed or removed before the agent started running, or thedisk wasn’t part of a RAID group.
Enabled Part of a bound LUN.
Expanding Disk is being added to a RAID group.
Formatting Being hardware formatted. Generally, modules do not needformatting.
Rebuilding The data is being rebuilt on a replacement disk module.
Removed Disk module is removed from the chassis; applies only to adisk module that is part of a LUN.
Low Power Drive is in low -power state (less than full power); a possibledelay can occur with media access.
Reduced Power, Transitioning Drive is transitioning from a low power/no power to a fullpower state or vice versa.
Unbound Ready to be bound into a LUN.
SYNTAX
getdisk [-bind] [-capacity] [-actualcapacity] [-userlba][-cppct] [-hr][-hs] [-hw][-lun] [-private] [-product] [-rb] [-read] [-rev][-serial] [-sectors] [-sig] [-sr] [ -state] [-sw][-type] [-vendor] [-write] [-rg] [-numluns] [-cpn][-rds] [-wrts] [-bytrd] [-bytwrt] [-bndcrs] [-drivetype][-tla] [ -usercapacity] [-idleticks] [-busyticks] [-speeds][-powersavingsdiskcapable] [-powersavingsdiskeligible][-powersavingsstate][-spinstats][-arrivalswithnonzeroqueue][-highsumofseeks] [-idleticks_SPA] [-idleticks_SPB][-busyticks_SPA] [-busyticks_SPB] [-que] [-all]
OPTIONS
disk-positionReturns status for a specific disk. Refer the VNX for Block Concepts guide, section onLUN IDs, unique IDs, and disk IDs to verify the format for specifying disks.
When the disk-position is not entered, getdisk reports on all disks, regardless ofwhich switches are set. To obtain only the information specified by the optionalswitches, you must include disk-position in the getdisk command.
-actualcapacityReturns the actual capacity of the disk.
-arrivalswithnonzeroqueue
VNX CLI for Block
getdisk 79

Returns the cumulative number of requests sent to a disk, while one or morerequests were already outstanding.
-bindReturns the percentage of the disk that is bound.
-bndcrsReturns the number of Stripe Boundary Crossings (string value or Unknown).
-busyticksReturns the amount of time that this disk is busy.
-busyticks_SPAReturns the amount of time in 100 ms ticks where the disk was serving requestsfrom SPA, respectively.
-busyticks_SPBReturns the amount of time in 100 ms ticks where the disk was serving requestsfrom SPB, respectively.
-bytrdReturns the number of KB read.
-bytwrtReturns the number of KB written.
-capacityReturns the disk capacity in MB.
-cpnReturns the system part number (string value) or N/A.
-cppctDisplays the progress of the following three operations:
l Automatic hot spare replacementl Explicit copytodisk command
-drivetypeReturns the drive type of the disk.
-highsumofseeksReturns the cumulative seek distance in 512 Byte sectors of all requests to this disk.The seek distance between two consecutive requests is the delta of theircorresponding LBAs.
-hrReturns the total number of hard read errors for all the disk modules in the LUN thatpersisted through all the retries. A growing number of hard errors may mean that oneor more of the LUN’s disk modules is nearing the end of its useful life.
-hsReturns hot spare status: NO if not a hot spare, the disk position otherwise; see diskmodule operational states on page 79. The Hot Spare value will be shown as N/A onVNX.
-hwReturns the total number of hard write errors for all the disk modules in the LUN thatpersisted through all the retries. A growing number of hard errors may mean that oneor more of the LUN’s disk modules is nearing the end of its useful life.
-idleticksReturns the amount of time that this disk is idle.
-idleticks_SPAReturns the amount of time in 100 ms ticks where the disk had no outstandingrequests from SPA, respectively.
-idleticks_SPBReturns the amount of time in 100 ms ticks where the disk had no outstandingrequests from SPB, respectively.
-lunReturns the LUN number(s) to which this disk belongs.
-numluns
VNX CLI for Block
80 EMC VNX Series 5.33 Command Line Interface Reference for Block

Returns the number of LUNs bound to this disk. LUNs may span multiple disks.-powersavingsdiskcapable
Displays whether the vendor has approved the drives for spin down. It states YES orNO.
-powersavingsdiskeligibleDetermines if the drive has met the system requirements (slot location) fortransitioning to low-power standby state.
-powersavingsstateDisplays the power savings state of the drive.
-privateReturns the offset of every partition on the disk.
-queReturns the sum of outstanding requests to the disk. For each newly arriving request,this value gets incremented by the number of currently still outstanding requests tothe disk, plus the arriving request itself.
-productReturns the product ID of the disk.
-rbReturns the percentage of the disk that is rebuilt.
-readReturns the total number of read requests made to the disk module. You might findthe LUN read information in getlun more useful because it is for the entire LUN,and not just for one of the disk modules in the LUN.
-rdsReturns the number of read requests.
-revReturns the product revision number of the disk.
-rgReturns the RAID group (if any) associated with this disk.
-sectorsReturns the number of user sectors.
-serialReturns the serial number of the disk.
-sigReturns the bind signature, which was automatically assigned during the bindprocess. The Bind Signature value will be shown as N/A, enclosure number,slot number (for example, N/A, 0, 1).
-spinstatsReturns the new disk power savings statistics.
-srReturns the total number of soft read errors for all the disk modules in the LUN thatdisappeared before all the retries. A growing number of soft errors may indicate thatone of the LUN’s disk modules is nearing the end of its useful life.
-stateReturns the state of the disk.
-swReturns the total number of soft write errors for all the disk modules in the LUN thatdisappeared before all the retries. A growing number of soft errors may indicate thatone of the LUN’s disk modules is nearing the end of its useful life.
-tlaReturns the TLA part number.
-typeReturns the RAID type of the disk.
-usercapacityReturns the amount of space on the disk that is assigned to bound LUNs.
VNX CLI for Block
getdisk 81

-userlbaReturns user LBA information.
-vendorReturns the vendor ID of the disk.
-writeReturns the total number of write requests to the disk module. You might find theLUN write information in getlun more useful because it shows the entire LUN, andnot just one disk.
-wrtsReturns the number of write requests.
-allIn addition to the getdisk command information, it displays maximum queuedrequests, average queued requests, percent idle, percent busy information, powersaving attributes, the percent copied, actual capacity, and LBA of user space.
EXAMPLEReturns information for disk 1 in disk array enclosure 1 (DAE or DAE2 number 1) on bus 1.
naviseccli -h 10.244.211.212 getdisk 0_1_B1
OUTPUTThe following is sample output. Actual output varies depending on the switches you usewith the getdisk command:
Bus 0 Enclosure 1 Disk B1Vendor Id: HITACHIProduct Id: HUC10606 CLAR600Product Revision: C202Lun: 16377Type: N/AState: UnboundHot Spare: N/APrct Rebuilt: 16377: 100Prct Enabled: 16377: 100Serial Number: PPG9RTPBSectors: 1125185536 (549407)Capacity: 549691Private: 16377: 65536Bind Signature: N/A, 0, 1Hard Read Errors: 0Hard Write Errors: 0Soft Read Errors: 0Soft Write Errors: 0Read Retries: N/AWrite Retries: N/ARemapped Sectors: N/ANumber of Reads: 0Number of Writes: 0Number of Luns: 1Raid Group ID: 3Clariion Part Number: DG118xxxxx3Request Service Time: N/ARead Requests: 0Write Requests: 0Kbytes Read: 0Kbytes Written: 0Stripe Enabledary Crossing: 0Drive Type: SASClariion TLA Part Number:005000000User Capacity: 536.530273Idle Ticks: 0Busy Ticks: 0Current Speed: 6GbpsMaximum Speed: 6Gbps
VNX CLI for Block
82 EMC VNX Series 5.33 Command Line Interface Reference for Block
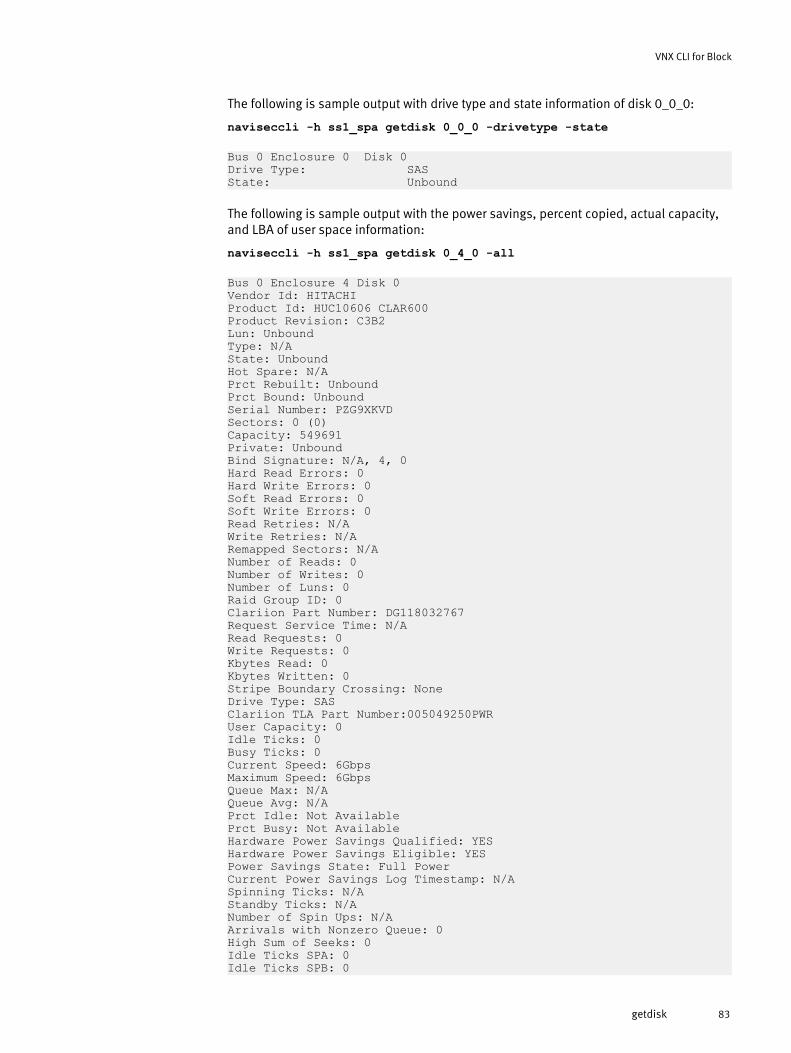
The following is sample output with drive type and state information of disk 0_0_0:
naviseccli -h ss1_spa getdisk 0_0_0 -drivetype -state
Bus 0 Enclosure 0 Disk 0Drive Type: SASState: Unbound
The following is sample output with the power savings, percent copied, actual capacity,and LBA of user space information:
naviseccli -h ss1_spa getdisk 0_4_0 -all
Bus 0 Enclosure 4 Disk 0Vendor Id: HITACHIProduct Id: HUC10606 CLAR600Product Revision: C3B2Lun: UnboundType: N/AState: UnboundHot Spare: N/APrct Rebuilt: UnboundPrct Bound: UnboundSerial Number: PZG9XKVDSectors: 0 (0)Capacity: 549691Private: UnboundBind Signature: N/A, 4, 0Hard Read Errors: 0Hard Write Errors: 0Soft Read Errors: 0Soft Write Errors: 0Read Retries: N/AWrite Retries: N/ARemapped Sectors: N/ANumber of Reads: 0Number of Writes: 0Number of Luns: 0Raid Group ID: 0Clariion Part Number: DG118032767Request Service Time: N/ARead Requests: 0Write Requests: 0Kbytes Read: 0Kbytes Written: 0Stripe Boundary Crossing: NoneDrive Type: SASClariion TLA Part Number:005049250PWRUser Capacity: 0Idle Ticks: 0Busy Ticks: 0Current Speed: 6GbpsMaximum Speed: 6GbpsQueue Max: N/AQueue Avg: N/APrct Idle: Not AvailablePrct Busy: Not AvailableHardware Power Savings Qualified: YESHardware Power Savings Eligible: YESPower Savings State: Full PowerCurrent Power Savings Log Timestamp: N/ASpinning Ticks: N/AStandby Ticks: N/ANumber of Spin Ups: N/AArrivals with Nonzero Queue: 0High Sum of Seeks: 0Idle Ticks SPA: 0Idle Ticks SPB: 0
VNX CLI for Block
getdisk 83
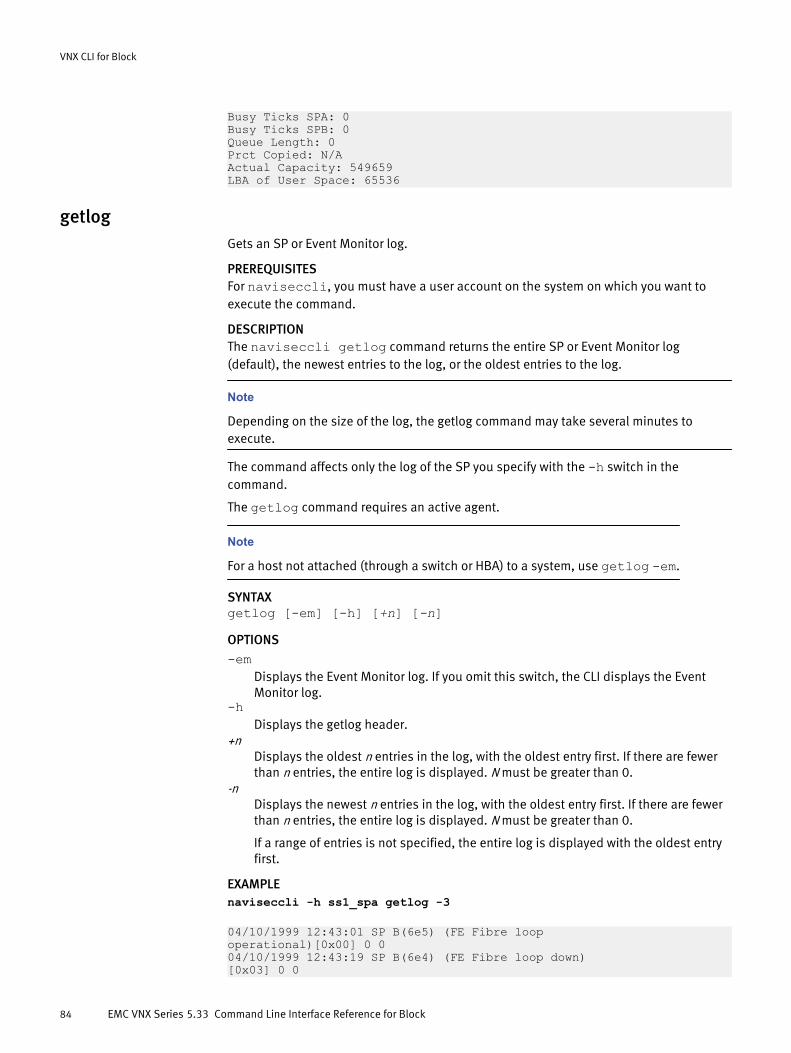
Busy Ticks SPA: 0Busy Ticks SPB: 0Queue Length: 0Prct Copied: N/AActual Capacity: 549659LBA of User Space: 65536
getlogGets an SP or Event Monitor log.
PREREQUISITESFor naviseccli, you must have a user account on the system on which you want toexecute the command.
DESCRIPTIONThe naviseccli getlog command returns the entire SP or Event Monitor log(default), the newest entries to the log, or the oldest entries to the log.
Note
Depending on the size of the log, the getlog command may take several minutes toexecute.
The command affects only the log of the SP you specify with the -h switch in thecommand.
The getlog command requires an active agent.
Note
For a host not attached (through a switch or HBA) to a system, use getlog -em.
SYNTAXgetlog [-em] [-h] [+n] [-n]OPTIONS
-emDisplays the Event Monitor log. If you omit this switch, the CLI displays the EventMonitor log.
-hDisplays the getlog header.
+nDisplays the oldest n entries in the log, with the oldest entry first. If there are fewerthan n entries, the entire log is displayed. N must be greater than 0.
-nDisplays the newest n entries in the log, with the oldest entry first. If there are fewerthan n entries, the entire log is displayed. N must be greater than 0.
If a range of entries is not specified, the entire log is displayed with the oldest entryfirst.
EXAMPLEnaviseccli -h ss1_spa getlog -3
04/10/1999 12:43:01 SP B(6e5) (FE Fibre loop operational)[0x00] 0 004/10/1999 12:43:19 SP B(6e4) (FE Fibre loop down)[0x03] 0 0
VNX CLI for Block
84 EMC VNX Series 5.33 Command Line Interface Reference for Block

04/10/1999 12:43:19 SP B(6e5) (FE Fibre loop operational)[0x00] 0 0
getloopGets fibre loop information.
PREREQUISITESFor naviseccli, you must have a user account on the system on which you want toexecute the command.
DESCRIPTIONThe naviseccli getloop command returns information about the fibre loop.
This command is not valid for IRIX hosts.
Note
This command applies only to Fibre Channel systems.
SYNTAXgetloop [-clfo] [-conn] [-dlf] [-icl] [-ple] [-spf]OPTIONS
-clfoDisplays whether the command loop has failed over.
-connDisplays the connection number.
-dlfDisplays the data loop failover status as follows:
Does system have data loop fail-over: Yes/NoDoes system have illegal Cross-Loop: Yes/No
-iclDisplays whether there is an illegal cross loop.
-pleDisplays whether private loop is enabled.
-spfDisplays whether this SP can fail over.
EXAMPLEnaviseccli -h ss1_spa getloop
Has Data Loop Failed Over: NOCan This SP Failover: NOPrivate Loop Enabled: YESIllegal Cross Loop: NOConnection #0: Enclosure 0 Connection #1: Enclosure 1 Connection #2: Enclosure 2
getlunGets LUN information.
PREREQUISITESFor naviseccli, you must have a user account on the system on which you want toexecute the command.
VNX CLI for Block
getloop 85

DESCRIPTIONThe naviseccli getlun command returns information about a LUN and the customerreplaceable units (CRUs) that make up that LUN.
Note
If statistics logging is disabled, some fields are not printed (switches marked with *below). Other switches must be used with the -disk switch (switches marked with **below).
If the target LUN is a metaLUN, We recommend that you use the metalun -listcommand (see metalun -list on page 191) instead of the getlun command to returninformation about the metaLUN. If you use the getlun command, only the followingfields report data that apply to metaLUNs — Name, Current owner, Default owner, LUNCapacity (Megabytes), LUN Capacity (Blocks), UID, Is Private, Snapshot List, MirrorViewName if any.
If you target the LUNs that make up a metaLUN, all fields apply.
If the target LUN is a pool LUN, we recommend that you use the storagepool -listcommand (see storagepool -list on page 310) instead of the getlun command to returninformation about the pool LUN.
SYNTAX
getlun [lun-number] [-aa] [-at] [-bp] [-bread] [-brw][-busy] [-bwrite] [-capacity] [-crus] [-default] [-disk][-drivetype] [-dsa] [-element] [-ena] [-ff] [-hrdscsi][-idle] [-name] [-owner] [-prb][-qavg] [-qmax] [-que] [-rc] [-rd3][-rchm] [-reads] [-remap] [-rh] [-rhist] [-rr][-rwr] [-service] [-sftscsi] [-srcp][-stripe][-totque][-type] [-upb] [-was][-wc] [-wch] [-uid] [-wh] [-whist] [-wr] [-writes][-rg] [-state] [-private] [-usage] [-sc] [-addroffset][-ismetalun] [-isthinlun] [ -ispoollun] [-idleticks] [-busyticks][-lunidleticks] [ -luncache] [-lunbusyticks] [-trespass][-brwsp] [-rwrsp] [-lunbusytickssp] [-lunidletickssp][-nanzq] [-sqlah] [-slst] [-slct] [-etp] [-itp] [-nzrca][-sor][-wcrh] [-fwc] [-fastcache] [issnapmountpoint][-idleticks_SPA] [-idleticks_SPB] [-busyticks_SPA] [-busyticks_SPB][-highsumofseeks] [-arrivalswithnonzeroqueue] [-all]
OPTIONS
lun-numberSpecifies the logical unit number (LUN) on which to report. If no LUN number isspecified, the CLI reports on all LUNs in the system. Refer to LUN IDs, unique IDs, anddisk IDs in the VNX for Block Concepts guide for information about identifying LUNnumbers.
-aaReturns the auto-assignment status (enabled/disabled).
-addroffsetDisplays the starting LBA (logical block address) of the LUN. This address tells youwhere a LUN begins within a RAID group.
-at
VNX CLI for Block
86 EMC VNX Series 5.33 Command Line Interface Reference for Block
Returns auto-trespass status (enabled or disabled). Shows FAST cacheproperties.
-bp*Returns the number of blocks prefetched by read cache.
-bread**Returns the number of blocks read for each CRU.
-brwsp *Returns the number of host blocks read and written in SP A and SP B.
-busy**Returns the percentage of time that the disk is busy.
-busyticksReturns the amount of time that the disks on this LUN are busy.
-bwrite**Returns the number of blocks written for each CRU.
-capacityReturns, in MB, the LUN capacity.
-crusReturns the names and states of disks in this LUN.
-defaultReturns the name of the default owner (SP) of the LUN.
-diskReturns the disk statistics for the disks in the specified lun-number. Valid only whenstatistics logging is enabled.
-drivetypeReturns the drive type of the disks in the LUN.
-dsaDisplays the status of Dual Simultaneous Access (dsa).
-elementReturns, in blocks, the stripe size. The stripe size is the number of sectors that thesystem can read or write to a single disk module in the LUN. The default size is 128sectors. This size was specified when the LUN was bound. Stripe element size doesnot apply to a RAID 1 LUN, individual unit, or hot spare.
-ena**Returns the disk status (enabled/disabled). Valid only when the -disk switchis included in the command.
-etp*Returns the explicit trespasses in SP A and SP B.
-fastcacheDisplays the FAST Cache properties of the LUN. Enables or disables fast cache usagefor each LUN.
-ff*Returns the number of times that a write had to flush a page to make room in thecache.
-fwcReturns the number of write requests that do not have to wait for the allocation ofcache pages.
-hrdscsiReturns the total number of hard errors.
-idle**Returns the percentage of time that the disks within the LUN are idle.
-idleticksReturns the amount of time that the disks on this LUN are idle.
-ismetalunReturns information about whether the LUN is a metaLUN or not.
-isthinlunReturns information about whether the LUN is a thin LUN or not.
VNX CLI for Block
getlun 87
-itp*Returns the implicit trespasses in SP A and SP B.
-lunbusytickssp*Returns the amount of time in 10 microsecond increments where any requests tothis LUN were outstanding through SPA and SPB, respectively.
-lunidletickssp*Returns the amount of time in 10 microsecond increments where no requests to thisLUN were outstanding through SPA and SPB, respectively.
-luncacheReturns LUN offline (cache dirty) condition information for the specified LUN. Seealso the luncache command.
-mirrornameReturns the MirrorView mirror name.
-nameReturns the LUN name. This switch applies only to systems running a version of VNXOE for Block software that supports storage group commands. LUN names aredisplayed in the UI. You cannot use the LUN name as a CLI command argument.
Note
The -name switch applies only to shared systems.
-nanzq*Returns the number on arrivals with nonzero queue.
-nzrca*Returns the nonzero request count arrivals in SP A and SP B.
-ownerReturns the name of the SP that currently owns the LUN. If neither SP owns the LUN avalue of Unknown is returned.
-prbReturns the percentage of the LUN that is rebuilt.
-privateReturns information on all private LUNs in the system.
-queReturns the queue length, a number.
-rcReturns the LUN’s read cache state (alwaysenabled).
Note
The read SP cache is enabled by default while binding LUNs on flash drives. It isenabled for all RAID types.
-reads**Returns the number of reads received for each CRU.
-readtimeReturns the cumulative read time in microseconds.
-rgReturns the RAID group ID.
-rhist*Returns Read Histogram information. Read Histogram is an system of 10 locationsthat contain the number of reads. Element n of the system contains the number ofreads that were larger than or equal to 2n-1 and less than 2n blocks in size. Forexample, the first bucket contains the number of 1 block reads, the second containsthe number of 2-3 block reads, the third contains the number of 4-7 block reads, and
VNX CLI for Block
88 EMC VNX Series 5.33 Command Line Interface Reference for Block

so on. -rhist also displays read histogram overflows, which are the number of I/Ooperations that were larger than 512 blocks.
-rwrsp*Returns the number of host read and write requests in SP A and SP B.
-scReturns the LUN capacity as stripe count.
-sftscsiReturns the total number of soft (correctable) errors.
-slct*Returns the statistics logging current time.
-slst*Returns the statistics logging start time.
-snapshotReturns the number of SnapView snapshots (copy images on which a SnapViewsession is active).
-sor*Returns the sum of outstanding requests in SP A and SP B.
-sqlah*Returns the sum of queue lengths on arrivals high.
-srcpReturns the read cache configuration.
-stateReturns the state of the LUN. Valid states are: Expanding, Defragmenting, Faulted,Transitional, or bound.
-stripeReturns the number of times an I/O crossed a stripe boundary on a RAID 6, RAID 5,RAID 0, or RAID 1/0 LUN.
-totqueReturns the total queue length, a number.
-typeReturns the RAID type of the LUN as follows:
RAID 0 - nonredundant individual access arrayRAID 1 - mirrored pairRAID 3 - single-disk parityRAID 5 - distributed parityRAID 6 - double distributed parityRAID 1/0 - mirrored RAID 0 groupDisk - individual unitHot Spare - hot spare
-uidReturns the LUN unique ID.
-upb*Returns the number of prefetched blocks not used by the read cache.
-usageReturns the usage for a private LUN. For standard LUNs the usage displays asUnknown.
-wasReturns the minimum block size request that bypasses cache.
-wcReturns the LUN’s write cache state (enabled or disabled).
VNX CLI for Block
getlun 89

Note
The write SP cache is enabled by default while binding LUNs on flash drives. It isenabled for all RAID types.
-wch*Returns the number of write requests that do not have to wait for the allocation ofcache pages.
-wcrhReturns the number of write requests to a previously written address location whosedata is still resident in cache. Write rehits form a subset of write cache hits sincethey overwrite already existing data in the write cache.
-wh*Returns the write hit information, if statistics logging is enabled.
-whist*Returns write histogram information. Write Histogram is an system of 10 locationsthat contain the number of writes. Element n of the system contains the number ofwrites that were larger than or equal to 2n-1 and less than 2n blocks in size. Forexample, the first bucket contains the number of 1 block writes, the second containsthe number of 2-3 block writes, the third contains the number of 4-7 block writes,and so on. whist also displays the write histogram overflows, which are thenumber of writes that were larger than 512 blocks.
-writes**Returns the number of writes received for each CRU.
-writetimeReturns the cumulative write time in microseconds.
-allLists the getlun command information along with the FAST Cache information.
EXAMPLE #1This example retrieves the LBA (logical block address), LUN capacity, and alignmentoffset information.
naviseccli -h ss1_spa getlun -addroffset -offset -capacity
LOGICAL UNIT NUMBER 0Offset: N/ALUN Capacity(Megabytes): 1024LUN Capacity(Blocks): 2097152Address Offset: 0
LOGICAL UNIT NUMBER 1Offset: N/ALUN Capacity(Megabytes): 5120LUN Capacity(Blocks): 10485760Address Offset: 2097152
LOGICAL UNIT NUMBER 2Offset: N/ALUN Capacity(Megabytes): 10240LUN Capacity(Blocks): 20971520Address Offset: 12582912
EXAMPLE #2This example retrieves the cumulative read time and write time.
VNX CLI for Block
90 EMC VNX Series 5.33 Command Line Interface Reference for Block

naviseccli –h ss1_spa getlun 0 –readtime –writetime
Cumulative Read Time (microseconds): 87937Cumulative Write Time (microseconds): 0
EXAMPLE #3This example retrieves information about LUN number 0: (See sample listing following)
naviseccli -h ss1_spa getlun 0
OUTPUTThe following is a sample output. Actual output varies depending on the switches you usewith the getlun command.
LOGICAL UNIT NUMBER 0Prefetch size (blocks) = N/APrefetch multiplier = N/ASegment size (blocks) = N/ASegment multiplier = N/AMaximum prefetch (blocks) = N/APrefetch Disable Size (blocks) = N/APrefetch idle count = N/A
Prefetching: N/A Prefetched data retained N/A
Read cache configured according to specified parameters.
Total Hard Errors: 0Total Soft Errors: 0Total Queue Length: 0Name LUN 0Minimum latency reads N/A
RAID Type: RAID5RAIDGroup ID: 0State: BoundStripe Crossing: 0Element Size: 128Current owner: SP BOffset: N/AAuto-trespass: DISABLEDAuto-assign: DISABLEDWrite cache: ENABLEDRead cache: ENABLEDIdle Threshold: N/AIdle Delay Time: N/AWrite Aside Size: 0Default Owner: SP BRebuild Priority: N/AVerify Priority: N/APrct Reads Forced Flushed: N/APrct Writes Forced Flushed: N/APrct Rebuilt: 100Prct Bound: N/ALUN Capacity(Megabytes): 51200LUN Capacity(Blocks): 104857600UID: 60:06:01:60:E8:90:32:00:EF:14:8D:66:13:4E:E2:11Bus 0 Enclosure 4 Disk 19 Queue Length: 0Bus 0 Enclosure 4 Disk 0 Queue Length: 0Bus 0 Enclosure 4 Disk 2 Queue Length: 0Bus 0 Enclosure 4 Disk 4 Queue Length: 0Bus 0 Enclosure 4 Disk 6 Queue Length: 0Bus 0 Enclosure 4 Disk 7 Queue Length: 0Bus 0 Enclosure 4 Disk 19 Hard Read Errors: 0Bus 0 Enclosure 4 Disk 0 Hard Read Errors: 0Bus 0 Enclosure 4 Disk 2 Hard Read Errors: 0
VNX CLI for Block
getlun 91

Bus 0 Enclosure 4 Disk 4 Hard Read Errors: 0Bus 0 Enclosure 4 Disk 6 Hard Read Errors: 0Bus 0 Enclosure 4 Disk 7 Hard Read Errors: 0Bus 0 Enclosure 4 Disk 19 Hard Write Errors: 0Bus 0 Enclosure 4 Disk 0 Hard Write Errors: 0Bus 0 Enclosure 4 Disk 2 Hard Write Errors: 0Bus 0 Enclosure 4 Disk 4 Hard Write Errors: 0Bus 0 Enclosure 4 Disk 6 Hard Write Errors: 0Bus 0 Enclosure 4 Disk 7 Hard Write Errors: 0Bus 0 Enclosure 4 Disk 19 Soft Read Errors: 0Bus 0 Enclosure 4 Disk 0 Soft Read Errors: 0Bus 0 Enclosure 4 Disk 2 Soft Read Errors: 0Bus 0 Enclosure 4 Disk 4 Soft Read Errors: 0Bus 0 Enclosure 4 Disk 6 Soft Read Errors: 0Bus 0 Enclosure 4 Disk 7 Soft Read Errors: 0Bus 0 Enclosure 4 Disk 19 Soft Write Errors: 0Bus 0 Enclosure 4 Disk 0 Soft Write Errors: 0Bus 0 Enclosure 4 Disk 2 Soft Write Errors: 0Bus 0 Enclosure 4 Disk 4 Soft Write Errors: 0Bus 0 Enclosure 4 Disk 6 Soft Write Errors: 0Bus 0 Enclosure 4 Disk 7 Soft Write Errors: 0Bus 0 Enclosure 4 Disk 19 Enabled Bus 0 Enclosure 4 Disk 0 EnabledBus 0 Enclosure 4 Disk 2 Enabled Bus 0 Enclosure 4 Disk 4 EnabledBus 0 Enclosure 4 Disk 6 Enabled Bus 0 Enclosure 4 Disk 7 EnabledIs Private: NOSnapshots List: Not AvailableMirrorView Name if any: Not Available
getresumeDisplays resume information for system devices.
PREREQUISITESFor naviseccli, you must have a user account on the system on which you want toexecute the command.
DESCRIPTIONThe naviseccli getresume command displays the properties (resume information)for system devices, such as the enclosure display board, link control card (LCC), powersupply (PS), storage processor (SP), SAN personality card, central processing unit module(CPU), I/O module, management module, and the standby power supply (SPS). You candisplay resume information for a specific device or for all devices.
The product serial number, product part number, and product revision are displayed onlyfor the SPE enclosure on VNX systems. This information is displayed only when you usethe -all switch. Only Secure CLI supports use of this switch.
SYNTAX
getresume [-sp] [-lcc busNumber enclosureNumber [lcca|lccb]][-ps busNumber enclosureNumber|xpe [psa|psb]][-pc] [-mp] [-sps] [-vendorinfo] [-all]
OPTIONS
-allDisplays resume information for all devices.
-lcc busNumber enclosureNumber [lcca|lccb]Displays resume information for the link control card. If you omit lcca or lccb,information is returned for link control cards A and B.
-mpDisplays resume information for the enclosures.
-pc
VNX CLI for Block
92 EMC VNX Series 5.33 Command Line Interface Reference for Block

Displays resume information for the SAN personality card.-ps busNumber enclosureNumber | xpe [psa|psb]
Displays resume information for the power supply. If you omit psa or psb,information is returned for power supplies A and B.
-spDisplays resume information for SPs.
-spsDisplays resume information for the standby power supply (SPS) that is associatedwith the SP you specify in the command line.
EXAMPLEThis example displays information stored in the resume PROM for power supplies A and B(bus 0, enclosure 0).
naviseccli -h ss1_spa getresume -ps 0 0
Bus 0 Enclosure 0 Power A EMC Part Number: N/A EMC Artwork Revision: N/A EMC Assembly Revision: N/A EMC Serial Number: N/A Vendor Part Number: SG9006-710G Vendor Artwork Number: 010 Vendor Assembly Number: A10 Vendor Serial Number: AC7111210221 Vendor Name: ACBEL POLYTECH INC. Location of Manufacture: TANG XIA TOWN, DONG GUAN, CHINA
Year of Manufacture: 2011 Month of Manufacture: 03 Day of Manufacture: 30 Assembly Name: Dual +12V P/S & Cooling Module.
Programmable Name: 1sa :2sa :3sa :4sa
Programmable Revision: 5.21:3.31:3.21:2.04
Bus 0 Enclosure 0 Power B EMC Part Number: N/A EMC Artwork Revision: N/A EMC Assembly Revision: N/A EMC Serial Number: N/A Vendor Part Number: SG9006-710G Vendor Artwork Number: 010 Vendor Assembly Number: A10 Vendor Serial Number: AC7111210334 Vendor Name: ACBEL POLYTECH INC. Location of Manufacture: TANG XIA TOWN, DONG GUAN, CHINA Year of Manufacture: 2011 Month of Manufacture: 03 Day of Manufacture: 30 Assembly Name: Dual +12V P/S & Cooling Module.
Programmable Name: 1sa :2sa :3sa :4sa
Programmable Revision: 5.33:3.31:3.21:2.04
VNX CLI for Block
getresume 93
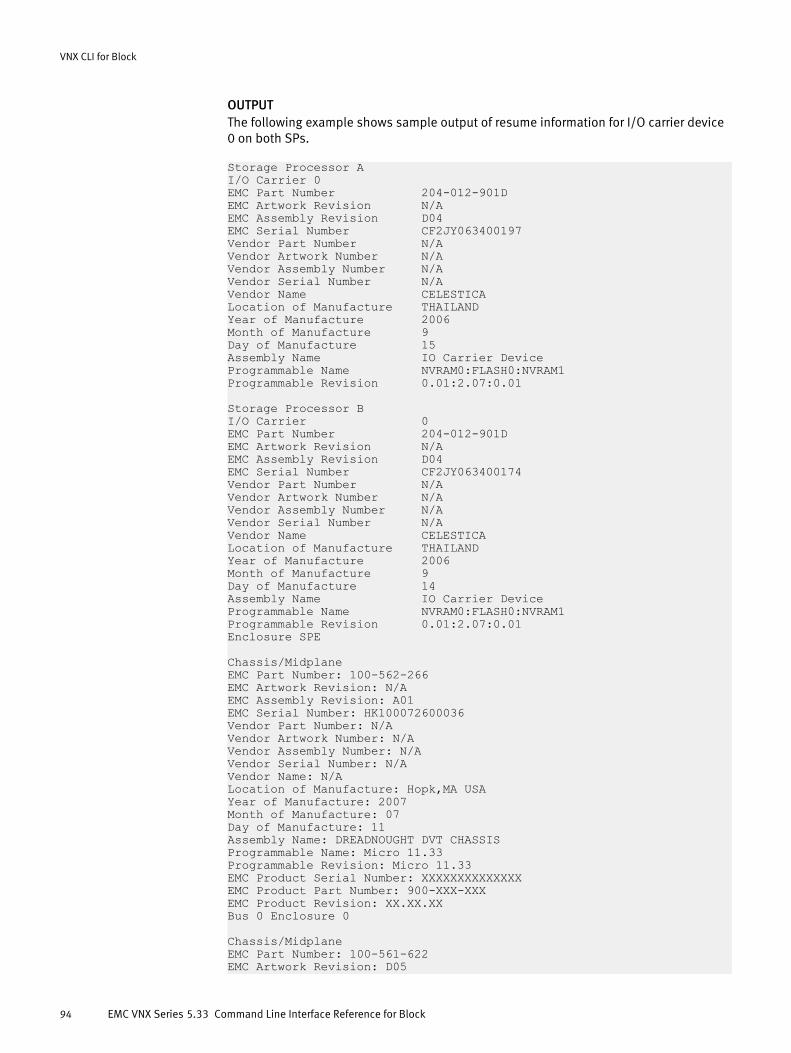
OUTPUTThe following example shows sample output of resume information for I/O carrier device0 on both SPs.
Storage Processor A I/O Carrier 0 EMC Part Number 204-012-901D EMC Artwork Revision N/A EMC Assembly Revision D04 EMC Serial Number CF2JY063400197 Vendor Part Number N/A Vendor Artwork Number N/A Vendor Assembly Number N/A Vendor Serial Number N/A Vendor Name CELESTICA Location of Manufacture THAILAND Year of Manufacture 2006 Month of Manufacture 9 Day of Manufacture 15 Assembly Name IO Carrier Device Programmable Name NVRAM0:FLASH0:NVRAM1 Programmable Revision 0.01:2.07:0.01
Storage Processor B I/O Carrier 0 EMC Part Number 204-012-901D EMC Artwork Revision N/A EMC Assembly Revision D04 EMC Serial Number CF2JY063400174 Vendor Part Number N/A Vendor Artwork Number N/A Vendor Assembly Number N/A Vendor Serial Number N/AVendor Name CELESTICA Location of Manufacture THAILAND Year of Manufacture 2006 Month of Manufacture 9 Day of Manufacture 14 Assembly Name IO Carrier Device Programmable Name NVRAM0:FLASH0:NVRAM1 Programmable Revision 0.01:2.07:0.01Enclosure SPE
Chassis/MidplaneEMC Part Number: 100-562-266EMC Artwork Revision: N/AEMC Assembly Revision: A01EMC Serial Number: HK100072600036Vendor Part Number: N/AVendor Artwork Number: N/AVendor Assembly Number: N/AVendor Serial Number: N/AVendor Name: N/ALocation of Manufacture: Hopk,MA USAYear of Manufacture: 2007Month of Manufacture: 07Day of Manufacture: 11Assembly Name: DREADNOUGHT DVT CHASSISProgrammable Name: Micro 11.33Programmable Revision: Micro 11.33EMC Product Serial Number: XXXXXXXXXXXXXXEMC Product Part Number: 900-XXX-XXXEMC Product Revision: XX.XX.XXBus 0 Enclosure 0
Chassis/MidplaneEMC Part Number: 100-561-622 EMC Artwork Revision: D05
VNX CLI for Block
94 EMC VNX Series 5.33 Command Line Interface Reference for Block

EMC Assembly Revision: A08 EMC Serial Number: FCNST064401287 Vendor Part Number: N/A Vendor Artwork Number: N/A Vendor Assembly Number: N/A Vendor Serial Number: N/A Vendor Name: FOXCONN, SHENZHEN, CHINA Location of Manufacture: LONGHUA TOWN, SHENZHEN,CHINA Year of Manufacture: 2006 Month of Manufacture: 10 Day of Manufacture: 30 Assembly Name: 4GB FC DAE STILETTO W/FLANGES Programmable Name: Micro 11.33 Programmable Revision: Micro 11.33 Bus 1 Enclosure 0
Chassis/Midplane EMC Part Number: 100-561-622 EMC Artwork Revision: D05 EMC Assembly Revision: A08 EMC Serial Number: FCJST064500188 Vendor Part Number: N/A Vendor Artwork Number: N/A Vendor Assembly Number: N/A Vendor Serial Number: N/A Vendor Name: FOXCONN, SHENZHEN, CHINA Location of Manufacture: LONGHUA TOWN, SHENZHEN, CHINA Year of Manufacture: 2006 Month of Manufacture: 11 Day of Manufacture: 09 Assembly Name: 4GB FC DAE STILETTO W/FLANGES Programmable Name: Micro 11.33 Programmable Revision: Micro 11.33
getrgGets RAID group information.
PREREQUISITESFor naviseccli, you must have a user account on the system on which you want toexecute the command.
DESCRIPTIONThe naviseccli getrg command returns information about the specified RAID group.
If no RAID group is specified, the command returns information about all RAID groups.
SYNTAX
getrg rg [-type] [-state] [-disks] [-drivetype] [-lunlist][-maxd] [-maxl] [-tcap] [-ucap] [-lusc] [ -pod] [-prcntdf][-prcntex] [-exdisks] [-lunex] [-legal] [-powersavingssetting][-powersavingseligible] [-isrginstandbystate] [-elementsize][-all]
OPTIONS
rgIs the RAID group identification number. rg specifies a number between 0 and themaximum number of RAID groups supported by the system.
-disksReturns the state of disks in the RAID group.
-drivetypeReturns information about what drive type the RAID group consists of.
VNX CLI for Block
getrg 95

-exdisksReturns information about which disks are expanding. Displays N/A for notexpanding.
-legalReturns information about specific RAID type LUNs that you can bind for a specificRAID group. How you can bind the new LUNs depends on the number of LUNs thatalready exist and upon the number of disks in the RAID group.
-lunexReturns information about which LUNs are expanding. Displays NO for notexpanding.
-lunlistReturns a list of LUNs that are currently in the RAID group.
-luscReturns a free contiguous group of unbound segments in blocks.
-maxdReturns the maximum number of disks that are allowed in the RAID group.
-maxlReturns the maximum number of LUNs that are allowed in the RAID group.
-podReturns the priority of defragmention/expansion operations. The Defrag/Expandpriority value is always shown as N/A on VNX.
-powersavingssettingSets the power savings setting ON or OFF. The default value for a nonconfigured RAIDgroup is OFF.
-powersavingseligibleDetermines the eligibility of a RAID group for the power savings option. A RAID groupis eligible for power savings when all the disks in the RAID group are eligible forpower savings.
-isrginstandbystateReturns the power savings state of the RAID group when all the disks participating inRAID group are in power savings mode.
-prcntdfReturns the percent of defragmention that is complete. The Percent defragmentedvalue is always shown as N/A on VNX.
-prcntexReturns the percent of expansion that is complete. The Percent expanded value isalways shown as N/A on VNX.
-stateReturns the RAID group state, which may be one of the following: Invalid, Valid_luns,Halted, and Busy.
-tcapReturns the raw and logical capacity of the RAID group in blocks.
-typeReturns the RAID group type.
-ucapReturns the free (unbounded) capacity of the RAID group in blocks.
-allLists the RAID group information.
-elementsizeDisplays the element size of a RAID group. The element size of a LUN is always equalto the element size of the RAID Group that holds the LUN.
EXAMPLERetrieves information about RAID group 1.
naviseccli -h ss1_spa getrg 1 -all
VNX CLI for Block
96 EMC VNX Series 5.33 Command Line Interface Reference for Block

OUTPUTThe following is a sample output. The actual output varies depending on the switches youuse with the getrg command.
RaidGroup ID: 1RaidGroup Type: r5RaidGroup State: Valid_lunsList of disks: Bus 0 Enclosure 1 Disk 24Bus 0 Enclosure 1 Disk 23Bus 0 Enclosure 1 Disk 22Bus 0 Enclosure 1 Disk 21Bus 0 Enclosure 1 Disk 20List of luns: 0 1 2 3Max Number of disks: 16Max Number of luns: 256Raw Capacity (Blocks): 2799769600Logical Capacity (Blocks): 2239815680Free Capacity (Blocks,non-contiguous): 2223038464Free contiguous group of unbound segments: 2223038464Defrag/Expand priority: N/APercent defragmented: N/APercent expanded: N/ADisk expanding onto: N/ALun Expansion enabled: NOLegal RAID types: r5Power Savings Setting: OFFRAID GROUP Power Savings Eligible: NOIs RAID GROUP in Power Savings Mode: NODrive Type: SASElement Size: 1024
If you request the -elementsize option explicitly, the following output is generated:
RaidGroup ID: 1Element Size: 128
The following is a sample output of the getrg -drivetype command.
RaidGroup ID: 1Drive Type: SATA Flash
RaidGroup ID: 5Drive Type: NL SAS
getsnifferGets background verify reports.
PREREQUISITESFor naviseccli, you must have a user account on the system on which you want toexecute the command.
DESCRIPTIONThe naviseccli getsniffer command retrieves background verify reports. You canretrieve reports for a specific LUN, all LUNs in a RAID group, or all LUNs in a system.
Note
The getsniffer command does not support thin LUNs.
VNX CLI for Block
getsniffer 97

SYNTAX
getsniffer lun-number|-rg rg-number]| [-all] [-curr][-rec] [-alltot]
OPTIONS
-allRetrieves reports on all LUNs in the system.
Note
When you specify the -all switch, it may generate a sizeable amount of data and
take a considerable amount of time to generate the data.
lun-numberSpecifies the logical unit on which to report. lun-number specifies the logical unitnumber.
-rg rg-numberRetrieves reports on all LUNs in the RAID group.
-alltotRetrieves and displays the report of historical totals of all full unit verifies.
-currRetrieves and displays the report of the currently running full unit verify.
-recRetrieves and displays the report of the most recently completed full unit verify.
EXAMPLERetrieves the report of the active full unit verify operation for LUN 0.
naviseccli -h ss1_spa getsniffer 0
OUTPUTThe following is a sample output. Actual output varies depending on the switches you usewith the getsniffer command.
VERIFY RESULTS FOR UNIT 0Currently Running Full Unit Verify----------------------------------------------------------------- Corrected UncorrectableChecksum errors 0 0Write Stamp errors 0 0Time Stamp errors 0 0Shed Stamp errors 0 0Coherency errors 0 0Multi Bit CRC errors 0 0LBA Stamp errors 0 0Media errors
VNX CLI for Block
98 EMC VNX Series 5.33 Command Line Interface Reference for Block
0 0Soft Media errors 0
Most Recently Completed Full Unit Verify----------------------------------------------------------------- Corrected UncorrectableChecksum errors 0 0Write Stamp errors 0 0Time Stamp errors 0 0Shed Stamp errors 0 0Coherency errors 0 0Multi Bit CRC errors 0 0LBA Stamp errors 0 0Media errors 0 0Soft Media errors 0
Historical Total of All Full Unit Verifies (3 passes)----------------------------------------------------------------- Corrected UncorrectableChecksum errors 0 0Write Stamp errors 0 0Time Stamp errors 0 0Shed Stamp errors 0 0Coherency errors 0 0Multi Bit CRC errors 0 0LBA Stamp errors 0 0Media errors 0 0Soft Media errors 0
VNX CLI for Block
getsniffer 99

getspGets the SP revision and serial number information.
PREREQUISITESFor naviseccli, you must have a user account on the system on which you want toexecute the command.
DESCRIPTIONDisplays SP identification information. If you omit switches, it displays all SPconfiguration information.
Note
Use the getsp command to display SP revision and signature information.
SYNTAXgetsp [-type] [-sig] [-psig] [-rev] [-ser] [-mem] [-id]OPTIONS
-typeDisplays the SP type.
-sigDisplays the SP unique signature.
-psigDisplays the SP peer unique signature.
-revDisplays the SP revision number.
-serDisplays the SP serial number.
-memDisplays the SP memory size.
-idDisplays the SP SCSI ID if available, otherwise displays N/A.
EXAMPLE #1naviseccli -h ss1_spa getsp
SP A
Cabinet: SPE9Signature For The SP: 3178501Signature For The Peer SP: 3194985Revision Number For The SP: 05.33.000.1.467Serial Number For The SP: FCNMS120700013Memory Size For The SP: 131072SP SCSI ID if Available: 0
SP B
Cabinet: SPE9Signature For The SP: 3194985Signature For The Peer SP: 3178501Revision Number For The SP: 05.33.000.1.467Serial Number For The SP: FCNMS121200069Memory Size For The SP: 131072SP SCSI ID if Available: 0
VNX CLI for Block
100 EMC VNX Series 5.33 Command Line Interface Reference for Block

EXAMPLE #2The following command displays the enclosure type for VNX5400/VNX5600/VNX5800/VNX7600 Block systems.
naviseccli -h ss1_spa getsp -type
SP ACabinet: DPE9
SP BCabinet: DPE9
EXAMPLE #3The following command displays the enclosure type for VNX8000 Block systems.
naviseccli -h ss1_spa getsp -type
SP ACabinet: SPE9
SP BCabinet: SPE9
getsptimeGets the date and time setting on each SP system clock.
PREREQUISITESFor naviseccli, you must have a user account on the system on which you want toexecute the command.
DESCRIPTIONThe naviseccli command displays the time on the system clocks in one or bothstorage processors. The VNX OE for Block software ensures that the system clocks in bothSPs are close but necessarily identical.
SYNTAXgetsptime [-spa|-spb]OPTIONS
-spa or -spbSpecifies from which SP to display the date and time.
EXAMPLEnaviseccli -h 10.35.50.11 -user xxxxxx -password xxxxxx -scope 0getsptime
Time on SP A: 08/25/10 10:09:28Time on SP B: 08/25/10 10:09:40
OUTPUTThe SP date and time.
getspuptimeGets the length of time since the SPs were last rebooted.
PREREQUISITESFor naviseccli, you must have a user account on the system on which you want toexecute the command.
VNX CLI for Block
getsptime 101

DESCRIPTIONThis naviseccli command determines the length of time since the Storage Processor(SPA or SPB) on the VNX system was last rebooted.
SYNTAXgetspuptime [-spa|-spb]OPTIONS
-spa or -spbSpecifies the SP for which to display the time since the last reboot. Not specifying anoption displays the uptime for both SPs.
EXAMPLEnaviseccli -h a.b.c.d -user xxxxxx -password xxxxxx -scope 0getspuptime
OUTPUT
SP A Uptime: 51 days 10 hours 15 minutesSP B Uptime: 51 days 9 hours 45 minutes
“N/A” is shown if the peer information could not be retrieved.
getunusedlunsReturns the number of LUNs not used by any storage group or by any replicationapplications.
PREREQUISITESFor naviseccli, you must have a user account on the system on which you want toexecute the command.
DESCRIPTIONThe naviseccli getunusedluns command displays all the unused LUNs, which arethose the storage group and replication applications are not using.
SYNTAXgetunusedlunsEXAMPLEnaviseccli -h ss1_spa getunusedluns
OUTPUT
RaidGroup ID: 0 List of luns: 20
RaidGroup ID: 1 List of luns: 4094 4095 4092 4093 4090 21
RaidGroup ID: 2 List of luns: 10 11 12 13 14
RaidGroup ID: 3 List of luns: 4091 16 17 18 19
RaidGroup ID: 4 List of luns: 0 1 2 3 4
VNX CLI for Block
102 EMC VNX Series 5.33 Command Line Interface Reference for Block
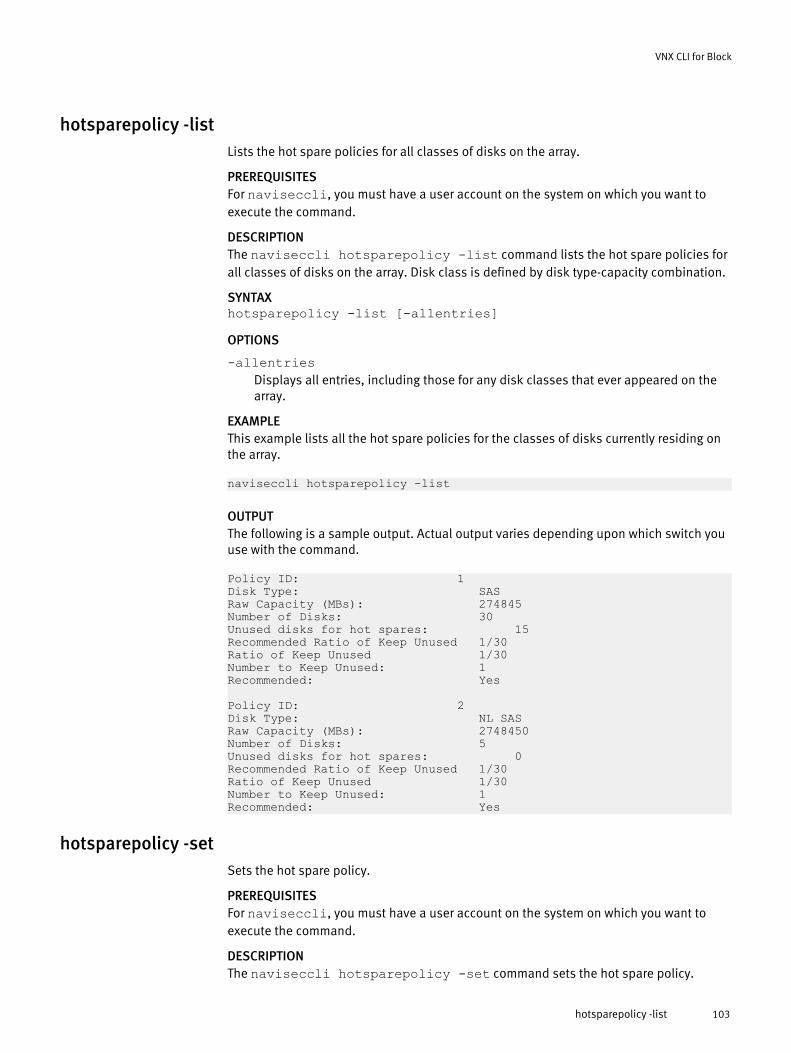
hotsparepolicy -listLists the hot spare policies for all classes of disks on the array.
PREREQUISITESFor naviseccli, you must have a user account on the system on which you want toexecute the command.
DESCRIPTIONThe naviseccli hotsparepolicy -list command lists the hot spare policies forall classes of disks on the array. Disk class is defined by disk type-capacity combination.
SYNTAXhotsparepolicy -list [-allentries]OPTIONS
-allentriesDisplays all entries, including those for any disk classes that ever appeared on thearray.
EXAMPLEThis example lists all the hot spare policies for the classes of disks currently residing onthe array.
naviseccli hotsparepolicy -list
OUTPUTThe following is a sample output. Actual output varies depending upon which switch youuse with the command.
Policy ID: 1Disk Type: SASRaw Capacity (MBs): 274845Number of Disks: 30Unused disks for hot spares: 15Recommended Ratio of Keep Unused 1/30Ratio of Keep Unused 1/30Number to Keep Unused: 1Recommended: Yes Policy ID: 2Disk Type: NL SASRaw Capacity (MBs): 2748450Number of Disks: 5Unused disks for hot spares: 0Recommended Ratio of Keep Unused 1/30Ratio of Keep Unused 1/30Number to Keep Unused: 1Recommended: Yes
hotsparepolicy -setSets the hot spare policy.
PREREQUISITESFor naviseccli, you must have a user account on the system on which you want toexecute the command.
DESCRIPTIONThe naviseccli hotsparepolicy -set command sets the hot spare policy.
VNX CLI for Block
hotsparepolicy -list 103

SYNTAXhotsparepolicy -set id -keep1unusedper ratio [-o]OPTIONS
idSpecifies the ID of the hot spare policy.
-keep1unusedper ratioSpecifies hot spare policy ratio. The allowable value for ratio is an integer equal to orlarger than 0. For example, 0 means no hot spare, 1 means all disks are kept as hotspare, 15 means to keep one disk per 15 disks are kept as hot spares.
-oExecutes the command without prompting for confirmation.
EXAMPLEThis example changes the hot spare policy ratio to 1/15.
naviseccli hotsparepolicy -set 1 -keep1unusedper 15You are about to change the hotspare policy, do you want to change the ratio to 1/15 for SAS drives with 274845 MBs capacity for hot spare use? [Y/N] ? (Y)
OUTPUTNone if the command succeeds; status or error information if it fails.
inserttesteventInserts an event into the event monitor log to let you verify the accuracy of an eventmonitor template.
PREREQUISITESFor naviseccli, you must have a user account on the system on which you want toexecute the command.
DESCRIPTIONThe naviseccli inserttestevent command inserts a dummy event of code in theevent log. The event is code 0x2003 and its description is Test Event - internaluse only. The event is in the local event queue for processing.
To verify that the monitoring agent will respond as specified (for example, issue email,send a page) use the responsetest command.
SYNTAXinserttesteventEXAMPLEFor ss1_spa, this command writes a test event into the log file.
naviseccli -h ss1_spa inserttestevent
ioportconfig -config -maxvlansSets the maximum number of VLANs per port.
PREREQUISITESFor naviseccli, you must have a user account on the system on which you want toexecute the command.
VNX CLI for Block
104 EMC VNX Series 5.33 Command Line Interface Reference for Block
DESCRIPTIONThe naviseccli ioportconfig -config -maxvlans command sets themaximum number of VLANs per port.
SYNTAXioportconfig -config [-maxvlans 8|16] [-delay delay] [-o]OPTIONS
-maxvlans 8 | 16Sets the maximum number of VLANs per port to either 8 or 16.
-delay delayDelays the coordinated reboot between SPs for the specified value. The value rangesfrom 0 to 1140 seconds. The default value is 360 seconds.
-oExecutes the command without prompting for confirmation.
EXAMPLEThis example shows how to set the maximum number of VLANs per port to 16.
naviseccli –h ss1_spa -user user11 –password pswd11 –scope 0ioportconfig –config –maxvlans 16
OUTPUT
WARNING: This operation will change the maximum VLAN ports. The operation will reboot the SPs.DO YOU WISH TO CONTINUE (Y/N)?
ioportconfig -listDisplays information about all I/O modules and corresponding I/O ports.
PREREQUISITESFor naviseccli, you must have a user account on the system on which you want toexecute the command.
DESCRIPTIONThe naviseccli ioportconfig -list command displays the information aboutall I/O modules and I/O ports on VNX series systems.
SYNTAX
ioportconfig -list -iomodule "onboard"|"basemodule"|slot_num[-sp a|b] [label] [-pportid] [-portrole] [-portusage][-porttype] [-portstate] [-portsubstate] [-isportpersisted][-lportid] [-all]
OPTIONS
-listDisplays information about all I/O modules and I/O ports (for both SPs).
-iomodule "onboard" | "basemodule" | slot_numDisplays information about the module and all I/O ports that exist on the givenmodule. If the slot_num is not provided, the system returns an error.
Note
"basemodule" is not supported on VNX8000 Block systems.
-sp a | b
VNX CLI for Block
ioportconfig -list 105

Specifies the SP, either A or B. If an -sp switch is not specified, then informationabout the I/O module with the given slot_num for both SPs will be shown.
-labelDisplays the IO Module Label information.
-pportidDisplays the physical port number.
-portroleDisplays whether the port is operating as a front-end or back-end port. If notpersisted, this field displays an error Uninitialized.
-portusageIndicates how the port is being used. If the port is a MirrorView port, it displaysSpecial. If the port is initialized, and is not the MirrorView port, it displaysNormal. If the port is not initialized, the state is Uninitialized. Refer to EMCMirrorView/Asynchronous Command Line Interface (CLI) Reference for informationabout the MirrorView ports for the various systems.
-porttypeDisplays the port transport type (Fibre Channel or iSCSI).
-portstateDisplays the state of the port. If not persisted, this field displays Uninitialized.
-portsubstateProvides a detailed description of why the port is in a particular state.
-isportpersistedIndicates whether the port is currently persisted.
-lportidShows the logical port ID.
EXAMPLEThis example shows information about all I/O modules and corresponding I/O ports.
naviseccli -h ss1_spa -user user11 –password pswd11 -scope 0ioportconfig -list -all
OUTPUT
Information about each I/O module(s) on SPA:
SP ID: AI/O Module Slot: 0I/O Module Type: UnknownI/O Module State: EmptyI/O Module Substate: Not PresentI/O Module Power state: Not AvailableI/O Carrier: NoI/O Module Label: Unknown
SP ID: AI/O Module Slot: 1I/O Module Type: Fibre ChannelI/O Module State: PresentI/O Module Substate: GoodI/O Module Power state: OnI/O Carrier: NoI/O Module Label: 8 Gb Fibre
Information about each port on this I/O module:Physical Port ID: 0Port Role: FELogical Port ID: 0Port Usage: SpecialPort Type: Fibre ChannelPort State: Enabled
VNX CLI for Block
106 EMC VNX Series 5.33 Command Line Interface Reference for Block

Port Substate: GoodIs Persisted: Yes
Physical Port ID: 1Port Role: FELogical Port ID: 1Port Usage: NormalPort Type: Fibre ChannelPort State: EnabledPort Substate: GoodIs Persisted: Yes
Physical Port ID: 2Port Role: FELogical Port ID: 2Port Usage: NormalPort Type: Fibre ChannelPort State: EnabledPort Substate: GoodIs Persisted: Yes
Physical Port ID: 3Port Role: FELogical Port ID: 3Port Usage: NormalPort Type: Fibre ChannelPort State: EnabledPort Substate: GoodIs Persisted: Yes
SP ID: AI/O Module Slot: 2I/O Module Type: iSCSII/O Module State: PresentI/O Module Substate: GoodI/O Module Power state: OnI/O Carrier: NoI/O Module Label: 10 GbE v3
Information about each port on this I/O module:Physical Port ID: 0Port Role: FELogical Port ID: 4Port Usage: SpecialPort Type: iSCSIPort State: EnabledPort Substate: GoodIs Persisted: Yes
Physical Port ID: 1Port Role: FELogical Port ID: 5Port Usage: NormalPort Type: iSCSIPort State: EnabledPort Substate: GoodIs Persisted: Yes
SP ID: AI/O Module Slot: 3I/O Module Type: iSCSII/O Module State: PresentI/O Module Substate: GoodI/O Module Power state: OnI/O Carrier: NoI/O Module Label: 10 GbE BaseT
Information about each port on this I/O module:
VNX CLI for Block
ioportconfig -list 107

Physical Port ID: 0Port Role: FELogical Port ID: 6Port Usage: NormalPort Type: iSCSIPort State: EnabledPort Substate: GoodIs Persisted: Yes
Physical Port ID: 1Port Role: FELogical Port ID: 7Port Usage: NormalPort Type: iSCSIPort State: EnabledPort Substate: GoodIs Persisted: Yes
SP ID: AI/O Module Slot: 4I/O Module Type: iSCSII/O Module State: PresentI/O Module Substate: GoodI/O Module Power state: OnI/O Carrier: NoI/O Module Label: 1 GbE iSCSI/TOE
Information about each port on this I/O module:Physical Port ID: 0Port Role: FELogical Port ID: 8Port Usage: NormalPort Type: iSCSIPort State: EnabledPort Substate: GoodIs Persisted: Yes
Physical Port ID: 1Port Role: FELogical Port ID: 9Port Usage: NormalPort Type: iSCSIPort State: EnabledPort Substate: GoodIs Persisted: Yes
Physical Port ID: 2Port Role: FELogical Port ID: 10Port Usage: NormalPort Type: iSCSIPort State: EnabledPort Substate: GoodIs Persisted: Yes
Physical Port ID: 3Port Role: FELogical Port ID: 11Port Usage: NormalPort Type: iSCSIPort State: EnabledPort Substate: GoodIs Persisted: Yes
SP ID: AI/O Module Slot: Base ModuleI/O Module Type: SASI/O Module State: Present
VNX CLI for Block
108 EMC VNX Series 5.33 Command Line Interface Reference for Block

I/O Module Substate: GoodI/O Module Power state: OnI/O Carrier: NoI/O Module Label: N/A
Information about each port on this I/O module:Physical Port ID: 0Port Role: BELogical Port ID: 0Port Usage: NormalPort Type: SASPort State: EnabledPort Substate: GoodIs Persisted: Yes
Physical Port ID: 1Port Role: BELogical Port ID: 1Port Usage: NormalPort Type: SASPort State: MissingPort Substate: SFP is missingIs Persisted: Yes
Information about each I/O module(s) on SPB:
SP ID: BI/O Module Slot: 0I/O Module Type: UnknownI/O Module State: EmptyI/O Module Substate: Not PresentI/O Module Power state: Not AvailableI/O Carrier: NoI/O Module Label: Unknown
SP ID: BI/O Module Slot: 1I/O Module Type: Fibre ChannelI/O Module State: PresentI/O Module Substate: GoodI/O Module Power state: OnI/O Carrier: NoI/O Module Label: 8 Gb Fibre
Information about each port on this I/O module:Physical Port ID: 0Port Role: FELogical Port ID: 0Port Usage: SpecialPort Type: Fibre ChannelPort State: EnabledPort Substate: GoodIs Persisted: Yes
Physical Port ID: 1Port Role: FELogical Port ID: 1Port Usage: NormalPort Type: Fibre ChannelPort State: EnabledPort Substate: GoodIs Persisted: Yes
Physical Port ID: 2Port Role: FELogical Port ID: 2Port Usage: NormalPort Type: Fibre Channel
VNX CLI for Block
ioportconfig -list 109

Port State: EnabledPort Substate: GoodIs Persisted: Yes
Physical Port ID: 3Port Role: FELogical Port ID: 3Port Usage: NormalPort Type: Fibre ChannelPort State: EnabledPort Substate: GoodIs Persisted: Yes
SP ID: BI/O Module Slot: 2I/O Module Type: iSCSII/O Module State: PresentI/O Module Substate: GoodI/O Module Power state: OnI/O Carrier: NoI/O Module Label: 10 GbE v3
Information about each port on this I/O module:Physical Port ID: 0Port Role: FELogical Port ID: 4Port Usage: SpecialPort Type: iSCSIPort State: EnabledPort Substate: GoodIs Persisted: Yes
Physical Port ID: 1Port Role: FELogical Port ID: 5Port Usage: NormalPort Type: iSCSIPort State: EnabledPort Substate: GoodIs Persisted: Yes
SP ID: BI/O Module Slot: 3I/O Module Type: iSCSII/O Module State: PresentI/O Module Substate: GoodI/O Module Power state: OnI/O Carrier: NoI/O Module Label: 10 GbE BaseT
Information about each port on this I/O module:Physical Port ID: 0Port Role: FELogical Port ID: 6Port Usage: NormalPort Type: iSCSIPort State: EnabledPort Substate: GoodIs Persisted: Yes
Physical Port ID: 1Port Role: FELogical Port ID: 7Port Usage: NormalPort Type: iSCSIPort State: EnabledPort Substate: GoodIs Persisted: Yes
VNX CLI for Block
110 EMC VNX Series 5.33 Command Line Interface Reference for Block

SP ID: BI/O Module Slot: 4I/O Module Type: iSCSII/O Module State: PresentI/O Module Substate: GoodI/O Module Power state: OnI/O Carrier: NoI/O Module Label: 1 GbE iSCSI/TOE
Information about each port on this I/O module:Physical Port ID: 0Port Role: FELogical Port ID: 8Port Usage: NormalPort Type: iSCSIPort State: EnabledPort Substate: GoodIs Persisted: Yes
Physical Port ID: 1Port Role: FELogical Port ID: 9Port Usage: NormalPort Type: iSCSIPort State: EnabledPort Substate: GoodIs Persisted: Yes
Physical Port ID: 2Port Role: FELogical Port ID: 10Port Usage: NormalPort Type: iSCSIPort State: EnabledPort Substate: GoodIs Persisted: Yes
Physical Port ID: 3Port Role: FELogical Port ID: 11Port Usage: NormalPort Type: iSCSIPort State: EnabledPort Substate: GoodIs Persisted: Yes
SP ID: BI/O Module Slot: Base ModuleI/O Module Type: SASI/O Module State: PresentI/O Module Substate: GoodI/O Module Power state: OnI/O Carrier: NoI/O Module Label: N/A
Information about each port on this I/O module:Physical Port ID: 0Port Role: BELogical Port ID: 0Port Usage: NormalPort Type: SASPort State: EnabledPort Substate: GoodIs Persisted: Yes
Physical Port ID: 1Port Role: BE
VNX CLI for Block
ioportconfig -list 111

Logical Port ID: 1Port Usage: NormalPort Type: SASPort State: MissingPort Substate: SFP is missingIs Persisted: Yes
Information about maximum VLANs per port:Max VLANs per port: 8
ioportconfig -list -maxvlansDisplays information about the maximum number of VLANs per I/O port.
PREREQUISITESFor naviseccli, you must have a user account on the system on which you want toexecute the command.
DESCRIPTIONThe ioportconfig -list -maxvlans command displays the information aboutVLANs per I/O port on VNX series systems.
SYNTAXioportconfig -list [-maxvlans]OPTIONS
-maxvlansShows the maximum number of VLANs per port.
EXAMPLEThis example shows information for VLANs.
naviseccli -h ss1_spa -user user11 –password pswd11 -scope 0ioportconfig -list -maxvlans
OUTPUT
Information about maximum VLANs per port:Max VLANs per port: 8
ioportconfig -persistWrites the port configuration information to persistent memory.
PREREQUISITESFor naviseccli, you must have a user account on the system on which you want toexecute the command.
DESCRIPTIONThe naviseccli ioportconfig -persist command writes all port configurationinformation on the subsystem to persistent memory and reboots both SPs. You canspecify the delay value for writing the port configuration information. If you do not specifythe delay, then the system takes the default value of 360 seconds.
SYNTAXioportconfig -persist [-delay delay] [-o]OPTIONS
-delay delay
VNX CLI for Block
112 EMC VNX Series 5.33 Command Line Interface Reference for Block

Delays the coordinated reboot between SPs for the specified value. The value rangesfrom 0 to 1140 seconds. The default value is 360 seconds.
-oExecutes the command without prompting for confirmation.
EXAMPLEnaviseccli -h ioportconfig -persist -delay 20
OUTPUT
This operation will cause both SPs to reboot in a coordinated fashion. DO YOU WISH TO CONTINUE (Y/N)?
luncache -clearClears the LUN offline (cache dirty) condition.
PREREQUISITESFor naviseccli, you must have a user account on the system on which you want toexecute the command.
You can verify the offline condition of a LUN, using the luncache -list command.
DESCRIPTIONThe naviseccli luncache command with the -clear function clears the LUNoffline (cache dirty) condition. You can clear the LUN offline condition for a specific LUN,or for all LUNS on the system.
When a storage processor (SP) fails, writes destined for a LUN that have not yet beenflushed to disk place the LUN in an offline (cache dirty) condition. LUNs in an offlinecondition are inaccessible until pending writes for the LUN are cleared.
Note
When you execute luncache -clear, all pending writes on the LUN are lost. You must
issue the command to the SP that owns the LUN. The luncache -clear command
does not support thin LUNs.
SYNTAXluncache lun-number -clear [-o]OPTIONS
lun-numberSpecifies the LUN for which to clear the LUN offline condition. If you do not specify aLUN number, clears the LUN offline condition for all LUNS on the system.
-oExecutes the command without prompting for confirmation.
EXAMPLEThis command clears the LUN offline condition for the specified LUN.
naviseccli -h ss1_spa luncache 9 -clear
Bringing the LUN online will cause all pending writes on the LUN to be lost.
Do you want to bring the LUN online now? (y/n)
OUTPUTNone if the command succeeds; status or error information if it fails.
VNX CLI for Block
luncache -clear 113

luncache -listReturns LUN offline (cache dirty) condition information.
PREREQUISITESFor naviseccli, you must have a user account on the system on which you want toexecute the command.
DESCRIPTIONThe naviseccli luncache command with the -list function returns the LUNoffline (cache dirty) condition information. You can return information for a specific LUNor for all LUNS on the system.
When a storage processor (SP) fails, writes destined for a LUN that have not yet beenflushed to disk place the LUN in an offline (cache dirty) condition. LUNs in an offlinecondition are inaccessible until pending writes for the LUN are cleared.
Note
You must issue the command to the SP that is the default owner of the LUN which is notnecessarily the current owner. You can clear the LUN offline condition using luncache-clear. The luncache -list command does not support thin LUNs.
SYNTAXluncache lun-number -listOPTIONS
lun-numberIndicates the LUN for which to display LUN offline condition information. If you donot specify a LUN number, LUN offline condition information is returned for all LUNSon the system.
EXAMPLEThis command displays LUN offline condition information for the specified LUN.
naviseccli -h ss1_spa luncache 9 -list
OUTPUT
LUN Offline (Cache Dirty Condition): YES
managedbyDisplays the application that manages the system.
PREREQUISITESFor naviseccli, you must have a user account on the system on which you want toexecute the command.
DESCRIPTIONYou use the managedby command for purposes of the VSS Provider. The VSS Provider isused in conjunction with the SnapView functionality, to provide backup capabilities.
Note
The command returns an output value of Navi Manager (Unisphere) or None. A value
of None is synonymous to Unisphere.
VNX CLI for Block
114 EMC VNX Series 5.33 Command Line Interface Reference for Block

SYNTAXmanagedbyEXAMPLEThe system is managed by Unisphere.
naviseccli -h ss1_spa managedby
OUTPUT
Managed By: Navi Manager
managefiles -deleteDeletes SP logging files on the specified system.
PREREQUISITESFor naviseccli, you must have a user account on the system on which you want toexecute the command.
DESCRIPTIONThe naviseccli managefiles command with the -delete function lets you deleteSP logging files from supported directories.
Note
The dumps and logs directories are supported for managefiles.
You can specify the files you want to delete by using the -all or -file switches, or youcan omit switches and display a list of files, and then choose a file from the list.
SYNTAXmanagefiles -delete [-all] [-file filenames] [-o]OPTIONS-all
Deletes all the files from the supported directory.-file filenames
Deletes the specified files from the supported directory.-o
Executes the command without prompting for confirmation.
EXAMPLEThis command shows you all file index numbers and names. The files appear in theformat shown below. You then enter the file you want to delete, by either its indexnumber or name.
naviseccli -h ss1_spa managefiles -delete
Index Size Last modified Filename 0 0 10/26/2000 17:39:53 naviagent_Oct-26-00_13-36-17.log 1 138 10/27/2000 12:37:19 naviagent_Oct-26-00_13-48-40.log 2 0 10/27/2000 13:20:53 naviagent_Oct-27-00_08-48-38.log 3 0 10/27/2000 13:29:57 naviagent_Oct-27-00_09-29-57.log 4 0 10/27/2000 18:31:42 naviagent_Oct-27-00_11-06-09.log 5 0 10/27/2000 18:41:37 naviagent_Oct-27-00_14-41-37.log
Enter files to be deleted with index separated by comma (1,2,3,4-5) OR a range (1-3) OR enter 'all' to delete all file OR 'quit' to quit> 2
VNX CLI for Block
managefiles -delete 115
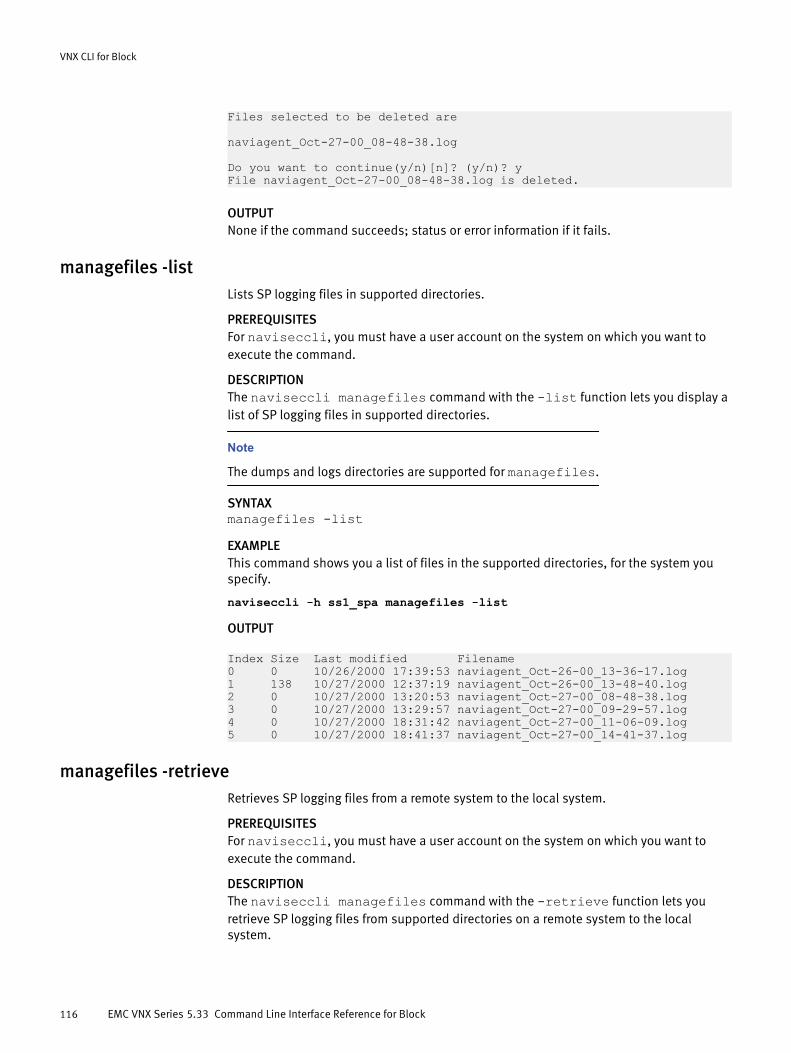
Files selected to be deleted are
naviagent_Oct-27-00_08-48-38.log
Do you want to continue(y/n)[n]? (y/n)? yFile naviagent_Oct-27-00_08-48-38.log is deleted.
OUTPUTNone if the command succeeds; status or error information if it fails.
managefiles -listLists SP logging files in supported directories.
PREREQUISITESFor naviseccli, you must have a user account on the system on which you want toexecute the command.
DESCRIPTIONThe naviseccli managefiles command with the -list function lets you display alist of SP logging files in supported directories.
Note
The dumps and logs directories are supported for managefiles.
SYNTAXmanagefiles -listEXAMPLEThis command shows you a list of files in the supported directories, for the system youspecify.
naviseccli -h ss1_spa managefiles -list
OUTPUT
Index Size Last modified Filename 0 0 10/26/2000 17:39:53 naviagent_Oct-26-00_13-36-17.log 1 138 10/27/2000 12:37:19 naviagent_Oct-26-00_13-48-40.log 2 0 10/27/2000 13:20:53 naviagent_Oct-27-00_08-48-38.log 3 0 10/27/2000 13:29:57 naviagent_Oct-27-00_09-29-57.log 4 0 10/27/2000 18:31:42 naviagent_Oct-27-00_11-06-09.log 5 0 10/27/2000 18:41:37 naviagent_Oct-27-00_14-41-37.log
managefiles -retrieveRetrieves SP logging files from a remote system to the local system.
PREREQUISITESFor naviseccli, you must have a user account on the system on which you want toexecute the command.
DESCRIPTIONThe naviseccli managefiles command with the -retrieve function lets youretrieve SP logging files from supported directories on a remote system to the localsystem.
VNX CLI for Block
116 EMC VNX Series 5.33 Command Line Interface Reference for Block

Note
The dumps and logs directories are supported for managefiles.
You can specify the files you want to retrieve by using the -all or -file switches, oryou can omit switches and display a list of files, and then choose a file from the list.
SYNTAX
managefiles -retrieve [-path path] [-all] [-file filenames][-o]
OPTIONS
-path pathSpecifies the path on the local system where you want to copy the file. If you do notuse this switch, the file is copied to the current directory.
-allRetrieves all files from the supported directory.
-file filenamesRetrieves the specified files from the supported directory.
-oExecutes the command without prompting for confirmation.
EXAMPLEThis command shows you all file index numbers and names. The files appear in theformat shown below. You then enter the file you want to retrieve, by either its indexnumber or name.
naviseccli -h ss1_spa managefiles -retrieve
Index Size Last modified Filename 0 0 10/26/2000 17:39:53 naviagent_Oct-26-00_13-36-17.log 1 138 10/27/2000 12:37:19 naviagent_Oct-26-00_13-48-40.log 2 0 10/27/2000 13:20:53 naviagent_Oct-27-00_08-48-38.log 3 0 10/27/2000 13:29:57 naviagent_Oct-27-00_09-29-57.log 4 0 10/27/2000 18:31:42 naviagent_Oct-27-00_11-06-09.log 5 0 10/27/2000 18:41:37 naviagent_Oct-27-00_14-41-37.log
Enter files to be retrieved with index seperated by comma (1,2,3,4-5) OR a range (1-3) OR enter 'all' to retrieve all file OR 'quit' to quit> 2
Files selected to be retrieved are naviagent_Oct-27-00_08-48-38.log
Do you want to continue(y/n)[n]? (y/n)? y
File naviagent_Oct-27-00_08-48-38.log is retrieved to the current directory.
OUTPUTNone if the command succeeds; status or error information if it fails.
ndu -listDescribes installed SP driver software packages.
PREREQUISITESFor naviseccli, you must have a user account on the system on which you want toexecute the command.
You must be able to log in to the host running VNX CLI for Block.
VNX CLI for Block
ndu -list 117
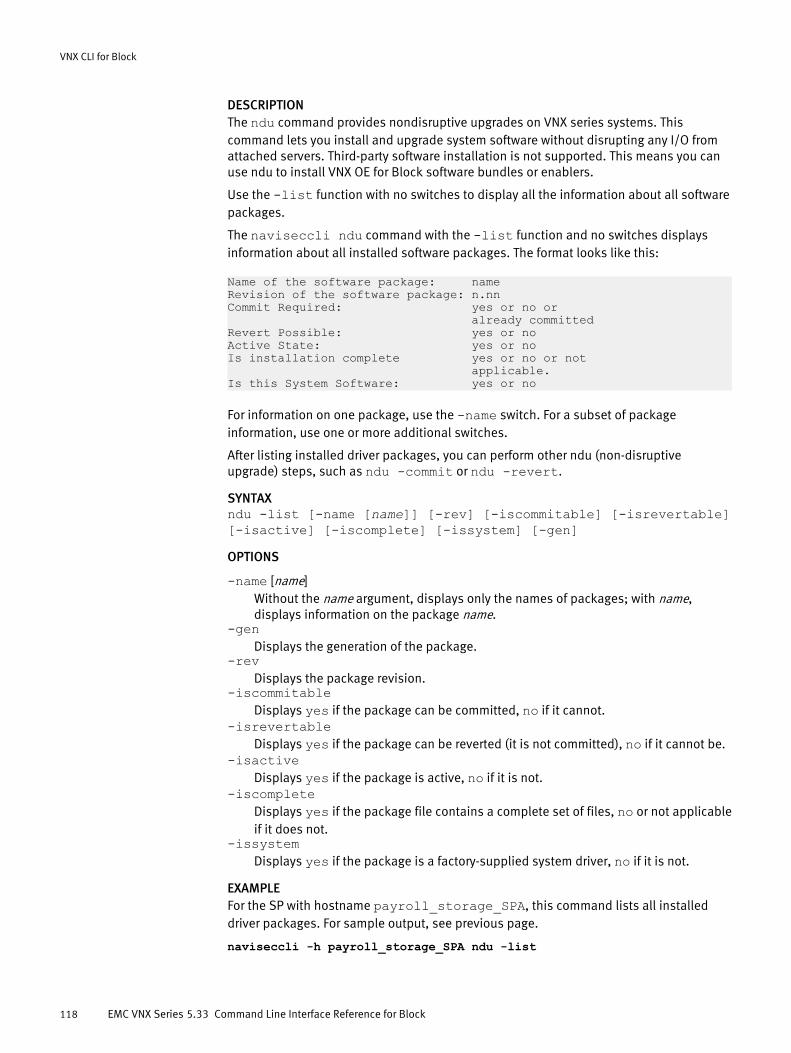
DESCRIPTIONThe ndu command provides nondisruptive upgrades on VNX series systems. Thiscommand lets you install and upgrade system software without disrupting any I/O fromattached servers. Third-party software installation is not supported. This means you canuse ndu to install VNX OE for Block software bundles or enablers.
Use the -list function with no switches to display all the information about all softwarepackages.
The naviseccli ndu command with the -list function and no switches displaysinformation about all installed software packages. The format looks like this:
Name of the software package: nameRevision of the software package: n.nn Commit Required: yes or no or already committed Revert Possible: yes or noActive State: yes or noIs installation complete yes or no or not applicable.Is this System Software: yes or no
For information on one package, use the -name switch. For a subset of packageinformation, use one or more additional switches.
After listing installed driver packages, you can perform other ndu (non-disruptiveupgrade) steps, such as ndu -commit or ndu -revert.
SYNTAXndu -list [-name [name]] [-rev] [-iscommitable] [-isrevertable][-isactive] [-iscomplete] [-issystem] [-gen]OPTIONS
-name [name]Without the name argument, displays only the names of packages; with name,displays information on the package name.
-genDisplays the generation of the package.
-revDisplays the package revision.
-iscommitableDisplays yes if the package can be committed, no if it cannot.
-isrevertableDisplays yes if the package can be reverted (it is not committed), no if it cannot be.
-isactiveDisplays yes if the package is active, no if it is not.
-iscompleteDisplays yes if the package file contains a complete set of files, no or not applicableif it does not.
-issystemDisplays yes if the package is a factory-supplied system driver, no if it is not.
EXAMPLEFor the SP with hostname payroll_storage_SPA, this command lists all installeddriver packages. For sample output, see previous page.
naviseccli -h payroll_storage_SPA ndu -list
VNX CLI for Block
118 EMC VNX Series 5.33 Command Line Interface Reference for Block

OUTPUTSee previous page. If the version of VNX OE for Block software running on the SP does notsupport this command, a Not supported error message is printed to stderr.
ndu -installTransfers SP software driver packages to the system private LUN (PSM LUN).
PREREQUISITESFor naviseccli, you must have a user account on the system on which you want toexecute the command.
You must have a user entry in the Unisphere agent configuration file.
Preinstallation validation checks
Preinstallation validation checks identify unsupported or unsafe installation conditions.You initiate the validation checks functionality when you issue the ndu -installcommand. The validation checks run in the background, prior to installing the software. Ifa validation check fails, the CLI displays the error and terminates the installation. You canchoose to display all validation checks as the functionality executes by specifying the -verbose switch, otherwise the CLI only displays failures that prevent installation. Thefollowing responses exist for each validation check:
Table 9 Validation check responses
Response Definition
Successful Validation check is successful. Installation proceeds.
Warning Conditions exist that may need correction. Installation proceeds.
Failure Conditions exist that require correction before installation canproceed. Installation terminates.
Note
The preinstallation validation checks identify a series of unsupported or unsafeinstallation conditions, but cannot guarantee a successful install.
In addition to the user access requirements for the ndu command, the validation checkhas associated configuration requirements that you must follow:
l Create the required user accounts on the system (refer to the VNX for Block Conceptsguide, section Getting Started with Secure CLI) . You can create the user accountsusing the Secure CLI syntax.
l Create a security file on the host. If you do not create a security file, the CLI promptsyou for a valid username, password and scope:
Security File does not exist Please enter security information to proceed: Enter User (Existing user on system) Enter Password Enter Scope (0 – global [default]; 1 – local
VNX CLI for Block
ndu -install 119

Note
If the system is uninitialized, user credential information is not required. Therefore, asecurity file is not required and the CLI does not prompt you for a username, passwordand scope.
You can also issue validation checks without installing or upgrading software (see ndu -runrules).
Note
Use the naviseccli ndu -list command to display installed package information. If the
ndu -install command succeeds, the SPs restart.
DESCRIPTIONThe ndu command with the -install function transfers files from media to the system,queries and displays information about the packages, and then installs or upgradesselected software packages.
The naviseccli ndu command -install function transfers one or more SP driverpackages from a user-accessible file system to the system private storage LUN (PSM).Media should be present before you issue this command.
You should use a Windows-based management software (either Unisphere or VNX CLI forBlock) to install software.
Before starting a non-disruptive software installation, record the read and write cachesizes because they will be set to zero.
Before the SP starts a nondisruptive software installation, it disables the caches and setstheir sizes to zero. If the write cache is full and I/O is heavy, disabling the cache may takeover an hour because the cached data must be written to disk. After the data is written,the installation starts.
When you install new SP software using the CLI, the only way to determine when theinstallation is finished is to issue periodic ndu -status commands until the CLI showsthe operation is completed.
When the installation is complete, restore the cache sizes to their original sizes ifpossible. You may not be able to use the original sizes because the new softwarerequires more memory than the version that it replaced.
The software prompts for information as needed; then it installs or upgrades thespecified software packages and restarts the SPs. The SPs then load and run the newpackages. After successful installation, it deletes the files from the system.
You can install more than one package with one ndu command.
Note
When you install an upgrade (that is, a newer version of an installed package), you mustinstall all the software packages you want to use in the same command. For example, ifyou are upgrading SnapView in a system that has SnapView, Access Logix, and VNX OEfor Block software installed, then you must upgrade all three using one ndu -installcommand. When you install a new package of the same revision as other existingpackages, you may install only that package and not the others.
The CLI takes the following actions in order:
l If it can find the packages, it transfers them without interaction.
VNX CLI for Block
120 EMC VNX Series 5.33 Command Line Interface Reference for Block

l Unless you used -force (which prevents the prompt and is equivalent to the allresponse), the software examines each package and displays the followinginformation for confirmation:
Item number: nName of the software package: driver-nameRevision of the software package: n.nnAlready Installed Revision: NO or YESInstallable YES or NO
Enter Item number of the packages to be installed separated by blanks. Enter 'all' for all packages and 'quit' to quit without installing:
Specify the package(s) you want installed. If you make an invalid choice, the CLI doesnot install any package.
Note
Do not change the configuration; for example, binding new LUNs or expanding metaLUNswhile a software install is in progress. Such operations will be rejected; delay them untilafter the software upgrade is complete and committed.
SYNTAX
ndu -install pathlist [-delay seconds] [-force] [-gen][-verbose]
OPTIONS
pathlistSpecifies filenames, with full pathnames, of the software packages to be installed.You can use a Windows or UNIX pathname (for example, C:\temp or/usr/bin).Enclose the pathname list in quotes and separate multiple names by a space. If youare installing a newer version of an existing package, you must install all otherpackages (as explained above).
-delay delaySpecifies the delay time that allows attached hosts enough time after SP B hasfinished rebooting to rescan and mark paths available to SP B, before SP A reboots.The minimum allowed delay is zero seconds and the maximum allowed is 1140seconds. In most cases, the EMC recommended NDU delay of 360 seconds shouldbe used. However, some host configurations (such as those using Veritas DMP) mayrequire a longer delay.
-forceInstalls without user interaction. If any package is not installed for any reason, thesoftware displays an error message and continues installing other packagesspecified in the command.
-genDisplays the generation of the package.
-verboseDisplays all results of the preinstallation validation checks. Without this switch, onlyerrors that prevent installation (failures) are displayed.
VNX CLI for Block
ndu -install 121

EXAMPLE
naviseccli -h ss1_spa ndu -installVNX-Block-Operating-Environment-05.33.000.1.539.pbu
Item number: 0Name of the software package: VNX-Block-Operating-EnvironmentRevision of the software package: 05.33.000.3.539Already Installed Revision 05.33.000.3.486Installable YESDisruptive upgrade: NO
The requested package(s) will be installed. Do you wish to proceed?: (y/n)?y
OUTPUTIf the version of VNX OE for Block software running on the SP does not support thiscommand, a Not supported error message is printed to stderr. Other errormessage(s):
NDU_NOT_SUPPORTEDNDU_CANNOT_FIND_FILENDU_CANNOT_XFER_FILEINVALID_PACKAGE
ndu -runrulesExecutes the preinstallation validation checks.
PREREQUISITESFor naviseccli, you must have a user account on the system on which you want toexecute the command.
You must have a user entry in the Unisphere agent configuration file.
DESCRIPTIONThe naviseccli ndu command with the -runrules function executes thepreinstallation validation checks, without performing software installation (see ndu -install).
Note
The ndu -runrules command has associated configuration requirements for the
preinstallation validation checks functionality. See Preinstallation validation checksunder ndu -install on page 119.
Note
Use the naviseccli ndu -install command to both run the preinstallation
validation checks and install software.
SYNTAXndu -runrules [pathlist] [-listrules] [-verbose]OPTIONS
pathlistSpecifies filenames, with full pathnames, of the software packages to be committed.
-listrules
VNX CLI for Block
122 EMC VNX Series 5.33 Command Line Interface Reference for Block

Displays a list of preinstallation validation checks that would run for the specifiedhost. The validation checks do not execute. To run the validation checks, do notinclude this switch.
-verboseDisplays all results of the preinstallation validation checks. Without this switch, onlyerrors that prevent installation (failures) are displayed.
EXAMPLEFor the SP with hostname payroll_storage_SPA, this command executes thepreinstallation validation checks.
naviseccli -h ss1_spa ndu -runrules
OUTPUTIf the preinstallation validation checks detect failures, the failures are displayed.
ndu -commitCommits (makes permanent) an installed system driver package.
PREREQUISITESFor naviseccli, you must have a user account on the system on which you want toexecute the command.
You must have a user entry in the Unisphere agent configuration file.
DESCRIPTIONThe naviseccli ndu command with the -commit function commits an installedsoftware package. Every package does not require commit.
If a package needs to be committed and it is not committed, all new features of the newlyinstalled package may not be available. A committed package cannot be reverted. It canbe uninstalled.
Note
You cannot create any new RAID groups or bind any new LUNs until you commit VNX OEfor Block and Access Logix software.Use the naviseccli ndu -listcommand to display installed package information.
SYNTAXndu -commit namelistOPTIONS
namelistLists package names of the software packages to be committed.
EXAMPLEFor the SP with hostname payroll_storage_SPA, this command commits theinstalled package mypackage.
naviseccli -h ss1_spa ndu -commit mypackage
OUTPUTIf the version of VNX OE for Block software running on the SP does not support thiscommand, a Not supported error message is printed to stderr.
VNX CLI for Block
ndu -commit 123

ndu -statusReturns the status of the ndu install, commit, or revert operations.
PREREQUISITESFor naviseccli, you must have a user account on the system on which you want toexecute the command.
You must have a user entry in the Unisphere agent configuration file.
DESCRIPTIONThe naviseccli ndu command with the -status function reports the progress of thelast ndu -install, -commit, or -revert function executed.
Note
Use the naviseccli ndu -list command to display installed package information.
SYNTAXndu -status [-clear]OPTIONS
-clearClears the status of the last executed ndu command.
EXAMPLEFor the SP with hostname payroll_storage_SPA, this command reports the status ofthe ndu -install, -commit, or -revert function.
naviseccli -h ss1_spa ndu -status
OUTPUTIf the version of VNX OE for Block software running on the SP does not support thiscommand, a Not supported error message is printed to stderr.
ndu -revertReturns to (restores functionality of) the previous revision of an installed system driver.
PREREQUISITESFor naviseccli, you must have a user account on the system on which you want toexecute the command.
You must have a user entry in the Unisphere agent configuration file.
DESCRIPTIONThe naviseccli ndu command with the -revert function restores the functionalityof the previous revision of an installed driver package. A committed package cannot bereverted, nor can a package that had no previous revision installed. After the commandsucceeds, the SPs will restart.
If you omit the -o (override) switch, the CLI prompts for confirmation:
Revert operation will revert package-name from both SPs. Do youstill want to revert. (y/n)?Answer y to revert; answer n to cancel the command.
VNX CLI for Block
124 EMC VNX Series 5.33 Command Line Interface Reference for Block

Note
Use the naviseccli ndu -list command to display installed package information.
SYNTAXndu -revert [-delay seconds] namelist [-o]OPTIONS
-delay secondsSpecifies the delay time that allows attached hosts enough time after SP B hasfinished rebooting to rescan and mark paths available to SP B, before SP A reboots.The minimum allowed delay is zero seconds and the maximum allowed is 1140seconds. In most cases, the EMC recommended NDU delay of 360 seconds shouldbe used. However, some host configurations (such as those using Veritas DMP) mayrequire a longer delay.
namelistLists package names of the software packages to be reverted.
-oExecutes the command without prompting for confirmation.
EXAMPLEFor the SP with hostname payroll_storage_SPA, this command reverts to theprevious revision of mypackage for both SPs.
naviseccli -h ss1_spa ndu -revert mypackage
OUTPUTIf the version of VNX OE for Block software running on the SP does not support thiscommand, a Not supported error message is printed to stderr. Other errors:
NDU_CANNOT_FIND_FILENDU_CANNOT_XFER_FILEINVALID_PACKAGE
networkadmin -getLists network name and address information.
PREREQUISITESFor naviseccli, you must have a user account on the system on which you want toexecute the command.
DESCRIPTIONThe naviseccli networkadmin command with -get function without switches listsall the network information for an SP. This command supports IPv6 networkcommunication to the management ports of systems with VNX OE for Block version 04.28or later. If you do not specify the IP address (either IPv4 or IPv6), then by default IPv4information is displayed. The default IP address is IPv4. If the -ipv4 and the -ipv6switches are specified, the information is displayed for both IP addresses with the IPv4information listed first.
Issue the command to the SP for which this information is needed.
VNX CLI for Block
networkadmin -get 125

Issuing this command with one or more switches displays the information based on thespecified switch. The line Storage Processor: is always displayed. This commanddisplays information in the following format:
Storage Processor: SP-id (A or B) Storage Processor Network Name: SP-network-name Storage Processor IP Address: SP-IP-address Storage Processor Subnet Mask: SP-subnet-mask Storage Processor Gateway Address: SP’s-gateway-system address
Note
If you need to change an SP network name or address, then use the networkadmincommand with the -set function described in networkadmin -set on page 131.
SYNTAX
networkadmin -get [-sp a|b] [-name] [-portid portid [-vportidvportid]] [-vlanid][-ipv4 [-mode] [-address] [-subnetmask] [-gateway]][-ipv6 [-mode] [-address] [-globalprefix] [-gateway]][-speed][-auto] [-capablespeeds] [-requestedspeed][-linkstatus] [-all]
OPTIONS
-sp [a|b]Displays the properties of the specified SP. The default is the properties of theconnected SP.
-portid portidDisplays the management port ID. If you do not specify the port ID, the systemdisplays the information of all management ports.
-vportid vportidDisplays the virtual port ID associated with the management port. If you do notspecify the virtual port ID, the system displays the information of all virtual ports.
-vlanidDisplays the virtual LAN (VLAN) ID of the management port/virtual port. If the VLANsare disabled, the system displays Disabled.
-nameDisplays the SP's network name.
-ipv4Displays all the IPv4 information. This is the default IP address.
-ipv6Displays all the IPv6 information.
-addressDisplays the SP's network IP address (IPv4/IPv6 address).
-gatewayDisplays the IP address (IPv4/IPv6 address) of the SP's gateway system.
-subnetmaskDisplays the SP's IPv4 subnet mask.
-globalprefixDisplays the SP's IPv6 global prefix.
-modeDisplays the IPv4/IPv6 status. The statuses are automatic, manual, and disabled.
-speedDisplays the current port speed for a specified SP.
VNX CLI for Block
126 EMC VNX Series 5.33 Command Line Interface Reference for Block

-auto (CX4 series only)Indicates whether the auto-negotiate feature is turned on or off. The CLI returns ayes value if the feature is turned on, a no value if the feature is turned off, and anot supported value if the feature is not supported.
Note
If you have the auto-negotiate feature turned on, the speed value that is generated inthe output will not be auto. The value reflects the speed at which the port is currentlyoperating. If you have the Auto-Negotiate feature turned on and you specify the -requestedspeed switch, the Requested Value displays a value of auto.
-capablespeeds (CX4 series only)Returns a list of valid speed values for each port.
-requestedspeed (CX4 series only)Displays the requested speed value.
-linkstaus (CX4 series only)Displays the link status of the management port.
-all (CX4 series only)Displays all information for the network admin command.
Note
The command switches -speed, -auto, -capablespeeds, -requestedspeed, -linkstatus, -portid, -vportid, -vlanid, -ipv4, -ipv6, and -all are supported only with Secure CLI.
EXAMPLE #1naviseccli –h ss1_spa networkadmin -get -speed
Storage Processor SP AManagement Port SettingsLink Status: Link-upCurrent Speed: 100 Mbps/half duplex
EXAMPLE #2naviseccli –h ss1_spa networkadmin -get -capablespeeds -auto
Storage Processor : SP AManagement Port Settings:Link Status: Link-upCurrent Speed: 100 Mbps/half duplexAuto-Negotiate: NoCapable Speeds: 10 Mbps half/full duplex 100 Mbps half/full duplex 1000 Mbps half/full duplex Auto
EXAMPLE #3
Note
The IPv6 information contains IPv6 in the header to distinguish the output from the IPv4information.
VNX CLI for Block
networkadmin -get 127

naviseccli -address 10.5.2.12 -user a -password a –scope 0networkadmin –get -ipv4 –ipv6
Storage Processor: SP AStorage Processor Network Name: lumpy-spaStorage Processor IP Address: 10.5.2.12Storage Processor Subnet Mask: 255.255.255.0Storage Processor Gateway Address: 10.5.2.1Storage Processor IPv6 Mode: AutomaticStorage Processor IPv6 Address:3ffe:80c0:22c:4d:20d:56ff:fec5:bff4Storage Processor IPv6 Global Prefix: 3ffe:80c0:22c:4d::Storage Processor IPv6 Local Address:fe80::20d:56ff:fec5:bff4Storage Processor IPv6 Gateway Address:fe80::20a:8bff:fe5a:967c
EXAMPLE #4naviseccli –h ss1_spa networkadmin -get -all
Storage Processor: SP AStorage Processor Network Name: kirk-spa
Port ID: 0Management Port Settings:Link Status: Link-UpCurrent Speed: 100Mbps/full duplexRequested Speed: AutoAuto-Negotiate: YESCapable Speeds: 10Mbps half/full duplex 100Mbps half/full duplex 1000Mbps half/full duplex Auto
Virtual Port ID: 0VLAN ID: 102Storage Processor IP Mode: ManualStorage Processor IP Address: 10.5.2.178Storage Processor Subnet Mask: 255.255.255.0Storage Processor Gateway Address: 10.5.2.1Storage Processor IPv6 Mode: AutomaticStorage Processor IPv6 Address:3ffe:80c0:22c:47:260:1600:3ce0:151cStorage Processor IPv6 Global Prefix:3ffe:80c0:22c:47::Storage Processor IPv6 Link-local Address:fe80::260:1600:3ce0:151cStorage Processor IPv6 Gateway Address:fe80::20a:8bff:fe5a:967c
OUTPUTSee the previous page. If the version of VNX OE for Block software running on the SP doesnot support this command, a Not supported error message is printed to stderr.
If the command switches -speed, -auto, -capablespeeds, -requestedspeed, -linkstatus, and -all are not supported on the system then an Invalid commandline parameters error message is printed to stderr.
If IPv6 does not support the system an error is displayed: IPv6 is not supportedfor this platform.IPv6 is enabled but a value for one of the IPv6 values has not been set so, the value willbe displayed as an empty string.
VNX CLI for Block
128 EMC VNX Series 5.33 Command Line Interface Reference for Block

networkadmin -mibConfigures the SNMP services on the system SP.
PREREQUISITESFor naviseccli, you must have a user account on the system on which you want toexecute the command.
DESCRIPTIONThe naviseccli networkadmin command with the -mib function enables ordisables the processing of SNMP MIB read requests on an SP and sets the SNMPcommunity string. This command with no option lists the current status of the SNMPservice.
Note
To discover current settings, use the networkadmin command with the -mib function.
SYNTAXnetworkadmin -mib [-enable] [-disable] [-community string] [-o]OPTIONS
-enableEnables the SNMP services.
-disableDisables the SNMP services.
-community newstringSets the SNMP community string to newstring.
Note
The -community switch is supported only with ManagementServer release 28 or
later.
-oExecutes the command without prompting for confirmation.
EXAMPLEThis command disables the SNMP services on SP A.
naviseccli -h ss1_spa networkadmin -mib -disable
Disable processing of SNMP read requests on SP A (y/n)[n]
OUTPUT
Storage Processor: SP ASNMP MIB Status: DisabledCommunity: public
If the version of VNX OE for Block software running on the SP does not support thiscommand, a Not supported error message is printed to stderr.
VNX CLI for Block
networkadmin -mib 129

networkadmin -routeSets up the static routes.
PREREQUISITESFor naviseccli, you must have a user account on the system on which you want toexecute the command.
DESCRIPTIONThe naviseccli networkadmin command with the -route function is used to setup the static routes to the specific hosts or networks.
SYNTAXnetworkadmin -route [-sp a|b] [-portid portid -vportid vportid][-add -destination destination [-subnetmask subnetmask |-prefixlength length] [-metric metric] [-persistent]][-delete -destination destination [-subnetmask subnetmask |-prefixlength length]] [-list] [-o]OPTIONS
-sp a|bSpecifies the destination SP. The default is the connected SP.
-portid portidThe -portid and the -vportid together specify the interface associated with theroute. If you do not specify the interface, the system determines it.
-vportid vportidThe -portid and the -vportid together specify the interface associated with theroute. If you do not specify the interface, the system determines it.
-addAdds a network route.
-destination destinationSpecifies the IPv4/IPv6 address or the hostname of the destination.
-subnetmask netmaskSpecifies the IPv4 subnet mask value for the route entry. The default value is255.255.255.255. It is valid only for an IPv4 destination address.
-prefixlength lengthSpecifies the prefix length and the part of the address to compare while determiningthe route. The default value is 128. It is valid only for an IPv6 destination address.
-metric metricDetermines the best route using the routing algorithm. The route with the lowestmetric is preferred over another route.
-persistentSpecifies whether the route should persist across restarts.
-deleteDeletes an existing route.
-listDisplays the routes for the SP. By default, it displays the routes of the connected SP.It also displays the routes for a specific port/virtual port.
-oExecutes the command without prompting for confirmation.
EXAMPLEnaviseccli -h kirk-spa networkadmin -route -list
VNX CLI for Block
130 EMC VNX Series 5.33 Command Line Interface Reference for Block

OUTPUT
SP A, Port 0, Virtual Port 0: Protocol: IPv4 Subnet Mask: 255.255.255.0 Gateway: 10.5.2.1 Originator: OS Metric: 10 Destination Address: 10.5.2.0 Persistent: YES Static: NO
Protocol: IPv4 Subnet Mask: 255.255.255.255 Gateway: 10.5.2.1 Originator: OS Metric: 10 Destination Address: 10.255.255.255 Persistent: YES Static: NO
Protocol: IPv4 Subnet Mask: 240.0.0.0 Gateway: 10.5.2.1 Originator: OS Metric: 10 Destination Address: 224.0.0.0 Persistent: YES Static: NO
Protocol: IPv4 Subnet Mask: 255.255.255.255 Gateway: 10.5.2.1 Originator: OS Metric: 1 Destination Address: 255.255.255.255 Persistent: YES Static: NO
Protocol: IPv6 Destination Prefix Length: 64 Originator: OS Metric: 8 Destination Address: 3ffe:80c0:22c:47:: Persistent: YES Static: NO
networkadmin -setUpdates network information for an SP.
PREREQUISITESFor naviseccli, you must have a user account on the system on which you want toexecute the command.
DESCRIPTIONThe naviseccli networkadmin command with the -set function changes one ormore network settings for an SP. This command supports IPv6 network communication tothe management ports of systems with VNX OE for Block version 04.28 or later. If you donot specify the IP address (either IPv4 or IPv6), then by default IPv4 information isdisplayed. The default IP address is IPv4. If both the -ipv4 and -ipv6 switches arespecified, the information is displayed for both IP addresses, with the IPv4 informationlisted first.
Issue the command to the SP whose information you want to update.
VNX CLI for Block
networkadmin -set 131

If you omit the -o (override) option, the CLI displays a message in the following form toconfirm the update.
Changing the name of SP <A|B> from oldname to newname (y/n)[n]?
Changing the IP address of SP <A|B> from old-address to new-address (y/n)[n]?
Changing the sub-net mask of SP <A|B> from old-mask to new-mask(y/n)[n]?
Changing the gateway address of SP <A|B> from old-gateway-address to new-gateway-address (y/n)[n]?
To make the change, enter y; otherwise, enter n.
Note
To discover current settings, use the networkadmin command with the -get function.
EMC service personnel set the network properties initially to work at your site. Do notchange any value unless you are moving the SP to another LAN or subnet.
If you change any value, after you confirm, the SP restarts and uses the new value.
SYNTAX
networkadmin -set [-o] [-sp a|b] [-name name] [-portid portid-vportid vportid] [-vlanid vlanid | -vlandisable][-ipv4 [-address address] [-subnetmask subnetmask] [-gatewaygateway-IP-address]][-ipv6 [-automatic | -disable | -manual[[-globalprefix prefix | -address IPv6-address][-gateway gateway-IP-address]]][-speed [-duplex]]
OPTIONS
-oExecutes the command without prompting for confirmation.
-sp [a|b]Modifies the properties of the specified SP. The default is the connected SP.
-name nameChanges the SP's network name to name. The maximum length of the name is 64characters.
-portid portidSpecifies the management port ID. The default management port is 0.
-vportid vportidSpecifies the virtual port ID associated with the management port. The default virtualport is 0.
-vlanid vlanidSpecifies the VLAN ID to be used for the management port/virtual port. If you specifyan invalid VLAN ID or if the ID is already in use, an error message appears displayingthe valid range.
-vlandisableDisables VLAN tagging on the virtual port.
-ipv4Specifies the settings for IPv4.
VNX CLI for Block
132 EMC VNX Series 5.33 Command Line Interface Reference for Block
-address IP-addressChanges the SP's IPv4 network address to IP-address.
-subnetmask maskChanges the SP's IPv4 subnet mask to mask.
-gateway gateway-IP-addressChanges the SP's IPv4 or IPv6 gateway IP address to gateway-IP-address.
-ipv6Specifies the settings for IPv6.
[-automatic | -disable | -manual]Specifies whether you want to enable IPv6 on the SP automatically, disable IPv6 onthe SP, or enable IPv6 on the SP manually. If you choose manual, also choosewhether to set either a global prefix or a specific IPv6 address, and a gateway.
-globalprefix prefixChanges the SP's IPv6 global prefix to prefix. If you are using this option, you cannotalso use the -address IPv6-address option.
-address IPv6-addressSets an IPv6 address on the SP, overriding any previous IPv6 configuration. If you areusing this option, you cannot also use the -globalprefix prefix option.
-speed [-duplex] (CX4 series only)Changes the speed on the management port for the target SP.
EXAMPLE #1For SP A, this command changes the gateway address.
naviseccli -h ss1_spa networkadmin -set -gatewayaddress
Changing the gateway address of SP A from 123.456.789.011 to 123.456.789.011
This operation will cause a management server restart!Do you wish to continue? (y/n)[n] y
EXAMPLE #2This command enables IPv6 (if not enabled) and maintains the current settings.
naviseccli -address 10.5.2.12 -user a -password a –scope 0networkadmin –set –ipv6 -manual
EXAMPLE #3This command enables IPv6 (if not enabled) and sets the IPv6 global prefix.
naviseccli -address 10.5.2.12 -user a -password a –scope 0networkadmin –set –ipv6 -manual -globalprefix 3ffe:80c0:22c:4c:
EXAMPLE #4For SP A, this command changes the management port speed to 1000 Mbps/half duplex.
naviseccli -h ss1_spa networkadmin -set -speed 1000-duplex half
Change the management port speed for SP A to 1000 Mbps/half duplex DO YOU WISH TO CONTINUE? (y/n)?
EXAMPLE #5For SP A, this command manually sets an IPv6 address.
VNX CLI for Block
networkadmin -set 133
naviseccli -h ss2_spa -user b -password b -scope 0networkadmin -set -ipv6 -manual -address 3ffe:80c0:22c:4c:1319:8a2e:370:7348
Setting the IPv6 Mode to Manual on SP A, Port 0, Virtual Port 0This operation will cause a management server restart!Do you wish to continue? (y/n)
OUTPUTSee the description section of this command. If the version of VNX OE for Block softwarerunning on the SP does not support this command, a Not supported error message isprinted to stderr. Other errors:
NETADMIN_NOT_FOUNDNETADMIN_INVALID_NAMEInvalid command line parametersInvalid speed request
portLists SP port information, removes an HBA entry from an SP’s initiator list, and providesdiagnostic capabilities.
PREREQUISITESFor naviseccli, you must have a user account on the system on which you want toexecute the command.
DESCRIPTIONThe naviseccli port command lists SP port information, removes an HBA entry froman SP’s permitted initiator list (initiator record), and provides diagnostic capabilities forSAN Copy initiator records and duplicate host initiator records. See also thestoragegroup -setpath command in storagegroup on page 168 and the alpacommand in alpa -set on page 27.
Note
To register an individual HBA with a system, you need to use Unisphere.
The optional port -diagnose switches are:
[-sancopy [-clean]] [-host]SYNTAX
port -list [-hba|-arrayhba|-sp|-gname groupname |-uid UID][-all] [-arraycommpath] [-failovermode] [-unitserialnumber][-mac] [-initiatorcount] [-sfpstate] [-reads] [-writes][-bread] [-bwrite] [-qfull] [-physical] [-usage] [-prominfo]-removeHBA [-o] [-hbauid HBAUID |–host host|-hostip ip|-all]-diagnose [-o] -sancopy [-clean] |-host
OPTIONS
-sancopy [-clean]Lists the SAN Copy initiator records where the initiator is the same as that of thetargeted SP. If you include the optional -clean switch, the CLI prompts you toremove the initiator records that are displayed.
VNX CLI for Block
134 EMC VNX Series 5.33 Command Line Interface Reference for Block

-hostScans the host initiator records and displays duplicate hosts with the same host ID.
Without arguments, -list displays information about all ports in the system butdoes not list information given by -all, -arraycommpath, and -failovermode. This allows -list without an argument to produce outputcompatible with scripts written for old revisions of Secure CLI. Example 1 showsoutput without switches. Example 2 shows output with the -all switch. You canuse one of the following optional switches with -list:
-allLists all port information, including any information that is new with this Unisphererelease.
-arraycommpathDisplays the status of the arraycommpath setting: 0 if arraycommpath isdisabled; 1 if arraycommpath is enabled.
-arrayhbaDisplays information about all systems attached to this HBA, or about systems thatwere logged in at some point for which initiator records still exist. See Example 2 fora display.
-breadDisplays the number of blocks read for each port.
-failovermodeDisplays the failover mode: 0, 1, 2, 3, or 4. The storagegroup -failovermodedescription provides more information.
-gname groupnameSpecifies a storage group. goupname specifies the user-defined storage group name.If you omit the -gname and the -uid switches, the CLI describes all HBA portsconnected to this storage group.
-hbaReturns information on HBA ports. The initiator and target -hba field returnsdifferent information depending on whether you are targeting a Fibre Channel orFCoE or an iSCSI HBA. When you target a Fibre Channel or FCoE HBA, the -hbareturns the World Wide Name such as: 10:00:00:00:C9:20:DE:0C:10:00:00:00:C9:20:DE:0C. When you target an iSCSI HBA, -hba returns the initiatorname.
-initiatorcountDisplays the initiator information for each port on a given SP. Lists the number ofinitiators that are defined, logged in and not logged in.
-macDisplays the MAC address for the front-end ports of an iSCSI system and also FCoEports. Running the port ... -mac command returns a MAC Address field for eachport. When you run the port ... -mac command, if any ports are Fibre Channelports, the MAC Address field for those ports will display Not Applicable.
-physical (CX4 series only)Displays the physical location of the port including I/O module and physical portinformation.
-readsDisplays the number of reads for each port.
-sfpstateDisplays the small form factor pluggable (SFP) state for each port. This lets youdetermine if an incompatible or faulty SFP is detected, in which the status is set tofaulted.
-spSpecifies SP ports only.
VNX CLI for Block
port 135

-uid UIDSpecifies the storage group unique ID (also known as the World Wide Name, WWN).If you omit the -gname and the -uid switches, the CLI describes all HBA portsconnected to this storage group.
-usage (CX4 series only)Indicates how the port is used. For example, when either of the MirrorView enablersis installed, it displays MirrorView.
-prominfoDisplays the new EEPROM information for SFP+ SFPs inserted into the front-endports.
-unitserialnumberSpecifies the unitserialnumber mode.
-writesDisplays the number of writes for each port.
The optional port -removeHBA switches are:
-hbauid HBAUIDRemoves a specific initiator record specified with -hbauid. HBAUID specifies aunique host bus adapter identification number (must use uppercase).
-host hostRemoves all initiator records that are logged out and registered, for the specifiedhostname.
-hostip ipRemoves all initiator records that are logged out and registered, for the specifiedhost IP address. You can specify the IP address either as IPv4 or IPv6 address. If anincorrect IP address is specified, an error message appears as follows:
The IP address must be specified as an IPv4 address indotted-decimal format or as an IPv6 address in colon-hexadecimal notation.
Note
If an IPv6 address is specified, EMC recommends that you use a global unicastaddress.
-allRemoves all initiator records that are logged out and registered, for the specifiedsystem.
-oExecutes the command without prompting for confirmation.
EXAMPLE #1The following example shows sample output of the port -list command targeted toFibre Channel HBAs and SPs:
Note
The StorageGroup Name field displays None if the HBA is not explicitly mapped to a user-
defined, a non-user defined, a null, a management, or a physical storage group.
naviseccli -h ss1_spa port -list
Information about each HBA:
HBA UID:10:10:10:10:10:10:10:10:10:10:10:10:10:10:10:10
VNX CLI for Block
136 EMC VNX Series 5.33 Command Line Interface Reference for Block

Server Name: mattServer IP Address: 1.2.3.4HBA Model Description: ModelABCHBA Vendor Description:VendorABCHBA Device Driver Name:N/AInformation about each port of this HBA:SP Name: SP ASP Port ID: 0HBA Devicename: N/ATrusted: NOLogged In: NODefined: YESInitiator Type: 3StorageGroup Name: Private
Information about each HBA:
HBA UID:20:00:00:00:C9:21:FE:D5:10:00:00:00:C9:21:FE:D5Server Name:20:00:00:00:C9:21:FE:D5:10:00:00:00:C9:21:FE:D5Server IP Address: UNKNOWNHBA Model Description:HBA Vendor Description:HBA Device Driver Name:Information about each port of this HBA:SP Name: SP BSP Port ID: 0HBA Devicename:Trusted: NOLogged In: YESSource ID: 7280384Defined: NOInitiator Type: 128StorageGroup Name: None
Information about each HBA:
HBA UID:AA:01:34:11:22:33:44:44:72:68:01:38:01:21:42:53Server Name: dochost.example.comServer IP Address: 10.10.10.1HBA Model Description:HBA Vendor Description:HBA Device Driver Name:Information about each port of this HBA:SP Name: SP ASP Port ID: 0HBA Devicename:Trusted: NOLogged In: NODefined: YESInitiator Type: 3StorageGroup Name: DocumentationSP Name: SP ASP Port ID: 1HBA Devicename:Trusted: NOLogged In: NODefined: YESInitiator Type: 3StorageGroup Name: Documentation
Information about each HBA:
HBA UID:20:00:00:00:C9:2B:53:D3:10:00:00:00:C9:2B:53:D3Server Name:
VNX CLI for Block
port 137
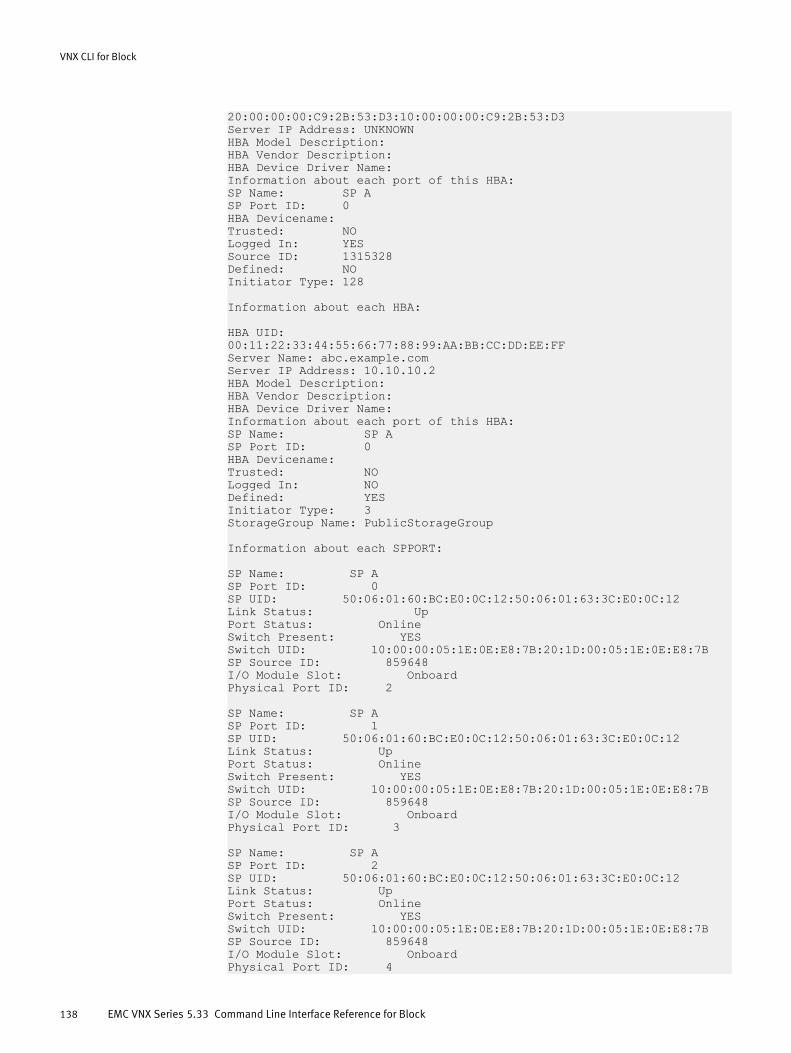
20:00:00:00:C9:2B:53:D3:10:00:00:00:C9:2B:53:D3Server IP Address: UNKNOWNHBA Model Description:HBA Vendor Description:HBA Device Driver Name:Information about each port of this HBA:SP Name: SP ASP Port ID: 0HBA Devicename:Trusted: NOLogged In: YESSource ID: 1315328Defined: NOInitiator Type: 128
Information about each HBA:
HBA UID:00:11:22:33:44:55:66:77:88:99:AA:BB:CC:DD:EE:FFServer Name: abc.example.comServer IP Address: 10.10.10.2HBA Model Description:HBA Vendor Description:HBA Device Driver Name:Information about each port of this HBA:SP Name: SP ASP Port ID: 0HBA Devicename:Trusted: NOLogged In: NODefined: YESInitiator Type: 3StorageGroup Name: PublicStorageGroup
Information about each SPPORT:
SP Name: SP ASP Port ID: 0SP UID: 50:06:01:60:BC:E0:0C:12:50:06:01:63:3C:E0:0C:12Link Status: UpPort Status: OnlineSwitch Present: YESSwitch UID: 10:00:00:05:1E:0E:E8:7B:20:1D:00:05:1E:0E:E8:7BSP Source ID: 859648I/O Module Slot: OnboardPhysical Port ID: 2
SP Name: SP ASP Port ID: 1SP UID: 50:06:01:60:BC:E0:0C:12:50:06:01:63:3C:E0:0C:12Link Status: UpPort Status: OnlineSwitch Present: YESSwitch UID: 10:00:00:05:1E:0E:E8:7B:20:1D:00:05:1E:0E:E8:7BSP Source ID: 859648I/O Module Slot: OnboardPhysical Port ID: 3
SP Name: SP ASP Port ID: 2SP UID: 50:06:01:60:BC:E0:0C:12:50:06:01:63:3C:E0:0C:12Link Status: UpPort Status: OnlineSwitch Present: YESSwitch UID: 10:00:00:05:1E:0E:E8:7B:20:1D:00:05:1E:0E:E8:7BSP Source ID: 859648I/O Module Slot: OnboardPhysical Port ID: 4
VNX CLI for Block
138 EMC VNX Series 5.33 Command Line Interface Reference for Block

SP Name: SP ASP Port ID: 3SP UID: 50:06:01:60:BC:E0:0C:12:50:06:01:68:3C:E0:0C:12Link Status: UpPort Status: OnlineSwitch Present: YESSwitch UID: 10:00:00:05:1E:0E:E8:7B:20:1D:00:05:1E:0E:E8:7BSP Source ID: 859648I/O Module Slot: OnboardPhysical Port ID: 5
EXAMPLE #2The following example shows sample output of the port -list -all commandtargeted to Fibre Channel HBAs and SPs.
naviseccli -h ss1_spa port -list -all
Total number of initiators: 1
SP Name: SP ASP Port ID: 1Registered Initiators: 0Logged-In Initiators: 0Not Logged-In Initiators: 0
SP Name: SP ASP Port ID: 0Registered Initiators: 0Logged-In Initiators: 0Not Logged-In Initiators: 0
SP Name: SP BSP Port ID: 1Registered Initiators: 0Logged-In Initiators: 0Not Logged-In Initiators: 0
SP Name: SP BSP Port ID: 0Registered Initiators: 1Logged-In Initiators: 1Not Logged-In Initiators: 0
SP Name: SP ASP Port ID: 2Registered Initiators: 0Logged-In Initiators: 0Not Logged-In Initiators: 0
SP Name: SP ASP Port ID: 3Registered Initiators: 0Logged-In Initiators: 0Not Logged-In Initiators: 0
SP Name: SP BSP Port ID: 2Registered Initiators: 0Logged-In Initiators: 0Not Logged-In Initiators: 0
SP Name: SP BSP Port ID: 3Registered Initiators: 0Logged-In Initiators: 0
VNX CLI for Block
port 139
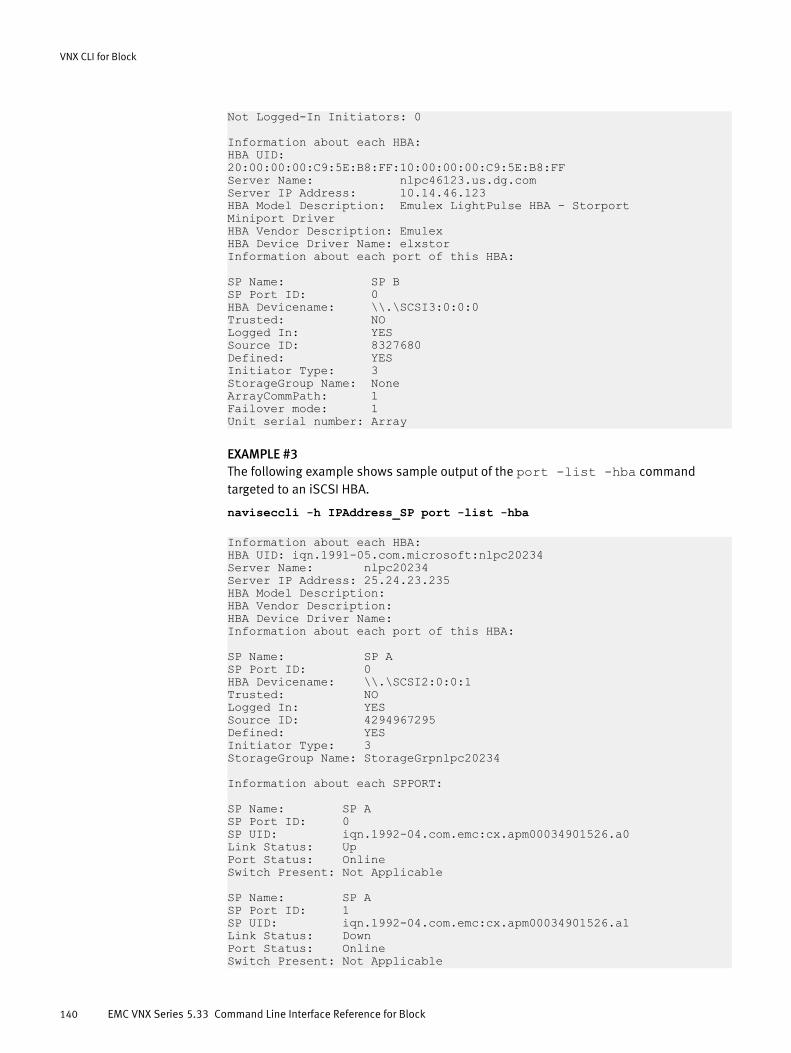
Not Logged-In Initiators: 0
Information about each HBA:HBA UID:20:00:00:00:C9:5E:B8:FF:10:00:00:00:C9:5E:B8:FFServer Name: nlpc46123.us.dg.comServer IP Address: 10.14.46.123HBA Model Description: Emulex LightPulse HBA - StorportMiniport DriverHBA Vendor Description: EmulexHBA Device Driver Name: elxstorInformation about each port of this HBA:
SP Name: SP BSP Port ID: 0HBA Devicename: \\.\SCSI3:0:0:0Trusted: NOLogged In: YESSource ID: 8327680Defined: YESInitiator Type: 3StorageGroup Name: NoneArrayCommPath: 1Failover mode: 1Unit serial number: Array
EXAMPLE #3The following example shows sample output of the port -list -hba commandtargeted to an iSCSI HBA.
naviseccli -h IPAddress_SP port -list -hba
Information about each HBA:HBA UID: iqn.1991-05.com.microsoft:nlpc20234Server Name: nlpc20234Server IP Address: 25.24.23.235HBA Model Description:HBA Vendor Description:HBA Device Driver Name:Information about each port of this HBA:
SP Name: SP ASP Port ID: 0HBA Devicename: \\.\SCSI2:0:0:1Trusted: NOLogged In: YESSource ID: 4294967295Defined: YESInitiator Type: 3StorageGroup Name: StorageGrpnlpc20234
Information about each SPPORT:
SP Name: SP ASP Port ID: 0SP UID: iqn.1992-04.com.emc:cx.apm00034901526.a0Link Status: UpPort Status: OnlineSwitch Present: Not Applicable
SP Name: SP ASP Port ID: 1SP UID: iqn.1992-04.com.emc:cx.apm00034901526.a1Link Status: DownPort Status: OnlineSwitch Present: Not Applicable
VNX CLI for Block
140 EMC VNX Series 5.33 Command Line Interface Reference for Block
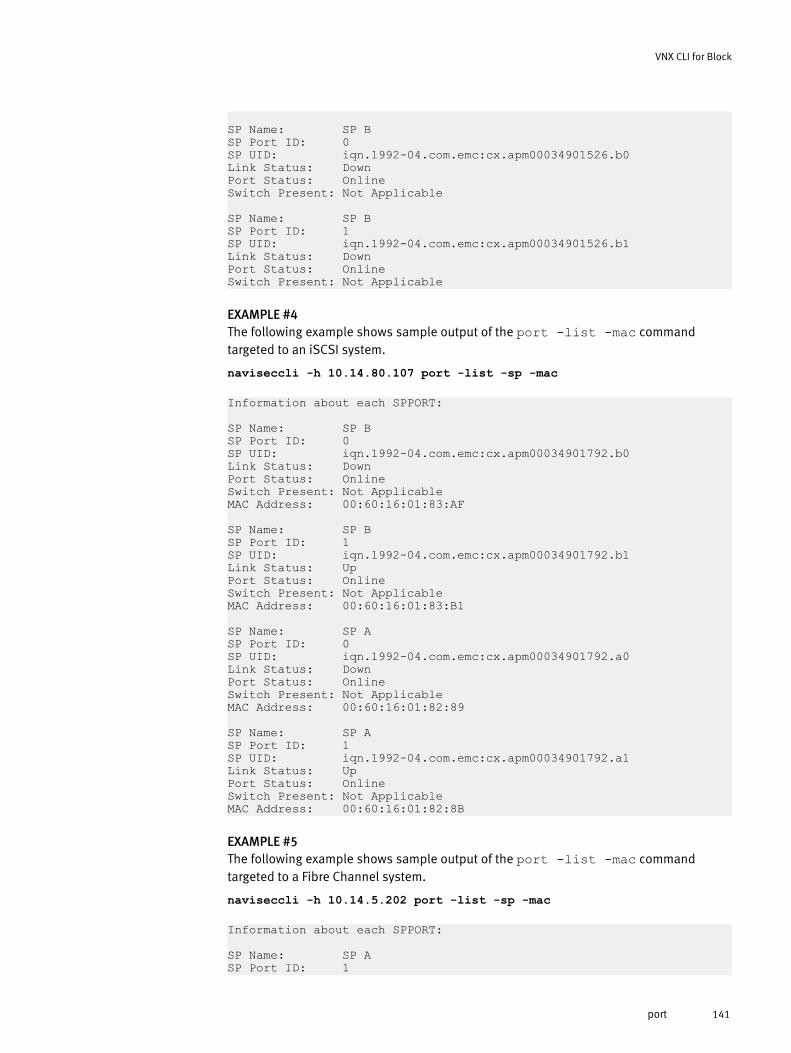
SP Name: SP BSP Port ID: 0SP UID: iqn.1992-04.com.emc:cx.apm00034901526.b0Link Status: DownPort Status: OnlineSwitch Present: Not Applicable
SP Name: SP BSP Port ID: 1SP UID: iqn.1992-04.com.emc:cx.apm00034901526.b1Link Status: DownPort Status: OnlineSwitch Present: Not Applicable
EXAMPLE #4The following example shows sample output of the port -list -mac commandtargeted to an iSCSI system.
naviseccli -h 10.14.80.107 port -list -sp -mac
Information about each SPPORT:
SP Name: SP BSP Port ID: 0SP UID: iqn.1992-04.com.emc:cx.apm00034901792.b0Link Status: DownPort Status: OnlineSwitch Present: Not ApplicableMAC Address: 00:60:16:01:83:AF
SP Name: SP BSP Port ID: 1SP UID: iqn.1992-04.com.emc:cx.apm00034901792.b1Link Status: UpPort Status: OnlineSwitch Present: Not ApplicableMAC Address: 00:60:16:01:83:B1
SP Name: SP ASP Port ID: 0SP UID: iqn.1992-04.com.emc:cx.apm00034901792.a0Link Status: DownPort Status: OnlineSwitch Present: Not ApplicableMAC Address: 00:60:16:01:82:89
SP Name: SP ASP Port ID: 1SP UID: iqn.1992-04.com.emc:cx.apm00034901792.a1Link Status: UpPort Status: OnlineSwitch Present: Not ApplicableMAC Address: 00:60:16:01:82:8B
EXAMPLE #5The following example shows sample output of the port -list -mac commandtargeted to a Fibre Channel system.
naviseccli -h 10.14.5.202 port -list -sp -mac
Information about each SPPORT:
SP Name: SP ASP Port ID: 1
VNX CLI for Block
port 141

SP UID: 50:06:01:60:90:21:26:3D:50:06:01:61:10:21:26:3DLink Status: UpPort Status: OnlineSwitch Present: NOMAC Address: Not Applicable
SP Name: SP ASP Port ID: 0SP UID: 50:06:01:60:90:21:26:3D:50:06:01:60:10:21:26:3DLink Status: UpPort Status: OnlineSwitch Present: YESSwitch UID:10:00:08:00:88:60:8E:77:20:0D:08:00:88:60:8E:77SP Source ID: 7998739MAC Address: Not Applicable
SP Name: SP BSP Port ID: 1SP UID: 50:06:01:60:90:21:26:3D:50:06:01:69:10:21:26:3DLink Status: UpPort Status: OnlineSwitch Present: NOMAC Address: Not Applicable
SP Name: SP BSP Port ID: 0SP UID: 50:06:01:60:90:21:26:3D:50:06:01:68:10:21:26:3DLink Status: UpPort Status: OnlineSwitch Present: YESSwitch UID:10:00:08:00:88:60:8E:77:20:0C:08:00:88:60:8E:77SP Source ID: 7998483MAC Address: Not Applicable
EXAMPLE #6The following example shows sample output of the port -list -mac commandtargeted to a Fibre Channel over Ethernet (FCoE) system that has FC(0,1,2,3), 1GiSCSI(4,5), 10G iSCSI(6,7) and 10G FCoE(8,9) ports.
naviseccli -h peregrine-spa port -list -mac
Information about each SPPORT:SP Name: SP BSP Port ID: 3MAC Address: Not Applicable
SP Name: SP BSP Port ID: 2MAC Address: Not Applicable
SP Name: SP BSP Port ID: 0MAC Address: Not Applicable
SP Name: SP BSP Port ID: 1MAC Address: Not Applicable
SP Name: SP ASP Port ID: 3MAC Address: Not Applicable
SP Name: SP ASP Port ID: 2
VNX CLI for Block
142 EMC VNX Series 5.33 Command Line Interface Reference for Block

MAC Address: Not Applicable
SP Name: SP ASP Port ID: 0MAC Address: Not Applicable
SP Name: SP ASP Port ID: 1MAC Address: Not Applicable
SP Name: SP BSP Port ID: 4MAC Address: 00:60:16:1A:3B:C2
SP Name: SP BSP Port ID: 5MAC Address: 00:00:00:00:00:00
SP Name: SP BSP Port ID: 6MAC Address: 00:60:16:32:12:1C
SP Name: SP BSP Port ID: 7MAC Address: 00:00:00:00:00:00
SP Name: SP ASP Port ID: 4MAC Address: 00:60:16:1A:36:52
SP Name: SP ASP Port ID: 5MAC Address: 00:00:00:00:00:00
SP Name: SP ASP Port ID: 6MAC Address: 00:60:16:32:0E:8E
SP Name: SP ASP Port ID: 7MAC Address: 00:00:00:00:00:00
SP Name: SP BSP Port ID: 8MAC Address: 00:60:16:3B:47:B2
SP Name: SP BSP Port ID: 9MAC Address: 00:60:16:3B:47:B3
SP Name: SP ASP Port ID: 8MAC Address: 00:60:16:3B:55:42
SP Name: SP ASP Port ID: 9MAC Address: 00:60:16:3B:55:43
EXAMPLE #7The following example shows sample output of the port -list -sp -all command.
SP Name: SP BSP Port ID: 0SP UID: 50:06:01:60:B6:60:02:DC:50:06:01:68:36:60:02:DC
VNX CLI for Block
port 143

Link Status: UpPort Status: OnlineSwitch Present: YESSwitch UID: 10:00:00:05:1E:E0:0B:E0:20:03:00:05:1E:E0:0B:E0SP Source ID: 932096ALPA Value: 0Speed Value : 8GbpsAuto Negotiable : NOAvailable Speeds:2Gbps4Gbps8GbpsAutoRequested Value: AutoMAC Address: Not ApplicableSFP State: OnlineReads: 0Writes: 0Blocks Read: 0Blocks Written: 0Queue Full/Busy: 0I/O Module Slot: 0Physical Port ID: 0Usage: GeneralSFP/Connector EMC Part Number: 019-078-042SFP/Connector EMC Serial Number: 000000000000000SFP/Connector Vendor Part Number: N/ASFP/Connector Vendor Serial Number: AGL1211D3004397SFP/Connector Supported Speeds:2Gbps4Gbps8Gbps
EXAMPLE #8The following example shows sample output of the port -list -sfpstatecommand targeted to FCoE ports, 10G iSCSI, and FC ports.
SPF Normal:
SP Name: SP ASP Port ID: 11SP UID: 50:06:01:60:16:21:02:B6:50:06:01:60:16:25:02:B6Link Status: DownPort Status: DISABLEDSwitch Present: NOSFP State: Online
SFP Faulted:
SP Name: SP ASP Port ID: 8SP UID: 50:06:01:60:BB:20:13:0D:50:06:01:68:3B:24:13:0DLink Status: DownPort Status: DISABLEDSwitch Present: NOSFP State: Faulted
EXAMPLE #9The following example shows the output for the port –list –prominfo command.
Information about each SPPORT:
SP Name: SP ASP Port ID: 2
VNX CLI for Block
144 EMC VNX Series 5.33 Command Line Interface Reference for Block
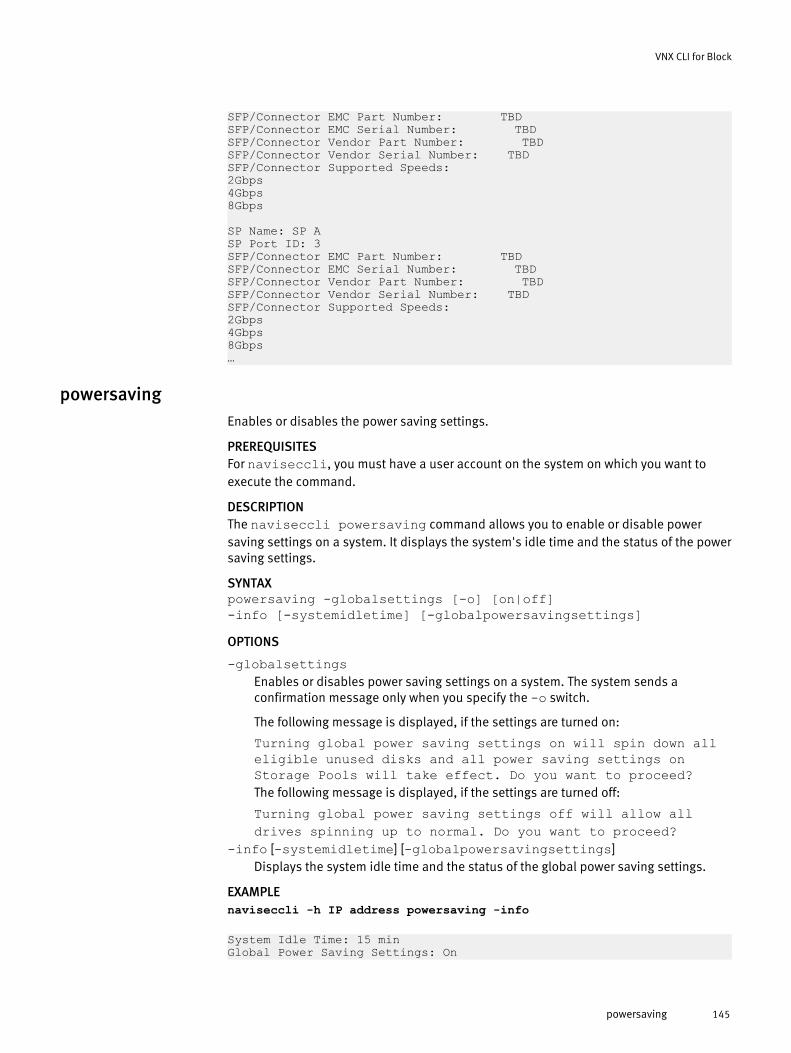
SFP/Connector EMC Part Number: TBDSFP/Connector EMC Serial Number: TBDSFP/Connector Vendor Part Number: TBDSFP/Connector Vendor Serial Number: TBDSFP/Connector Supported Speeds:2Gbps4Gbps8Gbps
SP Name: SP ASP Port ID: 3SFP/Connector EMC Part Number: TBDSFP/Connector EMC Serial Number: TBDSFP/Connector Vendor Part Number: TBDSFP/Connector Vendor Serial Number: TBDSFP/Connector Supported Speeds:2Gbps4Gbps8Gbps…
powersavingEnables or disables the power saving settings.
PREREQUISITESFor naviseccli, you must have a user account on the system on which you want toexecute the command.
DESCRIPTIONThe naviseccli powersaving command allows you to enable or disable powersaving settings on a system. It displays the system's idle time and the status of the powersaving settings.
SYNTAXpowersaving -globalsettings [-o] [on|off]-info [-systemidletime] [-globalpowersavingsettings]OPTIONS
-globalsettingsEnables or disables power saving settings on a system. The system sends aconfirmation message only when you specify the -o switch.
The following message is displayed, if the settings are turned on:
Turning global power saving settings on will spin down alleligible unused disks and all power saving settings onStorage Pools will take effect. Do you want to proceed?The following message is displayed, if the settings are turned off:
Turning global power saving settings off will allow alldrives spinning up to normal. Do you want to proceed?
-info [-systemidletime] [-globalpowersavingsettings]Displays the system idle time and the status of the global power saving settings.
EXAMPLEnaviseccli -h IP address powersaving -info
System Idle Time: 15 minGlobal Power Saving Settings: On
VNX CLI for Block
powersaving 145

rebootSPReboots an SP.
PREREQUISITESFor naviseccli, you must have a user account on the system on which you want toexecute the command.
DESCRIPTIONThis command reboots one or both SPs. If you omit switches, the current SP is rebooted.
Note
If rebootSP is executed while I/O processes are active, I/O errors may occur and/or theUnisphere agent process may hang. If the agent process hangs, you must reboot the hoston which the Unisphere agent is running. If you are binding LUNs assigned to one SP, youshould not reboot the peer SP until the binding process has completed. Otherwise, untilthe binding process is completed, you will see error messages each time the SP is polled.
Note
See the rebootpeerSP command, to reboot the peer SP of the target SP.
SYNTAXrebootSP [-both] [-o]OPTIONS
-bothReboot both SPs.
Note
If write cache is enabled, it is not allowed to reboot both SPs unless you disablewrite cache first or use -o option to override the warning and reboot directly.
-oExecutes the command without prompting for confirmation.
EXAMPLE #1naviseccli -h ss1_spa rebootSP
WARNING: This operation will reboot the target SP.Verify that the SPS on the surviving SP is operating correctly.Otherwise write cache must be disabled:naviseccli -h IPAddress cache -sp -modify -wc off.Failure to disable write cache may result in the loss of data.DO YOU WISH TO CONTINUE? (y/n)
EXAMPLE #2naviseccli -h ss1_spa rebootSP -both
Error: rebootSP command failedBefore you can execute the rebootSP command, you need to eitherdisable write cache or override the warning.To disable write cache, run the “naviseccli -h IPAddress cache -sp-modify -wc off” command.To override the warning and reboot both SPs directly, run the“rebootSP -both -o” command.
VNX CLI for Block
146 EMC VNX Series 5.33 Command Line Interface Reference for Block

OUTPUTThere is no output. Errors are printed to stderr.
rebootpeerSPReboots a peer SP.
PREREQUISITESYou must have a user account on the system on which you want to execute the command.
DESCRIPTIONLets you reboot the peer SP of the target SP in a dual-SP system. For the rebootpeerSPcommand, the peer SP is the SP on the system to which the command is not targeted.
Note
See the rebootSP command, to reboot the target SP or both SPs on the system.
SYNTAXrebootpeerSP [-o]OPTIONS
-oExecutes the command without prompting for confirmation.
EXAMPLEThe following example reboots the peer SP of the target SP. The target SP is ss1_spa;the peer SP is ss1_spb.
naviseccli -h ss1_spa rebootpeerSP
WARNING: This operation will reboot the target SP.Verify that the SPS on the surviving SP is operating correctly.Otherwise write cache must be disabled:naviseccli -h IPAddress cache -sp -modify -wc off.Failure to disable write cache may result in the loss of data.DO YOU WISH TO CONTINUE? (y/n)
remoteconfig -getconfigDisplays information about a host or SP agent.
PREREQUISITESFor naviseccli, you must have a user account on the system on which you want toexecute the command.
DESCRIPTIONThe remoteconfig command displays and sets agent configuration information. Anagent can be any host agent or SP agent. These commands let you get and set theconfiguration of the agent running on a remote host, scan all the devices in the system ona remote host, and stop the agent running on a host.
Note
If you are running VMware ESX Server and issuing this command to a virtual machine(VM), it cannot target the host agent because the Unisphere Host Agent is supported onlyon ESX Server.
VNX CLI for Block
rebootpeerSP 147

The naviseccli remoteconfig command with -getconfig displays informationon the agent running on an SP. To display information on the agent for the specified host,see server -remoteconfig on page 289. If you omit switches, the command displays allagent information. You can request specific information with switches.
To write the agent information to a file, use the -write filename switch. If you use -write, the CLI writes all information to the file; you cannot select specific informationwith switches. If a file with the same name exists, the CLI will verify to overwrite.
Note
After listing agent information, you can change the agent settings with theremoteconfig -setconfig command.
SYNTAX
remoteconfig -getconfig [-description] [-contact] [-users][-interval] [-write filename]
OPTIONS
-descriptionDisplays contents of the description field.
-contactDisplays contents of the contact field.
-usersDisplays contents of the users field.
-intervalDisplays contents of the polling interval field.
-write filenameWrites an image of the configuration file as it exists on the host or SP to file filename.The file is written in the same format as the agent.config file, which differs fromthe output of the getconfig function without the -write switch. You can use thisfile to set the configuration for other agents using the remoteconfig setconfig-f filename function. No other switch is allowed with -write.
EXAMPLEThis command lists all agent information.
naviseccli -h ss1_spa remoteconfig -getconfig
OUTPUTSee remoteconfig -getconfig on page 147. If the version of VNX OE for Block softwarerunning on the SP does not support this command, a Not supported error message isprinted to stderr. Other errors:
RAC_AGENT_NOT_RUNNING
remoteconfig -setconfigChanges configuration information for a host or SP agent.
PREREQUISITESFor naviseccli, you must have a user account on the system on which you want toexecute the command.
DESCRIPTIONThe naviseccli remoteconfig command with -setconfig changes theconfiguration information for the agent running on an SP. To change configuration
VNX CLI for Block
148 EMC VNX Series 5.33 Command Line Interface Reference for Block

information for the agent running on the specified host, see server -remoteconfig on page289.
Note
The comments in the host agent configuration file are removed. When your changes tothe configuration file take effect, comments that previously resided in the file arepermanently lost.
The CLI prompts for confirmation of every change you specify unless you use the -o(override) or -f switch. To change the setting for the agent, enter y. The confirmationqueries for all settings are as follows.
Change host description from old to new <y/n> [y]?
Change contact information from old to new <y/n> [y]?
Add user in the authorized user list <y/n>[y] ?
Remove user from the authorized user list <y/n>[y] ?
Change polling interval to new-interval <y/n>[y] ?
To have the CLI obtain the agent information from a file (perhaps a file written with thegetconfig -write function), use the -ffilename switch. Only the -o (override) switchis allowed with the -f switch.
You can use the -getconfig function to see how settings are formatted. Make sure thatyour entries are valid for the agent you are configuring. A wrong setting can make anagent inaccessible.
SYNTAX
remoteconfig -setconfig [-o] [-adduser userlist] [-contactcontactinfo] [-description description] [-f filename][-intervalinterval] [-rmuser userlist]
OPTIONS
-oExecutes the command without prompting for confirmation.
-adduser userlistAdds the users specified in userlist to the authorized user list. The user name form isusername@hostname. Separate the user entries with a space.
-contact contactinfoSpecifies new contact information for the agent description field.
-description descriptionSpecifies new contents for the agent description field.
-f filenameReads the configuration information from file filename. This file must be in thecorrect format (same as the agent configuration file used in earlier Unisphererevisions). The -getconfig -write command automatically creates files in thecorrect format. When you use -f, the CLI does not prompt for confirmation; the -oswitch is not needed.
-interval intervalChanges the polling interval in seconds to interval. The valid range is 1 to 120. Thisswitch may not apply to all system types.
-rmuser userlistRemoves the specified users from the authorized user list.
VNX CLI for Block
remoteconfig -setconfig 149
EXAMPLEThis command adds the user tsjones on host viking to the agent privileged userslist.
naviseccli -h ss1_spa remoteconfig -setconfig -adduser tsjones@viking
Add tsjones@viking in the authorized user list <y/n>[y]?
OUTPUTSee remoteconfig -getconfig on page 147. If the version of VNX OE for Block softwarerunning on the SP does not support this command, a Not supported error message isprinted to stderr. Other errors:
RAC_AGENT_NOT_RUNNING RAC_REMOTECONFIG_NOT_SUPPORTED INVALID_MEGAPOLLINVALID_USEEXPLICITDEVNAMERAC_FILE_NOT_FOUND
removergRemoves a RAID group.
PREREQUISITESFor naviseccli, you must have a user account on the system on which you want toexecute the command.
DESCRIPTIONThe naviseccli removerg command removes a specified RAID group.
Note
This command cannot remove thin pools.
SYNTAXremoverg rgIDOPTIONS
rgIDRAID group identification number. rgID specifies a number between 0 and themaximum number of RAID groups supported by the RAID group system.
EXAMPLEThis command removes RAID group 1.
naviseccli -h ss1_spa removerg 1
resetandholdResets an SP and holds the reboot following the power on self tests (POST).
PREREQUISITESYou must have a user account on the system on which you want to execute the command.
DESCRIPTIONThe naviseccli resetandhold command, resets an SP and holds the rebootfollowing the power on self tests (POST), to allow an SP to be reset in a safe manner forsystems where pulling and reseating the SP is not permitted during operation. Because
VNX CLI for Block
150 EMC VNX Series 5.33 Command Line Interface Reference for Block

the boot process is held, a subsequent rebootpeerSP command must be issued toclear the hold and reboot the SP, to return the SP to service.
Note
Issue rebootpeerSP after you issue resetandhold, when you are ready to return the
SP to service.
SYNTAXresetandholdEXAMPLEThe following example resets and holds the reboot for the targeted SP on the system.
naviseccli -h ss1_spa resetandhold
This operation will cause the system to reset and then hold the reboot process following the Power On Self Tests (POST). To clear the hold state and complete the SP reboot, a rebootpeersp command must be issued to the peer SP. DO YOU WISH TO CONTINUE? (y/n)?
responsetestTests Event Monitor response.
PREREQUISITESFor naviseccli, you must have a user account on the system on which you want toexecute the command.
DESCRIPTIONThe naviseccli responstest command creates an artificial event to test eventmonitor response.
The responsetest command is designed for use without the event monitor UserInterface (UI). That is, you can use responsetest in conjunction with the event monitortemplate file, navimon.cfg, which you can edit to specify the event monitor responsesyou want. If you have used the event monitor UI to set up an event monitor template, donot use this command.
Event monitor functions accessed via responsetest are decentralized, providing emailand pager support from local systems only. The EMC phone home feature is not availablevia this command.
SYNTAXresponsetest -email response-parameters| -emailpage response-parameters | -modempage response-parameters |-snmp response-parametersOPTIONSresponse-parameters
Allows different parameters for each type of response you specify, as follows:-email-smtpmailserver smtpmailserver_hostname
Specifies the SMTP mail server; required.-destaddress destination_email_address
Specifies the destination email address; required.[-subject "text"]
The text, within quotation marks, specifies the subject of the email; optional.
VNX CLI for Block
responsetest 151

[-cc destination_email_address]The email address to send a cc (copy) to; optional.
[-message "text" | -file filename]The text, in quotation marks, describes the event; optional. Or you specify a file withdescriptive text using -file.
[-sender sender_email_address]Specifies the sender address; optional. If omitted, CLI inserts the agent hostname asthe sender_email_address.
-emailpage-smtpmailserver smtpmailserver_hostname
Specifies the SMTP mail server; required.-destaddress destination_email_address
Specifies the destination email address; required.[-subject "text" ]
The text, within quotation marks, specifies the subject of the email; optional.[-cc destination_email_address]
The email address to send a cc (copy) to;[-message "text" | -file filename]
The text, in quotation marks, describes the event; optional. Or you specify a file withdescriptive text using -file.
[-sender sender_email_address]Specifies the sender address; optional. If omitted, CLI inserts the agent hostname asthe sender_email_address.
-modempage(Not supported on AX4-5 series and AX series)
-destnumber phone-numberSpecifies the pager phone number (with area code) and is required.
-msgnumber phone-numberSpecifies the number that will appear on the pager display (with area code).
[ -comport number ]Specifies the number of the PC COM. If omitted, the CLI assumes COM l; optional.
[ -messagedelay seconds ]Specifies the delay between sending the destination phone number to the modemand sending the message to the modem. This allows enough time for the receivingmodem to answer the call. Optional.
[ -dialcommand command]Specifies the modem dial command to be used by the agent. Optional.
[ -initcommand command-to-modem ]Specifies the modem dial command to be used by the agent. The initcommandallows for some custom modem configuration before the data is sent to it. Optional.
-community communitySpecifies a community on the snmp managment host; optional.
-desthost destination-hostnameSpecifies an snmp management hostname; required.
-device deviceSpecifies the device represented by the snmp management host. Required.
EXAMPLEThis command sends a modem page test event.
naviseccli -h ss1_spa responsetest modempage -destnumber -msgnumber
OUTPUTResult of the test.
VNX CLI for Block
152 EMC VNX Series 5.33 Command Line Interface Reference for Block

sc_offDisables data access control.
PREREQUISITESFor naviseccli, you must have a user account on the system on which you want toexecute the command.
DESCRIPTIONThe naviseccli sc_off command disables data access control and turns off sharedstorage features. You can use this command to reset the system to its factory unsharedstorage settings.
CAUTION
Be aware that executing sc_off resets the system to its factory unshared storage
settings, permanently destroying all previously implemented shared storage features.
SYNTAXsc_off [-o]OPTIONS
-oExecutes the command without prompting for confirmation.
EXAMPLEnaviseccli -h ss1_spa sc_off
OUTPUTThe first time you run the sc_off command, you will see an output similar to thefollowing:
You have asked to remove all shared storage components from the indicated system.
The following functions will be performed, if necessary: Clear the system's password Turn fairness off Set the default storage group to ~physical Remove all initiator records Remove all user defined storage groups Do you wish to proceed? (y/n)? y
Clearing the system's password Old Password: *** Turning fairness off Setting the default storage group to ~physical Removing all initiator records Removing all user defined storage groups
If you run the command a second time, and the first time through completedsuccessfully, the output will be as follows:
You have asked to remove all shared storage components from the indicated system.
The following functions will be performed, if necessary: Clear the system's password Turn fairness off Set the default storage group to ~physical
VNX CLI for Block
sc_off 153

Remove all initiator records Remove all user defined storage groups Do you wish to proceed? (y/n)? y
setfeatureAdds a software feature to a LUN controlled by an SP.
PREREQUISITESFor naviseccli, you must have a user account on the system on which you want toexecute the command.
DESCRIPTIONThe naviseccli setfeature command adds and removes a software driver featureto a LUN owned by an SP.
SYNTAXsetfeature -on|-off -feature feature -lun lun| -lunuid uidOPTIONS
-on or -offAdds or removes the feature.
-feature featureIdentifies the feature; for example, RM for remote mirroring and sancopy for SANCopy.
-lun lun or -lunuid uidSpecifies the LUN. You can use the LUN number or the LUN unique ID, UID (which isthe World Wide Name, WWN).
OUTPUTIf the version of VNX OE for Block software running on the SP does not support thiscommand, a Not supported error message is printed to stderr. Other errors:
COMMAND_NOT_SUPPORTEDFEATURE_REQUIREDLUN_AND_LUNUID_SPECIFIED
setsnifferStarts a background verify process or changes verify process parameters.
PREREQUISITESFor naviseccli, you must have a user account on the system on which you want toexecute the command.
DESCRIPTIONThe naviseccli setsniffer command starts a background verify process orchanges the parameters for the verify process. You can indicate a specific LUN, all LUNsin a RAID group, or all LUNs in a system.
Note
The setsniffer command does not support thin LUNs.
SYNTAXsetsniffer lun-number| [-rg rg-number] [-all] [-bv] [-cr]
VNX CLI for Block
154 EMC VNX Series 5.33 Command Line Interface Reference for Block

OPTIONS
-allApplies sniffer parameters to all LUNs in the system. The target SP must own oneLUN at minimum.
lun-numberApplies sniffer parameters to the specified LUN. lun specifies the logical unitnumber. You must target the SP that owns the specified LUN.
-rg rg-numberApplies sniffer parameters to all LUNs in the specified RAID group.
-bvStarts a full unit background verify.
-crClears background verify reports.
EXAMPLEStarts a background verify on LUN 0.
naviseccli setsniffer 0 -bv
OUTPUTThere is no output. Errors are printed to stderr.
setsniffverifyEnables or disables sniff verify on all the disks on the array.
PREREQUISITESFor naviseccli, you must have a user account on the system on which you want toexecute the command.
DESCRIPTIONThe naviseccli setsniffverify command can enable or disable sniff verify on allthe disks on the array, including bound and unbound region. This command with nooption displays the current sniff verify state.
SYNTAXsetsniffverify [-on | -off]OPTIONS
–on | offEnables or disables sniff verify on all dissk.
-onEnables sniff verify on all disks.
-offDisables sniff verify on all disks.
EXAMPLE #1This example enables the disk based sniff verify. There is no output. Errors are printed tostderr.
naviseccli setsniffverify -on
VNX CLI for Block
setsniffverify 155

EXAMPLE #2If no option is provided, the command will display the current sniff verify state.
naviseccli setsniffverifysniffverify is ENABLED
setspstimeSets SPS or BBU battery test time.
PREREQUISITESFor naviseccli, you must have a user account on the system on which you want toexecute the command.
DESCRIPTIONThe naviseccli setspstime command sets the SPS battery test time. If no switchesare specified, the command returns the current SPS battery test time. The SPS test time isdisplayed for the client's time zone.
SYNTAX
setspstime [-d day-num] [-h hour-num] [-m minute-num][-nolocal]
OPTIONS
-d day-numSets the day of the week (0-6, 0=Sunday).
-h hour-numSets the hour of the day (0-23, 0=12:00 AM).
-m minute-numSets the minute of the hour (0-59).
Note
To set the SPS or BBU test time, all switches must be specified.
-nolocalThe SPS test time is displayed for the client's time zone.
Note
-nolocal is required if your system is communicating with a host agent version
less than 6.5. You cannot use this switch with version 6.5 or higher.
EXAMPLEThis example sets the SPS battery test time to Sunday at 1:00 AM.
naviseccli -h ss1_spa setspstime -d 0 -h 1 -m 0
OUTPUTThere is no output. Errors are printed to stderr.
setsptimeSets the SP system clocks.
PREREQUISITESFor naviseccli, you must have a user account on the system on which you want toexecute the command.
VNX CLI for Block
156 EMC VNX Series 5.33 Command Line Interface Reference for Block

DESCRIPTIONThe naviseccli setsptime command sets the system time for both SPs.
SYNTAX
setsptime [-M month-num] [-D day-num] [-Y year-num][-h hour-num ] [-m minute-num]
OPTIONS
-M month-numSpecifies the month (1-12).
-D day-numSpecifies the day (1-31).
-Y year-numSpecifies the year; use four digits.
-h hour-numSpecifies the hour (0-23).
-m minute-numSpecifies the minute (0-59).
EXAMPLEThis example sets the SP system clock to March 13, 2002, 9:00 am.
naviseccli -h data1_spa setsptime -M 3 -D 13 -Y 2002 -h 9
OUTPUTThere is no output. Errors are printed to stderr.
setstatsSets statistics logging.
PREREQUISITESFor naviseccli, you must have a user account on the system on which you want toexecute the command.
DESCRIPTIONThe naviseccli setstats command sets statistics logging. If no optional switchesare present, the command returns the current state of statistics logging. The SP maintainsa log of statistics for the LUNs, disk modules, and system caching that you can turn onand off. When enabled, logging affects system performance, so you may want to leave itdisabled unless you have a reason to monitor performance.
The log uses a 32-bit counter to maintain the statistics numbers. When the counter is full,the statistics numbers restart at zero. As a result, you will see a sudden decrease in astatistics number if you view it shortly before the counter is full and shortly after thecounter restarts at zero. If you want to keep the log turned on for more than two weeks,we recommend that you reset the log about every two weeks, so you know when thenumbers start at zero.
The command affects only the SP you specify.
SYNTAXsetstats -on|-off [-powersavings] [-on|-off]OPTIONS
setstats -on|-offEnables/disables the performance statistics logging.
VNX CLI for Block
setstats 157

Note
If statistics logging is off, certain options in other commands are disabled. Theoptions for the other commands specify whether statistics logging must be on fortheir options to be valid.
-powersavingsEnables/disables the disk spin-down statistics logging. It affects only the disk spin-down statistics.
-on|-offReturns the current state of power saving statistics logging.
EXAMPLEThe sample output is as follows:
naviseccli -h ss1_spa setstats -on
naviseccli -h ss1_spa setstats -powersavings
Disk Spin Down statistics logging is DISABLED
OR
Disk Spin Down statistics logging is ENABLEDStart Power Savings Log Timestamp: xx/xx/xxxx xx:xx:xx
OUTPUTThere is no output. Errors are printed to stderr.
shutdownShuts down and powers off the system.
PREREQUISITESFor naviseccli, you must have a user account on the system on which you want toexecute the command.
DESCRIPTIONThe naviseccli shutdown command shuts down and powers off the system youspecify.
SYNTAXshutdown [-o]OPTIONS
-oExecutes the command without prompting for confirmation.
EXAMPLEThis command shuts down and powers off the specified system.
naviseccli -h ss1_spa shutdown
Before you shutdown the system, stop all I/O fromany servers connected to the system and save allunsaved data to disk. During the shutdown process youwill lose access to all data on the LUNs but you will notlose any data. When you power up the system youwill regain access to the LUNs.
VNX CLI for Block
158 EMC VNX Series 5.33 Command Line Interface Reference for Block

Do you want to shutdown and power off the subsystem now(y/n)?
OUTPUTNone if the command succeeds; status or error information if it fails.
shutdownspShuts down and powers off the current SP.
PREREQUISITESFor naviseccli, you must have a user account on the system on which you want toexecute the command.
DESCRIPTIONThe naviseccli shutdownsp command shuts down the current storage processor(SP) of the system.
SYNTAXshutdownsp [-o]OPTIONS
-oExecutes the command without prompting for confirmation. The confirmationmessage varies depending on the system.
EXAMPLEThe confirmation message for a VNX system is as follows:
WARNING: This operation will shutdown the SP and hold it in reset.Verify that SPS on the surviving SP is operating correctly.Otherwise write cache must be disabled: naviseccli -h IPAddresscache -sp -modify -wc off.To reconnect please reboot the SP - this can be accomplished byusing therebootpeerSP command.Do you want to shutdown and hold the SP now? (y/n) ?
OUTPUTNone if the command succeeds; error information if used with any other system.
shutdownpeerspShuts down and powers off the peer SP.
PREREQUISITESFor naviseccli, you must have a user account on the system on which you want toexecute the command.
DESCRIPTIONThe naviseccli shutdownpeersp command shuts down the peer storage processor(SP).
SYNTAXshutdownpeersp [-o]OPTIONS
-oExecutes the command without prompting for confirmation.
VNX CLI for Block
shutdownsp 159

The confirmation message varies depending on the system.
EXAMPLEThe confirmation message for a VNX system is as follows:
WARNING: This operation will shutdown the SP and hold it in reset.Verify that SPS on the surviving SP is operating correctly.Otherwise write cache must be disabled: naviseccli -h IPAddresscache -sp -modify -wc off.To reconnect please reboot the SP - this can be accomplished byusing therebootpeerSP command.Do you want to shutdown and hold the SP now? (y/n) ?
OUTPUTNone if the command succeeds; error information if used with any other system.
spcollect -infoDisplays the setting of the automated SPCollect service.
PREREQUISITESYou must have a user account on the system on which you want to execute the command.
DESCRIPTIONThe naviseccli spcollect command with the -info function lets you display thesetting of the automated SPCollect functionality. The setting appears as Enabled whenthe SPCollect automated functionality is turned on; Disabled when it is turned off.
The automated SPCollect service is part of the Peerwatch service included with VNX OEfor Block version 02.19.xxx.5.yyy or higher.
SYNTAXspcollect -infoEXAMPLEThis command shows you the setting of the automated SPCollect functionality for thespecified system. The Enabled setting, indicating that the SPCollect process is turned on,appears in the output above.
naviseccli -address ss\1_spa spcollect -info
OUTPUT
AutoExecution: Enabled
spcollect -setSets the automated SPCollect service on or off.
PREREQUISITESYou must have a user account on the system on which you want to execute the command.
DESCRIPTIONThe naviseccli spcollect command with the -set function lets you set theautomated SPCollect process on or off.
The automated SPCollect service is part of the Peerwatch service included with VNX OEfor Block version 02.19.xxx.5.yyy or higher.
VNX CLI for Block
160 EMC VNX Series 5.33 Command Line Interface Reference for Block

Note
Use spcollect -info to verify whether the service is enabled or disabled.
SYNTAXspcollect -set -auto on|off [-o]OPTIONS-auto on|off
Sets the automated SPCollect process on or off. If you indicate on, it turns theautomation service on; if you indicate off, it turns the automation service off.
-oExecutes the command without prompting for confirmation.
EXAMPLEThis command turns the automated SPCollect process on.
naviseccli -address ss1_spa spcollect -set -auto on
OUTPUTNone if the command succeeds; status or error information if it fails.
spcollectSelects and places a collection of system log files into a single .zip file.
PREREQUISITESFor naviseccli, you must have a user account on the system on which you want toexecute the command.
DESCRIPTIONThe naviseccli spcollect command selects a collection of system log files andplaces them in a single .zip file on the system. You can retrieve the file from the systemusing the managefiles command.
Note
This command is not related to the automated SPCollect service that is part of thePeerwatch service included with VNX OE for Block version 02.19.xxx.5.yyy or higher. Thiscommand lets you run the SPCollect functionality separate from the scheduled service.See the spcollect -set command to enable or disable the automated SPCollect
service.
NOTICE
The SPCollect functionality can affect system performance (may degrade systemperformance).
SYNTAXspcollectEXAMPLEThis example creates a .zip file on the system, which contains system log files.
The .zip file has the following format:arrayserialnumber_SPx_date_time_spsignature_data.zipnaviseccli -h ss1_spa spcollectarrayserialnumber Is the system serial number.
VNX CLI for Block
spcollect 161

x Is SP A or B.
date Is the date of collection.
time Is the time of collection.
spsignature Is the SP signature
OUTPUTThere is no output. Errors are printed to stderr.
spportspeedSet or get the SP port speed.
PREREQUISITESFor naviseccli, you must have a user account on the system on which you want toexecute the command.
DESCRIPTIONThe naviseccli spportspeed command gets or sets the SP port speed. You can setthe port speed on either SP directly or through the other SP. The port speed you can setand the options available depend upon your system type.
For a port speed to work, the HBA, switch, and SP must all support it. You can set theports of an SP to different speeds if the ports connect to switches or HBAs with differentspeeds.
CAUTION
Incompatible port speeds will prevent the two devices from communicating. The CLIprompts for confirmation as follows before executing the -set command.
Changing the port speed is a disruptive function. Verify thatthe other device connected to the system, supports the newspeed. If the speed settings are incompatible, the system willbe unable to communicate with the other connected device. Areyou sure you want to change speed of SP x Port n from n Gigabitto n Gigabit <y/n>?SYNTAX
spportspeed -get [-isauto] [-avail] [-requested] [-type][-physical] [-sfp] [-all] -set -sp a|b-portid portid speed [-o]
OPTIONS
-isautoIndicates whether the Auto-Negotiate feature is turned on or off. The CLI returns a yesvalue if the feature is turned on, a no value if the feature is turned off, and a notsupported value if the feature is not supported.
Note
If you have the Auto-Negotiate feature turned on, the Speed Value that is generatedin the output does not have a value of auto. The value reflects the speed at whichthe port is currently operating. If you have the Auto-Negotiate feature turned on andyou specify the -requested switch, the Requested Value displays a value of auto.
-avail
VNX CLI for Block
162 EMC VNX Series 5.33 Command Line Interface Reference for Block

Indicates the available speeds for a specified port.-requested
Displays the speed requested through spportspeed -set. The speed that isrequested may not equal the actual speed of the port. For example when the Auto-Negotiate feature is turned on, the Requested Value displays auto and the SpeedValue displays the speed at which the port is currently operating.
-typeDisplays the connection type (Fibre Channel or iSCSI) for each port along with thespeeds.
-physical (CX series only)Displays the physical location of the port.or
-sp a|bSpecifies the SP on which to set the port speed ( a|b).
-portid portid speedportid specifies the port on the SP (0, 1, 2, or 3).
speed specifies the port speed: See the note above. For Fibre Channel systems, portspeed is 1 for 1 Gb mode, 2 for 2 Gb mode, 4 for 4 Gb mode, auto to initiate theAuto-Negotiate feature. For iSCSI systems, port speed is 10 for 10 Mb mode, 100 for100 Mb mode, 1000 for 1000 Mb mode, auto to initiate the Auto-Negotiate feature.
-oExecutes the command without prompting for confirmation.
EXAMPLE #1naviseccli -h ss1__spa spportspeed -get -physical
Storage Processor : SP APort ID : 0Speed Value : 8GbpsAuto Negotiable : YesAvailable Speeds:2Gbps4Gbps8GbpsAutoRequested Value: AutoConnection Type: Fibre ChannelI/O Module Slot: OnboardPhysical Port ID: 2SFP Supported Speeds:2Gbps4Gbps8Gbps
Storage Processor : SP APort ID : 1Speed Value : 8GbpsAuto Negotiable : YesAvailable Speeds:2Gbps4Gbps8GbpsAutoRequested Value: AutoConnection Type: Fibre ChannelI/O Module Slot: OnboardPhysical Port ID: 3SFP Supported Speeds:2Gbps4Gbps8Gbps
VNX CLI for Block
spportspeed 163

Storage Processor : SP APort ID : 2Speed Value : 8GbpsAuto Negotiable : YesAvailable Speeds:2Gbps4Gbps8GbpsAutoRequested Value: AutoConnection Type: Fibre ChannelI/O Module Slot: OnboardPhysical Port ID: 4SFP Supported Speeds:2Gbps4Gbps8Gbps
Storage Processor : SP APort ID : 3Speed Value : 8GbpsAuto Negotiable : YesAvailable Speeds:2Gbps4Gbps8GbpsAutoRequested Value: AutoConnection Type: Fibre ChannelI/O Module Slot: OnboardPhysical Port ID: 5SFP Supported Speeds:2Gbps4Gbps8Gbps
EXAMPLE #2naviseccli spportspeed -get –sfp
Storage Processor : SP APort ID : 0Speed Value : 8GbpsSFP Supported Speeds:2Gbps4Gbps8Gbps
Storage Processor : SP APort ID : 1Speed Value : 8GbpsSFP Supported Speeds:2Gbps4Gbps8Gbps
Storage Processor : SP APort ID : 2Speed Value : N/ASFP Supported Speeds:2Gbps4Gbps8Gbps
Storage Processor : SP APort ID : 3
VNX CLI for Block
164 EMC VNX Series 5.33 Command Line Interface Reference for Block

Speed Value : N/ASFP Supported Speeds:2Gbps4Gbps8Gbps
Storage Processor : SP BPort ID : 0Speed Value : N/ASFP Supported Speeds:2Gbps4Gbps8Gbps
Storage Processor : SP BPort ID : 1Speed Value : 8GbpsSFP Supported Speeds:2Gbps4Gbps8Gbps
Storage Processor : SP BPort ID : 2Speed Value : N/ASFP Supported Speeds:2Gbps4Gbps8Gbps
Storage Processor : SP BPort ID : 3Speed Value : N/ASFP Supported Speeds:2Gbps4Gbps8Gbps
EXAMPLE #3naviseccli spportspeed -get –all
Storage Processor : SP APort ID : 0Speed Value : 8GbpsAuto Negotiable : NoAvailable Speeds:2Gbps4Gbps8GbpsAutoRequested Value: AutoConnection Type: Fibre ChannelI/O Module Slot: 0Physical Port ID: 0SFP Supported Speeds:2Gbps4Gbps8Gbps
Storage Processor : SP APort ID : 1Speed Value : 8GbpsAuto Negotiable : NoAvailable Speeds:2Gbps4Gbps
VNX CLI for Block
spportspeed 165

8GbpsAutoRequested Value: AutoConnection Type: Fibre ChannelI/O Module Slot: 0Physical Port ID: 1SFP Supported Speeds:2Gbps4Gbps8Gbps
Storage Processor : SP APort ID : 2Speed Value : N/AAuto Negotiable : NoAvailable Speeds:2Gbps4Gbps8GbpsAutoRequested Value: 4GbpsConnection Type: Fibre ChannelI/O Module Slot: 0Physical Port ID: 2SFP Supported Speeds:2Gbps4Gbps8Gbps
Storage Processor : SP APort ID : 3Speed Value : N/AAuto Negotiable : NoAvailable Speeds:2Gbps4Gbps8GbpsAutoRequested Value: 4GbpsConnection Type: Fibre ChannelI/O Module Slot: 0Physical Port ID: 3SFP Supported Speeds:2Gbps4Gbps8Gbps
Storage Processor : SP BPort ID : 0Speed Value : N/AAuto Negotiable : NoAvailable Speeds:2Gbps4Gbps8GbpsAutoRequested Value: 4GbpsConnection Type: Fibre ChannelI/O Module Slot: 0Physical Port ID: 0SFP Supported Speeds:2Gbps4Gbps8Gbps
Storage Processor : SP BPort ID : 1Speed Value : 8Gbps
VNX CLI for Block
166 EMC VNX Series 5.33 Command Line Interface Reference for Block

Auto Negotiable : NoAvailable Speeds:2Gbps4Gbps8GbpsAutoRequested Value: AutoConnection Type: Fibre ChannelI/O Module Slot: 0Physical Port ID: 1SFP Supported Speeds:2Gbps4Gbps8Gbps
Storage Processor : SP BPort ID : 2Speed Value : N/AAuto Negotiable : NoAvailable Speeds:2Gbps4Gbps8GbpsAutoRequested Value: 4GbpsConnection Type: Fibre ChannelI/O Module Slot: 0Physical Port ID: 2SFP Supported Speeds:2Gbps4Gbps8Gbps
Storage Processor : SP BPort ID : 3Speed Value : N/AAuto Negotiable : NoAvailable Speeds:2Gbps4Gbps8GbpsAutoRequested Value: 4GbpsConnection Type: Fibre ChannelI/O Module Slot: 0Physical Port ID: 3SFP Supported Speeds:2Gbps4Gbps8Gbps
EXAMPLE #4naviseccli -h ss1_spa spportspeed -set -sp a -portid 0 2
Changing the port speed is a disruptive function. Verifythat the other device connected to the system,supports the new speed. If the speed settings areincompatible, the system will be unable tocommunicate with the other connected device.
Are you sure you want to change speed of SP A Port n from1 Gigabit to 2 Gigabit <y/n>? y
OUTPUTIf the version of VNX OE for Block software running on the SP does not support thiscommand, a Not supported error message is printed to stderr.
VNX CLI for Block
spportspeed 167

storagegroupCreates and configures storage groups.
PREREQUISITESFor naviseccli, you must have a user account on the system on which you want toexecute the command.
DESCRIPTIONThe naviseccli storagegroup command lets you create and manage sharedsystems, that is, systems that use storage groups and have the storage group option. Formost command operations, the CLI prompts for confirmation unless you use the -oswitch.
You can use the CLI command storagegroup -connecthost to assign a storagegroup to all HBAs in a host, or the command storagegroup -setpath to assign astorage group to a specific HBA in a host. To change the settings of a storage group thatis already assigned, use the command storagegroup -sethost. To disconnect ahost from all its storage groups, use storagegroup -disconnecthost.
The storagegroup command has many switches, some of which have functions thatyou also indicate with switches.
SYNTAXstoragegroup [-addhlu switches] |[-addsnapshot switches] |[-chgname switches] |[-connecthost switches] |[-create switch] |[-destroy switch]|[-disconnecthost switch] |[-enable] |[-list switches] |[-removehlu switches] |[-removesnapshot switches] |[-sethost switches] |[-setpath switches] |[-shareable switch] |OPTIONS
storagegroup command, -addhlu switch -addhlu -gnameStorageGroupName| -uid StorageGroupUID -hlu hlunumber -alu alunumber
Adds a host LUN to a storage group. This command requires a bound LUN. Ifrequired, use the bind command to create a LUN. You must use -gname or -uidand two other switches with -addhlu as follows. Also, see the example in unbind on page 181.-gname StorageGroupName
Specifies the name of the storage group.
-uid StorageGroupUID
Specifies the storage group unique identification number.l For Fibre Channel systems, the UID uses the World Wide Name (WWN)
format such as: 10:00:00:00:C9:20:DE:0C:10:00:00:00:C9:20:DE:0C.l For iSCSI systems, the UID uses the initiator name which uses the IQN
format such as: iqn.1992-04.com.emc:cx.apm00034901792.b0.
VNX CLI for Block
168 EMC VNX Series 5.33 Command Line Interface Reference for Block

-hlu hlunumber
Specifies the host LUN number, which is the number that the system server willsee. hlunumber is the virtual LUN number. (Virtual LUN numbers let a hostwhose operating system has LUN limit or LUN booting restrictions use a numberother than the actual system LUN ID (-alu below), which might be out of theoperating system’s range, to access a LUN.) This switch is required along with -alu and either the-gname or -uid switch.If you have not assigned a host LUN number of 0 and if the arraycommpathsetting is 1, then after the bus is rescanned, the system will display an entry forLUN 0 even though you have not assigned a host LUN 0. This occurs becausethe arraycommpath setting of 1 creates a virtual LUN 0 for communicationwith the system.
-alu alunumber
Specifies the system LUN number, the actual LUN number internal to thesystem. This is the number assigned when the LUN was bound. alunumberspecifies the logical unit number. This switch is required along with -hlu andeither the -gname or -uid switch.
storagegroup command, -addsnapshot switch -addsnapshot -gnameStorageGroupName| -uid StorageGroupUID -hlu hlunumber -snapshotnamesnapshotname| -snapshotuid snapshotuid
Adds a snapshot to a storage group. The storage group you choose should bedifferent from the source LUN storage group. You must use three of the followingswitches with -addsnapshot:
-gname StorageGroupName
Sets the name of the storage group. StorageGroupName specifies a user-definedstorage group name; or
-uid StorageGroupUID
Specifies the storage group unique identification number.
l For Fibre Channel systems, the UID uses the World Wide Name (WWN)format such as: 10:00:00:00:C9:20:DE:0C:10:00:00:00:C9:20:DE:0C.
l For iSCSI systems, the UID uses the initiator name which uses the IQNformat such as: iqn.1992-04.com.emc:cx.apm00034901792.b0.
-hlu hlunumber
Specifies the host LUN number for the snapshot, which is the unique numberthat the system server will see. hlunumber is the virtual LUN number.
-snapshotname snapshotname | -snapshotuid snapshotuid
Specifies the snapshot name or unique ID number (World Wide Name, WWN).One of these switches is required along with the -gname or -uid switch.
storagegroup command, -chgname switch -chgname -gnameStorageGroupName | -uid StorageGroupUID -newgname NewName [-o]
Renames the storage group. You must use two of the following switches with -chgname:
-gname StorageGroupName
Specifies the name of the storage group. StorageGroupName specifies a user-defined storage group name.
VNX CLI for Block
storagegroup 169

-uid StorageGroupUID
Specifies the storage group unique identification number.
l For Fibre Channel systems, the UID uses the World Wide Name (WWN)format such as: 10:00:00:00:C9:20:DE:0C:10:00:00:00:C9:20:DE:0C.
l For iSCSI systems, the UID uses the initiator name which uses the IQNformat such as: iqn.1992-04.com.emc:cx.apm00034901792.b0.
-newgname NewName
Sets the new storage group name for the storage group (specified by the -gname or -uid switch). NewNamespecifies the new name for the specifiedstorage group.
-oExecutes the command without prompting for confirmation.
storagegroup command, -connecthost switch -connecthost -hostHostName -gname StorageGroupName| -uid StorageGroupUID [-o]
Connects the specified host to the specified storage group. It connects all of thehost’s HBA/SP combinations to the storage group by assigning the host’s initiatorrecords to the storage group. To assign a storage group to a specific HBA, usestoragegroup -setpath.
You may use the port -list command to get a list of registered HBAs. If nothingis registered, use the navicli register command to register an HBA.
You must specify the host using the -host switch, and the storage group using the-gname switch or the -uid switch. If you include the -o switch, the command willbe executed without asking for user confirmation. Also, see the example in unbind on page 181.
-host HostName
Specifies the user-defined hostname.
-gname StorageGroupName
StorageGroupName specifies the storage group name.
-uid StorageGroupUID
StorageGroupUID specifies the unique ID.
storagegroup command, -create switch -create -gnameStorageGroupName
Creates a storage group. You must use the -gname switch with -create. Also seethe example in unbind on page 181.
-gname StorageGroupName
StorageGroupName specifies a user-defined storage group name.
storagegroup command, -destroy switch -destroy -gnameStorageGroupName | -uid StorageGroupUID [-o]
Destroys the specified storage group. If you include the -o switch, the command willbe executed without asking for user confirmation. You must use one of the followingswitches with -destroy:
-gname StorageGroupName
StorageGroupName specifies a user-defined storage group name.
VNX CLI for Block
170 EMC VNX Series 5.33 Command Line Interface Reference for Block
-uid StorageGroupUID
Specifies the storage group UID.
storagegroup command, -disconnecthost switch -disconnecthost -host HostName [-o]
Disconnects all of the specified host’s HBA/SP combinations from the currentlyconnected storage group, and reconnects them to ~management. You must specifythe host using the -host switch. If the -o switch is present, the command will beexecuted without asking for user confirmation.
-host HostName
HostName specifies the user-defined hostname.
storagegroup command, -enable switch [-o]Enables data access control. Sets the default storage group to ~management. If the-o switch is present, the command will be executed without asking for userconfirmation.
storagegroup command, -list switch -list [-gname StorageGroupName| -uid StorageGroupUID] -host
Displays information about the specified storage group. When no storage group isspecified, -list displays information about each user-defined storage group in thesystem. You can use one of the following optional switches with -list.
-gname StorageGroupName
StorageGroupName specifies a user-defined storage group name.
-hostDisplays the hostname of the attached host.
-uid StorageGroupUID
Specifies the storage group unique ID.
storagegroup command, -removehlu switch -removehlu -gnameStorageGroupName | -uid StorageGroupUID -hlu hlunumber
Removes the specified host LUN number from the specified storage group. You mustuse one of the following switches:
-gname StorageGroupName
StorageGroupName specifies a user-defined storage group name.
-uid StorageGroupUID
Specifies the storage group UID.
-hlu hlunumber
hlunumber specifies the logical unit number, which is the number that thesystem server will see. This switch is required along with either the -gname or -uid switch.
storagegroup command, -removesnapshot switch -removesnapshot -gname StorageGroupName | -uid StorageGroupUID -snapshotnamesnapshotname| -snapshotwwn snapshotUID
Removes a snapshot from a storage group. You must use one of the four followingswitches with -removesnapshot:
-gname StorageGroupName
StorageGroupName specifies the user-defined storage group name.
VNX CLI for Block
storagegroup 171

-uid StorageGroupUID
Specifies the storage group unique ID.
-snapshotname snapshotname | -snapshotwwn snapshotUID
Specifies the snapshot name or UID number (World Wide Name, WWN). One ofthese switches is required.
storagegroup command, -sethost switch -sethost [-host hostname | -ip host-ip-address [-arraycommpath 0|1] [-failovermode 0|1|2 |3|4] [-typeinitiator-type] [-unitserialnumber array|lun] [-o]
Creates or changes certain settings for all initiators (HBAs) in the specified host thatare connected to a specific system. You must specify the host (-host switch),unless you are issuing the command in the current host. To obtain -sethoststatus, use the port list command. The -sethost function has subfunctionswitches as follows.
Note
For AX4-5 series systems, the storagegroup command with the -sethostswitch will accept nondefault values for the following switches: -failovermode, -arraycommpath, -type, and -unitserialnumber.
-arraycommpath 0|1
storagegroup -sethost with -arraycommpath modifies one or morecommunication paths between the server and system. A communication path isa logical path between the host and the system. It may be needed when there isno LUN owned by an SP through which the host recognizes the system and inthe storage group through which the host recognizes the system.
Changing the arraycommpath setting may force the system to reboot. The CLI willissue a confirmation request that indicates whether a system reboot is required.However, the CLI will not issue a confirmation request if you include the -o switch.
CAUTION
Do not issue this command option unless you know the appropriate value for thetype of failover software running on the servers connected to the specified storagegroup. The command is designed for transition from one type of failover software toanother. Changing the arraycommpath to the wrong value will make the storagegroup inaccessible to any connected servers.
This form of -arraycommpath works for a host. For an entire system, or unsharedstorage, use the command arraycommpath.
To discover the current setting of arraycommpath, use the port -list -all orport -list -arraycommpath command.
0
Disables the communication path previously enabled.
1
Enables a communication path.
Example with arraycommpath:
VNX CLI for Block
172 EMC VNX Series 5.33 Command Line Interface Reference for Block
naviseccli -h ss1_spa storagegroup -sethost -hostname server101-arraycommpath 1
-failovermode 0|1|2|3}4
storagegroup -sethost with -failovermode sets the type of trespassneeded for failover software. Use this command with certain types of failoversoftware as suggested in the failover software release notice or manual.
Changing the failovermode setting may force the system to reboot. The CLI willissue a confirmation request that indicates whether a system reboot is required.However, the CLI will not issue a confirmation request if you include the -o switch.
CAUTION
Do not issue the failovermode command option unless you know the
appropriate value for the type of failover software running on the servers connectedto the specified storage group. The command is designed for transition from onetype of failover software to another. Changing the failovermode to the wrong valuewill make the storage group inaccessible to any connected servers.
This method of setting -failovermode works for systems with storage group only.For systems without storage group, use the command failovermode (see failovermode on page 61).
To discover the current setting of failovermode, use the port -list -failovermode or port -list -all command.
Note
For information about when to use these failover modes, refer to the InstallationRoadmap for CLARiiON Storage Systems, which is on EMC Online Support.
0
Failover mode 0.
1
Failover mode 1.
2
Failover mode 2.
3
Failover mode 3.
4
Failover mode 4.
Example with failovermode:
naviseccli -h ss1_spa storagegroup -sethost -failovermode 1-hostname server102
-hostname [host]
Specifies the HBA owner's hostname. You must specify the host’s hostname orits IP address (-ip host-ip-address switch).
VNX CLI for Block
storagegroup 173

-ip host-ip-address
Specifies the IP address of the host, in the form xx.xx.xx.xx. You must specifyeither the IP address or the hostname. The IP address can be specified as anIPv4 or IPv6 address. If an incorrect IP address is specified, the error message isdisplayed as follows:
The IP address must be specified as an IPv4 address in dotted-decimal format or as an IPv6 address in colon-hexadecimal notation.
-type initiatortype
Specifies an initiator type to override the system default. The CLI uses thedefault, 3, for the target if omitted. Type values (specify 0x to indicate hex) areas follows:
0x2
HP (auto trespass)
0x3
Open (default).
0x9
SGI
0xa
HP (no auto trespass)
0x13
Dell
0x16
Fujitsu
0x1c
Compaq Tru64
-unitserialnumber [array|lun]
The unitserialnumber command displays or sets the VDPP80 behaviormode, which defines how subsequent VPDP80 requests will be populated withthe system serial number. You might need to do this for software such asSunCluster 3. You can discover the mode with the port -list -unitserialnumber or port -list -all command. To set this mode fora host, see storagegroup -sethost above.
array
Sets the behavior mode to system.
lun
Sets the behavior mode to LUN.Example with unitserialnumber:
naviseccli -h ss1_spa storagegroup -sethost -unitserialnumberlun
storagegroup command, -setpath switch -setpath [-gnameStorageGroupName| -uid StorageGroupUID] [-arraycommpath 0|1] [-
VNX CLI for Block
174 EMC VNX Series 5.33 Command Line Interface Reference for Block

failovermode 0|1|2 |3|4] [-hbauid hbauid] [-host hostname] [-ip ip-address][-sp a|b] [-spport 0|1] [-unitserialnumber array|lun] [-o]
Creates or changes settings for a specific initiator (HBA). You must specify the HBA(-hba switch), SP (-sp), and SP port (-spport). You can identify the storage groupby name (-gname switch) or unique ID (-uid switch). If you omit both switches, theCLI uses the default path. To obtain -setpath status, use the port listcommand. The -setpath function has many function switches as follows.
-arraycommpath 0|1
storagegroup -setpath with -arraycommpath modifies one or morecommunication paths between the server and system. It may be needed whenthere is no LUN owned by an SP through which the host recognizes the systemand in the storage group through which the host recognizes the system.Changing the arraypath setting forces the system to reboot.
This form of -arraycommpath works for systems with storage group only. Forsystems without storage group, use the command arraycommpath (see arraycommpath on page 28).
To discover the current setting of arraycommpath, use the port -list -arraycommpath or port -list -all command.
0
Disables the communication path previously enabled.
1
Enables a communication path.
Example with arraycommpath:
naviseccli -h ss1_spa storagegroup -setpath -gname Group1-hbauid 10:00:00:00:C9:20:DE:0C:10:00:00:00:C9:20:DE:0C-sp a -spport 0 -arraycommpath 1
-failovermode 0|1|2 |3|4
storagegroup -setpath with -failovermode sets the type of trespassneeded for failover software. Use this command with certain types of failoversoftware as suggested in the Installation Roadmap for CLARiiON Storage Systems,which is on EMC Online Support.Changing the failovermode setting may force the system to reboot. The CLIwill issue a confirmation request that indicates whether a system reboot isrequired. However, the CLI will not issue a confirmation request if you specifiedthe -o switch.
This form of -failovermode works for one storage group. To set the entiresystem mode, use the command failovermode.
To discover the current setting of failovermode, use the port -list -failovermode or port -list -all command.
0
Failover mode 0.
1
Failover mode 1.
VNX CLI for Block
storagegroup 175
2
Failover mode 2.
3
Failover mode 3.
4
Failover mode 4.
-o
Executes the command without prompting for confirmation.
Example with failovermode:
naviseccli -h ss1_spa storagegroup -setpath -gnameGroup1 -hbauid10:00:00:00:C9:20:DE:0C:10:00:00:00:C9:20:DE:0C-sp a -spport 0 -failovermode 1
-gname StorageGroupName
StorageGroupName specifies a user-defined storage group name. Use this or thestorage group unique ID (below).
-hbauid hbauid
Specifies the HBA unique ID (WWN). Required.
-host [hostname]
Specifies the HBA owner's hostname. The system uses the hostname (or -ipaddress switch) for any subsequent storagegroup -connecthost and -disconnecthost commands you issue. If you omit this, the system uses theHBA UID. Not required.
-ip address
Specifies the HBA owner’s IP address (server’s IP address). You can specify theIP address as the IPv4 or IPv6 address. Not required. See -hostname switch.
-sp a|b
Specifies the SP that owns the storage group. Required.
-spport 0|1Specifies the SP port. Required.
-uid StorageGroupUID
Specifies the storage group unique ID.
-unitserialnumber array|lun
Sets the unit serial number operation mode. Use this switch if the softwareinstructs you to.
-oExecutes the command without prompting for confirmation.
storagegroup command, -shareable switch -shareable [-gnameStorageGroupName [yes|no] | -uid StorageGroupUID [yes|no]]
VNX CLI for Block
176 EMC VNX Series 5.33 Command Line Interface Reference for Block

Specifies whether more than one host can share the storage group. You must useone of the following switches with -shareable, followed by a yes or a no. A yes orno indicates whether the storage group can be shared. Only Unisphere can enforcesharing.
-gname StorageGroupName yes|no
Sets the storage group named StorageGroupName to be shareable (yes) or notshareable (no).
-uid StorageGroupUID yes|no
Sets the storage group with unique ID StorageGroupUID to be shareable (yes) ornot shareable (no).
EXAMPLE #1In the following example, Unisphere connects all of ss1_spa’s HBA-SP combinations tothe storage group mail.
naviseccli -h ss1_spa storagegroup -gname mail -connecthost -o
EXAMPLE #2In the following example, the -list command displays storage group information.
naviseccli -h ss1_spa storagegroup -list
Storage Group Name: Blade 150Storage Group UID:34:C7:72:A9:2D:DB:D8:11:AF:5E:08:00:1B:43:73:EEHBA/SP Pairs:
HBA UID SP NameSPPort------- -------------20:00:00:00:C9:39:40:C7:10:00:00:00:C9:39:40:C7 SP B020:00:00:00:C9:39:40:C8:10:00:00:00:C9:39:40:C8 SP A0
HLU/ALU Pairs:
HLU Number ALU Number---------- ----------0 151 142 133 114 105 96 77 68 59 310 211 1Shareable: YES
EXAMPLE #3The following examples creates two storage groups, connects them to separate hosts,and adds a LUN to each one.
naviseccli -h ss_spa storagegroup -create -gname Production
naviseccli -h ss_spa storagegroup -create -gname Backup
VNX CLI for Block
storagegroup 177
naviseccli -h ss_spa storagegroup -connecthost -o -host ServerABC-gname Production
naviseccli -h ss_spa storagegroup -connecthost -o -host ServerXYZ-gname Backup
naviseccli -h ss_spa storagegroup -addhlu -gname Production -hlu20 -alu 20
naviseccli -h ss_spa storagegroup -addhlu -gname Backup -hlu 21-alu 21
EXAMPLE #4The following example of storagegroup setpath and storagegroup sethostwith failovermode sets the type of trespass needed for failover software. Also, thefailover mode option is set to 4 in sethost and setpath switches.
naviseccli -h 10. 4. 78. 184 -user a -password a -scope 0 storagegroup-sethost -ip 10.4.78.184 -failovermode 4
naviseccli -h 10. 4. 78. 184 -user a -password a -scope 0 storagegroup-setpath -hbauid xxxxx-sp a -spport xxxxx -failovermode 4
EXAMPLE #5The following example specifies the form of failovermode for one storage group. For theoptions -failovermode and -all, the command displays the new failover mode as 4under the HBA information section when the failover mode is active/active.
naviseccli -h 10. 4. 78. 184 -user a -password a -scope 0 port -list-failovermode
Information about each port of this HBASP Name : SP ASP Port ID : 0Failover Mode : 4
naviseccli -h 10. 4. 78. 186 -user a -password a -scope 0 port -list-all
HBA UID: 20 : 20 : 20 : 20 : 20 : 20 : 20 : 20 : 20 : 20: 20 : 20 : 20 : 20 : 20 : 20Server Name : TCS_DellServer IP Address : 10 . 4 . 78 . 159HBA Model Description: 2HBA Vendor Description : DELLHBA Device Driver Name : N/AInformation about each port of this HBA :SP Name : SP ASP Port ID : 0HBA Devicename : N/ATrusted : NOLogged In : NODefined : YESInitiator Type : 3StorageGroup Name : NoneArray Commpath : 1
VNX CLI for Block
178 EMC VNX Series 5.33 Command Line Interface Reference for Block

Failover mode : 4Unit serial number : Array
systemtypeSets the system type.
PREREQUISITESFor naviseccli, you must have a user account on the system on which you want toexecute the command.
DESCRIPTIONThe naviseccli systemtype command changes the configured system type. Writecaching must be disabled for this command to work. Changing the system type causes anSP to restart.
If you issue the command without arguments, the CLI will display both the current andconfigured system types.
Note
Do not change the system type of any system running storage group. Do not change thesystem type of a system unless it has been quiesced. The agent must be running andmanaging the system.Depending on the type of HP-UX operating system, you may want auto-trespass to be onor off.
SYNTAXsystemtype -config [type] [-o]OPTIONS
-config [type]Sets the system type to one of the following:
A
HP-UX type with auto-trespass off; use this if your HP-UX system does not havethe PVLINKS feature.
2
HP-UX type with auto-trespass on; use this if your HP-UX system has thePVLINKS feature.
3
Open system (default)
9
SGI (CX600)
13
Dell
16
Fujitsu
1C
HP type
-o
VNX CLI for Block
systemtype 179

Executes the command without prompting for confirmation.
EXAMPLE #1naviseccli -h ss1_spa systemtype
The configured system type is: 0x3The current system type is: 0x3
EXAMPLE #2naviseccli -h ss1_spa systemtype -config 2
In order for this command to execute, write cachemust be disabled and memory size set to zero:
trespassTrespasses one or more LUNs to the control of an SP.
PREREQUISITESFor naviseccli, you must have a user account on the system on which you want toexecute the command.
DESCRIPTIONThis command trespasses one or more LUNs to the control of an SP.
Note
Not applicable to single-SP systems.
The command attempts to trespass all specified LUNs to the SP you specify with the -hswitch.
Note
If trespass is executed while I/O processes are active, I/O errors may occur.
SYNTAXtrespass [all | lun lun-number | mine]OPTIONS
allTrespasses all LUNs in the system.
lun lun-numberTrespasses one LUN (specified by lun-number).
minePerforms whatever trespassing is necessary to take all of the LUNs that have this SPas a default owner.
EXAMPLEnaviseccli -h ss1_spa trespass all
OUTPUTThere is no output. Errors are printed to stderr.
VNX CLI for Block
180 EMC VNX Series 5.33 Command Line Interface Reference for Block

unbindDeconfigures a LUN.
PREREQUISITESFor naviseccli, you must have a user account on the system on which you want toexecute the command.
DESCRIPTIONThe naviseccli unbind command deconfigures LUNs from their current logicalconfiguration. The unbind command destroys all data on the LUN; therefore, when youexecute an unbind command, you are prompted to verify that you really want to unbindthe LUN(s). If you do not want the prompt to appear, you can override prompting usingthe -o switch.
The command can unbind only LUNs owned by the SP you specify with -h.
You can unbind multiple LUNs at the same time.
Note
You cannot use this command to unbind thin LUNs.
SYNTAXunbind lun [-o]OPTIONS
lunSpecifies the LUN to be deconfigured.
-oExecutes the command without prompting for confirmation.
EXAMPLE #1This command destroys (deconfigures) LUN 3 without prompting you for permission, andfrees its disks to be reconfigured.
naviseccli -h ss1_spa unbind 3 -o
EXAMPLE #2This command destroys (deconfigures) LUNs 0, 1, 2, 3, and 4 without prompting you forpermission, and frees its disks to be reconfigured.
naviseccli -h ss1_spa unbind 0 1 2 3 4 -o
unitserialnumberDisplays or changes the VDPP80 (port 80) behavior mode.
PREREQUISITESFor naviseccli, you must have a user account on the system on which you want toexecute the command.
DESCRIPTIONThe naviseccli unitserialnumber command displays or sets the VDPP80behavior mode, which defines how subsequent VPDP80 requests will be populated withthe system serial number. You might need to do this for software such as SunCluster 3.
To set this mode for a specific storage group, see the storagegroup command instoragegroup.
VNX CLI for Block
unbind 181
SYNTAXunitserialnumber [array|lun] [-o]OPTIONS
arraySets the behavior mode to system.
lunSets the behavior mode to LUN.
-oExecutes the command without prompting for confirmation.
EXAMPLEThese two commands display the current behavior mode and then set the mode tosystem mode.
naviseccli -h ss1_spa unitserialnumber
Current unit serial number mode is: LUN
naviseccli -h ss1_spa unitserialnumber array
LUN Expansion (metaLUN) commandsThis section explains the VNX CLI for Block commands that manage Unisphere metaLUNs.
MetaLUNs overviewA metaLUN is a type of LUN whose maximum capacity is the combined capacities of allthe LUNs that compose it. The metaLUN feature lets you dynamically expand the capacityof a single LUN (primary LUN) into a larger unit called a metaLUN. You do this by addingLUNs to the primary LUN. You can also add LUNs to a metaLUN to further increase itscapacity. Like a LUN, a metaLUN can belong to a storage group, and can participate inSnapView, MirrorView and SAN Copy sessions.
During the expansion process, the host has access to any existing data on the LUN ormetaLUN, but it does not have access to any added capacity until the expansion iscomplete. Whether you can actually use the increased user capacity of the metaLUNdepends on the operating system running on the servers connected to the system.
A metaLUN can include multiple sets of LUNs that are striped together and areindependent of other LUNs in the metaLUN. Each set of striped LUNs is called acomponent. All metaLUNs contain at least one component that includes the primary LUNand one or more LUNs. Any data that gets written to a metaLUN component is stripedacross all the LUNs in the component.
You can expand a LUN or metaLUN in two ways — stripe expansion or concatenateexpansion. A stripe expansion takes the existing data on the LUN or metaLUN, andrestripes (redistributes) it across the existing LUNs and the new LUNs you are adding. Thestripe expansion may take a long time to complete. A concatenate expansion creates anew metaLUN component that includes the new LUNs and appends this component tothe end of the existing LUN or metaLUN. There is no restriping of data between theoriginal storage and the new LUNs. The concatenate operation completes immediately.
Sample stripe expansion on page 183 depicts a LUN using stripe expansion to add twoLUNs. The result is a metaLUN with a single component consisting of all three LUNs withthe data on the primary LUN re-striped across all three LUNs.
VNX CLI for Block
182 EMC VNX Series 5.33 Command Line Interface Reference for Block

Figure 1 Sample stripe expansion
EMC2705
Sample concatenate expansion on page 183 depicts a LUN using concatenate expansionto add two LUNs. The result is a metaLUN with two components. The first component isthe primary LUN. The second component consists of two new LUNs striped together, butnot striped to the first component.Figure 2 Sample concatenate expansion
EMC2706
Note
EMC does not recommend that you expand LUN capacity by concatenating LUNs ofdifferent RAID types. Do this only in an emergency situation when you need to addcapacity to a LUN and you do not have LUNs of the same RAID type or the disk capacity tobind new ones. Concatenating metaLUN components with a variety of RAID types couldimpact the performance of the resulting metaLUN. Once you expand a LUN, you cannotchange the RAID type of any of its components without destroying the metaLUN.Destroying a metaLUN unbinds all LUNs in the metaLUN, and therefore causes data to belost.
CLI metaLUN command functionsThe naviseccli metaLUN command functions, listed alphabetically, are:
l metalun -destroyl metalun -expandl metalun -infol metalun -listl metalun -modifyThe CLI metaLUN functions are listed functionally, in the order you would perform them,in naviseccli metaLUN command functions, listed in order of use on page 183.
Table 10 naviseccli metaLUN command functions, listed in order of use
Essential functions (in order performed)
metalun -expand Creates a metaLUN or expands one
metalun -destroy Destroys a metaLUN and then unbinds all LUNs that were part of themetaLUN
VNX CLI for Block
CLI metaLUN command functions 183

Table 10 naviseccli metaLUN command functions, listed in order of use (continued)
Optional and status functions (alphabetically)
metalun -info Provides metaLUN information with respect to a specific system
metalun -list Lists the properties of existing metaLUNs
Optional reconfiguration functions (alphabetically)
metalun -modify Modifies certain metaLUN properties
metalun -destroyDestroys a metaLUN and unbinds all LUNs that were part of the metaLUN.
PREREQUISITESYou must have a user account on the system on which you want to execute the command.
DESCRIPTIONThe naviseccli metalun command with the -destroy switch destroys an existingmetaLUN and then unbinds all LUNs that were part of the metaLUN. You will lose all dataon the LUNs.
Note
You cannot destroy a metaLUN that belongs to a storage group. You must remove themetaLUN from the storage group in order to destroy it. You cannot destroy any metaLUNsthat are currently participating in a snapshot, clone, mirror or SAN Copy session.
SYNTAXmetalun -destroy -metalun number|WWN| [-o]OPTIONS
-metalun number| WWNSpecifies the unique number or World Wide Name of the metaLUN you want todestroy. Use only one of the identifiers with the -metalun command. Use themetalun -list command to determine the number or WWN of the metaLUN (see metalun -list on page 191).
-oExecutes the command without prompting for confirmation.
EXAMPLEThis command destroys the metaLUN with the number 20.
naviseccli metalun -destroy 20
metalun -expandCreates a new metaLUN or expands the capacity of an existing one
PREREQUISITESThis section describes the general requirements and recommendations for both a stripeand concatenate expansion, as well as those specific to one or the other.
General expansion requirements and recommendations
l Each LUN within a metaLUN must be either a redundant (RAID 6, RAID 5, RAID 3,RAID 1, RAID 1/0) or non-redundant (RAID 0, disk) RAID type.
VNX CLI for Block
184 EMC VNX Series 5.33 Command Line Interface Reference for Block

l All disks within a metaLUN must be the same type.
l You can expand only the last component of a metaLUN.
l Expansion LUNs cannot be participating in a SnapView, MirrorView or SAN Copysession.
l The metalun -expand command will prohibit metaLUN creation and expansion ifthe element size of the selected LUN(s) differ from the primary LUN. The systemwill display the following error message:
The selected LUN(s) element size must be the same as the LUN being expanded. Please select LUN(s) that match the primary LUN’s element size.
Stripe expansion requirements and recommendationsAll LUNs within a striped metaLUN or metaLUN component must be the same sizeand RAID type, and we recommend that each LUN:
l be from a different RAID group.
l includes the same number of disks.
l has the same stripe element size.
Concatenate expansion requirements and recommendationsAll LUNs within a concatenated metaLUN component must be the same size andRAID type, but can differ from the size and RAID type of LUNs within othercomponents.
Note
EMC does not recommend that you expand LUN capacity by concatenating LUNs ofdifferent RAID types. Do this only in an emergency situation when you need to addcapacity to a LUN and you do not have LUNs of the same RAID type or the diskcapacity to bind new ones. Concatenating metaLUN components with a variety ofRAID types could impact the performance of the resulting metaLUN. Once youexpand a LUN, you cannot change the RAID type of any of its components withoutdestroying the metaLUN. Destroying a metaLUN unbinds all LUNs in the metaLUN,and therefore causes data to be lost.
DESCRIPTIONThe metalun -expand command is used with naviseccli (see naviseccli on page20). The naviseccli metalun command with the -expand function creates a newmetaLUN or expands the capacity of an existing one. There are two distinct versions ofthis command, one for Unisphere and one for Navisphere Express. When using thiscommand with Navisphere Express, the syntax is simpler and does not require bindingthe destination LUN first. The process is different with Unisphere and requires you to bindthe destination LUN before running the command. See the Prerequisite section above forrequirements and recommendations.
VNX CLI for Block
metalun -expand 185
Note
Thin LUNs do not support metaLUNs, so you cannot create metaLUNs using thin LUNs.For raw device mapping volumes (RDMs), if you are running VMware ESX Server, after youcreate or expand the metaLUN, you must rescan the bus at the ESX Server level. You canalso rescan at the virtual machine level (optional). You then must expand the file systemat the virtual machine level. ESX Server and the virtual machine will now recognize thenew or expanded metaLUN.
For configuration specifications, go to the E-Lab™ Interoperability Navigator on EMCOnline Support.
SYNTAX
metalun -expand -base number|WWN -lus number|WWN [-autoassign0|1] [-bindoffset sector-number] [-cap capacity][-defaultowner A|B] [-elszm elementSizeMultiplier][-expansionrate low|medium|high|ASAP|value][-name metaLUNname] [-preservedata 1|0] [-nogrow] [-o][-sq tb|gb|mb|bc] [-type C|S]
metalun -expand -base number|WWN -lus number|WWN [-type C|S][-sq tb|gb|mb|bc] [-cap number] [-nogrow] [-o]
metalun -expand -base number|WWN [-sq tb|gb|mb -cap number][-percent number] [-o]
OPTIONS
-base number|WWNSpecifies the unique number or World Wide Name of the LUN or metaLUN you wantto expand. Use only one of the identifiers with the -base switch. Use the metalun-list command to determine the number or WWN of the LUN or metaLUN (see metalun -list on page 191).
When you specify a LUN with the -base command, the CLI creates a new metaLUNwith the number and WWN of the primary LUN. Once the CLI creates the newmetaLUN, it assigns a new WWN to the original primary LUN and makes it a privateLUN. When expanding a single LUN, you can use any or all of the -expand switches.
Note
The primary LUN can belong to a storage group. Expansion LUNs cannot belong to astorage group.
When you specify an existing metaLUN with the -base command, the CLI expandsthe capacity of the existing metaLUN. The following switches are not valid during theexpansion of an existing metaLUN: -name, -preservedata, -expansionrate, -defaultowner, -autoassign, -elsz, and -bindoffset. The expandedmetaLUN retains the values of the original metaLUN. After the metaLUN is expanded,use the metalun -modify command to change the metaLUN using -name, -expansionrate, -defaultowner, or -autoassign. The -preservedata, -elsz and -bindoffset values cannot be changed.
-lus lunnumber|WWNSpecifies the LUN number or World Wide Name of the LUNs you want to add to theLUN or metaLUN (expansion LUNs). Use only one of the identifiers per LUN with the -
VNX CLI for Block
186 EMC VNX Series 5.33 Command Line Interface Reference for Block

lus command. Use the metalun -list command to determine the number or WWNof the LUNs (see metalun -list on page 191).
Note
Expansion LUNs cannot be participating in a SnapView (snapshot or clones),MirrorView, or SAN Copy session.
-autoassign 0|1)Enables or disables autoassign for a metaLUN. Specify 1 to enable autoassign and 0to disable it. If you do not specify an autoassign value, it defaults to the value of theprimary LUN.
Autoassign controls the ownership of the LUN when an SP fails in a system with twoSPs. With autoassign enabled, if the SP that owns the LUN fails and the server triesto access that LUN through the second SP, the second SP assumes ownership of theLUN to enable access. The second SP continues to own the LUN until the failed SP isreplaced and the system is powered up. Then, ownership of the LUN returns to itsdefault owner. If autoassign is disabled in the previous situation, the second SPdoes not assume ownership of the LUN, and access to the LUN does not occur.
If you are running failover software on a Windows or UNIX server connected to thesystem, you must disable autoassign for all LUNs that you want to fail over to theworking SP when an SP fails.
-bindoffset sector-number
Note
Available only if the preservedata switch is set to 0.EMC does not recommend using a metaLUN bindoffset value if the primary LUNalready has one.
Automatically aligns the logical sector number of the metaLUN to a stripe boundaryon the primary LUN. The value to enter is the number of sectors by which user data isoffset due to file system or partition metadata. Correct application of the bind offsetshould result in improved performance. Use a decimal, not hexadecimal, number forsector-number. If you do not specify a bind offset value, it defaults to 0.
-cap capacitySpecifies the capacity of usable space in the metaLUN. The capacity must be smallerthan the maximum capacity of the metaLUN components, and greater than or equalto the current capacity (user capacity of the LUN or metaLUN before adding LUNs).The default value is the maximum capacity of the metaLUN (total capacity of theexisting LUNs and any new LUNs).
Note
If you want to expand a LUN or metaLUN that is participating in a SnapView(snapshot or clone), MirrorView, or SAN Copy session, you must use the -nogrowswitch with the -expand -cap command. This command expands the capacity of
the LUN or metaLUN to the specified value, but keeps the available user capacity ofthe base (LUN or metaLUN) the same as it was before adding LUNs. In order for thehost to have access to the added capacity, you must wait for the session to completeand then follow the instructions in Using the added capacity of an expandedSnapView, MirrorView or SAN Copy LUN on page 197.
-defaultowner A|B
VNX CLI for Block
metalun -expand 187

Specifies the SP that will assume ownership of the metaLUN when the system ispowered up. If you do not specify a default owner, it defaults to the owner of theprimary LUN.
-elszm elementSizeMultiplier (Not supported on AX4-5 series systems runningUnisphere)
Sets the stripe element size for a metaLUN component. You determine this bymultiplying the stripe size of the first LUN in each component by the element sizemultiplier. The stripe size of the first LUN = stripe element size of the LUN multipliedby the number of disks in the LUN. Valid multiplier values are 1 through 255. Thedefault element size multiplier is 4.
-expansionrate low|medium|high|ASAP|valueSpecifies the relative importance of making additional LUN capacity available to thehost. It determines the amount of resources the SP devotes to re-striping the existingdata on the original LUNs across the original LUNs and the new LUNs instead of tonormal I/O activity. This rate is available only when you first create a metaLUN and isimportant only for a stripe expansion. Valid rebuild priorities are ASAP (default) or 3,High or 2, Medium or 1, and Low, or 0.An expansion rate of ASAP or High re-stripes the data across the metaLUN fasterthan one with Medium or Low priority, but may degrade system performance.
-name metaLUN-nameSpecifies the name of the metaLUN. If you do not specify a name, it defaults to thename of the primary LUN.
-nogrowKeeps the available user capacity of the metaLUN the same as it was before addingLUNs. You cannot use the added capacity until you change the capacity using the -modify switch.
Note
For a stripe expansion, any existing data is restriped across the original storage andany new LUNs, but you cannot access the added capacity at this time.
-oExecutes the command without prompting for confirmation.
-preservedata 1|0Use with the -type S command (see below). Allows you to preserve or overwriteany existing data on the primary LUN, only if the primary LUN is outside a storagegroup.
Note
You cannot use this command with the -type C switch.
If the primary LUN is outside of a storage group, do one of the following:
l Specify 1 to enable stripe expansion and preserve the data on the primary LUN.Note that this operation could take a while. The default value is 1.
Note
You must always specify 1 when the primary LUN is in a storage group. The CLIreturns an error message if you specify 0 in this case.
l Specify 0 to enable stripe expansion and overwrite the existing data on theprimary LUN. Note that you will lose the original data on the LUN.
-sq tb|gb|mb|bcSpecifies the size qualifier for the capacity of the metaLUN component.
VNX CLI for Block
188 EMC VNX Series 5.33 Command Line Interface Reference for Block

where:
tb equals terabytes, gb equals gigabytes, mb equals megabytes and bc equals blockcount.
Note
The default qualifier is block count.
-type C|SSets the expansion type for the metaLUN to concatenate or stripe. The defaultexpansion type is stripe.
C sets the expansion type to concatenate. A concatenate expansion appends thenew LUNs to the end of the primary LUN component or metaLUN as a single,separate striped component. There is no striping between the original storage andthe new LUNs.
S sets the expansion type to stripe. For a list of requirements for stripe expansion,see the Prerequisite section above.
If you are expanding a LUN (the primary LUN), the -type S switch creates ametaLUN with one component that includes the primary LUN and any LUNs that youadd. Any data on the primary LUN is re-striped across the primary LUN and the newLUNs.
Note
If the primary LUN has existing data, and it is outside of a storage group, refer to the -preservedata switch (see above) for additional options.
You can expand only the last component of an existing metaLUN. In this case, the -type S switch re-stripes any existing data across the original LUNs in thecomponent and any new LUNs that you add. The new LUNs become part of thatmetaLUN component.
-base number|WWNMandatory switch, supported with Navisphere Express, that specifies the source LUNor metaLUN you want to expand. You can specify the base number or World WideName of the LUN.
-cap numberMandatory switch, supported with Navisphere Express, that specifies the additionalstorage capacity you can add to the LUN or metaLUN. The size qualifier for the -capnumber is the -sq switch.
-sq tb|gb|mbMandatory switch, supported with Navisphere Express, that specifies the sizequalifier for the capacity of the metaLUN component.
where:
tb equals terabytes, gb equals gigabytes, and mb equals megabytes.
For example, if you are expanding a 20 GB LUN, and specify -sq gb -cap 20 in thecommand, the resulting metaLUN is 40 GB.
-percent numberOptional switch for Navisphere Express that specifies the amount of additionalstorage you want to expand by, as a percentage of the current size of the LUN. Thenumber should always be greater than 0. This switch can be used instead of -sq and-cap number switches.
VNX CLI for Block
metalun -expand 189
For example, if you are expanding a 20 GB LUN, and specify -percent 50 in thecommand, the resulting metaLUN is 30 GB.
EXAMPLEFor Unisphere Manager, this command creates a metaLUN with the name newMetaLUN,which includes primary LUN 20 and LUN 42. Since the default expansion type is stripe,this metaLUN is striped.
naviseccli metalun -expand -base 20 -lus 42 -name newMetaLUN
metalun -infoProvides general information about a system’s metaLUN environment.
PREREQUISITESYou must have a user account on the system on which you want to execute the command.
DESCRIPTIONThe naviseccli metalun command with the -info function and no other optionsdisplays all general information about the metaLUN environment for a system. Issuingthis command with one or more options displays the information based on the optionsissued.
SYNTAX
metalun -info [-canexpand] [-nummetaluns] [-maxmetaluns][-maxcomponents] [-maxluns] [-availableluns][-lunsinmeta]
OPTIONS
-canexpandSpecifies whether you can or cannot expand any LUNs or metaLUNs on the system.Valid values are Yes or No.
-nummetalunsDisplays the number of metaLUNs in the system.
-maxmetalunsDisplays the maximum number of metaLUNs that the system will support (based onsystem type). See the EMC Unisphere Release Notes for currently supported values.
-maxcomponentsDisplays the maximum number of components allowed per metaLUN for this system(based on system type). See the EMC Unisphere Release Notes for currently supportedvalues.
-maxlunsDisplays the maximum number of LUNs per component that this system supports(based on system type). See the EMC Unisphere Release Notes for currently supportedvalues.
-availablelunsLists all LUNs (by LUN number) in the system that are available for expansion.
-lunsinmetaLists any LUNs (by LUN number) in the system that are part of a metaLUN.
EXAMPLEThis command requests information about the metaLUN environment for the system withSP 10.14.20.57.
naviseccli -address 10.14.20.57 metalun -info
VNX CLI for Block
190 EMC VNX Series 5.33 Command Line Interface Reference for Block
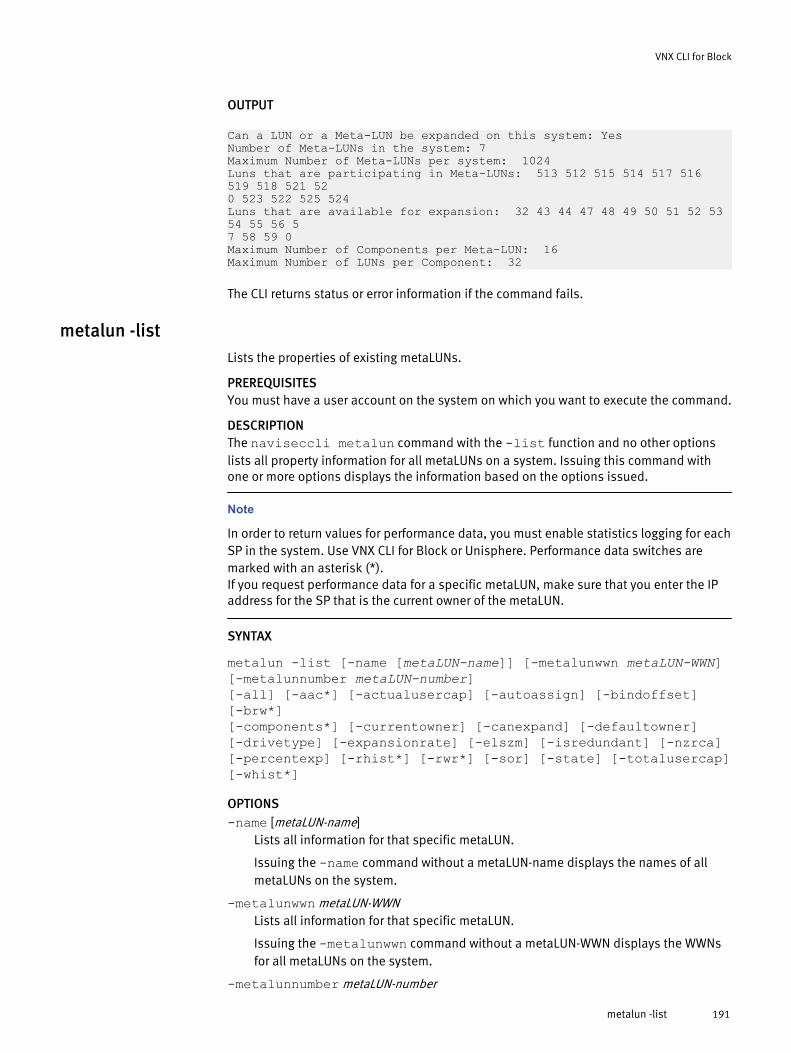
OUTPUT
Can a LUN or a Meta-LUN be expanded on this system: YesNumber of Meta-LUNs in the system: 7Maximum Number of Meta-LUNs per system: 1024Luns that are participating in Meta-LUNs: 513 512 515 514 517 516 519 518 521 520 523 522 525 524Luns that are available for expansion: 32 43 44 47 48 49 50 51 52 53 54 55 56 57 58 59 0Maximum Number of Components per Meta-LUN: 16Maximum Number of LUNs per Component: 32
The CLI returns status or error information if the command fails.
metalun -listLists the properties of existing metaLUNs.
PREREQUISITESYou must have a user account on the system on which you want to execute the command.
DESCRIPTIONThe naviseccli metalun command with the -list function and no other optionslists all property information for all metaLUNs on a system. Issuing this command withone or more options displays the information based on the options issued.
Note
In order to return values for performance data, you must enable statistics logging for eachSP in the system. Use VNX CLI for Block or Unisphere. Performance data switches aremarked with an asterisk (*).If you request performance data for a specific metaLUN, make sure that you enter the IPaddress for the SP that is the current owner of the metaLUN.
SYNTAX
metalun -list [-name [metaLUN-name]] [-metalunwwn metaLUN-WWN][-metalunnumber metaLUN-number][-all] [-aac*] [-actualusercap] [-autoassign] [-bindoffset][-brw*][-components*] [-currentowner] [-canexpand] [-defaultowner][-drivetype] [-expansionrate] [-elszm] [-isredundant] [-nzrca][-percentexp] [-rhist*] [-rwr*] [-sor] [-state] [-totalusercap][-whist*]
OPTIONS-name [metaLUN-name]
Lists all information for that specific metaLUN.
Issuing the -name command without a metaLUN-name displays the names of allmetaLUNs on the system.
-metalunwwn metaLUN-WWNLists all information for that specific metaLUN.
Issuing the -metalunwwn command without a metaLUN-WWN displays the WWNsfor all metaLUNs on the system.
-metalunnumber metaLUN-number
VNX CLI for Block
metalun -list 191
Lists all information for that specific metaLUN.
Issuing the -metalunnumber command without a metaLUN-number displays thenumbers for all metaLUNs on the system.
-aac*Displays the active/active counters associated with the metaLUN.
-actualusercapDisplays the current user capacity of all metaLUNs on the system.
Issuing the -actualusercap command with a metaLUN name, number or WWNdisplays the user capacity for that specific metaLUN.
-autoassignDisplays the current state of the autoassign feature for all metaLUNs on the system(Yes or No).
Issuing the -autoassign command with a metaLUN name, number or WWNdisplays the current state of the autoassign feature for that specific metaLUN.
-allDisplays all information for the metalun -list command.
-bindoffsetAligns the logical sector number of all metaLUNs on the system to a stripe boundaryon the primary LUN.
Issuing the -bindoffset command with a metaLUN name, number or WWNreturns the value of the bindoffset used for that metaLUN.
-brw*Displays the number of host block read and write requests to all metaLUNs on thesystem.
Issuing the -brw command with a metaLUN name, number or WWN displays thenumber of host block read and write requests to that specific metaLUN.
-components*Displays the contents of all components in all metaLUN on the system.
Issuing the -components command with a metaLUN name, number or WWNdisplays the contents of all components for that specific metaLUN.
-currentownerLists the current SP owner of all metaLUNs in the system. If neither SP owns themetaLUN a value of Unknown is returned.
Issuing the -components command with a metaLUN name, number or WWN liststhe current SP owner of the specified metaLUN.
-canexpand Yes | No
Yes
The specified metaLUN can be expanded.
No
The specified metaLUN cannot be expanded.
-defaultownerLists the default SP owner of all metaLUNs on the system.
Issuing the -defaultowner command with a metaLUN name, number or WWNlists the default SP owner of the specified metaLUN.
-drivetypeDisplays the drive type for all metaLUNs on the system.
VNX CLI for Block
192 EMC VNX Series 5.33 Command Line Interface Reference for Block

Issuing the -drivetype command with a metaLUN name, number or WWNdisplays the drive type for the specified metaLUN.
-expansionrateDisplays the expansion rate for all metaLUNs on the system (see the -expansionrate low|medium|high|ASAP|value option in metalun -expand on page184). Valid values are 0 (Low), 1 (Medium), 2 (High), 3 (ASAP), or N/A if the metaLUNis not currently expanding.
Issuing the -expansionrate command with a metaLUN name, number or WWNdisplays the expansion rate for the specified metaLUN (see the -expansionratelow|medium|high|ASAP|value option in metalun -expand on page 184).
-elszmDisplays the element size multiplier for all metaLUNs on the system (see -elszmelementSizeMultiplier in metalun -expand on page 184).
Issuing the -elszm command with a metaLUN name, number or WWN displays theelement size multiplier for the specified metaLUN (see -elszm elementSizeMultiplierin metalun -expand on page 184).
-isredundantDisplays the redundancy of all metaLUNs on the system:
Yes
if it is redundant
No
if it is not redundant
Issuing the -isredundant command with a metaLUN name, number or WWNdisplays the redundancy of the specified metaLUN.
-nzrcaReturns the nonzero request count arrivals in SP A and SP B.
-percentexpDisplays the percentage complete of the stripe expansion process of all primaryLUNs or metaLUNs on the system.
Issuing the -percentexp command with a metaLUN name, number or WWNdisplays the percentage complete of the stripe expansion process of the specifiedprimary LUN or metaLUN.
-rhist*Returns read histogram information for all metaLUNs on the system.
Note
A read histogram is an system of 10 locations that contain the number of reads.Element n of the system contains the number of reads that were larger than or equalto 2n-1 and less than 2n blocks in size. For example, the first bucket contains thenumber of 1 block reads, the second contains the number of 2-3 block reads, thethird contains the number of 4-7 block reads, and so on. The -rhist switch also
displays the number of read histogram overflows, which are the number of readsthat were larger than 512 blocks.
Issuing the -rhist command with a metaLUN name, number or WWN returns theread histogram for the specified metaLUN.
-rwr*Displays the number of host read and write requests to all metaLUNs on the system.
VNX CLI for Block
metalun -list 193

Issuing the -rwr command with a metaLUN name, number or WWN displays thenumber of host read and write requests to the specified metaLUN.
-sorReturns the sum of outstanding requests in SP A and SP B.
-stateDisplays the current state of all metaLUNs on the system.
When issuing the -state command with a metaLUN name, number or WWNdisplays the state of the specified metaLUN. The following are valid metaLUN states:
Normal
The metaLUN is operating normally.
Degraded
Some part of the metaLUN is faulted, but the metaLUN is still able to processI/O.
Shut down
The metaLUN is faulted and unusable.
Expanding
The metaLUN is in the process of expanding (re-striping data across allcomponent LUNs).
-totalusercapDisplays the total user capacity of all metaLUNs on the system.
Issuing the -totalusercap command with a metaLUN name, number or WWNdisplays the total user capacity of the specified metaLUN.
-whist*Returns write histogram information for all metaLUNs on the system.
Note
A write histogram is an system of 10 locations that contain the number of writes.Element n of the system contains the number of writes that were larger than or equalto 2n-1 and less than 2n blocks in size. For example, the first bucket contains thenumber of 1 block writes, the second contains the number of 2-3 block writes, thethird contains the number of 4-7 block writes, and so on. The -whist switch also
displays the number of write histogram overflows, which are the number of writesthat were larger than 512 blocks.
Issuing the -whist command with a metaLUN name, number or WWN returns thewrite histogram for the specified metaLUN.
EXAMPLEThis command requests information on all metaLUNs that are currently owned by the SPwith IP address 10.14.20.57.
naviseccli -address 10.14.20.57 metalun -list
OUTPUT
Meta-LUN Name: LUN30Meta-LUN WWN: 60:06:01:6D:35:0A:00:00:FC:35:5B:8C:66:60:D7:11Meta-LUN Number: 30Default Owner: SP ACurrent Owner: SP B
VNX CLI for Block
194 EMC VNX Series 5.33 Command Line Interface Reference for Block

Meta-LUN State: ENABLEDCan MetaLUN Be Expanded: YesExpansion Rate: MEDIUMPercent Expanded: 0Total Capacity (Blocks/Megabytes): 819200/400Actual User Capacity (Blocks/Megabytes): 819200/400Autoassign: NoIs Redundant: YesDrive Type: Fibre ChannelElement Size Multiplier: 40Bind Offset: 0Read Histogram [0] : 22Read Histogram [1] : 14Read Histogram [2] : 19Read Histogram [3] : 37Read Histogram [4] : 6Read Histogram [5]: 0Read Histogram [6]: 0Read Histogram [7]: 0Read Histogram [8]: 0Read Histogram [9]: 0Read Histogram Overflows: 45Write Histogram [0] : 22Write Histogram [1] : 22Write Histogram [2] : 22Write Histogram [3] : 22Write Histogram [4] : 22Write Histogram [5] : 22Write Histogram [6] : 22Write Histogram [7] : 22Write Histogram [8] : 22Write Histogram [9] : 22Write Histogram Overflows: 45Read Requests: 0Write Requests: 0Blocks Read: 0Blocks Written: 0Components:Number of LUNs: 2LUNs:LUN Number: 513LUN Name: LUN 30LUN WWN: 60:06:01:72:35:0A:00:00:B0:44:01:4B:61:60:D7:11RAID Type: RAID5LUN Number: 512LUN Name: LUN 31LUN WWN: 60:06:01:72:35:0A:00:00:15:FB:3B:4C:61:60:D7:11RAID Type: RAID5Number of LUNs: 1 (Lists LUN information for second component)
The CLI returns the status or the error information if the command fails.
This command displays the active/active counters for this metaLUN along with othermetaLUN output.
naviseccli -h 10.14.85.50 -user a -password a -scope 0 metalun -list-metalunnumber 4 -aac
Host Blocks Read SPA: 6 (optimal)Host Blocks Read SPB: 0Host Blocks Written SPA: 0 (optimal)Host Blocks Written SPB: 0Host Read Requests SPA: 6 (optimal)Host Read Requests SPB: 0Host Write Requests SPA: 0 (optimal)
VNX CLI for Block
metalun -list 195
Host Write Requests SPB: 0Busy Ticks SPA: 0 (optimal)Busy Ticks SPB: 0Idle Ticks SPA: 33224 (optimal)Idle Ticks SPB: 0Explicit Trespasses SPA: 0Explicit Trespasses SPB: 0Implicit Trespasses SPA: 0Implicit Trespasses SPB: 0
metalun -modifyModifies certain properties of an existing metaLUN.
PREREQUISITESYou must have a user account on the system on which you want to execute the command.
DESCRIPTIONThe naviseccli metalun command with the -modify function lets you edit certainproperties of a specified metaLUN. You must specify either the number or WWN for themetaLUN, and you must specify at least one other switch.
SYNTAX
metalun -modify -metalun number|WWN [-autoassign 0|1][-cap capacity] [-defaultowner A|B][-expansionrate low|medium|high|ASAP|value][-newname newName] [-o] [-sq tb|gb|mb|bc] [-tomaxcap]
OPTIONS
-metalun number|WWNSpecifies the number or WWN of the metaLUN whose properties you want to change.
-autoassign 1|0 (Not supported on AX4-5 series systems)Enables or disables auto assign for a metaLUN. Specify 1 to enable auto assign and0 to disable it. If you do not specify an auto assign value, it defaults to the value ofthe primary LUN. For more information about auto assign, see the -autoassign 0|1 option in metalun -expand on page 184.
-cap capacitySpecifies the capacity of usable space in the metaLUN. The capacity must be smallerthan the maximum capacity of the metaLUN, and greater than or equal to the currentcapacity (user capacity of the LUN or metaLUN before adding LUNs).
Note
If you want to modify the user capacity of a LUN or metaLUN that is participating in aSnapView (snapshot or clone), MirrorView or SAN Copy session, see Using the addedcapacity of an expanded SnapView, MirrorView or SAN Copy LUN on page 197.
-defaultowner A|BSpecifies the new default SP owner for the metaLUN — A or B.
-expansionrate low|medium|high|ASAP|valueSpecifies the relative importance of making additional LUN capacity available to thehost. It determines the amount of resources the SP devotes to re-striping the existingdata on the original LUNs across the original LUNs and the new LUNs instead of tonormal I/O activity. This rate is available only when you first create a metaLUN and isimportant only for a stripe expansion. Valid rebuild priorities are ASAP (default) or 3,High or 2, Medium or 1, and Low, or 0.
VNX CLI for Block
196 EMC VNX Series 5.33 Command Line Interface Reference for Block

An expansion rate of ASAP or High re-stripes the data across the metaLUN fasterthan one with Medium or Low priority, but may degrade storage-systemperformance.
-newname newNameSpecifies the new name for the metaLUN. A valid name must not exceed 64characters and must include at least one non-whitespace character. This name mustbe unique on the system.
-oExecutes the command without prompting for confirmation.
-sq tb|gb|mb|bcSpecifies the size qualifier for the capacity of the metaLUN component.
where:
tb equals terabytes, gb equals gigabytes, mb equals megabytes and bc equals blockcount. The default qualifier is block count.
-tomaxcapLets you expand the metaLUN to its maximum capacity.
Using the added capacity of an expanded SnapView, MirrorView or SAN Copy LUNYou must perform the operations detailed in the following sections to expand thecapacity of a LUN or metaLUN that is currently participating in a SnapView, MirrorView orSAN Copy session (see metalun -destroy on page 184), and to allow the host to accessthe added capacity.
Note
For a stripe expansion, any existing data is re-striped across the original LUN or metaLUNand the added LUNs during the SnapView, MirrorView or SAN Copy session. This re-striping is invisible to the host.
For LUNs in a SnapView session
To access the added capacity of an expanded snapshot source LUN:
Procedure
1. Stop all SnapView sessions and destroy all snapshots associated with the expandedsource LUN (see the SnapView Command Line Interface (CLI) Reference and the onlinehelp).
2. Use the metalun -modify on page 196 command to change the capacity of theexpanded LUNs.
3. Make sure the host operating system can utilize the added capacity.
Results
You can now start new sessions and create new snapshots with the expanded LUNs (seethe SnapView Command Line Interface (CLI) Reference and the online help).
For LUNs in a clone group
Note
You must expand the clone and the clone source LUN to the same size.
To access the added capacity of an expanded clone, or clone source LUN, do thefollowing:
VNX CLI for Block
Using the added capacity of an expanded SnapView, MirrorView or SAN Copy LUN 197

Procedure
1. For the clone, remove the clone from the clone group; for a clone source LUN, destroythe clone group.
2. Use the metalun -modify on page 196 command to change the capacity of theexpanded LUNs.
3. Make sure the host operating system can utilize the added capacity.
4. Reconstruct the clone group with the expanded LUNs and then perform a fullsynchronization of the LUNs in the clone group.
For LUNs in mirrors
Note
You must expand both the primary and secondary images of a mirror to the same size.
To access the added capacity of an expanded primary and secondary MirrorView LUN, dothe following:
Procedure
1. For the expanded primary image, destroy the mirror; for the expanded secondaryimage, remove it from the mirror (see the MirrorView CLI Reference or the online help).
2. Use the metalun -modify on page 196 command to change the capacity of theexpanded LUNs.
3. Make sure the host operating system can utilize the added capacity.
4. Reconstruct the mirror with the expanded LUNs and then perform a fullsynchronization of the mirror.
For LUNs in SAN Copy sessions
Note
If you expand the SAN Copy source logical unit, make sure that the destination LUNs areof equal or greater capacity.
To access the added capacity of an expanded SAN Copy source LUN or destination LUN,do the following:
Procedure
1. For any sessions that the expanded LUNs are participating in, wait until the SAN copysessions complete, or stop the sessions, and then remove these sessions. (See theonline help).
2. Use the metalun -modify on page 196 command to change the capacity of theexpanded LUNs.
3. Make sure the host operating system can utilize the added capacity.
4. Reconstruct the SAN Copy sessions that you removed and then, when you are ready,start the sessions. (See the online help.)
Reserved LUN Pool commandsThis section explains how to configure the reserved LUN pool, which is required forrunning replication software such as SnapView, incremental SAN Copy, or MirrorView/
VNX CLI for Block
198 EMC VNX Series 5.33 Command Line Interface Reference for Block

Asynchronous. It also describes the CLI commands that you can use if SnapView isinstalled on your system.
reserved -lunpool -addlunAdds a LUN to the reserved LUN pool.
PREREQUISITESFor naviseccli, you must have a user account on the system on which you want toexecute the command.
DESCRIPTIONThe naviseccli reserved command with the -lunpool and -addlun functionsadds one or more LUNs to the reserved LUN pool.
Note
The reserved –addlun command restricts the Reserved LUN Pool LUNs to 128 elementsize. If you select LUN(s) with element size not equal to 128, the system will display thefollowing error message: Invalid element size for chosen LUN(s).Please choose LUN(s) with element size of 128.
Each system has its own reserved LUN pool, and before starting a replication session, thereserved LUN pool must contain at least one LUN for each source LUN that will beparticipating in a session.
Note
This command does not support the thin LUNs.Replication sessions include SnapView sessions and any reserved sessions for use inanother application, such as incremental SAN Copy and MirrorView/A.
The software allocates reserved LUNs on a per source LUN basis. Each system managesits own reserved LUN pool space and allocates reserved LUNs on a per-source LUN basis,not a per-session basis.
Note
You must bind the LUN before you can add it to the reserved LUN pool. While a LUN ispart of the reserved LUN pool, you cannot use it for any other purpose.
SYNTAXreserved -lunpool -addlun lun_numbersOPTIONS
lun_numbersSpecifies the logical unit number(s) to add to the reserved LUN pool.
EXAMPLEFor ss1_spa, this command adds the LUN with ID 11 to the system’s reserved LUN pool.
naviseccli -h ss1_spa reserved -lunpool -addlun 11
OUTPUTIf the version of software running on the SP does not support this command, thefollowing error message is printed to stderr: Command is not supported
VNX CLI for Block
reserved -lunpool -addlun 199

reserved -lunpool -listDisplays reserved LUN pool information.
PREREQUISITESFor naviseccli, you must have a user account on the system on which you want toexecute the command.
DESCRIPTIONThe naviseccli reserved command with the -lunpool and -list functions andno other switches lists all information about the reserved LUN pool. You can obtain morespecific information with function switches.
Note
This command does not support the thin LUNs.
SYNTAX
reserved -lunpool -list [-allocatedluns] [-chunksize][-freeluncount] [-freeluns] [-freesize] [-luncount][-percentused] [-size] [-used]
OPTIONS
-allocatedlunsDisplays the LUN IDs of all allocated LUNs in the reserved LUN pool.
-chunksizeDisplays the number of disk blocks in the reserved LUN pool, in KB. The chunk sizeapplies to the entire system.
-freeluncountDisplays the total number of unallocated LUNs in the reserved LUN pool.
-freelunsDisplays the LUN IDs of all unallocated LUNs in the reserved LUN pool.
-freesizeDisplays the total size of unallocated LUNs in GBs.
-luncountDisplays the total number of LUNs in the reserved LUN pool. You can add LUNs withthe reserved -lunpool -addlun functions.
-percentusedDisplays the percentage of the reserved LUN pool that is used.
-sizeDisplays the size of the reserved LUN pool in GBs.
-usedDisplays the space used in the reserved LUN pool, in GBs.
EXAMPLEThis command displays the system’s reserved LUN pool information. A sample outputfollows.
naviseccli -h ss1_spa reserved -lunpool -list
OUTPUTThe following output samples show devices controlled by one agent. Actual output variesdepending on the command switches you use with the -lunpool -list command.
VNX CLI for Block
200 EMC VNX Series 5.33 Command Line Interface Reference for Block

Note
If your system is running VNX CLI for Block version 6.24 or later, reserved LUN poolinformation will be displayed for the enitre system, regardless of the SP you direct thecommand to. If your system is running VNX CLI for Block version 6.22 or earlier, reservedLUN pool information will be displayed for the SP you direct the command to.
naviseccli ouput:
Name of the SP: GLOBALTotal Number of LUNs in Pool: 6Number of Unallocated LUNs in Pool: 4Unallocated LUNs: 14, 24, 23, 22Total size in GB: 4.488281Unallocated size in GB: 1.292969Used LUN Pool in GB: 0.017639% Used of LUN Pool: 0.393005Chunk size in disk blocks: 128Allocated LUN Pool:Target LUN: 2Allocated LUNs: 249Lun Pool LUN % Used: 91.852825Allocated LUNs: 250Lun Pool LUN % Used: 0
If the version of software running on the SP does not support this command, a Commandis not supported error message is printed to stderr.
reserved -lunpool -rmlunRemoves one or more LUNs from the reserved LUN pool.
PREREQUISITESFor naviseccli, you must have a user account on the system on which you want toexecute the command.
DESCRIPTIONThe naviseccli reserved command with the -lunpool and -rmlun functionsremoves one or more LUNs from the reserved LUN pool. If you omit the override option,the CLI prompts for confirmation before removing the LUN from reserved LUN pool.
Note
This command does not support the thin LUNs.
SYNTAXreserved -lunpool -rmlunluns [-o]OPTIONS
-oExecutes the command without prompting for confirmation.
-rmlun lunsSpecifies the LUN ID of each LUN, with the IDs separated by blanks, you want toremove from the reserved LUN pool.
EXAMPLEFor ss1_spa, this command starts removing LUN 42 from the system’s reserved LUN pool.The software asks for confirmation:
VNX CLI for Block
reserved -lunpool -rmlun 201

naviseccli -h ss1_spa reserved-lunpool -rmlun 42
Do you really want to remove the luns from LUN pool. (y/n)[N]? y
OUTPUTIf the version of software running on the SP does not support this command, a Commandis not supported error message is printed to stderr.
iSCSI and FCoE commandsThis section explains each of the naviseccli Internet SCSI (iSCSI) and Fibre Channel overEthernet (FCoE) commands, that is, the CLI commands that are common to all iSCSIsystems and FCoE ports.
iSCSI commands overviewThe naviseccli iSCSI commands in this section include the connection and iSNScommands. naviseccli iSCSI commands on page 202 identifies the iSCSI commands thatcan be used.
Table 11 naviseccli iSCSI commands
Command Description
CHAP User Commands
connection -adduser Creates a CHAP user account.
connection -deleteuser Deletes a CHAP user account.
connection -getuser Displays CHAP user accounts.
Port administration commands
connection -getport Retrieves a specific iSCSI or FCOE port or the list of all theiSCSI or FCoE ports.
connection -setport Modifies the properties of a connection port.
connection -delport Deletes a virtual port.
connection -route Sets up the static routes.
connection -pingnode Verifies that packets reach a destination node withouterrors.
connection -traceroute Displays the route that a packet takes to a destination node.
Connection set database commands
connection -setsharedauth Sets a username and secret for the system’s sharedcredentials record.
connection -delsharedauth Removes the shared authentication information from thesystem.
connection -getsharedauth Displays the username and the switch enabled for theshared authentication record.
connection -addset Adds a connection set.
VNX CLI for Block
202 EMC VNX Series 5.33 Command Line Interface Reference for Block

Table 11 naviseccli iSCSI commands (continued)
Command Description
connection -delset Deletes a connection set and associated connection paths.
connection -modifyset Modifies parameters of the connection set.
connection -getset Lists a specific connection set or all the connection sets.
connection -addpath Adds a connection path to a specific connection set.
connection -delpath Deletes a connection path from a connection set.
connection -modifypath Modifies a connection path from a connection set.
connection -verifypath Tests a connection path from a connection set.
iSNS commands
isns -addserver Adds an iSNS server to a system’s iSNS serviceconfiguration.
isns -deleteserver Deletes an iSNS server from a system’s iSNS serviceconfiguration.
isns -listserver Displays all iSNS servers that are configured in the system’siSNS service.
isns -setprimary Sets a configured iSNS server as the primary server for asystem’s iSNS service configuration.
connection -adduserAdds a CHAP authentication user.
PREREQUISITESYou must have a user account on the system on which you want to execute the command.
DESCRIPTIONThe naviseccli connection command with the -adduser function adds either aninitiator CHAP authentication user or a target (system) CHAP authentication user to thesystem CHAP user database.
Note
If you try to create a CHAP user for an initiator and the user is already defined, an errormessage is returned that the user is already defined for the initiator.If you try to add a user for a target and the user is already defined, an error is returnedthat only one user can be defined for target access.
SYNTAX
connection -adduser -definedFor initiator|target |-initiatorName initiatorName | ANY [-userName userName]-secret secret [-hexsecret] [-o]
OPTIONS
-definedFor initiator | target
VNX CLI for Block
connection -adduser 203

initiator adds an initiator CHAP user account to the system user database. If youspecify initiator, you must specify an initiator using the -initiatorNameparameter. Target specifies that a target (system) CHAP user account will be created.If you specify target, do not use the -initiatorName parameter.
-initiatorName initiatorNameIf initiator user account data is being added, initiatorName is a unique identifier forthe initiator and uses the iSCSI Qualified Name (IQN) of the iSCSI initiator. Thisparameter is required if you are defining an initiator user.
-userName usernameIf initiator user account data is being added, username specifies the CHAP usernamethat the initiator uses when connecting to an iSCSI target. For CHAP, a username andsecret must be defined for each initiator. If the -userName parameter is omitted, itdefaults to the -initiatorName value. If a target is being configured for mutual CHAP,the target name becomes the username.
-secret secretIf initiator user account data is being added, secret specifies the CHAP secret(password) that the system will use to authenticate the initiator. You can specify thesecret in ASCII or hexadecimal characters (see the -hexsecret switch that follows). Bydefault, -secret is an ASCII string. ASCII secrets must consist of at least 12 and nomore than 16 characters. Hexadecimal secrets must consist of at least 12 and nomore than 16 pairs of data (24 to 32 characters).
-hexsecretIf initiator user account data is being added, including the -hexsecret parameterspecifies that -secret is a hexadecimal value.
-oExecutes the command without prompting for confirmation. If you include the -oswitch, you will not be prompted to confirm that you want to add the user accountdata. If you do not use the -o switch, you will be prompted to confirm that you wantto add the user.
EXAMPLEThe following example adds a user account to the system database.
naviseccli connection -adduser -definedfor initiator -initiatorName5.com.microsoft:cpc7745 -username Guest -secret 1234567890123456
Adding an iSCSI user account with the following attributes:Initiator Name: iqn.1991-05.com.microsoft:cpc7745User name: GuestSecret: 1234567890123456Defined For: initiatorDo you really want to perform this action (y/n)? y
connection -deleteuserDeletes a CHAP authentication user.
PREREQUISITESYou must have a user account on the system on which you want to execute the command.
DESCRIPTIONThe naviseccli connection command with the -deleteuser function deletes aspecified initiator or target CHAP authentication user from the system CHAP userdatabase.
VNX CLI for Block
204 EMC VNX Series 5.33 Command Line Interface Reference for Block

SYNTAX
connection -deleteuser -definedFor initiator | target-initiatorName initiatorName -userName username [-o]
OPTIONS
-definedFor initiator | targetinitiator specifies that an initiator user account will be deleted from the system userdatabase. If you specify initiator, you must specify an initiator using the -initiatorName parameter. target specifies that the target (system) user data willbe deleted.
-initiatorName initiatorNameIf initiator user account data is being deleted, initiatorName is the name that wasassigned for the initiator when the user account was created. The default initiatorname is the IQN of the initiator.
-userName usernameSpecifies the iSCSI CHAP username for the initiator or target user being deleted.
-oExecutes the command without prompting for confirmation. If you include the -oswitch, you will not be prompted to confirm the user account deletion. If you do notuse the -o switch, you will be prompted to confirm that you want to delete the useraccount data.
EXAMPLEThe following example deletes a user account from the system:
naviseccli connection -deleteuser -definedfor initiator -initiatorNameiqn.1991-05.com.microsoft:cpc7745 -username Guest
Deleting an iSCSI user account with the following attributes:Initiator Name: iqn.1991-05.com.microsoft:cpc7745User name: GuestDefined For: initiatorDo you really want to perform this action (y/n)? y
OUTPUTNone if the command succeeds; status or error information if it fails.
connection -getuserDisplay CHAP authentication user data.
PREREQUISITESYou must have a user account on the system on which you want to execute the command.
DESCRIPTIONThe naviseccli connection command with the -getuser function displays CHAPauthentication user account data that is configured on the system. If no arguments arespecified, all CHAP users defined on the system are displayed. Use -definedFor, -initiatorName, and -userName to display information for a specified user. If youspecify a particular user and that user is not found, the error message, The specifieduser account does not exist, is returned.
SYNTAX
connection -getuser [-definedFor initiator | target][-userName userName] [-initiatorName initiatorName]
VNX CLI for Block
connection -getuser 205
OPTIONS
-definedFor initiator | targetinitiator specifies that information for a CHAP initiator user is displayed. If youspecify initiator, you must include the -userName and -initiatorName.
target specifies that information for a CHAP target user (the system user account) isdisplayed. If you specify target, you must include the -userName.
-initiatorName initiatorNameThe initiator is the host or HBA that initiates the connection with the target system.The initiator is identified by the IQN of the iSCSI initiator.
-userName usernameSpecifies the iSCSI CHAP username for the initiator or target user being specified byinitiatorName.
EXAMPLEThe following example gets information on the current user:
naviseccli connection -getuser
OUTPUT
Initiator Name: iqn.1991-05.com.microsoft:cpc7745User Name: GuestDefined For: initiator
connection -getportRetrieve a specific iSCSI or FCoE port or the list of all the iSCSI or FCoE ports.
PREREQUISITESYou must have a user account on the system on which you want to execute the command.
DESCRIPTIONThe naviseccli connection command with the -getport function displaysinformation about either a specified iSCSI port or a list of all iSCSI ports. If no argumentsare specified, all of the iSCSI ports defined on the targeted system are displayed.
If a change in settings is requested, a confirmation is displayed.
The -sp and the -portid parameters select which iSCSI ports are displayed. If bothoptions are specified, a particular iSCSI port is specified. If either or both of the optionsare omitted, all iSCSI ports that meet the search criteria are displayed.
SYNTAX
connection -getport [-sp a|b] [-portid portid [-vportidvportid]] [-vlanid] [-address IPAddress] [-subnetmask][-gateway][-initiatorAuthentication] [-mac] [-mtu] [-flowctl][-hostWindow] [-replicationWindow] [-all]
OPTIONS
-sp a|bSpecifies SP A or B. Displays the information for iSCSI or FCoE ports configured onthe specified SP.
-portid portidSpecifies an iSCSI or FCoE port ID. Displays information only for the specified iSCSIport.The following parameters, -address, -subnetmask, -gateway, and -initiatorAuthentication, define additional information that is displayed for
VNX CLI for Block
206 EMC VNX Series 5.33 Command Line Interface Reference for Block

iSCSI ports. If none of these options is specified, all fields are displayed. The SP andport ID fields are always displayed.
-addressDisplays the IP address of the specified iSCSI ports. The address is a 32-bit numericaddress written as four 8-bit numbers (0-255) separated by periods (called the quad-dotted notation). For example, 165.152.36.35.
-subnetmaskDisplays the network mask for the specified iSCSI ports. The subnet mask uses thequad-dotted notation. For example, 255.255.255.0.
-gatewayDisplays the network gateway address that the specified iSCSI ports use. Thegateway address uses the quad-dotted notation. For example, 165.152.35.22.
-initiatorAuthenticationDisplays the state of the initiator authentication flag for the specified iSCSI ports.True indicates that initiator authentication is turned on for the port and that allinitiators logging into that port will be required to authenticate against the targetsystem. False indicates that initiator authentication has been disabled for the port.
-macDisplays the MAC address for the front-end ports of an iSCSI system and also FCoEports. Running the port ... -mac command returns a MAC Address field for eachport. When you run the port ... -mac command, if any ports are Fibre Channelports, the MAC Address field for those ports will be displayed as Not Applicable
-mtuDisplays the port’s MTU settings and lists the valid MTU settings for the portal.
-vlanidDisplays the virtual LAN (VLAN) ID of the specified virtual port.
-vportid vportidDisplays information for the specified virtual port ID.
-flowctlDetermines the flow control settings. Valid values are Auto, Transmit flow control(Tx), Receive flow control (Rx).
-hostWindowSets the receive window size for host-to-system traffic. The available window sizesare 64K, 128K, 256K, 512K, 1MB. The default value is 256K.
replicationWindowSets the receive window size for system-to-system traffic. The available windowsizes are 64K, 128K, 256K, 512K, 1MB. The default value is 256K.
-allDisplays all the physical and virtual port information for each iSCSI port.
EXAMPLE #1naviseccli connection -getport
SP: APort ID: 4Port WWN: iqn.1992-04.com.emc:cx.apm00093300877.a4iSCSI Alias: 0877.a4IP Address: 172.20.1.140Subnet Mask: 255.255.255.0Gateway Address: 172.20.1.1Initiator Authentication: Not Available
SP: APort ID: 5Port WWN: iqn.1992-04.com.emc:cx.apm00093300877.a5iSCSI Alias: 0877.a5
SP: A
VNX CLI for Block
connection -getport 207
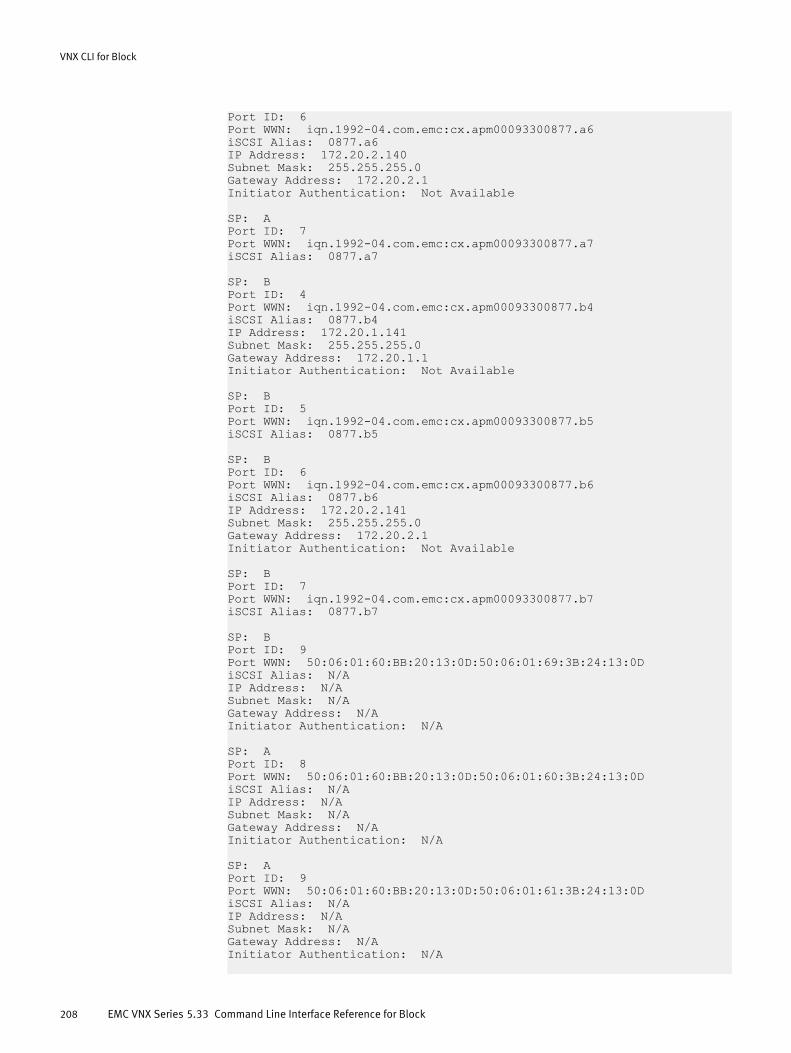
Port ID: 6Port WWN: iqn.1992-04.com.emc:cx.apm00093300877.a6iSCSI Alias: 0877.a6IP Address: 172.20.2.140Subnet Mask: 255.255.255.0Gateway Address: 172.20.2.1Initiator Authentication: Not Available
SP: APort ID: 7Port WWN: iqn.1992-04.com.emc:cx.apm00093300877.a7iSCSI Alias: 0877.a7
SP: BPort ID: 4Port WWN: iqn.1992-04.com.emc:cx.apm00093300877.b4iSCSI Alias: 0877.b4IP Address: 172.20.1.141Subnet Mask: 255.255.255.0Gateway Address: 172.20.1.1Initiator Authentication: Not Available
SP: BPort ID: 5Port WWN: iqn.1992-04.com.emc:cx.apm00093300877.b5iSCSI Alias: 0877.b5
SP: BPort ID: 6Port WWN: iqn.1992-04.com.emc:cx.apm00093300877.b6iSCSI Alias: 0877.b6IP Address: 172.20.2.141Subnet Mask: 255.255.255.0Gateway Address: 172.20.2.1Initiator Authentication: Not Available
SP: BPort ID: 7Port WWN: iqn.1992-04.com.emc:cx.apm00093300877.b7iSCSI Alias: 0877.b7
SP: BPort ID: 9Port WWN: 50:06:01:60:BB:20:13:0D:50:06:01:69:3B:24:13:0DiSCSI Alias: N/AIP Address: N/ASubnet Mask: N/AGateway Address: N/AInitiator Authentication: N/A
SP: APort ID: 8Port WWN: 50:06:01:60:BB:20:13:0D:50:06:01:60:3B:24:13:0DiSCSI Alias: N/AIP Address: N/ASubnet Mask: N/AGateway Address: N/AInitiator Authentication: N/A
SP: APort ID: 9Port WWN: 50:06:01:60:BB:20:13:0D:50:06:01:61:3B:24:13:0DiSCSI Alias: N/AIP Address: N/ASubnet Mask: N/AGateway Address: N/AInitiator Authentication: N/A
VNX CLI for Block
208 EMC VNX Series 5.33 Command Line Interface Reference for Block

SP: BPort ID: 8Port WWN: 50:06:01:60:BB:20:13:0D:50:06:01:68:3B:24:13:0DiSCSI Alias: N/AIP Address: N/ASubnet Mask: N/AGateway Address: N/AInitiator Authentication: N/A
EXAMPLE #2naviseccli connection -getport -sp a -portid 8
SP: APort ID: 8Port WWN: 50:06:01:60:BB:20:13:0D:50:06:01:68:3B:24:13:0DiSCSI Alias: N/AIP Address: N/ASubnet Mask: N/AGateway Address: N/AInitiator Authentication: N/A
EXAMPLE #3naviseccli connection -getport -sp a -portid 8 –vlanid
SP: APort ID: 8Port WWN: 50:06:01:60:BB:20:13:0D:50:06:01:60:3B:24:13:0DiSCSI Alias: N/AVirtual Port ID: 0VLAN ID: 101
EXAMPLE #4naviseccli connection -getport -sp a -portid 8 –mtu
SP: APort ID: 8Port WWN: 50:06:01:60:BB:20:13:0D:50:06:01:60:3B:24:13:0DiSCSI Alias: N/AIP Address: N/ASubnet Mask: N/AGateway Address: N/AInitiator Authentication: N/ACurrent MTU: 2240Available MTU Sizes: "2240"?
EXAMPLE #5naviseccli connection -getport -portid 8 -speed
SP: APort ID: 8Port WWN: 50:06:01:60:BB:20:13:0D:50:06:01:60:3B:24:13:0DiSCSI Alias: N/AIP Address: N/ASubnet Mask: N/AGateway Address: N/AInitiator Authentication: N/APort Speed: 10000 MbAuto-Negotiate: NoAvailable Speeds: 10000 Mb
VNX CLI for Block
connection -getport 209

EXAMPLE #6naviseccli connection -getport -sp a -portid 8 -vportid 0 -all
SP: APort ID: 8Port WWN: 50:06:01:60:BB:20:13:0D:50:06:01:60:3B:24:13:0DiSCSI Alias: N/APort Speed: 10000 MbAuto-Negotiate: NoAvailable Speeds: 10000 MbCurrent MTU: 2240Available MTU Sizes: "2240"
Virtual Port ID: 0VLAN ID: 101IP Address: N/ASubnet Mask: N/AGateway Address: N/AInitiator Authentication: N/A
EXAMPLE #7naviseccli connection -getport –mac
SP: APort ID: 4Port WWN: iqn.1992-04.com.emc:cx.apm00093300877.a4iSCSI Alias: 0877.a4Port Speed: 1000 MbAuto-Negotiate: YesAvailable Speeds: 10 Mb- : 100 Mb- : 1000 Mb- : AutoCurrent MTU: 1500Available MTU Sizes: "1260","1448","1500","1548","2000","2450","3000","4000","4080","4470","5000","6000","7000","8000","9000"
Virtual Port ID: 0VLAN ID: DisabledIP Address: 172.20.1.140Subnet Mask: 255.255.255.0Gateway Address: 172.20.1.1Initiator Authentication: Not Available
SP: APort ID: 5Port WWN: iqn.1992-04.com.emc:cx.apm00093300877.a5iSCSI Alias: 0877.a5Port Speed: 0 MbAuto-Negotiate: YesAvailable Speeds: 10 Mb- : 100 Mb- : 1000 Mb- : AutoCurrent MTU: 0Available MTU Sizes: "1260","1448","1500","1548","2000","2450","3000","4000","4080","4470","5000","6000","7000","8000","9000"
SP: APort ID: 6Port WWN: iqn.1992-04.com.emc:cx.apm00093300877.a6iSCSI Alias: 0877.a6Port Speed: 10000 MbAuto-Negotiate: NoAvailable Speeds: 10000 Mb
VNX CLI for Block
210 EMC VNX Series 5.33 Command Line Interface Reference for Block

Current MTU: 1500Available MTU Sizes: "1260","1448","1500","1548","2000","2450","3000","4000","4080","4470","5000","6000","7000","8000","9000"
Virtual Port ID: 0VLAN ID: DisabledIP Address: 172.20.2.140Subnet Mask: 255.255.255.0Gateway Address: 172.20.2.1Initiator Authentication: Not Available
SP: APort ID: 7Port WWN: iqn.1992-04.com.emc:cx.apm00093300877.a7iSCSI Alias: 0877.a7Port Speed: 0 MbAuto-Negotiate: NoAvailable Speeds: 10000 MbCurrent MTU: 1500Available MTU Sizes: "1260","1448","1500","1548","2000","2450","3000","4000","4080","4470","5000","6000","7000","8000","9000"
SP: BPort ID: 4Port WWN: iqn.1992-04.com.emc:cx.apm00093300877.b4iSCSI Alias: 0877.b4Port Speed: 1000 MbAuto-Negotiate: YesAvailable Speeds: 10 Mb- : 100 Mb- : 1000 Mb- : AutoCurrent MTU: 1500Available MTU Sizes: "1260","1448","1500","1548","2000","2450","3000","4000","4080","4470","5000","6000","7000","8000","9000"
Virtual Port ID: 0VLAN ID: DisabledIP Address: 172.20.1.141Subnet Mask: 255.255.255.0Gateway Address: 172.20.1.1Initiator Authentication: Not Available
SP: BPort ID: 5Port WWN: iqn.1992-04.com.emc:cx.apm00093300877.b5iSCSI Alias: 0877.b5Port Speed: 0 MbAuto-Negotiate: YesAvailable Speeds: 10 Mb- : 100 Mb- : 1000 Mb- : AutoCurrent MTU: 0Available MTU Sizes: "1260","1448","1500","1548","2000","2450","3000","4000","4080","4470","5000","6000","7000","8000","9000"
SP: BPort ID: 6Port WWN: iqn.1992-04.com.emc:cx.apm00093300877.b6iSCSI Alias: 0877.b6Port Speed: 10000 MbAuto-Negotiate: NoAvailable Speeds: 10000 Mb
VNX CLI for Block
connection -getport 211

Current MTU: 1500Available MTU Sizes: "1260","1448","1500","1548","2000","2450","3000","4000","4080","4470","5000","6000","7000","8000","9000"
Virtual Port ID: 0VLAN ID: DisabledIP Address: 172.20.2.141Subnet Mask: 255.255.255.0Gateway Address: 172.20.2.1Initiator Authentication: Not Available
SP: BPort ID: 7Port WWN: iqn.1992-04.com.emc:cx.apm00093300877.b7iSCSI Alias: 0877.b7Port Speed: 0 MbAuto-Negotiate: NoAvailable Speeds: 10000 MbCurrent MTU: 1500Available MTU Sizes: "1260","1448","1500","1548","2000","2450","3000","4000","4080","4470","5000","6000","7000","8000","9000"
SP: BPort ID: 9Port WWN: 50:06:01:60:BB:20:13:0D:50:06:01:69:3B:24:13:0DiSCSI Alias: N/AEnode MAC Address: 00-60-16-3B-47-B3Port Speed: 10 GbAuto-Negotiate: NoAvailable Speeds: 10 GbCurrent MTU: 2240Available MTU Sizes: "2240"
Virtual Port ID: 0VLAN ID: 666IP Address: N/ASubnet Mask: N/AGateway Address: N/AInitiator Authentication: N/AVN_Port MAC Address: 0E-FC-00-68-00-03
SP: APort ID: 8Port WWN: 50:06:01:60:BB:20:13:0D:50:06:01:60:3B:24:13:0DiSCSI Alias: N/AEnode MAC Address: 00-60-16-3B-55-42Port Speed: 0 GbAuto-Negotiate: NoAvailable Speeds: 10 GbCurrent MTU: 2240Available MTU Sizes: "2240"
Virtual Port ID: 0VLAN ID: N/AIP Address: N/ASubnet Mask: N/AGateway Address: N/AInitiator Authentication: N/AVN_Port MAC Address: 00-00-00-00-00-00
SP: APort ID: 9Port WWN: 50:06:01:60:BB:20:13:0D:50:06:01:61:3B:24:13:0DiSCSI Alias: N/AEnode MAC Address: 00-60-16-3B-55-43Port Speed: 10 Gb
VNX CLI for Block
212 EMC VNX Series 5.33 Command Line Interface Reference for Block

Auto-Negotiate: NoAvailable Speeds: 10 GbCurrent MTU: 2240Available MTU Sizes: "2240"
Virtual Port ID: 0VLAN ID: 666IP Address: N/ASubnet Mask: N/AGateway Address: N/AInitiator Authentication: N/AVN_Port MAC Address: 0E-FC-00-68-00-04
SP: BPort ID: 8Port WWN: 50:06:01:60:BB:20:13:0D:50:06:01:68:3B:24:13:0DiSCSI Alias: N/AEnode MAC Address: 00-60-16-3B-47-B2Port Speed: 0 GbAuto-Negotiate: NoAvailable Speeds: 10 GbCurrent MTU: 2240Available MTU Sizes: "2240"
Virtual Port ID: 0VLAN ID: N/AIP Address: N/ASubnet Mask: N/AGateway Address: N/AInitiator Authentication: N/AVN_Port MAC Address: 00-00-00-00-00-00
EXAMPLE #8naviseccli connection -getport -sp a -portid 8 -vportid 0 -mac
SP: APort ID: 8Port WWN: 50:06:01:60:BB:20:13:0D:50:06:01:60:3B:24:13:0DiSCSI Alias: N/APort Speed: 10000 MbAuto-Negotiate: NoAvailable Speeds: 10000 MbEnode MAC Address: 00:60:16:32:12:5B
Virtual Port ID: 0VLAN ID: 101IP Address: N/ASubnet Mask: N/AGateway Address: N/AInitiator Authentication: N/AVN_Port MAC Address: 0E:FC:00:2B:0B:04
EXAMPLE #9naviseccli -h peregrine-spa connection -getport -sp a -mac -all
SP: APort ID: 9Port WWN: 50:06:01:60:BB:20:13:0D:50:06:01:61:3B:24:13:0DiSCSI Alias: N/AEnode MAC Address: 00-60-16-3B-55-43Port Speed: 10 GbAuto-Negotiate: NoAvailable Speeds: 10 GbCurrent MTU: 2240Available MTU Sizes: "2240"
VNX CLI for Block
connection -getport 213
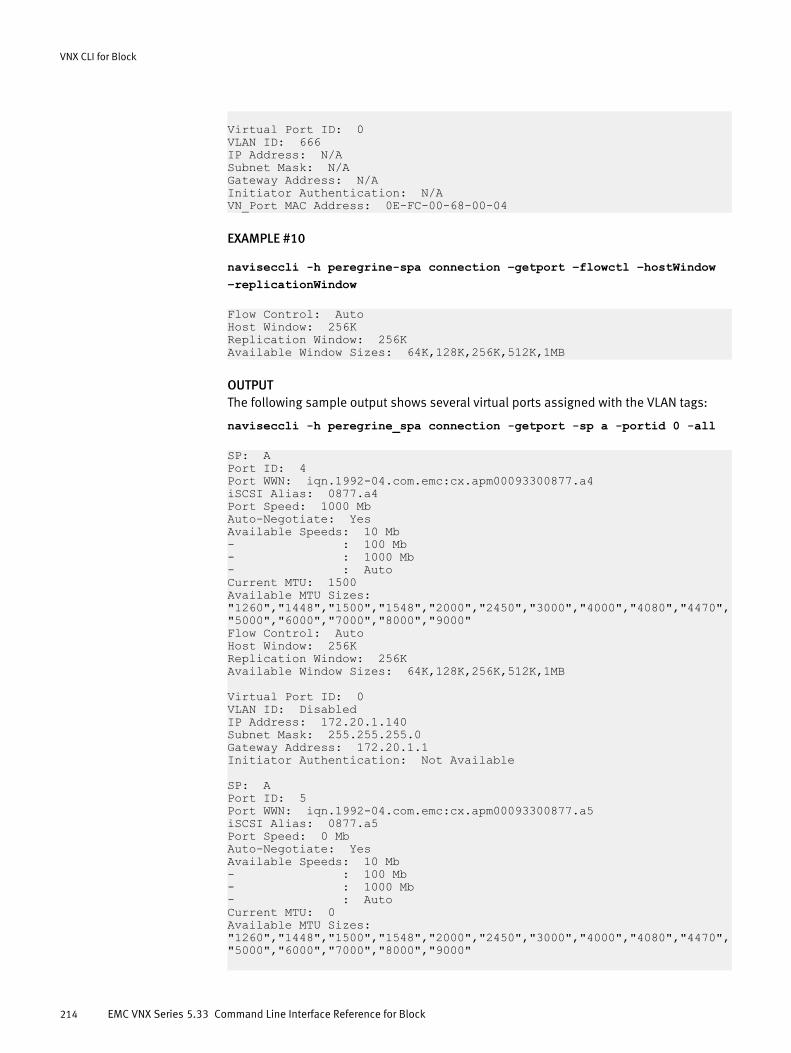
Virtual Port ID: 0VLAN ID: 666IP Address: N/ASubnet Mask: N/AGateway Address: N/AInitiator Authentication: N/AVN_Port MAC Address: 0E-FC-00-68-00-04
EXAMPLE #10
naviseccli -h peregrine-spa connection –getport –flowctl –hostWindow–replicationWindow
Flow Control: AutoHost Window: 256KReplication Window: 256KAvailable Window Sizes: 64K,128K,256K,512K,1MB
OUTPUTThe following sample output shows several virtual ports assigned with the VLAN tags:
naviseccli -h peregrine_spa connection -getport -sp a -portid 0 -all
SP: APort ID: 4Port WWN: iqn.1992-04.com.emc:cx.apm00093300877.a4iSCSI Alias: 0877.a4Port Speed: 1000 MbAuto-Negotiate: YesAvailable Speeds: 10 Mb- : 100 Mb- : 1000 Mb- : AutoCurrent MTU: 1500Available MTU Sizes: "1260","1448","1500","1548","2000","2450","3000","4000","4080","4470","5000","6000","7000","8000","9000"Flow Control: AutoHost Window: 256KReplication Window: 256KAvailable Window Sizes: 64K,128K,256K,512K,1MB
Virtual Port ID: 0VLAN ID: DisabledIP Address: 172.20.1.140Subnet Mask: 255.255.255.0Gateway Address: 172.20.1.1Initiator Authentication: Not Available
SP: APort ID: 5Port WWN: iqn.1992-04.com.emc:cx.apm00093300877.a5iSCSI Alias: 0877.a5Port Speed: 0 MbAuto-Negotiate: YesAvailable Speeds: 10 Mb- : 100 Mb- : 1000 Mb- : AutoCurrent MTU: 0Available MTU Sizes: "1260","1448","1500","1548","2000","2450","3000","4000","4080","4470","5000","6000","7000","8000","9000"
VNX CLI for Block
214 EMC VNX Series 5.33 Command Line Interface Reference for Block

SP: APort ID: 6Port WWN: iqn.1992-04.com.emc:cx.apm00093300877.a6iSCSI Alias: 0877.a6Port Speed: 10000 MbAuto-Negotiate: NoAvailable Speeds: 10000 MbCurrent MTU: 1500Available MTU Sizes: "1260","1448","1500","1548","2000","2450","3000","4000","4080","4470","5000","6000","7000","8000","9000"Flow Control: AutoHost Window: 256KReplication Window: 256KAvailable Window Sizes: 64K,128K,256K,512K,1MB
Virtual Port ID: 0VLAN ID: DisabledIP Address: 172.20.2.140Subnet Mask: 255.255.255.0Gateway Address: 172.20.2.1Initiator Authentication: Not Available
SP: APort ID: 7Port WWN: iqn.1992-04.com.emc:cx.apm00093300877.a7iSCSI Alias: 0877.a7Port Speed: 0 MbAuto-Negotiate: NoAvailable Speeds: 10000 MbCurrent MTU: 1500Available MTU Sizes: "1260","1448","1500","1548","2000","2450","3000","4000","4080","4470","5000","6000","7000","8000","9000"
SP: BPort ID: 4Port WWN: iqn.1992-04.com.emc:cx.apm00093300877.b4iSCSI Alias: 0877.b4Port Speed: 1000 MbAuto-Negotiate: YesAvailable Speeds: 10 Mb- : 100 Mb- : 1000 Mb- : AutoCurrent MTU: 1500Available MTU Sizes: "1260","1448","1500","1548","2000","2450","3000","4000","4080","4470","5000","6000","7000","8000","9000"Flow Control: AutoHost Window: 256KReplication Window: 256KAvailable Window Sizes: 64K,128K,256K,512K,1MB
Virtual Port ID: 0VLAN ID: DisabledIP Address: 172.20.1.141Subnet Mask: 255.255.255.0Gateway Address: 172.20.1.1Initiator Authentication: Not Available
SP: BPort ID: 5Port WWN: iqn.1992-04.com.emc:cx.apm00093300877.b5iSCSI Alias: 0877.b5Port Speed: 0 MbAuto-Negotiate: YesAvailable Speeds: 10 Mb
VNX CLI for Block
connection -getport 215

- : 100 Mb- : 1000 Mb- : AutoCurrent MTU: 0Available MTU Sizes: "1260","1448","1500","1548","2000","2450","3000","4000","4080","4470","5000","6000","7000","8000","9000"
SP: BPort ID: 6Port WWN: iqn.1992-04.com.emc:cx.apm00093300877.b6iSCSI Alias: 0877.b6Port Speed: 10000 MbAuto-Negotiate: NoAvailable Speeds: 10000 MbCurrent MTU: 1500Available MTU Sizes: "1260","1448","1500","1548","2000","2450","3000","4000","4080","4470","5000","6000","7000","8000","9000"Flow Control: AutoHost Window: 256KReplication Window: 256KAvailable Window Sizes: 64K,128K,256K,512K,1MB
Virtual Port ID: 0VLAN ID: DisabledIP Address: 172.20.2.141Subnet Mask: 255.255.255.0Gateway Address: 172.20.2.1Initiator Authentication: Not Available
SP: BPort ID: 7Port WWN: iqn.1992-04.com.emc:cx.apm00093300877.b7iSCSI Alias: 0877.b7Port Speed: 0 MbAuto-Negotiate: NoAvailable Speeds: 10000 MbCurrent MTU: 1500Available MTU Sizes: "1260","1448","1500","1548","2000","2450","3000","4000","4080","4470","5000","6000","7000","8000","9000"
SP: BPort ID: 9Port WWN: 50:06:01:60:BB:20:13:0D:50:06:01:69:3B:24:13:0DiSCSI Alias: N/APort Speed: 10 GbAuto-Negotiate: NoAvailable Speeds: 10 GbCurrent MTU: 2240Available MTU Sizes: "2240"Flow Control: AutoHost Window: 256KReplication Window: 256KAvailable Window Sizes: 64K,128K,256K,512K,1MB
Virtual Port ID: 0VLAN ID: 666IP Address: N/ASubnet Mask: N/AGateway Address: N/AInitiator Authentication: N/A
SP: APort ID: 8Port WWN: 50:06:01:60:BB:20:13:0D:50:06:01:60:3B:24:13:0DiSCSI Alias: N/A
VNX CLI for Block
216 EMC VNX Series 5.33 Command Line Interface Reference for Block

Port Speed: 0 GbAuto-Negotiate: NoAvailable Speeds: 10 GbCurrent MTU: 2240Available MTU Sizes: "2240"Flow Control: AutoHost Window: 256KReplication Window: 256KAvailable Window Sizes: 64K,128K,256K,512K,1MB
Virtual Port ID: 0VLAN ID: N/AIP Address: N/ASubnet Mask: N/AGateway Address: N/AInitiator Authentication: N/A
SP: APort ID: 9Port WWN: 50:06:01:60:BB:20:13:0D:50:06:01:61:3B:24:13:0DiSCSI Alias: N/APort Speed: 10 GbAuto-Negotiate: NoAvailable Speeds: 10 GbCurrent MTU: 2240Available MTU Sizes: "2240"Flow Control: AutoHost Window: 256KReplication Window: 256KAvailable Window Sizes: 64K,128K,256K,512K,1MB
Virtual Port ID: 0VLAN ID: 666IP Address: N/ASubnet Mask: N/AGateway Address: N/AInitiator Authentication: N/A
SP: BPort ID: 8Port WWN: 50:06:01:60:BB:20:13:0D:50:06:01:68:3B:24:13:0DiSCSI Alias: N/APort Speed: 0 GbAuto-Negotiate: NoAvailable Speeds: 10 GbCurrent MTU: 2240Available MTU Sizes: "2240"
Virtual Port ID: 0VLAN ID: N/AIP Address: N/ASubnet Mask: N/AGateway Address: N/AInitiator Authentication: N/A
connection -setportModify the properties of a port.
PREREQUISITESYou must have a user account on the system on which you want to execute the command.
DESCRIPTIONThe naviseccli connection command with the -setport function modifies theproperties of a specified SP port.
VNX CLI for Block
connection -setport 217

SYNTAX
connection -setport [-iscsi (Default)]-sp a|b -portid portid [-vportid vportid (default=0)][-vlanid vlanid|-vlandisable][-address address] [-subnetmask subnetmask] [-gateway gateway][-initiatorAuthentication 0|1] [-alias iscsialias][-speed speed] [-mtu mtu] [-o]
connection -setport [-fcoe]-sp a|b -portid portid [-vportid vportid (default=0)][-vlanid vlanid|-vlanautodiscovery] [-o]
OPTIONS
-sp a|bSpecifies that the iSCSI or FCOE port is on either SP A or SP B.
-portid portidSpecifies the port on the SP. For example, an SP with one port has port 1 and an SPwith two ports has port 0 and port 1.
-vportid vportidSpecifies the virtual port ID. If you do not specify the -vportid, the system defaults tovirtual port 0.
-vlanautodiscoverySets the port (FCoE only) specified by -portid to be in VLAN auto discovery mode.
-vlanid vlanidSpecifies the VLAN ID.
-vlandisableDisables VLAN tagging on the virtual port.
-address addressSpecifies the IP address of the iSCSI port. The address uses the dotted-quad format.For example: 165.152.36.35.
-subnetmask subnetmaskSpecifies the subnetwork mask for the iSCSI port. The subnet mask uses the dotted-quad format. For example: 255.255.255.0.
-gateway gatewaySpecifies the network gateway address that the iSCSI port uses. The gatewayaddress uses the dotted-quad format. For example: 165.152.35.22.
-initiatorAuthentication 0|1If initiator authentication is turned on, all initiators logging in to the port must beauthenticated by the system.0 = Not required - default
1 = Required
-aliasiscsialiasSpecifies the iSCSI alias.
-speed speedSpecifies the port speed.
-mtuConfigures the MTU size for the specified iSCSI port. If not specified during the initialcreation of a portal, the default is 1500. If -mtu is not specified during the update ofa portal’s setting, the MTU setting will not change. If a change in settings has beenrequested, a confirmation will be displayed.
-o
VNX CLI for Block
218 EMC VNX Series 5.33 Command Line Interface Reference for Block

Executes the command without prompting for confirmation. If you include the -oswitch, the port will be set (configured) without a confirmation prompt. Without the -o switch, the software displays confirmation messages that you must respond to.
EXAMPLE #1The following example configures the network settings for the port with IP address10.14.80.110:
naviseccli connection -setport -sp b -portid 0 -address -subnetmask255.255.255.0 -gateway 10.14.80.1
It is recommended that you consult with your Network Manager todetermine the correct settings before applying these changes.Changing the port properties may disrupt traffic on one or moreports of this I/O Module. Initiator configuration changes may benecessary to regain connections.Do you really want to perform this action (y/n)?y
EXAMPLE #2naviseccli connection –setport –hostWindow 32K –o
Request failed. Invalid window size: 32K.Available Window Sizes: 64K, 128K, 256K, 512K, 1MB
OUTPUTNone if the command succeeds; status or error information if it fails.
connection -delportDeletes a virtual port.
PREREQUISITESFor naviseccli, you must have a user account on the system on which you want to executethe command.
DESCRIPTIONThe naviseccli connection command with the -delport function lets you deletea virtual port from a physical port. To execute this command, more than one virtual portshould be associated with the management port.
If there is only one management port with only one virtual port, the command cannot beexecuted. Use of this command depends on the network provider capabilities.
SYNTAX
connection -delport -sp a|b -portid portid -vportid vportid[-o]
OPTIONS
-sp a|bDeletes the virtual port of the specified SP. The default is the connected SP.
-portid portidSpecifies the iSCSI port ID. If you specify an invalid port ID, the system displays thefollowing error: Request failed. Specified iSCSI port not found.
-vportid vportidSpecifies the virtual port ID. If you specify an invalid virtual port ID, the systemdisplays the following error message: Request failed. Specified iSCSIvirtual port not found.
-o
VNX CLI for Block
connection -delport 219

Executes the command without prompting for confirmation.
OUTPUTProvides output depending on the options used.
connection -routeSets up the static routes to specific hosts or networks.
PREREQUISITESFor naviseccli, you must have a user account on the system on which you want to executethe command.
DESCRIPTIONThe naviseccli connection command with the -route function is used to set upthe static routes to specific hosts or networks.
SYNTAX
connection -route [-sp a|b] [-portid portid|-vportid vportid][-add -destination destination [-subnetmask subnetmask|-prefixlength length] [-metric metric] [-persistent]][-delete -destination destination [-subnetmask subnetmask|-prefixlength length]][-list] [-o]
OPTIONS
-sp a|bSpecifies the destination SP. The default is the connected SP.
-portid portidThe -portid and the -vportid together specify the interface associated with theroute. If you do not specify the interface, the system determines it.
-vportid vportidThe -portid and the -vportid together specify the interface associated with theroute. If you do not specify the interface, the system determines it.
-addAdds a network route.
-destination destinationSpecifies the IPv4/IPv6 address or hostname of the destination.
-subnetmask netmaskSpecifies the IPv4 subnet mask value for the route entry. The default is255.255.255.255. It is valid only for an IPv4 destination address.
-prefixlength lengthSpecifies the prefix length, that is the part of the address to compare whiledetermining the route. The default is 128. It is valid only for an IPv6 destinationaddress.
-metric metricDetermines the best route using the routing algorithm. The route with the lowestmetric is preferred over another route.
-persistentSpecifies whether the route should persist across reboots.
-deleteDeletes an existing route.
-list
VNX CLI for Block
220 EMC VNX Series 5.33 Command Line Interface Reference for Block
Displays the routes for the SP. By default, it displays the routes for the connected SP.It also displays the routes for a specific port/virtual port.
-oExecutes the command without prompting for confirmation.
OUTPUTProvides output depending on the options used.
connection -pingnodeVerifies that packets reach a destination node without errors.
PREREQUISITESYou must have a user account on the system on which you want to execute the command.
DESCRIPTIONThe naviseccli connection command with the -pingnode function transmitspackets to a target node and returns a notification that the packets have reached thenode without errors. The connection -pingnode command pings a target node fromthe iSCSI port. Use the connection -pingnode and the connection -traceroute commands to verify and diagnose network connectivity.
SYNTAX
connection -pingnode [-sp a|b] [ [-portid portid -vportidvportid] |-source sourceaddress] -address address[-packetSize packetSize] [-count count] [-timeouts timeouts][-delays delays]
OPTIONS
-sp a|bSpecifies either storage processor A or storage processor B.
-portid portidSpecifies the port on the SP, either 0 or 1. For example, an SP with one port has port0 and an SP with two ports has port 0 and port 1.
-vportid vportidSpecifies the virtual port ID.
-address addressSpecifies the IP address of the target node that the iSCSI port will ping. The addressis a 32-bit numeric address written as four numbers separated by periods, forexample, 128.221.56.52. Network names are not supported.
-packetSize packetSizeSpecifies the size of the packets in bytes. The default is 32 bytes, the minimum is 0bytes, and the maximum is 2048 bytes.
-count countSpecifies the number of pings to send. The default is 4; the minimum is 1.
-timeouts timeoutsSpecifies the response wait timeout period in seconds. The default is 3 seconds, theminimum is 1 second, and the maximum is 15 seconds.
-delays delaysSpecifies a delay in seconds between pings. The default is 1 second, the minimum is1 second, and the maximum is 10 seconds.
EXAMPLE
naviseccli -h peregrine_spa connection -pingnode -sp a -portid 0-vportid 0 -address 128.222.132.100
VNX CLI for Block
connection -pingnode 221

OUTPUT
Reply from 128.222.132.100: bytes=32 time=1ms TTL=30 Reply from 128.222.132.100: bytes=32 time=1ms TTL=30Reply from 128.222.132.100: bytes=32 time=1ms TTL=30Reply from 128.222.132.100: bytes=32 time=1ms TTL=30
connection -tracerouteDisplay the route that a packet takes to a destination node.
PREREQUISITESYou must have a user account on the system on which you want to execute the command.
DESCRIPTIONThe naviseccli connection command with the -traceroute function displaysthe route that packets take to a target node that you specify in the command. Theconnection -traceroute command traces and displays the route from the systemiSCSI port to the target node. Use the connection -traceroute and connection-pingnode commands to verify and diagnose network connectivity.
SYNTAX
connection -traceroute[-sp a|b] -address IPAddress[ [-portid portid -vportid vportid] |-source sourceaddress[-mtu| -packetSize packetSize] ][-timeouts timeouts] [-delays delays]
OPTIONS
-address IPAddressSpecifies the IP address of the target node that the iSCSI port will attempt to contact.The address uses the dotted-quad format, for example, 128.221.56.52. Networknames are not supported.
-portid portidSpecifies the port on the SP, either 0 or 1. For example, an SP with one port has port0; an SP with two ports has port 0 and port 1.
-vportid vportidSpecifies the virtual port ID.
-sp a|bSpecifies either SP A or SP B.
-delays delaysSpecifies a delay in seconds between datagrams. The default is 1 second, theminimum is 1 second, and the maximum is 10 seconds.
-packetSize packetSizeSpecifies the size of the echo packets in bytes. The default is 32 bytes, the minimumis 0 bytes, and the maximum is 2048 bytes.
-mtuPerforms networking diagnostics, focusing on the maximum transmission unitbetween the two systems. If specified, -source is required.
-source sourceaddressSpecifies the source address and is required when -mtu is used.
-timeouts timeoutsSpecifies the response wait timeout period in seconds. The default is 3 seconds, theminimum is 1 second, and the maximum is 15 seconds.
EXAMPLEThe following example displays the route taken by a packet:
VNX CLI for Block
222 EMC VNX Series 5.33 Command Line Interface Reference for Block

naviseccli -user a -password a -scope 0 -h ss1_spa connection-traceroute -sp a -address -mtu -source
OUTPUT
1: 172.20.1.1 1 ms 1500 mtu2: 10.5.1.250 1 ms 1500 mtu
connection -setsharedauthSets username and secret for the system’s shared credentials record.
PREREQUISITESYou must have a user account on the system on which you want to execute the command.
DESCRIPTIONThe naviseccli connection command with the -setsharedauth function sets ausername and secret for the iSCSI intiator system’s shared credentials record of theconnection set database. The command lets you enable or disable the use of thesystem’s shared authentication credentials.
SYNTAX
connection -setsharedauth[-userNameuserName][-secret secret[-hexsecret]] [-enable|-disable] [-o]
OPTIONS
-userName userNameSpecifies the CHAP username used by the initiator when challenged by the targetsystem. For CHAP, a username and secret must be defined.
-secret secretSpecifies the CHAP secret to be used with the username when challenged by thetarget system. You can specify the secret in ASCII or hexadecimal characters (see the-hexsecret switch that follows). By default, -secret is an ASCII string. ASCIIsecrets must consist of at least 12 and no more than 16 characters. Hexadecimalsecrets must consist of at least 12 and no more than 16 pairs of data (24 to 32characters).
-hexsecretIf initiator user account data is being added, including the -hexsecret parameter,it specifies that -secret is a hexadecimal value.
-enable| -disableEnables or disables the use of the system’s shared credentials.
-oExecutes the command without prompting for confirmation.
EXAMPLEThe following example sets a username and secret for the system’s shared credentialsrecord:
naviseccli connection -setsharedauth -username user1-secret abcdefghi123 -enable -o
OUTPUTNone if the command succeeds; status or error information if it fails.
VNX CLI for Block
connection -setsharedauth 223

connection -delsharedauthRemoves the system shared authentication credentials.
PREREQUISITESYou must have a user account on the system on which you want to execute the command.
DESCRIPTIONThe naviseccli connection command with the -delsharedauth functionremoves the username and secret from the iSCSI initiator system.
SYNTAXconnection -delsharedauth[-o]OPTIONS
-oExecutes the command without prompting for confirmation. If you include the -oswitch, you will not be prompted to confirm the user account deletion. If you do notuse the -o switch, you will be prompted to confirm that you want to delete the useraccount data.
EXAMPLEThe following example removes the shared authentication credentials from the iSCSIinitiator system:
connection -delsharedauth -o
OUTPUTNone if the command succeeds; status or error information if it fails.
connection -getsharedauthDisplays the username and status of the shared authentication for the iSCSI initiatorsystem
PREREQUISITESYou must have a user account on the system on which you want to execute the command.
DESCRIPTIONThe naviseccli connection command with the -getsharedauth functiondisplays the username and status of the shared authentication for the iSCSI initiatorsystem.
SYNTAXconnection -getsharedauthEXAMPLEThe following example displays the username and status of the shared authentication forthe iSCSI initiator system:
connection -getsharedauth
OUTPUT
User Name: user1Enabled: True
VNX CLI for Block
224 EMC VNX Series 5.33 Command Line Interface Reference for Block

If no shared credentials are defined for the system, then the output is:
No system shared credentials are defined.
connection -addsetAdds a connection set.
PREREQUISITESYou must have a user account on the system on which you want to execute the command.
DESCRIPTIONThe naviseccli connection command with the -addset function adds aconnection set to the connection set database.
SYNTAX
connection -addset -name name[-digest none|Header|Data|Both][-authpolicy none|shared|setspecific -userName userName-secret secret [-hexsecret] ] [-o]
OPTIONS-name name
Specifies a unique identifier for the connection set. It is an arbitrary name suppliedby the administrator that indicates the specific connection set using the CLI or UI.
-digest none | Header | Data | BothIndicates the type of digest, a data protection mechanism, which is turned on forconnections established through this connection set.
Header indicates that the iSCSI packet headers have a checksum applied andverified.
Data indicates that the data portion of the iSCSI packet have a checksum appliedand verified.Both indicates that both the headers and the data portion of the iSCSIpacket have a checksum applied and verified.
-authpolicy none | shared | setspecificDefines the type of authentication this connection set uses.
none specifies that no credentials are needed to connect to the target system.
shared specifies that the system shared authentication credentials are used toauthenticate.
setspecific indicates that the username and secret stored as part of this connectionset are used for authentication.
-userName userNameSpecifies the CHAP username used by the initiator when challenged by the targetsystem. For CHAP, a username and secret must be defined.
-secret secretSpecifies the CHAP secret to be used with the username when challenged by thetarget system. You can specify the secret in ASCII or hexadecimal characters (see the-hexsecret switch that follows). By default, -secret is an ASCII string. ASCIIsecrets must consist of at least 12 and no more than 16 characters. Hexadecimalsecrets must consist of at least 12 and no more than 16 pairs of data (24 to 32characters).
-hexsecretIf initiator user account data is being added, including the -hexsecret parameterspecifies that -secret is a hexadecimal value.
VNX CLI for Block
connection -addset 225
-oExecutes the command without prompting for confirmation.
EXAMPLEThe following example adds a connection set to the connection set database:
connection -addset -name MirrorSet -authpolicy none -digest none -o
OUTPUTNone if the command succeeds; status or error information if it fails.
connection -delsetDeletes a connection set and associated connection paths.
PREREQUISITESYou must have a user account on the system on which you want to execute the command.
DESCRIPTIONThe naviseccli connection command with the -delset function deletes aconnection set and its associated connection paths by the name of the connection set.
SYNTAXconnection -delset -name name [-o]OPTIONS
-name nameSpecifies a unique identifier for the connection set. It is an arbitrary name suppliedby the administrator that indicates the specific connection set using the CLI or UI.
-oExecutes the command without prompting for confirmation. If you include the -oswitch, you will not be prompted to confirm the user account deletion. If you do notuse the -o switch, you will be prompted to confirm that you want to delete the useraccount data.
EXAMPLEThe following example deletes a connection set and associated connection paths usingthe name of the connection:
connection -delset -name MirrorSet -o
OUTPUTNone if the command succeeds; status or error information if it fails.
connection -modifysetModifies parameters of a connection set.
PREREQUISITESYou must have a user account on the system on which you want to execute the command.
DESCRIPTIONThe naviseccli connection command with the -modifyset function modifies parameters ofa connection set.
Note
You cannot change the name of the connection with this command.
VNX CLI for Block
226 EMC VNX Series 5.33 Command Line Interface Reference for Block

SYNTAX
connection -modifyset -name name [-digest None|Header|Data|Both] [-authpolicy none|shared|setspecific -userNameuserName -secret secret [-hexsecret] ] [-o]
OPTIONS
-name nameSpecifies a unique identifier for the connection set.
-digest None | Header | Data | BothIndicates the type of digest, which is turned on for connections established throughthis connection set.
Header indicates that the iSCSI packet headers have a checksum applied andverified.
Data indicates that the data portion of the iSCSI packet have a checksum appliedand verified.
Both indicates that both the headers and the data portion of the iSCSI packet have achecksum applied and verified.
-authpolicy none | shared | setspecificDefines the type of authentication this connection set uses.
none specifies that no credentials are needed to connect to the target system.
shared specifies that the system shared authentication credentials are used forauthentication.
setspecific indicates that the username and secret stored as part of this connectionset are used for authentication.
-userName userNameSpecifies the CHAP username used by the initiator when challenged by the targetsystem. For CHAP, a username and secret must be defined.
-secret secretSpecifies the CHAP secret to be used with the username when challenged by thetarget system. You can specify the secret in ASCII or hexadecimal characters (see the-hexsecret switch that follows). By default, -secret is an ASCII string. ASCIIsecrets must consist of at least 12 and no more than 16 characters. Hexadecimalsecrets must consist of at least 12 and no more than 16 pairs of data (24 to 32characters).
-hexsecretIf initiator user account data is being added, including the -hexsecret parameterspecifies that -secret is a hexadecimal value.
-oExecutes the command without prompting for confirmation.
EXAMPLEThe following example modifies the parameters of a connection:
connection -modifyset -name MirrorSet -authpolicy -setspecific-username user2 -secret Twelve2Sixteen -o
OUTPUTNone if the command succeeds; status or error information if it fails.
VNX CLI for Block
connection -modifyset 227

connection -getsetLists a specific connection set or all the connection sets
PREREQUISITESYou must have a user account on the system on which you want to execute the command.
DESCRIPTIONThe naviseccli connection command with the -getset function lists a specificconnection set or all the connection sets and displays the contents of each set.
SYNTAXconnection -getset [-name name]OPTIONS
-name nameSpecifies a unique identifier for the connection set.
EXAMPLEThe following example lists a specific connection set:
connection -getset -name MirrorSet
OUTPUT
Connection Set Name: MirrorSetUser Name: usernameAuthentication Usage: SetSpecificHeader Digest: DisabledData Digest: DisabledIP Address of Target: 192.168.0.1Listening IP Port of Target: 3260SP Ports: A-0 A-1 B-0 B-1Description: any comments that were entered.
Sample output if the system (CX4 series) has virtual ports:
Connection Set Name: tryzub_generatedUser Name: TRISHULA_MirrorViewGeneratedAuthentication usage: SetspecificHeader Digest: EnabledData Digest: EnabledIP Address of Target: 172.20.4.146Listening IP port of Target: 3260SP Ports: A-3v0 B-2v4Description: Path to tryzub A-1, generated for MirrorViewListening IP port of Target: 3260SP Ports: B-3v1Description: Path to tryzub B-1, generated for MirrorView
connection -addpathAdds a connection path to a specific connection set.
PREREQUISITESYou must have a user account on the system on which you want to execute the command.
DESCRIPTIONThe naviseccli connection command with the -addpath function adds aconnection path to a specific connection set. A connection path consists of the IPaddress of the target system, front-end ports used, and a comment field.
VNX CLI for Block
228 EMC VNX Series 5.33 Command Line Interface Reference for Block

SYNTAXconnection -addpath -name name -target address[:port] [-sp a|b-portid portid [-vportid vportid]] [comment text] [-o]OPTIONS
-name nameSpecifies the name of the connection set to which you will add the connection path.
-target address:portSpecifies the IP address and listening port (default 3260) of the target system.
-sp a|bSpecifies the storage processor on the initiating system used for the session.
-portid portidSpecifies the front-end port number on the storage processor of the initiating systemto be used for the session.
-vportid vportidSpecifies the virtual port number for the session. If you do not specify the virtual portnumber, then the system defaults to virtual port 0.
-comment textSpecifies a comment or description of the connection path.
-oExecutes the command without prompting for confirmation.
EXAMPLEThe following example adds a connection path to the specific connection set:
connection -addpath -name MirrorSet -target 123.231.1.1 -sp a-portid 3 -comment mirrorview connection path -o
OUTPUTNone if the command succeeds; status or error information if it fails.
connection -delpathDeletes a connection path from a connection set.
PREREQUISITESYou must have a user account on the system on which you want to execute the command.
DESCRIPTIONThe naviseccli connection command with the -delpath function deletes aconnection path from a connection set.
Note
You must have an IP address and optional port number to complete this command.
SYNTAXconnection -delpath -name name -target address[:port] [-o]OPTIONS
-name nameSpecifies the name of the connection set, which includes the path you want todelete.
-target address:portSpecifies the IP address and listening port (default 3260) of the target system.
-o
VNX CLI for Block
connection -delpath 229

Standard override option. Without this option, the user is prompted to confirmintent.
EXAMPLEThe following example deletes a connection path from a connection set:
connection -delpath -name MirrorSet -target 123.231.1.1 -o
OUTPUTNone if the command succeeds; status or error information if it fails.
connection -modifypathModifies the parameters of a connection path.
PREREQUISITESYou must have a user account on the system on which you want to execute the command.
DESCRIPTIONThe naviseccli connection command with the -modifypath function modifiesthe parameters of a connection path.
Note
You must have an IP address and optional port number to complete this command.
SYNTAX
connection -modifypath -name name -target address[:port] -add-sp a|b -portid portid [-vportid vportid] [-comment text][-o] |-add -comment text [-o] | -del -sp a|b -portidportid [-vportid vportid] [-o]
OPTIONS
-name nameSpecifies the name of the connection set, which includes the path you want tomodify.
-target address:portSpecifies the IP address and listening port (default 3260) of the target system.
-sp a|bSpecifies the storage processor on the initiating system used for the session.
-portid portidSpecifies the front-end port number on the storage processor of the initiating systemto be used for the session.
-vportid vportidSpecifies the virtual port number to be used for the session. If the virtual portnumber is not specified, the system defaults to virtual port 0.
-comment textSpecifies a new comment added to the connection path.
-oStandard override option. Without this option, the user is prompted to confirmintent.
EXAMPLEThe following example modifies a connection path from a connection set:
VNX CLI for Block
230 EMC VNX Series 5.33 Command Line Interface Reference for Block

connection -modifypath -name MirrorSet -target 23.231.1.1 -add -spb -portid 3 -o
OUTPUTNone if the command succeeds; status or error information if it fails.
connection -verifypathTests the parameters of a connection path.
PREREQUISITESYou must have a user account on the system on which you want to execute the command.
DESCRIPTIONThe naviseccli connection command with the -verifypath function tests theparameter of a connection path.
Note
A connection set name, an IP address, and an optional port number are needed tocomplete this command.
SYNTAX
connection -verifypath -name name -target address[:port][-sp a|b -portid portid [-vportid vportid] ]
OPTIONS
-name nameSpecifies the name of the connection set, which contains the path to verify.
-target address:portSpecifies the IP address and listening port (default 3260) of the target system.
-sp a|bSpecifies the storage processor on the initiating system used for the session.
-portid portidSpecifies the front-end port number on the storage processor of the initiating systemto be used for the session.
-vportid vportidSpecifies the virtual port number to be used for the session. If the virtual portnumber is not specified, the system defaults to virtual port 0.
-oStandard override option. Without this option, the user is prompted to confirmintent.
EXAMPLEThe following example tests a connection path from a connection set:
Connection -verifypath -name MirrorSet -target 23.231.1.1 -o
OUTPUT
Test/verify command for target {ipaddr[:portnum]} from {fe port} completed successfully.
VNX CLI for Block
connection -verifypath 231

isns -addserverAdds an iSNS server to a system’s iSNS service configuration.
PREREQUISITESYou must have a user account on the system on which you want to execute the command.
DESCRIPTIONThe naviseccli isns command with the -addserver function adds an iSNS serverto a system’s iSNS service configuration.
When you add a server, if it is the first server you add to a system’s iSNS serviceconfiguration, it is designated as the primary server. If a server exists in the system’siSNS service configuration, any subsequent server you add is designated as a backup.
Note
The primary server is the server the iSNS service actively communicates with.
SYNTAXisns -addserver IPAddr [-o]OPTIONS
IPAddrThe IP address of the iSNS server you want to add.
Note
You must identify the iSNS server by the server’s IP address. Specify the IP addressin the form b.c.d.e where b, c, d and e range from 0 through 255, for example,111.222.33.44.
-oExecutes the command without prompting for confirmation.
EXAMPLEThe following example adds the specified iSNS server, to the system’s iSNS serviceconfiguration:
naviseccli -address ss1_spa isns -addserver 111.222.33.44
Adding an iSNS server with the following IP address: 111.222.33.44.Do you really want to perform this action (y/n)? y
OUTPUTNone if the command succeeds; status or error information if it fails.
isns -deleteserverDeletes an iSNS server from a system’s iSNS service configuration.
PREREQUISITESYou must have a user account on the system on which you want to execute the command.
DESCRIPTIONThe naviseccli isns command with the -deleteserver function, deletes an iSNSserver from a system’s iSNS service configuration.
VNX CLI for Block
232 EMC VNX Series 5.33 Command Line Interface Reference for Block

Note
If the IP address of the server you want to delete is not configured, you will receive anerror message.
If you delete a primary server, the next server listed in the system’s iSNS serviceconfiguration becomes the primary.
Note
The primary server is the server the iSNS service actively communicates with.
SYNTAXisns -deleteserver IPAddr [-o]OPTIONS
IPAddrThe IP address of the iSNS server you want to delete.
Note
You must identify the iSNS server by the server’s IP address. Specify the IP addressin the form b.c.d.e where b, c, d and e range from 0 through 255, for example,111.222.33.44.
-oExecutes the command without prompting for confirmation.
EXAMPLEThe following example deletes the specified iSNS server from the system’s iSNSconfiguration:
naviseccli -address ss1_spa isns -deleteserver 111.222.33.44
Deleting an iSNS server with the following IP address: 111.222.33.44.Do you really want to perform this action (y/n)? y
OUTPUTNone if the command succeeds; status or error information if it fails.
isns -listserverDisplays all iSNS servers that are configured in the system’s iSNS service.
PREREQUISITESYou must have a user account on the system on which you want to execute the command.
DESCRIPTIONThe naviseccli isns command with the -listserver function, lists all serversthat are configured in a system’s iSNS service.
If multiple servers are configured in the system’s iSNS service, the -listserveroperation will list multiple IP addresses and server types. You can have only one primaryserver; therefore you will only have one server designated as the primary. All otherservers are designated as backup servers.
VNX CLI for Block
isns -listserver 233

Note
The primary server is the server the iSNS service actively communicates with.
SYNTAXisns -listserverEXAMPLEThe following example lists the primary and backup iSNS servers for the system:
naviseccli -address ss1_spa isns -listserver
OUTPUT
IP Address: 111.222.33.44Server Type: BackupIP Address: 111.222.33.45Server Type: Primary
IP Address is the IP address of the iSNS server. Server Type specifies whether the serveris set as the primary or backup server.
isns -setprimarySets a configured iSNS server as the primary server for a system’s iSNS serviceconfiguration.
PREREQUISITESYou must have a user account on the system on which you want to execute the command.
DESCRIPTIONThe naviseccli isns command with the -setprimary function, establishes aconfigured iSNS server as the primary server in a system’s iSNS service configuration. Theprimary server is the server the iSNS service actively communicates with. You can haveonly one primary server.
Note
If the IP address of the server you specify to be the primary server is not configured, youwill receive an error message.
Use this command when you want to change the primary server in a system’s iSNSservice configuration. You can also use this command to re-establish a primary serverafter a failover. When a failure occurs that takes the existing primary server out of service,the iSNS service automatically establishes a backup server as the new primary server.You can use the isns -setprimary command to restore the original primary server asthe primary server.
Note
If you have more than one backup server, the first backup server listed becomes the newprimary server (see isns -listserver).
SYNTAXisns -setprimary IPAddr [-o]OPTIONS
IPAddrThe IP address of the iSNS server you want to designate as the primary server.
VNX CLI for Block
234 EMC VNX Series 5.33 Command Line Interface Reference for Block
Note
You must identify the iSNS server by the server’s IP address. Specify the IP addressin the form b.c.d.e where b, c, d and e range from 0 through 255, for example,111.222.33.44.
-oExecutes the command without prompting for confirmation.
EXAMPLEThe following example establishes the specified iSNS server as the primary server:
naviseccli -address ss1_spa isns -setprimary 111.222.33.44
The listed IP Address will become the Primary iSNS server: 111.222.33.44.Do you really want to perform this action (y/n)? y
OUTPUTNone if the command succeeds; status or error information if it fails.
LUN Migration commandsThis section explains the VNX CLI for Block commands that manage LUN migration.
LUN migration lets you improve the performance of a LUN by migrating the data from thesource LUN to a destination LUN that has more desirable performance characteristics.
migrate -startStarts a LUN migration session.
PREREQUISITESYou must have a user account on the system on which you want to execute the command.
DESCRIPTIONThe naviseccli migrate command with the -start switch starts a LUN migrationsession.
Note
If the maximum number of migrations already exists on the subsystem, the new sessionis still created, but its state is queued.
For raw device mapping volumes (RDMs), if you are running VMware ESX Server and youare using the migration feature to copy LUNs to larger LUNs only, after you complete themigration you must rescan the bus at the ESX Server level. You can also rescan at thevirtual machine level (optional). You then must expand the file system at the virtualmachine level. ESX Server and the virtual machine will now recognize the completedmigration.
For configuration specifications, go to the E-Lab Interoperability Navigator on EMC OnlineSupport.
SYNTAXmigrate -start -source number|WWN -dest number|WWN -rate low|medium|high|ASAP|value [-destroySnapshots] [-o]
VNX CLI for Block
LUN Migration commands 235
OPTIONS
-source number|WWNSpecifies the source LUN for the migration. You can specify the LUN ID or World WideName (WWN).
-dest number|WWNSpecifies the destination LUN of the migration. You can specify the LUN ID or WorldWide Name.
Note
The destination LUN must be the same size or larger than the source LUN.
-rate low|medium|high|ASAP|valueSpecifies the LUN migration rate. Valid rates are low or 0, medium or 1, high or 2,and ASAP or 3.
Note
Do not use the ASAP migration rate when the system is in production, as the normalhost I/O may be interrupted. Use ASAP only when the system is offline (free of anyhost-level I/O).
-destroySnapshotsDeletes snapshots automatically after migration if source LUN has snapshots,including any snapshots that were taken of consistency groups while this LUN was amember.
-oExecutes the command without prompting for confirmation.
EXAMPLEThis command starts a LUN migration session where the source LUN’s ID is 6, thedestination LUN’s ID is 7, and the LUN migration rate is low.
naviseccli migrate -start -source 6 -dest 7 -rate low
OUTPUTNone if the command succeeds; status or error information if it fails.
migrate -cancelCancels a LUN migration session.
PREREQUISITESYou must have a user account on the system on which you want to execute the command.
DESCRIPTIONThe naviseccli migrate command with the -cancel switch cancels an in-processLUN migration. The destination LUN is deleted when canceling occurs. Canceling themigration does not cause any data loss. The original LUN remains unchanged.
Note
You can cancel only one migration at a time.
SYNTAXmigrate -cancel -source number|WWN [-o]
VNX CLI for Block
236 EMC VNX Series 5.33 Command Line Interface Reference for Block

OPTIONS
-source number|WWNSpecifies the source LUN for migration as the LUN ID or World Wide Name (WWN).
-oExecutes the command without prompting for confirmation.
EXAMPLEThis command cancels a LUN migration session whose source LUN’s ID is 6.
naviseccli migrate -cancel -source 6
OUTPUTNone if the command succeeds; status or error information if it fails.
migrate -modifyModifies a LUN migration session.
PREREQUISITESYou must have a user account on the system on which you want to execute the command.
DESCRIPTIONThe naviseccli migrate command with the -modify switch modifies a LUNmigration session according to the parameters you specify.
SYNTAX
migrate -modify -source number|WWN [-rate low|medium|high|ASAP|value] [-o]
OPTIONS
-source number|WWNSpecifies the source LUN of the migration you want to modify. You can specify theLUN ID or World Wide Name (WWN).
-rate low|medium|high|ASAP|valueSpecifies the LUN migration rate. Valid rates are low or 0, medium or 1, high or 2,and ASAP or 3.
Note
Do not use the ASAP migration rate when the system is in production, as the normalhost I/O may be interrupted.Use ASAP only when the system is offline (free of any host-level I/O).
-oExecutes the command without prompting for confirmation.
EXAMPLEThis command modifies the LUN migration rate to medium.
naviseccli migrate -modify -source 6 -rate medium
OUTPUTNone if the command succeeds; status or error information if it fails.
VNX CLI for Block
migrate -modify 237
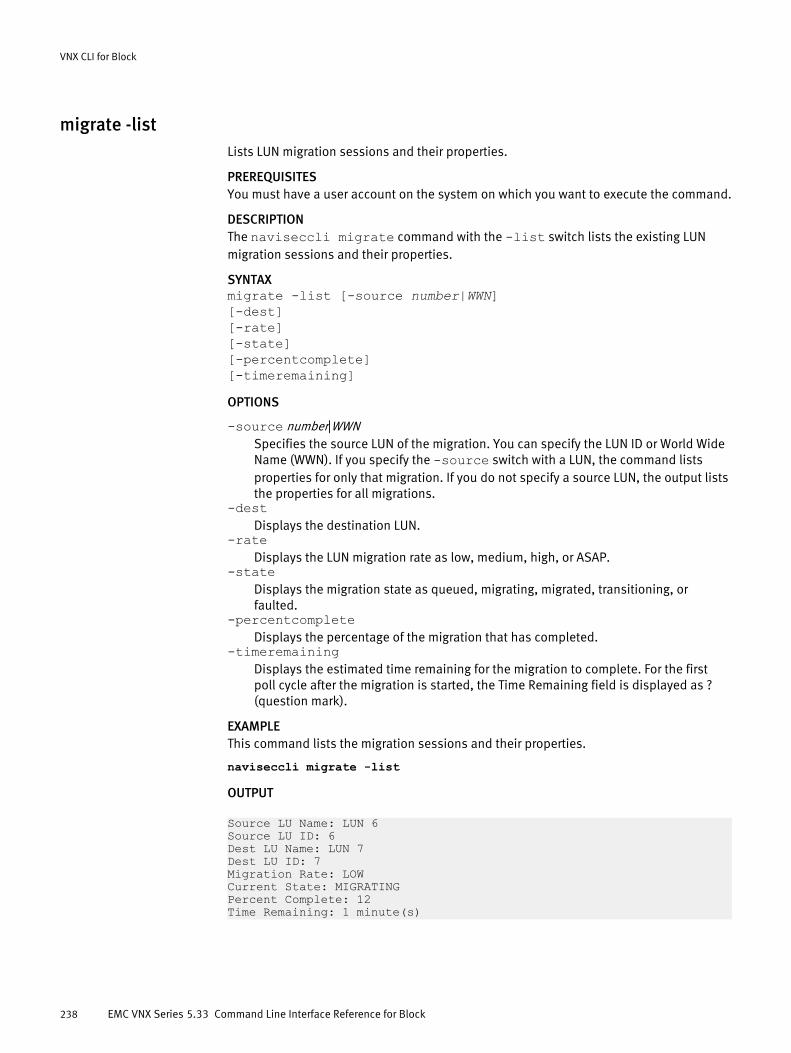
migrate -listLists LUN migration sessions and their properties.
PREREQUISITESYou must have a user account on the system on which you want to execute the command.
DESCRIPTIONThe naviseccli migrate command with the -list switch lists the existing LUNmigration sessions and their properties.
SYNTAXmigrate -list [-source number|WWN][-dest][-rate][-state][-percentcomplete][-timeremaining]OPTIONS
-source number|WWNSpecifies the source LUN of the migration. You can specify the LUN ID or World WideName (WWN). If you specify the -source switch with a LUN, the command listsproperties for only that migration. If you do not specify a source LUN, the output liststhe properties for all migrations.
-destDisplays the destination LUN.
-rateDisplays the LUN migration rate as low, medium, high, or ASAP.
-stateDisplays the migration state as queued, migrating, migrated, transitioning, orfaulted.
-percentcompleteDisplays the percentage of the migration that has completed.
-timeremainingDisplays the estimated time remaining for the migration to complete. For the firstpoll cycle after the migration is started, the Time Remaining field is displayed as ?(question mark).
EXAMPLEThis command lists the migration sessions and their properties.
naviseccli migrate -list
OUTPUT
Source LU Name: LUN 6Source LU ID: 6Dest LU Name: LUN 7Dest LU ID: 7Migration Rate: LOWCurrent State: MIGRATINGPercent Complete: 12Time Remaining: 1 minute(s)
VNX CLI for Block
238 EMC VNX Series 5.33 Command Line Interface Reference for Block

Domain and Security commandsThis section provides a brief overview of the domain and security features, and includes alist of commands you can use to manage system domains and user access to systems.
About domains and user accountsA domain is a group of one or more systems with Storage Management Server softwarewhose SPs are connected to a network and which have been assigned to the domain byVNX CLI for Block or Unisphere. Each domain has a master node (master system) thatmaintains the master copy of the domain data — the systems and global user accountsthat make up the domain.
Setting up a domain allows a group of systems to be monitored and managed using asingle login. Even if you plan to use a system by itself (manage it separately), we suggestthat you create a domain for that system.
Note
When you setup a user account, you assign a scope of either global, local, or LDAP.Global user accounts apply to all systems within a domain. Local user accounts apply to aspecific system. LDAP uses an external server to authenticate accounts for an entiredomain.
VNX CLI for Block versions 6.24 and later support lightweight directory access protocol(LDAP). This requires an active and operational LDAP environment to which you canconnect Unisphere security for the purpose of sharing user accounts and authenticatingusernames and passwords.
Administrators can manage accounts in a centralized directory accessible to multipleapplications. Users can use their LDAP credentials to log in and perform Unisphere andCLI operations.
Note
In order to issue domain CLI commands, you must have global administrator privileges.
A user (that is, someone who needs to view or manage system operations) can have oneof these roles:
l Administrator
l Security Administrator
l Manager
l Monitor
l Replication
l Local replication
l Replication/recovery
Note
To issue security CLI commands for user account setup, modification, or removal youmust have administrator privileges. Global administrators can manage both global andlocal user accounts. Local administrators can manage only local user accounts. Table 4provides an explanation of operations that can be performed by role and scope.
VNX CLI for Block
Domain and Security commands 239

You can assign a user a role globally (the user has the role across all systems in thedomain) or locally (the user has the role on a specific system only). Each global usernamemust be unique in the domain; each local username must be unique within the localmanagement server.
Note
Usernames and passwords can be 1 to 32 characters, including letters (case sensitive),numbers, underscores, non-numeric, non-alpha characters, spaces, and must start with aletter.
Operations that users with different roles can perform on page 240 defines theoperations a user can perform by role and scope.
Table 12 Operations that users with different roles can perform
User role Can view Can add, modify, or delete
Administrator All domain and systemsettings, and global andlocal accounts
All domain and system settings, andglobal and local accounts (cannot deletethe last global administrator account)
Currently, the following security administrator roles are supported only on CX and CX3 seriessystems running VNX OE for Block version 02.26.xxx.yyy.zzz or higher.
Security Administrator All security-related features,global and local accounts
All security features. Cannot see ormanage system features
Manager All system settings indomain
All system settings in domain
Monitor All system settings indomain
Nothing
Local Replication All system settings indomain
Some operations of MirrorView, SANCopy, and SnapView (see Actionspermission on page 240)
Replication All system settings indomain
Some operations of MirrorView, SANCopy, and SnapView (see Actionspermission on page 240)
Replication andrecovery
All system settings indomain
Some operations of MirrorView, SANCopy, and SnapView (see Actionspermission on page 240)
Table 13 Actions permission
Command Local replication Replication Replication/Recovery
SnapView
Start a (consistent) snap session Yes Yes Yes
Stop a (consistent) snap session Yes Yes Yes
Activate a session to a snapshot LUN Yes Yes Yes
Deactivate a session from a snapshotLUN
Yes Yes Yes
VNX CLI for Block
240 EMC VNX Series 5.33 Command Line Interface Reference for Block
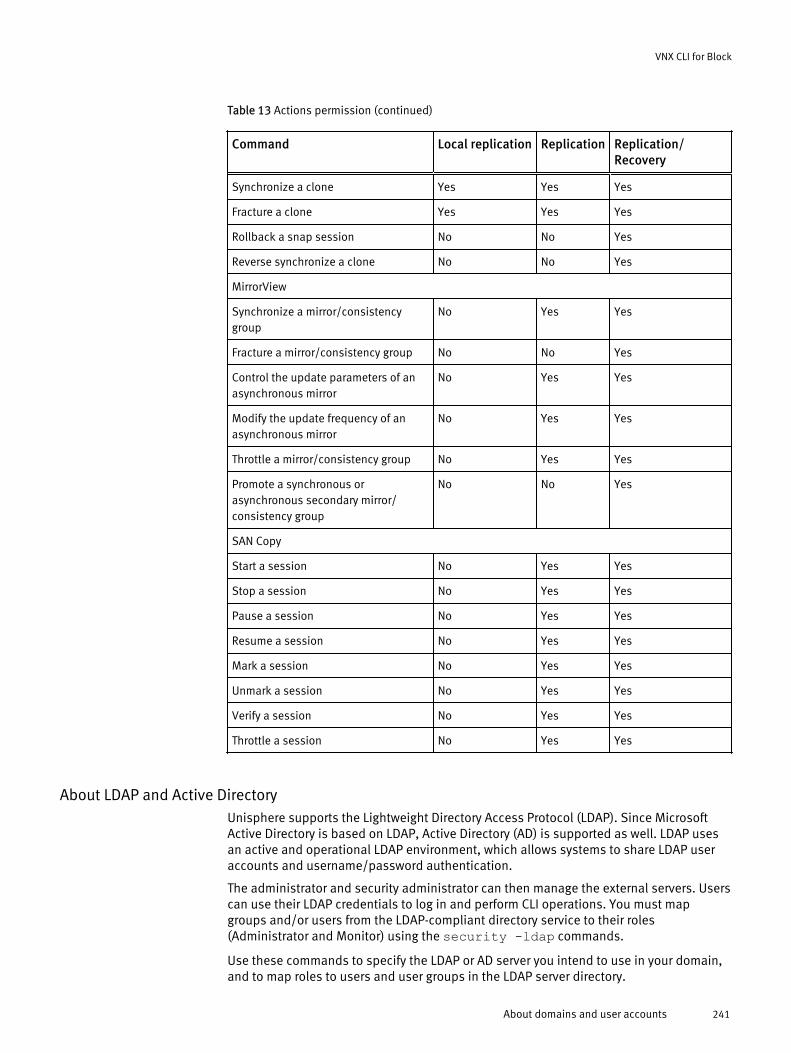
Table 13 Actions permission (continued)
Command Local replication Replication Replication/Recovery
Synchronize a clone Yes Yes Yes
Fracture a clone Yes Yes Yes
Rollback a snap session No No Yes
Reverse synchronize a clone No No Yes
MirrorView
Synchronize a mirror/consistencygroup
No Yes Yes
Fracture a mirror/consistency group No No Yes
Control the update parameters of anasynchronous mirror
No Yes Yes
Modify the update frequency of anasynchronous mirror
No Yes Yes
Throttle a mirror/consistency group No Yes Yes
Promote a synchronous orasynchronous secondary mirror/consistency group
No No Yes
SAN Copy
Start a session No Yes Yes
Stop a session No Yes Yes
Pause a session No Yes Yes
Resume a session No Yes Yes
Mark a session No Yes Yes
Unmark a session No Yes Yes
Verify a session No Yes Yes
Throttle a session No Yes Yes
About LDAP and Active DirectoryUnisphere supports the Lightweight Directory Access Protocol (LDAP). Since MicrosoftActive Directory is based on LDAP, Active Directory (AD) is supported as well. LDAP usesan active and operational LDAP environment, which allows systems to share LDAP useraccounts and username/password authentication.
The administrator and security administrator can then manage the external servers. Userscan use their LDAP credentials to log in and perform CLI operations. You must mapgroups and/or users from the LDAP-compliant directory service to their roles(Administrator and Monitor) using the security -ldap commands.
Use these commands to specify the LDAP or AD server you intend to use in your domain,and to map roles to users and user groups in the LDAP server directory.
VNX CLI for Block
About domains and user accounts 241

This feature also supports advanced functions, such as specifying attributes for whichuser IDs and user/group common names are appended in the LDAP/AD server, defininguser and group object classes, and mapping roles to additional servers.
Consult with your site LDAP administrator to determine the correct parameters.
navisecclidomain and security commands on page 239 provides the list of security -ldap commands used to configure the LDAP settings.
Domain and security commands overviewThe commands in this section include the domain and security commands. The followingtable identifies the commands.
Table 14 naviseccli domain and security commands
Command Description
Domain commands
domain -add Adds one or more systems to a domain.
domain -list Displays all systems in a domain.
domain -remove Removes a system from a domain.
domain -setmaster Sets a system as the master system in adomain.
domain -uninitialize Destroys the domain and security configurationof the system.
ntp -list Lists the NTP configuration settings in a domain.
ntp -set Modifies the NTP configuration in a domain.
Security commands
security -adduser Creates a user account.
security -changeuserinfo Changes the password and/or role of a useraccount.
security -list Displays user accounts.
security -listrole Lists the user’s security role.
security -rmuser Deletes a user account.
Security LDAP commands
security -ldap -addServer Creates a new LDAP directory server.
security -ldap -modifyserver Modifies the external server login configuration.
security -ldap -removeserver Removes a server.
security -ldap -listserver Lists the LDAP external server information.
security -ldap -addrolemapping Creates a new role mapping.
security -ldap -modifyrolemapping Modifies the role mapping.
security -ldap -removerolemapping Removes the role mapping entity.
security -ldap -listrolemapping Lists the role mapping entity.
VNX CLI for Block
242 EMC VNX Series 5.33 Command Line Interface Reference for Block

Table 14 naviseccli domain and security commands (continued)
Command Description
security -ldap -synchronize Synchronizes the accounts.
Security Certificate commands
security -certificate -add Imports the certificate.
security -certificate -remove Removes the specified certificate.
security -certificate -list Lists all certificates.
security -certificate -alert -BeforeExpiration
Indicates that an alert should be generated priorto the expiration of the SSL/TLS certificate.
security -pkcs12upload Uploads a PKCS #12 file which contains acertificate and private key to the storage system.
security -SPcertificate -generate Generates a new self-signed certificate andreplaces the one currently in use.
Security FIPS commands
security –fipsmode -set Sets the FIPS mode of Unisphere.
security –fipsmode -get Gets the FIPS mode of Unisphere.
Other Security commands
security -setport Sets the http/https ports that Unisphere uses.
security -trustedclient -enable Enables or disables IP Filter for all storagesystems supporting filtering.
security -trustedclient -add Adds an IP Filter to the storage system.
security -trustedclient -list Lists the current IP Filters for the storage system.
security -trustedclient -re Removes IP Filters from the storage system.
domain -addAdds system to a domain.
PREREQUISITESYou must have a user account on the system on which you want to execute the command.
DESCRIPTIONThe naviseccli domain command with the -add function, adds the system youspecify to the system domain. You can add only one system to the domain one time.When you add a system to the domain, you specify the system’s IP address.
See domain -setmaster if you need to establish a domain. You then can add system tothe domain using domain -add.
The -olduser, -oldpassword, and -oldscope are optional switches. Theseswitches must be provided all together or none of them must be provided. If none ofthem are provided, the user account, sysadmin with global scope is used as a defaultuser to operate on the system.
VNX CLI for Block
domain -add 243

Only one IP address is supported. If multiple IP addresses are provided, displays the errormessage,
Invalid Command. Too many parameters Please also make sure onlyONE ip address is provided.If the user uses domain -add to add File or Unified systems into a domain withoutSystem account, the command fails and displays the error message,
Domain add operation failed. The local domain does not have asystem account, which is required when adding a file or unifiedsystem into a domain. Create a system administrator account inorder to continue with adding this system into the domain.Any File or Unified system is allowed to be added into another domain, only if it is in adomain. Otherwise, displays the error message,
Domain add operation failed.Security is not initialized.Security must be initialized before any domain operations canbe performed in this system. Create a global administrator toinitialize security. 10.244.212.164.SYNTAXdomain -add IPAddr [[-olduser olduser][-oldpasswordoldpassword][-oldscope oldscope]][-o]OPTIONS
IPAddrThe IP address of the system you want to add.
Note
You must identify the system by the system’s IP address. Specify the IP address inthe form b.c.d.e where b, c, d and e range from 0 through 255, for example,111.222.33.44.
-olduser olduserSpecifies a valid username in the old domain.
-oldpassword oldpasswordSpecifies the matching password for the -olduser.
-oldscope oldscopeSpecifies the valid scope for the -olduser.
-oExecutes the command without prompting for confirmation.
EXAMPLE #1The following example adds the specified systems, to the system domain:
naviseccli -address ss1_spa domain -add 111.222.33.44 111.222.33.45
WARNING: You are about to add following node(s) to the domain.111.222.33.44111.222.33.45
Proceed? (y/n) y
EXAMPLE #2
naviseccli -h 10.14.22.33 -user a –password a –scope global domain–add 10.14.33.44 –olduser b –oldpassword b –scope global
VNX CLI for Block
244 EMC VNX Series 5.33 Command Line Interface Reference for Block

EXAMPLE #3If any of the switches, -olduser, -oldpassword, or -oldscope are missing, thefollowing error messages are displayed accordingly:
C:\>naviseccli -h 10.244.212.164 domain -add 10.244.211.204 -oldscopeglobal
Invalid command line parameters. Please provide the scope for the remote system: -oldscope
C:\>naviseccli -h 10.244.212.164 domain -add 10.244.211.204 -olduserglobal
Invalid command line parameters. Please provide the user name for the remote system: -olduser
C:\>naviseccli -h 10.244.212.164 domain -add 10.244.211.204 -oldpassword global
Invalid command line parameters. Please provide the password for the remote system: -oldpassword
OUTPUTNone if the command succeeds; status or error information if it fails.
domain -listDisplays all systems in a domain.
PREREQUISITESYou must have a user account on the system on which you want to execute the command.
DESCRIPTIONThe naviseccli domain command with the -list function, lists the IP address,name, port and secure port information for all systems in a system domain. If you want toview only information about the master system in the domain, you can use the optional -master switch.
Note
You can have only one master system in a domain (see domain -setmaster on page 248).
SYNTAXdomain -list [-master]OPTIONS-master
Displays only information about the master system in the domain.
EXAMPLEThe following example lists the systems in the system domain:
naviseccli -address 111.222.33.44 domain -list
OUTPUT
Node: APM00011111111IP Address: 111.222.33.55 (Master)
VNX CLI for Block
domain -list 245

Name: CX300I_33_55Port: 80Secure Port: 443IP Address: 111.222.33.44Name: CX300I_33_44Port: 80Secure Port: 443
domain -removeRemoves a system from a domain.
PREREQUISITESYou must have a user account on the system on which you want to execute the command.The software package VNX-Block-Operating-Environment must be committed before this
operation is allowed.
DESCRIPTIONThe naviseccli domain command with the -remove function removes the systemyou specify from a system domain. When you remove a system from a domain, youspecify the system’s IP address.
If you want to move a system to a different domain, use domain -remove to removethe system from the current domain, then domain -add to add the system to the otherdomain.
Note
If you remove the master system from the domain, you destroy the domain. The CLI warnsyou before you can complete the operation. If the system you want to move is the mastersystem in the domain, and you want to retain the domain, then you should change themaster system to another system in the domain before moving the old master (see domain -setmaster on page 248).
SYNTAXdomain -remove IPAddr[-passwordpassword][-o]OPTIONS
IPAddrThe IP address of the system you want to remove.
Note
You must identify the system by the system’s IP address. Specify the IP address inthe form b.c.d.e where b, c, d and e range from 0 through 255, for example,111.222.33.44.
-password passwordOverrides the default password for the global administrator.
NOTICE
You must override the default password. If you don’t override it, the system acceptsthe default password that may pose a high security risk.
-oExecutes the command without prompting for confirmation.
VNX CLI for Block
246 EMC VNX Series 5.33 Command Line Interface Reference for Block
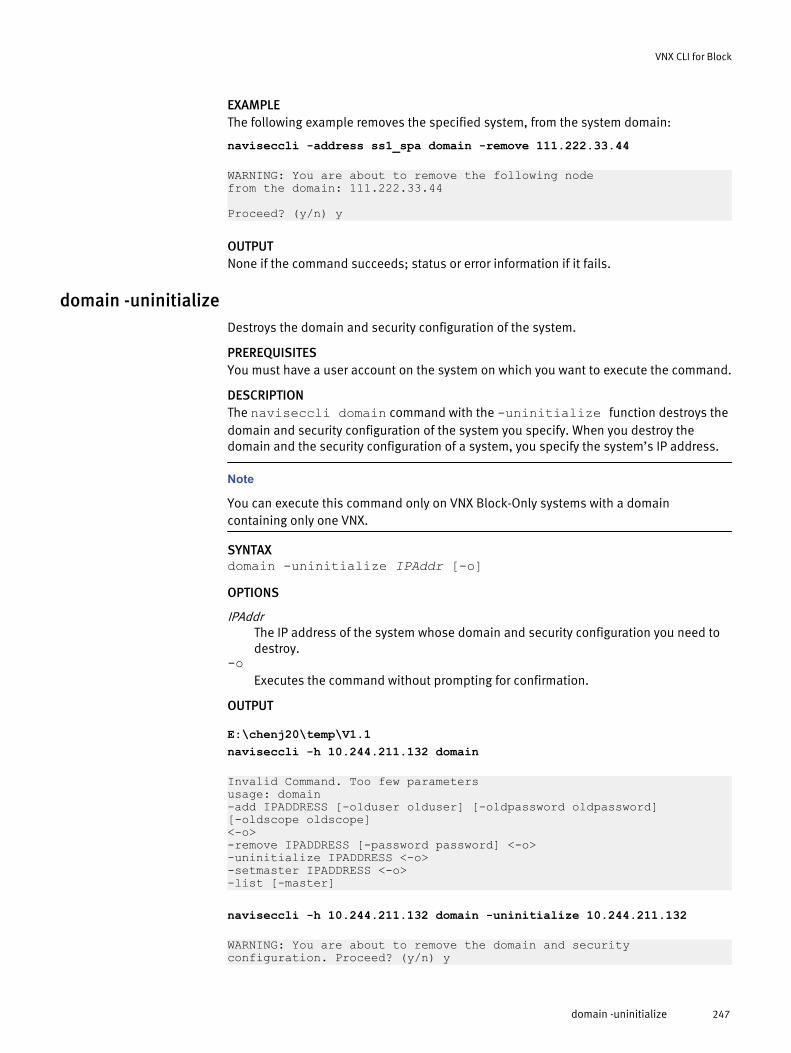
EXAMPLEThe following example removes the specified system, from the system domain:
naviseccli -address ss1_spa domain -remove 111.222.33.44
WARNING: You are about to remove the following node from the domain: 111.222.33.44
Proceed? (y/n) y
OUTPUTNone if the command succeeds; status or error information if it fails.
domain -uninitializeDestroys the domain and security configuration of the system.
PREREQUISITESYou must have a user account on the system on which you want to execute the command.
DESCRIPTIONThe naviseccli domain command with the -uninitialize function destroys thedomain and security configuration of the system you specify. When you destroy thedomain and the security configuration of a system, you specify the system’s IP address.
Note
You can execute this command only on VNX Block-Only systems with a domaincontaining only one VNX.
SYNTAXdomain -uninitialize IPAddr [-o]OPTIONS
IPAddrThe IP address of the system whose domain and security configuration you need todestroy.
-oExecutes the command without prompting for confirmation.
OUTPUT
E:\chenj20\temp\V1.1naviseccli -h 10.244.211.132 domain
Invalid Command. Too few parametersusage: domain-add IPADDRESS [-olduser olduser] [-oldpassword oldpassword] [-oldscope oldscope]<-o>-remove IPADDRESS [-password password] <-o>-uninitialize IPADDRESS <-o>-setmaster IPADDRESS <-o>-list [-master]
naviseccli -h 10.244.211.132 domain -uninitialize 10.244.211.132
WARNING: You are about to remove the domain and security configuration. Proceed? (y/n) y
VNX CLI for Block
domain -uninitialize 247
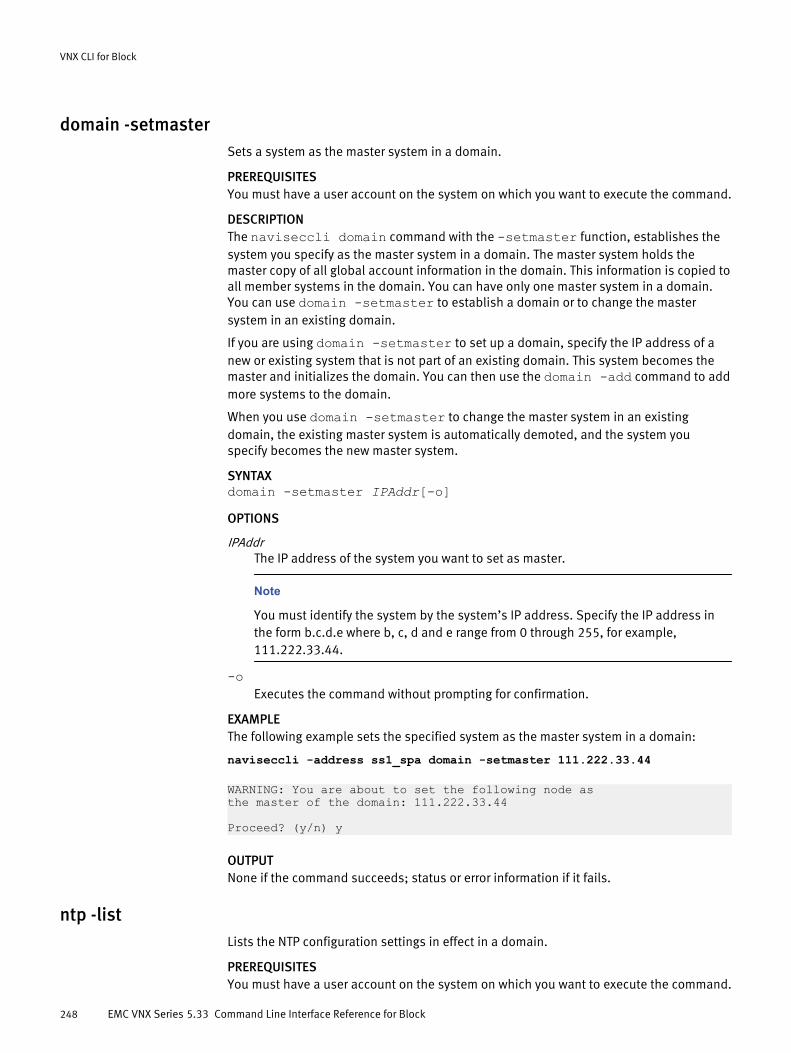
domain -setmasterSets a system as the master system in a domain.
PREREQUISITESYou must have a user account on the system on which you want to execute the command.
DESCRIPTIONThe naviseccli domain command with the -setmaster function, establishes thesystem you specify as the master system in a domain. The master system holds themaster copy of all global account information in the domain. This information is copied toall member systems in the domain. You can have only one master system in a domain.You can use domain -setmaster to establish a domain or to change the mastersystem in an existing domain.
If you are using domain -setmaster to set up a domain, specify the IP address of anew or existing system that is not part of an existing domain. This system becomes themaster and initializes the domain. You can then use the domain -add command to addmore systems to the domain.
When you use domain -setmaster to change the master system in an existingdomain, the existing master system is automatically demoted, and the system youspecify becomes the new master system.
SYNTAXdomain -setmaster IPAddr[-o]OPTIONS
IPAddrThe IP address of the system you want to set as master.
Note
You must identify the system by the system’s IP address. Specify the IP address inthe form b.c.d.e where b, c, d and e range from 0 through 255, for example,111.222.33.44.
-oExecutes the command without prompting for confirmation.
EXAMPLEThe following example sets the specified system as the master system in a domain:
naviseccli -address ss1_spa domain -setmaster 111.222.33.44
WARNING: You are about to set the following node as the master of the domain: 111.222.33.44
Proceed? (y/n) y
OUTPUTNone if the command succeeds; status or error information if it fails.
ntp -listLists the NTP configuration settings in effect in a domain.
PREREQUISITESYou must have a user account on the system on which you want to execute the command.
VNX CLI for Block
248 EMC VNX Series 5.33 Command Line Interface Reference for Block

Only a security administrator or an administrator has the access rights.
You will receive an error message if access is denied or an invalid parameter is set.
DESCRIPTIONThe naviseccli ntp command with the -list function, lists the Network TimeProtocol (NTP) configuration settings in effect in a domain.
SYNTAXntp -list |-control|-servers|-allOPTIONS
-controlDisplays start/stop and interval information.
-serversDisplays configured server addresses and any associated authenticationinformation.
-allDisplays all information.
EXAMPLEThe following example lists all the information:
naviseccli -user a -password a -scope 0 -address 10.5.1.207 ntp -list-all
OUTPUT
Output: -allstart: YESinterval: 720 minutesaddress: 10.5.1.207 128.221.142.13serverkey: 0keyvalue: ""
XML Output:
-list -all
<?xml version="1.0" encoding="utf-8" ?><CIM CIMVERSION="2.0" DTDVERSION="2.0"><MESSAGE ID="877"PROTOCOLVERSION="1.0"><SIMPLERSP><METHODRESPONSENAME="ExecuteClientRequest"><RETURNVALUETYPE="Navi_Error"><VALUE.NAMEDINSTANCE><INSTANCENAME CLASSNAME="Navi_Error"></INSTANCENAME><INSTANCE CLASSNAME="Navi_Error"><PROPERTY NAME="errorCode"TYPE="uint32"><VALUE>0</VALUE></PROPERTY><PROPERTY NAME="success"TYPE="boolean"><VALUE>true</VALUE></PROPERTY><PROPERTY NAME="where"TYPE="string"><VALUE>NTPProvider</VALUE></PROPERTY><PROPERTY NAME="why" TYPE="string"><VALUE>Operationsuccessfully completed. </VALUE></PROPERTY></INSTANCE></VALUE.NAMEDINSTANCE></RETURNVALUE><PARAMVALUE NAME="start:"
VNX CLI for Block
ntp -list 249
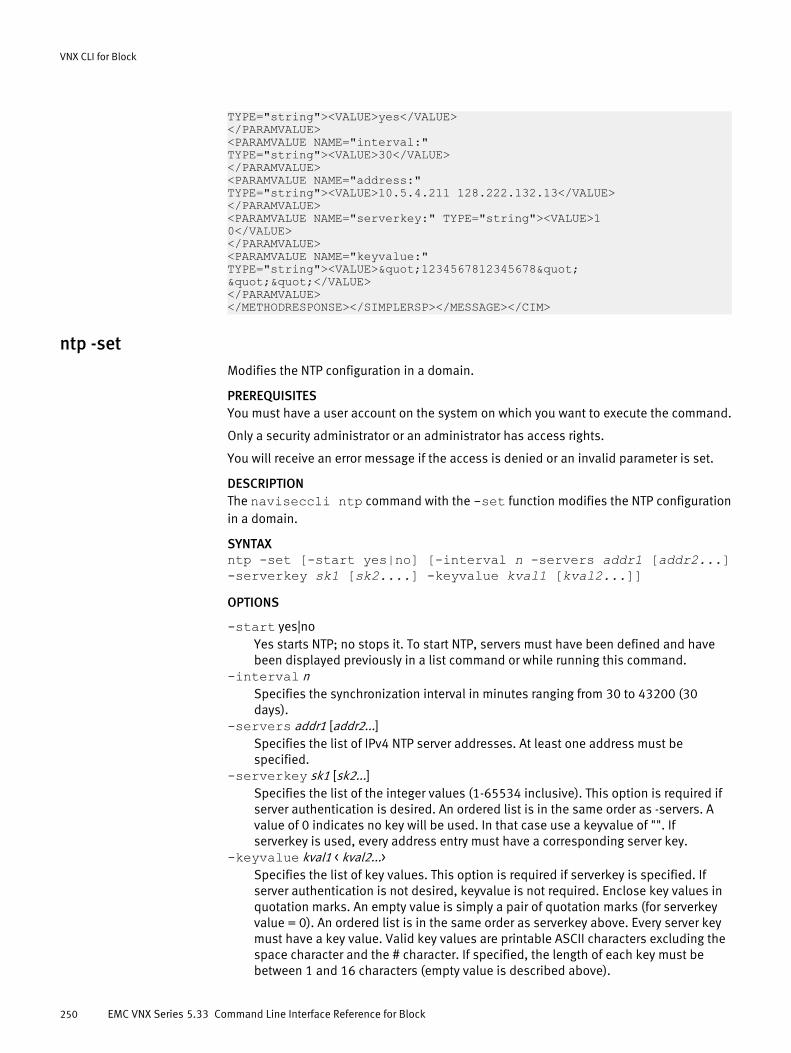
TYPE="string"><VALUE>yes</VALUE></PARAMVALUE><PARAMVALUE NAME="interval:"TYPE="string"><VALUE>30</VALUE></PARAMVALUE><PARAMVALUE NAME="address:"TYPE="string"><VALUE>10.5.4.211 128.222.132.13</VALUE></PARAMVALUE><PARAMVALUE NAME="serverkey:" TYPE="string"><VALUE>10</VALUE></PARAMVALUE><PARAMVALUE NAME="keyvalue:"TYPE="string"><VALUE>"1234567812345678"""</VALUE></PARAMVALUE></METHODRESPONSE></SIMPLERSP></MESSAGE></CIM>
ntp -setModifies the NTP configuration in a domain.
PREREQUISITESYou must have a user account on the system on which you want to execute the command.
Only a security administrator or an administrator has access rights.
You will receive an error message if the access is denied or an invalid parameter is set.
DESCRIPTIONThe naviseccli ntp command with the -set function modifies the NTP configurationin a domain.
SYNTAXntp -set [-start yes|no] [-interval n -servers addr1 [addr2...]-serverkey sk1 [sk2....] -keyvalue kval1 [kval2...]]OPTIONS
-start yes|noYes starts NTP; no stops it. To start NTP, servers must have been defined and havebeen displayed previously in a list command or while running this command.
-interval nSpecifies the synchronization interval in minutes ranging from 30 to 43200 (30days).
-servers addr1 [addr2...]Specifies the list of IPv4 NTP server addresses. At least one address must bespecified.
-serverkey sk1 [sk2...]Specifies the list of the integer values (1-65534 inclusive). This option is required ifserver authentication is desired. An ordered list is in the same order as -servers. Avalue of 0 indicates no key will be used. In that case use a keyvalue of "". Ifserverkey is used, every address entry must have a corresponding server key.
-keyvalue kval1 < kval2...>Specifies the list of key values. This option is required if serverkey is specified. Ifserver authentication is not desired, keyvalue is not required. Enclose key values inquotation marks. An empty value is simply a pair of quotation marks (for serverkeyvalue = 0). An ordered list is in the same order as serverkey above. Every server keymust have a key value. Valid key values are printable ASCII characters excluding thespace character and the # character. If specified, the length of each key must bebetween 1 and 16 characters (empty value is described above).
VNX CLI for Block
250 EMC VNX Series 5.33 Command Line Interface Reference for Block

EXAMPLE #1Specifies all items for ss1_spa including server authentication.
naviseccli -address ss1_spa -set -start yes -interval45 -servers 10.5.1.207 128.222.132.13 -serverkey1 5 -keyvalue "1234567812345678" "abcdefghabcdefgh"
EXAMPLE #2Specifies all items for ss1_spa including server authentication but the key for addr2 isnot specified.
naviseccli -address ss1_spa -set -start yes -interval45 -servers 10.5.1.207 128.222.132.13 -serverkey5 0 -keyvalue "1234567812345678" ""
EXAMPLE #3Specifies items for ss1_spa choosing not to use server authentication.
naviseccli -address ss1_spa -set -start yes -interval45 -servers 10.5.1.207
EXAMPLE #4Stops (disables) NTP operations for ss1_spa.
Note
Does not affect synchronization interval or servers settings.
naviseccli -address ss1_spa -set -start no
EXAMPLE #5Specifies the interval and server information for ss1_spa.
Note
Does not affect start/stop settings.
naviseccli -address ss1_spa -set -interval 45 -servers10.5.1.207 128.222.132.13 -serverkey 5 0 -keyvalue"1234567812345678" ""
OUTPUTVaries depending on the switch you use.
security -adduserCreates a user account.
PREREQUISITESYou must have a user account on the system on which you want to execute the command.
The software package VNX-Block-Operating-Environment must be committed before thisoperation is allowed.
DESCRIPTIONThe naviseccli security command with the -adduser function, adds a useraccount to the system you specify. If you create a global account, it replicates to allsystems in the domain. When you add a user account, you specify the username,password, scope and role.
VNX CLI for Block
security -adduser 251

System account is a special global administrator account which is used to issue CLIcommand from File to Block. System account needs to be created immediately after theupgrade to R31
The -type option differentiates the user account and system account. If –type is notspecified, the system creates the account of User type, by default.
Note
When you create the initial global administrator user account, you do not need to providea username and password at login.
SYNTAXsecurity -adduser -user username -password password -scopeglobal|local -role administrator|storageadmin|operator|securityadministrator|dataprotection|localdataprotection|datarecovery|sanadmin|networkadmin|nasadmin|vmadmin [-typeuser|system] [-o]OPTIONS
-user usernameSpecifies the username you want to create for the user account.
-password passwordSpecifies the password you want to create for the user account.
-scope global|local|LDAPSpecifies the scope (global, local, or LDAP) you want to apply to the user account.
-role administrator|storageadmin|operator|securityadministrator|dataprotection |localdataprotection|datarecovery|sanadmin|networkadmin|nasadmin|vmadmin]
Specifies the role, administrator, storageadmin, operator, securityadministrator,dataprotection, localdataprotection, datarecovery, sanadmin, networkadmin,nasadmin, or vmadmin you want to apply to the user account.
-type user|systemIf you specify user, a user account is created. If you specify system, a system accountis created. You cannot create more than one system account in a domain and a non-global or a non-administrator system account.
-oExecutes the command without prompting for confirmation.
EXAMPLEThe following example creates the initial global administrator account on the system. Youare then prompted to create a domain for the system you specify:
naviseccli -address ss1_spa security -adduser -user a -passwordb -scope global -role administrator
Global security is not initialized. It is highly recommended that you initialize global security.
Do you still want to continue? y
WARNING: You are about to add user: a
Proceed?(y/n) y
This system is not in a domain. It is highly recommended you create a new domain for this system.
VNX CLI for Block
252 EMC VNX Series 5.33 Command Line Interface Reference for Block

OUTPUTNone if the command succeeds; status or error information if it fails.
security -changeuserinfoChanges the password and/or role of a user account.
PREREQUISITESYou must have a user account on the system on which you want to execute the command.
DESCRIPTIONThe naviseccli security command with the -changeuserinfo function,modifies the password and/or role of a user account. When you modify a user account,you specify the username and scope, then designate a new password and/or role.
Note
You can change the password in a user account without providing the user’s currentpassword.
Note
If a user attempts to change the role or the scope of an account with the Systemdesignation, the command fails.
SYNTAX
security -changeuserinfo -user username -scope global|local[-newpassword password] [-newrole administrator|manager|monitor][-o]
OPTIONS
user usernameSpecifies the username of the user account you want to modify.
-scope global|localSpecifies the scope, global or local, of the user account you want to modify. A globalaccount has access to all systems in a domain.
-newpassword passwordSpecifies the new password you want to create for the user account.
-newrole administrator|manager|monitorSpecifies the new role, administrator, manager, or monitor, you want to apply to theuser account.
-oExecutes the command without prompting for confirmation.
EXAMPLEThe following example modifies the role of an existing user account:
naviseccli -address ss1_spa security -changeuserinfo -userb -scope local -newrole manager
WARNING: You are about to change user: b (local)
Proceed?(y/n) y
VNX CLI for Block
security -changeuserinfo 253

OUTPUTNone if the command succeeds; status or error information if it fails.
security -listDisplays user accounts.
PREREQUISITESYou must have a user account on the system on which you want to execute the command.
DESCRIPTIONThe naviseccli security command with the -list function, lists the username,scope, role of user accounts, and type of account.
Note
The security -list command is supported on all Unisphere systems.
SYNTAXsecurity –list [–user username] [–scope global|local] [-roleadministrator|storageadmin|operator|securityadministrator|dataprotection |localdataprotection|datarecovery|sanadmin|networkadmin|nasadmin|vmadmin][-type]OPTIONS
-user usernameIdentifies a specific username for which you want to display information.
-scope global|localIdentifies users with a specific scope for which you want to display information.
-roleIdentifies users with a specific role for which you want to display information.
-typeDisplays the type of account, either a user account or a system account.
EXAMPLEThe following example lists users with the specified scope and role:
naviseccli -address ss1_spa security -list –rolemonitor -scope global
OUTPUT
Username: cRole: monitorScope: global
security -listroleLists the user’s security role.
PREREQUISITESYou must have a user account on the system on which you want to execute the command.If no user account matches the query, an access denied error will be displayed.
DESCRIPTIONThe naviseccli security command with the -listrole function, lists the user’ssecurity role.
VNX CLI for Block
254 EMC VNX Series 5.33 Command Line Interface Reference for Block

SYNTAXsecurity -listroleEXAMPLEThe following example lists the user’s security role:
naviseccli -h 10.14.83.44 security -listrole
OUTPUT
Role: Administrator
security -rmuserDeletes a user account.
PREREQUISITESYou must have a user account on the system on which you want to execute the command.
DESCRIPTIONThe naviseccli security command with the -rmuser function, removes the useraccount you specify. When you remove a user account, you specify the username andscope.
Note
You must specify a scope for the user you want to remove, since you can establish twouser accounts with the same username and varying scopes, one global and one local.
SYNTAXsecurity –rmuser –user username –scope global|local [-o]OPTIONS
-user usernameIdentifies the username of the account you want to remove.
-scope global|localSpecifies the scope, global or local, of the account you want to remove.
-oExecutes the command without prompting for confirmation.
EXAMPLEThe following example removes the specified user account:
naviseccli -address ss1_spa security -rmuser -user b -scopelocal
WARNING: You are about to remove user: b (local)
Proceed?(y/n) y
OUTPUTNone if the command succeeds; status or error information if it fails.
security -ldap -addserverCreates a new LDAP directory server.
PREREQUISITESYou must have a user account on the system on which you want to execute the command.
VNX CLI for Block
security -rmuser 255

DESCRIPTIONThe naviseccli security -ldap command with the -addserver subcommandcreates a new external server login configuration. Only a Unisphere security administratoror administrator can connect your system to an LDAP or Active Directory (AD) service.After defining the server connection settings, and mapping the user’s roles, users can login to the system with their LDAP username/password. Only two service connections canbe configured at a time.
System security must be initialized and a domain master must be selected beforeconfiguring LDAP connection settings. Consult with the LDAP site administrator todetermine the correct parameters.
SYNTAX
security -ldap -addserver IPaddress -portnumber portnumber-servertype LDAP|AD -protocol LDAP|LDAPS -binddn binddn-bindpassword password -usersearchpath usersearchpath[-groupsearchpath groupsearchpath] [-useridattribute attribute][-usernameattribute nameattribute] [-groupnameattributegroupattribute] [-groupmemberattribute memberattribute][-userobjectclass objectclass] [-groupobjectclass groupclass]][-certpathToCertificatefile] [-o]
OPTIONS
IPaddressSpecifies the network IP address (IPv4) of the LDAP/AD server with the informationrequired to authenticate users.
-portnumber portnumberSpecifies the port number that the server will open to allow external programs toaccess it. If the protocol is LDAP, the default port number is 389. If the protocol isLDAPS, the default port number is 636.
-servertype LDAP|ADSpecifies whether the server is a LDAP directory or AD server. The default is LDAP.
-protocol LDAP|LDAPSLets you specify either LDAPS or LDAP protocol.
-binddn binddnSpecifies the login name for the LDAP/AD server; it cannot exceed 512 characters.This field allows an LDAP-enabled application to access the targeted server andsearch for a user ID/password to validate. It should be in "cn=, ou=, dc=, dc="format.
-bindpassword passwordCredentials used to authenticate the bind DN. If you specify the length of otheroptions such as -binddn, the length of bindpassword should also be specified here.The bindPassword cannot exceed 512 characters.
-usersearchpath usersearchpathSets the path within the LDAP user entry database where a search for the username/password begins. It cannot exceed 512 characters. It should be in "ou=, dc=, dc="format.
-groupsearchpath groupsearchpathSets the path within the LDAP user-group entry database where a search for thegroup name/password begins. It cannot exceed 512 characters. It should be in"ou= , dc=, dc= " format. The option defaults to the User Search Path if you do notspecify the path.
-useridattribute useridattributeSpecifies the attribute to which the user ID will be appended in the LDAP/AD servers.The directory hierarchy will be searched using this attribute/userid pair. The default
VNX CLI for Block
256 EMC VNX Series 5.33 Command Line Interface Reference for Block
for an LDAP directory is uid and the default for an AD is sAMAccountName. It cannotexceed 128 characters.
-usernameattribute nameattributeSpecifies the attribute to which the user’s common name (cn) will be appended inthe servers. The default is cn and it cannot exceed 128 characters.
-groupnameattribute groupattributeSpecifies the attribute to which the user group’s common name will be appended inthe servers. This is stored as an attribute of an entry within the Group Search Path ofthe directory. The default is cn and it cannot exceed 128 characters.
-groupmemberattribute groupattributeActs as a search filter for the different attribute types to identify the different groupsof members. If you do not specify this field, then a search will be performed usingonly the Group Name Attribute parameter. The default value for an LDAP directory isuniqueMembers and the default for an AD is member. It cannot exceed 128characters.
-userobjectclass objectclassDefines the required and optional attributes so that the user entry can act as asearch filter in a situation where a user has multiple entries in a server. If you do notspecify this field, then a search will be performed using only the User ID Attributeparameter. It cannot exceed 128 characters.
-groupobjectclass groupclassDefines the required and optional attributes so that the group entry can act as asearch filter in a situation where a group has multiple entries in a server. If you donot specify this field, then a search will be performed using only the Group NameAttribute parameter. The default for an LDAP directory is groupOfUniqueNames andthe default for an AD is group. It cannot exceed 128 characters.
-cert pathToCertificatefileSpecifies the full pathname of the trusted certificate file to be uploaded to thecertificate store.
-oExecutes the command without prompting for confirmation.
EXAMPLE
naviseccli -h 10.32.123.229 -user a -password a -scope 0 security-ldap -addserver 10.5.4.111 -portnumber 389 -servertype LDAP-protocol LDAP -binddn cn=Manager,dc=ipv4,dc=com-bindpassword ipv4int -usersearchpath ou=Users,dc=ipv4,dc=com
OUTPUTNone if the command succeeds; status or error information if it fails.
security -ldap -modifyserverModifies the external server login configuration.
PREREQUISITESYou must have a user account on the system on which you want to execute the command.
DESCRIPTIONThe naviseccli security -ldap command with the -modifyserversubcommand modifies the settings that connect your system to an LDAP or AD service.Consult with the LDAP/AD site administrator to determine the correct parameters. Onlythe security administrator or administrator can execute this command.
VNX CLI for Block
security -ldap -modifyserver 257

SYNTAXsecurity -ldap -modifyserver IPaddress -bindpassword password[-ldapserver IPaddress] [-portnumber portnumber] [-servertypeLDAP| AD] [-protocol LDAP| LDAPS] [-binddn binddn][-newbindpassword password] [-usersearchpath usersearchpath][-groupsearchpath groupsearchpath] [-useridattributeuseridattribute][-usernameattribute usernameattribute] [-groupnameattributegroupnameattribute] [-groupmemberattributegroupmemberattribute] [-userobjectclass userobjectclass][-groupobjectclass groupclass] [-o]OPTIONSIPaddress
Specifies the network IP address (IPv4) of the LDAP/AD server with the informationrequired to authenticate users.
-bindpassword passwordCredentials used to authenticate the bind DN. If you specify the length of otheroptions such as -binddn, the length of bindpassword should also be specifiedhere. The bindpassword cannot exceed 512 characters.
-ldapserver IPaddressSpecifies the network IP address (IPv4) of the LDAP server.
-portnumber portnumberLets you specify the port number that the server will open to allow external programsto access it. If the protocol is LDAP, the default port number is 389. If the protocol isLDAPS, the default port number is 636.
-servertype LDAP|ADSpecifies whether the server is an LDAP directory or AD server. The default is LDAP.
-protocol LDAP|LDAPSLets you specify either LDAPS or LDAP protocol.
-binddn binddnSpecifies the login name for the LDAP/AD server; it cannot exceed 512 characters.This field allows an LDAP-enabled application to access the targeted server andsearch for a userid/password to validate. It should be in "cn=, ou=, dc=, dc="format.
-newbindpassword passwordSpecifies the password that corresponds to the bind DN; and it cannot exceed 512characters.
-usersearchpath usersearchpathSets the path within the LDAP user entry database where a search for the username/password begins. It cannot exceed 512 characters. It should be in "ou=, dc=, dc="format.
-groupsearchpath groupsearchpathSets the path within the LDAP user-group entry database where a search for thegroup name/password begins. It cannot exceed 512 characters. It should be in"ou= , dc=, dc= " format . The option defaults to the User Search Path if you do notspecify the path.
-useridattribute useridattributeSpecifies the attribute to which the user ID will be appended in the LDAP/AD servers.The directory database is searched using this attribute/userid pair. The default foran LDAP directory is uid and the default for an AD is sAMAccountName. It cannotexceed 128 characters.
-usernameattribute usernameattributeSpecifies the attribute to which the user’s common name (cn) will be appended inthe servers. The default is cn. It cannot exceed 128 characters.
VNX CLI for Block
258 EMC VNX Series 5.33 Command Line Interface Reference for Block
-groupnameattribute groupnameattributeSpecifies the attribute to which the user group’s common name will be appended inthe servers. This is stored as an attribute of an entry within the Group Search Path ofthe directory. The default is cn. It cannot exceed 128 characters.
-groupmemberattribute groupmemberattributeActs as a search filter for the different attribute types to identify the different groupsof members. If you do not specify this field, then a search will be performed usingonly the Group Name Attribute parameter. The default value for an LDAP directory isuniqueMembers and the default for an AD is member. It cannot exceed 128characters.
-userobjectclass userobjectclassDefines the required and optional attributes so that the user entry can act as asearch filter in a situation where a user has multiple entries in a server. If you do notspecify this field, then a search will be performed using only the User ID Attributeparameter. It cannot exceed 128 characters.
-groupobjectclass groupclassDefines the required and optional attributes so that the group entry can act as asearch filter in a situation where a group has multiple entries in a server. If you donot specify this field, then a search will be performed using only the Group NameAttribute parameter. The default for an LDAP directory is groupOfUniqueNames, andthe default for an AD is group. It cannot exceed 128 characters.
-oExecutes the command without prompting for confirmation.
EXAMPLE
naviseccli -h 10.32.123.229 -user a -password a -scope 0 security-ldap -modifyserver 10.5.4.250 -bindpassword crosstor -servertypeLDAP
OUTPUTNone if the command succeeds; status or error information if it fails.
security -ldap -removeserverRemoves a server.
PREREQUISITESYou must have a user account on the system on which you want to execute the command.
DESCRIPTIONThe naviseccli security -ldap command with the -removeserversubcommand deletes an LDAP external server login configuration. It also destroys all rolemapping information related to the specified server. Only the security administrator oradministrator can execute the command.
SYNTAXsecurity -ldap -removeserver IPaddress [-o]OPTIONS
IPaddressDeletes the specified network IP address (IPv4) of the LDAP or the AD server.
-oExecutes the command without prompting for confirmation.
EXAMPLEsecurity -ldap -removeserver 10.5.4.250
VNX CLI for Block
security -ldap -removeserver 259

OUTPUTNone if the command succeeds; status or error information if it fails.
security -ldap -listserverLists the LDAP external server information.
PREREQUISITESYou must have a user account on the system on which you want to execute the command.
DESCRIPTIONThe naviseccli security -ldap -listserver command lists the existingservice connections, that the IP address of the LDAP server identifies. You can use theoptional switches to list a particular server. Only the security administrator oradministrator can execute the command.
SYNTAXsecurity -ldap -listserver [-primaryserver|-alternateserver]OPTIONS-primaryserver
Displays the primary server information. The connection, which is set up first, isautomatically designated as the primary and is contacted first to authenticate a useror user request.
-alternateserverDisplays the alternate server information. The only way to change the alternateserver to primary is to delete the primary server.
EXAMPLESecurity -ldap -listserver
Primary Server Name: 10.5.4.111Primary Server Port Number: 389Primary Server Protocol: ldapPrimary Server ServerType: ADPrimary Server BindDn:cn=administrator,cn=users,dc=NavilabTEST,dc=us,dc=dg,dc=comPrimary Server UserSearchPath:dc=NavilabTEST,dc=us,dc=dg,dc=comPrimary Server GroupSearchPath: groupsearchpathPrimary Server UserIDAttribute: testuidPrimary Server UserNameAttribute: usernameattributePrimary Server GroupNameAttribute: groupnameattributePrimary Server GroupMemberAttribute: groupmemberattributePrimary Server UserObjectClass(optional): userobjectclassPrimary Server GroupObjectClass: groupclass
Alternate Server Name: 10.14.46.100Alternate Server Port Number: 389Alternate Server Protocol: ldapAlternate Server ServerType: LDAPAlternate Server BindDn: cn=root,dc=corp,dc=emc,dc=comAlternate Server UserSearchPath: ou=Group1,dc=corp,dc=emc,dc=comAlternate Server GroupSearchPath: groupsearchpathAlternate Server UserIDAttribute: useridattributeAlternate Server UserNameAttribute: usernameattributeAlternate Server GroupNameAttribute: groupnameattributeAlternate Server GroupMemberAttribute: groupmemberattribute
VNX CLI for Block
260 EMC VNX Series 5.33 Command Line Interface Reference for Block

Alternate Server UserObjectClass(optional): userobjectclassAlternate Server GroupObjectClass: groupclass
OUTPUTNone if the command succeeds; status or error information if it fails.
security -ldap -addrolemappingCreates a new role mapping.
PREREQUISITESYou must have a user account on the system on which you want to execute the command.
DESCRIPTIONThe naviseccli security -ldap command with the -addrolemappingsubcommand creates a new role mapping entity for the corresponding external server.You must initialize system security and select a domain master before configuring LDAPconnection settings. Consult with the LDAP administrator for your site to determine theLDAP/AD names of users and groups to which you want to map Unisphere roles. Onceyou have defined the server connection settings, and mapped the user’s roles, users canlog in to the system with their LDAP username/password. The roles are administrator,manager, monitor, security administrator, replication, local replication, and replication/recovery.
SYNTAXsecurity -ldap -addrolemapping IPaddress -name name -typegroup|user -role role [-o]OPTIONS
IPaddressSpecifies the network IP address (IPv4) of the LDAP or AD server with the informationrequired to authenticate users.
-name nameSpecifies the name of the role that maps to Unisphere.
-type group|userSpecifies the type of role mapping. The group type of role mapping applies to agroup of people. The user type of role mapping applies to only one individual.
-role roleSpecifies the user/group role that maps to Unisphere.
-oExecutes the command without prompting for confirmation.
EXAMPLE
security -ldap -addrolemapping 10.5.4.250 -name ldap4ipv4 -typeuser -role administrator
OUTPUTNone if the command succeeds; status or error information if it fails.
security -ldap -modifyrolemappingModifies the role mapping.
PREREQUISITESYou must have a user account on the system on which you want to execute the command.
VNX CLI for Block
security -ldap -addrolemapping 261

DESCRIPTIONThe naviseccli security -ldap command with the -modifyrolemappingsubcommand modifies the user or group role mappings to an LDAP or AD service.
SYNTAXsecurity -ldap -modifyrolemapping IPaddress -name name -typegroup|user -role role [-o]OPTIONSIPaddress
Specifies the network IP address (IPv4) of the LDAP or the AD server.-name name
Specifies the name of the role that maps to Unisphere.-type group|user
Specifies the type of the role mapping to be modified. The group type of rolemapping applies to a group of people. The user type of role mapping applies to onlyone individual.
-role roleSpecifies the user/group role that maps to Unisphere.
-oExecutes the command without prompting for confirmation.
EXAMPLE
security -ldap -modifyrolemapping 10.5.4.250 -name test -type user-role monitor
OUTPUTNone if the command succeeds; status or error information if it fails.
security -ldap -removerolemappingRemoves the role mapping entity.
PREREQUISITESYou must have a user account on the system on which you want to execute the command.
DESCRIPTIONThe naviseccli security -ldap command with the -removerolemappingsubcommand removes the role mapping entity from Unisphere for the correspondingexternal server. Only the Unisphere administrator can remove user or group rolemappings to an LDAP or AD service.
You can delete all role mappings using the -all switch. To delete a particular rolemapping, specify the -name and -type switch.
SYNTAXsecurity -ldap -removerolemapping IPaddress [-name name -typegroup|user] | [-all] [-o]OPTIONSIPaddress
Specifies the network IP address (IPv4) of the LDAP or the Active Directory server.-name name -type group|user
Deletes role mapping with a specified role mapping name and type. The group typeof role mapping applies to a group of people. The user type of role mapping appliesto only one individual.
-all
VNX CLI for Block
262 EMC VNX Series 5.33 Command Line Interface Reference for Block
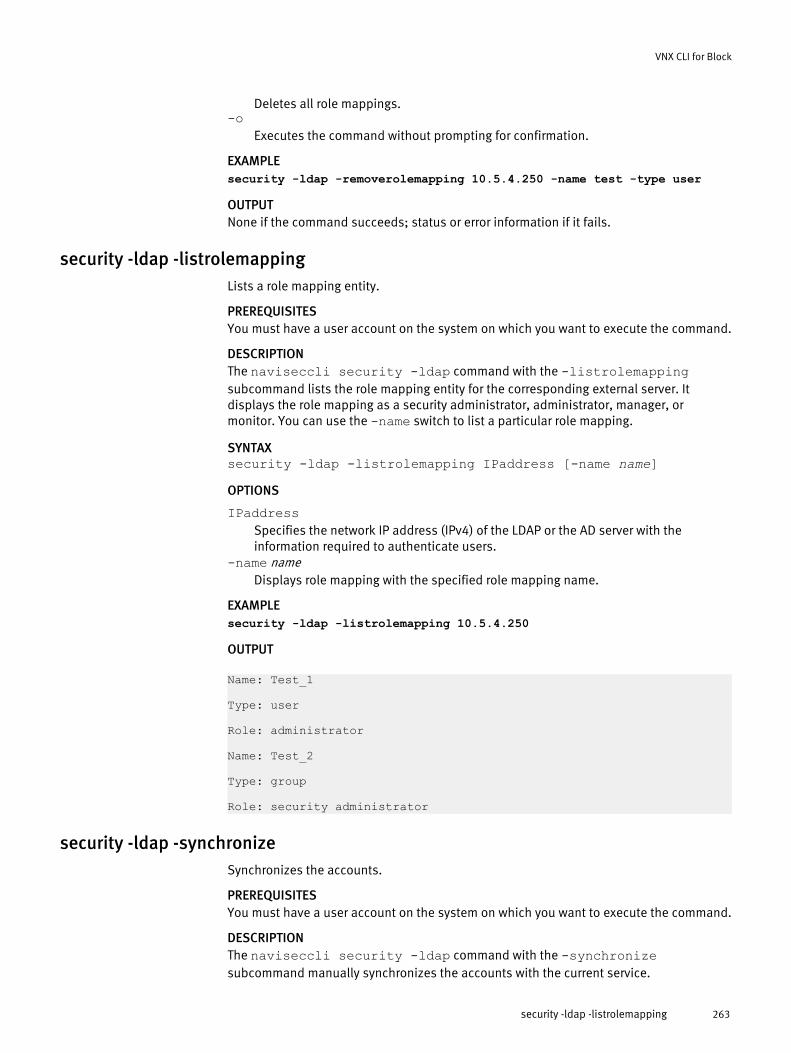
Deletes all role mappings.-o
Executes the command without prompting for confirmation.
EXAMPLEsecurity -ldap -removerolemapping 10.5.4.250 -name test -type user
OUTPUTNone if the command succeeds; status or error information if it fails.
security -ldap -listrolemappingLists a role mapping entity.
PREREQUISITESYou must have a user account on the system on which you want to execute the command.
DESCRIPTIONThe naviseccli security -ldap command with the -listrolemappingsubcommand lists the role mapping entity for the corresponding external server. Itdisplays the role mapping as a security administrator, administrator, manager, ormonitor. You can use the -name switch to list a particular role mapping.
SYNTAXsecurity -ldap -listrolemapping IPaddress [-name name]OPTIONS
IPaddressSpecifies the network IP address (IPv4) of the LDAP or the AD server with theinformation required to authenticate users.
-name nameDisplays role mapping with the specified role mapping name.
EXAMPLEsecurity -ldap -listrolemapping 10.5.4.250
OUTPUT
Name: Test_1
Type: user
Role: administrator
Name: Test_2
Type: group
Role: security administrator
security -ldap -synchronizeSynchronizes the accounts.
PREREQUISITESYou must have a user account on the system on which you want to execute the command.
DESCRIPTIONThe naviseccli security -ldap command with the -synchronizesubcommand manually synchronizes the accounts with the current service.
VNX CLI for Block
security -ldap -listrolemapping 263

SYNTAXsecurity -ldap -synchronize [-o]OPTIONS
-oExecutes the command without prompting for confirmation.
OUTPUTNone if the command succeeds; status or error information if it fails.
security -certificate -addImports the certificate.
PREREQUISITESYou must have a user account on the system on which you want to execute the command.
DESCRIPTIONThe security -certificate -add command imports the certificate from thecertificate file. Secure CLI supports BASE64PEM format certificate.
SYNTAXsecurity –certificate -add -file filename [-client -role role]OPTIONS
-file filenameSpecifies the path of the certification on the local file system.
-clientSpecifies that this is a client certificate and not a server certificate.
-role roleSpecifies the role you want to apply to the client certificate.
EXAMPLEnaviseccli security –certificate –add -file c:\Node1.cer
security -certificate -removeRemoves the specified certificate.
PREREQUISITESYou must have a user account on the system on which you want to execute the command.
DESCRIPTIONThe naviseccli security -certificate -remove command removes thespecified certificate in certificate store.
SYNTAXsecurity –certificate –remove [-issuer issuer -serialnumberserial number] [-client] |[-all]OPTIONS
-issuerissuerSpecifies the issuer of the certificate that will be removed.
-serialnumberserial numberSpecifies the certificate.
-allRemoves all certificates in the certificate store.
-client
VNX CLI for Block
264 EMC VNX Series 5.33 Command Line Interface Reference for Block

Specifies that this is a client certificate rather than a server certificate.
EXAMPLE
naviseccli security –certificate –remove –issuer “CN=ICA1 1rstIntermediate CA – Signed by Root, OU=CSP, O=RSA, ST=MA,C=US”-serialNumber 00e2
security -certificate -listLists the certificates.
PREREQUISITESYou must have a user account on the system on which you want to execute the command.
DESCRIPTIONThe naviseccli security -certificate -list command lists all certificatesin the certificate store. Use the expire option to list only the expired certificate.
SYNTAXsecurity -certificate –list[-client][-showOnly expired]OPTIONS
-showOnly expiredLists only the expired certificates.
-clientLists the client SSL certificates.
EXAMPLEnaviseccli security –certificate –list
OUTPUT
_____________________________________________________________________-------------Subject:CN=TrustedRoot,C=US,ST=MA,L=Hopkinton,[email protected],OU=CSP,O=RSAIssuer:CN=TrustedRoot,C=US,ST=MA,L=Hopkinton,[email protected],OU=CSP,O=RSASerial#: 00d8280b0c863f6d4eValid From: 20090407135111ZValid To: 20190405135111Z______________________________________________________________________-------------Subject: CN=ICA1 1rst Intermediate CA – Signed by Root, OU=CSP,O=RSA, ST=MA,C=USIssuer: CN=TrustedRoot,C=US,ST=MA,L=Hopkinton,[email protected],OU=CSP,O=RSASerial#: 00e2Valid From: 20090407135113ZValid To: 20190405135113Z______________________________________________________________________-------------Subject: CN=ICA1 2nd Intermediate CA,OU=CSP,O=RSA,ST=MA,C=USIssuer: CN=ICA1 1rst Intermediate CA – Signed byRoot,OU=CSP,O=RSA,ST=MA,C=USSerial#: 00e3Valid From: 20090407135113ZValid To: 20190405135113Z______________________________________________________________________-------------
VNX CLI for Block
security -certificate -list 265

Subject: CN=node 1 CA – Signed by ICA1, OU=CSP, O=RSA, ST=MA,C=USIssuer: CN=ICA1 1rst Intermediate CA – Signed by Root, OU=CSP,O=RSA, ST=MA,C=USSerial#: 00e2Valid From: 20090407135113ZValid To: 20190405135113Z______________________________________________________________________-------------
security -certificate -alertBeforeExpirationIndicates that an alert should be generated prior to the expiration of the SSL/TLScertificate.
PREREQUISITESYou must have a user account on the system on which you want to execute the command.
DESCRIPTIONThe naviseccli security -certificate -alertBeforeExpirationcommand indicates that an alert should be generated prior to the expiration of theSSL/TLS certificate.
SYNTAXsecurity -certificate -alertBeforeExpiration DAYSOPTIONS
-alertBeforeExpiration DAYSSets the number of days to send an alert before the certificate expires. Valid valuesare from 0 to 366.
EXAMPLEnaviseccli security -certificate -alertBeforeExpiration 10
OUTPUTNone if the command succeeds; status or error information if it fails.
security -pkcs12uploadUploads a PKCS #12 file which contains a certificate and private key to the storagesystem.
PREREQUISITESYou must have a user account on the system on which you want to execute the command.
DESCRIPTIONThe naviseccli security -pkcs12upload command uploads a PKCS #12 file,which contains a certificate and private key, to the storage system.
SYNTAXsecurity -pkcs12upload -file FILE [-passphrase PASSPHRASE]OPTIONS
-file FILESpecifies the file full name of the certificate to be imported.
-passphrase PASSPHRASESpecifies the export password of the certificate.
EXAMPLEnaviseccli security -pkcs12upload c:\cert.p12
VNX CLI for Block
266 EMC VNX Series 5.33 Command Line Interface Reference for Block

OUTPUTNone if the command succeeds; status or error information if it fails.
security -SPcertificate -generateGenerates a new self-signed certificate and replaces the one currently in use.
PREREQUISITESYou must have a user account on the system on which you want to execute the command.
DESCRIPTIONThe naviseccli security -SPcertificate -generate command generates anew self-signed certificate and replaces the one currently in use.
SYNTAXsecurity -SPcertificate –generateEXAMPLEnaviseccli security -SPcertificate –generate
OUTPUTNone if the command succeeds; status or error information if it fails.
security -fipsmode -setSets the FIPS (Federal Information Processing Standards) mode of Unisphere.
PREREQUISITESYou must have a user account on the system on which you want to execute the command.
DESCRIPTIONThe naviseccli security -fipsmode -set command sets the FIPS mode ofUnisphere.
SYNTAXsecurity -fipsmode -set 0|1 [-o]OPTIONS
-set 0|1Sets the FIPS mode of Unisphere. Valid values are 0 and 1.
0
Sets the mode to Non-FIPS 140-2-compliant mode.
1
Sets the mode to FIPS 140-2-compliant mode.
-oExecutes the command without prompting for confirmation.
EXAMPLEnaviseccli security -fipsmode -set 1
WARNING: You are about to change FIPS mode. Any other existingbackground management tasks will be interrupted and the system willbe unavailable for management while the environment restarts. IOto the system will be unaffected.Proceed?(y/n)
VNX CLI for Block
security -SPcertificate -generate 267

OUTPUTNone if the command succeeds; status or error information if it fails.
security -fipsmode -getGets the FIPS (Federal Information Processing Standards) mode of Unisphere.
PREREQUISITESYou must have a user account on the system on which you want to execute the command.
DESCRIPTIONThe naviseccli security -fipsmode -get command gets the FIPS mode ofUnisphere.
SYNTAXsecurity -fipsmode -getEXAMPLEnaviseccli security -fipsmode -get
OUTPUT
FIPS 140-2 compliant: ENABLED
security -setportSets the http/https ports that Unisphere uses.
PREREQUISITESYou must have a user account on the system on which you want to execute the command.
DESCRIPTIONThe naviseccli security -setport command changes the http/https portnumbers.
SYNTAXsecurity -setport -port [80/443]|[2162/2163]OPTIONS
-port [80/443]|[2162/2163]Sets the ports that Unisphere uses. Valid port pairs are either 80/443 or 2162/2163.EMC recommends that all systems in the domain use the same management portpair.
EXAMPLEnaviseccli security -setport -port 80/443
OUTPUTNone if the command succeeds; status or error information if it fails.
security -trustedclient -enableEnables or disables IP Filtering for all storage systems supporting filtering.
PREREQUISITESYou must have a user account on the system on which you want to execute the command.
VNX CLI for Block
268 EMC VNX Series 5.33 Command Line Interface Reference for Block
DESCRIPTIONThe naviseccli security -trustedclient command with the -enablesubcommand enables or disables IP Filtering for all storage systems supporting filtering.
SYNTAXsecurity -trustedclient -enable yes|no [-o]OPTIONS
-enable yes|noEnables (yes) or disables (no) IP Filtering.
-oExecutes the command without prompting for confirmation.
EXAMPLEnaviseccli security -trustedclient -enable yes
WARNING: You are about to enable IP Filtering which may cut offaccess from clients.Proceed?(y/n) y
OUTPUTNone if the command succeeds; status or error information if it fails.
security -trustedclient -addAdds an IP Filter to the storage system or Unisphere Domain.
PREREQUISITESYou must have a user account on the system on which you want to execute the command.
DESCRIPTIONThe naviseccli security -trustedclient command with the -addsubcommand adds an IP Filter to the storage system or Unisphere Domain.Administrators and security administrators can extend remote service tool access to astorage system's management ports by entering the IP addresses of attached, trustedclients.
SYNTAXsecurity -trustedclient -add -ipaddress ADDRESS -applytosingle|all [-o]OPTIONS
-ipaddress ADDRESSSpecifies the client's IP Address to allow access for.
-applyto single|allApplies the filter to the connected storage system only (single) or all storage systemsin the domain (all).
-oExecutes the command without prompting for confirmation.
EXAMPLEnaviseccli security -trustedclient -add -ipaddress 10.238.74.171 -applyto all
WARNING: You are about to grant access solely to this trusted client.Proceed?(y/n) y
VNX CLI for Block
security -trustedclient -add 269

OUTPUTNone if the command succeeds; status or error information if it fails.
security -trustedclient -listLists the current IP Filters for the storage system and Unisphere Domain.
PREREQUISITESYou must have a user account on the system on which you want to execute the command.
DESCRIPTIONThe naviseccli security -trustedclient command with the -listsubcommand lists the current IP Filters for the storage system and Unisphere Domain.
SYNTAXsecurity -trustedclient -list [-ipaddress ADDRESS]|[-showall]OPTIONS
-ipaddress ADDRESSSpecifies the client's IP Address to list filtering for.
-showallShows all trusted clients, including locals that only apply to other storage systems.
EXAMPLEnaviseccli security -trustedclient -list
OUTPUT
Current IP Filtering State: enabledTrusted Client: 10.238.74.171Applies To: all
security -trustedclient -removeRemoves IP Filters from the storage system or Unisphere Domain.
PREREQUISITESYou must have a user account on the system on which you want to execute the command.
DESCRIPTIONThe naviseccli security -trustedclient command with the -removesubcommand removes IP Filters from the storage system or Unisphere Domain.
SYNTAXsecurity -trustedclient -remove [-ipaddress ADDRESS] -applytosingle|all [-o]OPTIONS
-ipaddress ADDRESSSpecifies the client's IP Address to remove filtering for.
-applyto single|allApplies the filter to the connected storage system only (single) or all storage systemsin the domain (all).
-oExecutes the command without prompting for confirmation.
VNX CLI for Block
270 EMC VNX Series 5.33 Command Line Interface Reference for Block

EXAMPLEnaviseccli security -trustedclient -remove -ipaddress 10.238.74.171 -applyto all
WARNING! If you proceed, access will be terminated for the initiatingclient.Proceed?(y/n) y
OUTPUTNone if the command succeeds; status or error information if it fails.
Event Monitor commandsThis section provides a brief overview of the event monitor and includes a list ofcommands you can use to configure and manage Event Monitor.
Event Monitoring overviewThe Event Monitor is an enterprise tool that supports centralized or distributedmonitoring of storage systems in a heterogeneous environment. Event Monitor is part ofthe Agent, and it is available on many operating systems. Once configured, the EventMonitor runs continuously as a service or daemon, observing the state of all specifiedstorage systems and notifying you when selected events have occurred.
The Event Monitor has portal, template, and monitor commands for portal configuration,template management, and centralized and distributed event monitor managementrespectively.
naviseccli Event Monitor commands on page 271 lists the event monitor commands.
Table 15 naviseccli Event Monitor commands
Command Description
-portal -create Adds a host agent to the portal system.
-portal -list Lists the portal configurations.
-portal -migrate Migrates the portals.
-portal -destroy Deletes the host agent from the portal system.
-template -list Lists the templates.
-template -import Imports the template files.
-template -export Exports the templates.
-template -destroy Deletes the templates.
-template -findconflict Finds and resolves template conflicts.
-template -swap Swaps two templates.
-monitor -addsystem Adds the storage system to be monitored.
-monitor -removesystem Removes the storage system from the monitor.
-monitor -listmapping Lists the storage template mappings.
-monitor -applytemplate Applies the template to the monitor.
VNX CLI for Block
Event Monitor commands 271

Table 15 naviseccli Event Monitor commands (continued)
Command Description
-monitor -stoptemplate Stops applying the template to the monitor.
-monitor -getlog Displays the Event Monitor log.
-monitor -enableresponse Enables the response from the specified monitor.
-monitor -disableresponse Disables the response from the specified monitor.
-monitor -getlogsize Gets the log size of the monitor.
-monitor -setlogsize Sets the log size of the monitor.
-monitor -inserttestevent Inserts an event in the log.
-monitor -responsetest Creates an artificial event.
-monitor -reloadconfig Reloads the template file.
-portal -createAdds a host agent to the portal system.
PREREQUISITESFor naviseccli, you must have a user account on the system on which you want toexecute the command.
DESCRIPTIONThe naviseccli -portal -create command adds the specified host agent to thespecified portal system.
SYNTAXeventmonitor -portal -create -system portalsystemname -serverhostagentname
OPTIONS
-system portalsystemnameSpecifies the portal system.
-server hostagentnameSpecifies the host agent.
EXAMPLEeventmonitor -portal -create -system cx380_123_227 -server10.32.123.205
OUTPUTNone if the command succeeds; status or error information if it fails.
-portal -listLists the portal configurations.
PREREQUISITESFor naviseccli, you must have a user account on the system on which you want toexecute the command.
VNX CLI for Block
272 EMC VNX Series 5.33 Command Line Interface Reference for Block

DESCRIPTIONThe naviseccli -portal -list command lists the portal system and its hosts.
SYNTAXeventmonitor -portal -listOUTPUTPortal configuration is listed. Nothing is listed if the portal configuration is not available.
-portal -migrateMigrates the portals.
PREREQUISITESFor naviseccli, you must have a user account on the system on which you want toexecute the command.
DESCRIPTIONThe naviseccli -portal -migrate command migrates the portal system. Thehost to which the portals are connected is migrated automatically.
SYNTAXeventmonitor -portal -migrate -source source portal system name-dest destination portal system nameOPTIONS
-source source portal system nameSpecifies the original portal configuration name.
-dest destination portal system nameSpecifies the destination portal configuration name.
EXAMPLE
eventmonitor -portal -migrate -source cx380_123_223 -destcx380_123_227
OUTPUTNone if the command succeeds; status or error information if it fails.
-portal -destroyDeletes the host agent from the portal system.
PREREQUISITESFor naviseccli, you must have a user account on the system on which you want toexecute the command.
DESCRIPTIONThe naviseccli -portal -destroy command deletes the specified host agentfrom the specified portal system.
SYNTAX
eventmonitor -portal -destroy -system portal system name-server hostname [-o]
OPTIONS
-system portal system nameSpecifies the portal system whose host is deleted.
VNX CLI for Block
-portal -migrate 273

-server hostnameDeletes the specified host agent.
-oExecutes the command without prompting for confirmation.
EXAMPLE
eventmonitor -portal -destroy -system cx380_123_227 -server10.32.123.205
OUTPUTNone if the command succeeds; status or error information if it fails.
-template -listLists the templates.
PREREQUISITESFor naviseccli, you must have a user account on the system on which you want toexecute the command.
DESCRIPTIONThe naviseccli eventmonitor -template command with the -list functionlists all the templates available in the template database of the target system.
SYNTAXeventmonitor -template -listOUTPUTThe templates in the database are listed; none if the templates are not available.
-template -importImports the template files.
PREREQUISITESFor naviseccli, you must have a user account on the system on which you want toexecute the command.
DESCRIPTIONThe naviseccli eventmonitor -template command with the -import functionimports the template file from the file system to the template database.
SYNTAXeventmonitor -template -import -templatefilename filenameOPTIONS
-templatefilename filenameSpecifies the template to be imported to the template database of the target system.
EXAMPLE
eventmonitor -template -import -templatefilenameD:\Templates\Template_Test.tpl
OUTPUTNone if the command succeeds; status or error information if it fails.
VNX CLI for Block
274 EMC VNX Series 5.33 Command Line Interface Reference for Block

-template -exportExports the templates.
PREREQUISITESFor naviseccli, you must have a user account on the system on which you want toexecute the command.
DESCRIPTIONThe naviseccli eventmonitor -template command with the -export functionexports the template from the template database to the file system.
SYNTAX
eventmonitor -template -export -templatename templatename-filepath localfilepath
OPTIONS
-templatename template nameSpecifies the template.
-filepath localfilepathSpecifies the local file path.
EXAMPLE
eventmonitor -template -export -templatename Template_Test-filepath D:\Templates\
OUTPUTNone if the command succeeds; status or error information if it fails.
-template -destroyDeletes the templates.
PREREQUISITESFor naviseccli, you must have a user account on the system on which you want toexecute the command.
DESCRIPTIONThe naviseccli eventmonitor -template command with the -destroyfunction deletes the specified template from the template database on the target system.
SYNTAXeventmonitor -template -destroy -templatename templatename [-o]OPTIONS
-templatename templatenameDeletes the specified template.
-oExecutes the command without prompting for confirmation.
EXAMPLEeventmonitor -template -destroy -templatename Template_Test
OUTPUTNone if the command succeeds; status or error information if it fails.
VNX CLI for Block
-template -export 275

-template -findconflictFinds and resolves template conflicts.
PREREQUISITESFor naviseccli, you must have a user account on the system on which you want toexecute the command.
DESCRIPTIONThe naviseccli eventmonitor -template command with the -findconflictfunction lists the conflicting templates. The -resolve switch prompts you to resolvethem.
SYNTAXeventmonitor -template -findconflict [-resolve]OPTIONS
-resolveResolves the template conflict.
EXAMPLEeventmonitor -template -findconflict -resolve
OUTPUTThe sample output is as follows:
Event Template <template name> from host <host name> isin conflict with the template in the database.How do you want to resolve the conflict?1. Update the template on the remote host.2. Rename the template on the remote host.3. Delete the template on the remote host.4. Ignore this conflict.Would you like to apply this option to all conflictingtemplate(s)?(y/n)
-template -swapSwaps the two templates.
PREREQUISITESFor naviseccli, you must have a user account on the system on which you want toexecute the command.
DESCRIPTIONThe naviseccli eventmonitor -template command with the -swap functionswaps the two specified templates. The system that used template A uses template Bafter the swap.
SYNTAX
eventmonitor -template -swap -templateName template name Atemplate name B [-keepResponses]
OPTIONS
-templateName template name A template name BSwaps the specified template names.
VNX CLI for Block
276 EMC VNX Series 5.33 Command Line Interface Reference for Block

EXAMPLE
EventMonitor -template -swap -templateName Template_Test_1Template_Test_2 -keepResponses
OUTPUTNone if the command succeeds; status or error information if it fails.
-monitor -addsystemAdds the system to be monitored.
PREREQUISITESFor naviseccli, you must have a user account on the system on which you want toexecute the command.
DESCRIPTIONThe naviseccli -monitor command with the -addsystem function adds thespecified system to the monitored system list of the specified host agent.
SYNTAXeventmonitor -monitor -addsystem -server hostname -systemsystem name
OPTIONS
-server hostnameSpecifies the host agent.
-system system nameSpecifies the system.
EXAMPLE
eventmonitor -monitor -addsystem -server 10.32.123.205-system cx380_123_223
OUTPUTNone if the command succeeds; status or error information if it fails.
-monitor -removesystemRemoves the system from the monitor.
PREREQUISITESFor naviseccli, you must have a user account on the system on which you want toexecute the command.
DESCRIPTIONThe naviseccli -monitor command with the -removesystem function removesthe specified system from the monitored system list of the specified host agent.
SYNTAXeventmonitor -monitor -removesystem -server hostname -systemsystem name
OPTIONS
-server hostnameSpecifies the host agent.
-system system name
VNX CLI for Block
-monitor -addsystem 277

Specifies the system.
EXAMPLE
eventmonitor -monitor -removesystem -server 10.32.123.205-system cx380_123_223
OUTPUTNone if the command succeeds; status or error information if it fails.
-monitor -listmappingLists the storage template mappings.
PREREQUISITESFor naviseccli, you must have a user account on the system on which you want toexecute the command.
DESCRIPTIONThe naviseccli -monitor command with the -listmapping function lists all thestorage template mappings of the specified centralized or distributed monitor.
SYNTAXeventmonitor -monitor -listmapping -server hostname|-systemstorage system name
OPTIONS
-server hostnameLists the mapping information of the centralized monitor.
-system system nameLists the mapping information of the distributed monitor.
EXAMPLE
eventmonitor -monitor -listmapping -server 10.32.123.205
eventmonitor -monitor -listmapping -system cx380_123_223
OUTPUTThe mapping information of the specified monitor is listed. None will be listed if themapping is not available.
-monitor -applytemplateApplies the template to the monitor.
PREREQUISITESFor naviseccli, you must have a user account on the system on which you want toexecute the command.
DESCRIPTIONThe naviseccli -monitor command with the -applytemplate function appliesthe template to the specific event monitor.
SYNTAX
eventmonitor -monitor -applytemplate [-server hostname][-system system name] -templatename templatename
VNX CLI for Block
278 EMC VNX Series 5.33 Command Line Interface Reference for Block
OPTIONS
-server hostnameApplies the template to the specified centralized monitor as a global template.
-system system nameApplies the template to the specified distributed monitor. If you specify both theserver and the system, it applies the template to the specific system monitored bythe centralized monitor.
-templatename templatenameSpecifies the template name.
EXAMPLE
eventmonitor -monitor -applytemplate -server 10.32.123.205-system cx380_123_223 -templatename Template_Test
OUTPUTNone if the command succeeds; status or error information if it fails.
-monitor -stoptemplateStops applying the template to the monitor.
PREREQUISITESFor naviseccli, you must have a user account on the system on which you want toexecute the command.
DESCRIPTIONThe naviseccli -monitor command with the -stoptemplate function stopsapplying the template to the specific event monitor.
SYNTAX
eventmonitor -monitor -stoptemplate [-server hostname] [-systemsystem name] -templatename templatename
OPTIONS
-server hostnameStops applying the template to the specified centralized monitor.
-system system nameStops applying the template to the specified distributed monitor. If you specify boththe server and the system, it stops applying the template to the specific system andthe centralized monitor.
-templatename templatenameSpecifies the template name.
EXAMPLE
eventmonitor -monitor -stoptemplate -server 10.32.123.205 -systemcx380_123_223 -templatename Template_Test
OUTPUTNone if the command succeeds; status or error information if it fails.
VNX CLI for Block
-monitor -stoptemplate 279

-monitor -getlogDisplays the event monitor log.
PREREQUISITESFor naviseccli, you must have a user account on the system on which you want toexecute the command.
DESCRIPTIONThe naviseccli -monitor command with the -getlog function displays the eventmonitor log. If the range of entries is not specified, the entire log is displayed with theoldest entry first.
SYNTAXeventmonitor -monitor -getlog -server hostname [-h] [+N]|[-N]OPTIONS
-server hostnameSpecifies the host agent.
-hDisplays the getlog header.
+NDisplays the oldest n entries in the log, with the oldest entry first.
-NDisplays the newest n entries in the log, with the newest entry first.
OUTPUT
Audit Logging Service01/27/2009 14:41:46 N/A (4612)NaviCLI.exe application wasstarted by the user, following was the application detailProcess Id : 2540Path :C:\emc\Navisphere\6.28.20.1.5.1\msgbin\NaviCLI.exeUser : user1Domain : cx420_47_52.
Audit Logging Service01/27/2009 14:41:46 N/A (2004)Test EventNaviEventMonitorApp01/27/2009 14:41:48 N/A (4613)NaviCLI.exe application wasclosed by the user, following was the application detailProcess Id : 2540Path :C:\emc\Navisphere\6.28.20.1.5.1\msgbin\NaviCLI.exeUser : user1Domain : cx420_47_52.
-monitor -enableresponseEnables the response from the specified monitor.
PREREQUISITESFor naviseccli, you must have a user account on the system on which you want toexecute the command.
DESCRIPTIONThe naviseccli -monitor command with the -enableresponse function enablesthe response from the specified event monitor.
VNX CLI for Block
280 EMC VNX Series 5.33 Command Line Interface Reference for Block

SYNTAX
eventmonitor -monitor -enableresponse -server hostname |-system system name
OPTIONS
-server hostnameEnables the response from the centralized monitor.
-system system nameEnables the response from the distributed monitor.
EXAMPLE
eventmonitor -monitor -enableresponse -system cx380_123_223
eventmonitor -monitor -enableresponse -server 10.32.123.205
OUTPUTNone if the command succeeds; status or error information if it fails.
-monitor -disableresponseDisables the response from the specified monitor.
PREREQUISITESFor naviseccli, you must have a user account on the system on which you want toexecute the command.
DESCRIPTIONThe naviseccli -monitor command with the -disableresponse functiondisables the response from the specified event monitor.
SYNTAX
eventmonitor -monitor -disableresponse -server hostname |-system system name -time duration min [-o]
OPTIONS
-server hostnameDisables the response from the centralized monitor.
-system system nameDisables the response from the distributed monitor.
-timeSpecifies the time in minutes.
-oExecutes the command without prompting for confirmation.
EXAMPLE
eventmonitor -monitor -disableresponse -system cx380_123_223-time 30
eventmonitor -monitor -disableresponse -server 10.32.123.205-time 30
OUTPUTNone if the command succeeds; status or error information if it fails.
VNX CLI for Block
-monitor -disableresponse 281

-monitor -getlogsizeGets the log size of the monitor.
PREREQUISITESFor naviseccli, you must have a user account on the system on which you want toexecute the command.
DESCRIPTIONThe naviseccli -monitor command with the -getlogsize function gets the logsize of the event monitor.
SYNTAXeventmonitor -monitor -getlogsize -server hostname | -systemsystem name
OPTIONS
-server hostnameGets the log size of the centralized monitor.
-system system nameGets the log size of the distributed monitor.
EXAMPLE
eventmonitor -monitor -getlogsize -server 10.32.123.205
eventmonitor -monitor -getlogsize -system cx380_123_223
OUTPUTNone if the command succeeds; status or error information if it fails.
-monitor -setlogsizeSets the log size of the monitor.
PREREQUISITESFor naviseccli, you must have a user account on the system on which you want toexecute the command.
DESCRIPTIONThe naviseccli -monitor command with the -setlogsize function changes thelog size of Event Monitor.
SYNTAXeventmonitor -monitor -setlogsize -server hostname | -systemsystem name -size logsize [-o]OPTIONS
-server hostnameSets the log size of the centralized monitor.
-system system nameSets the log size of the distributed monitor.
-size logsizeSpecifies the log size in bytes.
-oExecutes the command without prompting for confirmation.
VNX CLI for Block
282 EMC VNX Series 5.33 Command Line Interface Reference for Block

EXAMPLE
eventmonitor -monitor -setlogsize -server 10.32.123.205-size 20000000
eventmonitor -monitor -setlogsize -system cx380_123_223-size 20000000
OUTPUTNone if the command succeeds; status or error information if it fails.
-monitor -inserttesteventInserts an event in the log.
PREREQUISITESFor naviseccli, you must have a user account on the system on which you want toexecute the command.
DESCRIPTIONThe naviseccli -monitor command with the -inserttestevent functioninserts an event into the Event Monitor event log.
SYNTAXeventmonitor -monitor -inserttestevent -server hostnameOPTIONS
-server hostnameSpecifies the host agent.
OUTPUTNone if the command succeeds; status or error information if it fails.
-monitor -responsetestCreates an artificial event.
PREREQUISITESFor naviseccli, you must have a user account on the system on which you want toexecute the command.
DESCRIPTIONThe naviseccli -monitor command with the -responsetest function creates anartificial event to test the Event Monitor response.
SYNTAX
eventmonitor -monitor -responsetest-server hostname-email -smtpmailserver smtpmailserver -destaddress destaddress[-subject subject] [-cc cc] [-message message|-file filename[-sender sender_email_addr]
-emailpage -smtpmailserver smtpmailserver -destaddressdestaddress [-subject subject] [-cc cc][-message message|-file filename] [-sender sender_email_addr]
-modempage -destnumber destnumber -msgnumber msgnumber
VNX CLI for Block
-monitor -inserttestevent 283
[-comport comport] [-dialcommand dialcommand][-initcommand initcommand] [-messagedelay messagedelay]
-snmp -desthost desthost [-device device] [-communitycommunity]
OPTIONS
-server hostnameSpecifies the host agent.
-smtpmailserver smtpmailserverSpecifies the SMTP mail server.
-destaddress destaddressSpecifies the destination email address.
[-subject subject]Specifies the subject of the email.
[-cc cc]The email address to which to send a cc (copy).
[-message message |-file filename]The message describes the event and -file specifies a file with descriptive text.
[-sender sender_email_address]Specifies the sender address. If omitted, the CLI inserts the agent hostname as thesender_email_address.
-destnumber destnumberSpecifies the pager phone number (with area code).
-msgnumber msgnumberSpecifies the number that will appear on the pager display (with area code).
[-comport comport]Specifies the PC COM port number. If omitted, the CLI assumes COM l.
[-dialcommand dialcommand]Specifies the modem dial command to be used by the agent.
[-initcommand initcommand]Specifies the modem dial command to be used by the agent. It allows for somecustom modem configuration before the data is sent to it.
[-messagedelay messagedelay]Specifies the delay between sending the destination phone number to the modemand sending the message to the modem. This allows enough time for the receivingmodem to answer the all.
-desthost desthostSpecifies an SNMP management hostname.
-device deviceSpecifies the device represented by the SNMP management host.
-community communitySpecifies a community on the SNMP managment host.
OUTPUTProvides an output depending on the switches used; provides status or error informationif it fails.
VNX CLI for Block
284 EMC VNX Series 5.33 Command Line Interface Reference for Block

-monitor -reloadconfigReloads the template file.
PREREQUISITESFor naviseccli, you must have a user account on the system on which you want toexecute the command.
DESCRIPTIONThe naviseccli -monitor command with the -reloadconfig function reloadsthe template file.
SYNTAXeventmonitor -monitor -reloadconfig -server hostnameOPTIONS
-server hostnameSpecifies the host agent.
OUTPUTNone if the command succeeds; status or error information if it fails.
Virtual server commandsThis section explains the virtual server commands to configure virtual center/ESXcredentials.
Virtual server overviewThe virtual server integration feature simplifies the process for assigning a system to thevirtual servers and their virtual machines.
The virtual server commands identify and display the ESX server or Virtual Center (VC)server, and display the mapping between the LUN and the virtual machine. Thesecommands let you configure VC/ESX credentials.
You must configure an ESX server that needs virtualization integration information with asystem in the domain. To execute host agent commands, the host does not need beattached to the system, but network connectivity is required.
naviseccli virtual server commands on page 285 lists the virtual server commands.
Table 16 naviseccli virtual server commands
Command Description
server -volmap Lists the volume map information.
server -update Updates the server information.
server -getagent Displays the agent information.
server -remoteconfig Displays the remote configuration information.
server -register Displays the agent information on the host.
hypervisor -addvirtualcenter Adds virtual center credentials.
hypervisor -modifyvirtualcenter Modifies virtual center credentials.
VNX CLI for Block
-monitor -reloadconfig 285

Table 16 naviseccli virtual server commands (continued)
Command Description
hypervisor -removevirtualcenter Removes virtual center credentials.
hypervisor -addESX Adds ESX credentials.
hypervisor -modifyESX Modifies ESX server properties.
hypervisor -removeESX Removes ESX credentials.
hypervisor -listESX Lists ESX servers.
server -volmapLists the volume map information.
PREREQUISITESYou must have a user account on the system on which you want to execute the command.
DESCRIPTIONThe naviseccli server -volmap command lists the volume map information. Ifthe host is an ESX server (ESX_1), then it displays the ESX server information (LUN to VMmappings) of all the systems attached to the host. If the specified host is a physical host,it displays lunmapinfo information for all systems attached to the host. Refer to the EMCNavisphere CLI Reference (P/N 300-003-628 Rev. A10) for information on thelunmapinfo command.
SYNTAX
naviseccli -h array_a server -volmap -host ipaddress [-local][-vm]
OPTIONS
-host ipaddressSpecifies the IP address of the attached host whose information is displayed.
-localDisplays only the attached host information.
-vmDisplays all ESX_1 mount points on systems A and B.
EXAMPLEnaviseccli server -volmap -host ipaddress
OUTPUTSample output (if the host is a physical host):
Logical Drives: N\APhysical Device: \\.\PhysicalDrive13LOGICAL UNIT WWN:60:06:01:60:93:31:19:00:01:DC:1D:0B:07:0D:DB:11LOGICAL UNIT NUMBER: 3Current Owner: N\ADefault Owner: N\ATrespassed: N\ALUN Capacity(Gigabytes): .2LUN Capacity(Blocks): 4194304
VNX CLI for Block
286 EMC VNX Series 5.33 Command Line Interface Reference for Block

Logical Drives: P:\Physical Device: \\.\PhysicalDrive14LOGICAL UNIT WWN:60:06:01:60:93:31:19:00:01:DC:1D:0B:07:0D:DB:12LOGICAL UNIT NUMBER: 4Current Owner: SP ADefault Owner: SP BTrespassed: YesLUN Capacity(Gigabytes): 1.2LUN Capacity(Blocks): 2097152naviseccli server -volmap –host ipaddress -local
Logical Drives: F:\Physical Device: \\.\PhysicalDrive18LOGICAL UNIT WWN:60:06:01:60:36:F7:22:00:2A:48:A4:C1:57:0E:DE:11SNAPSHOT admhost_snapshot1_0 ----- snapshot name will replace LUNDefault Owner: SP ADefault Owner: SP ATrespassed: NOLUN Capacity(Gigabytes): 0LUN Capacity(Blocks): 204800
Sample output (if the host is an ESX server):
ESX Server Info:Name: nlpc12197.us.dg.comIP address: 10.14.12.197
Device Id: vmhba1:0:1Device Name: vmhba1:0:1
Datastore:N/ALOGICAL UNIT WWN:60:06:01:60:93:31:19:00:01:DC:1D:0B:07:0D:DB:11LOGICAL UNIT NUMBER: 4Current Owner: SP ADefault Owner: SP BLUN Capacity(Gigabytes): .2LUN Capacity(Blocks): 4194304naviseccli server -volmap -host ipaddress -vm
Sample output (if the host is an ESX server):
ESX Server Info:Name: nlpc12197.us.dg.comIP address: 10.14.12.197
Virtual Machine Info:VM Name: Hard Disk 1Guest Host Name:Guest IP Address:Guest OS:
Name: Hard Disk 1Type: Mapped Raw LUNFile Size(MB):100File Path: \[DataStore1]\VM1\hd1.vmdkLUN Name: LUN 5LUN ID: 5Name: My virtual machineType: VMX Config FileFile Size(MB): N/AFile Path: \[DataStore1]\VM1\hd1.vmdk
VNX CLI for Block
server -volmap 287

LUN Name: N/ALUN ID: N/A
server -updateUpdates the server information.
PREREQUISITESYou must have a user account on the system on which you want to execute the command.
DESCRIPTIONThe naviseccli server -update command polls and updates the physical andESX servers attached to the system. It also displays the update status.
SYNTAX
naviseccli -h sp server-update [-host ipaddress[-rescandevices[-o]]][-all [-rescandevices[-o]]] [-status]
OPTIONS
-host ipaddressSpecifies the IP address of the host (physical host or ESX server). It polls andupdates the host.
-allPolls and updates all the hosts (physical and ESX server) attached to the system.
-statusDisplays the status of all hosts polled in the last poll cycle.
-rescandevicesRescans and then updates the servers. It displays the confirmation beforeproceeding.
-oOverrides the confirmation.
EXAMPLEnaviseccli server -update -status
OUTPUT
Update Status:Poll Servers started at 06-NOV-2008 16:19:53.Poll Servers completed successfully at 06-NOV-2008 16:22:53Processed 3 out of 3 servers
server -getagentGets the agent information.
PREREQUISITESYou must have a user account on the system on which you want to execute the command.
DESCRIPTIONThe naviseccli server -getagent command lists the agent information on thehost.
SYNTAXnaviseccli -h sp server -getagent -host ipaddress
VNX CLI for Block
288 EMC VNX Series 5.33 Command Line Interface Reference for Block

OPTIONS
-host ipaddressSpecifies the IP address of an attached host. It is applicable for any host running theagent.
OUTPUT
Agent Rev: 6.29.75 (0.9)
server -remoteconfigGets the remote configuration information.
PREREQUISITESYou must have a user account on the system on which you want to execute the command.
DESCRIPTIONThe naviseccli server -remoteconfig command displays and modifies thehost agent configuration information. The command scans all the devices in the systemon a remote host.
SYNTAXnaviseccli -h sp server -remoteconfig -host ipaddressOPTIONS
-host ipaddressSpecifies the IP address of an attached host. It is applicable for any host running theagent.
-descriptionGets/sets the contents of description field.
-contactGets/sets the contents of the contact field.
-devDisplays the device name, system, comments, and the connection type (SCSI, TTY,and LAN).
-usersDisplays information about the users.
-intervalGets/sets the contents of the polling interval field. The valid range is 1 to 120.
-baudrateGets/sets the baud rate.
-logsizeGets/sets the log size to be transferred.
-userexplicitdevnamesGets/sets user explicit device names.
-writeWrites an image of the configuration file as it exists on the host.
-managedevAdds the SCSI devices in the managed device list. Each device includes a devicename, system name, and an optional description.
-openKeeps the device handle open between requests. This improves or degrades theagent performance depending on the operating system.
-managettyAdds the serial devices in the managed device list. Each device includes a devicename, system name, and an optional description.
-managelan
VNX CLI for Block
server -remoteconfig 289

Adds the LAN devices in the managed device list. Every device includes a devicename, system name, and an optional description.
-adduserSets the users field. The format of the usernames for SP A/SP B issystem@ipaddress of SPA/SPB ; separate these usernames with a space.
-unmanagedevRemoves the device from the managed device list.
-manageautoExecutes auto configuration (manages all SCSI devices).
-rmuserRemoves the specified users from the authorized user list.
-fReads an image of the configuration file as it exists on the host.
-reloadconfigReloads the agent configuration file without stopping and starting the agent. Oncepolling of the server has completed, the changes will be reflected.
-scanScans the devices in the system on a remote host.
OUTPUTProvides output depending on the options used.
server -registerCalls the Unisphere Agent running on the server to push/registration to systems.
PREREQUISITESYou must have a user account on the system on which you want to execute the command.
DESCRIPTIONThe naviseccli server -register command calls the Unisphere Agent runningon the server to push/registration to systems.
SYNTAXnaviseccli -h sp server -register -host ipaddressOPTIONS
-host ipaddressSpecifies the IP address of an attached host. It is applicable for any host running theagent.
OUTPUTNone if the command succeeds; status or error information if it fails.
hypervisor -addvirtualcenterAdds virtual center credentials.
PREREQUISITESYou must have a user account on the system on which you want to execute the command.
DESCRIPTIONThe naviseccli hypervisor -addvirtualcenter command adds the virtualcenter credentials. The virtual center credentials are stored in the system.
SYNTAX
naviseccli -h sp server -hypervisor-addvirtualcenter ipaddress
VNX CLI for Block
290 EMC VNX Series 5.33 Command Line Interface Reference for Block
-username user [-password password][-description description][-cert pathToCertificatefile][-o]
OPTIONS
ipaddressSpecifies the IP address of the virtual center server.
-username userSpecifies the username of the virtual center.
-password passwordSpecifies the password of the virtual center. If you do not type the password, thesystem prompts you to type it.
-description descriptionMaximum variable length is 128 characters and the minimum variable length is 0.
-cert pathToCertificatefileSpecifies the full pathname of trusted certificate file to be uploaded to the certificatestore.
-oSends a prompt if you specify the incorrect username/password.
OUTPUTNone if the command succeeds; status or error information if it fails.
hypervisor -modifyvirtualcenterModifies virtual center credentials.
PREREQUISITESYou must have a user account on the system on which you want to execute the command.
DESCRIPTIONThe naviseccli hypervisor -modifyvirtualcenter command modifies anexisting virtual center server’s credentials.
SYNTAX
naviseccli -h sp server -hypervisor -modifyvirtualcenter name |ipaddress [-username user -password password] [-o][-description description]
OPTIONS
name | ipadressSpecifies the name or the IP address of the virtual center server.
-username userSpecifies the new username of the virtual center.
-password passwordSpecifies the password of the virtual center.
-descriptionMaximum variable length is 128 characters and the minimum variable length is 0.
-oSends a prompt if you specify the incorrect username/password.
OUTPUTNone if the command succeeds; status or error information if it fails.
VNX CLI for Block
hypervisor -modifyvirtualcenter 291

hypervisor -removevirtualcenterRemoves virtual center credentials.
PREREQUISITESYou must have a user account on the system on which you want to execute the command.
DESCRIPTIONThe naviseccli hypervisor -removevirtualcenter command removes anexisting virtual center server’s credentials.
SYNTAXnaviseccli -h sp server -hypervisor -removevirtualcenter name |ipaddress [-o]OPTIONS
name | ipaddressSpecifies the name or the IP address of the virtual center server.
-oExecutes the command without prompting for confirmation.
OUTPUTNone if the command succeeds; status or error information if it fails.
hypervisor -addesxAdds ESX credentials.
PREREQUISITESYou must have a user account on the system on which you want to execute the command.
DESCRIPTIONThe naviseccli hypervisor -addesx command adds ESX credentials. You mustspecify the ESX credentials manually if the ESX server is not managed by the virtualcenter server.
SYNTAX
naviseccli -h sp server -hypervisor -addesx name|ipaddress-username user [-password password] [-certpathToCertificatefile] [-o]
OPTIONS
-username userSpecifies the username of the ESX server.
-password passwordSpecifies the password of the ESX server.
-cert pathToCertificatefileSpecifies the full pathname of the trusted certificate file to be uploaded to thecertificate store.
-oSends a prompt if you specify the incorrect username/password.
OUTPUTNone if the command succeeds; status or error information if it fails.
VNX CLI for Block
292 EMC VNX Series 5.33 Command Line Interface Reference for Block
hypervisor -modifyesxModifies ESX server properties.
PREREQUISITESYou must have a user account on the system on which you want to execute the command.
DESCRIPTIONThe naviseccli hypervisor -modifyesx command modifies an existing virtualcenter server’s credentials.
SYNTAXnaviseccli -h sp server -hypervisor -modifyesx name | ipaddress-username user -password password [-o]OPTIONS
name | ipaddressSpecifies the name or the IP address of the ESX server to be modified.
-username userSpecifies the new username of the ESX server.
-password passwordSpecifies the new password of the ESX server.
Note
The options -username and -password have to be specified to change either one
of them.
-oSends a prompt if you specify the incorrect username/password.
OUTPUTNone if the command succeeds; status or error information if it fails.
hypervisor -removeesxRemoves ESX credentials.
PREREQUISITESYou must have a user account on the system on which you want to execute the command.
DESCRIPTIONThe naviseccli hypervisor -removeesx command removes existing ESX servercredentials.
SYNTAXnaviseccli -h sp server -hypervisor -removeesx name | ipaddress[-o]OPTIONS
name | ipaddressSpecifies the name or the IP address of the ESX server to be removed.
-oExecutes the command without prompting for confirmation.
OUTPUTNone if the command succeeds; status or error information if it fails.
VNX CLI for Block
hypervisor -modifyesx 293

hypervisor -listesxLists ESX servers.
PREREQUISITESYou must have a user account on the system on which you want to execute the command.
DESCRIPTIONThe naviseccli hypervisor -listesx command lists all servers with IP addressand description.
SYNTAXnaviseccli -h sp server -hypervisor -listesxOUTPUT
ESX Server(s):Name: nlpc12241.us.dg.comIP Address: 10.14.12.241Virtual center Managed ESX server(s):Virtual Center IP Address: 10.14.12.82Virtual Center Description:Virtual Center IP Address: 10.14.12.248Virtual Center Description:
hypervisor -bypassCert -setSets bypass certificate verification.
PREREQUISITESYou must have a user account on the system on which you want to execute the command.
DESCRIPTIONThe naviseccli hypervisor -bypassCert -set command sets the bypasscertificate verification for virtual servers.
SYNTAXnaviseccli -h sp server -hypervisor -bypassCert -set [0|1]OPTIONS
-setSets the bypass certificate verification for virtual servers. Valid values are 0 (notbypass) and 1 (bypass).
OUTPUTNone if the command succeeds; status or error information if it fails.
hypervisor -bypassCert -getGets bypass certificate verification.
PREREQUISITESYou must have a user account on the system on which you want to execute the command.
DESCRIPTIONThe naviseccli hypervisor -bypassCert -get command gets the bypasscertificate verification for virtual servers.
SYNTAXnaviseccli -h sp server -hypervisor -bypassCert -get
VNX CLI for Block
294 EMC VNX Series 5.33 Command Line Interface Reference for Block

OPTIONS
-getGets the bypass certificate verification for virtual servers.
OUTPUTNone if the command succeeds; status or error information if it fails.
Host Agent commandsThis section explains the host agent commands to configure virtual center/ESXcredentials.
server -volmapLists the volume map information.
PREREQUISITESYou must have a user account on the system on which you want to execute the command.
DESCRIPTIONThe naviseccli server -volmap command lists the volume map information. Ifthe host is an ESX server (ESX_1), then it displays the ESX server information (LUN to VMmappings) of all the systems attached to the host. If the specified host is a physical host,it displays lunmapinfo information for all systems attached to the host. Refer to the EMCNavisphere CLI Reference (P/N 300-003-628 Rev. A10) for information on thelunmapinfo command.
SYNTAX
naviseccli -h array_a server -volmap -host ipaddress [-local][-vm]
OPTIONS
-host ipaddressSpecifies the IP address of the attached host whose information is displayed.
-localDisplays only the attached host information.
-vmDisplays all ESX_1 mount points on systems A and B.
EXAMPLEnaviseccli server -volmap -host ipaddress
OUTPUTSample output (if the host is a physical host):
Logical Drives: N\APhysical Device: \\.\PhysicalDrive13LOGICAL UNIT WWN:60:06:01:60:93:31:19:00:01:DC:1D:0B:07:0D:DB:11LOGICAL UNIT NUMBER: 3Current Owner: N\ADefault Owner: N\ATrespassed: N\ALUN Capacity(Gigabytes): .2LUN Capacity(Blocks): 4194304
Logical Drives: P:\
VNX CLI for Block
Host Agent commands 295

Physical Device: \\.\PhysicalDrive14LOGICAL UNIT WWN:60:06:01:60:93:31:19:00:01:DC:1D:0B:07:0D:DB:12LOGICAL UNIT NUMBER: 4Current Owner: SP ADefault Owner: SP BTrespassed: YesLUN Capacity(Gigabytes): 1.2LUN Capacity(Blocks): 2097152naviseccli server -volmap –host ipaddress -local
Logical Drives: F:\Physical Device: \\.\PhysicalDrive18LOGICAL UNIT WWN:60:06:01:60:36:F7:22:00:2A:48:A4:C1:57:0E:DE:11SNAPSHOT admhost_snapshot1_0 ----- snapshot name will replace LUNDefault Owner: SP ADefault Owner: SP ATrespassed: NOLUN Capacity(Gigabytes): 0LUN Capacity(Blocks): 204800
Sample output (if the host is an ESX server):
ESX Server Info:Name: nlpc12197.us.dg.comIP address: 10.14.12.197
Device Id: vmhba1:0:1Device Name: vmhba1:0:1
Datastore:N/ALOGICAL UNIT WWN:60:06:01:60:93:31:19:00:01:DC:1D:0B:07:0D:DB:11LOGICAL UNIT NUMBER: 4Current Owner: SP ADefault Owner: SP BLUN Capacity(Gigabytes): .2LUN Capacity(Blocks): 4194304naviseccli server -volmap -host ipaddress -vm
Sample output (if the host is an ESX server):
ESX Server Info:Name: nlpc12197.us.dg.comIP address: 10.14.12.197
Virtual Machine Info:VM Name: Hard Disk 1Guest Host Name:Guest IP Address:Guest OS:
Name: Hard Disk 1Type: Mapped Raw LUNFile Size(MB):100File Path: \[DataStore1]\VM1\hd1.vmdkLUN Name: LUN 5LUN ID: 5Name: My virtual machineType: VMX Config FileFile Size(MB): N/AFile Path: \[DataStore1]\VM1\hd1.vmdkLUN Name: N/ALUN ID: N/A
VNX CLI for Block
296 EMC VNX Series 5.33 Command Line Interface Reference for Block

server -updateUpdates the server information.
PREREQUISITESYou must have a user account on the system on which you want to execute the command.
DESCRIPTIONThe naviseccli server -update command polls and updates the physical andESX servers attached to the system. It also displays the update status.
SYNTAX
naviseccli -h sp server-update [-host ipaddress[-rescandevices[-o]]][-all [-rescandevices[-o]]] [-status]
OPTIONS-host ipaddress
Specifies the IP address of the host (physical host or ESX server). It polls andupdates the host.
-allPolls and updates all the hosts (physical and ESX server) attached to the system.
-statusDisplays the status of all hosts polled in the last poll cycle.
-rescandevicesRescans and then updates the servers. It displays the confirmation beforeproceeding.
-oOverrides the confirmation.
EXAMPLEnaviseccli server -update -status
OUTPUT
Update Status:Poll Servers started at 06-NOV-2008 16:19:53.Poll Servers completed successfully at 06-NOV-2008 16:22:53Processed 3 out of 3 servers
server -getagentGets the agent information.
PREREQUISITESYou must have a user account on the system on which you want to execute the command.
DESCRIPTIONThe naviseccli server -getagent command lists the agent information on thehost.
SYNTAXnaviseccli -h sp server -getagent -host ipaddressOPTIONS-host ipaddress
Specifies the IP address of an attached host. It is applicable for any host running theagent.
VNX CLI for Block
server -update 297
OUTPUT
Agent Rev: 6.29.75 (0.9)
server -remoteconfigGets the remote configuration information.
PREREQUISITESYou must have a user account on the system on which you want to execute the command.
DESCRIPTIONThe naviseccli server -remoteconfig command displays and modifies thehost agent configuration information. The command scans all the devices in the systemon a remote host.
SYNTAXnaviseccli -h sp server -remoteconfig -host ipaddressOPTIONS
-host ipaddressSpecifies the IP address of an attached host. It is applicable for any host running theagent.
-descriptionGets/sets the contents of description field.
-contactGets/sets the contents of the contact field.
-devDisplays the device name, system, comments, and the connection type (SCSI, TTY,and LAN).
-usersDisplays information about the users.
-intervalGets/sets the contents of the polling interval field. The valid range is 1 to 120.
-baudrateGets/sets the baud rate.
-logsizeGets/sets the log size to be transferred.
-userexplicitdevnamesGets/sets user explicit device names.
-writeWrites an image of the configuration file as it exists on the host.
-managedevAdds the SCSI devices in the managed device list. Each device includes a devicename, system name, and an optional description.
-openKeeps the device handle open between requests. This improves or degrades theagent performance depending on the operating system.
-managettyAdds the serial devices in the managed device list. Each device includes a devicename, system name, and an optional description.
-managelanAdds the LAN devices in the managed device list. Every device includes a devicename, system name, and an optional description.
-adduserSets the users field. The format of the usernames for SP A/SP B issystem@ipaddress of SPA/SPB ; separate these usernames with a space.
VNX CLI for Block
298 EMC VNX Series 5.33 Command Line Interface Reference for Block
-unmanagedevRemoves the device from the managed device list.
-manageautoExecutes auto configuration (manages all SCSI devices).
-rmuserRemoves the specified users from the authorized user list.
-fReads an image of the configuration file as it exists on the host.
-reloadconfigReloads the agent configuration file without stopping and starting the agent. Oncepolling of the server has completed, the changes will be reflected.
-scanScans the devices in the system on a remote host.
OUTPUTProvides output depending on the options used.
server -registerCalls the Unisphere Agent running on the server to push/registration to systems.
PREREQUISITESYou must have a user account on the system on which you want to execute the command.
DESCRIPTIONThe naviseccli server -register command calls the Unisphere Agent runningon the server to push/registration to systems.
SYNTAXnaviseccli -h sp server -register -host ipaddressOPTIONS
-host ipaddressSpecifies the IP address of an attached host. It is applicable for any host running theagent.
OUTPUTNone if the command succeeds; status or error information if it fails.
Unisphere Server UtilityThis section provides the CLI commands for Unisphere Server Utility tools.
Using the server utility command line to generate a high-availability reportThe high-availability option determines if the server is configured for high availability byverifying that the server has at least one connection path to each system SP, and thatPowerPath or some other failover software, such as DMP, VMware native, PV Links, or HPnative failover is running. The utility will not detect any other native failover software,such as native multipath (MPIO) for Linux, Solaris, or Windows Server 2008.
Generate a high-availability report to:
l check the status of a server.
l prepare for software installation on a system.
VNX CLI for Block
server -register 299

Checking the status of a serverTo periodically check the high-availability status of a server, issue the appropriatecommand for your operating system.
For UNIX servers:naviserverutilcli hav[-directory | -d outputdirectorywhere outputdirectory specifies the directory to which you want to deposit the reporton the server. This switch is required only if you are running the server utility fromthe CD. Otherwise the report is automatically saved to the Unisphere Server Utilityinstallation directory. If the server utility is installed on your server and you specify adirectory, the directory you specify will override the server utility's installationdirectory.
For Windows servers:
1. Open a command window and enter one of the following:
l cd C:\Program Files\EMC\Unisphere Server Utilityl cd C:\Program Files (x86)\EMC\Unisphere Server Utility
2. Enter:naviserverutilcli hav[-directory | -d outputdirectorywhere outputdirectory specifies the directory to which you want to deposit thereport on the server. This switch is required only if you are running the serverutility from the CD. Otherwise the report is automatically saved to the UnisphereServer Utility installation directory. If the server utility is installed on your serverand you specify a directory, the directory you specify will override the serverutility's installation directory.
3. For ESX servers, use the following additional switches to specify the ESX serveror vCenter for which you want a report.
l -esx ipaddressSpecifies the IP address of the VMware ESX Server's environment for whichyou want to generate a report.
l -virtualcenter ipaddressSpecifies the IP address of the vCenter. You must also specify the -esxipaddress for which you want to generate a report.
l -vmuser usernameSpecifies the username for the ESX Server or vCenter.
l -vmpassword passwordSpecifies the password for the ESX Server or vCenter.
Preparing for software installation on a system
If you are generating a high-availability report as a prerequisite for updating the systemsoftware, you need to upload this report to the system prior to installing the software onthe system.
To generate and upload an HA report, issue the following command from the directory inwhich you installed the utility:
naviserverutilcli hav -upload -ip IPaddress |-hIPaddress|network_name -user|-u username-password|-p userpassword -scope|-s scopelevel -secfilepathsecurityfilepath -port 443|2163[-directory|-d outputdirectory ]-esx ipaddress -virtualcenter -virtualcenter ipaddress -vmuserusername -vmpassword password-ip IPaddress
VNX CLI for Block
300 EMC VNX Series 5.33 Command Line Interface Reference for Block

Specifies the IP address of an SP on the system to which you will upload the report.You cannot use this switch in conjunction with the -h switch.
-h IPaddress | network_nameSpecifies the IP address or the network name of an SP on the system to which youwill upload the report. You cannot use this switch in conjunction with the -ipswitch.
-user|-u usernameSpecifies the login name for the system. You must use this switch in conjunctionwith the -password|-p and -scope|-s switches. You cannot use this switch inconjunction with the -secfilepath switch.
-password|-p userpasswordSpecifies the password required to access the system. You must use this switch inconjunction with the -user|-u and -scope|-s switches. You cannot use thisswitch in conjunction with the -secfilepath switch.
-scope|-s scopelevelSpecifies the level of access the username and password has to the system: 0 =global; 1 = local; 2 = LDAP. You must use this switch in conjunction with the -user|-u and -password|-p switches. You cannot use this switch in conjunctionwith the -secfilepath switch.
-secfilepath securityfilepathSearches the security file for the specified IP address. If the utility does not find thespecified IP address, then the utility will use the default entry in the security file. Asecurity file is required to run this switch. For information on how to create a securityfile, refer to the EMC Navisphere Command Line (CLI) Reference guide. You cannotuse this switch in conjunction with the -user|-u, -password|-p, and -scope|-sswitches.
-port 443|2163Specifies the Unisphere Management Server port number. The default port is 443.
-directory|-d outputdirectorySpecifies the directory to which you want to deposit the report on the server. Thisswitch is required only if you are running the server utility from the CD. Otherwise thereport is automatically saved to the Unisphere Server Utility installation directory.If the server utility is installed on your server and you specify a directory, thedirectory you specify will override the server utility's installation directory.
-esx ipaddressSpecifies the IP address of the VMware ESX Server's environment for which you wantto generate a report.
-virtualcenter ipaddressSpecifies the IP address of the Virtual Center. You must also specify the -esxipaddress for which you want to generate a report.
-vmuser usernameSpecifies the username for the ESX Server or Virtual Center.
-vmpassword passwordSpecifies the password for the ESX Server or Virtual Center.
After uploading the HA reportIn addition to running the server utility to validate server high availability, we stronglyrecommend that you perform the following manual checks:
Verify support of software and hardwareMake sure that you have verified that all software and hardware are supportedaccording to the EMC E-Lab™ Interoperability Navigator and support matrices. This
VNX CLI for Block
Using the server utility command line to generate a high-availability report 301

tool does not verify that you are running supported switch firmware, nor that you areusing redundant switches (recommended).
Upgrading system softwareIf you are about to perform a system online software upgrade or you added an HBA, aLUN, or changed connectivity (added a path or changed zoning):l Make sure that you have validated all software and hardware that are supported
and interoperable according to EMC E-Lab Interoperability Navigator and supportmatrices.
l Verify that all LUNs (virtual disks) that your servers will access during theupgrade are under path management software control. For servers runningPowerPath and DMP, see the Failover Software section on the Details tab of thereport and locate these LUNs.
Unisphere Initialization UtilityThis section provides the CLI commands for Unisphere Initialization Utility tools.
Using the command line initialization utilityFor Fibre Channel systems, use the Unisphere Initialization Utility to discover systemsand set network parameters (IP address, subnet mask, and default gateway). In addition,for iSCSI systems with iSCSI data ports attached to Windows server, use the utility to setnetwork parameters for these ports.
You can install the utility on a server or other host such as an off-array managementstation. The only requirement is that the host be connected to the same network subnetas the system management ports.
After you start the command line version of the initialization utility, use the naviinittoolclicommand with any of the switches below.
eula [-language language] discover [-all] [-xml]configure -serial serialnumber [-file filename][-ipa spAIpaddress |-sphosta spAhostname] [-ipb spBIpaddress |-sphostb spBhostname] [-mask subnetmask] [-gatewaygatewayaddress][-user username] [-password password] [-storagenamestorageName][-ipv6mode |automatic |disable | [manual [-globalprefix prefix[-ipv6gateway ipv6gateway]] [-help]where:
eulaDisplays the EMC end-user license agreement (EULA) in the specified language.
-language languageThe default language is English. Currently, the only valid language is English.
discoverDiscovers and displays a list of partially initialized systems.
-allDiscovers and displays a list of initialized and partially initialized systems.
-xmlDisplays the output in xml format.
configureSpecifies the network parameters for the specified system.
-serial serialnumberSpecifies the serial number of the system you want to initialize. If a system with therequested serial number is not found, the command fails.
VNX CLI for Block
302 EMC VNX Series 5.33 Command Line Interface Reference for Block

-file filenameSpecifies the name of an optional input file that stores all the network parameters.Both the SP management ports need to be on the same subnet for the inittoolcommand to function appropriately. If you want the ports on different subnets, youcan change subnets after the inittool has run.
-ipa spAipaddress | -sphosta spAhostnameSpecifies the IP address of the management port on SP A, or the server name for SPA for the specified system.
-ipb spBipaddress | -sphostb spBhostnameSpecifies the IP address of the management ports on SP B, or the server name for SPB for the specified system.
-mask subnetmaskSpecifies the subnet mask for the specified system.
-gateway gatewaySpecifies the gateway for the specified system.
-user usernameSpecifies the system login username.
-password passwordSpecifies the system login password.
-storagename storagenameSpecifies the storage name for the specified system.
-helpDisplays the help screen and does not start the initialization process.
-ipv6mode automatic | disable | [manual -globalprefix prefix | -ipv6gateway ipv6gateway]
Specifies the configuration type for the IPv6 network. Refer to the IPv6 configurationtype table for details.
Table 17 IPv6 configuration types
IPv6mode Description
automatic Automatically sets the IPv6 global prefix and IPv6 gateway for theinterface, based on Router Advertisements.
disable Disables the IPv6 functionality on this interface.
manual -globalprefix prefix[-ipv6gateway gateway]
Initializes the interface with the user specified prefix and(optional) gateway. It ignores any Router Advertisements.
VNX CLI for Block
Using the command line initialization utility 303

VNX CLI for Block
304 EMC VNX Series 5.33 Command Line Interface Reference for Block

CHAPTER 3
Virtual Pools Commands
This chapter provides a brief overview of the Virtual Pools feature and describes thestorage pool and thin commands that you can use if this feature is enabled on yoursystem.
Major topics include:
l Virtual Pools overview......................................................................................... 306l storagepool -create............................................................................................. 307l storagepool -list.................................................................................................. 310l storagepool -destroy........................................................................................... 316l storagepool -modify............................................................................................ 316l storagepool -expand........................................................................................... 318l storagepool -cancelexpand................................................................................. 319l storagepool -feature -info....................................................................................319l storagepool -resumeharvesting........................................................................... 321l lun -create...........................................................................................................321l lun -modify..........................................................................................................323l lun -expand.........................................................................................................325l lun -destroy.........................................................................................................326l lun -list................................................................................................................326l deduplication -feature -pause............................................................................. 330l deduplication -feature -resume........................................................................... 330l deduplication -feature -info.................................................................................330
Virtual Pools Commands 305

Virtual Pools overviewThe Virtual Pools feature allows you to allocate storage using thick and thin LUNs withinpools and requires that the thin provisioning enabler be installed on the system. ThickLUNs and thin LUNs can reside within the same pool and they share the pool's storagecapacity. Both thick and thin LUNs can be easily provisioned, expanded, and compressedby using the Unisphere interface.
A thin LUN lets you assign more storage capacity to a host than is physically available.Storage is assigned to the server in a capacity-on-demand method from a shared pool. Athin LUN competes with other LUNs in the pool for the available pool storage. The storagesystem software monitors and adds storage capacity, as required, to each pool, not eachLUN. This simplifies the creation and allocation of storage capacity.
Note
The actual consumed capacity and rate of consumption for the thin LUN can varydepending on the attached host file system or the application using the LUN. This is anormal condition typical of most thin provisioning services.
A thick LUN reserves all of its assigned capacity at the time it is created.
Current Virtual Pool restrictions
l Thin LUNs cannot be used in the reserved LUN pool, the Write Intent Log, or as ClonePrivate LUNs (CPLs).
l Thick LUNs cannot be used in the Write Intent Log or as CPLs. They can be included inthe reserved LUN pool.
l Thin and thick LUNs cannot be a component in a metaLUN.
l Virtual Pools support RAID 5, RAID 6 and RAID 1/0 types. RAID 5 is the default RAIDtype for the Extreme Performance and Performance Tiers, and RAID 6 is the defaultRAID type for the Capacity Tier.
l Pools support Flash (Extreme Performance), SAS (Performance), and NL-SAS(Capacity) drives.
PoolsA pool contains a set of disks that can include any of the following drive types: Flash,SAS, and NL-SAS. The maximum number of disks for a pool depends on system type. Formore efficient performance, we recommend that all disks in the pool have the samecapacity and RAID type. RAID 5 is the default RAID type for the Extreme Performance andPerformance Tiers, and RAID 6 is the default RAID type for the Capacity Tier. A storagepool shares its user capacity with all the LUNs in the pool. You can expand the usercapacity of a pool by adding disks to it.
Note
Vault drives (the first four drives in a system) cannot be part of a pool. The Unispheredialogs and wizards will not let you select these drives.
For the latest pool LUN limit information, refer to the product's Simple Support Matrix on EMC Online Support.
Virtual Pools Commands
306 EMC VNX Series 5.33 Command Line Interface Reference for Block

Table 18 naviseccli thin provisioning commands
Command Description
Storage pool commands
storagepool -create Creates a thin pool.
storagepool -list Lists the thin pools properties.
storagepool -destroy Deletes a thin pool.
storagepool -modify Modifies thin pool properties.
storagepool -expand Expands the thin pool on the system.
storagepool -cancelexpand Cancels the expansion, if the expansion has failed.
storagepool -feature -info Lists out the parameters and settings of the mappeddriver and certain configuration information.
storagepool - resumeharvesting Resumes harvesting on an existing storage pool
LUN commands
lun –create Creates a pool LUN or a thin LUN depending if the -type switch is specified.
lun –destroy Deletes a LUN.
lun –list Lists the LUNs on a system and their properties.
lun –modify Modifies the LUN properties.
lun –expand Expands a pool LUN.
Deduplication commands
deduplication -feature -pause Pauses deduplication.
deduplication -feature -resume Resumes deduplication.
deduplication -feature -info Displays deduplication status.
storagepool -createCreates the thin pool.
PREREQUISITESFor naviseccli, you must have a user account on the system on which you want toexecute the command.
DESCRIPTIONThe naviseccli storagepool -create command creates the thin pool. A thinpool contains physical disks on which you bind thin LUNs. You can create more than onethin pool on a system, each with a different set of disks. There are two types of storagepools: Thin pools and RAID groups. A thin pool contains thin LUNs. If you specify the RAIDtype when creating the storage pool, the specified RAID type is used for creating thestorage pool. If you do not specify the RAID type, the storage pools are created based onbest practices. This may result in a storage pool with multiple RAID types. If you want tocreate a storage pool with 3 tiers and you specify the RAID types for each tier, then youwill need to use the following steps:
Virtual Pools Commands
storagepool -create 307
1. Create the storage pool with the disks for the first tier and wait until it initializes.
2. Expand the storage pool with the disks for the second tier and wait for the expand tocomplete.
3. Expand the storage pool with the disks for the third tier.
SYNTAX
storagepool -create -disks diskslist [-rtyperaidType[-rdrivecount drivecount]][-description description][-name name] [-prcntFullThreshold threshold][-autoTiering scheduled|manual(default)][-fastcache on|off][snapPoolFullThresholdEnabled on|off][-skipRules][-snapPoolFullHWM poolFullHWM][-snapPoolFullLWM poolFullLWM][-snapSpaceUsedThresholdEnabled on|off][-snapSpaceUsedHWM snapSpaceUsedHWM][-snapSpaceUsedLWM snapSpaceUsedLWM][-initialverify yes|no][-dedupRate Low|Medium|High][-dedupTieringPolicy noMovement|autoTier|highestAvailable|lowestAvailable][-dedupInitialTier optimizePool|highestAvailable|lowestAvailable]
OPTIONS
-disksSpecifies the list of disks in Bus X Enclosure Y Disk Z format. If you do not specify Busin the disk format, Bus 0 is assumed.
-rtypeSpecifies the type of RAID group of the thin pool. The valid RAID types are r_5, r_6,and r_10.
-rdrivecountSpecifies the RAID drive count used to create internal RAID groups.
-descriptionSets the description for the thin pool to be created. The character length ranges from0 to 255.
-nameSets the unique name for the thin pool. The character length ranges from 1 to 64.
-prcntFullThresholdSpecifies the percentage of the thin pool to be used before the system generates thealerts. The percentage ranges from 1 to 84. The default value is 70%.
-skipRulesSkips the best practices check while creating the thin pools. If you do not specifythis option, the thin pool creation may fail due to any error checked in the thin rules.
-autoTiering scheduled|manualSets the auto-tiering state to scheduled or manual for the storage pool. The defaultauto-tiering state is manual.
-fastcache on|offEnables or disables the FAST Cache for the entire storage pool. The default value isenabled.
-snapPoolFullThresholdEnabledIndicates that the system should check the pool full high water mark for auto delete.Valid values are On or Off.
-snapPoolFullHWMSpecifies the pool full high watermark that triggers the auto delete process of thestorage pool to be created.
Virtual Pools Commands
308 EMC VNX Series 5.33 Command Line Interface Reference for Block

-snapPoolFullLWMSpecifies the pool full low watermark that stops the auto delete process of thestorage pool to be created.
-snapSpaceUsedThresholdEnabledIndicates that the system should check the snapshot space used high water mark forauto delete. Valid values are On and Off.
-snapSpaceUsedHWMSpecifies the snapshot space used high watermark that triggers the auto deleteprocess of the storage pool to be created.
-snapSpaceUsedLWMSpecifies the snapshot space used low watermark that stops the auto delete processof the storage pool to be created.
-initialverifyAllows the user to specify not to have inital background verify during pool creationand expansion in order to improve operation performance of pool creation andexpansion.
-dedupRateSpecifies the deduplication rate on this storage pool. Valid values are Low, Medium,or High.
-dedupTieringPolicySpecifies the common FAST VP tiering policy for all deduplicated LUNs in this storagepool. Valid values are noMovement, autoTier, highestAvailable, or lowestAvailable.
-dedupInitialTierSpecifies the common initial tier for all deduplicated LUNs in this storage pool. Validvalues are optimizePool, highestAvailable, or lowestAvailable.
EXAMPLE #1This command creates a storage pool with a mix of Flash drives (4 – 8) and SAS drives (9– 13). In this case, the best practices are used to create the storage pool for each tier byusing RAID 5.
naviseccli -h riker-spa storagepool -create -disks 0_0_4 0_0_50_0_6 0_0_7 0_0_8 0_0_9 0_0_10 0_0_11 0_0_12 0_0_13 –rtype r_5
EXAMPLE #2
naviseccli -h riker-spa storagepool –create –disks 0_1_0 0_1_1 0_1_20_1_3 0_1_4 0_1_5 0_1_6 0_1_7 0_1_8 –rtype r_5 –rdrivecount 9
OUTPUTNone if the command succeeds; status or error information if initiating the commandfails.
EXAMPLE #3naviseccli -h riker-spa storagepool -create –disks 0_0 0_1 0_2 –rtyper_5 –dedupRate high -dedupTieringPolicy autoTier -dedupInitialTierhighestAvailable
OUTPUTNone if the command succeeds; status or error information if initiating the command fails
Virtual Pools Commands
storagepool -create 309

If the user’s choice of disks for the storage pool or RAID Group breaks the hot spare policyand –skipRules option is not used, the system will reject the request with thefollowing message:
The current selection of disks will break the hot spare policy.
storagepool -listLists the thin pool properties and RAID groups.
PREREQUISITESFor naviseccli, you must have a user account on the system on which you want toexecute the command.
DESCRIPTIONThe naviseccli storagepool -list command lists the thin pool properties andRAID groups. For RAID group information, see getrg on page 95.
If you do not specify the options, the system displays all the thin pool properties.
Note
If a storage pool has tiers with different RAID types, the pool RAID type is displayed as'Mixed'.
SYNTAX
storagepool -list [-id poolID|-name poolName][-availableCap][-consumedCap] [-currentOp] [-description] [-disks] [-diskType][-luns] [-opState] [-opStatus] [-prcntOp] [-rawCap] [-rtype][-prcntFullThreshold] [-state] [-status] [-subscribedCap][-userCap] [-prcntFull] [-autoTiering] [-tiers[-rdrivecount][-loadBalance]] [-rebalance] [-fastcache][-lunAllocation] [-snapshotAllocation][-metadataAllocation] [-lunSubscribedCap][-snapshotSubscribedCap] [-metadataSubscribedCap][-compressionSavings] [-capacities][-snapPoolFullThresholdEnabled] [-snapPoolFullHWM][-snapPoolFullLWM] [-snapPoolFullState][-snapSpaceUsedThresholdEnabled] [-snapSpaceUsedHWM][-snapSpaceUsedLWM] [-snapSpaceUsedState][-dedupState] [-dedupRate] [-dedupTieringPolicy][-dedupInitialTier] [-efficiencySavings] [-dedupSharedCap] [-all]
OPTIONS
-id poolID |-name poolNameDisplays the name or ID of the thin pool with the specified name or ID. You cannotuse the options -id and -name together.
-availableCapDisplays the free shared capacity (in blocks and GB).
-consumedCapDisplays the total allocated capacity in the shared capacity of the thin pool. Theconsumed capacity of a thin pool includes storage used by MLU for maintainingmetadata (mapping info).
-currentOpDisplays the current operation.
Virtual Pools Commands
310 EMC VNX Series 5.33 Command Line Interface Reference for Block

-descriptionReturns the description of the thin pool.
-disksLists the disks used in each thin pool on the system. The disks are listed inBus_Enclosure_BankSlot format, with each disk on a new line.
-diskTypeDisplays the disk type of the components in the pool. If the components havedifferent types, the system displays Mixed.
-lunsLists the IDs of all thin LUNs in the thin pool.
-opStateDisplays the current operation state. The system displays N/A, if the currentoperation state cannot be determined.
-opStatusDisplays the additional descriptive information for the current state of the thin pool.
-prcntOpDisplays the additional descriptive information for the current state of the thin pooloperation in progress. If there is no operation, the system displays 0.
-rawCapDisplays the raw capacity of the thin pools.
-rtypeLists the thin pool RAID type.
-prcntFullThresholdDisplays the user modifiable used space threshold, beyond which the systemgenerates the alerts.
-stateDisplays the state of the thin pool.
-statusDisplays the information for the current state of the thin pool.
-subscribedCapDisplays the host-visible capacity of the thin pool.
-userCapDisplays the user-accessible capacity of the thin pool.
-prcntFullDisplays the used percentage.
-autoTieringDisplays the auto-tiering state (scheduled/manual)
-tiersDisplays the tier name, RAID type, capacity, and disk information for each tier. Ifauto-tiering is enabled, the data to be relocated up/down will also be displayed.
-rdrivecountSpecifies the RAID drive count used to create the internal RAID groups.
-loadBalanceDisplays the load balance data, which is the data targeted within the tier.
-rebalanceDisplays the rebalancing percent completed.
-fastcacheLists the FAST Cache state of the storage pool.
-lunAllocationSpecifies the total amount of storage allocated within a pool to the data that hasbeen written to all the primary LUNs in that pool.
-snapshotAllocationSpecifies the total amount of storage allocated within a pool to all the VNXsnapshots created in that pool.
-metadataAllocation
Virtual Pools Commands
storagepool -list 311
Specifies the total amount of storage allocated within a pool to store the metadatafor the LUNs and VNX snapshots in that pool.
-lunSubscribedCapSpecifies the total amount of user data that can be written to all of the LUNs in thatPool.
-snapshotSubscribedCapSpecifies the total amount of space that all the LUN snapshots consume, as well aswhat they would consume if all the primary LUN data would be overwritten.
-metadataSubscribedCapSpecifies the total amount of metadata storage required to support writing to theentire contents of all of the LUNs in the pool.
-compressionSavingsSpecifies the total amount of storage saved by using compression on the LUNs in thepool.
-capacitiesSpecifies all the related capacity of a pool such as, Raw Capacity, User Capacity,Consumed Capacity, LUN Allocation, Snapshot Allocation, Metadata Allocation,Available Capacity, Percent Full, Total Subscribed Capacity, LUN SubscribedCapacity, Snapshot Subscribed Capacity, Metadata Subscribed Capacity, PercentSubscribed, Oversubscribed by, and Compression Savings.
-snapPoolFullThresholdEnabledSpecifies if the system should check the pool full high water mark for auto delete.
-snapPoolFullHWMSpecifies the pool full high watermark of the specified storage pool(s).
-snapPoolFullLWMSpecifies the pool full low watermark of the specified storage pool(s).
-snapPoolFullStateSpecifies the pool full auto delete state.
-snapSpaceUsedThresholdEnabledSpecifies if the system should check the used snapshot space for high water markfor auto delete.
-snapSpaceUsedHWMSpecifies the used snapshot space for high watermark of the specified storagepool(s).
-snapSpaceUsedLWMSpecifies the used snapshot space for low watermark of the specified storagepool(s).
-snapSpaceUsedStateSpecifies the used snapshot space in auto delete state.
-dedupStateDisplays Deduplication State, Deduplication Status, Deduplication PercentCompleted, and Deduplication Remaining Size of the specified storage pool.Possible values of Deduplication State are Idle (No Deduplicated LUNs), Pending,Running, or Paused.
-dedupRateDisplays the deduplication rate of the specified storage pool. Possible values areLow, Medium, or High.
-dedupTieringPolicyDisplays the common tiering policy for all deduplicated LUNs in this storage pool.Possible values are No Movement, Auto Tier, Highest Available, or Lowest Available.
-dedupInitialTierDisplays the common initial tier for all deduplicated LUNs in this storage pool.Possible values are Optimize Pool, Highest Available, or Lowest Available.
-efficiencySavingsDisplays space savings from deduplication and VNX Snapshots for the specifiedstorage pool.
Virtual Pools Commands
312 EMC VNX Series 5.33 Command Line Interface Reference for Block

-dedupSharedCapDisplays the consumed capacity of all deduplicated LUNs in the storage pool.
-allDisplays all the storage pool information, including the tiers (always) and auto-tiering state (if the auto-tiering enabler has been installed).
EXAMPLE #1List the RAID type for a storage pool with tiers that are RAID 5 and RAID 6
naviseccli -h riker-spa storagepool -list -id 0 -rtype
Pool Name: Pool 0Pool ID: 0Raid Type: Mixed
EXAMPLE #2naviseccli -h riker-spa storagepool –list –id 0 –tiers –rdrivecount
EXAMPLE #3List all deduplication properties.
naviseccli -h riker-spa storagepool -list -dedupState-dedupRatededupTieringPolicy –dedupInitialTier –efficiencySavings-dedupSharedCap
Pool Name: Pool 0Pool ID: 0Deduplication State: Idle (No Deduplicated LUNs)Deduplication Status: OK(0x0)Deduplication Percent Completed: 100Deduplication Remaining Size (Blocks): 0Deduplication Remaining Size (GBs): 0.000Optimal Deduplicated LUN SP Owner: N/ADeduplication Rate: MediumDeduplicated LUNs’ Tiering Policy: Auto TierDeduplicated LUNs’ Initial Tier: Highest AvailableEfficiency Savings (Blocks): 20986976Efficiency Savings (GBs): 10.007Deduplication Shared Capacity (Blocks): 209869760Deduplication Shared Capacity (GBs): 100.07
EXAMPLE #4List all capacity properties.
naviseccli -h riker-spa storagepool -list -capacities
Pool Name: Pool 0Pool ID: 0Raw Capacity (Blocks): 2814421510Raw Capacity (GBs): 1342.021User Capacity (Blocks): 2246234112User Capacity (GBs): 1071.088Consumed Capacity (Blocks): 98758656Consumed Capacity (GBs): 47.092Available Capacity (Blocks): 21474754565Available Capacity (GBs): 1023.996Percent Full: 4.397LUN Allocation (Blocks): 31457280LUN Allocation (GBs): 15.000Snapshot Allocation (Blocks): N/A3Snapshot Allocation (GBs): N/AMetadata Allocation (Blocks): 509317121Metadata Allocation (GBs): 24.286
Virtual Pools Commands
storagepool -list 313

Total Subscribed Capacity (Blocks): 3984588800Total Subscribed Capacity (GBs): 1900.000Percent Subscribed: 177.390Oversubscribed by (Blocks): 1738354688Oversubscribed by (GBs): 828.912LUN Subscribed Capacity (Blocks): 3856662528LUN Subscribed Capacity (GBs): 1839.000Snapshot Subscribed Capacity (Blocks): N/A4Snapshot Subscribed Capacity (GBs): N/AMetadata Subscribed Capacity (Blocks): 1069392962Metadata Subscribed Capacity (GBs): 50.993Compression Savings (Blocks): 0Compression Savings (GBs): 0.000Efficiency Savings (Blocks): 20986976Efficiency Savings (GBs): 10.007Deduplication Shared Capacity (Blocks): 209869760Deduplication Shared Capacity (GBs): 100.07
EXAMPLE #5List all properties.
naviseccli -h riker-spa storagepool -list -all
Pool Name: Pool 0Pool ID: 0Raid Type: r_5Percent Full Threshold: 70Description:Disk Type: Fibre ChannelState: ReadyStatus: OK(0x0)Current Operation: NoneCurrent Operation State: N/ACurrent Operation Status: N/ACurrent Operation Percent Completed: 0Raw Capacity (Blocks): 1401742320Raw Capacity (GBs): 668.403User Capacity (Blocks): 1111558400User Capacity (GBs): 530.032Consumed Capacity (Blocks): 29361920Consumed Capacity (GBs): 14.001Available Capacity (Blocks): 1082196480Available Capacity (GBs): 516.031Percent Full: 2.642Total Subscribed Capacity (Blocks): 25167360Total Subscribed Capacity (GBs): 12.001Percent Subscribed: 2.264Oversubscribed by (Blocks): 0Oversubscribed by (GBs): 0.000Auto-Tiering: Manual
Tier Name: FCRaid Type: r_5User Capacity (GBs): 530.03Consumed Capacity (GBs): 4.00Available Capacity (GBs): 526.03Percent Subscribed: 0.75%Data Targeted for Higher Tier (GBs): 0.00Data Targeted for Lower Tier (GBs): 0.00Disks (Type):Bus 0 Enclosure 0 Disk 13 (Fibre Channel)Bus 0 Enclosure 0 Disk 11 (Fibre Channel)Bus 0 Enclosure 0 Disk 14 (Fibre Channel)Bus 0 Enclosure 0 Disk 12 (Fibre Channel)Bus 0 Enclosure 0 Disk 10 (Fibre Channel)
Disks:
Virtual Pools Commands
314 EMC VNX Series 5.33 Command Line Interface Reference for Block

Bus 0 Enclosure 0 Disk 11Bus 0 Enclosure 0 Disk 13Bus 0 Enclosure 0 Disk 10Bus 0 Enclosure 0 Disk 12Bus 0 Enclosure 0 Disk 14LUNs: 1, 0Flash Cache: EnabledDeduplication State: RunningDeduplication Status: OK(0x0)Deduplication Percent Completed: 70Deduplication Remaining Size (Blocks): 12608078Deduplication Remaining Size (GBs): 3.006Optimal Deduplicated LUN SP Owner: ADeduplication Rate: MediumDeduplicated LUNs’ Tiering Policy: Auto TierDeduplicated LUNs’ Initial Tier: Highest AvailableEfficiency Savings (Blocks): 20986976Efficiency Savings (GBs): 10.007Deduplication Shared Capacity (Blocks): 209869760Deduplication Shared Capacity (GBs): 100.07
EXAMPLE #6Default output (deduplication properties do not display).
naviseccli -h riker-spa storagepool -list
Pool Name: Pool 0Pool ID: 0Raid Type: r_5Percent Full Threshold: 70Description:Disk Type: Fibre ChannelState: ReadyStatus: OK(0x0)Current Operation: NoneCurrent Operation State: N/ACurrent Operation Status: N/ACurrent Operation Percent Completed: 0Raw Capacity (Blocks): 1401742320Raw Capacity (GBs): 668.403User Capacity (Blocks): 1111558400User Capacity (GBs): 530.032Consumed Capacity (Blocks): 29361920Consumed Capacity (GBs): 14.001Available Capacity (Blocks): 1082196480Available Capacity (GBs): 516.031Percent Full: 2.642Total Subscribed Capacity (Blocks): 25167360Total Subscribed Capacity (GBs): 12.001Percent Subscribed: 2.264Oversubscribed by (Blocks): 0Oversubscribed by (GBs): 0.000Disks:Bus 0 Enclosure 0 Disk 11Bus 0 Enclosure 0 Disk 13Bus 0 Enclosure 0 Disk 10Bus 0 Enclosure 0 Disk 12Bus 0 Enclosure 0 Disk 14LUNs: 1, 0
Virtual Pools Commands
storagepool -list 315

storagepool -destroyDestroys the thin pool.
PREREQUISITESFor naviseccli, you must have a user account on the system on which you want toexecute the command.
DESCRIPTIONThe naviseccli storagepool -destroy command deletes a thin pool. You mustspecify the thin pool ID or the thin pool name to be deleted from the system.
SYNTAXstoragepool -destroy -id poolID |-name poolName [-o]OPTIONS
-id poolID |-name poolNameSpecifies the thin pool ID or name to be destroyed. You cannot use the options -idand -name together.
-oExecutes the command without prompting for confirmation.
OUTPUTNone if the command succeeds; status or error information if the command fails.
storagepool -modifyModifies the thin pool.
PREREQUISITESFor naviseccli, you must have a user account on the system on which you want toexecute the command.
DESCRIPTIONThe naviseccli storagepool -modify command lets you modify certainproperties of an existing thin pool. You must specify at least one property of the thin poolto be modified.
SYNTAX
storagepool -modify -id poolID|-name poolName[-newNamenewName] [-description description] [-fastcache on|off][-prcntFullThreshold threshold] [-autotiering scheduled|manual][-snapPoolFullThresholdEnabled on|off] [-snapPoolFullHWMpoolFullHWM] [-snapPoolFullLWM poolFullLWM][-snapSpaceUsedThresholdEnabled on|off] [-snapSpaceUsedHWMsnapSpaceUsedHWM] [-snapSpaceUsedLWM snapSpaceUsedLWM][-dedupState Running|Paused] [-dedupRate Low|Medium|High][-dedupTieringPolicy noMovement|autoTier|highestAvailable|lowestAvailable][-dedupInitialTier optimizePool|highestAvailable|lowestAvailable] [-o][-startDedup force]
Virtual Pools Commands
316 EMC VNX Series 5.33 Command Line Interface Reference for Block

OPTIONS
-id poolID | -name poolNameSpecifies the thin pool ID or name to be modified. You cannot use the options -idand -name together.
-newNameSets the unique name for the thin pool. The character length ranges from 1 to 64.
-descriptionSets the new description of the thin pool. The character length ranges from 0 to 255.
-fastcache on|offModifies the FAST Cache configuration of the storage pool.
-prcntFullThresholdSpecifies the new user capacity threshold, beyond which the system generates thealerts. The value ranges from 1 to 84. The default value is 70%.
-autotiering scheduled|manualSets the auto-tiering state to scheduled or manual for the storage pool.
-snapPoolFullThresholdEnabledIndicates that the system should check the pool full high water mark for auto delete.Valid values are On and Off.
-snapPoolFullHWMSpecifies the new pool full high watermark that triggers the auto delete process ofthe storage pool to be modified.
-snapPoolFullLWMSpecifies the new pool full low watermark that stops the auto delete process of thestorage pool to be modified.
-snapSpaceUsedThresholdEnabledIndicates that the system should check the snapshot space used high water mark forauto delete. Valid values are On and Off.
-snapSpaceUsedHWMSpecifies the new snapshot space used high watermark that triggers the auto deleteprocess of the storage pool to be modified.
-snapSpaceUsedLWMSpecifies the new snapshot space used low watermark that stops the auto deleteprocess of the storage pool to be modified.
-dedupStateAllows you to pause or resume deduplication on the specified storage pool. Validvalues are Running or Paused.
-dedupRateSpecifies the deduplication rate on the specified storage pool. Valid values are Low,Medium, or High.
-dedupTieringPolicySpecifies the common FAST VP tiering policy for all deduplicated LUNs in thespecified storage pool. Valid values are noMovement, autoTier, highestAvailable, orlowestAvailable.
-dedupInitialTierSpecifies the common FAST VP initial tier for all deduplicated LUNs in the specifiedstorage pool. Valid values are optimizePool, highestAvailable, or lowestAvailable.
-oForce the pool modification by ignoring any potential warnings.
-startDedup forceStarts a pool-level deduplication operation immediately. All restrictions arebypassed, including the less than 64G threshold, for one deduplication pass. If threededuplication operations are currently running, the new request will wait until onesession finishes before starting.
Virtual Pools Commands
storagepool -modify 317

Note
This option should be used on a limited basis. Forcing a deduplication operationcould affect future deduplication jobs.
EXAMPLE #1naviseccli -h riker-spa storagepool -modify -poolid 0 -dedupRate high-dedupTieringPolicy autoTier -dedupState paused -dedupInitialTierhighestAvailable
EXAMPLE #2naviseccli -h <array_ip> storagepool -modify -poolid 0 -startDedupforce
You are about to override the default deduplication schedule for this pool. Forcing deduplication can impact future deduplication opportunities.
Are you sure you want to perform this operation?(y/n):
storagepool -expandExpands thin pool capacity.
PREREQUISITESFor naviseccli, you must have a user account on the system on which you want toexecute the command.
DESCRIPTIONThe naviseccli storagepool -expand command lets you expand the physicalcapacity of the thin pool on the system. If you need to expand an existing tier of theselected set of disks, the current RAID type of the tier is used to expand the tier. However,if you specify a RAID type that doesn’t match the RAID type of the existing tier, the systemdisplays an error message.
SYNTAXstoragepool -expand -id poolID| -name poolName-disksdisksList[-rtype raidType[-rdrivecountdrivecount]][-initialverify yes|no][-skipRules] [-o]OPTIONS-id poolID | -name poolName
Specifies the thin pool ID or name to be expanded. You cannot use the options -idand -name together.
-rtypeSpecifies the type of RAID group of the thin pool to be expanded. The valid RAIDgroups are r_5, r_6, and r_10.
-disksSpecifies the list of disks in Bus_Enclosure_BankSlot notation. If you do not specifybus in the format, Bus 0 is assumed.
-oExecutes the command without prompting for confirmation.
-initialverifyAllows the user to specify not to have inital background verify during pool creationand expansion in order to improve operation performance of pool creation andexpansion.
-skipRules
Virtual Pools Commands
318 EMC VNX Series 5.33 Command Line Interface Reference for Block
Skips the best practices check while expanding thin pools. If you do not specify thisoption, the thin pool expansion may fail due to any error checked in the thin rules.The default value is FALSE.
EXAMPLE #1
naviseccli -h riker-spa storagepool –modify –id 0 –disks 0_1_140_2_0 … 0_2_14 –rtype r_6 –rdrivecount 16
EXAMPLE #2Expanding a storage pool with NL_SAS drives using RAID 6. The storage pool does nothave any disks in the Capacity tier, therefore the tier is created using RAID 6
naviseccli -h riker-spa storagepool -expand -id 0 -rtype r_6 -disks0_1_0 0_1_1 0_1_2 0_1_3 0_1_4 0_1_5 0_1_6 0_1_7 –o
OUTPUTNone if the command succeeds; status or error information if the command fails.
storagepool -cancelexpandCancels a failed expansion.
PREREQUISITESFor naviseccli, you must have a user account on the system on which you want toexecute the command.
DESCRIPTIONThe naviseccli storagepool -cancelexpand command lets you cancel a failedexpansion on a storage pool. You must specify the thin pool ID or thin pool name tocancel the expand operation.
SYNTAXstoragepool -cancelexpand -id poolID| -name poolNameOPTIONS
-id poolID | -name poolNameSpecifies the thin pool ID or name. You cannot use the options -id and -nametogether.
OUTPUTNone if the command succeeds; status or error information if the command fails.
storagepool -feature -infoLists the pool configuration information.
PREREQUISITESYou must have a user account on the system on which you want to execute the command.
DESCRIPTIONThe storagepool -feature -info command displays the pool configurationinformation. If the options are not specified, then all the values are displayed.
Virtual Pools Commands
storagepool -cancelexpand 319

SYNTAX
storagepool -feature -info [-isVirtualProvisioningSupported][-maxPools] [-maxDiskDrivesPerPool] [-maxDiskDrivesAllPools][-maxDiskDrivesPerOp] [-maxPoolLUNs] [-minPoolLUNSize][-maxPoolLUNSize] [-numPools] [-numPoolLUNs] [-numThinLUNs][numDiskDrivesAllPools] [-availableDisks]
OPTIONS-isVirtualProvisioningSupported
Specifies whether the thin enabler is installed on the system.-maxPools
Displays the maximum number of the storage pools that can be created on thesystem.
-maxDiskDrivesPerPoolSpecifies the maximum number of the disk drives in a pool.
-maxDiskDrivesAllPoolsSpecifies the maximum number of the disk drives in all pools.
-maxDiskDrivesPerOpSpecifies the maximum number of the disk drives used per operation.
-maxPoolLUNsDisplays the maximum number of storage pool LUNs that can be created on thesystem.
-minPoolLUNSizeDisplays the minimum pool LUN size supported (as reported by the MLU driver) inblocks and MBs.
-maxPoolLUNSizeDisplays the maximum pool LUN size supported (as reported by the MLU driver) inblocks and TBs.
-numPoolsDisplays the current number of storage pools created on the system.
-numPoolLUNsDisplays the current number of storage pool LUNs created on the system.
-numThinLUNsDisplays the total number of all pool LUNs created that are thin and non-thin.
numDiskDrivesAllPoolsDisplays the number of disk drives used in all pools.
-availableDisksA line feed separated list of disks that are available for use by the Virtual Poolsfeature.
OUTPUT
Is Virtual Provisioning Supported: trueMax. Pools: 120Max. Disks Per Pool: 120Max. Disks for all Pools: 0Max. Disks per Operation: 120Max. Pool LUNs: 4094Min. Pool LUN Size(Blocks): 2097152 Max. Pool LUN Size(Blocks): 30064771072 Max. Pool LUN Size(GBs): 14336.000 Total Number of Pools: 1Total Number of Pool LUNs: 0Total Number of all Pool LUNs that are thin: 20Total Number of all Pool LUNs that are non-thin: 20Number of Disks used in Pools: 0Available Disks:Bus 1 Enclosure 1 Disk 9
Virtual Pools Commands
320 EMC VNX Series 5.33 Command Line Interface Reference for Block

Bus 1 Enclosure 1 Disk 8Bus 1 Enclosure 1 Disk 7Bus 1 Enclosure 1 Disk 6Bus 1 Enclosure 1 Disk 5Bus 1 Enclosure 1 Disk 4Bus 1 Enclosure 1 Disk 3Bus 1 Enclosure 1 Disk 2Bus 1 Enclosure 1 Disk 1Bus 1 Enclosure 1 Disk 0Bus 1 Enclosure 0 Disk 9Bus 1 Enclosure 0 Disk 8Bus 1 Enclosure 0 Disk 7Bus 1 Enclosure 0 Disk 6Bus 1 Enclosure 0 Disk 5Bus 1 Enclosure 0 Disk 4Bus 1 Enclosure 0 Disk 3Bus 1 Enclosure 0 Disk 2Bus 1 Enclosure 0 Disk 1Bus 1 Enclosure 0 Disk 0Bus 0 Enclosure 0 Disk 14Bus 0 Enclosure 0 Disk 13Bus 0 Enclosure 0 Disk 12Bus 0 Enclosure 0 Disk 11Bus 0 Enclosure 0 Disk 10
storagepool -resumeharvestingResumes harvesting on an existing storage pool.
PREREQUISITESYou must have a user account on the system on which you want to execute the command.
DESCRIPTIONThe naviseccli storagepool -resumeharvesting command lets you resumeharvesting on an existing storage pool.
SYNTAXstoragepool -resumeharvesting -id poolID|-name poolNameOPTIONS
-id poolID | -name poolNameSpecifies the ID or name of the storage pool on which the resume harvestingoperation takes place.
OUTPUTNone if the command succeeds; status or error information if the command fails.
lun -createCreates a LUN.
PREREQUISITESThis command is available only on subsystems running Unisphere version 6.30 and later.
To create thin LUNs, you must have the Thin Provisioning Enabler installed on thesubsystem.
DESCRIPTIONThe naviseccli lun -create command lets you create pool LUNs or thin LUNs inthe storage pool.
Virtual Pools Commands
storagepool -resumeharvesting 321

SYNTAXlun -create [-type Thin|nonThin]-capacity capacity [-sq mb|gb|tb|bc]-poolId storagePoolID |-poolname storagePoolName -sp SPID[-aa autoAssignment][-l lunNumber][-name lunName][-offset logicalBlockAddress][-tieringPolicy noMovement|autoTier|highestAvailable|lowestAvailable][-initialTier optimizePool|highestAvailable|lowestAvailable][-deduplication On|Off]OPTIONS
-type Thin|nonThinSpecifies whether a thin LUN or pool LUN (non-thin LUN) is created. If not specifiedand poolID or poolName is provided, a pool LUN will be created.
Note
To create a thin pool LUN, you must explicitly use the -type Thin option, or a thick
pool LUN is created.
-capacity capacitySpecifies the storage capacity of the LUN.
-sq mb|gb|tb|bcSpecifies the size qualifier for the capacity. The valid values are gb, tb, and bc. Thedefault value is GB.
-poolId storagePoolID|-poolName storagePoolNameSpecifies the storage pool ID or storage pool name in which the new LUN will becreated.
-sp SPIDSpecifies the default SP to which the new LUN must belong. The valid values are Aand B.
-aa autoAssignmentSpecifies whether auto assignment is enabled by default or not. The valid values are1 (yes) and 0 (no). The default value is 0.
-l lunNumberSpecifies the LUN number. The lower limit is 0 and the upper limit is the number ofLUNs supported on the platform. The default value is the next lowest available value.
-name lunNameSpecifies the LUN name. The name has to be unique amongst the pool LUNs. If youdo not specify a name, the system defaults to LUN <id>.
-offset logicalBlockAddressSets the LUN’s starting Logical Block Address (LBA) to begin at a specified offsetlocation. The valid value is any unsigned decimal number. The default value is 0.
-tieringPolicy noMovement|autoTier|highestAvailable|lowestAvailableSets the auto-tiering policy. If the auto-tiering policy is not set when creating theLUN, the default policy will depend on the initialTier settings. The auto-tiering policycan be set to:
noMovement
No data relocation between tiers but the initial tier is used to guide initialplacement of data.
Virtual Pools Commands
322 EMC VNX Series 5.33 Command Line Interface Reference for Block
autoTier
Slices are subject to relocation based on the stats collected. This settingrequires that the initial tier also be set to optimize pool.
highestAvailable
Slices are subject to relocation with a bias to the highest tier. This settingrequires that the initial tier also be set to the highest available tier.
lowestAvailable
Slices are subject to relocation with a bias to the lowest tier. This settingrequires that the initial tier also be set to the lowest available tier.
-initialTier optimizePool|highestAvailable|lowestAvailableSets the initial tier preference.
optimizePool
No preference is specified and the default data placement algorithm applies.
highestAvailable
Sets the preferred tier for initial data placement to be the highest tier.
lowestAvailable
Sets the preferred tier for initial data placement to be the lowest tier.
Note
The following combination is now a valid combination and does not return anincompatible options error: lun –create […] -tieringPolicy autoTier-initialTier highestAvailable.The combination of tieringPolicy and initialTier is now compatible for theStart High then Auto-tier option.
-deduplicationSpecifies whether deduplication is enabled on this LUN. Valid values are On or Off.
EXAMPLEnaviseccli –h riker-spa lun -create -deduplication on
OUTPUTReturns 0 if the command succeeds; status or error information if it fails.
lun -modifyModifies the LUN properties.
PREREQUISITESYou must have a user account on the system on which you want to execute the command.
DESCRIPTIONThe naviseccli lun -modify command lets you modify the properties of anexisting LUN. At least one property to modify a LUN should be specified to issue thiscommand. The lun -modify command provides the same options for all pool LUNs.
SYNTAX
lun -modify -l lunNumber|-name lunName[-aa Autoassign]
Virtual Pools Commands
lun -modify 323
[-newname lunName][-sp newDefaultSPID][-tieringPolicy noMovement|autoTier|highestAvailable|lowestAvailable][-initialTieroptimizePool|highestAvailable|lowestAvailable][-deduplication On|Off [-destroySnapshots]] [-o]
OPTIONS
-l lunNumberSpecifies the LUN number. The valid value is a number that represents an existingLUN.
-name lunNameSpecifies the LUN name. The name has to be unique among the LUNs in the storagepool.
-aa AutoassignSpecifies whether auto assignment is enabled by default or not. The valid values are1 (yes) and 0 (no).
-newname lunNameSpecifies the new LUN name. The name has to be unique among the LUNs in thestorage pool.
-sp newDefaultSPIDSpecifies the default SP to which the LUN belongs. The valid values are A and B. Ifthe value is changed from the allocation owner, a prompt displays a warning aboutpotential performance impact. Select Yes to proceed.
-tieringPolicy noMovement|autoTier|highestAvailable|lowestAvailableModifies the auto-tiering policy. The auto-tiering policy can be set to:
noMovement
No data relocation between tiers but the initial tier is used to guide initialplacement of data.
autoTier
Slices are subject to relocation based on stats collected. This setting requiresthat the initial tier also be set to optimize pool.
highestAvailable
Slices are subject to relocation with a bias to the highest tier. This settingrequires that the initial tier also be set to the highest available tier.
lowestAvailable
Slices are subject to relocation with a bias to the lowest tier. This settingrequires that the initial tier also be set to the lowest available tier.
-initialTier optimizePool|highestAvailable|lowestAvailableSets the initial tier preference.
optimizePool
No preference is specified and the default data placement algorithm applies.
highestAvailable
Sets the preferred tier for initial data placement to be the highest tier.
lowestAvailable
Sets the preferred tier for initial data placement to be the lowest tier.
Virtual Pools Commands
324 EMC VNX Series 5.33 Command Line Interface Reference for Block

Note
The combinations lun –modify […] -tieringPolicy autoTier –initialTier highestAvailable and lun –modify […] –initialTierhighestAvailable are now a valid combination and do not return an
incompatible options error. These combinations are now compatible for the StartHigh then Auto-tier option.
-deduplication On|OffSpecifies whether deduplication is enabled on this LUN. Valid values are On or Off.
Note
You cannot modify deduplication settings for a LUN that belongs to file storage. Tomodify deduplication settings for a file storage pool or a file system, use Unisphereor the VNX for File CLI
-destroySnapshotsSpecifies to explicitly destroy associated VNX Snapshots before turningdeduplication on or off for the specified LUN. If a LUN has associated VNX Snapshotsand you do not use the -destroySnapshots option, you cannot change thededuplication value.
-oOverrides the confirmation message.
EXAMPLEnaviseccli lun -modify -l LUN3 -deduplication on
"SP A" is the optimal owner for the deduplicated LUNs in the storage pool. Enabling deduplication on “LUN3" owned by "SP B" may greatly impact the performance of deduplication. It is recommended that you change the default owner to avoid performance impact.
Are you sure you want to perform this operation? (y/n):
lun -expandExpands a LUN.
PREREQUISITESYou must have a user account on the system on which you want to execute the command.
DESCRIPTIONThe naviseccli lun -expand lets you expand a pool LUN. This command will notwork for classic LUNs. If the new capacity specified is higher than the existing capacityand the requirements for expansion are met, the LUN would expand. If the new capacityis less than the existing capacity, an error message will be displayed.
SYNTAX
lun -expand -l lunNumber|-name lunName-capacity capacity[-sq mb|gb|tb|bc] [-o]
OPTIONS
-l lunNumberSpecifies the LUN number. The valid value is a number that represents an existingLUN.
Virtual Pools Commands
lun -expand 325

-name lunNameSpecifies the LUN name. The name has to be unique among the pool LUNs.
-capacity capacitySpecifies the new capacity of the LUN. The new capacity should be higher than theexisting capacity for LUN expansion.
-sq mb|gb|tb|bcSpecifies the size qualifier for the capacity. The valid values are mb, gb, tb, and bc.The default value is GB.
OUTPUTReturns 0 if the command succeeds; status or error information if it fails.
lun -destroyDestroys a LUN.
PREREQUISITESYou must have a user account on the system on which you want to execute the command.
DESCRIPTIONThe naviseccli lun -destroy command lets you destroy a LUN. The LUN numberor LUN name is used to destroy any type of LUN since they are unique across all LUNs inthe storage pools.
SYNTAXlun -destroy -l lunNumber|-name lunName [-o]OPTIONS
-l lunNumberSpecifies the LUN number.
-name lunNameSpecifies the LUN name.
OUTPUTReturns 0 if the command succeeds; status or error information if it fails.
lun -listLists the LUN properties.
PREREQUISITESYou must have a user account on the system on which you want to execute the command.
DESCRIPTIONThe naviseccli lun -list lets you list all the LUN properties. If the options are notspecified, then all the values will be returned for all the LUNs. If only one option isspecified, it will be displayed along with the Logical Unit Number and Name.
SYNTAX
lun -list [-l lunNumber|-name lunName] | [-showOnly Thin|nonThin|Compressed|nonCompressed|Deduped|NonDeduped][-primaryLunName primaryLunName][-aa] [-alowner] [-at] [-userCap] [-consumedCap] [-default][-drivetype] [-offset] [-rtype] [-state] [-status] [-owner][-poolName] [-uid] [-opDetails] [-isPoolLun] [-isThinLUN][-isCompressed] [-isPrivate] [-featureData] [-perfData]
Virtual Pools Commands
326 EMC VNX Series 5.33 Command Line Interface Reference for Block

[-tieringPolicy] [-initialTier] [-tiers][-dedupState] [-all]
OPTIONS-l lunNumber
Specificies the LUN number in unsigned decimal format. If the LUN number is notfound, an error message will be returned indicating the LUN may not exist.
-name lunNameSpecifies the LUN name. If the LUN name is not found, an error message will bereturned indicating the LUN may not exist.
-showOnly Thin|nonThin|Compressed|nonCompressed|Deduped|NonDedupedSpecifies the types of LUNs to be listed. The value Thin lists all thin LUNs, nonThinlists all non-thin LUNs, Compressed shows all compressed LUNs, nonCompressedshows all non-compressed LUNs, Deduped shows only deduplicated LUNs, andNonDeduped shows only non-deduplicated LUNs. The options Compressed andNonCompressed will be shown in the command usage even if the compressionfeature is not enabled.
-primaryLunShow only the Snapshot Mount Point associated with the specified primary LUNnumber.
-primaryLunNameShow only the Snapshot Mount Point associated with the specified primary LUNname.
-aaSpecifies the auto assign property.
-alownerSpecifies the allocation owner of the LUN.
-atSpecifies the auto-trespass property.
-userCapSpecifies the user (host visible) capacity of the LUN in blocks and GBs.
-consumedCapSpecifies the consumed capacity of the LUN. The consumed capacity is always largerthan the user capacity for pool LUNs.
-defaultSpecifies the default owner of the LUN.
-drivetypeDisplays the drive type of the LUN which is essentially the drive type of the storagepool. If more than one type of drive are present in the pool, then Mixed will bedisplayed.
-offsetDisplays the alignment offset of the LUN that was assigned when the LUN wasbound.
-opDetailsDisplays the details of the currently running operation. The values are name, state,status, and percent completed. If no current operation is running, then the values forthese fields are N/A, N/A, N/A, and 0, respectively. This could be used to showcompression and auto-tiering related information.
-ownerDisplays the name of the SP that currently owns the LUN. If neither SP owns the LUNa value of Unknown is returned.
-isPoolLUNDisplays Yes, if it is either a thin LUN or pool LUN.
-isThinLUNDisplays Yes if it is a thin LUN.
-isCompressed
Virtual Pools Commands
lun -list 327

Displays the isCompressed property of the LUN.-poolName
Displays the name of the storage pool to which the mapped LUN belongs.-rtype
Specifies the RAID group type of the LUN.-perfData
Specifies the following information: Statistics Logging Current Time, Read Requests,Write Requests, Blocks Read, Blocks Written, Busy Ticks, Idle Ticks, Sum ofOutstanding Requests, Non-Zero Request Count Arrivals, Implicit Trespasses, andExplicit Trespasses.
-isPrivateSpecifies if the LUN is a private LUN. Pool LUNs can be private since they can be partof a reserved LUN pool.
-featureDataReturns the information about the features on the LUN.
-stateDisplays the state of the mapped LUN.
-statusDisplays the status of the mapped LUN. This displays a string that corresponds tothe status code, along with the status code in hex in lowercase, enclosed inbrackets.
-uidDisplays the unique identifier (System WWN + LUN WWN) for the LUN.
-tieringPolicyDisplays the auto-tiering policy.
-initialTierDisplays the initial tier information.
-tiersDisplays the tier information.
-dedupStateDisplays the Deduplication State and Deduplication Status. Possible values ofDeduplication State are Enabling, On, Disabling, or Off.
-allDisplays the LUN information along with the auto-tiering policy (if the auto-tieringenabler is installed), the initial tier, and the tier information.
EXAMPLE #1LUN has deduplication enabled.
naviseccli -h riker-spa lun -list -dedupState
LOGICAL UNIT NUMBER 0Name: LUN 0Deduplication State: Enabling(80% complete)Deduplication Status: OK(0x0)
EXAMPLE #2List only deduplication-enabled LUNs.
naviseccli -h riker-spa lun -list -showOnly Deduped -dedupState
LOGICAL UNIT NUMBER 0Name: LUN 0Deduplication State: OnDeduplication Status: OK(0x0)
EXAMPLE #3List all properties.
Virtual Pools Commands
328 EMC VNX Series 5.33 Command Line Interface Reference for Block

naviseccli -h riker-spa lun -list -all
LOGICAL UNIT NUMBERLOGICAL UNIT NUMBER 0Name: LUN 0UID: 60:06:01:60:83:32:28:00:3A:23:E6:E2:5C:37:DF:11Current Owner: SP ADefault Owner: SP AAllocation Owner: SP AUser Capacity (Blocks): 209715200User Capacity (GBs): 100.000Consumed Capacity (Blocks): 218117120Consumed Capacity (GBs): 104.006Pool Name: Pool 0Raid Type: r_5Disk Type: MixedOffset: 0Auto-Assign Enabled: DISABLEDAuto-Trespass Enabled: DISABLEDCurrent State: ReadyStatus: OK(0x0)Is Faulted: falseIs Transitioning: falseCurrent Operation: NoneCurrent Operation State: N/ACurrent Operation Status: N/ACurrent Operation Percent Completed: 0Statistics Logging Current Time: 04/06/10 08:07:09Read Requests: 0Read Requests SP A: 0Read Requests SP B: 0Write Requests: 0Write Requests SP A: 0Write Requests SP B: 0Blocks Read: 0Blocks Read SP A: 0Blocks Read SP B: 0Blocks Written: 0Blocks Written SP A: 0Blocks Written SP B: 0Busy Ticks: 0Busy Ticks SP A: 0Busy Ticks SP B: 0Idle Ticks: 0Idle Ticks SP A: 0Idle Ticks SP B: 0Sum of Outstanding Requests: 0Sum of Outstanding Requests SP A: 0Sum of Outstanding Requests SP B: 0Non-Zero Request Count Arrivals: 0Non-Zero Request Count Arrivals SP A: 0Non-Zero Request Count Arrivals SP B: 0Implicit Trespasses: 0Implicit Trespasses SP A: 0Implicit Trespasses SP B: 0Explicit Trespasses: 0Explicit Trespasses SP A: 0Explicit Trespasses SP B: 0Is Pool LUN: YesIs Thin LUN: NoIs Private: NoIs Compressed: NoFeatures: N/ATiering Policy: Lowest AvailableInitial Tier: Lowest AvailableTier Distribution:FC: 100.00%
Virtual Pools Commands
lun -list 329
EXAMPLE #4Default output (deduplication properties do not display).
naviseccli -h riker-spa lun -list
LOGICAL UNIT NUMBER 0Name: LUN 0
deduplication -feature -pausePauses deduplication on the system.
PREREQUISITESYou must have a user account on the system on which you want to execute the command.
DESCRIPTIONThe naviseccli deduplication -feature -pause command pauses all underlyingdeduplication processes on the system. You must manually resume deduplication tocancel a pause. The system does not cancel the pause automatically.
SYNTAXdeduplication -feature -pauseEXAMPLEnaviseccli deduplication -feature –pause
OUTPUTNone if the command succeeds; status or error information if it fails.
deduplication -feature -resumeResumes deduplication on the system.
PREREQUISITESYou must have a user account on the system on which you want to execute the command.
DESCRIPTIONThe naviseccli deduplication -feature -resume command resumes all underlyingdeduplication processes on the system.
SYNTAXdeduplication -feature -resumeEXAMPLEnaviseccli deduplication -feature –resume
OUTPUTNone if the command succeeds; status or error information if it fails.
deduplication -feature -infoDisplays the deduplication feature information.
DESCRIPTIONThe naviseccli deduplication -feature -info command displays the deduplication featureinformation.
Virtual Pools Commands
330 EMC VNX Series 5.33 Command Line Interface Reference for Block

SYNTAXdeduplication -feature -infoEXAMPLE # 1Deduplication feature is enabled.
naviseccli –h <array_ip> deduplication –feature –info
Is Deduplication Supported: trueDeduplication Feature State: On
EXAMPLE # 2Deduplication feature is paused.
naviseccli –h <array_ip> deduplication –feature –info
Is Deduplication Supported: trueDeduplication Feature State: Paused
Virtual Pools Commands
deduplication -feature -info 331

Virtual Pools Commands
332 EMC VNX Series 5.33 Command Line Interface Reference for Block

CHAPTER 4
Auto-tiering Commands
This chapter provides a brief overview on the auto-tiering feature and includes a list ofcommands that you can use if the feature is enabled on your system.
Major topics include:
l About tiered storage............................................................................................334l autotiering -schedule -modify..............................................................................335l autotiering -schedule -enable|-disable................................................................ 336l autotiering -relocation -start................................................................................336l autotiering -relocation -setrate............................................................................ 337l autotiering -relocation -pause|-resume................................................................ 338l autotiering -relocation -stop................................................................................ 338l autotiering -info.................................................................................................. 339
Auto-tiering Commands 333

About tiered storageTiered storage is the assignment of different categories of data to different types ofstorage media to reduce the total storage cost. Data categories may be based on thelevels of protection needed, performance requirements, frequency of use, cost, and otherconsiderations. The purpose of tiered storage is to retain the most frequently accessed orimportant data on fast, high performance (more expensive) drives, and move the lessfrequently accessed and less important data to low performance (less expensive) drives.The software provides two types of tiered storage:
l Inital tier placement (does not require the auto-tiering enabler)
l Auto-tiering placement (requires the auto-tiering enabler)
Initial tier placement (auto-tiering enabler is not installed)
For initial tier placement, you must manually specify the storage tier to place the LUNdata. The tier choices are Optimize for Pool Performance, Highest Available Tier, andLowest Available Tier. Select the tier based on the relative performance requirements forthe LUN data. After you assign a LUN to a specific tier, you must perform a LUN migrationto relocate the data to a different tier or install the auto-tiering enabler.
Table 19 Initial tier placement (auto-tiering enabler is not installed)
Initial tier placement Description
Optimize for PoolPerformance
No tier preference is specified. The system uses the default dataplacement algorithm to place the data.
Highest AvailableTier
Sets the preferred tier for inital data placement to the highest availabletier.
Lowest Available Tier Sets the preferred tier for inital data placement to the lowest availabletier.
Auto-tiering placement (auto-tiering enabler is installed)
The auto-tiering feature migrates data between storage tiers to lower the customer's totalcost of ownership (TCO). Storage pools are configured with multiple classes of storagedevices (EFD, FC, and SATA) and system software continually tracks the usage of the datastored on the LUNs. Using these LUN statistics, the auto-tiering feature relocates datablocks (slices) of each LUN to the storage tier that is best suited for that data.
Table 20 Auto-tiering placement (auto-tiering enabler is installed)
Auto-tieringplacement
Description
Auto Tier The system uses the LUN performance statistics for data relocation.
Highest AvailableTier
Sets the preferred tier for data relocation to the highest available tier.
Lowest AvailableTier
Sets the preferred tier for data relocation to the lowest available tier.
No Data Movement No data relocation between tiers. The initial tier placement is retained.
Auto-tiering Commands
334 EMC VNX Series 5.33 Command Line Interface Reference for Block
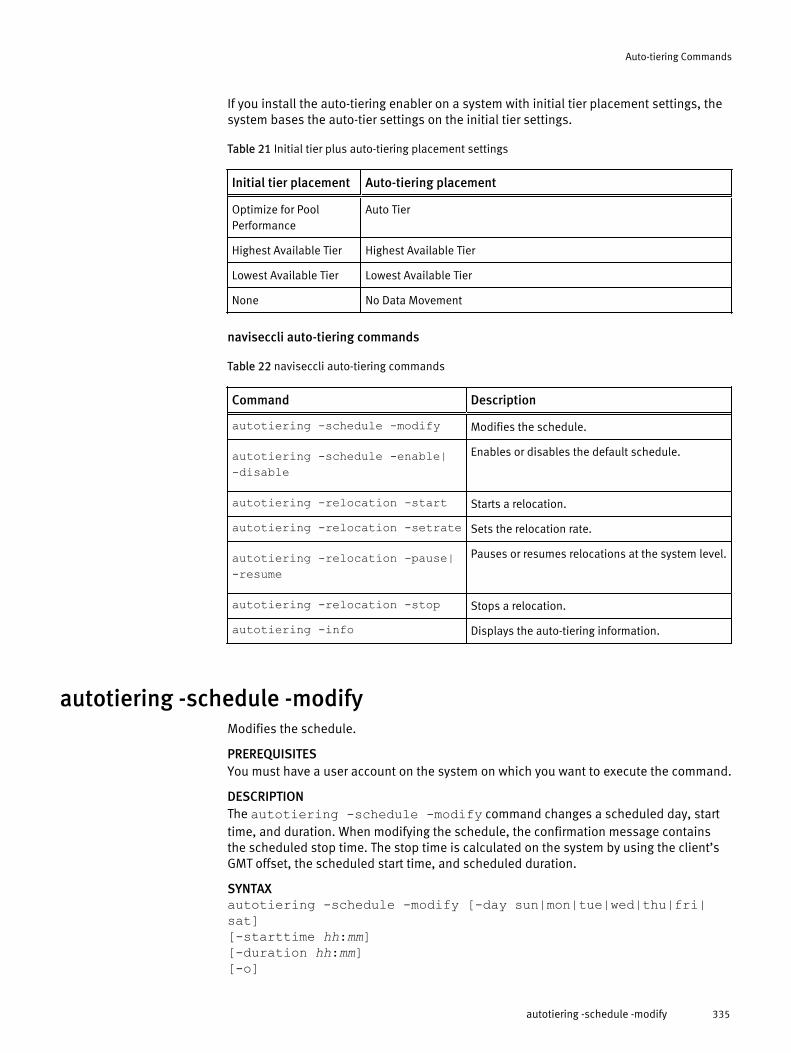
If you install the auto-tiering enabler on a system with initial tier placement settings, thesystem bases the auto-tier settings on the initial tier settings.
Table 21 Initial tier plus auto-tiering placement settings
Initial tier placement Auto-tiering placement
Optimize for PoolPerformance
Auto Tier
Highest Available Tier Highest Available Tier
Lowest Available Tier Lowest Available Tier
None No Data Movement
naviseccli auto-tiering commands
Table 22 naviseccli auto-tiering commands
Command Description
autotiering -schedule -modify Modifies the schedule.
autotiering -schedule -enable|-disable
Enables or disables the default schedule.
autotiering -relocation -start Starts a relocation.
autotiering -relocation -setrate Sets the relocation rate.
autotiering -relocation -pause|-resume
Pauses or resumes relocations at the system level.
autotiering -relocation -stop Stops a relocation.
autotiering -info Displays the auto-tiering information.
autotiering -schedule -modifyModifies the schedule.
PREREQUISITESYou must have a user account on the system on which you want to execute the command.
DESCRIPTIONThe autotiering -schedule -modify command changes a scheduled day, starttime, and duration. When modifying the schedule, the confirmation message containsthe scheduled stop time. The stop time is calculated on the system by using the client’sGMT offset, the scheduled start time, and scheduled duration.
SYNTAXautotiering -schedule -modify [-day sun|mon|tue|wed|thu|fri|sat][-starttime hh:mm][-duration hh:mm][-o]
Auto-tiering Commands
autotiering -schedule -modify 335
OPTIONS
-day sun|mon|tue|wed|thu|fri|satSpecified as a space separated list containing one or more of the followingabbreviations: Sun, Mon, Tue, Wed, Thu, Fri, or Sat.
-starttime hh:mmSpecifies the scheduled start time. The hours are specified from 0-23 and theminutes are specified from 00-59. The start time is set relevant to the client’s GMToffset.
-duration hh:mmSpecifies the scheduled duration. The maximum duration is 23 hours and 59minutes. The minimum duration is 1 minute.
-oExecutes the command without prompting for the confirmation.
EXAMPLE
autotiering -schedule -modify -day Mon Wed Fri -starttime 10:30-duration 2:00
OUTPUTNone if the command succeeds; status or error information if it fails.
autotiering -schedule -enable|-disableEnables or disables the default schedule.
PREREQUISITESYou must have a user account on the system on which you want to execute the command.
DESCRIPTIONThe autotiering -schedule -disable command disables the auto-tieringdefault schedule. The default schedule can be enabled using the schedule -enablecommand.
SYNTAXautotiering -schedule -enable|-disable [-o]OPTIONS
-oExecutes the command without prompting for the confirmation.
EXAMPLE #1autotiering -schedule -enable -o
EXAMPLE #2autotiering -schedule -disable -o
OUTPUTNone if the command succeeds; status or error information if it fails.
autotiering -relocation -startStarts a relocation.
PREREQUISITESYou must have a user account on the system on which you want to execute the command.
Auto-tiering Commands
336 EMC VNX Series 5.33 Command Line Interface Reference for Block

DESCRIPTIONThe autotiering -relocation -start command manually starts a relocation ona storage pool regardless of the auto-tiering state.
SYNTAX
autotiering -relocation -start -poolId poolId1 [poolId2] |-poolname poolname] [poolname2] | -all[-duration hh:mm][-rate high|medium|low][-o]
OPTIONS
-poolID poolID| -poolname poolnameSpecifies the storage pool ID or the storage pool name on which the manualrelocation starts.
-allStarts the manual relocation on all the storage pools on the system.
-duration hh:mmSpecifies the duration for the manual relocation. The maximum duration is 23 hoursand 59 minutes and the minimum duration is 1 minute. The default duration is 8hours.
-rate high|medium|lowSpecifies the rate for a manual relocation. The valid values are high, medium, or low.If the rate is not specified, it defaults to the system rate, that is, the value returnedfrom the autotiering -info -rate.
-oExecutes the command without prompting for the confirmation.
EXAMPLEautotiering -relocation -start -all -rate high -duration 10:00
OUTPUTNone if the command succeeds; status or error information if it fails.
autotiering -relocation -setrateSets the relocation rate.
PREREQUISITESYou must have a user account on the system on which you want to execute the command.
DESCRIPTIONThe autotiering -relocation -setrate command sets the relocation rate thatdetermines how the scheduled relocations will be performed on the system. If the rate isnot specified when starting a manual relocation, it will use this rate.
SYNTAXautotiering -relocation -setrate -rate high|medium|low[-o]OPTIONS
-rate high|medium|lowSets the scheduled relocation rate. The valid values are high, medium, or low.
-oExecutes the command without prompting for the confirmation.
Auto-tiering Commands
autotiering -relocation -setrate 337

EXAMPLEautotiering -relocation -setrate -rate low -o
OUTPUTNone if the command succeeds; status or error information if it fails.
autotiering -relocation -pause|-resumePauses or resumes relocations at the system level.
PREREQUISITESYou must have a user account on the system on which you want to execute the command.
DESCRIPTIONThe autotiering -relocation -pause command pauses all the active relocationtasks on the system. It also prevents running new relocations (manual and scheduled) byimmediately placing the tasks in the paused state.
The autotiering -relocation -resume command allows relocation tasks in thepaused state to continue and allows new relocations (manual and scheduled) to startimmediately.
SYNTAXautotiering -relocation -pause|-resume [-o]OPTIONS
-oExecutes the command without prompting for the confirmation.
EXAMPLE #1autotiering -relocation -pause -o
EXAMPLE #2autotiering -relocation -resume
OUTPUTNone if the command succeeds; status or error information if it fails.
autotiering -relocation -stopStops a relocation.
PREREQUISITESYou must have a user account on the system on which you want to execute the command.
DESCRIPTIONThe autotiering -relocation -stop command stops a relocation that wasstarted manually or by the scheduler.
SYNTAX
autoTiering -relocation -stop -poolId poolID1 [poolID2] |-poolname pool name1 [pool name2] | -all [-o]
OPTIONS
-poolId poolid|-poolname poolnameSpecifies the storage pool ID or the storage pool name on which the manualrelocation stops.
Auto-tiering Commands
338 EMC VNX Series 5.33 Command Line Interface Reference for Block

-allStops the manual relocation on all the storage pools on the system.
-oExecutes the command without prompting for the confirmation.
EXAMPLEautotiering -relocation -stop -all
OUTPUTNone if the command succeeds; status or error information if it fails.
autotiering -infoDisplays the auto-tiering information.
PREREQUISITESYou must have a user account on the system on which you want to execute the command.
DESCRIPTIONThe autotiering -info command displays the auto-tiering state, schedules,relocation rate, and operation status.
SYNTAXautotiering -info [-state][-schedule][-rate][-opstatus [–loadBalance][-poolId-poolId1[-poolId 2...]|-poolName -poolName1[-poolName2...]]]OPTIONS
-stateDisplays the auto-tiering state.
-scheduleDisplays the auto-tiering schedule.
-rateDisplays the auto-tiering relocation rate.
-opstatusDisplays the auto-tiering operations status for all the storage pools on the system orfor a given list of storage pools. If a relocation is not in progress for a storage pool,the status of the most recent relocation will be displayed.
–loadBalanceDisplays the data to move within a tier. This data is also called the Load Balancingdata.
-poolId poolID1 [poolID2...] [-poolName poolName1 [poolName2...]Specifies the storage pool ID or the storage pool name.
OUTPUTnaviseccli –h 10.5.2.182 autotiering -info -opstatusThe data to move within tiers information is displayed only if the -loadBalance optionis used.
Storage Pool Name: Pool 0Storage Pool ID: 0Relocation Start Time: 02/01/13 10:07Relocation Stop Time: N/ARelocation Status: ActiveRelocation Type: Rebalance
Auto-tiering Commands
autotiering -info 339
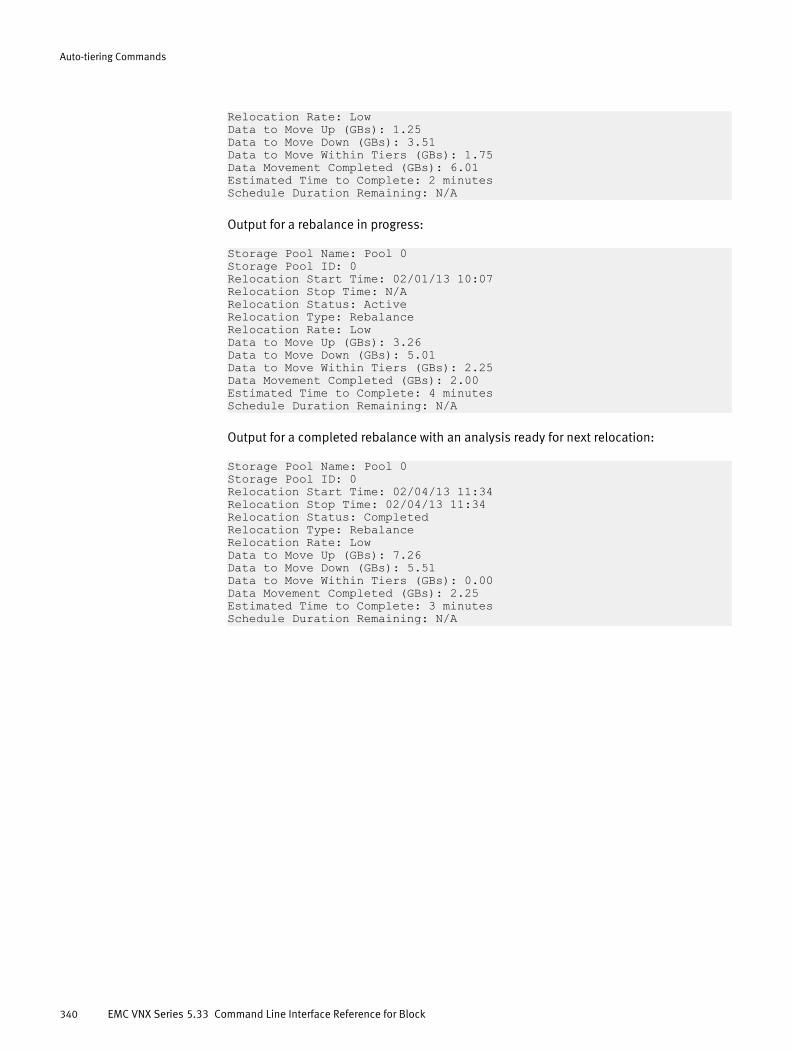
Relocation Rate: LowData to Move Up (GBs): 1.25Data to Move Down (GBs): 3.51Data to Move Within Tiers (GBs): 1.75Data Movement Completed (GBs): 6.01Estimated Time to Complete: 2 minutesSchedule Duration Remaining: N/A
Output for a rebalance in progress:
Storage Pool Name: Pool 0Storage Pool ID: 0Relocation Start Time: 02/01/13 10:07Relocation Stop Time: N/ARelocation Status: ActiveRelocation Type: RebalanceRelocation Rate: LowData to Move Up (GBs): 3.26Data to Move Down (GBs): 5.01Data to Move Within Tiers (GBs): 2.25Data Movement Completed (GBs): 2.00Estimated Time to Complete: 4 minutesSchedule Duration Remaining: N/A
Output for a completed rebalance with an analysis ready for next relocation:
Storage Pool Name: Pool 0Storage Pool ID: 0Relocation Start Time: 02/04/13 11:34Relocation Stop Time: 02/04/13 11:34Relocation Status: CompletedRelocation Type: RebalanceRelocation Rate: LowData to Move Up (GBs): 7.26Data to Move Down (GBs): 5.51Data to Move Within Tiers (GBs): 0.00Data Movement Completed (GBs): 2.25Estimated Time to Complete: 3 minutesSchedule Duration Remaining: N/A
Auto-tiering Commands
340 EMC VNX Series 5.33 Command Line Interface Reference for Block

CHAPTER 5
Compression Commands
This chapter provides a brief overview of the compression feature and includes a list ofcompression commands that you can use if this feature is enabled on your system.
Major topics include:
l About LUN Compression......................................................................................342l compression -on................................................................................................. 342l compression -pause............................................................................................343l compression -feature -pause...............................................................................344l compression -resume..........................................................................................344l compression -feature -resume.............................................................................345l compression -feature -info.................................................................................. 345l compression -modify...........................................................................................345l compression -off................................................................................................. 346l compression -list.................................................................................................346
Compression Commands 341

About LUN CompressionCompression is an optional software feature that lets you compress all types of LUN datathereby freeing up storage space in your systems. Data compression analyzes the data ona disk and applies algorithms that reduce the size of repetitive sequences of bits that areinherent in some types of files. The amount of reduction resulting from compression isdependent on the mix of data types being stored; however, unlike de-duplication,compression does not depend on the presence of multiple copies of the same data.
All compression operations perform in the background while continuing to service hostI/O. In order to use the compression feature, you must install the compression enablerand the thin provisioning enabler on the system. You can compress classic LUNs as wellas pool LUNs. All compressed LUNs are thin LUNs.
During the compression operation for a classic LUN, the software migrates andcompresses the LUN data to a thin LUN in a pool. The LUN becomes a compressed thinLUN while migrating the software. During the migration phase, the software detects thezeros on the source LUN and deallocates them on the target LUN which frees up morestorage capacity on the target LUN. For better performance and improved spaceutilization, we strongly recommend that the target LUN is a newly created LUN with noexisting data.
Compression operations for pool LUNs (thick and thin) take place within the pool inwhich the LUN being compressed resides. When compressed, thick and thin LUNsbecome compressed thin LUNs.
If, for some reason, you need to decompress the compressed data or temporarily pauseany active compression operations, the software lets you do both. When decompressed,classic LUNs become fully-provisioned thin LUNs with the same capacity as the originalclassic LUN and thick LUNs become fully-provisioned thin LUNs. In addition, the softwarelets you easily monitor the status of all LUN compression operations.
Table 23 naviseccli compression commands
Command Description
compression -on Turns on compression on a LUN.
compression -pause Pauses compression on a LUN.
compression -pauseall Pauses compression on the system.
compression -resume Resumes compression on a LUN.
compression -resumeall Resumes compression on the system.
compression -modify Modifies the compression rate.
compression -off Turns off compression.
compression -list Lists compression information.
compression -onTurns on compression on a LUN.
PREREQUISITESYou must have a user account on the system on which you want to execute the command.
Compression Commands
342 EMC VNX Series 5.33 Command Line Interface Reference for Block
DESCRIPTIONThe naviseccli compression -on command turns on compression for pool LUNsand classic LUNs. The command syntax differs depending on the LUN, either a pool LUNor classic LUN.
SYNTAXFor pool LUNs:
naviseccli –h sp compression –on-l LUN number [-rate low|medium|high|value]
For classic LUNs:
naviseccli –h sp compression –on-l LUN number -destpoolid storagepoolid |-destpoolname storagepoolname[-rate low|medium|high|value]
OPTIONS
-l LUN numberSpecifies the LUN number to be compressed.
-destpoolid storagepoolidSpecifies the destination pool ID to which the classic LUN gets migrated. This optionis valid only when the LUN being compressed is a classic LUN.
-destpoolname storagepoolnameSpecifies the destination pool name to which the classic LUN gets migrated. Thisoption is valid only when the LUN being compressed is a classic LUN.
-rate low|medium|high|valueSpecifies the compression rate. The default compression rate is medium. The validcompression rates are low or 1, medium or 2, and high or 3.
EXAMPLEnaviseccli compression -on -l 10 –destpoolid 0 –rate low
OUTPUTNone if the command succeeds; status or error information if it fails.
compression -pausePauses compression on a LUN.
PREREQUISITESYou must have a user account on the system on which you want to execute the command.
DESCRIPTIONThe naviseccli compression -pause command pauses compression on a LUN.
SYNTAXnaviseccli –h sp compression –pause -l LUN numberOPTIONS
-l LUN numberSpecifies the LUN number of the compressed LUN to be paused.
EXAMPLEnaviseccli compression -pause -l 10
Compression Commands
compression -pause 343

OUTPUTNone if the command succeeds; status or error information if it fails.
compression -feature -pausePauses compression on the system.
PREREQUISITESYou must have a user account on the system on which you want to execute the command.
DESCRIPTIONThe naviseccli compression -feature -pause command pausescompression on the system.
SYNTAXnaviseccli –h sp compression –feature -pause [-o]OPTIONS
-oExecutes the command without prompting for confirmation.
EXAMPLEnaviseccli compression -feature -pause
OUTPUTNone if the command succeeds; status or error information if it fails.
compression -resumeResumes compression on a LUN.
PREREQUISITESYou must have a user account on the system on which you want to execute the command.
DESCRIPTIONThe naviseccli compression -resume command resumes paused compressionon a LUN. The command can also work for overriding compression in decompressionsystem paused state.
SYNTAXcompression -resume -l LUN number [-o]OPTIONS
-l LUN numberSpecifies the LUN number of the paused compressed LUN to resume.
-oExecutes the command without prompting for confirmation.
EXAMPLEnaviseccli compression -resume -l 10
OUTPUTNone if the command succeeds; status or error information if it fails.
Compression Commands
344 EMC VNX Series 5.33 Command Line Interface Reference for Block

compression -feature -resumeResumes compression on the system.
PREREQUISITESYou must have a user account on the system on which you want to execute the command.
DESCRIPTIONThe naviseccli compression -feature -resume command resumescompression on the system.
SYNTAXnaviseccli –h sp compression –feature -resume [-o]OPTIONS
[ -o]Executes the command without prompting for confirmation.
EXAMPLEnaviseccli compression -feature -resume
OUTPUTNone if the command succeeds; status or error information if it fails.
compression -feature -infoDisplays the compression feature information.
PREREQUISITESYou must have a user account on the system on which you want to execute the command.
DESCRIPTIONThe naviseccli compression -feature -info command displays thecompression feature information.
SYNTAXnaviseccli -h sp compression -feature -infoEXAMPLEnaviseccli compression -feature -info
OUTPUT
Compression Feature State: Paused
compression -modifyModifies the compression rate.
PREREQUISITESYou must have a user account on the system on which you want to execute the command.
DESCRIPTIONThe naviseccli compression -modify command changes the compression rateon a specified LUN.
Compression Commands
compression -feature -resume 345
SYNTAXnaviseccli –h sp compression –modify -l LUN number -rate low|medium|high|valueOPTIONS
-l LUN numberSpecifies the LUN number of the compressed LUN to be modified.
-rate low|medium|high|valueSpecifies the compression rate. The valid compression rates are low or 1, medium or2, and high or 3.
EXAMPLEnaviseccli compression -modify -l 10 –rate low
OUTPUTNone if the command succeeds; status or error information if it fails.
compression -offTurns off compression.
PREREQUISITESYou must have a user account on the system on which you want to execute the command.
DESCRIPTIONThe naviseccli compression -off command turns off compression on a LUN.
SYNTAXnaviseccli -h sp compression -off -l LUN number [-o]OPTIONS
-l LUN numberSpecifies the LUN number of the LUN on which you want to stop compression.
-oExecutes the command without prompting for confirmation.
EXAMPLEnaviseccli compression -off -l 10
OUTPUTNone if the command succeeds; status or error information if it fails.
compression -listLists compression information.
PREREQUISITESYou must have a user account on the system on which you want to execute the command.
DESCRIPTIONThe naviseccli compression -list command lists compression information ona specified LUN or all LUNs.
SYNTAXnaviseccli –h sp compression –list [-l LUN number][-destpoolid][-uid]
Compression Commands
346 EMC VNX Series 5.33 Command Line Interface Reference for Block
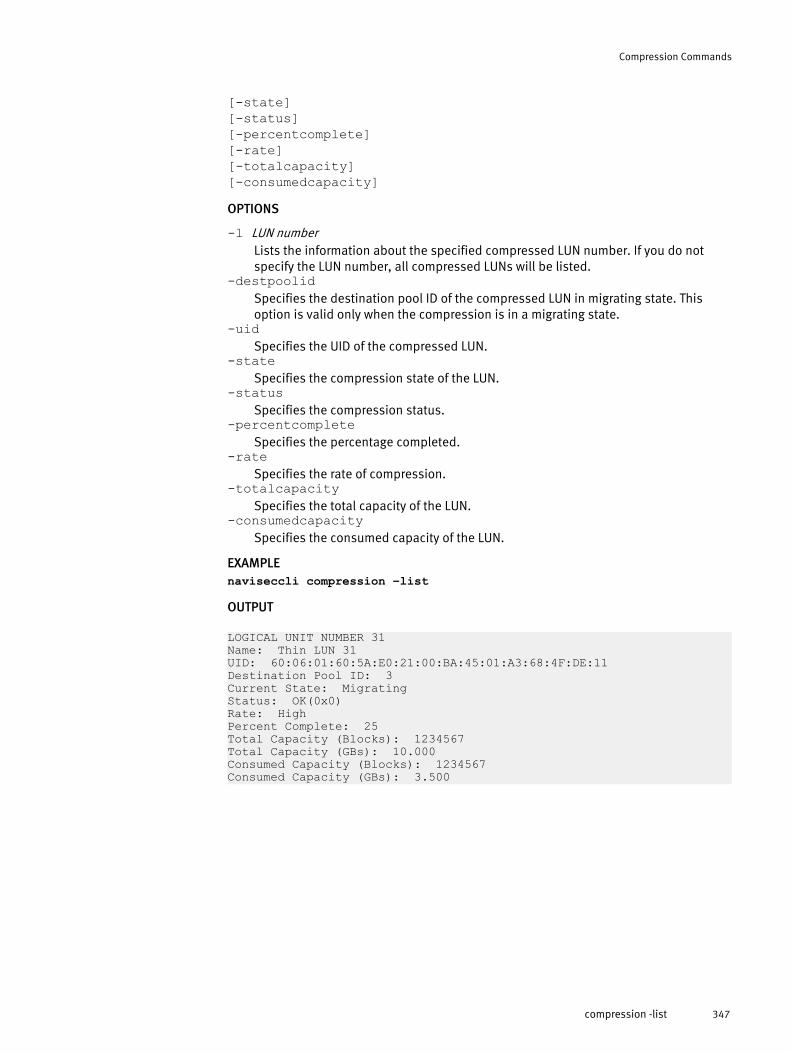
[-state][-status][-percentcomplete][-rate][-totalcapacity][-consumedcapacity]OPTIONS
-l LUN numberLists the information about the specified compressed LUN number. If you do notspecify the LUN number, all compressed LUNs will be listed.
-destpoolidSpecifies the destination pool ID of the compressed LUN in migrating state. Thisoption is valid only when the compression is in a migrating state.
-uidSpecifies the UID of the compressed LUN.
-stateSpecifies the compression state of the LUN.
-statusSpecifies the compression status.
-percentcompleteSpecifies the percentage completed.
-rateSpecifies the rate of compression.
-totalcapacitySpecifies the total capacity of the LUN.
-consumedcapacitySpecifies the consumed capacity of the LUN.
EXAMPLEnaviseccli compression –list
OUTPUT
LOGICAL UNIT NUMBER 31Name: Thin LUN 31 UID: 60:06:01:60:5A:E0:21:00:BA:45:01:A3:68:4F:DE:11Destination Pool ID: 3Current State: MigratingStatus: OK(0x0)Rate: HighPercent Complete: 25Total Capacity (Blocks): 1234567Total Capacity (GBs): 10.000Consumed Capacity (Blocks): 1234567Consumed Capacity (GBs): 3.500
Compression Commands
compression -list 347

Compression Commands
348 EMC VNX Series 5.33 Command Line Interface Reference for Block

CHAPTER 6
FAST Cache Commands
This chapter provides a brief overview of the EMC FAST Cache feature and includes a listof FAST Cache commands that you can use, if the feature is enabled on your system.
Major topics include:
l Introduction to caching....................................................................................... 350l cache -fast -create...............................................................................................351l cache -fast -destroy.............................................................................................352l cache -fast -info.................................................................................................. 352
FAST Cache Commands 349
Introduction to cachingCaching temporarily stores frequently accessed data in the storage processor's DRAMmemory (SP cache) or in FAST Cache. SP cache operates at the finest granularity 8Kphysical page size with a 64K logical page size. SP cache has the fastest access times,but is limited in size. FAST Cache provides a large secondary cache area with a 64K pagesize that can be configured in much larger capacities. FAST Cache uses its understandingof LUN mappings to avoid caching data that is already resident on solid-state disk (SSD)storage.
SP cacheSP cache includes read caching and write caching. SP cache dynamically adjusts theamount of cache used by each LUN based on the I/O load on that LUN. SP cache does notallow one LUN to monopolize the whole cache.
l Read caching is always enabled for a system, and the setting cannot be changed.
l Write caching is enabled by default for a system. You can disable write cache at thesystem level for both classic LUNs and pool LUNs. You can disable write cache at theLUN level for classic LUNs only.
FAST Cache
Note
Storage systems with unbound Flash (SSD) disks and with the FAST Cache enablerinstalled support the FAST Cache.
FAST Cache is a private storage pool consisting of two or more Flash disks. FAST Cachesupports read and write caching. FAST Cache can be enabled for all pool LUNs in astorage pool or for individual classic LUNs.
If the LUN is in a RAID group, it can use FAST Cache if it is enabled for the LUN. If this LUNis in a FAST Cache-enabled pool, it is eligible to use the FAST Cache.
Data already on a Flash drive is not eligible to be moved to FAST Cache.
To use FAST Cache, the system must have:
l FAST Cache enabler installed
l FAST Cache configured
l FAST Cache enabled at the classic LUN and/or storage pool
You can enable FAST Cache for a classic LUN when you create the LUN or after the LUN isbound using the LUN Cache or SP Cache properties tab. You enable the FAST Cache for apool LUN when you create the pool or after the pool is created using the Advanced poolproperties tab.
Note
You should not enable the FAST Cache for write intent log LUNs and Clone Private LUNs.Enabling the FAST Cache for these LUNs is a suboptimal use of the FAST Cache and mayreduce the performance of the cache for other LUNs.
FAST Cache Commands
350 EMC VNX Series 5.33 Command Line Interface Reference for Block

naviseccli FAST Cache commands
Table 24 naviseccli FAST Cache commands
Command Description
cache -fast -create Creates FAST Cache.
cache -fast -destroy Destroys FAST Cache.
cache -fast -info Displays FAST Cache information.
cache -fast -createCreates FAST Cache.
PREREQUISITESYou must have a user account on the system on which you want to execute the command.
DESCRIPTIONThe naviseccli cache -fast -create command creates the FAST Cache.
SYNTAXcache -fast -create -disks disksList [-rtype raidtype][-mode rw | ro][-o]OPTIONS
-disks disksListSpecifies the name of the disks used as FAST Cache. If you do not specify the disks,the command will fail.
-mode rw|roSpecifies the cache mode. The rw is readwrite mode. The ro is readonly mode.
-rtype raidtypeSpecifies the RAID type. Valid RAID type is r_1.
-oExecutes the command without prompting for confirmation.
EXAMPLEnaviseccli cache -fast -create -disks 0_0_6 0_0_7 -mode rw -rtype r_1
OUTPUT
Configuring FAST Cache may take up to several hours to complete. Itwill also reduce the amount of Storage System memory available foruse by SP Cache. Do you want to continue? (y/n) y
If the user wants to create fast cache and the operation would violate the hot sparepolicy, then the following confirmation message will be displayed:
The selection of disks for the FAST Cache creation will violate thehot spare policy.Configuring FAST Cache may take up to several hours to complete. Itwill also reduce the amount of Storage System memory available foruse by SP Cache.Do you want to continue? (y/n) y
FAST Cache Commands
cache -fast -create 351

cache -fast -destroyDestroys FAST Cache.
PREREQUISITESYou must have a user account on the system on which you want to execute the command.
DESCRIPTIONThe naviseccli cache -fast -destroy command destroys the FAST Cache.
SYNTAXcache -fast -destroy [-o]OPTIONS
-oExecutes the command without prompting for confirmation.
EXAMPLEnaviseccli cache -fast –destroy
OUTPUT
To destroy FAST Cache, the System must flush all data to disk. This operation may be time consuming and may impact system performance. You can monitor the progress of this operation by using the following command: cache -fast -info.Do you want to continue? (y/n) Y
cache -fast -infoDisplays FAST Cache properties.
PREREQUISITESYou must have a user account on the system on which you want to execute the command.
DESCRIPTIONThe naviseccli cache -fast -info command lets you view the FAST Cacheproperties.
SYNTAXcache -fast -info [-disks][-status][-perfData]OPTIONS
-disksDisplays the disks used for FAST Cache.
-statusDisplays FAST Cache status.
-perfDataDisplays FAST Cache statistics.
-oExecutes the command without prompting for confirmation.
FAST Cache Commands
352 EMC VNX Series 5.33 Command Line Interface Reference for Block
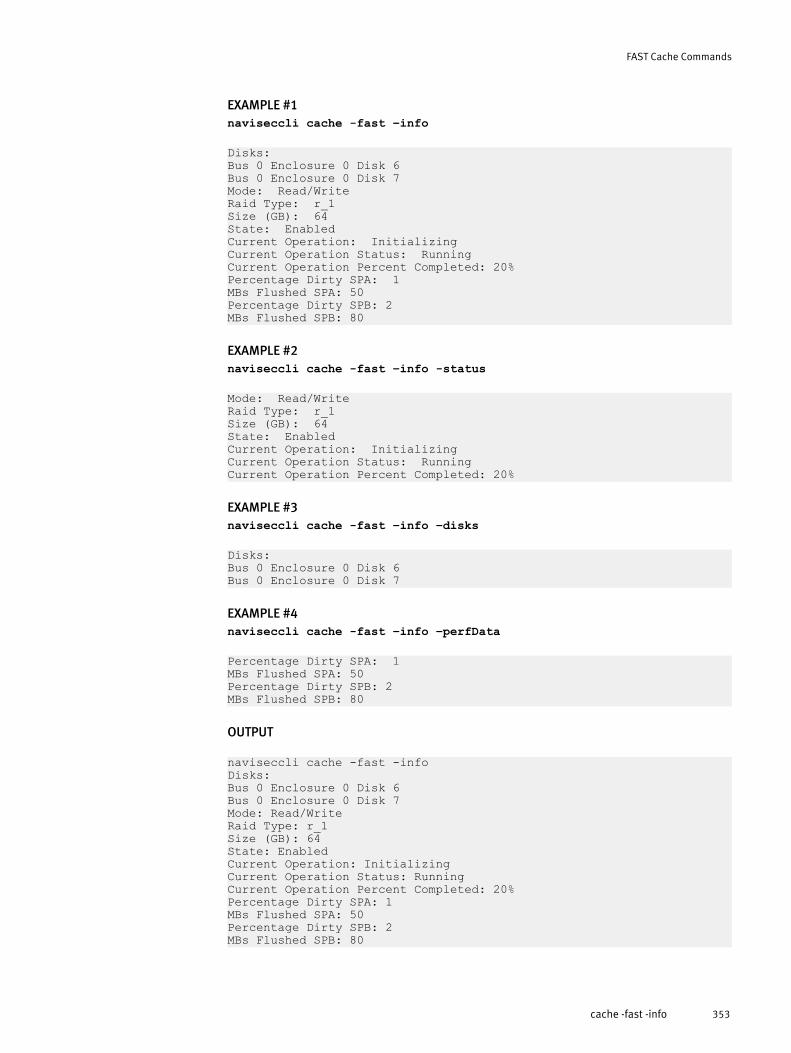
EXAMPLE #1naviseccli cache -fast –info
Disks: Bus 0 Enclosure 0 Disk 6Bus 0 Enclosure 0 Disk 7 Mode: Read/WriteRaid Type: r_1Size (GB): 64State: EnabledCurrent Operation: Initializing Current Operation Status: Running Current Operation Percent Completed: 20%Percentage Dirty SPA: 1MBs Flushed SPA: 50Percentage Dirty SPB: 2MBs Flushed SPB: 80
EXAMPLE #2naviseccli cache -fast –info -status
Mode: Read/WriteRaid Type: r_1Size (GB): 64State: EnabledCurrent Operation: Initializing Current Operation Status: Running Current Operation Percent Completed: 20%
EXAMPLE #3naviseccli cache -fast –info –disks
Disks: Bus 0 Enclosure 0 Disk 6Bus 0 Enclosure 0 Disk 7
EXAMPLE #4naviseccli cache -fast –info –perfData
Percentage Dirty SPA: 1MBs Flushed SPA: 50Percentage Dirty SPB: 2MBs Flushed SPB: 80
OUTPUT
naviseccli cache -fast -infoDisks:Bus 0 Enclosure 0 Disk 6Bus 0 Enclosure 0 Disk 7Mode: Read/WriteRaid Type: r_1Size (GB): 64State: EnabledCurrent Operation: InitializingCurrent Operation Status: RunningCurrent Operation Percent Completed: 20%Percentage Dirty SPA: 1MBs Flushed SPA: 50Percentage Dirty SPB: 2MBs Flushed SPB: 80
FAST Cache Commands
cache -fast -info 353

FAST Cache Commands
354 EMC VNX Series 5.33 Command Line Interface Reference for Block
CHAPTER 7
EMC Unisphere QoS Manager
This chapter introduces the EMC® Unisphere™ Quality of Service (QoS) Managerapplication, associated dependencies, and the online help system.
Major topics are:
l About Unisphere Quality of Service Manager....................................................... 356l QoS Manager CLI commands...............................................................................356l Client tools..........................................................................................................375
EMC Unisphere QoS Manager 355
About Unisphere Quality of Service ManagerQoS Manager lets you allocate system performance resources on an application-by-application basis. You can use QoS Manager to solve performance conflicts inenvironments where multiple applications share the same system. Within systemcapacity, QoS Manager lets you meet specific performance targets for applications, andcreate performance thresholds to prevent applications from monopolizing systemperformance.
Note
QoS Manager lets you centrally manage system resources with no host footprint (no hostmanagement or software installs are required on the host).
With QoS Manager, you create user-defined I/O classes that characterize, for example, aparticular application in order to monitor and control the performance of the I/O class.You must specify various I/O characteristics of your applications to define your I/Oclasses. You can then determine goals for your I/O classes, and define how to achievethose goals with control methods. You create one or more policies by selecting I/Oclasses, goals and control methods.
Note
QoS Manager is system specific. Therefore, you must enable QoS Manager on eachsystem for which you want to use QoS Manager. You do not need to reboot your system toenable QoS Manager.
QoS Manager prerequisitesQoS Manager requires the following:
l QoS Manager must be enabled on each system on which you want to use it.
Note
Your system must be running the required EMC VNX OE for Block revision to run QoSManager. QoS Manager is automatically installed with the required VNX OE for Blockrevision. You must enable QoS Manager on the system. For required VNX OE for Blockrevisions, see the release notes supplied with the software.You do not need to reboot your system to enable QoS Manager.
l The correct version of the Java Runtime Environment (JRE) (see the release notes)must be installed on the client from which you run the browser.
For system support and the latest requirements, see the release notes supplied with thesoftware.
QoS Manager CLI commandsThis section explains the naviseccli command and the CLI commands for QoSManager application.
EMC Unisphere QoS Manager
356 EMC VNX Series 5.33 Command Line Interface Reference for Block

Note
The commands in this section function only with a system that has the optional QoSManager software installed.
nqm -getlatestperfDisplays the latest performance information for a running or measuring policy.
PREREQUISITESYou must have a user account on the system on which you want to execute the command.
DESCRIPTIONThe nqm -getlatestperf command lets you view the latest performance informationfor a running or measuring policy.
SYNTAXnqm –getlatestperf [-ioclasses classnames] [-value bw|tt|rt]OPTIONS
-ioclasses classnamesSpecifies an I/O class name. If not specified, all of the I/O classes in the currentlyrunning policy will be listed. If the I/O class specified is not a part of a currentlyrunning policy, an error message appears.
-value bw |tt |rtLists the performance counters output. The following are the valid counter types:
bw: Bandwidth (MB/s)
tt: Throughput (I/O/s)
rt: Response time (ms)
EXAMPLEFor ss1_spa, this command displays the latest performance information.
naviseccli –h ss1_spa nqm -getlatestperf
OUTPUT
Class Name:OLTP class Local Time:Sun June 19 09:10:00 2005Response Time[ms]:20 Throughput[I/O/sec]:1000Bandwidth[MB/s]:500 Class Name:Background class Local Time: Sun June 19 09:10:00 2005 Response Time[ms]:28 Throughput[I/O/sec]:800 Bandwidth[MB/s]:300
nqm -infoProvides information about QoS Manager on the system.
PREREQUISITESYou must have a user account on the system on which you want to execute the command.
DESCRIPTIONThe nqm -info command provides you with information about QoS Manager on thesystem.
EMC Unisphere QoS Manager
nqm -getlatestperf 357

SYNTAXnqm –infoEXAMPLEFor ss1_spa, this command displays information about QoS Manager on the system.
naviseccli –h ss1_spa nqm –info
OUTPUT
Current State of NQM: Running Goal Satisfied: N/A NQM Provider Version: 6.24 Total User Defined Classes: 2 Total User Defined Policies: 2 Log Event On: Goal no longer satisfied Fallback Policy:aPolicy Current Policy: aRunningPolicy Current Localized Array Time: 22:12:33 10/2/2005
nqm -ioclass -createCreates a new I/O class.
PREREQUISITESYou must have a user account on the system on which you want to execute the command.
DESCRIPTIONThe nqm -ioclass command with the -create switch creates a new I/O class. Themaximum number of user-defined classes per system is 128.
SYNTAX
nqm -ioclass –create -ctrlmethod limit -gmetric bw|tt|rt-gval value|-ctrlmethod cruise -gtol value|-ctrlmethod fixed | -noctrl –name classname[-snapshots name|WWN | -luns number|WWN | -nolun]-iotype r|w|rw[[-minsize value_in_kb][-maxsize value_in_kb]] | [-anyio][-o]
OPTIONS
-ctrlmethod limitLimits maximum throughput, maximum bandwidth, or minimum response time.
-gmetric bw|tt|rtSpecifies the metric type. It is not valid if the goal type is fixed. Options are:
bw: Bandwidth (MB/s)
tt: Throughput (I/O/s)
rt: Response time (ms)
-gval valueSpecifies the goal value for this class. If the control method is fixed, this value mustbe between 1 and 512. Otherwise, it must be greater than 0 and less than10,000,000,000.
-ctrlmethod cruiseGives the specific value of throughput, bandwidth, or response time.
-gtol valueSpecifies the tolerance ratio for goal settings. It must be a value between 0 and 100.Unit is percent (%). It is used only for a cruise goal type.
EMC Unisphere QoS Manager
358 EMC VNX Series 5.33 Command Line Interface Reference for Block

-ctrlmethod fixedSets a fixed queue depth for an I/O class.
-noctrlIf specified, creates the I/O class without any control method.
-name classnameSpecifies a new class name.
-snapshots name|WWNLists the COFW snapshot LUN names, the snapshot mount point names, or theWWNs.
-luns number|WWNLists the LUN numbers or the LUN WWNs. You can use this option for classic LUNs,metaLUNs, thin LUNs, and fully provisioned LUNs.
-nolunSpecifies that the I/O class will not be modified to any specific LUN.
-iotype r|w|rwLists the I/O type. Valid inputs are r (read) or w (write) or rw (readwrite).
-minsize value_in_kbIndicates the minimum I/O size in KBs, a value between .5 and 64 in increments of .5.
-maxsize value_in_kbIndicates the maximum I/O size in KBs.
-anyioIndicates the I/O class range, if any. If no I/O size range is specified, the defaultsetting will be anyio.
-oCreates an I/O class without prompting for warning/confirmation. If you do notspecify the -o switch, the following confirmation message appears:
You chose Fixed Queue Depth as your control method. Pleasebe aware that this feature is for EXPERT users ONLY.Running NQM with this control method may prevent you fromfully utilizing your system's performance resources byrestricting your I/O classes to a certain queue depth onthe array. Please use with caution. Do you want to continueit (y/n)?
EXAMPLEFor ss1_spa, this command creates an I/O class with the name testClass includingLUNs 1, 2, 3 with an I/O type of read. The I/O range is 32–64 KB. The throughput has agoal value of 500 I/Os per second and a tolerance ratio of 10%.
naviseccli –h ss1_spa nqm -ioclass –create –name testClass –luns 1 2 3–iotype r –minsize 32 –maxsize 64 –ctrlmethod cruise -gmetric tt–gval 500 –gtol 10
OUTPUTNone
nqm -ioclass -destroyRemoves an existing I/O class.
PREREQUISITESYou must have a user account on the system on which you want to execute the command.
EMC Unisphere QoS Manager
nqm -ioclass -destroy 359

DESCRIPTIONThe nqm -ioclass command with the -destroy switch removes an existing I/O class.
Note
The operation is not allowed while the class is in a running state.
SYNTAXnqm –ioclass -destroy -name classname [-o]OPTIONS-name classname
Specifies an existing class name.-o
Destroys an I/O class without prompting for warning/confirmation. If you do notspecify the -o switch when destroying an I/O class, a confirmation messageappears.
y = Destroy an I/O class.
n = Do not destroy an I/O class.
EXAMPLEFor ss1_spa, testClass will be removed.
naviseccli –h ss1_spa nqm –ioclass -destroy -name testClass
OUTPUTNone
nqm -ioclass -listLists all application classes previously created.
PREREQUISITESYou must have a user account on the system on which you want to execute the command.
DESCRIPTIONThe nqm -ioclass command with the -list switch displays all previously createdapplication classes.
SYNTAXnqm -ioclass -list [-ctrlmethod][-iorange][-iotype][-luns][-name [ioclassname]][-snapshots][-status][-state]OPTIONS-ctrlmethod
Displays the control method and one or more of the following parameters. For thecruise control method, it displays the goal metric, goal value, and tolerance. For thelimit method, it displays the goal metric and goal value. For the fixed-queue-depthmethod, it displays only the queue depth value.
-iorangeLists the range of I/O sizes in this class.
-iotype
EMC Unisphere QoS Manager
360 EMC VNX Series 5.33 Command Line Interface Reference for Block

Lists the I/O type. They are read, write, or readwrite.-luns
Lists the LUNs contained in the class. For each classic LUN, thin LUN, and fullyprovisioned LUN, the LUN number, name, WWN, and RAID type are displayed. FormetaLUNs, the RAID type is displayed as N/A. For the class that does not contain anyLUNs, the LUNs are listed as Not LUN Specific.
-name [ioclassname]Specifies an I/O class name and lists all information for that I/O class. If you do notspecify this option, all I/O class names are displayed.
-snapshotsLists the snapshots LUN (s) and the snapshot mount points contained in the class.For each snapshot LUN, the snapshot LUN name, the WWN, and the target logicalunit are displayed.
-statusDisplays the current status of an I/O class, which may be one of the following:
Ready: The I/O class is ready to be run within the context of a policy.
Warning: The I/O class does not have a goal and can only be measured in thecontext of a policy.
Broken: The I/O class does not include any LUNs because its last LUN, which couldbe a classic LUN, a metaLUN, or a thin LUN, was destroyed. If the last LUN is a thinLUN and it goes offline, the I/O class (or any policies that contain this I/O class) isdisplayed as Broken.
-stateDisplays the class operational state, which may be one of the following:
Running: QoS Manager actively controls the system’s I/O flow and collectsperformance information.
Idle: QoS Manager is not controlling or measuring I/O.
Measuring: QoS Manager collects performance, but does not tune it.
EXAMPLEFor ss1_spa, this command displays all previously created application classes.
naviseccli –h ss1_spa nqm –ioclass -list
OUTPUT
Name: TestClassWithNOGoal Status: Ready Current State: Idle Number of LUNs: 3 LUNs: LUN Number: 0 LUN Name: LUN 0 LUN WWN: 60:06:01:60:4E:22:0E:00:4C:CC:D6:F8:67:6C:D8:11 RAID Type: RAID5 LUN Number: 2 LUN Name: LUN 2 LUN WWN: 60:06:01:60:4E:22:0E:00:4E:CC:D6:F8:67:6C:D8:11 RAID Type: RAID5 LUN Number: 1 LUN Name: LUN 1 LUN WWN: 60:06:01:60:4E:22:0E:00:4D:CC:D6:F8:67:6C:D8:11 RAID Type: RAID5 Number of Snapshot(s): 1 Snapshot(s): Snapshot Name: Snap7 Snapshot WWN: 60:06:01:60:4B:50:1D:00:B4:21:88:CF:39:E6:DD:11
EMC Unisphere QoS Manager
nqm -ioclass -list 361

Target Logical Unit: 8170 IO Type: ReadWrite IO Size Range: Any Control Method: Limit Goal Metric: Throughput Metric Type: Throughput Goal Value: 400 IO/s
Name: TestCompleteClass Status: Ready Current State: Idle Number of LUNs: 3 LUNs: LUN Number: 0 LUN Name: LUN 0 LUN WWN: 60:06:01:60:4E:22:0E:00:4C:CC:D6:F8:67:6C:D8:11 RAID Type: RAID5 LUN Number: 2 LUN Name: LUN 2 LUN WWN: 60:06:01:60:4E:22:0E:00:4E:CC:D6:F8:67:6C:D8:11 RAID Type: RAID5 LUN Number: 1 LUN Name: LUN 1 LUN WWN: 60:06:01:60:4E:22:0E:00:4D:CC:D6:F8:67:6C:D8:11 RAID Type: RAID5 IO Type: ReadWrite IO Size Range: 12KB -- 32KB Control Method: Cruise Control Goal Metric: Throughput Metric Type: Throughput Goal Value: 400 IO/s Goal Tolerance[%]: 50
nqm -ioclass -modifyModifies an existing I/O class.
PREREQUISITESYou must have a user account on the system on which you want to execute the command.
DESCRIPTIONThe nqm -ioclass command with the -modify switch modifies an existing I/O class.You can use this command to rename the class, change the properties of a class, orupdate the contained target lists.
Note
This operation is not allowed while the class is in a running state.
SYNTAX
nqm -ioclass -modify -name classname[-anyio][-iotype r|w|rw][-snapshots name|WWN|-luns number|WWN|-nolun][[-maxsize value_in_kb] [-minsize value_in_kb]][-newname newname][goal switches][-o][-ctrlmethod limit -gmetric bw|tt|rt -gval value|-ctrlmethod cruise-gmetric bw|tt|rt -gval value -gtol value|-ctrlmethod fixed -gval value|-noctrl]
EMC Unisphere QoS Manager
362 EMC VNX Series 5.33 Command Line Interface Reference for Block
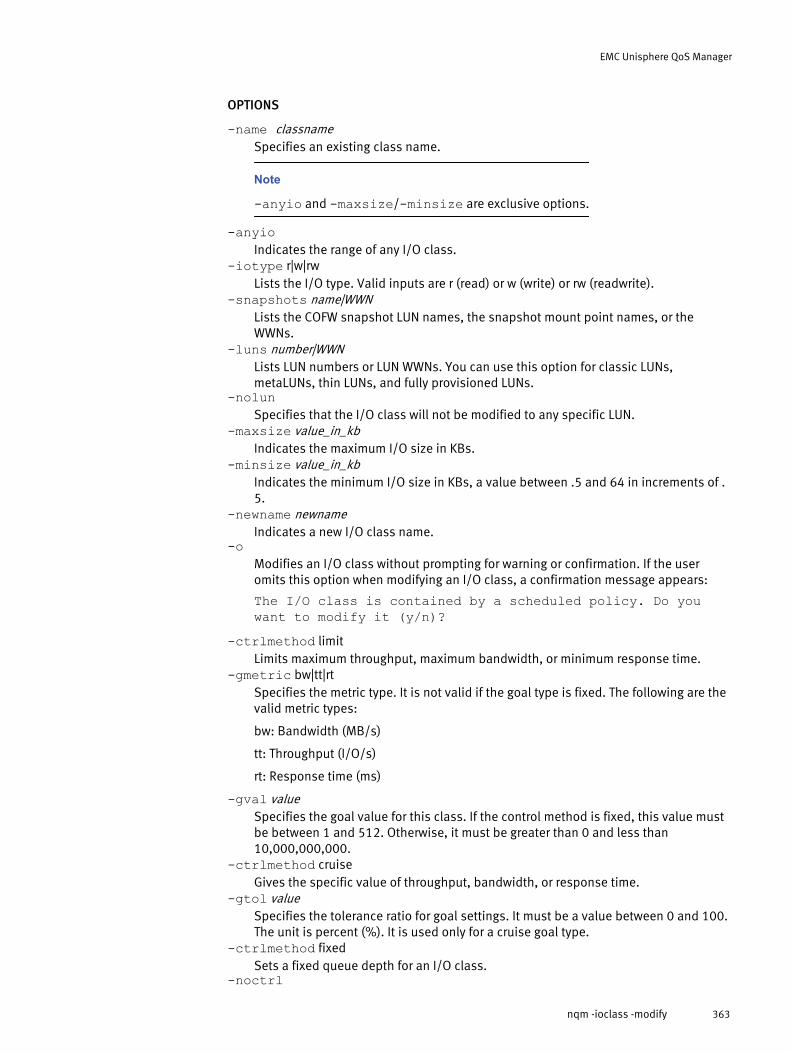
OPTIONS
-name classnameSpecifies an existing class name.
Note
-anyio and -maxsize/-minsize are exclusive options.
-anyioIndicates the range of any I/O class.
-iotype r|w|rwLists the I/O type. Valid inputs are r (read) or w (write) or rw (readwrite).
-snapshots name|WWNLists the COFW snapshot LUN names, the snapshot mount point names, or theWWNs.
-luns number|WWNLists LUN numbers or LUN WWNs. You can use this option for classic LUNs,metaLUNs, thin LUNs, and fully provisioned LUNs.
-nolunSpecifies that the I/O class will not be modified to any specific LUN.
-maxsize value_in_kbIndicates the maximum I/O size in KBs.
-minsize value_in_kbIndicates the minimum I/O size in KBs, a value between .5 and 64 in increments of .5.
-newname newnameIndicates a new I/O class name.
-oModifies an I/O class without prompting for warning or confirmation. If the useromits this option when modifying an I/O class, a confirmation message appears:
The I/O class is contained by a scheduled policy. Do youwant to modify it (y/n)?
-ctrlmethod limitLimits maximum throughput, maximum bandwidth, or minimum response time.
-gmetric bw|tt|rtSpecifies the metric type. It is not valid if the goal type is fixed. The following are thevalid metric types:
bw: Bandwidth (MB/s)
tt: Throughput (I/O/s)
rt: Response time (ms)
-gval valueSpecifies the goal value for this class. If the control method is fixed, this value mustbe between 1 and 512. Otherwise, it must be greater than 0 and less than10,000,000,000.
-ctrlmethod cruiseGives the specific value of throughput, bandwidth, or response time.
-gtol valueSpecifies the tolerance ratio for goal settings. It must be a value between 0 and 100.The unit is percent (%). It is used only for a cruise goal type.
-ctrlmethod fixedSets a fixed queue depth for an I/O class.
-noctrl
EMC Unisphere QoS Manager
nqm -ioclass -modify 363

If specified, creates the I/O class without any control method.
EXAMPLEFor ss1_spa, this command modifies testClass and gives a new I/O class name ofOLTPClass.
naviseccli –h ss1_spa nqm -ioclass –modify –name testClass -newnameOLTPClass
OUTPUTNone
nqm -measureStarts a specified policy in measuring mode.
PREREQUISITESYou must have a user account on the system on which you want to execute the command.
DESCRIPTIONThe nqm -measure command starts a specified policy in measuring mode.
SYNTAXnqm –measure policynameOPTIONSpolicyname
Specifies the existing policy name.
EXAMPLEFor ss1_spa, this command starts testPolicy in measuring mode.
naviseccli –h ss1_spa nqm –measure testPolicy
OUTPUTNone
nqm -offShuts down the QoS Manager operations.
PREREQUISITESYou must have a user account on the system on which you want to execute the command.
DESCRIPTIONThe nqm -off command shuts down the QoS Manager operations. Use this commandto stop QoS Manager from running, suspend all scheduled tasks, and disable the fallbackfeature. This command does not work if QoS Manager is not active.
SYNTAXnqm –off [-o]OPTIONS-o
Shuts down the QoS Manager operations without prompting for warning/confirmation. If you omit the -o switch, the following confirmation messageappears:
This command will stop NQM from running, suspend allscheduled tasks and disable fallback feature. Do you wantto continue (y/n)?
EMC Unisphere QoS Manager
364 EMC VNX Series 5.33 Command Line Interface Reference for Block

EXAMPLEFor 10.15.17.205, this command shuts down QoS Manager operations.
naviseccli -user admin –password admin –scope 0 –h 10.15.17.205 nqm–off
OUTPUTNone
nqm -policy -createCreates a new policy.
PREREQUISITESYou must have a user account on the system on which you want to execute the command.
DESCRIPTIONThe naviseccli nqm -policy command with the -create switch creates a newpolicy. A maximum of 10 policies are supported on a storage system.
SYNTAX
nqm -policy –create –name policyname [-evalwindownumber_of_samples][-failaction stop|measure|continue][-ioclasses classnames|-noclass][-timelimit value_in_min]
OPTIONS
-name policynameSpecifies the policy name.
-evalwindow number_of_samplesSpecifies the number of sample periods needed to meet (or to fail to meet) the goalin order for the goal to be classified as satisfied (or unsatisfied). This value must bebetween 3 and 30. The default value is 3.
-failaction stop |measure|continueSpecifies the action QoS Manager takes when the goal is not satisfied. The defaultaction is stop.
-ioclasses classnamesSpecifies the I/O class names. The maximum I/O classes allowed is 64.
-noclassCreates the policy with no I/O class.
-timelimit value_in_minSpecifies the maximum time in minutes that a system takes to satisfy the goal. Youmust specify the limit in minutes. This value must be between 5 and 1440. Thedefault value is 60.
EXAMPLEFor ss1_spa, this command creates a new policy for clitestpolicy. The specifiedI/O class is testClass. The system has 20 minutes to satisfy the goal. QoS Managerstops if the goal is not satisfied in the given time limit. The number of sample periods is3.
naviseccli –h ss1_spa nqm –policy -create -name clitestpolicy–ioclasses testClass –timelimit 20 –failaction stop –evalwindow 3
EMC Unisphere QoS Manager
nqm -policy -create 365

OUTPUTNone
nqm -policy -destroyDeletes an existing policy.
PREREQUISITESYou must have a user account on the system on which you want to execute the command.
DESCRIPTIONThe naviseccli nqm -policy command with the -destroy switch deletes anexisting policy that is not contained by any scheduled task. This command will not beallowed if the specified policy is running or measuring.
SYNTAXnqm -policy -destroy -name policyname [-o]OPTIONS
-name policynameSpecifies the policy name to be destroyed.
-oDestroys the policy without prompting for warning/confirmation. If you do notspecify the -o switch when destroying a policy, a confirmation message appears.
y = Destroy a policy.
n = Do not destroy a policy.
EXAMPLEFor ss1_spa, this command deletes the policy, testPolicy.
naviseccli –h ss1_spa nqm -policy –destroy -name testPolicy
OUTPUTNone
nqm -policy -listCreates and manages QoS Manager policies.
PREREQUISITESYou must have a user account on the system on which you want to execute the command.
DESCRIPTIONThe naviseccli nqm -policy command with the -list switch creates andmanages the QoS Manager policies.
SYNTAXnqm -policy -list [-evalwindow][-failaction][-ioclasses classnames][-name [policyname]][-state][-status][-timelimit]OPTIONS
-evalwindow
EMC Unisphere QoS Manager
366 EMC VNX Series 5.33 Command Line Interface Reference for Block

Specifies the number of sample periods needed to meet (or to fail to meet) the goalin order for the goal to be classified as satisfied (or unsatisfied).
-failactionSpecifies the action QoS Manager takes when it fails to satisfy the goal. If the policycontains a class with the control method of fixed queue depth, this switch optionwill be N/A.
-ioclasses classnamesSpecifies the I/O class names.
-name [policyname]Specifies the policy name. If not specified, all policy names will be displayed.
-stateDisplays the policy’s current state.
-statusDisplays the policy’s current status.
-timelimitSpecifies the maximum time it should take the system to satisfy the goal. The unit ismeasured in minutes.
EXAMPLEFor ss1_spa, the command displays the created QoS Manager policies.
naviseccli –h ss1_spa nqm –policy –list
OUTPUT
Name: TestInCompletePolicy2 Status:Ready Current State: Idle Number of I/O Classes: 2 I/O Classes: Name: TestClassWithNOGoalName: Background Class Action on Failure: Stop NQM tuning after failure to converge Time Limit:15 min Evaluation Window: 10 samples
Name: TestCompletePolicy Status:Ready Current State: Idle Number of I/O Classes: 2 I/O Classes: Name: TestCompleteClass Name: Background Class Action on Failure: Stop NQM after failure to satisfy goal Time Limit:15min Evalution Window: 10 samples
nqm -policy -modifyModifies an existing policy.
PREREQUISITESYou must have a user account on the system on which you want to execute the command.
DESCRIPTIONThe naviseccli nqm -policy command with the -modify switch modifies anexisting policy.
SYNTAXnqm -policy -modify -name policyname [-evalwindownumber_of_samples][-failaction stop|measure|continue]
EMC Unisphere QoS Manager
nqm -policy -modify 367

[-ioclasses classnames] | [-noclass][-newname newname][-o][-timelimit value_in_min]OPTIONS
-name policynameSpecifies the policy name.
-evalwindow number_of_samplesSpecifies the number of sample periods needed to meet (or to fail to meet) the goalin order for the goal to be classified as satisfied (or unsatisfied). This value must bebetween 3 and 30. The default value is 3.
-failaction stop |measure|continueSpecifies the action QoS Manager takes when the goal is not satisfied. The defaultaction is stop.
-ioclasses classnamesSpecifies the I/O class names.
-noclassModifies the policy to contain no I/O classes.
-newname newnameNew name for an existing policy.
-oModifies a policy without prompting for warning/confirmation.
-timelimit value_in_minSpecifies the maximum time it should take the system to satisfy the goal. Measuredin minutes, the value must be between 5 and 1440. The default value is 60.
EXAMPLEFor ss1_spa, this command modifies the existing policy name, clitestpolicy2, andassigns a new name, OLTPPolicy. The QoS Manager stops if the goal is not satisfied.
naviseccli –h ss1_spa nqm -policy –modify –name clitestpolicy2-newname OLTPPolicy -failaction stop
OUTPUTNone
nqm -runStarts a specified policy.
PREREQUISITESYou must have a user account on the system on which you want to execute the command.
DESCRIPTIONThe naviseccli nqm -run command starts a specified policy.
SYNTAXnqm –run policynameOPTIONS
policynameSpecifies which policy to run.
EXAMPLEFor ss1_spa, this command runs testPolicy.
naviseccli -h ss1_spa nqm -run testPolicy
EMC Unisphere QoS Manager
368 EMC VNX Series 5.33 Command Line Interface Reference for Block

OUTPUTNone
nqm -schedule -createCreates a scheduled task.
PREREQUISITESYou must have a user account on the system on which you want to execute the command.
DESCRIPTIONThe naviseccli nqm -schedule command with the -create switch creates ascheduled task.
SYNTAXnqm -schedule -create -name schedulename -startdate mm/dd/yyyy-starttimehh:mm:ss –duration hours:minutes -policy policyname[-daily frequency]| [-weekly frequency -pattern [su] [mo] [tu] [we] [th] [fr][sa]] | -norecurOPTIONS
-name schedulenameSpecifies the scheduled task name.
-startdate mm/dd/yyyyIndicates the date the task is scheduled to start.
-starttime hh:mm:ssIndicates the time the task is scheduled to start.
-duration hours:minutesIndicates how long the policy will run. The hours can be a value between 0 and 168.Minutes is a value between 0 and 59.
-policy policynameSpecifies the policy name to which the scheduled task is associated.
-daily frequencySpecifies that this scheduled task should occur daily at the specified frequency.
-weekly frequencySpecifies that this scheduled task should occur weekly at the specified frequency.
-pattern [su] [mo] [tu] [we] [th] [fr] [sa]Specifies the list of weekdays, separated by spaces, that the task will reoccur.Specify this switch only with the -weekly switch.
-norecurSpecifies no recurrence of the scheduled task, if specified.
EXAMPLEFor ss1_spa, this command creates a daily recurring task forTestScheduleRecurring. The task will occur every day at 12:10:00. The duration willbe 4 hours and 20 minutes, effective 4/5/2004. The scheduled task will be associatedwith TestCompletePolicy.
naviseccli –h ss1_spa nqm -schedule –create –nameTestScheduleRecurring -startdate 04/05/2004 –starttime12:10:00 –duration 4:20 -policy TestCompletePolicy -daily 1
EMC Unisphere QoS Manager
nqm -schedule -create 369

OUTPUTNone
nqm -schedule -destroyClears a specified scheduled task.
PREREQUISITESYou must have a user account on the system on which you want to execute the command.
DESCRIPTIONThe naviseccli nqm -schedule command with the -destroy switch clears aspecified scheduled task.
SYNTAXnqm -schedule -destroy –name schedulename [-o]OPTIONS
-name schedulenameSpecifies the scheduled task name.
-oDestroys the scheduled task without prompting for warning/confirmation. If you donot specify the -o switch when destroying a scheduled task, a confirmationmessage appears.
y = Destroy a scheduled task.
n = Do not destroy the scheduled task.
EXAMPLEFor ss1_spa, this command clears the scheduled task testSchedule.
naviseccli –h ss1_spa nqm –schedule –destroy –name testSchedule
OUTPUTNone
nqm -schedule -listLists all scheduled tasks.
PREREQUISITESYou must have a user account on the system on which you want to execute the command.
DESCRIPTIONThe naviseccli nqm -schedule command with the -list switch lists all scheduledtasks in a timely order. If there is no task scheduled, then no task will be displayed.
SYNTAXnqm -schedule -list [-name [schedulename]][-state][-start][-duration][-policy policyname][-recur]OPTIONS
-name schedulenameLists all information for a specific QoS Manager task.
-state
EMC Unisphere QoS Manager
370 EMC VNX Series 5.33 Command Line Interface Reference for Block

Specifies the state of the tasks. The different states include:
scheduled: A scheduled occurrence is waiting for its turn to run.
suspended: A suspended task is temporarily excluded and will not be run at itsscheduled start time.
running: A scheduled policy is currently running.
broken: A broken task contains a broken policy that cannot be run.
-startDisplays the calendar time to start QoS Manager.
-durationSpecifies the duration the schedule runs.
-policy policynameSpecifies the name of the policy to be run.
-recurDisplays the recurring pattern or no recurrence.
EXAMPLEFor ss1_spa, this command lists all scheduled tasks.
naviseccli –h ss1_spa nqm –schedule –list
OUTPUT
Name: TestScheduleRecurring Current State: Scheduled Next Start Time: Mon Apr 05 10:10:00 2004 Duration: 2 hours Policy Name: TestCompletePolicy Recurrence Type: Weekly Frequency: Every 2 weeks Pattern: Sunday, Monday and Tuesday
Name: TestScheduleRecurring Current State: Running Next Start Time: Mon Apr 05 12:00:00 2004 Duration: 4 hours Policy Name: TestCompletePolicy Recurrence Type: Weekly Frequency: Every week Pattern: Sunday
Name: TestScheduleRecurringDaily Current State: Idle Next Start Time: Mon Apr 05 16:00:00 2004 Duration: 2 hours Policy Name: TestCompletePolicy Recurrence Type: Daily Frequency: Every day Pattern: N/A
Name: TestScheduleNoRecurring Current State: Idle Next Start Time: Mon Apr 05 18:10:00 2004 Duration: 2 hours Policy Name: TestCompletePolicy Recurrence Type: None Frequency: N/A Pattern: N/Az
EMC Unisphere QoS Manager
nqm -schedule -list 371

nqm -schedule -modifyModifies a scheduled task.
PREREQUISITESYou must have a user account on the system on which you want to execute the command.
DESCRIPTIONThe naviseccli nqm -schedule command with the -modify switch modifies aspecified scheduled task.
SYNTAXnqm -schedule –modify –name schedulename [-newname newname][-policy policyname][-startdate mm/dd/yyyy ][-starttime hh:mm:ss][-duration hours:minutes ][-daily frequency] | [-weekly frequency -pattern [su] [mo] [tu][we] [th] [fr] [sa]] | -norecurOPTIONS
-name schedulenameSpecifies the existing scheduled task name.
-newname newnameSpecifies a new name for the existing scheduled task.
-policy policynameIndicates the policy name to which the scheduled task is associated.
-startdate mm/dd/yyyyIndicates the date the task is scheduled to start.
-starttime hh:mm:ssIndicates the time the task is scheduled to start.
-duration hours:minutesIndicates the length of time the policy will run.
-daily frequencySpecifies that this scheduled task should occur daily at the specified frequency.
-weekly frequencySpecifies that this scheduled task should occur weekly at the specified frequency.
-pattern [su] [mo] [tu] [we] [th] [fr] [sa]Specifies the list of weekdays, separated by spaces, that the task will reoccur. Thisswitch should be specified only with the –weekly switch.
-norecurCreates the scheduled task with no recurrence.
EXAMPLEFor ss1_spa, this command modifies the task testSchedule. The task will start on6/11/2004 at 12:00:00 and will run for 5 hours and 30 minutes.
naviseccli –h ss1_spa nqm -schedule -modify –name testSchedule–startdate 6/11/2004 –starttime 12:00:00 –duration 5:30
OUTPUTNone
EMC Unisphere QoS Manager
372 EMC VNX Series 5.33 Command Line Interface Reference for Block

nqm -schedule -resumeResumes a scheduled task.
PREREQUISITESYou must have a user account on the system on which you want to execute the command.
DESCRIPTIONThe naviseccli nqm -schedule command with the -resume switch resumes ascheduled task.
SYNTAXnqm –schedule -resume -all | -name schedulenameOPTIONS
-allResumes all existing tasks.
-name schedulenameSpecifies an existing scheduled task name.
EXAMPLE #1For ss1_spa, this command resumes the scheduled task testSchedule.
naviseccli –h ss1_spa nqm –schedule –resume –name testSchedule
EXAMPLE #2For ss1_spa, this command resumes all existing scheduled tasks.
naviseccli –h ss1_spa nqm –schedule –resume –all
OUTPUTNone
nqm -schedule -suspendSuspends scheduled tasks.
PREREQUISITESYou must have a user account on the system on which you want to execute the command.
DESCRIPTIONThe naviseccli nqm -schedule command with the -suspend switch suspends ascheduled task.
SYNTAXnqm –schedule -suspend -all | -name schedulename [-o]OPTIONS
-allSuspends all existing tasks.
-name schedulenameSpecifies the existing scheduled task.
-oSuspends a scheduled task without prompting for confirmation.
EXAMPLE #1For ss1_spa, this command suspends the task named testSchedule.
naviseccli -h ss1_spa nqm -schedule -suspend -name testSchedule
EMC Unisphere QoS Manager
nqm -schedule -resume 373
EXAMPLE #2For ss1_spa, this command suspends all scheduled tasks without prompting forconfirmation.
naviseccli -h ss1_spa nqm -schedule -suspend -all -o
OUTPUTNone
nqm -setfallbackSets or unsets a fallback policy.
PREREQUISITESYou must have a user account on the system on which you want to execute the command.
DESCRIPTIONThe naviseccli nqm -setfallback command will set or unset a fallback policy.
SYNTAXnqm -setfallback -enable pname | -disableOPTIONS
-enable pnameEnables and sets a fallback policy with the specified policy name.
-disableDisables and unsets the fallback policy.
EXAMPLEFor ss1_spa, this command enables a fallback policy for apolicy.
naviseccli -h ss1_spa nqm -setfallback -enable apolicy
OUTPUTNone
nqm -setoptionsToggles data logging and event control switches.
PREREQUISITESYou must have a user account on the system on which you want to execute the command.
DESCRIPTIONThe naviseccli nqm -setoptions command toggles data logging and event controlswitches.
SYNTAXnqm -setoptions -logevent [[gs][gu][gn]]| noneOPTIONS
-logevent [[gs] [gu] [gn]] | noneIndicates if an event needs to be added in the event log due to the following fourconditions:gs: Goal satisfied
gu: Goal unattainable
gn: Goal no longer satisfied
none: Log no events
EMC Unisphere QoS Manager
374 EMC VNX Series 5.33 Command Line Interface Reference for Block

EXAMPLEFor ss1_spa, this command toggles the data logging and the event control switch.Events will be put into the event log if the goal is satisfied, unattainable, or no longersatisfied.
naviseccli -h ss1_spa nqm -setoptions -logevent gs gu gn
OUTPUTNone
nqm -stopStops the active policy immediately.
PREREQUISITESYou must have a user account on the system on which you want to execute the command.
DESCRIPTIONThe naviseccli nqm -stop command stops the active policy (running or measuring)immediately.
SYNTAXnqm -stop [-nofallback][-o]OPTIONS
-nofallbackStarts the fallback policy unless this switch is specified.
-oStops a policy without prompting for warning/confirmation.
EXAMPLEFor ss1_spa, the command immediately stops the active policy without starting thefallback policy.
naviseccli -h ss1_spa nqm -stop -nofallback
OUTPUTNone
Client toolsThis section describes the QoS Manager client tools.
nqm -archive -dumpDumps QoS Manager archive files.
PREREQUISITESThe host, username/password, and scope options of naviseccli are ignored since thiscommand runs locally.
DESCRIPTIONThe naviseccli nqm command with the -archive -dump command dumps theperformance data, relationship, configuration, and statistics information in a format thatyou specify. You can specify the output format, XML or CSV, for the dumped information.
The -archive -dump command includes the following subcommands:
l -data
EMC Unisphere QoS Manager
nqm -stop 375
l -rell -configl -stats
Note
The -archive -dump command recognizes and reports an error message when you try
to open an encrypted archive file.
SYNTAX
nqm -archive -dump -data filename(s) [-out filename(s)][-join][-overwrite y|n][-xml|-delim code][-enquote code][-eol code][-header y|n][-object codes] [-format codes] [-stime starttime][-ftime endtime] [-timezone code] [-progress]
ornqm -archive -dump -rel filename(s) [-out filename(s)][-join][-overwrite y|n][-xml|-delim code][-enquote code][-eol code][-root objcode][-level depth][-progress]
ornqm -archive -dump -config filename(s) [-out filename(s)][-join][-overwrite y|n][-xml] [-delim code] [-enquote code][-eol code] [-object objcode] [-progress]
ornqm -archive -dump -stats filename(s) [-out filename(s)][-join] [-overwrite y|n] [-timezone code]
OPTIONS
-data filename(s)Dumps data from archive files. You must provide the archive filename following the-data command.
Note
It lets you specify QoS Manager archive files and dump QoS Manager specific data.
The optional switches are as follows:
-out filename(s)Dumps multiple files. Specify multiple output filenames separated by commas. Theoutput filenames list corresponds to the dumped filenames list.
EMC Unisphere QoS Manager
376 EMC VNX Series 5.33 Command Line Interface Reference for Block
Note
You can dump multiple files into a single file using the -join switch.
-joinAppends the output from multiple files into a single file. The header will be dumpedonly once if this switch is used and if the header switch is enabled. This switch isvalid only if you specify multiple files.
-overwrite y|nWorks with the -out switch. If you use the -overwrite switch without the -outswitch, it is ignored. The -overwrite switch applies to all the output files if youspecify multiple files to dump.y = Without a warning, overwrites the existing file specified by the -out switch.
n = Displays an error message if the file that the -out switch specified alreadyexists.
Note
If you try to overwrite a read-only file, an error message appears.
-xmlSpecifies the output as XML format. This switch is optional, and you cannot use itwith the -delim type. If you do not specify the -xml switch, delimited outputresults. If you use it with the -data command and the -format switch, an errormessage appears.
-delim codeSpecifies a delimiter that separates the output data. With this switch, you canspecify the output as delimited type. It is optional and cannot be used with the -xmlswitch. Specify the delimiter when you use this switch. If you do not specify either -xml or -delim, delimited output results.
Table 25 Delimiter codes
Delimiter Code
Comma (default) cm
Semicolon sc
Colon cl
Tab tb
Slash sl
Backslash bs
Period pd
White space ws
Note
If you use a slash or a period as a delimiter, you must also use the -enquoteswitch.
-enquote code
EMC Unisphere QoS Manager
nqm -archive -dump 377

Encloses each performance characteristic within a set of special characters. If youspecify the output type as -xml, an error message appears.The possible special characters that you can use for the -enquote switch are listedbelow:
Table 26 Valid -enquote switch special characters
Enclosing character Code
None no
Quote qu
Apostrophe ap
Accent character ac
Note
Use this switch only when you specify an output type as -delimited.
-eol codeSpecifies a particular end-of-line character. The output reaches an end of line whenall performance characteristics for one specific object at a particular time have beenoutput. The underlying client system determines the default end-of-line character. Ifyou specify the output type as -xml, an error message appears. The possible end-of-line characters for the switch are listed below:
Table 27 Valid end-of-line characters
End-of-line character Code
Carriage return cr
Line feed lf
Note
Use this switch only when you specify an output type as -delimited.
-header y|nSpecifies whether to output a column header.
y = Output a header
n = Do not output a header
-object codesSpecifies the objects for which to collect the performance statistics and the order inwhich to output them. Not specifying this switch dumps all policy session objects.
Table 28 Valid object type codes
Object type Code
Policy session (QoS Manager) ps
-format codes
EMC Unisphere QoS Manager
378 EMC VNX Series 5.33 Command Line Interface Reference for Block
Specifies which performance characteristics to output and the order in which theywill appear. This switch is optional and cannot be used with the -xml switch. If youuse the -xml switch with the -format switch, an error message appears. The -format switch requires one or more of the codes listed below. If you do not specifythis switch, all performance characteristics are output in the order listed below:
Table 29 Performance characteristics without -format code
Performance characteristic Object type Code
Object Name All objects on
Owner Array Name All objects oan
Poll Time All objects pt
Policy Start Time Policy Session psst
Policy End Time Policy Session pset
I/O Class Name Policy Session cn
I/O Delay I/O Class fd
Response Time (ms) LUN, metaLUN, disk, SP, I/O Class, Snapshot, Thin LUN rt
Total Bandwidth (MB/s) LUN, metaLUN, disk, SP, I/O Class, Snapshot, Thin LUN tb
Total Throughput (I/O/s) LUN, metaLUN, disk, SP, I/O Class, Snapshot, Thin LUN tt
Queue Depth LUN, metaLUN, disk, SP, I/O Class, Snapshot, Thin LUN qd
-stime starttimeSpecifies an archive poll time to start iterating through the data. The -stime switchrequires the start time to be in the following format:
mm/dd/yyyy hh:mm:ss
where:
mm is the month of a year (1-12)
dd is the day of a month (1-31)
yyyy is the four-digit year
hh is the hour of the day (0-23)
mm is the minute in an hour (0-59)
ss is the second in a minute (0-59).
You must enclose the time in double quotation marks.
The -stime switch works in combination with the -ftime switch, described below.If the start time is greater than the end time, an error message appears. If you do notspecify a start time, this switch defaults to the earliest poll time in the archive file.
Note
If you use the -stime switch with the -timezone switch, you must apply the time
zone to the start time.
EMC Unisphere QoS Manager
nqm -archive -dump 379

If the start time you specify does not exist in the time interval of the archive file, anerror message containing the valid time range of the archive file appears. Also, if thestart time format is not valid, an error message appears.
-ftime endtimeSpecifies an archive poll time to stop iterating through the data. The -ftime switchrequires the end time to be in the following format:
mm/dd/yyyy hh:mm:ss
where:
mm is the month of a year (1-12)
dd is the day of a month (1-31)
yyyy is the four-digit year
hh is the hour of the day (0-23)
mm is the minute in an hour (0-59)
ss is the second in a minute (0-59).
You must enclose the time in double quotation marks.
The -ftime switch works in combination with the -stime switch, describedabove. If the start time is greater than the end time, an error message appears. If youdo not specify an end time, this switch defaults to the latest poll time in the archivefile.
Note
If you use the -ftime switch with the -timezone switch, you must apply the time
zone to the end time.
If the end time you specify does not exist in the time interval of the archive file, anerror message containing the valid time range of the archive file appears. Also, if theend time format is not valid, an error message appears.
-timezone codeApplies a particular time zone to the performance characteristic, Poll Time, includedin the output data. By default, QoS Manager displays this characteristic in the localtime of the client system. The possible time zones for the switch are listed below:
Table 30 Time zone values
Time zone Code
Local time (default) local
Universal time utc
-progressDisplays information about the current dump status, including the name of the filebeing dumped and the percentage dumped. An approximate value is calculatedbased on the number of objects for the percentage dumped information. This switchworks with the -out switch. If you use the -progress switch without the -outswitch, it is ignored. Do not use this switch in scripts.
-relDumps the relationship information for the various objects in the archive file.Unisphere version 1.0 contains fully provisioned LUN support for QoS Manager. Youcan dump and display the fully provisioned LUN if it is part of any I/O class. You can
EMC Unisphere QoS Manager
380 EMC VNX Series 5.33 Command Line Interface Reference for Block

also dump and display the snapshot mount point if it is a part of any I/O class. Youmust provide the archive filename following the -rel command. You can specifymultiple archive filenames separated by commas to dump the relationshipinformation for all of them.
In addition to the switches, -join, -out, -overwrite, -progress, -eol, and-enquote (which are described above), you can also use the following optionalswitches with the -rel command:
-xmlSpecifies the output in XML format. This switch is optional and you cannot use it withthe -delim type. If you do not specify the -xml switch, delimited output results.
-delimSpecifies the output as delimited. In the delimited format, the relationship isdumped in a logical tree format, whereby each node appears on a separate line.
-configDumps the configuration information of objects in the archive file. You must providethe archive filename following the -config command. You can specify multiplearchive files separated by commas to dump the configuration information for all ofthem. In addition to the switches, -join, -out, -overwrite, -progress, -delim, -enquote, and -eol (which are described above), you can also use thefollowing optional switches with the -config command:
-object objcodeSpecifies which objects and in what order you want to dump the configurationinformation. If you do not specify this switch, all object types are dumped in theorder of policies, I/O classes, metaLUNs, classic LUNs, thin LUNs, fully provisionedLUNs, and snapshot mount points. If you use the plu object code for pool-basedLUNs, the tl option for thin LUNs is ignored. Use the al object code to dump all LUNtargets including metaLUNs, classic LUNs, thin LUNs, fully provisioned LUNs, andsnapshot LUNs. All other object codes are ignored if you specify the al object code.
Table 31 Order of dump configuration information
Object type Code
Policy session ps
I/O class cl
All LUNs (including all supported public LUNs) al
MetaLUN ml
Classic LUN l
Thin LUN tl
Pool LUN (including thin LUN and fully provisioned LUN) plu
Snapshot LUN sl
-xmlSpecifies the output in XML format. This switch is optional and you cannot use it withthe -delim type. If you do not specify the -xml switch, delimited output results.
-stats archive filename(s)Dumps the statistical information for multiple archive files. A blank line separatesdumped information of different files. You can use the following optional switches
EMC Unisphere QoS Manager
nqm -archive -dump 381
with the -stats command: -join, -out, -overwrite (which are describedabove).
EXAMPLE #1This command lets you dump data from the archive file archive.nqm withoutoutputting a header.
naviseccli -h ss1_spa nqm -archive -dump -data archive.nqm -header n
EXAMPLE #2This command lets you dump relationship information of various objects in the archivefile archive.nqm and output it in XML format.
naviseccli -h ss1_spa nqm -archive -dump -rel archive.nqm -xml
EXAMPLE #3This command lets you dump configuration information of objects in the archive filearchive.nqm; if the output file archive.csv exists, the system overwrites it withouta warning.
naviseccli -h ss1_spa nqm -archive -dump -config archive.nqm -outarchive.csv -overwrite y
EXAMPLE #4This command lets you dump statistical information for multiple archive filesarchive1.nqm and archive2.nqm.
naviseccli -h ss1_spa nqm -archive -dump -stats archive1.nqm,archive2.nqm
OUTPUTVaries depending upon which switch you use.
nqm -archive -retrieveRetrieves QoS Manager archive files.
PREREQUISITESYou must have a user account on the system on which you want to execute the command.
Note
The navicli nqm command is not required for the -archive -retrieve command
to run.
DESCRIPTIONThe naviseccli nqm command with the -archive -retrieve command lets youcreate and retrieve the archive files from the system.
SYNTAXnqm -archive -retrieve -file filename [-location directorypath][-overwrite y|n][-retry number][-v]OPTIONS
-file filenameSpecifies the name of the archive file once it is retrieved to the client system.
-location directorypath
EMC Unisphere QoS Manager
382 EMC VNX Series 5.33 Command Line Interface Reference for Block

Specifies the path location of the archive file once it is retrieved to the client system.If you do not specify a location, QoS Manager uses the current working directory.
-overwrite y|nSpecifies whether to overwrite an existing archive file on the client system. If thespecified archive file already exists and this switch is not used, the command fails.
y = Without a warning, overwrites the existing file specified by the -out switch.
n = Displays an error message if the file that the -out switch specified alreadyexists.
-retry numberSpecifies the number of times to retry a retrieval before giving up completely. A retrywill occur only when the actual move of the archive file from the system to the clientsystem fails.
-vAs the retrieval process progresses, the status of each stage will be output.
EXAMPLEThis command retrieves an archive to the file, archive.nqm in c:\Temp, overwritesthe existing file and retries two times.
naviseccli -h ss1_spa nqm -archive -retrieve -file archive.nqm-location c:\temp -overwrite y -retry 2
OUTPUTNone
EMC Unisphere QoS Manager
nqm -archive -retrieve 383

EMC Unisphere QoS Manager
384 EMC VNX Series 5.33 Command Line Interface Reference for Block
CHAPTER 8
EMC Unisphere Analyzer
This chapter introduces the EMC® Unisphere™ Analyzer performance monitor application,which measures the performance of disk-array storage systems.
Major topics are:
l About Unisphere Analyzer................................................................................... 386l Analyzer CLI commands...................................................................................... 386l Client tools..........................................................................................................392
EMC Unisphere Analyzer 385

About Unisphere AnalyzerAnalyzer works within storage domains that the web-based Unisphere softwareadministers. It gathers system performance statistics and presents them in various typesof charts. These charts can help you find and anticipate bottlenecks in the disk storagecomponent of a computer system.
Analyzer has two parts: a provider program that accumulates performance informationand a user interface (UI). For information about the Analyzer UI, see the Unisphere onlinehelp.
The Analyzer enabler must be installed on any system you want to analyze. It controls,accumulates, and manages access to performance information on storage processors(SPs), logical units (LUNs), and disks. The new information displaces the old. This manualuses the term LUN to refer to LUNs, metaLUNs, fully provisioned LUNs, and thin LUNs,except where explicitly noted.
Analyzer can display the performance data directly (in real time) or as a file containingpast performance data from an archive. It can display real time and archive file datasimultaneously. You can compare charts from different systems (using real time data) oryou can compare different times on one system (using real time and archive data).
Analyzer chart typesAnalyzer has seven types of charts:
l Performance Overview
l Performance Survey
l Performance Summary
l Performance Detail
l IO Size Distribution Summary (for LUNs and metaLUNs only)
l IO Size Distribution Detail (for LUNs and metaLUNs only)
l LUN IO Disk Detail (for LUNs only)
PrerequisitesAnalyzer requires the following:
l Unisphere software must be installed and enabled on at least one of the systems inthe system domain that you want to analyze.
l Analyzer must be enabled on the system you want to analyze.
l The correct version of the Java Runtime Environment (JRE) must be on the client fromwhich you run the browser.
For the latest requirements, see the release notes supplied with the software.
Analyzer CLI commandsThis section explains the naviseccli command and the commands for monitoring andmeasuring the performance of VNX series systems with the Analyzer option.
EMC Unisphere Analyzer
386 EMC VNX Series 5.33 Command Line Interface Reference for Block

Note
The commands in this section function only with a system that has the optional Analyzersoftware installed.
analyzer -setModifies the performance logging properties.
PREREQUISITESYou must have a user account on the system on which you want to execute the command.If one of the switches is specified, the user account needs the administrator or managerrole.
DESCRIPTIONThe naviseccli analyzer command with the -set switch lets you modify theperformance logging properties.
analyzer -set is used with naviseccli( see naviseccli on page 20).
SYNTAXanalyzer -set [-narinterval seconds] [-rtinterval seconds][-nonstop|-logperiod days][-periodicarchiving 0|1] [-default]OPTIONS
-narinterval secondsChanges the polling interval for performance logging. The allowable range is 60 to3600, and the default is 120. Modifying this value affects the duration of the data inthe file. For example, at 600 seconds an archive should have approximately 26hours of data. If you lower the rate to 1200 seconds, the archive file would haveapproximately 52 hours of data.
-rtinterval secondsChanges the polling interval for real-time chart windows. The valid range is 60 to3600; the default is 60.
-nonstopSets performance logging to run non-stop.
-logperiod daysSets performance logging to run for a period of days. The valid range is 1 to 30 days;the default is 7 days.
-periodicarchiving 0 | 1When you set -periodicarchiving to 1, performance logging automaticallycreates archive files at periods of 156 samples. The default is 0, no periodicarchiving.
-defaultResets the values of all performance properties back to their default values. It doesnot change the -nonstop or -logperiod switch when performance logging isrunning.You cannot specify -nonstop and -logperiod in the same command line. If youdo not specify any switches, you will get back the current values.
EXAMPLE #1This command sets the archive interval to 20 minutes.
naviseccli -h ss1_spa analyzer -set -narinterval 1200
EMC Unisphere Analyzer
analyzer -set 387

EXAMPLE #2This command sets the archive interval back to 2 minutes.
naviseccli -h ss1_spa analyzer -set -default
OUTPUTNone if the command succeeds; status or error information if it fails.
analyzer -getReturns the current values of the performance logging properties.
PREREQUISITESYou must have a user account on the system on which you want to execute the command.
DESCRIPTIONThe naviseccli analyzer command with the -get switch lets you view the currentvalues of the performance logging properties for the switch you specify.
analyzer -get is used with naviseccli (refer to naviseccli on page 20).
SYNTAXanalyzer -get [-narinterval ] [-rtinterval ] [-logperiod ][-periodicarchiving ]OPTIONS
-narintervalReturns the current archive polling interval in seconds.
-rtintervalReturns the current real-time polling interval in seconds.
-logperiodReturns the current logging period (number of days or nonstop).
-periodicarchivingReturns the -periodicarchiving setting, No or Yes.
Note
If you do not specify any switches, the analyzer -get command displays all the
current values.
EXAMPLEThis command returns the current archive interval.
naviseccli -h ss1_spa analyzer -get -narinterval
OUTPUTFor this example, the output is:
Archive Poll Interval (sec): 600
analyzer -loggingResets performance logging.
PREREQUISITESYou must have a user account on the system on which you want to execute the command.You need administrator or manager privileges to use this command.
EMC Unisphere Analyzer
388 EMC VNX Series 5.33 Command Line Interface Reference for Block

DESCRIPTIONThe naviseccli analyzer command with the -logging switch lets you resetperformance logging.
analyzer -logging is used with naviseccli (refer to naviseccli on page 20).
SYNTAXanalyzer -logging [-reset]OPTIONS
-resetStops performance logging. It deletes all the data that the Analyzer provider hascollected. Then it starts performance logging.
EXAMPLEThis command resets performance logging.
naviseccli -h ss1_spa analyzer -logging -reset
OUTPUTNone if the command succeeds; status or error information if it fails.
analyzer -startStarts performance logging.
PREREQUISITESYou must have a user account on the system on which you want to execute the command.You need administrator or manager privileges to use this command.
DESCRIPTIONThe naviseccli analyzer command with the -start switch starts performancelogging. It turns on statistics logging if it is not on already.
analyzer -start is used with naviseccli (refer to naviseccli on page 20).
SYNTAXanalyzer -startEXAMPLEThis command starts performance logging.
naviseccli -h ss1_spa analyzer -start
OUTPUTNone if the command succeeds; status or error information if it fails.
analyzer -stopStops performance logging.
PREREQUISITESYou must have a user account on the system on which you want to execute the command.You need administrator or manager privileges to use this command.
DESCRIPTIONThe naviseccli analyzer command with the -stop switch stops performancelogging. It restores the statistics logging state to what it was before logging was started.
analyzer -stop is used with naviseccli (refer to naviseccli on page 20).
EMC Unisphere Analyzer
analyzer -start 389

SYNTAXanalyzer -stopEXAMPLEThis command stops performance logging.
naviseccli -h ss1_spa analyzer -stop
OUTPUTNone if the command succeeds; status or error information if it fails.
analyzer -statusDisplays performance logging status.
PREREQUISITESYou must have a user account on the system on which you want to execute the command.
DESCRIPTIONThe naviseccli analyzer command with the -status switch lets you see thecurrent status of performance logging. Possible status includes the following:
l Running. Started on date timel Stoppedl Stopped on date timeanalyzer -status is used with naviseccli (refer to naviseccli on page 20).
SYNTAXanalyzer -statusEXAMPLEThis command provides the current status of performance logging.
naviseccli -h ss1_spa analyzer -status
OUTPUTFor this example, the output is:
Running. Started on 10/17/2006 13:27:32
analyzer -archiveManages archive files.
PREREQUISITESYou must have a user account on the system on which you want to execute the command.
DESCRIPTIONThe naviseccli analyzer command with the -archive switch lets you list,retrieve, or delete one or more archive files from an SP. It retrieves both the encryptedand decrypted archive files.
SYNTAXanalyzer -archive[[-list][-path pathname][-o][-all|-file filenames][-delete]]oranalyzer -archive[-new|-statusnew filename]
EMC Unisphere Analyzer
390 EMC VNX Series 5.33 Command Line Interface Reference for Block

OPTIONS
-listLists all the archive files, ignoring all other switches.
-path pathnameRetrieves files to the path you specify. If you do not specify a pathname, files areretrieved to the current directory.
-oDoes not display warning messages.
-allRetrieves all archive files.
-file filenamesRetrieves archive files you specify.
-deleteDeletes files you select or specify with the -all or -file switches. If you do notspecify the -o switch, a warning message lists files to delete and asks forconfirmation.
-newImmediately creates a new archive file and output name for the new archive file. Ifyou cannot create a new archive file because less than ten samples were collected,this switch returns the name of the newest archive file.
-statusnew filenameReturns the status of the new archive file, filename, which you created with the -newswitch. The possible status is done or not done.
EXAMPLEThis command lists all the archive files.
naviseccli -h ss1_spa analyzer -archive -list
OUTPUT
Index Size in KB Last Modified Filename 0 39 10/04/2006 16:07:24 APM00035101236_SPA_2006-10-04_20-07-21-GMT_M05-00.nar 1 60 10/06/2006 10:39:56 APM00035101236_SPA_2006-10-06_14-39-56-GMT_M05-00.nar 2 114 10/06/2006 13:49:51 APM00035101236_SPA_2006-10-06_17-49-50-GMT_M05-00.nar 3 68 10/08/2006 12:12:42 APM00035101236_SPA_2006-10-08_16-12-42-GMT_M05-00.nar 4 68 10/08/2006 14:48:42 APM00035101236_SPA_2006-10-08_18-48-42-GMT_M05-00.nar 5 70 10/08/2006 17:24:42 APM00035101236_SPA_2006-10-08_21-24-42-GMT_M05-00.nar 6 70 10/08/2006 20:00:42 APM00035101236_SPA_2006-10-09_00-00-42-GMT_M05-00.nar 7 71 10/08/2006 22:36:42 APM00035101236_SPA_2006-10-09_02-36-42-GMT_M05-00.nar 8 70 10/09/2006 01:12:42 APM00035101236_SPA_2006-10-09_05-12-42-GMT_M05-00.nar 9 70 10/09/2006 03:48:42 APM00035101236_SPA_2006-10-09_07-48-42-GMT_M05-00.nar 10 71 10/09/2006 06:24:42 APM00035101236_SPA_2006-10-09_10-24-41-GMT_M05-00.nar 11 69 10/09/2006 09:00:42 APM00035101236_SPA_2006-10-09_13-00-42-GMT_M05-00.nar 12 72 10/09/2006 11:36:42 APM00035101236_SPA_2006-10-09_15-36-42-GMT_M05-00.nar
EMC Unisphere Analyzer
analyzer -archive 391

Client toolsThis section describes the Analyzer client tools that you use with naviseccli.
analyzer -archivedumpDumps Analyzer archive files.
PREREQUISITESThe host, username/password and scope options of naviseccli are ignored since thiscommand runs locally.
DESCRIPTIONThe naviseccli analyzer command with the -archivedump command dumpsthe performance data, relationship, and configuration information in a format that youspecify.
Note
The -archivedump command recognizes and reports an error message when you try to
open an encrypted archive file.
The -archivedump command includes the following subcommands:
l -datal -statsl -rell -configanalyzer -archivedump is used with naviseccli (refer to naviseccli on page 20).
SYNTAX
analyzer -archivedump -data filename(s) [-out filename(s)][-join][-overwrite y|n] [-xml|-delim code] [-enquote code][-eol code][-header y|n] [-object codes] [-format codes][-stime starttime] [-ftime endtime] [-timezone code][-progress]
analyzer -archivedump -stats filename(s) [-out filename(s)][-join][-overwrite y|n] [-timezone code]
analyzer -archivedump -rel filename(s) [-out filename(s)][-join][-overwrite y|n] [-xml|-delim code] [-enquote code][-eol code] [-root objcode] [-level depth] [-progress]
analyzer -archivedump -config filename(s) [-out filename(s)][-join][-overwrite y|n] [-xml|-delim code] [-enquote code][-eol code] [-object objcode] [-progress]
EMC Unisphere Analyzer
392 EMC VNX Series 5.33 Command Line Interface Reference for Block

OPTIONS
-data filename(s)Dumps data from archive files. You must provide the archive filename following the-data command. The optional switches are as follows:
-out filename(s)Dumps multiple files. Specify multiple output filenames separated by commas.The output filenames list corresponds to the dumped filename list.
Note
You can dump multiple files into a single file using the -join switch.
-joinAppends the output from multiple files into a single file. The header will bedumped only once if this switch is used and if the header switch is enabled.This switch is valid only if you specify multiple files. If you use this switch withthe single file following -data, the switch is ignored.
overwrite y|nWorks with the -out switch. If you use the -overwrite switch without the -out switch, it is ignored. The -overwrite switch applies to all the output filesif you specify multiple files to be dumped.
y
Without a warning, overwrites the existing file specified by the -outswitch.
n
Displays an error message if the file that the -out switch specified alreadyexists.
Note
If you try to overwrite a read-only file, an error message appears.
-xmlSpecifies the output in XML format. This switch is optional, and you cannot useit with the -delim type. If you do not specify the -xml switch, delimited outputresults. If you use it with the -data command and the -format switch, anerror message appears.
-delim codeSpecifies a delimiter that separates the output data. With this switch, you canspecify the output as delimited type. It is optional and cannot be used with the-xml switch. Specify the delimiter when you use this switch. If you do notspecify either -xml or -delim, delimited output results.
Table 32 Delimiter codes
Delimiter Code
Comma (default) cm
Semicolon sc
Colon cl
Tab tb
EMC Unisphere Analyzer
analyzer -archivedump 393

Table 32 Delimiter codes (continued)
Delimiter Code
Slash sl
Backslash bs
Period pd
White space ws
Note
If you use a slash or a period as a delimiter, you must also use the -enquoteswitch with an option other than None.
-enquote codeEncloses each performance characteristic within a set of special characters. Bydefault, the special characters None are used. The possible special charactersfor the switch are listed below:
Table 33 Valid -enquote switch special character codes
Enclosing character Code
None no
Quote qu
Apostrophe ap
Accent character ac
Note
Use this switch only when you specify -delimited as an output type.
-eol codeSpecifies a particular end-of-line character. The output reaches an end of linewhen all performance characteristics for one specific object at a particular timehave been output. The underlying client system determines the default end-of-line character. The possible end-of-line characters for the switch are listedbelow:
Table 34 Valid end-of-line characters
End-of-line character Code
Carriage return cr
Line feed lf
Note
Use this switch only when you specify -delimited as an output type.
EMC Unisphere Analyzer
394 EMC VNX Series 5.33 Command Line Interface Reference for Block

-header y | nSpecifies whether to output a column header. This switch is optional. If you donot specify the switch, by default, it outputs a header.
y
Output a header.
n
Do not output a header.
-object codesSpecifies the objects for which to collect performance statistics and the order inwhich to output them. If you do not specify this switch, all object types aredumped in the following order: SPs, public classic LUNs, metaLUNs, fullyprovisioned LUNs, thin LUNs, Snapshot mount point, private classic LUNs,disks, MirrorView/A, Snap sessions, RAID groups, pools, Snapshots,Consistency Groups, and ports. If the objects have no performance data, noinformation is dumped.
Table 35 Valid object type codes
Object type Code
SP s
LUNa l
MetaLUN ml
Disk d
Asynchronous mirror am
Snap session ss
RAID group rg
Port p
Private classic LUNs b pl
Host LUNc hl
Thin LUNd tl
All LUNs al
Public/private pool LUNs plu
Thin pool tp
Pool e pool
Snapshotf snap
Consistency Groupg cg
Snapshot Seth cgsnap
Snapshot mount pointi sl
a. RAID group based public or private LUNsb. Private LUNs are metaLUN components and other reserved LUNs.c. Host LUNs are all LUNs with host I/O.d. Thin LUNs are LUNs whose storage capacity grows by using a shared pool of storage. They
dump only the host statistics.
EMC Unisphere Analyzer
analyzer -archivedump 395

Table 35 Valid object type codes (continued)
e. Thin pool and pool mean the same object. Thin pool is kept for backward compatibilitypurposes in Unisphere version 1.0
f. New snapshot object for VNX snapshots.g. New object for VNX snapshots.h. Snap of a consistency group. New objects for VNX snapshots.i. Snapshot mount point for VNX snapshots.
-format codesSpecifies which performance characteristics to output and the order in whichthey appear. The -format switch requires one or more of the codes listedbelow. If you do not specify this switch, all performance characteristics areoutput in the order listed below:
Table 36 Performance characteristics without -format code
Performance characteristic Object type Code
Object Name All objects on
Poll Time All objects pt
Owner Array Name All objects oan
Current Owner LUN, metaLUN, pool-based LUN co
Utilization (%) LUN, metaLUN, pool-based LUN,disk, SP
u
Queue Length LUN, metaLUN, pool-based LUN,disk, SP
ql
Response Time (ms) LUN, metaLUN, pool-based LUN,disk, SP
rt
Total Bandwidth (MB/s) LUN, metaLUN, pool-based LUN,disk, SP, asynchronous mirror,port
tb
Total Throughput (IO/s) LUN, metaLUN, pool-based LUN,disk, SP, asynchronous mirror,port
tt
Read Bandwidth (MB/s) LUN, metaLUN, pool-based LUN,disk, SP, port
rb
Read Size (KB) LUN, metaLUN, pool-based LUN,disk, SP, port
rs
Read Throughput (IO/s) LUN, metaLUN, pool-based LUN,disk, SP, port
rio
Write Bandwidth (MB/s) LUN, metaLUN, pool-based LUN,disk, SP, port
wb
Write Size (KB) LUN, metaLUN, pool-based LUN,disk, SP, port
ws
Write Throughput (IO/s) LUN, metaLUN, pool-based LUN,disk, SP, port
wio
Full Stripe Write/s LUN, metaLUN fsw
EMC Unisphere Analyzer
396 EMC VNX Series 5.33 Command Line Interface Reference for Block
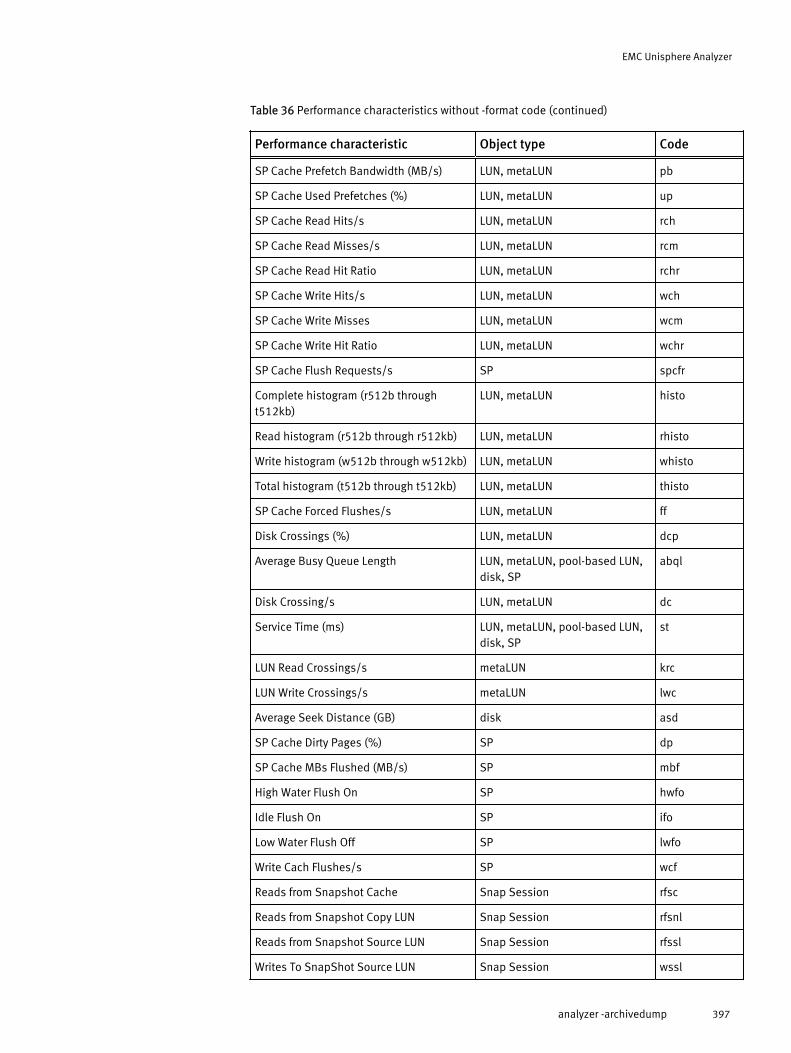
Table 36 Performance characteristics without -format code (continued)
Performance characteristic Object type Code
SP Cache Prefetch Bandwidth (MB/s) LUN, metaLUN pb
SP Cache Used Prefetches (%) LUN, metaLUN up
SP Cache Read Hits/s LUN, metaLUN rch
SP Cache Read Misses/s LUN, metaLUN rcm
SP Cache Read Hit Ratio LUN, metaLUN rchr
SP Cache Write Hits/s LUN, metaLUN wch
SP Cache Write Misses LUN, metaLUN wcm
SP Cache Write Hit Ratio LUN, metaLUN wchr
SP Cache Flush Requests/s SP spcfr
Complete histogram (r512b throught512kb)
LUN, metaLUN histo
Read histogram (r512b through r512kb) LUN, metaLUN rhisto
Write histogram (w512b through w512kb) LUN, metaLUN whisto
Total histogram (t512b through t512kb) LUN, metaLUN thisto
SP Cache Forced Flushes/s LUN, metaLUN ff
Disk Crossings (%) LUN, metaLUN dcp
Average Busy Queue Length LUN, metaLUN, pool-based LUN,disk, SP
abql
Disk Crossing/s LUN, metaLUN dc
Service Time (ms) LUN, metaLUN, pool-based LUN,disk, SP
st
LUN Read Crossings/s metaLUN krc
LUN Write Crossings/s metaLUN lwc
Average Seek Distance (GB) disk asd
SP Cache Dirty Pages (%) SP dp
SP Cache MBs Flushed (MB/s) SP mbf
High Water Flush On SP hwfo
Idle Flush On SP ifo
Low Water Flush Off SP lwfo
Write Cach Flushes/s SP wcf
Reads from Snapshot Cache Snap Session rfsc
Reads from Snapshot Copy LUN Snap Session rfsnl
Reads from Snapshot Source LUN Snap Session rfssl
Writes To SnapShot Source LUN Snap Session wssl
EMC Unisphere Analyzer
analyzer -archivedump 397

Table 36 Performance characteristics without -format code (continued)
Performance characteristic Object type Code
Writes To Snapshot Cache Snap Session wsc
Writes Larger Than Snapshot Cache ChunkSize
Snap Session wltsccs
Chunks Used in Snapshot Copy Session Snap Session cuscs
Average Transfer Size (KB) Asynchronous Mirror amats
Time Lag (min) Asynchronous Mirror amtl
Data Lag (MB) Asynchronous Mirror amml
Cycle Count Asynchronous Mirror amcc
Average Cycle Time (min) Asynchronous Mirror amact
Read 512B LUN, metaLUN r512b
Read 1KB+ LUN, metaLUN r1kb
Read 2KB+ LUN, metaLUN r2kb
Read 4KB+ LUN, metaLUN r4kb
Read 8KB+ LUN, metaLUN r8kb
Read 16KB+ LUN, metaLUN r16kb
Read 32KB+ LUN, metaLUN r32kb
Read 64KB+ LUN, metaLUN r64kb
Read 128KB+ LUN, metaLUN r128kb
Read 256KB+ LUN, metaLUN r256kb
Read 512KB+ LUN, metaLUN r512kb
Write 512B LUN, metaLUN w512b
Write 1KB+ LUN, metaLUN w1kb
Write 2KB+ LUN, metaLUN w2kb
Write 4KB+ LUN, metaLUN w4kb
Write 8KB+ LUN, metaLUN w8kb
Write 16KB+ LUN, metaLUN w16kb
Write 32KB+ LUN, metaLUN w32kb
Write 64KB+ LUN, metaLUN w64kb
Write 128KB+ LUN, metaLUN w128kb
Write 256KB+ LUN, metaLUN w256kb
Write 512KB+ LUN, metaLUN w512kb
Total 512B LUN, metaLUN t512b
Total 1KB+ LUN, metaLUN t1kb
EMC Unisphere Analyzer
398 EMC VNX Series 5.33 Command Line Interface Reference for Block

Table 36 Performance characteristics without -format code (continued)
Performance characteristic Object type Code
Total 2KB+ LUN, metaLUN t2kb
Total 4KB+ LUN, metaLUN t4kb
Total 8KB+ LUN, metaLUN t8kb
Total 16KB+ LUN, metaLUN t16kb
Total 32KB+ LUN, metaLUN t32kb
Total 64KB+ LUN, metaLUN t64kb
Total 128KB+ LUN, metaLUN t128kb
Total 256KB+ LUN, metaLUN t256kb
Total 512KB+ LUN, metaLUN t512kb
Queue Full Count port qfc
FAST Cache Read Hit Ratio LUN, Pool fcrhr
FAST Cache Write Hit Ratio LUN, Pool fcwhr
FAST Cache Read Hits/s LUN, Pool fcrh
FAST Cache Write Hits/s LUN, Pool fcwh
FAST Cache Read Misses/s LUN, Pool fcrm
FAST Cache Write Misses/s LUN, Pool fcwm
FAST Cache Dirty Pages [%] SP fcdp
FAST Cache Flushed MB/s SP fcmbf
The options of new performance characteristics are as shown below:
Table 37 Performance characteristics
Optimal performancecharacteristics
Nonoptimalperformancecharacteristics
Optimal/nonoptimalcode
Object type
Utilization-Optimal[%] Utilization-Nonoptimal[%]
uo/un LUN, metaLUN, pool-based LUN
Queue Length-Optimal Queue Length-Nonoptimal
qlo/qln LUN, metaLUN, pool-based LUN
Response time-Optimal[ms]
Response time-Nonoptimal [ms]
rto/rtn LUN, metaLUN, pool-based LUN
Total Bandwidth-Optimal[MB/s]
Total Bandwidth-Nonoptimal [MB/s]
tbo/tbn LUN, metaLUN, pool-based LUN
Total Throughput-Optimal[IO/s]
Total Throughput-Nonoptimal [IO/s]
tto/ttn LUN, metaLUN, pool-based LUN
Read Bandwidth-Optimal[MB/s]
Read Bandwidth-Nonoptimal[MB/s]
rbo/rbn LUN, metaLUN, pool-based LUN
EMC Unisphere Analyzer
analyzer -archivedump 399

Table 37 Performance characteristics (continued)
Optimal performancecharacteristics
Nonoptimalperformancecharacteristics
Optimal/nonoptimalcode
Object type
Read Size-Optimal[KB] Read Size-Nonoptimal[KB]
rso/rsn LUN, metaLUN, pool-based LUN
Read Throughput-Optimal[IO/s]
Read Throughput-Nonoptimal[IO/s]
rioo/rion LUN, metaLUN, pool-based LUN
Write Bandwidth-Optimal[MB/s]
Write Bandwidth-Nonoptimal[MB/s]
wbo/wbn LUN, metaLUN, pool-based LUN
Write Size-Optimal [KB] Write Size-Nonoptimal[KB]
wso/wsn LUN, metaLUN, pool-based LUN
Write Throughput-Optimal[IO/s]
Write Throughput-Nonoptimal[IO/s]
wioo/wion LUN, metaLUN, pool-based LUN
Average Busy QueueLength-optimal
Average Busy QueueLength-Nonoptimal
abqlo/abqln LUN, metaLUN, pool-based LUN
Service Time - Optimal[ms]
Service Time -Nonoptimal [ms]
sto/stn LUN, metaLUN, pool-based LUN
Explicit Trespass Count etc LUN, metaLUN, pool-based LUN
Implicit Trespass Count itc LUN, metaLUN, pool-based LUN
Implicit Trespass Count–Optimal
Implicit Trespass Count–Nonoptimal
itco/itcn LUN, metaLUN, pool-based LUN
Explicit Trespass Count–Optimal
Explicit Trespass Count–Nonoptimal
etco/etcn LUN, metaLUN, pool-based LUN
The following table is an example of the -archivedump command, which displaysoptimal and nonoptimal statistics and also displays the current owner:
Table 38 -archivedump command statistics
Objectname
Owner array name Currentowner
Utilization(%)
Utilization-optimal [%]
Responsetime-optimal[ms]
LUN 2 HK192200361 A 0 0 0
LUN 1 HK192200361 B 8.153079 8.153079 34.986851
-stime starttimeSpecifies an archive poll time from which to start iterating through the data. The-stime switch requires start time to be in the following format:
mm/dd/yyyy hh:mm:ss
where:
EMC Unisphere Analyzer
400 EMC VNX Series 5.33 Command Line Interface Reference for Block

mm
is the month of a year (1-12)
dd
is the day of a month (1-31)
yyyy
is the four-digit year
hh
is the hour of the day (0-23)
mm
is the minute in an hour (0-59)
ss
is the second in a minute (0-59)
You must enclose the time in double quotation marks.
The -stime switch works in combination with the -ftime switch, describedbelow. If the start time is greater than the end time, an error message appears.If you do not specify an end time, this switch defaults to the latest poll time inthe archive file.
Note
If you use the -stime switch with the -timezone switch, you must apply the
time zone you specify to the start time.
If the start time you specify does not exist in the time interval of the archive file,an error message containing the valid time range of the archive file appears.Also, if the start time format is not valid, an error message appears.
-ftime endtimeSpecifies an archive poll time at which to stop iterating through the data. The -ftime switch requires end time to be in the following format:
mm/dd/yyyy hh:mm:ss
where:
mm
is the month of a year (1-12)
dd
is the day of a month (1-31)
yyyy
is the four-digit year
hh
is the hour of the day (0-23)
mm
is the minute in an hour (0-59)
ss
is the second in a minute (0-59)
EMC Unisphere Analyzer
analyzer -archivedump 401

You must enclose the time in double quotation marks.
The -ftime switch works in combination with the -stime switch, describedabove. If the start time is greater than the end time, an error message appears.If you do not specify an end time, this switch defaults to the latest poll time inthe archive file.
Note
If you use the -ftime switch with the -timezone switch, you must apply the
time zone you specify to the end time.
If the end time you specify does not exist in the time interval of the archive file,an error message containing the valid time range of the archive file appears.Also, if the end time format is not valid, an error message appears.
-timezone codeApplies a particular time zone to the performance characteristic, Poll Time,included in the output data. By default, Analyzer displays this characteristic inthe local time of the client system. The possible time zones for the switch arelisted below:
Table 39 Time zone values
Time zone Code
Local time (default) local
Universal time utc
-progressDisplays information about the current dump status, including the name of thefile being dumped and the percentage dumped. An approximate value iscalculated based on the number of objects for the percentage dumpedinformation. This switch works with the -out switch. If you use the -progress switch without the -out switch, it is ignored. Do not use this switchin scripts.
-statsDumps the statistical information for multiple archive files. Dumped information ofdifferent files is separated by a blank line. The output information includes the starttime, end time, total number of objects, LUNs, SPs, disks, metaLUNs, pools, thinLUNs, snap sessions, and the number of other objects such as host and system. Youcan use the following switches with the -stats command: -out, -join, -overwrite, and -timezone codes (described above). The -stats commanddoes not support -xml format.
-relDumps the relationship information among the various objects in the archive file.You must provide the archive filename following the -rel command. You canspecify multiple archive files separated by commas to dump the relationshipinformation of all of them.In addition to the switches -join, -out, -overwrite, -progress, -enquote, -eol, -xml, -delim and -progress (described above), you can also use thefollowing optional switches with the -rel command:
-root objcodeDumps the relationship information about the specified root and its subnodes.The following object codes specify the object types of a root node:
EMC Unisphere Analyzer
402 EMC VNX Series 5.33 Command Line Interface Reference for Block
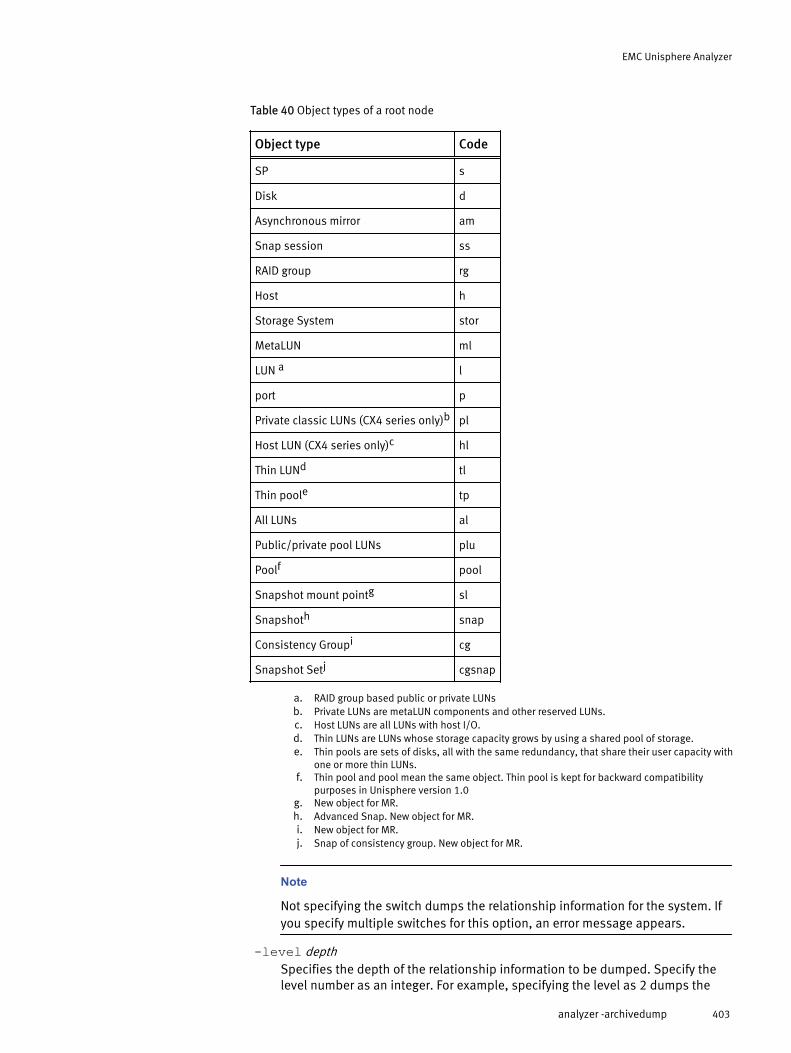
Table 40 Object types of a root node
Object type Code
SP s
Disk d
Asynchronous mirror am
Snap session ss
RAID group rg
Host h
Storage System stor
MetaLUN ml
LUN a l
port p
Private classic LUNs (CX4 series only)b pl
Host LUN (CX4 series only)c hl
Thin LUNd tl
Thin poole tp
All LUNs al
Public/private pool LUNs plu
Poolf pool
Snapshot mount pointg sl
Snapshoth snap
Consistency Groupi cg
Snapshot Setj cgsnap
a. RAID group based public or private LUNsb. Private LUNs are metaLUN components and other reserved LUNs.c. Host LUNs are all LUNs with host I/O.d. Thin LUNs are LUNs whose storage capacity grows by using a shared pool of storage.e. Thin pools are sets of disks, all with the same redundancy, that share their user capacity with
one or more thin LUNs.f. Thin pool and pool mean the same object. Thin pool is kept for backward compatibility
purposes in Unisphere version 1.0g. New object for MR.h. Advanced Snap. New object for MR.i. New object for MR.j. Snap of consistency group. New object for MR.
Note
Not specifying the switch dumps the relationship information for the system. Ifyou specify multiple switches for this option, an error message appears.
-level depthSpecifies the depth of the relationship information to be dumped. Specify thelevel number as an integer. For example, specifying the level as 2 dumps the
EMC Unisphere Analyzer
analyzer -archivedump 403

immediate subnodes of all the objects of the type you specified with the -rootswitch. Specifying the level as 1 dumps the name of all object types youspecified with the -root switch. If you specify a level as 0, an error messageappears. Not specifying this switch dumps the complete hierarchy of all theobjects of the type specified with the -root switch.
-configDumps the configuration information of objects in the archive file. You must providethe archive filename following the -config command. You can specify multiplearchive files separated by commas to dump the configuration information for all ofthem.You can use the following switches with the -config command: -out, -join, -overwrite, -xml, -delim, -enquote, -eol, and -progress (describedabove).
-object objcodeSpecifies for which objects and in what order you want to dump theconfiguration information. If you do not specify this switch, all object types aredumped in the following order: SPs, public classic LUNs, metaLUNs, fullyprovisioned LUNs, thin LUNs, Snapshot mount point, private classic LUNs,disks, MirrorView/A, Snap sessions, RAID groups, pools, hosts, systems,Snapshots, Consistency Groups, and ports.
Table 41 Order of dump configuration information
Object type Code
SP s
Disk d
Snap session ss
Asynchronous mirror am
RAID group rg
Host h
Storage System stor
metaLUN ml
LUN l
Port p
Private classic LUNs (CX4 series only) pl
Host LUN (CX4 series only) hl
Thin LUN tl
Thin pool tp
All LUNs al
Public/private pool LUNs plu
Pool pool
EMC Unisphere Analyzer
404 EMC VNX Series 5.33 Command Line Interface Reference for Block

EXAMPLE #1This command lets you dump data from the archive file archive.nar withoutoutputting a header.
naviseccli analyzer -archivedump -data archive.nar -header n
EXAMPLE #2This command lets you dump statistical information for multiple archive files,archive1.nar and archive2.nar.
naviseccli analyzer -archivedump -stats archive1.nar,archive2.nar
EXAMPLE #3This command lets you dump relationship information of various objects in the archivefile archive.nar and outputs it in XML format.
naviseccli analyzer -archivedump -rel archive.nar -xml
EXAMPLE #4This command lets you dump configuration information of objects in the archive filearchive.nar; if the output file archive.csv exists, this command overwrites itwithout a warning.
naviseccli analyzer -archivedump -config archive.nar -outarchive.csv -overwrite y
EXAMPLE 5naviseccli analyzer –archivedump –data archive.nar –out output.csv
OUTPUTVaries depending upon which switch you use.
analyzer -archiveretrieveRetrieves Analyzer archive files.
PREREQUISITESYou must have a user account on the system on which you want to execute the command.
DESCRIPTIONThe naviseccli analyzer command with the -archiveretrieve command letsyou create the archive files on the SP, retrieve the archive files from the SP, and deletethem from the SP.
analyzer -archiveretrieve is used with naviseccli (refer to naviseccli on page20).
SYNTAXanalyzer -archiveretrieve [-file filename] [-location pathname][-overwrite y|n] [-retry times] [-v]OPTIONS
-file filenameSpecifies the name of the archive file once it is retrieved to the client.
-location pathnameSpecifies the path location of the archive file once it is retrieved to the client system.If you do not specify a location, Analyzer uses the current working directory.
-overwrite y|nSpecifies whether to overwrite an existing archive file on the client system. If thespecified archive file already exists and this switch is not used, the command fails.
EMC Unisphere Analyzer
analyzer -archiveretrieve 405
y = Overwrite existing file.
n = Do not overwrite existing file.
-retry timesSpecifies the number of times to retry a retrieve before giving up completely. A retryoccurs only when the actual move of the archive file from the system to the clientsystem fails.
-vAs the retrieve process progresses, the status of each stage appears.
EXAMPLEThis command retrieves an archive to the file archive.nar in c:\Temp, overwrites theexisting file and retries three times.
naviseccli -h ss1_spa -user username -password password-scope scope -code analyzer -archiveretrieve -file archive.nar-location c:\Temp\ -overwrite y -retry 3
analyzer -archivemergeMerges Analyzer archive files.
PREREQUISITESThe host, username/password and scope options of naviseccli are ignored since thiscommand runs locally.
DESCRIPTIONThe naviseccli analyzer command with the -archivemerge command lets youmerge two archives from the same SP into a single archive.
Note
The -archivemerge command recognizes and reports an error message when you try
to open an encrypted archive file.
analyzer -archivemerge is used with naviseccli (refer to naviseccli on page20).
SYNTAX
analyzer -archivemerge -data archive1 archive2 [-outoutputarchive] [-overwrite y|n]
OPTIONS
-data archive1 archive2Merges the data of two archive files that you specify.
-out outputarchiveSpecifies an output file to which to write the merged archive. Use quotation marksaround the filename if it has spaces. If you do not specify this switch, the outputmerged file will be in the current directory with the default name(DD_MM_YY_HH_MM_merged.nar).
-overwrite y|nSpecifies whether to overwrite an existing archive file on the client system.y = Overwrite existing file
n = Do not overwrite existing file
EMC Unisphere Analyzer
406 EMC VNX Series 5.33 Command Line Interface Reference for Block

Note
If you try to overwrite a read-only file, an error message appears.
EXAMPLEThis command merges the files C:\Temp\archive1.nar and C:\Temp\archive2.nar and writes the merged archive in C:\Temp\mergedArchive.nar.
naviseccli analyzer -archivemerge -data C:\Temp\archive1.narC:\Temp\archive2.nar -out C:\Temp\mergedArchive.nar
EMC Unisphere Analyzer
analyzer -archivemerge 407

EMC Unisphere Analyzer
408 EMC VNX Series 5.33 Command Line Interface Reference for Block

CHAPTER 9
EMC VNX MirrorView/A CLI
This chapter introduces the EMC®VNX MirrorView™/Asynchronous software and explainsthe commands for creating and managing the MirrorView/ Asynchronous remote mirrorsand consistency groups. This manual refers to the EMC VNX MirrorView/Asynchronousproduct as MirrorView /A.
Major topics include:
l MirrorView/A remote mirroring commands.......................................................... 410l MirrorView/A consistency group commands........................................................431
EMC VNX MirrorView/A CLI 409

MirrorView/A remote mirroring commandsThis section explains the naviseccli commands and the commands for creating andmanaging remote mirrors on VNX series systems with the MirrorView/A option. Thesecommands let you use MirrorView/A software to create a byte-for-byte copy of one ormore local LUNs connected to a distant system server.
Note
The commands in this section function only with a system that has the optionalMirrorView/A software installed.
MirrorView/A operations overviewThis section provides an overview of MirrorView/A operations and how to manage thesystems using the management software.
Procedure
1. Connect the same management software to both systems and configure the software,so that you can manage both systems.
Note
Optionally, you can perform this step at the secondary site as well.
You must manage both systems, which can be in different domains (see theUnisphere online help).
2. Estimate the size of the reserved LUN pool and the reserved LUNs.
3. Establish a usable, two-way connection between the MirrorView/A systems using themirror -enablepath command (see mirror -enablepath on page 421).
4. If the primary LUN does not exist, bind it on its server’s system. Wait for the LUN tofinish binding and add it to the storage group.
5. If the secondary LUN does not exist, create a secondary image LUN.
Note
The secondary LUN can be a different RAID type from the primary, as long as the blocksize matches.
6. Wait for the secondary LUN to finish binding.
7. From the management workstation, create the remote mirror (see mirror async -create on page 418).
Next add a secondary image. To add a secondary image, see mirror async -addimage on page 413.
Normally, when you add a secondary image to a mirror, the software synchronizes thesecondary image with the primary image.
The software will initially copy all the data from the primary LUN to the secondary LUN,in order to ensure that the two LUNs are identical.
At any time in the previous sequence of steps, you can get remote mirror status withthe mirror -async -list command.
EMC VNX MirrorView/A CLI
410 EMC VNX Series 5.33 Command Line Interface Reference for Block
8. Create a consistency group and add the primary image to it (optional). See mirror -async -creategroup on page 431.
9. If a primary failure occurs, Unisphere reports the failure.
If the primary failure is minor, have the primary fixed and resume mirroring.
If the primary failure is catastrophic, the original client that is managing the systemmay be unusable and thus unable to report the failure. For such a failure, theadministrator at the secondary site must set up a client to manage the system (if notalready done), then promote the secondary to primary and take other recovery actionas needed. This includes assigning the newly promoted LUN to a storage group, if it isnot already the appropriate one.
When you use MirrorView/A on a VMware ESX Server, after you promote the secondaryimage to a primary image, perform the following steps:
a. If not already assigned, assign the newly promoted primary image to a storagegroup on the same or standby ESX Server.
b. Rescan the bus at the ESX Server level.
c. If not already created, create a virtual machine (VM) on the same or standby ESXServer. The VM is not powered up when you create it.
d. Assign the newly promoted primary to the VM.
e. Power up the VM.
If the VM is created and running and you have not already assigned the newlypromoted primary to the VM, perform these steps:
a. Perform steps a and b above.
b. If you are running ESX Server 2.5.x, power it down.
c. To assign the newly promoted primary to the VM, use the virtual center interfacefor ESX Server 3.x and 2.5.x or the Management User interface for ESX Server 2.5.x.
Note
If you are running ESX Server 3.x, you do not need to power down the VM.
d. If you are running ESX Server 2.5.x, power up the VM.
Note
If you are running ESX Server 3.x, you do not need to power up the VM.
The primary image (which is now the secondary image) will not be accessible tothe primary ESX Server.
Note
For configuration restrictions when using VMFS volumes, go to the E-Lab™
Navigator on EMC Online Support, and under the PDFs and Guides tab, open theVMware ESX server.pdf file.
10. If access to the secondary storage image fails, the primary system will fracture theremote mirror. If the problem with the secondary is minor (for example, replacing acable), then the administrator can fix it. Mirroring will recover and resynchronize theimage, if the image recovery policy is Automatic.
EMC VNX MirrorView/A CLI
MirrorView/A operations overview 411

Whenever you want to stop mirroring, you can first fracture and remove the secondaryimages, and then destroy the mirror. This does not affect any data on either imageLUN, and access to the primary LUN is also unaffected. The LUN that held thesecondary image now becomes accessible as a regular LUN.
MirrorView/A CLI functionsThe VNX CLI for Block provides one of the two interfaces to the MirrorView/A mirroringsoftware. The Unisphere UI provides the other.
You can use the naviseccli mirror CLI command to set up and manage remote mirrorsessions.
The naviseccli mirror command functions are summarized in naviseccli MirrorView/Acommand functions on page 412.
Table 42 naviseccli MirrorView/A command functions
Essential functions (in order performed)
mirror -enablepath Opens a path between the local and remote system. Requiredregardless of the type of connection between systems.
mirror -async -create Creates a new remote mirror using an existing LUN. The LUN onwhich the -create command is executed becomes the primaryimage.
mirror -async-addimage
Adds a secondary image to a mirror using a LUN on a remotesystem. The default is to synchronize unless you specifyotherwise.
mirror -async-changeimage
Changes secondary image properties such as auto recoverysetting and recovery policy.
mirror -async-fractureimage
Fractures a secondary image, suspending mirroring of data to thatimage. A fracture log is maintained, so that the image can bequickly resynchronized later.
mirror -async-removeimage
Removes a secondary image from a mirror.
mirror -async-promoteimage
Promotes a secondary image to primary, while simultaneouslydemoting the primary image (if still accessible) to secondary.Required in order to access the data in the secondary image in theevent of a failure of the primary.
mirror -async-syncimage
Starts synchronization of the secondary image with the primary.Needed if automatic recovery is not on. I/O is allowed with theprimary while synchronization occurs. You can specify asynchronization rate to avoid serious performance impact.
mirror -async -info Displays MirrorView/A information about a system.
mirror -async -list Displays information on existing mirrors.
EMC VNX MirrorView/A CLI
412 EMC VNX Series 5.33 Command Line Interface Reference for Block

Table 43 naviseccli MirrorView/A optional functions
Optional reconfiguration functions (alphabetically)
mirror -async -change Changes remote mirror properties.
mirror -async -destroy Terminates remote mirroring of a LUN. This does not affect thedata in the LUN, and the server continues to access it.
mirror -disablepath Severs all paths between the local system SPs and the remotesystem SPs.
mirror -async -addimageAdds an image to a previously created mirror.
PREREQUISITESYou must have a user account on the system on which you want to execute the command.
DESCRIPTIONThis command is used with naviseccli (see naviseccli on page 20) to add a secondaryimage to a mirror using a LUN on a remote system. The -addimage function is required ifyou want mirroring to occur. You must direct the command to the system that holds theprimary image. This command lets you create primary and secondary images on thinLUNs, if all the participating systems support mirroring on thin LUNs.
Note
The Thin Provisioning™ enabler must be installed to create thin LUNs.
You can use the -info function to display the UIDs of systems that have images that canbe mirrored.
Note
To add a secondary image, you must have a working connection to the remote system,and the remote LUN must be exactly the same size (number of blocks) as the primaryimage.
Note
In this syntax "or" means that you can specify the switch, -arrayhost sp-hostname |
sp-IP-address -lun lun-number | -lunuid lun-uid or you can specify the switch, -arrayuid system-uid -lunuid lun-uid. The rest of the syntax is common to both.
SYNTAX
mirror -async -addimage -name name | -mirroruid mirroruid-arrayhost sp-hostname|sp-IP-address-lun lun-number|-lunuid lun-uid
or
mirror -async -addimage -name name|-mirroruid mirroruid-arrayuid system-uid -lunuid lun-uid[-recoverypolicy auto|manual]
EMC VNX MirrorView/A CLI
mirror -async -addimage 413

[-syncrate high|medium|low][-manualupdate|-delaystart time|-enddelay time][-nosyncrequired]
OPTIONS
-name nameSpecifies the name that you gave to the mirror with the -create command.
-mirroruid uidSpecifies the unique 16-byte primary image ID (World Wide Name) the softwareassigned when the mirror was created. For any letters in the ID, you must specify thesame case as the software assigned when the mirror was created (use the mirror -async -list on page 425 function).
-arrayhost sp-hostname|sp-IP-addressSpecifies the hostname or network address of the remote SP that will hold thesecondary image. The secondary image will be added to the remote mirrorconnected to this host’s SP. Use this switch or -arrayuid.
-lun lun-numberSpecifies the LUN number that will serve as the secondary image of the mirror.
-arrayuid system-uidSpecifies the unique 8-byte system ID of the remote SP. You can determine this byusing the mirror -info command or the getarrayuid command. For anyletters in the ID, use the same case that the software assigned when the mirror wascreated. Use this switch or -arrayhost.
-lunuid lun-uidSpecifies the unique 16-byte identification number (World Wide Name) of the LUN tobe added as a secondary image. If you specified -arrayuid, then -lunuid isrequired. If you specified -arrayhost , then you can use either -lun or -lunuid.
Note
When you specify -arrayuid and -lunuid, you must add the mirror driver on the
remote LUN using the -setfeature command before executing the -addimagecommand.
-recoverypolicy manual|autoSpecifies the policy for recovering the secondary mirror image after a systemfracture. Values are:
manual: The administrator must explicitly start a synchronization operation torecover the secondary mirror image.
auto: Recovery automatically resumes as soon as the primary image determines thatthe secondary mirror image is once again accessible. This is the default.
-syncrate high|medium|lowSpecifies a relative value (low, medium, or high) for the priority of completingupdates. High completes updates faster, but may significantly affect systemperformance for server I/O requests, particularly where there are multiple concurrentsynchronizations occurring. Low completes updates much slower, but alsominimizes impact on other system operations.
-manualupdateIndicates that you must explicitly update the image.
-delaystart timeSpecifies the time (in minutes) from the beginning of the previous update to the startof the next update. The current update must complete before the next one can start.
EMC VNX MirrorView/A CLI
414 EMC VNX Series 5.33 Command Line Interface Reference for Block

If the update is still in process when the time period expires, the next update willstart immediately once the current update completes.
-enddelay timeSpecifies the time (in minutes) from the end of the previous update to the nextupdate. A value of 0 causes updates to occur as fast as possible.
-nosyncrequiredSpecifies that the image will be added in a synchronized state; thus, no initialsynchronization will occur.
EXAMPLEAny of the following commands adds an image to a mirror. Note that if you specify theremote system using the -arrayuid switch, before issuing the command you mustexplicitly add drivers to the LUN stack using the -setfeature command. For SPss1_spa, any of the above commands adds to the remote mirror db_mirror the LUN insystem 50:06:06:10:00:FD:A1:69 (or a LUN on the remote system cpc426) whoseunique LUN ID (world wide name, WWN) is 60:06:06:5A:62:02:00:00:92:95:DE:7C:E4:71:D4:11 or whose LUN number is 9. See also the example in mirror -async -create on page 418.
naviseccli -h ss1_spa mirror -async -addimage -name db_mirror-arrayuid 50:06:06:10:00:FD:A1:69-lunuid 60:06:06:5A:62:02:00:00:92:95:DE:7C:E4:71:D4:11
naviseccli -h ss1_spa mirror -async -addimage -name db_mirror-arrayhost cpc426 -lun 9
naviseccli -h ss1_spa mirror -async -addimage -name db_mirror-arrayhost cpc426-lunuid 60:06:06:5A:62:02:00:00:92:95:DE:7C:E4:71:D4:11
OUTPUTIf the version of VNX OE for Block software running on the SP does not support thiscommand, a Command is not supported error message is printed to stdout. Youmay also receive other error messages.
mirror -async -changeChanges mirror properties.
PREREQUISITESYou must have a user account on the system on which you want to execute the command.
DESCRIPTIONThis command is used with naviseccli (see naviseccli) to change one or moreparameters of a previously created mirror.
You must direct the command to the system that holds the primary image. You mustspecify at least one of the optional switches with this command. If you omit the overrideoption, then the CLI displays a message for each parameter to confirm the change.
SYNTAXmirror -async -change -name name | -mirroruid uid[-description description][-requiredimages num_of_images] [-o][-enablereadonlysecondary yes|no]
EMC VNX MirrorView/A CLI
mirror -async -change 415

OPTIONS
-name nameSpecifies the name the -create command gave the mirror. You can specify eitherthe mirror name or unique ID (next).
-mirroruid uidSpecifies the unique 16-byte remote mirror ID assigned when the mirror was created.For any letters in the ID, you must specify the same case as the software assignedwhen the mirror was created (use the mirror -list command).
-description descriptionProvides a meaningful title for the mirror (for example, Employee and Benefits Tablefor Human Resources). The software does not use the description to identify themirror. You can specify up to 256 characters, but we suggest that you should notexceed the line length defined by the operating system.
-requiredimages num_of_imagesSpecifies the minimum number of secondary images that should be accessible tothe mirror. The default value is 0. Allowed values are 0, 1, and all. If the number ofaccessible images goes below the specified value, the mirror goes into the Attentionstate and generates a log message. You can configure this to generate anappropriate warning (for example, e-mail message or page) to the administrator toenable the administrator to correct the problem.
-oExecutes the command without prompting for confirmation.
EXAMPLEFor the remote mirror dbmirror on SP ss0_spa, this command reduces the minimumnumber of accessible secondary images to 0. Use the -list command to confirm thatthe changes were made.
naviseccli -h ss0_spa mirror -async -change -namedbmirror -requiredimages 0
OUTPUTIf the version of VNX OE for Block software running on the SP does not support thiscommand, a Command is not supported error message is printed to stdout. Youmay also receive other error messages.
mirror -async -changeimageChanges secondary image properties.
PREREQUISITESYou must have a user account on the system on which you want to execute the command.
DESCRIPTIONThis command is used with naviseccli (see naviseccli) to change one or moreparameters of a mirror image.
You must direct the command to the system that holds the primary image. You mustspecify at least one of the optional switches. If you omit the override option, then itdisplays a message similar to the following for each parameter to confirm the change.
Do you want to change the sync rate from Medium to High (y/n)?To change a parameter, enter y.
SYNTAXmirror -async -changeimage -name name | -mirroruid uid-imageuid image-uid
EMC VNX MirrorView/A CLI
416 EMC VNX Series 5.33 Command Line Interface Reference for Block

[-recoverypolicy manual|auto][[-manualupdate] | [-delaystart time]][-enddelay time][-syncrate high|medium|low] [-o]OPTIONS
-name nameSpecifies the name you gave to the remote mirror in the -create command. Youcan specify either the mirror name or uid (next).
-mirroruid uidSpecifies the unique 16-byte ID assigned when the mirror was created. For anyletters in the ID, you must specify the same case as the software assigned when themirror was created (use the mirror -list command).
-imageuid image-uidSpecifies the unique 8-byte ID of the secondary image you want to change. For anyletters in the ID, you must specify the same case that the software assigned to theimage when the mirror was created (use the mirror -list command).
-recoverypolicy manual|autoSpecifies the policy for recovering the secondary mirror image after a systemfracture. Values are:manual: The administrator must explicitly start a synchronization operation torecover the secondary mirror image.
auto: Recovery automatically resumes as soon as the primary image determines thatthe secondary mirror image is once again accessible. This is the default.
-manualupdateIndicates that you must explicitly update the image.
-delaystart timeSpecifies the time (in minutes) from the beginning of the previous update to the startof the next update. The current update must complete before the next one can start.If the update is still in process when the time period expires, the next update willstart immediately once the current update completes.
-enddelay timeSpecifies the time (in minutes) from the end of the previous update to the nextupdate. A value of 0 causes updates to occur as fast as possible.
-syncrate high|medium|lowSpecifies a relative value (low, medium, or high) for the priority of completingupdates. High completes updates faster, but may significantly affect systemperformance for server I/O requests, particularly where there are multiple concurrentsynchronizations occurring. Low completes updates much slower, but alsominimizes impact on other system operations.
-oExecutes the command without prompting for confirmation.
EXAMPLEFor system server1, mirror db_mirror, image 50:06:06:10:00:FD:A1:6, thiscommand changes the synchronization rate to high. Use the -list command to confirmthat the changes were made.
naviseccli -h server1 mirror -async -changeimage -namedb_mirror -imageuid 50:06:06:10:00:FD:A1:6 -syncrate high
EMC VNX MirrorView/A CLI
mirror -async -changeimage 417

OUTPUTIf the version of VNX OE for Block software running on the SP does not support thiscommand, a Command is not supported error message is printed to stdout. Youmay also receive other error messages.
mirror -async -createCreates a new asynchronous mirror using an available LUN for mirroring.
PREREQUISITESYou must have a user account on the system on which you want to execute the command.
DESCRIPTIONThis command is used with naviseccli to create a new mirror using an existing LUN.The LUN on which you run the command becomes the primary LUN. But, for mirroring tooccur, you must add an image with the -addimage function. Later, you can changesome of the parameters you specify here with the -change function. This commandsupports thin LUNs after you install the latest Unisphere version, which contains thin LUNsupport for MirrorView.
If you specify a minimum number of required images (other than the default value zero)in the -create command, the mirror will start in the attention state, since you have notyet added the required secondary images. To avoid this problem, do not specify aminimum number of images with -create; instead, create the mirror, add the image,and then if you want a minimum number of required images, change the mirror with the -change command.
SYNTAXmirror -async -create -name name-lun lun_number[-description description][-requiredimages num_of_images][-o]OPTIONS
-name nameLets you assign a meaningful name to the mirror; for example "EmployeeBenefits". To include spaces in the name, enclose the entire string in quotationmarks as in the example. You can use this name to manage the mirror. The name caninclude as many as 35 characters.
-lun lun_numberSpecifies the LUN number that will serve as the primary image of the mirror you arecreating.
-description descriptionLets you assign a description for the mirror. The software does not use thedescription to identify the mirror. You can specify up to 256 characters, but wesuggest that you should not exceed the line length defined by the operating system.
-requiredimages num_of_imagesSpecifies the minimum number of secondary images that should be accessible tothis mirror. The default value is 0. Allowed values are 0, 1 and all. If the number ofaccessible images goes below the specified value, the mirror goes into the Attentionstate and generates a log message. You can configure this to generate anappropriate warning (for example, e-mail message or page) to the administrator toenable the administrator to correct the problem.
-oExecutes the command without prompting for confirmation.
EMC VNX MirrorView/A CLI
418 EMC VNX Series 5.33 Command Line Interface Reference for Block

EXAMPLEThe mirror -async -create command creates the mirror named db_mirror on LUN112. The mirror automatically activates.
naviseccli -h ss1_spa mirror -async -create -name db_mirror -lun 112
OUTPUTIf the version of VNX OE for Block software running on the SP does not support thiscommand, a Command is not supported error message is printed to stdout. Youmay also receive other error messages.
mirror -async -destroyDestroys a mirror.
PREREQUISITESYou must have a user account on the system on which you want to execute the command.
DESCRIPTIONThis command is used with naviseccli (see naviseccli) to destroy a mirror. It is thecounterpart of -create. It ends mirroring of the LUN that is part of the mirror. This doesnot affect the data in the LUN, and the server continues to access it.
Note
You cannot destroy a mirror while it is a member of a consistency group.
You must remove the secondary image in the mirror before issuing the command to thesystem holding the primary image. If you cannot remove the secondary image or accessthe primary image, you can use the -force option. You must direct the command to thesystem that holds the primary image unless -force is specified, in which case, you candirect it to either system.
CAUTION
Use -force only if all other options to remove an image and the mirror have failed.
If you omit the override option, a message to confirm the destruction of the mirrorappears:
Do you really want to destroy the mirror <mirror-name> (y/n)?To destroy the mirror, answer y; to take no action, enter n.
SYNTAXmirror -async -destroy -name name | -mirroruid uid[-force] [-o]OPTIONS
-name nameSpecifies the name you gave to the mirror with the -create command. You canalso use the remote mirror ID.
-mirroruid uidSpecifies the unique 16-byte remote mirror ID assigned when the mirror was created.For any letters in the ID, you must specify the same case as the software assignedwhen the mirror was created (use the mirror -list command).
-forceForcibly destroys the mirror. This option affects only the local system.
-o
EMC VNX MirrorView/A CLI
mirror -async -destroy 419

Executes the command without prompting for confirmation.
EXAMPLEFor SP ss1_spa, this command destroys the remote mirror that was created with thename db_mirror.
naviseccli -h ss1_spa mirror -async -destroy db_mirror
Do you really want to destroy the mirror db_mirror?(y/n)? y
OUTPUTIf the version of VNX OE for Block software running on the SP does not support thiscommand, a Command is not supported error message is printed to stdout. Youmay also receive other error messages if the command fails for some reason.
mirror -disablepathDisables the communication paths created by -enablepath to remote mirror SPs.
PREREQUISITESYou must have a user account on the system on which you want to execute the command.
DESCRIPTIONUse this command with naviseccli (see naviseccli on page 20) to sever the pathestablished by -enablepath in the remote system.
When issued to any SP, the command severs paths for both SPs in both the primary andsecondary systems; that is, it severs these paths if:
l SP A of the local system is connected to SP A of the remote system
l SP A of the remote system is connected to SP A of the local system
l SP B of the local system is connected to SP B of the remote system
l SP B of the remote system is connected to SP B of the local system
This means you can issue the command to either SP of either system to sever the pathsbetween the systems you are targeting.
If you issue the command while a mirror exists, the CLI issues a warning message; if youcontinue, any mirror connected over the specified path will be fractured.
Note
If both asynchronous and synchronous mirrors are installed, you need to run thecommand only once. It will take effect for both mirrors.
If you omit the override option, the CLI displays a message to confirm the disabling of thepath. To disable the path, answer y; to take no action, enter n.
SYNTAXmirror -disablepath connected-SP-hostname [-connectiontypefibre|iscsi] [-o]OPTIONS
connected-SP-hostnameSpecifies the hostname of SP A or SP B of a connected system to disconnect.
-connectiontype fibre | iscsiSpecifies the connection type as fibre or iSCSI for the path you are disabling. If youdo not specify the -connectiontype switch, the system first tries to find a fibreconnection; if it does not find one, it looks for an iSCSI connection.
EMC VNX MirrorView/A CLI
420 EMC VNX Series 5.33 Command Line Interface Reference for Block

-oExecutes the command without prompting for confirmation. Without this switch, theCLI displays a confirmation message for each SP.
EXAMPLE #1For SP ss1_spa, this command and confirmation remove the paths between the localSPs and the remote mirror SPs.
naviseccli -h ss1_spa mirror -disablepath ss27_spa -connectiontypefibre
Disabling of the path will stop mirroring of data to allimages if any among these arrays. A system fracture ofall mirrors between two arrays on following storageprocessors will occur due to this action.>128.221.39.29>10.14.20.154Do you want to continue (y/n)? y
EXAMPLE #2The mirror -info command displays the updated status.
naviseccli -h ss1_spa mirror -async -info
OUTPUTIf the version of VNX OE for Block software running on the SP does not support thiscommand, a Command is not supported error message is printed to stdout.
mirror -enablepathEstablishes a path for remote mirroring between a local and remote system.
PREREQUISITESYou must have a user account on the system on which you want to execute the command.
DESCRIPTIONThis command is used with naviseccli (see naviseccli on page 20) to create a pathbetween the specified SP and its peer SP to a remote SP and its peer. These paths willserve as paths for remote mirroring. A remote mirror requires a path between the primaryand secondary systems.
When issued to any SP, the command creates paths for both SPs in both systems; that is,it creates these paths:
l SP A of the local system to SP A of the other system
l SP A of the other system to SP A of the local system
l SP B of the local system to SP B of the other system
l SP B of the other system to SP B of the local system
The SP As or the SP Bs in both systems must be physically connected.
If you cannot enable paths on one SP due to some error, an informational messageappears and the paths are enabled for the other SP. To obtain status information, run themirror -info -systems command.
Note
If both asynchronous and synchronous mirrors are installed, you will need to run thecommand only once. It will take effect for both mirrors.
SYNTAXmirror -enablepath SP-hostname [-connectiontype fibre|iscsi]
EMC VNX MirrorView/A CLI
mirror -enablepath 421

OPTIONS
SP-hostnameSpecifies the hostname of SP A or SP B of the remote system on which you want toenable remote mirroring.
-connectiontype fibre | iscsiSpecifies the connection type as fibre or iSCSI for the path you are enabling. If youdo not specify the -connectiontype switch, the system first tries to find a fibreconnection; if it does not find one, it looks for an iSCSI connection.
Note
To change the connection type, you must first disable the current enabled path. Tomodify, test, or delete connections or change the credentials, see the EMCNavisphere Command Line Interface (CLI) Reference.
EXAMPLEFor SP ss1_spa, this command enables the paths between ss1_spa and its peer SPand ss27_spa and its peer SP. The mirror -info command that follows displays theupdated status.
naviseccli -h ss1_spa mirror -enablepath ss27_spa -connectiontypeiscsi
naviseccli -h ss1_spa mirror -async -info
OUTPUTIf the version of VNX OE for Block software running on the SP does not support thiscommand, a Command is not supported error message is printed to stdout.
mirror -async -fractureimageFractures an image in a mirror.
PREREQUISITESYou must have a user account on the system on which you want to execute the command.
DESCRIPTIONThis command is used with naviseccli to start an administrative fracture of asecondary image. It also prevents scheduled updates from starting in the future. Youmust direct the command to the system that holds the primary image.
(An automatic fracture, called a system fracture, occurs if a secondary image becomesinaccessible to the primary image. After a system fracture, the system periodically tries tocommunicate with the secondary image and — if it succeeds — starts synchronizationbased on the fracture log. If you issue the -fractureimage command while the mirroris system fractured, the system will not try to communicate or resynchronize until youissue a -syncimage command.)
The software displays a message to confirm the fracture:
Do you want to fracture the image image UID (y/n)?To fracture the mirror, answer y; to take no action, enter n.
SYNTAXmirror -async -fractureimage -name name | -mirroruid uid-imageuid uid[-o]
EMC VNX MirrorView/A CLI
422 EMC VNX Series 5.33 Command Line Interface Reference for Block

OPTIONS
-name nameSpecifies the name you gave to the mirror with the -create command.
-mirroruid uidSpecifies the unique 16-byte mirror ID (World Wide Name) that the softwareassigned when it created the mirror.
-imageuid uidSpecifies the unique 8-byte image ID of the secondary image to be fractured.
-oExecutes the command without prompting for confirmation.
EXAMPLEFor SP ss1_spa of the mirror named db_mirror, this command fractures thesecondary image with the unique ID shown.
naviseccli -h ss1_spa mirror -async -fractureimage -namedb_mirror -imageuid 50:06:06:10:00:FD:A1:6
Do you really want to fracture the image(y/n)? y
OUTPUTIf the version of VNX OE for Block software running on the SP does not support thiscommand, a Command is not supported error message is printed to stdout. Youmay also receive other error messages.
mirror -async -infoDisplays general information about asynchronous mirroring in a system.
PREREQUISITESYou must have a user account on the system on which you want to execute the command.
DESCRIPTIONThis command, when used with naviseccli and no other switches, lists all generalinformation for asynchronous mirror support. Issuing this command with one or moreoptions displays the information based on the option issued. See the example for sampleoutput.
SYNTAXmirror -async -info [-cancreate][-maxmirrors][-maxremoteimages][-mirroredluns][-mirrorableluns][-systems [-connectiontype]][-all]OPTIONS
-cancreateIndicates whether an asynchronous mirror can be created in this system: yes or no.
-maxmirrorsDisplays the maximum number of mirrors that can be created in this system.
-maxremoteimagesSpecifies the maximum number of secondary images allowed. A maximum of oneimage is allowed.
-mirroredluns
EMC VNX MirrorView/A CLI
mirror -async -info 423
Lists the LUN numbers of LUNs that are mirrored in this system. The list includesLUNs used as both secondary and primary images.
-mirrorablelunsLists LUNs that can be mirrored in this system but are not mirrored at present.
-systemsLists remote systems that can be used for a secondary image.
-connectiontypeDisplays the connection type (fibre or iSCSI) for the enabled mirror. For unexpectederror cases, it displays the value, unknown.
-allLists all properties of a session without having to type in any other switch.
EXAMPLE #1For SP ss1_spa, this command displays potential and current remote mirrorinformation.
naviseccli -h ss1_spa mirror -async -info
Can a mirror be created on this system:YESMaximum number of remote images: 1 LogicalUnits that are mirrored in Primary Images:128 5Logical Units that are mirrored in Secondary Images:0Logical Units that can be mirrored:1 2 3 4 10 11 12 13 14 21 22 58 59Remote systems that can be enabled for mirroring:Array UID: 50:06:01:60:90:20:27:47Status: Enabled on both SPs Enabled ConnectionType(s): iSCSI Disabled Connection Type(s): Fibre MaximumNumber of possible Mirrors: 100
EXAMPLE #2The following example shows the output for the mirror -async -info -allcommand.
mirror –async –info –all
Can a mirror be created on this system: YESMaximum number of Remote Images: 1Logical Units that are mirrored in Primary Images: 2Logical Units that are mirrored in Secondary Images:Logical Units that can be mirrored: 3Remote systems that can be enabled for mirroring:Array UID: 50:06:01:60:88:60:01:8CRemote systems that are enabled for mirroring:Array UID: 50:06:01:60:88:60:07:4BStatus: Enabled on both SPsEnabled Connection Type(s): FibreDisabled Connection Type(s):Maximum number of possible Mirrors: 256Logged-in status of Remote systems:Array UID: 50:06:01:60:88:60:01:8CFibre Logged-in Status: SPA:Y; SPB:YArray UID: 50:06:01:60:88:60:07:4BFibre Logged-in Status: SPA:Y; SPB:YMirrorView port(s):SP A:I/O Module Slot: 0Physical Port ID: 0Logical Port ID: 0Port Type: FibreSP B:I/O Module Slot: 0Physical Port ID: 0
EMC VNX MirrorView/A CLI
424 EMC VNX Series 5.33 Command Line Interface Reference for Block

Logical Port ID: 0Port Type: Fibre
OUTPUTIf the version of the VNX OE for Block software running on the SP does not support thiscommand, a Command is not supported error message is printed to stdout.
mirror -async -listDisplays information about existing asynchronous mirrors.
PREREQUISITESYou must have a user account on the system on which you want to execute the command.
DESCRIPTIONThe naviseccli -async mirror command with -list and no other switches listsall information for all mirrors on the system. Issuing this command with one or moreoptions displays the information based on the option(s) issued. You can direct thecommand to any system; however, only the system holding the primary image of a mirrorwill always have the latest information about the mirror. Status obtained from othersystems may be stale; do not use it unless the primary system is unavailable. See theexample for sample output.
SYNTAXmirror -async -list [-name [[name]] [-mirroruid] [uid][-description][-faulted][-images][-imagecount][-imagesize][-lun][-ownergroupuid][-ownergroupname][-requiredimages][-state][-timestamp][-transition]OPTIONS
-name nameSpecifies the name you gave the mirror with the -create function. You can use themirror name or unique ID to obtain information on a mirror.
-mirroruid uidSpecifies the unique 16-byte remote mirror ID (World Wide Name) the softwareassigned when it created the mirror.
-descriptionLists the meaningful title for the mirror, if any. The software does not use thedescription to identify the mirror.
-faultedLists whether the remote mirror is faulted: yes or no. If it is faulted, the mirror iseither fractured or in the attention state.
-imagesDisplays image information, such as the role of the image (primary or secondary),image ID, WWN of the LUN containing the image, recovery policy, sync rate, imagestate, image condition, and image transitioning. It also displays the update type(Manual, Time elapsed since the start of last update, and Time elapsed since the
EMC VNX MirrorView/A CLI
mirror -async -list 425

end of the last update), the update period in minutes (displays N/A where notapplicable), the time in minutes since the last update, the time in minutes until thenext update, the last image error (why the image is faulted; displays the NotAvailable if no error).
-imagecountLists the current number of images that compose the mirror. This count includes theprimary image.
-imagesizeLists the size of the image (capacity of the LUN containing the image) in user blocks.
-lunLists the LUN number of the local image.
-ownergroupuidLists the unique ID value of the consistency group of which the mirror is a member.
-ownergroupnameLists the unique name of the consistency group of which the mirror is a member.
-requiredimagesLists the minimum number of secondary images required for the mirror.
-stateDescribes the operational state of the mirror. Values are: active and attention.
-timestampReturns the clock time when the last update started.
-transitionSpecifies whether the mirror is in a changing state.
EXAMPLEnaviseccli -h ss1_spa mirror -async -list
MirrorView Name: pbc async ml 80 MirrorView Description: MirrorView UID: 54:33:20:90:60:01:06:50:03:00:00:00:00:00:00:00 Logical Unit Numbers: 80 Remote Mirror Status: Mirrored MirrorView State: Active MirrorView Faulted: NO MirrorView Transitioning: NO Minimum number of images required: 0 Image Size: 409600 Image Count: 2 Images: Image UID: 50:06:01:60:90:20:33:54 Is Image Primary: YES Logical Unit UID: 60:06:01:60:2F:E7:0C:00:3C:5B:04:A2:50:4C:D8:11 Image Condition: Unknown Image Condition
Image UID: 50:06:01:60:90:20:29:85Is Image Primary: NOLogical Unit UID: 60:06:01:60:3F:E1:0D:00:A4:C9:01:63:B6:4C:D8:11Image State: SynchronizedImage Condition: NormalRecovery Policy: AutomaticSynchronization Rate: MediumImage Faulted: NOImage Transitioning: NOSynchronizing Progress(%): 0Update Type: ManualTime in secs since previous update: 12550Time in secs until next update: Not Available
EMC VNX MirrorView/A CLI
426 EMC VNX Series 5.33 Command Line Interface Reference for Block

OUTPUTIf the version of VNX OE for Block software running on the SP does not support thiscommand, a Command is not supported error message is printed to stdout. Youmay also receive other error messages.
mirror -async -promoteimagePromotes a secondary image to primary.
PREREQUISITESYou must have a user account on the system on which you want to execute the command.
DESCRIPTIONThis command promotes a secondary image to the role of the primary image. Thecommand is successful if it can promote the secondary to a primary that is server-accessible. You must direct this command to a system that holds the secondary image —never to the system that holds the primary. The command will fail if you issue it to thesystem that holds the primary image.
You can promote a secondary image if the secondary is in a synchronized or consistentstate. There must be no current update, in addition to the state restrictions listed.
When you promote a secondary image to primary, the software assigns a new mirror UIDto the promoted image to distinguish it from the old mirror. The new status of the oldprimary image depends on whether the old primary image is accessible when promotionoccurs.
After promoting an image, you must explicitly add the newly promoted image to anappropriate storage group. EMC recommends that you also remove the old primary fromits storage group, if possible.
In normal operation when there is no failure, you can (but probably would not want to)promote a secondary image. If you do so, the primary image is demoted to secondary.The new primary image inherits the mirror properties of the demoted primary image.Before issuing this command consider the following:l If possible, the secondary image should be synchronized (synchronized state) with
the primary image. If the secondary image is in the consistent state (not synchronizedstate) when you promote it to primary image, data will probably be lost during thepromotion process.The secondary image to be promoted must be in a consistent or synchronized state. Ifthe secondary image is out-of-sync or synchronizing, then you cannot promote it; anerror will result.
l You must stop I/O to an accessible primary image before you issue this command. IfI/O continues to the original primary, data may be lost as the software demotes theprimary to secondary and/or an SP may reboot unexpectedly during the attemptedpromotion.
SYNTAXmirror -async -promoteimage -name name | -mirroruid uid-imageuid imageuid[-type normal|oos|local ] [-o][-type type][-o]OPTIONS-name name
Specifies the name you gave the mirror with the -create command. You can usethe mirror name or unique ID to promote a secondary image.
-mirroruid uid
EMC VNX MirrorView/A CLI
mirror -async -promoteimage 427

Specifies the unique 16-byte mirror ID (World Wide Name) that was assigned whenthe mirror was created. For any letters in the ID, see comments under -imageuidbelow.
-imageuid uidSpecifies the unique 8-byte image ID of the secondary image you want to promote.For any letters in the ID, you must specify the same case as the software assigned tothe image when it created the mirror (use the mirror -list function).
-type normal|oos|localChecks the status of the mirror images. Normal (the default) directs the driver toperform internal safety checks and return the appropriate error if the promotionwould cause an out-of-sync state for the old primary or remote image if the mirror isunreachable. OOS indicates that no safety check is performed, and the promote willoccur even if it results in an out-of-sync state for the old primary. Local results inpromoting the local image only to the primary. The driver attempts to contact the oldprimary, and if it reaches it, the old primary removes its secondary image.
-oRuns the command without prompting for confirmation.
EXAMPLEFor SP ss1_spa, the owner of the remote mirror named db_mirror, this commandpromotes the secondary image with the unique ID shown.
naviseccli -h ss1_spa mirror -async -promoteimage-name db_mirror -imageuid 50:06:06:10:00:FD:A1:6
OUTPUTIf the version of VNX OE for Block software running on the SP does not support thiscommand, a Command is not supported error message is printed to stdout. Youmay also receive other error messages.
mirror -async -removeimageRemoves a secondary image from a mirror.
PREREQUISITESYou must have a user account on the system on which you want to execute the command.
DESCRIPTIONThis command is used with naviseccli to remove a secondary image from the remotemirror. You must issue this command to a system that holds the primary image.
Note
If an update is in progress, this command will not execute. We recommend that youfracture the secondary image first, and then you can issue the mirror -async -removeimage command.
If you omit the -override option, the software displays a message to confirm theremove operation:
Removing of the image will stop mirroring of data to thespecified image. It may cause the minimum number of imagesrequired parameter to be violated that will cause the mirror togo into attention state. Do you really want to remove theimage(y/n)?Answering yes will remove the image.
EMC VNX MirrorView/A CLI
428 EMC VNX Series 5.33 Command Line Interface Reference for Block
SYNTAX
mirror -async -removeimage -name name|-mirroruid mirroruid-arrayhost sp-hostname|sp-IP-address|-imageuid imageuid[-o]
OPTIONS
-name nameSpecifies the name you gave the mirror with the -create command. You can usethe mirror name or unique ID to remove a secondary image.
-mirroruid uidSpecifies the unique 16-byte remote mirror ID (World Wide Name) assigned when thesoftware created the mirror. For any letters in the ID, see comments under -imageuid below.
-arrayhost sp-hostname | sp-IP-addressSpecifies the hostname or network address of the remote SP that holds thesecondary image you want to remove. If you specify this switch, the driver(s) fromthe secondary LUN stack is removed.
-imageuid image-uidSpecifies the unique 8-byte image ID of the secondary image you want to remove.For any letters in the ID, you must specify the same case as the software assigned tothe image when it created the mirror (use the mirror -list command). If youspecify this switch, you must explicitly remove the driver(s) from the secondary LUNstack using the -setfeature command.
-oExecutes the command without prompting for confirmation.
EXAMPLEFor SP address ss1_spa, the owner of the mirror named db_mirror, this commandremoves the image with the unique ID shown.
naviseccli -h ss1_spa mirror -async -removeimage-name db_mirror -imageuid 50:06:06:10:00:FD:A1:6
OUTPUTIf the version of VNX OE for Block software running on the SP does not support thiscommand, a Command is not supported error message is printed to stdout. Youmay also receive other error messages.
mirror -async -setfeatureAdds or removes an asynchronous mirror driver to or from the LUN stack.
PREREQUISITESYou must have a user account on the system on which you want to execute the command.
DESCRIPTIONUse this command with naviseccli (see naviseccli) to add the asynchronous mirrordriver to or remove it from the LUN stack depending on whether you specify the -on or -off option. You must issue this command to the system where the LUN resides.
Note
-setfeature is needed only if you want to use the -arrayuid switch to specify the
remote system for the -addimage command.
EMC VNX MirrorView/A CLI
mirror -async -setfeature 429
SYNTAXmirror -async -setfeature -on | -off -lun lun_number | -lunuiduid
OPTIONS
-onAdds the driver to the LUN stack.
-offRemoves the driver from the LUN stack.
-lun lun_numberSpecifies the LUN number to which you want to add or from which you need toremove the driver.
-lunuid uidSpecifies the unique 16-byte identification number (World Wide Name) of the LUN towhich you will add the driver or from which you will remove the driver.
EXAMPLEFor SP ss1_spa, this command starts adding the driver to LUN 112.
naviseccli -h ss1_spa mirror -async -setfeature -on -lun 112
OUTPUTIf the version of VNX OE for Block software running on the SP does not support thiscommand, a Command is not supported error message is printed to stdout. Youmay also receive other error messages.
mirror -async -syncimageStarts an update of the secondary image.
PREREQUISITESYou must have a user account on the system on which you want to execute the command.
DESCRIPTIONUse this command with naviseccli (see naviseccli on page 20) to begin thesynchronization operation on a secondary image that was previously administrativelyfractured or on one where the mirror image condition is normal. You must issue thiscommand to the system that holds the primary image. The secondary image should befractured when performing this operation. If you specify a secondary image that is notfractured, an internal error message will be returned.
The software displays a confirmation message:
During synchronization, array performance will be impacted. Doyou want to sync the image (y/n)?Answering y will start synchronization.
SYNTAX
mirror -async -syncimage -name name|-mirroruid mirroruid-imageuid imageuid [-o]
OPTIONS
-name nameSpecifies the name given to the mirror with the -create command. You can use themirror name or unique ID to update a secondary image.
-mirroruid uid
EMC VNX MirrorView/A CLI
430 EMC VNX Series 5.33 Command Line Interface Reference for Block

Specifies the unique 16-byte remote mirror ID (World Wide Name) assigned when thesoftware created the mirror. For any letters in the ID, see comments under -imageuid below.
-imageuid imageuidSpecifies the unique 8-byte image ID of the secondary image you will synchronize.For any letters in the ID, you must specify the same case as the software assigned tothe image when the software created the mirror (use the mirror -listcommand).
-oExecutes the command without prompting for confirmation.
EXAMPLEFor SP ss1_spa, the owner of the mirror named db_mirror, this command startssynchronizing the image with the unique ID shown.
naviseccli -h ss1_spa mirror -async -syncimage-name db_mirror -imageuid 50:06:06:10:00:FD:A1:6
During synchronization, array performance will be impacted. Do you want to sync the image (y/n)? y
OUTPUTIf the version of VNX OE for Block software running on the SP does not support thiscommand, a Command is not supported error message is printed to stdout. Youmay also receive other error messages.
MirrorView/A consistency group commandsThis section explains the commands for creating and managing groups of mirrors on VNXseries systems with the EMC MirrorView/A option. This section refers to groups of mirrorsas consistency groups.
Note
The LUNs in a MirrorView/A consistency group must reside on the same system, unlikethe volumes in a Symmetrix consistency group, which can reside on multiple systems.
mirror -async -creategroupEstablishes a consistency group to which you can later add mirrors.
PREREQUISITESYou must have a user account on the system on which you want the command executed.
DESCRIPTIONThis command is used with naviseccli to create a consistency group to which you canadd mirrors with subsequent commands. You must direct the command to the system onwhich you are creating the MirrorView/A group.
SYNTAXmirror -async -creategroup -name name | -mirroruid uid[-description description][-manualupdate | -delaystart minutes | -enddelay minutes][-syncrate rate] [-o][-recoverypolicy policy][-o]
EMC VNX MirrorView/A CLI
MirrorView/A consistency group commands 431

OPTIONS
-name nameSpecifies the name of the consistency group. Use only alphanumeric characters forthe consistency group name. The name can be up to 35 characters.
-description descriptionSpecifies a textual description of the consistency group.
-manualupdateSpecifies that you must explicitly start each update of the group. If you specifyneither -manualupdate, -delaystart, nor -enddelay, the default is -enddelay 60.
Note
When a consistency group begins an update, the mirrors within the group beginupdating and end whenever each individual update finishes. The consistency groupupdate completes when the last mirror completes. If an update is not running, youcan manually start an update even if an automatic update interval is set.
-delaystart minutesSpecifies the time (in minutes) from the start of the previous update until the start ofthe next one. If the previous update has not completed, the next update is delayeduntil the update in progress has completed. If you specify neither -manualupdate,-delaystart, nor -enddelay, the default is -enddelay 60.
-enddelay minutesSpecifies the time (in minutes) from the end of the previous update until the start ofthe next one. Specifying a value of 0 results in the group being updated as fast aspossible. If you specify neither -manualupdate, -delaystart, nor -enddelay,the default is -enddelay 60.
-syncrate rateSpecifies a relative value (low, medium, or high) for the priority of completingupdates. Values for rate are low, medium, or high. High completes updates faster,but may significantly affect system performance for server I/O requests. Lowcompletes updates slower, but also minimizes the impact on other systemoperations.
-recoverypolicy policySpecifies the policy for recovering the mirrors in a group after a failure causes asystem fracture. Values are:
manual: Update of the secondary image does not begin until you explicitly issue asynchronize command.
auto: Update of the secondary image automatically begins as soon as theconnection between the two systems is again operational.
-oExecutes the command without prompting for confirmation.
Note
All the switches, except -name and -o, are meaningful only if the system receiving
the command hosts the primary images for the mirrors in the consistency group.
EXAMPLEFor SP ss1_spa, this command creates a consistency group with the name dbgroup.
naviseccli -h ss1_spa mirror -async -creategroup -name dbgroup
EMC VNX MirrorView/A CLI
432 EMC VNX Series 5.33 Command Line Interface Reference for Block

OUTPUTIf the version of VNX OE for Block software running on the SP does not support thiscommand, a Command is not supported error message is printed to stdout. Youmay also receive other error messages.
mirror -async -destroygroupDestroys a consistency group.
PREREQUISITESYou must have a user account on the system on which you want to execute the command.
DESCRIPTIONThis command is used with naviseccli (see naviseccli) to destroy a consistencygroup. It is the counterpart of -creategroup.
Note
Make sure that the consistency group is empty before destroying it.
If you omit the override option, the system displays a message to confirm the destructionof the consistency group:
Do you really want to destroy the group <group-name>? (y/n)?To destroy the consistency group, answer y; to take no action, enter n.
SYNTAXmirror -async -destroygroup -name name | -groupid id[-force] [-o]OPTIONS
-name nameSpecifies the name you gave the mirror with the -creategroup command. You canalso use the consistency group ID.
-groupid idSpecifies the consistency group unique ID assigned when the consistency group wascreated.
-forceDestroys the consistency group even if it is not empty.
Note
Particularly in a failure situation you can use the -force switch to destroy a group
that still has members.
-oExecutes the command without prompting for confirmation.
EXAMPLEFor SP ss1_spa, this command destroys the consistency group that was created with thename dbgroup.
naviseccli -h ss1_spa mirror -async -destroygroup dbgroup
Do you really want to destroy the group dbgroup?(y/n)? y
EMC VNX MirrorView/A CLI
mirror -async -destroygroup 433

OUTPUTIf the version of VNX OE for Block software running on the SP does not support thiscommand, a Command is not supported error message is printed to stdout. Youmay also receive other error messages if the command fails.
mirror -async -addtogroupAdds a mirror to a previously created consistency group.
PREREQUISITESYou must have a user account on the system on which you want to execute the command.
DESCRIPTIONThis command is used with naviseccli (see naviseccli) to add one mirror at a time to aconsistency group.
Note
The mirror you specify must have its primary image on the system. No two secondaryimages of mirrors in the consistency group can be on different systems.
SYNTAXmirror -async -addtogroup -name name | -groupid id-mirrorname name | -mirroruid idOPTIONS
-name nameSpecifies the name of the consistency group to which you want to add the mirror.
-groupid idSpecifies the unique ID of the consistency group to which you want to add the mirror.
-mirrorname nameSpecifies the name of the mirror you want to add to the consistency group.
-mirroruid idSpecifies the World Wide Name of the mirror you want to add to the consistencygroup.
EXAMPLEFor SP ss1_spa, this command adds the mirror, Sales Accounts Mirror toEurope, to the consistency group, dbgroup.
naviseccli -h ss1_spa mirror -async -addtogroup -name dbgroup-mirrorname "Sales Accounts Mirror to Europe"
OUTPUTIf the version of VNX OE for Block software running on the SP does not support thiscommand, a Command is not supported error message is printed to stdout. Youmay also receive other error messages.
mirror -async -removefromgroupRemoves a mirror from a consistency group.
PREREQUISITESYou must have a user account on the system on which you want to execute the command.
EMC VNX MirrorView/A CLI
434 EMC VNX Series 5.33 Command Line Interface Reference for Block

DESCRIPTIONThis command is used with naviseccli (see naviseccli) to remove one mirror at a timefrom the consistency group.
Note
The mirror you specify must have its primary image on the system. This does not apply ifyou use the -force switch.
If you omit the -o option, the software displays a message to confirm the removeoperation. Answering yes will remove the mirror.
SYNTAXmirror -async -removefromgroup -name name | -groupid id-mirrorname name | -mirroruid id[-force] [-o]OPTIONS-name name
Specifies the name of the consistency group from which you want to remove themirror.
-groupid idSpecifies the unique ID of the consistency group to which you want to add the mirror.
-mirrorname nameSpecifies the name of the mirror you want to remove from the consistency group.
-mirroruid idSpecifies the World Wide Name of the mirror you want to remove from theconsistency group.
-forceRemoves the mirror even if the connection with the remote system is not functioning.
-oExecutes the command without prompting for confirmation.
EXAMPLEFor SP ss1_spa, the owner of the consistency group named dbgroup, this commandremoves the mirror with the unique ID shown.
naviseccli -h ss1_spa mirror -async -removefromgroup -name dbgroup-mirroruid 83:5A:20:90:60:01:06:50:01:00:00:00:00:00:00:00
OUTPUTIf the version of VNX OE for Block software running on the SP does not support thiscommand, a Command is not supported error message is printed to stdout. Youmay also receive other error messages.
mirror -async -changegroupChanges consistency group properties.
PREREQUISITESYou must have a user account on the system on which you want to execute the command.
DESCRIPTIONThis command is used with naviseccli to change one or more parameters of aconsistency group.
You must specify at least one of the optional switches. If you omit the override option,then it displays a message similar to the following for each parameter to confirm thechange.
EMC VNX MirrorView/A CLI
mirror -async -changegroup 435

Do you want to change the group synchronization rate fromMedium to High (y/n)?To change a parameter, enter y.
SYNTAXmirror -async -changegroup -name name | -groupid id[-description description][-manualupdate | -delaystart minutes | -enddelay minutes][-syncrate rate][-recoverypolicy policy] [-o]OPTIONS
-name nameSpecifies the name of the consistency group you want to change. You can specifyeither the consistency group name or ID (next).
-groupid idSpecifies the unique ID of the consistency group you want to change.
-description descriptionSpecifies a textual description for the consistency group.
-manualupdateSpecifies that you must explicitly start each update of the group.
-delaystart minutesSpecifies the time (in minutes) from the start of the previous update until the start ofthe next one. If the previous update has not completed, the next update is delayeduntil the update in progress has completed.
-enddelay minutesSpecifies the time (in minutes) from the end of the previous update until the start ofthe next one. Specifying a value of 0 results in the group being updated as fast aspossible.
-syncrate rateSpecifies a relative value (low, medium, or high) for the priority of completingupdates. Values for rate are low, medium, or high. High completes updates faster,but may significantly affect system performance for server I/O requests. Lowcompletes updates slower, but also minimizes the impact on other systemoperations.
-recoverypolicy policySpecifies the policy for recovering the mirrors in a group after a failure causes asystem fracture. Values are:
manual: Update of the secondary image does not begin until you explicitly issue asynchronize command.
auto: Update of the secondary image automatically begins as soon as theconnection between the two systems is again operational.
-oExecutes the command without prompting for confirmation.
EXAMPLEFor system server1, consistency group dbgroup, this command changes thesynchronization rate to high.
naviseccli -h server1 mirror -async -changegroup -name dbgroup-syncrate high
EMC VNX MirrorView/A CLI
436 EMC VNX Series 5.33 Command Line Interface Reference for Block
OUTPUTIf the version of VNX OE for Block software running on the SP does not support thiscommand, a Command is not supported error message is printed to stdout. Youmay also receive other error messages.
Use the -listgroups command on the mirror to confirm that the changes were made.
mirror -async -syncgroupStarts an update of the consistency group.
PREREQUISITESYou must have a user account on the system on which you want to execute the command.
DESCRIPTIONThis command is used with naviseccli to begin the synchronization operation on aconsistency group. All the images in the consistency group must be primary.
SYNTAXmirror -async -syncgroup -name name | -groupid id[-synctype startnow][-o]OPTIONS
-name nameSpecifies the name of the consistency group you want to update or synchronize. Youcan specify either the consistency group name or id (next).
-groupid idSpecifies the unique ID of the consistency group you want to update or synchronize.
-synctype startnowStarts synchronization immediately. startnow is the only currently supported option.
-oExecutes the command without prompting for confirmation.
EXAMPLEFor SP ss1_spa, the owner of the consistency group named dbgroup, this commandstarts synchronizing the consistency group immediately.
naviseccli -h ss1_spa mirror -async -syncgroup -name dbgroup-synctype startnow
OUTPUTIf the version of VNX OE for Block software running on the SP does not support thiscommand, a Command is not supported error message is printed to stdout. Youmay also receive other error messages.
mirror -async -fracturegroupFractures all image(s) in a consistency group.
PREREQUISITESYou must have a user account on the system on which you want to execute the command.
DESCRIPTIONThe naviseccli mirror -async command with -fracturegroup starts anadministrative fracture of all images in the consistency group, even if they are alreadysystem fractured. The consistency group cannot be in a scrambled state, and all imagesmust be primary. If the consistency group is in the process of updating, it stops.
EMC VNX MirrorView/A CLI
mirror -async -syncgroup 437

SYNTAXmirror -async -fracturegroup -name name | -groupid id[-fracturetype abort][-o]OPTIONS
-name nameSpecifies the name of the consistency group you want to fracture. You can specifyeither the consistency group name or ID (next).
-groupid idSpecifies the unique ID of the consistency group you want to fracture.
-fracturetype abortSpecifies that you want to abort an update if one is in progress. The secondaryretains any extents that have been copied to the secondary, and therefore do notneed to be resent on the next synchronization.
-oExecutes the command without prompting for confirmation.
EXAMPLEFor SP ss1_spa, with the consistency group named dbgroup, this command fracturesall the images in the consistency group.
naviseccli -h ss1_spa mirror -async -fracturegroup-name dbgroup
OUTPUTIf the version of VNX OE for Block software running on the SP does not support thiscommand, a Command is not supported error message is printed to stdout. Youmay also receive other error messages.
mirror -async -promotegroupPromotes all secondary images in a consistency group to primary images.
PREREQUISITESYou must have a user account on the system on which you want to execute the command.
DESCRIPTIONThis command promotes all secondary images to the role of the primary images. Thiscommand is used with naviseccli (see naviseccli).
SYNTAXmirror -async -promotegroup -name name | -groupid id[-type type] [-o]OPTIONS
-name nameSpecifies the name of the consistency group you want to promote. You can specifyeither the consistency group name or ID (next).
-groupid idSpecifies the unique ID of the consistency group you want to promote.
-type typeSpecifies the type of promotion. Values are:
normal (default), which causes a failure if the connection to the primary system isnot functioning or if at least one set of the images to promote are not synchronizedwith the primaries. Otherwise, it will destroy the original mirrors and create new ones
EMC VNX MirrorView/A CLI
438 EMC VNX Series 5.33 Command Line Interface Reference for Block

with the targeted secondaries as primaries and the original primaries assecondaries.
local, which does not attempt to add back the original primaries as secondaries, butalways creates new mirrors with only primary images consisting of the targetedsecondaries.
-oRuns the command without prompting for confirmation.
EXAMPLEFor SP ss1_spa, the owner of the consistency group named dbgroup, this commandpromotes all secondary images:
naviseccli -h ss1_spa mirror -async -promotegroup -name dbgroup
OUTPUTIf the version of VNX OE for Block software running on the SP does not support thiscommand, a Command is not supported error message is printed to stdout. Youmay also receive other error messages.
mirror -async -listgroupsDisplays information about existing consistency groups.
PREREQUISITESYou must have a user account on the system on which you want to execute the command.
DESCRIPTIONThe naviseccli mirror -async command with -listgroups and no otherswitches lists all information for all asynchronous consistency groups on the system.Issuing this command with one or more options displays the information based on theoption(s) issued. This command is used with naviseccli (see naviseccli).
SYNTAXmirror -async -listgroups [-name[name]] [-groupid[-id]][-feature] [-update] [-nextupdate][-syncrate] [-state] [-role] [-mirrors][-condition][-recoverypolicy] [-description]OPTIONS
-name nameSpecifies the name of the consistency group whose information you want to display.If you do not specify the name of the consistency group with this switch, that pieceof information will be provided for the consistency group(s) being displayed.
-groupid idSpecifies the unique ID of the consistency group whose information you want todisplay.
-featureDisplays the maximum number of consistency groups allowed on the system and themaximum number of members per consistency group.
-updateDisplays the type of update as either manual, Time elapsed since the start of the lastupdate (in minutes), or Time elapsed since the end of the last update (in minutes).On the next line it also displays the Update Period in minutes. If the Update Period isnot applicable, it displays N/A.
-nextupdateDisplays the number of minutes until the next update.
-syncrate
EMC VNX MirrorView/A CLI
mirror -async -listgroups 439

Displays the rate at which data is transferred during updates and initialsynchronizations.
-stateDisplays Synchronized, Out-of-Sync, Synchronizing, Consistent, Rollingback, Quasi-Consistent, Scrambled, Incomplete, Local Only, or Empty.
-roleDisplays Primary, Secondary, or Unknown.
-mirrorsDisplays the mirror name, mirror uid, the IDs of both images in the pair, and thesystem ID of the paired image.
-conditionDisplays the consistency group condition as Normal, Initializing, Updating, AdminFractured, System Fractured, Waiting on Admin.
-recoverypolicyDisplays either manual or automatic to describe whether the system will wait for youto restart updates in the event of a system fracture, after the problem is corrected.
-descriptionDisplays the description associated with the consistency group.
EXAMPLEnaviseccli -h 10.14.5.200 mirror -async -listgroups
Group Name: taraFARGroupGroup ID: 50:06:01:60:90:20:5A:83:00:00:00:00Description:Maximum Number of Groups Allowed: 16Maximum Number of Mirrors per Group: 16Update Type: ManualTime to next update: 0State: Quasi ConsistentRole: SecondaryMirror Name: taraFAR202Mirror WWN: C6:05:20:88:60:01:06:50:08:00:00:00:00:00:00:00Primary WWN: 50:06:01:60:88:20:05:C6Secondary WWN: 50:06:01:60:90:20:5A:83Array hosting remote image: 50:06:01:60:88:20:05:C6Mirror Name: taraFAR201Mirror WWN: C6:05:20:88:60:01:06:50:07:00:00:00:00:00:00:00Primary WWN: 50:06:01:60:88:20:05:C6Secondary WWN: 50:06:01:60:90:20:5A:83Array hosting remote image: 50:06:01:60:88:20:05:C6Mirror Name: taraFAR200Mirror WWN: C6:05:20:88:60:01:06:50:06:00:00:00:00:00:00:00Primary WWN: 50:06:01:60:88:20:05:C6Secondary WWN: 50:06:01:60:90:20:5A:83Array hosting remote image: 50:06:01:60:88:20:05:C6Condition: Admin Fractured - Intervention requiredSync Rate: MediumRecovery Policy: ManualGroup Name: HWLocalPromoteTestGroupGroup ID: 50:06:01:60:90:20:5A:83:01:00:00:00Description:Maximum Number of Groups Allowed: 16Maximum Number of Mirrors per Group: 16Update Type: ManualTime to next update: 0State: SynchronizedRole: SecondaryMirror Name: HWLocalPromoteTestMirrorMirror WWN: C6:05:20:88:60:01:06:50:09:00:00:00:00:00:00:00Primary WWN: 50:06:01:60:88:20:05:C6Secondary WWN: 50:06:01:60:90:20:5A:83Array hosting remote image: 50:06:01:60:88:20:05:C6Condition: Normal
EMC VNX MirrorView/A CLI
440 EMC VNX Series 5.33 Command Line Interface Reference for Block

Sync Rate: MediumRecovery Policy: Manual
OUTPUTIf the version of VNX OE for Block software running on the SP does not support thiscommand, a Command is not supported error message is printed to stdout. Youmay also receive other error messages.
EMC VNX MirrorView/A CLI
mirror -async -listgroups 441

EMC VNX MirrorView/A CLI
442 EMC VNX Series 5.33 Command Line Interface Reference for Block

CHAPTER 10
EMC VNX MirrorView/S CLI
This chapter introduces the EMC®VNX MirrorView™/Synchronous software and explainsthe commands for creating and managing the MirrorView/Synchronous remote mirrorsand consistency groups. This manual refers to the EMC VNX MirrorView/Synchronousproduct as MirrorView/S.
Major topics include:
l MirrorView/S Remote Mirroring commands......................................................... 444l MirrorView/S consistency group commands........................................................471
EMC VNX MirrorView/S CLI 443

MirrorView/S Remote Mirroring commandsThis section explains the naviseccli commands and the commands for creating andmanaging remote mirrors on VNX series systems with the MirrorView/S option. Thesecommands let you use MirrorView/S software to create a byte-for-byte copy of one ormore local LUNs connected to a distant system server.
Note
The commands in this section function only with a system that has the optionalMirrorView/S software installed.
MirrorView/S operations overviewThis section provides an overview of MirrorView/S operations and how to manage thesystems using the management software.
Procedure
1. Connect the same management software to both systems and configure the software,so that you can manage both systems.
Note
Optionally, you can perform this step at the secondary site as well.
You must manage both systems, which can be in different domains (see theUnisphere online help).
2. If you want to use the write intent log, allocate the LUNs on all participating systems,so that if you promote, the write intent log is enabled.
In the CLI, to designate the write intent log, use the mirror -sync -allocatelog command. You can specify any LUN that can be made a private LUN,that is, any LUN that is not part of a storage group and is not a hot spare.
3. Establish a usable, two-way connection between the MirrorView/S systems using themirror -enablepath command (see mirror -enablepath on page 458).
4. If the primary LUN does not exist, bind it on its server’s system. Wait for the LUN tofinish binding and add it to the storage group.
5. If the secondary LUN does not exist, create a secondary image LUN.
Note
The secondary LUN can be a different RAID type from the primary, as long as the blocksize matches.
6. Wait for the secondary LUN to finish binding.
7. On the host use the CLI to create the mirror using the mirror -sync -createfunction. You can specify write intent log information in the command. The -createfunction activates the mirror.
8. Create a consistency group and add the primary image to it (optional). See mirror -sync -creategroup on page 471.
9. With the CLI, add the secondary images you need with the -addimage function. Youcan list images with the mirror -sync -list function.
EMC VNX MirrorView/S CLI
444 EMC VNX Series 5.33 Command Line Interface Reference for Block

By default, when you use the -addimage command, the software startssynchronizing the secondary image with the primary. Unless the source LUN is freshlybound or similarly contains no meaningful data, a full synchronization is necessary.
If you do not want the default action when you add the image (perhaps because thesource LUN is newly bound and synchronizing the mirror to it would be pointless),then you can tell the CLI that synchronization is not required – an option in the -addimage command.
After you add the image, all writes to the primary LUN will be duplicated to thesecondary LUNs.
At any time in the previous sequence of steps, you can get remote mirror status withthe CLI mirror -sync -info or -list command. You can also check theprogress of synchronization with the -listsyncprogress command.
10. If a primary failure occurs, Unisphere reports the failure.
If the primary failure is minor, have the primary fixed and resume mirroring.
If the primary failure is catastrophic, the original client that is managing the systemmay be unusable and thus unable to report the failure. For such a failure, theadministrator at the secondary site must set up a client to manage the system (if notalready done), then promote the secondary to primary and take other recovery actionas needed. This includes assigning the newly promoted LUN to a storage group, if it isnot already the appropriate one.
When you use MirrorView/S on a VMware ESX Server, after you promote the secondaryimage to a primary image, perform the following steps:
a. If not already assigned, assign the newly promoted primary image to a storagegroup on the same or standby ESX Server.
b. Rescan the bus at the ESX Server level.
c. If not already created, create a virtual machine (VM) on the same or standby ESXServer. The VM is not powered up when you create it.
d. Assign the newly promoted primary to the VM.
e. Power up the VM.
If the VM is created and running and you have not already assigned the newlypromoted primary to the VM, perform these steps:
a. Perform steps a and b above.
b. If you are running ESX Server 2.5.x, power it down.
c. To assign the newly promoted primary to the VM, use the virtual center interfacefor ESX Server 3.x and 2.5.x or the Management User interface for ESX Server 2.5.x.
Note
If you are running ESX Server 3.x, you do not need to power down the VM.
d. If you are running ESX Server 2.5.x, power up the VM.
Note
If you are running ESX Server 3.x, you do not need to power up the VM.
The primary image (which is now the secondary image) will not be accessible tothe primary ESX Server.
EMC VNX MirrorView/S CLI
MirrorView/S operations overview 445

Note
For configuration restrictions when using VMFS volumes, go to the E-Lab™
Navigator on EMC Online Support, and under the PDFs and Guides tab, open theVMware ESX server.pdf file.
11. If access to the secondary storage image fails, the primary system will fracture theremote mirror. If the problem with the secondary is minor (for example, replacing acable), then the administrator can fix it. Mirroring will recover and resynchronize theimage, if the image recovery policy is Automatic.
Whenever you want to stop mirroring, you can first fracture and remove the secondaryimages, and then destroy the mirror. This does not affect any data on either imageLUN, and access to the primary LUN is also unaffected. The LUN that held thesecondary image now becomes accessible as a regular LUN.
MirrorView/S CLI functionsThe VNX CLI for Block provides one of the two interfaces to the MirrorView/S mirroringsoftware. The Unisphere UI provides the other. You can use the naviseccli mirrorcommand to set up and manage remote mirror sessions.
The mirror command functions are summarized in naviseccli MirrorView/S commandfunctions on page 446.
Table 44 naviseccli MirrorView/S command functions
Essential functions (in order performed)
mirror -enablepath Opens a path between the local and remote system. Only asingle connection is required for synchronous and/orasynchronous mirroring.
mirror -sync -create Creates a new remote mirror using an existing LUN. The LUNon which the -create command is executed becomes the
primary image.
mirror -sync -addimage Adds a secondary image to a mirror using a LUN on a remotesystem. Synchronization is optional — if specified,synchronization of the image begins automatically.
mirror -sync-fractureimage
Fractures a secondary image, suspending mirroring of datato that image. A fracture log is maintained, so that the imagecan be quickly resynchronized later.
mirror -sync -removeimage Removes a secondary image from a mirror.
mirror -sync-promoteimage
Promotes a secondary image to primary, whilesimultaneously demoting the primary (if still accessible) tosecondary. Required in order to access the data in thesecondary image in the event of a failure of the primary.
mirror -sync -syncimage Starts synchronization of the secondary image with theprimary. Needed if automatic recovery is not on. I/O isallowed with the primary while the synchronization occurs.You can specify synchronization rate to avoid seriousperformance impact.
EMC VNX MirrorView/S CLI
446 EMC VNX Series 5.33 Command Line Interface Reference for Block

Table 44 naviseccli MirrorView/S command functions (continued)
Essential functions (in order performed)
mirror -sync -destroy Terminates remote mirroring of a LUN. This does not affectthe data in the LUN, and the host continues to access ituninterrupted.
Optional status functions (alphabetically) (see also getall -mirrorview in EMC
Navisphere CLI Reference)
mirror -sync -info Displays MirrorView/S information about a system.
mirror -sync -list Displays information about existing mirrors.
mirror -sync -listlog Displays write intent log information.
mirror -sync-listsyncprogress
Displays the percentage of synchronization.
Optional reconfiguration functions (alphabetically)
mirror -sync -allocatelog Allocates LUNs as space for the write intent log. This isoptional — it allows recovery through a partialresynchronization if a recoverable failure of the primary SPoccurs.
mirror -sync -change Changes remote mirror properties such as name anddescription.
mirror -sync -changeimage Changes secondary image properties such as recoverypolicy and synchronization rate.
mirror -sync-deallocatelog
Removes the write intent log LUN that was allocated with the-allocatelog function. Allowed only when the log is not
active.
mirror -disablepath Severs all paths between the local system SPs and theremote system SPs.
mirror -setfeature Enables or disables mirroring to/from a LUN. Required inonly a few specific cases where the software has insufficientinformation to do this automatically.
mirror -sync -addimageAdds an image to a previously created mirror.
PREREQUISITESYou must have a user account on the system on which you want to execute the command.
Note
When you add a secondary image, MirrorView/S automatically allocates and retainsadditional memory. This additional memory counts against the total replication softwarememory budget.
EMC VNX MirrorView/S CLI
mirror -sync -addimage 447

DESCRIPTIONThis command is used with naviseccli (see naviseccli) to add a secondary image to amirror using a LUN on a remote system. The -addimage function is required if you wantmirroring to occur. You must direct the command to the system that holds the primaryimage. This command lets you create primary and secondary images on thin LUNs, if allthe participating systems support mirroring on thin LUNs.
Note
The Thin Provisioning™ enabler must be installed to create thin LUNs.
You can use the -info function to display the UIDs of systems that have images that canbe mirrored. Also, if the two arrays are not in the same domain, you need to use an IPaddress instead of a host name.
Note
To add a secondary image, you must have a working connection to the remote system,and the remote LUN must be exactly the same size (number of blocks) as the primaryimage.
Note
In this syntax "or" means that you can specify the switch, -arrayhost sp-hostname |
sp-IP-address -lun lun-number | -lunuid lun-uid or you can specify the switch, -arrayuid system-uid -lunuid lun-uid. The rest of the syntax is common to both.
The options -lun lun-number and -lunuid lun-uid are optional. You can use either ofthe two options.
SYNTAX
mirror -sync -addimage -name name|-mirroruid mirroruid-arrayhost sp-hostname -lun lun-number -lunid lun-uid[-recoverypolicy auto|manual][-syncrate high|medium|low] [-nosyncrequired]
or
mirror -sync -addimage -name name|-mirroruid mirroruid-arrayuid system-uid -lunuid lun-uid[-recoverypolicy auto|manual][-syncrate high|medium|low] [-nosyncrequired]
OPTIONS
-name nameSpecifies the name that you gave to the mirror with the -create command. Useeither this name or the mirror unique ID (16-byte world wide name).
-mirroruid uidSpecifies the unique 16-byte primary image ID (World Wide Name) the softwareassigned when the mirror was created. For any letters in the ID, you must specify thesame case as the software assigned when the mirror was created (use the mirror -sync -list on page 425 function).
-arrayhost sp-hostname
EMC VNX MirrorView/S CLI
448 EMC VNX Series 5.33 Command Line Interface Reference for Block

Specifies the hostname or network address of the remote SP that will hold thesecondary image. The secondary image will be added to the remote mirrorconnected to this host’s SP. Use this switch or -arrayuid.
-lun lun-numberSpecifies the LUN number that will serve as the secondary image of the mirror.
-arrayuid system-uidSpecifies the unique 8-byte system ID of the remote SP. You can determine this byusing the mirror -info command or the getarrayuid command. For anyletters in the ID, use the same case that the software assigned when the mirror wascreated. Use this switch or -arrayhost.
-lunuid lun-uidSpecifies the unique 16-byte identification number (World Wide Name) of the LUN tobe added as a secondary image. If you specified -arrayuid, then -lunuid isrequired. If you specified -arrayhost , then you can use either -lun or -lunuid.
Note
When you specify -arrayuid and -lunuid, you must add the mirror driver on the
remote LUN using the -setfeature command before executing the -addimagecommand.
-recoverypolicy manual|autoSpecifies the policy for recovering the secondary mirror image after a systemfracture. Values are:
manual: The administrator must explicitly start a synchronization operation torecover the secondary mirror image.
auto: Recovery automatically resumes as soon as the primary image determines thatthe secondary mirror image is once again accessible. This is the default.
-syncrate high|medium|lowSpecifies a relative value (low, medium, or high) for the priority of completingupdates. High completes updates faster, but may significantly affect systemperformance for server I/O requests, particularly where there are multiple concurrentsynchronizations occurring. Low completes updates much slower, but alsominimizes impact on other system operations.
-nosyncrequiredSpecifies that synchronization is not needed for the newly added secondary image.The image will not be useful until it is synchronized. If you omit this switch, asynchronization occurs.
EXAMPLEAny of the following commands adds an image to a mirror. For SP ss1_spa, any of theabove commands adds to the remote mirror db_mirror the LUN in system50:06:06:10:00:FD:A1:69 (or a LUN on the remote system cpc426) whose uniqueLUN ID (world wide name, WWN) is 60:06:06:5A:62:02:00:00:92:95:DE:7C:E4:71:D4:11 or whose LUN number is 9. See also the example in mirror -sync -create on page 453.
naviseccli -h ss1_spa mirror -sync -addimage-name db_mirror -arrayuid 50:06:06:10:00:FD:A1:69-lunuid 60:06:06:5A:62:02:00:00:92:95:DE:7C:E4:71:D4:11
naviseccli -h ss1_spa mirror -sync -addimage-name db_mirror -arrayhost cpc426 -lun 9
EMC VNX MirrorView/S CLI
mirror -sync -addimage 449

naviseccli -h ss1_spa mirror -sync -addimage-name db_mirror -arrayhost cpc426-lunuid 60:06:06:5A:62:02:00:00:92:95:DE:7C:E4:71:D4:11
OUTPUTIf the version of VNX OE for Block software running on the SP does not support thiscommand, a Command is not supported error message is printed to stderr. Youmay also receive other error messages.
mirror -sync -allocatelogAllocates or re-allocates a LUN for use as a write intent log.
PREREQUISITESYou must have a user account on the system on which you want to execute the command.
DESCRIPTIONThe naviseccli mirror command with -allocatelog assigns a LUN as the writeintent log on each SP of the system. The recommended (and minimum) size for the log is128 MB. The write intent log allows recovery with a partial resynchronization if arecoverable failure of the primary SP occurs. If you do not use the intent log, a fullsynchronization is always required in the event of a failure of the SP controlling theprimary image.
You must specify both SPs in one command line.
SYNTAX
mirror -sync -allocatelog -spA LUN-number -spB LUN-number[-unbind] [-o]
OPTIONS
-spA LUN-number and -spB LUN-numberIdentify the LUN to be used for the write intent log. It must hold at least 128 MB,must not be part of a storage group and must not be a hot spare.
-unbindIf write intent log LUNs are currently defined, unbinds the old LUNs after the writeintent log function starts using the new LUNs.
-oExecutes the command without prompting for confirmation.
EXAMPLEFor SP ss1_spa, this command allocates as the write intent log for SP A the LUN with ID122 and for SP B the LUN with ID 124.
naviseccli -h ss1_spa mirror -sync -allocatelog -spA 122 -spB 124
OUTPUTIf the version of VNX OE for Block software running on the SP does not support thiscommand, a Command is not supported error message is printed to stderr. Youmay also receive other error messages.
mirror -sync -changeChanges mirror properties.
PREREQUISITESYou must have a user account on the system on which you want to execute the command.
EMC VNX MirrorView/S CLI
450 EMC VNX Series 5.33 Command Line Interface Reference for Block

DESCRIPTIONThis command is used with naviseccli (see naviseccli ) to change one or moreparameters of a previously created mirror.
You must direct the command to the system that holds the primary image. You mustspecify at least one of the optional switches with this command. If you omit the overrideoption, then the CLI displays a message for each parameter to confirm the change.
Note
Always view and modify remote mirror properties from the primary system. Informationdisplayed from the secondary system may not be up to date, especially if the primarysystem has lost contact with the secondary system.
Note
When you enable the write intent log on a mirror that did not previously use it,MirrorView/S automatically allocates and retains additional memory. This additionalmemory counts against the total replication software memory budget.
SYNTAXmirror -sync -change -name name | -mirroruid uid[-newname name][-description description][-requiredimages num_of_images] [-o][-qthresh qthresh] [-usewriteintentlog yes|no]OPTIONS-name name
Specifies the name the -create command gave the mirror. You can specify eitherthe mirror name or unique ID (next).
-mirroruid uidSpecifies the unique 16-byte remote mirror ID assigned when the mirror was created.For any letters in the ID, you must specify the same case as the software assignedwhen the mirror was created (use the mirror -list command).
-newname nameSpecifies the new name for the mirror. You can specify up to 32 characters.
-description descriptionProvides a meaningful title for the mirror (for example, Employee and Benefits Tablefor Human Resources). The software does not use the description to identify themirror. You can specify up to 256 characters, but we suggest that you should notexceed the line length defined by the operating system.
-requiredimages num_of_imagesSpecifies the minimum number of secondary images that should be accessible tothe mirror. The default value is 0. Allowed values are 0, 1, and all. If the number ofaccessible images goes below the specified value, the mirror goes into the Attentionstate and generates a log message. You can configure this to generate anappropriate warning (for example, e-mail message or page) to the administrator toenable the administrator to correct the problem.
-qthresh qthreshSpecifies the time delay, in seconds, after the last I/O is received before a mirror willautomatically be transitioned to the synchronized state. The default is 60 seconds.Valid values are 10-3600.
-usewriteintentlog yes | noDirects the software to use or not use the remote mirror write intent log. If you wantto use the log, you must have allocated it with -allocatelog.
EMC VNX MirrorView/S CLI
mirror -sync -change 451

yesUse or start using, the write intent log.
noDo not use, or stop using, the write intent log.
-oExecutes the command without prompting for confirmation.
EXAMPLEFor the remote mirror dbmirror on SP ss0_spa, this command reduces the minimumnumber of accessible secondary images to 0. Use the -list command to confirm thatthe changes were made.
naviseccli -h ss0_spa mirror -sync -change -name dbmirror-requiredimages 0
OUTPUTIf the version of VNX OE for Block software running on the SP does not support thiscommand, a Command is not supported error message is printed to stderr. Youmay also receive other error messages.
mirror -sync -changeimageChanges secondary image properties.
PREREQUISITESYou must have a user account on the system on which you want to execute the command.
DESCRIPTIONThis command is used with naviseccli (see naviseccli) to change one or moreparameters of a mirror image.
You must direct the command to the system that holds the primary image. You mustspecify at least one of the optional switches. If you omit the override option, then itdisplays a message similar to the following for each parameter to confirm the change.
Do you want to change the sync rate from Medium to High (y/n)?To change a parameter, enter y.
SYNTAXmirror -sync -changeimage -name name | -mirroruid uid-imageuid image-uid[-recoverypolicy manual|auto][-syncrate high|medium|low] [-o]OPTIONS
-name nameSpecifies the name you gave to the remote mirror in the -create command. Youcan specify either the mirror name or uid (next).
-mirroruid uidSpecifies the unique 16-byte ID assigned when the mirror was created. For anyletters in the ID, you must specify the same case as the software assigned when themirror was created (use the mirror -list command).
-imageuid image-uidSpecifies the unique 8-byte ID of the secondary image you want to change. For anyletters in the ID, you must specify the same case that the software assigned to theimage when the mirror was created (use the mirror -list command).
-recoverypolicy manual|auto
EMC VNX MirrorView/S CLI
452 EMC VNX Series 5.33 Command Line Interface Reference for Block
Specifies the policy for recovering the secondary mirror image after a systemfracture. Values are:manual: The administrator must explicitly start a synchronization operation torecover the secondary mirror image.
auto: Recovery automatically resumes as soon as the primary image determines thatthe secondary mirror image is once again accessible. This is the default.
-syncrate high|medium|lowSpecifies a relative value (low, medium, or high) for the priority of completingupdates. The default is medium. High completes updates faster, but maysignificantly affect system performance for server I/O requests, particularly wherethere are multiple concurrent synchronizations occurring. Low completes updatesmuch slower, but also minimizes impact on other system operations.
-oExecutes the command without prompting for confirmation.
EXAMPLEFor SP ss1_spa, mirror db_mirror, image 50:06:06:10:00:FD:A1:6, thiscommand changes the synchronization rate to high.
naviseccli -h ss1_spa mirror -sync -changeimage -name db_mirror-imageuid 50:06:06:10:00:FD:A1:6 -syncrate high
OUTPUTIf the version of VNX OE for Block software running on the SP does not support thiscommand, a Command is not supported error message is printed to stderr. Youmay also receive other error messages.
mirror -sync -createCreates a new mirror using an available LUN for mirroring.
PREREQUISITESYou must have a user account on the system on which you want to execute the command.
Since the write intent log is on by default, before creating a synchronous mirror, you mustfirst allocate the write intent log (see mirror -sync -allocatelog on page 450).
DESCRIPTIONThis command is used with naviseccli to create a new mirror using an existing LUN.The LUN on which you run the command becomes the primary LUN. But, for mirroring tooccur, you must add an image with the -addimage function. Later, you can changesome of the parameters you specify here with the -change function. This commandsupports thin LUNs after you install the latest Unisphere version, which contains thin LUNsupport for MirrorView.
If you specify a minimum number of required images (other than the default value zero)in the -create command, the mirror will start in the attention state, since you have notyet added the required secondary images. To avoid this problem, do not specify aminimum number of images with -create; instead, create the mirror, add the image,and then if you want a minimum number of required images, change the mirror with the -change command.
You can use the -info command to display the LUN numbers that can be mirrored.
EMC VNX MirrorView/S CLI
mirror -sync -create 453

Note
When you create a mirror, MirrorView/S automatically allocates and retains additionalmemory. This additional memory counts against the total replication software memorybudget.
SYNTAXmirror -sync -create -name name-lun lun_number[-description description][-requiredimages num_of_images][-qthresh qthresh][-nowriteintentlog ][-o]OPTIONS
-name nameLets you assign a meaningful name to the mirror; for example "EmployeeBenefits". To include spaces in the name, enclose the entire string in quotationmarks as in the example. You can use this name to manage the mirror. The name caninclude as many as 32 characters.
-lun lun_numberSpecifies the LUN number that will serve as the primary image of the mirror you arecreating.
-description descriptionLets you assign a description for the mirror. The software does not use thedescription to identify the mirror. You can specify up to 256 characters, but wesuggest that you should not exceed the line length defined by the operating system.
-requiredimages num_of_imagesSpecifies the minimum number of secondary images that should be accessible tothis mirror. The default value is 0. Allowed values are 0, 1, 2, and all. If the numberof accessible images goes below the specified value, the mirror goes into theAttention state and generates a log message. You can configure this to generate anappropriate warning (for example, e-mail message or page) to the administrator toenable the administrator to correct the problem.
-qthresh qthreshThis specifies the time delay, in seconds, after the last I/O is received before a mirrorwill automatically transition to the synchronized state. The default is 60 seconds.Valid values are 10-3600.
-nowriteintentlogLets you create a synchronous mirror with the write intent log off. When creating asynchronous remote mirror, the write intent log will be on for the mirror by default.
-oExecutes the command without prompting for confirmation.
EXAMPLE #1The mirror -create command creates the mirror named db_mirror on LUN 112.
naviseccli -h ss1_spa mirror -sync -create -name db_mirror -lun 112
EXAMPLE #2The -change command sets a minimum of one secondary image for the mirror.
naviseccli -h ss1_spa mirror -sync -change -name db_mirror-requiredimages 1
EMC VNX MirrorView/S CLI
454 EMC VNX Series 5.33 Command Line Interface Reference for Block
EXAMPLE #3The -list command confirms the change.
naviseccli -h ss1_spa mirror -sync -list
OUTPUTIf the version of VNX OE for Block software running on the SP does not support thiscommand, a Command is not supported error message is printed to stderr. Youmay also receive other error messages.
mirror -sync -deallocatelogRemoves LUNs from service as write intent log LUNs.
PREREQUISITESYou must have a user account on the system on which you want to execute the command.
DESCRIPTIONThe naviseccli mirror command with -deallocatelog deassigns the LUNs thathave been used for the write intent log on this system. This command deallocates theLUNs used by both SPs of the system. The LUNs themselves and their contents are notaffected by this command. If at least one mirror is still configured to use the write intentlog LUNs, this command will fail with an error message.
If you omit the override option, it displays a message to confirm the deallocation of theintent log:
Do you want to deallocate write intent log(y/n)?To deallocate the log for both SPs, answer y; to take no action, enter n.
SYNTAXmirror -sync -deallocatelog [-unbind] [–o]OPTIONS
-unbindDirects the software to unbind the LUNs used in write intent logs. (optional)
-oExecutes the command without prompting for confirmation.
EXAMPLEThis command deallocates the LUNs used for the write intent log function onbothssl_spa and its peer. This command does not affect the LUNs themselves.
naviseccli -h ss1_spa mirror -sync -deallocatelog
Do you want to deallocate write intent log on SP A (y/n)?
OUTPUTIf the version of VNX OE for Block software running on the SP does not support thiscommand, a Command is not supported error message is printed to stderr. Youmay also receive other error messages.
mirror -sync -destroyDestroys a mirror.
PREREQUISITESYou must have a user account on the system on which you want to execute the command.
EMC VNX MirrorView/S CLI
mirror -sync -deallocatelog 455

DESCRIPTIONThis command is used with naviseccli (see naviseccli) to destroy a mirror. It is thecounterpart of -create. It ends mirroring of the LUN that is part of the mirror. This doesnot affect the data in the LUN, and the server continues to access it.
Note
You cannot destroy a mirror while it is a member of a consistency group.
You must remove the secondary image in the mirror before issuing the command to thesystem holding the primary image. If you cannot remove the secondary image or accessthe primary image, you can use the -force option. You must direct the command to thesystem that holds the primary image unless -force is specified, in which case, you candirect it to either system.
CAUTION
Use -force only if all other options to remove an image and the mirror have failed.
If you omit the override option, a message to confirm the destruction of the mirrorappears:
Do you really want to destroy the mirror <mirror-name> (y/n)?To destroy the mirror, answer y; to take no action, enter n.
SYNTAXmirror -sync -destroy -name name | -mirroruid uid[-force] [-o]OPTIONS
-name nameSpecifies the name you gave to the mirror with the -create command. You canalso use the remote mirror ID.
-mirroruid uidSpecifies the unique 16-byte remote mirror ID assigned when the mirror was created.For any letters in the ID, you must specify the same case as the software assignedwhen the mirror was created (use the mirror -list command).
-forceForcibly destroys the mirror. This option affects only the local system.
-oExecutes the command without prompting for confirmation.
EXAMPLEFor SP ss1_spa, this command destroys the remote mirror that was created with thename db_mirror.
naviseccli -h ss1_spa mirror -sync -destroy db_mirror
Do you really want to destroy the mirror db_mirror?(y/n)? y
OUTPUTIf the version of VNX OE for Block software running on the SP does not support thiscommand, a Command is not supported error message is printed to stderr. Youmay also receive other error messages if the command fails for some reason.
EMC VNX MirrorView/S CLI
456 EMC VNX Series 5.33 Command Line Interface Reference for Block
mirror -disablepathDisables the communication paths created by -enablepath to remote mirror SPs.
PREREQUISITESYou must have a user account on the system on which you want to execute the command.
DESCRIPTIONUse this command with naviseccli (see naviseccli on page 20) to sever the pathestablished by -enablepath in the remote system.
When issued to any SP, the command severs paths for both SPs in both the primary andsecondary systems; that is, it severs these paths if:
l SP A of the local system is connected to SP A of the remote system
l SP A of the remote system is connected to SP A of the local system
l SP B of the local system is connected to SP B of the remote system
l SP B of the remote system is connected to SP B of the local system
This means you can issue the command to either SP of either system to sever the pathsbetween the systems you are targeting.
If you issue the command while a mirror exists, the CLI issues a warning message; if youcontinue, any mirror connected over the specified path will be fractured.
Note
If both asynchronous and synchronous mirrors are installed, you need to run thecommand only once. It will take effect for both mirrors.
If you omit the override option, the CLI displays a message to confirm the disabling of thepath. To disable the path, answer y; to take no action, enter n.
SYNTAXmirror -disablepath connected-SP-hostname [-connectiontypefibre|iscsi] [-o]OPTIONS
connected-SP-hostnameSpecifies the hostname of SP A or SP B of a connected system to disconnect.
-connectiontype fibre | iscsiSpecifies the connection type as fibre or iSCSI for the path you are disabling. If youdo not specify the -connectiontype switch, the system first tries to find a fibreconnection; if it does not find one, it looks for an iSCSI connection.
-oExecutes the command without prompting for confirmation. Without this switch, theCLI displays a confirmation message for each SP.
EXAMPLE #1For SP ss1_spa, this command and confirmation remove the paths between the localSPs and the remote mirror SPs.
naviseccli -h ss1_spa mirror -disablepath ss27_spa -connectiontypefibre
Disabling of the path will stop mirroring of data to all images if any among these arrays. A system fracture of
EMC VNX MirrorView/S CLI
mirror -disablepath 457
all mirrors between two arrays on following storage processors will occur due to this action.128.221.39.2910.14.20.154Do you want to continue (y/n)? y
EXAMPLE #2The mirror -info command displays the updated status.
naviseccli -h ss1_spa mirror -sync -info
OUTPUTIf the version of VNX OE for Block software running on the SP does not support thiscommand, a Command is not supported error message is printed to stderr.
mirror -enablepathEstablishes a path for remote mirroring between a local and remote system.
PREREQUISITESYou must have a user account on the system on which you want to execute the command.
DESCRIPTIONThis command is used with naviseccli (see naviseccli on page 20) to create a pathbetween the specified SP and its peer SP to a remote SP and its peer. These paths willserve as paths for remote mirroring. A remote mirror requires a path between the primaryand secondary systems.
When issued to any SP, the command creates paths for both SPs in both systems; that is,it creates these paths:
l SP A of the local system to SP A of the other system
l SP A of the other system to SP A of the local system
l SP B of the local system to SP B of the other system
l SP B of the other system to SP B of the local system
The SP As or the SP Bs in both systems must be physically connected.
If you cannot enable paths on one SP due to some error, an informational messageappears and the paths are enabled for the other SP. To obtain status information, run themirror -info -systems command.
Note
If both asynchronous and synchronous mirrors are installed, you will need to run thecommand only once. It will take effect for both mirrors.
Note
If the two arrays are not in the same domain, you need to use an IP address instead of ahost name for remote mirroring.
SYNTAXmirror -enablepath SP-hostname [-connectiontype fibre|iscsi]OPTIONS
SP-hostnameSpecifies the hostname of SP A or SP B of the remote system on which you want toenable remote mirroring.
EMC VNX MirrorView/S CLI
458 EMC VNX Series 5.33 Command Line Interface Reference for Block

-connectiontype fibre | iscsiSpecifies the connection type as fibre or iSCSI for the path you are enabling. If youdo not specify the -connectiontype switch, the system first tries to find a fibreconnection; if it does not find one, it looks for an iSCSI connection.
Note
To change the connection type, you must first disable the current enabled path. Tomodify, test, or delete connections or change the credentials, see the EMCNavisphere Command Line Interface (CLI) Reference.
EXAMPLEFor SP ss1_spa, this command enables the paths between ss1_spa and its peer SPand ss27_spa and its peer SP. The mirror -sync-info command that followsdisplays the updated status.
naviseccli -h ss1_spa mirror -enablepath ss27_spa -connectiontypeiscsi
naviseccli -h ss1_spa mirror -sync -info
OUTPUTIf the version of VNX OE for Block software running on the SP does not support thiscommand, a Command is not supported error message is printed to stderr.
mirror -sync -fractureimageFractures an image in a mirror.
PREREQUISITESYou must have a user account on the system on which you want to execute the command.
DESCRIPTIONThis command is used with naviseccli to start an administrative fracture of asecondary image. It also prevents scheduled updates from starting in the future. Youmust direct the command to the system that holds the primary image.
(An automatic fracture, called a system fracture, occurs if a secondary image becomesinaccessible to the primary image. After a system fracture, the system periodically tries tocommunicate with the secondary image and — if it succeeds — starts synchronizationbased on the fracture log. If you issue the -fractureimage command while the mirroris system fractured, the system will not try to communicate or resynchronize until youissue a -syncimage command.)
The software displays a message to confirm the fracture:
Warning! If the Write Intent Log is not enabled for this mirror, afull mirror sync of the secondary image will be required in the eventof a failure on the primary image.Do you want to fracture the image image UID (y/n)?
To fracture the mirror, answer y; to take no action, enter n.
SYNTAXmirror -sync -fractureimage -name name | -mirroruid uid-imageuid uid[-o]
EMC VNX MirrorView/S CLI
mirror -sync -fractureimage 459

OPTIONS
-name nameSpecifies the name you gave to the mirror with the -create command.
-mirroruid uidSpecifies the unique 16-byte mirror ID (World Wide Name) that the softwareassigned when it created the mirror. For any letters in the ID, see comments under -imageuid below.
-imageuid uidSpecifies the unique 8-byte image ID of the secondary image to be fractured. For anyletters in the ID, you must specify the same case as the software assigned to theimage when the mirror was created (use mirror -list function).
-oExecutes the command without prompting for confirmation.
EXAMPLEFor SP ss1_spa of the mirror named db_mirror, this command fractures thesecondary image with the unique ID shown.
naviseccli -h ss1_spa mirror -sync -fractureimage -namedb_mirror -imageuid 50:06:06:10:00:FD:A1:6
Warning! If the Write Intent Log is not enabled for this mirror, a full mirror sync of the secondary image will be required in the event of a failure on the primary image.Do you really want to fracture the image(y/n)? y
OUTPUTIf the version of VNX OE for Block software running on the SP does not support thiscommand, a Command is not supported error message is printed to stderr. Youmay also receive other error messages.
mirror -sync -infoDisplays general information about synchronous mirroring in a system.
PREREQUISITESYou must have a user account on the system on which you want to execute the command.
DESCRIPTIONThis command, when used with naviseccli and no other switches, lists all generalinformation for remote mirror support. Issuing this command with one or more optionsdisplays the information based on the option issued. See the example for sample output.
For information on existing mirrors, use the -list function. For synchronization statusinformation, use the -listsyncprogress function.
SYNTAXmirror -sync -info [-cancreate][-maxmirrors][-mirroredluns][-mirrorableluns][-systems [-connectiontype]][-logs][-all]OPTIONS
-cancreate
EMC VNX MirrorView/S CLI
460 EMC VNX Series 5.33 Command Line Interface Reference for Block
Indicates whether an remote mirror can be created in this system: yes or no.-maxmirrors
Displays the maximum number of mirrors that can be created in this system.-mirroredluns
Lists the LUN numbers of LUNs that are mirrored in this system. The list includesLUNs used as both secondary and primary images.
-mirrorablelunsLists LUNs that can be mirrored in this system but are not mirrored at present.
-systemsLists remote systems that can be used for a secondary image.
-connectiontypeDisplays the connection type (fibre or iSCSI) for the enabled mirror. For unexpectederror cases, it displays the value, unknown.
-logsLists LUNs that are assigned for the write intent log on this system.
-allLists all properties of a session without having to type in any other switch.
EXAMPLE #1For SP ss1_spa, this command displays potential and current remote mirror information.
naviseccli -h ss1_spa mirror -sync -info
Can a mirror be created on this system:YESLogical Units that are mirrored in Primary Images:82 76Logical Units that are mirrored in Secondary Images:75 572Logical Units that can be mirrored:10 6 18 74 16 9 85 1187 77 19 14 25078 4 15 7 83 17 12 88 100 71 13 89 81Is Write Intent Log Used: NORemote systems that can be enabled for mirroring:Remote systems that are enabled for mirroring:Array UID: 50:06:01:60:20:04:A1:6BStatus: Enabled on both SPsArray UID: 50:06:01:60:90:20:33:54Status: Enabled on both SPsArray UID: 50:06:01:60:20:02:C1:A3Status: Enabled on both SPsEnabled Connection Type(s): iSCSIDisabled Connection Type(s): FibreMaximum number of possible Mirrors:50
EXAMPLE #2The following example shows the output for the mirror -async -info command.
mirror –sync –info –all
Can a mirror be created on this system: YESLogical Units that are mirrored in Primary Images:Logical Units that are mirrored in Secondary Images: 3Logical Units that can be mirrored: 8186 8191 8188 8190 8187 8189Is Write Intent Log Used: NORemote systems that can be enabled for mirroring:Array UID: 50:06:01:60:88:60:01:8CAvailable Connection Type(s): FibreRemote systems that are enabled for mirroring:Array UID: 50:06:01:60:88:60:07:4BStatus: Enabled on both SPsEnabled Connection Type(s): FibreDisabled Connection Type(s):Maximum number of possible Mirrors: 256Logged-in status of Remote systems:
EMC VNX MirrorView/S CLI
mirror -sync -info 461
Array UID: 50:06:01:60:88:60:01:8CFibre Logged-in Status: SPA:Y; SPB:YArray UID: 50:06:01:60:88:60:07:4BFibre Logged-in Status: SPA:Y; SPB:YMirrorView port(s):SP A:I/O Module Slot: 0Physical Port ID: 0Logical Port ID: 0Port Type: FibreSP B:I/O Module Slot: 0Physical Port ID: 0Logical Port ID: 0Port Type: Fibre
OUTPUTIf the version of VNX OE for Block software running on the SP does not support thiscommand, a Command is not supported error message is printed to stderr.
mirror -sync -listDisplays information about existing mirrors.
PREREQUISITESYou must have a user account on the system on which you want to execute the command.
DESCRIPTIONThe naviseccli -sync mirror command with -list and no other switches lists allinformation for all mirrors on the system. Issuing this command with one or more optionsdisplays the information based on the option(s) issued. You can direct the command toany system; however, only the system holding the primary image of a mirror will alwayshave the latest information about the mirror. Status obtained from other systems may bestale; do not use it unless the primary system is unavailable. See the example for sampleoutput.
For synchronization status information, use the -listsyncprogress function.
SYNTAX
mirror -sync -list [-name [name]] [-mirroruid] [uid][-description][-faulted][-images][-imagecount][-imagesize][-lun][-qthresh][-requiredimages][-state][-transition][-usewriteintentlog]
OPTIONS
-name nameSpecifies the name you gave the mirror with the -create function. You can use themirror name or unique ID to obtain information on a mirror.
-mirroruid uid
EMC VNX MirrorView/S CLI
462 EMC VNX Series 5.33 Command Line Interface Reference for Block

Specifies the unique 16-byte remote mirror ID (World Wide Name) the softwareassigned when it created the mirror.
-descriptionLists the meaningful title for the mirror, if any. The software does not use thedescription to identify the mirror.
-faultedLists whether the remote mirror is faulted: yes or no. If it is faulted, the mirror iseither fractured or in the attention state.
-imagesDisplays image information, such as the role of the image (primary or secondary),image ID, WWN of the LUN containing the image, recovery policy, sync rate, imagestate, image condition, and image transitioning.
-imagecountLists the current number of images that compose the mirror. This count includes theprimary image.
-imagesizeLists the size of the image (capacity of the LUN containing the image) in user blocks.
-lunLists the LUN number of the local image.
-qthreshLists the time delay, in seconds, after the last I/O is received before a mirror willautomatically transition to the synchronized state. The default is 60 seconds.
-requiredimagesLists the minimum number of secondary images required for the mirror.
-stateDescribes the operational state of the mirror. Values are: inactive, active, andattention.
-transitionSpecifies whether the mirror is in a changing state.
-usewriteintentlogLists whether the mirror uses the write intent log. You cannot use the log unless youfirst allocate it.
EXAMPLEnaviseccli -h ss1_spa mirror -sync -list
MirrorView Name: pbc sync on 82MirrorView Description:MirrorView UID:50:06:01:60:90:20:29:85:01:00:00:00:00:00:00:00Logical Unit Numbers: 82Remote Mirror Status: MirroredMirrorView State: ActiveMirrorView Faulted: YESMirrorView Transitioning: NOQuiesce Threshold: 60Minimum number of images required: 0Image Size: 204800Image Count: 2Write Intent Log Used: NOImages: Image UID: 50:06:01:60:90:20:29:85 Is Image Primary: YES Logical Unit UID:60:06:01:60:57:A0:0E:00:56:7D:92:1C:37:73:D8:11 Image Condition: Primary Image Preferred SP: AImage UID: 50:06:01:60:90:20:33:54Is Image Primary: NOLogical Unit UID:
EMC VNX MirrorView/S CLI
mirror -sync -list 463
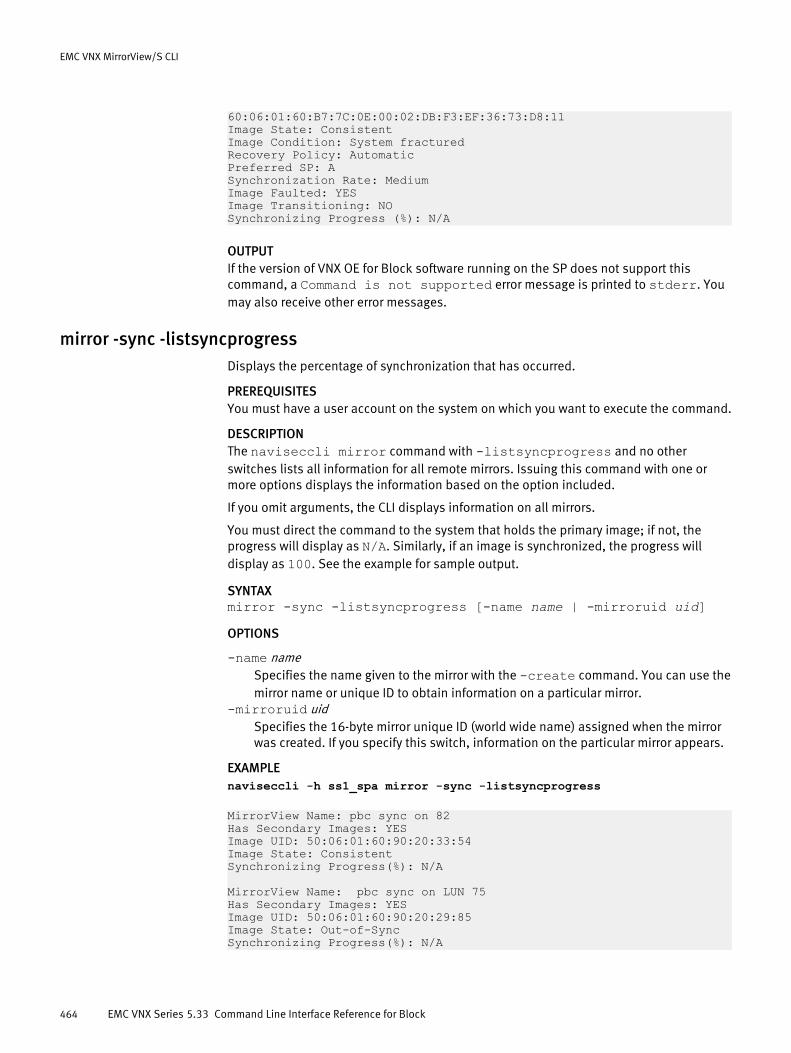
60:06:01:60:B7:7C:0E:00:02:DB:F3:EF:36:73:D8:11Image State: ConsistentImage Condition: System fracturedRecovery Policy: AutomaticPreferred SP: ASynchronization Rate: MediumImage Faulted: YESImage Transitioning: NOSynchronizing Progress (%): N/A
OUTPUTIf the version of VNX OE for Block software running on the SP does not support thiscommand, a Command is not supported error message is printed to stderr. Youmay also receive other error messages.
mirror -sync -listsyncprogressDisplays the percentage of synchronization that has occurred.
PREREQUISITESYou must have a user account on the system on which you want to execute the command.
DESCRIPTIONThe naviseccli mirror command with -listsyncprogress and no otherswitches lists all information for all remote mirrors. Issuing this command with one ormore options displays the information based on the option included.
If you omit arguments, the CLI displays information on all mirrors.
You must direct the command to the system that holds the primary image; if not, theprogress will display as N/A. Similarly, if an image is synchronized, the progress willdisplay as 100. See the example for sample output.
SYNTAXmirror -sync -listsyncprogress [-name name | -mirroruid uid]OPTIONS
-name nameSpecifies the name given to the mirror with the -create command. You can use themirror name or unique ID to obtain information on a particular mirror.
-mirroruid uidSpecifies the 16-byte mirror unique ID (world wide name) assigned when the mirrorwas created. If you specify this switch, information on the particular mirror appears.
EXAMPLEnaviseccli -h ss1_spa mirror -sync -listsyncprogress
MirrorView Name: pbc sync on 82Has Secondary Images: YESImage UID: 50:06:01:60:90:20:33:54Image State: ConsistentSynchronizing Progress(%): N/A
MirrorView Name: pbc sync on LUN 75Has Secondary Images: YESImage UID: 50:06:01:60:90:20:29:85Image State: Out-of-SyncSynchronizing Progress(%): N/A
EMC VNX MirrorView/S CLI
464 EMC VNX Series 5.33 Command Line Interface Reference for Block

OUTPUTIf the version of VNX OE for Block software running on the SP does not support thiscommand, a Command is not supported error message is printed to stderr. Youmay also receive other error messages.
mirror -sync -listlogDisplays write intent log information.
PREREQUISITESYou must have a user account on the system on which you want to execute the command.
DESCRIPTIONThe naviseccli mirror command with -listlog lists the write intent log LUNnumbers. If a write intent log is not allocated, then it displays nothing. You can direct thiscommand to any system that has MirrorView/S installed.
Format of the display is:
SP:A/B
LUN-number (Number of LUN used as write-intent log)
SYNTAXmirror -sync -listlogEXAMPLEFor both ss1_spa and its peer SP, this command lists the write intent log LUNinformation. If the write intent log is allocated, example output may be as follows:
naviseccli -h ss1_spa mirror -sync -listlog
Storage Processor: SP ALUN Number: 129Storage Processor: SP BLUN Number: 128
OUTPUTIf the version of VNX OE for Block software running on the SP does not support thiscommand, a Command is not supported message is written to sterr.
mirror -sync -promoteimagePromotes a secondary image to primary.
PREREQUISITESYou must have a user account on the system on which you want to execute the command.
DESCRIPTIONThis command promotes a secondary image to the role of the primary image. Thecommand is successful if it can promote the secondary to a primary that is server-accessible. You must direct this command to a system that holds the secondary image —never to the system that holds the primary. The command will fail if you issue it to thesystem that holds the primary image.
You can promote a secondary image if the secondary is in a synchronized or consistentstate. If the original primary is available, the software does a full resynchronizationunless it confirms that the two images were synchronized.
EMC VNX MirrorView/S CLI
mirror -sync -listlog 465

Use -promoteimage carefully. The software will prompt for confirmation as followsbefore processing the command:
Warning! This command is a very powerful and unforgivingcommand like formatting a disk. An improper use of this commandcan create unexpected results. If you have not done any of thefollowing steps then answer ’n’ and fulfil these steps and re-issue the command. Did you put primary image in a quiescentstate? Is image synchronized? It does not have to besynchronized but it is better to be synchronized to avoid anykind of loss of data. Do you want to continue (y/n)?Answering yes will continue with processing of promote command. Answering no stopsthe command execution.
When you promote a secondary image to primary, the software assigns a new mirror UIDto the promoted image to distinguish it from the old mirror. The new status of the oldprimary image depends on whether the old primary image is accessible when promotionoccurs:l If the original primary image is not accessible when you issue the promote command,
the software creates a new mirror with the original secondary image as the primaryimage, and the original primary is not part of the new mirror. If the original mirror hada second secondary, it is added as a secondary to the new mirror if it is accessible. Ifthe original primary image becomes available later, you should destroy the originalmirror using the Unisphere force destroy, or VNX CLI for Block mirror -sync -destroy -force option. After destroying the original mirror, you can (if desired)add the LUN that held the original primary image to the new mirror as its secondaryimage. This secondary image requires a full synchronization before it provides dataprotection.
l If the original primary is accessible when you issue the promote command, then thepromoted image becomes primary and the original primary becomes secondary (thatis, the images swap). The software then tests to see if the two images aresynchronized. If it finds the images are synchronized, then it proceeds with mirroredI/O as usual. If the mirror is not in the synchronized state, then the mirror will be out-of-sync and waiting on admin. The recovery policy is changed to manual during thepromotion, so that you must initiate the synchronization. If you choose tosynchronize the mirror, it will be a full synchronization.
Note
A promotion changes the mirror’s recovery policy to manual.
After promoting an image, you must explicitly add the newly promoted image to anappropriate storage group. EMC recommends that you also remove the old primary fromits storage group, if possible.
Note
You cannot issue this command on a mirror that is part of a consistency group.
Note
Promoting when I/O is going to the primary image can cause data loss. Any I/Os inprogress during the promotion may not be recorded to the secondary image and will beunavailable after the secondary image is promoted. It will also probably require a fullsynchronization of the new secondary image after the promotion.
In normal operation when there is no failure, you can (but probably would not want to)promote a secondary image. If you do so, the primary image is demoted to secondary.
EMC VNX MirrorView/S CLI
466 EMC VNX Series 5.33 Command Line Interface Reference for Block

The new primary image inherits the mirror properties of the demoted primary image.Before issuing this command consider the following:
l If possible, the secondary image should be synchronized (synchronized state) withthe primary image. If the secondary image is in the consistent state (not synchronizedstate) when you promote it to primary image, data will probably be lost during thepromotion process.The secondary image to be promoted must be in a consistent or synchronized state. Ifthe secondary image is out-of-sync or synchronizing, then you cannot promote it; anerror will result.
l You must stop I/O to an accessible primary image before you issue this command. IfI/O continues to the original primary, data may be lost as the software demotes theprimary to secondary and/or an SP may reboot unexpectedly during the attemptedpromotion.
l If the primary system has a write intent log, ensure that the secondary system doesalso.
SYNTAXmirror -sync -promoteimage -name name | -mirroruid uid-imageuid imageuid[-o]OPTIONS
-name nameSpecifies the name you gave the mirror with the -create command. You can usethe mirror name or unique ID to promote a secondary image.
-mirroruid uidSpecifies the unique 16-byte mirror ID (World Wide Name) that was assigned whenthe mirror was created. For any letters in the ID, see comments under -imageuidbelow.
-imageuid uidSpecifies the unique 8-byte image ID of the secondary image you want to promote.For any letters in the ID, you must specify the same case as the software assigned tothe image when it created the mirror (use the mirror -list function).
-oRuns the command without prompting for confirmation.
EXAMPLEFor SP ss1_spa, the owner of the remote mirror named db_mirror, this commandpromotes the secondary image with the unique ID shown.
naviseccli -h ss1_spa mirror -sync -promoteimage -name db_mirror-imageuid 50:06:06:10:00:FD:A1:6
OUTPUTIf the version of VNX OE for Block software running on the SP does not support thiscommand, a Command is not supported error message is printed to stdout. Youmay also receive other error messages.
mirror -sync -removeimageRemoves a secondary image from a mirror.
PREREQUISITESYou must have a user account on the system on which you want to execute the command.
EMC VNX MirrorView/S CLI
mirror -sync -removeimage 467

DESCRIPTIONThis command is used with naviseccli to remove a secondary image from the remotemirror. You must issue this command to a system that holds the primary image.
An image can be removed even if it is an active image. However, you can remove asecondary image only if it is in the synchronized state or you have fractured the mirror.
If you omit the -override option, the software displays a message to confirm theremove operation:
Removing of the image will stop mirroring of data to thespecified image. It may cause the minimum number of imagesrequired parameter to be violated that will cause the mirror togo into attention state. Do you really want to remove theimage(y/n)?Answering yes will remove the image.
Note
You cannot issue this command on a mirror that is part of a consistency group.
SYNTAXmirror -sync -removeimage -name name | -mirroruid mirroruid-arrayhost sp-hostname | -imageuid imageuid [-o]OPTIONS
-name nameSpecifies the name you gave the mirror with the -create command. You can usethe mirror name or unique ID to remove a secondary image.
-mirroruid uidSpecifies the unique 16-byte remote mirror ID (World Wide Name) assigned when thesoftware created the mirror. For any letters in the ID, see comments under -imageuid below.
-arrayhost sp-hostnameSpecifies the hostname or network address of the remote SP that holds thesecondary image you want to remove. If you specify this switch, the driver(s) fromthe secondary LUN stack is removed.
-imageuid image-uidSpecifies the unique 8-byte image ID of the secondary image you want to remove.For any letters in the ID, you must specify the same case as the software assigned tothe image when it created the mirror (use the mirror -list command). If youspecify this switch, you must explicitly remove the driver(s) from the secondary LUNstack using the -setfeature command.
-oExecutes the command without prompting for confirmation.
EXAMPLEFor SP address ss1_spa, the owner of the mirror named db_mirror, this commandremoves the image with the unique ID shown.
naviseccli -h ss1_spa mirror -sync -removeimage-name db_mirror -imageuid 50:06:06:10:00:FD:A1:6
Removing the image will stop mirroring of data to the specified image. It may cause the minimum number ofimages required parameter to be violated that will cause
EMC VNX MirrorView/S CLI
468 EMC VNX Series 5.33 Command Line Interface Reference for Block

the mirror to go into attention state. Do you really wantto remove the image (y/n)? y
OUTPUTIf the version of VNX OE for Block software running on the SP does not support thiscommand, a Command is not supported error message is printed to stderr. Youmay also receive other error messages.
mirror -sync -setfeatureAdds or removes an synchronous mirror driver to or from the LUN stack.
PREREQUISITESYou must have a user account on the system on which you want to execute the command.
DESCRIPTIONUse this command with naviseccli (see naviseccli) to add the synchronous mirrordriver to or remove it from the LUN stack depending on whether you specify the -on or -off option. You must issue this command to the system where the LUN resides.
This command is required after you remove a secondary image from a mirror, using the -imaguid switch to specify the image. In this case, Unisphere has insufficientinformation to automatically remove the MirrorView/S driver from the stack of thesecondary image LUN, and you must use this command to do this manually.
Note
When you add a synchronous mirror driver to the LUN stack using the -on switch,
MirrorView/S automatically allocates and retains additional memory. This additionalmemory counts agains the total replication software memory budget.
SYNTAXmirror -sync -setfeature -on | -off -lun lun_number | -lunuiduid
OPTIONS
-onAdds the driver to the LUN stack.
-offRemoves the driver from the LUN stack.
-lun lun_numberSpecifies the LUN number to which you want to add or from which you need toremove the driver.
-lunuid uidSpecifies the unique 16-byte identification number (World Wide Name) of the LUN towhich you will add the driver or from which you will remove the driver.
EXAMPLEFor SP ss1_spa, this command starts adding the driver to LUN 112.
naviseccli -h ss1_spa mirror -sync -setfeature -on -lun 112
OUTPUTIf the version of VNX OE for Block software running on the SP does not support thiscommand, a Command is not supported error message is printed to stderr. Youmay also receive other error messages.
EMC VNX MirrorView/S CLI
mirror -sync -setfeature 469
mirror -sync -syncimageStarts an update of the secondary image.
PREREQUISITESYou must have a user account on the system on which you want to execute the command.
DESCRIPTIONUse this command with naviseccli (see naviseccli) to begin the synchronizationoperation on a secondary image that was previously administratively fractured or on onewhere the mirror image condition is normal. You must issue this command to the systemthat holds the primary image. The secondary image should be fractured when performingthis operation. If you specify a secondary image that is not fractured, an internal errormessage will be returned.
If -o is not specified, the software displays a message asking you to confirm:
During synchronization, array performance will be impacted anddata is vulnerable to a failure of the primary image. Do youwant to sync the image (y/n)?Answering y will start synchronization.
Note
You cannot issue this command on a mirror that is part of a consistency group.
SYNTAX
mirror -sync -syncimage -name name|-mirroruid mirroruid-imageuid imageuid [-o]
OPTIONS
-name nameSpecifies the name given to the mirror with the -create command. You can use themirror name or unique ID to update a secondary image.
-mirroruid uidSpecifies the unique 16-byte remote mirror ID (World Wide Name) assigned when thesoftware created the mirror. For any letters in the ID, see comments under -imageuid below.
-imageuid imageuidSpecifies the unique 8-byte image ID of the secondary image you will synchronize.For any letters in the ID, you must specify the same case as the software assigned tothe image when the software created the mirror (use the mirror -listcommand).
-oExecutes the command without prompting for confirmation.
EXAMPLEFor SP ss1_spa, the owner of the mirror named db_mirror, this command startssynchronizing the image with the unique ID shown.
EMC VNX MirrorView/S CLI
470 EMC VNX Series 5.33 Command Line Interface Reference for Block

naviseccli -h ss1_spa mirror -sync -syncimage-name db_mirror -imageuid 50:06:06:10:00:FD:A1:6
During synchronization, array performance will beimpacted and data is vulnerable to a failure of theprimary image. Do you want to sync the image (y/n)? y
OUTPUTIf the version of VNX OE for Block software running on the SP does not support thiscommand, a Command is not supported error message is printed to stderr. Youmay also receive other error messages.
MirrorView/S consistency group commandsThis section explains the commands for creating and managing groups of mirrors on VNXseries systems with the EMC MirrorView/S option. This section refers to groups of mirrorsas consistency groups.
Note
The LUNs in a MirrorView/S consistency group must reside on the same system, unlikethe volumes in a Symmetrix consistency group, which can reside on multiple systems.
mirror -sync -creategroupEstablishes a consistency group to which you can later add mirrors.
PREREQUISITESYou must have a user account on the system on which you want the command executed.
DESCRIPTIONThis command is used with naviseccli to create a consistency group to which you canadd mirrors with subsequent commands. You must direct the command to the system onwhich you are creating the MirrorView/S group.
Note
You should not enable the FAST Cache for write intent log LUNs and Clone Private LUNs.Enabling the FAST Cache for these LUNs is a suboptimal use of the FAST Cache and mayreduce the performance of the cache for other LUNs.When you create a consistency group, MirrorView/S automatically allocates and retainsadditional memory. This additional memory counts against the total replication softwarememory budget.
SYNTAX
mirror -sync -creategroup -name name[-description description] [-recoverypolicy policy] [-o]
OPTIONS
-name nameSpecifies the name of the consistency group. Use only alphanumeric characters forthe consistency group name. The name can be up to 32 characters.
-description descriptionSpecifies a textual description of the consistency group.
-recoverypolicy policy
EMC VNX MirrorView/S CLI
MirrorView/S consistency group commands 471

Specifies the policy for recovering the mirrors in a group after a failure causes asystem fracture. Values are:
manual: Update of the secondary image does not begin until you explicitly issue asynchronize command.
auto: Update of the secondary image automatically begins as soon as theconnection between the two systems is again operational.
-oExecutes the command without prompting for confirmation.
EXAMPLEFor SP ss1_spa, this command creates a consistency group with the name dbgroup.
naviseccli -h ss1_spa mirror -sync -creategroup -name dbgroup
OUTPUTIf the version of VNX OE for Block software running on the SP does not support thiscommand, a Command is not supported error message is printed to stdout. Youmay also receive other error messages.
mirror -sync -destroygroupDestroys a consistency group.
PREREQUISITESYou must have a user account on the system on which you want to execute the command.
DESCRIPTIONThis command is used with naviseccli (see naviseccli) to destroy a consistencygroup. It is the counterpart of -creategroup.
Note
Make sure that the consistency group is empty before destroying it.
If you omit the override option, the system displays a message to confirm the destructionof the consistency group:
Do you really want to destroy the group <group-name>? (y/n)?To destroy the consistency group, answer y; to take no action, enter n.
SYNTAXmirror -sync -destroygroup -name name | -groupid id[-force] [-o]OPTIONS
-name nameSpecifies the name you gave the mirror with the -creategroup command. You canalso use the consistency group ID.
-groupid idSpecifies the consistency group unique ID assigned when the consistency group wascreated.
-forceDestroys the consistency group even if it is not empty. Force destroy destroys onlythe group on the local system; you must also destroy the group on the other system.
-oExecutes the command without prompting for confirmation.
EMC VNX MirrorView/S CLI
472 EMC VNX Series 5.33 Command Line Interface Reference for Block
EXAMPLEFor SP ss1_spa, this command destroys the consistency group that was created with thename dbgroup.
naviseccli -h ss1_spa mirror -sync -destroygroup dbgroup
Do you really want to destroy the group dbgroup?(y/n)? y
OUTPUTIf the version of VNX OE for Block software running on the SP does not support thiscommand, a Command is not supported error message is printed to stdout. Youmay also receive other error messages if the command fails.
mirror -sync -addtogroupAdds a mirror to a previously created consistency group.
PREREQUISITESYou must have a user account on the system on which you want to execute the command.
DESCRIPTIONThis command is used with naviseccli (see naviseccli) to add one mirror at a time to aconsistency group.
Note
The mirror you specify must have its primary image on the system. No two secondaryimages of mirrors in the consistency group can be on different systems.When you add a mirror to a consistency group, MirrorView/S automatically allocates andretains additional memory. This additional memory counts against the total replicationsoftware memory budget.
SYNTAXmirror -sync -addtogroup -name name | -groupid id-mirrorname name | -mirroruid idOPTIONS
-name nameSpecifies the name of the consistency group to which you want to add the mirror.
-groupid idSpecifies the unique ID of the consistency group to which you want to add the mirror.
-mirrorname nameSpecifies the name of the mirror you want to add to the consistency group.
-mirroruid idSpecifies the World Wide Name of the mirror you want to add to the consistencygroup.
EXAMPLEFor SP ss1_spa, this command adds the mirror, Sales Accounts Mirror toEurope, to the consistency group, dbgroup.
naviseccli -h ss1_spa mirror -sync -addtogroup -name dbgroup-mirrorname "Sales Accounts Mirror to Europe"
EMC VNX MirrorView/S CLI
mirror -sync -addtogroup 473

OUTPUTIf the version of VNX OE for Block software running on the SP does not support thiscommand, a Command is not supported error message is printed to stdout. Youmay also receive other error messages.
mirror -sync -removefromgroupRemoves a mirror from a consistency group.
PREREQUISITESYou must have a user account on the system on which you want to execute the command.
DESCRIPTIONThis command is used with naviseccli (see naviseccli) to remove one mirror at a timefrom the consistency group.
Note
The mirror you specify must have its primary image on the system. This does not apply ifyou use the -force switch.
If you omit the -o option, the software displays a message to confirm the removeoperation. Answering yes will remove the mirror.
SYNTAX
mirror -sync -removefromgroup -name name|-groupid id-mirrorname name|-mirroruid id[-force] [-o]
or
mirror -sync -removefromgroup -name name|-groupid id-localLunUid uid | -localLunnumber number[-force] [-o]
OPTIONS
-name nameSpecifies the name of the consistency group from which you want to remove themirror.
-groupid idSpecifies the unique ID of the consistency group to which you want to add the mirror.
-mirrorname nameSpecifies the name of the mirror you want to remove from the consistency group.
-mirroruid idSpecifies the World Wide Name of the mirror you want to remove from theconsistency group.
-localLunUid uidSpecifies the world wide name of the local LUN belonging to the local image, whichparticipates in the consistency group. You can use this switch to remove groupmembers only in the failure scenario.
-localLunnumbernumberSpecifies the LUN number of the local LUN belonging to the local image, whichparticipates in the consistency group. You can use this switch to remove groupmembers only in the failure scenario.
EMC VNX MirrorView/S CLI
474 EMC VNX Series 5.33 Command Line Interface Reference for Block

Note
Failure scenarios may occur where a mirror may no longer exist, but is stillconsidered to be a member of the consistency group. In this case, the consistencygroup is in an incomplete state. A mirror can be missing from the consistency groupif the promotion fails between destroying the original mirror and creating a new one.In this case, all the properties of the missing mirrors, except the local LUN uidand local LUN number appear as unknown in the -listgroups command.
You can remove the mirror from the consistency group only by specifying the groupname or group ID and the local LUN uid or local LUN number. Use the local LUN uidor local LUN number only in this failure case. Removing a regular mirror in a group byspecifying -locallunnumber or -locallunuid returns an error. Removing the
missing mirror by specifying the -mirrorname or -mirroruid also returns an
error.If a mirror is missing only on the secondary side, then issuing theremovefromgroup command on the primary side will remove the missing memberon the secondary side also.
-forceRemoves the mirror even if the connection with the remote system is not functioning.If you direct this command at the secondary system with this switch, only thesecondary member is removed; the primary system is not contacted.
-oExecutes the command without prompting for confirmation.
EXAMPLEFor SP ss1_spa, the owner of the consistency group named dbgroup, this commandremoves the mirror with the unique ID shown.
naviseccli -h ss1_spa mirror -sync -removefromgroup-name dbgroup -mirroruid
83:5A:20:90:60:01:06:50:01:00:00:00:00:00:00:00
OUTPUTIf the version of VNX OE for Block software running on the SP does not support thiscommand, a Command is not supported error message is printed to stdout. Youmay also receive other error messages.
mirror -sync -changegroupChanges consistency group properties.
PREREQUISITESYou must have a user account on the system on which you want to execute the command.
DESCRIPTIONThis command is used with naviseccli to change one or more parameters of aconsistency group.
You must specify at least one of the optional switches. If you omit the override option,then it displays a message similar to the following for each parameter to confirm thechange.
Do you want to change the group synchronization rate fromMedium to High (y/n)?
EMC VNX MirrorView/S CLI
mirror -sync -changegroup 475
To change a parameter, enter y.
SYNTAXmirror -sync -changegroup -name name | -groupid id[-newname newname][-description description][-recoverypolicy policy] [-o]OPTIONS
-name nameSpecifies the name of the consistency group you want to change. You can specifyeither the consistency group name or ID (next).
-groupid idSpecifies the unique ID of the consistency group you want to change.
-description descriptionSpecifies a textual description for the consistency group.
-recoverypolicy policySpecifies the policy for recovering the mirrors in a group after a failure causes asystem fracture. Values are:
manual: Update of the secondary image does not begin until you explicitly issue asynchronize command.
auto: Update of the secondary image automatically begins as soon as theconnection between the two systems is again operational.
-oExecutes the command without prompting for confirmation.
EXAMPLEFor system ss1_spa, consistency group dbgroup, this command automatically startssynchronization.
naviseccli -h ss1_spa mirror -sync -changegroup -name dbgroup-recoverypolicy auto
OUTPUTIf the version of VNX OE for Block software running on the SP does not support thiscommand, a Command is not supported error message is printed to stdout. Youmay also receive other error messages.
mirror -sync -syncgroupSynchronizes all members of the consistency group.
PREREQUISITESYou must have a user account on the system on which you want to execute the command.
DESCRIPTIONThe naviseccli mirror -sync command with -syncgroup synchronizes allmembers of a consistency group. When one member of the group is fractured, all will befractured; therefore, it is necessary to synchronize the group. You cannot synchronize anindividual image whose primary image is part of a consistency group. The -syncgroupcommand returns successfully that all members of the consistency group have beenqueued for synchronization.
SYNTAXmirror -sync -syncgroup -name name | -groupid id[-o]
EMC VNX MirrorView/S CLI
476 EMC VNX Series 5.33 Command Line Interface Reference for Block
OPTIONS
-name nameSpecifies the name of the consistency group you want to update or synchronize. Youcan specify either the consistency group name or id (next).
-groupid idSpecifies the unique ID of the consistency group you want to update or synchronize.
-oExecutes the command without prompting for confirmation.
EXAMPLEFor SP ss1_spa, the owner of the consistency group named dbgroup, this commandstarts synchronizing the consistency group.
naviseccli -h ss1_spa mirror -sync -syncgroup -name dbgroup
OUTPUTIf the version of VNX OE for Block software running on the SP does not support thiscommand, a Command is not supported error message is printed to stdout. Youmay also receive other error messages.
mirror -sync -fracturegroupFractures all image(s) in a consistency group.
PREREQUISITESYou must have a user account on the system on which you want to execute the command.
DESCRIPTIONThe naviseccli mirror -sync command with -fracturegroup starts anadministrative fracture of all images in the consistency group, even if they are alreadysystem fractured. You must direct this command to the primary system.
SYNTAXmirror -sync -fracturegroup -name name | -groupid id[-o]OPTIONS
-name nameSpecifies the name of the consistency group you want to fracture. You can specifyeither the consistency group name or ID (next).
-groupid idSpecifies the unique ID of the consistency group you want to fracture.
-oExecutes the command without prompting for confirmation.
EXAMPLEFor SP ss1_spa, with the consistency group named dbgroup, this command fracturesall the images in the consistency group.
naviseccli -h ss1_spa mirror -sync -fracturegroup-name dbgroup
OUTPUTIf the version of VNX OE for Block software running on the SP does not support thiscommand, a Command is not supported error message is printed to stdout. Youmay also receive other error messages.
EMC VNX MirrorView/S CLI
mirror -sync -fracturegroup 477

mirror -sync -promotegroupPromotes all secondary images in a consistency group to primary images.
PREREQUISITESYou must have a user account on the system on which you want to execute the command.
Before promoting, perform the following steps:
1. Stop all I/O.
2. If possible, make sure that the group is in a synchronized state.
3. Before running a force promote, first perform a normal promotion and, if possible, fixany error conditions that it returns.
CAUTION
After force promoting a consistency group that is out-of-sync after the promotion, usecaution before synchronizing the consistency group. If the group was fractured beforethe promotion, the new primary system may have data that is much older than theoriginal primary (now secondary) system. Synchronizing the group may overwrite newerdata on the original primary system.
DESCRIPTIONThis command promotes all secondary images to the role of the primary images. Youmust direct this command to a secondary system. This command is used withnaviseccli (see naviseccli).
Note
To promote a consistency group, the group on the secondary side must be Consistent orSynchronized. When the primary system is not reachable, the group may not be in aConsistent or Synchronized state.
CAUTION
Promoting when I/O is going to the primary image can cause data loss. Any I/Os inprogress during the promotion may not be recorded to the secondary image and will beunavailable after the secondary image is promoted. It will also probably require a fullsynchronization of the new secondary image after the promotion.
SYNTAXmirror -sync -promotegroup -name name | -groupid id[-type type] [-o]OPTIONS
-name nameSpecifies the name of the consistency group you want to promote. You can specifyeither the consistency group name or ID (next).
-groupid idSpecifies the unique ID of the consistency group you want to promote.
-type typeSpecifies the type of promotion. Values are:
normal (default), which promotes each mirror in the consistency group. Otherwise, itwill destroy the original mirrors and create new ones with the targeted secondariesas primaries and the original primaries as secondaries.
EMC VNX MirrorView/S CLI
478 EMC VNX Series 5.33 Command Line Interface Reference for Block

local, which creates only the new primary image. If the original primary system canbe contacted, then the secondary image is removed from the mirror on the originalprimary system. Thus, both systems will have a mirror with primary images only.
force, which continues the promotion despite most errors that may occur. Werecommend that before using force promote, first use normal promote and, ifpossible, fix any errors that it returns.
-oRuns the command without prompting for confirmation.
EXAMPLEFor SP ss1_spa, the owner of the consistency group named dbgroup, this commandpromotes all secondary images:
naviseccli -h ss1_spa mirror -sync -promotegroup -name dbgroup
OUTPUTIf the version of VNX OE for Block software running on the SP does not support thiscommand, a Command is not supported error message is printed to stdout. Youmay also receive other error messages.
mirror -sync -listgroupsDisplays information about existing consistency groups.
PREREQUISITESYou must have a user account on the system on which you want to execute the command.
DESCRIPTIONThe naviseccli mirror -sync command with -listgroups and no otherswitches lists all information for all synchronous consistency groups on the system.Issuing this command with one or more options displays the information based on theoption(s) issued. This command is used with naviseccli (see naviseccli).
SYNTAXmirror -sync -listgroups [-name[name]] [-groupid[-id]][-feature][-state][-role][-mirrors][-condition][-recoverypolicy][-canbeaddedtogroup]OPTIONS
-name nameSpecifies the name of the consistency group whose information you want to display.If you do not specify the name of the consistency group with this switch, that pieceof information will be provided for the consistency group(s) being displayed.
-groupid idSpecifies the unique ID of the consistency group whose information you want todisplay.
-featureDisplays the maximum number of consistency groups allowed on the system and themaximum number of members per consistency group.
-stateDisplays Synchronized, Out-of-Sync, Synchronizing, Consistent, Scrambled,Incomplete, Local Only, or Empty.
-roleDisplays Primary, Secondary, or Unknown.
-mirrorsDisplays the mirror name, mirror uid, the IDs of both images in the pair, and thesystem ID of the paired image.
EMC VNX MirrorView/S CLI
mirror -sync -listgroups 479

-conditionDisplays the consistency group condition as Active, Admin Fractured, SystemFractured, Waiting on Sync, Inactive, or Invalid.
-recoverypolicyDisplays either manual or automatic to describe whether the system will wait for youto restart updates in the event of a system fracture, after the problem is corrected.
-descriptionDisplays the description associated with the consistency group.
-canbeaddedtogroupDisplays all the mirrors that you can add to a group. A mirror appears in the list onlyif it is consistent or synchronized and not fractured. Also, the consistency groupmust be in-sync or consistent and not fractured.
EXAMPLEnaviseccli -h 10.14.5.200 mirror -sync -listgroups
Maximum Number of Groups Allowed: 16Maximum Number of Mirrors per Group: 16
Group Name: vidGroup ID: 50:06:01:60:90:60:2D:03:00:00:00:00Description:State: SynchronizedRole: SecondaryCondition: ActiveRecovery Policy: ManualMirror Name: vidMirror WWN:50:06:01:60:90:60:2C:BA:01:00:00:00:00:00:00:00Primary WWN: 50:06:01:60:90:60:2C:BASecondary WWN: 50:06:01:60:90:60:2D:03Array hosting remote image: 50:06:01:60:90:60:2C:BALocal LUN ID:60:06:01:60:8B:53:10:00:A0:FF:D5:30:DE:B4:D8:11Local LUN Number: 0Remote LUN ID:60:06:01:60:90:53:10:00:A3:58:04:80:DE:B4:D8:11Mirrors can be added to group:Mirror Name: djp1Mirror WWN:50:06:01:60:90:60:2C:BA:03:00:00:00:00:00:00:00
OUTPUTIf the version of VNX OE for Block software running on the SP does not support thiscommand, a Command is not supported error message is printed to stdout. Youmay also receive other error messages.
EMC VNX MirrorView/S CLI
480 EMC VNX Series 5.33 Command Line Interface Reference for Block

CHAPTER 11
SAN Copy and its command line utilities
This chapter introduces the EMC® SAN Copy™ software and its command line utilities:admhost, with commands that the operating system uses to manage SAN Copy devices;and the CLI, with commands that manage SAN Copy sessions.
Major topics are:
l Introducing SAN Copy software........................................................................... 482l Preparing a Block system for a copy session........................................................482l Preparing a Symmetrix system for a copy session................................................485l About admhost for SAN Copy.............................................................................. 488l admhost SAN Copy command functions.............................................................. 488l Preparing logical units for a SAN Copy session.................................................... 490l SAN Copy CLI commands.....................................................................................492l SAN Copy command functions.............................................................................492l sancopy -create...................................................................................................494l sancopy -destinfo................................................................................................498l sancopy -duplicate..............................................................................................501l sancopy -info...................................................................................................... 502l sancopy -mark.....................................................................................................506l sancopy -modify..................................................................................................507l sancopy -pause...................................................................................................512l sancopy -remove.................................................................................................513l sancopy -resume.................................................................................................514l sancopy -settings................................................................................................ 515l sancopy -start..................................................................................................... 516l sancopy -stop..................................................................................................... 518l sancopy -throttle................................................................................................. 519l sancopy -transfer................................................................................................ 520l sancopy -unmark.................................................................................................521l sancopy -updateconnections.............................................................................. 521l sancopy -verify.................................................................................................... 522
SAN Copy and its command line utilities 481

Introducing SAN Copy softwareEMC SAN Copy software (referred to as SAN Copy later in this document) runs on a SANCopy system (system with SAN Copy software enabled). It copies data between blocksystems, within block systems, between block and Symmetrix systems, and betweenblock and qualified non-EMC systems. SAN Copy can copy data directly from a sourcelogical unit on one system to destination logical units on other systems, without usinghost resources. SAN Copy connects directly or through a SAN, and also supportsprotocols that let you use the IP WAN (wide area network) to send data over extendeddistances. SAN Copy can perform multiple copies—each in its own copy session—simultaneously. The RAID type of the logical units participating in a copy session doesnot have to be the same; that is, the source and destination logical units can be differentRAID types.
You can use SAN Copy to create full and incremental copies of a source logical unit. Anincremental session copies only the data that has changed since the last copy session.This can significantly reduce the time needed to copy the data, thereby allowing the copyoperation to be performed more frequently and more effectively. Unlike full copysessions, the source logical unit for an incremental session can remain online during thecopy process. You must, however, prepare the source logical unit prior to starting thesession (see Preparing logical units for a SAN Copy session on page 490). Regardless ofthe type of copy session—full or incremental—the participating logical units must meetcertain requirements.
You can use SAN Copy for the following tasks:
l One-time data migrationl Routine copying of data for application testingl Content distributionl Scheduled updates to multiple databases
To manage SAN Copy sessions, you can use either the UI-based Unisphere (described inthe Unisphere online help), or the SAN Copy command line interface described in thismanual.
Preparing a Block system for a copy sessionIf you will be copying data between Block systems or between VNX Block and Symmetrixsystems, follow the SAN Copy configuration requirements in EMC VNX for Block Concepts,and prepare the Block systems as described in the following procedure. You can uselogical units (LUNs) in a Block system as the source or destination of SAN Copy sessions.
If you will be copying data between LUNs within a Block system, see "Copying databetween LUNs within a Block system" described in EMC VNX for Block Concepts.
Note
For all sessions, you must install SAN Copy software on at least one of the Block systems.For incremental copy sessions, the source logical unit must reside in the SAN Copysystem.
Procedure
1. For Fibre Channel replication, use the native switch management tools to zone at leastone port from an SP on the SAN Copy system to one or more SP ports on theparticipating remote systems (see Fibre Channel zoning requirements andrecommendations described in EMC VNX for Block Concepts ).
SAN Copy and its command line utilities
482 EMC VNX Series 5.33 Command Line Interface Reference for Block

For iSCSI replication, create connection sets. A connection set establishes areplication session between an iSCSI initiator and an iSCSI target. A connection setconsists of a unique user-defined name, optional username and password (secret),method for assigning security credentials (connection specific, array-shared or none),and one or more connection paths. Each connection set should include only one iSCSIinitiator.
Note
SAN Copy ports act as host initiators to remote systems (system without SAN Copysoftware).
2. Register the SAN Copy ports with any other SP ports in the same zone using thenaviseccli or navicli -h spname sancopy -updateconnections command(see sancopy -updateconnections on page 521).
If the remote system is a Block system, the SAN Copy ports are registered with eachsystem, and the software adds a record for each SAN Copy port to the system’s hostinitiator table. Unisphere displays an entry for each registered SAN Copy port in theConnectivity Status dialog box, and the SAN Copy Summary dialog box.
3. Verify that the SAN Copy ports are connected and registered with any systems that willparticipate in a copy session using the following command for each SP on the SANCopy system:
naviseccli -h spname -port -listwhere spname is the name of an SP in the SAN Copy system.
Note
To use this command with navicli, replace naviseccli with navicli.
4. Connect the SAN Copy ports to Block groups (see the next section, Connecting SANCopy ports to storage groups on page 483).
Connecting SAN Copy ports to storage groups
Note
Each SAN Copy port acts like a host initiator and, therefore, can connect to only onestorage group at a time in a storage system.
In order for the LUNs to be accessible to the SAN Copy ports, you must connect the SANCopy ports to the storage groups in which the LUNs reside. When connecting to thestorage group, SAN Copy lets you select all available SP ports with valid connections tothe storage group, or it lets you select specific ports.
If all participating logical units of a remote storage system already belong to the samestorage group, you can connect SAN Copy ports to the existing storage group. However, ifthe logical units belong to different storage groups, we recommend that you create one ormore new storage groups, place the logical units in these storage groups, and thenconnect SAN Copy ports to them. This is the only time we recommend placing the samelogical unit in more than one storage group.
SAN Copy and its command line utilities
Connecting SAN Copy ports to storage groups 483

Note
Some operating systems do not support the same host accessing identical LUNs.Therefore, once SAN Copy completes the copy session, we recommend that you move anyLUN copies to different storage groups.
For more information on the following CLI commands, refer to the EMC Command LineInterface (CLI) Reference.To use the navicli CLI command, replace naviseccli withnavicli.Procedure
1. Use the following command to create storage groups:
naviseccli -h spname storagegroup -create -gnamestoragegroupname
2. Use the following command to add LUNs to storage groups:
naviseccli -h spname storagegroup -addhlu -gnamestoragegroupname -hlu hlunnumber -alu alunnumber
3. Use the following command (with information from the previous naviseccli -port -list command) to add the SAN Copy ports to storage groups:
naviseccli -h spname storagegroup -setpath -gnamestoragegroupname -hbauid hbawwn -sp a or b -spportportnumber
Table 45 naviseccli -h Parameters
Parameter Description
spname IP address of the SP on the storage system to which the storage groupbelongs.
storagegroupname name of the storage group to which you want to connect.
hbawwn World wide name of the SAN Copy port (from the -portlist command) .
a or b SP that owns the storage group.
portnumber the ID of the SP port hat owns the storage group (from the -portlistcommand).
If the sharing state of the storage group is Dedicated (only a single host can accessthe LUNs in the storage group), you must also specify one of the following switches:
-host hostname, or -ip ipaddress
where:
Table 46 host Switches
Parameter Description
hostname name of the host that has access to the LUNs in the storage group
ipaddress IP address of the host that has access to the LUNs in the storage group
Sample SAN Copy storage group configuration on page 485 shows a sample storagegroup configuration for SAN Copy. The remote storage system includes three storage
SAN Copy and its command line utilities
484 EMC VNX Series 5.33 Command Line Interface Reference for Block

groups labeled SG 1, SG 2 and SG 3. SG 1 and SG 2 provide I/O access to the LUNsfrom the attached hosts. SG 3 is a SAN Copy storage group.
In this example, we start with two SAN Copy sessions running concurrently. The LUNsin storage group 1 (LUN 1 and LUN 2) are participating in both sessions. Source LUN 1on the SAN Copy storage system is copying data to LUN 1 in SG 1, and LUN 2 in SG 1 iscopying data to the destination LUN on the SAN Copy system. Since both LUN 1 andLUN 2 belong to the same storage group, you can connect the same SAN Copy portdirectly to this storage group and both sessions can use this SAN Copy port.
In the future, you may want to start a third session that copies data from source LUN 2to LUN 3 using the same SAN Copy port. Since LUN 3 is in a different storage group,we recommend that you create a new storage group (SG 3) for the SAN Copy sessions,and place LUN 1, LUN 2 and LUN 3 in this storage group. This is the only time werecommend placing the same logical unit in more than one storage group.
Note
Some operating systems do not support the same host accessing identical LUNs.Therefore, once SAN Copy completes the copy session, we recommend that you moveany LUN copies to different storage groups.
Figure 3 Sample SAN Copy storage group configuration
Server Server
EMC2693
LUN1
LUN2
SG 1
LUN3
LUN4
SG 2
SG 3
Destination LUN
Source LUN 1
Source LUN 2
SAN Copy Storage System Remote Storage System
Preparing a Symmetrix system for a copy sessionYou can use logical units (volumes) in Symmetrix systems as the source or destination ofa full SAN Copy session. For incremental sessions, the source logical units must reside ina SAN Copy system. In order to prepare a Symmetrix system for SAN Copy sessions, youmust follow the SAN Copy configuration requirements section in EMC VNX for BlockConcepts, and use one of the following procedures.
SAN Copy and its command line utilities
Preparing a Symmetrix system for a copy session 485

Preparing a Symmetrix system using EMC ControlCenter SAN Manager
Note
To complete this procedure, you must be familiar with Unisphere, EMC ControlCenter®
SAN Manager, and Solutions Enabler Device Manager CLI.
Procedure
1. Use EMC ControlCenter SAN Manager 5.2 or higher to zone at least one port from anSP on the SAN Copy system to one or more FA ports on the participating Symmetrixsystems (see Fibre Channel zoning requirements and recommendations section inEMC VNX for Block Concepts).
Note
You can also use the native switch management tools to zone a SP to one or moreSymmetrix FA ports.
2. Verify that the host:
l Has access to the Symmetrix volumes that are participating in the SAN Copysession
l Is running the Unisphere Host Agent
l Is connected to a system in the domain
l Is part of a portal configuration within the domain. For information about portals,refer to the Unisphere online help.
3. Use Unisphere to register the SAN Copy ports with Symmetrix systems:
a. In the Storage tree of the Enterprise Storage window, right-click the icon for theSAN Copy system.
b. Select SAN Copy > Update Connections.
The SAN Copy ports log in to the Symmetrix storage ports.
4. To verify that the SAN Copy ports have been registered with the Symmetrix system,use the Solutions Enabler CLI command:
symmask -sid symmID list loginswhere symmID is the Symmetrix serial ID.
Note
Use the SymmCLI command sympd list -sid to determine the pathname for the
VCM database, or run inq on the host, if available.
5. Use the following Solutions Enabler symmask command to assign Symmetrixvolumes to the SAN Copy ports:
symmask -sid symmID -wwn SPportWWN add devs SymDevname|SymDevname -dir <#> -p <#>For example:
symmask -sid 0128 -wwn 11:22:33:44:55:66:77:88 add devs 0014,0015-dir 16a -p 0
SAN Copy and its command line utilities
486 EMC VNX Series 5.33 Command Line Interface Reference for Block

Preparing a Symmetrix system using ESN Manager
Note
To complete this procedure, you must be familiar with both Unisphere and ESN Manager.
Procedure
1. Use the native switch management tools to zone at least one port from an SP on theSAN Copy system to one or more FA ports on the participating Symmetrix systems (seeFibre Channel zoning requirements and recommendations in EMC VNX for BlockConcepts).
Note
SAN Copy ports act as host initiators to remote systems (system without SAN Copysoftware).
2. Use ESN Manager version 2.1 to place the SAN Copy ports on the host side of thetopology view.
l If this is a new installation of the system, complete steps 2a and 2b.
l If ESN Manager has already discovered the system and it is visible on the storageside of the topology view, complete all of step 2b.
Note
ESN Manager will not allow the SAN Copy ports (SP ports being used as initiators) toaccess the Symmetrix volumes unless the ports are visible on the host side of thetopology view.
a. Configure ESN Manager to discover the system.
Once ESN Manager discovers the system, it places an icon for it on the storageside of the topology view.
b. Use ESN Manager to move the system to the host side of the topology view.
a. In the Tools menu, select Options > Out Band.
b. In the Out-Band dialog box, select the system and clear the Enable checkbox.
Icons for the SAN Copy ports are displayed as hosts in the topology view.
3. Verify that the host with access to the Symmetrix volumes that are participating in theSAN Copy session is running the Unisphere Host Agent, and is either:
l Connected to a system in the domainor
l Part of a portal configuration within the domain. For information about portals, seethe online help or the EMC Command Line Interface (CLI) Reference.
4. Register the SAN Copy ports with any other SP ports in the same zone using thenavicli -h spname sancopy -updateconnections command (see sancopy -updateconnections on page 521).
The SAN Copy ports log in to the Symmetrix storage ports.
5. To verify that the SAN Copy ports have been registered with the Symmetrix system,use the Symmetrix CLI command:
SAN Copy and its command line utilities
Preparing a Symmetrix system using ESN Manager 487

fpath lshist -d physicaldrivewhere physicaldrive is the location of the VCM database on this host.
Note
Use the SymmCLI command fpath lshostdev to determine the pathname for the
VCM database, or run inq on the host, if available.
6. Use ESN Manager to assign Symmetrix volumes to the SAN Copy ports.
Note
This is the same as assigning volumes to the host initiator.
7. Use ESN Manager to move the system back to the storage side of the topology view.
8. To verify that the SAN Copy port has access to the Symmetrix remote volumes, clickthe SAN Copy port entry and, in the volumes panel, make sure that ESN Managersurrounds any volumes that are accessible to the SP port with solid blue squares.
If you are copying data to a third-party system, use the third-party systemmanagement documentation to:
l Verify that the SAN Copy initiator has logged in to the system
l Provide access to the volume on the third-party system to the SAN Copy initiator
About admhost for SAN CopyThe admhost utility is an executable program that you can run interactively with a script.The admhost commands can activate and deactivate the source and destination logicalunits being used in a SAN Copy session, and can flush data from operating systembuffers to ensure that the information on the source logical unit is current.
Note
Currently, admhost is supported only on the following Microsoft Windows platforms:Windows Server 2003, and Windows 2000. For the supported versions of these operatingsystems, see the EMC SAN Copy and Admhost Release Notes.
admhost SAN Copy command functionsThis section lists the admhost commands and describes their function in SAN Copysessions.
Note
The admhost utility is not supported on a UNIX host. Use the commands your operatingsystem normally uses to discover new logical units, flush buffers, and unmount thelogical units.
SAN Copy and its command line utilities
488 EMC VNX Series 5.33 Command Line Interface Reference for Block

Table 47 admhost functions and descriptions
Function Description Syntax and examples
admhostlun_activate
The admhost lun_activate command scansthe bus for new devices and assigns a driveletter to all Symmetrix® and Block devicesthat do not already have one.Use the -l and -d switches to scan the bus fornew devices and assign a drive letter to adevice that has a specific World Wide Name(WWN). This command does not assign driveletters to any other devices.
If admhost_activate is used and no newdevices are found, and drive letters arealready assigned to the Block and Symmetrixlogical units, admhost reports an errormessage.
admhost lun_activate [-llun_wwn -d drive_letter][-h]where
-l lun_wwn specifies the WorldWide Name (WWN) of the LUN towhich you want to assign a driveletter (requires the -d switch).
-d drive_letter specifies the driveletter you want to assign to thespecified LUN (requires the -lswitch).
-h displays the help message.
If the admhost lun_activatecommand activates more thanone device, the drive letter isassigned to the first device inthe list.
admhostlun_deactivate
The admhost lun_deactivate commandattempts to take devices offline and makethem inaccessible to the operating system.The command deletes the drive letter anddismounts the device.Use the admhost lun_activate command tobring the volume back online.
Use this command on the source ordestination host prior to starting a SAN Copysession (see Preparing logical units for a SANCopy session on page 490).
admhost lun_deactivate -oobject_name [-t object_type][-h]where
-o object_name specifies thedrive letter of the device youwant to deactivate.
When you specify the objectname, admhost finds the device,deletes its drive letter,dismounts it, and then takes thedevice offline.
-t object_type is an optionalswitch that specifies the objecttype (device or drive letter) of thedevice you want to deactivate.
-h displays the help message.
admhostlun_flush
On a Windows host, the command flushes alldata for the specified object_type so that thedata in the write cache is written to disk.Use this command on the source ordestination host prior to starting a SAN Copysession (see Preparing logical units for a SANCopy session on page 490).
admhost lun_flush [-h] -oobject_name [-t object_typedevice|driveletter]where
-h displays a help message.
-o object_name specifies thename or drive letter of the deviceyou want to flush.
-t object_type is an optionalswitch that specifies the objecttype (device or drive letter) of thedevice you want to flush.
SAN Copy and its command line utilities
admhost SAN Copy command functions 489

Table 47 admhost functions and descriptions (continued)
Function Description Syntax and examples
If you specify the device name,admhost identifies thecorresponding device and driveletter.
admhostlun_list
Use to perform a list operation. Thiscommand lists the drive letters and WWNs forall host devices.
admhost lun_list [-h] [-llun_wwn] [-d object_name] [-aoutput_style]where
-h displays a help message.
-l lun_wwn specifies the WWN ofthe device you want to list.
-d object_name specifies thedrive letter or name of the deviceyou want to list.
-a output_style specifies analternative output style for thelist output. The default style liststhe drive letter and WWN for thelogical unit. The -a switch letsyou specify physical drive as theoutput style.
admhost help This command displays the syntax for eachadmhost command and the revision numberof the admhost utility.Output for the admhost help command isshown below.
Revision number: V1.1.0.0.0 - 0 Valid operations include: lun_flush, lun_activate, lun_deactivate, lun_list, and help.
Valid types include: device and driveletter.
admhost help
Preparing logical units for a SAN Copy sessionBefore you start a full SAN Copy session, and before you mark an incremental copysession, you must prepare the source and destination logical units that will beparticipating in the session. For a SAN Copy session with logical units connected to aWindows server, use the admhost utility. For all other types of servers, use the commandspecific to the server’s operating system.
Use the following procedures to prepare source and destination logical units for full andincremental sessions.
SAN Copy and its command line utilities
490 EMC VNX Series 5.33 Command Line Interface Reference for Block

Preparing source and destination logical units for full and incremental sessions
CAUTION
You must follow this procedure explicitly to avoid data loss or data corruption.
Procedure
1. Stop all I/O to the source and destination logical units.
Note
For incremental copy sessions, we strongly recommend that you stop all I/O to thesource logical unit, and flush any server buffers prior to starting/marking the session.Once you receive confirmation that the mark or start session operation wassuccessful, you can resume I/O to the source LUN.If you do not stop all I/O and flush the server buffers to the source logical unit, theresultant data copy will be "crash consistent." This means that the contents of thecopy will be similar to the contents left on a logical unit if the server crashes. You maybe required to use the fsck or similar utility to make the data copy mountable. In thissituation, the data copy may not contain the unflushed server data.
2. From the servers connected to any destination logical units, flush the host buffers anddisconnect the logical units from the server by doing one of the following:
Note
If the destination logical units are not mounted, ignore this step.
l On a Windows Server 2003, or Windows 2000 host, use the following command toflush the host buffers and write the data to disk:admhost lun_flush -odestination drive letterFor example, to flush the host buffers on drive F:, enter the following command:
admhost lun_flush -o F:l On a Windows Server 2003 or Windows 2000 host, use the following command to
take the disk offline:admhost lun_deactivate -o destination -drive letterFor example, to take drive F: offline, enter the following command:
admhost lun_deactivate -o F:l On a UNIX server, use the unmount command to unmount the file system on any
destination logical units.
l On a NetWare server, use the dismount command to dismount the file system onany destination logical units.
3. From the server connected to the source logical units, deactivate source logical unit,flush the server buffers and disconnect the source logical units from the server bydoing one of the following:
Note
If you want to maintain read access to the source logical unit, skip this step.
SAN Copy and its command line utilities
Preparing source and destination logical units for full and incremental sessions 491
l On a Windows Server 2003 or Windows 2000 host, use the following command toflush the host buffers and write the data to disk:admhost lun_flush -osource -drive letterFor example, to flush the host buffers on drive F:, enter the following command:
admhost lun_flush -o F:l On a Windows Server 2003, or Windows 2000 host, use the following command to
take the disk offline:admhost lun_deactivate -o source -driveletterFor example, to take drive F: offline, enter the following command:
admhost lun_deactivate -o F:l On a UNIX server, use the umount command to unmount the file system on any
source logical units.
l On a NetWare server, use the dismount command to dismount the file system onany source logical units.
SAN Copy CLI commandsThis section explains the sancopy commands used with naviseccli or navicli CLIcommands to manage the SAN Copy software. These commands function only with asystem that has the optional SAN Copy software installed.
SAN Copy command functionsThe EMC VNX CLI for Block provides one of the two interfaces to the SAN Copy software.The Unisphere UI provides the other. The CLI command is naviseccli sancopy ornavicli sancopy and you specify functions with switches.
The sancopy command functions, listed alphabetically, are:
l sancopy -create
l sancopy -destinfo
l sancopy -duplicate
l sancopy -info
l sancopy -mark
l sancopy -modify
l sancopy -pause
l sancopy -remove
l sancopy -resume
l sancopy -settings
l sancopy -start
l sancopy -stop
l sancopy -throttle
l sancopy -transfer
l sancopy -unmark
l sancopy -updateconnections
SAN Copy and its command line utilities
492 EMC VNX Series 5.33 Command Line Interface Reference for Block

l sancopy -verify
The sancopy functions are listed functionally, in the order you would perform them, in thefollowing table.
Table 48 naviseccli or navicli sancopy command functions, listed in order of use
Command Description
Essential functions (in order performed)
sancopy -create, orsancopy -create -incremental
Creates a full SAN CopysessionCreates an incremental SANCopy session
sancopy -mark (incremental copy sessions only) Creates a point-in-time copy ofthe changes that have takenplace since the last copysession up to the time thesession is marked
sancopy -start Starts a SAN Copy sessionbased on copy descriptorinformation
Optional status functions (alphabetically)
sancopy -destinfo Displays information on aparticular session from thedestination point of view
sancopy -info Displays information on allSAN Copy sessions or displaysattributes for a particularsession
sancopy -stop Stops a SAN Copy session
sancopy -verify Ensures that the SAN Copysoftware can access a logicalunit
Optional reconfiguration functions (alphabetically)
sancopy -duplicate (full copy sessions only) Creates a duplicate copydescriptor
sancopy -modify Changes parameters in a copydescriptor
sancopy -pause Pauses a SAN Copy session
sancopy -remove Deletes a copy descriptor
sancopy -resume Continues a paused, stoppedor failed session
sancopy -throttle Changes the throttle(execution rate) of an existing,running session
SAN Copy and its command line utilities
SAN Copy command functions 493

Table 48 naviseccli or navicli sancopy command functions, listed in order of use (continued)
Command Description
sancopy -unmark (incremental copy sessions only) Removes the existing mark inpreparation for inserting a newmark
sancopy -transfer Transfers control of a copydescriptor to the peer SP
sancopy -settings Gets or sets environmentalcontrol parameters
sancopy -updateconnections Updates system registrationinformation
sancopy -createCreates full and incremental SAN Copy sessions
PREREQUISITESFor naviseccli, you must have a user account on the system on which you want toexecute the command.
For navicli, you must have a username/host entry in the Unisphere SP agentconfiguration file to use this command.
DESCRIPTION
Note
In addition to all the sancopy -create command switches, the sancopy -create-incremental command uses the following optional switches: -changesonly, -linkbw, and -latency (See Incremental SAN Copy sessions in EMC VNX for Block
Concepts ).
The naviseccli or navicli sancopy command with the -create switch creates afull SAN Copy session. A full session copies all the data on the source LUN to thedestination logical units. When used with the optional -incremental switch, the -create command creates an incremental SAN Copy session. An incremental sessioncopies only the data that has changed since the last copy session. This commandsupports thin LUNs as either sources or targets in the systems, if the system executingthe CLI command (or the target system) is running a committed bundle that supports SanCopy with thin LUNs.
Note
The destination logical unit(s) must exist when you execute this command.
By default a descriptor does not start a session unless you specify the -start switch.
For information on logical units accessible to the host use the basic CLI commandlunmapinfo explained in the CLI reference manual.
SAN Copy and its command line utilities
494 EMC VNX Series 5.33 Command Line Interface Reference for Block

SYNTAX
sancopy -create [-incremental] -name sessionName
-srcwwn source-lun-wwn | -srclun source -sp sourcelunnumber[-device devicename]
-srcportwwn destportwwn destlunnumber
-destwwn dest-lun-wwn | -destlunnumber dest -sp destlunnumber|-destportwwn destportwwn destlunnumber [-start][-throttle n][-verify][-o]
OPTIONS
-name sessionNameSpecifies the SAN Copy session name. The name can be up to 64 characters andmust be unique on a per-system basis. The names you create persist until youremove them.
For incremental SAN Copy sessions, SAN Copy creates a corresponding reservedsession. The name assigned to the reserved session consists of the SAN Copysession name prefixed with the text "SANCopy_". This text is included in the 64-character limit. For example, if a SAN Copy session has the name june_update, thename of the corresponding reserved session is SANCopy_june_update.
-srcwwn source-lun-wwn
Note
For incremental sessions, the source LUN cannot be a SnapView snapshot, and itcannot be on a remote system. For incremental sessions, the source LUN must residein the SAN Copy system.
Specifies the World Wide Name (WWN) of the source logical unit (LUN or snapshot)that will participate in the session. For full copy sessions, the source logical unit canreside in either the SAN Copy system or the remote system. If the source logical unitdoes not reside in the system specified by the -h switch, all destination logical unitsmust reside in the system specified with -h.
By default, the connection type for the specified source logical unit will be set tofibrepreferred. This sets the connection type to fibre or iSCSI (if fibre pathcould not be found) each time you start or resume a session. You can change theconnection type using one of the following switches: -fibre or -iscsi.
Note
If the source logical unit does not reside in a remote system, setting the connectiontype will be ineffective.
-fibreSets the source logical unit’s connection type to fibre.
-iscsiSets the source logical unit’s connection type to iSCSI.
-srclun source-sp sourcelunnumber
SAN Copy and its command line utilities
sancopy -create 495

An alternate way of adding a source logical unit entry to the copy descriptor. Forsource-sp, specify the SP hostname (or SP IP address) that owns the source logicalunit. For sourcelunnumber, specify the logical unit number.
Note
For pre-FC4700 systems, if you use the -srclun source-sp sourcelunnumber
function, you must use -device devicename.
By default, the connection type for the specified source logical unit will be set tofibrepreferred. This sets the connection type to fibre or iSCSI (if fibre pathcould not be found) each time you start or resume a session. You can change theconnection type using one of the following switches: -fibre or -iscsi.
Note
If the source logical unit does not reside in a remote system, setting the connectiontype will be ineffective.
-fibreSets the source logical unit’s connection type to fibre.
-iscsiSets the source logical unit’s connection type to iSCSI.
-device devicename
Note
This command is required for pre-FC4700 systems.
Specifies the device name of the source LUN or destination LUN.
-srcportwwn destportwwn destlunnumberValid only for specifying source LUNs that reside in supported non-EMC systems. Forsrcportwwn, specify the World Wide Name of the SP port on the source system thatowns the source LUN; for srclunnumber specify the number of the source LUN.
-destwwn dest-lun-wwnSpecifies which logical unit will be the destination of the copy. You can specify morethan one destination logical unit if you want more than one copy of the sourcelogical unit. If the destination logical units are not reachable by the client system,and you did not use the -o function, the CLI will display a warning and ask forconfirmation.
By default, the connection type for the specified destination logical unit will be set tofibrepreferred. This sets the connection type to fibre or iSCSI (if a fibre pathcould not be found) each time you start or resume a session. You can change theconnection type with one of the following switches: -fibre or -iscsi.
Note
If the destination logical unit does not reside in a remote system, setting theconnection type will be ineffective.
-fibreSets the destination logical unit’s connection type to fibre.
-iscsiSets the destination logical unit’s connection type to iSCSI.
-destlunnumber dest-sp destlunnumber
SAN Copy and its command line utilities
496 EMC VNX Series 5.33 Command Line Interface Reference for Block
An alternate way of adding a destination LUN entry to the copy descriptor. For dest-sp, specify the SP hostname (or SP IP address) that owns the destination logicalunit; for destlunnumber, specify the LUN number. As with -destwwn, you canspecify more than one destination logical unit if you want more than one copy of thesource logical unit.
If you specify the -verify function, and the software cannot reach the SP or findthe logical unit on the SP, it returns an error.
By default, the connection type for the specified destination logical unit will be set tofibrepreferred. This sets the connection type to fibre or iSCSI (if a fibre pathcould not be found) each time you start or resume a session. You can change theconnection type with one of the following switches: -fibre or -iscsi.
Note
If the destination logical unit does not reside in a remote system, setting theconnection type will be ineffective.
-fibreSets the destination logical unit’s connection type to fibre.
-iscsiSets the destination logical unit’s connection type to iSCSI.
-destportwwn destportwwn destlunnumberValid only for specifying destination LUNs that reside in supported non-EMCsystems. For destportwwn, specify the World Wide Name of the SP port on thedestination system that owns the destination LUN; for destlunnumber specify thenumber of the destination LUN.
-startStarts a SAN Copy session using this copy descriptor. By default, the -createcommand does not start a session.
-throttle nSpecifies the I/O rate of the copy. The maximum value is 10 and the minimum valueis 1. If you omit this switch, the default value is 6.
-verifyVerifies that SAN Copy can access all of the logical units specified in the -createcommand.
-oSuppresses a message asking you to confirm that you want to create a session now.
-incrementalThe following optional switches are used only with the sancopy -create -incremental command:
-changesonlyIf the source LUN and destination LUNs are synchronized when you create thesession, use this switch. When you start the session, SAN Copy will copy only thechanges that have occurred to the source LUN since the initial synchronization, andany subsequent sessions will copy only the changes.
If the source LUN and destination LUNs are not synchronized (or you are unsure ofthe copy state), do not use this switch. The first time you run the session, SAN Copywill copy the entire source LUN to the destination LUNs. Any subsequent sessionswill copy only the changes.
-linkbwSpecifies the available link bandwidth for the copy session. You can use the entirebandwidth of your network connection for incremental SAN Copy sessions, or youcan specify only a portion of it.
SAN Copy and its command line utilities
sancopy -create 497

-latencyThe amount of time it takes to transmit a block of data to its destination expressedin milliseconds. Valid values are auto (SAN Copy computes the latency value), or adecimal number with no maximum limit. The default value is auto.
Note
If you create and start incremental sessions, and the copy is performed over a linkthat is slower than Fibre Channel, SAN Copy uses the link bandwidth and latencyvalues to calculate the optimum buffer space for the session.
EXAMPLEFull session example: For SP ss1_spa, the -create command creates a full copysession named copy_lun66 that defines source logical unit 66 on this SP and destinationlogical unit 22 on host SP ss5_spa. The -start command then starts the copy sessionand the -throttle command specifies a throttle value of 3 for this session.
Incremental session example: The command below creates an incremental copy session named copy_77 that defines logical unit 1 on SP 10.22.33.44 as the source and logical unit 22 on SP ss5_spa as the destination. The -linkbw command specifies a bandwidth value of 100 Mbits/sec., and the latency value defaults to auto.
naviseccli -h ss1_spa sancopy -create -name copy_lun66 -srclunss1_spa 66 -destlunnumber ss5_spa 22 - start -throttle 3
naviseccli -h 10.22.33.44 sancopy -create -incremental -namecopy_77 -srclun 10.22.33.44 1 -destlunnumber ss5_spa 22 -linkbw 100
OUTPUTIf the version of VNX OE for Block software running on the SP does not support thiscommand, a command is not supported error message is printed to stderr.Other errors are:
DMF_NAME_SPECIFIED_NOT_UNIQUEDMF_CREATE_PARAMSDMF_SRCLUN_WWN_AND_NUMBER_SPECIFIEDDMF_DESTLUN_WWN_AND_NUMBER_SPECIFIEDDMF_INVALID_THROTTLE_VALUE
sancopy -destinfoDisplays information about destination logical units for a running session
PREREQUISITESFor naviseccli, you must have a user account on the system on which you want toexecute the command.
For navicli, you must have a username/host entry in the Unisphere SP agentconfiguration file to use this command.
SAN Copy and its command line utilities
498 EMC VNX Series 5.33 Command Line Interface Reference for Block

DESCRIPTION
Note
In addition to all the sancopy -destinfo command switches listed above,
incremental copy sessions use the optional -syncstate switch.
The naviseccli or navicli sancopy command with -destinfo gets sessionstatus from the destination point of view.
Note
If you have only full copy sessions, issuing the -destinfo command with no argumentsdisplays all destination information for all copy sessions belonging to the specified SP.
If you have both full and incremental copy sessions, and you issue the -destinfocommand with no arguments, some parameters for full sessions and all parametersspecific to incremental sessions will not be displayed. In order to see all parameters forboth full and incremental sessions, you must use the -destinfo -all command.
We recommend that you use the -destinfo -all command for both full andincremental sessions.
SYNTAXsancopy-destinfo [-peer][-descriptorid descriptorid] | [-name name][-destwwn dest-lun-wwn] [-destlunnumber destsp destlunnumber][-destportwwn destportwwndestlunnumber][-complete][-counts][-failure][-time][-connectiontype][-all]OPTIONS
-peerLists all destination information for the peer SP.
-descriptorid descriptorid | -name nameUsed alone, -descriptorid or -name displays descriptor IDs or names of allcopy descriptors of the specified SP; -descriptorid with an ID or -name with aname lists the status (WWN, failure status, transfer count, percent complete andfailure time) of all destinations of the copy descriptor.
-destwwn dest-lun-wwnUsed alone, -destwwn displays the WWNs of all destinations of the descriptors. -destwwn with a WWN lists the status of the specified destination logical unit.
-destlunnumber destsp destlunnumberThe switch -destlunnumber cannot be used alone. When used with the SP nameand LUN number, it displays the status of the specified destination logical unit.
-destportwwn destportwwn lunnumberThe switch -destportwwn displays the status of the specified destination LUN thatresides in a supported non-EMC system.
-completeDisplays the percentage complete of the copy session when any destination logicalunit(s) failed. Displays N/A when there is no failure.
-counts
SAN Copy and its command line utilities
sancopy -destinfo 499

Displays the number of disk blocks transferred when any destination logical unitsfailed. Displays N/A when there is no failure.
-failureDisplays failure status or No Failure for destination logical unit(s). For moreinformation, also use the -time, -counts, and/or -complete switches.
-timeDisplays the time when any destination logical unit(s) failed. Displays N/A whenthere is no failure.
-connectiontypeDisplays the requested and the actual connection type used for all destinationlogical units participating in the copy session.
Valid values for Requested Connection Type are fibre, iSCSI or fibre preferred. Validvalues for Actual Connection Type are fibre, iSCSI, undetermined and N/A (fordestination logical units within the same system).
-allDisplays all destination information for both full and incremental copy sessionsbelonging to the specified SP.
Note
If you have both full and incremental copy sessions, and you issue the -destinfocommand with no arguments, some parameters for full sessions and all parametersspecific to incremental sessions will not be displayed. In order to see all parametersfor both full and incremental sessions, use the destinfo -all command.
The following optional switch is used only with incremental sessions:
-syncstateDisplays the state of the data of the specified destination logical unit with respect tothe source logical unit. Valid states are N/A, Inconsistent, and Initial Copy Required.
EXAMPLEThis example displays the output for a full copy session using the -destinfo commandwithout the -all switch. In order to display all the information for an incremental copysession, use the -destinfo -all command.
naviseccli -h dm340c-16a sancopy -destinfo -connection type
Copy Descriptor Name: Std0_1Copy Descriptor ID: 7202Owner: SPA
Requested Connection Type: Fibre PreferredActual Connection Type: N/A
Requested Connection Type: Fibre PreferredActual Connection Type: N/A
In the example below, the session includes two destination logical units. The requestedconnection type and the actual connection type are displayed for both destinations.
naviseccli -h ss1_spa sancopy -destinfo
Copy Descriptor Name: DMHOST7_SAN005_10.6.92.169_00_p000Copy Descriptor ID: 8Owner: SPBCopy Descriptor Type: IncrementalCopy Whole LUN: NO
SAN Copy and its command line utilities
500 EMC VNX Series 5.33 Command Line Interface Reference for Block

Source LUN WWN: 60:06:01:60:0E:C2:1C:00:84:C4:31:B2:1C:24:DC:11Source PortWWN and LUN: N/ANumber of Blocks to Copy: 0Size of source LUN: 8388608Number Of Destinations: 2Destination LUN WWN: 60:06:01:60:61:31:19:00:FD:C8:6D:54:1C:24:DC:11, 60:06:01:60:61:31:19:00:6E:F0:C3:61:1C:24:DC:11Destination PortWWN and LUN: N/ASession Status: CompleteInitial Throttle: 4Current Throttle: 4Transfer Count: 8388608Percent Complete: 100Start Time: 06/27/07 10:51:05Completion Time: 06/27/07 12:55:12Duration: 2 hr 4 min 7 secFailure Status: No FailureMarked: NOMark Time: N/ABlocks modified since mark: N/ALink Bandwidth (Mbps): 1.024Effective Bandwidth (Mbps): 0.719Latency (msec): AutoMeasured Latency (msec): 6.140Requested Connection Type: Fibre PreferredActual Connection Type: N/A
OUTPUTIf the version of VNX OE for Block software running on the SP does not support thiscommand, a Command is not supported error message is printed to stderr.
sancopy -duplicateMakes a copy of a copy descriptor
PREREQUISITESFor naviseccli, you must have a user account on the system on which you want to executethe command.
For navicli, you must have a username/host entry in the Unisphere SP agent configurationfile to use this command.
DESCRIPTIONThe naviseccli or navicli sancopy command with -duplicate makes a copy ofan existing copy descriptor. You can then modify the copy as needed (-modify). Thecopy descriptor that you want to duplicate can be part of an active SAN Copy session. Youdo not need to stop the copy descriptor before duplicating it.
Note
The sancopy -duplicate command is not supported for incremental SAN Copy
sessions.
SYNTAXsancopy -duplicate -descriptoriddescriptorid|-name nameOPTIONS
-descriptorid descriptorid | -name nameIdentifies the descriptor you want to duplicate.
SAN Copy and its command line utilities
sancopy -duplicate 501

EXAMPLEThis command duplicates SP ss1_spa’s copy descriptor copy_lun_66 and assigns adefault name to the new descriptor - copy of xxx, where xxx is the name of the descriptoryou are duplicating, for example, a copy of copy_lun_66.
naviseccli -h ss1_spa sancopy -duplicate -name copy_lun_66
Note
To use this command with navicli, replace naviseccli with navicli.
OUTPUTIf the version of VNX OE for Block running on the SP does not support this command, aCommand is not supported error message is printed to stderr. Other errors are:
DMF_NAME_AND_UID_SPECIFIEDDMF_NAME_OR_UID_REQUIREDDMF_UNKNOWN_DESCRIPTOR
sancopy -infoDisplays information about copy descriptors
PREREQUISITESFor naviseccli, you must have a user account on the system on which you want to executethe command.
For navicli, you must have a username/host entry in the Unisphere SP agent configurationfile to use this command.
DESCRIPTION
Note
In addition to all the sancopy -info command switches listed above, incremental
copy sessions use the following optional switches: -copywholelun, -markstatus, -srcsize, -link (see Incremental SAN Copy sessions in EMC VNX for Block Concepts ).
The naviseccli or navicli sancopy command with -info displays information oncopy sessions. It differs from -destinfo in that -destinfo gets information on thedestination logical units.
Note
If you have only full copy sessions, issuing the -info command with no argumentsdisplays all destination information for all copy sessions belonging to the specified SP.
If you have both full and incremental copy sessions, and you issue the -info commandwith no arguments, some parameters for full sessions and all parameters specific toincremental sessions will not be displayed. In order to see all parameters for both fulland incremental sessions, use the -info -all command.
We recommend that you use the -info -all command for both full and incrementalsessions.
SYNTAXsancopy -info [-peer][-descriptorid descriptorid|-name name]
SAN Copy and its command line utilities
502 EMC VNX Series 5.33 Command Line Interface Reference for Block

[-srcwwn][-length][-numdests][-dests][-sessionstatus][-throttle][-counts][-complete][-time][-failure][-duration][-type][-connectiontype][-all]OPTIONS
-peerLists all destination information on the peer SP.
-descriptorid descriptoridLists the descriptor IDs of all sessions belonging to the specified SP when you issuethis command without a specific descriptor ID.
Lists the status of the specified session when you issue this command with aspecific descriptor ID.
-name nameLists the names of all copy descriptors belonging to the specified SP when you issuethis command without a specific copy descriptor name.
Lists the status of the specified copy descriptor when you issue this command with aname.
-srcwwnDisplays the WWNs of all source logical units.
-lengthDisplays the number of blocks to copy. Displays N/A if the descriptor was createdusing the source WWN.
-numdestsDisplays the number of destination logical units.
-destsDisplays the WWNs of all destinations logical units in the specified descriptor.
-sessionstatusDisplays the status of the session associated with the copy descriptor: not started,complete, stop, pause, or failed.
-throttleDisplays the current throttle value for the copy session.
-countsDisplays the number of disk blocks transferred.
-completeDisplays the percentage complete of the copy session.
-timeDisplays the time when the copy completes.
-failureDisplays failure status or No Failure for the copy descriptor’s source anddestination logical units.
-durationDisplays the completion time and duration of the session.
-type
SAN Copy and its command line utilities
sancopy -info 503

Displays the session type - Full or Incremental.-connectiontype
Displays the requested and the actual connection type used for the source logicalunit participating in the copy session.
Valid values for Requested Connection Type are fibre, iSCSI or fibre preferred. Validvalues for Actual Connection Type are fibre, iSCSI, undetermined and N/A (for sourcelogical units within the same system).
-copywholelunDisplays whether the session will copy the entire source logical unit or only changesto it. If Yes, the session copies the entire logical unit; if No, it copies only thechanges.
-markstatus
Note
If a session is marked, SAN Copy creates a point-in-time copy of the changes thathave taken place since the last copy session up to the time the session is marked.
Displays whether the session has been marked, and if yes, displays the time of themark, and the number of blocks of data that have changed since the mark occurred(these data blocks will not be copied when the session starts).
-srcsizeDisplays the size, in blocks, of the source logical unit.
-linkDisplays the status of any network link utilization performance parameters asfollows:
Link Bandwidth — Link bandwidth of the network connection set when the sessionwas created. Value is in Mb/sec.
Effective Bandwidth — Actual link bandwidth for the session measured by SAN Copy.
Latency — Displays the latency value set when the session was created or thedefault value of Auto. Latency is the amount of time it takes to transmit a block ofdata to its destination expressed in milliseconds.
Measured Latency — The actual measured latency of the session expressed inmilliseconds.
-allDisplays all session information for both full and incremental copy sessionsbelonging to the specified SP.
Note
You must use the -destinfo -all command to display information that isspecific to incremental sessions. We recommend that you use the -destinfo -all command for both full and incremental sessions.
The information displayed with the -all command may change in future revisionsof the software.
EXAMPLEThis command displays the status of all copy descriptors for both SPs, but does notinclude any information specific to incremental copy sessions. The format is as follows:
SAN Copy and its command line utilities
504 EMC VNX Series 5.33 Command Line Interface Reference for Block

naviseccli sancopy -info -all
Copy Descriptor name: session1 Copy Descriptor ID: 4Owner: SP ACopy Descriptor Type: FullSource LUN WWN: 60:06:01:60:72:70:18:00:5A:FE:9A:58:0E:5A:DB:11 Source PortWWN and LUN: N/A Number of Blocks to Copy: 4194304 Number Of Destinations: 1Destination LUN WWN: 60:06:01:60:72:70:18:00:5B:FE:9A:58:0E:5A:DB:11 Destination PortWWN and LUN: N/ASession Status: A session was active when the Storage Processor (SP) rebooted. The session may be restarted. Initial Throttle: 6 Current Throttle: 4 Transfer Count: 158720Percent Complete: 3 Start Time: 10/12/06 16:54:57 Completion Time: 10/12/06 16:59:44 Duration: 4 min. 47 sec Failure Status: N/A
Copy Descriptor name: ses_change_ar Copy Descriptor ID: 1 Owner: SP BCopy Descriptor Type: FullSource LUN WWN: 60:06:01:60:72:70:18:00:C4:AD:19:66:0E:5A:DB:11 Source PortWWN and LUN: N/A Number of Blocks to Copy: 4194304 Number Of Destinations: 1Destination LUN WWN: 60:06:01:60:72:70:18:00:C45AD:19:66:0E:5A:DB:11Destination PortWWN and LUN: N/ASession Status: Session is paused.Initial Throttle: 6Current Throttle: 6Transfer Count: 799744Percent Complete: 19Start Time: 10/12/06 17:17:37 Completion Time: N/ADuration: N/A Failure Status: No Failure Copy Descriptor name: SAN000_10.6.84.185_00_p1608Copy Descriptor ID: 21646Copy Descriptor Type: FullSource LUN WWN: 60:06:01:60:E3:FA:15:00:0E:4E:70:A1:8B:C5:DA:11Source PortWWN and LUN: 60:06:01:60:E3:FA:15:00:0E:4E:70:A1:8B:C5:DA:11 Number of Blocks to Copy: 2097152Number Of Destinations: 1Destination LUN WWN: 60:06:01:60:E3:FA:15:00:0F:4E:70:A1:8B:C5:DA:11Destination PortWWN and LUN: N/ASession Status: CompleteInitial Throttle: 4 Current Throttle: 4 Transfer Count: 2097152Percent Complete: 100Start Time: 04/19/06 09:55:39 Completion Time: 04/19/06 09:55:57 Duration: 18 sec Failure Status: No Failure
OUTPUTIf the version of VNX OE for Block software running on the SP does not support thiscommand, a Command is not supported error message is printed to stderr.
SAN Copy and its command line utilities
sancopy -info 505

sancopy -markFor incremental sessions only--Makes a point-in-time copy of changes to the sourcelogical unit since the last copy session.
PREREQUISITESFor naviseccli, you must have a user account on the system on which you want to executethe command.
For navicli, you must have a username/host entry in the Unisphere SP agent configurationfile to use this command.
DESCRIPTIONThe naviseccli or navicli sancopy command with -mark creates a point-in-timecopy of the changes that have taken place since the last copy session up to the time thesession is marked. You can mark the session at any time before you start the session, orSAN Copy will mark the session at the time the session starts. When you start a markedsession, all changes made to the source LUN up to the time of the mark will be copied tothe destination logical units.
Note
Before marking the session, make sure that you prepare the source logical unit asdescribed in the section, Preparing logical units for a SAN Copy session on page 490.Once you receive confirmation that the mark operation was successful, you can resumeI/O to the source logical unit.
SYNTAXsancopy -mark -descriptoriddescriptorid|-namesessionNameOPTIONS
-descriptorid descriptorid | -name sessionNameIdentifies the session you want to mark.
EXAMPLEThis command marks the SAN Copy session named monday. When the session isstarted, it copies only the changes to the source logical unit that have taken place sincethe last copy session up to the time of the mark.
naviseccli -h 10.11.22.33 sancopy -mark -name monday
Note
To use this command with navicli, replace naviseccli with navicli.
OUTPUTIf the version of VNX OE for Block software running on the SP does not support thiscommand, a Command is not supported error message is printed to stderr.Other errors are:
DMF_NAME_AND_UID_SPECIFIED DMF_NAME_OR_UID_REQUIREDDMF_UNKNOWN_DESCRIPTOR
SAN Copy and its command line utilities
506 EMC VNX Series 5.33 Command Line Interface Reference for Block

sancopy -modifyChanges the definitions for a copy session
PREREQUISITESFor naviseccli, you must have a user account on the system on which you want to executethe command.
For navicli, you must have a username/host entry in the Unisphere SP agent configurationfile to use this command.
DESCRIPTIONThe naviseccli or navicli sancopy command with -modify changes an existingSAN Copy session. This command will fail if the session has started or is in the pausedstate. You must stop the session before modifying the session. This command supportsthin LUNs only when the system executing the CLI command (or the target system) isrunning a committed bundle that supports San Copy with thin LUNs.
The new session information will not take effect until you start a new session.
You must include a copy descriptor ID or name and one or more switches to indicatechanges.
Note
If you are modifying an incremental SAN Copy session, the following optional switchesare available: -copywholelun, -chglinkbw, and -chglatency.
SYNTAX
sancopy -modify -descriptorid descriptor-id|-name name[-adddestbywwn dest-lun-wwn][-adddestbylunnumber destsp destlunnumber][-adddestbyportwwn destportwwn destlunnumber][-chgdestconnectiontypebywwn destwwn][-chgdestconnectiontypebylunnumber destspname destlunmumber][-chgname newname][-chgsrcbylunnumber srcspname srclunnumber][-chgsrcbywwn srcwwn][-chgsrcbyportwwn srcportwwn srclunnumber][-chgsrcconnectiontype srcwwn][-chgsessiontype][-o][-rmdestbylunnumber destsp destlunnumber][-rmdestbywwn dest-lun-wwn][-rmdestbyportwwn destportwwn destlunnumber][-throttle n]
OPTIONS
-descriptorid descriptor-id | -name nameIdentifies the descriptor you want to change.
-adddestbywwn dest-lun-wwnAdds a destination logical unit to the descriptor by World Wide Name.
By default, the connection type for the specified logical unit will be set tofibrepreferred. This sets the connection type to fibre or iSCSI (if fibre path
SAN Copy and its command line utilities
sancopy -modify 507

could not be found) each time you start or resume a session. You can change theconnection type using one of the following switches: -fibre or -iscsi.
Note
If the logical unit does not reside in a remote system, setting the connection type willbe ineffective.
-fibreSets the logical unit’s connection type to fibre.
-iscsiSets the logical unit’s connection type to iSCSI.
-adddestbylunnumber destsp destlunnumberAdds a destination logical unit to the descriptor by destination SP (specify the SPname or IP address) and destination logical unit number.
By default, the connection type for the specified logical unit will be set tofibrepreferred. This sets the connection type to fibre or iSCSI (if fibre pathcould not be found) each time you start or resume a session. You can change theconnection type with one of the following switches: -fibre or -iscsi.
Note
If the logical unit does not reside in a remote system, setting the connection type willbe ineffective.
-fibreSets the logical unit’s connection type to fibre.
-iscsiSets the logical unit’s connection type to iSCSI.
-adddestbyportwwn destportwwn destlunnumberAdds only destination logical units that reside in supported non-EMC systems. Fordestportwwn, specify the World Wide Name of the SP port on the destination systemthat owns the destination LUN; for destlunnumber specify the number of thedestination LUN.
-chgdestconnectiontypebywwn destwwnChanges the connection type of the destination logical unit using its World WideName, destwwn.
You can change the connection type of the logical unit using one of the followingswitches: -fibre, -iscsi, or -fibrepreferred.
Note
If the destination logical unit does not reside in a remote system, setting theconnection type will be ineffective.
-fibreSets the destination logical unit’s connection type to fibre.
-iscsiSets the destination logical unit’s connection type to iSCSI.
-fibrepreferredSets the destination logical unit’s connection type to fibre or iSCSI (if fibre pathcould not be found).
-chgdestconnectiontypebylunnumber destspname destlunnumberChanges the connection type of the destination logical unit using its destination SP(specify the SP name or IP address), destspname, and its destination logical unitnumber, destlunnumber.
SAN Copy and its command line utilities
508 EMC VNX Series 5.33 Command Line Interface Reference for Block

You can change the connection type of the logical unit with one of the followingswitches: -fibre, -iscsi, or -fibrepreferred.
Note
If the destination logical unit does not reside in a remote system, setting theconnection type will be ineffective.
-fibreSets the destination logical unit’s connection type to fibre.
-iscsiSets the destination logical unit’s connection type to iSCSI.
-fibrepreferredSets the destination logical unit’s connection type to fibre or iSCSI (if a fibre pathcould not be found).
-chgname newname
Note
Not available for incremental sessions.
Changes the descriptor name to newname.
-chgsrcbylunnumber srcspname srclunnumber
Note
Not available for incremental sessions.
Changes the source logical unit in the session owned by source SP (for srcspname,specify the SP name or IP address) and source logical unit number.
By default, the connection type for the specified source logical unit will be set tofibrepreferred. This sets the connection type to fibre or iSCSI (if fibre pathcould not be found) each time you start or resume a session. You can change theconnection type with one of the following switches: -fibre or -iscsi.
Note
If the source logical unit does not reside in a remote system, setting the connectiontype will be ineffective.
-fibreSets the source logical unit’s connection type to fibre.
-iscsiSets the source logical unit’s connection type to iSCSI.
-chgsrcbywwn srcwwn
Note
Not available for incremental sessions.
Changes the source logical unit in the descriptor using the World Wide Name of thenew source logical unit.
By default, the connection type for the specified source logical unit will be set tofibrepreferred. This sets the connection type to fibre or iSCSI (if a fibre pathcould not be found) each time you start or resume a session. You can change theconnection type with one of the following switches: -fibre or -iscsi.
SAN Copy and its command line utilities
sancopy -modify 509

Note
If the source logical unit does not reside in a remote system, setting the connectiontype will be ineffective.
-fibreSets the source logical unit’s connection type to fibre.
-iscsiSets the source logical unit’s connection type to iSCSI.
-chgscrbyportwwn srcportwwn srclunnumberValid only for changing source logical units that reside in supported non-EMCsystems. For srcportwwn, specify the World Wide Name of the SP port on the sourcesystem that owns the source LUN; for srclunnumber specify the number of the sourceLUN.
-chgsrcconnectiontype srcwwnChanges the connection type of the source logical unit using its World Wide Name(srcwwn).
You can change the connection type of the logical unit with one of the followingswitches: -fibre, -iscsi, or -fibrepreferred.
Note
If the logical unit does not reside in a remote system, setting the connection type willbe ineffective.
-fibreSets the session connection type to fibre.
-iscsiSets the session connection type to iSCSI.
-fibrepreferredFor connections between combo systems (Fibre Channel and iSCSI), sets theconnection type to fibre, if possible. If not possible, uses iSCSI.
-chgsessiontypeChanges the type of the SAN Copy session — incremental or full.
If you change the session type from full to incremental, the following optionalswitches are available: -changesonly, -linkbw, and -latency.
-changesonlyIf the source LUN and destination LUNs are synchronized, use this switch. When youstart the session, SAN Copy will copy only the changes that have occurred to thesource LUN since the initial synchronization, and any subsequent sessions will copyonly the changes.
If the source LUN and destination LUNs are not synchronized (or you are unsure ofthe copy state), do not use this switch. The first time you run the session, SAN Copywill copy the entire source LUN to the destination LUNs. Any subsequent sessionswill copy only the changes.
-linkbwSpecifies the available link bandwidth for the copy session. You can use the entirebandwidth of your network connection for incremental SAN Copy sessions, or youcan specify only a portion of it. The default value is .15 mbps (equivalent to a T1line).
-latencySpecifies the latency value for the incremental session. Latency is the amount oftime it takes to transmit a block of data to its destination expressed in milliseconds.Valid values are auto (SAN Copy computes the latency value), or a decimal number
SAN Copy and its command line utilities
510 EMC VNX Series 5.33 Command Line Interface Reference for Block
with no maximum limit. The default value is auto. Entering a 0 latency value is theequivalent to entering auto.
Note
If you create and start incremental sessions, and the copy is performed over a linkthat is slower than Fibre Channel, SAN Copy uses the link bandwidth and latencyvalues to calculate the optimum buffer space for the session.
-oSuppresses a confirmation message describing the descriptor.
-rmdestbylunnumber destsp destlunnumberRemoves a destination logical unit from the specified descriptor by destination SP(specify the SP name or IP address) and destination logical unit number.
-rmdestbywwn dest-lun-wwnRemoves a destination logical unit from the specified descriptor by World WideName.
-rmdestbyportwwn destportwwn destlunnumberValid only for removing destination logical units that reside in supported non-EMCsystems. For destportwwn, specify the World Wide Name of the SP port on thedestination system that owns the destination LUN; for destlunnumber specify thenumber of the destination LUN.
-throttle nChanges the I/O rate to n (valid values 1 through 10). The default value is 6. Tochange the throttle value of an active session, use the command sancopy -throttle.
For incremental SAN Copy sessions, the following optional switches are available.
-copywholelunSpecifies that SAN Copy copy the entire contents of the source logical unit the nexttime the session is run.
-chglinkbwChanges the link bandwidth for the specified session.
The default value is .15 mbps (equivalent to a T1 line).
-chglatencyChanges the latency value for the specified session. Latency is the amount of time ittakes to transmit a block of data to its destination expressed in milliseconds. Validvalues are auto (SAN Copy computes the latency value), or a decimal number with nomaximum limit. The default value is auto.
EXAMPLEFor SP ss1_spa, copy descriptor copy_66 is a full copy session. This command adds thedestination logical unit whose World Wide Name is 60:06:01:6B:61:09:00:00:6A:6F:9F:ED:0B:A3:D6:11. For SP ss1_spa, copy descriptor copy_77 is an incremental copysession. The next time session copy_77 is run, SAN Copy will copy the contents of theentire source LUN to the destinations.
Note
To use this command with navicli, replace naviseccli with navicli.
naviseccli -h ss1_spa sancopy -modify -name copy_66 -adddestbywwn60:06:01:6B:61:09:00:00:6A:6F:9F:ED:0B:A3:D6:11
naviseccli -h ss1_spa sancopy -modify -name copy_77 -copywholelun
SAN Copy and its command line utilities
sancopy -modify 511
OUTPUTIf the version of VNX OE for Block software running on the SP does not support thiscommand, a Command is not supported error message is printed to stderr.Other errors are:
DMF_NAME_AND_UID_SPECIFIEDDMF_NAME_OR_UID_REQUIREDDMF_UNKNOWN_DESCRIPTORDMF_INVALID_THROTTLE_VALUEDMF_REMOVED_DEST_DOESNOT_EXIST
Errors returned from the driver or agent are:
UNKNOWN_DESCRIPTOR_IDUNKNOWN_DESCRIPTOR_NAMESESSION_NAME_EXISTS
sancopy -pauseSuspends I/O in an active SAN Copy session
PREREQUISITESFor naviseccli, you must have a user account on the system on which you want to executethe command.
For navicli, you must have a username/host entry in the Unisphere SP agent configurationfile to use this command.
DESCRIPTIONThe naviseccli or navicli sancopy command with -pause pauses an existing SANCopy session. You must specify the descriptor ID or name.
To continue the paused session, use the sancopy -resume function.
SYNTAXsancopy -pause -descriptorid descriptor -id|-name nameOPTIONS
-descriptorid descriptor-id | -name nameIdentifies the descriptor whose session you want to pause.
EXAMPLEFor SP ss1_spa, this command pauses the session with the copy_lun_ 66 descriptor.
naviseccli -h ss1_spa sancopy -pause -name copy_lun_66
Note
To use this command with navicli, replace naviseccli with navicli.
OUTPUTIf the version of VNX OE for Block software running on the SP does not support thiscommand, a Command is not supported error message is printed to stderr.Other errors are:
DMF_NAME_AND_UID_SPECIFIEDDMF_NAME_OR_UID_REQUIREDDMF_UNKNOWN_DESCRIPTOR
SAN Copy and its command line utilities
512 EMC VNX Series 5.33 Command Line Interface Reference for Block

Errors returned from the driver or agent are:
UNKNOWN_DESCRIPTOR_IDUNKNOWN_DESCRIPTOR_NAMEINVALID_SIZE
sancopy -removeDeletes a copy session.
PREREQUISITESFor naviseccli, you must have a user account on the system on which you want to executethe command.
For navicli, you must have a username/host entry in the Unisphere SP agent configurationfile to use this command.
DESCRIPTIONThe naviseccli or navicli sancopy command with -remove deletes one or allpreviously stored copy sessions. A copy session cannot be removed if it is currentlyactive. An active copy session must complete the copy first or be stopped.
If you omit the override -o option, the CLI displays a message asking you to confirm theremoval of the copy session.
This command can use only one of the following switches at a time:
-descriptorid; -name; -allSYNTAXsancopy -remove -descriptorid descriptor-id|-name name|-all [-o]OPTIONS
-descriptorid descriptor-id| -name nameIdentifies the descriptor you want to remove.
-allDirects the CLI to remove all descriptors on the SP.
-oSuppresses a message confirming the removal of the descriptor.
EXAMPLEFor SP ss1_spa, this command deletes the copy descriptor named copy_lun_80.naviseccli -h ss1_spa sancopy -remove -name copy_lun_80
Note
To use this command with navicli, replace naviseccli with navicli.
Do you really want to remove the copy descriptor(y/n)[n]? y
SAN Copy and its command line utilities
sancopy -remove 513

OUTPUTIf the version of VNX OE for Block software running on the SP does not support thiscommand, a Command is not supported error message is printed to stderr.Other errors are:
DMF_NAME_AND_UID_SPECIFIED DMF_NAME_OR_UID_REQUIREDDMF_UNKNOWN_DESCRIPTOR
Errors returned from the driver or agent are:
UNKNOWN_DESCRIPTOR_ID
sancopy -resumeContinues I/O in a SAN Copy session
PREREQUISITESFor naviseccli, you must have a user account on the system on which you want to executethe command.
For navicli, you must have a username/host entry in the Unisphere SP agent configurationfile to use this command.
DESCRIPTIONThe naviseccli or navicli sancopy command with -resume resumes an existingSAN Copy session that was paused, stopped, or failed. If the copy session was paused, itwill start at the paused point.
If the copy session was stopped or failed, the -resume command will restart the copysession from the latest checkpoint (explained in the settings command). If thecheckpoint feature is disabled (the checkpoint was set to disable), the copy session willrestart from the beginning.
You must specify the descriptor ID or name.
SYNTAXsancopy -resume -descriptorid descriptor-id | -name nameOPTIONS
-descriptorid descriptor-id | -name nameIdentifies the descriptor whose session you want to resume.
EXAMPLEFor SP ss1_spa, this command resumes the sancopy_lun_66 copy session.
naviseccli -h ss1_spa sancopy -resume -name copy_lun_66
Note
To use this command with navicli, replace naviseccli with navicli.
SAN Copy and its command line utilities
514 EMC VNX Series 5.33 Command Line Interface Reference for Block

OUTPUTIf the version of VNX OE for Block software running on the SP does not support thiscommand, a Command is not supported error message is printed to stderr.Other error messages are:
DMF_NAME_AND_UID_SPECIFIEDDMF_NAME_OR_UID_REQUIREDDMF_UNKNOWN_DESCRIPTOR
Errors returned from the driver or agent are:
UNKNOWN_DESCRIPTOR_IDUNKNOWN_DESCRIPTOR_NAMESESSION_ALREADY_IN_PROGRESS
sancopy -settingsLists or changes SAN Copy environmental parameters
PREREQUISITESFor naviseccli, you must have a user account on the system on which you want to executethe command.
For navicli, you must have a username/host entry in the Unisphere SP agent configurationfile to use this command.
DESCRIPTIONThe naviseccli or navicli sancopy command with -settings gets and sets fourSAN Copy environmental control parameters :
l the maximum number of concurrent active sessions
l a checkpoint interval for session status
l number of buffers per session
l buffer size
To find the current settings, use the -list switch; to change a setting, omit -list andspecify the setting.
If you do not change the setting specifications, the software uses default values.
SYNTAX
sancopy -settings -list
sancopy -settings [-setmax MaxNumSessions][-setcheckpoint CheckpointInterval][-setbufsize buffersize][-setbufnum buffervalue]
OPTIONS
-listDisplays the current environmental parameter settings.
-setmax maxNumSessionsSets the maximum number of SAN Copy sessions. The maximum number of sessionsdepends on the system type.
-setcheckpoint CheckpointInterval
SAN Copy and its command line utilities
sancopy -settings 515

Sets the checkpoint interval in minutes (values 5, 10, 15, 20, 25, 30, 35, 40, 45, 50,55, 60, 65, 70, 75, 80, 85, or 90) or, with the literal Disable, disables the checkpointfeature. By default, checkpointing is enabled with a value of 10 minutes.
The SAN Copy software can track the progress of a copy session by checkpointinterval. If a session fails while checkpointing is enabled, then after correcting theproblem, you can direct the software to resume (-resume function). It will continuecopying from the last checkpoint, if possible. If checkpointing is disabled, or ifresuming is not possible, you can start copying from the beginning.
-setbufsize buffersizeSpecifies the maximum buffer size to be used by SAN Copy sessions on a FibreChannel connection. The default buffer size is 1024 blocks. The minimum buffer sizeis 64 KB.
-setbufnum buffernumberSpecifies the maximum number of buffers to be used by SAN Copy sessions on aFibre Channel connection. The default number is 4, and the minimum is 1.
EXAMPLEFor SP ss1_spa, this command lists the current value for maximum number of sessions,checkpoint interval, number of buffers per session, and buffer size. For SP ss1_spa, thiscommand changes the checkpoint interval to 45 minutes. For SP ss1_spa, thiscommand changes the number of buffers to 3.
Note
To use this command with navicli, replace naviseccli with navicli.
naviseccli -h ss1_spa sancopy -settings -list
naviseccli -h ss1_spa sancopy -settings -setcheckpoint 45
naviseccli -h ss1_spa sancopy -settings -setbufnum 3
OUTPUTIf the version of VNX OE for Block software running on the SP does not support thiscommand, a Command is not supported error message is printed to stderr.Other errors are:
DMF_LIST_AND_SET_SPECIFIEDDMF_INVALID_MAX_SESSION_VALUEDMF_INVALID_CHECKPOINT_INTERVAL_VALVE
Errors returned from driver or agent are:
SESSION_MAX_OVER_LIMITSESSION_POLL_OVER_LIMIT
sancopy -startStarts a SAN Copy session based on values in a copy descriptor
PREREQUISITESFor naviseccli, you must have a user account on the system on which you want to executethe command.
For navicli, you must have a username/host entry in the Unisphere SP agent configurationfile to use this command.
SAN Copy and its command line utilities
516 EMC VNX Series 5.33 Command Line Interface Reference for Block

DESCRIPTIONThe naviseccli or navicli sancopy command with -start starts a SAN Copysession with the source and destination logical unit(s) identified in the copy descriptor.You can start a session using the descriptor ID or name.
The command works only when issued to the SP that owns the copy descriptor.
The sancopy -info command provides useful information for the sancopy -startcommand.
Note
Before starting a copy session, make sure you prepare the source and destination logicalunits as described in the section, Preparing logical units for a SAN Copy session on page490 . When you start a SAN Copy session , SAN Copy automatically allocates and retainsadditional memory. This additional memory counts against the total replication softwarememory budget.
SYNTAX
sancopy -start -descriptorid descriptor-id | -name name[-copywholelun [-nomark new | all] ]
OPTIONS
-descriptorid descriptor-id | -name nameIdentifies the copy descriptor for the session you want to start.
For incremental SAN Copy sessions, the following optional switches are available.-copywholelun
Specifies that this incremental session will copy the entire contents of the sourcelogical unit to all the destination logical units. To use this command the sessionmust be unmarked. When you start the session using this command, SAN Copy willmark the session for you. This command overrides any existing settings for thesession.
-nomark new|allUsed with the -copywholelun switch, and works only if the session is not alreadymarked. Specifies that this session will not be marked when it is started. A sessionrun with the -copywholelun -nomark command completes more quickly, but atthe end of the session, the source and destination logical units are inconsistent. Tomake them consistent, you must run the session again.
When -nomark is used with the new option, SAN Copy starts an unmarked sessionthat copies the contents of the source logical unit to any new destinations.
When -nomark is used with the all option, SAN Copy starts an unmarked sessionthat copies the contents of the source logical unit to all destinations.
EXAMPLEFor SP ss1_spa, this command starts a copy session based on the copy descriptornamed copy_lun_66.
naviseccli -h ss1_spa sancopy -start -name copy_lun_66
Note
To use this command with navicli, replace naviseccli with navicli.
SAN Copy and its command line utilities
sancopy -start 517
OUTPUTIf the VNX OE for Block software running in the SP does not support the command, the CLIprints a Command is not supported error message to stderr. Other errors are:
DMF_NAME_AND_UID_SPECIFIEDDMF_NAME_OR_UID_REQUIREDDMF_UNKNOWN_DESCRIPTOR
Errors returned from the driver or agent are:
UNKNOWN_DESCRIPTOR_IDUNKNOWN_DESCRIPTOR_NAMESESSION_ALREADY_IN_PROGRESS
sancopy -stopStops (terminates) a SAN Copy session
PREREQUISITESFor naviseccli, you must have a user account on the system on which you want to executethe command.
For navicli, you must have a username/host entry in the Unisphere SP agent configurationfile to use this command.
DESCRIPTIONThe naviseccli or navicli sancopy command -stop terminates the specifiedsession. The session stops automatically when it is complete, so this command is notneeded in the normal course of SAN Copy operations.
SYNTAXsancopy -stop -descriptorid descriptor-id | -name nameOPTIONS
-descriptorid descriptor-id | -name nameIdentifies the descriptor whose session you want to stop.
EXAMPLEFor SP ss1_spa, this command stops the copy session with the copy descriptor namecopy_lun_66.
naviseccli -h ss1_spa sancopy -stop -name copy_lun_66
Note
To use this command with navicli, replace naviseccli with navicli.
OUTPUTIf the version of VNX OE for Block software running on the SP does not support thiscommand, a Command is not supported error message is printed to stderr.Other error messages are:
DMF_NAME_AND_UID_SPECIFIEDDMF_NAME_OR_UID_REQUIREDDMF_UNKNOWN_DESCRIPTOR
SAN Copy and its command line utilities
518 EMC VNX Series 5.33 Command Line Interface Reference for Block

Errors returned from the driver or agent are:
UNKNOWN_DESCRIPTOR_IDUNKNOWN_DESCRIPTOR_NAME
sancopy -throttleChanges the I/O rate of an active copy descriptor
PREREQUISITESFor naviseccli, you must have a user account on the system on which you want to executethe command.
For navicli, you must have a username/host entry in the Unisphere SP agent configurationfile to use this command.
DESCRIPTIONThe naviseccli or navicli sancopy command with -throttle lets you change thethrottle of an existing, running copy descriptor. The new throttle value is valid only whilethe session is running and will not change the value in the descriptor database.
To change the throttle value of an existing copy descriptor that is not running, use thesancopy -modify -throttle command (see sancopy -modify on page 507)
SYNTAXsancopy -throttle -descriptorid descriptor-id | -name name nOPTIONS
-descriptorid descriptor-id | -name nameIdentifies the descriptor whose throttle value you want to change.
nIs the new throttle value, ranging from 1 (slowest) to 10 (highest). The default valueis 6.
EXAMPLEFor SP ss1_spa descriptor copy_lun_66 , this command displays information,including throttle information. For SP ss1_spa descriptor copy_lun_66, thesecommands get information (including throttle value), then change the throttle value to 8.
Note
To use this command with navicli, replace naviseccli with navicli.
naviseccli -h ss1_spa sancopy -info -name copy_lun_66
naviseccli -h ss1_spa sancopy -throttle -name copy_lun_66 8
OUTPUTIf the version of VNX OE for Block software running on the SP does not support thiscommand, a Command is not supported error message is printed to stderr.Other errors are:
DMF_NAME_AND_UID_SPECIFIEDDMF_NAME_OR_UID_REQUIREDDMF_INVALID_THROTTLE_VALUEDMF_UNKNOWN_DESCRIPTOR
SAN Copy and its command line utilities
sancopy -throttle 519

Errors returned from the driver or agent are:
UNKNOWN_DESCRIPTOR_IDUNKNOWN_DESCRIPTOR_NAME
sancopy -transferTransfers a copy descriptor from the peer SP
PREREQUISITESFor naviseccli, you must have a user account on the system on which you want to executethe command.
For navicli, you must have a username/host entry in the Unisphere SP agent configurationfile to use this command.
DESCRIPTIONThe naviseccli or navicli sancopy command with -transfer moves the specifieddescriptor from the peer SP to the SP you specify in the command.
After transferring the copy descriptor, you can start a new session on the working SPusing that descriptor.
SYNTAXsancopy -transfer -descriptorid descriptor-id | -name nameOPTIONS
-descriptorid descriptor-id | -name nameIdentifies the descriptor you want to transfer to the working SP.
EXAMPLEThis command transfers the copy descriptor copy_lun_66 to the SP namedss1_spb.
naviseccli -h ss1_spb sancopy -transfer -name copy_lun_66
Note
To use this command with navicli, replace naviseccli with navicli.
OUTPUTIf the version of VNX OE for Block software running on the SP does not support thiscommand, a Command is not supported error message is printed to stderr.Other errors are:
DMF_NAME_AND_UID_SPECIFIEDDMF_NAME_OR_UID_REQUIREDDMF_UNKNOWN_DESCRIPTORDMF_PEER_SP_ALIVE
Errors returned from the driver or agent are:
UNKNOWN_DESCRIPTOR_IDUNKNOWN_DESCRIPTOR_NAME
SAN Copy and its command line utilities
520 EMC VNX Series 5.33 Command Line Interface Reference for Block
sancopy -unmarkFor incremental sessions only--Removes the point-in-time copy from a markedincremental SAN Copy session
PREREQUISITESFor naviseccli, you must have a user account on the system on which you want to executethe command.
For navicli, you must have a username/host entry in the Unisphere SP agent configurationfile to use this command.
DESCRIPTIONThe naviseccli or navicli sancopy command with -unmark removes the point-in-time copy from a marked incremental SAN Copy session.
Note
You cannot unmark a session if any of the session’s destination logical units have failed.
SYNTAXsancopy -unmark -descriptorid descriptor-id | -name nameOPTIONS
-descriptorid descriptor-id | -name nameIdentifies the session you want to unmark.
EXAMPLEThis command removes the mark from the incremental copy session named monday.
naviseccli -h 10.11.22.33 sancopy -unmark -name monday
Note
To use this command with navicli, replace naviseccli with navicli.
OUTPUTIf the version of VNX OE for Block software running on the SP does not support thiscommand, a Command is not supported error message is printed to stderr.Other errors are:
DMF_NAME_AND_UID_SPECIFIEDDMF_NAME_OR_UID_REQUIREDDMF_UNKNOWN_DESCRIPTOR
sancopy -updateconnectionsUpdates connection and registration information
PREREQUISITESFor naviseccli, you must have a user account on the system on which you want to executethe command.
For navicli, you must have a username/host entry in the Unisphere SP agent configurationfile to use this command.
SAN Copy and its command line utilities
sancopy -unmark 521
DESCRIPTIONThe naviseccli or navicli sancopy command with -updateconnectionsupdates registration information for all attached systems.
You should run this command for each SP.
SYNTAXsancopy -updateconnectionsEXAMPLEThese commands update connections on both SPs, ss1_spa and ss1_spb.
naviseccli -h ss1_spa sancopy -updateconnections
naviseccli -h ss1_spb sancopy -updateconnections
Note
To use this command with navicli, replace naviseccli with navicli.
sancopy -verifyEnsures that the SAN Copy software can access a logical unit
PREREQUISITESFor naviseccli, you must have a user account on the system on which you want to executethe command.
For navicli, you must have a username/host entry in the Unisphere SP agent configurationfile to use this command.
DESCRIPTIONThe naviseccli or navicli sancopy command with -verify ensures that the SANCopy software can access a logical unit. You should issue the command to both SPs asone SP might have access, where the other does not.
SYNTAX
sancopy -verify -wwn lun-wwn | -lunnumber sp-name lunnumber[-device devicename][-log][-iscsi|-fibre]
OPTIONS
-wwn lun-wwnSpecifies the World Wide Name of the logical units. You can specify more than oneWWN.
-lunnumber sp-name lunnumberAn alternate way of specifying a logical unit. For sp-name, specify the SP hostname(or SP IP address). For lunnumber, specify the source or destination logical unitnumber. You can specify more than one LUN number.
-device devicenameSpecifies the system device name.
-logLogs events to the SP event log.
SAN Copy and its command line utilities
522 EMC VNX Series 5.33 Command Line Interface Reference for Block

Note
If SAN Copy cannot find a LUN on a remote system, use these events to helpdetermine the reason.
-iscsi |-fibreSpecifies which connection type to use to verify the connection. If a connection typeis not specified, fibre is used first to verfiy the connection, and if no connection isfound, iSCSI is used.
EXAMPLEThe example below uses the LUN’s World Wide Name to verify that the LUN is reachable,and logs any events to the SP event log. If the LUN is reachable, the software displays thefollowing message: This example verifies two LUNs using the SP name and LUN number.If one or both LUNs are not reachable, the software displays a message similar to thefollowing:
Storage device is reachable.
Error: sancopy command failedError returned from Agent SP A: CPM unable to locate device. Check that the device with this WWN exists (0x712ac007)
Note
To use this command with navicli, replace naviseccli with navicli.
naviseccli -h 11.12.13.14 sancopy -verify -wwn60:06:01:FA:2C:09:00:00:2B:89:4C:E9:65:D7:11 -log
naviseccli -h 11.12.13.14 sancopy -verify -lunnumber 12.34.56.78 612.34.56.78 12
SAN Copy and its command line utilities
sancopy -verify 523

SAN Copy and its command line utilities
524 EMC VNX Series 5.33 Command Line Interface Reference for Block
CHAPTER 12
EMC SnapView Software
This chapter introduces the EMC® SnapView™ software and its user interface, as well asthe two command line interfaces for it. The command line interfaces include the server-based admsnap utility and the EMC VNX CLI for Block interface.
Note
Unless indicated otherwise, references to LUNs include classic LUNs and thin LUNs.If your system includes FAST Cache (solid state disk drives with flash memory, or SSDdrives), refer to the Best Practices documentation for information on using these diskswith SnapView, which is available on EMC Online Support.
Major topics are:
l SnapView clone CLI commands........................................................................... 526l Admsnap commands for clones.......................................................................... 554l SnapView Snapshot CLI commands.....................................................................560l Admsnap commands for snapshots.................................................................... 583
EMC SnapView Software 525
SnapView clone CLI commandsThis chapter explains the Unisphere SnapView clone CLI commands that manageSnapView clones.
Setting up SnapView to use clonesThis section describes how to set up SnapView to use clones.
Note
You cannot expand the capacity of a LUN that is participating in a clone group until youremove the clone from the clone group and destroy the clone group. Neither theproduction nor secondary server can access this added capacity until the expansion iscomplete and you perform some additional operations. For detailed information onexpanding a LUN, see vnx_bcli_c_cli_cmd_ref_navi_cli_chap on page 23.
Prerequisites for setting up clones
Before you can set up and use clones, the following must be true:
l Source LUNs must be bound. For a client or production server to access a source LUN,you must assign the source LUN to a storage group and connect the storage group tothe production server. To do this, you must enable data access control on the storagesystem.
l LUNs that you plan to use as clone LUNs must be bound. These LUNs must be thesame size as the source LUNs that you will clone. EMC strongly recommends that youbind your clone LUNs on storage pools (RAID groups or thin pools) that are differentfrom their source LUNs. The clone’s storage pool does not have to be the same RAIDtype as the source LUN.
l For VMware ESX Servers, verify that the source LUN is presented to the virtualmachine (guest operating system running on the virtual machine). For information onhow to present a LUN to the virtual machine, refer to the VMware documentation thatshipped with your ESX Server.
l For configuration restrictions when using VMFS volumes, go to the EMC E-Lab™
Interoperability Navigator on EMC Online Support and under the PDFs and Guidestab, open the VMware ESX server.pdf file.
l For a secondary server to access the clone LUN, the clone must be assigned to astorage group (but you cannot read the clone until you fracture it). The storage groupmust be connected to the secondary server that will access the clone. You mustassign the clone LUN to a storage group other than the storage group that holds thesource LUN. EMC supports placing a clone in the same storage group as its sourceLUN only if you use Replication Manager or Replication Manager/SE to put the clonein the storage group. This software provides the same host access to the clone andthe source LUN. For information on using these software products, refer to thedocumentation for the product.
If you have a VMware ESX Server, the clone and source LUNs must be accessed bydifferent virtual machines, unless the virtual machine is running one of the softwareprograms that support same host access.
Overview of setting up SnapView to use clones
The following is a checklist for setting up SnapView clones:
EMC SnapView Software
526 EMC VNX Series 5.33 Command Line Interface Reference for Block
l Allocate clone private LUNs; see clone - snapview -allocatecpl on page 531.
Note
This step is required only in the initial setup of clones.
l Create a clone group; see clone - snapview -createclonegroup on page 537.
l Add a clone to a clone group; see clone - snapview -addclone on page 528.
CLI clone command functionsThe naviseccli clone functions, listed alphabetically, are:
Note
As of version 6.26, you can issue clone commands using the clone or snapview prefix.
l clone | snapview -addclone
l clone | snapview -allocatecpl
l clone | snapview -changeclone
l clone | snapview -changeclonefeature
l clone | snapview -changeclonegroup
l clone | snapview -consistentfractureclones
l clone | snapview -createclonegroup
l clone | snapview -deallocatecpl
l clone | snapview -destroyclonegroup
l clone | snapview -fractureclone
l clone | snapview -listclone
l clone | snapview -listclonefeature
l clone | snapview -listclonegroup
l clone | snapview -removeclone
l clone | snapview -reversesyncclone
l clone | snapview -syncclone
The CLI clone functions are listed functionally, in the order you would perform them, inthe following table.
Table 49 naviseccli SnapView clone command functions, listed in order of use
Essential functions (in order performed)
clone | snapview -allocatecpl Designates clone private LUNs.
clone | snapview -createclonegroup Creates a clone group.
clone | snapview -addclone Adds a clone LUN to the clone group.
clone | snapview -syncclone Starts synchronizing the clone with the source LUN.
clone | snapview -consistentfractureclonesor
clone | snapview -fractureclone
Frees the clone LUN(s) from its source, allowing youto use the clone independently.
EMC SnapView Software
CLI clone command functions 527

Table 49 naviseccli SnapView clone command functions, listed in order of use (continued)
clone | snapview -removeclone Deletes a clone from a clone group.
clone | snapview -destroyclonegroup Deletes a clone group.
Optional and status functions (alphabetically)
clone | snapview -listclone Displays clone information.
clone | snapview -listclonefeature Displays clone features such as whether creating aclone group on this system is supported and otheruseful information.
clone | snapview -listclonegroup Displays clone group information.
Optional reconfiguration functions (alphabetically)
clone | snapview -changeclone Changes one or more properties of a clone.
clone | snapview -changeclonefeature For a system, enables or disables clone features suchas protected restore.
clone | snapview -changeclonegroup Changes clone group settings.
clone | snapview -deallocatecpl Frees LUNs that were allocated as clone private LUNsfrom the system clone structure.
clone | snapview -reversesyncclone Starts a reverse sync process, in which the softwarecopies the clone data to the source.
clone | snapview -addcloneAdds a clone to a clone group.
PREREQUISITESYou must have a user account on the system on which you want to execute the command.
DESCRIPTIONThe naviseccli clone or the naviseccli snapview command with -addcloneadds a clone to a clone group. Each clone LUN you add must be the same size as thesource LUN. When you add a clone to a clone group, you create an actual copy of thesource LUN you specified when creating the group. The copy of the source LUN beginswhen you specify the -issyncrequired 1 command when adding the clone LUN. Thiscommand is also used to add an initializing thin LUN as a clone target, provided thebundle containing the thin LUN support is committed in all the systems.
The software assigns each clone a clone ID. This ID remains with the clone until youremove the clone from its group.
Note
When you add a clone to a clone group, SnapView automatically allocates and retainsadditional memory. This additional memory counts against the total replication softwarememory budget.
Source LUN writes and unfractured clone states — While the clone is part of the clonegroup and unfractured (not accessible to a secondary server), server writes to the sourceLUN can continue, with the following results:
EMC SnapView Software
528 EMC VNX Series 5.33 Command Line Interface Reference for Block

Server writes to the source — When a source LUN receives a server write request, theclone transitions into a consistent state because the clone is no longer a byte-for-bytecopy of its source. Writes made to the source LUN are simultaneously copied to the clone.The clone remains in a consistent state if server writes are made to the source LUN duringthe duration of the quiesce threshold. The quiesce threshold is the amount of time theclone must wait before transitioning from a consistent state to a synchronized state. If thesource LUN receives any server writes during this period of time, the time set for thequiesce threshold restarts. You specify the quiesce threshold when you create a clonegroup.
Note
When you add a clone to the clone group, with the Initial Sync Required propertyselected, the clone state is synchronizing. The software transitions the clone tosynchronized or consistent state only after the initial synchronization is complete.
No server writes to the source — If a source LUN does not receive any server writes for theduration of the quiesce threshold, any unfractured clone in a consistent state transitionsinto a synchronized state.
Note
See Clone states in EMC VNX for Block Concepts for information about the state of a clone.
SYNTAXclone | snapview -addclone -name name|-CloneGroupUid uid -lunslun_numbers [-issyncrequired 0|1][-RecoveryPolicy manual|auto][-SyncRate high|medium|low|value][-UseProtectedRestore 0|1]OPTIONS
-name nameSpecifies the name that you gave to the clone group with the -createclonegroup function. Use either this name or the clone group unique ID(16-byte WWN).
-CloneGroupUid uidSpecifies the 16-byte unique ID the software assigned when the clone group wascreated. The clone group ID consists of the numbers 0 through 9 and the letters Athrough F (these letters are not case sensitive). You can use the -listclonegroup command function to obtain the clone group ID (refer to clone |snapview -listclonegroup on page 546 for more information).
-luns lun_numbersSpecifies the LUN numbers that can serve as clones. Currently only one LUN issupported per command.
-issyncrequired 0|1Specifies whether the software must synchronize the newly added clone.
0 - Synchronization is not required. Using this value lets you skip thesynchronization period if the source LUN contains null data (as with a newly boundsource LUN).
EMC SnapView Software
clone | snapview -addclone 529

CAUTION
When you specify issyncrequired 0, the software marks the clone as
synchronized regardless of its contents. Therefore, do not specifyissyncrequired 0 if the source LUN contains any data, because the clone will
appear as synchronized when it is not synchronized, and will probably not containusable data.
1 - Synchronization is required (default). The software starts synchronizing the cloneimmediately.
-RecoveryPolicy manual|autoSpecifies the synchronization action the system will take after a hardwarecomponent (such as an SP) fails. Values are:
l manual - Manual recovery. The administrator must act to start synchronization.
l auto - Automatic. Synchronization will start automatically using the other path (ifavailable). This is the default.
The value you select also applies if reverse-synchronization was in progress beforethe failure.
-SyncRate high|medium|low|valueSets the interval between writes to a clone being synchronized to high, medium, orlow, or a value in milliseconds. If the value is larger than 100, the interval is inmilliseconds. Otherwise, it is the scaled between high rate and medium rate - thevalue 1 is equivalent to high rate and 100 to medium rate. Default is medium. A highrate synchronizes the clone the fastest, but may affect performance on other systemresources. A low value has minimal effect on performance, but prolongs thesynchronization process.
Note
EMC recommends that you do not use a high synchronization rate on a system with asingle SP.
-UseProtectedRestore 0|1Determines the way the software reacts when I/O is received during a reverse syncoperation.
0 - Updates the clone with the incoming server I/O. This is the default.
1 - Does not update the clone with the I/O.
EXAMPLEThis example adds the current logged-in user to the security file. Once you enter thiscommand, you do not have to re-enter your username, password, or scope in thecommand line.
naviseccli -password password -scope 0 -addusersecurity
naviseccli -address ss1_spa clone -allocatecpl -spA 54 -spB 55
naviseccli -address ss1_spa clone -createclonegroup -name db3_clone-luns 22
naviseccli -address ss1_spa clone -addclone -name db3_clone -luns 43-o
EMC SnapView Software
530 EMC VNX Series 5.33 Command Line Interface Reference for Block

naviseccli -address ss1_spa clone -listclonegroup
Name: db3_cloneCloneGroupUid: 50:06:01:60:20:04:21:3E:0C:00:00:00:00:00:00:00InSync: No
These commands allocate clone private LUNs (LUNs 54 and 55), create a clone groupnamed db3_clone for source LUN 22, add a clone LUN (LUN 43) to the group, and thenlist clone groups. Synchronization starts by default with the -addclone command sincethat command does not specify -issyncrequired 0. To remove the logged in userfrom the security file, issue the following last command:
naviseccli -removeusersecurity
OUTPUTNone if the command succeeds; status or error information if it fails.
clone | snapview -allocatecplReserves a clone private LUN for use with clones.
PREREQUISITESYou must have a user account on the system on which you want the command executed.
Each clone private LUN must be a minimum of 1 gigabyte. Clone private LUNs larger than1 gigabyte provide no performance benefit. You must bind these LUNs before youallocate them as a clone private LUN. You can use any LUN that is at least 1 gigabyte insize as a clone private LUN, except for the following:
l Thin LUNs
l Hot spare LUNs
l MirrorView remote mirror LUNs (LUNs used as either a primary or secondary image)
l SnapView clone, snapshot, or source LUNs
l SAN Copy source or destination logical units
l Private LUNs (LUNs reserved as clone private LUNs or for use by the reserved LUNpool)
You should bind clone private LUNs in a RAID group that normally does not see heavy I/O.
DESCRIPTIONThe naviseccli clone or the naviseccli snapview command with -allocatecpl allocates or reallocates a clone private LUN on both SPs for cloneoperations. You must allocate one clone private LUN for each SP before you can create aclone group. This command supports thin LUNs, provided the bundle containing the thinsupport is committed in all the systems.
Note
The clone –allocatecpl command restricts Clone Private LUNs to 128 element size. If youselect LUN(s) with element size not equal to 128, the system will display the followingerror message:
Invalid element size for chosen LUN(s). Please choose LUN(s) with element size of 128.
If you use -allocatecpl to reallocate (change an existing allocation) clone privateLUN, you must change the clone private LUN for both SPs. When you reallocate the clone
EMC SnapView Software
clone | snapview -allocatecpl 531
private LUNs, the software transfers the information stored in the previous clone privateLUNs to the new clone private LUNs.
Note
When you allocate clone private LUNs, SnapView automatically allocates and retainsadditional memory. This additional memory counts against the total replication softwarememory budget.
SYNTAX
clone | snapview -allocatecpl -spA lun_number -spB lun_number-o
OPTIONS
-spA lun_numberlun-number identifies the LUN to be used for the clone private LUN for SP A. The LUNmust be bound. You must specify a clone private LUN for both SP A and SP B.However, the ownership of these LUNs does not matter, since the software willtrespass each LUN you specify in each -sp switch to the specified SP.
-spB lun_numberlun_number identifies the LUN to be used for the clone private LUN for SP B. The LUNmust be bound. See comments under -spA.
-oExecutes the command without prompting for confirmation.
EXAMPLEThis example allocates a clone private LUN to SP A (the LUN with LUN ID 54) and SP B(LUN with ID 55) for clone operations (see also the -addclone example):
naviseccli -address ss1_spa clone -allocatecpl -spA 54 -spB 55 -o
OUTPUTNone if the command succeeds; status or error information if it fails.
clone | snapview -changecloneChanges one or more properties of a clone. The clone -changeclone or snapview-changeclone comamnd is used with naviseccli as follows.
PREREQUISITESYou must have a user account on the system on which you want the command executed.
DESCRIPTIONThe naviseccli clone or the naviseccli snapview command with -changeclone changes one or more clone properties. The clone can be in any statewhen you use this function. If you omit the override option (-o), the software displays amessage to confirm the change.
SYNTAX
clone | snapview -changeclone -name name|-CloneGroupUid uid-cloneid id [-RecoveryPolicy manual|auto][-SyncRate high|medium|low|value][-UseProtectedRestore 0|1][-o]
EMC SnapView Software
532 EMC VNX Series 5.33 Command Line Interface Reference for Block

OPTIONS
-name nameSpecifies the name that you gave to the clone group with the -createclonegroup function. Use either this name or the clone group unique ID(16-byte WWN).
-CloneGroupUid uidSpecifies the 16-byte unique ID the software assigned when the clone group wascreated. The clone group ID consists of the numbers 0 through 9 and the letters Athrough F (these letters are not case sensitive). You can use the -listclonegroup command function to obtain the clone group ID.
-cloneid idSpecifies the 16-character clone ID the system assigned when the clone was added.You can obtain this using the -listclonegroup command function. The id isnumeric.
-RecoveryPolicy manual|autoSpecifies the synchronization action the system will take after a hardwarecomponent (such as an SP) fails. Values are:
l manual - Manual recovery. The administrator must act to start synchronization.l auto - Automatic. Synchronization will start automatically using the other path (if
available). This is the default.
The value you select also applies if reverse-synchronization was in progress beforethe failure.
-SyncRate high|medium|low|valueSets the interval between writes to a clone being synchronized to high, medium, orlow, or a value in milliseconds. If the value is larger than 100, the interval is inmilliseconds. Otherwise, it is the scaled between high rate and medium rate - thevalue 1 is equivalent to high rate and 100 to medium rate. Default is medium. A highrate synchronizes the clone fastest, but may degrade overall performance. A lowvalue has minimal effect on performance, but prolongs the synchronization process.
-UseProtectedRestore 0|1Specifies the way the software will react when I/O is received during a reverse syncoperation.
0 - Updates the clone with the I/O. Default.
1 - Does not update the clone with I/O.
This property is available only if the option is supported on the targeted system.
Note
When you change the property for the -UseProtectedRestore option, SnapView
automatically allocates and retains additional memory. This additional memorycounts against the total replication software memory budget.
-oExecutes the command without prompting for confirmation.
EXAMPLEThis command changes the sync rate for the clone 0100000000000000 in clone groupdb3_clone.
naviseccli -address ss1_spa clone -changeclone -name db3_clone-cloneid 0100000000000000 -syncrate high -o
EMC SnapView Software
clone | snapview -changeclone 533

OUTPUTNone if the command succeeds; status or error information if it fails.
clone | snapview -changeclonefeatureEnables or disables clone features such as protected restore.
PREREQUISITESYou must have a user account on the system on which you want the command executed.
DESCRIPTIONThe naviseccli clone or the naviseccli snapview command with -changeclonefeature can globally enable or disable the -AllowProtectedRestore option. This option allows you to use the protected restorefeature on a per clone basis. For information on the protected restore feature, refer to clone | snapview -reversesyncclone on page 550.
If you omit the override option (-o), the software displays a message to confirm thechange.
SYNTAX
clone | snapview -changeclonefeature [-AllowProtectedRestore 0|1] [-o]
OPTIONS
-AllowProtectedRestore 0|1Enables or disables the ability to use protected restores on LUNs in a system. Beaware that enabling protected restores reserves SP memory and prevents it frombeing used for any other purpose.
0-Does not allow protected restores on this system. Default.
1-Allows protected restores on this system.
Note
When you enable the -AllowProtectedRestore option, SnapView
automatically allocates and retains additional memory. This additional memorycounts against the total replication software memory budget.
-oExecutes the command without prompting for confirmation.
EXAMPLEThis example allows protected restores on the system that contains the SP ss1_spa.
naviseccli -address ss1_spa clone -changeclonefeature-AllowProtectedRestore 1
Do you really want to perform this operation? y
OUTPUTNone if the command succeeds; status or error information if it fails.
EMC SnapView Software
534 EMC VNX Series 5.33 Command Line Interface Reference for Block
clone | snapview -changeclonegroupChanges one or more parameters of an existing clone group.
PREREQUISITESYou must have a user account on the system on which you want the command executed.
DESCRIPTIONThe naviseccli clone or the naviseccli snapview command with -changeclonegroup can change certain settings of an existing clone group.
SYNTAXclone | snapview -changeclonegroup -name name|-CloneGroupUiduid [-description description][-newname name][-o][-quiescethreshold seconds]OPTIONS
-name nameIdentifies the clone group. Use the name assigned when the clone group was createdwith -createclonegroup. To identify a clone group, you can use either the clonename or the clone group unique ID.
-CloneGroupUid uidSpecifies the 16-byte unique ID the software assigned when the clone group wascreated. The clone group ID consists of the numbers 0 through 9 and the letters Athrough F (these letters are not case sensitive). You can use the -listclonegroup command function to obtain the clone group ID.
-description descriptionLets you enter a description about the clone group—up to 256 characters. If youwant to include any spaces, enclose the entire description in double quotationmarks. The quotation marks do not count towards the 256-character limit.
-newname nameLets you specify a new name for the clone group. A valid name consists of at leastone printable character and must not exceed 64 characters. Each clone group namemust be unique on its system.
-oExecutes the command without prompting for confirmation.
-quiescethreshold secondsLets you specify the amount of time that must pass after an I/O to the source LUNbefore the software places any of its unfractured clones in the synchronized state.The minimum value is 10, the maximum value is 3600.
EXAMPLEThis example changes the quiesce threshold for clone group db3_clone to 30 seconds.
naviseccli -address ss1_spa clone -changeclonegroup -name db3_clone-quiescethreshold 30
Do you really want to perform this operation? y
OUTPUTNone if the command succeeds; status or error information if it fails.
EMC SnapView Software
clone | snapview -changeclonegroup 535

clone | snapview -consistentfractureclonesSplits a set of clones from their source LUNs.
PREREQUISITESYou must have a user account on the system on which you want the command executed.
The clones you want to fracture must be within different clone groups. You cannotperform a consistent fracture on clones belonging to different systems. You must specifytwo or more clones that you want to fracture or an error will be displayed.
DESCRIPTIONThe naviseccli clone or the naviseccli snapview command with -consistentfractureclones fractures more than one clone at the same time inorder to preserve the point-in-time restartable copy across the set of clones. TheSnapView driver will delay any I/O requests to the source LUNs of the selected clonesuntil the fracture has completed on all clones (thus preserving the point-in-timerestartable copy on the entire set of clones).
Note
A restartable copy is a data state having dependent write consistency and where allinternal database/application control information is consistent with a databasemanagement system/application image.
After the consistent fracture completes, no group association exists between the clones.If a failure occurs on any of the clones, the consistent fracture will fail on all of the clones.If any clones within the group were fractured prior to the failure, the software willresynchronize those clones. For more information on the effects of fracturing a clone,refer to the -fractureclone description in clone | snapview -fractureclone on page540.
SYNTAX
clone | snapview -consistentfractureclones-CloneGroupNameCloneId name cloneId|-CloneGroupUidCloneId CGUidcloneId [-o]
OPTIONS
-CloneGroupNameCloneId name cloneIdLets you specify the clone group name and the clone ID for the clones you want tofracture. If you specify the clone group name and clone ID for one clone, you mustspecify the same information for all the other clones you want to fracture at the sametime.
The clone group name is the name you specified when you created the clone group.The clone ID is the 16-character ID. The system assigned when the clone was addedto the clone group. The clone ID is always numeric.
Use the -listclonegroup command to display all the clone group names andclone IDs on the system (see clone | snapview -listclonegroup on page 546).
-CloneGroupUidCloneId CGUid cloneIdLets you specify the clone group ID and the clone ID for the clones you want tofracture. If you specify the clone group ID and clone ID for one clone, you mustspecify the same information for all the other clones you want to fracture at the sametime.
EMC SnapView Software
536 EMC VNX Series 5.33 Command Line Interface Reference for Block

The clone group ID is the 16-byte unique ID the software assigned when you createdthe clone group. The clone group ID consists of the numbers 0 through 9 and theletters A through F (these letters are not case sensitive). The clone ID is the 16-character ID the system assigned when the clone was added to the clone group. Theclone ID is always numeric.
Use the -listclonegroup command to display all the clone group IDs and cloneIDs on the system (see clone | snapview -listclonegroup on page 546).
-oExecutes the command without prompting for confirmation.
EXAMPLE
naviseccli -address ss1_spa clone -consistentfractureclones-CloneGroupNameCloneId CGname1 0100000000000000 CGname20200000000000000 CGname3 0300000000000000 -o
naviseccli -address ss1_spa snapview -consistentfractureclones-CloneGroupUidCloneId 50:06:01:60:80:60:03:E5:3A:00:00:00:00:00:00:000100000000000000 50:06:01:60:80:60:03:E5:3A:00:00:00:00:00:00:000200000000000000 50:06:01:60:80:60:03:E5:3A:00:00:00:00:00:00:000300000000000000 -o
OUTPUTNone if the command succeeds; status or error information if it fails.
clone | snapview -createclonegroupCreates a new clone group based on a source LUN.
PREREQUISITESYou must have a user account on the system on which you want the command executed.
You must have allocated a clone private LUN for each SP.
Any source LUN that is at least 1 GB in size is eligible to be cloned, except for thefollowing:
l Hot spare LUNs
l Clone LUNs (LUNs participating in any clone group as either a source LUN or a cloneLUN)
l Snapshot LUNs
l MetaLUNs
l Private LUNs (LUNs reserved as clone private LUNs, in a reserved LUN pool, or in awrite intent log)
l A LUN in the process of a migration
Note
With SnapView version 6.24 or later, a clone's source LUN can be a remote mirror LUN (aLUN participating as either a primary or secondary image).
DESCRIPTIONThe naviseccli clone or the naviseccli snapview command with -createclonegroup creates a new clone group using an existing LUN as a source.
EMC SnapView Software
clone | snapview -createclonegroup 537

Note
When you create a clone group, SnapView automatically allocates and retains additionalmemory. This additional memory counts against the total replication software memorybudget.
SYNTAXclone | snapview -createclonegroup -name name -luns lun_number[-description description][-quiescethreshold seconds][-o]OPTIONS
-name nameLets you specify the name of the clone group. A valid name consists of at least oneprintable character and must not exceed 64 characters. Each clone group name mustbe unique on its system.
-luns lun_numberThe lun_number identifies the source LUN of the clone group.
-description descriptionLets you enter a description about the clone group—up to 256 characters. If youwant to include any spaces, enclose all text with double quotation marks.
-quiescethreshold secondsLets you specify the amount of time that must pass after an I/O to the source LUNbefore the software places any of its unfractured clones in the synchronized state.The minimum value is 10, the maximum value is 3600.
-oExecutes the command without prompting for confirmation.
EXAMPLEThis command creates a clone group named db3_clone for source LUN 22. Refer to theexample for -addclone, clone | snapview -addclone on page 528.
naviseccli -address ss1_spa clone -createclonegroup -name db3_clone-luns 22 -o
OUTPUTNone if the command succeeds; status or error information if it fails.
POSTREQUISITESYou will need to add a clone using the clone | snapview -addclone commandand synchronize the clone before you can fracture and use it.
You can use the -changeclonegroup function to change some of the createparameters.
clone | snapview -deallocatecplDeallocates the clone private LUNs.
PREREQUISITESYou must have a user account on the system on which you want the command executed.
You must remove all clones and destroy any clone groups before deallocating the cloneprivate LUNs. You must also globally disable the Allow Protected Restore option. To dothis, issue the clone | snapview -changeclonefeature -AllowProtectedRestore 0command (refer to clone | snapview -changeclonefeature on page 534 for moreinformation on this command).
EMC SnapView Software
538 EMC VNX Series 5.33 Command Line Interface Reference for Block

DESCRIPTIONThe naviseccli clone or the naviseccli snapview command with -deallocatecpl removes the LUNs that were previously allocated as clone privateLUNs. You can also use the -deallocatecpl command to reallocate clone privateLUNs, for instance, if a clone private LUN fails or if you decide that you want to use adifferent LUN as your clone private LUN. If you use the -deallocatecpl command toreallocate the clone private LUNs, you can do so with existing clone groups and clones.When you reallocate the clone private LUN, the software transfers the information storedin the previous clone private LUN to the new clone private LUN.
Note
If you reallocate one clone private LUN, you must reallocate the other clone private LUN.
SYNTAXclone | snapview -deallocatecpl [-o]OPTIONS-o
Tells the CLI to execute the command without waiting for confirmation.
EXAMPLE
naviseccli -address ss1_spa clone -deallocatecpl-o
OUTPUTNone if the command succeeds; status or error information if it fails.
clone | snapview -destroyclonegroupDeletes a clone group.
PREREQUISITESYou must have a user account on the system on which you want the command executed.
Before you can destroy a clone group, you must remove all clones in the clone group.
DESCRIPTIONThe naviseccli clone or the naviseccli snapview command with -destroyclonegroup permanently removes a clone group from the system andreleases the source LUN specified when you created the clone group.
SYNTAXclone | snapview -destroyclonegroup -namename|-CloneGroupUiduid[-o]OPTIONS
-name nameIdentifies the clone group. Use the name assigned when the clone group was createdwith -createclonegroup. To identify a clone group, you can use either the clonename or the clone group unique ID.
-CloneGroupUid uidSpecifies the 16-byte unique ID the software assigned when the clone group wascreated. The clone group ID consists of the numbers 0 through 9 and the letters Athrough F (these letters are not case sensitive). You can use the -listclonegroup command function to obtain the clone group ID (see clone |snapview -listclonegroup on page 546).
EMC SnapView Software
clone | snapview -destroyclonegroup 539

-oTells the CLI to execute the command without waiting for confirmation.
EXAMPLE
naviseccli -address ss1_spa clone -destroyclonegroup -name db3_clone-o
OUTPUTNone if the command succeeds; status or error information if it fails.
clone | snapview -fracturecloneSplits a clone from its source LUN.
PREREQUISITESYou must have a user account on the system on which you want to execute the command.
DESCRIPTIONThe naviseccli clone or the naviseccli snapview command with -fractureclone splits a clone from its source LUN, allowing a secondary server toaccess the clone as an independent LUN.
Note
To fracture more than one clone at the same time, you must use the -consistentfractureclones command (see clone - snapview -
consistentfractureclones on page 536).
Fracturing a clone or a set of clones (-consistentfracture) does not remove theclone(s) from its clone group. It remains a part of the clone group — although otherservers can access it as an independent LUN — until you explicitly remove it (-removeclone). While a clone remains in its clone group, you can synchronize it againusing just the -syncclone function.
Note
Unless you have additional software that supports same host access, you must assignthe clone LUN to a storage group other than the storage group that holds the sourceLUN(s). You also must assign multiple fractured clones, of the same source LUN(s), todifferent storage groups. See Prerequisites for setting up clones on page 526 forinformation on software that supports same host access.
Two types of fractures can occur - administrative or system.
An administrative fracture will occur after any of the following events:
l The production server performed a fracture operation on the clone or set of clones.
l The secondary server performed a reverse synchronization operation on anotherclone in the clone group.
l The clone driver receives an error reading or writing to the source or clone during asynchronization or reverse synchronization. Possible errors include a failed sector ora bad block.
EMC SnapView Software
540 EMC VNX Series 5.33 Command Line Interface Reference for Block
Note
To verify if an error occurred, issue the -listclonegroup command and determine if
the value for SourceMediaFailure or CloneMediaFailure is set to TRUE. If an error didoccur, you must correct the failure, then re-issue the synchronization or reversesynchronization operation. If the error persists, contact your EMC service provider.
A system fracture will occur after any of the following events:l The clone driver encountered an internal driver error and fractured the clone as a
result. If this occurs, you must correct the error condition, perform a fracture(administrative fracture), and then synchronize the clone.
l The source LUN trespasses to the peer SP, either manually or due to an SP failure. Ifthis occurs, the system fracture is temporary and the clone will automaticallysynchronize with its source LUN when the source trespasses back to its SP.
l Other replication software uses the clone or its source, for example, to start a SANCopy session or to create a snapshot of the LUN. If this occurs, the system fracture istemporary and the clone will automatically synchronize with its source LUN after theevent completes.
You can fracture a clone in any state. However, to make a fractured clone available forserver write requests, you must fracture the clone while it is in a synchronized orconsistent state. Once you fracture the clone in either of these states, it transitions to aconsistent state.
If you want the clone to contain a predictable point-in-time copy, you must ensure that noserver writes are occurring when you fracture the clone. You can determine that no writeshave been issued to the source LUN for a period of time equal to the quiesce threshold ifyou fracture the clone while it is in a synchronized state. However, it does not guaranteethat another server write will not occur around the same time you fracture the clone.
If the clone never enters the synchronized state, server writes are continuing. Any serverwrites to the source that occur after the fracture are not copied to the clone. If you believeyou have stopped all I/O to the clone’s source LUN, it may be difficult to determine thereason for those writes. For example, they can be due to heartbeats in some clusteredsystems.
In some cases it is useful to fracture the clone in a consistent state. For instance, youwould fracture a clone in a consistent state when:l you can determine that there are no writes being issued to the source LUN and you
prefer not to wait for the quiesce threshold to elapse.l your application has a hot backup mode in which the application continues to write
to the source, but internally understands how to disregard writes generated after yourspecified point in time.
l you need only a crash consistent image (the image you would have if the server failedor shut down improperly).
If the clone synchronization is detracting from the system’s performance, you can fracturethe clone in any other state and then synchronize it at a time when performance is not anissue.
Writes to the fractured clone LUN
When a fractured clone receives a server write request, the software marks the clone asdirty, which indicates that the clone has been modified and is no longer a byte-for-bytecopy of its source LUN.
Writes to the source LUN
After you fracture the clone, the software does not copy any server write requests made tothe source LUN unless you manually perform a synchronization. Synchronizing a
EMC SnapView Software
clone | snapview -fractureclone 541

fractured clone unfractures the clone and updates the contents on the clone with itssource LUN.
SYNTAXclone | snapview -fractureclone -namename| -CloneGroupUid uid-cloneid id [-o]OPTIONS
-name nameIdentifies the clone group. Use the name assigned when the clone group was createdwith -createclonegroup. To identify a clone group, you can use either the clonename or the clone group unique ID.
-CloneGroupUid uidSpecifies the 16-byte unique ID the software assigned when the clone group wascreated. The clone group ID consists of the numbers 0 through 9 and the letters Athrough F (these letters are not case sensitive). You can use the -listclonegroup command to obtain the clone group ID (see clone | snapview -listclonegroup on page 546).
-cloneid idSpecifies the 16-character clone ID the system assigned when the clone was added.You can obtain this using the -listclonegroup command function. The id isnumeric.
-oTells the CLI to execute the command without waiting for confirmation.
EXAMPLEnaviseccli -address ss1_spa clone -fractureclone -name db3_clone -o
OUTPUTNone if the command succeeds; status or error information if it fails.
clone | snapview -listcloneDisplays information about a specific clone LUN.
PREREQUISITESYou must have a user account on the system on which you want the command executed.
DESCRIPTIONThe naviseccli clone or the naviseccli snapview command with -listclone displays information about one clone, not clone groups. You must specifythe clone name or clone group ID. You can obtain more specific information with functionswitches.
SYNTAX
clone | snapview -listclone -Name name|-CloneGroupUid uid[-all][-AvailableForIO][-CloneCondition][-cloneid id][-CloneLuns][-CloneLunWWNs][-CloneState][-CloneMediaFailure][-IsDirty][-IsFractured]
EMC SnapView Software
542 EMC VNX Series 5.33 Command Line Interface Reference for Block
[-PercentSynced][-RecoveryPolicy][-SyncRate][-timeoffracture][-UseProtectedRestore 0|1]
OPTIONS
-Name nameSpecifies the name of the clone group. This is required for getting information on aclone.
-CloneGroupUid uidSpecifies the 16-byte unique ID the software assigned when the clone group wascreated. The clone group ID consists of the numbers 0 through 9 and the letters Athrough F (these letters are not case sensitive). You can use the -listclonegroup command function to obtain the clone group ID (see clone |snapview -listclonegroup on page 546).
-allLists all the properties of a clone without having to type in any other switch. Thisswitch must be specified to know the -timeoffracture of the clone.
-AvailableForIODisplays whether the clone is available for I/O from an attached server (yes or no).
-CloneConditionDisplays the clone condition. Typically, this shows the nature of a faulted clone. Thevalues include Administratively Fractured, System Fractured, Waiting onadministrator to initiate synchronization, Queued to be synchronized,Synchronizing, Normal, Unknown.
Note
If you fractured a clone (-fractureclone) or a group of clones (-consistentfractureclones), the clone condition will be displayed as
Administratively Fractured.
-cloneid idSpecifies the 16-character clone ID the system assigned when the clone was added.You can learn this using the -listclonegroup command function. The id is casesensitive.
-CloneLunsDisplays a list of clone LUN numbers.
-CloneLUNWWNsDisplays the WWN of the clone.
-CloneStateStates are consistent, out-of-sync, remote mirror synchronizing, reverse-out-of-sync,reverse-synchronizing, synchronized or synchronizing.
-CloneMediaFailureIndicates whether an error occurred during I/O with the clone LUN (yes or no).
-IsDirtyIndicates whether the clone received a server write request, which means it is not abyte-for-byte duplicate of its source LUN (yes or no).
-IsFracturedIndicates whether the clone was fractured (yes or no).
-PercentSyncedDisplays the percentage of the clone that is synchronized with its source.
-RecoveryPolicyIndicates the recovery policy (see -addclone), Automatic or Manual.
EMC SnapView Software
clone | snapview -listclone 543
-SyncRateDisplays high,medium,low or a user-specified positive integer.
-timeoffractureDisplays the date/time when the clone images were administrative fractured.
-UseProtectedRestore 0|1Indicates the state of the Protected Restore option. Values are 0 (clone may beupdated with new I/O during a restore) or 1 (clone cannot be updated with new I/Oduring restore).
EXAMPLE #1naviseccli -address ss1_spa clone -listclone -name db3_clone
Name: db3_cloneCloneGroupUid: 50:06:01:60:80:60:03:E5:3A:00:00:00:00:00:00:00CloneID: 0100000000000000CloneState: SynchronizedCloneCondition: NormalAvailableForIO: NoCloneMediaFailure: NoIsDirty: NoIsFractured: NoPercentSynced: 100RecoveryPolicy: AutoSyncRate: MediumCloneLUNs: 1UseProtectedRestore: No
EXAMPLE #2naviseccli -scope 0 snapview -listclone -name CG -timeoffracture
Name: CGCloneGroupUid: 50:06:01:60:BC:E0:1C:43:01:00:00:00:00:00:00:00CloneID: 0200000000000000TimeofFracture: 12/15/09 11:25:19
EXAMPLE #3naviseccli -scope 0 snapview -listclone -name CG -all
Name: CGCloneGroupUid: 50:06:01:60:BC:E0:1C:43:01:00:00:00:00:00:00:00CloneID: 0200000000000000CloneState: ConsistentCloneCondition: Administratively FracturedAvailableForIO: YesCloneMediaFailure: NoIsDirty: NoIsFractured: YesPercentSynced: N/ARecoveryPolicy: AutoSyncRate: MediumCloneLUNs: 10UseProtectedRestore: NoTimeofFracture: 12/15/09 11:25:19
clone | snapview -listclonefeatureDisplays general information for a system that supports clones.
PREREQUISITESYou must have a user account on the system on which you want the command executed.
EMC SnapView Software
544 EMC VNX Series 5.33 Command Line Interface Reference for Block

DESCRIPTIONThe naviseccli clone or the naviseccli snapview command with -listclonefeature and no other switches lists general clone information for a systemthat supports clones. You can obtain more specific information with switches.
SYNTAXclone | snapview -listclonefeature [-AllowProtectedRestore][-AvailableLUNs][-CanCreate][-Cpl][-CplSPA][-CplSPB][-DriverVersion][-MaxCloneGroupsUsingCPL][-MaxCloneMemory][-MaxClonesPerGroup][-MaxLUNsPerSource][-MinCplSize]OPTIONS-AllowProtectedRestore
Displays the state of the system Protected Restore option. The state can be no,which indicates that the system should update the clone with the I/O, or yes, whichindicates that it should not update the clone with the I/O. This option is availableonly if it is supported on the targeted system.
-AvailableLUNsLists LUN numbers currently available to be used as either a source or clone.
-CanCreateIndicates if a clone group can be created on this system. Valid answers are yes or no.
-CplIndicates whether clone private LUNs are allocated and enabled on this system.Valid answers are yes or no.
-CplSPADisplays the LUN number of the clone private LUN for SP A.
-CplSPBDisplays the LUN number of the clone private LUN for SP B.
-DriverVersionDisplays the version of the clone driver.
-MaxCloneGroupsUsingCPLDisplays the maximum number of clone groups that will use the clone private LUNsthat this system supports.
-MaxCloneMemoryDisplays the maximum amount of memory that the clone driver can allocate.
-MaxClonesPerGroupDisplays the maximum number of clones per clone group.
-MaxLUNsPerSourceDisplays the maximum number of LUNs allowed in a source.
-MinCplSizeDisplays the minimum size allowed, in blocks, for each clone private LUN.
EXAMPLEnaviseccli -address ss1_spa clone -listclonefeature
CanCreate: NoMaxCloneGroupsUsingCPL: 50MaxClonesPerGroup : 8
EMC SnapView Software
clone | snapview -listclonefeature 545

MaxLUNsPerSource: 1MaxCloneMemory: 10485760Cpl: YesCplSPA: 2CplSPB: 3MinCplSize: 250000DriverVersion: 2AvailableLUNs:AllowProtectedRestore: No
clone | snapview -listclonegroupDisplays clone group information.
PREREQUISITESYou must have a user account on the system on which you want the command executed.
DESCRIPTIONThe naviseccli clone or the naviseccli snapview command with -listclonegroup and no other switches lists general information for a clone group.You can obtain more specific information with switches.
SYNTAXclone | snapview -listclonegroup [-all][-CloneCount][-CloneGroupUid][-Clones][-CloneLunWWNs][-Description][-InSync][-IsControllingSP][-Name [name]][-QuiesceThreshold][-SourceLUNSize][-SourceMediaFailure][-Sources]OPTIONS
-allLists all the properties of a clone without having to type in any other switch. Thisswitch must be specified to know the -timeoffracture of the clone.
-CloneCountDisplays the number of clones and clone names defined in the clone group.
-CloneGroupUidDisplays the Uid and clone name. The Uid is the 16-byte unique ID assigned whenthe clone group was created.
-ClonesDisplays the following information about each clone:
Table 50 Clones information
CloneID Identification number of the clone. This number is unique per clonegroup, not system.
CloneState Values include consistent, out-of-sync, remote mirror synchronizing,reverse-out-of-sync, reverse-synchronizing, synchronized orsynchronizing
EMC SnapView Software
546 EMC VNX Series 5.33 Command Line Interface Reference for Block

Table 50 Clones information (continued)
CloneCondition Values include Administratively Fractured, System Fractured, Waitingon administrator to initiate synchronization, Queued to besynchronized, Synchronizing, Normal, or Unknown.
AvailableForIO Clone LUN availability for I/O from an attached server: yes or no.
CloneMedia Failure Whether clone media failure occurred: yes or no.
IsDirty Clone containing writes occurred from a source other than the clonegroup source: yes or no.
IsFractured Clone fractured state: yes or no.
PercentSynced Percentage of the clone instance that is currently synchronized withits source. Also applies to reverse-synchronizing operations.
RecoveryPolicy A user-defined value: Automatic or Manual.
SyncRate A user-defined value: high/medium/low.
CloneLUNs List of clone LUN numbers.
UseProtected Restore State of the clone Protected Restore option: yes or no.
-CloneLUNWWNsDisplays the WWN of the clone.
-DescriptionDisplays the descriptions and clone names in the clone group.
-InSyncIndicates whether the source LUN is available for I/O.
-IsControllingSPIndicates whether the SP specified in the command is the SP that owns the clonegroup (yes or no).
-Name nameDisplays information for the clone group name as given to the clone group with the -createclonegroup function.
-QuiesceThresholdDisplays the amount of time that must pass after an I/O to the source LUN before thesoftware places any of its unfractured clones in the synchronized state. Theminimum value is 10, the maximum value is 3600.
-SourceLUNSizeDisplays the names and combined size of the source LUNs.
-SourceMediaFailureIndicates whether an error occurred during I/O with the source LUNs.
-SourcesDisplays the LUN numbers that constitute the source in the clone group.
EXAMPLEnaviseccli -address ss1_spa clone -listclonegroup -Name clone_0 -all
Name: clone_0CloneGroupUid: 50:06:01:60:BB:20:10:DD:01:00:00:00:00:00:00:00InSync: YesDescription:QuiesceThreshold: 60SourceMediaFailure: No
EMC SnapView Software
clone | snapview -listclonegroup 547
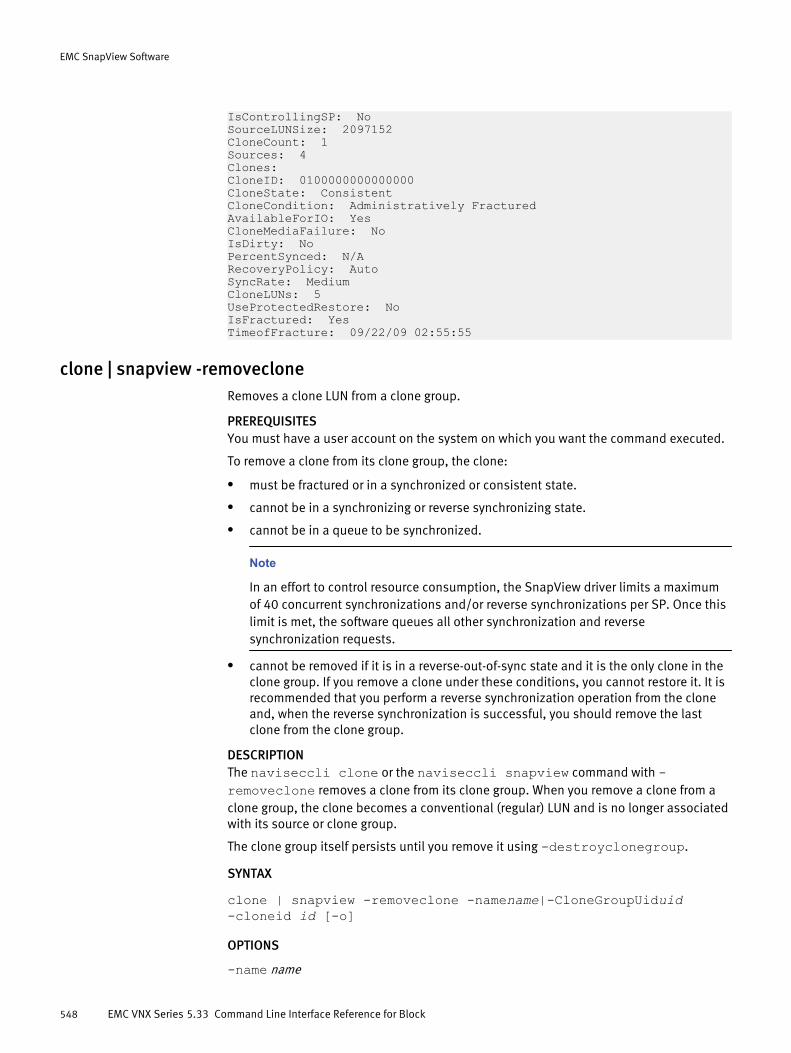
IsControllingSP: NoSourceLUNSize: 2097152CloneCount: 1Sources: 4Clones:CloneID: 0100000000000000CloneState: ConsistentCloneCondition: Administratively FracturedAvailableForIO: YesCloneMediaFailure: NoIsDirty: NoPercentSynced: N/ARecoveryPolicy: AutoSyncRate: MediumCloneLUNs: 5UseProtectedRestore: NoIsFractured: YesTimeofFracture: 09/22/09 02:55:55
clone | snapview -removecloneRemoves a clone LUN from a clone group.
PREREQUISITESYou must have a user account on the system on which you want the command executed.
To remove a clone from its clone group, the clone:
l must be fractured or in a synchronized or consistent state.
l cannot be in a synchronizing or reverse synchronizing state.
l cannot be in a queue to be synchronized.
Note
In an effort to control resource consumption, the SnapView driver limits a maximumof 40 concurrent synchronizations and/or reverse synchronizations per SP. Once thislimit is met, the software queues all other synchronization and reversesynchronization requests.
l cannot be removed if it is in a reverse-out-of-sync state and it is the only clone in theclone group. If you remove a clone under these conditions, you cannot restore it. It isrecommended that you perform a reverse synchronization operation from the cloneand, when the reverse synchronization is successful, you should remove the lastclone from the clone group.
DESCRIPTIONThe naviseccli clone or the naviseccli snapview command with -removeclone removes a clone from its clone group. When you remove a clone from aclone group, the clone becomes a conventional (regular) LUN and is no longer associatedwith its source or clone group.
The clone group itself persists until you remove it using -destroyclonegroup.
SYNTAX
clone | snapview -removeclone -namename|-CloneGroupUiduid-cloneid id [-o]
OPTIONS
-name name
EMC SnapView Software
548 EMC VNX Series 5.33 Command Line Interface Reference for Block

Identifies the clone group. Use the name assigned when the clone group was createdwith -createclonegroup. To identify a clone group, you can use either the clonename or the clone group unique ID.
-CloneGroupUid uidSpecifies the 16-byte unique ID the software assigned when the clone group wascreated. The clone group ID consists of the numbers 0 through 9 and the letters Athrough F (these letters are not case sensitive). You can use the -listclonegroup command function to obtain the clone group ID (see clone |snapview -listclonegroup on page 546).
-cloneid idSpecifies the 16-character clone ID of the system assigned when the clone wasadded. You can obtain this using the -listclonegroup command function. Theid is numeric.
-oTells the CLI to execute the command without waiting for confirmation.
EXAMPLEnaviseccli -address ss1_spa clone -removeclone -name db3_clone -o
OUTPUTNone if the command succeeds; status or error information if it fails.
clone | snapview -resetfracturelogMarks all data chunks of the source or clone LUN as being modified in the clone privateLUN log. This allows you to perform a full synchronization or reverse-synchronization.
PREREQUISITESYou must have a user account on the system on which you want the command executed.
You can use this switch only if the clone was administratively fractured and the clone is inan out-of-sync or reverse-out-of-sync state.
DESCRIPTIONThe naviseccli clone or the naviseccli snapview command with -resetfracturelog simulates server writes to the source or clone LUN, marking alldata chunks on the LUN as being modified (changed).
SYNTAXclone | snapview -resetfracturelog -namename| -CloneGroupUiduid-cloneid id [-o]OPTIONS-name name
Identifies the clone group. Use the name assigned when the clone group was createdwith -createclonegroup. To identify a clone group, you can use either the clonename or the clone group unique ID.
-CloneGroupUid uidSpecifies the 16-byte unique ID the software assigned when the clone group wascreated. The clone group ID consists of the numbers 0 through 9 and the letters Athrough F (these letters are not case sensitive). You can use the -listclonegroup command function to obtain the clone group ID (see clone |snapview -listclonegroup on page 546).
-cloneid idSpecifies the 16-character clone ID the system assigned when the clone was added.You can obtain this using the -listclonegroup command function. The id isnumeric.
EMC SnapView Software
clone | snapview -resetfracturelog 549
-oTells the CLI to execute the command without waiting for confirmation.
EXAMPLEnaviseccli -address ss1_spa clone -resetfracturelog -name db3_clone
OUTPUTNone if the command succeeds; status or error information if it fails.
POSTREQUISITESAfter issuing the -resetfracturelog command, you must issue a synchronization orreverse-synchronization. This will initiate a full synchronization or reverse-synchronization since all data chunks were marked as being modified.
Note
Performing multiple full synchronizations or reverse-synchronizations at the same timemay affect performance on other system resources.
clone | snapview -reversesynccloneOverwrites the source LUN with data from the clone LUN.
PREREQUISITESYou must have a user account on the system on which you want the command executed.
NOTICE
You cannot reverse synchronize the clone if the clone's source is a MirrorView secondaryimage or a MirrorView primary image with unfractured secondaries.
To reverse synchronize a fractured clone, the following must be true:
l The clone is not in an out-of-sync state.
l Another clone in the clone group is not in a synchronizing or reverse synchronizingstate.
For a Windows operating system, you must disable the indexing service and recycle binon the source LUN of the clone. This prevents data corruption during reversesynchronization.
DESCRIPTIONThe naviseccli clone or the naviseccli snapview command with -reversesyncclone replaces the data on the source LUN with the data on the clone.This allows you to revert to an earlier copy of the source LUN, for instance if the sourcebecame corrupted.
To ensure that there is no data corruption on the source LUN, you have to take the sourceLUN offline before you initiate the reverse synchronization. Once the operation begins,you can bring the source LUN back online.
When you initiate a reverse synchronization from Unisphere, the software immediatelyfractures all the clones in the clone group and then the software unfractures the clonefrom which you initiated the reverse synchronization. The software then copies the datachunks that differ between the source and the clone to the source LUN. The source LUNcan instantly access the data, while the actual copying continues in the background.
Writes to the source LUN
Any server writes made to the source LUN after the clone was originally fractured areoverwritten with the data on the clone. Any unmodified (unchanged) chunks of data are
EMC SnapView Software
550 EMC VNX Series 5.33 Command Line Interface Reference for Block

not rewritten to the source. After the reverse synchronization has completed, the clonethat initiated the reverse synchronization remains unfractured.
Note
If you issue the -UseProtectedRestore 1 switch with the clone | snapview -reversesyncclone command, after the reverse synchronization has completed,
SnapView fractures the clone that initiated the reverse synchronization.
During a reverse synchronization, the software automatically copies any server writesmade from the source LUN to the clone. If you do not want source writes copied to theclone during a reverse synchronization, you must issue the -UseProtectedRestore1 switch with the clone | snapview -reversesyncclone command.
Note
If you modify the same data chunk on the clone more than once, the software copies onlythe last modification to the source LUN.
The Protected Restore feature protects the data on a clone during a reversesynchronization. When you select this feature, during a reverse synchronization thesoftware will not copy any server writes made from the source LUN to the clone. Instead,the software records information in the clone private LUN to identify the source LUNwrites for subsequent synchronizations.
Once you initiate a reverse synchronization, the software immediately unfractures theclone that initiated the reverse synchronization. Then the software fractures any otherclones in the clone group in order to protect them from corruption should the reversesynchronization operation fail. The software then begins to copy its data to its sourceLUN. After the reverse synchronization has completed, the software fractures the clonethat initiated the reverse synchronization.
You can enable the Protected Restore feature on a per-clone basis (and not on a per-clone-group basis). You can select this feature when you first add a clone to a clonegroup (clone | snapview -addclone -UseProtectedRestore 1) or at any timebefore you perform a reverse synchronization ( clone | snapview -listclone -UseProtectedRestore 1).
Note
Before you can initiate the Protected Restore feature, you must globally enable it byissuing the clone | snapview -changeclonefeature [-AllowProtectedRestore 1] command. When you select this option, the SnapView
driver automatically allocates 8 MB of additional memory per SP. The additional memoryis fixed and is used to monitor modified blocks on the source LUN, in order to preventthese blocks from being overwritten by the clone during a reverse synchronization. Thisadditional memory counts against the total replication software memory budget.
While the clone is reverse synchronizing, you cannot:l add a clone to the clone groupl remove the clone that is reverse synchronizing from the clone groupl synchronize any clone in the clone groupl reverse synchronize any clone in the clone group
SYNTAXclone | snapview -reversesyncclone -name name|-clonegroupUiduid -cloneid id [-UseProtectedRestore 0|1]
EMC SnapView Software
clone | snapview -reversesyncclone 551

[-o]OPTIONS
-clonegroupUid uidSpecifies the 16-byte unique ID the software assigned when the clone group wascreated. The clone group ID consists of the numbers 0 through 9 and the letters Athrough F (these letters are not case sensitive). You can use the -listclonegroup command function to obtain the clone group ID (see clone |snapview -listclonegroup on page 546).
-cloneid idSpecifies the 16-character clone ID the system assigned when the clone was added.You can obtain this using the -listclonegroup command function. The id isnumeric.
-name nameIdentifies the clone group. Use the name assigned when the clone group was createdwith -createclonegroup. To identify a clone group, you can use either the clonename or the clone group unique ID.
-oTells the CLI to execute the command without waiting for confirmation.
-UseProtectedRestore 0|1Specifies the way the software will react when I/O is received during a reversesynchronizing operation.
0-Updates the clone with I/O to the source LUN.
1-Does not update the clone with I/O to the source LUN.
This property is available only if the option is supported on the targeted system.
EXAMPLE
naviseccli -address ss1_spa clone -reversesyncclone -name db3_clone-cloneid 0100000000000000 -o
OUTPUTNone if the command succeeds; status or error information if it fails.
clone | snapview -synccloneStarts copying the data on a source LUN to its clone.
PREREQUISITESYou must have a user account on the system on which you want the command executed.
To synchronize a fractured clone, the following must be true:
l The clone cannot be in a reverse-out-of-sync state.
l Another clone in the clone group cannot be in a reverse synchronizing state.
l If a clone is system fractured, you must manually fracture the clone before you cansynchronize it.
For a Windows operating system, the indexing service and recycle bin must be disabledon the clone LUN. This prevents data corruption during the synchronization.
DESCRIPTIONThe naviseccli clone or the naviseccli snapview command with -syncclone begins the process of synchronization: the copying of data on the sourceLUN to its clone. The purpose of synchronizing a fractured clone is to update the contents
EMC SnapView Software
552 EMC VNX Series 5.33 Command Line Interface Reference for Block

on the clone with its source LUN. Once you synchronize a fractured clone, the clonebecomes unfractured and behaves the same as a newly added clone in a clone group.
When you initiate a synchronization, the software copies the data chunks that aredifferent between the source LUN and the clone LUN to the clone. The software alsocopies any server writes from the source LUN to the clone LUN. The software does notcopy any unmodified chunks to the clone.
Note
If the same chunk of data is modified on the source LUN more than once, only the lastmodification is copied to the clone.
While the clone is synchronizing, you:l cannot remove the clone in a synchronizing state.l cannot perform a reverse synchronization with any other clone in the clone group.
Note
In an effort to control resource consumption, the SnapView driver limits a maximum of 40concurrent synchronizations and/or reverse synchronizations per SP. Once this limit ismet, the software queues all other synchronization and reverse synchronization requests.
SYNTAX
clone | snapview -syncclone -name name|-CloneGroupUid uid-cloneid id [-o]
OPTIONS-name name
Identifies the clone group. Use the name assigned when the clone group was createdwith -createclonegroup. To identify a clone group, you can use either the clonename or the clone group unique ID.
-CloneGroupUid uidSpecifies the 16-byte unique ID the software assigned when the clone group wascreated. The clone group ID consists of the numbers 0 through 9 and the letters Athrough F (these letters are not case sensitive). You can use the -listclonegroup command function to obtain the clone group ID (see clone |snapview -listclonegroup on page 546).
-cloneid idSpecifies the 16-character clone ID the system assigned when the clone was added.You can obtain this using the -listclonegroup command function. The id isnumeric.
-oTells the CLI to execute the command without waiting for confirmation.
EXAMPLE
Note
Before issuing the synchronization command, you should flush all cached data to thesource LUN.
These commands list the state of all clone groups on system SP ss1_spa, and then startsynchronization of the clone db3_clone.
naviseccli -address ss1_spa clone -listclonegroup
EMC SnapView Software
clone | snapview -syncclone 553

naviseccli -address ss1_spa clone -syncclone -name db3_clone -cloneid0100000000000000 -o
Name: db3_cloneCloneGroupUid: 50:06:01:60:20:04:21:3E:0C:00:00:00:00:00:00:00InSync: YesDescription:QuiesceThreshold: 60SourceLUNSize: 2097152CloneCount: 2Sources: 16Clones:CloneID: 0100000000000000
OUTPUTNone if the command succeeds; status or error information if it fails.
Admsnap commands for clonesThis section explains how to use the admsnap utility software with SnapView clones.
About admsnap software and clonesThe admsnap utility is an executable program that you can run interactively with a scriptto manage clones. The admsnap utility resides on the servers connected to the systemwith the SnapView driver. You must execute the following admsnap commands from oneof these attached servers:
l admsnap clone_activate – scans for new devices and, for Windows, assigns adrive letter.
l admsnap clone_deactivate – flushes server buffers and removes the driveletter assigned with clone_activate (Windows only).
l admsnap flush – flushes data from a source LUN to its clone, so that the sourceand clone are in a synchronized state.
l admsnap list – lists devices and their World Wide Name (WWN) within theoperating system.
Note
The admsnap software supports native device names and PowerPath pseudo-devicenames. If you use a PowerPath pseudo-device name, you can add this device name to theetc/fstab file (for Linux) or to the etc/vfstab file (for Solaris). Admsnap supports
both disk-based naming scheme and enclosure-based naming scheme for Veritasdevices.
For a step-by-step overview and examples on setting up and using clones with admsnapand VNX CLI for Block, refer to SnapView examples in EMC VNX for Block Concepts.
Requirements for admsnap and clonesBefore you can use admsnap for clones, the following must be true.
General requirements
l The server must have access to VNX CLI for Block. This is required to create aprerequisite LUN called a clone private LUN and to create clones.
EMC SnapView Software
554 EMC VNX Series 5.33 Command Line Interface Reference for Block

l The system must have the SnapView software installed.
l The production and secondary servers must have both the Unisphere Host Agent andadmsnap software installed. To install the host agent and admsnap, refer to the EMCBlock server support products guide for your operating system.
Platform-specific requirements
l For HP-UX, admsnap requires a volume group entry for each path to the system. Theentry or entries can be contained in a single volume group or multiple volume groups.On the destination system, the volume group entry or entries must specify a clone.
admsnap clone_activateScans for new LUNs on the secondary server.
PREREQUISITESYou must have administrative privileges on the secondary server.
Before this command will work, a clone group must exist (clone | snapview -createclonegroup) and a clone must already exist (that is, you must start one byadding a LUN to the clone group using clone | snapview -addclone). Then youmust fracture the clone and add it to a storage group that is connected to the secondaryserver.
DESCRIPTIONThe admsnap clone_activate command scans for new devices and, for Windows,assigns a drive letter to every new device it finds. When you activate a clone and add it toa storage group, the clone becomes accessible on the secondary server.
Note
Although the clone_activate command is prefixed with the term clone, you may
issue this command on any device that requires a scan for new LUNs and, for Windowsonly, for the assignment of a drive letter.
Depending on your operating system, the admsnap clone_activate command willdo the following:
Table 51 Function of admsnap clone_activate command for an operating system
Server OS Function description
Windows Scans for new devices and assigns a drive letter to everynew device it finds.For Windows Remote Desktop and Terminal Services - If aterminal server is running on the secondary server, you mustremove and disable it before using the clone_activatecommand. If you have the terminal server enabled, itprevents the command from working properly.
AIX, HP-UX, and Solaris Rescans the bus for new devices.
Linux The clone_activate command is not supported. You
must either reboot the server or unload and load the HBAdriver.
EMC SnapView Software
admsnap clone_activate 555

Table 51 Function of admsnap clone_activate command for an operating system (continued)
Server OS Function description
NetWare The clone_activate command is not supported. Run the
command list_devices or use the command
scan_all_LUNs on the console.
SYNTAXadmsnap clone_activate [-h]OPTIONS
-hLists the help output for a given operation. If you use this option on the commandline, a help message is displayed for each option you specify. Admsnap will notperform the command; it lists the help output only.
This option is valid for Windows, Solaris, HP-UX, and AIX systems only.
EXAMPLEadmsnap clone_activate
admsnap clone_deactivateFlushes server buffers and removes assigned drive letters. This command is supported onWindows systems only.
PREREQUISITESYou must have administrative privileges on the secondary server.
You must use this command on a secondary server after the clone has been activatedand before you synchronize the fractured clone, or on the production server before youreverse synchronize a fractured clone.
DESCRIPTIONOn a Windows server, the admsnap clone_deactivate command flushes all serverbuffers and removes the drive letter assigned by clone_activate. When youdeactivate a clone, the software takes the clone offline making it inaccessible to thesecondary server.
Note
Although the clone_deactivate command is prefixed with the term clone, you may
issue this command on any Windows device that requires a volume to be taken offline,making it inaccessible to the secondary server. After you issue the deactivate command,you can remove the clone from the storage group.
Table 52 Function of admsnap clone_deactivate command for an operating system
Server OS Function description
Windows Flushes all server buffers and removes the drive letter assigned byclone_activate. This operation will attempt to take the device offline and to
make it inaccessible by the operating system. To bring the device back online,you must issue the clone_activate command.
EMC SnapView Software
556 EMC VNX Series 5.33 Command Line Interface Reference for Block

Table 52 Function of admsnap clone_deactivate command for an operating system (continued)
Server OS Function description
For Windows Remote Desktop and Terminal Services - If a terminal server isrunning on the secondary server, you must remove and disable it before usingthe clone_deactivate command. If you have the terminal server enabled, it
prevents the clone_deactivate command from working properly.
For Microsoft Cluster Services (MSCS) - When you need to stop I/O to a clone ora clone’s source LUN, you must take the clone LUN offline in order to ensureMSCS stops generating I/O. You must do this in addition to using the admsnapclone_deactivate command. You can take the clone LUNs offline by doing
the following:
1. Locate the MSCS Disk Group resource that includes the clone LUNs.
2. Use the Microsoft Cluster Administrator to take the Disk Group offline by
right-clicking the Disk Group and selecting Take Offline.
3. Perform the clone operation.
When you are ready to resume I/O to the disk, use the Microsoft ClusterAdministrator to bring the Disk Group(s) back online by right-clicking the Disk
Group and selecting Bring Online.
AIX, HP-UX, andSolaris
The clone_deactivate command is not supported; it is provided for script
compatibility between Windows and UNIX only. If you issue the command onthis server, admsnap will return an error.Unmount the file system by issuing the umount command. If you cannot
unmount the file system, you can use the sync command to flush buffers. The
sync command is not considered a substitute for unmounting the file system,
but you can use it to reduce the number of times you have to issue the fsckcommand on your backup server’s file system. Refer to your system's manpages for sync command usage.
Linux The clone_deactivate command is not supported. You must either reboot
the server or unload and load the HBA driver.
NetWare The clone_deactivate command is not supported. Use the dismountcommand on the clone volume to dismount the file system.
SYNTAXadmsnap clone_deactivate [-h] -o object_name [-t object_type]OPTIONS
-hLists the help output for a given operation. If you use this option on the commandline, a help message is displayed for each option you specify. Admsnap will notperform the command; it lists the help output only.
-o object_nameSpecifies an object name. The object name must be a device name or drive letter. Ifthe device name is provided as an object name, admsnap will find the associateddevice and drive letter. It will then delete the drive letter, dismount the device andtake the device offline.
EMC SnapView Software
admsnap clone_deactivate 557

If you use the -t option, the device name must be a valid name for the type of objectspecified with the -t option.
-t object_typeSpecifies the object type. Valid Windows object types are device and drive letter.
If you do not specify the -t option, admsnap will attempt to determine the correctobject type and report a failure if it cannot.
EXAMPLEWindows example:
admsnap clone_deactivate -o e:
admsnap flushFlushes all data that has been written to the source LUN.
DESCRIPTIONThe admsnap flush command clears buffers and flushes all data to a LUN.
Use it on the source LUN's server before fracturing a clone to ensure that all cached datahas been written to the clone.
Depending on your operating system, the admsnap flush command will do thefollowing:
Table 53 Function of admsnap flush command for an operating system
Server OSa Function description
Windows Writes the data from the buffers to the disk.
AIX, HP-UX, Linux, and Solaris Writes the data from the buffers to the disk.We recommend that you unmount the filesystem by issuing the umount command to
ensure that no additional source writes arein process. If you are unable to unmountthe file system, you can issue the admsnapflush commandb.
NetWare The flush command is not supported.
Dismount the file system by using thedismount command on the volume.
a. With some operating systems, you may need to shut down the application to flush the data.Specific operating systems have different requirements.
b. Neither the flush command nor the sync command is a substitute for unmounting the filesystem. Both commands only complement unmounting the file system.
SYNTAXadmsnap flush [-h] -o object_name [-t object_type]OPTIONS-h
Lists the help output for a given operation. If you use this option on the commandline, a help message is displayed for each option you specify. Admsnap will notperform the command; it lists the help output only.
This option is valid for Windows, Solaris, HP-UX, Linux, and AIX systems.
-o object_name
EMC SnapView Software
558 EMC VNX Series 5.33 Command Line Interface Reference for Block

Specifies an object name. Valid Windows object names are drive letter and physicaldrive name. Valid Solaris object names are device names, file system names, orVeritas volume names. For HP-UX and Linux, a valid object name is either a devicename, a file system name or Veritas volume name. For AIX, a valid object name iseither a device name or a file system name.
If you use the -t option, the device name must be a valid name for the type of objectspecified with the -t option.
-t object_typeSpecifies the object type. This switch is supported on Windows or UNIX operatingsystems only. Valid Windows object types are device and drive letter. Valid UNIXobject types are device, volume, and file system. If the object type name containsspaces, enter the name without spaces.
If you do not specify the -t option, admsnap will try to determine the correct objecttype and will report a failure if it cannot.
EXAMPLEWindows example:
admsnap flush -o E:
admsnap listPerforms a list operation and provides the World Wide Name (WWN) of all supporteddevices on the system.
PREREQUISITESYou must have administrative privileges on the production and secondary server.
DESCRIPTIONThe admsnap list command will attempt to list devices and their World Wide Names(or WWN) on the operating system. You can use the WWN to distinguish one operatingsystem device from another.
The admsnap list command is supported on Windows, Solaris, HP-UX, Linux, and AIXsystems only.
SYNTAXadmsnap list [-h][-l lun_wwn][-d object_name][-a output_format]OPTIONS
[ -h ]Lists the help output for a given operation. If you use this option on the commandline, a help message is displayed for each option you specify. Admsnap will notperform the command; it lists the help output only.
This option is valid for Windows, Solaris, HP-UX, Linux, and AIX systems.
[-l lun_wwn]Lists the device name for the WWN you specify. The WWN must be in a valid WWNformat.
[-d object_name]Specifies an object name that must be a device name, file system mount point, aVeritas volume name, or a drive letter.
EMC SnapView Software
admsnap list 559
Note
The -a option is ignored when used with the -d option and the object name
argument is a Windows device name, for instance \\.\PhysicalDrive1.
[-a output_format]Specifies an alternative output style on a Windows server. The default Windowsoutput style is to list the drive letter and its WWN. The output style must be a validstyle that is either a drive letter (default if -a is not specified at all) or a physicaldrive.
Note
The -a option is ignored when used with the -d option and the object name
argument is a Windows device name, for instance \\.\PhysicalDrive1.
EXAMPLEWindows example:
admsnap list -d E:
SnapView Snapshot CLI commandsThis section explains the SnapView snapshot CLI commands that manage SnapViewsnapshots.
Setting up SnapView to use snapshotsThis section describes how to set up SnapView to use snapshots.
Prerequisites for setting up snapshots
Before you can set up and use snapshots, the following must be true:
l Source LUNs must be bound. For a client or production server to access a source LUN,you must assign the source LUN to a storage group and connect the storage group tothe production server. To do this, you must enable data access control on the system.
l For VMware ESX Servers, verify that the source LUN is presented to the virtualmachine (guest operating system running on the virtual machine). For information onhow to present a LUN to the virtual machine, refer to the VMware documentation thatshipped with your ESX Server.
l For configuration restrictions when using VMFS volumes, go to the E-LabInteroperability Navigator on EMC Online Support and under the PDFs and Guidestab, open the VMware ESX server.pdf file.
l For a secondary server to access the snapshot, you must assign the snapshot to astorage group. The storage group must be connected to the secondary server that willactivate the snapshot. You must assign the snapshot to a storage group other thanthe storage group that holds the source LUN. EMC supports placing a snapshot in thesame storage group as its source LUN only if you use Replication Manager orReplication Manager/SE to put the snapshot in the storage group. This softwareprovides same host access to the snapshot and the source LUN. For information onusing these software products, refer to the documentation for the product.If you have a VMware ESX Server, the snapshot and source LUNs must be accessed bydifferent virtual machines, unless the virtual machine is running one of the softwareprograms that supports same host access.
EMC SnapView Software
560 EMC VNX Series 5.33 Command Line Interface Reference for Block

Note
VMware ESX Servers must activate the snapshot before adding it to a storage group.
l Reserved LUNs must be bound and added to the reserved LUN pool before starting aSnapView session. You must add a reserved LUN to the reserved LUN pool for eachsource LUN you will replicate. To configure the reserved LUN pool, refer to VNX CLI forBlock on page 23.
Note
Thin LUNs are not eligible for use as reserved LUNs.
Overview of setting up SnapView to use snapshots
The following is a checklist for setting up SnapView snapshots.
Note
You must complete the prerequisites for setting up snapshots, as listed in Prerequisitesfor setting up snapshots on page 560, before you can perform any of the followingprocedures.
l Start a SnapView session, refer to snapview -startsession on page 579.
Note
You can create a snapshot before starting a session but the snapshot has no useuntil you start a session on it. A secondary server can then activate the snapshot tothe session.
l Create a snapshot, refer to snapview -createsnapshot on page 566.l If you do not have a VMware ESX Server - Add the snapshot to a storage group
connected to the server that will access the snapshot.
If you have a VMware ESX Server - Activate the snapshot on page 563. After youhave activated the snapshot, do the following:
1. Add the snapshot to a storage group connected to the ESX Server that will accessthe snapshot.
2. Rescan the bus at the ESX Server level.
3. If a virtual machine is already running, power off the virtual machine and use theService Console of the ESX Server to assign the snapshot to the virtual machine. Ifa virtual machine is not running, create a virtual machine on the ESX Server andassign the snapshot to the virtual machine.
If a virtual machine is not running, create a virtual machine on the ESX Server andassign the snapshot to the virtual machine.
4. Power on the virtual machine. If the snapshot is already presented to the virtualmachine, rescan the bus at the virtual machine level. For virtual machines runningWindows, you can use the admsnap activate command to rescan the bus.
Reserved LUN pool with SnapView
The reserved LUN pool consists of one or more private LUNs and works with SnapViewsessions and snapshots. The reserved LUN pool stores the original source LUN datachunks that have been modified since the start of the session. For any one session, thecontents of a reserved LUN(s) and any unchanged source LUN(s) blocks compose thesnapshot.
EMC SnapView Software
Setting up SnapView to use snapshots 561

Server writes made to an activated snapshot are also stored on a reserved LUN in theglobal reserved LUN pool. When you deactivate the snapshot, the reserved LUN space isfreed and all snapshot writes are destroyed.
Before starting a session, the reserved LUN pool must contain at least one LUN for eachsource LUN that will be starting a session. You can add any LUNs that are available to thereserved LUN pool. Each system manages its own LUN pool and assigns a separatereserved LUN (or multiple LUNs) to each SnapView source LUN. Multiple sessions of asingle source LUN will share the same reserved LUN or LUNs.
If the reserved LUN fills up and there are no available reserved LUNs in the reserved LUNpool, the software automatically terminates the session that is trying to allocate reservedLUN space, logs an error, releases the reserved LUN(s) used by this session, and returnsthem to the reserved LUN pool. The software also destroys all copy-on-first-write datastored in the reserved LUN pool for that session. At this point, the snapshot becomesinactive and any server that has mounted volumes on the snapshot will receive I/O errorsand lose access.
If you have multiple sessions of a single source LUN and the reserved LUN fills up, whenthe production server modifies a chunk on the source LUN, resulting in a copy-on-first-write, every session that has the same chunk will be terminated if no additional LUNs areavailable in the reserved LUN pool. Other sessions that did not have this chunk willcontinue to run and use the reserved LUN space that the terminated sessions were using.
Note
SnapView, incremental SAN Copy, and MirrorView/Asynchronous share the LUNresources of the reserved LUN pool. For example, if you are running an incremental SANCopy session on one LUN and a SnapView session on another LUN, the reserved LUN poolmust contain at least two LUNs - one for each source LUN. If both sessions are running onthe same source LUN, the sessions will share a reserved LUN.
Configuring the reserved LUN poolYou must configure the reserved LUN pool before you start a SnapView session. Use VNXCLI for Block to configure the reserved LUN pool (refer to VNX CLI for Block on page 23).The CLI Reference also explains how you can manually estimate a suitable LUN pool size.
Note
Thin LUNs are not eligible for use as reserved LUNs.
SnapView command functionsThe naviseccli or navicli snapview functions, listed alphabetically, are:
l snapview -activatesnapshot
l snapview -chgrollback
l snapview -chgsnapshot
l snapview -createsnapshot
l snapview -deactivatesnapshot
l snapview -listrollback
l snapview -listsnapshots
l snapview -listsessions
l snapview -listsnapableluns
l snapview -lunpool
EMC SnapView Software
562 EMC VNX Series 5.33 Command Line Interface Reference for Block

l snapview -rmsnapshotl snapview -startrollbackl snapview -startsessionl snapview -stopsession
In naviseccli or navicli SnapView command functions on page 563, the SnapViewsnapshot CLI functions are listed alphabetically according to essential and optionalfunctions.
Table 54 naviseccli or navicli SnapView command functions
Command Description
Essential functions (alphabetically)
snapview -activatesnapshot or admsnap-activate
Associates a session with a snapshot LUN, required formultiple sessions on a LUN(s). The admsnapactivate command returns a drive letter or device
name of the snapshot.
snapview -createsnapshot Creates a snapshot LUN.
snapview -startrollback Starts a rollback on the selected SnapView session.
snapview -startsession Starts a single SnapView session.
snapview -stopsession Stops a SnapView session.
Optional status functions (alphabetically)
snapview -listrollback Displays rollback information such as the rollbackstatus and performance statistics.
snapview -listsessions Displays information on all active SnapView sessions.
snapview -listsnapableluns Displays the unique IDs of all potential snapshotsource LUNs.
snapview -listsnapshots Displays information on snapshot LUNs.
snapview -lunpool Lists all reserved LUNs that are currently being usedwith SnapView.
Optional reconfiguration functions (alphabetically)
snapview -chgrollback Changes the rollback rate.
snapview -chgsnapshot Renames a snapshot LUN.
snapview -deactivatesnapshot Removes the association of a session with a snapshotLUN.
snapview -rmsnapshot Removes (deletes) a snapshot LUN.
snapview -activatesnapshotActivates a snapshot LUN with a session.
PREREQUISITESFor naviseccli, you must have a user account on the system on which you want to executethe command. For navicli, you must have a username/server entry in the Unisphere SPAgent configuration file.
EMC SnapView Software
snapview -activatesnapshot 563

A session must already exist (that is, you must start one using snapview -startsession) and a snapshot LUN must exist (snapview -createsnapshot)before this command will work.
If you have a VMware ESX Server, you must activate the snapshot before you add it to astorage group.
DESCRIPTIONThe naviseccli or navicli snapview command with -activatesnapshotmaps a snapshot LUN to a SnapView session. When you activate a snapshot to a session,the session becomes accessible on the secondary server’s system.
Note
You must issue this command to the SP that owns the source LUN(s); otherwise, thecommand will fail.
Once a secondary server activates a snapshot to a session, this server can write to theactivated snapshot. The software stores all writes made to the snapshot in the reservedLUN pool. If the secondary server deactivates the snapshot from the session, the softwaredestroys all writes made to the session.
Note
The snapview -activatesnapshot command has a similar function as the
admsnap activate command, but the snapview -activatesnapshot command
does not return snapshot device information or allow you to activate all snapshots usingone command.
SYNTAX
snapview -activatesnapshot sessionname -snapshotid uidorsnapview -activatesnapshot sessionname -snapshotname name
OPTIONS
-activatesnapshot sessionnameSpecifies a session name (that you assigned when the session was started with -startsession).
-snapshotid uidSpecifies the 32-byte unique ID of the snapshot (assigned by the system when thecopy was created with -createsnapshot).
-snapshotname nameSpecifies the name of the snapshot (that you optionally assigned when the copy wascreated with -createsnapshot).
EXAMPLEFor SP ss1_spa, these commands start a session named 2pmsession with snapshot LUNlun20copy, and then associate the session and snapshot. The copy then becomesaccessible on the secondary server’s system.
Note
To use this command with navicli, replace naviseccli with navicli.
naviseccli -h ss1_spa snapview -startsession 2pmsession -snapshotnamelun20copy
EMC SnapView Software
564 EMC VNX Series 5.33 Command Line Interface Reference for Block
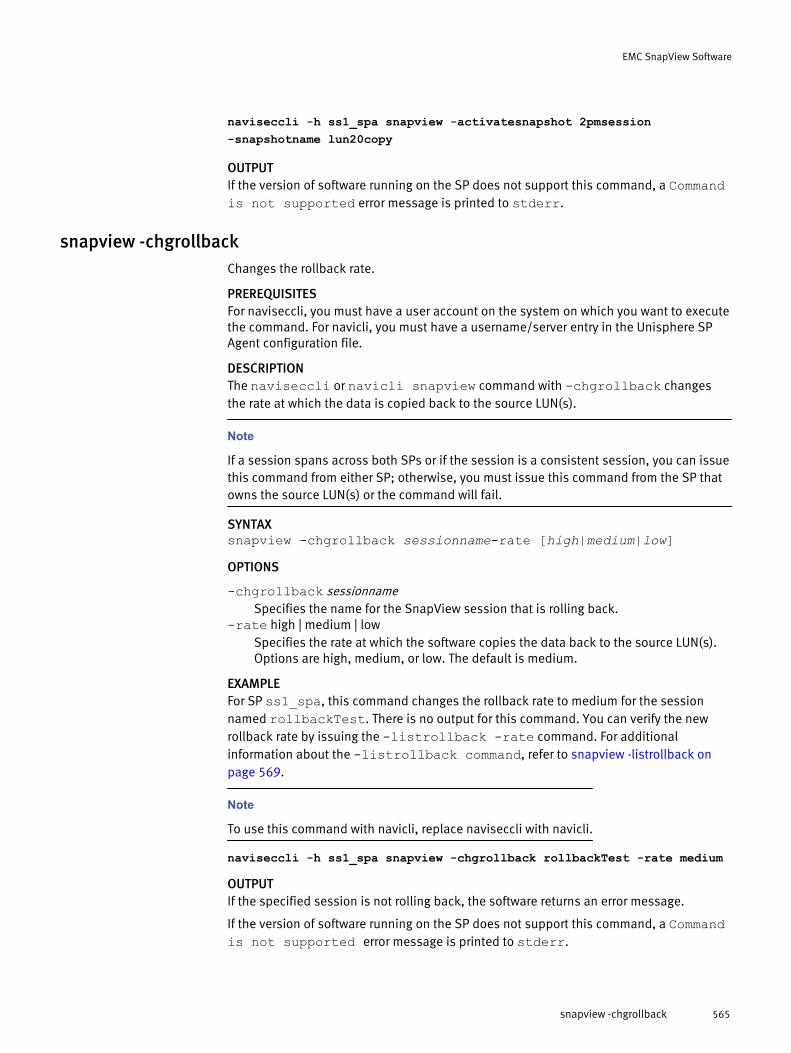
naviseccli -h ss1_spa snapview -activatesnapshot 2pmsession-snapshotname lun20copy
OUTPUTIf the version of software running on the SP does not support this command, a Commandis not supported error message is printed to stderr.
snapview -chgrollbackChanges the rollback rate.
PREREQUISITESFor naviseccli, you must have a user account on the system on which you want to executethe command. For navicli, you must have a username/server entry in the Unisphere SPAgent configuration file.
DESCRIPTIONThe naviseccli or navicli snapview command with -chgrollback changesthe rate at which the data is copied back to the source LUN(s).
Note
If a session spans across both SPs or if the session is a consistent session, you can issuethis command from either SP; otherwise, you must issue this command from the SP thatowns the source LUN(s) or the command will fail.
SYNTAXsnapview -chgrollback sessionname-rate [high|medium|low]OPTIONS
-chgrollback sessionnameSpecifies the name for the SnapView session that is rolling back.
-rate high | medium | lowSpecifies the rate at which the software copies the data back to the source LUN(s).Options are high, medium, or low. The default is medium.
EXAMPLEFor SP ss1_spa, this command changes the rollback rate to medium for the sessionnamed rollbackTest. There is no output for this command. You can verify the newrollback rate by issuing the -listrollback -rate command. For additionalinformation about the -listrollback command, refer to snapview -listrollback onpage 569.
Note
To use this command with navicli, replace naviseccli with navicli.
naviseccli -h ss1_spa snapview -chgrollback rollbackTest -rate medium
OUTPUTIf the specified session is not rolling back, the software returns an error message.
If the version of software running on the SP does not support this command, a Commandis not supported error message is printed to stderr.
EMC SnapView Software
snapview -chgrollback 565

snapview -chgsnapshotRenames a snapshot.
PREREQUISITESFor naviseccli, you must have a user account on the system on which you want to executethe command. For navicli, you must have a username/server entry in the Unisphere SPAgent configuration file.
DESCRIPTIONThe naviseccli or navicli snapview command with -chgsnapshot changesthe name of a snapshot.
Note
You can issue this command from either SP.
SYNTAX
snapview -chgsnapshot -snapshotid uid -snapshotnewname newnameorsnapview -chgsnapshot -snapshotname name -snapshotnewnamenewname
OPTIONS
-snapshotid uidSpecifies the 32-byte LUN unique ID (WWN) of the snapshot, assigned when thesnapshot was created. For any letters in the ID, you must specify the same case thatthe software assigned to the image when the snapshot was created (use thesnapview -listsnapshots function).
-snapshotname nameSpecifies the existing name for the snapshot.
-snapshotnewname newnameSpecifies the new name for the snapshot.
EXAMPLEFor SP ss1_spa, this command renames the snapshot named snap11am to snap3pm.
Note
To use this command with navicli, replace naviseccli with navicli.
naviseccli -h ss1_spa snapview -chgsnapshot -snapshotname snap11am-snapshotnewname snap3pm
OUTPUTIf the version of software running on the SP does not support this command, a Commandis not supported error message is printed to stderr.
snapview -createsnapshotCreates a snapshot.
PREREQUISITESFor naviseccli, you must have a user account on the system on which you want to executethe command. For navicli, you must have a username/server entry in the Unisphere SPAgent configuration file.
EMC SnapView Software
566 EMC VNX Series 5.33 Command Line Interface Reference for Block

DESCRIPTIONThe naviseccli or navicli snapview command with -createsnapshot createsa snapshot. A snapshot is a virtual LUN and when activated (-activatesnapshot), itallows a secondary server to view a SnapView session. An active snapshot is a compositeof a source LUN and reserved LUN data that lasts until you destroy the snapshot. You cancreate a snapshot before or after you start a session; however, the snapshot has no useuntil a secondary server activates it to a session.
Note
When you create a snapshot, SnapView automatically allocates and retains additionalmemory. This additional memory counts against the total replication software memorybudget.
If the system loses power while the SnapView session is running, both the session andsnapshot will survive the system power failure, since all sessions run in persistencemode.
You must issue this command to the SP that owns the source LUN(s); otherwise, thecommand will fail.
Note
Unless you have additional software that supports same host access, you must assignthe snapshot to a storage group other than the storage group that holds the sourceLUN(s). You also must assign multiple snapshots, of the same source LUN(s), to differentstorage groups. For information on software that supports same host access, refer to the Prerequisites for setting up snapshots on page 560.
SYNTAXsnapview -createsnapshotlun [-snapshotname name]OPTIONS
-createsnapshot lunSpecifies the LUN ID of the source LUN(s).
-snapshotname nameLets you assign a meaningful name to the snapshot; for example 2pmsnap. You canuse this name during the session to manage the snapshot. The name can include asmany as 32 characters and spaces are allowed.
EXAMPLEFor SP ss1_spa, this -createsnapshot command creates a snapshot for the sourceLUN(s) that has the LUN ID 20. The snapshot name is lun20snap.
Note
To use this command with navicli, replace naviseccli with navicli.
naviseccli -h ss1_spa snapview -createsnapshot 20 -snapshotnamelun20snap
OUTPUTIf the version of software running on the SP does not support this command, a Commandis not supported error message is printed to stderr.
EMC SnapView Software
snapview -createsnapshot 567

snapview -deactivatesnapshotRemoves the association between a SnapView session and a snapshot LUN.
PREREQUISITESFor naviseccli, you must have a user account on the system on which you want to executethe command. For navicli, you must have a username/server entry in the Unisphere SPAgent configuration file.
DESCRIPTIONThe naviseccli or navicli snapview command with -deactivatesnapshotunmaps a snapshot from a SnapView session and destroys any secondary server writesmade to the snapshot. The snapshot becomes inaccessible on the secondary server’ssystem, while the session continues.
Note
You must issue this command to the SP that owns the source LUN(s); otherwise, thecommand will fail.
SYNTAX
snapview -deactivatesnapshot -snapshotid uid [-o]orsnapview -deactivatesnapshot -snapshotname name[-o]
OPTIONS
-snapshotid uidSpecifies the 32-byte unique ID of the snapshot (assigned when the copy wascreated with -createsnapshot).
-snapshotname nameSpecifies the name of the snapshot (optionally assigned when the copy was createdwith -createsnapshot).
-oExecutes the command without prompting for confirmation.
EXAMPLEFor SP ss1_spa, this command removes the existing association between the snapshotlun20copy and its session. The snapshot then becomes inaccessible on the secondaryserver’s system.
Note
To use this command with navicli, replace naviseccli with navicli.
naviseccli -h ss1_spa snapview -deactivatesnapshot -snapshotnamelun20copy
OUTPUTIf the version of software running on the SP does not support this command, a Commandis not supported error message is printed to stderr.
EMC SnapView Software
568 EMC VNX Series 5.33 Command Line Interface Reference for Block

snapview -listrollbackDisplays rollback information, such as the rollback status and performance statistics.
PREREQUISITESFor naviseccli, you must have a user account on the system on which you want toexecute the command. For navicli, you must have a username/server entry in theUnisphere SP Agent configuration file.
DESCRIPTION
Note
If a session spans across both SPs, the switches that provide statistical information willspecify only the statistics for the SP in the navicli command.
The naviseccli or navicli snapview command with -listrollback and noother switches lists all rollback information. You can obtain more specific informationwith the switches described below.
Note
If a session spans across both SPs or if the session is a consistent session, you can issuethis command from either SP; otherwise, you must issue this command to the SP thatowns the source LUN(s) or the command will fail.
SYNTAXsnapview-listrollback [-name sessionname][-rate [-high|-medium|-low]][-complete][-incomplete][-reads][-writes][-spanreads][-spanwrites][-blocksread][-blockswritten][-rollbackpercent]OPTIONS
-name sessionnameSpecifies the name for the SnapView session that is rolling back. If you do notspecify a session name, the software returns the names for all sessions that arerolling back on that SP.
-rate high|medium|lowSpecifies the rate at which the software copies the data back to the source LUN(s).Values are high, medium, or low.
-completeDisplays the number of chunks that have been copied to the source LUN(s). Thisincludes the number of chunks flushed and the number of chunks invalidated.
The number of chunks flushed is the number of reserved LUN chunks that have beencopied from the session that is rolling back to the source LUN(s).
The number of chunks invalidated is the number of reserved LUN chunks that willnot be copied to the source LUN(s). Server writes made to the source LUN(s) while
EMC SnapView Software
snapview -listrollback 569
the rollback is in progress will take precedence over the data chunks being rolledback.
-incompleteDisplays the number of copy-on-first-write chunks that have not been copied back tothe session’s source LUN(s).
-readsDisplays the number of server read requests made to the source LUN(s) during therollback operation.
-writesDisplays the number of server write requests made to the source LUN(s) during therollback operation.
-spanreadsDisplays the number of server read requests made to the source LUN(s) during therollback operation, which spanned a partial chunk.
-spanwritesDisplays the number of server write requests made to the source LUN(s) during therollback operation, which spanned a partial chunk.
-blocksreadDisplays the number of 512-byte disk blocks that were read by the source LUN’sserver during the rollback operation.
-blockswrittenDisplays the number of 512-byte disk blocks that were written by the source LUN’sserver during the rollback operation. Server writes made to the source LUN(s) whilethe rollback is in progress will overwrite the data being rolled back.
-rollbackpercentDisplays the percentage of data chunks that have been copied to the source LUN(s).
EXAMPLEYou can specify no switches or only those that you are interested in, as illustrated in theexamples below.
naviseccli -h ss1_spa snapview -listrollbackWithout any switches specified for SP ss1_spa, this command will display the statisticsinformation for all sessions that are rolling back.
naviseccli -h ss1_spa snapview -listrollback -nameFor SP ss1_spa, this command displays only the names of all sessions that are rollingback.
naviseccli -h ss1_spa snapview -listrollback -name sessionNameFor SP ss1_spa, this command displays the statistics information for the specifiedsession.
naviseccli -h ss1_spa snapview -listrollback -name -rate -completeFor SP ss1_spa, this command displays the rollback rate and the number of chunkscompleted for each session that is rolling back.
Note
To use this command with navicli, replace naviseccli with navicli.
EMC SnapView Software
570 EMC VNX Series 5.33 Command Line Interface Reference for Block
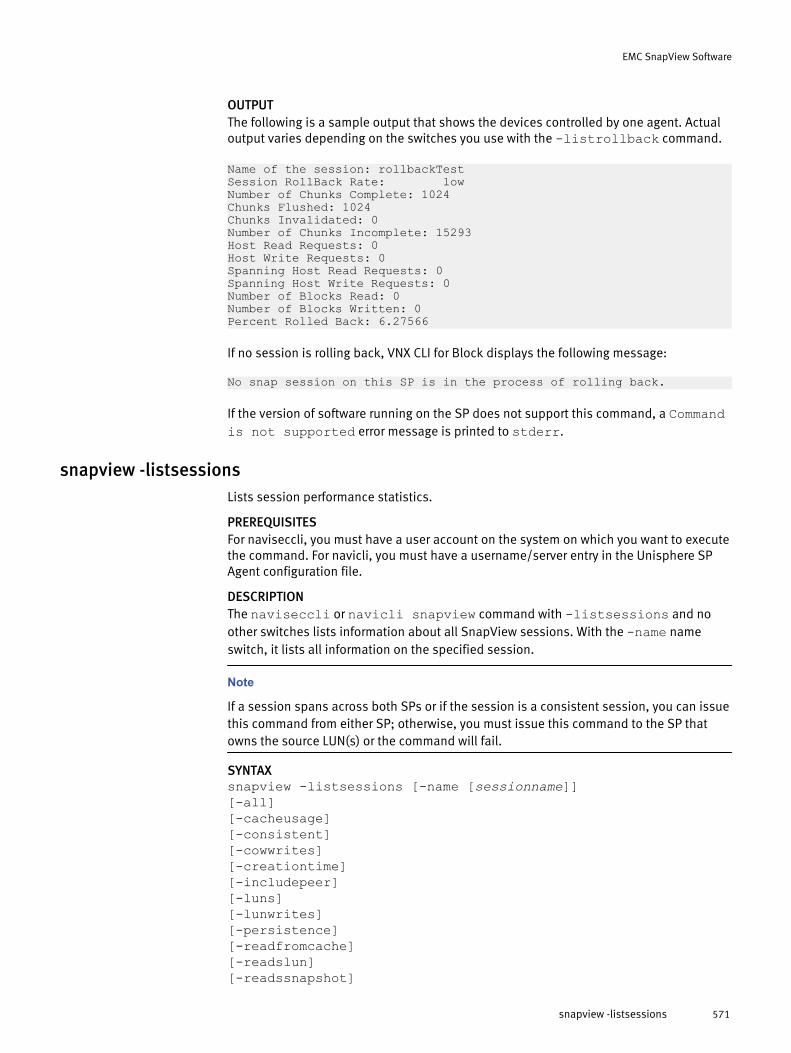
OUTPUTThe following is a sample output that shows the devices controlled by one agent. Actualoutput varies depending on the switches you use with the -listrollback command.
Name of the session: rollbackTestSession RollBack Rate: low Number of Chunks Complete: 1024Chunks Flushed: 1024Chunks Invalidated: 0Number of Chunks Incomplete: 15293Host Read Requests: 0Host Write Requests: 0Spanning Host Read Requests: 0Spanning Host Write Requests: 0Number of Blocks Read: 0Number of Blocks Written: 0Percent Rolled Back: 6.27566
If no session is rolling back, VNX CLI for Block displays the following message:
No snap session on this SP is in the process of rolling back.
If the version of software running on the SP does not support this command, a Commandis not supported error message is printed to stderr.
snapview -listsessionsLists session performance statistics.
PREREQUISITESFor naviseccli, you must have a user account on the system on which you want to executethe command. For navicli, you must have a username/server entry in the Unisphere SPAgent configuration file.
DESCRIPTIONThe naviseccli or navicli snapview command with -listsessions and noother switches lists information about all SnapView sessions. With the -name nameswitch, it lists all information on the specified session.
Note
If a session spans across both SPs or if the session is a consistent session, you can issuethis command from either SP; otherwise, you must issue this command to the SP thatowns the source LUN(s) or the command will fail.
SYNTAXsnapview -listsessions [-name [sessionname]][-all][-cacheusage][-consistent][-cowwrites][-creationtime][-includepeer][-luns][-lunwrites][-persistence][-readfromcache][-readslun][-readssnapshot]
EMC SnapView Software
snapview -listsessions 571

[-reserved][-sessionstate][-snapshotsname][-snapshotsuid][-tlunumber][-totalwrites][-writeslargerthansize]OPTIONS
-name [sessionname]Specifies the name of the session to be described. If you omit -sessionname, the CLIdisplays all session names.
-allLists all properties of a session without having to type in any other switch.
-cacheusageDisplays the system’s reserved LUN pool capacity in gigabytes and percentage of ortotal number of chunks used in this SnapView session.
-consistentLists whether the session is running in consistent mode.
-cowwritesDisplays the number of write requests to the reserved LUN pool that triggered a copyon first write.
-creationtimeDisplays the time and date that the session was created.
-includepeerLists sessions on the peer SP and LUNs from sessions spanning both SPs.
-lunsLists the source LUNs used in the sessions.
-lunwritesDisplays the total number of write requests from the source LUN(s).
-persistenceLists whether the session is running in persistence mode. VNX CLI for Block version6.24 or later enables persistence mode as the default.
-readfromcacheDisplays the number of chunks read from the reserved LUN pool.
-readslunDisplays the total number of chunks read from the source LUN(s).
-readssnapshotDisplays the number of chunks read from the snapshot.
-reservedLists all reserved sessions. Reserved sessions are sessions used for anotherapplication such as SAN Copy and MirrorView/Asynchronous.
-sessionstateDisplays the state of the session: Stopping, Normal, or Rolling Back.
-snapshotsnameLists the names of any active snapshots in this session.
-snapshotsuidLists the 16-byte LUN unique IDs of the snapshots in this session.
-tlunumberDisplays the LUN number of the source LUN(s).
-totalwritesDisplays the sum of write requests to the source LUN(s) and to the reserved LUN poolin the SnapView session.
-writeslargerthansizeDisplays the number of write requests larger than the chunk size.
EMC SnapView Software
572 EMC VNX Series 5.33 Command Line Interface Reference for Block

EXAMPLEFor SP ss1_spa, this command lists all sessions. A sample output follows.
Note
To use this command with navicli, replace naviseccli with navicli.
naviseccli -h ss1_spa snapview -listsessions
OUTPUTThe following is a sample output that shows the devices controlled by one agent. Actualoutput varies depending on the switches you use with the -listsessions command.
Name of the session: rollbackTestNumber of read requests serviced by the snapview reserved LUNpool: 65264Total number of read requests on the snapview logical unit: 0Number of reads from the Thin LUN: 4294902032Number of writes requests in the session: 65264Number of writes requests to reserved LUN pool that triggered aCOW: 0Total number of writes requests on the snapview target logicalunit: 65264Number of writes requests larger than the chunk size: 0LUN Pool Capacity in GB: 6Session Usage for This SP: 33.257List of Thin LUNs: LUN 8 LUN 9snap Logical Units UIDsnap Logical Units NameSession in persistence: YESSession creation time: 03/21/03 06:56:28Session state: Normal
If the version of VNX OE for Block software running on the SP does not support thiscommand, a Command is not supported error message is printed to stderr.
snapview -listsnapshotsDisplays information on snapshot copies.
PREREQUISITESFor naviseccli, you must have a user account on the system on which you want toexecute the command. For navicli, you must have a username/server entry in theUnisphere SP Agent configuration file.
DESCRIPTIONThe naviseccli or navicli snapview command with -listsnapshots and noother switches lists all information on all snapshot copies.
With -snapshotname name or -snapshotid uid, it lists all information about onesnapshot. The command works only after a snapview -createsnapshot command hascreated one or more snapshot copies.
Note
You can issue this command from either SP.
SYNTAXsnapview -listsnapshots [-lun][-name][-reserved]
EMC SnapView Software
snapview -listsnapshots 573

[-snapshotname [name]][-snapshotid [uid]][-state]OPTIONS
-lunLists source LUNs.
-nameLists the SnapView session names.
-reservedLists all reserved snapshots. Reserved snapshots are snapshots used for anotherapplication such as SAN Copy and MirrorView/Asynchronous.
-snapshotname [name]Specifies the name of the snapshot assigned when the snapshot was created or thesession started. If you omit name, it displays all snapshot names.
-snapshotid [uid]Specifies the unique ID of the snapshot. If you omit uid, it displays the unique IDsof all copies.
-stateLists the state of the copy: Active or Inactive.
EXAMPLEFor SP ss1_spa1, this command lists all information on snapshot copies. A sampleoutput follows.
Note
To use this command with navicli, replace naviseccli with navicli.
naviseccli -h ss1_spa snapview -listsnapshots
OUTPUTThe following is a sample output that shows the devices controlled by one agent. Actualoutput varies depending on the switches you use with the -listsnapshots command.
SnapView logical unit name: snapOnLun4SnapView logical unit ID: 60:06:01:67:51:09:00:00:CD:2E:76:86:FE:5D:D7:11Target Logical Unit: 4State: ActiveSession Name: sessionAtNoonOnLun4
If the version of software running on the SP does not support this command, a Commandis not supported error message is printed to stderr.
snapview -listsnapablelunsLists all source LUNs on which you can create a snapshot.
PREREQUISITESFor naviseccli, you must have a user account on the system on which you want to executethe command. For navicli, you must have a username/server entry in the Unisphere SPAgent configuration file.
DESCRIPTIONThe naviseccli or navicli snapview command with -listsnapableluns listsall source LUNs that you can snap.
EMC SnapView Software
574 EMC VNX Series 5.33 Command Line Interface Reference for Block
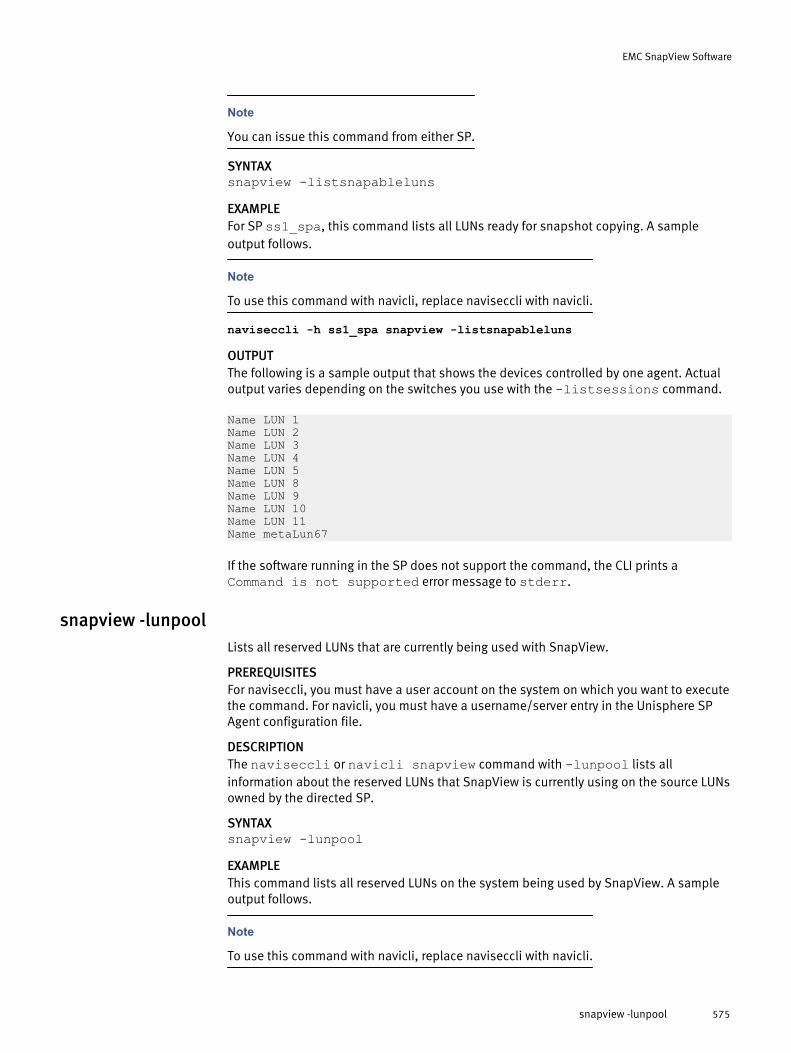
Note
You can issue this command from either SP.
SYNTAXsnapview -listsnapablelunsEXAMPLEFor SP ss1_spa, this command lists all LUNs ready for snapshot copying. A sampleoutput follows.
Note
To use this command with navicli, replace naviseccli with navicli.
naviseccli -h ss1_spa snapview -listsnapableluns
OUTPUTThe following is a sample output that shows the devices controlled by one agent. Actualoutput varies depending on the switches you use with the -listsessions command.
Name LUN 1Name LUN 2Name LUN 3Name LUN 4Name LUN 5Name LUN 8Name LUN 9Name LUN 10Name LUN 11Name metaLun67
If the software running in the SP does not support the command, the CLI prints aCommand is not supported error message to stderr.
snapview -lunpoolLists all reserved LUNs that are currently being used with SnapView.
PREREQUISITESFor naviseccli, you must have a user account on the system on which you want to executethe command. For navicli, you must have a username/server entry in the Unisphere SPAgent configuration file.
DESCRIPTIONThe naviseccli or navicli snapview command with -lunpool lists allinformation about the reserved LUNs that SnapView is currently using on the source LUNsowned by the directed SP.
SYNTAXsnapview -lunpoolEXAMPLEThis command lists all reserved LUNs on the system being used by SnapView. A sampleoutput follows.
Note
To use this command with navicli, replace naviseccli with navicli.
EMC SnapView Software
snapview -lunpool 575

naviseccli -h ss1_spa snapview -lunpool
OUTPUTThe following is a sample output that shows the devices controlled by one agent.
Target LUNs AssociatedLUNPoolLUNs LUNPoolLUNUsedPercent4 20 3.5625005 21 3.5625001 16 0.3479000 17 0.347900
If the software running in the SP does not support the command, the CLI prints aCommand is not supported error message to stderr.
snapview -rmsnapshotDeletes a snapshot.
PREREQUISITESFor naviseccli, you must have a user account on the system on which you want to executethe command. For navicli, you must have a username/server entry in the Unisphere SPAgent configuration file.
DESCRIPTIONThe naviseccli or navicli snapview command with -rmsnapshot deletes asnapshot created with the snapview -create function.
You can specify either the snapshot unique ID or name (if you assigned a name when youcreated the copy).
Note
You must issue this command to the SP that owns the source LUN(s); otherwise, thecommand will fail.
SYNTAX
snapview -rmsnapshot -snapshotid uid [-o]orsnapview -rmsnapshot -snapshotname name[-o]
OPTIONS
-snapshotid uidSpecifies the 32-byte unique ID of the snapshot (assigned when the copy wascreated with -createsnapshot).
-snapshotname nameSpecifies the name of the snapshot (optionally assigned when the copy was createdwith -createsnapshot).
-oRemoves the copy without prompting for confirmation.
EXAMPLEFor SP ss1_spa, this command starts removing the snapshot with the name 2pmsnap.The software asks for confirmation.
EMC SnapView Software
576 EMC VNX Series 5.33 Command Line Interface Reference for Block

Note
To use this command with navicli, replace naviseccli with navicli.
naviseccli -h ss1_spa snapview -rmsnapshot -snapshotname 2pmsnap
Do you really want to remove the snapshot (y/n)[N]? y
OUTPUTIf the version of software running on the SP does not support this command, a Commandis not supported error message is printed to stderr.
snapview -startrollbackStarts a rollback on the selected SnapView session.
PREREQUISITESFor naviseccli, you must have a user account on the system on which you want to executethe command. For navicli, you must have a username/server entry in the Unisphere SPAgent configuration file.
Before starting a rollback on a SnapView session, verify the following:
l The session is running in persistence mode. VNX CLI for Block version 6.24 or laterenables persistence mode as the default.
l The session is not in the process of being rolled back.
l The source LUN(s) is not participating in another rollback.
l If an activated snapshot is mapped to this session, unmount the snapshot.
DESCRIPTION
Note
Once you start a rollback, you cannot stop it or the session that is rolling back.
The naviseccli or navicli snapview command with -startrollback starts arollback on the selected SnapView session. Rollback lets you restore the point-in-timecopy of a session to the source LUN(s).
CAUTION
Windows operating systems only - To prevent data corruption during the rollbackoperation, you should disable the indexing service and recycle bin on the source LUN(s)of the session you will roll back.
When you confirm the start of a rollback operation, the source LUN can instantly accessthe session’s point-in-time data, while background copying continues (until all thesession’s point-in-time blocks are copied to the source LUN). You cannot start a newsession on any source LUN that is participating in the rollback operation until all itsbackground data copying has completed. The rollback operation itself does not countagainst the eight-session limit per source LUN.
Note
If a session spans across both SPs or if the session is a consistent session, you can issuethis command from either SP; otherwise, you must issue this command to the SP thatowns the source LUN(s) or the command will fail.
EMC SnapView Software
snapview -startrollback 577

Rolling back with snapshots
Each source LUN belonging to a session that is rolling back can have an activated ordeactivated snapshot. If the session has an activated snapshot, the software copies anyserver writes made to this snapshot to the source LUN. However, you must unmount thesnapshot before you start the rollback operation. When the rollback operation completes,including background copying, you can remount the snapshot.
If you deactivate the snapshot prior to starting the rollback operation, any server writesmade to the snapshot are lost.
Allocating reserved LUN pool space
The rollback operation itself does not use reserved LUN pool space. However, the rollbackmay cause copy-on-first-write operations for sessions you started after the session that isrolling back. This in turn will consume more reserved LUN pool space. These copy-on-first-write operations occur because the original point-in-time data of those sessions isbeing modified by the rollback operation. Additionally, since you can resume I/O to thesource LUN(s) or start another session while background copying continues, you mayneed additional reserved LUN space.
If you run out of reserved LUNs in the SP’s LUN pool while the rollback operation is inprogress (during the background copying), the software will terminate the session that isrolling back after it completes all background copying. The software will also terminateany other session that tries to allocate additional reserved LUN pool space.
You cannot roll back a SnapView session if the session’s source LUN(s) is:
l an unfractured clone. You must fracture the clone before rolling back the session.
l a fractured clone that is unavailable for I/O, for instance, if the clone was fracturedwhile in an out-of-sync state.
l a clone group’s source LUN that has any unfractured clone LUNs or clones that are inthe process of reverse synchronizing. All clone LUNs for this source LUN must befractured in a synchronized or consistent state before you can roll back a session toits source LUN.
l a primary image that has one or more unfractured secondary images. You mustfracture the secondary image(s) before rolling back the session.
l a secondary mirror image. You must promote the secondary image and then fractureit before rolling back the session.
SYNTAXsnapview -startrollbacksessionname [-rate high|medium|low][-o]OPTIONS
-startrollback sessionnameSpecifies the name for the SnapView session you want to roll back.
-rate high | medium | lowSpecifies the rate at which the software copies the data back to the source LUN(s).Options are high, medium, or low. The default is medium. You can change this ratewhile the rollback operation is in progress (see -chgrollback on page 565). If you donot specify the -rate option, the software uses the default value of medium.
-oExecutes the command without prompting for confirmation.
EXAMPLEFor SP ss1_spa, this command starts rolling back the session named rollbackTest. Thespecified rollback rate is low. The software asks for confirmation.
EMC SnapView Software
578 EMC VNX Series 5.33 Command Line Interface Reference for Block

Note
To use this command with navicli, replace naviseccli with navicli.
naviseccli -h ss1_spa snapview -startrollback rollbackTest -rate low
This session has at least one active snapshot associated with it. Continuing this operation will restore not just the original data but also any modifications made to the active snapshot LUNs. If only the original data is desired for the RollBack, then quit this operation and deactivate the snapshot first.
Make sure that you have quiesced all host I/O to the Session's source LUNs and to any of the associated active Snapshot LUNs. This command will flush the Session's data back to the Source LUNs asynchronously in the background.
NOTE: If you want a recovery session for this rollback, you must create a persistent session NOW before beginning the rollback. Otherwise you will not be able to recover the current data once rollback begins.
Do you want to continue? (y/n)?
OUTPUTIf the version of software running on the SP does not support this command, a Commandis not supported error message is printed to stderr.
snapview -startsessionStarts a SnapView session in persistence mode, and optionally in consistent mode.
PREREQUISITESFor naviseccli, you must have a user account on the system on which you want to executethe command. For navicli, you must have a username/server entry in the Unisphere SPAgent configuration file.
Before starting a SnapView session, verify the following:
l You configured the reserved LUN pool by using the reserved -lunpool -addlunfunction.
l The source LUNs are currently not being used to start another consistent session.Once the consistent session starts on all the source LUNs, you can start anotherconsistent session using the same source LUNs.
l If MirrorView/Asynchronous is installed, the source LUNs that you will use to start theconsistent session cannot be in the process of starting an update to a group. If theyare, you may receive an error when you attempt to start the consistent session. Oncethe mirror or group is updating or has been updated and before the next updateoccurs, you can start the consistent session using the same source LUNs.
DESCRIPTION
Note
With VNX CLI for Block version 6.24 or later, all SnapView sessions run in persistencemode, so the -persistence switch is no longer required.
The naviseccli or navicli snapview command with -startsession starts aSnapView session on the specified source LUN(s). A SnapView session is a point-in-timecopy of a source LUN. The session keeps track of how the source LUN looks at a particular
EMC SnapView Software
snapview -startsession 579
point in time. You start a session using the snapshot name, snapshot unique ID(snapshot WWN), or the source LUN’s number.
With VNX CLI for Block version 6.24 or later, all SnapView sessions run in persistencemode, which means that the session will survive SP reboot or failure, softwareinstallation, system reboot or power failure, and server I/O trespassing to the peer SP.You can also run a session in consistent mode using the -consistent option, whichwill preserve the point-in-time restartable copy across a set of source LUNs.
Note
When you start a session, SnapView automatically allocates and retains additionalmemory. This additional memory counts against the total replication software memorybudget.
After you start a SnapView session and as the production server writes to the sourceLUN(s), the software stores a copy of the original data in the reserved LUN pool in chunks.This copy is referred to as copy-on-first-write and occurs only once, which is when theserver first modifies a data chunk on the source LUN(s).
Note
If a session spans across both SPs or if the session is a consistent session, you can issuethis command from either SP; otherwise, you must issue this command to the SP thatowns the source LUN(s) or the command will fail.
SYNTAX
snapview -startsession sessionname -snapshotid uids |-snapshotname names | -lun luns [-consistent] -persistence
OPTIONS
-startsession sessionnameSpecifies the name of the session to be started. A session name can have as manyas 32 characters. A name is required. If you use spaces in the name, enclose theentire name string in quotation marks in this command and in other CLI commandsthat access the session.
-snapshotid uidSpecifies one or more snapshot 32-byte unique IDs (WWNs). The snapshot softwareassigns a unique ID to the snapshot when you create it with -createsnapshot .For multiple IDs, separate IDs with blanks. For any letters in the ID, you must specifythe same case as the software assigned to the image when the snapshot wascreated (use the snapview -listsnapshots function).
-snapshotname namesSpecifies one or more snapshot names that you assigned when you created thesnapshot with -createsnapshot. For multiple names, separate the names withcommas.
-lun lunsSpecifies one or more source LUN numbers. For multiple LUNs, separate thenumbers with blanks.
-consistentSpecifies a consistent session. The session will preserve the point-in-timerestartable copy across a set of source LUNs. The SnapView driver will delay any I/Orequests to the set of source LUNs until the session has started on all LUNs (thuspreserving the point-in-time restartable copy on the entire set of LUNs).
EMC SnapView Software
580 EMC VNX Series 5.33 Command Line Interface Reference for Block

Note
A restartable copy is a data state having dependent write consistency and where allinternal database/application control information is consistent with a databasemanagement system/application image.
If the session spans both SPs you must specify only one SP and the software willstart the session on both SPs. Once you start a consistent session, you cannot addanother source LUN to the session. In the event of a failure, the software will notstart the session on any source LUN and will display an error message.
You would use consistent mode if any of the following is true:
l You want a consistent replica across a set of LUNs.
l You do not want to stop I/O to the source LUN(s) before starting a session.
l You want to prevent other LUNs from being added to the session. If desired, youcan start a consistent session on a single source LUN to prevent other LUNs frombeing added to the session.
l The set of source LUNs that you will use to start the session spans both SPs;however, the source LUNs cannot span systems.
The consistent feature is available on a per-session basis (not per snapshot orsource LUN) and counts as one of the eight sessions per source LUN limit.
Note
When a consistent session is in the process of starting on all LUNs, you cannot stopthe session (the software may stop the session immediately after the startcompletes if I/O is queued and there is not enough space in the reserved LUN pool),perform a rollback operation, or activate a snapshot to the session.
-persistence
Note
With VNX CLI for Block version 6.24 or later, all SnapView sessions run in persistencemode, so the -persistence switch is no longer required.
Specifies a persistent session. The session will survive SP reboot or failure, softwareinstallation, system reboot or power failure, and server I/O trespassing to the peerSP.
The persistence feature is available on a per-session basis (not per snapshot orsource LUN). In the event of a failure, reserved LUNs along with the source LUNs willtrespass to the other SP. Depending on your failover software, once the failed SP isrunning, you may need to issue a restore command in order to restore the propersource LUNs and reserved LUNs back to their original SP. For the appropriate restorecommand, refer to the documentation that shipped with your failover software.
Note
For information on supported failover software for the system you are managing,refer to the EMC SnapView and Admsnap Release Notes.
EXAMPLEIn the first example, the -startsession command starts a persistent session named2pmsession. In the second example, the -startsession command starts apersistent and consistent session named 2pmsession on LUNs one, two, and three. If
EMC SnapView Software
snapview -startsession 581
the session spans both SPs you need to specify only one SP and the software will startthe session on both SPs.
Note
To use this command with navicli, replace naviseccli with navicli.
naviseccli -h ss1_spa snapview -startsession 2pmsession
naviseccli -h ss1_spa snapview -startsession 2pmsession -persistence
OUTPUTIf the version of software running on the SP does not support this command, a Commandis not supported error message is printed to stderr.
POSTREQUISITESAfter you start a SnapView session, a secondary server can then activate (map) asnapshot to the SnapView session. The snapshot views the original source LUN datachunks that have been modified since you started the session from the reserved LUNpool and unmodified data chunks from the source LUN(s).
snapview -stopsessionStops a SnapView session.
PREREQUISITESFor naviseccli, you must have a user account on the system on which you want to executethe command. For navicli, you must have a username/server entry in the Unisphere SPAgent configuration file.
DESCRIPTIONThe naviseccli or navicli snapview command with -stopsession stops thespecified session and frees the reserved LUN pool space used by the session.
If the snapshots participating in the session belong to one or more storage groups andyou stop the session, the servers connected to the storage groups will no longer haveaccess to the snapshots in those storage groups. EMC recommends that you do one ofthe following:
l Flush the I/O on the server viewing the active snapshot before stopping the session.l Deactivate the snapshot before stopping the session.
Stopping a session with an active snapshot makes the snapshot appear inactive.
Note
If a session spans across both SPs or if the session is a consistent session, you can issuethis command from either SP; otherwise, you must issue this command to the SP thatowns the source LUN(s) or the command will fail. If you started a session on multiplesource LUNs, you can select any of the source LUNs to stop the session.
SYNTAXsnapview -stopsession sessionname [-o]OPTIONS
-stopsession sessionnameSpecifies the name of the session to be stopped. Someone must have assigned thename when the snapshot was created or when the session was started.
-o
EMC SnapView Software
582 EMC VNX Series 5.33 Command Line Interface Reference for Block

Stops the session without asking for confirmation.
EXAMPLEFor SP ss1_spa, this command stops the session named 2pmsession. The softwareasks for confirmation:
Note
To use this command with navicli, replace naviseccli with navicli.
naviseccli -h ss1_spa snapview -stopsession 2pmsession
Stopping of the session will stop data SnapView. Do you really want to stop the session (y/n)[n]? y
OUTPUTIf the version of software running on the SP does not support this command, a Commandis not supported error message is printed to stderr. Other errors:
INVALID_SESSION Session does not exist.
POSTREQUISITESFor a step-by-step overview and examples on setting up and using snapshots withadmsnap and the CLI, refer to SnapView examples in EMC VNX for Block Concepts.
Admsnap commands for snapshotsThis section explains how to use the admsnap utility software with SnapView snapshots.
About admsnap software and snapshotsThe admsnap utility is an executable program that you can run interactively or with ascript to manage snapshots. The admsnap utility resides on the servers connected to thesystem with the SnapView driver. You must execute the following admsnap commandsfrom one of these attached servers:l admsnap activate – activates a snapshot to a session.l admsnap deactivate – deactivates a snapshot from a session.l admsnap flush – flushes cached data to the LUN.l admsnap list – lists all current snapshots.l admsnap start – starts a session.l admsnap stop – stops a session.
Note
The admsnap software supports native device names and PowerPath pseudo-devicenames. If you use a PowerPath pseudo-device name, you can add this device name to theetc/fstab file (for Linux) or to the etc/vfstab file (for Solaris). Admsnap supports
both device naming scheme and enclosure naming scheme for Veritas.
For a step-by-step overview and examples of setting up and using snapshots withadmsnap and VNX CLI for Block, refer to SnapView examples in EMC VNX for BlockConcepts .
Reserved LUN pool (snapshot cache)With SnapView version 02.03.xxx (or higher), the snapshot cache is referred to as thereserved LUN pool. The reserved LUN pool and the snapshot cache work with SnapView in
EMC SnapView Software
Admsnap commands for snapshots 583
the same way. However, unlike the snapshot cache, which was used solely for SnapView,the reserved LUN pool shares its LUN resources with other applications such as SAN Copyand MirrorView/Asynchronous. VNX CLI for Block snapshot cache commands are stillsupported; however, EMC recommends that you use the new reserved LUN poolcommands. For information on the new reserved LUN pool commands, refer to VNX CLI forBlock on page 23.
For reserved LUN pool information that is specific to SnapView, refer to SnapViewcommand functions on page 562.
Requirements for snapshotsBefore you can use admsnap for snapshots, the following must be true:
General requirements
l A connected server must be running a suitable web browser to run VNX CLI for Block(and optionally the Unisphere). CLI is needed to configure and maintain the reservedLUN pool.
l The system must have the SnapView software enabled.
l The production and secondary servers must have both the Unisphere Host Agent andadmsnap software installed. To install the host agent and admsnap, refer to the EMCBlock server support products guide for your operating system.
l A reserved LUN must be available for each source LUN(s) for which you will start asession; otherwise an admsnap start command will fail. You can bind a reserved LUNand add it to an SP’s reserved LUN pool using VNX CLI for Block or Unisphere.
Platform/server-specific requirements
l For HP-UX, admsnap requires a volume group entry for each path to the system. Theentry or entries can be contained in a single volume group or multiple volume groups.On the secondary server, the volume group entry or entries must specify a snapshotLUN.
l For UNIX, if a session is unexpectedly stopped (due to SP panic or path failure), thesecondary server must unmount the inactive snapshot or reboot the secondary serverin order for this server to disregard the session's point-in-time data.
l For Windows, you may have to reboot the secondary server the first time you add thesnapshot to the server’s storage group.
l If you have a VMware ESX Server, you must activate the snapshot before you add thesnapshot to a storage group. Refer to the Overview of setting up SnapView to usesnapshots on page 561 for additional information.
admsnap activateAllows an attached server to access a snapshot.
PREREQUISITESYou must have administrative privileges on the secondary server.
DESCRIPTIONFrom the secondary server, the activate command scans system buses for systemdevices and determines if any device is part of a SnapView session.
When a secondary server activates (maps) a snapshot to a session, this server can writeto the snapshot. The software stores all writes made to the snapshot in the reserved LUNpool. If the secondary server deactivates the snapshot from the session, the softwaredestroys all writes.
EMC SnapView Software
584 EMC VNX Series 5.33 Command Line Interface Reference for Block

Note
If you failed to flush the file system buffers before starting the session, the snapshot maynot be usable.
You can activate only one session to a snapshot. To list current sessions use the CLIcommand naviseccli snapview -listsessions.
Note
The snapview -activatesnapshot command serves a similar function to the
admsnap activate command, but does not return snapshot device information as
admsnap does or allow you to activate all snapshots using one command. You mustissue the admsnap activate command from the secondary server (the server that will
access the snapshot).
Depending on your operating system, the admsnap activate command will do thefollowing:
Table 55 Operating system and admsnap activate command
Server OS Function description
Windows Returns the snapshot drive letter. You can use this drive immediately.If the activated snapshot has multiple volumes or partitions, admsnap will assigna drive letter to each volume or partition. If the volume is a dynamic drive,admsnap will activate all the physical drives but will not assign a drive letter.Additional steps will be required to bring the volume online and to assign the driveletter. If the given session is on multiple physical disks and each physical disk hasits own volume, then each volume will be assigned a drive letter. If no drive lettersare available, then admsnap will activate only one physical disk and an errorappears through the command line.
For Windows Remote Desktop and Terminal Services - If a terminal server isrunning on the secondary server, you must remove and disable it before using theactivate command. If you have the terminal server enabled, it prevents the
activate command from working properly.
AIX, HP-UX,Linux, andSolaris
Returns the snapshot device name. You will need to run fsck on this device only
if it contains a file system and you did not unmount the source LUN(s) when youstarted the session. Then, if the source LUN(s) contains a file system, mount thefile system on the secondary server using the snapshot device name to make thefile system available for use.
SYNTAXadmsnap activate [-h] -s session_name [-o object_name] [-tobject_type] | [-d driveletter] [-r 0 | -r 1] [-c rescan_count]OPTIONS
[-h]Lists the help output for a given operation. If you use this option on the commandline, a help message will be displayed for each option you specify. Admsnap will notperform the command; it lists the help output only.
This option is valid for Windows, Solaris, HP-UX, Linux, and AIX systems.
-s sessionname
EMC SnapView Software
admsnap activate 585

Specifies the session name that you assigned when you started the session. This isa string of up to 256 characters, and can be composed of letters, numbers andunderscores.
The session name is case sensitive and must be unique on the system. If the sessionname contains spaces, you must enter the name in double quotation marks (forexample, "June 21st Session").
[-o object_name]Specifies an object name that you want to activate. You should use this option onlywhen admsnap can determine the snapshot device list for the specified objectname.
In UNIX, the objects that are generally available for this option are the raw UNIXdevice names and the EMC PowerPath device names. In Windows, the objects thatare generally available for this option are the raw Windows device names.
If you omit this switch, the software searches all devices for the appropriate device,which takes time. You cannot use this option with the -d option. If you use the -toption, the device name must be a valid name for the type of object specified withthe -t option.
The table below lists the supported object names for your operating system.
Table 56 Operating system object names
Operating system Supported object name(s)
Windows l Drive letter
l Physical drive name
HP-UXal Device name (Legacy and agile views)
l File system nameb
l Powerpath device
l Veritas volume name (disk-based and enclosure-based)c
Solaris l Device name
l File system nameb
l Powerpath device
l Veritas volume name (disk-based and enclosure-based)c
Linux l Device name
l File system nameb
l Powerpath device
l Veritas volume name (disk-based and enclosure-based)c
l Linux MPIO’s mpath device
AIXal Device name
l File system nameb
l Powerpath device
a. If the object name is on a Logical Volume Manager, then admsnap will parse the LogicalVolume Manager (LVM) to get the device names and will attempt to flush those devices.
EMC SnapView Software
586 EMC VNX Series 5.33 Command Line Interface Reference for Block

Table 56 Operating system object names (continued)
b. If the object name is a file system, then admsnap will parse the file system table entry to getthe device name and will attempt to flush that device.
c. If the object name is a Veritas volume name, admsnap will parse the Veritas volume todetermine all physical disks for the volume and will attempt to flush each physical disk.
[-t object_type]Specifies the object type. Valid Windows object types are device, file system,volume, and drive letter. Valid UNIX object types are device, volume, and file system.If the object type name contains spaces, enter the name without spaces.
If you do not specify an object type, admsnap will attempt to determine the correctobject type among the valid object types and report a failure if it cannot.
You should use the -t option when the argument for the -o option is not in astandard and recognizable form for your operating system’s object or device. Thismeans if you specify a valid argument for the -o option, you do not need the -toption for any operating system drive letter, file system, Veritas volume, orPowerPath pseudo-device names. For example, on Solaris systems, admsnapdetermines the -o argument of /dev/rdsk/cXdXtXsX to be a Solaris native devicename, so you do not need to specify the -t device.
You cannot use this option in conjunction with the -d option.
[-d driveletter]Specifies the drive letter you want to assign to the snapshot device, and if available,admsnap will assign the specified drive letter to the snapshot device. If theoperation resulted in more than one device being activated, then all devices areactivated but only the first device is assigned the drive letter.
Note
The admsnap activate command does not allow the use of drive letters A:, B:,
C:, or D: with the -d option.
This option is valid on Windows systems only. All other operating systems ignorethis option. You cannot use this option in conjunction with the -o or -t options.
[-r 0 | -r 1]Specifies whether to perform a rescan of the operating system devices beforeperforming the activate operation. The default rescanning behavior (when the -roption is not present on the command line) depends on whether you specify anobject name with the -o option. If you do specify the object name, the default is notto perform a rescan. If you do not specify the object name, the default is to perform arescan, which may take some time because it will rescan every device on theoperating system.
When you use the -r [0|1] option, it overrides any default behavior.
This option is valid on Windows, Solaris, HP-UX, and Linux systems only. All otheroperating systems ignore this option.
[-c rescan_count]Specifies the number of rescans for devices on the operating system. A rescan countoccurs after a successful activate operation to bring the snapshot devices online. Ifyou specify a count of 0, admsnap will not perform a rescan; however, the devicecould activate successfully on the system but will not be online with the server. Ifyou omit the -c option, then a default value of 1 is set.
This option is valid on Windows only. All other operating systems ignore this option.
EMC SnapView Software
admsnap activate 587

EXAMPLEWindows example:
admsnap activate -s session1 -d e:
admsnap deactivateAllows the secondary server to remove access to a snapshot and destroys any writes thesecondary server made to the snapshot.
PREREQUISITESYou must have administrative privileges on the secondary server.
DESCRIPTIONThe admsnap deactivate command unmaps a snapshot LUN from a SnapViewsession by removing access to the snapshot device from the secondary (backup) server.The deactivated snapshot goes offline and thereby becomes inaccessible to thesecondary server.
Use this command on the secondary (backup) server after the session has been activatedand you no longer require the snapshot device.
Note
The snapview -deactivatesnapshot command has a similar function as the
admsnap deactivate command, but does not remove the snapshot device
information from the server. You must issue the admsnap deactivate command from
the secondary server (the server that activated it).
When the secondary server deactivates the snapshot from the session, admsnapdestroys all writes made to the snapshot.
Depending on your operating system, the admsnap deactivate command will do oneof the following:
Table 57 Operating system and admsnap deactivate command
Server OS Function description
Windows Flushes all buffers and removes the drive letter assigned with admsnap activate.The snapshot goes inactive and continued I/O is not possible. This command letsyou avoid rebooting the secondary server between activates.
If the deactivated snapshot has multiple volumes or partitions, admsnap willremove a drive letter from each volume or partition. If the volume is a dynamicdrive, admsnap will deactivate all the physical drives but will not remove the driveletter. Additional steps will be required to bring the volume offline and to removethe drive letter. If the given session is on multiple physical disks and eachphysical disk has its own volume, then the drive letter on each volume will beremoved.
For Windows Remote Desktop and Terminal Services - If a terminal server isrunning on the secondary server, you must remove and disable it before using thedeactivate command. If you have the terminal server enabled, it prevents the
deactivate command from working properly.
AIX, HP-UX,Linux, andSolaris
Removes access to the snapshot but does not flush buffers.
EMC SnapView Software
588 EMC VNX Series 5.33 Command Line Interface Reference for Block

Table 57 Operating system and admsnap deactivate command (continued)
Server OS Function description
Before you deactivate the snapshot, you must unmount the file system by issuingthe umount command to flush all buffers. If you are unable to unmount the file
system, you can issue the admsnap flush command.a
a. The flush command is not considered a substitute for unmounting the file system; it onlycomplements unmounting the file system.
SYNTAXadmsnap deactivate [-h] -s session_name [-o object_name [-tobject_type]] [-f]OPTIONS
[ -h ]Lists the help output for a given operation. If you use this option on the commandline, a help message is displayed for each option you specify. Admsnap will notperform the command; it lists the help output only.
This option is valid for Windows, Solaris, HP-UX, Linux, and AIX systems.
-s sessionnameSpecifies the session name that you assigned when you started the session. This isa string of up to 256 characters, and can be composed of letters, numbers andunderscores.
The session name is case sensitive and must be unique on the system. If the sessionname contains spaces, you must enter the name in double quotation marks (forexample, "June 21st Session").
The name you specify must be a valid session name for an active SnapView sessionstarted from a production server and activated on the secondary (or backup) serverthat is performing the deactivate operation. All snapshots with the given sessionname will be deactivated.
On Windows systems, if the activated LUN with the given session name has multiplevolumes and the system assigned drive letters, then admsnap will delete each driveletter, dismount the volumes, and then set the volumes offline before deactivatingthe LUN. If multiple LUNs have the same given session, then admsnap deletes thedrive letters for all volumes and sets the volumes offline before deactivating theLUNs.
On UNIX servers, admsnap only deactivates the devices and no other operations areperformed before deactivating the device.
[-o object_name]Specifies an object name. When you execute the admsnap deactivatecommand with a device name as an object name, admsnap attempts to deactivatethe snapshot on that device with the given session name. If the session name doesnot exist on the device, admsnap will report an error.
If you specify an object name that contains multiple devices, admsnap willdeactivate the session on all the LUNs that make up those devices.
If you use the -t option, the device name must be a valid name for the type of objectspecified with the -t option.
The table below lists the supported object names for your operating system.
EMC SnapView Software
admsnap deactivate 589
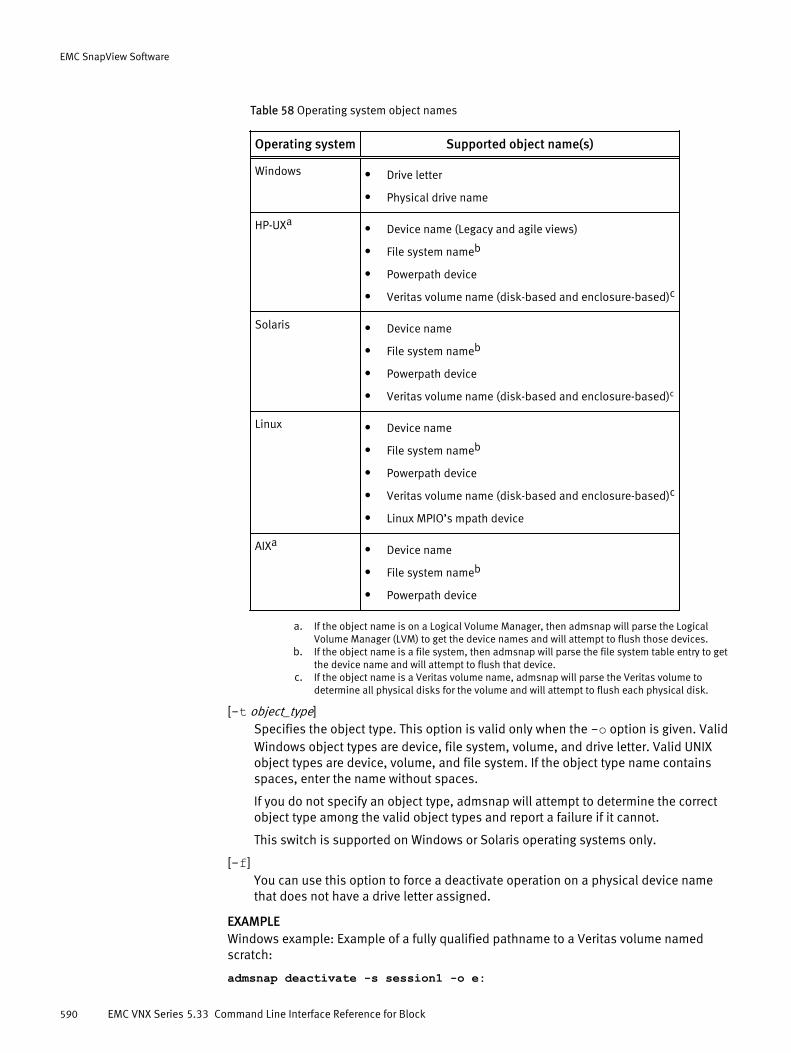
Table 58 Operating system object names
Operating system Supported object name(s)
Windows l Drive letter
l Physical drive name
HP-UXal Device name (Legacy and agile views)
l File system nameb
l Powerpath device
l Veritas volume name (disk-based and enclosure-based)c
Solaris l Device name
l File system nameb
l Powerpath device
l Veritas volume name (disk-based and enclosure-based)c
Linux l Device name
l File system nameb
l Powerpath device
l Veritas volume name (disk-based and enclosure-based)c
l Linux MPIO’s mpath device
AIXal Device name
l File system nameb
l Powerpath device
a. If the object name is on a Logical Volume Manager, then admsnap will parse the LogicalVolume Manager (LVM) to get the device names and will attempt to flush those devices.
b. If the object name is a file system, then admsnap will parse the file system table entry to getthe device name and will attempt to flush that device.
c. If the object name is a Veritas volume name, admsnap will parse the Veritas volume todetermine all physical disks for the volume and will attempt to flush each physical disk.
[-t object_type]Specifies the object type. This option is valid only when the -o option is given. ValidWindows object types are device, file system, volume, and drive letter. Valid UNIXobject types are device, volume, and file system. If the object type name containsspaces, enter the name without spaces.
If you do not specify an object type, admsnap will attempt to determine the correctobject type among the valid object types and report a failure if it cannot.
This switch is supported on Windows or Solaris operating systems only.
[-f]You can use this option to force a deactivate operation on a physical device namethat does not have a drive letter assigned.
EXAMPLEWindows example: Example of a fully qualified pathname to a Veritas volume namedscratch:
admsnap deactivate -s session1 -o e:
EMC SnapView Software
590 EMC VNX Series 5.33 Command Line Interface Reference for Block

Example of a fully qualified pathname to a raw Veritas device name:
admsnap deactivate -o /dev/vx/dsk/scratchdg/scratch
admsnap deactivate -o /dev/vx/rdmp/c1t0d0s2
admsnap flushFlushes all data that has been written to the source LUN.
PREREQUISITESYou must have administrative privileges on the production server.
DESCRIPTIONThe admsnap flush command flushes all data.
Use it on the production server before starting a SnapView session to ensure that allcached data has been written to disk. Also, use the flush command on the secondaryserver before issuing a deactivate command to ensure that all data has been written.
Depending on your operating system, the admsnap flush command will do thefollowing:
Table 59 Function of admsnap flush command for an operating system
Server OS a Function description
Windows Writes the data from the buffers to the disk.
AIX, HP-UX, Linux,and Solaris
Writes the data from the buffers to the disk. We recommend that youunmount the file system by issuing the umount command to ensure that no
additional source writes are in process. If you are unable to unmount the filesystem, you can issue the admsnap flush commandb.
a. With some operating systems, you may need to shut down the application to flush the data.Specific operating systems have different requirements.
b. Neither the flush command nor the sync command is a substitute for unmounting the filesystem. Both commands only complement unmounting the file system.
SYNTAXadmsnap flush [-h] -o object_name [-t object_type]OPTIONS
[ -h ]Lists the help output for a given operation. If you use this option on the commandline, a help message is displayed for each option you specify. Admsnap will notperform the command; it lists the help output only.
This option is valid for Windows, Solaris, HP-UX, Linux, and AIX systems.
-o object_nameSpecifies an object name. If you use the -t option, the device name must be a validname for the type of object specified with the -t option.
The table below lists the supported object names for your operating system.
EMC SnapView Software
admsnap flush 591

Table 60 Operating system object names
Operating system Supported object name(s)
Windows l Drive letter
l Physical drive name
HP-UXal Device name (Legacy and agile views)
l File system nameb
l Powerpath device
l Veritas volume name (disk-based and enclosure-based)c
Solaris l Device name
l File system nameb
l Powerpath device
l Veritas volume name (disk-based and enclosure-based)c
Linux l Device name
l File system nameb
l Powerpath device
l Veritas volume name (disk-based and enclosure-based)c
l Linux MPIO’s mpath device
AIXal Device name
l File system nameb
l Powerpath device
a. If the object name is on a Logical Volume Manager, then admsnap will parse the LogicalVolume Manager (LVM) to get the device names and will attempt to flush those devices.
b. If the object name is a file system, then admsnap will parse the file system table entry to getthe device name and will attempt to flush that device.
c. If the object name is a Veritas volume name, admsnap will parse the Veritas volume todetermine all physical disks for the volume and will attempt to flush each physical disk.
[-t object_type]Specifies the object type. This switch is supported on Windows or Solaris operatingsystems only. Valid Windows object types are device and drive letter. Valid Solarisobject types are device, volume, and file system. If the object type name containsspaces, enter the name without spaces.
If you do not provide an object type, admsnap will attempt to determine the correctobject type from the supported types and report a failure if it cannot.
You should use the -t option when the argument for the -o option is not in astandard and recognizable form for your operating system’s object or device. Thismeans if you specify a valid argument for the -o option, you do not need to specifythe -t option for any operating system drive letter, file system, Veritas volume, ornative or PowerPath pseudo-device names. For example, on Solaris systems,admsnap determines the -o argument of /dev/rdsk/cXdXtXsX to be a Solaris nativedevice name, so you do not need to specify the -t device.
EXAMPLEWindows example:
EMC SnapView Software
592 EMC VNX Series 5.33 Command Line Interface Reference for Block

admsnap flush -o e:
admsnap listPerforms a list operation and provides the World Wide Name (WWN) of all supporteddevices on the system.
PREREQUISITESYou must have administrative privileges on the production and secondary server.
DESCRIPTIONThe admsnap list command will attempt to list devices and their World Wide Names(or WWN) on the operating system. You can use the WWN to distinguish one operatingsystem device from another.
The WWN is a worldwide unique string that the system provides for its devices. Use theWWN to uniquely identify those devices on the server. Use this operation to match theserver’s devices with the devices the server sees on the system.
This command is supported on Windows, Solaris, HP-UX, Linux, and AIX operatingsystems only.
SYNTAXadmsnap list [-h] [-l lun_wwn] [-d object_name] [-aoutput_format]OPTIONS
[-h]Lists the help output for a given operation. If you use this option on the commandline, a help message is displayed for each option you specify. Admsnap will notperform the command; it lists the help output only.
This option is valid for Windows, and Solaris systems only.
[-l lun_wwn]Lists the WWN of all supported devices on the system. The WWN must use a validWWN format.
[-d object_name]Specifies an object name. On Windows systems, the -a option is ignored when usedwith the -d option and the object name argument is a Windows physical devicename, for example: \\.\PhysicalDrive1.
The table below lists the supported object names for your operating system.
Table 61 Operating system object names
Operating system Supported object name(s)
Windows l Drive letter
l Physical drive name
HP-UXal Device name (Legacy and agile)
l File system nameb
l Veritas volume name (disk-based and enclosure-based)c
l Powerpath device
AIXal Device name
EMC SnapView Software
admsnap list 593
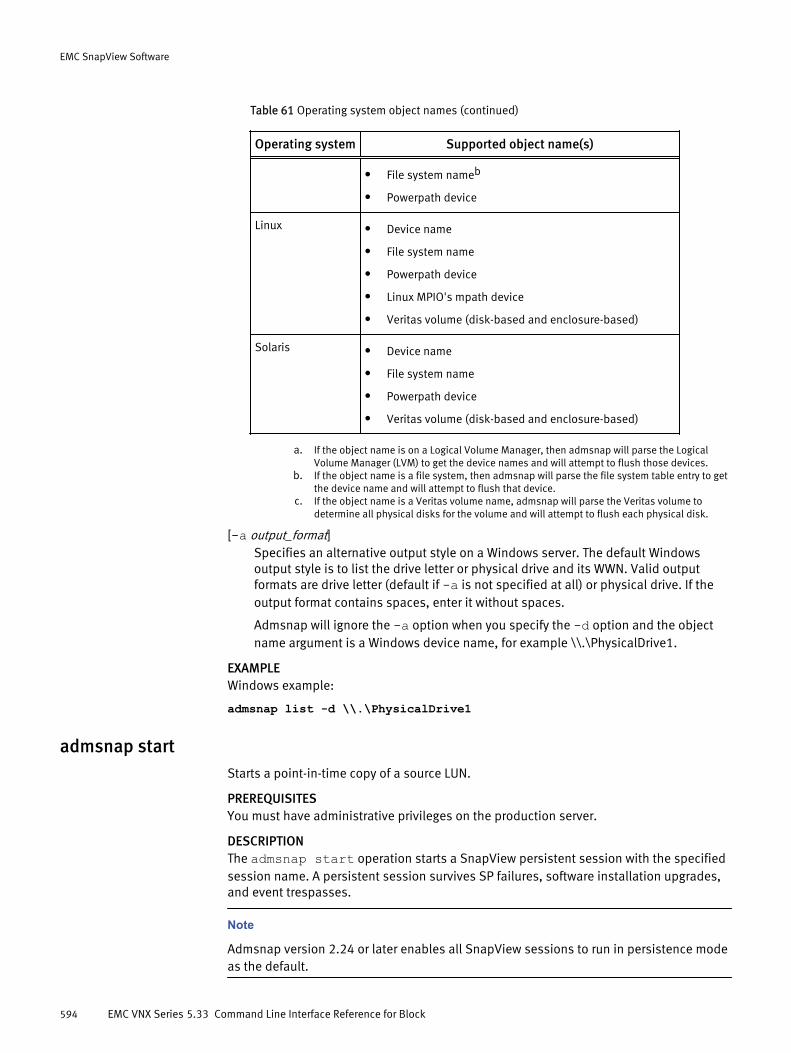
Table 61 Operating system object names (continued)
Operating system Supported object name(s)
l File system nameb
l Powerpath device
Linux l Device name
l File system name
l Powerpath device
l Linux MPIO's mpath device
l Veritas volume (disk-based and enclosure-based)
Solaris l Device name
l File system name
l Powerpath device
l Veritas volume (disk-based and enclosure-based)
a. If the object name is on a Logical Volume Manager, then admsnap will parse the LogicalVolume Manager (LVM) to get the device names and will attempt to flush those devices.
b. If the object name is a file system, then admsnap will parse the file system table entry to getthe device name and will attempt to flush that device.
c. If the object name is a Veritas volume name, admsnap will parse the Veritas volume todetermine all physical disks for the volume and will attempt to flush each physical disk.
[-a output_format]Specifies an alternative output style on a Windows server. The default Windowsoutput style is to list the drive letter or physical drive and its WWN. Valid outputformats are drive letter (default if -a is not specified at all) or physical drive. If theoutput format contains spaces, enter it without spaces.
Admsnap will ignore the -a option when you specify the -d option and the objectname argument is a Windows device name, for example \\.\PhysicalDrive1.
EXAMPLEWindows example:
admsnap list -d \\.\PhysicalDrive1
admsnap startStarts a point-in-time copy of a source LUN.
PREREQUISITESYou must have administrative privileges on the production server.
DESCRIPTIONThe admsnap start operation starts a SnapView persistent session with the specifiedsession name. A persistent session survives SP failures, software installation upgrades,and event trespasses.
Note
Admsnap version 2.24 or later enables all SnapView sessions to run in persistence modeas the default.
EMC SnapView Software
594 EMC VNX Series 5.33 Command Line Interface Reference for Block

From the production server, the start command specifies systems that have a LUN orfile system you want to copy, then it begins the point-in-time copy of the specifiedsource.
Note
Before you start a SnapView session, admsnap requires that you create a snapshot usingthe -createsnapshot command.
The admsnap start command is valid on Windows, Solaris, HP-UX, Linux, NetWare,and AIX systems.
SYNTAXadmsnap start [-h] -s session-name -o object-name [-tobject_type] -p -cOPTIONS
[-h]Lists the help output for a given operation. If you use this option on the commandline, a help message is displayed for each option you specify. Admsnap will notperform the command; it lists the help output only.
This option is valid for Windows, Solaris, HP-UX, Linux, and AIX systems.
-s session_nameSpecifies the session name that you assigned when you started the session. This isa string of up to 256 characters, and can be composed of letters, numbers andunderscores.
The session name is case sensitive and must be unique on the system. If the sessionname contains spaces, you must enter the name in double quotation marks (forexample, "June 21st Session").
Note
If you issue multiple start operations from the production server (this includes otherproduction servers) using the same session name, the session will consist of all theLUNs that make up those devices. This operation can be called multiple times (evenfrom different servers or EMC Unisphere) with the same session name and the resultis that the new objects are added into the existing session.
-o object_nameSpecifies an object name. You must specify an object name to identify the session. Ifyou specify a device name or a drive letter, the LUN(s) you specify may have multiplepartitions; if so, the snapshot will consist of all partitions on that LUN(s).
If you use the -t option, the device name must be a valid name for the type of objectspecified with the -t option.
EMC SnapView Software
admsnap start 595

Note
Admsnap version 2.1 with a Windows, or UNIX server - If you specify an object namethat spans multiple devices with the admsnap start command, and one of those
devices fails to start, admsnap will stop the session on all the devices. For example,you start a session on a Solaris file system and that file system spans across twoLUNs on the system. The first device successfully starts the session but the seconddoes not. The admsnap software will stop the first session started on the device, andthen you must restart the session on the file system after you have corrected thecause of the failure.
The table below lists the supported object names for your operating system.
Table 62 Operating system object names
Operating system Supported object name(s)
Windows l Drive letter
l Physical drive name
HP-UXal Device name (Legacy and agile views)
l File system nameb
l Powerpath device
l Veritas volume name (disk-based and enclosure-based)c
Solaris l Device name
l File system nameb
l Powerpath device
l Veritas volume name (disk-based and enclosure-based)c
Linux l Device name
l File system nameb
l Powerpath device
l Veritas volume name (disk-based and enclosure-based)c
l Linux MPIO’s mpath device
AIXal Device name
l File system nameb
l Powerpath device
a. If the object name is on a Logical Volume Manager, then admsnap will parse the LogicalVolume Manager (LVM) to get the device names and will attempt to flush those devices.
b. If the object name is a file system, then admsnap will parse the file system table entry to getthe device name and will attempt to flush that device.
c. If the object name is a Veritas volume name, admsnap will parse the Veritas volume todetermine all physical disks for the volume and will attempt to flush each physical disk.
-t object_typeSpecifies the object type. This switch is valid on Windows and UNIX operatingsystems only. Valid Windows object types are device and drive letter. Valid Solarisobject types are device, volume, and file system. If the object type name containsspaces, enter the name without spaces.
EMC SnapView Software
596 EMC VNX Series 5.33 Command Line Interface Reference for Block

You should use the -t option when the argument for the -o option is not in astandard and recognizable form for your operating system’s object or device.
If you do not specify the -t option, admsnap will attempt to determine the correctobject type and report a failure if it cannot.
-cSpecifies a consistent session. The session will preserve the point-in-time copyacross a set of source LUNs. The SnapView driver will delay any I/O requests to theset of source LUNs until the session has started on all LUNs (thus preserving thepoint-in-time on the entire set of LUNs). Once you start a consistent session, youcannot add another source LUN to the session. In the event of a failure, the softwarewill not start the session on any source LUN and will display an error message.
Note
When starting a consistent session, multiple object names must be separated by acomma with no spaces. If desired, you can specify different object names. Forexamples, refer to SnapView examples in EMC VNX for Block Concepts .
You would use consistent mode if:l you cannot stop I/O to the source LUN(s) before starting a session.l you want to prevent other LUNs from being added to the session. If desired, you
can start a consistent session on a single source LUN to prevent other LUNs frombeing added to the session.
l the set of source LUNs that you will use to start the session spans both SPs;however, the source LUNs cannot span systems.
The consistent feature is available on a per-session basis (not per snapshot orsource LUN) and counts as one of the eight sessions per source LUN limit.
Note
While a consistent session is in the process of starting on all LUNs, you cannot stopthe session (the software may stop the session immediately after the startcompletes if I/O is queued and there is not enough space in the SP's reserved LUNpool), perform a rollback operation, or activate a snapshot to the session.
-pSpecifies a persistent session. If you use this option, the session will run inpersistence mode and will survive SP failures, software installation upgrades, andtrespass events. With admsnap version 2.24 or later, all SnapView sessions run inpersistence mode, so the -p switch is no longer required.
EXAMPLEWindows examples:
admsnap start -s session1 -o \\.\PhysicalDrive1
admsnap start -s session1 -o \\.\PhysicalDrive1,PhysicalDrive2,PhysicalDrive3 -c
admsnap start -s session1 -o F:,G:,H:,I -c -p
admsnap start -s session1 -o F:,G:,\\.\PhysicalDrive1,PhysicalDrive2-c UNIX examples:
admsnap start -s session1 -o /mnt/fs1 -p
EMC SnapView Software
admsnap start 597

admsnap start -s session1 -o /mnt/fs1,/mnt/fs2,/mnt/fs3 -c
admsnap start -s session1 -o /dev/sda,/dev/sdc,/dev/sdd -c -p
admsnap start -s session1 -o /dev/sda,/mnt/fs2,vol_name -c
admsnap stopStops the point-in-time copy of a source LUN.
PREREQUISITESYou must have administrative privileges on the production server.
DESCRIPTIONThe admsnap stop operation stops a SnapView session. From the production server thatowns the source LUN, the stop command stops a SnapView session, freeing thereserved LUN and disk space the session used.
The admsnap stop command is valid on Windows, Solaris, HP-UX, Linux, NetWare, andAIX systems.
Note
If you started a session on multiple source LUNs, you can select any of the source LUNs tostop the session.
SYNTAXadmsnap stop [-h] -s session-name -o object_name[-t object_type]OPTIONS
[-h]Lists the help output for a given operation. If you use this option on the commandline, a help message is displayed for each option you specify. Admsnap will notperform the command; it lists the help output only.
This option is valid for Windows, Solaris, HP-UX, Linux, and AIX systems.
-s session_nameSpecifies the session name that you assigned when you started the session. Youmust specify the session name you used when you started the session. This is astring of up to 256 characters, and can be composed of letters, numbers andunderscores.
The session name is case sensitive and must be unique on the system. If the sessionname contains spaces, you must enter the name in double quotation marks (forexample, "June 21st Session").
-o object_nameSpecifies an object name. You must specify an object name to identify the session.
If you use the -t option, the device name must be a valid name for the type of objectspecified with the -t option.
The table below lists the supported object names for your operating system.
EMC SnapView Software
598 EMC VNX Series 5.33 Command Line Interface Reference for Block

Table 63 Operating system object names
Operating system Supported object name(s)
Windows l Drive letter
l Physical drive name
HP-UXal Device name (Legacy and agile views)
l File system nameb
l Powerpath device
l Veritas volume name (disk-based and enclosure-based)c
Solaris l Device name
l File system nameb
l Powerpath device
l Veritas volume name (disk-based and enclosure-based)c
Linux l Device name
l File system nameb
l Powerpath device
l Veritas volume name (disk-based and enclosure-based)c
l Linux MPIO’s mpath device
AIXal Device name
l File system nameb
l Powerpath device
a. If the object name is on a Logical Volume Manager, then admsnap will parse the LogicalVolume Manager (LVM) to get the device names and will attempt to flush those devices.
b. If the object name is a file system, then admsnap will parse the file system table entry to getthe device name and will attempt to flush that device.
c. If the object name is a Veritas volume name, admsnap will parse the Veritas volume todetermine all physical disks for the volume and will attempt to flush each physical disk.
The only time admsnap will not stop the session on all devices within an object iswhen the device is also in another object that already has the same session namestarted.
[-t object_type]Specifies the object type. This switch is valid on Windows or UNIX operating systemsonly. Valid types on Windows are device and drive letter. Valid types on Solaris aredevice, volume, and file system. If the object type name contains spaces, enter thename without spaces.
You should use the -t option when the argument for the -o option is not in astandard and recognizable form for your operating system’s object or device. If youdo not specify the -t option, admsnap will attempt to determine the correct objecttype and report a failure if it cannot.
EXAMPLEWindows example:
admsnap stop -s session1 -o \\.\PhysicalDrive1
EMC SnapView Software
admsnap stop 599

EMC SnapView Software
600 EMC VNX Series 5.33 Command Line Interface Reference for Block

CHAPTER 13
EMC VNX Snapshots Software
This chapter introduces the EMC VNX Snapshots™ software and the associatedcommands. The VNX Snapshots commands are divided into two types: Snapshot CLIcommands and SnapCLI commands.
Major topics include:
l VNX Snapshots CLI commands............................................................................602l SnapCLI commands for VNX Snapshots...............................................................623
EMC VNX Snapshots Software 601
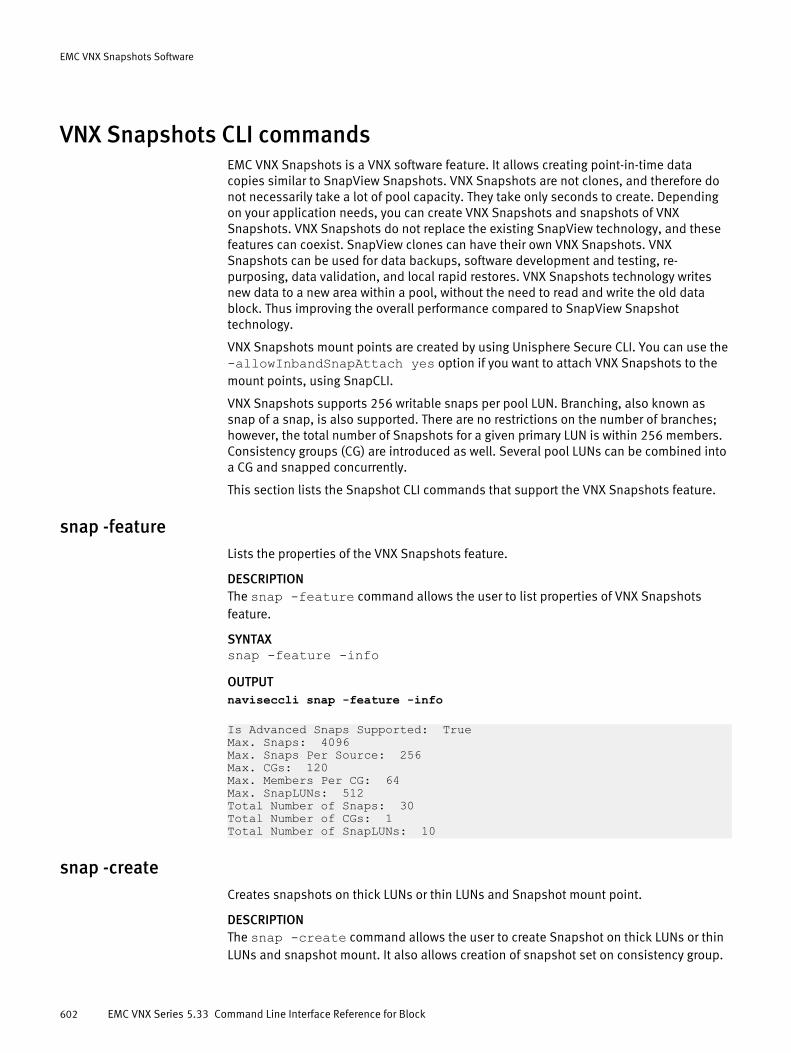
VNX Snapshots CLI commandsEMC VNX Snapshots is a VNX software feature. It allows creating point-in-time datacopies similar to SnapView Snapshots. VNX Snapshots are not clones, and therefore donot necessarily take a lot of pool capacity. They take only seconds to create. Dependingon your application needs, you can create VNX Snapshots and snapshots of VNXSnapshots. VNX Snapshots do not replace the existing SnapView technology, and thesefeatures can coexist. SnapView clones can have their own VNX Snapshots. VNXSnapshots can be used for data backups, software development and testing, re-purposing, data validation, and local rapid restores. VNX Snapshots technology writesnew data to a new area within a pool, without the need to read and write the old datablock. Thus improving the overall performance compared to SnapView Snapshottechnology.
VNX Snapshots mount points are created by using Unisphere Secure CLI. You can use the-allowInbandSnapAttach yes option if you want to attach VNX Snapshots to themount points, using SnapCLI.
VNX Snapshots supports 256 writable snaps per pool LUN. Branching, also known assnap of a snap, is also supported. There are no restrictions on the number of branches;however, the total number of Snapshots for a given primary LUN is within 256 members.Consistency groups (CG) are introduced as well. Several pool LUNs can be combined intoa CG and snapped concurrently.
This section lists the Snapshot CLI commands that support the VNX Snapshots feature.
snap -featureLists the properties of the VNX Snapshots feature.
DESCRIPTIONThe snap -feature command allows the user to list properties of VNX Snapshotsfeature.
SYNTAXsnap -feature -infoOUTPUTnaviseccli snap -feature -info
Is Advanced Snaps Supported: TrueMax. Snaps: 4096Max. Snaps Per Source: 256Max. CGs: 120Max. Members Per CG: 64Max. SnapLUNs: 512Total Number of Snaps: 30Total Number of CGs: 1Total Number of SnapLUNs: 10
snap -createCreates snapshots on thick LUNs or thin LUNs and Snapshot mount point.
DESCRIPTIONThe snap -create command allows the user to create Snapshot on thick LUNs or thinLUNs and snapshot mount. It also allows creation of snapshot set on consistency group.
EMC VNX Snapshots Software
602 EMC VNX Series 5.33 Command Line Interface Reference for Block

SYNTAX
snap -create -res resource[-resType type] [-name snapName] [-descr description][-keepFor number {h|d|m|y}|-allowAutoDelete{yes|no}] [-allowReadWrite {yes|no}][-ignoreMigrationCheck] [-ignoreDeduplicationCheck]
OPTIONS
-res resourceSpecifies the ID of the resource to be snapped.
-resType typeSpecifies the type of the resource to be snapped. The valid values are CG(consistency group) and LUN. If this is not specified, -create checks whether aconsistency group exists with the same name as the value specified in the -resoption. If it does, the matching consistency group is snapped. If no consistencygroup exists, it will check if any LUN exists with its number same as the valuespecified in the -res switch. If LUN exists, it will be snapped. Otherwise, an error isreturned. To create a Snapshot, you must use the LUN ID, not the LUN name.
Note
You must flush the host buffers before creating a Snapshot.
-name snapNameSpecifies the name of the snapshot.
-descr descriptionSpecifies the description of the snapshot.
-keepFor number {h|d|m|y}Specifies the retention time after which the snapshots will be deleted. The intervalcan be defined in years, months, days, or hours. The format of the value number { h|d|m|y}where:
number - An integer value.
h|d|m|y --The qualifier of the number. The valid values (case-insensitive) are h(hours), d (days), m (months) and y (years).
l If the qualifier is h (hours), the valid range is from 1 to 87600.
l If the qualifier is d (days), the valid range is from 1 to 3650.
l If the qualifier is m (months), the valid range is from 1 to 120.
l If the qualifier is y (years), the valid range is from 1 to 10.
-allowAutoDelete {yes|no}Specifies whether auto delete is allowed on this Snapshot. Valid values are:
l Yes – allow auto delete
l No – disallow auto delete
The options -keepFor and -allowAutoDelete are mutually exclusive. If any -keepFor value is specified, the -allowAutoDelete is disabled.
-allowReadWrite {yes|no}Specifies whether a user can attach one or more Snapshot mount points to thissnapshot. The valid values are:
l Yes - attachable
EMC VNX Snapshots Software
snap -create 603

l No - non-attachable
-ignoreMigrationCheckExecutes the command without prompting for confirmation.
-ignoreDeduplicationCheckOverrides the error during snapshot creation while the source is enablingdeduplication or disabling deduplication.
EXAMPLE #1
naviseccli snap -create -res 1 -name TLU1_Snapshot1 -keepFor 10d-allowReadWrite yes
EXAMPLE #2naviseccli –h riker-spa snap -create –res 1 -ignoreDeduplicationCheck
OUTPUTThere is no output for this command.
snap -destroyDeletes a snapshot.
DESCRIPTIONThe snap -destroy command allows the user to delete a snapshot.
SYNTAXsnap -destroy -id snapName [-o]OPTIONS
-idSpecifies the ID of the snapshot to be deleted.
EXAMPLEnaviseccli snap -destroy -id TLU1_Snapshot1
OUTPUTThere is no output for this command.
snap -listLists the properties of selected snapshot or snapshot set.
DESCRIPTIONThe snap -list command lists the properties of the specified snapshot. If noparameter is specified, all the basic properties of the specified snapshot are returned. Ifnone of the snapshots matches the identifier parameters, nothing is returned.
SYNTAXsnap -list [{-id snapName |[-resType type] [ -res resource]}][{-brief|-detail}]OPTIONS
-idSpecifies the ID of snapshot or snapshot set to be listed.
-resTypeSpecifies the type of snapshot or snapshot set to be listed. The valid values are:
l lun - list snapshot
EMC VNX Snapshots Software
604 EMC VNX Series 5.33 Command Line Interface Reference for Block

l cg - list snapshot set-brief
Shows only the basic properties of a snapshot or snapshot set.-detail
Shows all the properties of a snapshot or snapshot set.
Note
If neither -brief nor –detail option is specified, the basic properties are
shown.
EXAMPLE #1To show all the snapshots on the array:
naviseccli snap -list
Name: LUN0_2009-04-13-11:13:31_2 Description: Snapshot before update to new exchange server Creation time: 04/13/09 11:13:31 Source LUNs: 0 Source CG: N/A State: Ready Allow Read/Write: Yes Modified: Yes Allow auto delete: Yes Expiration date: Never
Name: LUN1_2009-04-15-09:01:01_8 Description: Snapshot before installing Visual Studio Creation time: 04/15/09 09:01:01 Source LUNs: 1 Source CG: N/A State: Ready Allow Read/Write: No Modified: No Allow auto delete: No Expiration date: 04/25/09 09:01:01
Name: CG0_2009-04-13-11:30:31_2 Description: Snapshot of CG0 before update to new sql server Creation time: 04/13/09 11:30:31 Source LUNs: 11, 12 Source CG: CG0 State: Ready Allow Read/Write: Yes Modified: NoAllow auto delete: Yes Expiration date: Never
EXAMPLE #2To show the snapshot with the specified ID with detailed output:
naviseccli snap -list -id CG0_2009-04-13-11:30:31_2 -detail
Name: CG0_2009-04-13-11:30:31_2Description: Snapshot of CG0 before update to new sql server Creation time: 04/13/09 11:30:31 Last modify time: N/A Last modified by: N/A Source LUNs: 11, 12 Source CG: CG0 Primary LUNs: 11, 12 State: Ready Status: N/A Allow Read/Write: Yes Modified: No Attached LUN(s): 4091,4092
EMC VNX Snapshots Software
snap -list 605

Allow auto delete: Yes Expiration date: Never
EXAMPLE #3To show all the snapshots of the specified resource type:
naviseccli snap -list -resType lun
Name: LUN0_2009-04-13-11:13:31_2 Description: Snapshot before update to new exchange server Creation time: 04/13/09 11:13:31 Source LUNs: 0 Source CG: N/A State: Ready Allow Read/Write: Yes Modified: Yes Allow auto delete: Yes Expiration date: Never
Name: LUN1_2009-04-15-09:01:01_8 Description: Snapshot before installing Visual Studio Creation time: 04/15/09 09:01:01 Source LUNs: 1 Source CG: N/A State: Ready Allow Read/Write: No Modified: No Allow auto delete: No Expiration date: 04/25/09 09:01:01
EXAMPLE #4To show all the snapshots related to the specified source resource, with detailed output:
naviseccli snap -list -res 0 -detail
Name: LUN0_2009-04-13-11:13:31_2 Description: Snapshot before update to new exchange server Creation time: 04/13/09 11:13:31 Last modify time: 04/15/09 12:30:20 Last modified by: SnapLUN4 Source LUNs: 0 Source CG: N/APrimary LUNs: 0 State: Ready Status: N/A Allow Read/Write: Yes Modified: Yes Attached LUN(s): N/A Allow auto delete: Yes Expiration date: Never
snap -modifyModifies the snapshot's name, description, expiration time, auto delete policy, or attachpolicy.
DESCRIPTIONThe snap -modify command allows the user to give a different name, description,expiration time, auto delete policy, or attach policy to the Snapshot.
SYNTAX
snap -modify -id snapName [-name newName] [-descr description][{-keepFor number {h|d|m|y}|-allowAutoDelete {yes|no}}][-allowReadWrite{yes|no}]
EMC VNX Snapshots Software
606 EMC VNX Series 5.33 Command Line Interface Reference for Block

OPTIONS
-id snapNameSpecifies the ID of Snapshot to be modified.
-name newNameSpecifies the new name for the Snapshot. This option changes the ID as well.
-descr descriptionSpecifies the new description for the Snapshot.
-keepFornumber {h|d|m|y}Specifies the retention time after which the snapshots will be deleted. The intervalcan be defined in years, months, days, or hours. The format of the value is: number{h|d|m|y}.where:
number - An integer value.
{h|d|m|y} - The qualifier of the number. The valid values (case-insensitive) are h(hours), d (days), m (months) and y (years).
l If the qualifier is h (hours), the valid range is from 1 to 87600.
l If the qualifier is d (days), the valid range is from 1 to 3650.
l If the qualifier is m (months), the valid range is from 1 to 120.
l If the qualifier is y (years), the valid range is from 1 to 10.
-allowAutoDelete {yes|no}Specifies the new auto delete policy. The valid values are:
l Yes - allow auto delete
l No - disallow auto delete
-allowReadWrite {yes|no}Specifies whether a user can attach Snapshot mount point(s) to this Snapshot. Thevalid values are:
l Yes - attachable
l No - non-attachable
EXAMPLE
naviseccli snap -modify -id TLU1_Snapshot1 -name TLU1_Snapshot2-allowAutoDelete yes
OUTPUTThere is no output for this command.
snap -copyReplicates a Snapshot.
DESCRIPTIONThe snap -copy command allows the user to replicate a Snapshot.
SYNTAXsnap -copy -id snapName [-name newName] [-ignoreMigrationCheck][-ignoreDeduplicationCheck]OPTIONS
-idSpecifies the ID of a Snapshot to be replicated.
EMC VNX Snapshots Software
snap -copy 607
-nameSpecifies the new Snapshot name.
-ignoreMigrationCheckExecutes the command without prompting for confirmation.
-ignoreDeduplicationCheckOverrides the error during snapshot creation while the source is enablingdeduplication or disabling deduplication.
EXAMPLEnaviseccli –h riker-spa snap -copy –id snap1 -ignoreDeduplicationCheck
OUTPUT
naviseccli snap -copy -id TLU1_Snapshot1 -name TLU1_Snapshot2ID = TLU1_Snapshot2Operation completed successfully
snap -restoreRestores a primary LUN, snapshot mount point, or consistency group.
DESCRIPTIONThe snap -restore command allows a primary LUN, snapshot mount point, orconsistency group to be rolled back to a previous point in time, which is defined by asnapshot.
SYNTAXsnap -restore -id snapName [-bakName bakName] [-res lunNumber]OPTIONS
-idSpecifies the ID of the snapshot to be restored.
-bakNameSpecifies the backup snapshot name.
Note
To save the current file, a backup snapshot is created on the primary LUN beforerestoring.
-resSpecifies the LUN number of the primary LUN, snapshot mount point, or one of theLUNs in snapshot set to be restored.
Note
l Must be specified when restoring the Snapshot
l Optional when restoring the Snapshot Set
EXAMPLE
naviseccli snap -restore -id TLU1_Snapshot1 -bakName TLU1_Snapshot2-res 1
OUTPUTThere is no output for this command.
EMC VNX Snapshots Software
608 EMC VNX Series 5.33 Command Line Interface Reference for Block

snap -attachAttaches snapshot mount points to the snapshot.
DESCRIPTIONThe snap -attach command allows the user to attach snapshot mount point(s) to thesnapshot, so that the data of the Snapshot is exposed to host.
SYNTAXsnap -attach -id snapName -res lunNumberOPTIONS
-idSpecifies the ID of snapshot to be attached.
-resSpecifies the LUN number of snapshot mount point to be attached.
EXAMPLEnaviseccli snap -attach -id TLU1_Snapshot1 -res 4
OUTPUTThere is no output for this command.
snap -detachDetaches snapshot mount points from a snapshot.
DESCRIPTIONThe snap -detach command allows the user to detach snapshot mount points from asnapshot.
SYNTAXsnap -detach -id snapName [-res lunNumber] [-o]OPTIONS
-idSpecifies the ID of snapshot to be detached from.
-resSpecifies the LUN number of snapshot mount point to be detached.
-oOverrides the warning on detaching a snapshot mount point that has snapshots.
EXAMPLEnaviseccli snap -detach -id TLU1_Snapshot1 -res 4
OUTPUTThere is no output for this command.
snap -group -createCreates a consistency group.
DESCRIPTIONThe snap -group -create command allows user to create a consistency group.
SYNTAXsnap -group -create -name cgName [-res lunNumber(s)] [-descrdescription] [-allowSnapAutoDelete {yes|no} ]
EMC VNX Snapshots Software
snap -attach 609
OPTIONS
-nameSpecifies the name of the consistency group to be created.
-resSpecifies the LUN number of the LUNs to be added into the consistency group. Ifthere are multiple LUN IDs, then they should be separated by commas.
-descrSpecifies the description of the consistency group.
-allowSnapAutoDeleteSpecifies the default auto delete policy, which will apply on snapshot set of this CG.The valid values are:
l yes - allow auto delete
l no - disallow auto delete
EXAMPLEnaviseccli snap -group -create -name CG1_Exchange -res 2,3
OUTPUTThere is no output for this command.
snap -group -destroyDeletes a consistency group.
DESCRIPTIONThe snap -group -destroy command allows user to delete a consistency group.
SYNTAXsnap -group -destroy -id cgName [-destroySnapshots]OPTIONS
-idSpecifies the ID of the consistency group to be deleted.
-destroySnapshotsForces all the snapshot set associated with this consistency group to be deleted.
EXAMPLEnaviseccli snap -group -destroy -id CG1_Exchange
OUTPUTThere is no output for this command.
snap -group -modifyModifies a consistency group name, description, or auto delete policy.
DESCRIPTIONThe snap -group -modify command allows user to modify consistency group name,description, or auto delete policy.
SYNTAXsnap -group -modify -id cgName [-name newName] [-descrdescription] [-allowSnapAutoDelete {yes|no}]OPTIONS
-idSpecifies the ID of the Consistency Group to be modified.
EMC VNX Snapshots Software
610 EMC VNX Series 5.33 Command Line Interface Reference for Block

-nameSpecifies a new name for the Consistency Group. The ID will also be changed.
-descrSpecifies a new description for the Consistency Group
-allowSnapAutoDeleteSpecifies the default auto delete policy that will apply to the Snapshot Set of thisConsistency Group. Valid values are:
l yes - allow auto delete
l no - disallow auto delete
EXAMPLEnaviseccli snap -group -modify -id CG1_Exchange -allowSnapAutoDeleteyes
OUTPUTThere is no output for this command.
snap -group -listLists the properties of the selected or all consistency groups.
DESCRIPTIONThe snap -group -list command allows the user to list properties of selected or allconsistency groups. If none of the consistency group matches the identifier parameterspassed, nothing will be returned.
SYNTAXsnap -group -list -id cgName [{-brief|-detail}]OPTIONS
-idSpecifies the ID of consistency groups to be listed.
-briefShow only the basic properties of a consistency group.
-detailShow all properties of a consistency group.
EXAMPLE #1To show all consistency groups on the array:
naviseccli snap -group -list
Name: CG123Description: Consistency Group containing all LUNs used in exchangeAllow auto delete: YesMember(s): 1, 3, 5, 6, 10State: Ready
Name: CG_SQLServerDescription: Consistency Group containing all LUNs used in SQL ServerAllow auto delete: YesMember(s): 2, 4State: Ready
EXAMPLE #2To show consistency groups with the specified ID, with detail output:
EMC VNX Snapshots Software
snap -group -list 611

naviseccli snap -group -list -id CG_SQLServer -detail
Name: CG_SQLServerDescription: Consistency Group containing all LUNs used in SQL ServerAllow auto delete: YesMember(s): 2, 4State: ReadyStatus: N/A
snap -group -addmemberAdds member LUNs to the consistency group.
DESCRIPTIONThe snap -group -addmember command adds member LUNs to the consistencygroup.
SYNTAXsnap -group -addmember -id cgName -res lunNumber(s)OPTIONS
-idSpecifies the ID of consistency group to which the LUNs will be added.
-resSpecifies ID of LUNs to be added to the consistency group. Multiple LUN IDs shouldbe separated by commas.
EXAMPLEnaviseccli snap -group -addmember -id CG1_Exchange -res 2
OUTPUTThere is no output for this command.
snap -group -rmmemberRemoves member LUN from the consistency groups.
DESCRIPTIONThe snap -group -rmmember command removes member LUN from the consistencygroups.
SYNTAXsnap -group -rmmember -id cgName -res lunNumber(s)OPTIONS
-idSpecifies the ID of consistency group from which the LUN will be removed.
-resSpecifies ID of LUNs to be removed from the consistency groups. Multiple LUN IDsshould be separated by commas.
EXAMPLEnaviseccli snap -group -rmmember -id CG1_Exchange -res 2
OUTPUTThere is no output for this command.
EMC VNX Snapshots Software
612 EMC VNX Series 5.33 Command Line Interface Reference for Block

snap -group -replmemberReplaces member LUNs of the consistency groups with the specified LUNs.
DESCRIPTIONThe snap -group -replmember command replaces member LUNs of the consistencygroups with the specified LUNs.
SYNTAXsnap -group -replmember -id cgName -res lunNumber(s)OPTIONS
-idSpecifies the ID of the consistency group of which the LUNs will be replaced.
-resSpecifies ID of LUNs to replace the existing members in the consistency group.
EXAMPLEnaviseccli snap -group -replmember -id CG1_Exchange -res 2,3
OUTPUTThere is no output for this command.
lun -createCreates snapshot mount point to allow the user to attach a snapshot on it, so that thesnapshot data can be exposed to the host.
DESCRIPTIONThe lun -create command creates snapshot mount point to allow user to attach asnapshot on it, so that the snapshot data can be exposed to the host.
SYNTAX
lun -create -type Snap -primaryLun primaryLunNumber |-primaryLunName primaryLunName [-l lunNumber] [-name lunName][-allowSnapAutoDelete yes|no] [-allowInbandSnapAttach yes|no][-sp spID]
OPTIONS
-typeSpecifies the type of the new MLU; the value must be Snap to create snapshotmount point.
-primaryLunSpecifies the ID of the primary LUN.
-primaryLunNameSpecifies the name of the primary LUN.
-lSpecifies the snapshot mount point number.
-nameSpecifies the snapshot mount point name.
-allowSnapAutoDeleteSpecifies the snapshot auto delete policy of the snapshot mount point. Valid valuesare:
l Yes - allow auto delete
EMC VNX Snapshots Software
snap -group -replmember 613

l No - disallow auto delete
-allowInbandSnapAttachSpecifies whether to allow host-based SnapCLI to attach snapshots. Valid valuesare:
l Yes - allow
l No - disallow
-spSpecifies the owner SP of the snapshot mount point to be created.
OUTPUTThere is no output for this command.
lun -createCreates a LUN by specifying an auto delete policy.
DESCRIPTIONThe lun -create command allows the user to create a LUN by specifying an autodelete policy.
SYNTAX
lun -create[-type Thin|NonThin] -capacity capacity [-sq mb|gb|tb|bc]-poolId storagePoolID|-poolName storagePoolName -sp spID[-aa autoAssignment] [-l lunNumber] [-name lunName][-offset logicalBlockAddress] [-initialTier optimizePool|highestAvailable|lowestAvailable] [-allowSnapAutoDelete yes|no][-ignoreThresholds] [-allocationPolicy onDemand|automatic]
OPTIONS
-offsetSpecifies the LUN to be offset.
-allowSnapAutoDeleteSpecifies the snapshot auto delete policy of the LUN to be created. Valid values are:
l yes - allow auto delete
l no - disallow auto delete
-allocationPolicySpecifies the allocation policy on the pool LUN. Valid values are:
l onDemand
l automatic (default)
-ignoreThresholdsForces the non-snap LUN to be created, ignoring possible threshold related error.
OUTPUTThere is no output for this command.
lun -destroyDeletes the primary LUN or snapshot mount point.
DESCRIPTIONThe lun -destroy command allows the user to delete the primary LUN or snapshotmount point.
EMC VNX Snapshots Software
614 EMC VNX Series 5.33 Command Line Interface Reference for Block

SYNTAX
lun -destroy -l lunNumber -name lunName [-destroySnapshots][-forceDetach] [-o]
OPTIONS
-lSpecifies the number of the LUN to be deleted.
-nameSpecifies the name of the LUN to be deleted.
-destroySnapshotsForces deletion of the primary LUN along with all of its snapshots.
-forceDetachForces deletion of the snapshot mount point even if it is currently attached.
-oOverrides the confirmation message.
OUTPUTThere is no output for this command.
lun -modifyModifies the primary LUN or snapshot mount point name and auto delete policy.
DESCRIPTIONThe lun -modify command modifies the primary LUN or snapshot mount point name,auto delete policy, and allows inband snap attach policy.
SYNTAX
lun -modify -l lunNumber|-name lunName [-aa autoAssign][-newName newLUNName] [-sp newDefaultSPID][-allowSnapAutoDelete yes|no] [-allowInbandSnapAttach yes|no][-allocationPolicy automatic][-deduplication On|Off [-destroySnapshots]] [-o]
OPTIONS
-lSpecifies the number of LUNs to be modified.
-nameSpecifies the name of LUN to be modified.
-aaSpecifies the auto assignment.
-newNameSpecifies the new name for the specified LUN.
-spSpecifies the new default SP of the LUN to be modified.
-allowSnapAutoDeleteSpecifies the snapshot auto delete policy of the LUN to be modified. The valid valuesare:
l yes - allow auto delete
l no - disallow auto delete
-allowInbandSnapAttachSpecifies whether the host-based SnapCLI can attach snapshots. Valid values are:
l yes - allow
EMC VNX Snapshots Software
lun -modify 615

l no - disallow
-allocationPolicySpecifies the allocation policy on the pool LUN. The only valid value is automatic.
-oOverrides the confirmation message.
-deduplication On|OffSpecifies whether deduplication is enabled on this LUN. Valid values are On or Off.
-destroySnapshotsSpecifies to explicitly destroy associated VNX Snapshots before turningdeduplication on or off for the specified LUN. If a LUN has associated VNX Snapshotsand you do not use the -destroySnapshots option, you cannot change thededuplication value.
OUTPUTThere is no output for this command.
lun -expandExpands the primary LUN or snapshot mount point.
DESCRIPTIONThe lun -expand command expands the primary LUN or snapshot mount point.
SYNTAX
lun -expand -l lunNumber -name lunName -capacity capacity[-sq mb|gb|tb|bc] [-ignoreThresholds] [-o]
OPTIONS
-ignoreThresholdsForce the non-snap LUN to be created, ignoring the possible threshold-related error.
OUTPUTThere is no output for this command.
lun -attachAttaches the snapshot mount point to the specified snapshot.
DESCRIPTIONThe lun -attach command allows the user to attach snapshot mount point to thespecified snapshot.
SYNTAXlun -attach-l lunNumber -name lunName -snapName snapNameOPTIONS
-lSpecifies the LUN number to be attached.
-nameSpecifies the name of the LUN to be detached.
-snapNameSpecifies the snapshot name to be attached to.
OUTPUTThere is no output for this command.
EMC VNX Snapshots Software
616 EMC VNX Series 5.33 Command Line Interface Reference for Block
lun -detachDetaches the snapshot mount point from the attached snapshot.
DESCRIPTIONThe lun -detach command allows the user to detach the snapshot mount point fromthe attached snapshot.
SYNTAXnaviseccli lun -detach -l lunNumber |-name lunNameOPTIONS
-lSpecifies the LUN number to be detached.
-nameSpecifies the name of the LUN to be detached.
OUTPUTThere is no output for this command.
storagepool -createCreates a storage pool by specifying a snapshot auto delete policy and MR-relatedthresholds.
DESCRIPTIONThe storagepool -create command allows the user to create a storage pool byspecifying a snapshot auto delete policy and MR-related thresholds.
SYNTAX
storagepool -create [-snapPoolFullThresholdEnabled on|off][-snapPoolFullHWM poolFullHWM] [-snapPoolFullLWM poolFullLWM][-snapSpaceUsedThresholdEnabled on|off][-snapSpaceUsedHWM snapSpaceUsedHWM][-snapSpaceUsedLWM snapSpaceUsedLWM]
OPTIONS
-snapPoolFullThresholdEnabledIndicates that the system should check the pool full high water mark for auto delete.Valid values are:
l on - enabledl off - disabled
-snapPoolFullHWMSpecifies the pool full high watermark (that will trigger the auto delete process) ofthe storage pool to be created.
-snapPoolFullLWMSpecifies the pool full low watermark (that will stop the auto delete process) of thestorage pool to be created.
-snapSpaceUsedThresholdEnabledIndicates that the system should check the snapshot space used high water mark forauto delete. Valid values are:
l on - enabledl off - disabled
-snapSpaceUsedHWM
EMC VNX Snapshots Software
lun -detach 617

Specifies the snapshot space used high water mark that will trigger the auto deleteprocess of the storage pool to be created.
-snapSpaceUsedLWMSpecifies the snapshot space used low water mark that will stop the auto deleteprocess of the storage p to be created.
OUTPUTThere is no output for this command.
storagepool -modifyModifies the snapshot auto delete policy and MR-related thresholds of an existingstorage pool.
DESCRIPTIONThe storagepool -modify command allows the user to modify the snapshot autodelete policy and MR-related thresholds of an existing storage pool.
SYNTAX
storagepool -modify [-snapPoolFullThresholdEnabled on|off][-snapPoolFullHWM poolFullHWM] [-snapPoolFullLWM poolFullLWM][-snapSpaceUsedThresholdEnabled on|off][-snapSpaceUsedHWM snapSpaceUsedHWM][-snapSpaceUsedLWM snapSpaceUsedLWM]
OPTIONS
-snapPoolFullThresholdEnabledIndicates that the system should check the pool full high water mark for auto delete.Valid values are:
l on - enabled
l off - disabled
-snapPoolFullHWMSpecifies the new pool full high water mark (that will trigger the auto delete process)of the Storage Pool to be modified.
-snapPoolFullLWMSpecifies the new pool full low water mark (that will stop the auto delete process) ofthe Storage Pool to be modified.
-snapSpaceUsedThresholdEnabledIndicates the system to check the snapshot space used high water mark for autodelete. Valid values are:
l on - enabled
l off - disabled
-snapSpaceUsedHWMSpecifies the new snapshot space used high water mark (that will trigger the autodelete process) of the Storage Pool to be modified.
-snapSpaceUsedLWMSpecifies the new snapshot space used low water mark (that will stop the autodelete process) of the Storage Pool to be modified.
OUTPUTThere is no output for this command.
EMC VNX Snapshots Software
618 EMC VNX Series 5.33 Command Line Interface Reference for Block

storagepool -listLists the total snapshot capacity, auto delete policy, auto delete state, and MR relatedthresholds of the specified storage pool or pools.
DESCRIPTIONThe storagepool -list command allows the user to list the total snapshot capacity,auto delete policy, auto delete state, and MR-related thresholds of specified storage poolor pools.
SYNTAX
storagepool -list[-lunAllocation] [-snapshotAllocation][-metadataAllocation] [-lunSubscribedCap][-snapshotSubscribedCap] [-metadataSubscribedCap][-compressionSavings] [-capacities][-snapPoolFullThresholdEnabled] [-snapPoolFullHWM][-snapPoolFullLWM] [-snapPoolFullState][-snapSpaceUsedThresholdEnabled] [-snapSpaceUsedHWM][-snapSpaceUsedLWM] [-snapSpaceUsedState]
OPTIONS
-lunAllocationThe total amount of storage that has been allocated from the pool for data written toall the primary LUNs in the pool.
-snapshotAllocationThe total amount of storage that has been allocated from the pool for all the VNXsnapshots created in the pool.
-metadataAllocationThe total amount of storage that has been allocated from the pool to store metadatafor the LUNs and VNX snapshots in the pool.
-lunSubscribedCapThe total amount of user data that can be written to all of the LUNs in the pool.
-snapshotSubscribedCapThe total amount of space that all LUN snapshots currently consume as well as whatthey would consume if all of the primary LUNs, data was overwritten.
-metadataSubscribedCapThe total amount of metadata storage that is required to support writing to the entirecontents of all of the LUNs in the pool.
-compressionSavingsThe total amount of storage that is being saved by using compression on the LUNs inthe pool.
-capacitiesShows all related capacities including “Raw Capacity”, “User Capacity”, “ConsumedCapacity”, “LUN Allocation”, “Snapshot Allocation”, “Metadata Allocation”,“Available Capacity”, “Percent Full”, “Total Subscribed Capacity”, “LUN SubscribedCapacity”, “Snapshot Subscribed Capacity”, “Metadata Subscribed Capacity”,“Percent Subscribed”, “Oversubscribed by”, and “Compression Savings”.
-snapPoolFullThresholdEnabledShows whether the system should check the pool full high water mark for autodelete.
-snapPoolFullHWMShows the pool full high water mark of the specified storage pool or pools.
-snapPoolFullLWMShows the pool full low water mark of the specified storage pool or pools.
EMC VNX Snapshots Software
storagepool -list 619
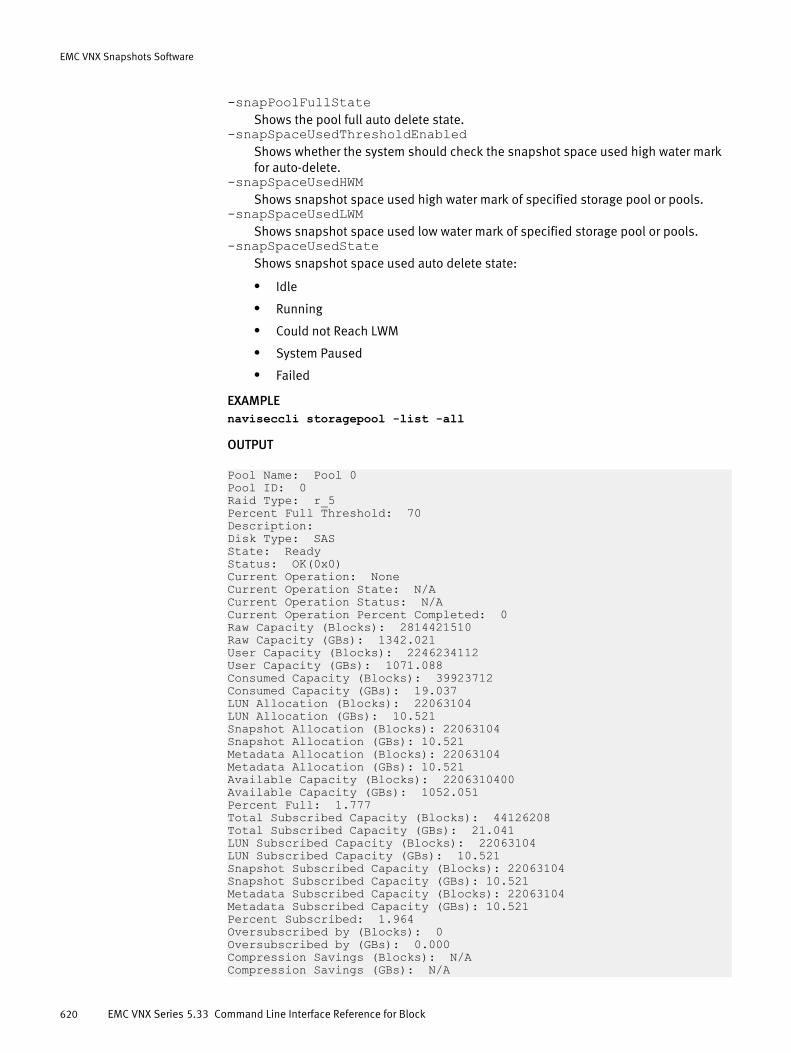
-snapPoolFullStateShows the pool full auto delete state.
-snapSpaceUsedThresholdEnabledShows whether the system should check the snapshot space used high water markfor auto-delete.
-snapSpaceUsedHWMShows snapshot space used high water mark of specified storage pool or pools.
-snapSpaceUsedLWMShows snapshot space used low water mark of specified storage pool or pools.
-snapSpaceUsedStateShows snapshot space used auto delete state:
l Idle
l Running
l Could not Reach LWM
l System Paused
l Failed
EXAMPLEnaviseccli storagepool -list -all
OUTPUT
Pool Name: Pool 0Pool ID: 0Raid Type: r_5Percent Full Threshold: 70Description:Disk Type: SASState: ReadyStatus: OK(0x0)Current Operation: NoneCurrent Operation State: N/ACurrent Operation Status: N/ACurrent Operation Percent Completed: 0Raw Capacity (Blocks): 2814421510Raw Capacity (GBs): 1342.021User Capacity (Blocks): 2246234112User Capacity (GBs): 1071.088Consumed Capacity (Blocks): 39923712Consumed Capacity (GBs): 19.037LUN Allocation (Blocks): 22063104LUN Allocation (GBs): 10.521Snapshot Allocation (Blocks): 22063104Snapshot Allocation (GBs): 10.521Metadata Allocation (Blocks): 22063104Metadata Allocation (GBs): 10.521Available Capacity (Blocks): 2206310400Available Capacity (GBs): 1052.051Percent Full: 1.777Total Subscribed Capacity (Blocks): 44126208Total Subscribed Capacity (GBs): 21.041LUN Subscribed Capacity (Blocks): 22063104LUN Subscribed Capacity (GBs): 10.521Snapshot Subscribed Capacity (Blocks): 22063104Snapshot Subscribed Capacity (GBs): 10.521Metadata Subscribed Capacity (Blocks): 22063104Metadata Subscribed Capacity (GBs): 10.521Percent Subscribed: 1.964Oversubscribed by (Blocks): 0Oversubscribed by (GBs): 0.000Compression Savings (Blocks): N/ACompression Savings (GBs): N/A
EMC VNX Snapshots Software
620 EMC VNX Series 5.33 Command Line Interface Reference for Block

Tier Name: PerformanceRaid Type: r_5User Capacity (GBs): 1071.09Consumed Capacity (GBs): 9.02Available Capacity (GBs): 1062.07Percent Subscribed: 0.84%Disks (Type):Bus 0 Enclosure 0 Disk 10 (SAS)Bus 0 Enclosure 0 Disk 12 (SAS)Bus 0 Enclosure 0 Disk 14 (SAS)Bus 0 Enclosure 0 Disk 11 (SAS)Bus 0 Enclosure 0 Disk 13 (SAS)
Disks:Bus 0 Enclosure 0 Disk 14Bus 0 Enclosure 0 Disk 12Bus 0 Enclosure 0 Disk 10Bus 0 Enclosure 0 Disk 13Bus 0 Enclosure 0 Disk 11LUNs: 200, 100, 101, 300FAST Cache: N/A
Auto-Delete Pool Full Threshold Enabled: OnAuto-Delete Pool Full High Water Mark: 95Auto-Delete Pool Full Low Water Mark: 85Auto-Delete Pool Full State: RunningAuto-Delete Snapshot Space Used Threshold Enabled: OnAuto-Delete Snapshot Space Used High Water Mark: 25Auto-Delete Snapshot Space Used Low Water Mark: 20Auto-Delete Snapshot Space State: Idle
storagepool -resumeAutoDeleteResumes auto-delete on an existing storage pool.
DESCRIPTIONThe storagepool -resumeAutoDelete command allows the user to resumesnapshots auto delete on an existing storage pool.
SYNTAXstoragepool -resumeAutoDelete -id poolID | -namepoolNameOPTIONS
-idSpecifies the ID of the storage pool to be operated on.
-nameSpecifies the name of the storage pool to be operated on.
OUTPUTThere is no output for this command.
getlunGets the snapshot mount points as a LUN.
DESCRIPTIONThe getlun command allows the user to get snapshot mount points as a LUN.
EMC VNX Snapshots Software
storagepool -resumeAutoDelete 621

SYNTAX
getlun
-edit <lun-number> <-aa> <-at> <-bind> <-bp><-bread> <-brw> <-busy> <-bwrite> <-capacity> <-crus> <-default> <-disk> <-drivetype> <-dsa> <-element> <-ena> <-ff> <-hrdscsi> <-idle> <-idt> <-it> <-mp> <-name> <-nminus> <-owner><-parityelements> <-pd> <-pic> <-prb> <-prefetch> <-prf> <-ps><-psm> <-qavg> <-qmax> <-que> <-rb> <-rc> <-rd3> <-rchm> <-reads> <-remap> <-ret> <-rh> <-rhist> <-rr> <-rwf> <-rwr> <-service> <-sftscsi> <-srcp> <-ss> <-ssm> <-stripe> <-totque> <-type> <-upb> <-verify> <-was> <-wc> <-wch> <-uid> <-wh> <-whist> <-wr> <-writes> <-rg> <-state> <-private> <-usage> <-sc><-offset> <-addroffset> <-ismetalun> <-isthinlun> <-ispoollun><-idleticks> <-busyticks> <-lunidleticks> <-luncache> <-lunbusyticks> <-trespass> <-status> <-brwsp> <-rwrsp> <-lunbusytickssp> <-lunidletickssp> <-nanzq> <-sqlah> <-slst> <-slct> <-etp> <-itp> <-nzrca> <-sor> <-wcrh> <-fwc> <-fastcache><-issnapmountpoint> <-all>
EXAMPLEnaviseccli getlun 1 -all
OUTPUT
Statistics logging is disabled.Certain fields are not printed if statisticslogging is not enabled.
Prefetch size (blocks) = 0Prefetch multiplier = 0Segment size (blocks) = 0Segment multiplier = 0Maximum prefetch (blocks) = 0Prefetch Disable Size (blocks) = 0Prefetch idle count = 0
Prefetching: NOPrefetched data retained NO
Read cache configured according tospecified parameters.
Name LUN 1Minimum latency reads N/A
RAID Type: N/ARAIDGroup ID: N/AState: BoundStripe Crossing: 0Element Size: 0Current owner: SP AOffset: N/AAuto-trespass: DISABLEDAuto-assign: DISABLEDWrite cache: ENABLEDRead cache: ENABLEDIdle Threshold: 0Idle Delay Time: 0Write Aside Size: 0Default Owner: SP ARebuild Priority: N/AVerify Priority: N/APrct Reads Forced Flushed: 0Prct Writes Forced Flushed: 0Prct Rebuilt: 100
EMC VNX Snapshots Software
622 EMC VNX Series 5.33 Command Line Interface Reference for Block
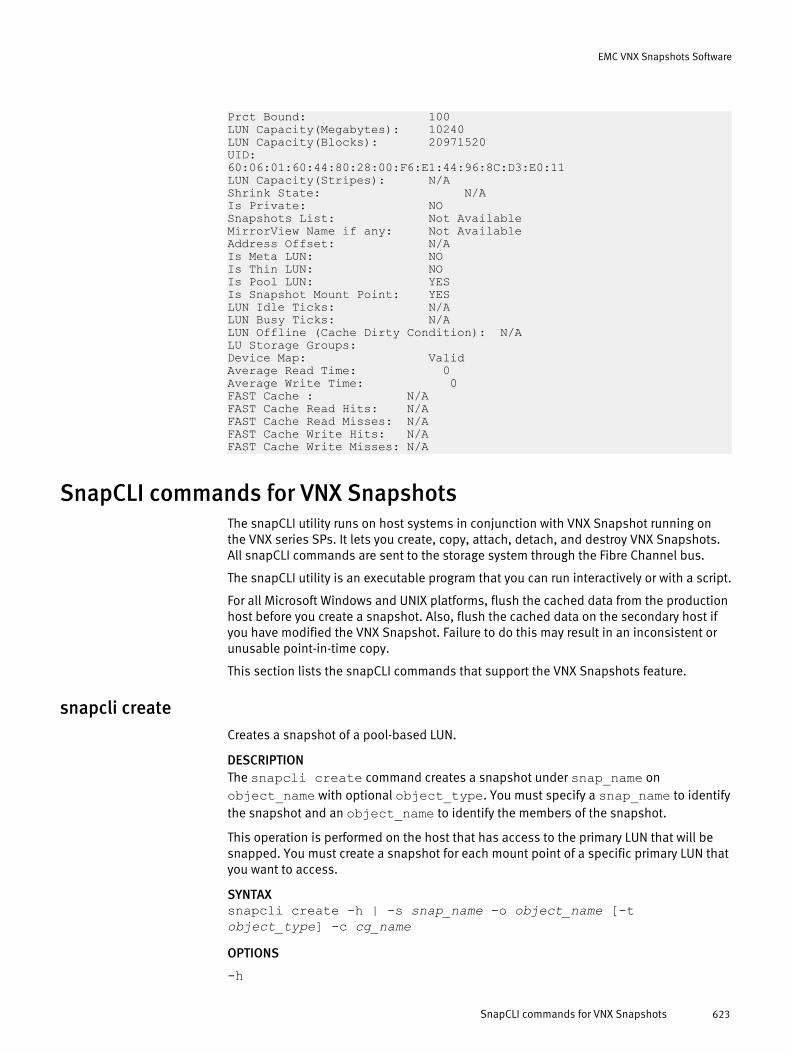
Prct Bound: 100LUN Capacity(Megabytes): 10240LUN Capacity(Blocks): 20971520UID: 60:06:01:60:44:80:28:00:F6:E1:44:96:8C:D3:E0:11LUN Capacity(Stripes): N/AShrink State: N/AIs Private: NOSnapshots List: Not AvailableMirrorView Name if any: Not AvailableAddress Offset: N/AIs Meta LUN: NOIs Thin LUN: NOIs Pool LUN: YESIs Snapshot Mount Point: YESLUN Idle Ticks: N/ALUN Busy Ticks: N/ALUN Offline (Cache Dirty Condition): N/ALU Storage Groups:Device Map: ValidAverage Read Time: 0Average Write Time: 0FAST Cache : N/AFAST Cache Read Hits: N/AFAST Cache Read Misses: N/AFAST Cache Write Hits: N/AFAST Cache Write Misses: N/A
SnapCLI commands for VNX SnapshotsThe snapCLI utility runs on host systems in conjunction with VNX Snapshot running onthe VNX series SPs. It lets you create, copy, attach, detach, and destroy VNX Snapshots.All snapCLI commands are sent to the storage system through the Fibre Channel bus.
The snapCLI utility is an executable program that you can run interactively or with a script.
For all Microsoft Windows and UNIX platforms, flush the cached data from the productionhost before you create a snapshot. Also, flush the cached data on the secondary host ifyou have modified the VNX Snapshot. Failure to do this may result in an inconsistent orunusable point-in-time copy.
This section lists the snapCLI commands that support the VNX Snapshots feature.
snapcli createCreates a snapshot of a pool-based LUN.
DESCRIPTIONThe snapcli create command creates a snapshot under snap_name onobject_name with optional object_type. You must specify a snap_name to identifythe snapshot and an object_name to identify the members of the snapshot.
This operation is performed on the host that has access to the primary LUN that will besnapped. You must create a snapshot for each mount point of a specific primary LUN thatyou want to access.
SYNTAXsnapcli create -h | -s snap_name -o object_name [-tobject_type] -c cg_nameOPTIONS
-h
EMC VNX Snapshots Software
SnapCLI commands for VNX Snapshots 623

Prints out this message. If this option is present on the command line, no otheroption validation is performed.
-sThis option specifies a snapshot name. This is a string of up to 256 characters, andcan be composed of letters, numbers, or underscores. The snap_name must beunique on the array.
-oThis option specifies an object-name. The object-name must be a valid object namethat is one of the following object types:
l A device name
l A file system mount point
l A Veritas volume name
l A drive letter
If -c option is used, then a set of object names can be given on the command linewith the object names separated by a comma field separator.
-tThis option specifies the object-type. The only valid object-types are "device","filesystem", "volume", and "driveletter". This option is optional for these foursupported object types. If not provided, SnapCLI attempts to determine the correctobject type and reports a failure if it cannot.
-cThis option identifies a consistency group of LUNs, that could be snapped together,as follow:
l If the specified cg_name does not exist and a list of object_names is specified,the array attempts to create a new consistency group named cg_name for theobject_names specified, and then snaps the consistency group. However, if anyof the specified LUNs is in another consistency group, the create snap operationfails.
l If the cg_name already exists and the list of object_names is specified, itsmember LUNs are updated with the specified object_names, and the consistencygroup is snapped.
snapcli destroyDestroys a named snapshot.
DESCRIPTIONThis operation is used to destroy a snapshot named snap_name on object_name withoptional object_type. You must specify a snap_name to identify the snapshot and anobject_name to identify the members of the snapshot.
This operation is performed on the host that has access to the primary LUN that waspreviously snapped. Only one device per VNX storage array, currently in the snapshot, isneeded to destroy the snapshot. A snapshot is not allowed to be destroyed if it is stillattached to a mount point. If the named snap is for a consistency group, the consistencygroup will not be removed.
SYNTAXsnapcli destroy -h | -s snap_name -o object_name [-tobject_type]OPTIONS
-h
EMC VNX Snapshots Software
624 EMC VNX Series 5.33 Command Line Interface Reference for Block
This option prints out this message. If this option is present on the command line,no other option validation is performed.
-sThis option specifies a snapshot name. This is a string of up to 256 characters, andcan be composed of letters, numbers, or underscores. The snap_name must beunique on the array.
-oThis option specifies an object_name. The object_name must be a valid object namethat is one of the following object types:
l A device name
l A file system mount point
l A Veritas volume name
l A drive letter
-tThis option specifies the object_type. The only valid object_types are "device","filesystem", "volume", and "driveletter". This option is optional for these four basicsupported object types. If no option is provided, SnapCLI attempts to determine thecorrect object type among these four object types, and reports a failure if it cannot.
snapcli copyCreates a copy of the snapshot.
DESCRIPTIONYou must specify the name of the snap to be created and the name of the snap to besnapped.
This operation is performed on the host that has access to the primary LUN or anymember of the snap family. An attached snapshot cannot be copied, therefore therequest to copy it will fail.
SYNTAXsnapcli copy -h | -s object_type-b snap_name -o object_nameOPTIONS
-hPrints out this message. If this option is present on the command line, no otheroption validation is performed and this message is printed.
-sSpecifies a snapshot name for the snap to be created. This is a string of up to 256characters, and can be composed of letters, numbers or underscores. Thesnap_name must be unique on the array.
-bIdentifies a Snapshot to be snapped.
-oThis option specifies an object name. The object name must be a valid object namethat is one of the following object types:
l A device name
l A file system mount point
l A Veritas volume name
l A drive letter
EMC VNX Snapshots Software
snapcli copy 625
snapcli attachAttaches a mount point with one of its Snapshot instances.
DESCRIPTIONThis operation is used to attach a snapshot named snap_name on object_name. It is alsooptionally used to decide whether to rescan the operating system's devices beforeattempting the attach operation. If an object_name is specified, you can optionally specifyan object_type. Specifying an object_type without specifying an object_name is notpermitted. You must specify a snap_name to identify the Snapshot.
This operation is performed on the host that has access to the mount point to beattached. You must perform an attach operation for each device you wish to access. If noobject_name is given, all devices are searched and those belonging to the specifiedSnapshot are subsequently attached.
SYNTAX
snapcli attach -h | -s snap_name | [[-o object_name[-t object_type]] | [-d driveletter]] [-r 0|1][-c rescan_count] [-f]
OPTIONS
-hPrints out this message. If this option is present on the command line, no otheroption validation is performed and this message is printed.
-sSpecifies a snapshot name. This is a string of up to 256 characters, and can becomposed of letters, numbers, or underscores. The snap_name must be unique onthe array.
-oSpecifies an object_name. The object_name must be a valid object name of one of thefollowing object types:
l A device
l A file system mount point
l A Veritas volume
l A drive letter
This option cannot be used in conjunction with the -d option.
-tThis option specifies the object type. This option is only a valid option when a -ooption is given. The only valid object types are "device", "filesystem", "volume", and"driveletter". This option is optional for these four basic supported object types. If nooption is provided, SnapCLI attempts to determine the correct object type among thefour object types and reports a failure if it cannot.This option cannot be used in conjunction with the -d option.
-dThis option is only valid for the Microsoft Windows platform and is ignored on allother platforms. This option specifies the drive letter to attempt to assign to theoperating system device attached. If the attach operation performed results in morethan one device attached, then only the first device in that list will be affected. If youwish to provide a drive letter for all devices attached, they must be attachedindividually.This option cannot be used in conjunction with the -o or -t options.
EMC VNX Snapshots Software
626 EMC VNX Series 5.33 Command Line Interface Reference for Block

-rThis option specifies whether to perform a rescan of the operating system's devicesbefore performing an attach operation. The default rescanning behavior when -r isnot present depends on whether an object_ name was specified with the -o option. Ifan object_name is given, then the default behavior is to not perform a rescanoperation. The default behavior is to perform a rescan of the operating system'sdevices.When present, -r (0 | 1) overrides default behavior.
-c rescan_countThis option specifies the number of rescans to be performed of the operatingsystem's devices, after performing a successful attach operation to bring the devicesonline. If a count of 0 is specified, no rescans are performed. However, this couldresult in the device attaching successfully on the array, but not being online withinthe host.If the -c is not present, then a default value of 1 is set.
-fThis option forces SnapCLI to attach the snapshot, regardless of the current value ofthe snapshot's allowReadWrite property. A snapshot created with SnapCLIalways has allowReadWrite=No, to prevent accidental modifications to thesnapshot. The -f option does not modify the value of the allowReadWriteproperty, which can only be changed using Unisphere.
snapcli detachDetaches a mount point from a snapshot.
DESCRIPTIONThis operation is used to detach a snapshot named snap_name on object_name. If anobject_name is specified, you can optionally specify an object_type. Specifying anobject_type without specifying anobject_name is not permitted. You must specify asnap_name to identify the snapshot.
This operation is performed on the host that has access to the mount point that will bedetached. You must perform a detach operation for each device you wish to detach. If noobject_name is provided, all devices will be searched and those belonging to thespecified Snapshot will be subsequently detached.
SYNTAXsnapcli detach -h | -s snap_name [-o object_name [-tobject_type]] [-f]OPTIONS
-hPrints out this message. If this option is present on the command line, no otheroption validation is performed and this message is printed.
-sSpecifies a snapshot name. This is a string of up to 256 characters, and can becomposed of letters, numbers or underscores. The snap_name must be unique onthe array.
-oSpecifies an object_name. The object_name must be a valid object name of one of thefollowing object types:
l A device
l A file system mount point
EMC VNX Snapshots Software
snapcli detach 627

l A Veritas volume
l A drive letter
-tThis option specifies the object type. This option is only a valid option when a -ooption is given. The only valid object_type are "device", "filesystem", "volume", and"driveletter". This option is optional for these four basic supported object types. If nooption is provided, SnapCLI attempts to determine the correct object type amongthese four object types and reports a failure if it cannot.
-fThis option is only valid for the Microsoft Windows platform and this option isignored on all other platforms. This option specifies whether to force SnapCLI toremove the drive letter after a detach operation.
EMC VNX Snapshots Software
628 EMC VNX Series 5.33 Command Line Interface Reference for Block

CHAPTER 14
EMC Secure Remote Support on the StorageProcessor
This chapter introduces EMC Secure Remote Support (ESRS) on the Storage Processor(SP) and the associated commands for configuring and managing this feature.
Major topics include:
l ESRS Device Client on Storage Processor.............................................................630l esrsconfig -agentprovision.................................................................................. 630l esrsconfig -agentstatus....................................................................................... 631l esrsconfig -configproxy -addproxy....................................................................... 632l esrsconfig -configproxy -list.................................................................................632l esrsconfig -configproxy -removeproxy..................................................................633l esrsconfig -configpolicymanager -addpm............................................................ 633l esrsconfig -configpolicymanager -list.................................................................. 634l esrsconfig -configpolicymanager -addpolicyproxy............................................... 634l esrsconfig -configpolicymanager -removepolicyproxy.......................................... 635l esrsconfig -configpolicymanager -removePM.......................................................635
EMC Secure Remote Support on the Storage Processor 629

ESRS Device Client on Storage ProcessorThe ESRS device client on Storage Processor feature is included only in VNX operatingenvironment (OE) for Block versions 5.32 that are later than version 05.32.000.5.209 orversions 05.33 that are later than version 05.33.000.5.051. This software monitors theoperation of your VNX for Block systems for error events and automatically sendsConnectEMC notifications to your service provider. It also provides a path for your serviceprovider to use to securely connect to your specified VNX for Block system (through theassociated storage processor).
This solution offers a secure architecture from end to end, including the followingfeatures:
l EMC issues X.509 digital certificates to authenticate the ESRS device client onStorage Processor to EMC.
l EMC professionals are authenticated using two unique factors.
l All EMC service professionals have a unique username that is logged with all theiractions.
l All communication originates from the Storage Processor. The ESRS device client onStorage Processor does not accept unsolicited connections from EMC or the Internet.
l All communications between EMC and the ESRS device client on Storage Processorincludes the latest security practices and encryption technologies, includingcertificate libraries based on RSA Lockbox technology, and Advanced EncryptionStandard (AES) 256-bit encryption.
l Those who implement the ESRS device client on Storage Processor solution canfurther control remote access by using the Policy Manager. The Policy Manager givesfull control of how EMC interacts with VNX systems. SSL is available between theESRS device client on Storage Processor and the Policy Manager.
For more information about the ESRS device client on Storage Processor feature for VNXfor Block systems, refer to the EMC Secure Remote Support for VNX technical module onthe EMC Online Support website at http://Support.EMC.com.
esrsconfig -agentprovisionProvisions ESRS on the storage processor (SP).
PREREQUISITESThe VNX system must be configured with at least one DNS server for EMC Secure RemoteSupport (ESRS) to function properly. To provision ESRS, you must be logged in withAdministrator privileges.
DESCRIPTIONThe esrsconfig -agentprovision command allows you to provision ESRS on theStorage Processor (SP).
SYNTAXesrsconfig -agentprovision -user user [-emcuser] -passwordpassword [-reprovision] [-http|-socks -proxyhost proxyhostname|proxyipaddress -proxyport proxyportnumber | [-proxyuserproxyhostuser -proxypassword proxypassword]]OPTIONS
-user
EMC Secure Remote Support on the Storage Processor
630 EMC VNX Series 5.33 Command Line Interface Reference for Block
Specifies an EMC Online Support username. For EMC users, specify an EMCusername.
-passwordSpecifies an EMC Online Support password. For EMC users, specify an RSA SecureIDtoken password.
-emcuserSpecified when the user is an administrator or authorized service provider.
-reprovisionSpecified if reprovisioning ESRS.
-http | -socksSets the proxy type.
-proxyhostSpecifies the proxy Host or IP address. Used only if either -http or -socks isspecified, otherwise ignored.
-proxyportSpecifies the proxy port. Used only if either -http or -socks is specified,otherwise ignored.
-proxyuserSpecifies the proxy user name. Used only if either -http or -socks is specified,otherwise ignored.
-proxypasswordSpecifies the proxy user password. Used only if either -http or -socks isspecified, otherwise ignored.
EXAMPLEnaviseccli -h 10.244.70.103 -user administrator -passwordpasswordsample12 -scope 0 esrsconfig -agentprovision [email protected] -password Password1
OUTPUT
Software installed successfully.
ESRS has been provisioned and Template Call_Home_Template_7.33.0.9 applied successfully.
POSTREQUISITESProvision ESRS for the other SP immediately after provisioning it for the first SP. Thisensures ESRS will send CallHomes appropriately in the event of an SP failover.
esrsconfig -agentstatusReturns the status of the ESRS device client.
DESCRIPTIONThe esrsconfig -agentstatus command returns the status of the ESRS deviceclient on the storage processor.
SYNTAXesrsconfig -agentstatusOUTPUT
Connecting To: esrs-corestg.emc.com on port 443Connection Status: ConnectedProxy Server: Disabled
EMC Secure Remote Support on the Storage Processor
esrsconfig -agentstatus 631
Policy Manager: Disabled.SSL: Enabled, strength 168Remote Sessions:
esrsconfig -configproxy -addproxyAdds proxy server configuration information for ESRS on the SP.
DESCRIPTIONThe esrsconfig -configproxy -addproxy command is used to add proxy serverconfiguration information for ESRS on the SP.
SYNTAX
esrsconfig -configproxy -addproxy -http|-socks -proxyhostproxyhostname | proxyipaddress -proxyport proxyportnumber |[-proxyuser proxyhostuser -proxypassword proxypassword]
OPTIONS
-http | -socksSets the proxy type.
-proxyhostSpecifies the proxy Host or IP address. Used only if either -http or -socks isspecified, otherwise ignored.
-proxyportSpecifies the proxy port. Used only if either -http or -socks is specified,otherwise ignored.
-proxyuserSpecifies the proxy username. Used only if either -http or -socks is specified,otherwise ignored.
-proxypasswordSpecifies the proxy user password. Used only if either -http or -socks isspecified, otherwise ignored.
EXAMPLE
naviseccli -h 10.244.70.103 -user administrator -passwordpasswordexample1 -scope 0 esrsconfig -configproxy -addproxy -http-proxyhost 10.245.36.219 -proxyport 80
OUTPUT
Agent Proxy configuration Successful.
esrsconfig -configproxy -listLists the proxy configuration status of ESRS on the SP.
DESCRIPTIONThe esrsconfig -configproxy -list command lists the current status anddetails of the proxy server configuration for ESRS for the SP.
SYNTAXesrsconfig -configproxy -list
EMC Secure Remote Support on the Storage Processor
632 EMC VNX Series 5.33 Command Line Interface Reference for Block

OUTPUT
DRMProxy ServerEnabled: trueProxy Type: HTTPHost: 10.245.36.219Port: 80User name:
esrsconfig -configproxy -removeproxyRemoves proxy server configuration for ESRS for the SP.
DESCRIPTIONThe esrsconfig -configproxy -removeproxy command removes the proxyserver configuration for ESRS on the SP.
SYNTAXesrsconfig -configproxy -removeproxyOUTPUT
Agent Proxy configuration Successful.
esrsconfig -configpolicymanager -addpmAdds and configures policy manager for ESRS on the SP.
DESCRIPTIONThe esrsconfig -configpolicymanager -addpm command configures PolicyManager for EMC Secure Remote Support (ESRS) on the storage processor (SP).
SYNTAX
esrsconfig -configpolicymanager -addpm [-secure] -hostpmhostname | pmipaddress [-port PMportnumber] [-http|-socks-proxyhost proxyhostname|proxyhostipaddress[-proxyport proxyportnumber] [-proxyuser proxyhostuser-proxypassword proxypassword]]
OPTIONS
-addpmAdds Policy Manager and configuration information.
-secureIf specified, uses the HTTPS protocol to access the server.
-hostSpecifies the IP address of the policy manager host.
-portSpecifies the port used to access the policy manager.
-http | -socksSets the proxy type.
-proxyhostSpecifies the proxy Host or IP address. Used only if either -http or -socks isspecified, otherwise ignored.
-proxyportSpecifies the proxy port. Used only if either -http or -socks is specified,otherwise ignored.
EMC Secure Remote Support on the Storage Processor
esrsconfig -configproxy -removeproxy 633

-proxyuserSpecifies the proxy username. Used only if either -http or -socks is specified,otherwise ignored.
-proxypasswordSpecifies the proxy user password. Used only if either -http or -socks isspecified, otherwise ignored.
EXAMPLEnaviseccli -h 10.241.216.50 -user sysadmin -password sysadmin -scope 0esrsconfig -configpolicymanager -addpm -host 10.245.36.202
OUTPUT
Agent PM changes successful
esrsconfig -configpolicymanager -listLists the status of the policy manager configuration for ESRS on the SP.
DESCRIPTIONThe esrsconfig -configpolicymanager -list command lists the details of thepolicy manager configuration for ESRS on the SP.
SYNTAXesrsconfig -configpolicymanager -listEXAMPLE
naviseccli -h 10.241.216.50 -user admin -password passwordsample1-scope 0 esrsconfig -configpolicymanager -list
OUTPUT
Policy Server Enabled: true Host: 10.245.36.202 Port: 8090 SSL Enabled: falseProxy Server Enabled: false
esrsconfig -configpolicymanager -addpolicyproxyAdds proxy configuration to policy manager for ESRS on the SP.
DESCRIPTIONThe esrsconfig -configpolicymanager -addpolicyproxy command addsthe proxy server configuration information.
SYNTAX
esrsconfig -configpolicymanager -addpolicyproxy -http|-socks-proxyhost proxyhostname | proxyhostipaddress [-proxyportproxyportnumber] [-proxyuser proxyhostuser -proxypasswordproxypassword]
OPTIONS
-addpolicyproxy
EMC Secure Remote Support on the Storage Processor
634 EMC VNX Series 5.33 Command Line Interface Reference for Block

Adds proxy server configuration to Policy Manager for ESRS on the SP.-http | -socks
Sets the proxy type.-proxyhost
Specifies the proxy Host or IP address. Used only if either -http or -socks isspecified, otherwise ignored.
-proxyportSpecifies the proxy port. Used only if either -http or -socks is specified,otherwise ignored.
-proxyuserSpecifies the proxy username. Used only if either -http or -socks is specified,otherwise ignored.
-proxypasswordSpecifies the proxy user password. Used only if either -http or -socks isspecified, otherwise ignored.
EXAMPLE
naviseccli -h 10.241.216.50 -user admin -password passwordsample1-scope 0 esrsconfig -configpolicymanager -addpolicyproxy-socks -proxyhost 10.245.36.219
OUTPUT
Agent PM changes successful
esrsconfig -configpolicymanager -removepolicyproxyRemoves the proxy server for Policy Manager for ESRS on the SP.
DESCRIPTIONThe -configpolicymanager -removepolicyproxy command removes the proxyserver configuration from Policy Manager for ESRS on the SP.
SYNTAXesrsconfig -configpolicymanager -removepolicyproxyEXAMPLE
naviseccli -h 10.241.216.50 -user admin -password passwordsample2-scope 0 esrsconfig -configpolicymanager -removepolicyproxy
OUTPUT
Agent PM changes successful
esrsconfig -configpolicymanager -removePMRemoves Policy Manager configuration from ESRS on the SP.
DESCRIPTIONThe esrsconfig -configpolicymanager -removePM command removes thepolicy manager configuration from ESRS on the SP.
SYNTAXesrsconfig -configpolicymanager -removePM
EMC Secure Remote Support on the Storage Processor
esrsconfig -configpolicymanager -removepolicyproxy 635
EXAMPLEnaviseccli -h 10.241.216.50 -user sysadmin -password sysadmin -scope 0esrsconfig -configpolicymanager -removePM
OUTPUT
Agent PM changes successful
EMC Secure Remote Support on the Storage Processor
636 EMC VNX Series 5.33 Command Line Interface Reference for Block

CHAPTER 15
Data at Rest Encryption
This chapter introduces Data at Rest Encryption (D@RE) and the associated commandsfor activating and monitoring this feature.
Major topics include:
l Data at Rest Encryption overview.........................................................................638l securedata -feature -activate...............................................................................639l securedata -feature -info..................................................................................... 640l securedata -backupkeys -status.......................................................................... 641l securedata -backupkeys -retrieve........................................................................642l securedata -auditlog -retrieve..............................................................................643l securedata -auditlog -cksum............................................................................... 644
Data at Rest Encryption 637

Data at Rest Encryption overviewData at Rest Encryption (D@RE) is provided through controller-based encryption (CBE) ata physical disk drive level. A unique data encryption key (DEK) is generated for each driveand is used to encrypt data as it is sent to the drive. The goal of this feature is to ensurethat all customer data and identifying information will be encrypted with strongencryption, primarily to ensure security in the event of loss of a disk drive.
Note
Some unencrypted data could be in the system partition (for example, hostnames, IPaddresses, dumps, and so on). In addition, there is potential for small amounts ofunencrypted user data as a result of writing diagnostic materials to the system partition.All the data written to the array by using regular I/O protocols (iSCSI, FC) are encrypted.Anything that comes into the array by using the control path will not be encrypted by thissolution; however, information that is sensitive (for example, passwords) are encryptedby a different mechanism (as they are on non-encrypting arrays).
For new VNX systems that are ordered with the D@RE feature, encryption should beenabled on the systems during manufacturing. Verify whether D@RE has been enabledand activated by running the securedata -feature -info command. If EncryptionMode appears as N/A, you need to perform a non-disruptive upgrade (NDU) of theDataAtRestEncryption enabler and activate it as described in theSecurity ConfigurationGuide for VNX. If Encryption Mode appears as Unencrypted, you only need to activate itusing the securedata -feature -activate command.
NOTICE
Once activated, the encryption operation cannot be reverted. When possible, enableencryption prior to populating the system with data, RAID groups, and such. This actionwill avoid the data in place upgrade process and its effects on system cache and systemperformance.
For VNX systems that do not have D@RE enabled, enabling of encryption on the systemrequires a non-disruptive upgrade (NDU) of the DataAtRestEncryption enabler. Thisupgrade can be done upon request. A subsequent activate operation must be initiatedthrough the securedata -feature -activate command.
A new component, referred to as the VNX Key Management Server, is responsible forgenerating, storing and otherwise managing the encryption keys for the system. Thekeystore that is generated to store the encryption keys resides on a managed LUN inprivate space on the system. Keys are generated or deleted in response to notificationsthat a RAID group/disk drive have been respectively added or removed.
Changes to the configuration of the system that result in changes to the keystore willgenerate alerts that recommend key backups be created. When an operation that resultsin a change to the keystore occurs, an alert will appear and persist until the keystore hasbeen retrieved from the system for backup. Backup the keystore by using thesecuredata -backupkeys -retrieve -path command.
In the event that the keystore becomes corrupted, the system will be nonfunctional. Thesystem will enter a degraded state, only the operating system boots. In this state,attempts to access the system through Unisphere will return an error indicating that thekeystore is in an inaccessible state. In this case, a service engagement is required forresolution.
Data at Rest Encryption
638 EMC VNX Series 5.33 Command Line Interface Reference for Block

A separate auditing function is provided for general key operations that track all keyestablishment, deletion, backup, and restore changes as well as SLIC addition.
For additional information about the Data at Rest Encryption feature, refer to the EMCVNX2: Data at Rest Encryption white paper.
securedata -feature -activateInitiates the encryption operation.
PREREQUISITESIn order to activate Data at Rest Encryption, the DataAtRestEncryption enabler must beinstalled on the system. A user role of administrator, storageadmin, or sanadmin isrequired to activate encryption. FAST cache must be destroyed before activatingencryption.
DESCRIPTIONThe securedata -feature -activate command activates the encryptionoperation.
SYNTAXsecuredata -feature -activate [-status]OPTIONS
-statusReturns the status of the current encryption operation. Note that the encryptionactivation request can take several minutes.
EXAMPLE #1This example shows output for when the encryption enabler is not yet installed.
naviseccli -h <array_ip> securedata -feature -activate
Encryption operations are not supported until the DataAtRestEncryption enabler is installed.
EXAMPLE #2This example shows output for when the encryption feature is activated and no errors arereturned.
naviseccli -h <array_ip> securedata -feature -activate
WARNING: You are about to activate the Data at Rest Encryption Feature on the targeted array. This is not a revertible operation. This will cause data encryption keys to be created and all user data will begin to be encrypted. It is recommended that you have an up-to-date and verified backup of your array as well as an up-to-date config capture, created via the arrayconfig command, before executing this command. Do you wish to continue (y or n)? y
EXAMPLE #3This example shows output for when encryption cannot be activated because FAST cacheis enabled on the array.
naviseccli -h <array_ip> securedata -feature -activate
Please make sure the FAST cache is disabled on your array. Please use naviseccli command: cache -fast -destroy to disable FAST cache. After you activate encryption you may recreate your FAST Cache using the cache –fast -create command.
Data at Rest Encryption
securedata -feature -activate 639
EXAMPLE #4This example shows output for when the -status switch is used and encryption wassuccessful.
naviseccli -h <array_ip> securedata -feature -activate -status
Status: Operation completed successfully
EXAMPLE #5naviseccli -h <array_ip> securedata -feature -activate -statusThis example shows output for when the -status switch is used and encryption hasfailed.
SP A: Activation failed because one or more BE I/O modules cannot support Data at Rest Encryption. Examine other SP Event Log entries for details, gather SPcollects and contact your service provider. (0x7140801b)
securedata -feature -infoReturns feature information for Data at Rest Encryption.
PREREQUISITESThis command is valid for all user roles except VASA Administrator.
DESCRIPTIONThe securedata -feature -info command allows you to see the status anddetails for the Data at Rest Encryption feature.
SYNTAXsecuredata -feature -info [-isencryptionsupported] [-encryptionmode] [-encryptionstatus] [-encryptionpct]OPTIONS
-isencryptionsupportedReturns whether the encryption feature is available/enabled.
-encryptionmodeReturns the current encryption mode of the array.
-encryptionstatusReturns the status of the encryption process. A status of Scrubbing indicates thatthe feature is in the process of wiping any clear text data that existed on unbounddrives (drives previous removed from a RAID Group) when the encryption feature wasactivated.
-encryptionpctReturns the percent of completion of the encryption process on the array.
EXAMPLE #1This example shows output for when the encryption enabler is installed, but theencryption feature has not yet been activated.
naviseccli -h <array_ip> securedata -feature -info
Is Encryption Supported: YesEncryption Mode: UnencryptedEncryption Status: Not encryptingPercent Encrypted: 0.00
Data at Rest Encryption
640 EMC VNX Series 5.33 Command Line Interface Reference for Block

EXAMPLE #2This example shows output for an encryption operation that is currently in progress.
naviseccli -h <array_ip> securedata -feature -info
Is Encryption Supported: YesEncryption Mode: Controller Based EncryptionEncryption Status: In progressPercent Encrypted: 25.67
EXAMPLE #3This example shows output for when an encryption operation is 100% complete, but anew drive has been added to the array, which must be scrubbed.
naviseccli -h <array_ip> securedata -feature -info
Is Encryption Supported: YesEncryption Mode: Controller Based EncryptionEncryption Status: ScrubbingPercent Encrypted: 100.00
EXAMPLE #4This example shows output for an encryption operation that is 100% complete.
naviseccli -h <array_ip> securedata -feature -info
Is Encryption Supported: YesEncryption Mode: Controller Based EncryptionEncryption Status: EncryptedPercent Encrypted: 100.00
EXAMPLE #5This example shows output for when the -encryptionmode switch is used. This willreturn only the encryption mode.
naviseccli -h <array_ip> securedata -feature -info -encryptionmode
Encryption Mode: Controller Based Encryption
securedata -backupkeys -statusRetrieves the status of the keystore backup operation.
PREREQUISITESAll user roles, with the exception of VASA administrator (vmadmin), can execute thiscommand.
DESCRIPTIONThe securedata -backupkeys -status command returns the status of thekeystore backup operation. It also indicates whether the keystore has changed and if abackup operation is required.
SYNTAXsecuredata -backupkeys -statusEXAMPLE #1This example shows the output for when the encryption enabler is installed, but theencryption feature has not yet been activated on the array.
Data at Rest Encryption
securedata -backupkeys -status 641

naviseccli -h <array_ip> securedata -backupkeys -status
Status: No operation required
EXAMPLE #2This example shows the output for when a backup operation is required. This can displayfor the initial keystore backup operation, or because the keystore has changed since thelast backup.
naviseccli -h <array_ip> securedata -backupkeys -status
Status: Backup keystore operation required
EXAMPLE #3This example shows the output for when the backup operation was initiated and is inprogress.
naviseccli -h <array_ip> securedata -backupkeys -status
Status: Backup keystore operation in progress
EXAMPLE #4This example shows the output for when no backup operation is required because noadditional changes to the keystore were made since the last backup completed.
naviseccli -h <array_ip> securedata -backupkeys -status
Status: Backup keystore operation complete
securedata -backupkeys -retrieveRetrieves a backup file containing a copy of the keystore from the array.
PREREQUISITESYou must have a user role of administrator or securityadmin to execute this command.
DESCRIPTIONThe securedata -backupkeys -retrieve command retrieves a backup filecontaining a copy of the keystore.
SYNTAXsecuredata -backupkeys -retrieve -path backupfilepathEXAMPLE #1This example shows output for when the encryption enabler is installed, but the featurehas not yet been activated.
naviseccli -h <array_ip> securedata -backupkeys -retrieve
This operation is not supported until the encryption feature has been activated.
EXAMPLE #2This example shows output for when the file is retrieved successfully.
Data at Rest Encryption
642 EMC VNX Series 5.33 Command Line Interface Reference for Block

naviseccli -h <array_ip> securedata -backupkeys -retrieve -path C:\Temp
The process of retrieving the file(s) is in progressSuccessfully retrieved:FNM00125200242_2014_03_10_15_21_14_0000000000000005.lbb
EXAMPLE #3This example shows output for when the file retrieval fails because the request has timedout.
naviseccli -h <array_ip> securedata -backupkeys -retrieve -path C:\Temp
The process of retrieving the file(s) is in progressOperation failedThe retrieval process is taking longer than expected. The system is too busy to handle the request. Please try again later.
securedata -auditlog -retrieveRetrieves the audit log file and its accompanying checksum file from the array.
PREREQUISITESYou must have a user role of administrator or securityadmin to execute this command.
DESCRIPTIONThe securedata -auditlog -retrieve command retrieves the audit log file andits accompanying checksum file from the array and stores them in a location specified bythe user.
SYNTAXsecuredata -auditlog -retrieve all | mmyyyy -path logpath
OPTIONS
allReturns all log entries up to a limited file size of 100 MBs. If the log entries exceed100 MBs, the first 100 MBs of the file will be returned (beginning with transaction ID1). In these cases, the file name will contain the word "partial". Approximately1,500,000 transactions are required to generate a file that exceeds 100 MBs. If apartial file is retrieved using the all option, utilize the mmyyyy option to retrieve theremaining log entries, starting at the month and year of the last log entry in thepartial file.
mmyyyyIf specified, returns the log entries for a specific month and year.
-pathSpecifies the path on the local system where the auditlog and checksum files will besaved.
EXAMPLE #1This example shows output if the command succeeds, but with a partial file retrieval asthe full log file exceeds 100 MBs.
naviseccli -h <array_ip> securedata -auditlog -retrieve all -path C:\SecureData_Files
The process of retrieving the file(s) is in progressSuccessfully retrieved:
Data at Rest Encryption
securedata -auditlog -retrieve 643

FNM00125200242_2014_03_10_18_48_16_00000000000001B7_0000000000000789_partial.logFNM00125200242_2014_03_10_18_48_16_00000000000001B7_0000000000000789_partial.hsh
EXAMPLE #2This example shows input where the month and year were specified, and output if thecommand succeeds with a full log file retrieval for that month and year.
naviseccli -h <array_ip> securedata -auditlog -retrieve 032014 -pathC:\SecureData_Files
The process of retrieving the file(s) is in progressSuccessfully retrieved:FNM00125200242_2014_03_10_18_48_16_0000000000000001_000000000000002A_full.logFNM00125200242_2014_03_10_18_48_16_0000000000000001_000000000000002A_full.hsh
EXAMPLE #3This example shows output if the command fails because an invalid month/yearcombination is specified.
naviseccli -h <array_ip> securedata -auditlog -retrieve 031844 -pathC:\SecureData_Files
Invalid time period entered for the audit log retrieval request.
securedata -auditlog -cksumRetrieves a regenerated checksum file from the array for a previously retrieved audit logfile.
PREREQUISITESYou must have a role of administrator or securityadmin to execute this command.
A checksum file must have been previously generated using the securedata -auditlog -retrieve command.
Note
The newly retrieved checksum file will have a .hsh extension and the same file name asthe original checksum file. To keep the original checksum file, you must save a copy ofthe original file with either a new name or to a different location so the original file willnot be overwritten. If renaming a copy of the original file, it is recommended that youpreserve the file-naming convention, which includes the timestamp and transaction IDrange, and append the file name with a unique identifier, such as "_xxx".
DESCRIPTIONThe securedata -auditlog -cksum command retrieves a regenerated checksumfile for a previously retrieved audit log file.
SYNTAXsecuredata -auditlog -cksum logFilename -path cksumPathOPTIONS
-cksum
Data at Rest Encryption
644 EMC VNX Series 5.33 Command Line Interface Reference for Block

Specifies the file name of the audit log file for which to retrieve the regeneratedchecksum file.
-pathSpecifies the path on the local system where the regenerated checksum file will besaved.
EXAMPLE #1This example shows output if the command is executed successfully.
naviseccli -h <array_ip> securedata -auditlog -cksumFNM00125200242_2014_03_10_18_48_16_0000000000000001_000000000000002A_full.log -path C:\Temp
The process of retrieving the file(s) is in progressSuccessfully retrieved:FNM00125200242_2014_03_10_18_48_16_0000000000000001_000000000000002A_full.hsh
EXAMPLE #2This example shows output if the command fails. This can occur when the file requestedto be retrieved is for a different array, or or if the filename of the originally retrieved .logfile was modified and the system cannot locate the requested log entries based on thefilename.
naviseccli -h <array_ip> securedata -auditlog -cksumCF2U6124800059_2014_05_21_18_02_33_0000000000000001_0000000000000038_full.log -path C:\SecureData_Files
The process of retrieving the file(s) is in progressOperation failedSP A: The checksum file retrieval process failed. Examine other SP Event Log entriesfor details, gather SPcollects and contact your service provider. (0x71408019)
EXAMPLE #3This example shows output if the command fails because the request has timed out.
naviseccli -h <array_ip> securedata -auditlog -cksumFNM00125200242_2014_03_10_18_48_16_0000000000000001_000000000000002A_full.log -path C:\SecureData_Files
The process of retrieving the file(s) is in progressOperation failedThe retrieval process is taking longer than expected. The system is too busy tohandle the request. Please try again later.
Data at Rest Encryption
securedata -auditlog -cksum 645

Data at Rest Encryption
646 EMC VNX Series 5.33 Command Line Interface Reference for Block