genicom intelliprint cl160 user guide
TRANSCRIPT

Apr 02
Gc
ENICOM Intelliprint L160 User Guide
Genicom Publication No. GEG-99141

ii GENICOM Intelliprint cL160 User Guide
TrademarksThe following are trademarks or registered trademarks of their respective owners. Other product names mentioned in this manual may also be trademarks or registered trademarks of their respective owners. Registered trademarks are registered in the United States Patent and Trademark Office; some trademarks may also be registered in other countries. GENICOM LLC, the GENICOM logo, are registered trademarks of GENICOM LLC. PostScript is a trademark of Adobe Systems Incorporated for a page description language and may be registered in certain jurisdictions. Throughout this manual, “PostScript Level 3” (PS-3) is used to refer to a set of capabilities defined by Adobe Systems for its PostScript Level 3 page description language. Adobe, Adobe PhotoShop, Adobe PageMaker/Adobe Systems Incorporated. Apple, AppleTalk, EtherTalk, LaserWriter, LocalTalk, Macintosh, TrueType/Apple Computer, Inc. Banyan, VINES/Banyan. DEC, DECnet, LN03, VMS/Digital Equipment Corporation. Hewlett-Packard, HP, PCL, HP-GL, HP-UX, LaserJet/Hewlett-Packard Co. IBM PC, Token-Ring/International Business Machines Corporation. Intel/Intel Corporation. Microsoft, MS-DOS, Windows/Microsoft Corporation. Novell and NetWare/Novell, Inc. The ENERGY STAR logo/United States Environmental Protection Agency. The ENERGY STAR emblem does not represent EPA endorsement of any product or service. UNIX/UNIX Systems Laboratories. Ethernet/Genicom Corporation.
Proprietary StatementThe digitally encoded software included with your Intelliprint cL160 is Copyrighted © 2001by GENICOM LLC. All Rights Reserved. This software may not be reproduced, modified, displayed, transferred, or copied in any form or in any manner or on any media, in whole or in part, without the express written permission of GENICOM LLC.
Copyright NoticeThis manual is Copyrighted © 2001 by GENICOM LLC, 4500 Daly Drive, Suite 100, Chantilly, VA 20151. All Rights Reserved. This manual may not be copied in whole or in part, nor transferred to any other media or language, without the express written permission of GENICOM LLC.
The specifications of your printer and the content of this publication are subject to change without prior notice. Every attempt has been made to verify the accuracy of the content herein.
◆ ◆ ◆
Publication No. GEG-99141 Genicom Apr 02

Apr 02
Contents
Contents iii
Preface 1About this Manual 2
Scope 2Overview 2Printer Orientation 3
About the Printer 3Features 3Available Configuration 4
Safety Precautions 4Conventions 5Installing and Relocating Your Printer 5Other Precautions 7Precautions for Power and Earth Connections 7Cautions 8Other Precautions 9Operating Precautions 9Notes on Handling Consumables 11
Genicom Publication No. GEG-99141

iv GENICOM Intelliprint cL160 User Guide
Chapter 1 Unpacking and Installing the Printer 1-1Positioning the Printer 1-2
Installation Environment 1-2Minimum Installation Clearances 1-3
Accessories 1-4
Transporting the Printer 1-7Removing the packing tape 1-8Removing the Spacers 1-9Installing the Drum Cartridge 1-12Installing the Toner Cartridges 1-15Loading Paper 1-19Installing the Tray Cover 1-23Connecting the Power Cord 1-23
Turning the Printer On 1-24
Selecting a Display Language 1-25
Adjusting Color Registration 1-26
Installing Printer Drivers and Locating User Documentation 1-26Installing Printer Drivers and other Software for UNIX and Windows 1-26Installing Printer Drivers for MacOS 1-27Locating User Documentation 1-27
Printing a Configuration Summary 1-27
Printing a Test Page 1-29
Printing PCL and PostScript Font Lists 1-30
Turning the Printer Off 1-31
Chapter 2 Maintenance 2-1Names and Functions of the Printer’s Parts 2-2
Front View 2-2Operation Panel 2-3Rear View 2-4Internal View 2-5
Selecting Print Media 2-6Print Media Weight, Type, and Size 2-7Suitable Paper Types 2-8Unsuitable Paper types 2-9Storing Paper 2-10Loading Paper in the Paper Tray 2-11Loading Paper in the Multi Purpose Tray 2-15Loading Transparency Sheets in the Multi Purpose Tray 2-17
Publication No. GEG-99141 Genicom Apr 02

GENICOM Intelliprint cL160 User Guide v
Loading Postcards in the Multi Purpose Tray 2-18Loading Envelopes in the Multi Purpose Tray 2-19
Chapter 3 Dealing with Problems 3-1Troubleshooting 3-2
Power Problems 3-2Print Quality Problems 3-3Paper Transport Problems 3-7Other problems 3-8Cleaning the Density Sensor 3-8
Solving Printer Power-on Problems 3-11
Control Panel LCD Messages 3-12
Ethernet Network Interface Troubleshooting 3-13Power-Up Troubleshooting 3-14Printing Problems 3-15BOOTP Troubleshooting 3-15DHCP Troubleshooting 3-16RARP Troubleshooting 3-16PostScript Problems 3-16Bitmap Graphics 3-17Technical Support 3-17
Chapter 4 Paper Jams 4-1Clearing Paper Jams 4-2
Paper Jams in the Multi Purpose Tray 4-3Paper Jams in the Paper Tray 4-4Paper Jams Between the Drum Cartridge and Fuser Unit 4-7Paper Jams in the Paper Rotator 4-9Paper Jams in the High Capacity Feeder (2 shelves) 4-10
Chapter 5 Consumables 5-1Consumables Overview 5-2
Toner Cartridges 5-2Drum Cartridge 5-2Transfer Roller Cartridge 5-3Fuser Unit 5-3Paper Feed Roller 5-4
Toner Cartridges 5-4Toner Cartridge Handling Precautions 5-4
Apr 02 Genicom Publication No. GEG-99141

vi GENICOM Intelliprint cL160 User Guide
Replacing Toner Cartridges 5-5
Drum Cartridge 5-8Drum Cartridge Handling Precautions 5-8Replacing the Drum Cartridge 5-9
Transfer Roller Cartridge 5-13Transfer Roller Cartridge Handling Precautions 5-13Replacing the Transfer Roller Cartridge 5-14
Fuser Unit 5-16Replacing the Fuser Unit 5-16
Paper Feed Roller 5-21Replacing the Paper Feed Roller 5-21
Chapter 6 Options 6-1Options Overview 6-2
High Capacity Feeder (2 Shelves) 6-2
High Capacity Feeder (2 Shelves) 6-2Installing the High Capacity Feeder (2 shelves) 6-3Removing the High Capacity Feeder (2 shelves) 6-9
Chapter 7 Understanding and Navigating the Control Panel Menus 7-1Control Panel Features 7-2
LCD Display 7-2LED Indicators 7-3Pushbuttons 7-3
Publication No. GEG-99141 Genicom Apr 02

GENICOM Intelliprint cL160 User Guide vii
Navigating the Control Panel Menus 7-5
Menu Structure 7-7
Paper Menu 7-8
Interface Menu 7-10
PS Menu 7-12
PCL Menu 7-14
System Menu 7-17
Quality Menu 7-19
Color Menu 7-19
Functions Menu 7-23
FLASH Menu 7-23
DISK Menu 7-24
Status Menu 7-25
Chapter 8 Using DRAM DIMMs and Power-on Files 8-1Installing DRAM Memory DIMMS 8-2
Installing a FLASH DIMM Module 8-5
Using the Power-On Files Feature 8-7Power-on Files Defined 8-7
Appendix A General Information A-1Sources of Support A-2
Your GENICOM LLC Vendor A-2Your Application Vendor A-2Internet A-2GENICOM LLC Technical Support A-2GENICOM LLC Service A-3
GENICOM LLC Worldwide Offices A-3
GENICOM Part Numbers A-4Printers A-5Paper Handling Options A-5Network Interfaces A-5Controller Options A-5User Publications A-5Consumables A-6
Apr 02 Genicom Publication No. GEG-99141

viii GENICOM Intelliprint cL160 User Guide
Appendix B Safety Notes and Regulatory Compliance B-1Safety Notes B-2
Regulatory Compliance B-2Safety Compliance B-2EMC Compliance B-3
Appendix C Printing Font Summaries C-1Printing a Font Summary C-2
PostScript Font Summary C-3
PostScript Font Summary (cont’d) C-4
PostScript Font Summary (cont’d) C-5
PostScript Font Summary (cont’d) C-6
PCL Font Summary (cont’d) C-8
Appendix D Frequently Used Ethernet Commands D-1Server Commands D-3
Protocol Commands D-6
Publication No. GEG-99141 Genicom Apr 02

Apr 02
Preface
In this Chapter . . .
• “Welcome” on page 2
• “About this Manual” on page 2
• “About the Printer” on page 3
• “Safety Precautions” on page 4
Genicom Publication No. GEG-99141

2 GENICOM Intelliprint cL160 User GuideAbout this Manual
WelcomeThank you for selecting the Intelliprint cL160 laser printer. This User Guide contains important information about the operation and care of your printer. Please read this manual in its entirety and keep it at hand for later reference.
About this Manual
ScopeThis User Guide contains all of the information necessary to operate and care for your printer and accessories. It is intended to be used with the pictorial unpacking instructions and the Installation Guide, both included in the printer packaging. If you have not already unpacked and installed the printer, please refer to these documents. This guide does not contain instructions for unpacking and installing the printer.
OverviewThis manual contains nine chapters and four appendixes:
PrefaceThe Preface contains information about this guide and about the features and available configura-tions of the printer. This chapter also describes precautions for the safe use and preservations of the printer. In order to avoid serious injury or accident, all users should read this chapter.
Chapter 1: Installing the PrinterThis chapter describes how to select an appropriate installation location, what accessories are pro-vided with the printer, and the installation procedures required once you have chosen a location for your printer.
Chapter 2: MaintenanceThis chapter explains any necessary maintenance procedures, such as feeding paper, cleaning, and other procedures required for normal operation.
Chapter 3: Dealing with ProblemsThis chapter describes solutions to any problems that might occur when using the printer. Read this chapter to determine the nature of the problem and the best method of dealing with it.
Chapter 4: Paper JamsThis chapter explains procedures for dealing with paper jams.
Chapter 5: Consumables This chapter provides information about the expendables used with the printer, and also describes handling and replacement procedures.
Chapter 6: OptionsThis chapter describes any available options and the procedures for their installation and removal.
Publication No. GEG-99141 Genicom Apr 02

GENICOM Intelliprint cL160 User Guide 3About the Printer
Chapter 7: Understanding and Navigating the Control Panel MenuThis chapter explains the control panel and its functions, and also demonstrates how to navigate through the control panel menus and submenus that allow you to view and change the printer set-tings.
Chapter 8: Using DRAMM DIMMs, FLASH DIMMs and Power-on FilesThis chapter describes procedures for installation of DRAM memory DIMMs and FLASH DIMM modules. Downloading software to the FLASH DIMM module is also discussed in this chapter.
Appendix A: General InformationThis appendix provides information on how to contact GENICOM LLC for technical support, service, and repair issues, and also provides part numbers for the printer, options, and consumables.
Appendix B: Safety Notes and Regulatory Compliances]This appendix describes cautions to take when installing, transporting, or operating the printer, and also includes the applicable regulatory compliances.
Appendix C: Printing Font SummariesThis appendix explains the procedure for printing summaries of PCL or PostScript fonts installed in your printer.
Appendix D: Frequently Used Ethernet CommandsThis appendix lists some of the most frequently used commands of the Print Server command set. More information about the command set, including additional options, can be found in the Ethernet Network Interface Manual on the Electronic Library CD-ROM.
Printer OrientationThroughout this guide, the four sides of the printer are referred to as front, rear, right, and left. The front of the printer is the side near the control panel, and the rear of the printer is opposite the front. The left and right sides of the printer are defined as the sides to the left and right, respec-tively, of a person who is facing the front of the printer.
About the Printer
FeaturesThis printer provides the following high-grade features to satisfy a wide variety of printing require-ments. Your laser printer has the following features:
• High quality, high-resolution full color laser printing at 600/1,200 dpi with duplex printingcapabilities.
• High-speed 600 dpi monochrome/color output at 16 pages per minute (Letter), and 8 pagesper minute (Letter) monochrome/color output at 1,200 dpi.
• Printing on a wide variety of sizes such as postcards, A5 through A4, and long paper (215.9mm × 900 mm).
• With the optional High Capacity Feeder installed, you can increase printing efficiency byusing both paper trays. You can set up to 1,600 sheets with this option.
• The illustration below shows the printer with the optional High Capacity Feeder installed.
Apr 02 Genicom Publication No. GEG-99141

4 GENICOM Intelliprint cL160 User GuideSafety Precautions
• Easy operation, the easy-to-read control panel display clearly shows the status of printer oper-ation. Control panel pushbuttons allow you to access and view printer menus, submenus, andstatus messages.
• Network-readiness, the standard configuration of the printer includes an Ethernet NetworkInterface Card.
Available ConfigurationThe cL160 is available in the following configuration:
Standard Configuration • Memory: 128 MB
• Resolutions: 600 x 600 dpi, and 1200 x 1200 dpi
• Paper Input: One 500-sheet A4/letter paper tray and one 100-sheet front tray for paper,transparencies, envelopes, and other non-standard print media
• Paper Output: One 250-sheet face-down tray
• Interfaces: IEEE 1284 Parallel, 10/100BaseT, 10Base2
• Printer Languages: PCL6, Adobe Postscript 3
• The illustration below shows the printer with the optional High Capacity Feeder installed.
NOTE: Various optional accessories are also available for the printer. Please see Appendix AGENICOM Part Numbers to order optional accessories.
Safety PrecautionsTo ensure safe operation of your printer, make sure you read this section thoroughly before use.
Publication No. GEG-99141 Genicom Apr 02

GENICOM Intelliprint cL160 User Guide 5Safety Precautions
Conventions This following conventions are used throughout this manual to emphasize certain procedures or information:
NOTE: A note is a tip or extra information that may be helpful in installing or using the printer.
This symbol alerts you to procedures that require close attention. Make sure you read and fol-low the instructions carefully.
This symbol alerts you to prohibited procedures. Make sure you read the instructions carefully.
This symbol alerts you to procedures that should be performed. Make sure you perform the procedure after reading the instructions carefully.
Installing and Relocating Your PrinterDo not place the printer in a hot, humid, dusty, or poorly ventilated environment. Pro-longed exposure to these adverse conditions can cause fire or electric shocks.
Do not place the printer near heaters or near volatile, flammable, or combustible materials, such as curtains, that may catch fire.
Place the printer on a level and sturdy surface that can withstand a good weight. If tilted, the printer may fall and cause injuries.
Because the printer weighs 34.5 kg fully assembled, therefore make sure that at least two people carry it.
To lift the printer, face the front and back of the printer and, with both hands, grip the recessed areas at the bottom left and right. Never try to lift the printer by gripping any other areas. Lifting the printer by gripping other areas can cause the printer to fall, resulting in injury.
CAUTION: A caution message provides information that may help you avoid equipment damage, process failure, or inconvenience. Read all caution messages carefully. GENICOM will not be responsible for damage that results from improper use of the printer.
WARNING! A warning message indicates the possibility of personal injury if a specific proce-dure is not performed exactly as described in the guide. Pay close attention to these sec-tions and read them fully to prevent possible injury. GENICOM will not be responsible for damage that results from improper use of the printer.
Apr 02 Genicom Publication No. GEG-99141

6 GENICOM Intelliprint cL160 User GuideSafety Precautions
When lifting the printer, get a firm footing and bend your knees to avoid possible injuries to your back.
The printer has ventilation holes on the rear panel. Ensure that the printer is installed no less than 150 mm from the wall on the right, 100 mm from the wall on the left, and 200 mm from the wall at the back. A poorly ventilated printer can cause excessive internal heat and fire. The accompanying diagram shows the minimum clearances required for normal operation, consumables replacement, and maintenance to ensure your printer operates at peak performance.
When moving the printer, be sure to unplug the power cord from the outlet. If the printer is moved with the power cord connected, it can cause damage to the cord, which could result in fire or electric shocks.
When moving the printer, do not tilt it more than 10 degrees. If tilted excessively, the printer may fall over and cause injuries.
There is danger of the printer falling.
100mm 200mm
150mm
600mm
Publication No. GEG-99141 Genicom Apr 02

GENICOM Intelliprint cL160 User Guide 7Safety Precautions
After installing the High Capacity Feeder, lock down the brakes on the casters at the front of the High Capacity Feeder. Failure to lock down the brakes can cause the printer to move unexpectedly, resulting in injury.
Other Precautions• Operate the printer in a location that meets the following conditions:
Ambient temperature range of 10 to 32°C, relative humidity of 15 to 85% (no condensation)If operating the printer with an ambient temperature of 32°C, the relative humidity shouldnot exceed 65%. If the relative humidity reaches 85%, the ambient temperature should notexceed 28°C.
NOTE: Do not place the printer in a room where there are sudden fluctuations in temperature, and donot move the printer from a cold place to a warm humid place. If you do, condensation mayoccur within the printer and print quality deteriorate.
• Do not place the printer in direct sunlight, as this may damage the printer.
• To prevent trays or consumables from falling out, do not tilt the printer more than 10 degreesin any direction.
• When moving the printer, remove the toner cartridges. Do not reuse toner cartridges onceyou have removed them from the printer. Loose toner can spill inside the printer and deterio-rate print quality.
• Do not place the printer directly next to an air conditioner or heater, as this affects the tem-perature inside the printer and can cause damage.
Precautions for Power and Earth Connections
Three power specifications are listed below. The specifications that apply to your printer depend on its configuration. Connect the power plug only to a properly rated power outlet. Otherwise, it can cause fire or electric shocks. If in doubt, contact your Genicom Customer Support Center.
Rated voltage:100 VRated frequency:50/60 Hz
Rated voltage:110-127 VRated frequency:60 Hz
Rated voltage:220-240 VRated frequency:50/60 Hz
Ensure that the plug connection is dustless. In a damp environment, a contaminated con-nector can draw a non-negligible amount of current that can generate heat and eventually cause fire over an extended period of time.
Apr 02 Genicom Publication No. GEG-99141

8 GENICOM Intelliprint cL160 User GuideSafety Precautions
Always use the power cord provided with your printer. When an extension power cord is required, always use a properly rated cord.
If you use a cord with an unspecified current rating, the printer or plug may emit smoke or become hot to the touch.
Do not attempt to modify, pull, bend, chafe, or otherwise damage the power cord. Do not place a heavy object on the cord. A damaged cord can cause fire or electric shocks.
Never touch a power cord with wet hands. This constitutes an electric shock hazard.
Stop operation immediately if your printer emits smoke, excessive heat, unusual noise or smell, or if water is spilt onto the printer. These conditions can cause fire. Immediately turn off and unplug the printer, and contact your Genicom Customer Support Center.
To prevent fire or electric shocks, follow the instructions below based on your printer's con-figuration. If in doubt, contact your Genicom Customer Support Center.
If your printer is a 100 or 110 V model, use the green earth wire bundled with the power cord, located at the back of the printer.
• The earth wire must be connected to one of the following conductors:
Earth terminal of the specified power outlet
A piece of copper buried in the earth 650 mm or deeper
A Class D* earth terminal
* Class D is the regulation for Japan only.
Never connect the earth wire to any of the following:
Gas pipes, which can be ignited and explode
Telephone line earth wires or lightning rods, which can draw an excessive electric currentif hit by lightning
Water faucets or pipes whose electrical conductivity is broken by a non-metallic part
If the power cord is broken or insulated wires are exposed, ask your Genicom Customer Support Center for a replacement. Using a damaged cord can cause fire or electric shocks.
Cautions
Do not unplug or replug the printer while it is on. Unplugging a live connector can deform the plug and cause fire.
When unplugging the printer, grasp the plug instead of the cord. Forcibly pulling on a cord can damage it and cause fire or electric shocks.
Publication No. GEG-99141 Genicom Apr 02

GENICOM Intelliprint cL160 User Guide 9Safety Precautions
Be sure to switch off and unplug the printer before accessing the interior of the printer for cleaning, maintenance, or fault clearance. Access to a live printer's interior can cause electric shocks.
Once a month, unplug the printer and check the power cord for the following:
The power cord is plugged firmly into a receptacle.
The plug is not excessively heated, rusted, or bent.
The plug and receptacle are free of dust.
The cord is not cracked or frayed.
If you notice any unusual conditions, contact your Genicom Customer Support Center.
When the printer is not used over an extended period of time, switch it off and unplug it. If an unused printer is left connected to a power source for a long period, degraded insulation can cause electric shocks, current leakages, or fire.
Switch off the printer before connecting the interface cable or options. Connecting the cable or card with a live printer can cause electric shocks.
Other Precautions• This printer may interfere with radio or television reception, causing flickering or distortion.
This can be determined by turning the printer off and on. To correct interference, performone, or a combination of the following procedures:
Move the printer away from TV and/or radio.
Reposition the printer, TV and/or radio.
If the printer, TV and/or radio are plugged into the same outlet, unplug them, then plugthem into different outlets.
Reposition the TV and/or radio antennas and cables until the interference stops. Forexternal antennas, consult your local electrician.
Use coaxial cable with the antennas
Operating Precautions
Do not place any liquid containers such as vases or coffee cups on the printer. Liquids spilt on the printer constitue a fire and electrical shock hazard.
Do not place any metal parts such as staples or clips on the printer. If metal and flammable parts get into the printer, they can short-circuit internal components, and cause fire or elec-tric shocks.
If debris (metal or liquid) gets into the printer, turn off and unplug the printer. Contact your Genicom Customer Support Center. Operating a debris-contaminated printer can cause fire or electric shocks.
Apr 02 Genicom Publication No. GEG-99141

10 GENICOM Intelliprint cL160 User GuideSafety Precautions
Never open or remove printer covers that are secured with screws unless specifically instructed to do so in the this manual. A high-voltage component can cause electric shocks.
Do not try to alter the printer's configuration or modify any parts. An unauthorized modifi-cation can cause smoke or fire.
This printer complies with the IEC60825 (Class 1) international laser standard. This means that the printer does not present any risk of injury to persons from laser radiation. Various covers confine the laser radiation to the inside of the printer; hence, users cannot incur injury from the laser under normal operating conditions. Removing covers, unless instructed to do so in this manual, can cause injury from laser radiation.
Never touch a labeled area found on or near the fuser unit. You can burn yourself. If a sheet of paper is wrapped around the fuser roller, do not try to remove it by yourself to avoid inju-ries or burns. Turn off the printer immediately and contact your Genicom Customer Sup-port Center.
Do not place any heavy objects on the printer. An off-balance printer can fall over or the heavy object can fall, causing injuries.
Do not use highly flammable sprays or solvents in or around the printer, as this can result in fire.
When removing paper jams, make sure no pieces of paper are left inside the printer, as this can cause fire. If the paper is wrapped around the fuser or roller, or you cannot see the jam you are trying to clear, do not attempt to remove the paper by yourself, as this may cause injury or burns.Turn off the printer immediately, and contact the place of purchase or a Genicom Customer Support Center.
Do not place magnets near the safety switch of the printer. Magnets can activate the printer accidentally, resulting in injuries.
Refer to this manual for procedures on clearing paper jams and how to resolve any other trou-bles that may occur.
Publication No. GEG-99141 Genicom Apr 02

GENICOM Intelliprint cL160 User Guide 11Safety Precautions
Notes on Handling ConsumablesNever throw a toner cartridge into an open flame. It can cause an explosion and injuries.
Never throw a transfer roller cartridge into an open flame. It can cause an explosion and injuries.
Never throw a drum cartridge into an open flame. It can cause an explosion and injuries.
Apr 02 Genicom Publication No. GEG-99141

12 GENICOM Intelliprint cL160 User GuideSafety Precautions
• Do not open consumables until you are ready to use them. Do not store consumables in thefollowing conditions:
In high temperature or humidity
Near a naked flame
Exposed to direct sunlight
Dusty areas
• Before using consumables, read the operating instructions and precautions on the packaging.
• Administer emergency first aid as follows:
If you get toner in your eyes, rinse them well with plenty of clean water. Consult a physi-cian if necessary.
If you get toner on your skin, wash it with soap and water and rinse well.
If you inhale toner, leave the area of exposure immediately and gargle with plenty ofwater.
If you swallow toner, induce vomiting and consult your physician immediately.
• When you remove the transfer roller cartridge from the printer because the waste toner col-lection box is full, do not attempt to empty the waste toner box and reuse the cartridge, astoner may spill inside the printer and cause damage.
• Do not tilt or shake drum cartridges or transfer roller cartridges that has been removed tem-porarily. The toner may leak and cause damage.
◆ ◆ ◆
Publication No. GEG-99141 Genicom Apr 02

Apr 02
Chap
ter
1
Unpacking and Installing the Printer
In this Chapter . . .
• “About this Chapter” on page 1-2
• “Positioning the Printer” on page 1-2
• “Accessories” on page 1-4
• “Transporting the Printer” on page 1-7
• “Installation Procedure” on page 1-8
• “Turning the Printer On” on page 1-24
• “Selecting a Display Language” on page 1-25
• “Adjusting Color Registration” on page 1-26
• “Installing Printer Drivers and Locating User Documentation” on page 1-26
• “Printing a Configuration Summary” on page 1-27
• “Printing a Test Page” on page 1-29
• “Printing PCL and PostScript Font Lists” on page 1-30
• “Turning the Printer Off” on page 1-31
Genicom Publication No. GEG-99141

1-2 GENICOM Intelliprint cL160 User GuidePositioning the Printer
About this ChapterThis chapter describes how to select an appropriate installation location, what accessories are pro-vided with the printer, and the installation procedures required once you have chosen a location for your printer.
Positioning the PrinterFor safe and convenient printer operation, take time to read the information in this section when deciding where to place your printer.
Installation Environment Place the printer in a location that meets the following conditions:
• Level and stable surface.
• Well ventilated.
• Ambient temperature range of 10 to 32°C, relative humidity 15 to 85% (no condensation).
• If you use the printer at an ambient temperature of 32°C, the relative humidity should not exceed 65%. If the relative humidity reaches 85%, the ambient temperature should not exceed 28°C.
NOTE: Do not position the printer in a room where there are sudden temperature fluctuations. Do notmove the printer from a cool, dry location to a warm, humid location. Sudden temperaturefluctuations can cause water droplets (condensation) to form inside the printer and cause theprint quality to deteriorate. If condensation occurs, allow at least one hour for the printer toadapt to the new environment before use.
Connect the printer to its own AC outletDo not plug any other equipment into the printer’s AC outlet, especially high-current equipment such as copiers or air conditioners. Electrical noise and voltage fluctuations from other equipment plugged into the same outlet can cause computing errors and data loss.
Avoid exposing the printer to:
• Direct sunlight
• Air conditioners or heaters
• Windy locations
• Surfaces subject to vibration
• Dusty or dirty places
• Naked flames
• Humidity
• Magnetic fields
• Wide ranging temperature and humidity fluctuations
WARNING: Connect the power plug to an AC outlet with the same voltage as the printer (100V), and rated for at least 15A. No other devices should be plugged into this AC outlet, as overheating could cause fire or electrical shock. The printer draws 8.5A at 100V.
Publication No. GEG-99141 Genicom Apr 02

GENICOM Intelliprint cL160 User Guide 1-3Positioning the Printer
When using an ultrasonic water vaporizerUsing tap or well water with ultrasonic water vaporizers disperses impurities into the air. These impurities can accumulate inside the printer and cause print quality to deteriorate. If you install the printer in the same room as an ultrasonic water vaporizer, use only filtered water in the water vapor-izer.
Minimum Installation ClearancesBe sure to install the printer in a location that respects the minimum clearances indicated in the illustrations below.
Top View
Front View
CAUTION: To avoid obstruction of the ventilation grills on the back and the side of the printer, position the printer no less than 150 mm from the wall on the right side, 100 mm from the wall on the left side, and 200mm from the wall at the back. Obstructing the venti-lation grills can cause the printer to overheat and become a fire hazard. To allow easy rou-tine maintenance, replacement of consumables, proper operation and ensure satisfactory performance, confirm that the printer’s position is as illustrated below.
100mm 200mm
150mm
600mm
100mm 150mm
Apr 02 Genicom Publication No. GEG-99141

1-4 GENICOM Intelliprint cL160 User GuideAccessories
Side View
AccessoriesThe standard printer package consists of the following items. Before installing the printer, confirm that all the items listed below are accounted for.
NOTE: Keep the box and packaging in case you need to transport the printer over long distances in thefuture.
NOTE: For information about optional accessories for the printer, please refer to See Chapter 6Options and the literature accompanying the optional accessories.
Printer
200mm
600mm
Publication No. GEG-99141 Genicom Apr 02

GENICOM Intelliprint cL160 User Guide 1-5Accessories
Drum cartridge
Toner cartridges: (Black, Yellow, Magenta, Cyan)
Power Cord
Apr 02 Genicom Publication No. GEG-99141

1-6 GENICOM Intelliprint cL160 User GuideAccessories
Tray cover
NOTE: The tray cover does not come standard with the printer.
User Manual
CD-ROM GENICOM Intelliprint CL160 Electronic Library CD-ROM
Publication No. GEG-99141 Genicom Apr 02

GENICOM Intelliprint cL160 User Guide 1-7Transporting the Printer
CE-ROM RCS (Remote Control Software) CD-ROM
Transporting the Printer Note the following points when transporting the printer into position.
Keep the printer level.When carrying the printer, keep it level to prevent trays and consumables from falling out. Do not tilt it more than 10 degrees in any direction.
CAUTION: At least two people should carry the printer.Because the printer weighs 34.5kg with the tray and consumables installed, at least two peopleshould carry it.
To lift the printer, face the front and back of the printer and grip the recessed areas at the bot-tom left and right with both hands. Never try to lift the printer by gripping any other areas. Lift-ing the printer by gripping other areas can cause the printer to fall, resulting in injury. Bend yourknees when lifting the printer to avoid back injury.
There is danger of the printer falling.
Apr 02 Genicom Publication No. GEG-99141

1-8 GENICOM Intelliprint cL160 User GuideTransporting the Printer
Installation ProcedureInstall the printer as follows:
1. Remove all the packing tape from the printer.
2. Remove all the spacers from the printer.
3. Install the drum cartridge.
4. Install the toner cartridges.
5. Load the paper.
6. Plug the power cord.
NOTE: Spacers are installed in various parts of the printer to protect it from shock and vibrationsduring shipping. Make sure you remove all the spacers before using the printer. If you purchased the optional High Capacity Feeder (2 shelves), install it first. For details oninstalling optional accessories, See Chapter 6 Options and the literature accompanying theHigh Capacity Feeder.
NOTE: Keep the cardboard box, handles, polystyrene packaging and spacers in case you need totransport the printer over long distances in the future.
Removing the packing tape When you first remove the printer from its box, there is packing tape in 8 places to secure the covers during shipping. Refer to the illustrations below and remove all the packing tape from the printer.
Right Side
Publication No. GEG-99141 Genicom Apr 02

GENICOM Intelliprint cL160 User Guide 1-9Transporting the Printer
Left Side
Removing the SpacersA spacer is installed in the paper tray to protect it from shock and vibrations during shipping. Remove the spacer before using the printer.
Follow the procedure below to remove the spacer from the paper tray.
NOTE: Keep the spacer in case you need to transport the printer over long distances in the future.
Apr 02 Genicom Publication No. GEG-99141

1-10 GENICOM Intelliprint cL160 User GuideTransporting the Printer
1. Gently pull out the paper tray until it stops.
2. Hold the tray with both hands, lift the front up slightly and pull it completely out of the printer.
NOTE: Place the tray on a flat surface.
3. Remove the tape from the cardboard spacer in the tray and remove the spacer.
Publication No. GEG-99141 Genicom Apr 02

GENICOM Intelliprint cL160 User Guide 1-11Transporting the Printer
NOTE: Keep the spacer in case you need to transport the printer over long distances in the future.
4. Holding the paper tray with both hands, align it with the opening in the printer and gently insert it.
5. Push the paper tray completely back into the printer.
NOTE: Do not use excessive force on the paper tray.
Apr 02 Genicom Publication No. GEG-99141

1-12 GENICOM Intelliprint cL160 User GuideTransporting the Printer
Installing the Drum Cartridge Follow the procedure below to install the drum cartridge.
1. Push up button ‘A’ 1 and fully open the front cover 2.
2. Open the paper outlet cover.
Publication No. GEG-99141 Genicom Apr 02

GENICOM Intelliprint cL160 User Guide 1-13Transporting the Printer
3. Take a new drum cartridge out of its package and pull hard on each the 8 seals to remove them. Pull the seals completely out.
NOTE: Keep the aluminum package of the drum cartridge in case you need to transport the printerover long distances in the future.
4. Hold the left and right sides of the drum cartridge and remove the protective cover from it.
Apr 02 Genicom Publication No. GEG-99141

1-14 GENICOM Intelliprint cL160 User GuideTransporting the Printer
5. Remove the protective sheet from the drum cartridge as shown in the illustration.
NOTE: -Do not touch the transfer roller (black colored part). Make sure nothing touches or scratchesthe roll surface. Scratches or oil from your hands on the drum deteriorates print quality. -Make sure you remove the protective sheet. Installing the drum cartridge without removing theprotective sheet deteriorates print quality.-Remove the protective sheet with the drum cartridge in a horizontal position.
6. Hold the drum cartridge by the handle, align its 4 shafts with the slots indicated by the arrows on the printer, and gently lower it into the printer.
Publication No. GEG-99141 Genicom Apr 02

GENICOM Intelliprint cL160 User Guide 1-15Transporting the Printer
NOTE: -Do not touch the transfer roller. -Lowering the cartridge into the printer without correctly aligning the shafts with the slots candamage the cartridge.-Do not allow the surface of the transfer roller to come into contact with anything.
7. Close the paper outlet cover.
8. Close the front cover.
Installing the Toner CartridgesFollow the procedure below to install the toner cartridges
NOTE: The toner is harmless but should still be washed off immediately if it comes into contact withhands or clothing.
Apr 02 Genicom Publication No. GEG-99141

1-16 GENICOM Intelliprint cL160 User GuideTransporting the Printer
1. Remove the top cover.
2. Select the new toner cartridge whose color matches the label on the insertion point and remove it from its packaging.
Publication No. GEG-99141 Genicom Apr 02

GENICOM Intelliprint cL160 User Guide 1-17Transporting the Printer
3. Shake the toner cartridge 7 or 8 times as shown in the illustration to distribute the toner evenly.
4. Align the toner cartridge with the corresponding insertion point in the printer and insert it as shown in the illustration.
5. Grip the levers at each end of the toner cartridge with your fingers, then push down lightly to rotate the levers forward.
Apr 02 Genicom Publication No. GEG-99141

1-18 GENICOM Intelliprint cL160 User GuideTransporting the Printer
6. Pull the toner seal straight up to remove it.
NOTE: Pull the toner seal straight up. Pulling the toner seal diagonally may tear the seal.
7. Repeat steps 2 - 6 to install the remaining toner cartridges.
8. Replace the top cover.
Publication No. GEG-99141 Genicom Apr 02

GENICOM Intelliprint cL160 User Guide 1-19Transporting the Printer
Loading PaperFollow the procedure below to load paper into the paper tray.
NOTE: See “Paper Handling” on page 2-6 for information about the types of paper suitable for printing.See “Loading Paper in the Multi Purpose Tray” on page 2-15 for more details on setting paper inthe manual feed tray.
1. Pull the paper tray out until it stops.
Apr 02 Genicom Publication No. GEG-99141

1-20 GENICOM Intelliprint cL160 User GuideTransporting the Printer
2. Hold the tray with both hands lift up the front slightly and remove it from the printer.
NOTE: Place the tray on a flat surface.
3. Move the end and side paper guides to their outermost positions. Gently lift the end paper guide to move it.
4. Grip the end paper guide with your fingers and gently lift it up. Insert the pins at the bottom of the guide in the holes corresponding to the paper size that you want to load.
END PAPER GUIDE
Publication No. GEG-99141 Genicom Apr 02

GENICOM Intelliprint cL160 User Guide 1-21Transporting the Printer
NOTE: -Make sure that the end guide is properly inserted into the holes corresponding to theappropriate paper size.-Only a small amount of movement of the end paper guide can make automatic paper sizedetection impossible. If this occurs, move the end paper guide all the way to its outermostposition again, then realign it with the appropriate paper size mark.
5. Align the four corners of the paper stack and insert the paper (print side up) under the tab.
NOTE: Do not use paper that is folded, creased, or heavily warped.Do not overload the paper tray.
6. Align the side guides with the edges of the paper.
NOTE: Pushing the paper guides too hard against the edges of the paper stack can cause a paper jam.However, if the paper guide is too loose, the paper may twist as it feeds through the printer.
Apr 02 Genicom Publication No. GEG-99141

1-22 GENICOM Intelliprint cL160 User GuideTransporting the Printer
7. Hold the paper tray with both hands, align it with the opening in the printer and gently
insert it.
8. Push the paper tray completely back into the printer.
NOTE: Do not use excessive force on the paper tray.
NOTE: There is an indicator next to the paper tray that tells you how much paper remains in the tray.Use the meter as a guide to refill the paper tray.
Publication No. GEG-99141 Genicom Apr 02

GENICOM Intelliprint cL160 User Guide 1-23Transporting the Printer
Installing the Tray CoverFollow the procedure below to install the tray cover.
NOTE: The tray cover does not come standard with the printer.
1. Clip the hooks on the tray cover onto the 2 tabs at the back of the printer as illustrated.
Connecting the Power CordFollow the procedure below to connect the power cord.
WARNING: Connect the power plug to an AC outlet with the same voltage as the printer (100V), and rated for at least 15A. No other devices should be plugged to this AC outlet, as overheating could cause fire or electrical shock. The printer draws 10A at 100V.The green ground wire of the power cord is meant to prevent electric shock or fire hazard in the event of a power leak.Connect it to the ground lead of the power outlet, or a copper pipe buried at least 650 mm in the ground, or a type D earth connection.
Apr 02 Genicom Publication No. GEG-99141

1-24 GENICOM Intelliprint cL160 User GuideTurning the Printer On
1. Plug the power cord into the power inlet at the back of the printer. Plug the other end of the cord into the AC outlet. Connect the earth connection to the ground, if possible.
Turning the Printer OnOn the printer’s right side, press the side of the power switch marked [ I ] to turn the printer on.
NOTE: The printer motors run for 1 or 2 minutes when you first turn the power on.
The top line of the LCD display reads:
Loading
followed by asterisks progressing across the bottom line:
**************
Following a LED self test, asterisks progress across both lines of the display
**************
**************
and the Power On Self Test ends with the top line of the display reading:
Ready
NOTE: While turned on, the printer will go into the standby state if it remains idle for a period of time.Ifan error message appears, see “Control Panel LCD Messages” in the Intelliprint cL160 User’sGuide located on the GENICOM Intelliprint CL160 Electronic Library.
Publication No. GEG-99141 Genicom Apr 02

GENICOM Intelliprint cL160 User Guide 1-25Selecting a Display Language
Selecting a Display LanguageThe default language for all LCD display messages and the Configuration Summary and Test Page is English. You can change the default language to Espanol, Italiano, Deutsch or Francais.
NOTE: The language that you select will be reflected on all LCD display messages, and also thecontent of the Configuration Summary and Test Page.
To change the default language from English to one of the other four available selections:
1. From the Ready status, press MENU, the control panel display will read:
Menu
Paper
2. Press PREVIOUS or NEXT until the display reads:
Menu
System Menu
3. Press SELECT, the display will read:
System Menu
Factory Defaults
4. Press NEXT or PREVIOUS until the display reads:
System Menu
Display Language
5. Press SELECT, the display will read:
System Menu
English
6. Press NEXT or PREVIOUS until the desired default language appears on the bottom line of the display:
Press SELECT. You have now changed the default language.
Apr 02 Genicom Publication No. GEG-99141

1-26 GENICOM Intelliprint cL160 User GuideAdjusting Color Registration
Adjusting Color RegistrationFollow the procedure below to adjust the color registration when first installing the printer or after moving it to a new location.
1. Use the control panel to print the color registration adjustment chart.
2. From the Y (yellow), M (magenta) and C (cyan) lines to the right of the chart, find the value of the straightest lines.
3. Input the values that you found in step 2 into the Y=?, M=? and C=? fields of the Color regis-tration adjustment.
4. Press the Set button.‘*’ appears and the new color balance chart is printed.
5. Color registration adjustment is complete when the straightest Y (yellow), M (magenta) and C (Cyan) lines is next to the ‘0’ line. Close the menu on the control panel.
NOTE: If 0 is not next to the straightest lines, repeat steps 2 - 5.
Installing Printer Drivers and Locating User Documentation
Installing Printer Drivers and other Software for UNIX and WindowsTo install printer drivers and other software for UNIX and Windows, go to the SOFTWARE folder located on the Electronic Library CD-ROM. The SOFTWARE folder contains the following sub-folders:
Drivers Folder
The Drivers folder contains all of the printer drivers necessary to print from Windows 3.1and 95/98, and Windows NT 3.5.1 and 4.0, and Windows 2000 systems. Refer to the DRIV-ERS.TXT file included in this folder for more information about installing and using driver software.
EZWebCon Folder
The EZWebCon folder contains the EZWebCon software used to configure and manage your Network Interface Card. Refer to the README.TXT file included in this folder for more information about installing and using EZWebCon.
Straightest lines
Publication No. GEG-99141 Genicom Apr 02

GENICOM Intelliprint cL160 User Guide 1-27Printing a Configuration Summary
NetPort Folder
The NetPort folder contains the network port software that allows you to print directly from Windows 95/98 and Intel Windows NT 4.0 systems. Refer to the README.TXT file included in this folder for more information about installing and using this software.
PFDload Folder
The PFDload folder contains information about downloading printer firmware updates. Refer to the README.TXT file included in this folder for more information.
UnixSW Folder
The UnixSW folder contains Genicom UNIX Printing Software, which is an enhanced print filter and network socket driver that allows you to take advantage of all of the printing fea-tures of your printer. Refer to the INSTSALL.PDF file included in this folder for more infor-mation about installing and using Genicom UNIX Printing Software.
Installing Printer Drivers for MacOSTo install printer drivers for MacOS, refer to the following folder on the Electronic Library CD-ROM:
GENICOM Printer Driver folder
The Printer Driver folder contains the AdobePS driver installation kit and PPD file for the printer. These items are available in English, German, French, Italian, and Spanish.
Locating User Documentation
To locate other documentation that will assist you in operating and maintaining your printer, go to the MANUALS folder on the Electronic Library CD-ROM. You can open and read these manuals directly from the CD-ROM, save the manuals to the hard drive of your computer, or print the manuals. The MANUALS folder includes the following documents in Adobe PDF format:
User Guide
Printer Installation Guide (English, French, German, Italian, Spanish)
Other installation and user guides for printer options
Refer to the README.TXT file (UNIX and Windows) or the Read Me First file (MacOS) included in the MANUALS folder for more information about the documentation.
Printing a Configuration SummaryYour printer can print a configuration summary that lists the currently selected status of menu options, media selections in trays, options installed and other relevant information about your printer. To print a Configuration Summary, follow these steps:
1. From the Ready status, press MENU, the control panel display will read:
Menu
Paper
Apr 02 Genicom Publication No. GEG-99141

1-28 GENICOM Intelliprint cL160 User GuidePrinting a Configuration Summary
2. Press PREVIOUS or NEXT until the display reads:
Menu
Functions
3. Press SELECT, the display will read:
Functions
Reset Printer
4. Press NEXT or PREVIOUS until the display reads:
Functions
Print Summary
5. Press SELECT. A two page Configuration Summary will print. An example of a Configura-tion Summary appears on the following page.
NOTE: Depending upon the options installed and menu settings, your Configuration Summary mayvary.
Publication No. GEG-99141 Genicom Apr 02

GENICOM Intelliprint cL160 User Guide 1-29Printing a Test Page
Printing a Test PageYour printer can print a test page that lists the indicates, grey scale, resolution settings, page counter, and other relevant information about your printer. To print a Test Page, follow these steps:
1. From the Ready status, press MENU, the control panel display will read:
Menu
Paper Menu
Apr 02 Genicom Publication No. GEG-99141

1-30 GENICOM Intelliprint cL160 User GuidePrinting PCL and PostScript Font Lists
2. Press PREVIOUS or NEXT until the display reads:
Menu
Functions
3. Press SELECT, the display will read:
Functions
Reset Printer
4. Press NEXT or PREVIOUS until the display reads:
Functions
Print Test
5. Press SELECT, the display will read:
Print Test
Single
6. Press SELECT. A single page Test Page will print. An example of a Test Page appears on the following page.
NOTE: The size of the Test Page will match the size of the default paper size selected.
Sample to be provided.
Printing PCL and PostScript Font ListsYour printer has the capability of printing lists of all installed PCL or PostScript fonts. To print a Font List, follow these steps:
1. From the Ready status, press MENU, the control panel display will read:
Menu
Paper Menu
2. Press PREVIOUS or NEXT until the display reads:
Menu
Functions
3. Press SELECT, the display will read:
Functions
Reset Printer
4. Press NEXT or PREVIOUS until the display reads:
Functions
Print Fonts
5. Press SELECT, the display will read:
Print Fonts
PCL Fonts
Publication No. GEG-99141 Genicom Apr 02

GENICOM Intelliprint cL160 User Guide 1-31Turning the Printer Off
NOTE: You may toggle between PCL Fonts and Postscript Fonts using the PREVIOUS or NEXTpush-buttons.
6. Press SELECT. A multi page resident Font List will print. Examples of a PCL and PostScript Font Lists appears in Appendix C of the Intelliprint cL160 User’s Guide located on the GENI-COM Intelliprint CL160 Electronic Library.
Turning the Printer Off Remember to turn off the printer at the end of day or when the printer will not be used for an extended period of time.
NOTE: When the printer is turned off, all print data still in memory will be erased.
Set the power switch to the [0] position to turn off the printer.
Apr 02 Genicom Publication No. GEG-99141

1-32 GENICOM Intelliprint cL160 User GuideTurning the Printer Off
Publication No. GEG-99141 Genicom Apr 02

Apr 02
Chap
ter
2
Maintenance
In this Chapter . . .
• “About this Chapter” on page 2-2
• “Names and Functions of the Printer’s Parts” on page 2-2
• “Paper Handling” on page 2-6
• “Loading Paper” on page 2-11
• “Cleaning” on page 2-21
• “Storing the Printer” on page 2-22
• “Transporting the Printer” on page 2-24
Genicom Publication No. GEG-99141

2-2 GENICOM Intelliprint cL160 User GuideNames and Functions of the Printer’s Parts
About this ChapterThis chapter explains any neccessary maintenance procedures, such as feeding paper, cleaning, and other procedures required for normal operation.
Names and Functions of the Printer’s Parts The names and functions of the various parts of the printer are as follows:
Front View
No. Name Description
1 Paper Tray Load paper here.
2 Multi purpose Tray Use this tray when feeding manually to load items such as postcards and envelopes.
3 Front Cover Open to clear paper jams, replace the drum cartridge, transfer roller cartridge, and fuser unit.
4 Operation Panel Use the buttons and display to control the printer.
5 Face Down Tray Printed documents are output here, printed side down.
6 Exhaust Grilles Allows internal heat to dissipate. Make sure the grilles are never obstructed.
7 Power Switch The printer’s power switch. Press [ I ] to turn the printer on, and [O] to turn it off.
8 Button B Use button B to open the upper part of the front cover.
9 Button A Use button A to open the whole front cover.
10 Paper Meter Use the meter as a guide to refill the paper tray.
1
10
2
9
3
8
4
7
5
6
Publication No. GEG-99141 Genicom Apr 02

GENICOM Intelliprint cL160 User Guide 2-3Names and Functions of the Printer’s Parts
Operation Panel
POWER
POWER SAVER
STATUS MENU
NEXT
PREVIOUS
RETURN SELECT
READY
START/STOP
ACTIVE FAULT
CANCEL
Display
LEDIndicators
Buttons
Apr 02 Genicom Publication No. GEG-99141

2-4 GENICOM Intelliprint cL160 User GuideNames and Functions of the Printer’s Parts
Rear View
No. Name Description
11 Interface Connector Connect the printer to your computer or network here.
12 Power Cord Connector Connect the power cord here.
13 Exhaust Grille Allows internal heat to dissipate. Make sure the grille is never obstructed.
14 Toner Cartridges The black, yellow, magenta, and cyan toner cartridges are inserted here.
15 Top Cover (face down tray)
Acts as the top cover and the face down tray of the printer. Remove it to change the toner cartridges. Printed documents are output here, printed side down. Do not operate the printer without the Top Cover.
11
12
13
14
15
Publication No. GEG-99141 Genicom Apr 02

GENICOM Intelliprint cL160 User Guide 2-5Names and Functions of the Printer’s Parts
Internal View
<Cover open with button A> < Cover open with button B >
No. Name Description
16 Transfer Roller Cartridge Transfers the image created on the drum surface to the paper, and collects used toner.
17 Drum Cartridge Consists of the light-sensitive drum, the developer and the transfer roller. Images are initially created as an electrical charge on the surface of this drum.
18 Paper Outlet Cover Open to replace the drum cartridge and fuser unit.
19 Paper Rotator With duplex printing, it turns the paper over after the front surface is printed.
20 Fuser Unit Fuses the toner to the paper with heat. The fuser unit gets very hot during printing. Do not touch it to avoid burns.
16 17 18 19 20
Apr 02 Genicom Publication No. GEG-99141

2-6 GENICOM Intelliprint cL160 User GuideSelecting Print Media
Paper HandlingUsing paper that is unsuitable for printing can cause paper jams and deteriorate print quality. We recommend using the types of paper listed below to obtain the best results from your printer.
Selecting Print Media Your printer can print on a variety of media, including plain paper, labels, transparencies, and enve-lopes. Always use print media that meet the guidelines for use with this printer. Print media that is not recommended for use with this printer may cause frequent paper jams or poor print quality.
NOTE: Expect a slight reduction in image quality when you print on envelopes, labels, transparencies,or postcards.
Specialty PaperIn addition to plain paper, you can use the following types of specialty paper.
• Transparency sheets (for monochrome printing only)
• Label sheets (uncut)
• Envelopes
• Postcards
• Cardboard (max. density 216 g/m2)
• Coated paper
• Glossy paper
When printing on rigid cardboard, the image position may shift.
When printing on coated or glossy paper, feed the sheets one at a time. Moisture cancause the sheets to stick together causing more than one sheet to be fed, which can resultin malfunction or damage.
Do not use envelopes that have a tape seals on the adhesive of the flap. You can usepre-glued envelopes if the adhesive on the flap is dry.
Using postcards that have already been printed to on one side and are warped can causepaper jams. Flatten warped postcards with your hands before loading them. We do notrecommend printing on multicolored postcards.
Publication No. GEG-99141 Genicom Apr 02

GENICOM Intelliprint cL160 User Guide 2-7Selecting Print Media
Print Media Weight, Type, and SizeThe following table defines print media that you can use in each of the paper sources, and also indi-cates the feed orientation—long edge feed (LEF) or short edge feed (SEF). If you have concerns about a specific brand or type of media, try samples of the media to determine if the resulting printer performance and print quality meet your expectations.
Paper Source Meter Weight Paper Type and Feed Direction
Paper Sizes Accommodated
Universal Paper Tray (main tray and optional 550 sheet paper feeder)
Do not use label stock or other special media in the 500 sheet paper tray.
60 to 216g/m2 Any paper Width:98.4mm to 215.9mm3.87 to 8.5 inches
Length:148.5mm to 355.6mm5.85 to 14 inches
A4 SEF 297 x 210mm11.7 x 8.27 inches
Letter SEF 279.4 x 215.9mm11 x 8.5 inches
Legal 13 inch 330.2 x 215.9mm13 x 8.5 inches
Legal 14 inch 355.6 x 215.9mm14 x 8.5 inches
Executive SEF 266.7 x 184.5mm10.5 x 7.2 inches
A5 SEF 210 x 149mm8.27 x 5.9 inches
B5 SEF 257 x 182mm10.12 x 7.17 inches
Front Tray 60 to 216g/m2 EnvelopesTransparenciesLabelsPostcardsStandard Paper (LEF and SEF)Other Paper
Width: 3.0 to 8.5 inches76.2mm to 215.9mm Length: 5.0 to 14 inches127mm to 355.6mm
Apr 02 Genicom Publication No. GEG-99141

2-8 GENICOM Intelliprint cL160 User GuideSelecting Print Media
Suitable Paper Types
Paper Trays, Types, and Sizes You can load the following types of paper into the paper tray or multi purpose tray.
NOTE: The number of sheets that you can load varies according to paper thickness.
Duplex Printing Paper Types and SizesThe various paper types and sizes you can use for duplex printing are as follows:
Feeding Method Paper Type/number of Sheets Size
Multi Purpose Tray Plain paperPostcardsEnvelopesLabel sheetsTransparency sheets (for monochrome printing only)Cardboard
Up to 100 sheets or a 10mm stack
A5 (210×149 mm) portraitB5 (257×182 mm) portraitA4 (297×210 mm) portraitExecutive (266.7×184.2 mm) portraitLetter (279.4×215.9 mm) portraitLegal 13” (330.2×215.9 mm) portraitLegal 14” (355.6×215.9 mm) portraitPostcardsEnvelopes Custom size(width: 88.9 to 215.9 mm, length 139.7 to 900 mm)
Using low-quality paper cancause creasing and deterio-rate print quality. When print-ing on paper longer than355.6 mm, support thepaper with your hands while itfeeds through the printer.
Coated paperPaper longer than 355.6 mm
sheet
Standard paper tray (tray 1)
Plain paper Up to 500 sheets or a 56mm stack
For A5 por-trait, youcan use upto 350sheets or a40 mmstack.
5(210×149 mm) portraitB5 (257×182 mm) portraitA4 (297×210 mm) portraitExecutive (266.7×184.2 mm) portraitLetter (279.4×215.9 mm) portraitLegal 13” (330.2×215.9 mm) portraitLegal 14” (355.6×215.9 mm) portrait
High Capacity Feeder (2 shelves)(Trays 2 and 3)
Publication No. GEG-99141 Genicom Apr 02

GENICOM Intelliprint cL160 User Guide 2-9Selecting Print Media
NOTE: The illustrations below provide a description of ‘width,’ ‘length,’ ‘portrait’ and ‘landscape,’mentioned in the tables above.
Unsuitable Paper typesAvoid using the following paper types as they can cause paper jams or damage to the printer.
• Transparency sheets other than those recommended.
• Ink jet paper
• Paper that is too thick or too thin
• Paper already printed using another printer or copier
• Folded, creased or torn paper
• Damp or wet paper
• Undulated or warped paper
• Sheets adhered by static electricity
• Layered or adhesive paper
• Specially coated paper
• Colored paper with a treated surface
• Paper printed with ink that cannot withstand temperatures of 155°C.
• Heat-sensitive paper
• Carbon paper
• Paper with staples, paper clips, tape or ribbons attached
Paper Type Size
Plain paper A5 (210×149 mm) portraitB5 (257×182 mm) portraitA4(297×210 mm) portraitExecutive (266.7×184.2 mm) portraitLetter (279.4×215.9 mm) portraitLegal 13” (330.2×215.9 mm) portraitLegal 14” (355.6×215.9 mm) portrait
LandscapePortrait
LengthLength
Width
Width
Fee
d di
rect
ion
Fee
d di
rect
ion
Apr 02 Genicom Publication No. GEG-99141

2-10 GENICOM Intelliprint cL160 User GuideSelecting Print Media
• Paper with a rough surface such as textured or fiber form paper
• Using acidic paper can cause the characters to fade over time. Use neutral paper to preventthis problem.
• Envelopes with a rough surface or clips attached
• Envelopes with sticky adhesive
• Label sheets where the backing has peeled away or are pre-cut.
• T-shirt transfer paper (Heat press use)
• Transfer paper (cold water use)
• Luminous paper
• Digital coated glossy paper
• Label film (transparent, colorless)
Storing PaperFailure to store paper properly can cause paper jams, deteriorate print quality, and/or damage to the printer. Store paper under the following conditions:
• Between 10°C and 30°C
• Between 30% to 65% relative humidity
• In a dry place
• After opening the package, wrap unused sheets in their original package and store in a cabinetor other dry place.
• Store paper on a flat surface. Do not lean paper against other objects or place it in an uprightposition.
• Avoid storing paper in way that may cause creasing, folding or curling.
• Store paper away from direct sunlight.
Do not use
Shiny backed paper Paper cut into labels
OK to use
Full page labels (uncut)
Publication No. GEG-99141 Genicom Apr 02

GENICOM Intelliprint cL160 User Guide 2-11Selecting Print Media
Loading PaperThis section describes the following loading methods:
• Loading paper in the paper tray
• Loading paper in the multi purpose tray
• Loading transparency sheets in the multi purpose tray
• Loading postcards in the multi purpose tray
• Loading envelopes in the multi purpose tray
NOTE: For information about suitable paper types, refer to “Paper Handling” on page 2-6”.
Loading Paper in the Paper TrayFollow the procedure below to load paper into the paper tray.
NOTE: Load paper into the optional High Capacity Feeder (2 shelves) the same way.
1. Gently pull out the paper tray until it stops.
2. Hold the tray with both hands, lift the front slightly and pull it completely out of the printer.
NOTE: Place the tray on a flat surface.
Apr 02 Genicom Publication No. GEG-99141

2-12 GENICOM Intelliprint cL160 User GuideSelecting Print Media
3. Move the end and side paper guides to their outermost positions. Gently lift the end paper
guide to move it.
NOTE: You do not need to move the paper guides if you are refilling the tray with paper of the samesize.
4. Grip the end paper guide with your fingers and gently lift it up. Insert the pins at the bottom of the guide in the holes corresponding to the paper size that you want to load.
Publication No. GEG-99141 Genicom Apr 02

GENICOM Intelliprint cL160 User Guide 2-13Selecting Print Media
NOTE: Make sure that the end guide is properly inserted into the holes corresponding to theappropriate paper size.Only a small amount of movement of the end paper guide can make automatic paper sizedetection impossible. If this occurs, move the end paper guide all the way to its outermostposition again, then realign it with the appropriate paper size mark.To set A5 paper, use the provided A5 spacer. Remove the A5 spacer from the tray. Set the end guide into the appropriate paper size mark, and then insert the A5 spacer in
front of the end guide.
5. Align the four corners of the paper stack and insert the paper (print side up) under the tab.
NOTE: Do not use paper that is folded, creased, or heavily warped.Do not overload the paper tray.
6. Align the side guides with the edges of the paper.
Apr 02 Genicom Publication No. GEG-99141

2-14 GENICOM Intelliprint cL160 User GuideSelecting Print Media
NOTE: Pushing the paper guides too hard against the edges of the paper stack can cause a paper jam.However, if the paper guides are too loose, the paper may twist as it feeds through the printer.
7. Hold the paper tray with both hands, align it with the opening in the printer and gently insert it.
8. Push the paper tray completely back into the printer.
NOTE: Do use excessive force on the paper tray.
Publication No. GEG-99141 Genicom Apr 02

GENICOM Intelliprint cL160 User Guide 2-15Selecting Print Media
NOTE: There is an indicator next to the paper tray that tells you how much paper remains in the tray.Use this meter as a guide to refill the paper tray.
Loading Paper in the Multi Purpose Tray
Follow the procedure below to load paper into the multi purpose tray.
NOTE: To avoid paper jams, do not load paper of different sizes into the tray at the same time and donot refill the tray before it is empty.
1. If retracted, open the tray.
NOTE: To avoid damage to the tray, do not use excessive force or place heavy objects on the tray.
2. Align the paper guide with the mark of the desired paper size.
Apr 02 Genicom Publication No. GEG-99141

2-16 GENICOM Intelliprint cL160 User GuideSelecting Print Media
NOTE: When printing on long paper, pull out the tray extension. Printing long paper with the trayextension retracted can cause the paper to fall out or make feeding impossible.
3. When using media such as transparency sheets, label sheets, or envelopes, fan the stack before loading so that there is air between the sheets.
NOTE: Fanning the stack helps prevent paper jams caused when more than one sheet feeds at thesame time.
NOTE: Do not fan plain paper before loading.If the paper is poorly cut and the edges are not clean, remove any unsuitable sheets beforeloading the paper.When printing on coated or glossy paper, feed the sheets one at a time. Moisture can cause thesheets to stick together causing more than one sheet to be fed, which can result in malfunctionor damage.
4. Align the four corners of the paper stack and insert it (print side down) until it lightly touches the feeding slot.
Publication No. GEG-99141 Genicom Apr 02

GENICOM Intelliprint cL160 User Guide 2-17Selecting Print Media
NOTE: Do not use paper that is folded, creased, or heavily warped.Do not overload the paper tray.When printing on sheets longer than Legal portrait (355.6mm), load the sheets one at a time,and support the sheet with your hands to ensure proper feeding.
5. When loading paper, carefully align the paper guides with the edges of the paper so that there is a small gap between the paper stack and the guides. Pushing the paper guides too hard against the edge of the paper stack can warp the paper and cause paper jams. Load the paper so that it is straight in the tray.
NOTE: If the paper is not loaded correctly, the printing position may shift and cause incorrect printing.
Loading Transparency Sheets in the Multi Purpose TrayFeed transparency sheets from the multi purpose tray. Use only monochrome transparency sheets.
NOTE: Use only the recommended types of transparency sheet. Do not use any other types, such ascolor transparency sheets (bordered by a white frame).
NOTE: Remove each transparency sheet from the face down tray as soon as it is ejected. Iftransparency sheets are allowed to accumulate in the face down tray, static electricity can buildup and cause a jam.
Apr 02 Genicom Publication No. GEG-99141

2-18 GENICOM Intelliprint cL160 User GuideSelecting Print Media
1. Fan a few transparency sheets at a time.
2. Insert the transparency sheets into the multi purpose tray until they lightly touch the feeding slot.
NOTE: Do not use full color transparency sheets. They can jam in the printer and damage the fuserunit.
Loading Postcards in the Multi Purpose TrayFeed postcards from the multi purpose tray.
OHP
Publication No. GEG-99141 Genicom Apr 02

GENICOM Intelliprint cL160 User Guide 2-19Selecting Print Media
NOTE: When printing on the back of pre-printed postcards, make sure the postcards are not bent. Evenslightly bent postcards can cause paper jams. Flatten bent postcards by hand before loadingthem. We do not recommend printing on multicolored postcards.
Loading Envelopes in the Multi Purpose TrayFeed envelopes from the Multi Purpose Tray. Open the envelope flaps before feeding and load them as illustrated below.
NOTE: Do not use envelopes that have tape seals. When using envelopes with an adhesive seal, makesure that the adhesive is dry. Do not use envelopes larger than 3.5 inches wide and 5.5 incheslong (88.9 mm wide and 139.7 mm long). Load the envelopes with the flap pointing outward.Using poor quality envelopes can cause creasing and deteriorate print quality.
Apr 02 Genicom Publication No. GEG-99141

2-20 GENICOM Intelliprint cL160 User GuideSelecting Print Media
Larger than 5.5 in (139.7 mm)Larger than
3.5 in (88.9 mm)
Publication No. GEG-99141 Genicom Apr 02

GENICOM Intelliprint cL160 User Guide 2-21Selecting Print Media
CleaningUse a soft, damp, well-wrung cloth to clean the outside of the printer. Wipe any remaining water with a soft dry cloth. If some stains prove difficult to remove, use a cloth moistened with a mild neutral detergent.We recommend that you clean the printer at least once a month to keep it in good working condition and to maintain print quality.
NOTE: Never spray detergent directly onto the printer. Droplets of detergent can enter the printer andcause malfunctions. Never use detergents other than neutral detergents.Never lubricate the printer with oil. The printer does not require lubrication.Never use a vacuum cleaner to clean the printer.
CAUTION: To prevent electric shock, turn off the printer and unplug the power cord from the AC outlet before cleaning.
Apr 02 Genicom Publication No. GEG-99141

2-22 GENICOM Intelliprint cL160 User GuideSelecting Print Media
Storing the PrinterFollow the procedure below when you do not need to use the printer for a long period.
1. On the right side of the printer, press [O] on the power switch to turn off the printer.
2. Disconnect the power cord, interface cable, and any other cables.
WARNING: To prevent electric shock, never touch the power plug with wet hands.
CAUTION: When removing the power cord, make sure that you pull the plug and not the cord. Pulling the cord can damage it, which can lead to fire or electrical shock.
Publication No. GEG-99141 Genicom Apr 02

GENICOM Intelliprint cL160 User Guide 2-23Selecting Print Media
3. Remove any remaining paper from the paper tray and store it in a dry, dust-free place.
NOTE: If the paper proves difficult to remove, pull the tray completely out of the printer and tryremoving the paper again.
Apr 02 Genicom Publication No. GEG-99141

2-24 GENICOM Intelliprint cL160 User GuideSelecting Print Media
Transporting the PrinterBefore transporting the printer by car or truck over long distances, follow the procedure below to prevent strong vibrations from damaging the printer.
NOTE: When carrying the printer, keep it level to prevent trays or consumables from falling out. Do nottilt it more than 10 degrees in any direction.Do not remove the toner cartridges before moving the printer. Toner may spill inside the printerand damage it.When the optional High Capacity Feeder (2 shelves) is installed, remove it before transportingthe printer. If the High Capacity Feeder is not removed, it may fall, resulting in damage or injury.To remove the High Capacity Feeder, refer to chapter ”Chapter 6 Options”.”
CAUTION: Because the printer weighs 80 lbs. (34.5 kg) fully assembled, make sure that at least two peo-ple carry it.
To lift the printer, face the front and back of the printer and grip the recessed areas at the bot-tom left and right with both hands. Never try to lift the printer by gripping any other areas. Lift-ing the printer by gripping other areas can cause the printer to fall, resulting in injury.
Bend your knees when lifting the printer to avoid back injuries.
There is danger of the printer falling.
Publication No. GEG-99141 Genicom Apr 02

GENICOM Intelliprint cL160 User Guide 2-25Selecting Print Media
1. On the right side of the printer, press [O] on the power switch to turn off the printer.
2. Disconnect the power cord, interface cable, and any other cables.
WARNING: To prevent electric shock, never touch the power plug with wet hands.
CAUTION: When removing the power cord, make sure that you pull the plug and not the cord. Pulling the cord can damage it, which can lead to fire or electrical shock.
Apr 02 Genicom Publication No. GEG-99141

2-26 GENICOM Intelliprint cL160 User GuideSelecting Print Media
3. Gently pull out the paper tray until it stops.
4. Hold the tray with both hands, lift the front up slightly and pull it completely out of the printer.
5. Remove the paper from the paper tray, and store it in a dry, dust-free place.
Publication No. GEG-99141 Genicom Apr 02

GENICOM Intelliprint cL160 User Guide 2-27Selecting Print Media
6. Insert the cardboard spacer in the tray as illustrated on the left.
7. Hold the paper tray with both hands, align it with the opening in the printer and gently insert it.
8. Push the paper tray completely back into the printer.
Apr 02 Genicom Publication No. GEG-99141

2-28 GENICOM Intelliprint cL160 User GuideSelecting Print Media
9. Remove the tray cover.
10. Push up button ‘A’ 1 and fully open the front cover 2.
11. Open the paper outlet cover.
Publication No. GEG-99141 Genicom Apr 02

GENICOM Intelliprint cL160 User Guide 2-29Selecting Print Media
12. Grip the drum cartridge handle and gently lift it out of the printer.
NOTE: Do not touch the transfer roller (black colored part). Hold the drum cartridge by the handle ontop of the cartridge to prevent the cartridge from falling.
NOTE: Wrap the drum cartridge in its aluminum package or thick paper to avoid exposing it to directsunlight or other strong light.
13. Close the paper outlet cover.
Transfer roller
Apr 02 Genicom Publication No. GEG-99141

2-30 GENICOM Intelliprint cL160 User GuideSelecting Print Media
14. Close the front cover.
15. To protect the printer from damage, pack it in a box before transporting it.
NOTE: After moving the printer to the new location, you need to readjust the color registration. Fordetails, refer to ““ on page 2-31.
◆ ◆ ◆
Publication No. GEG-99141 Genicom Apr 02

Apr 02
Chap
ter
3
Dealing with Problems
In this Chapter . . .
• “About this Chapter” on page 3-2
• “Troubleshooting” on page 3-2
• “Solving Printer Power-on Problems” on page 3-11
• “Control Panel LCD Messages” on page 3-12
• “Ethernet Network Interface Troubleshooting” on page 3-13
Genicom Publication No. GEG-99141

3-2 GENICOM Intelliprint cL160 User GuideTroubleshooting
About this ChapterThis chapter describes solutions to any problems that might occur when using the printer. Read this chapter to determine the nature of the problem and the best method of dealing with it.
TroubleshootingWhen your printer suffers from a problem, refer to one of the four categories below to determine the cause of your problem, and the action needed to rectify it.
• Power problems
• Print quality problems
• Paper transport problems
• Other problems
If your problem is not included in these categories or if you cannot rectify the problem using the prescribed procedures, turn off the printer, disconnect the power cord from the AC outlet, and con-tact your Genicom dealer or a Genicom Customer Service Center for assistance.
Power Problems
WARNING: Do not make any changes or modifications to the equipment, as this may result in fire.
CAUTION: Turn off the printer and disconnect the power cord from the AC outlet before per-forming maintenance on the printer. Failure to turn off the printer and disconnect the power cord may result in electric shock.
Description Cause Action
No power The [ I ] mark of the power switch is not depressed.
Check that the power switch is in the [ I ] position.
The power cord is not properly connected to the AC outlet.
Turn off the unit, confirm that the power cord is properly connected to the AC outlet, and turn the unit back on.
The AC power supply’s voltage is not suitable for use with the unit.
Confirm that the printer is connected to an AC 100 V power supply.
Publication No. GEG-99141 Genicom Apr 02

GENICOM Intelliprint cL160 User Guide 3-3Troubleshooting
Print Quality Problems
The unit turns off frequently
The printer is defective. Turn off the unit, disconnect the power cord from the AC outlet, and contact your Genicom dealer or a Genicom Customer Service Center for assistance.
The power cord is not properly connected to the AC outlet.
Turn off the unit, confirm that the power cord is properly connected to the AC outlet, and turn the unit back on.
Description Cause Action
Description Cause Action
Faded printouts The media is outside the recommended specification range.
Replace the media with a recommend size and type, and confirm that your printer driver settings are correct.See “Paper Handling“ on page 2-6.
The paper is damp. Replace the paper.See “Paper Handling“ on page 6
The drum cartridge is old or damaged.
Replace the drum cartridge.See “Drum Cartridge“ on page 5-8.
The high-voltage supply is defective. Contact your Genicom dealer or a Genicom Customer Service Center for assistance.
Stray black dots or white areas (drop outs)
The paper is outside the recommended specification range.
Replace the paper with a recommend size and type, and confirm that your printer driver settings are correct. See “Paper Handling“ on page 2-6.
The drum cartridge is old or damaged.
Replace the drum cartridge. See “Drum Cartridge“ on page 5-2.
Vertical black streaks The drum cartridge, transfer roller, or fuser unit is old or damaged.
Check the condition of the drum cartridge, transfer roller and fuser unit, and replace as necessary.See “Drum Cartridge“ on page 5-2, orSee “Transfer Roller Cartridge“ on page 5-13, or See “Fuser Unit“ on page 5-16.
Apr 02 Genicom Publication No. GEG-99141

3-4 GENICOM Intelliprint cL160 User GuideTroubleshooting
Description Cause Action
Recurring smudges Dirt in the paper path. Print several blank sheets.
The drum cartridge, transfer roller, or fuser unit is old or damaged.
Check the condition of the drum cartridge, transfer roller and fuser unit, and replace as necessary.See “Drum Cartridge“ on page 5-2, orSee “Transfer Roller Cartridge“ on page 5-13, or See “Fuser Unit“ on page 5-16
Ink smears when rubbed The paper is damp. Replace the paper.See “Paper Handling“ on page 2-6.
The paper is outside the recommended specification range.
Replace the paper with a recommend size and type, and confirm that your printer driver settings are correct.See “Paper Handling“ on page 2-6.
Black pages The drum cartridge is old or damaged.
Replace the drum cartridge.See “Drum Cartridge“ on page 5-8.
The high-voltage supply is defective. Contact your Genicom dealer or a Genicom Customer Service Center for assistance.
Blank pages Two or more sheets may be feeding at once.
Remove the paper stack from the tray, fan it, and reinsert it.
The drum cartridge is old or damaged.
Replace the drum cartridge.See “Drum Cartridge“ on page 5-8.
The high-voltage supply is defective. Contact your Genicom dealer or a Genicom Customer Service Center for assistance.
Publication No. GEG-99141 Genicom Apr 02

GENICOM Intelliprint cL160 User Guide 3-5Troubleshooting
Description Cause Action
Hair-like marks appear in or around black half-tone printing
Shadows appear around areas of dense black printing
The paper was left unwrapped for a long time (especially in a dry environment).
Replace the paper.
The paper is outside the recommended specification range.
Replace the paper with a recommend size and type, and confirm that your printer driver settings are correct.See “Paper Handling“ on page 2-6.
The transfer roller cartridge is old or damaged.
Replace the transfer roller. See “Transfer Roller Cartridge“ on page 5-13.
Color around the edge of printing is incorrect
The color registration is incorrect. Adjust the color registration.See ““ on page 1-31.
Apr 02 Genicom Publication No. GEG-99141

3-6 GENICOM Intelliprint cL160 User GuideTroubleshooting
Description Cause Action
Partial blanks, creased paper or blotted printing
The paper is damp. Replace the paper.See “Paper Handling“ on page 2-6.
The paper is outside the recommended specification range.
Replace the paper with a recommend size and type.See “Paper Handling“ on page 2-6.
The transfer roller or fuser unit is not installed correctly.
Reinstall the transfer roller and/or fuser unit.See “Transfer Roller Cartridge“ on page 5-13, and/or See “Fuser Unit“ on page 5-16.
Publication No. GEG-99141 Genicom Apr 02

GENICOM Intelliprint cL160 User Guide 3-7Troubleshooting
Paper Transport Problems
Vertical blanks The drum cartridge is not installed correctly.
Reinstall the drum cartridge.See “Drum Cartridge“ on page 5-8.
The drum cartridge, transfer roller, or fuser unit is old or damaged.
Check the condition of the drum cartridge, transfer roller and fuser unit, and replace as necessary.See “Drum Cartridge“ on page 5-8, orSee “Transfer Roller Cartridge“ on page 5-13, or See “Fuser Unit“ on page 5-16
Slanted printing The paper guides in the paper tray or multi purpose tray are not set correctly.
Reset the paper guides in the paper tray or multi purpose tray. See “Loading Paper“ on page 2-11.
Description Cause Action
Description Cause Action
Paper does not feedPaper jamsSeveral sheets feed at oncePaper does not feed straight
The paper is not loaded correctly. Reload the paper in the paper tray or multi purpose tray. See “Loading Paper“ on page 11.
The paper is outside the recommended specification range.
Replace the paper with a recommend size and type.See “Paper Handling“ on page 6.
The paper is damp. Replace the paper.See “Paper Handling“ on page 6.
There is paper jammed in the printer. Remove the jammed paper. Also, inspect the inside of the printer and thoroughly remove any tape or adhesive stuck to the rollers and other components along the paper path. “Clearing Paper Jams” on page 3-2.
The printer is not level. Reposition the printer on a flat, stable surface. See “Safety Precautions“ on page 4.
Apr 02 Genicom Publication No. GEG-99141

3-8 GENICOM Intelliprint cL160 User GuideTroubleshooting
Other problems
Cleaning the Density SensorWhen the printer’s density sensor dirty, follow the procedure below to clean it.
1. Push the [O] mark on the power switch to turn off the printer.
Description Cause Action
Unusual noises The printer is not level. Reposition the printer on a flat, stable surface.See “Safety Precautions“ on page 4.
The paper tray is not inserted properly.
Push the paper tray completely into the printer.
There is a foreign object inside the printer.
Turn off the printer and remove the foreign object.If you need to disassemble the printer to remove the foreign object(s), contact your Genicom dealer or a Genicom Customer Service Center for assistance.
Publication No. GEG-99141 Genicom Apr 02

GENICOM Intelliprint cL160 User Guide 3-9Troubleshooting
2. Push up button ‘A’ ➀ and fully open the front cover ➁ .
3. Grip the tabs at both ends of the transfer roller and gently lift it out of the printer.
NOTE: Lift the roller carefully to prevent waste toner from spilling out.
4. Gently wipe the density sensor window with a clean dry cloth or cotton swab.
NOTE: Do not allow anything hard to come into contact with the density sensor window. Do not useexcessive force to clean the window.
Apr 02 Genicom Publication No. GEG-99141

3-10 GENICOM Intelliprint cL160 User GuideTroubleshooting
5. Insert the pins at both ends of the transfer roller cartridge into the u-shaped bearings inside the printer.
6. To lock the transfer roller cartridge into the printer, push down on the base of the tabs until you hear a click.
7. Close the front cover.
8. Push the [ I ] mark on the power switch to turn on the printer.
Publication No. GEG-99141 Genicom Apr 02

GENICOM Intelliprint cL160 User Guide 3-11Solving Printer Power-on Problems
Solving Printer Power-on ProblemsThis section describes problems that can occur when starting up the printer. If the trouble persists after performing the checks listed below, turn the printer off [ O ], disconnect the power cord from the AC outlet, and see ”Appendix A General Information” to arrange for a technical support or ser-vice or repair call.
CAUTION: To prevent the risk of fire or smoke generation, do not attempt to modify the printer in any way.
WARNING: Before cleaning the printer or performing any other maintenance, be sure to turn the printer off [ O ], and disconnect the power cord from the AC outlet to prevent the risk of electric shock.
DESCRIPTION POSSIBLE CAUSE
REQUIRED ACTION
No power. Power switch not turned on. Switch is not set to [ I ].
Check power switch. See ”Chapter 1 Unpacking and Installing the Printer” for Printer” for more information
Power cord not properly plugged into AC outlet or AC connector on rear of printer
Set power switch to [ O ] (off) and plug in power cord firmly. See ”Chapter 1 Unpacking and Installing the Printer” for more information.
Voltage of AC power line not correct.
Verify that AC outlet is rated for the correct voltage and amperage of your printer. See ”Chapter 1 Unpacking and Installing the Printer” for more information.
Power is frequently interrupted
Printer is defective Turn printer off [ O ], disconnect power cord from the AC outlet. See ”Appendix A General Information” to arrange for a technical support or service or repair call.
Apr 02 Genicom Publication No. GEG-99141

3-12 GENICOM Intelliprint cL160 User GuideControl Panel LCD Messages
Control Panel LCD MessagesLCD MESSAGE
(LINE 1)LCD MESSAGE
(LINE 2)CAUSE OF
ERROR MESSAGEREQUIRED
ACTION
TONER Y MISSING INSTALL/RESET Yellow toner cartridge is missing.
Install Yellow toner cartridge.
TONER M MISSING INSTALL/RESET Magenta toner cartridge is missing.
Install Magenta toner cartridge.
TONER C MISSING INSTALL/RESET Cyan toner cartridge is missing.
Install Cyan toner cartridge.
TONER K MISSING INSTALL/RESET Black toner cartridge is missing.
Install Black toner cartridge.
PHD MISSING INSTALL/RESET Print Head Cartridge is missing.
Install Print Head cartridge.
BTR MISSING INSTALL/RESET Bias Transfer Roll is missing.
Install Bias Transfer Roll.
FUSER MISSING INSTALL/RESET Fuser is missing. Install Fuser.
BAD PHD TYPE REPLACE PHD Bad Print Head Cartridge.
Replace Print Head Cartridge.
MEDIA MISMATCH CLEAR PAPER Incorrect paper in tray. Check paper type in tray.
FEED JAM CHECK TRAY Paper jam. Clear paper jam in tray.
REGISTRATION JAM OPEN COVER A Paper jam. Open Cover A and remove paper.
FUSER JAM OPEN COVER A Paper jam. Open Cover A and remove paper.
DUPLEX JAM OPEN COVER B Paper jam. Open Cover B and remove paper.
ROS FAILURE CALL SERVICE ROS failure. Service Call required
FUSER FAILURE CALL SERVICE Fuser failed. Service Call required
MCU/NVRAM ERROR CALL SERVICE Service Call required
CTD SENSOR ERROR CALL SERVICE CTD sensor failure. Service Call required
FAN MOTOR FAIL CALL SERVICE Fan motor failure. Service Call required
MCU SW ERROR CALL SERVICE Service Call required
ENV SENSOR ERROR CALL SERVICE Envelope sensor failure.
Service Call required
CTD SENSOR DUSTY CLEAN CTD SENSOR
Publication No. GEG-99141 Genicom Apr 02

GENICOM Intelliprint cL160 User Guide 3-13Ethernet Network Interface Troubleshooting
NOTE: 1: These faults are not necessarily hard faults. They only become hard faults when an attempt ismade to use the “faulted” device. For these errors, the printing can continue if one simplyavoids the problem. For instance, “tray trouble” faults usually indicate that the tray in questionhas been removed. These errors are only treated as faults when there is no alternative action totake. Your printer may be configured so that the problem is easily avoided. When the problemcannot be avoided, the described faults will be displayed.
2: The Communications Error indicates an error that requires a service call. However, beforearranging for a service call, ensure that all associated cabling is correctly installed.
Ethernet Network Interface TroubleshootingThis section offers various troubleshooting procedures and technical support advice for the Ether-net network interface.
FRONT COVER OPEN CLOSE CLOVER Front cover is open. Close front cover.
LOAD PAPER TRAY1LOAD PAPER TRAY2LOAD PAPER TRAY3
LOAD PAPERACCORDING TOREQUESTED SIZEAND MEDIA TYPE
There is an empty paper tray.
Put paper in empty paper tray.
TRAY 1 MISSINGTRAY 2 MISSINGTRAY 3 MISSING
REPLACE TRAY There is a paper tray missing.
Replace missing paper tray.
OUTPUT TRAY FULL REMOVE PAPER The output tray is full. Remove the paper from the output tray.
TONER Y EMPTY REPLACE TONER Yellow toner cartridge is empty.
Replace Yellow toner cartridge.
TONER M EMPTY REPLACE TONER Magenta toner cartridge is empty.
Replace Magenta toner cartridge.
TONER C EMPTY REPLACE TONER Cyan toner cartridge is empty.
Replace Cyan toner cartridge.
TONER K EMPTY REPLACE TONER Black toner cartridge is empty.
Replace Black toner cartridge.
PHD LIFE OVER REPLACE PHD Print Head Cartridge needs to be replaced.
Install new Print Head cartridge.
BTR LIFE OVER REPACE BTR Bias Transfer Roll needs to be replaced.
Install new Bias Transfer Roll.
FUSER LIFE OVER REPLACE FUSER Fuser needs to be replaced.
Install new Fuser.
Apr 02 Genicom Publication No. GEG-99141

3-14 GENICOM Intelliprint cL160 User GuideEthernet Network Interface Troubleshooting
Power-Up TroubleshootingThere are several possible error situations if the unit does not display the welcome message or the LEDs do not flash:
Error Messages
Message Diagnosis/Remedy
Power-up diagnostic failure (hardware failure)
Note which LED is blinking and its color, then contact your dealer or Technical Support.
The network interface boots but does not try to load the Flash ROM code
Briefly press the Test button on the network interface’s I/O panel. A network interface configuration page will be printed. (To press the Test button, you will need a pointed object - e.g. paper clip.)
Network Error: The ACT LED will blink yellow 2-3 times per second
A. Make sure the Ethernet network cable is properly connected and reboot the server.
B. If option A fails to resolve the problem, reload Flash ROM. Refer to the Updating Software chapter of the Ethernet Network Interface Reference Manual.
Publication No. GEG-99141 Genicom Apr 02

GENICOM Intelliprint cL160 User Guide 3-15Ethernet Network Interface Troubleshooting
Printing Problems
BOOTP TroubleshootingIf the BOOTP request is failing and you have configured your host to respond to the request, check these areas:
Area to Check Explanation
Physical connection To test a non-PostScript printer use the Test Port 1 Count 100 command. This command will send 100 lines of test data to the printer.
Service characteristics Use the Show Service Local Characteristics command from a network login to see if the desired service is available and to verify that the appropriate protocols are enabled on the service.
The IP address The IP address must be unique on the network. Many problems will occur when there are duplicate IP addresses on the network.
Queue Status and Port counters Use the Monitor Queue command to ensure queue entries appear in the job list. If an entry does not appear, refer to the appropriate host section in this Appendix. Use the Monitor Port n Counters command to verify that the counter is incrementing with each job. If it is not, verify the connection between the network interface and the printer.
Area to Check Explanation
BOOTP is in your system’s /etc/services file
BOOTP must be an uncommented line in the /etc/services file.
The network interface’s name is in the loadhost’s /etc/hosts file
The network interface’s name must be in this file for the host to answer a BOOTP or TFTP request.
The download file is in the correct directory and is world-readable
The download file must be in the correct directory and world-readable. Specify the complete pathname for the download file in the BOOTP configuration file or, a add a default pathname to the download filename.
The network interface and host are in the same IP network
Some hosts will not allow BOOTP replies across IP networks. Either use a host running a different operating system or put the network interface in the same IP network as the host.
Apr 02 Genicom Publication No. GEG-99141

3-16 GENICOM Intelliprint cL160 User GuideEthernet Network Interface Troubleshooting
DHCP Troubleshooting
RARP Troubleshooting
PostScript ProblemsPostScript printers will silently abort jobs if they detect an error.
Area to Check Explanation
DHCP is enabled on the network interface.
Use the Define Server DHCP Enabled command. If you manually enter an IP address, DHCP is automatically disabled.
Make sure the DHCP server is operational.
Check to see that the DHCP server is on and is functioning correctly.
Did the network interface get its IP address from the DHCP server?
Refer to the DHCP Manager on your Windows DHCP server for information about addresses currently in use. If the DHCP server does not list your network interface’s IP address, there many be a problem.
Area to Check Explanation
The network interface’s name and hardware address in the host’s /etc/ethers file
The network interface’s name and hardware address must be in this file for the host to answer a RARP request.
The network interface’s name and IP address in the /etc/hosts file
The network interface’s name and IP address must be in this file for the host to answer a RARP request.
The operating system Many operating systems do not start a RARP server at boot time. Check the host’s RARPD documentation for details, or use the ps command to see if there is a RARPD process running.
Area to Check Explanation
The network interface is communicating with the printer
To test a PostScript printer use the Test Port 1 PostScript Count 2. This command will send 2 pages of PostScript data out the parallel port. Watch the indicators on the printer to verify that the network interface is communicating with the printer. If the printer is capable of bidirectional communication, use the Test Service PRQLPSEPS_xxxxxx_PS PostScript Count 5 command. This will transfer data both to and from the printer. Autoselection must be disabled and the printer must be configured as a PostScript printer for this test to succeed.
Publication No. GEG-99141 Genicom Apr 02

GENICOM Intelliprint cL160 User Guide 3-17Ethernet Network Interface Troubleshooting
Bitmap GraphicsIf files that contain embedded bitmap graphics print incorrectly, it is because the bitmaps are being sent as actual binary data and binary data cannot be printed via serial or parallel interfaces.
Most major application packages have provisions to print using either “binary postscript” (for printers connected to the network via LocalTalk) or “hex postscript” (for printers connected to the network via a serial port or parallel port). If your application does not have this provision, ask the application vendor for an upgrade version or “patch” that will add the “hex postscript” function.
Technical SupportIf you are experiencing an error that is not listed in this chapter, or if you are unable to fix the error, contact your point of purchase or Technical Support as listed in Appendix A.
When you report a problem, please provide the following information:
• Your name, and your company name, address, and phone number
• Printer model number
• Printer serial number
• Software version (use the Show Server command to display)
• Network configuration, including the information from a Netstat command
• Description of the problem
• Debug report (stack dump), if applicable
• Status of the unit when the problem occurred (please try to include information on user andnetwork activity at the time of the problem).
Service Characteristics Issue the Show Service Characteristics command. If the service rating is zero, the parallel port is in use. Verify that the PostScript characteristic and appropriate protocols have been enabled on the service.
Port Counters If PostScript jobs appear to print but nothing comes out of the printer, verify the amount of data sent from the host. Issue the appropriate print command from the host system. After the job has completed, use the Show Port 1 Counters command.
Area to Check Explanation
Apr 02 Genicom Publication No. GEG-99141

3-18 GENICOM Intelliprint cL160 User GuideEthernet Network Interface Troubleshooting
Publication No. GEG-99141 Genicom Apr 02

Apr 02
Chap
ter
4
Paper Jams
In this Chapter . . .
• “About this Chapter” on page 4-2
• “Clearing Paper Jams” on page 4-2
Genicom Publication No. GEG-99141

4-2 GENICOM Intelliprint cL160 User GuideClearing Paper Jams
About this ChapterThis chapter explains procedures for dealing with paper jams.
Clearing Paper Jams If a paper jam occurs, refer to the illustration below to select the appropriate corrective action and clear the paper the paper jam immediately.
NOTE: The illustration below shows the printer with the optional High Capacity Feeder (2 shelves)installed.
1. Paper jam in the multi purpose tray
2. Paper jam in the paper tray
3. Paper jam betweenthe drum cartridge and fuser unit
5. Paper jam in the High Capac-ity Feeder (2 shelves)
4. Paper jam in the paper rotator
CAUTION: Make sure to remove all the paper scraps from the printer when clearing paper jams. Paper scraps remaining inside the machine can result in fire. To avoid injury or burns, do not use excessive force to remove jammed paper that is difficult remove or wound tightly around the fuser or roller. If paper is difficult to remove, turn off the power and con-tact your Genicom dealer or a Genicom Customer Service Center for assistance.To prevent burns, never touch the area marked “CAUTION! HOT!” (fuser area).
Publication No. GEG-99141 Genicom Apr 02

GENICOM Intelliprint cL160 User Guide 4-3Clearing Paper Jams
NOTE: Remove jammed paper slowly and carefully to avoid tearing it.
NOTE: Paper jams can be caused by incorrect printer installation or by using unsuitable or low-qualitypaper. For information about paper, refer to “Paper Handling” on page 2-6.
Paper Jams in the Multi Purpose Tray Follow the procedure below to remove paper jammed in the multi purpose tray.
CAUTION: If smoke comes out of the printer when a paper jam occurs, do not open the printer covers. Turn off the power, remove the power cord from the AC outlet, and contact your Genicom dealer or a Genicom Customer Service Center for assistance.
Apr 02 Genicom Publication No. GEG-99141

4-4 GENICOM Intelliprint cL160 User GuideClearing Paper Jams
1. Pull the jammed paper out of the multi purpose tray.
2. Push up button ‘A’ ➀ and fully open the front cover ➁ . Confirm that there are no scraps of paper remaining inside the printer.
3. Close the front cover.
Paper Jams in the Paper TrayFollow the procedure below to remove paper jammed in the paper tray.
1. Slowly, completely remove the paper tray from the printer.
Publication No. GEG-99141 Genicom Apr 02

GENICOM Intelliprint cL160 User Guide 4-5Clearing Paper Jams
2. Remove all the jammed and/or creased paper from the tray.
3. If there is jammed paper remaining inside the printer, pull it out carefully to avoid tearing it.
Apr 02 Genicom Publication No. GEG-99141

4-6 GENICOM Intelliprint cL160 User GuideClearing Paper Jams
4. Push up button ‘A’ ➀ and fully open the front cover ➁ . Confirm that there are no scraps of paper remaining inside the printer.
5. Close the front cover.
6. Hold the paper tray with both hands, align it with the opening in the printer and gently insert it.
7. Push the paper tray completely back into the printer.
NOTE: Do not use excessive force on the paper tray.
Publication No. GEG-99141 Genicom Apr 02

GENICOM Intelliprint cL160 User Guide 4-7Clearing Paper Jams
Paper Jams Between the Drum Cartridge and Fuser UnitThis section describes the procedures to remove paper jammed around the drum cartridge and in the fuser. Select the appropriate procedure according to the location of the jammed paper.
Paper jams around the drum cartridge:Follow the procedure below to remove paper jammed around the drum cartridge.
1. Push up button ‘A’ ➀ and fully open the front cover ➁ .
2. Remove the jammed paper.If the paper is torn, remove any scraps of paper remaining inside the printer.
3. Close the front cover.
Apr 02 Genicom Publication No. GEG-99141

4-8 GENICOM Intelliprint cL160 User GuideClearing Paper Jams
Paper jams in the fuser unit:Follow the procedure below to remove paper jammed in the fuser unit.
1. Press button ‘B’ ➀ and open the upper part of the front cover ➁ .
2. Lift the levers at both ends of the fuser unit, and remove the jammed paper. If the paper is torn, remove any scraps of paper remaining inside the printer.
NOTE: During operation, the fuser unit (heater) becomes very hot. To prevent burns, do not touch itwith your bare hands.Completely push down the levers at both ends of the fuser after removing the jammed paper.
3. If you cannot see the jammed paper, it may be jammed around the drum cartridge. Refer to “Paper jams around the drum cartridge:” on page 4-7 to remove the jammed paper.
Publication No. GEG-99141 Genicom Apr 02

GENICOM Intelliprint cL160 User Guide 4-9Clearing Paper Jams
NOTE: If only a small portion of the jammed paper is visible, making it difficult to remove, refer to“Paper jams around the drum cartridge” on the previous page to remove the jammed paper.
4. Close the Front Cover
Paper jams with long paper:If paper longer than 355.6 mm becomes jammed in the printer, cut the paper as necessary and remove the paper from the location where it is jammed using the appropriate procedure. If the front cover is difficult to open, do not force it. Turn off the printer immediately and contact your Geni-com dealer or Genicom Customer Service Center for assistance.
Paper Jams in the Paper Rotator Follow the procedure below to remove paper jammed in the paper rotator.
Apr 02 Genicom Publication No. GEG-99141

4-10 GENICOM Intelliprint cL160 User GuideClearing Paper Jams
1. Press button ‘B’ ➀ and open the upper part of the front cover ➁ .
2. Remove the jammed paper.If the paper is torn, remove any scraps of paper remaining inside the printer.
3. Close the front cover.
Paper Jams in the High Capacity Feeder (2 shelves)Follow the procedure below to remove paper jammed in the High Capacity Feeder.
1. Open the trays until you find the jammed paper.
Publication No. GEG-99141 Genicom Apr 02

GENICOM Intelliprint cL160 User Guide 4-11Clearing Paper Jams
NOTE: Paper in the High Capacity Feeder feeds to the printer from the front of the trays, thereforepaper jammed in the lower tray can block the upper tray of the module or the paper tray in theprinter, preventing you from opening them. Look for the jammed paper sequentially, startingwith the lowest tray.
2. Remove all jammed and/or creased paper from the tray.
3. Pull the jammed paper out carefully to avoid tearing it.If the paper is torn, confirm that there are no scraps of paper remaining inside the printer.
4. Push up button ‘A’ ➀ and fully open the front cover ➁ . Confirm that there are no scraps of paper remaining inside the printer.
Apr 02 Genicom Publication No. GEG-99141

4-12 GENICOM Intelliprint cL160 User GuideClearing Paper Jams
5. Close the front cover.
6. Close all open paper trays.
◆ ◆ ◆
Publication No. GEG-99141 Genicom Apr 02

Apr 02
Chap
ter
5
Consumables
In this Chapter . . .
• “About this Chapter“ on page 5-2
• “Consumables Overview“ on page 5-2
• “Toner Cartridges“ on page 5-4
• “Drum Cartridge“ on page 5-8
• “Transfer Roller Cartridge“ on page 5-13
• “Fuser Unit“ on page 5-16
• “Paper Feed Roller“ on page 5-21
Genicom Publication No. GEG-99141

5-2 GENICOM Intelliprint cL160 User GuideConsumables Overview
About this ChapterThis chapter provides information about the expendables used with the printer, and also describes handling and replacement procedures.
Consumables OverviewThe following consumables are provided with the printer. For replacements, contact your Genicom dealer.
Toner CartridgesThe printer uses four toner cartridges: black, yellow magenta, and cyan. When the toner supply in a cartridge begins to run out, an error message appears. At this stage, confirm that you have a replacement toner cartridge available. Replace toner cartridges as soon as the message prompting you to do so appears. The printer stops operating if you do not replace the toner cartridge when required.
NOTE: For more information about toner cartridges, refer to “Toner Cartridges“ on page 5-4.
Drum CartridgeThe drum cartridge is composed of a light-sensitive drum, a developer and a transfer roller. Images are initially created as an electrical charge on the surface of this drum. When the drum cartridge reaches the end of its life span, print quality begins to deteriorate. Replace the drum cartridge at this stage.
NOTE: For more information about the drum cartridge, refer to “Drum Cartridge“ on page 5-8.
Publication No. GEG-99141 Genicom Apr 02
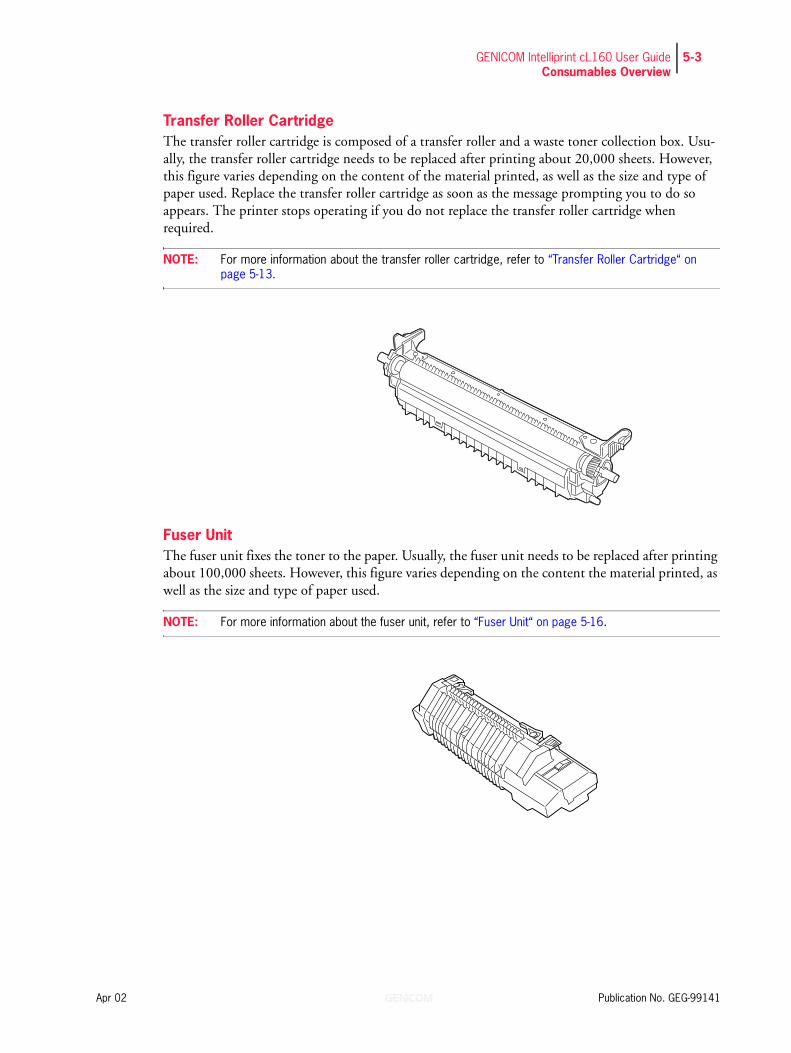
GENICOM Intelliprint cL160 User Guide 5-3Consumables Overview
Transfer Roller CartridgeThe transfer roller cartridge is composed of a transfer roller and a waste toner collection box. Usu-ally, the transfer roller cartridge needs to be replaced after printing about 20,000 sheets. However, this figure varies depending on the content of the material printed, as well as the size and type of paper used. Replace the transfer roller cartridge as soon as the message prompting you to do so appears. The printer stops operating if you do not replace the transfer roller cartridge when required.
NOTE: For more information about the transfer roller cartridge, refer to “Transfer Roller Cartridge“ onpage 5-13.
Fuser UnitThe fuser unit fixes the toner to the paper. Usually, the fuser unit needs to be replaced after printing about 100,000 sheets. However, this figure varies depending on the content the material printed, as well as the size and type of paper used.
NOTE: For more information about the fuser unit, refer to “Fuser Unit“ on page 5-16.
Apr 02 Genicom Publication No. GEG-99141

5-4 GENICOM Intelliprint cL160 User GuideToner Cartridges
Paper Feed RollerThe paper feed roller feeds paper from the paper tray into the printer. Usually, the paper feed roller needs to be replaced after printing about 100,000 sheets. However, this figure varies depending on the size and type of paper used. When the paper feed roller deteriorates, paper may not feed cor-rectly from the paper tray, resulting in paper jams.
NOTE: For more information about the paper feed roller, refer to “Paper Feed Roller“ on page 5-21.
Toner CartridgesThis section describes how to handle, store and replace toner cartridges.
Toner Cartridge Handling PrecautionsThe printer uses four toner cartridges: black, yellow, magenta, and cyan. The black toner cartridge is capable of printing about 9,000 sheets. The yellow, magenta, and cyan cartridges are capable of printing about 6,000 A4 sheets (at the default print density, with 5% coverage per color).
Handling Precautions• Never use a vacuum cleaner to clean toner. Static electricity could build up and damage sen-
sors.
• Do not reuse toner cartridges once you have removed them from the printer. Loose tonercould spill inside the printer and deteriorate print quality.
• To prevent residual toner form spilling, avoid shaking or bumping used toner cartridges.
• After moving a toner cartridge from a cold place to a warm place, allow 1 hour for the car-tridge to adapt to room temperature before installing it. (This is not necessary if there is nocondensation.)
• Toner is harmless, but should still be washed off immediately if it comes into contact withhands or clothing.
WARNING: Never throw used toner cartridges into a fire. The residual toner could explode resulting in burns and injuries.
CAUTION: To prevent electric shock, always turn off the printer and disconnect the power cord from the AC outlet before cleaning the printer or performing maintenance.
Publication No. GEG-99141 Genicom Apr 02

GENICOM Intelliprint cL160 User Guide 5-5Toner Cartridges
• Only use toner cartridges recommended by Genicom. Using toner cartridges that are not rec-ommended may result in lower print quality and unsatisfactory printer performance.
• Wrap used toner cartridges in plastic bags and dispose of them as non-burnable waste.
Storage Precautions• Store toner cartridges away from direct sunlight under the following conditions:
• Ambient temperature range, 0 to 35°C. Humidity range 15 to 80% RH (no condensation).
• Avoid hot and humid areas.
• Avoid storing near magnetic objects such as CRT screens, disk drives, or floppy disks.
• Keep out of reach of children.
Replacing Toner CartridgesFollow the procedure below to replace toner cartridges.
1. Remove the top cover.
Apr 02 Genicom Publication No. GEG-99141

5-6 GENICOM Intelliprint cL160 User GuideToner Cartridges
2. Grip the levers at the ends of the toner cartridge that you want to replace and pull them up.
3. Pull out the toner cartridge.
NOTE: Put the toner cartridge on a piece of paper to prevent toner from staining the floor or furniture.
4. Select the new toner cartridge whose color matches the label on the insertion point and remove it from its packaging.
Publication No. GEG-99141 Genicom Apr 02

GENICOM Intelliprint cL160 User Guide 5-7Toner Cartridges
5. Shake the toner cartridge 7 or 8 times as illustrated to distribute the toner evenly.
6. Align the toner cartridge with the corresponding insertion point in the printer and insert it as illustrated.
7. Grip the levers at each end of the toner cartridge with your fingers and them push down lightly to rotate the levers forward.
Apr 02 Genicom Publication No. GEG-99141

5-8 GENICOM Intelliprint cL160 User GuideDrum Cartridge
8. Pull the toner seal straight up to remove it.
NOTE: Pull the toner seal straight up. Pulling the toner seal diagonally may tear the seal.
9. Replace the top cover.
Drum CartridgeThis section describes procedures for handling, storing and replacing the drum cartridge.
Drum Cartridge Handling PrecautionsThe drum cartridge consists of a light-sensitive drum, a developer and a transfer roller. The drum cartridge is capable of printing about 30,000 Letter/A4 sheets (continuous portrait, at the default print density with 5% color coverage) with a 1:1 color/monochrome ratio.
CAUTION: To prevent electric shock, always turn off the printer and disconnect the power cord from the AC outlet before cleaning the printer or performing maintenance.
Publication No. GEG-99141 Genicom Apr 02

GENICOM Intelliprint cL160 User Guide 5-9Drum Cartridge
Handling Precautions• Make sure nothing touches or scratches the light-sensitive drum surface (blue colored part) or
transfer roller (black colored part). Scratches, dirt, or oil from your hands on the drum ortransfer roller deteriorates print quality.
• Do not expose the drum cartridge to direct sunlight and avoid exposing the drum cartridge tofluorescent indoor light, as this may result in dropouts or dirty printing.
• When replacing the drum cartridge, work on a desk or other flat surface to avoid scratchingthe light-sensitive drum and transfer roller.
• Avoid removing the drum cartridge from the printer before it is time to replace it. Removingand replacing the drum cartridge can cause dirt to stick to the cartridge and deteriorate printquality.
• Avoid tilting or shaking the drum cartridge when removing it, as toner may spill inside theprinter and cause damage.
• To ensure good print quality, keep the drum cartridge level when handling it.
• The drum cartridge weighs 10 lbs. (4.5 kg). Handle it carefully.
• Wrap used drum cartridges in a plastic bag and dispose of them as non-burnable waste.
Storage Precautions• Do not unpack the new drum cartridge until you are ready to install it. If the drum cartridge
is unpacked put it in its aluminum package for storage.
• Store drum cartridges away from direct sunlight under the following conditions:
• Ambient temperature range, 0 to 35°C; humidity range, 15 to 80 % RH (no condensation)
• Avoid storing in hot humid areas.
• Avoid storing near magnetic objects such as CRT screens, disk drives, or floppy disks.
• Keep out of reach of children.
• Store in a level position.
Replacing the Drum CartridgeFollow the procedure below to replace the drum cartridge.
Apr 02 Genicom Publication No. GEG-99141

5-10 GENICOM Intelliprint cL160 User GuideDrum Cartridge
1. Push up button ‘A’ ➀ and fully open the front cover ➁ .
2. Open the paper outlet cover.
3. Grip the handle on top of the drum cartridge and gently lift it out of the printer.
Publication No. GEG-99141 Genicom Apr 02

GENICOM Intelliprint cL160 User Guide 5-11Drum Cartridge
NOTE: Hold the drum cartridge by the handle on top of the cartridge to prevent the cartridge fromfalling.
4. Take a new drum cartridge out of its package and pull hard on each the 8 seals to remove them. Pull the seals completely out.
NOTE: Keep the aluminum package of the drum cartridge in case you need to transport the printerover long distances in the future.
5. Hold the left and right sides of the drum cartridge and remove the protective cover from it.
6. Remove the protective sheet from the drum cartridge as illustrated.
Apr 02 Genicom Publication No. GEG-99141

5-12 GENICOM Intelliprint cL160 User GuideDrum Cartridge
NOTE: Do not touch the transfer roller (black colored part). Make sure that nothing touches orscratches the roller surface. Scratches or oil from your hands on the roller deteriorates printquality.Make sure that you remove the protective sheet. Installing the drum cartridge with theprotective sheet deteriorates print quality.Remove the protective sheet with the drum cartridge in a horizontal position.
7. Hold the drum cartridge by the handle, align its 4 shafts with the slots indicated by the arrows on the printer, and gently lower it into the printer.
NOTE: Do not touch the transfer roller.Lowering the cartridge into the printer without correctly aligning the shafts with the slots candamage the cartridge.Do not allow the surface of the transfer roller to come into contact with anything.
8. Close the paper outlet cover.
Publication No. GEG-99141 Genicom Apr 02
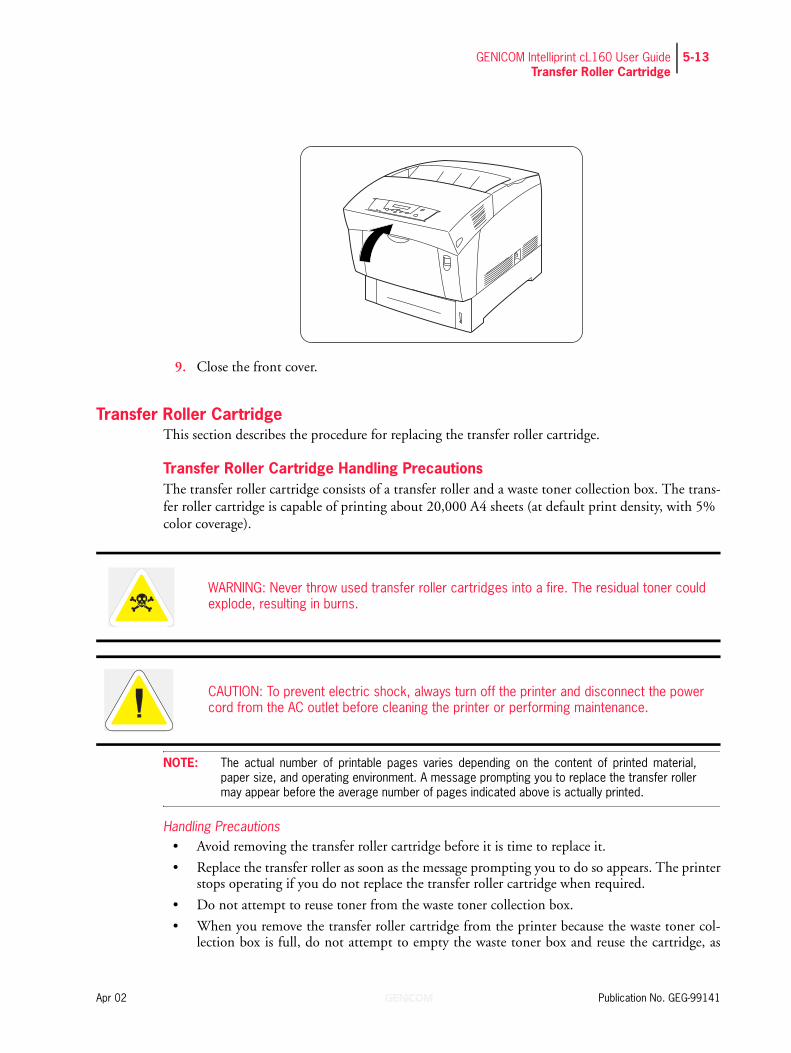
GENICOM Intelliprint cL160 User Guide 5-13Transfer Roller Cartridge
9. Close the front cover.
Transfer Roller CartridgeThis section describes the procedure for replacing the transfer roller cartridge.
Transfer Roller Cartridge Handling PrecautionsThe transfer roller cartridge consists of a transfer roller and a waste toner collection box. The trans-fer roller cartridge is capable of printing about 20,000 A4 sheets (at default print density, with 5% color coverage).
NOTE: The actual number of printable pages varies depending on the content of printed material,paper size, and operating environment. A message prompting you to replace the transfer rollermay appear before the average number of pages indicated above is actually printed.
Handling Precautions• Avoid removing the transfer roller cartridge before it is time to replace it.
• Replace the transfer roller as soon as the message prompting you to do so appears. The printerstops operating if you do not replace the transfer roller cartridge when required.
• Do not attempt to reuse toner from the waste toner collection box.
• When you remove the transfer roller cartridge from the printer because the waste toner col-lection box is full, do not attempt to empty the waste toner box and reuse the cartridge, as
WARNING: Never throw used transfer roller cartridges into a fire. The residual toner could explode, resulting in burns.
CAUTION: To prevent electric shock, always turn off the printer and disconnect the power cord from the AC outlet before cleaning the printer or performing maintenance.
Apr 02 Genicom Publication No. GEG-99141

5-14 GENICOM Intelliprint cL160 User GuideTransfer Roller Cartridge
toner may spill inside the printer and cause damage.
• Do not remove the transfer roller from the printer before it is time to replace it, as toner mayspill inside the printer and cause damage.
Replacing the Transfer Roller CartridgeFollow the procedure below to replace the transfer roller cartridge.
Publication No. GEG-99141 Genicom Apr 02

GENICOM Intelliprint cL160 User Guide 5-15Transfer Roller Cartridge
1. Push up button ‘A’ ➀ and fully open the front cover ➁ .
2. Grip the tabs at both ends of the transfer roller cartridge and gently lift the cartridge out of the printer.
NOTE: Lift the roller carefully to prevent waste toner from spilling out.
3. Unpack a new transfer roller cartridge and insert the stubs on both ends of the transfer roller cartridge into the u-shaped guides inside the printer.
4. To lock the transfer roller cartridge into the printer, push down on the base of the tabs until you hear a click.
Apr 02 Genicom Publication No. GEG-99141

5-16 GENICOM Intelliprint cL160 User GuideFuser Unit
5. Close the front cover.
Fuser UnitThis section describes the procedure for replacing the fuser unit.
NOTE: To avoid burns, do not replace the fuser unit immediately after printing, as the fuser gets veryhot during this process.
Replacing the Fuser UnitFollow the procedure below to replace the fuser unit.
NOTE: To allow the fuser unit to cool down, turn the printer off for at least 30 minutes before replacingthe fuser unit.
CAUTION: To prevent burns, never touch the area marked “CAUTION! HOT!” (fuser area). To avoid injury or burns, do not use excessive force to remove jammed paper that is difficult remove or wound tightly around the fuser or rollers. If paper proves difficult to remove, turn off the printer and contact your Genicom dealer or a Genicom Customer Service Center for assistance.To prevent electric shock, always turn off the printer and disconnect the power cord from the AC outlet before cleaning the printer or performing maintenance.
Publication No. GEG-99141 Genicom Apr 02

GENICOM Intelliprint cL160 User Guide 5-17Fuser Unit
1. Push up button ‘A’ ➀ and fully open the front cover ➁ .
2. Open the paper outlet cover.
1
12
Apr 02 Genicom Publication No. GEG-99141

5-18 GENICOM Intelliprint cL160 User GuideFuser Unit
3. Close the front cover.
4. Press button ‘B’ ➀ and open the upper part of the front cover ➁ .
5. Move the slide switches at both ends of the fuser unit forward.
Publication No. GEG-99141 Genicom Apr 02

GENICOM Intelliprint cL160 User Guide 5-19Fuser Unit
6. Lift up the levers at both ends of the fuser unit.
7. Grip the levers and gently lift the fuser unit out of the printer.
8. Unpack a new fuser unit, lift up the levers at both ends ➀ , grip the fuser unit by the levers, align it with the slots in the printer, and slowly push it in ➁ .
1
12
Apr 02 Genicom Publication No. GEG-99141

5-20 GENICOM Intelliprint cL160 User GuideFuser Unit
9. Completely push down the levers at both ends of the fuser unit.
10. Move the slide switches at both ends of the fuser unit all the way to the back.
11. Close the paper outlet cover.
Publication No. GEG-99141 Genicom Apr 02

GENICOM Intelliprint cL160 User Guide 5-21Paper Feed Roller
12. Close the front cover.
Paper Feed RollerThis section describes the procedure for replacing the paper feed roller.
Replacing the Paper Feed RollerFollow the procedure below to replace the paper feed roller.
CAUTION: To prevent electric shock, always turn off the printer and disconnect the power cord from the AC outlet before cleaning the printer or performing maintenance procedures.
Apr 02 Genicom Publication No. GEG-99141

5-22 GENICOM Intelliprint cL160 User GuidePaper Feed Roller
1. Pull the paper tray out of the printer until it stops.
2. Hold the tray with both hands, lift the front slightly, and remove it from the printer.
3. Push the tabs of the paper feed roller cover to open the cover.
Publication No. GEG-99141 Genicom Apr 02

GENICOM Intelliprint cL160 User Guide 5-23Paper Feed Roller
4. Lift the clip at the end of the paper feed roller and remove the paper feed roller.
5. Align the new paper feed roller axis with the shaft in the paper tray as illustrated and slide the shaft through the roller until the clip locks into the groove at the end of the shaft.
Apr 02 Genicom Publication No. GEG-99141

5-24 GENICOM Intelliprint cL160 User GuidePaper Feed Roller
6. Close the paper feed roller cover.
7. Hold the paper tray with both hands, align it with the opening in the printer and gently insert it.
8. Push the paper tray completely back into the printer.
Publication No. GEG-99141 Genicom Apr 02

GENICOM Intelliprint cL160 User Guide 5-25Paper Feed Roller
NOTE: Do not use excessive force on the paper tray.
◆ ◆ ◆
Apr 02 Genicom Publication No. GEG-99141

5-26 GENICOM Intelliprint cL160 User GuidePaper Feed Roller
Publication No. GEG-99141 Genicom Apr 02

Apr 02
Chap
ter
6
Options
In this Chapter . . .
• “About this Chapter” on page 6-2
• “Options Overview” on page 6-2
• “High Capacity Feeder (2 Shelves)” on page 6-2
Genicom Publication No. GEG-99141

6-2 GENICOM Intelliprint cL160 User GuideOptions Overview
About this ChapterThis chapter describes any available options and the procedures for their installation and removal.
Options OverviewThe following optional accessories are available with this printer. To order any of the options, con-tact your Genicom dealer.
High Capacity Feeder (2 Shelves)
This option allows you to attach an additional 2 trays to the printer. Each tray of the module holds up to 500 sheets of paper. When installed, the trays become the printer’s tray 2 and tray 3.
To install the High Capacity Feeder, refer to “High Capacity Feeder (2 Shelves)” on page 6-2 or to the docu-mentation accompanying the High Capacity Feeder.
High Capacity Feeder (2 Shelves)This section describes the procedures for installing and removing the High Capacity Feeder (2 shelves).
High Capacity Feeder(2 shelves)
Publication No. GEG-99141 Genicom Apr 02

GENICOM Intelliprint cL160 User Guide 6-3High Capacity Feeder (2 Shelves)
Installing the High Capacity Feeder (2 shelves)Follow the procedure below to install the High Capacity Feeder (2 shelves).
1. Gently pull out the upper tray of the High Capacity Feeder until it stops.
2. Hold the tray with both hands, lift up the front slightly and remove it from the High Capac-ity Feeder.
CAUTION: To prevent electric shock, turn off the printer before connecting optional acces-sories or interface cables.The High Capacity Feeder (2 shelves) weighs 40 lbs. (18.5 kg). Make sure that 2 people carry it.Bend your knees to avoid back injury when lifting the High Capacity Feeder (2 shelves).
Apr 02 Genicom Publication No. GEG-99141

6-4 GENICOM Intelliprint cL160 User GuideHigh Capacity Feeder (2 Shelves)
3. Remove the tape from the cardboard spacer in the tray and remove the spacer.
NOTE: Keep the spacer in case you need to transport the printer over long distances in the future.
4. Remove the lower tray from the High Capacity Feeder and remove the cardboard spacer from the tray as explained in steps - .
Publication No. GEG-99141 Genicom Apr 02

GENICOM Intelliprint cL160 User Guide 6-5High Capacity Feeder (2 Shelves)
5. Lock down the brakes of the 2 casters at the front of the High Capacity Feeder (2 shelves) as illustrated on the left
6. Lift the printer and align the 5 guide pins of the High Capacity Feeder (2 shelves) with the holes at the bottom of the printer.Gently lower the printer onto the High Capacity Feeder.
CAUTION: Failure to lock down the brakes can cause the printer to move unexpectedly, resulting in injury.
CAUTION: Because the printer weighs 76 lbs. (34.5 kg) fully assembled, make sure that at least two people carry it.To lift the printer, face the front and back of the printer and grip the recessed areas at the bottom left and right with both hands. Never try to lift the printer by gripping any other areas. Lifting the printer by gripping other areas can cause the printer to fall, resulting in injury.Bend your knees when lifting the printer to avoid back injury.
Apr 02 Genicom Publication No. GEG-99141
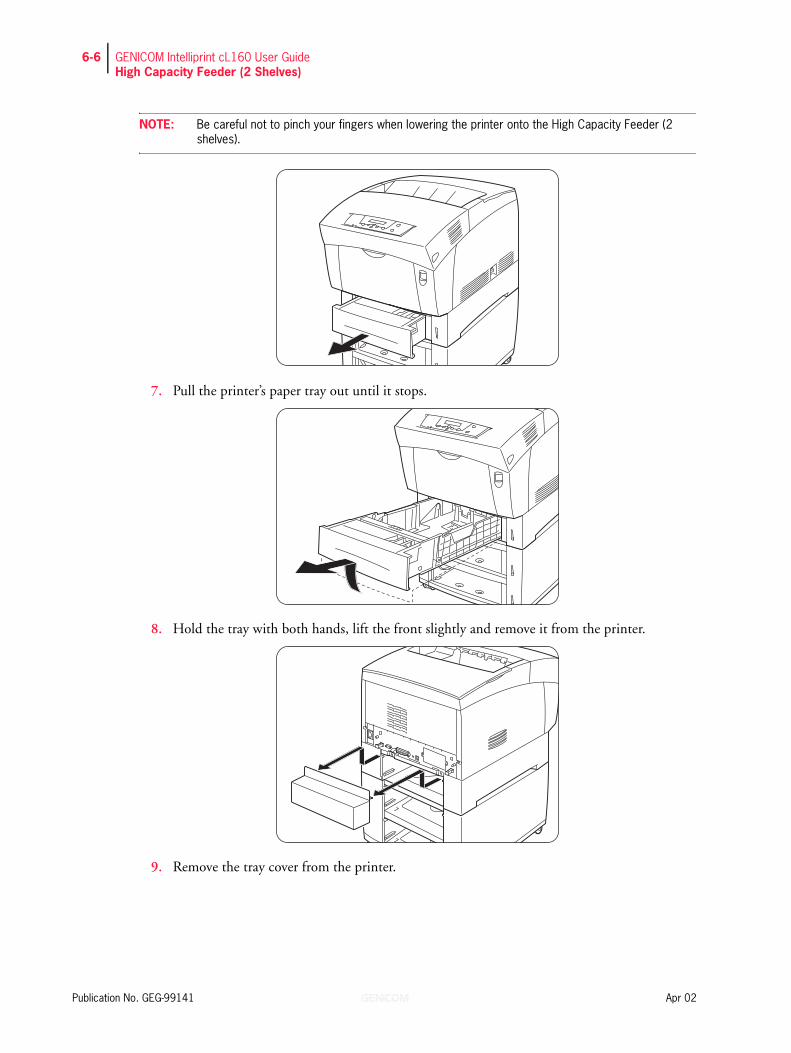
6-6 GENICOM Intelliprint cL160 User GuideHigh Capacity Feeder (2 Shelves)
NOTE: Be careful not to pinch your fingers when lowering the printer onto the High Capacity Feeder (2shelves).
7. Pull the printer’s paper tray out until it stops.
8. Hold the tray with both hands, lift the front slightly and remove it from the printer.
9. Remove the tray cover from the printer.
Publication No. GEG-99141 Genicom Apr 02

GENICOM Intelliprint cL160 User Guide 6-7High Capacity Feeder (2 Shelves)
10. Insert the 4 screws provided into the 4 holes inside the printer and tighten them with a coin to secure the printer to the High Capacity Feeder (2 shelves).
NOTE: Make sure the screws are firmly tightened.
11. Install the tray covers provided with the High Capacity Feeder (2 shelves).
Apr 02 Genicom Publication No. GEG-99141

6-8 GENICOM Intelliprint cL160 User GuideHigh Capacity Feeder (2 Shelves)
NOTE: Replace the printer’s tray cover in the same manner.
12. Insert the High Capacity Feeder’s lower paper tray in to the High Capacity Feeder (2 shelves).
13. Push the paper tray until it stops.
NOTE: Do not use excessive force on the paper tray.
14. Replace the High Capacity Feeder’s upper paper tray and the printer’s paper tray in the same manner.
Publication No. GEG-99141 Genicom Apr 02

GENICOM Intelliprint cL160 User Guide 6-9High Capacity Feeder (2 Shelves)
Removing the High Capacity Feeder (2 shelves)Follow the procedure below to remove the High Capacity Feeder (2 shelves).
1. Pull the printer’s paper tray out until it stops.
2. Hold the tray with both hands, lift the front slightly and remove it from the printer.
CAUTION: To prevent electric shock, turn off the printer before disconnecting optional accessories or interface cables. The High Capacity Feeder (2 shelves) weighs 40 lbs. (18.5 kg). Make sure that 2 people carry it.Bend your knees to avoid back injury when lifting the High Capacity Feeder (2 shelves).
Apr 02 Genicom Publication No. GEG-99141

6-10 GENICOM Intelliprint cL160 User GuideHigh Capacity Feeder (2 Shelves)
3. Remove the tray cover from the printer.
4. Using a coin, remove the 4 screws inside the printer.
5. Hold the paper tray with both hands, align it with the opening in the printer and gently insert it.
Publication No. GEG-99141 Genicom Apr 02

GENICOM Intelliprint cL160 User Guide 6-11High Capacity Feeder (2 Shelves)
6. Push the paper tray completely back into the printer.
NOTE: Do not use excessive force on the paper tray.
7. Replace the printer’s tray cover.
8. Gently lift the printer off the High Capacity Feeder, and place it on a level surface.
Apr 02 Genicom Publication No. GEG-99141

6-12 GENICOM Intelliprint cL160 User GuideHigh Capacity Feeder (2 Shelves)
NOTE: Be careful not to pinch your fingers when lowering the printer.
◆ ◆ ◆
CAUTION: Because the printer weighs 76 lbs. (34.5) kg fully assembled, make sure that at least two people carry it.To lift the printer, face the front and back of the printer and grip the recessed areas at the bottom left and right with both hands. Never try to lift the printer by gripping any other areas. Lifting the printer by gripping other areas can cause the printer to fall, resulting in injury.Bend your knees when lifting the printer to avoid back injury.
Publication No. GEG-99141 Genicom Apr 02

Apr 02
Chap
ter
7
Understanding and Navigating the Control Panel MenusIn this Chapter . . .
“About this Chapter” on page 7-2“Control Panel Features” on page 7-2“Navigating the Control Panel Menus” on page 7-5“Menu Structure” on page 7-7“Paper Menu” on page 7-8“Interface Menu” on page 7-10“PS Menu” on page 7-12“PCL Menu” on page 7-14“System Menu” on page 7-17“Quality Menu” on page 7-19“Color Menu” on page 7-19“Functions Menu” on page 7-23“Status Menu” on page 7-25
Genicom Publication No. GEG-99141

7-2 GENICOM Intelliprint cL160 User GuideControl Panel Features
About this ChapterThis chapter explains the control panel and its functions, and also demonstrates how to navigate through the control panel menus and submenus that allow you to view and change the printer set-tings.
Control Panel FeaturesThe control panel is located on the front of the printer, and contains the display, indicators, and pushbuttons that allow you to view and change the printer settings.
The figure below shows the control panel features.
Figure 7-1: Control Panel.
LCD DisplayThe LCD display shows status and error messages that inform you of the current status of the printer, and also displays menus, submenus, and printer settings when you are in the menu system. The display contains two lines of text, each with a maximum of sixteen characters.
POWER
POWER SAVER
STATUS MENU
NEXT
PREVIOUS
RETURN SELECT
READY
START/STOP
ACTIVE FAULT
CANCEL
Pushbuttons
LCD Display
LED Indicators
Publication No. GEG-99141 Genicom Apr 02

GENICOM Intelliprint cL160 User Guide 7-3Control Panel Features
LED IndicatorsThe LED indicators also indicate printer status. The four indicators can each be on, off, or blink-ing, indicating different phases of printer operation. The table below explains the LED indicators.
PushbuttonsThe control panel pushbuttons allow you to access and navigate menus, and also assist you in recovering from printer errors. The table below explains the functions of the eight pushbuttons.
LED COLOR WHEN OFF WHEN ON WHEN BLINKING
Green Printer is NOT READY
Printer is READY N/A
Green Printer is IDLE Printer is ACTIVE (processing a job)
Printer is WAITING (a partial job has been printed, and the printer is waiting for additional job data)
Yellow Printer is not in error mode
There is an error that requires user intervention, such as a paper jam, a service call required, etc.
N/A
Green POWER is off POWER is on Power Saver Mode ON
PUSHBUTTON FUNCTION
START/STOP—Push this button to start or stop the printer, or to exit the menu system.
MENU—Push this button to enter the menu system.
READY
ACTIVE
FAULT
POWER
START/STOP
MENU
Apr 02 Genicom Publication No. GEG-99141

7-4 GENICOM Intelliprint cL160 User GuideControl Panel Features
NEXT—Push this button to move to the next menu, submenu, or setting within the same level of the menu structure.
SELECT—Push this button to select the menu or submenu that is shown on the second line of the display or to choose and save the setting shown on the second line of the display.
CANCEL—Push this button to cancel an action.
STATUS—Push this button to enter the Status Menu and view the current status of printer.
PREVIOUS—Push this button to return to the previous menu, submenu, or option within the same level of the menu structure.
RETURN—Push this button to move up one level in the menu structure to the menu shown on the first line of the display.
PUSHBUTTON FUNCTION
NEXT
SELECT
CANCEL
STATUS
PREVIOUS
RETURN
Publication No. GEG-99141 Genicom Apr 02

GENICOM Intelliprint cL160 User Guide 7-5Navigating the Control Panel Menus
Navigating the Control Panel MenusWhen you press the MENU button on the control panel, you enter the printer’s menu system. At that point, the first line of the display contains the text “Menu”, indicating that you are in the menu system. The second line of the display lists the active menu, which you can change by pressing the NEXT or PREVIOUS button.
If you press the NEXT button repeatedly, the second line of the display cycles through the main menus in the following order:
Paper MenuInterface MenuPS MenuPCL MenuSystem MenuQuality MenuColor MenuFunctionsStatus
NOTE: Additional menus and submenus may appear in the printer menu system when other options areinstalled.
MenuPaper Menu
Apr 02 Genicom Publication No. GEG-99141

7-6 GENICOM Intelliprint cL160 User GuideNavigating the Control Panel Menus
The following figure shows the sequence of pushbuttons and display messages that would allow you to change the number of copies printed. This example illustrates the basic relationship between menus and submenus and demonstrates how the NEXT, PREVIOUS, SELECT, and RETURN buttons help you to navigate through the menus.
Figure 7-2: Navigating the Paper Menu.
1. Press the MENU button on the control panel.
2. Press the NEXT button until the text “Paper Menu” is shown on the second line of the display.
3. Press the SELECT button to enter the paper menu.
4. Press the NEXT button until the text “Copies” is shown on the second line of the display.
5. Press the SELECT button to enter the copies submenu.
6. Press the NEXT or PREVIOUS button to increase or decrease the number of copies printed.
7. Press the SELECT button to save this setting.
8. Press the START/STOP button to exit the menu system.
MenuPaper Menu
MenuInterface Menu
MenuPaper Menu
Paper MenuCopies
Copies1
Copies2
Copies3
Paper MenuCopies
MenuPaper Menu
Publication No. GEG-99141 Genicom Apr 02

GENICOM Intelliprint cL160 User Guide 7-7Menu Structure
Menu StructureThe following figure shows the structure of the control panel main menus and submenus.
Figure 7-3: Printer Menu Structure.
Paper MenuCopiesDefault SourceManual FeedOutput TrayMedia Size/Type
MBFTray 1Tray 2Tray 3 (optional)
Tray LinkingJob OffsetBlank PagesFace Up InstMBF FirstGloss Level
Interface MenuPort
Parallel Network 1
Parallel SetupInterpreterFormatMode
Network 1SetupInterpreterFormatNetwork ChannelNetwork AddressIP AddressSubnet MaskDefault RouterLPD BannerDHCPNetwork FrameDelay Out Close
PS MenuPrint PS ErrorsManual Feed TO
PCL MenuOrientationFont SourceFont NumberPitchSymbol SetMacro FilterLines Per PageCR ModeLF ModeFF ModePrint AreaParameter Values
Paper SourcePaper Size
System MenuFactory DefaultsDisplay LanguageAlarm ControlPower SaverStandby TimeWait TimeoutJob TimeoutJam RecoveryHex PrintToner Out
Quality MenuResolutionEnhancementToner SaverPrint Density
FunctionsReset PrinterPrint SummaryPrint TestPrint Fonts
Status MenuMBF
Media SizeMedia TypeLevel
Tray 1Media SizeMedia TypeLevel
Tray 2Media SizeMedia TypeLevel
OutputTrayToner
Color MenuScreening ModeColor RenderingColor Mgmt.
Apr 02 Genicom Publication No. GEG-99141

7-8 GENICOM Intelliprint cL160 User GuidePaper Menu
NOTE: Additional menus and submenus may appear in the printer menu system when other options areinstalled.
Paper MenuThe Paper Menu provides access to the printer settings for various paper-handling functions. Use the following procedure to enter the paper menu:
1. Press the MENU button on the control panel.
2. Press the NEXT button until the text “Paper Menu” is shown on the second line of the display.
3. Press the SELECT button to enter the Paper Menu.
4. Press the NEXT button to move through the submenus.
5. Use the procedures in the following table to access and change the printer paper-handling settings:
Submenus Default Setting Available Settings Procedure for Changing Setting
CopiesThis submenu allows you to change the number of copies printed.
1 Numbers 1 - 999 1. Press NEXT or PREVIOUS to increase or decrease the number of copies printed.
2. Press SELECT to save this setting.
Default SourceThis submenu allows you to choose a default paper source from a list of all installed sources.
Tray 1 MBFTray 1Tray 2 (optional)Tray 3 (optional)
1. Press NEXT or PREVIOUS to scroll through the list of available sources of paper.
2. Press SELECT to set a source as the default.
Manual FeedThis submenu allows you to turn the manual feed on or off.
Off OnOff
1. Press NEXT or PREVIOUS to toggle between ON and OFF.
2. Press SELECT to save this setting.
Publication No. GEG-99141 Genicom Apr 02

GENICOM Intelliprint cL160 User Guide 7-9Paper Menu
Media Size/TypeThis submenu allows you to set the media size and type for the MBF Tray and set the medial type for all other trays.
MBFSize: Letter LEFType: PlainTray 1Type: PlainTray 2 (optional)Type: PlainTray 3 (optional)Type: Plain
SizeMBF: Letter LEF, A4 LEF, B5 LEF, A5, A6, Statement, Executive, C5 Envelope, DL Envelope, Com10 Envelope, Monarch Envelope, Legal,Folio, A4 SEF, Letter SEF
TypeMBF: Plain, Transparency, Prepunched, Letterhead, Colored, Preprinted, Bond, Label, Card Stock, Postcard, Envelope, Other
Other Trays: Plain, Transparency, Prepunched, Letterhead, Colored, Preprinted, Bond, Other
1. Press NEXT or PREVIOUS to scroll through the list of available sources of paper.
2. Press SELECT to choose a tray. 3. Press NEXT or PREVIOUS to toggle
between MEDIA SIZE and MEDIA TYPE.
4. Press SELECT to choose either. 5. Press NEXT or PREVIOUS to scroll
through the available sizes or types. 6. Press SELECT to set a size or type.
Tray LinkingThis submenu allows you to turn the tray linking function on or off.
On OnOff
1. Press NEXT or PREVIOUS to toggle between ON and OFF.
2. Press SELECT to save this setting.
Blank PagesThis submenu allows you to choose to either print or not print blank pages of a document.
Print PrintDo Not Print
1. Press NEXT or PREVIOUS to toggle between PRINT and DO NOT PRINT.
2. Press SELECT to save this setting.
MBF First Off OnOff
1. Press NEXT or PREVIOUS to toggle between ON and OFF.
2. Press SELECT to save this setting.
Gloss LevelThis menu is used to set the level of gloss in toned areas of printed output. The “Low” setting will produce printed pages with a slight gloss wherever toner is placed. The printer prints at full speed in this mode. The “High” setting causes toned areas to be printed with a higher level of gloss. The printer prints at half speed in this mode.
Low LowHigh
1. Press NEXT or PREVIOUS to toggle between LOW and HIGH.
2. Press SELECT to save this setting.
Submenus Default Setting Available Settings Procedure for Changing Setting
Apr 02 Genicom Publication No. GEG-99141

7-10 GENICOM Intelliprint cL160 User GuideInterface Menu
Interface MenuThe Interface Menu provides access to the printer interface settings. Use the following procedure to enter the interface menu:
1. Press the MENU button on the control panel.
2. Press the NEXT button until the text “Interface Menu” is shown on the second line of the display.
3. Press the SELECT button to enter the interface menu.
4. Press the NEXT button to move through the submenus: Port, Parallel Setup, and Network Setup.
5. Use the procedures in the following table to access and change the printer interface settings:
Submenus Default Setting
Available Settings
Procedure for Changing Setting
PortThis submenu allows you to enable the type of interface.
Parallel:On
Network Card 1:Off
Parallel:On, Off
Network Card 1:On, Off
1. Press NEXT or PREVIOUS to toggle between PARALLEL and NETWORK CARD 1.
2. Press SELECT to save this setting.
Publication No. GEG-99141 Genicom Apr 02

GENICOM Intelliprint cL160 User Guide 7-11Interface Menu
Parallel SetupThis submenu allows you to set up the parallel interface.
Interpreter:Auto Switch
Format:Raw
Mode:Bidirectional
Delay Out Close:Off
Interpreter:Auto SwitchPCLPostScript 3
Format:RawNormal Binary
Mode:BidirectionalStandard
Delay Out Close:OffOn
1. Press NEXT or PREVIOUS to scroll through the INTERPRETER, FORMAT, MODE, and DELAY OUT CLOSE submenus.
2. Press SELECT to choose a submenu. 3. Press NEXT or PREVIOUS to scroll through the
settings. 4. Press SELECT to choose and save a setting.
Submenus Default Setting
Available Settings
Procedure for Changing Setting
Apr 02 Genicom Publication No. GEG-99141

7-12 GENICOM Intelliprint cL160 User GuidePS Menu
PS MenuThe PS Menu provides access to the PostScript settings. Use the following procedure to enter the PS Menu:
1. Press the MENU button on the control panel.
2. Press the NEXT button until the text “PS Menu” is shown on the second line of the display.
3. Press the SELECT button to enter the PS menu.
Network 1 SetupThis submenu allows you to set up the Network interface.
Interpreter:Auto Switch
Format:Raw
Network Channel:Netware
Network Address:
IP Address:(user-specified)
Subnet Mask:(user-specified)
Default Router:(user-specified)
LPD Banner:On
DHCP:Off
Network Frame:Auto-Sense
Delay Out Close:Off
Interpreter:Auto SwitchPCLPostScript 3
Format: RawNormal Binary
Network Channel:DEC LAT, AppleTalk, TCP/IP
Network Address:
IP Address:(user-specified)
Subnet Mask:(user-specified)
Default Router:(user-specified)
LPD Banner:OnOff
DHCP:OffOn
Network Frame:802.3, Ethernet II, 802.2 SNAP, 802.2
Delay Out Close:OffOn
1. Press NEXT or PREVIOUS to move among the submenus.
2. Press SELECT to choose a submenu. 3. Press NEXT or PREVIOUS to scroll through the
settings. 4. Press SELECT to save this setting.
Submenus Default Setting
Available Settings
Procedure for Changing Setting
Publication No. GEG-99141 Genicom Apr 02

GENICOM Intelliprint cL160 User Guide 7-13PS Menu
4. Press the NEXT button to move through the submenus: Print PS Errors, and Manual Feed TO.
5. Press the SELECT button to enter a submenu.
6. Use the procedures in the following table to access and change the PostScript settings:
Submenus Default Setting
Available Settings Procedure for Changing Settings
Print PS ErrorsThis submenu allows you to choose to either print or not print PS errors.
Off OnOff
1. Press NEXT or PREVIOUS to toggle between ON (print) and OFF (do not print).
2. Press SELECT to save this setting.
Manual Feed TOThis submenu allows you to set the manual feed timeout—the number of seconds the printer should wait for a manual feed. A setting of 0 will cause printer to wait indefinitely for a manual feed.
0 0 - 99999 1. Press NEXT or PREVIOUS to increase or decrease each digit of the five-digit number.
2. Press SELECT to move to the next number. 3. Press SELECT after setting the last digit to save
the setting.
Apr 02 Genicom Publication No. GEG-99141

7-14 GENICOM Intelliprint cL160 User GuidePCL Menu
PCL MenuThe PCL Menu provides access to the PCL settings. Use the following procedure to enter the PCL menu:
1. Press the MENU button on the control panel.
2. Press the NEXT button until the text “PCL Menu” is shown on the second line of the display.
3. Press the SELECT button to enter the PCL menu.
4. Press the NEXT button to move through the submenus: Print PS Errors, Manual Feed TO.
5. Press the SELECT button to enter a submenu.
6. Use the procedures in the following table to access and change the PCL settings:
Submenus Default Setting Available Settings Procedure for Changing Setting
OrientationThis submenu allows you to choose the orientation of the page.
Portrait PortraitLandscape
1. Press NEXT or PREVIOUS to toggle between PORTRAIT and LANDSCAPE.
2. Press SELECT to choose and save an orientation.
Font SourceThis submenu allows you to choose a font source.
Internal Internal 1. Press NEXT or PREVIOUS to scroll through the available font sources.
2. Press SELECT to choose and set a source.
Font NumberThis submenu allows you to set the font number.
0 Numbers 0-? 1. Press NEXT or PREVIOUS to increase or decrease the font number.
2. Press SELECT to save this setting.
PitchThis submenu allows you to change the pitch of text.
10.00 0.08 - 100.00 1. Press NEXT or PREVIOUS to increase or decrease the pitch.
2. Press SELECT to save this setting.
Symbol SetThis submenu allows you to choose a symbol set.
10U:PC-8 CP437 10U:PC-8 CP43711U:PC-8 D/N12U:PC-85017U:PC-8529T:PC-Turkish19U:WIN Latin19E:WIN Latin25T:WIN Latin57J:Desk Top10J:PS Text13J:Ventura Intl14J:Ventura US6J:Microsoft Pub8M:Math-8PS:Math6M:Ventura Math
15U:Pi Font1U: Legal1E: ISO4 UK0U:ISO6 ASCII0S:ISO11 Swedish0I:ISO15 Italian2S:ISO17 Spanish1G:ISO21 German0D:ISO60 Norweg.1F:ISO69 French9U:WIN3.0 Latin18U:Roman 80N:ISO 8859-12N:ISO 8859-25N:ISO 8859-5
1. Press NEXT or PREVIOUS to scroll through the available symbol sets.
2. Press SELECT to choose and set a symbol set.
Publication No. GEG-99141 Genicom Apr 02

GENICOM Intelliprint cL160 User Guide 7-15PCL Menu
Macro FilterThis submenu allows you to turn the macro filter on or off.
Off OnOff
1. Press NEXT or PREVIOUS to toggle between ON and OFF.
2. Press SELECT to save this setting.
Lines Per PageThis submenu allows you to change the number of lines per page.
45 5 - 128 1. Press NEXT or PREVIOUS to increase or decrease the lines per page.
2. Press SELECT to save this setting.
CR ModeThis submenu allows you top define the action prompted by a carriage return—a carriage return equals either a carriage return alone, or a carriage return and a line feed together.
CR = CR CR = CRCR = CR/LF
1. Press NEXT or PREVIOUS to choose from CR=CR or CR=CR/LF.
2. Press SELECT to save this setting.
LF ModeThis submenu allows you to define the action prompted by a line feed—a line feed equals either a line feed alone or a carriage return and a line feed together.
LF = LF LF = LFLF = CR/LF
1. Press NEXT or PREVIOUS to choose from LF=LF or LF=CR/LF.
2. Press SELECT to save this setting.
FF ModeThis submenu allows you to define the action prompted by a form feed—a form feed equals either a form feed alone or a carriage return and a form feed together.
FF = FF FF = FFFF = CR/FF
1. Press NEXT or PREVIOUS to choose from FF=FF or FF=CR/FF.
2. Press SELECT to save this setting.
Submenus Default Setting Available Settings Procedure for Changing Setting
Apr 02 Genicom Publication No. GEG-99141

7-16 GENICOM Intelliprint cL160 User GuidePCL Menu
Print AreaThis submenu allows you to set the print area.
Normal NormalExpanded
1. Press NEXT or PREVIOUS to toggle between the NORMAL and EXPANDED settings.
2. Press SELECT to save this setting.
Parameter Values Paper Source:MBF
Paper Size:Executive
Paper Source:MBFTray 1Tray 2Tray 3Auto-select
Paper Size:Executive, Letter, Legal, Statement, Folio, A6, A5, A4, B5, B4, Monarch Envelope, Com10 Envelope, DL Envelope, CS Envelope
1. Press NEXT or PREVIOUS to toggle between the PAPER SOURCE and PAPER SIZE submenus.
2. Press SELECT to choose a submenu.
3. Press NEXT or PREVIOUS to scroll through the settings.
4. Press SELECT to save this setting.
Submenus Default Setting Available Settings Procedure for Changing Setting
Publication No. GEG-99141 Genicom Apr 02

GENICOM Intelliprint cL160 User Guide 7-17System Menu
System MenuThe system menu provides access to system settings. Use the following procedure to enter the sys-tem menu:
1. Press the MENU button on the control panel.
2. Press the NEXT button until the text “System Menu” is shown on the second line of the display.
3. Press the SELECT button to enter the system menu.
4. Press the NEXT button to move through the submenus: Factory Defaults, Display Language, Power Saver, Wait Timeout, Job Timeout, Jam Recovery, Hex Print, and Toner Out.
5. Press the SELECT button to enter a submenu.
6. Use the procedures in the following table to access and change the system settings:
Submenus Default Setting Available Settings Procedure for Changing Setting
Factory DefaultsThis submenu allows you to reset the printer to U.S. or Non-U.S. factory defaults.
U.S. U.S.Non-U.S.
1. Press NEXT or PREVIOUS to toggle between U.S. and NON-U.S.
2. Press SELECT to choose and set the factory defaults.
Display LanguageThis submenu allows you to change the language of the display messages.
English EnglishFrancais (French)Deutsch (German)Italiano (Italian)Espanol (Spanish)
1. Press NEXT or PREVIOUS to scroll through the available languages: English, French (Francais), German (Deutsch), Italian (Italiano), or Spanish (Espanol).
2. Press SELECT to choose and set the language.
Alarm ControlThis submenu allows you to set the alarm control.
Single Single ContinuousOff
1. Press NEXT or PREVIOUS to move among the alarm settings.
2. Press SELECT to choose and set the alarm setting.
Power SaverThis submenu allows you to set the number of minutes the printer is idle before it reverts to Power Saver Mode.
15 0 - 999 1. Press NEXT or PREVIOUS to increase or decrease the number of minutes.
2. Press SELECT to save this setting.
Wait TimeoutThis submenu allows you to increase or decrease the length of time (in seconds) that the printer will remain in the waiting state—a job is being processed, no end-of-file has been detected, and there is no more data to process. This setting applies to both PCL and PostScript print jobs.
20 0 - 99999 1. Press NEXT or PREVIOUS to increase or decrease each digit of the five-digit number.
2. Press SELECT set one digit and move to the next digit.
3. Press SELECT after changing the last digit to save this setting.
Apr 02 Genicom Publication No. GEG-99141

7-18 GENICOM Intelliprint cL160 User GuideSystem Menu
Job TimeoutThis submenu allows you to increase or decrease the time limit (in seconds) for PostScript jobs. A 0 setting indicates no timeout. This setting applies only to PostScript jobs.
0 0 - 99999 1. Press NEXT or PREVIOUS to increase or decrease each digit of the five-digit number.
2. Press SELECT set one digit and move to the next digit.
3. Press SELECT after changing the last digit to save this setting.
Jam RecoveryThis submenu allows you to turn jam recovery on or off.
On OnOff
1. Press NEXT or PREVIOUS to toggle between ON and OFF.
2. Press SELECT to save this setting.
Hex PrintThis submenu allows you to print hexadecimal characters.
Off OnOff
1. Press NEXT or PREVIOUS to toggle between ON and OFF.
2. Press SELECT to save this setting.
Toner OutThis submenu allows you to specify whether the printer should stop or continue when out of toner.
Stop StopContinue
1. Press NEXT or PREVIOUS to toggle between STOP and CONTINUE.
2. Press SELECT to save this setting.
Submenus Default Setting Available Settings Procedure for Changing Setting
Publication No. GEG-99141 Genicom Apr 02

GENICOM Intelliprint cL160 User Guide 7-19Quality Menu
Quality Menu The Quality Menu provides access to the printer settings that are related to print quality. Use the following procedure to enter the Quality Menu:
1. Press the MENU button on the control panel.
2. Press the NEXT button until the text “Quality Menu” is shown on the second line of the display.
3. Press the SELECT button to enter the system menu.
4. Press the NEXT button to move through the submenus: Resolution, Enhancement, Toner Saver, and Print Density.
5. Press the SELECT button to enter a submenu.
6. Use the procedures in the following table to access and change the system settings:
Color MenuThe Color Menu contains the settings related to the quality of printed color.. Use the following procedure to enter the Color Menu:
1. Press the MENU button on the control panel.
2. Press the NEXT button until the text “Color Menu” is shown on the second line of the display.
3. Press the SELECT button to enter the system menu.
4. Press the NEXT button to move through the submenus: Screening Mode, Color Rendering, Color Mgmt.
5. Press the SELECT button to enter a submenu.
Submenus Default Setting Available Settings Procedure for Changing Setting
ResolutionThis submenu allows you to set the resolution (dpi).
600 dpi 600 dpi1200 dpi
1. Press NEXT or PREVIOUS to scroll through the available resolutions.
2. Press SELECT to choose and set the dpi.
Toner SaverThis submenu allows you to choose from several toner-saving settings.
Off OffOn
1. Press NEXT or PREVIOUS to scroll through the available toner settings.
2. Press SELECT to choose and save this setting.
Print DensityThis submenu allows you to specify the print density.1 represents the lightest print density, while 7 represents the darkest print density.
5 Numbers 1-7 1. Press NEXT or PREVIOUS to scroll through the available print density settings.
2. Press SELECT to choose and save this setting.
Apr 02 Genicom Publication No. GEG-99141

7-20 GENICOM Intelliprint cL160 User GuideColor Menu
Use the procedures in the following table to access and change the system settings:
Submenus Default Setting Available Settings Procedure for Changing Setting
Screening ModeThe screening mode setting determines the method used to produce the various tones to be printed. Enhanced screening the default, which may reproduce finer detail in photographic images. If you experience print quality problems in photographic images, select the "normal" screening.This menu allows you to set the fine detail printing.
Enhanced NormalEnhanced
1. Press NEXT or PREVIOUS to scroll through the available selections.
2. Press SELECT to choose and set the screening mode.
Publication No. GEG-99141 Genicom Apr 02

GENICOM Intelliprint cL160 User Guide 7-21Color Menu
Color RenderingThis submenu allows you to choose from several color settings. Depending on the type of printing you do, this setting should be set to an appropriate value
Photographic Photographic:This setting will print the most realistic photographic images.Presentation:This setting is best suited when printing Business Graphics, Presentations, etc. This setting places emphasis on bold, saturated colors.Logo Art:When absolute color fidelity is important, as when corporate logos and the like are being printed, this setting will yield the greatest color fidelity. Colors that not possible to accurately produce will be remapped to the closest possible color.Proofing: This setting is very similar to the Logo Art setting, but the colors will be shifted by the color of the media on which you are printing.
1. Press NEXT or PREVIOUS to scroll through the available color rendering settings.
2. Press SELECT to choose and save this setting.
Submenus Default Setting Available Settings Procedure for Changing Setting
Apr 02 Genicom Publication No. GEG-99141

7-22 GENICOM Intelliprint cL160 User GuideColor Menu
Color ManagementThis submenu allows you to enable automatic color correction when printer color documents in RGB format.
On OffWith this setting set to Off, RGB colors are internally converted to their CMYK equivalent and are then placed on the paper. It is possible that the colors that print will be different than what you see on your screen.
OnWith this setting set to On, the RGB colors are processed by the printer's internal Color Management system before being placed on the page. The ColorRendering menu setting is used to determine the exact color translations performed. This setting will yield printed colors that are as true as possible to what you see on your screen.
1. Press NEXT or PREVIOUS to scroll through the available settings.
2. Press SELECT to choose and save this setting.
Submenus Default Setting Available Settings Procedure for Changing Setting
Publication No. GEG-99141 Genicom Apr 02

GENICOM Intelliprint cL160 User Guide 7-23Functions Menu
Functions MenuThe Functions Menu provides access to several printer functions that can supply you with informa-tion about the printer and its settings. Use the following procedure to enter the Functions Menu:
1. Press the MENU button on the control panel.
2. Press the NEXT button until the text “Functions Menu” is shown on the second line of the display.
3. Press the SELECT button to enter the system menu.
4. Press the NEXT button to move through the available functions: Reset Printer, Print Summary, Print test, and Print Fonts.
5. Use the procedures in the following table to execute the functions:
FLASH Menu
NOTE: This menu will only appear if an optional FLASH DIMM has been installed in the FLASH DIMMslot. Consult the documentation that came with your FLASH DIMM for detailed installation andusage instructions.
The FLASH Menu provides access to the printer settings that are related to the optional FLASH DIMM. Use the following procedure to enter the FLASH Menu:
1. Press the MENU button on the control panel.
2. Press the NEXT button until the text “FLASH Menu” is shown on the second line of the display.
3. Press the SELECT button to enter the system menu.
4. Press the NEXT button to move through the submenus: Print, Delete, Format FLASH, and FLASH summary.
5. Press the SELECT button to enter a submenu.
Functions Procedure for Executing Function
Reset PrinterThis function resets the printer.
Press SELECT to reset the printer.
Print SummaryThis function prints a list of all printer settings:
Press SELECT to print a summary of the printer settings.
Print TestThis function allows you to print a single test page or a continuous test page.
1. Press NEXT or PREVIOUS to toggle between SINGLE PAGE and CONTINUOUS.
2. Press SELECT to print the test page(s).
Print FontsThis function allows you to print Postscript or PCL font lists.
1. Press NEXT or PREVIOUS to toggle between POSTSCRIPT and PCL.
2. Press SELECT to select and print the specific fonts list.
Apr 02 Genicom Publication No. GEG-99141

7-24 GENICOM Intelliprint cL160 User GuideDISK Menu
6. Use the procedures in the following table to access and change the system settings:
.
DISK Menu
NOTE: This menu selection will only appear if an optional hard disk drive has been installed. Consult thedocumentation that came with your hard disk drive for detailed installation and usageinstructions.
The Disk Menu provides access to the printer settings that are related to the optional Hard Disk. Use the following procedure to enter the Disk Menu:
1. Press the MENU button on the control panel.
2. Press the NEXT button until the text “Disk Menu” is shown on the second line of the display.
3. Press the SELECT button to enter the system menu.
4. Press the NEXT button to move through the submenus: Print, Delete, Format Disk, and Disk Summary.
5. Press the SELECT button to enter a submenu.
Submenus Procedure for Changing Setting
PrintThis selection will read the selected file from FLASH and print it as if it were being received from one of the input ports.
1. Press NEXT or PREVIOUS to scroll through the files.
2. Press SELECT to choose and print the file.
DeleteThis selection will delete the selected disk file or directory from the FLASH DIMM. To delete an entire directory, you must first delete all the files within that directory.
1. Press NEXT or PREVIOUS to scroll through the files.
2. Press SELECT to choose and delete the file.
Format FlashThis selection will reformat the FLASH DIMM.
1. Press SELECT to reformat the FLASH DIMM.
Flash SummaryThis selection will print a page containing information about the installed FLASH DIMM including a list of all the current existing files and directories.
1. Press SELECT to print the FLASH summary.
WARNING! All files on the FLASH DIMM will be deleted if the Format FLASH function is selected.
Publication No. GEG-99141 Genicom Apr 02

GENICOM Intelliprint cL160 User Guide 7-25Status Menu
6. Use the procedures in the following table to access and change the system settings:
.
Status MenuIn addition to the main menus listed above, the printer also provides a status menu that allows you to view the current settings for the input and output trays and the toner cartridge. Use the follow-ing procedure to enter the Status Menu:
1. Press the STATUS button on the control panel.
2. Press the NEXT button to move through the submenus: MBF, Tray 1, Tray 2, Output Tray, and Toner.
3. Press the SELECT button to enter a submenu.
4. Use the procedures in the following table to view the status of the printer:
Submenus Procedure for Changing Setting
PrintThis selection will read the selected file from Disk and print it as if it were being received from one of the input ports.
1. Press NEXT or PREVIOUS to scroll through the files.
2. Press SELECT to choose and print the file.
DeleteThis selection will delete the selected disk file or directory from the hard disk. To delete an entire directory, you must first delete all the files within that directory.
1. Press NEXT or PREVIOUS to scroll through the files.
2. Press SELECT to choose and delete the file.
Format DiskThis selection will reformat the hard disk.
1. Press SELECT to reformat the hard disk.
Disk SummaryThis selection will print a page containing information about the installed hard disk, including a list of all the current existing files and directories.
1. Press SELECT to print the Disk summary.
WARNING! All files on the hard disk will be deleted if the Format Disk function is selected.
Submenu Procedure for Executing Function
MBFThis submenu allows you to view the current Media Size and Media Type for the MBF tray.
1. Press NEXT or PREVIOUS to scroll through the MEDIA SIZE, MEDIA TYPE, and LEVEL settings for the MBF.
2. Press SELECT to view a specific setting.
Apr 02 Genicom Publication No. GEG-99141
7-26 GENICOM Intelliprint cL160 User GuideStatus Menu
Tray 1This submenu allows you to view the current Media Size, Media Type, and Level for Tray 1.
1. Press NEXT or PREVIOUS to scroll through the media size, media type, and level settings for Tray 1.
2. Press SELECT to view a specific setting.
Tray 2 (optional)This submenu allows you to view the current Media Size, Media Type, and Level for Tray 2.
1. Press NEXT or PREVIOUS to scroll through the media size, media type, and level settings for Tray 2.
2. Press SELECT to view a specific setting.
Tray 3 (optional)This submenu allows you to view the current Media Size, Media Type, and Level for Tray 3.
1. Press NEXT or PREVIOUS to scroll through the media size, media type, and level settings for Tray 3.
2. Press SELECT to view a specific setting.
Output TrayThis submenu allows you to view the status of the face down tray.
1. Press SELECT to view the status of the Output Tray.
TonerPress SELECT to view the status of the toner cartridge.
Publication No. GEG-99141 Genicom Apr 02

GENICOM Intelliprint cL160 User Guide 7-27Status Menu
Apr 02 Genicom Publication No. GEG-99141

7-28 GENICOM Intelliprint cL160 User GuideStatus Menu
Publication No. GEG-99141 Genicom Apr 02

Apr 02
Chap
ter
8
Using DRAM DIMMs and Power-on Files
In this Chapter . . .
• “About this Chapter” on page 8-2
• “Installing DRAM Memory DIMMS” on page 8-2
• “Installing a FLASH DIMM Module” on page 8-5
• “Using the Power-On Files Feature” on page 8-7
Genicom Publication No. GEG-99141

8-2 GENICOM Intelliprint cL160 User GuideInstalling DRAM Memory DIMMS
About this ChapterThis chapter describes the procedures for installation of DRAM memory DIMMs and FLASH DIMM modules. Downloading software to the FLASH DIMM module is also discussed in this chapter.
Installing DRAM Memory DIMMS1. Ensure that the printer power switch is set to the OFF [ O ] position.
2. Disconnect the power cord from the wall outlet.
Publication No. GEG-99141 Genicom Apr 02

GENICOM Intelliprint cL160 User Guide 8-3Installing DRAM Memory DIMMS
3. Turn thumbscrews on controller assembly counterclockwise until loose and gently pull con-troller assembly towards you to remove from printer.
4. Carefully insert a DRAM DIMM which is compatible with your printer into any available DRAM DIMM slot as shown below. When properly seated, gently push down on the DIMM until the white braces close and snap onto the ends of the DIMM.
Apr 02 Genicom Publication No. GEG-99141

8-4 GENICOM Intelliprint cL160 User GuideInstalling DRAM Memory DIMMS
5. Reinstall the controller assembly. Once firmly in place, push and hand tighten the thumb-screws in a clockwise direction.
6. Connect the power cord to the wall outlet.
7. Turn the printer power switch to the ON [ I ] position.
Publication No. GEG-99141 Genicom Apr 02

GENICOM Intelliprint cL160 User Guide 8-5Installing a FLASH DIMM Module
Installing a FLASH DIMM Module1. Ensure that the printer power switch is set to the OFF [ O ] position.
2. Disconnect the power cord from the wall outlet.
3. Turn thumbscrews on controller assembly counterclockwise until loose and gently pull con-troller assembly towards you to remove from printer.
Apr 02 Genicom Publication No. GEG-99141

8-6 GENICOM Intelliprint cL160 User GuideInstalling a FLASH DIMM Module
4. Carefully insert a FLASH DIMM module in FLASH DIMM slot as shown below. When properly seated, gently push down on the DIMM until the white braces close onto the ends of the DIMM.
NOTE: To remove the FLASH DIMM, pull the white braces away from the ends of the DIMM until theDIMM snaps out of the slot.
5. Reinstall the controller assembly. Once firmly in place, push and hand tighten the thumb-screws in a clockwise direction.
Publication No. GEG-99141 Genicom Apr 02

GENICOM Intelliprint cL160 User Guide 8-7Using the Power-On Files Feature
6. Connect the power cord to the wall outlet.
7. Turn the printer power switch to the ON [ I ] position.
Using the Power-On Files Feature
Power-on Files DefinedIf an optional FLASH DIMM or hard disk drive is installed in your printer, your printer has the capability of storing additional power-on files which can be read and interpreted at power-on. See “FLASH Menu” on page 8-23 and “DISK Menu” on page 8-24
Power-on files can contain either PCL or PostScript language content. Examples of power-on files include soft fonts, and macro/overlay definitions. The FLASH DIMM can store approximately 8MB of file storage, the hard disk drive storage depends on the size of the drive that is installed in your printer.
NOTE: Power-on files are processed at power-on initialization only and not at the start of every printjob.
Optional control panel menu selections become available when either of these options are installed and power-on files are detected. See “FLASH Menu” on page 8-23 and “DISK Menu” on page 8-24
Apr 02 Genicom Publication No. GEG-99141

8-8 GENICOM Intelliprint cL160 User GuideUsing the Power-On Files Feature
NOTE: Contact the technical support team at your point of purchase for additional informationregarding loading and using power-on files.
Publication No. GEG-99141 Genicom Apr 02

GENICOM Intelliprint cL160 User Guide 8-9Using the Power-On Files Feature
Apr 02 Genicom Publication No. GEG-99141

8-10 GENICOM Intelliprint cL160 User GuideUsing the Power-On Files Feature
Publication No. GEG-99141 Genicom Apr 02

Apr 02
Appe
ndix
A
General Information
In this Chapter . . .
• “About this Appendix” on page A-2
• “Sources of Support” on page A-2
• “GENICOM LLC Worldwide Offices” on page A-3
• “GENICOM Part Numbers” on page A-4
Genicom Publication No. GEG-99141

A-2 GENICOM Intelliprint cL160 User GuideSources of Support
About this AppendixThis appendix provides information on how to contact GENICOM LLC for technical support, service, and repair issues, and also provides part numbers for the printer, options, and consumables.
Sources of SupportThere are several sources of Customer Support available to you, depending upon the type of assis-tance that you need.
Your GENICOM LLC VendorThe local vendor that you purchased the printer through may be best equipped to help you with printer problems. Your vendor has specially trained service technicians available to answer ques-tions, and also has equipment that is necessary to analyze printer problems.
Your Application VendorPrinting problems often have more to do with the application you are using than with the printer itself. Contact the manufacturer of the application in use for assistance in resolving such problems.
InternetThe GENICOM LLC server provides access to technical reports, new product announcements, a trade show schedule, and other general information about GENICOM LLC.
You can access the GENICOM LLC server via any one of the many world-wide web browsers avail-able to Internet users. The GENICOM LLC home page is http://www.genicom.com.
GENICOM LLC Technical SupportGENICOM LLC Technical Support is available M-F, 8:00 am-8:00 pm, Eastern Time, (540) 949-1031(US). You can also fax questions to GENICOM Technical Support at (540) 949-1505 (US). Please indicate whether you would like a fax or telephone reply.
If you call for assistance, have the following information ready so our technicians can help you more quickly—also include this information with any question that you fax to GENICOM Tech-nical Support:
• Your phone number, fax number, and shipping address
• A description of the problem
• The printer model
• The type of host computer you are using
• The type and version of operating system you are using
• The interface you are using, and, if serial, the protocol
• The application and version you are using
• The emulation you are using
• Your printer firmware version (listed on the status pages)
Publication No. GEG-99141 Genicom Apr 02

GENICOM Intelliprint cL160 User Guide A-3GENICOM LLC Worldwide Offices
GENICOM LLC ServiceIf you have a hardware problem you cannot resolve, contact GENICOM LLC Service at (877) 547-7250.
Other important GENICOM phone numbers:
• GENICOM Sales - (800) 436-4266
• GENICOM Parts - (800) 436-4266 x 2 x 3, Parts ID: (800) 436-4266 x 2 x 4
• GENICOM Supplies - (800) 436-4266 x 2 x 1
GENICOM LLC Worldwide Offices
GENICOM United States
GENICOM LLCCorporate Headquarters
GENICOM LLC4500 Daly Drive, Suite 100Chantilly, VA 20151Telephone: 703-633-8700Fax: 703-222-7630
Document Solutions(Printer Products)
Document SolutionsOne Solutions WayWaynesboro, VA 22980-1999Telephone: 800-436-4266 or 540-949-1000Fax: 540-949-1392
GENICOM Worldwide
GENICOM Australia GENICOM Pty. Ltd.Level 313-15 Lyon Park RoadNorth Ryde NSW 2113Telephone: 61 2 9889 1900Fax: 61 2 9889 1311
GENICOM Belgium GENICOM BelgiumCPG International N.V.c/o Airport Business CenterVuurberg 80B-1831 Machelen, BelgiumTelephone: 32 2 712 6270Fax: 32 2 720 5811
GENICOM France GENICOM S.A.CPG International S.A.150, Avenue Joseph KesselParc de la Grande Ile78960 Voisins-le-BretonneauxTelephone: 33 01 61 08 59 00Fax: 33 01 61 08 59 01
Apr 02 Genicom Publication No. GEG-99141

A-4 GENICOM Intelliprint cL160 User GuideGENICOM Part Numbers
GENICOM Part NumbersBelow lists the part numbers for cL160 printers, options, and consumables. To order parts, contact your local authorized GENICOM dealer.
GENICOM Germany GENICOM GmbHRobert-Bosch-StraBe 5263225 Langen/GermanyTelephone: 49 0 61 03/706 59-0Fax: 49 0 61 03/706 59-59
GENICOM GMBHLilienthalstrasse 2585399 Hallbergmoos, GermanyTelephone: 49 811 8060Fax: 49 811 80626
GENICOM Italy GENICOM SpACPG International S.p.A.Viale G. Richard, 7-Torre F20143 MilanoItalyTelephone: 39 02 818731Fax: 39 02 8139008
GENICOM The Netherlands GenicomEuropalaan 6a5232 BC 's-HertogenboschThe NetherlandsTelephone: 31 736458150Fax: 31 736446894
GENICOM Singapore GENICOM Singapore15 Beach Road #04-09Beach CentreSingapore 189677, SingaporeTelephone: 65 338 3438Fax: 65 338 7336
GENICOM U.K. Compuprint GENICOM InternationalAnglesey HouseFarnborough RoadALDERSHOTHampshire GU11 3BJUnited KingdomTelephone: 44 1252 357830Fax: 44 1252 357860
Publication No. GEG-99141 Genicom Apr 02

GENICOM Intelliprint cL160 User Guide A-5GENICOM Part Numbers
Printers
Paper Handling Options
Network Interfaces
Controller Options
User Publications
GENICOM Part Number Description
CL160N-CA Intelliprint CL160 Color Laser Printer, Ethernet, US, 110V
CL160N-CC Intelliprint CL160 Color Laser Printer, Ethernet, CE, 220V
GENICOM Part Number Description
CL160F-TL CL160 High Capacity Feeder, 500 Sh (HCF)
CL160F-TE CL160 Univ Cass, 500 Sh A4/LTR
GENICOM Part Number Description
MLXXXN-EA Ethernet 10/100BaseT
MLXXXF-SI RS-232C/422 Serial Option
GENICOM Part Number Description
MLXXXM-128 128MB Memory DIMM
MLXXXF-FP 16MB FLASH DIMM for PostScript
MLXXXF-HD Hard Disk Option
MLXXXF-BP2 Barcodes Plus
MLXXXF-BE2 Barcodes Extended
GENICOM Part Number Description
GEG-99142 cL160 Electronic LibraryContents include but are not limited to the following documents:
• cL160 User Guide
• Ethernet Network Interface Installation Guide (NorthAmerican Version, includes English only)
• Ethernet Network Interface Reference Guide
• Hard Disk Option Guide
• Serial Option Guide
Apr 02 Genicom Publication No. GEG-99141

A-6 GENICOM Intelliprint cL160 User GuideGENICOM Part Numbers
Consumables
◆ ◆ ◆
GEG-99143 cL160 Installation Guide(North American Version, includes English only)*also available on the Electronic Library CD-ROM
GEG-99144 cL160 Installation Guide(International Version, includes English, French, German, Italian, and Spanish.)*also available on the Electronic Library CD-ROM
GENICOM Part Number Description
CL160X-AA CL160 Black Toner Cartridge 8.5K
CL160X-AY CL160 Yellow Toner Cartridge 6K -
CL160X-AM CL160 Magenta Toner Cartridge 6K
CL160X-AC CL160 Cyan Toner Cartridge 6K
CL160X-AG Fuser Unit (110v) 100K Pages
CL160X-BG Fuser Unit (220v) 100K Pages
CL160X-PH Print Head Cartridge 30K Pages
CL160X-BT BTR (Bias Transfer Roll) 25K Pages
Publication No. GEG-99141 Genicom Apr 02

Apr 02
Appe
ndix
B
Safety Notes and Regulatory Compliance
In this Chapter . . .
• “About this Appendix” on page B-2
• “Safety Notes” on page B-2
• “Regulatory Compliance” on page B-2
Genicom Publication No. GEG-99141

B-2 GENICOM Intelliprint cL160 User GuideSafety Notes
About this AppendixThis appendix lists important safety precautions and identifies the applicable regulatory compli-ances of your printer.
Safety Notes• Be sure to switch off and unplug the printer before accessing the interior of the printer for
cleaning, maintenance, or fault clearance. Accessing the interior of a live machine exposes youto the risk of electric shock.
• Do not place the printer in a hot, humid, dusty, or poorly ventilated environment. Prolongedexposure to these adverse conditions may cause fire or expose you to electric shock.
• The printer is capable of operating normally within the following environmental limits:
• Temperature range: 50°F -95°F (10°C -35°C) At high temperatures (95°F /35°C), humidity should be at or below 70%.
• Humidity range: 15%-85% (no condensation) At maximum humidity (85%), temperature should be at or below 82°F(28°C).
• Stop operation immediately if your printer produces smoke, excessive heat, unusual noise, orsmell. These conditions can indicate or result in a fire. Immediately switch off and unplug theprinter, and contact your point of purchase.
• The fuser becomes very hot in normal operation. If a paper jam has occurred, turn the poweroff and wait at least 10 minutes before removing the drum cartridge and touching the fusersection.
Regulatory Compliance
Safety ComplianceThis product conforms the following safety standards:
• UL1950
• CSA C22.2 No. 950
• EN 60950
• IEC 950
• 73/23/EEC
Class 1 Laser Device and CDRH ComplianceThis printer is certified as a Class 1 laser product under the U.S. Department of Health and Human Services (DHHS) Radiation Performance Standard according to the Radiation Control for Health and Safety Act of 1968. This certification indicates that the printer does not emit hazardous laser radiation. Since radiation emitted inside the printer is completely confined within the protec-tive housings and external covers, the laser beam cannot escape from the machine during any phase of user operation.
The Center for Devices and Radiological Health (CDRH) of the U.S. Food and Drug Administra-tion implemented regulations for laser products on August 1976. These regulations apply to laser products marketed in the United States. The label on the printer indicates compliance with the CDRH regulations and must be attached to laser products marketed in the United States.
Publication No. GEG-99141 Genicom Apr 02

GENICOM Intelliprint cL160 User Guide B-3Regulatory Compliance
EMC ComplianceClass B EquipmentThis equipment has been tested and found to comply with the limits for a Class B digital device, pursuant to Part 15 of FCC rules. These limits are designed to provide reasonable protection against harmful interference in a residential installation. Changes or modifications not expressly approved by the party responsible for compliance could void the user’s authority to operate the equipment.
If your machine is a 220-240V model, there is no need to attach a separate earth line since the earth connection is incorporated in the power line. Plug it into a properly rated outlet.
The use of a non-shielded interface cable with the reference devices is prohibited. Shielded interface cables must not exceed the following limitations:
• The length of the IEEE 1284 parallel interface cable must be 50 feet (15 meters) or less.
• The length of the Ethernet interface cable must be 328 feet (100 meters) or less for type 10/100BASE-2 or 185 meters (607 feet) or less for type 10/BASE-T.
• The length of the power cord must be 10 feet (3 meters) or less.
This equipment generates, uses, and can radiate radio frequency energy. If the equipment is not installed and used in accordance with the instructions, it may cause harmful interference to radio communications. However, there is no guarantee that interference will not occur in a particular installation. If this equipment does cause interference to radio or television reception, which can be determined by turning the equipment off and on, try to correct the interference using one or more of the following measures:
• Reorient or relocate the receiving antenna.
• Increase the separation between the equipment and receiver.
• Connect the equipment and the reciever to outlets that are on different circuits.
• Consult with the dealer or an experienced radio/television technician to help.
• Always use the power cord provided with your machine. When an extension cord is required,always use a properly rated cord.
• In countries other than the United States, please contact your point of purchase.
Other EMC StandardsThis product also conforms to the following EMC standards:
• CNS 13438
• VCCI V-3/97.04
• AS/NZS 3548:1995 including A1:1997 and A2:1997
• EN55022: 1994 including A1:1995 and A2:1997
• FCC Part 15, Subpart B (CFR 47, 1995)
• CISPR22: 1993 including A1:1995 and A2:1996
◆ ◆ ◆
Apr 02 Genicom Publication No. GEG-99141

B-4 GENICOM Intelliprint cL160 User GuideRegulatory Compliance
Publication No. GEG-99141 Genicom Apr 02

Apr 02
Appe
ndix
C
Printing Font Summaries
In this Chapter . . .
“About this Appendix” on page C-2“Printing a Font Summary” on page C-2“PostScript Font Summary” on page C-3“PCL Font Summary” on page C-7
Genicom Publication No. GEG-99141

C-2 GENICOM Intelliprint cL160 User GuidePrinting a Font Summary
About this AppendixThis appendix explains the procedure for printing summaries of PCL or PostScript fonts installed in your printer.
Printing a Font SummaryYour printer has the capability of printing summaries of all installed PCL or PostScript fonts. To print a Font Summary, follow these steps:
1. From the Ready status, press MENU, the control panel display will read:Menu
Paper Menu
2. Press PREVIOUS or NEXT until the display reads:Menu
Functions
3. Press SELECT, the display will read:Functions
Reset Printer
4. Press NEXT or PREVIOUS until the display reads:Functions
Print Fonts
5. Press SELECT, the display will read:Print Fonts
PCL Fonts
NOTE: You may toggle between PCL Fonts and Postscript Fonts using the PREVIOUS or NEXTpush-buttons.
6. Press SELECT. A multi page Font Summary will print.
Examples of PCL and PostScript Font Summaries follow.
Publication No. GEG-99141 Genicom Apr 02

GENICOM Intelliprint cL160 User Guide C-3PostScript Font Summary
PostScript Font Summary
Apr 02 Genicom Publication No. GEG-99141

C-4 GENICOM Intelliprint cL160 User GuidePostScript Font Summary (cont’d)
PostScript Font Summary (cont’d)
Publication No. GEG-99141 Genicom Apr 02

GENICOM Intelliprint cL160 User Guide C-5PostScript Font Summary (cont’d)
PostScript Font Summary (cont’d)
Apr 02 Genicom Publication No. GEG-99141

C-6 GENICOM Intelliprint cL160 User GuidePostScript Font Summary (cont’d)
PostScript Font Summary (cont’d)
Publication No. GEG-99141 Genicom Apr 02

GENICOM Intelliprint cL160 User Guide C-7PostScript Font Summary (cont’d)
PCL Font Summary
Apr 02 Genicom Publication No. GEG-99141

C-8 GENICOM Intelliprint cL160 User GuidePCL Font Summary (cont’d)
PCL Font Summary (cont’d)
Publication No. GEG-99141 Genicom Apr 02

GENICOM Intelliprint cL160 User Guide C-9PCL Font Summary (cont’d)
Apr 02 Genicom Publication No. GEG-99141

C-10 GENICOM Intelliprint cL160 User GuidePCL Font Summary (cont’d)
Publication No. GEG-99141 Genicom Apr 02

Apr 02
Appe
ndix
D
Frequently Used Ethernet CommandsIn this Chapter . . .
• “About this Appendix” on page D-2
• “Server Commands” on page D-3
• “Protocol Commands” on page D-6
Genicom Publication No. GEG-99141

D-2 GENICOM Intelliprint cL160 User Guide
About this AppendixThis appendix lists some of the most frequently-used commands of the Print Server command set. More information about the command set, including additional options, can be found in the Ethernet Network Interface Manual on the Electronic Library CD-ROM.
Please note the following before continuing:
• In this command set appendix the NIC is referred to as the Server.
• Commands are divided into Server (general), Port, and Protocol sections. Within each sec-tion, commands are listed alphabetically.
• Commands may require privileged user status. Enter Set Privileged, then enter the privi-leged password when prompted.
• When you enter a Define or Purge command, you must reboot the Server for the commandto take effect.
• When the abbreviated syntax “{EN|DIS}” is shown, you must choose either Enabled or Dis-abled to complete the command.
Each section lists additional information needed to use the command table in that section.
Publication No. GEG-99141 Genicom Apr 02

GENICOM Intelliprint cL160 User Guide D-3Server Commands
Server CommandsFrequently-used Server Commands
Command Option(s) Description
DEFINE SERVER BOOTP {EN|DIS} Enables or disables querying for a BOOTP host at system boot time.
DEFINE SERVER DHCP {EN|DIS} Enables or disables querying for a DHCP host at system boot time.
DEFINE SERVER GATEWAY ipaddress Specifies the host to be used as a TCP/IP gateway to forward packets between networks. Enter an IP address.
DEFINE SERVER INCOMING option
BOTH Enables incoming LAT and Telnet connections.
LAT Enables only incoming LAT connections.
NONE Disables incoming connections.
TELNET Enables only incoming Telnet connections.
PASSWORD Causes the server to prompt for a password for all incoming connections.
NOPASSWORD Allows connections to be established without prompting for a password.
DEFINE SERVER IPADDRESS ipaddress Sets the Server’s network IP address.
DEFINE SERVER LOADHOST ipaddress Specifies the TCP/IP host from which the Server requests its run-time code.
DEFINE SERVER LOGIN PASSWORD Sets a new password that will be required before incoming logins are accepted. You will be prompted for the new password (up to 6 alphanumeric characters, case-insensitive).
DEFINE SERVER NAME “newname” Specifies a new name for the Server. Names are restricted in length; generally a name of 11 or fewer characters is permissible.
DEFINE SERVER NETWARE LOADHOST server Specifies the NetWare host from which the Server requests its run-time code. Enter a file server name of up to 11 characters.
DEFINE SERVER PRIVILEGED PASSWORD Sets a new password that will be required for privileged user status. You will be prompted for the new password (up to 6 alphanumeric characters, case-insensitive).
DEFINE SERVER RARP {EN|DIS} Enables or disables querying for a RARP host at system boot time.
Apr 02 Genicom Publication No. GEG-99141

D-4 GENICOM Intelliprint cL160 User GuideServer Commands
DEFINE SERVER SOFTWARE “filename” Specifies the name or path (TCP) of the software download file. The filename can be up to 11 characters, and the pathname can be up to 26. The Server will add a “.SYS” extension.
DEFINE SERVER SUBNET MASK ipmask Specifies the subnet mask to be used for the Server. The ipmask must be in n.n.n.n format.
HELP option <nothing> Displays a list of top-level (general) Help topics.
<keyword> Displays information about the keyword(s) entered. Multiple keywords must be specified in the order they occur in a command.
DEFINE SERVICE “name” PORT num Creates a new service and associates it with the specified port.
DEFINE SERVICE “name” option
APPLETALK {EN|DIS} Toggles whether the named service can be used to service networks running the specified protocol. RTEL applies to TCP/IP networks.
LAT {EN|DIS}
NETWARE {EN|DIS}
RTEL {EN|DIS}
DEFINE SERVICE “name” option
BANNER {EN|DIS} When Enabled, causes the Server to print a banner page before jobs.
BINARY {EN|DIS} When Enabled, the Server will not process data passed through the service. This characteristic should be enabled when printing PCL data.
EOJ string Causes the Server to send an end-of-job string to the attached device after every job. Enter an end string or the word none.
FORMFEED {EN|DIS} When Enabled, causes the Server to append a formfeed to the end of LPR print jobs.
PSCONVERT {EN|DIS} When Enabled, causes the Server to place a PostScript wrapper around each job.
SOJ string Causes the Server to send a start-of-job string to the attached device before every job. Enter a start string or the word none.
Frequently-used Server Commands
Command Option(s) Description
Publication No. GEG-99141 Genicom Apr 02

GENICOM Intelliprint cL160 User Guide D-5Server Commands
DEFINE SERVICE “name” option
TCPPORT string Specifies a raw TCP listener socket for the service. Enter a socket number (4000 to 4999) or the word none.
TELNETPORT string Specifies a TCP listener socket for the service. Unlike TCPport, this option performs Telnet IAC interpretation on the data stream. Enter a socket number (4000 to 4999) or the word none.
INITIALIZE option DELAY num Schedules a reboot after num minutes. Enter a value from 0 to 120.
CANCEL Cancels an impending initialization.
FACTORY Reboots the server to its factory default settings.
NOBOOT Forces the Server to stop in Boot Configuration Mode rather than fully rebooting.
RELOAD Forces the Server to download new operational code and reprogram its flash-ROM.
LOGOUT option <nothing> Logs out the current port (the port that issued the command).
PORT num Logs out the specified port.
PURGE SERVICE option
LOCAL Removes the definitions of all local services.
“service” Removes the definition of the specified service.
SET PRIVILEGED Enters privileged mode, provided the user enters the proper privileged password when prompted.
{SHOW|MONITOR} QUEUE Displays the status of Server queues once (Show) or continually every three seconds (Monitor).
{SHOW|MONITOR} SERVER Displays Server information once (Show) or continually every three seconds (Monitor).
{SHOW|MONITOR} SERVICE option
<nothing> Displays characteristics about all configured services once (Show) or continually every three seconds (Monitor).
“service” Displays only characteristics related to the named service.
ZERO COUNTERS option
ALL Zeroes all port, node, and Server counters.
PORT num Zeroes port counters for the specified port.
Frequently-used Server Commands
Command Option(s) Description
Apr 02 Genicom Publication No. GEG-99141

D-6 GENICOM Intelliprint cL160 User GuideProtocol Commands
Protocol CommandsIn the following table, PROTO is an abbreviation for the optional keyword PROTOCOL
Protocol Commands
Command Option(s) Description
DEFINE PROTO APPLETALK option
{EN|DIS} Enables or Disables the AppleTalk protocol for the Server.
ZONE newzone Places the Server in a zone other than the default.
DEFINE PROTO IP option
{EN|DIS} Enables or Disables the TCP/IP protocol for the Server.
GATEWAY ipaddr Same as “DEFINE SERVER GATEWAY ipaddress” on page D-3.
IPADDRESS ipaddr Same as “DEFINE SERVER IPADDRESS ipaddress” on page D-3.
LOADHOST ipaddr Same as “DEFINE SERVER LOADHOST ipaddress” on page D-3.
NAMESERVER ipaddr Specifies the IP address of the host that will resolve text host names into their numeric equivalents for TCP/IP connection attempts.
DEFINE PROTO LAT option
{EN|DIS} Enables or Disables the LAT protocol for the Server.
DEFINE PROTO NETWARE option
{EN|DIS} Enables or Disables the NetWare (IPX) protocol for the Server.
DSCONTEXT string Configures the NetWare Directory Services context in which the Server is located. For more information about NDS contexts, see your NDS documentation.
DSLICENSE string Configures the NetWare Directory Services license needed to enable NDS on your Server. Enter the license string obtained from your dealer or Lantronix.
DSTREE string Configures the NetWare Directory Services tree in which the Server is located. For more information about NDS trees, see your NDS documentation.
DEFINE PROTO NETWARE ENCAPSULATION option {EN|DIS}
NATIVE Configures the Server to use the “native mode” frame format.
ETHER_II Configures the Server to use Ethernet v2 frame format.
802_2 Configures the Server to use 802.2 frame format with NetWare SAPs.
SNAP Configures the Server to use 802.2 frame format with SNAP SAPs.
Publication No. GEG-99141 Genicom Apr 02
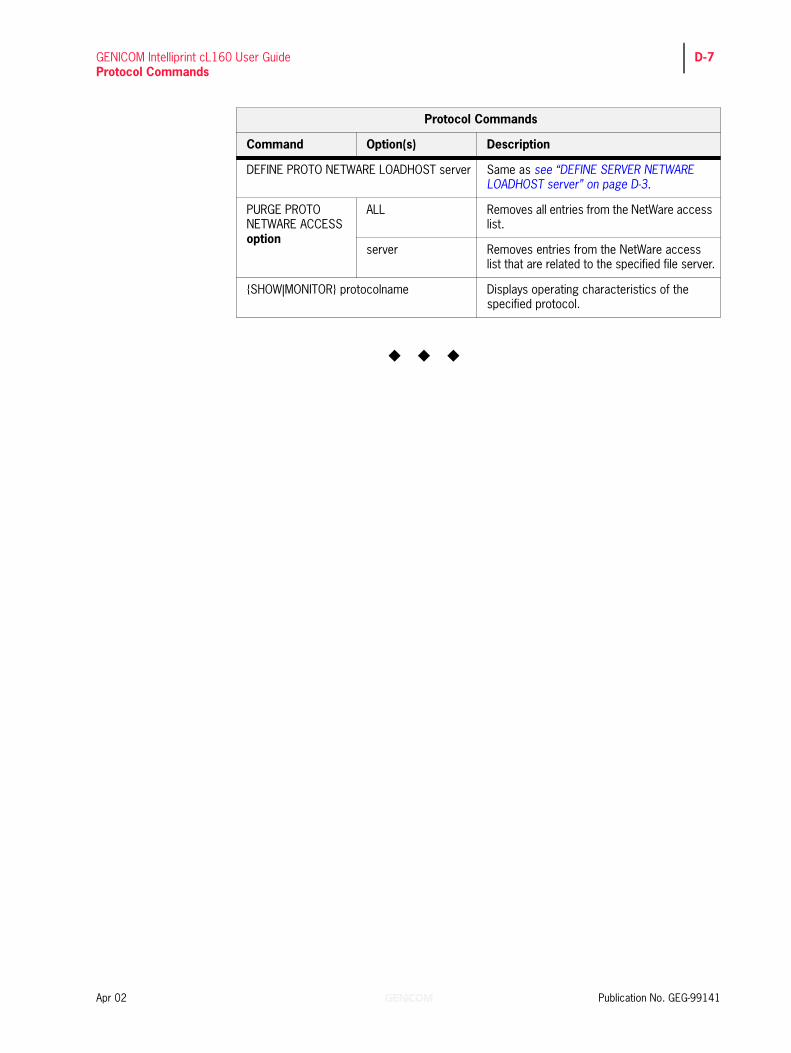
GENICOM Intelliprint cL160 User Guide D-7Protocol Commands
◆ ◆ ◆
DEFINE PROTO NETWARE LOADHOST server Same as see “DEFINE SERVER NETWARE LOADHOST server” on page D-3.
PURGE PROTO NETWARE ACCESS option
ALL Removes all entries from the NetWare access list.
server Removes entries from the NetWare access list that are related to the specified file server.
{SHOW|MONITOR} protocolname Displays operating characteristics of the specified protocol.
Protocol Commands
Command Option(s) Description
Apr 02 Genicom Publication No. GEG-99141

D-8 GENICOM Intelliprint cL160 User GuideProtocol Commands
Publication No. GEG-99141 Genicom Apr 02