general methods for creating tensegrity towers, arches...
TRANSCRIPT

GENERAL METHODS FOR CREATING
TENSEGRITY TOWERS, ARCHES, BRIDGES AND
ROOFS
YIYI ZHOU
(Master of Engineering)
2007
RMIT

GENERAL METHODS FOR CREATING TENSEGRITY
TOWERS, ARCHES, BRIDGES AND ROOFS
A thesis submitted in fulfilment of the requirements for the degree of
Master of Engineering
YIYI ZHOU B.Eng.
School of Civil, Environmental and Chemical Engineering
RMIT University
July 2007

Declaration
I certify that except where due acknowledgement has been made, the work is
that the author alone; the work has not been submitted previously, in whole
or in part, to quality for any other academic award; the content of the thesis
is the result of work which has been carried out since the official
commencement date of the approved research program; and, any editorial
work, paid or unpaid, carried out by a third party is acknowledged.
______________
______________

ACKNOWLEDGEMENTS
I wish to express my sincere gratitude to my supervisor, Prof. Mike Xie, who has given
me abundant support to my research work over the past two years. He is always
encouraging, patient and responsive. His advice has given me a lot of inspirations in my
research works. I am really impressed by and benefited from his guidance in structural
optimisation, computer programming and technical writing, which has enabled me to
finish my project successfully. I also wish to express my gratitude to my second
supervisor, Dr Xiaodong Huang, for his cordial help in my thesis writing and computer
programming.
I would also like to thank other members of the Innovative Structure Group. We have
shared our ideas and experiences every week and I have received many good suggestions,
especially during the investigation of the observation tower proposal for the Eureka
building. I wish to thank Dr. Yew Chin Koay and Mr. Jiwu Tang for providing valuable
suggestions and assistance in constructing the physical models. I also wish to thank Mr
Dominik Holzer for rendering the computer images of the Eureka building with the
curved reticulated tower for me.
It is in the excellent School of Civil, Environmental and Chemical Engineering, RMIT
University that my postgraduate research has been carried out. The School has provided
me with high quality research resources and facilities and a positive study environment. I
will never forget the research experience in RMIT University.
Finally I would like to acknowledge my family in China: my parents and my
grandmother. They have given me emotional and financial support during these years.
Especially I wish to thank my mother for her understanding, encouragement and constant
love. She is always the most important person in my life.

CONTENTS
ABSTRACT 1
Chapter 1 INTRODUCTION 2
1.1 Background 2
1.2 Objectives 3
1.3 Layouts 3
Chapter 2 LITERATURE RIVIEW 5
2.1 History and definition 5
2.2 Characteristics of tensegrity structures 7
2.2.1 Self equilibrium and self stress 8
2.2.2 Compression inside tension 8
2.3 Examples 9
2.3.1 Snelson’s triangle tensegrity structure 10
2.3.2 Tensegrity cable domes 10
2.3.3 Weaving tower structure 11
2.4 Conclusions 13
Chapter 3 CREATING TENSEGRITY TOWER, ARCH AND BRIDGE
14
3.1 Introduction 14
3.2 Tensegrity tower 14

3.2.1 Tensegrity tower cell 14
3.2.2 Computer programming 15
3.2.3 Several topologies in physical modelling 18
3.2.4 Three level tensegrity tower model 22
3.2.5 Thirteen level tensegrity tower model 23
3.2.6 Conclusion 25
3.3 Tensegrity arch 25
3.4 Tensegrity bridge 27
3.5 Conclusions 29
Chapter 4 HEXAGON TENSEGRITY ROOF 30
4.1 Introduction 30
4.2 Tensegrity roof structure 30 4.2.1 Creating tensegrity roof cells 31
4.2.2 Shape control 34
4.2.3 Pure tensegrity (no column) design 36
4.2.4 Physical modelling 38
4.3 Comparison with other tensegrity roofs 42
4.4 Conclusion 43
Chapter 5 ZIG-ZAG TENSEGRITY TOWER AND PROPOSAL FOR
EUREKA COMMUNICATION TOWER 44
5.1 Zig-zag tensegrity tower structures 45
5.1.1 Construction of zig-zag tower 45
5.1.2 Comparison of two tower structures 46
5.1.3 Computer programming and physical modelling 47

5.2 Observation tower proposal for Eureka building 51
5.2.1 Project objective 51
5.2.2 Rigid zig-zag tower proposal 52
5.2.3 Curved zig-zag tower proposal 53
5.2.4 Reticulated tower proposal 55
5.2.5 Design of staircase for the tower 56
5.2.6 Physical modelling 57
5.3 Conclusion 60
Chapter 6 CONCLUSIONS 62
6.1 General conclusions 62
6.2 Objectives achieved 62
REFERENCES 64
APPENDIX 66

1
ABSTRACT
Tensegrity is a structural system constructed of tensile cables and compressive bars. This
thesis proposes several general methods for creating tensegrity structures. The author has
developed new methods for creating specific tensegrity cells and the corresponding
computer code. Furthermore, the author has constructed various physical models to
validate the proposed methods. A proposal for an observation tower on top of the Eureka
building in Melbourne has also been devised by the author.
Over the past four decades, Snelson and his followers have built a wide range of tensegrity
structures. Some of the best examples, such as the famous Needle Tower, can be found at
Snelson’s excellent website (Snelson, 2002). The first method proposed by the author is a
generalization of Snelson’s method for creating tensegrity towers. Most of Snelson’s
towers have three or four bars at each level. This thesis shows that using the same
methodology it is possible to construct towers and arches with any number of bars at each
level. Various examples obtained from using the proposed method are presented including
several towers, an arch, and a cable-stayed bridge with two tensegrity towers.
The second method presented in the thesis describes the author’s novel idea for creating
tensegrity roofs using hexagon cells. It actually follows the same theme of attempting to
devise a method which is generally applicable for creating a whole class of tensegrity
structures. The proposed method is capable of generating tensegrity stadium roofs of
arbitrary geometries. Two physical models have been constructed by the author to illustrate
the simple concept and its general applicability.
Compared with the previous tensegrity towers, the zig-zag tower presented in the third part
of the thesis has a specific rigidity characteristic. The zig-zag tower structure has been
created for devising an observation tower structure on top of the Eureka tower in
Melbourne. The author has invented different structures utilizing rigid and curved bars.
Several options are given in the final proposal. Two physical models of the reticulated
curved bar tower structure have been constructed.
It is worth pointing out that this thesis has focused on the conceptual designs of various
forms of tensegrity structures. A detailed numerical analysis of the forces and
displacements in such structures, while extremely important, is beyond the scope of this
thesis and is recommended for future research.

2
Chapter 1 INTRODUCTION 1.1 Background
Tensegrity is a structural system constructed of tensile cables and compressive bars. It
corresponds to a specific field of forces, in a stable equilibrium, with a very specific
distribution of the components which are always inside a continuum of tensions (Motro,
2003). The memorable quotation from Heraclites who claimed that: “The universe is a
harmony of tensions” and explanation by Fuller “Islands of compression in an ocean of
tensions” (1961) both describe the specific characteristics of this special type of structure.
Tensegrity structure was developed for several decades ago. Nevertheless, the concept is
not completed. How can a tensegrity system be properly studied? What design process do
we need to follow? There is of course no single solution. In this thesis, the author presents
several new methods for creating various types of tensegrity structures by following the
process: creating tensegrity cells, computer programming and physical modelling.
Unlike the traditional design process for tensegrity structures, the author proposes to
create a suitable tensegrity cell or module before the constructions. The advantage of
building tensegrity cells is that the structure is constructed by adding further tensegrity
cells. The whole process is more easily controlled by computer code.
Many investigators focus on developing practical tensegrity structures in industry. The
two obvious examples are Georgia dome in Atlanta, America (Castro & Levy, 1992) and
the gymnasium in Seoul for the 1986 Asian Games and the 1988 Olympics (Rastorfer,
1988). The author also created several physical models based on the thesis. Physical
models have been constructed for every structural form after the computer design. The
observation tower proposal for Eureka building in Melbourne is also a novel experience
which attempts to utilise a tensegrity structure in practical construction.

3
1.2 Objectives
The objective of the investigation is to develop several general methods for creating
tensegrity structures, such as tower or roof structures. The investigation is expected to
lead to several simple rules so that similar tensegrity structures can be created by the
method. The objectives could be divided into three parts.
1. Tensegrity modules or cells are expected to be created and the corresponding
computer codes are implemented so that similar tensegrity structures could be generated
simply by computer calculations. Tensegrity modules or cells should be created by
following the specific requirements of the structure. For example, tensegrity tower
modules should be able to be connected in the direction of one axis and tensegrity roof
cells should be able to connect to form a flat panel or a curved roof structure.
2. Computer code should be completed by carefully considering the characteristics of the
tension and compression elements. The distribution of elements should be well displayed
and the connectivity between elements could be easily established.
3. Physical models should be constructed to validate the methods. At the same time, the
physical models provide valuable insights into the real behaviour of tensegrity structures.
Such insights would help modify and enhance the theoretical methods being developed.
1.3 Layouts
The thesis is divided into 6 chapters.
Chapter 1 describes the research background, objectives and the layout of the thesis.
Chapter 2 presents a literature review. It examines the tensegrity structures created and
developed by other people. The history and definition of tensegrity are presented first.
Specific characteristics of tensegrity such as self-stress, tension inside compression are
then explained. Finally, several examples that are closely related to the research work of
this thesis are discussed.

4
Chapter 3 presents the methods developed by the author for creating tensegrity towers,
arches, and bridges. The proposed method is a generalization and further development of
Snelson’s original method for creating tensegrity towers (Snelson, 1965). Most of
Snelson’s towers have three or four bars at each level. It is shown that using the same
methodology it is possible to construct towers and arches with any number of bars at each
level. Various examples obtained from the proposed method are presented, including
several towers, an arch, and a cable-stayed bridge with two tensegrity towers.
Chapter 4 presents the author’s idea for creating tensegrity roof from hexagon cells. The
proposed tensegrity roofs are totally different from traditional roof structures. There is no
currently existing roof that is based purely on the concept of tensegrity. However this
chapter shows that it is possible to create tensegrity roofs to span long distances and to
cover areas of complex geometries. Two physical models have been constructed by the
author to demonstrate the simple concept and its general applicability.
Chapter 5 presents a method for creating zig-zag tower and a proposal for the observation
tower of the Eureka building in Melbourne. The zig-zag tower structure created in this
chapter is more rigid than other forms of tensegrity towers discussed previously and is
more suitable for making a practical observation tower. The tower proposal for the Eureka
building is developed from the zig-zag tower structure. Several options for the proposal
have been presented and physical models of the observation tower have been built.
Chapter 6 summarizes the achievements of the research.

5
Chapter 2 LITERATURE RIVIEW This chapter reviews previous work that has been done by others in the area of tensegrity
structures. The content is divided into three parts, namely history and definition,
characteristics of tensegrity structures and real constructions.
2.1 History and definition
A tensegrity structure is a special type of structure consisting of tensile cables and
compressive bars. The development of tensegrity structures started in the early twentieth
century. Many works have been devoted to the history of the tensegrity system during
these years. The origin of the tensergrity structure can be traced back to 1921 and a
structure called “study in balance” made by the Russian constructivist Ioganson (Tibert,
2002) in an exhibition held at the Guggenheim Museum. Ioganson displayed a “sculpture-
structure” as shown in Figure 2.1. (Lodder, 1992) This is the earliest study of a tensegrity-
related structure in the world.
Figure 2.1 Loganson Sculpture.
The development of tensegrity structures has had a long history and many contributors.
Fuller (1961) and Snelson (1965) are regarded as the two men who contuibuted most to
the tensegrity system. The word “tensegrity”, which is a contraction of tensile integrity,
was coined by Fuller in his patent form. He described a tensegrity structure as “an
assemblage of tension and compression components arranged in a discontinuous
compression system.”(Fuller, 1961) The concept was adeptly described by Fuller himself
as “islands of compression in an ocean of tension” as is quoted in the International
6
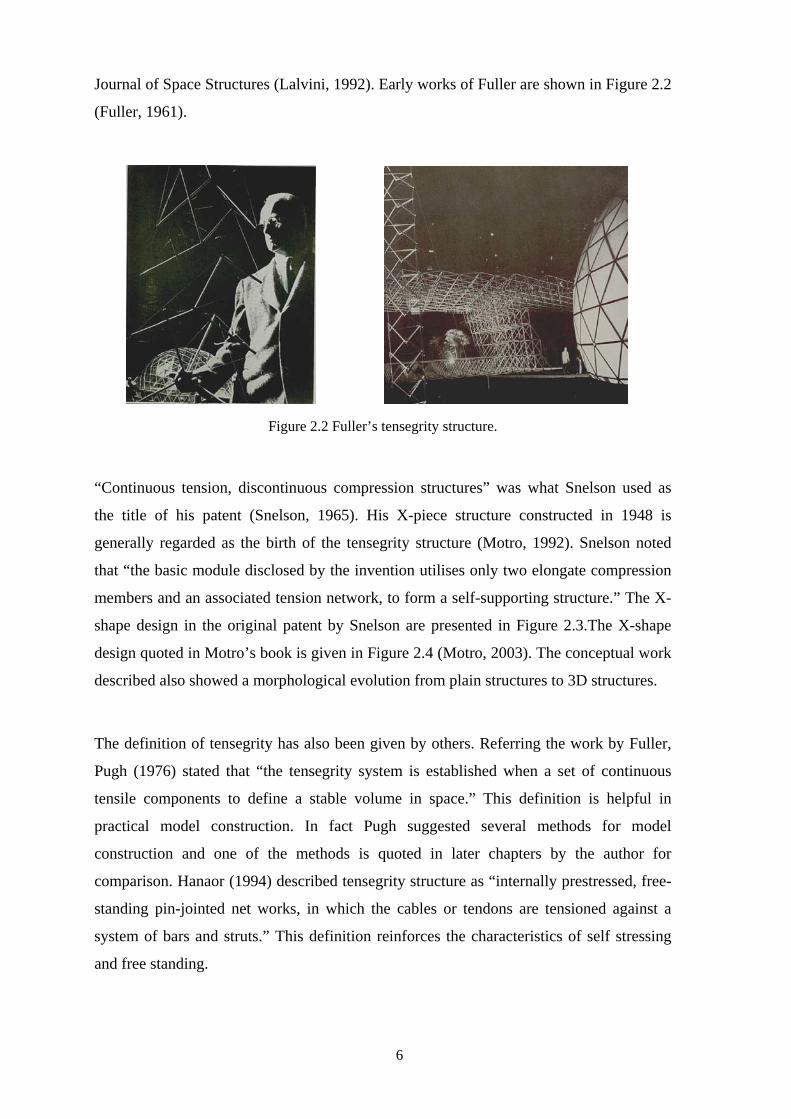
Journal of Space Structures (Lalvini, 1992). Early works of Fuller are shown in Figure 2.2
(Fuller, 1961).
Figure 2.2 Fuller’s tensegrity structure.
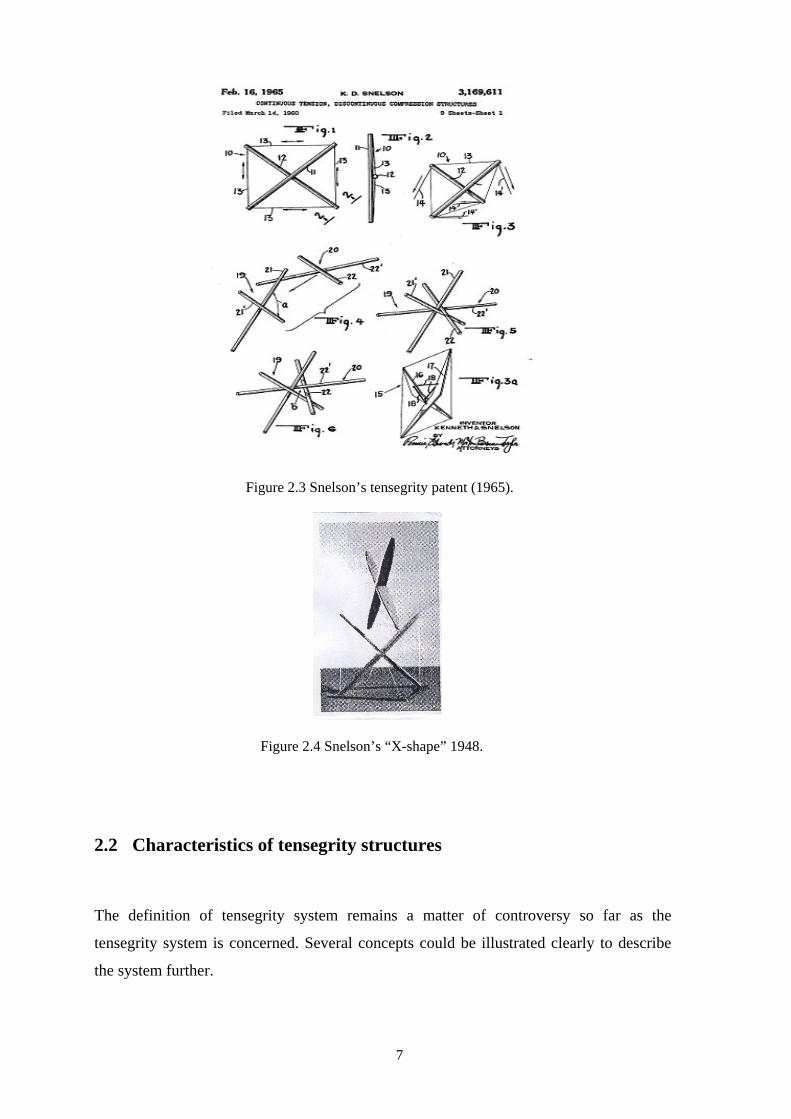
“Continuous tension, discontinuous compression structures” was what Snelson used as
the title of his patent (Snelson, 1965). His X-piece structure constructed in 1948 is
generally regarded as the birth of the tensegrity structure (Motro, 1992). Snelson noted
that “the basic module disclosed by the invention utilises only two elongate compression
members and an associated tension network, to form a self-supporting structure.” The X-
shape design in the original patent by Snelson are presented in Figure 2.3.The X-shape
design quoted in Motro’s book is given in Figure 2.4 (Motro, 2003). The conceptual work
described also showed a morphological evolution from plain structures to 3D structures.
The definition of tensegrity has also been given by others. Referring the work by Fuller,
Pugh (1976) stated that “the tensegrity system is established when a set of continuous
tensile components to define a stable volume in space.” This definition is helpful in
practical model construction. In fact Pugh suggested several methods for model
construction and one of the methods is quoted in later chapters by the author for
comparison. Hanaor (1994) described tensegrity structure as “internally prestressed, free-
standing pin-jointed net works, in which the cables or tendons are tensioned against a
system of bars and struts.” This definition reinforces the characteristics of self stressing
and free standing.
7
Figure 2.3 Snelson’s tensegrity patent (1965).
Figure 2.4 Snelson’s “X-shape” 1948.
2.2 Characteristics of tensegrity structures
The definition of tensegrity system remains a matter of controversy so far as the
tensegrity system is concerned. Several concepts could be illustrated clearly to describe
the system further.

8
2.2.1 Self equilibrium and self stress
The concept of self-stress is expressed as the initial mechanical state of the system, before
any loading, even gravitational. The system has to be in self-equilibrium, which means
the system could be equivalent to a self-stress state with any –self stress level. The system
has no finite mechanism (Vassart, 2000). The explanation by Motro is “stiffness is
produced by the self-stress, independently of all external actions connecting action
included. The self-weight is not taken in account at the step, and has no contribution to
their initial equilibrium” (Motro, 1992).
The self-stress is achieved by several form-finding methods. The main methods have been
investigated by several artists. An illustration of stability of study called “an energetic
stability criterion of the self-stress state’ was submitted by Vassart (2000). The sections
are for a very simple case of two aligned components. Analytical methods which is
utilised for simple cases as well as Dynamic relaxation method are mainly created by
Skelton and Sultan (Williamson, 1998). “Trial and error process” which developed
basically on progressive experiments, is called “Snelson process”. The process is mainly
developed by Snelson. Pre-stressability is checked through the process and lengths are
adapted to the possibility of self-stress. This method is created by author in creating
tensegrity model cell in later chapters. Hooke’s principles are utilized and the method is
controlled by elements distributions and of the geometry.
Whatever the chosen method, if the feasibility of the whole self-stress is ensured,
designers have to note that: “it is necessary to have the equivalent of the ‘cutting pattern’
in order to assemble components in such a way that at the end the system is
simultaneously at the right geometry and at the chosen state of initial stress” (Motro,
2003).
2.2.2 Compression inside tension
Compression and tension elements are basic components of tensegrity structure.
Compression inside tension is the characteristic performed in all definitions of tensegrity
structures, such as: “continues tension, Discontinuous Compression” by Snelson (1965)
and “island of compression in an ocean of tension” by Fuller (1961). The related
association of tension and compression elements is obviously in the definitions which is
components in compression are included inside the set of components in tension.

9
Compression and tension are mechanically a load effect, which implies the matter of one
component is subjected either to a compressive or a tension effect.
The relationship of the tension and compression components is defined by the key word
“inside”. “Two arranges of elements, one which is a part of constructive culture and based
one compression. Another one based on tension as fundamental support elements.”(Motro,
2003) The illustration by Motro expressed the distributions and characteristics of the
elements. Compression elements are generally constructive part of a structure. These
elements are large and stable as “columns in a hall” while discontinues with each other.
Similarly as membrane structure, tensions elements are usually outside the system are
applying pre-stress. They are elements establishing self-stress characteristic of the
tensegrity system.
2.3 Examples
Figure 2.5 Snelson’s tensegrity patent.

10
Several examples are presented in this section. The examples represented some specific
achievement in tensegrity structure development. Further works by the author in later
chapters are also related to these examples.
2.3.1 Snelson’s triangle tensegrity structure
This patent presenting a classic tensegrity structure which has three bars in each level is
developed by Snelson in 1965. This mast is created by assembling triangular prisms on
top of each other. The direction of rotation of the prisms varies so that every second
prisms on top of each other and each next two prisms’ rotation is inversely. It is obviously
compression bar elements are inside the tension cable elements in this structure. The
patent is shown in Figure 2.5.
It was pointed out by Snelson (2002) that “It is possible to construct any number of varied
tensegrity configurations, from simple to highly complex. Yet, only those forms whose
tension network is composed entirely of triangles are truly stable. If the network has
squares, pentagons, etc. the structure will be deformable and flaccid. This is especially
true of tensegrity spheres, none of which have triangulated tension networks.”
2.3.2 Tensegrity cable domes
Cable domes have been developed in recent years. Geiger and Levy (1997) are main
investigators of the structure. The structure is obviously inspired by tensegrity principle.
Tensegrity Dome is a pre-stressed system. The whole cable-strut net is associated with a
huge compression ring, just as membranes are tensioned on fixed masts and beams. They
can not be strictly classified as tensegrity systems (Snelson, 2002). The principle
developed later by author is not utilizing the ring so that the structures are purely
tensegrity structure. Two kinds of compressed components are identified which are
vertical bars and compressed ring as shown in Figure 2.6. The other components are
tensile cables connected with the bars and the ring.
The concept of the dome structure was summarized by Motro who stated that “Generally
the compressed ring is made of reinforced concrete, sometimes in pre-stressed concrete
and the size of ring is not comparable with other components. This ring can be a part of

11
the whole building and it can be difficult to identify them as a separate entity.” The
structure is obviously very efficient.
Figure 2.6 Cable dome principle (Motro, 2003).
2.3.3 Weaving tower structure
The waving structural principle is developed by Snelson in recent years. It is obviously
the principle is an extending work of tensegrity. The words in this paragraph is by
Snelson to explain the waving structure: Weaving and tensegrity share the same
grounding principle of alternating helical directions; of left to right; of bypasses clockwise
and counter clockwise. In these figures, the column on the left shows the primary weave
cells. To their right are the equivalent basic tensegrity modules. By transposing each
weave filament to become a strut (stick, tube or rod) the cells transform into arrays of two,
three, four, etc. compression members. They retain their original form and helical
direction (Snelson, 2002). Comparison Figures of waving and tensegrity structures are
shown in Figure 2.7.

12
Figure 2.7 Weave Tetrahedron and tensegrity Tetrahedron (Snelson, 2002).
Tower examples by waving principle are two waving column structures. The two columns
showed here share an identity with braiding or plaiting. The examples are shown in
Figure 2.8. In later chapters a similar reticulated tower structure is developed by the
author. The tower structure is deformed from tensegrity towers and the principle is
considering the waving structure.
Figure 2.8 Weaving principled tower structures (Snelson, 2002).

13
2.4 Conclusions
This chapter presents the main principles of tensegrity structures. The history and
definitions are introduced first. Tensegrity structures can be traced back to the 1920’s.
The word tensegrity was created by Fuller. Other investigators such as Snelson and Motro
did significant works to develop the concept. Tensegrity structures are compromised of
tension and compression components and have a self-stress state. The principles and
characteristics of system, self-stress and tension inside compression are explained. Some
special examples which also related to the research work of this thesis are discussed.

14
Chapter 3 CREATING TENSEGRITY TOWER, ARCH AND
BRIDGE 3.1 Introduction This chapter presents methods for creating tensegrity tower, arch and bridge. The initial
design of the tensegrity tower cell derives from a classic model of Snelson (Snelson, 1965)
which has a mast with three bars at each level. An important characteristic of the structure
is that it has a single state of self-stress. Structures with any number of bars at each level
are developed by the author later by computer programming. A structure with four bars at
each level was defined to be the basic cell of the tensegrity tower in physical modelling.
A three level physical tower model was finished at first to evaluate the design. The
thirteen level tower was finally constructed. Several topologies were developed in
practical modelling to tighten the structure and apply pre-stress.
The tensegrity arch was developed by coordinate transformation. The main objective of
this transformation is to control the shape and the size of the structure after the tensegrity
cell is determined. It then proved that not only the tensegrity arch but also other shapes of
structures can be established by the similar deformation principle. A practical arch model
was also established. The tensegrity bridge is an construction of practical tensegrity
structures. Two tensegrity arches provide main support of the structure instead of
traditional columns. Cables are connected between arches and the bridge deck.
Four bars in each level tensegrity cell is the basic element in these constructions.
Computer programming plays an important role in the design tasks. Different shapes and
sizes are performed by deformation in 3D which in practical achieved by coordinates
exchange in computer programming. Physical models are developed to prove the designs.
Cables are tightened so that the self-stressed characteristic is well performed in physical
models.
3.2 Tensegrity tower
3.2.1 Tensegrity tower cell
Generally, a tensegrity structure is a special type of structure consisting of tensile cables
and compressive bars. Since the pioneering work by Snelson (1965), there has been an

15
ever-increasing interest in, and extensive research on, the theory and applications of
tensegrity structures. Figure 3.1 shows a simple example of Snelson’s creations. This
mast is created by assembling triangular prisms on top of each other. The direction of
rotation of the prisms varies so that every second prisms on top of each other and each
next two prisms’ rotation is inversely.
Figure 3.1 A three level tensegrity structure by Snelson with three bars at each level.
Snelson’s traditional triangle model is simple in concept. Three bars each level tensegrity
cell is the basic module of the structure. Extending this principle, the author proposes to
build tensegrity cell with any number of bars at each level. This cell is the main module of
the tensegrity tower and arch structures. The procedure is given below.
a) Specify the number of bars at each level.
b) Fix the position of all the bars at each level (usually by arranging the bars in
regular/repetitive patterns, as shown in the example in Figure 1).
c) The end points of the bars are called “nodes”. Now connect the two ends of each bar to
two other nodes which are closest to this particular bar by using four cables.
3.2.2 Computer programming
Any bars each level tower structure is created by computer programming. Computer
programming is powerful in designing tensegrity structures. Components deployments are
controlled; structure deformation is also easily achieved so that various structures can be
created. The computer codes are created by FORTRAN and displayed in ABAQUS.
Given 4 bars in each level and 20 levels in total, an effective tensegrity tower can be

16
constructed. Given 7 and 10 bars in each level, other tensegrity tower is constructed by
same topology. These pictures are shown in Figure 3.2. The programming is divided to 3
parts. The tasks are as follows.
In order to generalize tensegrity towers with any number of levels and any number of bars
at each level, the first part of the program gives the parameters of the levels and numbers
of bars in each level. This program defines the shape and size of the whole construction.
Three parameters which are heights of each level, diameters of each level and angles
between next two levels are output accordingly. The structural shape and size are then
determined in this process.
The second part of the program is to define the position of the bars in three dimensional.
After the shape and size of the construction is confirmed, the deployments of bars are also
finished accordingly. The method is achieved by recording the coordinates of two
bottoms of the bars and output the bar element with the coordinates, so that the definition
is successful. Cable connection is served by the third part of the program. Referring to
energy method presented in last paragraph, cables are connected with nearest several bars.
The number of connection is calculated by the number of mechanism referring to the
(a) (b) (c) Figure 3.2 A 20 level tensegrity tower with several bars at each level: (a) four bars; (b) seven bars;
(c) ten bars.

17
ideas provided by Tibert (2002). Cables are then connected with chosen closed bars
automatically. The computer codes mentioned above is attached in attachment part.1 and
part. 2.
An additional program is added so that the computer code is also able to creating the
tensegrity ball structure, the task is similar and the position of bars is changed so that the
shape of the sturcture is exhibited as a ball. The simple ball structure in Figure 3.3 is
deformed from Snelsons traditional triangle model, which also has three bars at each level.
Figure 3.3 A tensegrity ball with three bars at each level.
Computer programming provides a new method in tensegrity structure which did not exist
in Snelson’s early stage. It has several advantages in creating tensegrity models.
Tensegrity is a structure which is considered irregularly in shape. While in this
investigation, after tensegrity cell is fixed, the shape can be controlled by computer
programming. Structure deformation can also be easily achieved. The programming is
powerful in elements deployment. For example in tower construction, bar elements, cable
elements and element numbers can be displayed separately as shown in Figure 3.4. This
is an improvement comparing with traditional creating method. More tensegrity structures
are demonstrated by author later in this thesis by computer programming.

18
(a) (b) (c)
Figure 3.4 A computer generalised thirteen levels tower: (a) bar elements; (b) all elements; (c) all
elements with elements number.
3.2.3 Several topologies in physical modelling
Conceptually the structure is established after all the members are defined to connect with
each other, while the structure in practical needs complicated joint design. The cables are
also tightened enough to achieve a state of self-stress. In practical modelling process, two
main problems are summarized which are the connection sequence topology and joint
connection topology. The programs are investigated step by step as follows.
Different from conceptually structure, all elements can not be jointed together at the same
time in practical modelling. Two methods are applied to define the connection sequence.
Figure 3.5 is a connecting method of Snelson’s model (Snelson, 1965) which earliest
comes from Pugh’s diamond pattern systems (Pugh, 1976). The conclusion of this
method is: most of cables and bars are connected initially in 2 dimensional (The process
can be easily achieved) and several key joints are connected finally, when these key joints
are connected the whole models then stands up by itself.

19
This method was not chosen by the author. Pugh’s method is perfect theoretically and
efficient for simple structures of three or four levels simple structures, but not suitable
dealing with complicated models with large amount of elements, even curved bars are
utilised in the structure (the structure is expressed in later chapters) or the structure is
more then ten levels (thirteen levels structure is expressed below), the precision of this
method is then challenged because a complicated three dimensioned model is not easy to
be performed in a not completed two dimensional situation. Another level by level
topology in practical modelling is chosen by author.
The theoretically substratum of the level by level method is self-stressed characteristics of
tensegrity structure, which means any level tensegrity structure is self-stressed and stands
up automatically. This principle provides the author confidence that the structure is able
to be constructed level by level. Thus, even one level tensegrity structure is a standing
three dimensional structure. The second level can be established on top of the one below
which is already in place. The level by level connection sequence has several advantages.
Easy visualization is the obvious one. Compared with Pugh’s method, the transformation
from two dimensional and three dimensional structures is avoided so that potential
mistakes can be avoided; all elements are directly connected in 3D utilizing the level by
level method according to the computer output as shown in figure 3.6
Figure 3.5 Pugh’s diamond pattern system connection of Snelson’s triangle structure (Pugh,
1976).

20
Figure 3.6 A 3 level tensegrity tower with four bars at each level with element numbers of cables
and bars.
The second advantage of the method is stability. Whether a tensegrity structure is stable
or not is depends on the tightness of the cables without sufficient prestress in the cables,
the tensegrity structure would not work. while all components are tightening enough
means more pre-stress is well applied. According to Pugh’s method, most cables are
connect initially with no pre-stress in two dimensional, it is hard to tighten all cable in the
process of connecting last several bars and cables in deformation process from 2
dimensional to three dimensional. Level by level method is efficiently in applying pre-
stress because all cables are already tightening enough in connection process, when
creating structure in a new level, the initial level is already tightened and self-stressed.
The second topology is joint connection. Joint connection is the most significant topology
in practical modelling process. Two objectives are focused here: space management
should be reasonable and structure should be tightening enough to exhibit the self-stress
characteristic.
The space management problem is comparatively easy to solve. Referring to the analysis
by Tibert (2002), a bar is connected with 4 cables at each bottom. The process is: Drill
four holes at one bottom of a bar and make sure the angle between each next two holes is
90 degrees. Thus, four cables can be connected with a bar through the holes. Four cables
are then extending in four directions to connect with other corresponding bars so that the
cables and bars never cross to each other.
21
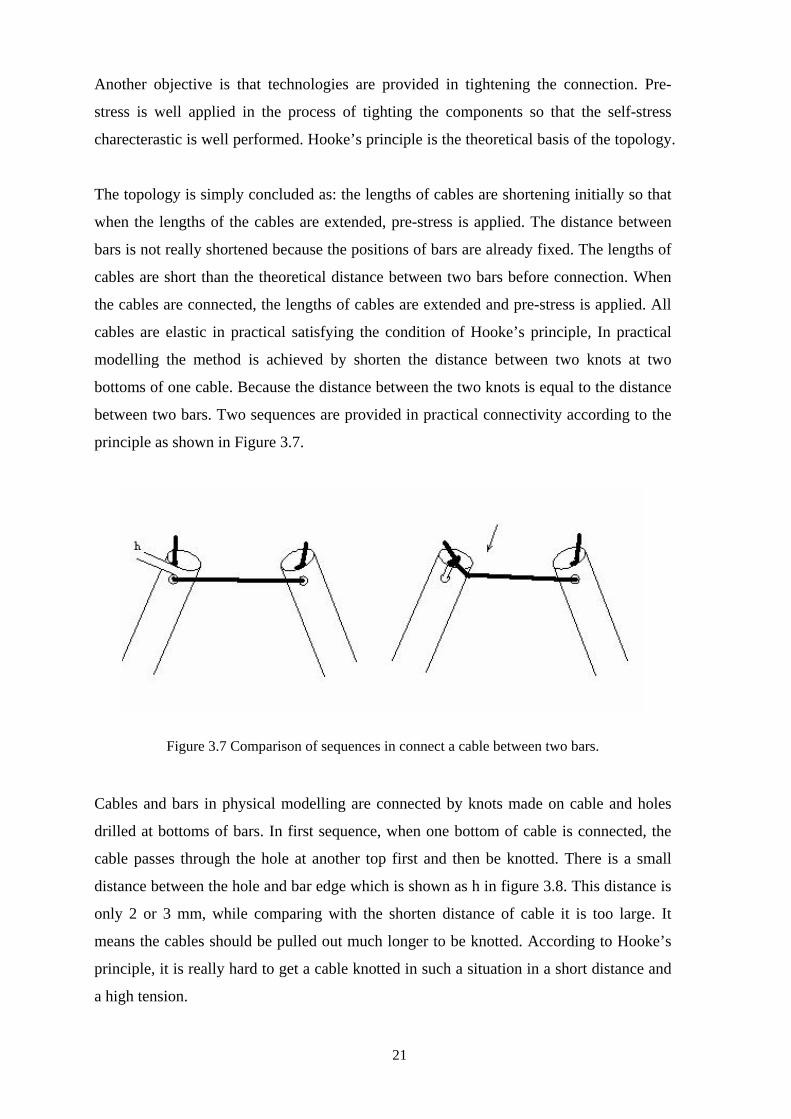
Another objective is that technologies are provided in tightening the connection. Pre-
stress is well applied in the process of tighting the components so that the self-stress
charecterastic is well performed. Hooke’s principle is the theoretical basis of the topology.
The topology is simply concluded as: the lengths of cables are shortening initially so that
when the lengths of the cables are extended, pre-stress is applied. The distance between
bars is not really shortened because the positions of bars are already fixed. The lengths of
cables are short than the theoretical distance between two bars before connection. When
the cables are connected, the lengths of cables are extended and pre-stress is applied. All
cables are elastic in practical satisfying the condition of Hooke’s principle, In practical
modelling the method is achieved by shorten the distance between two knots at two
bottoms of one cable. Because the distance between the two knots is equal to the distance
between two bars. Two sequences are provided in practical connectivity according to the
principle as shown in Figure 3.7.
Figure 3.7 Comparison of sequences in connect a cable between two bars.
Cables and bars in physical modelling are connected by knots made on cable and holes
drilled at bottoms of bars. In first sequence, when one bottom of cable is connected, the
cable passes through the hole at another top first and then be knotted. There is a small
distance between the hole and bar edge which is shown as h in figure 3.8. This distance is
only 2 or 3 mm, while comparing with the shorten distance of cable it is too large. It
means the cables should be pulled out much longer to be knotted. According to Hooke’s
principle, it is really hard to get a cable knotted in such a situation in a short distance and
a high tension.

22
The second sequence is adapted by the author. The procedures are: the cable is knotted
initially and then be hooked in to the holes. A small slot is added from the bar edge to the
hole. After the cable is knotted, one bottom of the cable will be hooked though a slot in to
the hole so that the cable and bar are connected. The advantage of the method is: cables
are knotted before connection so that the distances between two knots are more accurately.
Slots are added so that knotted cables can be hooked in to the holes easily. All cables and
bars are connected by this topology finally.
3.2.4 Three level tensegrity tower model
Physical modelling is the most effective way to check the structure creating method. Not
only in material chosen but also in connection and stressing, physical modelling is a
totally different work compared with computer programming and theoretical design.
Various topologies are utilized in this construction process as presented. A simple 3 level
tensegrity tower model with 4 bars in each level is created first. The procedure is as
follows.
The tower is built following the level by level method. Four bars in first level are initially
connected with corresponding cables as shown in Figure 3.8. All the elements in first
level (except the cables connected with the bars in second level) are contained in this
figure. After the structure is transformed to 3D, first level of the structure is then built.
Figure 3.8 2D structure of first level of the tower.
The bars in second level are added to the model together with the associated cables
between first and second levels. When these bars and cables are added, the first level is
then automatically stood up. The picture is shown in Figure 3.9.

23
Figure 3.9 The finished first level of 3 levels tensegrity tower.
The method for connecting the bars and cables in the second level is the same as that foe
the first level. Figure 3.10 displays the imagination and final physical model.
(a) (b)
Figure 3.10 A 3 level tensegrity tower with four bars at each level: (a) computer generated model;
(b) physical model.
3.2.5 Thirteen level tensegrity tower model
Thirteen levels tensegrity tower is a complicated physical model which also adapts four
bars tensegrity cells at each level. The diameter of the tower is gradually reduced in the
bottom eight levels and then extended again in top five levels. The shape of the 13 level
tower is defined first by computer programming. Bars and cables distributions are

24
established later. This complicated tower model is also practically modelled level by level.
The advantage of level by level modelling topology is examined in this model, According
to the topology extra levels can be added from bottom or on top.
Tightening of the cables is also performed in this model. All cables are tightened when
hooked into holes at the bars through slots so that pre-stress of the structure is well
applied. The thirteen level tensegrity tower structure is much complicated than the initial
3 level tensegrity tower The diameter of the first level is 80 centimetres and the total
height of the tower is 230 centimetres. The length of the bars in the structure is between
20 to 70 centimetres. 16mm aluminium rod with gold coloured coating is selected to be
the material of the bar because of its shining, striking look. White nylon of 2mm in
diameter is chosen as cable in this structure. The final structure is shown in Figure 3.11.
(a) (b)
Figure 3.11 A 13 level tensegrity tower with four bars at each level: (a) computer generated model; (b) physical model.

25
3.2.6 Conclusion
Tensegrity tower is the first experience of creating tensegrity model. While in cell
definition, computer programming and physical modelling, several topologies are
concluded and utilised. The construction of final thirteen levels tower proved author’s
methods and established a substratum for further deformation of the structure.
3.3 Tensegrity arch Tensegrity arch is deformed from the tensegrity tower structure which is created by 4 bars
each level cell. The main concept is called “coordinate exchange” which in this case is if
the axis is bended to an arch and the position of struts is adjusted accordingly. The cables
connectivity can also be found. Using the following function transform the Z coordinate
hxaZ +−= )cosh( θ a tensegrity arch is then established. The details are as follows. The computer code of the
deformation is attached in attachment part 3.
Referring to the computer codes in tower construction, three parts of the program are
demonstrated as shapes definition, bar elements definition and cable connection. Arch
deformation is achieved by adding a coordination exchange program in computer code.
When creating a tensegrity arch, a similar tensegrity tower is created first. The hight of
the tower is equal to the whole length of axis of the arch. Diameters and components
connectivity in each level is also similar. Then the tower is transformeded in Z coordinate
and an arch is obtained.
A thirteen level tensegrity arch is established by the author finally. The arch is
symmetrical in centre; the diameters from two legs to the top are reduced gradually. The
generated picture of the arch is presented in Figure 3.12(a) and the actual model is shown
in Figure 3.12(b).

26
(a)
(b)
Figure 3.12 A 13 level tensegrity arch with four bars at each level: (a) computer generated model; (b) physical model.

27
3.4 Tensegrity bridge After the tensegrity tower and arch have been constructed, a cable-stayed bridge with two
tensegrity arches is also proposed. Two identical tensegrity arches are established instead
of traditional columns and several cables are attached between the arches and bridge deck
tightly. The final tensegrity bridge proposal is shown in Figure 3.13.
Comparing to traditional column, self-stress becomes a special characteristic in tensegrity
structure. It means more loads are applied on this structure; the structure is more stable
and more difficult to be deformed. Furthermore, the loads applied to the structure would
not concentrate on one element or several elements.
The tensegrity arches and the bridge deck are connected using cables. The connection is
similar to that of a bridge in Frankston beach in south of Melbourne. A picture of the
bridge is given in Figure 3.14. Although the structure of the Frankston bridge is different
from the tensegrity one, the deployment of cable connection between steel arch and
bridge deck could be considered. Two curved bars position is similar to that of the
tensegrity arches of the author’s structure. Cables are connected between the two curved
bars and the bridge. In the author’s tensegrity bridge, a similar connection is utilized.
(a)

28
(b)
Figure 3.13 A cable-stayed bridge with two tensegrity arches: (a) side view (b) top view.
Figure 3.14 A cable connected bridge in Frankston beach (photo by author).
Tensegrity bridge is the first experience by the author of applying tensegrity structure to
practical industry field. Later chapters will also introduce another practical proposal of an
observation tower for Eureka building in south Melbourne. In this bridge structure,
sophisticated column bridge structure is replaced by two tensegrity arches. The tensegrity
characteristics of self-stress and integrity are exhibited. The management of structure is
reasonable and the maintenance of this structure of this bridge is comparatively easier.

29
3.5 Conclusions
Creating tengsegrity cell is the most important process in the investigation. Tensegrity
cell is defined and the rules for the connection between cells are decided so that the
tensegrity structure system is constructed. Irregular deployments of elements are
performed and complicated connections between components are associated to create a
structure has simple outlook and complicated mechanics characteristics. Snelson’s initial
work provides many inspirations in the investigation.
Computer programming provides new tropologies in tensegrity structure which did not
exist in Snelson’s early stage. Computer code is powerful in elements distribution.
Controlling and deforming the shape of the structure is also the advantage of computer
programming. All tensegrity cells are continuous in several specific directions (The
hexagon roof tensegrity introduced in the next chapter is continuous in panel.) While
coordinate exchanges are utilised by computer programming. More tensegrity structures
are created. The creation of tensegrity arch is a result of coordinate transformation from a
vertical tower.
Physical modelling is a significant process in investigation. True models are more
convictive in proving a concept than computer codes and generated figures. During the
processes of joint connection; several difficulties are encountered and subsequently
solved.
Tensegrity Bridge is the first experience of creating practical structure. Tensegrity arches
are utilised to instead of traditional column to support the bridge. More loads are applied
on the structure, more stable the arch becomes. Cable connection between arches and
bridge is similar as a realistic bridge in Frankston beach.

30
Chapter 4 HEXAGON TENSEGRITY ROOF
4.1 Introduction
This chapter discusses a special tensegrity hexagon roof system. The introduction of
tensegrity roof is presented first to indicate several advantages of this structure. Such as
tensegrity roofs span long distances with minimal weight and save more materials.
A specific hexagon tensegrity roof cell is created by the author in this chapter. The
investigation of tensegrity roof structure is started with the definition of tensegrity roof
cells. The inspiration of hexagon roof cell is generated from the geometry characteristic of
the hexagon shape. Hexagon tensegrity roof cell is established by geometry analysis and
comparison with triangle and square shapes. The structure of the hexagon tensegrity cell
is simple and efficient. Parallel connection method and diagonal connection method is
adapted in connectivity.
No column support designs make sure the whole structure is pure tensegrity system. Self-
stress characteristic is better performed and pre-stress is well adapted. Connection
sequence is well managed in physical modelling. A simple ten hexagon cells roof was
finished to identify the design. A more complicated roof with irregular shape and wave
cling was built finally. Compared with some existing tensegrity roofs, hexagon tensegrity
roof has several special characteristics.
4.2 Tensegrity roof structure Tensegrity roof structure is a roof construction created only by tension cables and
compression bars, which is totally different from traditional roofs. Roof structure is
widely utilized in large constructions such as exhibition centres, gyms and airports.
Generally a roof is not required to sustain much load above it, but roof structure is stable
and continues so that it will not fall down. Beautiful outlook is also considered in the
construction.
Considering the requirements of a roof structure, tensegrity roof has several advantages as
follows. Firstly, tensegrity roof is constructed by cables and bars. The weight of
tensegrity structure is comparatively less heavy than other structures, so that less gravity
is applied to the bottom. Secondly, a tensegrity structure is a self-stressed integrity. All

31
bars and cables elements are related to each other and the whole roof system is continuous.
This characteristic means a tensegrity system is definitely a good choice of a roof
construction. Comparing with traditional roofs built by concrete columns and clines,
tensegrity roof is more stable.
The two obvious examples of tensegrity roofs are Georgia Dome in Atlanta in America
(Castro & Levy, 1992) and gymnasium in Seoul for the 1986 Asian Games and the 1988
Olympics (Rastorfer,1988). An investigation of tensegrity roof is chosen by the author to
be the second tensegrity system in this thesis. The key point of the investigation is still to
define the tensegrity roof cell. A new hexagon tensegrity roof with simple appearance and
continuous construction is established by the author in this chapter later.
4.2.1 Creating tensegrity roof cells
When creating the tensegrity roof cell, the principle in early chapters is accreted that
continues characteristic of the tensegrity cells is defined by the geometry characteristic of
the construction. Theoretically a roof is a panel or a curve panel, which means the
tensegrity roof cells continue in several directions and all this directions should in a panel.
(Generally a curve panel assumption is contained in a panel solution in roof structure.)
The investigation then focuses on finding a geometry shape satisfying the condition of
continuous in a panel by connecting with other similar shapes. Triangle, square and
hexagon are all classical shapes in geometry. A special characteristic of these shapes is:
these shapes themselves can create a panel by multiplying each other. This special
geometry characteristic determines that these shapes can be the shape of a tensegrity cell.
Comparing with triangle and square, hexagon is finally chosen to be the shape of the
tensegrity cell. The analyses are as follows.
The situation of connecting several similar triangles to create a panel is shown in Figure
4.1. Point A is noted in a triangle shown in Figure 4.1(a). A is noted in the panel shown in
Figure 4.1(b). Obviously the point A is connected with other triangles in four directions
which are a, b, c and d.

32
(a) (b)
Figure 4.1 Triangle shape connections in a panel.
The same condition of square is shown in Figure 4.2. When connecting with several
similar squares to create a panel. Point A is noted in a square in Figure 4.2(a) and A is
noted in a panel shown in Figure 4.2(b). Point A is connected with other squares in two
directions which are a and b.
(a) (b)
Figure 4.2 Square shape connections in a panel.
Finally the condition of hexagon cells is shown in Figure 4.3. When adding several
identical hexagons to create a panel, Point A is noted in a square as shown in Figure 4.3(a)
and A is noted in a panel shown in Figure 4.3(b). Point A is connected with other
hexagons with only one direction.

33
(a) (b)
Figure 4.3 Hexagon shape connections in a panel.
The comparison of the triangle, square and hexagon shape has significant effect on cell
definition. Ponit A is connected with other triangles in four directions as shown in Figure
4.1(a), and point A is totally connected with six cables as shown in Figure 4.1(b). Square
shape connection is better than triangle. A square is connected with others at point A with
two cables. Point A is totally connected with four cables. Hexagon is best in these shapes
because a hexagon is connected with other hexagons at point A with only one direction,
and point A is connected with three cables totally.
If fewer directions and fewer cables are connected; the construction of the cell will be
simpler. Hexagon is finally chosen as the shape of the tensegrity cell. Furthermore,
hexagon is the shape of honeycomb in nature. The appearance of hexagon structure is
more interesting than rectangle and triangle. Therefore, hexagon is finally defined as the
basic element of the tensegrity roof.
The creation of hexagon tensegrity cell is not completed yet. Hexagon shapes in 2D are
connected with points and lines while hexagon tensegrity roof cells is connected by cables
and bars in 3D. In this deformation process, the top view of the roof cell is the same as the
panel imagination shown in Figure 24. What if points are instead of bars and lines are
instead of parallel cables connected with two close bars in Figure 4.4. A final hexagon
tensegrity roof cell is established as shown in Figure 4.5.

34
Figure 4.4 Connecting hexagonal tensegrity cells to form a roof (top view).
Figure 4.5 Hexagon tensegrity roof cell.
Six vertical bars are set around to establish the hexagon shape and parallel cables are
connected with each closed two bars, additional cables which extend to external six
directions is to connect with other cells. The sizes of cables and bars are able to be
changed accordingly. The tensegrity cell is symmetrically in six directions. Hexagon
tensegrity roof cell is finally defined.
4.2.2 Shape control
The property of shape control is to build tensegrity roofs of any shapes. Even irregular
and wave shape roofs can be established. The methods of shape control are concluded as
several geometrical concepts. Irregular shape means irregular boundary of panel and wave
shape is concluded as a deformation from a normal panel to a curve panel. The following
paragraphs explain how to create and control irregular and wave shape roof.

35
Irregular shape is easily achieved by adjusting the shapes of hexagon tensegrity cells in
top view. The deformation to curve roof is achieved by the cable connection method
between each closed two bars. Indeed it means parallel cable connections in the panel are
changed to diagonal cable connections. Referring to the analysis of tensegrity cell; after
the hexagon shape is chosen, points in 2D are instead of bars in 3D; Cables between
points are instead of several parallel cables between close bars; Parallel cable connections
between bars are shown in Figure 4.6.
Figure 4.6 Parallel cable connections between two bars.
All bars are not in same height in practical modelling. In this process, cable connection is
then instead of a special diagonal connection as shown in Figure 4.7. When parallel cables
connections are exchanged to diagonal cable connection, the height of bars is able to be
enhanced or be declined gradually. Diagonal cable connection is able to control all bars
height so that curve shape roof is constructed. Parallel cable connections are still exists
when two close bars are in same height; this connection becomes a special condition of
diagonal cable connection.

36
Figure 4.7 Diagonal cable connections between two bars. The above-mentioned paragraphs are explaining the creation of tensegrity roofs since the
analysis of how to creating tensegrity cell. Practical parallel cable connections and
diagonal cable connections are explained later. Main structure of a tensegrity roof is then
created.
4.2.3 Pure tensegrity (no column) design A complete tensegrity roof is constructed by two parts which are tensegrity dome and
support system at the bottom. Some existing “tensegrity” roofs such as Georgia Dome in
Atlanta, America, chose traditional column support. Nevertheless, referring to the
characteristic of tensegrity system, if the support part and the top roof are in a whole
tensegrity system, the structure can be much more stable. All external loads can be
transferred through the tensegrity system and finally become pre-stress of the system.
A special characteristic of this model is no column support. Totally different from
traditional structures and other cable domes, no a single column is used in this structure.
This roof is constructed by tension and compression between cables and bars. At the base
of each long bar, an outer hinge fixes it on the floor. On the other hand, at the top of each
bar a cable is pulled to apply tension. This design make sure the whole structure is a pure
tensegrity system. The details will be displayed in follow practical models. The
comparison of the methods and traditional column support is shown in Figure 4.8.

37
(a)
(b)
Figure 4.8 Comparisons of no column support methods and traditional column support: (a) column
with bending system; (b) bar without bending (no column) system.
As shown in Figure 4.8, in traditional design the weight of the whole construction is
pushed on the support columns. The columns should be strong enough. Weary problem of
columns and the loose problem of the roof should be considered. When columns sustain
much load in a long time, the column may breach or deform somewhere because not only
pressure but also contortion is applied on the columns. No column design can avoid these
problems because the bending is transformed to tension in cables and compression in bars.
The whole structure could stay much longer time and easy to maintain.
Another advantage of the no column pure tensegrity system is stability. The figure clearly
shows that the edge bars become part of the whole tensegrity system. The weight and
other loads on the system are automatically transferred to the pre-stress along cables and
bars according to the self-stress characteristic. The edge bars are only fixed by an hinge.

38
No foundations are required in the structure. The task is more easily to achieve in
practical construction. It means the edge bars are no longer the only support bars of the
system. More tension and compression are applied in the system to apply pre-stress so
that the loose problem of top roof is also prevented.
After the design of tensegrity roof cell and the no column support system is established,
theoretical preparation of the tensegrity roof structure is completed. The following
physical modelling will prove the method and gain more experiences of this structure.
4.2.4 Physical modelling
Totally two hexagon models have been built. A small regular ellipse shape roof with 10
tensegrity roof cells was finished first. Investigation of partly deformations of the
structure such as adding cling windows and entrance in one side was tested in this model
later. A final irregular wave shape complicated roof combined with two ellipse shapes
was built finally. Several topologies are utilized in physical modelling which are
connection sequence, pre-stress apply and partly adjust method. The details are as follows.
The methods of connection sequence and pre-stress apply is related. Correct connection
sequence prevents the system from loosing and makes sure efficient pre-stress is applied.
Because no column support system is utilized in the structure. The edge bars and cables
become part of the whole tensegrity system. Traditional modelling sequence of fixing
columns first is not suitable here because the edge bars are only hinged on the floor. They
could not be fixed first. The whole roof structure is divided to two parts which are
hexagon cell roof and the perimeter support without columns. The correct sequence of
building this physical model is: 1) constructing the hexagon roof; 2) connecting the roofs
to the edge bars; 3) fixing the perimeter bars to the floor by hinges; 4) applying pre-stress
are shown in Figure 4.9.

39
The details of hinging bars and fixing pull cables are explained here to show the pre-stress
applied process. One bottom of the bar is hinged on the floor at point A. A cable is then
connected with another bottom of the bar at point B. Finally the pulling cable which also
provides pre-stress of the whole system is connected from B to the floor with another
hinge at point C. The cable lenth between B and C should be slightly shorter than the
theoretical lenth as explained in chapter 3 about applying pre-stress. Pre-stress is applied
automatically when the cable between B and C is extended to the theoretical length.
When maintaining the structure after construction, the roof part does not need to be
changed, while the pulling cables at the perimeter are also tightening the whole structure.
Partly adjust method is created after the first ellipse roof is finished. The picture of the
roof is in Figure 4.10. Figure 4.11 is the picture after adjusted. A window on the cling and
an entrance in front is added. The cling window is added by removing two bars in centre
part. The entrance in front is added by removing an edge bar and related cables. Four
cables are added to establish an entrance.
The theoretical record of partly adjust of the tensegrity roof is the continue characteristic
of tensegrity structure, which means a tensegrity system is integrity. The deformation of
tensegrity structure should make sure the new structure is still tensegrity system. All
connection in tensegrity roof is following parallel connection method or diagonal
connection method. When several cables and bars are removed, the remaining
components are still connected with these methods, new close system is created and
whole system is still tensegrity. Self-stress state is still working in the new system. This
Figure 4.9 Details of hinge bars and fixing pull cables at bottom.

40
adjust method is also an advantage of tensegrity roof. The details of shape are in control
and it gives more choices in practical modelling.
Figure 4.10 Physical model of a 10 hexagon cells roof.
Figure 4.11 An entrance and a skylight are added roof.
Finally a complicated hexagon tensegrity roof structure shown in Figure 4.12 was completed
by the author. It has irregular and waving outlook. Entrances and windows can also be added
as necessary. The outer hinges fixed the bottom of bars with cables pulling on the top. Figure

41
4.12(a) shows the situation when all roof cells and edge bars are connected, the whole
structure is waiting for being applied pre-stress and hinged on the floor. Figure 4.12(b) is the
final model after pre-stress is applied.
(a)
(b)
Figure 4.12 Physical model of a tensegrity stadium with a curved roof covering an irregular area:
(a) before erection; (b) finished model.
4.3 Comparison with other tensegrity roofs
Tensegrity roof structures are difficulty to design. Two obvious examples are Georgia
dome in Atlanta in America (Castro & Levy, 1992) and the gymnasium in Seoul for the

42
1986 Asian Games and the 1988 Olympics (Rastorfer,1988). The Georgia dome had only
some tension hoop between the inner tension ring and outer compression ring. Triangle
net tensegrity system is the basic elements of the dome (Castro & Levy, 1992). The
design of Seoul gymnasium used similar load transfer system to that of the Georgia dome.
This dome is made up of a central tension ring, a series of circular ridge cables, tension
hoops and diagonal cables. These two domes are shown in Figure 4.13 and Figure 4.14.
Figure 4.13 Georgia Dome in Atlanta in America.
Figure 4.14 Seoul Olympics Gymnasium Dome.
Compared with these two structures, the hexogen tensegrity roof has several special
characters. First and foremost, the outlook of these two domes shows that triangle
tensegrity cells are utilized in these two domes. Although the connection method of cables
is not clearly shown as parallel or diagonal connection method, hexagon tensegrity roof
cell is much simpler than triangle cell referring to the analysis in tencegrity cell creating
parts. A bar in triangle tensegrity systems is connected with close six bars while in
hexagon tensegrity systems only connected with three. It is simple to understand that

43
remove a bar in triangle system will influence the near 6 bars while in hexagon system
only influence 3 bars. The deformation of a hexagon cell is much reasonable.
The hexogen roof is a pure tensegrity system with tension cables and compression bars
but no columns in bending. The tightening the perimeter cables no column design also
applies pre-stress efficiently.
4.4 Conclusion Hexagon tensegrity roof cell is defined first according to the geometry characteristic of
hexagon. The extending directions of tensegrity cell are considered so that the hexagon
cell fulfils the requirement of establishing a panel or a curved panel. Compared with
triangular and rectangular shapes, hexagon also has the advantages of simple and
beautiful appearance.
No column design has another advantage of the structure. Unlike the Georgia Dome in
Atlanta and the Gymnastics Arena in Seoul which rely on the non-tensegrity perimeter
rings to support the tensegrity roofs, the stadium models presented in this paper are bona
fide tensegrity structures where all members of the whole structural system, including the
perimeter columns, are in pure tension or pure compression.

44
Chapter 5 ZIG-ZAG TENSEGRITY TOWER AND PROPOSAL FOR EUREKA COMMUNICATION TOWER
This chapter presents a rigid tower structure which is connected by zig-zag method. The
objective of creating the zig-zag tensegrity tower structure is defined before the
investigation, which is to create a stable and efficient structure for a practical observation
tower building. The rigid characteristic is considered first. Practical building methods and
topology are also evaluated during the process. The whole process is focused on practical
tower creating.
Tensegrity tower cell with four bars at each level is chosen while new zig-zag connection
method is utilised. Hinged bars and horizontal limited cables are displayed to create a
closed system at each level. Rigid characteristic is maximised so that the structure is tight
enough in any directions. Computer programming is utilised to create different shapes of
zig-zag towers. All bars and cables are displayed clearly so that the details of the structure
can be exhibited and adjusted easily. A 3 level physical model of zig-zag tower is
established later. Metal chains and turnbuckles are utilised to exhibit the rigid
characteristic.
Later work are focused on the communication tower proposal for Eureka tower building
in Melbourne which is now the tallest residential building in the world (Wikipedia, 2007).
Eureka tower is located in South bank set back from the river promenade between the
Southgate entertainment precinct and Crown. Eureka Tower stands at 300m high and
comprises 88 storeys (Eureka website, 2007). A 50 meter observation tower proposal on
top of the building is asked by owner so that total 350m hight Eureka tower could be the
tallest building in Australia.
An observation tower proposal is completed by the author. Several options are given in
the proposal. Initial works are started with the zig-zag tower structure and several rigid
tower structure designs are created. The concept of utilising curved bars instead of rigid
bars is then investigated. Four curved tower structure designs are created by this principle.
The outlook of the structure is a DNA shape. Reticulated tower proposal are also created
by considering the waving structures of Snelson. Physical models are made finally.

45
5.1 Zig-zag tensegrity tower structures
5.1.1 Construction of zig-zag tower
Zig-zag tower structure is also created by tensegrity cell with 4 bars in each level. The
analysis in early chapters has explained the extending method of this cell. tensegrity cell
with 4 bars in each level is extending in axis direction. The method is still satisfied here.
Zig-zag tower connection method is different from the initial tower connection method.
The new method connected closed two levels by hinges and horizontal cables. Generally,
bars in next two levels are connected in four joint accordingly, four common cables are
preserved between next two levels. Self-stress characteristic is performed in each level
and the whole structure is still pure tensegrity.
Figure 5.1 Computer model of a three level zig-zag tensegrity tower.
A three levels zig-zag tensegrity tower shown in Figure 5.1 is created by the author. Four
bar tensegrity cell each level in shown clearly in each stage. Bars in two close stages are
hinged; the connected bars can still rotate in any directions. This connection is satisfied
with tensegrity characteristics. The effect of solo tensegrity cell is enhanced in this
structure because of the hinge connectivity between levels. Four horizontal cables are
utilised to connect four hinges in a circle to build a close system in each level. If efficient
pre-stress is applied, the tensegrity cell in each level could be more rigid then Snelson’s
tensegrity tower structure.

46
Hinges, which are utilised to connect all closed bars in this structure, are applied to limit
the movement of bars. Four horizontal cables which connected the 4 hinges at the same
height are applied to prevent the hinges form extending in horizontal directions. The
dimension of the square which is created by hinges and cables are then limited. Close
system is then created level by level. The close system in each level maximizes the self-
stress principle of tensegrity in each level. It means when sustaining load the cell can not
has large geometry deformation. The above design makes the whole structure more rigid.
5.1.2 Comparison of two tower structures
The comparison of the zig-zag tower with the initial tensegrity tower structure is shown in
this paragraph to show the difference of the two structures. The main differences are
concluded as 1) Connection method between levels; 2) Rigid characteristics. These two
parts are related to each other.
(a) (b)
Figure 5.2 Comparison of (a) the previous tensegrity tower; with (b) the zig-zag tower.
A three level tensegrity tower and zig-zag tower are shown in Figure 5.2. The tensegrity
tower cell in each level is similar and the material of cables and bars are the same. It is
obvious that the number of cables of zig-zag tower is less than the first tower. The
difference is due to the connection method between levels.

47
When noticing the cable connection, the cables are divided into two parts. The cables
connected in horizontal direction are called parallel cables. While the cables connected in
vertical direction are called vertical cables. When investigating the zig-zag tower, one bar
in second level is connected with only three cables but hinged with a bar in first level.
Comparing with the initial tensegrity tower, one vertical cable and one parallel cable are
removed. The cables which are removed in the zig-zag tower are instead by hinges.
Comparing with connection with more cables in initial tower, the hinges in zig-zag tower
limit the movement of the bars. Furthermore, after one parallel cable is removed the
remaining one is connected with two hinges directly. The connectivity could largely limit
the movement of the hinges and the cables then create a close system. The zig-zag
connection minimised the elastic characteristic of the structure. Because cables are more
elastic then bars so that the movement is more easilier when more cables are connected.
The whole structure is more rigid in a zig-zag tower.
5.1.3 Computer programming and physical modelling
Sophisticated computer programming plays an important role in a zig-zag structure
modelling. Any bars each level tensegrity cell is initially created in earlier chapters. The
main task to create zig-zag tower is to get cells connected and to display the position of
the cables and bars. The tasks are divided into two parts due to the structure characteristic.
The first task is defining the positions of the bars in each level. The deployments of the
bars are determined by cells. The second level bars are hinged with the first ones. The
hinge connectivity gives convenience in computer programming. Thus, when the size and
angle between levels are defined, all bars connection can be displayed altogether. After
the bar position is determined, cable connections are then added in the structure. Parallel
cables and vertical cables are added accordingly with the bars they are associated with.
The numbers of bars are noted earlier so that the connections of cables are easily achieved
in computer programming method. Figure 5.3 shows the tasks of the computer
programming of a 10 level zig-zag tower. Figure 5.3(a) is the bar deployment of the tower.
Figure 5.3(b) is for after adding parallel cables. Figure 5.3(c) is the final model after
adding parallel and vertical cables.

48
(a) (b)
(c)
Figure 5.3 Computer model of 10 level zig-zag tower with: (a) bar elements; (b) bar and parallel cables; (c) bar and all cables.

49
Physical modelling is the task to identify the construction of the zig-zag tower. A simple
3 level zig-zag tower is established. Metal chains and turnbuckles are components of
cables. Figure 5.4 exhibits the details of a cable connection in practical. Turnbuckles are
connected with 2 chains at two tops. On top of the chain a slot is opened. At the tops of
the bars, several holes are droll so that the chains can hook in to the bars. Figure 5.5(a)
and Figure 5.5(b) show the details.
Figure 5.4 The connection of turnbuckle and chains.
(a)
(b)
Figure 5.5 The details of chain and bar connection: (a) bar; (b) chain.

50
The connection utilizes chains and turnbuckles in order to fulfill the requirement of the
rigidity characteristic of the zig-zag tower. The rigidity of the tower can be enhanced by
applying high pre-stress. The turnbuckles are instruments to easily apply pre-stress. When
turning the buckle in the middle, the two sides of the turnbuckle are moved towards the
center so that the total length of the turnbuckle is shorten. The total length of the cable is
also shorten in this process. Comparing to plastic cables, chains which connected with
turnbuckles are much rigid because it is hard to deform in tension according to hooke’s
principle. The topology here means the whole structure is able to sustain more pre-stress.
Figure 5.6(a) shows the final model of a zig-zag tower. Figure 5.6(b) shows the model
sustaining the load of a heavy concrete box on the top.
(a)
(b)
Figure 5.6 A three level zig-zag tower model: (a) tower; (b) tower with a concrete box on top.

51
5.2 Observation tower proposal for Eureka building 5.2.1 Project objective Eureka Tower is a residential building in the South bank precinct of Melbourne, Australia.
Construction began in August 2002 and the exterior completed on June 1, 2006. The plaza
was finished in June 2006 and the building was officially opened on October 11, 2006.
Eureka Tower is the tallest residential building in the world, when measured either by the
height of its roof, or by the height of its highest habitable floor. The building stands
297.3m in height (300m above sea level), with 91 stories above ground plus one basement
level. It is one of the only six buildings in the world with 90 or more stories. (Wikipedia,
2007)
Figure 5.7 Details of the roof of Eureka building.
The observation tower project on top of Eureka tower building focuses on creating an
approximately 50 meter height tower structure so that the whole building will reach a
height of 350 meters and become the tallest building in Australian and southern

52
hemisphere. The tower diameter is limited by the width of the cling of the Eureka
building. Figure 5.7 which provided by designer of the building shows the details of the
roof of Eureka building.
The width of the roof is approximately 9 meters in shortest according to the Figure.
Considering the deployment of the roof, the observation tower should be located in centre
of the roof. The bottom of the tower should be reinforced and the structure of the tower
could not influence the whole building.
5.2.2 Rigid zig-zag tower proposal
Advantages of a zig-zag tower are presented in early paragraph. All levels of the tower
are hinged tightly and each level is a closed and self-stressed system. The whole tower
structure is rigid and vertically rigid enough. The proposal is then start with the zig-zag
tower structure.
Figure 5.8 A ten level zig-zag tower with rigid bars.

53
A zig-zag tensegrity tower is proposed initially for the project due to the requirements of
project and the advantages of the zig-zag structure. Figure 5.8 show the zig-zag tower
structure options. The tower is constructed 55 meters high in ten levels; the diameter of
the tower is 7 meters at bottom and 4 meters on top. An outer 5 metres antenna is
vertically devised on top of the tower. The antenna is connected with the 4 edges of the
top level.
This zig-zag tower proposal draft is simply created by a 10 level zig-zag tower. The
shape and height is adjusted to satisfy the requirement of the proposal. The hinged bars,
parallel and vertical cables are shown clearly. Later works are focused on changing the
shape of bars and number of cables.
5.2.3 Curved zig-zag tower proposal
Significant achievement has been done which is exchanging the bar shape form rigid to
curved. The principle is as follows. Tensegrity structure is created by compression bars
and tension cables as presented before. Thus, when remaining the constructions of the
zig-zag tower, exchange of the shape of bars could not damage the self-stress
characteristic. Figure 5.9 performs the detail of rigid bars and curved bars connected with
cables in a same construction. The figure is created by computer programming.
(a) (b)
Figure 5.9 Rigid bars and curved pars connected with cables in similar construction: (a) rigid bars;
(b) curved bars.

54
These two figures show the connection of 2 cells in zig-zag tower. It is obvious that the
connection between cables and bars are similar. Only the shapes of bars are changed.
When investigating the rigid bars in Figure 5.9(a), the directions of compassion in bars
are through the bar so that two load in a hinge would have an angle between each other.
Comparing with the rigid bars, when two curved bars are connected, the connectivity is
better than the rigid ones because the bars extending direction near the hinge are the same.
The load in a hinge from two bars is in a same direction.
A ten-level zig-zag tower with curved bars is then established by computer programming
with this principle. It also has ten levels and an antenna is attached on the top as exhibited
in Figure 5.10. The curved tower keeps the zig-zag structure characteristics. The
appearence is smoother and the whole shape is like DNA.
Figure 5.10 A ten level zig-zag tower with curved bars

55
5.2.4 Reticulated tower proposal
After the rigid and curved zig-zag tower proposals are created, the reticulated tower is
developed basically to the tensegrity principle while considering Snelson’s waving tower
structure. When investigating the bar deployment of the zig-zag tower, it is obvious the
bars are continually rotated in same anti-clockwise direction in this proposal. The bottoms
of the bars are hinged with the building roof, if Four more bars are started form the hinges
in clockwise direction symmetrical to initial 4 bars, the bars would cross each other and
new reticulated tower can be built in both rigid and curved tower proposals. Figure 5.11
shows the structure of reticulated tower.
(a) (b)
Figure 5.11 10 level reticulated tower with: (a) rigid bars; (b) curved bars.

56
5.2.5 Design of staircase for the tower
Stair design presented here added two stairs which are not crossing each other for people
to climb the tower, the details of the stairs are exhibited in Figure 5.12. The stairs are
attached with two extending arrays of bars form the bottom to the top.
In the tower, the stairs are defined 60 centimetres width and 120 centimetres hight hand-
rail are set at two sides of the stairs. Safety ropes can be attached with the banisters to
ensure security. The final proposal of reticulated tower with stairs is presented in Figure
5.13 with (a) rigid straight bars and (b) curved bars.
(a) (b)
Figure 5.12 Details of the stairs.
(a)

57
(b)
Figure 5.13 A ten level reticulated tower attached stairs with: (a) straight bars; (b) curved bars.
5.2.6 Physical modelling
Several options are given in computer programming according to the zig-zag tower
principle and extending reticulated tower principle. The curved 10 level reticulated tower
proposal is more interested by the owner of the building. Several practical models of the
structure are then established.
A 1:100 proportional model is completed first. The model is 55 centimetres high. The
diameter of the bottom is 7 centimetres. Eight steel wires are rotated since 4 hinges of the
bottom with both clockwise and anti clockwise directions. The steel wires are forming the
curved bars in the tower structure.
In physical modelling, the steel wires are initially rotated around a wood column as
shown in Figure 5.15(a). The rotations and the height of each level are noted on the wood
column so that the steels can be rotated accordingly. The steels are wheeled when cross
each other. After all the crosses are wheeled, the wood column in centre is then removed
and the steel model is finished. A 5 cm antenna is added on top of the model. The stairs
are not shown in this structure. The model is also identified the stability of the reticulated
structure. The final model is shown in Figure 5.15(b).

58
Figure 5.14 Steel model of a 10 level curved reticulated tower: (a) wood column inside; (b)
finished.
A 1:25 proportional copper tube model is finished later as shown in Figure 5.15. The bars
in this model are component of copper tubes. The model is built in a similar manner as
explained in the last paragraph.

59
Figure 5.15 Copper tube model of 10 level curved reticulated tower.
Imagination pictures of the Eureka building with the curved reticulated tower are created
as shown in Figure 5.16. The pictures consider the real proportion of the building and the
observation tower. It is rendered using Photoshop. Both a day time picture and a night
time picture are provided.

60
(a) (b)
Figure 5.16 Computer images of the Eureka building with the curved reticulated tower on top.
5.3 Conclusion The zig-zag tensegrity tower structure is introduced first in this chapter. Comparing with
initial tensegrity tower, zig-zag tower exhibits the specific rigid characteristic. 4 bars each
level tensegrity cell are connected to create rigid and self-stress system. Bars are hinged
and parallel and vertical cables are utilized to reinforce the system. Zig-zag tower is
established for building a practical observation tower structure.

61
An observation tower structure proposal is prepared for the Eureka building in South bank
which is the tallest residential building in the world. Several options are given as rigid
zig-zag tower, curved zig-zag tower and reticulated tower. Several Physical models have
been built. Imagination pictures of the building with observation towers are shown at last.

62
Chapter 6 CONCLUSIONS 6.1 General conclusions This thesis proposes several methods for creating tensegrity towers arches bridges and
roofs. The examples shown in this paper have clearly demonstrated that it is possible,
indeed quite straightforward, to extend Snelson’s original work on tensegrity tower to the
creation of towers and arches with any number of bars at each level. The shapes of the
towers and arches can be varied readily by performing simple transformations of nodal
coordinates of a basic cylindrical tower. The towers and arches can be built level-by-level,
thus allowing for modularized construction – a feature that is of significant practical
importance. A cable-stayed bridge using two tensegrity arches is also proposed.
The idea of the proposed hexagonal tensegrity cell is very simple too. It is most probable
that other researchers may have used a similar concept before, perhaps in a different
context. Nevertheless, this thesis has shown that by using the hexagonal tensegrity cells as
the basic building blocks, one can create stadium roofs of arbitrary geometries. The roof
can be curved and the area to be covered by the roof can be of an irregular shape. Also
one may easily create an entrance to the stadium or a skylight to the roof by removing
certain bars.
Extending the work of the previous tensegrity tower, the zig-zag tower utilises the same
tensegrity cell while the connection between cells is changed for improved rigidity of the
tower. Based on the concept of zig-zag tower, a proposal for the observation tower on top
of the Eureka building in Melbourne has been devised. Several design options have been
proposed. Finally 2 physical models of areticulated curved tower structure have been
constructed.
6.2 Objectives achieved The objectives of the investigation presented in Chapter 1have been successfully achieved.
1 Tensegrity modules or cells have been created and the corresponding computer codes
have been implemented so that similar tensegrity structures can be generated simply by
computer calculations. Tensegrity modules or cells are created by following the specific
requirements of the structure. For example, tensegrity tower modules can be connected in

63
the direction of one axis and tensegrity roof cells should be able to connect to form a flat
panel or a curved roof structure.
The first objective is generating the methods of creating tensegrity cells. This objective is
generally achieved by creating tensegrity tower cells and hexagon tensegrity roof cells.
The experiences of the creation indicate that a tensegrity cell must satisfy two conditions:
a. The tensegrity cell itself is a tensegrity structure.
b. The tensegrity cell can be extended in several specific directions.
2 Computer codes have been completed carefully by considering the characteristics of
the tension and compression elements. The distribution of elements can be well displayed
and the connectivity between elements could be easily established.
The second objective is computer modelling. Most construction works are finished by
computer code in the investigation presented in the thesis. After tensegrity structure cells
are defined. The processes of shape control, components deployment and association are
all completed by computer programming in the research. Computer programming has
advantages in calculation and structure deformation. Two obvious examples are the
creation of any bars each level tensegrity towers in chapter 3 and curved reticulated
observation tower in chapter 5.
3 Physical models have been constructed to verify the correctness of the method. At the
same time, the physical models provide valuable insights into the real behaviour of
tensegrity structures. Such insights have helped modify and enhance the theoretical
methods being developed.
Reviewing the definition of tensegrity system, the tensegrity structure is mainly a
structure component with tension and compression elements, with a state of self-stress.
The investigation of Author is focus on: how to create a tensegrity cell and how to build a
structure by created cell. This is the method by the author for creating a category of
tensegrity structures.

64
REFERENCES:
Castro G. & Levy M., 1992, Analysis of the Georgia Dome Cable Roof
http://www.columbia.edu/cu/gsapp/BT/DOMES/GEORGIA/g-anal.html.
Eureka tower website 2007 http://www.eurekatower.com.au/.
Fuller R.B., 1985, Inventions: The patented works of R.B Fuller, ST Martin’s Press.
Fuller R. B., 1961, Tensegrity, Portfolio and Art News Annual, No.4.
Fuller R.B., Tensegrity website
http://www.rwgrayprojects.com/rbfnotes/fpapers/tensegrity/tenseg01.html.
Gunnar T., 2002, Deployable Tensegrity Structures for Space Applications Stockholm.
Lalvini H., 1996, “Morphology”, International Journal of Space Structures, Vol.
11,No1&2.
Hanaor A., 1994, Geometrically rigid double-layer tensegrity grids. International Journal
of Space Structures Vol.9, No.4, pp. 227-238.
Lodder C. 1992, The Transition to Constructivism. The Great Utopia. The Russian and
Soviet Avant-Grade, 1915-1932, exhibition, Guggenheim Museum.
Motro R. 1992, Tensegrity system: State of the art, International Journal of Space
Sturctures, Vol 7,No2.
Motro R, 2003, Tensegrity, structural systems for the future. ISBN 1903996376.
Pugh A., 1976, AnIintroduction toTensegrity, University of California Press, Berkeley.
Rastorfer D., 1988, Structural Gymnastics for the Olympics,
http://www.columbia.edu/cu/gsapp/BT/DOMES/SEOUL/s-struc.html.
Snelson K., 2002, Continuous Tension, Discontinuous Compression Structures, U.S.
Patent No 3169611.1965.
Snelson K., Triangulated Tension Networks. http://www.kennethsnelson.net/.

65
Vassart N., Laporte R., Motro R., 2000, Determination of mechanism’s order for
Kinematically and statically indeterminate systems, International Journal of Solids
and Structures, Vol. 37 , PP 3807-3839.
Williamson D., Skelton R.R., 1998, A general class of tensegrity systems: Equilibrium
analysis, Engineering Mechanics For The 20st Century, SCE conference, Lajolla.
Wikipedia, 2007, The free encyclopedia, http://en.wikipedia.org/wiki/Eureka_Tower.

66
APPENDIX :
(Computer code in FORTRAN for generating tensegrity towers and
arches)
Part 1
PROGRAM MAIN
PARAMETER (N=14,N1=14)
REAL AH(N),AR(N),AD(N/2)
REAL AH1(N1),AR1(N1),AD1(N1/2)
REAL TH(N+N1),TR(N+N1)
OPEN(1,FILE='PARA.txt')
AH(1)=0.0
AR(1)=400.0
AR(3)=360.0
AH(3)=400.0
AD(1)=100.0
AR(2)=AR(3)+AD(1)/(AH(3)-AH(1))*(AR(1)-AR(3))
AR(5)=AR(2)*AR(3)/AR(1)
AH(2)=AH(3)-AD(1)
AH(5)=AH(2)+(AH(3)-AH(1))*AR(2)/AR(1)
AD(2)=AD(1)*AR(2)/AR(1)
DO I=2,N/2-2

67
AR(2*I)=AR(2*I+1)+AD(I)/(AH(2*I+1)-AH(2*I-2))
1 *(AR(2*I-2)-AR(2*I+1))
AR(2*I+3)=AR(2*I)*AR(2*I+1)/AR(2*I-2)
AH(2*I)=AH(2*I+1)-AD(I)
AH(2*I+3)=AH(2*I)+(AH(2*I+1)-AH(2*I-2))*AR(2*I)/AR(2*I-2)
AD(I+1)=AD(I)*AR(2*I)/AR(2*I-2)
ENDDO
AR(N-2)=AR(N-1)+AD(N/2-1)/(AH(N-1)-AH(N-4))*(AR(N-4)-AR(N-1))
AR(N)=AR(N-2)*AR(N-1)/AR(N-4)
AH(N-2)=AH(N-1)-AD(N/2-1)
AH(N)=AH(N-2)+(AH(N-1)-AH(N-4))*AR(N-2)/AR(N-4)
AD(N/2)=AD(N/2-1)*AR(N)/AR(N-1)
IF (N1.NE.0) THEN
AR1(1)=AR(N)
AR1(3)=AR(N)*AR(1)/AR(3)
AH1(1)=AH(N)-AD(N/2)
AH1(3)=AH1(1)+AH(N)-AH(N-2)
AD1(1)=AD(N/2)
AR1(2)=AR1(3)+AD1(1)/(AH1(3)-AH1(1))*(AR1(1)-AR1(3))
AR1(5)=AR1(2)*AR1(3)/AR1(1)
AH1(2)=AH1(3)-AD1(1)
AH1(5)=AH1(2)+(AH1(3)-AH1(1))*AR1(2)/AR1(1)

68
AD1(2)=AD1(1)*AR1(2)/AR1(1)
DO I=2,N1/2-2
AR1(2*I)=AR1(2*I+1)+AD1(I)/(AH1(2*I+1)-AH1(2*I-2))
1 *(AR1(2*I-2)-AR1(2*I+1))
AR1(2*I+3)=AR1(2*I)*AR1(2*I+1)/AR1(2*I-2)
AH1(2*I)=AH1(2*I+1)-AD1(I)
AH1(2*I+3)=AH1(2*I)+(AH1(2*I+1)-AH1(2*I-2))*AR1(2*I)/AR1(2*I-2)
AD1(I+1)=AD1(I)*AR1(2*I)/AR1(2*I-2)
ENDDO
AR1(N1-2)=AR1(N1-1)+AD1(N1/2-1)/(AH1(N1-1)-AH1(N1-4))
1 *(AR1(N1-4)-AR1(N1-1))
AR1(N1)=AR1(N1-2)*AR1(N1-1)/AR1(N1-4)
AH1(N1-2)=AH1(N1-1)-AD1(N1/2-1)
AH1(N1)=AH1(N1-2)+(AH1(N1-1)-AH1(N1-4))*AR1(N1-2)/AR1(N1-4)
ENDIF
DO I=1,N-1
TH(I)=AH(I)
TR(I)=AR(I)
ENDDO

69
IF (N1.NE.0) THEN
TH(N)=AH1(1)
TR(N)=AR1(1)
TH(N+1)=AH(N)
TR(N+1)=AR(N)
DO I=2,N1
TH(I+N)=AH1(I)
TR(I+N)=AR1(I)
ENDDO
ELSE
TH(N)=AH(N)
TR(N)=AR(N)
ENDIF
WRITE(1,*) 'H'
WRITE(1,100) (TH(I),I=1,N+N1)
WRITE(1,*) 'R'
WRITE(1,100) (TR(I),I=1,N+N1)
100 format(4(F8.2,','))
END
Part 2
PROGRAM MAIN
DIMENSION X(10000,3)
INTEGER L(100000,2),LR(100000,2),NONEL(100000)

70
PARAMETER(M=10,N=40,PI=3.1415926,length=800,unit=1000,HI=2.25)
REAL RA(N),H(N),R(N),S(N),T(N),W(N),spum
DATA RA/0.,0.5,0.001,0.0,0.501,
1 0.5,0.001,0.0,0.501,
1 0.5,0.001,0.0,0.501,
1 0.5,0.001,0.0,0.501,
1 0.5,0.001,0.0,0.501,
1 0.5,0.001,0.0,0.501,
1 0.5,0.001,0.0,0.501,
1 0.5,0.001,0.0,0.501,
1 0.5,0.001,0.0,0.501,
1 0.5,0.001,0.0/
DATA H/ 0.00, 300.00, 400.00, 543.75,
1 625.00, 741.80, 807.81, 902.71,
1 956.35, 1033.45, 1077.03, 1139.68,
1 1175.09, 1225.99, 1254.76, 1296.12,
1 1319.49, 1353.09, 1372.09, 1399.39,
1 1414.82, 1437.00, 1449.54, 1467.57,
1 1477.75, 1492.40, 1500.67, 1512.57,
1 1519.30, 1528.97, 1534.43, 1542.28,
1 1546.72, 1553.11, 1556.71, 1561.90,
1 1564.83, 1569.04, 1571.42, 1576.78/
DATA R/400.00, 325.00, 300.00, 264.06,

71
1 243.75, 214.55, 198.05, 174.32,
1 160.91, 141.64, 130.74, 115.08,
1 106.23, 93.50, 86.31, 75.97,
1 70.13, 61.73, 56.98, 50.15,
1 46.29, 40.75, 37.61, 33.11,
1 30.56, 26.90, 24.83, 21.86,
1 20.18, 17.76, 16.39, 14.43,
1 13.32, 11.72, 10.82, 9.53,
1 8.79, 7.74, 7.14, 5.80/
c 19.25,18.5,17.75,17.,
c 1 16.25,15.5,14.75,14.,
c 1 13.25,12.5,11.75,11.,
c 1 10.25,9.5,8.75,8.,
c 1 7.25,6.50,5.75/
*M IS THE TOTAL NUMBER OF BASE POINTS
*N IS THE TOTAL NUMBER OF LEVELS
*R IS THE RADIUS OF HOOP DIRECTION
OPEN(100,FILE='NAE.INP')
ANGLE=2.0*PI/M
NP=0
DO I=1,N
DO J=1,M

72
NP=NP+1
X(NP,1)=R(I)*COS(ANGLE*(J-1+RA(I)))
X(NP,2)=R(I)*SIN(ANGLE*(J-1+RA(I)))
X(NP,3)=H(I)
ENDDO
ENDDO
*CONNECT THE RIGID BARS
NER=0
DO J=1,M
NER=NER+1
LR(NER,1)=J
IF (J.NE.M) THEN
IF (N==2) THEN
LR(NER,2)=M+J+1
ELSE
LR(NER,2)=2*M+J+1
ENDIF
ELSE
IF (N==2) THEN
LR(NER,2)=M+1
ELSE
LR(NER,2)=2*M+1
ENDIF
ENDIF
ENDDO

73
IF (N.GT.3) THEN
DO I=1,N/2-1
DO J=1,M
NER=NER+1
LR(NER,1)=(2*I-1)*M+J
IF ((2*I+3).LT.N) THEN
IF (MOD(I,2)==1) THEN
IF (J==1) THEN
LR(NER,2)=(2*I+2)*M+M
ELSE
LR(NER,2)=(2*I+2)*M+J-1
ENDIF
ELSE
IF (J==M) THEN
LR(NER,2)=(2*I+2)*M+1
ELSE
LR(NER,2)=(2*I+2)*M+J+1
ENDIF
ENDIF
ELSE
IF (MOD(I,2)==1) THEN
IF (J==1) THEN
LR(NER,2)=(N-1)*M+M
ELSE
LR(NER,2)=(N-1)*M+J-1

74
ENDIF
ELSE
IF (J==M) THEN
LR(NER,2)=(N-1)*M+1
ELSE
LR(NER,2)=(N-1)*M+J+1
ENDIF
ENDIF
ENDIF
ENDDO
ENDDO
ENDIF
NE=0
DO I=1,N
!Connect the ith level itself
DO J=1,M
NE=NE+1
L(NE,1)=(I-1)*M+J
L(NE,2)=(I-1)*M-M*(J/M)+J+1
ENDDO
c IF (I.lE.N-2) THEN
c IEND=I+2
c ELSE
c IEND=N
c ENDIF

75
IF (I.NE.N) THEN
DO J=I+1,N
DO K2=0,M-1
DO K=1,M
ISW=0
NE=NE+1
L(NE,1)=(I-1)*M+K
L(NE,2)=(J-1)*M-M*((K+K2-1)/M)+K+K2
c*FOR A CYLIDRICAL SHELL
c D=sqrt((X(L(NE,1),1)-X(L(NE,2),1))**2.0+(X(L(NE,1),2)
c 1 -X(L(NE,2),2))**2.0)
c R1=R((L(NE,1)-1)/M+1)
c R2=R((L(NE,2)-1)/M+1)
c IF (D.LE.1.0E-5) THEN
c D1=0.
c D2=0.
c ELSE
c D1=(D**2.0-R2**2.0+R1**2.0)/(2.0*D)
c D2=(D**2.0-R1**2.0+R2**2.0)/(2.0*D)
c ENDIF
c T1=D1/R1
c T2=D2/R2
c IF (T1.GE.1.0) THEN
c T1=1.0
c ELSE IF (T1.LE.-1.0) THEN
c T1=-1.0

76
c ENDIF
c IF (T2.GE.1.0) THEN
c T2=1.0
c ELSE IF (T2.LE.-1.0) THEN
c T2=-1.0
c ENDIF
c TANGLE1=ASIN(T1)
c TANGLE2=ASIN(T2)
c TANGLE=TANGLE1+TANGLE2
c IF ((TANGLE-ANGLE).GT.(-1.0)) THEN
c ISW=1
c ENDIF
**************************************************
DO I1=1,NER
IF ((LR(I1,1)==L(NE,1).AND.LR(I1,2)==
1 L(NE,2)).OR.(LR(I1,2)==L(NE,1).AND.
1 LR(I1,1)==L(NE,2))) ISW=1
ENDDO
IF (ISW==1) NE=NE-1
ENDDO
ENDDO
ENDDO
ENDIF
ENDDO
77
c DO I=1,2
c DO J=1,M
c NE=NE+1
c L(NE,1)=J+(I-1)*(N-1)*M
c L(NE,2)=1+(I-1)*(N-1)*M
c ELSE
c L(NE,2)=J+1+(I-1)*(N-1)*M
c ENDIF
c ENDDO
c ENDDO
*WRITE OUTPUT FILE
WRITE(100,500) '*Node'
DO I=1,NP
WRITE(100,501) I,(X(I,J),J=1,3)
ENDDO
WRITE(100,500) '*Element, type=T3D2'
c WRITE(100,500) '*Element, type=B31'
DO I=1,NER
WRITE(100,502) I,LR(I,1),LR(I,2)
ENDDO
DO I=1,NE
c WRITE(100,502) I+NER,L(I,1),L(I,2)
ENDDO
WRITE(100,500) '*Elset, elset=Picked1, internal, generate'

78
WRITE(100,503) NER
WRITE(100,500) '*Elset, elset=Picked2, internal,generate'
WRITE(100,504) NER+1,NE+NER
500 FORMAT(A)
501 FORMAT(I6,3(',',F10.4))
502 FORMAT(I6,2(',',I6))
503 FORMAT(' 1,',I6,' 1')
504 FORMAT(2(I6,','),' 1')
END
Part 3
OPEN(100,FILE='NAE.INP')
ANGLE=2.0*PI/M
C=0.
SC=0.
spum=0.005
do while(SC<(2*length))
e=sqrt(1.+HI*HI*(sinh(((SC-length)*HI/unit))*sinh
1((SC-length)*HI/unit)))
f=sqrt(1.+HI*HI*(sinh(((SC+spum-length)*HI/UNIT))*sinh
1((SC+spum-length)*HI/unit)))
c=c+(spum*(e+f))/2

79
SC=SC+spum
end do
scale=c/H(N)
do I=1,N
H(I)=H(I)*scale
end do
S(1)=0.
T(1)=0.
W(1)=0.
b=0.
High=unit*cosh((HI*length)/unit)
do I=2,N
S(I)=S(I-1)
do while((abs(H(I)-b)/H(I)>0.001))
e=sqrt(1.+HI*HI*(sinh(((S(I)-length)*HI/unit))*sinh
1((S(I)-length)*HI/unit)))
f=sqrt(1.+HI*HI*(sinh(((S(I)+spum-length)*HI/UNIT))*sinh
1((S(I)+spum-length)*HI/unit)))
b=b+(spum*(e+f))/2
S(I)=S(I)+spum
ENDDO

80
T(I)=High-unit*cosh((S(I)-length)*HI/unit)
W(I)=PI/2.-ATAN(-HI*sinh((S(I)-length)*HI/unit))
enddo
scale=abs(PI/W(N))
do I=1,N
W(I)=W(I)*scale
end do
NP=0
DO I=1,N
DO J=1,M
NP=NP+1
X(NP,1)=R(I)*COS(ANGLE*(J-1+RA(I)))*COS(W(I))+S(I)
X(NP,2)=R(I)*SIN(ANGLE*(J-1+RA(I)))
if (W(I)>(PI/2))then
X(NP,3)=T(I)-R(I)*COS(ANGLE*(J-1+RA(I)))*SIN(W(I))
else
X(NP,3)=T(I)-R(I)*COS(ANGLE*(J-1+RA(I)))*SIN(W(I))
end if
ENDDO
ENDDO

81