general ledger getting started - sage partner portal · sage accpac multicurrency accounting ......
TRANSCRIPT

.
SAGE ACCPAC
Sage Accpac ERP™
General Ledger Getting Started
Sage Accpac International, Inc. Confidential

GLGS ttl.doc, printed on 1/21/2008, at 4:18:29 PM. Last saved on 1/21/2008 4:18:00 PM.
© 2008 Sage Software, Inc. All rights reserved. Sage Software, Sage Software logos, and all Sage Accpac product and service names are registered trademarks or trademarks of Sage Software, Inc., or its affiliated entities. All other trademarks are the property of their respective owners. Sage Software, Inc. Publisher No part of this documentation may be copied, photocopied, reproduced, translated, microfilmed, or otherwise duplicated on any medium without written consent of Sage Software, Inc. Use of the software programs described herein and this documentation is subject to the Sage Software License Agreement enclosed in the software package.
Sage Accpac International, Inc. Confidential

Glgs-Toc.doc, printed on 3/14/2008, at 3:45:12 PM. Last saved on 3/14/2008 3:44:00 PM.
Contents
Chapter 1: Introducing General Ledger General Ledger and Financial Reporter Features ..................................1–1
Tailor General Ledger to Your Business.......................................1–2 Use Multiple Methods of Entering Transactions ...............................1–3 Produce Complete Audit Trails ..............................................1–4 Protect the Integrity of Your Data ............................................1–4 Produce Comprehensive Management Reports ................................1–5 Maintain Budgets...........................................................1–7 Exchange Data with Spreadsheets............................................1–7 Sage Accpac Multicurrency Accounting ......................................1–7
Flexible Financial Reporting .....................................................1–8 Integrating with Other Applications..............................................1–9 General Ledger Documentation.................................................1–10
General Ledger User Guide.................................................1–10 Financial Reporter User Guide ..............................................1–11 Financial Reporter Quick Reference .........................................1–11 General Ledger Getting Started Guide .......................................1–11
Other Online Documentation...................................................1–12 Where To Now?...............................................................1–12
Chapter 2: What You Need to Know Before Setting Up General Ledger Install the System Manager and Configure Common Services.......................2–1 Designing the Chart of Accounts.................................................2–2
Follow These Steps to Design Your Chart of Accounts..........................2–2
Getting Started iii
ACCPAC International, Inc. Confidential

Glgs-Toc.doc, printed on 3/14/2008, at 3:45:12 PM. Last saved on 3/14/2008 3:44:00 PM.
Defining the Accounts.......................................................... 2–5 Segments.................................................................. 2–6 Account Structures ......................................................... 2–9 Account Groups .......................................................... 2–12
Optional General Ledger Setup Information ..................................... 2–13 Source Codes ............................................................. 2–14 Source Journals ........................................................... 2–15 Revaluing Multicurrency Accounts ......................................... 2–16 G/L Security .............................................................. 2–18 Optional Fields ........................................................... 2–22 Rollup Accounts .......................................................... 2–23
General Ledger Account Data.................................................. 2–24 Adding the General Ledger Accounts........................................... 2–26
Detail and Consolidated Posting............................................ 2–29 Assigning Optional Fields to Accounts ...................................... 2–30 Allocation ................................................................ 2–31 Multicurrency Accounts ................................................... 2–36 Creating G/L Accounts Automatically....................................... 2–38 Adding Rollup Accounts .................................................. 2–41
Recurring Entries ............................................................. 2–44 Importing and Exporting Account Information .................................. 2–44 Fiscal Sets .................................................................... 2–45
Types of Fiscal Sets........................................................ 2–46 Setting Up Historical and Current Financial Data ................................ 2–48
Adding Financial and Quantity Data for Historical Years ..................... 2–49 Entering Current Year‐To‐Date Transactions................................. 2–49 Entering Historical and Current Data — a Diagram .......................... 2–51
Budgets...................................................................... 2–52 Importing Budgets from a Spreadsheet...................................... 2–53 Budget Entry Methods..................................................... 2–53
Displaying Account Information ............................................... 2–54 Where To Now? .............................................................. 2–55
iv Sage Accpac ERP General Ledger
ACCPAC International, Inc. Confidential

Glgs-Toc.doc, printed on 3/14/2008, at 3:45:12 PM. Last saved on 3/14/2008 3:44:00 PM.
Chapter 3: Setting Up General Ledger Using General Ledger with an Internet Browser ...................................3–2 Summary of General Ledger Setup Steps .........................................3–2 While You Work ...............................................................3–5 Prepare General Ledger Data ....................................................3–5 Step 1: Configure System Manager ..............................................3–6 Step 2. Activate General Ledger .................................................3–8
Access to General Ledger....................................................3–9 Step 3: Set Up General Ledger Options..........................................3–10 Step 4: Set Up Segment Codes..................................................3–21 Step 5: Set Up Account Structures ..............................................3–22 Step 6: Set Up Source Codes ...................................................3–24 Step 7: Set Up Account Groups .................................................3–26 Step 8: Set Up Source Journal Profiles ...........................................3–28 Step 9: Set Up Revaluation Codes ..............................................3–28
Back Up the Data ..........................................................3–31 Step 10: Set Up Optional Fields.................................................3–32
Deleting Optional Fields ...................................................3–35 Step 11: Add Accounts ........................................................3–36
Importing Accounts .......................................................3–37 Entering Accounts Individually .............................................3–38
Step 12: Add General Ledger Opening Balances and Period Data ..................3–54 Entering Historical Data....................................................3–55 Entering Current‐Year Opening Balances ....................................3–57 Entering Current Year‐to‐Date Transactions..................................3–59 Add Budgets..............................................................3–61
Step 13: Assign Account Permissions ...........................................3–66 Turning on G/L Security and Setting the Default Security Option...............3–66 Default Access Security Option .............................................3–67 Setting User Account Permissions ...........................................3–68 Test Permissions...........................................................3–72
Step 14: Set Up Recurring Entries...............................................3–72
Getting Started v
ACCPAC International, Inc. Confidential

Glgs-Toc.doc, printed on 3/14/2008, at 3:45:12 PM. Last saved on 3/14/2008 3:44:00 PM.
Creating G/L Accounts Automatically .......................................... 3–75 Before You Start .......................................................... 3–75 Creating New Accounts ................................................... 3–76
Financial Reporter ............................................................ 3–84 Where To Now? .............................................................. 3–84
Appendix A: Setup Checklist Sample Setup Checklist.........................................................A–2
Index
vi Sage Accpac ERP General Ledger
ACCPAC International, Inc. Confidential

Getting Started 1–1
GLGS-1.doc, printed on 3/25/2008, at 1:31:50 PM. Last saved on 3/25/2008 12:51:00 PM.
Sage Software Confidential
Introducing G
/L
Chapter 1 Introducing General Ledger
This chapter introduces you to the General Ledger and Financial Reporter and to the General Ledger documentation. It describes important software features, discusses how General Ledger integrates with other applications, and suggests how to use the guides to learn about the system.
Use General Ledger through a browser or from the Sage Accpac desktop
Note that you can access your General Ledger data using the Sage Accpac desktop or through your Internet browser. All General Ledger data entry forms are designed to enable users at remote locations to enter transaction data using a browser.
To find out how to set up your system for use with an Internet browser, see the System Manager Administrator Guide.
General Ledger and Financial Reporter Features General Ledger and Financial Reporter handle all your financial record‐keeping and reporting needs, whatever the size and complexity of your business.
You can use General Ledger and Financial Reporter to set up and maintain your general ledger accounts, and enter or transfer transactions from various sources. You can track account and transaction details on displays and printed reports.
You can use General Ledger and Financial Reporter by itself or as part of an integrated system with other Sage Accpac accounting applications. You can also transfer General Ledger account data to and from spreadsheet and database applications, such as Excel, Access, or dBase 5.0.

General Ledger and Financial Reporter Features
1–2 Sage Accpac ERP General Ledger
GLGS-1.doc, printed on 3/25/2008, at 1:31:50 PM. Last saved on 3/25/2008 12:51:00 PM.
Sage Software Confidential
Tailor General Ledger to Your Business
With General Ledger and Financial Reporter, you can:
• Set up a chart of accounts that fits your company today and allows for growth in the future.
• Set up departments, divisions, cost centers, and other accounting subdivisions, assigning different retained earnings accounts and producing separate financial statements and reports for each.
• Structure your account numbers any way you wish, use different structures for different cost and revenue subdivisions, and add new structures in the future as your needs change.
• Assign optional fields to accounts to include extra information that your company wants to keep with your General Ledger accounts.
• Assign optional transaction fields that will be used with transaction details that use the accounts to which the optional fields are assigned.
• Assign account access rights to individual users, to minimize the risk of unauthorized activity.
• Use either 12 or 13 fiscal periods per year, and keep account detail and summary data for as long as you wish.
• Create an unlimited number of account groups.
• Create Rollup accounts that show the relationships between accounts to assist in classification, budgeting, and reporting.
• Maintain additional account balances, including:
− Quantities associated with monetary amounts.
− Up to five budgets.

General Ledger and Financial Reporter Features
Getting Started 1–3
GLGS-1.doc, printed on 3/25/2008, at 1:31:50 PM. Last saved on 3/25/2008 12:51:00 PM.
Sage Software Confidential
Introducing G
/L
− Provisional account balances based on provisional postings. Test the outcome of batch processing without affecting the actual amounts in accounts. Once you are satisfied that a batch will create the correct results in the general ledger, you post the batch to your permanent records.
Use Multiple Methods of Entering Transactions
General Ledger and Financial Reporter allow you to:
• Enter batches of transactions directly into General Ledger.
• Set up any number of recurring journal entries for fast processing of monthly transactions.
• Schedule recurring entries with reminders, so that Sage Accpac will remind you to process recurring entries when they are due. (You can then process the transactions directly from the Reminder List, or use the Create Recurring Entries Batch feature later.)
• Review, edit, and post batches generated by other Sage Accpac accounting applications.
• Import batches from non‐Sage Accpac applications.
• Create batches of entries that automatically allocate account balances to other accounts, using the percentages you specify — to redistribute costs to cost centers, for example.
• Create batches of currency revaluation transactions that reflect gains and losses from changes in exchange rates.
• Save copies of batches that recur regularly, to use again later.

General Ledger and Financial Reporter Features
1–4 Sage Accpac ERP General Ledger
GLGS-1.doc, printed on 3/25/2008, at 1:31:50 PM. Last saved on 3/25/2008 12:51:00 PM.
Sage Software Confidential
Produce Complete Audit Trails
With General Ledger and Financial Reporter, you can:
• Require batch listings to be printed before posting (this is optional).
• Enter a reference, a description, and a comment of up to 250 characters to precisely identify each journal entry and each debit or credit entry within a journal entry.
• Print a journal of entries posted in each posting run, listing key pieces of information you can use to track each detail.
• Use the G/L Transactions Listing to trace details back to their posting journals.
• Drill down from the Transaction History form to display subledger source documents online.
• Control the level of editing allowed for batches generated by Sage Accpac subledgers and by non‐Sage Accpac applications.
• Assign source codes to identify the source and type of transaction details, for reporting in the source journals you define.
• Create multiple levels of account relationships by designating an account as a rollup account to which other accounts will be rolled up.
Protect the Integrity of Your Data
Several built‐in controls prevent you from taking actions that could damage your data. For example:
• When adding entries, you must use valid accounts, fiscal periods, and source codes.
• You cannot post unbalanced entries.
General Ledger and Financial Reporter Features
Getting Started 1–5
GLGS-1.doc, printed on 3/25/2008, at 1:31:50 PM. Last saved on 3/25/2008 12:51:00 PM.
Sage Software Confidential
Introducing G
/L
• You cannot import data containing errors, such as missing accounts or fields out of order.
Produce Comprehensive Management Reports
General Ledger provides a full range of reports, journals, and lists, including (but not limited to) the following:
• Chart of Accounts. Lists all accounts in order by account number, segment, or account group. It also contains the information entered to define the account and, optionally, allocation definitions or budget and historical net changes by fiscal period, and optional account fields.
− If you use optional fields, it can print the report for accounts that use specified optional fields and values.
− You can exclude accounts with no activity.
− You can print account groups by a range of account group sort codes.
− You can choose Rollup Accounts in the Report Format field to print a report that shows all rollup accounts and their directly‐related rollup member accounts. You can also print a list of all rollup accounts related to a member account or to a group of member accounts.
• Trial Balance. Prints a complete trial balance for the accounts, accounting subdivisions, and fiscal period you specify, either as a report of account balances or in a worksheet format, including columns for manual adjustments. You can include a range of account group sort codes, and print amounts and quantities of a rollup account (and all of its rollup member accounts) rolled up into a single amount or quantity. (The debits and credits on the report may not balance if any account is a member of more than one rollup group.)
• Batch Listing. Contains the entire contents of unposted batches, including batches that have been posted provisionally. You can

General Ledger and Financial Reporter Features
1–6 Sage Accpac ERP General Ledger
GLGS-1.doc, printed on 3/25/2008, at 1:31:50 PM. Last saved on 3/25/2008 12:51:00 PM.
Sage Software Confidential
define the range of transactions to be printed by batch number, by source ledger, by date, and by type of batch.
• Posting Journal. The printed record of posted batches, including journal entries and batches produced by periodic processing such as year end, automatic allocation, and multicurrency revaluation.
• G/L Transactions Listing. Lists the opening and closing balances, debits, credits, and changes in balances for any range of accounts, accounting subdivisions, and fiscal periods. Also contains information to help trace transactions back to their sources. You can select Use Rolled Up Amounts to print the transactions of a rollup account and all of its rollup member accounts (at any level), rolled up into a single amount for each transaction. (Note that rollup member account transactions are included only once in the rolled up transactions.)
• Source Journals. List related transactions, such as cash disbursements or checks, selected for up to 50 of the source codes you have defined, listed in the order you choose. You can include a range of account group sort codes. Select the Use Rolled Up Amounts option if you want the journal entries of rollup accounts and all of their rollup member accounts rolled up into a single amount for each journal entry.
• Batch Status. Prints a summarized record of all the batches currently in your system, selected by the batch number, source ledger, and batch creation date you specify.
• Optional Fields. Prints a list of the optional fields set up for accounts and transaction details, showing for each optional field code, the description, default value, and whether the optional field is set for automatic insertion in new accounts.
• Transaction Details Optional Fields. This report lets you print posted transactions using transaction detail optional fields as selection criteria. You can include a range of account group sort codes.

General Ledger and Financial Reporter Features
Getting Started 1–7
GLGS-1.doc, printed on 3/25/2008, at 1:31:50 PM. Last saved on 3/25/2008 12:51:00 PM.
Sage Software Confidential
Introducing G
/L
For descriptions of all reports, please see Chapter 6, “Reports,” in the General Ledger User Guide.
Maintain Budgets
If you are using Sage Accpac 500 ERP, you can maintain up to five sets of budget figures for each account, to project future needs and compare projections. In addition, you can set up budgets by transferring or adding amounts from the current or previous year for any account.
Exchange Data with Spreadsheets
You can transfer account and transaction data to General Ledger from applications such as Excel, Access, and dBase, and transfer General Ledger account information to those applications.
Sage Accpac Multicurrency Accounting
Sage Accpac multicurrency accounting allows you to:
• Enter, post, and report transactions in all the currencies you use in your business, transfer multicurrency transactions from other Sage Accpac applications to General Ledger, and import them from non‐Sage Accpac applications.
• Post transactions to each general ledger account in as many currencies as you need. General Ledger automatically converts source‐currency amounts to their equivalents in your company’s functional (home) currency.
• View account balances in the functional currency (the base currency of a given set of data) and source currencies (the currency in which the transaction was entered) at any time.
• Select the currency and type of rate, such as spot rate or floating rate, for each transaction detail.

Flexible Financial Reporting
1–8 Sage Accpac ERP General Ledger
GLGS-1.doc, printed on 3/25/2008, at 1:31:50 PM. Last saved on 3/25/2008 12:51:00 PM.
Sage Software Confidential
• Accept a predefined exchange rate or override the default rate for individual details.
• Use revaluation codes to group currencies and accounts you want to revalue together.
• Revalue source‐currency balances as exchange rates change. Revaluation creates all the transactions needed to update account balances and report exchange gains or losses.
For companies using the euro as their functional currency, and for those who select the Euro option in the Company Profile, General Ledger provides the following capabilities:
• The ability to maintain and display transactions and account balances in a source currency, the euro functional currency, and a reporting currency.
• The ability to print reports and prepare financial statements in the reporting currency as well as the euro.
Flexible Financial Reporting The Financial Reporter is a powerful reporting tool that uses a spreadsheet program to manipulate, format, and print general ledger data. It provides sets of basic balance sheets (and summaries), income statements (and summaries), financial analysis statements, and financial forecasting statements which you can customize for your company’s needs.
Using Financial Reporter, you can:
• Print balance sheets, income statements, and financial analysis and forecasting statements, using the specifications provided in the General Ledger sample reports. (For a details about each report, please see Chapter 4, “Sample Reports,” in the Financial Reporter User Guide, or go to the Financial Reports page in the General Ledger online Help.)

Integrating with Other Applications
Getting Started 1–9
GLGS-1.doc, printed on 3/25/2008, at 1:31:50 PM. Last saved on 3/25/2008 12:51:00 PM.
Sage Software Confidential
Introducing G
/L
• Report monetary, quantity, and provisionally‐posted balances or net changes from any fiscal period in your database, data for accounting subdivisions, totals and subtotals you require, amounts in any currency you use, and text you want to appear on the statement.
Figure 1.1 General Ledger and Financial Reporter is central to the Sage Accpac accounting system. The subledger applications pass accounting data to General Ledger for posting to the accounts.
Integrating with Other Applications General Ledger processes batches of financial transactions created for it by other Sage Accpac applications, including:
• Accounts Receivable. Transactions generated from invoices, cash receipts, adjustments, interest charges, and recurring charges.
• Accounts Payable. Transactions generated from invoices, adjustments, and manual checks, and created by check runs.
• Payroll. Transactions for the wages payable, tax withholding, and payroll expense accounts.
• Inventory Control. Transactions generated by entry of adjustments, receipts, shipments, and item assembly.

General Ledger Documentation
1–10 Sage Accpac ERP General Ledger
GLGS-1.doc, printed on 3/25/2008, at 1:31:50 PM. Last saved on 3/25/2008 12:51:00 PM.
Sage Software Confidential
• Order Entry. Transactions generated from orders, invoices, and credit/debit notes.
• Purchase Orders. Transactions created by the processing of invoices, receipts, and returns.
• G/L Consolidations. Account balances or transaction information transferred from general ledgers at branch offices to be merged in a consolidated general ledger at the head office or holding company.
• Intercompany Transactions. Transactions distributed automatically across two or more companies.
General Ledger Documentation The Sage Accpac ERP DVD includes the User Guide, the Financial Reporter User Guide, the Financial Reporter Quick Reference Guide, the Getting Started Guide, and the Update Notice in Adobe PDF format, as well as the Readme file for this version of General Ledger.
You can optionally install the guides on Sage Accpac ERP servers and workstations when you install the General Ledger program, and then open them from the Help menu on the Sage Accpac ERP desktop (click Help > Online Documentation > General Ledger). You will also find the General Ledger Readme file in the documents list.
General Ledger User Guide
The General Ledger User Guide contains an overview of General Ledger processing and describes daily and periodic processing and maintenance procedures. It includes a chapter that describes General Ledger reports.
The appendixes in the General Ledger User Guide contain technical information and provide information about importing and exporting.

General Ledger Documentation
Getting Started 1–11
GLGS-1.doc, printed on 3/25/2008, at 1:31:50 PM. Last saved on 3/25/2008 12:51:00 PM.
Sage Software Confidential
Introducing G
/L
Turn to the User Guide once you have finished setting up General Ledger.
Financial Reporter User Guide
The Financial Reporter User Guide describes how to develop customized financial statements if the predefined financial statements included with General Ledger do not meet your needs.
Financial Reporter Quick Reference
The Financial Reporter Quick Reference describes what you see when you open a file in G/L Statement Designer.
General Ledger Getting Started Guide
This Getting Started guide introduces the General Ledger and Financial Reporter software and documentation. It provides an overview that will help you make best use of General Ledger’s powerful features and then steps you through starting and setting up the application.
To learn how to install Sage Accpac products and set up your printer, follow the instructions in the System Manager Administrator Guide.
In addition to Chapter 1, the General Ledger Getting Started guide contains the following chapters:
Chapter 2, What You Need to Know Before Setting Up General Ledger, tells you how to take advantage of General Ledger’s features to get the most comprehensive, powerful, and flexible reporting that the system can provide.
Chapter 3, Setting Up General Ledger, guides you through setting up General Ledger to meet the unique needs of your company and transferring your current general ledger data to your new system.

Other Online Documentation
1–12 Sage Accpac ERP General Ledger
GLGS-1.doc, printed on 3/25/2008, at 1:31:50 PM. Last saved on 3/25/2008 12:51:00 PM.
Sage Software Confidential
Appendix A, Setup Checklist, shows the sample setup checklist that ships with General Ledger, and explains how to print the checklist so you can use it during General Ledger setup.
The Index contains an alphabetical listing of topics in this guide, with corresponding page‐number references.
Other Online Documentation When you install General Ledger, you also install the following General Ledger online documents into \Sage Accpac\DOCS\ GL55AENG:
• README contains specialized information about the program, and describes any program changes that occurred after the manual was finished.
• GLTECHINFO contains technical information, such as a list of all the database tables in the General Ledger program, the fields you can import and export, and database or report changes.
• GL-SETUP is a checklist that lists the steps for setting up the General Ledger program.
Where To Now? Install and activate Sage Accpac ERP applications by following the instructions in the System Manager Administrator Guide.
If you have already installed General Ledger, we suggest you read Chapter 2 in this manual, “What You Need to Know Before Setting Up General Ledger.”
When you are ready to create your own General Ledger system, follow the instructions in Chapter 3, “Setting Up General Ledger,” in this manual.

Where To Now?
Getting Started 1–13
GLGS-1.doc, printed on 3/25/2008, at 1:31:50 PM. Last saved on 3/25/2008 12:51:00 PM.
Sage Software Confidential
Introducing G
/L
If you are new to General Ledger, try the exercises for General Ledger in the Sage Accpac Workbook before you begin using General Ledger with your own data.
You can find the Sage Accpac Workbook in the Docs directory on the Sage Accpac ERP DVD, or choose it from the Help menu on the Sage Accpac ERP desktop (click Help > Online Documentation > System Manager > Workbook).


Getting Started 2–i
Before
Setting Up
Chapter 2 What You Need to Know
Before Setting Up General Ledger
Install the System Manager and Configure Common Services.......................2–1 Designing the Chart of Accounts.................................................2–2
Follow These Steps to Design Your Chart of Accounts..........................2–2 Tips for Numbering Accounts............................................2–4
Defining the Accounts ..........................................................2–5 Segments ..................................................................2–6
Segment Codes .........................................................2–8 Closing Year End Income and Expenses by Segment .......................2–8
Account Structures .........................................................2–9 Account Groups...........................................................2–12
Handling Opening and Closing Periodic Inventory .......................2–13 Optional General Ledger Setup Information .....................................2–13
Source Codes .............................................................2–14 Source Journals............................................................2–15 Revaluing Multicurrency Accounts..........................................2–16 G/L Security ..............................................................2–18
Account Permissions ...................................................2–18 Default Access Security Option..........................................2–19 Setting User Account Permissions .......................................2–20
Optional Fields............................................................2–22 Rollup Accounts...........................................................2–23
General Ledger Account Data ..................................................2–24 Adding the General Ledger Accounts ...........................................2–26
Detail and Consolidated Posting ............................................2–29 Assigning Optional Fields to Accounts ......................................2–30 Allocation ................................................................2–31

2–ii Sage Accpac ERP General Ledger
Example of Allocation by Account Balance............................... 2–32 Example of Allocation by Quantity...................................... 2–33
Multicurrency Accounts ................................................... 2–36 Creating G/L Accounts Automatically....................................... 2–38 Adding Rollup Accounts .................................................. 2–41
Recurring Entries ............................................................. 2–44 Importing and Exporting Account Information .................................. 2–44 Fiscal Sets .................................................................... 2–45
Types of Fiscal Sets........................................................ 2–46 Setting Up Historical and Current Financial Data ................................ 2–48
Adding Financial and Quantity Data for Historical Years ..................... 2–49 Entering Current Year‐To‐Date Transactions................................. 2–49
Entering Opening Account Balances .................................... 2–50 Posting Current‐Year Data ............................................. 2–50
Entering Historical and Current Data — a Diagram .......................... 2–51 Budgets...................................................................... 2–52
Importing Budgets from a Spreadsheet...................................... 2–53 Budget Entry Methods..................................................... 2–53
Displaying Account Information ............................................... 2–54 Where To Now? .............................................................. 2–55

Getting Started 2–1
Before
Setting Up
Chapter 2 What You Need to Know
Before Setting Up General Ledger
If you are responsible for setting up Sage Accpac General Ledger, you should read this chapter.
This chapter describes the structure of the general ledger
The overview of General Ledger in this chapter is intended to help you take full advantage of the application’s features. Understanding General Ledger options will help you set up your books so they meet your company’s current and future needs.
Chapter 3 in this guide steps you through setup
After you read this chapter, follow the instructions in Chapter 3, “Setting Up General Ledger,” in this guide, to set up your company.
Install the System Manager and Configure Common Services
You must install the Sage Accpac System Manager and General Ledger programs, create the database, choose company‐wide options in Common Services, and activate General Ledger before you can set up your company’s ledger.
The System Manager Administrator Guide provides detailed instructions for installing the System Manager, installing other applications, creating databases, defining the Administrative and Common Services for your company, and activating General Ledger.
Chapter 3, “Setting Up General Ledger,” in this guide, summarizes installing, creating the database, choosing options, and activating General Ledger, as well as providing detailed instructions for setting up the General Ledger.

Designing the Chart of Accounts
2–2 Sage Accpac ERP General Ledger
Designing the Chart of Accounts Before you begin setting up any part of your own general ledger, design your chart of accounts.
Each account in the chart of accounts records information for a particular type of transaction. For example, you might have an office supplies expense account in which you record the purchase of office supplies, a petty cash account in which you record the expenditure and receipt of petty cash, and so on. Together, all the accounts related to a company make up the chart of accounts.
General Ledger provides two sets of sample data:
• SAMINC is a single‐currency company.
• SAMLTD includes multicurrency accounts.
Use a sample chart of accounts as a model
You can use one of the sample data charts of accounts as a guideline for designing your own chart of accounts. You can also use the sample data to learn how General Ledger operates. You can print the sample charts of accounts by choosing the Chart of Accounts icon from the General Ledger Reports.
Keep in mind that it is much easier to rearrange accounts before entering them into the system than to change them afterward.
Follow These Steps to Design Your Chart of Accounts
1. List the accounts you need. Include all accounts, including control accounts, required by your subledger applications such as Accounts Receivable, Accounts Payable, and Payroll.
2. Design an account numbering scheme that suits your financial reporting needs.
Account numbers Account numbers can be up to 45 characters long (including delimiter, or separator, characters).

Designing the Chart of Accounts
Getting Started 2–3
Before
Setting Up
You must modify the standard General Ledger reports to display account numbers longer than 24 characters.
Account segments An account number can consist of up to 10 parts, called segments. You use segments to control posting by department, by division, or by any accounting entity that is appropriate for your company.
All account numbers must contain at least one segment, called the account segment. This segment is the nucleus of the account number, and can identify the account as an asset, liability, income, or expense account. (For example, accounts with account segments in the 1000 to 1999 range could be asset accounts, 2000 to 2999 could be liability accounts, and so forth.)
Sections that follow in this chapter explain segments in detail.
Account groups 3. Decide whether you want to assign accounts to account groups.
General Ledger uses account groups to create standard financial statements. Account groups include Current Assets, Current Liabilities, Shareholder’s Equity, Revenue, Cost of Sales, Cost and Expenses, and so forth.
You can create an unlimited number of account groups for your business, or use those included with the installation.
You should use account groups unless you have a good reason not to use them. (If you do not assign accounts to account groups, you cannot use the balance sheets or income statements provided with Financial Reporter.)
4. Arrange and number the accounts.
5. Decide if you want to keep quantity information, such as number of items sold, in certain general ledger accounts. If so, decide which accounts will store quantities.
6. If you do business in more than one currency, decide which accounts should receive transactions in currencies other than your own currency.
Designing the Chart of Accounts
2–4 Sage Accpac ERP General Ledger
7. If you allocate account balances periodically, decide which accounts should be allocable and which accounts should receive the allocations.
8. Assign optional fields to the accounts.
9. Create rollup accounts (optional).
10. Create your control accounts.
Tips for Numbering Accounts
Before you complete your account numbering scheme, consider the following suggestions:
• Use numbers (rather than letters or combinations of letters and numbers) for all segments. It is easier to define ranges of accounts for General Ledger and Financial Reporter if all segments are numbers. Numbers also make the order in which accounts appear more predictable.
• If your account numbers have more than one segment, make the account segment the first segment in the account structure. (The account segment is the core part of the account number that identifies the type of account, such as asset or liability.) The system will sort and select accounts for display and printing most efficiently and predictably when the account segment is the first segment.
• Define account numbers so you can add accounts in the future.
Leave unused blocks of numbers between segments so you can add new accounts in their normal number range. For example, assign numbers such as 1100, 1200, and 1300 to consecutive account segments, rather than 1001, 1002, and 1003.
• Order accounts according to how you want them to appear on reports.
Assign consecutive numbers to accounting subdivisions you normally want to print as a group. For example, you can assign

Defining the Accounts
Getting Started 2–5
Before
Setting Up
100, 200, and 300 to the three departments in your eastern offices, and 600, 700, and 800 to the three departments in your western offices. You can then define ranges for printing that will include just the eastern or western departments.
• If the segments that represent different entities are different lengths, you can easily tell which part of the account represents which entity. In the sample chart of accounts, for example, the segment representing divisions is three digits and the segment representing regions is two digits. You know at a glance that account 4000‐100‐10 is sales for division 100, region 10.
Defining the Accounts Setting up multi‐segment account numbers consists of several steps:
1. Define the segments required by your company.
2. Provide a code (a number or some other combination of characters) for each segment except the account segment. For example, if you define a one‐digit segment that represents your 3 departments, you then set up a code of 1 for Department 1, a code of 2 for Department 2, and a code of 3 for Department 3.
The system uses the segment codes to validate account numbers when you enter transactions.
3. Finally, you set up one or more multi‐segment account formats called account structures.
An account structure identifies which segments are included in an account number and the order in which the segments appear when the account number is printed in displays and on reports. You assign an account structure to each account as you set up the account.
The following sections provide more detailed information about segments and the account structures you use to validate and organize accounts.

Defining the Accounts
2–6 Sage Accpac ERP General Ledger
Segments
An account number can consist of up to 10 parts called segments. You must define the segments and the codes for each segment (except the account segment) before you can add the accounts to your ledger.
Note that the maximum number of segments varies depending on which edition of Sage Accpac you use.
A multi‐segment account number provides flexibility and control in several ways:
• You can close multi‐segment income and expense accounts to multiple retained earnings accounts by selecting certain segments to use in closing.
Single‐segment income and expense accounts close to a single, company‐wide retained earnings account.
• The system validates account numbers as you add to the chart of accounts.
• You can arrange segments in different ways for different reporting needs.
Each segment code can be up to 15 characters. The number of characters in all the segments (as defined by that account’s structure) in an account number can be up to a total of 45, including delimiter characters. (Delimiters are the characters that separate the segments.)
Account segment One segment, known as the account segment, is a required part of every account number. The account segment identifies the account as an asset, liability, income, or expense account and determines the type of transaction you normally post to the account.
Other segments Other segments can identify separate entities in your company, such as departments, locations, divisions, product lines, or partners, for which you want to track accounting data.

Defining the Accounts
Getting Started 2–7
Before
Setting Up
Delimiter character The delimiter character separates segments within the account number to make the account number easier to enter and to read. For your delimiter, you can choose the hyphen (‐), the slash (/ or \), the period (.), or the asterisk (*).
You select the delimiter character when you define the segments of the account number. The delimiter is displayed when account numbers appear on forms and on reports.
Some examples In the example that follows, the account segment identifies the account as an asset account called Petty Cash. The department segment shows that you keep separate petty cash accounts for each department in the company.
Account Segment Department Segment Account Description 1000 15 Petty Cash, Office 1000 20 Petty Cash,
Warehouse 1000 25 Petty Cash, Worksit
The next example shows four accounts with three segments.
Account Segment
Department Segment
Division Segment
Account Description
4250 15 1 Hardware Sales, Retail
4250 20 1 Software Sales, Retail
4250 15 2 Hardware Sales, Corporate
4250 20 2 Software Sales, Corporate
In the example, the second segment represents a department within the company and the third segment represents a division within the company.
The account segment identifies the account as a sales account, used to post the sales for the departments within the divisions shown.

Defining the Accounts
2–8 Sage Accpac ERP General Ledger
A segment may also represent cost centers, product lines, or partners in a legal firm. Your use of segments depends on the requirements of your company.
You can add more segments later
At any time, you can add more segments to the account structure. For example, if your company now has one location, you can wait until you add a second location to add a location segment to the account structure.
Segment Codes
After you set up each segment in your account‐numbering scheme with a name and a length, for each segment, you enter the codes that identify the accounting entities it represents. For example, you might enter 10, 20, 30, and 40 as the codes for the segment that represents the four regions in your company.
Used to verify accounts
When you add a new account with multiple segments, General Ledger verifies each segment (except the account segment) against existing segment codes before adding the account to the chart of accounts. All the codes for each segment (except the account segment) must be listed in the segment codes you set up.
For each segment code you enter, you can optionally specify a corresponding description and a retained earnings account. Closing entries for income and expense accounts with this segment code can be posted to this retained earnings account when you create a new fiscal year.
Closing Year End Income and Expenses by Segment
When you create a new fiscal year, General Ledger automatically creates transactions that transfer the income and expense account balances to retained earnings.

Defining the Accounts
Getting Started 2–9
Before
Setting Up
Year-end transfer to multiple retained earnings accounts
If your account numbers have more than one segment, you can assign a different retained earnings account for each segment code.
For example, if one segment of your account number represents departments, you can define a different retained earnings account for each department. Creating a new fiscal year posts retained earnings to the account specified for each department.
Department Segment
Segment Code Description Retained Earnings (Closing Account)
12 Shoe Sales 1-12-3000 13 Hat Sales 1-13-3000 14 Computer Sales 1-14-3000 15 Furniture Sales 1-15-3000
In this example, when you create a new fiscal year, retail sales accounts for departments 12, 13, 14, and 15 generate entries to 4 different retained earnings accounts because you assigned separate closing accounts by segment code.
Year end transfer to default closing account
If you do not specify retained earnings accounts for income and expense segment codes, when you create the new fiscal year, General Ledger posts income and expense account balances to a single retained earnings account you assigned as the default closing account.
If your account numbers have only one segment (the account segment), creating the new year transfers the company’s income and expense account balances to the default closing account.
Account Structures
An account structure defines the length and “shape” of an account number by defining the number of segments, the order in which the segments are stored, and the order in which the segments appear when an account is printed or displayed.

Defining the Accounts
2–10 Sage Accpac ERP General Ledger
The account number limit of 45 characters applies to the characters in the segments defined by the account’s structure, plus the delimiters.
Flexible account format
The ability to define multiple account structures gives you control over account number formatting on an account‐by‐account basis.
For many companies, a single account structure is sufficient. If you want to merge charts of accounts, however, the account structure feature lets you add or import accounts in any format, as long as you first identify the format to General Ledger by creating an account structure (plus segments and segment codes) for it.
You can define an unlimited number of account structures in General Ledger if you use the G/L 500 ERP edition. If you use ERP 200, you can define up to 4 account structures; if you use ERP 100, you can define up to 3 account structures.
When you add a new account, you assign it an account structure. Each account has only one account structure; you can assign an account structure to an unlimited number of accounts. You specify a default account structure to appear automatically as you create accounts.
Examples of account structure
The first example is a company whose account numbers have an account segment and segments that represent different departments.
The company has defined two account structures: all company‐wide accounts use the first account structure and all departmentalized accounts use the second.
Account structure for company-wide accounts
Account structure for departmental accounts

Defining the Accounts
Getting Started 2–11
Before
Setting Up
The next example is a company that uses different account structures for its two divisions, sales and manufacturing. The company defines its segments as shown:
Segments
Segment Description Length 1 Account 4 2 Department 2 3 Division 1 4 Cost Center 2 5 Product Line 1
The sales division has the following account number structure:
Account Structure for divisional accounts
The accounts in the manufacturing division have the following structure:
Manufacturing
6250 - 25 - 2 - 7 Division
Cost Center
Account Product Segment Line
Accounts for each division have different account structures
Each division uses different segments in its account number and has a different number of segments. Sales accounts have the account structure SALES and Manufacturing accounts have the account structure MANUF.

Defining the Accounts
2–12 Sage Accpac ERP General Ledger
Account Structure: SALES
Position Segment Length 1 Account 4 2 Department 2 3 Division 1
Account Structure: MANUF
Position Segment Length 1 Account 4 2 Cost Center 2 3 Division 1 4 Product Line 1
Single-segment You may choose to use single‐segment account numbers, especially if your company has fairly simple accounting needs.
If you use only one segment, the account number consists only of the account segment. Keep in mind that with single‐segment account numbers, you cannot use the segment code and multiple closing accounts features of the system and you will not be able to print financial statements (or other reports) by segment.
Account Groups
Using the sample data shipped with General Ledger, the Financial Reporter can generate sample financial statements. (If you do not select the option to assign accounts to account groups, you can still use these sample FR reports.)
You assign new accounts to an account group if you want to generate FR reports like our samples. If you want to use the sample statements to generate your own statements, you need to have the same set of account groups as used by the sample data (making sure to select the option to assign accounts to account groups).
If you select the option to use account groups, you assign each of your accounts to an account group.

Optional General Ledger Setup Information
Getting Started 2–13
Before
Setting Up
You should use account groups unless you have a good reason not to use them.
The following table lists the sample account groups shipped with General Ledger sample data:
01 Current Assets 09 Cost of Sales 02 Fixed Assets 10 Opening Inventory 03 Other Assets 11 Purchases 04 Accumulated
Depreciation 12 Closing Inventory
05 Current Liabilities 13 Cost and Expenses 06 Long Term Liabilities 14 Other Income and Expenses 07 Shareholdersʹ Equity 15 Provision for Income Taxes 08 Revenue 16 Other <Blank> Unclassified
You can change the default account groups that ship with G/L or create an unlimited number of account groups for your business.
Handling Opening and Closing Periodic Inventory
The Opening Inventory and Closing Inventory account groups are included in the account group classifications to accommodate a periodic inventory system, where you update records after physical inventory counts.
If you use a perpetual inventory system, you have a single Inventory account in General Ledger assigned to the Current Assets account group.
Optional General Ledger Setup Information Before you add your chart of accounts, consider the optional General Ledger features that are part of setup. You can:
• Add source codes in addition to the ones provided.

Optional General Ledger Setup Information
2–14 Sage Accpac ERP General Ledger
• Create source journals.
• Add automatic multicurrency revaluation information.
• Assign permissions to users that provide access only to certain accounts.
• Set up recurring entries. (Note that accounts must be set up prior to setting up recurring entries.)
• Set up optional fields for both accounts and transaction details.
If you plan to use the multicurrency features, you should set them up before you add accounts. You can add source codes and source journals at any time.
Account security If you plan to use account security, you need to select the Use G/L Security option on the G/L Options form. See “G/L Security” on page 2‐18.
Source Codes
A source code is associated with each General Ledger transaction detail line to identify the transaction origin (ledger or subledger) and transaction type. You can print customizable reports, called source journals, that allow you to select and group transactions by source code (and other characteristics).
Subledger batch source codes
When you create batches in a Sage Accpac subledger, the system automatically assigns a source ledger code identifying the application that created the batch (such as AR for Accounts Receivable) and a transaction type code. For example, subledger source codes might include AP‐CK (Accounts Payable ‐ Check Run) and AR‐CA (Accounts Receivable ‐ Cash Receipt).

Optional General Ledger Setup Information
Getting Started 2–15
Before
Setting Up
General Ledger batch source codes
When you create entries for a General Ledger batch using the Journal Entry form, you assign a source code to each entry. The Finder in the Journal Entry form displays a list of source codes and allows you to choose one. The source code you assign to an entry must already exist in the list of General Ledger source codes.
Default source code
You can specify a source code to use as the default for journal entries on the Posting tab of the G/L Options form.
Allocation and revaluation
The automatic allocation function and the revaluation function also create batches of journal entries.
When you enter setup information for automatic allocation and for revaluation of accounts, you assign source codes to the transactions created by running the functions. You can assign any existing GL source code to allocations, and assign any existing source code to revaluations.
Source Journals
General Ledger lets you define an unlimited number of reports, called source journals, that you can use to meet a variety of transaction reporting requirements. You do not have to define source journals.
Customize your posting journals
Source journals list posted batch entries by their source codes. Typical source journals are a cash receipts journal, a cash disbursements journal, and a check register.
You construct the source journals by entering a list of source codes (discussed in the previous section) to be included in each source journal.
You can select transactions within the predefined source journals by account number, segment, account group, fiscal period, reference, date, batch number, and posting sequence number. You can also include transaction optional fields, account optional fields, select account groups by sort code range, and use rolled up amounts. In a

Optional General Ledger Setup Information
2–16 Sage Accpac ERP General Ledger
multicurrency system, you can also select and report source journal transactions by their source currency.
Other examples of source journals you can print include:
• All details that have the same source code, such as all credit card payments, all credit memos, and all checks.
• All details entered on a particular day (specifying all source codes for a single date).
• All details entered in a particular batch.
• All details that contain a common reference.
• All details posted to a division, department, or any accounting entity associated with a segment.
• You can include Transaction Optional Fields data with any of the journals.
Revaluing Multicurrency Accounts
A multicurrency General Ledger allows you to record transactions and maintain account balances in more than one currency. Sage Accpac keeps two sets of amounts for each currency that you post to an account:
• Source-currency balances. The source currency is the currency in which the transactions are conducted.
• Functional-equivalent balances. The functional‐equivalent balance is the source transaction amounts expressed in your functional currency. Functional‐equivalent transaction amounts are posted with the source‐currency amounts when transactions are posted.
The balance in a multicurrency account is the sum of the functional‐equivalent balances.

Optional General Ledger Setup Information
Getting Started 2–17
Before
Setting Up
As currency rates fluctuate, you may need to revalue multicurrency account balances at current rates, particularly at period and year end or before printing financial statements and reports. For example, you may periodically revalue a bank account kept in a foreign currency. (You would not usually revalue non‐monetary accounts such as building or land asset accounts.) You would also likely revalue your receivables and payables control accounts. If you use Sage Accpac Accounts Receivable and Accounts Payable, you should revalue the control accounts in the subledger applications, rather than in General Ledger.
You set up revaluation codes to help automate account revaluation. When you set up each revaluation code, you specify:
• A source code to associate with the transactions resulting from revaluation.
• The Unrealized Exchange Gain/Loss accounts or the Recognized Gain/Loss accounts to which the system posts gains or losses due to changes in exchange rates.
When you set up a multicurrency account, you can assign to it a revaluation code for each currency you wish to revalue.
You can use one revaluation code for all the accounts and currencies you revalue, or you can define several revaluation codes to revalue accounts and currencies in any combination that is useful to you.
The revaluation coding schemes you might choose allow you to:
• Group accounts and currencies by type of account, using revaluation codes such as BANK or CASH. You could then revalue bank accounts separately from cash accounts.
• Track exchange gains and losses by currency. For example, you can define a revaluation code for Italian lire, so that when you revalue transactions made in lire, the exchange rate gains or losses post automatically to the same Unrealized Exchange Gain/Loss or the Recognized Exchange Gain/Loss account.

Optional General Ledger Setup Information
2–18 Sage Accpac ERP General Ledger
G/L Security
G/L Security lets you limit the accounts that individual users can have access to.
Account Permissions
Once you select “Use G/L Security” on the G/L Options form, an Account Permissions icon appears in the G/L Accounts folder that lets you assign account permissions to individual users.
By assigning permissions, you can control which accounts Sage Accpac users can view and work with to minimize the risk of unauthorized activity.
You can block off entire account segments or only the most sensitive accounts (for example, Payroll, Retained Earnings, Sales, Common Stock, and Preferred Stock). For maximum security, you can block your entire chart of accounts to all Sage Accpac users except user ADMIN.
Assign permissions based on any number of factors
Depending on your security needs, access to accounts can be assigned according to any number of factors:
• Specific security concerns, such as loss prevention.
• Individual account access needs.
• Departmental, divisional, or business unit account access needs, rank, reporting structure, geographic location, and so on.
For example, you can set up identical access rights for all Sage Accpac ERP users within a department, division, or business unit that restrict access to accounts outside that group.
Security settings are flexible
Once you set up user access permissions, you can modify or cancel them at any time.

Optional General Ledger Setup Information
Getting Started 2–19
Before
Setting Up
How Access Restrictions Affect Sage Accpac Users
Account access restrictions affect Sage Accpac users as follows:
Account lookup and inquiry. Users can’t look up restricted account numbers in Finders or perform account inquiries in General Ledger.
If users enter restricted account numbers into fields, they will see an error message stating that the specified account does not exist in the General Ledger.
Adding new accounts. Users cannot add new accounts that fall within a restricted segment range.
Posting and other batch-related activities. Posting is limited to batches that do not contain restricted accounts. Users cannot view a batch that contains transactions with restricted account numbers. The batch will not appear in batch list windows.
Invoice entry. Users cannot enter invoices for restricted accounts in other Sage Accpac subledgers, such as Purchase Orders or Accounts Receivable.
Importing and exporting account data. Users cannot import and export data for restricted accounts.
Report generation. Restricted account ranges do not appear in financial reports created using Financial Reporter.
Rollup accounts. If a rollup account is accessible under the user’s security rights, all of its member accounts are also assumed to be accessible.
Default Access Security Option
The Default Access security setting in G/L Options determines whether, by default, users have access to general ledger accounts.
If you select All Accounts:
All Sage Accpac users will have access to all G/L accounts unless you add their User ID to the G/L Account Permissions form and specify

Optional General Ledger Setup Information
2–20 Sage Accpac ERP General Ledger
ranges of account numbers and/or ranges of account segment codes to which you want to restrict access.
If you select No Accounts:
No Sage Accpac users except the ADMIN user can view or post account data to G/L accounts or save account data in subledger applications unless you add their User ID to the G/L Account Permissions form and grant them individual access rights to ranges of accounts and account segments.
Test security settings
You can test the effects of the option you select by logging on to Sage Accpac as a user other than ADMIN and checking which accounts are visible in the General Ledger Chart of Accounts window.
If you chose No Accounts, you will not see any account numbers in the Finder or in the Chart of Accounts window.
Setting User Account Permissions
You use the G/L Account Permissions form to define account access permissions for individual Sage Accpac users.
Note: Depending on the Default Access setting, you will need to use the Account Permissions form mainly to grant access to accounts, or to restrict it.

Optional General Ledger Setup Information
Getting Started 2–21
Before
Setting Up
In the following example, R. Brown cannot use two ranges of account numbers: between 6120 and 6400, and between 6720 and 6760.
The Segment tab can be used to further restrict the user’s access to the accounts of a single department or division.
Define access rights or restrictions
The Account Permissions form gives you the flexibility to define an allowable account range or a restricted account range by choosing Yes or No in the Allow column.
This allows you to define available accounts within a restricted range—as in the following example:
Mixed account structures
If you use a mix of account structures in your chart of accounts, you need to consider how the program handles accounts that do not contain all the segments you use in your system.
If an account number does not include a particular segment, say division, the program considers this segment blank. Unless you specifically restrict blank values for the division segment, the segment will be allowed.
For instance, for the sample company, SAMLTD, account 1000 contains only the account segment. If you do not restrict blank
Optional General Ledger Setup Information
2–22 Sage Accpac ERP General Ledger
division and region segments and the account segment 1000 is allowed, account 1000 will be visible.
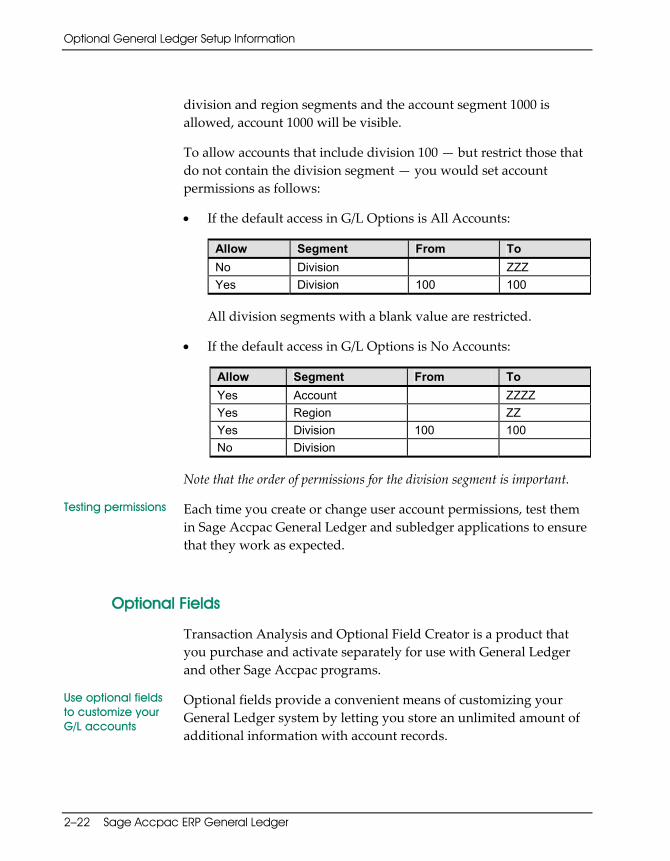
To allow accounts that include division 100 — but restrict those that do not contain the division segment — you would set account permissions as follows:
• If the default access in G/L Options is All Accounts:
Allow Segment From To No Division ZZZ Yes Division 100 100
All division segments with a blank value are restricted.
• If the default access in G/L Options is No Accounts:
Allow Segment From To Yes Account ZZZZ Yes Region ZZ Yes Division 100 100 No Division
Note that the order of permissions for the division segment is important.
Testing permissions Each time you create or change user account permissions, test them in Sage Accpac General Ledger and subledger applications to ensure that they work as expected.
Optional Fields
Transaction Analysis and Optional Field Creator is a product that you purchase and activate separately for use with General Ledger and other Sage Accpac programs.
Use optional fields to customize your G/L accounts
Optional fields provide a convenient means of customizing your General Ledger system by letting you store an unlimited amount of additional information with account records.

Optional General Ledger Setup Information
Getting Started 2–23
Before
Setting Up
Customize information
You can also use optional transaction fields to customize the information that is posted with General Ledger transaction details.
If the optional transaction fields you set up for General Ledger match those used in other Sage Accpac applications, General Ledger retains the optional transaction fields when you send batches to General Ledger from the other Sage Accpac application.
Note that optional transaction fields are maintained at the detail level. If you consolidate transactions, the optional transaction information is removed.
Before setting up optional fields
• Before you can use optional fields in General Ledger, you must define optional fields for your Sage Accpac system using the Optional Fields form in Common Services. (For more information about setting up optional fields in Common Services, see Chapter 9 in the System Manager User Guide.)
• Once you have set up optional fields for your system, you can define the optional fields you will use to customize your chart of accounts and to store additional information with general ledger transaction details. Then you assign the General Ledger optional fields to particular accounts.
Optional fields are displayed in Finders.
For information about assigning optional fields to your accounts, see “Assigning Optional Fields to Accounts,” later in this chapter.
For step‐by‐step instructions on defining optional fields for General Ledger, see “Step 10: Set Up Optional Fields” in Chapter 3 of this guide.
Rollup Accounts
A rollup account is an account that shows the relationships between accounts that can be used for classification, budgeting, and reporting. Creating a relationship between accounts lets you consolidate or rollup account balances (and quantities, if applicable)

General Ledger Account Data
2–24 Sage Accpac ERP General Ledger
to provide a summary balance similar to the consolidation options provided in Financial Reporter.
• When you designate an account as a rollup account, you can also add member accounts to it (using the fields in the Rollup tab that appears when this option is selected). You can also add rollup member accounts to an accountʹs member accounts, creating a tree.
FR Paste • Choose the Rollup Members Account option in the FR Paste function to include balances or quantities for rollup member accounts whose balances or quantities are also being rolled up to their rollup account in the same paste function in the report.
• To view details about the currency of a multicurrency member account, highlight the account, then click the Currency button.
• To hide the tree, click the Hide Tree button. To view it again, click the Show Tree button.
• Rollup is multi‐level. You can double‐click the account number in the tree to open the G/L Rollup Accounts form, where you can add accounts to this rollup account. You can also do this by double‐clicking on the member account in the grid, or by clicking on the Rollup zoom form, or by pressing Shift+F9 to assign a member as a rollup account. If an account being copied to the grid is already on the grid, it will not be copied again; an account cannot be a rollup member of itself.
For information about adding rollup accounts, see “Adding Rollup Accounts,” later in this chapter.
General Ledger Account Data This section describes the information the system maintains for general ledger accounts. General ledger data includes descriptive information and posting instructions, as well as account balances and transaction detail for each account. For a discussion of account

General Ledger Account Data
Getting Started 2–25
Before
Setting Up
numbering and the account number format, see “Defining the Accounts,” earlier in this chapter.
General Ledger stores the following information for each account:
Accounts • Basic information that describes and defines the account, such as the number, description, account group, normal balance type (debit or credit), whether the account is a rollup account, and account structure.
You enter this information when you create the account.
Amounts • Net changes for each fiscal period.
You can store the following net changes for each account:
− Actual amounts that reflect the net monetary transactions of the company.
− A quantity corresponding to each monetary amount (optional).
− Up to five sets of budgets.
− Provisionally (temporarily) posted amounts.
− Source‐currency amounts that reflect the net transactions in each currency that posts to the account (multicurrency accounts only).
− Functional‐equivalent currency amounts that reflect the net transactions in the functional currency for each source currency (multicurrency accounts only).
Period net changes and balances
Note: General Ledger stores opening balances and net changes. On reports and forms that show period balances, General Ledger calculates the period balances from opening balances and net changes.
Transaction details • Transaction details that have been posted to each account.

Adding the General Ledger Accounts
2–26 Sage Accpac ERP General Ledger
The following diagram illustrates the pieces of information associated with a single‐currency Sage Accpac 500 ERP account.
Chart of Accounts Acct 1000-1
Acct 1000-2
Acct 1100-1
Acct 1100-2
Acct 1200-1
Acct 1200-2
Acct 1300-1
Acct 1300-2
Acct 1200-1
Basic Account Information
(name, number, group, etc.)
Actual Amounts
Budget Amounts
Quantities
Transaction
Adding the General Ledger Accounts This section provides guidelines for entering your general ledger accounts into the system.
After you add the accounts, you can add historical and current year‐to‐date amounts as well as budgets.
Remember that you must turn on some options early during the process of setting up your data to make them available when you set up accounts. For example, the ability to assign accounts to account groups, to maintain a multicurrency ledger, to maintain quantities, and to assign permissions to accounts are available only after you turn on these options. Indicating which segment to use in closing is available only if you selected one or more segments to use in closing when you set up segments.
For information on planning your chart of accounts and defining the segments and account structures, see “Designing the Chart of Accounts,” and “Defining the Accounts,” earlier in this chapter.

Adding the General Ledger Accounts
Getting Started 2–27
Before
Setting Up
Four ways to add accounts
You can add accounts to General Ledger in the following ways:
• Set them up using the Sage Accpac Setup Wizard.
For information on using the Setup Wizard, see the System Manager Quick Start Guide.
• Enter them directly into the system, using the Accounts form.
• Import them from another application, such as a spreadsheet.
Information about creating files to import into General Ledger is contained in Appendix B, “Importing and Exporting,” in the General Ledger User Guide.
• Automatically create a new set of accounts that have the same characteristics as an existing set of accounts. (See “Creating G/L Accounts Automatically” on page 2‐38.
Basic information in an account
To define each account, you take the following steps:
• Assign an account number, a description (name), and an account type (balance sheet, income statement, or retained earnings).
• Select the normal balance type for the account (debit or credit).
• Indicate whether the account is active (that is, whether you can post to it).
• Choose whether to post to the account in detail form (posting each detail separately) or consolidated form (combining the debits and credits for the account into a single entry for the posting run, fiscal period, and source code). You can also choose the Prohibited option to prevent users from posting to this account.
• Select the account’s account structure, if other than the default account structure.
• Indicate whether it is a control account for a subledger.

Adding the General Ledger Accounts
2–28 Sage Accpac ERP General Ledger
Accounts marked as control accounts can be posted to only by the subledger.
• Assign the account to an account group, if you have selected the option to use account groups.
• Choose to maintain quantities for accounts for which you want to keep quantity data, if you have selected the option to maintain quantities for the company.
• For income statement accounts, indicate the segment to use in closing if you want to close income and expenses to multiple retained earnings accounts.
• Enter account allocation information for any accounts whose balances you intend to allocate to other accounts.
• Enter multicurrency information for accounts you use for multicurrency transactions.
• If you use Optional Fields:
− Enter any optional account fields for information that you want to keep with the account.
− Enter any optional transaction fields that you wish to use with transactions that you post to the account.
• If you assign an account as a rollup account:
− Select member accounts.
• Select the Post to Account option:
− Detail
− Consolidated
− Prohibited.

Adding the General Ledger Accounts
Getting Started 2–29
Before
Setting Up
Detail and Consolidated Posting
General Ledger provides two methods for consolidating posted transactions:
• When you set up an account, you can select an option to consolidate transactions as they are posted to the account.
• You can consolidate details for selected accounts after the transactions have been posted.
This section discusses consolidation during posting. The section, “Consolidate Posted Transactions,” in Chapter 2 of the User Guide discusses consolidating after transactions have been posted.
Consolidating during posting
When you post in consolidated form, posting combines all the details in the transactions destined for the account into a single entry for each fiscal period and source code. The date assigned to each consolidated entry is the ending date of the fiscal period to which the details were posted.
Note that when you consolidate transactions, you lose the ability to drill down to originating transactions in source ledgers. You also lose any optional fields posted with the transactions.
Consolidated accounts
Postings for the account appear only in consolidated form in the Source Journals and G/L Transactions Listing.
Regardless of the posting form specified for an account, all the details posted to it are listed in the Posting Journal.
Note, however, that if you consolidate transactions in General Ledger, you lose the ability to drill down to source transactions in Accounts Receivable and Accounts Payable.
The posting option you select for an account depends on such considerations as the number of details usually posted to the account, the type of information you need to have available for the account, and the amount of free disk space you have (consolidated postings consume less space).

Adding the General Ledger Accounts
2–30 Sage Accpac ERP General Ledger
Prohibited You can also choose the Prohibited option, which prevents users from posting to the account. Note that an account that has the Post To Account field set as Prohibited, cannot be selected as the default closing account, nor as an exchange account.
Assigning Optional Fields to Accounts
Optional account fields
If you use the Transaction Analysis and Optional Field Creator, you can customize your chart of accounts by assigning to particular accounts optional fields for storing additional information that you want to keep with the accounts.
The Accounts form displays two tabs: the Optional Fields tab, and the Transaction Optional Fields tab that you use when assigning optional fields.
You can include optional account fields when you print your chart of accounts. You can also use them as selection criteria when printing a variety of other reports in General Ledger.
You use the Optional Fields tab to assign optional account fields to specific accounts.
Optional transaction fields
You use the Transaction Optional Fields tab to assign optional fields to store custom information with transactions that you post to the account. These optional transaction fields then appear in journal entry details that use the account.
You can edit or delete both types of optional fields in a journal detail before you post a transaction.
Automatic insertion of optional fields in account records
The program displays any optional fields that you set for automatic insertion automatically, along with their default values, on the Optional Fields or Transaction Optional Fields tabs when you start a new account record.
You can accept the inserted optional fields and their default values, or you can add, edit, or delete them, providing the optional fields are defined in General Ledger. Note that if an optional field requires

Adding the General Ledger Accounts
Getting Started 2–31
Before
Setting Up
validation, you can enter only values that are defined for the optional field in Common Services.
An optional field can be set as “Required” without also requiring the user to enter a default value. In this case, you must also set the Auto Insert option to Yes.
Note: Before you can assign optional fields to an account, you must set up system‐wide optional fields in Common Services, then define the optional fields you want to use for accounts and transactions in General Ledger. You define General Ledger optional fields using the G/L Optional Fields form, as described earlier in this chapter.
For step‐by‐step instructions on assigning optional account fields and optional transaction fields to specific accounts, see “Entering Accounts Individually,” in Chapter 3 of this guide.
Allocation
You can have General Ledger automatically allocate selected account balances to other accounts.
To set up an allocable account, you specify the accounts that receive the allocations and the percentage of the allocable account balance to allocate to each receiving account. You can allocate amounts to any number of accounts, but the sum of the allocation percentages must be 100 percent.
You also specify one of the following methods by which to allocate an account balance:

Adding the General Ledger Accounts
2–32 Sage Accpac ERP General Ledger
Allocation can be based on account balance or change in quantity
• Account Balance, distributes the balance in the account to the target accounts based on the percentages that you specify on the Allocation tab. (For example, you could distribute 25% of the balance to each of four accounts.) This choice distributes balances only, and does not distribute quantities (see below).
• Account Quantity, distributes the net quantity in an account to the target accounts according to the percentages that you specify. It then distributes the account balance to the target accounts based on the quantities that were distributed. All accounts must maintain quantities, and they must use the same unit of measure.
Each time you run the automatic allocation, General Ledger creates journal entries that:
• Distribute the allocated amount to the accounts to which the balance is allocated.
• Reduce the balance of the allocated account by the amount allocated (100 percent of the balance).
When reallocating account balances by quantity, General Ledger:
• Distributes the net quantity for the range of periods you specify from the source account to target accounts (specified on the Allocation tab of the G/L Accounts form for the source account).
• Distributes the balance in the final period you specify according to the percentage represented by each distributed quantity. (So, if four units were evenly distributed to four accounts, the program would also distribute 25% of the source balance to each target G/L account.)
Example of Allocation by Account Balance
Suppose the company’s Corporate Accounting & Legal Fees account (5550‐1) contains amounts that must be allocated to the Accounting & Legal Fees accounts of several different departments within the company.

Adding the General Ledger Accounts
Getting Started 2–33
Before
Setting Up
These costs are allocated to each department according to a percentage that reflects its size. Department 10 is the largest; departments 20 and 30 are the same size.
The following chart reflects the setup of the allocation:
Account Allocation Percent
5550-10-1 Accounting & Legal Fees – Dept. 10 40% 5550-20-1 Accounting & Legal Fees – Dept. 20 30% 5550-30-1 Accounting & Legal Fees – Dept. 30 30%
If the account balance of the Corporate Accounting & Legal Fees account (5550‐1) is 1000.00, General Ledger will create an allocation batch containing the following transactions:
Account Debit Credit 5550-10-1 Accting & Legal Fees – Dept. 10 400.00 5550-20-1 Accting & Legal Fees – Dept. 20 300.00 5550-30-1 Accting & Legal Fees – Dept. 30 300.00 5550-1 Accting & Legal Fees 1000.00
Example of Allocation by Quantity
Reallocation by quantities will often redistribute account balances differently than reallocation by account balances, and these differences will be greater when you are distributing small quantities over a large number of accounts.
The following example illustrates the drawbacks of reallocation by small quantities, but it also shows clearly how the program calculates the reallocation quantities and amounts.
For this example, assume:
• Quantity = 3 (no decimal places)
• Account balance = $100.
• Distribution is 25% to each of four accounts.

Adding the General Ledger Accounts
2–34 Sage Accpac ERP General Ledger
If you reallocate by account balance, the program will distribute $25 to each account (and no quantities).
If you reallocate by quantity, the program will distribute one unit to each of three accounts, and, based on the quantity distribution, will transfer $33.33 to two accounts, $33.34 to one account, and $0.00 to one account.
The program performs a running total method of proration (where it continually checks how much of the total allocation it has made to date).
This is how the actual distribution will look (assuming an initial credit balance in the source account).
Account Debit Credit Qty. Source account 100 ~3
1st Distribution Account 33.33 1
2nd Distribution Account 33.34 1
3rd Distribution Account 0.00 0
4th Distribution Account 33.33 1
Here’s how the account reallocation works:
• General Ledger first determines the net change in quantities for the range of periods being considered for the allocation.
• General Ledger calculates the quantities for each distribution before calculating the amounts:
− By the end of distribution 1, the program should have allocated 25% of the units. 25% is ¾ of a unit, which is rounded up to 1.
− By the end of distribution 2, the program should have allocated 50% of the units.
50% of 3 units is 1 ½ units, and the program has already allocated 1 unit, so it can allocate ½ of a unit (which is rounded up to 1).
Adding the General Ledger Accounts
Getting Started 2–35
Before
Setting Up
− By the end of distribution 3, the program should have allocated 75% of the units.
75% of 3 units is 2 ¼ units, but the program has already allocated 2 units, so it can only allocate ¼ of a unit (which is rounded down to 0).
− Finally, by the end of distribution 4, the program should have allocated 100% of the units.
100% of 3 units is 3 units, and the program has already allocated 2 units, so it can allocate 1 unit to the last distribution.
• Once the quantities have been allocated, the program does the same thing to calculate the amounts based on the quantity:
− By the end of distribution 1, the program should have allocated 1/3 of the account balance. 1/3 of the balance is $33.33.
− By the end of distribution 2, the program should have allocated 2/3 of the account balance.
2/3 of the account balance is $66.67, but the program has already allocated $33.33, so the program allocates $33.34.
− Distribution 3 has no units allocated, so the distribution amount is also $0.00.
− Finally, by the end of distribution 4, the program should have allocated all of the balance.
Since the program has allocated $66.67, the remaining amount for allocation is $33.33.
Note the following points regarding account reallocations:
• All accounts associated with reallocations based on quantity must maintain quantities.

Adding the General Ledger Accounts
2–36 Sage Accpac ERP General Ledger
• All accounts associated with the same quantity reallocation transaction must use the same unit of measure.
• Reallocations based on quantity use the net change in quantity for the range of periods you specify.
• Period ranges for reallocations based on quantity cannot span fiscal years.
Multicurrency Accounts
Multicurrency accounts are the accounts to which you want to post transactions in more than one currency.
General Ledger keeps current, historical, and (optional) budget data for all accounts. For multicurrency accounts, the system keeps two additional sets of amounts for each currency used by the account: the source‐currency amounts that have been posted to the account and the equivalents of these amounts in the functional currency. If the euro is your functional currency, and you specified a reporting currency, the system keeps a separate set for the reporting currency equivalent.
Each multicurrency account contains the following:
• Source Currency. A separate set of period totals is kept for each currency that is posted to a multicurrency account, including the functional currency if it is assigned to the account.
• Functional Equivalent. The period totals for each source currency that posts to a multicurrency account are converted to the functional currency and stored as functional‐equivalent amounts. The sum of all the functional‐equivalent amounts is equal to the corresponding period totals in the functional currency account.
• Functional Currency. Amounts include the opening balances and net changes in each fiscal period, stated in the functional currency of the ledger. These amounts equal the sums of the functional‐equivalent amounts for the periods.

Adding the General Ledger Accounts
Getting Started 2–37
Before
Setting Up
• Reporting Equivalent. If your functional currency is the euro and you specified a reporting currency, each account will have a fiscal set storing the reporting currency equivalent of each source currency amount as well as the reporting currency equivalent of all amounts posted to the account.
Revalue multicurrency accounts automatically
General Ledger’s automatic revaluation function allows you to revalue multicurrency accounts at current exchange rates. Assigning revaluation information to multicurrency accounts is discussed in the section earlier in this chapter, “Revaluing Multicurrency Accounts.”
For multicurrency accounts, you must indicate whether all or only specified currencies can be posted to the account. When you post multicurrency transactions and revalue multicurrency accounts, you must provide exchange rates for General Ledger to use.
Posting in specified currencies
You have the option to enter and post transactions to a multicurrency account in specified currencies only.
Posting in all currencies
If you select the option to post in all currencies, you can enter, import, post and provisionally post transactions to the account in any of the currencies you have defined on the Common Services Currency form.
Currencies in imported, subledger transactions
If the transactions you enter, import, and receive from subledgers are always in the functional currency, you do not have to select the multicurrency option for an account.
Consider the following points when you make decisions about multicurrency accounting:
• A multicurrency General Ledger can receive, import, or retrieve transaction batches from multicurrency or single‐currency subledgers.
• A single‐currency General Ledger can receive transaction batches from local multicurrency subledgers and can retrieve multicurrency batches from an ACCPAC Plus for DOS subledger.

Adding the General Ledger Accounts
2–38 Sage Accpac ERP General Ledger
A single‐currency General Ledger cannot import multicurrency batches from remote Sage Accpac subledgers.
• A single‐currency General Ledger cannot import multicurrency batches from non‐Sage Accpac applications. If you want to bring transactions of this type into General Ledger, you must edit the import file to remove the multicurrency fields before you can import the transactions.
Specifying the currency option for retained earnings accounts
If you use multicurrency retained earnings accounts, you should choose the option to post in all currencies, or at least make very sure the retained earnings account has all the currencies assigned to it that are assigned to the income and expense accounts that close to it. If the Create New Year function finds currencies in closing entries that cannot be posted to the target retained earnings account, the function cannot close those accounts.
Assign the functional currency to retained earnings
If you use multicurrency retained earnings accounts, you must specify the functional currency as one of the currencies that can be posted to the account. The Create New Year function must be able to post to retained earnings accounts in the functional currency.
Default currency For each multicurrency account, you can specify the default currency to appear when you enter transactions for the account.
Creating G/L Accounts Automatically
General Ledger lets you automatically generate new General Ledger accounts based on the characteristics of an existing set of accounts. For example, you can create a set of accounts for a new department using the accounts for an existing department as a model.
You use the Create Accounts icon from the G/L Accounts folder to generate new accounts automatically by a range of accounts, by account groups, or by a specific segment code.

Adding the General Ledger Accounts
Getting Started 2–39
Before
Setting Up
Example This example illustrates how you can use the G/L Create Account form to generate new accounts. The example uses accounts from Sample Company Ltd., one of the sample companies that come with Sage Accpac ERP.
Sample Company has decided that the Revenue section of the Chart of Accounts needs some expansion because the existing accounts no longer meet the demands of increased sales. Their accountant wants to create new sales accounts, to ensure that each region is represented.
The existing chart of accounts looks like this:
With accounts using the ACC account structure as the model, the accountant creates new accounts that use the REGION account structure.

Adding the General Ledger Accounts
2–40 Sage Accpac ERP General Ledger
The following screen shows the choices used to generate the new accounts:
The program uses accounts with the visible structure code as a starting point and inserts new accounts with the required structure in the specified range.
The resulting chart of accounts looks like this:
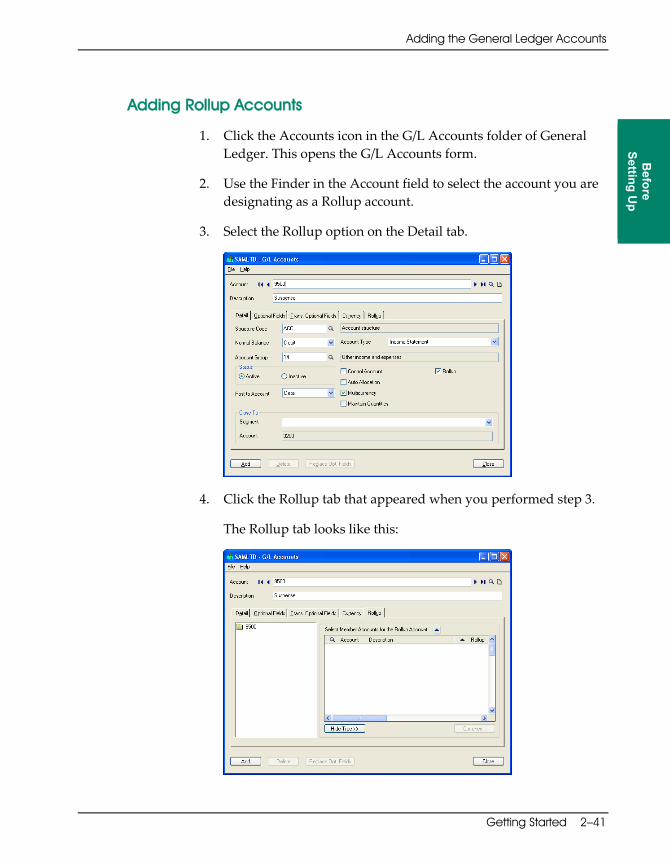
Adding the General Ledger Accounts
Getting Started 2–41
Before
Setting Up
Adding Rollup Accounts
1. Click the Accounts icon in the G/L Accounts folder of General Ledger. This opens the G/L Accounts form.
2. Use the Finder in the Account field to select the account you are designating as a Rollup account.
3. Select the Rollup option on the Detail tab.
4. Click the Rollup tab that appeared when you performed step 3.
The Rollup tab looks like this:

Adding the General Ledger Accounts
2–42 Sage Accpac ERP General Ledger
5. To add individual member accounts, or a range of accounts:
a. To add individual accounts, click the Finder in the Account column to open the Account Finder, where you select the account you wish to add, then continue at step 6.
b. To add a range of member accounts, click the Zoom button beside ʺSelect Member Accounts...ʺ.
The G/L Account Selector popup appears:
c. Select the ranges of Account Numbers, Account Segments, or Account Groups that will be members of this rollup.
d. Select Account Types.
Note: Accounts selected will include only those accounts whose account types match the Account Types selected here. For example, if the Income Statement option is not selected, then even if the Account Number range includes income statement accounts, those accounts will not be copied into the grid.
e. Select criteria ranges based on your Account Segments (optional).
f. Select criteria ranges for Account Optional Fields (optional).

Adding the General Ledger Accounts
Getting Started 2–43
Before
Setting Up
g. Click the Preview button to view your choices, then click Copy to return to the Rollup tab.
Accounts that meet all the criteria of the Select By fields and Account Type options are copied to the grid, and appear in the tree, as shown below:
Note: If the rollup account is single‐currency, only single‐currency accounts which meet the G/L Account Selector will be generated in the Preview window. Accounts that already exist or were already added in the Rollup grid will not be shown again in the Preview window.
• Upon previewing accounts in the G/L Account Selector Preview screen, if there are accounts which should not be added as members, you can double‐click Yes in the Add column to toggle it to No, or use the space bar in the grid in the Rollup tab to toggle to No.
6. Click Add, then click Close.

Recurring Entries
2–44 Sage Accpac ERP General Ledger
Recurring Entries General Ledger lets you set up and schedule recurring journal entries for recurring transactions that vary little from period to period, such as periodic depreciation charges or loan repayments.
Set up Recurring Entry records
You use the G/L Recurring Entries form to set up one or more recurring entry records.
Create transactions periodically
Later, you use the Create Recurring Entries Batch, in the Periodic Processing folder, to create a batch of recurring transactions.
You can also schedule reminders for Sage Accpac users who are responsible for processing these recurring entries. When a recurring entry comes due, Sage Accpac reminds these users to create journal entries for the recurring entries. (For information about scheduling reminders, refer to the System Manager User Guide.)
Security access required
Users need Journal Entry security access in order to create, modify or delete recurring entries, run recurring entry batches, and print reports.
Importing and Exporting Account Information You can use the Import and Export commands to import account information from other general ledgers or from non‐Sage Accpac applications, and to export your account data to other applications. You can also use Import to set up the accounts in a new ledger.
Importing and exporting currency information
If you use more than one currency in your General Ledger, you can also import and export source‐currency information for multicurrency accounts.
For details on account information that can be imported and exported, and for information on the import and export file formats, see Appendix B, “Importing and Exporting,” in the General Ledger User Guide.

Fiscal Sets
Getting Started 2–45
Before
Setting Up
Fiscal Sets General Ledger stores the totals of all transaction amounts for each account in records called fiscal sets. General Ledger automatically adds the fiscal sets you require when you post transactions to general ledger accounts, create new fiscal years, set up budgets, and otherwise create account data for current and previous years.
A fiscal set contains the following data:
• The opening balance for the year, an adjustment amount, and a closing entry.
• The net changes for periods 1 through 15 for the year.
• The net changes resulting from adjustments for the fiscal year end.
• The net changes resulting from transferring income and expense account balances to retained earnings (closing entries).
Fiscal set contents Each fiscal set stores 12 or 13 periods of accounting transaction summary data, depending upon whether the ledger uses 12 or 13 periods. In addition, each fiscal set has an adjustment period and a closing period.
Multicurrency fiscal sets
Multicurrency accounts have additional fiscal sets that hold amounts posted to the account in each source currency used with the account. Designating an account as a multicurrency account causes the system to create source‐currency and functional‐currency equivalent fiscal sets for the account as required. Refer to the section earlier in this chapter, “Multicurrency Accounts,” which discusses multicurrency fiscal sets in detail.
Euro-based If you selected the euro as your functional currency and specified a reporting currency, General Ledger maintains a fiscal set for storing the reporting currency equivalent of each period to let you display balances and net changes in the reporting currency.

Fiscal Sets
2–46 Sage Accpac ERP General Ledger
Types of Fiscal Sets
Each account has many fiscal sets
Each single‐currency general ledger account has more than one fiscal set, because each fiscal set stores only one set of numbers for one fiscal year and an account can have different types of fiscal sets.
A An Actual fiscal set stores one year (12 or 13 periods plus a 14th period for adjusting, and a 15th period for closing records) of actual monetary data for one general ledger account in home currency.
R Reporting currency (only available if you selected the euro as your functional currency and specified a reporting currency in the Company Profile form in Common Services).
Q A Quantity fiscal set stores quantity information related to the actual amounts. If you use quantities, each actual fiscal set is paired with a quantity fiscal set.
P The Provisional fiscal set temporarily stores amounts from provisional batch postings.
PQ A Provisional Quantity fiscal set stores provisionally‐posted quantities.
1 Budget Fiscal Set 1 stores planning information. Depending on the Sage Accpac edition you can store up to five separate budgets in sets 1 through 5. You might want to use budget set 1 to store your original budgets.
2 Budget Fiscal Set 2. You might want to use this budget set to store your revised budgets.
3 Budget Fiscal Set 3. You might want to use this budget set to store forecasts.
4 Budget Fiscal Set 4. You might want to store budgeted quantity information for the account.
5 Budget Fiscal Set 5.

Fiscal Sets
Getting Started 2–47
Before
Setting Up
For example... For example, for a given single‐currency account, in addition to the current year’s transactions, you can maintain the following information in your General Ledger:
• Fiscal sets containing an account’s history for two years.
• Quantities for the account.
• Two sets of budget amounts for the account.
Two years of historical amounts plus the current year’s amounts make up three actual fiscal sets. Two years of historical quantities plus the current year’s quantities make up three quantity fiscal sets. The two budgets make up two budget fiscal sets. You have a total of eight fiscal sets for the account.
Actual fiscal set All accounts have an actual fiscal set. The amounts stored in the actual fiscal set are the totals of all transactions posted to the account.
Actual fiscal set information appears on General Ledger reports such as the Income Statement and the Balance Sheet. When you post a batch of transactions, the system updates the actual fiscal sets.
Quantity fiscal set If you want to store quantity data with general ledger accounts, you must first choose the option to maintain quantities on the G/L Options form.
Then, to maintain quantity data for individual accounts, you select the option to maintain quantities for each applicable account.
You enter quantity information as you enter monetary amounts in transaction batches. Each time you make a journal entry for an account for which quantities are maintained, General Ledger prompts you for a debit or credit amount and a quantity. When you post the batch, General Ledger updates the actual and the quantity fiscal sets.

Setting Up Historical and Current Financial Data
2–48 Sage Accpac ERP General Ledger
Budget fiscal sets You can maintain up to five budget fiscal sets (identified by the numbers 1 through 5) for each account. You decide how many of the five you want to use and the type of budget information you want to keep in each.
Provisional fiscal set
The provisional fiscal set contains amounts that have been provisionally (temporarily) posted to general ledger accounts.
Posting and fiscal sets
General Ledger allows you to post amounts temporarily to accounts to test their effects on financial statements. When you post batches provisionally, General Ledger adds the transaction amounts to the provisional fiscal set instead of to the actual fiscal set, and keeps the batches available for further editing and posting.
When you post the batch permanently, General Ledger removes the effects of provisional posting. You can print financial statements that include provisional amounts, and check the results before posting the transactions permanently to ledger accounts. You can post batches provisionally only if you select the option to allow provisional posting.
Setting Up Historical and Current Financial Data You must establish an opening balance
When you create your ledger, you must at least enter and post the opening balances for each balance sheet and retained earnings account for the current year. (The opening balances in income and expense accounts are always zero.)
Current year If you create the chart of accounts partway through a fiscal year, you must also add amounts for the current year up to the present date.
Historical years You enter information for historical years only if you want to print financial statements that compare current‐year and previous‐year performance.
Chapter 3, “Setting Up General Ledger,” in this guide provides step‐by‐step instructions for establishing historical data, opening balances, and current‐year data by posting journal entries.

Setting Up Historical and Current Financial Data
Getting Started 2–49
Before
Setting Up
Budgets If you want to print statements comparing actual and budget amounts, you must also add budget amounts for your accounts. Budgets are discussed in the “Budgets” section, later in this chapter.
Adding Financial and Quantity Data for Historical Years
You may not need historical data
You do not have to enter historical data into General Ledger.
You only need to provide historical data if you plan to print comparative statements that use the historical year financial and/or quantity information.
The historical (and current) monetary and quantity amounts stored for each account in General Ledger include:
• The opening balance.
• The net changes for each of the fiscal periods in the fiscal set.
• Year‐end adjustments and closing transactions.
Enter historical data as batches of transactions
If you want to enter data for years before the current fiscal year, you must enter transaction batches for opening balances and net changes in all active accounts for each fiscal period. You post the transactions to the appropriate fiscal periods and years.
Entering Current Year-To-Date Transactions
If you are setting up your ledger partway through the year, you must enter the transaction data for the current year‐to‐date, in addition to the opening balance for the year.

Setting Up Historical and Current Financial Data
2–50 Sage Accpac ERP General Ledger
Entering Opening Account Balances
You may already have entered opening balances
If you made journal entries to the fiscal year before your current fiscal year to add historical data to General Ledger accounts, the opening balances for the current fiscal year are established when you Create New Year.
Using the Journal Entry form
If you did not enter historical data, you establish opening balances for the current fiscal year by entering a batch of ending balances for the fiscal year before your current year (using the Journal Entry form), posting the batch, and then creating a new fiscal year.
If you use this method, you can print a Posting Journal of the transactions and keep it as part of your audit trail.
Posting Current-Year Data
You must post to the current year
The only way to add current‐year fiscal period data is to enter and post transactions.
You can decide how much detail you want in your ledger. The more detail you want, the more detail you must post, for example:
• Enter all the current‐year transactions, one at a time, period by period. (This provides a complete audit trail for current‐year transactions.)
• Enter the net changes for each of the earlier periods in the current year and all the transactions for the current period. (This creates balances for previous periods in the current year and provides full detail for current‐period transactions. You can print financial statements for all the current‐year periods to date, and detailed audit trail reports for the current period.)
• Enter only the net changes (net increase or decrease) for each account in each period to date, including the current period. (This produces balances for each account in each period of the current year, allowing you to print financial statements. However, it does not provide transaction detail, such as date, reference, and description, for audit trail reports.)

Setting Up Historical and Current Financial Data
Getting Started 2–51
Before
Setting Up
Entering Historical and Current Data — a Diagram
The following diagram illustrates entering one year of historical data and bringing the current year up to date after you are several periods into the current fiscal year. In the example, the current fiscal year is 2010, the fiscal year has 12 periods corresponding to the calendar months, and you want to keep one year of history.
For simplicity, this diagram assumes you are entering historical data for a single account:
Historical Fiscal Year
Change to each succeeding period, enter the net change for the account
and post the batch.
After you enter the Period 12 net change and post, run
Create New Year.
Open the Journal Entry form And select: Year 2008 Period 12 Date 12/31/08
Enter the ending balance of the account and post the batch.
Run Create New Year.
Open the Journal Entry form And select: Year 2009 Period 1 Date 1/31/09
Enter the net change for Period 1 for the account and post the batch.
Change to Period 2, enter the net change for the account
and post the batch.
Once you reach the current period, back up your data.
Change to each succeeding period, enter the net change or transaction for the account and post the batch.
Change to Period 2, enter the net change or transactions for
the account and post.
Enter the net change or transactions for the account and post the batch.
Current Fiscal Year
Open the Journal Entry form And select: Year 2010 Period 1 Date 1/31/10
Begin entering current transactions.
Figure 2.1 Entering Historical and Current Data

Budgets
2–52 Sage Accpac ERP General Ledger
Budgets The Sage Accpac 500 ERP edition lets you maintain up to five budgets for each account; the 200 edition provides 3 budgets for each account, while with the 100 edition, you can have 2 budget sets for each account. You can import budget amounts to set up or update the amounts, and you can export the amounts to non‐Sage Accpac applications such as spreadsheets and databases. General Ledger comes with a spreadsheet macro that lets you update budget amounts using Excel.
If you enter budget data, you can print financial statements that compare actual and budget amounts.
Multicurrency budget fiscal sets
If you have a multicurrency ledger, you can store budgets for source currencies and their functional equivalents.
Budget fiscal sets When you create a budget for an account, you specify the budget fiscal set and year for the budget data. The five budget fiscal sets are identified by the numbers 1 through 5. You can decide how many of the five budget fiscal sets you want to use for an account (all are optional) and the information each will hold.
For example, you could decide to use three budget sets for the following purposes:
Budget fiscal set 1 — Original budget
Budget fiscal set 2 — Revised budget
Budget fiscal set 3 — Forecast
Use the same budget setup for all accounts to create reports that compare the actual amounts to your original budget in budget fiscal set 1 and your revised budget in budget fiscal set 2.
Future year budgets
In addition to current‐year budgets, you can create budgets for an unlimited number of future years. Be aware, however, that these future year budgets consume disk space.

Budgets
Getting Started 2–53
Before
Setting Up
Locking budget sets
The option to lock budget sets determines whether you can enter, delete, or change amounts in a budget fiscal set.
You can lock or unlock a budget fiscal set at any time to prevent users from changing budget data. For example, you may want to lock the fiscal set that contains your original budget.
Importing Budgets from a Spreadsheet
General Ledger’s importing and exporting functions let you transfer General Ledger account data and budget amounts to and from non‐Sage Accpac applications.
You can use this feature to export actual or budget account data to a spreadsheet, manipulate it, then import it as budget data.
See Appendix B, “Importing and Exporting,” in the General Ledger User Guide.
Budget Entry Methods
Fiscal set lookup You can call up any existing fiscal set to use as a basis for the budget you are setting up.
The methods for setting up budget amounts in each period, described in detail in Chapter 3, “Setting Up General Ledger,” allow you to:
• Enter or add a fixed amount into each period.
• Enter an amount to distribute over the periods.
• Enter a percent increase over a base amount.
• Enter an amount increase over a base amount.
• Copy the amounts from the fiscal set you are using as a base, increase them by a percent, or increase them by an amount.
• Use a weighting factor.

Displaying Account Information
2–54 Sage Accpac ERP General Ledger
Displaying Account Information In addition to the account and budget maintenance forms discussed in this chapter, General Ledger has several forms dedicated to displaying account information.
You can review the following account information using these forms:
Chart of Accounts. The Chart of Accounts form displays basic account information including account number, description, status, type, and the balance for the selected period.
The Chart of Accounts form provides an option to use rolled up balances, as well as buttons for entry into the other account maintenance and inquiry forms:
• The Open button opens the G/L Accounts form.
• The Transactions button opens the Transaction History form.
• The Comparison button opens the Fiscal Set Comparison form.
• The Budget button opens the Budget Maintenance form.
• The History button opens the Account History Inquiry form.
• The Currency button opens the Source Currency Inquiry form.
Transaction History. The Transaction History form displays details posted to an account, including the posting period and date, source code, reference, description, and posted amount and quantity.
Drilldown You can view transactions from any year for which you maintain fiscal sets. You can also drill down from Transaction History to view the source transaction — such as an Accounts Receivable invoice or receipt.
In multicurrency ledgers, the program displays source currency code, rate type, rate date, and posting rate and amount.
Fiscal Set Comparison. The Fiscal Set Comparison form displays and compares the net changes or balances in each fiscal period for

Where To Now?
Getting Started 2–55
Before
Setting Up
two selected fiscal sets. The comparison shows the difference between the two fiscal sets and the ratio of the difference between the fiscal sets over Fiscal Set 2.
In multicurrency ledgers, you can choose either the source‐ or functional‐equivalent amounts for a specified currency. If the euro is your functional currency, you have an additional currency option: reporting currency. Choose this option to see amounts in the currency you designated as reporting currency.
Use Rolled Up Amounts option
If the account you select is a rollup account, the Use Rolled Up Amounts option appears. You can select it to view the balances, net changes, and quantities of the member accounts rolled into a single account.
Source Currency Inquiry. For multicurrency accounts, you can use the Source Currency Inquiry form to view the source‐currency balance and functional‐equivalent balance for any revaluation code and source currency. If the account you select is a Rollup Account, the Use Rolled Up Balances option appears. Select it to see rolled‐up balances for this account.
Account History Inquiry. Use the Account History Inquiry form to view an account’s beginning balances, period net changes, period balances, ending balances, adjustments, closing entries, quantities and total quantities (if applicable), total net changes, for any year. The system maintains account history for the number of years specified in the Keep Years of Fiscal Sets field in the G/L Options form. If the account you select is a rollup account, you can roll up the balances.
Where To Now? Once you understand how General Ledger manages your accounts and their associated data, you should go on to Chapter 3 in this guide, “Setting Up General Ledger,” which provides step‐by‐step instructions for getting your ledger up and running.


Getting Started 3–i
GLGS-3.doc, printed on 3/18/2008, at 3:45:30 PM. Last saved on 3/18/2008 9:50:00 AM.
Sage Software Confidential
Setting Up G
/L
Chapter 3 Setting Up General Ledger
Using General Ledger with an Internet Browser ...................................3–2 Summary of General Ledger Setup Steps .........................................3–2 While You Work ...............................................................3–5 Prepare General Ledger Data ....................................................3–5 Step 1: Configure System Manager ..............................................3–6 Step 2. Activate General Ledger .................................................3–8
Access to General Ledger....................................................3–9 Step 3: Set Up General Ledger Options..........................................3–10 Step 4: Set Up Segment Codes..................................................3–21 Step 5: Set Up Account Structures ..............................................3–22 Step 6: Set Up Source Codes ...................................................3–24 Step 7: Set Up Account Groups .................................................3–26 Step 8: Set Up Source Journal Profiles ...........................................3–28 Step 9: Set Up Revaluation Codes ..............................................3–28
Back Up the Data ..........................................................3–31 Step 10: Set Up Optional Fields.................................................3–32
Deleting Optional Fields ...................................................3–35 Step 11: Add Accounts ........................................................3–36
Importing Accounts .......................................................3–37 Entering Accounts Individually .............................................3–38
Step 12: Add General Ledger Opening Balances and Period Data ..................3–54 Entering Historical Data....................................................3–55
Posting Historical Year Period Changes to G/L Accounts ..................3–55 Check Data Integrity and Back Up the Data ..............................3–56
Entering Current‐Year Opening Balances ....................................3–57 Converting to a Euro‐based General Ledger ..............................3–58 Check Data Integrity and Back Up the Data ..............................3–59

3–ii Sage Accpac ERP General Ledger
GLGS-3.doc, printed on 3/18/2008, at 3:45:30 PM. Last saved on 3/18/2008 9:50:00 AM.
Sage Software Confidential
Print Additional Reports to Verify Account Data ......................... 3–59 Entering Current Year‐to‐Date Transactions ................................. 3–59 Add Budgets ............................................................. 3–61
Using the Budget Maintenance Form.................................... 3–63 Check Data Integrity and Back Up the Data .............................. 3–66
Step 13: Assign Account Permissions........................................... 3–66 Turning on G/L Security and Setting the Default Security Option .............. 3–66 Default Access Security Option............................................. 3–67 Setting User Account Permissions .......................................... 3–68
Changing and Canceling Permissions ................................... 3–71 Test Permissions .......................................................... 3–72
Step 14: Set Up Recurring Entries .............................................. 3–72 Creating G/L Accounts Automatically .......................................... 3–75
Before You Start .......................................................... 3–75 Creating New Accounts ................................................... 3–76
Financial Reporter ............................................................ 3–84 Where To Now? .............................................................. 3–84

Getting Started 3–1
GLGS-3.doc, printed on 3/18/2008, at 3:45:30 PM. Last saved on 3/18/2008 9:50:00 AM.
Sage Software Confidential
Setting Up G
/L
Chapter 3 Setting Up General Ledger
This chapter contains instructions for defining and creating a general ledger system suited to your business. It also describes how to transfer your existing general ledger records to Sage Accpac General Ledger and Financial Reporter after you have set up the system.
The Quick Start Guide summarizes General Ledger setup
You can use the Setup Wizard to set up General Ledger — particularly your chart of accounts — very quickly. The Quick Start Guide that comes with System Manager was written especially for use with the Setup Wizard, but you may find its summary of General Ledger setup useful even if you are setting up your ledger manually.
Setup Wizard Follow-up Checklist
If you use the Setup Wizard, print the Follow‐up Checklist and use it to complete the setup process. (To print the checklist, on the Sage Accpac program group on the Windows Start menu, click Online Documentation, Setup Wizard, then Setup Wizard Follow‐up Checklist. Or, from the Help menu in the Sage Accpac desktop, choose Online Documentation, then choose General Ledger, then choose Setup Wizard Follow‐up Checklist.)
This guide contains more detail than the Quick Start Guide on setting up General Ledger. The purpose of this chapter is to get you “up and running” quickly. For a complete understanding of the options you encounter in this chapter as you set up the system, read Chapter 2 of this guide.

Using General Ledger with an Internet Browser
3–2 Sage Accpac ERP General Ledger
GLGS-3.doc, printed on 3/18/2008, at 3:45:30 PM. Last saved on 3/18/2008 9:50:00 AM.
Sage Software Confidential
Using General Ledger with an Internet Browser All General Ledger forms are designed to enable users at remote locations to enter and view data using an Internet browser.
If you are using General Ledger through a browser, you navigate the program a little differently than you would from the Sage Accpac desktop. Because the differences are minimal, they are noted once, here, rather than throughout this guide.
The following illustration depicts the browser after you have signed on to your company database.
To find out how to set up your system for use on the Web and how to sign on to Sage Accpac through your browser, see the System Manager Administrator Guide.
Summary of General Ledger Setup Steps This chapter begins with a summary of the steps for installing and setting up General Ledger, followed by details on each step.
You must have already installed the System Manager, created a company database, and chosen some company‐wide options in Common Services before you can use General Ledger.
The left-hand panel provides buttons that let you open the program you wish to use.
Click the button in the left panel for the form you wish to use, or click the related icon in the area to the right.

Summary of General Ledger Setup Steps
Getting Started 3–3
GLGS-3.doc, printed on 3/18/2008, at 3:45:30 PM. Last saved on 3/18/2008 9:50:00 AM.
Sage Software Confidential
Setting Up G
/L
The Sage Accpac System Manager Administrator Guide provides instructions for installing the System Manager and other applications, creating databases, and defining the Administrative and Common Services for your company.
1. Install the System Manager and General Ledger on your computer, following the instructions in your System Manager Administrator Guide.
• If you plan to use the Setup Wizard:
− Print and complete the Setup Wizard Data Entry form. (From the Sage Accpac program group on the Windows Start menu, click Online Documentation, Setup Wizard, and then click Setup Wizard Data Entry Form.)
− Use the Setup Wizard to select options and create your chart of accounts, and then use the Follow‐Up Checklist to complete the rest of the setup.
2. Activate General Ledger, following the instructions in your System Manager Administrator Guide.
3. Use the G/L Setup Options form to enter basic information on the Company, Account, Posting, and Segments tabs.
Before you can add accounts (using the G/L Accounts form), you must indicate the name and length of each segment and which segment is the account segment on the Segments tab of G/L Options. Even if you use only one segment, you must specify it.
4. Set up segment codes if your account number consists of more than one segment.
5. Set up account structures before you enter General Ledger accounts. You must set up at least one account structure.
6. Set up source codes. You perform this step only if you want to organize transactions by source codes other than the several codes General Ledger automatically provides.

Summary of General Ledger Setup Steps
3–4 Sage Accpac ERP General Ledger
GLGS-3.doc, printed on 3/18/2008, at 3:45:30 PM. Last saved on 3/18/2008 9:50:00 AM.
Sage Software Confidential
7. Set up source journal profiles. You can define custom source journals, using sets of source codes that organize transactions meaningfully for your company. This step is optional.
8. Set up account groups. (optional).
9. Set up revaluation codes if your company does multicurrency accounting.
10. Add optional fields for accounts and for transaction details (optional).
11. Add accounts to your general ledger.
12. Update the G/L Options form by adding the following account numbers:
• Default Closing Account on the Account tab.
• Default Source Code on the Posting tab.
• Default Structure Code on the Segments tab.
13. Add historical data if you want to do previous‐year comparisons.
a. Add current fiscal year beginning balances (if not already established by adding historical year data).
b. Enter year‐to‐date transactions if you are moving to Sage Accpac after the fiscal year is underway. You can add budget data at any time.
14. Set account permissions if you use G/L Security.
15. Set up recurring entries for regular transactions that vary little (for example, depreciation or prepaid insurance).

While You Work
Getting Started 3–5
GLGS-3.doc, printed on 3/18/2008, at 3:45:30 PM. Last saved on 3/18/2008 9:50:00 AM.
Sage Software Confidential
Setting Up G
/L
While You Work Use the setup checklist
You can simplify the data entry process by following the checklist as you go through setup.
Review “What You Need to Know...”
When you need background or overview information before making a choice, consult Chapter 2 in this guide for information about how the General Ledger options work together.
Skip steps that do not apply to the way you will use General Ledger.
Make frequent backups
Throughout this chapter you will see reminders to make backups of your Sage Accpac data. Do not ignore the suggestion.
As a rule, you should back up your data each time you have entered information you would not want to have to enter a second time.
Prepare General Ledger Data Gather all your current general ledger records, including manual records, printed listings, or reports from other accounting software.
• Chart of accounts. Information you should have on hand for each account includes:
− Account number.
− Account description (optional).
− Account type (balance sheet, income statement, or retained earnings).
− Method of posting (detail, consolidated, or prohibited).
− Account group (optional).
− Allocation accounts and percentages.
− Whether it is a control ledger.
− Whether you post quantities for this account.

Step 1: Configure System Manager
3–6 Sage Accpac ERP General Ledger
GLGS-3.doc, printed on 3/18/2008, at 3:45:30 PM. Last saved on 3/18/2008 9:50:00 AM.
Sage Software Confidential
• Whether the account is a rollup account or is a member of a rollup account.
• Optional fields information.
• Trial balance as of the beginning of the current year.
• Trial balance as of the current date (if you are setting up your General Ledger partway through a fiscal year).
• Trial balance for each period end of the current year (optional, if you are setting up your General Ledger partway through a fiscal year).
• Samples of the source journals you use.
• Samples of the financial statements you use.
• Monthly trial balances from previous years for which you want to enter historical data (optional).
• Budget figures (optional).
• A list of the source currencies and current exchange rates (if you use a multicurrency General Ledger).
You may be able to transfer data by importing from another application. To see whether you can make use of this option, read Appendix B, “Importing and Exporting,” in the General Ledger User Guide.
Step 1: Configure System Manager Follow the instructions in the System Manager Administrator Guide and System Manager User Guide to install, to enter the basic company information, and to configure System Manager.

Step 1: Configure System Manager
Getting Started 3–7
GLGS-3.doc, printed on 3/18/2008, at 3:45:30 PM. Last saved on 3/18/2008 9:50:00 AM.
Sage Software Confidential
Setting Up G
/L
The following section summarizes the instructions in the System Manager Administrator Guide for getting started. These steps are critical for General Ledger to operate correctly:
1. Create a system database using the Database Setup function.
2. Create a company database using the Database Setup function.
3. Start Sage Accpac and select the company you created.
Enter the fiscal year starting date
4. When you first select a newly created company, Common Services Activation prompts you for the starting date of your fiscal year. Enter the starting date of the current fiscal year. Sage Accpac will create this fiscal year in the fiscal calendar.
5. Use the Company Profile form to:
a. Indicate the number of fiscal periods (12 or 13) in your fiscal year. (If you use 13 periods, indicate which quarter will contain four periods.)
b. Select a functional currency (the currency in which the company books are kept). You cannot change your functional currency after saving the Company Profile.
c. Select the Multicurrency option to set up a multicurrency ledger.
d. Designate a reporting currency if you chose the Euro as your functional currency.
Fiscal period start and end dates
6. Review the fiscal period start and end dates in the Fiscal Calendar form. Edit the dates if the displayed dates are not correct.
Exchange rates 7. Set up currencies and currency rate tables using the Currency forms, if you are setting up a multicurrency ledger.
8. Complete the Administrative Services and Common Services information as required for your company.

Step 2. Activate General Ledger
3–8 Sage Accpac ERP General Ledger
GLGS-3.doc, printed on 3/18/2008, at 3:45:30 PM. Last saved on 3/18/2008 9:50:00 AM.
Sage Software Confidential
Step 2. Activate General Ledger The General Ledger folder does not appear on the company desktop until you activate the General Ledger application.
1. Activate General Ledger by choosing Data Activation from the Administrative Services folder.
The General Ledger Activation form appears:
If you intend to enter data for historical years...
When you activate General Ledger, the system prompts for the starting date of your oldest fiscal year and for the current fiscal year.
Enter the oldest fiscal year for which you want to enter data
2. For the oldest fiscal year starting date, enter the starting date of the first fiscal year for which you want to enter a full year of history.
If you plan to add data from historical years so you can print comparative financial statements, you should use the same fiscal year starting date in Sage Accpac that you used in your old general ledger.
3. For the current fiscal year, enter your current fiscal year. General Ledger will create the historical fiscal years you need to enter your historical data.
For example, if you enter January 1, 2008 as the oldest fiscal year starting date and 2010 as the current fiscal year, General Ledger will create the following fiscal years:

Step 2. Activate General Ledger
Getting Started 3–9
GLGS-3.doc, printed on 3/18/2008, at 3:45:30 PM. Last saved on 3/18/2008 9:50:00 AM.
Sage Software Confidential
Setting Up G
/L
• Fiscal year 2007, since you need to enter the ending balances of the year 2007 to establish the opening balances of 2008, the first year of historical data.
• Fiscal years 2008, 2009, and 2010 so you can enter historical data for 2008 and 2009 and begin the current year.
If you do not intend to enter historical data, enter the starting date of the current fiscal year as the oldest fiscal year starting date.
General Ledger will create the previous year, so you can enter its ending balances, and the current year.
4. After General Ledger activation is complete, check your fiscal calendar and verify that the dates are correct.
Access to General Ledger
If you belong to a user group that does not have access to the General Ledger application, the General Ledger folder will never appear on your desktop.
Your password and security profile (defined by your System Administrator) determine the icons that appear when you sign on to Sage Accpac. Some folders and icons discussed in this guide may not be available to you. If you require access to a folder or an icon that does not appear on your screen, contact your administrator.
For information about security and access to Sage Accpac applications, see the System Manager Administrator Guide. Also, Appendix C, “General Ledger Security,” in the General Ledger User Guide, lists the G/L task groups to which security can be assigned.

Step 3: Set Up General Ledger Options
3–10 Sage Accpac ERP General Ledger
GLGS-3.doc, printed on 3/18/2008, at 3:45:30 PM. Last saved on 3/18/2008 9:50:00 AM.
Sage Software Confidential
Step 3: Set Up General Ledger Options The G/L Options form allows you to display and define settings for basic company information, account processing, batch posting, and account segments.
1. Double‐click Options in the Setup folder to open the G/L Options form. This form provides several tabs on which you can enter company information.
Company tab The Company tab displays the company name, address, contact name, and telephone and fax numbers:
Company-wide information
To change the company name and address, or to change the contact name, telephone number, and fax number at the company level, use the Company Profile form in Common Services.
You can change the contact person, the telephone number, and the fax number for General Ledger on this form.
2. Complete the fields on the Company tab as follows:
Contact Name. Type a name to identify a contact person or position in the company for which you are setting up General Ledger, or use the field for your own purposes.
Telephone. Type the telephone number.

Step 3: Set Up General Ledger Options
Getting Started 3–11
GLGS-3.doc, printed on 3/18/2008, at 3:45:30 PM. Last saved on 3/18/2008 9:50:00 AM.
Sage Software Confidential
Setting Up G
/L
Fax Number. Type the fax number.
Account tab The Account tab lets you define company‐wide account information.
3. Complete the Account tab as follows:
Functional Currency. The Account tab displays the functional currency for the company, as specified on the Common Services Company Profile form.
Multicurrency. The Multicurrency option lets you enter, import, post, store, and report transactions in more than one currency. You can turn on the Multicurrency option at any time, but you cannot turn it off again once you select it. This option is available in G/L only if you selected multicurrency accounting for the company on the Company Profile form in Common Services.
If you do not select the multicurrency option, you will be able to enter transactions in only one currency in General Ledger. However, a single‐currency General Ledger can post transactions created by other Sage Accpac applications that use the multicurrency option.
The functional‐equivalent amounts in the subledger transactions are posted to the functional currency in the General Ledger. You can also post transactions created by a single currency subledger

Step 3: Set Up General Ledger Options
3–12 Sage Accpac ERP General Ledger
GLGS-3.doc, printed on 3/18/2008, at 3:45:30 PM. Last saved on 3/18/2008 9:50:00 AM.
Sage Software Confidential
to a multicurrency General Ledger if both use the same functional currency.
Default Rate Type. If you select multicurrency processing for the company, the default rate type (for example, spot rate or average rate) specified in the Common Services Company Profile form is displayed on the Account tab.
The default rate type determines the currency exchange rate that appears as a default for transactions entered in a currency other than the functional currency. When you enter or edit transactions, you can specify a different rate type or a unique rate for each detail entry. Rate types are defined in the Rate Types form in Common Services.
You can change the Default Rate Type at any time.
Use Account Groups. The Financial Reporter uses account groups to create standard financial statements for your chart of accounts. If you select the option to use account groups, you must assign each General Ledger account to an account group (such as current assets, current liabilities, revenue, cost of sales, and so forth). You can print many General Ledger reports by account group.
If you do not use the Account Groups option, you will not be able to use your own data with the balance sheets or income statements that come with General Ledge. You will have to create your own financial statement specifications.
Maintain Quantities. The option to maintain quantities lets you enter quantity information, such as the number of units sold, as well as amounts, when you enter transactions for General Ledger accounts. If you select this option for the General Ledger, you can then select the option for individual accounts. Unlike financial information, quantity information has no balancing requirements (that is, credits are not required to equal debits within a journal entry). Quantity information is maintained for as many years as financial information for accounts.

Step 3: Set Up General Ledger Options
Getting Started 3–13
GLGS-3.doc, printed on 3/18/2008, at 3:45:30 PM. Last saved on 3/18/2008 9:50:00 AM.
Sage Software Confidential
Setting Up G
/L
To __ Decimal Places. Type the number of decimal places you want to use for entering quantities, up to three decimal places. Once you define the number of decimal places, you can increase the number of decimal places (up to three), but you cannot decrease the number.
Default Closing Account. When you create a new fiscal year, the system transfers income and expense account balances to the retained earnings account you assign as the default closing account, unless you specify other retained earnings accounts for use in closing by specific account segments.
You must enter the account number of the retained earnings account you want to use as a default for posting the end of year balances in income and expense accounts before you create a new year. You can change the default closing account at any time. (The section “Closing Year End Income and Expenses by Segment,” in Chapter 2 of this guide discusses closing accounts to retained earnings accounts other than the default closing account you define in this form.)
Note: You cannot enter a Default Closing Account number until after you have set up the chart of accounts.
Use G/L Security. Select this option to control account access rights to individual users (to minimize the risk of unauthorized activities). After selecting this option, you set permissions in the Account Permissions form found in the Accounts folder.
You can block off entire account segments or only the most sensitive accounts (for example, Payroll, Sales, Retained Earnings, Common Stock and Preferred Stock).
Close and reopen company database
The Account Permissions icon will not appear in the G/L accounts folder until you select this option and then close and reopen your company database.
Reporting Rounding Account. If you selected the euro as your functional currency, a Report Rounding Account field appears

Step 3: Set Up General Ledger Options
3–14 Sage Accpac ERP General Ledger
GLGS-3.doc, printed on 3/18/2008, at 3:45:30 PM. Last saved on 3/18/2008 9:50:00 AM.
Sage Software Confidential
on the Account tab. This account is used by G/L to ensure that reports print in the reporting currency.
Note: You cannot add a Report Rounding Account number until after setting up the chart of accounts.
Posting tab 4. Select posting options and review posting statistics. The options you choose can be changed at any time.
Lock Budget Sets. You can create up to five budgets for each account in Sage Accpac 500 ERP. (In Sage Accpac ERP 200 edition, you can create 3 budget sets for each account, and in the 100 edition, you can create 2.) The Lock Budget Sets option
Default Rounding Account field

Step 3: Set Up General Ledger Options
Getting Started 3–15
GLGS-3.doc, printed on 3/18/2008, at 3:45:30 PM. Last saved on 3/18/2008 9:50:00 AM.
Sage Software Confidential
Setting Up G
/L
controls which of the five budgets you can create, change, or delete. You cannot change a locked budget set.
You can lock and unlock budget sets at any time. For example, you can create an “original budget” in Budget Set 1, and then lock it to protect your benchmark. You can create a “revised budget” by copying the original budget amounts to Budget Set 2. You can lock and unlock Budget Set 2 as required to make changes.
Allow Posting To Previous Years. You can set up General Ledger to allow or prevent posting of batches to periods in previous fiscal years. Most of the time, you probably want to prevent posting to previous years to maintain the integrity of your financial information. When you need to post to previous years, you can change this option. For example, you may need to post to previous years to:
• Enter the last year’s ending account balances when you create the General Ledger in order to set up opening balances for the current year.
• Add historical data.
• Correct errors in previous years.
• Enter adjustments for a previous year after beginning the new year.
You can turn on the option as required for setup and end‐of‐year adjustments and then turn it off to protect the integrity of “closed” years.
Allow Provisional Posting. The option to allow provisional posting lets you post transactions on a provisional basis to test their effects on your ledger before you permanently post to the accounts. This feature is particularly useful when you are doing period end or year end adjustments, and want to ensure that you have entered all the transactions you need before you post them permanently.

Step 3: Set Up General Ledger Options
3–16 Sage Accpac ERP General Ledger
GLGS-3.doc, printed on 3/18/2008, at 3:45:30 PM. Last saved on 3/18/2008 9:50:00 AM.
Sage Software Confidential
You can turn this option on or off at any time.
Force Listing Of Batches. Click this check box to require printing of batch listings before they are posted.
If you use the option, General Ledger will not post a batch for which you have not printed a batch listing.
Whether or not you use the option, you can print listings for all your unposted batches.
Default Source Code. This field lets you designate a source code to use as the default for journal entries.
Use the Finder to select a source type for the default source code.
Edit Imported Entries. The option to allow editing of imported entries lets you control the editing of transaction batches from non‐Sage Accpac applications, such as ACCPAC Plus Accounting and non‐Sage Accpac applications.
Select the level of editing you want to allow in batches retrieved from ACCPAC Plus or imported from other programs using the Import function:
• All Fields. Permits editing of every field.
• Fiscal Period, Year, Transaction Date. Limits editing to the (fiscal) period, year, and transaction date.
• No Edit. Prevents any editing of imported batches.
You can change your choice for this option at any time.
Posting Statistics. The following information is available at any time for review on the Posting tab:
• Last Batch. The last number to be assigned to a newly created batch. General Ledger automatically assigns batch numbers in sequence.

Step 3: Set Up General Ledger Options
Getting Started 3–17
GLGS-3.doc, printed on 3/18/2008, at 3:45:30 PM. Last saved on 3/18/2008 9:50:00 AM.
Sage Software Confidential
Setting Up G
/L
• Next Posting Sequence. The number that will be assigned as the posting sequence number when the next batch, or a group of batches, is posted. This number appears on the batch posting audit trail reports. Provisionally posted batches are not included in this count.
• Next Provisional Posting Sequence. The number that will be assigned as the provisional posting sequence number to the next provisionally posted batch or group of batches.
• Current Fiscal Year. The currently open fiscal year.
• Oldest Year Of Fiscal Sets. The oldest year for which Actual and Quantity summary account data exist. Fiscal sets from the Oldest Year forward are available for reporting and posting.
• Oldest Year Of Transaction Detail. The oldest year for which Actual and Quantity transaction details exist. Transaction detail from the Oldest Year forward is available for reporting.
Keep __ Years of Fiscal Sets. You specify how many past years of financial, quantity, and budget summary information you want to keep.
Each fiscal set consists of a year’s opening and closing balances and period net changes.
The number of years of fiscal sets you can maintain depends on the Sage Accpac edition you are using:
Edition Years of fiscal sets 500 ERP Up to 99 200 ERP 7 100 ERP 7
Keep in mind, however, that keeping many fiscal sets of account history consumes disk space. Two to three years of fiscal sets will usually provide the information you need.

Step 3: Set Up General Ledger Options
3–18 Sage Accpac ERP General Ledger
GLGS-3.doc, printed on 3/18/2008, at 3:45:30 PM. Last saved on 3/18/2008 9:50:00 AM.
Sage Software Confidential
You use the Period End Maintenance form to delete fiscal sets older than the number of years you specify for keeping fiscal sets. For example, if the current fiscal year is 2010, and the number of years to keep fiscal sets is 2, the system keeps amounts and quantities for 2008 and 2009. Amounts and quantities for 2007 and all previous years are deleted.
The number of years to keep fiscal sets applies only to account summary information. The number of years of transaction detail saved is determined by the number of years of transaction detail to keep.
Keep __ Years of Transaction Detail. You specify how many years of posted transaction detail you want to keep. The number of years of transaction detail you can keep depends on the Sage Accpac edition you are using.
Edition Years of transaction details ERP 500 Up to 99 ERP 200 7 ERP 100 7
Keep in mind, however, that transaction history consumes disk space. One or two years of transaction detail will usually provide the information you need.
You use the Period End Maintenance form to delete transaction detail older than the number of years you specify for keeping detail. For example, if the current fiscal year is 2010, and the years to keep transaction detail is 1, the system keeps posted transactions for 2009 and transactions for 2008 and all previous years are deleted.
The number of years of transaction detail you save must be equal to or less than the number of years of fiscal sets you want to save.
The number of years to keep detail applies only to transaction details. The number of years of account summary information saved is determined by the number of years of fiscal sets to keep.

Step 3: Set Up General Ledger Options
Getting Started 3–19
GLGS-3.doc, printed on 3/18/2008, at 3:45:30 PM. Last saved on 3/18/2008 9:50:00 AM.
Sage Software Confidential
Setting Up G
/L
Segments tab 5. Define segments and specify which segments (if any) can be used to close income and expense accounts at year end.
You also use the Segments tab to specify the default account structure, to identify one of the segments as the account segment, and to select the delimiter character.
If you decide to define only one segment, you cannot take advantage of some of the account number processing capabilities of General Ledger. (For example, you will not automatically be able to print financial statements by department or division.)
Segment definitions
You define your segments during setup. You can make changes in the segment definitions as described below.
• You can add up to 10 new segments at any time in Sage Accpac 500 ERP, 4 segments in Sage Accpac 200 ERP, and 3 segments in the Sage Accpac 100 ERP edition.
• You can change the length of a segment at any time, provided it is not used in an account structure definition.
• You can change a segment description at any time.
• At any time, you can change your choice to Yes or to No for the Use In Closing option. Use In Closing indicates whether the segment can be used to define a separate retained earnings account for each segment code. If the setting for a

Step 3: Set Up General Ledger Options
3–20 Sage Accpac ERP General Ledger
GLGS-3.doc, printed on 3/18/2008, at 3:45:30 PM. Last saved on 3/18/2008 9:50:00 AM.
Sage Software Confidential
segment for Use In Closing is Yes, you can set up a different closing account for each segment code.
Segment Name. Type a name for each segment. The name can be the accounting entity represented by the segment, such as “Department,” “Division,” or “Account segment.”
Length. You can define up to 10 segments; each segment can consist of up to 15 characters. Type the number of characters you want in each segment.
Use In Closing. Indicate with Yes or No in this column whether the segment can be used to define a separate retained earnings account for each segment code.
If the setting is Yes, the system displays a column in the Segment Codes form for you to enter the retained earnings account for each segment code. The segments allowed for closing on the Segments tab are the choices available in the Accounts form. When you add an account made up of segments that can be used in closing, you select the segment (and its associated retained earnings account) for the system to actually use in closing.
Account Segment. When you define multiple segments for your account numbers, you identify one of the segments as the account segment by entering the number (1 through 10) of the account segment.
The account segment is the nucleus of the account number. It identifies the account as an asset, liability, income, or expense account.
Segment Delimiter. The delimiter character separates the segments of the account number during entry and display to make the number easier to read. The delimiter can be any one of these characters:
‐ / \ * .
Default Structure Code. You can define the account structure code to use by default for each new General Ledger account you

Step 4: Set Up Segment Codes
Getting Started 3–21
GLGS-3.doc, printed on 3/18/2008, at 3:45:30 PM. Last saved on 3/18/2008 9:50:00 AM.
Sage Software Confidential
Setting Up G
/L
add in the Accounts form. (If you have not added account structures, you can wait to define the default structure in the Account Structure form.) You can select a different account structure when you add an account.
6. Review the tabs in the G/L Options form to make sure your choices and entries are correct. When you finish, click the Save button.
7. Click Print on the File menu on this form, or choose the G/L Options icon in the Reports folder to print a report of your choices, to verify that they are correct and complete.
Step 4: Set Up Segment Codes If you defined more than one segment for your account number on the Segments tab of the Options form, you now use the Segment Codes form to enter valid codes for each of the segments you defined (except the account segment).
You can enter a description for each valid code and assign a closing account to any of the segments that you indicated can be used in closing on the Segments tab of the Options form.
1. Review your chart of accounts and complete the Segment Codes form as follows:
Segment Name. Select the segment for which you want to enter valid segment codes.

Step 5: Set Up Account Structures
3–22 Sage Accpac ERP General Ledger
GLGS-3.doc, printed on 3/18/2008, at 3:45:30 PM. Last saved on 3/18/2008 9:50:00 AM.
Sage Software Confidential
Segment Code. Type a code for each entity represented by this segment. For example, if the segment represents divisions and the segment length is 3, type a code for each division such as 100, 200, 300. Tab into the grid, then press the Insert key to add new codes.
Description. Type a meaningful description of the segment code — for example, Marketing, Development, Accounting.
Closing Account. You can assign a separate retained earnings account to each segment code, if you wish.
• You must define the retained earnings accounts in the Accounts form before you can enter them in the Segment Codes form. When you first set up General Ledger, you will leave this Closing Account column empty. You can return to the Segment Codes form any time after you set up the retained earnings accounts you will be using.
• You must enter the segment closing accounts before you create a new fiscal year; otherwise, income and expense accounts will close to the company‐wide default closing account.
2. Review the segment codes and closing accounts to be sure your entries are correct, then click the Save button.
3. Use the Print command on the File menu in this form or choose the Segment Codes icon in the Reports folder to print the codes, to verify that they are correct and complete.
Step 5: Set Up Account Structures
The Account Structures form allows you to define multiple account structures for your company. You must define an account structure for each combination of segments you want to use in account numbers.

Step 5: Set Up Account Structures
Getting Started 3–23
GLGS-3.doc, printed on 3/18/2008, at 3:45:30 PM. Last saved on 3/18/2008 9:50:00 AM.
Sage Software Confidential
Setting Up G
/L
About account structures
An account structure specifies the segments an account number contains and the order in which they appear. Define as many account structures as you need or as allowed for the edition of General Ledger you are using:
• G/L 500 ERP: you can define an unlimited number of account structures.
• G/L 200 ERP: you can define up to 4 account structures.
• G/L 100 ERP: you can define up to 3 account structures.
Default account structure
Specify a default account structure to appear automatically as you create accounts. When you add a new account, you can use the default structure or assign the account a different structure. The system validates the account number against the segments contained in the assigned structure as you add accounts.
1. Review your chart of accounts design as you complete the Account Structures form. Use the Include and Exclude buttons to include segments in an account structure or remove them.
2. Complete the fields in this form as follows:
Structure Code. Type an account structure code.
Description. Type a meaningful description.
Use As Company Default Structure. Select this option to use the structure you created to define most of your accounts as the default. (After adding the default structure, you can use the Finder in the Default Structure Code field on the Segments tab of

Step 6: Set Up Source Codes
3–24 Sage Accpac ERP General Ledger
GLGS-3.doc, printed on 3/18/2008, at 3:45:30 PM. Last saved on 3/18/2008 9:50:00 AM.
Sage Software Confidential
the G/L Options form to choose this as the default for all accounts.) The company default structure appears automatically as you add accounts to the chart of accounts.
Choose The Segments To Be Added To This Account. Select the segments for inclusion in an account structure in the order you want them to appear in the account structure. Select each segment and click the Include button.
Segments Currently Used By This Account. The segments are listed in the order they appear in the account structure. To remove a segment, select it and click the Exclude button.
To verify that your account structures are correct and complete, print a list of the account structures by using the Print command on the File menu or by choosing the Account Structures icon in the G/L Reports folder.
Step 6: Set Up Source Codes
You define source codes for General Ledger batches using the Source Codes form.
Source codes allow you to group posted transactions for viewing and reporting.
A source code is a two‐part code of four characters that General Ledger uses to show where a transaction originated. For example, you could assign the source code GL‐CD to identify a cash disbursement entered in a General Ledger batch.
Once you post transactions, you can print source journals that contain selected source codes. For example, you can print a report of all checks

Step 6: Set Up Source Codes
Getting Started 3–25
GLGS-3.doc, printed on 3/18/2008, at 3:45:30 PM. Last saved on 3/18/2008 9:50:00 AM.
Sage Software Confidential
Setting Up G
/L
issued in General Ledger and Accounts Payable by creating a source journal with the appropriate source codes.
Batches of General Ledger transactions generated by Sage Accpac subledgers contain system‐generated source codes that program activation automatically adds to the source codes list in General Ledger. You must assign source codes to entries in batches created by any non‐Sage Accpac applications.
General Ledger comes with a set of source codes already defined. You can view the predefined source codes by clicking the Finder in the Source Code field.
The Source Codes Finder shows some of the predefined source codes
1. Complete the Source Codes form as follows:
Source Code. Look at the items in the Finder to view how the Source Code is created: the first two characters, the source ledger code, identify the ledger or subledger where the transaction originated (for example, GL for General Ledger). The second two characters, the source type code, describe the type of transaction (for example, CD for cash disbursement).
In the Source Codes form, define all the codes you want to assign to transactions entered directly into General Ledger. If you require separate source codes for allocation transactions, transactions posted to previous years, or any other transactions you want to track separately, define those codes as well. If you use a multicurrency ledger, you can also define source codes for the transactions created when you revalue accounts.

Step 7: Set Up Account Groups
3–26 Sage Accpac ERP General Ledger
GLGS-3.doc, printed on 3/18/2008, at 3:45:30 PM. Last saved on 3/18/2008 9:50:00 AM.
Sage Software Confidential
Description. Type a meaningful description.
2. Review each source code and description and click the Add button to add it to General Ledger. Use the Print command on the File menu in this form or choose Source Code from the Reports folder to print a list of the code definitions, to verify that they are correct and complete.
Step 7: Set Up Account Groups Sage Accpac ERP ships with sample account groups.
To set up account groups:
1. Double‐click the Account Groups icon in the G/L Setup folder to open the following form:
2. Enter up to 12 characters in the Account Group field.
These can consist of alphabetical or numerical characters, or a combination. (The sample account groups are labeled 01 to 16; you can continue with the numbering system or create one of your own.) The system will assign a blank account group (Unclassified Account Group) if you did not assign the account to any account group.
3. Tab out of the Account Group field.
The characters you entered appear in the Code field.
4. Type a description for the new group.
5. Click Add.

Step 7: Set Up Account Groups
Getting Started 3–27
GLGS-3.doc, printed on 3/18/2008, at 3:45:30 PM. Last saved on 3/18/2008 9:50:00 AM.
Sage Software Confidential
Setting Up G
/L
When you use the Finder in the Account Group field in other forms, the groups you created are included in the Finder list.
After you assign a sort code to account groups and return to the Account Groups form, a sort code number appears in the Sort Code field for every account group so assigned, as shown below:
6. Click the Change Sort Codes button if you want to print certain account groups but not others on reports. (In the report’s dialog box, you choose Print By Sort Code Order, then select the sort code you set up here.)
a. In the Change Sort Codes form, tab to the New Sort Code column.
b. For the account groups you will print, change the sort codes to the same number.
c. Click the Process button, then click Close to return to the G/L Account Groups form.
The Original Sort Code for Account Groups 10 to 13 were changed to 10.
Sort Code field

Step 8: Set Up Source Journal Profiles
3–28 Sage Accpac ERP General Ledger
GLGS-3.doc, printed on 3/18/2008, at 3:45:30 PM. Last saved on 3/18/2008 9:50:00 AM.
Sage Software Confidential
Step 8: Set Up Source Journal Profiles Each journal definition is basically a set of source codes for the transactions you want to include on the printed journal.
Review your source journal requirements and complete the Source Journal Profiles form as follows:
Profile. Enter a name to print as a title for the journal. You can change the name at any time.
Source. Enter the source codes to include in the report or select source codes from the Finder. To set up source journals, you must have already defined your source codes. You can include up to 50 source codes in the definition for a single journal. You can add and remove source codes at any time. Press the Insert key to enter a new source code.
Use the Print command from the File menu in this form or choose the Source Journal Profile icon in the Reports folder to print a list of the source journal definitions.
Step 9: Set Up Revaluation Codes
Revaluation Codes allows you to maintain revaluation information for General Ledger to use when you revalue multicurrency accounts due to changes in exchange rates.

Step 9: Set Up Revaluation Codes
Getting Started 3–29
GLGS-3.doc, printed on 3/18/2008, at 3:45:30 PM. Last saved on 3/18/2008 9:50:00 AM.
Sage Software Confidential
Setting Up G
/L
In this form, you assign revaluation codes to source currencies when you add accounts you intend to revalue.
Revaluation codes tell the system which currency table (set up in the Currency forms in Common Services) to use for revaluation, and allows you to specify different source codes and the exchange gain and exchange loss accounts for different currencies.
Review your multicurrency accounting requirements to determine how many different revaluation codes you need for revaluing accounts, and complete the Revaluation Codes form as follows:
To be sure your entries are correct and complete, use the Print command on the File menu in the Revaluation Codes form or choose Revaluation Code from the Reports folder to print the codes.
Revaluation Code. Enter a code of up to six characters. You can use a code that refers to accounts you intend to use it to revalue. For example, “JSALES” might identify the method you use to revalue accounts to which you post sales in Japanese yen.
You will later assign a revaluation code to each currency that you want to revalue in a multicurrency account.
Description. Enter a description of the revaluation, such as the purpose for which it is used or the currencies to which it is assigned.
Rate Type. Specify the rate type to use to determine the rates that are displayed when you specify the revaluation code in the Create Revaluation Batches function. When revaluing accounts, you can either use the rate type specified by the revaluation code or enter another rate.
You must create a separate revaluation code for every rate type you wish to use (because you can assign only one rate type to each revaluation code). The rate type assigned to the code determines the rate that is displayed for you to accept or change, in the Create Revaluation Batches function.

Step 9: Set Up Revaluation Codes
3–30 Sage Accpac ERP General Ledger
GLGS-3.doc, printed on 3/18/2008, at 3:45:30 PM. Last saved on 3/18/2008 9:50:00 AM.
Sage Software Confidential
You set up and maintain currency rate types through Common Services. See the System Manager User Guide for information about defining currency rate types.
Source Code. Specify the source code to be assigned to revaluation transactions created by the revaluation function for each revaluation code. You can also select the source code from the Finder. (You must enter a source code that has been defined in the Source Codes form.)
Unrealized Exchange Gain/Loss Account. These field labels appear if you chose Realized and Unrealized Gain/Loss when setting up the Company Profile in the Gain/Loss Accounting Method field on the Options tab.
Exchange gains and losses resulting from fluctuations of exchange rates are unrealized until the transaction is actually settled. Outstanding balances in foreign currencies must then be revalued at each Balance Sheet date if there were changes in exchange rates.
These fluctuations are considered to be temporary and do not get included in the determination of net income. When the revaluation occurs, the gains/losses are recorded in one period and must be reversed in the next period.
To use different Unrealized Exchange Gain and Loss accounts for each source currency, you must create at least one revaluation code for each source currency you use.
If you use the same Unrealized Exchange Gain and Loss accounts for more than one currency, you can still report the gains and losses separately by currency. Revaluation posts gains or losses to the functional‐equivalent fiscal set for the currency.
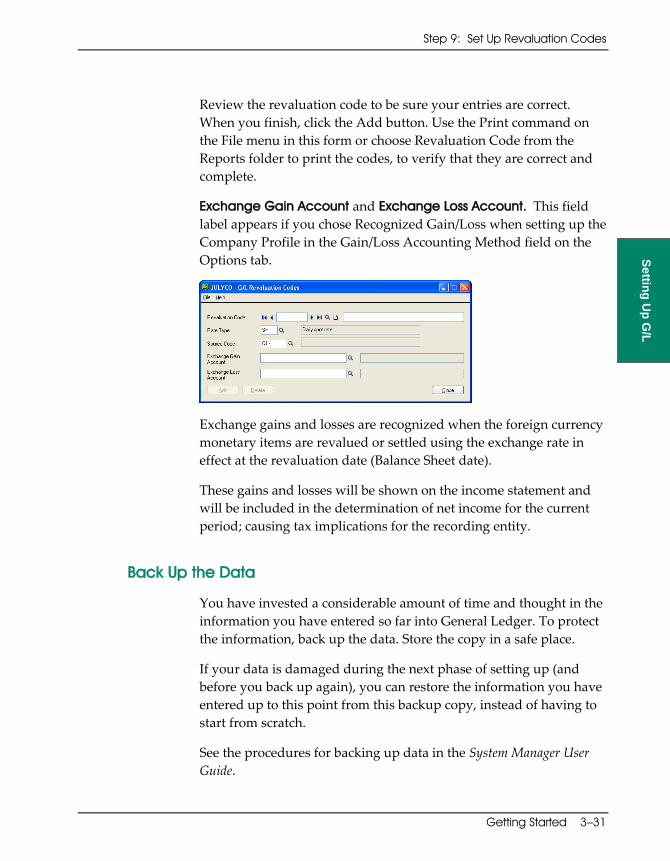
Step 9: Set Up Revaluation Codes
Getting Started 3–31
GLGS-3.doc, printed on 3/18/2008, at 3:45:30 PM. Last saved on 3/18/2008 9:50:00 AM.
Sage Software Confidential
Setting Up G
/L
Review the revaluation code to be sure your entries are correct. When you finish, click the Add button. Use the Print command on the File menu in this form or choose Revaluation Code from the Reports folder to print the codes, to verify that they are correct and complete.
Exchange Gain Account and Exchange Loss Account. This field label appears if you chose Recognized Gain/Loss when setting up the Company Profile in the Gain/Loss Accounting Method field on the Options tab.
Exchange gains and losses are recognized when the foreign currency monetary items are revalued or settled using the exchange rate in effect at the revaluation date (Balance Sheet date).
These gains and losses will be shown on the income statement and will be included in the determination of net income for the current period; causing tax implications for the recording entity.
Back Up the Data
You have invested a considerable amount of time and thought in the information you have entered so far into General Ledger. To protect the information, back up the data. Store the copy in a safe place.
If your data is damaged during the next phase of setting up (and before you back up again), you can restore the information you have entered up to this point from this backup copy, instead of having to start from scratch.
See the procedures for backing up data in the System Manager User Guide.

Step 10: Set Up Optional Fields
3–32 Sage Accpac ERP General Ledger
GLGS-3.doc, printed on 3/18/2008, at 3:45:30 PM. Last saved on 3/18/2008 9:50:00 AM.
Sage Software Confidential
Step 10: Set Up Optional Fields This is an optional step and only applies if you purchased and activated Transaction Analysis and Optional Field Creator.
You use the G/L Optional Fields form to add optional fields for General Ledger.
Set up system-wide optional fields, first
You can define an unlimited number of optional fields for General Ledger, providing you first set up the optional fields for system‐wide use in Common Services. (See the instructions for setting up optional fields in Common Services in the System Manager Administrator Guide.)
The following instructions show how to set up:
• Optional fields for use with accounts.
• Optional fields for use with transactions.
To add optional fields for General Ledger:
1. Click the Optional Fields icon in the G/L Setup folder.
Optional fields for accounts
General Ledger displays Accounts as the default entry in the Optional Fields For field.

Step 10: Set Up Optional Fields
Getting Started 3–33
GLGS-3.doc, printed on 3/18/2008, at 3:45:30 PM. Last saved on 3/18/2008 9:50:00 AM.
Sage Software Confidential
Setting Up G
/L
To add optional fields that you will use to customize your General Ledger accounts, proceed to Step 2. If you do not wish to add optional account fields at this time, skip Step 2, and continue at Step 3.
2. For each optional field that you will use to store custom information for accounts, complete the G/L Optional Fields form as follows:
Optional Fields For. Accept the default entry, Accounts.
Optional Field. Enter an optional field code or use the Finder to select an optional field code. (The optional field must already have been created in Common Services.)
When you enter the optional field code, the program displays the description for the optional field.
Value Set. Toggle Yes in this column to have the default value appear when you’re setting up new accounts in the G/L Accounts form.
Default Value. Enter or select the value that the program will display as the default for the optional field.
If the optional field you selected requires validation, you must select a value that is defined for the optional field in Common Services. However, if the optional field allows blanks, you can leave the default value field blank.
If the optional field does not use validation, you can do one of the following:
• Select a value that is defined for the optional field in Common Services.
• Leave the field blank.
• Enter a combination of alphanumeric or special characters and spaces. The entry must be consistent with the type of field (text, number, date, amount, and so on) and must not

Step 10: Set Up Optional Fields
3–34 Sage Accpac ERP General Ledger
GLGS-3.doc, printed on 3/18/2008, at 3:45:30 PM. Last saved on 3/18/2008 9:50:00 AM.
Sage Software Confidential
exceed the number of characters specified for the optional field. In a Yes/No field, you can enter only Yes or No. In an Integer field you can enter any integer with an absolute value less than 2,147,483,647.
When you specify a value that is defined in Common Services, the program displays the description for the value.
Required. Set this to Yes if the optional field value is required when setting up G/L Accounts. If you select Yes, then you must also select Yes in the Auto Insert field.
Auto Insert. Select Yes in this field for the optional field and its default value to be displayed on the G/L Accounts form when you set up new accounts. (If you selected Yes in the Required field, the Auto Insert value automatically changes to Yes.)
Select No if you do not want the optional field to appear automatically.
Optional fields for transaction details
3. To define optional fields for transaction details, select Transaction Details in the Optional Fields For field, then:
Optional Field. Select or enter an optional field code that you have set up in Common Services. The program displays the description for the selected optional field.
Value Set. Toggle Yes in this column to have the default value appear when you’re setting up new accounts in the G/L Accounts form.
Default Value. Enter or select the value that the program will display as the default for the optional field.
If the optional field you selected requires validation, you must select a value that is defined for the optional field in Common Services. If the optional field allows blanks, you can leave the field blank.
If the optional field does not use validation, you can do one of the following:

Step 10: Set Up Optional Fields
Getting Started 3–35
GLGS-3.doc, printed on 3/18/2008, at 3:45:30 PM. Last saved on 3/18/2008 9:50:00 AM.
Sage Software Confidential
Setting Up G
/L
• Select a value that is defined for the optional field in Common Services.
• Leave the field blank.
• Enter a combination of alphanumeric or special characters and spaces. The entry must be consistent with the type of field (text, number, date, amount, and so on) and must not exceed the number of characters specified for the optional field. In a Yes/No field, you can enter only Yes or No. In an Integer field you can enter any integer with an absolute value less than 2,147,483,647.
When you specify a value that is defined in Common Services, the program displays the description for the value.
Required. Set this to Yes if the optional field value is required when setting up G/L Accounts. If you select Yes, then you must also select Yes in the Auto Insert field.
Auto Insert. Select Yes in this field if you want the program to display the optional field and its default value on the G/L Accounts form when you set up new accounts. (If you selected Yes in the Required field, the Auto Insert value automatically changes to Yes.)
Select No if you do not want the optional field to appear automatically.
4. Click Save.
You are now ready to assign optional fields to specific accounts, as described in the section, “Step 11: Add Accounts.”
Deleting Optional Fields
You can delete optional fields, as long as they are not assigned to an account or used in an unposted transaction.

Step 11: Add Accounts
3–36 Sage Accpac ERP General Ledger
GLGS-3.doc, printed on 3/18/2008, at 3:45:30 PM. Last saved on 3/18/2008 9:50:00 AM.
Sage Software Confidential
To delete an optional field:
1. On the Optional Fields form, in the Optional Fields For field, select the type of optional field you want to delete.
2. Highlight the optional field on the grid, then click Delete.
You receive the following message:
3. Click OK.
Step 11: Add Accounts Review the design of your chart of accounts to be sure it makes the best use of General Ledger’s data entry and reporting features.
The chart should be organized in the standard balance sheet and income statement order, with account numbers assigned so that when you report the data by account number, the accounts are listed in meaningful order.
Before you can add accounts to General Ledger, you must enter:
• G/L Options (various options, then return to enter the Default Closing Account after creating accounts).
• Segment Codes.
• Account Structures.
• Structure Code (after you create account structures, return to the G/L Options Accounts tab to add this).
• Account Groups.
• Optional Fields (if used)

Step 11: Add Accounts
Getting Started 3–37
GLGS-3.doc, printed on 3/18/2008, at 3:45:30 PM. Last saved on 3/18/2008 9:50:00 AM.
Sage Software Confidential
Setting Up G
/L
If you use single‐segment accounts, you do not have to enter segment codes in the Segment Codes form (step 3 in the illustration).
To produce financial statements using the standard financial statement formats supplied with General Ledger, you must assign each account to an account group on the G/L Accounts form.
Assign account numbers with unused blocks of numbers between them so you can insert other accounts later without disturbing the arrangement of the entire chart.
If you did not previously use numeric account identifiers, consider switching to numbers before adding your accounts to General Ledger.
For more information, read the section, “Designing the Chart of Accounts,” in Chapter 2 of this guide.
You can add accounts to General Ledger in three ways:
• Add them with the Setup Wizard at the same time as you create your company database.
• Import a chart of accounts with the Import command on the File menu in the Accounts form.
• Enter each account individually in the Accounts form.
Importing Accounts
Use the Import command on the File menu in the G/L Accounts form to import files containing a chart of accounts from another set of Sage Accpac General Ledger data files or a spreadsheet or database application. Or, as a base upon which to build your own chart of accounts, you can import the sample data chart of accounts. You can import accounts in a number of standard file formats.

Step 11: Add Accounts
3–38 Sage Accpac ERP General Ledger
GLGS-3.doc, printed on 3/18/2008, at 3:45:30 PM. Last saved on 3/18/2008 9:50:00 AM.
Sage Software Confidential
If you use Import to help set up General Ledger, you can:
• Import accounts from another set of General Ledger data files.
If you want to use another General Ledger chart of accounts as the basis for your Sage Accpac General Ledger, you can export those accounts (using that General Ledger’s export function and any one of the export formats), then import the accounts into the new General Ledger (using the Import command and the same import format as you used to export the chart of accounts).
• Import accounts from a spreadsheet or database application.
• Import accounts from the General Ledger sample data.
You may be able to use the sample chart of accounts provided with General Ledger and Financial Reporter as the basis for your own chart of accounts.
See Appendix B, “Importing and Exporting,” in the General Ledger User Guide for assistance in creating the files to be imported into General Ledger.
Entering Accounts Individually
You add accounts and set them up for optional automatic revaluation and allocation using the Accounts form.
In multicurrency ledgers, the multicurrency option lets you enter and revise information about the source currencies used with an account, and specify the default currency that appears when you enter transactions for the account.
If you use Transaction Analysis and Optional Field Creator, you also assign optional account fields and optional transaction fields to accounts using the G/L Accounts form.
To add individual accounts:
1. Enter an account number in the Account field.

Step 11: Add Accounts
Getting Started 3–39
GLGS-3.doc, printed on 3/18/2008, at 3:45:30 PM. Last saved on 3/18/2008 9:50:00 AM.
Sage Software Confidential
Setting Up G
/L
Account. Each account is identified by an account number, which can be up to 45 characters long, and divided into as many as 10 segments. (Only 24 characters of the account number are displayed on screens and printed on reports.)
• You must define at least one account structure in the Account Structures form before you can add General Ledger accounts.
• If you use multiple segments, you must use the Segment Codes form to specify the valid segment codes that are part of your account numbers.
− For example, if one of your segments represents departments, you must add all the department codes in the Segment Codes form before you can add the departmental accounts.
− The system verifies the contents of each segment in each account number (except the account segment) against the list of segment codes you set up in the Segment Codes form.
• You can enter account numbers with or without the delimiter character used to separate account number segments.
2. Enter a description in the Description field.
Description. The description of up to 60 characters is displayed with the account number in forms and on reports, and you can include it on financial statements you print using the Financial Reporter. In addition, you can use Finders to search for the account using the account description field.

Step 11: Add Accounts
3–40 Sage Accpac ERP General Ledger
GLGS-3.doc, printed on 3/18/2008, at 3:45:30 PM. Last saved on 3/18/2008 9:50:00 AM.
Sage Software Confidential
3. After entering an account code and a description, begin entering data on the Detail tab (shown below):
Detail tab
Structure Code. Use the Finder to choose an account structure defined in the G/L Setup Account Structures form. When you add or save the account, the system verifies that the account number fits this structure. For example, if the account number has two segments, the structure must consist of the same two segments.
Normal Balance. Select Debit or Credit to indicate whether the account is normally a debit or credit balance account.
For example, asset and expense accounts normally maintain a debit balance, while liability, revenue, and retained earnings accounts normally maintain a credit balance. Using the Normal Balance option, you can define a different normal account balance for an individual account, if appropriate.
You can use the normal balance on inquiries as selection criteria to help you distinguish between asset and liability accounts (balance sheet accounts) and between revenue and expense accounts (income statement accounts). The normal account balance setting does not affect account postings; the “true” account balance may be the opposite of the defined “normal” balance.

Step 11: Add Accounts
Getting Started 3–41
GLGS-3.doc, printed on 3/18/2008, at 3:45:30 PM. Last saved on 3/18/2008 9:50:00 AM.
Sage Software Confidential
Setting Up G
/L
Match account groups to account type
Account Group. Assign the account to an Account Group, if you use the Account Groups option. Be sure that all the accounts you assign to a particular group are of the same account type.
Status. Select Active as the account status for all accounts to which you want to be able to post transactions. Select Inactive as the account status if you want to prevent posting to the account. For example, if you plan to delete an account, you can set its status to Inactive to ensure that no transactions are posted to it. You can change the status back to Active at any time.
Entering transactions to inactive accounts
You can enter or import transactions for inactive accounts, although the system issues a warning when you do. You cannot post transactions to inactive accounts.
When you do period end maintenance, General Ledger deletes inactive accounts with zero balances if all the periods in the current fiscal year contain zero amounts and previous years contain zero amounts.
Post To Account. You can post in Consolidated form to accounts for which you do not want to keep full detail. When an account is posted in Detail form, all the debits and credits posted to it are kept and can be listed individually on source journals and posted transaction reports. When Prohibited is the choice, no transactions will be posted to the account.
Notes about the Detail option
Select Detail to be able to drill down to transactions, and post optional fields with transactions. (If you consolidate on posting, you cannot drill down to the original transaction from the posted details on the Transaction History form. Also, you will not be able to post any optional fields with transaction details if you consolidate on posting.)
Account Type. You must specify one of the following account types for each account you enter:
• Income statement (revenue and expense)

Step 11: Add Accounts
3–42 Sage Accpac ERP General Ledger
GLGS-3.doc, printed on 3/18/2008, at 3:45:30 PM. Last saved on 3/18/2008 9:50:00 AM.
Sage Software Confidential
• Balance sheet (assets and liabilities)
• Retained earnings
General Ledger needs to know the account types so it can automatically transfer the income and expense account balances to retained earnings at year‐end.
Define a retained earnings account
You must define at least one account in the chart of accounts with the retained earnings type.
Additional retained earnings accounts
General Ledger lets you define as many retained earnings accounts as you like.
Close To. For income statement accounts, indicate the segment to use in closing if you want to close income and expenses to multiple retained earnings accounts. The choices available at “Close To” in the Accounts form are the segments you indicated could be used for closing on the Segments tab of G/L Options (“Use In Closing” = “Yes”).
Control Account (for Subledger). Click the check box to designate the account as a control account for a subledger application. Only transactions created by subledgers can be posted to control accounts. When you select the Control Account option, the Subledger tab appears.
To further restrict posting, you must enter the subledgers and source codes for which this account is a control. Only transactions created by the specified subledgers can be posted to the account.
Auto Allocation. The Auto Allocation option lets you indicate whether you want to allocate the balance of an account periodically to other accounts. You can use the automatic allocation function, for example, for allocating income and expense account balances from head‐office accounts to department accounts or for allocating profits to partners.
When you select the allocation option, the Allocation tab becomes available for you to enter allocation details.

Step 11: Add Accounts
Getting Started 3–43
GLGS-3.doc, printed on 3/18/2008, at 3:45:30 PM. Last saved on 3/18/2008 9:50:00 AM.
Sage Software Confidential
Setting Up G
/L
Multicurrency. If you use multicurrency accounting in your General Ledger, you can define accounts that accept transactions only in the functional currency or accept transactions in any of the source currencies assigned to the account. You choose to accept multicurrency transactions for an account by selecting this option.
Selecting the Multicurrency option makes the Currency tab available for you to enter currency details.
The Multicurrency option is available for accounts only if you chose Multicurrency in the G/L Options form.
Maintain Quantities. The Maintain Quantities option determines whether quantity information can be maintained for the account. (You specify the number of decimal places used for storing quantities for all accounts in the G/L Options form.)
When you select the option for an account, you can enter a quantity when you enter a transaction to the account. The system posts the quantity as well as the monetary amount for the account.
Selecting the Maintain Quantities option also lets you allocate account balances by quantity.
Note that you must first choose Maintain Quantities on the G/L Options form.
Units. When you designate that quantity information should be maintained for an account, the Units field appears, in which you specify the unit of measure.
Rollup. When you select the Rollup option, the Rollup tab appears, where you designate accounts that can be rolled up into this account.

Step 11: Add Accounts
3–44 Sage Accpac ERP General Ledger
GLGS-3.doc, printed on 3/18/2008, at 3:45:30 PM. Last saved on 3/18/2008 9:50:00 AM.
Sage Software Confidential
4. Go to the Optional Fields tab (shown below).
Optional Fields tab
If you use the Transaction Analysis and Optional Field Creator, optional account fields that are set for automatic insertion appear in the Optional Field Finder, with their default values.
Use the fields on this tab to add any number of optional fields to store additional information your company wants to track for the account. These optional account fields will appear on reports of accounts, such as your chart of accounts.
5. Complete the following fields to assign optional fields for the custom information you want to keep with the account:
Optional Field. Using the Finder, select an optional field to add. There is no limit to the number of optional fields you can use for the account. However, you can add only optional fields that have been:
• Defined in Common Services.
• Specified as account optional fields using the G/L Optional Fields setup form.
When you enter an optional field code, the program displays the description field entered for the optional field in Common Services.

Step 11: Add Accounts
Getting Started 3–45
GLGS-3.doc, printed on 3/18/2008, at 3:45:30 PM. Last saved on 3/18/2008 9:50:00 AM.
Sage Software Confidential
Setting Up G
/L
Value Set. This field displays Yes when you select an optional field that was set to Yes in the G/L Optional Fields setup form.
Default Value. If the optional field is validated, you must specify a value that is defined for the optional field in Common Services. If the optional field allows blanks, you can also leave the optional field value blank.
If the optional field is not validated, you can select an optional field value that has been defined in Common Services, or you can enter any combination of alphanumeric, special characters, and spaces that does not exceed the length specified for the optional field.
If the Required setting was chosen for this optional field (in the G/L Optional Fields setup form), you must enter a value (unless a validated value can be blank).
6. Open the Transaction Optional Fields tab (shown below).
Transaction Optional Fields tab
You use the Transaction Optional Fields tab to assign optional fields to transaction details. Optional fields for transaction details that were set in the G/L Optional Fields form to be inserted automatically appear on this tab, along with their default values.

Step 11: Add Accounts
3–46 Sage Accpac ERP General Ledger
GLGS-3.doc, printed on 3/18/2008, at 3:45:30 PM. Last saved on 3/18/2008 9:50:00 AM.
Sage Software Confidential
This tab lets you assign any number of optional fields for additional information that you want to include with transactions processed for this account.
Transaction details that use the account will include these optional fields, whether you enter the transactions through General Ledger’s Journal Entry, Create Allocation Batch, Create Revaluation Batch, and Create Recurring Entries Batch forms or you create them in an Sage Accpac subledger.
7. Complete the Transaction Optional Fields tab as follows:
Assign optional fields for transaction details
Optional Field. Using the Finder, select optional fields to use with transaction details. There is no limit to the number of optional fields you can use, but you can add only optional fields that you have:
• Defined in Common Services.
• Specified as optional transaction details fields using the General Ledger Optional Fields setup form.
When you enter an optional field code, the program displays the description field entered for the optional field in Common Services.
Value Set. Toggle Yes in this column to have the default value appear when you’re setting up new accounts in the G/L Accounts form.
Default Value. If the optional field is validated, you must specify a value that is defined for the optional field in Common Services. If the optional field allows blanks, you can also leave the optional field value blank.
If the optional field is not validated, you can select an optional field value that has been defined in Common Services, or you can enter any combination of alphanumeric, special characters, and spaces that does not exceed the length specified for the optional field.

Step 11: Add Accounts
Getting Started 3–47
GLGS-3.doc, printed on 3/18/2008, at 3:45:30 PM. Last saved on 3/18/2008 9:50:00 AM.
Sage Software Confidential
Setting Up G
/L
Replace Optional Fields
Providing you have set up matching optional fields for accounts and transaction details in G/L Optional Fields, you can use the same optional fields for transaction details as you use for the account.
To use the same optional fields for transaction details as you assigned to the account, click the Replace Optional Fields button.
If an optional account field has no matching optional transaction field in G/L Optional Fields, however, that field will not appear for transaction details.
Auto Insert. Select Yes in this field if you want the program to display the optional field and its default value on the transaction detail when you are using this account on the transaction entry, for example, in Journal Entry or in Recurring Entry.
Select No if you do not want the optional field to appear automatically.
Required. When you choose Required, you also must choose Auto Insert. (The system does not allow you to save an optional field when Required = Yes and Auto Insert = No).
Thus, when you create a new account (using G/L Accounts), the required optional field appears on the appropriate tab. You cannot add the new account without the required optional field.
This is true for optional fields set up as Required for both Accounts and Transaction Details.

Step 11: Add Accounts
3–48 Sage Accpac ERP General Ledger
GLGS-3.doc, printed on 3/18/2008, at 3:45:30 PM. Last saved on 3/18/2008 9:50:00 AM.
Sage Software Confidential
8. Open the Allocation tab if it is displayed (shown below).
Allocation tab
The Allocation tab tells the system how to distribute the amount in an account when you run Create Allocation Batch.
9. Complete the Allocation tab as follows:
Source Code. Select the source code to be associated with the allocation transactions for the account.
Allocate By. Specify the basis for calculating the amounts to allocate. You can select Account Balance or Account Quantity.
Account. Enter the accounts to which you want to transfer the balance in the allocated account. The account description appears automatically.
Reference. You can optionally enter a transaction reference for each account to which amounts are allocated. After creating an allocation batch, you can review and edit the entries and add comments using the Journal Entry form.
Description. You can optionally enter a transaction description for each account to which amounts are allocated.

Step 11: Add Accounts
Getting Started 3–49
GLGS-3.doc, printed on 3/18/2008, at 3:45:30 PM. Last saved on 3/18/2008 9:50:00 AM.
Sage Software Confidential
Setting Up G
/L
Percent. You allocate 100 percent of the account balance to other accounts. Enter the percentage of the allocated account balance you want to distribute to each account.
10. Go to the Currency tab (shown below).
Currency tab
You record multicurrency information for the account on the Currency tab.
11. Complete the Currency tab for each multicurrency account as follows:
Post In. The posting option lets you specify for each multicurrency account whether to allow amounts to be posted to the account only in the specified currencies, or in any of the currencies defined in the Common Services Currency form.
Specified Currencies posting option
If you want to post to the account only in the currencies assigned to it, select Specified Currencies for the option, then enter each currency to be used with the account. The posting function will reject transactions in other currencies and report them on the Posting Journal error report.
General Ledger interacts with single‐currency or multicurrency subledgers and imported batches as follows:

Step 11: Add Accounts
3–50 Sage Accpac ERP General Ledger
GLGS-3.doc, printed on 3/18/2008, at 3:45:30 PM. Last saved on 3/18/2008 9:50:00 AM.
Sage Software Confidential
• Multicurrency General Ledger can receive, import, or retrieve transaction batches from multicurrency or single currency subledgers.
• Single‐currency General Ledger can receive transaction batches from multicurrency Sage Accpac subledgers that are part of the same company database and can retrieve multicurrency batches from an ACCPAC Plus subledger.
• A single‐currency General Ledger cannot import multicurrency batches from remote Sage Accpac subledgers.
• A single‐currency General Ledger cannot import multicurrency batches from non‐Sage Accpac applications. If you bring transactions of this type into General Ledger, you must edit the import file to remove the multicurrency fields before you can import the transactions.
All Currencies posting option
To be able to post to the account in any of the currencies you have defined in the Currency forms, select All Currencies for the option. You can then enter, import, provisionally post, and post transactions to the account in all currencies.
Specifying the Post In option for retained earnings accounts
If you use multicurrency retained earnings accounts, you should select All Currencies for this option. If you do not want to use the All Currencies choice, you must make very sure the retained earnings account has all the currencies assigned to it that are assigned to the income and expense accounts that close to it. If Create New Year finds new currencies in closing entries and is not able to add them to the target retained earnings account, General Ledger cannot close those accounts.
Specifying the Post In option for exchange gain and loss accounts
The exchange gain and loss accounts you use in revaluation must be multicurrency accounts. They also must be able to receive transactions in all the currencies in which you revalue them.
Default Currency. For each multicurrency account, you can specify the currency to appear as the default when you enter transactions for the account. This option can speed up

Step 11: Add Accounts
Getting Started 3–51
GLGS-3.doc, printed on 3/18/2008, at 3:45:30 PM. Last saved on 3/18/2008 9:50:00 AM.
Sage Software Confidential
Setting Up G
/L
transaction entry if you set the default to the currency used most often with the account.
If you do not specify a default currency for a multicurrency account, the functional currency will be the default when you enter transactions for the account, even if the functional currency is not assigned to the account.
If you use all the currencies assigned to an account equally, you may prefer to have the functional currency appear as the default. If so, you do not need to specify a default.
Source Currency. Enter the code for each currency you are assigning to the account. You can assign any of the currencies you have defined in the Common Services Currency forms, including the functional currency.
For more information about how amounts are stored in multicurrency accounts, refer to the section “Multicurrency Accounts” in Chapter 2 of this guide.
Assign the functional currency to retained earnings
If you use multicurrency retained earnings accounts, you must specify the functional currency as one of the currencies that can be posted to the account. The Create New Year function must be able to post to retained earnings accounts in the functional currency.
Currency Description. The description is displayed when you choose the source currency.
Revaluation. Indicate whether the specified source currency can be revalued by the Revaluation function. If the currency can be revalued, you must enter a revaluation code for it in the next field. (For information about revaluing accounts, see the section “Revaluing Multicurrency Accounts” in Chapter 2 of this guide.)

Step 11: Add Accounts
3–52 Sage Accpac ERP General Ledger
GLGS-3.doc, printed on 3/18/2008, at 3:45:30 PM. Last saved on 3/18/2008 9:50:00 AM.
Sage Software Confidential
Determining which accounts to revalue
You would normally choose to revalue only monetary accounts, such as cash accounts and bank accounts. Income and expenses are normally revalued in the subledgers. For example, Accounts Receivable and Accounts Payable contain their own revaluation functions for receivables and payables accounts, and recognize gain or loss upon payment.
The default in this field is set to No. You must change the choice to Yes for each of the currencies and accounts you plan to revalue.
Revaluation Code. The revaluation code determines which source code and exchange gain and loss accounts to use. The code you assign must be defined in the Revaluation Codes form.
Subledger tab 12. Go to the Subledger tab if you designated this account as a control account (if you did not, then this tab does not appear).
13. Use the Subledger tab to enter the subledger source codes that can be posted to this control account.
14. Review the account information on each tab to be sure your entries are correct. When you finish, click the Add or Save button.

Step 11: Add Accounts
Getting Started 3–53
GLGS-3.doc, printed on 3/18/2008, at 3:45:30 PM. Last saved on 3/18/2008 9:50:00 AM.
Sage Software Confidential
Setting Up G
/L
15. Print the Chart of Accounts report to verify that they are correct and complete.
Rollup tab 16. Go to the Rollup tab if you selected Rollup on the Detail tab.
17. Click the Finder in the Account column to add individual member accounts.
Or
To add a range of member accounts, click the Zoom button beside ʺSelect Member Accounts...ʺ.
a. In the G/L Account Selector popup, select the ranges of Account Numbers, Account Segments, or Account Groups that will be members of this rollup. You can also use the Account Optional Fields as a selection criteria.
b. Select Account Types.
Note: Accounts selected will include only those accounts whose account types match the Account Types selected here. For example, if the Income Statement option is not selected, then even if the Account Number range includes income statement accounts, those accounts will not be copied into the grid.

Step 12: Add General Ledger Opening Balances and Period Data
3–54 Sage Accpac ERP General Ledger
GLGS-3.doc, printed on 3/18/2008, at 3:45:30 PM. Last saved on 3/18/2008 9:50:00 AM.
Sage Software Confidential
You can select criteria based on your segments. Also, an additional criteria for Account Optional Fields can be used to select member accounts.
c. Click the Preview button to view your choices, then click Copy to return to the Rollup tab. Accounts that meet all the criteria of the Select By fields and Account Type options are copied to the grid, and appear in the tree.
Note: If the rollup account is single‐currency, only single‐currency accounts that meet the G/L Account Selector will be generated in the Preview. Accounts that already exist or were already added in the Rollup grid will not be shown again.
Upon previewing accounts in the G/L Account Selector Preview screen, if there are accounts which should not be added as members, you can double‐click Yes in the Add column to toggle it to No (or use the space bar to toggle).
d. Click Save.
Step 12: Add General Ledger Opening Balances and Period Data
You must at least enter beginning balances for the current fiscal year before you can begin to use General Ledger. If you intend to enter period data for previous years, DO IT FIRST. Entering last year’s ending balances will establish the current year’s beginning balances.
After establishing account balances, you can set up budgets, if required.
Converting to the euro?
If you are converting your database to use the euro as your functional currency, you must create a new Sage Accpac database, convert all account balances to the euro, and enter the balances in your new general ledger.

Step 12: Add General Ledger Opening Balances and Period Data
Getting Started 3–55
GLGS-3.doc, printed on 3/18/2008, at 3:45:30 PM. Last saved on 3/18/2008 9:50:00 AM.
Sage Software Confidential
Setting Up G
/L
For more information on entering opening balances, see the section “Converting to a Euro‐based General Ledger,” later in this chapter.
Entering Historical Data
If you want to print financial statements comparing data between previous years and with the current year, you must add the data for the previous fiscal years.
If you do not want to add data for previous years, you can skip this section and go to “Entering Current‐Year Opening Balances,” on page 3‐57 in this chapter.
Historical amounts include the opening and closing balances for the previous years and the net changes and balances for each fiscal period of the previous years.
To add the historical amounts, you enter and post the historical opening balances and period net changes as journal entries in the General Ledger Journal Entry form. The section that follows, “Posting Historical Year Period Changes to G/L Accounts,” details the steps.
Collect the monthly financial statements for the years for which you want to enter historical data.
Posting Historical Year Period Changes to G/L Accounts
If you have already added current-year amounts...
Do not post historical data if you have already entered current‐year opening balances and transactions, because it will result in overstatement of account balances.
Add historical data as General Ledger journal entries, as follows:
1. When you activate General Ledger, as the starting date of your oldest fiscal year, you must enter the starting date of your first full historical year.
General Ledger creates the fiscal years you need to add historical data and begin entering current transactions.

Step 12: Add General Ledger Opening Balances and Period Data
3–56 Sage Accpac ERP General Ledger
GLGS-3.doc, printed on 3/18/2008, at 3:45:30 PM. Last saved on 3/18/2008 9:50:00 AM.
Sage Software Confidential
2. Open the Journal Entry form for a new batch, using the last date of the fiscal year previous to the year for which you want to begin entering a full year of history.
3. Enter and post the ending balance for each balance sheet account, including retained earnings accounts.
4. Run Create New Year.
5. Open the Journal Entry form for a new batch, using the first fiscal period of the first year for which you want to enter history.
6. Enter and post the net changes to each fiscal period of the year for all balance sheet accounts and all income statement accounts, except retained earnings accounts.
You make no entries directly to the retained earnings accounts, except for entering the ending balances in step 3 above to establish the first full historical year’s opening balances.
7. Run Create New Year.
8. Repeat steps 5 through 7 (omitting step 7 when you get to the current year) for as many periods and years as you want to enter historical data, either:
• Through the current period of the current fiscal year.
Or
• Through the latest period for which summary data is sufficient. (Then enter individual transactions for the periods for which you require detail, described in the section, “Entering Current Year‐to‐Date Transactions,” later in this chapter.)
Check Data Integrity and Back Up the Data
When you have entered the data up to this point from your old system into General Ledger, use Data Integrity in the Administrative Services folder to ensure that your data is sound. Next, back up the data. Store the backup in a safe place.

Step 12: Add General Ledger Opening Balances and Period Data
Getting Started 3–57
GLGS-3.doc, printed on 3/18/2008, at 3:45:30 PM. Last saved on 3/18/2008 9:50:00 AM.
Sage Software Confidential
Setting Up G
/L
If something should happen to damage your data before you complete the next phase and back it up, you can restore from this backup copy, instead of having to enter setup information, accounts, and account history all over again.
To back up data, see the System Manager User Guide.
Entering Current-Year Opening Balances
You add current‐year opening balances by entering and posting them as transactions into General Ledger, using the following instructions.
The balances may already be added
If you added historical data by posting period changes for historical fiscal years to G/L accounts according to the instructions earlier in this chapter, you have already established the opening account balances for the current year. Skip to the section “Entering Current Year‐to‐Date Transactions.”
Review your current‐year records and create current‐year opening balances for each account, as follows:
Create the batch 1. Open the Journal Entry form and start a new batch. For the date and fiscal period, enter the closing date of the last fiscal period in your previous fiscal year, and the number that corresponds to that period (12 or 13).
Create a batch containing the balances that were in all your balance sheet, income statement, and retained earnings accounts immediately before the ledger was closed at the end of the previous year.
Entering multicurrency opening balances
If you have a multicurrency ledger, the batch should contain the ending balances at the end of the previous year for all the source currencies used with each account.
List the batch 2. Print a listing of the batch.
Use the Print command on the File menu on the Journal Entry form or click the Print button in the Batch List form to list the

Step 12: Add General Ledger Opening Balances and Period Data
3–58 Sage Accpac ERP General Ledger
GLGS-3.doc, printed on 3/18/2008, at 3:45:30 PM. Last saved on 3/18/2008 9:50:00 AM.
Sage Software Confidential
batch contents. Be sure that all accounts are included, and that the balances are correct. If you discover errors, use the Journal Entry form to correct them, then print the listing again. File the listing.
Post the batch 3. Post the batch.
4. Print the Posting Journal.
Check the journal to be sure all the account balances were correctly posted, then file the report as part of your audit trail.
5. Run Create New Year.
This step transfers income and expense account balances to retained earnings and establishes opening balances for the current fiscal year.
Converting to a Euro-based General Ledger
While General Ledger supports the euro, it does not provide a conversion utility to automate the transition from a non‐euro based general ledger.
Follow these steps to enter opening balances in euro:
1. Print financial reports from your old general ledger in your functional currency to ensure that you have all closing balances on hand.
2. Export your chart of accounts.
3. Create a new company and select the euro as your functional currency in the Company Profile form in Common Services. You can also specify a reporting currency (optional).
4. Activate General Ledger for the new company. You can use any starting date for the fiscal year as long as you enter opening balances with detail line dates later than January 1, 1999.
5. Import your chart of accounts.

Step 12: Add General Ledger Opening Balances and Period Data
Getting Started 3–59
GLGS-3.doc, printed on 3/18/2008, at 3:45:30 PM. Last saved on 3/18/2008 9:50:00 AM.
Sage Software Confidential
Setting Up G
/L
6. Enter opening balances in the euro, using closing balances for the previous year from all financial reports. Opening balances can be added to the first period of the new fiscal year.
7. If conversion takes place after a year‐end close, only balance sheet balances must be transferred to your new general ledger.
8. Create or import batches of transactions to post opening balances.
Check Data Integrity and Back Up the Data
By the time you reach this step you will have entered a large amount of data into General Ledger. To protect your work, take the time now to check the integrity of the data, and to back it up.
Follow the instructions for checking data integrity and making backups in the System Manager User Guide.
Print Additional Reports to Verify Account Data
Print a Balance Sheet
Go to General Ledger > Financial Reporter > Print Financial Statements , choose a Balance Sheet from the form, then compare it to the balance sheet from your previous system, to be sure the figures agree and you are satisfied with the format of the statement. File the balance sheet as part of your permanent records.
Print a Trial Balance
Use the Trial Balance report from the Reports folder to print a trial balance in Report format for fiscal period 1. Compare it to the trial balance you produced from your former General Ledger system at the beginning of the current year, to be sure you have added all account balances correctly, and that your new ledger balances.
Correct any errors you find before proceeding to the next step.
Entering Current Year-to-Date Transactions
If you create your General Ledger and Financial Reporter system partway through a fiscal year, you need to enter and post transactions for the current year.

Step 12: Add General Ledger Opening Balances and Period Data
3–60 Sage Accpac ERP General Ledger
GLGS-3.doc, printed on 3/18/2008, at 3:45:30 PM. Last saved on 3/18/2008 9:50:00 AM.
Sage Software Confidential
You must have already entered last year’s closing balances and set up the opening balances for the current fiscal year.
Review your current‐year records and create year‐to‐date data for each account, as follows:
1. Enter current‐year transactions, using the Journal Entry form. Enter the transactions in one of the following ways:
• Enter all the current‐year transactions, one at a time, period‐by‐period. Create a separate batch for each period.
This provides full detail for current‐year transactions and produces the clearest and most complete audit trail.
• Enter all the transactions for the current period, and the net changes for the earlier periods in the current year.
This provides full detail for current‐period transactions, and creates accurate balances for previous periods in the current year. You can print comparative financial statements for all the previous periods in the current year, and detailed audit trail reports for the current period.
• Enter the net change (net increase or decrease) for each account in each period to‐date in the current year, including the current period.
This produces accurate balances for each account in each period of the current year, allowing you to print comparative financial statements. However, it does not provide transaction detail (such as date, reference, and description) for the audit trail reports.
2. Enter the net change between the year’s opening balances and current balances for each account.
This is the quickest method, but it does not allow you to print financial statements for past periods in the current year and does not provide transaction detail for audit trail reports. Using this

Step 12: Add General Ledger Opening Balances and Period Data
Getting Started 3–61
GLGS-3.doc, printed on 3/18/2008, at 3:45:30 PM. Last saved on 3/18/2008 9:50:00 AM.
Sage Software Confidential
Setting Up G
/L
method, you would have to rely on your manually prepared financial statements for comparisons.
3. Use the Batch Listing report in the Reports folder to print listings of each batch.
Check each listing to be sure all transactions have been entered correctly, then file the listings.
4. Post the batches. Before posting, ensure that all the fiscal periods to which you want to post have a status of Unlocked in the Fiscal Calendar.
5. Print the Posting Journal. (If you did not post all batches at the same time, you will have more than one Posting Journal to print.)
6. Print the G/L Transactions Listing to list all the account details for the current year to date.
7. Use the listing as an additional verification of the batches you posted to the current year, then file it as part of your audit trail.
8. Use Trial Balance in the Reports folder to print a Trial Balance in Report format for each fiscal period in the current year.
Ensure that the accounts balance, then compare the reports to the trial balances you produced from your former General Ledger system, to verify that the amounts are the same.
Add Budgets
Use the Budget Maintenance form to enter budgets. If you are using the Sage Accpac 500 ERP edition, you can create up to five optional budgets for an account.

Step 12: Add General Ledger Opening Balances and Period Data
3–62 Sage Accpac ERP General Ledger
GLGS-3.doc, printed on 3/18/2008, at 3:45:30 PM. Last saved on 3/18/2008 9:50:00 AM.
Sage Software Confidential
The Budget Maintenance form provides calculation methods and tools to help you create budgets. You can use any combination of the methods described below to arrive at the budget amounts.
The Budget Maintenance form allows you to:
• Type the budget amounts in the Budget Amount column for each period.
• Enter a base amount and let the system calculate and enter the period amounts.
• Use the Fiscal Set Lookup feature to display amounts from another fiscal set and/or account in the Inquiry Amount column, then:
− Use the Add To button to add the Inquiry Amount values to the Budget Amounts.
− Use the Replace button to replace the Budget Amount values with the Inquiry Amount values.
− Use a Copy budget method to perform an operation on the Inquiry Amount values and add or copy the new calculated amounts to the Budget Amount values.

Step 12: Add General Ledger Opening Balances and Period Data
Getting Started 3–63
GLGS-3.doc, printed on 3/18/2008, at 3:45:30 PM. Last saved on 3/18/2008 9:50:00 AM.
Sage Software Confidential
Setting Up G
/L
Using the Budget Maintenance Form
After you review your budgeting requirements, complete the Budget Maintenance form for each year’s budget, using the Add To and Replace buttons, as follows:
Account, Budget Set, Year, Currency, Currency Type. Identify the account for which you want to enter a budget. Then click the Go button.
Fiscal Set Lookup. To base the budget on an existing fiscal set, click the Fiscal Set Lookup button and enter the Account, Fiscal Set, Year, Currency, and Currency Type of the account you want to use. You can base a budget on any existing fiscal set for any account.
You can transfer the displayed amounts directly from the Inquiry Amount column or you can manipulate the numbers in various ways before adding them to the budget.
For example, you might want to use last year’s actual amounts, increased by five percent to adjust for inflation, as this year’s budget for an account.
Credit amounts must be negative
Note that you must enter credit amounts (for example, in the Budget Amount column) as negative numbers.
Budget Method. To have the system calculate amounts for you, click the Budget Method you want to use. Each method is described below.
Method for calculating
The methods for calculating budget amounts based on amounts and percentages you specify are:
• Fixed Amount. Select this option to enter an amount that the system adds or copies into the Budget Amount column for each period.
• Spread Amount. Select this option to enter an amount that the system distributes evenly across the Budget Amount column for each period. Any remainder is added into the last period.

Step 12: Add General Ledger Opening Balances and Period Data
3–64 Sage Accpac ERP General Ledger
GLGS-3.doc, printed on 3/18/2008, at 3:45:30 PM. Last saved on 3/18/2008 9:50:00 AM.
Sage Software Confidential
• Base, Percent Increase. Select this option to enter the base amount you want to budget for Period 1 in the Base Amount field. Enter the percentage by which to increase the amount in each subsequent period in the % Increase field.
The system uses the Base Amount you specify as the Period 1 Budget Amount. To calculate the budget amount for Period 2, the system multiplies the Period 1 amount by the percentage in the % Increase field. To calculate the Period 3 budget amount, the system multiplies the Period 2 amount by the % Increase percentage. The system continues to calculate budget amounts in this manner until all the periods have a budget amount.
• Base, Amount Increase. Select this option to enter the base amount you want to budget for Period 1 in the Base Amount field. Enter the amount by which to increase the amount in each subsequent period in the Amount Increase field.
The system uses the Base Amount you specify as the Period 1 Budget Amount. To calculate the budget amount for Period 2, the system adds the Amount Increase to the Base Amount. To calculate the budget amount for Period 3, the system adds the Amount Increase to the Period 2 amount. The system continues to calculate budget amounts in this manner until all the periods have a budget amount.
Lookup methods The methods for calculating budget amounts based on amounts in the Inquiry Amount column are:
• Copy, As Is. Select this option to copy or add the exact amounts in each period of the Inquiry Amount column into the corresponding periods of the Budget Amount column.
• Copy, Percent Increase. Select this option to enter the percentage by which to increase the period amounts in the % Increase field.
The system multiplies the period amount in the Inquiry Amount field by the percentage in the % Increase field and adds or copies

Step 12: Add General Ledger Opening Balances and Period Data
Getting Started 3–65
GLGS-3.doc, printed on 3/18/2008, at 3:45:30 PM. Last saved on 3/18/2008 9:50:00 AM.
Sage Software Confidential
Setting Up G
/L
the result into the Budget Amount field for the corresponding period.
• Copy, Amount Increase. Select this option to enter the amount by which to increase the period amounts in the Amount Increase field.
The system adds the period amount in the Inquiry Amount field to the amount in the Amount Increase field and adds or copies the result into the Budget Amount field for the corresponding period.
• Copy, Prorated Spread. Select this option to enter a base amount and have the system apply a weighting factor in calculating the period amounts.
The system performs a weighted distribution of amounts based on:
− The period amount in the Inquiry Amount column.
− The sum of period amounts in the Inquiry Amount column.
− The amount you specify in the Spread Amount field.
The system uses the following equation to compute each period’s budget amount:
Period Inquiry Amount
Sum of Inquiry Amounts for All Periods
x Spread Amount for Period
= Budget Amount for Period
The system first arrives at a ratio (weight factor) by dividing the individual period’s Inquiry Amount by the sum of the Inquiry Amounts for all periods. It then multiplies that weight factor by the Spread Amount you specify to arrive at each period’s Budget Amount.
Add To, Replace. Use the Add To button to add the amount in the Inquiry Amount column to the amount in the Budget Amount column. Use the Replace button to replace the amount in the Budget Amount column with the amount in the Inquiry Amount column.

Step 13: Assign Account Permissions
3–66 Sage Accpac ERP General Ledger
GLGS-3.doc, printed on 3/18/2008, at 3:45:30 PM. Last saved on 3/18/2008 9:50:00 AM.
Sage Software Confidential
Review the budget to be sure your entries are correct, then click the Add or Save button.
Check Data Integrity and Back Up the Data
When you have finished entering the data from your old system into General Ledger, use the Data Integrity function to ensure your data is sound.
Next, back up the data. Store the backup in a safe place.
If something should happen to damage your data, you can restore it from the backup, instead of having to enter it all over again.
See the procedures for backing up data in the System Manager User Guide.
Step 13: Assign Account Permissions You assign account permissions using G/L Security, a feature of General Ledger that provides account level security for your general ledger accounts.
Turning on G/L Security and Setting the Default Security Option
1. Select the Use G/L Security choice on the Account tab of the G/L Options form.

Step 13: Assign Account Permissions
Getting Started 3–67
GLGS-3.doc, printed on 3/18/2008, at 3:45:30 PM. Last saved on 3/18/2008 9:50:00 AM.
Sage Software Confidential
Setting Up G
/L
For the Default Access, you can choose All Accounts or No Accounts.
All Accounts. Allows all Sage Accpac users unrestricted access to General Ledger accounts unless you set up restrictions in the G/L Account Permissions window.
No Accounts. Prevents all Sage Accpac users except user ADMIN from seeing accounts and account data in General Ledger and subledger applications unless you grant individual access rights to accounts in the G/L Account Permissions window.
If you choose No Accounts, other Sage Accpac users won’t be able to enter invoices for restricted accounts in other Sage Accpac subledgers, and will only be able to post to batches that do not contain restricted accounts. Users will not be able to view a batch containing transactions with restricted account numbers, nor will the batch appear in batch lists.
See the larger discussion in the next section.
2. Choose Save, and then close the G/L Options form, close all other Sage Accpac forms, and exit your company database.
3. Restart your company database in Sage Accpac.
The Account Permissions icon will appear in the G/L Accounts folder.
Default Access Security Option
The Default Access security setting in G/L Options determines whether, by default, users have access to general ledger accounts.
If you select All Accounts:
All Sage Accpac users will have access to all G/L accounts unless you add their User ID to the G/L Account Permissions form and specify ranges of account numbers and/or ranges of account segment codes to which you want to restrict access.

Step 13: Assign Account Permissions
3–68 Sage Accpac ERP General Ledger
GLGS-3.doc, printed on 3/18/2008, at 3:45:30 PM. Last saved on 3/18/2008 9:50:00 AM.
Sage Software Confidential
If you select No Accounts:
No Sage Accpac users except the ADMIN user can view or post account data to G/L accounts or save account data in subledger applications unless you add their User ID to the G/L Account Permissions form and grant them individual access rights to ranges or accounts and account segments.
Test security settings You can test the effects of the option you select by logging on to Sage Accpac as a user other than ADMIN and checking which accounts are visible in the General Ledger Chart of Accounts window.
If you chose No Accounts, you will not see any account numbers in the Finder or in the Chart of Accounts window.
Setting User Account Permissions
You use the G/L Account Permissions form to define account access permissions for individual Sage Accpac users.
Note: Depending on the Default Access setting, you will need to use the Account Permissions form mainly to grant access to accounts, or to restrict it.
In the following example, R Brown cannot use two ranges of account numbers: between 6120 and 6400, and between 6720 and 6760.

Step 13: Assign Account Permissions
Getting Started 3–69
GLGS-3.doc, printed on 3/18/2008, at 3:45:30 PM. Last saved on 3/18/2008 9:50:00 AM.
Sage Software Confidential
Setting Up G
/L
The Segment tab can further restrict access to the accounts of a single department or division.
Define access rights or restrictions
The Account Permissions form gives you the flexibility to define an allowable account range or a restricted account range by choosing Yes or No in the Allow column.
This allows you to define available accounts within a restricted range—as in the following example:
To set user account permissions:
1. Install and turn on G/L Security following the instructions in the prior section “Turning on G/L Security and Setting Security Options.”
2. Choose the Account Permissions icon from the G/L Account Activities folder to open the Account Permissions form.
3. If you have already added the User IDs to G/L Security, you can browse through the list of User IDs using the Previous and Next buttons or you can click the Finder button and choose a User ID.
If you have not added the User ID for which you want to set permissions, click the Zoom button to display all Sage Accpac User IDs, and then select the User ID from the Finder that appears.
4. The Segment tab appears first. Use it to specify ranges of department or division segment codes to allow or restrict access to department or division accounts:
a. Click in the first row of the Allow column, then use the Spacebar or double‐click to switch between No and Yes.

Step 13: Assign Account Permissions
3–70 Sage Accpac ERP General Ledger
GLGS-3.doc, printed on 3/18/2008, at 3:45:30 PM. Last saved on 3/18/2008 9:50:00 AM.
Sage Software Confidential
b. Tab to or click in the Segment column, and then click the dropdown list that appears.
In our example, we selected Division so we could restrict account access based on the company’s divisions.
c. Tab to the From column and click the Finder button that
appears (or click the Finder in the column heading). Select the first segment code in the range that you want to allow or restrict.
d. Tab to the To column and select the last code in the segment range.
e. Click the Insert key to specify a second segment range on a new line.
f. Click the Save button if you are finished setting account permissions for this user.
For example, in the sample data, you could specify a range of division 200 to division 200 to restrict access to the Retail division.
Note: You cannot choose a range of account numbers on this tab. Use the Account tab to specify an account range.
5. Choose the Account tab to allow or restrict access to ranges of account numbers.
a. Click in the first row of the Allow column, then use the Spacebar or double‐click to switch between No and Yes.
b. Tab to the From column and click the Finder in the column heading. Select the first account code in the range that you want to allow or restrict.
c. Tab to the To column and select the last account in the range.

Step 13: Assign Account Permissions
Getting Started 3–71
GLGS-3.doc, printed on 3/18/2008, at 3:45:30 PM. Last saved on 3/18/2008 9:50:00 AM.
Sage Software Confidential
Setting Up G
/L
d. Click the insert key to specify a range of account numbers on a new line.
e. Click the Save button if you are finished setting account permissions for this user.
If you click the Close button without saving, a message prompts you to save the record.
Testing permissions
To quickly test user account permissions:
• Click the Test button to test the account segments you have specified. The Finder‐Accounts form lists the accounts this user has access permissions to see and work with.
If you need to set up identical permissions
To copy account permissions:
• Create permissions for one user, and copy them to other user IDs by using the File menu’s Import and Export commands to import and export user permissions.
For information about using the Import and Export commands, see Chapter 12, “Importing and Exporting Data,” in the System Manager User Guide.
Changing and Canceling Permissions
You can change and cancel any access permissions you have defined in the Account Permissions form.
To change or delete permissions:
1. Open the Account Permissions form.
2. Select the user ID.
3. Choose the Segment or Account tab, depending on whether you want to add a range of segment codes or account numbers.
To add a new range:
a. Tab to the Allow column, and press the Insert key.

Step 14: Set Up Recurring Entries
3–72 Sage Accpac ERP General Ledger
GLGS-3.doc, printed on 3/18/2008, at 3:45:30 PM. Last saved on 3/18/2008 9:50:00 AM.
Sage Software Confidential
b. Fill in the columns on the row.
To delete a row:
• Highlight the row that you want to remove, and press the Delete key.
To modify entries:
a. Select the columns that you want to change.
b. Type or select new values.
4. Click the Save button.
Test Permissions
Each time you create or change user account permissions, test them in Sage Accpac General Ledger and subledger applications to ensure that they work as expected.
Step 14: Set Up Recurring Entries Setting up a recurring entry is similar to recording a journal entry, except that the Recurring Entry form contains additional fields for identification and timing of the recurring transaction.

Step 14: Set Up Recurring Entries
Getting Started 3–73
GLGS-3.doc, printed on 3/18/2008, at 3:45:30 PM. Last saved on 3/18/2008 9:50:00 AM.
Sage Software Confidential
Setting Up G
/L
To set up recurring entries:
1. In the G/L Setup folder, click the Recurring Entries icon.
2. In the Recurring Entry Code field, enter a unique code that represents the type of entry you are creating. Your code can be up to 16 characters long. For example, if you are creating a recurring entry for processing monthly depreciation expenses, your code might be DEPREC.
3. In the Entry Description field, enter a description of the code, up to 60 characters long (for example, “Equipment Depreciation”). Descriptions help to identify each code.
4. For the Schedule Code field, select an existing code using the Finder if schedules have been defined in Common Services, or create a new schedule.
The schedule you attach to your recurring entry determines the frequency and the day on which the recurring transaction will be processed. If you attach a schedule that includes a reminder to a user, Sage Accpac will remind the user when the recurring entry comes due.
To set up a new schedule, click the Zoom button, then click the New button in the Schedules form that appears. (Note that you must have security authorization to maintain schedules in Common Services to be able to add or modify an existing schedule.)
To create schedules
Refer to the System Manager User Guide for instructions on setting up schedules for recurring transactions.
5. In the Start Date field, enter the first processing date for the entry, or choose it from the calendar.
Later, when you create a recurring batch, General Ledger will check this start date to determine if the recurring entry should be included in the batch. If the run date for the batch is the same as or later than the specified start date, the recurring entry will be included in the batch.

Step 14: Set Up Recurring Entries
3–74 Sage Accpac ERP General Ledger
GLGS-3.doc, printed on 3/18/2008, at 3:45:30 PM. Last saved on 3/18/2008 9:50:00 AM.
Sage Software Confidential
6. In the Expiration Type field, select No Expiration Date or Specific Date.
If you select Specific Date, you must specify an expiration date in the field that appears. When an expiration date is specified, the entry is included in the recurring entry batch only if the expiration date is later than the run date.
7. Tab past the Last Run Date field and the Last Maintained field, which are display‐only fields. The Last Run Date field displays the last date that this entry was included in a recurring batch. The Last Maintained field displays the date when you last changed this record.
8. In the Description field, enter a description for the recurring entry, for example, Depreciation Expense. You can use up to 60 characters.
9. Select the Inactive checkbox if you want this record to be inactive. If the record is inactive, it will not appear on the Reminder List and it will not be included in a recurring entries batch.
10. In the Exchange Rate field, select the method by which the program will determine the exchange rate to use when you generate the recurring entries batch. You can select one of the following options:
• Use Recurring Entry Rate. When you choose this option, the program will use the same exchange rate each time you produce a batch for this recurring entry.
• Use Current Rate. When you choose this option, the program will use the exchange rate in effect when you create a batch for the recurring entry.
If you select the Use Current Rate option, enter in the Rounding Account field the account you wish to use for recording rounding differences that may arise when you create a recurring entry batch. (The debits and credits that balanced in the

Creating G/L Accounts Automatically
Getting Started 3–75
GLGS-3.doc, printed on 3/18/2008, at 3:45:30 PM. Last saved on 3/18/2008 9:50:00 AM.
Sage Software Confidential
Setting Up G
/L
functional currency when you added the recurring entry record may no longer balance when you generate the journal entry. In this situation, the program debits or credits the rounding account to balance the debits and credits in the journal entry.)
11. Complete the remaining fields the same way you would complete a typical journal entry. For information about recording journal entries, see Chapter 4 in the General Ledger User Guide.
12. Save this recurring entry record by clicking Add.
Creating G/L Accounts Automatically General Ledger lets you automatically generate new General Ledger accounts based on the characteristics of an existing set of accounts. For example, you can create a set of accounts for a new department using the accounts for an existing department as a model.
You use the Create Accounts icon in the G/L Accounts folder to generate new accounts automatically by:
• A range of accounts structures.
• A range of account numbers, account groups, or sort code – account groups.
• A range of segment codes.
For background information on creating accounts automatically, see the section, “Creating G/L Accounts,” in Chapter 2 of this guide.
Before You Start
Before you create accounts automatically, you should print and examine your chart of accounts carefully to be sure you select an appropriate range of accounts, account structures, account groups, or segment codes on which to model the accounts, and to determine what other criteria you need for creating the new accounts.

Creating G/L Accounts Automatically
3–76 Sage Accpac ERP General Ledger
GLGS-3.doc, printed on 3/18/2008, at 3:45:30 PM. Last saved on 3/18/2008 9:50:00 AM.
Sage Software Confidential
Creating New Accounts
To generate new accounts automatically:
1. Click the Create Accounts icon in the G/L Accounts folder.
Note that the segment criteria entered in the grid on the following form depend on your account selection criteria.
2. Enter criteria for selecting the model accounts and for creating the new accounts as follows:
From Accounts With Structure Code. Enter, or select using the Finder, the structure code for the accounts that the new accounts will be based on.
The program adds new segments (or segment codes) to the model accounts, giving the new accounts the same properties as the accounts on which they are modeled. For example, you might generate new accounts, 1000‐300‐10 and 1000‐300‐20, using account 1000‐300 as the model. The new accounts will contain the same first two segments, Detail options, optional account and transaction details fields, and, if you choose, Currency and Subledger options as the model account.
Create Accounts With Structure Code. Enter the structure code to be used by the new accounts, or select it using the Finder.

Creating G/L Accounts Automatically
Getting Started 3–77
GLGS-3.doc, printed on 3/18/2008, at 3:45:30 PM. Last saved on 3/18/2008 9:50:00 AM.
Sage Software Confidential
Setting Up G
/L
The structure code you enter must contain the segments you want to include in the new accounts, and it must contain all of the segments used in the structure code you entered in the From Accounts With Structure Code field. You can enter the same structure code in both fields, as long as you already have some accounts that use this structure code.
Select By. Select the range of accounts into which you want to insert the new accounts.
Your choice in the Select By field determines the fields you use for the next section criteria, as follows:
• From/To Account Number. If you selected Account Number in the Select By field, specify the range of account numbers to which you want to add new accounts.
• From/To Account Group. If you selected Account Group in the Select By field, specify the range of account groups to which you want to add new accounts.
• From/To Sort Code-Account Group. Using the Finders, specify the range of sort codes to use.
Default Subledger Details. Select this option if you want the new accounts to use the same control account options as the model accounts.
Default Currency Details. Select this option if you want the new accounts to use the same currency options as the model accounts.
If you do not select the option, a new account will use the multicurrency option if the model account also uses it. However, the Post In currency option for the new account will be set to All Currencies, and the default currency will be set to the functional currency.
This option is available only in multicurrency ledgers.

Creating G/L Accounts Automatically
3–78 Sage Accpac ERP General Ledger
GLGS-3.doc, printed on 3/18/2008, at 3:45:30 PM. Last saved on 3/18/2008 9:50:00 AM.
Sage Software Confidential
Include Existing Accounts. Select this option if you wish to display existing accounts in the Create Accounts Preview form. Note that if an account already exists in your chart of accounts, General Ledger will not overwrite it when you create the new accounts.
3. Specify the segments to create as follows:
Segment Name. This column displays all the non‐account segments used in the structure code you specified in the Create Accounts With Structure Code field.
Create New. This field lets you choose whether to add new accounts for segment codes that are not used by the model accounts. If you select No, the new accounts will use only the segment codes that are used by the model accounts.
To change the value to Yes or No, double‐click the field or, with the Create New field selected, press the spacebar.
From/To. If you set the Create New field to Yes for the segment, enter the range of segment codes for which you want to create the new accounts.
Default Options From. If you set the Create New field to Yes, the program may generate new accounts that use segment codes that do not exist in the set of model accounts.
If the program creates an account that uses a segment code not used by the model accounts, you can identify existing accounts from the selected range on which to model the new accounts. The program will model the new accounts on accounts that use the segment code you specify in this field. The new accounts will use the same Detail options as the model accounts, including the:
• Account Group
• Account Status
• Account Type

Creating G/L Accounts Automatically
Getting Started 3–79
GLGS-3.doc, printed on 3/18/2008, at 3:45:30 PM. Last saved on 3/18/2008 9:50:00 AM.
Sage Software Confidential
Setting Up G
/L
• Close To Segment
• Maintain Quantity
• Normal Balance
• Post In
• Optional Fields
• Transaction Detail Optional Fields
• Post to Account
If the program does not find a model account, it will create the accounts using the program defaults.
4. Click Preview to generate a list of the accounts that the program will create if you are ready to add them permanently to your chart of accounts.
The program displays a message telling you how many accounts it previewed.
5. Click Close to close the message box.
The following form appears:

Creating G/L Accounts Automatically
3–80 Sage Accpac ERP General Ledger
GLGS-3.doc, printed on 3/18/2008, at 3:45:30 PM. Last saved on 3/18/2008 9:50:00 AM.
Sage Software Confidential
The G/L Create Accounts Preview form lets you:
• Choose whether to add individual previewed accounts to your chart of accounts.
• Change any account options before you create the accounts.
• Change the account optional fields and transaction optional fields that will be assigned to the new accounts.
The preview form resembles the G/L Chart of Accounts, with two additional fields (Processed and Create) and two additional buttons (Subledger and Currency).
If an account already exists and you chose Include Existing Accounts, No appears in the Processed field and in the Create field. You cannot change these entries.
Choose whether to add an account using the Create field
If you do not wish to create an account that is marked Yes for creation, change the Create field to No for the selected account by double‐clicking the field, or by selecting the field and pressing the spacebar.
Previewing a subledger control account
When you select a preview account that is based on a subledger control account, the Subledger button becomes available. To view or change the information that will be added to the Subledger tab on the new G/L Account record, click the Subledger button. You can also double‐click the Control Account Zoom button for any account whose control account attributes you want to change.
Previewing currency options
When you select a preview account that is based on a multicurrency account, the Currency button is available. To view or change the information that will be added to the Currency tab of the G/L Account record, click the Currency button. Toggle Yes or No in the Multicurrency column to change an account’s multicurrency option. Double‐click the Default Currency field of a multicurrency account to change the default currency for the account.

Creating G/L Accounts Automatically
Getting Started 3–81
GLGS-3.doc, printed on 3/18/2008, at 3:45:30 PM. Last saved on 3/18/2008 9:50:00 AM.
Sage Software Confidential
Setting Up G
/L
Previewing optional fields
When you select a preview account to which the program will assign optional account fields or optional transaction detail fields, the Optional Fields and the Trans. Optional Fields buttons become available.
To view or change the optional fields that will be added to the Optional Fields tab of the G/L Account record, click the Optional Fields button.
The Preview Account Optional Fields form appears.
• To remove an optional account field, select it on the grid, and then press the Delete key.
• To add an optional account field, press the Insert key, double‐click in the Optional Field column for the line you are editing, then enter the code for the optional field or use the Finder to select the code.
• To change the default value for the optional account field, double‐click in the Value column for the line you are editing, then enter the value or use the Finder to select it. (Note that if the optional field requires validation, you must select a value you have set up for the field in Common Services.)
To view or change the optional transaction details fields that will be assigned to the account on the Trans. Optional Fields tab, click the Trans. Optional Fields button.
The Preview Account Transaction Optional Fields form appears.
• To remove an optional transaction details field, select it on the grid, then press the Delete key.
• To add an optional transaction details field, press the Insert key, double‐click in the Optional Field column for the line you are editing, then enter the code for the optional field or use the Finder to select the code.
• To change the default value for the optional account transaction details field, double‐click in the Value column

Creating G/L Accounts Automatically
3–82 Sage Accpac ERP General Ledger
GLGS-3.doc, printed on 3/18/2008, at 3:45:30 PM. Last saved on 3/18/2008 9:50:00 AM.
Sage Software Confidential
for the line you are editing, then enter the value or use the Finder to select it. (Note that if the optional field requires validation, you must select a value you have set up for the field in Common Services.)
6. To print the preview information, click Print.
The Print Create Accounts Preview Information form appears, as shown next:
a. Choose sorting options and the range of accounts you want to print. You can sort by Account Number, Segment, or Account Group.
b. Select whether you want to print subledger, currency, or optional fields information.
c. Click Print.
d. Click Close to return to the G/L Create Accounts Preview form.
7. When you have finished selecting and editing the accounts you want to create, click Close to return to the G/L Create Accounts form.

Creating G/L Accounts Automatically
Getting Started 3–83
GLGS-3.doc, printed on 3/18/2008, at 3:45:30 PM. Last saved on 3/18/2008 9:50:00 AM.
Sage Software Confidential
Setting Up G
/L
8. In the G/L Create Accounts form, all the fields are now dimmed — you cannot change them. You can proceed as follows:
• Click Preview to return to the Preview form.
• Click Process to add the accounts to your chart of accounts.
− If processing is successful, the program creates the accounts, then displays a message telling you processing has finished and the number of new accounts that were created.
Click Close to close the message box. You then receive a message asking whether you want to clear the temporary file. You must clear the preview accounts before you can create another set of accounts. If you click No, you are returned to the G/L Create Accounts form, but (as before) all the fields are dimmed.
− If there is an error in processing the accounts, you are returned to the G/L Create Accounts form, but all fields are dimmed. Click Preview to view and remove any unsuitable accounts, or click Clear to abort the process. Note that some accounts may have been added to your Chart of Accounts; these accounts are marked Yes in the Processed field.
• Click Clear to delete the temporary file if you want to create a different set of accounts.
9. After creating accounts, print the Chart of Accounts report, and keep it for reference.

Financial Reporter
3–84 Sage Accpac ERP General Ledger
GLGS-3.doc, printed on 3/18/2008, at 3:45:30 PM. Last saved on 3/18/2008 9:50:00 AM.
Sage Software Confidential
Financial Reporter
You can use the Financial Reporter functions to open Microsoft Excel where you design and print financial statements.
For complete instructions for using the Statement Designer, see the Financial Reporter User Guide.
The Financial Reporter subfolder in the General Ledger folder provides Print Financial Statements and Statement Designer icons that you can use to produce financial statements.
Use the Statement Designer to adapt the sample reports, or to create your own specifications for statements. Use Print Financial Statements to print the standard reports and the reports you create.
Chapter 4 in the Financial Reporter User Guide describes the standard statements provided with the Financial Reporter.
Where To Now? Your General Ledger system is now ready for use.
To practice using General Ledger with the sample data before you start working with your own data, do the lessons in Chapter 2, “General Ledger,” in the Sage Accpac Workbook.

GLGS-a.doc, printed on 7/17/2007, at 12:26:59 PM. Last saved on 7/17/2007 12:26:00 PM.
Appendix A Setup Checklist
This appendix describes the General Ledger Setup Checklist that ships with the General Ledger, and tells you how to print it.
You can print the Setup Checklist (GL‐SETUP.PDF) to use for setting up General Ledger. As you complete the step‐by‐step instructions in Chapter 3 of the Getting Started manual, check off each step on the checklist, including:
• Installing General Ledger.
Setup C
hecklist
• Setting up General Ledger options.
• Setting up segment codes.
• Setting up account structures.
• Setting up source codes.
• Setting up journal profiles.
• Adding account groups.
• Setting up revaluation codes.
• Adding optional fields (if you use them).
• Adding accounts to General Ledger.
• Adding data.
• Setting up account permissions.
• Adding recurring entries.
• Preparing and testing formats for printed reports.
Getting Started A–1
Sage Accpac International, Inc. Confidential

Sample Setup Checklist
GLGS-a.doc, printed on 7/17/2007, at 12:26:59 PM. Last saved on 7/17/2007 12:26:00 PM.
Sample Setup Checklist The General Ledger Setup Checklist (shown on the following pages) can guide you through the steps of setting up your General Ledger.
To print the checklist:
1. From the Windows Start menu, click Programs, then Sage Accpac.
2. Click the subfolder Online Documentation, then General Ledger 5.5A.
3. Click Setup Checklist.
You can also open a checklist from:
X:\Sage Accpac\DOCS\GL55AENG
where X: is the drive where your Sage Accpac programs are located.
Acrobat Reader starts.
4. From the File menu, click Print. Adjust the settings if necessary, and then click OK.
A–2 Sage Accpac ERP General Ledger
Sage Accpac International, Inc. Confidential

Sample Setup Checklist
GLGS-a.doc, printed on 7/17/2007, at 12:26:59 PM. Last saved on 7/17/2007 12:26:00 PM.
Date
Completed by Sage Accpac ERPGeneral Ledger Setup Checklist Approved by
G/L Setup Checklist (GL-SETUP.PDF) Page 1 of 3
1. Install General Ledger Install and activate General Ledger after installing and setting up the System Manager.Request an activation code.
Read the General Ledger guides.
2. Define Source Codes
Enter a Code and a Description in the G/L Source Codes form.
3. Configure G/L Setup Options
Company tab Enter the Company contact name
Enter the Company telephone number
Enter the Company fax number Account tab If you are using a multicurrency ledger, select the Multicurrency option, THEN
enter a default rate type. If you want to use predefined financial reports, select the Use AccountGroups option. (Note that you must install the sample data before you can use the predefined financial reports’ account groups.)If you want to maintain quantities, select the Maintain Quantities option, and enter the number of decimal places you can use to enter quantities.You cannot enter a Default Closing Account number at this stage; you will have to come back to this after adding your accounts. (See step 10.)If you use G/L Security, select the G/L Security option, then select the DefaultAccount access to allow.
Posting tab Select budget sets that you wish to lock (to prevent changes).Select Allow Posting To Previous Years to post transactions to previous fiscal years.Select Allow Provisional Posting to post transactions provisionally.Select Force Listing of Batches to require batch listings to be printed before they can be selected for posting.Specify the Default Source Code to be used for journal entries (defined in step 2). Specify whether imported entries can be edited, and, if so, which fields.
Enter the number of years to retain fiscal sets.
Enter the number of years to retain transaction details.Segments tab For each segment, enter a segment name, specify the length, and indicate
whether to use the segment in closing.Enter the segment number that represents your account segment.
Choose a Segment Delimiter.After you create account structures (see step 5), return here to add the Default Structure Code.
4. Set Up Segment CodesFor each segment you created on the Segment tab of the G/L Options form, enter a segment code and a description.
Setup C
hecklist
Getting Started A–3
Sage Accpac International, Inc. Confidential

Sample Setup Checklist
GLGS-a.doc, printed on 7/17/2007, at 12:26:59 PM. Last saved on 7/17/2007 12:26:00 PM.
Date
Completed by Sage Accpac ERPGeneral Ledger Setup Checklist Approved by
G/L Setup Checklist (GL-SETUP.PDF) Page 2 of 3
5. Set Up Account StructuresYou must set up at least one account structure.
Enter structure codes and descriptions.Choose the segments to be used in each structure (defined in step 3). If applicable, mark one as the default.
6. Set Up Source Journal Profiles (optional) Enter a journal profile name, then choose the source codes (from step 2) to include in the source journal report.
7. Add Account GroupsYou can create account groups if you are running Sage Accpac 500 ERP or Sage Accpac 200 ERP. Sage Accpac 100 ERP uses only standard account groups.
Enter a code and description for each account group you create.Click the Change Sort Codes button if you want to print certain accountgroups and not others in reports or if you want to change the sort code order.
8. Set Up Revaluation Codes (if you use multicurrency)
Enter the revaluation codes and a description for each.Enter the rate type. Enter the source code.Use the Finders to select the exchange gain and loss accounts.
9. Set Up Optional Fields (if you use Transaction Analysis and Optional Field Creator)In the G/L Optional Fields form, specify the optional fields to use for accountsand transaction details, along with their default values.In the Value Set column, indicate for each optional field used, whether the optional field is to be used as a default when setting up new records.Indicate in the Required field if this optional field is required (if so, then Auto Insert must also be set to Yes).
10. Add Accounts to Chart of AccountsIn the G/L Accounts form, enter an account number and description, then enter information on each tab, as described below.
Detail tab Select the Structure Code.
Select whether the Normal Balance is a credit or a debit.Select Account Type: Income Statement, Balance Sheet, or RetainedEarnings.Select the Account Group.
Decide if the account is Active or Inactive.
Choose the Maintain Quantities option, and enter the Units (optional).
In the Post to Account field, choose Detail, or Consolidated, or ProhibitedFor your Income Statement accounts, add the Close to Segment if you do not want to specify the segment you wish to close at year-end. Choose Control Account, Auto Allocation, Multicurrency, and / or Rollup options and then enter data on other tabs that appear (see below).
A–4 Sage Accpac ERP General Ledger
Sage Accpac International, Inc. Confidential

Sample Setup Checklist
GLGS-a.doc, printed on 7/17/2007, at 12:26:59 PM. Last saved on 7/17/2007 12:26:00 PM.
Date
Completed by Sage Accpac ERPGeneral Ledger Setup Checklist Approved by
G/L Setup Checklist (GL-SETUP.PDF) Page 3 of 3
Optional Fields tab If you use optional fields, use the Finder to select the optional fields for each account.Toggle Yes or No in the Value Set column.
If the Value Set column is Yes, use the Finder to select a Value.
Tran. OptionalFields tab
If you use transaction optional fields, use the Finder to select the optionalfields for each account.
Toggle Yes or No in the Value Set column.
If the Value Set column is Yes, use the Finder to select a Default Value.
Toggle Yes or No in the Auto Insert column.
Allocation tab Use the Finder to select the Source Code.In the Allocate By field, choose whether the account is reallocated based on the account balance or on the account quantities.Use the Finder to select the accounts to which to allocate balances.
Add a Reference and a Description.Enter a percent of the account balance or quantity for each account listed to assign to each transaction detail (they must add up to 100%)
Currency tab Choose Specified Currencies or choose All Currencies in the Post In section.Choose the currency that should appear as the default during transactionentry.If you chose the Specified Currencies options, enter each of the source currencies in which you want to enter transactions, then:
- Toggle Yes or No in the Revaluation column.- If you toggled Yes, use the Finder to select the Revaluation Code.
Subledger tab Use the Finder to select the accounts that will use this ledger (for example, A/P, A/R) as a control account.
Rollup tab Use the Finder in the Account column or click the Zoom button to use the G/L Account Selector to select accounts that will be rolled up to this account.
Return to the G/L Options form to add the Default Closing Account on the Accounts tab.
Return to the Segment Codes form to add Closing Account numbers for each segment.
11. Add Historical and Budget DataAdd historical data. If you do prior-year comparisons, post batches tohistorical balances.Run Create New Year.Add and post year-to-date transactions (if the current fiscal year is alreadyunderway).Add budget data (if you do budget comparisons).
12. Set Account Permissions (If you use G/L Security)In the G/L Options form, select the G/L Security option (on the Account tab). In the Account Permissions form, assign account permissions to users.
13. Set Up Recurring Entries (optional)
In the Recurring Entries form, add an entry for each recurring transaction.
Setup C
hecklist
Getting Started A–5
Sage Accpac International, Inc. Confidential


Glgs-inx.DOC, printed on 10/15/2007, at 11:43:04 AM. Last saved on 10/15/2007 11:42:00 AM.
Index
A Accounts (continued)
delimiter, 3–21 Account groups, 2–12, 3–42 entering historical data, 3–56
choose option to use, 2–3, 3–12 entering opening balances, 3–58 Account history fiscal sets, 2–44
viewing details, 2–54 functional currency, 2–36 viewing summary, 2–55 functional equivalent, 2–36
Account optional fields granting user permissions, 3–70 assigning to accounts, 3–45 groups, 2–3, 2–12, 3–42 setting up, 3–34 history, 2–54
Account permissions importing, 3–38 changing or canceling, 3–73 importing and exporting, 2–44
Account Permissions multicurrency granting access, 3–70 revaluation, 2–16
Account segment, 2–3 setting up, 3–50
Index
Account segment, defining, 3–20 numbering tips, 2–4 Account Selector, 3–54 numbers longer than 24, 2–3 Account structures, 2–5, 2–9 opening balances, 2–49
assign to account, 3–41 printing, 3–54 default account structure, 3–24 quantities, 2–3, 3–44 description, 3–24 restricting access to, 2–18 segments in, 3–24 segments, 2–3, 2–6, 3–19 setup, 3–23 sorting quickly, 2–4
Accounts source currency, 2–36 account groups, 2–3, 2–12, 3–42 structures, 2–5, 2–9, 3–23, 3–24, 3–41 account numbers, 3–40 subledger control, 3–43 account segment, 2–3, 3–20 types, 3–42 adding, 2–26 using G/L security, 3–67 allocation of balances, 2–31, 3–43 viewing, 2–53 budgets, 2–51, 3–62‐–43 Activating General Ledger, 3–6 data stored, 2–24, 2–44 Actual fiscal sets, 2–46 default closing, 3–13 Add member accounts, 3–54
Getting Started Index–1
ACCPAC International, Inc. Confidential

Glgs-inx.DOC, printed on 10/15/2007, at 11:43:04 AM. Last saved on 10/15/2007 11:42:00 AM.
Codes Adding account structure, 3–24 current‐year data, 2–49 revaluation, 2–17, 3–30 historical data, 2–49, 3–56 segment, 2–8, 3–22 opening balances, 2–49, 3–58 source, 2–14, 3–25 Adding rollup accounts, 2–40
Consolidating Allocation, 2–31, 3–43 during posting, 2–28, 3–42 setting up automatic, 3–49
Contact name, 3–10 Assign account permissions, 3–67 Converting to the euro, 3–59 Auto Allocation Current‐year data example of allocating by quantity, 2–32
adding, 2–49
B D
Backing up data, 3–5 Data Balance sheet type accounts, 3–43
importance of backing up, 3–32 Balance, normal (debit or credit), 3–41 Data entry forms for General Ledger Balances
printing instructions, A–2 allocating account, 2–31, 3–43 Date entering opening, 3–58
consolidating during posting, 2–28 Batches Default Access security setting, 3–69 force listing option, 3–16 Default Source Code, 3–16 restricting editing of, 3–16 Delimiter, account, 3–21 Browser
using General Ledger through, 3–1 Budget fiscal sets, 2–47, 2–52
E Budgets adding, 2–51, 3–62 entry methods, 2–53, 3–64 Entering locking, 3–14 historical data, 2–49, 3–56
opening account balances, 2–49, 3–58 Euro
C capabilities of Sage Accpac ERP General Ledger, 1–8
Chart of accounts. See also Accounts converting to euro functional currency, 3–59 numbering, 3–40
numbering tips, 2–4 Exchange Rate field printing, 3–54 in recurring entry record, 3–76 use sample data, 2–2 Exporting accounts, 2–44
Index–2 Sage Accpac ERP General Ledger
ACCPAC International, Inc. Confidential

Glgs-inx.DOC, printed on 10/15/2007, at 11:43:04 AM. Last saved on 10/15/2007 11:42:00 AM.
F H
Features Hide Tree, 2–23 General Ledger and Financial Reporter,
1–2 historical data
adding, 3–56 integration with other applications, 1–9 Historical data
Fiscal calendar, 3–7 adding, 2–49 Fiscal sets, 2–44 keep years of detail option, 3–18
actual, 2–46 keep years of fiscal sets option, 3–17 budget, 2–47 viewing summary, 2–55 comparison, 2–54 viewing transactions, 2–54 lookup in budget maintenance, 3–64 multicurrency, 2–35
I provisional, 2–47 quantity, 2–47 years to keep option, 3–17 Importing accounts, 2–44, 3–38
Flexible reporting Income statement type accounts, 3–42 features, 1–8 Internet
Force Listing Of Batches option, 3–16 using General Ledger through a browser, 1–1 Forms, data entry. See: Data entry forms
Functional currency, 2–36 using General Ledger with a browser, 3‐1 Functional equivalent accounts, 2–36
Inventory accounts opening and closing, 2–13
Index
G
J G/L Account Selector, 2–41 G/L Security
assign account permissions, 3–67 Journals changing or canceling permissions, 3–73 source, 2–15 effects of restricting account access, 2–18 turning on the option, 3–68
General Ledger L activating, 3–6 using, on the Internet, 1–1
Listing of batches using, with a browser, 3–1 option to force, 3–16 General Ledger and Financial Reporter
features, 1–2 integration with other applications, 1–9
General Ledger reports, 1–5
Getting Started Index–3
ACCPAC International, Inc. Confidential

Glgs-inx.DOC, printed on 10/15/2007, at 11:43:04 AM. Last saved on 10/15/2007 11:42:00 AM.
M Optional transaction details fields assigning to accounts, 3–46 setting up, 3–35 Member accounts, 3–54
Options additional criteria, 3–55 automatic allocation, 2–31, 3–43 Multicurrency, 1–7 contact name, 3–10 Multicurrency accounting Default Access choosing option, 3–11, 3–44
turning on, 3–69 default rate type, 3–12 Default Source Code, 3–16 Multicurrency accounts detail and consolidated posting, 2–28 default currency, 3–51 edit imported entries, 3–16 post in all currencies option, 3–51 force listing of batches, 3–16 post in specified currencies option, 3–50 G/L Security retained earnings, 2–37, 3–51
turning on, 3–68 revaluing, 2–16 General Ledger, 3–9 setting up, 3–50 keep years of fiscal sets, 3–17 source currency, 3–52 keep years of transaction detail, 3–18 unrealized exchange gain and loss, 3–51 locking budgets, 3–14 Multicurrency fiscal sets, 2–35 maintain quantities, 2–3, 3–12, 3–44 multicurrency, 3–11, 3–44 posting to previous years, 3–15 N provisional posting, 3–15
Numbering accounts, 2–4, 3–40
P O
Periodic inventory accounts as used in General Ledger, 2–13
Online Perpetual inventory accounts using General Ledger through a
browser, 3–1 as used in General Ledger, 2–13
Posting Optional account fields consolidated, 2–28, 3–42
assigning to accounts, 3–45 consolidated transactions setting up, 3–34 effects, 3–42
Optional fields multicurrency transactions, 3–50 acceptable values for, 3–34, 3–35 previous years option, 3–15 changing when creating accounts
automatically, 3–82 provisional option, 3–15 statistics displayed, 3–17
overview, 3–33 Previous‐year data posting detailed transactions, 3–42 adding, 2–49, 3–56
Optional fields option to post to previous years, 3–15 overview, 2–22to2–23
Index–4 Sage Accpac ERP General Ledger
ACCPAC International, Inc. Confidential

Glgs-inx.DOC, printed on 10/15/2007, at 11:43:04 AM. Last saved on 10/15/2007 11:42:00 AM.
Printing Rollup accounts, 2–23 data entry forms, A–2 account types, 2–42
Printing accounts, 3–54 adding, 2–40 Provisional fiscal set, 2–47 FR Paste, 2–23 Provisional posting member accounts, 2–23
option to allow, 3–15 Rounding account field in recurring entry record, 3–76
Q S
Quantities Segments, 2–3, 2–6 maintaining, 2–3
closing income and expense accounts to, 2–9, 3–22, 3–43
selecting option to maintain, 3–12, 3–44 Quantity fiscal sets, 2–47
defining, 3–19 description, 3–20
R length, 3–20 segment code description, 3–22 segment codes, 2–8, 3–22 Recurring entries use in closing option, 3–20 Exchange Rate field, 3–76 validation, 3–23 Rounding Account field, 3–76
Select member accounts, 2–41 Reports Setup Batch Listing, defined, 1–6
preparing your data, 3–5 Batch Status, defined, 1–6
Index
summary of General Ledger, 3–2 Chart of Accounts, defined, 1–5 Show Tree, 2–23 G/L Transaction Listing, defined, 1–6 Source codes, 2–14 Optional Fields, defined, 1–6
description, 3–26 Posting Journal, defined, 1–6 including in source journal definition,
3‐29 Source Journals, defined, 1–6 Transaction Details Optional Fields,
defined, 1–6 setup, 3–25 Source currency, 3–52 Trial Balance, defined, 1–5
accounts, 2–36 Retained earnings account, 3–13, 3–51 inquiry, 2–55 Retained earnings type accounts, 3–43
Source journals, 2–15 Revaluation, 2–16, 3–52 examples of, 2–15 Revaluation codes, 2–17, 3–30 name, 3–29 description, 3–30 number of source codes, 3–29 rate type, 3–30
Structures, account, 2–5, 2–9 source code, 3–31 assign to account, 3–41 Rollup, 3–54 default, 3–24 single‐currency accounts, 3–55 description, 3–24
Getting Started Index–5
ACCPAC International, Inc. Confidential

Glgs-inx.DOC, printed on 10/15/2007, at 11:43:04 AM. Last saved on 10/15/2007 11:42:00 AM.
Structures, account (continued) segments in, 3–24 setup, 3–23
T
Transaction detail years to keep option, 3–18
Transaction Details optional fields assigning to accounts, 3–46 effect of consolidation on, 3–42 setting up, 3–35
U
Unrealized exchange gain and loss accounts, 3–51
Using General Ledger through an Internet browser, 1–1 with a browser, 3–1
V
Viewing accounts, 2–53
W
Web using General Ledger through a
browser, 1–1, 3–1
Y
Year‐to‐date adding data, 2–49
Index–6 Sage Accpac ERP General Ledger
ACCPAC International, Inc. Confidential