gaia 3d viewer - gaia technologies...
TRANSCRIPT
Gaia 3D Viewer
Technical Training Manual v3
Gaia Technologies Plc
Gaia 3D Software
Technical Training Manual
1
1. What are the different types of 3D?
Humans are able to perceive the spatial relationship between objects just by looking at them because we have 3D perception, also known as depth perception. There are a number of ways of using technology to recreate this effect for viewers. 1.1 Active 3D
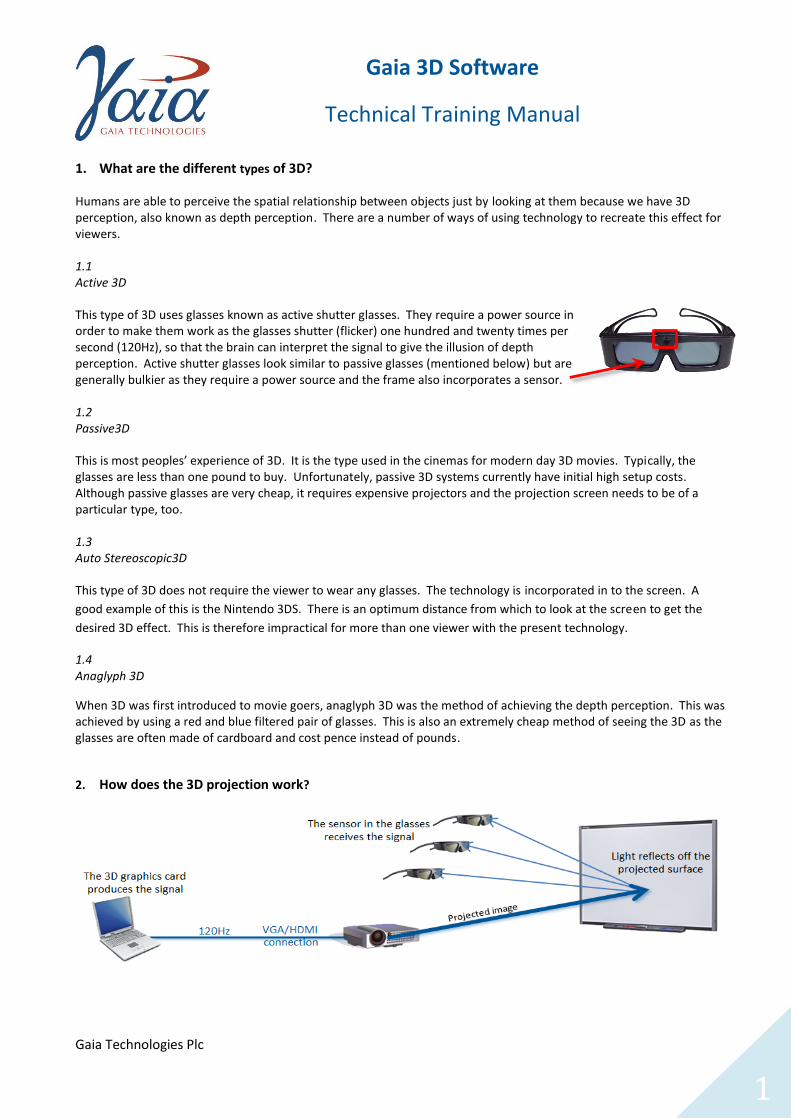
This type of 3D uses glasses known as active shutter glasses. They require a power source in order to make them work as the glasses shutter (flicker) one hundred and twenty times per second (120Hz), so that the brain can interpret the signal to give the illusion of depth perception. Active shutter glasses look similar to passive glasses (mentioned below) but are generally bulkier as they require a power source and the frame also incorporates a sensor. 1.2 Passive3D
This is most peoples’ experience of 3D. It is the type used in the cinemas for modern day 3D movies. Typically, the glasses are less than one pound to buy. Unfortunately, passive 3D systems currently have initial high setup costs. Although passive glasses are very cheap, it requires expensive projectors and the projection screen needs to be of a particular type, too. 1.3 Auto Stereoscopic3D
This type of 3D does not require the viewer to wear any glasses. The technology is incorporated in to the screen. A
good example of this is the Nintendo 3DS. There is an optimum distance from which to look at the screen to get the
desired 3D effect. This is therefore impractical for more than one viewer with the present technology.
1.4 Anaglyph 3D
When 3D was first introduced to movie goers, anaglyph 3D was the method of achieving the depth perception. This was achieved by using a red and blue filtered pair of glasses. This is also an extremely cheap method of seeing the 3D as the glasses are often made of cardboard and cost pence instead of pounds.
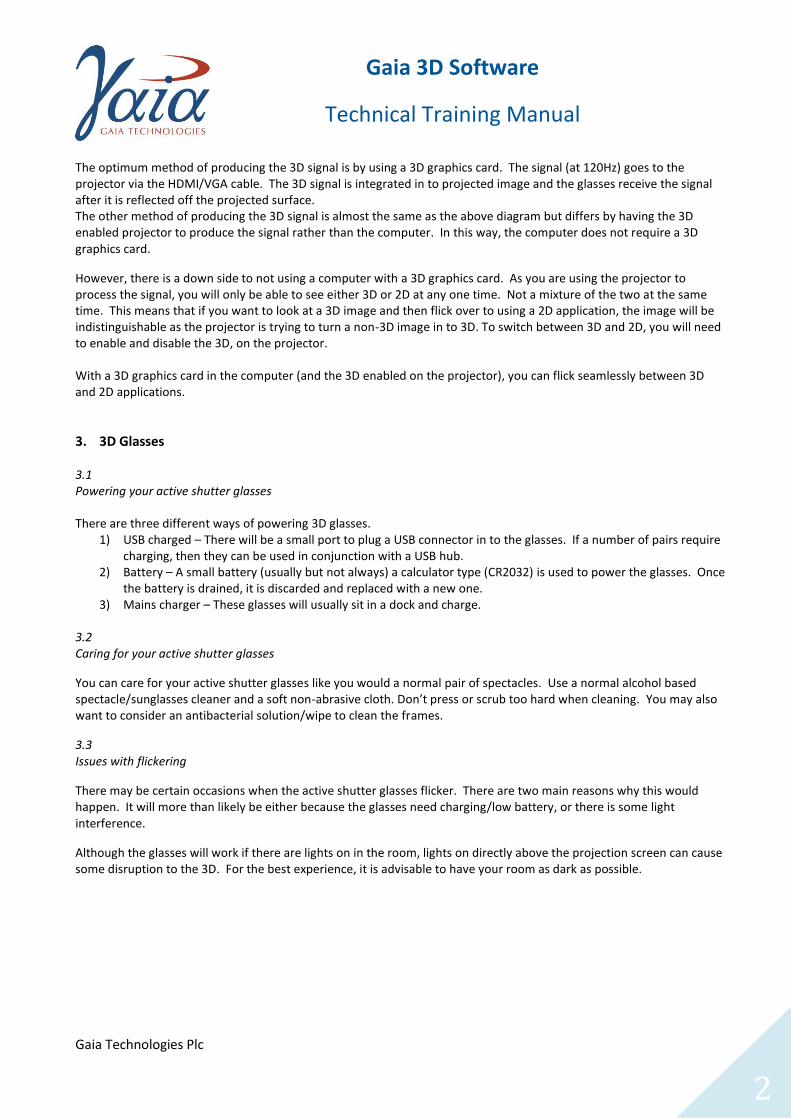
2. How does the 3D projection work?
Gaia Technologies Plc
Gaia 3D Software
Technical Training Manual
2
The optimum method of producing the 3D signal is by using a 3D graphics card. The signal (at 120Hz) goes to the projector via the HDMI/VGA cable. The 3D signal is integrated in to projected image and the glasses receive the signal after it is reflected off the projected surface. The other method of producing the 3D signal is almost the same as the above diagram but differs by having the 3D enabled projector to produce the signal rather than the computer. In this way, the computer does not require a 3D graphics card.
However, there is a down side to not using a computer with a 3D graphics card. As you are using the projector to process the signal, you will only be able to see either 3D or 2D at any one time. Not a mixture of the two at the same time. This means that if you want to look at a 3D image and then flick over to using a 2D application, the image will be indistinguishable as the projector is trying to turn a non-3D image in to 3D. To switch between 3D and 2D, you will need to enable and disable the 3D, on the projector. With a 3D graphics card in the computer (and the 3D enabled on the projector), you can flick seamlessly between 3D and 2D applications.
3. 3D Glasses 3.1 Powering your active shutter glasses There are three different ways of powering 3D glasses.
1) USB charged – There will be a small port to plug a USB connector in to the glasses. If a number of pairs require charging, then they can be used in conjunction with a USB hub.
2) Battery – A small battery (usually but not always) a calculator type (CR2032) is used to power the glasses. Once the battery is drained, it is discarded and replaced with a new one.
3) Mains charger – These glasses will usually sit in a dock and charge. 3.2 Caring for your active shutter glasses
You can care for your active shutter glasses like you would a normal pair of spectacles. Use a normal alcohol based spectacle/sunglasses cleaner and a soft non-abrasive cloth. Don’t press or scrub too hard when cleaning. You may also want to consider an antibacterial solution/wipe to clean the frames.
3.3 Issues with flickering
There may be certain occasions when the active shutter glasses flicker. There are two main reasons why this would happen. It will more than likely be either because the glasses need charging/low battery, or there is some light interference.
Although the glasses will work if there are lights on in the room, lights on directly above the projection screen can cause some disruption to the 3D. For the best experience, it is advisable to have your room as dark as possible.
Gaia Technologies Plc
Gaia 3D Software
Technical Training Manual
3
3.4 ‘Swap Eyes’
On launching the software, it may appear that the 3D is not working properly. This may look like the 3D effect goes in to the screen and there may appear to be some doubling of the image in some places. This will require you to ‘swap eyes’ (or invert the image as it is also known).
This occurs when the projected image is out of sync with the glasses. There is a ‘swap eyes’ key on the teacher’s interface. It can also be done by pressing the shortcut (f11) key. Please note that it will not be the case that some of the active shutter glasses are in sync and some are out of sync. They will be either all in sync or all out of sync.
It is good practice to check to make sure that the image is correct when you open the software so there is no confusion with the students. Once you have made sure the glasses are in sync they will remain so, as long as the software is running. The next time the software is launched, you will need to check this again.
Swap eyes is an unavoidable consequence of the way sequential 3D imagery is sent to the projector.
4 Interface
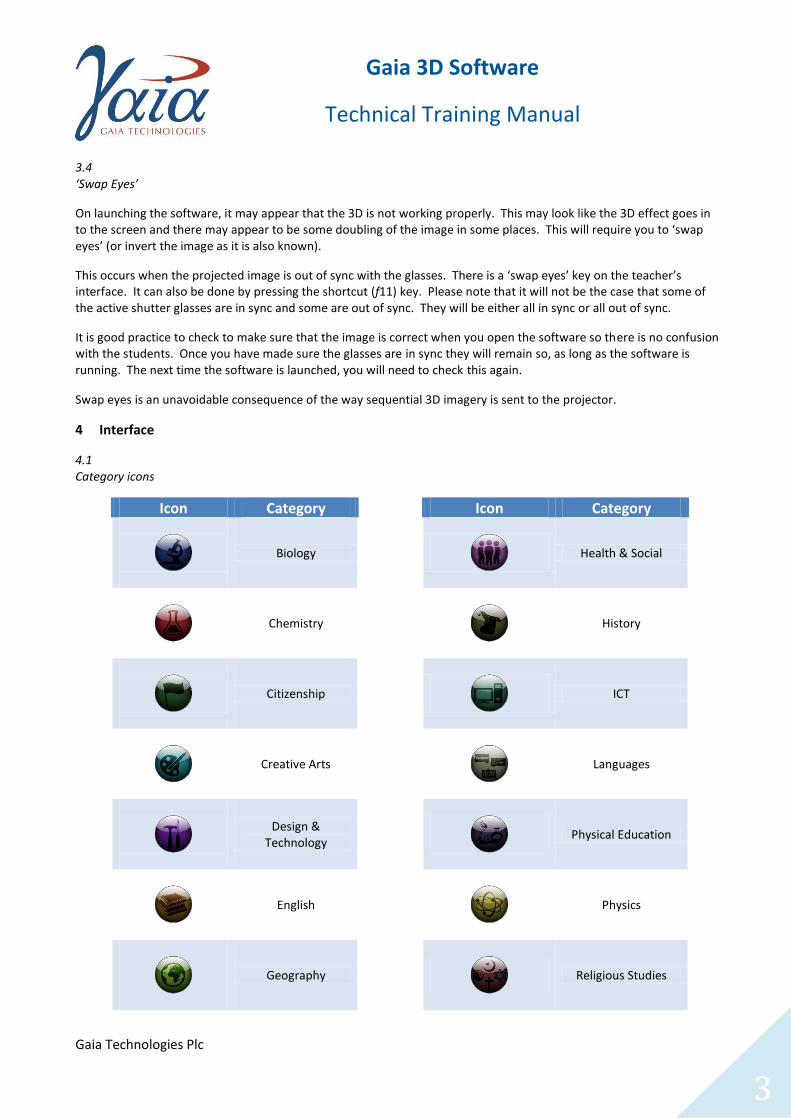
4.1 Category icons
Icon Category Icon Category
Biology
Health & Social
Chemistry
History
Citizenship
ICT
Creative Arts
Languages
Design & Technology
Physical Education
English
Physics
Geography
Religious Studies

Gaia Technologies Plc
Gaia 3D Software
Technical Training Manual
4
4.2 Layout of interface
Category Open the category/subcategory Search facility
Exit the software
Full screen mode
Help
Settings

Gaia Technologies Plc
Gaia 3D Software
Technical Training Manual
5
Back up a level
Model name and description
Label editor
Open the model
Return to home screen
4.3 Using the interface
4.3.1 Using a mouse: To move up/down through the categories use the scroll wheel. To select a category, use a left mouse click.
4.3.2 Using an IWB: Use your finger/pen to sweep across the between the categories and press to open.

Gaia Technologies Plc
Gaia 3D Software
Technical Training Manual
6
4.4 Teacher view
View of the model projected
Teacher controls:
Main Menu (Esc) – will return you to the main menu to load another model or other options.
Multimedia – shows you any additional resources attached to that particular model.
Swap Eyes (F11) – allows you to synchronise with the active shutter glasses (as in 3.4).
Fill Window (F9) – takes away the options from the view.
Reset All – will reset the model to its original state.
Object interaction
Many objects have additional types of interactivity, such as labels and fact boards. Some models have sliders which animate the object. In this case, the slider turns the skin progressively transparent.
Gaia Technologies Plc
Gaia 3D Software
Technical Training Manual
7
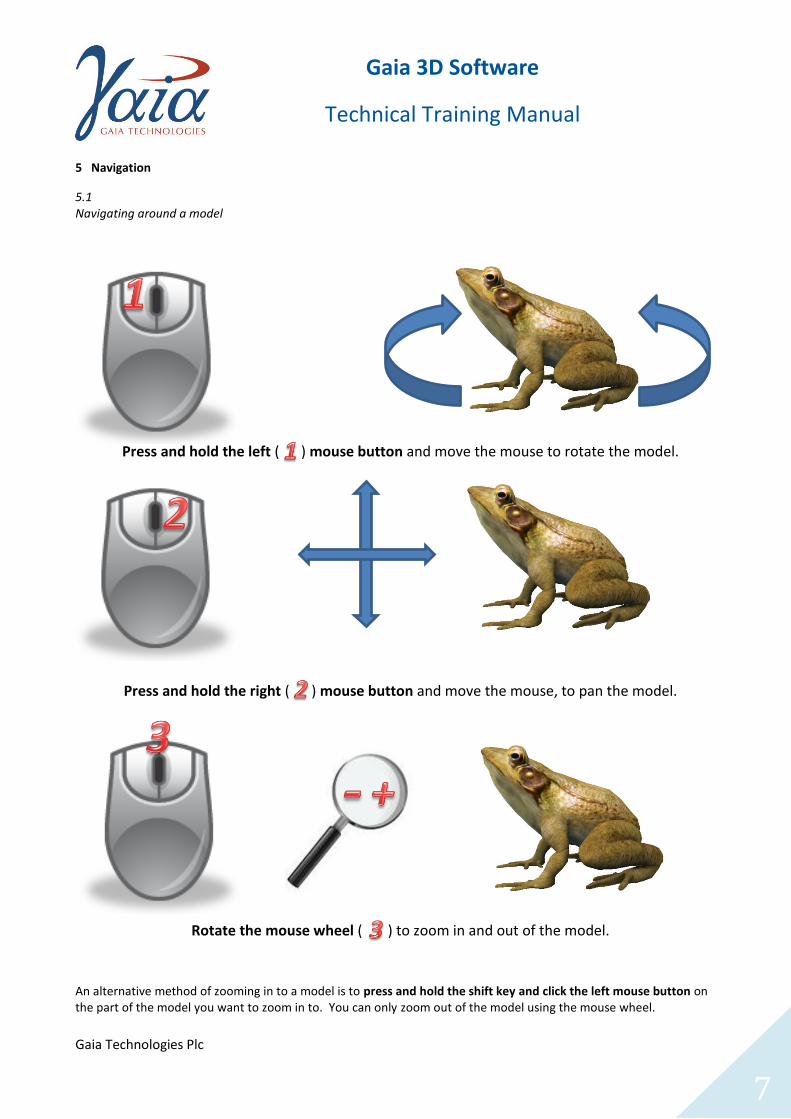
5 Navigation
5.1 Navigating around a model
Press and hold the left ( ) mouse button and move the mouse to rotate the model.
Press and hold the right ( ) mouse button and move the mouse, to pan the model.
Rotate the mouse wheel ( ) to zoom in and out of the model.
An alternative method of zooming in to a model is to press and hold the shift key and click the left mouse button on the part of the model you want to zoom in to. You can only zoom out of the model using the mouse wheel.

Gaia Technologies Plc
Gaia 3D Software
Technical Training Manual
8
5.2 Navigating on an Interactive Whiteboard (IWB)
To switch the IWB mode on/off, click on the options button.
Click on the Hardware button
Select the Whiteboard Mode on/off
IWB tools
Gaia Technologies Plc
Gaia 3D Software
Technical Training Manual
9
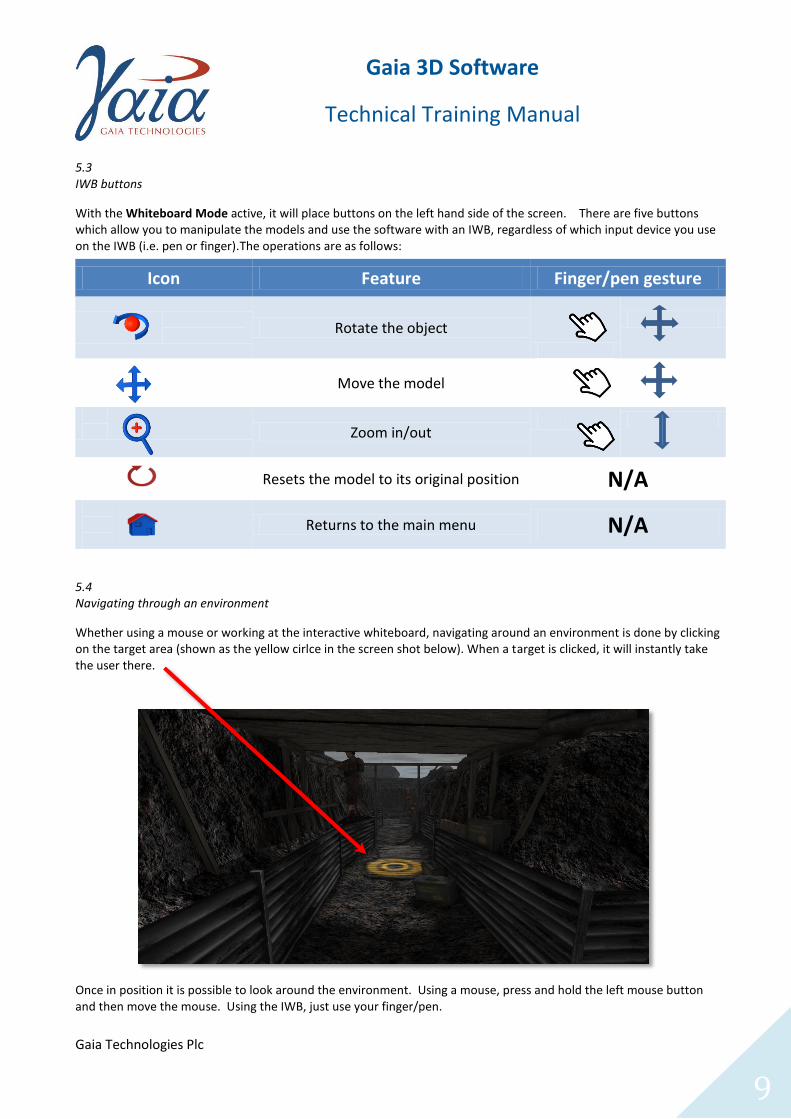
5.3 IWB buttons
With the Whiteboard Mode active, it will place buttons on the left hand side of the screen. There are five buttons which allow you to manipulate the models and use the software with an IWB, regardless of which input device you use on the IWB (i.e. pen or finger).The operations are as follows:
5.4 Navigating through an environment
Whether using a mouse or working at the interactive whiteboard, navigating around an environment is done by clicking on the target area (shown as the yellow cirlce in the screen shot below). When a target is clicked, it will instantly take the user there.
Once in position it is possible to look around the environment. Using a mouse, press and hold the left mouse button and then move the mouse. Using the IWB, just use your finger/pen.
Icon Feature Finger/pen gesture
Rotate the object
Move the model
Zoom in/out
Resets the model to its original position N/A
Returns to the main menu N/A
Gaia Technologies Plc
Gaia 3D Software
Technical Training Manual
10
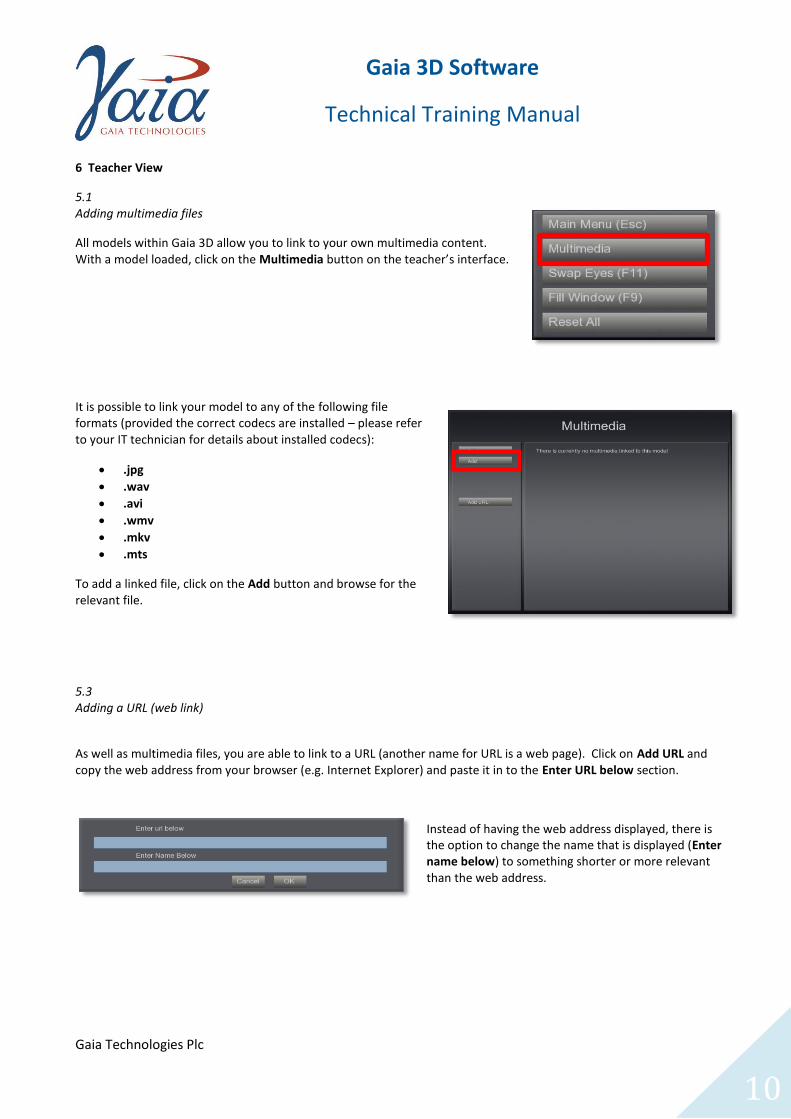
6 Teacher View
5.1 Adding multimedia files
All models within Gaia 3D allow you to link to your own multimedia content. With a model loaded, click on the Multimedia button on the teacher’s interface.
It is possible to link your model to any of the following file formats (provided the correct codecs are installed – please refer to your IT technician for details about installed codecs):
.jpg
.wav
.avi
.wmv
.mkv
.mts
To add a linked file, click on the Add button and browse for the relevant file.
5.3 Adding a URL (web link)
As well as multimedia files, you are able to link to a URL (another name for URL is a web page). Click on Add URL and copy the web address from your browser (e.g. Internet Explorer) and paste it in to the Enter URL below section.
Instead of having the web address displayed, there is the option to change the name that is displayed (Enter name below) to something shorter or more relevant than the web address.
Gaia Technologies Plc
Gaia 3D Software
Technical Training Manual
11
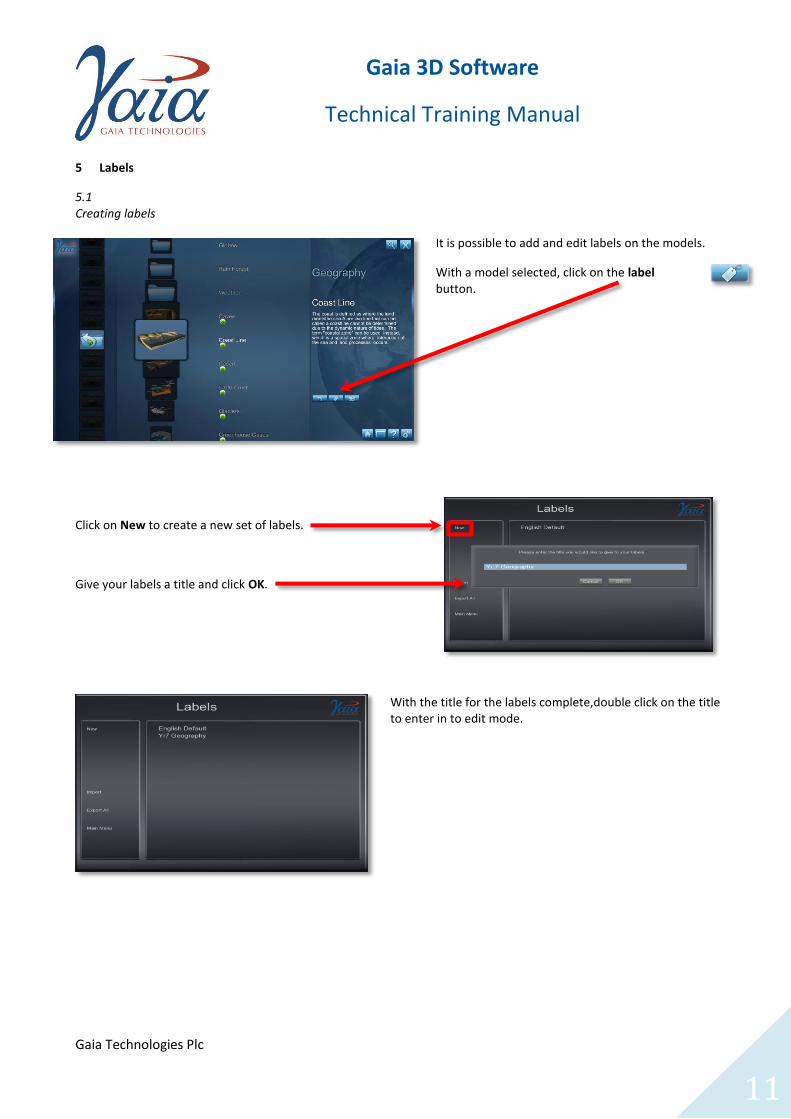
5 Labels
5.1 Creating labels
It is possible to add and edit labels on the models.
With a model selected, click on the label button.
Click on New to create a new set of labels.
Give your labels a title and click OK.
With the title for the labels complete,double click on the title to enter in to edit mode.
Gaia Technologies Plc
Gaia 3D Software
Technical Training Manual
12
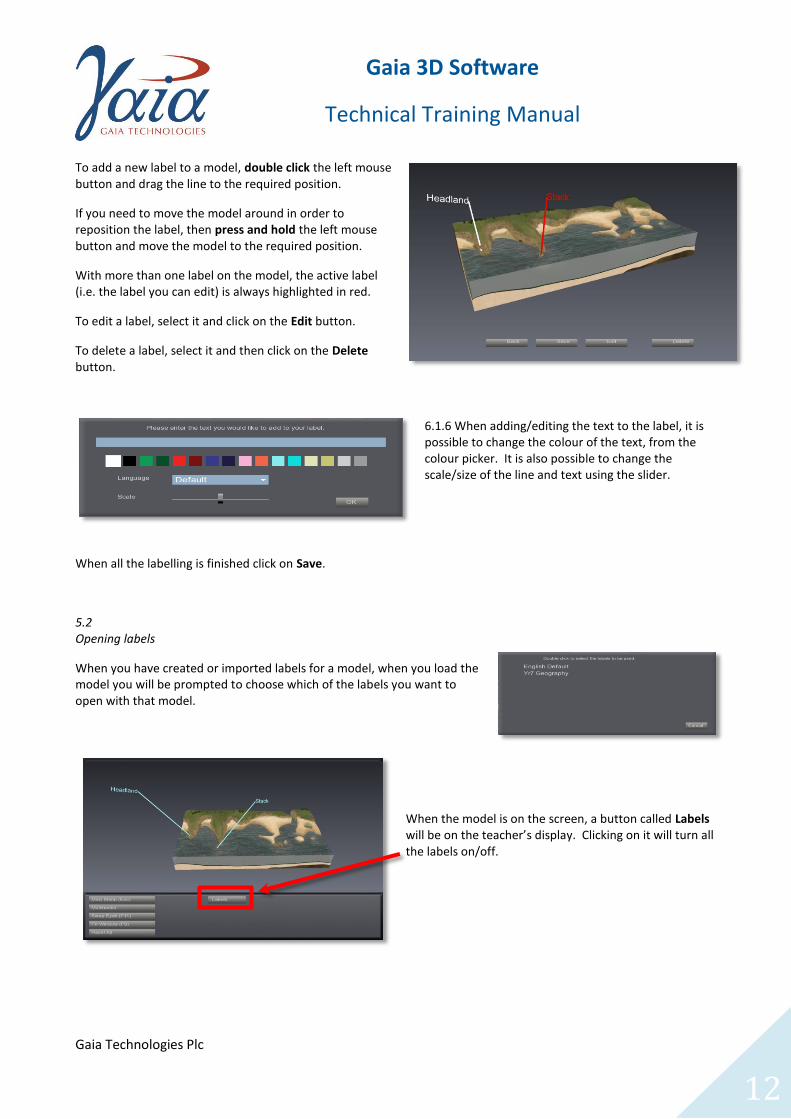
To add a new label to a model, double click the left mouse button and drag the line to the required position.
If you need to move the model around in order to reposition the label, then press and hold the left mouse button and move the model to the required position.
With more than one label on the model, the active label (i.e. the label you can edit) is always highlighted in red.
To edit a label, select it and click on the Edit button.
To delete a label, select it and then click on the Delete button.
6.1.6 When adding/editing the text to the label, it is possible to change the colour of the text, from the colour picker. It is also possible to change the scale/size of the line and text using the slider.
When all the labelling is finished click on Save.
5.2 Opening labels
When you have created or imported labels for a model, when you load the model you will be prompted to choose which of the labels you want to open with that model.
When the model is on the screen, a button called Labels will be on the teacher’s display. Clicking on it will turn all the labels on/off.
Gaia Technologies Plc
Gaia 3D Software
Technical Training Manual
13
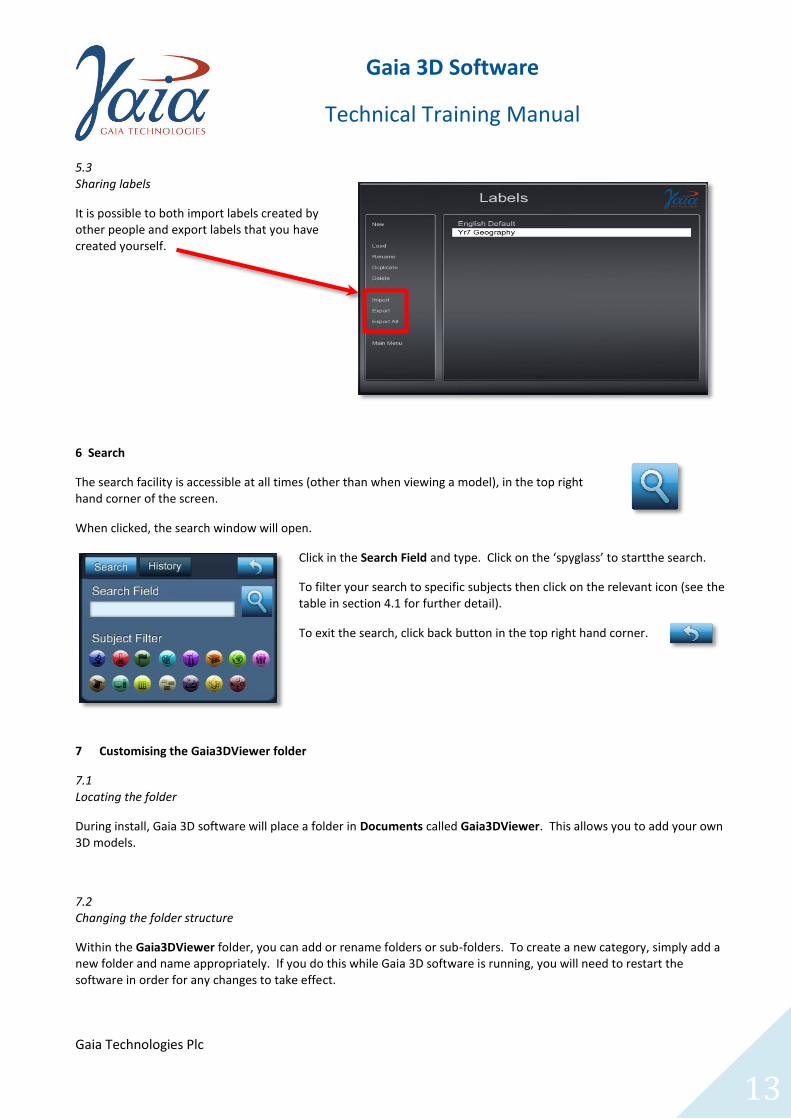
5.3 Sharing labels
It is possible to both import labels created by other people and export labels that you have created yourself.
6 Search
The search facility is accessible at all times (other than when viewing a model), in the top right hand corner of the screen.
When clicked, the search window will open.
Click in the Search Field and type. Click on the ‘spyglass’ to startthe search.
To filter your search to specific subjects then click on the relevant icon (see the table in section 4.1 for further detail).
To exit the search, click back button in the top right hand corner.
7 Customising the Gaia3DViewer folder
7.1 Locating the folder
During install, Gaia 3D software will place a folder in Documents called Gaia3DViewer. This allows you to add your own 3D models.
7.2 Changing the folder structure
Within the Gaia3DViewer folder, you can add or rename folders or sub-folders. To create a new category, simply add a new folder and name appropriately. If you do this while Gaia 3D software is running, you will need to restart the software in order for any changes to take effect.
Gaia Technologies Plc
Gaia 3D Software
Technical Training Manual
14
8 Options
8.1
3D
This gives the different options to change the type of 3D you use. The default option for this, is
Frame Sequential.
Although the 3D options do not need to be changed once they are set up for the system being used, it may be required
from time-to time to change to viewing the software in 2D. To do this, click on None and then you will be prompted to
restart the software for the setting to take effect.
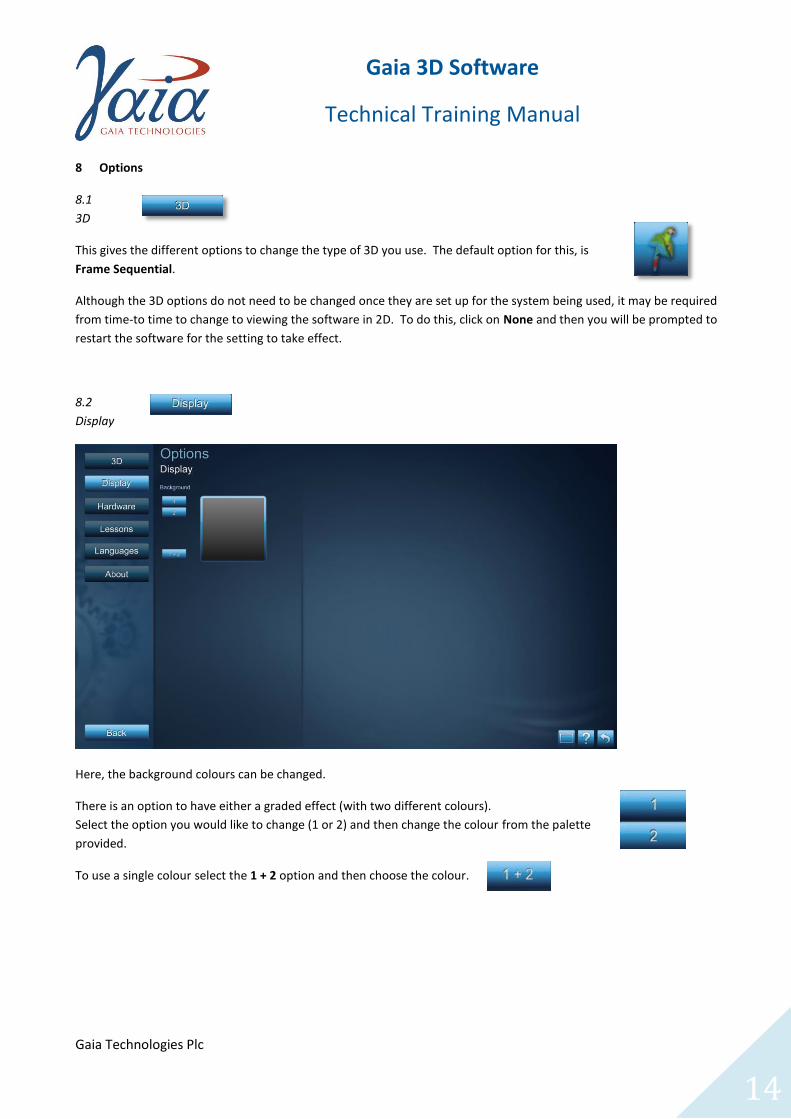
8.2
Display
Here, the background colours can be changed.
There is an option to have either a graded effect (with two different colours).
Select the option you would like to change (1 or 2) and then change the colour from the palette
provided.
To use a single colour select the 1 + 2 option and then choose the colour.
Gaia Technologies Plc
Gaia 3D Software
Technical Training Manual
15
Trimble 3D Warehouse (fromerly Google 3D Warehouse)
8.1 Searching for models
There are many thousands of free 3D models already available from the Trimble 3D Warehouse
(http://sketchup.google.com/3dwarehouse/). Almost all models that are available on Google Earth are available for
download but there are also tens of thousands of user generated models available. As the majority of these models
have been
created by
users, then
quality and accuracy of them may need to be checked before using for educational purposes.
8.2 Searching & downloading models
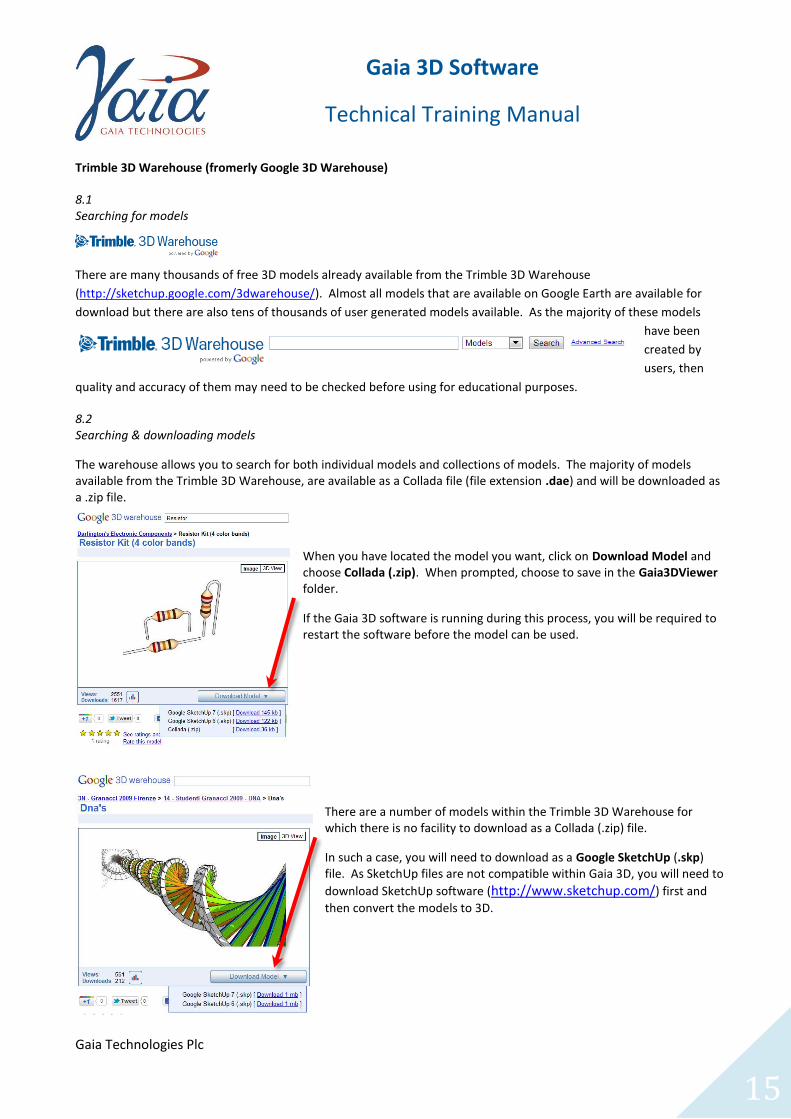
The warehouse allows you to search for both individual models and collections of models. The majority of models available from the Trimble 3D Warehouse, are available as a Collada file (file extension .dae) and will be downloaded as a .zip file.
When you have located the model you want, click on Download Model and choose Collada (.zip). When prompted, choose to save in the Gaia3DViewer folder.
If the Gaia 3D software is running during this process, you will be required to restart the software before the model can be used.
There are a number of models within the Trimble 3D Warehouse for which there is no facility to download as a Collada (.zip) file.
In such a case, you will need to download as a Google SketchUp (.skp) file. As SketchUp files are not compatible within Gaia 3D, you will need to
download SketchUp software (http://www.sketchup.com/) first and
then convert the models to 3D.
Gaia Technologies Plc
Gaia 3D Software
Technical Training Manual
16
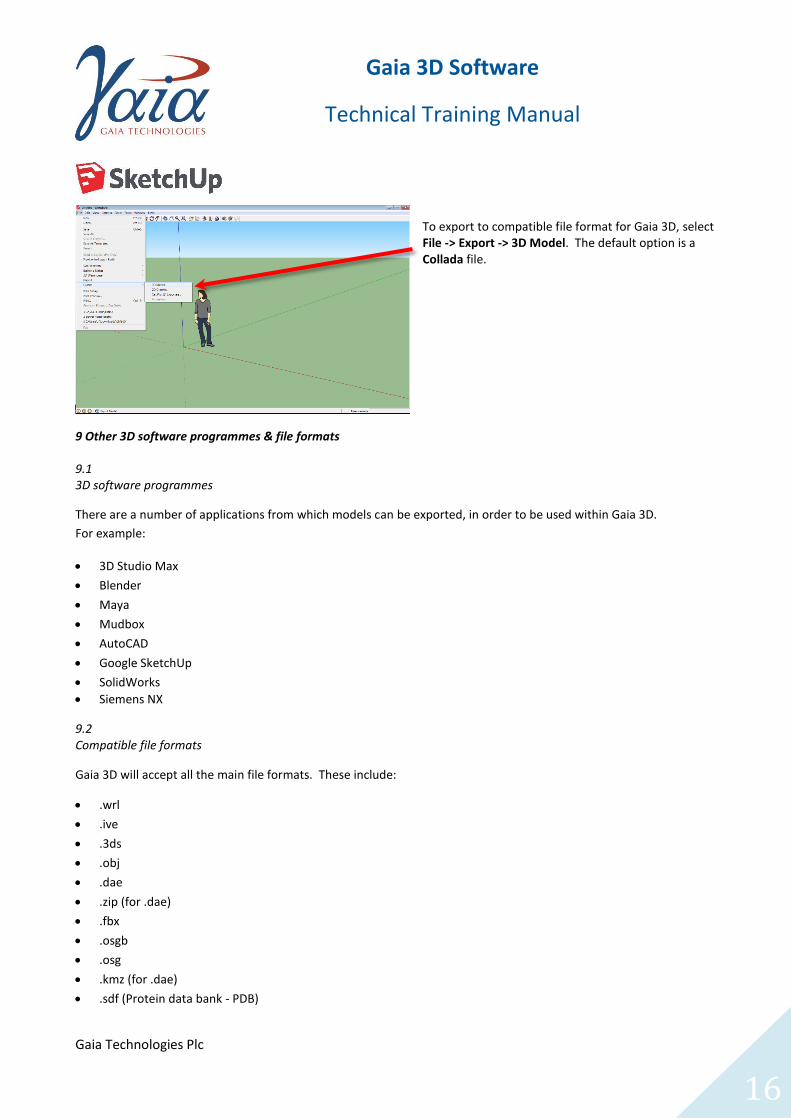
To export to compatible file format for Gaia 3D, select File -> Export -> 3D Model. The default option is a Collada file.
9 Other 3D software programmes & file formats 9.1 3D software programmes
There are a number of applications from which models can be exported, in order to be used within Gaia 3D.
For example:
3D Studio Max
Blender
Maya
Mudbox
AutoCAD
Google SketchUp
SolidWorks
Siemens NX
9.2 Compatible file formats
Gaia 3D will accept all the main file formats. These include:
.wrl
.ive
.3ds
.obj
.dae
.zip (for .dae)
.fbx
.osgb
.osg
.kmz (for .dae)
.sdf (Protein data bank - PDB)

Gaia Technologies Plc
Gaia 3D Software
Technical Training Manual
17
10 Lesson directory location
In case users are not able to access the Gaia lesson content directory, due to permissions, it is possible to have up to five locations for your lesson directories.
To add a new directory location, select Options -> Lessons.
11 Automatic Updates
When new content or software updates are provided by Gaia, you will be informed via newsletter/email. To download the updates, we recommend the use of the Check for Automatic Updates option in the Start menu.
We only recommend you follow this method if you are updating to a PC with a local install. Should you have the software installed on a server; Gaia will provide you with the software, via links in an email.
Locate the Gaia 3D Viewer in the Start menu
Click on Check for Automatic Updates
A window will open with confirmation of the update and its size.
It will also give you information with regards to:
New features
Enhancements/improvements
Bug fixes
Gaia Technologies Plc
Gaia 3D Software
Technical Training Manual
18