g u i d e i n s t a l l a t i o n a n d c o n f i g u r a ... documentation/6/s360... ·...
TRANSCRIPT

Informatica® MDM - Supplier 36010.1 HotFix 5
Installation and Configuration Guide

Informatica MDM - Supplier 360 Installation and Configuration Guide10.1 HotFix 5November 2017
© Copyright Informatica LLC 2015, 2018
This software and documentation are provided only under a separate license agreement containing restrictions on use and disclosure. No part of this document may be reproduced or transmitted in any form, by any means (electronic, photocopying, recording or otherwise) without prior consent of Informatica LLC.
U.S. GOVERNMENT RIGHTS Programs, software, databases, and related documentation and technical data delivered to U.S. Government customers are "commercial computer software" or "commercial technical data" pursuant to the applicable Federal Acquisition Regulation and agency-specific supplemental regulations. As such, the use, duplication, disclosure, modification, and adaptation is subject to the restrictions and license terms set forth in the applicable Government contract, and, to the extent applicable by the terms of the Government contract, the additional rights set forth in FAR 52.227-19, Commercial Computer Software License.
Informatica and the Informatica logo are trademarks or registered trademarks of Informatica LLC in the United States and many jurisdictions throughout the world. A current list of Informatica trademarks is available on the web at https://www.informatica.com/trademarks.html. Other company and product names may be trade names or trademarks of their respective owners.
The information in this documentation is subject to change without notice. If you find any problems in this documentation, please report them to us in writing at Informatica LLC 2100 Seaport Blvd. Redwood City, CA 94063.
Informatica products are warranted according to the terms and conditions of the agreements under which they are provided. INFORMATICA PROVIDES THE INFORMATION IN THIS DOCUMENT "AS IS" WITHOUT WARRANTY OF ANY KIND, EXPRESS OR IMPLIED, INCLUDING WITHOUT ANY WARRANTIES OF MERCHANTABILITY, FITNESS FOR A PARTICULAR PURPOSE AND ANY WARRANTY OR CONDITION OF NON-INFRINGEMENT.
Publication Date: 2018-04-05

Table of Contents
Preface . . . . . . . . . . . . . . . . . . . . . . . . . . . . . . . . . . . . . . . . . . . . . . . . . . . . . . . . . . . . . . . . . . . . . . 7Informatica Resources. . . . . . . . . . . . . . . . . . . . . . . . . . . . . . . . . . . . . . . . . . . . . . . . . . . 7
Informatica Network. . . . . . . . . . . . . . . . . . . . . . . . . . . . . . . . . . . . . . . . . . . . . . . . . 7
Informatica Knowledge Base. . . . . . . . . . . . . . . . . . . . . . . . . . . . . . . . . . . . . . . . . . . . 7
Informatica Documentation. . . . . . . . . . . . . . . . . . . . . . . . . . . . . . . . . . . . . . . . . . . . . 7
Informatica Product Availability Matrixes. . . . . . . . . . . . . . . . . . . . . . . . . . . . . . . . . . . . 8
Informatica Velocity. . . . . . . . . . . . . . . . . . . . . . . . . . . . . . . . . . . . . . . . . . . . . . . . . . 8
Informatica Marketplace. . . . . . . . . . . . . . . . . . . . . . . . . . . . . . . . . . . . . . . . . . . . . . . 8
Informatica Global Customer Support. . . . . . . . . . . . . . . . . . . . . . . . . . . . . . . . . . . . . . 8
Chapter 1: Introduction to Informatica MDM - Supplier 360. . . . . . . . . . . . . . . . . . . 9Informatica MDM - Supplier 360 Application Overview. . . . . . . . . . . . . . . . . . . . . . . . . . . . . . . 9
Example. . . . . . . . . . . . . . . . . . . . . . . . . . . . . . . . . . . . . . . . . . . . . . . . . . . . . . . . 10
Architecture. . . . . . . . . . . . . . . . . . . . . . . . . . . . . . . . . . . . . . . . . . . . . . . . . . . . . . . . . 11
Supplier Management. . . . . . . . . . . . . . . . . . . . . . . . . . . . . . . . . . . . . . . . . . . . . . . . 11
Supplier Portal. . . . . . . . . . . . . . . . . . . . . . . . . . . . . . . . . . . . . . . . . . . . . . . . . . . . 12
Product Information Management Integration. . . . . . . . . . . . . . . . . . . . . . . . . . . . . . . . 12
Supplier Data Models and Database Schema. . . . . . . . . . . . . . . . . . . . . . . . . . . . . . . . . . . . 13
User Roles. . . . . . . . . . . . . . . . . . . . . . . . . . . . . . . . . . . . . . . . . . . . . . . . . . . . . . . . . . 13
User Authentication. . . . . . . . . . . . . . . . . . . . . . . . . . . . . . . . . . . . . . . . . . . . . . . . . 14
Business Processes for Supplier Management. . . . . . . . . . . . . . . . . . . . . . . . . . . . . . . . . . . 14
Supplier Profile. . . . . . . . . . . . . . . . . . . . . . . . . . . . . . . . . . . . . . . . . . . . . . . . . . . . 14
Storage for Supplier Documents. . . . . . . . . . . . . . . . . . . . . . . . . . . . . . . . . . . . . . . . . 15
Supplier 360. . . . . . . . . . . . . . . . . . . . . . . . . . . . . . . . . . . . . . . . . . . . . . . . . . . . . . 15
Online Supplier Application Form. . . . . . . . . . . . . . . . . . . . . . . . . . . . . . . . . . . . . . . . . 16
Supplier Profile Maintenance. . . . . . . . . . . . . . . . . . . . . . . . . . . . . . . . . . . . . . . . . . . 16
Product Information Management Integration. . . . . . . . . . . . . . . . . . . . . . . . . . . . . . . . . . . 16
MDM-PIM Adapter. . . . . . . . . . . . . . . . . . . . . . . . . . . . . . . . . . . . . . . . . . . . . . . . . . 16
Product Catalogs. . . . . . . . . . . . . . . . . . . . . . . . . . . . . . . . . . . . . . . . . . . . . . . . . . . 17
Chapter 2: S360 Installation Overview. . . . . . . . . . . . . . . . . . . . . . . . . . . . . . . . . . . . . . . 18Installation Overview. . . . . . . . . . . . . . . . . . . . . . . . . . . . . . . . . . . . . . . . . . . . . . . . . . . 18
Read the Release Notes. . . . . . . . . . . . . . . . . . . . . . . . . . . . . . . . . . . . . . . . . . . . . . . . . 18
Verify Software Requirements. . . . . . . . . . . . . . . . . . . . . . . . . . . . . . . . . . . . . . . . . . . . . . 19
Verify Minimum System Requirements. . . . . . . . . . . . . . . . . . . . . . . . . . . . . . . . . . . . . 19
Pre-installation Tasks. . . . . . . . . . . . . . . . . . . . . . . . . . . . . . . . . . . . . . . . . . . . . . . . . . . 19
Installation Topology. . . . . . . . . . . . . . . . . . . . . . . . . . . . . . . . . . . . . . . . . . . . . . . . . . . 20
Install the S360 Application. . . . . . . . . . . . . . . . . . . . . . . . . . . . . . . . . . . . . . . . . . . . . . . 20
Post-installation Tasks. . . . . . . . . . . . . . . . . . . . . . . . . . . . . . . . . . . . . . . . . . . . . . . . . . 20
Table of Contents 3

Chapter 3: Before You Install. . . . . . . . . . . . . . . . . . . . . . . . . . . . . . . . . . . . . . . . . . . . . . . . 21Extract the Application. . . . . . . . . . . . . . . . . . . . . . . . . . . . . . . . . . . . . . . . . . . . . . . . . . 21
Create the Operational Reference Store. . . . . . . . . . . . . . . . . . . . . . . . . . . . . . . . . . . . . . . 22
Import the Database Schema into the Operational Reference Store. . . . . . . . . . . . . . . . . . . . . . 23
Importing the MDM Metadata. . . . . . . . . . . . . . . . . . . . . . . . . . . . . . . . . . . . . . . . . . . 24
Registering the Operational Reference Store. . . . . . . . . . . . . . . . . . . . . . . . . . . . . . . . . 25
Importing the Application Metadata. . . . . . . . . . . . . . . . . . . . . . . . . . . . . . . . . . . . . . . 25
Uploading Composite Objects and Composite Services. . . . . . . . . . . . . . . . . . . . . . . . . . 26
Creating an Additional Repository Table. . . . . . . . . . . . . . . . . . . . . . . . . . . . . . . . . . . . 26
Inserting Reference Data. . . . . . . . . . . . . . . . . . . . . . . . . . . . . . . . . . . . . . . . . . . . . . 26
Integrate the MDM Hub with Informatica Address Verification Cleanse Engine. . . . . . . . . . . . . . . 27
Import InfaSupplierMaster into Informatica Data Director. . . . . . . . . . . . . . . . . . . . . . . . . . . . 27
Importing InfaSupplierMaster into Informatica Data Director. . . . . . . . . . . . . . . . . . . . . . . 27
Inserting Entity 360 Component Instances. . . . . . . . . . . . . . . . . . . . . . . . . . . . . . . . . . . 28
Assign a Message Queue for the Message Triggers. . . . . . . . . . . . . . . . . . . . . . . . . . . . . . . . 29
Setting the Configuration Properties. . . . . . . . . . . . . . . . . . . . . . . . . . . . . . . . . . . . . . . . . 29
Setting Properties in the connection_properties.properties File. . . . . . . . . . . . . . . . . . . . . 29
Setting Properties in the appconfig.properties File. . . . . . . . . . . . . . . . . . . . . . . . . . . . . 30
Setting Properties in the siperian-client.properties File. . . . . . . . . . . . . . . . . . . . . . . . . . . 30
Install the Application Configuration Tool. . . . . . . . . . . . . . . . . . . . . . . . . . . . . . . . . . . . . . 30
Prerequisites. . . . . . . . . . . . . . . . . . . . . . . . . . . . . . . . . . . . . . . . . . . . . . . . . . . . . 31
Installing the Application Configuration Tool. . . . . . . . . . . . . . . . . . . . . . . . . . . . . . . . . 31
Setting the cmx.dataview.enabled Property to True. . . . . . . . . . . . . . . . . . . . . . . . . . . . . 32
Enabling the HTTPS Protocol. . . . . . . . . . . . . . . . . . . . . . . . . . . . . . . . . . . . . . . . . . . . . . 32
Configure the Supplier 360 Properties. . . . . . . . . . . . . . . . . . . . . . . . . . . . . . . . . . . . . . . . 33
Supplier 360 Properties. . . . . . . . . . . . . . . . . . . . . . . . . . . . . . . . . . . . . . . . . . . . . . . 33
Setting Properties from the Application Configuration UI. . . . . . . . . . . . . . . . . . . . . . . . . 36
Configuring the Security Property. . . . . . . . . . . . . . . . . . . . . . . . . . . . . . . . . . . . . . . . 36
Configure the Supplier Portal. . . . . . . . . . . . . . . . . . . . . . . . . . . . . . . . . . . . . . . . . . . . . . 36
Adding Images for the Supplier Portal. . . . . . . . . . . . . . . . . . . . . . . . . . . . . . . . . . . . . 36
Configure the Products and Services Page. . . . . . . . . . . . . . . . . . . . . . . . . . . . . . . . . . 37
Configure the Product Related Questions Page. . . . . . . . . . . . . . . . . . . . . . . . . . . . . . . . 40
Configure Email Templates. . . . . . . . . . . . . . . . . . . . . . . . . . . . . . . . . . . . . . . . . . . . . . . 41
Configure the Email Templates. . . . . . . . . . . . . . . . . . . . . . . . . . . . . . . . . . . . . . . . . . 42
Configure the Body Text in Email Templates. . . . . . . . . . . . . . . . . . . . . . . . . . . . . . . . . 44
Configure Product Information Management. . . . . . . . . . . . . . . . . . . . . . . . . . . . . . . . . . . . 45
Edit Email Templates for Informatica Product 360. . . . . . . . . . . . . . . . . . . . . . . . . . . . . . 45
Set Configuration Properties in Informatica Product 360 Supplier Portal. . . . . . . . . . . . . . . 45
Create Users in the PIM Server. . . . . . . . . . . . . . . . . . . . . . . . . . . . . . . . . . . . . . . . . . 46
Edit the webfrontend.properties File. . . . . . . . . . . . . . . . . . . . . . . . . . . . . . . . . . . . . . . 48
4 Table of Contents

Chapter 4: Install the Application. . . . . . . . . . . . . . . . . . . . . . . . . . . . . . . . . . . . . . . . . . . . 49Install the Application Overview. . . . . . . . . . . . . . . . . . . . . . . . . . . . . . . . . . . . . . . . . . . . 49
Installing the Supplier 360 Application. . . . . . . . . . . . . . . . . . . . . . . . . . . . . . . . . . . . . . . . 49
Chapter 5: After You Install. . . . . . . . . . . . . . . . . . . . . . . . . . . . . . . . . . . . . . . . . . . . . . . . . 51Configure the MDM Hub. . . . . . . . . . . . . . . . . . . . . . . . . . . . . . . . . . . . . . . . . . . . . . . . . 51
Add User Accounts and Assign Roles for Business Users. . . . . . . . . . . . . . . . . . . . . . . . . 51
Configure the Hub for Informatica Product 360. . . . . . . . . . . . . . . . . . . . . . . . . . . . . . . . 56
Configure the Operational Reference Store. . . . . . . . . . . . . . . . . . . . . . . . . . . . . . . . . . . . . 57
Truncating a Repository Table. . . . . . . . . . . . . . . . . . . . . . . . . . . . . . . . . . . . . . . . . . 57
Setting the Value of the GETLIST Limit Property. . . . . . . . . . . . . . . . . . . . . . . . . . . . . . . 57
Populate Supplier 360 Charts with Data. . . . . . . . . . . . . . . . . . . . . . . . . . . . . . . . . . . . . . . 58
Chart Configurations for Supplier 360. . . . . . . . . . . . . . . . . . . . . . . . . . . . . . . . . . . . . . 58
Importing the Chart Configurations. . . . . . . . . . . . . . . . . . . . . . . . . . . . . . . . . . . . . . . 58
Configuring the Data Mart Database Connection. . . . . . . . . . . . . . . . . . . . . . . . . . . . . . . 59
Configuring Parameters. . . . . . . . . . . . . . . . . . . . . . . . . . . . . . . . . . . . . . . . . . . . . . 60
Populating the Data Mart with Data. . . . . . . . . . . . . . . . . . . . . . . . . . . . . . . . . . . . . . . 61
Configure the ActiveVOS Email Service. . . . . . . . . . . . . . . . . . . . . . . . . . . . . . . . . . . . . . . . 62
Mail Server Properties. . . . . . . . . . . . . . . . . . . . . . . . . . . . . . . . . . . . . . . . . . . . . . . . 62
Configuring the ActiveVOS Email Service. . . . . . . . . . . . . . . . . . . . . . . . . . . . . . . . . . . . 62
Test the Supplier Portal. . . . . . . . . . . . . . . . . . . . . . . . . . . . . . . . . . . . . . . . . . . . . . . . . . 63
Test Supplier 360. . . . . . . . . . . . . . . . . . . . . . . . . . . . . . . . . . . . . . . . . . . . . . . . . . . . . . 63
Chapter 6: Business Processes for Supplier Management. . . . . . . . . . . . . . . . . . . . 64Business Processes for Supplier Management Overview. . . . . . . . . . . . . . . . . . . . . . . . . . . . . 64
Create a Supplier Process. . . . . . . . . . . . . . . . . . . . . . . . . . . . . . . . . . . . . . . . . . . . . . . . 65
Supplier Profile Change Approval Process. . . . . . . . . . . . . . . . . . . . . . . . . . . . . . . . . . . . . . 66
Delete a Supplier Internal Process. . . . . . . . . . . . . . . . . . . . . . . . . . . . . . . . . . . . . . . . . . . 67
Chapter 7: Customize the Application. . . . . . . . . . . . . . . . . . . . . . . . . . . . . . . . . . . . . . . 68Customize the Application Overview. . . . . . . . . . . . . . . . . . . . . . . . . . . . . . . . . . . . . . . . . 68
Extending the Data Model. . . . . . . . . . . . . . . . . . . . . . . . . . . . . . . . . . . . . . . . . . . . . . . . 68
Guidelines for Extending the Data Model. . . . . . . . . . . . . . . . . . . . . . . . . . . . . . . . . . . . 69
Guidelines for Adding Base Objects. . . . . . . . . . . . . . . . . . . . . . . . . . . . . . . . . . . . . . . 69
Extending the Business Entities and Business Entity Views. . . . . . . . . . . . . . . . . . . . . . . . . . . 70
Guidelines for Extending Business Entities and Business Entity Views. . . . . . . . . . . . . . . . . 70
Customize Edit Privileges for Supplier Profile Pages. . . . . . . . . . . . . . . . . . . . . . . . . . . . . . . 70
Default Page Privileges. . . . . . . . . . . . . . . . . . . . . . . . . . . . . . . . . . . . . . . . . . . . . . . 71
Page User Roles and Edit Privileges. . . . . . . . . . . . . . . . . . . . . . . . . . . . . . . . . . . . . . . 71
Supplier Portal User Roles and Edit Privileges. . . . . . . . . . . . . . . . . . . . . . . . . . . . . . . . 72
<resource> Attributes. . . . . . . . . . . . . . . . . . . . . . . . . . . . . . . . . . . . . . . . . . . . . . . . 73
Editing Page Privileges. . . . . . . . . . . . . . . . . . . . . . . . . . . . . . . . . . . . . . . . . . . . . . . 73
Table of Contents 5

Chapter 8: Troubleshooting. . . . . . . . . . . . . . . . . . . . . . . . . . . . . . . . . . . . . . . . . . . . . . . . . 74Suppliers are not created in Informatica Product 360. . . . . . . . . . . . . . . . . . . . . . . . . . . . . . . 74
Suppliers report issues with the Products and Services list. . . . . . . . . . . . . . . . . . . . . . . . . . . 74
Cannot Log In to the Informatica Data Director Application. . . . . . . . . . . . . . . . . . . . . . . . . . . 75
Chapter 9: MDM - Supplier 360 Upgrade. . . . . . . . . . . . . . . . . . . . . . . . . . . . . . . . . . . . . 76Upgrade Overview. . . . . . . . . . . . . . . . . . . . . . . . . . . . . . . . . . . . . . . . . . . . . . . . . . . . . 76
Extracting the Application. . . . . . . . . . . . . . . . . . . . . . . . . . . . . . . . . . . . . . . . . . . . . . . . 76
Importing the Database Schema. . . . . . . . . . . . . . . . . . . . . . . . . . . . . . . . . . . . . . . . . . . . 77
Adding JBoss Remoting JAR Files to Lib Folder. . . . . . . . . . . . . . . . . . . . . . . . . . . . . . . . . . 78
Installing the Application Configuration Tool. . . . . . . . . . . . . . . . . . . . . . . . . . . . . . . . . . . . 78
Enabling the HTTPS Protocol. . . . . . . . . . . . . . . . . . . . . . . . . . . . . . . . . . . . . . . . . . . . . . 78
Setting the cmx.dataview.enabled Property to True. . . . . . . . . . . . . . . . . . . . . . . . . . . . . . . . 79
Verifying the S360 Application Settings. . . . . . . . . . . . . . . . . . . . . . . . . . . . . . . . . . . . . . . 79
Installing S360. . . . . . . . . . . . . . . . . . . . . . . . . . . . . . . . . . . . . . . . . . . . . . . . . . . . . . . 80
Index. . . . . . . . . . . . . . . . . . . . . . . . . . . . . . . . . . . . . . . . . . . . . . . . . . . . . . . . . . . . 81
6 Table of Contents

PrefaceThis guide is intended for MDM administrators. Administrators use the guide to install, configure, and customize the Informatica MDM - Supplier360 Application. For more information about configuring the underlying Informatica MDM ME environment, see the Informatica MDM Multidomain Edition Configuration Guide.
Informatica Resources
Informatica NetworkInformatica Network hosts Informatica Global Customer Support, the Informatica Knowledge Base, and other product resources. To access Informatica Network, visit https://network.informatica.com.
As a member, you can:
• Access all of your Informatica resources in one place.
• Search the Knowledge Base for product resources, including documentation, FAQs, and best practices.
• View product availability information.
• Review your support cases.
• Find your local Informatica User Group Network and collaborate with your peers.
Informatica Knowledge BaseUse the Informatica Knowledge Base to search Informatica Network for product resources such as documentation, how-to articles, best practices, and PAMs.
To access the Knowledge Base, visit https://kb.informatica.com. If you have questions, comments, or ideas about the Knowledge Base, contact the Informatica Knowledge Base team at [email protected].
Informatica DocumentationTo get the latest documentation for your product, browse the Informatica Knowledge Base at https://kb.informatica.com/_layouts/ProductDocumentation/Page/ProductDocumentSearch.aspx.
If you have questions, comments, or ideas about this documentation, contact the Informatica Documentation team through email at [email protected].
7

Informatica Product Availability MatrixesProduct Availability Matrixes (PAMs) indicate the versions of operating systems, databases, and other types of data sources and targets that a product release supports. If you are an Informatica Network member, you can access PAMs at https://network.informatica.com/community/informatica-network/product-availability-matrices.
Informatica VelocityInformatica Velocity is a collection of tips and best practices developed by Informatica Professional Services. Developed from the real-world experience of hundreds of data management projects, Informatica Velocity represents the collective knowledge of our consultants who have worked with organizations from around the world to plan, develop, deploy, and maintain successful data management solutions.
If you are an Informatica Network member, you can access Informatica Velocity resources at http://velocity.informatica.com.
If you have questions, comments, or ideas about Informatica Velocity, contact Informatica Professional Services at [email protected].
Informatica MarketplaceThe Informatica Marketplace is a forum where you can find solutions that augment, extend, or enhance your Informatica implementations. By leveraging any of the hundreds of solutions from Informatica developers and partners, you can improve your productivity and speed up time to implementation on your projects. You can access Informatica Marketplace at https://marketplace.informatica.com.
Informatica Global Customer SupportYou can contact a Global Support Center by telephone or through Online Support on Informatica Network.
To find your local Informatica Global Customer Support telephone number, visit the Informatica website at the following link: http://www.informatica.com/us/services-and-training/support-services/global-support-centers.
If you are an Informatica Network member, you can use Online Support at http://network.informatica.com.
8 Preface

C h a p t e r 1
Introduction to Informatica MDM - Supplier 360
This chapter includes the following topics:
• Informatica MDM - Supplier 360 Application Overview, 9
• Architecture, 11
• Supplier Data Models and Database Schema, 13
• User Roles, 13
• Business Processes for Supplier Management, 14
• Product Information Management Integration, 16
Informatica MDM - Supplier 360 Application OverviewInformatica MDM - Supplier 360 (S360) provides clean, consistent, and connected information about suppliers. Business managers use this master supplier data to make better business decisions about suppliers and to implement processes that can save the organization money.
With S360, business users can achieve the following goals:
• Automate supplier applications and profile maintenance with the Supplier Portal.
• Streamline the supplier onboarding and qualification processes.
• Centralize data about suppliers in a master database.
• Enrich supplier data with related information, such as compliance documents, for a true 360 degree view of a supplier.
• Reflect relationships among suppliers, parent companies, subsidiaries, and subsuppliers.
• Alert business managers to existing and upcoming compliance issues.
• Analyze suppliers based on attributes, such as performance, location, products, services, and invoices.
• Connect supplier data with the supplier product catalogs.
• Distribute trustworthy supplier data to business applications and analytical applications across the organization.
S360 is an application designed for Informatica Master Data Management Multidomain Edition (Informatica MDM). Business users connect to master supplier data through a business-friendly user interface, which displays an enterprise-level dashboard as well as 360 degree supplier views that are customized for different business users.
9

You can add optional products to your S360 environment. When the environment includes a Product Information Management (PIM) system, such as Informatica Product 360 (PIM), suppliers can remotely upload product catalogs to the PIM system. When the environment includes Data-as-a-Service, all supplier contact information goes through a validation process.
S360 contains the following components:
• Supplier Relationship Management
• Supplier Portal
• Product Information Management Integration
ExampleA global automobile manufacturer experiences multiple issues with its supply chain. The management team has poor insight into everything from the total spend with a supplier to supplier performance.
Total spend is virtually impossible to assess. The manufacturer has hundreds of suppliers, and the supplier information is dispersed across multiple systems in different geographic areas. The same supplier can be in the systems under slightly different supplier names. The manufacturer holds multiple locally negotiated contracts with a supplier. Without a complete picture, the contract terms do not reflect the total spend with a supplier.
The management team does not have insight into supplier overall performance, such as the percentage of orders delivered on time over the last year. Therefore, managers do not take action to resolve performance issues. Late or incomplete shipments of parts continuously affect the supply chain. In some cases, managers have not lined up alternative suppliers for parts, so when parts are unavailable from one supplier, the manufacturing line falters.
Finally, the organization is acquiring another company later in the year. The management team wants a solution in place before that acquisition completes.
Informatica Solution
The IT department implements Informatica MDM - Supplier 360 (S360). An administrator loads data from source systems into S360, which includes a centralized database for master supplier profiles. Within the centralized database, the application identifies potential duplicate suppliers.
Data stewards review potential duplicate suppliers and merge the supplier profiles as appropriate. Data stewards edit supplier profiles and set up supplier relationships by identifying parent companies and their subsidiaries. Whenever a data steward modifies a record that is part of a supplier profile, the data steward sends the record for review through an online business process.
With the reviewed and approved master data in place, data stewards send invitations to all qualified suppliers to register on the Supplier Portal. Registered qualified suppliers can update their information, add product catalogs, and monitor their performance. Other suppliers use the Portal to apply to become a supplier to the organization. Online application forms go through an online onboarding and qualification process.
Managers participate in reviews of supplier applications and monitor supplier performance and compliance. When business managers identify compliance and performance issues, they create alerts to notify suppliers of the issues. Managers edit supplier profiles and initiate a change-approval review from the Data workspace. Managers identify alternative suppliers for all key parts and invite the suppliers to complete an online application through the Portal.
Results
Within the first year, the organization realized savings in the following areas:
• Saved on purchase prices by negotiating with suppliers to provide single favorable contracts for all locales, including volume discounts and early payment discounts
10 Chapter 1: Introduction to Informatica MDM - Supplier 360

• Reduced costly delays in the supply chain by using alternative suppliers for parts and by monitoring and correcting supplier performance
• Reduced administrative costs by implementing a self-service approach for new suppliers to apply online and for existing suppliers to maintain their supplier data online
• Reduced administrative costs by using an automated business process for the qualification workflow
• Reduced the costs of integrating supplier data after the acquisition by adding the acquired systems as source systems to the MDM Hub
ArchitectureThe Application requires Informatica MDM Multidomain Edition with Informatica Data Director and the embedded Informatica ActiveVOS Server. For mapping data, you can use any ETL product, such as Informatica PowerCenter. For product catalogs, you can use any Product Information Management system, such as Informatica Product 360.
The following diagram shows Supplier Relationship Management in the center and the Supplier Portal to the right. The inputs to the MDM Hub are internal and external data sources. A PIM system is optional.
Supplier ManagementS360 adds features to the Informatica MDM environment, such as a database schema for supplier data, business processes for supplier management, and an interface that business users use to access supplier data.
Supplier relationship management includes qualification of a supplier, supplier profile management, and assessment of the supplier performance.
Architecture 11

Informatica Master Data Management Multidomain EditionSupplier Relationship Management includes the standard Informatica MDM components:
Hub Store
Databases that store and consolidate business data. The Hub Store consists of an MDM Hub Master Database and Operational Reference Stores. The Application ships with a database schema that you use to create an Operational Reference Store for supplier master data.
Hub Server
A J2EE application that you deploy on an application server. The Hub Server processes data within the Hub Store and integrates the MDM Hub with external applications. The Hub Server is the run-time component that manages core and common services for the MDM Hub. It also manages user authentication across all components.
Process Server
A J2EE application that you deploy on an application server. The Process Server cleanses and matches data and performs batch jobs such as load, recalculates best version of the truth, and revalidates. The Process Server interfaces with cleanse engines to standardize the data and to optimize the data for match and consolidation.
ActiveVOS Server
Business process management software that automates business processes. The Application ships with business processes that help you to manage the supplier lifecycle. These processes ensure that authorized business managers review supplier applications and review internal updates to master data.
Informatica Data Director
A browser-based interface that business managers use to view and manage data. The Application ships with Supplier 360, which contains an enterprise-level Start workspace focused on suppliers and customizable Entity 360 views designed for business managers.
Hub Console
A browser-based interface that administrators use to manage the MDM Hub and data stewards use for managing records and batch processing of records.
Supplier PortalThe Supplier Portal (Portal) is a web application that you implement in a public-facing website. Suppliers use the Portal to initiate and maintain a supplier relationship with your organization.
The Portal requires that users log in. The MDM Server manages user authentication through its Security Access Manager.
Product Information Management IntegrationProduct Information Management (PIM) systems create a single repository for all product data. In S360, a PIM system is an optional component. When the Application environment includes a PIM system, suppliers can upload their product catalogs from the Supplier Portal.
When Informatica Product 360 is pre-installed, the Application integrates Informatica MDM and the Supplier Portal with Informatica Product 360 (PIM) through an MDM-PIM adapter. The MDM Hub Server manages user authentication with Informatica Product 360 through its Security Access Manager and a customized security provider.
12 Chapter 1: Introduction to Informatica MDM - Supplier 360

If you want to integrate the Application with a third-party PIM system, contact your Informatica representative. Your representative can request the customization of the MDM-PIM adapter for the third-party PIM system.
Supplier Data Models and Database SchemaYou configure an Operational Reference Store (ORS) to use a database schema designed for supplier data. The Application ships with a conceptual data model, a logical data model, and the database schema.
Conceptual Data Model for Supplier Data
The conceptual data model presents the entities, attributes, and relationships for supplier data.
Logical Data Model for Supplier Data
The logical data model presents the structure of the ORS for supplier data, including the tables, columns, foreign key relationships, and lookups.
Database Schema for Supplier Data
The database schema contains the base object tables, staging tables, and other elements required to create the schema for supplier data. You have a choice about whether you start the implementation with empty tables or whether you start with reference data. If you use the reference data, some of the repository tables are set up for you.
You can find the data model diagrams and a description of the database schema in the distribution package.
User RolesMDM Hub user roles control read and write privileges in the Operational Reference Store that contains the supplier master data.
The Application has the following MDM Hub user roles:
User roles for system users
User roles for system users include Application Administrator, Data Steward, and Data Entry Operator. The Application Administrator role is for a super user, who has full privileges.
User roles for business users
User roles for business users control the data privileges in the Operational Reference Store and also the review privileges in business processes. Each business user who is authorized to participate in supplier management receives one or more role assignments. Many people can have the same role.
S360 includes predefined roles for the following business users:
• Commodity Manager
• Finance Manager
• Contracts Manager
• Compliance Manager
Supplier Data Models and Database Schema 13

User roles for the Supplier Portal
User roles for the Portal control which pages can be edited and by whom. When an authorized supplier representative edits a page, the data in the Operational Reference Store is updated.
S360 includes the following predefined roles in the MDM Hub:
• Supplier Administrators
• Supplier Users
User AuthenticationThe MDM Hub manages user authentication across the MDM Hub, Supplier Portal, Supplier 360, and a PIM system. You only need to sign in once.
Business Processes for Supplier ManagementBusiness processes help you automate some common supplier lifecycle management workflows.
The Application ships with ActiveVOS business processes for the following workflows:
• Create a supplier (initiated from the Supplier Portal)
• Create or update a supplier profile (initiated from Supplier 360)
• Delete a supplier (initiated from Supplier 360)
For more information about the business processes, see the chapter on Business Processes for Supplier Management.
Supplier ProfileAfter a supplier is approved, the supplier application is converted to a supplier profile. The supplier profile contains all the information from the application.
Supplier representatives use the Supplier Portal to view their supplier profile. When a supplier representative signs on to the Portal, the representative sees the Welcome dashboard. In the left navigation panel under Company, the links summarize the information that makes up the supplier profile. In the display area, the representative can see messages, links to catalogs, notifications, renewal alerts, invoices, and some performance metrics. Authorized supplier representatives can modify information, add supporting documentation, upload catalogs, and monitor performance.
Business users use Supplier 360 to open and view supplier profiles. A data steward can edit data in the supplier profile, send notifications to the supplier, and change the status of a supplier. A data steward can also create supplier profiles.
If the Supplier Portal connects to a Product Management Information (PIM) system, the product catalog upload and product catalog management operations are available to the suppliers. The supplier must have the necessary permissions to upload and edit product catalogs.
14 Chapter 1: Introduction to Informatica MDM - Supplier 360

The following image shows the Supplier Portal user interface when the environment has a PIM system:
The following image shows the Supplier Portal user interface when the environment does not have a PIM system:
Storage for Supplier DocumentsWhen the Operational Reference Store (ORS) resides in an Oracle database or a Microsoft SQL Server database, you can upload documents to the ORS. Documents can include proof of insurance, certifications, or any other documentation required by your organization.
You can upload documents in any of the following file formats: .pdf, .doc, .png, and .jpg. The ORS stores the files as blobs (binary large objects) and the metadata about the stored files resides in a FILE_METADATA table, which is a child table of the party base object (PARTY_BO).
Supplier 360Business managers use Supplier 360 to access supplier master data. Supplier 360 runs in Informatica Data Director and acts on the supplier records stored in the Operational Reference Store that contains supplier data.
Business managers can view enterprise-level information about suppliers and view 360 degree information about a supplier. From the Start workspace, managers participate in the review process and monitor all suppliers. From the Data workspace, managers can edit supplier profiles, change the status of a supplier profile, create alerts that appear in the Supplier Portal, and launch the Entity 360 views. From the Entity 360
Business Processes for Supplier Management 15

views, managers monitor supplier compliance and monitor supplier performance. After editing a supplier profile, the manager can initiate a business process where other business managers review and approve the edits.
Online Supplier Application FormWhen a supplier wants to become a supplier to a buyer organization, the supplier registers on the Supplier Portal and completes an online supplier application form. The application form prompts the supplier to provide all the information that the buyer requires to begin a qualification process. Each page of the application focuses on a different type of information, such as general company information or banking information.
As a supplier representative fills out the application through the Portal, the MDM Hub stores the records that make up the application in a pending state in the Operational Reference Store. After the supplier representative submits the application, the application goes through a business approval process. If business users approve the application, the supplier becomes an approved supplier and the application becomes the supplier profile. In the Operational Reference Store, the state of the profile records changes from pending to active. The MDM Hub links the records to construct a 360 degree supplier profile.
The data from the application is now the official supplier profile.
Supplier Profile MaintenanceApproved suppliers use the Supplier Portal to manage their supplier profile.
Authorized supplier representatives can add contacts, monitor delivery performance, receive notifications, and keep data and certifications up-to-date. If the Application environment includes a Product Information Management (PIM) system, a supplier representative can also upload a product catalog to the PIM system.
Product Information Management IntegrationWhen the S360 environment includes a Product Information Management (PIM) system, suppliers can view their product catalogs from the Supplier Portal. Suppliers can also upload a product catalog to the PIM system from the Supplier Portal.
MDM-PIM AdapterThe MDM-PIM adapter integrates the Application with a PIM system. The adapter handles signing into the systems and coordinates activities between the Application and the PIM system.
The adapter is preconfigured for Informatica Product 360 (PIM). If you want to integrate the Application with a third-party PIM system, contact your Informatica representative. Your representative can request the customization of the MDM-PIM adapter for the third-party PIM system.
16 Chapter 1: Introduction to Informatica MDM - Supplier 360

The following table lists the actions that a business user or a supplier representative can take in one system that causes a change in the other system:
Action MDM-PIM Adapter Actions
In Supplier 360, a business user qualifies a supplier by participating in a review process.
Creates a user with the same user credentials as the qualified supplier in the PIM system. Adds the PIM supplier ID to the supplier profile in the Operational Reference Store.
In the Supplier Portal, a supplier representative uploads a product catalog.
Replaces the product catalog in the PIM system.
In Supplier 360, a business user deactivates a supplier. Deactivates the supplier in the PIM system.
In Supplier 360, a business user deletes a supplier. Deletes the supplier from the PIM system and from the Operational Reference Store.
In the Supplier Portal or Supplier 360, a supplier representative or a business user adds users as contacts.
Creates users in the PIM system with the same user credentials.
In the PIM system, a business user changes supplier information.
Updates the supplier information in the Operational Reference Store.
Product CatalogsWhen the S360 environment includes a Product Information Management (PIM) system, suppliers can view and upload their product catalogs from the Supplier Portal.
Business managers can upload catalogs from the PIM system user interface.
Product Information Management Integration 17
C h a p t e r 2
S360 Installation OverviewThis chapter includes the following topics:
• Installation Overview, 18
• Read the Release Notes, 18
• Verify Software Requirements, 19
• Pre-installation Tasks, 19
• Installation Topology, 20
• Install the S360 Application, 20
• Post-installation Tasks, 20
Installation OverviewThe S360 application requires Informatica MDM Multidomain Edition and, optionally, a Product Information Management system, such as Informatica Product 360 (PIM). You must install these products before you install the Application.
You receive S360 as an archive file. The archive contains configuration files, template files, and a setup script. You edit the configuration files to specify properties that reflect your environment. You also need to replace template files with customized files, such as replacing the placeholder logo file with a file containing your organization logo. Then you can run the setup script.
Installation of S360 consists of the following steps:
1. Read the Release Notes.
2. Verify the software requirements.
3. Perform the pre-installation tasks.
4. Install the application.
5. Complete the post-installation tasks.
Read the Release NotesRead the MDM - Supplier 360 Release Notes for updates to the installation and upgrade process. You can also find information about known limitations for the release.
18

Verify Software RequirementsSet up the Informatica MDM Multidomain Edition environment before you install S360.
Perform the following tasks:
1. Review the Product Availability Matrix for S360 to discover the system requirements and supported versions for products, databases, and application servers. You can find all Product Availability Matrices at https://network.informatica.com/community/informatica-network/product-availability-matrices.
2. Install a supported version of Informatica MDM, including Informatica Data Director and the embedded version of Informatica ActiveVOS Server. Follow the instructions in the Informatica MDM Multidomain Edition Installation Guide or the Informatica MDM Multidomain Edition Upgrade Guide for your environment.
Note: When you create the Operational Reference Store, you must use the name supplier_hub.
3. If using a PIM system, install a supported version of Informatica Product 360 (PIM) or a third-party PIM product.
Note: If you want to integrate the Application with a third-party PIM system, contact your Informatica representative. Your representative can request the customization of the MDM-PIM adapter for the third-party PIM system.
Verify Minimum System RequirementsS360 requires the same system requirements as Informatica MDM.
To use the Supplier Portal, enable cookies in the browser.
For more information about product requirements and supported platforms, se the Product Availability Matrix: https://network.informatica.com/community/informatica-network/product-availability-matrices.
Pre-installation TasksTo configure the S360 application, you must perform the following tasks:
1. Extract the Application archive.
2. Import resources into the MDM Hub.
3. Import Entity 360 into Informatica Data Director.
4. Set configuration properties.
5. Install the Application Configuration tool and enable the data view.
6. Set the global application properties.
7. Configure the supplier portal.
8. Configure the email templates.
9. Configure a Product Information Management system.
Verify Software Requirements 19

Installation TopologyYou can run S360 application with or without Informatica Product 360 (PIM).
Based on your requirements, use one of the following installation topologies:With PIM
If you run the application with PIM, the Supplier portal uses the following Informatica Product 360 services:
• Timeline, which shows updates from Informatica Product 360
• Product catalog upload
• Product catalog management
• User authentication and user management, including password resets.
Without PIM (standalone mode)
If you run the application without PIM, all the PIM services are hidden in the user interface.
If you run the application without PIM, you must build a custom adapter to handle user authentication and user management. You must also build email templates for ActiveVOS to handle user invitations and password resets.
For more information about configuring a custom adapter, contact your Informatica representative.
Install the S360 ApplicationAfter you finish the pre-installation tasks, install S360 by running the install-tsr script.
Post-installation TasksTo complete the configuration, perform the following post-installation tasks:
1. Configure the MDM Hub.
2. Configure the Operational Reference Store.
3. Populate the S360 charts with data.
4. Configure the ActiveVOS email service.
20 Chapter 2: S360 Installation Overview

C h a p t e r 3
Before You InstallThis chapter includes the following topics:
• Extract the Application, 21
• Create the Operational Reference Store, 22
• Import the Database Schema into the Operational Reference Store, 23
• Integrate the MDM Hub with Informatica Address Verification Cleanse Engine, 27
• Import InfaSupplierMaster into Informatica Data Director, 27
• Assign a Message Queue for the Message Triggers, 29
• Setting the Configuration Properties, 29
• Install the Application Configuration Tool, 30
• Enabling the HTTPS Protocol, 32
• Configure the Supplier 360 Properties, 33
• Configure the Supplier Portal, 36
• Configure Email Templates, 41
• Configure Product Information Management, 45
Extract the ApplicationYou receive the S360 application as an archive file. Create the following directory structure and extract the contents of the S360 archive file into it:
<MDM Installation Directory>/app/tsr
The extracted content contains the following files and folders:
• bin/. Contains build files, the setup script, and an uninstall wizard.
• bpm/. Contains the ActiveVOS email service and the default business processes in a deployable format.
• config/. Contains configuration properties files.
• datamart/. Contains the data-mart service and the chart configurations.
• email-config/. Contains the directory that defines the email templates. The email templates are used by the ActiveVOS email service.
- templates/. Contains the avos-templates and pim-templates subdirectories with email body text templates for ActiveVOS and for Informatica Product 360.
21

• hub/. Contains the subdirectories that contain the database schema and the configuration files to deploy to Informatica Data Director (IDD).
- cocsconfig/. Contains configuration files for composite objects and composite services.
- entity360config/. Contains copies of the Entity 360 component instance definitions that ship with Informatica MDM.
- idd/. Contains the configuration files that you use to create the S360 interface in Informatica Data Director.
- schema/. Contains the database schema for supplier data and reference data.
• images/. Contains placeholder images for a logo and for a background image for the Supplier Portal login page.
• pre-install-config/. Contains a file to set global Application properties and a file to set the list of products and services in the Supplier Portal.
• userprofile-provider/. Contains the configuration files that you use after the installation is finished. Contains the appconfig.properties, PIMLoginProvider.jar, and RoleMappingSource.xml files.
• lib/. You must include external libraries in this folder. If you use a JBoss application server, copy the jboss-ejb-client, jboss-remote-naming, jboss-remoting, xnio-nio, and xnio-api files to the folder.
• supplierapp-ear.ear file.
• appconfiguration.war file.
Create the Operational Reference StoreCreate an Operational Reference Store (ORS) with the schema name supplier_hub. When entering database parameters, use the parameters that you specified when you created the Oracle database instance.
Note: You must use the name supplier_hub. If you use a different name, the integration with Informatica Product 360 (PIM) does not work.
1. Navigate to the following directory:
<MDM installation directory>/hub/server/bin2. Run one of the following commands:
• On Windows. sip_ant.bat create_ors• On Linux. sip_ant.sh create_ors
3. Enter values for the ORS parameters.
Note: The prompts display default text in brackets. Press Enter to use the default value and go to the next prompt.
Parameter Description
Oracle Connection Type Enter the type that you specified for the Oracle database instance.
Operational Reference Store DB host name
Enter the IP address of the host running Oracle.
22 Chapter 3: Before You Install

Parameter Description
Operational Reference Store DB port number
Enter the port number that Oracle uses.
Operational Reference Store DB service name
If the Oracle Connection Type=service, enter the name of the Oracle service that you specified for the Oracle database instance.
Oracle Net connect identifier Enter the TNS name that you specified for the Oracle database instance.
Connect URL Use the default URL unless you are required to change the URL for business reasons or technical reasons.
Operational Reference Store DB user name (schema name)
Enter supplier_hub.
Operational Reference Store DB user password
Enter a password to assign to the supplier_hub user.
Locale name Enter the language to use.
DBA user name Enter the user name for the Oracle database instance.
DBA password Enter the password for this user.
MDM index tablespace Use the default value. Creates a tablespace to contain the index components for the ORS.
MDM temporary tablespace Use the default value. Creates a tablespace to contain the temporary components for the ORS.
Oracle temporary tablespace Use the default value. Creates a tablespace to contain the temporary components for the database instance.
The script triggers the process that creates the ORS.
4. If the process fails, check the log file for errors:
<MDM installation directory>/hub/server/bin/sip_ant.log
Import the Database Schema into the Operational Reference Store
After you create the Operational Reference Store, import the database schema from a change list.
After you create the schema, you edit and upload XML files to repository tables. The XML files are required for Supplier 360.
Import the Database Schema into the Operational Reference Store 23

Importing the MDM MetadataAfter you create the supplier_hub Operational Reference Store (ORS), import the MDM metadata into the ORS.
1. Navigate to the following directory:
<MDM installation directory>/hub/server/bin2. Run one of the following commands:
• On Windows. sip_ant.bat import_ors• On Linux. sip_ant.sh import_ors
3. Enter values for the ORS parameters.
Note: The prompts display default text in brackets. Press Enter to use the default value and go to the next prompt.
Parameter Description
Database Type Enter Oracle.
Oracle Connection Type Enter the type that you specified for the Oracle database instance.
Operational Reference Store DB host name
Enter the IP address of the host running Oracle.
Operational Reference Store DB port number
Enter the port number that Oracle uses.
Operational Reference Store DB service name
If the Oracle Connection Type=service, enter the name of the Oracle service that you specified for the Oracle database instance.
Oracle Net connect identifier Enter the TNS name that you specified for the Oracle database instance.
Connect URL Use the default URL unless you are required to change the URL for business reasons or technical reasons.
Operational Reference Store DB user name (schema name)
Enter supplier_hub.
Operational Reference Store DB user password
Enter the password for the supplier_hub user.
Locale name Enter the language to use.
DBA user name Enter the user name for the Oracle database instance.
DBA password Enter the password for this user.
Timeline granularity Enter the timeline units to use.Note: After the database schema is imported, you cannot change the timeline granularity.
The script triggers the process that loads the metadata into the ORS.
24 Chapter 3: Before You Install

4. If the process fails, check the log files for errors. You can find log files in the following locations:
• User input errors. <MDM installation directory>/hub/server/bin/sip_ant.log• Database errors. <MDM installation directory>/hub/server/bin/<database type>/seed.log
Registering the Operational Reference StoreRegister the supplier_hub Operational Reference Store.
1. Log into the MDM Hub Console.
2. In the Configuration workbench, click Databases.
3. From the main menu, click Write Lock > Acquire Lock.
4. Click Register database.
The Informatica MDM Hub Connection Wizard starts.
5. Follow the online instructions to specify the same parameters that you specified when you created the Operational Reference Store.
6. On the Summary page, click Test Database.
The Wizard tests the database connection parameters.
7. Ensure that the Create datasource after registration check box is selected.
8. Click Finish.
9. When prompted, enter the user credentials for the application server.
The wizard creates a data source.
Importing the Application MetadataThe metadata for the supplier database schema resides in an MDM Hub change list. You import the change list into the Hub Store. The metadata change list creates components, such as landing tables, user exits, lookup tables, staging tables, base objects, and match and merge rules. The created tables are empty.
1. In the Hub Console, in the Configuration workbench, click Repository Manager.
2. Click the Import tab.
3. Click the button next to the Source field.
The Open Repository dialog box opens.
4. Click File Repository.
5. Navigate to the following directory:
<MDM installation directory>/app/tsr/hub/schema/met-export6. Select the SUPPLIER_hub_change.xml file, and click OK.
7. From the Target field, select supplier_hub.
8. Select all the schema components and click Apply.
The Repository Manager imports the selected components from the change list.
Import the Database Schema into the Operational Reference Store 25

Uploading Composite Objects and Composite ServicesThe application requires composite objects and composite services to support the Start workspace and Entity 360 views in S360. Upload files to the repository table C_REPOS_CO_CS_CONFIG.
Note: If the table contains rows, replace the files in the table.
1. In a database tool that supports the BLOB data type, open the table C_REPOS_CO_CS_CONFIG.
2. Insert rows with the following custom CONFIG_TYPE values:
• CUSTOM_JAVA_CLASSES
• CUSTOM_XML_SCHEMA
3. For the CUSTOM_JAVA_CLASSES row, in the CONFIG_DATA column, upload the CUSTOM_JAVA_CLASSES.jar file from the following directory:
<MDM installation directory>/app/tsr/hub/cocsconfig4. For the CUSTOM_XML_SCHEMA row, in the CONFIG_DATA column, upload the custom.xsd file from the
following directory:
<MDM installation directory>/app/tsr/hub/cocsconfig
Creating an Additional Repository TableAfter you import the change list, add the C_REPOS_APP_CONFIG repository table. To add the table, run two scripts.
1. At a command prompt, navigate to the following directory:
<MDM installation directory>/app/tsr/hub/schema/ddl2. Use a database tool to run the following script:
DDL_C_REPOS_APP_CONFIG_ORACLE.sql3. Open the following file in an editor:
DDL_S_FILE_REPOS_ORACLE4. Edit the following line to point to the supplier_hub:
CREATE TABLE supplier_hub.S_FILE_REPOS5. Save the file with the file extension .sql.
6. Use a database tool to run the following script:
DDL_S_FILE_REPOS_ORACLE.sql
Inserting Reference DataAfter you import the metadata, you can populate the tables with some reference data. By using reference data, you can complete the configuration steps faster, because you do not have to insert the rows into the tables manually.
1. At a command prompt, navigate to the following directory:
<MDM installation directory>/app/tsr/hub/schema/reference-data2. Use a database tool to run the following script:
Supplier_lookup_script_oracle.sql
26 Chapter 3: Before You Install

3. Verify that the lookup records loaded successfully from the Hub Console.
a. In the Hub Console, in the Utilities workbench, click Batch Group.
b. Expand BG_All_Lookup_Load and select Control & Logs.
c. In the Logs for each job table, review the Status column to verify that the load was successful. The Total records column shows the number of records added. The columns to the right of the Total records column displays zeros if all records load successfully.
d. If the load was unsuccessful, try running the load. Select BG_All_Lookup_Load and click Execute.
4. Use a database tool to run the following script:
INSERT_C_REPOS_APP_CONFIG_ORACLE.sqlThe table C_REPOS_APP_CONFIG is populated with reference data.
Integrate the MDM Hub with Informatica Address Verification Cleanse Engine
You must integrate the MDM Hub with the Informatica Address Verification cleanse engine for S360. Use the Informatica Address Verification Adapter for the integration.
For more information about integrating the MDM Hub with the Informatica Address Verification cleanse engine, see Informatica MDM Multidomain Edition Cleanse Adapter Guide.
Import InfaSupplierMaster into Informatica Data Director
S360 requires Informatica Data Director (IDD) applications: InfaSupplierMaster.
InfaSupplierMaster contains the user interface for business users. You configure the URL for the MDM File Manager. Then you import, validate, and deploy this IDD application.
Importing InfaSupplierMaster into Informatica Data DirectorImport the InfaSupplierMaster.zip file as an IDD application, and then deploy it.
1. Start Informatica Data Director Configuration Manager.
https://<hostname>:<port>/bdd/config 2. Click Import > Import Complete IDD Application (ZIP).
3. Click Browse, and navigate to the following directory:
<MDM installation directory>/app/tsr/hub/idd4. Select InfaSupplierMaster.zip, and click Open.
5. Click Import.
6. Under Bind Logical ORS, select supplier_hub.
Integrate the MDM Hub with Informatica Address Verification Cleanse Engine 27

7. Click Save.
Informatica Data Director imports and validates the IDD application. This might take some time.
8. Review the validation results. Resolve any errors.
9. With the application selected, click Application State > Full Deployment.
Informatica Data Director deploys the IDD application.
Inserting Entity 360 Component InstancesEntity 360 pages contain components that ship with Informatica MDM. The component instance definitions ship with the Application. You insert these components into the repository table C_REPOS_COMPONENT_INSTANCE.
1. In a database tool that supports the BLOB data type, open the table C_REPOS_COMPONENT_INSTANCE.
2. Ensure that you have rows with the values pairs contained in the following table. Insert rows for any missing values.
Instance Name Type Name
AlternateSuppliers_ExternalLink ExternalLink
DueForRenewal_ExternalLink ExternalLink
FileManager_ExternalLink ExternalLink
Supplier_GetOneHop Supplier_GetOneHop
Supplier_MatchMerge MatchMerge
OnboardingTime_ExternalLink ExternalLink
ProductCategory_ExternalLink ExternalLink
StartPage StartPage
Supplier ContainerCoView
Supplier_CoMgr RootCo
Supplier_RootView RootCo
Supplier_RootViewFinanceMgr RootCo
XrefSourceSystems XrefSourceSystems
Contacts_ExternalLink ExternalLink
Documents_ExternalLink ExternalLink
SupplierOverview_ExternalLink ExternalLink
Twitter_ExternalLink ExternalLink
28 Chapter 3: Before You Install

3. For each row, verify that you have an XML file uploaded in the CONFIG_DATA column. If the column is empty, upload the XML file with the same name from the following directory:
<MDM installation directory>/app/tsr/hub/entity360config
Assign a Message Queue for the Message TriggersYou must specify a message queue for each of the predefined message triggers of the Party and Party Relationship base objects.
1. Log in to the MDM Hub Console.
2. In the Model workbench, click Schema.
3. Acquire a write lock.
4. Expand the Party base object, and select Message Trigger Setup.
5. Select a target message queue for each of the message triggers.
6. Expand the Party Relationship base object, and select Message Trigger Setup.
7. Select a target message queue for each of the message triggers.
8. Click Save.
Setting the Configuration PropertiesSet the configuration properties that the setup script requires. If you change these properties in the future, you need to rerun the setup script.
You set properties in the following files:
• appconfig.properties • connection_properties.properties• siperian-client.propeties• log4j.xml
Setting Properties in the connection_properties.properties FileYou select connection properties for the database and the application server.
1. Navigate to the following directory:
<MDM installation directory>/app/tsr/config2. Open the connection_properties.properties file in an editor.
3. For the jdbc.dialect property, enable the property that matches your database. Comment out the other property. For example, the following code enables the property for Oracle 10g and disables the same property for Microsoft SQL Server:
#jdbc.dialect=org.hibernate.dialect.SQLServerDialectjdbc.dialect=org.hibernate.dialect.Oracle10gDialect
Assign a Message Queue for the Message Triggers 29

Note: Do not edit the value of these properties or the connection might fail.
4. Set the jdbc.datasource property to the supplier_hub data source.
5. Set the orsID property.
In the Hub Console, navigate to Configuration > Databases to get the ORS ID.
6. For the application server properties, find the comment that mentions the application server you use, and enable the group of properties under the comment. Comment out the properties for other application servers.
7. Set the application server properties as instructed in the file comments.
8. Save the file.
Setting Properties in the appconfig.properties FileSet the value of the JDBC data source. Do not edit the other properties in this file or the connection might fail.
1. At a command prompt, navigate to the following directory:
<MDM installation directory>/app/tsr/config2. Open the appconfig.properties file in an editor.
3. Set the value of the jdbc.datasource property to match the value that you set in the connection_properties.properties file.
4. Save the file.
Setting Properties in the siperian-client.properties FileSet the ORS ID and the InitialContext parameters, based on the application server that you use.
1. At a command prompt, navigate to the following directory:
<MDM installation directory>/app/tsr/config2. Open the siperian-client.properties file in an editor.
3. Set the value of the siperian-client.orsId property to the ORS ID.
In the Hub Console, navigate to Configuration > Databases for the ORS ID.
4. Search and uncomment all the properties related to the application server that you use. If required, provide the property values. Ensure that you comment all the properties related to other application servers.
5. Set the application server properties as instructed in the file comments.
6. Save the file.
Install the Application Configuration ToolYou must install the Application Configuration tool and set the S360 global configuration properties from the Application Configuration user interface. The Application Configuration tool runs within IDD.
30 Chapter 3: Before You Install

PrerequisitesIf you use a JBoss application server, you must add the JBoss remoting JAR files to the app/tsr/lib/ folder.
Based on the JBoss version you use, download the following files from Maven repository to the app/tsr/lib/ folder:
• jboss-ejb-client
• jboss-remote-naming
• jboss-remoting
• xnio-nio
• xnio-api
Installing the Application Configuration ToolTo install the Application Configuration tool, run the install-tsr script.
1. Navigate to the following directory:
<MDM installation directory>/app/tsr/config2. Edit the following configuration files and specify the property values:
Configuration File Property
appconfig.properties JDBC source
connection_properties.properties JDBC datasource, ORS ID
siperian-client.propeties ORS ID, application server specific properties
log4j.xml Location of the log file
3. At a command prompt, navigate to the following directory:
<MDM installation directory>/app/tsr/bin4. Run one of the following scripts:
• On Windows. install-tsr.bat• On Linux. ./install-tsr.sh
5. At the prompts, enter the following parameters:
Parameter Description
MDM Hub installation directory
Press Enter to use the default path or type the fully-qualified path to the directory where you installed Informatica MDM Hub.
MDM Supplier 360 Application installation directory
Press Enter to use the default path or type the fully-qualified path to the directory that contains the Application files.
Install the Application Configuration Tool 31

Parameter Description
Application Server Type the name of the application server in lowercase.
Application to deploy Type appconfig.
6. If the application server is WebSphere, open the WebSphere Application Server Administrative Console, and deploy the appconfiguration.war file located in the following directory:
<MDM installation directory>/app/tsr
Setting the cmx.dataview.enabled Property to TrueThe cmx.dataview.enabled option specifies whether the Data workspace, Application Configuration, and related elements appear in IDD applications. When cmx.dataview.enabled=true, you can view the Application Configuration tab.
1. Navigate to the following directory:
<MDM installation directory>/hub/server/resources2. Use a text editor to open the cmxserver.properties file.
3. Set cmx.dataview.enabled=true.
4. Save and close the file.
5. Restart the application server.
Enabling the HTTPS ProtocolIf the MDM Hub and Informatica Product 360 are configured to use the HTTPS protocol, enable the HTTPS protocol for the Supplier 360 components.
1. Extract the InfaSupplierMaster.zip file located in the following directory:
<MDM installation directory>/app/tsr/hub/idd2. In a text editor, open the BDDConfig.xml file.
3. In the XML file, search for the following entries:
• <externalLink name="supplier_doc_child_link" type="IFRAME" url="http://@LOCALHOST@:@LOCALPORT@/supplierapp-war/mdm/supplierapp/document">
• <externalLink displayName="App Configuration" name="appconfig" type="IFRAME" url="http://@LOCALHOST@:@LOCALPORT@/appconfiguration">
4. In the url parameter of the selected entries, change http to https.
5. Save the XML file.
6. Log in to the IDD Configuration Manager, and select the application.
7. Click Import > Import to existing IDD application.
8. In the Import to existing IDD application dialog box, select BDD Configuration.
9. Click Browse, and select the BDDConfig.xml file.
10. Click Import.
32 Chapter 3: Before You Install

Configure the Supplier 360 PropertiesBefore you install Supplier 360, configure the Supplier 360 properties that include connection parameters, security parameters, and workflow adapter-related parameters.
Supplier 360 PropertiesUse the Application Configuration UI to configure the Supplier 360 properties based on your environment.
You can configure the following Supplier 360 properties:
Connection Types
Configure the connection types based on your environment. When you configure different connection types, ensure that you use the HTTP port number even though your environment is configured to use the HTTPS protocol.
The following table describes the connection types and their properties:
Connection Type
Description Host Instance User Credentials
MDMHub Runs the business entity service and services integration framework (SIF) requests.
Name of the host that runs the MDM Hub.
Name of the Operational Reference Store of Supplier 360.
User credentials to execute the business entity service and services integration framework (SIF) requests.
Bpm Provides access to the ActiveVOS workflows.
Name of the host that runs the Informatica ActiveVOS instance.
Reserved for future use.
User credentials of the trusted user to access the Informatica ActiveVOS instance.
FileService Uploads documents from the Supplier Portal and Informatica Data Director.
Name of the host that runs the MDM Hub.
Name of the Operational Reference Store of Supplier 360.
User credentials to upload documents.
ExternalApp Provides access to an external application, such as Product 360.
Name of the host that runs the external application.
Name of the Operational Reference Store of Supplier 360.
User credentials to access the external application. For Product 360, use the Product 360 Supplier Portal credentials.
email Provides access to the ActiveVOS email service.
Name of the host that runs the Informatica ActiveVOS instance.
Name of the ActiveVOS email service. Specify avosEmailNotification.
User credentials of the trusted user to access the ActiveVOS email service.
System Configuration - JMS
Lists the properties related to Java Message Service (JMS).
Configure the Supplier 360 Properties 33

The following table lists the properties that you can configure for JMS:
Property Description
JMS Connection Factory The Java Naming and Directory Interface (JNDI) name of the queue connection factory.
JMS Destination The JNDI name of the Hub outbound queue.
Portal Configuration
Lists the properties related to Portal Configuration.
The following table lists the properties that you can configure for Portal Configuration:
Property Description
Licensed to Organization to which S360 is licensed.
Organization Email Email of the organization.
Copyright Copyright notice that is displayed on the portal.
TermsOfUse Link to the terms of use content.
Server Idle Time Idle time that must elapse before an active session is suspended.
Time Warning Before Logout Time between a time out warning and suspension of the session due to continuous idle time.
System Configuration - API
Lists the properties for the SIF search requests.
The following table lists the properties that you can configure for System Configuration - API:
Property Description
Page Size Maximum number of records to be retrieved.
System Name System name that the portal must use.
System Configuration - Adapter
Lists the properties for the external adapter, such as PIM.
34 Chapter 3: Before You Install

The following table lists the properties that you can configure for System Configuration - Adapter:
Property Description
Adapter Class Name of the adapter class. Change the default value if you use a custom adapter.
Custom Adapter Used Indicates whether you use a custom adapter.
Custom Adapter Location Location of the custom adapter jar file, if you use a custom adapter.
System Configuration - Mode of Operation
Indicates the mode of operation in which you want to run the application. You can run the application with or without Informatica Product 360 (PIM).
The following table lists the properties that you can configure to specify the environment:
Property Description
Enable HTTPS Indicates whether the application runs in a secure connection.
Standalone Mode Indicates whether the application runs in a standalone mode.
With PIM Indicates whether the application uses PIM.
System Configuration - Workflows
Lists the properties for System Configuration - Workflows to configure workflows:
The following table lists the properties that you can configure for System Configuration - Workflows:
Property Description
Portal First Task Type The first task that is triggered when a supplier registers from the supplier portal side.
Approval SLA SLA for supplier profile approval.
BPM Adapter Type of the workflow adapter used, whether business entity or subject area.
Create Workflow Name of the ActiveVOS create workflow.
Twitter Configuration
Lists the properties that you can configure for Twitter.
The following table lists the Twitter properties that you can configure:
Property Description
Twitter Account Twitter account for the dashboard.
Twitter Widget ID Twitter widget ID for the dashboard.
Configure the Supplier 360 Properties 35

Setting Properties from the Application Configuration UISet the appConnection and the appProperty related properties from the Application Configuration UI.
1. Launch Informatica Data Director.
http://<host>:<port number>/bdd/config2. Log in with your user credentials.
3. If prompted to select an application, select InfaSupplierMaster.
4. Click App Configuration.
5. On the Connections tab, configure the following connection types:
• MDMHub
• Bpm
• FileService
• ExternalApp
6. On the Properties tab, specify the properties.
7. Click Save Changes.
Tip: To undo a change, click Reset.
Configuring the Security PropertyThe appConfig.xml file contains the security property. You can edit the file to configure the Supplier Portal pages that you want to be editable. By default, all pages are editable by supplier representatives with the Admin User role when the supplier profiles is in the Registered or Approved status.
1. At a command prompt, navigate to the following directory:
<MDM installation directory>/app/tsr/pre-install-config2. Open the appConfig.xml file in an XML editor.
3. Edit the <appSecurity> property.
4. Save the file.
Configure the Supplier PortalYou configure the list of products and services that your organization is interested in purchasing. You can also create a list of questions to ask suppliers questions about products and services.
Adding Images for the Supplier PortalYou can add a logo and a background image for the Supplier Portal sign in page.
Prepare your image files:
• Get a .png version of your logo and save it as portal_logo.png.
36 Chapter 3: Before You Install

• Create a .png version of a background image and save it as portal.png
1. Navigate to the following directory:
<MDM installation directory>/app/tsr/images2. Copy the prepared image files to the images directory.
Note: The file names must match the file names in the directory.
Configure the Products and Services PageOn the Supplier Portal, you can include a list of the products and services that your organization is interested in purchasing. When a supplier representative fills out the online supplier application form, the representative can select the products and services that the organization offers.
To populate the Products and Services page, first create the list of products and services as an XML file. Then add the content of the XML file to the page by loading the XML file into a repository table.
Creating the List of Products and ServicesYou create an XML file that contains a list of products and services. The list can be hierarchical to represent categories and subcategories. You can create as many levels of nested subcategories as you require.
1. Navigate to the following directory:
<MDM installation directory>/app/tsr/pre-install-config2. Open prod_hierarchy.xml in an XML editor.
3. Create a hierarchy of products and services.
Element Description
tns:products (top-level element)
Use with the default attributes as the top-level parent element. Do not edit.
tns:product Use to define a product, a service, or the name of a subcategory. Ensure that the element has a code attribute with a unique value and a description attribute that contains the text to display on the Products and Services page.
tns:products (subcategory)
Use without attributes to contain a list of products or services with a subcategory. Add this element as a child element of the target tns:product element.
4. Save the file.
Sample Product Hierarchy XML File
For example, to create the following hierarchy of products:
• Clothing & Handbags
- BOYS CLOTHING
- Basics
- Clothing Sets
- Footwear
- Outerwear
Configure the Supplier Portal 37
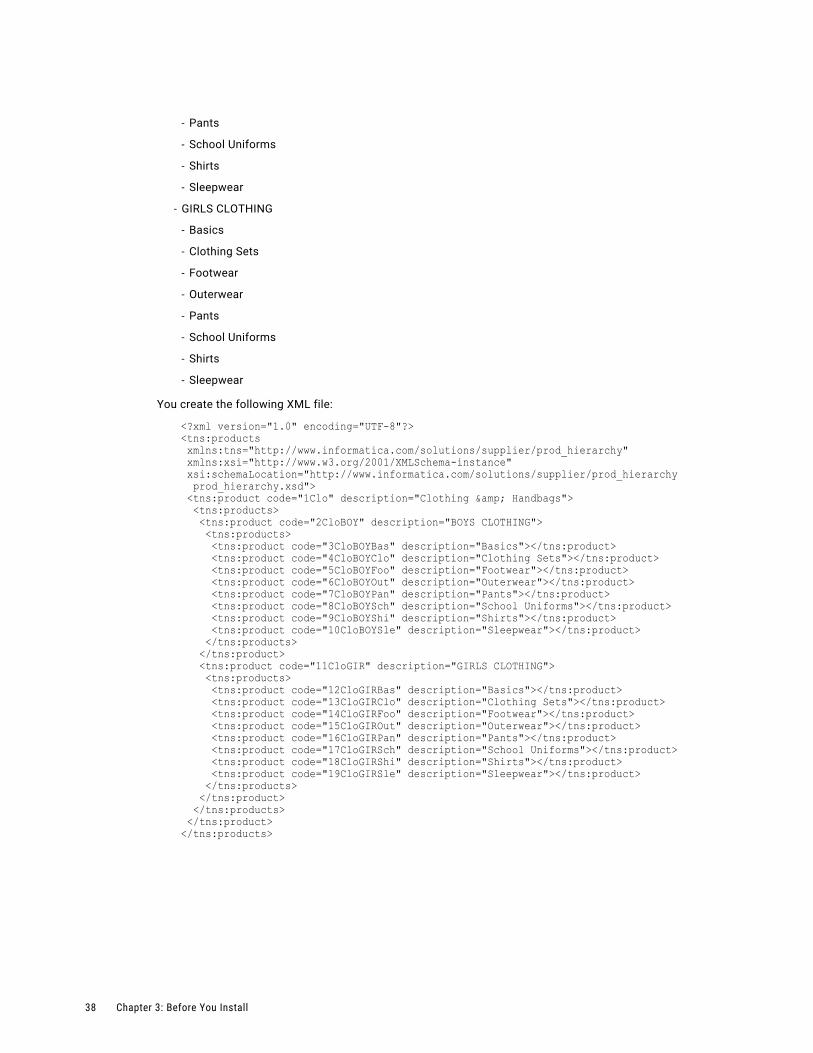
- Pants
- School Uniforms
- Shirts
- Sleepwear
- GIRLS CLOTHING
- Basics
- Clothing Sets
- Footwear
- Outerwear
- Pants
- School Uniforms
- Shirts
- Sleepwear
You create the following XML file:
<?xml version="1.0" encoding="UTF-8"?><tns:products xmlns:tns="http://www.informatica.com/solutions/supplier/prod_hierarchy" xmlns:xsi="http://www.w3.org/2001/XMLSchema-instance" xsi:schemaLocation="http://www.informatica.com/solutions/supplier/prod_hierarchy prod_hierarchy.xsd"> <tns:product code="1Clo" description="Clothing & Handbags"> <tns:products> <tns:product code="2CloBOY" description="BOYS CLOTHING"> <tns:products> <tns:product code="3CloBOYBas" description="Basics"></tns:product> <tns:product code="4CloBOYClo" description="Clothing Sets"></tns:product> <tns:product code="5CloBOYFoo" description="Footwear"></tns:product> <tns:product code="6CloBOYOut" description="Outerwear"></tns:product> <tns:product code="7CloBOYPan" description="Pants"></tns:product> <tns:product code="8CloBOYSch" description="School Uniforms"></tns:product> <tns:product code="9CloBOYShi" description="Shirts"></tns:product> <tns:product code="10CloBOYSle" description="Sleepwear"></tns:product> </tns:products> </tns:product> <tns:product code="11CloGIR" description="GIRLS CLOTHING"> <tns:products> <tns:product code="12CloGIRBas" description="Basics"></tns:product> <tns:product code="13CloGIRClo" description="Clothing Sets"></tns:product> <tns:product code="14CloGIRFoo" description="Footwear"></tns:product> <tns:product code="15CloGIROut" description="Outerwear"></tns:product> <tns:product code="16CloGIRPan" description="Pants"></tns:product> <tns:product code="17CloGIRSch" description="School Uniforms"></tns:product> <tns:product code="18CloGIRShi" description="Shirts"></tns:product> <tns:product code="19CloGIRSle" description="Sleepwear"></tns:product> </tns:products> </tns:product> </tns:products> </tns:product></tns:products>
38 Chapter 3: Before You Install

Uploading the List of Products and ServicesAfter you create the list of products and services, you upload the XML file to a repository table. Then you populate a lookup table with the same values. You need to restart the application server to see the changes in the Supplier Portal
1. In a database tool that supports the BLOB data type, open the table C_REPOS_APP_CONFIG.
2. Do one of the following:
• If a row exists with the value PRODUCT_HIERARCHY in the CONFIG_TYPE column, use this row.
• If not, insert a row and enter PRODUCT_HIERARCHY in the CONFIG_TYPE column.
3. In the CONFIG_DATA column, load the prod_hierarchy.xml file.
4. Open the lookup table C_BT_PRDCTS_SRVCS.
a. Insert a row.
b. In the PRDCT_SRVC_CD column, enter the value of a code attribute for a <tns:product> element in the XML file.
c. In the PRDCT_SRVC_DESC column, enter the value of the description attribute for the same <tns:product> element.
d. Repeat the substeps to create rows for all the products and services defined in the XML file.
5. Restart the application server.
Sample Product Hierarchy on the Product and Services Page
The following image shows how the sample product hierarchy appears on the Product and Services Page after you restart the application server and refresh the browser instance:
Configure the Supplier Portal 39

Configure the Product Related Questions PageOn the Supplier Portal, you can include a list of questions about products and services. When a supplier representative fills out the online supplier application form, the representative can answer the questions.
To populate the Product Related Questions page, you add questions as records in a base object table. Then you populate a relationship base object with mappings between the questions and the products or services to which they apply. You can map the same question to more than one product or service.
Creating Questions about Products and ServicesYou add questions to the Product Related Questions base object by inserting records into the C_BO_PRDCT_RLTD_QSTNS table. You use the Data Manager in the Hub Console to insert records.
1. In the Hub Console, acquire a write lock.
2. In the Data Steward workbench, click Data Manager.
3. In the screen, set the following options:
Option Description
Base Object Select Product Related Questions.
Put package Select Package Product Related Questions.
Display package Select Use put Package.
Query Do not set.
Page size Do not set.
4. Click Begin Administration.
5. Click Finish to close the wizard without setting options.
The wizard closes and the Data Manager screen appears.
6. Add questions one at a time. Click the Add icon.
7. In the Record Editor dialog box, set the following options:
Option Description
Hub State Indicator Select 1 - Active.
Question Type the question.
Active Indicator Select Yes.
8. Click OK.
9. Add remaining questions.
Creating Relationships Between Questions and Products or ServicesAfter you create both the list of products or services and the list of questions, you can create relationships between the products or services and the questions. You create the relationships in the Products and
40 Chapter 3: Before You Install

Services Questions Relationship base object by inserting records into the C_BO_PRDCT_SRVC_QSTN_REL table.
Note: You can map the same question to more than one product or service by creating a record for each mapping.
1. In the Hub Console, acquire a write lock.
2. In the Data Steward workbench, click Data Manager.
3. In the screen, set the following options:
Option Description
Base Object Select Product And Services Questions Relationship.
Put package Select Package Product Relates Ques Product Rel.
Display package Select Use put Package.
Query Do not set.
Page size Do not set.
4. Click Begin Administration.
5. Click Finish to close the wizard without setting options.
The wizard closes and the Data Manager screen appears.
6. Add mappings one at a time. Click the Add icon.
7. In the Record Editor dialog box, set the following options:
Option Description
Hub State Indicator Select 1 - Active.
Product Related Questions Id Select the question.
Product and Service Code Select the product or service to link with the question.
Mandatory Indicator If suppliers must answer the question, select Y. Otherwise, select N.
8. Click OK.
9. Add remaining mappings.
10. Restart the application server.
Configure Email TemplatesSome business processes and services send requests to the email service. The email service generates and sends personalized emails to supplier representatives.
To configure email templates, perform the following tasks:
• Edit the email template definitions to add buyer-side email addresses.
Configure Email Templates 41

• Edit the predefined body text to reflect your organization name, contact information, and Service Level Agreement (SLA) information.
After you install S360, you configure the email service in ActiveVOS.
Configure the Email TemplatesThe email service creates personalized email messages based on email templates. A service request that invokes the email service includes the name of the email template and the values for email template attributes and for body text parameters.
The following table describes the email templates:
Email Template Description
OnInvitationSupplier_en Invites a representative from a qualified supplier to register on the Supplier Portal. Used by the buyer after implementing S360.
inviteNewSupplier Invites a representative from a new supplier to go to the Supplier Portal, register, and fill out an application.
OnboardingRegistrationSupplier_en Notifies the supplier representative that the Supplier Portal registration was successful and describes the next steps.
AfterRegistrationSupplier_en Notifies the supplier representative that the submitted application was received and is under review.
AfterAcceptSupplier_en Welcomes the supplier as an approved suppler.
AfterRejectSupplier_en Notifies the supplier representative that their application was declined.
newSupplierUserEmail_en Welcomes a supplier contact as a user of the Supplier Portal. The supplier representative can add multiple contacts on the Contacts page, and each person receives this email.
LostPassword_en Notifies a user that someone has requested a password reset for the user account.
error_message Notifies an administrator on the buyer-side when there is an error in the ActiveVOS workflow.
Email Template AttributesThe emailConfig.xml file contains the definitions of the predefined email templates.
In the XML file, the parent <emailConfigs> element contains multiple <emailConfig> elements, one for each email template. When a service requests an email, it must specify one of these email templates.
The following table describes the attributes that are defined within the <emailConfig> element:
Attribute Value Type Description
emailTemplate template name Specifies the name of the email template. The workflow or service that sends the request to the email service specifies which email template to use.
42 Chapter 3: Before You Install

Attribute Value Type Description
replyTo email address Specifies a buyer-side email address. This email address receives replies from the supplier representatives.
sendFrom email address Specifies a buyer-side email address. When a service request does not include an email address to display in the email From field, the email service uses this static email address.
subject text Specifies the text that appears in the subject line of the email.
template XSL template file name
Specifies the name of the XSL email template that contains the body text for the email.
type text/html Specifies the format of the email message.
Example Email Template
The following XML sample contains the definition of an email template. When using this template, the email service creates a personalized email that uses the subject line "Supplier Portal - Next Steps" and the body text contained in the RegistrationSuccessful_en.xsl file. The personalized email is sent to the supplier representative.
<email-configs> <email-config emailTemplate ="registrationSuccessful"> <replyTo>[email protected]</replyTo> <sendFrom>[email protected]</sendFrom> <subject>Supplier Portal - Next Steps</subject> <template>RegistrationSuccessful_en</template> <type>text/html</type> </email-config> ... </email-configs>
Editing the Email TemplatesYou configure the email templates to add a valid email address that can be used when the service request does not contain an email address. You might also want to add your organization name to the subject line.
1. Navigate to the following directory:
<MDM installation directory>/app/tsr/email-config2. Open emailConfig.xml in an editor.
3. Search for the <sendFrom> attribute and insert an email address. Repeat for each template.
4. Search for the <replyTo> attribute and insert an email address. Repeat for each template.
5. If you want, search for the <subject> attribute and add your organization name before "Supplier Portal." Repeat for each template.
6. Save the file.
Configure Email Templates 43

Configure the Body Text in Email TemplatesThe email templates contain references to .xsl files. The .xsl files contain the body text that is used by the templates. You need to configure the .xsl files.
Different types of text appear in the files:
• Placeholder text, which is enclosed in square brackets, such as [organization name]
• Plain text for the message
• Parameters for personalization which start with <xsl:value-of select=...>
You need to replace placeholder text with your organization name and contact information. You can also edit the plain text and add or remove parameters.
Parameters Used in Email Body TextWhen the email service generates a personalized email, it replaces parameters with values that it receives in the service request. For example, a welcome email can include user credentials for the Supplier Portal. Avoid editing these parameters.
The following tables describes the parameters that you can use in body text:
Parameter Description
<a target="_blank" href="${loginPage}"> Link to the sign in page of the Supplier Portal
<xsl:value-of select="tns:sendEmail/properties/property[@name='firstName']"/>
First name of a supplier representative
<xsl:value-of select="tns:sendEmail/properties/property[@name='lastName']"/>
Last name of a supplier representative
<xsl:value-of select="tns:sendEmail/properties/property[@name='loginName']"/>
User name of a supplier representative, which is the representative's email address
<xsl:value-of select="tns:sendEmail/properties/property[@name='errorDesc']"/>
Error message
Editing the Body TextIn each XSL file, you need to edit the placeholder text to reflect details about your organization, such as the name and the contact information.
1. Navigate to:
<MDM installation directory>/app/tsr/email-config/templates/avos-templates2. Open an XSL file in an editor.
3. Search for an opening square bracket ([). Replace the square brackets and the enclosed text with the requested information.
4. Repeat the previous step until you replace all placeholder text.
5. Save the file.
6. Repeat for all other XSL files in this directory.
44 Chapter 3: Before You Install

Configure Product Information ManagementIf the S360 environment includes Informatica Product 360, you must perform some pre-installation tasks for Informatica Product 360. Later, after you install the application, you finish the integration by configuring MDM Hub to manage user authentication between the S360 Supplier Portal and the Informatica Product 360 Portal.
Note: If you want to use a third-party PIM product, contact your Informatica representative.
Perform the following pre-installation tasks:
• Edit email templates for Informatica Product 360.
• Set the configuration properties in Product 360.
• Create users in the Product 360 Server.
• Edit the webfrontend.properties file.
Edit Email Templates for Informatica Product 360The Application ships with modified email templates for Informatica Product 360. In each HTML file, edit the placeholder text to reflect details about your organization, such as the name and the contact information. Avoid editing parameters, which start with the $ character. When you are finished, copy the templates to the Informatica Product 360 mailTemplates directory.
Note: The file names of the edited templates must match the file names of the original Informatica Product 360 email templates.
1. Navigate to the following directory:
<MDM installation directory>/app/tsr/email-config/templates/pim-templates2. Open an HTML file in an editor.
3. Search for an opening square bracket ([). Replace the square brackets and the enclosed text with the requested information.
4. Repeat the previous step until you replace all placeholder text.
5. Save the file.
6. Repeat for all other HTML files in this directory.
7. Copy the HTML files to the following directory:
<PIM installation directory> /configuration/mailTemplates8. If prompted to overwrite files, select Yes.
Set Configuration Properties in Informatica Product 360 Supplier Portal
In the Informatica Product 360 (PIM) configuration properties file, set user permissions and set the timeline and notification properties to their default values.
1. At a command prompt, navigate to the following directory:
<PIM Supplier Portal directory>/configuration/ 2. Open the configuration.properties file in a editor.
Configure Product Information Management 45

3. Set the permissions for the default user roles to the specified values:
permissions.portalAdmin=VIEW_IMPORT_MANAGER, MANAGE_SUPPLIER_USERpermissions.supplierAdmin=START_DRY_RUN
Note: If these roles have additional permissions, remove the other permissions.
4. If you want the Supplier Administrator role to edit a catalog in the Supplier Portal, add the following entry to the file:
global.permission.itemeditor=EDIT5. Verify that the timeline and notification settings are set to default values:
# Default values for email notifications of new feed messages# Supplier userfeednotification.supplier.USER_REQUEST=truefeednotification.supplier.USER_REGISTRATION=falsefeednotification.supplier.TEST_RUN_COMPLETE=truefeednotification.supplier.IMPORT_RUN_COMPLETE=true# Portal userfeednotification.portal.USER_REQUEST=truefeednotification.portal.USER_REGISTRATION=truefeednotification.portal.TEST_RUN_COMPLETE=falsefeednotification.portal.IMPORT_RUN_COMPLETE=truefeedfilter.type
6. Save the file.
Create Users in the PIM ServerTo provide access to the PIM Web Item Editor functionality from the Portal, you need to configure special PIM system users on the PIM server. You need to create a PIM Supplier Portal administrator user for actions triggered by a portal administrator. You also need to create two PIM Supplier Portal system users for actions triggered by suppliers.
The S360 administrator is a PIM Supplier Portal administrator user. This user must belong to a group that has all action rights. This user can call PIM APIs for the S360 application.
Suppliers are PIM Supplier Portal system users. These users either have edit access or read-only access to the Supplier Portal. All supplier calls from the Portal to edit product catalogs use the credentials of the PIM system user with edit access. Similarly, all supplier calls with read-only permissions use the credentials of the PIM system user with read-only access.
Creating an Administrative User in Informatica Product 360 (PIM)You need to create an administrative user that can call the PIM APIs for S360. You create the user in the PIM Desktop and assign the user to a user group with all action rights.
1. Launch PIM Desktop.
2. To create a user, perform the following steps:
a. Open the User perspective.
b. Click Management > User.
c. In the User view, click the Add icon.
The Add action creates a row in the table.
46 Chapter 3: Before You Install

d. Specify the following properties:
Property Description
User name Name of the user. For example, TSRAdministrator.
Password Password for the user. The password must have at least six characters.
Active Select this option.
Name Enter TSR Administrator.
Authentication Mode Select Internal to indicate the user is an internal user.
e. Click the Save icon.
3. To create a user group, perform the following steps:
a. Open the User Group perspective.
b. Click Management > User Group.
c. In the User Group view, click the Add icon.
The Add action creates a row in the table.
d. Enter a name for the user group.
e. Select Active.
f. Click the Save icon.
4. To map the user to the user group with all the action rights, perform the following steps:
a. Right-click the user that you created, and then click Object properties. .
b. Click the Add icon.
c. Select the user group that you created, and then click OK.
d. Select all the check boxes, and then click OK.
e. Click Management > Organization.
The Action Rights properties appear in the right pane and the list of user groups appears in the left pane.
f. Select the group that you created, and then select all the actions in the right-hand pane.
g. Click the Save icon.
Configuring Supplier Portal Groups and Users on the PIM ServerSuppliers can use the PIM Web Item Editor functionality as a Supplier Portal editor to upload, view, and edit their product catalogs. To use the PIM Web Item Editor, configure two PIM system users, one for suppliers with edit access and the other for suppliers with read-only access.
You have to create two PIM system users, one user with edit access and the other user with read-only access. The PIM server uses these users as default system users for Item Editor access through the Supplier Portal. The webfrontend.properties file of the PIM server must reference both users. This file must contain the user names and credentials of the two users.
1. In the PIM Desktop, create a PIM system user group with edit access permissions.
2. Add a user and assign the user to the user group with the edit access permissions.
Configure Product Information Management 47

3. Create a PIM system user group with read-only access permissions.
4. Add a user and assign the user to the user group with the read-only access permissions.
5. Log out of the PIM Desktop.
6. To finish configuring these users, edit the webfrontend.properties file.
Edit the webfrontend.properties FileAdd the login name and password of the users that you created and then specify the Web client theme that is used with the application.
1. Navigate to the following directory:
<PIM installation directory>/server/configuration/HPM/2. Open the webfrontend.properties file in an editor.
3. To add the supplier users, set the following properties:
Property Name Description
web.client.hsx.supplier.login Login name of the supplier user with edit permission.
web.client.hsx.supplier.password Login password of the supplier user with edit permission.
web.client.hsx.readonly.supplier.login Login name of the supplier user with read-only permission.
web.client.hsx.readonly.supplier.password Login password of the supplier user with read-only permission.
4. To set the client theme, set the following property to the specified value:
web.client.theme=symphony5. Save the file.
Sample Configuration for UsersThe following example shows the configuration of users in the webfrontend.properties file for access to the PIM Web Item Editor from the Supplier Portal:
########################################################### Informatica PIM - Supplier Portal Integration ############################################################ Login name of HPM user that is used for supplier editorweb.client.hsx.supplier.login=hsx# Login password of HPM user that is used for supplier editorweb.client.hsx.supplier.password=!!hsx!!
# Login name of HPM user that is used for supplier view# This user has only read-only permissionsweb.client.hsx.readonly.supplier.login=hsx# Login password of HPM user that is used for supplier view# This user has only read-only permissionsweb.client.hsx.readonly.supplier.password=!!hsx!!
48 Chapter 3: Before You Install

C h a p t e r 4
Install the ApplicationThis chapter includes the following topics:
• Install the Application Overview, 49
• Installing the Supplier 360 Application, 49
Install the Application OverviewAfter you finish the pre-installation tasks, you run the setup script.
When you run the setup script, the script gets the following resources:
• Properties from the configuration files
• Properties for database connections from the property files that were created when Informatica MDM was installed
• Customized image files
• Customized email template files
• ActiveVOS business processes and the email service in .bpr files
The script updates the Application files:
• Updates the S360 application .ear file with the resources.
• Updates the ActiveVOS URN mapping parameters to the values required by S360.
• Deploys the .bpr files to the ActiveVOS Server.
Installing the Supplier 360 ApplicationTo install S360, run the install-tsr script.
1. At a command prompt, navigate to the following directory:
<MDM installation directory>/app/tsr/bin2. Run one of the following scripts:
• On Windows. install-tsr.bat• On Linux. ./install-tsr.sh
49

3. At the prompts, enter the following parameters:
Parameter Description
MDM Hub installation directory Press Enter to use the default path or type the fully-qualified path to the directory where you installed Informatica MDM Hub.
MDM Supplier 360 Application installation directory
Press Enter to use the default path or type the fully-qualified path to the directory that contains the application files.
Application Server Type the name of the application server in lowercase.
Application to deploy Type tsr.
avos console username Type the ActiveVOS Console username.
avos console password Type the ActiveVOS Console password.
The script updates the supplier-ear.ear file.
50 Chapter 4: Install the Application

C h a p t e r 5
After You InstallThis chapter includes the following topics:
• Configure the MDM Hub, 51
• Configure the Operational Reference Store, 57
• Populate Supplier 360 Charts with Data, 58
• Configure the ActiveVOS Email Service, 62
• Test the Supplier Portal, 63
• Test Supplier 360, 63
Configure the MDM HubPerform the following post-installation tasks:
• Add user accounts and assign roles
• Configure the MDM Hub for Informatica Product 360 (PIM)
Add User Accounts and Assign Roles for Business UsersUser roles for business managers control the data privileges in the MDM Hub and review privileges in business processes. Each data steward and business user who is authorized to participate in supplier relationship management receives one or more role assignments. Many people can have the same role.
To add user accounts and assign roles, perform the following tasks:
1. If the business users who need to use the Supplier 360 do not have MDM user accounts, add a user account for each business user.
2. Assign roles to users.
3. If you added new users, add the new users to the application server.
For more information about users and roles, see the Informatica MDM Multidomain Edition Security Guide.
Role PrivilegesYou can assign any of the predefined or custom user roles to a user account.
51

The following table lists the predefined user roles that you can use and summarizes the role privileges:
Role Add or edit a supplier profile
Review supplier applications or profile updates
Approve supplier applications or profile updates
ApplicationAdministrator Yes Yes Yes
DataSteward Yes Yes No
DataEntryOperator Yes No No
CommodityManager Yes Yes No
FinanceManager Yes Yes No
ContractsManager Yes Yes No
ComplianceManager Yes Yes Yes
If you create a custom user role to provide restricted administrator access to the resources, ensure that you assign the user role with the minimum required resource privileges.
The following table lists the minimum resource privileges required for an administrator user role:
Resources Read Create Update Delete Merge Execute
Lookup Alternate Id Type Yes No No No No Yes
Lookup Business Title Yes No No No No Yes
Lookup Country Yes No No No No Yes
Lookup Electronic Address Type Yes No No No No Yes
Lookup Party Status Type Yes No No No No Yes
Lookup Party Status Value Yes No No No No Yes
Lookup Phone Type Yes No No No No Yes
Lookup Portal User Role Yes No No No No Yes
Lookup Postal Address Type Yes No No No No Yes
Lookup State Yes No No No No Yes
Party Yes Yes Yes Yes Yes Yes
Party Alternate Identifier Yes Yes No No No Yes
Party Electronic Address Yes Yes No No No Yes
Party Phone Communication Yes Yes No No No Yes
52 Chapter 5: After You Install
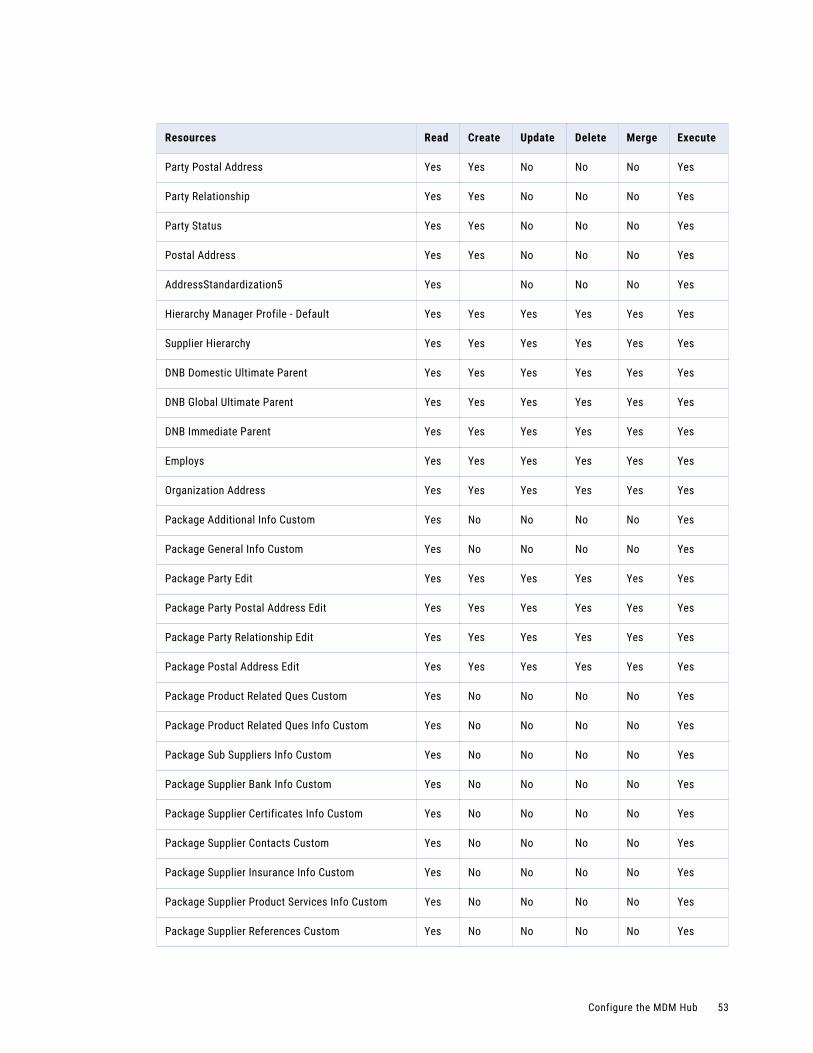
Resources Read Create Update Delete Merge Execute
Party Postal Address Yes Yes No No No Yes
Party Relationship Yes Yes No No No Yes
Party Status Yes Yes No No No Yes
Postal Address Yes Yes No No No Yes
AddressStandardization5 Yes No No No Yes
Hierarchy Manager Profile - Default Yes Yes Yes Yes Yes Yes
Supplier Hierarchy Yes Yes Yes Yes Yes Yes
DNB Domestic Ultimate Parent Yes Yes Yes Yes Yes Yes
DNB Global Ultimate Parent Yes Yes Yes Yes Yes Yes
DNB Immediate Parent Yes Yes Yes Yes Yes Yes
Employs Yes Yes Yes Yes Yes Yes
Organization Address Yes Yes Yes Yes Yes Yes
Package Additional Info Custom Yes No No No No Yes
Package General Info Custom Yes No No No No Yes
Package Party Edit Yes Yes Yes Yes Yes Yes
Package Party Postal Address Edit Yes Yes Yes Yes Yes Yes
Package Party Relationship Edit Yes Yes Yes Yes Yes Yes
Package Postal Address Edit Yes Yes Yes Yes Yes Yes
Package Product Related Ques Custom Yes No No No No Yes
Package Product Related Ques Info Custom Yes No No No No Yes
Package Sub Suppliers Info Custom Yes No No No No Yes
Package Supplier Bank Info Custom Yes No No No No Yes
Package Supplier Certificates Info Custom Yes No No No No Yes
Package Supplier Contacts Custom Yes No No No No Yes
Package Supplier Insurance Info Custom Yes No No No No Yes
Package Supplier Product Services Info Custom Yes No No No No Yes
Package Supplier References Custom Yes No No No No Yes
Configure the MDM Hub 53

Resources Read Create Update Delete Merge Execute
Package Supplier Tax Info Custom Yes No No No No Yes
Package User Auth Custom Yes No No No No Yes
Supplier Documents Info Custom Yes No No No No Yes
Other Resources - USER Yes Yes Yes Yes No No
Note: If you do not see the Package Supplier Product Services Info Custom resource in the list of resources, use the Security Access Manager workbench of the Hub Console to change the resource status to secure.
Creating User AccountsIf some business users do not have MDM Hub user accounts, create the user accounts.
Before you begin, you might want to review an existing MDM Hub user account to see which authentication type is in use in the Informatica MDM environment.
1. In the Hub Console, in the Configuration workbench, click Users.
2. Acquire a write lock.
3. Click the Users tab.
4. Click Add user.
The Users tool displays the Add User dialog box.
5. Enter a first, middle, and last name for the user.
6. Enter the user name for the user. This is the name entered when the user logs in to the Hub Console.
7. Enter the default database for the user, which is the Operational Reference Store that contains the supplier master data.
8. Enter and verify a password for the user.
9. Choose the type of authentication.
• Select the Use external authentication check box if your MDM Hub implementation uses authentication through a third-party security provider.
• Clear the Use external authentication check box if you want to use the internal authentication in the MDM Hub.
10. Click OK.
The Users tool adds the user to the list of users on the Users tab.
Assigning Roles to Business UsersYou need to assign the user roles to the business users who are responsible for reviewing applications and edited supplier profiles.
You use the Hub Console to assign user roles. You can follow either a role-first approach or a user-first approach. For a role-first approach, you select a role and then select the users and user groups that you want to associate with the role. For a user-first approach, you select a user or user group and then select roles.
54 Chapter 5: After You Install

When you connect to the Operational Reference Store (ORS), select supplier_hub.
1. In the Hub Console, connect to the Operational Reference Store that supports the IDD application.
2. Acquire a write lock.
3. Expand the Security Access Manager workbench and click Users and Groups.
The Users and Groups tool opens. You can use a role-first approach, a user-first approach, or a mix to attach roles to users.
4. If you want to follow a role-first approach, click the Assign Users/Groups to Role tab.
a. Select a workflow role.
b. Click the Edit button.
c. In the Assign Users to Role dialog box, select the users and user groups who should have this role.
d. Click OK.
e. Repeat for each workflow role.
5. If you want to follow a user-first approach, click the Assign Roles to User/Group tab.
a. Select a user or user group.
b. Click the Edit button.
c. In the Assign Roles to User dialog box, select the workflow roles suitable for the user or user group.
d. Click OK.
e. Repeat for each user or user group who requires workflow roles.
Adding MDM-ActiveVOS Users to the Application ServerWhen you install and configure Informatica MDM Multidomain Edition with the embedded ActiveVOS Server, you must set up container-based authentication in the application server and add a user.
Follow these steps to use the ActiveVOS workflow engine with the MDM Hub:
1. In the application server console, create a trusted user and assign the following roles to the user: abAdmin,abServiceConsumer,abTaskClient,abTrust.
2. To configure ActiveVOS to use MDM Identity Services, follow these steps:
a. In the ActiveVOS console, select Admin > Configure Services > Identity Services.
b. In the Provider Configuration section, enable the Enable check box and select MDM from the Provider Type list.
c. On the Connection tab, enter the ActiveVOS workflow engine user password as the MDM connection settings password.The ActiveVOS workflow engine user is the user that you specified when you added the ActiveVOS workflow engine to the Workflow Manager tool in the MDM Hub Console.
d. Click Update.
e. Test the connection.
a. Select the Test tab.
b. In the User for test field, enter an ActiveVOS user name.
c. Click Test Settings.
Configure the MDM Hub 55

Configure the Hub for Informatica Product 360When the environment includes Informatica Product 360, the MDM Hub manages user authentication among all the application components.
When a supplier uploads product catalogs from the S360 Supplier Portal to the Informatica Product 360 Supplier Portal, the MDM Hub handles user authentication between the Portals. A custom user profile provider maps the Supplier Portal user roles to the MDM Hub roles. A login provider authenticates Supplier Portal users with Informatica Product 360. The two providers are packaged in a bundle called PIMLoginProvider.jar.
Perform the following tasks:
• Map Portal roles to MDM Hub roles.
• Upload a security provider for Informatica Product 360.
Mapping Informatica Product 360 Supplier Portal Roles to MDM Hub RolesMap the roles using the RoleMappingSource.xml and appconfig.properties files.
The RoleMappingSource.xml contains the mapping of external roles to internal roles in the Security Access Manager. The appconfig.properties contains the URL to the Informatica Product 360 Supplier Portal. You need to copy these files and edit the properties file.
1. In a file explorer, navigate to the following directory:
<MDM installation directory>/app/tsr/userprofile-provider2. Copy the files appconfig.properties and RoleMappingSource.xml.
3. Navigate to the following directory:
<MDM installation directory>/hub/server/resources4. Paste the copied files into the directory.
5. Open the copied file appconfig.properties in an editor.
6. Set the pim.url property to the host name and the port number of the Informatica Product 360 Supplier Portal. You can use the following format for the URL:
pim.url=http|https://<Host>:<Port>The following sample URL uses the HTTPS protocol and 9090 as the port number:
pim.url=https://localhost:90907. Save the file.
8. If you imported the metadata from a change list, open the copied file RoleMappingSource.xml in an editor.
9. Change the value of the <InternalRoleRowID> property to match the rowid of the Supplier Administrators role in the C_REPOS_SAM_ROLE table.
10. Save the file.
Uploading the Security Provider for Informatica Product 360The security provider for Informatica Product 360 provides security services, such as authentication and authorization, for users that access the MDM Hub. You upload the provider file from the Hub Console.
1. In the Hub Console, open the Configuration workbench and select Security Providers.
2. Acquire a write lock.
56 Chapter 5: After You Install

3. In the Security Providers tool, right-click Provider File and select Upload Provider File.
4. Navigate to the following directory:
<MDM installation directory>/app/tsr/userprofile-provider5. Select the PIMLoginProvider.jar file.
6. Click Open.
The Security Provider tool populates the Providers list with the additional provider information. After you upload the provider file, you can remove the original file from the file system.
7. Exit the Hub Console.
8. Stop the application server.
9. Restart the application server.
Configure the Operational Reference StoreBefore you start the Application, configure the Operational Reference Store that contains supplier data. You must diable a trigger, truncate the data in a repository table, and review the value of the GETLIST Limit property.
Truncating a Repository TableIf you imported the Oracle database dump, the repository table C_REPOS_RPT_DETAILS contains sample data. You must truncate the data.
1. In a database tool, connect to the Operational Reference Store for supplier data.
2. Run the following command:
truncate table C_REPOS_RPT_DETAILS
Setting the Value of the GETLIST Limit PropertyThe GETLIST Limit property controls how many records a SIF search request returns. The default is 200. Set this value to 500 from the Appconfiguration user interface.
Note: If business users report missing addresses, try increasing the value of this property even more. The maximum value is 1000.
1. Launch Informatica Data Director.
http://<host>:<port number>/bdd2. Log in with your user credentials.
3. If prompted to select an application, select InfaSupplierMaster.
4. Click App Configuration.
5. On the Properties tab, type the value 500 in the text box next to Page Size.
6. Click Save Changes.
Configure the Operational Reference Store 57

Populate Supplier 360 Charts with DataSupplier 360 contains a Start workspace and Entity 360 views. These pages contain charts with metrics or data about suppliers. The data for all charts come from a data mart.
The following diagram shows how the data mart works.
The data mart service retrieves data from the Operational Reference Store and stores the results in a repository table. When the Start workspace or an Entity 360 view loads, the page queries the data mart service for the data and populates the charts.
Note: In the data mart service and configuration files, the term report refers to the chart configuration.
To populate the charts, perform the following tasks:
1. Import the chart configurations into a repository table.
2. Configure a database connection between the data mart and the database that contains the Operational Reference Store.
3. Configure the report parameters to include the database name.
4. Populate the data mart with report data.
Chart Configurations for Supplier 360Informatica MDM ships with predefined chart configurations for the data mart service. S360 adds chart configurations for supplier data that can be used to populate the charts in the Start page or in the Entity 360 views.
The following reports contain the chart configurations:
• supplier_by_region
• address_by_validation
• contract_by_expiry_date
• document_by_expiry_date
• supplier_onboarding
• task_by_status
• task_by_priority
• supplier_segmentation
Importing the Chart ConfigurationsTo import the chart configurations, run an insert script on the supplier_hub Operational Reference Store (ORS). The script imports the chart configurations into the repository table C_REPOS_RPT_CONFIG.
1. Open a command prompt.
58 Chapter 5: After You Install

2. Navigate to the following directory:
<MDM installation directory>/app/tsr/datamart/chart-config3. Use a database tool to run the insert_c_repos_rpt_config.sql script on the supplier_hub.
For example, for sqlplus, log in with the ORS user name and password and the service name. Then start the script.
.../chart-config> sqlplus supplier_hub/password@serviceSQL> @insert_c_repos_rpt_config.sql
The script inserts the charts into the repository table C_REPOS_RPT_CONFIG.
Configuring the Data Mart Database ConnectionBefore you can generate reports or populate charts, you must configure the data mart database connection.
1. Go to the following directory:
<MDM installation directory>/app/tsr/datamart/lib2. If the directory does not contain the following files, copy them from the <MDM installation
directory>/hub/server/lib directory:
• log4j-1.2.16.jar• ojdbc7.jar• siperian-common.jar• commons-validator-1.4.0.jar
3. At a command prompt, navigate to the following directory:
<MDM installation directory>/app/tsr/datamart4. Run the following command:
java -jar populate_datamart.jar config5. At the prompt, type C to configure the database connection.
6. Answer the prompts described in the following table:
Prompt Description
Connection Name Enter a unique name for the connection. If the name exists, it will be overwritten.
Type of Connection Enter the type of connection to the data mart. Currently only DB is supported.
Populate Supplier 360 Charts with Data 59

Prompt Description
Database vendor Enter the database to connect with, such as Oracle or IBM DB2 or MS SQL.
User Enter the database user.
Password Enter the database password.
Token Reserved for future use
Host Name Enter the database host name.
Port Enter the database port.
Database Name Enter the database name/SID.
7. When prompted to finish the configuration, enter Y.
The tool saves the connection information to the config/mart-population-config.xml file.
Configuring ParametersBefore you can populate the data mart, you must configure the report parameters for the chart configuration.
You need information contained in other sources.
To find the report names, open the config/report-class-mapping.properties file.
To find the configuration IDs, open the C_REPOS_RPT_CONFIG table in a database tool.
1. Open a command prompt.
2. Navigate to the data mart directory.
<MDM installation directory>/app/tsr/datamart 3. Run the following command:
java -jar populate_datamart.jar config4. Type P to configure the report parameters.
5. Answer the prompts described in the following table:
Prompt Description
Report Name Specify a report name that appears the report-class-mapping.properties file.
Report Configuration ID
Enter the report configuration ID for the report as it appears in the C_REPOS_RPT_CONFIG table.
60 Chapter 5: After You Install

Prompt Description
Mart Connection Name
Enter the connection name for connecting the data mart to an Operational Reference Store. Use the connection name that you defined for the Operational Reference Store that contains the supplier data.
Query Connection Name
Enter the connection name for the database to be queried.- For reports that include the word Tasks, specify the connection name that you defined
for the ActiveVOS database.- For all other reports, specify the connection name that you defined for the Operational
Reference Store that contains the supplier data.
6. When prompted to finish the configuration, enter N. Add the next table in the list.
7. After you enter all tables, exit the configuration tool.
The tool saves the parameters to the config/mart-population-config.xml file.
Populating the Data Mart with DataYou run a java command to populate the data mart with data for all charts or for a specific chart. If you want to specify a chart, you need to use its report name.
1. Open a command prompt.
2. Run a java command to populate the data mart.
• To populate the data mart with data for all available reports, run the following command:
java -jar populate_datamart.jar • To populate the data mart with data for a specific report, run the following command:
java -jar populate_datamart.jar exec <report name> If the supplier_hub contains data, the C_REPOS_RPT_DETAILS repository table is populated with report data. The ROWID_RPT_CONFIG column links the data to the report configuration that requested the data.
Populate Supplier 360 Charts with Data 61

Configure the ActiveVOS Email ServiceThe Application uses the email service available with the ActiveVOS Server. You need to enable the service and specify a mail server.
You configure the email service from the ActiveVOS Console. You can do this step now, while you are configuring the email templates, or you can configure the email service after you install the Application.
Mail Server PropertiesWhen you enable the email service, you need to specify a mail server.
The following table describes the mail server properties that you need to set:
Property Description
Host Specify the mail server DNS name or IP address.
Port Specify the port number to use for communications between the ActiveVOS server and the mail server. The default value is 25.
From Address Specify the email address to display in the From field of an email. For example, [email protected].
Username Specify the name used to log in to the mail server.
Password Specify the password for the user name.
Security Optional. Select a security protocol. If you set a security protocol, ensure that the Port you specified supports the protocol.
Configuring the ActiveVOS Email ServiceYou configure the ActiveVOS email service from the ActiveVOS Console.
If you do not know the location of the ActiveVOS Console or your log in credentials, contact your MDM Hub administrator.
1. Launch the ActiveVOS Console. In a browser, type the following URL, substituting the correct host name and port number:
http://[host]:[port]/activevos2. Log in to the ActiveVOS Console.
3. Click Admin.
4. Click Configure Services.
5. Click Email Service.
6. Select the Enable check box.
7. Specify the properties for your mail server.
8. Click Update to save your configuration or click Update and Test to save your configuration and send a test mail.
62 Chapter 5: After You Install

Test the Supplier PortalVerify that you can launch the Supplier Portal.
1. Open a supported browser.
2. Navigate to the following URL, substituting the host name and the port number:
http://<host name>:<port>/supplierapp-war/mdm/supplierapp/The Portal opens and displays the images you added.
3. Click Sign Up and register a fictitious organization. Use your email address so that you receive the confirmation email.
If the registration returns with an error, review your PIM system set up to check for problems.
4. If you want to test that the Create Supplier business process is working, complete an application form and submit it.
Test Supplier 360Supplier 360 runs within Informatica Data Director (IDD). You can log in with your administrative user credentials.
Note: The Start workspace contains the Task Inbox and charts. The charts are empty of data until your organization begins adding supplier profiles.
1. Launch Informatica Data Director:
http://<host>:<port number>/bdd2. Log in with your user credentials.
3. If prompted to select an application, select InfaSupplierMaster.
Supplier 360 launches and displays the Start workspace.
Test the Supplier Portal 63

C h a p t e r 6
Business Processes for Supplier Management
This chapter includes the following topics:
• Business Processes for Supplier Management Overview, 64
• Create a Supplier Process, 65
• Supplier Profile Change Approval Process, 66
• Delete a Supplier Internal Process, 67
Business Processes for Supplier Management Overview
Business processes automate some common supplier lifecycle management workflows.
The Application ships with ActiveVOS business processes for the following workflows:
• Create a supplier (initiated from the Supplier Portal)
• Create or update a supplier profile (initiated from Supplier 360)
• Delete a supplier (initiated from Supplier 360)
The following descriptions identify the purpose of each process and identifies the people activities within each process. To view the entire process, open the process in the ActiveVOS Console.
64

Create a Supplier ProcessThe CreateSupplierProcess.bpel defines a four-step approval process. The process begins when a supplier submits an online application.
The following diagram shows an overview of the process and highlights the people activities.
The first people activity is the commodity evaluation, which requires a commodity manager to review the application. If the commodity manager accepts it, the application moves on to a credit evaluation and then a contract evaluation. The last approval step is a risk evaluation. If the compliance manager believes the risk is acceptable, the manager approves the application and notifies the supplier. At any stage, a manager can reject the application.
The following table summarizes the people activities within the process, the required role, and the possible actions:
People Activity
Role Assigned Possible Actions
Commodity Evaluation
CommodityManager - Accepts the application. This action sends the application onto the Credit Evaluation step.
- Rejects the application. This action deletes the pending record containing the changes.
- Disclaims the task with an explanation so that someone else can claim it.
Credit Evaluation
FinanceManager - Accepts the application. This action sends the application onto the Contract Evaluation step.
- Rejects the application with explanation. This action sends the application back to the Commodity Evaluation step.
- Disclaims the task with an explanation so that someone else can claim it.
Contract Evaluation
ContractManager - Accepts the application. This action sends the application onto the Risk Evaluation step.
- Rejects the application with explanation. This action sends the application back to the Commodity Evaluation step.
- Disclaims the task with an explanation so that someone else can claim it.
Risk Evaluation
ComplianceManager - Approves the application. This action applies the changes to the master data.
- Rejects the application with explanation. This action sends the application back to the Commodity Evaluation step.
- Disclaims the task with an explanation so that someone else can claim it.
Create a Supplier Process 65

Supplier Profile Change Approval ProcessThe default change approval process is a four-step process. The process begins when a business manager creates or edits a supplier profile.
The following diagram shows an overview of the process and highlights the people activities.
The first people activity is the commodity evaluation, which requires a commodity manager to review the update. If the commodity manager accepts it, the update moves on to a credit evaluation and then a contract evaluation. The last approval step is a risk evaluation. If the compliance manager believes the risk is acceptable, the manager approves the update and notifies the supplier. At any stage, a manager can reject the update.
The following table summarizes the people activities within the process, the required role, and the possible actions:
People Activity
Role Assigned Possible Actions
Commodity Evaluation
CommodityManager - Accepts the update. This action sends the update onto the Credit Evaluation step.
- Rejects the update. This action deletes the pending record containing the changes.
- Disclaims the task with an explanation so that someone else can claim it.
Credit Evaluation
FinanceManager - Accepts the update. This action sends the update onto the Contract Evaluation step.
- Rejects the update with explanation. This action sends the update back to the Commodity Evaluation step.
- Disclaims the task with an explanation so that someone else can claim it.
Contract Evaluation
ContractManager - Accepts the update. This action sends the update onto the Risk Evaluation step.
- Rejects the update with explanation. This action sends the update back to the Commodity Evaluation step.
- Disclaims the task with an explanation so that someone else can claim it.
Risk Evaluation
ComplianceManager - Approves the update. This action applies the changes to the master data.- Rejects the update with explanation. This action sends the update back to
the Commodity Evaluation step.- Disclaims the task with an explanation so that someone else can claim it.
66 Chapter 6: Business Processes for Supplier Management

Delete a Supplier Internal ProcessThe DeleteSupplierProcess.bpel defines a one-step approval process. The process begins when a business manager deletes a supplier profile.
The following diagram shows an overview of the process and highlights the people activity.
When an internal user attempts to delete a supplier profile, the action is sent to a commodity manager to review.
The following table summarizes the people activity within the process, the required role, and the possible actions:
People Activity Role Assigned Possible Actions
Commodity Evaluation
CommodityManager - Accepts the deletion. This action deletes the supplier profile and notifies the supplier.
- Rejects the deletion. This action preserves the supplier profile and notifies the supplier that the deletion was rejected.
- Disclaims the task with an explanation so that someone else can claim it.
Delete a Supplier Internal Process 67

C h a p t e r 7
Customize the ApplicationThis chapter includes the following topics:
• Customize the Application Overview, 68
• Extending the Data Model, 68
• Extending the Business Entities and Business Entity Views, 70
• Customize Edit Privileges for Supplier Profile Pages, 70
Customize the Application OverviewAfter you configure the Application, you can customize some of the features to better suit your environment. After you customize items, you need to rerun the setup script.
The customization includes extending the data model and customizing the edit privileges for the Supplier Portal pages. If you want to customize other elements of the Application, contact your Informatica representative.
Extending the Data ModelYou can extend the Supplier 360 data model by changing the physical schema or by adding types and values to some of the existing tables. You can also add new tables and attributes.
To extend the data model, perform the following steps:
1. Compare your business requirements with the existing schema.
2. List the tables and columns that you want to add.
3. Take a backup of the existing schema.
4. Review the guidelines to extend the data model.
5. Add the tables and columns.
68

Guidelines for Extending the Data ModelYou can modify the definitions of tables or add new tables to the database.
Consider the following guidelines when you extend the data model:
• Check if you can use an existing child base object.
• Do not add a root base object to store the person or organization information.
• Do not define tables with names greater than 24 characters.
• Do not delete existing base objects.
• Do not delete existing columns.
• Do not modify the physical names of existing base objects. However, you can modify the display names.
• Do not modify the data type of an existing column.
• Do not decrease the length of an existing column.
• Prefix the names of the new base object tables to distinguish the tables from the existing tables. The prefix indicates the type of table. Use the following naming convention when you create a base object:
Prefix Table
C_XO_ Entity root or child base object.
C_XR_ Relationship base object.
C_XT_ Lookup base object.
• If you add a column to an existing table, prefix the name of a column with X_.
For more information about adding tables and columns, see the Informatica MDM Multidomain Edition Configuration Guide.
Guidelines for Adding Base ObjectsYou can add base objects to extend the data model. You can add root or child base objects, lookup base objects, and relationship base objects.
Consider the following guidelines when you add a base object table:
• Child base object with one-to-many relationship. Add a Party Role foreign key in the table to relate the table to the Party Role table.
• Child base object with many-to-many relationship. Use the relationship base object to relate the table to the Party Role table.
• Lookup base object. Set the LookupIndicator to true.
Extending the Data Model 69

Extending the Business Entities and Business Entity Views
You can add a business entity or a lookup business entity. You can add a child, field, or reference fields to an existing business entity. You can add a business entity view for an existing business entity. You can create a business entity, and then add a business entity view.
Guidelines for Extending Business Entities and Business Entity Views
Consider the following guidelines when you extend business entities or business entity views:
• When you extend a business entity, add the prefix Ex to the names of the new business entities or lookup entities to distinguish them from the existing business entities. For example, Ex_<BE_NAME>.
• When you extend a business entity, add the prefix Ex_ to the names of the new child, field, or referenceOne field. For example, Ex_<BE_CHILD_NAME>.
Note: A referenceOne field specifies a one-to-one relationship between a parent node and a child reference entity.
• Do not add a new view for an existing business entity. Create a new business entity, and then add the business entity view.
• When you extend a business entity view, add the prefix Ex to the names of the new child, field, or referenceOne field. For example, Ex <BE_CHILD_NAME>.
Customize Edit Privileges for Supplier Profile PagesFor the Supplier Portal, you control the pages that can be edited by supplier representatives and at what stage. For example, you can choose to make some pages not editable in an approved supplier profile. For the pages that remain editable, suppliers decide which of their representatives is responsible for editing the editable pages.
When you make a page non-editable, a supplier must contact a business manager to make changes on behalf of the supplier. For example, if Finance Managers want to know when approved suppliers need to update banking information, you make the Bank page non-editable. Then, when this information requires an update, a supplier representative contacts the Finance Manager. The Finance Manager updates the banking information.
Page edit privileges are controlled through MDM Hub user roles. Supplier Portal user roles are controlled through the Contacts page. When a supplier representative with the appropriate role edits a page and submits the change, the MDM Hub updates the master data.
70 Chapter 7: Customize the Application

Default Page PrivilegesBy default, all Supplier Portal pages are editable during the application process and all pages are non-editable while the application is under review. After a supplier is approved, some pages are editable and some are non-editable.
The following table lists all the Supplier Portal pages and summarizes when each page is editable:
Supplier Portal Page Editable While Filling Out the Online Application Form (Registered)
Editable While the Application is Under Review (Submitted)
Editable in the Approved Supplier Profile (Approved)
General Information Yes No Yes
Additional Information Yes No Yes
Products and Services Yes No Yes
Tax Yes No Yes
Bank Yes No Yes
Insurance Yes No Yes
Certificates Yes No Yes
References Yes No Yes
Sub Suppliers Yes No Yes
Product Related Questions Yes No Yes
Documents Yes No Yes
Contacts Not available No Yes
Page User Roles and Edit PrivilegesYou control edit privileges on a page by associating the page with a user role. A page can be in one of three stages, based on the status of the supplier application. You can set a different user role for each combination of page and application status.
Each page has the following possible application statuses:
• Registered. The page is being used as part of the supplier application.
• Submitted. The completed application form is under review by business user.
• Approved. The supplier is approved and the page is now part of the supplier profile.
For page and status, you can assign one of the following page user roles:
• Supplier Administrators. This role makes a page editable by supplier representatives with the Supplier Portal Admin User role and viewable by all supplier representatives.
• Supplier Users. This role makes a page non-editable for all supplier representatives. The page is viewable by all supplier representatives.
For example, if you want the Contacts page to be editable only after the application is approved, you assign the Contacts page with the Approved status to the Supplier Administrators role. You can leave the other
Customize Edit Privileges for Supplier Profile Pages 71

statuses for this page undefined. When a page status is undefined, the page is treated as if you assigned the Supplier Users role.
Supplier Portal User Roles and Edit PrivilegesSuppliers control which supplier representatives have edit privileges by assigning Supplier Portal user roles.
The Supplier Portal user roles grant different privileges to supplier representatives:
• Admin User. This role grants edit privileges on all editable pages and view privileges on all non-editable pages.
• Portal User. This role grants view privileges on all pages.
After business users approve a supplier, the supplier representative who filled out the supplier application form is assigned the Admin User role. This authorized supplier representative can log in to the Supplier Portal and add additional supplier contact names on the Contacts page. Each contact receives access to the Portal. On the Contacts page, the supplier representative assigns the contact a user role by selecting either Portal User or Admin User.
The following image shows the Contacts page with the Portal User selected.
72 Chapter 7: Customize the Application

<resource> AttributesIn the appConfig.xml file, under <appSecurity>, the element <editableResources> contains definitions for the Supplier Portal pages that you want to be editable. Each page is defined within a <resource> element.
The following table describes the attributes that you can use within the <resource> element:
Attribute Value Description
resourceId Page identifier Identifies the Supplier Portal page. Specify one of the following IDs:- GENERALINFO- ADDITIONALDETAILS- PRODUCTSANDSERVICES- TAX- INSURANCE- REFERENCES- SUBSUPPLIERS- PRODUCTQUESTIONS- DOCUMENTS- CONTACTS
appStatus Status identifier Identifies the status of the supplier application. Specify one of the following statuses:- Registered. The application is being created.- Submitted. The application is under review by business
users.- Approved. The supplier is approved and has access to the
supplier profile.
Editing Page PrivilegesYou can define which pages are editable and at what stages. Any given page can have different edit privileges at different stages.
You need to edit the app-config.xml file to customize page privileges.
1. In a database tool that supports the BLOB data type, open the table C_REPOS_APP_CONFIG.
2. In the CONFIG_TYPE column, find the row that contains APP_CONFIG.
3. In the CONFIG_DATA column, download the app-config.xml file.
4. Open the appConfig.xml file in an XML editor.
5. Add or edit the resource properties.
6. Save the file.
7. In the CONFIG_DATA column, upload the edited XML file.
Customize Edit Privileges for Supplier Profile Pages 73

C h a p t e r 8
TroubleshootingThis chapter includes the following topics:
• Suppliers are not created in Informatica Product 360, 74
• Suppliers report issues with the Products and Services list, 74
• Cannot Log In to the Informatica Data Director Application, 75
Suppliers are not created in Informatica Product 360When the connection to the PIM Server is interrupted, approved suppliers are not created in Informatica Product 360.
While the PIM Server is inaccessible, the JMS messages that were not received by the PIM Server remain in a pending state. After you re-establish the connection to the PIM Server, you can run a recovery service. The recovery service retrieves all pending messages and processes the messages in the order in which they arrived. The PIM Server receives the pending messages and creates the missing suppliers.
To start the recovery service, run the following REST API:
REST API GET URL: http://<host>:<port>/supplierapp-war/services/jms/recoveryThe message "Recovery service started" appears. The recovery service retrieves all the pending messages and processes the messages in the order in which they arrived.
Suppliers report issues with the Products and Services list
In the Supplier Portal on the Product and Services page, when a supplier representative clicks the root node for a set of products or services, not all child nodes are selected.
The Supplier Portal uses a SIF search request to retrieve the contents of the list. Two properties control how many records a SIF search request returns: GETLIST Limit and pageSize. The value of the GETLIST Limit property must be equal to the value of the pageSize property. When the values are different, the Supplier Portal uses the lower value. If one or both values are too low, the entire list is not returned.
74

To resolve this issue, first check if the value of both properties are the same.
• If the values are different, increase the lower value to match the other value.
• If the values are the same, increase the value of both properties.
For instructions about finding and setting these properties, see the following topics:
• “Setting the Value of the GETLIST Limit Property” on page 57
• “Configure the Supplier 360 Properties” on page 33
Cannot Log In to the Informatica Data Director Application
When you try to log in to the Informatica Data Director application, the login fails.
After you deploy the InfaSupplierMaster application , the user roles might lose their assigned privileges. The login fails because your credentials might not have sufficient privileges to log in.
To reassign all the privileges to the user roles, promote the following change list to the Operational Reference Store:
<MDM installation directory>/app/tsr/hub/schema/met-export/SUPPLIER_hub_change.xml
Cannot Log In to the Informatica Data Director Application 75

C h a p t e r 9
MDM - Supplier 360 UpgradeThis chapter includes the following topics:
• Upgrade Overview, 76
• Extracting the Application, 76
• Importing the Database Schema, 77
• Adding JBoss Remoting JAR Files to Lib Folder, 78
• Installing the Application Configuration Tool, 78
• Enabling the HTTPS Protocol, 78
• Setting the cmx.dataview.enabled Property to True, 79
• Verifying the S360 Application Settings, 79
• Installing S360, 80
Upgrade OverviewTo upgrade to MDM - Supplier 360 10.1, you must first import the database schema from a change list. You must install the Appconfiguration application and verify the global S360 properties. Then you install S360.
Extracting the ApplicationYou receive the S360 application as an archive file. Create the following directory structure and extract the contents of the S360 archive file into it:
<MDM Installation Directory>/app/tsr
The extracted content contains the following files and folders:
• bin/. Contains build files, the setup script, and an uninstall wizard.
• bpm/. Contains the ActiveVOS email service and the default business processes in a deployable format.
• config/. Contains configuration properties files.
• datamart/. Contains the data-mart service and the chart configurations.
76

• email-config/. Contains the directory that defines the email templates. The email templates are used by the ActiveVOS email service.
- templates/. Contains the avos-templates and pim-templates subdirectories with email body text templates for ActiveVOS and for Informatica Product 360.
• hub/. Contains the subdirectories that contain the database schema and the configuration files to deploy to Informatica Data Director (IDD).
- cocsconfig/. Contains configuration files for composite objects and composite services.
- entity360config/. Contains copies of the Entity 360 component instance definitions that ship with Informatica MDM.
- idd/. Contains the configuration files that you use to create the S360 interface in Informatica Data Director.
- schema/. Contains the database schema for supplier data and reference data.
• images/. Contains placeholder images for a logo and for a background image for the Supplier Portal login page.
• pre-install-config/. Contains a file to set global Application properties and a file to set the list of products and services in the Supplier Portal.
• userprofile-provider/. Contains the configuration files that you use after the installation is finished. Contains the appconfig.properties, PIMLoginProvider.jar, and RoleMappingSource.xml files.
• lib/. You must include external libraries in this folder. If you use a JBoss application server, copy the jboss-ejb-client, jboss-remote-naming, jboss-remoting, xnio-nio, and xnio-api files to the folder.
• supplierapp-ear.ear file.
• appconfiguration.war file.
Importing the Database SchemaThe metadata for the supplier database schema resides in an MDM Hub change list. You import the change list into the Hub Store. The metadata change list creates components, such as landing tables, user exits, lookup tables, staging tables, base objects, and match and merge rules. The created tables are empty.
1. In the Hub Console, in the Configuration workbench, click Repository Manager.
2. Click the Import tab.
3. Click the button next to the Source field.
The Open Repository dialog box opens.
4. Click File Repository.
5. Navigate to the following directory:
<MDM installation directory>/app/tsr/hub/schema/met-export6. Select the SUPPLIER_hub_change.xml file, and click OK.
7. From the Target field, select supplier_hub.
8. Select all the schema components and click Apply.
The Repository Manager imports the selected components from the change list.
9. Click Verify Repository.
Importing the Database Schema 77

Adding JBoss Remoting JAR Files to Lib FolderIf you use a JBoss application server, you must add the JBoss remoting JAR files to the app/tsr/lib/ folder.
Based on the JBoss version, download the following files from Maven repository to the app/tsr/lib/ folder:
• jboss-ejb-client
• jboss-remote-naming
• jboss-remoting
• xnio-nio
• xnio-api
Installing the Application Configuration ToolTo install the Application Configuration tool, run the install-tsr script.
1. At a command prompt, navigate to the following directory:
<MDM installation directory>/app/tsr/bin2. Run one of the following scripts:
• On Windows. install-tsr.bat• On Linux. ./install-tsr.sh
3. At the prompts, enter the following parameters:
Parameter Description
MDM Hub installation directory
Press Enter to use the default path or type the fully-qualified path to the directory where you installed Informatica MDM Hub.
MDM Supplier 360 Application installation directory
Press Enter to use the default path or type the fully-qualified path to the directory that contains the Application files.
Application Server Type the name of the application server in lowercase.
Application to deploy Type appconfig.
Enabling the HTTPS ProtocolIf the MDM Hub and Informatica Product 360 are configured to use the HTTPS protocol, enable the HTTPS protocol for the Supplier 360 components.
1. Extract the InfaSupplierMaster.zip file located in the following directory:
<MDM installation directory>/app/tsr/hub/idd2. In a text editor, open the BDDConfig.xml file.
78 Chapter 9: MDM - Supplier 360 Upgrade

3. In the XML file, search for the following entries:
• <externalLink name="supplier_doc_child_link" type="IFRAME" url="http://@LOCALHOST@:@LOCALPORT@/supplierapp-war/mdm/supplierapp/document">
• <externalLink displayName="App Configuration" name="appconfig" type="IFRAME" url="http://@LOCALHOST@:@LOCALPORT@/appconfiguration">
4. In the url parameter of the selected entries, change http to https.
5. Save the XML file.
6. Log in to the IDD Configuration Manager, and select the application.
7. Click Import > Import to existing IDD application.
8. In the Import to existing IDD application dialog box, select BDD Configuration.
9. Click Browse, and select the BDDConfig.xml file.
10. Click Import.
Setting the cmx.dataview.enabled Property to TrueThe cmx.dataview.enabled option specifies whether the Data workspace, Application Configuration, and related elements appear in IDD applications. When cmx.dataview.enabled=true, you can view the Application Configuration tab.
1. Navigate to the following directory:
<MDM installation directory>/hub/server/resources2. Use a text editor to open the cmxserver.properties file.
3. Set cmx.dataview.enabled=true.
4. Save and close the file.
5. Validate the schema and redeploy the IDD application.
6. Restart the application server.
Verifying the S360 Application SettingsVerify the global S360 application settings in the Application Configuration tool.
1. Launch Informatica Data Director.
2. Log in with your user credentials.
3. If prompted to select an application, select InfaSupplierMaster.
4. Click App Configuration.
5. On the Connections tab, verify the connection parameters.
6. On the Properties tab, verify the properties.
Setting the cmx.dataview.enabled Property to True 79

Installing S360To install S360, run the install-tsr script.
1. At a command prompt, navigate to the following directory:
<MDM installation directory>/app/tsr/bin2. Run one of the following scripts:
• On Windows. install-tsr.bat• On Linux. ./install-tsr.sh
3. At the prompts, enter the following parameters:
Parameter Description
MDM Hub installation directory Press Enter to use the default path or type the fully-qualified path to the directory where you installed Informatica MDM Hub.
MDM Supplier 360 Application installation directory
Press Enter to use the default path or type the fully-qualified path to the directory that contains the application files.
Application Server Type the name of the application server in lowercase.
Application to deploy Type tsr.
avos console username Type the ActiveVOS Console username.
avos console password Type the ActiveVOS Console password.
The script updates the supplier-ear.ear file.
80 Chapter 9: MDM - Supplier 360 Upgrade

I n d e x
Aaccounts
MDM Hub users, creating 54PIM administrative user, creating 46PIM system users, creating 47
ActiveVOS adding users to the application server 55business processes 64email service, configuring 62
adapters MDM-PIM 16
administrative user PIM Server, creating 46
appconfig.properties editing 30
appConfig.xml properties, setting 36
application 16application configuration tool
global properties 30application configuration UI
global properties 33application server
adding MDM Hub users 55architecture
S360 11
Bbusiness managers
MDM Hub user accounts, creating 54user roles, assigning 54
business processes create a supplier 65create or update a supplier internal process 66delete a supplier 67description 14overview 64
Ccatalog
description 17charts
configuration reports 58configurations, importing 58populating with data 58
components for Entity 360 views inserting 28
composite objects and services uploading 26
configuration properties setting 29
connection_properties.properties editing 29
create a supplier process description 65
create or update a supplier process description 66
Ddata mart
configuring 58database connections, configuring 59populating 61report parameters, configuring 60
data model description 13
database connections configuration properties, setting 29data mart, configuring 59
database schema description 13import options 23
delete a supplier process description 67
directory structure 21, 76
document storage description 15
Eemail service in ActiveVOS
configuring 62server properties 62
email templates for ActiveVOS attributes 42body text, configuring 44configuring 42editing 43
email templates for Informatica Product 360 editing 45
enabling data view 32
entity 14Entity 360 views
component instances, inserting 28extending
business entities 70business entity views 70data model 68
81

Fforms
online supplier application 16
GGETLIST Limit property
setting 57guidelines
adding base objects 69extending business entities 70extending business entity views 70extending data model 69
HHTTPS protocol 32, 78
Iimages
adding 36InfaSupplierMaster
importing 27Informatica Data Director
logging in 63Supplier 360, importing 27
installation directory structure 21, 76setup_app script, running 49, 80
interface business users 15
introduction Supplier 360 Application 9
Llogging in
Informatica Data Director 63logo
adding 36
MMDM Hub
post-installation, configuring 51MDM-PIM adapter
definition 16metadata
Application, importing 25, 77MDM, importing 24
OOperational Reference Store
configuring 57document storage 15schema, importing 23
operational reference stores registering 25
Operational Reference Stores MDM Hub Store metadata, importing 24
ORS Operational Reference Store 57
overview MDM Supplier 360 Application 9
Ppages
default edit privileges 71edit privileges, customizing 70
pageSize property GETLIST Limit property, synchronizing 57
PIM 12PIM Server
users, configuration example 48users, creating 46
PIM Web Item Editor 47Portal 12processes 64product catalog
description 17Product Information Management
configuration properties, setting 45description 12email templates, editing 45MDM-PIM adapter 16post-installation tasks 45product catalog description 17user accounts, creating 46
product related questions configuring 40creating 40relationships, creating 41
products and services configuring 37creating a list 37uploading the list 39
profiles 14properties
appconfig.properties, setting 30appConfig.xml, setting 36application, setting 33configuration, setting 29connection_properties.properties, setting 29Informatica Product 360 configuration, setting 45Informatica Product 360 Server, setting 48siperian-client.properties, setting 30
Qquestions
product related, configuring 40
Rrecords displayed
increasing number 57reference data
inserting 26report parameters
data mart 60repository tables
C_REPOS_APP_CONFIG, adding 26
82 Index

repository tables (continued)C_REPOS_APP_CONFIG, editing page privileges 73C_REPOS_APP_CONFIG, populating 26C_REPOS_CO_CS_CONFIG 26C_REPOS_COMPONENT_INSTANCE 28C_REPOS_RPT_DETAILS, populating data mart 61C_REPOS_RPT_DETAILS, truncating 57
requirements software 19system 19
respository tables C_REPOS_SAM_ROLE 56
Sschema 13, 23search
number of records returned 57services
ActiveVOS email 62setup_app script
overview 49running 49, 80
siperian-client.properties editing 30
software requirements verifying 19
storage documents 15
Supplier 360 architecture 11charts, populating with data 58description 15importing 27InfaSupplierMaster, importing 27logging in 63
supplier application description 16
supplier data model description 13
supplier database schema 13supplier entity 14Supplier Portal
configuring 36edit privileges for pages, setting 71
Supplier Portal (continued)images, adding 36page edit privileges, customizing 70page privileges, editing 73supplier application description 16supplier profiles, about 14user roles 72
supplier profiles about 14
supplier user roles 13system requirements
verifying 19
Ttables
C_BO_PRDCT_RLTD_QSTNS 40C_BO_PRDCT_SRVC_QSTN_RE 41See also repository tables
Uuser accounts
MDM Hub users, creating 54PIM administrative user, creating 46PIM system users, creating 47
user interface business users 15
user roles business managers, assigning 54description 13overview 51page edit privileges 71privileges 51Supplier Portal 72
Wwebfrontend.properties
editing 48example 48
workflows 64
Index 83