fundamentals of programming languages ii · pdf filefundamentals of programming languages ii...
TRANSCRIPT

FUNDAMENTALS OF PROGRAMMING LANGUAGES II
SRCOE, PUNE Page1
Shree Ramchandra Education Society‟s
SHREE RAMCHANDRA COLLEGE OF ENGINEERING,
LONIKAND, PUNE-412 216
Department of Engineering Science
LAB MANUAL
FUNDAMENTALS OF PROGRAMMING LANGUAGES II
FE (Engineering Science) Semester-II
Prepared by
Mrs. Vaishali Mali (Assistant Professor)

FUNDAMENTALS OF PROGRAMMING LANGUAGES II
SRCOE, PUNE Page2
INDEX
Sr.
No. Name of Experiment
Page
No.
1 Write a program in (Eclipse) to Display String “Hello World”.
2 Web technology Programming using HTML for “Hello World” Program.
Display images, web links.
3 Write a class in C++/Java to add integer number
4 Write C++ program to Calculate Addition, Subtraction, Multiplication,
Division.
5 Write a C++ Class for sorting Numbers in Ascending/Descending Order.
6 Write a class for showing the current Time and Date.
7 Write a Java class for finding Palindrome
8 Write a class to implement various Boolean Algebra Function
9 Installation by Android ADT for eclipse.
10 Study and implementation on Android Simulator, “Hello! World”.

FUNDAMENTALS OF PROGRAMMING LANGUAGES II
SRCOE, PUNE Page3
Experiment No. 1
Title: Write a program in (Eclipse) Java to Display String “Hello World”.
Aim: The objective of this assignment is to learn the concepts of input, output, in Java.
Software required: 1. Eclipse(C++/Java)
Theory:
Create A New Project
we need to create a Java project before we can begin coding. A Java project is just a bunch of Java
files and other files needed for your program to work.
Right click on the left side panel, go to new, and select Java Project.

FUNDAMENTALS OF PROGRAMMING LANGUAGES II
SRCOE, PUNE Page4
The form will close and you should see your new project for your Java Hello World program on the
side panel.
Create a New Class
If you expand your new project by clicking the plus sign next to the folder, you'll see a folder called
src and also a JRE System Library. Right click on the src folder, go to new, and select Class.

FUNDAMENTALS OF PROGRAMMING LANGUAGES II
SRCOE, PUNE Page5
Just give this new file a name. Type in HelloWorld (no spaces!) where it asks for the name. Java
files should always start with a capital letter as the first letter and should have no spaces, so
remember that. Also, check the box that says public static void main(String[] args), because you'll
need that. Then hit finish.

FUNDAMENTALS OF PROGRAMMING LANGUAGES II
SRCOE, PUNE Page6
Writing the Java Hello World Program
public class HelloWorld : is the beginning of your class file. It has the same name as the file itself.
public static void main(String[] args) : is called the main method.
{
and then further down you see two closing brackets
}
Anything you write inside the inner two brackets belong to the main method, and anything inside of
the outer brackets belongs to the class. All methods and classes have opening and closing brackets.
To make the screen say hello to the world. To do this, make sure you're typing inside of the main
method, meaning inside the open and close brackets belonging to the main method. Just write the
new line under public static void main, because that would be considered to be inside the main
method brackets. Add this line:
Your full Java Hello World code should look like this:

FUNDAMENTALS OF PROGRAMMING LANGUAGES II
SRCOE, PUNE Page7

FUNDAMENTALS OF PROGRAMMING LANGUAGES II
SRCOE, PUNE Page8
Result:
Input: Give input of “Hello world” to display.
Output: Display string “Hello world”
Conclusion: We have successfully studied to display string “Hello World” in Java.

FUNDAMENTALS OF PROGRAMMING LANGUAGES II
SRCOE, PUNE Page9
Experiment No. 2
Title: Web technology Programming using HTML for “Hello World” Program. Display images,
web links.
Aim: The objective of this assignment is to learn the concepts HTML language.
Software required: Eclipse (C++/Java)
Theory:
A public Web document is part of the World Wide Web and operates according the client-server
model. A Web page is a file that resides on a server. People use client software (a Web browser) to
access a Web page. Web sites can contain massive numbers of pages of hypertext and multimedia. A
Web site truly represents a new kind of communication with unique characteristics and qualities.
Web Document:
You create a file and put special character sequences called HTML elements into your file. These
elements identify the structural parts of your document. When a Web browser displays the file, it
will display your file's content, but not the characters that make up the structure.
Tag What it is When to use it
<a> Anchor (most
commonly a
link)
Vital. Use to create links in content. Use the title attribute
whenever the contents of the <a>…</a> pair do not
accurately describe what you‟ll get from selecting the link.
Title attribute often displays as a tooltip in visual browsers,
which may be a helpful usability aid.
<abbr> Defines an
abbreviation
Works in a similar way to <dfn> and <acronym>, using a
title attribute (displays a tooltip in standard visual
browsers). e.g. <abbr title=”Hypertext markup
language”>HTML</abbr>
<ACRONYM> Defines an
acronym
Works in a similar way to <abbr> and <dfn>, using a title
attribute (displays a tooltip in standard visual browsers).
<ADDRESS> Used for
marking up a
physical (e.g.
mailing) address
Not commonly used. Recommend looking into
microformats, which allow for more detail and
interoperability.
<APPLET> Inserts a Java
applet
The old way to insert a Java app. Use <object> instead
today.
<AREA> Hotspot in image
map
Avoid image maps where possible. Occasionally
necessary.

FUNDAMENTALS OF PROGRAMMING LANGUAGES II
SRCOE, PUNE Page10
<BASE> Specifies the
base location of
the document.
Use only when necessary. Adjusts any relative links and
paths within the document.
<BASEFONT> Sets default font
size
Display info – never use it
<BIG> Larger text Display info – never use it
<BLINK> Makes text blink You go to hell if you use this
<BLOCKQUOTE> Large quoted
block of text
Use for any quoted text that constitutes one or more
paragraphs (note: should contain <p> tags as well). Use
<q> for quotations within a paragraph. Often used in
conjunction with <cite> to cite the quotation‟s source.
<BODY> Document body Essential (unless you‟re using frames)
<BR> Line break This is arguably display information. Still in common use,
but use with restraint.
<B> Bold text Display info – never use it
<BUTTON> Used for a
standard
clickable button
within a form
Often better than <input type=”button” /> or <input
type=”submit” />, as it allows you to assign different
styles based on the HTML element alone, whereas
differentiating style based on the type of input is less well
supported.
<CAPTION> Caption for a
table: describes
the table‟s
contents
The correct way to assign a title to a table
<CENTER> Centred block Display info – never use it. Use <div> or some other
block-level tag with the style text-align:center instead
<CITE> Defines a
citation
Defines the source of a quotation (in conjunction with
content in <q> or <blockquote> pairs).
<CODE> Defines an
extract of code
Not commonly used. Similar to <pre> tag, but collapses
consecutive white spaces and line breaks in the source.
<COL> Identifies a
particular
column in a table
Can be very useful. e.g. <col class=”namecol”> can be
applied to each first column in a series of tables, then the
width of each column may be set to be equal in the
stylesheet, overriding the table‟s natural tendency to adjust
its own column widths to fit its contents.
<DFN> Definition of a
term
Works in a similar way to <abbr> and <acronym>, using
a title attribute (displays a tooltip in standard visual

FUNDAMENTALS OF PROGRAMMING LANGUAGES II
SRCOE, PUNE Page11
browsers).
<DIR> Directory list Now deprecated. Use a standard <ul> or other list instead.
<DIV> Division Specifies a logical division within a document. Use it to
separate or identify chunks of content that are not
otherwise distinguished naturally using other tags.
One of the most common HTML tags.
<DL> Definition list Contains one or more definition-term / definition-
description pairs.
<DT> Definition term Used as part of a <dt></dt><dd></dd> pair within a
definition list (<dl></dl>) <DD> Definition
description
<EM> Emphasis Commonly used in place of the old <i> (italics) tag to
indicate emphasis (but less than <strong>)
<FONT> Font settings Display info – never use it
<FORM> Input form Essential for data input
<H1> Level 1 header Aim to have one H1 on each page, containing a description
of what the page is about.
<H2> Level 2 header Defines a section of the page
<H3> Level 3 header Defines a sub-section of the page (should always follow an
H2 in the logical hierarchy)
<H4> Level 4 header Etc. Less commonly used
<H5> Level 5 header Less commonly used. Only complex academic documents
will break down to this level of detail.
<H6> Level 6 header Less commonly used
<HEAD> Document head Essential. Contains information about a page that does not
constitute content to be communicated as part of the page.
<HR> Horizontal rule Display info with no semantic value – never use it.
“Horizontal”, by definition, is a visual attribute.
<HTML> Core element of every web page.
<IMG > Show an image Vital. Always use the alt or longdesc attributes when the
image has content value
<INPUT> Input fields
within forms
Vital. (I prefer to use <button> for buttons and submit
buttons though)

FUNDAMENTALS OF PROGRAMMING LANGUAGES II
SRCOE, PUNE Page12
<ISINDEX> Old type of
search input
Not really used any more. Use <form> instead.
<I> Italicised text Display info – never use it
<KBD> Keyboard input Display info – never use it
<LINK> Defines a
relationship to
another
document
Commonly used to reference external stylesheets, but has
other minor uses
<LI> List item Specifies an item in an unordered or ordered list (<ul> or
<ol>)
<MAP> Client-side
imagemap
May have occasional value, but only use when absolutely
necessary
<MARQUEE> Makes text scroll
across the screen
See <blink>
<MENU> Menu item list Deprecated. Do not use. Use other standard list types
instead.
<META> Meta-
information
Useful way to insert relevant information into the <head>
section of the page that does not need to be displayed.
<OL> Ordered list Type of list where the order of elements has some
meaning. Generally rendered with item numbers (best
managed with CSS).
<OPTION> Selection list
option
Vital for options within a drop-down control.
<PARAM> Parameter for
Java applet
Used in conjunction with an <object> or <applet> tag to
pass additional setting information at runtime.
<PRE> Preformatted text Renders text in a pre-formatted style, preserving line
breaks and all spaces present in the source. May be useful.
(This one’s a paradox, as it is strictly display info that
applies only to visual browsing, but it’s still so commonly
used and useful that I’m hesitant to advise against using
it.)
<P> Paragraph Only use to denote a paragraph of text. Never use for
spacing alone.
<Q> Short quotation Use for inline quotations (whereas <blockquote> should
be used for quotations of a paragraph or more). Often used
in conjunction with <cite> to cite the quotation‟s source.
<SAMP> Denotes sample Similar to the <code> tag. Rarely used. Avoid.

FUNDAMENTALS OF PROGRAMMING LANGUAGES II
SRCOE, PUNE Page13
output text
<SCRIPT> Inline script (e.g.
JavaScript)
It‟s better to have all scripts as separate files than to write
inline or in the <head> section, however still has its uses.
<SELECT> Selection list A drop-down selector for a form.
<SMALL> Smaller text Display info – never use it
<SPAN> An inline span
within text
Use to apply meaning (and style) to a span of text that goes
with the flow of content (whereas a <div> tag is block-
level and breaks the flow)
<Strikeout> Display info – never use it
<STRONG> Strong emphasis Use this instead of the old <b> tag.
<STYLE> CSS style
settings
Normally used in <head> section of a page. Try to use
external stylesheets, to enable you to apply different styles
for different output media.
<SUB> Subscript text Arguably display info – recommend using alternative tags
(e.g. <cite>). May be required in some academic uses, e.g.
Chemical formulas. <SUP> Superscript text
<TABLE> Table Use for repeated data that has a naturally tabular form.
Never use for layout purposes.
<TD> Table data cell A cell containing actual data. If a cell actually contains a
descriptor or identifier for a row or column, use a <th>
(table header) tag, not a <td>. This usually applies to
column headers (within a <thead>), column footers
(within a <tfoot>), as well as row headers (usually the first
cell in a row in the <tbody>).
<TEXTAREA> Multi-line text
input area in a
form
Essential
<TH> Table column or
row header cell
May appear in a <thead> (to denote a column header cell),
<tbody> (to denote a row header), and in <tfoot> (to
denote a column foot cell, e.g. a total)
<TBODY> Indicates the
main body of a
data table
It is always worth using this tag, as well as using <thead>
and <tfoot> where appropriate.
Note that it is permissible to have more than one <tbody>,
<thead>, and <tfoot> in the same table.
<THEAD> The head section
of a table
The place to put column header cells (<th>)

FUNDAMENTALS OF PROGRAMMING LANGUAGES II
SRCOE, PUNE Page14
<TFOOT> The foot section
of a table
Good place to put e.g. summary data, such as totals. Note
that it goes before the <tbody> tag!
<TITLE> Document title Essential
<TR> Table row Essential with tables
<TT> “Teletype” –
simulates
typewriter output
Similar to <pre>, except that it collapses white space like
normal HTML (whereas <pre> leaves all consecutive
white space intact). Avoid if possible
<UL> Unordered list Essential. Use for lists where the order or items has no
particular importance.
<U> Underline text Display info – never use it
<VAR> Variable in
computer code
Obscure tag, may only be useful in academic documents.
Avoid.
Simple HTML document : Make a file called hi.html" containing this
<!DOCTYPE html PUBLIC "-//IETF//DTD
HTML 2.0//EN">
<HTML>
<HEAD>
<TITLE>
A Small Hello
</TITLE>
</HEAD>
<BODY>
<H1>Hi</H1>
<P>This is very minimal "hello world" HTML
document.</P>
</BODY>
</HTML>
Algorithm:
Result:
Input: Give input of “Hello world” , images, to display

FUNDAMENTALS OF PROGRAMMING LANGUAGES II
SRCOE, PUNE Page15
Output: Display string “Hello world” with images & web links.
Conclusion: We have display HTML for “Hello World” successfully in Notepad.
Experiment No. 3
Title: Write a class in C++/Java to add integer number
Aim: The objective of this assignment is to learn the concepts classes and objects.
Software required: 2. Eclipse(C++/Java)
Theory:
Using Both Input And Output
Now that we can do both input and output The program will ask the user to type in a number, ask the
user to type in a second number, and then display the addition of the two numbers.
You can create a new Java class or you can just delete everything inside of the main method you're
working with now(everything in between main's two curly brackets). If you're making a new file,
name the class whatever you want, as long as the first letter is capitalized.
we create the Scanner variable:
you need to create an int variable to store the first input.

FUNDAMENTALS OF PROGRAMMING LANGUAGES II
SRCOE, PUNE Page16
Algorithm:
1. Start
2. Define three variables a,b,res.
3. Take input values from keyboard for addition.
4. Convert this values into integers by using parseInt method.
5. Do addition by using res=a+b.
6. Display the result.
7. Stop.
Result:
Input:
The input of two integer numbers for addition.
Output:
The addition of integer numbers.
Conclusion:
We have performed Addition successfully in C++ & Java.

FUNDAMENTALS OF PROGRAMMING LANGUAGES II
SRCOE, PUNE Page17
Experiment No. 4
Title: Write C++ program to Calculate Addition, Subtraction, Multiplication, and Division.
Aim: The objective of this assignment is to implement simple calculator.
Software required: Eclipse(C++/Java)
Theory:
There are two types of decision making statements in Java. They are:
if statements
switch statements
The if Statement:
An if statement consists of a Boolean expression followed by one or more statements.
Syntax:
The syntax of an if statement is:
if(Boolean_expression)
{
//Statements will execute if the Boolean expression is true
}
If the Boolean expression evaluates to true then the block of code inside the if statement will be
executed. If not the first set of code after the end of the if statement (after the closing curly brace)
will be executed.
Example: public class Test {
public static void main(String args[]){
int x = 10;
if( x < 20 ){
System.out.print("This is if statement");
}
}
}

FUNDAMENTALS OF PROGRAMMING LANGUAGES II
SRCOE, PUNE Page18
This would produce the following result:
This is if statement
The if...else Statement:
An if statement can be followed by an optional else statement, which executes when the Boolean
expression is false.
Syntax:
The syntax of an if...else is:
if(Boolean_expression){
//Executes when the Boolean expression is true
}else{
//Executes when the Boolean expression is false
}
Example:
public class Test {
public static void main(String args[]){
int x = 30;
if( x < 20 ){
System.out.print("This is if statement");
}else{
System.out.print("This is else statement");
}
}
}
This would produce the following result:
This is else statement
The switch Statement:
A switch statement allows a variable to be tested for equality against a list of values. Each value is
called a case, and the variable being switched on is checked for each case.
Syntax:
The syntax of enhanced for loop is:
switch(expression){
case value :
//Statements
break; //optional
case value :
//Statements

FUNDAMENTALS OF PROGRAMMING LANGUAGES II
SRCOE, PUNE Page19
break; //optional
//You can have any number of case statements.
default : //Optional
//Statements
}
The following rules apply to a switch statement:
The variable used in a switch statement can only be a byte, short, int, or char.
You can have any number of case statements within a switch. Each case is followed by the
value to be compared to and a colon.
The value for a case must be the same data type as the variable in the switch and it must be a
constant or a literal.
When the variable being switched on is equal to a case, the statements following that case
will execute until a break statement is reached.
When a break statement is reached, the switch terminates, and the flow of control jumps to
the next line following the switch statement.
Not every case needs to contain a break. If no break appears, the flow of control will fall
through to subsequent cases until a break is reached.
A switch statement can have an optional default case, which must appear at the end of the
switch. The default case can be used for performing a task when none of the cases is true. No
break is needed in the default case.
Algorithm:
1. Start
2. Take variables for two values, result & choice from user.
3. Create menu for addition, subtraction, multiplication, division using switch-case.
4. Take the choice from user.
5. Perform Function according to choice.
6. End.
Result:
Input:
Take two values & choice value from user.
Output:
To implement simple calculator of addition, subtraction, multiplication,& division function.
Conclusion:
We successfully implement simple calculator of addition, subtraction, multiplication,& division
function.

FUNDAMENTALS OF PROGRAMMING LANGUAGES II
SRCOE, PUNE Page20
.
Experiment No. 5
Title: Write a C++ Class for sorting Numbers in Ascending/Descending Order.
Aim: The objective of this assignment is to learn the concepts of sorting.
Software required: 1. Eclipse(C++/Java)
Theory:
Java provides a data structure, the array, which stores a fixed-size sequential collection of elements
of the same type. An array is used to store a collection of data, but it is often more useful to think of
an array as a collection of variables of the same type.
Instead of declaring individual variables, such as number0, number1, ..., and number99, you declare
one array variable such as numbers and use numbers[0], numbers[1], and ..., numbers[99] to
represent individual variables.
This tutorial introduces how to declare array variables, create arrays, and process arrays using
indexed variables.
Declaring Array Variables:
To use an array in a program, you must declare a variable to reference the array, and you must
specify the type of array the variable can reference. Here is the syntax for declaring an array
variable:
dataType[] arrayRefVar; // preferred way.
or
dataType arrayRefVar[]; // works but not preferred way.
Example:
The following code snippets are examples of this syntax:
double[] myList; // preferred way.
or
double myList[]; // works but not preferred way.

FUNDAMENTALS OF PROGRAMMING LANGUAGES II
SRCOE, PUNE Page21
Creating Arrays:
You can create an array by using the new operator with the following syntax:
arrayRefVar = new dataType[arraySize];
The above statement does two things:
It creates an array using new dataType[arraySize];
It assigns the reference of the newly created array to the variable arrayRefVar.
Declaring an array variable, creating an array, and assigning the reference of the array to the variable
can be combined in one statement, as shown below:
dataType[] arrayRefVar = new dataType[arraySize];
Alternatively you can create arrays as follows:
dataType[] arrayRefVar = {value0, value1, ..., valuek};
The array elements are accessed through the index. Array indices are 0-based; that is, they start from
0 to arrayRefVar.length-1.
Algorithm:
1. Start
2. Enter an array of size n from user.
3. Create a class ascending-descending for the members in ascending & descending order.
4. Display the output of user with display function.
5. End.
Result:
Input:
Input numbers for ascending & descending orders
Output:
Numbers are printed in ascending & descending orders.
Conclusion: We have implemented C++ class for sorting number in ascending & descending
orders

FUNDAMENTALS OF PROGRAMMING LANGUAGES II
SRCOE, PUNE Page22
Experiment No. 6
Title: Write a class for showing the current Time and Date.
Aim: The objective of this assignment is to learn classes & objects for displaying current date &
time in Java.
Software required: 2. Eclipse(C++/Java)
Theory:
Java provides the Date class available in java.util package, this class encapsulates the current date
and time. The Date class supports two constructors. The first constructor initializes the object with
the current date and time.
Date( )
The following constructor accepts one argument that equals the number of milliseconds that have
elapsed since midnight, January 1, 1970
Date(long millisec)
The java.util.Timer class provides facility for threads to schedule tasks for future execution in a
background thread.
This class is thread-safe i.e multiple threads can share a single Timer object without the need
for external synchronization.
This class schedules tasks for one-time execution, or for repeated execution at regular
intervals.
All constructors start a timer thread.

FUNDAMENTALS OF PROGRAMMING LANGUAGES II
SRCOE, PUNE Page23
Class declaration
Following is the declaration for java.util.Timer class:
public class Timer
extends Object
Class constructors
Timer() :-This constructor creates a new timer.
Timer(boolean isDaemon) :-This constructor creates a new timer whose associated thread may be
specified to run as a daemon.
Timer(String name) :-This constructor creates a new timer whose associated thread has the
specified name.
Timer(String name, boolean isDaemon) :-This constructor creates a new timer whose associated
thread has the specified name, and may be specified to run as a daemon.
Date Formatting using SimpleDateFormat:
SimpleDateFormat is a concrete class for formatting and parsing dates in a locale-sensitive manner.
SimpleDateFormat allows you to start by choosing any user-defined patterns for date-time
formatting. For example:
import java.util.*;
import java.text.*;
public class DateDemo {
public static void main(String args[]) {
Date dNow = new Date( );
SimpleDateFormat ft =
new SimpleDateFormat ("E yyyy.MM.dd 'at' hh:mm:ss a zzz");
System.out.println("Current Date: " + ft.format(dNow));
}
}
This would produce the following result:
Current Date: Sun 2004.07.18 at 04:14:09 PM PDT
Algorithm:
1. Start
2. Create the object of Date & Time class.
3. Import the package Java.Util.*.
4. Pass the object to the Println method.
5. End.

FUNDAMENTALS OF PROGRAMMING LANGUAGES II
SRCOE, PUNE Page24
Result:
Input: Pass objects to display Date and Time in Java.
Output: Display Date and Time in Java
Conclusion:
We have successfully performed a program to display Date and Time in Java.
Experiment No. 7
Title: Write a Java class for finding Palindrome
Aim: The objective of this assignment is to learn the concepts of Sting Classes, Objects and
Methods of Java.
Software required: Eclipse(C++/Java)
Theory: String Class
Strings, which are widely used in Java programming, are a sequence of characters. In the Java
programming language, strings are objects.
Creating Strings:
The most direct way to create a string is to write:
String greeting = "Hello world!";
Another way of the String class has eleven constructors that provides as an array of characters.
public class StringDemo{
public static void main(String args[]){
char[] helloArray = { 'h', 'e', 'l', 'l', 'o', '.'};
String helloString = new String(helloArray);
System.out.println( helloString );
}
}
This would produce the following result:
hello.

FUNDAMENTALS OF PROGRAMMING LANGUAGES II
SRCOE, PUNE Page25
String Length: You can use with strings is the length() method, which returns the number of
characters contained in the string object.
Concatenating Strings: The String class includes a method for concatenating two strings:
string1.concat(string2);
Example:
public class StringDemo {
public static void main(String args[]) {
String string1 = "saw I was ";
System.out.println("Dot " + string1 + "Tod");
}
}
This would produce the following result:
Dot saw I was Tod
Algorithm:
1. Start
2. Print „Enter any string‟.
3. Calculate length by using length () assign to n variable.
4. Take two for loop for forward traversing & reverse traversing.
5. Converting string into array of characters by using to char Array () method.
6. Compare reverse array (rev[i]) with original (array[i])
If they are equal print string is palindrome. Else they are not palindrome
7. Stop.
Result:
Input: Strings required for Palindrome.
Output: To Check whether String is Palindrome or not.
Conclusion: We have successfully completed a java program to display whether string is palindrome or not.

FUNDAMENTALS OF PROGRAMMING LANGUAGES II
SRCOE, PUNE Page26
Experiment No. 8
Title: Write a class to implement various Boolean Algebra Function
Aim: The objective of this assignment is to learn various Boolean Algebra Functions.
Software required: Eclipse(C++/Java)
Theory:
The Bitwise Operators:
Java defines several bitwise operators, which can be applied to the integer types, long, int, short,
char, and byte.
Bitwise operator works on bits and performs bit-by-bit operation. Assume if a = 60; and b = 13; now
in binary format they will be as follows:
a = 0011 1100
b = 0000 1101
-----------------
a&b = 0000 1100
a|b = 0011 1101
a^b = 0011 0001
~a = 1100 0011
The Logical Operators:
The following table lists the logical operators:
Assume Boolean variables A holds true and variable B holds false, then:

FUNDAMENTALS OF PROGRAMMING LANGUAGES II
SRCOE, PUNE Page27
Operator Description Example
&& Called Logical AND operator. If both the operands are non-zero, then the
condition becomes true. (A && B) is false.
|| Called Logical OR Operator. If any of the two operands are non-zero, then
the condition becomes true. (A || B) is true.
! Called Logical NOT Operator. Use to reverses the logical state of its
operand. If a condition is true then Logical NOT operator will make false. !(A && B) is true.
The Assignment Operators:
There are following assignment operators supported by Java language:
Operator Description Example
= Simple assignment operator, Assigns values from right side operands to left
side operand
C = A + B will
assign value of A +
B into C
+= Add AND assignment operator, It adds right operand to the left operand and
assign the result to left operand
C += A is equivalent
to C = C + A
-= Subtract AND assignment operator, It subtracts right operand from the left
operand and assign the result to left operand
C -= A is equivalent
to C = C - A
*= Multiply AND assignment operator, It multiplies right operand with the left
operand and assign the result to left operand
C *= A is equivalent
to C = C * A
/= Divide AND assignment operator, It divides left operand with the right
operand and assign the result to left operand
C /= A is equivalent
to C = C / A
%= Modulus AND assignment operator, It takes modulus using two operands
and assign the result to left operand
C %= A is
equivalent to C = C
% A
<<= Left shift AND assignment operator C <<= 2 is same as
C = C << 2
>>= Right shift AND assignment operator C >>= 2 is same as
C = C >> 2
&= Bitwise AND assignment operator C &= 2 is same as C

FUNDAMENTALS OF PROGRAMMING LANGUAGES II
SRCOE, PUNE Page28
= C & 2
^= bitwise exclusive OR and assignment operator C ^= 2 is same as C
= C ^ 2
|= bitwise inclusive OR and assignment operator C |= 2 is same as C =
C | 2
Algorithm:
1. Start
2. Take two input values for bit operators.
3. Read input values from keyboard and convert into integers.
4. Perform various Boolean algebra operations.
5. End.
Result:
Input: Numbers provided for different Boolean algebra functions.
Output: Results for different Boolean algebra functions.
Conclusion: We have studied various Boolean algebra functions.

FUNDAMENTALS OF PROGRAMMING LANGUAGES II
SRCOE, PUNE Page29
Experiment No. 9
Title: Installation by Android ADT for eclipse.
Theory: Android Environment Setup
you can start your Android application development on either of the following operating systems:
Microsoft Windows XP or later version.
Mac OS X 10.5.8 or later version with Intel chip.
Linux including GNU C Library 2.7 or later.
To develop Android applications are freely available and can be downloaded from the Web.
Following is the list of software's you will need before you start your Android application
programming.
Java JDK5 or JDK6
Android SDK
Eclipse IDE for Java Developers (optional)
Android Development Tools (ADT) Eclipse Plugin (optional)
Here last two components are optional and if you are working on Windows machine then these
components make your life easy while doing Java based application development. So let us have a
look how to proceed to set required environment.

FUNDAMENTALS OF PROGRAMMING LANGUAGES II
SRCOE, PUNE Page30
Step 1 - Setup Java Development Kit (JDK)
You can download the latest version of Java JDK from Oracle's Java site: Java SE Downloads. You
will find instructions for installing JDK in downloaded files, follow the given instructions to install
and configure the setup. Finally set PATH and JAVA_HOME environment variables to refer to the
directory that contains java and javac, typically java_install_dir/bin and java_install_dir
respectively.
If you are running Windows and installed the JDK in C:\jdk1.6.0_15, you would have to put the
following line in your C:\autoexec.bat file.
set PATH=C:\jdk1.6.0_15\bin;%PATH%
set JAVA_HOME=C:\jdk1.6.0_15
Alternatively, you could also right-click on My Computer, select Properties, then Advanced, then
Environment Variables. Then, you would update the PATH value and press the OK button.
On Linux, if the SDK is installed in /usr/local/jdk1.6.0_15 and you use the C shell, you would put
the following code into your .cshrc file.
setenv PATH /usr/local/jdk1.6.0_15/bin:$PATH
setenv JAVA_HOME /usr/local/jdk1.6.0_15
Alternatively, if you use an Integrated Development Environment (IDE) Eclipse, then it will know
automatically where you have installed your Java.
Step 2 - Setup Android SDK
You can download the latest version of Android SDK from Android official website : Android SDK
Downloads. If you are installing SDK on Windows machine, then you will find a installer_rXX-
windows.exe, so just download and run this exe which will launch Android SDK Tool Setup wizard
to guide you throughout of the installation, so just follow the instructions carefully. Finally you will
have Android SDK Tools installed on your machine.
If you are installing SDK either on Mac OS or Linux, check the instructions provided along with the
downloaded android-sdk_rXX-macosx.zip file for Mac OS and android-sdk_rXX-linux.tgz file for
Linux. This tutorial will consider that you are going to setup your environment on Windows machine
having Windows 7 operating system.
So let's launch Android SDK Manager using the option All Programs > Android SDK Tools >
SDK Manager, this will give you following window:

FUNDAMENTALS OF PROGRAMMING LANGUAGES II
SRCOE, PUNE Page31
Once you launched SDK manager, its time to install other required packages. By default it will list
down total 7 packages to be installed, but I will suggest to de-select Documentation for Android
SDK and Samples for SDK packages to reduce installation time. Next click Install 7 Packages
button to proceed, which will display following dialogue box:

FUNDAMENTALS OF PROGRAMMING LANGUAGES II
SRCOE, PUNE Page32
If you agree to install all the packages, select Accept All radio button and proceed by clicking
Install button. Now let SDK manager do its work and you go, pick up a cup of coffee and wait until
all the packages are installed. It may take some time depending on your internet connection. Once all
the packages are installed, you can close SDK manager using top-right cross button.
Step 3 - Setup Eclipse IDE
All the examples in this tutorial have been written using Eclipse IDE. So I would suggest you should
have latest version of Eclipse installed on your machine.
To install Eclipse IDE, download the latest Eclipse binaries from Eclipse can be started by executing
the following commands on windows machine, or you can simply double click on eclipse.exe
%C:\eclipse\eclipse.exe
Eclipse can be started by executing the following commands on Linux machine:
$/usr/local/eclipse/eclipse
After a successful startup, if everything is fine then it should display following result:

FUNDAMENTALS OF PROGRAMMING LANGUAGES II
SRCOE, PUNE Page33
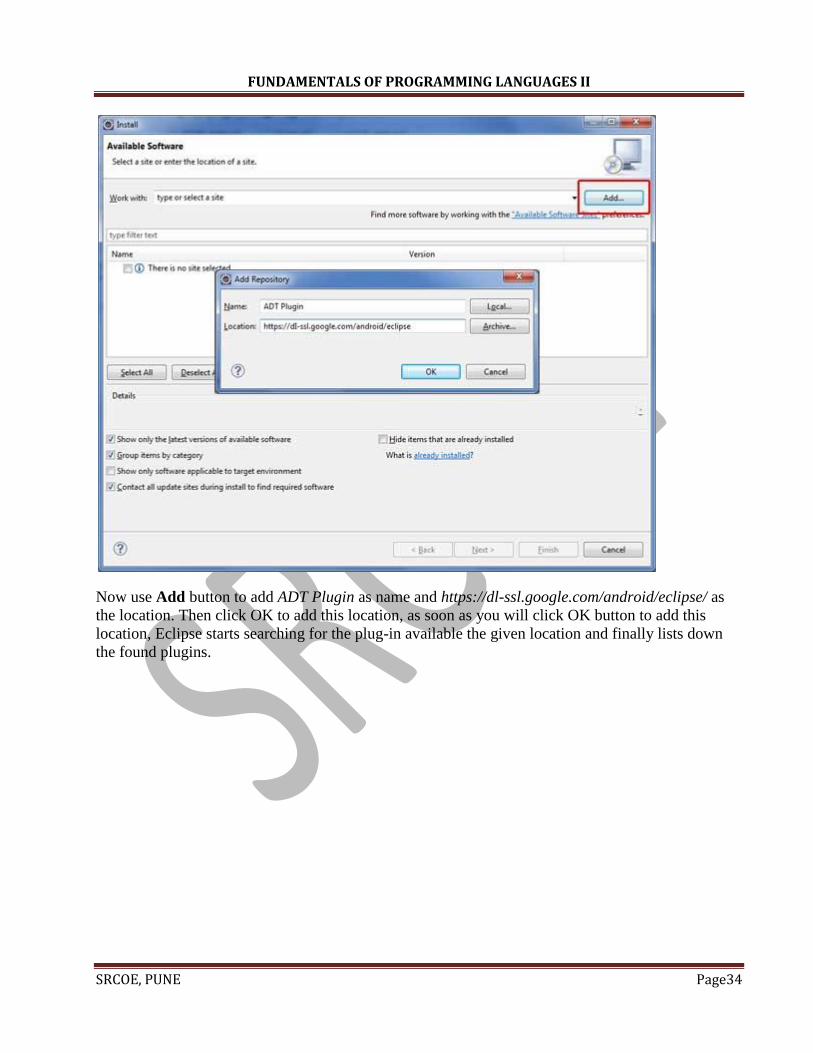
Step 4 - Setup Android Development Tools (ADT) Plugin
This step will help you in setting Android Development Tool plugin for Eclipse. Let's start with
launching Eclipse and then, choose Help > Software Updates > Install New Software. This will
display the following dialogue box.
FUNDAMENTALS OF PROGRAMMING LANGUAGES II
SRCOE, PUNE Page34
Now use Add button to add ADT Plugin as name and https://dl-ssl.google.com/android/eclipse/ as
the location. Then click OK to add this location, as soon as you will click OK button to add this
location, Eclipse starts searching for the plug-in available the given location and finally lists down
the found plugins.

FUNDAMENTALS OF PROGRAMMING LANGUAGES II
SRCOE, PUNE Page35
Now select all the listed plug-ins using Select All button and click Next button which will guide you
ahead to install Android Development Tools and other required plugins.
Step 5 - Create Android Virtual Device
To test your Android applications you will need a virtual Android device. So before we start writing
our code, let us create an Android virtual device. Launch Android AVD Manager using Eclipse
menu options Window > AVD Manager> which will launch Android AVD Manager. Use New
button to create a new Android Virtual Device and enter the following information, before clicking
Create AVD button.

FUNDAMENTALS OF PROGRAMMING LANGUAGES II
SRCOE, PUNE Page36
If your AVD is created successfully it means your environment is ready for Android application
development. If you like, you can close this window using top-right cross button. Better you re-start
your machine and once you are done with this last step, you are ready to proceed for your first
Android example but before that we will see few more important concepts related to Android
Application Development.

FUNDAMENTALS OF PROGRAMMING LANGUAGES II
SRCOE, PUNE Page37
Experiment No. 10
Title: Study and implementation on Android Simulator, “Hello! World”.
Aim: The objective of this assignment is to learn the Android Simulator, “Hello! World”.
Software required: 1.Eclipse IDE 3.7,Indigo
2.JDK 1.6
3. Android SDK
Theory: Android Hello World Example
Create Android Application
The first step is to create a simple Android Application using Eclipse IDE. Follow the option File ->
New -> Project and finally select Android New Application wizard from the wizard list. Now
name your application as HelloWorld using the wizard window as follows:
Next, follow the instructions provided and keep all other entries as default till the final step. Once
your project is created successfully, you will have following project screen:

FUNDAMENTALS OF PROGRAMMING LANGUAGES II
SRCOE, PUNE Page38
Anatomy of Android Application
Before you run your app, you should be aware of a few directories and files in the Android project:
Src :-This contains the .java source files for your project. By default, it includes an MainActivity.java source
file having an activity class that runs when your app is launched using the app icon.
Gen :-This contains the .R file, a compiler-generated file that references all the resources found in your
project. You should not modify this file.
Bin :-This folder contains the Android package files .apk built by the ADT during the build process and
everything else needed to run an Android application.
res/drawable-hdpi :-This is a directory for drawable objects that are designed for high-density screens
res/layout :-This is a directory for files that define your app's user interface. res/values:-This is a directory for other various XML files that contain a collection of resources, such as
strings and colors definitions.
AndroidManifest.xml This is the manifest file which describes the fundamental characteristics of the app and defines each of its
components

FUNDAMENTALS OF PROGRAMMING LANGUAGES II
SRCOE, PUNE Page39
Running the Application
Algorithm:
1. Install Android SDK.
2. Install ADT Eclipse plugin.
3. Create an Android Virtual Device(AVD).
4. Create an Android Project with Eclipse(Wizard).
5. Code it.
6. Start it in Android Virtual Devide(AVD).
Result:
Input: Input string “Hello! World”.
Output: Display output strig “Hello! World”
Conclusion:
We have successfully implement Android Simulator.