function-based indexes partitioned indexes
TRANSCRIPT

302 CH AP T E R 7 ■ SC H E M A M AN AG E M E N T
SQL> CREATE INDEX emp_indx1 ON employees(ename) TABLESPACE users COMPRESS 1;
The previous statement compresses all duplicate occurrences of an indexed key in the index leaf block (level 1) of the index.
Function-Based IndexesFunction-based indexes precompute functions on a given column and store the results in an index. When where clauses include functions, function-based indexes are an ideal way to index the column. Here’s how to create a function-based index, using the LOWER function:
SQL> CREATE INDEX lastname_idx ON employees(LOWER(l_name));
This CREATE INDEX statement will create an index on the l_name (last name) column, which contains the last names of the employees in uppercase. However, this index will be a function-based index, since the database will actually create the index on the l_name column after first using the LOWER function to convert the l_name column values to lowercase.
Partitioned IndexesPartitioned indexes are used to index partitioned tables. Oracle provides two types of indexes for partitioned tables: local and global.
The essential difference between the two is that local indexes are based on the underlying table partitions. If the table is partitioned 12 ways using date ranges, the indexes are also distributed over the same 12 partitions. There is a one-to-one correspondence, in other words, between data parti-tions and index partitions. There is no such one-to-one correspondence between global indexes and the underlying table partitions—a global index is partitioned independently of the base tables.
The following sections cover the important differences between managing globally partitioned indexes and locally partitioned indexes.
Global Indexes
Global indexes on a partitioned table can be either partitioned or nonpartitioned. The globally nonpartitioned indexes are similar to the regular Oracle indexes for nonpartitioned tables. You just use the regular CREATE INDEX syntax to create these globally nonpartitioned indexes.
Here’s an example of a global index on the ticket_sales table:
SQL> CREATE INDEX ticketsales_idx ON ticket_sales(month) GLOBAL PARTITION BY range(month) (PARTITION ticketsales1_idx VALUES LESS THAN (3) PARTITION ticketsales1_idx VALUES LESS THAN (6) PARTITION ticketsales2_idx VALUES LESS THAN (9) PARTITION ticketsales3_idx VALUES LESS THAN (MAXVALUE);
Note that there’s substantial maintenance involved in the management of globally partitioned indexes. Whenever there is DDL activity on a partitioned table, its global indexes need to be rebuilt. DDL activity on the underlying table will mark the associated global indexes as unusable. By default, any table maintenance operation on a partitioned table will invalidate (mark as unusable) global indexes.
Let’s use the ticket_sales table as an example to see why this is so. Let’s assume that you drop the oldest partition each quarter, in order to make room for the new partition for the new quarter. When a partition belonging to the ticket_sales table gets dropped, the global indexes could be inval-idated, because some of the data the index is pointing to isn’t there anymore. To prevent this invalidation due to the dropping of a partition, you have to use the UPDATE GLOBAL INDEXES option along with the DROP PARTITION statement, as shown here:

CH AP T E R 7 ■ S CH E M A M AN AG E M E N T 303
SQL> ALTER TABLE ticket_sales DROP PARTITION sales_quarter01 UPDATE GLOBAL INDEXES;
■Note If you don’t include the UPDATE GLOBAL INDEXES statement, the entire global index will be invalidated. You can also use the UPDATE GLOBAL INDEX option when you add, coalesce, exchange, merge, move, split, or trun-cate partitioned tables. Of course, you can use the ALTER INDEX . . . REBUILD option to rebuild any index that becomes unusable, but this option also involves additional time and maintenance.
When you have a small number of index leaf blocks leading to high contention, Oracle recom-mends using hash-partitioned global indexes. The syntax for creating a hash-partitioned global index is similar to that used for a hash-partitioned table. For example, the following statement creates a hash-partitioned global index:
SQL> CREATE INDEX hgidx ON tab (c1,c2,c3) GLOBAL PARTITION BY HASH (c1,c2) (PARTITION p1 TABLESPACE tbs_1, PARTITION p2 TABLESPACE tbs_2, PARTITION p3 TABLESPACE tbs_3, PARTITION p4 TABLESPACE tbs_4);
Local Indexes
Locally partitioned indexes, unlike globally partitioned indexes, have a one-to-one correspondence with the table partitions. You can create locally partitioned indexes to match partitions or even subpartitions. The database constructs the index so that it is equipartitioned with the underlying table. Any time you modify the underlying table partition, the database automatically maintains the index partition. This is probably the biggest advantage to using locally partitioned indexes—Oracle will automatically rebuild the locally partitioned indexes whenever a partition gets dropped, or any other DDL activity occurs on a partition.
Here is a simple example of creating a locally partitioned index on a partitioned table:
SQL> CREATE INDEX ticket_no_idx ON ticket_sales(ticket__no) LOCAL TABLESPACE localidx_01;
■Tip You can use the new SQL Access Advisor tool to get recommendations on which indexes to create. The SQL Access Advisor will also tell you which of your indexes aren’t being used and hence are candidates for removal. I show how to use the SQL Access Advisor in the “Using the SQL Access Advisor” section, later in this chapter.
Invisible IndexesBy default, the optimizer “sees” all indexes. However, you can create an index as an invisible index that’s not seen by the optimizer and hence isn’t taken into account by the optimizer when it’s creating the execution plan for a statement. You can use the invisible index as a temporary index for certain special operations or for testing the use of an index before making it “official.” In addition, sometimes making an index invisible could be used as an alternative to dropping an index or making it unusable. You can make an index invisible temporarily to test the effects of dropping the index.
The database maintains an invisible index just as it does a normal (visible) index. The only difference will be that that optimizer won’t be able to make use of the invisible index. After making

304 CH AP T E R 7 ■ SC H E M A M AN AG E M E N T
an index invisible, you can make it and all other invisible indexes visible to the optimizer again by setting the optimizer_use_invisible_indexes parameter to TRUE either at the session or the system level. The default value of this parameter is FALSE, meaning the optimizer can’t make use of any invisible indexes by default.
Creating an Invisible Index
You must add the clause INVISIBLE to the CREATE INDEX statement to make the index invisible, as shown here:
SQL> CREATE INDEX test_idx ON test(tname) TABLESPACE testdata STORAGE (INITIAL 20K NEXT 20k PCTINCREASE 75) INVISIBLE;
The previous statement creates the invisible index test_idx for the tname column of the table test.
Altering an Index to Make It Invisible
In addition to creating an invisible index, you can alter an existing index to an invisible status, by issuing the ALTER INDEX statement as shown here:
SQL> ALTER INDEX test_idx INVISIBLE;
To make an invisible index visible again, use the following statement:
SQL> ALTER INDEX test_idx VISIBLE;
A query on the DBA_INDEXES view indicates whether an index is visible, as shown here:
SQL> SELECT INDEX_NAME, VISIBILITY FROM USER_INDEXES WHERE INDEX_NAME = 'INDX1';
INDEX_NAME VISIBILITY ---------- ---------- INDX1 VISIBLESQL>
Monitoring Index UsageOracle offers the EXPLAIN PLAN and SQL Trace tools to help you see the path followed by your queries on the way to their execution. You can use the EXPLAIN PLAN output or the results of a SQL Trace to see what the execution path of the query looks like and thus determine whether your indexes are being used. I discuss EXPLAIN PLAN and SQL Trace in detail in Chapter 19.
Oracle also provides an easier way to monitor index usage in your database. If you are doubtful as to the usefulness of a particular index, you can ask Oracle to monitor the index usage. This way, if the index turns out to be redundant, you can drop it and save the storage space and the overhead during DML operations.
Here’s what you have to do to monitor index usage in your database. Assume you’re trying to find out whether the p_key_sales index is being used by certain queries on the sales table. Make sure you use a representative time period to gauge index usage. For an OLTP database, this period could be relatively short. For a data warehouse, you may need to run the monitoring test for several days to accurately check index usage.

CH AP T E R 7 ■ S CH E M A M AN AG E M E N T 305
To start monitoring the index use, log in as the owner of the p_key_sales index and run this command:
SQL> ALTER INDEX p_key_sales MONITORING USAGE;
Index altered.SQL>
Now, run some queries on the sales table. End the monitoring by using the following command:
SQL> ALTER INDEX p_key_sales NOMONITORING USAGE;
Index altered.SQL>
You can now query the V$OBJECT_USAGE dictionary view to find out whether the p_key_sales index is being used. The following results confirm that the index is indeed being used:
SQL> SELECT * FROM v$object_usage WHERE index_name='P_KEY_SALES';
INDEX_NM TAB_NM MON USED START_MON END_MONITORING----------- ------ ---- ----- -------------------- --------------------P_KEY_SALES SALE NO YES 01/23/2008 06:20:45 01/23/2008 06:40:22
In the preceding output, Oracle placed a YES value in the USED column, thus indicating that the index in question was being used by the database. If the index had been ignored during the moni-toring period, the column would contain NO instead. The reason why you can’t actually get an estimate of the number of times an index is used is because the database performs the index usage monitoring only at parse time—if it were done for each execution, there would be a performance hit.
Index MaintenanceIndex data constantly changes due to the underlying table’s DML activity. Indexes often become too large if there are many deletions, because the space used by the deleted values is not reused auto-matically by the index. You can use the REBUILD command on a periodic basis to reorganize indexes to make them more compact and thus more efficient. You can also use the REBUILD command to alter the storage parameters you set during the initial creation of the index. Here’s an example:
SQL> ALTER INDEX sales_idx REBUILD;
Index alteredSql>
Rebuilding indexes is better than dropping and re-creating a bad index, because users will continue to have access to the index while you’re rebuilding it. However, indexes in the process of rebuilding do impose many limits on users’ actions. An even more efficient way to rebuild indexes is to do them online, as shown in the following example. You can perform all DML operations, but not any DDL operations, while the online rebuild of the index is going on.
SQL> ALTER INDEX p_key_sales REBUILD ONLINE;
Index altered.SQL>
You can speed up the online index build by adding the ONLINE NOLOGGING clause to the ALTER INDEX statement shown here. When you add this clause, the database doesn’t generate redo data for the index rebuild operation.

306 CH AP T E R 7 ■ SC H E M A M AN AG E M E N T
Managing Database Integrity ConstraintsIntegrity constraints in relational databases enable easy and automatic enforcement of important business rules in the database tables. For example, in a human resources–related table, you can’t have an employee without assigning him or her to a supervisor. When you create the relevant tables, you can declare the necessary integrity constraints, which must be satisfied each time data is entered or modified in the table.
You can also use application logic to enforce business rules, but integrity constraints are usually simpler to enforce than application logic, and they usually do their job by making sure that inserts, updates, and deletes of table data conform to certain rules. Application logic, on the other hand, has the advantage that it can reject or approve data without having to check the entire table’s contents. Thus, you have to determine which method you’ll use to enforce the business rules—application logic or integrity constraints—based on the needs of your application. In any case, integrity constraints are so fundamental to the operation of relational databases that you are bound to use them in your database.
By default, Oracle allows null values in all columns. If null values are not permissible for some columns in a table, you need to use the NOT NULL constraint when specifying the column. Note that you can impose the database constraints on tables either at table creation time or later by using the ALTER TABLE command. Obviously, however, if you already have null columns or duplicate data, it is not possible to alter the table to impose a NOT NULL or unique constraint on the table.
You can enforce several types of constraints in an Oracle table. For simplicity’s sake, you can divide the constraints into five different types:
• Primary key constraints
• NOT NULL constraints
• Check constraints
• Unique constraints
• Referential integrity constraints
I discuss each of these types of constraints in the following sections. In addition, I also present a brief discussion of integrity constraint states.
Primary Key ConstraintsThe primary key is a very important kind of constraint on a table. When you want a column’s values to be identified uniquely, you can do this by creating a primary key on the column value. A column on which a primary key has been defined has to be unique as well as not null.
A table can have only one primary key. You can create a primary key when creating the table, as shown in the following example:
SQL> CREATE TABLE dept (dept_id number(9) PRIMARY KEY);
You can also add a constraint to an existing table in the following way:
SQL> ALTER TABLE dept ADD PRIMARY KEY(dept_id);
Since the constraint wasn’t assigned a name in the preceding example, Oracle will assign a system-generated constraint name. If you want to give your own name to the constraint, you can use the following command, which names the constraint dept_pk:
SQL> ALTER TABLE dept ADD CONSTRAINT dept_pk PRIMARY KEY(dept_id);

CH AP T E R 7 ■ S CH E M A M AN AG E M E N T 307
Table altered.SQL>
Note that if the primary key will have more than one column in it (meaning that it will be a composite key), you can’t specify the primary key designation against the column name during table creation. You have to specify the primary key columns as a separate item at the end of the CREATE TABLE statement, after listing all the columns.
■Note In both of the preceding examples, Oracle automatically creates an index on the column you designate as the primary key.
Not Null ConstraintsA table usually has one or more columns that can’t be allowed to be left null—that is, with no values. A good example is the last_name column in the employee table. You can force users to always put a value in this column at table creation time by using the NOT NULL option for the column you don’t want to be null:
SQL> CREATE TABLE employee (last_name VARCHAR(30) NOT NULL);
If the table has already been created and you want to modify a column from a nullable to a non-nullable constraint, you can use the following statement:
SQL> ALTER TABLE employee MODIFY last_name NOT NULL;
Check ConstraintsYou use check constraints to ensure that data in a column is within some parameters that you specify. For example, say the salary for an employee in a firm can’t be equal to or exceed $100,000 under any circumstances. You can enforce this condition by using the following statement, which uses the CHECK constraint on the SALARY column:
SQL> CREATE TABLE employee (employee_id NUMBER, last_name VARCHAR2(30), first_name VARCHAR2(30), department_id NUMBER, salary NUMBER CHECK(salary < 100000));
Unique ConstraintsUnique constraints are very common in relational databases. These constraints ensure the unique-ness of the rows in a relational table. You may have more than one unique constraint on a table. For example, a unique constraint on the employee_id column ensures that no employee is listed twice in the employee table.
In the following example, the first statement specifies a unique constraint on the combination of the dept_name and location columns:
SQL> CREATE TABLE dept( dept_no NUMBER(3), dept_name VARCHAR2(15), location VARCHAR2(25), CONSTRAINT dept_name_ukey UNIQUE(dept_Name,location);
308 CH AP T E R 7 ■ SC H E M A M AN AG E M E N T
You can also create a unique constraint on the department table by executing the ALTER TABLE statement:
SQL> ALTER TABLE dept ADD CONSTRAINT dept_idx UNIQUE(dept_no);
Table altered.SQL>
Referential Integrity ConstraintsReferential integrity constraints ensure that values for certain important columns make sense. Suppose you have a parent table that refers to values in another table, as in the case of the dept table and the employee tables. You shouldn’t be able to assign an employee to a department in the employee table if the department doesn’t exist in the department table.
You can ensure the existence of a valid department by using a referential integrity constraint. In this case, the department_id column is the dept table’s primary key, and the dept_id column in the employee table, which refers to the corresponding column in the department table, is called the foreign key. The table containing the foreign key is usually referred to as the child table, and the table containing the referenced key is called the parent table. As with all the other types of constraints, you can create the referential integrity constraint at table creation time or later on, with the help of the ALTER TABLE statement:
SQL> CREATE TABLE employee (employee_id NUMBER(7), last_name VARCHAR2(30), first name VARCHAR2(30), job VARCHAR2(15), dept_id NUMBER(3) NOT NULL CONSTRAINT dept_fkey REFERENCES dept(dept_id));
The database designates the dept_id column of the employee table as a foreign key because it refers to the dept_id column in the dept table. Note that for a column to serve as the referenced column, it must be unique or be a primary key in the reference table.
Integrity Constraint StatesAs you saw in the previous section, integrity constraints are defined on tables to ensure that data that violates preset rules doesn’t enter the tables. However, during times like data loading, you can’t keep the integrity constraints in a valid state, as this will lead to certain problems. Oracle lets you disable constraints when necessary and enable them when you want. Let’s examine the various ways you can alter the states of table constraints.
During large data loads, using either the SQL*Loader or the Import utility, it may take a consid-erably longer time to load the data if you have to check for integrity violations for each row inserted into the table. A better strategy would be to disable the constraint, load the data, and worry about any possible insertion of bad data later on. After the load is completed, the constraints are brought into effect again by enabling them. When you disable the constraint as explained here, the database drops the index. It’s therefore a better strategy to precreate nonunique indexes for constraints, which the database doesn’t have to drop because they can handle duplicates.
■Note The enabled state is Oracle’s default constraint state.
You can disable constraints in two ways: you can specify either the disable validate or the disable no validate constraint state, using the DISABLE VALIDATE or DISABLE NO VALIDATE command, respec-

CH AP T E R 7 ■ S CH E M A M AN AG E M E N T 309
tively. Similarly, you can use the ENABLE VALIDATE or the ENABLE NO VALIDATE commands when enabling a constraint. The next sections briefly discuss the different ways to disable and enable constraints.
Disable Validate State
When you use the DISABLE VALIDATE command, you’re doing the following two things at once. First, by using the VALIDATE clause, you’re ensuring that all the data in the table satisfies the constraint. Second, by using the DISABLE clause, you’re doing away with the requirements of maintaining the constraint. Oracle drops the index on the constraint, but keeps it valid. Here’s an example:
SQL> ALTER TABLE sales_data ADD CONSTRAINT quantity_unique UNIQUE (prod_id,customer_id) DISABLE VALIDATE;
When you issue the preceding SQL statement, Oracle ensures that only unique combinations of the unique key prod_id and customer_id exist in the table, but it will not maintain a unique index. Note that because I have chosen to keep the constraint in a disabled state, no DML is possible against the table. This option is really ideal for large data warehouse tables, which are normally used only for querying purposes.
Disable No Validate State
Under the disable no validate constraint state, the constraint is disabled and there is no guarantee of the data meeting the constraint requirements, because Oracle does not perform constraint valida-tion. This is essentially the same as a DISABLE constraint command.
Enable Validate State
This constraint state will have an enabled constraint that ensures that all data is checked to ensure compliance with the constraint. This state is exactly the same as the plain enabled state. The following example shows the use of this state:
SQL> ALTER TABLE sales_data ADD CONSTRAINT sales_region_fk FOREIGN KEY (sales_region) REFERENCES region(region_id) ENABLE VALIDATE;
Enable No Validate State
Under this constraint state, the database checks all new inserts and updates for compliance with the constraint. Because the existing data won’t be checked for compliance, there’s no assurance that the data already in the table meets the constraint requirements. You’ll usually use this option when you’re loading large tables and you have reason to believe that the data will satisfy the constraint. Here’s an example:
SQL> ALTER TABLE sales ADD CONSTRAINT sales_region_fk FOREIGN KEY (sales_region_id) REFERENCES time(time_id) ENABLE NOVALIDATE;
A better strategy would be to use the DISABLE NOVALIDATE state while you load data, transition to the ENABLE NOVALIDATE state while you clean the data, and then finally, adopt the ENABLE VALIDATE state at the end of the extraction, transformation, loading (ETL) cycle.

310 CH AP T E R 7 ■ SC H E M A M AN AG E M E N T
Rely ConstraintsData ETL steps are usually undertaken before loading data into data warehouse tables. If you have reason to believe that the data is good, you can save time during loading by disabling and not vali-dating the constraints. You can use the ALTER TABLE command to disable the constraints with the RELY DISABLE NOVALIDATE option, as shown in the following example:
SQL> ALTER TABLE sales ADD CONSTRAINT sales_region_fk FOREIGN KEY (sales_region_id) REFERENCES time(region_id) RELY DISABLE NOVALIDATE;
Deferrable and Immediate ConstraintsIn addition to specifying the type of validation of a constraint, you can specify when exactly this constraint is checked during the loading process.
If you want the constraint to be checked immediately after each data modification occurs, choose the not deferrable option, which is, in fact, the default behavior in Oracle databases. If you want a one-time check of a constraint after the whole transaction is committed, choose the defer-rable option. All constraints and foreign keys may be declared deferrable or not deferrable.
If you choose the deferrable option, you have two further options. You can specify that the defer-rable constraint is either initially deferred or initially immediate. In the former case, the database will defer checking until the transaction completes. If you choose the initially immediate option, the database checks the constraint before any data is changed. Note that if you precreate an index, it must be nonunique to handle duplicate values.
The following example shows how to specify this kind of constraint in the employee table:
SQL> CREATE TABLE employee employee_id NUMBER, last_name VARCHAR2(30), first_name VARCHAR2(30), dept VARCHAR2(30) UNIQUE REFERENCES department(dept_name) DEFERRABLE INITIALLY DEFERRED;
Oracle also provides a way of changing a deferrable constraint from immediate to deferred or vice versa with the following statements:
SQL> SET CONSTRAINT constraint_name DEFERRED;SQL> SET CONSTRAINT constraint_name IMMEDIATE;
Constraint- and Index-Related ViewsHow do you find out what constraints exist on a table’s columns? When a process fails with the message “Referential integrity constraint violated,” what’s the best way to find out what the constraint and the affected tables are? The constraint- and index-related data dictionary views are critical for resolving problems similar to these. In the following sections, you’ll examine the key constraint- and index-related views.
DBA_CONSTRAINTSThe DBA_CONSTRAINTS view provides information on all types of table constraints in the database. You can query this view when you need to figure out what type of constraints a table has. The view lists several types of constraints, as shown by the following query:

CH AP T E R 7 ■ S CH E M A M AN AG E M E N T 311
SQL> SELECT DISTINCT constraint_type FROM DBA_CONSTRAINTS;
Constraint_type-------------------- C /* check constraints */ P /* primary key constraint */ R /* referential integrity (foreign key) constraint */ U /* unique key constraint */SQL>
The following query lets you know what, if any, constraints are in the TESTD table. The response indicates that the table has a single check constraint defined on it. The SYS prefix in the NAME column shows that CONSTRAINT_NAME is a default name, not one that was explicitly named by the owner of the table.
SQL> SELECT constraint_name, constraint_type 2 FROM DBA_CONSTRAINTS 3* WHHERE table_name='TESTD';
CONSTRAINT_NAME CONSTRAINT_TYPE------------------- ---------------SYS_C005263 CSQL>
Note that if you want to see the particular referential constraints and the delete rule, you have to use a slight variation on the preceding query:
SQL> SELECT constraint_name, constraint_type, R_constraint_name, delete_rule FROM dba_constraints WHERE table_name='ORDERS';
CONSTRAINT_NAME TYPE R_CONSTRAINT_NAME DELETE_RULE---------------------- ------ ----------------- -----------ORDER_DATE_NN CORDER_CUSTOMER_ID_NN CORDER_MODE_LOV CORDER_TOTAL_MIN CORDER_PK PORDERS_SALES_REP_FK R EMP_EMP_ID_PK SET NULLORDERS_CUSTOMER_ID_FK R CUSTOMERS_PK SET NULL7 rows selected.SQL>
DBA_CONS_COLUMNSThe DBA_CONS_COLUMNS view provides the column name and position in the table on which a constraint is defined. Here’s the view:
SQL> DESC DBA_CONS_COLUMNS
Name ---------------- OWNER CONSTRAINT_NAME TABLE_NAME COLUMN_NAME

312 CH AP T E R 7 ■ SC H E M A M AN AG E M E N T
POSITIONSQL>
Using ViewsA view is a virtual table—it’s a specific representation of a table or set of tables, and it is defined by using a SELECT statement. A view doesn’t physically exist, like regular tables, as part of a tablespace. A view, in effect, creates a virtual table or subtable with only those rows and/or columns that you want the user to access.
A view is the product of a stored query, so only the view definition is stored in the data dictionary. When you export the database, you’ll see the statement “exporting views,” but that’s referring only to the view definitions and not to any physical objects
You can query views and even modify, remove, or add data using UPDATE, DELETE, or INSERT state-ments, provided the user has the appropriate privileges on the underlying base tables. For example, if you grant a user only the INSERT privilege on the base table underlying a view, that user can only insert new rows into that table but won’t be able to select, update, or delete any rows.
Views are used in applications for several reasons, including the following:
• Reduce complexity.
• Improve security.
• Increase convenience.
• Rename table columns.
• Customize the data for users.
• Protect data integrity.
You create views by using a SQL statement that describes the composition of the view. When you invoke the view, the query by which the view is defined is executed, and the results are presented to you. A query on a view looks exactly like a regular query, but the database converts the query on the view into an identical query on the underlying tables. In order to create a view, you must have the CREATE VIEW system privilege, and to create a view in any schema, rather than just in your own, you need the CREATE ANY VIEW system privilege. In addition, you must either own the underlying tables or must be granted the SELECT, INSERT, UPDATE, and DELETE object privileges on all the tables under-lying the view. You can use a view to add column-level or value-based security to a table. Column-level security is provided by creating views that give access to selected columns of base tables. Value-based security involves using a WHERE clause in the view definition, which displays only selected rows of base tables. In order to use a view, a user needs privileges on the view itself, and not on the base tables underlying the view.
The following statement creates a view called MY_EMPLOYEES that gives a specific manager’s information only on the employees managed directly by her:
SQL> CREATE VIEW my_employees AS SELECT employee_id, first_name, last_name, salary FROM employees WHERE manager_id=122;
View created.SQL>
■Tip You can add the WITH READ ONLY clause to a CREATE VIEW statement to ensure that users can only select from the view. This means the users can’t modify the view and thus indirectly update, insert, or delete any rows of the underlying base tables. Otherwise, by default, Oracle allows you to update the view.

CH AP T E R 7 ■ S CH E M A M AN AG E M E N T 313
Now the manager with the ID 122 can query the my_employees view just as he or she would a normal table, but it gives this manager information on his or her employees only. Listing 7-16 shows the output of a query on the view.
Listing 7-16. Selecting Data from a View
SQL> SELECT * FROM my_employees;
EMPLOYEE_ID FIRST_NAME LAST_NAME SALARY----------- ----------- --------- ------ 133 Jason Mallin 3300 134 Michael Rogers 2900 135 Ki Gee 2400 136 Hazel Philtanker 2200 188 Kelly Chung 3800 189 Jennifer Dilly 3600 190 Timothy Gates 2900 191 Randall Perkins 25008 rows selectedSQL>
You can also specify multiple base tables or even views in the FROM clause, when creating a view. The views you create thus are called join views, and the following example shows the creation of one such view:
SQL> CREATE VIEW view_1 AS SELECT ename, empno, job,dname FROM employee, dept WHERE employee.deptno IN (10, 60) AND employee.deptno = DEPT.DEPTNO;
Although you use views mostly for querying purposes, under some circumstances you can also use INSERT, DELETE, and UPDATE views. For example, you can perform a DML operation on a view if it doesn’t have any GROUP BY, START WITH, or CONNECT BY clauses, or any subqueries in its SELECT clause. However, since a view doesn’t really exist, you’ll be modifying the underlying table data, and the view will therefore be subject to the same integrity constraints as the underlying base tables. The following example shows how to insert rows into a view named sales_view, which depends on the employees table.
SQL> INSERT INTO sales_view VALUES (1234, 'ALAPATI', 99);
The previous statement inserts the new row into the underlying base table named employees. Updates, deletes, and inserts on a view are subject to a few restrictions. For example, when you use a CHECK constraint when creating a view, you can’t insert a row or update the base table with that row, if the view can’t select the row from the underlying base table.
You can drop a view by simply using the DROP VIEW command, as shown here:
SQL> DROP VIEW my_employees;
View dropped.
Instead of dropping and re-creating a view, you can also use the OR REPLACE clause to redefine a view, as shown in the following example:
SQL> CREATE OR REPLACE VIEW view1 AS SELECT empno, ename,deptno FROM employee WHERE deptno=50;
314 CH AP T E R 7 ■ SC H E M A M AN AG E M E N T
If there are other views in a database that depend on a replaced view, they’ll become unusable. You can recompile an invalidated view by executing the ALTER VIEW statement. If a PL/SQL program unit such as a procedure or function depends on the view, the database may invalidate that program unit if the changes in the new view pertain to the number of view columns or the column names in the view or the data types.
Using Materialized ViewsEvery time you need to access a view, Oracle must execute the query that defines the view in ques-tion and get you the results. This process of populating the view is called view resolution, and it must be done afresh each time a user refers to the view. If you’re dealing with views with multiple JOIN and GROUP BY clauses, this process of view resolution could take a very long time. If you need to access a view frequently, it is very inefficient to have to constantly resolve the view each time.
Oracle’s materialized views offer a way out of this predicament. You can think of materialized views as specialized views that have a physical representation, unlike normal views. They occupy space and need storage just like your regular tables. You can even partition materialized views and create indexes on them if necessary.
■Note A view is always computed on the fly, and its data isn’t stored separately from the tables on which it’s defined. Thus, queries using views, by definition, guarantee that up-to-the-minute data will be returned. Any change in the source tables on which the view is defined will be reflected by the view instantaneously. Materialized views, on the other hand, are static objects that derive their data from the underlying base tables. If you refresh your mate-rialized views infrequently, the data in them may be at odds with the data in the underlying tables.
Traditionally, data warehousing and other similar large databases have needed summary tables or aggregate tables to perform their work. Defining these summary tables and constantly main-taining them was a complex task. Any time you added data to the underlying detail table, you had to manually update all the summary tables and their indexes. Oracle’s materialized views offer a way to simplify summary management in large databases. Materialized views in these environments are also called summaries because they store summarized data.
You can use tables, views, or other materialized views as the source for a materialized view. The source tables are called master tables, and it’s common to refer to the master tables as detail tables in a data warehousing environment. When you create a new materialized view, Oracle will automat-ically create an internal table to hold the data of this materialized view. Thus, a materialized view will take up physical space in your database, whereas a regular view doesn’t, since a view is only the output of a SQL query.
You can do the following with a materialized view:
• Create indexes on a materialized view.
• Create a materialized view on partitioned tables.
• Partition a materialized view.
■Tip You can use an index to access a materialized view directly, as you would a table. Similarly, you can also access a materialized view directly in an INSERT, UPDATE, or DELETE statement. However, Oracle recommends that
you not do so, and that you let the Oracle Cost Based Optimizer (CBO) make the decision about whether to rewrite your normal queries to take advantage of a materialized view. If the execution plan using the materialized view has a lower cost of accessing it compared to accessing the tables directly, Oracle will automatically do so.

CH AP T E R 7 ■ S CH E M A M AN AG E M E N T 315
You can use various types of aggregations like SUM, COUNT(*), AVG, MIN, and MAX in a materialized view. You can also use multiple table joins in the materialized view definition.
Creating a materialized view is pretty straightforward, but optimizing it can be tricky. Opti-mizing a materialized view involves both ensuring that the Oracle cost-based optimizer rewrites users’ queries to use the materialized views that you have created, and keeping the data in the mate-rialized views current. Let’s briefly look at these two aspects of optimizing materialized views.
Query RewritingIn large databases with heavy time- and processing power–consuming activity, such as table joins and the use of aggregates like SUM, materialized views speed up queries. Materialized views makes queries faster by recalculating and storing the results of expensive join and aggregate operations. The beauty of Oracle’s materialized view facility is that you can specify during their creation that the database must automatically update the materialized views whenever there are changes in the underlying base tables. The materialized views are completely transparent to users. If users write queries using the underlying table, Oracle will automatically rewrite those queries to use the mate-rialized views—this query-optimization technique is known as query rewrite. The Oracle CBO will automatically recognize that it should rewrite a user’s query to use the materialized view rather than the underlying tables if the estimated query cost of using the materialized views is lower. Query cost here refers to the I/O, CPU, and memory costs involved in processing a SQL query. Complex joins involve a lot of I/O and CPU expense, and the use of materialized views will avoid incurring this cost each time you need to perform such joins. Because the materialized views already have the summary information precomputed in them, your queries will cost much less in terms of resource usage, and hence run much more quickly.
The automatic query rewrite optimization technique is at the heart of materialized view usage. The QUERY_REWRITE_ENABLED initialization parameter allows you to enable or disable query writing at a global level. The parameter can take the following values:
• FALSE: The database doesn’t rewrite any queries.
• TRUE: The database compares the cost of the query with and without a rewrite and chooses the cheaper method.
• FORCE: The database always rewrites the query, without evaluating any costs. Use the FORCE setting if you are certain that the query is beneficial and will result in shortening the response time.
The default value for this parameter is TRUE, provided you set the OPTIMIZER_FEATURES_ENABLE parameter to 10.0.0 or higher (it is FALSE if you set the OPTIMIZER_FEATURES_ENABLE parameter to 9.2.0 or lower), which means that Oracle automatically uses the query rewrite feature. When the parameter is set to TRUE, Oracle will estimate the cost of the query both with and without a rewrite and will choose the one with the lesser processing cost. When you enable query rewriting, it’s enabled systemwide, for the entire database.
You must specify the FORCE value for the OPTIMIZER_QUERY_REWRITE parameter only if you are sure that it is beneficial to do so. To enable query rewriting for a specific materialized view, you must explicitly specify the ENABLE QUERY REWRITE clause when you create the materialized view.
The Rewrite_or_Error HintLet’s say you create a new materialized view and find out that the intended queries aren’t being rewritten to take advantage of your new materialized view. If the queries take too long to complete without the materialized view, you can force Oracle to stop executing the query without the materi-alized view. You can use a hint (a user-created directive that provides guidance to the CBO; I discuss hints in detail in Chapter 19) to tell Oracle to issue an error instead of executing the unrewritten query. The hint is called the REWRITE_OR_ERROR hint, and here’s how you use it:
SQL> SELECT /*+ REWRITE_OR_ERROR */ prod_id

316 CH AP T E R 7 ■ SC H E M A M AN AG E M E N T
SUM(quantity_sold) AS sum_sales_qty FROM sales_data GROUP BY prod_idSQL>
If the query fails to rewrite, you’ll see the following error:
ORA-30393: a query block in the statement did not write.
Once you get the preceding error, you can use the DBMS_MVIEW.EXPLAIN_REWRITE procedure to figure out why the query didn’t rewrite, and fix the problem so it will rewrite as planned and take advantage of your materialized view.
Rewrite IntegrityWhen you set up query rewrite, Oracle will use only fresh data from the materialized views by default. Further, it only utilizes ENABLED VALIDATED primary, unique, or foreign key constraints. The QUERY_REWRITE_INTEGRITY initialization parameter determines the optimizer’s behavior in this regard. The default behavior is known as the ENFORCED mode. Besides this mode, the QUERY_REWRITE_INTEGRITY parameter can take two other values:
• TRUSTED: In this mode, the optimizer will accept several relationships other than those accepted under the ENFORCED mode. The optimizer will accept, for example, unenforced rela-tionships as well as declared but not ENABLED VALIDATED primary or unique key constraints. Since you are allowing the optimizer to accept relationships on trust (not on an enforced basis), more queries will be eligible for a query rewrite.
• STALE_TOLERATED: The optimizer will accept fresh and stale data, as long as the data is valid. Of course, you’ll rewrite more queries in this mode, but you also run a higher risk of getting incorrect results if the stale data doesn’t accurately represent the true nature of the current table.
Refreshing Materialized View DataSince a materialized view is defined on underlying master tables, when the data in the master tables changes, the materialized view becomes outdated. To take care of this problem, materialized views are updated, thus keeping them in sync with the master tables. The following sections present the materialized view refresh options.
Refresh Mode
You can choose between the ON COMMIT and ON DEMAND modes of data refresh.
• ON COMMIT: In this mode, whenever a data change in one of the master tables is committed, the materialized view is refreshed automatically to reflect the change.
• ON DEMAND: In this mode, you must execute a procedure like DBMS_MVIEW.REFRESH to update the materialized view.
The default refresh mode is ON DEMAND.
Refresh Type
You can choose from the following four refresh types:
• COMPLETE: This refresh option will completely recalculate the query underlying the material-ized view. Thus, if the materialized view originally took you 12 hours to build, it’ll take about the same time to rebuild it. Obviously, you wouldn’t want to use this option each time a few rows are modified, dropped, or inserted into your master tables.

CH AP T E R 7 ■ S CH E M A M AN AG E M E N T 317
• FAST REFRESH: Under the fast refresh mechanism, Oracle will use a materialized view log to log all changes to the master tables. It’ll then use the materialized view log to update the materi-alized view. The materialized view log is a table based on the associated materialized view. Each of the tables involved in the join in the materialized view needs its own materialized view log to capture changes to the tables. Oracle can also use data from partition mainte-nance operation or a data load made by using the SQL*Loader direct-path method to perform the fast refresh of a materialized view.
• FORCE: If you choose this option, Oracle will try to use the fast refresh mechanism. If it isn’t able to use it for some reason, it’ll use the complete refresh method.
• NEVER: This refresh option never refreshes a materialized view. Obviously, this isn’t a viable option for a materialized view whose master tables undergo significant change over time.
The default refresh type is FORCE.
Using the DBMS_MVIEW PackageEven after you specify the query rewrite mechanism, the Oracle cost-based optimizer may not always automatically rewrite a query, accessing the master tables instead of the materialized view. Thus, even though you have a materialized view, the optimizer ignores it, defeating the purpose of creating and maintaining the materialized view. The Oracle optimizer does this because some conditions for query rewrite may not have been met. You can use the Oracle-supplied DBMS_MVIEW package to diagnose this and other materialized view problems.
You can use the DBMS_MVIEW package’s procedures in the following way:
• Use the EXPLAIN_MVIEW procedure to see what types of query rewrite are possible.
• Use the EXPLAIN_REWRITE procedure to see why a particular query is not being rewritten to use the materialized view.
• Use the TUNE_MVIEW procedure to enable a query rewrite. This procedure will suggest how you can rewrite a materialized view to make it eligible for a query rewrite. The TUNE_MVIEW proce-dure also tells you how to satisfy the requirements for a fast refreshable materialized view. The procedure will take your input and produce a materialized view creation script (and any necessary materialized view logs) that is ready to implement.
Creating Materialized ViewsIn this section, I’ll show you how to create a basic materialized view, using some of the options that I described in the previous sections. If you aren’t sure about which materialized views to create, you can take advantage of Oracle’s SQL Access Advisor, which can make specific recommendations regarding the use of indexes and materialized views. The SQL Access Advisor can design a material-ized view and tell you whether it’s eligible for a query rewrite. The “Using the SQL Access Advisor” section, later in this chapter, covers the SQL Access Advisor in detail.
There are three steps required to get the materialized views going, although the creation itself is simple:
1. Grant the necessary privileges.
2. Create the materialized view log (assuming you’re using the FAST refresh option).
3. Create the materialized view.
Granting the Necessary Privileges
You must first grant the necessary privileges to the user who is creating the materialized views. The main privileges are those that enable the user to create a materialized view. In addition, you must grant the QUERY REWRITE privilege to the user, by using either the GLOBAL QUERY REWRITE priv-

318 CH AP T E R 7 ■ SC H E M A M AN AG E M E N T
ilege or specific QUERY REWRITE privileges on each object that is not part of the user’s schema. Here are the grant statements that enable a user to create a materialized view in the user’s schema:
SQL> GRANT CREATE MATERIALIZED VIEW TO salapati;SQL> GRANT QUERY REWRITE TO salapati;
In addition, if the user doesn’t already have it, you must grant the ability to create tables, by using the following GRANT statement:
SQL> GRANT CREATE ANY TABLE TO salapati;
If the user doesn’t own any of the master tables that are part of the materialized view definition, you must grant the user the SELECT privilege on those individual tables, or just make the following grant:
SQL> GRANT SELECT ANY TABLE TO salapati
Creating the Materialized View Log
Let’s use the fast refresh mechanism for our materialized view. In most cases, you must create a materialized view log if you want to use the fast refresh mechanism. This will require the creation of two materialized view logs, of course, to capture the changes to the two master tables that are going to be the basis for our materialized view.
If you want to use the fast refresh mechanism to refresh the materialized view, you must first create materialized view logs for al the tables that are part of the materialized view. In our case, these are the products and the sales tables. In addition, you must also specify the ROWID clause in the CREATE MATERIALIZED VIEW LOG statement when you want to use the fast refresh mechanism. You must also include all columns referenced in the materialized view, and the SEQUENCE and the INCLUDING NEW VALUES clause, as shown in the following example:
SQL> CREATE MATERIALIZED VIEW LOG ON products WITH SEQUENCE, ROWID (prod_id, prod_name, prod_desc, prod_subcategory, prod_subcategory_desc, prod_category, prod_category_desc, prod_weight_class, prod_unit_of_measure, prod_pack_size, supplier_id, prod_status, prod_list_price, prod_min_price) INCLUDING NEW VALUES;
SQL> CREATE MATERIALIZED VIEW LOG ON sales WITH SEQUENCE, ROWID (prod_id, cust_id, time_id, channel_id, promo_id, quantity_sold, amount_sold) INCLUDING NEW VALUES;
The example shows how to create two materialized view logs to capture changes in the products and sales master tables, respectively. In the next step, I show how to create the materialized view itself.
Creating the Materialized ViewNow you are ready to create your materialized view. The example, shown in Listing 7-17, uses the FAST REFRESH clause to specify the refresh mechanism for the materialized view.

CH AP T E R 7 ■ S CH E M A M AN AG E M E N T 319
■Tip If you already have a table containing some type of aggregates or summary results in your database, you can use the CREATE MATERIALIZED VIEW statement with the ON PREBUILT TABLE clause to register the existing summary table as a materialized view.
Listing 7-17. Creating a Materialized View
SQL CREATE MATERIALIZED VIEW product_sales_mv TABLESPACE test1 STORAGE (INITIAL 8k NEXT 8k PCTINCREASE 0) BUILD IMMEDIATE REFRESH FAST ENABLE QUERY REWRITE AS SELECT p.prod_name, SUM(s.amount_sold) AS dollar_sales, COUNT(*) AS cnt, COUNT(s.amount_sold) AS cnt_amt FROM sales s, products p WHERE s.prod_id = p.prod_id GROUP BY p.prod_name;GROUP BY p.prod_name;SQL>
Let’s look at some of the important clauses of the CREATE MATERIALIZED VIEW statement:
• BUILD IMMEDIATE populates the materialized view right away, and this is the default option. The alternative is to use the build deferred option, which will actually load the materialized view with data later on, at a specified time.
• REFRESH FAST specifies that the materialized view should use the FAST refresh method, which requires using the two materialized logs that you created in the previous step, to capture all changes to the master tables. The ON COMMIT part of the REFRESH clause specifies that all committed changes to the master tables should be propagated to the materialized view immediately upon the committing of the changes.
• ENABLE QUERY REWRITE means that the Oracle optimizer will transparently rewrite your queries to use the newly created materialized views instead of the underlying master tables.
• The AS subquery defines the materialized view. Oracle will store the output of this subquery in the materialized view you’re creating. You can use any valid SQL subquery you wish here.
• The last four lines of code contain the actual query defining the materialized view; it retrieves the output from the master tables and makes it part of the materialized view.
■Note Due to space limitations, I presented a simple example of creating a materialized view and materialized view log here. In reality, you may have to satisfy additional requirements to be able to create these objects. For example, to enable a fast-refreshable materialized view with materialized view logs, there are specific conditions that you must satisfy. Refer to the Oracle manuals (especially the Data Warehousing Guide) for the full requirements.
Note that you can enable query rewrite by specifying ENABLE QUERY REWRITE when you create the materialized view itself (as shown in Listing 7-16) or by specifying the option after the materialized view is created, by using the ALTER MATERIALIZED VIEW statement.
Instead of using the EXPLAIN_REWRITE procedure of the DBMS_MVIEW package, you can use the EXPLAIN PLAN tool to see the proposed execution plan for the query. Your EXPLAIN PLAN should not show any references to the underlying base tables. It should show that the materialized view is being referred to instead, to convince you that the query rewrite is indeed forcing queries to use the new materialized view.

320 CH AP T E R 7 ■ SC H E M A M AN AG E M E N T
■Tip Collect optimizer statistics (see Chapter 19) for a materialized view immediately after you create it. This helps the Oracle optimizer optimize the query rewriting process.
If you think you don’t need a materialized view, you can drop it by simply using the DROP MATE-RIALIZED VIEW statement, as shown here:
SQL> DROP MATERIALIZED VIEW sales_sum_mv;
Using the SQL Access AdvisorAs you realize by now, materialized views are very helpful, but creating and maintaining them is no trivial task. It’s not easy to figure out the optimal or best materialized views to create. You can use the SQL Access Advisor to help determine which materialized views, materialized view logs, indexes, and partitioned tables you must create in your database. The SQL Access Advisor can also recom-mend removal of certain indexes to enhance performance.
■Note In addition to making recommendations for creating new materialized views (and indexes as well) and helping to implement those recommendations, the SQL Access Advisor also helps you optimize your materialized
views by showing you how to ensure query rewriting and to make a materialized view fast-refreshable.
The SQL Access Advisor can use one of the following sources of SQL to determine ideal materi-alized views and indexes:
• A hypothetical database workload
• An actual workload you provide
• SQL cache
You can also filter the workloads according to criteria such as queries containing only a certain table or tables.
You can use the SQL Access Advisor tool manually, by invoking various procedures that belong to the DBMS_ADVISOR package. Or, you can take a smart shortcut by invoking the SQL Access Advisor wizard through the OEM Database Control (or Grid control) interface.
You can also use the DBMS_ADVISOR’s QUICK_TUNE procedure, if you want to get quick recommendations for a single SQL statement. The following sections explain all three methods, with the easiest method, using the OEM Database Control, being first.
Using the OEM Database ControlThe SQL Access Advisor works the same way when you invoke it using the OEM Database Control (or Grid Control) as it does when you invoke it directly through the DBMS_ADVISOR package. The reason for this is that the OEM internally relies on the DBMS_ADVISOR package for its functionality. You can provide a SQL workload as input to the SQL Access Advisor, and you can use a user-defined workload, current and recent SQL statements in the database’s SQL cache, or a SQL repository as the source for this SQL workload.
When you use the SQL Access Advisor through the OEM, you create tasks and view the recom-mendations with the help of an intuitive SQL Access Advisor wizard. You provide the SQL statements that are going to use the materialized views during several steps presented by the wizard. You can access this wizard through the Advisor Central link on the Database Control home page (under the

CH AP T E R 7 ■ S CH E M A M AN AG E M E N T 321
Related Links section at the bottom of the page). You can also access it through links provided on individual alerts or performance pages.
■Tip You can also use the SQL Access Advisor in an evaluation mode, where the advisor evaluates existing indexes and materialized views and tells you which of those are being utilized by the database.
Follow these steps to use the SQL Access Advisor through the Database Control:
1. Clear the SQL cache.
2. Grant the necessary privileges.
3. Create the SQL cache.
4. Get the SQL Access Advisor recommendations.
5. Review the recommendations.
6. Implement the recommendations.
Clearing the Cache
The first step is to flush the shared pool to clear the cache of older SQL statements:
SQL> ALTER SYSTEM FLUSH SHARED_POOL;
System altered.SQL>
Granting Necessary Privileges
You must next grant the user sh the ADVISOR privilege in order to use the SQL Access Advisor:
SQL> GRANT ADVISOR TO sh;
Grant succeeded.SQL>
Creating the SQL Cache
In order to provide a SQL workload, you can use any one of the methods mentioned previously. In this example, the workload is created by providing three SQL statements that become part of the SQL cache. Connect as the SH user, and run the SQL statements shown in Listing 7-18.
Listing 7-18. Providing a SQL Workload for the SQL Access Advisor
SQL> SELECT c.cust_last_name, SUM(s.amount_sold), SUM(s.quantity_sold) FROM sales s, customers c, products p WHERE c.cust_id = s.cust_id AND s.prod_id = p.prod_id AND c.cust_state_province IN ('Texas','New Jersey')
SQL> SELECT c.cust_id, SUM(amount_sold) FROM sales s, customers c WHERE s.cust_id= c.cust_id GROUP BY c.cust_id;
322 CH AP T E R 7 ■ SC H E M A M AN AG E M E N T
SQL> SELECT SUM(unit_cost) FROM costs GROUP BY prod_id;
■Tip The SQL Access Advisor can be resource-hungry and thus adversely affect your production database perfor-mance. To avoid this, simply collect the necessary workload-related data from the production database and use one of your test databases to run the SQL Access Advisor’s analysis and recommendation steps.
Getting the SQL Access Advisor Recommendations
The previous step created the SQL workload. Using this workload, the SQL Access Advisor will recommend the necessary materialized views. Log into the OEM Database Control with SYSDBA privileges, and then follow these steps to use the SQL Access Advisor:
1. Go the OEM home page ➤ Advisor Central (under the Related Links section) ➤ ?SQL Access Advisor.
2. The Initial Options page will be displayed. You can choose between the following:
• Default options: Your task will use the Oracle-recommended options.
• Inherit options: Your task will inherit the options from the selected task or template.
For this example, select Use Default Options and click Next.
3. The Workload Source page is displayed. In this page, you must select one of the following as the source for your SQL workload:
• Current and Recent SQL Activity
• Import Workload from SQL Repository
• User-Defined Workload; Import SQL from a Table or View
• Create a Hypothetical Workload from the Following Schemas and Tables
You’ve already executed the three SQL statements you want to use as your workload, so select the Current and Recent SQL Activity option.
4. Click Filter Options to fine-tune the scope of the SQL workload. Select Filter Workload under Filter Options. Under the USERS section, select the option that states Include Only SQL Statements Executed by These Users. Enter SH in the Users field.
5. The Recommendation Options page is displayed. There are two sections: Recommendation Types and Advisor Mode.
In the Recommendation Types section, you must select one of the following:
• Indexes
• Materialized Views
• Both Indexes and Materialized Views
• Partitioned tables
• Evaluation Only
Since our goal is to create materialized views, select the second option.

CH AP T E R 7 ■ S CH E M A M AN AG E M E N T 323
In the Advisor Mode section, choose one of the following two modes for the SQL Access Advisor:
• Limited: This mode is quicker and only processes statements with the highest cost.
• Comprehensive: This mode takes longer to finish, but it performs an exhaustive analysis. The Comprehensive mode is very resource-intensive, so you may not want to run it during the day in a production database.
Select the Limited mode option.
6. The Schedule page is displayed. This page lets you run the analysis immediately or schedule it for a later time. You can also enter a task name for your SQL Access Advisor job in the Task Name box at the top of the page. Go all the way to the bottom of the page and select Imme-diately under the Start options. Click Next.
7. The Review page appears next, and you can confirm all your choices before the Advisor starts its run.
8. You’ll see the Advisor Central page next, with a confirmation note saying that your SQL Access Advisor job was created successfully.
Reviewing the Recommendations
Once the SQL Access Adviser job successfully completes, you can review the recommendations and decide whether you want to implement them. Follow these steps:
1. On the Advisor Central page (see step 7 in the previous section), navigate to the Results section at the bottom of the page and select your task name. Click View Result.
2. The Results for Task: Task Number page appears next. Click Recommendation ID 1 to see the recommendation details.
3. Change the Schema Name for the Create Materialized View to SH, and click OK.
4. On the next page, click Show SQL to view the materialized view generation script, and click OK.
Implementing the Recommendations
To implement the recommendations, follow these steps:
1. Click Schedule Implementation on the Results for Task page.
2. Enter your task name and click Submit.
3. Click View to see if your job is running.
4. Review the summary, click Materialized View, enter SH in the schema field, and click Go.
Using the DBMS_ADVISOR PackageSince the OEM Database Control offers such an intuitive interface for using the SQL Access Advisor to generate recommendations regarding indexes and materialized views, I won’t discuss the labo-rious steps you need to use when invoking the SQL Access Advisor through the DBMS_ADVISOR package. I’ll merely summarize the approach here:
1. Run some SQL statements so you can use them for your task later on.
2. Create a task using the CREATE_TASK procedure.
3. Create a workload using the CREATE_SQLWKLD procedure.
4. Link your task to the workload by using the ADD_SQLWKLD_REF procedure.

324 CH AP T E R 7 ■ SC H E M A M AN AG E M E N T
5. Use the appropriate procedure for loading either a hypothetical workload, a SQL cache workload, or a SQL tuning set.
6. Set the task parameters by using the SET_TASK_PARAMETER procedure.
7. Generate recommendations by using the EXECUTE_TASK procedure, using your task name.
8. View the recommendations using the USER_ADVISOR_RECOMMENDATIONS view.
Here’s a query using the USER_ADVISOR_ACTIONS view that shows the SQL Access Advisor’s recommendations:
SQL> SELECT rec_id, action_id, SUBSTR(command,1,30) AS command FROM user_advisor_actions WHERE task_name = :task_name ORDER BY rec_id, action_id;
REC_ID ACTION_ID COMMAND------------ ------------ -------------------------------- 1 5 CREATE MATERIALIZED VIEW LOG 1 8 ALTER MATERIALIZED VIEW LOG 1 9 CREATE MATERIALIZED VIEW LOG 1 19 CREATE INDEXSQL>
Using the QUICK_TUNE ProcedureYou can use the QUICK_TUNE procedure of the DBMS_ADVISOR package when you have a single SQL statement to tune. You need to supply a task name and a SQL statement as inputs to the proce-dure. Here’s an example:
VARIABLE task_name VARCHAR2(255);VARIABLE sql_stmt VARCHAR2(4000);EXECUTE :sql_stmt := 'SELECT COUNT(*) FROM customers WHERE cust_state_province=''TX''';EXECUTE :task_name := 'MY_QUICKTUNE_TASK';EXECUTE DBMS_ADVISOR.QUICK_TUNE(DBMS_ADVISOR.SQLACCESS_ADVISOR, - :task_name, :sql_stmt);
This will produce identical results as when you use all the steps outlined in the “Using the DBMS_ADVISOR Package” section.
Using SynonymsSynonyms are aliases for objects in the database, and they are used mainly to make it easy for users to access database objects owned by other users, and for security purposes. Synonyms hide the underlying object’s identity and can be either private or public. Public synonyms are accessible by all the users in the database, and private synonyms are part of the individual user’s schema—access rights have to be individually granted to specific users before they can use the private synonyms. Oracle synonyms can be created for tables, views, materialized views, and stored code, such as pack-ages and procedures.
Synonyms are very powerful from the point of view of allowing users access to objects that do not lie within their schemas. All synonyms have to be created explicitly with the create synonym command, and the underlying objects can be located in the same database or in other databases that are connected by database links.

CH AP T E R 7 ■ S CH E M A M AN AG E M E N T 325
There are two major uses of synonyms:
• Object transparency: Synonyms can be created to keep the original object transparent to the user.
• Location transparency: Synonyms can be created as aliases for tables and other objects that belong to a database other than the local database.
■Note Keep in mind that even if you know the synonym for a schema table, you can’t necessarily access it. You must also have been granted the necessary privileges on the table for you to be able to access the table.
When you create a table or procedure, the database creates it in your schema, and other users can access it only by using your schema name as a prefix to the object’s name. Listing 7-19 shows a couple of examples that illustrate this point.
Listing 7-19. Using Schema Names to Access Tables
SQL> SHOW USER
USER is "SYSTEM"
SQL> DESC employees
ERROR:ORA-04043: object employees does not exist
SQL> DESC hr.employees
Name Null? Type --------------- -------- -------------- EMPLOYEE_ID NOT NULL NUMBER(6) FIRST_NAME VARCHAR2(20) LAST_NAME NOT NULL VARCHAR2(25) EMAIL NOT NULL VARCHAR2(25) PHONE_NUMBER VARCHAR2(20) HIRE_DATE NOT NULL DATE JOB_ID NOT NULL VARCHAR2(10) SALARY NUMBER(8,2) COMMISSION_PCT NUMBER(2,2) MANAGER_ID NUMBER(6) DEPARTMENT_ID NUMBER(4)SQL>
As you can see, when the user SYSTEM tried to describe the table without the schema prefix, Oracle issued an error stating that the table “does not exist.” The way around this is for the schema owner to create a synonym with the same name as the table name. Once the user SYSTEM uses the schema.table notation, the table’s contents can be seen.
Creating a Public SynonymPublic synonyms are owned by a special schema in the Oracle database called PUBLIC. As mentioned earlier, public synonyms can be referenced by all users in the database. Public synonyms

326 CH AP T E R 7 ■ SC H E M A M AN AG E M E N T
are usually created by the application owner for tables and other objects such as procedures and packages so the users of the application can see the objects.
The following code shows how to create a public synonym for the employees table:
SQL> CREATE PUBLIC SYNONYM employees FOR hr.employees;
Synonym created.SQL>
Now any user can see the table by just typing the original table name.If you wish, you could provide a different name for the table in the CREATE SYNONYM statement.
Remember that the DBA must explicitly grant the CREATE PUBLIC SYNONYM privilege to user hr before that user can create any public synonyms.
Just because you can see a table through a public (or private) synonym doesn’t mean that you can also perform SELECT, INSERT, UPDATE, or DELETE operations on the table. To be able to perform those operations, a user needs specific privileges for the underlying object, either directly or through roles, from the application owner. The topic of granting privileges and roles is discussed in Chapter 12.
Creating a Private SynonymPrivate synonyms, unlike public synonyms, can be referenced only by the schema that owns the table or object. You may want to create private synonyms when you want to refer to the same table by different aliases in different contexts. You create private synonyms the same way you create public synonyms, but you omit the PUBLIC keyword in the CREATE statement.
The following example shows how to create a private synonym called addresses for the locations table. Note that once you create the private synonym, you can refer to the synonym exactly as you would the original table name.
SQL> CREATE SYNONYM addresses FOR hr.locations;
Synonym created.SQL> SELECT * FROM addresses;
Dropping a SynonymYou can drop both private and public synonyms with the DROP SYNONYM command, but there is one important difference. If you are dropping a public synonym, you need to add the keyword PUBLIC after the keyword DROP.
Here’s an example of dropping a private synonym:
SQL> DROP SYNONYM addresses;
Synonym dropped.SQL>
Managing SynonymsThe DBA_SYNONYMS view provides information on all synonyms in your database. Synonyms are based on underlying base tables, and you can find out the names of the base objects by issuing a query such as the following:
SQL> SELECT TABLE_NAME, SYNONYM_NAME FROM dba_synonyms WHERE OWNER = 'SALAPATI';

CH AP T E R 7 ■ S CH E M A M AN AG E M E N T 327
TABLE_NAME SYNONYM_NAME---------- ------------DEPT DEPTEMP EMPSQL>
Use the DBA_SYNONYMS view to clarify the names of the base tables underlying synonyms.
Switching to a Different SchemaIf you have to constantly use tables owned by a different schema and there aren’t any synonyms on the table, you may be forced to use the schema qualifier in front of every table name. For example, you might need to use scott.emp to refer to the emp table owned by the user scott. To avoid this, you can simply use the ALTER SESSION SET SCHEMA statement, as shown here:
SQL> CONNECT samalapati/sammyy1SQL> ALTER SESSION SET CURRENT_SCHEMA = scott;SQL> SELECT * FROM emp;
The use of the ALTER SESSION statement here doesn’t confer any automatic object privileges. In order to query the emp table without any schema qualifier, as shown in the preceding example, the user must have SELECT privileges on the emp table.
Using SequencesOracle uses a sequence generator to automatically generate a unique sequence of numbers that users can use in their operations. Sequences are commonly used to create a unique number to generate a unique primary key for a column. We’ll look at using an Oracle sequence to generate employee numbers during a data insert.
■Note If users were to use programmatically created sequence numbers instead, Oracle would have to constantly lock and unlock records holding the maximum value of those sequences to ensure an orderly incrementing of the sequence. This locking would result in users waiting for the next value in the sequence to be issued to their trans-actions. Oracle’s automatic generation of sequences increases database concurrency.
You have several options to choose from to create a sequence. We will use a plain vanilla sequence that starts at 10,000 and is incremented by 1 each time. The sequence is never recycled or reused, because we want distinct sequence numbers for each employee.
■Note There are two pseudo-columns called currval and nextval that you can use to query sequence values. The currval pseudo-column provides you with the current value of the sequence, and the nextval pseudo-column gets you the new or next sequence number.
First, create a sequence as shown in the following example. This is usually the way you use a sequence to generate a unique primary key for a column.
SQL> CREATE SEQUENCE employee_seq START WITH 10000 INCREMENT BY 1 NOMAXVALUE

328 CH AP T E R 7 ■ SC H E M A M AN AG E M E N T
NOCYCLE;Sequence created.SQL>
Second, select the current sequence number by using the following statement:
SQL> SELECT employee_seq.currval FROM dual;
Third, insert a new row into the employee table using nextval from the employee_seq sequence:
SQL> INSERT INTO employees(employee_id, first_name, last_name, email, 2 phone_number, hire_date) 3 VALUES 4* (employee_seq.nextval,'sam','alapati','salapati.tnt.org' ,345-555-5555,to_char('21-JUN-2005');1 row created.
SQL> COMMIT;Commit complete.SQL>
Finally, check to make sure the employee_id column is being populated by the employee_seq sequence:
SQL> SELECT employee_id, first_name, last_name FROM employees WHERE last_name = 'alapati';EMPLOYEE_ID FIRST_NAME LAST_NAME------------- ---------------- ---------- 10011 sam alapatiSQL>
Note that you can have an Oracle sequence that is incremented continuously, but there may be occasional gaps in the sequence numbers. This is because Oracle always keeps 20 values (by default) in memory, and that’s where it gets the nextval from. If there should be a database crash, the numbers stored in memory will be lost, and there will be a gap in that particular sequence.
Using TriggersOracle triggers are similar to PL/SQL procedures, but they are automatically fired by the database based on specified events. For DBAs, triggers come in handy in performing audit- and security-related tasks. Besides the standard Oracle triggers, which fire before or after DML statements, there are powerful triggers based on system events, such as database startup and shutdown and the users logging on and logging off. Chapter 11 shows you how to use triggers to enhance database security.
You create a trigger with the CREATE TRIGGER statement. You can choose to have the trigger fire BEFORE, AFTER, or INSTEAD OF the triggering event.
The following example shows the structure of the CREATE TRIGGER statement for a BEFORE event trigger. Before a DML statement can delete, insert, or update a row in the employees table, Oracle automatically fires this trigger:
SQL> CREATE TRIGGER scott.emp_permit_changes BEFORE DELETE OR INSERT OR UPDATE ON employees. . ./* Your SQL or PL/SQL code here

CH AP T E R 7 ■ S CH E M A M AN AG E M E N T 329
When you create a trigger, it is enabled by default. If you want to temporarily disable a trigger for some reason, you use the following statement:
SQL> ALTER TRIGGER test DISABLE;
You can reenable this trigger by using the following command:
SQL> ALTER TRIGGER test ENABLE;
Viewing Object InformationThere are several important data dictionary views you can use to find out detailed information about any of the database objects discussed in this chapter. DBAs also make heavy use of data dictionary views to manage various schema objects. I provide a brief list of the important views here, some of which were explained earlier in the chapter. To get complete information about the types of infor-mation you can glean from each of these views, use the SQL command DESCRIBE (as in DESCRIBE DBA_CATALOG.
Views for Managing Database ObjectsIn this section, you’ll look at the important data dictionary views that help you manage nondata objects (that is, objects other than tables and indexes). The following is a list of the important data dictionary views for looking up various database objects:
• DBA_SYNONYMS: Information about database synonyms
• DBA_TRIGGERS: Information about triggers
• DBA_SEQUENCES: Information about user-created sequences
• DBA_DB_LINKS: Information about database links
As mentioned earlier, the DBA_OBJECTS view provides important information on the preceding objects, as well as several other types of database objects. However, the preceding views provide detailed information about the object, such as the source text of a trigger, which you won’t get from the DBA_OBJECTS view.
You manage objects such as tables and views by referring to the data dictionary views, such as DBA_TABLES and DBA_VIEWS. There are also separate views for partitioned tables. Let’s look at the key table- and index-related dictionary views.
DBA_OBJECTSThe DBA_OBJECTS view contains information about all the objects in the database, including tables, indexes, packages, procedures, functions, dimensions, materialized views, resource plans, types, sequences, synonyms, triggers, views, and table partitions. As you can surmise, this view is useful when you need to know general information regarding any database object. Listing 7-20 shows a query designed to find out the created time and the LAST_DDL_TIME (the last time the object was modified). This type of query helps you identify when a certain object was modified, and is often used for auditing purposes.
Listing 7-20. Querying the DBA_OBJECTS View
SQL> SELECT object_name, 2 object_type, 3 created, 4 last_ddl_time, 5 FROM DBA_OBJECTS

330 CH AP T E R 7 ■ SC H E M A M AN AG E M E N T
6 WHERE owner ='APPOWNER' 7* AND object_name LIKE 'YTD%';
OBJECT_NAME OBJECT_TYPE CREATED LAST_DDL_TIME----------------- ---------- ---------- -------------YTD_ADJ2005050603 TABLE 01/23/2008 01/23/2008SQL>
DBA_TABLESThe DBA_TABLES view contains information about all relational tables in your database. The DBA_TABLES view is your main reference for finding out storage information, the number of rows in the table, logging status, buffer pool information, and a host of other things. Here’s a simple query on the DBA_TABLES view:
SQL> SELECT tablespace_name,table_name FROM DBA_TABLES;
TABLESPACE_NAME TABLE_NAME--------------- ----------------EXAMPLE DEPARTMENTSEXAMPLE EMPLOYEES_INTERIEXAMPLE EMPLOYEES_NEWEXAMPLE JOBSEXAMPLE JOB_HISTORYEXAMPLE TEST6 rows selected.SQL>
■Note The DBA_ALL_TABLES view contains information about all object tables and relational tables in a data-base, while the DBA_TABLES view is limited to only relational tables.
You can use the DBA_TABLES view to find out things such as whether table compression and row-level dependency tracking are enabled, and whether the table has been dropped and is in the Recycle Bin.
DBA_EXTERNAL_TABLESThe DBA_EXTERNAL_TABLES view shows details about any external tables in a database, including their access type, access parameters, and directory information.
DBA_TAB_PARTITIONSThe DBA_TAB_PARTITIONS view is similar to the DBA_TABLES view, but it provides detailed infor-mation about table partitions. You can get information about the partition name, partition high values, partition storage information, and partition statistics, plus all the other information that’s available from the DBA_TABLES view. Listing 7-21 shows a simple query using the DBA_TAB_PARTITIONS view.

CH AP T E R 7 ■ S CH E M A M AN AG E M E N T 331
Listing 7-21. Querying the DBA_TAB_PARTITIONS View
SQL> SELECT table_name, partition_name, 2 high_value, 3* FROM DBA_TAB_PARTITIONS;
TABLE_NAME PARTITION_NAME HIGH_VALUE------------ -------------- -------------------------------SALES SALES_Q2_2004 TO_DATE(' 2007-07-01 00:00:00')SALES SALES_Q3_2004 TO_DATE(' 2007-10-01 00:00:00')SALES SALES_Q4_2004 TO_DATE(' 2008-01-01 00:00:00')SALES SALES_Q1_2005 TO_DATE(' 2008-04-01 00:00:00')SALES SALES_Q2_2005 TO_DATE(' 2008-07-01 00:00:00')SALES SALES_Q3_2005 TO_DATE(' 2008-10-01 00:00:00')SALES SALES_Q4_2005 TO_DATE(' 2009-01-01 00:00:00')EMPLOYEES EMPLOYEES1 100EMPLOYEES EMPLOYEES2 300SQL>
DBA_PART_TABLESThe DBA_PART_TABLES view provides information about the type of partition scheme and other storage parameters for partitions and subpartitions. You can find out the partition type of each partitioned table using the following query:
SQL> SELECT table_name, partitioning_type, 2 def_tablespace_name 3 FROM DBA_PART_TABLES;
TABLE_NAME PARTITION_TYPE DEF_TABLESPACE_NAME------------------ --------------- -------------------EMPLOYEES RANGE EXAMPLEEMPLOYEES_INTERIM RANGE EXAMPLECOSTS RANGE EXAMPLESALES RANGE EXAMPLESQL>
DBA_TAB_MODIFICATIONSThe DBA_TAB_MODIFICATIONS view shows all DML changes in a table since statistics were last collected for that table. Here’s a query on this view:
SQL> SELECT table_name, inserts, updates, deletes FROM DBA_TAB_MODIFICATIONS;
TABLE_NAME INSERTS UPDATES DELETES-------------------------- ------- ------- -------WRH$ACTIVE_SESSION_HISTORY 1233 0 0WRH$SERVICE_STAT 5376 0 0WRH$SERVICE_WAIT_CLASS 1050 0 0. . .SQL>
The database doesn’t update the DBA_TAB_MODIFCATIONS view in real time. Consequently, you may not see the changes you make to various tables immediately reflected in this view.

332 CH AP T E R 7 ■ SC H E M A M AN AG E M E N T
DBA_TAB_COLUMNSSuppose you want to find out the average length of each row in a table or the default value of each column (if there is one). The DBA_TAB_COLUMNS view is an excellent way to quickly get detailed column-level information on schema tables, as shown in Listing 7-22.
Listing 7-22. Using the DBA_TAB_COLUMNS View
SQL> SELECT column_name, 2 avg_col_len, 3 data_type, 4 data_length, 5 nullable, 6 FROM dba_tab_columns 7* WHERE owner='OE';
COLUMN_NAME AVG_COL_LEN DATA_TYPE DATA_LENGTH NULL---------------------- ----------- --------- ------------- ----CUSTOMER_ID 4 NUMBER 22 NCUST_FIRST_NAME 7 VARCHAR2 20 NCUST_LAST_NAME 8 VARCHAR2 20 NTRANSLATED_DESCRIPTION 245 NVARCHAR2 4000 NPRODUCT_DESCRIPTION 123 VARCHAR2 2000 YWARRANTY_PERIOD 5 INTERVAL YEA 5 YSQL>
DBA_VIEWSAs you know, views are the product of a query on some database table(s). The DBA_VIEWS dictionary view provides you with the SQL query that underlies the views. Listing 7-23 shows how to get the text of a view, OC_CUSTOMERS, owned by user oe.
■Tip To ensure you see the whole text of the view when you use the DBA_VIEWS view, set the long variable to a large number (for example, SET LONG 2000). Otherwise, you’ll see only the first line of the view definition.
Listing 7-23. Getting the Source for a View Using the DBA_VIEWS View
SQL> SET LONG 2000SQL> SELECT text 2 FROM DBA_VIEWS 3 WHERE view_name ='OC_CUSTOMERS' 4* AND owner = 'OE';
TEXT--------------------------------------------------SELECT c.customer_id, c.cust_first_name, c.cust_last_name, c.cust_address, c.phone_numbers,c.nls_language,c.nls_territory,c.credit_limit, c.cust_email, CAST(MULTISET(SELECT o.order_id, o.order_mode, MAKE_REF(oc_customers,o.customer_id),

CH AP T E R 7 ■ S CH E M A M AN AG E M E N T 333
o.order_status,o.order_total,o.sales_rep_id, CAST(MULTISET(SELECT l.order_id,l.line_item_id, l.unit_price,l.quantity, MAKE_REF(oc_product_information, l.product_id)FROM order_items lWHERE o.order_id = l.order_id)AS order_item_list_typ)FROM orders oWHERE c.customer_id = o.customer_id)AS order_list_typ)FROM customers cSQL>
DBA_MVIEWSThe DBA_MVIEWS dictionary view tells you all about the materialized views in your database, including whether the query rewrite feature is enabled or not on the views. Listing 7-24 shows you how to use this view.
Listing 7-24. Using the DBA_MVIEWS View
SQL> SELECT 2 mview_name, 3 query, 4 updatable, 5 rewrite_enabled, /* whether query rewrite is enabled */ 6 refresh_mode, /* demand,commit, or never */ 7 refresh_method /* complete,force, fast, or never */ 8* FROM dba_mviews;
MVIEW_NAME QUERY UPD REW REFR REFRESH_ME---------------- ---------------------------- ---- ---- ---------------MONTH_SALES_MV SELECT t.calendar_month_desc N Y DEMAND FORCEPCAT_SALES_MV SELECT t.week_ending_day N Y DEMAND COMPLETESQL>
DBA_INDEXESYou can use the DBA_INDEXES dictionary view to find out just about everything you need to know about the indexes in your database, including the index name, index type, and the table and tablespace an index belongs to. Certain columns, such as BLEVEL (tells you the level of the B-tree index) and DISTINCT_KEYS (number of distinct index key values), are populated only if you’ve collected statistics for the index using the DBMS_STATS package.
DBA_IND_COLUMNSThe DBA_IND_COLUMNS view is similar to the DBA_CONS_COLUMNS view in structure, and it provides information on all the indexed columns in every table. This is important during SQL perfor-mance tuning when you notice that the query is using an index, but you aren’t sure exactly on which columns the index is defined. The query in Listing 7-25 may reveal that the table has indexes on the wrong columns after all.
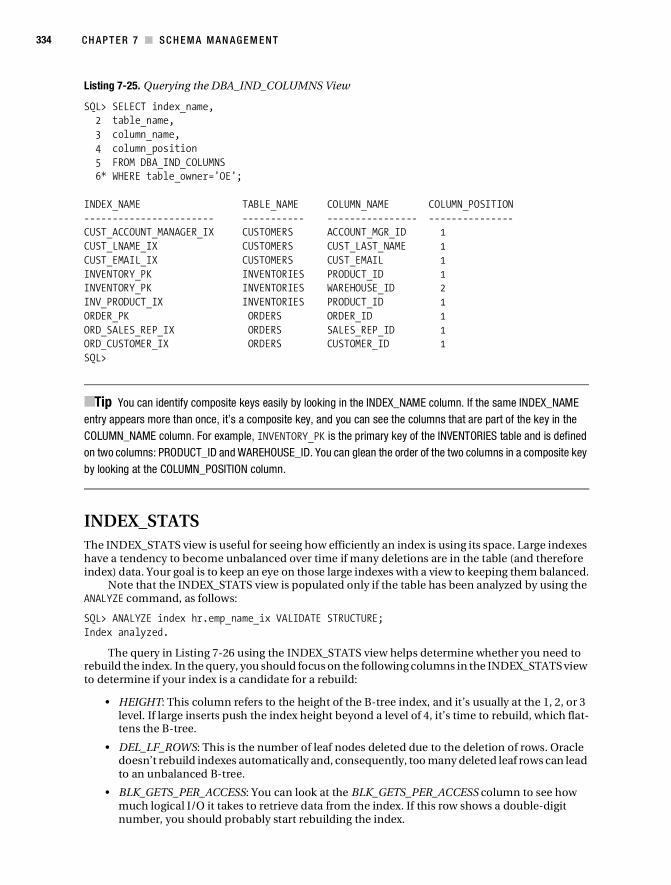
334 CH AP T E R 7 ■ SC H E M A M AN AG E M E N T
Listing 7-25. Querying the DBA_IND_COLUMNS View
SQL> SELECT index_name, 2 table_name, 3 column_name, 4 column_position 5 FROM DBA_IND_COLUMNS 6* WHERE table_owner='OE';
INDEX_NAME TABLE_NAME COLUMN_NAME COLUMN_POSITION----------------------- ----------- ---------------- ---------------CUST_ACCOUNT_MANAGER_IX CUSTOMERS ACCOUNT_MGR_ID 1CUST_LNAME_IX CUSTOMERS CUST_LAST_NAME 1CUST_EMAIL_IX CUSTOMERS CUST_EMAIL 1INVENTORY_PK INVENTORIES PRODUCT_ID 1INVENTORY_PK INVENTORIES WAREHOUSE_ID 2INV_PRODUCT_IX INVENTORIES PRODUCT_ID 1ORDER_PK ORDERS ORDER_ID 1ORD_SALES_REP_IX ORDERS SALES_REP_ID 1ORD_CUSTOMER_IX ORDERS CUSTOMER_ID 1SQL>
■Tip You can identify composite keys easily by looking in the INDEX_NAME column. If the same INDEX_NAME entry appears more than once, it’s a composite key, and you can see the columns that are part of the key in the COLUMN_NAME column. For example, INVENTORY_PK is the primary key of the INVENTORIES table and is defined on two columns: PRODUCT_ID and WAREHOUSE_ID. You can glean the order of the two columns in a composite key by looking at the COLUMN_POSITION column.
INDEX_STATSThe INDEX_STATS view is useful for seeing how efficiently an index is using its space. Large indexes have a tendency to become unbalanced over time if many deletions are in the table (and therefore index) data. Your goal is to keep an eye on those large indexes with a view to keeping them balanced.
Note that the INDEX_STATS view is populated only if the table has been analyzed by using the ANALYZE command, as follows:
SQL> ANALYZE index hr.emp_name_ix VALIDATE STRUCTURE;Index analyzed.
The query in Listing 7-26 using the INDEX_STATS view helps determine whether you need to rebuild the index. In the query, you should focus on the following columns in the INDEX_STATS view to determine if your index is a candidate for a rebuild:
• HEIGHT: This column refers to the height of the B-tree index, and it’s usually at the 1, 2, or 3 level. If large inserts push the index height beyond a level of 4, it’s time to rebuild, which flat-tens the B-tree.
• DEL_LF_ROWS: This is the number of leaf nodes deleted due to the deletion of rows. Oracle doesn’t rebuild indexes automatically and, consequently, too many deleted leaf rows can lead to an unbalanced B-tree.
• BLK_GETS_PER_ACCESS: You can look at the BLK_GETS_PER_ACCESS column to see how much logical I/O it takes to retrieve data from the index. If this row shows a double-digit number, you should probably start rebuilding the index.

CH AP T E R 7 ■ S CH E M A M AN AG E M E N T 335
Listing 7-26. Using the INDEX_STATS View to Determine Whether to Rebuild an Index
SQL> SELECT height, /*Height of the B-Tree*/ 2 blocks, /* Blocks in the index segment */ 3 name, /*index name */ 4 lf_rows, /* number of leaf rows in the index */ 5 lf_blks, /* number of leaf blocks in the index */ 6 del_lf_rows, /* number of deleted leaf rows in the index */ 7 rows_per_key /* average number of rows per distinct key */ 8 blk_gets_per_access /* consistent mode block reads (gets) */ 8 FROM INDEX_STATS 9* WHERE name='EMP_NAME_IX';
HEIGHT BLOCK LF_ROWS LF_BLKS DEL_LF_ROWS ROWS_PER_KEY BLK_GETS------ ----------- ------- -------- ----------- ------------ ---------16 EMP_NAME_IX 107 1 0 1 1SQL>

337
■ ■ ■
C H A P T E R 8
Oracle Transaction Management
Transaction management is at the heart of database processing. In order for a large number of users to run concurrent transactions, the DBMS must manage the transactions with the least amount of conflict while ensuring the consistency of the database. Transaction management ensures that a database is accessible to many users simultaneously, and that users can’t undo each other’s work.
A transaction is a logical unit of work consisting of one or more SQL statements. Transactions may encompass all of your program or just a part of it. A transaction may perform one operation or an entire series of operations on the database objects, either interactively or as part of a program. Transactions are begun implicitly whenever data is read or written, and they are ended by a COMMIT or ROLLBACK statement.
In this chapter, I cover the basics of transaction management. I start with an explanation of a transaction in the context of a relational database, I explain the main types of data anomalies, and I explain the standard transaction isolation levels and Oracle’s implementation of the read-committed isolation level for maintaining consistency and concurrency.
The concept of serializability is crucial in transaction processing. Concurrency of usage gives relational databases their great strength, and serializability conditions ensure the concurrency of database transactions. In this chapter, I explain how Oracle uses the twin techniques of transaction locking and multiversion concurrency control using undo records to enforce serializability in trans-actions. The other component in Oracle’s transaction management is its automatic locking feature, which helps Oracle increase concurrency.
Undo space management is an important part of transaction management, and in this chapter you’ll learn about the Automatic Undo Management (AUM) feature. You’ll also learn how to use Oracle’s powerful flashback features, which help you perform various tasks such as quickly recov-ering from logical errors, for example. I explain the key Oracle flashback features such as the Flashback Query, Flashback Versions Query, Flash Transaction Query, and the powerful Flashback Table features, which help in auditing and correcting logical data errors. All of these Flashback features rely on the use of undo data in your undo tablespace.
Longer transactions can run the risk of failing to complete due to space errors. You’ll learn how to use Oracle’s new Resumable Space Allocation feature to resume transactions that are suspended due to a space-related error. You’ll also learn how to use autonomous transactions. This chapter also provides an introduction to the Oracle Workspace Manager feature, which offers version control for table data.
Oracle TransactionsDDL statements issued by a DBA usually aren’t very complex to process. The DDL commands alter the schema (which means changing the data dictionary), which contains object definitions and other related metadata for the database. DML language (also called query language) operations are a different kettle of fish altogether. The majority of DML statements retrieve data from the database, and the rest modify data or insert new data. DML transaction processing involves compiling and

338 CH AP T E R 8 ■ O R AC L E T R AN S AC T I O N M A N AG E M E N T
executing SQL statements in the most efficient manner with the least contention among multiple transactions, while preserving the consistency of the database.
A transaction starts implicitly when the first executable SQL statement begins, and it continues as the following SQL statements are processed until one of the following events occurs:
• COMMIT: If a transaction encounters a COMMIT statement, all the changes to that point are made permanent in the database.
• Rollback: If a transaction encounters a ROLLBACK statement, all changes made up to that point are cancelled.
• DDL statement: If a user issues a DDL statement, such as CREATE, DROP, RENAME, or ALTER, Oracle first commits any current DML statements that are part of the transaction, before executing and committing the results of the DDL statement. This is called an implicit commit, since the committing of the DML statements immediately preceding the DDL statements isn’t explic-itly done by the user.
• Normal program conclusion: If a program ends without errors, all changes are implicitly committed by the database. When you make a normal clean exit from SQL*Plus, the database automatically commits all changes you made to data in that session.
• Abnormal program failure: If the program crashes or is terminated, all changes made by it are implicitly rolled back by the database.
When a transaction begins, Oracle will assign the transaction an undo segment, where the orig-inal data is recorded whenever data is modified by an update or delete. In the case of an insert operation, the undo segments will record the relevant ROWIDs. The first statement after the comple-tion of a transaction will mark the beginning of a new transaction. In the sections that follow, you’ll look at the COMMIT and ROLLBACK transaction control statements in detail.
COMMIT StatementThe COMMIT statement ends a transaction successfully. All changes made by all SQL statements since the transaction began are recorded permanently in the database. Before the COMMIT statement is issued, the changes may not be visible to other transactions.
You can commit a transaction by using either of the following statements, which make the changes permanent:
SQL> COMMIT;SQL> COMMIT WORK;
Before Oracle can issue a COMMIT statement, the following things happen in the database:
• Oracle generates undo records in the undo segment buffers in the SGA. As you know, the undo records contain the old values of the updated and deleted table rows.
• Oracle generates redo log entries in the redo log buffers in the SGA.
• Oracle modifies the database buffers in the SGA.
■Note The modified database buffers may be written to the disk before a COMMIT statement is issued. Similarly, the redo log entries may be written to the redo logs before a COMMIT statement is ever issued.

C H AP TE R 8 ■ OR A CL E TR A N SA CT I ON M AN AG E M E N T 339
When an Oracle transaction is committed, the following three things happen:
1. The transaction tables in the redo records are tagged with the unique system change number (SCN) of the committed transaction.
2. The log writer writes the redo log information for the transaction from the redo log buffer to the redo log files on disk, along with the transaction’s SCN. This is the point at which a commit is considered complete in Oracle.
3. Any locks that Oracle holds are released, and Oracle marks the transaction as complete.
■Note If you set the SQL*Plus variable AUTOCOMMIT to on, Oracle will automatically commit transactions, even without an explicit COMMIT statement.
The default behavior for the COMMIT statement, which is generally the only type you’ll encounter, is to use the IMMEDIATE and WAIT options:
• IMMEDIATE vs. BATCH: With the IMMEDIATE option, the log writer writes the redo log records for the committing transaction immediately to disk. If you’d rather the log writer write the redo records by buffering them in memory until it’s convenient to write them, you can use the alternative BATCH option.
• WAIT vs. NOWAIT: With the WAIT option, the COMMIT statement doesn’t return as successful until the redo records are successfully written to the redo logs. If you’d rather have the COMMIT state-ment return without waiting for the writing of the redo records, you can use the NOWAIT option.
As you can see, the default behavior means that there is a disk I/O after each commit, and conse-quently, a slight delay in finishing the transaction. For certain types of long transactions, you may want to avoid the delay resulting from frequent writing of redo log records and waiting for the confir-mation of those writes.
You can modify this default behavior by using the initialization parameters COMMIT_WAIT and COMMIT_LOGGING. Use the COMMIT_WAIT parameter to control when the database flushes the redo for a commit to the redo logs. Use the COMMIT_LOGGING parameter to control how the log writer batches redo.
ROLLBACK StatementThe ROLLBACK statement undoes, or rolls back, the changes made by SQL statements within a trans-action, so long as you didn’t already commit the transaction. Once you issue the ROLLBACK statement, none of the changes made to the tables by SQL statements since the transaction began are recorded to the database permanently. You can roll back an entire transaction by rolling back all changes made by all the SQL statements within that transaction by simply using the ROLLBACK command as follows:
SQL> ROLLBACK;
You can also partially roll back the effects of a transaction by using save points in the transaction. Using a save point, you can roll back to the last SAVEPOINT command in the transaction, as follows:
SQL> ROLLBACK TO SAVEPOINT POINT A;
The SAVEPOINT statement acts like a bookmark for the uncommitted statements in the transac-tion. In the second of the preceding examples, the rollback is only up to point A in the transaction. Everything before point A is still committed.

340 CH AP T E R 8 ■ O R AC L E T R AN S AC T I O N M A N AG E M E N T
Oracle uses the undo records in the undo tablespace to roll back the transactions after a ROLL-BACK command. It also releases any locks that are held, and it marks the transaction as complete. If the rollback is to a save point, the transaction is deemed incomplete, and you can continue the transaction.
If a SQL statement errors out during its execution, all the changes made by it to that point are automatically rolled back. This is known as a statement-level rollback. A deadlock is a condition that occurs when SQL statements from two sessions contend for the same piece of data. In that situation, Oracle automatically rolls back one of the SQL statements to resolve deadlocks.
Transaction PropertiesTransactions in RDBMSs must possess four important properties, symbolized by the ACID acronym, which stands for atomicity, consistency, isolation, and durability of transactions. Transaction management, in general, means supporting database transactions so the ACID properties are maintained.
Let’s look at the transaction properties in more detail:
• Atomicity: Either a transaction should be performed entirely or none of it should be performed. That is, you can’t have the database performing only a part of a transaction. For example, if you issue a SQL statement that should delete 1,000 records, your entire transac-tion should abort (roll back) if your database crashes after the transaction deletes 999 records.
• Consistency: The database is supposed to ensure that it’s always in a consistent state. For example, in a banking transaction that involves debits from your savings account and credits to your checking account, the database can’t just credit your checking account and stop. This will lead to inconsistent data, and the consistency property of transactions ensures that the database doesn’t leave data in an inconsistent state. All transactions must preserve the consistency of the database. For example, if you wish to delete a department ID from the Department table, the database shouldn’t permit your action if some employees in the Employees table belong to the department you’re planning on eliminating.
• Isolation: Isolation means that although there’s concurrent access to the database by multiple transactions, each transaction must appear to be executing in isolation. The isola-tion property of transactions ensures that a transaction is kept from viewing changes made by another transaction before the first transaction commits. This property is upheld by the data-base’s concurrency control mechanisms, as you’ll see in the following sections. Although concurrent access is a hallmark of the relational database, isolation techniques make it appear as though users are executing transactions serially, one after another. This chapter discusses how Oracle implements concurrency control—the assurance of atomicity and isola-tion of individual transactions in a concurrently accessed database.
• Durability: The last ACID property, durability, ensures that the database saves commit trans-actions permanently. Once a transaction completes, the database should ensure that the transaction’s changes are not lost. This property is enforced by the database recovery mech-anisms, which make sure that all committed transactions are retrieved. As you saw in Chapter 5, Oracle uses the write-ahead protocol, which ensures that all changes are first written to the redo logs on disk before they’re transferred to the database files on disk.
■Note Users can name a transaction to make it easier to monitor it, and there are several advantages to giving a meaningful name to a long-running transaction. For example, using the LogMiner utility, you can look for details of
the specific transaction you’re interested in. Chapter 16 shows how to use the LogMiner utility to help undo DML changes. Assigning names to transactions also makes it easier for the user to query the transaction details using the name column of the V$TRANSACTION view.

C H AP TE R 8 ■ OR A CL E TR A N SA CT I ON M AN AG E M E N T 341
Transaction Concurrency ControlTo ensure data consistency, each user must see a consistent set of data that includes all changes made by that user’s transactions as well as all the other users’ transactions. In a single-user database, it’s a trivial matter to achieve data consistency. However, real-life databases need to allow simulta-neous operations by numerous users, a requirement that’s known as data concurrency. Improper interactions among transactions can cause data to become inconsistent.
Transaction concurrency is achieved by managing various users’ simultaneous transactions without permitting any interference among them. If you’re the only user of the database, you don’t need to worry about concurrency control of transactions. However, in most cases, databases enable thousands of users to perform simultaneous select, update, insert, and delete transactions against the same table.
One solution to concurrency control is to lock the entire table for the duration of each opera-tion, so one user’s transactions do not impact another’s. Thus, each user would be operating in isolation, thereby sacrificing data concurrency. However, this would mean that access to the table would be severely reduced. As you’ll see, Oracle does use locking mechanisms to keep the data consistent, but the locking is done in the least restrictive fashion, with the goal of maintaining the maximum amount of concurrency.
Concurrency no doubt increases the throughput of an RDBMS, but it brings along its own special set of problems, which we’ll look at next.
Concurrency ProblemsConcurrent access to the database by multiple users introduces several problems. Some of the most important problems potentially encountered in concurrent transaction processing are dirty reads, phantom reads, lost updates, and nonrepeatable reads.
The Dirty-Read Problem
A dirty read occurs when a transaction reads data that has been updated by an ongoing transaction but has not been committed permanently to the database. For example, say transaction A has just updated the value of a column, and it is now read by transaction B. What if transaction A rolls back its changes, whether intentionally or because it aborts for some reason? The value of the updated column will also be rolled back as a result. Unfortunately, transaction B has already read the new value of the column, which is now incorrect because of the rolling back of transaction A.
■Tip The problem described in this section could be avoided by imposing a simple rule: Don’t let any transaction
read the intermediate results of another transaction before the other transaction is either committed or rolled back. This way, the reads are guaranteed to be consistent.
The Phantom-Read Problem
Say you’re reading data from a table (using a SELECT statement). You re-execute your query after some time elapses, and in the meantime, some other user has inserted new data into the table. Because your second query will come up with extra rows that weren’t in the first read, they’re referred to as “phantom” reads, and the problem is termed a phantom read. Phantom-read prob-lems are caused by the appearance of new data in between two database operations in a transaction.
The Lost-Update Problem
The lost-update problem is caused by transactions trying to read data while it is being updated by other transactions. Say transaction A is reading a table’s data while it is being updated by transaction

342 CH AP T E R 8 ■ O R AC L E T R AN S AC T I O N M A N AG E M E N T
B, and transaction B completes successfully and is committed. If transaction A has read the data before transaction B has fully completed, it might end up with intermediate data. The lost update anomaly occurs because two users have updated the same row, and since the second update over-writes the first, the first update is lost. Allowing transactions to read and update a table before the completion of another transaction causes the problem in this case.
The Nonrepeatable-Read (Fuzzy-Read) Problem
When a transaction finds that data it has read previously has been modified by some other transac-tion, you have a nonrepeatable-read (or fuzzy-read) problem. Suppose you access a table’s data at a certain point in time, and then you try to access the same data a little later, only to find that the data values are different the second time around. This inconsistent data during the same transaction causes a nonrepeatable-read problem.
Schedules and SerializabilityAs you can see, all the data problems are due to concurrent access—you can safely assume that a transaction executed in isolation will always leave the database in a consistent state when the transaction completes. If the database permits concurrent access, then you need to consider the cumulative effect of all the transactions on database consistency.
To do this, the database uses a schedule, which is a sequence of operations from one or more transactions. If all the transactions executed serially, one after another, the schedule would also be serial. If the database can produce a schedule that is equivalent in its effect to a serial schedule, even though it may be derived from a set of concurrent transactions, it is called a serializable schedule. The serializable schedule consists of a series of intermingled database operations drawn from several transactions, the final outcome of which is a consistent database.
As you can surmise, deriving a schedule is not easy in practice. However, users don’t have to concern themselves with the mechanics of serialization when they use their transactions. The Oracle database automatically derives serializable schedules through the use of isolation levels and the management of undo data. Let’s look at these important concepts next.
Isolation Levels and the ISO Transaction StandardYou know that one way to avoid data anomalies is to prevent more than one user from viewing or changing data at the same time. However, this defeats our main purpose of providing concurrent access to users. To control this trade-off between concurrency and isolation, you specify an isolation level for each transaction.
The ISO (http://www.iso.ch) standard for transactions rests on the two key transaction-ending statements: COMMIT and ROLLBACK. All transactions, according to the ISO standard, begin with a SELECT, UPDATE, INSERT or DELETE statement. No transaction can view another transaction’s interme-diate results. Results of a second transaction are available to the first transaction only after the second transaction completes.
The ISO transaction standards ensure the compliance of transactions with the atomic and isola-tion properties, and help avoid the concurrency problems explained in the previous section. All transactions must ensure that they preserve database consistency. A database is consistent before a transaction begins, and it must be left in a consistent state at the end of the transaction. If you can devise a method to avoid the problems mentioned in the previous section, you can ensure a high degree of concurrent interactions among transactions in the database. There is a price to pay for this, however. Attempts to reduce the anomalies will result in reduced concurrency.
You can achieve consistency by enforcing serial use of the database, but it’s impractical. There-fore, the practical goal is to find those types of concurrent transactions that don’t interfere with each other—in other words, to find transactions that guarantee a serializable schedule. Proper ordering of the transactions becomes very important, unless they’re all read-only transactions.

C H AP TE R 8 ■ OR A CL E TR A N SA CT I ON M AN AG E M E N T 343
THE MAIN STAGES OF SQL PROCESSING
SQL statements pass through several stages during their processing: parsing, binding, and executing. Oracle uses cursors, private SQL areas, to store parsed statements and other information relating to the statements it’s currently processing. Oracle automatically opens a cursor for all SQL statements.
Parsing
During the parsing stage, Oracle does several things to check your SQL statements:
• Oracle checks that your statements are syntactically correct. The server consults the data dictionary to check whether the tables and column specifications are correct.
• Oracle ensures that you have the privileges to perform the actions you are attempting through your SQL state-ments.
• Oracle draws up the execution plan for the statement, which involves selecting the best access methods for the objects in the statement.
After it checks the privileges, Oracle assigns a number called the SQL hash value to the SQL statement for identifi-cation purposes. If the SQL hash value already exists in memory, Oracle will look for an existing execution plan for the statement, which details the ideal way it should access the various database objects, among other things. If the execution plan exists, Oracle will proceed straight to the actual execution of the statement using that execution plan. This is called a soft parse, and it is the preferred technique for statement processing. Because it uses previously formed execution plans, soft parsing is fast and efficient.
The opposite of a soft parse is a hard parse, and Oracle has to perform this type of parse when it doesn’t find the SQL hash value in memory for the statement it wants to execute. Hard parses are tough on system memory and other resources. Oracle has to create a fresh execution plan, which means that it has to evaluate the numerous possibili-ties and choose the best plan from among them. During this process, Oracle needs to access the library cache and dictionary cache numerous times to check the data dictionary, and each time it accesses these commonly used areas, Oracle needs to use latches, which are low-level serialization control mechanisms, to protect shared data structures in the SGA. Thus, hard parsing contributes to an increase in latch contention.
Any time there’s a severe contention for resources during statement processing, the execution time will increase. Remember that too many hard parses will lead to a fragmentation of the shared pool, making the contention worse.
After the parsing operation is complete, Oracle allots a shared SQL area for the statement. Other users can access this parsed version as long as it is retained in memory.
Binding
During the binding stage, Oracle retrieves the values for the variables used in the parsing stage. Note that the vari-ables are expanded to literal values only after the parsing stage is over.
Execution
Once Oracle completes the parsing and binding, it executes the statement. Note that Oracle will first check whether there is a parsed representation of the statement in memory already. If there is, the user can execute this parsed representation directly, without going through the parsing process all over again.
It’s during the execution phase that the database reads the data from the disk into the memory buffers (if it doesn’t find the data there already). The database also takes out all the necessary locks and ensures that it logs any changes made during the SQL execution. After the execution of the SQL statement, Oracle automatically closes the cursors.

344 CH AP T E R 8 ■ O R AC L E T R AN S AC T I O N M A N AG E M E N T
■Note It’s important for you as a DBA to fully understand the nature of transactions in relational databases. A good reference is the book by Jim Gray (a leading expert on database and transaction processing) and Andreas Reuter, Transaction Processing: Concepts and Techniques (Morgan Kaufmann, 1993).
Oracle’s Isolation LevelsThe ISO transaction standards use the term isolation level to indicate the extent to which a database allows interaction among transactions. Isolation defines how and when the changes made by an operation are made visible to other concurrent operations in the database. Isolation of transactions keeps concurrently executing database transactions from viewing incomplete results of other trans-actions. The main isolation levels are the serializable, repeatable-read, read-uncommitted, and read-committed isolation levels. Here’s what the different transaction isolation levels mean:
• Serializable: At the serializable isolation level, all transactions are isolated completely from each other, as if the transactions have executed in a serial fashion, one after the other. Under the serializable level of isolation, a transaction that performs an insert, delete, or update places a write lock on the set of data that is affected by the DML operation. The database locks the affected data until the isolating transaction releases its locks, which happens when this transaction is committed or rolled back. Because other transactions involving DML opera-tions have to wait until the locks are cleared, those transactions won’t read any “dirty” data. The serializable level of isolation also helps you avoid nonrepeatable reads, because the subsequent transactions can’t update or delete the locked data. You also get rid of phantom data because the subsequent transactions can’t insert any new rows that fall into the range of data locked by the first transaction.
• Repeatable read: The repeatable-read isolation level guarantees read consistency—a transac-tion that reads the data twice from a table at two different points in time will find the same values each time. You avoid both the dirty-read problem and the nonrepeatable-read problem through this level of isolation.
• Read uncommitted: The read-uncommitted level, which allows a transaction to read another transaction’s intermediate values before it commits, will result in the occurrence of all the problems of concurrent usage.
• Read committed: Oracle’s default isolation level is the read-committed level of isolation at the statement level. Oracle queries see only the data that was committed at the beginning of the query. Because the isolation level is at the statement level, each statement is allowed to see only the data that was committed before the commencement of that statement. The read-committed level of isolation guarantees that the row data won’t change while you’re accessing a particular row in an Oracle table.
■Note If you’re in the process of updating a row that you fetched into a cursor, you can rest assured that no one else is updating the same row simultaneously. However, if you’re executing queries, you may get different values each time if other transactions have updated data successfully in between your queries. Remember that Oracle only guarantees statement-level isolation here, not transaction-level isolation.
Practical real-world databases need a compromise between concurrency access and serializ-able modes of operation. The key issue here is that by specifying a high degree of isolation, you can keep one transaction from affecting another, but at the cost of significant deterioration in database

C H AP TE R 8 ■ OR A CL E TR A N SA CT I ON M AN AG E M E N T 345
performance. On the other hand, a low level of transaction isolation will introduce the data problems outlined earlier in the chapter, but it leads to better performance. A transaction running at a serial-izable isolation level will appear as if it’s running in isolation—it’s as if all the other concurrent transactions run either before or after this transaction.
Three of the four main ISO isolation levels allow for some deviation from the theoretical concept of serializable transactions. Table 8-1 shows the extent to which each of the four main levels of isola-tion suffers from the concurrency problems listed earlier. Note that a value of Yes in the table means that the particular problem is possible under that isolation level, and a value of No means that the problem isn’t possible for that isolation level.
As you can see, the last isolation level in Table 8-1, serializable, avoids all concurrency prob-lems, but unfortunately, it’s not a practical option because it doesn’t allow any concurrent use of the database. Oracle’s default read-committed isolation level will get rid of the dirty-read and the lost-update problems. You won’t have the dirty-read problem because your queries will read only data that was committed at the beginning of the query, thereby avoiding reading data that may later be rolled back by a different transaction. In addition, you’ll avoid the lost-update problem because transactions can’t read data that’s currently being modified until the updates have been completed.
Transaction- and Statement-Level ConsistencyOracle automatically provides statement-level read consistency by default. That is, all data that a query sees comes from a single point in time. This means that a query will see consistent data when it begins. The query sees only data committed before it starts, and no data committed during the course of the query is visible to it. Queries in this context don’t have to be SELECT statements. An INSERT with a subquery or an UPDATE or DELETE will also involve an implicit query, and they all return consistent data.
Oracle can also provide transaction-level read consistency, though this is not the default. Oracle can use pre-change data images stored in undo segments to provide the transaction- and statement-level read consistency.
Changing the Default Isolation LevelOracle’s read-committed level of isolation provides protection against dirty reads and lost updates because queries read data only after the COMMIT statement is executed. The transactions are all consistent on a per-statement basis. Readers will not block writers of transactions, and vice versa. As you can see, Oracle’s default read-committed isolation level doesn’t guarantee you’ll avoid the nonrepeatable-read and phantom-read problems. Oracle guarantees only statement-level, not transaction-level, read consistency. However, Oracle allows you to explicitly change the default read-committed isolation level by selecting the serializable isolation level as an alternative.
Table 8-1. Preventable Concurrency Problems Under Various Isolation Levels
Isolation Level Dirty Read Nonrepeatable Read Phantom Read
Read uncommitted Yes Yes Yes
Read committed No Yes Yes
Repeatable read No No Yes
Serializable No No No

346 CH AP T E R 8 ■ O R AC L E T R AN S AC T I O N M A N AG E M E N T
■Note The read-committed level of isolation provides a great deal of concurrency and consistency in the data-base. However, this mode does not provide transaction-level consistency. Because it’s a statement-level isolation, changes made in between statements in a transaction may not be seen by a query, and for this reason you’ll continue to have the nonrepeatable-read problem; you simply can’t be guaranteed the same results if you repeat your queries. The phantom-read problem also still lurks because the model doesn’t prevent other transactions from
updating tables in between your queries.
The serializable isolation level will treat the database as a single-user database, thus eliminating the data anomalies caused by simultaneous use and modification of the data. By using the ALTER SESSION statement, you can serialize the isolation level, thus avoiding the concurrency problems. You can change the isolation level from the default level of read-committed to a serializable isolation level using the following statement:
SQL> ALTER SESSION SET ISOLATION LEVEL SERIALIZABLE;
Once you execute this statement, you are shielded from all transactions, committed as well as uncommitted, that have occurred since you set the transaction. Instead of using the serializable isolation level, you can also use the SET TRANSACTION READ ONLY command to give you repeatable reads without phantom reads. A serializable level of isolation is suited for databases where multiple consistent queries are made during an update transaction. However, serialization isn’t a simple choice, because it seriously reduces your concurrency. These are some of the problems involved in setting the serializable isolation level:
• Since serialization involves the locking of data for exclusive use by transactions, it thereby slows down transaction concurrency.
• You have to set the INITTRANS parameter for tables at creation time to at least 3 in order for the serialization level of isolation to take effect. The INITTRANS parameter determines the number of concurrent transactions on a table.
• Throughput in the serialization isolation level is much lower than in the read-committed isolation level, especially in high-concurrency databases with many transactions accessing the same tables for updates.
• You must incorporate error-checking code in the application if you want to use the serializ-able mode of isolation.
• Serializable transactions are more prone to deadlocks, a situation in which transactions are stuck waiting for each other to release locks over data objects. Deadlocks lead to costly roll-backs of transactions.
In general, it’s safest to stick with Oracle’s default read-committed level of transaction isolation, although it isn’t perfect. Oracle recommends that you stick with the default read-committed level of isolation, which produces the maximum throughput with only a slight risk of running into the nonre-peatable-read and phantom-read anomalies.
The read-committed transaction level provides a good trade-off between data concurrency and data consistency. Also, the throughput is much higher with this mode of isolation than with the purer serialization mode. If getting a repeatable read is your objective in using a serializable isolation level, you can always use explicit locks in situations where that is necessary.
For standard OLTP applications, in particular, with their high-volume, concurrent, short-lived transactions that are unlikely to conflict with each other, this mode is ideal from a performance point of view. Very few transactions in an OLTP database issue the same query multiple times, so phantom reads and nonrepeatable reads are rare. Serializable modes of concurrency are more appropriate for databases with mostly read-only transactions that run for a long time.

C H AP TE R 8 ■ OR A CL E TR A N SA CT I ON M AN AG E M E N T 347
Implementing Oracle’s Concurrency ControlA database may use one or more methods to implement concurrency of use. These include locking mechanisms to guarantee exclusive use of a table by a transaction, time-stamping methods that enable serialization of transactions, and the validation-based scheduling of transactions. Locking methods are called pessimistic because they assume that transactions will violate the serializable schedules unless they’re prevented explicitly from doing so. The time-stamping and validation methods, on the other hand, are called optimistic because they don’t assume that transactions are bound to violate the serializable schedules.
As you might guess, locking methods cause more delays than the optimistic methods because they keep conflicting transactions waiting for access to the locked database objects. On the positive side, however, locking methods don’t have to abort transactions because they prevent potentially conflicting transactions from interacting with other transactions. The optimistic methods usually have to abort transactions when they might violate a serializable schedule.
Time-stamping methods assign time stamps to each transaction and enforce serializability by ensuring that the transaction time stamps match the schedule for the transactions. Validation methods maintain a record of transaction activity. Before committing a transaction, the database validates the changed data against the changed items of all currently active transactions to eliminate any unserialized schedules.
Oracle uses a combination of the available methods. It uses locks along with what is called the multiversion concurrency control system (a variation of the time-stamping method) to manage concurrency.
Oracle locks prevent destructive interaction between transactions that are trying to access the same resource. The resource could be an application table or row, or it could be a shared system data structure in memory. It could also be a data dictionary table or row. Locks ensure data consistency while allowing data concurrency by letting multiple users simultaneously access the database.
Oracle does its locking implicitly; you don’t have to worry about which table to lock or how to lock it, as Oracle will automatically place locks on your transaction’s behalf when necessary. By default, Oracle uses row-level locking, which involves the least restrictive amount of locking, thus guaranteeing the highest amount of concurrency. By default, Oracle stores the locked row informa-tion in the data blocks. Also, Oracle never uses lock escalation—that is, it doesn’t go from a lower-level granularity like row-level locking to a higher level of granularity like table-level locking.
Oracle’s multiversion concurrency control system is a variation of the time-stamp approach to concurrency control; it maintains older versions of table data to ensure that any transaction can read the original data even after it has been changed by other transactions. Unlike locking, no waits are involved here; transactions use different versions of the same table instead of waiting for other trans-actions to complete. When transactions want to update a row, Oracle first writes the original before-image to an undo record in the undo tablespace. Queries then have a consistent view of the data, which provides read consistency—they only see data from a single point in time. Using the same mechanism, Oracle is also capable of providing transaction-level read consistency, meaning that all the separate statements in a transaction see data from a single point in time. The multiversion concurrency control system used by Oracle enables you to get by with the less-stringent read-committed mode of isolation instead of having to use the slower but safer serializable isolation level.
Here are some important features of Oracle locking:
• Oracle implements locks by setting a bit in the data item being locked. The locking informa-tion is stored in the data block where the row lives.
• Locks are held for the entire length of a transaction and are released when a COMMIT or a ROLL-BACK statement is issued.

348 CH AP T E R 8 ■ O R AC L E T R AN S AC T I O N M A N AG E M E N T
• Oracle doesn’t use lock escalation. Oracle doesn’t need to escalate locks, as it stores the locking information in the individual data blocks. Lock escalation—for example, an escala-tion from the row level to the table level—reduces concurrency.
• Oracle does use lock conversion, which involves changing the restrictiveness of a lock while keeping the granularity of the lock the same. For example, a row share table lock is converted into a more restrictive row exclusive table lock when a SELECT FOR UPDATE statement starts updating the previously locked rows in the table. I explain locking granularity and Oracle locking types in more detail in the following sections.
In the next few sections, you’ll learn more about the locking methods and lock types used by Oracle’s concurrency control mechanism.
Oracle Locking MethodsOracle uses locks to control access to two broad types of objects: user objects, which include tables, and system objects, which may include shared memory structures and data dictionary objects. Oracle follows a pessimistic locking approach, which anticipates potential conflicts and will block some transactions from interfering with others in order to avoid conflicts between concurrent transactions.
Granularity, in the context of locking, is the size of the data unit locked by the locking mecha-nism. Oracle uses row-level granularity to lock objects, which is the finest level of granularity (exclusive table locking is the most coarse level). Several databases, including Microsoft SQL Server, provide only page-level, not row-level, locking. A page is somewhat similar to an Oracle data block, and it can have a bunch of rows, so page-level locking means that during an update, several rows in addition to the rows of interest are locked; if other users need the locked rows that are not part of the update, they have to wait for the lock on the page to be released. For example, if your page size is 8KB, and the average row length in a table is 100 bytes, about 80 rows can fit in that one page. If one of the rows is being updated, a block-level lock limits access to the other 79 rows in the block. Locking at a level larger than the row level would reduce data concurrency.
■Note Remember, the coarser the locking granularity, the more serializable the transactions, and thus the fewer the concurrency anomalies. The flip side of this is that the coarser the granularity level, the lower the concurrency level. Oracle locks don’t prevent other users from reading a table’s data, and by default, queries never place locks on tables.
All locks acquired by statements in a transaction are held by Oracle until the transaction completes. When an explicit or implicit COMMIT or ROLLBACK is issued by a transaction, Oracle releases any locks that the statements within the transaction have been holding. If Oracle rolls back to a save point, it releases any locks acquired after the save point.
Oracle Lock TypesLocks, as you have seen, prevent destructive interaction between transactions by allowing orderly access to resources. These resources could be database objects such as tables, or other shared data-base structures in memory. Oracle locks can be broadly divided into the following types, according to the type of object that is locked: DML locks, DDL locks, latches, internal locks, and distributed locks. These lock types are described in the following sections.

C H AP TE R 8 ■ OR A CL E TR A N SA CT I ON M AN AG E M E N T 349
DML Locks
DML locks are locks placed by Oracle to protect data in tables and indexes. Whenever a DML state-ment seeks to modify data in a table, Oracle automatically places a row-level lock on the rows in the table that are being modified. (This makes it impossible, for example, for a group of booking clerks to sell the “last” ticket to more than one customer.) Row-level DML locks guarantee that readers of data don’t wait for writers of data, and vice versa. Writers will only have to wait when they want to update the same rows that are currently being modified by other transactions.
Any Oracle lock mode will permit queries on the table. A query will never block an update, delete, or insert, and vice versa. An exclusive lock only permits queries on a table, and prevents users from performing any other activity on it, like updating or deleting data. A row exclusive lock, on the other hand, allows concurrent access to a table for updating, deleting, and inserting data, but prevents any user from locking the entire table for exclusive use. There are other lock modes as well, but for our purposes, it’s enough to focus on these two basic Oracle lock modes.
Any query that a transaction issues won’t interfere with any other transaction, because all they do is read data—they don’t modify it. Queries include transactions using the SELECT statement, as well as transactions such as INSERT, UPDATE, and DELETE if they happen to use an implicit SELECT state-ment. Queries never need locks, and they never need to wait for any other locks to be released. So, a SELECT statement that reads data from a table will never have to wait for a lock to be acquired.
Any INSERT, DELETE, UPDATE, or SELECT FOR UPDATE statements will automatically issue an exclu-sive row-level lock on the rows affected by the transaction. This exclusive row-level lock means that other transactions can’t modify the affected rows until the original transaction commits or rolls back, thereby releasing the exclusive locks.
A simultaneous DDL table lock is held for operations that include the INSERT, UPDATE, DELETE, and the SELECT FOR UPDATE DML operations. DML operations need DDL table locks to ensure that some other transaction isn’t changing the table definition while modifying data. This means that a table can’t be altered or dropped while an uncommitted transaction is still holding a table lock on the table.
Table locks can range from being very restrictive to minimally restrictive. Oracle acquires a row exclusive table lock, which indicates that a transaction holding the lock has updated one or more rows in the table. Other transactions are allowed to select, insert, update, delete, or lock rows in the same table concurrently. However, other transactions can’t lock the table exclusively for their own reads or writes. All INSERT, UPDATE, and DELETE statements impose row exclusive locks.
Table 8-2 summarizes the row-level and table-level DML locks that are acquired for the most common database operations.
Table 8-2. DML Row- and Table-Level Locks Held for Common Operations
Operation Row-Level Lock Table-Level Lock
SELECT . . . FROM table None None
INSERT INTO table Exclusive Row exclusive
UPDATE table Exclusive Row exclusive
INSERT INTO table Exclusive Row exclusive
DELETE FROM table Exclusive Row exclusive

350 CH AP T E R 8 ■ O R AC L E T R AN S AC T I O N M A N AG E M E N T
Here’s a brief summary of how Oracle’s transactions most commonly use the Oracle locking features:
• The transaction that contains a DML statement acquires exclusive row locks on the rows modified by a statement within the transaction. Until this transaction commits or rolls back, other transactions can’t update or delete these rows.
• A query in a transaction can see only committed changes made by earlier statements in the same transaction, but won’t be able to see data committed by other transactions after it started.
• In addition to the exclusive row locks, a transaction that contains a DML statement acquires at least a row exclusive table lock on the table that contains the rows. If it’s already holding a more restrictive table-level DML lock, it retains the more restrictive lock.
Oracle offers other kinds of table locks besides the row exclusive lock described previously, but they are not important for our purposes here. All you need to understand is that Oracle uses row-level locking for updates, inserts, and deletes, and that it also automatically imposes a row exclusive table lock during these operations.
DDL Locks
As you’ve seen, Oracle automatically places DML locks on tables that are in the process of having some of their rows modified by a transaction. In addition, such a transaction simultaneously holds a table-level DDL lock on the table, which will prevent other transactions from altering or dropping the table while its DML transactions aren’t yet completed.
You can also place DDL locks on tables when you are conducting a purely DDL operation, without any accompanying DML transaction.
Allowing DDL Locks to Wait for DML LocksBy default, a DDL lock request won’t wait for a DML lock. That is, the DDL lock request will fail auto-matically if it’s unable to acquire an immediate DML lock on the table. You can, however, use the ddl_lock_timeout initialization parameter to specify the duration for which a DDL statement will wait for a DML lock.
Since the default value of the ddl_lock_timeout parameter is zero, DDL statements won’t wait at all for a DML lock. You can set the parameter up to the maximum value of 1,000,000 seconds, which is about 11 and a half days. Here’s an example that shows how to set the parameter inside a session:
SQL> ALTER SESSION SET ddl_lock_timeout = 30;
Session altered.
SQL>
Explicit Table LockingWhenever you add a column to a table, the database needs to acquire an exclusive DML lock on that table. You can specify that a DDL command wait for a specific length of time before it fails, when it’s unable to acquire a DML lock. The LOCK TABLE statement lets you specify the maximum length of time a DDL statement can wait for the acquiring of a DML lock on a table. Use this feature when adding a column that is frequently updated by users.
Here’s the syntax of the LOCK TABLE statement:
LOCK TABLE . . . IN lockmode MODE [NOWAIT | WAIT integer]

C H AP TE R 8 ■ OR A CL E TR A N SA CT I ON M AN AG E M E N T 351
In the LOCK TABLE statement, the MODE parameter values NOWAIT and WAIT mean the following:
• If you want the database to return control to you immediately upon finding that a necessary table is already locked by other users, specify the NOWAIT option.
• You can use the wait parameter to specify the number of seconds the LOCK TABLE statement can wait in order to acquire a DML lock. You can set the value of this parameter to any integer value you want—there’s no limit.
• If you don’t specify either WAIT or NOWAIT, the database will wait until the locked table is avail-able and then lock it before returning control to you.
Latches, Internal Locks, and Distributed Locks
Latches are internal mechanisms that protect shared data structures in the SGA. For example, data dictionary entries are accessed in the buffer by many processes, and latches control the processes’ access to these memory structures. The data structures that list the blocks currently in memory are also frequently consulted during the running of the Oracle instance, and server and background processes that need to change or read the data in critical data structures such as these would acquire a very short lock (called a latch, in this instance) on the object. The implementation of latches, including the specification of how long a process will wait for it, is usually specific to the operating system.
Data dictionary locks are used by Oracle whenever the dictionary objects are being modified. Distributed locks are specialized locking mechanisms used in a distributed database system or in the Oracle Real Application Clusters (RAC) environment. Internal locks are used by Oracle to protect access to structures such as datafiles, tablespaces, and rollback segments.
Explicit Locking in OracleOracle automatically applies the necessary locks to the tables and other objects based on the trans-actions that are coded in the applications. Oracle’s locking mechanism works automatically to ensure statement-level read consistency and concurrency. For the most part, Oracle’s default, behind-the-scenes locking operations should suffice, but there occasionally may be situations when the application developer will be better off manually locking tables. Sometimes when the transac-tion needs to see consistent data across many joined tables, the application developer can use explicit locking. In addition, when you don’t want the data values changed during long transactions, it may sometimes be necessary for the application developer to apply explicit locks.
Oracle provides explicit locking features to override the implicit locks placed by Oracle on behalf of transactions. You can override Oracle’s default (implicit) locking mechanism at the trans-action level or the session level. If you want to override all Oracle’s default locking mechanisms, you can do so by using the SET TRANSACTION ISOLATION LEVEL SERIALIZABLE statement at the session level. The same statement will also override the default locking modes at the transaction level. In addition, you can manually lock a table by explicitly using a table lock or by using the SELECT FOR UPDATE command.
Blocking Locks
A blocking lock occurs when a lock placed on an object by a user prevents or blocks other users from accessing the same object or objects. The DBA_BLOCKERS table is useful in getting this informa-tion—it tells you which sessions are currently holding locks on objects for which some other object is presently waiting. You can combine the information in the DBA_BLOCKERS table with that in the V$SESSION tables, to find out who is holding the blocking session. Here is the SQL statement:

352 CH AP T E R 8 ■ O R AC L E T R AN S AC T I O N M A N AG E M E N T
SQL> SELECT a.username, a.program, a.sid, a.serial# 2 FROM v$session a, dba_blockers b 3 WHERE a.sid = b.holding_session;SQL>
The following is a simple example of a blocking session: user nick alapati issues the following DML statement, but doesn’t commit it:
SQL> DELETE FROM emp WHERE name='samalapati';1 row deleted.SQL>
User nina alapati, in the meanwhile, issues an identical statement, but when she executes it, it hangs:
SQL> DELETE FROM emp WHERE name='samalapati';
The second user’s DML statement will hang because the first user hasn’t committed yet, and thus holds a row-level lock on the row the second user is trying to change. When the first user rolls back or commits, the second user’s session automatically moves forward and finishes.
You can use the V$SESSION view to find out which sessions are blocking other sessions. Here’s a simple query using the view that shows the blocking lock caused by the previous two SQL statements:
SQL> SELECT username, blocking_session blocking_session_status FROM V$SESSION WHERE blocking_session_status='VALID';
When you do find a blocking session, and it is blocking another session from doing its job, you may have to terminate the blocking session by using the ALTER SYSTEM KILL SESSION command. If the process or the session still won’t go away, go to the operating system level and kill the process or the thread that spawned the Oracle session.
Deadlocks
Deadlocks occur in any RDBMS when two sessions block each other while each waits for a resource that the other session is holding. This is a catch-22 situation, because the stalemate can’t be broken by either session unilaterally. In such circumstances, Oracle steps in, terminates one of the sessions, and rolls back its statement. Oracle quickly recognizes that two sessions are deadlocked and termi-nates the session that issued the most recent request for a lock. This will release the object locks that the other session is waiting for. You don’t really need to do anything when there are deadlocks, although you’ll see messages in your dump directory that deadlocks are currently in the database.
When Oracle encounters a deadlock between transactions, it records in the trace file the session IDs involved, the SQL statements issued in the transactions, and the specific object name and the rows on which locks are held in each session involved in the deadlock. Oracle further informs you that the deadlock is not an Oracle error, but is due to errors in application design or is a result of issuing ad hoc SQL. Application designers must write exception handlers in the code to roll back the aborted transaction and restart it.
You can avoid deadlocks by paying attention in the design phase and ensuring the proper locking order of the objects. Given that writers block other writers, deadlocks in Oracle are a rare phenomenon.

C H AP TE R 8 ■ OR A CL E TR A N SA CT I ON M AN AG E M E N T 353
Managing Oracle LocksAs I mentioned in the previous sections, locking in Oracle is usually done implicitly by Oracle itself, at the least restrictive level. Users can override Oracle’s default locking behavior, but you probably won’t find too many cases where you’re dealing with user-managed locks. Most of your lock management on a live database will involve checking whether any active locks are actually blocking users from conducting their DML operations. You can use either a script-based approach or the Oracle Enterprise Manager to analyze locks in your instance.
Using SQL to Analyze Locks
It’s possible to examine the current locking situation in your instance by using SQL scripts. You may have to first run the catblock.sql script, located in the $ORACLE_HOME/rdbms/admin directory, before executing any locking-related SQL scripts for the first time in a database. This script will create several important locking-related views, such as DBA_LOCKS, DBA_WAITERS, and DBA_BLOCKERS.
Oracle provides a script called utllockt.sql that gives you a lock wait-for graph in a tree-struc-tured format showing sessions that are holding locks affecting other sessions. Using this script, you can see what locks a session may be waiting for and which session is holding the lock. The script is located in the $ORACLE_HOME/rdbms/admin directory. Here’s a sample execution of the utllockt.sql script:
SQL> @$ORACLE_HOME/rdbmsa/admin/utllockt.sqlWaiting session Type Mode requested Mode Held Lock Id1--------------- ---- -------------- ------------- ---------682 None None None 0363 TX Share (S) Exclusive (X)
■Note The utllockt.sql script prints the sessions in the system that are waiting for locks, and the locks that they are waiting for. The printout is tree-structured. If a session ID is printed immediately below and to the right of another session, then it is waiting for that session. The session IDs printed at the left side of the page are the sessions everyone is waiting for.
In the preceding example, the session ID on the left side, 682, is what session 363 is waiting for. The information printed to the right of each session shows information about the lock it’s waiting for. Thus, session 682, although it’s holding a lock, doesn’t show anything (None) in the lock-informa-tion columns because it isn’t waiting for any lock. Session 363, however, tells you that it has requested a share (S) lock and is waiting for session 682 to release its exclusive (X) lock on the table row.
In the following example from the utllockt.sql script, session 9 is waiting for session 8, session 7 is waiting for session 9, and session 10 is waiting for session 9 as well.
* WAITING SESSION TYPE MODE REQUESTED MODE HELD LOCK ID1 LOCK ID2 * ----------------- ---- ----------------- ----------------- -------- -------- * 8 NONE None None 0 0 * 9 TX Share (S) Exclusive (X) 65547 16 * 7 RW Exclusive (X) S/Row-X (SSX) 33554440 2 * 10 RW Exclusive (X) S/Row-X (SSX) 33554440 2
The lock information to the right of the session ID describes the lock that the session is waiting for (not the lock it is holding).

354 CH AP T E R 8 ■ O R AC L E T R AN S AC T I O N M A N AG E M E N T
The V$LOCK and the V$LOCK_HOLDERS views are very helpful in analyzing locks in your instance, but sometimes they take a long time to run. The V$SESSION view can provide a quick idea about the blocking sessions in your database. The blocking_session column of the V$SESSION view reveals the identity of the user who is holding the lock. The blocking_session_status column shows whether the blocking_session data is valid or not. For example, if you find the value VALID in the blocking_session_status column, it means that you’ll find the SID of the blocking user under the blocking_session column.
Here’s a simple query that shows how to use the V$SESSION view to find out who is blocking a certain session:
SQL> SELECT sid, blocking_session, username, event 2 FROM v$session 3* WHERE blocking_session_status = 'VALID';
SID BLOCKING_SESSION USERNAME EVENT--- ---------------- -------- ----------------------------------24 32 SALAPATI enq: TX - row lock contentionSQL>
The previous query shows that the user with the SID 24 is being blocked by user with the SID 32. The event column shows the type of lock that the blocking session holds.
■Note The data dictionary tables that you need to look at to find locking information are the DBA_LOCKS, DBA_BLOCKERS, and DBA_WAITERS views. If, for some reason, you don’t see the DBA_BLOCKERS view, run the catblock.sql script, located in the $ORACLE_HOME/rdbms/admin directory, to create it.
Using Database Control to Manage Session Locks
The most efficient way to see what locks currently exist within your instance is to use the Oracle Enterprise Manager (OEM) Database Control (or Grid Control). You can get to this page by going to Database Control Home Page ➤ Performance ➤ Additional Monitoring Links ➤ Instance Locks. The Instance Locks page shows all locks, both blocking and nonblocking. Most of the locks you’ll see are harmless; they are routine nonblocking locks Oracle uses to maintain concurrency.
To see locks that are causing contention in your system, choose the Blocking Sessions option from the drop-down list in the Instance Locks page. The Blocking Session page will show you all the sessions that are currently blocking other sessions. You can also go directly to the Blocking Sessions page by going to Database Control Home Page ➤ Performance ➤ Additional Monitoring Links ➤ Blocking Sessions.
The Blocking Sessions page shows the session IDs of both the blocking and the blocked sessions (see Figure 6-1). You can terminate a blocking session by selecting the appropriate session and clicking the Kill Session button.
Figure 6-1 shows that the user nick_alapati is holding an exclusive lock (on a certain row in the test01 table, which you can’t see in the figure), thereby blocking the user nina_alapati from getting an exclusive lock on the same row. The blocking session is identified by a value of 1 or greater under the Sessions Blocked column on the Blocking Sessions page (see Figure 8-1). The session that’s being blocked is indicated by a value of zero.

C H AP TE R 8 ■ OR A CL E TR A N SA CT I ON M AN AG E M E N T 355
Figure 8-1. Using the Database Control to identify blocking and waiting sessions
You can also use OEM’s Hang Analysis page (go to Database Control Home Page ➤ Performance ➤ Additional Monitoring Links ➤ Hang Analysis) to find out the exact wait status of the blocking and waiting sessions. The Hang Analysis page will show you the following:
• Instantaneously blocked sessions
• Sessions in a prolonged wait state
• Sessions that are hung
When there is a severe contention for locks in the instance, the Hang Analysis page will help you identify the problems much more quickly than running a SQL script, which might actually worsen the locking problems.
■Note Be prepared to wait for a very long time when you run most of the SQL scripts that relate to locking situ-
ations. Also, be aware that some of the scripts might sometimes make matters worse. The utllockt.sql script, for example, creates a table to store locking information, and it needs to acquire locks to create this table, which might exacerbate the locking problems that you are trying to diagnose in the first place! It’s smarter to schedule these scripts using a scheduling tool or the Oracle Enterprise Manager and arrange for database alerts when there are problem locks in the system, so you can take action to fix the problem.

356 CH AP T E R 8 ■ O R AC L E T R AN S AC T I O N M A N AG E M E N T
Using Undo Data to Provide Read ConsistencyOracle uses special structures called undo records to help provide automatic statement-level read consistency. All data for a single query will come from a single point in time. Only data committed when a query begins will be seen by the query—any changes made by other transactions after a query begins won’t be seen by the query once it begins executing.
If a transaction is modifying data, Oracle will write a before-image of the table data to its undo records. For example, if you update the salary of an employee from 10,500 to 11,000, the undo record will store the old salary value of 10,500. When a query begins execution, Oracle will determine the current system change number, which identifies the order in which transactions occurred in the database. When data blocks are read for this query, Oracle will only use data blocks with the SCN that it determined for this query. When it encounters data blocks for the query with a more recent SCN, Oracle will automatically go to the undo segments and reconstruct the data from the undo records stored there. Any changes made by other transactions during the query’s execution will have more recent SCNs, and are disregarded, guaranteeing that only consistent data is returned for the query at hand.
Oracle’s undo records are stored in the undo tablespace specified at database creation time. The undo tablespace will always hold the before-image of table data for users if other transactions have updated it since a query began. Undo data is used for the following purposes:
• Providing read consistency for SQL queries
• Rolling back unwanted active transactions
• Recovering terminated transactions
• Analyzing older data by using Flashback Query
• Recovering from logical corruptions using the Flashback features
Remember that the undo data remains in the undo tablespace even after a database shutdown. This makes Oracle’s undo management valuable for activities beyond providing read consistency and rolling back transactions. By using the Flashback features and undo data together, you can fix logical errors and query past data.
Automatic Undo ManagementAutomatic Undo Management takes the entire issue of sizing and allocation of undo segments from the DBA’s hands and makes it Oracle’s responsibility. As the DBA, all you have to do is create an adequately sized tablespace (the undo tablespace) for storing undo information. Oracle will dynam-ically create undo (rollback) segments and adjust their number to match the instance’s workload requirements. The database will automatically allocate and deallocate undo segments to match the transaction throughput in the instance.
■Tip Proper undo management means that necessary undo information is not overwritten by newer undo data.
By setting the appropriate size for the undo tablespace and the undo_retention interval, you can increase the chance that long-running queries can complete without receiving the snapshot-too-old error. It also ensures that critical Flashback features can retrieve the older data they are seeking.
Traditionally, DBAs had to contend with regular ORA_1555 (snapshot-too-old) errors because the rollback segments were being written over with new information too quickly for some transac-tions. When a DBA uses traditional rollback segments, he or she has the responsibility of monitoring the rollback segments for contention and may also need to change the number and size of the roll-back segments. AUM eliminates most of the undo-block and consistent-read contention.

C H AP TE R 8 ■ OR A CL E TR A N SA CT I ON M AN AG E M E N T 357
Traditional rollback segments would sometimes be slow to relinquish the space they occupied, even after their transactions completed. Undo segments use space much more efficiently by exchanging space dynamically with other segments. Oracle will create, bring online, and take offline the undo segments automatically as needed. When the undo segments are no longer necessary, Oracle will reclaim the space used by the segments. It is common practice for DBAs to assign a trans-action to a specific rollback segment using the SET TRANSACTION command. AUM removes the need to do this manual assignment of rollback segments—Oracle manages all undo space allocation auto-matically behind the scenes.
Several of the Flashback recovery features, like Flashback Query, Flashback Versions Query, Flashback Transaction Query, and Flashback Table, require the use of undo data.
Setting up AUM
To enable the automatic management of your undo space, you first need to specify the automatic undo mode in the init.ora file or your SPFILE. By default, the database uses AUM in Oracle Data-base 11g. Second, you need to create a dedicated tablespace to hold the undo information. This will guarantee that you don’t end up storing the undo information in the System tablespace, which isn’t a great idea. You also must choose an interval for undo retention.
If you want to choose AUM when you create a new database, you need to configure the following three initialization parameters:
• undo_management
• undo_tablespace
• undo_retention
The UNDO_MANAGEMENT Parameter
You specify AUM in your initialization parameter file by adding the following line:
UNDO_MANAGEMENT = auto
The default for undo management in Oracle Database 11g is automatic, which means you can leave out the UNDO_MANAGEMENT initialization parameter if you want.
■Tip Use the Database Resource Manager to set up undo quotas for groups of users called consumer resource groups, if you think any users are monopolizing undo tablespace usage.
The UNDO_TABLESPACE Parameter
The UNDO_TABLESPACE parameter isn’t mandatory—if you only have a single undo tablespace, you don’t have to specify this parameter in your initialization parameter file, because Oracle will use the one available undo tablespace automatically. If you specify AUM and don’t have an undo tablespace in your database at all, Oracle will be forced to use the System tablespace (the System rollback segment, to be more specific) for storing the undo data. You should avoid using the System tablespace for storing the undo data, since that tablespace also stores the data dictionary, and you don’t want to use up space there and cause problems such as fragmentation. Note that you can’t create application tables and indexes in an undo tablespace, since it’s exclusively reserved for undo data.
If you have multiple undo tablespaces in your database, however, you must specify which undo tablespace you want the database to use, by specifying the UNDO_TABLESPACE parameter in the initial-ization parameter file. You can have multiple tablespaces in your database, but only one of them can be active at any given time. You activate an undo tablespace by using the ALTER SYSTEM SET UNDO_TABLESPACE command, which you’ll see shortly.

358 CH AP T E R 8 ■ O R AC L E T R AN S AC T I O N M A N AG E M E N T
You create an undo tablespace when you create your database. The following database creation statement shows how to create the undo tablespace during database creation:
SQL> CREATE DATABASE cust_prod . . . UNDO TABLESPACE undotbs_01 datafile DATAFILE '/u10/orcl/oradata/undotbs01_01.dbf' size 750M; . . .
■Note I also explain the creation of the undo tablespace in Chapter 10, which deals with creating an Oracle database.
You may choose not to create the undo tablespace when you create a new database, and even if you create an undo tablespace at database creation time, you may choose to add another undo tablespace later on. Creating an undo tablespace is like creating any other tablespace, except that you use the keyword UNDO in the CREATE TABLESPACE statement. To create an undo tablespace by itself, in an existing database, use this statement:
SQL> CREATE UNDO TABLESPACE undotbs_02 DATAFILE 'c:\oracle11g\oradata\finance\undotbs01_01.dbf' SIZE 500M;
Tablespace created.SQL>
You can add space to an existing undo tablespace by using the ALTER TABLESPACE statement, as shown here:
SQL> ALTER TABLESPACE undotbs_01 ADD DATAFILE '/u09/oradata/test/undo01dbf' 500M;
You can create several undo tablespaces for your database, but the instance can only use a single undo tablespace at any given time. Let’s say you are using the undo tablespace undotbs_01 as your current undo tablespace. The following alter system SQL statement will dynamically change the undo tablespace for your database:
SQL> ALTER SYSTEM SET UNDO_TABLESPACE = undotbs_02;
If you want Oracle to continue to use the new undo tablespace you just created, undotbs_02, you need to specify this in the init.ora file. Otherwise, Oracle will always use the default undo tablespace, which is the tablespace you specified for the UNDO TABLESPACE parameter in the database creation statement.
In the preceding example, I used a fixed-size undo tablespace, where there is a hard limit on the undo tablespace size. If the undo data uses up all the assigned space, however, you’ll have problems. To avoid this, you should create auto-extensible undo tablespaces. Especially when you are creating a new database and implementing it in production, you may not be sure how big you should size your undo tablespace. The best course of action is to let the undo tablespace automatically increase in size, based on the undo requirements. You can enable the automatic growth of the undo tablespace by using the AUTOEXTEND keyword when you create a new undo tablespace, as shown here:
SQL> CREATE UNDO TABLESPACE undotbs_01 DATAFILE '/u10/oradata/prod/undo0101.dbf' SIZE 100M AUTOEXTEND ON;

C H AP TE R 8 ■ OR A CL E TR A N SA CT I ON M AN AG E M E N T 359
If you’ve already created the undo tablespace, you can make it auto-extensible by simply adding an auto-extensible data file to the undo tablespace, as shown here:
SQL> ALTER TABLESPACE undotbs_01 ADD DATAFILE '/u01/oradata/prod/undo0102.dbf' AUTOEXTEND ON NEXT 5M MAXSIZE UNLIMITED;
If, for some reason, you decide that you have to create a fixed-size undo tablespace, you can use the Undo Advisor to get recommendations about the ideal size. The Undo Advisor uses the data collected by the Automatic Workload Repository (AWR) as the basis for its analysis, so you should let the instance run for a good while after you start it, so that the Undo Advisor has enough data to figure out its recommendations. The Undo Advisor takes two inputs—the estimated length of the longest query in the database, and how far you want to go back in time for your Flashback operations that depend on undo data. Using the larger of these as a guide, you can look up the ideal size for your undo tablespace on an Undo Advisor graph. I explain how to use the Undo Advisor later in this chapter, in the “Using the OEM to Manage Undo Data” section.
■Note Sometimes when you start an instance or switch an undo tablespace, it takes several minutes for the undo segments to come online. To avoid this problem, the database uses the data in the Automatic Workload Repository to determine the number of undo segments to bring online upon an instance restart or the switching of an undo tablespace. This feature is also known as the fast ramping up of undo segments.
The UNDO_RETENTION Parameter
When a transaction commits, the undo data for that transaction isn’t needed any more. That undo data will stay in the undo tablespace, however, until space is needed to record undo data for newer transactions. When the newer transactions’ undo data comes in, it may overwrite the old undo data (from the committed transactions) if there isn’t enough free space left in the undo tablespace. For a long-running query that needs to retain older undo data for consistency purposes, there is a possi-bility that some of the undo data it needs has been overwritten by other, newer transactions. In this case, you could get an error message (“snapshot too old”) from the database indicating that the before-image of the transaction has been overwritten.
To prevent this, Oracle provides the UNDO_RETENTION configuration parameter, which you can set to the interval you wish. Note that in the older manual undo management mode, DBAs don’t have the option of determining how long Oracle retains undo information.
Let’s briefly review how undo information is managed in an undo segment. Undo information can be classified in two broad types:
• If a transaction that has generated the undo data is still active, the undo data is said to be active (uncommitted). Oracle will always retain active undo data to support ongoing uncom-mitted transactions.
• If the transaction that generated the undo data is inactive (committed), then the undo data is said to be committed. The committed undo data can be either expired or unexpired. Expired data can be overwritten by new transactions. Oracle will try to save the unexpired data as long as it can, subject to undo space limitations. When there is no more room in the undo tablespace for newer transactions, Oracle will finally overwrite the unexpired data, depending on how you configure the UNDO_RETENTION parameter.
The UNDO_RETENTION parameter lets you control the reuse of the committed undo space. By setting the UNDO_RETENTION parameter, you can specify the lower limit for how long the database will retain uncommitted undo data as unexpired data, so that it is available for read consistency and Flashback purposes.
Note that setting the UNDO_RETENTION interval is not a guarantee that Oracle will always retain undo information for at least that time period. If there is no free space left in the undo tablespace for
360 CH AP T E R 8 ■ O R AC L E T R AN S AC T I O N M A N AG E M E N T
a new transaction, Oracle will use an unexpired undo extent—a transaction can’t be stopped, after all. This is a last-resort event, but you should be aware that it is a possibility. The key is to make the undo tablespace big enough so that it can support your undo retention interval, thus helping Oracle retain undo information for the specified period.
You can set the undo retention size by specifying it in the initialization file as follows:
UNDO_RETENTION = 1800
The default for the UNDO_RETENTION parameter is 900 seconds.
■Tip Your undo tablespace must be able to accommodate any increase in the undo retention period. If the undo tablespace can’t keep undo records for the required time, you run the risk of queries failing with the snapshot-too-old error.
If you wish to change the amount of time the database should retain the undo information, you can dynamically change the UNDO_RETENTION parameter as follows:
SQL> ALTER SYSTEM SET UNDO_RETENTION = 7200 /* two hours
There is no one ideal UNDO_RETENTION time interval. Your retention time interval will depend on how long you estimate your longest transactions may run. Based on the information about the maximum length of transactions in your database, you can arrive at an approximate time to assign for the UNDO_RETENTION parameter.
The V$UNDOSTAT table provides an indicator for helping figure out the undo retention interval. Query the V$UNDOSTAT view as follows:
SQL> SELECT MAX(maxquerylen) FROM v$undostat;
MAX(MAXQUERYLEN)---------------- 210
The maxquerylen column of the V$UNDOSTAT view tells you the length of the longest executed query (in seconds) during the past 24 hours. The time set in the UNDO_RETENTION parameter should be at least as long as the time indicated in the maxquerylen column. This, by itself, won’t guarantee that a new long-running query will definitely be accommodated, but you’ll have a reasonable chance that your longest transactions will have read consistency when using the undo tablespace.
Oracle provides the following guidelines for setting the undo retention interval for a new database:
• OLTP: 15 minutes
• Mixed: 1 hour
• DSS: 3 hours
• Flashback Query: 24 hours
If you think all of this undo retention business is too much work, take the easy way out and let Oracle automatically tune undo in your database. Oracle automatically tunes the undo retention period for the longest-running query and collects query-duration information every 30 seconds. Depending on your workload characteristics, Oracle will adjust the length of the undo retention period. For example, during the day, shorter transactions may mean a shorter undo retention period, and during the nightly batch jobs, you’d need a much longer undo retention period to avoid the snapshot-too-old errors. If you don’t set a value for the UNDO_RETENTION parameter (or if you set a value of 0), Oracle automatically tunes undo with 900 seconds as the minimum value.

C H AP TE R 8 ■ OR A CL E TR A N SA CT I ON M AN AG E M E N T 361
Here’s a summary of automatic undo retention in Oracle Database 11g Release 1:
• If you use an auto-extensible undo tablespace (using an AUTOEXTEND datafile), Oracle will treat any UNDO_RETENTION value you specify as the low threshold value and retain undo for at least this time period. If you set an undo retention period of 30 minutes, Oracle will adjust the retention period upward of 30 minutes if needed, but never let it go below 30 minutes (unless faced with a lack of space in the undo tablespace). The database will tune the undo retention to take care of the undo needs of the longest queries in your database. Thus, in the case of auto-extensible undo tablespaces, Oracle will
• Retain undo data a little longer than the longest query in your database, if space allows it
• Retain undo data at least as long as the low threshold of undo retention, subject to space limitations
• If you use a fixed-size undo tablespace, Oracle will ignore any UNDO_RETENTION value you may have set. The database will automatically tune undo with the goal of achieving the maximum possible retention period, given the undo tablespace size and its usage history. Of course, if you use the guaranteed undo retention feature, as explained later in this chapter, Oracle will have to honor any UNDO_RETENTION period you set. If you’ve specified any Flashback require-ments, Oracle will satisfy them as well.
• If you’re considering a fixed size and an auto-extensible tablespace of the same size, know that the fixed-size tablespace will provide you with a slightly longer undo retention period.
• Even if you do set a value for the UNDO_RETENTION parameter, Oracle will still auto-tune undo, with the value you specified as the minimum value. Note that the value you assign for the UNDO_RETENTION parameter is treated by Oracle as a requested minimum. If Oracle determines, through its automatic tuning, that the undo retention period should be longer than this requested minimum to accommodate long transactions, it will retain undo data for the longer retention period.
■Tip By default, Oracle Database 11g automatically tunes the undo retention period. Oracle recommends that you not set a value for the UNDO_RETENTION parameter unless your system has Flashback or LOB retention requirements.
In Automatic Undo Management, the database is in charge of creating, allocating, and deallo-cating the undo segments as necessary. You can query the DBA_ROLLBACK_SEGS view to find out which of your undo segments are online, as shown here:
SQL> SELECT segment_name, tablespace_name, status FROM dba_rollback_segs;
The undo segments created under AUM are structurally similar to the traditional rollback segments. The big difference, of course, is that Oracle will automatically create them and drop them as necessary. Oracle creates a predetermined number of undo segments when you create the undo tablespace, and it may bring all or some of them online when you start up the instance. Oracle will always try to assign each transaction its own undo segment, and it will create more undo segments if necessary, based on the transactions in the database. During a day’s time, it’s common for Oracle to increase and decrease the number of undo segments based on its own internal algorithms and the level of database activity.
If the UNDO_RETENTION parameter is set to AUTO and you fail to create a specific undo tablespace for storing undo information, Oracle will still create undo records in a default tablespace named SYS_UNDOTBS, with a default size of around 200MB.

362 CH AP T E R 8 ■ O R AC L E T R AN S AC T I O N M A N AG E M E N T
The following SQL script will tell you the location and size of the undo tablespace in your database:
SQL> SELECT file_name, bytes 2 FROM dba_data_files 3 WHERE tablespace_name='UNDOTBS';
FILE_NAME BYTES----------------------------------- ---------/u01/orcl/oradata/undotbs01_01.dbf 209715200SQL>
Sizing the Undo Tablespace
Oracle recommends that you size your undo tablespace with the help of the Undo Advisor. However, if you’ve just created your database, the Undo Advisor won’t have enough historical data about undo requirements to help you. Oracle makes the following recommendations for a new database.
Initially, create a small-sized (approximately 500MB) undo tablespace, with the AUTOEXTEND datafile attribute set to ON, thus allowing an automatically extensible tablespace. The tablespace will automatically grow, both to support a growing number of active transactions as well as the growing length of transactions in the database.
After the database has run for a reasonable length of time, use the Undo Advisor to get recom-mendations for sizing the undo tablespace. Use the maximum time allowed in the Analysis Time Period field. You can use the Longest-Running Query length shown in the OEM Undo Management page for this purpose. You must also specify a value for the New Undo Retention field based on your Flashback requirements. If you wish to be able to flash back your tables, for example, for a period of 24 hours in the past, use 24 hours as the value for this field.
■Tip The main reason for fixing the size of the undo tablespace (rather than keeping it auto-extensible) is to prevent a single runaway query from taking up all the free space in the database.
Using these two values (those in the Analysis Time Period field and the New Undo Retention field), the Undo Advisor will recommend the appropriate undo tablespace size. You can then add about 20 percent to the size you arrive at as a safety margin, and make the undo tablespace a fixed-size tablespace by disabling the AUTOEXTEND attribute.
Guaranteed Undo RetentionUnder AUM, the Oracle database collects undo data and stores it in the undo segments. Tradition-ally, Oracle has used data in the undo segments to provide read consistency for queries, to roll back transactions, and to recover terminated transactions. Starting with Oracle9i, undo data has been used for even farther-reaching purposes—to query past data and recover from logical errors in the data. Undo data also supports the new Flashback features at the row and table levels.
The UNDO_RETENTION initialization parameter enables you to specify the length of time undo information must be saved in the undo segments. Oracle Database 11g automatically tunes undo information by collecting statistics on the longest-running queries and the undo generation rate in your database. If you don’t set the UNDO_RETENTION parameter or specify a zero value for the param-eter, Oracle automatically tunes undo, using 900 seconds as the default value for the UNDO_RETENTION parameter. By setting a higher value than the default of 900 seconds, you can keep undo records longer and go back further in the past. Since several Flashback features in Oracle Database 11g rely on undo data, you should set the UNDO_RETENTION parameter much higher than the default value. (In addition to enabling more effective Flashback features, this will reduce the probability of snapshot-too-old errors.)

C H AP TE R 8 ■ OR A CL E TR A N SA CT I ON M AN AG E M E N T 363
Guaranteed undo retention simply means that Oracle will retain undo data for the entire length of the undo retention period you specify, no matter what. That is, if you specify half an hour as the undo retention interval, Oracle will retain the undo data for the full 30 minutes, under all circum-stances. If you run out of room for recording the undo information generated by new transactions, any new DML transactions will fail, since Oracle won’t be able to store the undo information for those changes. Thus, there is a trade-off between guaranteeing undo information and the potential failure of some DML statements.
■Tip By default, Oracle doesn’t guarantee undo retention; the default retention time is 900 seconds (15 minutes) if you decide to guarantee undo retention.
You can specify guaranteed undo retention for the undo tablespace when you create the data-base, or by specifying the RETENTION GUARANTEE clause while creating a new undo tablespace, as shown here:
SQL> CREATE UNDO TABLESPACE undotbs01 2 DATAFILE 3 '/u01/orcl/oradata/undotbs01_01.dbf' 4 SIZE 10M AUTOEXTEND ON 5* RETENTION GUARANTEE;Tablespace created.SQL>
You can also use the ALTER TABLESPACE command to guarantee undo retention in your database, as shown here:
SQL> ALTER TABLESPACE undotbs01 RETENTION GUARANTEE;
You can use the RETENTION NOGUARANTEE clause to turn off the guaranteed retention of undo information, as shown in the following example:
SQL> ALTER TABLESPACE undotbs01 RETENTION NOGUARANTEE;
■Caution A high value for the UNDO_RETENTION parameter doesn’t guarantee the retention of undo data for the duration specified by the UNDO_RETENTION parameter. You must use the RETENTION GUARANTEE clause to guar-
antee undo retention for a specified time.
Let’s say you’ve configured guaranteed undo retention in your database by using the RETENTION GUARANTEE clause. If your undo tablespace is too small to accommodate all the active transactions that are using it, the following will happen:
• Oracle will issue an automatic tablespace warning alert when the undo tablespace is 85 percent full (if you haven’t disabled the automatic tablespace alert feature).
• Oracle will also issue an automatic tablespace critical alert when the undo tablespace is 97 percent full.
• All DML statements will be disallowed and will receive an out-of-space error.
• DDL statements will continue to be allowed.

364 CH AP T E R 8 ■ O R AC L E T R AN S AC T I O N M A N AG E M E N T
Managing Undo Tablespaces
Managing undo tablespaces is similar to managing any other tablespaces in your database. You add space to an undo tablespace by adding a datafile, and you decrease the size of an undo tablespace by reducing the size of the datafile(s) in it with the ALTER DATABASE DATAFILE . . . RESIZE command.
You drop an undo tablespace with the normal DROP TABLESPACE command. (If the undo table-space contains any outstanding transactions, you can’t drop it.) The DROP TABLESPACE command, since it removes all contents of the undo tablespace, is similar to using the DROP TABLESPACE . . . WITH CONTENTS command. If you need to switch undo tablespaces for some reason, you can drop the old one after you create a new undo tablespace.
The Snapshot-Too-Old Error
Occasionally, a long-running transaction can’t find the undo data it needs, and consequently fails with the well-known Oracle snapshot-too-old error. Here’s an example:
SQL> BEGIN 2 purge_data_pkg.main_driver(1502,2005,'N','B','N','N'); 3 END; 4 /
begin*ERROR at line 1:ORA-01555: snapshot too old: rollback segment number 9 with name "_SYSSMU9$"too smallORA-06512: at "APPOWNER.PURGE_DATA_PKG", line 2040ORA-06512: at "APPOWNER.PURGE_DATA_PKG", line 4318ORA-06512: at line 2
SQL>
Even when you use Automatic Undo Management, as the previous example shows, you can get this error, since the UNDO_RETENTION parameter is set too low. This happens even when there is plenty of free space in the undo tablespace. Your best bet is to raise the value of the UNDO_RETENTION param-eter so the necessary undo data isn’t overwritten before your long transaction finishes. The only certain way to avoid the snapshot-too-old error is to enable guaranteed undo retention in your database.
Managing Undo Space Information
You can use the SHOW PARAMETER UNDO command in SQL*Plus to see what the configured options are for undo space management, as shown here:
SQL> SHOW PARAMETER UNDO
NAME TYPE VALUE----------------- ------- -------------undo_management string AUTOundo_retention integer 900undo_tablespace string UNDOTBS_01SQL>

C H AP TE R 8 ■ OR A CL E TR A N SA CT I ON M AN AG E M E N T 365
■Note If you used older versions of Oracle, you are most likely familiar with the SET TRANSACTION USE ROLLBACK SEGMENT . . . statement, which enabled you to assign large rollback segments to a transaction to avoid the snapshot-too-old error. You can use this statement only under manual undo management. If you’re using the Oracle-recommended Automatic Undo Management feature, the database will ignore this statement if you use it—however, no errors are generated.
If you use the Database Resource Manager to create consumer groups in your database, which are a convenient way to group your users based on their usage of database resources (see Chapter 12), you can easily prevent a single transaction from taking up most of the undo space, thus hindering new transactions from acquiring undo space. You can set a special parameter called UNDO_POOL to limit the maximum undo space a resource consumer group can use. Once this UNDO_POOL limit is reached, any transactions that need more undo room will error out. Only after some of the currently running transactions in the resource consumer group finish can more undo space be granted to that group.
The following data dictionary views are useful in managing undo space information:
• V$UNDOSTAT: This is the view Oracle uses to tune undo space allocation in the database. This view can indicate whether your current allocation of space in the undo tablespace is enough. It also indicates whether you have set the UNDO_RETENTION parameter correctly. The TUNED_UNDORETENTION column in the V$UNDOSTAT view tells you the length of time undo is retained in your undo tablespace.
• DBA_ROLLBACK_SEGS: You can use this view to find out the undo segment name, initial, next, and maximum extents, and other related information.
• DBA_TABLESPACES: This view will show whether the guaranteed undo retention feature is enabled for a certain undo tablespace.
• V$TRANSACTION: You can get transaction information from this view.
• V$ROLLSTAT: You can join V$ROLLSTAT and V$ROLLNAME to get a lot of information on the behavior of the undo segments.
• DBA_UNDO_EXTENTS: This view provides detailed information on the undo extents within the undo tablespace.
Using the OEM to Manage Undo DataYou can use OEM to help you correctly size your undo tablespace and set the right UNDO_RETENTION parameter value. OEM provides the Undo Advisor to help you determine the space required for your undo tablespace, based on average and peak-level undo generation rates.
To get to the Undo Advisor page, go to the OEM Home Page ➤ Advisor Central ➤ Undo Manage-ment and click on the Undo Advisor button. (You can also get to the Undo Advisor by going to the OEM Home Page ➤ Performance Page ➤ Advisor Central ➤ Undo Management and clicking on the Undo Advisor button.)
The Undo Advisor shows you the best undo retention possible for a given undo tablespace size. It can also advise you about the correct size for the undo tablespace, based on an undo retention value that you specify, by analyzing the impact of various hypothetical undo retention values.
You can also use the Undo Management page (OEM Home Page ➤ Administration ➤ Instance ➤ Undo Management) to perform the following tasks:
• Change and edit the undo tablespace.
• View system activity and undo tablespace usage statistics, including the average and maximum undo generation rates and the length (in minutes) of the longest running query.
• Get recommendations for both undo retention length and undo tablespace size.

366 CH AP T E R 8 ■ O R AC L E T R AN S AC T I O N M A N AG E M E N T
Figure 8-2 shows the Undo Generation Rate and Tablespace Usage graph from the bottom of the OEM Undo Management page. This graph is color-coded so you can see at a glance how the undo tablespace is handling the amount of undo information generated in your instance.
Figure 8-2. The Undo Generation and Tablespace Usage graph
Flashback Error Correction Using Undo DataUp until the Oracle9i database version, the only way to correct user errors was to perform point-in-time recovery, which is tedious and somewhat complex. The Oracle9i database introduced the first Flashback features in the database. Flashback features enable you to query past versions of data, as well as retrieve the history of changes made to a table’s data. You can use the historical information either to query past data or to recover from logical corruption in the data.
Oracle Database 11g provides several error-correction techniques that depend on undo data. The following Flashback features in Oracle Database 11g depend on undo data:
• Flashback Query: Retrieves data from a past point in time.
• Flashback Versions Query: Shows you the different versions of table rows, and provides meta-data, such as the start and end time of the particular transaction that created the row version.
• Flashback Transaction Query: Lets you retrieve historical data for a given transaction, along with the SQL code to undo the changes made to particular rows.
• Flashback Table: Recovers a table quickly to its state at a past point in time, without having to perform point-in-time recovery.
• Flashback Transaction: Enables you to roll back a transaction, along with all of its dependent transactions.

C H AP TE R 8 ■ OR A CL E TR A N SA CT I ON M AN AG E M E N T 367
■Note There are other flashback features, like Flashback Drop and Flashback Database, but they don’t use undo data. I’ll discuss these features in Chapter 16, which deals with database recovery.
In the following sections, we’ll look at each of these important Flashback features in detail.
■Tip If you want to make serious use of the new Flashback features, make sure that you provide sufficiently sized undo tablespaces. Preferably, you must use auto-extensible undo tablespaces, so that Oracle retains undo data longer than the longest query duration. In addition, you should specify RETENTION GUARANTEE for the undo data. Simply setting a large UNDO_RETENTION value doesn’t guarantee that Oracle won’t discard unexpired undo data (as was discussed previously).
Querying Old Data with Flashback QueryUsing the Flashback Query feature simply involves using the SELECT statement with an AS OF clause. This type of query lets you retrieve committed data as it existed at some time in the past. You can select data from the past based on a time stamp or SCN.
It is common for an application to need older data for analysis purposes. A company’s sales force, for example, may need older sales data but may find that it has been modified already. Even more important, sometimes a user error or faulty application code may require the restoration of older data. Right now, the most common way to go back in time is for the DBA to perform a laborious and time-consuming point-in-time database recovery, which may involve some disruption in service and a loss of critical business data. The Flashback Query feature provides you an easy way to query data at a point in time.
Flashback Query with the AS OF Clause
Here’s a simple example that shows how to use Flashback Query. Suppose you find that a user was accidentally deleted from your employees table around noon. The only thing you know for sure is that the employee was in the database at 8 AM. You can use a SELECT statement with the AS OF clause to find the lost data.
■Tip How far back in time you can go with a Flashback Query depends on your UNDO_RETENTION parameter setting.
First, you must grant the necessary privileges. A user needs to have the privilege to issue a Flash-back Query on the table if the user doesn’t own the table. Note that you don’t need this privilege to execute the DBMS_FLASHBACK package or any of its component procedures.
Here’s how the DBA can grant the object privileges to enable a user to issue a Flashback Query:
SQL> GRANT FLASHBACK ON employees TO salapati
Grant succeeded.SQL>

368 CH AP T E R 8 ■ O R AC L E T R AN S AC T I O N M A N AG E M E N T
Or you could use a statement like this:
SQL> GRANT FLASHBACK ANY TABLE TO salapati;
Grant succeeded.SQL>
You can grant the Flashback Query object privilege (GRANT FLASHBACK ANY TABLE) on a table, view, or a materialized view.
Next, use the SELECT . . . AS OF query to retrieve Flashback data from the past.
SQL> SELECT * FROM employees AS OF TIMESTAMP TO_TIMESTAMP ('2008-09-02 08:00:00', 'YYYY-MM-DD HH:MI:SS') WHERE last_name = 'Alapati';
Once you confirm the validity of the accidentally deleted data, it’s easy to reinsert the data by using the previous query as part of an INSERT statement, as shown here:
SQL> INSERT INTO employees SELECT * FROM employees AS OF TIMESTAMP TO_TIMESTAMP('2008-09-02 08:00:00', 'YYYY-MM-DD HH:MI:SS') WHERE last_name = 'Alapati';
The previous two examples use a time stamp to pinpoint the exact time the data was acciden-tally dropped. You could use the SCN for the transaction instead of time stamps. Just note that an SCN will only put you within 3 seconds of the actual occurrence of the event. If you need to be very specific regarding the time point, use the time-stamp method to specify the time.
Flashback Using the DBMS_FLASHBACK PackageOracle provides a special package called DBMS_FLASHBACK that allows you to see a consistent version of the database at a time (or SCN) that you specify. A big advantage of using the DBMS_ FLASHBACK package over the other Flashback features is that you can use existing PL/SQL code with it to retrieve older data without having to add the AS OF and VERSIONS BETWEEN clauses, which you have to do if you wish to use the other types of Flashback features.
You can specify either a time stamp or an SCN number as the starting point for your query. In the simple example that follows, you’ll see how you can query for the number of rows that existed in a table before they were deleted permanently from the table.
In the following trivial example that illustrates the use of the DBMS_FLASHBACK package, the following query is first used to get the number of rows that currently exist in the employees table:
SQL> SELECT COUNT(*) FROM employees;
COUNT(*)-----------495
Suppose you’re interested in finding out the number of rows that existed in this table on December 11, 2008. You can call the DBMS_FLASHBACK.ENABLE_AT_TIME procedure, as shown in the following code, to specify the specific past point in time you are interested in:
SQL> EXECUTE DBMS_FLASHBACK.ENABLE_AT_TIME (TO_TIMESTAMP '11-DEC- 2008:10:00:00', -'DD-MON-YYYY:hh24:MI:SS');PL/SQL procedure successfully completed.SQL>

C H AP TE R 8 ■ OR A CL E TR A N SA CT I ON M AN AG E M E N T 369
If you’d rather use an SCN instead of a time stamp, you must use the DBMS_FLASHBACK. ENABLE_AT_SYSTEM_CHANGE_NUMBER procedure instead. To get the correct SCN, you can use the DBMS_FLASHBACK.GET_SYSTEM_CHANGE procedure first.
Next, issue the same query as before. Now, the results of the output will reflect the contents of the emp table on December 11, 2004, not the current time. Note that you don’t have to use the AS OF formulation in your query, since you’re using the DBMS_FLASHBACK package.
Here’s the query that gets you the output as of December 11, 2004:
SQL> SELECT COUNT(*) FROM emp;
COUNT(*)----------- 525
Once you’ve finished executing your query to fetch the results from a past point in time, disable the DBMS_FLASHBACK package as follows:
SQL> EXECUTE DBMS_FLASHBACK.DISABLE ();
PL/SQL procedure successfully completed.SQL>
Enabling the Flashback Query feature in the preceding example allowed you to see how many rows were in a table at a time in the past. You found out from your simple query that the emp table had 525 rows at the time in the recent past that you specified. If you want, you can use cursors to retrieve the past data in order to either compare it to present data in the emp table, or, if necessary, insert it into the emp table. You must open the cursor before you disable the DBMS_FLASHBACK feature, and store the results so you can do the comparisons or inserts.
Use the DBMS_FLASHBACK package in cases where you can’t touch the code, as is the case with packaged applications. The package comes in handy when you have to specify the past point in time several times, to retrieve older data. You can recover lost data using other methods, as you will see in Chapter 16, which discusses database recovery. However, the Flashback Query feature gives you a chance to just analyze or verify old data, even in cases where you are not interested in restoring that data.
■Tip To ensure data consistency, make sure you issue a COMMIT or a ROLLBACK statement before using a Flash-back operation of any kind.
Flashback Versions QueryThe Flashback Versions Query feature provides you with row history by letting you retrieve all the versions of a row between either two points in time or two SCNs. Oracle creates a new version of a row each time a COMMIT statement is executed. If you insert a row and subsequently update or delete the row, only the latest version of the row will be preserved in your table. If you wish to find out exactly what changes a row went through over a certain interval of time, you can use the Flashback Versions Query feature. The Flashback Versions Query will return one row for each version of every row in the table. The feature is ideal when you’re trying to audit table data or undo erroneous changes to data.
Here are some things to keep in mind about the Flashback Versions query feature:
• You can retrieve only the committed versions of a row.
• The query will retrieve all deleted rows as well as current rows.

370 CH AP T E R 8 ■ O R AC L E T R AN S AC T I O N M A N AG E M E N T
• The query will retrieve any rows that were deleted and reinserted later on.
• The query result is in the form of a table and contains a row for each version of a row during the time or SCN interval you specify.
By reviewing the history of the rows in a table, you can audit the changes and find out which transactions changed the rows.
Syntax of the Flashback Versions Query
The Flashback Versions Query feature enables you to retrieve all committed versions of a table’s data between two time points. If you’ve updated a table row ten different times, for example, the Flash-back Versions Query will get you all ten versions of that row over time.
The complete syntax for the Flashback Versions Query is as follows:
SQL> SELECT [pseudocolumns] . . . /* provide details about the row history */ FROM . . . /* table name goes here */ VERSIONS BETWEEN {SCN|TIMESTAMP {expr|MINVALUE} AND {expr|MAXVALUE}} [AS OF{SCN|TIMESTAMP expr}] WHERE [pseudocolumns . . . ] . . .
Using the versions clause in a query will get you multiple versions of the rows returned by the query. In the preceding syntax statement, you can use the VERSIONS clause as a part of your normal SELECT statement, with a BETWEEN clause appended to it. You can also specify an SCN or a TIMESTAMP clause. You must specify the start and end expressions by using MINVALUE and MAXVALUE, which indi-cate the start time and end time of the interval for which you are seeking the different row versions. The MINVALUE and the MAXVALUE are resolved to the time stamp or the SCN of the oldest and the most recent data that’s available in the database, respectively.
■Note You must ensure that the beginning and ending interval, framed by either SCNs or time stamps, don’t go back beyond the time specified by the UNDO_RETENTION parameter. While you can actually specify a begin or an end time point that lies outside the interval spanned by the UNDO_RETENTION parameter, the query may not work.
Note that the AS OF clause is optional, and when you use it, the database will retrieve all the rows as of that particular SCN or time stamp. If the VERSIONS clause is used by itself, as in VERSIONS BETWEEN SCN MINVALUE and MAXVALUE, without using the optional AS OF clause, the data is retrieved as of the current session. If you add the AS OF clause, as shown next, the data is retrieved as of a specified SCN or clock time:
VERSIONS BETWEEN SCN MINVALUE and MAXVALUE AS OF SCN 56789
■Note You may also use the VERSIONS clause in subqueries of DML and DDL statements.
Flashback Versions Query Pseudo-Columns
The output of a Flashback Versions Query is unlike the output of your typical SELECT statement. The output can show multiple versions of the same row, with a row representing each time the particular row was inserted, updated, or deleted. In addition to the column values you specify in the SELECT statement, Oracle will provide you with values for a set of pseudo-columns for each row version. These pseudo-columns provide metadata about the various row versions, including the type of

C H AP TE R 8 ■ OR A CL E TR A N SA CT I ON M AN AG E M E N T 371
operation, the begin and end time of the transaction, and so on. It is these pseudo-columns that tell you exactly when a row was modified and what was done to the row at that time.
Here is a brief explanation of each pseudo-column in the Flashback Versions Query output:
• VERSIONS_STARTSCN and VERSIONS_STARTTIME: These pseudo-columns tell you the SCN and time stamp when this particular row was first created. If the VERSIONS_STARTTIME is null, the row was created before the lower time boundary of the query.
• VERSIONS_ENDSCN and VERSIONS_ENDTIME: These pseudo-columns tell you when this particular row expired. If the VERSIONS_ENDTIME column value is null, it means that the row is either current or that it has been deleted.
• VERSIONS_OPERATION: This pseudo-column provides you with information about the type of DML activity that was performed on the particular row. The column has three possible values: I represents an insert, D a delete operation, and U an update operation.
• VERSIONS_XID: This pseudo-column displays the unique transaction identifier of the trans-action that resulted in this row version.
■Note An index-organized table (IOT) will show an update operation as a delete and an insert operation. Your
Flashback Versions Query would produce both the deleted and inserted rows as two independent versions. The first version would show a D for the delete operation under the VERSIONS_OPERATION pseudo-column, and the subse-quent insert column would show an I for the same pseudo-column.
If the version of a row was created before the MINVALUE or the beginning of the query, you can’t capture the value for the starting time stamp or SCN, and your VERSIONS_STARTSCN and VERSIONS_STARTTIME pseudo-columns will be null—there won’t be any history for this row in your undo segments.
The VERSIONS_ENDSCN and VERSIONS_ENDTIME pseudo-columns tell you when the row version expired. If the row version is still current at the time of your Flashback Versions Query, the VERSIONS_ENDSCN and VERSIONS_ENDTIME pseudo-columns will be null. Similarly, if the row version has been deleted from the table, you’ll see a null value for these two pseudo-columns.
Using Flashback Versions Query
To understand the capabilities and power of the Flashback Versions Query feature, let’s look at the simple example shown in Listing 8-1.
Listing 8-1. Using the Flashback Versions Query Feature
SQL> SELECT versions_xid AS XID, versions_startscn AS START_SCN, versions_endscn AS END_SCN, versions_operation AS OPERATION, empname FROM EMPLOYEES VERSIONS BETWEEN SCN MINVALUE AND MAXVALUE AS OF SCN 7920 WHERE emp_id = 222;
XID START_SCN END_SCN OPERATION EMPNAME SALARY---------------- --------- -------- ---------- ---------- -------0003002F00038BA9 2266 I Nick 190000004002D0002B366 0864 D Sam 20000000400170002B366 0827 0864 I Sam 20000SQL>

372 CH AP T E R 8 ■ O R AC L E T R AN S AC T I O N M A N AG E M E N T
The example in Listing 8-1 retrieves three versions of a row for employee number (emp_id) 222. The AS OF SCN of the query is 7920. That is, we want to know what versions of the row existed at this SCN. Although you see three versions in the output, only one of the row versions is true as of the SCN you’re interested in. So, which version is it?
Let’s read the query output from top to bottom. Pay particular attention to the START_SCN and the END_SCN columns. All rows will have a START_SCN, but they may have a null value for the END_SCN if the version of the row still exists at the current SCN.
The first row, which inserted (operation I) employee name Nick at SCN 2266, is the latest version of the row. Since the END_SCN is null for the first row, you know that this row still existed at SCN 7920. If you look under the OPERATION column, you see the letter D for the second version (START_SCN 0864), indicating that the middle row was deleted (probably accidentally), and the row didn’t exist at SCN 7920. The first row thus reflects the fact that the row was reinserted, with a different employee’s name. The bottom or third row has an END_SCN number, so clearly this row expired at SCN 0864. This was the originally inserted version of this row, as indicated by the value I (insert) under the OPERATION column.
■Note You must substitute VERSIONS BETWEEN TIMESTAMP . . . for the VERSIONS BETWEEN SCN nn AND nn clause to use time stamps to specify the time interval for retrieving the various versions of a row instead of using SCNs.
Restrictions and Observations on the Flashback Versions Query
Here are the main limitations of the Flashback Versions Query feature:
• You can only use the feature to query actual tables, not views.
• You can’t apply the VERSIONS clause across DDL operations.
• The query will ignore purely physical row changes as happen, for example, during a segment shrink operation.
• You can’t use this feature if you’re dealing with external or temporary tables.
If you want to query past data at a precise time, you must use an SCN, since the actual time might be up to three seconds earlier or later than the time you specify with a time stamp. Oracle Database 11g uses SCNs internally and maps them to time stamps with a granularity of three seconds. This potential gap between an SCN and a time stamp may cause problems when you’re trying to flash back to an exact time that immediately follows a DDL operation. Suppose you created a new table. If you use a time stamp, your Flashback Versions Query might start a little before the exact time the table was created and miss the new table entirely. You’ll end up with an error in this case instead of the Flashback Version Query results. By using an SCN instead of a time stamp, you can avoid this problem.
Flashback Transaction QueryThe FLASHBACK_TRANSACTION_QUERY view lets you identify which transaction or transactions were responsible for a certain change in a table’s data during a specified interval. A Flashback Trans-action Query is simply a query on the FLASHBACK_TRANSACTION_QUERY view, and it can provide transaction information, including the SQL statements needed to undo all the changes made by either a single transaction or a set of transactions during a specified interval of time. This feature enables you not only to correct logical errors, but also to conduct transaction audits in your database.

C H AP TE R 8 ■ OR A CL E TR A N SA CT I ON M AN AG E M E N T 373
Flashback Transaction Query gets all its transaction information from the undo segments. Thus, the value you set for the UNDO_RETENTION parameter determines how far back you can go to retrieve undo data.
When you use Oracle’s LogMiner tool to undo SQL statements, Oracle has to serially read entire redo log files to get the necessary information. The Flashback Transaction Query feature lets you use an indexed access path to get to the required undo data directly, instead of traversing an entire redo log file. You can also undo a single transaction or a set of bad transactions during an interval of time.
Using the Flashback Transaction Query Feature
You need the SELECT ANY TRANSACTION system privilege to query the FLASHBACK_ TRANSACTION_QUERY view. This view contains columns that let you identify a transaction’s time stamp, the identity of the user who made the transaction, the type of operations done during the transaction, and the undo statements necessary to retrieve the original row. Listing 8-2 shows the structure of the FLASHBACK_TRANSACTION_QUERY view.
Listing 8-2. The Flashback Transaction Query View
SQL> DESC flashback_transaction_query Name Null? Type ----------------- ------ -------------- XID RAW(8) START_SCN NUMBER START_TIMESTAMP DATE COMMIT_SCN NUMBER COMMIT_TIMESTAMP DATE LOGON_USER VARCHAR2(30) UNDO_CHANGE# NUMBER OPERATION VARCHAR2(32) TABLE_NAME VARCHAR2(256) TABLE_OWNER VARCHAR2(32) ROW_ID VARCHAR2(19) UNDO_SQL VARCHAR2(4000)SQL>
The FLASHBACK_TRANSACTION_QUERY view contains the following columns:
• START_SCN and START_TIMESTAMP identify when a certain row was created.
• COMMIT_SCN and COMMIT_TIMESTAMP tell you when a transaction was committed.
• XID, ROW_ID, and UNDO_CHANGE# identify the transaction, the row, and the undo change number, respectively.
• OPERATION tells you whether the DML operation was an insert, update, or delete operation.
■Note If you see a value of UNKNOWN under the OPERATION column, it means that there isn’t sufficient undo infor-mation in your undo tablespace to correctly identify the transaction’s exact operation type.
• LOGON_USER, TABLE_NAME, and TABLE_OWNER provide the username, table name, and schema name.
• UNDO_SQL gives you the exact SQL statement required to undo the transaction. Here’s an example of the type of data you would find under the UNDO_SQL column:
delete from "APPOWNER"."PERSONS" where ROWID = 'AAAP84AAGAAAAA1AAB';

374 CH AP T E R 8 ■ O R AC L E T R AN S AC T I O N M A N AG E M E N T
Oracle recommends that if any of the tables that are part of the Flashback Transaction Query operation contained chained rows, or if you’re using clustered tables, you must turn on supple-mental logging in your database before using the Flashback Transaction Query. You can turn supple-mental logging on at the database level, using the following SQL statement:
SQL> ALTER DATABASE ADD SUPPLEMENTAL LOG DATA;
The following query will display all transactions, both committed and active, in all the undo segments:
SQL> SELECT operation, undo_sql, table_name FROM flashback_transaction_query;
The query in Listing 8-3 shows how to determine the operation that will undo a transaction and the specific SQL statement that will undo it.
Listing 8-3. Identifying SQL Statements to Undo Data Changes
SQL> SELECT operation, undo_sql, table_name 2 FROM flashback_transaction_query 3 WHERE start_timestamp >= TO_TIMESTAMP 4 ('2009-02-15 05:00:00', 'YYYY-MM-DD HH:MI:SS') 5 AND commit_timestamp <= TO_TIMESTAMP('2009-02-15 06:30:00', 'YYYY-MM-DD HH:MI:SS') 6* AND table_owner='PASOWNER';
OPERATION UNDO_SQL TABLE_NAME------------------- -------------------------------------- ---------------INSERT delete from "APPOWNER"."FR_DETAILS" FR_DETAILS where ROWID = 'AAQXXZAC8AAAB+zAAb';INSERT delete from "APPOWNER"."FR_DETAILS" FR_DETAILS where ROWID = 'AAQXXZAC8AAAB +zAAa';SQL>
The OPERATION column in Listing 8-3 indicates that two inserts were made during the time period specified in the query. The UNDO_SQL column shows the exact SQL statement you must run to undo the changes—this is information the query fetched for you from the undo segments. In this simple example, there are only two delete statements that you’ll have to execute if you wish to undo the inserts displayed by your query. However, transactions usually contain several DML statements, in which case you’ll have to apply the undo changes in the sequence that the query returns them to correctly recover the data to its original state.
■Tip Consider using the RETENTION GUARANTEE setting for your undo tablespace if you’re going to issue an Oracle Flashback Query or an Oracle Flashback Transaction Query to resolve a critical data error. This will ensure that the database preserves the necessary unexpired undo data in all undo segments.
Flashback Transaction Query Considerations
Keep the following points in mind concerning the Flashback Transaction Query feature:
• Turn on minimal supplemental logging if your operations involve chained rows and special storage structures, such as clustered tables.
• When querying index-organized tables, an update operation is always shown as a two-step delete/insert operation.

C H AP TE R 8 ■ OR A CL E TR A N SA CT I ON M AN AG E M E N T 375
• If the query involves a dropped table or a dropped user, it returns object numbers and user IDs instead of the object names and usernames.
Using Flashback Transaction Query and Flashback Versions Query TogetherThe Flashback Versions Query feature lets you retrieve the various versions of a row, along with their unique version IDs, row version time stamps, SCNs, and so on. It tells you what was in the row and what happened to it. The Flashback Transaction Query feature, on the other hand, not only identi-fies the type of operations performed on each version of a row, but also provides the necessary undo SQL to put the rows back in their original state. It tells you how to get back to a previous version of the row.
You can combine the capabilities of these two features by using them in sequence, to perform auditing and related activities. Let’s look at an example that shows how you can combine the Flash-back Versions Query and the Flashback Transaction Query features to undo undesirable changes to your data.
First, use the Flashback Versions Query feature to identify all the row versions in a certain table that have changed in a certain time period, as shown in Listing 8-4 (which is identical to Listing 8-1).
Listing 8-4. Using the Flashback Versions Query to Identify Changed Row Versions
SQL> SELECT versions_xid AS XID, versions_startscn AS START_SCN, versions_endscn AS END_SCN, versions_operation AS OPERATION, empname FROM EMPLOYEES VERSIONS BETWEEN SCN MINVALUE AND MAXVALUE AS OF SCN 7920 WHERE emp_id = 222;
XID START_SCN END_SCN OPERATION EMPNAME SALARY---------------- -------- -------- ---------- --------- --------0003002F00038BA9 2266 I Nick 190000004002D0002B366 0864 D Sam 20000000400170002B366 0827 0864 I Sam 20000
SQL>
In Listing 8-4, let’s say we identified the second row, which indicates a delete operation (D) as the culprit. By mistake, one of our users incorrectly deleted the row. All you need to do in order to extract the correct SQL to undo this delete operation is to take the transaction ID (XID) from this Flashback Versions Query and search for it in the FLASHBACK_TRANSACTION_QUERY view. Listing 8-5 shows the query you’ll need to execute.
Listing 8-5. Selecting Undo SQL Based on a Transaction ID
SQL> SELECT xid, start_scn START, commit_scn COMMIT, operation OPERATION, logon_user USER, undo_sql FROM flashback_transaction_query WHERE xid = HEXTORAW('0004002D0002B366');
XID START COMMIT OPERATION USER UNDO_SQL--------- ------ ------ --------- ---- ------------------------------00020030D 195243 195244 DELETE HR insert into "HR"."EMP" ("EMPNO","EMPNAME","SALARY")

376 CH AP T E R 8 ■ O R AC L E T R AN S AC T I O N M A N AG E M E N T
values ('222','Mike','20000');1 row selected.SQL>
The query in Listing 8-5 gives you the exact undo SQL statement to undo the deletion operation performed by the transaction with XID 0020030002D. As you can see, the Flashback Versions Query and the Flashback Transaction Query provide complementary features. You can use the two together not only to undo logical data errors, but also to audit transactions in your database. By using the two features, you can tell exactly how a certain row came to have a certain set of values and then get the exact SQL statements you need to undo the changes if necessary.
The Flashback Table FeatureOracle’s Flashback Table feature lets you recover a table to a previous point in time. This feature relies on undo information in the database undo segments to perform the point-in-time recovery without restoring any datafiles or applying any archived redo log files, as needed to be done for tradi-tional point-in-time recovery. You can use the Flashback Table feature to roll back changes to a previous point in time defined by either a time stamp or an SCN.
Since you rely on undo data to flash back a table (rather than restoring your backup files), you don’t have to take your database or tablespaces offline during a Flashback Table operation. Oracle acquires exclusive DML locks on the table or tables that it is recovering, but the tables continue to remain online.
■Note There are two distinct table-related Flashback features in Oracle Database 11g. The first, Flashback Table, lets you flash back a table to a past point in time. This feature depends entirely on the availability of the necessary undo data, and is discussed in this chapter. The second feature, Flashback Drop (FLASHBACK TABLE table_name TO BEFORE DROP), lets you retrieve a table that has been dropped altogether. This feature is helpful in performing a point-in-time recovery and relies on the Recycle Bin, not undo data. I’ll discuss the Flashback Drop feature in Chapter 16, which deals with database recovery.
How the Flashback Table Feature Works
Flashback Table uses undo information to restore data rows in changed blocks of tables with DML statements like INSERT, UPDATE, and DELETE. Let’s review the steps in a Flashback Table operation.
■Note You can’t flash back any of the SYS user’s objects.
First, you need to make sure the user performing the Flashback Table operation has all privi-leges, which could be either FLASHBACK ANY TABLE or the more specific FLASHBACK object privilege on the table to be flashed back. The user must also have SELECT, INSERT, DELETE, and ALTER privileges on the table.
The flashback operation doesn’t preserve Oracle ROWIDs when it restores rows in the changed data blocks of the table, since it uses DML operations to perform its work. These DML operations change the ROWIDs of the affected rows, so you must ensure that you have enabled row movement in the tables you are using for the Flashback Table feature, as shown here:
SQL> ALTER TABLE emp ENABLE ROW MOVEMENT;
Table altered.SQL>
C H AP TE R 8 ■ OR A CL E TR A N SA CT I ON M AN AG E M E N T 377
Once you enable row movement in the table, you are ready to flash back the table to any time or any SCN in the past, providing you have the necessary undo information in your undo tablespace.
Before you use the Flashback Table feature, note its complete syntax:
SQL> FLASHBACK TABLE [schema.]table [,[schema.]table] . . . TO {{SCN|TIMESTAMP} expr [{ENABLE|DISABLE}TRIGGERS ] |BEFORE DROP[RENAME TO table] };
In this chapter, you’ll only see the FLASHBACK TABLE . . . TO SCN|TIMESTAMP part of the FLASH-BACK TABLE statement. In the last line, BEFORE DROP refers to the FLASHBACK DROP feature, which is covered in Chapter 16 in the discussion of database recovery techniques.
Here’s an example that shows how to flash back a table to a past SCN:
SQL> FLASHBACK TABLE emp TO SCN 5759290864;Flashback complete.SQL>
■Tip When a Flashback Table operation completes, all indexes that belong to the tables in the Flashback Table list will have their indexes reverted to the time to which the tables are flashed back. However, the optimizer statis-tics will still reflect the current data in the table.
You can also specify a time to flash back to, using a time stamp instead of an SCN, as shown here:
SQL> FLASHBACK TABLE persons TO TIMESTAMP TO_TIMESTAMP ('2008-01-30 07:00:00', 'YYYY-MM-DD HH24:MI:SS');
The preceding FLASHBACK TABLE command restores the persons table to 10:00 AM on April 5, 2005.
You can use the following statement to flash back a table by one day:
SQL> FLASHBACK TABLE persons to TIMESTAMP (SYDATE -1);
You can flash back more than one table at a time, as shown in the following example (but first make sure you enable row movement for both tables):
SQL> FLASHBACK TABLE persons,person_orgs TO TIMESTAMP (SYSDATE -1)
The Flashback Table operation is an in-place, online operation and thus doesn’t involve taking datafiles or tablespaces offline, unlike traditional point-in-time recovery. Oracle disables all relevant triggers by default and reenables them upon completing the table recovery, though you can override this by appending the ENABLE TRIGGERS clause to your FLASHBACK TABLE statement, as shown here:
SQL> FLASHBACK TABLE persons to TIMESTAMP TO_TIMESTAMP ('2009-04-05 10:00:00', 'YYYY-MM-DD HH24:MI:SS') ENABLE TRIGGERS;
If you don’t have sufficient undo data to flash back the table, you’ll get the error shown in Listing 8-6, which means that part of the undo information was overwritten. Unfortunately, the Flashback Table feature can’t help you here, as it relies entirely on the presence of adequate undo information. The only solution is to use a larger undo tablespace or enable the guaranteed undo retention feature as explained in the “The UNDO_RETENTION Parameter” section, earlier in this chapter.

378 CH AP T E R 8 ■ O R AC L E T R AN S AC T I O N M A N AG E M E N T
Listing 8-6. Failure of a Flashback Table Operation
SQL> FLASHBACK TABLE emp,dept to TIMESTAMP (SYSDATE -1); flashback table emp, dept to TIMESTAMP (SYSDATE -1) *ERROR at line 1:ORA-00604: error occurred at recursive SQL level 1ORA-12801: error signaled in parallel query server P005ORA-01555: snapshot too old: rollback segment number 108 with name"_SYSSMU108$" too small01555, 00000, "snapshot too old: rollback segment number %s with name \"%s\" toosmall"// *Cause: rollback records needed by a reader for consistent read are// overwritten by other writers// *Action: If in Automatic Undo Management mode, increase undo_retention// setting.
Undoing a Flashback Table Operation
If it turns out that your Flashback Table results aren’t to your liking, you can use the FLASHBACK TABLE statement again to go back to just before you first issued the FLASHBACK TABLE statement.
It’s important to always note your current SCN before running a Flashback Table operation so that you can undo it with the FLASHBACK TABLE . . . TO SCN statement if necessary. You can find out the current SCN in your database by using the following query:
SQL> SELECT current_scn from V$DATABASE;
CURRENT_SCN--------------------- 5581746576SQL>
Restrictions on the Flashback Table Feature
Several restrictions apply to the Flashback Table feature. Here are the important ones:
• You can’t flash back a table owned by SYS, recovered objects, or a remote table.
• You can’t flash back a table to a time preceding any DDL operation involving a change in table structure, such as modifying or dropping a column, truncating a table, adding a constraint, or performing any partition-related operations, such as adding or dropping a partition.
• The FLASHBACK statement involves a single transaction, and the Flashback operation succeeds entirely or it fails. If the flashback operation involves multiple tables, all of the tables must be flashed back or none.
• If Oracle discovers any constraint violations during the Flashback operation, it abandons the operation, leaving the tables in their original state.
• If you shrink a table or change any nonstorage attributes of a table (other than attributes such as PCTFREE, INITTRANS, and MAXTRANS), you won’t be able to flash back to a time before these changes were made.
■Note The entire flashback table operation executes as a single transaction.

C H AP TE R 8 ■ OR A CL E TR A N SA CT I ON M AN AG E M E N T 379
Flashback Transaction
You can use the Flashback Transaction feature to back out an unwanted transaction. You can back out not only the unwanted transaction, but also its dependent transactions as well, with a single click. So, if you’re using the Database Control to do this instead of a PL/SQL procedure, the Flash-back Transaction feature offers a far superior alternative to restoring backups to undo transactions, since the database remains online to users while you’re backing out the unwanted transactions. Undo data is the key to the Flashback Transaction feature. The database uses the undo data to create and execute the necessary compensation transactions that’ll undo the unwanted transaction.
The TRANSACTION_BACKOUT procedure analyzes all transactional dependencies and performs the necessary DML operations to undo the changes made in a transaction. Execution of the procedure also generates reports of the changes it made. However, the critical thing to know is that the procedure doesn’t automatically commit the DML operations that it performs, but waits for you to explicitly commit the transaction and make the backout operation permanent.
Using Flashback Transaction
You can back out transactions either through the Database Control or by executing PL/SQL proce-dures. To back out a transaction manually, use the DBMS_FLASHBACK.TRANSACTION_BACKOUT procedure. The TRANSACTION_BACKOUT procedure contains the following parameters:
PROCEDURE TRANSACTION_BACKOUT Argument Name Type In/Out Default? ------------------------------ ------------------- ------ -------- NUMTXNS NUMBER IN XIDS XID_ARRAY IN OPTIONS BINARY_INTEGER IN DEFAULT SCNHINT NUMBER IN DEFAULTPROCEDURE TRANSACTION_BACKOUT Argument Name Type In/Out Default? ------------------------------ ------------------ ------ -------- NUMTXNS NUMBER IN XIDS XID_ARRAY IN OPTIONS BINARY_INTEGER IN DEFAULT TIMEHINT TIMESTAMP INPROCEDURE TRANSACTION_BACKOUT Argument Name Type In/Out Default?------------------------------- ------------------ ------ -------- NUMTXNS NUMBER IN NAMES TXNAME_ARRAY IN OPTIONS BINARY_INTEGER IN DEFAULT SCNHINT NUMBER IN DEFAULTPROCEDURE TRANSACTION_BACKOUT Argument Name Type In/Out Default?------------------------------- ------------------ ------ -------- NUMTXNS NUMBER IN NAMES TXNAME_ARRAY IN OPTIONS BINARY_INTEGER IN DEFAULT TIMEHINT TIMESTAMP IN
As you can see, the procedure is overloaded. Here’s what the different parameters stand for:
• NUMTXNS: Indicates the number of transactions to be backed out.
• NAMES: Defines a list of transactions to be backed out, which you can pass out in the form of an array by using XIDs or by passing the names of the transactions.
• TIMEHINT: Lets you specify a time if you’re identifying transactions by name.

380 CH AP T E R 8 ■ O R AC L E T R AN S AC T I O N M A N AG E M E N T
• SCNHINT: Lets you specify the SCN for identifying transactions.
• OPTIONS: Lets you specify the backout options. You can use the following values for the OPTIONS parameter:
• Cascade: Use this to back out the child transactions before backing out the parent transactions.
• Nocascade: Use this if a transaction isn’t supposed to have any dependent transactions.
• Nocascade_force: Use this to back out the transactions and ignore any dependent transactions.
• Nonconfict_only: Use this to back out only the changes made to the nonconflicting rows of a transaction.
Monitoring the Backout of Transactions
You can query the data dictionary views DBA_FLASHBACK_TXN_STATE and DBSA_FLASHBACK_ TXN_REPORT to view the reports generated by executing the TRANSACTION_BACKOUT procedure.
Transaction ManagementOracle enables you to use two special types of transactions, discrete transactions and autonomous transactions, to help you manage transactions. I briefly review these two concepts in the following sections.
Discrete TransactionsTo enhance the speed of transactions, Oracle enables the explicit use of discrete transactions. When you specify a transaction as a discrete transaction, Oracle skips certain routine processing overhead, such as writing the undo records, thereby speeding up the transaction. Oracle doesn’t modify the data blocks until the transaction commits.
You use the BEGIN_DISCRETE_TRANSACTION procedure, which is part of the DBMS_ TRANSACTION package, to implement the discrete transaction strategy. Short transactions run faster when you use this procedure, but if discrete transactions occur during the course of long queries, and these queries request data modified by the discrete transactions, there could be prob-lems. Because discrete transactions skip the undo writing process, it isn’t possible for a long-running query to get a consistent view of the data. Oracle doesn’t generate undo records for discrete transac-tions because the data blocks aren’t modified until the discrete transaction commits.
Autonomous TransactionsA transaction can run as part of another transaction. In such cases, the parent transaction is called the main transaction, and the independent child transaction is called the autonomous transaction. An autonomous transaction is formally defined as an independent transaction that can be called from another transaction. Notice that although the child transaction is called from the parent trans-action, it is independent of the parent transaction.
Packages, procedures, functions, and triggers could all include transactions marked as autono-mous. You have to include a directive in the main transaction so that Oracle will know you intend to use an autonomous transaction within the main transaction. The autonomous transaction can have its own ROLLBACK and COMMIT statements, just like normal transactions. The main transaction, by using an autonomous transaction, can pause and execute the autonomous transaction, and then continue from where it stopped. In other words, you leave the calling transaction’s context, execute SQL statements that are part of the autonomous transaction, either commit or roll back your trans-

C H AP TE R 8 ■ OR A CL E TR A N SA CT I ON M AN AG E M E N T 381
action, and resume the parent transaction upon returning to the calling transaction’s context. Note that the autonomous transaction does not share transaction resources, such as locks, with the parent transaction.
Autonomous transactions provide developers with the ability to create more fine-grained trans-actions, where a transaction will not be an all-or-nothing affair. You can have the nested autonomous transactions commit or roll back their transactions independent of the calling parent transaction.
■Note If you don’t use an autonomous transaction, all the changes in your session will be committed or rolled back at once (when you issue a COMMIT or ROLLBACK statement). The autonomous transactions give you the ability to commit or roll back the subprogram’s changes independent of the main program. Also note that if you don’t commit or roll back an autonomous transaction, Oracle will issue an error message.
Listing 8-7 provides a simple example of an autonomous transaction. Note that the PRAGMA AUTONOMOUS_TRANSACTION (a compiler directive) statement is instructing Oracle to mark the attached piece of code, the loans function, as autonomous.
Listing 8-7. A Simple Autonomous Transaction
SQL> CREATE OR REPLACE package lending AS function loans (user_id integer) return real; -- add additional functions and/or packages END lending; CREATE OR REPLACE PACKAGE BODY lending AS function loans (user_id integer) return REAL IS PRAGMA AUTONOMOUS_TRANSACTION; loan_bal REAL; BEGIN --the code goes here END; -- any additional functions and/or packages go here END lending;SQL>
Autonomous transactions provide you with a lot of flexibility. You can suspend the main trans-action, run the autonomous transaction, and resume the processing of the main transaction. The autonomous transaction’s committed changes are visible to the main transaction, because the default isolation level in Oracle is read committed, meaning that a transaction will see all the committed data.
There can be many uses for autonomous transactions. For example, you can use the transac-tions to send error-logging messages. You can have a single procedure that will write error messages to an error log table and invoke this procedure as an autonomous transaction from a regular trans-action. Listing 8-8 shows how to write error messages to a table.
Listing 8-8. Writing Error Messages to a Table
SQL> CREATE OR REPLACE PROCEDURE error_log(error__msg in varchar2, procedure_name IN VARCHAR2 IS PRAGMA AUTONOMOUS_TRANSACTION; BEGIN INSERT INTO log_table (error_msg, procedure_name) VALUES (error_msg,procedure_name)); COMMIT;
382 CH AP T E R 8 ■ O R AC L E T R AN S AC T I O N M A N AG E M E N T
EXCEPTION WHEN OTHERS THEN ROLLBACK; END;SQL>
Autonomous transactions can serve other purposes in the Oracle database. For example, they can enable the handling of nonstandard PL/SQL coding issues, such as using DDL statements in trig-gers. Autonomous transactions also are useful in performing an audit of database queries and failed (unauthorized) database activity.
Listing 8-9 shows an example in which the autonomous transaction feature is used to audit (presumably) unauthorized update activity. Even when a user is unsuccessful in the update attempt, the user’s name can be successfully logged into an audit table if you code a simple pair of triggers that use the autonomous transaction feature.
Listing 8-9. Using an Autonomous Transaction to Audit Database Activity
SQL> CREATE OR REPLACE TRIGGER aud_bef_trig BEFORE INSERT ON emp FOR EACH ROW DECLARE PRAGMA AUTONOMOUS_TRANSACTION BEGIN INSERT INTO audit_employee VALUES ( :new.username, 'before insert', sysdate); COMMIT; END;
SQL> CREATE OR REPLACE TRIGGER aud_aft_trig AFTER INSERT ON emp FOR EACH ROW DECLARE PRAGMA AUTONOMOUS TRANSACTION BEGIN INSERT INTO audit_emp VALUES ( :new.username, 'after insert', sysdate); COMMIT; END;SQL>
Note that you can’t always just use a pair of normal triggers to audit database activity because auditing data provided by the triggers won’t be recorded if the triggering statement is rolled back.
Resumable Space AllocationImagine you’re running a very long batch job and it runs out of space for some reason, whether because of an unexpected amount of data or because of a failure to notice that the space was running out for the objects involved in the DML transactions. Or perhaps there was a “maximum number of extents reached” error. What are your options when this sort of thing happens (as it inev-itably will)?
Most of the time, you must correct the space problem or other condition that caused the error in the first place, and then restart your transactions. More often than not, you will roll back the whole operation, which will take quite a bit of time. Sometimes you have to restart at the very beginning of the program, which is a waste of time. In any case, your actions as a DBA are limited to playing catch-up after the fact to rectify the error and redo the operation. Oracle’s Resumable Space Allocation feature will suspend database operations that run into problems due to lack of space, and it restarts those operations automatically when the space problems are fixed. The Resumable Space Allocation
C H AP TE R 8 ■ OR A CL E TR A N SA CT I ON M AN AG E M E N T 383
feature comes in handy when you’re trying to ensure that key batch jobs or data loads run within the window of operation they are allotted when they encounter space-related issues.
■Tip To take full advantage of the Resumable Space Allocation feature, you should use locally managed tablespaces coupled with Automatic Undo Management.
You can explicitly make operations run in the Resumable Space Allocation mode by using the ALTER SESSION command. The Resumable Space Allocation feature will just suspend operations until the problem is fixed (such as by your adding a datafile to extend space) and it will resume automat-ically after that.
Resumable OperationsThe following types of database operations are resumable:
• Queries: These operations can always be resumed after they run out of temporary sorting space.
• DML operations: Insert, update, and delete operations can be resumed after an error is issued.
• DDL operations: Index operations involving creating, rebuilding, and altering are resumable, as are CREATE TABLE AS SELECT operations and several other DDL operations.
• Import and export operations: SQL*Loader data load jobs that run out of space are resumable. You must use the RESUMABLE parameter when you specify the SQL*Loader job, to make the operation resumable. Two other resumable operation parameters, RESUMABLE_TIMEOUT and RESUMABLE_NAME, can be set only if you set the RESUMABLE parameter.
Common Resumable ErrorsYou can resume operations after fixing any of the following types of errors during the execution of any operation:
• Out of space errors: Typically, operations fail when you can’t add extents to your tables or indexes because the tablespace is full. You need to add a datafile to your tablespace to enable the objects to throw a new extent and continue to grow. The typical error message is ORA-01653.
• Maximum extents errors: When a table or a rollback segment reaches the maximum extents specified, it can’t grow any further, even if you have space in the tablespace. You end up with errors such as ORA-01628.
• User’s space quota errors: If the user’s quota on a tablespace is exceeded, your operations on that tablespace will come to a halt. The typical Oracle error is ORA-01536.
Using the Resumable Space Allocation FeatureTo use the Resumable Space Allocation feature, a user must have the appropriate privileges:
SQL> GRANT RESUMABLE TO salapati;
Grant succeeded.SQL>

384 CH AP T E R 8 ■ O R AC L E T R AN S AC T I O N M A N AG E M E N T
When you wish to revoke the privilege, use the following command:
SQL> REVOKE RESUMABLE FROM salapati;
Revoke succeeded.SQL>
You can enable a session for Resumable Space Allocation in one of two ways—set the resumable_timeout initialization parameter, or use the ALTER SESSION command to enable and disable resumable space allocation. The following sections discuss these methods.
Using the RESUMABLE_TIMEOUT Initialization Parameter
Using the RESUMABLE_TIMEOUT initialization parameter, you can enable the resumable space alloca-tion features across the entire system. For example, to enable all database sessions for Resumable Space Allocation for a period of two hours, you’d set the parameter this way:
RESUMABLE_TIMEOUT=7200
You can change the RESUMABLE_TIMEOUT parameter dynamically using the ALTER SYSTEM command. You can also dynamically disable the feature by setting the parameter to 0.
Using the ALTER SESSION Statement
You can enable Resumable Space Allocation in your session simply by using the following state-ment, regardless of whether you’ve set the RESUMABLE_TIMEOUT initialization parameter:
SQL> ALTER SESSION ENABLE RESUMABLE;
Session altered.SQL>
Similarly, you can disable the feature by using the ALTER SESSION ENABLE TIMEOUT statement.
Providing a Timeout Interval
You can also use the optional TIMEOUT clause with the ALTER SESSION ENABLE RESUMABLE statement to specify a time interval within which you need to fix the problem that caused the operation to be suspended. If you don’t respond within the allotted time interval, the program will error out with the ORA-30032 error (“the statement has timed out”), and you can’t resume it from where it stopped.
In the following example, the TIMEOUT parameter is set to 18,000 seconds (5 hours). The Oracle default timeout is set for 7,200 seconds. If you don’t want to change the default timeout period, all you have to do is issue the simpler ALTER SESSION ENABLE RESUMABLE command.
SQL> ALTER SESSION ENABLE RESUMABLE TIMEOUT 18000;
Session altered.SQL>
■Note By default, the Resumable Space Allocation feature is disabled for all sessions unless you’ve set the RESUMABLE_TIMEOUT initialization parameter to a nonzero value.

C H AP TE R 8 ■ OR A CL E TR A N SA CT I ON M AN AG E M E N T 385
You can also set the timeout interval using the DBMS_RESUMABLE package, as follows:
SQL> EXECUTE DBMS_RESUMABLE.set_session_timeout(4349,18000);
PL/SQL procedure successfully completed.SQL>
In the preceding example, the first number in the parentheses, 4349, is the SID of the session for which you want the timeout to be enforced. You can omit the SID if you’re setting the timeout for the current session. The second number, 18000, is the timeout period.
Naming a Resumable Operation
You may sometimes want to name an operation to help track it later on. The NAME parameter is optional and has no real operational significance.
You can name any resumable operation in the following manner:
SQL> ALTER SESSION ENABLE RESUMABLE NAME 'resumable_test';
Session altered.SQL>
■Caution If an operation is suspended, any locks that are held by Oracle on various database objects will not be released automatically. The locks and other resources will be released only after the transaction either completes successfully upon resumption or ends and throws an exception.
A Resumable Operation Example
Let’s look at a simple example of the Resumable Space Allocation feature.First, the alert log showed the following message, indicating that a DML statement was
suspended because the undo tablespace ran out of space. Instead of erroring out immediately, the statement is merely suspended.
Fri Aug 1 11:15:00 2008statement in resumable session 'User PASOWNER(11), Session 173, Instance 1' wassuspended due to ORA-30036: unable to extend segment by 8 in undo tablespace 'UNDOTBS_01'
Once the problem was corrected by adding space to the undo tablespace (UNDOTBS_01), the alert log showed the following message, indicating that the suspended statement was resumed after the problem was cleared:
Fri Aug 1 11:21:52 2008statement in resumable session 'User PASOWNER(11), Session 173, Instance 1' wasresumed
If space wasn’t added to the undo tablespace within the timeout interval, the suspended state-ment would be aborted. The following entry from the alert log shows that situation:
Fri Aug 1 10:29:34 2008Errors in file /a03/app/oracle/admin/pasx/bdump/pasx_smon_7091.trc:ORA-30036: unable to extend segment by 8 in undo tablespace 'UNDOTBS_01'Fri Aug 1 10:33:07 2008statement in resumable session 'User PASOWNER(11), Session 184, Instance 1' wasaborted

386 CH AP T E R 8 ■ O R AC L E T R AN S AC T I O N M A N AG E M E N T
Notification of Suspended OperationsUpon suspending an operation for a space-related problem, Oracle will automatically generate an AFTER SUSPEND system event. If you want automatic notification, you can write a trigger that will be set off by this event, as shown here:
SQL> CREATE OR REPLACE TRIGGER page_dba AFTER SUSPEND ON DATABASE DECLARE PRAGMA AUTONOMOUS_TRANSACTION; BEGIN /* Code here that'll page the DBA */ COMMIT; END;Trigger created.SQL>
Note that the trigger must always be declared as an autonomous transaction.
Operation-Suspended AlertWhen Oracle suspends a resumable session, it automatically issues an operation-suspended alert through the automatic Server Generated Alerts feature. Once you fix the problem by allocating the necessary resources and the operation completes, Oracle will automatically clear this alert.
Monitoring Resumable Space AllocationYou can monitor resumable operations by using the DBA_RESUMABLE view. This view provides the name of the operation, the user’s SID, the start time of the statement, the error message encountered, the suspend and resume times, and the text and current status of the SQL statements. The V$SESSION_WAIT view also provides information about suspended resumable statements. The EVENT column of this view shows you that a statement is suspended, pending the clearance of a “wait error.”
The DBMS_RESUMABLE package contains procedures to help you manage suspended sessions. The SET_SESSION_TIMEOUT procedure, for example, allows you to specify the time a suspended session will wait before failing.
Managing Long TransactionsSuppose you’re running transactions in your database that are extremely long—maybe even as long as a whole day. Oracle primarily uses locks to ensure concurrency and atomicity, but locks on a long-running transaction can reduce concurrency dramatically because other users are forced to wait for the long-running transaction to complete.
Fortunately, Oracle provides the Workspace Manager, a feature you can use to version-enable tables, so different users can maintain different versions of the data. During long-running transac-tions, changes can be made to the same table in different workspaces, and these versions are finally reconciled and the results are stored permanently in the original table. You can think of a workspace as a virtual environment shared by several users making changes to the same data.
In addition to facilitating long transactions, the Workspace Manager enables you to create multiple data scenarios for what-if analyses. It can also help you track the history of all the changes to a set of tables. The feature is especially useful in collaborative projects because it allows teams to share content.
The Workspace Manager enables simultaneous read and write access to production data during long transactions. It uses multiple versioning of tables to enable the simultaneous reading and writing of data. Consistency is guaranteed because the final, permanent version of the table will not

C H AP TE R 8 ■ OR A CL E TR A N SA CT I ON M AN AG E M E N T 387
have any conflicts within the data. All the users see is their own virtual version of the database—that is, different versions of the rows in the same tables. But the versions each user sees from his or her workspace are guaranteed to be transactionally consistent; the user’s versions will have the original data the user started with, plus all the changes he or she made to the original data.
Benefits of Using the Workspace ManagerAmong other things, the Workspace Manager enables you to try out various scenarios with your data (such as the effects of different marketing campaigns) before you finally settle on one acceptable version that you can make permanent by merging all the virtual versions of the table data. Merging, in effect, incorporates the child workspace data with the original (parent workspace) data. If, after analysis, you decide to nullify all the child workspace’s data, you can do so by rolling it back, just like you would roll back a transaction under normal circumstances.
■Note Although the Workspace Manager provides you with the capability to create multiple versions of one table, or even of all the tables in your database, it doesn’t impose a severe storage cost because only the changed rows in each workspace are versioned, and these new versions are saved in the original table (and in the original
tablespace). In other words, you don’t need to make any special storage allocations for the database tables that belong to different versions.
The Workspace Manager offers the following features:
• You can maintain multiple versions of data, which you can keep or discard as necessary.
• Multiple users can simultaneously access and modify the same data.
• The updates made by several users over time are isolated in workspaces until they’re merged into the production database.
• Conflicts between multiple versions are resolved automatically by the Workspace Manager.
Table Versioning and WorkspacesThe concepts of table versioning and workspaces are the foundation of the Workspace Manager feature. Table versioning enables you to have different sets of rows sharing the same table name. The amazing thing about table versioning is that users can continue to change data through DML oper-ations on a day-to-day basis. The Workspace Manager maintains the structure of the versioned tables using views based on the original production table. This ability to version-enable even production tables makes the Workspace Manager very powerful in performing what-if analyses.
You can use the WM$VERSIONED_TABLES and WM$VERSION_TABLE tables to find out details about the versioned tables. The WMSYS schema owns both of these tables, so first make sure that you have the WMSYS schema in your database.
Workspaces enable users to make changes to versions of a table, and the workspaces isolate the versioned tables until they’re finally discarded or merged with the original table. This ability of the workspaces to save the versioned tables means that access to the original tables isn’t impeded. You can assign each workspace to one or several users, and they can see a consistent view of the database, including the rows in their versions of the tables in the workspace, plus all the other tables at the time the workspaces were either created or refreshed, whichever is later.
Note that when versioned tables are created in a database, the original table is renamed tableName_LT. Oracle also creates a new table called tableName_AUX and a view with an identical name as the original table. When users log in, they are placed, by default, in the LIVE workspace. All other workspaces that exist in the database are children of the LIVE workspace. Whenever you refresh your workspace, you can see the latest changes made in the parent workspace, which also includes any changes merged from other child workspaces. The merging of a workspace with the

388 CH AP T E R 8 ■ O R AC L E T R AN S AC T I O N M A N AG E M E N T
parent LIVE tablespace makes the changes in the child workspace public. The MERGE statement follows the resolution of any conflicts.
The Workspace Manager feature is provided with the Oracle software, but it won’t be automat-ically installed in a database that you create manually. If you use the DBCA to create a new database, and you let Oracle create a seed database as part of the Oracle software installation, the Workspace Manager feature is automatically installed.
An easy way to find out whether the Workspace Manager is already installed is to look for the WMSYS user using the DBA_USERS view, since WMSYS owns the Workspace Manager tables. If that user is already there, you can go ahead and use the feature. Otherwise you’ll need to install the Oracle Workspace Manager in your database.
The easiest way to use the Workspace Manager is by accessing it through OEM. OEM lets you create and manage workspaces, as well as enable and disable table versioning.

■ ■ ■
P A R T 3
Installing Oracle Database 11g, Upgrading, and Creating Databases

391
■ ■ ■
C H A P T E R 9
Installing and Upgrading to Oracle Database 11g
This chapter will give you a good understanding of the procedure for correctly installing the Oracle Database 11g server software, and it includes an example of an installation of Oracle Database 11g on a server using the Red Hat Enterprise Linux WS 3 operating system.
There are some variations in the installation procedure for the different flavors of UNIX, such as Sun’s Solaris, Hewlett Packard’s HP-UX, IBM’s AIX, and so on, but the steps are essentially the same. Several steps need to be performed before and after the installation of the Oracle software, both by you and the Linux/UNIX system administrator, and this chapter explains those steps. The software must be installed according to a sensible plan, and this chapter shows you how to install Oracle by following the well-known Optimal Flexible Architecture (OFA) guidelines.
Note that you’ll be going through the main features of a generic Oracle installation in this chapter. It’s important that you have access to the Oracle installation manuals for your specific oper-ating system before you begin installing the Oracle Database 11g software. The installation manuals are all available on the Oracle Technology Network (OTN) web site.
Of course, if you’re configuring Oracle Real Application Clusters (RAC) or some such advanced architecture, you’ll need more time to finish the installation. Complex as the Oracle database server software is, the actual time you need to install the software is trivial compared to the time you need to spend to ensure that all the preinstallation steps have been completed correctly. If you follow all the recommended steps, the installation process should work the first time around.
Installing OracleWhen it comes to the mechanics of the process, installing the Oracle server software is really a simple affair. Installing all the software will probably not take you more than a couple of hours. All the real effort goes into the proper planning of such things as the physical space and memory allocation, and the operating system configuration you need for your Oracle databases to function optimally.
■Note Installing the Oracle client is a much simpler task. When you invoke the Oracle installer, simply choose the client installation option instead of the server installation option.
I’m assuming that you, or your organization, have bought the necessary software from Oracle Corporation. If that’s the case, the software CDs will have been sent to you by Oracle. If you just want to try the Oracle database software, however, you don’t have to purchase a thing. You can download the Oracle server software freely from the OTN web site at http://technet.oracle.com/. The OTN

392 CH AP T E R 9 ■ I N ST AL L I N G A N D U P G R AD I N G T O OR A CL E DA TA B AS E 1 1 G
site has complete enterprise versions of the server software for all UNIX, Linux, and Windows servers. In addition, you can check out the operating system installation and administration manuals at http://tahiti.oracle.com.
Reviewing the DocumentationYou can save yourself a lot of grief during the installation process by carefully reviewing the Oracle installation manuals for your particular operating system. These manuals are very clear and provide you with a detailed map of the installation process. You’ll need to review three sets of installation documents:
• Oracle Installation Guide for your operating system: This document will provide you with information about the system requirements, UNIX users and groups, and other require-ments, and it will step you through the installation and post-installation processes.
• Release Notes and Release Notes Addendums: The Release Notes and any related Addendums are very important, and they cover the most recent changes to the installation and upgrade procedures for many components of the Oracle database server and client. The last-minute changes that are covered in the Release Notes (and related Addendums) may make the differ-ence between a successful installation of the various components and an error-prone installation.
• README files: The README files are usually in the \doc\readmes directory on the first product CD-ROM.
The Release Notes and the README files inform you about any potential restrictions, limita-tions concerning the installation, and the use of new Oracle Database 11g software.
■Note The Installation Guide and the Release Notes are available at the OTN site (http://technet.oracle. com/), or you can access them by going to http://docs.oracle.com/ or http://tahiti.oracle.com/.
Determining Disk and Memory RequirementsYou should focus on two key operating system resources when you are planning a new Oracle instal-lation: disk storage and the amount of memory (RAM) that your systems need on the server machine.
The amount of total physical space (disk storage) will depend on the size of your applications and data. The Oracle software itself takes approximately 1.5–2 gigabytes of disk space, depending on the operating system. You also have to run one or more databases with this software, so the total space you need will depend on the requirements for all the databases considered together. You need to determine the sizes of the tables and indexes and the number of stored procedures you will have in the database. You also need to find out as much as you can about the growth expectations for your data over time. If you have a database that you anticipate will grow quickly, you need to make allow-ances for that. Plan ahead, because disk space is something that needs to be budgeted for, and you may find yourself scrambling for space if you are way off the mark.
■Tip For larger databases, the size of the tables and indexes will be the predominant component of total database size. Fortunately, you can easily find out your database’s size by using database-sizing spreadsheets. One such sizing spreadsheet is available from Blue Hills Technology Corporation at http://bhtech.com/. Although the spreadsheet is for an older version of Oracle, the idea behind it remains the same, and you can derive meaningful estimates of the size of your tables and indexes using this spreadsheet.
CH A PT E R 9 ■ I N ST A LL I N G AN D U P G R A DI N G T O OR ACL E DA TA B AS E 1 1 G 393
The total amount of memory that you need will depend on the size and nature of your applica-tions. Oracle does provide a rule of thumb for memory requirements, and you can follow this rule when you are in the initial stages of planning your system. Later on, you can adjust these initial estimates.
The minimum requirement that Oracle imposes for memory is 256MB, but this is not enough for serious applications. Depending on your application’s size and the number of users, your memory requirements may run to several gigabytes of RAM. In addition, Oracle requires that you allocate swap space that is about two to three times your Oracle RAM allocation. The requirements of the applications that your system will be running will determine the total memory you need. At the very least, your system shouldn’t be memory-bound, because inadequate memory leads to excessive swapping and paging, and your system could slow to a crawl. In Chapter 20, you’ll learn how to monitor memory usage and determine when you may need to increase it.
Optimal Flexible ArchitectureAlthough the Oracle database server software and the databases managed by the server will function even if they’re installed on a single disk or a set of disks without any organization, as such, you’ll lose performance and endanger the safety of the databases if you don’t follow a well-thought-out strategy regarding disk allocation. Oracle strongly recommends a disk layout methodology formally called the Optimal Flexible Architecture for efficiency as well as many other reasons.
Before you start any installation of the Oracle software itself, it is absolutely necessary for you to be familiar with the OFA recommendations regarding proper disk layout. The OFA is a set of recom-mendations from Oracle Corporation aimed at simplifying management of complex software and databases often running under multiple versions of software. The OFA essentially imposes a stan-dardized way of naming the different physical components of Oracle and places them on the file system according to a logical plan.
■Note The OFA guidelines were formulated at Oracle in 1990 in an internal paper by Cary Millsap. Millsap revised them in 1995 and published them under the title “OFA Standard: Oracle for Open Systems.” You can find this paper and many other excellent white papers at http://www.hotsos.com/.
The OFA guidelines are only Oracle’s recommendations, and you do not have to follow them in their entirety, but OFA was designed to minimize disk contention, to provide for operating more than one database without administrative confusion, and to improve database performance. Laying out the UNIX directories according to the OFA guidelines leads to a clear and efficient distribution of Oracle’s various files, even with several databases simultaneously running under different Oracle versions. You can consider the OFA guidelines a set of best practices regarding two important issues—disk layout and naming conventions—based on extensive field experience by Oracle profes-sionals. Although originally intended only for internal Oracle use, the OFA is now the standard by which all Oracle installations should be measured.
If you’ve ever walked into an organization and taken over a database installation that had files stored all over the place, you’ll immediately recognize the benefits of the OFA. If the previous DBA has adhered to the OFA guidelines, any new hire can easily go to the standard directories and look for various types of information. If your database is growing and needs more space, following the OFA guidelines will ensure that space will be added in the right directories with the standard naming convention. The standardization of directory and file placement leads to minimal administrative overhead and helps create more efficient databases. When you separate categories of files into inde-pendent UNIX subdirectories, files in one category are minimally affected by operations on files in other categories.
The usefulness of the OFA guidelines becomes particularly clear when you are trying to manage multiple databases on the same server. You can simplify administration by using the structured OMF system for maintaining your files. Creating new databases won’t pose any problems, because each

394 CH AP T E R 9 ■ I N ST AL L I N G A N D U P G R AD I N G T O OR A CL E DA TA B AS E 1 1 G
database is separated into its own directories, simplifying user administration and the creation of new databases. The OFA guidelines contribute to database reliability, because your hard drive fail-ures won’t propagate to whole applications—they help in balancing the load efficiently across the disk drives, thereby enhancing performance and minimizing contention. The OFA guidelines also promote the efficient separation of administrative files from several databases by using standard naming conventions. Another big benefit in using the OFA guidelines is that they enable you to simultaneously run multiple versions of Oracle software. You thus can run your production and test databases using different versions of Oracle on the same server.
Before plunging into a detailed discussion of the OFA concepts and the implementation details, you should be familiar with the following terms:
Mount points: These are directories in the UNIX file system that are used to access mounted file systems.
Product files: These are the many sets of configuration and binary executable files that come with the Oracle software.
Versions: These can refer to entirely different releases or to point upgrades (patch upgrades). For example, 9.2.0.1.0 and 10.1.0.2.0 are different versions of the server software.
Oracle datafiles: These are the UNIX files that hold Oracle table and index data.
Oracle administrative files: These include the database log files, error logs, and so forth.
Tablespaces: These refer to the logical allocation of space within Oracle and are discussed in detail in Chapter 6.
■Tip If you are using NFS file systems, you should know that these can’t guarantee that writes always complete successfully, leaving open the possibility of file corruption. Unless your storage vendor is listed in the Oracle Storage Compatibility Program (OSCP) member list, don’t install the software on NFS file systems.
Mount PointsMount points are the directory names under which file systems are mounted by the UNIX operating system. That is, the mount point refers to the top-level directory of a file system. Oracle recommends that all your Oracle mount points be named according to the convention /pm, where p is a string constant to distinguish itself from other mount points and m is a two-digit number. This means you can name your mount points /u01, /u02, /u03, and so on. Keep the mount point names simple, and don’t include any hardware-related information in the mount point name. That way, changing your disk system hardware will not affect the mount point names.
Oracle recommends that you have four mount points to fully comply with the OFA guidelines. The first of these is for locating the Oracle Database 11g server binaries, and the other three are for holding the database files. Let’s say you’re creating mount points for a database named prod. In this case, the three mount points designated for the datafiles can be clearly named as follows: /u01/oradata/prod, /u02/oradata/prod, and /u03/oradata/prod. This nomenclature makes it clear that these file systems are meant for Oracle databases and that the data for different databases is stored on separate mount points.
Directory and File-Naming ConventionsIn Linux and UNIX systems, a home directory is the directory that a user lands in when he or she first logs in. All home directories should follow the naming convention /pm/h/u, where pm is the mount point name, h is a standard directory name, and u refers to the directory owner. For example, the /u01/app/oracle directory could be the home directory for the user named oracle. Note that the

CH A PT E R 9 ■ I N ST A LL I N G AN D U P G R A DI N G T O OR ACL E DA TA B AS E 1 1 G 395
entire home directory for each user (e.g., /u01/app/oracle) is denoted by the letter h for the purposes of the following discussion.
Directory Structure
During the installation, you’ll be prompted for the path for several key Oracle directories, and I’ll briefly discuss these in this section. You can use any directory structure you wish for these directo-ries, but, as you’ll see, following the standard directory structures recommended here makes it easy to administer multiple databases and software versions on the same server.
Oracle Base
At the root of the Oracle directory structure is the directory called Oracle base, denoted by the envi-ronmental variable ORACLE_BASE. The Oracle base directory is the top directory for all Oracle software installations. As mentioned previously, Oracle recommends that you use the form /pm/h/u.
The default owner of the Oracle base directory is usually a user named oracle, and the standard directory is usually named app. Therefore, the Oracle base directory usually has the form of /pm/app/oracle (for example, /u01/app/oracle).
The Oracle installer will take this as the default Oracle base and install all the software under this base directory. You can create the Oracle base directory by using the following commands (assuming that u01 is your mount point and user oracle is the Oracle software owner):
# mkdir -p /u01/app/oracle# chown -R oracle:oinstall /u01/app/oracle# chmod -R 775 /u01/app/oracle
Oracle Home
The Oracle home directory, denoted by the ORACLE_HOME environment variable, is very important, since the Oracle server software executable files and other configuration files are located under this directory. For example, the $ORACLE_HOME/bin directory holds the executables for the Oracle prod-ucts, and the $ORACLE_HOME/network directory holds the Oracle Net Services files.
In Oracle Database 11g, the OFA-recommended Oracle home directory path has changed. In order to comply with the OFA requirement of enabling the simultaneous running of multiple versions of Oracle software, you need to install Oracle software in a directory with the following path: /pm/h/u/product/v/type_[n], where the new variables have the following meanings:
v: The version of the software
type: The type of installation, such as database (db), client (client), or companion (companion)
n: An optional counter, which enables you to install the same product multiple times under the same Oracle base directory
In the preceding syntax for the Oracle home, the first part, /pm/h/u, is nothing but the Oracle base directory. Thus the Oracle home directory is always located underneath the Oracle base direc-tory, and it can also be specified as $ORACLE_BASE/product/v/type_[n].
Using the preceding OFA-based Oracle home path, you can install different products—the server and the client with the same release number (Oracle 11.1.0)—in the same Oracle base directory.
■Note The formal name for the Oracle database server version in this book is Oracle Database 11g Release 2. However, you’ll occasionally see references to 11.1, 11.1.0, or Oracle 11.1, all of which are alternative names for the same software.

396 CH AP T E R 9 ■ I N ST AL L I N G A N D U P G R AD I N G T O OR A CL E DA TA B AS E 1 1 G
/u01/app/oracle/product/11.1.0/db_1/u01/app/oracle/product/11.1.0/client_1
The db_1 and client_1 at the end of the paths indicate that these are the Oracle home directories for the first installation of the Oracle database and the Oracle client software, respectively.
Oracle supports multiple Oracle homes, but you can’t install products from one release of Oracle into an Oracle home directory of a different release. You must install the Oracle Database 10.2 software into a new Oracle home directory. For example, you can’t install Release 10.2 software into an existing Oracle9i Oracle home directory. You can install this release more than once on the same system, however, as long as you choose a separate Oracle home directory for each release. It’s also okay to install the same product multiple times in the Oracle home directory, as shown here:
/u01/app/oracle/product/11.1.0/db_1/u01/app/oracle/product/11.1.0/db_2
Once you finish your Oracle software installation, set your ORACLE_HOME environment variable to specify your Oracle home directory.
When you install the Oracle Database 11g software, the Oracle Universal Installer prompts you to provide the Oracle base location. Oracle recommends that you share the Oracle base for all Oracle homes that you create on a server. Although the installer will derive the default Oracle home location from the Oracle base location you provide during the installation, you can change this default location.
In the current version, the ORACLE_BASE environment variable is only recommended, but Oracle intends to make it a mandatory variable in future releases. Oracle recommends that you create the flash recovery area and the datafiles under the Oracle base location.
Flash Recovery Area and Datafile Location
The Oracle base is your starting point for the default locations of all datafiles and the flash recovery area. Oracle recommends that you place the Oracle home, the Oracle datafiles, and the flash recovery area on separate mount points, as shown in the following example:
$ORACLE_BASE/flash_recovery_area$ORACLE_BASE/oradata$ORACLE_BASE/product/11.1.0/db_1
Of course, in an Oracle RAC installation, you share the flash recovery area and the datafiles among the different nodes of the RAC.
Automatic Diagnostic Repository
In Oracle Database 11g, all diagnostic data is consolidated into the new Automatic Diagnostic Repository (ADR). The database stores the ADR under the ADR base directory. The new initialization parameter DIAGNOSTIC_DEST sets the default location of the ADR base directory. The following is how the database determines the value of the DIAGNOSTIC_DEST parameter, if you don’t explicitly set the parameter.
• If you set the ORACLE_BASE environment variable, the default value of the DIAGNOSTIC_DEST parameter is the same as the value of the ORACLE_BASE variable.
• If you haven’t set the ORACLE_BASE environment variable, the default value of the DIAGNOSTIC_DEST parameter is set to $ORACLE_HOME/log.
Oracle Inventory Directory
Oracle uses a special directory called the Oracle Inventory directory, also known as OraInventory, to store an inventory of all the Oracle software on a server. Multiple Oracle installations can share the same Oracle Inventory directory. You need to specify the path for this directory only the first time you install an Oracle product on a server. The usual format of this directory is as follows:

CH A PT E R 9 ■ I N ST A LL I N G AN D U P G R A DI N G T O OR ACL E DA TA B AS E 1 1 G 397
$ORACLE_BASE/ora_inventory
For example, if /u01/app/oracle is your ORACLE_BASE directory location, then the Oracle Inven-tory directory will be
/u01/app/oracle/ora_inventory
The first time you install Oracle software, the installer prompts for the OraInventory directory path, and creates the directory itself.
Administrative Files
Every Oracle database has several administrative files associated with it. Among these files are configuration files, core dump files, trace files, export files, and other related log files. You need to store these files under separate directories for ease of maintenance. Assuming you have about ten or so of these directories for each database, you can see why it’s imperative that you have a simple means of organizing them. Oracle recommends the following directory structure for clarity: /h/admin/d/a, where h is the Oracle base directory (e.g., /u01/app/oracle), admin indicates that this directory holds administration-related files, d refers to the specific database, and a refers to the subdirectories for each specific type of administrative files. For example, the /u01/app/oracle/admin/prod1/bdump directory will contain all background process trace files as well as the all-impor-tant alert log files for the prod1 database.
Table 9-1 lists some of the standard administrative directories that you’ll need in most cases. Of course, you may add to the recommended list or modify it to fit your circumstances.
Product Files
The whole idea behind properly naming and placing the product files is to be able to implement multiple versions of the Oracle server software simultaneously. This is necessary because when you migrate between versions, it is normal to retain the older software versions until you switch over to the new version. Different applications on the system may have different timeframes within which they want to migrate to the new version. Consequently, in most cases, you’ll end up having to support multiple versions of the Oracle server software simultaneously.
Oracle recommends that you keep each version of the software in a separate directory distin-guished by the naming convention /h/product/v, where h is the home directory, product indicates that the software versions are under this directory, and v is the version of the product. For example, I have a directory on my system called /u01/app/oracle/product/10.1.0.2.0 under which I save all the Oracle server software subdirectories during installation. If I decide to install the 10.2.0 version, I’ll do so under the directory /u01/app/oracle/product/10.2.0. You can see that this type of naming convention makes it very easy to install and manage multiple versions of the Oracle software.
Table 9-1. Typical Administrative Directories
Directory Contents
adhoc Contains ad hoc SQL files
arch Contains archived redo log files
create Contains SQL scripts that you can use for creating your databases
dpdump Contains the Data Pump Export files
pfile Contains instance parameter files (such as init.ora)

398 CH AP T E R 9 ■ I N ST AL L I N G A N D U P G R AD I N G T O OR A CL E DA TA B AS E 1 1 G
Installing on a Multihomed Computer
A server with multiple IP addresses is called a multihomed computer. A multihomed computer uses multiple network cards, with each IP address linked to a distinct host name or an alias.
By default the installer identifies the host name on a multihomed computer by using the ORACLE_HOSTNAME environment variable. You can set the ORACLE_HOSTNAME environment variable in the following way.
Bourne, Bash, or Korn shell:$ ORACLE_HOSTNAME=myhost.us.example.com$ export ORACLE_HOSTNAME
C shell:% setenv ORACLE_HOSTNAME myhost.us.example.com
In the previous examples, the fully qualified host name is myhost.us.example.com. If you haven’t set the ORACLE_HOSTNAME environment variable and the server has multiple network cards, the installer finds the host name by looking up the first entry in the /etc/hosts file. All clients must be able to access the server by utilizing this host name or an alias for it.
Database Files
The administrative and product files are generic files. Oracle databases contain another set of key files called database files. These include the datafiles that contain the table and index data and certain operational files called control files and redo log files. Control files are crucial to the operation of the database, and redo log files hold information necessary to recover the database during an instance crash and similar situations.
The OFA recommendation for control and redo log files is to follow the naming conventions /pm/q/d/controln.ctl and /pm/q/d/redon.log, respectively. In this notation, pm is the mount point; q is an indicator, such as oradata, denoting that the files contain Oracle-related data; d is the data-base name (provided by the DB_NAME initialization parameter, which is the same as the SID for the database); and n is a two-digit number.
Since Oracle recommends that you have multiple control files and duplexed online redo log files, it’s common to see the following naming structure for redo log files and control files:
/u01/oradata/prod1/control01.ctl/u05/oradata/prod1/control02.ctl/u02/oradata/prod1/redo01.log/u04/oradata/prod1/redo02.log
Oracle recommends that all tablespaces be named with no more than eight characters, with the format tn, where t is a descriptive name for the tablespace and n is a two-digit number. For datafiles, the recommended notation is /pm/q/d/tn.dbf, where pm is the mount point; q is an indicator, usually oradata; d is the database name; t is the descriptive name for the tablespace that contains this data-file; and n is a two-digit number. Thus, a typical datafile under the OFA guidelines would have a name like /u20/oradata/prod/system01.dbf, which refers to a datafile in the System tablespace.
OFA file-naming conventions are designed to achieve the following goals:
• Show which tablespace a datafile belongs to.
• Distinguish database files from other files on the system.
• Distinguish between database files belonging to various databases.
• Identify control files, redo log files, and datafiles easily.
Table 9-2 clearly shows how an OFA-compliant database enables you to easily manage files belonging to several database versions. The example also shows two Oracle home directories, one for Oracle 9.2 and the other for Oracle 10.2. There are a total of four mount points. The Oracle software

CH A PT E R 9 ■ I N ST A LL I N G AN D U P G R A DI N G T O OR ACL E DA TA B AS E 1 1 G 399
is on mount point /u01, and the database files are distributed across three mount points: /u02, /u03, and /u04.
Creating Directories for Oracle Database Files
Although our concern in this chapter is with installing Oracle server software, the storage space necessary for database files (which includes the files for tables and indexes, as well as the files for the redo logs and the undo tablespace and so on) will, in most cases, dwarf the space needed for the installation files.
Although nothing prevents you from placing all your database files on one storage device, Oracle recommends that you use a logical volume spread over several disks or use a RAID system. Oracle further recommends that you use the SAME (stripe-and-mirror-everything) technique. For
Table 9-2. Directory Structure for an OFA-Compliant Oracle Database
Directory Format Description
/ Root directory
/u01 User data mount point 1
/u01/app/ Subdirectory for application software
/u01/app/oracle/ Oracle base directory
/u01/app/oracle/admin Directory for the Oracle administrative files
/u01/app/oracle/admin/nina/
Admin subdirectory for the nina database
/u01/app/oracle/flash_recovery_area/
Subdirectory for recovery files
/u01/app/oracle/flash_recovery_area/nina
Recovery files for the nina database
/u01/app/oracle/product/ Distribution files
/u01/app/oracle/product/10.2.0
Oracle home directory for Oracle Database 10g Release 2 (10.2.0)
/u01/app/oracle/product/11.1/db_1
Oracle home directory for Oracle Database 11g Release 1 (11.1.0)
/u02 User data mount point 2
/u02/oradata/ Subdirectory for Oracle data
/u02/oradata/nina/ Subdirectory for database files for the nina database
/u03 User data mount point 3
/u03/oradata/ Subdirectory for Oracle data
/u03/oradata/nina/ Subdirectory for database files for the nina database
/u04 User data mount point 4
/u04/oradata/ Subdirectory for Oracle data
/u04/oradata/nina/ Subdirectory for database files for the nina database

400 CH AP T E R 9 ■ I N ST AL L I N G A N D U P G R AD I N G T O OR A CL E DA TA B AS E 1 1 G
each of the mount points you select for your database files, you need to issue the following commands as root in order to set the owner, group, and permissions:
# mkdir /mount_point/oradata# chown oracle:oinstall /mount_point/oradata# chmod 775 /mount_point/oradata
Using the preceding command structure, you can create as many subdirectories for your data-files as necessary; for example, /u10/oradata, /u11/oradata, and so on.
Creating the Flash Recovery Area
The flash recovery area is a disk area set apart for storing all the recovery-related files. It’s a good idea to create it on entirely different storage devices from where you have your datafiles. You also need to set another parameter, DB_RECOVERY_FILE_DEST, to indicate the location of the flash recovery area. You can set the physical size of the flash recovery area by using the DB_RECOVERY_FILE_DEST_SIZE initialization parameter.
Here is how you create the flash recovery area directory:
# mkdir /mount_point/flash_recovery_area# chown oracle:oinstall /mount_point/flash_recovery_area# chmod 775 /mount_point/flash_recovery_area
For example, you can designate /u20/flash_recovery_area as your flash recovery area, and set the DB_RECOVERY_FILE_DEST_SIZE parameter to 5GB.
Performing Preinstallation TasksThe installation of the Oracle software, as I mentioned earlier, is a straightforward exercise. You do the bulk of your work before the installation of the software. Your crucial partner in this process is the Linux/UNIX system administrator.
To estimate the total disk space you need, you have to add the space required for the Oracle Database 11g installation to the total space you expect the database files to consume. For example, for an Oracle Database 11g installation on the HP UNIX system, Oracle recommends that you allo-cate around 2GB of space for your software. You must add this 2GB to whatever space estimates you’ve come up with for your database files in the previous section.
You can also estimate memory requirements by following some basic guidelines. Most small OLTP systems require about 500MB of RAM, medium installations require about 1GB, and larger installations require more RAM. A more important issue at software installation time is that you allo-cate enough swap space for your system.
■Note The Oracle Universal Installer, which comes with the software distribution, will let you install a seed data-base. This might be a good idea if you are a complete beginner. If you already have some experience, you’re better off configuring your own customized database.
Checking the Preinstallation RequirementsThe preinstallation tasks depend on your operating system, but the steps are similar. In this discus-sion, I show you how to install the Oracle software on a Red Hat 3.0 WS Linux operating system. You will need to consult your specific documentation from Oracle for the exact installation procedures for your operating system.
The installation process for Oracle Database 11g is much more automated than were previous versions. The installation process automatically checks the following prerequisites:

CH A PT E R 9 ■ I N ST A LL I N G AN D U P G R A DI N G T O OR ACL E DA TA B AS E 1 1 G 401
• Platform version: The installation process checks to make sure the operating system is appro-priate for the Oracle installation. If you were using an HP-UX system, for example, you would need to have at least the HP-UX-11.11 operating system version. In this chapter, since we’re using a Linux-based server for the Oracle installation, we can use one of the following Linux distributions, which are certified for Oracle Database 11g:
• Oracle Enterprise Linux 4.0
• Oracle Enterprise Linux 5.0
• Red Hat Enterprise Linux 4.0
• Red Hat Enterprise Linux 5.0
• SUSE Linux Enterprise Server 10.0
• Operating system patches: The installation process checks to ensure that you’ve applied the latest operating system patches.
• Kernel parameters: The installation process verifies that your OS kernel settings are adequate. It also verifies that you have installed the necessary OS system packages.
• Space: The installation process checks to ensure that you have the minimum amount of temporary space in your /tmp directory before starting the installation. It also checks for adequate swap space.
• ORACLE_HOME directory: The installation process checks that you have either a non-empty Oracle home directory or one that qualifies for the installation because it contains a release on top of which Oracle Database 11g can be installed.
■Note If you aren’t sure whether your operating system is certified for a certain Oracle release, you can check the latest Oracle product and platform certification matrices on the Oracle web site: http://www.oracle.com/technology/support/metalink/content.html.
Although it’s true that the Oracle installer software checks to ensure that all the prerequisites are satisfied, you shouldn’t wait until installation time to find out. You must diligently check each neces-sary component, to make sure your installation will be a smooth process, instead of erroring out several times. You can divide the checking of the prerequisites into tasks that fall into the domain of the UNIX or Linux (or Windows) system administrator and those that are the responsibility of the Oracle DBA.
Oracle Products Installed with the 11.1 Release
The following products are installed by default when you install the 11.1 release database server.
• Oracle Application Express: Tool for developing and deploying web applications
• Oracle Warehouse Builder: Tool to design, deploy, and manage business intelligence systems
• Oracle Configuration Manager: Tool that collects and uploads configuration information to the Oracle configuration repository
• Oracle SQL Developer: Graphical version of SQL*Plus
• Oracle Database Vault: Tool that enables you to secure business data
System Administrator’s Preinstallation TasksThe UNIX/Linux system administrator needs to perform several steps before you can install your Oracle software. First, the system administrator should make sure that the latest operating system

402 CH AP T E R 9 ■ I N ST AL L I N G A N D U P G R AD I N G T O OR A CL E DA TA B AS E 1 1 G
patch sets are applied, per Oracle’s installation recommendations. The other important tasks are creating separate mount points for the Oracle software, reconfiguring the kernel (if necessary), creating the necessary users and groups on the UNIX/Linux server, and making sure that the Oracle users have the right file and directory permissions.
All these system administrator tasks are covered in some detail in the following sections. The tasks are discussed in general, but the examples are all based on an actual installation on a Red Hat Linux 3 system.
Verifying Operating System Software
The system administrator must check several things regarding the compatibility of the operating system software for the Oracle installation, such as checking the OS and kernel versions and making sure necessary packages are present and patches applied.
Checking Operating System Version
The system administrator must also make sure that the server on which you’re installing Oracle is using the correct operating system version for Oracle Database 11g. On a Linux system, for example, the operating system must be one of the following for installing Oracle Database Release 1 for Linux x86 and Linux x86-64.
• Asianux 2.0
• Asianux 3.0
• Oracle Enterprise Linux 4.0
• Oracle Enterprise Linux 5.0
• Red Hat Enterprise Linux 4.0
• Red Hat Enterprise Linux 5.0
• SUSE Linux Enterprise Server 10.0
The correct version of Linux must be installed on a platform certified for it. To find out what OS version is installed on a UNIX or Linux server, use the following command:
# cat /etc/issueRed Hat Enterprise Linux WS Release 3 (Taroon Update 4)Kernel \r on an \m
Checking Kernel Version
Once the system administrator has ensured that one of the approved operating system versions is indeed being used, the next step is to check to ensure that the OS is using the correct kernel version. The Oracle Universal Installer performs checks on your system to verify that it meets the require-ments. If you don’t have the necessary OS version, the installation will fail, however, so it is a good idea to verify the requirements before you start the Oracle Universal Installer.
Following are the kernel requirements for Oracle Database 11g Release 1:
• For Asianux 2.0, Oracle Enterprise Linux 4.0, and Red Hat Enterprise Linux 4.0: 2.6.9
• For Asianux 3.0, Oracle Enterprise Linux 5.0, and Red Hat Enterprise Linux 5.0: 2.6.18
• For SUSE Linux Enterprise Server 10: 2.6.16.21
On my Red Hat Linux Enterprise Linux 4.0 system, the kernel version must be at least at the 2.4.21-27 EL level. The system administrator can verify the kernel version by using the following command:
# uname –r2.6.9-55.0.0.0.2.EL

CH A PT E R 9 ■ I N ST A LL I N G AN D U P G R A DI N G T O OR ACL E DA TA B AS E 1 1 G 403
The uname command shows that the kernel version is 2.6.9 and the errata level is 55.0.0.0.2.EL.In this case, the kernel version is exactly what is required. If it turns out that you need kernel
updates or a newer OS version, the system administrator will have to download the updates and install them, in most cases. Alternatively, you can use the command /cat /proc/version to find out your kernel version.
Checking for Required Packages
The installation process also requires that certain operating system packages be installed. For example, my Linux 3 OS must have the following packages:
make-3.79.1gcc-3.2.3-34glibc-2.3.2-95.20compat-db-4.0.14-5compat-gcc-7.3-2.96.128compat-gcc-c++-7.3-2.96.128compat-libstdc++-7.3-2.96.128compat-libstdc++-devel-7.3-2.96.128openmotif21-2.1.30-8setarch-1.3-1
The system administrator can verify whether a particular required package is installed by using the following command:
# rpm -q package_name
If a package is not installed, the system administrator can copy it from the OS software installa-tion CDs or download it from the Linux vendor.
Applying Necessary OS Patches
The system administrator must ensure that all required operating system patches are installed before performing the Oracle software installation. Oracle’s operating system–specific guides will provide you with the required and recommended patches for your operating system.
Checking Physical OS Requirements for Oracle Installation
Check that you have at least the following memory and physical space:
• A minimum of 1024MB of physical RAM.
• 1GB of swap space, or twice the size of the physical RAM if your RAM is between 256MB and 512MB. Oracle provides a matrix that shows the amount of swap space for varying RAM sizes.
• At least 400MB of free space in the /tmp directory.
• From 1.5GB to 3GB of disk space for the Oracle software, depending on the installation type.
The root user should run the following two commands to check the amount of RAM and swap space:
# grep MemTotal /proc/meminfoMemTotal: 1203934 kB# grep SwapTotal /proc/meminfoSwapTotal: 2040244 kB
To check the available disk space, run the following command:
# df -hFilesystem Size Used Avail Used% Mounted on

404 CH AP T E R 9 ■ I N ST AL L I N G A N D U P G R AD I N G T O OR A CL E DA TA B AS E 1 1 G
/dev/sda3 11G 8.7G 1.7G 85% //dev/sda1 99M 15M 79M 16% /bootnone 588M 0 588M 0% /dev/shm
To find out how much space you have in your /tmp directory, the system administrator can run the following command:
$ df –k /tmp
Based on the physical disk storage requirements, the Oracle DBA will need to prepare an instal-lation-requirements document, identifying the resources required and the preferred layout of the disks. Once the DBA’s requirements pass through any necessary approvals, the system administrator will allocate the memory and disk space. The system administrator will also provide the location of all your mount points.
Creating Mount Points for the Installation
Oracle recommends a minimum of four mount points for an OFA-compatible Oracle installation. You absolutely must have at least two mount points: one for the software and the other for the data-base files. However, you actually need more than that for a database with several large datafiles. A minimum OFA-compatible installation requires four mount points: one for the Oracle software and three for the various database files.
The number of mount points you need depends on your total space requirements. If your computations indicate that you need around 200GB of total space, and each of your mount points supports 7GB, you would need roughly 30 mount points for your applications.
It is important that the UNIX administrator name the mount points in accordance with the OFA guidelines discussed earlier in this chapter.
Reconfiguring the Kernel
Oracle requires huge amounts of shared memory segments, which are usually not configured by default in the Linux (or UNIX) operating system. There is a good possibility that the system admin-istrator will need to change certain kernel parameters, such as the ones dealing with memory and semaphores (structures that control access to the operating system’s memory).
■Note It is extremely important for the kernel to be reconfigured at the outset. If enough memory resources aren’t configured per Oracle’s guidelines, either your installation will not succeed or you will encounter an error when you try to create a database after the installation of the Oracle software. The kernel reconfiguration is a very simple task for the administrator. All he or she has to do is change the kernel configuration file and regenerate a new kernel file using the appropriate command. The system administrator then needs to restart the system with the new kernel file replacing the older version.
Each UNIX or Linux operating system may have a different set of kernel requirements for an Oracle installation. Table 9-3 shows the kernel requirements for the Red Hat Linux 3 operating system I am using for the Oracle software installation.
Table 9-3. Sample Linux Kernel Requirements for an Oracle Installation
Parameter Value
semmsl 250
semmns 32000

CH A PT E R 9 ■ I N ST A LL I N G AN D U P G R A DI N G T O OR ACL E DA TA B AS E 1 1 G 405
To view the current kernel configuration, issue this command:
$ cat /etc/sysctl.conf
During the operating system prerequisite checks, the Oracle installer might show errors that can be fixed by reconfiguring the UNIX or Linux kernel. If the kernel needs reconfiguring, the system administrator will need to edit to the kernel configuration file.
If the values of any of the kernel parameters are not big enough, the installation will fail; if the values of any parameters are below the minimum values, you must edit the /etc/sysctl.conf file to specify the larger values for the parameters, as shown here:
fs.file-max = 512 * PROCESSESkernel.shmall = 2097152kernel.shmmax = 2147483648kernel.shmmni = 4096kernel.sem = 250 32000 100 128net.ipv4.ip_local_port_range = 1024 65000net.core.rmem_default = 262144net.core.rmem_max = 4194304net.core.wmem_default = 262144
On my Linux server, I modified the /etc/sysctl.conf file, but this may vary depending on your OS. After reconfiguring the kernel parameter settings and generating a new kernel, the system administrator must reboot the system using the new kernel for the new settings to take effect.
The system administrator can also use the following command on Red Hat Linux to dynamically change the current values of the kernel parameters, without a need to reboot the system (this will only change the values temporarily and they’ll revert to their original values upon rebooting):
# /sbin/sysctl –p
After the kernel parameters have been changed, the system administrator can verify the settings by running the following commands as root:
semopm 100
semmni 128
shmall 2097152
shmmax Minimum of half the physical memory or 4GB
shmmni 4096
file-max 65536 (512*processes)
ip_local_port_range Minimum 1024
ip_local_port_range Maximum 65000
rmem_default 262144
rmem_max 4194304
wmem_default 262144
wmem_max 262144
Table 9-3. Sample Linux Kernel Requirements for an Oracle Installation (Continued)
Parameter Value

406 CH AP T E R 9 ■ I N ST AL L I N G A N D U P G R AD I N G T O OR A CL E DA TA B AS E 1 1 G
/sbin/sysctl -a | grep shm/sbin/sysctl -a | grep sem/sbin/sysctl -a | grep file-max/sbin/sysctl -a | grep ip_local_port_range
■Note Oracle uses the shared memory segments of the operating system to share data among its various processes.
In addition to modifying the kernel parameters, the system administrator must also check limits on user processes as well as certain user login shell scripts, and change them if necessary. The following sections discuss these additional changes to be made by the system administrator.
Changing Shell Limits
Oracle recommends setting limits on the number of processes and open files each Linux account may use. To improve the performance of Oracle software on Linux systems, the system adminis-trator must increase certain shell limits for the oracle user by adding the following lines to the /etc/security/limits.conf file:
oracle soft nproc 2047oracle hard nproc 16384oracle soft nofile 1024oracle hard nofile 65536
You must also add the following line to the /etc/pam.d/login file:
session required /lib/security/pam_limits.so
Changing Login Scripts
The system administrator must also make changes to the Oracle users’ login shell. The changes depend on the default shell type.
For the Bourne, BASH, or Korn shell, add the following lines to the /etc/profile file:
if [ $USER = "oracle" ];then if [ $SHELL = "/bin/ksh" ]; then ulimit -p 16384 ulimit -n 65536else ulimit -u 16384 -n 65536 fifi
For the C shell (csh or tcsh), add the following lines to the /etc/csh.login file:
if ( $USER == "oracle" ) then limit maxproc 16384 limit descriptors 65536endif
Creating Necessary Groups
Operating system groups consist of a set of users who perform related tasks and have similar privi-leges. Oracle recommends that you create three operating system groups for both Linux and UNIX

CH A PT E R 9 ■ I N ST A LL I N G AN D U P G R A DI N G T O OR ACL E DA TA B AS E 1 1 G 407
operating systems: OSDBA, OSOPER, and ORAINVENTORY (Oracle Inventory group). The default name for the OSDBA group is dba, for the OSOPER group is oper, and for the ORAINVENTORY group is oinstall. You can find out whether each of these three groups already exists in your system by checking the /etc/group file.
Members of the OSDBA (dba) group will have the SYSDBA Oracle database privilege, which lets them perform privileged actions such as starting up and shutting down the database. The ORAINVENTORY (oinstall) group is mandatory when you install Oracle software for the first time on any server. The ORAINVENTORY group owns all Oracle inventory, which is a catalog of all the Oracle software installed on a server. All new installations and upgrades are performed by users belonging to the ORAINVENTORY group.
The OSOPER (oper) group is optional, and you need to create it only if you plan to grant any users the OSOPER Oracle privilege to perform a limited set of administrative tasks, such as backing up databases. All database users with the OSOPER privilege will be members of the OSOPER group at the OS level.
■Note Users belonging to the ORAINVENTORY group must be given read, write, and execute privileges on the ORAINVENTORY directory only. The group shouldn’t be given write permissions for any other directories.
Creating the Oracle Inventory Group
The ORAINVENTORY group needs to be created only if it doesn’t already exist in your system. Here’s the command to create it, with the default name for the group:
# /usr/sbin/groupadd oinstall
The Oracle installer creates the oraInst.loc file when you install Oracle software on a server for the first time. This file tells you the name of the ORAINVENTORY group and the path of the Oracle Inventory directory. Use the following command to determine whether the ORAINVENTORY group already exists on your server:
# more /etc/oraInst.loc
If the oraInst.loc file exists, you’ll see the following, which means you don’t have to create the ORAINVENTORY group:
inventory_loc=/u01/app/oracle/oraInventoryinst_group=oinstall
Creating the OSDBA Group
Create this group only if one doesn’t exist, or if you want to give a new group of users DBA privileges in a new Oracle installation. Use the following command to create the OSDBA group:
# /usr/sbin/groupadd dba
Creating the OSOPER Group
The OSOPER group is optional—it should be created only if you’re planning to create one or more Oracle users with limited administrative privileges. Here’s how you create the OSOPER group:
# /usr/sbin/groupadd oper
The OSASM Group (asmadmin)
In order to clearly divide the responsibilities between ASM administration and database administra-tion, Oracle 11g introduces a new SYSASM privilege. There is a new operating system group called

408 CH AP T E R 9 ■ I N ST AL L I N G A N D U P G R AD I N G T O OR A CL E DA TA B AS E 1 1 G
OSASM, which you use exclusively for ASM administration. Members of the OSASM group can connect as SYSASM using operating system authentication, similar to members using the SYSDBA privilege for database administration.
Create a new OSASM operating system group with the following command:
# /usr/sbin/groupadd asadmin
The group name in this example is asadmin.
Verifying That an Unprivileged User Exists
An unprivileged user called nobody is necessary to own the external jobs (extjob) executable. Before you install the Oracle software, verify that the user nobody exists in the system. If the user nobody doesn’t exist, create the user by executing the following command:
$ /usr/sbin/useradd -g nobody
Creating the Oracle Software Owner User
After the system administrator has created the necessary groups, he or she needs to create the all-important user that owns the Oracle software, usually named oracle (you can choose any name, but oracle is used by convention). The oracle user is the owner of the Oracle software, and this user’s default or primary group will be the newly created ORAINVENTORY group.
You need to install Oracle software as the Oracle software owner (the oracle user), rather than as root. The oracle user’s secondary group should be the OSDBA group, and if necessary, the OSOPER group as well. The oracle user will have a home directory like all the other users (usually something like /u01/app/oracle), under which you’ll create the rest of the directory structure for holding the Oracle Database 11g server software.
■Caution Don’t use the root account to install or modify Oracle software. Only the oracle user should perform the Oracle software installation operations.
Under an HP-UX system, you can use the administrative tool SAM to create the users. In any UNIX or Linux system, you can create the users manually, with the following command:
# /usr/sbin/useradd –g oinstall –G dba –d /home/oracle -p oracle1 oracle
In the preceding command
g denotes the primary group of the user oracle, which is the oinstall group.
G is the secondary group, which is the dba group.
d denotes the home directory for the new user.
p is the password for the oracle user.
You may use the following command to set the password for the oracle user, if you wish:
# /usr/bin/passwd oracle
Refer to Chapter 3 for more details about the passwd command.Note that the default home directory of the oracle user should be similar to that of the normal
users of the system. The ORACLE_HOME directory is not meant for the oracle user; it’s the location for the Oracle software binaries and similar files.
CH A PT E R 9 ■ I N ST A LL I N G AN D U P G R A DI N G T O OR ACL E DA TA B AS E 1 1 G 409
■Note The oracle user should be given read, write, and execute privileges on all files and directories that are part of the Oracle Database 11g installation.
Setting File Permissions
The next step is to set the default Linux/UNIX file permissions. To do this, the system administrator must first check the existing default permissions by issuing the umask command. If the umask is set to anything but 022, change it to 022 by issuing the umask 022 command. The system administrator can simply open the default login shell (which, for the BASH shell on Red Hat Linux, is .bash_profile) and add this line:
umask 022
As you saw in Chapter 3, the default permissions for a newly created file system are 666 under the octal notation. That is, everyone is able to read and write any file. By using a default file permis-sion of 644 (by using the umask of 022), you are granting any users other than the oracle user read permission only on the file systems. Of course, the system administrator must make sure the oracle user has write permissions to create files in all the user’s directories.
The UNIX administrator must ensure that a local bin directory exists, such as /user/local/bin or /opt/bin. The administrator must further ensure that this directory is included in the PATH envi-ronment variable used by the oracle user and that the oracle user has execute permission on this directory.
The system administrator must also create a directory with the name /var/opt/oracle that is owned by the oracle user. This directory will contain files that describe various components of the Oracle server software installation. The following commands will create the directory and assign it the necessary privileges:
$ mkdir /var/opt/oracle$ chown oracle:dba /var/opt/oracle$ chmod 755 /var/opt/oracle
Creating Necessary Directories
The system administrator (root) must also create the Oracle base directory, which acts as a top-level directory for Oracle software installations, and its ownership must be assigned to the oracle user. Assuming you choose the standard /u01/app/oracle directory as your Oracle base directory, you can create it and assign the necessary ownership and file permissions with these commands:
$ mkdir -p /u01/app/oracle$ chown -R oracle:oinstall /u01/app/oracle$ chmod -R 775 /u01/app/oracle
During the installation, you must set the ORACLE_BASE environment variable to specify the full path to this directory (/u01/app/oracle).
Oracle Inventory Directory
The Oracle Inventory directory is usually the /$ORACLE_BASE/oraInventory directory, and it contains an inventory of all Oracle software installed on the system. You don’t need to explicitly create this directory. The Oracle Universal Installer will prompt you for its location the first time it installs soft-ware on your server. The installer creates the directory and assigns the Oracle user the necessary rights.

410 CH AP T E R 9 ■ I N ST AL L I N G A N D U P G R AD I N G T O OR A CL E DA TA B AS E 1 1 G
Oracle Home Directory
As mentioned earlier in this chapter, the Oracle home directory is the key directory where the installer actually installs all the Oracle executables. The Oracle home directory must be a subdirectory of the Oracle base directory you just created. You don’t have to explicitly create the Oracle home directory—the installer prompts you for a symbolic name as well as the direct location for it. The installer will then automatically create this directory and assign the Oracle user the necessary privileges.
This is an example of the correct format for the Oracle home directory (first installation of the database software):
$ORACLE_BASE/product/11.1.0/db_1
Database Directories (for Data Storage)
Of course, the Oracle home directory is only for the Oracle binaries. The DBA must also create sepa-rate database directories for locating the datafiles, control files, redo logs, and other files. The Oracle installer suggests a subdirectory of the Oracle base directory for locating these files.
However, the system administrator must create separate directories for the database-related files. Ideally, these directories must be created on separate physical devices. This way, you can distribute physical I/O as well as have different devices for locating your duplexed control files and redo log files. Although the same drive can be used for creating all the directories, it won’t be possible to fully implement the OFA guidelines.
Create multiple database directories using the following format (adjusted for your require-ments), and make sure that the oracle user has write permissions on them:
$ mkdir -p /prod10/oradata/prod$ chown -R oracle:oinstall /prod10/oradata/prod$ chmod -R 775 /prod10/oradata/prod
Flash Recovery Area
As I mentioned earlier in this chapter, Oracle strongly recommends that you maintain a flash recovery area for storing all recovery-related files. You must place the recovery files on a different physical disk from the database files, to prevent a disk failure from affecting both the current data-base files and the recovery files.
Here’s an example showing how to create and set the appropriate owner, group, and permis-sions on the directory for the flash recovery area. I named the subdirectory flash_recovery_area, but it could be anything that you specify using the DB_RECOVERY_FILE_DEST parameter:
$ mkdir -p /prod20/oradata/prod/flash_recovery_area$ chown -R oracle:oinstall /prod20/oradata/prod/flash_recovery_area$ chmod -R 775 /prod20/oradata/prod/flash_recovery_area
Oracle Owner’s Preinstallation TasksAs I mentioned earlier, the system administrator must create an account for the owner of the Oracle software. Usually, this is an account with the name oracle. The Oracle owner—in our case, the oracle user—needs to set the environment variables before the installation of the software.
Setting the Environment Variables
You need to log in as the oracle user and set a number of environment variables. Although all of the environment variables can be set manually, you are better off editing the default shell startup file, which, on my Red Hat Linux server, is the .bash_profile file in the home directory of the oracle user (the /home/oracle directory by default). By editing the shell startup file, you will ensure that the envi-ronment will always be set appropriately each time you log in. Here are the main environment variables that you need to set:

CH A PT E R 9 ■ I N ST A LL I N G AN D U P G R A DI N G T O OR ACL E DA TA B AS E 1 1 G 411
• ORACLE_BASE: The ORACLE_BASE variable is the starting directory for all Oracle installations. All the software files and other files are placed in directories underneath the ORACLE_BASE direc-tory. In our example, the directory is /u01/app/oracle.
• ORACLE_HOME: When you’re installing the Oracle server, the ORACLE_HOME variable should be set to oracle_base/product/10.2.0/db_1. In our case, this will be /u01/app/oracle/product/10.2.0/db_1. The Oracle installer prompts you for the value of the ORACLE_HOME variable during the installation of the software.
■Caution Your environment variables may be slightly different from the ones listed here, depending on your operating system and its version. Always check the operating system–specific installation guides—it’s well worth the effort to read them. The specifics in this chapter are based on a Red Hat Linux operating system.
■Note You can identify existing ORACLE_HOME directories by looking at the contents of the oratab file:
# cat /etc/oratab
If the oratab file exists, it contains lines similar to the following:
prod1:/a03/app/oracle/product/11.1.0:Yprod2:/a04/app/oracle/product/10.2.0:Y
The oratab file’s contents reveal that there is one 11.1 and one 10.2 version of Oracle home on this server.
• PATH: The PATH variable should be set to the following:
$ export PATH=$ORACLE_HOME/bin:/usr/bin:/usr/ccs/bin:/etc:/usr/binx11:/usr/local/bin
• DISPLAY: You may or may not have to set the DISPLAY environment variable. See the “Setting the DISPLAY Variable” sidebar for details.
■Note An easy way to check whether you need to set the DISPLAY variable is to run an x11-base program such as xclock. Simply type the following command in a new xterm, dtterm, or xconsole at the very outset:
$ xclock
You can also specify the complete path to the xclock program this way:
$ /usr/bin/x11/xclock
If the DISPLAY variable is set, you’ll see a small analog clock displayed on your screen. If the DISPLAY variable isn’t set correctly, you’ll see the following message:
$ xclockError: Can't open display:$

412 CH AP T E R 9 ■ I N ST AL L I N G A N D U P G R AD I N G T O OR A CL E DA TA B AS E 1 1 G
• TNS_ADMIN: The TNS_ADMIN variable is used to set the location of the Oracle Net configuration files. By default, the network configuration file, called tnsnames.ora, is located in the $ORACLE_HOME/network/admin directory.
• ORACLE_SID: The important ORACLE_SID variable need not be set if you are not planning to create a database right now.
• ORAENV_ASK: In addition to the environment variables in the .profile file, you need to add another line to source the oraenv file, so all user sessions will automatically read the oraenv file upon logging in as the oracle software user. The oraenv file will prompt the oracle user for the correct SID of the database he or she wants to use. On a system with several database instances, the oraenv file comes in handy in making this choice as soon as you log in. Here’s the line you must add to the .profile file:
. /usr/local/bin/oraenv
• If you set the value of the ORAENV_ASK variable to NO, the current value of ORACLE_SID will be assumed to be the SID you want to use.
SETTING THE DISPLAY VARIABLE
If you’re performing the Oracle installation directly from an X Window System workstation or X terminal connected to the server on which you’re installing the software, just start an X terminal window. No other changes are necessary. If you’re installing the software on a remote system, you must set the DISPLAY environment variable so the X appli-cations will display on your local PC or workstation window.
If you’re using the Bourne, BASH, or Korn shell, enter this command:
$ DISPLAY=localhost:0.0; export DISPLAY
If you’re using the C shell, enter this command:
% setenv DISPLAY localhost:0.0
In both of the preceding commands, replace localhost with the IP address or symbolic name of the host PC or work-station where you want to run the Oracle installer. Here’s an example that sets the DISPLAY variable using an IP address of 174:16.14.15:
$ export DISPLAY=174:16:14:15:0.0
If you’re getting errors when trying to run the Oracle installer (even after setting your DISPLAY environment variable), you may have to use the xhost program to add your local host name to the list of hosts allowed to make connections to the X server on the host where you’re running the Oracle installer. The xhost program is a server access-control program for X windows, and you can add your local host name to the access list for the X Window System as follows:
$ xhost +localhost
Or you can use the following variation, to enable access for anyone, by essentially turning access control off:
$ xhost +access control disabled, clients can connect from any host$
Once you finish installing the Oracle software, you can turn access control off again by using the xhost command with the - option (xhost -).

CH A PT E R 9 ■ I N ST A LL I N G AN D U P G R A DI N G T O OR ACL E DA TA B AS E 1 1 G 413
■Tip It may be a good idea to incorporate as many of the environment variables as possible in the shell startup file in the oracle user’s home directory. This way, when you log in as the oracle user, the variables will already be in force in your shell.
You must also edit the /home/oracle/.bash_profile file as follows, so the environment variables are set correctly each time the user oracle logs in:
umask 022PATH=/bin:/usr/bin:/usr/local/bin:/usr/X11R6/binORACLE_BASE=/u01/app/oracleORACLE_HOME=$ORACLE_BASE/product/11.1.0/db_1PATH=$ORACLE_HOME/bin:$PATHLD_LIBRARY_PATH=$ORACLE_HOME/libexport ORACLE_BASE ORACLE_HOMEexport PATH LD_LIBRARY_PATH
■Tip If you’re installing the Oracle 11.1.0 software on a server where you already have other Oracle databases, make sure you back up those databases first. Delete the ORACLE_HOME environment variable that you’re currently using, and stop all running services if you’re installing software in an already existing Oracle Database 11g release 1 (11.1) home.
A Final Checklist for the InstallationTo ensure that your Oracle installation won’t abort in the middle, make sure you satisfy the following requirements:
• Make sure you have enough temporary space. There is usually only a small amount of tempo-rary space on most UNIX servers—something like 100MB or so. If this is the case on your system, your Oracle installation will fail midway through, because Oracle uses the temporary directory on the server heavily during the installation process. You have two ways to get around this problem. You can either ask your system administrator to increase the size of the temporary directory on the server, or you can change the environment variable for the temporary directory. Usually, you do this by setting the TMPDIR environment variable to something other than /tmp and making sure that there is at least 400MB of space under this temporary directory. Here’s how I changed my temporary space during the Oracle installation:
$ export TMPDIR=/test01/app/oracle/tmp$ export TMP=/test01/app/oracle/tmp
• Set the swap space to a high amount, at least satisfying Oracle’s requirements specified in the operating system–specific installation guide. Oracle provides a matrix recommending varying swap space requirements based on the size of the available RAM. Make sure you allo-cate about 500MB to avoid any swapping or paging problems on the server.
• Modify the UNIX kernel to meet your installation requirements. Even if you install the server software correctly, if kernel parameters such as SHMMAX and SEMMNS are not set high enough and you have a large number of processes in your initialization file, your database creation will fail.

414 CH AP T E R 9 ■ I N ST AL L I N G A N D U P G R AD I N G T O OR A CL E DA TA B AS E 1 1 G
• Set the DISPLAY variable properly so the Oracle installer will come up correctly. If you’re installing the Oracle software directly on the server, you need to change the DISPLAY variable on the server; if you’re installing remotely from a client, you need to set the variable on the client. In most cases, a command such as the following will set up your display correctly:
$ export DISPLAY=<Your IP address or hostname>:0.0
• Sometimes when you are working on a workstation, you will be unable to use the X Window System emulation on the machine, which means the Oracle Universal Installer cannot func-tion in the GUI mode. In these circumstances, use the xhost command in a window on the workstation. Here’s an example:
$ xhost +localhost
• Mount the installation CD correctly, if you’ve chosen to use it to install the software. Just follow your operating system–specific installation guide for the correct CD installation commands.
Accessing the Installation SoftwareOnce you have finished all the preinstallation work, you are ready to install the Oracle Database 11g software. In this chapter, I install Oracle Database 11g Release 1 software on a Linux server as an example. You can install directly from the Oracle software distribution available on CD or DVD. You can also download the software for free, from the Oracle Technology Network web site (http://technet.oracle.com).
Using Oracle Software Packages
The following are the important CDs that are part of the Oracle Enterprise Edition software CD pack:
• Oracle Database 11g CD: This is the only CD you’ll need to install the Oracle Database 11g server software.
• Companion CD: This CD contains additional software that you may want to install for prod-ucts like Oracle JVM, Oracle Multimedia, and Oracle Text.
• Oracle Database 11g Client CD: This CD contains the client software you may need to install on your users’ or developers’ servers.
• Oracle Enterprise Manager CD: This CD contains the Enterprise Manager Grid Control soft-ware, which lets you manage all the databases, servers, and other components from a centralized location. The local OEM Database Control is automatically installed when you create a new Oracle database.
■Caution Make sure you are logged in as the Oracle software owner, oracle, and not as root, when you perform the various installation procedures. Otherwise, your installation process will fail. There are only a couple of times during the installation process when you’ll need to log in as root to perform certain tasks.
In several versions of Linux and UNIX, the Oracle CDs load automatically, but sometimes you may have to use an explicit command, such as the following to mount the CD (make sure you log in as the root user to run these commands):
$ umount /dev/cdrom$ mount /dev/cdrom /mnt/cdrommount: block device /dev/cdrom is write-protected, mounting read-only$

CH A PT E R 9 ■ I N ST A LL I N G AN D U P G R A DI N G T O OR ACL E DA TA B AS E 1 1 G 415
Your Oracle software CD is now mounted for your use, and you should see its files under the CD mount point, which is /mnt/cdrom in our case.
You can move to the /mnt/cdrom directory to view the files on the CD, as shown here:
$ cd /mnt/cdrom$ lsdoc install response runInstaller stage welcome.htm
The runInstaller file is the executable you must run to invoke the Oracle Universal Installer, which helps you install the Oracle server software.
■Note In the installation example that follows, I used the Linux x86–specific Oracle Database 11g version 11.1 software.
Downloading Oracle Software
The Oracle software download site (http://technet.oracle.com) gives clear instructions on how to download and install the software on various operating systems. Once you download the software, you usually need to use either the gunzip (gzip) utility on UNIX and Linux systems or the WinZip utility on Windows to unzip the compressed installation files before you can install the software.
Here’s a brief summary of the Oracle software downloading process: First download the zipped Linux x86 file by FTP. The file name is ship.db.cpio.gz. Once the file is downloaded, the following two steps will extract the software files. The following command unzips the original ship.db.cpio.gz file that I downloaded:
$ gunzip ship.db.cpio.gz
The next command extracts the installation files:
$ cpio -idmv < ship.db.cpio
Once you have extracted the zipped file, you’ll see a new directory named Disk1, which is created as a subdirectory in the directory from which you extracted the zipped file. The Disk1 direc-tory contains several directories and one binary file, runInstaller, which is the executable for invoking the Oracle Universal Installer.
You can use the runInstaller script and invoke the Oracle Universal Installer not just for the initial installation of the Oracle Database 11g software, but also for modifications and additions to the initial software configuration. Ensure your system administrator is nearby, because you may need help with setting the DISPLAY variable for the installer GUI, or you may run into unforeseen space or file privilege problems. You’ll also need the administrator to run the root.sh script (discussed in the next section) as the root user, toward the end of the installation process.
■Tip Make sure you have enough space in the temporary directory, as the Oracle installer creates a lot of files in this directory. Your installation may stop in the middle, and you’ll have to restart it if this happens. About 400MB to 500MB of space in the /tmp directory should be available for the Oracle installer’s use during the installation process.
You can install the Oracle software in the following ways:
• Install directly from the Oracle product CDs.
• Install from software downloaded from the OTN site.
• Copy the software from the product CDs to disk, and install it from disk.

416 CH AP T E R 9 ■ I N ST AL L I N G A N D U P G R AD I N G T O OR A CL E DA TA B AS E 1 1 G
In the next section, I show you how to copy the software from the Oracle product CDs to disk, and to install from there.
Installing the SoftwareYou can install the Oracle server software from the software CD or the downloaded files directly, but Oracle recommends that you perform the installation from a staging directory on your system. If you’re installing Oracle from the CD, first create a staging directory, such as /staging. You can then copy the contents of the CD to your staging directory, as shown here:
$ cp –r /mnt/cdrom /staging
The previous command will recursively copy all the directories on the installation CD to the /staging directory. Installing from disk is slightly faster than installing from the CD. Saving the installation files on disk in this manner will also help you down the road, when you need to invoke the Oracle installer to perform installation-related tasks—you won’t need to locate the CD.
In this section, I detail the interactive installation method, which involves you responding to the installer’s prompts from the command line. I also briefly discuss the less frequently employed auto-mated installation method using response files in the section “Using Response Files to Install Oracle Software” later in this chapter.
To begin the installation process, switch to the appropriate directory and execute the runInstaller script as the oracle user. (If you’re using the extracted files, you’ll start from the Disk1 directory. If you’re using the CD staging area, it’ll be the /staging directory.)
To start from the /staging directory, first go to the directory:
$ cd /staging
Check to make sure the runInstaller executable script is there:
$ lsdoc install response runInstaller stage welcome.htm
Invoke the Oracle Universal Installer by executing the runInstaller script:
$ ./runInstaller[pasu] $ ./runInstallerStarting Oracle Universal Installer . . .Checking Installer requirements . . .Checking operating system version: must be redhat 2.1, UnitedLinux-1.0 or redhat-3 PassedPreparing to launch Oracle Universal Installer from /tmp/OraInstall . . . Please wait . . .
At this point, assuming there are no problems with the DISPLAY variable settings, the GUI version of the Oracle Universal Installer should show up. (If the GUI doesn’t show up on your screen, you probably have to adjust your DISPLAY variable or use the xhost command, as explained earlier.) The following series of windows and prompts will be displayed during the Oracle Database 11g Release 1 server software installation:
1. You’ll see the Welcome to the Oracle Database 11g Installation window, as shown in Figure 9-1. In Oracle Database 11g Release 1, you can choose between the options Basic Installation and Advanced Installation. Basic Installation is the default method, and it quickly installs the Oracle software and, optionally, also creates a general-purpose database for you. The Advanced Installation option will let you upgrade databases to the 11g version, use raw devices or the Automatic Storage Management options for storage, specify different passwords for administrators (like SYS and SYSTEM schemas), configure automatic database backups and Oracle Enterprise Manager (OEM) notifications, and other options.
Choose Advanced Installation and click Next, which will start up the installer in the advanced mode.

CH A PT E R 9 ■ I N ST A LL I N G AN D U P G R A DI N G T O OR ACL E DA TA B AS E 1 1 G 417
Figure 9-1. The Oracle Universal Installer’s welcome window
2. Oracle offers you a choice of installation types in the Select Installation Type window. You can choose one of the following installation types when installing Oracle Database 11g:
• Enterprise Edition: Installs the Oracle database with all of its performance, high avail-ability, and security features to enable the running of mission-critical applications
• Standard Edition: Installs a scaled-down offering suitable for small businesses and depart-ments within a large organization
• Custom: Allows you to choose individual components to install
Choose the Enterprise Edition option (1.28GB) and click Next.
3. The Specify Home Details window is next. You specify the Oracle home name and provide the complete path to the Oracle home directory. If this is the first installation of Oracle Database 11g software on this server, I recommend the following path:
/u01/app/oracle/product/11.1.0/db_1
Click Next after you specify the Oracle home path.
■Caution Oracle recommends that you specify an empty or nonexistent directory for the Oracle home location. Otherwise, Oracle will warn you before letting you proceed further.

418 CH AP T E R 9 ■ I N ST AL L I N G A N D U P G R AD I N G T O OR A CL E DA TA B AS E 1 1 G
4. Oracle will perform product-specific prerequisite checks at this point. Note that the earlier OS-compatibility checks were purely for determining whether Oracle could run the Uni-versal Installer successfully. At this point, the installer verifies that your system meets the minimum necessary operating system requirements for the Oracle Database 11g server software installation. The installer checks the following:
• Operating system
• Operating system packages
• Operating system kernel
• Physical memory
• Swap space
• Network configuration
• Oracle home setting (for compatibility and space)
The installer may simply issue a warning if some minor requirements aren’t met, or it may ask you to bring the system up to par before proceeding further. If your kernel parameters or OS level aren’t correct, for example, there will be a warning that the particular component failed the check and that you need to cancel the installation at this point. Once you fix the kernel parameters or whatever it was that the installer objected to, you can restart the instal-lation process by running the runInstaller script once again.
5. Once you pass the checks without getting any error messages from the installer, as shown in Figure 9-2, click Next.
Figure 9-2. Passing the Oracle Universal Installer’s prerequisite checks

CH A PT E R 9 ■ I N ST A LL I N G AN D U P G R A DI N G T O OR ACL E DA TA B AS E 1 1 G 419
6. The installer displays the Select Configuration Options window. Here, you’re presented with three options, as shown in Figure 9-3:
• Create a Database
• Configure Automatic Storage Management (ASM)
• Install Software Only
Choose the last option to just install the database software, and click Next.
Figure 9-3. Selecting a configuration for the Oracle installation
7. You’ll be shown a Summary window as a final confirmation (see Figure 9-4). Click Install to begin the actual installation of the Oracle binaries.

420 CH AP T E R 9 ■ I N ST AL L I N G A N D U P G R AD I N G T O OR A CL E DA TA B AS E 1 1 G
Figure 9-4. Summary of installation settings
8. The Install window appears and shows the components as they are installed on your server. At the bottom of this screen, you’ll also see the directory name to which the installation log is being written. It can sometimes be nerve-wracking to watch the installer seemingly stall on some action, but you can monitor what the installer is doing on the server by using the tail command and monitoring the installation log file in a separate window.
9. The install process will pause briefly to ask you to run a privileges script named root.sh as the system administrator (root). Open a different window and run the /u01/app/oracle/product/11.1/db_1/root.sh script as root. The root.sh script sets the values for the ORACLE_OWNER and ORACLE_HOME environment variables. The script adds the appropriate values to the /etc/oratab file.
In addition, if you’re installing Oracle software for the first time on this server, the installer also asks the root user to run orainstRoot.sh, located in the /u01/app/oracle/oraInventory directory.
10. Once you’ve run one or both scripts as required, click OK. You’ll immediately see the End of Installation window, which signifies the successful end of the Oracle Database 11g software installation.
11. Click Exit and confirm the choice to end the Oracle Universal Installer session.
Your Oracle Database 11g server installation is now complete.
■Note Oracle Database 11g supports multiple Oracle homes, meaning that you can install the server software in different Oracle directories.

CH A PT E R 9 ■ I N ST A LL I N G AN D U P G R A DI N G T O OR ACL E DA TA B AS E 1 1 G 421
Using Response Files to Install Oracle SoftwareBy creating a response file and specifying this file when you start the Oracle Universal Installer, you can automate some or all of the Oracle Database installation. When you use a response file, you can run the Oracle Universal Installer in one of the following modes, depending on whether you specify all of the required information or not:
• Silent mode: Oracle Universal Installer runs in silent mode if you use a response file that spec-ifies all the required information. None of the Oracle Universal Installer windows are displayed.
• Suppressed mode: Oracle Universal Installer runs in suppressed mode if you do not specify all the required information in the response file. Oracle Universal Installer displays only the windows that prompt you for the information that you did not specify.
The silent mode is useful when you can’t be physically present for an installation—the response file will contain the responses to the questions asked by the installer. This method can be very useful for client installations when you can’t physically visit and install the software on all the different client servers. It is also particularly useful when you need to perform multiple installations on simi-larly configured systems, because the response file will ensure uniformity and consistency in the product installation. For example, suppose you’re working in an organization that has multiple geographical locations and client installations are required, but there are no skilled database personnel at some of the locations—the silent mode is the simplest way to install Oracle in such as situation. The silent mode is also useful if your server doesn’t have the X Window System software.
Oracle supplies different response files for the installation of various types of software. I provide a list of the important response files Oracle provides, later in this section.
Before you can run the Oracle installation in either silent or suppressed mode, you need to create the oraInst.loc file, which lists the Oracle products on your server, and then create the response files themselves.
Creating the oraInst.loc File
If you have never had an Oracle installation on your server, you must create the oraInst.loc file in the /etc directory as the root user. If you had an older Oracle installation (even one that has been uninstalled), you’ll have this file already. The file provides the installer with the location of the inven-tory of Oracle products installed on your server.
To create the oraInst.loc file, follow these steps:
1. Log in as the root user and change to the /etc directory:
# cd /etc
2. Create the oraInst.loc file with the following two lines:
inventory_loc=ORACLE_BASE/oraInventoryinst_group= oinstall
3. Enter the following commands to set the appropriate owner, group, and permissions on the oraInst.loc file:
# chown oracle:oinstall oraInst.loc# chmod 664 oraInst.loc
Creating the Response Files
The easiest way to create a response file is to edit one of the Oracle-provided response file templates, located in the /db/response directory on the CD. If you create a staging directory, the response files will be in the /staging/response directory. If you don’t create a staging directory, they’ll be in the

422 CH AP T E R 9 ■ I N ST AL L I N G A N D U P G R AD I N G T O OR A CL E DA TA B AS E 1 1 G
/Disk1/response directory. These are the response file templates provided by Oracle, with each one meant for a specific purpose:
• enterprise.rsp: Oracle Database 11g Enterprise version
• standard.rsp: Oracle Database 11g Standard version
• netca.rsp: Oracle Net Configuration Assistant
• custom.rsp: Custom installation of Oracle Database 11g
• emca.rsp: Enterprise Manager Configuration Assistant
• dbca.rsp: Database Configuration Assistant
The response file for the Enterprise Edition installation is copied from the CD during installa-tion, along with the other files and scripts. It’s located in a separate directory called response, which is located in the same directory as the runInstaller executable file. You need to copy the response file to a directory on your own system and edit it according to your needs. The editing of the response file may take some time, but it’s well worth it if you’re planning multiple installations.
Once you’ve edited the response file, you can start the automatic silent installation. Make sure you set your DISPLAY variable correctly before using the silent mode for installation. When you’re ready to start, run this command:
$ cd $CDROM_mount_directory$ ./runInstaller -silent –response[Response File Name]
The preceding command will run the Oracle Universal Installer in the silent mode. You must include responses for all the prompts in the response file in order to specify the -silent option. You won’t see any installer screens—only the progress information in the terminal.
If you include responses for some of the prompts in the response file, and just use the runInstaller command without the -silent option, the Oracle Universal Installer will run in suppressed mode. During this type of installation, the installer displays only those screens for which you didn’t specify any information.
When Oracle finishes a silent installation, it will display the following message on the screen:
The installation of Oracle Database 11g was successful.Please check /u01/app/oracle/oraInventory/logs/silentInstall.log for more details.
At this point, you need to manually run the root.sh script, just as you would in the normal manual installation procedure. You’ll find the root.sh script in the /u01/app/oracle/product/10.2.0.0.0 directory. After the root.sh script runs successfully, you’re done with the silent installa-tion of Oracle. Of course, you still have to create your database and configure the networking components.
Oracle provides a whole set of response files for several types of installations, including server and client installations. You’ll probably use the Oracle client response file more frequently, because it makes it unnecessary for you to physically visit all the client stations for a new installation.
After the InstallationAfter you’ve installed the Oracle Database 11g server software, you still have some chores left to do. You need to perform several post-installation steps carefully to make sure that the software func-tions correctly. As with the installation procedures, the system administrator and the oracle user are responsible for specific tasks. Let’s look at the important tasks that the system administrator and the Oracle software owner (user oracle here) must perform after the server software installation is finished.

CH A PT E R 9 ■ I N ST A LL I N G AN D U P G R A DI N G T O OR ACL E DA TA B AS E 1 1 G 423
System Administrator’s Post-Installation TasksThe UNIX/Linux administrator has to perform the following tasks after the installation of Oracle software is complete:
• Update the database shutdown and startup scripts.
• Create additional operating system accounts.
Updating Shutdown and Startup Scripts
The Oracle software comes with sample scripts that automatically start up and shut down the data-base, and the system administrator must add them to the system startup and shutdown scripts. When installed, these scripts will start up and shut down the Oracle database whenever the server is booted up or shut down, ensuring that the database is always closed cleanly and that you don’t have to manually bring up the database after system crashes. These sample scripts are located in the $ORACLE_HOME/bin directory. To start a database automatically upon system reboot, use the dbstart.sh script. To stop a database upon system shutdown, use the dbshut.sh script. Both these files are designed to be run as part of the system boot procedure.
In most versions of UNIX and Linux, the contents of the /etc/oratab file will determine whether your database will automatically start up or shut down each time the server starts up and shuts down. The /etc/oratab file is simply a list of the databases running on a server, each with a yes or no indicator for automatic startup and shutdown. If you’re creating a new database named finance1, and you want to automate the startup and shutdown process for it, here’s what you would need to add to the oratab file:
finance1:/u01/app/oracle/product/11.1/db_1:Y
The entry in the /etc/oratab file has three components separated by colons: the database name, the Oracle home location, and a Y or N indicating whether the database should automatically start and stop when the host starts up or shuts down. If you want automatic startup and shutdown, specify Y at the end of the line; otherwise specify N.
The UNIX or Linux administrator must add the database startup and shutdown scripts to the system startup and shutdown scripts. For example, on an HP UNIX system, the rc scripts (in the /sbin directory) are run automatically whenever the system moves from one run level to the other. When the system moves to run level 0 (shutdown), the rc script halts the UNIX system by stopping certain daemons and server processes. Similarly, when the run level changes from 0 to 1, the rc script starts the system by starting the necessary daemons and server processes. The system administrator has to include Oracle-related information in the /sbin/rc script to automate the shutdown and startup of the Oracle databases whenever the UNIX server stops and starts for any reason.
Following is an example of the startup information that the system administrator needs to add to the rc script (you must modify the generic dbstart.sh and dbshut.sh scripts to reflect particular database names):
/u01/app/oracle/product/11.1.0/bin/dbstart_finance/u01/app/oracle/product/11.1.0/bin/lsnrctl start
And here is an example of the shutdown information:
/u01/app/oracle/product/11.1.0/bin/dbshut_finance/u01/app/oracle/product/11.1.0/bin/lsnrctl stop
The script will determine whether to use the startup or shutdown scripts after testing the system run level. The first lines in the preceding startup and shutdown information will start and stop the database (named finance in our example). The second lines will start and stop the Oracle listener process, which helps you establish communication with the database server (the Oracle listener is discussed in detail in Chapter 11).

424 CH AP T E R 9 ■ I N ST AL L I N G A N D U P G R AD I N G T O OR A CL E DA TA B AS E 1 1 G
Creating Additional Operating System Accounts
After the installation is complete, the system administrator must create any other necessary user accounts. All the DBA users must be part of the OSDBA group.
Oracle Owner’s Post-Installation TasksThe oracle user has a set of tasks to perform after the Oracle server software is installed. These include setting the correct environment, applying any necessary Oracle patches, and setting the initialization parameters.
Setting the Environment
Before you can create a database on your system, you need to set some environment variables. The most important of these are the ORACLE_HOME, ORACLE_SID, TNS_ADMIN, CLASS_PATH, TWO_TASK, and LD_LIBRARY_PATH variables. Please refer to your operating system–specific guidelines before you set these and other environment variables.
As the oracle user, you also need to initialize the oraenv script (the coraenv script if you’re using the C shell). This script lets you ensure a common environment for all Oracle users. The oraenv script is initialized by including it in the .login or .profile file. For example, for a single-instance database in the Korn shell, this is what you’d need to add to your .login or .profile file:
ORAENV_ASK=NO. /usr/local/bin/oraenv
Miscellaneous Tasks
You need to perform some additional tasks as the oracle user. Make sure you check the patch direc-tory on your CD and apply any available patches. You also need to ensure that your databases are a part of the /etc/oratab file, so they can be automatically started up and shut down.
■Tip Back up the root.sh script, as it may be overwritten during additional Oracle product installations.
Setting Initialization Parameters
You also have to edit the sample initialization file and modify it for your needs. After you create the database, make sure you create an SPFILE, which is a more sophisticated way of managing your initialization parameters than the traditional init.ora file. Creating SPFILEs is discussed in detail in Chapter 10.
THE ORATAB FILE
The oratab file, which is usually located in the /etc directory on UNIX systems, is useful for several reasons. First, you can use this file to specify whether you want automatic start/stop procedures in place for your databases. Second, oraenv reads the contents of the /etc/oratab file during the setting of the environment variables. If you want to back up all the databases on the server in sequence, you can use the oratab file to provide a list of all the databases the backup script must include.

CH A PT E R 9 ■ I N ST A LL I N G AN D U P G R A DI N G T O OR ACL E DA TA B AS E 1 1 G 425
Configuring Oracle Net Services
To enable connectivity to the database, you must configure Oracle Net Services. The configuration tasks include starting the listener process or, if the listener is already running on the server, making sure your databases are registered with it. All databases automatically register with the listener when they are created.
We haven’t covered creating databases yet, so you probably won’t have to configure the network connections at this point. You’ll learn all about connectivity in Chapter 11, which discusses Oracle Net Services.
Uninstalling OracleSometimes, your installation process may get messed up in the middle, or a lack of disk space may force you to abort the installation abruptly. In this case, the best thing is to simply uninstall all the components that you have already installed. You can install again from scratch when you are ready. There may also be times when you need to remove Oracle software from your server. Before you remove the software, make sure you remove the databases from the server.
During an installation
• Oracle automatically removes all files, including files that belong to configuration assistants and patch sets, during the uninstallation process.
• The installer automatically cleans up all the Windows registry entries.
The following two sections list the simple steps you need to follow to uninstall first the Oracle databases and then the Oracle software.
Removing All Oracle Databases Running on Your ServerBefore you remove the Oracle software, first remove all databases from the server, using the Data-base Configuration Assistant (DBCA). Log in as the oracle user, and get the list of databases from a file such as /etc/oratab. Here’s an example:
$ cat /etc/oratabprod1:/a03/app/oracle/product/10.2.:Nprod2:/a03/app/oracle/product/10.2:Ytest1:/a03/app/oracle/product/11.1:Ntest2:/a03/app/oracle/product/11.1:Y$
For each database listed in the /etc/oratab file, follow these steps:
1. Use the oraenv or the coraenv script to set up the environment correctly for the particular database you want to remove. Here’s an example that removes the database named prod1 from the server:
$ . oraenvORACLE_SID = [prod2] ? prod1$
2. Start the DBCA by issuing the following command:
$ dbca
3. Click Next when you see the Welcome window.
4. Select Delete a Database in the Operations window that appears. Click Next.
426 CH AP T E R 9 ■ I N ST AL L I N G A N D U P G R AD I N G T O OR A CL E DA TA B AS E 1 1 G
5. Select the database you want to remove, click Finish, and confirm your choice in the next window.
6. After the database is removed, you are prompted to click Yes to go back to the Operations window and delete more databases or No to exit the DBCA session.
Removing the Oracle SoftwareTo remove the Oracle software, log in as the oracle user and follow these steps:
1. Set the ORACLE_HOME environment variable to specify the path of your Oracle home directory, as shown here:
$ export ORACLE_HOME=/u01/app/oracle/product/11.1.0/db_1
2. Stop all Oracle processes that may be running, using the appropriate commands, as shown here:
• Database Control: $ORACLE_HOME/bin/emctl stop dbconsole
• Oracle Net Listener: $ORACLE_HOME/bin/lsnrctl stop
3. Start the Oracle installer by using the following command:
$ /staging/runInstaller
4. Click Installed Products in the Welcome window.
5. The Inventory Contents tab is displayed, showing you all Oracle homes in your database. Select the Oracle home you wish to remove, and click the Remove button. If there are any dependencies, the installer may not allow you to uninstall the products right away. Click Yes in the Confirmation dialog that appears next.
When the uninstallation is over, click Cancel to exit, and click Yes. Note that no files will remain in the Oracle home directory after a complete uninstallation of the software.
Upgrading to Oracle Database 11gIn the previous section of this chapter, you’ve learned how to install the Oracle Database 11g server software. Of course, the next step is to run a database with this software. In most cases, you already have Oracle databases running with older release server software. You must therefore upgrade your current databases to the Oracle Database 11g release. Chapter 10 shows you how to create an Oracle database from scratch. This chapter shows you how to upgrade a pre–Oracle Database 11g release database to the Oracle Database 11g release. The chapter first reviews the available methods of upgrading to the new version and then explains how to use the new Database Upgrade Assistant (DBUA) tool as well as how to upgrade manually, which includes the use of Oracle’s new Pre-Upgrade Information Tool and the Post-Upgrade Status Tool.
Routes to Oracle Database 11gOracle has made the process of upgrading from Oracle9i (or even older releases) or an Oracle Database 10g database simple by automating a large portion of the upgrade process. I discuss the different upgrade paths to migrate to Oracle Database 11g in this section.
Depending on your current database release, you may or may not be able to directly upgrade to the Oracle Database 11g Release 1 (11.1) version. You can directly upgrade to Oracle Database 11g Release 1 if your current database is based on an Oracle 9.2.0.4 or newer release. For Oracle database releases older than Oracle 9.2.0.4, you have to migrate via one or two intermediate releases, as shown by the following upgrade paths:

CH A PT E R 9 ■ I N ST A LL I N G AN D U P G R A DI N G T O OR ACL E DA TA B AS E 1 1 G 427
• 7.3.3 (or lower) => 7.3.4 => 9.2.0.8 => 11.1
• 8.0.5 (or lower) => 8.0.6 => 9.2.0.8 => 11.1
• 8.1.7 (or lower) => 8.1.7.4 => 9.2.0.8 => 11.1
• 9.0.1.3 (or lower) => 9.0.1.4 => 9.2.0.8 => 11.1
• 9.2.0.3 (or lower) => 9.2.0.8 => 11.1
For example, if you want to upgrade a database from Release 8.1.6, the following would be your game plan: upgrade Release 8.1.6 to 8.1.7; upgrade 8.1.7 to Release 9.2.0.8; upgrade Release 9.2.0.8 to Release 11.1.
Upgrade Methods and ToolsThere are two ways for you to upgrade: the traditional manual method or the Database Upgrade Assistant method, which automates the upgrade process. The DBUA is an improved version of the Oracle Data Migration Assistant, which was a tool provided in previous versions of the database.
■Note The Oracle Database 11g upgrade process is somewhat automatic even if you do it manually. The following sections will show how the manual process uses the STARTUP UPGRADE command. After running this command, you have to run the main upgrade script, which upgrades your installation without causing dependency problems. The database determines the order in which it should upgrade components by querying the DBA_ SERVER_REGISTRY data dictionary view. It will also query this view for the upgrade status of each component after the conclusion of the database upgrade. The new Post-Upgrade Status Tool, which I discuss later in this chapter, also uses the DBA_SERVER_REGISTRY view.
The DBA_REGISTRY or the DBA_SERVER_REGISTRY view both contain the upgrade status of individual database components. These views are almost identical, except that the DBA_REGISTRY view has the extra namespace column. If you set the namespace to SERVER, you get identical results using either data dictionary view.
In the past, the upgrade process required you to run various scripts throughout the process, but the Oracle Database 11g upgrade process only requires a single upgrade script (there’s an example of the use of this script in the “Upgrading Manually” section later).
The Manual Upgrade ProcessIf you use the manual upgrade process, you must perform due diligence: this means removing or changing all your obsolete initialization parameters and running all the Oracle-provided database upgrade scripts. This method’s advantage is that you control the whole upgrade process. There are drawbacks to the manual method, however: you must back up the database yourself, you must use the correct initialization parameters, and you must give the System tablespace adequate free space.
■Note The old Export and Import utilities are still available, should you wish to use them, though they’ve been supplanted by the Data Pump Export and Import utilities. They are still pretty useful if you have a very small database.

428 CH AP T E R 9 ■ I N ST AL L I N G A N D U P G R AD I N G T O OR A CL E DA TA B AS E 1 1 G
The Database Upgrade AssistantIf you use the DBUA, it does the preinstallation checks for you and automatically manages the upgrade process by performing the following tasks:
• Performs initialization checks, including for invalid data types, unsupported character sets, invalid user accounts, and sufficient free space in the tablespaces
• Backs up the database
• Creates any necessary objects
• Invokes the correct upgrade script
• Shows the progress of the upgrade process
• Creates the parameter and listener files in the new Oracle home
■Tip The DBUA uses a GUI, but you can also use it in the silent mode.
The Pre-Upgrade Information ToolBefore you start an upgrade, you have to check your system for any necessary changes. Luckily, we have the Pre-Upgrade Information Tool, which does this for us. The Pre-Upgrade Information Tool, which is implemented by executing an Oracle-supplied script, helps you collect various critical pieces of information before the upgrade process begins. Too often in the past, DBAs have needed to restart the upgrade process because of initialization features that were incompatible or tablespace sizes that were too small, and this new tool helps avoid that situation.
■Note The manual process and the DBUA both use the same Pre-Upgrade Information Tool. The DBUA automat-ically runs it as part of this initial check.
The Pre-Upgrade Information Tool provides information about the following:
• The Sysaux tablespace: Before you run the upgrade script, you have to create the Sysaux tablespace. The Pre-Upgrade Information Tool will recommend the correct settings for this.
• Log files: The new version of Oracle needs redo log files to be at least 4MB. If your existing log files are smaller than this, the Pre-Upgrade Information Tool will tell you to increase their size.
• Tablespace sizes: If your existing tablespaces lack the free space required, the Pre-Upgrade Information Tool will tell you so you can increase their size.
• Initialization parameters: The Pre-Upgrade Information Tool tells you which initialization parameters you should remove (because they are deprecated and obsolete) and which you should add before you can upgrade.
• Database versions and compatibility level: The Pre-Upgrade Information Tool lets you know whether you need to change the compatibility level of your database with the COMPATIBLE initialization parameter.
• Time estimates: The Pre-Upgrade Information Tool will give you an estimate of how long the upgrade will take.
The Pre-Upgrade Information Tool will do a lot of the work for you. Just make sure that you implement the recommended changes, and you will be ready to upgrade to Oracle Database 11g.

CH A PT E R 9 ■ I N ST A LL I N G AN D U P G R A DI N G T O OR ACL E DA TA B AS E 1 1 G 429
The Pre-Upgrade Information Tool is actually a SQL script, called utlu111i.sql (in $ORACLE_HOME/rdbms/admin). Here’s how you invoke the Pre-Upgrade Information Tool:
SQL> @$ORACLE_HOME/rdbms/admin/utlu111i.sql
The Post-Upgrade Status ToolThe new Post-Upgrade Status Tool gives you an accurate summary of the upgrade process and lists any necessary corrective steps that need to be taken. No error messages during the upgrade process doesn’t guarantee that you upgraded successfully—the Post-Upgrade Status Tool looks in DBA_SERVER_REGISTRY to ascertain the status of every database component. If one or more components didn’t upgrade correctly, the Post-Upgrade Status Tool will show the details.
■Tip The Post-Upgrade Status Tool runs automatically when you use the DBUA. You have to run it yourself if you are doing a manual upgrade.
DATABASE COMPATIBILITY
The database compatibility level is set by the value of the COMPATIBLE initialization parameter—the compatibility level specifies the release with which the database must remain compatible. This is important because the COMPAT-IBLE parameter helps you guarantee backward compatibility with an earlier release. The parameter’s default value in Oracle Database 11g Release 1 is 11.0.0.0, and the minimum value is 10.0.0. When you are upgrading to Oracle Database 11g, and you set the COMPATIBLE parameter to 10.0.0, it means that you can undo the changes made by the upgrade process and go back to the older release if the upgrade doesn’t pan out. Otherwise, the only way to go back to the older release is to restore from a backup.
Oracle recommends that you set the COMPATIBLE parameter to 10.0.0 before you upgrade to Oracle Database 11g, which ensures that you can always revert to the Oracle Database 10g release if necessary. However, the price you pay for this convenience is that you can only use a limited subset of the new Oracle Database 11g features. After you’ve upgraded your database and are sure that you want to continue further, you can set the COMPATIBLE initial-ization parameter in your SPFILE to match the new release number (11.1.0).
The Post-Upgrade Status Tool provides you with the following information:
• The name and status (VALID or INVALID) of each database component
• The version compatibility of the component with the current database version
• Suggestions for corrective action if it finds invalid components (such as the names of appro-priate scripts to run)
The Post-Upgrade Status Tool is also a SQL script, called utlu111s.sql and located in the $ORACLE_HOME/rdbms/admin directory.
While manual upgrades are easy, the burden of due diligence is on you, and you can lose a lot of time if you make any mistakes.
■Tip Which of the two upgrade methods (DBUA or manual upgrade) is superior? The underlying scripts and upgrade procedures are identical for both methods—choose the method you’re most comfortable with.

430 CH AP T E R 9 ■ I N ST AL L I N G A N D U P G R AD I N G T O OR A CL E DA TA B AS E 1 1 G
Preparing the Database for the UpgradeBefore you upgrade to Oracle Database 11g, you must be aware of the following changes concerning privileges, timestamps, and the Oracle Database Vault.
Deprecated CONNECT Role
In Oracle Database 11g, the CONNECT role has only the CREATE SESSION privilege and nothing else. In previous versions, the CONNECT role had other privileges, which are automatically revoked during an upgrade to Oracle Database 10g. If you think any of the users with the CONNECT role in the previous release need the privileges that used to be a part of the CONNECT role, you must grant the specific required privileges prior to upgrading to Oracle Database 11g.
Timestamp with Time Zone Data Type
If the time zone versions used by the Oracle Database 11g server and the database that’s being upgraded are different, the upgrade will fail. To avoid this, you must first update the existing data-base to time zone file version 4 (path 5632264—TZ v4 FILE).
Disable Oracle Database Vault
You must disable the Oracle Database Vault before upgrading the database, in case you’ve enabled it.
Upgrading with the DBUAThe DBUA combines the work of the Pre-Upgrade Information Tool and the manual upgrade process. The DBUA performs the following pre-upgrade steps automatically:
• Sets ORACLE_HOME to the new Oracle Database 11g locations.
• Changes the oratab file entries to the new location.
• Copies your current init.ora file to the new Oracle Database 11g default init.ora location ($ORACLE_HOME/dbs in UNIX and Linux systems).
• Checks that your tablespaces have adequate space before the upgrade process begins. These checks also cover the undo tablespace and the rollback segments.
• Checks for unsupported character sets and invalid data types and usernames, and so on.
• Performs backups, if you choose.
• Updates obsolete initialization parameters.
• Configures the database with the Enterprise Manager, if you choose.
• Writes detailed trace and log files, as well as showing the upgrade progress.
The DBUA can upgrade not only a single instance configuration, but also Oracle Real Applica-tion Clusters and standby database configurations as well.
Starting the DBUAStart the DBUA by simply typing dbua at the operating system prompt. You have to log in as the oracle user first. On a Windows server, you start the DBUA tool by going to Start ➤ All Programs ➤ Oracle ➤ Configuration and Migration Tools ➤ Database Upgrade Assistant.
As mentioned previously, you can do a silent upgrade using the DBUA if you don’t want to use the GUI. This means you won’t see any prompts when you invoke the DBUA.

CH A PT E R 9 ■ I N ST A LL I N G AN D U P G R A DI N G T O OR ACL E DA TA B AS E 1 1 G 431
Here’s how you would invoke the DBUA in the silent mode for a database called nina:
$ dbua -silent –dbName nina
That’s it. Your current database will be migrated to the Oracle Database 11g release.
Running the DBUALet’s take a look at the steps in the automatic upgrade process using the DBUA from the command line.
1. Invoke the DBUA with this command:
$ dbua
2. The DBUA GUI Welcome window is displayed, as shown in Figure 9-5. Click Next.
Figure 9-5. The DBUA Welcome window
3. In the Selecting a Database Instance window, first ensure that the database you want to upgrade is running. Then select the instance you want to upgrade, and click Next.
4. In the Recompile Invalid Objects window, select the option to recompile invalid objects. The upgrade process always invalidates several database objects, and you have the option of letting the DBUA automatically recompile invalid database objects as soon as the upgrade is over.

432 CH AP T E R 9 ■ I N ST AL L I N G A N D U P G R AD I N G T O OR A CL E DA TA B AS E 1 1 G
■Tip Telling Oracle to recompile invalid objects as part of the upgrade process is the same as running the utlrp.sql script as part of a manual upgrade.
5. In the next window, Choosing a Database Backup Procedure, you can select the option to do a cold backup of your database. If you have already made backups, choose the I Have Already Backed Up My Database option.
■Tip If the upgrade process doesn’t go well, and you need to go back to the pre-upgrade database, the DBUA-created database backup makes it easy to do so. You can also make a backup manually, prior to starting the upgrade process. If you choose the option to let the DBUA do the backup, it will back up the database files to the file location
you specify in the Backup Directory field before it starts the upgrade of the database to the 11.1.0 release. The DBUA will also create a file called db_name_restore.sh (db_name_restore.bat in a Windows system), which enables you to easily restore the current database files if necessary.
6. In the Management Options window, you can choose to configure the OEM. The options for database control are the Grid Control or Database Control version of the OEM. The Database Control component is bundled with the installation package, and Oracle automatically installs it; the Grid Control must be installed separately. If you haven’t installed the Grid Control software, choose the Database Control option at this point.
7. In the Database Credentials window, you have to choose passwords for the default Oracle users, such as SYSMAN and DBSNMP.
8. In the Recovery Configuration window, you can choose to specify a flash recovery area as well as to enable archiving.
9. In the Network Configuration window, you can use the Listener tab to choose whether you want to register the upgraded database with selected listeners or all the listeners. If you have directory services configured in the new Oracle home, you must use the Directory Service tab and choose to either register the upgraded database with your directory service or not.
10. In the Upgrade Summary window, shown in Figure 9-6,the names of the source and target databases and the database versions are displayed, along with a list of all obsolete and new initialization parameters. An estimate of the time it’ll take to upgrade the database is also provided. The DBUA automatically shuts down the database that is being upgraded before it starts the upgrade process. Click Finish to begin.

CH A PT E R 9 ■ I N ST A LL I N G AN D U P G R A DI N G T O OR ACL E DA TA B AS E 1 1 G 433
Figure 9-6. The Upgrade Results window
11. When the database upgrade is finished, you’ll see the results in the Upgrade Results window for you to review. You have three options at this point:
• Configure database passwords.
• Restore the database to what it was before the upgrade and revert all changes made to the database.
• Close the window to finish the installation.
Restoring the Pre-Upgrade DatabaseIf you aren’t sure you want to upgrade to the new version at the conclusion of the DBUA upgrade process, you can simply click the Restore button to revert to the previous database version. If the DBUA backed up your database, then Oracle will automatically restore the original database and the original database settings. If the DBUA didn’t do the backup, the DBUA can’t automatically revert the database to the previous version. You’ll have to use your backups to manually restore the data-base from the earlier version.
You can also run an Oracle-provided script at a later time to go back to the previous database. Oracle automatically creates this script when you select to back up the database during the begin-ning of the upgrade process.

434 CH AP T E R 9 ■ I N ST AL L I N G A N D U P G R AD I N G T O OR A CL E DA TA B AS E 1 1 G
Upgrading ManuallyLet’s step through the manual database upgrade process in this section so you understand what happens during a database upgrade. Recall that the DBUA does a lot of the following steps for you.
Upgrade and Downgrade ScriptsFollowing are the various scripts you use for upgrading to Oracle Database 11g. You’ll find all these scripts in the $ORACLE_HOME/rdbms/admin directory.
• catdwgrd.sql enables a direct downgrade from the Oracle Database 11g release to the Oracle Database 11g release from which you upgraded.
• catupgrd.sql enables a direct upgrading to the Oracle Database 11g release.
• utlu111i.sql analyzes the database you’re upgrading and shows the requirements and issues for upgrading to Oracle Database 11g.
• utlu111s.sql shows the component upgrade status after upgrading to Release 11.1.
• utlrp.sql recompiles PL/SQL modules such as packages, procedures, and types that are in an invalid state.
• utluppset.sq performs upgrade actions that don’t require you to keep the database in upgrade mode.
Following is the list of steps to manually upgrade to Oracle Database 11g:
1. Create a spool file.
2. Log in as a user with the SYSDBA privilege, and run the Pre-Upgrade Information Tool. Make any changes it recommends.
3. Back up the database you’re going to upgrade.
4. Copy the current init.ora file to the new Oracle Database 11g init.ora file location.
5. Shut down the database and restart it under the new Oracle 11g home in the STARTUP UPGRADE mode.
6. Create the required Sysaux tablespace.
7. Run the catupgrd.sql upgrade script.
8. Check to see if any objects became invalidated during the database upgrade.
9. Run the utlrp.sql script to recompile any objects that became invalid during the database upgrade.
10. Run the Post-Upgrade Status Tool.
11. End the spool file.
12. Shut down and start up the new database.
In the following sections, I explain each of the upgrade actions I listed.
Creating a Spool FileCreate a spool file to record the upgrade process so that you can easily review it later.
SQL> SPOOL upgrade.log

CH A PT E R 9 ■ I N ST A LL I N G AN D U P G R A DI N G T O OR ACL E DA TA B AS E 1 1 G 435
Running the Pre-Upgrade Information ToolFirst, copy the Pre-Upgrade Information Tool (utlu11i.sql script) from the Oracle Database 11g $ORACLE_HOME/rdbms/admin directory to a temporary directory such as /u01/app/oracle/upgrade, for example. Log into SQL*Plus as the user SYS. To start the Pre-Upgrade Information Tool, run the following:
SQL> @/u01/app/oracle/upgrade/utlu11i.sql
To see the results of the pre-upgrade check, turn spooling off with the following command:
SQL> spool off
Check the upgrade.log spool file to see if you meet all upgrade requirements. Listing 9-1 shows part of the output from a sample run.
Listing 9-1. Partial Output of the Pre-Upgrade Information Tool
SQL> @utlu111i.sqlOracle Database 11.1 Pre-Upgrade Information Tool 01-30-2008 05:33:22.**********************************************************************Database:**********************************************************************--> name: ORCL10--> version: 10.2.0.1.0--> compatible: 10.2.0.1.0--> blocksize: 8192--> platform: Linux IA (32-bit)--> timezone file: V2.**********************************************************************Tablespaces: [make adjustments in the current environment]**********************************************************************--> SYSTEM tablespace is adequate for the upgrade..... minimum required size: 723 MB.... AUTOEXTEND additional space required: 243 MB--> UNDOTBS1 tablespace is adequate for the upgrade..... minimum required size: 471 MB.... AUTOEXTEND additional space required: 441 MB--> SYSAUX tablespace is adequate for the upgrade..... minimum required size: 412 MB.... AUTOEXTEND additional space required: 182 MB--> TEMP tablespace is adequate for the upgrade..... minimum required size: 61 MB.... AUTOEXTEND additional space required: 41 MB--> EXAMPLE tablespace is adequate for the upgrade..... minimum required size: 69 MB.**********************************************************************Update Parameters: [Update Oracle Database 11.1 init.ora or spfile]**********************************************************************WARNING: --> "sga_target" needs to be increased to at least 336 MB.**********************************************************************Renamed Parameters: [Update Oracle Database 11.1 init.ora or spfile]

436 CH AP T E R 9 ■ I N ST AL L I N G A N D U P G R AD I N G T O OR A CL E DA TA B AS E 1 1 G
**********************************************************************-- No renamed parameters found. No changes are required..**********************************************************************Obsolete/Deprecated Parameters: [Update Oracle Database 11.1 init.ora or spfile]**********************************************************************--> "background_dump_dest" replaced by "diagnostic_dest"--> "user_dump_dest" replaced by "diagnostic_dest"--> "core_dump_dest" replaced by "diagnostic_dest".**********************************************************************Components: [The following database components will be upgraded or installed]**********************************************************************--> Oracle Catalog Views [upgrade] VALID--> Oracle Packages and Types [upgrade] VALID--> JServer JAVA Virtual Machine [upgrade] VALID--> Oracle XDK for Java [upgrade] VALID--> Oracle Workspace Manager [upgrade] VALID--> OLAP Analytic Workspace [upgrade] VALID--> OLAP Catalog [upgrade] VALID--> EM Repository [upgrade] VALID--> Oracle Text [upgrade] VALID--> Oracle XML Database [upgrade] VALID--> Oracle Java Packages [upgrade] VALID--> Oracle interMedia [upgrade] VALID--> Spatial [upgrade] VALID--> Data Mining [upgrade] VALID--> Expression Filter [upgrade] VALID--> Rule Manager [upgrade] VALID--> Oracle OLAP API [upgrade] VALID.**********************************************************************Miscellaneous Warnings**********************************************************************WARNING: --> Database is using an old timezone file version..... Patch the 10.2.0.1.0 database to timezone file version 4.... BEFORE upgrading the database. Re-run utlu111i.sql after.... patching the database to record the new timezone file version.WARNING: --> Database contains stale optimizer statistics..... Refer to the 11g Upgrade Guide for instructions to update.... statistics prior to upgrading the database..... Component Schemas with stale statistics:.... SYS.... OLAPSYS.... SYSMAN.... CTXSYS.... XDBWARNING: --> Database contains schemas with objects dependent on networkpackages..... Refer to the 11g Upgrade Guide for instructions to configure Network ACLs..... USER SYSMAN has dependent objects.WARNING: --> EM Database Control Repository exists in the database..... Direct downgrade of EM Database Control is not supported. Refer to the.... 11g Upgrade Guide for instructions to save the EM data prior to upgrade.

CH A PT E R 9 ■ I N ST A LL I N G AN D U P G R A DI N G T O OR ACL E DA TA B AS E 1 1 G 437
.PL/SQL procedure successfully completed.SQL> spool off
Make all the changes pointed out by the Pre-Upgrade Information Tool before proceeding with the upgrade.
Backing up the DatabaseBack up the database you are upgrading, either by using RMAN or by using your own backup techniques.
■Tip At this point, make sure you’ve set your ORACLE_HOME variable to the new Oracle home using the format $ORACLE_BASE/product/11.1/db_name.
Copying the Parameter FileCopy your current init.ora file to its default location in the new Oracle Database 11g home ($ORACLE_HOME/dbs). You should also make the changes that the Pre-Upgrade Information Tool recommended. Remove all obsolete and deprecated parameters and add the new parameters, such as MEMORY_TARGET, which automates memory management.
If you’re using a password file, move or copy that password file to the Oracle Database 11g Release 1 (11.1) Oracle home.
Starting Up the New DatabaseShut down the current database if it’s running, and start it up again with the updated init.ora parameter file under the new Oracle Database 11g home. Make sure the ORACLE_HOME and the PATH variables point to the new Oracle Database 11g Release 1 (11.1) directories. You must use the STARTUP UPGRADE command to start up your database under the Oracle 11.1 version, which tells Oracle to modify those initialization parameters that would otherwise cause errors during the upgrade (for example, the new startup mode will set the job_que_processes parameter to 0). The startup upgrade mode starts a restricted session and prepares the environment for the upgrade.
Listing 9-2 shows how to start the database using the STARTUP UPGRADE command. Note that if you’re storing your initialization parameter in the default location ($ORACLE_HOME/dbs), you don’t need to specify its path when you use the STARTUP UPGRADE command.
Listing 9-2. Starting the Database with the STARTUP UPGRADE Command
SQL> CONNECT sys/sammyy1 AS SYSDBAConnected to an idle instance.SQL> STARTUP UPGRADEORACLE instance started.
Total System Global Area 314572800 bytesFixed Size 1236756 bytesVariable Size 99164396 bytesDatabase Buffers 213909504 bytesRedo Buffers 524288 bytesDatabase mounted.Database opened.SQL>

438 CH AP T E R 9 ■ I N ST AL L I N G A N D U P G R AD I N G T O OR A CL E DA TA B AS E 1 1 G
If you’re upgrading from the Oracle Database 9i Release 2 (9.2) database, you must create a Sysaux tablespace, which is mandatory for the Oracle 10g and 11g releases. Here’s the code for creating the Sysaux tablespace.
SQL> CREATE TABLESPACE sysaux DATAFILE '/u01/app/oracle/sysaux01.dbf' SIZE 1000m EXTENT MANAGEMENT LOCAL SEGMENT SPACE MANAGEMENT AUTO ONLINE;
The database is now technically converted into an Oracle Database 11g version database, as the following query shows:
SQL> SELECT * FROM V$VERSION;
BANNEROracle Database 11g Enterprise Edition Release 11.1.0.6.0 - ProductionPL/SQL Release 11.1.0.6.0 - ProductionCORE 11.1.0.6.0 - ProductionTNS for Linux: Version 11.1.0.6.0 - ProductionNLSRTL Version 11.1.0.6.0 - Production
SQL>
In the next step, you actually upgrade the current database to the 11.1 version.
Running the Upgrade ScriptFrom the Oracle Database 11g Release 1 (11.1) environment, run the catupgrd.sql script (found in the $ORACLE_HOME/rdbms/admin directory). This script automatically runs the appropriate upgrade script for the database version you’re upgrading and uses procedures from the DBMS_REGISTRY package to execute various component upgrades.
Make sure you’re logged in as a user with SYSDBA privileges, and run the upgrade script from the new environment:
SQL> @$ORACLE_HOME/rdbms/admin/catupgrd.sql
The catupgrd.sql script creates and alters certain data dictionary tables and upgrades or installs several database components in the new database.
Running the Upgrade Actions ScriptAfter the catupgd.sql script finishes executing, you must run the new upgrade script called catuppset.sql to perform upgrade actions that don’t require the database to be in upgrade mode.
SQL> @$ORACLE_HOME/rdbms/admin/catuppst.sql
You can run the catuppst.sql script simultaneously with the catupgd.sql script in a different SQL*Plus session.
Restarting the InstanceRestart the instance to reinitialize the system parameters. The restart ensures that all caches and buffers are cleared and ensures the integrity and consistency of the newly upgraded database.

CH A PT E R 9 ■ I N ST A LL I N G AN D U P G R A DI N G T O OR ACL E DA TA B AS E 1 1 G 439
Running the Post Upgrade Actions ScriptExecute the new upgrade script catuppset.sql to perform the remaining upgrade actions that don’t require you to run the database in upgrade mode.
SQL> @catuppset.sql
You can run the catuppset.sql script simultaneously with the catupgd.sql script to save time.
Checking for Invalid ObjectsOracle will create, drop, and alter some database objects as the upgrade process progresses, thus invalidating some internal Oracle packages and procedures. After the upgrade script has finished, you need to check for invalid objects:
SQL> SELECT count(*) FROM DBA_OBJECTS WHERE status = 'INVALID';
Recompiling and Validating ObjectsBy running the Oracle-provided utlrp.sql script, you can do a recompilation and validation of all the objects invalidated during the upgrade process. During this process, utlrp.sql calls utlprp.sql (a wrapper based on the UTL_RECOMP package). Note that Oracle will dynamically compile each of the invalidated objects when they are accessed if you don’t do it now. However, this runtime compi-lation of invalidated objects could slow down your database’s performance.
You can recompile all invalidated Oracle database objects using the utlrp.sql script:
SQL> @$ORACLE_HOME/rdbms/admin/utlrp.sql. . .PL/SQL procedure successfully completed.
TIMESTAMP-----------------------------------------------COMP_TIMESTAMP UTLRP_END 2008-2-21 15:20:49PL/SQL procedure successfully completed.SQL>
To check that there aren’t any invalid objects left, you should run the check again:
SQL> SELECT count(*) FROM dba_objects WHERE status = 'INVALID';
COUNT(*)--------------- 01 row selected.SQL>
Once it has validated all the invalid objects, the utlrp.sql script validates each individual component in the database and updates the DBMS_SERVER_REGISTRY view.
■Note You can revert to the older database as long as you have a backup of the database made before starting the upgrade process. It’s vital to have a backup, since the upgrade process may fail before it’s completed, leaving you with a database that won’t be functional under the pre- or post-upgrade version of Oracle.

440 CH AP T E R 9 ■ I N ST AL L I N G A N D U P G R AD I N G T O OR A CL E DA TA B AS E 1 1 G
Running the Post-Upgrade Status ToolAfter the upgrade process completes, you must run the Post-Upgrade Status Tool, using the following script:
SQL> @$ORACLE_HOME/rdbms/admin/utlu1111s.sql
The Post-Upgrade Status Tool summarizes the upgrade process, which should look similar to Listing 9-3, if everything went okay during the database upgrade.
Listing 9-3. Partial Output from the Post-Upgrade Status Tool
Oracle Database 11.1 Upgrade Status Utility01-30-2008 22:05:04.Component Status Version HH:MM:SS.Oracle Server VALID 11.1.0.1.0 00:14:01JServer JAVA Virtual Machine VALID 11.1.0.1.0 00:11:08Oracle Workspace Manager VALID 11.1.0.1.0 00:00:40OLAP Analytic Workspace VALID 11.1.0.0.0 00:00:25OLAP Catalog . VALID 11.1.0.1.0 00:00:50Oracle OLAP API VALID 11.1.0.1.0 00:00:31Oracle Enterprise Manager VALID 11.1.0.1.0 00:08:06Oracle XDK VALID 11.1.0.1.0 00:00:58Oracle Text VALID 11.1.0.1.0 00:00:45Oracle XML Database VALID 11.1.0.1.0 00:09:29Oracle Database Java Packages VALID 11.1.0.1.0 00:01:00Oracle interMedia VALID 11.1.0.1.0 00:16:11Spatial VALID 11.1.0.1.0 00:04:43Oracle Expression Filter VALID 11.1.0.1.0 00:00:13Oracle Rules Manager VALID 11.1.0.1.0 00:00:11.Total Upgrade Time: 01:13:55PL/SQL procedure successfully completed.SQL>
The utlu111s.sql script shows that the database components have been upgraded correctly. If you see the INVALID status for any component, that’ll most likely be taken care of when you run the utlrp.sql script next. If that fails, you may have to rerun the catupgrd.sql.
The Post-Upgrade Status Tool determines the upgrade status of each database component by querying the DBA_SERVER_REGISTRY view. You can also query the DBA_SERVER_REGISTRY view, as shown in Listing 9-4.
Listing 9-4. Querying the DBA_SERVER_REGISTRY View for Post-Upgrade Information
SQL> SELECT comp_id, comp_name, version, status FROM DBA_SERVER_REGISTRY;
COMP_ID COMP_NAME VERSION STATUS--------- ------------------------------ --------- ------CATALOG Oracle Database Catalog 1.1.1.0.6 VALIDCATPROC Oracle Database Packages 11.1.0.6 VALIDJAVAVM JServer JAVA Virtual Machine 11.1.0.6 VALID

CH A PT E R 9 ■ I N ST A LL I N G AN D U P G R A DI N G T O OR ACL E DA TA B AS E 1 1 G 441
CATJAVA Oracle Database Java Packages 11.1.0.6 VALIDCONTEXT Oracle Text 11.1.0.6 VALIDSQL>
The Post-Upgrade Status Tool will tell you how the upgrade went. If you didn’t cleanly upgrade a component, the Post-Upgrade Status Tool will tell you what you have to do to fix the problem.
■Caution Don’t start the newly upgraded database under the old Oracle home—this corrupts your database.
Ending the Spool FileAfter the upgrade script had finished, you can turn off the spooling of the upgrade process:
SQL> SPOOL OFF
Restarting the New DatabaseYou can now shut down and restart the instance so you’re ready for normal database operations:
SQL> SHUTDOWN IMMEDIATESQL> STARTUP
After the UpgradeAfter the upgrade, you have a brand-new Oracle Database 11g (11.1.0) instance. Of course, at this point, all your old application code continues to remain at the Oracle 9.2, Oracle Database 10g, or whatever release level you upgraded from. You may want to test the new database features as well as your old applications, to see that they run in the upgraded database without problems.
It’s a good idea to promptly back up the new database. You must also change the passwords for the Oracle-supplied user accounts if you manually upgraded the database. You may also need to modify the listener.ora file, as well as migrate to the SPFILE from your init.ora file.
Resetting Passwords for Stronger Password ProtectionAfter the upgrade is completed, you may want to reset the user passwords to take advantage of the case sensitivity new to Oracle Database 11g. If you create a brand-new Oracle Database 11g release database, passwords are automatically case sensitive. If you’re upgrading to Oracle Database 11g, however, you must reset each user’s password with the ALTER USER statement. Chapter 12 explains the new password case-sensitivity feature in Oracle Database 11g.
You can also start migrating database jobs to the new Oracle Scheduler and check out the Auto-matic Jobs feature, the Automatic Database Diagnostic Monitor, and many other goodies you have available in your new Oracle Database 11g Release 1 database.
Downgrading to an Old VersionOracle supports downgrades to the 10.1 and 10.2 releases. You can downgrade only to the exact release from which you upgraded. If you upgraded to 11.1 from 10.1, you can’t downgrade to 10.2. If you’ve set the COMPATIBLE parameter to 11.0.0 or higher, you won’t be able to downgrade, however. You can downgrade to Oracle Database 10g Release 2 (10.2) if the COMPATIBLE parameter is set to 10.2.0 or lower. Similarly, you can downgrade to Oracle Database 10g Release 1 (10.1) if the COMPATIBLE parameter is set to 10.1.0.

442 CH AP T E R 9 ■ I N ST AL L I N G A N D U P G R AD I N G T O OR A CL E DA TA B AS E 1 1 G
Here’s a summary of the steps you must take to downgrade your Oracle Database 11g Release 1 (11.1) database to a lower release:
1. Log into the database as the owner of the Oracle Database 11g Release 1 (11.1) Oracle home directory.
2. Go the $ORACLE_HOME/rdbms/admin directory and start SQL*Plus from there.
3. Connect to the database as the user SYS.
SQL> CONNECT ssys/sammyy1 AS sysdba
4. Start up the instance in downgrade mode.
SQL> STARTUP DOWNGRADE
5. Drop the user sysman from the database.
SQL>DROP USER sysman CASCADE;
6. Turn spooling on to capture the downgrade effects.
SQL> SPOOL downgrade.log
7. Issue the command to run the downgrade.
SQL> @catdwgrd.sql
8. The catdowngrd.sql script downgrades the database to the major release from which you upgraded to Oracle Database 11g Release 1. Once the script stops running, turn spooling off as shown here:
SQL> SPOOL OFF
9. Shut down the instance.
SQL> SHUTDOWN IMMEDIATE
10. Change the ORACLE_HOME and PATH variables to point to the correct release to which you’ve just downgraded the database.

443
■ ■ ■
C H A P T E R 1 0
Creating a Database
You can create an Oracle database as part of the Oracle software installation process in both Windows and UNIX versions. The Oracle Universal Installer provides several templates for database creation, including the decision-support system (DSS) and online transaction processing (OLTP) templates. You can also invoke the Oracle Database Configuration Assistant (DBCA), a GUI tool, which will guide you through the installation process.
Until you become very well versed in the creation of databases, however, you may be better off using the tedious but more flexible manual mode to create databases. I recommend that you manu-ally type in the database creation SQL statements line by line from SQL*Plus; this will give you insight into the various steps involved in creating a database and the potential problems at every stage. Later on, when you’re more comfortable with the process, you can just enter all the commands into a script and run the whole script to create other databases, or just use the DBCA.
Before you start creating an Oracle database, there are some steps you need to take: ensuring that you have the right permissions, checking that the file structures are in place, and determining whether you have sufficient resources to start up your new database. Next you need to set up the initialization parameters for the database. This chapter covers all of these topics and provides a summary of the important Oracle configuration (initialization) parameters, with guidelines for their use in your database.
After you create a new database, there are additional tasks you must perform, which I discuss in this chapter: running the necessary post–database creation scripts, changing the passwords, and configuring the database for archive logging. You’ll need to know the various modes in which you can start an Oracle instance, as well as how to stop it in different modes and how to restrict access to just the DBAs when necessary. To round out your basic knowledge, we’ll look at how to quiesce and suspend a database, which you’ll need to know to efficiently manage your databases, and how to drop an Oracle database with the DROP DATABASE command.
Getting Ready to Create the DatabaseYou can create a new database either manually (using scripts) or by using the Oracle Database Configuration Assistant. The DBCA is configured to appear immediately after the installation of the Oracle software to assist you in creating a database, and you can also invoke the DBCA later on to help you create a database.
Whether you create a database manually or let Oracle create one for you at software installation time, a configuration file called init.ora, or its newer equivalent, SPFILE, holds all the database configuration details. After the initial creation of the database, you can always change the behavior of the database by changing the initialization parameters. You can also change the behavior of the database for brief periods or during some sessions by using the ALTER SYSTEM and ALTER SESSION commands to change certain initialization parameter values.
Before you create a database, however, you need to make sure you have the necessary software and appropriate memory and storage resources. The next few sections run through the brief list of things to check.

444 CH AP T E R 1 0 ■ C R E AT IN G A DA TA B AS E
Installing the Oracle SoftwareBefore you can create a database, you must first install the Oracle Database 11g software. If you haven’t already done so, see Chapter 9, which covers the installation of the Oracle server software on UNIX and Linux systems.
Creating the File System for the DatabasePlanning your file systems is an important task, and you need to complete it before you start creating the database. You have to plan the location of the various database files, such as the redo log files and archivelog files, before you create the database, and the placement of the files can have serious effects on performance down the road. Let’s look at the sizing and location issues in some detail.
Sizing the File System
The amount of file system space you need depends primarily upon the total space you need to allo-cate for Oracle datafiles. You use datafiles to create the System and Sysaux tablespaces, as well as the undo tablespace, default permanent tablespace, redo logs, and files to hold application data (tables and indexes). Your overall space estimate should include space for the following:
• Tables and indexes: Table and index data is the biggest component of the physical database. You first need to estimate the size of all the tables, which you can base on the number and width of columns and the expected number of rows in each table. You don’t need accurate numbers here; rough figures should suffice. You must know what indexes are needed by your application. You also need to know the type of indexes you’re going to create, as this has a major bearing on the physical size of the indexes. You can use formulas to determine the space required for the indexes.
• Undo tablespace: How much space needs to be allocated to the undo tablespace depends on the size of your database and the nature of your transactions. If you anticipate a lot of large transactions, or you need to plan for large batch jobs, you will require a fairly large undo tablespace. You can always enlarge the undo tablespace later on by adding datafiles to the undo tablespace.
• Temporary tablespace: The temporary tablespace size also depends on the nature of your application and the transaction pattern. If the queries involve a lot of sorting operations, you’re better off with a larger temporary tablespace in general. Note that you’ll be creating the temporary tablespace explicitly during creation of the database and assigning it to be the default temporary tablespace for the users in the database.
• Default permanent tablespace: As I explained in Chapter 6, it’s a good idea to assign a default permanent tablespace for the database. All database users are automatically assigned the default permanent tablespace.
• System and Sysaux tablespaces: The System and Sysaux tablespaces are both mandatory tablespaces used by the database to store data dictionary information and objects pertaining to various Oracle schemas.
• Redo log files: Redo log files are critical for the functioning of a database, and they’re key components when you’re trying to recover the database without any loss of committed data. Oracle recommends that you have a minimum of two redo log groups (with each group having one or more members). Redo log files need to be multiplexed—that is, you should have more than a single redo log file in each group, because they’re a critical part of the data-base and they’re a single point of failure. With multiplexed redo logs, the instance will continue to run even if one copy of the redo log file is removed by error or is corrupted.

C H AP TE R 1 0 ■ CR E AT IN G A D AT AB ASE 445
The appropriate size for the redo log file will depend on how quickly your database is writing to the log. If you have a lot of DML operations in your database, and the redo logs seem to be filling up very quickly, you may want to increase the size of the log files. (You can’t increase the size of an existing redo log file, but you can create larger redo log files and drop the smaller files.) The redo log files are written in a circular fashion, and your goal should be to size the log files such that no more than two or three redo log files are filled up every hour. The funda-mental conflict here is between performance and recovery time. A very large redo log file will be efficient because there won’t be many log switches and associated checkpoints, all of which impose a performance overhead on the database. However, when you need to perform recovery, larger redo logs take more time to recover from, because you have more data to recover.
You can figure out the optimal redo log file size by looking at the OPTIMAL_LOGFILE_SIZE column of the V$INSTANCE_RECOVERY view, after your database has been running for a while. An easier way to get recommendations for the redo log file size is to view the Redo Log Groups page of the Oracle Enterprise Manager (OEM) Database Control.
■Note Oracle recommends that you have four redo log groups, to keep the log writer from having to wait for an available group after each log switch. The members of the redo log groups (the redo log files) should be the same size. Oracle suggests sizing the redo log files such that they switch about every 20 minutes during a busy workload and about once an hour during normal workloads.
• Flash recovery area: Oracle recommends that you create a flash recovery area to hold all data-base backup- and recovery-related files needed for a recovery from a media failure. The flash recovery area holds all datafile backups, Recovery Manager (RMAN) backups, flashback logs, archived redo log files, and control file backups. The size of the flashback area depends on the size and frequency of your backups and on how long you want to retain backups on disk. For example, if you plan on taking weekly backups, you must allocate enough space in the flash recovery area to hold one week’s full backups as well as the archived redo logs. If you plan on taking incremental backups in between the weekly full backups, you must also allocate space for those backups in the flash recovery area.
Choosing the Location for the Files
You should place the database files, such as the system, redo log, and archivelog files, in locations that allow you to benefit from the Optimal Flexible Architecture (OFA) guidelines, which I discussed in Chapter 5. Following the OFA guidelines for file placement in your database offers the following benefits:
• Makes it easy for you to locate and identify the various files, such as database files, control files, and redo log files
• Makes it easy to administer multiple Oracle databases and multiple Oracle software versions
• Improves database performance by minimizing contention among the different types of files
If you followed the OFA guidelines while installing your software, you should be in good shape regarding the way your files are physically laid out.
Ensuring Sufficient Memory AllocationIf you don’t have enough memory in the system to satisfy the requirements of your database, your database instance will fail to start. Even if it does start, there will be a lot of memory paging and

446 CH AP T E R 1 0 ■ C R E AT IN G A DA TA B AS E
swapping that will slow your database down. The cost of memory is such a small component of enterprise computing costs these days that you’re better off getting a large amount of memory for the server on which you plan to install the Oracle database. In Oracle Database 11g, you can use the new MEMORY_TARGET initialization parameter to completely automate the allocation of memory to the Oracle instance.
Getting Necessary AuthorizationsYou will need authorization to be granted by the UNIX/Linux system administrator for you to be able to create file systems on the server. Your Oracle username should be included in the DBA group by the system administrator, if you are working on a UNIX or a Linux server.
Setting the OS Environment VariablesBefore you proceed to create the database, you must set all the necessary operating system environ-ment variables. In UNIX and Linux environments, you must set the following environment variables:
• ORACLE_SID: This is your database’s name and is the same as the value of the DB_NAME initial-ization parameter.
• ORACLE_BASE: This is the top directory for the Oracle software, which for our purposes, is /u01/app/oracle. ORACLE_BASE is currently a recommended variable, but Oracle intends to make it a required variable in a future release.
• ORACLE_HOME: This is the directory in which you installed the Oracle software. Oracle recom-mends you use the following format for this variable: $ORACLE_BASE/product/release/db_n. For this chapter’s purposes, this directory is /u01/app/oracle/product/11.1.0.0/db_1.
• PATH: This is the directory in which Oracle’s executable files are located. Oracle’s executables are always located in the $ORACLE_HOME/bin directory. You can add the location of Oracle’s executable files to the existing PATH value in the following way:
export PATH=$PATH:$ORACLE_HOME/bin
• LD_LIBRARY_PATH: This variable points out where the Oracle libraries are located. The usual location is the $ORACLE_HOME/lib directory.
Creating the Parameter FileEvery Oracle instance makes use of a set of initialization parameters that dictate database limits such as the number of users, specify the names and locations of key files and directories, and opti-mize performance by setting the size of key resources such as memory. Before you jump into the details of Oracle database creation, it’s important to familiarize yourself with the important Oracle initialization parameters and how Oracle uses them.
Types of Database Parameter FilesOracle uses a parameter file to store the initialization parameters and their settings for an instance. You can use either of the following two types of parameter files:
• Server parameter file (SPFILE): A binary file that contains the initialization parameters
• Initialization parameter file (PFILE): A text file that contains a list of all initialization parameters
The key difference between these two types of files is that with an SPFILE, you have the option of making any changes to the initialization parameters while an instance is running persist across an

C H AP TE R 1 0 ■ CR E AT IN G A D AT AB ASE 447
instance shutdown. You can’t do this using the PFILE, since any dynamic changes that are also not recorded in that file will not persist after you restart your instance.
Note that I use the filename init.ora to refer to the PFILE, as the standard name for the PFILE is initdb_name.ora. After I create the database, I’ll show you how to create the SPFILE from the init.ora file.
The initialization parameter file was traditionally the only type of file in which you could store these initialization parameter values. An initialization parameter file is a text file that you can edit like any other text file. By default, this file is located in the $ORACLE_HOME/dbs directory (though you can store it in any place that’s helpful to you). If you store the configuration file in a location other than the default, you must specify the complete location when you start the instance. If the initial-ization parameter filename and the location follow the default conventions, you don’t have to specify the name or location of the file at startup.
■Note The initialization files are used not only to create the database itself, but also each time you start an Oracle instance. You can tune several aspects of a database’s performance by modifying parameter values. You can change some of these parameters dynamically while the instance is running, but for other changes to take effect, you’ll have to restart the instance.
The initialization parameter file includes parameters that will help tune the instance, that set limits on certain database resources, and that specify the names and locations of important files. It also contains parameters that affect database performance, such as those specifying the amount of memory allocated to Oracle. Once you create the initialization file, you can start the instance by using the file in your database startup commands.
You can dynamically modify several important configuration parameters while the instance is running. The dynamic changes are made in a SQL*Plus session, without changing the init.ora file itself. You can make an instance-wide change by using the ALTER SYSTEM statement and a session-wide change by using the ALTER SESSION statement. These modifications won’t be permanent, however; as soon as you shut down the database, the changes are gone and you’re back to the values hard-coded in the init.ora file. To make any configuration parameter changes permanent, you must edit the initialization parameter (init.ora) file.
If you want to make the dynamic changes permanent, so that the parameter is automatically updated and the database uses these new values upon restarting, you should use a server parameter file. The SPFILE is also an initialization file, but you can’t make changes to it directly because it’s a binary file, not a text file. Using the SPFILE to manage your instance provides several benefits, as you’ll see in the “Using a Server Parameter File” section later in the chapter. Oracle recommends that you use the SPFILE because of the advantages it offers.
The Initialization Parameter FileIn the database creation example I show later, I use the traditional init.ora file to create the data-base. Once I create my database, I’ll create an SPFILE from this init.ora file. Oracle provides a template to make it easy for you to create your own initialization parameter file. This template is located in the $ORACLE_HOME/dbs directory in UNIX/Linux systems and in the $ORACLE_HOME/database directory in Windows systems. Copy this init.ora template, rename it initdb_name.ora, and then edit it to meet your own site’s requirements. Don’t be too nervous about trying to make “correct” esti-mates for the various configuration parameters, because most of the configuration parameters are easily modifiable throughout the life of the database. Just make sure you’re careful about the handful of parameters that you can’t change without redoing the entire database from scratch. I point out these parameters in the “Important Oracle Database 11g Initialization Parameters” section later in this chapter.
The interesting thing about the initialization parameter file is that it contains the configuration parameters for memory and some I/O parameters, but not for the database filenames or the tablespaces that the datafiles belong to. The control file holds all that information. The initialization

448 CH AP T E R 1 0 ■ C R E AT IN G A DA TA B AS E
file, though, has the locations of the control files and the dump directories for error messages. It also specifies the modes chosen for undo management, the optimizer, and archiving for the redo logs.
With the exception of DB_NAME, all Oracle initialization parameters are optional. Oracle will simply use the default values for all the initialization parameters you leave out of the initialization parameter file.
Of course, when you let Oracle use default values for a parameter, you relinquish control over that parameter. You should leave parameters out of the init.ora file only if you determine that their default values are okay for your database. In general, it’s a good idea to use approximate sizes for the important configuration parameters and use a trial-and-error method to determine whether you need to use parameters that are new or that you haven’t used before.
Oracle Database 11g is highly configurable, but that benefit also carries with it the need for DBAs to learn not only how the large number of parameters work, but also how they may interact with one another to produce results at variance with your original plans. For example, an increase in the SGA size may increase database performance up to a point, but too big an increase might actually slow the database down, because the operating system might be induced to swap the higher SGA in and out of real memory. Be cautious about making configuration changes; always think through the implications of tinkering with initialization parameters.
Changing the Initialization Parameter ValuesYou can change the value of any initialization parameter by simply editing the init.ora file. However, for the changes to actually take effect, you have to bounce the database—stop it and start it again. As you can imagine, this is not always possible, especially if you are managing a production database. However, you can change several of the parameters on the fly—these are called dynamic parameters for that reason. The parameters you can change only by changing the init.ora file and then restarting the database are called static parameters.
You have three ways to change the value of dynamic parameters: the ALTER SESSION, ALTER SYSTEM, and ALTER SYSTEM . . . DEFERRED commands.
Using the ALTER SESSION Command
The ALTER SESSION command enables you to change dynamic parameter values for the duration of the session that issues the command. The ALTER SESSION command is used only to change a param-eter’s value temporarily.
Here is the general syntax for the command:
ALTER SESSION SET parameter_name=value;
Using the ALTER SYSTEM Statement
The ALTER SYSTEM statement changes the parameter’s value for all sessions. However, these changes will be in force only for the duration of the instance; when the database is restarted, these changes will go away, unless you modify the init.ora file accordingly or you use the SPFILE.
Here is the syntax for this command:
ALTER SYSTEM SET parameter_name=value;
Using the ALTER SYSTEM . . . DEFERRED Statement
The ALTER SYSTEM . . . DEFERRED statement will make the new values for a parameter effective for all sessions, but not immediately. Only sessions started after the statement is executed are affected. All currently open sessions will continue to use the old parameter values.
Here is the syntax for this command:
ALTER SYSTEM SET parameter_name DEFERRED;
The ALTER SYSTEM . . . DEFERRED statement works only for only a few initialization parameters. Therefore, you must use the ALTER SYSTEM statement instead for systemwide initialization parameter

C H AP TE R 1 0 ■ CR E AT IN G A D AT AB ASE 449
changes. Any parameter value change you make through the ALTER SYSTEM statement, of course, applies immediately to all sessions.
When you change the value of a parameter by using the ALTER SESSION or ALTER SYSTEM state-ment, the change in the parameter’s value will last only for the duration of the instance. When you have to restart the instance, the parameter values will revert to their old values, unless you record the changes in the init.ora file or you use (started up your instance with) the SPFILE.
Important Oracle Database 11g Initialization ParametersThe following sections present the most important Oracle initialization parameters you need to be familiar with. For the sake of clarity, I’ve divided the parameters into various groups, such as audit-related parameters, process and session parameters, memory configuration parameters, and so on. My parameter groupings are arbitrary and are designed simply to make it easier to understand the configuration of a new database.
Although this list looks long and formidable, it isn’t a complete list of the initialization parame-ters for Oracle Database 11g—it’s a list of only the most commonly used parameters. Oracle Database 11g has over 250 documented initialization parameters that DBAs can configure (if you add the undocumented or hidden initialization parameters, the total comes to well over a thousand parameters). Don’t be disheartened, though. The basic list of parameters that you need in order to start your new database can be fairly small and easy to understand. Oracle has, for the first time, grouped together the most common initialization parameters, and according to Oracle, most data-bases should only need these basic parameters set. Oracle advises you to become familiar with these basic parameters and to use other parameters only when directed to do so by the documentation or in special circumstances. Later on, as you study various topics such as backup and recovery, perfor-mance tuning, networking, and so on, you’ll have a chance to really understand how to use the more esoteric initialization parameters.
DIAGNOSTIC_DEST
Oracle Database 11g uses a new infrastructure for storing diagnostic information, called the Auto-matic Diagnostic Repository (ADR). You specify the location of this directory with the initialization parameter DIAGNOSTIC_DEST. The DIAGNOSTIC_DEST parameter specifies the structure of the ADR in the following way:
<diagnostic_dest>/diag/rdbms/<dbname>/<instname>
If your database name is orcl1 and the instance name is also orcl1, the ADR home directory will be
<diagnostic_dest>/diag/rdbms/orcl1/orcl1
The ADR home directory contains alert logs, trace files, core files, and incident files, as I explain in Chapter 5. If you set the ORACLE_BASE directory, the location of the ADR is derived from that. Other-wise, the default location of the diagnostic directory is $ORACLE_HOME/log.
FIXED_DATE
This is a new initialization parameter in Oracle Database 11g that enables you to set a constant date that SYSDATE will return instead of the current date. You can undo the FIXED_DATE setting with a value of NONE. Here is the syntax of the parameter:
Example: FIXED_DATE = YYYY-MM-DD-HH24:MI:SS (or the default Oracle date format)
Default value: None
Parameter type: Dynamic

450 CH AP T E R 1 0 ■ C R E AT IN G A DA TA B AS E
Audit-Related Parameters
An Oracle database can be configured to audit actions by its users, and you can configure this auditing feature according to several criteria, although the default behavior of the database is not to audit actions. The following parameters let you configure how you audit your database usage.
AUDIT_TRAIL
The AUDIT_TRAIL parameter turns auditing on or off for the database. If you don’t want auditing to be turned on, do nothing, since the default value for this parameter is none, or false, which disables database auditing. If you want auditing turned on, you can set the AUDIT_TRAIL parameter to any of the following values:
• os: Oracle writes the audit records to an operating system audit trail, which is an operating system file, including audit records from the OS, audit records for the SYS user, and those database actions that are always automatically audited.
• db: Oracle records the same type of auditing as with the os setting, but it directs all audit records to the database audit trail, which is the AUD$ table owned by SYS.
• db,extended: This is similar to the db setting, but also provides extended audit information like the SQLBIND and SQLTEXT columns of the SYS.AUD$ table.
• none: This value disables auditing.
In addition, you have two XML-related AUDIT_TRAIL values:
• XML: This value for audit trail enables database auditing and writes audit details to OS files in XML format.
• XML,EXTENDED: This value prints all database audit records plus the SQLTEXT and SQLBIND values to OS files in the XML format.
The parameter is set as follows:
Example: AUDIT_TRAIL=db
Default value: None
Parameter type: Static
Chapter 12 provides more information about auditing actions within an Oracle database.
■Tip Even if you don’t set the AUDIT_TRAIL parameter to any value, Oracle will still write audit information to an operating system file for all database actions that are audited by default. On a UNIX system, the default location for this file is the $ORACLE_HOME/rdbms/audit directory. Of course, you can specify a different directory if you wish.

C H AP TE R 1 0 ■ CR E AT IN G A D AT AB ASE 451
AUDIT_FILE_DEST
The AUDIT_FILE_DEST parameter specifies the directory in which the database will write the audit records, when you choose the operating system as the destination with the AUDIT_TRAIL parameter by specifying AUDIT_TRAIL=os. You can also specify this parameter if you choose the XML or XML,EXTENDED options for the AUDIT_TRAIL option, since the audit records are written to oper-ating system files in both cases.
Example: AUDIT_FILE_DEST=/u01/app/oracle/audit
Default value: $ORACLE_HOME/rdbms/audit
Parameter type: Dynamic. You can modify this parameter with the ALTER SYSTEM . . . DEFERRED command.
AUDIT_SYS_OPERATIONS
If set to a value of true, AUDIT_SYS_OPERATIONS will audit all actions of the SYS user and any other user with a SYSDBA or SYSOPER role and will write the details to the operating system audit trail specified by the AUDIT_TRAIL parameter. By writing the audit information to a secure operating system loca-tion, you remove any possibility of the SYS user tampering with an audit trail that is located within the database. The possible values are true and false.
Example: AUDIT_SYS_OPERATIONS=true
Default value: false
Parameter type: Static
LDAP_DIRECTORY_SYSAUTH
LDAP_DIRECTORY_SYSAUTH is a new initialization parameter in Oracle Database 11g that enables or disables directory authentication for the SYSDBA and SYSOPER privileges. Possible values are yes and no.
Example: LDAP_DIRECTORY_SYSAUTH=yes
Default value: None
Parameter type: Static
Database Name and Other General Parameters
The most important of the general parameters is the parameter that sets the name of the database. Let’s look at this set of parameters in detail.
DB_NAME and DB_UNIQUE_NAME
The DB_NAME parameter sets the name of the database. This is a mandatory parameter, and the value is the same as the database name you used to create the database. The DB_NAME value should be the same as the value of the ORACLE_SID environment variable. This parameter can’t be changed after the database is created. You can have a DB_NAME value of up to eight characters.
Example: DB_NAME=orcl11
Default value: false
Parameter type: Static
The DB_UNIQUE_NAME parameter lets you specify a globally unique name for the database.

452 CH AP T E R 1 0 ■ C R E AT IN G A DA TA B AS E
DB_DOMAIN
The DB_DOMAIN parameter specifies a fully qualified name (in Internet dot notation) for the database, and this is typically the same as the name of the organization that owns the database. The DB_DOMAIN parameter specifies the logical location of the database within the network structure, and you should set this parameter if your database is part of a distributed system.
Example: DB_DOMAIN=world
Default value: Null
Parameter type: Static
INSTANCE_NAME
The INSTANCE_NAME parameter will have the same value as the DB_NAME parameter in a single instance environment. You can associate multiple instances to a single database service (DB_NAME) in a Real Application Clusters environment.
Example: INSTANCE NAME=orcl11
Default value: The instance SID
Parameter type: Static
SERVICE_NAME
The SERVICE_NAME parameter provides a name for the database service, and it can be anything you want it to be. Usually, it is a combination of the database name and your database domain.
Example: SERVICE_NAME=orcl11
Default value: DB_NAME.DB_DOMAIN
Parameter type: Dynamic. This parameter can be changed with the ALTER SYSTEM command.
COMPATIBLE
The COMPATIBLE parameter allows you to use the latest Oracle database release, while making sure that the database is compatible with an earlier release.
Suppose you upgrade to the Oracle Database 11g Release 1 version, but your application devel-opers haven’t made any changes to their Oracle 10.2 application. In this case, you could set the COMPATIBLE parameter equal to 10.2 so the untested features of the new Oracle version won’t hurt your application. Later on, after the application has been suitably upgraded, you can reset the COMPATIBLE initialization parameter to 11.1.0, which is the default value for Oracle Database 11g Release 1.
If, instead, you immediately raise the compatible value to 10.2, you can use all the new 10.2 features, but you won’t be able to downgrade your database to 9.2 or any other lower versions. You must understand this irreversible compatibility clearly, before you set the value for this parameter.
Example: COMPATIBLE=11.1.0.6
Default value: 10.2.0
Parameter type: Static
INSTANCE_TYPE
The INSTANCE_TYPE parameter specifies whether your instance is a database instance or an Auto-matic Storage Management instance. You specify ASM if the instance is an Automatic Storage Management instance. A setting of RDBMS denotes a normal database instance.
C H AP TE R 1 0 ■ CR E AT IN G A D AT AB ASE 453
Example: INSTANCE_TYPE=asm
Default value: RDBMS
Parameter type: Static
■Note A set of parameter values is specific to an Oracle database using ASM, and some parameters pertain only
to the special ASM instances. You’ll review these initialization parameters in Chapter 17, where I discuss ASM in detail.
NLS_DATE_FORMAT
The NLS_DATE_FORMAT parameter specifies the default date format Oracle will use. Oracle uses this date format when using the TO_CHAR or TO_DATE functions in SQL. There is a default value, which is derived from the NLS_TERRITORY parameter. For example, if the NLS_TERRITORY format is America, the NLS_DATE_FORMAT parameter is automatically set to the DD-MON-YY format.
Example: NLS_DATE_FORMAT=DD-MM-YYYY HH:MI:SS
Default value: Depends on the NLS_TERRITORY variable and the operating system
Parameter type: Dynamic. This parameter can be altered by using the ALTER SESSION command.
File-Related Parameters
You can specify several file-related parameters in your init.ora file. Oracle requires you to specify several destination locations for trace files and error messages. In addition, you need to specify the UTL_FILE_DIR parameter in order to use the UTL_FILE package. The following sections cover the key file-related parameters.
IFILE
You can use the IFILE parameter to embed another initialization file in it. For example, you can have a line in your init.ora file such as this:
ifile=config.ora
In the config.ora file, you could then have some common initialization parameters for several instances. You can have up to three levels of nesting.
Default value: No default value
Parameter type: Static
CONTROL_FILES
Control files are key files that hold datafile names and locations and a lot of other important infor-mation. The database needs only one control file, but because this is such an important file, you always save multiple copies of it. The way to multiplex the control file is to simply specify multiple locations (up to a maximum of eight) in the CONTROL_FILES parameter. The minimum number of control files is one, but Oracle recommends you have at least two control files per instance, and most DBAs usually use three. If one of the control files is damaged or accidentally deleted, the instance will fail when it tries to access that control file. When this happens with multiple copies of the control file, you can always restart the database after first copying the undamaged control file to a different location.

454 CH AP T E R 1 0 ■ C R E AT IN G A DA TA B AS E
When you use the CREATE DATABASE statement, Oracle creates the control files listed in the CONTROL_FILES parameter. If you don’t include this parameter in your initialization file when creating the database, Oracle will create a control file using a default operating system–dependent filename or, if you have enabled Oracle Managed Files, it will create Oracle-managed control files. You must have a minimum of one control file and may have up to eight control files per database.
Example: CONTROL_FILES=('/u01/app/oracle/orcl11/control/ctl01.ora', ' /u01/app/oracle/orcl11/control/ctl02.ora',/ u01/app/oracle/orcl11/control/ctl03.ora'
Default value: Depends on the operating system
Parameter type: Static
CONTROL_FILE_RECORD_KEEP_TIME
The CONTROL_FILE_RECORD_KEEP_TIME parameter specifies how many days Oracle will retain records in the control file before overwriting them. Oracle recommends that you set this parameter to a high value, to ensure that all online disk backup information remains in the control file. For example, if you maintain a flash recovery area that holds two full weekly backups and daily incremental backups, you must set CONTROL_FILE_RECORD_KEEP_TIME to at least 21 days.
Example: CONTROL_FILE_RECORD_KEEP_TIME=14
Default value: Seven days
Parameter type: Modifiable dynamically, with the ALTER SYSTEM statement
UTL_FILE_DIR
You can use the UTL_FILE_DIR parameter to specify the directory (or directories) Oracle will use to process I/O when you use the Oracle UTL_FILE package to read from or write to the operating system files. You can set UTL_FILE_DIR to any OS directory you want. If you just specify an asterisk (*) instead of any specific directory name, the UTL_FILE package will read and write to and from all the OS direc-tories; Oracle recommends against this practice.
Example: UTL_FILE_DIR=/u01/app/oracle/utl_dir
Default value: None; you can’t use the UTL_FILE package to do any I/O with this setting.
Parameter type: Static
■Caution You’ll need to use some directory on the server where you have read/write privileges as the setting for UTL_FILE_DIR; otherwise the package can’t process I/O to the operating system. If you use * as the value for the UTL_FILE_DIR parameter, however, users can write to and read from all directories for which you have read/
write privileges. Obviously, you don’t want this to happen!
Oracle Managed Files Parameters
You’ll need to use three parameters to specify the format of the Oracle Managed Files (OMF) when you decide to use the feature: DB_CREATE_FILE_DEST, DB_CREATE_ONLINE_LOG_DEST_n, and DB_RECOVERY_ FILE_DEST. I describe the first two parameters in the sections that follow and the third under the “Recovery-Related Parameters” section. Chapter 6 discusses in more detail how to use the initializa-tion parameters dealing with OMF.

C H AP TE R 1 0 ■ CR E AT IN G A D AT AB ASE 455
DB_CREATE_FILE_DEST
The DB_CREATE_FILE_DEST parameter specifies the default location for Oracle-managed datafiles. It’s also the directory where Oracle will create datafiles and temporary files when you don’t specify an explicit location for them. The directory must already exist with the correct read/write permissions for Oracle.
Example: DB_CREATE_FILE_DEST=/u01/app/oracle/orcl11/dbfile/
Default value: None
Parameter type: Dynamic. It can be changed using either the ALTER SYSTEM or ALTER SESSION command.
DB_CREATE_ONLINE_LOG_DEST_n
The DB_CREATE_ONLINE_LOG_DEST_n parameter specifies the default location for OMF online redo log files and control files. To multiplex the online redo log files or the control file, specify more than one value for the parameter. Oracle creates one member of each online redo log and one control file in each location when you specify a value of n greater than one. You can have a maximum of five sepa-rate directory locations. Please see Chapter 17 for examples of how to use this parameter.
Example: DB_CREATE_ONLINE_LOG_DEST_1=/u01/app/oracle/orcl11/log
Default value: None
Parameter type: Dynamic. This parameter can be changed using either the ALTER SYSTEM or ALTER SESSION command.
Process and Session Parameters
Several initialization parameters relate to the number of processes and the number of sessions that your database can handle. The following sections explore the important process and session parameters.
PROCESSES
The value of the PROCESSES parameter will set the upper limit for the number of operating system processes that can connect to your database concurrently. Both the SESSIONS and TRANSACTIONS parameters derive their default values from this parameter.
Example: PROCESSES=200
Default value: At least 6, but varies according to the operating system
Parameter type: Static
DB_WRITER_PROCESSES
The DB_WRITER_PROCESSES parameter specifies the initial number of database writer processes for your instance. Instances with very heavy data modification may opt for more than the default, which is one process or the number of CPUs divided by 8, whichever is greater. You can have up to 20 processes per instance.
Example: DB_WRITER_PROCESSES=12
Default value: 1 or the number of CPUs divided by 8, whichever is greater
Parameter type: Static

456 CH AP T E R 1 0 ■ C R E AT IN G A DA TA B AS E
OPEN_CURSORS
The OPEN_CURSORS parameter sets the limit on the number of open cursors a single session can have at any given time.
Example: OPEN_CURSORS=300
Default value: 50
Parameter type: Modifiable with the ALTER SYSTEM statement
Memory-Configuration Parameters
The memory-configuration parameters determine the memory allocated to key components of the SGA. There are two major areas of memory you allocate to Oracle from the operating system’s memory: the system global area (SGA) and the program global area (PGA). Oracle Database 11g takes the guessing and fine-tuning out of both SGA and PGA memory allocations. You can simply set the MEMORY_TARGET parameter to completely automate Oracle’s memory management.
■Note Oracle’s guidelines regarding the ideal settings for the various components of memory, such as the
DB_CACHE_SIZE and shared pool, are often vague and not really helpful to a beginner. For example, Oracle states that the DB_CACHE_SIZE should be from 20 to 80 percent of the available memory for a data warehouse database. The shared pool recommendation for the same database is between 5 and 10 percent. The wide ranges make the DB_CACHE_SIZE recommendations useless. If your total memory is 2GB, you’re supposed to allocate from 100MB to 200MB of memory for the shared pool. If your total memory allocation is 32GB, your allocation for the shared pool would be between 1.6GB and 3.2GB, according to the “standard” recommendations. The best thing to do is use a trial-and-error method to see whether the various memory settings are appropriate for your database.
Let’s briefly review the key Oracle Database 11g parameters concerning memory allocation. The buffer cache is the area of Oracle’s memory where it keeps data blocks that have been read in from disk, and the data blocks may be modified here before being written back to disk again. Having a big enough buffer cache will improve performance by avoiding too many disk accesses, which are much slower than accessing data in memory.
You can set up the buffer cache for your database in units of the standard or primary block size you chose for the database (using the DB_BLOCK_SIZE parameter), or you can use nonstandard-block-sized buffer caches. If you want to base your buffer cache on the standard block size, you use the DB_CACHE_SIZE parameter to size your cache.
MEMORY_MAX_TARGET
The MEMORY_MAX_TARGET parameter defines the maximum value to which you can set the MEMORY_TARGET initialization parameter. The value can range from 0 to the maximum physical memory available to the Oracle instance. You can set the value in KB, MB, or GB.
Example: MEMORY_MAX_TARGET=1800m
Default value: 0
Parameter type: Static
If you omit the MEMORY_MAX_TARGET parameter but set the MEMORY_TARGET parameter, the MEMORY_MAX_TARGET parameter’s value defaults to that of the MEMORY_TARGET parameter’s value.

C H AP TE R 1 0 ■ CR E AT IN G A D AT AB ASE 457
MEMORY_TARGET
The MEMORY_TARGET parameter specifies the memory allocated to Oracle when you use automatic memory management to allocate memory to the Oracle instance. The database will raise or lower the values of the SGA and the PGA components so the combined value is equal to the MEMORY_TARGET parameter setting. You can set the value in KB, MB, or GB.
Example: MEMORY_TARGET=1000m
Default value: 0
Parameter type: Dynamic
DB_CACHE_SIZE
The DB_CACHE_SIZE parameter sets the size of the default buffer pool for those buffers that have the primary block size (this is the block size defined by DB_BLOCK_SIZE). For example, you can use a number like 1024MB.
Example: DB_CACHE_SIZE = 750MB
Default value: If you’re using the MEMORY_TARGET parameter, the default is 0. If you aren’t using MEMORY_TARGET, it’s the greater of 48MB or 4MB.
Parameter type: Dynamic. It can be modified with the ALTER SYSTEM command.
If you’re using automatic memory management, of course, you don’t have any specific memory-related initialization parameters, including the DB_CACHE_SIZE parameters. The database assigns a default value of 0 for this parameter if you choose automatic memory management and ignore this parameter. However, you can assign a specific value for this parameter even when you choose to implement automatic memory management. When you do so, Oracle will treat the value you assign for the DB_CACHE_SIZE parameter as the minimum value for the memory pool.
DB_KEEP_CACHE_SIZE
The normal behavior of the buffer pool is to treat all the objects placed in it equally. That is, any object will remain in the pool as long as free memory is available in the buffer cache. Objects are removed (aged out) only when there is no free space. When this happens, the oldest unused objects sitting in memory are removed to make space for new objects.
The use of two specialized buffer pools—the keep pool and the recycle pool—allows you to specify at object-creation time how you want the buffer pool to treat certain objects. For example, if you know that certain objects don’t really need to be in memory for a long time, you can assign them to a recycle pool, which removes the objects right after they’re used. In contrast, the keep pool always retains an object in memory if it’s created with the KEEP option.
The DB_KEEP_CACHE_SIZE parameter specifies the size of the keep pool, and it’s set as follows:
Example: DB_KEEP_CACHE_SIZE = 500MB
Default value: 0; by default, this parameter is not configured.
Parameter type: Dynamic. It can be changed by using the ALTER SYSTEM command.

458 CH AP T E R 1 0 ■ C R E AT IN G A DA TA B AS E
DB_RECYCLE_CACHE_SIZE
The DB_RECYCLE_CACHE_SIZE parameter specifies the size of the recycle pool in the buffer cache. Oracle removes objects from this pool as soon as the objects are used. The parameter is set as follows:
Example: DB_RECYCLE_CACHE_SIZE = 200MB
Default value: 0; by default, this parameter is not configured.
Parameter type: Dynamic. It can be changed by using the ALTER SYSTEM command.
DB_nK_CACHE_SIZE
If you prefer to use nonstandard-sized buffer caches, you need to specify the DB_nK_CACHE_SIZE parameter for each. You can use 2, 4, 8, 16, or 32 as the value for the variable n.
Example: DB_8K_CACHE_SIZE=4096MB
Default value: 0
Parameter type: Dynamic. You can change the value of this parameter’s value with the ALTER SYSTEM command.
AUDIT_SYS_OPERATIONS
The AUDIT_SYS_OPERATIONS parameter enables and disables the auditing of actions by the user SYS as well as any users connecting with the SYSDBA or the SYSOPER privileges. The database writes the audit records to the operating system audit trail. Possible values are true and false.
Example: AUDIT_SYS_OPERATIONS=true
Default value: false
Parameter type: Static
CLIENT_RESULT_CACHE_LAG
The CLIENT_RESULT_CACHE_LAG initialization parameter specifies the maximum time that can elapse before the OCI client query makes another round-trip to retrieve database changes pertaining to queries cached on the client. The range of values is 0 to a system-dependent maximum value.
Example: CLIENT_RESULT_CACHE_LAG = 10000
Default value: 5000 (seconds)
Parameter type: Static
CLIENT_RESULT_CACHE_SIZE
The CLIENT_RESULT_CACHE_SIZE parameter specifies the maximum memory allocated to the client per process result set cache (in bytes). You must set a nonzero value for this parameter to enable the client query cache feature. You can override this parameter by setting the client configuration parameter OCI_RESULT_CACHE_MAX_SIZE. The range of values is 0 to an operating system–dependent value.
Example: CLIENT_RESULT_CACHE_SIZE = 50M
Default value: 0
Parameter type: Static

C H AP TE R 1 0 ■ CR E AT IN G A D AT AB ASE 459
CONTROL_MANAGEMENT_PACK_ACCESS
The CONTROL_MANAGEMENT_PACK_ACCESS parameter specifies which of the two Server Manageability Packs should be active in the database. You can use the following two packs:
• Diagnostic pack: Includes AWR, ADDM, and so on
• Tuning pack: Includes the SQL Tuning Advisor, SQL Access Advisor, and so on
You’ll need a separate license for the diagnostic pack in order to enable the tuning pack. Possible values are diagnostic, none, and diagnostic+tuning.
Example: CONTROL_MANAGEMENT_PACK=diagnostic
Default value: diagnostic+tuning
Parameter type: Dynamic. Modifiable with the ALTER SYSTEM statement
LARGE_POOL_SIZE
The shared pool can normally take care of the memory needs of shared servers as well as Oracle backup and restore operations, and a few other operations. Sometimes, though, this may place a heavy burden on the shared pool, causing a lot of fragmentation and the premature aging-out of important objects from the shared pool due to lack of space.
To avoid these problems, you can use the LARGE_POOL_SIZE parameter to mostly free up the shared pool for caching SQL queries and data dictionary information. If the PARALLEL_AUTOMATIC_TUNING parameter is set, the large pool is also used for parallel-execution message buffers. The amount of memory required for the large pool in this case depends on the number of parallel threads per CPU and the number of CPUs.
Example: LARGE_POOL_SIZE=800M
Default value: 0 (if the pool is not required for parallel execution and DBWR_IO_SLAVES is not set)
Parameter type: Dynamic. The ALTER SYSTEM command can be used to modify this parameter.
Archivelog Parameters
Oracle gives you the option of archiving your filled redo logs. When you configure your database to archive its redo logs, the database is said to be in an archivelog mode. You should always archivelog your production databases unless there are exceptional reasons for not doing so. If you decide to archive the redo logs, you have to specify that in the initialization file using the three parameters described next.
LOG_ARCHIVE_DEST_n
The LOG_ARCHIVE_DEST_n parameters (where n = 1, 2, 3, . . . 10) define up to ten archivelog destina-tions. This parameter enables you to specify the location (or locations) of the archived logs.
You should set this parameter only if you are running the database in archivelog mode. You can set the database to run in archivelog mode when you create the database by specifying the ARCHIVELOG keyword in your CREATE DATABASE statement.
This is how you specify the LOG_ARCHIVE_DEST_n parameter (n=1):
Example: LOG_ARCHIVE_DEST_1='LOCATION=/u02/app/oracle/arch/'
Default value: None
Parameter type: Dynamic. You can use the ALTER SESSION or the ALTER SYSTEM command to make changes.

460 CH AP T E R 1 0 ■ C R E AT IN G A DA TA B AS E
LOG_ARCHIVE_FORMAT
The LOG_ARCHIVE_FORMAT parameter specifies the default filename format for the archived redo log files. In this example, %t stands for the thread number, %s for the log sequence number, and %r for the resetlog’s ID that ensures a unique name for archived redo logs across multiple incarnations of the database (the multiple incarnations are created after using a resetlogs operation).
Example: LOG_ARCHIVE_FORMAT = 'log%t_%s_%r.arc'
Default value: Operating-system dependent
Parameter type: Static
Undo Space Parameters
The main undo-related parameters are the UNDO_MANAGEMENT, UNDO_TABLESPACE, and UNDO_RETENTION parameters. Note that you can specify the undo-retention guarantee when you create the database by using the RETENTION GUARANTEE clause in the CREATE UNDO TABLESPACE statement.
UNDO_MANAGEMENT
If the UNDO_MANAGEMENT parameter is set to auto, the undo tablespace is used for storing the undo records, and Oracle will automatically manage the undo segments.
Example: UNDO_MANAGEMENT = auto
Default value: auto
Parameter type: Static
UNDO_TABLESPACE
The UNDO_TABLESPACE parameter determines the default tablespace for undo records. If you have only a single undo tablespace, you don’t need to specify this parameter—Oracle will automatically use your undo tablespace. If you don’t have an undo tablespace available, Oracle will use the System rollback segment for undo storage, which isn’t a good option. If you don’t specify a value for this parameter when you create the database, and you have chosen to use Automatic Undo Management (AUM), Oracle will create a default undo tablespace with the name UNDOTBS. This default tablespace will have a single 10MB datafile that will be automatically extended without a maximum limit.
Example: UNDO_TABLESPACE = undotbs1
Default value: The first undo tablespace available
Parameter type: Dynamic. You can use the ALTER SYSTEM command to change the default undo tablespace.
UNDO_RETENTION
The UNDO_RETENTION parameter specifies the amount of redo information to be saved in the undo tablespace before it can be overwritten. The appropriate value for this parameter depends on the size of the undo tablespace and the nature of the queries in your database. If the queries aren’t huge, they don’t need to have large snapshots of data, and you could get by with a low undo retention interval. Similarly, if there is plenty of free space available in the undo tablespace, transactions won’t be overwritten, and you are less likely to run into the snapshot-too-old problem.
If you plan on using the Flashback Query feature extensively, you will have to figure out how far back in time your Flashback queries will go, and specify the UNDO_RETENTION parameter accordingly.
Example: UNDO_RETENTION = 14400 (4 hours)

C H AP TE R 1 0 ■ CR E AT IN G A D AT AB ASE 461
Default value: 900 (seconds)
Parameter type: Dynamic. You can use the ALTER SYSTEM command to increase the value to a practically unlimited time period.
Oracle Licensing Parameter
The use of Oracle software is limited by the license agreement between Oracle and the customer. There are two important parameters that control the usage of Oracle licenses, LICENSE_MAX_USERS and LICENSE_MAX_SESSIONS, the first setting a limit on the number of concurrent Oracle users and the second, the maximum number of users you can create in a database.
LICENSE_MAX_SESSIONS
The LICENSE_MAX_SESSIONS parameter sets the maximum number of concurrent sessions you can have at any given time. Once your database reaches this limit, new sessions can’t connect, getting a warning about the database reaching its maximum user capacity. If you set a zero value for this parameter, the database doesn’t enforce session licensing.
Example: LICENSE_MAX_SESSIONS=250
Default value: 0
Parameter type: Dynamic. You can issue the ALTER SYSTEM command to change the value of this parameter.
■Note You must set either the LICENSE_MAX_SESSIONS parameter or the LICENSE_MAX_USERS parameter, but
not both. That is, you must set one of the parameters to zero and the other to a positive number.
LICENSE_MAX_USERS
The LICENSE_MAX_USERS parameter specifies the maximum number of users you can create in your database. The value of this parameter can range from zero to the number of user licenses.
Example: LICENSE_MAX_USRS=1200
Default value: 0
Parameter type: Dynamic. You can issue the ALTER SYSTEM command to change the value of the parameter.
Performance- and Diagnostics-Related Parameters
You can configure several performance-related parameters in your parameter file. In addition, you can set several parameters to change the diagnostic capabilities of the database when you’re performing activities such as tracing SQL statements.
STATISTICS_LEVEL
You set the STATISTICS_LEVEL parameter to specify the level of statistics collection by Oracle. There are three possible values for this parameter: BASIC, TYPICAL, and ALL. Setting this parameter to the default value of TYPICAL will ensure the collection of all major statistics required for database self-management and will provide the best overall performance. When the STATISTICS_LEVEL parameter is set to ALL, Oracle collects additional statistics, such as timed OS statistics and plan-execution statistics.

462 CH AP T E R 1 0 ■ C R E AT IN G A DA TA B AS E
Example: STATISTICS_LEVEL = typical
Default value: TYPICAL
Parameter type: Modifiable with either the ALTER SESSION or the ALTER SYSTEM statement
■Caution Setting the STATISTICS_LEVEL parameter to BASIC disables the collection of many of the important
statistics required by Oracle Database 11g features and functionality, including these:
• Automatic Workload Repository (AWR) snapshots
• Automatic Database Diagnostic Monitor (ADDM)
• All server-generated alerts
• Automatic Shared Memory Management
• Automatic optimizer statistics collection
• Buffer cache advisory and the mean time to recover (MTTR) advisory
• Timed statistics
OPTIMIZER_CAPTURE_SQL_PLAN_BASELINES
The OPTIMIZER_CAPTURE_SQL_PLAN_BASELINES parameter enables the SQL Plan Management feature by enabling the capturing of repeatable SQL statements and the generation of SQL plan baselines for those statements. Possible values for this parameter are true and false.
Example: OPTIMIZER_CAPTURE_SQL_PLAN_BASELINES=true
Default value: false
Parameter type: Dynamic. Modifiable with the ALTER SESSION or the ALTER SYSTEM statement.
OPTIMIZER_MODE
The OPTIMIZER_MODE parameter dictates the type of optimization you want Oracle’s query optimizer to follow. You can set the optimizer mode to the following values:
• all_rows: The query optimizer uses a cost-based approach for all SQL statements and opti-mizes with a goal of best throughput (minimum resource cost to complete the entire statement).
• first_rows_n: The query optimizer uses a cost-based approach and optimizes with a goal of best response time to return the first n rows (where n = 1, 10, 100, or 1000).
• first_rows: The query optimizer uses a mix of costs and heuristics to find the best plan for quickly returning the first few rows.
■Note The first_rows setting is available for backward compatibility—Oracle recommends using the
first_rows_n setting instead.

C H AP TE R 1 0 ■ CR E AT IN G A D AT AB ASE 463
Example: OPTIMIZER_MODE = first_rows
Default value: all_rows
Parameter type: Dynamic. You can modify the value by issuing the ALTER SESSION or ALTER SYSTEM statement.
OPTIMIZER_FEATURES_ENABLE
The OPTIMIZER_FEATURES_ENABLE parameter enables the database to retain the behavior of an older Oracle software release after you upgrade it. For example, after upgrading an Oracle 10.2 release database to the Oracle 11.1 release, you can set the OPTIMIZER_FEATURES_ENABLE parameter to 10.2, thus retaining the optimizer behavior of Oracle Database 10g Release 2.
Example: OPTIMIZER_FEATURES_ENABLE = 10.2
Default value: 11.1.0.6
Parameter type: Dynamic. You can use the ALTER SESSION or the ALTER SYSTEM command to make changes.
OPTIMIZER_DYNAMIC_SAMPLING
When an object doesn’t have any optimizer statistics collected, Oracle dynamically samples the data in order to collect a quick set of statistics. You control the level of dynamic sampling by setting the OPTIMIZER_DYNAMIC_SAMPLING parameter.
Example: OPTIMIZER_DYNAMIC_SAMPLING = 2
Default value: Ranges from 0 to 2, depending upon the value of the OPTIMIZER_FEATURES_ENABLE parameter (if less than 9.0.1, 0; for 9.2.0, 1; and for 10.0.0 or higher, 2).
Parameter type: Dynamic. It can be modified by the ALTER SESSION or ALTER SYSTEM command.
OPTIMIZER_USE_INVISIBLE_INDEXES
The OPTIMIZER_USE_INVISIBLE_INDEXES parameter enables or disables the use of invisible indexes. Possible values are true and false.
Example: OPTIMIZER_USE_INVISIBLE_INDEXES=true
Default value: false
Parameter type: Dynamic. You can modify it with the ALTER SESSION or ALTER SYSTEM command.
OPTIMIZER_USE_PENDING_STATISTICS
The OPTIMIZER_USE_PENDING_STATISTICS parameter specifies whether the cost optimizer can use pending statistics. Possible values are true and false.
Example: OPTIMIZER_USE_PENDING_STATISTICS=true
Default value: false
Parameter type: Dynamic. You can modify it with the ALTER SESSION or ALTER SYSTEM command.

464 CH AP T E R 1 0 ■ C R E AT IN G A DA TA B AS E
OPTIMIZER_USE_SQL_PLAN_BASELINES
The OPTIMIZER_USE_SQL_PLAN_BASELINES initialization parameter enables or disables the use of SQL plan baselines stored in the database. If you enable SQL Plan Management by enabling this feature, the optimizer will look for a SQL plan baseline and choose the plan with the lowest cost. Possible values are true and false.
Example: OPTIMIZER_USE_SQL_PLAN_BASELINES=true
Default value: true
Parameter type: Dynamic. You can modify it with the ALTER SESSION or ALTER SYSTEM command.
PLSQL_CODE_TYPE
The PLSQL_CODE_TYPE initialization parameter enables you to specify native or interpreted compila-tion mode for PL/SQL library units. Possible values are interpreted and native.
Example: PLSQL_CODE_TYPE=native
Default value: interpreted
Parameter type: Dynamic. You can modify it with the ALTER SESSION or ALTER SYSTEM statement.
RESULT_CACHE_MAX_RESULT
The RESULT_CACHE_MAX_SIZE parameter specifies the percentage of the result cache that any single result can use. The range of values is from 1 to 100.
Example: RESULT_CACHE_MAX_RESULT=25
Default value: 5 percent
Parameter type: Dynamic. You can modify it with the ALTER SYSTEM command.
RESULT_CACHE_MAX_SIZE
The RESULT_CACHE_MAX_SIZE parameter specifies the maximum amount of the SGA that the result cache can use. Setting this parameter to 0 disables the result cache. The range of values is from 0 to an operating system–dependent value.
Example: RESULT_CACHE_MAX_SIZE=500m
Default value: Depends on the value you assign for the MEMORY_TARGET, SGA_TARGET, and SHARED_POOL parameters
Parameter type: Dynamic. You can modify it with the ALTER SYSTEM command.
RESULT_CACHE_MODE
The RESULT_CACHE_MODE parameter specifies when the database will use the results cache in memory for a SQL statement. Possible values are manual and force.
Example: RESULT_CACHE_MODE=force
Default value: manual
Parameter type: Dynamic. You can modify it with the ALTER SESSION or ALTER SYSTEM statement.
If you set the value of this parameter to manual, you must use a RESULT_CACHE hint in a query for the database to cache its results. If you specify the value force, the database will try to cache the results of all statements whenever it’s possible to do so.

C H AP TE R 1 0 ■ CR E AT IN G A D AT AB ASE 465
SEC_CASE_SENSITIVE_LOGON
The SEC_CASE_SENSITIVE_LOGON parameter enables or disables password case sensitivity. Possible values are true and false.
Example: SEC_CASE_SENSITIVE_LOGON=true
Default: true
Parameter type: Dynamic. You can modify it with the ALTER SYSTEM command.
SEC_MAX_FAILED_LOGIN_ATTEMPTS
You use the SEC_MAX_FAILED_LOGIN_ATTEMPTS parameter to specify the maximum number of unsuc-cessful authentication attempts a client can make before the server process automatically drops the connection attempt. The minimum value is 1 and maximum value is unlimited.
Example: SEC_MAX_FAILED_LOGIN_ATTEMPTS=3
Default: 10
Parameter type: Dynamic. You can modify it with the ALTER SYSTEM command.
QUERY_REWRITE_ENABLED
The QUERY_REWRITE_ENABLED parameter determines whether query rewriting is enabled or disabled, which is of importance mostly when you use materialized views.
Example: QUERY_REWRITE_ENABLED=false
Default: true if the OPTIMIZER_FEATURES_ENABLE parameter is set to 10.0.0 or higher; false if it is set to 9.2.0 or lower.
Parameter type: Dynamic. You can modify it with the ALTER SESSION or ALTER SYSTEM command.
QUERY_REWRITE_INTEGRITY
The QUERY_REWRITE_INTEGRITY parameter specifies the degree to which Oracle will enforce integrity rules during a query rewrite: trusted, enforced, or stale tolerated.
• trusted: Oracle assumes the materialized view is current and allows rewrites using relation-ships that are not enforced by Oracle.
• enforced: This is the safest mode; Oracle doesn’t use transformations that rely on unenforced relationships. This mode always uses fresh data, guaranteeing consistency and integrity.
• stale_tolerated: Oracle will allow query rewrites using unenforced relationships.
Example: QUERY_WRITE_INTEGRITY = trusted
Default value: enforced
Parameter type: Dynamic. You can modify it with the ALTER SESSION or ALTER SYSTEM command.

466 CH AP T E R 1 0 ■ C R E AT IN G A DA TA B AS E
CURSOR_SHARING
This crucial initialization parameter specifies how Oracle’s SQL statements are supposed to share cursors. The three possible values are forced, exact, and similar. You’ll learn more about setting this parameter in Chapters 19 and 20.
Example: CURSOR_SHARING = force
Default value: exact
Parameter type: Dynamic. Both the ALTER SESSION and ALTER SYSTEM commands can be used to change the value.
■Caution You have to be extremely careful when using the CURSOR_SHARING parameter. As you’ll learn in Chapter 19, using the forced option will force Oracle to use bind variables, and thus will enhance your application performance. However, there are many caveats, and the wrong option for this parameter can hurt performance.
DB_BLOCK_SIZE
The DB_BLOCK_SIZE parameter sets the standard database block size (measured in bytes, such as 4096, which is a 4KB block size). The System tablespace and most other tablespaces use the standard block size. You set the standard block size from 2KB to 32KB (2, 4, 8, 16, or 32) in the DB_BLOCK_SIZE parameter. (Because the size is specified in bytes, the actual range for the DB_BLOCK_SIZE parameter is 2,048–32,768.) You can also specify up to four nonstandard block sizes when creating tablespaces.
You have to carefully evaluate your application’s needs before you pick the correct database block size. Whenever you need to read data from or write data to an Oracle database object, you do so in terms of data blocks. Also, you always should make the DB_BLOCK_SIZE value a multiple of your operating system’s block size, which you can ascertain from your UNIX or Windows system administrator.
■Tip Remember that the data block is the smallest unit in the Oracle physical database structure. When you are querying data, the rows aren’t fetched individually; rather, the entire set of blocks in which the rows reside is read
into memory in one fell swoop.
If you’re supporting data warehouse applications, it makes sense to have a very large DB_BLOCK_SIZE—something between 8KB and 32KB. This will improve database performance when reading huge chunks of data from disk. Large data warehouses perform more full table scans and thus perform more sequential data access than random access I/Os.
However, if you’re dealing with a typical OLTP application, where most of your reads and writes consist of relatively short transactions, a large DB_BLOCK_SIZE setting would be overkill and could actually lead to inefficiency in input and output operations. Most OLTP transactions read and write a very small number of rows per transaction, and they conduct numerous transactions with random access I/O (index scans), so you need to have a smaller block size, somewhere from 2KB to 8KB. A larger block size may be too large for most OLTP applications, as the database has to read large amounts of data into memory even when it really needs very small bits of information. Data ware-housing applications, on the other hand, will benefit from a large block size, say 32KB.
Example: DB_BLOCK_SIZE=32768
Default value: 8192 (bytes)
Parameter type: Static
C H AP TE R 1 0 ■ CR E AT IN G A D AT AB ASE 467
■Note You can’t simply change the DB_BLOCK_SIZE parameter in the init.ora file after the database is created. The block size is more or less permanent. However, you can get around the need to re-create the whole database by creating new tablespaces (all but the System tablespace) with the required block size by using the BLOCKSIZE parameter, which will perform a roundabout change in the block size. Officially, the DB_BLOCK_SIZE parameter will still be set at the original value you specified. You can then use the online redefinition feature to move
tables to the newly created tablespaces with the new block size. You can also do this using OEM.
DB_FILE_MULTIBLOCK_READ_COUNT
The DB_FILE_MULTIBLOCK_READ_COUNT parameter specifies the maximum number of blocks Oracle will read during a full table scan. The larger the value, the more efficient your full table scans will be. The general principle is that data warehouse operations need high multiblock read counts because of the heavy amount of data processing involved. If you are using a 16KB block size for your data-base, and the DB_FILE_MULTIBLOCK_READ_COUNT parameter is also set to 16, Oracle will read 256KB in a single I/O. Depending on the platform, Oracle supports I/Os up to 1MB.
Note that when you stripe your disks, the stripe size should be a multiple of the I/O size for optimum performance. If you are using an OLTP application, a multiblock read count such as 8 or 16 would be ideal. Large data warehouses could go much higher than this.
Example: DB_FILE_MULTIBLOCK_READ_COUNT = 32
Default value: Platform dependent
Parameter type: Dynamic. It is modifiable with either an ALTER SYSTEM or an ALTER SESSION command.
■Tip Since Oracle Database has been self-tuning this parameter since Release 10.2, it’s probably a good idea not to set this parameter.
SQL_TRACE
The SQL_TRACE parameter will turn the SQL trace utility on or off. You can leave this parameter at its default setting of false (off), setting it to true (on) only when you are tuning a specific query or set of queries. Because of the heavy overhead, you should always use this parameter at the session, not the instance, level. Chapter 20 shows you how to use trace queries and format the trace output to help you in tuning SQL queries.
Example: SQL_TRACE = on
Default value: false
Parameter type: Dynamic. It can be changed with the ALTER SYSTEM or ALTER SESSION command.
PARALLEL_MAX_SERVERS
The PARALLEL_MAX_SERVERS parameter determines the number of parallel execution processes. Oracle recommends two parallel processes per CPU on larger systems, and four processes per CPU on smaller systems.

468 CH AP T E R 1 0 ■ C R E AT IN G A DA TA B AS E
Default value: Depends on the values of the CPU_COUNT, PARALLEL_AUTOMATIC_TUNING, and PARALLEL_ADAPTIVE_MULTI_USER parameters
Parameter type: Dynamic. It can be changed only at the system level with the ALTER SYSTEM command.
TIMED_STATISTICS
The TIMED_STATISTICS parameter is used to tell Oracle whether it should collect timed statistics during tracing. The possible values are true (timed statistics are collected) and false (timed statis-tics are not collected). If timed statistics are collected, they are used in some dynamic performance views. If you set the STATISTICS_LEVEL parameter to the recommended level of TYPICAL or to AUTO, the TIMED_STATISTICS parameter is by default set to true.
Example: TIMED_STATISTICS = true
Default value: true if the STATISTICS_LEVEL parameter is set to TYPICAL or ALL, false otherwise
Parameter type: Dynamic. You can change it with the ALTER SYSTEM or ALTER SESSION command.
PLSQL_OPTIMIZE_LEVEL
The PLSQL_OPTIMIZE_LEVEL parameter specifies the optimization level that will be used to compile PL/SQL library units. The higher you set this parameter (in a range from 0 to 2), the more effort the compiler makes to optimize PL/SQL library units. According to Oracle, setting this parameter to 2 pays off in better execution performance, but setting this parameter to 1 will result in almost as good a compilation with less use of compile-time resources.
Example: PL_SQL_OPTIMIZE_LEVEL = 2
Default value: 2
Parameter type: Dynamic. You can use the ALTER SYSTEM or ALTER SESSION command to change the value.
Recovery-Related Parameters
When you create a new database, you’ll need to configure several recovery-related parameters. When an instance crash occurs, all the data on disk is safe, but the data stored in the database buffers is wiped out instantaneously. Redo logs are on disk, so they are intact, but the redo log buffers are wiped out. To recover successfully from such a crash, the database needs to be brought to a consis-tent state by using Oracle’s redo logs and the undo records from the undo tablespace. The redo log records are used to write all the committed data to disk, and the undo records are used to roll back any uncommitted data that was stored on disk.
Recovering an instance can take a long time—and can keep the database out of commission for an unacceptable length of time—if you don’t configure any thresholds that determine how long an instance recovery can take. You can, for example, specify a precise time target for a complete instance recovery, and the database will automatically adjust the frequency of the checkpoints to make sure that there’s only a certain maximum amount of redo information to be rolled back when instance recovery is performed.
Of course, if you set a very low recovery time target, your instance recovery will be quick, but the database will need an excessive number of checkpoints on an ongoing basis, which will affect perfor-mance. There’s no one magic number for this recovery time target. You have to take into consideration your site’s service-level agreement and the tolerance for downtime.
The flash recovery area is an area reserved for all Oracle backup and recovery-related files, and it contains copies of current control files and online redo logs, as well as archived redo logs, flashback logs, and RMAN backups. The flash recovery area is completely separate from the database area, which is the location for the current database files (datafiles, control files, and online redo logs). The

C H AP TE R 1 0 ■ CR E AT IN G A D AT AB ASE 469
flash recovery area isn’t mandatory, but Oracle strongly recommends using it to simplify backup and recovery operations. You’ll learn more about the flash recovery area in Chapter 16.
The two parameters described next, DB_RECOVERY_FILE_DEST_SIZE and DB_RECOVERY_FILE_DEST, are used to configure the flash recovery area.
DB_RECOVERY_FILE_DEST_SIZE
The DB_RECOVERY_FILE_DEST_SIZE parameter specifies (in bytes) the size of the flash recovery area.
Example: DB_RECOVERY_FILE_DEST_SIZE=2000M
Default value: None
Parameter type: Dynamic. The ALTER SYSTEM command can be used to change the value.
DB_RECOVERY_FILE_DEST
The DB_RECOVERY_FILE_DEST parameter specifies the default location for the flash recovery area. If you don’t specify DB_CREATE_ONLINE_LOG_DEST_n when using OMF files, Oracle uses the location you specify for the DB_RECOVERY_FILE_DEST parameter as the default location for online redo log files and control files.
Example: DB_RECOVERY_FILE_DEST = /u05/app/oracle/fla
Default value: None
Parameter type: Dynamic. The ALTER SYSTEM command can be used to change the value.
■Note You must set the DB_RECOVERY_FILE_DEST_SIZE parameter in order to set the DB_RECOVERY_FILE_ DEST parameter. If you want to use the Flashback Database feature (explained in Chapter 16), you must also use the DB_FLASHBACK_RETENTION_TARGET parameter.
DB_FLASHBACK_RETENTION_TARGET
The DB_FLASHBACK_RETENTION_TARGET parameter specifies how far back (in minutes) you can flash back your database. The Flashback Database feature relies on flashback logs, and the DB_FLASHBACK_ RETENTION_TARGET parameter dictates the length of time the flashback logs are retained. How far back you can flash back your database depends on how much flashback data Oracle has kept in the flash recovery area.
Example: DB_FLASHBACK_RETENTION_TARGET = 2880
Default value: 1440 (minutes)
Parameter type: Dynamic. The ALTER SYSTEM command can be used to change the value.

470 CH AP T E R 1 0 ■ C R E AT IN G A DA TA B AS E
RESUMABLE_TIMEOUT
The RESUMABLE_TIMEOUT parameter enables or disables the Resumable Space Allocation feature and specifies resumable timeout at the system level. For example, if you set RESUMABLE_TIMEOUT=3600, the database will suspend any resumable space type operation and wait one hour (3,600 seconds) before erroring out. Chapter 8 discusses the Resumable Space Allocation feature in detail.
Example: RESUMABLE_TIMEOUT = 7200
Default value: 0
Parameter type: Dynamic. You can use the ALTER SYSTEM or ALTER SESSION command to change this parameter.
Corruption-Checking Parameters
The Oracle database is equipped with certain features that can automatically check your data blocks on the datafiles for consistency and data corruption. Block checking involves going through the data on the block and checking for consistency. Block checking prevents memory and data corruption, but costs from 1 to 10 percent overhead, so use these parameters with caution during peak produc-tion periods.
DB_LOST_WRITE_PROTECT
The DB_WRITE_LOST_PROTECT parameter is mainly for a Data Guard environment, where you have databases in either a standby or a primary role. The parameter enables or disables lost write detec-tion. A database lost write occurs when the I/O subsystem signals the completion of a write before the write is stored on disk. Possible values are none, typical, and full.
Example: DB_LOST_WRITE_PROTECT=full
Default value: none
Parameter type: Dynamic. The ALTER SYSTEM command can be used to change the value.
DB_ULTRA_SAFE
You can use the DB_ULTRA_SAFE initialization parameter to control the default settings for parameters that control database protection levels, such as the DB_BLOCK_CHECKING and DB_BLOCK_CHECKSUM parameters. You may set the DB_ULTRA_SAFE parameter to the following values:
• OFF: The database doesn’t make any changes if you set any of the following parameters: DB_BLOCK_CHECKING, DB_BLOCK_CHECKSUM, or DB_LOST_WRITE_PROTECT.
• DATA_ONLY: The database sets the DB_BLOCK_CHECKING parameter to MEDIUM, the DB_LOST_WRITE_ PROTECT parameter to TYPICAL, and the DB_BLOCK_CHECKSUM parameter to FULL.
• DATA_AND_INDEX: The database sets the DB_BLOCK_CHECKING parameter to FULL. The other two protection-related parameters will have the same values as you get when you choose the DATA_ONLY value for the DB_ULTRA_SAFE parameter.
Example: DB_ULTRA_SAFE = data_and_index
Default Value: OFF
Parameter type: Static
DB_BLOCK_CHECKSUM
Block checksums enable the detection of corruption caused by disks or the I/O system. Before Oracle writes a data block to disk, it calculates a checksum for that block and stores the value in the

C H AP TE R 1 0 ■ CR E AT IN G A D AT AB ASE 471
block itself. When it subsequently reads data from this block, it computes the checksum again and compares its value to the one it computed when writing to the block. If the checksums are different, Oracle notifies you that the data block is corrupted. You may have to perform a media recovery in this case, as explained in Chapter 16.
Oracle recommends that you turn block checksumming on in your database to catch corrup-tions in data blocks as well as redo log files. You can set the DB_BLOCK_CHECKSUM parameter to turn on the computing of checksums. You can use either the FULL or TYPICAL mode, or set it to OFF. In the FULL mode, Oracle will trap any in-memory corruption before it is recorded on the disk. However, Oracle recommends that you set this parameter to the alternative value of TYPICAL, since it involves a lower overhead (1 to 2 percent, instead of 4 to 5 percent). If you choose the OFF mode, DBWn calculates checksums just for the System tablespace.
Example: DB_BLOCK_CHECKSUM = full
Default value: TYPICAL
Parameter type: Dynamic. The ALTER SYSTEM command can be used to change the value.
DB_BLOCK_CHECKING
Using the DB_BLOCK_CHECKING parameter, you can set the database to check for corrupted data blocks. You can set this parameter to low, medium, or full, with each level involving a progressively higher amount of block checking (or you can set it to off to turn it off). When you enable block checking, Oracle automatically checks a block for consistency each time that block is modified. If a block isn’t consistent, Oracle will mark it as corrupt and create a trace file. Depending on your work-load, there is a 1 to 10 percent overhead when you turn block checking on. Oracle recommends that you turn block checking on. Note that Oracle checks the blocks in the System tablespace in all settings.
You can set the DB_BLOCK_CHECKING parameter to one of the following:
• OFF or FALSE: The database doesn’t perform block checking for tablespaces other than the System tablespace.
• LOW: The database performs only basic block header checks after a change of the block contents in memory.
• MEDIUM: In addition to the checks performed under the LOW setting, the database also performs semantic block checking for all non-index-organized table blocks.
• FULL or TRUE: The database performs all the checks specified under the LOW and MEDIUM settings, and additionally, performs semantic checks for index blocks.
Example: DB_BLOCK_CHECKING = medium
Default value: false
Parameter type: Dynamic. You can use the ALTER SYSTEM or ALTER SESSION command to change this parameter.

472 CH AP T E R 1 0 ■ C R E AT IN G A DA TA B AS E
DB_SECUREFILE
You use the DB_SECUREFILE parameter to specify whether you want the database to treat large objects as SecureFiles, new in Oracle Database 11g, or traditional BasicFiles. If you set this parameter to the value NEVER, the database will create all LOBS that you specify as SecureFiles as traditional Basic-Files. The value PERMITTED allows the creation of LOBs as SecureFiles. You can also assign the values ALWAYS and NEVER for this parameter.
Example: DB_SECUREFILE = always
Default value: PERMITTED
Parameter type: You can change this parameter with either the ALTER SYSTEM or the ALTER SESSION statement.
Security-Related Parameters
The following initialization parameters concern database security, including password authentication.
OS_AUTHENT_PREFIX
Oracle uses the value of the OS_AUTHENT_PREFIX parameter as a prefix to the operating system– authenticated usernames.
Default value: OPS$
Parameter type: Static
■Note The default value of OPS$ is well known to Oracle DBAs. However, Oracle suggests that you set the prefix value to the null string "" (OS_AUTHENT_PREFIX =""), which implies that you mustn’t add any prefix to operating system–account names.
REMOTE_LOGIN_PASSWORDFILE
The REMOTE_LOGIN_PASSWORDFILE initialization parameter specifies whether Oracle checks for a pass-word file for authentication purposes, and how many databases can use the password file. If you set the value to NONE, Oracle ignores any password file, and all privileged users must be authenticated by the operating system. If you use the SHARED value, Oracle will look for a password file to authenticate users, and one or more databases can share the same password file and can contain names other than SYS. Chapter 11 shows how to create a password file. The value EXCLUSIVE lets only one data-base use the password file, and it can include both SYS and non-SYS users.
Example: REMOTE_LOGIN_PASSWORDFILE = shared
Default value: EXCLUSIVE
Parameter type: Static
■Tip When you are using Oracle RAC, all instances must have the same value for the REMOTE_LOGIN_ PASSWORDFILE parameter.

C H AP TE R 1 0 ■ CR E AT IN G A D AT AB ASE 473
Undocumented Initialization ParametersIn addition to the initialization parameters listed in this chapter, Oracle has several undocumented initialization parameters. These parameters are not supposed to be altered in any way by regular users, and Oracle will not help you troubleshoot several kinds of problems that may occur if you use these undocumented and unsupported parameters. Once you gain sufficient experience, though, you will be able to make good use of some of these parameters.
Listing 10-1 shows how to query for the list of undocumented initialization parameters.
Listing 10-1. Query to List the Undocumented Oracle Parameters
SQL> SELECT a.ksppinm parameter, a.ksppdesc description, b.ksppstvl session_value, c.ksppstvl instance_value FROM x$ksppi a, x$ksppcv b, x$ksppsv c WHERE a.indx = b.indx AND a.indx = c.indx AND SUBSTR (a.ksppinm,1,1) = '_' ORDER BY a.ksppinm;
This query produced a list of 911 undocumented parameters for the Oracle Database 11g release.
Viewing the Current Initialization Parameter ValuesHow do you know what values the numerous initialization parameters are currently set to for your database? The following sections describe several ways.
Reading the init.ora File (or the SPFILE)
You can always use a file editor such as Windows Notepad to examine init.ora files, not only to view the settings for initialization parameters, but also (at your own risk) to change their values. However, there is a major drawback to doing this: you cannot see the default values of all the initialization parameters. Remember that there are about 300 initialization parameters in Oracle Database 11g, and you will probably not set the values of more than a quarter of these parameters explicitly by using your init.ora file.
The V$PARAMETER View
A good and quick way to find out the initialization settings for your database is to query the V$PARAMETER view. You can run the following query to find out the values of all the parameters:
SQL> SELECT name, value, isdefault FROM v$parameter;
The isdefault column has a value of true if the parameter is the default value and false if you actually set it to something other than the default value.
When I ran this command on my NT server, the output showed about 250 parameters. If you want to see only one or a set of related parameters and their values, you can add a WHERE clause to the previous SQL query.

474 CH AP T E R 1 0 ■ C R E AT IN G A DA TA B AS E
The SHOW PARAMETER Command
Even though it’s easy to query the V$PARAMETER view, there’s a simpler means of querying the database about your initialization parameters. You can just type SHOW PARAMETER and you’ll see all the initialization parameters with their values. You can also limit the vast amount of output by passing a keyword to SHOW PARAMETER. For example, the keywords LOCKS, FILES, LOG, and many others can be passed along to the SHOW PARAMETER command to get the values of a related set of parameters. (Note that the resulting list may not necessarily be a set of related parameters, as the command just uses a pattern search of the NAME column to pull the values from the V$PARAMETER table.)
Listing 10-2 shows an example of the use of the SHOW PARAMETER command. Here, the output shows all initialization parameters that contain the string “lock”.
Listing 10-2. Using the SHOW PARAMETER Command
SQL> SHOW PARAMETER LOCK
NAME TYPE VALUE------------------------------- ------- ------db_block_buffers integer 0db_block_checking boolean FALSEdb_block_checksum boolean TRUEdb_block_size integer 8192db_file_multiblock_read_count integer 8ddl_wait_for_locks boolean FALSEdistributed_lock_timeout integer 60dml_locks integer 400gc_files_to_locks stringlock_name_space stringlock_sga boolean FALSESQL>
Creating a New DatabaseAs I mentioned at the beginning of the chapter, you have several ways to create an Oracle database. One way is to have Oracle create a database for you as part of the server software installation. You simply choose the installation option to create a new database, and Oracle will lead you through the necessary steps to configure a database. Alternatively, you can use the DBCA to create a new database.
Manual CreationIn this section, I show you how to create a new database from scratch, using individual database creation statements. Of course, if you are familiar with the database creation process, you don’t have to run these SQL statements one by one—just create a script with all the necessary statements, and simply execute the script from SQL*Plus.
Setting OS Variables
You can use the SQL*Plus interface to create the database, either directly from a workstation or through a terminal connected to the server where you want to create the database. Before you log into the SQL*Plus session, however, you will need to set some environment variables at the oper-ating system level.

C H AP TE R 1 0 ■ CR E AT IN G A D AT AB ASE 475
First, make sure ORACLE_HOME is set for the session you log into. The ORACLE_HOME environment variable in Oracle Database 11g databases is in the following format:
$ORACLE_BASE/product/11.1.0/db_1
You can thus set your ORACLE_HOME as in the following example:
$ export ORACLE_HOME=/u01/app/oracle/product/11.1.0/db_1
Second, set the Oracle system identifier (ORACLE_SID) for your database to uniquely identify your database. This value will be the same as your DB_NAME initialization parameter value (which in this example is nina).
$ export ORACLE_SID=nina
Finally, make sure you set the LD_LIBRARY_PATH variable as shown here:
$ export LD_LIBRARY_PATH=$ORACLE_HOME/lib
Ensuring You Have the Privileges to Create Databases
Every Oracle database has a set of default administrative users to manage the database or to monitor various components of the database. Of these default users, two are special because their accounts can be used to perform most of the database administrative tasks. They are the SYS and SYSTEM accounts.
The default password for SYS is change_on_install and the password for the SYSTEM account is manager. You can specify passwords for these two critical accounts as part of your database creation process, as you’ll see shortly. In addition to the two administrative user accounts, most types of Oracle databases come with several other default accounts, usually with default passwords. (See the “Changing the Passwords for the Default Users” section later in this chapter to learn how to ensure that you change all the default passwords.) All users except SYS need to be explicitly granted high-level privileges before they can perform special administrative functions, such as creating databases and starting, stopping, and backing them up. The SYSDBA privilege will allow a user to create databases.
The interesting thing about the SYSDBA privilege is that you don’t really need to have the data-base open or even have a database before you can invoke it. Before you create the database, you’ll be creating the instance (SGA + Oracle processes), and the SYSDBA privilege is in effect even at the instance level. You’ll be connecting to the database as the super user SYS with the SYSDBA privilege, as shown here:
SQL> CONNECT sys AS sysdba
If the system administrator sets the oracle user to be part of a special group called DBA in the /etc/group file, you can also use the following command to log in as user SYS with the SYSDBA privilege:
SQL> CONNECT / AS sysdba
Creating the init.ora File
Before you can start the Oracle instance, you first must create the initialization parameter file (init.ora). Once you create the instance, you can create an SPFILE from your init.ora file. As you will recall, an Oracle instance consists of certain Oracle background processes and Oracle memory. Once you have the instance running, you can create the database proper. As most of the parameters in the initialization file are easily modifiable later on, the goal at this point isn’t to be precise or exhaustive, but rather to get the instance up and running quickly.
The Oracle instance I created as an example for the database nina (initnina.ora), shown in Listing 10-3, contains the standard parameters to help support an OLTP application. Thus, you won’t

476 CH AP T E R 1 0 ■ C R E AT IN G A DA TA B AS E
see data warehouse–oriented parameters in this initialization file. You’ll notice that in several cases, I explicitly state the default values for certain parameters—this is purely for pedagogical reasons.
Listing 10-3. The Initialization Parameter File for the Example Database nina
# first, specify the name of the databasedb_name=nina\pard\ri144\sl-240\slmult0 #for an ASM instance, use instance_type=ASM.Following is the default\parinstance_type=RDBMS\par# you can set the db_name to your organization name as well\pardb_domain=world\par# following two parameters set the max number of open files and processes\pardb_files=1000\parprocesses=600\par# following is the default block size\pardb_block_size=8192\par# following is the default value for the statistics_level parameter \parstatistics_level=typical\par# following is the default audit_trail value\paraudit_trail=none\par# following three lines set the dump directory destinations\parbackground_dump_dest=\rquote /u01/app/oracle/admin/nina/\rquote\paruser_dump_dest=\rquote /u01/app/oracle/admin/nina/\rquote\parcore_dump_dest=\rquote /u01/app/oracle/admin/nina/\rquote\par# following parameter sets the database compatibility level\parcompatible=10.2.1.0\par# two control files are specified below\parcontrol_files=(\lquote /u01/app/oracle/oradata/cont1.ctl\rquote ,\par \lquote /u01/app/oracle/oradata/cont2.ctl\rquote )\par# cursor sharing is set to force, to make the database use bind variables\parcursor_sharing=force\par# following two parameters set the SGA and the PGA targets.\parsga_target=300M\parpga_aggregate_target=2000M\par# the multiblock read count is 16\pardb_file_multiblock_read_count=16\par# the following will ensure that flashback logs \par# are retained for 2 hours\pardb_flashback_retention_target=7200\par# Following two parameters configure the optional flash recovery area\pardb_recovery_file_dest=\rquote /u02/app/oracle/flash_recovery_area\rquote\pardb_recovery_file_dest_size=1000M\par# Following two parameters control the archiving of the redo\par# log files. For now, I am not archiving the logs, but these two parameters\par# enable me to turn it on later.\parlog_archive_dest_1=\rquote LOCATION=/u02/app/oracle/arch/\rquote\parlog_archive_format=\rquote log%t_%s_%r.arc\rquote\par# following is the default optimizer mode\paroptimizer_mode=all_rows\par# the following line makes it necessary to use a password file#to connect as SYSDBA\parremote_login_passwordfile=none\par#Following parameter allows certain operations to resume after a suspension\parresumbable_timeout=1800\par

C H AP TE R 1 0 ■ CR E AT IN G A D AT AB ASE 477
# the following two parameters pertain to automatic undo management\parundo_management=auto\parundo_retention=7200\par# The following is optional, since I'm using only#a single undo tablespace\parundo_tablespace=undotbs_01\par\pard\f1\par}
■Tip The default value for the STATISTICS_LEVEL initialization parameter is TYPICAL. You need to use this setting if you want to use several of Oracle’s features, including the Automatic Shared Memory Management feature.
Once you configure your initialization file, you are ready to create the instance. Make sure you save the initnina.ora file in the $ORACLE_HOME/dbs directory, which is the default location for an init.ora file or an SPFILE on UNIX/Linux systems (on a Windows system, the default location is $ORACLE_HOME\database). This way, Oracle will always find it without you having to specify the complete path of the location.
Starting the Oracle Instance
To create the database, first you must have the instance up and running. Remember, an instance can exist without any database attached to it, and the active instance makes it possible for you to create the database. Follow these steps:
1. Make sure you have specified the correct ORACLE_SID and ORACLE_HOME locations, as explained earlier in the “Setting OS Variables” section in this chapter.
2. Log in to the database through the SQL*Plus interface, as shown here:
oracle@localhostdbs]$ sqlplus /nologSQL*Plus: Release 11.1.0.6.0 - Production on Fri Mar 7 15:35:32 2008
Copyright (c) 1982, 2007, Oracle. All rights reserved.
SQL> CONNECT sys AS sysdbaEnter password:Connected to an idle instance.SQL>
3. Start the instance in the NOMOUNT mode, since you don’t have any control files to mount yet. If you use the plain STARTUP command, Oracle will look for the control files. You’re probably thinking, “But we haven’t created those files yet!” Not to worry—that will come during the creation of the database itself.
If you saved your init.ora file in the default location ($ORACLE_HOME/dbs), and you correctly specified the ORACLE_SID environment variable (nina) before you started the instance, you don’t have to specify the init.ora file explicitly.
SQL> STARTUP NOMOUNTORACLE instance started.
Total System Global Area 314572800 bytesFixed Size 1236756 bytesVariable Size 99164396 bytes

478 CH AP T E R 1 0 ■ C R E AT IN G A DA TA B AS E
Database Buffers 213909504 bytesRedo Buffers 5169152 bytesSQL>
If you didn’t save your init.ora file in the default location ($ORACLE_HOME/dbs), you must specify the complete path and the name of the file:
SQL> NOMOUNT PFILE='/u01/app/oracle/product/10.2.0/db_1/dbs/initnina.ora'
■Tip It’s common to get a couple of ORA-01078 errors (failure to process system parameters) at this point. Just correct the error shown in the message in the init.ora file, and you should have no problem starting your instance.
4. The instance will start using the parameters specified in the initnina.ora file. You can see that all the background processes for your database instance have been started by using the ps -ef command, as shown here:
[oracle@localhost]$ ps -ef | grep nina
oracle 5211 1 0 Mar05 ? 00:00:32 ora_pmon_ninaoracle 5213 1 0 Mar05 ? 00:00:06 ora_vktm_ninaoracle 5217 1 0 Mar05 ? 00:00:04 ora_diag_ninaoracle 5219 1 0 Mar05 ? 00:00:06 ora_dbrm_ninaoracle 5221 1 0 Mar05 ? 00:00:11 ora_psp0_ninaoracle 5225 1 0 Mar05 ? 00:04:39 ora_dia0_ninaoracle 5227 1 0 Mar05 ? 00:00:07 ora_mman_ninaoracle 5229 1 0 Mar05 ? 00:00:19 ora_dbw0_ninaoracle 5231 1 0 Mar05 ? 00:00:17 ora_lgwr_ninaoracle 5233 1 0 Mar05 ? 00:01:34 ora_ckpt_ninaoracle 5235 1 0 Mar05 ? 00:00:15 ora_smon_ninaoracle 5237 1 0 Mar05 ? 00:00:01 ora_reco_ninaoracle 5239 1 0 Mar05 ? 00:00:52 ora_mmon_ninaoracle 5241 1 0 Mar05 ? 00:01:22 ora_mmnl_ninaoracle 5249 1 0 Mar05 ? 00:00:04 ora_fbda_ninaoracle 5251 1 0 Mar05 ? 00:00:07 ora_smco_ninaoracle 5257 1 0 Mar05 ? 00:00:03 ora_qmnc_ninaoracle 5273 1 0 Mar05 ? 00:00:00 ora_q000_ninaoracle 5275 1 0 Mar05 ? 00:00:02 ora_q001_nina(DESCRIPTION=(LOCAL=YES)(ADDRESS=(PROTOCOL=beq)))oracle 27290 1 0 15:29 ? 00:00:00 ora_w000_ninal11oracle 27394 27375 0 15:36 pts/2 00:00:00 grep nina[oracle@localhost] $
5. You can execute a simple query at this stage to verify the version of the database, as shown here:
SQL> SELECT * FROM v$version;
BANNER--------------------------------------------------------------------------------Oracle Database 11g Enterprise Edition Release 11.1.0.6.0 - ProductionPL/SQL Release 11.1.0.6.0 – ProductionCORE 11.1.0.6.0 ProductionTNS for Linux: Version 11.1.0.6.0 - Production

C H AP TE R 1 0 ■ CR E AT IN G A D AT AB ASE 479
NLSRTL Version 11.1.0.6.0 - ProductionSQL>
As you can see in the example in Listing 10-4, Oracle will write all the startup and shutdown information to the alert log, as well as any errors during instance creation and routine database oper-ation. The alert log also lists all the nondefault initialization parameters that you had specified in your init.ora file. Note the starting up of all the Oracle processes: database writer (DBWn), process monitor (PMON), log writer (LGWR), checkpoint (CKPT), system monitor (SMON), and recoverer (RECO). The startup shown in Listing 10-4 is clean so far, as there are no errors either on the screen or in the alert log file.
Listing 10-4. The Instance Creation Process in the Alert LogWed Feb 13 15:05:22 2008Starting ORACLE instance (normal)LICENSE_MAX_SESSION = 0LICENSE_SESSIONS_WARNING = 0Picked latch-free SCN scheme 2Autotune of undo retention is turned on.IMODE=BRILAT =73LICENSE_MAX_USERS = 0SYS auditing is disabledStarting up ORACLE RDBMS Version: 11.1.0.6.0.Using parameter settings in server-side pfile/u01/app/oracle/product/11.1.0.6/db_1/dbs/initorcl11.oraSystem parameters with non-default values: processes = 600 instance_type = "RDBMS" sga_target = 300M control_files = "/u01/app/oracle/oradata/orcl11/cont1.ctl" control_files = "/u01/app/oracle/product/11.1.0.6/db_1/dbs/ /u01/app/oracle/oradata/orcl11/cont2.ctl" db_block_size = 8192 compatible = "11.1.0" log_archive_dest_1 = "LOCATION=/u02/app/oracle/arch/" log_archive_format = "log%t_%s_%r.arc" db_files = 1000 db_recovery_file_dest = "/u02/app/oracle/oradata/orcl11/flash_recovery_area" db_recovery_file_dest_size= 1000M db_flashback_retention_target= 7200 undo_management = "AUTO" undo_tablespace = "undotbs_01" undo_retention = 7200 resumable_timeout = 1800 remote_login_passwordfile= "NONE" db_domain = "world" cursor_sharing = "force" audit_trail = "NONE" db_name = "orcl11" optimizer_mode = "all_rows" pga_aggregate_target = 2000M statistics_level = "typical"Wed Feb 13 15:05:24 2008WARNING:Oracle instance running on a system with low open file descriptor

480 CH AP T E R 1 0 ■ C R E AT IN G A DA TA B AS E
limit. Tune your system to increase this limit to avoid severe performance degradation.PMON started with pid=2, OS id=3548Wed Feb 13 15:05:25 2008DIAG started with pid=4, OS id=3554Wed Feb 13 15:05:25 2008DBRM started with pid=5, OS id=3557Wed Feb 13 15:05:25 2008VKTM started with pid=3, OS id=3550VKTM running at (100ms) precisionWed Feb 13 15:05:25 2008PSP0 started with pid=6, OS id=3559Wed Feb 13 15:05:25 2008DIA0 started with pid=8, OS id=3563Wed Feb 13 15:05:25 2008DSKM started with pid=7, OS id=3561Wed Feb 13 15:05:25 2008MMAN started with pid=7, OS id=3565Wed Feb 13 15:05:26 2008DBW0 started with pid=9, OS id=3567Wed Feb 13 15:05:26 2008LGWR started with pid=10, OS id=3569Wed Feb 13 15:05:26 2008SMON started with pid=12, OS id=3573Wed Feb 13 15:05:26 2008CKPT started with pid=11, OS id=3571Wed Feb 13 15:05:26 2008RECO started with pid=13, OS id=3575Wed Feb 13 15:05:26 2008MMON started with pid=14, OS id=3577Wed Feb 13 15:05:27 2008MMNL started with pid=15, OS id=3579ORACLE_BASE not set in environment. It is recommendedthat ORACLE_BASE be set in the environmentWed Feb 13 15:10:24 2008
At this point, you have a running Oracle instance, which consists of the Oracle processes and the SGA memory that you allocated for it. You don’t have a database yet; you’ll create one from scratch in the next section.
Creating the Database
The simplest database you can create will have a System tablespace to hold the data dictionary, a Sysaux tablespace, a pair of control files and redo log files, a default temporary tablespace, and an undo tablespace. Once you have this database going, you can add any number of new tablespaces to it.
Let’s create a bare-bones Oracle Database 11g database now. You can create your new database either by entering each line of the database-creation statement individually or by creating a data-base-creation script with the entire statement, as shown in Listing 10-5, and executing the script.
Listing 10-5. The CREATE DATABASE Script
SQL> CREATE DATABASE nina 2 USER SYS IDENTIFIED BY sys_password 3 USER SYSTEM IDENTIFIED BY system_password

C H AP TE R 1 0 ■ CR E AT IN G A D AT AB ASE 481
4 LOGFILE GROUP 1 ('/u01/app/oracle/oradata/nina/redo01.log') SIZE 100M, a. GROUP 2 ('/u01/app/oracle/oradata/nina/redo02.log') SIZE 100M, b. GROUP 3 ('/u01/app/oracle/oradata/nina/redo03.log') SIZE 100M 5 MAXLOGFILES 5 6 MAXLOGMEMBERS 5 7 MAXLOGHISTORY 1 8 MAXDATAFILES 300 9 CHARACTER SET US7ASCII 10 NATIONAL CHARACTER SET AL16UTF16 11 EXTENT MANAGEMENT LOCAL 12 DATAFILE '/u01/app/oracle/oradata/nina/system01.dbf' SIZE 500M REUSE 13 SYSAUX DATAFILE '/u01/app/oracle/oradata/nina/sysaux01.dbf' SIZE 325M REUSE 14 DEFAULT TABLESPACE users 15 DATAFILE '/u01/app/oracle/oradata/nina/users01.dbf' 16 SIZE 500M REUSE AUTOEXTEND ON MAXSIZE UNLIMITED 17 DEFAULT TEMPORARY TABLESPACE tempts1 18 TEMPFILE '/u01/app/oracle/oradata/nina/temp01.dbf' 19 SIZE 200M REUSE 20 UNDO TABLESPACE undotbs 21 DATAFILE '/u01/app/oracle/oradata/nina/undotbs01.dbf' 22 SIZE 200M REUSE AUTOEXTEND ON MAXSIZE UNLIMITED;
Database created.SQL>
Here’s a quick review of the CREATE DATABASE statement:
• Line 1 issues the CREATE DATABASE command to Oracle. This command prompts the creation of two control files, and their locations are read from the initnina.ora parameter file. If control files with the same names already exist at the time of database creation (from a prior failed installation), you must specify the CONTROLFILE REUSE clause in the CREATE DATABASE statement.
• Lines 2 and 3 show how you can specify the passwords for the two key users SYS and SYSTEM. These are optional clauses, and if you omit them, users SYS and SYSTEM are assigned the default passwords change_on_install and manager, respectively. Since these are well-known default passwords, Oracle advises you to use these clauses to change the default passwords.
• Line 4 creates the pair of online redo log groups required by Oracle.
• Lines 5 through 8 specify the maximum setting for datafiles, log files and such.
• Lines 9 and 10 specify the character sets used by the database. Just use these character sets for all the databases you’ll be creating, unless you have special needs based on languages other than English.
• Line 11 specifies that the System tablespace should be locally managed, rather than dictionary managed.
• Line 12 creates the System tablespace with one datafile of 500MB. The data dictionary is created within this System tablespace. One system rollback segment is also automatically created.
• Line 13 creates the new default tablespace Sysaux. You must create the Sysaux tablespace, or your database creation statement will fail.

482 CH AP T E R 1 0 ■ C R E AT IN G A DA TA B AS E
• Lines 14 through16 create the default permanent tablespace TEMP01 with one 500MB-sized tempfile. All users have to be allotted a temporary tablespace when they are initially created in the database. If you don’t do so, the users will be allocated to the default temporary tablespace, TEMP01, automatically. Notice how line 14 specifies that the file used for the temporary tablespace is a temp file, not a regular datafile. You can’t create the temporary tablespace with a normal datafile specification.
• Lines 17 through 19 create the new default temporary tablespace for the database. Any users that aren’t explicitly assigned a permanent tablespace will automatically be allocated this tablespace as their default tablespace, instead of the System tablespace.
• Lines 20 through 22 create the undo tablespace for the new database.
Oracle automatically mounts and opens the database after it creates all the files described previ-ously. As you’ll see in the last part of this chapter, mounting a database involves reading the control files, and opening the database enables all users to access the various parts of the new database.
Take a peek at the alert log at this point to see what Oracle actually did when the CREATE DATA-BASE command was issued. Listing 10-6 shows the relevant portion from the alert log.
Listing 10-6. The Database Creation Process in the Alert Log
Sun Feb 13 15: 13:00 2008create database orcl11 USER SYS IDENTIFIED BY *****USER SYSTEM IDENTIFIED BY ******LOGFILE GROUP 1 ('/u01/app/oracle/oradata/orcl11/redo01.log') SIZE 100M, GROUP 2 ('/u01/app/oracle/oradata/orcl11/redo02.log') SIZE 100M, GROUP 3 ('/u01/app/oracle/oradata/orcl11/redo03.log') SIZE 100M MAXLOGFILES 5 MAXLOGMEMBERS 5 MAXLOGHISTORY 1 MAXDATAFILES 100 CHARACTER SET US7ASCII NATIONAL CHARACTER SET AL16UTF16 EXTENT MANAGEMENT LOCAL DATAFILE '/u01/app/oracle/oradata/orcl11/system01.dbf' SIZE 325M REUSE SYSAUX DATAFILE '/u01/app/oracle/oradata/orcl11/sysaux01.dbf' SIZE 325M REUSE DEFAULT TABLESPACE users DATAFILE '/u01/app/oracle/oradata/orcl11/users01.dbf' SIZE 500M REUSE AUTOEXTEND ON MAXSIZE UNLIMITED DEFAULT TEMPORARY TABLESPACE tempts1 TEMPFILE '/u01/app/oracle/oradata/orcl11/temp01.dbf' SIZE 20M REUSE UNDO TABLESPACE undotbs DATAFILE '/u01/app/oracle/oradata/orcl11/undotbs01.dbf' SIZE 200M REUSE AUTOEXTEND ON MAXSIZE UNLIMITEDDatabase mounted in Exclusive ModeLost write protection disabledWed Feb 13 15:33:08 2008Successful mount of redo thread 1, with mount id 3893367911Assigning activation ID 3893367911 (0xe8101467)Thread 1 opened at log sequence 1 Current log# 1 seq# 1 mem# 0: /u01/app/oracle/oradata/orcl11/redo01.logSuccessful open of redo thread 1Wed Feb 13 15:33:08 2008MTTR advisory is disabled because FAST_START_MTTR_TARGET is not set

C H AP TE R 1 0 ■ CR E AT IN G A D AT AB ASE 483
Wed Feb 13 15:33:08 2008SMON: enabling cache recoveryprocessing ?/rdbms/admin/dcore.bsqcreate tablespace SYSTEM datafile '/u01/app/oracle/oradata/orcl11/system01.dbf' SIZE 325M REUSE
EXTENT MANAGEMENT LOCAL onlineWed Feb 13 15:33:20 2008Completed: create tablespace SYSTEM datafile '/u01/app/oracle/oradata/orcl11/system01.dbf' SIZE 325M REUSE
EXTENT MANAGEMENT LOCAL onlinecreate rollback segment SYSTEM tablespace SYSTEM storage (initial 50K next 50K)Completed: create rollback segment SYSTEM tablespace SYSTEM storage (initial 50K next 50K)processing ?/rdbms/admin/dsqlddl.bsqprocessing ?/rdbms/admin/dmanage.bsqCREATE TABLESPACE sysaux DATAFILE '/u01/app/oracle/oradata/orcl11/sysaux01.dbf' SIZE 325M REUSE
EXTENT MANAGEMENT LOCAL SEGMENT SPACE MANAGEMENT AUTO ONLINEWed Feb 13 15:33:36 2008Completed: CREATE TABLESPACE sysaux DATAFILE'/u01/app/oracle/oradata/orcl11/sysaux01.dbf' SIZE 325M REUSE
EXTENT MANAGEMENT LOCAL SEGMENT SPACE MANAGEMENT AUTO ONLINEprocessing ?/rdbms/admin/dplsql.bsqprocessing ?/rdbms/admin/dtxnspc.bsqCREATE UNDO TABLESPACE UNDOTBS DATAFILE'/u01/app/oracle/oradata/orcl11/undotbs01.dbf' SIZE 200M REUSE AUTOEXTEND ON MAXSIZE UNLIMITEDSuccessfully onlined Undo Tablespace 2.Completed: CREATE UNDO TABLESPACE UNDOTBS DATAFILE'/u01/app/oracle/oradata/orcl11/undotbs01.dbf' SIZE 200M REUSE AUTOEXTEND ON MAXSIZE UNLIMITEDCREATE TEMPORARY TABLESPACE TEMPTS1 TEMPFILE'/u01/app/oracle/oradata/orcl11/temp01.dbf' SIZE 20M REUSE
Completed: CREATE TEMPORARY TABLESPACE TEMPTS1 TEMPFILE'/u01/app/oracle/oradata/orcl11/temp01.dbf' SIZE 20M REUSE
ALTER DATABASE DEFAULT TEMPORARY TABLESPACE TEMPTS1Completed: ALTER DATABASE DEFAULT TEMPORARY TABLESPACE TEMPTS1CREATE TABLESPACE USERS DATAFILE '/u01/app/oracle/oradata/orcl11/users01.dbf' SIZE 500M REUSE AUTOEXTEND ON MAXSIZE UNLIMITED SEGMENT SPACE MANAGEMENT MANUALWed Feb 13 15:34:12 2008Completed: CREATE TABLESPACE USERS DATAFLE'/u01/app/oracle/oradata/orcl11/users01.dbf' SIZE 500M REUSE AUTOEXTEND ON MAXSIZE UNLIMITED SEGMENT SPACE MANAGEMENT MANUAL

484 CH AP T E R 1 0 ■ C R E AT IN G A DA TA B AS E
ALTER DATABASE DEFAULT TABLESPACE USERSCompleted: ALTER DATABASE DEFAULT TABLESPACE USERSprocessing ?/rdbms/admin/dfmap.bsq. . .Wed Feb 13 15:34:32 2008SMON: enabling tx recoveryStarting background process SMCOWed Feb 13 15:34:33 2008SMCO started with pid=17, OS id=4055Wed Feb 13 15:34:38 2008Starting background process FBDAWed Feb 13 15:34:38 2008FBDA started with pid=19, OS id=4059replication_dependency_tracking turned off (no async multimaster replication found)Starting background process QMNCWed Feb 13 15:34:40 2008QMNC started with pid=20, OS id=4063Completed: create database orcl11. . .Wed Feb 13 15:50:43 2008Sat Feb 16 11:00:18 2008
■Tip If you want to see exactly what Oracle is doing during the database-creation process, go to the directory where the alert log is located and run the following command:
$ tail –f alertnina.log
Here are the key steps in the database-creation log shown in Listing 10-6:
• The database mounted statement means that Oracle has opened the control files you specified in the init.ora file.
• The successful open of redo thread 1 statement indicates that the first redo log file has successfully been created and opened for recovery purposes.
• The Sysaux and System tablespaces are successfully created.
• The rollback segment named “system” is created in the System tablespace.
• The undo tablespace, UNDOTBS, is successfully created.
• The TEMP01 tablespace is created as a temporary tablespace, using a temp file instead of the regular datafiles used for permanent tablespaces. After the temporary tablespace is created, the ALTER DATABASE DEFAULT TEMPORARY TABLESPACE TEMP01 statement is executed to desig-nate TEMP01 as the default temporary tablespace for this database.
• The USERS tablespace is created and the ALTER DATABASE DEFAULT TABLESPACE USERS state-ment is executed to designate the USERS tablespace as the default permanent tablespace for the new database.
• The new background processes, QMNC and MMNL, are started.

C H AP TE R 1 0 ■ CR E AT IN G A D AT AB ASE 485
■Note When you create the flash recovery area, which is a specialized location for storing recovery-related files, you can’t use the traditional LOG_ARCHIVE_DEST and LOG_ARCHIVE_DUPLEX_DEST parameters. You must instead specify the LOG_ARCHIVE_DEST_n parameter.
Running Oracle Scripts to Create Data Dictionary Objects
Oracle provides two important scripts, catalog.sql and catproc.sql, that you need to run right after you create your new database:
• catalog.sql populates the database with the data dictionary views, public synonyms, and other objects. The data dictionary base tables, the parents of the V$ views, are the first objects created in the Oracle database.
• catproc.sql creates the Oracle-provided packages and other objects to support the use of PL/SQL code in the database.
When you run these scripts, you’ll see a lot of information flow past on the screen, indicating that the necessary database objects are being created, and so on. Just let the two scripts do what they are supposed to do. It should take about an hour or so to run both scripts.
■Note Ignore any errors that you see during the execution of the catalog.sql and catproc.sql scripts. These errors mostly state that the object that is to be dropped doesn’t exist. If it bothers you to see all those errors, you can reassure yourself by running each script twice. You won’t see any errors during the second execution if you do this.
Connect as the SYS user with SYSDBA privileges, and run the scripts as follows:
SQL> @$ORACLE_HOME/rdbms/admin/catalog.sql. . .Grant succeeded
PL/SQL procedure successfully completed.SQL>SQL> @$ORACLE_HOME/rdbms/admin/catproc.sql. . .
PL/SQL procedure successfully completed.SQL>
A Simple Way to Create a Database
You’ve seen how to create a database by first specifying various initialization parameters in the parameter file to start the instance and then using the CREATE DATABASE statement to create the data-base itself. Both the initialization parameter file and the CREATE DATABASE statement are pretty detailed, if not complex. However, you don’t have to have such an elaborate initialization file and CREATE DATABASE statement each time you create a new database. If you want to create a new Oracle database in a hurry, you can do so by following these steps:
1. Create a new init.ora file with just one parameter, DB_NAME (DB_NAME=orcl11, for example).
2. Start up your new instance as follows:

486 CH AP T E R 1 0 ■ C R E AT IN G A DA TA B AS E
SQL> STARTUP NOMOUNTORACLE instance started.Total System Global Area 188743680 bytesFixed Size 1308048 bytesVariable Size 116132464 bytesDatabase Buffers 67108864 bytesRedo Buffers 5169152 bytesSQL>
3. Create your new database with the following simple statement:
SQL> CREATE DATABASE;Database created.SQL>
Oracle will automatically create an OMF System and a Sysaux tablespace. The database will run with manual undo management using rollback segments. Of course, you must still run the two scripts, catalog.sql and catproc.sql, in order to create the data dictionary and the Oracle packages.
■Tip The initialization parameter file will contain the locations for the datafiles, redo log files, and control files. Oracle will automatically create a 100MB auto-extensible system file, a pair of redo logs, control files, an undo tablespace, and a temporary tablespace. Simple as that! Chapter 17 shows you other interesting features of OMF.
Using the DBCA to Create a DatabaseThe simplest way to create an Oracle database is to the use the Oracle database creation wizard, Database Configuration Assistant. The Oracle Universal Installer automatically invokes the DBCA when you choose to create a database as part of the installation of the Oracle Database 11g software. You can also launch DBCA anytime after the installation is completed to create an Oracle database.
You can run the DBCA in interactive or silent mode, and it has several benefits, including providing templates for creating DSS, OLTP, or hybrid databases. The biggest benefit to using the DBCA is that for DBAs with little experience, it lets Oracle set all the configuration parameters and start up a new database quickly without errors. Finally, the DBCA also automatically creates all its file systems based on the highly utilitarian Optimal Flexible Architecture standard.
The DBCA is an excellent tool, and it even allows you to register a new database automatically with Oracle Internet Directory (OID). However, I recommend strongly that you use the manual approach initially, so you can get a good idea of what initialization parameters to pick and how the database is created step by step. Once you gain sufficient confidence, of course, the DBCA is, without a doubt, the best way to create an Oracle database of any size and complexity.
You can perform the following tasks with the DBCA:
• Create a database.
• Change the configuration of an existing database.
• Delete a database.
• Configure ASM.
Starting DBCA
On a Windows operating system, click Start and then select Programs ➤ Oraclehome_name ➤ Configuration and Migration Tools ➤ Database Configuration Assistant. You can start DBCA on a UNIX or Linux system by typing dbca at the command-line prompt. Since DBCA is a GUI tool, make sure you set the DISPLAY environment variable correctly before you invoke the tool.
C H AP TE R 1 0 ■ CR E AT IN G A D AT AB ASE 487
Database Creation Steps
Here’s a summary of the steps you must follow to create a new database using the DBCA:
1. If you haven’t already started DBCA, type dbca at the operating system prompt.
2. In the Welcome window, click Next.
3. The DBCA Operations window appears. Select Create a Database, and click OK.
4. In the Database Templates window, the DBCA offers you a choice of the type of database you can create. The three choices are Data Warehouse, General Purpose, and Transaction Pro-cessing. You can select the default General Purpose template if you aren’t sure which type of database you want to create. You can also select the Custom Database option if you wish, where you’ll have to provide more information to DBCA in order to create the database. Click Next.
5. In the Database Identification window, enter the database name in the form database_name.domain name (for example, orcl11.world). In the SID field, enter the system identifier, which defaults to the database name (orcl11). Click Next.
6. In the Management Options window, you can set up management by the Oracle Enterprise Manager. You can choose between the Grid Control and Database Control. If you have already installed the Oracle Management Agent on the host computer, you can select Grid Control. Otherwise, select Configure Database Control for local management. You can also select the Enable Daily Backup to Recovery Area option in this window. Click Next.
7. In the Database Credentials window, specify passwords for the administrative accounts such as SYS and SYSTEM. Click Next.
8. In the Storage Options window, specify the type of storage devices you want to use for the new database. Select File System and click Next.
9. In the Database File Locations window, using the Choose Common Location for All Database Files option, specify the Oracle software home and the directory path where you want DBCA to create the database files. You can choose Oracle Managed Files if you want, making the database completely manage the database files.
10. In the Recovery Configuration window, choose between the default noarchivelog mode and archivelog mode of operating the database. Oracle recommends that you choose the Enable Archiving option to enable the archiving of the redo logs. Oracle recommends that you also enable the Select Flash Recovery Area option so the database will use a flash recovery area to store all backup- and recovery-related files. The flash recovery area is distinct from the storage location of the current database files such as datafiles, control files, and online redo logs.
11. In the Database Content page, select Sample Schemas to include the Sample Schemas tablespace (EXAMPLE tablespace) in your database. Oracle recommends you do this in order to use the examples based on the sample schemas such as HR and OE.
12. In the Initialization Parameters page, you can set the initialization parameters related to the following four areas:
• Memory
• Sizing
• Character Sets
• Connection Mode
Let’s take a closer look at each of these areas before continuing with creating our database.

488 CH AP T E R 1 0 ■ C R E AT IN G A DA TA B AS E
Memory
The Memory window lets you set initialization parameters that control how the database manages the memory allocated to it. You can choose between the Typical and the Custom options to specify a method of memory management. The easiest way to manage memory is to select Typical and enter a percentage value, such as 40 percent. The instance will then use Automatic Memory Management, a new Oracle Database 11g feature, to automatically tune both the SGA and the PGA.
Sizing
In the Sizing tab, you specify the database block size and the maximum number of user processes that can connect simultaneously to the database. For the block size, accept the default value, which is 8KB. For processes, use a number such as 150, unless you know that you have a larger number of processes.
Character Sets
Use the default value for the database character set, which supports the language used by the oper-ating system for all database users and database applications.
Connection Mode
The Connection Mode tab lets you specify the connection method users will use to connect to the database. Select Dedicated Server Mode to specify the default mode in which the database operates.
13. Once you make your choices for memory allocation, database block sizing, character sets, and connection mode, click Next.
14. In the Security Settings window, select the new enhanced default, which includes the enabling of auditing and default password file settings.
15. In the Automatic Maintenance Tasks page, select the Enable automatic maintenance tasks option so the three automated maintenance tasks can run daily in the database.
16. In the Database Storage window, you can modify the default file locations for the datafiles, control files, and redo logs. Once you’ve done so, click Next.
17. In the Creation Options window, select Create Database and click Finish. DBCA presents a confirmation page. Review the information and click OK to start the database creation. Once the database creation finishes, click Exit to leave the DBCA.
Changing the Configuration of a Database
You can use DBCA to change certain database configuration options for an existing database. For example, you can change the memory allocation method or the database storage method using the DBCA.
Deleting a Database
You can delete a database easily with the DBCA. Select the Delete a Database option in the Opera-tions window. DBCA will remove all the database files. If you’re on the Windows operating system, DBCA also deletes the associated services, thus enabling you to make a clean deletion of the data-base instead of physically removing the database files yourself.

C H AP TE R 1 0 ■ CR E AT IN G A D AT AB ASE 489
Creating Additional Tablespaces
Now you have a real Oracle database humming away on your server, although you still can’t do a whole lot with it because it’s just a bare-bones database. You don’t have any application code, appli-cation objects, or data stored in it. To be able to create objects and load data, you need physical space, and you assign the space by creating a number of tablespaces.
The first thing you should do is size your planned tables, indexes, and other database objects using standard table-sizing guidelines. This will give you an idea of how many tablespaces you’ll need to create. You don’t want thousands of small tablespaces, because you’ll have a hard time managing all of them. The idea is to have as many tablespaces as are necessary to group related application tables. You can theoretically create everything in just one large tablespace, but that defeats the purpose of having a tablespace in an Oracle database.
Once you’ve decided on the tablespaces you need, use commands like the following to create the additional tablespaces (by default, Oracle will create a locally managed tablespace):
SQL> CREATE TABLESPACE sales01 DATAFILE '/u02/app/oracle/oradata/nina/sales01_01.dbf' size 500M Tablespace created.SQL>SQL> CREATE TABLESPACE sales02 DATAFILE '/u02/app/oracle/oradata/nina/sales02_01.dbf' size 500M Tablespace created.SQL>
Now, verify the tablespaces in the new database, as shown in Listing 10-7.
Listing 10-7. Query Showing Various Characteristics of Tablespaces in the New Database
SQL> SELECT tablespace_name, extent_management, allocation_type, segment_space_management FROM dba_tablespaces;
TABLESPACE_NAME EXTENT_MAN ALLOCATIO SEGMEN--------------- ----------- --------- ------SYSTEM LOCAL SYSTEM MANUALUNDOTBS_01 LOCAL SYSTEM MANUALSYSAUX LOCAL SYSTEM AUTOTEMP01 LOCAL UNIFORM MANUALUSERS LOCAL SYSTEM MANUALSALES01 LOCAL SYSTEM AUTOSALES02 LOCAL SYSTEM AUTO7 rows selected.SQL>
The query shows a total of seven tablespaces, five of which were created during the database-creation process (System, Sysaux, undo, temporary, and the default permanent tablespace). The other two are the newly created application tablespaces, sales01 and sales02.

490 CH AP T E R 1 0 ■ C R E AT IN G A DA TA B AS E
STARTING OEM DATABASE CONTROL
The Oracle Enterprise Manager comes in two versions: the Grid Control and Database Control. You have to install the OEM Grid Control software separately and use it along with agents on remote servers to manage your entire system. The Database Control is part of the Oracle Database 11g server software, and no special installation is necessary.
If you create your new database using the DBCA, Oracle automatically starts up the Database Control service. If you manually create the database, you must run the following command to start up the dbconsole for the Enterprise Manager:
$ emctl start dbconsole
Once you start up the dbconsole process, you can access OEM Database Control by opening your web browser and entering the following URL:
http://hostname:portnumber/em
In the URL, hostname is your computer name or address, and portnumber is the Database Control HTTP port number. The default port is 1158 on my Red Hat Linux server, and you can look up port values by viewing the portlist.ini file, located in the $ORACLE_HOME/install/portlist directory.
Changing the Passwords for the Default Users
One of the first tasks to perform after you create a new database is to change the passwords for all the default users. The names and number of these default users could differ among databases. For example, if you choose to let Oracle create your database using the Oracle Universal Installer, you can pick a database customized for an OLTP, a DSS, or a hybrid database. Each of these databases has a different group of specialized default users associated with it. Nevertheless, all types of data-bases will have at least a handful of common default users.
The following are some of the common default users in a new Oracle database:
SQL> SELECT username FROM dba_users;
USERNAME--------DBSNMPSYSTEMSYSOUTLN. . .SQL>
You don’t have to worry about the SYS and SYSTEM passwords, as you’ve already changed them during the database-creation process. The OUTLN user account is used to provide stored outlines for SQL queries, and the DBSNMP account is for the Oracle Intelligent Agent. There may be other users created in your database, depending on the type of database you create and the options you choose for your database. The default password for each of these accounts is the same as the user-name. Change these passwords immediately, as they represent a potential security problem. For each of the default users, you must modify the default passwords, as shown in the following examples:
SQL> ALTER USER outln IDENTIFIED BY 'new_password';SQL> ALTER USER dbsnmp IDENTIFIED BY 'new_password';

C H AP TE R 1 0 ■ CR E AT IN G A D AT AB ASE 491
■Tip Most default accounts (other than SYS, SYSTEM, DBSNMP, and SYSMAN) are initially locked with their pass-words expired. You need to unlock and reset the passwords for these accounts, using the ALTER USER statement. Chapter 12 details how to unlock user passwords.
Case-Sensitive Passwords
In Oracle Database 11g, all passwords are case sensitive by default. When you upgrade a database to the Oracle Database 11g release, however, passwords will continue to remain case insensitive, and you must use the ALTER USER statement to make these passwords case sensitive.
The initialization parameter SEC_CASE_SENSITIVE_LOGON controls the password case sensitivity. By default, this parameter is set to true, meaning passwords are case sensitive by default. If for some reason you need to alter this default, say because one of your applications requires the use of case-insensitive passwords, you can do so by setting the SEC_CASE_SENSITIVE_LOGON parameter to false.
Changing the Archive Logging Mode
You can configure a database to run in noarchivelog mode or in archivelog mode. In noarchivelog mode, Oracle won’t archive or save the redo logs it fills up. Instead, it overwrites them when it needs to write to a new log file. In archivelog mode, Oracle ensures that it first saves the filled-up redo log file before permitting it to be overwritten.
The distinction between archivelog mode and noarchivelog mode is extremely important. If you archive all the filled redo logs, you’ll have a complete record of the changes made to the database since the last backup. In the event that you lose a disk, for example, you can use your backups of the database along with the archived redo logs to recover the database without losing any committed data. Chapters 15 and 16 deal with database backup and recovery in detail. Here, I’ll show you how to alter the logging mode of a database.
Before you change anything, you should confirm the archivelog mode of the database. Here is one way of doing so:
SQL> SELECT log_mode FROM v$database;
LOG_MODE----------------NOARCHIVELOG1 row selected.SQL>
The other method is to use the ARCHIVE LOG LIST command:
SQL> ARCHIVE LOG LIST
Database log mode No Archive ModeAutomatic archival DisabledArchive destination /u02/app/oracle/oradata/arch/Oldest online log sequence 3Current log sequence 4SQL>
This command shows the archivelog destination (/u02/app/oracle/arch) and confirms that the database is running in noarchivelog mode (No Archive Mode). Automatic archival is disabled as well.
Now that you’ve verified that your database is indeed running in the noarchivelog mode, let’s see what you need to do to turn archiving on in your new database.
First, make sure that the archivelog-related parameters in your init.ora file (or SPFILE) are set. In my init.ora file, I add (or uncomment) the following parameters:

492 CH AP T E R 1 0 ■ C R E AT IN G A DA TA B AS E
log_archive_dest_n = 'LOCATION=/u02/app/oracle/oradata/nina/arch'log_archive_format = 'log%t_%s_%r.arc'
Second, you need to shut down the database so it can use the new archivelog-related informa-tion, which wasn’t in the init.ora file or was commented out initially. Note that only the LOG_ARCHIVE_ DEST_n parameter is a dynamically modifiable parameter. The other archivelog-related parameter, LOG_ARCHIVE_FORMAT, is static, meaning you can’t use the ALTER SYSTEM command to change the archive logging mode of your database; you have to bounce your database. However, you have a certain amount of room to maneuver around this limitation. You don’t really have to set the static parameter for archiving to begin. The LOG_ARCHIVE_FORMAT variable just sets the format for the way your archived log files are named, and if you don’t specify a value, they will take Oracle’s default archivelog naming convention.
Here’s the database shutdown command:
SQL> SHUTDOWN IMMEDIATE
Database closed.Database dismounted.ORACLE instance shut down.SQL>
Third, start the database in mount mode only, by using the following command:
SQL> STARTUP MOUNT
Next, use the following command to turn archive logging on:
SQL> ALTER DATABASE ARCHIVELOGDatabase altered.SQL>
Finally, open the database. Your database will now run in archivelog mode.
SQL> ALTER DATABASE OPENDatabase altered.SQL>
You can confirm that the database is running in archivelog mode by using the following command. The results show that the database is in archive mode and that the automatic archival setting is enabled.
SQL> ARCHIVE LOG LIST
Database log mode Archive ModeAutomatic archival EnabledArchive destination /u02/app/oracle/oradata/nina/arch/Oldest online log sequence 3Next log sequence to archive 4Current log sequence 4SQL>
If you decide to turn off archiving for some reason, you can do so by using the ALTER DATABASE NOARCHIVELOG command, as shown in the following extract, after first starting up with the STARTUP MOUNT command:
SQL> ALTER DATABASE NOARCHIVELOG;
Database altered.SQL> archive log listDatabase log mode No Archive ModeAutomatic archival Disabled

C H AP TE R 1 0 ■ CR E AT IN G A D AT AB ASE 493
Archive destination /u02/app/oracle/oradata/nina/arch/Oldest online log sequence 47Current log sequence 48SQL>
■Note With Oracle Database 10g Release 10.1, Oracle deprecated the LOG_ARCHIVE_START parameter. When you place the database in the archivelog mode, Oracle automatically starts archiving the redo logs.
Running the pupbld.sql File
You may occasionally see errors like the following when new users you have created try accessing the database through SQL*Plus:
Error accessing PRODUCT_USER_PROFILEWarning: Product user profile information not loaded!You may need to run PUPBLD.SQL as SYSTEM
The product_user_profile table is a table Oracle maintains to control access to the database through SQL*Plus. Chapter 12 discusses how to use the product_user_profile table to restrict opera-tions by certain users. Make sure you are logged in as the SYSTEM user and run the following script to ensure that this table can be accessed properly by all users, so that their SQL*Plus privileges can be checked properly:
SQL> @$ORACLE_HOME/sqlplus/admin/pupbld.sqlDROP SYNONYM PRODUCT_USER_PROFILE. . .Synonym created.SQL>
Using a Server Parameter FileThe init.ora file is the initialization file where you specify values for all the parameters you intend to use at database-creation time. But what if you need to change some of the parameters later on? You can do so in two ways: You can change the init.ora parameters, and stop and start the database instance. Or, if the parameter is dynamically configurable, you can change its value while the instance is running. Although being able to dynamically reconfigure database parameters is nice, there are inherent problems with this approach. When you restart the database, dynamically changed param-eters are gone, because they weren’t part of the init.ora file; if you intend to make a change permanent after you dynamically change it, you have to remember to correctly modify the init.ora file so those changes will become permanent the next time the database reads the file when it’s restarted. Often, DBAs forget to perform this manual chore.
The server parameter file is an alternative (or a complement) to the init.ora file, and it makes the dynamic parameter changes permanent on an ongoing basis. You can specify that any dynamic parameter changes made by using the ALTER SYSTEM command be saved permanently in the server parameter file, which already consists of all the parameters in the regular init.ora file. After you create the database, you can create the SPFILE from your init.ora file as shown in the next section. If you later use this SPFILE to start your database, all dynamic changes made to the initialization parameters can be permanently saved in the SPFILE. By using the SPFILE, you can ensure that dynamic parameter changes will not be lost in between database shutdowns and restarts.
The file is called a server file because it is always maintained on the machine where the Oracle database server is located. Oracle recommends the use of the SPFILE to dynamically maintain the database configuration parameters.

494 CH AP T E R 1 0 ■ C R E AT IN G A DA TA B AS E
The number of dynamically modifiable parameters in Oracle Database 11g is quite high. More than half of the initialization parameters are dynamically changeable through the ALTER SYSTEM statement, which means that the SPFILE is a smart way to permanently record a dynamically changed parameter value.
When the database is started, unless you specify the type of initialization file and its location explicitly, Oracle will look for the SPFILE first. On UNIX/Linux systems, the default location for the SPFILE is the $ORACLE_HOME/dbs/ directory ($ORACLE_HOME\dbs in Windows). In the default directory, Oracle first looks for a file named spfile$ORACLE_SID.ora (in our case, for the database nina, this would be spfilenina.ora). If it can’t find this file, it then looks for a file named spfile.ora. If spfile.ora isn’t found, Oracle will next look for the init.ora file in the same default directory. The init.ora file is traditionally named init$ORACLE_SID.ora (in our example, it is initnina.ora).
■Note Although the SPFILE is placed in the $ORACLE_HOME/dbs directory by default, you can place it anywhere as long as you specify the location in an initialization parameter file by using the SPFILE parameter.
The V$SPPARAMETER dynamic view is comparable to the V$PARAMETER view and is used to record all the initialization parameter names and their values when using the SPFILE rather than the init.ora file.
Creating a Server Parameter FileOracle lets you use the traditional init.ora file (or PFILE) as the configuration file. However, Oracle also recommends that you create and use an SPFILE for all databases. You can create the SPFILE from the init.ora file, and the process is very simple.
You must first log in as a user with SYSDBA or SYSOPER privileges. Then run the following command, in which PFILE is the init.ora file for our new nina database (initnina.ora):
SQL> CREATE spfile FROM pfile = '/u03/app/oracle/dbs/initnina.ora';
File created.SQL>
■Caution Once you create the SPFILE, a subsequent request to create it from the init.ora file will overwrite the existing SPFILE.
The previous command will create the SPFILE in the default location ($ORACLE_HOME/dbs). The file will be named spfilenina.ora. You can also create an SPFILE by giving it an explicit name, as shown in the following example:
SQL> CREATE spfile = '/u03/app/oracle/dbs/nina_spfile.ora' FROM pfile = '/u03/app/oracle/dbs/initnina.ora';
If you want Oracle to create an SPFILE from your init.ora file, and both files are located in their default locations ($ORACLE_HOME/dbs), you can simply issue the following command:
SQL> CREATE spfile FROM pfile;
File created.SQL>

C H AP TE R 1 0 ■ CR E AT IN G A D AT AB ASE 495
You can also create a new init.ora file from the SPFILE in the default location by using the following command:
SQL> CREATE pfile FROM spfile;
File created.SQL>
If you bounce the database now, the instance will start up using your new SPFILE. Oracle will look for the initialization parameter lists in their default locations in the following order, and it will use the first one it finds:
1. It looks for the spfile$ORACLE_SID.ora file in the default location.
2. It looks for a file called spfile.ora in the default location.
3. It looks for the traditional init.ora file, with the name init$ORACLE_SID.ora, in the default location.
■Tip Although you can change the init.ora text file to your heart’s content, don’t try modifying the SPFILE directly. You’ll end up corrupting it, and your instance may fail to start the next time you try to use the SPFILE!
Creating the SPFILE from the init.ora file doesn’t mean that you can’t use the init.ora file anymore. If you need to start the instance with the original init.ora file, you can do so as before by specifying it explicitly:
SQL> STARTUP PFILE='/u01/app/oracle/product/10.1.0.2.0/dbs/initnina.ora';
However, you can’t specify the SPFILE instead of the PFILE in the preceding example—Oracle won’t allow you to specify the SPFILE directly in a STARTUP command. However, you can do so indi-rectly by using a PFILE (init.ora) file that includes just one initialization parameter: the SPFILE parameter:
spfile = ' /u01/app/oracle/product/10.1.0.2.0/dbs/spfilenina.ora
After creating this new init.ora file, you can specify the PFILE variable in the STARTUP command, as shown earlier.
Listing 10-8 shows the contents of the SPFILE (called SPFILEnina.ora) that was created from the initnina.ora file.
Listing 10-8. A Sample SPFILE
*.compatible='11.1.0.6'*.control_files='/u01/app/oracle/oradata/nina/control1.ctl','/u01/app/oracle/oradata/nina/control2.ctl*.cursor_sharing='force'*.db_block_size=8192*.db_domain='world'*.db_file_multiblock_read_count=16*.db_files=1000* db_flashback_retention_target=720*.db_name='nina'*.db_recovery_file_dest='/u02/app/oracle/flash_recov_area'*.db_recovery_file_dest_size=1000M* instance_type='RDBMS'*.log_archive_dest_1='LOCATION=/u02/app/oracle/arch/'

496 CH AP T E R 1 0 ■ C R E AT IN G A DA TA B AS E
*.log_archive_format='log%t_%s_%r.arc'*.pga_aggregate_target=1000M*.processes=600*.remote_login_passwordfile='none'*.resumable_timeout=1800*.sga_target=300M*.statistics_level='typical'*.undo_management='auto'*.undo_retention=7200*.undo_tablespace='undotbs_01'*.
■Tip It’s customary for DBAs to place comments in the init.ora file, but the SPFILE will not include comment lines from the init.ora file. However, the SPFILE will retain comments placed on the same line as the parameter in the init.ora file (for example, CURSOR_SHARING=false # comment).
Setting the Scope of Dynamic Parameter ChangesYou now have an SPFILE that contains all your initialization parameters, and you can control whether any changes to the initialization parameters persist by being recorded in the SPFILE or not. Once you create an SPFILE, you can use a special SCOPE clause as part of all your ALTER SYSTEM commands that will determine whether the changes persist or not. The SCOPE clause can take the following three values:
• SPFILE
• MEMORY
• BOTH
When the SCOPE clause is set to MEMORY, changes are merely temporary and they go away after the database is restarted. When the SCOPE clause is set to BOTH, all dynamic changes get recorded in the SPFILE and are operational in the instance immediately. When the SCOPE clause is set to SPFILE, changes aren’t applied immediately but only get recorded in the SPFILE; dynamic and static config-uration parameters become effective only after the next startup of the database. If the database instance is started with an SPFILE, SCOPE=BOTH is the default option used by Oracle.
■Note For static parameters, SCOPE=SPFILE is the only option, because the parameters can’t be activated right away by definition.
As you can see, you have enormous flexibility in determining how long a change in a dynami-cally configurable parameter’s value will persist. Here are some examples:
SQL> ALTER SYSTEM SET log_archive_dest_2='location=/test02/app/oracle/oradata/arch' SCOPE=SPFILE;SQL> ALTER SYSTEM SET log_checkpoint_interval=600 SCOPE=MEMORY;SQL> ALTER SYSTEM SET license_max_users=200 SCOPE=BOTH;

C H AP TE R 1 0 ■ CR E AT IN G A D AT AB ASE 497
RMAN, Oracle’s backup and recovery tool, will back up the server parameter file automatically when you back up your database. If you wish to modify several parameters in the SPFILE, the easiest way to do so is to first create an init.ora file from the SPFILE (as discussed in the previous section), make changes in the init.ora file, and create a new SPFILE from it. This process will, however, involve restarting the database.
■Tip Always create an SPFILE soon after you create the initial database. You’ll be making a lot of initialization parameter changes on a new database, and the SPFILE gives you the chance to make these changes permanent if you so wish. This eliminates a lot of confusion later on, when you’re making changes to several initialization param-
eters at once.
Creating an SPFILE or PFILE from MemoryYou can re-create the SPFILE or the PFILE from the current values of the initialization parameters that an instance is currently using. The following command will create an SPFILE from the current values in use:
SQL> CREATE spfile FROM MEMORY;
The command creates a new SPFILE in the default location, but you can specify an alternative location. You can similarly create a regular initialization parameter file, as shown in this example:
SQL> CREATE pfile FROM MEMORY;
This command will come in handy when you lose the current parameter file. In a RAC environ-ment, the command will capture the parameter settings being used by each of the instances in the system.
Starting Up and Shutting Down the Database from SQL*PlusYou can start up and shut down your Oracle database from the SQL*Plus interface, the OEM inter-face, and an RMAN interface. I’ll focus on performing these operations using the SQL*Plus interface in this chapter.
Starting the DatabaseWhen you issue the STARTUP command to start an Oracle database, Oracle will look for the initializa-tion parameters in the default location, $ORACLE_HOME/dbs (for UNIX/Linux). There, Oracle will look for the correct initialization file to use, in the following order:
• spfile$ORACLE_SID.ora
• spfile.ora
• init$ORACLE_SID.ora
■Note Regardless of which file Oracle reads, you don’t have to specify the path and location of the file if it’s in the default location. If you wish to store your initialization file in a nondefault location, you have to specify the loca-tion when you issue the startup commands.

498 CH AP T E R 1 0 ■ C R E AT IN G A DA TA B AS E
You can start an Oracle database in several modes. Let’s take a quick look at the different options you have while starting up a database.
The STARTUP NOMOUNT Command
You can start up the instance in a SQL*Plus session with just the instance running by using the STARTUP NOMOUNT command. The control files aren’t read and the datafiles aren’t opened when you open a database in this mode. The Oracle background processes are started up, and the SGA is allo-cated to Oracle by the operating system. In fact, the instance is running by itself, much like the engine of a tractor trailer being started with no trailer attached to the cab (you can’t do much with either).
Listing 10-9 shows the use of the STARTUP NOMOUNT command.
Listing 10-9. Using the STARTUP NOMOUNT Command
SQL> STARTUP NOMOUNTORACLE instance started.
Total System Global Area 314572800 bytesFixed Size 1236756 bytesVariable Size 99164396 bytesDatabase Buffers 213909504 bytesRedo Buffers 5169152 bytesSQL>
Sometimes during certain maintenance operations and during recovery times, you can’t have the database open for public access. That’s when this partial opening of the database is necessary. You also use the NOMOUNT startup option during database creation and when you have to re-create control files.
The STARTUP MOUNT Command
The next step in the startup process, after the instance is started, is the mounting of the database. During the mount stage, Oracle associates the instance with the database. Oracle opens and reads the control files and gets the names and locations of the datafiles and the redo log files. You can mount an already started instance with the ALTER DATABASE command, or you can use the STARTUP MOUNT command when you initially start the database.
If you’ve already started the database in the nomount mode, use this command:
SQL> ALTER DATABASE MOUNT;Database altered.SQL>
To start up in the mount mode directly, use this command:
SQL> STARTUP MOUNTORACLE instance started.Total System Global Area 314572800 bytesFixed Size 1236756 bytesVariable Size 99164396 bytesDatabase Buffers 213909504 bytesRedo Buffers 5169152 bytesDatabase mounted.SQL>
You usually need to start up a database in mount mode when you’re doing activities such as performing a full database recovery, changing the archive logging mode of the database, or

C H AP TE R 1 0 ■ CR E AT IN G A D AT AB ASE 499
renaming datafiles. Note that all three of these operations require Oracle to access the datafiles but can’t accommodate any user operations in the files.
The STARTUP OPEN Command
The last stage of the startup process is opening the database. When the database is started in the open mode, all valid users can connect to the database and perform database operations. Prior to this stage, the general users can’t connect to the database at all. You can bring the database into the open mode by issuing the ALTER DATABASE command as follows:
SQL> ALTER DATABASE OPEN;Database altered.
More commonly, you simply use the STARTUP command to mount and open your database all at once:
SQL> STARTUPOracle instance started.
Total System Global Area 314572800 bytesFixed Size 1236756 bytesVariable Size 99164396 bytesDatabase Buffers 213909504 bytesRedo Buffers 5169152 bytesDatabase mounted.Database opened.SQL>
To open the database, the Oracle server first opens all the datafiles and the online redo log files, and verifies that the database is consistent. If the database isn’t consistent—for example, if the SCNs in the control files don’t match some of the SCNs in the datafile headers—the background process will automatically perform an instance recovery before opening the database. If media recovery rather than instance recovery is needed, Oracle will signal that a database recovery is called for and won’t open the database until you perform the recovery.
■Note When you issue the simple STARTUP command, Oracle will process all the startup steps in sequence and will start the instance and open it for public access all at once. As long as your ORACLE_SID parameter is set to the right database, you don’t need to specify the database name in the STARTUP command.
Automatically Starting DatabasesYou can let all your databases start up automatically each time the operating system restarts by simply using standard operating system scripts. Each operating system will have its own system-specific way of automating Oracle database startups. Here, I’ll discuss the startup and shutdown scripts used in UNIX/Linux systems, and I’ll specifically use examples for a Red Hat Linux environ-ment. Automatic startup on Windows systems is covered in Chapter 20.
Oracle provides two files, dbstart and dbshut, that use the standard /etc/oratab file contents to determine which Oracle databases are running on the server, and automatically start up and shut down all the databases whenever the system is started up and shut down. In most UNIX/Linux systems, these two scripts are located in the $ORACLE_HOME/bin directory. After I created the new nina database, I added it to the oratab file by adding the following line (which specifies the database name, ORACLE_HOME, and whether the database should be automatically stopped and started):
nina:/u01/app/oracle/product/10.2.0/db_1:Y

500 CH AP T E R 1 0 ■ C R E AT IN G A DA TA B AS E
In order to make a database start up and shut down automatically upon a system reboot, you must add a script to the /etc/rc.d/init.d directory. This file will include the Oracle-provided dbstart and dbshut scripts in it, as shown in Listing 10-10. The script uses a case statement to deter-mine whether to start or stop all the Oracle databases and the Oracle Listener service.
Listing 10-10. A Script to Start and Stop Oracle Database and the Oracle Listener
#!/bin/sh# /etc/rc.d/init.d/oracle# Description: The following script# starts and stops all Oracle databases and listenerscase "$1" instart)echo -n "Starting Oracle Databases: "date +"! %T %a %D : Starting Oracle Databases aftersystem start up." >> /var/log/oracleecho "-------------------------------------" >> /var/log/oraclesu - oracle -c dbstart >> /var/log/oracleecho "Done."echo -n "Starting Oracle Listeners: "su - oracle -c "lsnrctl start" >> /var/log/oracleecho "Done."echo ""echo "--------------------------------------" >> /var/log/oracledate +"! %T %a %D : Finished." >> /var/log/oracleecho "--------------------------------------" >> /var/log/oracle;;stop)echo -n "Shutting Down Oracle Listeners: "echo "----------------------------------------" >> /var/log/oracledate +"! %T %a %D : Shutting Down All Oracle Databasesas part of system shutdown." >> /var/log/oracleecho "----------------------------------------" >> /var/log/oraclesu - oracle -c "lsnrctl stop" >> /var/log/oracleecho "Done."echo -n "Shutting Down Oracle Databases: "su - oracle -c dbshut >> /var/log/oracleecho "Done."echo ""echo "-----------------------------------------" >> /var/log/oracledate +"! %T %a %D : Finished." >> /var/log/oracleecho "-----------------------------------------" >> /var/log/oracle;;restart)echo -n "Restarting Oracle Databases: "echo "------------------------------------------" >> /var/log/oracledate +"! %T %a %D : Restarting Oracle Databases after system startup." >> /var/log/oracleecho "------------------------------------------" >> /var/log/oraclesu - oracle -c dbshut >> /var/log/oraclesu - oracle -c dbstart >> /var/log/oracleecho "Done."echo -n "Restarting the Oracle Listener: "su - oracle -c "lsnrctl stop" >> /var/log/oracle

C H AP TE R 1 0 ■ CR E AT IN G A D AT AB ASE 501
echo "Done."echo ""echo "---------------------------------------------" >> /var/log/oracledate +"! %T %a %D : Finished." >> /var/log/oracleecho "---------------------------------------------" >> /var/log/oracle;;*)echo "Usage: oracle {start|stop|restart}"exit 1esac
The system administrator needs to create start and kill symbolic links in the appropriate run-level directories /etc/rc.d/rcX.d. The following commands will ensure that the databases will come up in run levels 2, 3, and 4:
$ ln -s ../init.d/oracle /etc/rc.d/rc2.d/S99oracle$ ln -s ../init.d/oracle /etc/rc.d/rc3.d/S99oracle$ ln -s ../init.d/oracle /etc/rc.d/rc4.d/S99oracle
In order to stop the databases on each host reboot or restart, you must also add the following links:
$ ln -s ../init.d/oracle /etc/rc.d/rc0.d/K01oracle # Halting$ ln -s ../init.d/oracle /etc/rc.d/rc6.d/K01oracle # Rebooting
Restricting Database AccessSometimes when you’re performing data loads or an export or import of data, or when you’re performing other critical maintenance tasks, you’ll want the database to be open for you but not for general users. You can do so in a couple of different ways. First, you can bring up the database in a restricted mode, which will provide you with complete access and prevent general users from connecting, as shown in Listing 10-11.
Listing 10-11. Starting a Database in Restricted Mode
SQL> STARTUP RESTRICT;
ORACLE instance started.Total System Global Area 314572800 bytesFixed Size 1236756 bytesVariable Size 99164396 bytesDatabase Buffers 213909504 bytesRedo Buffers 5169152 bytesDatabase mounted.Database opened.SQL>
When you’re done with your maintenance or other tasks and wish to open up the database to the general public, you can simply use the ALTER SYSTEM command, as follows:
SQL ALTER SYSTEM DISABLE RESTRICTED SESSION;System altered.SQL>
You can also change an open and unrestricted database to a restricted state of operation by using the following command:

502 CH AP T E R 1 0 ■ C R E AT IN G A DA TA B AS E
SQL> ALTER SYSTEM ENABLE RESTRICTED SESSION;System altered.SQL>
When you put a database in a restricted mode using the ALTER SYSTEM command, as shown previously, existing users are not hindered in any way. Only new logins are prevented, unless they have the restricted session privilege. Once you are finished doing whatever you needed to do, you can put the database back in an unrestricted open mode by using the ALTER SYSTEM DISABLE RESTRICT SESSION command. Sometimes you may want to use an open database but prevent any changes to the database for the time being. That is, you want to allow reads (SELECT operations) against the database, but no writes. Listing 10-12 shows how you can put your database in a read-only mode.
Listing 10-12. Putting a Database in a Read-Only Mode
SQL> STARTUP MOUNTORACLE instance started.Total System Global Area 314572800 bytesFixed Size 1236756 bytesVariable Size 99164396 bytesDatabase Buffers 213909504 bytesRedo Buffers 5169152 bytes
Database mounted.SQL> ALTER DATABASE OPEN READ ONLY;Database altered.SQL>
The read-only mode is usually employed by standby databases, which are copies of production databases designed to relieve the querying load on the parent production database.
Shutting Down the DatabaseYou may need to shut down a running database for some types of backups, for upgrades of software, and so on, and there are several ways to do this. The option you choose will affect the time it takes to shut down the database and the potential for needing database instance recovery upon restarting the database. The following sections cover the four available database shutdown command options.
The SHUTDOWN NORMAL Command
When you issue the SHUTDOWN NORMAL command to shut the database down, Oracle will wait for all users to disconnect from the database before shutting it down. If a user goes on vacation for a week after logging in to a database, and you subsequently issue a SHUTDOWN NORMAL command, the data-base will have to keep running until the user returns and logs out. The normal mode is Oracle’s default mode for shutting down the database.
The command is issued as follows:
SQL> SHUTDOWN NORMAL
or
SQL> SHUTDOWN
Here are some details about the SHUTDOWN NORMAL command:
• No new user connections can be made to the database once the command is issued.
• Oracle waits for all users to exit their sessions before shutting down the database.

C H AP TE R 1 0 ■ CR E AT IN G A D AT AB ASE 503
• No instance recovery is needed when you restart the database because Oracle will write all redo log buffers and data block buffers to disk before shutting down. Thus, the database will be consistent when it’s shut down in this way.
• Oracle closes the datafiles and terminates the background processes. Oracle’s SGA is deallocated.
The SHUTDOWN TRANSACTIONAL Command
If you don’t want to wait for a long time for a user to log off, you can use the SHUTDOWN TRANSACTIONAL command. Oracle will wait for all active transactions to complete before disconnecting all users from the database, and then it will shut down the database. The command is issued as follows:
SQL> SHUTDOWN TRANSACTIONAL
Here are the details about the SHUTDOWN TRANSACTIONAL command:
• No new user connections are permitted once the command is issued.
• Existing users can’t start a new transaction and will be disconnected.
• If a user has a transaction in progress, Oracle will wait until the transaction is completed before disconnecting the user.
• After all existing transactions are completed, Oracle shuts down the instance and deallocates memory. Oracle writes all redo log buffers and data block buffers to disk.
• No instance recovery is needed because the database is consistent.
The SHUTDOWN IMMEDIATE Command
Sometimes, a user may be running a very long transaction when you decide to shut down the database. Both of the previously discussed shutdown modes are worthless to you under such circumstances. Under the SHUTDOWN IMMEDIATE mode, Oracle will neither wait indefinitely for users to log off nor wait for any transactions to complete. It simply rolls back all active transactions, disconnects all connected users, and shuts the database down. Here is the command:
SQL> SHUTDOWN IMMEDIATE
Here are the details about the SHUTDOWN IMMEDIATE command:
• No new user connections are allowed once the command is issued.
• Oracle immediately disconnects all users.
• Oracle terminates all currently executing transactions.
• For all transactions terminated midway, Oracle will perform a rollback so the database ends up consistent. This rollback process is why the SHUTDOWN IMMEDIATE operation is not always immediate. This is because Oracle is busy rolling back the transactions it just terminated. However, if there are no active transactions, the SHUTDOWN IMMEDIATE command will shut down the database very quickly. Oracle terminates the background processes and deallocates memory.
• No instance recovery is needed upon starting up the database because it is consistent when shut down.
The SHUTDOWN ABORT Command
The SHUTDOWN ABORT command is a very abrupt shutting down of the database. Currently running transactions are neither allowed to complete nor rolled back. The user connections are just discon-nected. This is the command:

504 CH AP T E R 1 0 ■ C R E AT IN G A DA TA B AS E
SQL> SHUTDOWN ABORT
These are the details about the SHUTDOWN ABORT command:
• No new connections are permitted once the command is issued.
• Existing sessions are terminated, regardless of whether they have an active transaction or not.
• Oracle doesn’t roll back the terminated transactions.
• Oracle doesn’t write the redo log buffers and data buffers to disk.
• Oracle terminates the background processes, deallocates memory immediately, and shuts down.
• Upon restarting, Oracle will perform an automatic instance recovery, because the database isn’t guaranteed to be consistent when shut down.
When you shut down the database using the SHUTDOWN ABORT command, the database has to perform instance recovery upon restarting to make the database transactionally consistent, because there may be uncommitted transactions that need to be rolled back. The critical thing to remember about the SHUTDOWN ABORT command is that the database may be shut down in an inconsistent mode. In most cases, you aren’t required to explicitly use a RECOVER command, because the database will perform the instance recovery on its own.
■Tip Oracle recommends that you always shut down the database in a consistent mode by using the SHUTDOWN or SHUTDOWN IMMEDIATE command and not the SHUTDOWN ABORT command before backing it up.
Listing 10-13 shows what happens when an attempt is made to put a database in a read-only mode after the SHUTDOWN ABORT command was used to shut it down first. Note that Oracle won’t put the datafiles in read-only mode until the database is manually recovered. (You’ll find a lot more information on recovery in Chapter 16.)
Listing 10-13. The SHUTDOWN ABORT Command and the Need for Instance Recovery
SQL> SHUTDOWN ABORTORACLE instance shut down.SQL> STARTUP MOUNTORACLE instance started.Total System Global Area 314572800 bytesFixed Size 1236756 bytesVariable Size 99164396 bytesDatabase Buffers 213909504 bytesRedo Buffers 5169152 bytesDatabase mounted.SQL> ALTER DATABASE OPEN READ ONLY;alter database open read only*ERROR at line 1:ORA-16005: database requires recoverySQL> RECOVER DATABASE;Media recovery complete.SQL>

C H AP TE R 1 0 ■ CR E AT IN G A D AT AB ASE 505
■Note In all shutdown modes, upon the issuing of the SHUTDOWN command, all new user connection attempts will fail. Except for the SHUTDOWN ABORT command, all the other SHUTDOWN commands won’t require instance recovery upon database startup.
Quiescing a DatabaseSuppose you want to put your database in a restricted mode to perform table reorganization or some other administrative task. Schema changes are especially hard to make while users are conducting live transactions in the database. The same goes for when you have to import data into a large table while users are connected to the database. You have to perform these activities during a “mainte-nance window,” or you have to shut down the database and bring it up in a restricted mode.
But what if you don’t have a maintenance window in which to shut down and restart the data-base? Or, as so often happens in practice, the assumed window magically disappears because you encounter some problem in performing your tasks during the allotted time? You are forced to wait for the next weekend, in most cases. To redress this problem, quiescing a database gives you the opportunity to put the database in a single-user mode without having to ever shut the database down.
When a database is put in a quiesced state by the DBA, the following conditions apply:
• All inactive sessions are prevented from issuing any database commands until the database is unquiesced.
• All active sessions are allowed to compile.
• All new login attempts will be queued. A user trying to log in during the time the database is in a quiesced state won’t get an error message. Rather, his or her login attempts will seem to hang.
• Only DBA queries, transactions, and PL/SQL statements will be allowed in the database. To be more precise, queries and statements issued by all users in the Oracle Resource Manager SYS_GROUP consumer group are allowed.
To place the database into a quiesced state, you use the following ALTER SYSTEM command as the SYS or SYSTEM user:
SQL> ALTER SYSTEM QUIESCE RESTRICTED;System altered.SQL>
Later on, when you’ve finished your administrative tasks, you can allow regular access to the database by issuing the following command:
SQL> ALTER SYSTEM UNQUIESCE;System altered.SQL>
Once the database is unquiesced, all the queued logins are allowed into the database, and all the inactive transactions are once again allowed to turn active by letting them execute their DML statements.
Suspending a DatabaseIf you want to suspend all I/O operations during some special administrative job, you can suspend the database. All reads from and writes to the datafiles and control files are prohibited while the database is under suspension. The suspension of activity on a database may be necessary when you want to perform an emergency backup of a tablespace, for example, or specialized chores such as splitting a mirror, which you can’t do in any other way.

506 CH AP T E R 1 0 ■ C R E AT IN G A DA TA B AS E
You can suspend and resume a database as follows:
SQL> ALTER SYSTEM SUSPEND;System altered.SQL> ALTER SYSTEM RESUME;System altered.SQL>
Dropping a DatabaseIn the past, Oracle DBAs constantly bemoaned their inability to issue a simple DROP DATABASE command to remove a database. Starting with the Oracle Database 10g release, you can drop a data-base with the help of a simple DROP DATABASE command. When you issue this command, all datafiles, redo log files, and control files are removed automatically. However, it doesn’t remove any param-eter files, like the init.ora file and the alert.log file.
You must start the database in the RESTRICT MOUNT mode for this operation, as shown in Listing 10-14.
Listing 10-14. Dropping a Database Using the DROP DATABASE Command
SQL> CONNECT sys/sys_passwd AS SYSDBAConnected to an idle instance.SQL> STARTUP RESTRICT MOUNTORACLE instance started.Total System Global Area 314572800 bytesFixed Size 1236756 bytesVariable Size 99164396 bytesDatabase Buffers 213909504 bytesRedo Buffers 5169152 bytesDatabase mounted.
SQL> SELECT name FROM v$database;NAME---------NINA
SQL> DROP DATABASE;Database dropped.Disconnected from Oracle Database 10g Enterprise Edition Release 10.2.0.0.0 -BetaWith the Partitioning, OLAP and Data Mining optionsSQL>
The STARTUP RESTRICT MOUNT command ensures that no other users can connect to the database. Make sure you verify the name of the database before using the DROP DATABASE command to drop the database.
■Caution Obviously, you can’t test the DROP DATABASE command casually! Be careful, since this command is unforgiving—it doesn’t give you any chances to recall the command. All your datafiles, log files, and control files will vanish before you can blink!

C H AP TE R 1 0 ■ CR E AT IN G A D AT AB ASE 507
Using the Data Dictionary to Monitor Database StatusThe dynamic view V$INSTANCE is useful in monitoring the current status of an instance. The following query tells you that the database is open and no shutdowns are pending:
SQL> SELECT instance_name, status, 2 shutdown_pending, 3 active_state 4* FROM v$instanceSQL> /
INST STATUS SHUTDOWN ACTIVENAME PENDING STATE----- ------ -------- ------nina OPEN NO NORMALSQL>
In the preceding output, the active state is normal, which means that the database is neither in the process of being quiesced nor is it already in a quiesced state. The database status column indi-cates open, where a suspended database would have a status of suspended.
The DATABASE_PROPERTIES view will provide the name of the default temporary tablespaces in your database, in addition to a host of other information regarding NLS parameters.
The V$DATABASE view gives you plenty of details about your database. Here’s a typical query, which shows the name of the database, whether archive logging is turned on (yes), and whether the database is in the flashback database mode (no):
SQL> SELECT name, log_mode, flashback_on FROM v$database;
NAME LOG_MODE FLASHBACK_ON------- ---------- ------------PASPROD ARCHIVELOG NOSQL>
What Next?You’ve now created the new database, but you still need to do a few things to make it fully functional (patience—you’re almost there!). At this point, you have the instance up and running and you have a first draft of the physical database based on tentative estimates.
To make this database do something useful, you need to create users. And to empower the users and ensure the security of the database, you’ll need to grant these users specific roles and privileges.
You have to create objects such as tables, views, indexes, synonyms, sequences, and so on, based on the requests of the application development team. You also have to create the necessary application code in the database, including stored procedures and packages. Because an empty database with no data won’t do anyone much good, you need to load data into the database. You also have to establish connectivity between the database you just created, the users, and other systems that need to access your database.
Finally, to secure your database from unexpected failures and malfunctioning systems, you need to back up the database and put a regular backup schema in place before you go off on your long-awaited and well-earned vacation. The remaining chapters of this book address all these important topics in detail.

■ ■ ■
P A R T 4
Connectivity and User Management
511
■ ■ ■
C H A P T E R 1 1
Connectivity and Networking
One of the DBA’s key tasks is to establish and maintain connectivity between the database on the server and the user community. In the traditional client/server model, users connect to databases on separate servers by using a client, and the client/server model is still used in many places to run business functions. However, web-based connection models are much more common today as a means of connecting to databases. Oracle calls its set of connectivity solutions (which encompasses connectivity, manageability, and network security) Oracle Net (previously SQL Net) Services. In this chapter, I show how to use Oracle Net, a component of Oracle Net Services, to make and maintain connections between clients and databases. I also show you how to install the Oracle Client soft-ware. You’ll also see how to use the new Oracle Instant Client, which lets you connect to an Oracle database without the use of network configuration files.
Oracle Database 11g provides several methods of connecting database servers to end users. For small sets of users, you can use the Oracle tnsnames.ora file, which is a local file containing the connection details. The new easy connect method lets clients connect to your databases without any configuration files. The most sophisticated connection method provided by Oracle is the directory naming method, which makes use of the LDAP-compliant Oracle Internet Directory (OID). You can use OID for security management and other purposes besides facilitating database connectivity. There is also an external naming method, which uses external naming services such as the Network Information Service to configure client connections to the Oracle database.
This chapter will provide you with a quick introduction to Java Database Connectivity (JDBC) as well. You’ll learn how to connect to an Oracle database from within a Java program, and you’ll step through a small example that illustrates the basic concepts of Oracle JDBC.
Oracle Networking and Database ConnectivityAfter you create the database and various database objects and load the data, the next big step is to establish connectivity between the database server and the users who will be using it. Oracle Net Services is the set of services that makes this possible. Oracle Net Services components have to “live” on both the client and the server, and they typically use the TCP/IP network protocol to establish network connectivity between clients and the database server.
Oracle Net Services is configured with several important features to make life easier for DBAs:
• Location transparency: Clients need not know the network location or any other privileged information about database services, because you can maintain all the information required to make database connections in a centralized repository. Users are given only the database name, and the connection is entirely transparent to them.

512 CH AP T E R 1 1 ■ C ON N E C T I V IT Y A N D N E T W O R K I N G
• Centralized configuration: For large installations, a centralized means of establishing and maintaining connections makes a lot of sense. The LDAP-compliant directory server supported by Oracle provides a very efficient centralized repository for meeting all your networking needs. Network, authentication, and other security information is saved in a central place where numerous users then access this information. Maintenance is extremely easy, because regardless of the number of clients, you only have to maintain the centralized information.
• Scalability: Oracle offers a specialized architecture, called the shared server architecture, to enhance scalability. This architecture enables several users to share the same connection process through the use of a dispatcher process. A small number of server connections can enable a large number of end users to use the system, thus increasing the scalability of the system. In addition, Oracle offers the Connection Manager feature, which provides connec-tion multiplexing whereby multiple connections are taken care of simultaneously.
SHARED SERVER VS. DEDICATED SERVER ARCHITECTURE
You can set up a connection architecture where the Oracle server starts a separate server process for each client connection, or you can enable several clients to share a single server process. The separate server processes use dedicated connections between each client and the Oracle server, and it is therefore named the dedicated server architecture. The shared server architecture is the term for connections where several user processes use the same Oracle server connection to perform their work.
Shared Server Architecture
The shared server architecture relies on a dispatcher service to process connection requests from clients. A single dispatcher can service many client connections simultaneously. Dispatchers essentially act as mediators between the clients and the shared servers. Dispatchers are in charge of receiving requests from clients and placing them in a request queue, from which the shared server picks them up.
When you use a dispatcher (that is, when you use the shared server approach), the listener will not hand off a connection request to the database server directly; it hands the request off to the dispatcher. This is referred to as a direct hand-off to the dispatcher. The listener can also redirect a client connection to a dispatcher. In this case, the listener will pass the dispatcher’s network address to the client connection, and this information enables the client to connect to the dispatcher, whereupon the listener connection is terminated.
You can use the Oracle Connection Manager to configure session multiplexing, which involves pooling multiple client sessions through a network connection to a shared server destination.
Dedicated Server Architecture
Dedicated server processes do not involve any sharing of resources by clients. Each client is assigned a dedicated server connection. The Oracle listener will start up a dedicated server process whenever a client process requests a connection. The listener passes the dedicated server’s protocol address back to the client; the client then uses that to connect directly to the database server. The listener connection is terminated as soon as it passes the dedicated server’s address to the client.
This chapter deals exclusively with the more commonly used dedicated server architecture. To learn how to set up a shared server configuration, please refer to Oracle’s manual for networking, the Net Services Administrator’s Guide.

C H AP TE R 1 1 ■ CO N N E CT IV I T Y AN D N E T W OR K IN G 513
Networking Concepts: How Oracle Networking WorksWhen you want to open a database session from a client, whether it’s a traditional client or a browser- based client, you need to connect to the database across a network. Suppose you’re establishing a connection over an existing network from your desktop to an Oracle database on a UNIX server across town. You need a method of making a connection between your desktop and the Oracle data-base (which involves the use of specialized software), you need some kind of interface to conduct the session (which, in this example, will be SQL*Plus), and you need some way of communicating with the industry-standard network protocols, such as TCP/IP.
To make it easier for you to configure and manage network connections, Oracle provides Oracle Net Services, which is a suite of components that provide connectivity solutions in distributed, heterogeneous computing environments. Oracle Net Services consists of Oracle Net, Oracle Net Listener, Oracle Connection Manager, Oracle Net Configuration Assistant, and Oracle Net Manager. The Oracle Net Services software is installed automatically as part of the Oracle Database Server or the Oracle Client software installation.
Oracle Net is a software component that initiates, establishes, and maintains connections between clients and servers. That’s why Oracle Net must be installed on both the client and the server. Oracle Net consists mainly of two components:
• Oracle Network Foundation Layer: Responsible for establishing and maintaining the connec-tion between the client application and the server, as well as exchanging messages between them
• Oracle Protocol Support: Responsible for mapping Transparent Network Substrate (TNS) functionality to industry-standard protocols used in connections
All servers that host an Oracle database also run a service called the Oracle Net Listener (commonly referred to as just the listener), whose main function is to listen for requests from client services to log into the Oracle database. The listener, after ensuring that the client service has the matching information for the database (protocol, port, and instance name), passes the client request on to the database. The database will allow the client to log in, provided the username and password are authenticated. Once the listener hands off the user request to the database, the client and the database will be in direct contact, without any help from the listener service.
Oracle provides a number of GUI-based utilities to help configure network connections for your databases. These utilities include the Oracle Connection Manager, Oracle Net Manager, and Oracle Net Configuration Assistant. These tools can help you take care of all your networking needs. After you finish reading this chapter, just click these program icons and start experimenting with test connections.
How a Web Application Connects to OracleTo make an Internet connection to an Oracle database, the web browser on the client communicates with the web server and makes the connection request using the HTTP protocol. The web server passes the request along to an application, which processes it and communicates with the Oracle database server using Oracle Net (which is configured on both the database server and the client).
In the next sections, you’ll look at some important terms that are crucial in Oracle networking.

514 CH AP T E R 1 1 ■ C ON N E C T I V IT Y A N D N E T W O R K I N G
Database Instance NamesAs you know by now, an Oracle instance consists of the SGA and a set of Oracle processes. The data-base instance name is specified in the initialization file (init.ora) as the INSTANCE_NAME parameter. When you talk about the Oracle system identifier (SID), you are simply referring to the Oracle instance.
Normally, each database can have only one instance associated with it. In an Oracle Real Appli-cation Clusters (RAC) configuration, however, a single database could be associated with multiple instances.
Global Database NamesThe global database name uniquely identifies an Oracle database and is of the format database_name.database_domain, for example, sales.us.acme.com. In this global database name, “sales” is the database name and “us.acme.com” is the database domain. Since no two databases in the same domain could have the same database name, every global database name is unique.
Database Service NamesTo a client, the database logically appears as simply a service. There is a many-to-many relationship between services and databases, since a database can be represented by one or more services, each dedicated to a different set of clients, and a service can cover more than one database instance. You identify each database in your system by its service name, and you specify the service name of a database with the SERVICE_NAMES initialization parameter. The service name parameter’s value defaults to the global database name.
Note that a database can be addressed by more than one service name. You may do this when you want different sets of clients to address the database differently to suit their particular needs. For example, you can take the same database and create two service names like the following:
sales.us.acme.comfinance.us.acme.com
The sales people will use the sales.us.acme.com service name, and the finance.us.acme.com service name will be used by the accounting and finance departments.
Connect DescriptorsTo connect to any database service in the world from your desktop, you need to provide two bits of information:
• Name of the database service
• Location of the address
Oracle uses the term connect descriptor to refer to the combined specification of the two neces-sary components for a database connection: a database service name and its address. A connect descriptor address portion contains three components: the communications protocol used for the connection, the host name, and the port number.

C H AP TE R 1 1 ■ CO N N E CT IV I T Y AN D N E T W OR K IN G 515
Knowing the communication protocol helps ensure that the networking protocols agree, so you can establish a connection. The standard protocol is TCP/IP or TCP/IP with Secure Sockets Layer (SSL). The standard port number for Oracle connections on UNIX servers is either 1521 or 1526. The default port on Windows machines is 1521. Because you can’t have more than one database with the same service name on any host, an Oracle database service name and a host name will uniquely identify any Oracle database in the world. Here’s an example of a typical connect descriptor:
(DESCRIPTION (ADDRESS=(PROTOCOL=tcp) (HOST=sales-server) (PORT=1521)) (CONNECT_DATA= (SERVICE_NAME=sales.us.acme.com)))
In this connect descriptor, the ADDRESS line specifies that the TCP protocol will be used for network communication. HOST refers to the UNIX (or Windows) server on which the Oracle listener is listening for connection requests at a specific port: 1521. The ADDRESS part of the connect descriptor is also called the protocol address.
Clients wishing to connect to the database first connect to the Oracle listener process. The listener receives the incoming connection requests and hands them off to the database server. Once the client and database server hook up through the mediation of the listener, they’re in direct commu-nication, and the listener won’t involve itself any further in the communication process for this client connection.
Connect IdentifiersA connect identifier is closely related to the connect descriptor. You can use the connect descriptor as your connect identifier, or you can simply map a database service name to a connect descriptor. For example, you can take a service name such as “sales” and map it to the connect descriptor you saw in the previous section. Here’s an example showing the mapping of the sales connect identifier:
sales=(DESCRIPTION (ADDRESS=(PROTOCOL=tcp) (HOST=sales-server) (PORT=1521)) (CONNECT_DATA= (SERVICE_NAME=sales.us.acme.com)))
Connect StringsYou connect to a database by providing a connect string. A connect string contains a username/pass-word combination and a connect identifier. One of the most common connect identifiers is a net service name, which is a simple name for a database service.
The following example shows a connect string that uses a complete connect descriptor as the connect identifier:
CONNECT scott/tiger@(DESCRIPTION= (ADDRESS=(PROTOCOL=tcp) (HOST=sales_server1) (PORT=1521)) (CONNECT_DATA=(SERVICE_NAME=sales.us.acme.com)))
Here’s a much easier way to connect to the same database, using the connect identifier sales:
CONNECT scott/tiger@sales
Both of the preceding examples will connect you to the sales database, but obviously the second connect string (using the sales connect identifier) is much simpler.

516 CH AP T E R 1 1 ■ C ON N E C T I V IT Y A N D N E T W O R K I N G
USING ORACLE NET SERVICES TOOLS
Oracle Net provides you with several GUI and command-line tools to configure connections between clients and database services. The most common command line you’ll probably use is the lsnrctl utility, which helps manage the Oracle Net Listener service. The following are the important GUI tools that help you manage Oracle Net Services:
• Oracle Net Configuration Assistant (NCA): This tool is used mostly to configure network components during installation, and it enables you to select one of the available options (I discuss these options later in the chapter) to configure client connectivity. The easy-to-use GUI interface enables you to quickly configure client connections under any naming method you choose. On UNIX/Linux systems, you can start NCA by running netca from the $ORACLE_HOME/bin directory. On Windows, choose Start ➤ Programs ➤ Oracle - HOME_NAME ➤ Configuration and Migration Tools ➤ Net Configuration Assistant.
• Oracle Net Manager: Oracle Net Manager can be run on clients and servers, and it allows you to configure various naming methods and listeners. With this tool, you can configure connect descriptors in local tnsnames.ora files or in a centralized OID, and you can easily add and modify connection methods.
To start Oracle Net Manager from the Oracle Enterprise Manager console, select Tools ➤ Service Manage-ment ➤ Oracle Net Manager. To start Oracle Net Manager as a stand-alone application on UNIX, run netmgr from $ORACLE_HOME/bin. On Windows, choose Start ➤ Programs ➤ Oracle - HOME_NAME ➤ Configura-tion and Migration Tools ➤ Net Manager.
• Oracle Enterprise Manager: OEM in Oracle Database 11g can do everything that the Oracle Net Manager can do, but for multiple Oracle homes across multiple file systems. In addition, using the OEM, you can export directory naming entries to a tnsnames.ora file.
• Oracle Directory Manager: This powerful tool enables you to create the various domains and contexts neces-sary for using OID. You can also perform password policy management and many Oracle advanced security tasks with this tool. On UNIX/Linux systems, you can start OID by running oidadmin from the $ORACLE_HOME/bin directory. On Windows, choose Start ➤ Programs ➤ Oracle - HOME_NAME ➤ Integrated Management Tools ➤ Oracle Directory Manager.
Establishing Oracle ConnectivityIn order to connect to an Oracle database using the network, you must first establish a network connection between your client and the server. You must have either the Oracle Client or the Oracle Database Server software installed on the machine you’re making the connection from. I explain the installation of the Oracle Client software in the following section.
Here are the steps you must take to make a successful connection:
1. Make sure the database server is installed and the Oracle instance is running.
2. Make sure that your Oracle Client software is installed on the client machine.
3. Check that the database server and client are running on the same network. Check this by using the ping command:
C:\> ping prod1Pinging prod1.netbsa.org [172.14.152.1] with 32 bytes of data:Reply from 172.14.152.1: bytes=32 time<1ms TTL=255Reply from 172.14.152.1: bytes=32 time<1ms TTL=255Reply from 172.14.152.1: bytes=32 time<1ms TTL=255Reply from 172.14.152.1: bytes=32 time<1ms TTL=255Ping statistics for 172.14.152.1: Packets: Sent = 4, Received = 4, Lost = 0 (0% loss),Approximate round trip times in milli-seconds:
C H AP TE R 1 1 ■ CO N N E CT IV I T Y AN D N E T W OR K IN G 517
Minimum = 0ms, Maximum = 0ms, Average = 0msC:\>
The results of the ping command show that the connection is successful. If the connection can’t be made, you’ll see a connection request timed out message, and the number of sent packets of data will be more than the number of received packets in the ping statistics.
4. The TCP/IP protocol must be installed on both the server and the client; if you install Oracle server and client software, these protocols are automatically installed in the form of the Oracle Net software component.
5. Ensure that the Oracle Net Listener service is running on the server and is listening at the appropriate port for incoming requests for connections.
6. Configure the client for connecting to the database. You can connect to an Oracle database by using one of four available methods: local naming, easy connect naming, directory naming, and external naming. I discuss these methods later in this chapter.
7. Connect to the database with SQL*Plus or a third-party tool. For example, with SQL*Plus you can connect to the database by providing the username/password combination and the database name:
C:\> sqlplus system/sammyy1@orcl
SQL*Plus: Release 11.1.0.6.0 - Production on Thu Mar 20 09:25:27 2008Copyright (c) 1982, 2007, Oracle. All rights reserved.
Connected to:Oracle Database 11g Enterprise Edition Release 11.1.0.6.0 - ProductionWith the Partitioning, OLAP, Data Mining and Real Application Testing options
SQL>
In the following sections, I’ll discuss the Oracle Client, the listener, and naming methods in more detail.
The Oracle ClientIf you wish to access an Oracle database from a PC, you must first install the Oracle Client software on the PC. The Oracle Client software comes with the Oracle Server software, and you can also download the Oracle Client software from the OTN site (http://technet.oracle.com). The Oracle Client software is available for download separately. Although the Oracle Server and Oracle Client software versions need not be the same, Oracle recommends you use matching versions of the types of software so you can take advantage of new features.
You can determine your Oracle Client version by looking at the output when you invoke the SQL*Plus utility, as shown here:
$ sqlplusC:\>sqlplus
SQL*Plus: Release 11.1.0.6.0 - Production on Thu Mar 20 09:27:14 2008
Copyright (c) 1982, 2007, Oracle. All rights reserved.
Enter user-name:
The output of the preceding SQL*Plus command shows that I have Release 11.1.0.6.0 Oracle Client software on my system.

518 CH AP T E R 1 1 ■ C ON N E C T I V IT Y A N D N E T W O R K I N G
When you install the Oracle Client software, you have four options:
• Administrator: Lets applications connect to local or remote Oracle databases and administer them as well
• Runtime: Lets you connect to local or remote Oracle databases
• Custom: Lets you select individual components from the Administrator and Runtime instal-lation components
• Instant Client: Installs only the shared libraries required by Oracle Call Interface (OCI), Oracle C++ Call Interface (OCCI), and Java Database Connectivity OCI applications
■Note The new Instant Client is discussed shortly in the “The Instant Client” section.
Installing the Oracle ClientHere’s how you install the Oracle Client software:
1. Insert the Oracle Database 11g Client CD in the CD drive, or run the runInstaller script from your staging directory, as shown in Chapter 9.
2. Select Install/Deinstall Products, and click Next.
3. The Welcome window is displayed. Click Next.
4. In the Specify File Locations page, accept the default file directory or enter an Oracle home name and directory path. Click Next.
5. In the Select Installation Type screen, you’re offered four choices—Instant Client, Adminis-trator, Runtime, or Custom. Select Runtime Installation from the list, and click Next.
6. Review the components of the Runtime install, and click Install.
7. After the installation of the Oracle Client software is completed, the Oracle Net Configu-ration Assistant will appear. Select the “No, I Will Create Service Names Myself” option, and click Next.
8. Under Database SID, enter your database name, and click Next.
9. Select TCP as the protocol, and click Next.
10. Under Host Name, enter your host server name, and select the standard port. Click Next.
11. Click the Yes button to test the connectivity, and click Next.
12. When you see the message, “Connecting . . . Test Successful,” click Next.
13. Select No when asked if you would like to configure another service. Click Next.
14. Confirm the completion of the Net Service Name configuration by clicking Next.
15. Click Finish and Exit.
■Tip If there are multiple Oracle installations on a PC, there may be several tnsnames.ora files on the system as well. A user may be unable to connect to a new database after adding the network configuration information to a tnsnames.ora file if it’s not the one in use. Make sure the correct tnsnames.ora file is in the Oracle Client’s path.

C H AP TE R 1 1 ■ CO N N E CT IV I T Y AN D N E T W OR K IN G 519
Using the TWO_TASK Environment VariableYou can bypass the use of an Oracle Net name by setting the TWO_TASK environment variable (on UNIX/Linux) or the LOCAL environment variable (on Windows).
The TWO_TASK environment variable specifies the connect string for connecting to a remote machine. SQL*Net will check the value of the TWO_TASK environment variable and automatically add it to your connect string, as shown in the following example:
$ export TWO_TASK=mydb
Once you set the TWO_TASK environment variable, you can connect to the mydb database in the following way:
$ sqlplus scott/tiger
Note that you didn’t have to use the specification sqlplus scott/tiger@mydb, since you’re using the TWO_TASK variable.
On a Windows server, the following is the equivalent for setting the TWO_TASK environment variable:
$ SET LOCAL=<mydb>$ sqlplus scott/tiger
The Instant ClientThe Oracle Client installation described in the previous section requires you to go through all the preparatory steps needed for a regular Oracle Database Server software installation. Fortunately, you may not always need to install the complete Oracle Client software for connecting to an Oracle database. Oracle’s new Instant Client software allows you to run your applications without installing the standard Oracle Client or having an ORACLE_HOME. You don’t need to install the Oracle Client soft-ware on every machine that needs access to the Oracle database. All existing OCI, ODBC, and JDBC applications will work with the Instant Client. If you wish, you can even use SQL*Plus with the Instant Client.
The Instant Client offers the following advantages, as compared to the full-blown Oracle Client software:
• It is free.
• It takes less disk space.
• The installation is faster (five minutes or so).
• No CD is required.
• It has all the features of the regular Oracle Client, including SQL*Plus if necessary.
Installing the Instant ClientHere are the steps to install the new Instant Client software and connect quickly to an Oracle database:

520 CH AP T E R 1 1 ■ C ON N E C T I V IT Y A N D N E T W O R K I N G
1. Download the Instant Client software from the OTN web site. You must install the Basic client package and you can also include any of the advanced optional packages. The packages contain the following items:
• Basic: Files required to run OCI, OCCI, and JDBC-OCI applications
• SQL*Plus: Additional libraries and executables for running SQL*Plus with Instant Client
• JDBC Supplement: Additional support for XA, Internationalization, and RowSet operations under JDBC
• ODBC Supplement: Additional libraries for enabling ODBC applications with Instant Client (Windows only)
• SDK: Additional files for developing Oracle applications with Instant Client
2. Unzip the selected packages into a single directory, and name it something like “instantclient”.
3. In UNIX and Linux systems, set the environment variable LD_LIBRARY_PATH to instantclient (thus making sure the setting for the parameter matches the name of the directory that con-tains the packages). On Windows systems, set the environment variable PATH to instantclient.
4. Test your connection to the Oracle server.
The Listener and ConnectivityThe Oracle Net Listener is a service that runs only on the server and listens for incoming connection requests. Oracle provides a utility called lsnrctl to manage the listener process. Here’s a summary of how the listener fits into Oracle networking:
• The database registers information about the services, instances, and service handlers with the listener.
• The client makes the initial connection with the listener.
• The listener receives and verifies the client connection request and forwards it to the service handler for the database service. Once the listener hands off the client request, the listener is out of the picture for that connection.
The listener.ora file, whose default location is the $ORACLE_HOME/network/admin directory on UNIX systems and the $ORACLE_HOME\network\admin directory on Windows systems, contains the configuration information for the listener. Because the listener service is run only on the server, there is no listener.ora file on the client machines. Listing 11-1 shows a typical listener.ora file.
All the configuration parameters in listener.ora have default values, and you don’t have to configure a listener service manually anymore. After the first database on the server is created, the listener service automatically starts, and the listener configuration file, listener.ora, is placed in the default directory. Upon the creation of a new database, the database’s network and service informa-tion is automatically added to the listener’s configuration file. Upon instance startup, the database registers itself automatically with the listener, and the listener starts listening for connection requests to this database.
Listing 11-1. A Typical Listener Configuration File
# LISTENER.ORA Network Configuration File:/u01/app/oracle/product/11.1.0.6.0 /db_1/network/admin/listener.ora# Generated by Oracle configuration tools.SID_LIST_LISTENER = (DESCRIPTION_LIST = (DESCRIPTION =

C H AP TE R 1 1 ■ CO N N E CT IV I T Y AN D N E T W OR K IN G 521
(ADDRESS_LIST = (ADDRESS = (PROTOCOL = IPC)(KEY = EXTPROC4)) ) (ADDRESS_LIST = (ADDRESS = (PROTOCOL = TCP)(HOST = NTL-ALAPATISAM)(PORT = 1521)) ) ) )
SID_LIST_LISTENER = (SID_LIST = (SID_DESC = (SID_NAME = PLSExtProc) (ORACLE_HOME = /u01/app/oracle/product/11.1.0/db_1) (PROGRAM = extproc) ) (SID_DESC = (GLOBAL_DBNAME = remorse.world) (ORACLE_HOME = /u01/app/oracle/product/11.1.0/db_1) (SID_NAME = remorse) ) (SID_DESC = (GLOBAL_DBNAME = finance.world) (ORACLE_HOME = /u01/app/oracle/product/11.1.0/db_1) (SID_NAME = finance) ) )
Automatic Service RegistrationThe Oracle PMON process is in charge of the dynamic service registration of new Oracle database service names with the listener—when you create new Oracle databases, they’ll automatically register themselves with the listener service. The PMON process will update the listener.ora file after each new database is created on a server.
For automatic service registration, the init.ora file or the SPFILE should contain the following parameters:
• SERVICE_NAMES (for example, sales.us.oracle.com)
• INSTANCE_NAME (for example, sales)
If you don’t specify a value for the SERVICE_NAMES parameter, it defaults to the global database name, which is a combination of the DB_NAME and DB_DOMAIN parameters. The INSTANCE_NAME param-eter’s value defaults to the SID entered during Oracle installation or database creation.
You can check the status of the listener on the server by using the lsnrctl utility, as shown in Listing 11-2. The output shows how long the listener has been up and where the configuration file for the listener service is located. It also tells you the names of the databases for which the listener is “listening” for connect requests.
Listing 11-2. Using the lsnrctl Utility to Check the Status of the Listener
$ lsnrctl statusC:\>lsnrctl status
LSNRCTL for 32-bit Windows: Version 11.1.0.6.0 - Production on 20-MAR-2008
Copyright (c) 1991, 2007, Oracle. All rights reserved.

522 CH AP T E R 1 1 ■ C ON N E C T I V IT Y A N D N E T W O R K I N G
Connecting to (DESCRIPTION=(ADDRESS=(PROTOCOL=TCP)(HOST=ntl-alapatisam.netbsa.org)(PORT=1522)))STATUS of the LISTENER------------------------Alias LISTENERVersion TNSLSNR for 32-bit Windows: Version 11.1.0.6.0 - ProductionStart Date 03-MAR-2008 11:15:53Uptime 16 days 21 hr. 14 min. 27 secTrace Level offSecurity ON: Local OS AuthenticationSNMP OFFListener Parameter File c:\orcl\app\oracle\product\11.1.0\db_1\network\admin\listener.oraListener Log File c:\orcl11\app\oracle\diag\tnslsnr\ntl-alapatisam\listener\alert\log.xmlListening Endpoints Summary... (DESCRIPTION=(ADDRESS=(PROTOCOL=tcp)(HOST=ntl-alapatisam.netbsa.org)(PORT=1522))) (DESCRIPTION=(ADDRESS=(PROTOCOL=ipc)(PIPENAME=\\.\pipe\EXTPROC1522ipc)))Services Summary...Service "orcl" has 1 instance(s). Instance "orcl", status READY, has 1 handler(s) for this service...Service "orclXDB" has 1 instance(s). Instance "orcl", status READY, has 1 handler(s) for this service...Service "orcl_XPT" has 1 instance(s). Instance "orcl", status READY, has 1 handler(s) for this service...The command completed successfullyC:\>
In the Services Summary section of Listing 11-2, the status can have one of the following values:
• READY: The instance can accept connections.
• BLOCKED: The instance cannot accept connections.
• UNKNOWN: The instance is registered in the listener.ora file rather than through dynamic service registration. The status is thus unknown.
Listener CommandsYou can run other important commands besides the status command after invoking the lsnrctl utility. For example, the services command will let you see what services the listener is monitoring for connection requests.
■Note You can also check the status of the listener service from the Net Services Administration page in Oracle Enterprise Manager.
You can see the various lsnrctl commands available by using the help command in the lsnrctl interface, as shown in Listing 11-3.

C H AP TE R 1 1 ■ CO N N E CT IV I T Y AN D N E T W OR K IN G 523
Listing 11-3. Using lsnrctl Help to List the lsnrctl Commands
$ lsnrctl help
LSNRCTL for 32-bit Windows: Version 11.1.0.6.0 - Production on 20-MAR-2008Copyright (c) 1991, 2007, Oracle. All rights reserved.
The following operations are availableAn asterisk (*) denotes a modifier or extended command:
start stop statusservices version reloadsave_config trace change_passwordquit exit set*show*$
You can start the listener by using the start command, and you can stop the listener by using the stop command after invoking the lsnrctl utility. If you want to issue these commands from the operating system command line, you can use the commands lsnrctl start and lsnrctl stop to perform the two tasks.
If you make changes to the listener.ora file, one way to put the changes into effect is to restart your listener. The other and safer method is to merely reload the listener information, which includes the newly made changes to the listener configuration file. The lsnrctl reload command lets you reload the listener on the fly, without your having to bounce it. Currently connected clients will continue to be connected while the listener is being reloaded (or even bounced) because the listener has already “handed off” the connections to the database and isn’t involved between the client and the database service.
■Caution I advise not modifying the listener.ora file unless you absolutely have to, and with dynamic auto-matic service registration, there is less need for you to modify the file. Nevertheless, there may be times when you have to change some part of the listener file, which consists of network configuration information for all the services the listener is monitoring for connection requests.
Listener ManagementAlthough it’s quite easy to set up the listener service, you can do several things afterward to tune up your connection process and to make the listener service secure. I’ll cover some of these options in the following sections.
Multiple Listeners
You can have more than one listener service running on the same server, but you’ll usually do this when you’re using Oracle Real Application Clusters (RAC). If you do use multiple listener services, you can configure the CONNECT_TIME_FAILOVER parameter, which determines how long a client connection waits for a connection through one listener before attempting a connection through another.
Setting a Queue Size
Sometimes a large volume of simultaneous connection requests from clients may overwhelm a listener service. To keep the listener from failing, you can use the QUEUESIZE parameter in the listener.ora configuration file to specify how many concurrent connection requests can be made.

524 CH AP T E R 1 1 ■ C ON N E C T I V IT Y A N D N E T W O R K I N G
For most operating systems, the default value for QUEUESIZE is a small number, such as 5. Here’s an example showing how to set the QUEUESIZE parameter:
LISTENER= (DESCRIPTION= (ADDRESS=(PROTOCOL=tcp)(HOST=sales-server)(PORT=1521)(QUEUESIZE=10)))
Setting a Password for the Listener
When the listener is first set up, there’s no password protection set for the utility. Any user who can get into the operating system can easily stop the listener and prevent clients from making new connections just by typing lsnrctl stop at the command prompt.
■Note The default password for the listener service is “listener,” and you don’t have to specify this password when you use the listener.
You can set your own password for the listener utility as shown in Listing 11-4.
Listing 11-4. Setting a Password for the Listener
LSNRCTL> set passwordPassword:The command completed successfullyLSNRCTL> change_passwordOld password:New password:Reenter new password:Connecting to (DESCRIPTION=(ADDRESS=(PROTOCOL=TCP)(HOST=ntl-alapatisam.netbsa.org)(PORT=1521)))Password changed for LISTENERThe command completed successfullyLSNRCTL> save_configConnecting to (DESCRIPTION=(ADDRESS=(PROTOCOL=TCP)(HOST=ntl-alapatisam.netbsa.org)(PORT=1521)))Saved LISTENER configuration parameters.Listener Parameter File/u01/app/oracle/product/11.1.0/db_1/network/admin/listener.oraOld Parameter File /u01/app/oracle/product/11.1.0/db_1/network/admin/listener.bak
After you change the password successfully, you can’t stop or start the listener service as before—you need to use your password to do so. You need to use the set password clause at the lsnrctl prompt to provide the listener with your (new) password, and then you can start and stop the listener service once again. Note that set password doesn’t set a new password; it merely causes the listener to ask you for the listener password so you can perform administrative tasks.
Listing 11-5 shows an attempt to stop the listener, which was refused because the password wasn’t provided. The listener is then stopped properly with the set password command.
Listing 11-5. Stopping a Listener with Password Protection
$ lsnrctl stopLSNRCTL for 32-bit Windows: Version 11.1.0.6.0 - Production on 20-MAR-2008
Copyright (c) 1991, 2001, Oracle Corporation. All rights reserved.

C H AP TE R 1 1 ■ CO N N E CT IV I T Y AN D N E T W OR K IN G 525
Connecting to (DESCRIPTION=(ADDRESS=(PROTOCOL=TCP)(HOST=ntl-alaptisam.netbsa.org)(PORT=1521)))TNS-01169: The listener has not recognized the password$ lsnrctl set passwordPassword:The command completed successfullyLSNRCTL> stopConnecting to (DESCRIPTION=(ADDRESS=(PROTOCOL=IPC)(KEY=EXTPROC0)))The command completed successfully
Naming and ConnectivityIn the previous examples of connect descriptors and connect identifiers, the “sales” connect identi-fier was used to connect to the sales service. A connect identifier can be the connect descriptor itself or a simpler name (like “sales”) that resolves into a connect descriptor. A commonly used simple connect identifier is called a net service name. Thus, the sales connect identifier in those earlier examples is a net service name.
Because providing the complete connect descriptor each time you want to make a connection is very tedious, the use of net service names makes more sense. In order to do so, however, you need to maintain a central repository of all the mappings between net service names and the connect descriptor information so that Oracle can validate the net service names. Thus, when a user starts the connection process by using the net service name “sales”, the central repository is searched for the connect descriptor for “sales.” Once the connect descriptor is found, a connection is initiated by Oracle Net to the database on the specified server.
Oracle allows you to have several types of naming repositories, and you can access the mapping information stored in these locations with one of the following four naming methods:
• Local naming: Uses a file called tnsnames.ora stored on each client to connect to the database server
• Easy connect naming: Enables connections without any service name configuration
• External naming: Uses a third-party naming service to resolve service names
• Directory naming: Uses a centralized LDAP-compliant directory server to resolve service names
No matter which naming method you use, the name-resolving process is the same. The following steps are followed under each naming method to resolve a connect descriptor to a net service name:
1. Select the naming method—local, easy connect, external naming, or directory service naming.
2. Map the connect descriptors to the service names.
3. Configure clients to use the naming method chosen in step 1.
The Local Naming MethodLocal naming is the simplest and easiest way to establish Oracle connectivity. Using this method, you store service names and their connect descriptors in a localized configuration file named tnsnames.ora. By default, this file is always stored in the $ORACLE_HOME/network/admin directory. Oracle provides a sample tnsnames.ora file for your use, and you can find it in the default directory. (You can think of the tnsnames.ora file as being similar to the /etc/hosts file, which contains the networking information for UNIX/Linux systems.) The tnsnames.ora file is always present on the client machine; if the database server is also used for client-type connections, there will be a tnsnames.ora file on the server for the other databases you need to connect to from that server.

526 CH AP T E R 1 1 ■ C ON N E C T I V IT Y A N D N E T W O R K I N G
When you initiate a connection by using either the SQL*Plus interface or some other means, you need to provide your username and password for the database you are connecting to. Once you do so, Oracle Net has to figure out which server the database is running on, so it consults the tnsnames.ora file to resolve the network address, the protocol, and the port for the database server. When it successfully resolves these, it initiates contact with the listener on the machine where the database server is located. Once the listener hands off the connection to the database server, the database authenticates your username and password.
Once you configure connections using the local naming method, all database connections, whether they are made directly through SQL*Plus or through an application’s logon page, will use the tnsnames.ora file to resolve service names.
In addition to the tnsnames.ora file, client machines make use of another file called sqlnet.ora when they use the local naming method. The sqlnet.ora file is located on each client and contains import network configuration parameters. (Of course, if a server is used as a client as well, there will be a sqlnet.ora file on the server.) Chapter 11 shows how to use the SQLNET.AUTHENTICATION_SERVICES parameter to configure operating system authentication. Here’s a typical sqlnet.ora file:
# SQLNET.ORA Network Configuration File:/u01/app/oracle/product/10.1.0/db_1/network/admin/sqlnet.ora# Generated by Oracle configuration tools.NAMES.DEFAULT_DOMAIN = wowcompany.comSQLNET.AUTHENTICATION_SERVICES= (NTS)NAMES.DIRECTORY_PATH= (TNSNAMES)
The tnsnames.ora and sqlnet.ora configuration files are usually located in the $ORACLE_HOME/network/admin directory on UNIX/Linux systems and in the $ORACLE_HOME\network\admin directory on Windows systems. However, you can place these files anywhere you like. If you place them in a nondefault location, you have to use the TNS_ADMIN environment variable to tell Oracle where the files are. Oracle will search for the two files in the following locations, and it will use the first of each it finds:
1. Oracle looks in the directory specified by the TNS_ADMIN environment variable.
2. For the tnsnames.ora file, Oracle will look in the global configuration directory. For a UNIX/Linux system, this is usually the /var/opt/oracle directory.
3. Oracle will look in the standard network directories: $ORACLE_HOME/network/admin on UNIX/Linux systems and $ORACLE_HOME\network\admin on Windows systems.
Modifying tnsnames.ora Manually
To configure local naming, you have to edit the tnsnames.ora file provided by Oracle when you create a database. All you need to do is go to the default tnsnames.ora location, $ORACLE_HOME/network/admin, and edit this file to reflect your network and database service name information. When you add a new database to your system, you also need to physically add the new database service name mapping to each user’s tnsnames.ora file or send all your users a new, updated tnsnames.ora file to replace the old one. Listing 11-6 shows a typical tnsnames.ora file.
Listing 11-6. A Typical tnsnames.ora File
# TNSNAMES.ORA Network Configuration File:/u01/app/oracle/product/10.1.0/db_1/network/admin/tnsnames.ora# Generated by Oracle configuration tools.finance = (DESCRIPTION = (ADDRESS_LIST = (ADDRESS = (PROTOCOL = TCP)(HOST = localhost)(PORT = 1521)) ) (CONNECT_DATA =

C H AP TE R 1 1 ■ CO N N E CT IV I T Y AN D N E T W OR K IN G 527
(SERVICE_NAME = finance.world) ) )salesprod = (DESCRIPTION = (ADDRESS_LIST = (ADDRESS = (PROTOCOL = TCP)(HOST = 172.11.150.1)(PORT = 1521)) ) (CONNECT_DATA = (SERVICE_NAME = salesprod.world) ) )custprod = (DESCRIPTION = (ADDRESS_LIST = (ADDRESS = (PROTOCOL = TCP)(HOST = custprod)(PORT = 1521)) ) (CONNECT_DATA = (SERVICE_NAME = custprod.world) ) )
Three databases are listed in the tnsnames.ora file in Listing 11-6, and all three have different features that distinguish them. The first entry is for the finance database, which is on the desktop computer, NTL-ALAPATISAM. The salesprod database is located on the UNIX server, whose IP address is 172.11.150.1, and Oracle Net can connect to it using port 1521 and the TCP protocol. The last database uses a symbolic name, custprod, instead of the IP address, to denote the host server.
If you were to add a fourth database, orderprod, located on the host with IP address 172.16.11.151, to this tnsnames.ora file, you would need to add the appropriate connect identifier to the tnsnames.ora file, as shown here:
orderprod = (DESCRIPTION = (ADDRESS_LIST = (ADDRESS = (PROTOCOL = TCP)(HOST = 172.16.11.151)(PORT = 1521)) ) (CONNECT_DATA = (SERVICE_NAME =orderprod.world) )
Once you configure a net service name and modify the tnsnames.ora file, here’s how you connect to the database:
1. Distribute the new service name configuration to your clients. You may do so by copying the tnsnames.ora and sqlnet.ora files to your clients, who must have the Oracle Client software installed. Alternatively, you can use the Oracle Net8 Assistant or Net8 Configuration Assistant to configure the net service names on the client itself.
2. Make sure the listener on the server where the database is running is started. Check that the listener is using the same protocol and address as that you configured for the net service name in the tnsnames.ora file. Also make sure that the listener is using the TCP/IP protocol and is listening on the default port 1521.
3. Make sure that the target database you’re trying to connect to is running.
4. Test the new connection by using the following syntax:
CONNECT username/password@net_service_name

528 CH AP T E R 1 1 ■ C ON N E C T I V IT Y A N D N E T W O R K I N G
Although local naming is quite easy to implement, it is a cumbersome method to use if you have a large number of client installations that need to access the database server directly because you need to maintain a local copy of the tnsnames.ora file on all your local clients. Furthermore, when you change hosts or add databases to your system, you need to ensure that you make the changes in all your client tnsnames.ora files. Of course, if you have a small client base, the maintenance of the tnsnames.ora files shouldn’t be a problem.
Modifying tnsnames.ora with the Net Configuration Assistant
I prefer using the Oracle Net Configuration Assistant (NCA) to add a new service to my tnsnames.ora file, rather than manually adding it to the file. Like the listener.ora file, the tnsnames.ora file is somewhat tricky, with all its parentheses, and it’s easy to make a mistake when you’re manually editing it. Creating new services using the GUI is very easy, with the NCA prompting you for the server name, database name, network address, and protocol type. Once you’re done configuring the connection, there will be a new or an updated tnsnames.ora file in the default location that includes the database services you just added.
To use the NCA, you must first install the Oracle Client software on the client machine by using the Oracle Client CD. The NCA comes bundled with both the server and the client versions of the software. You can create a connection and test it, all in under a minute.
Here are the steps involved in using the NCA to configure a new service name in your tnsnames.ora file:
1. Start the Oracle Net Configuration Assistant on a UNIX/Linux server with the netca command, as shown here:
$ export DISPLAY=172.16.14.15:0.0 $ netca
■Note You can start the NCA on a Windows system by selecting Start ➤ Programs ➤ Oracle ➤ Configuration and Migration Tools.
2. The Welcome page is displayed next. Select Local Net Service Name Configuration, and click Next.
3. On the Net Service Name Configuration page, select Add and click Next.
4. In the Service Name Configuration page, enter the service name you want to configure. In this example, it is the database named emrep.netbsa.org. Note that the database service name is generally the same as the global database name. Click Next.
5. In the Select Protocol page, select TCP and click Next.
6. In the TCP/IP Protocol page, enter the name of the host on which the database is running. Select the standard port number, 1521. Click Next.
7. In the Test Page, click the “Yes, Perform a Test” button, and click Next.
8. The NCA will try to connect to the database using the new configuration and will show you the results. If the connection fails, make sure the listener for the target database is up and that the default username and password combination the test process uses (system/manager) is changed to a valid username/password combination. Also, make sure that you’ve provided the correct database name and domain name.
9. The NCA will then ask you to confirm the net service name in the Net Service Name page. Click Next.

C H AP TE R 1 1 ■ CO N N E CT IV I T Y AN D N E T W OR K IN G 529
10. In the Another Service Name page, you can choose to configure more service names.
11. On the Net Service Name Configuration Done page, click Next. Click Finish on the Welcome page when it reappears.
■Note You can also configure net service names using the Net Services Administration page in Oracle Enterprise Manager, or the Oracle Net Manager GUI.
The Easy Connect Naming MethodOracle DBAs can simplify client configuration by using the easy connect naming method. Using this method, your database clients can connect to the database without using the tnsnames.ora configu-ration file for TCP/IP environments. All that your clients need is the host name and the optional port number and service name of the database. You thus have configuration-free, out-of-the-box TCP/IP connectivity to any database in your system.
The only condition for using the easy connect naming method is that you must have support for the TCP/IP protocol on both the client and the server. However, you don’t have to configure a tnsnames.ora file. You can look at this new connection method as an extension of the host naming method introduced in Oracle9i.
Here’s the general syntax of this new connecting method:
$ CONNECT username/password@[//]host[:port][/service_name]
In this easy connect syntax statement, there are four things you need to focus on:
• // (double slash): This is optional.
• Host: This is a mandatory parameter. You can specify either a symbolic host name or the IP address of the server hosting your target database.
• Port: This is an optional parameter. If you don’t specify a port, the default port, 1521, is used.
• Service_name: This specifies the service name of the database (the default is the host name), and it is optional. You can leave this parameter out if your host name and database server name are identical. If they aren’t, you must provide a valid service name to identify your database.
The following example shows a connection being made to the dev1 database located on the hp50 server. The connection is being made directly from the operating system prompt, so the SQLPLUS keyword is used instead of CONNECT:
$ sqlplus system/[email protected]:1521/emrep.netbsa.org–SQL*Plus: Release 11.1.0.6.0 - Production on Thu Mar 20 09:38:15 2008
Copyright (c) 1982, 2007, Oracle. All rights reserved.
Connected to:Oracle Database 11g Enterprise Edition Release 11.1.0.6.0 - ProductionWith the Partitioning, OLAP, Data Mining and Real Application Testing options
SQL>
Note that you can also connect without using the optional port number, as shown here:
$ sqlplus system/[email protected]/emrep.netbsa.org

530 CH AP T E R 1 1 ■ C ON N E C T I V IT Y A N D N E T W O R K I N G
Note that the main parameters of the easy connect method are the same as the connection information the local naming method requires in the tnsnames.ora file. The information provided in the preceding example would be configured in the tnsnames.ora file as follows:
(DESCRIPTION= (ADDRESS=(PROTOCOL=tcp)(HOST=ntl_alapatisam.netbsa.org)(PORT=1521)) (CONNECT_DATA= (SERVICE_NAME=emrep.netbsa.org)))
If I am connecting from within SQL*Plus, I can use the following syntax:
$ sqlplus /nolog
SQL*Plus: Release 11.1.0.6.0 - Production on Thu Mar 20 09:38:15 2008
Copyright (c) 1982, 2007, Oracle. All rights reserved.SQL> connect system/[email protected]:1521/emrep.netbsa.org
Connected.SQL>
■Note Of the four items you need to specify in the easy connect naming method, only the host name is mandatory.
Configuring Easy Connect Naming
As the name indicates, the easy connect naming method needs very little in the way of configura-tion. You specify the easy connect method by using the EZCONNECT keyword as a value for the NAMES.DIRECTORY_PATH variable in the sqlnet.ora file. Consider the following sqlnet.ora file:
# sqlnet.ora Network Configuration File:/u01/app/oracle/10.1.0/db_1/network/admin/sqlnet.ora# Generated by Oracle configuration tools.NAMES.DEFAULT_DOMAIN = netbsa.orgSQLNET.AUTHENTICATION_SERVICES = (NTS)NAMES.DIRECTORY_PATH = (TNSNAMES,EZCONNECT)
The last line shows the connect methods that Oracle Net will use to resolve connect identifiers to connect descriptors. The NAMES.DIRECTORY_PATH parameter specifies the order of the naming methods Oracle Net will use to resolve connect identifiers to connect descriptors. In this example, TNSNAMES is the first setting, so Oracle Net will use the tnsnames.ora file by default. If it fails to connect using the tnsnames.ora file, it will try connecting through the EZCONNECT method.
If you want EZCONNECT to be the default method, you can manually edit your sqlnet.ora file so that EZCONNECT comes first in your NAMES.DIRECTORY_PATH parameter, as shown here:
NAMES.DIRECTORY_PATH = (EZCONNECT, TNSNAMES)
Restrictions on the Easy Connect Naming Method
There are a few restrictions to using the easy connect naming method:
• You must install the Oracle Database 11g Net Services software on the client.
• TCP/IP protocol support must be provided on the client and the database server.
• You can’t use any advanced features of Oracle networking such as connection pooling, external procedure calls, or Heterogeneous Services.

C H AP TE R 1 1 ■ CO N N E CT IV I T Y AN D N E T W OR K IN G 531
Database Resident Connection PoolingUp until the Oracle Database 11g release, you could use two ways to connect user sessions to the database: a dedicated server process, which handles one user process at a time, or a shared server process, which serves multiple user processes. In Oracle Database 11g, you can use a third way to connect sessions to the database, which is a variation on the dedicated server approach and relies on the concept of using a pool of servers to serve connection requests.
Web-based applications typically acquire a connection, use it briefly, and relinquish it quickly. It’s common for these applications to share or reuse sessions. Web applications don’t usually main-tain a continuous active connection to the database, but use the database occasionally over a period of time, and usually don’t maintain state while they’re connected to the database. Database connec-tion pooling helps service thousands of end users through a small number of database sessions, thus enhancing database scalability. Technologies such as PHP can’t avail themselves of connection pooling through the application server, since each Web server process requires a dedicated database connection.
Oracle’s brand-new database resident connection pooling (DRCP) connection method uses pools of servers for serving a large number of user sessions. DRCP makes fewer demands for memory when compared to the dedicated server and the shared server configurations. DRCP is especially designed to help architectures such as PHP with the Apache server, that can’t take advantage of middle-tier connection pooling because they used multiprocess single-threaded application servers. DRCP enables applications such as these to easily scale up to server connections in the tens of thousands.
DRCP is quite similar to the dedicated server in the sense that it works like a dedicated server configuration, but each user connection doesn’t have to retain an exclusive dedicated server for the lifetime of a connection. Each database connection acquires a server from the pool of servers, for a brief period. When the user session completes its work, it releases the server connection back to the server pool.
How DRCP Works
DRCP uses a connection broker that assigns each new client session to an available pooled server. Once the client connection’s request is served by the database, the connection releases the pooled server back to the server pool. Thus, the sessions use memory and other resources only while the database is actually performing tasks for the sessions and release those resources when they release the pooled server back to the pool of servers.
As long as the database doesn’t reach the maximum number of pooled servers, the connection broker will create a pooled server to assign to a new client connection, if it can’t find a free pooled server. Once the maximum number of pooled servers is reached, the connection broker can’t create a new pooled server. It sends the client connections to a wait queue until some pooled servers are freed up. Unlike in a dedicated server approach where the amount of (PGA) memory used is propor-tional to the number of user sessions, under DRCP, the amount of memory is proportional to the number of active pooled servers. The following example shows how you can make significant gains in memory usage by switching to DRCP from a dedicated server configuration.
In the example, I assume that there are a total of 5,000 client connections, and that each client session requires 200KB of memory and each server process requires 5MB of memory. Also, let’s assume that you need a maximum of 200 server connections. You can compute the total memory requirements for the dedicated server configuration and the DRCP method as shown:
Dedicated serverTotal memory required = 5000 X (200KB + 5MB) = 260GB
Database Resident Connection Pooling
Total Memory Required = 200 X (200KB + 5MB) = 502 MB
Shared Server500 X 200KB + 200 X 5MB = 11GB

532 CH AP T E R 1 1 ■ C ON N E C T I V IT Y A N D N E T W O R K I N G
You can see that while a dedicated server configuration requires a total of 260GB, you’ll need only a little over a half gigabyte under the DRCP configuration.
Enabling and Disabling DRCP
By default, the database comes preconfigured with a default connection pool named SYS_ DEFAULT_CONNECTION_POOL. You must, however, start the default connection pool in order to take advantage of the DRCP feature. You start the connection pool by executing the START_POOL procedure of the DBMS_CONNECTION_POOL package, as shown here:
SQL> connect sys/sammyy1 as sysdbaSQL> exec dbms_connection_pool.start_pool();
PL/SQL procedure successfully completed.SQL>
You can check the status of the connection pool with the following query:
SQL> select connection_pool, status, maxsize from dba_cpool_info;
CONNECTION_POOL STATUS MAXSIZE---------------------------- ------ --------SYS_DEFAULT_CONNECTION_POOL ACTIVE 80SQL>
Once you start the connection pool, it will remain open even if you stop the database and start it back up again. You can stop the connection pool by executing the STOP_POOL procedure, as shown here:
SQL> exec dbms_connection_pool.stop_pool();
PL/SQL procedure successfully completed.SQL>
The background process Connection Monitor (CMON) manages the connection pool. Applica-tions hand back dedicated server processes to the CMON process, which returns the process back to the connection pool.
You can specify the DRCP connection in the following way:If you’re using an EZ Connect string, specify POOLED in the string, as shown here:
myhost.comany.com:1521/mydb.company.com:POOLED
If you’re using a tnsnames.ora file, specify SERVER=POOLED in the TNS connect string, as shown here:
mydb = (DESCRIPTION=(ADDRESS=(PROTOCOL=tcp) (HOST=myhost.company.com) (SERVER=POOLED)))
Configuring DRCP
You use the following parameters to configure DRCP in your database:You can configure the connection pool based on your database’s usage requirements. Here are
the main DRCP configuration parameters:
• INACTIVITY TIMEOUT: Maximum idle time allowable for a pooled server before it is terminated
• MAX_LIFETIME_PER_SESSION: The time to live (TTL) duration for a pooled session
• MAX_USES_PER_SESSION: The maximum number of times a pooled server can be released to the connection pool

C H AP TE R 1 1 ■ CO N N E CT IV I T Y AN D N E T W OR K IN G 533
• MAX_SIZE and MIN_SIZE: The maximum and minimum number of pooled servers in the connection pool
• MAX_THINK_TIME: The maximum time a client can remain inactive after obtaining a pooled server from the connection pool
You can execute the CONFIGURE_POOL procedure of the DBMS_CONNECTION_POOL package to configure several connection pool configuration parameters at once. You can execute the ALTER_PARAM procedure of the DBMS_CONNECTION_POOL package to modify the value of a single connection pool configuration parameter, as shown here:
SQL> exec dbms_connection_pool.alter_param(' ','INACTIVITY_TIMEOUT','2400')
The previous example shows how you can configure the INACTIVITY_TIMEOUT parameter. The database allows a pooled server to remain idle for up to one hour before terminating the connection based on the value of 2400 for the INACTIVITY_TIMEOUT parameter.
You can restore the connection pool configuration to its default values by executing the RESTORE_DEFAULTS procedure, as shown here:
SQL> exec dbms_connection_pool.restore_defaults()
The RESTORE_DEFAULTS procedure helps restore all connection pool configuration parame-ters to their default values.
Monitoring DRCP
Use the following views to monitor DRCP:
• DB_CPOOL_INFO: Shows the name of the connection pool, its status, the maximum and minimum number of connections, and the timeout for idle sessions
• V$CPOOL_STAT: Shows pool statistics such as the number of session requests and wait times for a session request
• V$CPOOL_CC_STATS: Shows details about the connection class-level statistics
The External Naming MethodThe external naming method uses external naming services such as the Network Information Service (NIS), originally developed by Sun Microsystems, to resolve net service names. NIS systems keep a central database of host names and use a flat namespace based on a master server.
Here are the steps you need to perform to use the external naming method for name resolution:
1. Have your system administrator configure NIS if it isn’t already in place.
2. Create a tnsnames.ora file as you would in the local naming method.
3. Convert the tnsnames.ora file to a tnsnames map, which you’ll need for the NIS server later on. You can derive the tnsnames map from the tnsnames.ora file by having your system administrator use the tns2nis command, as shown here:
# tns2nis tnsnames.ora
4. Copy the tnsnames map file to the server on which the NIS is running.
5. Install the tnsnames map file on the NIS server using the makedbm NIS program, as shown here:
# makedbm tnsnames /var/yp/'domainname'/tnsnames

534 CH AP T E R 1 1 ■ C ON N E C T I V IT Y A N D N E T W O R K I N G
6. Test the NIS installation of the tnsnames map by using the following command:
# ypmatch net_service_name tnsnames
You should get a confirmation back in the following form:
description=(address=(protocol=tcp) (host=host_name)(port=port_number))) (connect_data=(service_name=service_name)))
7. Edit the sqlnet.ora file as follows:
NAMES_DIRECTORY_PATH=(nis, hostname, tnsnames)
The nis method should be listed first inside the brackets so that Oracle Net will attempt to resolve the service name using NIS first. Apart from that, the order of the items in the brackets doesn’t matter.
The Directory Naming MethodTraditionally, network information was stored on multiple servers, often in different formats, but today’s Internet-based applications leave many organizations open to huge security risks. Decen-tralized systems are a constant source of worry for most security professionals. Centralized directory services for authenticating users and enforcing security policies enhance an organization’s power to safeguard its networked resources.
Directory services are huge centralized repositories that contain all the metadata pertaining to databases, networks, users, security policies, and so forth. The directory behind these services can replace a large number of localized files, such as the tnsnames.ora file, and can provide a single point of name resolution and authentication. These directories are relatively low-update databases with substantial numbers of reads against them. Retrieval performance is a key factor in the success of a directory service.
Here are some examples of the kinds of data that such directories can manage efficiently:
• Usernames and passwords
• User profiles
• Authorization policies
• Network configuration and Net Services information
Many kinds of commercial directory services are available, including Microsoft’s Active Direc-tory and Oracle Internet Directory, and they can be employed to perform a host of functions for an organization.
The directory naming method stores database connection information in a Lightweight Direc-tory Access Protocol (LDAP)–compliant directory server. The connect identifiers are stored under an Oracle context that contains entries for use with OID.
Although a centralized setup may seem daunting at first, it is quite easy to set up. The initial cost may be higher, but the cost of managing the information over time is minimal. In addition to helping clients connect to central networks and databases, directories such as OID are valuable for providing enterprise-wide security.
Oracle Internet Directory
OID is an LDAP-compliant directory service that stores connect identifiers, among other things. LDAP is a popular protocol for accessing online services, and it is an Internet standard for storage and directory access. OID is very scalable because it is implemented on the highly scalable Oracle database. Thus, a potentially huge amount of directory information can be stored and easily accessed. The data is secure because it is stored in the database, and OID is a high-availability

C H AP TE R 1 1 ■ CO N N E CT IV I T Y AN D N E T W OR K IN G 535
service, just like the Oracle database. The LDAP specification is also attractive because of the minimal client software it needs.
You can use OID for many applications, such as address books, security credential repositories, and corporate directory services. Oracle strongly recommends moving to OID as a way of config-uring database connectivity. By deemphasizing Oracle Names, a connection method offered in the past, Oracle is positioning OID as the main alternative to the traditional local naming method, which involves the use of the tnsnames.ora network configuration file. The Oracle database can use OID to store usernames and passwords and to store a password verifier along with the entry of each user. Other Oracle components use OID for various purposes:
• Oracle Application Server Single Sign-On: Uses OID to store user entries
• Oracle Collaboration Suite: Uses OID for centralized management of information about users and groups
• Oracle Net Services: Uses OID to store and resolve database services and net service names
• Oracle Advanced Security: Uses OID for central management of user authentication creden-tials, authorizations, mappings to shared schema, single password authentication, Enterprise user security, and the central storage of Public Key Infrastructure (PKI) credentials
OID includes the following elements:
• Oracle directory server: Provides service names and other information by using a multitiered architecture over TCP/IP
• Oracle directory replication server: Replicates LDAP data between Oracle directory servers
• Directory administration tools, including the following:
• Oracle Directory Manager, a GUI that helps you administer OID and other command-line administration tools
• Directory server management tools within Oracle Enterprise Manager 10g Application Server Control console, which enable you to monitor real-time events from a web browser
The basic idea behind the use of OID is straightforward. Users connect to OID, which is an application running on an Oracle database. Users provide OID with an Oracle service identifier (a database name). The directory returns the complete connection information—host name, connec-tion protocol, port number, and database instance name—to the client, which then connects to the database server. The connect identifiers are stored in the Oracle context, which contains entries such as database names and service names, for use with Oracle software such as OID.
Oracle’s Advanced Security option uses OID to centrally manage user-related information. If you are using Oracle’s replicated database technology, OID will come in very handy in managing the complexity of multiple servers and network protocols.
Although Oracle would like you to convert all your network configurations to OID, it is not clear that OID is worth the extra administrative overhead for most small to medium-sized enterprises. Remember that OID is not a product meant exclusively for network configuration. Networking data-base connections is only a small part of the capabilities of OID. The local naming approach (or the new easy connect naming method) is still useful for most organizations because of its simplicity.
How OID Makes Database Connections
When you use OID to resolve names, remember that the client doesn’t have a file, such as tnsnames.ora, with the name-resolution information. When using directory naming, Net Services clients connect to a database as follows:
1. The person wanting to connect types his or her usual username/password combination into the client computer, along with a connect identifier.
2. The sqlnet.ora file on the client specifies that it’s using OID to resolve names, so the Net Ser-vices client hands its request to the OID listener/dispatcher process.

536 CH AP T E R 1 1 ■ C ON N E C T I V IT Y A N D N E T W O R K I N G
3. The OID listener/dispatcher relays the LDAP request to the Oracle directory server.
4. The directory server connects to the OID database and resolves the connect identifier to the underlying connect descriptor, which contains the network, server, and protocol infor-mation. It sends this detailed connect descriptor information to the Net Services client.
5. The client sends the connect descriptor it receives to the Oracle Net Listener (or to the dis-patcher, if shared servers are being used).
6. The listener service receives the connection request and, after verifying it, sends it to the database.
The Organization of OID
A directory contains a set of information about various objects, such as employee names and addresses or database service name information (as is discussed in this chapter). The information in a directory is arranged in a hierarchical structure called the Directory Information Tree (DIT).
Every directory entry is made up of various object classes and attributes, as follows:
• Directories are made up of object classes.
• Object classes are groups of attributes.
• Attributes are the containers that hold the data.
A directory consists of entries, which are collections of information about an object. To identify an entry unambiguously, you need something to tell you where it is located in the directory struc-ture. This unambiguous address locator is the distinguished name (DN) of the entry. A DN is like an address that exactly locates an entry in the directory—it gives you the complete path from the top of the hierarchy to where an entry is located.
Here’s an example of a DN:
cn=ninaou=financec=uso= wowcompany
This DN for the nina entry has the following nodes:
• cn: Common name
• ou: Organizational unit
• c: Country
• o: Organization
Thus, the DN nina.finance.us.wowcompany uniquely identifies the person with the name Nina working in the finance department of the US branch of Wowcompany. Note that each of the various nodes are called relative distinguished names (RDNs), so in essence a DN is nothing more than a string of RDNs.
A naming context is a contiguous subtree on a single directory server. An Oracle context contains relevant entries for use with Oracle features, such as Oracle Net Service directory naming and enter-prise user security. You can have multiple Oracle contexts in one directory server. OID will create a default Oracle context at the root of the directory information tree. In the DIT, the Oracle context RDN (cn=OracleContext) is the default location a client uses to look up matching connect descriptors for a connect identifier in the directory.
An Oracle context in a directory tree would have all the service names underneath it, including complete network- and server-connection information. In addition to subentries that support direc-tory naming, an Oracle context contains other entries to support enterprise security. Therefore, if you’re trying to connect to a database on a server, the OID server doesn’t have to search the directory tree all the way from the root entry to the last node. You merely have to provide it with a partial DN

C H AP TE R 1 1 ■ CO N N E CT IV I T Y AN D N E T W OR K IN G 537
from the top root node to the Oracle context. The Oracle context will contain the net service names underneath it, and the net service names will contain the detailed connect information.
The administrative context, also known as the directory naming context, is a directory entry that contains an Oracle context. The following simple example demonstrates these sometimes confusing concepts.
The complete DN for the database orcl is the following:
dc=com,dc=wowcompanycn=orcl,cn=description,cn=address,cn=port,cn=service_name
In the DN, dc stands for domain component and is usually used to describe domain elements in the directory.
The important point to note is that because all the connect descriptor information is under the Oracle context RDN, you don’t have to provide the full DN each time you want to look up the connec-tion information for the database. You can replace the preceding lengthy DN with the following generic-looking DN:
dc=com,dc=wowcompany,cn=OracleContext
Note that dc identifies a domain component and cn stands for a common name. In this example, com and wowcompany are both domain components and are therefore at the top of the directory tree.
Installing OID
You can install OID using the Oracle Application Server 10g Release 2 (10.1.2.0.0) software. You must choose the OracleAS Infrastructure 10g option in the Select a Product to Install window when using the Oracle Universal Installer. This option lets you install a new OID on your server. In the next page of the Oracle Universal Installer—the Select Installation Type page—select the Identify Manage-ment and Metadata Repository option; this creates a Metadata Repository, which is a requirement for installing OID.
Coverage of the installation and management of OID is beyond the scope of this book. Please refer to the Oracle Application Server Release 2 documentation on the http://technet.oracle.com web site for details.
Once you’ve configured OID, you’re ready to enter Oracle net service names into it. You can use several methods to do so. The easiest ways are to add service names using Oracle Net Manager, if you’re adding entries individually, or to import your entire tnsnames.ora file into OID using Oracle Enterprise Manager.
Oracle and Java Database ConnectivityFrequently, Java programs need to connect to a database to perform data manipulation tasks. JDBC is an interface that permits a Java program to connect to a database and issue DML and DDL SQL statements. JDBC allows the use of dynamic SQL statements, for situations where you may not know the number and types of columns until run time. (If you’re going to write static SQL, you can use SQLJ, which lets you embed SQL statements in Java.) JDBC provides a rich library of routines that help you open and close connections to databases and process data.
In the following sections, you’ll see how you can use JDBC to connect to and work with Oracle databases from Java.

538 CH AP T E R 1 1 ■ C ON N E C T I V IT Y A N D N E T W O R K I N G
Establishing Database ConnectivityBefore you can connect to a database, you have to select the appropriate drivers. Oracle provides four major kinds of JDBC drivers:
• JDBC thin driver: This pure Java client–based driver provides a direct connection to the data-base using the TCP/IP protocol. The driver requires a listener and uses sockets for making connections to databases.
• JDBC OCI driver: This driver needs a client installation of Oracle, so it is specific to Oracle. This driver is highly scalable and can use connection pooling to serve large numbers of users.
• JDBC server-side thin driver: Running on the server, this driver connects to remote databases and provides the same functionality as the client-based thin driver.
• JDBC server-side internal driver: As its name indicates, this driver resides on the server and is used by the Java Virtual Machine (JVM) to talk to the Oracle database server.
Once you choose a specific type of JDBC driver, you must specify the JDBC driver in one of two ways: use the static registerDriver() method of the JDBC DriverManager class, or use the forName() method of the java.lang class. Here are the two methods of specifying the JDBC driver:
DriverManager.registerDriver ("new oracle.jdbc.OracleDriver()");
and
Class.forName("oracle.jdbc.driver.OracleDriver")
Once you’ve loaded the JDBC driver, it’s time to make the connection to the database by using the static getConnection() method of the DriverManager class. This will create an instance of the JDBC connection class. Listing 11-7 shows the code for doing this.
Listing 11-7. Making the Database Connection
connection conn=DriverManager.getConnection("jdbc:oracle:thin:@prod1:1521:finprod", username, passwd);/* Here's what the different parts of the connection object stand for: */jdbc=protocoloracle=vendorthin=driverprod1=server1521=port numberfinprod=Oracle databaseusername=database usernamepassword=database password
If all your information is valid, you are connected to the database from your Java application.
Working with the DatabaseNow that you’ve learned how to connect to the database using JDBC, it’s time to find out how you can process SQL statements in the database through the JDBC connection.
You can’t execute SQL directly from your Java program. First you need to create JDBC state-ments, and then you need to execute your SQL statements. Let’s look at these two steps in detail.

C H AP TE R 1 1 ■ CO N N E CT IV I T Y AN D N E T W OR K IN G 539
Creating the Statement Object
To relay your SQL statements to the database, you need to create a JDBC Statement object. This object will associate itself with an open connection and henceforth act as the conduit through which SQL statements are transferred from the Java program to the database for execution.
Here’s how you create the JDBC Statement object:
statement stmt = conn.createStatement();
No SQL statements are associated with the stmt object. However, under the Statement class, there is another object called PreparedStatement that always contains a SQL statement in addition to being the channel for the statement’s execution. This SQL statement is compiled immediately, and it can be compiled just once and used many times thereafter, which is a great benefit.
For simplicity, however, I’ll just use the Statement object in this discussion. Let’s now turn to the execution of SQL statements.
Executing SQL Statements
You can understand JDBC SQL statements if you separate the SELECT statements that query the data-base from all the other statements. Unlike the others, SELECT statements don’t change the state of the database.
Let’s first look at how to deal with query statements.
Handling Queries
SELECT statements use the executeQuery() method to get the query results. The method returns the results in the ResultSet object. Listing 11-8 shows an example.
Listing 11-8. Getting the Query Results
string first_name,last_name,manager;number salary;resultSet rs = stmt.executeQuery("SELECT * FROM Employees"); while (rs.next()) { first_name = rs.getString("first_name"); last_name = rs.getString("last_name"); manager = rs.getString("manager"); salary = rs.getNumber("salary"); system.out.println(first_name + last_name "works for" Manager "salary is:" salary.");
Note that rs is an instance of the resultSet object, and it holds the query results. The resultSet object also provides a cursor, so you can access the results one by one. Each time you invoke the resultSet method, the cursor moves to the next row in the result set.
Handling DDL and Nonquery DML Statements
Any statement that changes the state of the database—be it a DDL statement or a DML statement such as INSERT, UPDATE, or DELETE—is executed using the executeUpdate() method. Note that the word “update” in the method name indicates that the SQL statement will change something in the database.
Here are some examples of executeUpdate() statements:
statement stmt = conn.createStatement(); stmt.executeUpdate("CREATE TABLE Employees" +

540 CH AP T E R 1 1 ■ C ON N E C T I V IT Y A N D N E T W O R K I N G
"(last_name VARCHAR2(30), first_name VARCHAR2(20), manager VARCHAR2(30), salary(number"); stmt.executeUpdate("INSERT INTO Employees " + "VALUES ('Alapati', 'Valerie', 'Shannon', salary)");
The preceding statements create the Statement object, and then they create a table and insert some data into it.
All your normal SQL transaction properties, such as consistency and durability, are maintained when you use JDBC to execute SQL statements. By default, each statement commits after its execu-tion because the value of conn.setAutoCommit() is set to true, as you can see in the following example. You can ensure that there is a commit after every statement in either of the following ways (and if you wish, you can also use the conn.rollback() method to roll back a statement):
conn.setAutoCommit(false);
or
conn.commit();
Here’s a simple example that shows how to use the commit() and rollback() statements:
conn.setAutoCommit(false); Statement stmt = conn.createStatement();stmt.executeUpdate("INSERT INTO employeesVALUES('Alapati','Valerie','Nicholas',50000 )"); conn.rollback();stmt.executeUpdate("INSERT INTO employeesVALUES('Alapati','Nina','Nicholas',50000)"); conn.commit();
Error Handling
All programs must have an exception handler built in; especially those DML statements that change the database state. One way to do this is to use the rollback() statement when you run into an error, so your partial changes are all undone.
You can use the SQLException() method to catch errors. In Java programs, you use a try code block to generate (or throw) an exception, and the catch block will “catch” the exception thus thrown. Listing 11-9 shows a sample Java code block that illustrates these concepts.
Listing 11-9. Handling Errors in Java
try { conn.setAutoCommit(false); stmt.executeUpdate(" " + "(Disney World', 'MickeyMouse', 2.00)"); conn.commit(); conn.setAutoCommit(true); }catch(SQLException ex) { system.err.println("SQLException: " + ex.getMessage()); conn.rollback(); conn.setAutoCommit(true); }

C H AP TE R 1 1 ■ CO N N E CT IV I T Y AN D N E T W OR K IN G 541
A Complete ProgramListing 11-10 shows a sample program that puts together all the concepts of the preceding sections. The example first registers the Oracle thin driver and connects to the database using it. The program updates some rows in a table and uses the result set to print the data.
Listing 11-10. A Complete Java Program Using JDBC
/* import java packages */import java.sql.*;public class accessDatabase{ public static void main(String[] args) throws SQLException { stringfirst_name,last_name ; number salary ; connection c = null;/* register the Oracle Driver */ try { class.forName("oracle.jdbc.driver.OracleDriver"); c = DriverManager.getConnection( "jdbc:oracle:thin:@prod1:1521:finprod", "user", "user_passwd");/* create the statement object */ statement s = c.createStatement(); c.setAutoCommit(false); s.executeUpdate("CREATE TABLE employees " + "(first_name VARCHAR2(30), last_name VARCHAR2(20),salary NUMBER)"); s.executeUpdate("INSERT INTO employee VALUES " + "('nicholas', 'Alapati', 50000 )"); c.commit(); c.setAutoCommit(true);/* the result set */ resultSet rs = s.executeQuery("SELECT * FROM Employees"); while( rs.next() ){ first_name = rs.getString("first_name"); last_name = rs.getString("last_name"); salary = rs.getFloat("salary"); System.out.println(first_name + last_name + " works for " + Manager + " salary is:" + salary"); }/* exception handler */ } catch (ClassNotFoundException ex){ system.out.println(ex); } catch (SQLException ex){ if ( c != null ){ c.rollback(); c.setAutoCommit(true); } system.out.println("SQLException caught"); system.out.println("---"); while (ex != null){ system.out.println("Message : " + ex.getMessage()); system.out.println("SQLState : " + ex.getSQLState()); system.out.println("ErrorCode : " + ex.getErrorCode());

542 CH AP T E R 1 1 ■ C ON N E C T I V IT Y A N D N E T W O R K I N G
system.out.println("---"); ex = ex.getNextException(); } } }}
As our focus is on Oracle database administration and not on programming, I presented the simple Java program here mainly to draw your attention to aspects of Oracle database connectivity.

543
■ ■ ■
C H A P T E R 1 2
User Management and Database Security
Database security means different things to different people. The essential thing to remember, though, is that the underlying goal of database security is to prevent unauthorized use of the data-base or its components. Database security depends on system and network security as well, but this chapter mostly focuses on how you can provide solid security at the database level.
The first thing you’ll learn in this chapter is how to create and manage users in an Oracle data-base. Everything users can do within an Oracle database is based on explicit privileges granted to them. You can grant users system and object privileges directly, but it’s far more common to grant these privileges to roles, and to then grant roles to users, so this chapter shows you how to work with roles.
You’ll also learn about Oracle profiles and how to manage them. Profiles let you set limits on the resources used by each user in the database and enforce a password policy for security purposes. The Oracle Resource Manager enables you to allocate scarce database and server resources among groups of users according to a resource plan. This chapter provides you with an introduction to this tool.
While controlling database access through the use of grants and privileges is fairly common, you must also consider using Oracle’s powerful fine-grained access control feature, which lets you control access at the row level. This chapter discusses Oracle’s fine-grained access control feature, also known as a virtual private database, in detail.
In a production database, it’s always a good idea to audit database usage. You can audit both changes made to the data and database events, such as unsuccessful attempts to log into the data-base. Triggers based on system events can provide your database with a strong security layer, and this chapter explains how to use these special triggers. I also show how you can use Oracle’s fine-grained auditing polices.
Data encryption is an important tool for most organizations today. Oracle offers several ways to encrypt your data, including special PL/SQL encryption packages, the capability to encrypt a table’s columns with the transparent data-encryption feature, and the ability to encrypt an entire tablespace. I cover these encryption features in this chapter.
In short, these are the main aspects of Oracle database security management:
• Controlling access to data (authorization)
• Restricting access to legitimate users (authentication)
• Ensuring accountability on the part of the users (auditing)
• Safeguarding key data in the database (encryption)
• Managing the security of the entire organizational information structure (enterprise security)
Users are, of course, why a database exists, so let’s look at how to manage users in an Oracle database before covering the various Oracle security management techniques.

544 CH AP T E R 1 2 ■ U S E R M A N AG E M E N T A N D DA T AB A SE S E CU R IT Y
Managing UsersUser management is a pretty complex topic because not only does it deal with authorizing users to use the database, but it also touches on vital topics such as security and resource management. The DBA creates the users in the database and sets limits on their access to the various components. The DBA also limits the physical space and system resources that the users can use, generally by assigning database roles and setting privileges. You’ll see later on how to make sure that the default passwords associ-ated with various database users are changed soon after creating a new database.
When you create a new database, the only users at first will be the application or schema owners. Later on, you’ll create the actual end users who will be using the database on a day-to-day basis. For the first set of users, the application owners, you will be more concerned with allocating sufficient space and other privileges to create objects in the database. For the end users, your primary concern will be their access rights to various objects and the limits on their use of resources while accessing the database.
Temporary and Default TablespacesAll users need a temporary tablespace where they can perform work such as sorting data during SQL execution. Users also need to have a default tablespace, where their objects will be created if they don’t explicitly assign a different tablespace during object creation.
You can create a default temporary tablespace and a default permanent tablespace for all users during the database-creation process (Chapter 10 explains how to create these two tablespaces). Once you have created these two tablespaces, you don’t have to specify them again when you create a new database user.
■Caution If you don’t assign a specific tablespace as the default tablespace, the System tablespace becomes your default tablespace. If a user creates a very large object in the System tablespace, he or she might take up all the space in it and make it impossible for the SYS super user to create any new objects in it, causing the database to come to a grinding halt. This is the main reason why you should always create a default tablespace for every user.
Creating a New UserYou use the CREATE USER statement to create a user. It’s good practice to assign each new user both a default temporary and a default permanent tablespace. Since I’m assuming that you’ve already created both of these tablespaces when you created the database, the CREATE USER statement can be very simple, as shown here:
SQL> CREATE USER salapati IDENTIFIED BY sammyy1;User created.SQL>
This statement creates a new user, salapati, with sammyy1 as the password. You don’t have to assign a default temporary or permanent tablespace to the user (assuming that you created a default temporary and permanent tablespace for the database while creating your database). You can use the ALTER TABLESPACE DEFAULT TEMPORARY TABLESPACE statement to set up a default temporary tablespace after creating a database. Query the DATABASE_PROPERTIES view to see the current values for the default tablespace.
The following query shows the new user’s default (permanent) and temporary tablespaces:

CH AP T E R 1 2 ■ U SE R M A N AG E M E N T AN D DA TA B AS E S E CU R I TY 545
SQL> SELECT default_tablespace, temporary_tablespace 2 FROM dba_users 3* WHERE username='SALAPATI';
DEFAULT_TABLESPACE TEMPORARY_TABLESPACE------------------- -------------------------USERS TEMPTBS_01
SQL>
The new user can’t connect to the database, however, because the user doesn’t have any privileges to do so. This is what happens when the user salapati tries to connect using SQL*Plus:
$ sqlplus salapati/sammyy1
SQL*Plus: Release 11.1.0.6.0 - Production on Fri Mar 21 11:55:38 2008
Copyright (c) 1982, 2007, Oracle. All rights reserved.ERROR:Ora-01045: user SALAPATI lacks CREATE SESSION privilege; logon denied
Enter user-name:
In order for the salapati user to connect and start communicating with the database, you must grant the CREATE SESSION system privilege to the new user, as shown here:
SQL> GRANT CREATE SESSION TO salapati;Grant succeeded.SQL>
If you’ve followed the Oracle-recommended practice and have created default temporary and permanent tablespaces when creating the database, any new user you create will be able to use them instead of using the System tablespace as the temporary and default tablespace by default. In any case, after you create a user, the new user can’t create new objects, such as tables and indexes, right away. In the following example, USERS is the default permanent tablespace for the database, and you can see what happens when the user tries to create a table:
SQL> CONNECT salapati/sammyy1Connected.SQL> CREATE TABLE xyz (name VARCHAR2(30));create table xyz (name varchar2(30))*ERROR at line 1:ORA-01950: no privileges on tablespace 'USERS'SQL>
Let’s say you assigned the default permanent tablespace USERS to all users. Since user salapati didn’t specify a tablespace for creating the new xyz table, Oracle tries to create it in the default permanent tablespace, USERS. However, the user wasn’t granted any quota on the tablespace. By default, users aren’t given any space quotas on any tablespaces. Since the user is assigned the USERS tablespace but isn’t allocated a quota of space in that tablespace, the user can’t create any objects in the USERS tablespace. You must explicitly allocate tablespace quotas to a user.
It’s common to assign specific tablespace quotas at user creation time. Here’s how you grant a space quota on a tablespace to a user:
SQL> ALTER USER salapati 2 QUOTA 100M ON users;User altered.SQL>

546 CH AP T E R 1 2 ■ U S E R M A N AG E M E N T A N D DA T AB A SE S E CU R IT Y
■Tip If you don’t want a user to create any objects at all in the database, don’t assign a quota on any tablespace. If it’s an existing user with a specific quota on a tablespace, you can use the ALTER USER statement to set this quota to 0. When you use the ALTER USER statement to assign a quota of 0 on all tablespaces, any objects already created by the user will remain, but the user won’t be able to create any new objects. The existing objects also cannot grow in size, since you revoked the tablespace quotas.
Once the new user is given a space quota on a tablespace, the user can create database objects such as tables and indexes. By default, any objects a user creates will be placed in the user’s default permanent tablespace (USERS in our example). The user can choose to create the objects in any tablespace, however, as long as the user has a space quota on that tablespace. If you want a user to have unlimited space usage rights in all tablespaces, you need to grant the user the UNLIMITED TABLESPACE privilege, as shown here:
SQL> GRANT UNLIMITED TABLESPACE TO salapati;Grant succeeded.SQL>
If you want a user to create his or her own tablespaces, you must enable the user to create a tablespace by using the GRANT CREATE TABLESPACE TO username command. Similarly, you must grant the DROP TABLESPACE privilege. If a user wishes to subsequently create database objects in a tablespace that he or she has created, the user won’t need any space quotas on those tablespaces. You can see the individual tablespace quotas allocated to a user by using the DBA_TS_QUOTAS view, as shown here:
SQL> SELECT tablespace_name, username, bytes FROM DBA_TS_QUOTAS;
TABLESPACE USERNAME BYTES---------- --------- ----------SYSAUX DMSYS 196608SYSAUX OLAPSYS 16252928SYSAUX WK_TEST 12582912SYSAUX SYSMAN 78577664RMAN_TBSP RMAN 8585216SQL>
As you can see, four different users, all owners of various Oracle components, have quotas in the Sysaux tablespace, and the user RMAN has a quota on a tablespace created exclusively for the Recovery Manager’s use.
Since they aren’t mandatory, you can create a database without a default temporary tablespace or a default (permanent) tablespace. In such a case, you can assign both tablespaces explicitly when you create a new user. You can also assign a quota on the default permanent tablespace. Here’s an example showing how to create a user by explicitly specifying the default tablespaces (temporary and permanent). The GRANT QUOTA clause gives the user a 500MB space allocation in the USERS tablespace so the user can create objects there:
SQL> CREATE USER salapati IDENTIFIED BY sammyy1 TEMPORARY TABLESPACE TEMPTBS01 DEFAULT TABLESPACE USERS QUOTA 500M ON USERS;
User created.SQL>

CH AP T E R 1 2 ■ U SE R M A N AG E M E N T AN D DA TA B AS E S E CU R I TY 547
If you omit the QUOTA clause, the new user can’t use any space in the tablespace USERS, which is the default tablespace for the user. If you have created a permanent default tablespace, as recom-mended by Oracle, you can omit the DEFAULT TABLESPACE clause. If you haven’t, you should specify the DEFAULT TABLESPACE clause; otherwise, the new user will be assigned the System tablespace as the default tablespace and that’s not a good idea, since you don’t want users possibly creating objects in the System tablespace.
Altering a UserYou use the ALTER USER statement to alter a user in the database. Using this statement, you can do the following:
• Change a user’s password.
• Assign tablespace quotas.
• Set and alter default and temporary tablespaces.
• Assign a profile and default roles.
Here’s an example showing how a DBA (or the user being altered) can use the ALTER USER command to change a user’s password:
SQL> SHOW USER
USER is "SALAPATI"
SQL> ALTER USER salapati IDENTIFIED BY sammyy1;
User altered.SQL>
Only a DBA or another user to whom you’ve granted the ALTER USER privilege can change pass-words with the ALTER USER statement. Users can also change their own passwords with the PASSWORD command in SQL*Plus, as shown here:
SQL> PASSWORD
Changing password for SALAPATIOld password: *********New password: *********Retype new password: *********Password changedSQL>
Whether users assign their own passwords or a DBA creates their passwords, a DBA won’t ever be able to find out what any user’s password is, since all passwords are stored in the encrypted form. However, I’ll show you later in this chapter how to log in as another user by making use of the encrypted password.
Dropping a UserTo drop a user, you use the DROP USER statement, as shown here:
SQL> DROP USER salapati;
User Dropped.SQL>

548 CH AP T E R 1 2 ■ U S E R M A N AG E M E N T A N D DA T AB A SE S E CU R IT Y
The DROP USER statement will remove just the user from the database, but all the objects owned by the user will remain intact. If other objects in the database depend on this user, you won’t be able to use the simple DROP USER command—you must use the DROP USER . . . CASCADE statement, which drops the user, the user’s schema objects, and any dependent objects as well. Here’s an example:
SQL> DROP USER salapati CASCADE;
User Dropped.SQL>
In Chapter 16, you’ll learn about Oracle’s new Recycle Bin, which keeps the database from drop-ping a table permanently when you issue a DROP TABLE statement. This gives you the chance to revive a “dropped” table if necessary. When you drop a user, however, all tables and other objects in the user’s schema will be dropped permanently, without using the Recycle Bin! Therefore, if you aren’t sure whether you will need a user’s objects later, but you want to deny access, simply leave the user and the user’s schema intact, but deny the user access to the database by using the following statement:
SQL> REVOKE CREATE SESSION FROM salapati;
Revoke succeeded.SQL>
Since a user can have the CREATE SESSION privilege through another role such as CONNECT, for example, Oracle recommends that you use the ALTER USER username ACCOUNT LOCK statement to ensure that a user is locked out of the database.
Creating and Using User ProfilesWe have so far created a new user, assigned the user a set of default and temporary tablespaces, and granted the user the privileges to connect to the database. What is the limit on the amount of data-base resources this person can use? What if he or she unwittingly starts a SQL program that guzzles CPU resources like crazy and brings your system to its knees?
You can set the individual resource limits in Oracle by using what are known as profiles. A profile is a collection of resource-usage and password-related attributes that you can assign to a user. Multiple users can share the same profile, and you can have an unlimited number of profiles in an Oracle database. Profiles set hard limits on resource consumption by the various users in the database and help you limit the number of sessions a user can simultaneously keep open, the length of time these sessions can be maintained, and the usage of CPU and other resources. Here, for example, is a profile called “miser” (because it limits resource usage to a minimum):
SQL> CREATE PROFILE miser 2 LIMIT 3 connect_time 120 4 failed_login_attempts 3 5 idle_time 60 6* sessions_per_user 2;Profile created.SQL>
When a user with the miser profile connects, the database will allow the connection to be main-tained for a maximum of 120 seconds and will log the user out if he or she is idle for more than 60 seconds. The user is limited to two sessions at any one time. If the user fails to log in within three attempts, the user’s accounts will be locked for a specified period or until the DBA manually unlocks them.

CH AP T E R 1 2 ■ U SE R M A N AG E M E N T AN D DA TA B AS E S E CU R I TY 549
■Note Besides user profiles, you can also use some third-party tools that include query governs, which limit the types of queries that users can use within the database, thus ensuring that the database is not loaded down by inefficient queries.
Profile Parameters and Limits
Oracle databases enable you to set limits on several parameters within a profile. The following sections provide brief explanations of these parameters, which can be divided into two broad types: resource parameters, which are concerned purely with limiting resource usage, and password parameters, used for enforcing password-related security policies.
Resource Parameters
The main reason for using resource parameters is to ensure that a single user or a set of users doesn’t monopolize the database and server resources. Here are the most important resource parameters that you can set within an Oracle Database 11g database:
• CONNECT_TIME: Specifies the total time (in minutes) a session may remain connected to the database.
• CPU_PER_CALL: Limits the CPU time used per each call within a transaction (for the parse, execute, and fetch operations).
• CPU_PER_SESSION: Limits the total CPU time used during a session.
• SESSIONS_PER_USER: Specifies the maximum number of concurrent sessions that can be opened by the user.
• IDLE_TIME: Limits the amount of time a session is idle (which is when nothing is running on its behalf).
• LOGICAL_READS_PER_SESSION: Limits the total number of data blocks read (from the SGA memory area plus disk reads).
• LOGICAL_READS_PER_CALL: Limits the total logical reads per each session call (parse, execute, and fetch).
• PRIVATE_SGA: Specifies a session’s limits on the space it allocated in the shared pool compo-nent of the SGA (applicable only to shared server architecture systems).
• COMPOSITE_LIMIT: Sets an overall limit on resource use. A composite limit is a limit on the sum of several of the previously described resource parameters, measured in service units. These resources are weighted by their importance. Oracle takes into account four parameters to compute a weighted COMPOSITE_LIMIT: CPU_PER_SESSION, CONNECT_TIME, LOGICAL_READS_PER_SESSION, and PRIVATE_SGA. You can set a weight for each of these four parameters by using the ALTER RESOURCE COST statement, as shown in the following example:
SQL> ALTER RESOURCE COST 2 cpu_per_session 200 3 connect_time 2;Resource cost altered.SQL>
■Tip If you don’t use a weight for any of these four parameters, the parameters will be ignored in the computation of the COMPOSITE_LIMIT parameter.

550 CH AP T E R 1 2 ■ U S E R M A N AG E M E N T A N D DA T AB A SE S E CU R IT Y
Password Parameters
Oracle provides you with a wide variety of parameters to manage user passwords. You can set the following password-related profile parameters to enforce your security policies:
• FAILED_LOGIN_ATTEMPTS: Specifies the number of consecutive login attempts a user can make before being locked out.
• PASSWORD_LIFE_TIME: Sets the time limit for using a particular password. If you don’t change the password within this specified time, the password expires.
• PASSWORD_GRACE_TIME: Sets the time period during which you’ll be warned that your password has expired. After the grace period is exhausted, you can’t connect to the database with that password.
• PASSWORD_LOCK_TIME: Specifies the number of days a user will be locked out after reaching the maximum number of unsuccessful login attempts.
• PASSWORD_REUSE_TIME: Specifies the number of days that must pass before you can reuse the same password.
• PASSWORD_REUSE_MAX: Determines how many times you need to change your password before you can reuse a particular password.
• PASSWORD_VERIFY_FUNCTION: Lets you specify an Oracle-provided password-verification func-tion to set up an automatic password-verification mechanism.
The Default Profile
As you can see, you can set a number of resource- and password-related attributes to control access to the database and resource usage. If you create a user and don’t explicitly assign any profile to the user, the user will inherit the default profile, as shown here:
SQL> SELECT profile FROM dba_users WHERE username = 'SALAPATI'PROFILE-----------DEFAULT
The default profile, unfortunately, isn’t very limiting at all—virtually all the resource limits are set to UNLIMITED, meaning there’s no limit on resource usage whatsoever.
Listing 12-1 shows the results of querying the DBA_PROFILES table regarding the attributes for the profile named default.
Listing 12-1. Resource Limits for the Default Profile
SQL> SELECT DISTINCT resource_name, limit 2 FROM dba_profiles 3* WHERE profile='DEFAULT';
RESOURCE_NAME LIMIT-------------------------------- ----------PASSWORD_LOCK_TIME 1IDLE_TIME UNLIMITEDCONNECT_TIME UNLIMITEDPASSWORD_GRACE_TIME 7

CH AP T E R 1 2 ■ U SE R M A N AG E M E N T AN D DA TA B AS E S E CU R I TY 551
LOGICAL_READS_PER_SESSION UNLIMITEDPRIVATE_SGA UNLIMITEDLOGICAL_READS_PER_CALL UNLIMITEDSESSIONS_PER_USER UNLIMITEDCPU_PER_SESSION UNLIMITEDFAILED_LOGIN_ATTEMPTS 10PASSWORD_LIFE_TIME 180PASSWORD_VERIFY_FUNCTION NULLPASSWORD_REUSE_TIME UNLIMITEDPASSWORD_REUSE_MAX UNLIMITEDCOMPOSITE_LIMIT UNLIMITEDCPU_PER_CALL UNLIMITED
16 rows selected.SQL>
■Caution If you don’t assign a profile to a user, Oracle assigns that user the default profile. Because the default profile uses a value of UNLIMITED for several parameters, you could end up with resource usage problems if users are assigned the default profile.
By default, the default password profile is enabled when you create a database.
Assigning a User Profile
You can assign a user a profile when you create the user. Here’s an example:
SQL> CREATE USER salapati IDENTIFIED BY sammyy1 TEMPORARY TABLESPACE TEMPTBS01 DEFAULT TABLESPACE USERS GRANT QUOTA 500M ON USERS; PROFILE 'prod_user';
User created.SQL>
You can also assign a profile to a user any time by using the ALTER USER statement, as shown here:
SQL> ALTER USER salapati 2 PROFILE test;
User altered.SQL>
You can use the ALTER USER statement to assign an initial profile or to replace the current profile with another.

552 CH AP T E R 1 2 ■ U S E R M A N AG E M E N T A N D DA T AB A SE S E CU R IT Y
Altering a User Profile
You can alter a profile by using the ALTER PROFILE statement, as follows:
SQL> ALTER PROFILE test 2 LIMIT 3 sessions_per_user 4 4* failed_login_attempts 4;
Profile altered.SQL>
The previous ALTER PROFILE statement limits the sessions a user can create as well as the maximum login attempts (before locking the user’s account) to four.
Password Management Function
You can use the Oracle provided script named utlpwdmg.sql (from the $ORACLE_HOME/rdbms/admin directory) to implement various password management features such as setting the default password resource limits. This script lets you create a password verification function named verify_function_11g. The verify_function_11g function helps you implement password complexity in your database and lets you customize it for ensuring complex password checking.
The verify_function_11g function lets you implement password protection features such as the following:
• Ensuring that all passwords are at least eight characters long
• Ensuring that every password contains at least one number and one alphabetic character
• Ensuring that a password differs from the previous password by at least three characters
• Checking to make sure that passwords aren’t simply a reverse of the usernames
• Checking to make sure the passwords aren’t the same as or similar to the name of the server
• Checking to make sure that a password isn’t in a set of well-known and common passwords such as “welcome1” or “database1”
Here’s how you can execute the ALTER PROFILE statement in the utlpwdmg.sql script to create the verify_function_11g function first and, immediately after that, alter the DEFAULT profile that comes with the database and is automatically assigned to all users for whom you haven’t assigned a profile.
ALTER PROFILE DEFAULT LIMITPASSWORD_LIFE_TIME 180PASSWORD_GRACE_TIME 7PASSWORD_REUSE_TIME UNLIMITEDPASSWORD_REUSE_MAX UNLIMITEDFAILED_LOGIN_ATTEMPTS 10PASSWORD_LOCK_TIME 1PASSWORD_VERIFY_FUNCTION verify_function_11G;
Once you create the verify_function_11g function as shown here, the database will automati-cally execute the function every time the DBA or a user creates or modifies a password. The function ensures that the passwords meet the requirements specified by the function. Of course, you may alter the function to create more stringent password checks in your database.
When Do Profile Changes Go into Effect?
Unless you change the setting of the RESOURCE_LIMIT initialization parameter from its default value of false, the profile changes you make will never be applied. The RESOURCE_LIMIT parameter determines

CH AP T E R 1 2 ■ U SE R M A N AG E M E N T AN D DA TA B AS E S E CU R I TY 553
whether the resource limits are enforced in database profiles. You need to set this parameter to true in the init.ora file and restart the database, or use the ALTER SYSTEM command, as shown here:
SQL> ALTER SYSTEM SET resource_limit=true;
System altered.SQL>
■Tip Make sure you have the RESOURCE_LIMIT initialization parameter set to true so that the resource limits set by the profiles will be enforced. Otherwise, Oracle will ignore the limits set in the CREATE or ALTER PROFILE statement. The password-related profile attributes don’t depend on the RESOURCE_LIMIT parameter—they are enabled automatically when you create the profile.
Dropping a User Profile
Dropping a profile is straightforward. Here’s how you would drop the test profile:
SQL> DROP PROFILE test CASCADE;
Profile dropped.SQL>
The test profile is assigned to several users in the database, and to drop the profile for all of them, you must use the CASCADE keyword. Note that the users who were assigned the test profile will now be automatically assigned the default profile.
What Happens When Profile Limits Are Reached?
When a user hits either a session-level or a call-level resource limit, Oracle rolls back the user’s state-ment that is in progress and returns an error message. If it’s a call-level limit (such as CPU_PER_CALL), the user’s session remains intact, and other statements belonging to the current transaction remain valid. If a session-level limit is reached, the user can’t go any further in that session.
How Do You Know What the Profile Limits Should Be?
You have several ways to gather the statistics to determine the optimal values for several critical resource limits, such as LOGICAL_READS_PER_SESSION. If you’re too liberal with the value, some users may hog resources, and if you’re too conservative, you’ll be fielding many calls from irate users who are prevented from completing their jobs.
By using the IDLE_TIME profile attribute, you can limit the amount of time a user’s session can remain idle. However, using the DBMS_RESOURCE_MANAGER package may be a better way to control a user’s idle connection time, and I explain this package in the “Using the Database Resource Manager” section of this chapter. Using this package, you can set a maximum idle limit for a session as well as limit the length of time an idle session can block other sessions.
Try to get some information from test runs that you’ve made of certain jobs. If you don’t have reliable historical data, use the AUDIT SESSION statement to acquire baseline data for several param-eters, such as connect time and logical reads. You can also use Oracle Enterprise Manager (OEM) to gather the data. In addition, you may have feedback (or complaints!) from the users themselves about programs that are failing due to limits on resource use or that need longer connect times to the database server.

554 CH AP T E R 1 2 ■ U S E R M A N AG E M E N T A N D DA T AB A SE S E CU R IT Y
Managing ResourcesWith large numbers of database users, resource management becomes an important issue. Server resources are ultimately limited, and you must have some means of apportioning the scarce resources among the users. Oracle provides a powerful tool, the Database Resource Manager, which allows you to control database resource usage in a sophisticated manner.
You can use either the user profiles I discussed in the previous section or the Database Resource Manager to control resource usage in your database. User profiles are effective in controlling the resource usage of individual users, but Oracle prefers that you use profiles mainly for password management. Oracle recommends using the Database Resource Manager to control resource usage.
The Database Resource ManagerSuppose you’re managing a production database with the following problems:
• Batch jobs are taking up most of the available resources, which is hurting other, more critical jobs that need to run at the same time.
• Excessive loads at peak times are causing critical processes to run for an unacceptably long time.
• You schedule large jobs and really can’t predict when they might be launched.
• Some users are using an excessive amount of CPU time, causing you to kill their sessions abruptly.
• Some users are using a very high degree of parallelism in their operations, which is hurting the performance of the system as a whole.
• You can’t manage active sessions.
• You want to prioritize jobs according to some scheme, but you can’t do so using operating system resources.
As you can see, all these problems stem from the inability of the DBA to allocate the limited resources efficiently among competing operations, which leads to lopsided resource allocation and very long response times for critical jobs. The Oracle Resource Manager is the answer—it allows you to create resource plans, which specify how much of your resources should go to the various consumer groups. You can group users based on their resource requirements, and you can have the Database Resource Manager allocate a preset amount of resources to these groups. You can distribute the available CPU resources by allocating a set percentage of CPU time to various users. Thus, you can easily prioritize your users and jobs. Your higher-priority online users will be served faster, while your lower-priority batch jobs may take longer.
Using the Database Resource Manager, it’s possible for you to ensure that your critical user groups (formally referred to as resource consumer groups) are always guaranteed enough resources to perform their tasks.
The Database Resource Manager also enables you to limit the length of time a user session can stay idle and to automatically terminate long-running SQL statements and user sessions. Using the Database Resource Manager, you can set initial login priorities for various consumer groups. By using the concept of the active session pool, you can also specify the maximum number of concurrently active sessions for a consumer group—the Database Resource Manager will automatically queue all subsequent requests until the currently running sessions complete. The DBA can also automatically switch users from one resource group to another, based on preset resource usage criteria, and can limit the amount of undo space a resource group can use.

CH AP T E R 1 2 ■ U SE R M A N AG E M E N T AN D DA TA B AS E S E CU R I TY 555
The following four elements are integral to the Database Resource Manager:
• Resource consumer group: A resource consumer group is used to group together similar users based on their resource needs.
• Resource plan: The resource plan lays out how resource consumer groups are allocated resources. Each resource plan contains a set of resource consumer groups that belong to this plan, together with instructions as to how resources are to be allocated among these groups. For example, a resource plan may dictate that the CPU resource be allocated among three resource consumer groups so that the first group gets 60 percent and the remaining two groups 20 percent of the total CPU time. A resource plan can also have subplans, which enable the allocation of resources in greater detail among resource consumer groups.
• Resource allocation method: The resource allocation method dictates the specific method you choose to use to allocate resources like the CPU. These are the available methods of allocating database resources:
• CPU method: Oracle uses multiple levels of CPU allocation to prioritize and allocate CPU usage among the competing user sessions.
• Idle time: You can direct that a user’s session be terminated after it has been idle for a spec-ified period of time. You can also specify that only idle sessions blocking other sessions be terminated.
• Execution time limit: You can control resource usage by setting a limit on the maximum execution time of an operation.
• Undo pool: By setting an undo pool directive, you can limit the total amount of undos that can be generated by a consumer resource group.
• Active session pool: You can set a maximum allowable number of active sessions within any consumer resource group. All sessions that are beyond the maximum limit are queued for execution after the freeing up of current active sessions.
• Automatic consumer group switching: Using this method, you can specify that a user session be automatically switched to a different group after it runs more than a specified number of seconds. The group the session should switch to is called the switch group, and the time limit is the switch time. The session can revert to its original consumer group after the end of the top call, which is defined as an entire PL/SQL block or a separate SQL statement.
• Canceling SQL and terminating sessions: By using CANCEL_SQL or KILL_SESSION as the switch group, you can direct a long-running SQL statement or even an entire session to be canceled or terminated.
• Parallel degree limit: You can use this method to specify the limit of the degree of parallelism for an operation.
• Resource plan directive: The resource plan directive links a resource plan to a specific resource consumer group.
Using the Database Resource ManagerYou manage the Database Resource Manager by executing procedures in the Oracle-supplied DBMS_RESOURCE_MANAGER package. It enables you to create a resource plan for the various consumer groups and to assign the plans to the consumer groups. As a DBA, you’ll already have priv-ileges to execute any procedure in the DBMS_RESOURCE_MANAGER package, but for any other users that need to use the Database Resource Manager, you’ll need to grant a special system privilege called ADMINISTER_RESOURCE_MANAGER so they can use the Database Resource Manager, as shown here:

556 CH AP T E R 1 2 ■ U S E R M A N AG E M E N T A N D DA T AB A SE S E CU R IT Y
SQL> EXEC DBMS_RESOURCE_MANAGER_PRIVS.GRANT_SYSTEM_PRIVILEGE - (GRANTEE_NAME => 'scott', PRIVILEGE_NAME => 'ADMINISTER_RESOURCE_MANAGER');
The DBMS_RESOURCE_MANAGER package has several procedures, but we’ll focus on a few important ones that will let you use the package to control resource allocation among database users.
■Note The following discussion of the Database Resource Manager is meant to familiarize you with the various steps involved in creating resource plans and enforcing them. The Resource Plan Wizard in the OEM toolset is really the best way to quickly create resource plans in your database once you get the hang of the various steps involved in creating and maintaining the plans.
Here are the steps you need to follow to start using the Database Resource Manager:
1. Create a pending area. This is the work area where you create and validate resource consumer groups, resource plans, and plan directives.
2. Create a resource consumer group. This is a grouping of users who will receive the same amount of resources.
3. Create a resource plan. This is a collection of directives that specify how Oracle should allocate resources to resource consumer groups.
4. Create a plan directive. This associates resource consumer groups with resource plans and allocates resources among resource consumer groups.
5. Validate the pending area. This process validates the resource consumer group, the resource plan, and the plan directive.
6. Submit the pending area. This creates the resource consumer group, the resource plan, and the plan directives, and makes them active.
Once this is all done, you can assign users to resource consumer groups, and they’ll get the resources that have been assigned to that group.
Creating a Pending Area
Before you can use the Database Resource Manager to allocate resources, modify an old plan, or create a new plan, you need to create what is called a pending area to validate changes before their implementation. The pending area serves as a work area for your changes. All the resource plans you’ll create will be stored in the data dictionary, and the pending area is the staging area where you work with resource plans before they are implemented.
Here’s how you create the pending area:
SQL> EXECUTE dbms_resource_manager.create_pending_area;PL/SQL procedure successfully completed.SQL>
You can also clear the pending area by using the following procedure if you think you’ve made errors while creating the various components of the Database Resource Manager:
SQL> EXECUTE dbms_resource_manager.clear_pending_area;PL/SQL procedure successfully completed.SQL>

CH AP T E R 1 2 ■ U SE R M A N AG E M E N T AN D DA TA B AS E S E CU R I TY 557
Creating Resource Consumer Groups
Once the pending area is active, you can create the resource consumer groups to which you’ll allo-cate your users. You can assign users initially to one group and switch them to another group later, if necessary. You use three parameters to create a resource consumer group: consumer group name (CONSUMER_GROUP), a comment (COMMENT), and the method for distributing CPU resources among the resource consumer group’s active sessions (CPU_MTH). There are two choices you can use for the CPU_MTH parameter—the RUN_TO_COMPLETION method schedules sessions that will take the most time ahead of other, less time-intensive sessions, and the default ROUND_ROBIN method, which uses a round-robin scheduling system.
The example in Listing 12-2 shows how to create three consumer groups in the database: local, regional, and national. Note that I’m not using the CPU_MTH parameter, since I plan to use the default ROUND_ROBIN method.
Listing 12-2. Creating the Resource Consumer Groups
SQL> EXECUTE dbms_resource_manager.create_consumer_group - > (consumer_group => 'local', comment => 'local councils');PL/SQL procedure successfully completed.SQL> EXECUTE dbms_resource_manager.create_consumer_group - > (consumer_group => 'regional', comment => 'regional councils');PL/SQL procedure successfully completed.SQL>SQL> EXECUTE dbms_resource_manager.create_consumer_group - > (consumer_group => 'national', comment => 'national office');PL/SQL procedure successfully completed.SQL>
Determining What Groups Exist in Your Database
You can query the DBA_RSRC_CONSUMER_GROUPS view for information about what groups currently exist in your database (before validating and submitting the pending area), as shown in Listing 12-3.
Listing 12-3. Querying the DBA_RSRC_CONSUMER_GROUPS View
SQL> SELECT consumer_group, status 2* FROM dba_rsrc_consumer_groups;
CONSUMER_GROUP STATUS------------------------------ -------AUTO_TASK_CONSUMER_GROUP PENDINGDEFAULT_CONSUMER_GROUP PENDINGSYS_GROUP PENDINGOTHER_GROUPS PENDINGLOW_GROUP ACTIVEAUTO_TASK_CONSUMER_GROUP ACTIVEDEFAULT_CONSUMER_GROUP ACTIVESYS_GROUP ACTIVELOW_GROUP PENDINGOTHER_GROUPS ACTIVELOCAL PENDINGREGIONAL PENDINGNATIONAL PENDING13 rows selected.SQL>

558 CH AP T E R 1 2 ■ U S E R M A N AG E M E N T A N D DA T AB A SE S E CU R IT Y
Three new groups were created in the previous section—national, regional, and local—but Listing 12-3 shows eight distinct consumer groups. The same query would have given you the following output before you created the three new groups in the pending area:
SQL> SELECT consumer_group,status 2 FROM dba_rsrc_consumer_groups;
CONSUMER_GROUP STATUS-------------------------- ------ORA$AUTOTASK_URGENT_GROUPBATCH_GROUPORA$DIAGNOSTICSORA$AUTOTASK_HEALTH_GROUPORA$AUTOTASK_SQL_GROUPORA$AUTOTASK_SPACE_GROUPORA$AUTOTASK_STATS_GROUPORA$AUTOTASK_MEDIUM_GROUPINTERACTIVE_GROUPOTHER_GROUPSDEFAULT_CONSUMER_GROUPSYS_GROUPLOW_GROUPAUTO_TASK_CONSUMER_GROUP
14 rows selected.SQL>
The five resource consumer groups that you see in the preceding output are default groups that exist in every Oracle database:
• OTHER_GROUPS: This isn’t really a group, because you can’t assign users to it. When a resource plan is active, OTHER_GROUPS is the catchall term for all sessions that don’t belong to this active resource plan.
• DEFAULT_CONSUMER_GROUP: If you don’t assign users to any group, they will, by default, become members of the default group.
• SYS_GROUP and LOW_GROUP: These are part of the default plan, named system_plan, that exists in every database.
• BATCH_GROUP: This is a default group intended for use with batch operations.
• AUTO_TASK_CONSUMER_GROUP: This is a default resource consumer group used for auto-matically executed tasks, such as the gathering of statistics. The priority for jobs such as statistics collection will remain below jobs in the default consumer group. Oracle supplies seven default resource plans for each database, as shown by the output of the following query:
SQL> SELECT plan, comments FROM dba_rsrc_plans;
PLAN COMMENTS------------------- --------------------------------------------------MIXED_WORKLOAD_PLAN Example plan for a mixed workload that prioritizes interactive operations over batch operations.ORA$AUTOTASK_SUB_PLAN Default sub-plan for automated maintenance tasks. A directive to this sub-plan should be included in every top-level plan to manage the resources consumed by the automated maintenance tasks.

CH AP T E R 1 2 ■ U SE R M A N AG E M E N T AN D DA TA B AS E S E CU R I TY 559
ORA$AUTOTASK_HIGH_SUB_PLAN Default sub-plan for high-priority, automated maintenance tasks. This sub-plan is referenced by ORA$AUTOTASK_SUB_PLAN and should not be referenced directly.
INTERNAL_PLAN Internally-used plan for disabling the resource manager.
DEFAULT_PLAN Default, basic, pre-defined plan that prioritizes SYS_GROUP operations and allocates minimal resources for automated maintenance and diagnostics operations.
INTERNAL_QUIESCE Plan for quiescing the database. This plan cannot be activated directly. To activate, use the quiesce command.
DEFAULT_MAINTENANCE_PLAN Default plan for maintenance windows that prioritizes SYS_GROUP operations and allocates the remaining 5% to diagnostic operations and 25% to automated maintenance operations.
7 rows selected.SQL>
If you query the DBA_RSRC_CONSUMER_GROUPS view after you validate the pending area, you’ll see the five default groups and the three groups you just created. In Listing 12-4, you can see that the STATUS shows ACTIVE instead of PENDING for the three new resource consumer groups that I created.
Listing 12-4. Listing the Resource Consumer Groups
SQL> SELECT consumer_group, status FROM dba_rsrc_consumer_groups;
CONSUMER_GROUP STATUS------------------------------ --------AUTO_TASK_CONSUMER_GROUP ACTIVEDEFAULT_CONSUMER_GROUP ACTIVESYS_GROUP ACTIVEOTHER_GROUPS ACTIVELOW_GROUP ACTIVELOCAL ACTIVEREGIONAL ACTIVENATIONAL ACTIVE8 rows selected.SQL>
Creating Resource Plans
A resource plan contains directives that control the allocation of resources among various resource consumer groups. Resource plans enable you to set limits on resource use by specifying limits on four variables: CPU, number of active sessions, degree of parallelism, and the order in which queued sessions will execute. Let’s look at the five parameters that control these resources in more detail:

560 CH AP T E R 1 2 ■ U S E R M A N AG E M E N T A N D DA T AB A SE S E CU R IT Y
• CPU_MTH: You use this resource allocation method to specify how you wish to allocate the CPU resource among the resource consumer groups. The default method is called EMPHASIS, and it uses percentages to allocate CPU among the various groups. The alternative method, RATIO, uses ratios instead.
• ACTIVE_SESS_POOL_MTH: This parameter determines the limit on the number of active sessions in a resource consumer group. The only method available is the ACTIVE_SESS_POOL_ABSOLUTE method, which is the default.
• PARALLEL_DEGREE_LIMIT_MTH: This is the parameter that determines the degree of parallelism used by a specific operation. The only option is PARALLEL_DEGREE_LIMIT_ABSOLUTE (which is the default).
• SUB_PLAN: If this is TRUE, you can’t use the plan as the top plan (you can use it as a subplan only). The default value is FALSE.
• QUEUEING_MTH: This parameter determines the order in which queued sessions will execute. Only the default FIFO_TIMEOUT option is currently available.
You can also create subplans (plans within plans), which let you subdivide resources among different users.
Create your resource plan by invoking the DBMS_RESOURCE_MANAGER package again:
SQL> DBMS_RESOURCE_MANAGER.CREATE_PLAN (PLAN => 'membership_plan', CPU_MTH -> 'RATIO', COMMENT => 'New Membership Recruitment');PL/SQL procedure successfully completed.SQL>
Creating Plan Directives
You now have a resource plan, but the plan still doesn’t have any resource limits assigned to it. You need to create a resource plan directive to assign resources to the various resource consumer groups in the database. You can allocate resources according to the following criteria:
• CPU: Using the CPU method, you can allocate resources among consumer groups or subplans. You can use multiple levels of CPU resource allocation to prioritize CPU usage. For example, you could specify that level 2 gets CPU resources only if any CPU resources are left after level 1 is taken care of.
• Sessions: You can control the maximum number of active sessions open at any time by using the ACTIVE_SESSION_POOL parameter. You can also allow for the termination of long-running SQL queries and user sessions.
• Degree of parallelism: You can set a limit on the degree of parallelism during any operation.
• Automatic consumer group switching: You can specify that, under some conditions, the data-base will automatically switch sessions to another consumer group.
• Undo usage: You can set limits on the number of undo operations a resource consumer group can generate. The database automatically terminates SQL statements that cause the undo generated by a consumer group to exceed its undo limit. This will prevent new members of the consumer group from issuing DML statements.
• Idle time limit: The idle-time-limit resource directive, set by using the MAX_IDLE_TIME param-eter, helps you control resource use by various sessions in a busy database. You can use it to set the maximum idle time for a single session. In addition, you can also limit the amount of time a user session can block another session by setting the MAX_IDLE_BLOCKER_TIME parameter.

CH AP T E R 1 2 ■ U SE R M A N AG E M E N T AN D DA TA B AS E S E CU R I TY 561
• Session switching: You can use the SWITCH_GROUP parameter to specify the consumer group to which a session can be switched upon meeting specific switching criteria. The two switch group names are CANCEL_SQL and KILL_SESSION. Assigning a session to the former will result in canceling the current call, and assigning a session to the latter will terminate the session. The SWITCH_GROUP parameter can also specify values for the following switching-related parameters:
• SWITCH_IO_MEGABYTES: This parameter specifies the number of megabytes of I/O a session can transfer before the database takes an action.
• SWITCH_IO_REQS: This parameter specifies the number of I/O requests a session can execute before the database takes an action.
• SWITCH_FOR_CALL: If you set this parameter to TRUE, the database returns a session that was switched to its original group after the top call completes.
Here’s an example that shows how you can limit a session in a resource plan to a maximum idle time of 600 seconds and a maximum idle time of only 300 seconds if it happens to be blocking another session:
SQL> EXECUTE dbms_resource_manager.create_plan_directive - (plan => 'prod_plan', group_or_subplan => 'dss_group', comment => 'Limit idle time', max_idle_time => 900, max_idle_blocker_time => 300);
In the preceding example, when a session exceeds 900 seconds (or 300 seconds if it’s blocking another session), the PMON background process will automatically kill the offending session.
Listing 12-5 shows how to create a plan directive using the CPU method. The plan directive assigns 70 percent of the available CPU time at the first level to the local group, and the rest, 30 percent, to the regional group. It allocates 100 percent of the CPU at the second level to the national group. Note that this example uses the default emphasis method of CPU allocation, which allocates CPU in terms of percentages. There also is an alternative allocation method called ratio, which allocates CPU resources by using ratios.
Listing 12-5. Creating Plan Directives Using the CPU Method
SQL> EXECUTE dbms_resource_manager.create_plan - directive (plan => 'membership_plan', - GROUP_OR_SUBPLAN => 'local', COMMENT => 'LOCAL GROUP',- CPU_P1 => 70);PL/SQL procedure successfully completed.SQL> EXECUTE dbms_resource_manager.create_plan - directive (plan => 'membership_plan', - GROUP_OR_SUBPLAN => 'REGIONAL',COMMENT=> 'regional group',- CPU_P1 => 30);PL/SQL procedure successfully completed.SQL> EXECUTE dbms_resource_manager.create_plan directive (plan => 'membership_plan', - GROUP_OR_SUBPLAN => 'national',comment => 'national group',- CPU_P2 => 100);PL/SQL procedure successfully completed.SQL>

562 CH AP T E R 1 2 ■ U S E R M A N AG E M E N T A N D DA T AB A SE S E CU R IT Y
■Tip If you don’t include a resource directive for OTHER_GROUPS, and the plan directive is for a primary or top plan, Oracle won’t let you use your directives for the other groups in OTHER_GROUPS.
Validating the Pending Area
After you’ve created the resource consumer groups, the resource plans, and the plan directives, you are ready to validate the changes you made. Here’s how you do it:
SQL> EXEC DBMS_RESOURCE_MANAGER.VALIDATE_PENDING_AREA();PL/SQL procedure successfully completed.
Submitting the Pending Area
By submitting the pending area, you actually create all the necessary entities, such as the resource consumer group, the resource plan, and the plan directives, and make them active. You submit the pending area as follows:
SQL> EXEC DBMS_RESOURCE_MANAGER.SUBMIT_PENDING_AREA();PL/SQL procedure successfully completed.
You can use the query in Listing 12-6 to determine resource plan directives that are currently in force for various groups.
Listing 12-6. Determining the Status of the Resource Plans
SQL> SELECT plan,group_or_subplan,cpu_p1,cpu_p2,cpu_p3, status 2* FROM dba_rsrc_plan_directives;
PLAN GROUP CPU_P1 CPU_P2 CPU_P3 STATUS---------------- ------------ ------ ------- ------ ------SYSTEM_PLAN SYS_GROUP 100 0 0 ACTIVESYSTEM_PLAN OTHER_GROUPS 0 100 0 ACTIVESYSTEM_PLAN LOW_GROUP 0 0 100 ACTIVEINTERNAL_QUIESCE SYS_GROUP 0 0 0 ACTIVEINTERNAL_QUIESCE OTHER_GROUPS 0 0 0 ACTIVEINTERNAL_PLAN OTHER_GROUPS 0 0 0 ACTIVEMEMBERSHIP_PLAN REGIONAL 30 0 0 ACTIVEMEMBERSHIP_PLAN NATIONAL 0 100 0 ACTIVEMEMBERSHIP_PLAN OTHER_GROUPS 0 0 100 ACTIVEMEMBERSHIP_PLAN LOCAL 70 0 0 ACTIVE10 rows selected.SQL>
Assigning Users to Consumer Groups
After you create your resource consumer groups and validate your pending area, you can assign some of your users to the consumer groups you’ve created. Let’s say you want to assign three users named local_user, regional_user, and national_user to the three resource groups as follows: assign local_user to the local consumer group, regional_user to the regional consumer group, and national_user to the national consumer group.
Remember that the three users are already members of a default group, the default_consumer_group. Therefore, you need to first grant the three users privileges to switch their groups before you

CH AP T E R 1 2 ■ U SE R M A N AG E M E N T AN D DA TA B AS E S E CU R I TY 563
can actually switch them to your new groups. Listing 12-7 shows how you can use the DBMS_RESOURCE_MANAGER package to assign and switch users’ consumer groups.
■Tip If you grant the PUBLIC user the privilege to switch groups, you won’t have to grant the privilege to all the users in the group individually. If you have a large number of users in each group, this is a better approach.
Listing 12-7. Assigning Users to Consumer Groups
SQL> EXECUTE dbms_resource_manager_privs.grant_switch_ consumer_group ('local_user','local', true);PL/SQL procedure successfully completed.SQL> EXECUTE dbms_resource_manager.set_ initial_consumer_group ('local_user','local');PL/SQL procedure successfully completed.SQL> EXECUTE dbms_resource_manager_privs.grant_ switch_consumer_group('regional_user','regional', true);PL/SQL procedure successfully completed.SQL> EXECUTE dbms_resource_manager.set_initial_ consumer_group ('regional_user','regional');PL/SQL procedure successfully completed.SQL> EXECUTE dbms_resource_manager_privs.grant_ switch_consumer_group('national_user','national',true);PL/SQL procedure successfully completed.SQL> EXECUTE dbms_resource_manager.set_ initial_consumer_group ('national_user','national');PL/SQL procedure successfully completed.SQL>
You can verify that the three users have been assigned to the appropriate consumer groups by using the query in Listing 12-8.
Listing 12-8. Verifying Resource Consumer Group Membership of Users
SQL> SELECT username, initial_rsrc_consumer_group 2 FROM dba_users;
USERNAME INITIAL_RSRC_CONSUMER_GROUP---------------- ---------------------------SYS SYS_GROUPSYSTEM SYS_GROUPSALAPATI DEFAULT_CONSUMER_GROUPNATIONAL_USER NATIONALREGIONAL_USER REGIONALLOCAL_USER LOCAL6 rows selected.SQL>
Note that super users SYS and SYSTEM are default members of the SYS_GROUP. User salapati is a member of the DEFAULT_CONSUMER_GROUP, to which all users in the database are automatically assigned when they are first created. Your three new users, local_user, regional_user, and national_user, are correctly assigned to their new consumer groups, LOCAL, REGIONAL, and NATIONAL, respectively.

564 CH AP T E R 1 2 ■ U S E R M A N AG E M E N T A N D DA T AB A SE S E CU R IT Y
Automatic Assignment of a Resource Consumer Group to a Session
You can have the Database Resource Manager automatically assign a user session to a particular consumer group, based on certain session attributes. You map the session attributes to various consumer groups, and when the user logs in, the relevant consumer group is automatically assigned to the user based on the user’s attributes. If there is a conflict, it can be resolved by a prioritizing of the mapping between session attributes and resource consumer groups.
You use two DBMS_RESOURCE_MANAGER packages, SET_CONSUMER_GROUP_MAPPING and SET_CONSUMER_MAPPING_PRI, to map session attributes and consumer resource groups and set the priorities in the mappings. There are two distinct types of session attributes. The first set encompasses login attributes, which help the Database Resource Manager determine the user’s initial consumer group. The other set of session attributes consists of runtime attributes.
The following are some of the session attributes that are considered when mapping a user session to a particular consumer resource group:
ORACLE_USER
SERVICE_NAME
CLIENT_OS_USER
CLIENT_PROGRAM
CLIENT_MACHINE
MODULE_NAME
You map each of these session attributes to a particular resource consumer group using the SET_CONSUMER_GROUP_MAPPING procedure. In the following example, the hr user is mapped to the HUMAN_RESOURCES_GROUP at login time:
SQL> EXECUTE DBMS_RESOURCE_MANAGER.SET_CONSUMER_GROUP_MAPPING (DBMS_RESOURCE_MANAGER.ORACLE_USER, 'HR', 'HUMAN_RESOURCES_GROUP');
After login time, as the user’s session attributes change, so does the user’s resource consumer group, based on the mapping between session attributes and resource groups.
At times, there can be a conflict between two mappings, and to resolve these conflicts, you use the SET_CONSUMER_MAPPING_PRI procedure to set priorities for the various session attributes, ranging from 1 to 10, with 1 being the least important and 10 being the most important priority value. Here’s an example:
SQL> EXECUTE DBMS_RESOURCE_MANAGER. SET_CONSUMER_GROUP_MAPPING_PRI ( EXPLICIT => 1, CLIENT_MACHINE => 2, MODULE_NAME => 3, ORACLE_USER => 4, SERVICE_NAME => 5, CLIENT_OS_USER => 6, CLIENT_PROGRAM => 7, MODULE_NAME_ACTION => 8, SERVICE_MODULE=>9, SERVICE_MODULE_ACTION=>10);
When a session attribute changes, the user is automatically switched to the relevant resource consumer group.
Enforcing Per-Session CPU and I/O Limits
The database can also automatically switch sessions based on the session’s CPU and I/O usage, thus letting you enforce CPU and I/O usage per session. If a user is using excessive CPU, say, instead of killing that user’s session, you can have the database automatically switch the user to another resource group that has a lower CPU allocation. You can specify that the database take one of the following actions when a session exceeds its preset resource limits:

CH AP T E R 1 2 ■ U SE R M A N AG E M E N T AN D DA TA B AS E S E CU R I TY 565
• Switch the session to a resource group with lower resource allocation.
• Terminate the session.
• Abort the SQL statement that issued the database call.
Specify the values for the session within parameters such as SWITCH_IO_MEGABYTES, SWITCH_GROUP, and SWITCH_TIME when you create a plan. I present a couple of examples to show how you can set up automatic session switching to alternate resource consumer groups based on a session’s resource usage.
The following example shows how to specify session switching to a low-priority group if a session exceeds a specified limit on CPU usage:
SQL> BEGIN dbms_resource_manager.create_plan_directive ( plan => 'peaktime', group_or_subplan => 'oltp', mgmt_p1 => 75, switch_group => 'low_Group', switch_time => 10 switch_for_call => true); END;
When a session exceeds a preset CPU usage limit, the session is automatically switched to the resource consumer group LOW_GROUP, which is a lower- priority resource consumer group. Since I specified the SWITCH_FOR_CALL parameter, the database switches the session back to its original resource consumer group after the high-resource call is completed.
The following example shows how to specify that the database terminate a session if it exceeds a preset CPU usage limit:
SQL> BEGIN dbms_resource_manager.create_plan_directive ( plan => 'peaktime', group_or_subplan => 'oltp', mgmt_p1 => 75, switch_group => 'kill_session', switch_time => 60);
END;
The previous code specifies that the database must kill a session (SWITCH_GROUP=> 'kill_session') when the session exceeds 60 seconds of CPU usage time.
Enabling the Database Resource Manager
Just because you created a new plan and plan directives and submitted your pending area doesn’t mean that Oracle will automatically enforce the resource plans. It’s your job to explicitly activate the Database Resource Manager, either by specifying the RESOURCE_MANAGER_PLAN initialization param-eter in the init.ora file or by using the ALTER SYSTEM command as follows:
SQL> ALTER SYSTEM SET resource_manager_plan=MEMBERSHIP_PLAN;System altered.SQL> SELECT * FROM v$rsrc_plan;NAME--------------------------------MEMBERSHIP_PLANSQL>

566 CH AP T E R 1 2 ■ U S E R M A N AG E M E N T A N D DA T AB A SE S E CU R IT Y
If you decide to deactivate the Database Resource Manager, you can use the following command:
SQL> ALTER SYSTEM SET resource_manager_plan='';System altered.SQL> SELECT * FROM v$rsrc_plan;no rows selectedSQL>
At any given time, you can query V$RSRC_CONSUMER_GROUP to see what the resource usage among the consumer groups looks like:
SQL> SELECT name,active_sessions,cpu_wait_time, consumed_cpu_time, current_undo_consumption FROM v$rsrc_consumer_group;
NAME ACTIVE CPU_ CONSUMED_ CURRENT SESSIONS WAIT CPU_TIME UNDO_CONS------------- --------- ----- --------- ----------REGIONAL 0 0 0 0NATIONAL 0 0 0 0OTHER_GROUPS 1 0 74 0LOCAL 0 0 18017 0SQL>
Data Dictionary Views
The following data dictionary views help you manage the Database Resource Manager:
• The V$SESSION view shows which resource consumer groups the sessions are currently assigned to.
• The DBA_RSRC_CONSUMER_GROUP_PRIVS view shows all resource consumer groups granted to users or roles.
• The DBA_RSRC_PLANS view shows all resource plans in the database.
• The V$RSRC_PLAN view shows all currently active resource plans.
Using OEM to Administer the Database Resource ManagerNow that you’ve sweated through all the error-prone, time-consuming work of creating and enabling resource plans, let me remind you that using the Oracle Enterprise Manager to manage the Database Resource Manager is a far easier alternative. Here’s a brief introduction to using OEM to administer the Database Resource Manager.
Using the Resource Monitors Page
You can use the Resource Monitors page to display the current state of the active resource plan. You can view statistics for the currently active plan, and you can select a plan from the list and activate it. The Consumer Group Statistics table lists a series of statistics for the consumer groups that are part of the current resource plan.
■Tip When you activate a plan using the Resource Monitors page, you must exit the page and then choose Resource Monitors to update the page.

CH AP T E R 1 2 ■ U SE R M A N AG E M E N T AN D DA TA B AS E S E CU R I TY 567
Creating, Editing, and Deleting Resource Plans
You can manage the list of resource plans through the Resource Plans property sheet. As you know by now, you can use resource plans to allocate resources among consumer groups. The Resource Plans property sheet lets you create, delete, and modify the settings of a resource plan.
To manage a resource plan, go to Database Control Home Page ➤Administration ➤ Consumer Groups. From the Object_Type drop-down window, select Resource Plans. The Resource Plans page appears, with a listing of all the current resource plans. You can either create a new resource plan or select a resource plan from the list.
Managing Resource Consumer Groups
You can manage resource groups through the Resource Consumer Groups property sheet. You can use the property sheet to create, delete, and modify the settings of a resource consumer group.
To manage a resource consumer group, go to Database Control Home Page ➤ Administration ➤ Consumer Groups. The Resource Consumer Groups page appears, showing all resource consumer groups for the current database. You can create, edit, and delete resource consumer groups from here.
Controlling Database AccessOnce you create users in the database, you need to control their access to the various data objects. To take a simple example, a clerk in the human resources department of an organization may be able to see the salary data of employees, but he or she should not have the authority to change sala-ries. Oracle uses several means to control data access, and the most elementary way to do so is by assigning database privileges and roles to database users.
Privileges in an Oracle DatabaseA privilege is the right to execute a particular type of SQL statement or to access a database object owned by another user. In an Oracle database, you must explicitly grant a user privileges to perform any activity, including connecting to a database or selecting, modifying, and updating data in a table other than their own.
There are two basic types of Oracle privileges: system privileges and object privileges. You use the GRANT statement to grant specific system privileges as well as object privileges to users. The following sections cover these two types of Oracle privileges in detail.
■Note You can manage your users through Database Control by going to Database Control Home Page ➤ Administration ➤ Users (under the Users and Privileges Section).
System Privileges
You grant a system privilege to a user so the user can perform either a particular action within the database or an action on any schema object of a particular type. A good example of the first type of system privilege is the privilege that lets you connect to a database, called the CONNECT privilege. Other such system privileges include the CREATE TABLESPACE, CREATE USER, DROP USER, and ALTER USER privileges. The second class of system privileges grants users the right to perform oper-ations that affect objects in any schema. Examples of this type of system privilege include ANALYZE ANY TABLE, GRANT ANY PRIVILEGE, INSERT ANY TABLE, GRANT ANY PRIVILEGE, INSERT ANY

568 CH AP T E R 1 2 ■ U S E R M A N AG E M E N T A N D DA T AB A SE S E CU R IT Y
TABLE, DELETE ANY TABLE, and so on. As you can see, system privileges are very powerful, and granting them to the wrong user could have a devastating impact on your database.
Here are some common system privileges in an Oracle database:
• ADVISOR
• ALTER DATABASE
• ALTER SYSTEM
• AUDIT SYSTEM
• CREATE DATABASE LINK
• CREATE TABLE
• CREATE ANY INDEX
• CREATE SESSION
• CREATE TABLESPACE
• CREATE USER
• DROP USER
• INSERT ANY TABLE
Granting System Privileges
You use the GRANT statement to grant system privileges to users. When you grant a system privilege to a user, the user can immediately use that privilege. Thus, privileges work in a dynamic fashion.
■Tip You can use either Oracle Enterprise Manager Database Control or SQL statements to GRANT and REVOKE system privileges.
For example, to grant the CREATE SESSION system privilege to the sample user, hr, allowing hr to log onto an Oracle database, issue the following statement:
SQL> GRANT CREATE SESSION TO hr;Grant succeeded.SQL>
The CREATE SESSION privilege enables a user to log onto an Oracle database.
■Tip You can grant all system privileges to a user (except the SELECT ANY DICTIONARY privilege), by specifying ALL PRIVILEGES in the GRANT statement, as shown here:
SQL> GRANT ALL PRIVILEGES TO salapati;Grant succeeded.SQL>
ALL PRIVILEGES itself isn’t a system privilege—it’s a convenient way to grant all privileges in one step. You can revoke all system privileges similarly, by using the REVOKE ALL PRIVILEGES statement.

CH AP T E R 1 2 ■ U SE R M A N AG E M E N T AN D DA TA B AS E S E CU R I TY 569
As a DBA, you can also grant a system privilege to PUBLIC, in which case all users in the data-base can perform the actions authorized by the privilege. Here’s an example:
SQL> GRANT CREATE SESSION TO public;Grant succeeded.SQL>
Once you grant the CREATE SESSION privilege to PUBLIC, all users can log into the database without being granted the CREATE SESSION privilege on an individual basis. As you can see, granting a privilege to PUBLIC is fraught with danger, since all users will have that privilege.
You can grant a system privilege to a user, provided one of the following is true:
• You have been granted the system privilege with the WITH ADMIN OPTION clause.
• You have been granted the GRANT ANY PRIVILEGE system privilege.
Here’s an example of the use of the WITH ADMIN OPTION clause when granting a system privilege:
SQL> GRANT CREATE SESSION TO salapati WITH ADMIN OPTION;Grant succeeded.SQL>
The GRANT ANY OBJECT privilege is a special system privilege that lets the grantee grant (and revoke) object privileges for objects in any schema. The interesting thing is that when the grantee of this privilege grants any privileges on any object, it appears as if the schema owner granted the priv-ilege (the DBA_TAB_PRIVS view shows this). However, if you’re auditing the use of the GRANT statement, you’ll see the real user who issued this statement. All users with the SYSDBA privilege automatically have the GRANT ANY OBJECT privilege.
Revoking System Privileges
You use the REVOKE statement to revoke system privileges. The revoking of the privileges takes place immediately. Here’s an example:
SQL> REVOKE DELETE ANY TABLE FROM pasowner;Revoke succeeded.SQL>
You can use the REVOKE statement to revoke only those privileges that were previously granted to the user with a GRANT statement.
Only users with the SYSDBA privilege or those who have been explicitly granted object privi-leges can access objects in the SYS schema. You can also enable other users’ access to SYS-owned objects by granting one of the following three roles to those users. (Roles are named sets of privileges, and I discuss them in the “Roles” section of this chapter.)
• SELECT_CATALOG_ROLE: This role grants SELECT privileges on the data dictionary views.
• EXECUTE_CATALOG_ROLE: This role grants EXECUTE privileges on the data dictionary packages.
• DELETE_CATALOG_ROLE: This role enables users to delete records from the audit table, called SYS.AUD$. (This table is discussed in the “Auditing Database Usage” section later in this chapter.)
You can also use the SELECT ANY DICTIONARY system privilege to grant a user (usually devel-opers) the privilege to select data from any object in the SYS schema.

570 CH AP T E R 1 2 ■ U S E R M A N AG E M E N T A N D DA T AB A SE S E CU R IT Y
The SYSDBA and SYSOPER SYSASM System Privileges
There are two powerful administrative system privileges, known as SYSDBA and SYSOPER. Because of the powerful nature of these privileges, some restrictions apply to their administration. You can’t use WITH ADMIN OPTION when granting these roles; only a user connected as SYSDBA can grant (or revoke) these privileges to other users; and you can’t grant this system privilege to a role.
The SYSDBA system privilege includes the RESTRICTED SESSION privilege and has all system privileges with WITH ADMIN OPTION, including the SYSOPER system privilege. The SYSDBA privilege lets you do the following:
• Perform STARTUP and SHUTDOWN operations.
• Use the ALTER DATABASE command to open, mount, back up, or change a character set.
• Use the CREATE DATABASE command.
• Perform ARCHIVELOG and RECOVERY operations.
• Create an SPFILE.
The SYSOPER privilege similarly includes the RESTRICTED SESSION privilege, and it lets you do the following:
• Perform STARTUP and SHUTDOWN operations.
• Use the ALTER DATABASE command to open, mount, or back up.
• Perform ARCHIVELOG and RECOVERY operations.
• Create an SPFILE.
■Tip Several normal database operations require users to query some data dictionary tables routinely. Therefore, it’s a good idea to grant your developers on the development databases a set of basic system privileges by granting these users the SELECT_CATALOG_ROLE. This role gives the developers select privileges on all data dictionary views.
In addition to the SYSDBA and the SYSOPER privileges, there’s also a SYSASM privilege, which you can use to administer Automatic Storage Management (ASM) instances. Although you can work with ASM instances using your SYSDBA privileges, Oracle prefers you to separate database adminis-tration and ASM administration. In Chapter 17, I discuss the SYSASM privilege in more detail in the section “Automatic Storage Management.”
Object Privileges
Object privileges are privileges on the various types of database objects. An object privilege allows a user to perform actions on a specific table, view, materialized view, sequence, procedure, function, or package. Thus, all users of the database will need object privileges, even if they may not need any system privileges. There are some common object privileges that apply to all database objects and some that apply to only certain objects.
You can use the following SQL statements when you grant object privileges:
• ALTER
• SELECT
• DELETE
• EXECUTE

CH AP T E R 1 2 ■ U SE R M A N AG E M E N T AN D DA TA B AS E S E CU R I TY 571
• INSERT
• REFERENCES
• INDEX
The following list identifies the different types of object privileges in an Oracle database, the main object privileges of each type, and an example for each object type:
• Table privileges: SELECT, ALTER, DELETE, INSERT, and UPDATE
GRANT DELETE ON bonuses TO hr
■Tip You can grant INSERT and UPDATE privileges at a column level. Here is an example that shows how you grant the INSERT privilege on the column salary in the persons table:
SQL> GRANT INSERT (salary) ON persons to salapati;
In order to grant privileges at the row level, you can use Oracle’s virtual private database (which I discuss in the “Fine-Grained Data Access” section of this chapter) or the Oracle Label Security feature.
• View privileges: SELECT, DELETE, INSERT, and UPDATE
GRANT SELECT, UPDATEON emp_view TO PUBLIC;
• Sequence privileges: ALTER and SELECT
GRANT SELECTON oe.customers_seq TO hr;
• Procedure, function, and package privileges: EXECUTE and DEBUG
GRANT EXECUTE ON employee_pkg TO hr;
• Materialized view privileges: SELECT and QUERY REWRITE
GRANT QUERY REWRITE TO hr
• Directory privileges: READ and WRITE
GRANT READ ON DIRECTORY bfile_dir TO hr
If you grant a user an object privilege with an additional GRANT OPTION clause, the user can in turn grant that privilege to other users in the database. Here’s an example:
SQL> GRANT DELETE ON bonuses TO hr WITH GRANT OPTION;
Once you grant the user hr the DELETE privilege on the bonuses table in the preceding manner, hr can turn around and grant that privilege to any other users.
The owner of any object has all rights on the object and can grant privileges on that object to any other user in the database. The schema owner has the right to grant these privileges—not the DBA or the SYSTEM or SYS users. You can grant an object privilege to a user, provided one of the following is true:
• You are the owner of the object.
• The object’s owner gave you the object privileges with the GRANT OPTION.
• You have been granted the GRANT ANY OBJECT system privilege.

572 CH AP T E R 1 2 ■ U S E R M A N AG E M E N T A N D DA T AB A SE S E CU R IT Y
■Note You can’t grant object privileges on some schema objects, such as clusters, indexes, triggers, and data-base links. You control the use of these types of objects with a system privilege instead. For example, to alter a cluster, a user must own the cluster or have the ALTER ANY CLUSTER system privilege.
An object owner can add the additional ALL clause to a GRANT statement in order to grant all possible privileges on an object. For example, both the following GRANT statements are equivalent:
SQL> GRANT SELECT,INSERT,UPDATE,DELETE on EMPLOYEES TO oe;SQL> GRANT ALL ON EMPLOYEES TO oe;
The schema owner can grant one type or all types of privileges at once on any given object. Here are some examples that illustrate the granting of object privileges:
SQL> GRANT SELECT ON ods_process TO tester;Grant succeeded.SQL> GRANT INSERT ON ods_process TO tester;Grant succeeded.SQL> GRANT ALL ON ods_servers TO tester;Grant succeeded.SQL> GRANT INSERT ANY TABLE TO tester;grant insert any table to tester*ERROR at line 1:ORA-01031: insufficient privilegesSQL>
The ODS user is able to grant all privileges (SELECT, INSERT, UPDATE, and DELETE) on the ods_servers table to the tester user by using the GRANT ALL command. But ODS fails to successfully grant the INSERT ANY TABLE privilege to tester, because this requires a system privilege (INSERT ANY TABLE) that ODS does not have. Note, however, that the system user can successfully make this grant, as shown here:
SQL> CONNECT system/[email protected]> SHOW USERUSER is "SYSTEM"SQL> GRANT INSERT ANY TABLE TO tester;Grant succeeded.SQL>
If the owner of an object grants an object privilege to a user with the WITH GRANT clause, the grantee of the privilege is given the right to grant that same object privilege to other users. Here’s an example:
SQL> GRANT INSERT ANY TABLE TO tester WITH GRANT OPTION
Column-Level Object Privileges
In the previous discussion, object privileges always implied a right to perform a DML action on an entire table. However, a user can also be granted privileges on only certain columns of a table, as shown in the following examples:

CH AP T E R 1 2 ■ U SE R M A N AG E M E N T AN D DA TA B AS E S E CU R I TY 573
SQL> GRANT UPDATE (product_id) ON sales01 TO salapati;Grant succeeded.SQL>
Revoking Object Privileges
Revoking object privileges is analogous to granting privileges. You simply issue the REVOKE statement for each object privilege you want to revoke:
SQL> CONNECT ods/ods@finance1;Connected.SQL> REVOKE SELECT, INSERT ON ods_process FROM tester;Revoke succeeded.SQL>
Note that you can’t revoke privileges at a column level, even though the privilege may have been granted at that level. You’ll have to use the table level for the revocation of a privilege, regardless of the level at which it was granted, as you can see in the following example:
SQL> REVOKE UPDATE (hostname) ON ods_process FROM tester;revoke update(hostname) on ods_process from tester *ERROR at line 1:ORA-01750: UPDATE/REFERENCES may onlybe revoked from the whole table, not by columnSQL> REVOKE UPDATE ON ods_process FROM tester;Revoke succeeded.SQL>
The GRANT ANY OBJECT Privilege
A user with the GRANT ANY OBJECT system privilege can grant and revoke any object privilege as if he or she were the actual object owner. When you connect as SYSDBA (user SYS), you are automati-cally granted this role with the WITH ADMIN OPTION clause.
Invoker Rights and Definer Rights
When you create a stored procedure in Oracle, it is executed by using the creator’s privileges. This is the default behavior, and the stored procedure is said to have been created with definer’s rights. When a user executes the procedure, it executes with the creator’s (definer’s) object privileges, not the particular user’s, but there may be several situations where you don’t want all users to be able to execute a procedure with the same rights. You can customize the accessibility of a procedure by creating it with invoker’s rights, meaning the procedure will execute with the privileges of the user, not the creator, of the procedure.
When you create a procedure with invoker’s rights, the procedure will execute under the user’s security context, not the owner’s security context. Thus, any user who intends to execute a procedure from a different schema will need to have the object privileges on all the tables that are part of the procedure. All DML privileges on those tables should be granted directly, not through any role, to the user.
The AUTHID clause in a CREATE PROCEDURE statement indicates that this procedure is being created with user’s or invoker’s rights, not with the default owner’s or definer’s rights. Here is an example:

574 CH AP T E R 1 2 ■ U S E R M A N AG E M E N T A N D DA T AB A SE S E CU R IT Y
SQL> CREATE OR REPLACE PROCEDURE delete_emp 2 (p_emp_id number) 3 AUTHID current_user IS 4 BEGIN 5 DELETE FROM emp WHERE 6 emp_id = p_emp_id; 7 COMMIT; 8* END;
Procedure created.SQL>
In line 3, the AUTHID clause specifies that the procedure will execute with the privileges of the current_user, the invoker of the procedure. Obviously, the user must have the explicit object privi-lege on the table, DELETE on emp, for the procedure to execute successfully.
RolesAlthough you can fairly easily manage user privileges by directly granting and revoking them, the job can quickly become overwhelming when you add more users and the number of objects keeps increasing. It’s very difficult, after a while, to keep track of each user’s current privileges. Oracle addresses this problem by using roles, which are named sets of privileges that can be assigned to users.
Think of roles as a set of privileges that you can grant and revoke with a single GRANT or REVOKE command. A role can contain both a set of privileges and other roles as well. Roles make it easy for you to assign multiple privileges to a user. A default role is a role that’s automatically operative when a user creates a session, and you can assign more than one default role to a user.
■Tip The DBA role, which is predefined in Oracle databases, is a set of system privileges WITH ADMIN OPTION, meaning that the user with this role can grant these privileges to other users as well. In most cases, you grant this role to a handful of users who perform database administration.
There are several predefined roles in an Oracle database, including the EXP_FULL_DATABASE, IMP_FULL_DATABASE, and RECOVERY_CATALOG_OWNER roles. In addition, every Oracle data-base contains the following three important roles, which have listed privileges:
• The CONNECT role: CREATE SESSION (earlier, the CONNECT role had several other privi-leges, but now it has only the single CREATE SESSION privilege)
• The RESOURCE role: CREATE CLUSTER, CREATE INDEXTYPE, CREATE OPERATOR, CREATE PROCEDURE, CREATE SEQUENCE, CREATE TABLE, CREATE TRIGGER, CREATE TYPE
• The DBA role: All system privileges with the WITH ADMIN OPTION clause
There are also two other predefined roles, EXP_FULL_DATABASE and IMP_FULL_DATABASE, which enable a user to perform a Data Pump Export and Import at the database level.
The DBA role is traditionally assigned to all individuals in an organization who perform data-base administration tasks. Oracle has indicated, however, that it may drop the DBA, CONNECT, and RESOURCE roles in future versions, and it recommends that you create your own roles to replace these three.
■Note By default, no user is granted any system privileges except those who have been granted the DBA role.

CH AP T E R 1 2 ■ U SE R M A N AG E M E N T AN D DA TA B AS E S E CU R I TY 575
Creating a Role
Assuming you have either been granted the DBA role or you have a specific system privilege called CREATE ROLE, you can create a role in the following manner:
SQL> CREATE ROLE new_dba;Role created.SQL>
The new_dba role just created doesn’t have any privileges attached to it, so you must now grant privileges to this role. You may even grant other preexisting roles to the new_dba role. Roles are empty vessels into which you can pour any number of system and object privileges.
Once the role has been created, you simply assign the role to a user, and the user will inherit all the privileges contained in the role. Listing 12-9 shows how to grant various database privileges to a new role.
Listing 12-9. Granting Privileges to a Role
SQL> GRANT CONNECT TO new_dba;Grant succeeded.SQL> GRANT SELECT ANY TABLE TO new_dba;Grant succeeded.SQL> GRANT UPDATE ANY TABLE TO new_dba;Grant succeeded.SQL> GRANT select_catalog_role TO new_dba;Grant succeeded.SQL> GRANT exp_full_database TO new_dba;Grant succeeded.SQL> GRANT imp_full_database TO new_dba;Grant succeeded.SQL>
To grant user salapati all the preceding privileges, all you need to do is this:
SQL> GRANT new_dba TO salapati;Grant succeeded.SQL>
A user can be assigned more than one role, and all of the roles that are granted to that user will be active when the user logs into the database.
Role Authorization
In the example in the previous section, a password wasn’t needed to use the role. However, you can specify that a role must be authorized before it can be used. You can specify role authorization in several ways:
• Database authorization: You use a password when a role is authorized by the database, as shown in this example:
CREATE ROLE clerk IDENTIFIED BY password;
• Database authorization with a PL/SQL package: A developer can create a role and specify that a PL/SQL package be used to authorize that role. In the following example, the admin_role role is enabled by a module defined inside the hr.admin PL/SQL package:
CREATE ROLE admin_role IDENTIFIED USING hr.admin;

576 CH AP T E R 1 2 ■ U S E R M A N AG E M E N T A N D DA T AB A SE S E CU R IT Y
• Externally, by the operating system, network, or other external source: You can require that a role be authorized by an external source before it can be enabled, as shown here:
CREATE ROLE accts_rec IDENTIFIED EXTERNALLY;
• Globally, by an enterprise directory service: You can also define a role as a global role, which means that a user can only be authorized to use the role by an enterprise directory service. The following statement creates a global role that can be authorized by a directory service:
CREATE ROLE supervisor IDENTIFIED GLOBALLY;
Granting a Role Using WITH ADMIN OPTION
If you grant a user a role using the WITH ADMIN OPTION clause, the grantee can do the following:
• Grant the role to or revoke it from any user or other role in the database.
• Grant the role with the WITH ADMIN OPTION.
• Alter or drop the role.
Granting a Role to Another Role
You normally grant a role to a user. The user then can immediately exercise all the privileges encom-passed by the role. However, you can grant a role to another role. In this case, the database will add all the privileges of the role being granted to the privilege domain of the grantee role.
The PUBLIC User Group and Roles
If you grant a role to PUBLIC, the database makes the role available to all the users in your database. If you wish to give a certain privilege or role to all the users in the database, you simply grant this privilege or role to the PUBLIC user group, which exists in every database by default. This is not a recommended way to grant privileges, however, for obvious reasons.
Disabling and Enabling a Role
You can disable a user’s role by inserting the appropriate row into the Product_User_Profile table in the SYSTEM schema. Listing 12-10 shows you how to insert a row into this table to disable the TEST123 role, which has been assigned to the user TESTER.
Listing 12-10. Disabling a Role Using the Product_User_Profile Table
SQL> INSERT INTO PRODUCT_USER_PROFILE(PRODUCT,userid,attribute,char_value) 2* VALUES('SQL*Plus','TESTER','ROLES','TEST123');
1 row created.SQL> COMMIT;Commit complete.SQL> CONNECT tester/[email protected]> SELECT * FROM hr.regions;;select * from hr.regions *ERROR at line 1:ORA-00942: table or view does not exist
As you can see, once the TEST123 role is disabled, the TESTER user can’t select from the data-base tables, and an error is issued when the SELECT is attempted.

CH AP T E R 1 2 ■ U SE R M A N AG E M E N T AN D DA TA B AS E S E CU R I TY 577
When you want to reenable the TEST123 role, all you need to do is delete the appropriate row from the Product_User_Profile table, as shown here:
SQL> DELETE FROM product_user_profile 2 WHERE userid='TESTER' 3* AND char_value = 'TEST123';1 row deleted.SQL> commit;Commit complete.
Dropping a Role
Dropping a role is simple. Just use the DROP ROLE command:
SQL> DROP ROLE admin_user;Role dropped.SQL>
Using Views and Stored Procedures to Manage PrivilegesIn addition to using roles and privileges, Oracle also enables data security through the use of views and stored procedures. You’ve already seen in Chapter 5 how views on key tables or even table joins can not only hide the complexity of queries, but also provide significant data security.
DBA Views for Managing Users, Roles, and PrivilegesThe OEM is very handy when managing users in the database. However, you may wish to use a SQL script from time to time to glean information about the users. Specific data dictionary views can help you see who has what role, and what privileges a certain role has. You can also see what system- and object-level privileges have been granted to a certain user. Table 12-1 presents the key data dictionary views you can use to manage users, privileges, and roles in the database.
Table 12-1. Data Dictionary Views for Managing Users
Data Dictionary View Description
DBA_USERS Provides information about users
DBA_ROLES Shows all the roles in the database
DBA_COL_PRIVS Shows column-level object grants
DBA_ROLE_PRIVS Shows users and their roles
DBA_SYS_PRIVS Shows users who have been granted system privileges
DBA_TAB_PRIVS Shows users and their privileges on tables
ROLE_ROLE_PRIVS Shows roles granted to roles
ROLE_SYS_PRIVS Shows system privileges granted to roles
ROLE_TAB_PRIVS Shows table privileges granted to roles
SESSION_PRIVS Shows privileges currently enabled for the current session
SESSION_ROLES Shows roles currently enabled for the current session

578 CH AP T E R 1 2 ■ U S E R M A N AG E M E N T A N D DA T AB A SE S E CU R IT Y
Fine-Grained Data AccessThe traditional means of ensuring data security (using privileges, roles, views, etc.) works pretty well, but it has certain limitations. Chief among these is the fact that most security measures are too broad-based, with the result that you end up unnecessarily restricting users when your primary goal is to ensure that users can freely access information they need. In addition to the traditional concepts of roles and privileges, Oracle provides more fine-grained, lower-level data security techniques. For example, you can allow all users to access a central table, such as a payroll table, but you can insti-tute security policies that limit an individual user’s access to only those rows in the table that pertain to his or her department. Such limitations are transparent to the database users.
Oracle uses two related mechanisms to enforce fine-grained security within the database: an application context and a fine-grained access control (FGAC) policy. Oracle uses the term virtual private database to refer to the implementation of fine-grained access control policies using appli-cation contexts. Often, you’ll find the terms fine-grained access control, virtual private database, and row-level security used interchangeably to refer to Oracle’s capability to ensure security at the indi-vidual row level instead of the table level.
By using Oracle’s fine-grained access control, you can fine-tune security policies in a very sophisticated manner. You can use the fine-grained access control for the following purposes:
• Enforce row-level access control through SELECT, INSERT, UPDATE, and DELETE statements.
• Create a security policy that controls access based on a certain value of a column.
• Create policies that are applied the same way always as well as policies that dynamically change during the execution of the query.
• Create sets of security policies, called policy groups.
Oracle lets you control row-level access to database objects through the virtual private database (VPD) feature. Each user of an application can be limited to seeing only a part of a table’s data by using the VPD concept. This row-level security is enforced by attaching a security policy directly to a database object, such as a table, view, or synonym. No matter which tool the user uses to access the database (SQL*Plus, an ad hoc query tool, or a report writer), the user can’t elude this row-level secu-rity, which is enforced by the database server. Since the database enforces VPD, it provides much stronger security than application-based security.
VPD uses a type of query rewrite to restrict users to certain rows of tables and views. A security policy is attached to the table or tables to which you want to control access, and stored procedures are written to modify any relevant SQL statements made against the tables in question. When a user issues an UPDATE statement against a table with such a security policy, Oracle will dynamically append a predicate (a WHERE clause) to the user’s statement to modify it and limit the user’s access to that table.
For example, if a user belonging to the sales department issues the statement UPDATE EMPLOYEE SET salary=salary*1.10, the security policies attached to the employees table will cause Oracle to add the fine-grained security function to the clause WHERE dept='SALES' to ensure that only employees in sales are affected. Here is the original query:
UPDATE EMPLOYEE SET salary=salary*1.10
And here is the modified statement:
UPDATE EMPLOYEE SET salary=salary*1.10 WHERE dept='SALES'
To create a VPD, you have to create what is known as an application context and then imple-ment fine-grained access control to enforce the row-level security for database tables and views. The application context helps you create security policies that draw upon certain aspects of a user’s session information. To take a simple example, when a user logs into the database, the user’s ID identifies the user, and based on that piece of information, the application’s security policy sets

CH AP T E R 1 2 ■ U SE R M A N AG E M E N T AN D DA TA B AS E S E CU R I TY 579
limits on what the user can do within the database. VPD is simply the implementation of an applica-tion context with fine-grained access control.
■Note VPD policies can be applied to SELECT, INSERT, UPDATE, INDEX, and DELETE statements.
Application Context
An application context allows you to define a set of application attributes, usually a set of session environmental variables, that you can use to control an application’s access to the database. Using application attributes, you can supply relevant predicate values for fine-grained access control policies. Oracle uses a built-in application context namespace called USERENV, which has a set of predefined session attributes attached to it. These predefined attributes are then used by Oracle to control access. When a user logs in, the database automatically captures key session attributes such as the username, machine name, and IP address from the USERENV application context.
You can find out session-related information about any user by using the USERENV application context, as shown by the examples in Listing 12-11. In the first example, the TERMINAL attribute shows the name of the terminal from which the user is accessing the database. The second example uses the OS_USER attribute to show the name of the operating system account name of the database user. The third example gets the username by which the current user is authenticated from the SESSION_USER attribute.
Listing 12-11. Using sys_context to Discover Session Information
SQL> CONNECT system/system_passwd;Connected.SQL>
SQL> SELECT sys_context ('USERENV', 'TERMINAL') 2 FROM DUAL;SYS_CONTEXT('USERENV','TERMINAL')----------------------------------NTL-ALAPATISAMSQL>
SQL> SELECT sys_context ('USERENV', 'OS_USER') FROM DUAL;SYS_CONTEXT('_USERENV','CURRENT_USER')-------oracleSQL>
SQL> CONNECT fay/fay1;Connected.SQL>
SQL> SELECT first_name,last_name,employee_id FROM employees 2 WHERE UPPER(last_name)=sys_context('USERENV', 'SESSION_USER'); 3FIRST_NAME LAST_NAME EMPLOYEE_ID--------------- --------- ------------Pat Fay 2021 row selected.SQL>

580 CH AP T E R 1 2 ■ U S E R M A N AG E M E N T A N D DA T AB A SE S E CU R IT Y
Besides the TERMINAL, CURRENT_USER, and SESSION_USER attributes shown in the examples in Listing 12-11, several other important predefined attributes belong to the USERENV namespace. Table 12-2 lists some of the common predefined attributes.
When a user logs in, it’s useful to identify the type of the user and to capture certain key user attributes. You can later use this information in the security policies that are attached to the database objects. The built-in USERENV namespace is ideal for capturing these kinds of information.
The USERENV namespace, of course, is just one of the application context namespaces that you can use. You’ll have to create your own application context so you can define which attributes you want to use in setting your security policies. To define your own application context, you need to do the following:
1. Create a PL/SQL package that sets the context with the help of functions.
2. Create an application context that uses the package you created.
Creating a Package to Set the Context
To set the application context for the hr user, you need to create a PL/SQL package. Listing 12-12 shows you how to create a simple package called HR_CONTEXT to set the application context. The package includes a single procedure that selects the value of the employee_id column into the empnum variable. Since this SELECT statement is based on a WHERE clause that determines the last_name of the employee based on the value of the SESSION_USER attribute, the employee_id will be that of the user-name by which the current user is authenticated by the database.
Listing 12-12. Creating a Package to Set the Application Context
SQL> CONNECT hr/hrConnected.
SQL> CREATE OR REPLACE PACKAGE hr_context AS 2 PROCEDURE select_emp_no ; 3* END;
Table 12-2. Common Predefined Attributes in the USERENV Namespace
Attribute Description
instance Instance ID
entryID Auditing entry identifier
current_user Name of the user who started the session
session_user Database username by which the current user is authenticated
db_name Name of the database
host Name of the machine on which the database is running
os_user Operating system account name
terminal Client terminal through which the database is being accessed
ip_address IP address of the client machine
external_name External name of the database user

CH AP T E R 1 2 ■ U SE R M A N AG E M E N T AN D DA TA B AS E S E CU R I TY 581
SQL> /Package created.
SQL> CREATE OR REPLACE PACKAGE BODY hr_context as 2 PROCEDURE select_emp_no IS 3 empnum number; 4 BEGIN 5 SELECT employee_id INTO empnum FROM employees WHERE 6 UPPER(last_name) = 7 sys_context('USERENV', 'SESSION_USER'); 8 dbms_session.set_context('employee_info', 'emp_num', empnum); 9 END select_emp_no; 10* END;SQL> /Package body created.SQL>
Creating the Application Context
You can think of an application context as a named set of variable=value pairs that are specific to a session. Once you create the package (HR_CONTEXT) that helps set the application context, you can go ahead and create the application context itself as follows. Note that the hr user uses the package just created in the previous section to create the employee_info application context.
SQL> CONNECT system/system_passwd;Connected.SQL> GRANT CREATE ANY CONTEXT TO hr;Grant succeeded.
SQL> CONNECT hr/hr;Connected.SQL> CREATE CONTEXT employee_info USING hr.context;Context created.SQL>
You can set the application context for a user in two ways. The first is to implement an application context by itself, without fine-grained access control. To do this, you just create an event trigger on a user’s logon so the user will invoke the SELECT_EMP_NO procedure belonging to the HR_CONTEXT package upon logging into the database. Here’s how you create the logon trigger to set the initial context for a user:
SQL> CREATE OR REPLACE TRIGGER hr.security_context 2 AFTER LOGON ON DATABASE 3 BEGIN 4 hr_context.select_emp_no; 5* END;SQL> /Trigger created.SQL>
The preceding logon trigger uses the SELECT_EMP_NO procedure of the HR_CONTEXT package you created to grab the user’s employee_id and store it in the emp_num variable.
The second way to set or reference an application context is to do so as an integral part of VPD, using a policy function implementing fine-grained access control. The following section discusses this in detail.

582 CH AP T E R 1 2 ■ U S E R M A N AG E M E N T A N D DA T AB A SE S E CU R IT Y
Fine-Grained Access Control
Traditionally, security policies were applied to entire applications. Users were given roles or privileges, based on which they could access the tables in the application. This always left open the possibility of users using tools such as SQL*Plus to go around the application’s security protocols and modify data in the database tables. Furthermore, application-level security enforcement meant you had to manage a grant/revoke policy for each user in the system for access to all the tables in the database.
There are situations where you might want to limit access to an application’s data to certain segments of users. Of course, you could create views to such a thing, but managing views poses several problems, such as maintenance and auditing usage.
Fine-grained access control enables you to restrict Oracle users so that they can only use the data you want them to access and modify. FGAC is facilitated through the use of policy functions, which you attach to the tables or views you want to secure. It uses dynamically modifiable state-ments to restrict or limit users to certain portions of a table, view, or synonym. When a user’s SQL statements are parsed, FGAC makes Oracle automatically evaluate the policy functions (you can attach more than one policy to a table). Oracle will execute the user’s query after dynamically modi-fying the query if necessary.
■Note FGAC enables you to implement fine-grained data security. You can enforce a row-level security policy using this feature.
FGAC involves the following steps:
1. You create a policy function that will dynamically add a predicate to a user’s DML statement. A predicate is the WHERE clause based on an operator (=, !=, IS, IS NOT, >, >=, EXIST, BETWEEN, IN, NOT IN, and so on). Here’s an example of such a function:
cust_no = (SELECT custno FROM ordersWHEREcustname = SYS_CONTEXT ('USERENV','SESSION_USER'))
The package that implements your security policy will dynamically append a predicate to all SELECT statements on the ORDERS table, returning only those orders that pertain to the user’s customer number (cust_no).
2. A user enters a statement such as the following:
SELECT * FROM orders;
3. Oracle will use the policy function you created to dynamically modify the user’s statement. For example, the statement in step 2 would be modified by the policy function in step 1 as follows:
SELECT * FROM orders WHERE custno = ( SELECT custno FROM customers WHERE custname = SYS_CONTEXT('USERENV', 'SESSION_USER'))
4. Oracle uses the username returned by SYS_CONTEXT('USERENV', 'SESSION_USER') and executes the modified original query, thus limiting the data returned from the ORDERS table to that customer’s data only.
Creating a Package That Will Access the Context
Let’s look at a simple example of FGAC. This FGAC implementation will use a policy that limits an employee to only seeing appropriate data in the employees table.

CH AP T E R 1 2 ■ U SE R M A N AG E M E N T AN D DA TA B AS E S E CU R I TY 583
First, we will create the hr_security package, which we will use later to access the application context. This package is the key to row-level security, since it generates the dynamic-access predi-cates for a table. Listing 12-13 shows how to create the hr_security package.
Listing 12-13. Creating the hr_security Package
SQL> CREATE OR REPLACE PACKAGE hr_security AS 2 FUNCTION empnum_sec (A1 VARCHAR2, A2 VARCHAR2) 3 RETURN varchar2; 4 END; 5*/Package created.SQL> CREATE OR REPLACE PACKAGE BODY hr_security AS 2 FUNCTION empnum_sec (A1 VARCHAR2, A2 VARCHAR2) 3 RETURN varchar2 4 IS 5 d_predicate varchar2 (2000); 6 BEGIN 7 d_predicate:= 'employee_id = 8 SYS_CONTEXT("EMPLOYEE_INFO","EMP_NUM")'; 9 RETURN d_predicate; 10 END empnum_sec; 11 END hr_security; 12* /Package body created.SQL>
The package created in Listing 12-13, hr_security, will use the employee_info context (created earlier in the “Creating the Application Context” section) to get the emp_num variable. As you recall from the previous section, the employee_info application context gets the emp_num variable from the USERENV namespace (the SESSION_USER attribute of the USERENV namespace).
The d_predicate predicate in the hr_security package indicates the transformation that should be applied to any queries made by any employee whose employee_id matches the emp_num variable obtained from the employee_info context. For example, if user salapati issues the following command:
SQL> SELECT * FROM employees;
it will be modified by our predicate (d_predicate) as follows:
SQL> SELECT * FROM employees 2* WHERE employee_id = SYS_CONTEXT ('EMPLOYEE_INFO', 'EMP_NUM');
Creating the Security Policy
The hr_security package created in the previous section lets you attach a dynamic predicate (WHERE employee_id = SYS_CONTEXT ('EMPLOYEE_INFO', 'EMP_NUM')) to any SQL statements that can be used by employees whose employee_id matches the emp_num derived by using the employee_info applica-tion context. But we still haven’t attached a security policy to the employees table. That is, we now have to specify what kinds of SQL statements, and precisely what tables, the hr_security package would be applied to.
In previous releases of the Oracle database, all security polices were dynamic, meaning the database had to execute the policy function for each DML statement. Of course, repeated execution of the policy functions costs system resources and could hurt performance in a busy OLTP database. Oracle now offers several choices regarding the type of policy you can use. You can specify the

584 CH AP T E R 1 2 ■ U S E R M A N AG E M E N T A N D DA T AB A SE S E CU R IT Y
following five types of security policies by using the POLICY_TYPE parameter of the DBMS_RLS.ADD_POLICY procedure:
• Dynamic: Each time a statement is parsed or executed, the security policy function is executed afresh. This is the default policy type, and you can specify it either by setting the POLICY_TYPE parameter to DBMS_RLS.DYNAMIC or by just leaving the parameter out altogether.
• Static: This type of policy function needs to be executed only once, when a user first accesses a database object. Thereafter, the value of the policy function is cached in the SGA, and all users accessing the object will get the same predicate. You can choose this type by setting the POLICY_TYPE parameter to DBMS_RLS.STATIC. The function must be deterministic so that the predicate returned is always the same: if you have a branch in the function that can return different predicates, you must specify a dynamic security policy instead.
• Shared static: This is identical to a static policy, and it is applied to multiple objects. Shared poli-cies reduce your administrative burden by letting a single security policy cover several database objects. You can enable it by setting the POLICY_TYPE parameter to DBMS_RLS.SHARED_STATIC.
• Context sensitive: Under this type of security policy, the policy predicate can be modified based on changes in certain context attributes within a user’s session. The database caches the policy predicate in the SGA. You choose this type by setting the POLICY_TYPE parameter to DBMS_RLS.CONTEXT_SENSITIVE.
• Shared context sensitive: This policy type is similar to context-sensitive policies, but it is shared across multiple objects. You choose this type by setting the POLICY_TYPE parameter to DBMS_RLS.SHARED_CONTEXT_SENSITIVE.
You can add a security policy to a database by using the DBMS_RLS package (RLS stands for row-level security) provided by Oracle. This package enables you to administer security policies, which means you can add and drop policies, policy groups, or application contexts. You provide the name of the table, view, or synonym for which you want the security policy to apply, as well as the security policy for implementing the FGAC. You also specify the particular types of SQL statements the policy applies to, such as a SELECT, INSERT, UPDATE, DELETE, CREATE INDEX, or ALTER INDEX statement.
Here are the main procedures of the DBMS_RLS package:
• DBMS_RLS.ADD_POLICY: Adds a policy to a table, view, or synonym
• DBMS_RLS.CREATE_POLICY_GROUP: Creates a policy group
• DBMS_RLS.ADD_POLICY_CONTEXT: Adds the context for the application
You create the security policy using the DBMS_RLS.ADD_POLICY procedure, as shown here:
SQL> CONNECT system/system_passwdConnected.
SQL> EXECUTE dbms_rls.add_policy('hr','employees','manager_policy','hr',- 'hr_security.empnum_sec','select');PL/SQL procedure successfully completed.
Note that you could also have executed the preceding statement in the following equivalent manner:
SQL> BEGIN 2 dbms_rls.add_policy 3 (object_schema => 'hr', 4 object_name => 'employees', 5 policy_name => 'manager_policy', 6 function_schema => 'hr', 7 policy_function => 'hr_security.empnum_sec',

CH AP T E R 1 2 ■ U SE R M A N AG E M E N T AN D DA TA B AS E S E CU R I TY 585
8 statement_types => 'select'); 9* END;SQL> /
The DBMS_RLS.ADD_POLICY procedure in the preceding statements creates a policy called manager_policy in the hr schema. This security policy is actually implemented by the function empnum_sec, which is part of the hr_security package that you created earlier. The security policy specifies that it applies to all SELECT operations against the employees table.
To put it simply, the new security policy you created (manager_policy) will limit all SELECT state-ments against the hr.employees table to information that pertains to the employee_id of the user who issued the query.
You can check that the new policy was indeed created successfully by making the following query:
SQL> SELECT object_name, policy_name, sel, ins, upd, del, enable FROM all_policies;
OBJECT_NAME POLICY_NAME SEL INS UPD DEL ENABLED----------- ------------- ---- --- ---- ---- --------EMPLOYEES MANAGER_POLICY YES NO NO NO YES
SQL>
The output of the query indicates that all SELECT statements against the employees table are now controlled by the manager_policy security policy.
To make the security policy functions accessible to the public so that all users accessing the database will use it, you can make the following grant:
SQL> GRANT EXECUTE ON hr_security TO public;Grant succeeded.
Column-Level VPD
You’ve seen how you can enforce row-level security anytime you access a table. Oracle also lets you use a column-level VPD to enforce row-level security whenever a query references a certain column or columns only. You can apply column-level VPD to a table or a view.
Creating a column-level security policy is almost identical to creating regular security policies—you just add the additional SEC_RELEVANT_COLS parameter in the DBMS_RLS.ADD_POLICY procedure to specify the relevant columns for security. Here’s how you use the DBMS_RLS.ADD_POLICY proce-dure to create a column-level security policy.
SQL> BEGIN 2 dbms_rls.add_policy 3 (object_schema => 'hr', 4 object_name => 'employees', 5 policy_name => 'manager_policy', 6 function_schema => 'hr', 7 policy_function => 'hr_security.empnum_sec', 8 statement_types => 'select,insert', 9 sec_relevant_cols => 'salary'); 10*END;SQL> /
The column-level policy created in the preceding example would come into effect only if the salary column of the employees table is accessed. Suppose a user subsequently issues the following query:
SQL> SELECT fname, lname, salary FROM employees;

586 CH AP T E R 1 2 ■ U S E R M A N AG E M E N T A N D DA T AB A SE S E CU R IT Y
The column-level VPD policy kicks into action when it sees that the salary column is referenced in a query, and the policy function implementing the column-level security policy returns the pred-icate WHERE salary ='my_salary', thus transforming the query as follows:
SQL> SELECT fname, lname, salary FROM employees WHERE salary = 'my_salary';
Policy Groups
When you access a table, Oracle looks up the application context (the policy context) to determine which policy group, and therefore which security policy, should be enforced. There is one default policy group called SYS_DEFAULT that can never be dropped from the database, and every policy belongs to this group by default.
Using Oracle Policy Manager
You can use the Oracle Policy Manager GUI, an extension to Oracle Enterprise Manager, to admin-ister Oracle Label Security (discussed next) as well as to create VPD security policies. Oracle Policy Manager will help you effortlessly create application contexts and complex security policies to enforce fine-grained data security. This definitely beats creating application contexts and security policies manually.
When you use OEM to create a VPD policy, you create an application context and provide the table (or view or synonym) name, the policy name, the function name that generates the predicate, and the statement types to which the policy applies (SELECT, INSERT, UPDATE, or DELETE). Oracle Policy Manager executes the DBMS_RLS.ADD_POLICY function to create the FGAC policy to support your VPD.
Label-Based Access Control
Oracle allows you to label parts of your data, and users can be granted privileges to access data with certain labels. Security policies are implemented on a single column, which represents the label. The Oracle Label Security feature (based on the older Trusted Oracle security product) is built on the same components that help you create a VPD. You can easily construct labels to limit access to rows in a certain table, and use label authorizations and privileges to set up a label-based security policy. The Oracle Policy Manager GUI is mainly designed to create and administer Oracle Label Security policies.
Auditing Database UsageJust because you have set up a sophisticated system of access controls using privileges, roles, views, and even fine-grained security policies doesn’t guarantee that database security won’t be breached. Auditing database usage lets you know whether your access control mechanisms are indeed working as designed. Auditing involves monitoring and recording (selected) users’ database activity.
Oracle’s built-in auditing features allow you to track the changes made to database objects. You can audit the granting of privileges within the database, as well as non-DML and non-DDL changes, such as database startup and shutdown events. Auditing user activity can potentially lead to a large amount of data to keep track of, but fortunately, Oracle offers you a lot of control over what type of activities you want to audit. You can audit just at the session level or at the entire database level.
Oracle makes a broad distinction between standard auditing and fine-grained auditing. Standard auditing is based on statement-, privilege-, and object-level auditing. Fine-grained auditing deals with data access at a granular level, with actions based on content, such as value > 100,000. I discuss standard auditing first, and then fine-grained auditing.
CH AP T E R 1 2 ■ U SE R M A N AG E M E N T AN D DA TA B AS E S E CU R I TY 587
Standard AuditingOracle Database 11g lets you audit database use at three different levels: statement, privilege, and object. A statement-level audit specifies the auditing of all actions on any type of object. For example, you can specify that the database audit all actions on tables by using the AUDIT TABLE statement. A privilege-level audit tracks actions that stem from system privileges. You can audit all actions that involve the use of a granted privilege, such as auditing all CREATE ANY PROCEDURE statements. Finally, an object-level audit monitors actions such as UPDATE, DELETE, and INSERT statements on a specific table, so you could audit all DELETEs on the hr_employees table.
For each of the three levels of auditing, you can choose to audit either by session or by access. If you audit by session, Oracle will log just one record for all similar statements that fall under the purview of auditing. If you audit by access, Oracle writes a record for each access. You can also decide to log only whether a certain action failed or succeeded by using the WHENEVER SUCCESSFUL and the WHENEVER NOT SUCCESSFUL auditing options. When the operation is unsuccessful, it’s usually an indication that the user doesn’t have privileges to perform the operation. You’ll want to know who is attempting such unauthorized operations.
■Tip One of the common arguments against the use of Oracle database auditing is that it will consume a lot of space in the database. If you spend time analyzing why you are auditing, you can limit the amount of data written to the audit trail. By using a focused auditing policy that targets only vital data, rather than systemwide auditing, you can limit the auditing output to a manageable amount. You may also decide to turn on auditing only if you encounter questionable activity in the database.
Enabling Auditing
In order for you to audit any user activity within the database, and even attempt to log into the data-base, you need to enable auditing by specifying the AUDIT_TRAIL parameter in your init.ora file. Audit records contain the audit information, such as the audited user, the type of operation, and the date and time of the operation, and the AUDIT_TRAIL parameter specifies what is done with these records. The parameter can take the following values:
• NONE: Disables database auditing. NONE is the default value for this parameter.
• OS: Specifies that Oracle will write the audit records to an operating system file (operating system audit trail).
• DB: Specifies that Oracle will write the audit records to the database audit trail, viewable as DBA_AUDIT_TRAIL (stored in the SYS.AUD$ table).
• DB, EXTENDED: Specifies that Oracle will send all audit records to the database audit trail (SYS.AUD$), and in addition, populates the SQLBIND and SQLTEXT CLOB columns.
• XML: Specifies database auditing, with the XML-format audit records going to the OS files.
• XML, EXTENDED: Same as the XML setting, but also records all audit-trail columns, including SQLTEXT and SQLBIND.
There is a default location in which Oracle will place the audit file, and you can easily change the location of this file by using the AUDIT_FILE_DEST parameter in the init.ora file, as shown here:
AUDIT_TRAIL=DBAUDIT_FILE_DEST=/a10/app/oracle/oradata/audit_data

588 CH AP T E R 1 2 ■ U S E R M A N AG E M E N T A N D DA T AB A SE S E CU R IT Y
If you specify AUDIT_TRAIL=OS, the audit trail won’t store the audit information in the database. It will instead store that information in the location specified by the AUDIT_FILE_DEST parameter. If you specify AUDIT_TRAIL=OS and omit the AUDIT_FILE_DEST parameter, by default the audit informa-tion will be written to the $ORACLE_HOME/rdbms/audit/ directory.
■Tip If you specify AUDIT_TRAIL=DB, the audit records will be logged to a special table owned by SYS called SYS.AUD$, located in the System tablespace. If you want to do any kind of serious auditing on your database, the tablespace will quickly run out of space. Make sure you change the storage parameters of the SYS.AUD$ table and add more space to the System tablespace before you turn auditing on. Otherwise, you run the risk of filling up your System tablespace while auditing the database.
You can use the DBA_AUDIT_TRAIL view to make use of the information in the database audit trail table (SYS.AUD$). Depending on the event you are auditing and the options you select for auditing, you may see the following types of data in the audit trail:
• Operating system login
• Database username
• Terminal and session identifiers
• Operation performed or attempted
• Date and time stamp
• SQL text that triggered the auditing
You don’t need to be overly concerned with the filling up of the SYS.AUD$ table when auditing is turned on. You can always truncate the table after exporting the contents to a different location or when you deem it isn’t necessary to store the contents of the audit table any longer.
Oracle’s Default Auditing
Even when you don’t set up database auditing by specifying the AUDIT_TRAIL parameter at all, by default Oracle will log three types of database actions to the $ORACLE_HOME/rdbms/audit directory:
• Connections as SYSOPER or SYSDBA
• Database startup
• Database shutdown
Typically, the audit file captures the CONNECT, SHUTDOWN, and STARTUP events undertaken by the user SYS, who, of course has the SYSDBA privileges.
You can audit all actions of the user SYS, including all users connecting with the SYSDBA or SYSOPER privileges, by setting the AUDIT_SYS_OPERATIONS init.ora parameter to true.
AUDIT_SYS_OPERATIONS=TRUE
Note that if this parameter is set, all actions of the SYS user will be audited, whether you set the AUDIT_TRAIL parameter or not. The parameter has a default value of false.
Turning Auditing On
Once you have set the AUDIT_TRAIL parameter, you will have enabled auditing in your database. However, for the actual auditing to begin, you must also specify which tables and what actions you want the database to audit.

CH AP T E R 1 2 ■ U SE R M A N AG E M E N T AN D DA TA B AS E S E CU R I TY 589
You can start auditing actions at any level by using the appropriate command. Listing 12-14 shows a sampling of commands that specify auditing at various levels, with different options.
Listing 12-14. Turning Auditing On in the Database
SQL> AUDIT SELECT ON employees;Audit succeeded.SQL> AUDIT DELETE ANY TABLE BY salapati WHENEVER NOT SUCCESSFUL;Audit succeeded.SQL> AUDIT UPDATE ANY TABLE;Audit succeeded.SQL> AUDIT SESSION BY SALAPATI;Audit succeeded.SQL> AUDIT SELECT,INSERT,UPDATE,DELETE 2 ON employees BY ACCESS WHENEVER SUCCESSFUL;Audit succeeded.SQL>
Here is a more powerful audit option that ensures the auditing of all privileges:
SQL> AUDIT ALL PRIVILEGES;Audit succeeded.SQL>
Obviously, the audit trail for this auditing choice will be large if you have many users who have been granted object privileges in the database.
■Note The AUDIT SESSION statement does not audit the statements executed during an entire session—it logs the session start time, the end time, and the logical and physical I/O resources consumed by this session, among other things.
Turning Auditing Off
To turn auditing off, you use a statement that is almost identical to the one you used to turn auditing on. The big difference, of course, is that you use the NOAUDIT keyword in place of AUDIT. Here are some examples:
SQL> NOAUDIT SESSION;Noaudit succeeded.SQL> NOAUDIT DELETE ANY TABLE BY salapati WHENEVER NOT SUCCESSFUL;Noaudit succeeded.SQL> NOAUDIT DELETE ANY TABLE BY salapati;Noaudit succeeded.
■Note You can use either of the last two statements to turn DELETE ANY TABLE BY salapati WHENEVER NOT SUCCESSFUL off. That is, the NOAUDIT keyword, when applied to a more general statement, will turn off lower-level auditing that is subsumed by the general privilege.
If you want to turn off all the levels of auditing—statement, privilege, and object—you can do so by using the following three SQL statements:

590 CH AP T E R 1 2 ■ U S E R M A N AG E M E N T A N D DA T AB A SE S E CU R IT Y
SQL> NOAUDIT ALL; /* turns off all statement auditing */SQL> NOAUDIT ALL PRIVILEGES; /* turns off all privilege auditing */SQL> NOAUDIT ALL ON DEFAULT; /* turns off all object auditing */
Customizing Database Auditing with Triggers
Oracle triggers are special blocks of code that are triggered or fired off by certain events in the data-base. Most applications use triggers to update one table based on an action in another table. A trigger could fire off based on DML or DDL statements, and they can be used to help enforce business rules within the database. You can audit specific user actions by simply writing triggers or other stored procedures that will log user information to a table when the user performs a specific database operation.
You can create several types of triggers in Oracle, including DML and DDL triggers, which are based on actions performed by users on tables and views, and system-level triggers, which are more broad-based. In the following sections you’ll learn about these types of triggers.
■Tip You don’t have to necessarily turn database-wide auditing on if you’re solely interested in a specific user’s actions or want to audit limited actions in the database. You can write triggers that will insert information into a log table upon the occurrence of specified events.
Using DML-Based Triggers for Auditing
The most commonly used triggers in Oracle databases are DML triggers; applications routinely use them to maintain business rules within the database. Oracle triggers are easy to implement, and you can employ them if you’re interested in a modest range of auditing activity. Listing 12-15 shows a small example of how to use a trigger to audit insert operations by users on a certain table.
Listing 12-15. A Typical DML Trigger
SQL> CONNECT tester/tester1Connected.
SQL> CREATE OR REPLACE TRIGGER audit_insert 2 AFTER INSERT ON tester.xyz 3 FOR EACH ROW 4 INSERT INTO xyz_audit 5* VALUES(user, sysdate);Trigger created.SQL>
SQL> CONNECT tester/tester1Connected.
SQL> INSERT INTO xyz 2 VALUES 3 ('sam alapati');1 row created.
SQL> COMMIT;Commit complete.

CH AP T E R 1 2 ■ U SE R M A N AG E M E N T AN D DA TA B AS E S E CU R I TY 591
SQL> CONNECT system/system_passwdConnected.SQL> SELECT * FROM xyz_audit;USER_NAME ACTION_DATE---------------------------TESTER 24-MAR-08SQL>
The more actions you want to audit, the larger the space required to hold the audit trail. You have to understand why you are auditing and only audit those activities that are of true significance to your organization.
■Note There are no rules regarding the operations you should audit. In some organizations, all DML changes (INSERT, UPDATE, and DELETE) may have to be audited to ensure that you can track down any unauthorized changes. In other organizations, simply auditing failed logins might suffice.
Using System-Level Triggers for Auditing
Triggers that fire after DML operations, such as an INSERT or a DELETE, are the most commonly used triggers in Oracle databases, but they aren’t the only types of triggers you can use. Oracle provides powerful system-level triggers, such as those set to fire after database startup and before database shutdown. Login and logoff triggers are especially useful for database auditing.
The following are the main types of system-level triggers that Oracle Database 11g offers:
• Database startup triggers: You can use these triggers mostly to execute code that you want to execute immediately after database startup.
• Logon triggers: These triggers provide you with information regarding the logon times of a user and details about the user’s session.
• Logoff triggers: These triggers are similar to the logon triggers, but they execute right before the user’s session logs off.
• DDL triggers: You can capture all database object changes with these triggers.
• Server error triggers: These triggers capture all major PL/SQL code errors into a special table.
Let’s look at a simple example that shows the potential of the special Oracle triggers for auditing users. This example first creates a simple table to hold logon data. Whenever a user logs in, the table captures several pieces of information about the user. By auditing the logoff items with another trigger, it is easy to find out how long the user was inside the database on a given day.
Here are the steps involved in creating a logon/logoff auditing system using system-level triggers:
1. Create a test table called logon_audit:
SQL> CREATE TABLE logon_audit( 2 user_id VARCHAR2(30), 3 sess_id NUMBER(10), 4 logon_time DATE, 5 logoff_time DATE, 6* host VARCHAR2(20));Table created.SQL>

592 CH AP T E R 1 2 ■ U S E R M A N AG E M E N T A N D DA T AB A SE S E CU R IT Y
2. Create a pair of logon and logoff triggers:
SQL> CREATE OR REPLACE TRIGGER logon_audit_trig 2 AFTER LOGON 3 ON DATABASE 4 BEGIN 5 INSERT INTO logon_audit 6 VALUES 7 (user, 8 sys_context('userenv', 'sessionid'), 9 sysdate, 10 null, 11 sys_context('userenv', 'host')); 12* END;Trigger created.
SQL> CREATE OR REPLACE TRIGGER logoff_audit_trig 2 AFTER LOGOFF 3 ON DATABASE 4 BEGIN 5 INSERT INTO logon_audit 6 VALUES 7 (user, 8 sys_context('userenv', 'sessionid'), 9 null, 10 sysdate, 11 sys_context('userenv', 'host')); 12* END;Trigger created.SQL>
3. Review your users’ login/logout details:
SQL> SELECT * FROM logon_audit;USER_NAME SESS_ID LOGON_TIME LOGOFF_TIME HOST_NAME--------- -------- ------------------- ----------- ----------SYSTEM 347 24-MAR-085 07:00:30 NTL-ALAPATIHR 348 24-MAR-08 07:10:31 NTL-ALAPATIHR 348 24-MAR-08 07:32:17 NTL-ALAPATISQL>
You could also use a DDL trigger to capture changes made to objects by users, including modi-fication, creation, and deletion of various types of objects. You can capture a large number of attributes about the event and the user that sets off a DDL trigger.
To capture some of the important attributes of a user event, you first need to create a table to log DDL changes. Once you have done that, you can create a DDL trigger like the one shown in Listing 12-16. In this example, the table is named DDL_LOG and the trigger is DDL_LOG_TRIG.
Listing 12-16. Using DDL Triggers to Audit Users
SQL> CREATE OR REPLACE TRIGGER 2 ddl_log_trig 3 AFTER DDL ON DATABASE 4 BEGIN 5 INSERT INTO ddl_log 6 (username,

CH AP T E R 1 2 ■ U SE R M A N AG E M E N T AN D DA TA B AS E S E CU R I TY 593
7 change_date, 8 object_type, 9 object_owner, 10 database 11 ) 12 VALUES 13 (ora_login_user, 14 sysdate, 15 ora_dict_obj_type, 16 ora_dict_obj_owner, 17 ora_database_name) 16* END;Trigger created.SQL>
Once the trigger is in use, you can query the DDL_LOG table to see the changes. As you can see here, users HR and SYSTEM have made several DDL-based changes to the database:
SQL> SELECT * FROM ddl_log;USERNAME CHANGE_DATE OBJECT_TYPE OBJECT_OWNER DATABASE_NAME-------- ----------- --------------- ------------- -------------HR 24-MAR-08 SYNONYM HR NINASYSTEM 24-MAR-08 OBJECTPRIVILEGE SYSTEM NINAHR 24-MAR-08 TRIGGER HR NINASQL>
Using Flashback Features for Auditing
In addition to using the standard Oracle auditing features described in the previous sections, you can also take advantage of Oracle’s Flashback capabilities to audit changes made to a table’s rows. For example, you can use the Flashback Query feature to examine a table’s data at a past point in time. Using the Flashback Transaction Query, you can find out all the changes made to a row since a past point in time or an SCN.
The Flashback Versions Query will return each version of a row that existed in the specified period. You can easily identify the user and the specific operation that resulted in any inappropriate or unauthorized modifications to data. Using the transaction details from this query, you can go ahead and identify the entire transaction(s) with the help of another flashback feature, Flashback Transaction Query.
The Flashback Query, Flashback Versions Query, and Flashback Transaction Query features rely on undo data and are discussed in detail in Chapter 8.
Fine-Grained AuditingSuppose you’re interested in using auditing to find out whether users are viewing data in a table they’re not really supposed to access. For example, say a manager is supposed to be able to see salary-related information for employees working for him. Can you tell whether the manager is also looking at the salary information of his superiors? Do you need to audit all the SELECT statements done by the manager?
Auditing all SELECT statements would lead to a colossal amount of audit data, but fortunately there’s an easy out. Oracle lets you audit actions in the database on the basis of content. That is, you can specify that the audit records be written not for all SELECT, INSERT, UPDATE, and DELETE statements, but only for statements that meet certain criteria. Instead of trying to determine policy violations based on what is being done to any data, you apply fine-grained auditing (FGA) policies to individual tables or specific operations that you wish to monitor.

594 CH AP T E R 1 2 ■ U S E R M A N AG E M E N T A N D DA T AB A SE S E CU R IT Y
Enabling Fine-Grained Auditing
You use the DBMS_FGA Oracle package to enable fine-grained auditing. With FGA, you can audit only specific rows within a table. You can simulate a trigger for statements by executing a user-written procedure when an audit condition is met. You can catch employee misuse of data. You can also use FGA as an intrusion-detection device.
You don’t need to turn on database-wide auditing to use FGA, and since the auditing is based on table access, it is virtually impossible to bypass FGA policies. FGA records are accessible through the DBA_FGA_AUDIT_TRAIL and DBA_COMMON_AUDIT_TRAIL views, with the latter view combining both standard and fine-grained audit log records.
You use the DBMS_FGA package’s ADD_POLICY procedure to add a fine-grained audit policy. Listing 12-17 shows the structure of the ADD_POLICY procedure.
Listing 12-17. The ADD_POLICY Procedure
SQL> EXECUTE DBMS_FGA.ADD_POLICY( object_schema VARCHAR2, object_name VARCHAR2, policy_name VARCHAR2, audit_condition VARCHAR2, audit_column VARCHAR2, handler_schema VARCHAR2, handler_module VARCHAR2, enable BOOLEAN, statement_types VARCHAR2, audit_trail BINARY_INTEGER IN DEFAULT, audit_column_opts BINARY_INTEGER IN DEFAULT);
These are the parameters of the ADD_POLICY procedure:
• object_schema: The schema of the object you want to audit. The default is NULL meaning the logon user schema.
• object_name: The name of the object you want to audit.
• policy_name: A user-given name for the audit policy.
• audit_condition: A condition in a row that indicates a monitoring condition. The default value is NULL, which acts as TRUE.
• audit_column: The columns you want to audit for access. The default is NULL, which means that all column access will be audited. The audit_column_opts parameter works in conjunc-tion with this parameter.
• handler_schema: The schema that contains the event handler. The default is NULL, meaning that the current schema will be used.
• enable: The parameter that enables or disables the policy. The default value is TRUE, which enables the policy.
• statement_types: The SQL statement types to which this policy is applicable: INSERT, UPDATE, DELETE, or SELECT. The default is SELECT.
• audit_trail: The parameter that says whether to populate LSQLTEXT and LSQLBIND in the fga_log$ table. A setting of DB does not populate the columns. The default value is DB_EXTENDED, which populates the columns.

CH AP T E R 1 2 ■ U SE R M A N AG E M E N T AN D DA TA B AS E S E CU R I TY 595
• audit_column_opts: Determines whether auditing should be enforced when the query references any column or all columns specified in the audit_column parameter. Set to DBMS_FGA.ALL_COLUMNS, the statement will be audited only if it references all columns specified in the audit_column parameter. The default is DBMS_FGA.ANY_COLUMNS, which means the statement will be audited if it references any column specified in the audit_column parameter.
Using Fine-Grained Auditing
It’s time to see how you can use the DBMS_FGA package to enforce fine-grained auditing. The following FGA example audits any DML statement (INSERT, UPDATE, DELETE, and SELECT) on the hr.emp table that accesses the salary column for any employee belonging to the SALES department:
SQL> EXECUTE DBMS_FGA.ADD_POLICY( object_schema => 'hr', object_name => 'emp', policy_name => 'chk_hr_emp', audit_condition => 'dept = ''SALES'' ', audit_column => 'salary', statement_types => 'insert,update,delete,select', handler_schema => 'sec', handler_module => 'log_id', enable => TRUE);
Once the preceding ADD_POLICY procedure is executed, all subsequent SELECT statements that query the emp table for salary information where the employee belongs to the SALES department will be logged in the SYS.FGA_LOG$ table in the System tablespace; DBA_FGA_AUDIT_TRAIL is a view built on this table. You can also capture the SQL text, policy name, and other information through the LSQLTEXT and LSQLBIND columns of fga_log$, providing you specify audit_trail = DBMS_FGA.DB_EXTENDED.
The handler_module and the handler_schema parameters are used to take a predetermined set of actions whenever an audit event occurs, and you can create a trigger-like mechanism called the audit event handler that handles the audit event when it occurs.
Here are what the two event handler–related parameters stand for:
• handler_schema: The schema that owns the data procedure
• handler_module: The procedure or package name
In our example, the handler module is denoted by sec_id, which is the following procedure:
SQL> CREATE PROCEDURE sec.log_id (schema1 varchar2, table1 varchar2, policy1 varchar2) AS BEGIN UTIL_ALERT_PAGER(schema1, table1, policy1); /*send an alert to my pager*/ END;
■Tip You only need the execute privilege on the DBMS_FGA package in order to use FGA. When you use the DBMS_FGA package, the audit records don’t go into the standard audit table, the SYS.AUD$ table, even when you turn on the database audit trail. The audit records go into a special table called sys.fga_aud$.

596 CH AP T E R 1 2 ■ U S E R M A N AG E M E N T A N D DA T AB A SE S E CU R IT Y
Viewing the Audit Trail
The DBA_FGA_AUDIT_TRAIL view shows you the audit trail (stored in the sys.fga_aud$ table) when you use FGA in your database. It provides fine-grained audit information, such as the time stamp, database user ID, object name, and actual SQL text used in the statement flagged by your FGA policy. Here’s an example:
SQL> SELECT timestamp, db_user, os_user, object_schema, object_name, sql_text FROM dba_fga_audit_trail;
The standard audit trail in Oracle databases is also called DBA_AUDIT_TRAIL and the FGA audit trail is called DBA_FGA_AUDIT_TRAIL. If you wish, you can view both types of auditing in the new DBA_COMMON_AUDIT_TRAIL view, which combines both regular and FGA audit trails.
■Note Always try to keep your audit options to the minimum necessary to meet your auditing objectives. As a DBA, you should keep a close watch on the System tablespace and the SYS.AUD$ table when auditing is turned on. If the SYS.AUD$ table gets full, further connections and DML activity in the database might come to a standstill. You may want to archive and purge the records from the SYS.AUD$ table periodically.
Authenticating UsersDatabase authentication refers to the authentication of the user account and password directly by Oracle. However, although database authentication is easy to set up, it isn’t the only or the best means of authenticating Oracle users. You have a choice of several ways of authenticating database users—ways that aren’t dependent on the database.
The following section covers the most common means of Oracle user authentication, which is to authenticate users through the database. After this, I briefly discuss some other means of user authentication—external, proxy, and centralized user authentication.
Database AuthenticationDatabase authentication is the standard verification of a user’s access privileges by using database passwords. If you’re relying on the database to authenticate your users, you should have a strong password-management policy.
Here’s an example of database authentication:
SQL> CREATE USER scott IDENTIFIED BY tiger;
Managing Passwords
Depending on how you create a database (manually or using the DBCA), Oracle will have several accounts with default passwords. If you create a tablespace manually, you may only have SYS, SYSTEM, DBSNMP (the Oracle Intelligent Agent account), and OUTLN (the username for managing the outlines feature). In some cases, the user scott (owner of the old Oracle demo database schema) is also created with the default password of “tiger.” A standard database created by the DBCA may have up to 32 default user accounts.

CH AP T E R 1 2 ■ U SE R M A N AG E M E N T AN D DA TA B AS E S E CU R I TY 597
As part of securing the database, you must use all the standard password-management tech-niques, including changing passwords at set intervals, checking passwords for complexity, and preventing reuse of old passwords.
Let’s see how Oracle creates the default user accounts in a new database. The query in Listing 12-18 lists all the usernames and their status. An account may be open or it may be locked or expired. An open account is one you can log into, as long as you have a valid password. A locked account must be explicitly unlocked by the DBA. A locked regular account usually results from the user trying to enter the database with an incorrect password more times than the specified limit allows. An expired account is one whose password has to be changed, which ensures that the same passwords aren’t used forever.
Listing 12-18. Displaying the Account Status of All Users
SQL> SELECT username, account_status 2 FROM dba_users;
USERNAME ACCOUNT_STATUS---------- ---------------MGMT_VIEW OPENSYS OPENSYSTEM OPENDBSNMP OPENSYSMAN OPENSCOTT OPENOUTLN EXPIRED & LOCKEDHR EXPIRED & LOCKED. . .32 rows selectedSQL>
The DBA must change the passwords for all default user accounts immediately after the data-base has been created. Any unnecessary default accounts must be locked and expired.
Password Case Sensitivity
By default, all passwords are case sensitive in Oracle Database 11g. The initialization parameter SEC_CASE_SENSITIVE_LOGON controls whether passwords are case sensitive or not. The default value of this parameter is true, which means all passwords are case sensitive by default. If, for some reason, say because some of your applications use hard-coded passwords that require that passwords not be case insensitive, you can instruct the database to disregard case when evaluating passwords, by setting the SEC_CASE_SENSITIVE_LOGON parameter to false, as shown here:
sec_case_sensitive_logon=false
When you upgrade a pre–Oracle Database 11g release database to Oracle Database 11g, the passwords remain case insensitive, because that was the behavior in those releases. You must use the ALTER USER statement to change the password of each user, in order to make them case sensitive.
When you upgrade to Oracle Database 11g, passwords remain case insensitive until you change the passwords, If you leave the SEC_CASE_SENSITIVE_LOGON parameter at its default value of true, all new passwords will be case sensitive, just as in a newly created Oracle Database 11g release database. You can execute the following query in a newly upgraded database to find out in which release a user’s password was set or changed.

598 CH AP T E R 1 2 ■ U S E R M A N AG E M E N T A N D DA T AB A SE S E CU R IT Y
SQL> SELECT username, password, password_versions FROM dba_users;
USERNAME PASSWORD PASSWORD-------------------- --------- --------MGMT_VIEW 10G 11GSYS 10G 11GSYSTEM 10G 11GDBSNMP 10G 11GSYSMAN 10G 11GRMAN 10G 11GSH 10G 11G. . .39 rows selected.SQL>
The column PASSWORD_VERSIONS reveals the database version in which a password was initially set or modified. The output of the query shows that all passwords were either created or changed in the Oracle Database 11g release database. You can’t see the (encrypted) passwords in this query as you could in prior releases, but the encrypted passwords are available through the USER$ view.
When a user tries and fails to connect with a wrong password, the database will increase the time between successive attempts after the third failed attempt, for a maximum of 10 seconds.
Secure Password Support
In addition to making all passwords case sensitive by default, Oracle also provides other features to provide secure password support. These features include the passing of all passwords entered by users through the strong hash algorithm (SHA-1, which uses a 160-bit key) and comparing it with the stored credentials for that user, as well as making all passwords use salt, which is a unique random value that’s added to the passwords to ensure that the output credentials are unique.
Locking Accounts
Any user account that is locked can be unlocked for free access with the following statement:
SQL> ALTER USER hr ACCOUNT UNLOCK;User altered.SQL>
You can make Oracle lock any account after a certain number of failed login attempts with the CREATE or ALTER PROFILE statement. Oracle lets you specify how long you want the account to be locked after making the specified login attempts to enter the database; after that time is reached, Oracle will automatically unlock the account. To close this loophole, simply set the locked time period to UNLIMITED.
Here’s an example of creating a profile with the time period for locking the account:
SQL> CREATE PROFILE test_profile 2 LIMIT FAILED_LOGIN_ATTEMPTS 5 3* PASSWORD_LOCK_TIME UNLIMITEDProfile created.SQL>

CH AP T E R 1 2 ■ U SE R M A N AG E M E N T AN D DA TA B AS E S E CU R I TY 599
The database will lock an account once the FAILED_LOGIN_ATTEMPTS limit is reached. However, the DBA can unlock a user’s account at any time by using the following command:
SQL> ALTER USER hr ACCOUNT UNLOCK;User altered.SQL>
Password Expiration
Password aging policies, which ensure that users don’t hang onto the same password for a long time, are a standard part of database security. Once a password expires, the user is forced to change it.
You can make a password expire with the ALTER USER command, as shown here:
SQL> ALTER USER hr IDENTIFIED BY hr PASSWORD EXPIRE;User altered.SQL>
You can also make a password expire with the ALTER PROFILE command:
SQL> ALTER PROFILE test_profile 2* LIMIT PASSWORD_LIFE_TIME 30;Profile altered.
SQL> ALTER USER hr PROFILE test_profile;User altered.SQL>
The preceding ALTER PROFILE statement limits the password life to 30 days, and you can gently remind the user about this by using another clause in your ALTER PROFILE statement, PASSWORD_GRACE_TIME. Once you set the PASSWORD_GRACE_TIME clause as shown here, the first time the user logs in after the end of the password lifetime, the user will receive a warning that the password is about to expire in three days. If the user doesn’t change the password within the grace period of three days, the password will expire. After the user’s password expires, the password must be changed:
SQL> CONNECT hr/hrERROR:ORA-28001: the password has expiredChanging password for hrNew password: **Retype new password: **Password changedConnected.SQL>
The Password File
Oracle will let you choose how you want your privileged users to connect to the database. Privileged users are those users who can perform tasks such as starting up and shutting down the database. By default, only the SYS user has the SYSDBA and SYSOPER privileges, both of which are considered high-level privileges. The SYS user can grant these privileges to other users.
Of course, any DBA who knows the SYS password can log in as SYS and perform the privileged tasks. However, by granting the critical privileges SYSDBA and SYSOPER explicitly to users, you force them to provide their username and password, which makes it easy to track the actions of privileged users. The REMOTE_LOGIN_PASSWORDFILE initialization parameter specifies whether Oracle checks for a password file.

600 CH AP T E R 1 2 ■ U S E R M A N AG E M E N T A N D DA T AB A SE S E CU R IT Y
The REMOTE_LOGIN_PASSWORDFILE parameter can take the following values:
• none: No password file is used, and the database permits only operating system–authenticated users to perform privileged database administration tasks.
• exclusive: Only a single database can use the password file. The file can contain both SYS and non-SYS users.
• shared: A password file is created that can be used by multiple databases. The password file includes both SYS and non-SYS users.
Oracle recommends that you use the REMOTE_LOGIN_PASSWORDFILE=SHARED option for the highest degree of security. There is a way to manually create a password file and specify which users can have the SYSDBA and SYSOPER privileges, but if you use the EXCLUSIVE option, Oracle will automatically add users to the password file upon their being granted the SYSDBA and SYSOPER privileges. You can use the V$PWFILE_USERS view to see who has been granted these privileges besides the default SYS user by using the following query:
SQL> CONNECT sys/life1 AS SYSDBA;Connected.
SQL> GRANT sysoper, sysdba TO tester;Grant succeeded.
SQL> SELECT * FROM v$pwfile_users;USERNAME SYSDB SYSOP-------- ----- -----SYS TRUE TRUETESTER TRUE TRUESQL>
You use the orapwd command to create a new password file. The following output shows the possible values you can supply with the orapwd command and also which of them are required and which are optional.
$ orapwdUsage: orapwd file=<fname> password=<password> entries=<users> force=<y/n>ignorecase=<y/n> nosysdba=<y/n>
where file - name of password file (required), password - password for SYS (optional), entries - maximum number of distinct DBA (required), force - whether to overwrite existing file (optional), ignorecase - passwords are case-insensitive (optional), nosysdba - whether to shut out the SYSDBA logon (optional Database Vault only).
There must be no spaces around the equal-to (=) character.S
The following command creates a new password file called testpwd:
$ orapwd FILE=testpwd PASSWORD=remorse1 ENTRIES=20

CH AP T E R 1 2 ■ U SE R M A N AG E M E N T AN D DA TA B AS E S E CU R I TY 601
Encrypted Passwords
By default, Oracle user passwords aren’t encrypted, and this leaves them vulnerable to unauthorized use. By setting the following environment variables, one on the client and the other on the server, you can ensure that Oracle will always encrypt a password when it’s sending it across a network.
Set this one on the client:
ora_encrypt_login=true
And set this one on the server:
dblink_encrypt_login=true
■Note All passwords are always automatically encrypted during network connections, using a modified Data Encryption Standard (DES) algorithm.
External AuthenticationAnother method of authenticating database users is the external authentication method, under which you match the user accounts at the operating system level with the usernames in the data-base. Oracle manages the user’s privileges in the database itself, but the user authentication is performed by the operating system, which is external to the database. The advantage to this method is that you’ll need only a single username for both the operating system and database connections. This can also help in auditing user actions, as the database names and operating system accounts correspond.
To use operating system authentication, you first have to set the OS_AUTHENT_PREFIX configura-tion parameter in the init.ora file as follows:
OS_AUTHENT_PREFIX = ""
There shouldn’t be a space between the pair of quotes.
■Note The default value for the OS_AUTHENT_PREFIX parameter is "OPS$", but that is only for maintaining backward compatibility.
When you start the database again, you can start using external authentication based on the underlying operating system. To enable operating system authentication, this is how you need to create your users:
SQL> CREATE USER salapati IDENTIFIED EXTERNALLY;User created.SQL>
Note that the new user isn’t given a password—the user doesn’t need one. As long as the user can log into the operating system, all he or she will have to do is type the following command to log into the database:
$ sqlplus /

602 CH AP T E R 1 2 ■ U S E R M A N AG E M E N T A N D DA T AB A SE S E CU R IT Y
■Note The well-known Oracle OPS$ORACLE database account is a simple variation on the preceding example of external authentication. OPS$ is a prefix Oracle has used since the Oracle 5 version. You can use any prefix or no prefix at all for operating system external authentication.
The external operating system authentication described in this section doesn’t allow users to connect over Oracle Net, because that authentication method isn’t considered very secure. There-fore, shared server configurations that use Oracle Net can’t, by default, use operating system external authentication. To override this default behavior, you have to set the following parameter in your init.ora file:
REMOTE_OS_AUTHENT=TRUE
Proxy AuthenticationYou can use proxy authentication to allow a single, persistent database session to switch identity to other users without having to logon/logoff all the time. You can use several middle-tier products to facilitate user interaction with the Oracle database. A web server is often used as the middle or application layer connecting the clients to the database. You can choose to have the middle tier authenticate your users, or you can have the middle tier pass the username and password to the database for authentication.
Here is an example showing how to authorize connections by a database user logging on from a middle-tier node, using password authentication.
SQL> ALTER USER salapati 2 GRANT CONNECT THROUGH appserv 3* AUTHENTICATED USING PASSWORD;User altered.SQL>
The following example shows how you can allow a persistent session logged on as appserv to take on temporarily the identity of salapati, if the persistent session provides user salapati’s password.
SQL> ALTER USER salapati 2* GRANT CONNECT THROUGH appserv;User altered.SQL>
Centralized User AuthorizationIf you use the Oracle Advanced Security option, you can use a Lightweight Directory Access Protocol (LDAP)–based directory service, such as Oracle Internet Directory (OID), to perform user authenti-cation. The directory-based service lets you create enterprise users who can be granted global roles. Centralized user management enables the use of a single sign-on—that is, users need only sign in once to access all the databases they need to use.
Because Oracle Advanced Security isn’t used by every database, I don’t provide a detailed expla-nation of the implementation of centralized user authorization. Please refer to the Oracle manual Oracle Advanced Security Administrator’s Guide, available on the http://tahiti.oracle.com web site, for a detailed explanation of this feature.

CH AP T E R 1 2 ■ U SE R M A N AG E M E N T AN D DA TA B AS E S E CU R I TY 603
Enterprise User SecurityLarge organizations these days have both internal and Web-based applications to manage. It quickly becomes an administrative nightmare to manage users and their privileges on all these different applications. Centralized directories are increasingly being seen as the best way to manage multiple systems within an organization.
LDAP is a popular industry standard, and Oracle has its own implementation of it. Information that has been managed in multiple systems and formats can be brought under one umbrella using a directory service like LDAP. You can replace all your tnsnames.ora files on clients and manage user connectivity, authorization, and security with the help of the LDAP directory services. The LDAP directory can provide solid password policy management, data privacy, data integrity, and strong authentication and authorization protocols.
Shared SchemasWhen users are registered and maintained in an LDAP repository, they are referred to as shared schemas or schema-independent users. When an LDAP-registered user connects to a specific data-base, the database will ask the LDAP server for confirmation of the user’s identity and the roles that should be assigned to the user upon connection. Thus, in a database with several hundred users for a certain application, you need to create only one schema to manage the application. The individual user will be registered in the centralized directory, and when the user connects to the database, he or she will be assigned this common schema.
Single Sign-OnIf you use the Oracle Application Server, you can take advantage of the Single Sign-On feature, so a user need only log into the system once. Once the user is authenticated, he or she can access all the other applications on the system without having to enter a name and password repeatedly. This automatic authentication is very helpful to system administrators and other key users of systems in an organization.
Data EncryptionSometimes you may want to encrypt data (encode it so only users who are authorized can understand it). Oracle supports encryption of network data through its Advanced Security option. For encryption of data, Oracle provides two PL/SQL packages, the older of which is the DBMS_OBFUSCATION_TOOLKIT package. This package enables data encryption by using the DES algorithm. The toolkit supports triple DES encryption for the highest level of security. It also supports the use of the MD5 secure cryptographic hash.
You can also use the newer PL/SQL encryption package called DBMS_CRYPTO to encrypt and decrypt data. Compared to DBMS_OBFUSCATION_TOOLKIT, DBMS_CRYPTO provides a wider range of advanced security encryption and cryptographic algorithms and is easier to use. Oracle intends this package to replace the older DBMS_OBFUSCATION_TOOLKIT package. Whichever Oracle PL/SQL package you use, you have to manage the data encryption keys, which isn’t a trivial task. You often have to create views to help you decrypt the encrypted data, which adds to the manage-ment tasks. In addition, you can’t index the encrypted data according to Oracle’s recommendations, which reduces the value of both of these encryption packages in several cases.
604 CH AP T E R 1 2 ■ U S E R M A N AG E M E N T A N D DA T AB A SE S E CU R IT Y
There is also a third, easier option: encrypting data with the transparent data encryption feature. The next section shows you how to easily encrypt Oracle table data using an Oracle Wallet to store encryption keys. You can index the encrypted table’s columns as well, thus overcoming one of the biggest drawbacks in using the Oracle encryption packages.
Transparent Data Encryption
Even with all kinds of access control mechanisms in place, you may ultimately come to the realiza-tion that your data is physically stored on a disk drive or tape somewhere, making it vulnerable to unauthorized access. You often come across situations where certain key column values in a table need to be encrypted to provide security. You can use the transparent data encryption feature to encrypt a column. Transparent data encryption means that the database will handle encryption and decryption automatically, without the user or the application having to manage the encryption key. This means the application no longer needs to handle the cumbersome process of managing the encryption key.
For example, when you create a table, you can simply specify the ENCRYPT keyword along with the column name, as shown in the following example. This statement creates a table that converts the ssn column values into an encrypted data format when they are stored on disk:
SQL> CREATE TABLE employees ( empno NUMBER(5) PRIMARY KEY ename VARCHAR2(15) NOT NULL, ssn NUMBER(9) ENCRYPT,. . .
The ENCRYPT keyword in the preceding example specifies that the ssn (Social Security number) be encrypted. Once you do this, even if unauthorized users gain access to the data on your storage devices, they can’t read the data, since it’s encrypted. When authorized users access data, however, the encrypted data is automatically decrypted, and the decryption process is transparent to the user.
An Oracle Wallet is used to store authentication and signing credentials, including private keys and certificates. Before you can start encrypting or decrypting a table, the encryption key is retrieved from the Oracle Wallet and stored in the SGA.
■Note In addition to regular database tables, you can also encrypt external tables using the transparent data encryption feature.
In the following sections, I provide a brief introduction to this new Oracle feature, which lets you encrypt one or more of a table’s columns when you create the table, or even later on. Here are the steps you need to follow in order to use the transparent data encryption feature:
1. Create an Oracle Wallet.
2. Open the Oracle Wallet.
3. Generate the master encryption key that will be used to encrypt the column’s encryption key.
4. Specify exactly how you want the encrypted column to be encrypted.
■Note Data decryption is automatic when an authorized user accesses an encrypted column. You don’t need to create any views to decrypt the data. As with encryption, the database will load the master and the data encryption keys into the SGA from the Oracle Wallet prior to decrypting data.

CH AP T E R 1 2 ■ U SE R M A N AG E M E N T AN D DA TA B AS E S E CU R I TY 605
Creating the Oracle Wallet with OWM
You create the Oracle Wallet using the Oracle Wallet Manager (OWM). Follow these steps:
1. Start up the Oracle Wallet Manager by typing owm at the operating system prompt in a UNIX/Linux system. On a Windows server, select Start ➤ Programs ➤ Oracle ➤ Configuration and Management Tools ➤ Integration Management Tools ➤ Oracle Wallet Manager. Figure 12-1 shows the opening window of the Oracle Wallet Manager.
Figure 12-1. The Oracle Wallet Manager
2. At the top left of the Oracle Wallet Manager window, click the Wallet menu and choose the New option. If you don’t already have a default directory enabled to create the wallet in, the Oracle Wallet Manager will ask if you want to create one. You can choose to create the Oracle Wallet in the default directory, or choose any other directory you wish.
3. A box will open in which you can enter a password for wallet management. This is the same password that you’ll use later in SQL*Plus to open the Oracle Wallet and to create and alter the master encryption key. You can also select the wallet type; to keep things simple for now, just choose the default wallet type, which is STANDARD. Click OK.
4. A new empty Oracle Wallet is created, and you’re asked if you wish to create a certificate at this time. Click No.
Figure 12-2 shows that your Oracle Wallet is created, without any certificates. You can add Trusted Certificates later on, if you wish. For our examples, you won’t need them.

606 CH AP T E R 1 2 ■ U S E R M A N AG E M E N T A N D DA T AB A SE S E CU R IT Y
Figure 12-2. A newly created Oracle Wallet
The encryption keys are stored in the Oracle Wallet, whose location is specified in the sqlnet.ora configuration file. Once you successfully create your new Oracle Wallet, go the $ORACLE_HOME/network/admin directory and add the following line to the sqlnet.ora file (making sure it points to the directory you chose previously):
ENCRYPTION_WALLET_LOCATION = '/etc/oracle/wallet/oracle'
Now you’re ready to use your Oracle Wallet to encrypt your table columns.
Opening and Closing the Oracle Wallet
Before you can use the transparent data encryption feature to encrypt a column, you must open the Oracle Wallet, since it is closed after you create it. Here’s how you open the Oracle Wallet:
SQL> ALTER SYSTEM SET ENCRYPTION WALLET OPEN IDENTIFIED BY "password";System altered.SQL>
Note that the password is whatever you specified when you created the Oracle Wallet. Make sure you enclose it in double quotes.
The Oracle Wallet you opened can be closed in two ways:
• Use the ALTER SYSTEM SET ENCRYPTION WALLET CLOSE statement.
• Shut down the database—the wallet will be closed automatically.

CH AP T E R 1 2 ■ U SE R M A N AG E M E N T AN D DA TA B AS E S E CU R I TY 607
Once a wallet is closed, you have to open it again before you use it by using the ALTER SYSTEM SET ENCRYPTION WALLET OPEN statement again. You don’t have to open the wallet manually every time, if you use an auto-login wallet (set in the Oracle Wallet Manager). The auto-login wallet is opened when the user that created it logs in. It stays in effect until that user logs off.
Generating the Master Encryption Key
Even if an unauthorized user gains access to the stored table data, the encrypted data in the key columns you encrypted will thwart the user from understanding what’s there. Regardless of the number of columns you encrypt in your database, you use a single encryption key for each table. You can change this key if you wish, and the keys for each encrypted table are stored in the data dictionary after they are encrypted by the master key of the database.
The master key’s function is to protect the data encryption keys. The data encryption keys are automatically generated when you use the transparent data encryption feature (by using the ENCRYPT keyword), but you have to manually generate the master key to actually encrypt the table columns. Here’s how you create the master encryption key:
SQL> ALTER SYSTEM SET ENCRYPTION KEY IDENTIFIED BY "password";System altered.SQL>
Again, you provide your Oracle Wallet password, as in the previous example.If you ever think the master key has been compromised, you can regenerate a new key by using
the same statement. Each time you do so, a new master key is generated by the database.
Encrypting the Table Columns
Now that you’ve created the master encryption key, you can start encrypting your table data by using the ENCRYPT keyword after the name of the column you want to encrypt.
First, let’s look at how to encrypt a column while creating the table. In the following example, the ssn column in the employees table is encrypted:
SQL> CREATE TABLE EMPLOYEES first_name VARCHAR2(30), last_name VARCHAR2(30), emp_id NUMBER (9), salary NUMBER(6), ssn NUMBER(9) ENCRYPT;
Table created.SQL>
Table creation is not the only time you can encrypt a table’s columns. You can also encrypt a column in an existing table by using the ALTER TABLE statement. Let’s add a new column, ENCRYPT_ID, to the employees table:
SQL> ALTER TABLE EMPLOYEES ADD (ENCRYPT_ID NUMBER(9) ENCRYPT);Table altered.SQL>
You can also encrypt an existing column in a table, as shown here:
SQL> ALTER TABLE EMPLOYEES MODIFY (EMP_ID ENCRYPT);Table altered.SQL>

608 CH AP T E R 1 2 ■ U S E R M A N AG E M E N T A N D DA T AB A SE S E CU R IT Y
If you check the employees table now, you’ll find that the ssn, encrypt_id, and emp_id columns are all encrypted:
SQL> DESCRIBE employees
NAME NULL? TYPE------------ ------- -----------------FIRST_NAME VARCHAR2(30)LAST_NAME VARCHAR2(30)EMP_ID NUMBER(9) ENCRYPTSALARY NUMBER(6)SSN NUMBER(9) ENCRYPTENCRYPT_ID NUMBER(9) ENCRYPTSQL>
Note that encrypting data will result in a performance hit, especially when users are selecting or inserting data. If you decide you want to turn off encryption for any reason, you can do so by using the DECRYPT keyword, as shown here:
SQL> ALTER TABLE employees MODIFY (ssn DECRYPT);
Encryption Algorithms
The encrypted columns in the employees table use the default encryption algorithm. This default encryption algorithm uses salt, which involves adding a random string to data before it’s encrypted, thus making it harder for someone to match patterns in the text.
As mentioned earlier, you can index transparently encrypted columns, but Oracle recommends that you not use salt if you plan on using indexes on the encrypted columns. If you don’t wish to use salt, specify the ENCRYPT NO SALT option when you encrypt a column. Similarly, if you wish to use a nondefault encryption algorithm, you can do so by specifying the algorithm when you encrypt the column, as shown in the following example, where the 3DES168 algorithm is used:
ssn NUMBER(9) ENCRYPT USING '3DES168'
Tablespace EncryptionYou can use the DBMS_OBFUSCATION_TOOLKIT and the DBMS_CRYPTO packages provided by Oracle to implement encryption of data. Both these packages, however, impose a burden on you in the sense that your application must manage the encryption keys as well as call the APIs to encrypt and decrypt the data. To overcome these drawbacks, Oracle Database 10g introduced Transparent Data Encryption (TDE), which enabled you to encrypt columns in a table. The feature is called “transparent” because the database takes care of all the encryption and decryption details.
In Oracle Database 11g, you can also encrypt an entire tablespace. In fact, tablespace encryption helps you get around some of the restrictions imposed on encrypting a column in a table through the TDE feature. For example, you can get around the restriction that makes it impossible for you to encrypt a column that’s part of a foreign key or that’s used in another constraint, by using tablespace encryption.
Restrictions on Tablespace Encryption
You must be aware of the following restrictions on encrypting tablespaces. You
• Can’t encrypt a temporary or an undo tablespace.
• Can’t change the security key of an encrypted tablespace.
• Can’t encrypt an external table.
CH AP T E R 1 2 ■ U SE R M A N AG E M E N T AN D DA TA B AS E S E CU R I TY 609
As with TDE, you need to create an Oracle Wallet to implement tablespace encryption. There-fore, let’s first create an Oracle Wallet before exploring how to encrypt a tablespace.
Creating the Oracle Wallet
Tablespace encryption uses Oracle Wallets to store the encryption master keys. Oracle Wallets could be either encryption wallets or auto-open wallets. When you start the database, the auto-open wallet opens automatically, but you must open the encryption wallet yourself. Oracle recommends that you use an encryption wallet for tablespace encryption, unless you’re dealing with a Data Guard setup, where it’s better to use the auto-open wallet.
Earlier in this chapter, I showed you how to create an Oracle Wallet by using the OWM. However, you can also create an Oracle Wallet through the mkstore command at the operating system level or through executing a special SQL*Plus command.
Here’s an example showing how to use the mkstore command from the operating system command line to create an Oracle Wallet:
$ mkstore -wrl $ORACLE_BASE/admin/$ORACLE_SID/wallet -createEnter password:******Enter password again:******
You can also create the wallet easily by executing the following command in SQL*Plus:
SQL> alter system set encryption key identified by "password"
The previous command creates an Oracle Wallet if there isn’t one already and adds a master key to that wallet.
By default, Oracle stores the Oracle Wallet, which is simply an operating system file named ewallet.pl2, in an operating system–determined location. You can, however, specify a location for the file by setting the parameter encryption_wallet_location in the sqlnet.ora file, as shown here:
ENCRYPTION_WALLET_LOCATION = (SOURCE= (METHOD=file) (METHOD_DATA= (DIRECTORY=/apps/oracle/general/wallet) ) )
You must first create a directory named wallet under the $ORACLE_BASE/admin/$ORACLE_SID directory. Otherwise, you’ll get an error when creating the wallet:
ORA-28368: cannot auto-create wallet
Once you create the directory named wallet, issue the following command to create the Oracle Wallet:
SQL> ALTER SYSTEM SET ENCRYPTION KEY IDENTIFIED BY "sammyy11";
System altered.SQL>
The ALTER SYSTEM command shown here will create a new Oracle Wallet if you don’t have one. It also opens the wallet and creates a master encryption key. If you have an Oracle Wallet, the command opens the wallet and re-creates the master encryption key.
Once you’ve created the Oracle Wallet, you can encrypt your tablespaces, as I explain in the following section.

610 CH AP T E R 1 2 ■ U S E R M A N AG E M E N T A N D DA T AB A SE S E CU R IT Y
Creating an Encrypted Tablespace
The following example shows how to encrypt a tablespace:
SQL> CREATE TABLESPACE tbsp1 DATAFILE '/u01/app/oracle/test/tbsp1_01.dbf' SIZE 500m ENCRYPTION DEFAULT STORAGE (ENCRYPT);
Tablespace created.SQL>
The storage clause ENCRYPT tells the database to encrypt the new tablespace. The clause ENCRYPTION tells the database to use the default encryption algorithm, DES128. You can specify an alternate algo-rithm such as 3DES168, AES128, or AES256 through the clause USING, which you specify right after the ENCRYPTION clause. Since I chose the default encryption algorithm, I didn’t use the USING clause here.
The following example shows how to specify the optional USING clause, to define a nondefault encryption algorithm.
SQL> CREATE TABLESPACE mytbsp2 DATAFILE '/u01/app/oracle/test/mytbsp2_01.dbf' size 500m ENCRYPTION USING '3DES168' DEFAULT STORAGE (ENCRYPT);
Tablespace created.
SQL>
The example shown here creates an encrypted tablespace, MYTBSP2, that uses the 3DES168 encryption algorithm instead of the default algorithm.
You can check whether a tablespace is encrypted by querying the DBA_TABLESPACES view, as shown here:
SQL> SELECT tablespace_name, encrypted 2 FROM dba_tablespaces;
TABLESPACE_NAME ENC--------------- ----SYSTEM NOSYSAUX NOUNDOTBS1 NOTEMP NOUSERS NOMYTBSP1 YESMYTBSP2 YES7 rows selected.
SQL>
The database automatically encrypts data during the writes and decrypts it during reads. Since both encryption and decryption aren’t performed in memory, there’s no additional memory require-ment. There is, however, a small additional I/O overhead. The data in the undo segments and the redo log will keep the encrypted data in the encrypted form. When you perform operations such as a sort or a join operation that use the temporary tablespace, the encrypted data remains encrypted in the temporary tablespace.

CH AP T E R 1 2 ■ U SE R M A N AG E M E N T AN D DA TA B AS E S E CU R I TY 611
Oracle Internet DirectoryIn Chapter 11, I briefly explained the Oracle Internet Directory (OID). Using the OID, you can perform effective security management, including enforcing strict password policies for security manage-ment. OID also helps you maintain a single, global identity for each user across the application environment, and helps you centrally store user credentials.
Database Security Dos and Don’tsA common misunderstanding among DBAs is that once the database is behind a firewall, it’s immune to security attacks. This presupposes, of course, that your security threats are always external, when real-life statistics point out that the majority of security violations are from insiders. That’s why you have to follow a rock-solid authentication policy and sound data-access policies.
You can take several basic steps to enhance the security of your Oracle database. Most of these steps are based on common sense and prohibit easy entry into the database through well-known backdoor access points. Let’s quickly review these security guidelines.
Automatic Secure ConfigurationAs I mentioned in Chapter 6, when you create a new database using the DBCA, you can choose to implement automatic secure configuration for your database. By making the choice to use the new Oracle Database 11g secure configuration settings, you enable the following security-related features in your new database:
• Password-specific security settings: The database will enforce password expiration and other password-related security policies that enforce built-in complexity checking in the default password profile that you assign to users.
• Auditing: The database enables auditing for certain privileges by default. These privileges are considered crucial to database security, such as connecting to a database. The database stores the audit records in the AUD$ table by default and sets the audit_trail initialization parameter to the value db.
Adoption of the automatic secure configuration feature ensures that your database conforms to the security features recommended by the Center for Internet Security (CIS) benchmarks.
User AccountsOracle recommends that you lock and expire all default user accounts except, of course, the SYS and SYSTEM accounts, and other user accounts that you’ll need, like DBSNMP, SYSMAN, and MGMT_VIEW. The number of default accounts depends on the number of database features and components you use and how you create your database. For example, creating a database with the help of the DBCA usually results in the creation of a larger number of default accounts than you’ll find in a manually created database.
PasswordsYou mustn’t hard-code Oracle user passwords in shell scripts. Otherwise, your user passwords can be gleaned by using a simple ps -ef | grep command while the process is running.
Change the passwords for all default user accounts immediately after creating the database. You should set passwords for the SYS and SYSTEM users while creating the database, although this isn’t mandatory.

612 CH AP T E R 1 2 ■ U S E R M A N AG E M E N T A N D DA T AB A SE S E CU R IT Y
Use strict password aging and expiration policies, and force users to change passwords in a timely fashion. Use the FAILED_LOGIN_ATTEMPTS option when setting user profiles to limit unsuccessful login attempts to a reasonable number. Accounts should be locked indefinitely (which is the default behavior) if they hit the FAILED_LOGIN_ATTEMPTS ceiling. This way, the DBA will be the only one who can unlock these accounts. You can also use Oracle’s password-complexity verification routine to make sure your users’ passwords meet standard password-complexity requirements.
Operating System AuthenticationTwo initialization parameters enable access to an Oracle database through authentication at the operating system level. One is the well-known OS_AUTHENT_PREFIX parameter, which many people use to create the OPS$ account for use in shell scripts and other places. Of course, using the OPS$ account implies that you’re relying on operating system authentication and security.
The other initialization parameter affecting operating system authentication of users is the REMOTE_OS_AUTHENT parameter, which enables users who authenticate themselves not on the server, but on a remote workstation, to gain access to your database. There may be an exceptional circum-stance when you want to use this feature. In general, though, you should leave this parameter at its default value of false. Otherwise, a user from a remote system can log in using nonsecure protocols through the remote operating system authorization, and that’s a serious violation of security standards. Perhaps more importantly, any user can create an account on his or her own computer with the same name as your externally identified database user.
Database AuditingCheck the audit trail for logins as SYSDBA to make sure that only authorized people are logging in as SYSDBA users. The audit trail also lets you see whether the database was brought up at any time with the auditing feature disabled.
You should audit all unsuccessful attempts to log into the database. In addition, you can audit all actions by any user connected as SYSDBA or SYSOPER. To enable auditing of all SYSDBA and SYSOPER operations, you need to set the following initialization parameter:
AUDIT_SYS_OPERATIONS=TRUE
■Note Setting AUDIT_SYS_OPERATIONS=TRUE logs all SYSDBA and SYSOPER activity to an operating system audit trail, not a database audit trail. Thus, the audit trail can’t be tampered with by users with powerful privileges within the database.
Granting PrivilegesOracle recommends strongly that you avoid granting ANY privileges, as in delete ANY table, to reduce your vulnerability. You can avoid this problem generally by refraining from (carelessly) granting object privileges directly to users. In addition, avoid granting privileges with the ADMIN privilege. The ADMIN privilege means that the user to whom you granted a privilege can grant the same priv-ilege to other users in turn. This means that you, the DBA, can very quickly lose control over who is being granted privileges in your database.
Use roles rather than granting privileges directly to users. This will help you a lot on databases with a large user base, where it is hard to check which user has been granted which privilege if you have been granting them directly to the users.

CH AP T E R 1 2 ■ U SE R M A N AG E M E N T AN D DA TA B AS E S E CU R I TY 613
PUBLIC is a default role for every user created in the database. Make sure you don’t grant any unnecessary roles or privileges to PUBLIC, because every user will automatically inherit those roles and privileges, including default users such as DBSNMP and OUTLN.
The following query shows that PUBLIC has over 12,000 object-level privileges:
SQL> SELECT COUNT(*) FROM dba_tab_privs 2 WHERE grantee='PUBLIC';
COUNT(*) -------- 12814SQL>
Of the more than 12,000 object privileges that have been granted to PUBLIC, over 100 are privileges to execute DBMS packages, such as DBMS_JOB, DBMS_METADATA, DBMS_SNAPSHOT, DBMS_DDL, DBMS_SPACE, and DBMS_OBFUSCATION_TOOLKIT. Revoke all important execution privileges from PUBLIC. Grant important privileges to users through the judicious use of roles.
The SYSDBA privilege gives a user very powerful privileges, including the ability to drop database objects and alter data dictionary tables. It goes without saying that you must hand out the SYSDBA privilege very sparingly.
Dealing with Environments with Multiple DBAsIf you’re the only Oracle DBA in your organization, you must have all the system privileges to manage the database. However, if you have a group of Oracle DBAs managing a large number of databases, it’s smart not to give everyone the same type of privileges (such as SYSDBA) and the same type of roles (such as DBA). You should create your own specialized roles, with each role containing a specific set of privileges for performing certain database tasks. Thus, a DBA in charge of helping the developers create new objects won’t be able to perform certain recovery-related tasks, and vice versa. You can then assign these roles to the DBAs, ensuring that there is a clear demarcation of job duties.
Protecting the Data DictionaryUsers that are granted the ANY system privilege can drop data dictionary tables. To protect your data dictionary, you must set the 07_DICTIONARY_ACCESSIBILITY configuration parameter to FALSE in your parameter file. This will limit the ANY privilege to only those users who log in with the SYSDBA privilege.
Setting PermissionsSet the proper file permissions at the operating system level, as there often can be a security loophole at this level. The default permissions on a newly created file in most UNIX systems are rw-rw-rw. This means that any users who gain admission to the UNIX server can read or copy all files, including your database files. You should set the UMASK variable to 022, so only the Oracle username can read from and write to database files.
Ensure that you remove the SETUID on all Oracle files immediately. Some of the SETUID files may allow the execution of scripts as the root user in UNIX systems.
The UTL_FILE package enables writing to operating system files from within an Oracle PL/SQL program. When you use the UTL_FILE_DIR initialization parameter, never use the * value for the param-eter, which means that the package could output files to any directory in the operating system’s file system. Restrict the directories to some well-known locations that are exclusively set apart from the UTL_FILE output files.

614 CH AP T E R 1 2 ■ U S E R M A N AG E M E N T A N D DA T AB A SE S E CU R IT Y
Remove the PL/SQL EXTPROC functionality unless it is needed. First remove mentions to EXTPROC in both the listener.ora file on the server and the tnsnames.ora file on the client. You then can remove all EXTPROC executables from your $ORACLE_HOME/bin directory. There is usually a pair of executables called extproc and extproc0. The EXTPROC facility gives hackers a way to break into the operating system without any authentication. If you do need to use the EXTPROC functionality, refer to Note 175429.1 on Oracle’s MetaLink site (http://metalink.oracle.com).
Make sure you don’t allow ordinary users access to your export and import control files, because your passwords may appear in those files.
■Note Peter Finnegan’s Oracle security web site (http://www.petefinnigan.com) provides several inter-esting and useful Oracle security-related articles and scripts, including discussion about the detection of SQL injection and numerous other Oracle security issues. The comprehensive “Oracle Database Checklist” that’s available on Finnegan’s web site is used to audit Oracle database installations and pretty much covers all Oracle database security issues.
The Network and the ListenerThe network and the listener service are vulnerable points of Oracle security—there are many ways you can inadvertently leave avenues open for attacks on your database. Let’s first look at how you can strengthen the listener service.
Securing the Listener
As you learned in Chapter 11, you should always use a password for the listener to prevent unauthor-ized users from preventing connections to the database. Once you set a password for the listener, privileged actions such as shutting down or starting up the listener can’t be performed unless you provide the right password.
You can also prevent a user from using the SET command to interfere with listener functions. To do this, you need to add the following line to your listener.ora configuration file:
ADMIN_RESTRICTIONS=ON
By default, this parameter is set to false. You should also avoid remote management of the listener service, as its password isn’t encrypted over the network. The listener password is stored in the listener.ora file, so you must safeguard this file.
Securing the Network
One of the basic security requirements for today’s Internet-based database applications is that you must have a firewall protecting your system from the external world. Once you have a firewall in place, keep it secure by not poking holes in it for any reason, such as by using the ports used by the listener to connect to the Internet.
In addition to having a normal firewall, you can use a feature of Oracle Net to add an additional layer of protection called server-side access controls. Server-side access controls limit the capability of an address to connect to your database using the listener service. There are two ways to limit the addresses through which connections can be made. You can list either the invited (accepted) address or the excluded addresses in the sqlnet.ora file. All network addresses in the invited list are allowed to connect, and all addresses in the excluded nodes list are denied access.
When the listener service starts, it reads the sqlnet.ora file and provides access according to the access controls you specified. Here are the additions that you need to make to your sqlnet.ora file to enforce server-side access controls if you are specifying the invited addresses:

CH AP T E R 1 2 ■ U SE R M A N AG E M E N T AN D DA TA B AS E S E CU R I TY 615
tcp.validnode_checking = yestcp.invited_nodes = (server1.us.wowcompany.com,172.14.16.152)
Here is what you need to add if you are excluding addresses:
tcp.excluded_nodes = (server1.us.wowcompany.com, 172.14.16.152)
■Note In general, because it’s more likely that you know the addresses that are going to connect to your data-base, using the TCP_INVITED_NODES parameter may be the best way to limit access to your system.
Denying Remote Client Authentication
As you learned earlier in this chapter, letting remote clients authenticate logins is unsafe, and you should always let the server authenticate clients connecting to your database. You can turn client-based operating system authentication off by setting the following parameter in your init.ora file:
REMOTE_OS_AUTHENT=FALSE
The preceding setting will force server authentication of users, which is more secure than trusting the clients to perform operating system authentication.
Setting Security-Related Initialization Parameters
In addition to the SEC_CASE_SENSITIVE_LOGON initialization parameter, you can also use the following parameters to enforce database security:
• sec_protocol_error_further_action: Enables you to specify what the database must do (drop the connection or continue) when it receives bad network packets from clients, with the underlying presumption that those packets are being sent with malicious intent.
• sec_protocal_error_trace_action: Enables you to specify the kind of action to take in order to trace an error. For example, you may want to trace an error or send out an alert following an error.
• sec_max_failed_login_attempts: Lets you specify the maximum number of consecutive unsuccessful attempts a user can make and remains in force even if you choose not to enable a password profile for the user.
• ldap_directory_sysauth: Enables strong authentication (authentication that uses Kerberos tickets or certificates over a Secure Sockets Layer).
Fine-Grained Network Access ControlNetwork-related packages such as UTL_TCP, UTL_SMTP, UTL_MAIL, UTL_HTTP, and UTL_INADDR can create a security loophole, because the user PUBLIC has execute privileges on all these pack-ages. A malicious user can easily break into a database through one of these packages. You can use Oracle’s find-grained network access control feature to control a user’s access to the database through external network services. For example, you can limit a user to access to databases from specific hosts.
You can use the DBMS_NETWORK_ACL_ADMIN and the DBMS_NETWORK_ACL_UTILITY packages to create what are called access control lists (ACLs). An access control list is a list of users and the privileges you grant to those users. You can manage ACLs through Oracle XML DB. The data-base stores the ACLs in the form of an XML document in the /sys/acl folder in Oracle XML DB.
616 CH AP T E R 1 2 ■ U S E R M A N AG E M E N T A N D DA T AB A SE S E CU R IT Y
Creating an Access Control List
Use the CREATE_ACL procedure of the DBMS_NETWORK_ADMIN package to create an ACL, as shown here:
SQL> begin dbms_network_acl_admin.create_acl ( acl => 'my_xml', description => 'Permissions for my network', principal => 'APPOWNER', is_grant => 'TRUE', privilege => 'connect'); end;SQL>
The following list describes the create_acl procedure parameters:
• acl: Specifies the name of the XML file holding the usernames and privileges in the ACL.
• prinicpal: Indicates the username and must match the username of the session.
• is_grant: Shows whether a privilege is granted or denied.
• privilege: Specifies the network privilege you want to grant or deny. You can specify either CONNECT or RESOLVE as the values for the privilege parameter. You must grant a user the CONNECT privilege if that user needs to connect to the database through any of the network-related PL/SQL packages such as UTL_MAIL, for example. The RESOLVE privilege helps resolve the host name when given the host IP address or vice versa, when using the UTL_INADDR package.
Once you create an ACL, you can add users or privileges to that ACL by executing the ADD_PRIVILEGE procedure as shown here:
SQL> begin dbms_network_acl_admin.add_privilege ( acl => 'test.xml', prinicpal => 'test_users', is_grant => true, privilege => 'connect') end;SQL>
If an ACL that you reference in the add_privilege procedure doesn’t exist, the database creates it.
Assigning the Access Control List to a Host
Use the ASSIGN_ACL procedure to associate the ACL you just created with a network host, as shown here.
SQL> begin dbms_network_acl_admin.assign_acl ( acl => 'test.xml', host => '*.us.mycompany.com', lower_port => 80, upper_port => null); end;SQL>
You can assign ACLs to a host, domain, or IP subnet and optionally specify the TCP port range. When you execute the ASSIGN-ACL procedure, note the following:

CH AP T E R 1 2 ■ U SE R M A N AG E M E N T AN D DA TA B AS E S E CU R I TY 617
• You may assign only a single ACL to each host, domain, or IP subnet.
• The database doesn’t automatically drop an older ACL when you replace it with a new ACL. You have to execute the DROP_ACL procedure to drop the ACL.
• You may unassign a control list by executing the UNASSIGN_ACL procedure.
Precedence Order for a Host Computer
If you specify a wildcard character for the host name such as a *, the database assigns the control list to all hosts in the domain you specify. ACLs use the following order of precedence for evaluating host names:
• Fully qualified host names with ports
• Fully qualified host names
• Subdomains under a domain
In the same way, ACLs that you assign to an individual IP address are accorded precedence over ACLs assigned to subnets.
Checking the Privileges and Host Assignments
Use the CHECK_PRIVIELGE function to examine which privileges have been granted to a user in an ACL, as shown in the following example:
SQL> SELECT DECODE(dbms_network_acl_admin.check_privilege ( test.xml', 'hr','resolve'), 1, 'granted', 0, 'denied', null) privilege FROM DUAL;
The previous function execution will return 0 if a privilege was denied and 1 if the privilege was granted. It returns NULL if a privilege was neither granted nor denied.
MetaLink and Critical Patch Updates
An important part of security management is keeping up with the latest news about security vulner-abilities and the patches or workarounds to overcome them. Oracle has a policy of quickly issuing fixes for new security problems, so you should check for the latest security patches on the Oracle MetaLink web site (http://metalink.oracle.com).
You can find regular Oracle security alerts at the following location: http://technet.oracle.com/deploy/security/alerts.htm. You can also find news about security breaches on the MetaLink site in the “News & Notes” section. If you wish, Oracle will send you e-mail security alerts about new issues. You can sign up for this free service by registering at http://otn.oracle.com/deploy/security/alerts.htm.
Oracle provides Critical Patch Updates on a quarterly schedule, and Oracle’s customers are notified of these updates via MetaLink, the OTN Security Alerts page, and the Oracle Security RSS newsfeed. If you’re already a MetaLink subscriber, you are automatically signed up for the Critical Patch Updates. If a patch addresses a severe threat, Oracle will not wait for the quarterly Critical Patch Update to send the patch to you. In such cases, Oracle will issue an unscheduled Security Alert through MetaLink and will let you immediately download the patch. The patch will also be included in the next quarterly Critical Patch Update. For the most part, though, Critical Patch Updates will be the process by which most patches will be released by Oracle from now on.
Critical Patch Updates are comprehensive patches that address significant security vulnerabil-ities and include fixes you can apply, prerequisites for the security fixes, or both. You can thus have

618 CH AP T E R 1 2 ■ U S E R M A N AG E M E N T A N D DA T AB A SE S E CU R IT Y
a regular, planned quarterly schedule for patching your system. A single patch on a quarterly basis is better than a number of patches that need extensive testing and may conflict with each other.
Oracle has also introduced a new Risk Matrix along with its quarterly Critical Patch Updates. The Risk Matrix enables customers to estimate the scope and severity of the vulnerabilities addressed by each Critical Patch Update. The Risk Matrix tells you the threat you face to confidentiality, integrity, and availability, and the conditions under which your system is most exploitable. You can thus assess the risk to your system and prioritize patching on those systems.
Oracle’s Advanced Security OptionOracle doesn’t require or recommend that you use its Advanced Security option to secure your Oracle databases. However, the Advanced Security option provides so many strong security features that you may want to consider using it if your business needs warrant the highest degree of data and network security. Here are some of the additional security features available when you use Oracle’s Advanced Security option:
• Encryption of network traffic among clients, application servers, and databases
• Sophisticated authentication methods for users
• Centralized user management
• Support for Public Key Infrastructure (PKI)
Application SecurityAlthough the security guidelines thus far have mostly dealt with preventing unauthorized access to your network and the database, it’s extremely important that you review the application security policies to ensure no vulnerabilities exist there. There are some commonsense policies involving roles and SQL*Plus use that your organization must enforce to provide strong application security.
Granting Privileges Through Roles
You’ve already seen how you can use roles to encapsulate privileges rather than granting privileges directly to various users. You should minimize the number of direct object privileges by letting stored code such as procedures and packages be the means through which users can issue DML statements. Then you can just grant the user the privilege to execute a certain package or procedure to perform any DML actions. Once the package or procedure completes executing, the user will not have the privilege to perform the DML activity from outside the stored code.
Disabling Roles
All application roles should use the SET ROLE statement to enable the roles granted to users. Applica-tion users should be granted roles only for specific purposes, and the roles should be revoked from them when they aren’t needed any longer.
Application owners should consider creating secure application roles, which are enabled by PL/SQL packages. Once you create and assign a secure application role to a user, it automatically gets assigned to the user when the user logs into the database.
Restricting SQL*Plus Usage
One of the first things you should do when opening your database to the public is to tightly restrict the ability of users to use the SQL*Plus interface. You can restrict the SQL*Plus capabilities of a user by using the product_user_profile table.

CH AP T E R 1 2 ■ U SE R M A N AG E M E N T AN D DA TA B AS E S E CU R I TY 619
Useful Techniques for Managing UsersIn this section you’ll examine some simple scripts that can help you manage your users. You’ll also learn about some typical problems that you might encounter in this area.
Altering Profiles
The following code shows how to alter a user’s profile:
SQL> ALTER PROFILE fin_user 2 LIMIT 3 FAILED_LOGIN_ATTEMPTS 5 4 PASSWORD_LOCK_TIME 1;
Profile altered.SQL>
Listing User Information
You can use the DBA_USERS view to get quite a bit of information about the user population in your database. Here’s a typical query using the DBA_USERS view:
SQL> SELECT username, profile, account, status FROM dba_users;
USERNAME PROFILE ACCOUNT_STATUS---------- -------- ---------------SYS DEFAULT OPENSYSTEM DEFAULT OPENOUTLN DEFAULT OPENDBSNMP DEFAULT OPENHARTSTEIN DEFAULT OPENFINANCE DEFAULT OPENSQL>
Determining What SQL a User Is Currently Executing
You can use the query shown in Listing 12-19, which joins the V$SESSION and the V$SQLTEXT tables, to give you the text of the SQL currently being used by a user.
Listing 12-19. Finding Out the SQL Being Executed by a User
SQL> SELECT a.sid,a.username, 2 s.sql_text 3 FROM v$session a,v$sqltext s 4 WHERE a.sql_address = s.address 5 AND a.sql_hash_value = s.hash_value 6 AND a.username LIKE 'HR%' 7* ORDER BY a.username,a.sid,s.piece;
SID USERNAME SQL_TEXT-------- -------- ----------------------------------- 8 HR BEGIN dbms_stats.gather_table_stats ('HR','REGIONS'); END;SQL>

620 CH AP T E R 1 2 ■ U S E R M A N AG E M E N T A N D DA T AB A SE S E CU R IT Y
Logging In As a Different User
You may need to sometimes log in as another DBA to perform certain actions. However, even the Oracle DBA doesn’t have access to users’ passwords, which are stored in an encrypted form. You could use the ALTER USER statement to change the user’s password, but you might not want to incon-venience the user by changing the password for good.
In a case like this, you can change the password of a user temporarily and use the new password to get in as that user. Before you change a user’s password, get the original encrypted password, which you can use to reset the user’s password back after you’re done. You can get the encrypted password for all users from the USER$ view. Here’s an example:
SQL> SELECT 'alter user tester identified by values '||password||';' 2 FROM user$ 3* WHERE username='TESTER';
'ALTERUSERTESTERIDENTIFIEDBYVALUES'||';'---------------------------------------------------------alter user tester identified by values 1825ACAA229030F1;SQL>
Now change the password of user tester so you can log in as that user:
SQL> ALTER USER tester IDENTIFIED BY newpassword;
When you’re done using the tester user account, use the ALTER USER statement again to change user tester’s password back to its original value. Make sure you enclose the encrypted password in single quotes.
SQL> ALTER USER tester IDENTIFIED BY VALUES '1825ACAA229030F1';User altered.SQL>
Killing a User’s Session
You can use the ALTER SYSTEM command to kill any user’s session. You need to first query the V$SESSION view for the values of the SID and serial number of the user. Then using the SID and serial number, you can kill the user’s session. Here’s an example:
SQL> SELECT sid, serial# FROM v$session 2* WHERE username='SALAPATI';
SID SERIAL# ---------------- 10 32
SQL> ALTER SYSTEM KILL SESSION '10,32';
System altered.SQL>
If the session you want to kill is involved in a long operation, such as a lengthy rollback, Oracle will inform you that the session is marked to be killed and kills the session once the operation completes. When Oracle kills a session, it rolls back all ongoing transactions and releases all session locks.
If the UNIX process of the user is killed, the Oracle session will most likely be killed also, but that isn’t the most graceful way to end a session. If you think you must kill a user’s UNIX session, and the Oracle KILL SESSION command isn’t working, or it’s taking a long time, you can terminate the session
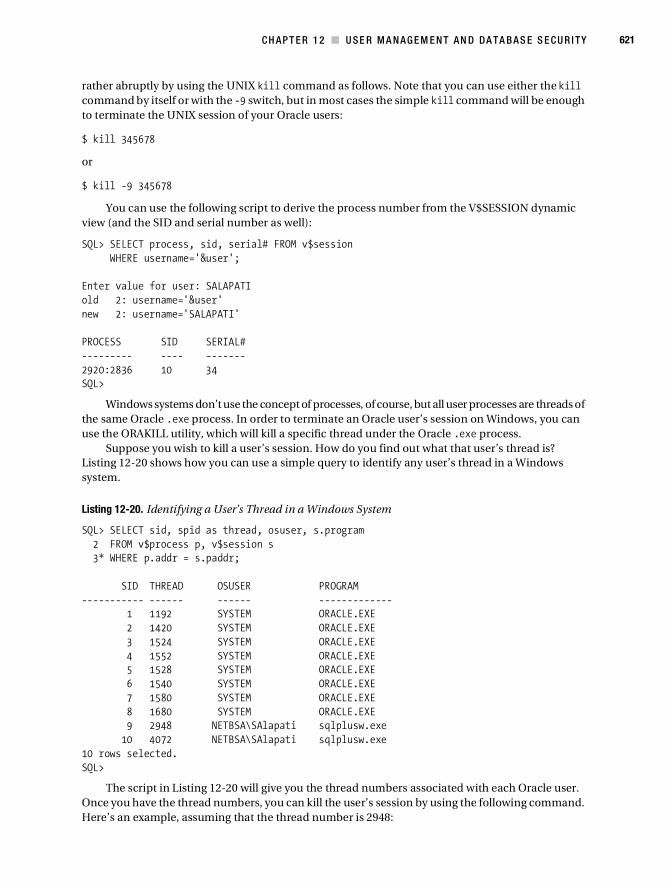
CH AP T E R 1 2 ■ U SE R M A N AG E M E N T AN D DA TA B AS E S E CU R I TY 621
rather abruptly by using the UNIX kill command as follows. Note that you can use either the kill command by itself or with the -9 switch, but in most cases the simple kill command will be enough to terminate the UNIX session of your Oracle users:
$ kill 345678
or
$ kill -9 345678
You can use the following script to derive the process number from the V$SESSION dynamic view (and the SID and serial number as well):
SQL> SELECT process, sid, serial# FROM v$session WHERE username='&user';
Enter value for user: SALAPATIold 2: username='&user'new 2: username='SALAPATI'
PROCESS SID SERIAL#--------- ---- -------2920:2836 10 34SQL>
Windows systems don’t use the concept of processes, of course, but all user processes are threads of the same Oracle .exe process. In order to terminate an Oracle user’s session on Windows, you can use the ORAKILL utility, which will kill a specific thread under the Oracle .exe process.
Suppose you wish to kill a user’s session. How do you find out what that user’s thread is? Listing 12-20 shows how you can use a simple query to identify any user’s thread in a Windows system.
Listing 12-20. Identifying a User’s Thread in a Windows System
SQL> SELECT sid, spid as thread, osuser, s.program 2 FROM v$process p, v$session s 3* WHERE p.addr = s.paddr;
SID THREAD OSUSER PROGRAM----------- ------ ------ ------------- 1 1192 SYSTEM ORACLE.EXE 2 1420 SYSTEM ORACLE.EXE 3 1524 SYSTEM ORACLE.EXE 4 1552 SYSTEM ORACLE.EXE 5 1528 SYSTEM ORACLE.EXE 6 1540 SYSTEM ORACLE.EXE 7 1580 SYSTEM ORACLE.EXE 8 1680 SYSTEM ORACLE.EXE 9 2948 NETBSA\SAlapati sqlplusw.exe 10 4072 NETBSA\SAlapati sqlplusw.exe10 rows selected.SQL>
The script in Listing 12-20 will give you the thread numbers associated with each Oracle user. Once you have the thread numbers, you can kill the user’s session by using the following command. Here’s an example, assuming that the thread number is 2948:

622 CH AP T E R 1 2 ■ U S E R M A N AG E M E N T A N D DA T AB A SE S E CU R IT Y
C:> orakill 2948
This chapter covered a vast terrain, including creating users, granting privileges and roles, auditing the Oracle database, security mechanisms (including the virtual private database concept), authen-tication methods, and data encryption. For more details about Oracle’s user management and security mechanisms, please refer to the Oracle Database Security Guide manual.

■ ■ ■
P A R T 5
Data Loading, Backup, and Recovery

625
■ ■ ■
C H A P T E R 1 3
Loading and Transforming Data
One of your most common tasks as a DBA is loading data from external sources. Although you normally do this when you first populate a database, you frequently need to load data into various tables throughout the life of a production database. Traditionally, DBAs have used the SQL*Loader utility to load data from flat files into the Oracle database tables.
Although SQL*Loader has always been an important tool for loading data into Oracle databases, Oracle also provides another way to load tables: using the external tables feature. External tables use SQL*Loader functionality and let you perform complex transformations on data before loading it into the database. Not only can you load data into your database, but you can also unload data into external files. You can then use these files to load data into other Oracle databases.
In many cases, especially in data warehouses, you need to transform the data you load. Oracle provides several means of performing data transformation within the database, including SQL and PL/SQL techniques. For example, the powerful MODEL clause enables you to create sophisticated multidimensional arrays and conduct complex interrow and interarray calculations using simple SQL.
Oracle provides a useful data replication feature called Oracle Streams, which lets you propa-gate changes from one database to another. You can use the Streams feature for various purposes, including the maintenance of a standby database.
This chapter covers all of these topics related to loading and transforming data. First, I’ll give you an overview of the extraction, transformation, and loading process.
An Overview of Extraction, Transformation, and LoadingBefore you can run your application on an Oracle database, you need to populate your database. One of the most common sources of database data is a set of flat files from legacy systems or some other source.
Traditionally, using the conventional or direct data load method with SQL*Loader was the only way to load this data from the external files into database tables. SQL*Loader is still technically the main Oracle-supplied utility to load data from external files, but you can also use the external tables feature, which employs the SQL*Loader tool to help you access data located in external datafiles.
Because the raw data may contain extraneous information or data in a different format from what your application needs, you frequently need to transform the data in some way before the data-base can use it. Transforming data is an especially common requirement for data warehouses, which extract their data from multiple sources. It’s possible to do some preliminary or basic transformation of the raw data during the SQL*Loader run itself. However, more complex data transformation requires separate steps, and you have a choice of several techniques to manage the transformation process. Most warehouse data goes through three major steps before you can analyze the data: extraction, transformation, loading (ETL). These steps are defined as follows:

626 CH AP T E R 1 3 ■ L O AD IN G AN D TR A N SF O R M I N G D AT A
• Extraction is the identification and extraction of raw data, possibly in multiple formats, from several sources, not all of which may be relational databases.
• Transformation of data is the most challenging and time consuming of the three processes. Transformation of data may involve the application of complex rules to data. It may also include performing operations such as data aggregation and the application of functions to the raw data.
• Loading is the process of placing the data in the database tables. This may also include the task of maintaining indexes and constraints on the tables.
Traditionally, organizations have used two different methods of performing the ETL process: the transform-then-load method and the load-then-transform method. In the former method, the data is cleaned or transformed before it’s loaded into Oracle tables. Custom-made ETL processes are usually used for the transformation of data. In the latter method of data cleansing, you aren’t fully taking advantage of Oracle’s built-in transformation capabilities in most cases. In the load-then-transform method, the raw data is first loaded into staging tables and moved to the final tables after the data transformation process is performed within the database itself. Intermediate staging tables are the key to the load-then-transform method. The drawback to this technique is that you must maintain multiple types of data in the table, some in a raw and original state and some in a finished state.
Oracle Database 11g offers terrific ETL capabilities that enable a newer way to load data into a database: the transform-while-loading method. By using the Oracle database to perform all the ETL steps, you can efficiently perform the typically laborious ETL processes. Oracle provides you with a whole set of complementary tools and techniques aimed at reducing the time needed to load data into the database while simplifying the work involved. Oracle’s ETL solution includes the following components:
• External tables: External tables provide a way to merge the loading and transformation processes. Using external tables will enable you to eliminate cumbersome and time-consuming intermediate staging tables during data loading. External tables are discussed in the “Using External Tables to Load Data” section in this chapter.
• Multitable inserts: Using the multitable insert feature, you can insert data into more than one table at the same time, using different criteria for the various tables. This capability eliminates the additional step of first dividing data into separate groupings and then performing data loading. Multitable inserts are discussed in the “Using Multitable Inserts” section in this chapter.
• Upserts: This is simply a made-up name indicating the technique by which you can either insert data into a table or just update the rows with a single SQL statement: MERGE. The MERGE statement will insert new data and update data if the rows already exist in the table. This simplifies your loading process because you don’t need to worry about whether a table already contains the data. Upserts are discussed in the “Using the MERGE Statement” section in this chapter.
• Table functions: Table functions produce a set of rows as output. Table functions return a collection type instance (nested table and VARRAY data types). Table functions are similar to views, but, instead of defining the transform declaratively in SQL, you define it procedurally in PL/SQL. Table functions are a great help when you’re doing large and complex transforma-tions, because you can perform the transformations before loading data into a data warehouse. Table functions are discussed in the “Using Table Functions for Data Transformation” section in this chapter.
• Transportable tablespaces: These tablespaces provide you with an efficient and speedy way to move data from one database to another. For example, you can migrate data between an OLTP database and a data warehouse using transportable tablespaces. I discuss transportable tablespaces in Chapter 14.

C HA P TE R 1 3 ■ L O A DI N G A N D T R AN S FO R M I N G D A TA 627
■Note You can also use Oracle Warehouse Builder (OWB) to efficiently load data. OWB offers you a wizard-driven facility to load data into the database through SQL*Loader. OWB can load data from an Oracle database or from flat files. In addition, OWB can extract data from other databases such as Sybase, Informix, and Microsoft SQL Server via Oracle Transparent Gateways. OWB combines ETL and design functions in an easy-to-use format.
In the next section, you’ll learn how to use the SQL*Loader utility to load data from external files. This will also help you understand how to use external tables to perform data loading. After exam-ining the external tables feature, you’ll review the various methods of data transformation offered by Oracle Database 11g.
Using the SQL*Loader UtilityThe SQL*Loader utility, which comes with the Oracle database server, is commonly used by DBAs to load external data into an Oracle database. SQL*Loader is an immensely powerful tool that’s capable of performing more than just a data load from text files. Here’s a quick list of the SQL*Loader utility’s capabilities:
• You can use SQL*Loader to transform data before it’s loaded into the database or during the data load itself (limited capabilities).
• You can load data from multiple sources: disk, tape, and named pipes. You can also use multiple datafiles in the same loading session.
• You can load data across a network.
• You can selectively load from the input file based on conditions.
• You can load all or part of a table. You can also load data into several tables simultaneously.
• You can perform simultaneous data loads.
• You can automate the load process, so it runs at scheduled times.
• You can load complex object-relational data.
You can use the SQL*Loader utility to perform several types of data loading:
• Conventional data loading: Under conventional data loading, SQL*Loader reads multiple rows at a time and stores them in a bind array. SQL*Loader subsequently inserts this whole array at once into the database and commits the operation.
• Direct-path loading: The direct-path loading method doesn’t use the SQL INSERT statement to load the data into Oracle tables. Column array structures are built from the data to be loaded, and these structures are used to format Oracle data blocks that are then written directly to the database tables.
• External data loading: The new external tables feature of Oracle relies on the functionality of SQL*Loader to access data in external files as if it were part of the database tables. When you use the ORACLE_LOADER access driver to create an external table, you are basically using the SQL*Loader’s functionality. In Oracle Database 11g, you can also use the new ORACLE_DATAPUMP access driver, which provides the ability to write to external tables.
The conventional and direct-path loading methods offer their own benefits and drawbacks. Because the direct-path loading method bypasses the Oracle SQL mechanism, it is much faster than the conventional loading method. However, when it comes to the data transformation capabilities, the conventional loading method is much more powerful than direct-path loading, because it allows a

628 CH AP T E R 1 3 ■ L O AD IN G AN D TR A N SF O R M I N G D AT A
full range of functions to be applied to the table columns during the load. The direct-path loading method supports a far more limited number of transformations during the load. Oracle recommends that you use the conventional loading method for small data loads and the direct-path loading method for larger loads. You’ll learn the specifics of direct-path loading after examining the main SQL*Loader features and using the conventional loading method. External data loading is covered in the “Using External Tables to Load Data” section later in this chapter.
Loading data using the SQL*Loader utility involves two main steps:
1. Select the datafile that contains the data you want to load. The datafile usually ends with the extension .dat and contains the data you want to load. The data could be in several formats.
2. Create a control file. The control file tells SQL*Loader how to map the data fields to an Oracle table and specifies whether the data needs to be transformed in some way. The control file usually ends with the extension .ctl.
The control file will provide the mapping of the table columns to the data fields in the input file. There is no requirement that you have a separate datafile for the load. If you wish, you can include the data in the control file itself, after you specify the load control information such as the field spec-ification and so on. The data can be supplied in fixed-length fields or in free format, separated by a character such as a comma (,) or a pipe (|). Let’s begin by studying the all-important SQL*Loader control file.
Exploring the SQL*Loader Control FileThe SQL*Loader control file is a simple text file in which you specify important details about the data load job, such as the location of the source datafile. The control file is also the place where you map the datafiles to the table columns. You can also specify any transformation during the load process within the control file. The control file contains the names of the log files for the load and files for catching bad and rejected data. The control file instructs SQL*Loader regarding the following aspects of the SQL*Loader session:
• The source of the data to be loaded into the database
• The column specification of the target table
• The nature of the input file formatting
• The mapping of the input file fields to the table columns
• Data transformation rules (applying SQL functions)
• The locations for the log files and error files
Listing 13-1 shows a typical SQL*Loader control file. SQL*Loader considers data rows in the source datafiles to be records, and you can specify the record formats in the control file. Note that you can also use a separate file for the data. In this example, you see the control information followed by in-line data, as shown by the use of the INFILE * specification in the control file. This specification indicates that the data for the load will follow the control information for the load. If you are doing a onetime data load, it is probably better to keep things simple and place the data in the control file itself. The keyword BEGINDATA tells SQL*Loader where the data portion of the control file starts.
Listing 13-1. A Typical SQL*Loader Control File
LOAD DATAINFILE *BADFILE test.badDISCARDFILE test.dsc

C HA P TE R 1 3 ■ L O A DI N G A N D T R AN S FO R M I N G D A TA 629
INSERTINTO TABLE tablenameFIELDS TERMINATED BY ',' OPTIONALLY ENCLOSED BY""(column1 POSITION (1:2) CHAR,column2 POSITION (3:9) INTEGER EXTERNAL,column3 POSITION (10:15) INTEGER EXTERNAL,column4 POSITION (16:16) CHAR)BEGINDATAAY3456789111111Y/* Rest of the data here . . .*/
The portion of the control file that describes the data fields is called the field list. In the control file in Listing 13-1, the field list is the following section:
(column1 POSITION (1:2) char, column2 POSITION (3:9) integer external, column3 POSITION (10:15) integer external, column4 POSITION (16:16) char)
The field list shows the field names, position, data type, delimiters, and any applicable conditions.You can specify numerous variables in the control file, and you can informally sort them into the
following groups:
• Loading-related clauses
• Datafile-related clauses
• Table- and field-mapping clauses
• Command-line parameters in the control file
The following sections describe the parameters you can specify in the control file to configure your data loads.
■Tip If you aren’t sure which parameters you can use for your SQL*Loader run, just type sqlldr at the operating system prompt to view all the available options. You will see a complete list of all the parameters and their operating system-specific default values (if any exist).
Loading-Related Clauses
The keywords LOAD DATA start off a control file. This simply means that the data is to be loaded from the input datafile to the Oracle tables using the SQL*Loader utility.
The INTO TABLE clause indicates into which table the data will be loaded. If you’re loading into multiple tables simultaneously, you’ll need an INTO TABLE statement for each table. The keywords INSERT, REPLACE, and APPEND instruct the database how the load will be done. If it is an INSERT, the table is assumed to be empty; otherwise, the loading process will generate an error and stop. The REPLACE clause will truncate the table and start loading new data. You’ll often see that a load job using the REPLACE option seems to hang initially. This is because Oracle is busy truncating the table before it starts the load process. The APPEND clause will add the new rows to existing table data.
630 CH AP T E R 1 3 ■ L O AD IN G AN D TR A N SF O R M I N G D AT A
Datafile-Related Clauses
You can use several clauses to specify the locations and other characteristics of the datafile(s) from which you’re going to load data using SQL*Loader. The following sections cover the important data-file-related clauses.
Datafile Specification
You specify the name and location of the input datafile by using the INFILE parameter:
INFILE='/a01/app/oracle/oradata/load/consumer.dat'
If you don’t want to use the INFILE specification, you can include the data in the control file itself. When you include the data in the control file instead of a separate input file, you omit the file location and use the * notation, as follows:
INFILE = *
If you choose to have the data in the control file itself, you must use the BEGINDATA clause before your data starts:
BEGINDATANicholas Alapati,243 New Highway,Irving,TX,75078. . .
Physical and Logical Records
Every physical record in the source datafile is equivalent to a logical record by default, but the control file can specify that more than one physical record be combined into a single logical record. For example, in the following input file, three physical records are also considered three logical records:
Nicholas Alapati,243 New Highway,Irving,TX,75078Shannon Wilson,1234 Elm Street,Fort Worth,TX,98765Nina Alapati,2629 Skinner Drive,Flower Mound,TX,75028
You can transform these three physical records by using either of two parameters in the control file: the CONCATENATE clause or the CONTINUEIF clause.
If your input is in the fixed format, you can specify the number of rows of data to be read for each logical record in the following way:
CONCATENATE 4
This CONCATENATE clause will combine four rows of data. If each row of data has 80 characters, then the total number of characters in the new logical record that is created will be 320. Therefore, when you use the CONCATENATE clause, you should also specify a record length (RECLEN) clause along with it. In this case, the record length clause is as follows:
RECLEN 320
The CONTINUEIF clause lets you combine physical records into logical records by specifying one or more characters in a specified location. Here’s an example:
CONTINUEIF THIS (1:4) = 'next'
In this line, the CONTINUEIF clause means that if SQL*Loader finds the four letters next at the beginning of a line, it should treat the data that follows as a continuation of the previous line (the four characters and the word next are arbitrary—continuation indicators can be any arbitrary characters).
If you are using fixed-format data, the CONTINUEIF character may be placed in the very last column, as shown in the following example:

C HA P TE R 1 3 ■ L O A DI N G A N D T R AN S FO R M I N G D A TA 631
CONTINUEIF LAST = '&'
This line means that if SQL*Loader encounters the ampersand (&) character at the end of a line, it will treat the following line as a continuation of the preceding line.
■Note Using either CONTINUEIF or CONCATENATE will slow down SQL*Loader, so map physical and logical records one to one. You should do this because when you join more than one physical record to make a single logical record, SQL*Loader must perform additional scanning of the input data, which takes more time.
Record Format
You may specify a record format in one of three ways:
• Stream record format: This is the most common record format, which uses a record terminator to indicate the end of a record. When SQL*Loader scans the input file, it knows it has reached the end of a record when it encounters the terminator string. If no terminator string is speci-fied, the last character defaults to a newline character or a linefeed (carriage return followed by a linefeed on Windows) character. The set of three records in the previous example uses this record format.
• Variable record format: In this format, you explicitly specify the length at the beginning of the each record, as shown in the following example:
INFILE 'example1.dat' "var 2"06sammyy12johnson,1234
This line contains two records: the first with six characters (sammyy) and the second with twelve characters (johnson,1234). var 2 indicates that the data records are of variable size, with record size indicators specified as a field of length 2, before every new record.
• Fixed record format: In this format, you specify that all records are a specific fixed size. Here’s an example, which specifies that every record is 12 bytes long:
INFILE 'example1.dat' "fix 12"sammyy,1234, johnso,1234
Although at first glance in this example, the record seems to include the entire line (sammyy,1234, johnso,1234), the fix 12 specification means that there are actually two 12-byte records in this line. Thus, when you use the fixed record format, you may have several loader records on each line in your source datafile.
Table- and Field-Mapping Clauses
During a load session, SQL*Loader takes the data fields in the data records and converts them into table columns. The table- and field-mapping clauses pertain to the mapping process between data fields and table columns. The control file provides details about fields, including the column name, position, input record data types, delimiters, and data transformation parameters.
Table Column Name
Each column in the table is specified clearly, with the position and data type of the matching field value in the input file. You don’t need to load all the columns in the table. If you omit any columns in the control file, they’re set to null.

632 CH AP T E R 1 3 ■ L O AD IN G AN D TR A N SF O R M I N G D AT A
Position
SQL*Loader must have a way of knowing the location of the various fields in the input file. Oracle calls the individual items in the datafile fields, and there is no direct correspondence between these fields and the columns in the table in which you are loading the data. The process of mapping fields in the input datafile to the table columns in the database is called field setting, and it is the biggest contributor to CPU time taken during the load. The POSITION clause specifies exactly where in the data record the various fields are. You have two ways to specify the location of the fields: relative and absolute.
Relative position implies that you specify the position of a field with respect to the position of the preceding field, as shown in the following example:
employee_id POSITION(*) NUMBER EXTERNAL 6employee_name POSITION(*) CHAR 30
In this example, the load starts with the first field, employee_id. SQL*Loader then expects employee_name to start in position 7 and continue for 30 characters. It will look for the next field starting at position 37, and so on.
When you use the POSITION clause in an absolute position sense, you just specify the position at which each field starts and ends, as follows:
employee_id POSITION(1:6) INTEGER EXTERNALemployee_name POSITION(7:36) CHAR
Data Types
The data types used in the control file refer to the input records only and aren’t the same as the column data types within the database tables. The following are the main data types used in SQL*Loader control files:
• INTEGER(n)—binary integer, where n can be 1, 2, 4, or 8
• SMALLINT
• CHAR
• INTEGER EXTERNAL
• FLOAT EXTERNAL
• DECIMAL EXTERNAL
Delimiters
After each column’s data type is specified, you can specify a delimiter, which indicates how the field should be delimited. You can delimit data by using one of the following two clauses: TERMINATED BY or ENCLOSED BY.
TERMINATED BY limits the field to the character specified and denotes the end of a field. Here are a couple of examples:
TERMINATED BY WHITESPACETERMINATED BY ","
The first example indicates that the field is terminated by the first blank that is encountered. The second example simply indicates that the fields are separated by commas.
The ENCLOSED BY " " delimiter specifies that the field is enclosed by a pair of quotation marks. Here is an example:
FIELDS TERMINATED BY ',' OPTIONALLY ENCLOSED BY '"'

C HA P TE R 1 3 ■ L O A DI N G A N D T R AN S FO R M I N G D A TA 633
■Tip Oracle recommends that you avoid delimited fields and choose positional fields (using the POSITION parameter) where possible. Choosing positional fields means that the database avoids scanning the datafile to find the delimiters you chose, thus reducing processing time.
Data Transformation Parameters
You can apply SQL functions to the field data before loading it into table columns. Only SQL func-tions that return single values can be used for transforming field values in general. The field should be denoted inside the SQL string as field_name. You specify the SQL function(s) after you specify the data type for the field, and you enclose the SQL string in double quotation marks, as shown in the following examples:
field_name CHAR TERMINATED BY "," "SUBSTR(:field_name, 1, 10)"employee_name POSITION 32-62 CHAR "UPPER(:ename)"salary position 75 CHAR "TO_NUMBER(:sal,'$99,999.99')"commission INTEGER EXTERNAL "":commission * 100"
As you can see, the application of SQL operators and functions to field values before they are loaded into tables helps you transform the data at the same time you are loading it. This is a handy feature.
Command-Line Parameters in the Control File
SQL*Loader allows you to specify a number of runtime parameters at the command line when you invoke the SQL*Loader executable. Usually, you specify in the parameter file those parameters whose values remain the same across jobs. You can then use the command line to start the SQL*Loader job, either interactively or as part of a scheduled batch job. On the command line, you specify runtime-specific parameters, along with the control filename and location.
As an alternative, you may use the OPTIONS clause of the control file to specify runtime parameters inside the control file itself. You can always specify a number of runtime parameters while invoking SQL*Loader, but you’re better off using the OPTIONS clause to specify them in the control file, if those parameters are something you’ll repeat often. Using the OPTIONS clause comes in handy particularly if your SQL*Loader command-line specification is so long that it exceeds your operating system’s maximum command-line size.
■Note Specifying a parameter on the command line will override the parameter’s values inside a control file.
The following sections cover some of the important parameters you can control using the OPTIONS clause in the control file.
USERID
The USERID parameter specifies both the username and the password of the user in the database who has the privileges for the data load:
USERID = samalapati/sammyy1
CONTROL
The CONTROL parameter specifies the name of the control file for the SQL*Loader session. The control file may include the specifications for all the load parameters. Of course, you can load data using

634 CH AP T E R 1 3 ■ L O AD IN G AN D TR A N SF O R M I N G D AT A
manual commands, but using a control file gives you more flexibility and enables the automation of the load process.
CONTROL = '/test01/app/oracle/oradata/load/finance.ctl'
DATA
The DATA parameter simply refers to the input datafile. The default filename extension is .dat. Note that the data doesn’t necessarily need to be inside a separate datafile. If you wish, you can include the data at the end of the control file load specifications.
DATA = '/test02/app/oracle/oradata/load/finance.dat'
BINDSIZE and ROWS
You can use the two parameters BINDSIZE and ROWS to specify a conventional path bind array. SQL*Loader in the conventional path mode doesn’t insert data into the table row by row. Rather, it inserts a set of rows at a time, and that set of rows, called the bind array, is sized based on either the BINDSIZE or ROWS parameter.
The BINDSIZE parameter sets the bind array size in bytes. On my system, the default bind size is 256,000 bytes.
BINDSIZE = 512000
The ROWS parameter does not set any limit on the number of bytes in the bind array. It imposes a limit on the number of rows in each bind array, and SQL*Loader multiplies this value in the ROWS parameter with its estimate of the size of each row in the table. The default number of rows under the conventional method on my system is 64.
ROWS = 64000
■Note If you specify both the BINDSIZE and ROWS parameters, SQL*Loader uses the smaller of the two values for the bind array.
DIRECT
If you specify DIRECT=true, SQL*Loader loads using the direct-path method instead of the conven-tional method. The default for this parameter is DIRECT=false, meaning the conventional method is the default method used.
ERRORS
The ERRORS parameter specifies the maximum number of errors that can occur before the SQL*Loader job is terminated. The default on most systems is 50. If you don’t want to tolerate any errors, set this parameter to 0:
ERRORS = 0
LOAD
Using the LOAD parameter, you can set the maximum number of logical records to be loaded into the table. The default is to load all the records in the input datafile.
LOAD = 10000

C HA P TE R 1 3 ■ L O A DI N G A N D T R AN S FO R M I N G D A TA 635
LOG
The LOG parameter specifies the name of the log file. The SQL*Loader log file, as you’ll see shortly, provides a lot of information about your SQL*Loader session.
LOG = '/u01/app/oracle/admin/finance/logs/financeload.log'
BAD
The BAD parameter specifies the name and location of the bad file. If any records are rejected due to data formatting errors, SQL*Loader will write the record to the bad file. For example, a field could exceed its specified length and be rejected by SQL*Loader. Note that besides the records rejected by SQL*Loader, other records may be rejected by the database. For example, if you try to insert rows with duplicate primary key values, the database will reject the insert. These records will be part of the bad file as well. If you don’t explicitly name a bad file, Oracle will create one and use a default name with the control filename as a prefix.
BAD = '/u01/app/oracle/load/financeload.bad'
SILENT
By default, SQL*Loader displays feedback messages on the screen showing the load job’s progress. You can turn off the display with the SILENT parameter. You can use several options with the SILENT parameter. For example, you can turn off all types of messages with the ALL option, as shown here:
SILENT = ALL
DISCARD and DISCARDMAX
The discard file contains all records rejected during the load because they didn’t meet the record selection criteria you specified in the control file. The default is to not have a discard file. Oracle will create this file only if there are discarded records, and, even then, only if you explicitly specify the discard file in the control file. You use the DISCARD parameter to specify the name and location of the discard file.
DISCARD = 'test01/app/oracle/oradata/load/finance.dsc'
By default, SQL*Loader doesn’t impose any limit on the number of records; therefore, all the logical records can be discarded. Using the DISCARDMAX parameter, you can set a limit on the number of records that can be discarded.
■Tip Both the bad and discard files contain records in the original format. Therefore, it’s easy, especially during large loads, to just edit these files and use them for loading the data that was left out during the first load run.
PARALLEL
The PARALLEL parameter specifies whether SQL*Loader can run multiple sessions when you’re employing the direct-path loading method.
sqlldr USERID=salapati/sammyy1 CONTROL=load1.ctl DIRECT=true PARALLEL=true
RESUMABLE
Using the RESUMABLE parameter, you can turn on Oracle’s Resumable Space Allocation feature. This way, if a job encounters a space problem while loading the data, the load job is merely suspended.

636 CH AP T E R 1 3 ■ L O AD IN G AN D TR A N SF O R M I N G D AT A
You can arrange for a notification about the job suspension and allocate more space so the job can continue without failing. The Resumable Space Allocation feature is discussed in Chapter 8. The default for the RESUMABLE parameter is false, meaning Resumable Space Allocation is disabled. Set RESUMABLE=true to enable this feature.
RESUMABLE_NAME
The RESUMABLE_NAME parameter enables you to identify a specific resumable load job when you use the Resumable Space Allocation feature. The default name is the combination of the username, session ID, and instance ID.
RESUMABLE_NAME = finance1_load
RESUMABLE_TIMEOUT
The RESUMABLE_TIMEOUT parameter can be set only when the RESUMABLE parameter is set to true. The timeout is the maximum length of time for which an operation can be suspended when it runs into a space-related problem. If the space-related problem is not fixed within this interval, the operation will be aborted. The default is 7,200 seconds.
RESUMABLE_TIMEOUT = 3600
SKIP
The SKIP parameter is very useful in situations where your SQL*Loader job fails to complete its run due to some errors, but it has already committed some rows. The SKIP parameter lets you skip a specified number of records in the input file when you run the SQL*Loader job the second time. The alternative is to truncate the table and restart the SQL*Loader job from the beginning—not a great idea if a large number of rows have already been loaded into the database tables.
SKIP = 235550
This example assumes the first job failed after loading 235,549 records successfully. You can find out this information from the log file for the load, or query the table directly.
Generating Data During the LoadThe SQL*Loader utility enables you to generate data to load columns. This means that you can do a load without ever using a datafile. More commonly, however, you generate data for one or more columns of the data when you are loading from a datafile. The following types of data can be gener-ated by SQL*Loader:
• Constant value: You can set a column to a constant value by using the CONSTANT specification. For example, with the following specification, all the rows populated during this run will have the value sysadm in the loaded_by column:
loaded_by CONSTANT "sysadm"
• Expression value: You can set a column to the value specified by a SQL operator or a PL/SQL function. You specify the expression value using the EXPRESSION parameter, as shown here:
column_name EXPRESSION "SQL string"
• Datafile record number: You can set a column’s value to the record number that loaded that row by using the RECNUM column specification:
record_num RECNUM

C HA P TE R 1 3 ■ L O A DI N G A N D T R AN S FO R M I N G D A TA 637
• System date: You can use the sysdate variable to set a column to the date you’re loading the data:
loaded_date sysdate
• Sequence: You can generate unique values to load a column by using the SEQUENCE function. In the following example, the current maximum value of the loadseq sequence is incremented by one each time a row is inserted:
loadseq SEQUENCE(max,1)
Invoking SQL*LoaderYou can invoke the SQL*Loader utility in a number of ways. The standard syntax for invoking the SQL*Loader is as follows:
SQLLDR keyword=value [,keyword=value,. . .]
Here’s an example showing how to invoke the SQL*Loader:
$ sqlldr USERID=nicholas/nicholas1 CONTROL=/u01/app/oracle/finance/finance.ctl \DATA=/u01/app/oracle/oradata/load/finance.dat \LOG=/u01/aapp/oracle/finance/log/finance.log \ERRORS=0 DIRECT=true SKIP=235550 RESUMABLE=true RESUMABLE_TIMEOUT=7200
■Note In the command-line invocation of the SQL*Loader utility, the backslash (\) at the end of each line simply indicates that the command continues on the next line. You can specify a command-line parameter with the parameter name itself or by position. For example, the username/password specification always follows the keyword sqlldr. If you ignore a parameter, Oracle will use the default value for that parameter. You can optionally use a comma after each parameter.
As you can see, the more parameters you want to use, the more information you need to provide at the command line. This approach presents two problems. First, if you make typing or other errors, you’ll have a mess on your hands. Second, there may be a limit on some operating systems regarding how many characters you can input at the command prompt. Fortunately, you can run the same SQL*Loader job with the following command, which is a lot less complicated:
$ sqlldr PARFILE=/u01/app/oracle/admin/finance/load/finance.par
The command-line parameter PARFILE stands for parameter file, which is a file in which you can specify values for all your command parameters. For example, for the load specifications shown in this chapter, the parameter file looks like this:
USERID=nicholas/nicholas1CONTROL='/u01/app/oracle/admin/finance/finance.ctl'DATA='/app/oracle/oradata/load/finance.dat'LOG='/u01/aapp/oracle/admin/finance/log/finance.log'ERRORS=0DIRECT=trueSKIP=235550RESUMABLE=trueRESUMABLE_TIMEOUT=7200
Using the parameter file is more elegant than typing all the parameters at the command line, and it is a logical approach when you need to regularly run jobs that use the same options. Any

638 CH AP T E R 1 3 ■ L O AD IN G AN D TR A N SF O R M I N G D AT A
option that you specify at the command line will override the value specified for that parameter inside a parameter file.
If you want to use the command line, but you don’t want to type the password where someone can easily see it, you can invoke SQL*Loader in the following manner:
$ sqlldr CONTROL=control.ctl
SQL*Loader will then prompt you for your username/password combination.
Exploring the Loader Log FileThe SQL*Loader log file offers a host of information regarding a SQL*Loader run. It tells you how many records were supposed to be loaded and how many actually were loaded. It tells you which records failed to get loaded and why. It also describes the field columns provided in the SQL*Loader control file. Listing 13-2 shows a typical SQL*Loader log file.
Listing 13-2. A Typical SQL*Loader Log File
SQL*Loader: Release 11.1.0.0.0 - Production on Sun Aug 24 14:04:26 2008Control File: /u01/app/oracle/admin/fnfactsp/load/test.ctl Data File: /u01/app/oracle/admin/fnfactsp/load/test.ctl Bad File: /u01/app/oracle/admin/fnfactsp/load/test.badlDiscard File: none specified (Allow all discards)Number to load: ALLNumber to skip: 0Errors allowed: 0Bind array: 64 rows, maximum of 65536 bytesContinuation: none specifiedPath used: ConventionalTable TBLSTAGE1, loaded when ACTIVITY_TYPE != 0X48(character 'H') and ACTIVITY_TYPE != 0X54(character 'T')Insert option in effect for this table: APPENDTRAILING NULLCOLS option in effect Column Name Position Len Term Encl Datatype------------------------------ ---------- ----- ---- ---- -----COUNCIL_NUMBER FIRST * , CHARACTERCOMPANY NEXT * , CHARACTERACTIVITY_TYPE NEXT * , CHARACTERRECORD_NUMBER NEXT * , CHARACTERFUND_NUMBER NEXT * , CHARACTERBASE_ACCOUNT_NUMBER NEXT * , CHARACTERFUNCTIONAL_CODE NEXT * , CHARACTERDEFERRED_STATUS NEXT * , CHARACTERCLASS NEXT * , CHARACTERUPDATE_DATE SYSDATEUPDATED_BY CONSTANT Value is 'sysadm'BATCH_LOADED_BY CONSTANT Value is 'sysadm'/*Discarded Records Section: Gives the complete list of discardedrecords, including reasons why they were discarded.*/

C HA P TE R 1 3 ■ L O A DI N G A N D T R AN S FO R M I N G D A TA 639
Record 1: Discarded - failed all WHEN clauses.Record 1527: Discarded - failed all WHEN clauses.Table TBLSTAGE1:/*Number of Rows: Gives the number of rows successfully loaded and the number of rows not loaded due to errors or because they failed the WHEN conditions, if any. Here, two records failed the WHEN condition*/ 1525 Rows successfully loaded. 0 Rows not loaded due to data errors. 2 Rows not loaded because all WHEN clauses were failed. 0 Rows not loaded because all fields were null.
/* Memory Section: Gives the bind array size chosen for the data load*/Space allocated for bind array: 99072 bytes(64 rows)Read buffer bytes: 1048576/* Logical Records Section: Gives the total records, number of rejected and discarded records.*/Total logical records skipped: 0Total logical records read: 1527Total logical records rejected: 0Total logical records discarded: 2/*Date Section: Gives the day and date of the data load.*/Run began on Sun Mar 06 14:04:26 2009Run ended on Sun Mar 06 14:04:27 2009/*Time section: Gives the time taken for completing the data load.*/Elapsed time was: 00:00:01.01CPU time was: 00:00:00.27
When you examine the log file, focus on the total logical records read and the records that are skipped, rejected, and discarded. When you encounter difficulty running a job, the log file is the first place you should look to see whether or not the data records are being loaded.
Using Return CodesThe log file provides a wealth of information about the load, but Oracle also allows you to trap the exit code after each load run. This enables you to check the results of the load when you run it through a cron job or a shell script. For a Windows server, you may use the at command to schedule the load job. Here are the key exit codes for the UNIX/Linux operating systems:
• EX_SUCC 0 indicates that all the rows were loaded successfully.
• EX_FAIL 1 indicates that there were command-line or syntax errors.
• EX_WARN 2 indicates that some or all rows were rejected.
• EX_FTL 3 indicates operating system errors.
Using the Direct-Path Loading MethodSo far, you have looked at the SQL*Loader utility from the point of view of a conventional load. As you recall, the conventional loading method uses SQL INSERT statements to insert data into tables one bind array size at a time. The direct-path loading option doesn’t use the SQL INSERT statement to put data into tables; rather, it formats Oracle data blocks and writes them directly to the database files. This direct-write process eliminates much of the overhead involved in executing SQL statements

640 CH AP T E R 1 3 ■ L O AD IN G AN D TR A N SF O R M I N G D AT A
to load tables. Since the direct-path loading method doesn’t contend for database resources, it will load data much faster than a conventional data load. For larger data loads, the direct-path loading method works best, and it may be the only viable method of loading data into tables for the simple reason that a conventional load may require more time than is available.
Besides the obvious advantages of a shorter load time, direct loading also helps you rebuild indexes and presort table data. Using the direct-path loading method as opposed to the conven-tional loading method has the following advantages:
• The load is much faster than in the conventional loading method because you aren’t using SQL INSERT statements for the load.
• The direct load uses multiblock asynchronous I/O for database writes, so the writing is fast.
• You have the option of presorting data using efficient sorting routines with the direct load.
• By setting the UNRECOVERABLE=Y parameter, you can avoid the writing of any redo data during a direct load.
• By using temporary storage, you can build indexes more efficiently during a direct load than when you’re using the conventional load method.
■Note A conventional load will always generate redo entries, whereas the direct-path loading method will generate such entries only under specific conditions. A direct load also won’t fire any insert triggers, unlike the conventional load, which fires the triggers during the load. Users can’t make any changes when a table is being loaded using a direct load, unlike in a conventional load.
However, direct-path loads have some serious limitations. You can’t use this method under the following conditions:
• You’re using clustered tables.
• You’re loading parent and child tables together.
• You’re loading VARRAY or BFILE columns.
• You’re loading across heterogeneous platforms using Oracle Net.
• You want to apply SQL functions during the load.
■Note In a direct load, you can’t use any SQL functions. If you need to perform a large data load and also trans-form the data during the load, you have a problem. The conventional data load will let you use SQL functions to transform data, but the method is very slow compared to the direct load. Thus, for large data loads, you may want to consider using one of the newer load/transform techniques, such as external tables or table functions.
Direct Load Options
Several SQL*Loader options are intended especially for use with the direct load option or are more significant for direct loads than conventional loads. The following options are relevant to the direct-path loading method:

C HA P TE R 1 3 ■ L O A DI N G A N D T R AN S FO R M I N G D A TA 641
• DIRECT: The DIRECT clause must be set to true in order for you to use the direct-path loading method (DIRECT=true).
• DATA_CACHE: The DATA_CACHE parameter comes in handy if you’re loading the same data or time-stamp values several times during a direct load. SQL*Loader has to convert the date and timestamp data each time it encounters them. If you have duplicate data and timestamp values in your data, you can reduce unnecessary data conversions, and thus processing time, by specifying the DATA_CACHE parameter. By default, the DATA_CACHE parameter is enabled for 1,000 values. If you don’t have duplicate date and timestamp values in your data, or if there are few such duplicates, you can disable the DATA_CACHE parameter by setting it to zero (DATA_CACHE=0).
• ROWS: The ROWS parameter is crucial because you can use it to specify how many rows SQL*Loader will read from the input datafile before saving the insertions to the tables. You use the ROWS parameter to set the ceiling on the amount of data lost if the instance fails during a long SQL*Loader run. When SQL*Loader reads the number of rows specified in the ROWS parameter, it will stop loading data until all of the data buffers are successfully written to the datafiles. This process is called a data save. For example, if SQL*Loader can load about 10,000 rows per minute, setting ROWS=150000 saves the data every 15 minutes.
• UNRECOVERABLE: If you want to minimize the use of the redo log, you can do so by using the UNRECOVERABLE parameter during a direct load (specify UNRECOVERABLE in the control file).
• SKIP_INDEX_MAINTENANCE: The SKIP_INDEX_MAINTENANCE parameter, when turned on (SKIP_INDEX_MAINTENANCE=true), instructs SQL*Loader not to bother maintaining the indexes during the load. The default for SKIP_INDEX_MAINTENANCE is false.
• SKIP_UNUSABLE_INDEXES: Setting a value of true for the SKIP_UNUSABLE_INDEXES parameter will ensure that SQL*Loader will load tables with indexes in an unusable state. These indexes won’t be maintained by SQL*Loader, however. The default for this parameter is based on the setting for the SKIP_UNUSABLE_INDEXES initialization parameter, whose default value is true.
• SORTED_INDEXES: The SORTED_INDEXES parameter signals SQL*Loader that data is sorted on a specified index, which helps improve load performance.
• COLUMNARRAYROWS: This parameter determines the number of rows loaded before the building of the stream buffer. For example, COLUMNARRAYROWS=100000 loads 100,000 rows first. The size of the direct-path column array is thus determined by this parameter. The default value for this parameter on my UNIX server is 5,000.
• STREAMSIZE: The STREAMSIZE parameter lets you set the size of the stream buffer. The default on my server, for example, is 256,000, and I can increase it using the STREAMSIZE parameter; for example, STREAMSIZE=512000.
• MULTITHREADING: Under MULTITHREADING, the conversion of column arrays to stream buffers and stream buffer loading are performed in parallel. On machines with multiple CPUs, by default, multithreading is turned on (true). If you wish, you can turn it off by setting MULTITHREADING=false.
Direct Loads and Constraint/Trigger Management
The direct-path loading method inserts data directly into the datafiles by formatting the data blocks. By bypassing the INSERT statement mechanism, the table constraints and triggers aren’t systematically applied during a direct load. All triggers are disabled, as are several integrity constraints. SQL*Loader

642 CH AP T E R 1 3 ■ L O AD IN G AN D TR A N SF O R M I N G D AT A
automatically disables all foreign keys and check constraints, but the not null, unique, and primary key constraints are still maintained by SQL*Loader. Upon completion of the SQL*Loader run, the disabled constraints are automatically enabled by SQL*Loader if the REENABLE clause has been spec-ified. Otherwise, the disabled constraints must be manually reenabled. The disabled triggers are automatically enabled after the load is completed.
TIPS FOR OPTIMAL USE OF SQL*LOADER
The following tips will help you optimize SQL*Loader during data loads, especially when the data loads are large and/or you have multiple indexes and constraints on the tables in your database.
• Try to use the direct-path loading method as much as possible. It’s much faster than conventional data loading.
• Use the UNRECOVERABLE=true option wherever possible (in direct loads). This will save you considerable time, because the newly loaded data doesn’t need to be logged in the redo log file. Media recovery is still in force for all the other users of the database, and you can always start a new SQL*Loader run if there’s a problem.
• Keep the use of the NULLIF and DEFAULTIF parameters to a minimum. These clauses must be tested for every single row on which they’re used.
• Minimize the number of data type and character set conversions, as they slow down processing.
• Wherever possible, use positional fields rather than delimited fields. SQL*Loader can move from field to field much faster if it’s given the position of the field.
• Map physical and logical records on a one-to-one basis.
• Disable constraints before the load, as the constraints will slow down the loading. Of course, you may some-times end up with errors while enabling the constraints, but it’s a small price to pay for a much faster data load, especially for large tables.
• If you’re using the direct-path loading method, specify the SORTED_INDEXES clause to optimize the load performance.
• If you’re doing large data loads, it’s smart to drop the indexes on the tables before the load. Index maintenance will slow down your SQL*Loader session. If it isn’t possible to drop the indexes, you can make them unusable and use the SKIP_UNUSABLE_INDEXES clause during the load. If it’s a direct load, use the SKIP_INDEX_MAINTENANCE clause.
Some Useful SQL*Loader Data-Loading TechniquesUsing SQL*Loader is efficient, but it’s not without its share of headaches. This section describes how to perform some special types of operations during data loads.
Using the WHEN Clause During Loads
You can use WHEN clauses during data loads to limit the load to only those rows that match certain conditions. For example, in a datafile, you can pick up only those records that have a field matching certain criteria. Here’s an example that shows how to use the WHEN clause in a SQL*Loader control file:
LOAD DATAINFILE *INTO TABLE stagetblAPPEND WHEN (activity_type <>'H') and (activity_type <>'T')FIELDS TERMINATED BY ','

C HA P TE R 1 3 ■ L O A DI N G A N D T R AN S FO R M I N G D A TA 643
TRAILING NULLCOLS/* Table columns here . . .*/BEGINDATA/* Data here . . .*/
The WHEN condition will reject all records where the data record field matching the activity_type column in the stagetbl table is neither H nor T.
Loading the Username into a Table
You can use the user pseudo-variable to load the username into a table during the load. The following example illustrates the use of this variable. Note that the target table stagetbl should have a column called loaded_by so SQL*Loader can insert the username into that column.
LOAD DATAINFILE *INTO TABLE stagetblINSERT(loaded_by "USER")/* Table columns and the data follow . . .*/
Loading Large Data Fields into a Table
If you try to load any field larger than 255 bytes into a table, even if the table column is defined as VARCHAR2(2000) or a CLOB, SQL*Loader won’t be able to load the data. You’ll get an error informing you that the “Field in datafile exceeds maximum length.” To manage the load of the large field, you need to specify the size of the table column in the control file when you’re matching table columns to the data fields, as in this example (for a table column called text):
LOAD DATAINFILE '/u01/app/oracle/oradata/load/testload.txt'INSERT INTO TABLE test123FIELDS TERMINATED BY ','(text CHAR(2000))
Loading a Sequence Number into a Table
Suppose you have a sequence named test_seq, and you want this sequence to be incremented each time you load a data record into your table. Here’s how to do it:
LOAD DATAINFILE '/u01/app/oracle/oradata/load/testload.txt'INSERT INTO TABLE test123 (test_seq.nextval,. . .)
Loading Data from a Table into an ASCII File
You may sometimes want to get data out of the database table into flat files; for example, to later use this data to load data into Oracle tables in a different location. You can write complex scripts to do the job if there are a number of tables, but if there are few tables to load, you can use the following simple method of extracting data using SQL*Plus commands:
SET TERMOUT OFFSET PAGESIZE 0SET ECHO OFFSET FEED OFF

644 CH AP T E R 1 3 ■ L O AD IN G AN D TR A N SF O R M I N G D AT A
SET HEAD OFFSET LINESIZE 100COLUMN customer_id FORMAT 999,999COLUMN first_name FORMAT a15COLUMN last_name FORMAT a25SPOOL test.txtSELECT customer_id,first_name,last_name FROM customer;SPOOL OFF
You may also use the UTL_FILE package to load data into text files.
Dropping Indexes Before Bulk Data Loads
There are two major reasons why you should seriously consider dropping indexes on a large table before performing a direct-path load using the NOLOGGING option. First, it may take you a longer time to do the load with the indexes included with the table data. Second, if you leave indexes on, there will be redo records generated by the changes that will be made to the index structure during the load.
■Tip Even if you choose to load data using the NOLOGGING option, there will be considerable redo generated to mark the changes being made to the indexes. In addition, there will always be some redo to support the data dictionary, even during a NOLOGGING data load operation. The best strategy here is to drop the indexes and rebuild them after the tables are created.
While you’re performing a direct load, the instance may fail halfway through, SQL*Loader may run out of space that it needs to update the index, or SQL*Loader may encounter duplicate values for the index keys. This situation is referred to as the indexes left unusable condition, as the indexes will be unusable upon instance recovery. In such cases, it may be better to create the indexes after the load is complete.
Loading into Multiple Tables
You can use the same SQL*Loader run to load into multiple tables. Here’s an example that shows how to load data into two tables simultaneously:
LOAD DATAINFILE *INSERTINTO TABLE dept WHEN recid = 1 (recid FILLER POSITION(1:1) INTEGER EXTERNAL, deptno POSITION(3:4) INTEGER EXTERNAL, dname POSITION(8:21) CHAR)INTO TABLE emp WHEN recid <> 1 (recid FILLER POSITION(1:1) INTEGER EXTERNAL, empno POSITION(3:6) INTEGER EXTERNAL, ename POSITION(8:17) CHAR, deptno POSITION(19:20) INTEGER EXTERNAL)
In the preceding example, data from the same datafile is simultaneously loaded into two tables, dept and emp, based on whether or not the recid field value is 1.

C HA P TE R 1 3 ■ L O A DI N G A N D T R AN S FO R M I N G D A TA 645
Trapping Error Codes from SQL*Loader
Here’s a simple example of how you can trap the process error codes issued by SQL*Loader:
$ sqlldr PARFILE=test.parretcode=$?if [[retcode !=2 ]] then mv ${ImpDir}/${Fil} ${InvalidLoadDir}/.${Dstamp}.${Fil} writeLog $func "Load Error" "load error:${retcode} on file ${Fil}" else sqlplus / ___EOF /* You can place any SQL statements to process the successfully loaded data */___EOF
Loading XML Data into an Oracle XML Database
SQL*Loader supports the XML data type for columns. If a column is of this type, you can use SQL*Loader to load the XML data into a table. SQL*Loader treats the XML columns as CLOBs. Oracle also lets you load the XML data either from a primary datafile or from an external LOB file. You can use fixed-length fields or delimited fields. The contents of the entire file could also be read into a single LOB field.
Using External Tables to Load DataFor many years, Oracle DBAs used SQL*Loader almost exclusively for loading data into Oracle data-base tables from outside sources, employing either the conventional loading method or the direct-path loading method. Oracle’s external tables feature goes one step further and enables you to use the SQL*Loader functionality to access data stored in operating system files without ever loading the data into a real Oracle table.
If your source data doesn’t need any transformations when loading into the database, using the SQL*Loader to perform a conventional or a direct load is sufficient. External tables complement the functionality of the SQL*Loader. If you want to perform major data transformations before the load, then external tables are the recommended way to go.
Using the external tables feature, you can visualize external data as if it were stored in an Oracle table. When you create an external table, the columns are listed the same way as they are when you create a regular table. However, the data fields in the external file are merely mapped to the external table columns, not actually loaded into them.
External tables don’t actually exist anywhere, inside or outside the database. The term external table implies that a given table structure is mapped to a datafile that’s located in an operating system file. When you create an external table, the only thing that happens in the database is the creation of new metadata entries in the data dictionary for the new table. You can’t change the datafile’s contents in any way while you’re accessing its contents from within the database. In other words, you can only use the SELECT command when you’re dealing with external tables, not the INSERT, UPDATE, or DELETE command.
In reality, an external table is an interface to an external datafile. However, you may query this external table like a virtual table, just as you would query any regular Oracle table, which makes it a very powerful tool for data warehouse ETL activities. You can query external tables or join them with regular tables, without ever loading the external data into your database. In addition, you may create other regular tables or views from the external tables, so this feature comes in handy during the population of data warehouses.
SQL*Loader and the external tables feature perform similarly in terms of data-loading speed, in most cases. The two techniques offer you alternative methods of loading data into your database

646 CH AP T E R 1 3 ■ L O AD IN G AN D TR A N SF O R M I N G D AT A
tables from external sources. The following are the general advantages that the external table method of loading offers in comparison with the SQL*Loader method:
• You can query data in the external files before it’s loaded into the tables.
• You can perform an extensive range of transformations on the data during the load process itself. SQL*Loader is limited in the number of data transformations you can perform.
• You may choose to perform data transformation at the same time you’re loading data into the tables. This is called the pipelining of the two phases. When you use SQL*Loader to load directly into the tables, you can’t perform anything other than the most minimal data trans-formation at load time. Consequently, major transformations must be done in a separate step from that of data loading.
• External tables are suitable for large data loads that may have a onetime use in your database.
• External tables save the time involved in creating real database tables and then aggregating the data dimensions for loading into other tables.
• External tables eliminate the need to create staging or temporary tables, which are almost a must if you’re using SQL*Loader to load the data from external sources.
• You don’t need any physical space even for the largest external table. Once the datafiles are loaded into the operating system, you can create your external tables and start executing SQL queries against them.
If you need to load data remotely, or if your data doesn’t need major transformations, SQL*Loader is the best way to go. External tables are in no way as versatile as regular database tables, because they’re read-only tables. Furthermore, external tables suffer from the limitation that you can’t index them. Therefore, high-powered query work with these tables is impractical. If the data in your staging tables needs to be indexed for some reason, then SQL*Loader is the only viable alternative. The real benefit of the external tables feature is primarily realized in data warehousing environments or in situa-tions where you need to load and transform huge amounts of data when you first load an application.
■Caution If you want to create indexes on a staging table, you’re better off using the SQL*Loader utility to load data into the table. You can’t index an external table!
For example, suppose you have an external datafile named sales_data that contains detailed information about your firm’s sales data for the last year. Your firm wants to perform product and time cost analysis based on this raw data. You create a cost table to do this analysis. Now, the sales_data datafile contains a lot of detailed information on costs, but your company wants the data to be aggregated, say on the basis of regions. External tables are excellent for this kind of analysis, where you have large amounts of raw data available, but you need only certain transformed parts of this data.
Traditionally, data warehousing DBAs had to create staging tables to first transform data, before loading it into the data warehouse. Using just the SQL*Loader, you would need to load the raw data into your database first, and then apply the necessary transformations to it. Using an external table, you can perform the loading and transform operations in one step!
Now, let’s look at how to create and populate external tables.
Creating the External Table LayerThe external table description is also called the external table layer, and it is basically a description of the columns in your external table. This external table layer, along with the access driver, maps the data in the external file to the external table definition.

C HA P TE R 1 3 ■ L O A DI N G A N D T R AN S FO R M I N G D A TA 647
Listing 13-3 shows how to create an external table.
Listing 13-3. Creating an External Table
SQL> CREATE TABLE sales_ext( 2 product_id NUMBER(6), 3 sale_date DATE, 4 store_id NUMBER(8), 5 quantity_sold NUMBER(8), 6 unit_cost NUMBER(10,2), 7 unit_price NUMBER(10,2)) 8 ORGANIZATION EXTERNAL ( 9 TYPE ORACLE_LOADER 10 DEFAULT DIRECTORY ext_data_dir 11 ACCESS PARAMETERS 12 (RECORDS DELIMITED BY NEWLINE 13 BADFILE log_file_dir:'sales.bad_xt' 14 LOGFILE log_file_dir:'sales.log_xt' 15 FIELDS TERMINATED BY "|" LDRTRIM 16 MISSING FIELD VALUES ARE NULL) 17 LOCATION ('sales.data')) 18* REJECT LIMIT UNLIMITED;Table created.SQL>
Let’s analyze this statement in detail, in order to understand the various components of an external table.
CREATE TABLE . . . ORGANIZATION EXTERNAL
The statement CREATE TABLE sales_ext (. . .) describes the external table structure, with the ORGANIZATION EXTERNAL clause that follows it indicating that this isn’t going to be a regular Oracle table, but an external table.
The CREATE statement for an external table is very similar to that of a regular table, except that in addition to the column definitions, you must provide the mapping for the columns to the data fields in the external datafile. In addition, the external table creation statement must provide the operating system location of the external datafile.
Access Parameters
The ACCESS PARAMETERS clause, somewhat similar to the OPTIONS clause in a SQL*Loader control file, indicates the various options chosen, as well as the location of the bad file and log file. Several external table parameters are available to specify the format of the data. Important among them are the following:
• RECORD_FORMAT_INFO: This is an optional clause. The default is RECORDS DELIMITED BY NEWLINE.
• FIXED: When you specify a fixed length by using the FIXED clause, you’re indicating that all records in the external file are of the same length.
ACCESS PARAMETERS (RECORD FIXED 20 FIELDS (. . .))
• VARIABLE: The VARIABLE clause indicates that each record may be a different size, indicated by a number of digits before the beginning of each record.
ACCESS PARAMETERS (RECORDS VARIABLE 2)

648 CH AP T E R 1 3 ■ L O AD IN G AN D TR A N SF O R M I N G D AT A
• When you use the VARIABLE clause, every record in this data set will have the following format, with the first two bytes indicating the length of the record:
22samalapati1999dallastx
• DELIMITED BY: This clause indicates the character that terminates each record. The most common delimiters are the pipe (|) and the comma (,).
• LOAD WHEN: This clause indicates the conditions that must be satisfied before a record can be loaded into a table.
LOAD WHEN (job != MANAGER)
• LOG FILE, BAD FILE, and DISCARD FILE: These are optional parameters, but a log file is always created by default. The bad file and the discard file are created only if data is rejected or data fails to meet a LOAD WHEN condition.
• Condition: This variable compares all or part of a field against an arbitrarily chosen constant string.
Access Driver
The access parameters describe the external data in the datafiles. The access driver ensures that the external data processing matches the description of the external table.
Two types of access drivers are available, and you specify each of them by using the attribute TYPE in the external table creation statement. The first is the ORACLE_LOADER access driver, which is the default. Listing 13-3 creates an external table using the ORACLE_LOADER access driver. Using this access driver, you can only load data into a table from an external text file.
The new ORACLE_DATAPUMP access driver lets you both load and unload data using external dump files. You can read data into database tables from an external dump file. You can also extract data from an Oracle table into an external table’s dump file.
Directory Objects and Their Locations
The clause DEFAULT DIRECTORY indicates the default location for all files that external tables need to read from or write to. You can’t place the external datafiles in a random operating system directory for obvious security reasons. For an external table creation statement to succeed, you must first create a directory object, and then grant rights to specific users on this directory object.
The LOCATION parameter toward the end of the external table creation statement shown in Listing 13-3 indicates where the datafiles for the external table creation are located. The LOCATION parameter could indicate both a directory object and a filename. The format of the LOCATION param-eter is directory: file, where directory is a directory object you’ve created in the database, not an actual directory path on your system. If you omit the directory part of the specification, then it’s assumed that the datafile(s) is located in the directory specified by the DEFAULT DIRECTORY clause. You can also use the directory: file notation to specify the datafiles directly under the ACCESS PARAMETERS clause, if you wish.
SQL*Loader uses the directory object(s) to indicate where the datafiles are located, as well as to store its output files, such as the bad and discard files. A user must have read privileges on the direc-tory object containing the datafiles and write privilege on the directory object containing the output files. If you wish to place both the datafiles and the output files in the same directory object, you may grant both read and write privileges on that directory object to the user. Here’s one such example:

C HA P TE R 1 3 ■ L O A DI N G A N D T R AN S FO R M I N G D A TA 649
SQL> CREATE DIRECTORY ext_data_dir AS '/u01/oradata/ext_data';Directory created.SQL> GRANT READ, WRITE ON DIRECTORY ext_data_dir TO samalapati;Grant succeeded.SQL>
Once you create the directory object ext_data_dir and grant the proper rights, you can then use this as the default directory for placing all the external datafiles as well as output files. The LOCATION parameter in the external table creation statement shown in Listing 13-3 simply names the external datafile, which will be located in the default directory specified by ext_data_dir.
For demonstration purposes, let’s create a new table named costs, into which you’ll eventually load the aggregate data (the totals of the unit_cost and unit_price columns) from the external datafile (external table):
SQL> CREATE TABLE costs 2 (sale_date DATE, 3 product_id NUMBER(6), 4 unit_cost NUMBER (10,2), 5 unit_price NUMBER(10,2));Table created.
Now you’re ready to insert the necessary aggregate data from the external table (external file, actually) sales_ext into the new costs table. This process of first reading data from an external table and then loading it into a normal database table is called loading data. Listing 13-4 shows how to insert data into a normal table from an external table. The Oracle table is named costs, and sales_ext is the external table.
Listing 13-4. Loading Data into a Normal Table from an External Table
SQL> INSERT INTO costs (sale_date, product_id, unit_cost, unit_price) SELECT sale_date, product_id, sum(unit_cost), sum(unit_price) FROM sales_ext GROUP BY time_id, prod_id;SQL>
Note that you can insert only some of the columns in the external table if you choose, and you can transform the data before it’s even loaded into your tables. This is the key difference between using external tables and SQL*Loader to load data into Oracle tables. The SQL*Loader tool permits you to perform data transformation, but its capabilities in that area are extremely limited, as you saw earlier in this chapter. You can use just about any arbitrary SQL transformations when creating an external table.
Populating External TablesThe terms loading and unloading in the context of external tables can be confusing, so let’s pause and make sure you understand these terms without any ambiguity. When you deal with external tables, this is what these terms mean:

650 CH AP T E R 1 3 ■ L O AD IN G AN D TR A N SF O R M I N G D AT A
• Loading data means reading data from an external table and loading it into a regular Oracle table. Oracle first reads the data stream from the files you specify. Oracle will then convert the data from its external representation to an Oracle internal data type and pass it along to the external table interface.
• Unloading data means reading data from a regular Oracle table and putting it into an external table. Actually, you’ll be loading table data into an external file. In Oracle Database 11g, you can load and transform large volumes of data into platform-independent, Oracle proprietary flat files for data propagation or storage.
The ORACLE_DATAPUMP access driver can load as well extract data; that is, it can both load an external table from a flat file and extract data from a regular database table to an external flat file. This external flat file data is written in a proprietary format, which only the ORACLE_DATAPUMP access driver can read. You can then use this newly created file to create an external table in the same data-base or a different database.
When you load an Oracle table from an external table (data loading), you use the INSERT INTO . . . SELECT clause, as shown in Listing 13-4. When you populate an external table using Oracle table data (data unloading), you use the CREATE TABLE . . . AS SELECT clause (CTAS), as shown later in Listing 13-6.
Following are some of the benefits of being able to populate tables with external tables:
• Loading table data into flat files means that you can now store data or move it to different databases easily. External tables help move large volumes of data across platforms, since they are platform-independent.
• In data warehousing environments, there are many situations where you need to perform complex ETL jobs. You can use SQL transformations to manipulate the data in the external tables before reloading them into the same or other databases.
Note that when you talk about writing to external tables, you are really referring to writing to an external file. You use a SELECT statement to extract table data to this operating system file. The ORACLE_DATAPUMP access driver writes data to this file in a binary Oracle-internal Data Pump format, and you can then use this file to load another external table in a different database.
Creating an External Table with the ORACLE_DATAPUMP Access Driver
The example in Listing 13-5 shows how you can create an external table and populate it with data from an external flat file using the ORACLE_DATAPUMP access driver rather than the ORACLE_LOADER driver.
Listing 13-5. Creating an External Table with the ORACLE_DATAPUMP Access Driver
SQL> CREATE TABLE test_xt( 2 product_id NUMBER(6), 3 warehouse_id NUMBER(3), 4 quantity_on_hand NUMBER(8)) 5 ORGANIZATION EXTERNAL( 6 TYPE ORACLE_DATAPUMP 7 DEFAULT DIRECTORY ext_data_dir 8 LOCATION ('test_xt.dmp'));Table created.SQL>
To load data from this external table into an existing database table, you can use the INSERT INTO . . . SELECT clause, as shown earlier in Listing 13-4.

C HA P TE R 1 3 ■ L O A DI N G A N D T R AN S FO R M I N G D A TA 651
Writing to an External Table
The example in Listing 13-6 shows how to write to an external table.
Listing 13-6. Populating an External Table
SQL> CREATE TABLE test_xt ORGANIZATION EXTERNAL( TYPE ORACLE_DATAPUMP DEFAULT DIRECTORY ext_data_dir LOCATION ('test_xt.dmp')) AS SELECT * FROM scott.dept;
Note how the external table creation statement uses the SELECT * FROM clause to write data from the scott.dept table to the external table (file). If your new external table contains some but not all of the columns of the table scott.dept, you use the appropriate SELECT statement instead of the SELECT * FROM statement.
■Note Remember that when you load an Oracle table from an external table (data loading), you use the INSERT INTO . . . SELECT clause. When you populate an external table using Oracle table data (data unloading), you use the CREATE TABLE . . . AS SELECT clause.
If you now go look in the location specified for the default directory (ext_data_dir), you’ll see the following:
SQL> ls -altrTotal 24drwxr-xr-x 5 root root 4096 March 4 14:08 ..-rw-r--r-- 1 oracle oinstall 41 March 5 10:08 TEST_XT_28637.log-rw-r------- 1 oracle oinstall 12288 March 5 10:08 test_xt.dmp
The first file, test_xt_28637.log, logs the creation of this external table. The dump file test_xt.dmp contains the data from the table. You are creating the external table test_xt as an external table. The table structure and data both come from the regular Oracle table scott.dept. If you wish, you can then use this dump file in the same database or a different database to load other tables. Note that you must create the default directory (ext_data_dir) beforehand for this external table creation statement to succeed. The CTAS method of table creation will load the data from the scott.dept table into the new external table dept_xt. The CTAS command simply stores the table data in the external file called dept_xt_dmp. Thus, the external table is really composed of proprietary format, operating system–independent flat files.
You can also use the ORACLE_DATAPUMP access loader to extract Oracle table data into multiple files, as shown here:
SQL> CREATE TABLE extract_cust ORGANIZATION EXTERNAL (TYPE ORACLE_DATAPUMP DEFAULT DIRECTORY ext_data_dir ACCESS PARAMETERS (NOBADFILE NOLOGFILE) LOCATION ('extract_cust1.exp', 'extract_cust2.exp', 'extract_cust3.exp', 'extract_cust4.exp')) PARALLEL 4 REJECT LIMIT UNLIMITED AS SELECT c.*, co.country_name, co.country_subregion, co.country_region FROM customers c, countries co where co.country_id=c.country_id;