fun-fly mission; dart-like stability · when i received that first issue, i was hooked on model...
TRANSCRIPT

by BLAINE STETLER
FUN-FLY MISSION; DART-LIKE STABILITY
Below: left to right: Kenny Martin (kneeling), 11, of Summerfield, FL; Scott Roddenberry, 15, Floral City, FL; Josh Courter, 16, of Crystal River, FL; Beau Terrell, 14, of Invernass, FL; Michael LaRosa, 17, of Invernass, FL; Gary Plutta, 15, of Lecanto, FL; Glenn Hawkins (kneeling), 12, of Lecanto, FL; Aaron Monier, 15, of Invernass, FL; and Blake Thorpe, 12, Hernando, FL. All of the nine are or were Blaine's students; five are flying Notforsales. (Photo by Phil Courter.)
Kenny Martin, 11, pilots his Notforsale. (Photo by Jeff Tibbetts.)
I N 1955 , W H E N I was 11 years old and bedridden, my
father scraped together enough money to subscribe to Model Airplane News. I r e m e m b e r what was on the cover of my first i s sue : an R/C a i rp lane called the "Smog Hog" held by Howard Bonner and a control-l ine m o d e l — t h e " T h u n d e r -b i rd"—he ld by Bob Palmer . You old-timers will remember both of these guys. The Smog Hog wing was eventually modified and used as the inspiration for the low-wing Astro Hog—originally kitted by Berkely and now by Sig Hobbies. I believe Bob Palmer went into the AMA Hall of Fame.
When I received that first issue, I was hooked on model airplanes, hook, line and sinker! To have Model Airplane News publish this design for the Notforsale 37 years later is, for me, quite a thrill. Over the years since then, I have learned to fly reasonably well with the aid of some very good friends. After going through (destroying) three or four planes, I could take off, fly around and successfully land. Eventually, I decided to help others learn to fly, and I have trained a few dozen new R/C pilots in recent years, many of them very eager youngsters.
Lately, I have been building kits for other people, mostly scratch-building for myself, and testing aircraft after aircraft. I rebuild crashed airplanes, make them flight-worthy, and then someone buys them from me so I can go on to the next project. Finally, I decided to design a totally different airplane, and the result is the Notforsale (see "Behind the Notfors a l e " s ideba r ) . There are about a dozen flying now, and the des ign has proved to be as reliable as it is popular.
CONSTRUCTION Start by cutting out the major parts from the plans. I cut out the 1/32" aircraft ply doublers (two pieces), the
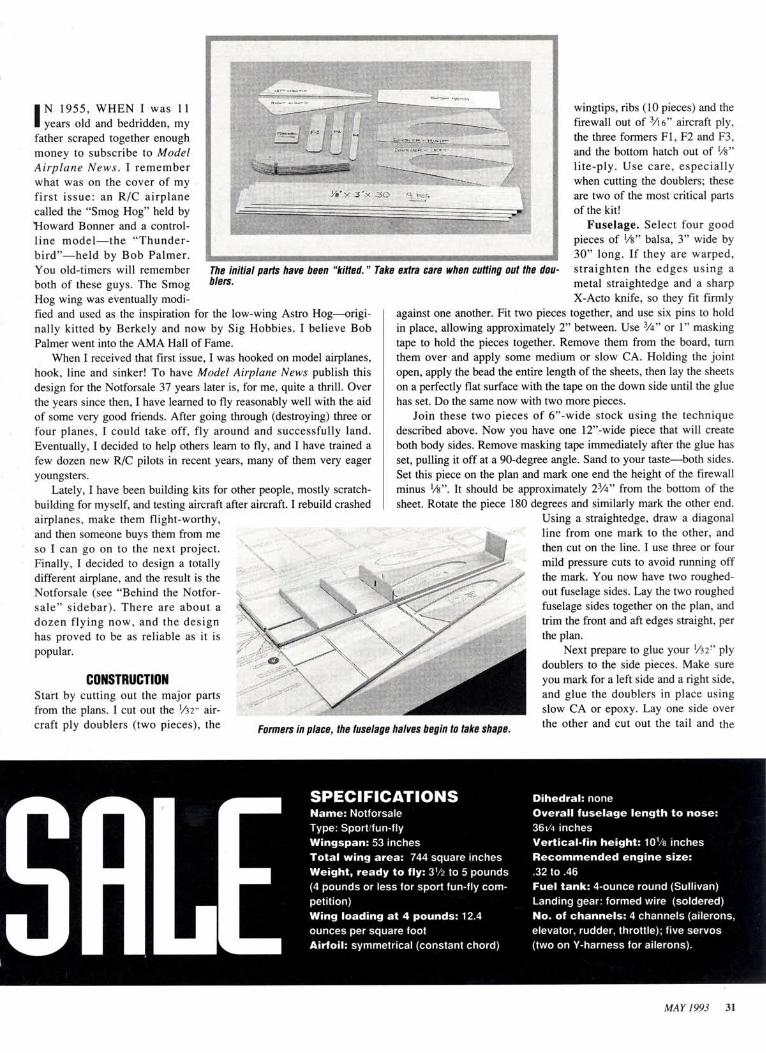
The initial parts have been "kitted." Take extra care when cutting out the doublers.
Formers in place, the fuselage halves begin to take shape
wingtips, ribs (10 pieces) and the firewall out of 3/16" aircraft ply, the three formers F1 , F2 and F3, and the bottom hatch out of 1/8" l i te-ply . Use care , espec ia l ly when cutting the doublers; these are two of the most critical parts of the kit!
F u s e l a g e . Select four good pieces of 1/8" balsa, 3 " wide by 3 0 " long. If they are warped, s t r a igh ten the edges us ing a metal straightedge and a sharp X-Acto knife, so they fit firmly
against one another. Fit two pieces together, and use six pins to hold in place, allowing approximately 2" between. Use 3/4" or 1" masking tape to hold the pieces together. Remove them from the board, turn them over and apply some medium or slow CA. Holding the joint open, apply the bead the entire length of the sheets, then lay the sheets on a perfectly flat surface with the tape on the down side until the glue has set. Do the same now with two more pieces.
Join these two pieces of 6"-wide stock using the technique described above. Now you have one 12"-wide piece that will create both body sides. Remove masking tape immediately after the glue has set, pulling it off at a 90-degree angle. Sand to your taste—both sides. Set this piece on the plan and mark one end the height of the firewall minus 1/8". It should be approximately 23/4" from the bottom of the sheet. Rotate the piece 180 degrees and similarly mark the other end.
Using a straightedge, draw a diagonal line from one mark to the other, and then cut on the line. I use three or four mild pressure cuts to avoid running off the mark. You now have two roughed-out fuselage sides. Lay the two roughed fuselage sides together on the plan, and trim the front and aft edges straight, per the plan.
Next prepare to glue your 1/32'' ply doublers to the side pieces. Make sure you mark for a left side and a right side, and glue the doublers in place using slow CA or epoxy. Lay one side over the other and cut out the tail and the
SALE SPECIFICATIONS N a m e : Notforsale Type: Sport/fun-fly W i n g s p a n : 53 i n c h e s T o t a l w i n g a r e a : 744 s q u a r e i n c h e s W e i g h t , r e a d y t o f l y : 31/2 to 5 p o u n d s (4 p o u n d s or l e s s for sport fun-fly c o m petition) W i n g l o a d i n g a t 4 p o u n d s : 12.4 o u n c e s per s q u a r e foot A i r f o i l : symmetr ica l ( cons tant chord)
D i h e d r a l : n o n e O v e r a l l f u s e l a g e l e n g t h t o n o s e : 361/4 i n c h e s V e r t i c a l - f i n h e i g h t : 101/8 is i n c h e s R e c o m m e n d e d e n g i n e s i z e : .32 to .46 F u e l t a n k : 4 - o u n c e round (Sull ivan) Landing gear: formed wire ( so ldered) N o . of c h a n n e l s : 4 c h a n n e l s (a i lerons , e levator , rudder, throttle); five s e r v o s (two o n Y - h a r n e s s for a i lerons) .

O R D E R T H E F U L L - S I Z E P L A N . . . P A G E 1 2 1
The tail section is tapered with a sanding block so that the two sides will properly join.
Note the five rear 1/16-inch webbing pieces that are glued to the rear of the center spars.
wing insert. When you've completed this airplane, you will swear that the engine, visually, has upthrust. The triangular fuselage produces this visual effect, and you will be tempted to add washers to your engine mount. Don't! Just make sure at this stage that everything is straight and in line.
Now lay the sides over the plan and mark your former locations on both fuselage sides. Glue 1/4" balsa triangle stock along the top of both inner fuselage sides and along the bottom inside edge from the tail to the front edge of former F 1 . Using a triangle, glue the firewalls, F 1 , F2, and F3 into place. Glue 1 / 4 " - s q u a r e hardwood rails from former F3 to the firewall. Use a saw to score the hardwood rails so they will bend at the point shown on the
plan. Glue a 1/4" balsa piece vertically to the aft end of the tail sec tion, and taper with a sanding block to a reasonable angle.
Glue the other fuselage side to the firewall, but do not glue form ers or the tail section together yet. Fit the 1/8" lite-ply hatch to the bot
tom of the fuselage, align on the plans, then drill the eight screw holes into the hardwood rails using a small drill. Remove and drill out the hatch holes to the next, larger drill bit size and attach to the rails with screws.
Now, checking the vertical alignment on the plan, bend and glue formers F1 , F2, F3 and the tail former (1/4" tapered piece) together. Holding the end together with several clothespins or straight pins will allow you to do this easily. You will have to trim some triangle stock at the end, top and bottom, before
you glue them together. Check for straightness over plans. Lay the fuselage aside for a while.
Rudder . Build the rudder per the plan using 3/8"-square balsa. Add your triangular piece for insertion of your tail-wheel wire. Drill the hole slightly larger than your wire so you can fill with extra epoxy when you install it. This adds strength and helps prevent the wire
Above: rudder, stab, elevator and ailerons are of conventional construction.
Right: the bottom hatch has been attached.

Feeder tubes tor the aileron servos were made from rolled, taped paper and glued into holes that were cut in the center ribs.
from loosening. Also, coating the triangular piece with thin CA will strengthen the whole sect ion. This is also where your control horns will be mounted.
Stab, elevator and ailerons. Build your horizontal stab and elevator surfaces in the same way, but use 1/4x1/2" hard balsa for the leading and trailing edges and 1/4"-square for the rest of the structure. Construct elevators per plan and connect with 1/4" dowel. Next, build both ailerons on one side of the plan, and flip over as per the elevator construction. At this stage, I use pins or masking tape to trial-fit all tail surfaces to the body. Checking during various stages can save you grief later.
Wings. Build directly over the plan. Cut to length three pieces of 3/8"-square balsa for wing spars and leading edges. Pin the bottom spar into place, angling the pins toward the rear of the wing for easy removal. Use at least one pin between every rib location. This wing is built in one piece. I use 48" stock whenever possible. At the rear, I set a block the entire length of the wing approximately 11/8 inches high for the trailing edge of the ribs to rest on. This is to prevent wash-out or wash-in from being accidentally built into the wing. The wing should be perfectly straight, or as close as possible.
Using med ium CA, tack each rib into place. I make a simple vertical holder out of some balsa scrap and weight the bottom so that each rib is true. Glue the 1/4"-square hard balsa trailing edge to the rear of the wing. Weight down the rear (or pin it) at this time to your rear support block. Put your top spar on the ribs and securely glue it into place.
Glue three pieces of 1/16" webbing to the center front spars at this time using epoxy or slow Jet. Glue the five rear 1/16" webbing pieces to the rear of the center spars. If splicing together 24" spars, increase center strength with 1/8" hardwood stock webbing (grain running lengthwise), or by using lite-ply. Glue the 1/16x1 trailing edge and 3 /8"-square leading edge into place.
The framed-up fuselage.
all four center ribs, and add the 3/8x1/16" capstrips to each rib including end ribs (make end-rib capstrips flush with rib outer edge). Install your 1/4" spruce rails for mounting your aileron servos.
Repeat the covering and capstripping process on the bottom, and sand to taste. You will next install the wing. The wingtips and ailerons are attached later—not now.
BEHIND THE NOTFORSALE
To sheet the front of the wing, I use m e d i u m 4 " -wide ba lsa . Cut ho les in the four center ribs, and glue two paper feeder tubes for a i l e ron servos in the center R-2 ribs. Cut a hole in each paper tube for feeding your servo leads through.
Add sheeting to
This simple rib jig ensures true alignment and is easier to use than a triangle square.
I knew what I wanted when I designed the Notforsale: an airplane that would
be good at sport fun-fly competition, control lable, particularly docile at slow speeds and capable of flying well when inverted. But I wanted a body—not a boom for the fuselage—and an airplane that would immediately correct itself and slow down drastically when throttled back.
Every unusual characteristic of this plane is there for a r e a s o n : thick tail su r faces for inc r e a s e d tail-end drag, ailerons starting 3" away from the fuselage to allow air to flow for uncluttered elevator response, an uncowled engine for best engine per formance and cooling, and a triangular fuselage that simulates a vertical airfoil for immediate directional correction and possible knife-edge flight.
It c a m e out a little ugly—like my Pekingese—but I love my Peke! You should have heard the comments when I took my partially framed-up original to one of our club meetings. "Which way is up?" "You going to put landing gear on the top or bottom?" "That thing won't roll!" "It surely won't spin with that much body," and on and on.
So when I tested the airplane, I had many reservations. Ground control was super, owing to the lack of flex in the simple landing gear. I used both rudder and
aileron when taxiing in the wind, and the wind didn't bother it, even with the massive side area.
I opened the throttle on the ASP .46. Airborne in about 8 feet; it gained some altitude so I throttled back to one-third power, and flew it around gently for a few minutes (to stop my hands from shaking). Then I proceeded through a ser ies of rolls, loops, (inside and out), spins (both right and left), crazy-8s, and sustained
inverted (surprisingly requiring no trim ad jus tmen t s ) . The fuel (4-ounce tank) ran out in about 10 to 15 minutes , and it coasted in for a dead-stick, three-point stall landing.
I was as amazed as anyone at the field, so we took off aga in ,
throttled it back to half speed and passed the transmitter around. We flew it until the battery was too low.
Then the questions came: "How much do you want for it?" "Will you sell it?" "Can I buy it?" To make a long story short, my answer was, "Guys, this is my airplane, and it's not for sale!" In the next couple of weeks, the same thing happened at several other area clubs.
So, one night after a couple of drinks (I believe it was tea?) , I took an X-Acto knife out and cut some letters out of MonoKote and put them on the side of the airplane. Thus, it was christened the "Notforsale."

INSTALLING THE WING Carefully feed the wing through until it is centered. Make sure the top of the wing with the servo cutouts faces upward. At this stage, I like to pin everything together in a trial alignment before I glue anything else. With the bottom hatch plate attached, set the whole plane on a flat surface, insert the horizontal tail, and block the tail and wing up equally. Pin the tail surfaces, ailerons and wingtips into position. Check and double-dheck for alignments.
Tack the wing where the sheeting touches so it can't shift; put masking tape on the outer surface of the wing/fuselage joints; and apply 5-minute epoxy to the inside of the wing/fuselage joints (this forms a fillet). You can also use CA with soft triangle stock to reinforce the bond for strength.
H o r i z o n t a l ta i l . Insert the horizontal tail and align carefully. Visually check that it is as straight as your wing. Measure the distance from the leading edge of the tail to the trailing edge of the wing to make sure both are equal; CA into place.
RADIO INSTALLATION All your radio gear is installed in the bottom of the fuselage (via the lite-ply hatch) before you sheet the fuselage top and bottom.
Servos . I use full-length 2/56 rods th readed at one end enclosed in nylon tubing. I prefer to have the control horn on the top of the elevator, so in a pu l lou t from high power dives, the servo is pulling and you have no possible flex. Install dual l inkages to your rudder. This is to safeguard more effectively against flutter. Remem-ber, the tail section is made intentionally thick and large; the tail's drag maintains directional stability, especially when you throttle back. Epoxy all control-rod guide tubes at formers F2. Install servos in the bottom wing section by cutting out parts of the wing sheeting and gluing in 1/4" hardwood servo mounts.
WRAPPING UP Attach your bent tail-wheel wire to the rudder, as shown on the plans. Make sure one rudder hinge is at the very top of the fuselage tail. Test-attach your ailerons to the wing—leave at least 1/8" for clearance for the wingtips—and place a hinge at the end of each aileron. Glue on the wingtips and
sand to shape, then CA the soft wingtip covering guides into place (see plans).
L a n d i n g gear. Solder your landing gear
Mounting the engine at a 45-degree angle keeps oil away from the servo in the top of the wing and directs the exhaust below the wing.
The Notforsale is completely framed.
together; I use 5/32" wire for main and 1/16" for forward support wire. Wrap copper wire at the connecting point after cleaning and sanding the area to be soldered. Using a small torch, solder well and let cool. Attach the main gear to the hatch.
E n g i n e m o u n t . Position and drill the firewall, and mount the engine (.32 to a .46).
Strive for accurate center-l ine thrus t . Mount the eng ine at a 4 5 - d e g r e e ang le . This keeps fuel away from the servo in the top of the wing and causes the exhaust to exit below the wing. Make sure the engine doesn ' t touch the landing-gear wire.
Glue on your 1/8" ply tail-wheel adapter mounting. Using 1 /8" balsa, sheet the top and bottom (aft of the hatch) of the airplane. Attach the hatch retaining
l ip . Be c rea t ive when cove r ing . A " N o t f o r s a l e " will be r ecogn izab le as a " N o t f o r s a l e " no mat te r what the co lor scheme! Just one hint: make the top of the wing totally different from the bottom, so you easily can tell if the plane is inverted in the air. Attach all control surfaces, and I recommend that you pin all hinges.
Fuel tank . Install a 4-ounce round tank; you may have to trim away most of your leading edge, but don't worry. A 4-ounce tank will give you 8 minutes full-bore with the ASP .46. Install throttle servo and linkage to the engine. I use a micro Airtronics servo. Any full-size servo is acceptable, but the lighter the airplane, the more competitive it will be.
FLIGHT TESTING Make sure your balance is at the indicated CG. If you are a novice, have your controls
checked out by an experienced flier, and allow him or her to test-fly and trim the controls for you. Pick s o m e o n e you know and trust! Don't rush! With the recommended throws (see plan) the plane will be very gentle on the ground and in the air.
Take off directly into the wind us ing a m o d e r a t e amount of "up" only after the airplane has reached a good speed. Once in the air, reduce to approx imate ly half to two-thirds throttle,
and climb moderately to a minimum of 100 to 150 feet.
With plenty of altitude, try some loops, rolls, etc. If it is at all "squirrely" (erratic), your CG is too far back and you are tail-heavy. If it is "doggy" (slow to respond) you are nose-heavy, but, either way, the airplane should land easily if throttled back to idle. Just keep the nose level or a hair down on your landing. I recommend that, on your test flight, you place the battery pack under the tank. If the plane does not loop or spin fast enough, move the pack back to the optional position shown on the plan.
A few words of warning on any test flight (for low-time pilots). Major causes of failures on any airplane are: • Pulling the airplane off the ground (pulling too much up) before the airplane is up to flying speed, especially in a headwind or cross-wind; • Climbing too steeply with too much power (pilot then has a tendency to overreact and over-control). I call this "panic attack." • Not gaining enough altitude before trying ae roba t i c s . R e m e m b e r , a l t i tude is your friend and will give you a chance to recover if something goes screwy. Most "basket cases" (both airplane and pilot) involve sudden contact with the ground from low altitude! • Out-of-trim conditions. Make sure all control surfaces are not warped and are straight with trims centered. Fly the airplane to a safe altitude before trying to adjust any of the trim controls.
Finally, once you have a couple of flying sessions under your belt and are familiar with your Notforsale, increase your throws gradually and experiment. Happy flying, people. And don' t forget to pull out your transmitter antenna.... •