fujitsu tablet stylistic q665solutions.us.fujitsu.com/www/content/pdf/support... · fujitsu tablet...
TRANSCRIPT

SystemOperating Manual
FUJITSU Tablet STYLISTIC Q665

Contact address in North America
FUJITSU AMERICA INC.
1250 East Arques Avenue, Sunnyvale,
CA 94085-3470, U.S.A.
Telephone: 800 831 3183 or 408 746 6000
"http://solutions.us.fujitsu.com"
"http://solutions.us.fujitsu.com/contact"
Have a question? Email us at: "[email protected]"
Copyright
© 2 0 1 5 Fujitsu America, Inc. All rights reserved
B5FK-6121-02ENZ0-00
FUJITSU Tablet STYLISTIC Q665
Operating Manual
Declarations of conformity 7
Fujitsu Contact Information 8
Ports and controls 10
Important notes 13
First-time setup of your device 18
Working with the Tablet PC 22
Accessories for your Tablet PC(optional) 45
Security functions 57
Connecting external devices 64
Settings in BIOS Setup Utility 68
Troubleshooting and tips 71
Technical data 81
Manufacturer’s notes 86
Declarations of conformity 89
FCC and IC Regulatory Information 90
Appendix 94
Index 109

Copyright and Trademark InformationFujitsu America, Incorporated has made every effort to ensure the accuracy and completenessof this document; however, as ongoing development efforts are continually improving thecapabilities of our products, we cannot guarantee the accuracy of the contents of thisdocument. We disclaim liability for errors, omissions, or future changes.
Fujitsu, the Fujitsu logo and STYLISTIC are registered trademarks of Fujitsu Limitedor its subsidiaries in the United States and other countries.
Intel and Intel Core are trademarks or registered trademarks of Intel Corporation orits subsidiaries in the United States and other countries.
Microsoft and Windows are either registered trademarks or trademarks of MicrosoftCorporation in the United States and/or other countries.
The ExpressCard word mark and logo are owned by the Personal ComputerMemory Card International Association (PCMCIA) and any use of such marks byFujitsu America, Incorporated is under license.
Google is a trademark or registered trademark of Google Incorporated.
Bluetooth is a trademark of Bluetooth SIG, Inc., USA.
OmniPass is a trademark of Softex, Inc.
Roxio is a trademark of Roxio, a division of Sonic Solutions.
PowerDirector, PowerDVD, YouCam, and MakeDisc are trademarks of CyberLink Corp.
Adobe, Acrobat, and Adobe Reader are either registered trademarks or trademarks of AdobeSystems Incorporated in the United States and/or other countries.

Contents
ContentsDeclarations of conformity . . . . . . . . . . . . . . . . . . . . . . . . . . . . . . . . . . . . . . . . . . . . . . . . . . . . . . . . . . . . . 7
Fujitsu Contact Information . . . . . . . . . . . . . . . . . . . . . . . . . . . . . . . . . . . . . . . . . . . . . . . . . . . . . . . . . . . . 8Notational conventions . . . . . . . . . . . . . . . . . . . . . . . . . . . . . . . . . . . . . . . . . . . . . . . . . . . . . . . . . . . . . . . . . . 9
Ports and controls . . . . . . . . . . . . . . . . . . . . . . . . . . . . . . . . . . . . . . . . . . . . . . . . . . . . . . . . . . . . . . . . . . . . . 10
Important notes . . . . . . . . . . . . . . . . . . . . . . . . . . . . . . . . . . . . . . . . . . . . . . . . . . . . . . . . . . . . . . . . . . . . . . . . 13Safety instructions . . . . . . . . . . . . . . . . . . . . . . . . . . . . . . . . . . . . . . . . . . . . . . . . . . . . . . . . . . . . . . . . . . . . . . 13Additional safety notes for devices with wireless components . . . . . . . . . . . . . . . . . . . . . . . . . . . . . . . 14Protecting the display screen . . . . . . . . . . . . . . . . . . . . . . . . . . . . . . . . . . . . . . . . . . . . . . . . . . . . . . . . . . . . 14Energy saving . . . . . . . . . . . . . . . . . . . . . . . . . . . . . . . . . . . . . . . . . . . . . . . . . . . . . . . . . . . . . . . . . . . . . . . . . . 14
Energy saving under Windows . . . . . . . . . . . . . . . . . . . . . . . . . . . . . . . . . . . . . . . . . . . . . . . . . . . . . . . 14Traveling with your Tablet PC . . . . . . . . . . . . . . . . . . . . . . . . . . . . . . . . . . . . . . . . . . . . . . . . . . . . . . . . . . . . 15
Before you travel . . . . . . . . . . . . . . . . . . . . . . . . . . . . . . . . . . . . . . . . . . . . . . . . . . . . . . . . . . . . . . . . . . . 15Transporting the Tablet PC . . . . . . . . . . . . . . . . . . . . . . . . . . . . . . . . . . . . . . . . . . . . . . . . . . . . . . . . . . . 16
Cleaning the Tablet PC . . . . . . . . . . . . . . . . . . . . . . . . . . . . . . . . . . . . . . . . . . . . . . . . . . . . . . . . . . . . . . . . . . 16Further information on cleaning the Tablet PC . . . . . . . . . . . . . . . . . . . . . . . . . . . . . . . . . . . . . . . . . 16
Cleaning with disinfectant wipes . . . . . . . . . . . . . . . . . . . . . . . . . . . . . . . . . . . . . . . . . . . . . . . . . . . . . . . . . . 17
First-time setup of your device . . . . . . . . . . . . . . . . . . . . . . . . . . . . . . . . . . . . . . . . . . . . . . . . . . . . . . . . . 18Unpacking and checking the device . . . . . . . . . . . . . . . . . . . . . . . . . . . . . . . . . . . . . . . . . . . . . . . . . . . . . . 18Choose a location . . . . . . . . . . . . . . . . . . . . . . . . . . . . . . . . . . . . . . . . . . . . . . . . . . . . . . . . . . . . . . . . . . . . . . . 19Connecting the AC adapter . . . . . . . . . . . . . . . . . . . . . . . . . . . . . . . . . . . . . . . . . . . . . . . . . . . . . . . . . . . . . . 19Switching on the device for the first time . . . . . . . . . . . . . . . . . . . . . . . . . . . . . . . . . . . . . . . . . . . . . . . . . . 20
Installing Bonus Apps . . . . . . . . . . . . . . . . . . . . . . . . . . . . . . . . . . . . . . . . . . . . . . . . . . . . . . . . . . . . . . . . 21
Working with the Tablet PC . . . . . . . . . . . . . . . . . . . . . . . . . . . . . . . . . . . . . . . . . . . . . . . . . . . . . . . . . . . . 22Status indicators . . . . . . . . . . . . . . . . . . . . . . . . . . . . . . . . . . . . . . . . . . . . . . . . . . . . . . . . . . . . . . . . . . . . . . . . 22Switching the Tablet PC on . . . . . . . . . . . . . . . . . . . . . . . . . . . . . . . . . . . . . . . . . . . . . . . . . . . . . . . . . . . . . . 24
Programing the ON/OFF button . . . . . . . . . . . . . . . . . . . . . . . . . . . . . . . . . . . . . . . . . . . . . . . . . . . . . . 24Switching the Tablet PC off . . . . . . . . . . . . . . . . . . . . . . . . . . . . . . . . . . . . . . . . . . . . . . . . . . . . . . . . . . . . . . 25Handwriting recognition . . . . . . . . . . . . . . . . . . . . . . . . . . . . . . . . . . . . . . . . . . . . . . . . . . . . . . . . . . . . . . . . . . 25Touchscreen . . . . . . . . . . . . . . . . . . . . . . . . . . . . . . . . . . . . . . . . . . . . . . . . . . . . . . . . . . . . . . . . . . . . . . . . . . . . 26Select display orientation (portrait or landscape format) . . . . . . . . . . . . . . . . . . . . . . . . . . . . . . . . . . . . 27Using fingers . . . . . . . . . . . . . . . . . . . . . . . . . . . . . . . . . . . . . . . . . . . . . . . . . . . . . . . . . . . . . . . . . . . . . . . . . . . 27
Calibrate the Dual Digitizer for finger-based operation of the device. . . . . . . . . . . . . . . . . . . . . . 27Actions with one finger (Windows 8.1 Modern) . . . . . . . . . . . . . . . . . . . . . . . . . . . . . . . . . . . . . . . . . 28Actions with one finger (Windows 7 / Windows 8.1 Desktop) . . . . . . . . . . . . . . . . . . . . . . . . . . . . 30Actions with two fingers (Windows 7 / Windows 8.1 Desktop) . . . . . . . . . . . . . . . . . . . . . . . . . . . 31
Using the stylus . . . . . . . . . . . . . . . . . . . . . . . . . . . . . . . . . . . . . . . . . . . . . . . . . . . . . . . . . . . . . . . . . . . . . . . . . 33Stylus location . . . . . . . . . . . . . . . . . . . . . . . . . . . . . . . . . . . . . . . . . . . . . . . . . . . . . . . . . . . . . . . . . . . . . . 34Adjusting the stylus . . . . . . . . . . . . . . . . . . . . . . . . . . . . . . . . . . . . . . . . . . . . . . . . . . . . . . . . . . . . . . . . . . 34Calibrating the stylus . . . . . . . . . . . . . . . . . . . . . . . . . . . . . . . . . . . . . . . . . . . . . . . . . . . . . . . . . . . . . . . . 35Securing the stylus tether (optional) . . . . . . . . . . . . . . . . . . . . . . . . . . . . . . . . . . . . . . . . . . . . . . . . . . . 35
Tablet buttons . . . . . . . . . . . . . . . . . . . . . . . . . . . . . . . . . . . . . . . . . . . . . . . . . . . . . . . . . . . . . . . . . . . . . . . . . . 36Webcam . . . . . . . . . . . . . . . . . . . . . . . . . . . . . . . . . . . . . . . . . . . . . . . . . . . . . . . . . . . . . . . . . . . . . . . . . . . . . . . 37Rechargeable battery . . . . . . . . . . . . . . . . . . . . . . . . . . . . . . . . . . . . . . . . . . . . . . . . . . . . . . . . . . . . . . . . . . . 37
Charging and maintaining the battery . . . . . . . . . . . . . . . . . . . . . . . . . . . . . . . . . . . . . . . . . . . . . . . . . 37Using the energy saving functions . . . . . . . . . . . . . . . . . . . . . . . . . . . . . . . . . . . . . . . . . . . . . . . . . . . . . . . . 38Memory cards . . . . . . . . . . . . . . . . . . . . . . . . . . . . . . . . . . . . . . . . . . . . . . . . . . . . . . . . . . . . . . . . . . . . . . . . . . 39
Supported formats . . . . . . . . . . . . . . . . . . . . . . . . . . . . . . . . . . . . . . . . . . . . . . . . . . . . . . . . . . . . . . . . . . 39
Fujitsu 3
Contents
Inserting the memory card . . . . . . . . . . . . . . . . . . . . . . . . . . . . . . . . . . . . . . . . . . . . . . . . . . . . . . . . . . . 39Removing the memory card . . . . . . . . . . . . . . . . . . . . . . . . . . . . . . . . . . . . . . . . . . . . . . . . . . . . . . . . . . 40
SIM card . . . . . . . . . . . . . . . . . . . . . . . . . . . . . . . . . . . . . . . . . . . . . . . . . . . . . . . . . . . . . . . . . . . . . . . . . . . . . . . 41Inserting a SIM card . . . . . . . . . . . . . . . . . . . . . . . . . . . . . . . . . . . . . . . . . . . . . . . . . . . . . . . . . . . . . . . . . 41Removing a SIM card . . . . . . . . . . . . . . . . . . . . . . . . . . . . . . . . . . . . . . . . . . . . . . . . . . . . . . . . . . . . . . . 42
Wireless LAN/Bluetooth/4G/LTE/NFC wireless components . . . . . . . . . . . . . . . . . . . . . . . . . . . . . . . . . 42Switching the wireless components on and off . . . . . . . . . . . . . . . . . . . . . . . . . . . . . . . . . . . . . . . . . 42Configuring WLAN access . . . . . . . . . . . . . . . . . . . . . . . . . . . . . . . . . . . . . . . . . . . . . . . . . . . . . . . . . . . 42Further information on WLAN and Bluetooth . . . . . . . . . . . . . . . . . . . . . . . . . . . . . . . . . . . . . . . . . . . 43Access via UMTS . . . . . . . . . . . . . . . . . . . . . . . . . . . . . . . . . . . . . . . . . . . . . . . . . . . . . . . . . . . . . . . . . . . 43Access via Wireless WAN . . . . . . . . . . . . . . . . . . . . . . . . . . . . . . . . . . . . . . . . . . . . . . . . . . . . . . . . . . . . 43Access via 4G . . . . . . . . . . . . . . . . . . . . . . . . . . . . . . . . . . . . . . . . . . . . . . . . . . . . . . . . . . . . . . . . . . . . . . 43NFC (Near Field Communication, optional) . . . . . . . . . . . . . . . . . . . . . . . . . . . . . . . . . . . . . . . . . . . . 43
Ethernet and LAN (only with performance docking cradle) . . . . . . . . . . . . . . . . . . . . . . . . . . . . . . . . . . 44GPS . . . . . . . . . . . . . . . . . . . . . . . . . . . . . . . . . . . . . . . . . . . . . . . . . . . . . . . . . . . . . . . . . . . . . . . . . . . . . . . . . . . 44
Accessories for your Tablet PC (optional) . . . . . . . . . . . . . . . . . . . . . . . . . . . . . . . . . . . . . . . . . . . . . . 45Your performance docking cradle (optional) . . . . . . . . . . . . . . . . . . . . . . . . . . . . . . . . . . . . . . . . . . . . . . . 46
Cradle components . . . . . . . . . . . . . . . . . . . . . . . . . . . . . . . . . . . . . . . . . . . . . . . . . . . . . . . . . . . . . . . . . . 46Setting up the cradle . . . . . . . . . . . . . . . . . . . . . . . . . . . . . . . . . . . . . . . . . . . . . . . . . . . . . . . . . . . . . . . . 46Connecting the Tablet PC to the cradle . . . . . . . . . . . . . . . . . . . . . . . . . . . . . . . . . . . . . . . . . . . . . . . 47Disconnecting the Tablet PC from the cradle . . . . . . . . . . . . . . . . . . . . . . . . . . . . . . . . . . . . . . . . . . 48
Keyboard cover (optional) . . . . . . . . . . . . . . . . . . . . . . . . . . . . . . . . . . . . . . . . . . . . . . . . . . . . . . . . . . . . . . . 49Components of the keyboard cover . . . . . . . . . . . . . . . . . . . . . . . . . . . . . . . . . . . . . . . . . . . . . . . . . . . 49Connecting the Tablet PC to the keyboard cover . . . . . . . . . . . . . . . . . . . . . . . . . . . . . . . . . . . . . . . 50Separating the Tablet PC from the keyboard cover . . . . . . . . . . . . . . . . . . . . . . . . . . . . . . . . . . . . . 51
Shoulder strap (optional) . . . . . . . . . . . . . . . . . . . . . . . . . . . . . . . . . . . . . . . . . . . . . . . . . . . . . . . . . . . . . . . . 51Folio case (optional) . . . . . . . . . . . . . . . . . . . . . . . . . . . . . . . . . . . . . . . . . . . . . . . . . . . . . . . . . . . . . . . . . . . . . 52Protective TPU cover with kickstand and handstrap (optional) . . . . . . . . . . . . . . . . . . . . . . . . . . . . . . . 54
Security functions . . . . . . . . . . . . . . . . . . . . . . . . . . . . . . . . . . . . . . . . . . . . . . . . . . . . . . . . . . . . . . . . . . . . . 57Configuring the fingerprint sensor . . . . . . . . . . . . . . . . . . . . . . . . . . . . . . . . . . . . . . . . . . . . . . . . . . . . . . . . 57Using the Security Lock . . . . . . . . . . . . . . . . . . . . . . . . . . . . . . . . . . . . . . . . . . . . . . . . . . . . . . . . . . . . . . . . . 58Configuring password protection in BIOS Setup Utility . . . . . . . . . . . . . . . . . . . . . . . . . . . . . . . . . . . . . . 58
Protecting BIOS Setup Utility (supervisor password and user password) . . . . . . . . . . . . . . . . . 59Password protection for booting the operating system . . . . . . . . . . . . . . . . . . . . . . . . . . . . . . . . . . 60Password protection for the hard disk . . . . . . . . . . . . . . . . . . . . . . . . . . . . . . . . . . . . . . . . . . . . . . . . . 60
SmartCard reader (optional) . . . . . . . . . . . . . . . . . . . . . . . . . . . . . . . . . . . . . . . . . . . . . . . . . . . . . . . . . . . . . 62Inserting the SmartCard . . . . . . . . . . . . . . . . . . . . . . . . . . . . . . . . . . . . . . . . . . . . . . . . . . . . . . . . . . . . . 62
Trusted Platform Module - TPM (device dependent) . . . . . . . . . . . . . . . . . . . . . . . . . . . . . . . . . . . . . . . . 63Enabling TPM . . . . . . . . . . . . . . . . . . . . . . . . . . . . . . . . . . . . . . . . . . . . . . . . . . . . . . . . . . . . . . . . . . . . . . . 63Disabling TPM . . . . . . . . . . . . . . . . . . . . . . . . . . . . . . . . . . . . . . . . . . . . . . . . . . . . . . . . . . . . . . . . . . . . . . 63
Connecting external devices . . . . . . . . . . . . . . . . . . . . . . . . . . . . . . . . . . . . . . . . . . . . . . . . . . . . . . . . . . . 64Connecting an external monitor . . . . . . . . . . . . . . . . . . . . . . . . . . . . . . . . . . . . . . . . . . . . . . . . . . . . . . . . . . 64
Micro HDMI port . . . . . . . . . . . . . . . . . . . . . . . . . . . . . . . . . . . . . . . . . . . . . . . . . . . . . . . . . . . . . . . . . . . . 64HDMI port (performance docking cradle only) . . . . . . . . . . . . . . . . . . . . . . . . . . . . . . . . . . . . . . . . . . 65VGA monitor port (only performance docking cradle) . . . . . . . . . . . . . . . . . . . . . . . . . . . . . . . . . . . 65
Connecting USB devices . . . . . . . . . . . . . . . . . . . . . . . . . . . . . . . . . . . . . . . . . . . . . . . . . . . . . . . . . . . . . . . . 66How to remove USB devices correctly . . . . . . . . . . . . . . . . . . . . . . . . . . . . . . . . . . . . . . . . . . . . . . . . 66
Connecting external audio devices . . . . . . . . . . . . . . . . . . . . . . . . . . . . . . . . . . . . . . . . . . . . . . . . . . . . . . . 67Connecting headphones or other audio output devices . . . . . . . . . . . . . . . . . . . . . . . . . . . . . . . . . 67Connecting a microphone or other audio input devices . . . . . . . . . . . . . . . . . . . . . . . . . . . . . . . . . 67
4 Fujitsu
Contents
Settings in BIOS Setup Utility . . . . . . . . . . . . . . . . . . . . . . . . . . . . . . . . . . . . . . . . . . . . . . . . . . . . . . . . . . 68Starting the BIOS Setup Utility . . . . . . . . . . . . . . . . . . . . . . . . . . . . . . . . . . . . . . . . . . . . . . . . . . . . . . . . . . . 68BIOS Setup Utility operation . . . . . . . . . . . . . . . . . . . . . . . . . . . . . . . . . . . . . . . . . . . . . . . . . . . . . . . . . . . . . 69Exiting BIOS Setup Utility . . . . . . . . . . . . . . . . . . . . . . . . . . . . . . . . . . . . . . . . . . . . . . . . . . . . . . . . . . . . . . . . 70
Exit Saving Changes - save changes and exit BIOS Setup Utility . . . . . . . . . . . . . . . . . . . . . . . 70Exit Discarding Changes - Reject changes and exit BIOS Setup Utility . . . . . . . . . . . . . . . . . . . 70Load Setup Defaults – load default values . . . . . . . . . . . . . . . . . . . . . . . . . . . . . . . . . . . . . . . . . . . . . 70Discard Changes - Discard Changes without exiting BIOS Setup Utility . . . . . . . . . . . . . . . . . . 70Save Changes - save changes without exiting the BIOS Setup Utility . . . . . . . . . . . . . . . . . . . . 70Save changes and power off . . . . . . . . . . . . . . . . . . . . . . . . . . . . . . . . . . . . . . . . . . . . . . . . . . . . . . . . 70
Troubleshooting and tips . . . . . . . . . . . . . . . . . . . . . . . . . . . . . . . . . . . . . . . . . . . . . . . . . . . . . . . . . . . . . . 71Executing a reset . . . . . . . . . . . . . . . . . . . . . . . . . . . . . . . . . . . . . . . . . . . . . . . . . . . . . . . . . . . . . . . . . . . . . . . 72
Forced shutdown . . . . . . . . . . . . . . . . . . . . . . . . . . . . . . . . . . . . . . . . . . . . . . . . . . . . . . . . . . . . . . . . . . . . 72Resetting the rechargeable battery . . . . . . . . . . . . . . . . . . . . . . . . . . . . . . . . . . . . . . . . . . . . . . . . . . . . 72
Help if problems occur . . . . . . . . . . . . . . . . . . . . . . . . . . . . . . . . . . . . . . . . . . . . . . . . . . . . . . . . . . . . . . . . . . . 72Recovering your Factory Image . . . . . . . . . . . . . . . . . . . . . . . . . . . . . . . . . . . . . . . . . . . . . . . . . . . . . . . . . . 72The Tablet PC’s date or time is incorrect . . . . . . . . . . . . . . . . . . . . . . . . . . . . . . . . . . . . . . . . . . . . . . . . . . 72Battery indicator does not illuminate . . . . . . . . . . . . . . . . . . . . . . . . . . . . . . . . . . . . . . . . . . . . . . . . . . . . . . 73The Tablet PC’s touchscreen remains dark . . . . . . . . . . . . . . . . . . . . . . . . . . . . . . . . . . . . . . . . . . . . . . . . 73The display on the Tablet PC’s touchscreen is difficult to read. . . . . . . . . . . . . . . . . . . . . . . . . . . . . . . 73The external monitor remains blank . . . . . . . . . . . . . . . . . . . . . . . . . . . . . . . . . . . . . . . . . . . . . . . . . . . . . . 74The external monitor is blank or the image is unstable . . . . . . . . . . . . . . . . . . . . . . . . . . . . . . . . . . . . . 74The cursor does not correctly follow the stylus movements . . . . . . . . . . . . . . . . . . . . . . . . . . . . . . . . . 74Stylus input not working . . . . . . . . . . . . . . . . . . . . . . . . . . . . . . . . . . . . . . . . . . . . . . . . . . . . . . . . . . . . . . . . . 75The Tablet PC does not start after switch on . . . . . . . . . . . . . . . . . . . . . . . . . . . . . . . . . . . . . . . . . . . . . . . 75The Tablet PC stops working . . . . . . . . . . . . . . . . . . . . . . . . . . . . . . . . . . . . . . . . . . . . . . . . . . . . . . . . . . . . . 75The printer does not print . . . . . . . . . . . . . . . . . . . . . . . . . . . . . . . . . . . . . . . . . . . . . . . . . . . . . . . . . . . . . . . . 76The wireless connection to a network does not work . . . . . . . . . . . . . . . . . . . . . . . . . . . . . . . . . . . . . . . 76The battery discharges too quickly . . . . . . . . . . . . . . . . . . . . . . . . . . . . . . . . . . . . . . . . . . . . . . . . . . . . . . . . 76Smart Card reader is not recognized . . . . . . . . . . . . . . . . . . . . . . . . . . . . . . . . . . . . . . . . . . . . . . . . . . . . . . 77SmartCard PIN forgotten . . . . . . . . . . . . . . . . . . . . . . . . . . . . . . . . . . . . . . . . . . . . . . . . . . . . . . . . . . . . . . . . 77User and/or supervisor Smart Card lost . . . . . . . . . . . . . . . . . . . . . . . . . . . . . . . . . . . . . . . . . . . . . . . . . . 77SmartCard lost . . . . . . . . . . . . . . . . . . . . . . . . . . . . . . . . . . . . . . . . . . . . . . . . . . . . . . . . . . . . . . . . . . . . . . . . . 77Acoustic warning . . . . . . . . . . . . . . . . . . . . . . . . . . . . . . . . . . . . . . . . . . . . . . . . . . . . . . . . . . . . . . . . . . . . . . . . 78Error messages on the screen . . . . . . . . . . . . . . . . . . . . . . . . . . . . . . . . . . . . . . . . . . . . . . . . . . . . . . . . . . . 79
Technical data . . . . . . . . . . . . . . . . . . . . . . . . . . . . . . . . . . . . . . . . . . . . . . . . . . . . . . . . . . . . . . . . . . . . . . . . . 81Tablet PC . . . . . . . . . . . . . . . . . . . . . . . . . . . . . . . . . . . . . . . . . . . . . . . . . . . . . . . . . . . . . . . . . . . . . . . . . . . . . . 81WLAN specifications . . . . . . . . . . . . . . . . . . . . . . . . . . . . . . . . . . . . . . . . . . . . . . . . . . . . . . . . . . . . . . . . . . . . 83Rechargeable battery . . . . . . . . . . . . . . . . . . . . . . . . . . . . . . . . . . . . . . . . . . . . . . . . . . . . . . . . . . . . . . . . . . . 84AC adapter 65 W for the Tablet PC . . . . . . . . . . . . . . . . . . . . . . . . . . . . . . . . . . . . . . . . . . . . . . . . . . . . . . . 84Performance docking cradle (optional) . . . . . . . . . . . . . . . . . . . . . . . . . . . . . . . . . . . . . . . . . . . . . . . . . . . . 84Keyboard cover (optional) . . . . . . . . . . . . . . . . . . . . . . . . . . . . . . . . . . . . . . . . . . . . . . . . . . . . . . . . . . . . . . . 85Shoulder strap (optional) . . . . . . . . . . . . . . . . . . . . . . . . . . . . . . . . . . . . . . . . . . . . . . . . . . . . . . . . . . . . . . . . 85Folio case (optional) . . . . . . . . . . . . . . . . . . . . . . . . . . . . . . . . . . . . . . . . . . . . . . . . . . . . . . . . . . . . . . . . . . . . . 85Protective TPU cover with kickstand and handstrap . . . . . . . . . . . . . . . . . . . . . . . . . . . . . . . . . . . . . . . . 85
Manufacturer’s notes . . . . . . . . . . . . . . . . . . . . . . . . . . . . . . . . . . . . . . . . . . . . . . . . . . . . . . . . . . . . . . . . . . 86Disposal and recycling . . . . . . . . . . . . . . . . . . . . . . . . . . . . . . . . . . . . . . . . . . . . . . . . . . . . . . . . . . . . . . . . . . 86
Recycling your battery . . . . . . . . . . . . . . . . . . . . . . . . . . . . . . . . . . . . . . . . . . . . . . . . . . . . . . . . . . . . . . . 86DOC (Industry CANADA) Notices . . . . . . . . . . . . . . . . . . . . . . . . . . . . . . . . . . . . . . . . . . . . . . . . . . . . . . . . 86
UL Notice . . . . . . . . . . . . . . . . . . . . . . . . . . . . . . . . . . . . . . . . . . . . . . . . . . . . . . . . . . . . . . . . . . . . . . . . . . . 87ENERGY STAR Compliance . . . . . . . . . . . . . . . . . . . . . . . . . . . . . . . . . . . . . . . . . . . . . . . . . . . . . . . . . . . . . 88
Fujitsu 5

Contents
Declarations of conformity . . . . . . . . . . . . . . . . . . . . . . . . . . . . . . . . . . . . . . . . . . . . . . . . . . . . . . . . . . . . . 89
FCC and IC Regulatory Information . . . . . . . . . . . . . . . . . . . . . . . . . . . . . . . . . . . . . . . . . . . . . . . . . . . . 90Regulatory Notes and Statements . . . . . . . . . . . . . . . . . . . . . . . . . . . . . . . . . . . . . . . . . . . . . . . . . . . . . . . . 90
Wireless LAN, Health and Authorization for use . . . . . . . . . . . . . . . . . . . . . . . . . . . . . . . . . . . . . . . . 90Regulatory Information/Disclaimers . . . . . . . . . . . . . . . . . . . . . . . . . . . . . . . . . . . . . . . . . . . . . . . . . . . 90Federal Communications Commission and Industry Canada statement: . . . . . . . . . . . . . . . . . . 90Déclaration d’Industrie Canada . . . . . . . . . . . . . . . . . . . . . . . . . . . . . . . . . . . . . . . . . . . . . . . . . . . . . . . 91FCC Interference Statement . . . . . . . . . . . . . . . . . . . . . . . . . . . . . . . . . . . . . . . . . . . . . . . . . . . . . . . . . 91FCC Radio Frequency Exposure statement . . . . . . . . . . . . . . . . . . . . . . . . . . . . . . . . . . . . . . . . . . . . 91Déclaration de la FCC/d’Industrie Canada sur l’exposition aux radiofréquences . . . . . . . . . . . 92Export restrictions . . . . . . . . . . . . . . . . . . . . . . . . . . . . . . . . . . . . . . . . . . . . . . . . . . . . . . . . . . . . . . . . . . . 92Restrictions concernant l’exportation . . . . . . . . . . . . . . . . . . . . . . . . . . . . . . . . . . . . . . . . . . . . . . . . . . 92Canadian Notice . . . . . . . . . . . . . . . . . . . . . . . . . . . . . . . . . . . . . . . . . . . . . . . . . . . . . . . . . . . . . . . . . . . . 92Avis pour le Canada . . . . . . . . . . . . . . . . . . . . . . . . . . . . . . . . . . . . . . . . . . . . . . . . . . . . . . . . . . . . . . . . . 93
Appendix . . . . . . . . . . . . . . . . . . . . . . . . . . . . . . . . . . . . . . . . . . . . . . . . . . . . . . . . . . . . . . . . . . . . . . . . . . . . . . 94Before Using the Optional Wireless LAN . . . . . . . . . . . . . . . . . . . . . . . . . . . . . . . . . . . . . . . . . . . . . . . . . . 94
Wireless LAN Devices Covered by this Document . . . . . . . . . . . . . . . . . . . . . . . . . . . . . . . . . . . . . . 94Characteristics of the WLAN Device . . . . . . . . . . . . . . . . . . . . . . . . . . . . . . . . . . . . . . . . . . . . . . . . . . 94Wireless LAN Modes Using this Device . . . . . . . . . . . . . . . . . . . . . . . . . . . . . . . . . . . . . . . . . . . . . . . 94Deactivating/Disconnecting the WLAN Device . . . . . . . . . . . . . . . . . . . . . . . . . . . . . . . . . . . . . . . . . 97
Configuring the Wireless LAN . . . . . . . . . . . . . . . . . . . . . . . . . . . . . . . . . . . . . . . . . . . . . . . . . . . . . . . . . . . . 97Connection to the network . . . . . . . . . . . . . . . . . . . . . . . . . . . . . . . . . . . . . . . . . . . . . . . . . . . . . . . . . . . 97Troubleshooting the WLAN . . . . . . . . . . . . . . . . . . . . . . . . . . . . . . . . . . . . . . . . . . . . . . . . . . . . . . . . . . . 97
Image Backup and Recovery Procedures . . . . . . . . . . . . . . . . . . . . . . . . . . . . . . . . . . . . . . . . . . . . . . . . . 99Creating a Backup of Bootable Disk and Recovery Image . . . . . . . . . . . . . . . . . . . . . . . . . . . . . . 100
RECOVER YOUR SYSTEM WHEN THE HARD DRIVE IS STILL ACCESSIBLE . . . . . . . . . . . . . 101Using the Recovery and Utility Tools . . . . . . . . . . . . . . . . . . . . . . . . . . . . . . . . . . . . . . . . . . . . . . . . . . 101Restore the Recovery Image from Hidden Partition . . . . . . . . . . . . . . . . . . . . . . . . . . . . . . . . . . . . . 103
RECOVER YOUR SYSTEM WHEN THE HARD DRIVE IS NOT BOOTABLE . . . . . . . . . . . . . . . . 104Restore the Recovery Image for Full Hard Drive . . . . . . . . . . . . . . . . . . . . . . . . . . . . . . . . . . . . . . . 104Recovering Your Recovery Image Using Recovery and Utility (for new hard drive ornon-bootable hard drive) . . . . . . . . . . . . . . . . . . . . . . . . . . . . . . . . . . . . . . . . . . . . . . . . . . . . . . . . . . . . . 105Installing the Software after the Recovery Image is Restored . . . . . . . . . . . . . . . . . . . . . . . . . . . . 106
Index . . . . . . . . . . . . . . . . . . . . . . . . . . . . . . . . . . . . . . . . . . . . . . . . . . . . . . . . . . . . . . . . . . . . . . . . . . . . . . . . . . 109
6 Fujitsu

Declarations of conformity
Declarations of conformity
DECLARATION OF CONFORMITYaccording to FCC Part 15
Responsible Party Name: Fujitsu America, Inc.Address: 1250 E. Arques Avenue Sunnyvale, CA 94085Telephone: (408) 746-6000 Declares that product: Base Model Configuration: STYLISTIC Q665
Complies with Part 15 of the FCC Rules.
This device complies with Part 15 of the FCC rules. Operations are subject to the following two conditions: (1) This device may not cause harmful interference. (2) This device must accept any interference received, including interference that may cause undesired operation.
Fujitsu 7

Fujitsu Contact Information
Fujitsu Contact InformationService and SupportYou can contact Fujitsu Service and Support in the following ways:
• Toll free phone: 1-800-8Fujitsu (1-800-838-5487)• Website: "http://solutions.us.fujitsu.com/www/content/support/contact/index.php"
Before you place the call, have the following information ready so that the customersupport representative can provide you with the fastest possible solution:
• Product name• Product configuration number• Product serial number• Purchase date• Conditions under which the problem occurred• Any error messages that have occurred• Type of device connected, if any
Fujitsu Shopping OnlinePlease go to "http://www.shopfujitsu.com/store/ ".
Maintaining Latest ConfigurationTo ensure that you always have the most current driver updates related to your system, occasionallyaccess the Fujitsu Software Download Manager (FSDM) utility. The FSDM utility is available fromthe Fujitsu Support site. FSDM will allow you to view a list of the most current drivers, utilitiesand applications to determine whether you have the latest versions. If you have a Windows 7or or Windows 8/8.1 operating system, you will need to go to the Support Site to download theFSDM Utility: "http://support.fujitsupc.com/CS/Portal/support.do?srch=DOWNLOADS".
Limited WarrantyYour STYLISTIC Tablet PC is backed by a Fujitsu International Limited Warranty. Check the servicekit that came with your Tablet PC for the Limited Warranty period and terms and conditions.
8 Fujitsu

Fujitsu Contact Information
Notational conventionsPay particular attention to text marked with this symbol. Failure to observethis warning will endanger your life, will damage the device or lead to lossof data. The warranty will be invalidated if the device becomes defectivethrough failure to observe these warnings.Indicates important information which is required to use the device properly.
► indicates an activity that must be performedindicates a result
This style indicates data entered using the keyboard in a program dialogue or atthe command line, e.g. your password (Name123) or a command used tostart a program (start.exe)
This style indicates information that is displayed on the screen by a program, e.g.:Installation is complete.
This style indicates
• terms and texts used in a software interface, e.g.: Click on Save.• names of programs or files, e.g. Windows or setup.exe.
"This style" indicates
• Cross-references to another section, e.g. "Safety information"• cross-references to an external source, e.g. a web address: For more
information, go to "http://solutions.us.fujitsu.com/"• names of CDs, DVDs and titles or designations of other materials, e.g.:
"CD/DVD Drivers & Utilities" or "Safety/Regulations" manualKey indicates a key on the keyboard, e.g: F10
This style indicates terms and text that are emphasized or highlighted, e.g.: Do notswitch off the device
Fujitsu 9

Ports and controls
Ports and controlsThis chapter presents the individual hardware components of your device. It gives anoverview of the indicators and connections of the device. Please familiarize yourselfwith these items before you start to work with the device.
Front
12 3
6
6
7
4
8
5
1 = Touchscreen2 = Webcam LED3 = Webcam4 = Ambient light sensor5 = Power-on indicator
6 = Mechanical mounting for keyboardcover / cradle
7 = Docking port8 = Windows button
10 Fujitsu

Ports and controls
Left side
1 2 3 654 7 8
1 = Tether eyelet for stylus tether2 = Combined microphone / Line-in /
Headphone / Line-out / Headset port3 = Storage card slot4 = SIM card slot
5 = Status indicators6 = Micro-HDMI port7 = Speaker8 = DC jack (DC IN)
Right side
1 3 4 97 865 102
1 = Security Lock device2 = Speaker3 = Shortcut button4 = Decrease volume button5 = Increase volume button
6 = ON/OFF button7 = USB port (USB 2.0)8 = USB port (USB 3.0)9 = Stylus slot10 = Eyelet for stylus cord
Fujitsu 11

Ports and controls
Back
2 3 46
1
5
1 = Webcam LED2 = Webcam3 = Camera light4 = Fingerprint sensor
5 = NFC (Near Field Communication)(device-dependent)
6 = SmartCard reader (device dependent)
12 Fujitsu

Important notes
Important notesImportantnotesNotes
This chapter contains essential safety information which must be followed when workingwith your Tablet PC. The other notes provide useful information about your Tablet PC.
Safety instructionsSafetyinformationInformation,
Please follow the safety notes provided in the "Safety/Regulations" manualas well as the safety notes given below.
Please pay special attention to the sections in the manual markedwith the symbol on the left.
When connecting and disconnecting cables, observe the relevantnotes in this operating manual.
Read the information on the ambient conditions in the "Technical data", Page 81 chapterand the information in the "First-time setup of your device", Page 18 chapter beforepreparing your Tablet PC for use and switching it on for the first time.
When cleaning the device, please observe the relevant notes in thesection "Cleaning the Tablet PC", Page 16.
Pay attention to the additional safety notes for devices with wireless componentsprovided in the "Safety/Regulations" manual.
When handling this device, you come into contact with lead, a chemical which inCalifornia is held to be a possible cause of birth defects and other damage to fertility.
Wash your hands after using the device.
This Tablet PC complies with the relevant safety regulations for data processing equipment. Ifyou have questions as to whether you can set up the Tablet PC in the intended environment,please contact your sales outlet or our hotline/service desk.
Fujitsu 13

Important notes
Additional safety notes for devices withwireless componentsWirelesscomponentsWirelessLANBluetooth,Safetynotes
If a wireless component (Wireless LAN, Bluetooth, 4G) is integrated in your Tablet PC, you mustbe sure to observe the following safety precautions when using your Tablet PC:
• Switch off the wireless components when you are in an aircraft or driving in a car.• Switch off the wireless components when you are in a hospital, an operating
room or near a medical electronics system. The transmitted radio wavescan impair the operation of medical devices.
• Switch off the wireless components, when you let the device get near flammablegases or into hazardous environments (e.g. gas station, paint stores), as thetransmitted radio waves can cause an explosion or a fire.
For further information on how to switch the wireless components on and off, referto section "Switching the wireless components on and off", Page 42.
Protecting the display screenDepending on your device configuration, where applicable your device is not waterproof.In this event, do not pour liquids onto the device and do not wash it with a wet cloth.Do not place items on the top of the display, or damage may occur.
The warranty does not cover a scratched screen.
Energy savingNotesEnergyPowersaving
If you will not be using your Tablet PC, switch it off. Switch off any connected external devices whenthey are not in use. If you use the energy-saving functions, the Tablet PC uses less power. If you dothis, you will be able to work longer with the Tablet PC before having to recharge the battery.
The energy efficiency is increased and environmental pollution is reduced.You save money and help protect the environment.
Energy saving under Windows► Make use of the available energy-saving functions as described in chapter
"Using the energy saving functions", Page 38.
14 Fujitsu

Important notes
Traveling with your Tablet PCMobileoperationNotesTransportationTabletPC
Please follow the instructions below when traveling with your Tablet PC.
Before you travel► Back up important data stored on your hard disk.
beforeyoutravelTravel
► Switch off the wireless component for data security reasons. With data traffic via a wirelessconnection, it is also possible for unauthorized third parties to receive data.
Information on activating data encryption is provided in the documentationfor your wireless component.
► If you want to use your Tablet PC during a flight, ask the flight attendants to seeit is safe to use it.
When traveling in other countries► If you are traveling abroad, check that the AC adapter can be operated with the
local AC voltage. If this is not the case, obtain the appropriate AC adapter foryour Tablet PC. Do not use any other voltage converter!
► Check whether the local AC voltage and the AC cable are compatible. If this is notthe case, buy an AC cable that suits the local conditions.
► Enquire with the appropriate government office of the country you will be traveling in as towhether you may there operate the wireless component integrated in your Tablet PC.
► Take the necessary travel adapters with you when traveling abroad. Check in the followingtable for which travel adapters you will need, or ask your travel organizer.
Power connection Travel destinationUnited States, Canada, Mexico, parts of LatinAmerica, Japan, Korea, Philippines, Taiwan
Russia and the Commonwealth of IndependentStates (CIS), much of Europe, parts of LatinAmerica, the Middle East, parts of Africa, HongKong, India, much of south-east AsiaUnited Kingdom, Ireland, Malaya, Singapore,parts of Africa
China, Australia, New Zealand
Fujitsu 15

Important notes
Transporting the Tablet PCProtect the Tablet PC from severe shocks and extreme temperatures(e.g. direct sunlight in a car).
• Do not transport your Tablet PC while it is turned on.• Carry your Tablet PC with you while traveling. Do not check it in as baggage.• Never put your Tablet PC through a metal detector. Have it hand-inspected by
security personnel. You can however put your Tablet PC through a properlytuned X-ray machine. To avoid problems, place it close to the entrance ofthe machine and remove it as soon as possible or have it hand-inspected bysecurity personnel. Security officials may require you to turn your Tablet PCon. So make sure you have a charged battery on hand for this.
► Switch the Tablet PC off.► Unplug the AC plug of the AC adapter and all external devices from the power outlets.► Disconnect the AC adapter cable and the data cables for all external devices.► To protect against damaging jolts and bumps, use a suitable Tablet PC
carrying case to transport your Tablet PC.
Cleaning the Tablet PC• Use of incorrect cleaners can result in optical impairment of the LCD and / or
damage to the computer. Always refer to the cleaner manufacturer’s guidelines andmaterial safety data sheets for proper handling and use of the products.
• Never use ammonia, acidic, or alkaline cleaners or organic chemicalssuch as paint thinner, acetone or kerosene. It may damage surfacefinishes and the coating of the LCD screen.
• Never use compressed air for cleaning your computer.• If your Tablet PC has a Smart Card slot, be very careful to avoid any
liquid entering the slot as this can damage the unit.
Further information on cleaning the Tablet PCThe Tablet PC does not float.
If the Tablet PC is exposed to water or other liquids with its connections open, liquidcan penetrate the Tablet PC and cause a malfunction. Do not continue to use theTablet PC. Switch it off and contact our hotline / our service desk (see enclosed list ofservice desks or visit our website at: "http://www.fujitsu.com/us/support/").
16 Fujitsu

Important notes
Cleaning with disinfectant wipesThere are many ways of disinfecting surfaces. The following disinfectant wipeshave been tested successfully with the Tablet PC:
• MG Chemicals Multipurpose Alcohol Wipes (alcohol-based)• PROSAT® Sterile™ PS-911EB/EtOH Life Sciences Wipes (alcohol-based)• Clorox® Healthcare Bleach Germicidal Wipes (without alcohol)
Remember, if your Tablet PC is configured with the Smart Card shell, it does nothave a cover to close the port and liquid could enter and damage the device. Takeextra precautions when cleaning around the Smart Card reader.
For proper use of disinfectant wipes, please read the manufacturer’s instructions.
Before cleaning, please test the disinfectant wipe on a small area of the TabletPC. Some medical disinfectant wipes may leave residue on the Tablet PC whichis difficult to remove again, or they may dry out quickly. Therefore dispose ofthe wipes after one single use and do not reuse them.
Fujitsu 17

First-time setup of your device
First-time setup of your deviceFirst-timesetupGettingstarted
Please read the chapter "Important notes", Page 13.
If your device is equipped with a Windows operating system, the necessaryhardware drivers and supplied software are already pre-installed.
Before switching it on for the first time, connect the device to the AC voltage usingthe AC adapter, see "Connecting the AC adapter", Page 19. The AC adapter mustremain connected during the whole of the installation process.
A system test is performed when your device is first switched on. Various messagescan appear. The display may remain dark for a short time or may flicker.
Please follow the instructions on the screen.
NEVER switch off your device during the first-time setup process.
The battery must be charged if you want to operate your device using the battery.
When used on the move, the built-in battery provides the device with the necessary power. Youcan increase the operating time by using the available energy-saving functions.
For instructions on how to connect external devices (e.g. mouse, printer) to your TabletPC, please refer to the operating manual for your device.
Unpacking and checking the deviceIf you find that damage has occurred during transport, please notifyyour local sales outlet immediately!
► Unpack all the individual parts.PackagingTransport
► Check your device for any visible damage which may have occurred during transportation.
You may need to reuse the packaging in the future, for example ifyou need to ship your device.
18 Fujitsu

First-time setup of your device
Choose a locationChoosealocationSetupACadapter
Choose a suitable location for the device before setting it up. In doingso, please follow these instructions:
• Never place the device or the AC adapter on a heat-sensitive surface.The surface could be damaged as a result.
• Never place the device on a soft surface (e.g. carpeting, upholstered furniture,bed). This can result in damage caused by overheating.
• The back of the device heats up during normal operation. Prolonged contactwith skin can become unpleasant or even result in burns.
• Place the device on a stable, flat, non-slippery surface. Please note that therubber feet of the device may mark certain types of delicate surfaces.
• Keep other objects at least 100 mm / 4 inches away from the deviceand its AC adapter to ensure adequate ventilation.
• Do not expose the device to extreme environmental conditions. Protectthe device against dust, humidity and heat.
Connecting the AC adapterMakingreadytouseACadapter
Observe the safety notes in the enclosed "Safety/Regulations" manual.
The supplied AC cable conforms to the requirements of the country in whichyou purchased your device. Make sure that the AC cable is approved foruse in the country in which you intend to use it.
3
1
2
► Connect the AC cable (1) to the AC adapter.► Plug the AC cable (2) into a power outlet.► Connect the AC adapter cable (3) to the
DC jack (DC IN) of the device.
Fujitsu 19

First-time setup of your device
Switching on the device for the first timeSwitchingon for thefirst time
To make it easier to use your device for the first time, the operating systemis pre-installed on the hard disk.
2
1
2
► Press the ON/OFF button (1) for about one second to switch the device on.The power-on indicators (2) light up whenever the system is switched on.
► During the installation process, follow the on-screen instructions.
You can find information and help on the Windows operating systemfunctions online at "http://windows.microsoft.com".
If a Windows 8.1 operating system is installed on your Tablet PC, a tutorialis automatically started when a new user logs on for the first time to showyou how to use the new functions of Windows 8.1.
20 Fujitsu

First-time setup of your device
Installing Bonus AppsBonusApps
After you have started your system the first time, you will see a Bonus Apps icon on your desktop.
► Click on the icon to see which additional applications are available for you to install.Applications that are already installed appear in grey, those that areavailable for installation appear in blue.
► Select the applications you wish to install by selecting the checkbox adjacent to your selection.
or► Click Select All if you would like to install all available applications.
► To confirm your selection, click Install.
Note that in some cases (depending upon which application was selected forinstallation) after installation completes, the system will prompt you to reboot.
There are also cases in which if multiple applications are selected to installbut one of them needs a reboot, the system will reboot and continueinstalling the rest of the selected applications.
Fujitsu 21

Working with the Tablet PC
Working with the Tablet PCTablet,operationTablet
This chapter describes the basics for operating your Tablet PC. You can find instructionson how to connect external devices (e.g. mouse, flash storage) to the Tablet PC inthe chapter "Connecting external devices", Page 64.
Please refer to the notes in the chapter "Important notes", Page 13.
Status indicatorsStatusindicatorsSymbols
The status indicators (1, 2, 3) provide information about the status of the powersupply, the battery and the radio components.
1
21
3
22 Fujitsu

Working with the Tablet PC
No. Status indicator Description1 Power-on indicator
• The indicator lights up white: The Tablet PC isswitched on.
• The indicator flashes: The Tablet PC is in sleep mode(Save-to-RAM).
• The indicator is not lit up: The Tablet PC is switchedoff or in Save-to-Disk mode.
2 Battery charging indicator• The indicator lights up orange: The rechargeable
battery is charging.• The indicator is not lit up: The battery is not charging
(the battery is already fully charged or the AC adapteris not connected).
3 Wireless indicator• The indicator lights up white: The wireless components
are switched on while the Tablet PC is switched on.• The indicator flashes: The wireless components are
switched on and Wake On Wireless LAN is enabledwhile the Tablet PC is in Sleep mode or Save-to-Diskmode, or while the Tablet PC is switched off.
• The indicator is not lit up: The wireless componentsare switched off.
Fujitsu 23
Working with the Tablet PC
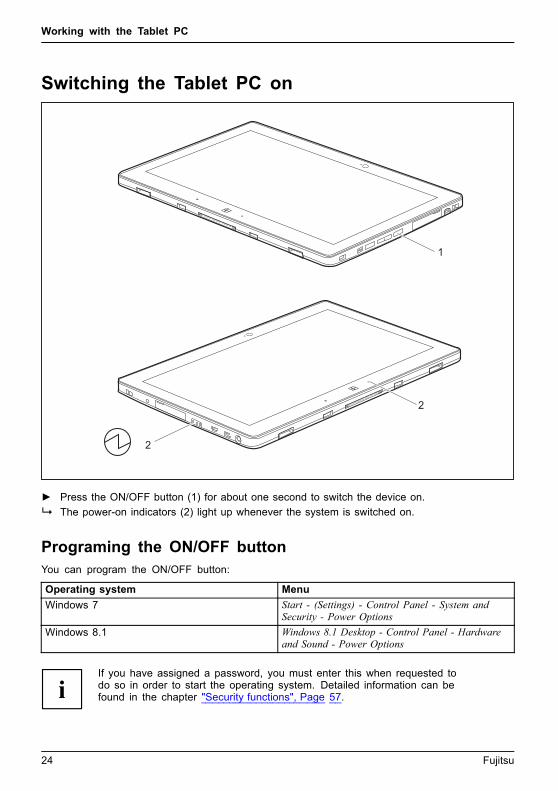
Switching the Tablet PC onTablet:SwitchingonPower-onPower-onindicatorSuspend/Resumebutton
2
1
2
► Press the ON/OFF button (1) for about one second to switch the device on.The power-on indicators (2) light up whenever the system is switched on.
Programing the ON/OFF buttonYou can program the ON/OFF button:
Operating system MenuWindows 7 Start - (Settings) - Control Panel - System and
Security - Power OptionsWindows 8.1 Windows 8.1 Desktop - Control Panel - Hardware
and Sound - Power Options
If you have assigned a password, you must enter this when requested todo so in order to start the operating system. Detailed information can befound in the chapter "Security functions", Page 57.
24 Fujitsu

Working with the Tablet PC
Switching the Tablet PC offBack up your data and close all applications before you switch off yourdevice. Otherwise data might be lost.
► Shut down the operating system correctly.Switchingoff the
► If the Tablet PC does not switch itself off automatically, press the ON/OFFbutton for approx. five seconds.
Handwriting recognitionFor detailed information on handwriting recognition, see the documentation for your operating system.
At present, handwriting recognition under Windows 7 or Window 8.1 supports the following languages:
English, German, French, Italian, Japanese, Korean, Chinese (traditional and simplified), Dutch,Portuguese, Spanish, Brazilian, Norwegian (Bokmål and Nynorsk), Swedish, Finnish, Danish,Polish, Rumanian, Serbian (Cyrillic and Latin script), Catalan, Russian, Czech and Croatian.
Under Windows 8.1 you can set the required language under Control Panel –Time, Language and Region – Language.
Fujitsu 25
Working with the Tablet PC
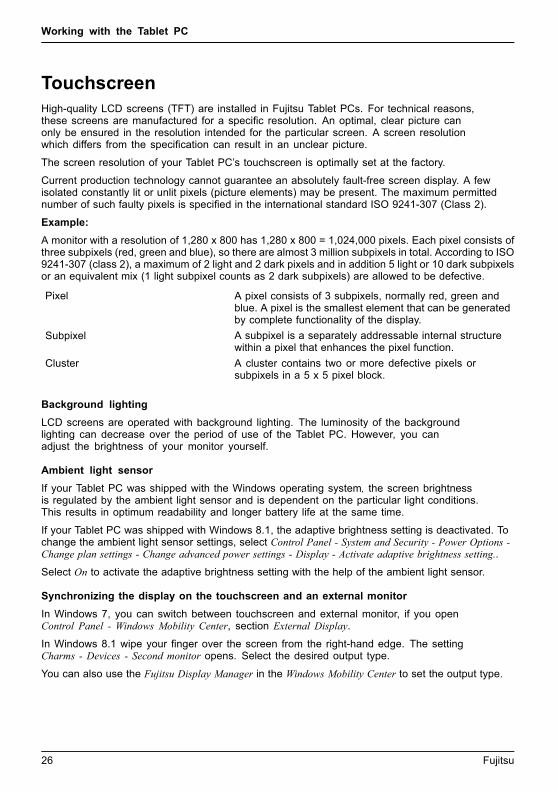
TouchscreenTouchscreenNotes
High-quality LCD screens (TFT) are installed in Fujitsu Tablet PCs. For technical reasons,these screens are manufactured for a specific resolution. An optimal, clear picture canonly be ensured in the resolution intended for the particular screen. A screen resolutionwhich differs from the specification can result in an unclear picture.
The screen resolution of your Tablet PC’s touchscreen is optimally set at the factory.
Current production technology cannot guarantee an absolutely fault-free screen display. A fewisolated constantly lit or unlit pixels (picture elements) may be present. The maximum permittednumber of such faulty pixels is specified in the international standard ISO 9241-307 (Class 2).
Example:A monitor with a resolution of 1,280 x 800 has 1,280 x 800 = 1,024,000 pixels. Each pixel consists ofthree subpixels (red, green and blue), so there are almost 3 million subpixels in total. According to ISO9241-307 (class 2), a maximum of 2 light and 2 dark pixels and in addition 5 light or 10 dark subpixelsor an equivalent mix (1 light subpixel counts as 2 dark subpixels) are allowed to be defective.
Pixel A pixel consists of 3 subpixels, normally red, green andblue. A pixel is the smallest element that can be generatedby complete functionality of the display.
Subpixel A subpixel is a separately addressable internal structurewithin a pixel that enhances the pixel function.
Cluster A cluster contains two or more defective pixels orsubpixels in a 5 x 5 pixel block.
Background lightingLCD screens are operated with background lighting. The luminosity of the backgroundlighting can decrease over the period of use of the Tablet PC. However, you canadjust the brightness of your monitor yourself.
Ambient light sensorIf your Tablet PC was shipped with the Windows operating system, the screen brightnessis regulated by the ambient light sensor and is dependent on the particular light conditions.This results in optimum readability and longer battery life at the same time.
If your Tablet PC was shipped with Windows 8.1, the adaptive brightness setting is deactivated. Tochange the ambient light sensor settings, select Control Panel - System and Security - Power Options -Change plan settings - Change advanced power settings - Display - Activate adaptive brightness setting..
Select On to activate the adaptive brightness setting with the help of the ambient light sensor.
Synchronizing the display on the touchscreen and an external monitorIn Windows 7, you can switch between touchscreen and external monitor, if you openControl Panel - Windows Mobility Center, section External Display.
In Windows 8.1 wipe your finger over the screen from the right-hand edge. The settingCharms - Devices - Second monitor opens. Select the desired output type.
You can also use the Fujitsu Display Manager in the Windows Mobility Center to set the output type.
26 Fujitsu

Working with the Tablet PC
Select display orientation (portrait orlandscape format)LandscapeformatPortraitformatDisplayorientation
You can choose to use either portrait or landscape format for the display.
Windows 7You can change these settings in the Fujitsu menu or under Start - (Settings -)Control Panel - Hardware and Sound - Display - Settings.
Windows 8.1You can change these settings under Windows 8.1 Desktop - Control Panel -Hardware and Sound - Windows Mobility Center / Rotate screen.
In the Fujitsu Tablet Controls settings, profiles are saved for operationwith different screen orientations. These profiles have preset standardconfigurations that can be modified as desired.
These settings do not just affect the monitor settings on the Tablet PC,but also on external monitors that are connected.
Using fingersYou can execute certain commands by using your finger tip on the touchscreen of your device.
Alternatively, everything which you can select or activate using your fingertip can also be selected or activated using the stylus.
Calibrate the Dual Digitizer for finger-basedoperation of the device.
Before the first finger-based operation, you must calibrate your Tablet PC via theoperating system, so that it recognizes your fingertips as accurately as possible.
As soon as you notice that the accuracy is becoming worse, youmust recalibrate the device.
Please note: There are separate calibration programs available for calibratingthe stylus and for calibrating finger-based operation. Do not use the calibrationtool for the stylus to calibrate finger-based operation.
Operating system MenuWindows 7 /Windows 8.1 Desktop
To calibrate, run the Hardware and Sound / Tablet PC Settings function in theControl Panel. You need to calibrate both portrait and landscape formats.
Fujitsu 27

Working with the Tablet PC
Actions with one finger (Windows 8.1 Modern)Action DescriptionWipe your finger over the screen from theright-hand edge.
► Open Charms with system commands(equivalent to pressing the Windows button+ C button on a keyboard).
► Working with the mouse: Position the mousepointer at the bottom right-hand edge of thescreen.
Wipe your finger over the screen from theleft-hand edge.
► Switch between the most recently usedapplications (equivalent to pressing theWindows button + Ctrl + Space on akeyboard).
► Working with the mouse: Position the mousepointer at the bottom left-hand edge of thescreen.
Wipe your finger over the screen from the topor bottom edge.
► Open the App commands (equivalent topressing the Windows button + Z button on akeyboard). Wipe from the top to the bottom ofthe screen to dock or close the current App.
► Working with the mouse: Right-click on theApp to display the App commands.
28 Fujitsu

Working with the Tablet PC
Action DescriptionPress and hold ► Keep your finger pressed on an object on the
screen to display a menu with further options.► Working with the mouse: Move the mouse
pointer over the object to display a menu withfurther options.
Tap on an object ► Tap your finger on an object on the screento open an App or a link or to execute acommand.
► Working with the mouse: Left-click on theobject.
Scroll / Move object / Swivel object ► Use this function to scroll through lists orwebsites or to swivel or move an object.
► Working with the mouse: Left-click on theobject, keep the mouse button pressed andmove / swivel the object or scroll.
Fujitsu 29

Working with the Tablet PC
Actions with one finger (Windows 7 / Windows 8.1 Desktop)Action DescriptionSelecting objects (click with the left mousebutton)
► Tap once briefly with the finger on the object.
Starting programs (double-click with the leftmouse button)
► Use one finger to tap twice in quicksuccession on the program symbol.
Moving objects/windows (while holding the leftmouse button pressed, drag & drop)
► Place your finger on the object/window,keep your fingertip pressed againstthe touchscreen and move the desiredobject/window.
Opening a context menu (click with the rightmouse button)
► Tap your finger on the desired item.Keep your fingertip pressed against thetouchscreen.
The context menu appears.Moving the cursor ► Position one finger on the touchscreen and
move your finger in the desired direction.
30 Fujitsu

Working with the Tablet PC
Actions with two fingers (Windows 7 / Windows 8.1 Desktop)Action DescriptionScrolling
► Place two fingers on the touchscreen.► Move the fingers up to scroll up.or
► Move the fingers down to scroll down.Rotating
► Position your thumb on the touchscreenand rotate the image clockwise orcounter-clockwise using your index finger.
Fujitsu 31

Working with the Tablet PC
Action DescriptionIncrease or decrease view
► Put two fingers on the touch screen andmove them apart to increase the size of theview.
or
► Put two fingers on the touch screen andmove them together to decrease the sizeof the view.
Lock context-sensitive menus ► Use two fingers to tap twice in quicksuccession on the touchscreen.
32 Fujitsu

Working with the Tablet PC
Using the stylusPen
1
2
3
1 = stylus tip
2 = stylus button (right mouse button)
3 = eyelet for optional stylus tether
You can use the stylus on your Tablet PC as an electronic writing tool, to select menu items and tonavigate through the programs. Programs that support handwriting recognition also allow you towrite directly on the screen with the stylus. You can also use the stylus as a drawing tool.
A stylus tether is available as an optional extra and you can use this to tie theeyelet on the stylus to the eyelet on the Tablet PC.
Use only the stylus that was provided with your Tablet PC. Do not use any other pointedobject as a substitute, that was not specially designed for your Tablet PC. Replacethe stylus tip if it is worn. The warranty does not cover a scratched screen.
While writing, take care that you do not scratch the surface of thedisplay (e.g. with a wristwatch or bracelet).
The stylus of the Tablet PC is an electronic instrument that can be damagedif used improperly. Handle the stylus with care.
Our recommendations for proper handling of the stylus are as follows:
• Do not gesture with the stylus.• Do not use the stylus as a pointer.• Do not use the stylus on surfaces other than the screen of the Tablet PC.• Do not try to turn the grip of the stylus. The grip is used to put the
stylus into its slot or to take it out of its slot.• Never store the stylus with its weight on the tip (e.g. with the tip down in a stylus
container). If the stylus is stored with the tip pointing down, this may have anadverse effect on the stylus mechanism (particularly in high temperatures). In thiscase, the stylus tip may react as though it is constantly being pressed down. Toavoid damage, the stylus should be stored in the slot when not in use.
The stylus can be influenced by electromagnetic fields (cursor quivers orjumps). There may be a few areas on the screen where the cursor quiversslightly in spite of pressing the stylus down firmly.
The screen responds to entries made with the tip of the finger or the stylus when thetip of the finger or the stylus directly touches the screen.
You can use the stylus to perform almost all functions for which you would otherwise use a mouse.
Fujitsu 33

Working with the Tablet PC
Delete functions are not supported by the stylus.
Action Mouse StylusSelecting menuitems
Click with the left mouse button. Tap on the menu entry with the tip ofthe stylus.
Starting programs Double-click with the left mousebutton.
Tap on the program symbol twice inrapid succession using the stylus tip.
Moving an objector window
Drag with the left mouse buttonpressed.
Place the stylus tip directly on theobject or window. Keep the stylus tipheld against the screen. Drag thedesired object or window.
Opening a contextmenu
Click with the right mouse button. Tap on the desired element with thestylus and keep the stylus pressedagainst the screen.
Moving the cursor Move the mouse Place the tip of the stylus directly onthe screen.
Stylus locationTo prevent the stylus from jamming in its slot, always make sure that you insert the styluscorrectly into its slot (flat part of the stylus points towards the bottom of the Tablet PC).
On delivery, the stylus (1) is located in the stylusslot:
1
Adjusting the stylusOperating system MenuWindows 7 Under Hardware and Sound - Pen and Input Devices, you can make various
settings for the stylus in the control panel (assignment and function ofthe stylus button).
Windows 8.1 Under Windows 8.1 Desktop - Control Panel - Hardware and Sound - Pen andInput Devices you can make various settings for the stylus (assignmentand function of the stylus button).
34 Fujitsu

Working with the Tablet PC
Calibrating the stylusBefore first use with the stylus, you must calibrate your Tablet PC via the operatingsystem, so that it recognizes the stylus as accurately as possible.
You should also always repeat the calibration if the coordination between thestylus and the cursor movement deteriorates.
Operating system MenuWindows 7 /Windows 8.1 Desktop
To calibrate, run the Hardware and Sound / Tablet PC Settings function in theControl Panel. You need to calibrate both portrait and landscape formats.
Securing the stylus tether (optional)To prevent accidentally dropping or losing the stylus, you should secure itwith the optional stylus tether.
► Attach one end of the stylus cord to the stylus and the other end of the stylus cord to the Tablet PC.
Fujitsu 35

Working with the Tablet PC
Tablet buttonsIn addition to an on/off switch (4), your Tablet PC is fitted with three tablet buttons.
1 2 43
No. Description Functions1 Shortcut button Start function manager or screen shot function2 Decrease volume button Decrease volume3 Increase volume button Increase volume
If the Tablet PC’s Windows button is pressed in combination withthe ON/OFF button (4), this function is equivalent to pressing theCtrl + Alt + Del key combination on a keyboard.
36 Fujitsu
Working with the Tablet PC
WebcamWebcam
Your device has two webcams: one on the front of the device and one on the rear.
The webcam has its own status indicator. The indicator lights up when the webcam is active.
Depending on the software used, you can use your webcam to take pictures,record video clips or take part in web chats.
• The picture quality depends on the lighting conditions and the software being used.• You can only operate the webcam with a particular application (e.g. an Internet telephony
program or a video conferencing program which supports a webcam).• When using the webcam the support of the Tablet PC must not wobble.• The webcam automatically adjusts itself to the current light level. For this reason,
the touchscreen may flicker while the light level is adjusted.
Further information on use of the webcam and additional settings for your webcamcan be found in the help function of the program using the webcam.
Rechargeable batteryBatteryBatteryServicelife,batteryRechargeablebatteryBattery
The built-in battery provides the Tablet PC with the necessary power for use on the move.You can increase the service life of the battery by caring for the battery properly. Theaverage battery service life is around 500 charge/discharge cycles.
You can extend the battery service life by taking advantage of the available energy-saving functions.
Charging and maintaining the batteryBatteryBattery
The Tablet PC battery can only be charged when the ambient temperature isbetween 5°C / 41 °F and max. 35°C / 95°F.
You can charge the battery by connecting the Tablet PC to the AC adapter(see "Connecting the AC adapter", Page 19).
If the battery is running low you will hear a warning alarm. If you do not connect the AC adapterwithin five minutes of hearing the warning alarm, your Tablet PC will switch off automatically.
Monitoring the battery state of chargeBatterybatterychargemeter
A battery symbol for monitoring the battery capacity is displayed in the system bar /status indicator. The battery symbol shows you the battery charge.
Fujitsu 37

Working with the Tablet PC
Using the energy saving functionsEnergyEnergyBattery
The Tablet PC uses less power when the energy saving features are enabled. You will thenbe able to work longer when using the battery before having to recharge it.
The energy efficiency is increased and environmental pollution is reduced.By choosing the best power options, you can make significant savings andat the same time help protect the environment.
We recommend the following settings:
Function Operating on AC power Operating on battery powerTurn off monitor After 10 minutes After 5 minutesTurn off hard disk(s) After 15 minutes After 10 minutesEnergy saving (S3) After 20 minutes After 15 minutesHibernate mode (S4) After 1 hour After 30 minutes
► Set the energy saving functions in your Control Panel.► Set the screen saver in your Control Panel.
or► Keep a finger pressed on the desktop to display the context menu. Configure the screen
saver under Change screen saver.
If you need further information about an option, you can get help with most settings by
pressing the ? symbol in the upper right of the screen to open the Microsoft Help.
When the Tablet PC is in a power-saving mode, you must remember the following:
During power-saving mode, open data is held in main memory orin a swap file on the hard disk.
Never switch off the Tablet PC while it is in a power-saving mode. If the built-in batteryis nearly flat, close all open files and do not go into power-saving mode.
If you do not intend to use your Tablet PC for a long period of time:
► Exit the power-saving mode if necessary by touching the screen or by switching the TabletPC on.
► Close all opened programs and completely shut down the Tablet PC.
38 Fujitsu

Working with the Tablet PC
Memory cardsSlot
Your Tablet PC is equipped with an integrated storage card reader. Use storagecards to enlarge the storage of your Tablet PC.
Follow the manufacturer’s instructions when handling the memory cards.Memorycard
Supported formatsThe following formats are supported:
• Micro Secure Digital (Micro SDTM Card)• Micro SDHC• Micro SDXC
Inserting the memory card
2
1
► Open the slot cover (1).► Carefully slide the storage card into the slot (2). The label area must be facing upward. Do
not apply any force, otherwise the delicate contact surfaces could be damaged.Memorycard
► Close the slot cover.
Fujitsu 39

Working with the Tablet PC
Removing the memory cardMemorycard
To avoid any loss of data, always follow the correct procedure for removing thecard (see the documentation for your operating system).
► Open the slot cover.
1
3
a1
2
► Press the edge of the memory card so that the memory card jumps (1) slightly out of the slot (a).► Pull the memory card out of the slot (a) in the direction of the arrow (2).► Close the slot cover (3).
40 Fujitsu

Working with the Tablet PC
SIM cardA SIM Card (Subscriber Identity Module) is a chip card which is inserted in a cellular phone or TabletPC and, together with an integrated 4G module, enables access to a cellular radio network.
Follow the instructions supplied by the provider of the SIM card. If you do not feel thethe SIM card engage as you insert it, use a pointed object to insert the SIM card.
Please note that the SIM card format must be micro-SIM (3FF). Other SIMcard formats, such as full-size (1FF), mini-SIM (2FF) or nano-SIM (4FF) donot fit in the SIM card slot of your Tablet PC.
Please do not insert any other format of SIM card as they may becometwisted, they could even damage the system.
Inserting a SIM card
2
1
a
► Open the slot cover (1).► Carefully push the SIM card into the slot (a) in the direction of the arrow (2) until you
feel the SIM card engage. The label area must be facing upward. Do not apply anyforce, otherwise the delicate contact surfaces could be damaged.
► Close the slot cover.
Fujitsu 41

Working with the Tablet PC
Removing a SIM card► Open the slot cover.
3
a
2
1
► Press the edge of the SIM card so that the SIM card jumps slightly out of the slot (1).► Pull the SIM card out of the slot (a) in the direction of the arrow (2).► Close the slot cover (3).
Wireless LAN/Bluetooth/4G/LTE/NFC wirelesscomponents
The installation of wireless components not approved by Fujitsu willinvalidate the certifications issued for this device.
Switching the wireless components on and offThe wireless components are switched on and off using the appropriatefunctions of the operating system.
► To switch wireless components on and off individually, select Settings – ChangePC settings – Network – Airplane mode.
Configuring WLAN access• Requirement: A WLAN is available and you have the necessary access data to hand.
Information on configuring WLAN access can be found in thedocumentation for your operating system.
42 Fujitsu

Working with the Tablet PC
Further information on WLAN and BluetoothFor further information about WLAN or Bluetooth, please refer to theappendix of this Operating Manual.
For WLAN specifications, see chapter "WLAN specifications", Page 83.
Access via UMTSIf you ordered an integrated UMTS module with your system, you can enjoy optimumreception and maximum energy efficiency without awkward cables or antennas. Theoptional UMTS module is ready for use immediately.
You will find information on establishing the connection with the UMTS networkin the documentation for the hardware used.
Your device can connect to the Internet via UMTS. To do this, use one ofthe following types of connection:
• Integrated UMTS module (availability dependent on your configuration)• USB dongle (a USB stick containing a SIM card from your cellular phone network provider)• A mobile end-device (e.g. cellular phone with Bluetooth or cable connection)
Access via Wireless WANYou can purchase the accessories for Wireless WAN reception from your Fujitsu dealer.
If you have ordered a Wireless WAN module, your device will alreadybe prepared when you receive it.
You will find information on establishing the connection with the Wireless WANnetwork in the documentation for the hardware you plan to use.
Access via 4GYou can order the accessories for 4G reception from your Fujitsu dealer.
If you have ordered an integrated 4G module with your system, the 4Gmodule is ready for use straight away.
You can find information on establishing the connection with the 4G networkin the documentation for the hardware used.
NFC (Near Field Communication, optional)Your Tablet PC can be equipped with an optional built-in NFC chip. Near Field Communication isused for contactless exchange of data via radio over short distances (a few centimeters).
Fujitsu 43
Working with the Tablet PC
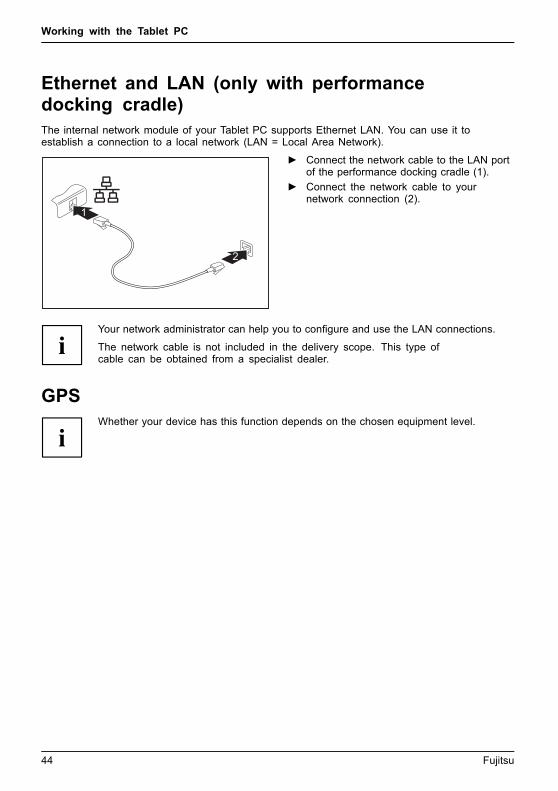
Ethernet and LAN (only with performancedocking cradle)EthernetLAN
The internal network module of your Tablet PC supports Ethernet LAN. You can use it toestablish a connection to a local network (LAN = Local Area Network).
2
1
► Connect the network cable to the LAN portof the performance docking cradle (1).
► Connect the network cable to yournetwork connection (2).
Your network administrator can help you to configure and use the LAN connections.
The network cable is not included in the delivery scope. This type ofcable can be obtained from a specialist dealer.
GPSGPS
Whether your device has this function depends on the chosen equipment level.
44 Fujitsu

Accessories for your Tablet PC (optional)
Accessories for your Tablet PC (optional)The following accessories are available for your Tablet PC:
• Performance docking cradle for charging the Tablet PC and with additional ports• Keyboard cover• Shoulder strap• Folio case• Protective TPU cover with kickstand and handstrapThe following sections provide more information on handling the accessories.
Fujitsu 45

Accessories for your Tablet PC (optional)
Your performance docking cradle (optional)As well as fast charging, your performance docking cradle is a device that also allows you toquickly connect your Tablet PC to your peripherals such as a monitor, keyboard, mouse, etc.You only need to dock the Tablet PC to be able to work with your peripheral devices.
Cradle componentsPortsPortsCradle
1
23 4
5 6
12
78
9 1011
1 = Dock release button2 = Docking port3 = USB port 3.04 = USB port 3.05 = USB port 3.06 = Microphone port
7 = Headphones port8 = VGA monitor port9 = HDMI port10 = LAN port11 = Security Lock device12 = DC jack socket (DC IN)
Setting up the cradleSelect a suitable location for the cradle before setting it up. In doingso, please follow these instructions:
• Place the cradle on a flat, stable, non-slippery surface.• Never place the cradle or the AC adapter on a heat-sensitive surface.• Do not expose the cradle to extreme environmental conditions.• Protect the cradle from dust, moisture and heat.
46 Fujitsu

Accessories for your Tablet PC (optional)
Connecting the Tablet PC to the cradleIt is possible to connect the Tablet PC to the cradle while it is running.
Disconnect the AC adapter from the Tablet PC before connectingthe Tablet PC to the cradle.
When the Tablet PC is connected to the cradle, you must connectthe AC adapter to the cradle.
Cradle
► Remove the AC plug of the AC adapter from the power outlet.► Remove the AC adapter cable from the DC jack (DC IN) of the Tablet PC.
12
3
4
The same AC adapter can be used for the Tablet PC as well as for the cradle.
► Position the Tablet PC so that it lies against the storage surface of the cradle.
Fujitsu 47

Accessories for your Tablet PC (optional)
► Push the Tablet PC onto the cradle in the direction of the arrow (1) until you feel it engageon the connector and until the slide-out position returns to its original position.
► Plug the AC adapter cable into the DC jack (DC IN) on the cradle (2).► Connect the AC cable to the AC adapter (3).► Plug the AC cable into the power outlet (4).
Disconnecting the Tablet PC from the cradleIt is possible to separate the Tablet PC from the cradle while it is running.
2
1
► Press the slide-out button in the direction of the arrow (1) until it firmlyremains in pressed position (red marking visible).
► While holding down the lower part of the cradle, lift the Tablet PC off thecradle in the direction of the arrow (2).
48 Fujitsu

Accessories for your Tablet PC (optional)
Keyboard cover (optional)The keyboard cover is an optimized device for the convenient input of text. Itonly needs to be docked with the Tablet PC.
Components of the keyboard coverKeyboardcoverPorts
1
3 4 5
2
1 = Release button2 = Docking port for the Tablet PC3 = Num Lock indicator (to switch virtual
numeric keypad on and off)
4 = Caps Lock indicator (to switchcapitalization function on and off)
5 = Scroll Lock indicator (function dependenton the application program)
Fujitsu 49

Accessories for your Tablet PC (optional)
Connecting the Tablet PC to the keyboard coverIf the Tablet PC is connected to the keyboard cover, you can connectthe AC adapter to the Tablet PC.
Keyboardcover
► Position the keyboard cover as shown.
1
2
3
4
► Push the Tablet PC onto the keyboard cover in the direction of the arrow(1) until you feel it engage with the plug.
► Connect the AC adapter cable to the DC input connector (DC IN) of the Tablet PC (2).► Connect the AC cable to the AC adapter (3).► Plug the AC cable into the power outlet (4).
50 Fujitsu

Accessories for your Tablet PC (optional)
Separating the Tablet PC from the keyboard coverIt is possible to separate the Tablet PC from the keyboard cover while it isrunning. However, to prevent any problems, we recommend that you execute theappropriate undocking function provided by the operating system.
2
1
► Press the slide-out button down (1) until it remains in the pressed position (red marking visible).► Lift the Tablet PC away from the keyboard cover in the direction of the arrow (2).
Shoulder strap (optional)This shoulder strap is compatible with the optional protective TPU cover.
Fujitsu 51

Accessories for your Tablet PC (optional)
Folio case (optional)If you are using the folio case, do not connect the Tablet PC to the keyboard cover.
Please note that the device cannot be placed into the docking station inclamshell mode if the tablet still has its cover on.
• This folio case contains magnets. Keep it away from objects that may be easilyaffected by the influence of magnetism, e.g. pacemakers and magnetic cards.
• Please note that the LCD screen may be accidentally turned on whentouched if the device is in its folio case.
• Make sure the device is firmly fitted into the folio case fasteners inorder to prevent it from falling out.
• The folio case is only designed to safely store and transport the device.Do not use the folio case for any other purpose.
• Keep the folio case away from fire or heaters.• Neither put the folio case in direct sunlight nor expose it to
high temperature or humidity.
► Position the Tablet PC on the folio case as shown.The following illustration shows you the many ways in which the folio case can be used:
52 Fujitsu

Accessories for your Tablet PC (optional)
Fujitsu 53

Accessories for your Tablet PC (optional)
Protective TPU cover with kickstand andhandstrap (optional)
If you are using the Protective TPU cover with kickstand and handstrap, open the TPUcover as illustrated below to connect the Tablet PC to the keyboard cover or cradle.
• Please note that the LCD screen may be accidentally turned on when touched if the device is in its TPU cover.
• Make sure the device is fitted into the TPU cover properly inorder to prevent it from falling out.
• The TPU cover is only designed to safely store and transport the device.• Do not use the TPU cover for any other purpose.• Do not attach the optional keyboard to the tablet and carry both using the
TPU cover. The keyboard and/or tablet could be damaged.• Keep the TPU cover away from fire or heaters.• Avoid putting the TPU cover in direct sunlight nor expose it to
high temperature or humidity.
1
► Open the TPU cover (1).
54 Fujitsu

Accessories for your Tablet PC (optional)
2
a
b
► Push the Tablet PC into the TPU cover as shown (2). Ensure that the Tablet PCfaces the TPU cover in the right direction, i.e., that the Windows button (a) and thewebcam (b) are in the locations shown, relative to the TPU cover.
3
► Close the TPU cover (3).
Fujitsu 55

Accessories for your Tablet PC (optional)
The following illustration shows you the way in which the TPU cover can be used:
56 Fujitsu
If required, secure the optional shoulder strap at the four attachment points (1,2,3 and 4).

Security functions
Security functionsSecurityfunctions
Your Tablet PC has several security features that you can use to secure your systemand your personal data from unauthorized access.
This chapter explains how to use these functions, and what the benefits are.
Please remember that in some cases, for example, forgetting your password,you may be locked out of the system and unable to access your data.Therefore, please note the following information:
• Back up your data on external data carriers at regular intervals.• Some security functions need you to choose passwords. Make a note
of the passwords and keep them in a safe place.If you forget your passwords you will need to contact our Service Desk.Deletion or resetting of passwords are not covered by your warrantyand a charge will be made for assistance.
Configuring the fingerprint sensorFingerprintsensorFingerprintsensor
The fingerprint sensor can record the image of a fingerprint. With additional fingerprintsoftware, this image can be processed and used instead of a password.
1
► Install the fingerprint software to be able to use the fingerprint sensor (1).
Fujitsu 57

Security functions
Using the Security LockSecurityLockAnti-theftprotectionSecurityLock
Your device comes with a Security Lock device for the Kensington Lock Cable. With theKensington Lock Cable, a sturdy steel cable, you can protect your device and the port replicatoragainst theft. The Kensington Lock Cable is available as an accessory.
► Fit the Kensington Lock Cable to thecorresponding mechanism on your device.
Attach another Kensington Lock Cable to your cradle to protect this from theft as well.
Configuring password protection in BIOS Setup UtilityBefore using the various options for password protection in the BIOS SetupUtility, please proceed as follows to increase data security:
Make a note of the passwords and keep them in a safe place. If you forget yoursupervisor password you will not be able to access your Tablet PC. Passwords arenot covered by your warranty and a charge will be made for assistance.Passwordprotection
Your password can be up to 32 characters long and can contain letters andnumbers. No distinction is made between uppercase and lowercase.
58 Fujitsu

Security functions
Protecting BIOS Setup Utility (supervisor passwordand user password)
If you have opened these operating instructions on the screen, we recommendthat you print them out. You cannot call up the instructions on the screenwhile you are setting up the password.
BIOSSetupUtility
The supervisor password and the user password both prevent unauthorized use of the BIOSSetup Utility. The supervisor password allows you to access all of the functions of the BIOS SetupUtility, while the user password will only give you access to some of the functions. You canonly set up a user password if a supervisor password has already been assigned.
Calling and using the BIOS Setup Utility is described in the chapter"Settings in BIOS Setup Utility", Page 68.
Assigning the supervisor and user passwords► Start the BIOS Setup Utility and go to the Security menu.► Select the Set Supervisor Password field and press the Enter key.
With Enter new Password: you are asked to enter a password.► Enter the password and press the Enter key.
Confirm new Password requires you to confirm the password.► Enter the password again and press the Enter key.
Changes have been saved is displayed as a confirmation that the new password has been saved.► To set the user password, select Set User Password and proceed exactly as
when configuring the supervisor password.If you do not want to change any other settings, you can exit BIOS Setup Utility.
► In the Exit menu, select the option Save Changes & Exit.► Select Yes and press the Enter key.
PasswordSupervisorpasswordUserpassword
The Tablet PC is rebooted and the new password is effective. It will now be necessary tofirst enter your supervisor or user password in order to open the BIOS Setup Utility. Pleasenote that the user password only provides access to a few of the BIOS settings.
Changing the supervisor password or user passwordYou can only change the supervisor password when you have logged into theBIOS Setup Utility with the supervisor password.PasswordSupervisorpasswordUserpassword
► Start the BIOS Setup Utility and go to the Security menu.► When changing the password, proceed exactly as when assigning a password.
Fujitsu 59

Security functions
Removing passwordsTo remove a password (without setting a new password) perform the following steps:PasswordSupervisorpasswordUserpassword
► Start the BIOS Setup Utility and go to the Security menu.► Highlight the Set Supervisor Password or Set User Password field and press the Enter key.
You will be requested to enter the current password by the Enter Current Password prompt.Enter New Password will appear and you will be requested to enter a new password.
► Press the Enter key twice at this request.► In the Exit menu, select the option Save Changes & Exit.► Select Yes and press the Enter key.
The Tablet PC is rebooted and the password is removed.Removing the supervisor password simultaneously deactivates the user password.
Password protection for booting the operating systemWith the supervisor password you have set in the BIOS Setup Utility (seesection "Assigning the supervisor and user passwords", Page 59), you canalso prevent booting of the operating system.Operatingsystem
Activating system protection► Start the BIOS Setup Utility and go to the Security menu.
Operatingsystem
► Select the Password on Boot option and press the Enter key.► Select the option you require (First Boot or Every Boot) and press the enter key► Select the Save Changes & Exit option under Exit.
The Tablet PC reboots. You will be prompted to enter your password (the supervisor password).
Deactivating system protection► Start the BIOS Setup Utility and go to the Security menu.
Operatingsystem
► Select the Password on Boot option and press the Enter key.► Select the Disabled option and press the Enter key.
If you do not want to change any other settings, you can exit BIOS Setup Utility.► Select the Save Changes & Exit option under Exit.
The Tablet PC reboots. The system is no longer password-protected.
Password protection for the hard diskPasswordprotection
The hard disk password prevents unauthorized access to the hard disk drivesand is checked internally each time the system is booted. The condition for thisis that you have assigned at least the supervisor password.
60 Fujitsu

Security functions
Activating hard disk protection► Call up the BIOS Setup and select the Security menu.
If you have not assigned BIOS passwords yet, define the supervisor and the userpassword now, if desired (see "Security functions", Page 57).
► Mark the Hard Disk Security field and press the Enter key.► In the area Drive0, mark the field Set Master Password and press the Enter key.
Enter new Password then appears and you are asked to enter a password.► Enter the password and press the Enter key.
Confirm new Password requires you to confirm the password.► Enter the password again and press the Enter key.
With Setup Notice: Changes have been saved you receive confirmation thatthe new password has been saved.The field Password Entry on Boot is set to Enabled by default. You can exit the BIOSSetup once you have finished changing the settings.
► From the Exit menu, choose the option Exit Saving Changes.► Press the Enter key and select Yes.
The Tablet PC reboots and your hard disk is now protected with a password. Thepassword prompt is enabled as soon as the Tablet PC has rebooted.
Deactivating hard disk protectionTo cancel a password (without setting a new password) proceed as follows:
► Call up the BIOS Setup and select the Security menu.► Mark the Hard Disk Security field and press the Enter key.► In the area Drive0, mark the field Set Master Password and press the Enter key.
With the prompt Enter current Password you are first asked to enter the old password again.With Enter new Password you are then prompted to enter a new password.
► After the request, press the Enter key three times.► From the Exit menu, choose the option Exit Saving Changes.► Press the Enter key and select Yes.
The Tablet PC reboots and there is no longer any password protection for this hard disk.
Fujitsu 61

Security functions
SmartCard reader (optional)Your device may be fitted with a SmartCard reader depending on your chosen model(only available in models with screw holes and SmartCard reader).
SecurityfunctionsSecurityfunctions
SmartCards are not supplied as standard equipment. You can use all SmartCards that comply withthe ISO standard 7816-1, -2 or -3. These SmartCards are available from various manufacturers.
With the appropriate software you can use your SmartCard as an alternative to password protection,but also as a digital signature, for encrypting your e-mails or for home banking.
We recommend that you always use two SmartCards. Always keep one of the SmartCardsin a safe place if you are carrying the other SmartCard with you.
Inserting the SmartCardYour device may be fitted with a SmartCard reader depending on your chosen model.
Do not use force when inserting and removing the SmartCard.
Make sure that foreign objects do not fall into the SmartCard reader.
1
► Push the SmartCard into the SmartCard reader (1) with the chip facing the rear of the Tablet PC.
62 Fujitsu
Security functions
Trusted Platform Module - TPM (device dependent)TPMTrustedPlatformModule
To use the TPM, you must enable the TPM in the BIOS Setup before the software isinstalled. The requirement for this is that you have assigned at least the supervisorHDD password (see "Security functions", Page 57).
Enabling TPM• Requirement: You have assigned a supervisor password (see "Security functions", Page 57).► Call BIOS Setup and select the Security menu.► Mark the TPM Security Chip Setting field and press the Enter key.► Select the entry Enabled to enable the TPM
Once you have enabled the TPM the Clear Security Chip menu item appears.You can clear the holder in the TPM using Clear Security Chip. With Enabled,all secret keys (e.g. SRK - Storage Root Keys, AIK - Attestation Identity Keysetc.) generated by applications are deleted.
Take note that you can then no longer access the data you haveencrypted on the holder-based keys!
► Select the Exit Saving Changes option in the Exit menu.► Press the Enter key and select Yes.
The Tablet PC restarts and the TPM is enabled after the reboot.
Disabling TPM• Requirement: You have assigned a supervisor password (see "Security functions", Page 57).► Call BIOS Setup and select the Security menu.► Mark the TPM Security Chip Setting field and press the Enter key.► Select the entry Disabled to disable the TPM.► From the Exit menu, choose the option Exit Saving Changes.► Press the Enter key and select Yes.
The Tablet PC is rebooted and the TPM is disabled.
Fujitsu 63
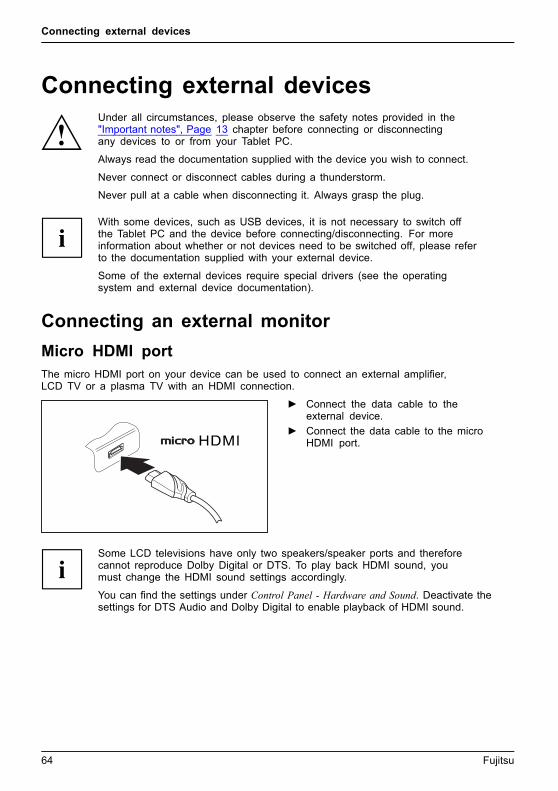
Connecting external devices
Connecting external devicesUnder all circumstances, please observe the safety notes provided in the"Important notes", Page 13 chapter before connecting or disconnectingany devices to or from your Tablet PC.
Always read the documentation supplied with the device you wish to connect.
Never connect or disconnect cables during a thunderstorm.
Never pull at a cable when disconnecting it. Always grasp the plug.
With some devices, such as USB devices, it is not necessary to switch offthe Tablet PC and the device before connecting/disconnecting. For moreinformation about whether or not devices need to be switched off, please referto the documentation supplied with your external device.
Some of the external devices require special drivers (see the operatingsystem and external device documentation).
Connecting an external monitorMicro HDMI portHDMIport
The micro HDMI port on your device can be used to connect an external amplifier,LCD TV or a plasma TV with an HDMI connection.
► Connect the data cable to theexternal device.
► Connect the data cable to the microHDMI port.
Some LCD televisions have only two speakers/speaker ports and thereforecannot reproduce Dolby Digital or DTS. To play back HDMI sound, youmust change the HDMI sound settings accordingly.
You can find the settings under Control Panel - Hardware and Sound. Deactivate thesettings for DTS Audio and Dolby Digital to enable playback of HDMI sound.
64 Fujitsu

Connecting external devices
HDMI port (performance docking cradle only)HDMIport
The HDMI port can be used to connect an external amplifier, LCD TV or aplasma TV with an HDMI connection.
► Connect the data cable to theexternal device.
► Connect the data cable to the HDMI port.
Some LCD televisions have only two speakers/speaker ports and thereforecannot reproduce Dolby Digital or DTS. To play back HDMI sound, youmust change the HDMI sound settings accordingly.
You can find the settings under Control Panel - Hardware and Sound. Deactivate thesettings for DTS Audio and Dolby Digital to enable playback of HDMI sound.
VGA monitor port (only performance docking cradle)An analog monitor is connected to the analog VGA monitor port. Screen output islimited to a maximum of two screens at the same time.MonitorVGAportScreenconnectionMonitorconnection
► Plug the data cable of the externalmonitor into the monitor port.
► First switch on the external monitor andthen switch on the Tablet PC.
You can also switch back and forth between the external monitor and the LCDscreen of the Tablet PC, see "Touchscreen", Page 26.
You can display the same image on the external monitor and on the LCDscreen of the Tablet PC at the same time.
Fujitsu 65

Connecting external devices
Connecting USB devicesUSBports
On the USB ports you can connect external devices that also have a USB port(e.g. a DVD drive, a printer, a scanner or a modem).
USB devices are hot-pluggable. This means you can connect and disconnect thecables of USB devices while the operating system is running.
USB 1.x has a maximum data transfer rate of 12 Mbps.
USB 2.0 has a data transfer rate of up to 480 Mbps.
USB 3.0 has a data transfer rate of up to 5 Gbps.
Additional information can be found in the documentation for the USB devices.
► Connect the data cable to theexternal device.
► Connect the data cable to the USBport on the Tablet PC.
or► Connect the data cable to a USB
port of the cradle.
Device driversUSB devices will be automatically recognized and installed by your operating system.
How to remove USB devices correctlyAlways correctly remove the device according to the rules described below,to ensure that none of your data is lost.
► Tap the symbol for safe removal of the hardware.► Select the device you wish to shut down and remove.► Tap OK.
Wait for the dialog box which tells you that it is now safe to remove the device.
66 Fujitsu

Connecting external devices
Connecting external audio devicesYour Tablet PC has a combined headphone and microphone port, your (optional) performancedocking cradle has separate ports for headphones and a microphone.
Connecting headphones or other audio output devicesConnectingaudiodevicesAudioconnectionsConnectingheadphones
The combined headphones and microphone port of the Tablet PC or the headphonesport of the performance docking cradle (optional) allows you to connect output devices,such as headphones, external speakers, etc., to your Tablet PC.
► Connect the audio cable to theexternal device.
► Connect the audio cable to the combinedheadphones and microphone port of theTablet PC or to the headphones port of theperformance docking cradle (optional).The internal speakers are disabled.
If you buy a cable from a retailer, please note the following:
The combined headphone and microphone port on your Tablet PCis a "3.5 mm jack socket".
If you want to connect headphones or speakers you will need a "3.5 mm jack plug".
Connecting a microphone or other audio input devicesConnectingaudiodevicesAudioconnectionsConnectingmicrophone
The combined headphones and microphone port of the Tablet PC or the microphone portof the performance docking cradle (optional) allows you to connect an external microphone,a MiniDisc player, MP3 player, CD player or a tape deck to your Tablet PC.
► Connect the audio cable to theexternal device.
► Connect the audio cable to the combinedheadphones and microphone port of theTablet PC or to the microphone port of theperformance docking cradle (optional).
Fujitsu 67

Settings in BIOS Setup Utility
Settings in BIOS Setup UtilityBIOSSetupUtilitySystemsettings,BIOSSetupUtilityConfiguration,BIOSSetupUtilitySetupConfiguringsystemConfiguringhardware
To navigate more easily in the BIOS Setup Utility, you can use an external USB keyboard.
The BIOS Setup Utility allows you to set the system functions and the hardwareconfiguration for the Tablet PC.
When the Tablet PC is delivered, the default settings are effective. You can changethese settings in the menus of the BIOS Setup Utility. Any changes you make takeeffect as soon as you save and exit the BIOS Setup Utility.
The BIOS Setup Utility program contains the following menus:
Info Displays information relating to the BIOS, processor and Tablet PCSystem Advanced system settingsAdvanced Configuration of various hardware components, such as mouse, keyboard,
processorSecurity Password settings and security functionsBoot Configuration of the start-up sequenceExit Exits the BIOS Setup Utility
Starting the BIOS Setup Utility► Keep the decrease volume button pressed down and switch the Tablet PC on.
BIOSSetupUtility
► If a password has been assigned, enter the password and press the Enter key.
If you have forgotten the password, contact your system administratoror contact our customer service centre.
The BIOS Setup Utility starts.
68 Fujitsu
Settings in BIOS Setup Utility
BIOS Setup Utility operationBIOSSetupUtility
Press the F1 key to display help about operation of the BIOS Setup Utility. The descriptionof the individual settings is shown in the right-hand window of the BIOS Setup Utility.
With the F9 key you can load the default settings of the BIOS Setup Utility.
► Use the cursor keys ← or → to select the menu you wish to access to make changes.The menu is displayed on the screen.
► Select the option you want to change with the cursor keys ↑ or ↓ .► Press the "Enter" key.► Press the ESC key to exit the selected menu.► For future reference, make a note of the changes you have made (for example, in this manual).
Fujitsu 69

Settings in BIOS Setup Utility
Exiting BIOS Setup UtilityBIOSSetupUtility
You need to select the desired option in the Exit menu and activate it by pressing the Enter key:
Exit Saving Changes - save changes and exit BIOS Setup Utility► To save the current menu settings and exit the BIOS Setup Utility, select Exit Saving Changes and Yes.
The Tablet PC is rebooted and the new settings come into effect.
Exit Discarding Changes - Reject changes andexit BIOS Setup Utility► To discard the changes, select Exit Discarding Changes and Yes.
The settings which were valid when BIOS Setup Utility was called remain effective.The BIOS Setup Utility ends and the Tablet PC is rebooted.
Load Setup Defaults – load default values► To copy the standard entries for all menus of the BIOS Setup Utility,
choose Load Setup Defaults and Yes.
Discard Changes - Discard Changes withoutexiting BIOS Setup Utility► To discard the changes you have made, select Discard Changes and Yes.
The settings in place when BIOS Setup Utility was called remain effective.You can now make additional settings in the BIOS Setup Utility.
► If you want to exit the BIOS Setup Utility with these settings, select Exit Saving Changes and Yes.
Save Changes - save changes without exitingthe BIOS Setup Utility► To save the changes, select Save Changes and Yes.
The changes are saved. You can now make additional settings in the BIOS Setup Utility.► If you want to exit BIOS Setup Utility with these settings, choose Exit Saving Changes and Yes.
Save changes and power off► To save the changes and switch off your device, select Save Changes and Power Off and Yes.
The changes are saved. Your device is shut down.
70 Fujitsu

Troubleshooting and tips
Troubleshooting and tipsTroubleshootingTipsFaultProblemsolving
If a fault occurs, try to correct it as described. If you fail to correct the problem, proceed as follows:
► Make a note of the steps and the circumstances that led to the fault. Alsomake a note of any error messages displayed.
► Switch the Tablet PC off.► Please contact the Hotline/Service Desk.
You can contact Fujitsu Service and Support in the following ways:
• Toll free phone: 1-800-8Fujitsu (1-800-838-5487)• Website: "http://solutions.us.fujitsu.com/www/content/support/contact/index.php"Before you place the call, have the following information ready so that the customersupport representative can provide you with the fastest possible solution:
• The model name and serial number of the Tablet PC. The serial numberis located on a sticker on the underside of the Tablet PC.
• Notes with the messages that appeared on the screen andinformation on acoustic signals.
• All changes you have made to the hardware or software after receiving the Tablet PC.• All changes you have made to the BIOS Setup settings after receiving the Tablet PC.• Your system configuration and all peripheral devices connected to your system.• Your sales contract.
Our Tablet PCs have been designed primarily with mobile applications in mind.This means that considerable effort has been made to optimize components andequipment in terms of weight, space and energy requirements. Depending on theparticular configuration you have purchased, it is possible that functionality may beslightly reduced compared to a desktop PC if you are running processor-intensivegaming software, e.g. games with intensive 3D graphics. Updating your hardware withdrivers which have not been approved by Fujitsu may result in performance losses,data losses or malfunction of the equipment. A list of approved drivers and currentBIOS versions can be downloaded from: "http://solutions.us.fujitsu.com"
Fujitsu 71
Troubleshooting and tips
Executing a resetIf the device no longer responds to your inputs, choose one of the following options:
Forced shutdown► Press and hold the ON/OFF button for at least 4 seconds.
The device will be shut down. You can then restart it.
Resetting the rechargeable battery► Shut down the device.
If the device does not respond, you may have to force the shutdown, as described above.
► Disconnect the AC adapter from the device.► Press the increase volume button and the shortcut button at the same time.
The device resets in a similar way to the removal of the rechargeablebattery. You can then restart it.
Help if problems occurShould you encounter a problem with your computer that you cannot resolve yourself:
► Note the ID number of your device. The ID number is found on the type ratingplate on the back or underside of the casing.
► For further clarification of the problem, contact the Fujitsu Service Desk. When you dothis, please have ready the ID number and serial number of your system.
Recovering your Factory ImageIn the event you need to restore your original Factory Image, please refer tothe appendix of this Operating Manual.
The Tablet PC’s date or time is incorrectSummertimeIncorrecttimeTimenotcorrectWrongdate/timeDatenotcorrectChargingback-upbattery
Cause TroubleshootingTime and date are incorrect. ► With the BIOS-Setup-Utility, you can set the
date and time in the Main menu.Date and time are still set incorrectly afterswitching on the Tablet PC.
► Please contact your sales outlet or ourhotline/service desk.
72 Fujitsu

Troubleshooting and tips
Battery indicator does not illuminateCause TroubleshootingThe battery is discharged. ► Charge the battery.
or► Connect the Tablet PC to a power outlet
using the AC adapter.
The Tablet PC’s touchscreen remains darkTouchscreendarktouchscreen
Cause TroubleshootingTouchscreen is switched off. ► Press a key (external keyboard) or tap on
the touchscreen.External monitor or television set connected. ► Check whether the graphics driver settings
are correct or whether an external monitorhas been detected in "Intel Graphics MediaAccelerator Driver for mobile".
The display on the Tablet PC’s touchscreenis difficult to read.TouchscreenTouchscreen
Cause TroubleshootingReflected glare ► Move the Tablet PC into a different position.
► Increase the brightness of the screen.
Fujitsu 73
Troubleshooting and tips
The external monitor remains blankMonitor
Cause TroubleshootingMonitor is switched off. ► Switch the external monitor on.Power saving has been activated (monitor isblank).
► Press a key (external keyboard) or tap onthe touchscreen.
Brightness is set to dark. ► Adjust the brightness of the monitor.Screen output is set to the Tablet PCtouchscreen.
► Check whether the graphics driver settingsare correct or whether an external monitorhas been detected in "Intel Graphics MediaAccelerator Driver for mobile".
The external monitor’s AC cable or data cable isnot connected properly.
► Switch off the Tablet PC and the externalmonitor.
► Check whether the AC cable is pluggedproperly into the external monitor and intothe power outlet.
► Check that the data cable is properlyconnected to the Tablet PC and the externalmonitor (if it is plugged in with a connector).
► Switch on the external monitor and theTablet PC.
The external monitor is blank or the image is unstableMonitorMonitor
Cause TroubleshootingThe wrong external monitor has been selectedor the wrong screen resolution has been set forthe application program.
► Shut down the application program inWindows. If the error persists after shuttingdown the program, use the key combinationfor switching the screen output in order toswitch to the touchscreen of the Tablet PC.Change the following setting:
► Set the screen resolution: Set the screenresolution as described in the documentationfor your operating system.
► Select monitor: Select monitor 1 or 2 asdescribed in the documentation for youroperating system.
The cursor does not correctly follow thestylus movementsCause TroubleshootingStylus incorrectly calibrated. ► Calibrate the stylus as described in chapters
"Adjusting the stylus", Page 34 and"Calibrating the stylus", Page 35.
74 Fujitsu

Troubleshooting and tips
Stylus input not workingCause TroubleshootingIncorrect driver installed. ► If your device is one which can only be
operated using the stylus, install the driverfor the standard model.
or► If your device is one which can be
operated using the stylus and by finger,install the driver for the "Dual Digitizer"model.
The Tablet PC does not start after switch onTabletPC
Cause TroubleshootingThe battery is dead. ► Charge the battery.
or► Connect the AC adapter to the Tablet
PC.The AC adapter is not connected properly. ► Check whether the AC adapter is properly
connected to the Tablet PC.► Switch the Tablet PC on.
The Tablet PC stops workingTabletPCEnding
Cause TroubleshootingThe Tablet PC is in energy saving mode. ► End energy saving mode.An application program has caused themalfunction.
► Close the application program or restartthe Tablet PC (by restarting the operatingsystem or switching the device off and backon again).
The battery is dead. ► Charge the battery.
or► Connect the AC adapter to the Tablet
PC.
Fujitsu 75
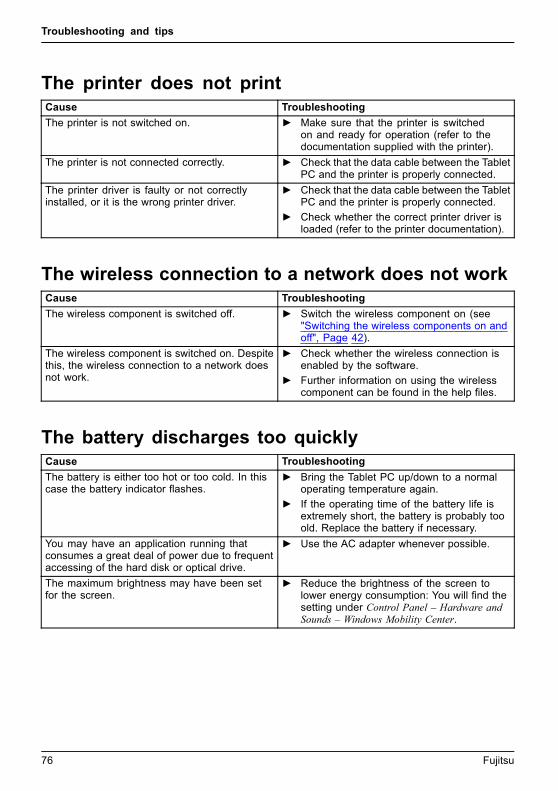
Troubleshooting and tips
The printer does not printPrinterdoesnotprint
Cause TroubleshootingThe printer is not switched on. ► Make sure that the printer is switched
on and ready for operation (refer to thedocumentation supplied with the printer).
The printer is not connected correctly. ► Check that the data cable between the TabletPC and the printer is properly connected.
The printer driver is faulty or not correctlyinstalled, or it is the wrong printer driver.
► Check that the data cable between the TabletPC and the printer is properly connected.
► Check whether the correct printer driver isloaded (refer to the printer documentation).
The wireless connection to a network does not workThewirelessconnectiontoanetworkdoesnotwork
Cause TroubleshootingThe wireless component is switched off. ► Switch the wireless component on (see
"Switching the wireless components on andoff", Page 42).
The wireless component is switched on. Despitethis, the wireless connection to a network doesnot work.
► Check whether the wireless connection isenabled by the software.
► Further information on using the wirelesscomponent can be found in the help files.
The battery discharges too quicklyBattery
Cause TroubleshootingThe battery is either too hot or too cold. In thiscase the battery indicator flashes.
► Bring the Tablet PC up/down to a normaloperating temperature again.
► If the operating time of the battery life isextremely short, the battery is probably tooold. Replace the battery if necessary.
You may have an application running thatconsumes a great deal of power due to frequentaccessing of the hard disk or optical drive.
► Use the AC adapter whenever possible.
The maximum brightness may have been setfor the screen.
► Reduce the brightness of the screen tolower energy consumption: You will find thesetting under Control Panel – Hardware andSounds – Windows Mobility Center.
76 Fujitsu

Troubleshooting and tips
Smart Card reader is not recognizedCause TroubleshootingSmart Card inserted incorrectly. ► Make sure you have inserted your Smart
Card into the Smart Card reader withthe chip facing upwards / downwards(device-dependent).
► Check whether the Smart Card you areusing is supported. Your Smart Card mustcomply with the ISO standard 7816-1, -2,-3 and -4.
SmartCard PIN forgottenCause TroubleshootingPIN forgotten ► If you work in a network, contact your
system administrator, who can unlock yourTablet PC using a supervisor PIN.
User and/or supervisor Smart Card lostCause TroubleshootingUser and/or Supervisor Smart Card lost. ► If you have lost your user Smart Card, you
can continue working with the SupervisorSmart Card and initialize a new user SmartCard.
► If you have lost the Supervisor Smart Card,you can also continue working, but you nolonger have all rights and cannot initializeanother Supervisor Smart Card.
► If you have lost both Smart Cards, youcannot boot your system. Please contact ourcustomer service center. You must provideproof of ownership for the device. Thecustomer service center will then refer youto our service partner, who will unlock yourdevice (for a charge).
SmartCard lostCause TroubleshootingSmartCard lost. ► If you work in a network, contact your
system administrator, who can boot yourTablet PC with a supervisor SmartCard.
Fujitsu 77

Troubleshooting and tips
Acoustic warningAcousticwarningsErrors
Cause TroubleshootingA beep sounds every few seconds.
The battery is almost dead.
► Charge the battery.
78 Fujitsu
Troubleshooting and tips
Error messages on the screenErrormessagesonthescreenErrors
This section describes the error messages generated by the BIOS Setup. Error messages displayedby the operating system or programs are described in the documentation for these programs.
If the error message appears repeatedly despite troubleshooting measures,contact the place of purchase or our customer service center.
Fujitsu 79

Troubleshooting and tips
Error message/cause TroubleshootingCMOS battery bad
If the error message occurs repeatedly, thebuffer battery in the Tablet PC is flat.
► Contact your sales outlet or our customerservice center.
System CMOS checksum bad - Default configurationused
The system configuration information isincorrect.
► Switch the Tablet PC off.► Switch the Tablet PC on.► In the BIOS Setup, select the Exit menu.► Select the entry Load Setup Defaults.► Select OK and press the Enter key.
Extended memory failed at offset: xxxx Failing Bits:zzzz zzzz
When testing the extended memory. an errorhas resulted at the address xxxx.
► Contact your sales outlet or our customerservice center.
Failure Fixed Disk n
The settings of the hard disk drive are incorrect.► Start the BIOS Setup (Primary Master
submenu) and select the correct settings.
Keyboard controller error ► Switch your Tablet PC off with the ON/OFFbutton.
► Wait 3 - 5 seconds and switch the Tablet PCon again.
Keyboard error If you use an external keyboard:
► Check the connection and reboot the TabletPC.
nn Stuck key ► Make sure that no key is pressed.Operating system not found ► Check in the BIOS Setup whether your hard
disk has been set correctly.► Make sure that the operating system is
installed on the corresponding drive.Press <F1> to resume, <F2> to SETUP
This error message appears if an error occursduring the self-test before starting the operatingsystem.
► Press the Alt tablet button to boot theoperating system
Real time clock error ► Contact your sales outlet or our customerservice center.
nnnnK Shadow RAM failed at offset: xxxx FailingBits: zzzz
► Contact your sales outlet or our customerservice center.
System battery is dead - Replace and run SETUP ► Contact your sales outlet or our customerservice center.
System cache error - Cache disabled ► Contact your sales outlet or our customerservice center.
System timer error ► Contact your sales outlet or our customerservice center.
80 Fujitsu

Technical data
Technical dataTablet PCGeneralProcessor Intel® Core-M processor familyMain memory (SO DIMM) 4 GByte / 8 GByte DIMM onboardElectrical dataSafety regulations complied with CEProtection class IIMaximum power consumption (when the TabletPC is switched on, connected to the keyboardcover and the battery is being charged):
65 W
TouchscreenSize 11.6" Full HD Wide ViewScreen resolution 1920 x 1080 / 16 million colorsPixel class IIBrightness control 12 levelsTechnology Wide-View High-Bright Display with LED
background lightingDigitizer and glass panel Dual Digitizer with Anti-Glare TouchscreenCameras • Front: HD camera, 2 megapixels
• Back: 5 megapixels, autofocus, mobile lightGraphics cardChip Intel® HD Graphics 5300 (CPU integrated)Maximum resolution of external display: 4,096 x 2,160DimensionsWidth x Depth x Height 294.8 x 192.4 x 11.9 mm
11.61 x 7.57 x 0.47 inch (dependent on the backvariant)
Weight depending on configuration from 1.71 lbs. (775 g)Input devicesTablet buttons 4 keysStylus Stylus with a pressure buttonSlotsMemory card slot 1 x Micro SDSIM card slot 1 x Micro SIMSmart Card slot (device-dependent) 1 xPortsCombined microphone / Line-in / Headphone /Line-out / Headset port
3.5 mm stereo mini jack
Fujitsu 81

Technical data
Docking port 1 xMicro HDMI port 1 xUSB (Universal Serial Bus) 1 x USB 2.0, 1 x USB 3.0Security Lock device 1 xAmbient conditionsEnvironment class DIN IEC 721 7K1Mechanism class DIN IEC 721 7M2Operating temperature 5 °C .... 35 °C / 41 °F .... 95 °FTransport temperature (2K2) –15 °C .... 60 °C / 5 °F .... 140 °F
82 Fujitsu

Technical data
WLAN specificationsType of network Intel® Dual Band Wireless-N 7265 2x2 ac with
integrated Bluetooth 4.0Transfer rate (Automatic switching) IEEE802.11 a and g: 54
Mbps max. data rate; IEEE802.11n: 300 Mbpsmax. data rate, IEEE802.11ac: 867 Mbps max.data rate
Active frequency • 802.11n: 2.4 GHz or 5 GHz• 802.11b/g: 2,400~2,473 MHz• 802.11a: 4,900~5,850 MHz• 802.11ac: 2.4 GHz / 5 GHz
Typical operating distances • 802.11a: 40 ft. (12 m) @ 54 Mbps; 300 ft.(91 m) @ 6 Mbits
• 802.11ac: 40 ft. (12 m) @ 54 Mbps; 300ft.(91 m) @ 6 Mbps
• 802.11b: 100 ft. (30 m) @ 11 Mbps; 300 ft.(91 m) @ 1 Mbps
• 802.11g: 100 ft. (30 m) @ 54 Mbps; 300 ft.(91 m) @ 1 Mbps
• 802.11n: Estimated double the operatingdistance of 802.11g and 802.11a in theirrespective frequencies
Number of channels • 802.11a: 8 independent channels• 802.11b/g: 11 channels, 3 non-overlapping
channels• 802.11n: Channel bonding takes two of
the non-overlapping 20MHz channels andcombines it into one 40MHz channel. It isactually 12 non-overlapping channels withchannel bonding and 24 without. Also it is 1non-overlapping channel in 2.4GHz whenchannel bonding is used.
• 802.11ac: 5 independent channelsSecurity Encryption types: WEP, TKIP, AES, WPA 1.0
and WPA 2.0 compliant
Encryption key, lengths supported: 64 bits and128 bits
Maximum recommended number of computersto be connected over wireless LAN (during adhoc connection)
10 units or less
Fujitsu 83

Technical data
Rechargeable batteryFor information on the batteries used in your device, please see"http://solutions.us.fujitsu.com/www/content/support/contact/index.php".
3-cell lithium polymer battery 3450 mAhRated voltage 11.1 VRated capacity 38 Wh
AC adapter 65 W for the Tablet PCTechnicaldata
Rated voltage 19 VoltsMax. rated current 3.42 A
An additional AC adapter or AC cable can be ordered at any time.
Performance docking cradle (optional)Electrical dataSafety regulations complied with CEProtection class IIIPortsHeadphone port 3.5 mm stereo mini jackMicrophone port 3.5 mm stereo mini jackDocking port 40-pinHDMI port 1 xVGA monitor port 1 xUSB (Universal Serial Bus) 3 x USB 3.0LAN port 1 xSecurity Lock device 1 xAmbient conditionsEnvironment class DIN IEC 721 7K1Mechanism class DIN IEC 721 7M2Operating temperature 5 °C .... 35 °C / 41 °F .... 95 °FTemperature in transit –15 °C .... 60 °C / 5 °F .... 140 °F
84 Fujitsu

Technical data
Keyboard cover (optional)Electrical dataSafety regulations complied with CEProtection class IIIPortsDocking port 40-pinAmbient conditionsEnvironment class DIN IEC 721 7K1Mechanism class DIN IEC 721 7M2Operating temperature 5 °C .... 35 °C / 41 °F .... 95 °FTemperature in transit –15 °C .... 60 °C / 5 °F .... 140 °F
Shoulder strap (optional)DimensionsWidth x Depth x Height 222 mm x 91 mm x 12.2 mm /
8.74 in. x 3.58 in. x 0.48 in.Weight 130 g / 0.29 lbs.
Folio case (optional)DimensionsWidth x Depth x Height 300 mm x 214 mm x 30 mm /
11.8 in. x 8.4 in. x 1.18 in.Weight 420 g / 0.91 lbs.
Protective TPU cover with kickstand and handstrapDimensionsWidth x Depth x Height 310 mm x 204 mm x 35 mm /
12.20 in. x 8.03 in. x 1.38 in.Weight 420 g / 0.93 lbs.
Fujitsu 85

Manufacturer’s notes
Manufacturer’s notesDisposal and recyclingNotes
You can find information on this subject on your Tablet PC or on our website("http://solutions.us.fujitsu.com/www/content/products/trade-in_program/").
Recycling your batteryOver time, the batteries that run your mobile computer will begin to hold a charge for ashorter amount of time; this is a natural occurrence for all batteries. When this occurs,you may want to replace the battery with a fresh one*. If you replace it, it is importantthat you dispose of the old battery properly because batteries contain materials thatcould cause environmental damage if disposed of improperly.
Fujitsu is very concerned with environmental protection, and has enlisted the services of theRechargeable Battery Recycling Corporation (RBRC)**, a nonprofit public service organizationdedicated to protecting our environment by recycling old batteries at no cost to you.
RBRC has drop-off points at tens of thousands of locations throughout the United States andCanada. To find the location nearest you, go to "www.RBRC.org" or call 1-800-822-8837.
If there are no convenient RBRC locations near you, you can also go to the EIA ConsumerEducation Initiative website "http://EIAE.org/ " and search for a convenient disposal location.
Remember – protecting the environment is a cooperative effort, and we mustmake every effort to protect it for current and future generations.
* To order a new battery for your Fujitsu mobile computer, go to the Fujitsu shopping siteat "www.shopfujitsu.com" in the US or "www.fujitsu.ca/products/notebooks" in Canada.
** RBRC is an independent third party to which Fujitsu provides funding forbattery recycling; RBRC is in no way affiliated with Fujitsu.
DOC (Industry CANADA) NoticesDOC(INDUSTRYCANADA)NOTICES
Radios and TelevisionThis Class B digital apparatus meets all requirements of Canadian Interference-Causing EquipmentRegulations.
CET appareil numérique de la class B respecte toutes les exigence du Réglementsur le matérial brouilleur du Canada.
86 Fujitsu

Manufacturer’s notes
UL NoticeIMPORTANT SAFETY INSTRUCTIONSThis unit requires an AC adapter to operate. Only use UL Listed I.T.E. adapters with an output ratingof 19 VDC, with a minimum current of 3.42 A (65 W). The correct output rating is indicated on theAC adapter label. Refer to the illustration below for the correct AC Adapter output polarity:
When using your Tablet PC equipment, basic safety precautions should always be followed toreduce the risk of fire, electric shock and injury to persons, including the following:
• Do not use this product near water for example, near a bathtub, washbowl, kitchensink or laundry tub, in a wet basement or near a swimming pool.
• Use only the power cord and batteries indicated in this manual. Do not dispose of batteries in afire. They may explode. Check with local codes for possible special disposal instructions.
SAVE THESE INSTRUCTIONSFor Authorized Repair Technicians Only
CAUTION:For continued protection against risk of fire, replace only with thesame type and rating fuse.
WARNING:Danger of explosion if Lithium (CMOS) battery is incorrectly replaced. Replace onlywith the same or equivalent type recommended by the manufacturer.
Dispose of used batteries according to the manufacturer’s instruction.
Fujitsu 87

Manufacturer’s notes
ENERGY STAR ComplianceYour Fujitsu system is an ENERGY STAR qualified mobile PC. Bychoosing a computer with the latest energy-saving technology, you’rehelping to preserve our environment for future generations. ENERGYSTAR is a joint program of the U.S. Environmental Protection Agency,U.S. Department of Energy, Natural Resources Canada, and othergovernments around the world helping us save money while protectingthe environment through energy efficient products and practices. Withenergy costs and global warming top-of-mind for consumers, Fujitsu iscommitted to offering solutions that help consumers conserve energyand improve the quality of our environment.
Sleep mode:You will notice that your computer is initially set so that the display turns off after 10 minutes ofuser inactivity, and the computer goes into Sleep mode after 20 minutes of user inactivity. Whengoing into Sleep mode, the computer also reduces the speed of any active Ethernet networklinks. To “wake” the computer from Sleep mode, press the Suspend/Resume Button.
Energy saving benefits:Fujitsu ENERGY STAR qualified mobile PCs use about half as much electricity as standardequipment – saving half in utility costs. But more than that, ENERGY STAR also makes a differencefor the environment. Did you know that the average house can be responsible for twice thegreenhouse gas emissions as the average car? That’s because every time you flip on a lightswitch, run your dishwasher, or turn on your PC, you use energy, which means more greenhousegas emissions from power plants. So the more energy we can save through energy efficiency,the more we help to reduce greenhouse gases and the risks of global warming.
To learn more about the important ENERGY STAR program, visit:"www.energystar.gov".
To read about how Fujitsu is supporting Sustainable Management along withseveral other environmental activities, visit the Fujitsu Corporate Citizenship page at:"http://www.computers.us.fujitsu.com/www/content/aboutus/environmental/environment.php".
88 Fujitsu

Declarations of conformity
Declarations of conformityDeclarationsofconformity
This device complies with Part 15 of the FCC Rules. Operations are subject to the following twoconditions: (1) This device may not cause harmful interference, (2) this device must accept anyinterference received, including interference that may cause undesired operation.
Fujitsu 89

FCC and IC Regulatory Information
FCC and IC Regulatory InformationPlease note the following regulatory information related to the wireless LANdevice.
Regulatory Notes and StatementsWireless LAN, Health and Authorization for useRadio frequency electromagnetic energy is emitted from Wireless LAN devices. The energy levels ofthese emissions, however, are far much less than the electromagnetic energy emissions from wirelessdevices such as mobile phones. Wireless LAN devices are safe for use by consumers because theyoperate within the guidelines found in radio frequency safety standards and recommendations. Theuse of Wireless LAN devices may be restricted in some situations or environments, such as:
• On board an airplane, or• In an explosive environment, or• In situations where the interference risk to other devices or services is
perceived or identified as harmful.In cases in which the policy regarding use of Wireless LAN devices in specific environments isnot clear (e.g., airports, hospitals, chemical/oil/gas industrial plants, private buildings), obtainauthorization to use these devices prior to operating the equipment.
Regulatory Information/DisclaimersInstallation and use of this Wireless LAN device must be in strict accordance with the instructionsincluded in the user documentation provided with the product. Any changes or modifications madeto this device that are not expressly approved by the manufacturer may void the user’s authority tooperate the equipment. The manufacturer is not responsible for any radio or television interferencecaused by unauthorized modification of this device, or the substitution or attachment of connectingcables and equipment other than those specified by the manufacturer. It is the responsibility of theuser to correct any interference caused by such unauthorized modification, substitution or attachment.The manufacturer and its authorized resellers or distributors will assume no liability for any damageor violation of government regulations arising from failure to comply with these guidelines.
This device must not be co-located or operated in conjunction with any other antenna or transmitter.
For IEEE 802.11a Wireless LAN: For operation within 5.15~5.25 GHz frequency range, it isrestricted to indoor environments, and the antenna of this device must be integral.
Federal Communications Commission and IndustryCanada statement:This device complies with Part 15 of FCC Rules and Industry Canada license exempt RSS standard(s).
Operation is subject to the following two conditions: (1) This device may not causeinterference, and, (2) This device must accept any interference, including interferencethat may cause undesired operation of this device.
90 Fujitsu

FCC and IC Regulatory Information
Déclaration d’Industrie CanadaCet appareil est conforme à la Section 15 des Règles de la FC C et à la ( aux) norme(s)RSS concernant les appareils exempt s de licence par Industrie Canada. Son fonctionnementest soumis aux deux condition s suivantes : (1) cet appareil ne doit pas causer d’interférencenuisib le; (2) cet appareil doit accepter toutes les interférences reçues, y compris cellespouvan t causer un mauvais fonctionnement de l’appareil.
FCC Interference StatementThis equipment has been tested and found to comply with the limits for a Class B digitaldevice, pursuant to Part 15 of the FCC Rules. These limits are designed to provide reasonableprotection against harmful interference in a residential installation. This equipment generates,uses, and can radiate radio frequency energy. If not installed and used in accordance withthe instructions, it may cause harmful interference to radio communications. However, thereis no guarantee that interference will not occur in a particular installation.
If this equipment does cause harmful interference to radio or television reception, whichcan be determined by turning the equipment off and on, the user is encouraged to try andcorrect the interference by one or more of the following measures:
1. Reorient or relocate the receiving antenna.2. Increase the distance between the equipment and the receiver.3. Connect the equipment to an outlet on a circuit different from the one the receiver is connected to.4. Consult the dealer or an experienced radio/TV technician for help.
FCC Radio Frequency Exposure statementThe available scientific evidence does not show that any health problems are associated withusing low power wireless devices. There is no proof, however, that these low power wirelessdevices are absolutely safe. Low power wireless devices emit low levels of radio frequencyenergy (RF) in the microwave range while being used. Whereas high levels of RF can producehealth effects (by heating tissue), exposure to low-level RF that does not produce heatingeffects causes no known adverse health effects. Many studies of low-level RF exposure havenot found any biological effects. Some studies have suggested that some biological effectsmight occur, but such findings have not been confirmed by additional research.
The wireless LAN radio device has been tested and found to comply with FCC radiationexposure limits set forth for an uncontrolled equipment and meets the FCC radio frequency(RF) Exposure Guidelines in Supplement C to OET65.
The exposure standard for wireless devices employs a unit of measurement known as the SpecificAbsorption Rate, or SAR. The SAR limit set by the FCC is 1.6W/kg, and 1.6W/kg by Industry Canada.
This device is compliant with SAR for general population /uncontrolled exposure limits inANSI/IEEE C95.1-1992 and Canada RSS 102, and had been tested in accordance withthe measurement methods and procedures specified in OET Bulletin 65 Supplement C,and Canada RSS 102. This device has been tested, and meets the FCC, IC RF exposureguidelines when tested with the device operating conditions.
Fujitsu 91

FCC and IC Regulatory Information
Déclaration de la FCC/d’Industrie Canada surl’exposition aux radiofréquencesLa norme régissant l’exposition des appareils sans fil aux radiofréquences emploie une unitéde mesure dénommée Taux d’absorption spécifique, ou TAS. La FCC et Industrie Canada ontdéfini la même limite de TAS : 1,6 W/kg. Cet appareil est conforme au TAS pour les limitesd’exposition générales de la population/non contrôlées définies par les règles C95.1-1992 del’ANSI/IEEE et RSS 102 d’Industrie Canada ; il a été testé en conformité avec les méthodeset procédures de mesure spécifiées dans le supplément C du bulletin 65 de l’OET (Officed’ingénierie et de technologie) et la règle RSS 102 d’Industrie Canada. Cet appareil a été testéselon les directives de la FCC et d’IC concernant l’exposition aux radiofréquences et s’est révéléconforme à ces dernières lorsqu’il a été testé en contact direct avec le corps.
Export restrictionsThis product or software contains encryption code which may not be exported or transferredfrom the US or Canada without an approved US Department of Commerce export license.This device complies with Part 15 of FCC Rules., as well as ICES 003 B / NMB 003 B.Operation is subject to the following two conditions: (1) this device may not cause harmfulinterference, and (2) this device must accept any interference received, including interferencethat may cause undesirable operation. Modifications not expressly authorized by FujitsuAmerica, Inc. may invalidate the user’s right to operate this equipment.
Restrictions concernant l’exportationCe produit ou logiciel contient du code de chiffrement qui ne peut être exporté ou transféré duCanada ou des États-Unis sans un permis d’exportation du département du commerce desÉtats-Unis. Ce matériel est conforme à la Partie 15 des règlements de la FCC, ainsi qu’à lanorme ICES 003 B/NMB 003 B. Son fonctionnement est soumis aux deux conditions suivantes: (1) cet appareil ne doit pas causer d’interférence nuisible; (2) cet appareil doit acceptertoutes les interférences reçues, y compris celles pouvant causer un mauvais fonctionnementde l’appareil. Toute modification n’ayant pas été expressément approuvée par la société FujitsuAmerica Incorporated peut annuler le droit de l’utilisateur de se servir du matériel.
Canadian NoticeThe device for the 5150 - 5250 MHz band is only for indoor usage to reduce the potentialfor harmful interference to co-channel mobile satellite systems.
The maximum antenna gain of 6 dBi permitted (for devices in the 5250 - 5350 MHz, 5470 - 5725MHz and 5725 - 5825 MHz bands) to comply with the e.i.r.p. limit as stated in A9.2 of RSS210.
In addition, users are cautioned to take note that high power radars are allocated as primaryusers (meaning they have priority) of 5250 - 5350 MHz and 5650 - 5850 MHz and theseradars could cause interference and/or damage to LE-LAN devices.
92 Fujitsu

FCC and IC Regulatory Information
Avis pour le CanadaLe matériel destiné à un usage sur la bande 5 150 - 5 250 MHz doit être utiliséuniquement à l’intérieur afin de réduire les risques de brouillage nuisible causé auxsystèmes mobiles par satellite fonctionnant sur un même canal.
Un gain d’antenne de 6 dBi est autorisé (pour le matériel utilisant les bandes 5 250 - 5 350MHz, 5 470 - 5 725 MHz et 5 725 - 5 825 MHz), conformément à la limite p.i.r.e. maximalepermise selon l’annexe A9.2 afférent aux périphériques RSS210.
En outre, les utilisateurs doivent prendre garde au fait que les radars de grande puissancesont considérés comme des utilisateurs principaux (ce qui signifie qu’ils sont prioritaires) desbandes 5 250 - 5 350 MHz et 5 650 - 5 850 MHz et qu’ils pourraient causer des interférenceset/ou des dommages aux appareils de réseau exempts de licence.
Fujitsu 93
Appendix
AppendixBefore Using the Optional Wireless LANThis manual describes the procedures required to properly set up and configure the optionalintegrated Wireless LAN Mini-PCI device (referred to as "WLAN device" in the rest of themanual). Before using the WLAN device, read this manual carefully to ensure its correctoperation. Keep this manual in a safe place for future reference.
Wireless LAN Devices Covered by this DocumentThis document is applicable to systems containing the following device:
• Intel® Dual Band Wireless-N 7265 2x2 ac with intgegrated Bluetooth 4.0
Characteristics of the WLAN Device• TheWLAN devices are PCI Express Mini cards attached to the main board of the mobile computer.• The WLAN devices operate in license-free RF bands, eliminating the need to procure
an FCC operating license. The WLAN operates in the 2.4GHz Industrial, Scientific,and Medical (ISM) RF band and the lower, middle, and upper bands of the 5GHzUnlicensed National Information Infrastructure (UNII) bands.
• The WLAN devices are capable of five operating modes, IEEE802.11a, IEEE802.11ac,IEEE802.11b, IEEE802.11g, and IEEE802.11n.
• The WLAN device is Wi-Fi certified and operates (as applicable) at a the maximumdata rate of 450 Mbps in IEEE802.11n mode (300 Mbps in this configuration); 54 Mbpsin IEEE802.11g mode; and 11 Mbps in IEEE802.11b mode.
• The WLAN devices support the following encryption methods - WEP,TKIP, CKIP, and AES encryption.
• The Wireless LAN devices are compliant with the following standards: WPA,WPA2, CCX1.0, CCX2.0, CCX3.0, and CCX4.0.
Wireless LAN Modes Using this DeviceAd Hoc Mode"Ad Hoc Mode" refers to a wireless network architecture where wireless network connectivitybetween multiple computers is established without a central wireless network device, typicallyknown as Access Point(s). Connectivity is accomplished using only client devices in a peer-to-peerfashion. That is why Ad Hoc networks are also known as peer-to-peer networks. Ad Hocnetworks are an easy and inexpensive method for establishing network connectivity betweenmultiple computers. Ad Hoc mode requires that the SSID, network authentication, and encryptionkey settings are identically configured on all computers in the Ad Hoc network.
94 Fujitsu

Appendix
Access Point (Infrastructure) ModeInfrastructure mode refers to a wireless network architecture in which devices communicate withwireless or wired network devices by communicating through an Access Point. In infrastructuremode, wireless devices can communicate with each other or with a wired network. Corporatewireless networks operate in infrastructure mode because they require access to the WLAN inorder to access services, devices, and computers (e.g., file servers, printers, databases).
Fujitsu 95

Appendix
**
*
* = An optional hub for a wired LAN maybe required depending upon the typeof access point used.
** = ADSL modem, cable modem, or similar
How to Handle This DeviceThe WLAN device is an optional device that may come pre-installed in your mobile computer. Undernormal circumstances, it should not be necessary for you to remove or re-install it. The OperatingSystem that your mobile computer comes with has been pre-configured to support the WLAN device.
• Integrated Intel Centrino wireless LAN devices support IEEE802.11a, IEEE802.11b,IEEE802.11ac, IEEE802.11g, and IEEE802.11n.
• The WLAN device operates in the 2.4 GHz ISM band and the 5 GHzlower, middle, and upper UNII bands.
• Microwave ovens may interfere with the operation of WLAN devices since they operate in thesame 2.4 GHz frequency range as IEEE802.11b/g/n devices. Interference by microwavesdoes not occur with IEEE802.11a radio which operates in the 5 GHz RF band.
• Wireless devices that transmit in the 2.4 GHz range may interfere with operation of WLANdevices in IEEE802.11b/g/n modes. Symptoms of interference include reduced throughput,intermittent disconnects, and many frame errors. It is HIGHLY recommended that theseinterfering devices be powered off to ensure proper operation of the WLAN device.
96 Fujitsu

Appendix
Deactivating/Disconnecting the WLAN DeviceDisconnecting the WLAN device may be desired in certain circumstances (to extend batterylife) or where certain environments require it (i.e. hospitals, clinics, airplanes, etc.). TheWLAN device can be disconnected in Windows using the WLAN icon in the system tray(Note that disconnecting via the icon in the system tray does not turn off the radio; itcontinues to transmit and receive even though it’s not connected.)
The radio components are switched on and off using the appropriate functions of the operating system.
► To switch radio components on and off individually, select Settings – ChangePC settings – Wireless – Wireless devices – Off.
Configuring the Wireless LANThe optional WLAN device can be configured to establish wireless network connectivityusing the software that is built into Windows. Support for most industry standardsecurity solutions is contained in this software.
Pre-defined parameters will be required for this procedure. Please consult withyour network administrator for these parameters:
Connection to the networkAfter you have configured your computer, you can connect to an active networkby performing the following steps:
1. Click on the WLAN icon in the system tray.2. Select Connect to a network.3. Select a network from the list that appears, and click the Connect button.
Troubleshooting the WLANCauses and countermeasures for troubles you may encounter while using yourwireless LAN are described in the following table.
Fujitsu 97

Appendix
Problem Possible Cause Possible SolutionIncorrect network name (SSID)or network key
Ad hoc connection: verify thatthe network names (SSID’s)and network keys (WEP) ofall computers to be connectedhave been configured correctly.SSID’s and WEP key valuesmust be identical on eachmachine.
Access Point (Infrastructure)connection: set the networkname (SSID) and network keyto the same values as those ofthe access point.
Set the Network Authenticationvalue identically to that of theAccess Point. Please consultyour network administrator forthis value, if necessary.
Unavailable network connection
Weak received signal strengthand/or link quality
Ad hoc connection: Retryconnection after shorteningthe distance to the destinationcomputer or removing anyobstacles for better sight.
Access Point (Infrastructure)connection: Retry connectionafter shortening the distance tothe access point or removingany obstacles for better sight.
98 Fujitsu

Appendix
Problem Possible Cause Possible SolutionThe WLAN device wasdeactivated or is disabled
Check if the wireless switchis turned On. Go to Start >Control Panel, and doubleclickon Windows Mobility Center. Ifthe wireless network is off, clickthe Turn wireless on button.
The computer to be connectedis turned off
Check if the computer to beconnected is turned ON.
Incorrectly configured networksettings
Recheck the configuration ofyour network settings.
RF interference from AccessPoints or other wirelessnetworks
The use of identical oroverlapping RF channels cancause interference with theoperation of the WLAN device.Change the channel of yourAccess Point to a channelthat does not overlap with theinterfering device.
Wireless network authenticationhas failed
Re-check your NetworkAuthentication, Encryption,and Security settings.Incorrectly configuredsecurity settings such asan incorrectly typed WEPkey, a mis-configured LEAPusername, or an incorrectlychosen authentication methodwill cause the LAN device toassociate but not authenticateto the wireless network.
Unavailable network connection(continued)
Incorrect IP addressconfiguration
This only applies to networksusing static IP addresses.Please contact your networkadministrator for the correctsettings.
Image Backup and Recovery ProceduresThank you for purchasing a Fujitsu computer. Fujitsu is committed to bringing youthe best computing experience with your new system.
It is very important that you create DVD copies of your Recovery Image and Bootable Diskbefore beginning to use your system. To do so, follow the instructions in the “Creating aBackup of Bootable Disk and Recovery Image” section of this document.
It is also important that you create a copy of the software that is essential for your system to access theinternet (hereafter called “essential access software”) to external writable media or an external drive.To do so, follow the instructions in the “Creating a Backup of the System-Specific Software Drivers”.
Fujitsu 99

Appendix
Creating a Backup of Bootable Disk and Recovery ImageWhen you purchased your new system, a copy of the recovery image was loaded into ahidden partition on your hard disk drive. Having a copy of the recovery image available toyou means that in the event of system failure, you will be able to restore it and re-installthe essential access software using Fujitsu Software Auto Installer.
To make a copy of the recovery image to DVD disks, you will need three or four blankdisks to create the copy. After creating the copy, be sure to label the disks and keepthem in a safe place to ensure they do not get damaged.
Note: If your system does not have an internal writable DVD drive, connect yoursystem to an external drive* before beginning the following steps.
1. Launch System Restore and Recovery from the desktop icon. It will allow you to createthe Bootable Disk and the Recovery Image Disk Set.
2. On “Step 1: Select the Bootable Disk from the list”:a. Select a media type.b. Notice the number of disks that are needed for the set.c. Click Next to proceed.
3. On “Step 2: Confirm your Recovery Disk”, click Next.4. On “Step 3:” follow the on-screen instructions to make the disk or disk set, then click
Start. It takes approximately 20 minutes to make one disk.5. On “Step 4”, when the disk creation is completed, a message appears.
Click Finish to exit the program.6. Repeat Step 1: Select Recovery Disk from the list and repeat the above
steps 2(a), 2(b), 2(c), 3, 4 and 5.* DEPENDING UPON YOUR OPTICAL DRIVE AND MEDIA FORMAT USED, SOME MEDIATYPES MAY BE INCOMPATIBLE FOR CREATING IMAGE BACKUPS.
100 Fujitsu

Appendix
Creating a Backup of Essential Access SoftwareWhen you purchased your new system, a “Fujitsu Software Extractor” shortcut was loaded to“C:\Fujitsu\Drivers\AutoInstaller\”. This shortcut allows you to save the software driver packagesalong with the extracted Auto Installer software package to a selected location. It is recommendedthat you save these packages to writable media or an external drive. This ensures that in theevent of system failure you will be able to re-install the essential access software.
1. Open the C:\Fujitsu\Drivers\AutoInstaller\ folder2. Run “Fujitsu Software Extractor” as an Administrator
a. Right-click on Fujitsu Software Extractor.b. Select the “Run as Administrator” option from the menu that is displayed.
3. The default save location is C:\Fujitsu\ AutoInstaller\ Drivers\. You can change the locationby clicking on the Browse button and selecting your preferred location.Note: It is recommended that you change the default location and save thesoftware packages to the external writable media or drive.
4. Click on the Save Packages button.5. Fujitsu Software Extractor copies the zipped software packages and Readme files,
and extracts the Auto Installer folder to the selected location.
Note: The extracted Auto Installer will later be used to install the softwareautomatically on the system in the event of generic image restoration whenthe software is not pre-installed in the image.
RECOVER YOUR SYSTEM WHEN THE HARDDRIVE IS STILL ACCESSIBLEUsing the Recovery and Utility ToolsThe Recovery and Utility tools consist of a variety of tools that will help you recover yourrecovery image and system images, and delete the data from your hard disk.
Methods for accessing the utilitiesRecovery and Utility Tools are preinstalled in a hidden partition by the factory, orthey can be accessed by using the bootable disk.
Note: The Recovery and Utility tools may be deleted from your hard diskdrive if you modify the partitions. If that occurs, you will not be able touse the hidden partition for booting to Recovery and Utility Tools, but youwill still be able to boot from the Bootable Disk.
Fujitsu 101

Appendix
Determining whether Recovery and Utility is pre-loaded1. Turn on or reboot your system. When the Fujitsu logo appears, press the F12 key.2. Use the Tab key to get to the Application Menu.3. Check whether the Recovery and Utility option is present. If it is not present, it means
that the utility must be used from the Bootable Disk. Proceed to “Running Recovery andUtility from the Bootable Disk” if Recovery and Utility is unavailable.
Running Recovery and Utility from hard disk1. Turn on or reboot your system. When the Fujitsu logo appears, press the F12 key.2. Use the Tab key to get to the Application Menu.3. Cursor down to Recovery and Utility and press the Enter key.4. Choose your language, if necessary. Select Recovery and Utility to proceed.5. Three tool options appear: Diagnostics, Recovery, and Utility (refer to the Recovery and
Utility tools section below for instructions on how to use these tools).6. If this was successful please skip the next step and go to “Recovery and Utility tools.”7. If this was NOT successful, please go to the next step.
Running Recovery and Utility from the Bootable diskTo verify/change the boot-up priority (rather than booting-up from the hard drive oran external media drive), perform the following steps:
1. Power on your system. When the Fujitsu logo appears on the screen, press the F12 key.2. Insert the bootable disk into the drive tray.3. Highlight the CD/DVD option from the Boot menu, then press Enter .4. Click OK.5. Select CD/DVD boot mode: UEFI Mode, if applicable, and then press Enter .
While the files are being loaded from the disk, the Fujitsu logo screen will appearfollowed by a progress bar at the bottom of the screen.
102 Fujitsu

Appendix
Recovery and Utility toolsNote: Recovery and Utility tools may not be available on your system dependingon the region from which the system was shipped.
Diagnostics tool: The Diagnostics tool is designed for use by IT professionals. It is not likely youwill need to use this tool. If you should need to use this tool, perform the following steps:
1. Press the Diagnostics Tool button to start the Diagnostics tool.2. Read the note, and then click OK.3. Choose one or more of the following options for diagnostics on the Fujitsu Hardware Diagnostics
Tool window: CPU, Memory, Display, Hard Disk, CD/DVD/BD, Floppy Disk, Keyboard, and Mouse.4. Click the Option button in the Tool menu to specify how many times the tool
should run diagnostics on each selected component.5. Press Execute to start the Diagnostics tool.6. After the execution is completed, the selected components are circled in red to indicate that they
have been diagnosed and the result dialog window opens. Click Close to close the window.7. Click End to close the Diagnostics tool, and then click Yes to confirm the end of diagnostics session.Recovery tool: The Recovery tool contains two options:
• Restore C Drive: Restore recovery image (only C: drive)• Restore Full Hard Drive: Restore recovery image (full hard drive).You can use these tools to restore the Recovery Image from the hidden partition, and perform a fullhard drive recovery. Please refer to instructions above for details on how to create a Recovery Image.
Restore the Recovery Image from Hidden Partition1. Click [Restore C: drive] from Recovery and Utility tools2. The progress bar is followed by “Restore Recovery image (only C: drive)” screen
confirming that the Image will be restored to the C: drive. Click Next.3. Read the instruction screen and select Agree, then click Next.4. Click OK to acknowledge the warning message to restore recovery image to the C: drive.5. When the progress bar appears, wait for the process to complete.6. Click Finish when the process completes; the computer will restart to Windows.7. Follow the steps listed in the “Auto Installation support for software packages
from hidden partition” section.8. Download FSDM (Fujitsu Software Download Manager) from the support site and download
all the software applicable to the model and OS using FSDM.9. Follow the steps listed in “Auto Installation support for software packages
downloaded from support website” section.
Fujitsu 103

Appendix
RECOVER YOUR SYSTEM WHEN THE HARDDRIVE IS NOT BOOTABLERestore the Recovery Image for Full Hard DriveFollow the steps in the “Recovering your Recovery Image using Recovery andUtility (for new hard drive or non-bootable hard drive)” section. You will need theBootable Disk and the Recovery Disk Set for this task.
Utility tool: If applicable for your region, the Utility tool contains two options:Hard Disk Data Delete and Partition Creation.
The Hard Disk Data Delete utility is used to delete all data on the hard diskand prevent the data from being reused.
NOTE: Do not use the Hard Disk Data Delete utility unless you are absolutely certainthat you want to erase your entire hard disk, including all partitions.
To delete hard disk data:
1. Click the Hard Disk Data Delete button. The progress bar appears, followed by the EULA screen.2. Agree to the EULA and click Next.3. Choose the hard disk from which the data should be deleted in the list of hard disks and click Next.The Partition Creation utility is used to change the C: and D: drive partition sizes.
To run this utility: (This is not an option when using Windows 7.)
1. Click the Partition Creation button.2. A progress bar appears, followed by the EULA screen. Agree to the EULA.3. On the Recovery Tool - Partition Creation screen, move the slider to set disk size, and then click OK.4. Click Yes in the Partition Creation confirmation dialog.
WARNING: It is highly recommended that you send your product to FujitsuService to replace a hard drive. A mistake could possibly destroy yourcomputer, your new hard drive or both.
104 Fujitsu

Appendix
Recovering Your Recovery Image Using Recovery and Utility(for new hard drive or non-bootable hard drive)If you have installed a new hard drive or your hard drive is not bootable, perform the following steps.
Note: You will need the Bootable disk and Recovery Image disk set for this recovery.
1. Power on your system. When the Fujitsu logo appears on the screen, press the Enter key.2. Insert the bootable disk in your DVD drive, then click OK.3. Highlight the CD/DVD option from the Boot Menu and press Enter .4. Select CD/DVD boot mode: Select UEFI Mode, if applicable and press Enter .
While the files are being loaded from the disk, the Fujitsu logo screen appearsfollowed by a progress bar at the bottom of the screen.
5. Choose your language, if necessary.6. Three tool options appear: Diagnostics, Recovery and Utility. Select Recovery.
• For Windows 8.1: Select Restore full hard drive• For Windows 7: Select Restoring the Factory Image (full hard drive recovery)
7. Click Next to confirm full hard drive restoration. All data on HDD will be deleted.8. Agree to EULA by selecting Agree option and clicking Next.9. Click Next on the Recovery Disk Check screen to verify that the bootable
disk has been inserted into the optical drive.10. The Checking for Recovery Disk screen appears followed by the prompt to insert the
first disk. Click OK to continue. Repeat this step for all disks. After all recovery diskshave been checked and the check has been completed, click Next.
11. Follow the prompt to reinsert the first recovery disk and click Next.12. Click OK when you receive the final warning informing you that all data on drive
C will be lost. This starts the recovery process.13. Follow the prompts to insert the next recovery disks and click OK.14. After the copying of the image to the HDD completes the restore process is
complete, click Finish to restart the system. The computer will restart automaticallyand then go through the first boot process.
15. Follow the steps listed in “Auto Installation support for essential accesssoftware from backup location” section.
16. Download FSDM (Fujitsu Software Download Manager) from support site and downloadall the software applicable to the model and OS using FSDM.
17. Follow the steps listed in “Auto Installation support for essential accesssoftware downloaded from support website.
Fujitsu 105

Appendix
Installing the Software after the Recovery Image is RestoredAuto-installation support for essential access softwarefrom hidden partitionThe below listed steps are applicable only in cases in which the recovery image restoreand hidden partition contents have not been wiped out.
1. After the recovery image is restored, launch the desktop icon “Fujitsu Software Auto Installer”.2. Double-click on “Fujitsu Software Auto Installer” desktop icon.3. Click Yes on User Account Control Dialog box. This will take some time to
process the software packages. A message will be displayed during this time,“Please wait while the content is being processed”.
4. If EULA is displayed for Fujitsu Software Auto Installer, accept the EULA, otherwise continue.5. Then Fujitsu Software Auto Installer user interface will be launched providing ability
to auto-install the essential access software on the system.6. It is recommended that you install all the software in the listed order. You can
Select All, to install the software in the order listed.7. Click Install to start the installation.8. After installing all the selected drivers, Installation Results window will be displayed. Click OK.9. “You must restart the system for the settings to take effect. Do you wish to
reboot now?” message appears. Select Yes.10. The system will now reboot.11. You can now connect to the internet and download FSDM (Fujitsu Software Download
Manager) from the support site and download all the software applicable to themodel and OS using FSDM if they are not downloaded yet.
106 Fujitsu
Appendix
Auto-installation support for essential access softwarefrom backup locationThe below listed steps are applicable in cases in which a backup copy was created asmentioned in the section “Creating a Backup of essential access software”.
1. It is important to have the extracted Auto installer software package folderand Readme file in the same location as other software folders. Otherwiseauto-installation of the software will not be supported.
2. Inside the Auto Installer software package, launch FjAutoinstall.exe as an Administrator.3. Click Yes on the User Account Control dialog box. This will take some time to
process the software packages. A message will be displayed during this time stating,“Please wait while the content is being processed”.
4. If EULA is displayed for Fujitsu Software Auto Installer, accept the EULA, otherwise continue.5. The Fujitsu Software Auto Installer user interface will be launched providing ability
to auto install the essential access software on the system.6. It is recommended that you install all the software in the listed order. You can
“Select All”, to install the software in the order listed.7. Click the Install button to start the installation.8. After installing all the selected drivers, Installation Results window is be displayed. Click OK.9. “You must restart the system for the settings to take effect. Do you wish to
reboot now?” message appears. Select Yes.10. The system will now reboot.
Auto Installation support for the software downloaded from support website1. Download FSDM (Fujitsu Software Download Manager) from the support site and download all
the drivers applicable to the model and OS using FSDM if they are not downloaded yet.2. When the software packages are downloaded from web, it is important to download
the Auto Installer Software package and the model/language- specific Readmefile if you prefer to auto install the software.
3. It is important to have the extracted Auto Installer software package folderand Readme file in the same location as other software folders. Otherwiseauto-installation of the software will not be supported.
4. Inside the Auto Installer software package, launch FjAutoinstall.exe as administrator.5. Click Yes on the User Account Control dialog box. This will take some time to
process the software packages. A message will be displayed during this time stating“Please wait while the content is being processed”.
6. If EULA is displayed for Fujitsu Software Auto Installer, accept the EULA, otherwise continue.7. The Fujitsu Software Auto Installer user interface will be launched providing the ability
to auto install the software downloaded from support site.8. It is recommended that you install all the software in the listed order. You can
Select All, to install the software in the order listed.9. Click the Install button to start the installation.10. After installing all the selected drivers, the Installation Results window is displayed. Click OK.11. “You must restart the system for the settings to take effect. Do you wish to
reboot now?” message appears. Select Yes.12. The system will now reboot.
Fujitsu 107

Appendix
Downloading Driver UpdatesTo ensure that you always have the most current driver updates related to your system,you should occasionally access the Fujitsu Software Download Manager (FSDM) utility.The FSDM utility is available from the Fujitsu Support site. FSDM will allow you to viewand download a list of the most current drivers, utilities, and applications to determinewhether you have the latest versions. To download the FSDM Utility, go to the Support Site:"http://support.fujitsupc.com/CS/Portal/support.do?srch=DOWNLOADS".
If you are planning on downgrading, upgrading or changing versions of your operating system duringthis process please see the User’s Guide for more information at "http://solutions.us.fujitsu.com".
108 Fujitsu

Index
IndexAAC adapter
connecting 19Set up 19
Acoustic warnings 78Anti-theft protection 58Audio connections 67
BBattery 37
battery charge 38Caring for and maintaining 37charge level 37Charging 37Discharges too quickly 76see Rechargeable battery 37Service life 37
battery charge meter 37before you travel 15BIOS Setup Utility
, protecting with password 59calling 68exiting 70operation 69Settings 68
Bluetooth, Safety notes 14Bonus Apps 21
CCharging back-up battery 72Choose a location 19Configuration, BIOS Setup Utility 68Configuring hardware 68Configuring system 68Connecting audio devices 67Connecting headphones 67Connecting microphone 67Cradle 46
Connecting a Tablet PC 47
Ddark touchscreen 73Date not correct 72Declarations of conformity 89Display orientation
select 27DOC (INDUSTRY CANADA) NOTICES 86
EEnding
energy saving mode 75Energy
Energy consumption 38Energy saving 14Energy saving functions 38
Error messages on the screen 79Errors
Acoustic warnings 78Screen messages 79
Ethernet LAN 44
FFault
Elimination 71Fingerprint sensor 57
configuring 57First-time setup 18
GGetting started 18GPS 44
HHDMI port 64–65
IImportant notes 13Incorrect time 72Information,
safety 13
KKeyboard cover
Connecting a Tablet PC 50Ports 49
LLandscape format
display 27
MMaking ready to use 19
Fujitsu 109

Index
Memory cardhandling 39inserting 39removing 40
Mobile operation 15Monitor
connection 65no image 74remains blank 74unstable image 74
Monitor connectionsee VGA port 65
NNotes 13
disposal / recycling 86Energy saving 14touchscreen 26Transport 15
OOperating system
activating system protection 60cancel system protection 60Protecting with password 60
PPackaging 18Password
changing 59entering 59removing 60
Password protection 58hard disk 60
Pen 33Portrait format
display 27Ports 46
Keyboard cover 49Power saving 14Power-on Power-on indicator 24Printer does not print 76Problem solving 71
RRechargeable battery
see battery 37
SSafety information 13Screen connection
see VGA port 65Security functions 57
SmartCard 62SystemLock 62
Security LockAnti-theft protection 58using 58
Service life, battery 37Set up
Device 19Setup
see BIOS Setup Utility 68Slot
Memory cards 39Status indicators 22Summer time 72Supervisor password
change 59entering 59removing 60
Suspend/Resume button 24Switching off the
Tablet PC 25Switching on for the first time 20Symbols
Indicators 22System settings, BIOS Setup Utility 68
TTablet
operating 22Tablet PC
cannot be started 75doesn’t work 75transporting 15
Tablet, operation 22Tablet: Switching on 24Technical data
AC adapter 84The wireless connection to a network
does not work 76Time not correct 72Tips 71Touchscreen
difficult to read 73notes 26reflected glare 73remains dark 73
TPM 63Transport
Damage during transportation 18Transportation 15Travel 15
110 Fujitsu
Index
Troubleshooting 71Trusted Platform Module 63
UUSB ports 66User password
change 59entering 59removing 60
VVGA port 65
WWebcam 37Wireless components
Safety notes 14Wireless LAN
Safety notes 14Wrong date/time 72
Fujitsu 111