fruit orchard manual 4 - afghan...
TRANSCRIPT

1
FRUIT ORCHARDS
PERENNIAL CROP SUPPORT SERIES
JALALABAD, AFGHANISTAN
Publication No. 2008‐005‐AFG
November 17, 2008

2

3
This manual was produced by Roots of Peace under USAID subcontract No. GS‐10F‐0359M, Task Order #306‐M‐00‐05‐00515‐00, Afghanistan Alternative Livelihoods Program for the Eastern Region. It was written by Ferenc Sandor and edited by Tucker Kuhn, Spencer Baird and Gary Kuhn of Roots of Peace, with support from Juan Estrada of DAI for the use by Roots of Peace and Ministry of Agriculture, Irrigation and Livestock extension agents, farmers, agriculture input suppliers and other teachers. The work was funded by USAID under the Alternative Livelihoods Program, Eastern Region which is managed by Development Alternatives, Inc. (DAI). For more information, contact Roots of Peace at [email protected] or +1 415 455 8008. Roots of Peace is a humanitarian, not‐for‐profit organization based in California, USA. Roots of Peace, established in 1997, focuses on post‐conflict countries to eradicate remnants of war and to re‐establish and promote economic livelihoods and social programs. Roots of Peace is funded by public and private sources.

4
First published in Afghanistan in 2008 by Roots of Peace. Contents may be reproduced without approval by not‐for‐profit organizations provided appropriate recognition of author, artist and photographers is included in the document. Any for profit organization application of these materials must be approved by Roots of Peace in writing prior to use.

5
Table of Contents 1 Pomology, Variety and Cultivar ................................................................................... 9 2 Site Preparation ......................................................................................................... 11 2.1 Cleaning the Site .................................................................................................. 17 2.2 Establish Roads and Footpaths ........................................................................... 18 2.3 Soil Preparation ................................................................................................... 18 2.3.1 Granular Structured Soil .............................................................................. 18 2.3.2 Platy Structured Soils ................................................................................... 19 2.3.3 Blocky, Prismatic and Columnar Structured Soils ........................................ 19
2.4 Bunding and Drainage Network .......................................................................... 20 2.5 Installation of Irrigation System .......................................................................... 21 2.6 Fencing ................................................................................................................ 22 2.6.1 Natural Shelter Belts .................................................................................... 22 2.6.2 Tree Lines and Strips .................................................................................... 22 2.6.3 Live Fencing .................................................................................................. 23
3 Orchard layout ........................................................................................................... 24 3.1 Basic measurement ............................................................................................. 24 3.1.1 Establishing a Straight Line .......................................................................... 24 3.1.2 Establishing a Right Angle ............................................................................ 25
3.2 Physical Layout .................................................................................................... 28 4 Planting Fruit Tree ...................................................................................................... 32 4.1 Prepare Planting Hole ......................................................................................... 32 4.2 Transplant Sapling ............................................................................................... 33 4.3 Pollination Management in Planting Process ..................................................... 35
5 Orchard Management................................................................................................ 39 5.1 Pruning Process ................................................................................................... 39 5.2 Traditional Canopy Shapes .................................................................................. 43 5.2.1 Natural Canopy ............................................................................................ 43 5.2.2 Central Leader System ................................................................................. 43 5.2.3 Modified or Radial Central Leader System .................................................. 45 5.2.4 Combined Central Leader System ................................................................ 45 5.2.5 Open Center or Vase System ....................................................................... 45 5.2.6 Fruit Bush System ........................................................................................ 46
5.3 Intensive Canopy Shapes ..................................................................................... 46 5.3.1 Productive Arbor Branch System ................................................................. 46 5.3.2 Slim Arbor Branch System ........................................................................... 47
5.4 Hedge Systems .................................................................................................... 48 5.4.1 Hungarian Hedge System ............................................................................. 48 5.4.2 Haag or Belgian Hedge System .................................................................... 48 5.4.3 Palmetta Hedge System ............................................................................... 48 5.4.4 Bouche‐Thomas Hedge System ................................................................... 48 5.4.5 “V” Shaped Hedge System ........................................................................... 49 5.4.6 Lepage Hedge System .................................................................................. 49 5.4.7 Meadow Orchard ......................................................................................... 49
5.5 Pruning Bearing Tree ........................................................................................... 50 5.5.1 Pruning Spurs and Fruit Bearing Shoots ...................................................... 51

6
5.5.2 Alternative Pruning Methods ...................................................................... 51 5.5.3 Thread Shoot Pruning .................................................................................. 51 5.5.4 Pruning to One Shoot ................................................................................... 52 5.5.5 Thinning Fruit ............................................................................................... 52
5.6 Tree Nutrition ...................................................................................................... 53 5.6.1 Role of the Main Nutrients .......................................................................... 54 5.6.2 Fertilizing Fruit Trees ................................................................................... 55
5.7 Irrigation of Fruit Trees ....................................................................................... 58 5.8 Pest and Disease Management ........................................................................... 62 5.8.1 Diseases ........................................................................................................ 63 5.8.2 Pests ............................................................................................................. 63 5.8.3 Pest and Disease Control ............................................................................. 64
5.9 Harvesting Fruit ................................................................................................... 65 6 Summary Table for Orchard Establishment ............................................................... 67 Appendices ......................................................................................................................... 68 Appendix 1: Glossary of Terms .......................................................................................... 69 Appendix 2: Tables ............................................................................................................. 71 Appendix 3: Figures ........................................................................................................... 72 Appendix 4 : References .................................................................................................... 74

7

8

9
1 Pomology, Variety and Cultivar Fruit plays an important role in our lives. Not only do they improve our nutrition and food security status, but they are also ideal products for industrialization, processing and marketing. The high value that fruits represent gives opportunity for the farmer to generate income if given access to local and export markets. The branch of botany that studies the cultivation of fruit is called pomology. Pomological research is mainly focused on the development of the cultural techniques and physiological studies in fruit trees. The goals of fruit tree improvement include enhancement of fruit quality, regulation of production periods, and reduction of production cost. When discussing fruit tree improvement, the technical term of the specific variety and cultivar appear frequently. The meaning of these terms is often unclear, which can easily confuse fruit growers. Variety is a subdivision of a species officially ranking between subspecies and forma. It is indicated in botanical nomenclature by its position following the species name (species, variety), for example, Prunus Dulcis Amara or bitter almond in its common name. Prunus is the species and Dulcis Amara is the variety. There are wild forms of specie, developed through natural selection, which means that they can grow without cultivation. Therefore, a variety is a taxonomic category consisting of members of a species that differ from others of the same species in minor but heritable characteristics; varieties are frequently recognized in botany. A cultivar is a horticultural variety that is produced by selective breeding, rather than by natural selection, and persists only in cultivation (not found in the wild). Cultivars are indicated in botanical nomenclature by single quotes (‘cultivar’). Hybrids are created by crosses between 2 different species or 2 different forms of the same species. Hybrids may occur through natural selection or selective breeding (hybridization). Hybrids are indicated in botanical nomenclature by a multiplication sign between the two parents (variety x variety). Therefore, a cultivar is a cultivated plant that has been selected and given a unique name because of its decorative or useful characteristics; it is usually distinct from similar plants and when propagated it retains those characteristics.
Based on the International Code of Nomenclature for Cultivated Plants, a cultivar must be distinct from other cultivars and it must be possible to propagate it reliably, in the manner prescribed for that particular cultivar, either by sexual or asexual means.
The word cultivar was given by Liberty Hyde Bailey and generated from the two words: "cultivated" and "variety", but could also be derived from "cultigens" and "variety". It is also a Spanish verb meaning "to cultivate." The word cultivar is not interchangeable with the botanical rank of variety, nor with the legal term "plant variety". Cultivars are a sub‐set of Bailey's broader grouping, the cultigen, defined as "a plant that has been deliberately altered or selected by humans".
The word cultivar is used in two senses — as a classification category (rank) of cultigens, and as a distinguishable group of cultigens (taxon).

10
The International Code of Nomenclature for Cultivated Plants of 2004 defines the cultivar [as a classification category] as:
“…the primary category of cultivated plants whose nomenclature is governed by this Code (Art. 2.1).”
It defines a cultivar [as a distinguishable group of cultigens] as:
“…an assemblage of plants that has been selected for a particular attribute or combination of attributes, and that is clearly distinct, uniform and stable in its characteristics and that, when propagated by appropriate means, retains those characteristics (Art. 2.2).”

11
2 Site Preparation Fruit production development takes three to five years. During this period the orchard goes through different stages of development. The following table summarizes the main stages of fruit orchard development:
Table 1 Main Stages of Orchard Development
Time Main stage Sub‐stage Main activities
3‐4 month before planting
Site preparation
Bush cleaning Cleaning and weeding
Land preparation
Loosening soil
Ploughing
Harrowing
Leveling
Terracing
Bunding
Fencing
Orchard layout
Design pattern
Establish row & plant distance
Install irrigation system
Digging holes
Manure & fertilizer application
Filling up and marking holes
Source: Ferenc Sandor, ROP, Afghanistan 2008

12
Time Main stage Sub‐stage Main activities
1st to 3rd year
Planting Planting saplings
Sapling preparation
Planting saplings
Basin formation
Staking
Mulching
Irrigation
Orchard management
Training fruit tree
Head back
1st‐3rd year shaping cut
Staking
Propping vs. trellising
Cloth pinning
Basin formation
Staking
Mulching
Irrigation
Weeding
Pest & disease management
Plant nutrition
4th to 5th year Shaping fruit trees
4th‐5th year shaping cut
Staking
Propping vs. trellising
Cloth pinning
Basin formation
Staking
Mulching
Irrigation
Weeding
Pest & disease management
Plant nutrition
5th to 12th year Main production period
Pruning
Propping
Irrigation
Pest & disease management
Plant nutrition
Harvesting
Source: Ferenc Sandor, ROP, Afghanistan 2008

13
Source: Photo by Ferenc Sandor
Time Main stage Sub‐stage Main activities
Over 12‐15 years
Reconstruction period
Rejuvenate fruit trees
Top cleft propagation
Barking fruit trees
Propping vs. trellising
Cloth pinning
Mulching
Irrigation
Weeding
Pest & disease management
Plant nutrition
Terminate orchard
Terminate orchard
Source: Ferenc Sandor, ROP, Afghanistan 2008
Selecting the proper site and the correct type of fruit for production are the first steps in fruit orchard establishment. Selecting both the correct fruit type and proper conditions for production depend upon each other. Climatic conditions, such as altitude, temperature, sunlight, wind, frost and rainfall determine which kind of fruit can be produced in the area and vice versa. To successfully produce a specific kind of fruit requires the selection of the area that has adequate climatic conditions. Apart from the climate, there are other factors that must be considered too, like topography, the soil type and conditions, the proximity to the market, accessibility to the area, labor availability and water conditions. There are many methods of fruit tree classification. With regards to the establishment of an orchard, three of them are essential. Climate Classification The first grouping classifies fruits by the prevailing climate where these fruit trees thrive.
Tropical fruits
Temperate fruits Rainfall Classification The second type of classification organizes fruits into two groups dependant upon which fruit trees thrive according to rainfall.
Low rainfall
High rainfall Pollination Classification The third type of classification is based on the kind of tree pollination process.
Most of the plants have the male (androecium) and female (gynoecium) organs in the same flower. They are called hermaphroditic (androgynous) flowers. Fruit trees that contain the female and male organ in different flowers but in the same plant are called monoecious plant.
Other trees, like papaya, have the male and female flower in separate plants. They are dioecious plants.

14
Figure 1 Fruit Species Classifications
Tropical Fruits Avocado Banana Cashew nut Granadilla Grapefruit Guava Lemon Litchi Macadamia Mango Mulberry Naartjie Orange Oyster nut Papaya Tomato tree
Fruit Tree Selection Criteria
High Rainfall Fruits Almond Apple Apricot Avocado Banana Custard apple Fig Granadilla Guava Kiwi Litchi Macadamia Mulberry Nectarine Oyster nut Peach Pear Pecan Plum Tomato
Temperate Fruits Almond Apple Apricot Fig Grape
Kiwi Nectarine Peach Pear
Pecan Plum Pomegranate
Low Rainfall Fruits Cashew nut Fig Granadilla Grape Kiwi Lemon Mango Mulberry Nartjie Orange Papaya Peach Pecan Pomegranate Tomato
Source: Ferenc Sandor, ROP, Afghanistan 2008
Pollination can happen in three ways. If the plant can be pollinated with pollen from the same plant, it is self‐compatible or self‐fertile. Some of these plants are able to accomplish pollination without an external pollinator, such as a few peach cultivars. A typical example of that is when the stamens grow into contact with the pistil to transfer pollen. This process is called self‐pollination, which is not the same as self‐pollenization. (However, most of the peach cultivars use insects for pollination). All other self‐fertile and self‐infertile (it cannot be pollinated with pollen from the same plant) plants need biotic or abiotic pollination.

15
Figure 2 Annual Cycle of Fruit Trees
Source: Cselotei‐Nyujto‐Csaki, 1985 Biotic pollination happens, when pollination is executed by a foreign organism. The plant attracts the organism in different ways (pollination syndrome). The organism can be insects (Entomophily) or vertebrates (Zoophily). Abiotic pollination occurs, when pollination is mediated by other factors, such as wind (Anemophily) or water (Hydrophily). The factor or organism that mediates the pollination is called a pollinator. The self‐infertile plants need other plants to provide the pollen, when the plant is to be pollinated. The plant that provides the pollen is called a pollenizer. Biotic and abiotic pollination can happen in two ways:
Cross pollination: In case of self‐infertile plants the pollen provided by another plant. Therefore, it requires a pollinator and an external pollenizer.
Self‐pollenization (autogamy): Pollen moves to the female part of the same flower, or to another flower of the same individual plant (self‐fertile). Self pollenization requires only a pollinator.
Some cultivars of a fruit species are self‐sterile. This means, that it cannot be pollinated with pollen from the same cultivar. The pollen comes from a different cultivar from the same specie called pollinator. This type of cultivars can be found in the varieties of apple, almond, plum or pear.

16
The pollen must come from the same species if pollination is to take place, but in some cases cross‐pollination is possible between two species of the same genus. This happens between the lemon, orange and naartjie from the Citrus genus. In perennial horticulture, pollinators play a significant role. They can improve the yield by about 20‐30%. Thus, pollination management becomes an important branch of agriculture. Pollination produces some $40 billion worth of products annually in the USA alone and helps save the economy by an estimated $3.1 billion annually.
Figure 3 Pollenization Methods
Source: Ferenc Sandor, ROP 2008
During fruit selection, farmers should carefully establish the number and place of pollinizers if the fruit type requires it. Otherwise the flowers will not be fertilized. Honey bee pollination is an outstanding part of pollination management. Bees deliberately gather honey and pollen to meet the nutritional need of the hive. As the bee flies from flower to flower, some of the pollen grains are transferred onto the stigma of other flowers pollinating them.

17
Table 2 Honey Bee Pollination
Number of recommended bee hives per Hectare
Common name No. of bee hives
Almonds 5‐8
Apple (normal size) 3
Apple (semi dwarf) 5
Apple (dwarf) 8
Apricot 3
Blueberry 8‐10
Cranberry 8
Nectarine 3
Peach 3
Pear 3
Plum 3
Raspberry 3
Strawberry 3
Source: Ferenc Sandor, ROP, Afghanistan 2008 Figure 4 Considerations for Site Selection
Source: Ferenc Sandor, ROP, Afghanistan 2008
2.1 Cleaning the Site Site preparation starts with the cleaning of the area. After cleaning the bush the next step will be to level the area and, if necessary, build up the terraces. Carefully avoid the complete removal of the topsoil during the process of leveling and terrace making. This can happen where the soil depth is shallow.

18
It is an important task in every farm to secure access to the orchard area so that the site build up continues with road and footpath sitting. There can be crest, contour and diagonal roads or footpaths.
2.2 Establish Roads and Footpaths The crest is the top of the hill and it continues in spurs as the high ground stretches out and down into the adjoining valleys. When the road or footpath follows this line, crest roads and footpaths come about. Straight‐up‐and‐down‐slope roads and footpaths go straight up and down the main slope. Contour roads and footpaths closely follow the natural contour lines of the landscape. They are typically used in farms, especially small farms, where the main cultivation methods are contour based cultivations. The diagonally aligned roads and footpaths cross the contour lines diagonally and they are exposed to the erosion of run‐off. Therefore, this type of road requires expensive structures for erosion protection. The road or footpath can be flat or formed. Flat roads have a cleared and smooth surface enabling the rain to run down the road surface. These roads avoid severe damage as road bolsters are used to stop water flow. The bolsters are humps or large bunds built up on the road. The formed roads and footpaths are built up with soil from either side of the road, which then form side drain canals. These side drains collect the water from the road and take it down the slope.
2.3 Soil Preparation Soil preparation depends on the soil conditions. The soil structure and texture together make one of the most critical factors in land preparation. The farmer’s ideal soil is granular in structure, rich in organic matter, with good porosity and a good capacity for water‐air exchange and movement. The soil presents problems and risks depending on its structure and texture as to whether it has high or low alkali or sodium content, its salinity, pollution and toxicity levels, the status of organic matter within it and its biological features. All these attributes are listed below, with the recommended production practice for each one.
2.3.1 Granular Structured Soil
Problems and risks Tilling the soil radically lowers its fertility: When tilled for the first time, soil can lose up
to 50% of its organic matter. Many farmers plough the soil twice for land preparation. This practice should be avoided. In the tropics the top layer humus content is very thin. It is common practice among smallholder farmers in the tropics to dig soil during the dry season to be ready for the rain. This practice destroys the soil structure, introduces more oxygen into the soil, and as a consequence, microbiological activity increases. Microbes burn up the organic matter and release carbon dioxide. Humus is lost from the unprotected surface of the already thin top layer. The application of organic fertilizer will not redress the imbalance, because the microbes will burn up the humus content faster than the soil is able to produce it.

19
Ploughing too deeply as well as intensively will turn up less structured soil into the topsoil level. Moreover, intensive ploughing destroys the structure of the soil and increases the leaching mechanism in it.
Harrow the soil into dust with a harrow, following up with soil cylinders that compact
the surface. This method causes irreparable damage in the soil structure, and the term given to the outcome is fine laboured soil face. After irrigation the dust becomes a cemented film on the surface hindering the proper ventilation of the soil.
Burning soil during land preparation sterilizes the soil, killing every living organism in it
and burning the organic matter content. Burning stubble decreases the organic matter, the mineral aggregates get glued together, and the aggregates release each other, causing the soil to lose its granular structure.
Recommendations Reduce tillage practice to a minimum. The soil should not be tilled any deeper than the
top layer, so as to avoid mixing topsoil with lower‐quality subsoil. Furthermore, instead of ploughing the soil deeply, it is better to use subsoil loosener to break up the compact layers in the subsoil. The subsoil loosener neither turns up the pound from the subsoil nor does it break up the soil structure. It may be applied every 3‐4 years.
If machinery is used, it is important to bear in mind the soil moisture content. Tillage of too dry soil turns up big pounds, but if the soil is too wet the plough sole spreads and dissipates the moisture.
Avoid burning. The slashed plant matter should be composted or returned to the soil as green manure. Do not burn the soil! Agriculture is for the future ‐ one must look beyond today.
2.3.2 Platy Structured Soils
Problems and risks Compaction: The main problem with platy structured soils is soil compaction caused by
the action of animals and machinery. These soils usually have higher bulk density, because they have less pore space, especially the fine‐texture platy soils. This high bulk density heavily affects root penetration into the soil.
Recommendations Moderate ploughing and use of soil loosener: The platy structure in the subsurface
clearly indicates wrong soil management. The damage can be reduced with moderate use of a plough or soil loosener.
Build windbreaks: There is a high risk of water and wind erosion, therefore erosion control with windbreaks is an important part of farming.
2.3.3 Blocky, Prismatic and Columnar Structured Soils
Problems and risks Very hard soils, the plant root system has difficulty penetrating into these dense soils.
The soil swells under wet conditions and cracks while under dry conditions. The clay content is high, mainly 2:1 type expanding clay.
Low levels of organic matter, low fertility: Especially the prismatic structured soils have
very low quality and they are infertile. They normally occur in the layer horizons instead of the surface, but their presence in the surface horizon usually indicates sodic or alkaline conditions. Prismatic and columnar structured soils crack vertically.

20
Source: Ferenc Sandor, ROP, Afghanistan 2008
Recommendation Deep tillage practice With this type of soil, tillage practice plays an important role during land preparation. Tilling the soil deeply can partially restore soil fertility. Apply additional organic matter to the soil: The deep tillage technique should be
accompanied by applying additional organic matter to improve the life, structure and fertility of the soil.
Use subsoil loosener. The use of soil subsoil loosener down to 50‐60 cm is another
recommended technique. It should bring an improvement in water infiltration and soil ventilation, and also in the balance between aerobic and anaerobic biochemical reactions. It will also help to improve the soil pH.
Recommendation for sandy soils Zero tillage practice Land preparation of sandy soils requires zero tillage practice to limit the possible erosion and to retain the soil. All soil preparation should attempt to minimize soil loss. Apply high volume of organic matter Cover the soil with vegetation or well composted mulch. These soils are exposed to
erosion, and so they should be covered all year round. Install soil protective structures or vegetation in and around the field.
Recommendation for clayey soils Deep tillage practice and subsoil loosener use are strongly recommended, in contrast
with the recommended approach for sandy soils. Apply high volume of organic matter, which can also improve the soil quality.
2.4 Bunding and Drainage Network
Figure 5 Graded bund
These are practices of graded or level physical conservation layout. The graded physical measures are just off the true contour on a

21
Source: Ferenc Sandor, ROP, Afghanistan 2008
Figure 6 Drainage Channel
grade or gradient so excess water is able to flow gently along them. The typical bund is the graded bund, which formed with a formed channel. Level or contour measures are on the true contour to guide ridges. These measures help to infiltrate and store as much as possible of the rainfall. Note: For more information about soil preparation and physical layout measurement see the manual of Soil Testing, Perennial crop support series, Publication No. 2008‐001‐AFG.
2.5 Installation of Irrigation System An irrigation system consists of 4 main components: Intake structure and pumping station: This is the structure, which divert the water from
its source to water reserve or directly to the field if the field application system uses gravity force.
Conveyance and distribution system: Conveyance is the structure, which transport the water from the main intake structure to the field. The distribution systems are canals, ditches or pipe lines, which are transport the water to the irrigated field.
Field application system: They are the different irrigation methods
Drainage system: The drainage system removes the excess water from the field. Small holding farmers usually use gravity based surface irrigation methods. Surface irrigation is applied by gravity and the water flows on the surface. There are three types of surface irrigation: Basin irrigation technique, where the entire field is flooded Furrow irrigation technique, where the water flow in furrow channels between ridges Border irrigation technique, where the water flows in long strips separated by bunds.
Basins are as wide as long approximately, and borders are several times longer than wide.

22
Source: Ferenc Sandor, ROP, Afghanistan 2008
Figure 8Source: Ferenc Sandor, ROP, Afghanistan 2008
Figure 9Source: Ferenc Sandor, ROP, Afghanistan 2008
Figure 7 Natural Shelter Belt The main risk of these methods is to over or under irrigate the orchard. This causes the main loss of young trees during the first one and half year after plantation. Note: For more information about irrigation systems see the manual of Soil Testing, Perennial crop support series, Publication No. 2008‐002‐AFG.
2.6 Fencing Windbreaks, fencing, wind erosion control measurements are belongs to the agro‐forestry practices. Trees and shrubs can grow in and around the orchard protecting the soil and especially the young fruit trees during the growing period. There are some main methods to fencing and protecting young fruit tree orchards.
2.6.1 Natural Shelter Belts
When a new orchard is established and cleaned from the bush, the soil and the recently planted fruit trees need some protection against heat and erosion that can be obtained by leaving a shelter belt some 20‐30m wide. The belt strips along the contour of the area.
Figure 10 Single Tree Line Strip Figure 11 Wind Break
Planted shelter belt Instead of using existing natural tree belts it is a designed and planted belt on potentially arable land.
2.6.2 Tree Lines and Strips
It is containing a tall and a small canopy tree variety along the field boundaries. It can be single or double lines. Tree lines and strips are commonly known as windbreak. Trees for contour measures

23
A variety of trees and shrubs can be planted on contour markers, buffers, level and graded bunds and drain channels. The spacing of the trees can be: Closely spaced trees: Leucaena leucocephala, etc. Widely spaced trees: Cassia siamea, Albizia lebbeck, etc. Very widely spaced trees: Faidhebia albida, etc.
2.6.3 Live Fencing
These are barriers of dense often thorny trees and shrubs. Live fence protects for long period and it is cheaper than any other type of fencing method. Site preparation guide line Site preparation is a critical phase for orchard establishment. Wrongly selected measurements can cause significant cost to correct them. Therefore a set up procedure guide line should help during the process: Correct land selection: Setting waterways Setting crest roads and pathways Setting drainage network Setting graded bunds Setting contour measures Setting ridges, small basins, etc. Setting field access
Physical soil conservation measures: Selection of a system, which effectively manage
rainfall and irrigation water (store and release water)
Agronomic and agro‐forestry measures Acceptation: Revise and refine the system as a whole unit

24
3 Orchard layout
3.1 Basic measurement The measurement of the future orchard depends on the type of fruit, the intensiveness of the production and the size of the matured tree (dwarf, semi‐dwarf, etc.). According to these characteristics the population density varies for the same size of area. Once you have determined the spacing for your trees, you may proceed with the orchard layout.
Source: Photo by Ferenc Sandor
3.1.1 Establishing a Straight Line
1. The first target is to establish a base line. All other measurements will be conducted in relation to its position from the base line. The base line is a straight line between two opposite points on the field. The two points will be marked with two poles. (A and B)
2. A third pole (C) will be set on the line roughly one third of the way toward the in between the first two poles (A and B).
3. Finally a fourth pole (D) should be set on the line roughly halfway in between the third (C) and second pole (B).
4. Return to the third pole (C) and correct its position on the line according the position of the first (A) and fourth (D) pole. Then go back again to the fourth (D) pole to correct its position according to the position of the third (C) and second (B) pole. This correction is repeated until all four poles are on a straight line between the two points on the field.

25
Figure 12 Establishing a Straight Line
Source: F. Sandor, RoP – Jalalabad (2008)
Step sequence:
1. Set out pole A and B (The two opposite points) 2. Set out C between A and B 3. Set out D between C and B 4. Correct C position between A and D 5. Correct D between C and B 6. Repeat the last two step until necessary
3.1.2 Establishing a Right Angle
3‐4‐5 Method When the base line is set out in a satisfactory manner, the next step is to measure a right angle (90°) and form perpendicular lines.

26
Figure 13 3‐4‐5 Method
1. From pole A measure 4 m along the base line and mark the point with a peg.
2. Next, tie a 3 m long string to pole A with a big nail or pointed stick attached to the other end.
3. Then draw a half circle in the soil with the nail/stick while making sure to keep the string constantly stretched.
4. Next, draw another half circle in the soil, from a string that is 5 m long that will be tied to the peg.
5. Put another peg where the two circles cross each other. In reference to the newly formed triangle’s dimensions, this method is called the 3‐4‐5 method.
When a line has to be set out perpendicular to the base line, it is advisable to use the rope method.
Rope Method 1. Mark the desired starting point with a
peg. 2. Then, take a section of rope that is a
few meters longer than the distance between the peg and the base line and attach a nail or pointed stick to one end.
3. Make a loop on the other end and place it around the installed peg.
4. Proceed to stretch out the rope and make a circle on the ground with the attached nail or stick. The circle will cross the base line twice.
5. Place a peg exactly half way in between the two crossing points. The two pegs will form a perpendicular line to the base line and the angle between this line and the base line is a right angle.
Figure 14 Establish Perpendicular to the Base Line
Source: Ferenc Sandor, ROP, Afghanistan 2008
Source: Ferenc Sandor, ROP, Afghanistan 2008

27
Source: Ferenc Sandor, ROP, Afghanistan 2008
Figure 16Source: Ferenc Sandor, ROP, Afghanistan 2008
Source: Ferenc Sandor, ROP, Afghanistan 2008
Figure 15 Area Division to Plots and Fields
After the measurement of the base line and the right angles, the next step is to divide the area into regular shaped fields and plots. For Rectangular Plots: First step is to mark the desired corners of the area. Proceed to divide the field into areas with triangular shapes . Set out a perpendicular line to the base line of each triangle in order to establish the height of the triangles. From this information calculate the surface area by multiplying the length of the
triangle base with the height and divide by two. For Irregular Plots: If we have a rectangular area we divided it to various triangles in order to calculate the area of each triangle. The summary of the four are is the area of the rectangle shaped plot.
One of the most difficult, but important measuring procedures is to establish horizontal lines and set out slopes for terraces, graded bunds, contour lines and especially for the installation of surface irrigation for the fruit orchards. For this work use a boning rod, an N‐frame and a tube water level. All of these tools can be purchased or made domestically.
Figure 17 Bonding Rod Figure 18 N‐frame

28
Source: Ferenc Sandor, ROP, Afghanistan 2008
Figure 19 Orchard Layout
The boning rod is a T shaped wood tool. The length is exactly 100 cm and the cross lath is 50 cm. The width of the tool including both laths is 10 cm. For measuring, the farmer usually needs 3‐4 of them. The N‐frame is also made from wood. The main lath is 2‐3 m long, with two 90 cm legs on both ends. The legs are supported by cross poles. On top of the main lath, in the middle section, a carpenter level is fixed with strips. The flexible tube water level consists of two 10 cm wide and approximately 1.7‐2.0 m long poles and a long and transparent flexible pipe line (hosepipe). Fix both ends of the pipe on the pole along the length with strips. The poles may already have a measuring scale marked along the length. If not, have the farmer mark the poles at a height of 1‐1.5 m. This is the point where the water level should stand during the measurement of a horizontal line. After that the transparent pipe should be filled with colored water. Make sure that during the measurement, the pipe does not have any air bubbles inside. To make a horizontal straight line, first measure a straight line and put pegs on both ends. Next, establish the level difference between the pegs by using the flexible tube level. Stand the two poles of the tube water level on top of the pegs. Correct the height of the pegs until both ends of the water tube show the same level. Through this same procedure, it is possible to use the tube water level to measure the level difference between any other two points in the field. Just put the poles on the top of any two, plotted pegs and register the readings. The difference between the two readings is the level difference between the two points of the field.
To establish a horizontal line using boning rods, first set out a straight line between two bench marks and place intermediate pegs. Place boning rods on top of the pegs and look over the top of the rods and correct the height of each peg until they reach a level point. The N‐frame is a useful tool to set out contour lines and slopes. The procedure is the same in both cases. Place one leg of the instrument on the initial benchmark. Then, turn the frame around this leg to find a position where the second leg is also on the ground and the bubble of the carpenter level is in between the marks. Place a peg to mark that point. Repeat the same process using the newly placed peg as the new start point.
3.2 Physical Layout After the site has been prepared, the farmer must make the decision on which planting system, more commonly known as orchard layout to use. The orchard layout depends on the slope of the land, the irrigation system, the drainage and the tree species to be grown.
29
The basic activities are the following: - Establish a straight line (base line) from the edge of the field, most commonly a road,
hedge or fence. - Mark the right angle - The base line forms a base row and the other line, running at a right angle to the first,
forms the line at which the first tree in each row is placed. - Using the base lines as reference points, a tape is stretched along one line and pegs are
put at the desired intervals of tree spacing.
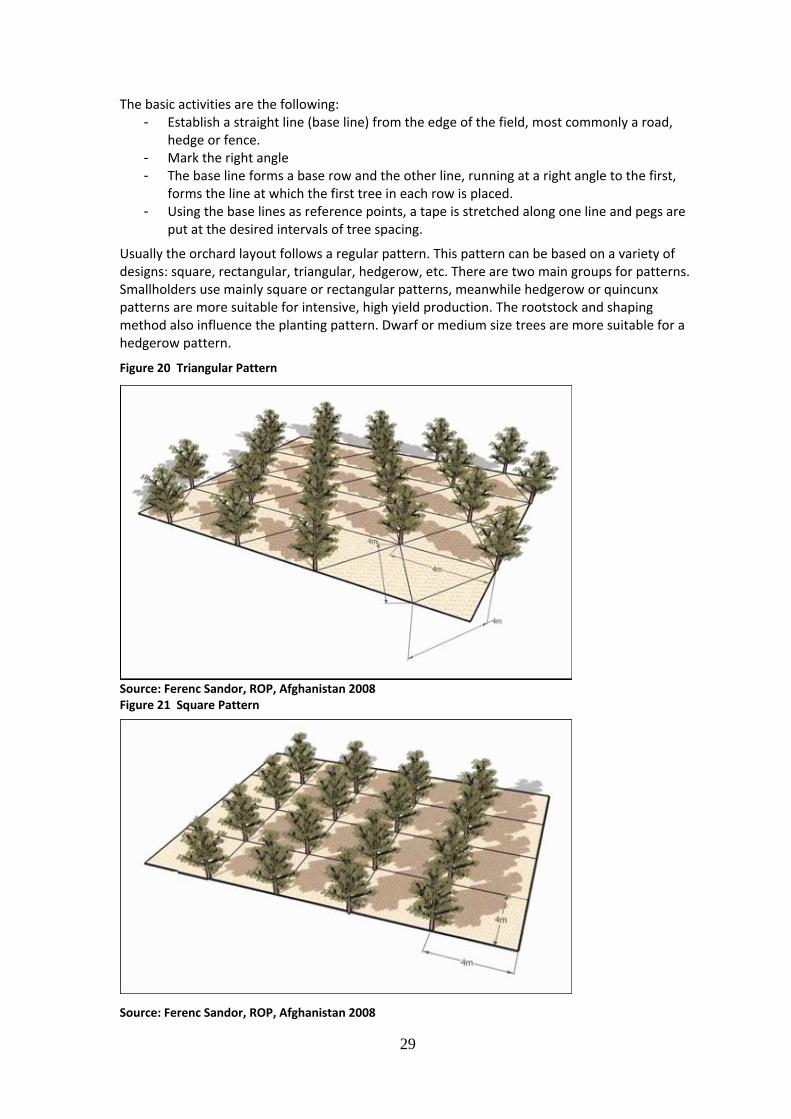
Usually the orchard layout follows a regular pattern. This pattern can be based on a variety of designs: square, rectangular, triangular, hedgerow, etc. There are two main groups for patterns. Smallholders use mainly square or rectangular patterns, meanwhile hedgerow or quincunx patterns are more suitable for intensive, high yield production. The rootstock and shaping method also influence the planting pattern. Dwarf or medium size trees are more suitable for a hedgerow pattern.
Figure 20 Triangular Pattern
Source: Ferenc Sandor, ROP, Afghanistan 2008 Figure 21 Square Pattern
Source: Ferenc Sandor, ROP, Afghanistan 2008

30
Figure 22 Rectangular Pattern
Source: Ferenc Sandor, ROP, Afghanistan 2008
Figure 23 Quincunx Pattern
Source: Ferenc Sandor, ROP, Afghanistan 2008

31
Figure 24 Hedgerow Pattern
Source: Francisco Sandor, ROP, Afghanistan 2008
Figure 25 Equilateral pattern for orchard layout
Source: Ferenc Sandor, ROP, Afghanistan 2008

32
Source: Ferenc Sandor, ROP, Afghanistan 2008
4 Planting Fruit Tree
4.1 Prepare Planting Hole The planting hole should be approximately 60cm x 60cm x 60cm. Dig the hole after rain or water the soil before digging. Compost and manure is an important part of the whole preparation, because additional organic matter content improves the soil’s physical properties and provides valuable nutrients for the tree. Figure 26 Planting Bare Root Sapling
Figure 27 Basin Around Tree
Source: Ferenc Sandor, ROP, Afghanistan 2008
Each hole needs around half a wheelbarrow (5‐10 kg) of compost‐manure. While digging the hole, divide the topsoil from the subsoil and place them in two separate piles near the hole. When the hole is ready, mix the compost‐manure with the topsoil and place it into the bottom of the hole (You can also add to the mix 250g of single super phosphate, but it is not absolutely necessary). Fill up the hole with the remaining subsoil. The soil level will be higher than the

33
surface level, but this is normal. Mark the hole with a wood peg and wait a minimum of 2‐3 weeks before planting the sapling. This period allows for the soil to settle down and for the compost‐manure to mature.
4.2 Transplant Sapling Fruit trees are normally purchased during the winter season and should be planted soon after their purchase. If they cannot be, the farmers should keep it moist through covering the root system with wet soil, sawdust or compost.
Figure 28 Standard for Sapling Quality
Source: Ferenc Sandor, ROP, Afghanistan 2008
Source: Ferenc Sandor, ROP, Afghanistan 2008

34
Source: Photos by Ferenc Sandor There are two types of saplings that are commonly used for transplant. One of them is the bare rooted sapling and the other is the rooted sapling with soil (or other medium) ball. A good bare rooted sapling has a trunk diameter of 12‐16mm and is characterized as such by the fact that it will establish faster than saplings with lesser or wider trunk diameters. When the sapling is planted into the soil the protruding notch of the union should be oriented toward the northeast to reduce the likelihood of sunburn. When dealing with a bare rooted tree, the planting process is the following: Open a large hole to accommodate the root system Cut off any roots that are broken or kinked Using two pegs fix the planting board on top of the hole Replace the planting board with the tree stem fitted into the central notch with the graft
at least 5‐10 cm above the soil surface Fill the hole with soil until the root ball is fully covered Gently firm the soil around the tree Level off the soil
When dealing with a sapling that is in a pot, the procedure is the following: Dig the middle of the hole big enough to accommodate the sapling root ball Remove the cover of the sapling (plastic bag or other pot) Make shallow cuts at the bottom of the root ball to induce quick root development Gently pull away from the root all circling or girdling roots Place the tree upright in the hole Set the tree at the same depth as it stood in the pot (up to the collar mark) Fill the hole with soil until the root ball is fully covered Gently firm the soil around the tree
Source: Photo by Ferenc Sandor Part of the planting procedures for both types of saplings is to form the tree basin or nest and water the plant immediately after planting. The basin or nest should be around one meter in diameter. In the center of the basin the soil level should be 10 cm higher in order to avoid the tree from standing in the water. This small heap should have approximately 25 cm in diameter. Place an 8‐15 cm thick mulch layer in the basin to protect the soil from heat and to reduce weed growth. The basin should be maintained on a regular basis and its diameter should increase during the growth of the tree. This process is called widening the basin. The

35
Source: Ferenc Sandor, ROP, Afghanistan 2008
Figure 30Source: Ferenc Sandor, RoP 2008
diameter of the basin should be a similar size to the diameter of the tree canopy. The importance of a quality basin around the tree is: To hold irrigation water in order to facilitate water penetration into the soil To hold manure, mulch and other nutrients To facilitate weed control under the tree canopy
Figure 29 Heading Planted Sapling
After the formation of the basin or nest is completed, water the plant immediately. The young tree’s water requirement is approximately 20‐30 liters per week. Newly planted trees frequently require support structures. This process is called staking the tree. The stake can be a 1.2 m long wooden or bamboo stake. The young tree is tied to the stake with a string in a figure eight formation. It is strongly recommended to place a rubber cushion or cardboard paper between the tree and the string to avoid the tying material from bruising the tree. Staking the tree helps young trees grow in the desired direction and protects the
branches from breaking.
Figure 31 Pruning Sapling with Side Branches The farmer should force the tree to develop low branches by heading (cutting) the tree at a 50‐60 cm height. Where access under the tree is important the height should be 90 cm. Although recently planted trees with a 9 cm or less trunk diameter normally do not have lateral branches, if they are present, they should be removed. Trees with over a 12 cm trunk diameter usually have side branches. They should be cut back to a length of 7 cm with two to three lateral buds for the future main scaffold branch development.
Figure 32 Sun Burn Protection
Protect Tree Against Sunburn For the protection of the planted tree against sunburn the farmer can use white latex paint diluted with equal parts of water. The application of the mixture should be 5 cm below the soil surface up the entire trunk including the dormant buds. The process should also be repeated for the second season while including any large branches that are also exposed to the afternoon sun.
4.3 Pollination Management in Planting Process During the planting process the farmer should create the best conditions for the future pollination, which will determine the potential yield capacity of the orchard. This principle is not necessarily applied for good‐self fertile cultivars, but is essential for the self‐infertile and self‐
Source: Ferenc Sandor, ROP, Afghanistan 2008

36
sterile cultivars. In these cases the potential yield capacity is determined by the distance between the fruit tree and the pollenizer male tree or cultivar.
Table 3 Maximum Distance Between Fruit Tree and Pollenizer
Maximum distance of the pollenizer from the fruit tree
Specie Distance in meter Apple 25
Pear 20
Cherry 10
Morello (self sterile) 9
Plum (self sterile) 16
Apricot (self sterile) 20
Almond 6
Blackcurrant 3
Walnut 100
Chestnut 100
Source: Ferenc Sandor, ROP, Afghanistan 2008
In the case of the self‐sterile morello cherry and blackcurrant the best pollination can be achieved if three different, but cross‐pollination capable, cultivars are planted together.
Table 4 Pollination Characteristics of Some Fruit Species
Source: Csider (1978)
The self‐fertile cultivars may be planted in blocks while the different cultivars are planted scattered. The different cultivars of morello, cherry, almond and blackcurrant can alternate by row. The cultivars can also be planted mixed by row in the case of the quince, morello, cherry, almond and blackcurrant.
Specie Self fertile Self sterile Apple Yes
Pear Yes
Cherry Yes
Morello Yes Yes
Plum Yes Yes
Apricot Yes, but pollenizer use recommended
Peach Yes
Walnut Yes Yes
Almond Yes
Raspberry Yes, but pollenizer use recommended
Redcurrant Yes
Blackcurrant Yes Yes
Gooseberry Yes Yes
Strawberry Yes
Avocado Yes Yes

37
The cultivars of self‐fertile species can be planted scattered (A). The cultivars of cherry, morello, almond and black currant are planted in alternate lines (B).
Figure 33 Self‐fertile Species Planting
Source: Ferenc Sandor, ROP, Afghanistan 2008
The cultivars of cherry, morello, almond and black currant are planted in alternate lines (C). The cultivars of cherry, morello, quince and almond can be planted in mixed lines (D).
Figure 34 Cherry, Morello, Almond and Black Currant
Source: F. Sandor, RoP – Jalalabad, Afghanistan (2008)

38
Cultivars of apple, pear, peach, apricot and plum can be planted in blocks (E)
Figure 35 Apple, Pear, Peach, Apricot and Plum
Source: F. Sandor, RoP – Jalalabad, Afghanistan (2008)
The cultivars of apple and pear can be planted in blocks and between blocks with one‐one line of pollenizer cultivars (F)
Figure 36 Apple and Pear
Source: F. Sandor, RoP – Jalalabad, Afghanistan (2008)
39
5 Orchard Management
5.1 Pruning Process The pruning of fruit trees is one of the most important activities in determining the yielding capacity of the tree. Its importance relies on four aspects: To develop a strong and sturdy framework To maintain the desired shape of the tree for light interception, fruit development and
easy operations To manage the balance between vegetative and generative growth of the tree To control pests and diseases
There are three main types of pruning activity: Shaping the fruit tree: Done to develop scaffold branches on the young tree, which can
support heavy loads of fruits and facilitate accessibility for tree management Selective pruning: Done to balance vegetative and generative growth of the tree Rejuvenation: Done to keep matured trees productive and healthy
The pruning equipment includes four tools: Secateur or pruning scissor Pruning shear Different types of saws to remove branches Jik or Jeyes fluid for washing the other tools (It prevents the spread of pests and diseases
through the use of pruning tools)
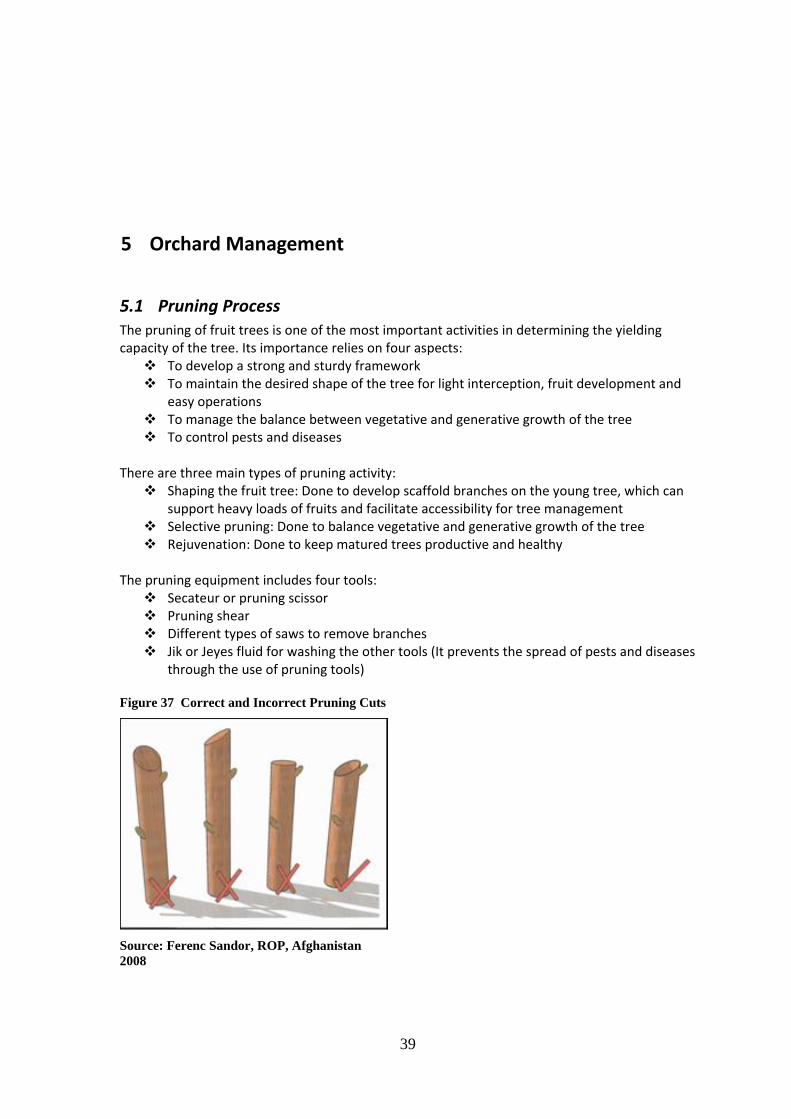
Figure 37 Correct and Incorrect Pruning Cuts
Source: Ferenc Sandor, ROP, Afghanistan 2008

40
Figure 39 Fruit settings in different branch positions
Source: L. Cselotei, 1985
Source: L. Cselotei 1985
There are some important rules to follow on how to properly prune fruit trees. Small branches should be cut just above a healthy bud. The bud should be pointed outward, away from the tree, so that the branch will not grow into the centre of the tree. The use of a bypass shear (two blades shear) is preferable for the cutting of small shoots rather than the use of an anvil (one blade shear) which is better for cutting large shoots. The three most commonly made mistakes during the pruning process are when the cuts go down towards the bud, the cuts are too high above the bud or when the cut is made straight. The preferred pruning cut is at a 45° angle across the branch.
Figure 38 Correct and Incorrect Branch Removal
Larger branches should be cut close to the trunk. The cut should be a sloping cut, so that it facilitates the run off of water. If the water does not run off, the branch may rot. If the farmer completely cuts down the branch, the bark may tear. If the cut is too far from the trunk, the branch may rot. To remove large branches the recommended procedure is to make two cuts; one cut on top of the branch and another cut underneath the branch. Saw part way up the branch from beneath then saw down on the branch from above until the two cuts meet. This will keep the branch from breaking off and tearing the bark. The application of emulsions, paint or other materials to the pruning cut should be avoided, because they may trap moisture and facilitate disease infection. The cut will heal naturally and dry out in the open air. The pruning process is strongly influenced by the tree physiology. Therefore it is important to know some of the cause‐effect aspects of pruning. Correctly choosing the pruning method will increase yield, but choosing the wrong method may have disastrous consequences on the yield. The branch of a tree can have two types of dominance; top dominance and basal dominance. Top dominance (Apical dominance) means that a
bud on the end of the branch sprouts and grows stronger than the others. If the top bud (Apical bud Apice caulinaris) is removed the other buds will sprout.
Figure 40 Lateral shooting in different branch positions
A consequence of this phenomenon is that the top bud sprouts out before the others. This happens when the branch position is vertical or has an angle on the horizontal line greater than 30°. When the branch position is horizontal the basal dominance overrides the top dominance. In this scenario the branches that are closer to the base of the branch are stronger and larger, and possess a greater vigor to
grow. When the position of the branch is about 30° in relation to the horizontal
Source: Ferenc Sandor, ROP, Afghanistan 2008

41
Source: Ferenc Sandor, ROP, Afghanistan 2008
Figure 41 Effect of Pruning Cut on Fruit Setting
line the two dominances work equally strong, therefore the buds sprout out in a uniform manner along the branch length. In the special case when the branch position is turned back under the horizontal position, both dominances keep their usual effect, however at the point of the branch arch the buds sprout out at an increased rate. A hormone called auxin is responsible for these effects. The top bud produces the hormone that regulates plant growth. The number of buds (which produce flowers) is higher when the position of the branch is horizontal (or close to) with a range of angle lower than 30° as compared with the horizontal line. The different pruning methods are based on this knowledge and the selection is made according to the purpose of the producer. After understanding the natural effects of the plant growing hormones, it is then necessary to learn the results of cutting back the branches during the pruning process and how it can be used to the advantage of the farmer. The branch can be cut back to many different lengths, with the tree reacting differently according to the length of the tree and the length of the branch. The size of the length of branch that is cut off directly correlates with the strength of production of the shoots: if there is more of the branch cut off, then more shoots will emerge. Long branches are weakened in sprouting and stronger if bald up (stripped of buds). Longer branches also contain more productive buds than shorter ones. Therefore, it is valid to say that pruning the trees stimulates the vegetative growth of the tree. Cutting back longer reduces the number of productive buds; however, the remaining buds will receive a greater number and a more balanced set of nutrients, which increases optimal conditions for their growth and development. With this knowledge the farmer receives a powerful tool. The farmer will be able to regulate the growth of the tree during the stage of the tree’s vegetative development. The farmer can greatly weaken growing branches with a long cut back (The remaining part of the branch is long) and strengthen weak branches with a short cut back (The remaining part of the branch is short). Note: The name of the pruning cut refers the length of the remaining part of the branch and not the removed part. Therefore a long cut back produces a remaining branch that is long in length and a short cut back produces a branch that is short in length. The correct interpretation of these short terms would be as “Cut back to a short or long branch”.
Commonly used cut back methods are: Cut back to 2/3: Radically increases yield capacity Cut back to half: Cutting back to the middle section Cut back to 1/3: Decrease yield capacity, but stimulates
vegetative growth Cutting back the branch to a longer length makes the tree produce fruit earlier than a tree with shorter branches after pruning would produce. The main purpose of pruning a tree is always to achieve an early start in fruit production, while at the same time keeping the high‐yield productivity of the tree for the longest possible period of time which is done through the formation of an optimal canopy for the tree. The final shape of the tree canopy is also influenced by the climatic conditions. Under optimal climatic conditions it is preferable to have a loose, more ventilated canopy. Dry places where the soil nutrient content is poor, the use of a closed tree canopy is more preferable.

42
Source: Photo by Ferenc Sandor
The magnitude of the pruning process is scaled in relation to the age of the tree and its productivity in that stage. The distribution of the number of branches and shoots should be in balance with the tree’s capacity to maintain them. The removal of unnecessary branches in a uniform manner helps lighten the canopy of the tree both inside and outside.
The complete removal of strong branches stimulates the generative characteristics; meanwhile the partial cut back
of these branches stimulates the vegetative characteristics of the tree.
Table 5 Pruning Cut‐back Effect on Apple
Apple
Pruning cut Growth Leaf
Leaf surface
Productive part
Flower Fruit
cm No. cm2 No. No. No.
Strong (1/3) 78 56 789 7 8 0.7
Medium (1/3) 81 65 872 11 14 2.0
Weak (2/3) 84 77 898 14 33 4.0
Non 66 60 748 13 16 2.0
Source: Gyurko (1968)
An additional activity of the pruning process is to manipulate the position of the branches and shoots. There are different methods available for the producer: Staking: Support structure which contains an approximately 1.2 m
long wooden or bamboo stake (See. Chapter: transplant sapling) Trellising: Commonly used for training of grape, granadilla, and other
viny fruits. A structure of open latticework, especially one used as a support for vines and other creeping plants. A form of slat fence used primarily as a screen or a support for vines. Trellises are one of the earliest forms of garden fence.
Spreading: Spreading branches with a wide and strong cloth, angle using a cloth pin. Propping: A stake or support structure placed beneath or against the branch to keep it
from breaking or shaking. Planting in angle: Well known characteristic of the Bouche‐Thomas and the Lepage
hedge production methods. The sapling is planted in an angle of 30°‐45° to the horizontal line. The budding point of the sapling is placed at a depth of 10‐15cm into the soil. In this way the scion is also rooting into the soil and gradually takes over the role of the rootstock.
Tying down: Method which is used for the formation of Haag and Palmetta hedge. It uses similar support structure as the trellising method.
Arching: The Lepage hedge is a typical example of this method. The branches are turned back forming an arch.
43
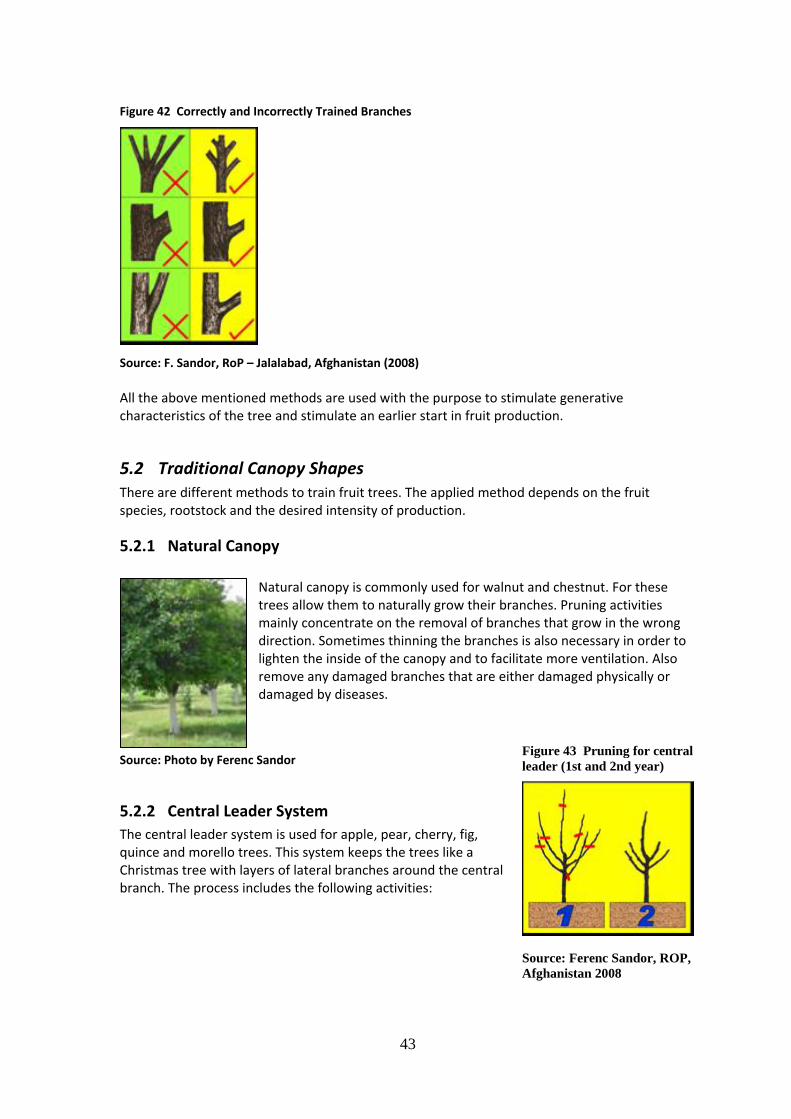
Figure 42 Correctly and Incorrectly Trained Branches
Source: F. Sandor, RoP – Jalalabad, Afghanistan (2008) All the above mentioned methods are used with the purpose to stimulate generative characteristics of the tree and stimulate an earlier start in fruit production.
5.2 Traditional Canopy Shapes There are different methods to train fruit trees. The applied method depends on the fruit species, rootstock and the desired intensity of production.
5.2.1 Natural Canopy
Natural canopy is commonly used for walnut and chestnut. For these trees allow them to naturally grow their branches. Pruning activities mainly concentrate on the removal of branches that grow in the wrong direction. Sometimes thinning the branches is also necessary in order to lighten the inside of the canopy and to facilitate more ventilation. Also remove any damaged branches that are either damaged physically or damaged by diseases.
Source: Photo by Ferenc Sandor
5.2.2 Central Leader System
The central leader system is used for apple, pear, cherry, fig, quince and morello trees. This system keeps the trees like a Christmas tree with layers of lateral branches around the central branch. The process includes the following activities:
Figure 43 Pruning for central leader (1st and 2nd year)
Source: Ferenc Sandor, ROP, Afghanistan 2008

44
Source: Photo by Ferenc Sandor
Source: F. Sandor, RoP – Jalalabad, Afghanistan (2008)
1st year pruning: For this system start with a sapling that has 3‐5 lateral branches. In the first year pruning, head back the central branch to half or a third of its length. If the tree has 4‐5 lateral branches, remove the highest, strongest branch or the lowest, weakest branch.
Position the lateral branches at 45° angle, spreading them if necessary. When cutting back the branches, make sure to consider the angle of the branch. If the angle is less than 45°, cut back for an upward positioned bud. If the angle is greater than 45°, cut back for a downward positioned bud. Cut back the lateral branches when they grow up to 60‐90cm length. These primary branches will form the first layer or tier. From the shoots, cut back the strongest ones to 1/3. The remaining buds will be on the first ¼ of the branch. During the selection of the shoots keep more strong shoots than weak ones.
2nd year pruning: During the second year the tree will replace the removed parts. Therefore it is unlikely that there will be the chance to form the second tier. Therefore, the main activity will be to fill up the space of the first layer.
Figure 43 Pruning for Central Leader (3rd and 4th year)
- 3rd year pruning: This is the year to form the
second tier of the tree. The second tier’s branches should be offset vertically from those of the first tier.
Between the two tiers the distance on the leader branch should be 50‐100cm. The leader branch should be cut back to 4‐5 buds. Remove all branches that grow facing the inside of the canopy (or crossing).
4th and 5th year pruning: The formation of the third or sometimes fourth tiers follows the
same process as the previous ones. The branches of the lower tiers should always be wider than those in the upper ones. Make sure to thin the branches on a regular basis.
Figure 44 Correct and Incorrect Heading Method
Source: F. Sandor, RoP – Jalalabad, Afghanistan (2008)

45
5.2.3 Modified or Radial Central Leader System
The modified central leader system is commonly used for apple, fig, persimmon and walnut trees. The process starts in a similar fashion as compared to the central leader system. The most upright and vigorous shoot is developed into the central leader. Choose 3‐5 lateral branches as primary scaffold branches. In this system, these branches should be well spaced not only horizontally as in the case of the central leader system, but vertically too. All other branches should be cut back, leaving 3‐5 buds. After the full development of the co‐dominant, primary scaffold branches the central leader will be removed.
5.2.4 Combined Central Leader System
This system is used for the same types of fruits that the central leader system uses. This system facilitates the penetration of light into the tree’s canopy. After developing the third tier, the central leader will be removed. On this way the top of the tree is opened and the whole system looks like a combination of the central leader and open center system.
5.2.5 Open Center or Vase System
This system is used more for peach trees, but is also frequently applied for almond, apricot, cherry, fig, nectarine, peach, plum and prune trees. 1st growing season: At the beginning of the first growing season select 3‐6 shoots that
will become the primary scaffold branches and cut back all other upright shoots to 10 to 15 cm long. The leader should be removed.
Figure 45 Pruning During the First Year
Source: Ferenc Sandor, ROP, Afghanistan 2008
These scaffold branches should be spaced apart vertically and should be distributed evenly around the trunk. The lowest branch should be about 50‐60cm above the ground. If the scaffold branches grow vigorously, they should be cut back to 60‐75cm length during early summer time. The primary scaffold branches should grow at 30‐45° angles. Do not select scaffold limbs that grow directly above one another. Avoid upright limbs that are attached with narrow, acute angles because they tend to be weak at the point of attachment. Flat or horizontal limbs should be avoided as scaffold limbs, but they can be used if new shoots coming from them are directed upward and outward. If the sapling is weak, cut back the lateral shoots to one bud and remove the leader shoot. If the sapling does not have lateral shoots, the central shoot should be cut back to the most vigorous buds.
Source: Photo by Ferenc Sandor
Figure 47 Pruning Weak Sapling
Source: Ferenc Sandor, ROP, Afghanistan 2008

46
2nd and 3rd year pruning: Select 3‐4 primary scaffold branches if this was not done the previous summer. During the 2nd year, select 5‐7 secondary scaffold branches that fill up the space. Head back the secondary scaffold branches at 60 to 75 cm long to develop two to three “tertiary” branches from each secondary branch. Ideally, two branches should originate from each primary. Heading back the primary scaffold branches encourages secondary scaffold branches to grow from them.
4th and 5th year pruning: During this period another 10‐12 tertiary scaffold branches will
be selected to form the vase shape of the tree. All strongly upward growing branches and shoots should be removed.
Figure 46 Pruning for open canopy shape
Source: Ferenc Sandor, ROP, Afghanistan 2008
5.2.6 Fruit Bush System
This system fits for all kinds of fruits. The preferred rootstock should be dwarf type rootstock. During the first growing season cut back half the new growth on two separate occasions. During the second year repeat the process in the same manner until the tree grows up to 1.5‐2.0m tall. These heading cuts promote an excess of branches, so make sure to thin them by removing some shoots to allow sunlight to reach the lower branches. Pruning in subsequent years involves cutting off any shoots above the tree’s permanent height 2‐3 times per year. Also, thin any crowding branches, especially at the top of the tree, and remove unproductive fruiting wood in early spring when branches without flowers are visible.
5.3 Intensive Canopy Shapes
5.3.1 Productive Arbor Branch System
This is the first known intensive canopy shape used for apple trees. The training of the tree takes 2‐3 years. During this time the leader cut back to 2/3 or half every year. Three tiers are developed around the leader. Without cutting back these lateral branches are tied down close to horizontal. Other branches are removed from the tree. This system is better works on medium‐semi dwarf rootstock (M‐4). Note: The rootstock clones of apple are divided to three groups: strong growing, medium‐strong growing and weak growing types. They form the ‘M” series. The “M” series had been selected in East Malling (M), Englang. For the identification of each clone in the series after the “M” every

47
clone has a number. The “MM” series was created in Merton through cross breeding and their number series is between 100 and 120. The most important apple rootstocks are:
Weak growing (Dwarf): M27, M9, M26 – Height: Between 1.8‐3.0 m
Medium‐strong growing: MM106, M7, M4, MM104, M2 – Height: Around 4.0m
Strong growing: MM111, MM109, M10 – Height: Between 4.8‐5.5m
5.3.2 Slim Arbor Branch System
Figure 47 Slim Arbor Branch System
Source: Ferenc Sandor, ROP, Afghanistan 2008
Currently, this is the most intensive production system for apple trees. It allows for a density of up to 2,500 trees per hectare. After planting, the central shot should be headed back at a length of 85‐90cm while allowing the tree to keep 3‐4 lateral shoots. The upward growing shoots can be later removed or tied down. Every year the leader should be removed and changed for one of the later shoots. The rest of the activities concentrate on the selection of the new shoots. When the tree is more than five years old, the central leader should be headed back annually. Through using this system the tree’s productive life time would be 12‐15 years. The rootstock should be M‐9 or M‐26. The system requires a support structure; therefore the central leader of the tree should be tied to a stake.
Figure 48 Pruning for Slim Arbor Branch Shape
Source: L. Cselotei (1985)
Figure 49 Parameters of Slim Arbor Branch System
Source: L. Cselotei (1985)

48
Figure 51 Palmetta Hedge Shape
Source: F. Sandor, RoP – Jalalabad, Afghanistan (2008)
5.4 Hedge Systems Hedge type systems are mainly used for apple, pear, cherry, morello and guava trees. These systems usually contain a support structure built up using columns (stakes) and strengthened wire. During the training of the trees the lateral branches are tied to the wire.
5.4.1 Hungarian Hedge System
The development of this system is very similar to the productive arbor branch system however; it is developed in only two directions. The support structure is built up with two meter high columns placed at intervals of every 15m. One wire is strengthened between the top of the columns. The tree spacing is two meters. At this level (2m) the central leader is removed. During the training of the tree the branches have to be tied down on regular basis. The distance between branches is 30‐40cm during the first 4‐5 years. After that, the distance in between should increase to 50‐60cm. The upward shoots should be removed continuously.
5.4.2 Haag or Belgian Hedge System
This system requires a support structure. During the training and shaping of the tree the branches are tied horizontally to a strengthened wire. The distance between the developed branch’s levels is 60‐80cm.
Figure 50 Haag hedge shape
Source: F. Sandor, RoP – Jalalabad, Afghanistan (2008)
5.4.3 Palmetta Hedge System
It is one of the first hedge type systems. The lateral branches of the tree are tied at 30‐45° angles to the horizontally fixed wires. The distance between the wires is 80‐100cm.
5.4.4 Bouche‐Thomas Hedge System
In this system the saplings are planted into the soil at an angle of 30°. Two saplings are facing each‐other forming a series of “V”‐s. The grafting point is placed under the surface in a depth of 10‐15cm, which allows the scion rooting too. The later branches are tied down at 30° to the wire and to each other.

49
Figure 52 Bouche‐Thomas Hedge Shape
Source: Ferenc Sandor, ROP, Afghanistan 2008
5.4.5 “V” Shaped Hedge System
The “V” shaped hedge system does not have a central leader. The two primary scaffold branches have an angle of 60° to the surface horizon and a length of 150‐200cm. The hedge’s height is 60‐80cm. The secondary (productive) branches are placed on the primary branch at 40cm apart from each other. These branches can be tied down horizontally to stimulate the early start of production (optional).
5.4.6 Lepage Hedge System
The Lepage hedge system is more of a curiosity than an applicable system for farms. It fits more in household gardens. The tree is planted at an angle of 30° to the surface horizon and the lateral branches are turned and tied back forming arches.
Figure 53 Lepage Hedge Shape
Source: L. Cselotei (1985)
5.4.7 Meadow Orchard
This type of system produces fruit like a crop. It has the maximum tree density of around 70,000 per hectare. During harvest the productive branches are removed together with the fruit. The orchard produces fruit in every second year. The first year productive branch growth and differentiation of fruiting buds are induced by chemicals and the second year the trees bear the fruits. Some early peach cultivars are able to produce fruit annually.

50
Table 6 Recommended Pruning and Training Methods
Type of tree Training system Amount of pruning
Almond Open center Light (Thinning)
Apple Central leader, Open center, Modified central leader
Medium
Apricot Open center Heavy
Avocado Natural canopy, Central leader Medium
Cherry Open center Light
Chestnut Natural canopy Medium
Citrus Natural canopy, Central leader Medium (Thinning)
Fig Open center, Modified central leader
Various
Guava Central leader, Multiple leader Light
Macadamia Central leader Light
Mango Open center, Multiple leader Medium
Morello Open center Light
Nectarine Open center Heavy
Peach Open center Heavy
Pear Open center, Modified central leader, Multiple leader
Medium
Persimmon Modified central leader Light (Thinning)
Plum Open center Medium
Pomegranate Central leader, Multiple leader Light
Prune Open center Medium
Quince Central leader, Open center Light (Thinning)
Walnut Modified central leader Light (Thinning)
Source: Ferenc Sandor, ROP, Afghanistan 2008
5.5 Pruning Bearing Tree The pruning of bearing trees is more related to the productivity and care than to the structure building. The main purpose of pruning these trees are: Achieve and maintain high yield Improve the quality of the fruit Balance vegetative and productive growth Facilitate better ventilation inside the canopy Facilitate proper light distribution inside the canopy Control pests and diseases
During the pruning process of fruit bearing trees the producer should avoid strong heading cuts in the previous years, because the previous year’s wood carries flower buds. On the other hand, all dead woods, suckers, water shoots, inward or rubbing or crossing o growing shoots, low hanging, overcrowded or unproductive shoot and pests or diseases infected shoots should be pruned. For better and proper light distribution the upper and outer part of the tree should be pruned. The trees for scion production should be pruned more severely to induce vegetative growth. Here the more frequent use of a head cut is justified.

51
5.5.1 Pruning Spurs and Fruit Bearing Shoots
Figure 54 Spur
Source: Growing Fruit Trees, Forestry Commission, Harare, Zimbabwe (2003)
From the sixth winter onwards, in order to prevent the tree from becoming bare in the centre, cut back two branches each year to wood that is three years old. This will cause new branches to grow on the inside of the tree. The selection of the fruit bearing shoots and the pruning of them is a crucial factor in yield capacity and quality. There are three main types of method. Peach is a good object to learn all tree types.
5.5.2 Alternative Pruning Methods
The main concept is to develop the fruit bearing shoots close to the scaffold branches. During the dormant season pruning, leave two shoots: one bearing shoot and another, called the fallow shoot. Cut back the bearing shoot to 3, 5 or 7 buds (Spur) and the fallow shoot to 2‐3 well‐developed buds. During the next growing season select two shoots (Green selection) from the shoots that grew from the fallow shoot and remove all of the other shoots.
Figure 55 Alternate Pruning Method
These two will be the new fruit bearing shoot (the top one) and the new fallow shoot (Under the new bearing shoot). The pervious fruit bearing shoot will be removed after producing fruits.
Source: Ferenc Sandor, ROP, Afghanistan 2008
5.5.3 Thread Shoot Pruning
It is a method, which is faster and easier to learn, but it requires places with good soil and water conditions and nutrient availability. During the pruning process, cut back all fruit bearing shoots to 10‐12 buds (Thread shoot). The next year remove only the shoots that are not growing under

52
Source: Photo by Ferenc Sandor
the proper conditions, which also can be seen as thinning the tree. The proper fruit bearings shoots should be cut back again.
5.5.4 Pruning to One Shoot
Figure 56 One‐shoot pruning method
Source: L. Cselotei (1985)
Using this method, leave only one shoot and cut it back to 3‐5 buds. In this way not only the fruiting buds will produce fruit, but the bottom part of the shoot is stimulated to produce new shoots. During the next year, cut back the fruit bearing shoot. This method can only be applied for cultivars that have flower buds on the bottom part of the shoot.
Table 7 Location of Fruiting Buds
Location of fruiting buds
Fruit type Long shoot Short shoot (spur) Spur life
Laterally Terminally Laterally Terminally (Years)
Almond Minor ‐‐‐‐‐‐‐ Major ‐‐‐‐‐‐‐ 5
Apple Minor Minor ‐‐‐‐‐‐‐ Major 8‐10
Apricot Minor ‐‐‐‐‐‐‐ Major ‐‐‐‐‐‐‐ 3
Cherry Minor ‐‐‐‐‐‐‐ Major ‐‐‐‐‐‐‐ 10‐12
Fig Major ‐‐‐‐‐‐‐ ‐‐‐‐‐‐‐ ‐‐‐‐‐‐‐ ‐‐‐‐‐‐‐
Nectarine Major ‐‐‐‐‐‐‐ Minor ‐‐‐‐‐‐‐ 1‐2
Peach Major ‐‐‐‐‐‐‐ Minor ‐‐‐‐‐‐‐ 1‐2
Pear Minor Minor ‐‐‐‐‐‐‐ Major 6‐8
Persimmon Major Minor ‐‐‐‐‐‐‐ ‐‐‐‐‐‐‐ ‐‐‐‐‐‐‐
Plum Minor ‐‐‐‐‐‐‐ ‐‐‐‐‐‐‐ ‐‐‐‐‐‐‐ 6‐8
Quince Major Minor Major ‐‐‐‐‐‐‐ ‐‐‐‐‐‐‐
Walnut (young)
Minor Major ‐‐‐‐‐‐‐ ‐‐‐‐‐‐‐ 8‐10
Walnut (matured)
Minor Major 8‐10
Source: C. Ingels‐P. M. Geisel‐ C. L. Unruh, University of California, USA (2002)
5.5.5 Thinning Fruit
Thinning fruits is an important activity in order to have good quality of fruit. Sometimes the tree is overcrowded with fruits; a situation that is not in balance with the nutrient availability and with the capacity of the tree to mature them. Different types of trees vary in this aspect. Peach, plum and apple trees need more fruit thinning while citrus and pear trees need less. Thinning fruits should follow the following procedure:

53
Fruit thinning should take place during the first 6 weeks of fruit set Shaking the tree before thinning helps to dislodge unfertilized fruits During the initial thinning, malformed, overcrowded and paired fruits should be pruned Short stems in apple trees should be pruned drastically A maximum of 2‐3 fruits are allowed to be kept per cluster
Table
8 Recommendation for Fruit Thinning
Fruit tree type Fruit thinning
Apple Leave 2‐3 evenly spaced fruits per spur. Thin when fruits begin to turn downwards
Peach Thin fruits after they have stoned. Leave one fruit in every 20‐25cm.
Plum Thin fruit after they have stoned. Leave one fruit every 5‐8cm
Pear Thin when fruit lets begin to turn downwards. Leave 1 or 2 fruits.
Source: Ferenc Sandor, ROP, Afghanistan 2008
5.6 Tree Nutrition Fertilizing fruit trees is a delicate issue. Too much fertilizer application can be more damaging than not fertilizing at all. There are many factors influencing the nutritional needs of the tree: Age of the tree: Young trees need more Nitrogen than mature trees to stimulate plant
growth Soil type: Different soil nutrient status differs Nutrient reserve of the tree: Flower buds mainly receive Nitrogen from the tree reserve
and not from applied fertilizer Size of the tree Fruit type, cultivar and rootstock Growth vigor of the tree Yield of the tree: With a greater yield, more nutrients are removed from the soil, which
often represents significant amounts
Table 9 Amount of Nutrient Removed From the Soil
Amount of nutrient removed from the soil by 10MT of fruit
Type N (Kg) P2O5 (Kg) K2O (Kg) CaO (Kg) MgO (Kg)
Apple 6.0 2.0 15.0 3.4 2.5
Pear 5.5 1.5 16.0 3.4 2.0
Peach 13.0 6.0 28.0 4.0 2.0
Source: Gautier (1979)

54
Source: Photo by Ferenc Sandor
5.6.1 Role of the Main Nutrients
Nitrogen Nitrogen influences tree growth. Nitrogen is especially important during the stage of young tree development. It also contributes to keep the balance of the tree physiology. However, too much nitrogen causes nutrient imbalance, weakened cell structures and low levels of sugar. It causes vegetative growth to increase excessively during bloom and fruit sets to decrease. Excessive Nitrogen facilitates infection of fire blight, brown rot and powdery mildew. Nitrogen deficiency causes the reduction of top growth, with short spindly shoots of pale green to yellow color. The fruit tends to be smaller and mature at an earlier stage. Phosphorus Phosphorus influences tree energy status and root system development. It helps in the generative growth of the tree. Deficient Phosphorus content in the soil causes the tree to take in more water and it increases the intensity of transpiration. When there is a deficiency, the terminal growth becomes limited and slender with abnormally dark green young leaves. The leaves form acute angles with the stem. Potassium Potassium influences the carbohydrate production and transport. It is important for maintaining water turgor (pressure for osmosis) in the leaves and for functions as the opener and closer of the stomata. Excessive levels of Potassium compete with calcium and magnesium for uptake in the plant. Deficiency symptoms generally develop first on older leaves at the base of the current season’s shoot growth. They are characterized by a marginal scorching of the leaves. In stone fruits, an upward lateral curling and chlorosis also may become evident with the development of scorching. Calcium The Calcium is a vital nutrient in the reduction of corking and bitter pit. If deficiencies occur, they are first noticed in younger leaves as an upward cupping of leaf margins and a uniform vein and inter‐vein chlorosis of the expanding leaves. Magnesium Magnesium occurs in the soil solution as a divalent cation (Mg++). Magnesium is involved in photosynthesis as a part of chlorophyll. It is involved in the enzyme activation that is necessary for plant growth. When deficiency occurs, the typical characteristic is a fading of the green color at the terminals of the older leaves, progressing inter‐veinal (between veins) towards the base and midrib of the leaf and giving the typical “herringbone” appearance.

55
Micronutrients Iron is available as Fe+++ It is a constituent of organic compounds in the plant. Its involvement in chlorophyll synthesis is crucial. Iron and manganese are in delicate balance within the plant, and this balance follows Liebig’s Law of Minimum. Iron deficiencies are very common in plants. Initial symptoms are a loss of green color in the very young leaves. While the inter‐vein tissue becomes pale green, yellow, or even white, the veins remain dark green. New leaves may unfold completely devoid of color, but the veins usually turn green later. Manganese is available as Mn++ It is involved in metabolic processes through activating phosphate‐transferring enzymes. It is also involved in the enzyme activities for photosynthesis, respiration and nitrogen metabolism. Manganese deficiency symptoms begin as chlorosis between the main veins starting near the margin of the leaf and extending toward the midrib. Zinc is available as Zn++ It activates enzyme functions and controls the synthesis of indoleacetic acid, which regulates plant growth. It is a functional co‐factor of many enzymes and hormones, such as auxin. Zinc is needed for carbohydrate metabolism, protein synthesis and inter‐nodal elongation (stem growth). When deficiency occurs newly developing leaves are smaller than normal. Reduced shoot elongation keeps them close together, resulting in the rosette appearance. Copper is available as: Cu++ It balances with iron in the plant, activates enzymes and is involved in plant growth. Copper deficiency interferes with protein synthesis. It is mainly accumulated in the root system and is part of nitrogen metabolism. In case of deficiency the younger leaves appear stunted or misshapen, narrow, and slightly elongated with wavy margins. There may be some terminal dieback. Boron is available as: H3BO3 It regulates carbohydrates metabolism in the plant. It is needed for cell wall formation, membrane integrity, calcium uptake and for the translocation of sugar. It affects flowering, pollen germination, fruiting, cell division, hormone movement, water relationship and many other plant functions. Younger leaves appear stunted or misshapen, narrow, and slightly elongated with wavy margins. There may be some terminal dieback.
5.6.2 Fertilizing Fruit Trees
The soil nutrient requirement is determined through foliar analysis and soil test.
Table 10 Nutritional ranges to interpret apple leaf analysis
Source: Pennsylvania Tree Fruit Production Guide (2008‐2009)

56
Table 11 Nutritional ranges to interpret peach and nectarine leaf analysis
Source: Pennsylvania Tree Fruit Production Guide (2008‐2009)
Table 12 Nutritional Ranges to Interpret Pear Leaf Analysis
Source: Pennsylvania Tree Fruit Production Guide (2008‐2009)
Table 13 Nutritional Ranges to Interpret Cherry Leaf Analysis
Source: Pennsylvania Tree Fruit Production Guide (2008‐2009)

57
The type of test that must be followed during nutrient estimates is dependent upon the type of the nutrients:
Table 14 Analysis for Nutrient Content
Type of nutrient Recommended analysis
Nitrogen Foliar analysis
Phosphorus Either soil analysis or foliar analysis
Potassium Either soil analysis or foliar analysis
Calcium Soil analysis
Magnesium Either soil analysis or foliar analysis
Boron Either soil analysis or foliar analysis
Copper Foliar analysis
Zinc Foliar analysis
Source: Ferenc Sandor, ROP, Afghanistan 2008
Manure or compost application is always recommended in fruit tree fertilization. If the application takes place annually, 10‐15 Mt of manure can be applied per hectare. If the application takes place every second year the required quantity is between 20‐45 Mt of manure per hectare according to the soil conditions.
Table 15 Recommended Amount of Manure per Fruit Tree
Recommended amount of manure per fruit tree
Year Qty. in Kg/tree Time
1st 2.0‐2.5 Monthly until leaves drop
2nd 2.5‐3.0 Monthly from bud break to leaves drop
3rd 3.0‐4.0 Monthly from bud break to leaves drop
4th – 5th 35.0‐40.0 Bud break‐After 6 weeks‐After harvest
6th – 7th 40.0‐50.0 Bud break‐After 6 weeks‐After harvest
8th – 9th 50.0‐60.0 Bud break‐After 6 weeks‐After harvest
10th onward 55.0‐65.0 Bud break‐After 6 weeks‐After harvest
Source: Ferenc Sandor, ROP, Afghanistan 2008
Nitrogen, Phosphorus, Potassium and Magnesium may be added by ground application, which is the most efficient way to apply these nutrients. Foliar application is recommended for Boron, Zinc, Copper and manganese. They can be applied by ground application too but the required amount is considerably higher. The Nitrogen application rate for young trees is around 130‐140gr per tree. Any type of Nitrogen fertilizer can be applied but the use of Urea, Ammonium sulfate and Ammonium nitrate should be avoided if the soil pH is under 6.0. The fertilizer should be applied 4‐6 weeks before bloom. Always be aware of the fact that most of this Nitrogen will accumulate actually in the foliage, thus, increasing the reserve in the tree. This reserve will provide the necessary Nitrogen for the fruit set. The application of Phosphorus is required if the soil Phosphorus content is less than 112Kg per hectare. Leaf analysis levels of less than 0.18 percent in apples and pears; 0.15 percent in peaches and nectarines; 0.23 percent in cherries; and 0.09 percent in plums indicate a need for phosphorus. Phosphorus can be applied anytime during the year.

58
Source: Photo by Ferenc Sandor
Potassium also can be applied anytime during the year if the leaf analysis shows low level of this nutrient. Any type of Potassium fertilizer can be used. Calcium need is determined by soil sample tests. If necessary, lime can be added to the soil. The lime application should take place 6 to 12 months prior to planting. Magnesium application is necessary when the soil Magnesium ratio is less than 2.0 of the percentage base saturation to Potassium (For leaf analysis see the table above). For the fertilizer type, Magnesium sulfate is recommended with application doses of 11.0‐11.5 Kg per Hectare. Boron, Zinc and Copper applied through foliar application. The time for Copper and Zinc application is during the dormant season or after harvest. Boron can be applied anytime during the year.
5.7 Irrigation of Fruit Trees There are three critical periods for fruit tree irrigation. The first period is during the first two years of the orchard establishment. The young tree is not rooted deeply and it is sensitive in regards to attaining water. Growers say if the tree survives the year and a half, it will survive indefinitely. The second period is the flowering stage and the third is the fruit set and development period. The need of water for the tree is calculated by the orchard evapo‐transpiration rate, which indicates the volume of water lost by evaporation and transpiration. To calculate the evaporation, the measured evaporation rate of the standard grass is used and multiply by the specific fruit crop factor of the fruit tree type. ETcrop = Kc x ETo Where, ETcrop = Crop water need Kc = Crop factor ETo = Reference crop evapo‐transpiration To measure the standard grass evaporation rate, evaporation pan can be used on the installed grass field. Evaporation pans provide accurate information about the reference crop evapo‐transpiration.

59
Table 16 Crop Coefficients and Maximum Heights of Crops
Single (Time‐averaged) crop coefficients and maximum height of crops
Tree type Kinitial Kmid Klate Height (m)
Tropical fruits and trees
Banana 1st year 0.50 1.10 1.00 3.0
Banana 2nd year 1.00 1.20 1.10 4.0
Cacao 1.00 1.05 1.05 3.0
Coffee bare ground 0.90 0.95 0.95 2.0‐3.0
Coffee weed ground cover 1.05 1.10 1.10 2.0‐3.0
Date palm 0.90 0.95 0.95 8.0
Palm trees 0.95 1.00 1.00 8.0
Pineapple bare soil 0.50 0.30 0.30 0.6‐1.2
Pineapple grass cover 0.50 0.50 0.50 0.6‐1.2
Rubber tree 0.95 1.00 1.00 10.0
Tea non‐shaded 0.95 1.00 1.00 1.5
Tea shaded 1.10 1.15 1.15 2.0
Grapes and Berries
Berries 0.30 1.05 0.50 1.5
Grape table 0.30 0.85 0.45 2.0
Grape wine 0.30 0.70 0.45 1.5‐2.0
Hops 0.30 1.05 0.85 5.0
Fruit trees
Almond, no ground cover 0.40 0.90 0.65 5.0
Apple no cover, frost 0.45 0.95 0.70 4.0
Apple no cover, no frost 0.60 0.95 0.75 4.0
Apple active cover, frost 0.50 1.20 0.95 4.0
Apple active cover, no frost 0.80 1.20 0.85 4.0
Apple no cover, frost 0.45 0.95 0.70 4.0
Apple no cover, no frost 0.60 0.95 0.75 4.0
Apple active cover, frost 0.50 1.20 0.95 4.0
Apple active cover, no frost 0.80 1.20 0.85 4.0
Cherry no cover, frost 0.45 0.95 0.70 4.0
Cherry no cover, no frost 0.60 0.95 0.75 4.0
Cherry active cover, frost 0.50 1.20 0.95 4.0
Cherry active cover, no frost 0.80 1.20 0.85 4.0
Pear no cover, frost 0.45 0.95 0.70 4.0
Pear no cover, no frost 0.60 0.95 0.75 4.0
Pear active cover, frost 0.50 1.20 0.95 4.0
Pear active cover, no frost 0.80 1.20 0.85 4.0
Apricot no cover, frost 0.45 0.90 0.65 3.0
Apricot no cover, no frost 0.55 0.90 0.65 3.0
Apricot active cover, frost 0.50 1.15 0.90 3.0
Apricot active cover, no frost 0.80 1.15 0.85 3.0
Peach no cover, frost 0.45 0.90 0.65 3.0
Peach no cover, no frost 0.55 0.90 0.65 3.0
Peach active cover, frost 0.50 1.15 0.90 3.0

60
Source: F. Sandor, RoP – Jalalabad, Afghanistan (2008)
Single (Time‐averaged) crop coefficients and maximum height of crops
Tree type Kinitial Kmid Klate Height (m)
Peach active cover, no frost 0.80 1.15 0.85 3.0
Stone fruit no cover, frost 0.45 0.90 0.65 3.0
Stone fruit no cover, no frost 0.55 0.90 0.65 3.0
Stone fruit active cover, frost 0.50 1.15 0.90 3.0
Stone fr. active cover, no frost 0.80 1.15 0.85 3.0
Avocado. No ground cover 0.60 0.85 0.75 3.0
Citrus, no cover, 70% canopy 0.70 0.65 0.70 4.0
Citrus, no cover, 50% canopy 0.65 0.60 0.65 3.0
Citrus, no cover, 20% canopy 0.50 0.45 0.55 2.0
Citrus, cover, 70% canopy 0.75 0.70 0.75 4.0
Citrus, cover, 50% canopy 0.80 0.80 0.80 3.0
Citrus, cover, 20% canopy 0.85 0.85 0.85 2.0
Conifer trees 1.00 1.00 1.00 10.0
Kiwi 0.40 1.05 1.05 3.0
Olive 0.65 0.70 0.70 3.0‐5.0
Pistachios 0.40 1.10 0.45 3.0‐5.0
Walnut 0.50 1.10 0.65 4.0‐5.0
Source: B.C. Allen‐L.S. Pereira‐D. Raes‐M. Smith (1988), Crop evapo‐transpiration‐Guidelines for computing crop water requirement, FAO, Rome
The irrigation water need will be equal to the crop water need minus effective rainfall (effective precipitation). Note: For more information about fruit tree irrigation see the manual of Irrigation, Perennial crop support series, Publication No. 2008‐002‐AFG.
Figure 57 Percentage of the Matured Tree Evaporation vs. Ground Shading
The smaller canopy of young trees results in less evapo‐transpiration than in mature trees. Estimates can be made from ground shading of the canopy. The young tree evapo‐transpiration is expressed as the percentage of the evapo‐transpiration of a mature tree versus the percent ground shading by a young tree. For this estimation, the relationship is shown in the above diagram. All newly planted trees should be watered thoroughly to settle the soil around the root ball. The soil must not be kept overly wet so it avoids anaerobe conditions. The recommended irrigation method for young trees is the basin irrigated
method. The basin should be built like a doughnut shape, so the water drains away from the trunk. The size of the basin should be slightly wider than the planting hole. In this way the water can be applied to the entire root area and just beyond. Until the establishment of the roots, the basin should be filled once or twice per week.

61
The most common irrigation systems applied for fruit tree irrigation are the border, basin, furrow, sprinkler and micro irrigation systems. All these systems are described and explained in the manual of Irrigation, Perennial crop support series, Publication No. 2008‐002‐AFG. During the growing season, trees go through three water using periods: Period of increasing water use: This stage starts from the bud break and finishes when
the tree fully develops the first groups of shoots. This definition cannot be applied for peach and apricot trees because these types of trees develop shoots throughout the whole vegetative period. During this stage, the water use increases gradually according to the growing tendency of evapo‐transpiration and canopy volume. Two important pheno‐phases are present in this stage: flowering‐fruit set phase and branch development phase. If the water availability is not adequate, the fruit set not will happen.
Period of main water use: This is the stage of foliar development. The water use is at its
maximum due to the foliar volume being so large huge as well as the heat causing the highest evapo‐transpiration of the whole growing season. Lack of water in this stage severely affects fruit development and causes the falling of fruits in plum, apricot and peach trees.
Period of decreasing water use: In this stage the temperature decreases, days are
shorter and the leaves dry up and fall. Therefore the volume of needed water decreases.

62
Figure 58 Surface Irrigation Methods
Source: Ferenc Sandor, ROP, Afghanistan 2008
5.8 Pest and Disease Management Fruit orchards, like any other crop, can be seriously affected by pests and diseases. Proper control is an important part of the production technology. The control measures include five categories: The cultural control is related to the grower’s behavior and management practices. These measures contain the use of resistant and healthy planting materials, the adequate plant density per unit area, effective weed control, sanitation, etc. Biological control utilizes the natural enemies of pests and diseases. These are parasites and predators. Mechanical controls are simple measures like picking up and destroying big bugs or removing and burning diseased branches from the tree.

63
Chemical control uses insecticides, fungicides, herbicides, nematicides, etc. Chemical use can be dangerous, therefore, their use requires care and attention. Legislative controls are attributed to the quarantine laws and standards preventing the introduction of pests and diseases.
5.8.1 Diseases
Diseases include four main groups: Fungal, Bacterial, Viral diseases and biological disorders. The diseases receive their name from the symptoms rather than from the agents which cause them. The most common symptoms of fungal diseases are: Rot: Different parts of the tree decay and rot. Soft plant tissue and bad smell
characterize the process. Leaf spot: Spots of different colors and increasing size appear on the leaf surrounded by
a yellow border. Rust: Rust or metal like spots on the underside of the leaves Scab: From yellow to black colored spots on the underside of the leaves. They can also
appear on the fruit, causing hardness and cracks. Powdery mildew: Light colored powder on the upper surface of the leaves. Downy mildew: Soft, grey growth on the lower surface of the leaves cause dead spots on
the upper surface. Damping‐off: Seedling’s disease. The bottom of the stem dries out and the seedlings fall
over. The most common symptoms of bacterial diseases are: Canker: Bumps and cankers appear on the branches, releasing gum onto the bark. It is
usually accompanied with small brown spots on the leaves. Blight: Brown areas and spots on the leaves grow from the edge of the leaf inwards. Spot: Light colored areas on the leaves that turn to black. The spots on the fruit dry and
crack. The most common symptoms of viral diseases are: Mosaic: Leaves are covered in small, yellow and green patches. Accompanied by dwarf
syndrome. Woodiness: Small and curly leaves with light colored patches on it. The woody patches
on the fruit skin crack open. The fruit is small and deformed. Greening: Small and yellow leaves with green veins. Accompanied by dwarf syndrome.
Leaves, fruits drop. The young shoots die back. The fruit will not rip and remain green and deformed.
Ring spot: Green and brown rings on the fruit. The tree stops growing.
5.8.2 Pests
Pests are animals who feed on the plants. They can be birds, mammals, insects, nematodes, etc. Nematodes attack the root system of the tree. Insects attack all parts of the tree. Usually the larvae or the nymph cause the damage. The insects can cause damage in two ways: Chewing and sucking.

64
The most common chewing insects are: Beetles, Grasshoppers and Caterpillars on leaves; Bollworms, Fruit fly larvae and Codling moths on fruits; Termites, Wood borers on wood and roots; Cutworms on seedling stem; Weevils on seeds; and CMR beetles on flowers. The most common sucking insects are: Aphids on leaves; Mites and Stinkbugs on leaves and fruits; Thrips and Red spider mites on leaves and fruits; Scale insects on fruits, shoots and branches; and Fruit‐piercing moths on fruits.
5.8.3 Pest and Disease Control
The best way for pest and disease control is using preventive measurements before irreparable damages appear. These methods do not necessarily use chemicals. There are many other ways to prevent possible damages. Pest and disease control begins with the use of pest/disease free planting material. The saplings should be healthy and possess good vigor. Do not buy saplings with unknown origin and without certificate. The grower should keep the trees on a good course of development through applying organic matter and mulch on a regular basis. Proper water management is also part of the process. Replace chemical control with other methods where possible. This allows the natural enemies of pests to effectively intervene with plant eating insects. Chemical use also kills the benevolent insects too. Tools such as pruning tools should be clean and disinfected frequently. These tools can transfer diseases from one tree to another. It is extremely important to check on a daily basis for the presence of pests and diseases. If necessary, chemicals should be applied in two or three repetitions. Water stress and increased heat are interrelated with shot hole and leaf drop in the orchard. Proper water management is necessary to avoid over watering the tree. Weeds reduce the vigor of the tree because they compete with the tree for water and nutrients. They also harbor pests and diseases. The entire orchard, especially the area around the trunk should be clean and weed free. Any weeds should be controlled before they mature to produce seed. The use of feeder geese or duck is a good option for weed removal. Mechanical control can also help keep the orchard free from pests and diseases. Aphids and mealy bugs can be washed off the leaves with a strong water spray or washing with soap. Larger insects can be picked up and destroyed. A paraffin lamp in a bowl of water is an effective insect trap. Fallen fruits often contain insect’s eggs. Burying these fruit under the fruit tree destroys the eggs. There are some agro‐technical measurements used to control pests and diseases. Overcrowded orchards cause lack of ventilation and rises of humidity, which are favorable conditions for fungal diseases. This problem can be avoided with adequate spacing between the trees and proper pruning practices which open the canopy to air ventilation and light distribution. Intercropping means the increase of plant diversification. Having large populations of the same species increases the population of pests which is a conducive environment for epidemic.

65
Through intercropping the pest population is controlled and obligates the pest to look for other feeding sources. The most difficult task is to control viral diseases. A tree that is already affected by a virus has no remedy. The tree should be removed and destroyed. It is important for the planting material to be virus free. Where possible, the grower should plant saplings with scions grafted into virus resistant rootstock. Virus vectors such as aphids and white flies should be controlled either with or without chemical use. However, the control of the white fly is extremely difficult since this insect has developed resistance to most of the known and authorized pesticides. There is a lot of controversy surrounding chemical control. Intensive use of chemicals produces a high risk for the environment (pollution of water, etc.) as well as for the fruit consumers themselves, whether they are human beings, birds, or any other animals. With the frequent use of chemicals, the pests also develop pesticide resistance. However, like medicine, chemical use is an effective way to kill pests and diseases. There are some concepts that should be followed for chemical use: Chemical use should be the last and an infrequent use for pest and disease control Some preventive pesticide use with proper protection measurements are well justified.
For example, spraying dormant trees with chemicals and oil reduces the pest’s population before the growing season starts. When fungicide is added to the pesticide and oil it will destroy over‐wintering fungus and bacterial spores.
Common practice that growers use is preventive spraying during a particular
development stage of the tree. They always apply one spray at petal fall and one more spray two weeks later.
Choose the proper way for chemical use. There are three ways. Spraying the chemical by
covering all sides of the leaves or fruits. Mixing the pesticide with food is a method called pesticide bait. Fumigants are used to kill pests and disease in the soil.
5.9 Harvesting Fruit Harvest is the most labor demanding activity in fruit production if it is implemented manually. Using machinery for harvest is only suitable for a few fruit types. The time for harvest very much depends on what purpose the fruit will be used for. The main concept for the establishment of a harvesting time is to measure the maturity stage of the fruit and according to that, establish the proper time. There are a couple of methods for establishing a time estimate. The day counting method is counting the number of days between flowering and maturity stages. For example, in the case of the Jonathan apple, the number of days is 130‐150. Another, more accurate method is the T‐stage method. The T‐stage is the development stage of the fruit when the stem and the shoulder of the fruit pedicle are still at a right angle to each other. When the pedicle sinks below this level, the fruit is considered to be ready for harvest. In some cases the guide for maturity is the color and/or hardness of the fruit.

66
The iodine test is also frequently used for harvest time establishment. When a Potassium‐iodine drop falls on the flesh of a fruit, it will change color. The bluer the color, the more mature the fruit. This is color transformation is directly related to the transformation of starch to sugar within the fruit. Not only does the harvesting time vary between different types of fruits but also the number of occasions when the grower can collect the fruits during same harvest season also varies:
Table 17 Number of Harvests During the Same Year
Fruit type No. of time to collect fruit in the same harvest period
At once 2‐3 times More than 3
Apple Some types Some types
Pear Some types Some types
Quince All types
Cherry Early maturing Late maturing
Morello Late maturing
Plum All types
Almond All types
Peach Late maturing Early maturing Early maturing
Apricot Late maturing Early maturing
Walnut All types
Hazel nut All types
Chest nut All types
Source: Gyuro (1978)
After harvest the fruits are selected first by quality then by size. Finally the selected fruits are packed properly and stored. There are two main types of storage systems: the unchanged airspace and the regulated environment system.
Table 18 Parameters for Fruit Storage
Fruit type
Unchanged RegulatedO2 CO2 Temp. Humid. Temp. Humid.
C° % C° % % %
Apple 2.0
1.0
1.0
0.5‐0.0
90
92
90
90‐91
2.0‐2.5
1.0‐1.5
1.0‐1.5
0.0
92
95‐96
92
02
4‐5
3‐4
3‐4
5‐6
1.0‐1.5
2.0‐2.4
2.0‐3.0
2.0‐3.0
Quince
Pear
Medlar
Cherry
0.0‐1.0 85‐90 0.5‐1.0 90 6‐8 1.0‐3.0
Morello
Peach
Apricot
Plum
Prune
Strawberry
0.0‐2.0 85‐90 1.0 90 8‐10 1.0‐3.0
Raspberry
Red currant
Black currant
Mulberry
Blackberry
Source: Sass‐Gyuro (1980)

67
6 Summary Table for Orchard Establishment
Table 19 Planting Distances
Species Row and plant distance (m)
Unit/Ha
Apple
5 X 5 400
7 X 4 358
6 X 4 417
5 X 3 667
Pear
5 X 3 667
5 X 4 500
5 X 5 400
Cherry 8 X 6 209
Morello
7 X 5 286
8 X 5 250
5 X 5 400
5 X 4 500
Plum 8 X 5 250
Apricot
6 X 6 277
8 X 5 250
7 X 5 286
Peach 5 X 5 400
6 X 4 417
Almond 5 X 5 400
6 X 4 417
Citrus 6 X 5 334
6 X 6 277
Avocado 10 X 10 100
Guava
6 X 6 277
6 X 5 334
6 X 4 417
Mango 10 X 10 100
8 X 8 156
Source: Ferenc Sandor, ROP, Afghanistan 2008
Source: Photo by Ferenc Sandor

68
Appendices

69
Appendix 1: Glossary of Terms
Bare root Nursery stock in which the plant is sold without soil around the roots.
Budding It consists of inserting a single leaf bud (scion), with or without attached bark and wood piece, into the stock by specific techniques.
Bud stick It is the current season’s shoot growth, which contains the buds for budding purposes.
Callus A mass of parenchyma cells, which are able to regenerate tissue. It grows from and around the wounded tissue.
Cambium A single layer of cells between bark and wood tissues. It produce the cells of phloem on the outside part and on the inner side develops the xylem (wood tissue).
Canopy The part of the tree composed of leaves and small twigs.
Clone A specific cultivar propagated asexually (vegetative propagation).
Crown The aboveground parts of the tree, including the trunk. The root crown is the trunk below ground and the large roots coming from the trunk.
Cultivar It is the variety, which was originated from a controlled cross under cultivated conditions.
Dormant stage When the tree is not actively growing.
Foliar analysis Foliar analysis is the process whereby leaves from fruit trees are dried, ground, and chemically analyzed for their nutrient content
Graftage Vegetative propagation, which uses budding and grafting techniques.
Grafting They are various techniques to insert a piece of stem with buds (scion) into the stock.
Heading Removing a portion of a shoot or branch, leaving only buds or a tiny twig on the remaining portion; results in an increased number of branches.
Inter‐node The part of a stem between two nodes.
Inter‐stem or Inter‐stock
It is a section of trunk, which is introduced between the rootstock and the scion cultivar.
Latent bud A dormant bud that is more than 2 years old but has grown enough each year so that its growing point remains at or near the surface of the bark.
Lateral A secondary branch arising from scaffold limbs.
Leader A dominant upright branch. The central leader is the trunk that extends from the root to the top of a tree.

70
Primary scaffold limb One of the major limbs arising from a tree trunk.
Rootstock It is the part of the grafted or budded tree, which will be the root system of the plant.
Sapling Refers to a plant grown from a vegetative part of the original plant asexually.
Scaffold Main branch that forms the structure of an open center tree.
Scion A short piece of twig or bud with attached section bark inserted into the stock.
Seedling It is a plant grown from seed.
Shoot The growth that emerged from a bud in the current growing season.
Spur Short twig that is specialized for bearing flower buds and fruit on many fruit species.
Stock It is a plant or root system to which a scion is grafted or budded.
Sucker A shoot grown from the crown or roots of the tree below the graft union or surface.
Waterspout It is a vigorous, current season shoot, which is growing un‐branched from a primary scaffold or smaller branch.

71
Appendix 2: Tables Table 1 The main stages of fruit orchard development and life cycle ............................. 11
Table 2 Recommendation for honey bee pollination practice ......................................... 17
Table 3 Allowed maximum distance between fruit tree and pollinizer ........................ 36
Table 4 Pollination characteristics of some fruit species ................................................. 36
Table 5 Pruning cut‐back effect on apple ........................................................................ 42
Table 6 Recommended pruning and training methods for different fruit species .......... 50
Table 7 Location of fruiting buds on different fruit species ............................................. 52
Table 8 Recommendation for fruit thinning of apple, peach, plum and pear.................. 53
Table 9 The amount of nutrient removed from the soil with 10 MT of fruit yield .......... 53
Table 10 Nutritional ranges to interpret apple leaf analysis ............................................ 55
Table 11 Nutritional ranges to interpret peach and nectarine leaf analysis .................... 56
Table 12 Nutritional ranges to interpret pear leaf analysis .............................................. 56
Table 13 Nutritional ranges to interpret cherry leaf analysis ........................................... 56
Table 14 Recommended analysis for nutrient content .................................................... 57
Table 15 Recommended amount of manure per fruit tree .............................................. 57
Table 16 Crop coefficients and maximum heights of crops ............................................. 59
Table 17 Number of harvest during the same period ...................................................... 66
Table 18 Parameters for fruit storage .............................................................................. 66
Table 19 Planting distances of different fruit species ...................................................... 67

72
Appendix 3: Figures
Figure 1 Fruit Species Classifications ................................................................................ 14 Figure 2 Annual Cycle of Fruit Trees ................................................................................. 15 Figure 3 Pollenization Methods ........................................................................................ 16 Figure 4 Considerations for Site Selection ........................................................................ 17 Figure 5 Graded bund ....................................................................................................... 20 Figure 6 Drainage Channel ................................................................................................ 21 Figure 7 Natural Shelter Belt ............................................................................................. 22 Figure 10 Single Tree Line Strip ......................................................................................... 22 Figure 11 Wind Break ........................................................................................................ 22 Figure 12 Establishing a Straight Line ............................................................................... 25 Figure 13 3‐4‐5 Method .................................................................................................... 26 Figure 14 Establish Perpendicular to the Base Line .......................................................... 26 Figure 15 Area Division to Plots and Fields ....................................................................... 27 Figure 17 Bonding Rod ...................................................................................................... 27 Figure 18 N‐frame ............................................................................................................. 27 Figure 19 Orchard Layout.................................................................................................. 28 Figure 20 Triangular Pattern ............................................................................................. 29 Figure 21 Square Pattern .................................................................................................. 29 Figure 22 Rectangular Pattern .......................................................................................... 30 Figure 23 Quincunx Pattern .............................................................................................. 30 Figure 24 Hedgerow Pattern ............................................................................................. 31 Figure 25 Equilateral pattern for orchard layout .............................................................. 31 Figure 26 Planting Bare Root Sapling ................................................................................ 32 Figure 27 Basin Around Tree ............................................................................................. 32 Figure 28 Standard for Sapling Quality ............................................................................. 33 Figure 29 Heading Planted Sapling ................................................................................... 35 Figure 31 Pruning Sapling with Side Branches .................................................................. 35 Figure 32 Sun Burn Protection .......................................................................................... 35 Figure 33 Self‐fertile Species Planting ............................................................................... 37 Figure 34 Cherry, Morello, Almond and Black Currant ..................................................... 37 Figure 35 Apple, Pear, Peach, Apricot and Plum .............................................................. 38 Figure 36 Apple and Pear .................................................................................................. 38 Figure 38 Correct and Incorrect Pruning Cuts .................................................................. 39 Figure 39 Correct and Incorrect Branch Removal ............................................................. 40 Figure 41 Lateral shooting in different branch positions ................................................. 40 Figure 40 Fruit settings in different branch positions ...................................................... 40 Figure 42 Effect of Pruning Cut on Fruit Setting ................................................................ 41 Figure 43 Correctly and Incorrectly Trained Branches ..................................................... 43 Figure 44 Pruning for Central Leader (3rd and 4th year) .................................................... 44

73
Figure 45 Correct and Incorrect Heading Method ............................................................ 44 Figure 46 Pruning During the First Year ............................................................................ 45 Figure 47 Pruning for open canopy shape ........................................................................ 46 Figure 48 Slim Arbor Branch System ................................................................................. 47 Figure 49 Pruning for Slim Arbor Branch Shape ............................................................... 47 Figure 50 Parameters of Slim Arbor Branch System ......................................................... 47 Figure 51 Haag hedge shape ............................................................................................. 48 Figure 52 Palmetta Hedge Shape ...................................................................................... 48 Figure 53 Bouche‐Thomas Hedge Shape .......................................................................... 49 Figure 54 Lepage Hedge Shape ......................................................................................... 49 Figure 55 Spur ................................................................................................................... 51 Figure 56 Alternate Pruning Method ................................................................................ 51 Figure 57 One‐shoot pruning method .............................................................................. 52 Figure 58 Percentage of the Matured Tree Evaporation vs. Ground Shading ................. 60 Figure 59 Surface Irrigation Methods ............................................................................... 62

74
Appendix 4 : References F. Gyuro: Fruit production. University of Horticulture, Budapest, Hungary 1980)
Dr. Cselotei‐Dr. Nyujto‐Csaki: Horticulture, Mezogazdasagi Kiado, Budapest, Hungary (1985)
Growing fruit trees. Forestry Commission, Harare, Zimbabwe
MacMillen: Avocado. Technical Centre for Agricultural and Rural Cooperation (1995)
J.N. Moll‐R. Wood: An efficient method for producing rooted avocado. Citrus and Subtropical Research Institute, Bulletin 99, Nelspruit, South Africa (1980)
B.O. Bergh: Avocado breeding in California. South African Avocado Growers Association Yearbook 10
A. Chandra‐A. Chandra‐I.C. Gupta: Arid fruit research. Scientific Publishers, Jodhpur, India (1994)
H. Kamprath: Proposal for a fruit tree orchard. GTZ DED, Blantayre, Malawi (2003)
Sowing of tree seed into pots. Department of Forestry, Lilongwe, Malawi (1999)
Care of young seedlings. Department of Forestry, Lilongwe, Malawi (1999)
Planning a new nursery. Department of Forestry, Lilongwe, Malawi (1999)
Seedling growth in pots. Department of Forestry, Lilongwe, Malawi (1999)
L.P. Stoltz‐J. Strang: Reproducing fruit trees by graftage: Budding and Grafting. University of Kentucky‐College of Agriculture (2004)
C. Ingels‐P. M. Geisel‐C. L. Unruh: Training and pruning fruit trees. University of California, USA (2002)
Brickell, C.‐D. Joyce: Pruning and training, New York, USA (1996)
Harris: Integrated management of landscape trees, shrubs, and vines, New York, USA (1999.)
R. N. Arteca: Plant Growth Substances, Pennsylvania State University, USA (1996)
D. B. Vieira: As Tecnicas de Irrigacao, Sao Paulo, Brasil, (1989)
Source: Photo by Ferenc Sandor, 2008

75

76
Roots of Peace INTERNATIONAL AGRICULTURE PROGRAMS
WWW.ROOTSOFPEACE.ORG