fritz!fon m2 - telecom namibia · fritz!fon m2 is a cordless telephone with which you can make...
TRANSCRIPT
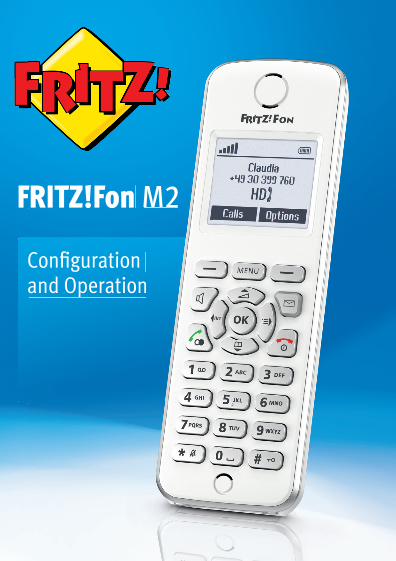
FRITZ!Fon M2
© AVM GmbH · Alt-Moabit 95 · 10559 Berlin · Telefon 030 39976-0 · [email protected]
www.avm.de
Configuration and Operation
8911
8600
1
FRITZ!Fon M2
Configuration and Operation

FRITZ!Fon M2

Handbuch_FRITZ!Fon M2-en.fm Seite 2 Mittwoch, 10. Oktober 2012 1:39 13
Table of Contents
Important Instructions . . . . . . . . . . . . . . . . . . . . . 6
1 FRITZ!Fon M2 at a Glance . . . . . . . . . . . . . . . . . . . 81.1 Package Contents . . . . . . . . . . . . . . . . . . . . . . . . . . . . . . . . . 81.2 Keys and Functions . . . . . . . . . . . . . . . . . . . . . . . . . . . . . . . . 91.3 Icons in the Display . . . . . . . . . . . . . . . . . . . . . . . . . . . . . . . 101.4 Technical Specifications . . . . . . . . . . . . . . . . . . . . . . . . . . . 11
2 Starting Operation of the FRITZ!Fon M2 . . . . . . . 132.1 Inserting the Battery . . . . . . . . . . . . . . . . . . . . . . . . . . . . . . 132.2 Charging the Battery . . . . . . . . . . . . . . . . . . . . . . . . . . . . . . 142.3 Registering FRITZ!Fon M2 with the Base Station . . . . . . . . 152.4 Navigating in the Menus . . . . . . . . . . . . . . . . . . . . . . . . . . . 18
3 Making Telephone Calls . . . . . . . . . . . . . . . . . . . 193.1 Dialing Numbers . . . . . . . . . . . . . . . . . . . . . . . . . . . . . . . . . 203.2 Accepting Calls . . . . . . . . . . . . . . . . . . . . . . . . . . . . . . . . . . 203.3 Adjusting the Volume . . . . . . . . . . . . . . . . . . . . . . . . . . . . . 213.4 Switching Off Ring Tone. . . . . . . . . . . . . . . . . . . . . . . . . . . . 223.5 Hands-Free Calling . . . . . . . . . . . . . . . . . . . . . . . . . . . . . . . 223.6 Muting the Microphone. . . . . . . . . . . . . . . . . . . . . . . . . . . . 233.7 Switching the Keylock On and Off . . . . . . . . . . . . . . . . . . . . 233.8 Finding FRITZ!Fon M2 . . . . . . . . . . . . . . . . . . . . . . . . . . . . . 24
FRITZ!Fon M2 2

Handbuch_FRITZ!Fon M2-en.fm Seite 3 Mittwoch, 10. Oktober 2012 1:39 13
4 Using the Telephone Book and Call Lists . . . . . . 254.1 Prerequisite . . . . . . . . . . . . . . . . . . . . . . . . . . . . . . . . . . . . . 254.2 Setting Up a Telephone Book . . . . . . . . . . . . . . . . . . . . . . . 254.3 Dialing from the Telephone Book . . . . . . . . . . . . . . . . . . . . 264.4 Dialing from Call Lists . . . . . . . . . . . . . . . . . . . . . . . . . . . . . 284.5 Finding a Telephone Book Entry . . . . . . . . . . . . . . . . . . . . . 294.6 Saving a New Telephone Book Entry. . . . . . . . . . . . . . . . . . 314.7 Saving Numbers from the Call List in the Telephone Book . . 31
5 Convenience Functions for Telephone Calls . . . . 335.1 Making Internal Calls. . . . . . . . . . . . . . . . . . . . . . . . . . . . . . 335.2 Answering Machine . . . . . . . . . . . . . . . . . . . . . . . . . . . . . . . 345.3 CLIR for One Call (Case by Case) . . . . . . . . . . . . . . . . . . . . . 395.4 Alternating Between Calls . . . . . . . . . . . . . . . . . . . . . . . . . . 405.5 Three-party Conference Call . . . . . . . . . . . . . . . . . . . . . . . . 415.6 Call Diversion. . . . . . . . . . . . . . . . . . . . . . . . . . . . . . . . . . . . 42
6 Alarm . . . . . . . . . . . . . . . . . . . . . . . . . . . . . . . . . . 446.1 Setting Up the Alarm . . . . . . . . . . . . . . . . . . . . . . . . . . . . . . 446.2 Switching the Alarm On and Off . . . . . . . . . . . . . . . . . . . . . 45
7 Baby Monitor . . . . . . . . . . . . . . . . . . . . . . . . . . . . 46
FRITZ!Fon M2 3

Handbuch_FRITZ!Fon M2-en.fm Seite 4 Mittwoch, 10. Oktober 2012 1:39 13
8 Receiving and Sending E-mail. . . . . . . . . . . . . . . 478.1 Setting Up an E-mail Account . . . . . . . . . . . . . . . . . . . . . . . 478.2 Reading E-mail . . . . . . . . . . . . . . . . . . . . . . . . . . . . . . . . . . . 488.3 Sending E-mail. . . . . . . . . . . . . . . . . . . . . . . . . . . . . . . . . . . 49
9 Receiving RSS Feeds . . . . . . . . . . . . . . . . . . . . . . 509.1 Setting Up RSS Feeds . . . . . . . . . . . . . . . . . . . . . . . . . . . . . 509.2 Reading RSS Feeds . . . . . . . . . . . . . . . . . . . . . . . . . . . . . . . 51
10 Receiving Podcasts . . . . . . . . . . . . . . . . . . . . . . . 5210.1 Setting Up a Podcast . . . . . . . . . . . . . . . . . . . . . . . . . . . . . . 5210.2 Listening to a Podcast . . . . . . . . . . . . . . . . . . . . . . . . . . . . . 53
11 Receiving Web Radio . . . . . . . . . . . . . . . . . . . . . . 5411.1 Setting Up a Web Radio Station . . . . . . . . . . . . . . . . . . . . . 5411.2 Listening to a Web Radio Station . . . . . . . . . . . . . . . . . . . . 55
12 Opening New Messages . . . . . . . . . . . . . . . . . . . 56
13 Setting Up FRITZ!Fon M2 . . . . . . . . . . . . . . . . . . . 5713.1 “Settings” Menu . . . . . . . . . . . . . . . . . . . . . . . . . . . . . . . . . 5713.2 Settings in the FRITZ!Box User Interface. . . . . . . . . . . . . . . 5813.3 DECT Eco: Switch Off Radio When Idle . . . . . . . . . . . . . . . . 60
FRITZ!Fon M2 4
Handbuch_FRITZ!Fon M2-en.fm Seite 5 Mittwoch, 10. Oktober 2012 1:39 13
14 Updating the Firmware . . . . . . . . . . . . . . . . . . . . 6114.1 Preparation: Updating the FRITZ!Box Firmware . . . . . . . . . 6114.2 Updating the FRITZ!Fon Firmware . . . . . . . . . . . . . . . . . . . . 62
15 Switching WLAN of the FRITZ!Box On and Off . . . 63
16 Customer Service. . . . . . . . . . . . . . . . . . . . . . . . . 6416.1 Support from the Support Team . . . . . . . . . . . . . . . . . . . . . 6416.2 Manufacturer’s Warranty . . . . . . . . . . . . . . . . . . . . . . . . . . 65
Legal Notice . . . . . . . . . . . . . . . . . . . . . . . . . . . . . 66
Declaration of CE Conformity . . . . . . . . . . . . . . . 67
Disposal Information. . . . . . . . . . . . . . . . . . . . . . 68
Index . . . . . . . . . . . . . . . . . . . . . . . . . . . . . . . . . . 69
FRITZ!Fon M2 5
Handbuch_FRITZ!Fon M2-en.fm Seite 6 Mittwoch, 10. Oktober 2012 1:39 13
Important Instructions
Symbols in this Manual
Safety InstructionsWhen working with the FRITZ!Fon M2, follow the instructions below to protect yourself and the device from damage.
Note for Hearing Aid UsersIf you wear a hearing aid, FRITZ!Fon can cause unpleasant noises. These are caused by radio signals coupled into the hearing aid.
This symbol indicates important instructions that must be observed to avoid malfunctions.
This symbol marks useful hints and tips.
Never let liquids get inside the FRITZ!Fon M2. Otherwise, electric shocks or short circuits may result.
Do not leave the FRITZ!Fon M2 lying in the sun for longer periods.
FRITZ!Fon M2 6

Handbuch_FRITZ!Fon M2-en.fm Seite 7 Mittwoch, 10. Oktober 2012 1:39 13
Operation RequirementsFor operation of FRITZ!Fon M2 the following requirements must be fulfilled:
• You need a DECT base station that is connected with a tele-phone line or the Internet and supports the DECT standard.
• The complete range of functions of the FRITZ!Fon M2 is avail-able when it is used with a FRITZ!Box model that offers DECT support.
All of the devices involved must have the latest firmware.
FRITZ!Fon M2 7
FRITZ!Fon M2 at a Glance
Handbuch_FRITZ!Fon M2-en.fm Seite 8 Mittwoch, 10. Oktober 2012 1:39 13
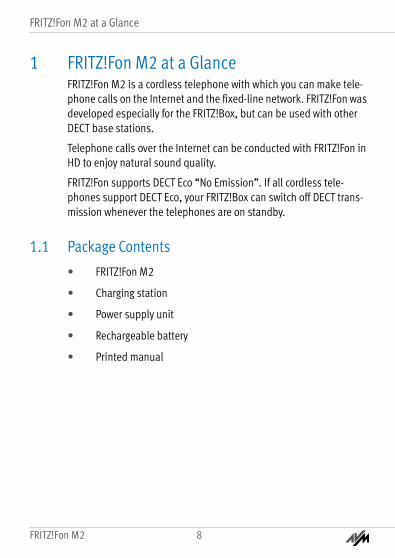
1 FRITZ!Fon M2 at a GlanceFRITZ!Fon M2 is a cordless telephone with which you can make tele-phone calls on the Internet and the fixed-line network. FRITZ!Fon was developed especially for the FRITZ!Box, but can be used with other DECT base stations.
Telephone calls over the Internet can be conducted with FRITZ!Fon in HD to enjoy natural sound quality.
FRITZ!Fon supports DECT Eco “No Emission”. If all cordless tele-phones support DECT Eco, your FRITZ!Box can switch off DECT trans-mission whenever the telephones are on standby.
1.1 Package Contents• FRITZ!Fon M2
• Charging station
• Power supply unit
• Rechargeable battery
• Printed manual
FRITZ!Fon 8
FRITZ!Fon M2 8
Keys and Functions
Handbuch_FRITZ!Fon M2-en.fm Seite 9 Mittwoch, 10. Oktober 2012 1:39 13
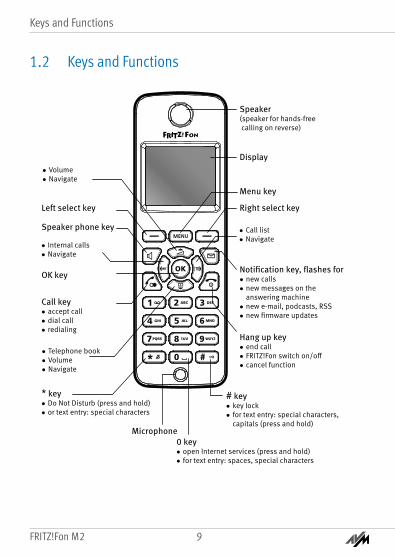
1.2 Keys and Functions
Speaker(speaker for hands-free calling on reverse)
Display
Right select key
Hang up key� end call� FRITZ!Fon switch on/off� cancel function
Microphone
Left select key
� Call list � Navigate
� Internal calls� Navigate
Speaker phone key
Call key� accept call� dial call� redialing
Notification key, flashes for� new calls� new messages on the
answering machine� new e-mail, podcasts, RSS� new firmware updates
Menu key
OK key
0 key� open Internet services (press and hold)� for text entry: spaces, special characters
* key� Do Not Disturb (press and hold)� or text entry: special characters
# key� key lock� for text entry: special characters,
capitals (press and hold)
� Volume � Navigate
� Telephone book� Volume� Navigate
FRITZ!Fon M2 9
FRITZ!Fon 9
Icons in the Display
Handbuch_FRITZ!Fon M2-en.fm Seite 10 Mittwoch, 10. Oktober 2012 1:39 13
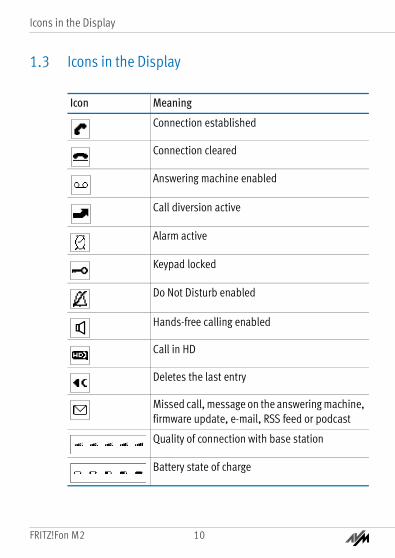
1.3 Icons in the Display
Icon Meaning
Connection established
Connection cleared
Answering machine enabled
Call diversion active
Alarm active
Keypad locked
Do Not Disturb enabled
Hands-free calling enabled
Call in HD
Deletes the last entry
Missed call, message on the answering machine, firmware update, e-mail, RSS feed or podcast
Quality of connection with base station
Battery state of charge
FRITZ!Fon 10
FRITZ!Fon M2 10

Technical Specifications
Handbuch_FRITZ!Fon M2-en.fm Seite 11 Mittwoch, 10. Oktober 2012 1:39 13
1.4 Technical Specifications• DECT wireless standard
• Free-field range of up to 300 m
• Range in buildings of up to 40 m
• Standby time up to up to 240 hours
• Talking time up to up to 15 hours
• Display: 112 x 65 pixels, monochrome
• Keypad with function keys, control keys and number keys
• 2 charging contacts on the bottom
• On/off switch using the hang-up key
• Loudspeaker/microphone
• Dimensions: approx. 145 x 48 x 18 mm
• Weight: 106 g
• Supply voltage of the charging station: 230 V / 50 Hz
• 1 battery pack, 750 mAh, 3.7 V
– charging station: charge time about 6 hours at 10°C to 30°C
– deep discharge protection
FRITZ!Fon M2 11
FRITZ!Fon 11

Technical Specifications
Handbuch_FRITZ!Fon M2-en.fm Seite 12 Mittwoch, 10. Oktober 2012 1:39 13
• Ambient conditions
– operating temperature: 0 °C – 35 °C
– storage temperature: -20 °C – 45 °C
– relative humidity: 5% – 95%, no condensation
• DECT Eco: with suitable DECT base station, DECT transmission can be switched off on standby
• Conforms to CE standards
FRITZ!Fon 12
FRITZ!Fon M2 12
Starting Operation of the FRITZ!Fon M2
Handbuch_FRITZ!Fon M2-en.fm Seite 13 Mittwoch, 10. Oktober 2012 1:39 13
2 Starting Operation of the FRITZ!Fon M2
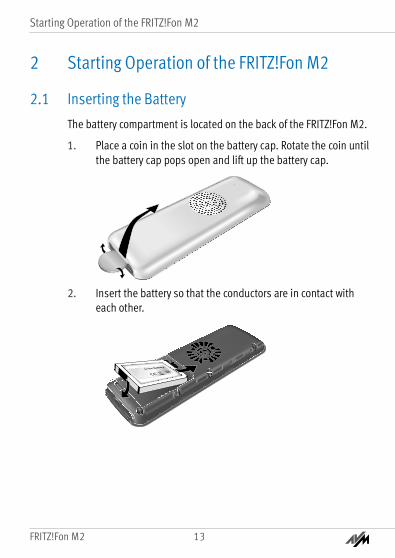
2.1 Inserting the BatteryThe battery compartment is located on the back of the FRITZ!Fon M2.
1. Place a coin in the slot on the battery cap. Rotate the coin untilthe battery cap pops open and lift up the battery cap.
2. Insert the battery so that the conductors are in contact with each other.
FRITZ!Fon M2 13
FRITZ!Fon 13

Charging the Battery
Handbuch_FRITZ!Fon M2-en.fm Seite 14 Mittwoch, 10. Oktober 2012 1:39 13
3. Close the battery compartment
2.2 Charging the BatteryProceed as follows to charge the battery:
1. Connect the power supply unit to the FRITZ!Fon M2 chargingstation.
2. Plug the other end into a power outlet.
3. Place the FRITZ!Fon M2 in the charging station. The battery will be charged.
FRITZ!Fon 14
FRITZ!Fon M2 14
Registering FRITZ!Fon M2 with the Base Station
Handbuch_FRITZ!Fon M2-en.fm Seite 15 Mittwoch, 10. Oktober 2012 1:39 13
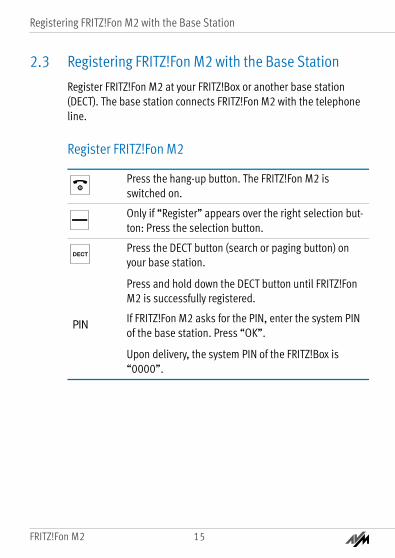
2.3 Registering FRITZ!Fon M2 with the Base StationRegister FRITZ!Fon M2 at your FRITZ!Box or another base station (DECT). The base station connects FRITZ!Fon M2 with the telephone line.
Register FRITZ!Fon M2
Press the hang-up button. The FRITZ!Fon M2 is switched on.
Only if “Register” appears over the right selection but-ton: Press the selection button.
Press the DECT button (search or paging button) on your base station.
Press and hold down the DECT button until FRITZ!Fon M2 is successfully registered.
If FRITZ!Fon M2 asks for the PIN, enter the system PIN of the base station. Press “OK”.
Upon delivery, the system PIN of the FRITZ!Box is “0000”.
PIN
FRITZ!Fon M2 15
FRITZ!Fon 15
Registering FRITZ!Fon M2 with the Base Station
Handbuch_FRITZ!Fon M2-en.fm Seite 16 Mittwoch, 10. Oktober 2012 1:39 13
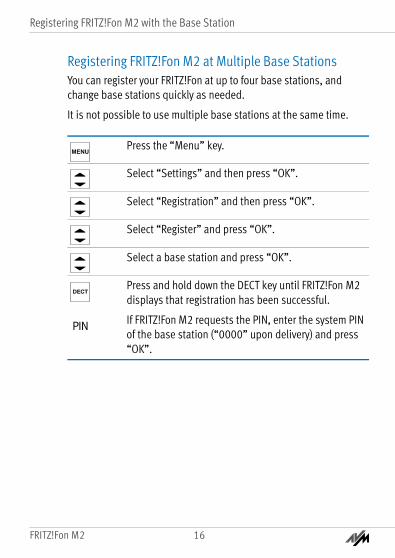
Registering FRITZ!Fon M2 at Multiple Base StationsYou can register your FRITZ!Fon at up to four base stations, and change base stations quickly as needed.
It is not possible to use multiple base stations at the same time.
Press the “Menu” key.
Select “Settings” and then press “OK”.
Select “Registration” and then press “OK”.
Select “Register” and press “OK”.
Select a base station and press “OK”.
Press and hold down the DECT key until FRITZ!Fon M2 displays that registration has been successful.
If FRITZ!Fon M2 requests the PIN, enter the system PIN of the base station (“0000” upon delivery) and press “OK”.
PIN
FRITZ!Fon 16
FRITZ!Fon M2 16

Registering FRITZ!Fon M2 with the Base Station
Handbuch_FRITZ!Fon M2-en.fm Seite 17 Mittwoch, 10. Oktober 2012 1:39 13
Switching Base StationsIf your FRITZ!Fon is registered at multiple base stations, you can switch base stations as follows:
Deregistering from a Base Station
Press the “Menu” key.
Select “Settings” and then press “OK”.
Select “Registration” and then press “OK”.
Select “Select Base” and then press “OK”.
Select the desired base station and click “OK”.
FRITZ!Fon connects with the base station and is ready for operation as soon as the device name appears in the display.
Press the “Menu” key.
Select “Settings” and then press “OK”.
Select “Registration” and then press “OK”.
Select “Deregister” and press “OK”.
Select the base station from which the FRITZ!Fon is to deregister. Confirm with “OK”.
FRITZ!Fon M2 17
FRITZ!Fon 17
Navigating in the Menus
Handbuch_FRITZ!Fon M2-en.fm Seite 18 Mittwoch, 10. Oktober 2012 1:39 13
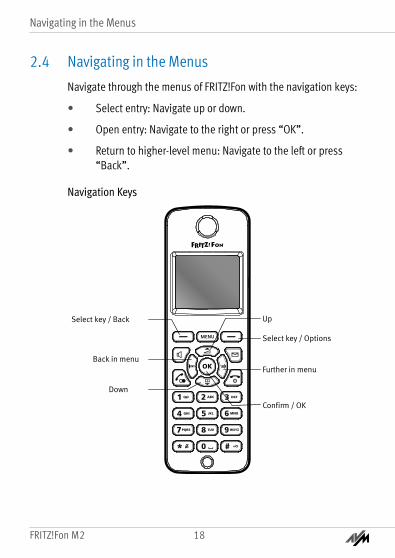
2.4 Navigating in the MenusNavigate through the menus of FRITZ!Fon with the navigation keys:
• Select entry: Navigate up or down.
• Open entry: Navigate to the right or press “OK”.
• Return to higher-level menu: Navigate to the left or press “Back”.
Navigation Keys
Select key / Options
Confirm / OK
Select key / Back
Further in menuBack in menu
Down
Up
FRITZ!Fon 18
FRITZ!Fon M2 18

Making Telephone Calls
Handbuch_FRITZ!Fon M2-en.fm Seite 19 Mittwoch, 10. Oktober 2012 1:39 13
3 Making Telephone CallsFunction Keys for Making Phone Calls
Hang up
Confirm / OK
Telephone book
Call list
Call key
Redial
Select partyUp
Select partyDown
FRITZ!Fon M2 19
FRITZ!Fon 19
Dialing Numbers
Handbuch_FRITZ!Fon M2-en.fm Seite 20 Mittwoch, 10. Oktober 2012 1:39 13
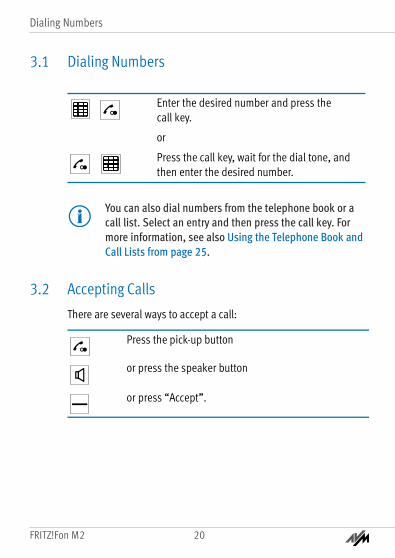
3.1 Dialing Numbers
3.2 Accepting CallsThere are several ways to accept a call:
Enter the desired number and press the call key.
or
Press the call key, wait for the dial tone, and then enter the desired number.
You can also dial numbers from the telephone book or a call list. Select an entry and then press the call key. For more information, see also Using the Telephone Book and Call Lists from page 25.
Press the pick-up button
or press the speaker button
or press “Accept”.
FRITZ!Fon 20
FRITZ!Fon M2 20

Adjusting the Volume
Handbuch_FRITZ!Fon M2-en.fm Seite 21 Mittwoch, 10. Oktober 2012 1:39 13
Enabling Direct PickupWhen you enable the “Direct Pickup” function, FRITZ!Fon accepts a call automatically as soon as you take the handset out of the charg-ing station.
3.3 Adjusting the VolumeThe volume of a call can be adjusted during calls with the handset and hands-free calls.
Press the “Menu” key.
Select “Settings” and then press “OK”.
Select “Telephony” and then press “OK”.
Select “Pick up directly” and then press “On”.
The volume is adjusted using the navigation keys:
Louder: To raise the volume, press the upper naviga-tion key.
Quieter: To reduce the volume, press the lower naviga-tion key.
FRITZ!Fon M2 21
FRITZ!Fon 21

Switching Off Ring Tone
Handbuch_FRITZ!Fon M2-en.fm Seite 22 Mittwoch, 10. Oktober 2012 1:39 13
3.4 Switching Off Ring ToneYou can switch off the ring tone of your FRITZ!Fon M2.
Switching Off the Ring Tone Permanently
Switching the Ring Tone Back On Permanently
Switching Of the Ring Tone for the Current Call
3.5 Hands-Free CallingFor hands-free calling you use the microphone and speaker of your FRITZ!Fon M2. You can set down FRITZ!Fon M2 and allow multiple par-ties to join in the conversation.
Press the * key. The “Do Not Disturb” icon appears in the display.
Press and hold the * key.
FRITZ!Fon rings.
Press and hold the * key. The ring tone will be switched off. You can still accept the call.
Press the speaker button before or during the call to switch on hands-free calling.
Press the speaker button again to return to handset operation.
FRITZ!Fon 22
FRITZ!Fon M2 22

Muting the Microphone
Handbuch_FRITZ!Fon M2-en.fm Seite 23 Mittwoch, 10. Oktober 2012 1:39 13
3.6 Muting the MicrophoneYou can switch off the microphone of your FRITZ!Fon M2 during a call to keep the other party from hearing you.
3.7 Switching the Keylock On and OffThe keylock prevents outgoing calls from being made accidentally.
When the keylock is on you can still accept incoming calls in the usu-al way.
Switching on the Keylock
You are talking to a caller.
Press the selection key labeled “Mute”. The “Micro-phone mute” icon appears on the display.
To switch the microphone back on, press the selection key labeled “Loud”.
Emergency numbers can be called even when the keylock is enabled.
Press the # key until the icon for the keylock ap-pears in the display.
FRITZ!Fon M2 23
FRITZ!Fon 23
Finding FRITZ!Fon M2
Handbuch_FRITZ!Fon M2-en.fm Seite 24 Mittwoch, 10. Oktober 2012 1:39 13
Switching off the Keylock
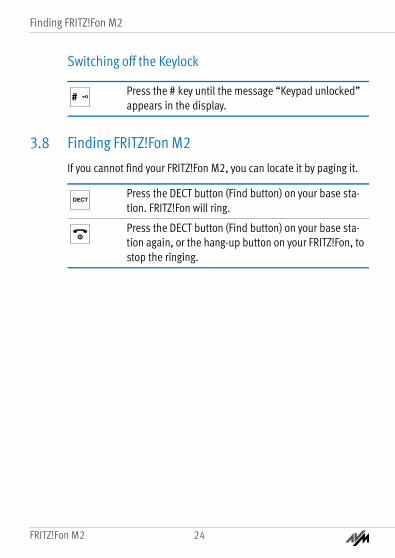
3.8 Finding FRITZ!Fon M2If you cannot find your FRITZ!Fon M2, you can locate it by paging it.
Press the # key until the message “Keypad unlocked” appears in the display.
Press the DECT button (Find button) on your base sta-tion. FRITZ!Fon will ring.
Press the DECT button (Find button) on your base sta-tion again, or the hang-up button on your FRITZ!Fon, to stop the ringing.
FRITZ!Fon 24
FRITZ!Fon M2 24

Using the Telephone Book and Call Lists
Handbuch_FRITZ!Fon M2-en.fm Seite 25 Mittwoch, 10. Oktober 2012 1:39 13
4 Using the Telephone Book and Call ListsOn your FRITZ!Fon you can use the telephone book and the call lists of a FRITZ!Box.
4.1 PrerequisiteTelephone book and call lists are available if you use a FRITZ!Box as the DECT base station for your FRITZ!Fon.
4.2 Setting Up a Telephone BookSet up a new telephone book for your FRITZ!Fon in the FRITZ!Box or use a telephone book already available there.
Setting Up a New Telephone Book in FRITZ!BoxYou can save up to six different telephone books in the FRITZ!Box.
1. Open the user interface of the FRITZ!Box in a web browser(http://fritz.box).
2. Select “Telephony / Telephone Book”.
3. Click the “New Telephone Book” button.
For more information on setting up the new telephone book, see the Help on the user interface.
4. Set up the new telephone book.
For more information on setting up the telephone book, click “Help” in the user interface.
FRITZ!Fon M2 25
FRITZ!Fon 25
Dialing from the Telephone Book
Handbuch_FRITZ!Fon M2-en.fm Seite 26 Mittwoch, 10. Oktober 2012 1:39 13
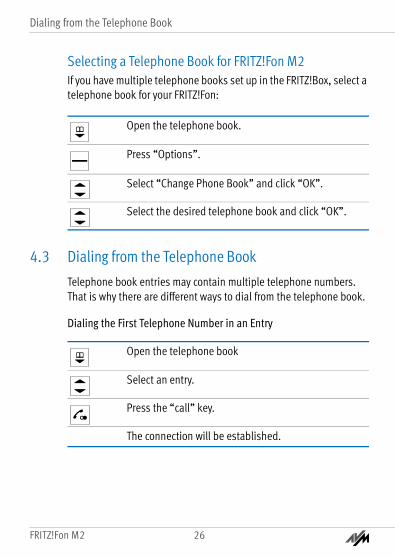
Selecting a Telephone Book for FRITZ!Fon M2If you have multiple telephone books set up in the FRITZ!Box, select a telephone book for your FRITZ!Fon:
4.3 Dialing from the Telephone BookTelephone book entries may contain multiple telephone numbers. That is why there are different ways to dial from the telephone book.
Dialing the First Telephone Number in an Entry
Open the telephone book.
Press “Options”.
Select “Change Phone Book” and click “OK”.
Select the desired telephone book and click “OK”.
Open the telephone book
Select an entry.
Press the “call” key.
The connection will be established.
FRITZ!Fon 26
FRITZ!Fon M2 26

Dialing from the Telephone Book
Handbuch_FRITZ!Fon M2-en.fm Seite 27 Mittwoch, 10. Oktober 2012 1:39 13
Selecting a Telephone Number
Changing or Adding to a Telephone NumberYou can change or add to telephone numbers before dialing, for in-stance by adding an extension number:
Open the telephone book
Select an entry and press “OK”.
Press the “Call List” key.
Select a telephone number.
Press the “call” key.
The connection will be established.
Open the telephone book.
Select an entry.
Press “Options”.
Select “Use” and press “OK”.
Only for entries with multiple telephone numbers: Se-lect a telephone number and press “OK”.
FRITZ!Fon M2 27
FRITZ!Fon 27
Dialing from Call Lists
Handbuch_FRITZ!Fon M2-en.fm Seite 28 Mittwoch, 10. Oktober 2012 1:39 13
4.4 Dialing from Call Lists
Dialing from Call List
Dialing from Redial List
Change or add to the telephone number. For instance, add an extension number.
Press the “call” key.
The connection will be established.
Press the “Call List” key.
Select a Call List and press “OK”.
Select an entry.
Press the “call” key.
The connection will be established.
Press the “Redial” key.
Select an entry.
Press the “call” key.
The connection will be established.
FRITZ!Fon 28
FRITZ!Fon M2 28
Finding a Telephone Book Entry
Handbuch_FRITZ!Fon M2-en.fm Seite 29 Mittwoch, 10. Oktober 2012 1:39 13
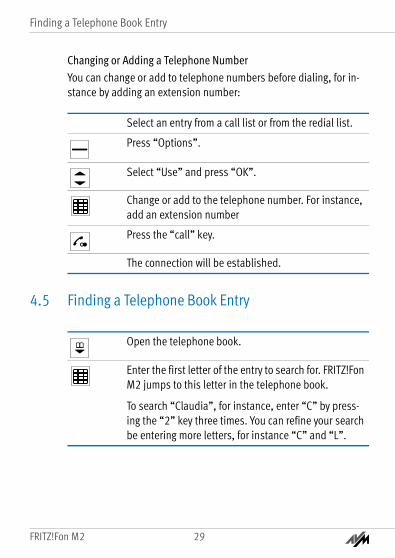
Changing or Adding a Telephone NumberYou can change or add to telephone numbers before dialing, for in-stance by adding an extension number:
4.5 Finding a Telephone Book Entry
Select an entry from a call list or from the redial list.
Press “Options”.
Select “Use” and press “OK”.
Change or add to the telephone number. For instance, add an extension number
Press the “call” key.
The connection will be established.
Open the telephone book.
Enter the first letter of the entry to search for. FRITZ!Fon M2 jumps to this letter in the telephone book.
To search “Claudia”, for instance, enter “C” by press-ing the “2” key three times. You can refine your search be entering more letters, for instance “C” and “L”.
FRITZ!Fon M2 29
FRITZ!Fon 29

Finding a Telephone Book Entry
Handbuch_FRITZ!Fon M2-en.fm Seite 30 Mittwoch, 10. Oktober 2012 1:39 13
If more than one number is saved for an entry in the telephone book, you can use the following function:
Simplified Telephone Book SearchIf you enable the “Simplified telephone book search” option, you can access each letter by pressing a key only once. By pressing the “5” key, for instance, you can view all of the entries that begin with “J”, “K”, or “L”. Here is how to enable the simplified telephone book search:
1. Open the user interface of the FRITZ!Box in a web browser(http://fritz.box).
2. Select “Telephony / Telephony Devices”.
3. Click the “Edit” button to open the settings of your FRITZ!Fon.
4. Switch to the “Telephony Device Features” tab.
For more information on enabling the simplified telephone book search, see the Help on the user interface.
Press the “Call List” key. All numbers saved for this telephone book entry will be displayed.
Select the desired telephone number and click “OK”.
If you do not use this function, the number assigned as the main number will be dialed.
FRITZ!Fon 30
FRITZ!Fon M2 30

Saving a New Telephone Book Entry
Handbuch_FRITZ!Fon M2-en.fm Seite 31 Mittwoch, 10. Oktober 2012 1:39 13
4.6 Saving a New Telephone Book EntryYou can manage your telephone book in the user interface of the FRITZ!Box and create new entries on the FRITZ!Fon.
4.7 Saving Numbers from the Call List in the Telephone BookYou can save telephone numbers from call lists in the telephone book.
Open the telephone book.
Press “Options”.
Select “New entry” and then press “OK”.
Enter a name and a telephone number.
Press “OK”. The new entry will be saved.
Open a Call List and select an entry.
Press “Options”.
FRITZ!Fon M2 31
FRITZ!Fon 31

Saving Numbers from the Call List in the Telephone Book
Handbuch_FRITZ!Fon M2-en.fm Seite 32 Mittwoch, 10. Oktober 2012 1:39 13
Select “Copy” and then press “OK”.
Select “New Entry”. Enter a name, select the kind of telephone number (home, office, mobile) and press “Paste”.
Press “OK”. The new entry will be saved.
FRITZ!Fon 32
FRITZ!Fon M2 32
Convenience Functions for Telephone Calls
Handbuch_FRITZ!Fon M2-en.fm Seite 33 Mittwoch, 10. Oktober 2012 1:39 13
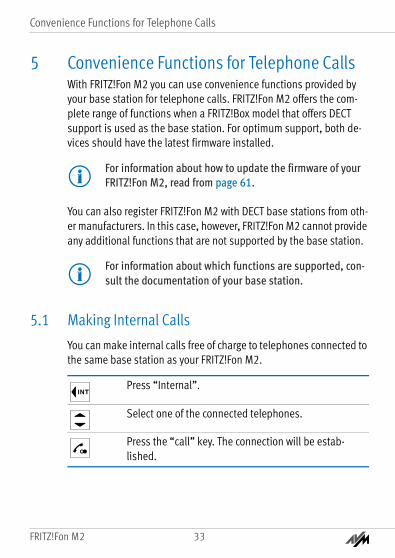
5 Convenience Functions for Telephone CallsWith FRITZ!Fon M2 you can use convenience functions provided by your base station for telephone calls. FRITZ!Fon M2 offers the com-plete range of functions when a FRITZ!Box model that offers DECT support is used as the base station. For optimum support, both de-vices should have the latest firmware installed.
You can also register FRITZ!Fon M2 with DECT base stations from oth-er manufacturers. In this case, however, FRITZ!Fon M2 cannot provide any additional functions that are not supported by the base station.
5.1 Making Internal CallsYou can make internal calls free of charge to telephones connected to the same base station as your FRITZ!Fon M2.
For information about how to update the firmware of your FRITZ!Fon M2, read from page 61.
For information about which functions are supported, con-sult the documentation of your base station.
Press “Internal”.
Select one of the connected telephones.
Press the “call” key. The connection will be estab-lished.
FRITZ!Fon M2 33
FRITZ!Fon 33

Answering Machine
Handbuch_FRITZ!Fon M2-en.fm Seite 34 Mittwoch, 10. Oktober 2012 1:39 13
5.2 Answering MachineThe answering machine for your FRITZ!Fon is set up in the FRITZ!Box user interface. Afterward you can operate it directly on the FRITZ!Fon.
If you have multiple FRITZ!Fon cordless telephones, you can set up a separate answering machine for each FRITZ!Fon.
PrerequisiteAn answering machine is available if you use a FRITZ!Box as the DECT base station for your FRITZ!Fon.
Setting Up an Answering Machine in FRITZ!Box1. Open the user interface of the FRITZ!Box in a web browser
(http://fritz.box).
2. Select “Telephony / Telephony Devices”.
3. Click “Configure New Device”.
4. Under “Integrated in the FRITZ!Box”, select the “Answering machine” option.
5. Click “Next”.
6. Specify the mode, greeting delay and recording length. In the “Greeting only” mode, callers cannot leave you any messages.
7. Enter a name for the answering machine and confirm by click-ing “Next”.
8. Select one or multiple telephone numbers that you assigned for incoming calls to your FRITZ!Fon as well.
9. Click “Next” and “Apply”.
FRITZ!Fon 34
FRITZ!Fon M2 34
Answering Machine
Handbuch_FRITZ!Fon M2-en.fm Seite 35 Mittwoch, 10. Oktober 2012 1:39 13
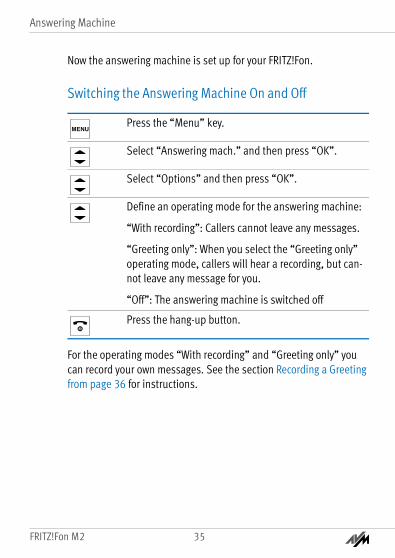
Now the answering machine is set up for your FRITZ!Fon.
Switching the Answering Machine On and Off
For the operating modes “With recording” and “Greeting only” you can record your own messages. See the section Recording a Greeting from page 36 for instructions.
Press the “Menu” key.
Select “Answering mach.” and then press “OK”.
Select “Options” and then press “OK”.
Define an operating mode for the answering machine:
“With recording”: Callers cannot leave any messages.
“Greeting only”: When you select the “Greeting only” operating mode, callers will hear a recording, but can-not leave any message for you.
“Off”: The answering machine is switched off
Press the hang-up button.
FRITZ!Fon M2 35
FRITZ!Fon 35

Answering Machine
Handbuch_FRITZ!Fon M2-en.fm Seite 36 Mittwoch, 10. Oktober 2012 1:39 13
Recording a GreetingThe answering machine provides a standard start greeting and a standard end greeting. Here is how to record your own greetings:
Press the “Menu” key.
Select “Answering mach.” and then press “OK”.
Select “Options” and then press “OK”.
Select an operating mode and press “Options”.
Only in the operating mode “With recording”: Select “Start greeting” and press “OK”.
Select “Record” and then press “OK”. Speak the entire greeting and confirm that you have finished by clicking “OK”.
Select “Play” and “OK” to check your recording.
Select “Ring delay” and define after how many sec-onds a call will be accepted. Press “OK”.
Select “Activate” and “OK”.
Select “Private greeting” and then press “OK”.
To set up an end greeting in the “With recording” oper-ating mode, press “Back”.
Press the hang-up key to return to the start screen.
FRITZ!Fon 36
FRITZ!Fon M2 36

Answering Machine
Handbuch_FRITZ!Fon M2-en.fm Seite 37 Mittwoch, 10. Oktober 2012 1:39 13
Listening to New MessagesThe message button on the FRITZ!Fon M2 flashes red whenever new messages have arrived. Here is how to listen to the messages:
Deleting Messages
Press and hold the “1” key. All new messages will be played back.
or
Press the message key and select a message. The most recent message is at the top of the list.
To listen to messages you have already heard again, select “Menu / Call list / Messages”.
Press the “Menu” key.
Select “Answering mach.” and then press “OK”.
Select “Messages” and then press “OK”.
Select a message and then press “OK”.
Select “Delete” and then press “OK”. The message will be deleted.
With the option “Delete all old” you can delete all mes-sages that have been listened to already.
FRITZ!Fon M2 37
FRITZ!Fon 37

Answering Machine
Handbuch_FRITZ!Fon M2-en.fm Seite 38 Mittwoch, 10. Oktober 2012 1:39 13
Picking Up a Call from the Answering MachineYou can pick up calls that the answering machine has already an-swered and accept them on your FRITZ!Fon M2.
Answering Machine Voice MenuThe answering machine can also be operated via a voice-controlled menu that takes you step by step through the settings and functions.
You can also open the “Messages” menu by pressing and holding down the button.
Press “Options”.
Select “Accept” and then press “OK”.
Press the * key twice.
Enter the internal telephone number of the an-swering machine.
The first answering machine of the FRITZ!Box has the internal telephone number 600.
Additional answering machines have the inter-nal telephne numbers 601 through 604.
Press the “call” key.
You will enter the voice menu.
FRITZ!Fon 38
FRITZ!Fon M2 38

CLIR for One Call (Case by Case)
Handbuch_FRITZ!Fon M2-en.fm Seite 39 Mittwoch, 10. Oktober 2012 1:39 13
5.3 CLIR for One Call (Case by Case)If you do not want your telephone number to appear on the display of the handset you are calling, you can suppress your telephone num-ber for an outgoing call (CLIR) on a case by case basis. Here is how to use CLIR (Calling Line Identification Restriction):
For an overview of the voice menu, see the manual of your FRITZ!Box.
The internal telephone numbers of all answering machines are displayed in the FRITZ!Box user interface in the “Tele-phony / Telephony Devices” menu.
Press “Options”.
Select “Anonymous call” and then press “OK”.
Press “On”.
Dial the desired telephone number. Your number will not be transmitted for this call.
If you would like to suppress your number permanently, enable CLIR in the FRITZ!Box user interface. See the sec-tion Settings in the FRITZ!Box User Interface on page 58 for instructions.
FRITZ!Fon M2 39
FRITZ!Fon 39
Alternating Between Calls
Handbuch_FRITZ!Fon M2-en.fm Seite 40 Mittwoch, 10. Oktober 2012 1:39 13
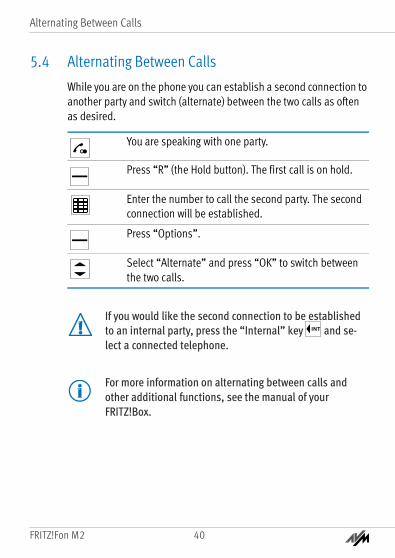
5.4 Alternating Between CallsWhile you are on the phone you can establish a second connection to another party and switch (alternate) between the two calls as often as desired.
You are speaking with one party.
Press “R” (the Hold button). The first call is on hold.
Enter the number to call the second party. The second connection will be established.
Press “Options”.
Select “Alternate” and press “OK” to switch between the two calls.
If you would like the second connection to be established to an internal party, press the “Internal” key and se-lect a connected telephone.
For more information on alternating between calls and other additional functions, see the manual of your FRITZ!Box.
FRITZ!Fon 40
FRITZ!Fon M2 40
Three-party Conference Call
Handbuch_FRITZ!Fon M2-en.fm Seite 41 Mittwoch, 10. Oktober 2012 1:39 13
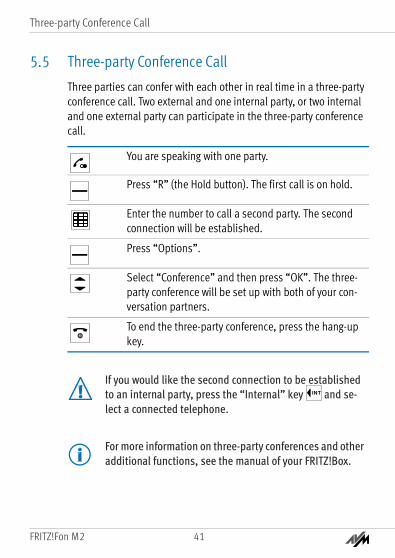
5.5 Three-party Conference CallThree parties can confer with each other in real time in a three-party conference call. Two external and one internal party, or two internal and one external party can participate in the three-party conference call.
You are speaking with one party.
Press “R” (the Hold button). The first call is on hold.
Enter the number to call a second party. The second connection will be established.
Press “Options”.
Select “Conference” and then press “OK”. The three-party conference will be set up with both of your con-versation partners.
To end the three-party conference, press the hang-up key.
If you would like the second connection to be established to an internal party, press the “Internal” key and se-lect a connected telephone.
For more information on three-party conferences and other additional functions, see the manual of your FRITZ!Box.
FRITZ!Fon M2 41
FRITZ!Fon 41

Call Diversion
Handbuch_FRITZ!Fon M2-en.fm Seite 42 Mittwoch, 10. Oktober 2012 1:39 13
5.6 Call DiversionWith this function you can divert calls that arrive for FRITZ!Fon M2. You can define for which calls the call diversion is active and where the calls are diverted to.
You can set up call diversion for the following calls:
• for all calls to FRITZ!Fon M2
• for all calls that come from a certain telephone number
• for all anonymous calls in which the caller does not transmit a telephone number
The following destinations can be defined for call diversion:
• a different telephone connected to the FRITZ!Box
• an external telephone line
• an answering machine set up in the FRITZ!Box
Configuring Call Diversion1. Open the user interface of the FRITZ!Box in a web browser
(http://fritz.box).
2. Select “Telephony / Call Diversion”.
3. Click the “New Call Diversion” button and set up a new call di-version setting.
For comprehensive information on setting up call diversion, see the Help on the user interface.
FRITZ!Fon 42
FRITZ!Fon M2 42

Call Diversion
Handbuch_FRITZ!Fon M2-en.fm Seite 43 Mittwoch, 10. Oktober 2012 1:39 13
Switching Call Diversion On and OffCall diversions that you set up for calls to the FRITZ!Fon M2 can be switched on and off with FRITZ!Fon M2.
Press the “Menu” key.
Select “Suppl. services” and then press “OK”.
Select “Call diversion” and then press “OK”.
Select a call diversion setting.
Switch the call diversion on or off.
Press the hang-up key.
FRITZ!Fon M2 43
FRITZ!Fon 43

Alarm
Handbuch_FRITZ!Fon M2-en.fm Seite 44 Mittwoch, 10. Oktober 2012 1:39 13
6 AlarmWith a FRITZ!Box model that supports DECT as a base station, you can use FRITZ!Fon M2 as an alarm clock. You can define different times at which the FRITZ!Fon M2 should wake you.
6.1 Setting Up the AlarmAn alarm call is set up in the user interface of the FRITZ!Box connect-ed to the FRITZ!Fon M2.
1. Open the user interface of the FRITZ!Box in a web browser(http://fritz.box).
2. Select “Telephony / Alarm”.
3. Select an alarm (“Alarm 1”- “Alarm 3”), enable the alarm func-tion and set the time at which the alarm should ring (e.g. “6:30”).
4. Select your FRITZ!Fon M2 from the drop-down menu for the telephone.
5. Define here when the alarm should be repeated. Confirm by clicking “Apply”.
The alarm has been set up and FRITZ!Fon M2 will ring at the specified times.
FRITZ!Fon 44
FRITZ!Fon M2 44

Switching the Alarm On and Off
Handbuch_FRITZ!Fon M2-en.fm Seite 45 Mittwoch, 10. Oktober 2012 1:39 13
6.2 Switching the Alarm On and OffAn alarm that you set up for calls to the FRITZ!Box can be switched on and off with FRITZ!Fon M2:
Press the “Menu” key.
Select “Suppl. services” and then press “OK”.
Select “Alarm” and then press “OK”.
Select an alarm setting and then press “Options”.
Select “Alarm on” to turn the alarm on.
Select “Alarm off” to turn the alarm off.
Press “OK”.
FRITZ!Fon M2 45
FRITZ!Fon 45
Baby Monitor
Handbuch_FRITZ!Fon M2-en.fm Seite 46 Mittwoch, 10. Oktober 2012 1:39 13
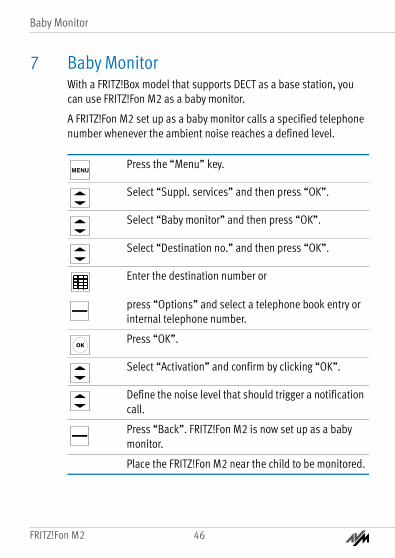
7 Baby MonitorWith a FRITZ!Box model that supports DECT as a base station, you can use FRITZ!Fon M2 as a baby monitor.
A FRITZ!Fon M2 set up as a baby monitor calls a specified telephone number whenever the ambient noise reaches a defined level.
Press the “Menu” key.
Select “Suppl. services” and then press “OK”.
Select “Baby monitor” and then press “OK”.
Select “Destination no.” and then press “OK”.
Enter the destination number or
press “Options” and select a telephone book entry or internal telephone number.
Press “OK”.
Select “Activation” and confirm by clicking “OK”.
Define the noise level that should trigger a notification call.
Press “Back”. FRITZ!Fon M2 is now set up as a baby monitor.
Place the FRITZ!Fon M2 near the child to be monitored.
FRITZ!Fon 46
FRITZ!Fon M2 46

Receiving and Sending E-mail
Handbuch_FRITZ!Fon M2-en.fm Seite 47 Mittwoch, 10. Oktober 2012 1:39 13
8 Receiving and Sending E-mailWith FRITZ!Fon M2 you can receive and send e-mail when your com-puter is switched off. In the FRITZ!Box you can set up up to ten e-mail accounts for this purpose. If you have more than one FRITZ!Fon cord-less telephones you can use different e-mail accounts on the differ-ent cordless telephones.
8.1 Setting Up an E-mail AccountIf you would like to receive and send e-mail with your FRITZ!Fon M2, set up an e-mail account in the FRITZ!Box:
1. Open the user interface of the FRITZ!Box in a web browser(http://fritz.box).
2. In the user interface select “DECT / E-mail”.
3. Click the “New E-mail Account” button.
4. Set up the new e-mail account on “Account Information”and “Additional Settings” tabs.
For comprehensive information on setting up the e-mail ac-count, see the Help on the user interface.
FRITZ!Fon M2 47
FRITZ!Fon 47

Reading E-mail
Handbuch_FRITZ!Fon M2-en.fm Seite 48 Mittwoch, 10. Oktober 2012 1:39 13
8.2 Reading E-mail
Press and hold the “0” key. The “Internet Services” menu is opened.
Select “Internet services / E-mail” and then press “OK”.
If more than one e-mail account is set up, select an e-mail account.
Select an e-mail and press “OK”.
With the navigation keys you can navigate up and down in the e-mail and skip to the next or the previous e-mail.
With the “OK” key you can page forward in the e-mail and skip to the next e-mail.
FRITZ!Fon 48
FRITZ!Fon M2 48

Sending E-mail
Handbuch_FRITZ!Fon M2-en.fm Seite 49 Mittwoch, 10. Oktober 2012 1:39 13
8.3 Sending E-mail
Press and hold the “0” key. The “Internet Services” menu is opened.
Select “Internet services / E-mail” and then press “OK”.
If more than one e-mail account is set up, select an e-mail account.
Press “Options”.
Select “New e-mail” and then press “OK”.
Write the subject line and the text of the e-mail.
Press “Options”.
Select from the telephone book that contains an e-mail address.
or
Select “Send to Distribution List” and enter one or more e-mail addresses. Then press “Options” and se-lect “Send”.
Use commas to separate the e-mail addresses.
Press “OK”. The e-mail message will be sent.
FRITZ!Fon M2 49
FRITZ!Fon 49
Receiving RSS Feeds
Handbuch_FRITZ!Fon M2-en.fm Seite 50 Mittwoch, 10. Oktober 2012 1:39 13
9 Receiving RSS FeedsWith FRITZ!Fon M2 you can read the RSS feeds to which you can sub-scribe on many websites. RSS is a format for rendering headlines and what are usually short items on certain subjects. Depending on the provider, RSS messages may send you regular updates on the latest headlines or information about innovations on a provider’s website.
The RSS icon indicates that a web page offers RSS feeds.
9.1 Setting Up RSS FeedsTo receive RSS feeds with FRITZ!Fon M2, first you must set up the de-sired RSS feeds in the user interface of your FRITZ!Box:
1. Open the user interface of the FRITZ!Box in a web browser(http://fritz.box).
2. Select “DECT / RSS Feeds”.
3. Select one of the preset feeds from the drop-down menu.
You can also set up a new information source:
– In the drop-down menu, select the entry “Other RSS feed...”.
– Enter a name for the RSS feed. This name will be displayed on the FRITZ!Fon.
– Enter the Internet address at which the RSS feed can be reached in the Internet.
– Click the “OK” button to save the settings.
FRITZ!Fon 50
FRITZ!Fon M2 50
Reading RSS Feeds
Handbuch_FRITZ!Fon M2-en.fm Seite 51 Mittwoch, 10. Oktober 2012 1:39 13
Now the RSS feed has been set up. Using the “Edit” button you can make individual settings for the RSS feed. If you are using more than one FRITZ!Fon cordless telephone, you can, for example, specify on which telephones the RSS feed will be displayed.
For more information on settings for the RSS feed, see the Help on the FRITZ!Box user interface.
9.2 Reading RSS Feeds
On websites the RSS icon is often a link to an RSS feed. Click the icon to view the URL of the RSS news source in the address line of the web browser.
Press and hold the “0” key. The “Internet Services” menu is opened.
Select “RSS feeds” and then press “OK”.
Select a news source for RSS feeds:
Select an RSS message and then press “Show”.
Use the the navigation keys to navigate upward and downward in the message and to skip to the next or the previous message.
With the “OK” key you can page forward in the mes-sage and skip to the next message.
FRITZ!Fon M2 51
FRITZ!Fon 51
Receiving Podcasts
Handbuch_FRITZ!Fon M2-en.fm Seite 52 Mittwoch, 10. Oktober 2012 1:39 13
10 Receiving PodcastsWith FRITZ!Fon M2 you can receive podcasts. A podcast is a series of media reports, for instance radio programs, that you can listen to whenever you want, regardless of when they are broadcast.
10.1 Setting Up a PodcastTo listen to a podcast with the FRITZ!Fon M2, first set up the podcast in the user interface of your FRITZ!Box:
1. Open the user interface of the FRITZ!Box in a web browser(http://fritz.box).
2. Select “DECT / Podcast”.
3. Select one of the preset podcasts from the drop-down menu.
You can also set up a new podcast:
– In the drop-down menu, select the entry “Other pod-cast...”.
– Enter a name for the podcast. This name will be displayed on the FRITZ!Fon.
– Enter the Internet address at which the podcast can be reached in the Internet.
– Click the “OK” button to save the settings.
Addresses of podcasts are listed, for instance, at www.podcast.com.
FRITZ!Fon 52
FRITZ!Fon M2 52
Listening to a Podcast
Handbuch_FRITZ!Fon M2-en.fm Seite 53 Mittwoch, 10. Oktober 2012 1:39 13
This concludes the setup of the podcast. Using the “Edit” button you can make individual settings for the podcast. If you are using more than one FRITZ!Fon cordless telephone, you can, for example, specify on which telephones the podcast will be displayed.
For more information on settings for the podcast, see the Help on the FRITZ!Box user interface.
10.2 Listening to a PodcastHere is how to play back set up podcasts:
Press and hold the “0” key. The “Internet Services” menu is opened.
Select “Podcasts” and then press “OK”.
Select a podcast and press “OK”.
Select an entry and then press “OK”. The entry will be played back.
Adjust the volume with the navigation keys.
Louder
Quieter
FRITZ!Fon M2 53
FRITZ!Fon 53
Receiving Web Radio
Handbuch_FRITZ!Fon M2-en.fm Seite 54 Mittwoch, 10. Oktober 2012 1:39 13
11 Receiving Web RadioWith FRITZ!Fon M2 you can receive radio from the Internet (web or In-ternet radio).
11.1 Setting Up a Web Radio StationSet up all of the web radio stations you would like to listen to on the FRITZ!Box user interface.
1. Open the user interface of the FRITZ!Box in a web browser(http://fritz.box).
2. Select a “DECT / Web Radio”.
3. Select one of the preset radio stations from the drop-down menu.
You can also set up a new radio station:
– In the drop-down menu, select the entry “Other web radio station...”.
– Enter a name for the radio station. This name will be dis-played on the FRITZ!Fon M2.
– Enter the web address at which this radio station can be reached in the Internet. With FRITZ!Fon you can play back radio stations in the formats “pls”, “m3u” and “mp3”.
– Click the “OK” button to save the settings.
Many web radio station addresses are available, for in-stance, at www.onlineradiostations.com and www.shout-cast.com.
FRITZ!Fon 54
FRITZ!Fon M2 54

Listening to a Web Radio Station
Handbuch_FRITZ!Fon M2-en.fm Seite 55 Mittwoch, 10. Oktober 2012 1:39 13
This concludes the setup of the radio station. Using the “Edit” button you can make individual settings for the radio station. If you are us-ing more than one FRITZ!Fon cordless telephone, you can, for exam-ple, specify on which telephones the radio station will be played.
For more information on settings for the radio station, see the Help on the FRITZ!Box user interface.
11.2 Listening to a Web Radio StationHere is how to play back set up radio stations:
Press and hold the “0” key. The “Internet Services” menu is opened.
Select “Web radio” and then press “OK”.
Select a radio station and then press “OK”. The radio station will be played back.
Adjust the volume with the navigation keys.
Louder
Quieter
FRITZ!Fon M2 55
FRITZ!Fon 55

Opening New Messages
Handbuch_FRITZ!Fon M2-en.fm Seite 56 Mittwoch, 10. Oktober 2012 1:39 13
12 Opening New MessagesDepending on which functions are enabled, FRITZ!Fon M2 notifies you about
• missed calls
• new firmware updates
• new messages on the answering machine
• new e-mail, podcasts and RSS feeds
As soon as a new message (call, e-mail or podcast, for instance) is available, a signal tone sounds on your FRITZ!Fon M2, the notification key flashes, and the “New Messages” icon appears in the display.
How to read or listen to new messages:
Press the message button.
Select a list, for instance “Missed Calls” or “E-mail”, and press “OK”.
If only one list contains new messages, the messages are displayed immediately.
New messages are black, messages that have already been read are gray.
FRITZ!Fon 56
FRITZ!Fon M2 56

Setting Up FRITZ!Fon M2
Handbuch_FRITZ!Fon M2-en.fm Seite 57 Mittwoch, 10. Oktober 2012 1:39 13
13 Setting Up FRITZ!Fon M2You can configure individual settings for the FRITZ!Fon M2 in the “Settings” menu
If you use FRITZ!Box as a base station, additional functions and set-tings for the FRITZ!Box are available in the FRITZ!Fon M2 user inter-face.
13.1 “Settings” Menu
The “Settings” menu offers you the following settings options and device information:
• Display: set contrast, illumination and hibernation.
• Telephony: set picking up directly and eavesdropping security for your DECT connection.
• Registration: register and deregister FRITZ!Fon M2 with a base station and select a base station for FRITZ!Fon M2. FRITZ!Fon M2 can be registered with up to four base stations.
• Firmware update: perform a firmware update for FRITZ!Fon M2. This function can be used only with a FRITZ!Box as base sta-tion.
• Firmware version: the firmware version of your FRITZ!Fon M2. Our staff requires this for support requests.
Press the “Menu” key.
Select “Settings” and then press “OK”.
FRITZ!Fon M2 57
FRITZ!Fon 57
Settings in the FRITZ!Box User Interface
Handbuch_FRITZ!Fon M2-en.fm Seite 58 Mittwoch, 10. Oktober 2012 1:39 13
• Reset: the “Reset” command restores FRITZ!Fon M2 to its fac-tory settings. All settings you made for this device will be dis-carded.
13.2 Settings in the FRITZ!Box User InterfaceFRITZ!Fon M2 offers the greatest convenience if you use a FRITZ!Box that supports DECT as the base station. This section describes func-tions and settings you can configure for FRITZ!Fon M2 in the FRITZ!Box user interface.
1. Open the user interface of the FRITZ!Box in a web browser(http://fritz.box).
2. Select “Telephony / Telephony Devices” in the user interface.
3. Click the “Edit” button to open the settings of your FRITZ!Fon M2.
4. Configure the desired settings. Then click the “OK” button to save your settings.
You can configure the following settings:
All current functions and settings are at your disposal if both devices are using the current firmware. For more in-formation, see the Updating the Firmware from page 61 section.
For more information on these settings, see the Help on the user interface.
FRITZ!Fon 58
FRITZ!Fon M2 58

Settings in the FRITZ!Box User Interface
Handbuch_FRITZ!Fon M2-en.fm Seite 59 Mittwoch, 10. Oktober 2012 1:39 13
• Telephone number for outgoing calls: The telephone number FRITZ!Fon M2 uses to place outgoing calls to the public tele-phone network.
• Numbers for incoming calls: FRITZ!Fon M2 rings when calls ar-rive for these telephone numbers.
• Name: The name of the device, to be displayed in the FRITZ!Fon M2 display and in the call list of the FRITZ!Box.
• Telephone book: If you have multiple telephone books set up in the FRITZ!Box, select a telephone book for FRITZ!Fon M2 here.
• Ring tones: You can assign various ring tones to your FRITZ!Fon M2.
• Do Not Disturb: You can define periods of time when FRITZ!Fon M2 does not ring.
• Telephony Device Features: You can enable various additional convenience features (for instance “busy on busy” and CLIR) and change the sound settings for your FRITZ!Fon M2.
FRITZ!Fon M2 59
FRITZ!Fon 59

DECT Eco: Switch Off Radio When Idle
Handbuch_FRITZ!Fon M2-en.fm Seite 60 Mittwoch, 10. Oktober 2012 1:39 13
13.3 DECT Eco: Switch Off Radio When IdleFRITZ!Fon M2 supports DECT Eco “No Emission”. Thanks to DECT Eco, the FRITZ!Box can switch off DECT transmission whenever all cordless telephones are on standby.
The connection between the FRITZ!Box and the telephones remains active. You can place and accept calls at any time.
Prerequisite for Using DECT EcoDECT Eco can be used only if all of the cordless telephones registered on the FRITZ!Box support DECT Eco.
To find out whether your cordless telephone supports DECT Eco, see the “DECT / DECT Monitor” menu in the FRITZ!Box user interface.
Enabling DECT Eco in the FRITZ!Box
1. Open the user interface of the FRITZ!Box in a web browser(http://fritz.box).
2. Select the “DECT / Base Station” menu.
3. Enable the “DECT Eco” option and define when DECT Eco should be active.
4. Click the “Apply” button to save the settings.
5. Register your FRITZ!Fon M2 and all of the cordless telephones on the FRITZ!Box again.
Now DECT Eco is enabled.
FRITZ!Fon 60
FRITZ!Fon M2 60

Updating the Firmware
Handbuch_FRITZ!Fon M2-en.fm Seite 61 Mittwoch, 10. Oktober 2012 1:39 13
14 Updating the FirmwareAVM provides free firmware updates for FRITZ!Fon M2 over the Inter-net. A firmware update updates the firmware of your FRITZ!Fon M2 and brings the device functions up to speed.
14.1 Preparation: Updating the FRITZ!Box FirmwareFor the firmware update, FRITZ!Fon M2 must be registered at a FRITZ!Box with the latest firmware. So update the firmware of the FRITZ!Box first:
Press the “Menu” key.
Select “Settings” and then press “OK”.
Select “FRITZ!Box” and then press “OK”.
Select “Firmware” and then press “OK”.
Press “OK”.
If “The latest firmware is not installed” appears on the display, update the firmware of the FRITZ!Box.
Open the user interface of the FRITZ!Box in a web browser (http://fritz.box) and start the “Firmware Up-date” Wizard.
FRITZ!Fon M2 61
FRITZ!Fon 61

Updating the FRITZ!Fon Firmware
Handbuch_FRITZ!Fon M2-en.fm Seite 62 Mittwoch, 10. Oktober 2012 1:39 13
14.2 Updating the FRITZ!Fon Firmware
Press the “Menu” key.
Select “Settings” and then press “OK”.
Select “Firmware update” and then press “OK”.
If a new firmware update is available, answer “OK” to the following questions. The firmware update will be transferred and then FRITZ!Fon M2 will be restarted.
FRITZ!Fon 62
FRITZ!Fon M2 62

Switching WLAN of the FRITZ!Box On and Off
Handbuch_FRITZ!Fon M2-en.fm Seite 63 Mittwoch, 10. Oktober 2012 1:39 13
15 Switching WLAN of the FRITZ!Box On and OffThe WLAN function of your FRITZ!Box can be switched on and off using the FRITZ!Fon.
Press the “Menu” key.
Select “FRITZ!Box” and then press “OK”.
Select “WLAN” and then press “OK”.
Switch the WLAN function on or off.
Press the hang-up key.
The WLAN guest access of the FRITZ!Box can also be swit-ched on and off with FRITZ!Fon M2. For this the WLAN guest access must first be set up in the FRITZ!Box user interface.
FRITZ!Fon M2 63
FRITZ!Fon 63

Customer Service
Handbuch_FRITZ!Fon M2-en.fm Seite 64 Mittwoch, 10. Oktober 2012 1:39 13
16 Customer Service
16.1 Support from the Support TeamOur Service area can be reached in the Internet at:
www.avm.de/en/service
Click “Support” and open a support query. First you receive a selec-tion of FAQs.
If you require additional help on a technical problem, click “Contact Support”. Fill out the support form and send it to us. Our Support team will respond by e-mail as quickly as possible.
FRITZ!Fon 64
FRITZ!Fon M2 64
Manufacturer’s Warranty
Handbuch_FRITZ!Fon M2-en.fm Seite 65 Mittwoch, 10. Oktober 2012 1:39 13
16.2 Manufacturer’s WarrantyWe offer a manufacturer’s warranty of 2 years on the hardware of this original product. Batteries constitute expendable material, which is not covered by the warranty. The warranty period begins with the purchase date from the first end user. Compliance with the warranty period can be proven by submission of the original invoice or comparable documents. This warranty does not restrict your warranty rights based on the contract of sale or other statutory rights.
Within the warranty period, we will remove defects to the product which are demonstrably due to faults in materials or manufacturing. Our warranty does not cover defects which occur due to incor-rect installation, improper use, non-observance of instructions in the user manual, normal wear and tear or defects in the environment of the system (third-party hardware or software). We may, at our discretion, repair or replace the defective product. Claims other than the right to the removal of de-fects which is mentioned in these terms of warranty are not constituted.
We guarantee that the software conforms with general specifications, not, however, that the soft-ware meets your individual requirements. Delivery costs will not be reimbursed. Products which have been replaced revert to our ownership. Claims recognized under warranty entail neither an ex-tension or recommencement of the warranty period. If we reject a warranty claim, this claim lapses no later than six months after being rejected by us.
This warranty shall be governed by German substantive law, to the exclusion of the United Nations Convention on Contracts for the International Sale of Goods (CISG).
FRITZ!Fon M2 65
FRITZ!Fon 65

Handbuch_FRITZ!Fon M2-en.fm Seite 66 Mittwoch, 10. Oktober 2012 1:39 13
Legal NoticeThis documentation and the software it describes are protected by copyright. AVM grants the non-exclusive right to use the software, which is supplied exclusively in object code format. The licensee may create only one copy of the software, which may be used exclusively for backup use.AVM reserves all rights that are not expressly granted to the licensee. Without previous approval in writing, and except for in cases permitted by law, it is particularly prohibited to• copy, propagate or in any other manner make this documentation or this software publicly ac-
cessible, or• process, disassemble, reverse engineer, translate, decompile or in any other manner open the
software and subsequently copy, propagate or make the software publicly accessible in any other manner.
This documentation and software have been produced with all due care and checked for correctness in accordance with the best available technology. AVM GmbH disclaims all liability and warranties, whether express or implied, relating to the AVM product’s quality, performance or suitability for any given purpose which deviates from the performance specifications contained in the product descrip-tion. The licensee bears all risk in regard to hazards and impairments of quality which may arise in connection with the use of this product.AVM will not be liable for damages arising directly or indirectly from the use of the manual or the software, nor for incidental or consequential damages, except in case of intent or gross negligence. AVM expressly disclaims all liability for the loss of or damage to hardware or software or data as a result of direct or indirect errors or destruction and for any costs (including connection charges) re-lated to the documentation and the software and due to incorrect installations not performed by AVM itself.The information in this documentation and the software are subject to change without notice for the purpose of technical improvement.© AVM GmbH 2012. All rights reserved. Documentation release 09/2012
Unless otherwise indicated, all trademarks mentioned are legally protected trademarks owned by AVM. This includes product names and logos in particular. Microsoft, Windows and the Windows lo-go are trademarks owned by Microsoft Corporation in the USA and/or other countries. Bluetooth is a trademark of Bluetooth SIG Inc. licensed to AVM GmbH. All other products and company names are trademarks of their respective owners.
AVM Audiovisuelles Marketingund Computersysteme GmbH Alt-Moabit 95D 10559 BerlinGermany
AVM Computersysteme Vertriebs GmbHAlt-Moabit 95D 10559 BerlinGermany
AVM in the Internet: www.avm.de/en
FRITZ!Fon M2 66

Declaration of CE Conformity
Handbuch_FRITZ!Fon M2-en.fm Seite 67 Mittwoch, 10. Oktober 2012 1:39 13
Declaration of CE ConformityThe manufacturer AVM GmbH
Alt-Moabit 95D 10559 Berlin
herewith declares that the product
FRITZ!Fon M2DECT telephone
complies with the following directives:
1999/5/EC R&TTE Directive: Radio Equipment and Telecommunications Terminal Equipment
2009/125/EC EU directive: ecodesign requirements for energy-related products
The following norms were consulted to assess conformity:
• EEN 60950-1:2006 + A11:2009 + A1:2010• EN 55024:2010• EN 301 489-1 V1.8.1
• EN 301 489-6 V1.3.1• EN 301 406 V2.1.1• EN 50371:2002
The CE symbol confirms that this product conforms with the above mentioned norms and regulations.
Berlin, 06-25-2012 Peter Faxel, Technical Director
FRITZ!Fon M2 67
FRITZ!Fon 67

Handbuch_FRITZ!Fon M2-en.fm Seite 68 Mittwoch, 10. Oktober 2012 1:39 13
Disposal InformationIn accordance with European regulations and the Waste Electrical and Electronic Equipment Directive (WEEE), the FRITZ!Fon M2, as well as all devices and electronic components contained in the package, may not be disposed with household waste.
Please bring these to a collection point in your local community for the disposal of electric and electronic appliances.
The FRITZ!Fon M2 contains a rechargeable battery. This battery, too, may not be disposed with household waste. Please bring the dis-charged batteries to a local or retail collection point.
Symbol for labeling electrical and electronic scrap
Watch for the symbol designating electrical and electronic scrap. Electrical and electronic equipment must be dispo-sed of separately from household waste.
FRITZ!Fon M2 68

Handbuch_FRITZ!Fon M2-en.fm Seite 69 Mittwoch, 10. Oktober 2012 1:39 13
Index
Aadjusting volume. . . . . . . . . . . 21alarm . . . . . . . . . . . . . . . . . . . . 44alternating between calls . . . . 40answering machine. . . . . . . . . 34assigning telephone numbers 58audio . . . . . . . . . . . . . . . . . . . . 57
Bbaby monitor . . . . . . . . . . . . . . 46base station, registering with. 15battery
disposal . . . . . . . . . . . . . . 68inserting . . . . . . . . . . . . . . 13
Ccall
accepting . . . . . . . . . . . . . 20calling anonymously . . . . 39internal . . . . . . . . . . . . . . . 33pickup. . . . . . . . . . . . . 38, 38placing . . . . . . . . . . . . . . . 20
call diversion . . . . . . . . . . . . . . 42call lists, dialing from . . . . . . . 28calling . . . . . . . . . . . . . . . . . . . 19capital letters . . . . . . . . . . . . . . 9CE conformity declaration . . . . 67charging. . . . . . . . . . . . . . . . . . 14
CLIR. . . . . . . . . . . . . . . . . . . . . . 39collection point
batteries . . . . . . . . . . . . . . 68convenience functions. . . . . . . 33copyright. . . . . . . . . . . . . . . . . . 66customer service . . . . . . . . . . . 64
Ddeclaration of CE conformity . .67DECT Eco . . . . . . . . . . . . . . . . . . 60deregistering from DECT
base station . . . . . . . . . . . . .17dialing. . . . . . . . . . . . . . . . . . . . 20
from call list. . . . . . . . . . . . 28from telephone book . . . . 26
direct pickup . . . . . . . . . . . . . . 21display . . . . . . . . . . . . . . . . . . . 57disposal, batteries. . . . . . . . . . 68disposal,
electronic equipment . . . . . . 68do not disturb . . . . . . . . . . . . .22
Ee-mail
reading . . . . . . . . . . . . . . . 48sending . . . . . . . . . . . . . . . 49setting up account . . . . . . 47
FRITZ!Fon M2 69

Handbuch_FRITZ!Fon M2-en.fm Seite 70 Mittwoch, 10. Oktober 2012 1:39 13
Ffinding
handset . . . . . . . . . . . . . . 24in telephone book . . . . . . 29
firmware update . . . . . . . . . . . 61function keys . . . . . . . . . . . . . . . 9
Hhands-free calling . . . . . . . . . . 22
Iicons in the display . . . . . . . . . 10imprint . . . . . . . . . . . . . . . . . . . 66Internet radio . . . . . . . . . . . . . 54Internet services
e-mail . . . . . . . . . . . . . . . . 47Internet radio . . . . . . . . . . 54podcasts. . . . . . . . . . . . . . 52RSS feeds . . . . . . . . . . . . . 50
Kkeylock. . . . . . . . . . . . . . . . . . . 23keys, overview . . . . . . . . . . . . . . 9
Llegal notice . . . . . . . . . . . . . . . 66listening. . . . . . . . . . . . . . . . . . 22
Mmaking calls . . . . . . . . . . . . . . . 19making internal calls . . . . . . . . 33manufacturer’s warranty . . . . . 65menu operation . . . . . . . . . . . . 18microphone off . . . . . . . . . . . . . 23muting . . . . . . . . . . . . . . . . . . . 23
Nnavigating. . . . . . . . . . . . . . . . . 18notice, legal . . . . . . . . . . . . . . . 66
Oopening messages . . . . . . . . . . 56operating . . . . . . . . . . . . . . . . . 19
Ppackage contents. . . . . . . . . . . . 8paging. . . . . . . . . . . . . . . . . . . . 24picking up call . . . . . . . . . . . . . 38podcast. . . . . . . . . . . . . . . . . . . 52
FRITZ!Fon M2 70

Handbuch_FRITZ!Fon M2-en.fm Seite 71 Mittwoch, 10. Oktober 2012 1:39 13
Rradio station
listening to . . . . . . . . . . . . 55configuring . . . . . . . . . . . . 54
recycling. . . . . . . . . . . . . . . . . . 68redialing . . . . . . . . . . . . . . . . . 28registering with
DECT base station . . . . . . . . 15reseting . . . . . . . . . . . . . . . . . . 57ring tones. . . . . . . . . . . . . . . . . 57RSS feeds. . . . . . . . . . . . . . . . . 50
Ssettings . . . . . . . . . . . . . . . . . . 57special characters . . . . . . . . . . . 9support . . . . . . . . . . . . . . . . . . 64suppress telephone number . 39
Ttelephone book
dialing from . . . . . . . . . . . 26finding entry . . . . . . . . . . . 29new entry . . . . . . . . . . . . . 31setting up . . . . . . . . . . . . . 25
text entry . . . . . . . . . . . . . . . . . . 9three-party conference call . . . 41
Vvoice menu . . . . . . . . . . . . . . . 38volume . . . . . . . . . . . . . . . . . . . 57
Wwarranty . . . . . . . . . . . . . . . . . . 65web radio . . . . . . . . . . . . . . . . . 54
FRITZ!Fon M2 71