fresh aire owner’s notes - san juan sailing and yachting · fresh aire owner’s notes ... main...
TRANSCRIPT

Fresh Aire Owner Manual 2018
1 Return to TOC
Fresh Aire Owner’s Notes Welcome Aboard!
We’re thrilled that we can offer Fresh Aire up for your adventure. She is an awesome boat!
We chartered boats with San Juan Sailing for seven years to see which one we liked and would
want to own and sail. As soon as we sailed Wind Song, the 2015 Bavaria 41 in the fleet, we were
in love and knew the Bavaria 41 was our boat of choice.
Why?
Because she is fast, she is simple to sail, yet elegant enough that serious sailors can challenge
themselves. She is sturdy and strong, pushing through 40 knot winds and 6-8 foot swells on a
few occasions. And finally, she has a simplistic, yet open interior. Everything we wanted in a
boat.
We have worked diligently to prepare Fresh Aire for charter and hope she meets your needs. We
already have ideas for improvements and would love to know any suggestions, issues, or
questions you may have.
We hope you enjoy your sail with Fresh Aire!
-Rich and Roberta
RR Sail, LLC

Fresh Aire Owner Manual 2018
2 Return to TOC
Contents
Contents ............................................................................................................................................................................. 2
1. Nuances ..................................................................................................................................................................... 5
2. Emergency Equipment ......................................................................................................................................... 5
Emergency Signaling Devices ................................................................................................................................ 5
Emergency Tiller .......................................................................................................................................................... 5
Fire Extinguishers ........................................................................................................................................................ 5
First Aid Kits .................................................................................................................................................................. 6
Throw Line ..................................................................................................................................................................... 6
3. Anchors and Anchoring ....................................................................................................................................... 6
Anchors .......................................................................................................................................................................... 6
Chain, anchor tension line, and anchor bridle ................................................................................................. 6
Pick a Safe Anchorage .............................................................................................................................................. 7
Determine Anchor Rode Length ........................................................................................................................... 7
Using the Windlass .................................................................................................................................................... 8
Lowering the anchor ................................................................................................................................................. 8
Raising the anchor ..................................................................................................................................................... 9
4. Barbecue ................................................................................................................................................................. 10
5. Batteries and Charging ..................................................................................................................................... 11
Monitoring battery levels ..................................................................................................................................... 11
6. Berths and Headroom ....................................................................................................................................... 12
7. Bilge Pumps .......................................................................................................................................................... 12
8. Boat hook ............................................................................................................................................................... 13
9. Davit, Dinghy, and Outboard.......................................................................................................................... 13
Operating the Davit ................................................................................................................................................ 13
Gasoline for the Outboard ................................................................................................................................... 15
Beaching the Dinghy .............................................................................................................................................. 16
10. Dodger & Bimini ............................................................................................................................................. 16
11. Electrical Control Panel (12-volt DC) ....................................................................................................... 17
Monitoring display .................................................................................................................................................. 17
Circuit Switches ........................................................................................................................................................ 18
Boat Lights ................................................................................................................................................................. 19
12-Volt Charger ........................................................................................................................................................ 19
Fresh Aire Owner Manual 2018
3 Return to TOC
12. Electrical AC Circuit Breakers (AC)............................................................................................................ 19
Panel Switches and breakers ............................................................................................................................... 20
Main Shore Power Circuit Breaker .................................................................................................................... 20
Using the Inverter .................................................................................................................................................... 21
13. Engine, Handling, and Fuel ......................................................................................................................... 21
Starting the Engine ................................................................................................................................................. 22
Idling the Engine ...................................................................................................................................................... 22
Proceeding in Forward/Reverse ......................................................................................................................... 23
Engine Shutdown..................................................................................................................................................... 23
Bow Thruster ............................................................................................................................................................. 23
Fuel Tank and Gauges............................................................................................................................................ 24
14. Entertainment Systems................................................................................................................................. 25
Fusion Sound System ............................................................................................................................................. 25
TV (is not tied to the Fusion sound system) .................................................................................................. 25
15. Head & Holding Tanks ................................................................................................................................. 26
Monitor Holding Tanks ......................................................................................................................................... 26
Empty Holding Tanks ............................................................................................................................................. 26
16. Heater ................................................................................................................................................................. 27
17. Keel Depth ........................................................................................................................................................ 28
18. Lights ................................................................................................................................................................... 28
Interior Cabin Lights ............................................................................................................................................... 28
Cockpit Courtesy Lights ........................................................................................................................................ 29
Cockpit Table Lamp ................................................................................................................................................ 29
Underwater Lights ................................................................................................................................................... 29
19. Navigation Instruments................................................................................................................................ 29
Initiating the Navigation Instruments .............................................................................................................. 29
Depth Sounder ......................................................................................................................................................... 29
Chart Plotter .............................................................................................................................................................. 30
Boat Position ............................................................................................................................................................. 30
Man Over Board ....................................................................................................................................................... 30
Radar ............................................................................................................................................................................ 31
AIS ................................................................................................................................................................................. 31
Knotmeter................................................................................................................................................................... 31
Fresh Aire Owner Manual 2018
4 Return to TOC
20. Propane .............................................................................................................................................................. 32
Connecting to the Propane Supply .................................................................................................................. 32
21. Refrigerator/Freezer ...................................................................................................................................... 33
Refrigerator ................................................................................................................................................................ 33
Freezer ......................................................................................................................................................................... 33
22. Sails ...................................................................................................................................................................... 33
Headsail ....................................................................................................................................................................... 34
Mainsail ....................................................................................................................................................................... 34
23. Shore Power ..................................................................................................................................................... 36
24. Shower ................................................................................................................................................................ 36
25. Solar..................................................................................................................................................................... 37
Solar Panels................................................................................................................................................................ 37
Solar Power Charger ............................................................................................................................................... 37
Monitor Solar Power Production ....................................................................................................................... 37
26. Spares and Tools ............................................................................................................................................ 38
27. Stove/Oven/Microwave ............................................................................................................................... 38
Stove ............................................................................................................................................................................. 38
Oven ............................................................................................................................................................................. 39
Microwave .................................................................................................................................................................. 39
28. Table (in the Main Saloon) .......................................................................................................................... 40
29. Water & Tanks ................................................................................................................................................. 40
Water tanks ................................................................................................................................................................ 40
Water pressure ......................................................................................................................................................... 41
Checking water level .............................................................................................................................................. 41
Hot Water ................................................................................................................................................................... 41
30. VHF Radio.......................................................................................................................................................... 42
Monitoring the Hailing/Distress Channel ....................................................................................................... 42
Weather ....................................................................................................................................................................... 42
DSC Signal .................................................................................................................................................................. 42
Remote Access Microphone (RAM) .................................................................................................................. 42
Handheld Unit ........................................................................................................................................................... 43
31. Appendix: Through Hulls ............................................................................................................................. 44
Fresh Aire Owner Manual 2018
5 Return to TOC
1. Nuances
Some things we love about Fresh Aire and some things we don’t:
1. Boat hook in the bimini is within easy reach for quick access, but it is difficult to release
and attach to the clasps.
2. Because of the davit we can keep the motor on the dinghy, so you don’t have to mount
and dismount it. Keeping the dinghy out of the water during transit also saves about ½
knot in boat speed.
3. Because of the LP plumbing we cannot operate the BBQ at the same time as the
stove/oven.
4. The Webasco heater has a dosing pump under the starboard berth. The pump ticks as
the heater warms up.
5. Forward electric toilet’s manufacturer implies a “silent” toilet. It’s not.
6. Having to go out on deck to change the Main furling between free-wheeling and ratchet.
7. The addition of larger batteries to the existing solar, days of gunkholing should be fun
with wise electrical management.
2. Emergency Equipment
Emergency Signaling Devices
• Visual day/night flares are under the nav station seat.
• A large spot light is above the nav table. It has an SOS mode reached by pressing the
trigger multiple times to cycle through the modes.
Emergency Tiller
The emergency tiller looks like a metal pipe with an elbow bend in and is in the port cockpit
locker. The rudderpost attachment point is under the cover in the middle of the cockpit sole
between the helm positions. To remove the cover, insert a winch handle in the star-shaped
fitting and unscrew.
Fire Extinguishers
Fresh Aire has six (6) fire extinguishers.
• All locations are marked with a red fire extinguisher sticker or a FIRE EXTINGUISHER
label.
• All red fire extinguishers are USCG approved Type A-B-C extinguishers and can be used
on all types of fires.
• White fire extinguishers are USCG approved Type B-C, which means they’re not as
effective on type A fires (trash, wood, and paper).
Fire extinguisher locations
1. Under the galley sink (red)
2. Aft starboard berth in left hand locker (red)
3. Aft port berth in the bench seat (red)

Fresh Aire Owner Manual 2018
6 Return to TOC
4. Attached to starboard side of steps of engine compartment (white)
5. Forward berth in the port locker (white).
6. Cockpit in starboard locker (red).
First Aid Kits
• A complete first aid kit is above the nav station in one of the cabinets.
• A smaller first aid kit is in the emergency equipment bag under the nav station seat.
Please note any usage of these items at check-in so they may be replaced for the next guest.
Throw Line
An emergency throw line (Lifeline) is on the starboard aft stanchion.
3. Anchors and Anchoring
• Always anchor with a minimum of two people: one at the helm to move the boat to and
from the anchor and another at the anchor locker to lower and raise the anchor.
• From personal experience: Because of limited hearing due to length of boat, engine
noise, and bimini cover, open and friendly communication improves the anchoring
experience.
• We also recommend establishing friendly hand signals for “move forward”, “back up”,
“STOP”.
Anchors
Fresh Aire is equipped with two anchors.
1. The primary bow anchor is a 35# Lewmar Delta with 300 feet of 5/16” chain.
2. The secondary anchor is a 35# Lewmar Delta with 160’ feet of 5/16”chain and 160’ of
5/8” nylon rode; all are UNATTACHED.
Chain, anchor tension line, and anchor bridle
The Primary anchor chain is 300’ and marked:
• At 100’ – ten feet of Yellow (from 100-110)
• After every 50’ thereafter is ten feet of Yellow.
• The last 20’ feet of chain is marked red.
This rode should suffice for all situations you are likely to encounter in the islands. If you need
additional rode, you can attach the secondary anchor rode.
The anchor tension line is red and is used to keep the primary anchor chain taut and remove
stress from the windlass when underway.
Fresh Aire Owner Manual 2018
7 Return to TOC
The anchor bridle is a blue thick line with a hook (the hook has a spring-action pull pin for
locking) in the anchor locker. The bridle replaces and snubber line. The bridle allows the boat to
pull straight while at anchor and to release the weight of the chain and anchor from the
windlass.
The secondary anchor chain is 160’ UNMARKED! chain in a bucket in the cockpit sole locker.
An additional white nylon rode is on a spool in the cockpit sole locker.
Pick a Safe Anchorage
Fresh Aire’s transducer is on the hull just forward of the keel.
You must add in the keel length to properly identify how much depth you have between the
keel and the bottom.
7 feet is a minimum approximation for a safe distance below the boat, so subtract 7 feet
minimum from depth sounder reading to determine if you have enough depth to safely anchor.
If the calculation equals less than 7 feet (taking low tides into consideration) we recommend
moving into deeper waters.
The Garmin chart plotter is set to 0 offset, so all depths are measured from the hull down so
add 7 feet to what you see on the depth reading.
Two Examples:
Depth sounder shows 12 feet. 12 – 7= 5; the recommendation is to move to deeper waters
Depth sounder shows 25 feet. 25 – 7 =18; this is probably safe anchorage depending on tides.
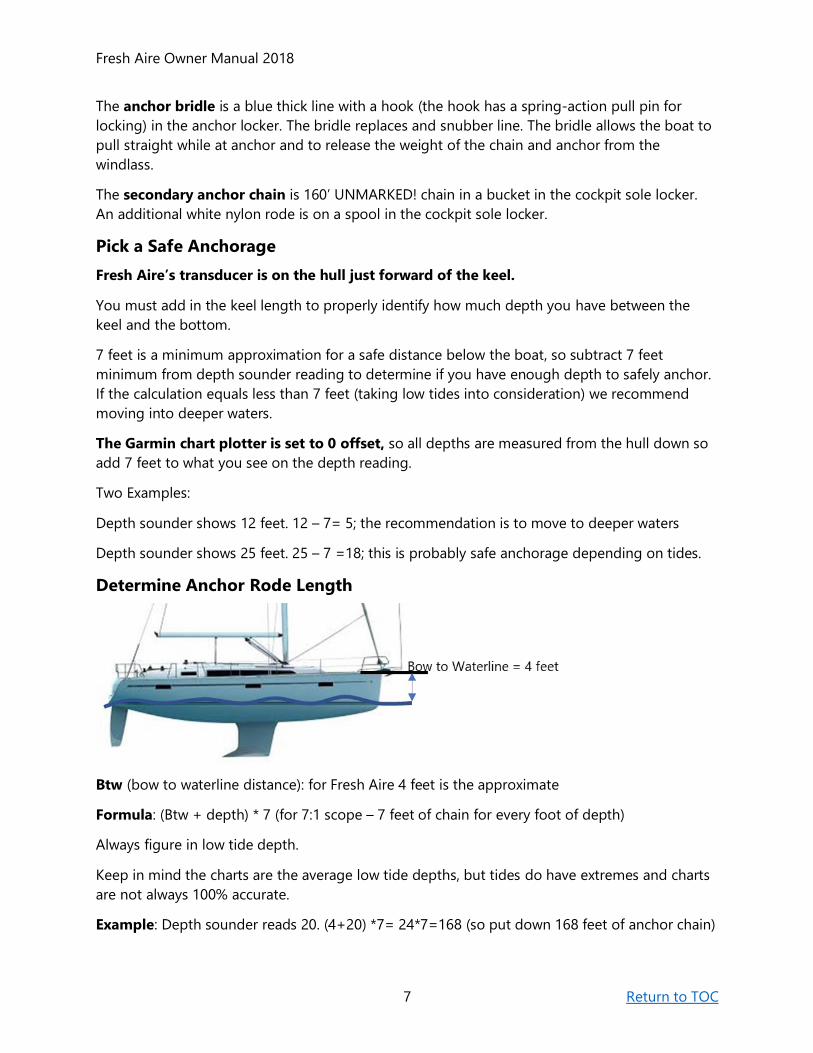
Determine Anchor Rode Length
Btw (bow to waterline distance): for Fresh Aire 4 feet is the approximate
Formula: (Btw + depth) * 7 (for 7:1 scope – 7 feet of chain for every foot of depth)
Always figure in low tide depth.
Keep in mind the charts are the average low tide depths, but tides do have extremes and charts
are not always 100% accurate.
Example: Depth sounder reads 20. (4+20) *7= 24*7=168 (so put down 168 feet of anchor chain)
Fresh Aire Owner Manual 2018
8 Return to TOC
NOTE: Fresh Aire carries 300 feet of primary anchor chain in the locker.
Using the Windlass
IMPORTANT NOTES!!
Run the engine when operating the windlass. Otherwise, the windlass will drain the battery,
potentially causing damage to both the windlass and battery. You may then have to deploy or
retrieve the anchor by hand using a winch.
The windlass and bow thruster run off the same battery. Use them wisely and sparingly.
Always have someone at the helm when performing anchor maneuvers. Drive the boat to
and from the anchor. Do not pull the boat to the anchor with the windlass. Use the bow thruster
to help with maneuvers.
The anchor has a swivel, which allows you to twist the anchor away from the boat or towards
the boat, but you do have to go out over the prow to adjust the position of the anchor. When
raising the anchor, the claw needs to face toward the boat to bring it onto the roller. Could try
using the boat hook to adjust the anchor.
Lowering the anchor
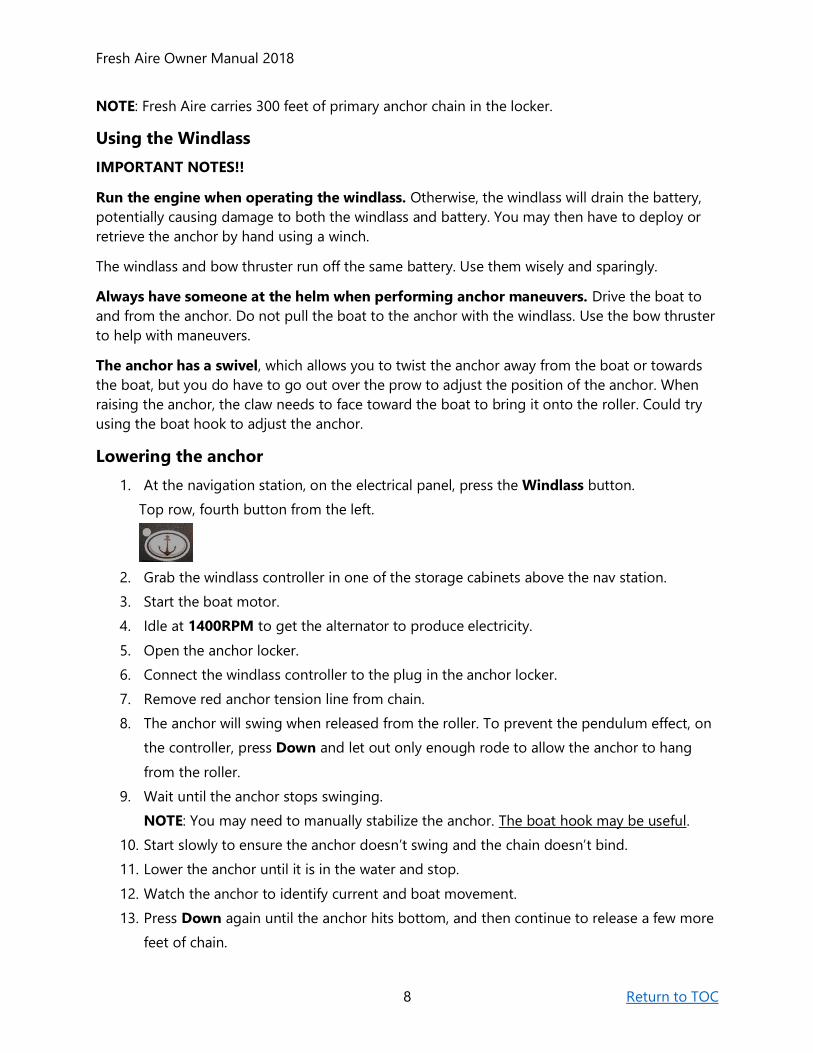
1. At the navigation station, on the electrical panel, press the Windlass button.
Top row, fourth button from the left.
2. Grab the windlass controller in one of the storage cabinets above the nav station.
3. Start the boat motor.
4. Idle at 1400RPM to get the alternator to produce electricity.
5. Open the anchor locker.
6. Connect the windlass controller to the plug in the anchor locker.
7. Remove red anchor tension line from chain.
8. The anchor will swing when released from the roller. To prevent the pendulum effect, on
the controller, press Down and let out only enough rode to allow the anchor to hang
from the roller.
9. Wait until the anchor stops swinging.
NOTE: You may need to manually stabilize the anchor. The boat hook may be useful.
10. Start slowly to ensure the anchor doesn’t swing and the chain doesn’t bind.
11. Lower the anchor until it is in the water and stop.
12. Watch the anchor to identify current and boat movement.
13. Press Down again until the anchor hits bottom, and then continue to release a few more
feet of chain.

Fresh Aire Owner Manual 2018
9 Return to TOC
14. Shift the boat into reverse and let out enough rode to properly anchor the boat based
on the scope requirements for your depth, weather conditions, and tide.
15. Hook the loop ends around the outside of the boat and place the loops on to the boat
cleats.
16. On the hook end, pull the pin, place the hook on a chain link, and release the pin.
17. Lower the chain and bridle into the water until it forms a V in front of the boat and the
weight of the chain and anchor are on the bridle, not on the windlass.
18. Take a sighting of surroundings and confirm the anchor is not dragging and you have
sufficient swing room.
19. Disconnect the controller.
20. Close and lock the anchor locker.
21. Turn off the windlass circuit breaker.
22. Replace windlass controller in the nav station cupboard.
Raising the anchor
1. On the electrical panel, press the windlass button.
Top row, fourth button from the left.
2. Grab the windlass controller in one of the storage cabinets above the nav station.
3. Start the boat motor.
4. Idle at 1400RPM to get the alternator to produce electricity.
5. Open the anchor locker.
6. Connect the windlass controller to the plug in the anchor locker.
7. On the windlass controller, press Up to get to the bridle hook.
8. Remove the bridle from the anchor chain and store the bridle.
9. On the windlass controller, press Up again, but stop often to prevent overrunning the
chain and move the boat forward to release tension on the chain.
If the tension is too much, the windlass will not pull up the chain and will simply spin.
NOTE: Again, do not use the windlass to move the boat to the anchor. Based on your
weather conditions, tides, and current drive the boat to the anchor.
10. When you can see the anchor, let it rest below the water surface to stop the swing and
clean the anchor.
11. Press Up and just before the swivel enters the roller, stop until the anchor stops
swinging. The boat hook may be useful.
Fresh Aire Owner Manual 2018
10 Return to TOC
12. Adjust the anchor so the claw faces the boat.
13. Press Up until the anchor is in place, slowly. Do not force the windlass to pull the chain
taut.
14. Use the anchor tension line to pull the anchor in tight.
15. Tie the anchor tension line off.
16. Disconnect the windlass controller.
17. Close and lock the anchor locker.
18. Turn off the windlass at the nav station.
19. Replace windlass controller in the nav station cupboard.
4. Barbecue
The BBQ plumbing only allows you to cook on the barbecue OR the galley. You cannot run the
stove and the BBQ at the same time.
The BBQ is a Magma propane stove with a large round party grill.
To operate the barbecue:
1. Open the valve on the propane tank.
2. Remove blue barbecue cover and stow.
3. To the left of the LP tank storage area, turn the clear plastic Barbecue LP Connector
cover counter-clockwise to open.
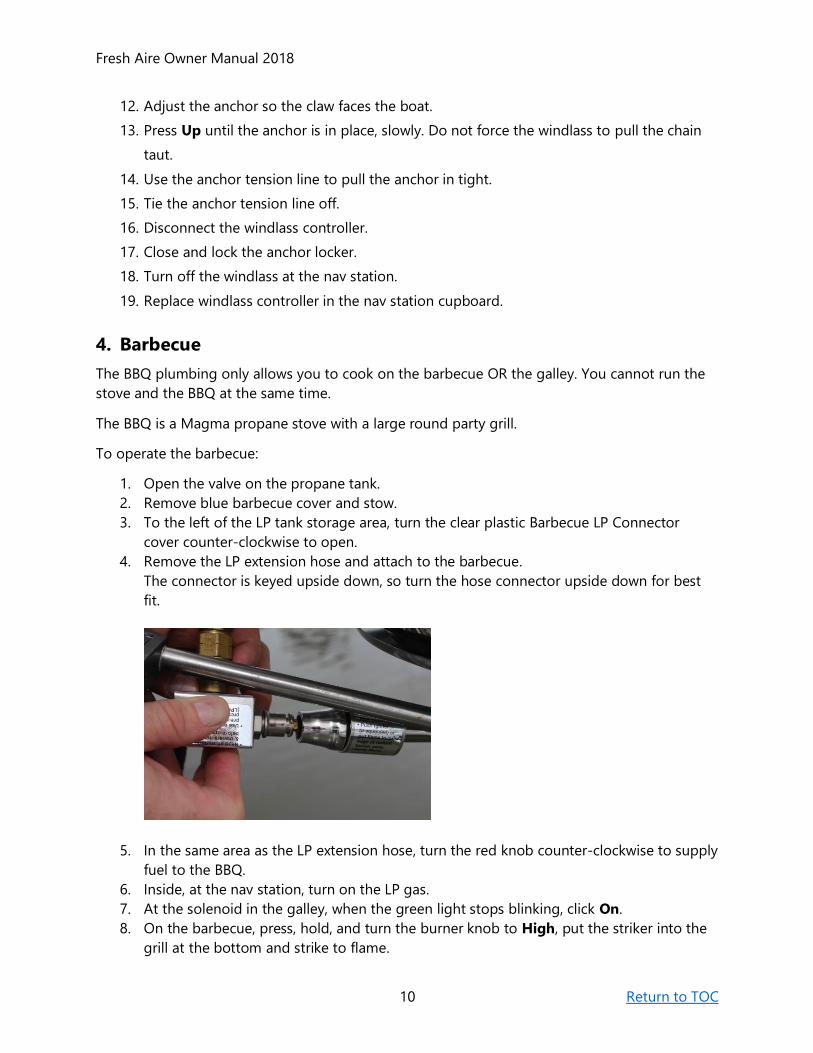
4. Remove the LP extension hose and attach to the barbecue.
The connector is keyed upside down, so turn the hose connector upside down for best
fit.
5. In the same area as the LP extension hose, turn the red knob counter-clockwise to supply
fuel to the BBQ.
6. Inside, at the nav station, turn on the LP gas.
7. At the solenoid in the galley, when the green light stops blinking, click On.
8. On the barbecue, press, hold, and turn the burner knob to High, put the striker into the
grill at the bottom and strike to flame.

Fresh Aire Owner Manual 2018
11 Return to TOC
9. When finished cooking, in the LP extension hose area, turn the red knob clockwise to
shut off fuel flow to allow galley cooking.
With the lid on, the BBQ tends to be hot and cook quickly, so tend your food often.
Please use the brush attached to the BBQ to clean the grates; this is most effective immediately
after cooking when the grates are warm. As a courtesy to the next guest, you could wash the
removable grates after using the BBQ for the last time.
5. Batteries and Charging
Fresh Aire has three sets of batteries:
1. 1 engine starter battery - under the steps
2. 1 windlass / bow thruster battery - under the forward berth
3. 1 house bank - under the starboard settee forward of the nav station.
The house bank consists of four carbon fiber 110-amp hour AGM deep cycle batteries for
a total capacity of 440-amp hours and a normal usable capacity of 220-amp hours.
NEVER drop the battery usage below 50% charge and below 11 volts. You never want to
take most common AGM deep cycle batteries to 0 volts as they will not recover.
Monitoring battery levels
A “smart” charging system supervises the batter charging and requires no user input. Solar
augments this system. The engine drives a high capacity 115-amp alternator (@ 12 volts) good
for battery charging.
Fresh Aire utilizes 30 amp/120-volt shore power with an onboard 40-amp battery charger.
To get a basic status of the starting battery and the service (house) bank
1. On the Electrical Control Panel, press the Panel Lt button (second row, third button).
2. Page through the LCD monitor using the Up or Down key.
To check the overall battery voltage
1. Use the Mastervolt electrical panel on the right side of the nav station instrument panel.
This device provides a granular view of the electrical aspects of the battery system.
2. Tap the screen to light the panel.
You should try not to discharge below 12.0 volts before recharging the batteries by (1)
running the engine or (2) plugging into shore power. If the service battery voltage drops to 11.8,
please reduce battery use by turning off electrical appliances, including the refrigerator and
freezer, until you can recharge the batteries.

Fresh Aire Owner Manual 2018
12 Return to TOC
We recommend that you check the status of the batteries in the evening. If the service
battery voltage is at or below 12.0 volts, please run the engine until the voltage reaches 12.5
volts.
6. Berths and Headroom
Fresh Aire is ideal for 6 people in three cabins. The forward bed is 6’4” long, 5’2” wide (at the
head) and 2’1” wide (at the foot). The aft beds are each 6’6” long, 4’8” wide (at the head) and
3’8” wide (at the foot). All beds have a 4” foam cushion and a 3” memory foam topper.
The headroom on Fresh Aire (taken centerline in the main salon) is 6’4”. There is approximately
6’6” headroom in the standing area of the aft cabins and 6’4” headroom in the standing area of
the forward cabin.
7. Bilge Pumps
For your own safety, do not store anything in the bilge pump area. This is one of the few
places in the Owners Manual where we wish to be emphatic. A shift in position by anything
stored in the bilge pump area because of a boat maneuver (one as simple as coming about)
could damage (a) the water level sensor which automatically activates the bilge pump, (b) the
bilge pump or (c) both. Because of the delay in alerting you (or a later charter guest) to a major
safety issue, this could alter a controllable leak to a catastrophic situation, endangering lives and
potentially causing the loss of the vessel. Please do not allow anyone on board to store
anything in the bilge area.
The circuit breaker switch for the bilge pump should always be on.
Top row, last button
Check the electronic bilge pump area every day! The bilge pump area is in front of the aft
head door. Lifting the floorboard directly to the starboard of the door of the aft head provides
access. Except in the event of a small amount of condensation, the bilge should always be
completely dry.
If you encounter excessive water (more than 2 or 3 cups) in the bilge pump area let SJS
know. Fresh Aire has a saildrive propulsion so there should be no leakage through the propeller
shaft packing and the bilge should always be completely dry.
When the bilge pump electric switch is on, the bilge pump operates automatically when
the float switch in the bilge is triggered. Bilge pump operation is accompanied by an alarm. If
the alarm goes off, please attempt to locate and stop the leak. If you cannot locate and stop a
slow leak, please report the situation to San Juan Sailing on check-in. The bilge pump will shut
off automatically when there is a very low level of water (approximately 1 ½ inches) in the bilge.
Please contact San Juan Sailing (or the Maintenance Professional after hours/Sunday) if there is
any substantial continuing water coming into the bilge.
Fresh Aire Owner Manual 2018
13 Return to TOC
Fresh Aire has two bilge pumps:
1. The electric bilge pump is wired to the breaker on the electrical panel.
2. The manual emergency bilge pump is behind and below the engine throttle and
engine monitor panel on the starboard side.
To operate the manual emergency bilge pump
1. Open from top with both hands.
2. Push it back and forth. There is no emergency bilge pump handle; it is completely hand
operated.
Note: The shower sump pumps are also effective water removal pumps in the event water is
high enough to enter the shower compartments. Turn them on at the electrical panel, second
button from the left in the second row.
Finally, there is a bucket in the port cockpit locker. Empty the water into the cockpit and it will
drain off the boat.
8. Boat hook
Boat hook is attached to the bimini in the cockpit.
We use the boat hook to push the dingy from the boat when raising and lowering, grabbing
buoys, and straightening the anchor when raising it.
Pull out and push in one end of the boat hook at a time. It does take some effort to remove
and replace the hook in the clips. We pull out one end and use it as leverage to release the
other. Please pull it straight out and not down to prevent breaking the clips.
9. Davit, Dinghy, and Outboard
Do NOT remove the motor from the dinghy. The motor is locked to the dinghy. The dinghy
rides on the davit with the motor in place.
The motor is in operational position on the dinghy. Meaning, the propeller will be in the
water when you lower the dinghy. If you want to use the dinghy with the oars, lift the motor to
the up position.
Put the dinghy drain plug in the dingy before lowering.
Operating the Davit
Before lowering the dinghy, BE SURE THE DINGHY DRAIN PLUG IS IN PLACE IN THE
BOTTOM OF THE DINGHY.
Do not raise the dinghy with the transom down.

Fresh Aire Owner Manual 2018
14 Return to TOC
We recommend that you do not lower the transom with the dinghy on the davit. If you
must lower the transom while the dinghy is on the davit watch out for the dinghy motor’s
propeller!
Davit tie-down strap operation - To release and tighten the black straps - we have a ratchet
and strap system - common type found in stores.
To release the dingy from the davit
1. BE SURE THE DINGHY DRAIN PLUG IS IN PLACE.
2. Pull blue painter line out of the dinghy with enough slack to tie off so the dinghy doesn’t
float away.
3. Release the ratchets on the dinghy securing straps just enough to loosen the straps.
Check out this video if you have not used ratchets like this before:
https://www.youtube.com/watch?v=yDf6j6RPVDM
4. Untie and unhook the securing straps from the davit.
DO NOT remove the ratchets from the straps.
5. On both sides of the davit, release the black lines from stainless steel cleats and black
clam cleats.
6. Slowly lower dinghy.
7. Once in in the water, open the transom.
NOTE: Use the boat hook to push the dinghy from the boat.
8. Release the davit pulley carabiners from the dinghy support cables. Leave the support
cables attached to the dinghy.
9. Attach the davit line carabiners to the davit frame.
To mount the dinghy to the davit
The dinghy and engine are heavy! It takes work to lift the boat from the water.
The dinghy will rub on the back of the boat. Use the boat hook to push on the dinghy’s aft
block tackle (by the motor). The boat hook is attached to the bimini.
1. Turn the dinghy so the motor is on the port side of Fresh Aire.
The davit has a block and tackle (pulley) system to raise the dinghy. The starboard side of
the davit has two pulleys versus three pulleys on the port side to handle the weight of
the motor.
2. Attach the davit pulley carabiners to the dinghy support cables.
3. Close the transom before raising the dinghy.
4. Remove black lines from the black clam cleats and use them to raise the dinghy.
5. Cleat the lines to the davit’s black clam cleats.
Fresh Aire Owner Manual 2018
15 Return to TOC
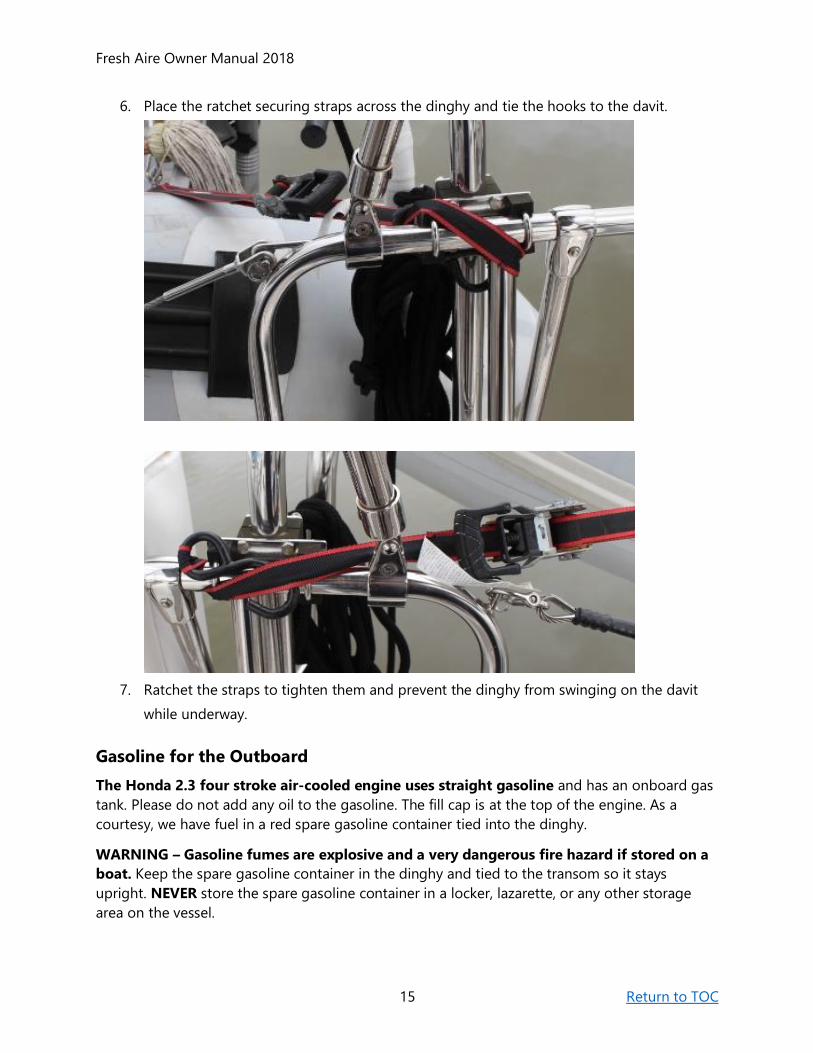
6. Place the ratchet securing straps across the dinghy and tie the hooks to the davit.
7. Ratchet the straps to tighten them and prevent the dinghy from swinging on the davit
while underway.
Gasoline for the Outboard
The Honda 2.3 four stroke air-cooled engine uses straight gasoline and has an onboard gas
tank. Please do not add any oil to the gasoline. The fill cap is at the top of the engine. As a
courtesy, we have fuel in a red spare gasoline container tied into the dinghy.
WARNING – Gasoline fumes are explosive and a very dangerous fire hazard if stored on a
boat. Keep the spare gasoline container in the dinghy and tied to the transom so it stays
upright. NEVER store the spare gasoline container in a locker, lazarette, or any other storage
area on the vessel.
Fresh Aire Owner Manual 2018
16 Return to TOC
Beaching the Dinghy
Please take special care when beaching the dinghy. Most of the beaches on which you will
land are barnacle-covered with bottom-slicing rocks. Please review the section on beaching the
dinghy in your Guest Charter Manual on the boat.
Owners Tip: We use crocs or diving booties to exit/enter the dinghy off the side into/out of the
water. We find this an easy and effective way to avoid damage to the bottom of the dinghy. You
can then change to other shoes and leave the crocs/booties in the dinghy while on land. Note
that you can use the cockpit shower to wash off salt and sand when you return to the boat.
10. Dodger & Bimini
CAUTION: San Juan Sailing has found that most spray sunscreens react chemically with
the clear vinyl. So please inform your crew to spray sunscreen downwind of the dodger and
bimini windows. And please don’t lean against the dodger and bimini windows with sunscreen
on your back and shoulders. Once that chemical reaction takes place, the clear vinyl is ruined
and must be replaced (at a cost of around $500).
Please don’t remove the dodger or the bimini. Every part is tightly fitted and difficult to put
back in place. The dodger not only protects the crew from the weather when in the cockpit, but
it has several stainless steel grab handles for safety.
Removing the bimini can cause damage to the solar panels. The solar panels are attached to the
bimini.
To clean, please use generous amounts of fresh water from a pan from the galley and
“flood” the glass to dissolve the salt crystals away. Please avoid directly touching the glass
with a damp rag or sponge. When salt spray dries on the glass, tiny salt deposits are left behind
and tend to obscure your vision. Salt does dissolve in water, but not as quickly as you might
think. The salt crystals remain un-dissolved for several seconds. So, using a cloth or sponge on it
is like rubbing the vinyl with sand paper! If the dodger vinyl is really clear, you can thank
previous guests for their care. We thank you too. Better yet, wait until you’re at a dock where
you can hose off the salt crystals.
Fresh Aire Owner Manual 2018
17 Return to TOC
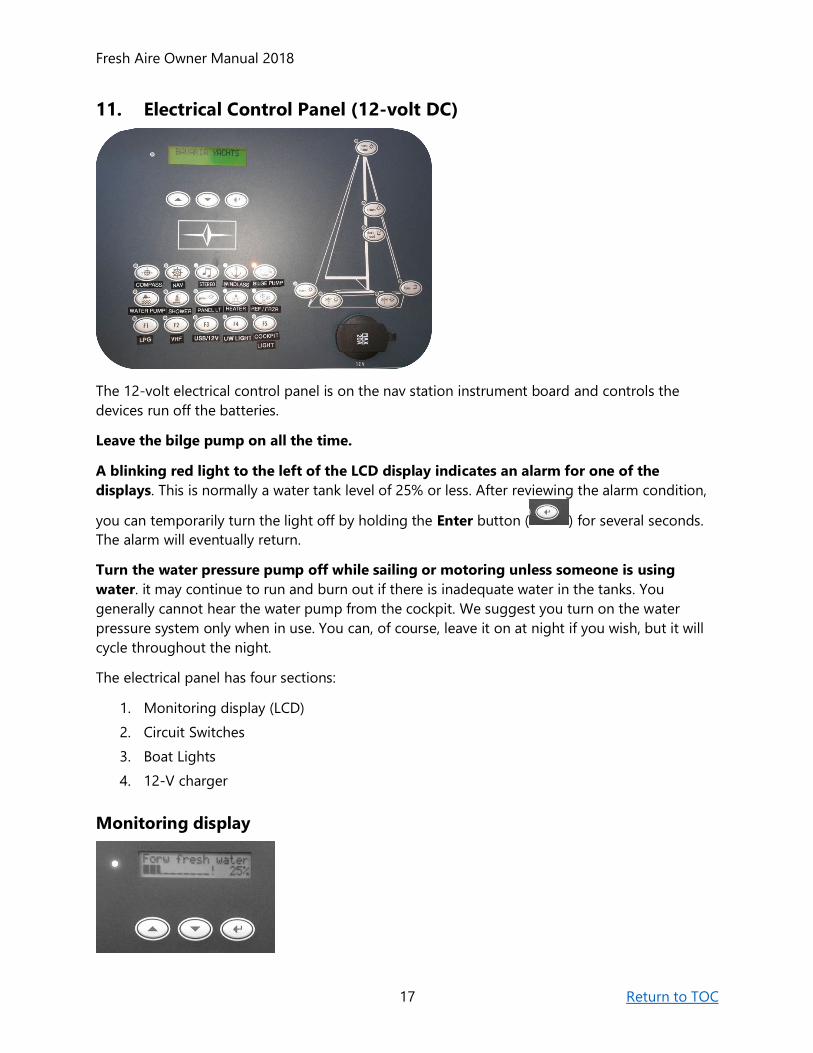
11. Electrical Control Panel (12-volt DC)
The 12-volt electrical control panel is on the nav station instrument board and controls the
devices run off the batteries.
Leave the bilge pump on all the time.
A blinking red light to the left of the LCD display indicates an alarm for one of the
displays. This is normally a water tank level of 25% or less. After reviewing the alarm condition,
you can temporarily turn the light off by holding the Enter button ( ) for several seconds.
The alarm will eventually return.
Turn the water pressure pump off while sailing or motoring unless someone is using
water. it may continue to run and burn out if there is inadequate water in the tanks. You
generally cannot hear the water pump from the cockpit. We suggest you turn on the water
pressure system only when in use. You can, of course, leave it on at night if you wish, but it will
cycle throughout the night.
The electrical panel has four sections:
1. Monitoring display (LCD)
2. Circuit Switches
3. Boat Lights
4. 12-V charger
Monitoring display

Fresh Aire Owner Manual 2018
18 Return to TOC
At the top left is an LCD display that you can page through using the “up/down” buttons, to
monitor battery charge, water tank, and waste tank status.
Please note that waste tank monitors are notoriously inaccurate.
Circuit Switches
Circuit switch buttons are located below the LCD display and the Bavaria logo. Use these to turn
on and off the specified electronics.
• First row, left to right: Cockpit compass light, all navigation instruments, Fusion
entertainment system, windlass, and bilge pump
• Second row, left to right: Water pressure, shower sump pumps, electrical panel lights,
Webasto heating system, refrigerator, and freezer
• Third row, left to right: (F1) propane delivery system, (F2) VHF, (F3) USB/12V outlets in
berths, (F4) stern underwater light, (F5) cockpit floor lights and cockpit table lamp
Except for the bilge pump, we highly recommend turning off all circuit switches unless the
specific equipment/item serviced by that electrical switch is in use, such as the
refrigerator/freezer.

Fresh Aire Owner Manual 2018
19 Return to TOC
Boat Lights
The third section is the boat lights schematic containing the interior and exterior light switches.
Note that your contract with San Juan Sailing specifically prohibits travel at night. You
should never be using the steaming, bow, or stern lights.
If any light on this panel blinks, a lightbulb is out. Only for this section. If this happens, let
SJS know during check in.
The mast head/anchor light should be on at night whenever you moor at a buoy or anchor.
Cabin #1 is for the v-berth lights and #2 is for the main and aft cabins.
12-Volt Charger
At the bottom right of the panel is a 12-volt receptacle for charging 12-volt electrical devices,
such as cell phones. A 12-volt adapter is in a cupboard above the nav station.
Each cabin also has a 12-volt outlet next to the USB outlets.
12. Electrical AC Circuit Breakers (AC)
Use the AC panel:
(a) while operating on shore power or
(b) while using the inverter to provide 110-volt alternating current to selected equipment
(primarily the microwave) and to the outlets when the boat is not connected to shore power.
Devices that use the inverter (microwave, hot water heater, and anything plugged into an
AC outlet) utilize a large draw on the house batteries and could reduce them to dangerous
levels. We suggest using the inverter only for short periods of time while the engine is idling at
1400 rpm.
Fresh Aire Owner Manual 2018
20 Return to TOC
The AC system utilizes a 110v 30-amp shore power connection. (this supplies to a 40-amp 12-
volt battery charger). This connection is just in front of the Starboard Helm engine controls.
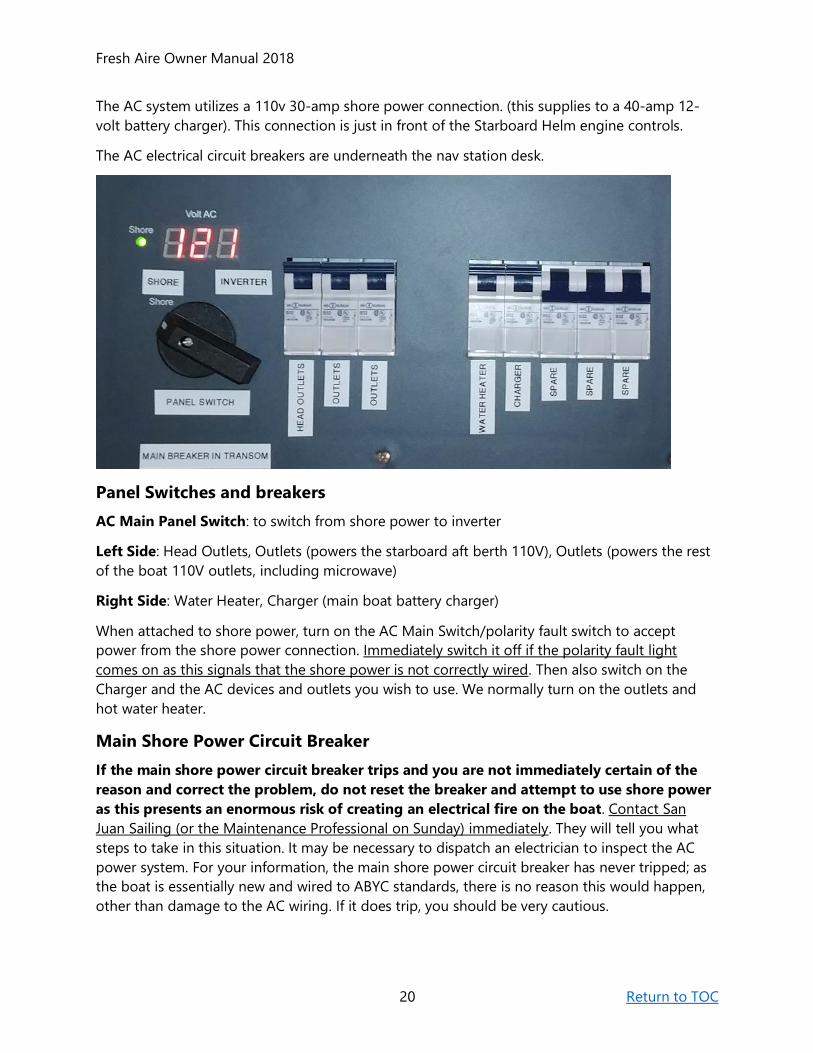
The AC electrical circuit breakers are underneath the nav station desk.
Panel Switches and breakers
AC Main Panel Switch: to switch from shore power to inverter
Left Side: Head Outlets, Outlets (powers the starboard aft berth 110V), Outlets (powers the rest
of the boat 110V outlets, including microwave)
Right Side: Water Heater, Charger (main boat battery charger)
When attached to shore power, turn on the AC Main Switch/polarity fault switch to accept
power from the shore power connection. Immediately switch it off if the polarity fault light
comes on as this signals that the shore power is not correctly wired. Then also switch on the
Charger and the AC devices and outlets you wish to use. We normally turn on the outlets and
hot water heater.
Main Shore Power Circuit Breaker
If the main shore power circuit breaker trips and you are not immediately certain of the
reason and correct the problem, do not reset the breaker and attempt to use shore power
as this presents an enormous risk of creating an electrical fire on the boat. Contact San
Juan Sailing (or the Maintenance Professional on Sunday) immediately. They will tell you what
steps to take in this situation. It may be necessary to dispatch an electrician to inspect the AC
power system. For your information, the main shore power circuit breaker has never tripped; as
the boat is essentially new and wired to ABYC standards, there is no reason this would happen,
other than damage to the AC wiring. If it does trip, you should be very cautious.

Fresh Aire Owner Manual 2018
21 Return to TOC
The main shore power circuit breaker is on the interior of the hull space below the instruments
next to the starboard steering wheel. You can access the breaker by removing the panel at the
rear of the starboard aft berth or by removing the storage compartment behind the starboard
steering wheel.
Using the Inverter
You can generate 110-volt AC power when not connected to shore power by using the inverter.
Devices that use the inverter (microwave, hot water heater, and anything plugged into an
AC outlet) utilize a large draw on the house batteries and could reduce them to dangerous
levels. We suggest using the inverter only for short periods of time while the engine is idling at
1400 rpm.
To use the inverter
1. Under the navigation table, on the AC Circuit Breaker panel, switch the big black Panel
Switch to Inverter.
NOTE: Once you make this switch, if the boat is plugged into shore power, it is not using
shore AC now - you are using only the house batteries.
2. On the right of navigation station instrument panel, tap the Mastervolt device screen to
activate the device.
3. Press Inverter.
4. Press Inverter Standby to activate the system.
5. Under navigation station, on the AC Circuit Breaker panel, switch on the circuits you
wish to use.
If the microwave clock is on, the inverter is generating your AC current.
6. Turn on the boat motor and set to idle at 1400 RPM.
Review steps in the Starting the Engine in the Engine & Handling section.
7. When finished using the inverter, on the AC Circuit Breaker panel, switch the big black
Panel Switch back to Shore Power.
NOTE: The Panel Switch should always be on Shore Power when not using the inverter.
13. Engine, Handling, and Fuel
Fresh Aire has a 40 HP Volvo Penta sail drive engine and a 3-blade foldable propeller.
All engine start-up controls are at the starboard helm.
(Economy Cruising RPM: 2200, Cruising RPM: 2550, Max RPM: 3000)
Fresh Aire Owner Manual 2018
22 Return to TOC
Starting the Engine
If control readings are dim, press and hold Alarm/Dim for at least 5 seconds or until
appropriate setting is reached.
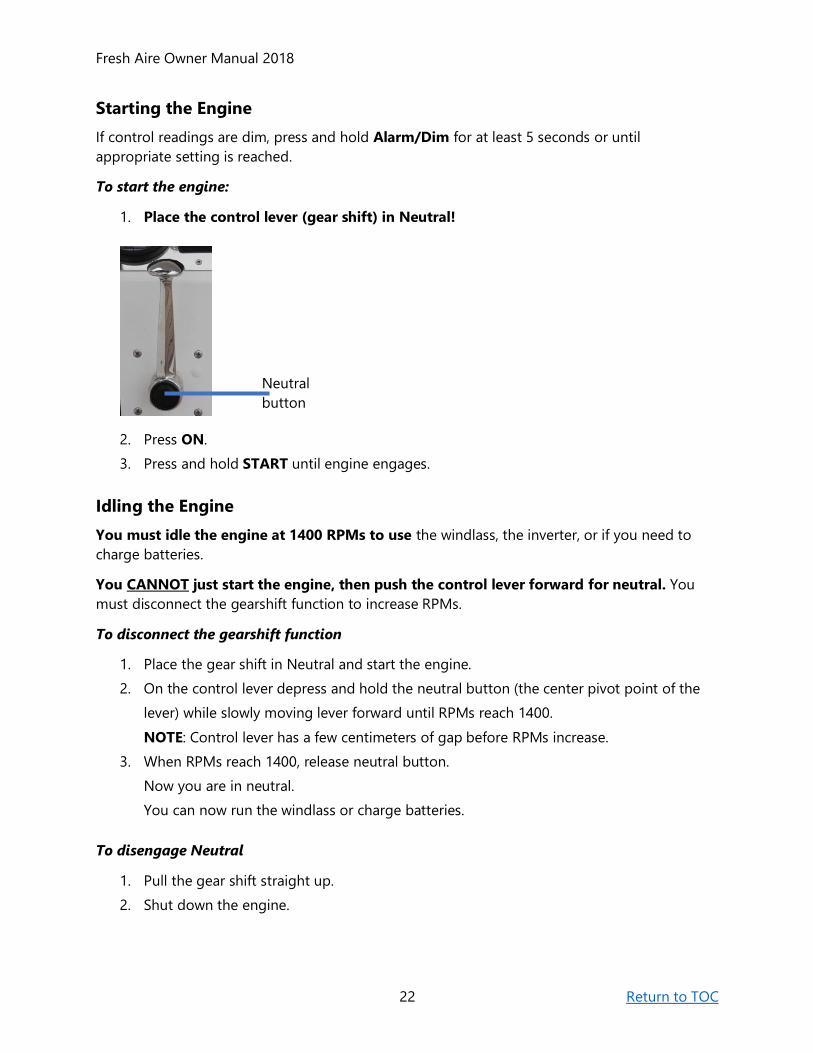
To start the engine:
1. Place the control lever (gear shift) in Neutral!
2. Press ON.
3. Press and hold START until engine engages.
Idling the Engine
You must idle the engine at 1400 RPMs to use the windlass, the inverter, or if you need to
charge batteries.
You CANNOT just start the engine, then push the control lever forward for neutral. You
must disconnect the gearshift function to increase RPMs.
To disconnect the gearshift function
1. Place the gear shift in Neutral and start the engine.
2. On the control lever depress and hold the neutral button (the center pivot point of the
lever) while slowly moving lever forward until RPMs reach 1400.
NOTE: Control lever has a few centimeters of gap before RPMs increase.
3. When RPMs reach 1400, release neutral button.
Now you are in neutral.
You can now run the windlass or charge batteries.
To disengage Neutral
1. Pull the gear shift straight up.
2. Shut down the engine.
Neutral
button

Fresh Aire Owner Manual 2018
23 Return to TOC
Proceeding in Forward/Reverse
To keep the transmission healthy, please remember to pause 1-2 seconds in the vertical neutral
position when shifting from forward to reverse and vice versa.
Fresh Aire has a single throttle; engage forward gear by pushing ahead on the throttle or reverse
gear by pulling back on the throttle. The further forward or back, the faster the engine speed.
Engine Shutdown
1. On the engine control panel, push the Stop button.
The engine is off if the RPM gauge goes to zero.
2. Wait until the oil pressure monitor drops, then push the On/Off button.
The LCD display will go blank.
If you do not push the “on/off” button, the system will give an audible alarm after a few seconds
or so.
If you turn the battery off when the engine is on, the engine will continue to run. Press the stop
lever on the engine.
If sailing after engine shutdown and you feel a vibration: with the engine turned off, push
the gear shift to reverse, then back to neutral to close the foldable prop. The foldable propeller
should fold up automatically on engine shut down but doesn’t always.
Bow Thruster
Fresh Aire has a bow thruster, which makes docking and mooring maneuvers much easier.
YOU MUST RUN THE ENGINE TO OPERATE THE BOW THRUSTER. The bow thruster uses the
same battery that powers the windlass. Because it draws a substantial amount of power, use in
short bursts, please use the bow thruster only when the engine is running.
Have RPMs up to 1400, so the alternator is producing electricity.
When performing bow thruster maneuvers remember that the boat’s pivot point is the
keel, which is dead center on the boat. Hence, the stern will move in the opposite direction
from the bow.
The bow thruster is powerful, so it only takes a couple of seconds to get the boat moving in the
desired direction.
To activate the bow thruster
The bow thruster controls are at the starboard helm.
1. With the engine running, on the bow thruster controller, push both On buttons at the
same time for a couple of seconds.
2. A light indicates when the bow thruster is activated.
Fresh Aire Owner Manual 2018
24 Return to TOC
To use the bow thruster: Push on the arrow in the direction you wish the bow to move.
To turn off the bow thruster: The bow thruster turns off automatically if not used for several
minutes.
Fuel Tank and Gauges
Fuel gauges on sailboats are notoriously inaccurate and Fresh Aire is no exception. It will
stay on “F” (full) until about 30% of the available fuel is used. At ½ tank there is probably less
than 25 gallons of fuel available. At a low fuel level (1/4 tank), the engine may suck air or sludge.
When the fuel gauge reaches ½ tank, please refuel at the first opportunity.
Please do not let the fuel level fall below ¼ full; you are in danger of running out of fuel,
which (in addition to requiring towing) can require extensive and expensive engine maintenance.
Because the fuel gauge overstates the available fuel, we recommend refueling promptly after
reaching the ½ tank mark.
Full fuel may still show below the Full fuel line.
Fresh Aire has a theoretical range under power of approximately 350 nautical miles (55
gallons x 1 gal per hour x 7 knots).
You can estimate how much fuel you will need to refill the fuel tank by noting the engine hours
at the time you start your cruise. Engine values: ~ .8 gal/hr @ Economy Cruising 2200 RPM
(6.9knots), ~ 1.1 gal/hr @ Cruising 2550 RPM (7.7 knots), ~ 2 gal/hr @ Max 3000 RPM (8.2
knots).
Keep in mind the Webasto cabin heater uses the same diesel as the engine.
Be extremely careful when filling the fuel tank. The fuel lines on sailboats are generally
smaller than those on motor vessels. If you are filling the tank at the fuel station at Bay 3 in
Bellingham Marina (where Fresh Aire is docked), the attendant will often turn down the pump
rate. One can normally hear when the pitch of the noise going into the line changes and gets
higher; unless you have created a surge in the line, this means the tank is full. To avoid a spill,
please stop.
When filling, we recommend that one person stand at the vent with paper towels to catch
any fuel that may exit through the vent.
The fuel fill line is on the starboard side of the stern.
The fuel vent is on the starboard side, about 4 feet from the stern. No wrench is needed.
Please fill slowly so that fuel does not come out of the fuel line or the vent. The fuel tends to
bubble up and over the sides at the end.
Diesel fuel will stain fiber glass. Please use soapy water to clean up any fuel drips. Thank you.
San Juan Sailing requests that after you restart the engine and before leaving the fuel
dock, check the fuel gauge. If the gauge is not on “F”, stop the engine and add more fuel. That
way, San Juan Sailing will not charge you a $50 fueling charge (plus the cost of fuel).

Fresh Aire Owner Manual 2018
25 Return to TOC
14. Entertainment Systems
Fresh Aire has a Fusion Sound System with interior cabin and cockpit speakers and a television
with DVD and USB input capabilities.
Fusion Sound System
To turn on the radio: On the Electrical System Control Panel, press the music button (top row,
third from left).
The radio will eventually turn on but takes about 30 seconds to receive the signal from the
electrical panel.
To change the volume
When the radio is first turned on, the interior AND cockpit speakers are turned up. Not a
pleasant experience in a quiet cove.
1. On the radio, push the big button on the center of the dial.
Two big columns will display (Interior and Cockpit).
2. Press the dial again to select Interior or Cockpit or both.
3. Once you have your option(s) selected, use the large dial to adjust the volume.
The radio will automatically return to default radio station view after a few seconds of
inactivity.
The radio can accept input from Bluetooth device (i.e. phone) and is listed as Fresh Aire in the
list of devices.
TV (is not tied to the Fusion sound system)
The TV does not have any connection to a TV program supplier and is made available to play
DVDs or other local input. There is a small selection of DVDs in one of the small cabinets above
the settee forward of the NAV station.
The TV will also accept other sources, including a USB Player (USB2) and several types of cards
(SD/MMC/MS), and HDMI. The system supports MPEG1 and MPEG2 video, WMA and MP3 audio
and JPEG photos. A portion of the TV Instruction Manual is on the shelf in the nav area.
To operate the TV as a DVD player
1. On the TV press the Power button. The “AXESS” logo will come up on the screen.
2. Insert the DVD at the bottom right side of the TV, with the top of the DVD toward the
bow and content side of the DVD toward the stern.
3. The DVD will automatically load.
To extract the DVD, press the Open button (left side of the far left button on the top of the TV).

Fresh Aire Owner Manual 2018
26 Return to TOC
15. Head & Holding Tanks
Fresh Aire has two 20 gallon holding tanks, one for each head.
The toilets are salt water flush.
San Juan Sailing staff will discuss holding tanks, overboard discharge, and pump outs upon your
arrival.
Offshore sailors have a rule: “Never put anything down a marine toilet that hasn’t been
eaten first.” And that, of course, includes feminine items. In fact, offshore sailors do not even
put soiled toilet tissue down a marine head. They simply deposit soiled toilet tissue (and
feminine items) in a receptacle such as a wastebasket with a liner bag or a Ziploc baggie. We
and San Juan Sailing highly recommend you follow this procedure. Since San Juan Sailing has
been recommending this, the fleet has had almost no incidents of plugged heads!
If the toilet pump starts to resist your flushing effort, don’t force it! Exploding or leaking
sewage is most unpleasant! Search out the problem and correct it. Pumping the toilet puts
everything into the holding tank behind the panel above the toilet.
Monitor Holding Tanks
Holding tank gauges on the Electrical Control Panel are not connected.
Empty Holding Tanks
If you pump out the holding tank at a shore facility, please fill it with about 5 gallons of fresh
water through the deck fitting to rinse, and then pump it out again. Thank you!
To empty the holding tanks through gravity feed
Because the holding tanks are above the water line, they can be emptied through a gravity
discharge system.
NOTE: Please keep in mind that it is illegal in the US to discharge holding tanks within 3 miles of
the shoreline.
Due to a recent boarding by the US Coast Guard, the head valves are disconnected, but
attached by lanyard to their waste seacock under the sink.
1. Under a head sink, attach the red handle to the large waste seacock, then turn the
handle to open.
2. All tank contents will drain overboard in just a few seconds…you’ll hear a noticeable
“whoosh” as it discharges.
3. Close the large waste seacock handle and remove from the valve and stow. All toilet
contents will go to and remain in the holding tank once again.
Fresh Aire Owner Manual 2018
27 Return to TOC
16. Heater
The diesel-fired Webasto cabin heater will make the interior “toasty” within 10-15 minutes.
The heat is dry, comfortable, and on those rainy days or cool evenings, makes a huge difference
in cruising comfort!
When it’s cool, we recommend warming the boat before turning in for the night, with the last
person to go to bed instructed to turn the diesel heater off before retiring. The first one up in
the morning can simply turn the cabin heater back on. Otherwise, the heater will keep a
constant temp in the boat during the night, but cycling to do so, and hence using the battery
when it runs. If you turn it off the comforters should keep you warm.
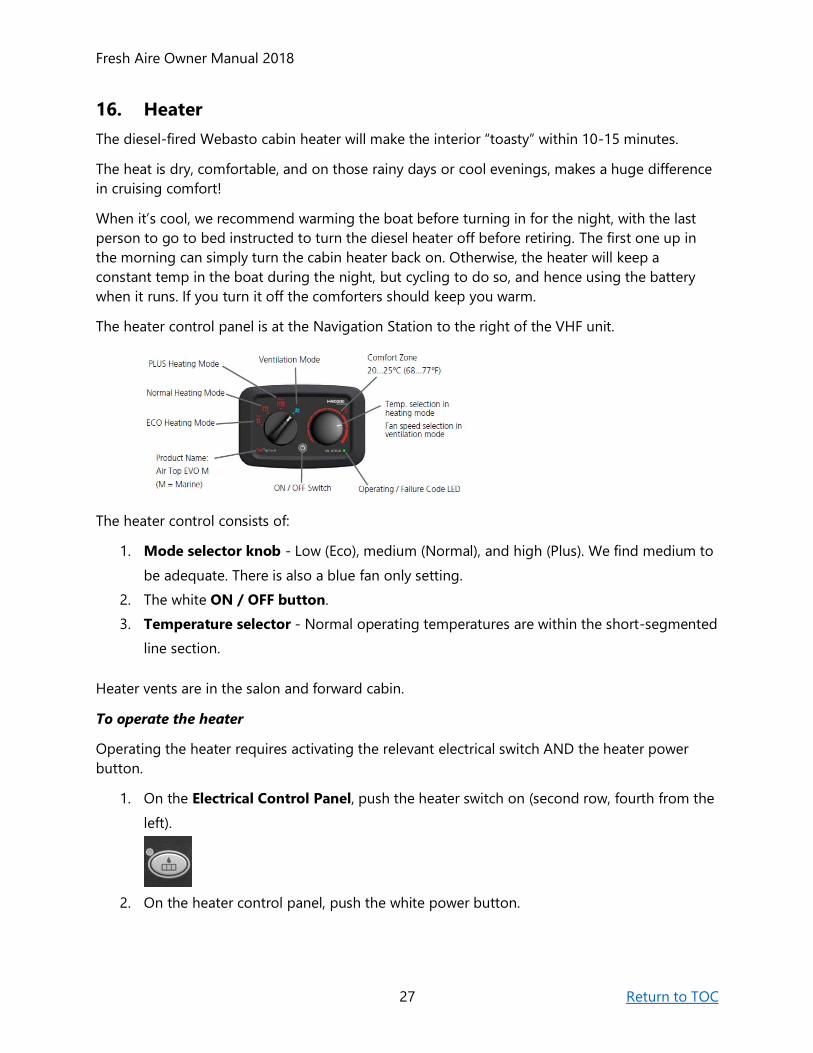
The heater control panel is at the Navigation Station to the right of the VHF unit.
The heater control consists of:
1. Mode selector knob - Low (Eco), medium (Normal), and high (Plus). We find medium to
be adequate. There is also a blue fan only setting.
2. The white ON / OFF button.
3. Temperature selector - Normal operating temperatures are within the short-segmented
line section.
Heater vents are in the salon and forward cabin.
To operate the heater
Operating the heater requires activating the relevant electrical switch AND the heater power
button.
1. On the Electrical Control Panel, push the heater switch on (second row, fourth from the
left).
2. On the heater control panel, push the white power button.

Fresh Aire Owner Manual 2018
28 Return to TOC
The heater takes several minutes to “cycle up” and get hot before the fan starts blowing hot air.
When the heater initially starts it will run at high speed. Once the setting temp is reached the
high speed will reduce to keep the setting temp.
What’s that ticking in the aft starboard berth? The heater has a dosing pump under the aft
starboard bed. You will hear it tick as the heater warms up. The ticking quiets once the heater is
running.
To turn off the heater
1. On the heater control panel, push the white power button.
2. On the Electrical Control Panel, push the heater button (second row, fourth from the
left).
The fan will also continue to run for several minutes after you turn off the unit as the
heater cycles down to cool.
17. Keel Depth
San Juan Sailing strongly recommends you maintain a minimum of 10’-12’ under the boat
at all times, both underway and at low tide on anchor. This means that some popular sites,
such as Fossil Bay on Sucia (buoys at 7-9 feet), are not accessible except at major positive tides.
Fresh Aire has a deep trapezoidal keel (which provides a major improvement in sailing
performance relative to a shallow draft keel) and draws roughly 7’.
To avoid grounding, always take into account the often significant tidal change while
anchored. Anchoring or taking a buoy in this Northwest cruising area is very different than
doing so in the Caribbean; in the Caribbean you are OK with 3’-5’ (sometimes even less) under
the keel because there is almost no tidal change. Here, in the Pacific Northwest, the tides shift
and significant variations in anchoring depths can occur. Check your low tides (in the onboard
tide data books) when choosing an anchor/mooring location.
18. Lights
Other than the steaming light, Fresh Aire is a fully LED equipped boat.
Interior Cabin Lights
Control the interior cabin lights on the Electrical Control Panel by pushing the Cabin 1 and
Cabin 2 buttons on the Boat Lights display.
Cabin #1 is for the v-berth, salon and port aft cabin lights.
Cabin #2 is for the starboard aft cabin lights.

Fresh Aire Owner Manual 2018
29 Return to TOC
Cockpit Courtesy Lights
The cockpit blue floor lights are great for guiding your footsteps when boarding late at night or
for some evening ambience.
To turn on the cockpit lights, on the Electrical Control Panel, press F5 - Cockpit Lights
(bottom row, last button). This switch also activates the cockpit table lamp.
Cockpit Table Lamp
See Cockpit Courtesy Lights.
Underwater Lights
The white underwater lights provide dockside viewing of the marine life at night, if they are
willing. We cannot guarantee the appearance of any creatures.
We recommend only using the underwater lights when on shore power. The underwater
lights are LED, but because of their output wattage they place a heavy draw on the house
batteries.
To turn on the underwater lights, on the Electrical Control Panel, press F4 - UW Light
(bottom row, fourth from left).
19. Navigation Instruments
Fresh Aire has a complete suite of technically sophisticated Garmin instruments. The
radar/chart plotter/GPS, depth sounder, wind instrument, and autopilot are all Garmin products.
AIS (Automatic Identification System) is integrated into the chart plotter to enhance collision
avoidance, especially with larger commercial vessels in low visibility.
The Garmin chart plotter and GMI instruments are by the steering wheels.
Initiating the Navigation Instruments
To activate the instruments
1. On the Electrical Control Panel, press the Nav button (first row, second from left).
2. On the chart plotter in the cockpit, on the center console between the steering wheels,
press the Power button to activate the instruments.
Depth Sounder
We never enter anchorage in less than 7 feet of depth. The transducer for the digital depth
sounder is on the bottom of the hull. We consider 7 feet as the draw depth.
Fresh Aire Owner Manual 2018
30 Return to TOC
The digital depth sounder will not give accurate readings beyond 400’. In deeper water, the
sensitivity on the unit decreases as the transducer tries to get some reading back. Consequently,
you will receive many false readings caused by currents, changes in water temperature, fish, and
seaweed. Use the depth sounder only as an aid to navigation in shallow water.
We do not recommend using the depth sounder’s alarm during the night. Besides a high
battery drain, it’s likely to sound at inappropriate times such as late at night while fish are
passing beneath the transducer. Instead, consult the onboard tide data books to determine
whether you’re anchored in a safe location, considering how shallow your depth will become
when the tide ebbs out of your anchorage in the middle of the night.
Chart Plotter
Fresh Aire is equipped with a color Garmin 820 GPS Map chart plotter. The chart plotter is
generally used without the radar to minimize battery drain.
Although sophisticated and highly reliable, chart plotters are fallible. If the instruments lose
connection with one or more GPS satellites, the chart plotter may show the boat in an erroneous
position, often significantly displaced from your actual condition. You can try to reset this by
turning off the chart plotter and the instrument circuit breaker, and then turning them back on.
To access charts
1. After powering up the navigation instruments, the chart plotter Home page will display.
You can always return to the Home page by pressing the Home button to the right of
the screen.
2. On the chart plotter Home page, press Navigation.
3. On the Navigation page, press Charts.
4. Press the + and - keys to zoom in and out.
Boat Position
In an emergency you may need to identify your boat position. If you make an emergency
call (“Pan, Pan, Pan” or “Mayday”) either U S Coast Guard Sector Puget Sound or Victoria Coast
Guard Radio will respond. After asking if you need assistance and the nature of your emergency,
the responding agency will immediately ask you for your position (longitude and latitude).
To Identify boat position
1. On the chart plotter Home page, press Gauges.
2. On the Gauges page, press Numbers.
Man Over Board
The chart plotter includes a Man Over Board (MOB) button (at the bottom of the Home page)
that will record the boat’s location with a MOB icon. The chart plotter then provides course and
distance to return to that location.
Fresh Aire Owner Manual 2018
31 Return to TOC
Radar
Fresh Aire is equipped with the Garmin model GMR 18HD radar.
To activate the radar
1. On the chart plotter Home page, press the Radar button.
2. On the Radar screen, press Cruising for full screen radar.
3. When the Ready to Transmit message appears, press the Menu button, and then the
Transmit button.
It takes a few seconds for the radar to spin up and the radar screen to populate with the
radar scan.
To see radar overlaid on the navigation chart
1. With the radar scan operating, on the Radar screen, press the Overlay button.
2. To place the navigation chart and the radar chart side-by-side, on the Radar page, press
the Combination button.
3. Page down and select Combination 2 (Navigation Chart and Radar).
AIS
To assist you in collision avoidance at all times, Fresh Aire is equipped with AIS
(Automatic Identification System). AIS is an automatic tracking system used on ships and by
vessel traffic services for identifying and tracking vessels. It provides traffic information and
collision avoidance information in real-time.
AIS is required to be used by (1) all sea-voyaging ships with a gross tonnage of 300 gross
tons or more and (2) all passenger ships. Most commercial vessels are equipped with AIS.
Larger recreational vessels often have AIS; smaller boats, such as recreational fishing boats,
generally do not have a broadcast AIS installation (but may be able to receive AIS signals).
On Fresh Aire AIS is integrated into the chart plotter. The chart plotter will automatically
display vessels broadcasting AIS signals if those vessels may approach your course. The chart
plotter will display the vessel name and its position, course and speed. The display projects the
vessels course and may indicate a danger of collision.
Knotmeter
Speed is indicated in knots or nautical miles per hour. (For comparison, 7 knots is approximately
8 statute mph.)
If the digital knotmeter shows a reading of “0.00” while underway, the paddlewheel in the
transducer is most likely clogged with a piece of eelgrass. Sometimes it will float off overnight.
You can also try removing it by traveling for a short distance in reverse.
Fresh Aire Owner Manual 2018
32 Return to TOC
The chart plotter also displays speed through water information from the knotmeter and speed
over ground (SOG) as determined by the GPS.
20. Propane
Propane is a hazardous gas and requires caution. For your safety, please follow the
appropriate procedures when turning on the stove, oven, or BBQ.
At night, San Juan Sailing recommends you turn off the propane tank with its faucet-like
hand valve. Propane is a deadly gas, heavier than air, and pools. By closing the propane tank,
should the solenoid valve fail, there’s no chance that propane will leak into the vessel. The first
one up in the morning can go out to the tank and turn it back on to start the water boiling for
the coffee!
Please note that the propane tank is in the propane locker at the port stern and isolated
from the rest of the boat. Any leaks there will move down, out, and away from the boat.
While the propane tank normally lasts for 4 weeks or more, San Juan Sailing’s staff tops them off
every 2 weeks so you will have plenty for your cruise.
Connecting to the Propane Supply
You must turn the propane on or off at four points:
1. The faucet-like hand valve at the tank
2. A valve under the stove at the forward edge of the storage cabinet. This is typically
always on.
3. The circuit breaker on the electrical control panel (third row, first button)
4. The solenoid switch at the aft end of the galley
To operate the stove or oven, you must turn on all four points.
To turn on the propane
1. Open the faucet-like hand valve at the propane tank all the way open.
2. Make sure all stove control knobs on the stove are in the “off” position.
3. Check to see that the shut-off valve in the cabinet under the stove is on (handle in the
vertical position).
4. On the Electrical Control Panel, press the LPG button (third row, first button).
5. A green light on the electric solenoid switch at the aft end of the galley will blink
indicating the system is testing for the presence of propane.
6. After the light turns a solid green, on the solenoid switch push the ON button.
When finished using the propane, use the LPG button on the Electrical Control Panel to turn off
the solenoid switch and then Close the valve on the propane tank.

Fresh Aire Owner Manual 2018
33 Return to TOC
NOTE: If you do not close the propane tank valve, consider leaving the LPG button on the
Electrical Control Panel On to enable the propane sniffer in case of a leak.
21. Refrigerator/Freezer
Fresh Aire has a port wall access refrigerator and a small top access freezer under the aft settee
seat.
We recommend leaving the refrigerator and freezer switch on at all times to preserve
food safely and maximum freshness. We generally keep the refrigerator at the “5” cold setting
and run the refrigerator and freezer all the time, which causes a draw on the batteries, but the
solar power generally augments this during the day. You can keep the refrigerator on during the
night, but keep in mind this will cause a draw on the batteries.
The temperature thermostat control dial (with 1 through 7, 7 being coldest and will probably
freeze your lettuce) is inside the refrigerator on the forward right edge.
Refrigerator
Fresh Aire’s refrigerator has two small boxes at the bottom and three shelves. The dimensions
are: height 19 ¼ inches, width 18 inches and depth 17 inches.
There is a small freezer compartment in the refrigerator. This freezer is 4 ½“ high, 16 ¾“ wide
and 7 ½“ deep.
To conserve the house battery power, you may want to turn the thermostat down to “3”
(the medium setting) at night. Then turn it back up to “5” or “6” during the day if the daytime
temperature is high. This is not necessary if you are charging the batteries daily either through
running the engine or with shore power. Solar may do the job depending on daily load and sun.
Freezer
The freezer is in the settee directly across from the aft head door. This freezer is 9” high, 10”
wide and 16” deep. It has a temperature control at the back of the unit. It should not be
necessary to change the freezer temperature control.
To turn on the refrigerator/freezer
On the Electrical Control Panel, press the REF / FRZR button (second row, last button).
22. Sails
Fresh Aire sails best (fastest and most comfortably) when sailed relatively flat. She is a fast boat
and an easy vessel to sail, yet she is versatile enough that experienced sailors can challenge
themselves with different sail configurations. Fresh Aire is fastest and sails easily when heeling 5-
15 degrees leeward depending on wind conditions.

Fresh Aire Owner Manual 2018
34 Return to TOC
We suggest that all deploying and furling operations take place on a starboard tack.
Having the sails on the port side of the boat means that the sail can deploy and furl more
smoothly.
When hoisting sails, we recommend unfurling the jib first. We find the jib easier to deploy
than the main and enough sail to have up while we identify what the boat can and cannot do
under the current wind conditions. This also helps straighten the mast for unfurling the main.
Fresh Aire sails easily with just a jib and will get up to 6-7+ knots with just the jib in favorable
winds.
Once you feel comfortable with the jib, we recommend letting out the mainsail only part way,
again to get comfortable with what the boat is doing under the current conditions.
Reef early and often.
When sailing in winds above 15-17 knots, reefing the Main first is best. Full sails can
generally be carried up to wind velocity of 15-17 knots depending on wave action. Because the
boat sails well with just a jib, you can use just the headsail in heavy winds.
Headsail
The 110% genoa/jib has roller furling. Whether fully or partially deployed, you’ll have good sail
shape. Slight hand-over-hand tension on opposing lines – furling line and sheets – prevents
problems such as a rat’s nest on the drum (should the wind catch the sail and unwrap it
violently) or a baggy furled sail.
Reefing the Headsail: Simply ease the jib sheets (keeping control of them) while pulling in the
jib reefing line until only the amount of sail you desire is deployed. Except in higher winds, you
should not have to use the winch to furl the jib. In a higher wind, consider going to a broad
reach on a starboard tack so the main sail partially blankets the jib, making the furling easier. It
is easier and the jib furls more compactly if the sail is on the port side. If you cannot furl by hand
in light winds, forcing it with the winch will only worsen the problem. Instead, please investigate
to see what is impeding the furling process and correct the problem.
Mainsail
The mainsail on Fresh Aire uses twin main sheets without a traveler to control the boom
and main sail. This is a common European rigging. It is often necessary to use both weather and
leeward sheets in tandem to obtain proper mainsail trim. Your check-out skipper can review the
use of this rigging with you at your request.
The main has an in-mast furling system. With an in-mast rig, in normal conditions, it’s
recommended that you deploy the headsail first (while underway). The mast bows slightly aft at
the top. By deploying the headsail first, the pressure of the wind in that sail tends to straighten
up the mast making it more “plumb.” This makes it easier for the main to deploy from within the
mast.
Fresh Aire has a mainsail outhaul ratchet on the mast, which controls the mainsail as it
exits and enters the mast. The ratchet controls the in-haul and the lazy in-haul and has two
Fresh Aire Owner Manual 2018
35 Return to TOC
settings Ratchet and Free Wheeling. When in free wheeling mode, if the wind catches the sail,
the sail will fly out of the mast and unfurl, which means you have limited control in free wheeling
mode. If you are furling sails in high winds and use free-wheeling, if the wind catches the sail, it
might very well grab it and pull it back to the top of the mast. Our recommendation is to set
the outhaul ratchet to Ratchet when furling sails. We admit that having to go out to the mast
to adjust the ratchet is a weakness of Fresh Aire.
NOTE: Due to the furling functions of both sails, the halyards are preset and only adjusted by
the Maintenance Professional.
To deploy sails (provided that the wind is less than 20 knots)
1. On the mast, set the mainsail outhaul ratchet to Free-Wheeling.
2. Steer to a course of approximately 60 degrees to the wind (close reach) with the wind on
the starboard side (so the sail will deploy on the port side).
NOTE: If your nervous, use the motor to head into the wind to deploy the sails.
3. Deploy the headsail first.
The headsail furling cleat is on the portside of the boat.
4. Now you may throttle down and place the engine in neutral, sailing on the head sail
alone.
5. When ready, deploy the main by loosening the in-haul lines and using the out-haul line
to pull out the sail. The wind will assist you in deploying the sail.
NOTE: For many small boat sailors, this sail deployment routine feels wrong, but helps with the
mast bend. We suggest you do what makes sense to you. It is much better to have control of
the boat and be safe then worry about a bit of mast bend.
Again, we suggest you perform all deploying and furling operations with the sails on the
port side of the boat. The sails will deploy and furl more smoothly.
If you’re in high wind (20+ knots) conditions, you may prefer to deploy the mainsail head-
to-wind instead.
Be conservative with the amount of sail you deploy in high winds. If you’ve been too
conservative, you can easily deploy more sail area in both the main and headsail while you’re
sailing.
1. In this situation, partially deploy the main sail first so it’s in effect “reefed.”
Since you’re in high winds, only partially deploy the main.
2. Once deployed, fall off to a close reach and begin sailing…just like you would on a vessel
with a conventional main.
3. If comfortable, deploy the headsail, in minimal reefed amounts.
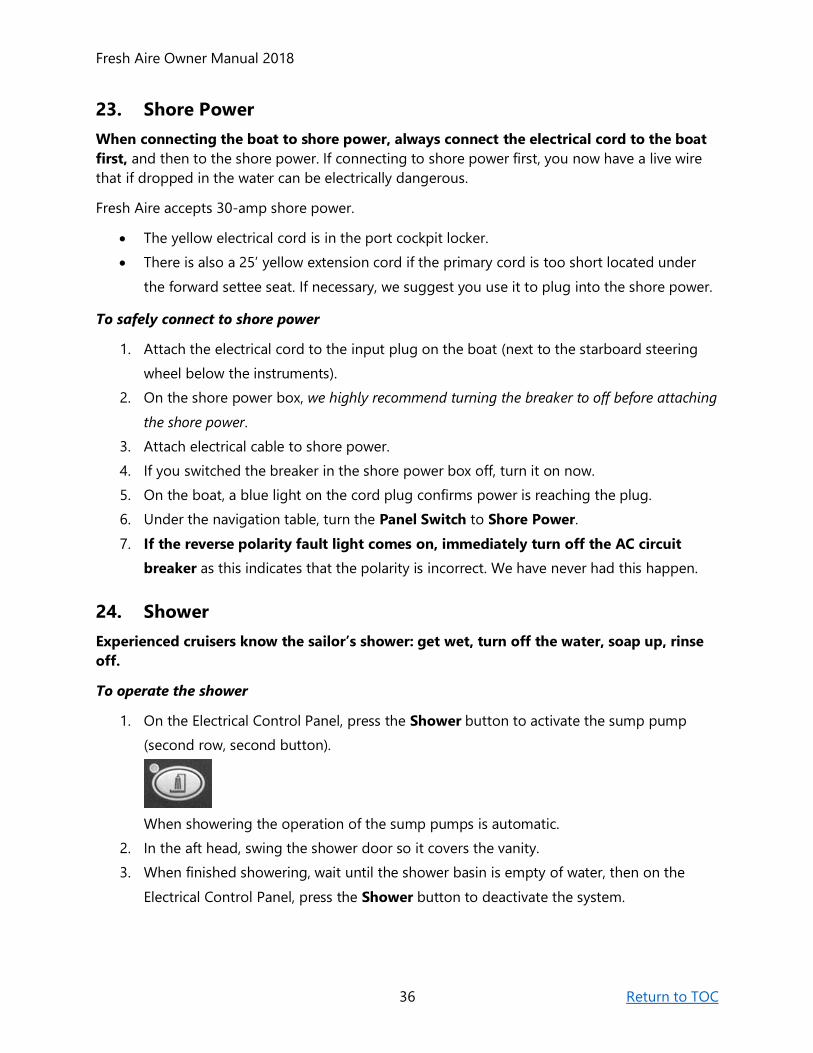
Fresh Aire Owner Manual 2018
36 Return to TOC
23. Shore Power
When connecting the boat to shore power, always connect the electrical cord to the boat
first, and then to the shore power. If connecting to shore power first, you now have a live wire
that if dropped in the water can be electrically dangerous.
Fresh Aire accepts 30-amp shore power.
• The yellow electrical cord is in the port cockpit locker.
• There is also a 25’ yellow extension cord if the primary cord is too short located under
the forward settee seat. If necessary, we suggest you use it to plug into the shore power.
To safely connect to shore power
1. Attach the electrical cord to the input plug on the boat (next to the starboard steering
wheel below the instruments).
2. On the shore power box, we highly recommend turning the breaker to off before attaching
the shore power.
3. Attach electrical cable to shore power.
4. If you switched the breaker in the shore power box off, turn it on now.
5. On the boat, a blue light on the cord plug confirms power is reaching the plug.
6. Under the navigation table, turn the Panel Switch to Shore Power.
7. If the reverse polarity fault light comes on, immediately turn off the AC circuit
breaker as this indicates that the polarity is incorrect. We have never had this happen.
24. Shower
Experienced cruisers know the sailor’s shower: get wet, turn off the water, soap up, rinse
off.
To operate the shower
1. On the Electrical Control Panel, press the Shower button to activate the sump pump
(second row, second button).
When showering the operation of the sump pumps is automatic.
2. In the aft head, swing the shower door so it covers the vanity.
3. When finished showering, wait until the shower basin is empty of water, then on the
Electrical Control Panel, press the Shower button to deactivate the system.
Fresh Aire Owner Manual 2018
37 Return to TOC
On warm, sunny days, an alternative to the below decks shower is the swim platform shower
(with hot and cold water) on the port side aft of the propane locker. This is also a good way to
rinse off salt after swimming or dirt after going ashore.
25. Solar
Fresh Aire is equipped with solar power. The system includes three solar panels attached to the
bimini and the Mastervolt monitoring system in the navigation instrument panel.
Solar Panels
Three solar panels are zipped into the top of the bimini and require no maintenance, but
do require special care with the bimini.
• Don’t let the boom rest on the bimini. This will damage the solar panels.
• Don’t let anything hit the bimini. This can happen when trying to snug up the boom.
• Be careful of the four black cloth covered solar power cables attached to the bimini.
These are not handholds. We tried to tuck them away so you don’t grab them while
moving about.
Solar Power Charger
The solar power charger is a smart charger that charges all the batteries.
The solar charger will switch to standby automatically when completely charged or when
insufficient sunlight is available (like at night, during a solar eclipse, end of the world).
The solar panel will not go to standby when motoring.
The solar panels will still charge during cloudy days, even when shadowed by the mainsail or
boom.
Monitor Solar Power Production
You can monitor solar power production on the Mastervolt monitoring system on the navigation
instrument panel.
The monitor also allows you to switch the solar power panels on or on standby.
To monitor solar power levels
1. On the Mastervolt, press the on button.
NOTE: The Mastervolt has a touch screen. If you touch the screen to turn on the device,
you may need to back out of a menu system to the home page.
2. On the Mastervolt home page, tap Solar Contro.
3. To page through solar power options, at the bottom of the screen, on the scroll bar,
press the right and left button.
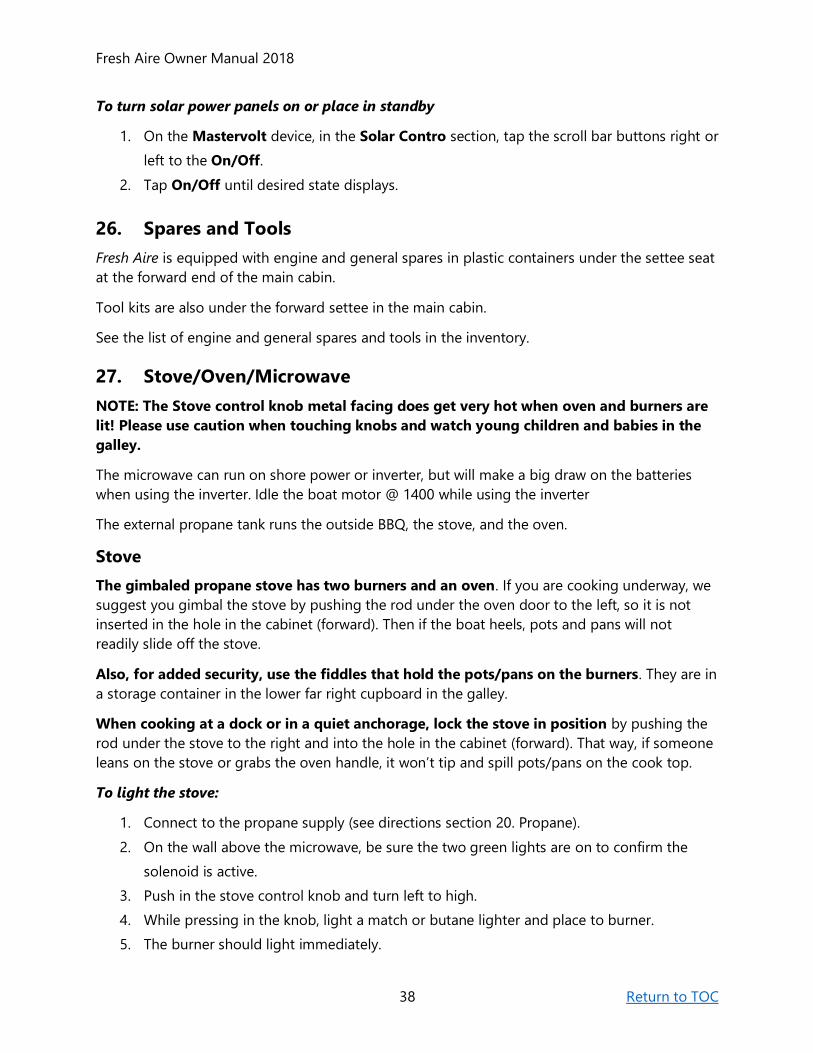
Fresh Aire Owner Manual 2018
38 Return to TOC
To turn solar power panels on or place in standby
1. On the Mastervolt device, in the Solar Contro section, tap the scroll bar buttons right or
left to the On/Off.
2. Tap On/Off until desired state displays.
26. Spares and Tools
Fresh Aire is equipped with engine and general spares in plastic containers under the settee seat
at the forward end of the main cabin.
Tool kits are also under the forward settee in the main cabin.
See the list of engine and general spares and tools in the inventory.
27. Stove/Oven/Microwave
NOTE: The Stove control knob metal facing does get very hot when oven and burners are
lit! Please use caution when touching knobs and watch young children and babies in the
galley.
The microwave can run on shore power or inverter, but will make a big draw on the batteries
when using the inverter. Idle the boat motor @ 1400 while using the inverter
The external propane tank runs the outside BBQ, the stove, and the oven.
Stove
The gimbaled propane stove has two burners and an oven. If you are cooking underway, we
suggest you gimbal the stove by pushing the rod under the oven door to the left, so it is not
inserted in the hole in the cabinet (forward). Then if the boat heels, pots and pans will not
readily slide off the stove.
Also, for added security, use the fiddles that hold the pots/pans on the burners. They are in
a storage container in the lower far right cupboard in the galley.
When cooking at a dock or in a quiet anchorage, lock the stove in position by pushing the
rod under the stove to the right and into the hole in the cabinet (forward). That way, if someone
leans on the stove or grabs the oven handle, it won’t tip and spill pots/pans on the cook top.
To light the stove:
1. Connect to the propane supply (see directions section 20. Propane).
2. On the wall above the microwave, be sure the two green lights are on to confirm the
solenoid is active.
3. Push in the stove control knob and turn left to high.
4. While pressing in the knob, light a match or butane lighter and place to burner.
5. The burner should light immediately.

Fresh Aire Owner Manual 2018
39 Return to TOC
6. Hold the knob in for 5 seconds (warming a thermal couple) and release.
7. You may then operate the knob like a normal stove.
When finished with the stove:
1. Turn off the burner(s).
2. On the electrical panel, press the LPG button to deactivate the electrical service to the
propane system.
3. Close the propane tank valve.
NOTE: If you do not close the propane tank valve, consider leaving the LPG button on the
Electrical Control Panel On to enable the LPG sniffer in case of a propane leak.
Typically, what little propane remains in the line from the tank to the galley is insignificant, and
even if this tiny amount of propane were to leak into the cabin, it would not cause a problem.
Oven
The oven door lock is a tab to the right of the left burner control knob. It is one of the few
deficient pieces of engineering on the boat. It generally does not lock the oven. We recommend
that you do not use the oven under way except for very small, light food—such a making toast.
To light the oven:
1. Connect to the propane supply.
2. Push and hold in the oven control knob and turn it to the left.
3. While still pressing in the oven knob, light a match or butane lighter and place into the
hole at the front center of the oven.
4. Hold the knob while lighting until the flame lights.
The oven may not light immediately if it is not primed.
5. Hold the knob in for 5 seconds (warming a thermal couple) and release.
6. You may then operate the knob like a normal oven.
Microwave
We highly recommend that you run the microwave on shore power. A microwave draws a
lot of power and is operated using the AC 120-volt electrical system on the boat. Though the
inverter will run the microwave, this will cause a terrible drain on the house batteries, requiring
running the engine to recharge the batteries. Even running on the boat motor is not sufficient.
The Bosch microwave operates at a lower power level than American microwaves, thus
requiring longer cooking times.
Running the microwave
Fresh Aire Owner Manual 2018
40 Return to TOC
1. On the Electrical AC Circuit Breakers panel under the navigation station, turn on the
second Outlets circuit breaker.
2. On the microwave, push the large circular button directly under the LED display so it is
out.
The clock should be on.
3. To select a power setting push one of the power buttons: 90,180,360,600 or 800 watts.
In our experience, the 800-watt button is closest to the power of the normal American
microwave.
4. Set the cook time by turning the large button clockwise to the desired amount of time.
5. Press Start.
6. Pressing Stop returns the LED to clock time.
NOTE: The microwave is a nag and when finished cooking, it will beep and beep and beep and
beep until you manually turn it off. No auto-off on the beeps.
28. Table (in the Main Saloon)
The main salon table opens to comfortably seat six people.
To enlarge the table:
1. Pull down the knob on the forward edge of the bottom of the table and slide the table
leaves forward.
2. Pull up and fold over the table leaf support bar (it has a black strip of material on the top
when folded over).
3. Unfold the table leaf.
To close the table, reverse the procedure.
29. Water & Tanks
Water tanks
Fresh Aire has two water tanks, holding a total of 95 gallons.
The forward tank under the bed in the forward berth holds 40 gallons.
The aft tank under the bed in the port berth holds 55 gallons.
Selection valve is in the aft head, under the sink on the forward wall. You will need a
flashlight to see the valve.
The tanks can be isolated or split to draw from both tanks. Note that the forward tank is higher
than the aft tank, so if both tanks are open, the forward tank will empty first.

Fresh Aire Owner Manual 2018
41 Return to TOC
Water conservation is, of course, a cruising skill. State parks have no pressurized water to
refill tanks, but all points of civilization do. We suggest refilling the tanks whenever possible.
Water pressure
Always turn off the water pump when motoring or sailing. Should one of the tanks run dry,
the water pump could burn out as it tries in vain to pump water to build pressure (and you
would likely not hear the pump running continuously over the sound of motoring or sailing).
To use any of the faucets in the boat you must activate the fresh water pump.
1. On the Electrical Control Panel, press the Water Pump button (second row, first
button).
2. When finished using the water, press the Water Pump button to turn off the pump.
Checking water level
You can access the water tank level indicators by paging through the LCD display at the top of
the electrical panel. They give levels in quarter of tank increments.
1. On the Electrical Control Panel, long press the Enter button until the LCD display lights
up and Bavaria Yachts displays.
2. Use the up and down arrows to page through displays.
Hot Water
Hot water is stored in a six-gallon hot water container under the aft starboard bunk.
You can heat water while motoring, on shore power, or by heating in the teapot on the stove.
CAUTION: The engine heats water to scalding temperatures! Please test the temperature of the
water to be certain it is appropriate.
Be Aware that using the inverter to heat water takes a large draw on the house batteries.
We recommend not using the inverter to heat water. Instead idle the boat engine at 1400 RPMs
to heat the water instead of using the inverter. It takes about 30 minutes of running the engine
under load (1100-1400RPMs) to get the water hot.
Do not heat the hot water using the inverter when not running the motor. The water
actually heats faster with the motor than the inverter. Also, the hot water heater is a significant
drain on the house batteries. If not on shore power and you use the inverter to power the hot
water tank, run the motor!
Fresh Aire Owner Manual 2018
42 Return to TOC
When on shore power, heat the water by turning the water heater switch on the Electrical AC
Circuit Breaker Panel to the “on” position. It takes about an hour to heat the water on shore
power.
30. VHF Radio
To turn on the VHF radio
1. On the Electrical Control Panel, push the VHF button (third row, second from the left).
2. Remove the Simrad cover from the VHF radio.
Monitoring the Hailing/Distress Channel
Please monitor channel 16 (the hailing and distress channel) during your cruise. You may save a
vessel or a life. You may hail vessels on channel 16, but after establishing contact on channel 16,
ask the skipper of the other boat to switch to working channels 78, 79 or 80.
Weather
You should listen to the weather reports in the morning before you head out and ½ hour
before reaching your destination. This is generally a light wind region in the summer, but
weather changes can be sudden. Listen for the “inland waters of western Washington” and the
“northern inland waters,” which cover the San Juan Islands and the Canadian Gulf Islands.
To listen to the weather reports
1. On the VHF radio, push the WX button.
2. On the left of the device, turn the black knob to scan the weather channels for the one
with the best reception (channel 4 or 7 in our experience).
DSC Signal
This radio receives DSC (Digital Select Calling) distress signals, which start with a long series of
what can only be described as shrieks. The location of the vessel sending the DSC distress signal
will display on the chart plotter. This will likely be followed by a message from either US Coast
Guard or Victoria Coast Guard radio; this may alert you to the opportunity of being of assistance
to another mariner.
Remote Access Microphone (RAM)
The VHF remote access microphone (RAM) bracket is in the cockpit, starboard side, aft of the
engine controls. This bracket also charges the RAM.
The RAM cannot control the base unit volume. You must do this on the VHF radio at the nav
station.
If you would like to review VHF radio protocol and procedures, please see the section in the
onboard Charter Guest Manual.

Fresh Aire Owner Manual 2018
43 Return to TOC
Handheld Unit
Fresh Aire has a handheld VHF radio in the nav station cupboard. We use this to communicate
back to the boat when ashore, communicate helm to bow when anchoring, and it serves as an
emergency backup in case the primary VHF fails.
This handheld device does not have the same range as the main VHF radio because the antenna
is closer to the ground, but it works well in above situations.
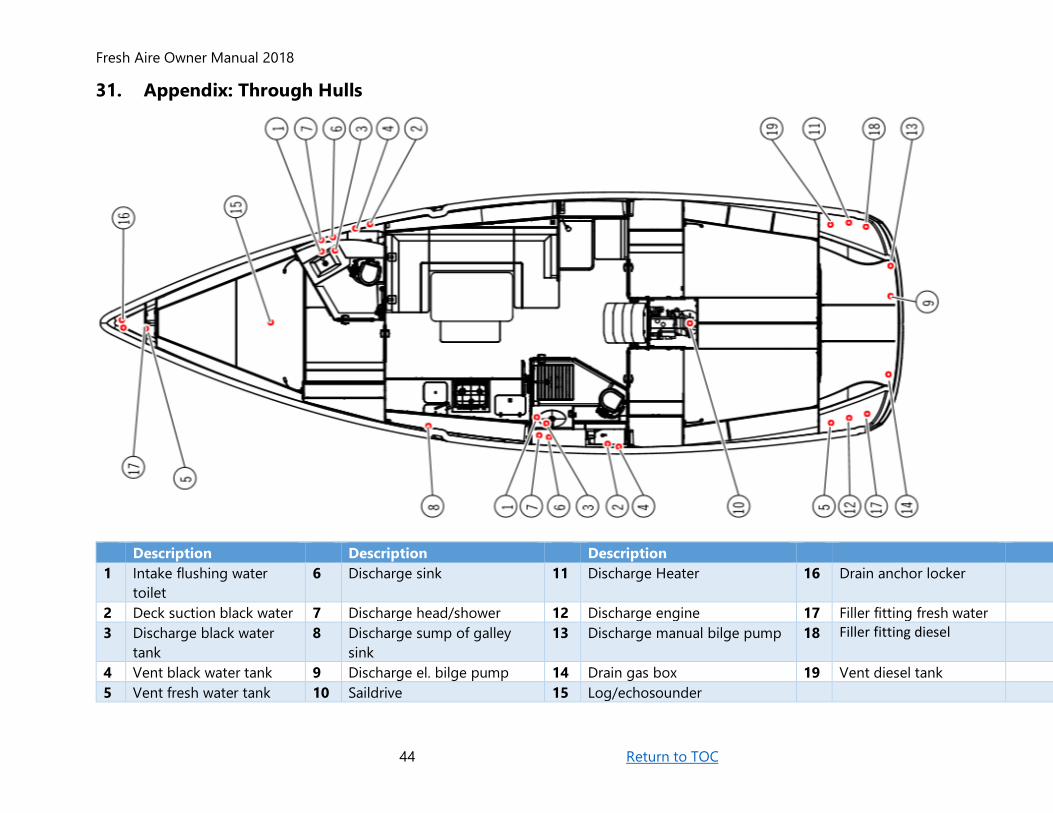
Fresh Aire Owner Manual 2018
44 Return to TOC
31. Appendix: Through Hulls
Description Description Description
1 Intake flushing water
toilet
6 Discharge sink 11 Discharge Heater 16 Drain anchor locker
2 Deck suction black water 7 Discharge head/shower 12 Discharge engine 17 Filler fitting fresh water
3 Discharge black water
tank
8 Discharge sump of galley
sink
13 Discharge manual bilge pump 18 Filler fitting diesel
4 Vent black water tank 9 Discharge el. bilge pump 14 Drain gas box 19 Vent diesel tank
5 Vent fresh water tank 10 Saildrive 15 Log/echosounder

Fresh Aire Owner Manual 2018
45 Return to TOC