frankie the f ish - holiday-crafts-and-creations.com · sew a black bead over the circle, securing...
TRANSCRIPT

Frankie The F ish
Instructions and PatternFREE
exclusively for
Newsletter Members of
holiday-crafts-and-creations.com
Copyright 2009 All Rights Reserved holiday-crafts-and-creations.com
Thanks for joining the

Table of Contents
Page 1
Frankie The Fish Pattern ............................................................... 2
Materials ........................................................................................... 3
Instructions ....................................................................................... 3 - 7
Running Stitch ................................................................................ 8
Backstitch ........................................................................................ 9
Whip Stitch ..................................................................................... 10 - 11
French Knot .................................................................................... 12
Greeting Card ................................................................................ Last page
Copyright 2009 All Rights Reserved holiday-crafts-and-creations.com

BellyCut 1
Fin Cut 2
Tail Cut 1
Frankie
The F ish
Page 2
holiday-crafts-and-creations.comCopyright All Rights Reserved
BodyCut 2
Top FinCut 1

Materials- Felt in two shades of the same color (1 piece each)
- Embroidery thread in two shades (one to match body color)
- Stuffing
- Two black beads
- Scissors
- Needle
InstructionsStep 1 :
Begin by printing out the pattern on page 2 and cutting out
each piece. Trace each piece onto your felt and cut out the felt
pieces. The body and belly should be in one color while the tail
and fins are in your other color.
Step 2 :
Next you will embellish the tail and fins. On the tail, sew
the backstitch in four lines as shown in the picture. For
the top fin, sew the running stitch around the border.
Once you are done, sew the running stitch back in the
opposite direction, filling in all the gaps from the first
time. This way you have what looks like a backstitch from
both sides, since the fin will be viewed from both sides.
For the side fins, simply make three French knots, and
three stitches from the base of each knot to the center
of the fin. Be sure that one fin is opposite from the other
when you sew on these embellishments.
Page 3Copyright 2009 All Rights Reserved holiday-crafts-and-creations.com

Step 3 :
Next you will sew on the designs on the body of the fish. Start by lightly drawing on the felt where you
want the scallops to be. The center scallop will hold the fin down. Start at the top, and use the
backstitch to sew on the scallops. Before sewing the middle scallop, fold the end of the fin under, and
sew the scallop over the top of the fin. This anchors it in place. Then finish the bottom scallop. For the
eyes, first cut out a small circle of felt in the color of the tail and fins. This could be done using a hole
punch, but you could just cut it out free hand. Then place the circle where you want the eye to be, and
sew a black bead over the circle, securing both to the fish. Of course be sure that you sew these
embellishments to the opposite sides of the body pieces as shown in the picture below.
Step 4 :
Now place the two sides of the fish together. Place the top fin in between these two pieces. Adjust
the pieces until they look in place and good to you. You will now begin sewing the fish together using
the whip stitch. Use the color of embroidery thread that best matches the color of the fish body. Also,
to make the stitches less noticible, it is a good idea to seperate the embroidery thread into three
strands rather than the six it comes with. This way the stitches will be thinner.
Start just behind the top fin as shown in the
picture. When sewing through the area where the
top fin is, do the whip stitch as normal. The only
difference is that you will need to sew through the
fin in order to complete each stitch.
Once you have sewn across the top and you are
past the top fin, continue sewing with the whip
stitch.
Page 4Copyright 2009 All Rights Reserved holiday-crafts-and-creations.com

Step 5 :
Continue sewing around the mouth. When
you get a stitch or two below the mouth,
place the belly piece in between the two
body pieces. Then continue sewing the whip
stitch, only start sewing one side of the body
piece to the belly piece, ingnoring the other
side of the body for now. Sew until you are
about 1/2" from the end of the belly piece.
Now thread a new piece of embroidery thread on a different needle. Go back to where the belly piece
begins. You now want to begin sewing the other side of the body to the belly piece. Do this using the
whip stitch. You may have to make a few repeated stitches at odd angles to assure that there is no hole
left at the point of the belly piece.
Step 6 :
Sew along the other side of the belly until you are
about 1/2" from the end (same as the previous
side). Now start stuffing your fish. You will stuff him
a little more later, but get the majority of the
stuffing in him at this point. Don't over stuff him,
but you may want to put more in than you might
think. Also at this step you can try to flatten out
some of the seams so there is less of a ridge.
Page 5
Step 7 :Pick one side to continue sewing on until you've
reached the end of the belly. Then knot off that
thread and you are done with that side. Now finish
sewing the other side of the belly, but don't knot
this side off yet. You will use this thread to finish
sewing the fish together.
Copyright 2009 All Rights Reserved holiday-crafts-and-creations.com
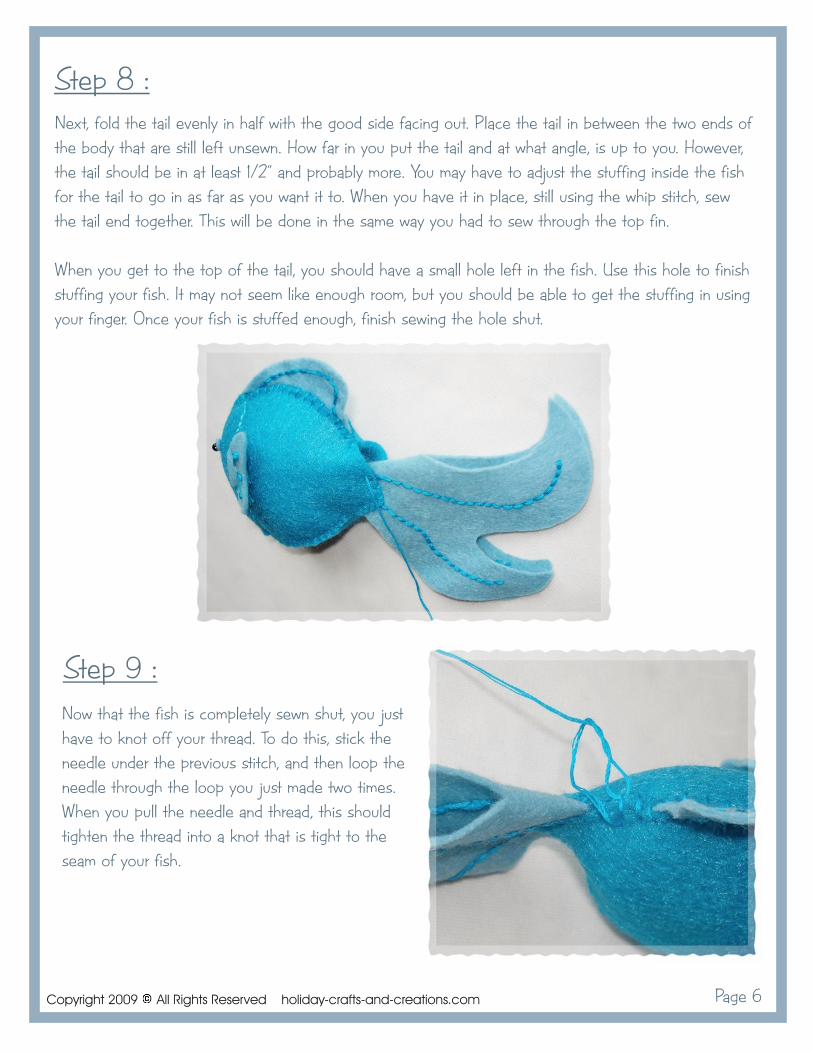
Step 8 :Next, fold the tail evenly in half with the good side facing out. Place the tail in between the two ends of
the body that are still left unsewn. How far in you put the tail and at what angle, is up to you. However,
the tail should be in at least 1/2" and probably more. You may have to adjust the stuffing inside the fish
for the tail to go in as far as you want it to. When you have it in place, still using the whip stitch, sew
the tail end together. This will be done in the same way you had to sew through the top fin.
When you get to the top of the tail, you should have a small hole left in the fish. Use this hole to finish
stuffing your fish. It may not seem like enough room, but you should be able to get the stuffing in using
your finger. Once your fish is stuffed enough, finish sewing the hole shut.
Step 9 :
Page 6
Now that the fish is completely sewn shut, you just
have to knot off your thread. To do this, stick the
needle under the previous stitch, and then loop the
needle through the loop you just made two times.
When you pull the needle and thread, this should
tighten the thread into a knot that is tight to the
seam of your fish.
Copyright 2009 All Rights Reserved holiday-crafts-and-creations.com

Page 7
Step 10 :
The last step is to hide the tail end of the thread. To do
this, poke the needle down through the seam of the
fish where you just tied the knot. Push the needle down
into the fish and out it's side. Then pull the thread tight
so no loose thread is visible from the seam. While the
thread is pulled tight, snip the thread off right next to
the side of the fish. The tail end of the thread should
then sink into the fish and no longer be visible.
You have now completed
Frankie the F ish!
Copyright 2009 All Rights Reserved holiday-crafts-and-creations.com

Running Stitch
Step 1 :
Begin the running stitch by poking your threaded needle up through the fabric.
Step 2 :
Poke the needle back down through the fabric next to where you just came up, and pull the thread
down into your first stitch.
Now poke your needle back up through the fabric, leaving a space from the previous stitch. Then
poke the needle back down through the fabric again making your second stitch.
Step 3 :
Now just continue this and you
are on your way!
Page 8Copyright 2009 All Rights Reserved holiday-crafts-and-creations.com

Page 9
Backstitch
Step 1 :Begin the backstitch by poking the needle up through the fabric, and then back down to make a
single stitch. Then poke the needle back up through the fabric a space away from the first stitch, as
if you were doing the running stitch.
Step 2 :
Now poke your needle back down through the fabric at the end of the first stitch. This is the "back"
part of the backstitch.
Step 3 :
Now poke your needle up through the fabric a space away from the previous stitch. You will then
stitch back again. Just repeat this pattern of stitching and you are good to go!
Copyright 2009 All Rights Reserved holiday-crafts-and-creations.com

Whip Stitch
Page 10
Begin the whip stitch by tying a knot in the end of your thread. Then
poke your needle up through the top layer of fabric, about 1/8" in,
from between the two pieces. This way the knot will be between the
two pieces of fabric and will not be visible.
Step 1 :
Step 2 :Next, poke the needle up through both layers of fabric so the needle
and thread come up in almost the same place as in step 1. By doing
this, the thread should be wrapped around the edges of the fabric in
one neat stitch. It is important to pull the stitches so that they are
snug, but not overly tight.
Step 3 :
Once again, poke the needle up through both layers of fabric. Poke
the needle though the same hole as before, so this next stitch will
cover the first stitch. However, this time you will angle the needle
so that it comes up about 1/8" from the first stitch (as well as 1/8"
from the edge of the fabric). Pull this stitch tight, and you should
have what still looks like one stitch, but the thread is coming out of
the fabric next to it.
Copyright 2009 All Rights Reserved holiday-crafts-and-creations.com
Step 4 :Now poke the needle up through the fabric, directly under where the
thread is coming up. But again, angle the needle so that the end
comes out next to this second stitch. When you pull this stitch tight,
it should be straight up and down, not angled. In others words, it
should be parallel to the first stitch.
Step 5 :Continue this pattern of poking the needle through the two layers at
an angle, coming up next to the previous stitch. When you have
reached the end of the section you want to stitch, or you need to
start with a new piece of thread, make the final stitch come straight
up, rather than angled off to the side. Then poke the needle through
the bottom of this stitch again (making the stitch doubled) but only
go through the bottom layer, so your thread is in between layers.
Basically you are trying to do the reverse of how you started the
whip stitch, so you can make a knot in between the layers of fabric.
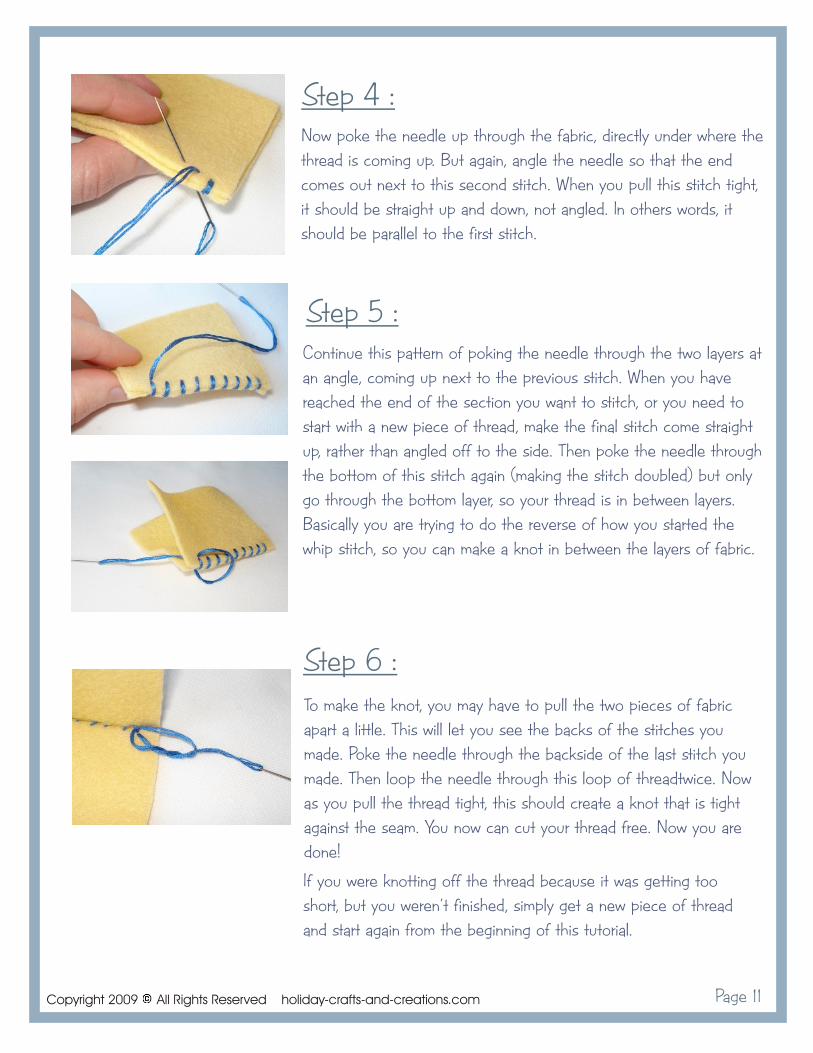
Step 6 :To make the knot, you may have to pull the two pieces of fabric
apart a little. This will let you see the backs of the stitches you
made. Poke the needle through the backside of the last stitch you
made. Then loop the needle through this loop of threadtwice. Now
as you pull the thread tight, this should create a knot that is tight
against the seam. You now can cut your thread free. Now you are
done!
If you were knotting off the thread because it was getting too
short, but you weren't finished, simply get a new piece of thread
and start again from the beginning of this tutorial.
Page 11Copyright 2009 All Rights Reserved holiday-crafts-and-creations.com

French Knot
Step 1 :Begin your French knot by poking the needle up through the fabric.
Pull enough thread through so that you can point the needle back at
the thread. It is helpful if you knot the thread on the underside of the
fabric so more thread doesn't keep pulling through.
Step 2 :Wrap the thread around the end of your needle once and pull it tight.
Then wrap the thread around the needle a second time. Again, make
sure you pull the thread tight around the needle.
Step 3 :While continuing to pull the looped thread tight around the needle,
poke the end of the needle back down into the fabric, fairly close to
where you came up. Put one hand under the fabric to slowly pull the
needle through while the other hand keeps the thread taut.
Once the needle has been pulled all the way through, let go of the
thread and pull the rest of the loop of thread down through the knot.
Pull the thread so it forms a nice knot, and you are finished!
Step 4 :
Page 12Copyright 2009 All Rights Reserved holiday-crafts-and-creations.com

Me
mb
ersh
ip G
ree
ting
Card
se
xclu
sively at
ho
liday-crafts-an
d-cre
ation
s.com
/cards
Co
pr
ht
A R
igh
se
ee
yig
ll
t R
srv
d