framer’s training manual on - europa
TRANSCRIPT

Framer’s Training Manual on
Post Harvest Management of Sorghum,
Groundnut and Rice
Project on Enhanced Value Addition and Strengthening Value Chains in the Greater
Bahr el Ghazal Region
Funded by: The European Union (EU)
Implemented by: The United Nations Industrial Development
Organization (UNIDO)

i
TABLE OF CONTENTS
LIST OF FIGURES .................................................................................................................. iii LIST OF TABLES .................................................................................................................... iv 1. INTRODUCTION .............................................................................................................. 1
PART 1 ...................................................................................................................................... 3 2. Post-harvest handling processing practices of groundnuts (Arachis hypogea) .................. 3
2.1. Specific objectives ....................................................................................................... 4 2.2. Introduction ................................................................................................................. 4 2.3. Uses of the crop ........................................................................................................... 4
2.4. What makes good quality groundnuts? ....................................................................... 4
2.5. Section 1: The process of harvesting groundnuts ........................................................ 5
2.5.1. Discussion points (45 minutes) ............................................................................ 5 2.5.2. Tools used for harvesting in your area ................................................................. 5 2.5.3. Timing for harvesting ........................................................................................... 5 2.5.4. Indicators for harvesting timing ........................................................................... 6
2.5.5. Harvesting process ............................................................................................... 6 2.6. Section 2: Stages in post–harvest handling of groundnuts .......................................... 8
2.6.1. Discussion points: (1 hour 30 mins) .................................................................... 8 2.6.2. Cleaning ............................................................................................................... 8 2.6.3. Drying .................................................................................................................. 8
2.6.3.1. Reasons for drying ............................................................................................ 8 2.6.4. Storage................................................................................................................ 10
2.6.5. Shelling .............................................................................................................. 11 2.7. Section 3: Aflatoxin problem in groundnut ............................................................... 12
2.7.1. What are Aflatoxins?.......................................................................................... 12 2.7.2. What causes contamination of groundnuts by Aflatoxin? ................................. 13 2.7.3. What are the effects of aflatoxins contamination? ............................................. 13
2.7.4. What are the symptoms for Aflatoxin poisoning? ............................................. 13 2.7.5. How can the effects of Aflatoxins be minimized? ............................................. 14
PART 3 .................................................................................................................................... 15 3. Post-harvest handling practices of Sorghum (Sorghum Bicolar) .................................... 15
3.1. Introduction (15 mins) ............................................................................................... 16
3.2. Uses of the crop ......................................................................................................... 16
3.3. Section 1: The Process of harvesting sorghum ......................................................... 16 3.3.1. Discussion Points (1 hour) ................................................................................. 16 3.3.2. Tools used for Harvesting in Your Area ............................................................ 16
3.3.3. Stage and Timing of Harvesting ........................................................................ 16 3.3.4. Precautions during harvesting ............................................................................ 17 3.3.5. Harvesting process of sorghum .......................................................................... 17
3.4. Section 2: Post–harvest handling practices ............................................................... 17 3.4.1. Discussion Points (45 mins) ............................................................................... 17
3.4.2. Drying ................................................................................................................ 17 3.4.3. Measurement of grains’ moisture content .......................................................... 17 3.4.4. Threshing/Shelling ............................................................................................. 18
3.4.5. Cleaning/winnowing .......................................................................................... 18 3.4.6. Sorting ................................................................................................................ 18

ii
3.5. Section 3: Causes of losses and loss management (1 hour) ...................................... 19 3.5.1. Insects ................................................................................................................. 19
3.5.2. Moulds ............................................................................................................... 22 3.5.3. Termites.............................................................................................................. 23 3.5.4. Rodents ............................................................................................................... 24 3.5.5. Birds ................................................................................................................... 25
3.6. Storage facilities ........................................................................................................ 25
3.6.1. Group discussion questions (30 mins) ............................................................... 25 3.6.2. Types of traditional storage containers/facilities ............................................... 26 3.6.3. Seed storage ....................................................................................................... 27 3.6.4. Storage practices ................................................................................................ 27
PART 4 .................................................................................................................................... 29
4. Post-harvest handling and managemnet of rice (sorghum bicolar) .................................. 29 4.1. Introduction ............................................................................................................... 30
4.2. Harvesting (45 mins) ................................................................................................. 30 4.2.1. General objective ............................................................................................... 30 4.2.2. Specific objective ............................................................................................... 30 4.2.3. How to harvest ................................................................................................... 30
4.2.4. How to observe the paddy field in order to determine an optimum harvest time
31 4.3. Threshing (30 mins) .................................................................................................. 33
4.3.1. Problems of manual threshing ............................................................................ 34 4.4. Winnowing/Cleaning ................................................................................................. 36
4.4.1. Manual winnowing ............................................................................................ 36 4.4.2. Mechanical winnowing ...................................................................................... 37
4.5. Drying ........................................................................................................................ 38 4.5.1. Drying methods .................................................................................................. 38
4.6. Milling ....................................................................................................................... 39 4.6.1. Objectives of milling .......................................................................................... 39 4.6.2. Equipment for milling ........................................................................................ 39
4.7. Grading ...................................................................................................................... 39 4.8. Bagging and packaging ............................................................................................. 40
4.8.1. Group Discussion Questions .............................................................................. 40 4.8.2. Storage and pest control ..................................................................................... 40 4.8.3. Factors responsible for poor grain storage ......................................................... 41 4.8.4. Basic requirements and recommendations for good storage.............................. 41
4.8.5. Requirements of good store management .......................................................... 43
4.9. Pest control ................................................................................................................ 43
4.9.1. Common pests during storage ............................................................................ 43 4.9.2. Moulds ............................................................................................................... 43 4.9.3. Pest Control ........................................................................................................ 44
4.10. Grain quality and standards ................................................................................... 44 4.10.1. General quality parameters ............................................................................. 44
4.10.2. Tips on conditions of good quality grain ........................................................ 45 4.10.3. Group discussion questions ............................................................................ 46
iii
LIST OF FIGURES
Figure 1-1: The food Pipeline (Source: Bourne, 1977, mimeo) ............................................... 2 Figure 2-1: Good groundnuts in the shells (NARO) .................................................................. 5 Figure 2-2: Different growth types of groundnuts ..................................................................... 6 Figure 2-3: Manual harvesting (hand pulling) of groundnut plants ........................................... 7
Figure 2-4: Manual stripping of groundnut pods ....................................................................... 7 Figure 2-5: Improved methods of stripping groundnuts ............................................................ 8 Figure 2-6: Drying of groundnuts in windrows ......................................................................... 9 Figure 2-7: Groundnut spread on the ground ............................................................................. 9 Figure 2-8: A-frame used for plant/pod drying ........................................................................ 10
Figure 2-9: Bag storage of groundnuts in shell ........................................................................ 11 Figure 2-10: Hermetic bag storage (PICS bag) ........................................................................ 11
Figure 2-11: Hand shelling....................................................................................................... 12 Figure 2-12: Groundnuts sample shellers ................................................................................ 12 Figure 2-13: comparison of aflatoxin contaminated and uncontaminated groundnuts ............ 13 Figure 3-1: Lesser Grain Borer, Rhyzopertha dominica (a), Sorghum /Maize Weevil,
Sitophilus Zeamais (Source: USAID, 2012) ............................................................................ 19 Figure 3-2: Angoumois grain moth, Sitotroga cerealella (a), Red flour beetle (b) ................. 20 Figure 3-3: Indian meal moth (Source: USAID, 2012) ...................................................... 20
Figure 3-4: Mixing insecticide with threshed grain ................................................................. 21 Figure 3-5: Aspergillus (ear rot) (a), and Aspergillus mycelium, (green mould) (b) (Source:
USAID, Post-Harvest handling training manual for extension workers, October 2012)......... 23 Figure 3-6: Rats climbing into the store ................................................................................... 25 Figure 3-7: Rat guards to stop rat climbing to the granary ...................................................... 25
Figure 3-8: Traditional containers used for seed storage ......................................................... 26
Figure 3-9: Traditional containers used for seed storage - (a) Traditional baskets; (b)
Underground pit ....................................................................................................................... 26 Figure 4-1: Harvesting rice with sickles at the plant height of 4-5 cm from the ground ......... 32
Figure 4-2: The full conventional combine harvester .............................................................. 33 Figure 4-3: Reaper.................................................................................................................... 33
Figure 4-4: Farmer threshing the rice, using wooden frame .................................................... 34 Figure 4-5: Different types of manual threshing methods (a) Drum and, (b) Using sticks ..... 35 Figure 4-6: Mechanical Pedal thresher (INRAB-Benin) ......................................................... 35 Figure 4-7: Mechanical motorized thresher (INRAB-Benin) .................................................. 35
Figure 4-8: Improved motorized thresher/cleaner (ADRAO/SAED/ISRA, Senegal) ............. 36
Figure 4-9: Manual winnowing techniques (Source: JICA, February 2015) ........................... 37
Figure 4-10: Motorized winnowers (Rep of BENIN) .............................................................. 37 Figure 4-11: Natural drying methods ....................................................................................... 38 Figure 4-12: Rice storage methods (Source: Eastern Africa Grain Institute-Farmers training
manual) .................................................................................................................................... 42

iv
LIST OF TABLES
Table 2-1: Challenges of both early and late harvesting of groundnuts .................................... 5

1. INTRODUCTION
Post-harvest handling or management is the stage immediately following the harvest. It
determines the final quality of product. Postharvest management includes the following
activities:
Post-harvest losses refers to quantitative and qualitative losses that occur to grains after
harvesting due to a series of operations the grains undergoes through such as: Inappropriate
pre-harvest practices; inadequate farming equipment, poor grain handling (quality losses) -
causing financial losses and food safety issues, poor grain drying systems - causing moisture
related problems (rotting, moulds etc.), poor grain storage systems-causing grain losses from
pest infestations
Post-harvest losses incurred by farmers are estimated at about 10%, cereal losses can be as
high as 13% - 15%. These losses impact greatly on household food vulnerability and cash
income (livelihood). In general, post-harvest losses can be minimized by proper post-harvest
management practices. These losses can easily be explained using the food pipeline (after
Bourne, 1977).
2
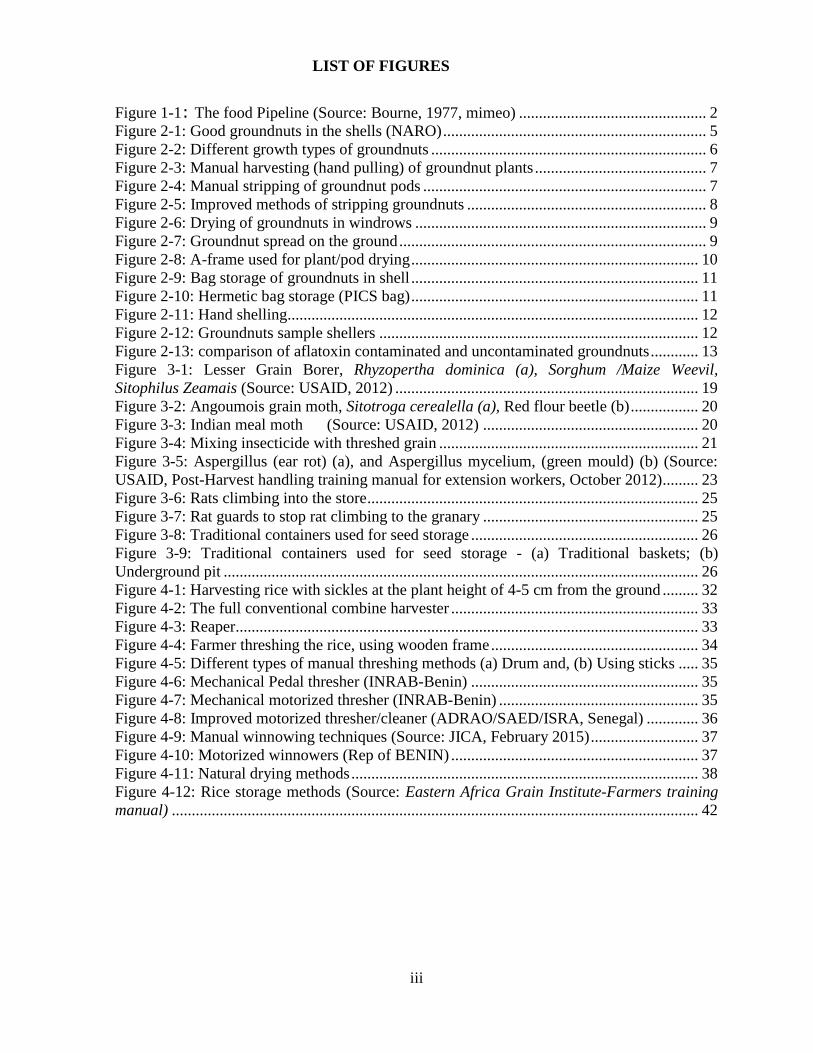
Figure 1-1: The food Pipeline (Source: Bourne, 1977, mimeo)
This training manual provides information useful for farmers training on post-harvest
handling practices of groundnuts, sorghum and rice. Adopting such practices would help
reduce post-harvest loses considerably.

3
PART 1
2. POST-HARVEST HANDLING PROCESSING PRACTICES OF
GROUNDNUTS (Arachis hypogea)
4
2.1. Specific objectives
At the end of this training session, the farmer is expected to know how to:
1. Minimize pre-harvest infestation,
2. How to prepare before the harvest,
3. When is the right time of harvesting,
4. Precautions to take during harvesting,
5. How grain should be transported to the house,
6. Utilization of the crop.
2.2. Introduction
Groundnut is widely grown worldwide as a food and cash crop. It is one of the highest paying
crop with fairly stable prices. Household consumption is quite high with preference to the
brown/red-kennelled varieties because of their reputed taste.
2.3. Uses of the crop
It is a useful crop rotation crop. Being a legume, it can fix atmospheric nitrogen and
this benefits subsequent crops especially when groundnuts are incorporated into the
soil during ploughing. This maintains soil fertility.
It controls soil erosion by providing ground cover.
All parts of the plant can be put to use. The plant stalks are fed to the cattle in the form
of green, dried and silage. Groundnut shells, haulms and hay are good fodder.
Groundnut cake is good feed for livestock and is also used as manure.
Is used as a vegetable cooking oil.
Kernels are used directly as food or snacks for human consumption.
A large number of food products are prepared from groundnuts-Boiled nuts,
groundnut butter, and bakery products etc.
2.4. What makes good quality groundnuts?
i. Purity level: This refers to the absence of foreign materials in grain such as stones,
rotten grains, broken or discolored grains. Most buyers prefer groundnuts with 95%
level of purity.
ii. Moisture content: The best quality groundnuts as measured by a moisture meter
should have a moisture content of 7-8%.
iii. Shelling percentage: This means that when shelling, at least 65% of the weight
should be grain weight while the other 25% is trash. A lower weight shows poor
quality groundnuts with high deficiencies of calcium during the pegging stage.
iv. Damage: This refers to the proportion of groundnuts that are mechanically or
physically damaged (cracked/broken) during the post-harvest handling process.
v. Aflatoxin: These are poisonous substances produced by fungi and make the grain
unfit for consumption. Good quality groundnuts should be aflatoxin free.

5
Figure 2-1: Good groundnuts in the shells (NARO)
2.5. Section 1: The process of harvesting groundnuts
2.5.1. Discussion points (45 minutes)
Preparation before harvesting and tools used for harvesting,
Timing of harvesting,
Indicators of harvesting time,
Precautions during harvesting,
Process of harvesting in your community.
2.5.2. Tools used for harvesting in your area
Molodo
Sickle
Knife /spear, etc.
2.5.3. Timing for harvesting
It is very important to harvest groundnuts at the correct time. If harvested too early, the seeds
will shrink when drying which lowers the oil content and quality of the seed. Delays in
harvesting will result in poor quality seed due to mould infections and subsequent aflatoxin
contamination of the seeds/pods. Late harvesting also reduces yield because higher
proportions of the pods are left in the ground due to the pegs being weak and the pods
breaking off. Late harvesting also causes some non-dormant varieties to begin sprouting in the
field resulting in yield losses.
Table 2-1: Challenges of both early and late harvesting of groundnuts
Challenges of early harvesting Challenges of late harvesting
Drop in oil content
Difficult to uproot as pods remain in the soil due to
weakening of the pegs
Not saleable,low income Sprouting of less dormant varieties

6
Challenges of early harvesting Challenges of late harvesting
Shrinkage of seeds
Low income
Weight loss
Mould infections of seeds/pods
Poor/low quality seeds
2.5.4. Indicators for harvesting timing
A proper time to commence harvest is when a good number of pods are fully
developed and are intact.
Maturity of pods is achieved when the vines begin to turn yellow and leaf shedding
starts.
It is recommended that a few plants (3-5) should be pulled up and the pods removed
and shed. The insides of the shells should be examined, if majority of the pods (70%
upwards) have dark markings inside the shell and the seeds are plump and the correct
colour for that variety, then the groundnuts are mature and ready for harvest.
The estimated period of maturity for each variety can be used as a rough guide (i.e. the
calendar method).
2.5.5. Harvesting process
The actual method of harvest used depends upon the type of groundnut grown. In bunch types
Figure 2-2(a), pod development is confined to the base of the plant and the pegs carrying the
pods into the soil are thick and strong. Almost all the pods are recovered with the plants when
they are pulled out of the soil. That is why the bunch type of groundnut is mostly harvested by
pulling out the plants with manual labour. The spreading or semi – spreading groundnut types
Figure 2-2(b) produce pods all along the running stem. This type of groundnut is harvested
either manual or by using a blade harrow or ox-plough. The soil should be sufficiently moist
for easy harvesting and without losing pods in the soil. Figure 2-3 shows the process of hand
pulling of groundnuts.
Figure 2-2: Different growth types of groundnuts
7
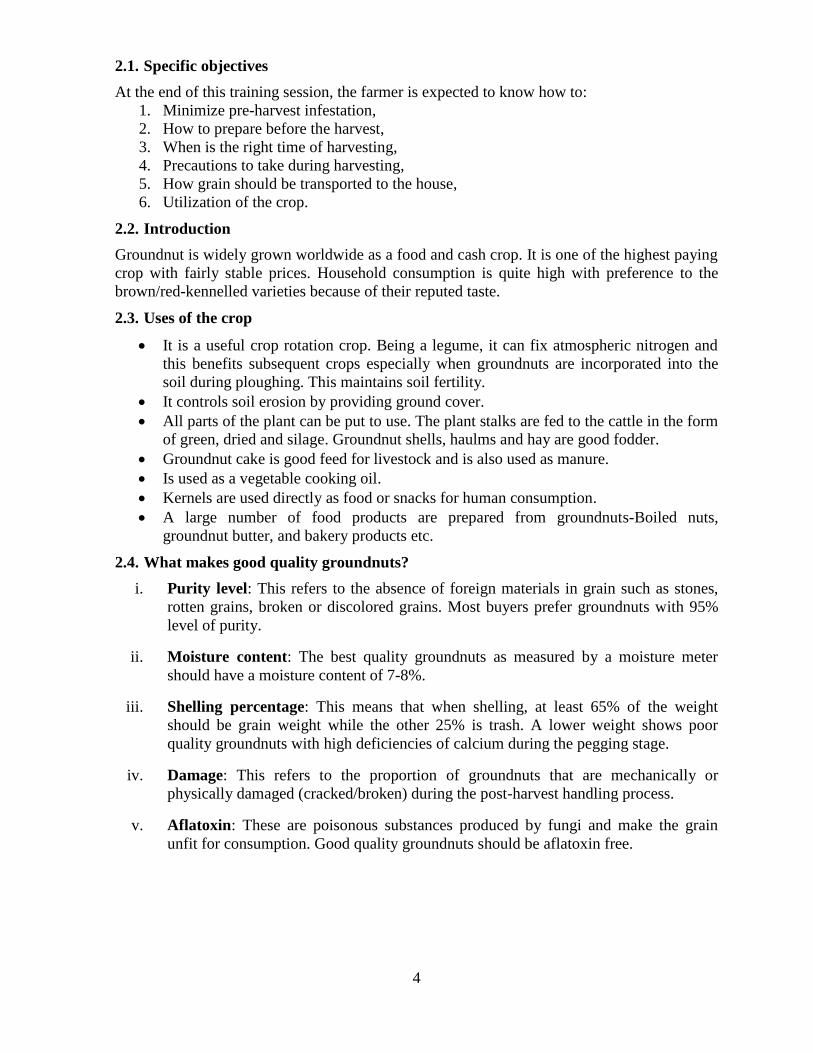
Figure 2-3: Manual harvesting (hand pulling) of groundnut plants
2.5.5.1. Stripping/Plucking
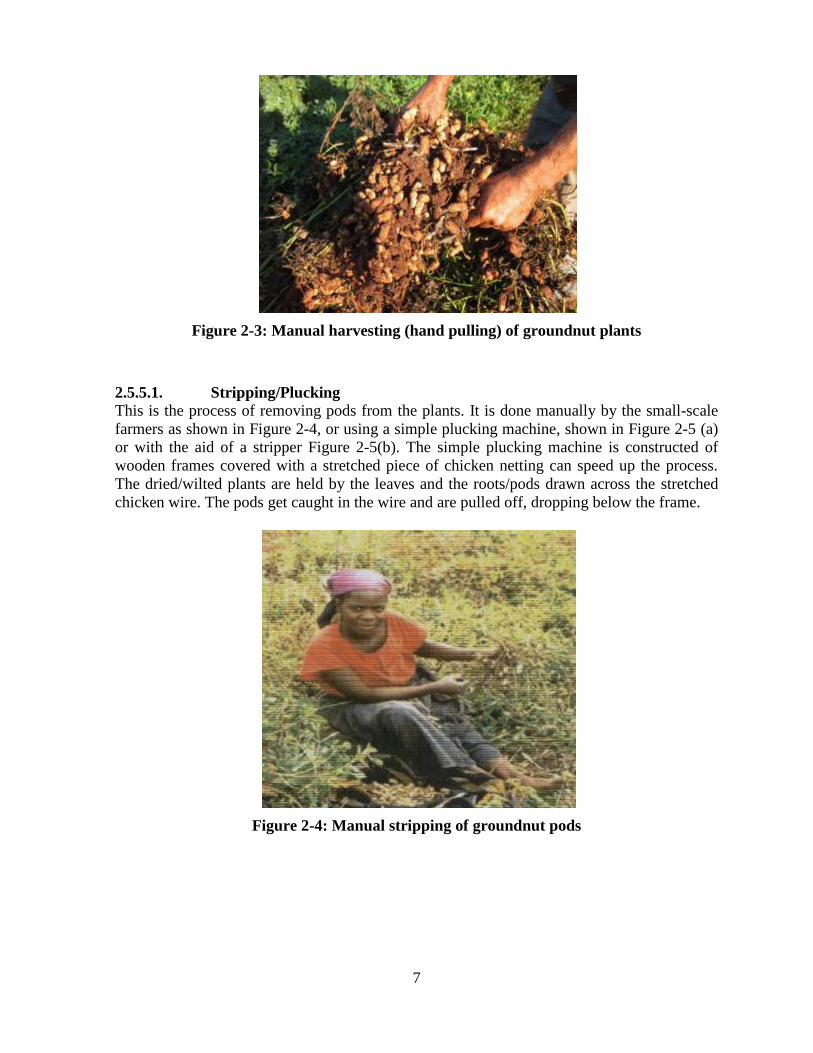
This is the process of removing pods from the plants. It is done manually by the small-scale
farmers as shown in Figure 2-4, or using a simple plucking machine, shown in Figure 2-5 (a)
or with the aid of a stripper Figure 2-5(b). The simple plucking machine is constructed of
wooden frames covered with a stretched piece of chicken netting can speed up the process.
The dried/wilted plants are held by the leaves and the roots/pods drawn across the stretched
chicken wire. The pods get caught in the wire and are pulled off, dropping below the frame.
Figure 2-4: Manual stripping of groundnut pods
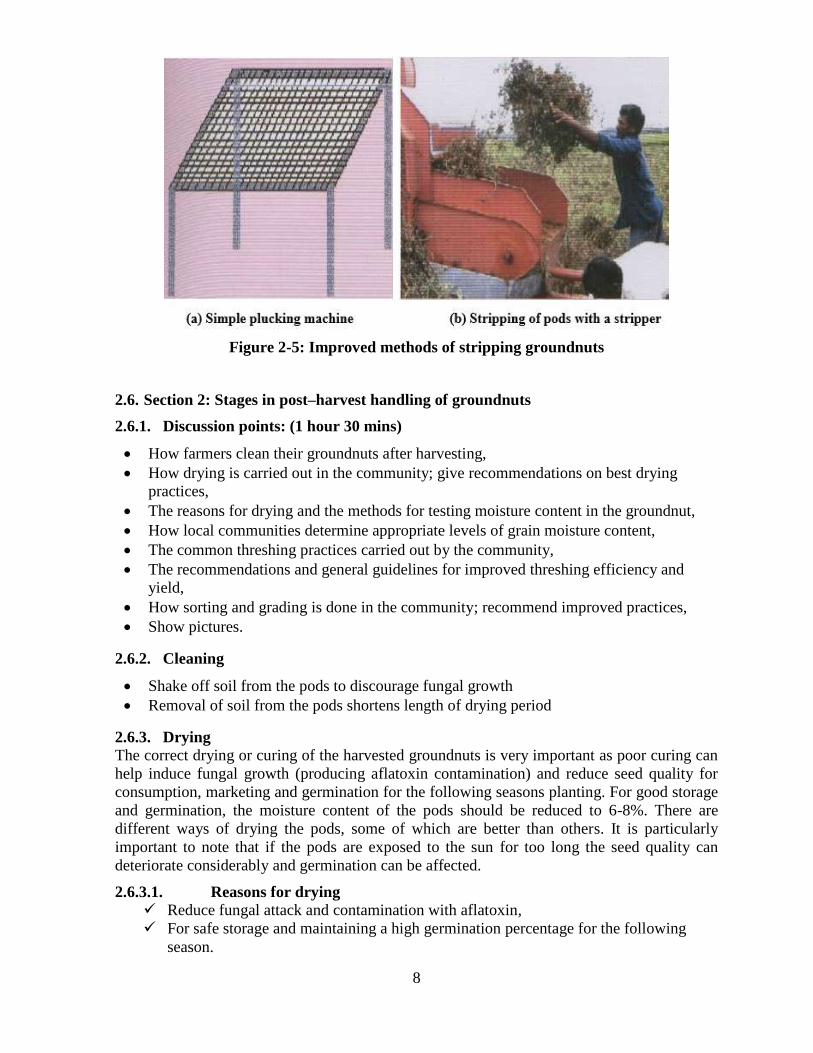
8
Figure 2-5: Improved methods of stripping groundnuts
2.6. Section 2: Stages in post–harvest handling of groundnuts
2.6.1. Discussion points: (1 hour 30 mins)
How farmers clean their groundnuts after harvesting,
How drying is carried out in the community; give recommendations on best drying
practices,
The reasons for drying and the methods for testing moisture content in the groundnut,
How local communities determine appropriate levels of grain moisture content,
The common threshing practices carried out by the community,
The recommendations and general guidelines for improved threshing efficiency and
yield,
How sorting and grading is done in the community; recommend improved practices,
Show pictures.
2.6.2. Cleaning
Shake off soil from the pods to discourage fungal growth
Removal of soil from the pods shortens length of drying period
2.6.3. Drying
The correct drying or curing of the harvested groundnuts is very important as poor curing can
help induce fungal growth (producing aflatoxin contamination) and reduce seed quality for
consumption, marketing and germination for the following seasons planting. For good storage
and germination, the moisture content of the pods should be reduced to 6-8%. There are
different ways of drying the pods, some of which are better than others. It is particularly
important to note that if the pods are exposed to the sun for too long the seed quality can
deteriorate considerably and germination can be affected.
2.6.3.1. Reasons for drying Reduce fungal attack and contamination with aflatoxin,
For safe storage and maintaining a high germination percentage for the following
season.

9
2.6.3.2. Drying in windrows
If the harvested groundnut plant are left to dry on the soil surface where they have been lifted,
the pod are likely to be in contact with the soil, which can contain moisture and be at a higher
temperature. This method can easily affect the quality of the seed, particularly if there is rain
during the drying period. If field drying is used, it is better to use windrows, where plants are
laid in rows to catch the wind and dry more quickly as shown in Figure 2-6. The drying of
pods in windrows (3-5 days) should produce the required level of moisture before the pods are
picked or stripped. Excessive exposure to the sun can affect the quality of the seed
Figure 2-6: Drying of groundnuts in windrows
2.6.3.3. Drying on mats
The plants can be picked from the windrow and spread in a thin layer in the sun to dry, as
shown in Figure 2-7 or mat for 2-5 days to achieve safe moisture storage. Pods should be
covered or taken indoors during wet weather. They can also be picked immediately after
lifting and then dried in the sun as above for 6-8 days. Once again, excessive exposure to the
sun can affect the quality of the seed
Figure 2-7: Groundnut spread on the ground

10
2.6.3.4. Curing
After 2-3 days of wilting, it is safe to begin natural curing. The following factors should be
considered:
Shade: Exposure to direct sunlight results in quality deterioration. It is recommended
that plants be stacked with pods innermost and foliage outermost,
Ventilation: Adequate air circulation is important to allow steady moisture loss,
Drainage: Ensure good drainage to avoid windrows and cocks being spoiled by
standing in water during wet weather.
The A frame (Figure 2-8) is used for curing the crop after wilting. The wilted plants are
placed on the A-frame with the pods facing down. They are left for 3-4 weeks to dry.
Figure 2-8: A-frame used for plant/pod drying
2.6.4. Storage
The points to note while drying groundnuts are:
The best way to store groundnuts is in their shell,
Store the groundnuts when the moisture content is between 7-8%,
Never bag groundnuts for storage when the pods are still dump,
Before storage remove broken, damaged, poor and fungus- infected nuts,
Store in a well ventilated and cool place,
Do not store in plastic bags as they restrict air circulation and this promote fungal
infection,
Apply Actellic super (pirimiphosmethyl) on unshelled pods before storage to control
storage pests.
2.6.4.1. Storage in bags
Gunny bags are recommended as they allow air circulation. They should not be
covered with plastic or tarpaulin (canvas) which may restrict ventilation and increase
condensation.
Bags should be stored away from the ground on wooden slats. If bags are stacked, a
gap should be left between stacks
Do not stack more than 10 bags high.
11
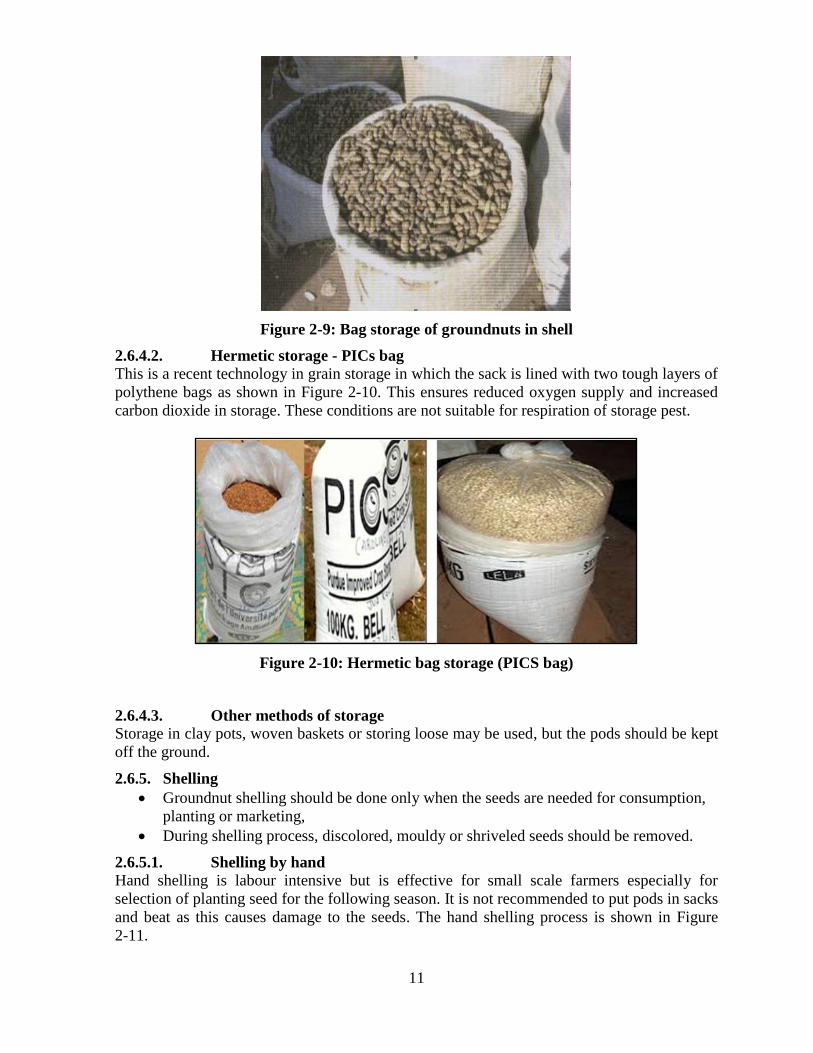
Figure 2-9: Bag storage of groundnuts in shell
2.6.4.2. Hermetic storage - PICs bag
This is a recent technology in grain storage in which the sack is lined with two tough layers of
polythene bags as shown in Figure 2-10. This ensures reduced oxygen supply and increased
carbon dioxide in storage. These conditions are not suitable for respiration of storage pest.
Figure 2-10: Hermetic bag storage (PICS bag)
2.6.4.3. Other methods of storage
Storage in clay pots, woven baskets or storing loose may be used, but the pods should be kept
off the ground.
2.6.5. Shelling
Groundnut shelling should be done only when the seeds are needed for consumption,
planting or marketing,
During shelling process, discolored, mouldy or shriveled seeds should be removed.
2.6.5.1. Shelling by hand
Hand shelling is labour intensive but is effective for small scale farmers especially for
selection of planting seed for the following season. It is not recommended to put pods in sacks
and beat as this causes damage to the seeds. The hand shelling process is shown in Figure
2-11.

12
Figure 2-11: Hand shelling
2.6.5.2. Mechanical shellers
There are a number of mechanical hand shellers on the market that can shell groundnuts at a
rate of up to six bags an hour. The rotary types have the advantage of continuous operation
(rather than shelling in batches) and new designs produce very little wastage in terms of
damaged seed. Figure 2-12 shows ground nut sample shellers used for shelling.
Figure 2-12: Groundnuts sample shellers
2.7. Section 3: Aflatoxin problem in groundnut
2.7.1. What are Aflatoxins?
They are poisonous substances produced by certain fungi. Small quantities of aflatoxin can
cause fatal liver cancer in both animals and humans and eventually death. Aflatoxin
contamination is serious quality problem in groundnuts.

13
2.7.2. What causes contamination of groundnuts by Aflatoxin?
2.7.2.1. At pre-harvest
End of season moisture stress to the crop for more than 20 days,
Growth cracks and mechanical injury to the pod,
Insects damage to pods by termites or pod borers,
Death caused by diseases (stem, root, and pod rots) at pod maturity stage,
Nematodes damage to the pod.
2.7.2.2. At post-harvest
Harvesting over mature crop,
Mechanical damage to the pod at the time of harvest,
Stacking the harvest when pod moisture is more than 10% or under humidity
conditions,
Storing haulms with immature pods,
Pod rotting due to roof leakage or high moisture levels,
Insect damage during storage.
2.7.3. What are the effects of aflatoxins contamination?
Aflatoxin causes marked deterioration in pod and kernel quality because of fungal
growth as shown in Figure 2-13,
Contaminated kernels are unfit for consumption. If eaten in sufficient quantities
aflatoxin can cause sickness, hepatitis and/or liver cancer. It is, therefore, extremely
important to ensure good management of ground nut crops and suspect seed should be
destroyed rather than used for human or animal consumption,
Reduced price for the produce,
Causes decay in both seeds and non-emerged seedlings,
Severely affects the export of groundnut and its by products.
Figure 2-13: comparison of aflatoxin contaminated and uncontaminated groundnuts
2.7.4. What are the symptoms for Aflatoxin poisoning?
The following are the major effects of aflatoxin poisoning:
14
Swollen stomach, hands and legs,
Fever,
Sweating,
Yellow eyes -Jaundice,
Liver cancer,
Reduced immunity,
Stunted growth in children,
Death in humans and domestic animals.
2.7.5. How can the effects of Aflatoxins be minimized?
The effects of aflatoxin can be minimized by the following methods:
Harvesting the crops as soon as it is mature, any delay will encourage the development
of fungus,
Avoiding damaging pods during cropping,
Removing soil from the pods before leaving to dry,
Ensuring that the correct drying procedures are used and that damaged, shriveled, or
rotten pods are removed before storage,
Store the pods under dry, well-ventilated conditions to ensure the moisture content
remains low, thus discouraging fungal growth,
Avoid damaging the seed during shelling and destroy any discolored, shriveled or
mould seed,
Avoid pod damage by insects as this can leave the pods / seeds susceptible to fungal
infection,
Pre – harvest contamination is severe during drought and extra care should be taken to
clean the seed, especially the smaller seed.
15
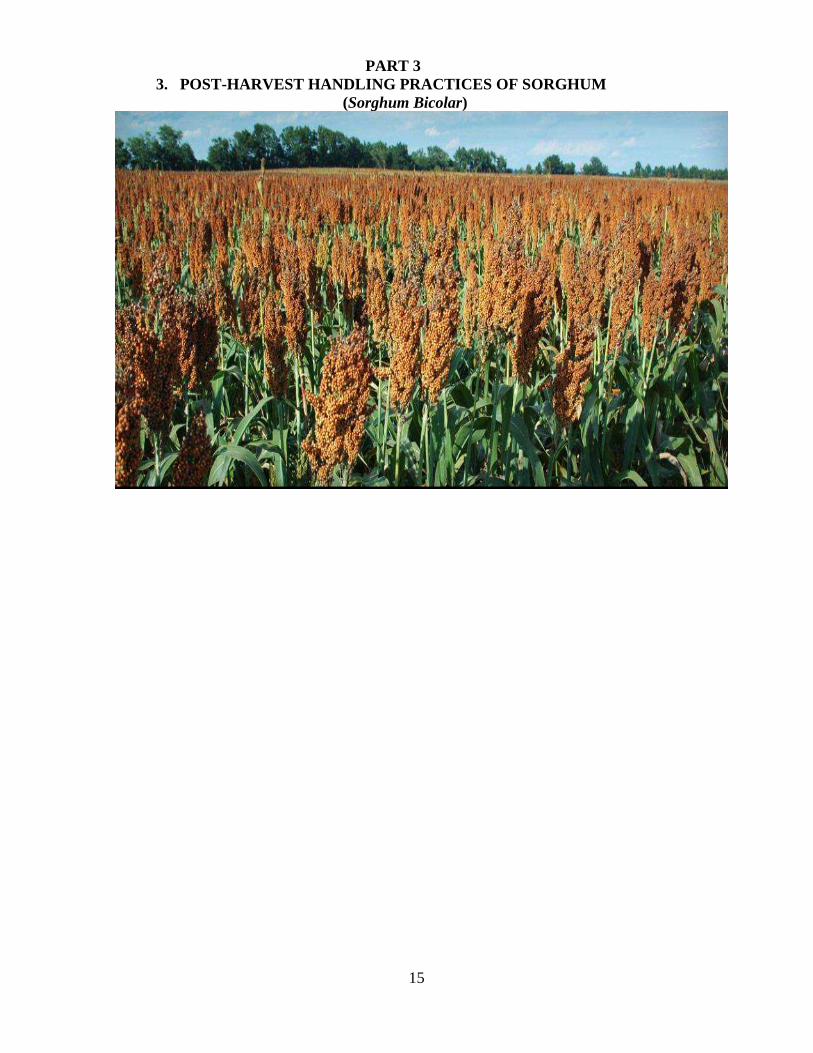
PART 3
3. POST-HARVEST HANDLING PRACTICES OF SORGHUM
(Sorghum Bicolar)
16
3.1. Introduction (15 mins)
Sorghum is the fifth most important grain crop after wheat, maize, rice and barley, which is
indigenous to Africa. It belongs to the grass family graminea. It is mainly grown on low
potential, shallow soils with a high clay content, which usually are not suitable for the
production of maize. It is grown mostly in an annual rainfall range of 300 to 750 mm. It is
grown in areas, which are too dry for maize.
3.2. Uses of the crop
The various uses for the crop are:
It is a potential food security crop since it is draught tolerant,
It is recommended for special cases such as diabetic and infants since it is rich in
essential minerals,
It is used as a livestock feed,
It is used for industrial manufacture of ethanol,
It is used traditionally for brewing purposes,
House thatching or fencing.
3.3. Section 1: The process of harvesting sorghum
3.3.1. Discussion Points (1 hour)
Tools used for harvesting,
Stage and timing of harvesting
Indicators of harvesting time,
Process of harvesting in your community.
3.3.2. Tools used for harvesting in your area
Molodo
Sickle
Knife/spear, etc.
3.3.3. Stage and timing of harvesting
Time of harvest influences yield, quality and storage life of crop,
Prematurely harvested sorghum crop has high moisture content and low quality,
Delayed harvesting leads to excess shattering, are pre disposed to pests, germination
and increased field losses(Heads of sorghum that fall to the ground come into contact
with fungi in the soil,
Harvest at the right time and moisture content,
The purpose of the crop or use for which the crop was intended; e.g. sorghum for
silage/fodder/feed harvested before flowering and for production harvested after grains
matures,
Market demand; e.g. maize harvested at green (fresh maize) or dry (dry maize grains)
stage depending on market demand,
Weather conditions – most crops are harvested during dry conditions,
Prevailing market price and profit margins – harvesting can be delayed in order to
obtain better prices at a later date,
At time’s farmers are forced to harvest their crops early to avoid floods (especially in
low lands) and to prevent destruction by livestock released before harvests.

17
3.3.4. Precautions during harvesting
During harvesting, care should be taken to make sure that produce is not affected in
quality or quantity,
The crop should be harvested at the right stage depending on the intended use,
The timing should also be correct and weather conditions should be dry because wet
weather enhances rotting of produce,
Delayed harvesting is not encouraged as many crops can get spoiled, thus reducing the
quality and quantity available for consumption and sale.
3.3.5. Harvesting process of sorghum
For Sorghum, harvesting is harvested by hand.
The panicle is cut from the standing stalk at about 16 -20% moisture content.
3.4. Section 2: Post–harvest handling practices
3.4.1. Discussion Points (45 mins)
How drying is carried out in the community; give recommendations on best drying
practices,
The reasons for drying and the methods for testing moisture content in the grain
(sorghum/maize),
How local communities determine appropriate levels of grain moisture content.
The common threshing practices carried out by the community,
The recommendations and general guidelines for improved threshing efficiency and
yield,
How cleaning, sorting and grading is done in the community; recommend improved
practices,
Show pictures of testing the moisture content of grain sorghum/maize.
3.4.2. Drying
Grains are usually dried until the correct moisture content (10 to 12 %) for optimum
storage is attained. The reasons for drying to reach a moisture content level of 10 to 13
percent include:
Prevention of mould growth and aflatoxin contamination of the grains,
Reduction of the likelihood of insect attack,
Prevention of grain germination.
Field drying is mostly practiced where the panicles are stack into bundles in the field and
allowed to dry in the sun. But they should be kept off the ground whilst being dried.
3.4.3. Measurement of grains’ moisture content
To measure the moisture content or dryness of grains, three simple methods are
recommended:
i). Salt test
Dry common salt (non-iodized) is mixed with the grain sample in a glass jar and
shaken,
The equilibrium relative humidity of dry salt is 75 percent at ambient temperatures,
The equilibrium moisture content of grain at 75 percent relative humidity is about 15
percent,
18
Therefore, if the salt in the grain sample adheres to the walls of the glass, it has
absorbed moisture from the air which must therefore have been at a relative humidity
greater than 75 percent,
This means that the grain had moisture content greater than 15 percent moisture
content, and is unsuitable for storage in bulk.
NB: The salt method is not precise, but it costs little and is simple to carry out
ii). Smelling a sample of grain for mouldy smell
Take a representative sample of the produce under consideration in a convenient
container,
Move the container with sample close to your nose,
Smell the sample: The smell of the produce should be typical. Other smells e.g. of
chemicals, mouldiness, rot etc. should not be detectable .
iii). Biting grain method
The biting test is even simpler to perform and can help determine suitability of grains for
storage: A dry grain is tested by biting. If suitable for storage it will be brittle, hard and break
easily into many parts.
3.4.4. Threshing/Shelling
This is the act of removing sorghum and grains from the heads. The time required for
threshing depends on:
Variety of grain,
The degree of dryness of the grain,
The method of threshing.
3.4.4.1. Common threshing practices
Beating with sticks on the ground or in sacks, or using a mortar and pestle,
Grinding on stones and motor,
Threshing machines (for large scale commercial farms).
3.4.4.2. General guidelines for improved threshing efficiency
Reduce losses during winnowing by threshing on mats, cement blocks or smeared
ground,
Thresh early to reduce crop exposure to birds, rats, and other pests in the field,
Dry thoroughly to reduce the moisture content of the grain before storage; (moisture
content should be at 10 to 12 percent, as noted above),
Sorting is very important, especially when maintaining some crops as seeds, or
improving the quality for marketing,
The grain may be stored as un-threshed panicles (in the case of sorghum) or threshed
before storage,
In other countries, motorized threshers are used but are very expensive.
3.4.5. Cleaning/winnowing
Grain cleaning is achieved by winnowing to remove the low density materials such as leaf,
stalk and empty seeds.
3.4.6. Sorting
It is done to remove the heavy material (stones, soil) which cannot be removed by winnowing.
19
3.5. Section 3: Causes of losses and loss management (1 hour)
The principle causes of quality/quantity losses and/or deterioration in stored grains are:
Insects
Moulds
Rodents
Birds
3.5.1. Insects
3.5.1.1. Discussion points
Types of insect storage pests and examples,
Losses caused by insect pests,
Sources of insect infestation,
Control measures for insect pests.
3.5.1.2. Primary pests
Are capable of attacking and breeding inside previously undamaged grains/beans/nuts,
Are very common in farm stores soon after harvest,
Can occur in the plant once it has reached maturity in the field.
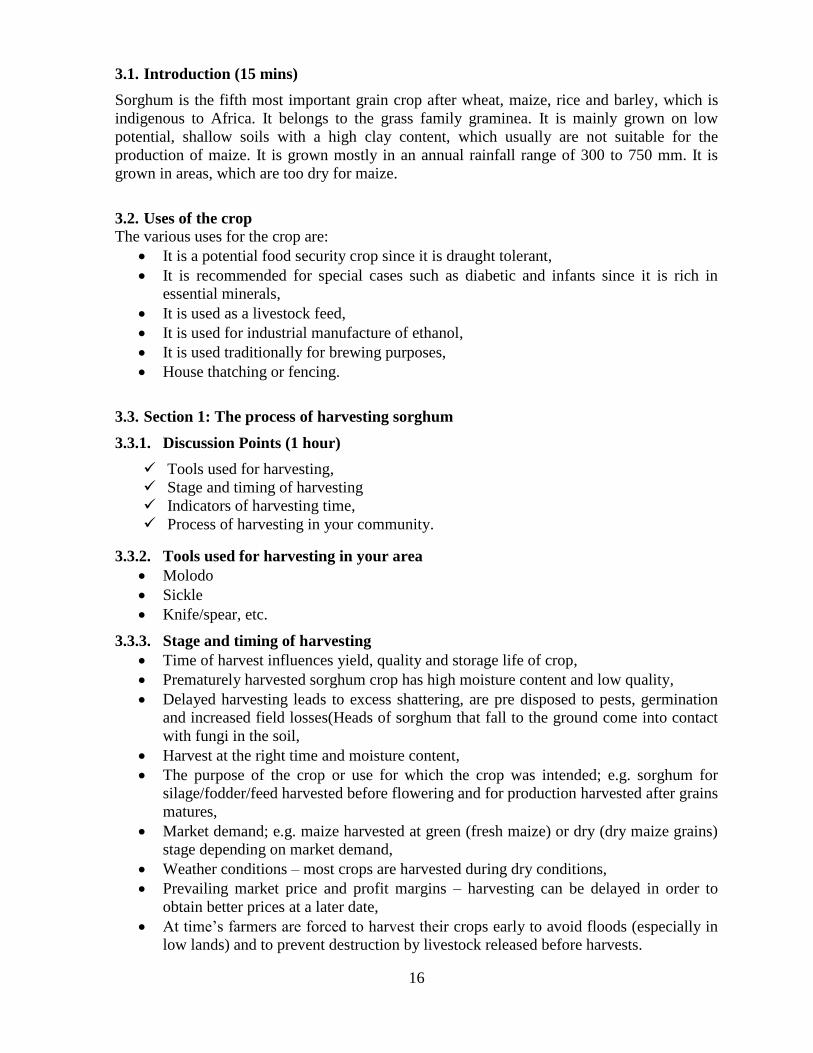
3.5.1.3. Common examples of primary insect pests
Lesser/smaller grain borer, Rhyzopertha dominica, shown in Figure 3-1(a),
Larger grain borer, Prostephanus truncates,
Weevils, Sitophilus species Figure 3-1 (b),
Moths found commonly in grain stores, Sitotroga cerealella, the Angoumois grain
moth shown in Figure 3-2; it is frequently found in stores of cob maize, especially
soon after harvest.
Figure 3-1: Lesser Grain Borer, Rhyzopertha dominica (a), Sorghum /Maize Weevil,
Sitophilus Zeamais (Source: USAID, 2012)

20
Figure 3-2: Angoumois grain moth, Sitotroga cerealella (a), Red flour beetle (b)
(Source: USAID, 2012)
Figure 3-3: Indian meal moth (Source: USAID, 2012)
3.5.1.4. Secondary pests
Only attack and breed in grains that have already been damaged or grain that has been
processed into flour or a similar product.
Tend to be most common once the grain has been damaged by primary pests and
therefore are found after grain has been stored for several months.
3.5.1.5. Losses caused by insects
The losses caused by insects include:
Weight loss,
Loss in quality/market value,
Promotion of mould development,
Reduced germination in seed material,
Reduced nutritional value.
3.5.1.6. Sources of infestation
Infested residues from the previous year, stored at home or on the farm,
The structure of the store itself, i.e. from: thatch, bamboo or timber of a traditional
crib,
Cracks in the wall of a silo, rumba or warehouse,
Old sacks and dunnage (used to support sacks or bags),
Natural habitats, such as: under the bark of trees, in rotting wood, in seed pods.
21
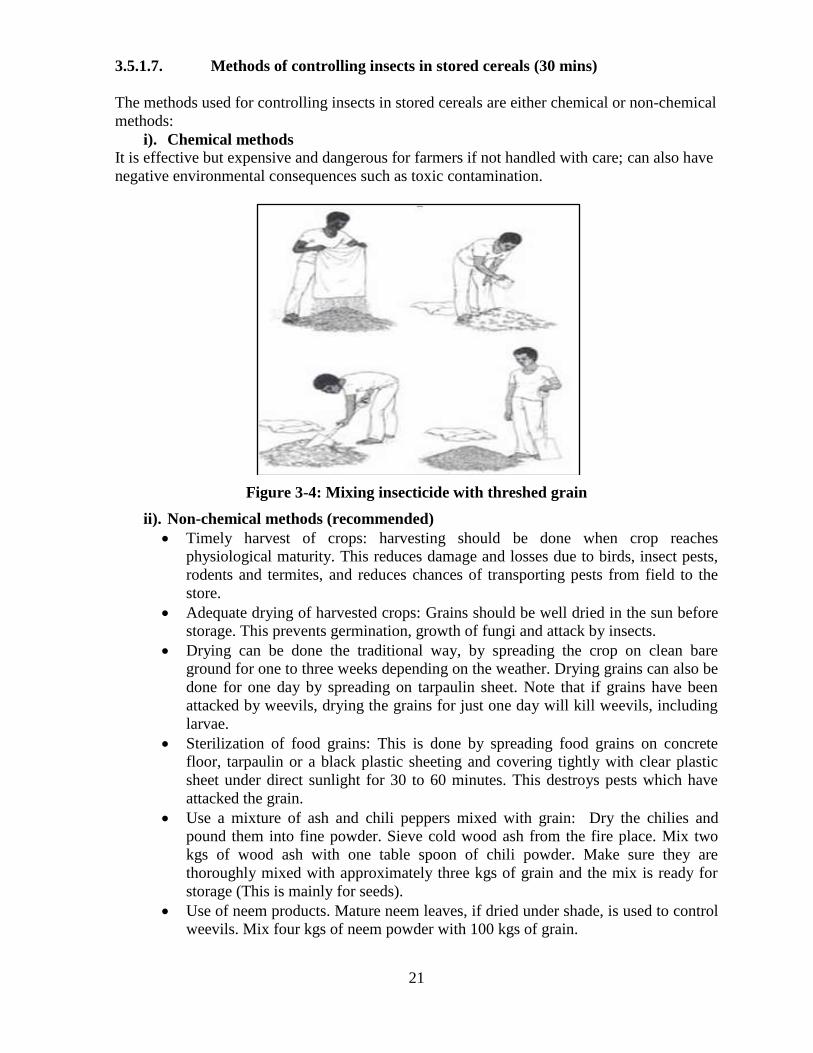
3.5.1.7. Methods of controlling insects in stored cereals (30 mins)
The methods used for controlling insects in stored cereals are either chemical or non-chemical
methods:
i). Chemical methods
It is effective but expensive and dangerous for farmers if not handled with care; can also have
negative environmental consequences such as toxic contamination.
Figure 3-4: Mixing insecticide with threshed grain
ii). Non-chemical methods (recommended)
Timely harvest of crops: harvesting should be done when crop reaches
physiological maturity. This reduces damage and losses due to birds, insect pests,
rodents and termites, and reduces chances of transporting pests from field to the
store.
Adequate drying of harvested crops: Grains should be well dried in the sun before
storage. This prevents germination, growth of fungi and attack by insects.
Drying can be done the traditional way, by spreading the crop on clean bare
ground for one to three weeks depending on the weather. Drying grains can also be
done for one day by spreading on tarpaulin sheet. Note that if grains have been
attacked by weevils, drying the grains for just one day will kill weevils, including
larvae.
Sterilization of food grains: This is done by spreading food grains on concrete
floor, tarpaulin or a black plastic sheeting and covering tightly with clear plastic
sheet under direct sunlight for 30 to 60 minutes. This destroys pests which have
attacked the grain.
Use a mixture of ash and chili peppers mixed with grain: Dry the chilies and
pound them into fine powder. Sieve cold wood ash from the fire place. Mix two
kgs of wood ash with one table spoon of chili powder. Make sure they are
thoroughly mixed with approximately three kgs of grain and the mix is ready for
storage (This is mainly for seeds).
Use of neem products. Mature neem leaves, if dried under shade, is used to control
weevils. Mix four kgs of neem powder with 100 kgs of grain.

22
Neem powder from seeds can also be used. Ripe neem seeds are harvested, the
outer coat peeled off and washed with water. The clean seeds are then dried under
a shade. The dry seeds are then pounded slowly to open the kernels. The kernels
are removed by winnowing. The balance is then pounded into a powder. Two kgs
of powder is mixed with 100 kgs of grain.
Use of hot pepper (chedher/sheta): Use four table spoons of well-ground pepper
mixed thoroughly with 20 kgs of grain.
Use of tobacco: Tobacco, though poisonous, can be used for seed storage. Mix
five kgs of ground tobacco with 50 kgs of grain seeds.
Use of sand: Dry sand mixed with grain seeds at a 50:50 ratio is an effective way
of controlling weevils. The sand seals all the air spaces between the grains making
it impossible for pests to survive.
Storage of grain in air tight containers: All insects, including weevils, need air to
breathe. So storing grains in such tight containers such as gourds, pots, or jerricans
can keep away weevils.
Smoking: Farmers can build a wood fire to place under granaries so that smoke
enters the cobs or pods of grains and shells of beans or nuts.
Storing new grains in a clean environment: Clean and clear all old grains from the
store in good time before harvest, and burn all trash. Also farmers are advised not
to mix old grains with new ones.
Proper threshing and cleaning of grains: Cleaning and sorting of grains to remove
broken, infested and dirty grains is important.
Regular inspection of stored grains: This gives farmers an opportunity to take
action before weevils start damaging grains, either by sun drying of the
grain/beans/nuts, or through the application of organic chemicals.
Area surrounding the store to be kept clean and tall grass cut regularly. Old fenced
can act as a hideout for rats.
3.5.2. Moulds
Moisture encourages the development of moulds during storage. Farmers can control moulds
through:
Timely harvesting of crops as soon as they reach maturity. This reduces chances of
crops falling down into wet soil,
Dry grains well in the sun before storage. If the weather is wet, stored grain can be
removed again and dried out in the sun,
Grains stored in sacks should be placed on a raised rack or logs to prevent direct
contact with the floor. Also the sacks should be placed in an alternating pattern to
allow air to pass through them,
Grain in storage cribs/houses or in jute sacks should be well ventilated, to allow air to
pass though the grain,
Roofs of cribs should be kept in good condition to prevent leakage of water into the
crib.
3.5.2.1. Discussion points
Maize cobs, sorghum and millet heads and pods of pulses that fall to the ground can
come into contact with mould spores that live in the soil,
Repeated planting of a crop in the same field may increase the risk of infection by
mould,
23
Poor handling techniques used at harvest during drying, threshing and transportation
can spread mould,
Insect infestation in storage.
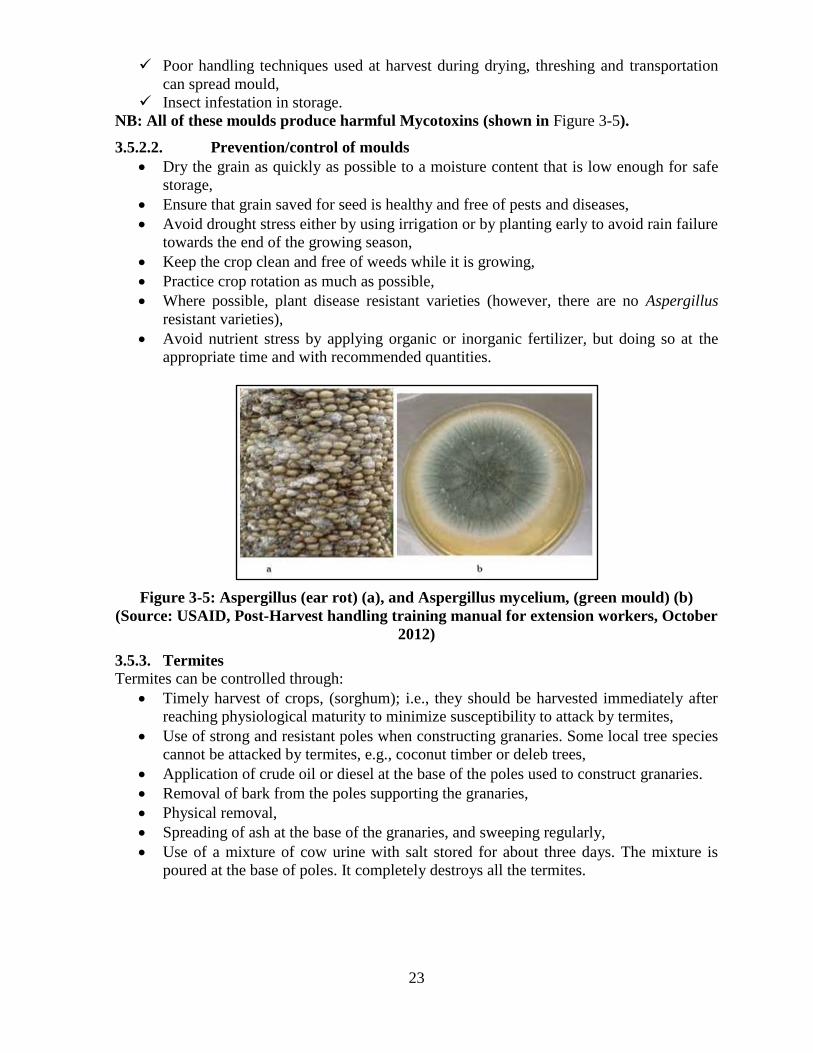
NB: All of these moulds produce harmful Mycotoxins (shown in Figure 3-5).
3.5.2.2. Prevention/control of moulds
Dry the grain as quickly as possible to a moisture content that is low enough for safe
storage,
Ensure that grain saved for seed is healthy and free of pests and diseases,
Avoid drought stress either by using irrigation or by planting early to avoid rain failure
towards the end of the growing season,
Keep the crop clean and free of weeds while it is growing,
Practice crop rotation as much as possible,
Where possible, plant disease resistant varieties (however, there are no Aspergillus
resistant varieties),
Avoid nutrient stress by applying organic or inorganic fertilizer, but doing so at the
appropriate time and with recommended quantities.
Figure 3-5: Aspergillus (ear rot) (a), and Aspergillus mycelium, (green mould) (b)
(Source: USAID, Post-Harvest handling training manual for extension workers, October
2012)
3.5.3. Termites
Termites can be controlled through:
Timely harvest of crops, (sorghum); i.e., they should be harvested immediately after
reaching physiological maturity to minimize susceptibility to attack by termites,
Use of strong and resistant poles when constructing granaries. Some local tree species
cannot be attacked by termites, e.g., coconut timber or deleb trees,
Application of crude oil or diesel at the base of the poles used to construct granaries.
Removal of bark from the poles supporting the granaries,
Physical removal,
Spreading of ash at the base of the granaries, and sweeping regularly,
Use of a mixture of cow urine with salt stored for about three days. The mixture is
poured at the base of poles. It completely destroys all the termites.
24
3.5.4. Rodents
3.5.4.1. Discussion points (15 min)
Losses/damages cause by rodents in stored grains,
Clues to the presence of rodents in the stores,
Major species of rats,
Control measures for rodents,
Show different pictures of rats.
3.5.4.2. Losses/damage caused by rodents in stores
Rats and mice damage storage containers,
Rats eat some of the stored produce, carry some away to their nests,
They spoil much more with droppings, urine and hairs.
3.5.4.3. Three species of rodents are major pests of stored produce
Rattus rattus (black rat) and Rattus norvegicus (brown rat).
Musmusculus (house mouse).
Praomys natalensis (multi-mamma rat).
3.5.4.4. Signs of the presence of rats in stores
Droppings,
Loose earth from burrowing,
Footprints on dusty floors,
Greasy marks on set routes of travel, e.g., on beams or along electrical wiring,
Holed sacks with grain escaping,
Gnawing damage to building fabric.
3.5.4.5. Control methods
Keep the store clean and tidy and have rodent-proofing in place.
Rat guards (no lower than one meter above the ground); should be attached to the legs
and supports of grain stores.
Stores should be built at least one meter away from trees, poles or buildings.
Traps should be used inside the house or storeroom.
Poisoning of rodents with rodenticides (but expensive and dangerous to human and
animal health, also detrimental to environment; therefore should be carefully
administered).
Keeping the compounds and surroundings in the village free from rubbish.
Bundles of thorns can be used as rat guards. They prevent the rats from climbing up the
granary. The thorns are also used to block the tunnels or holes dug by the rats.
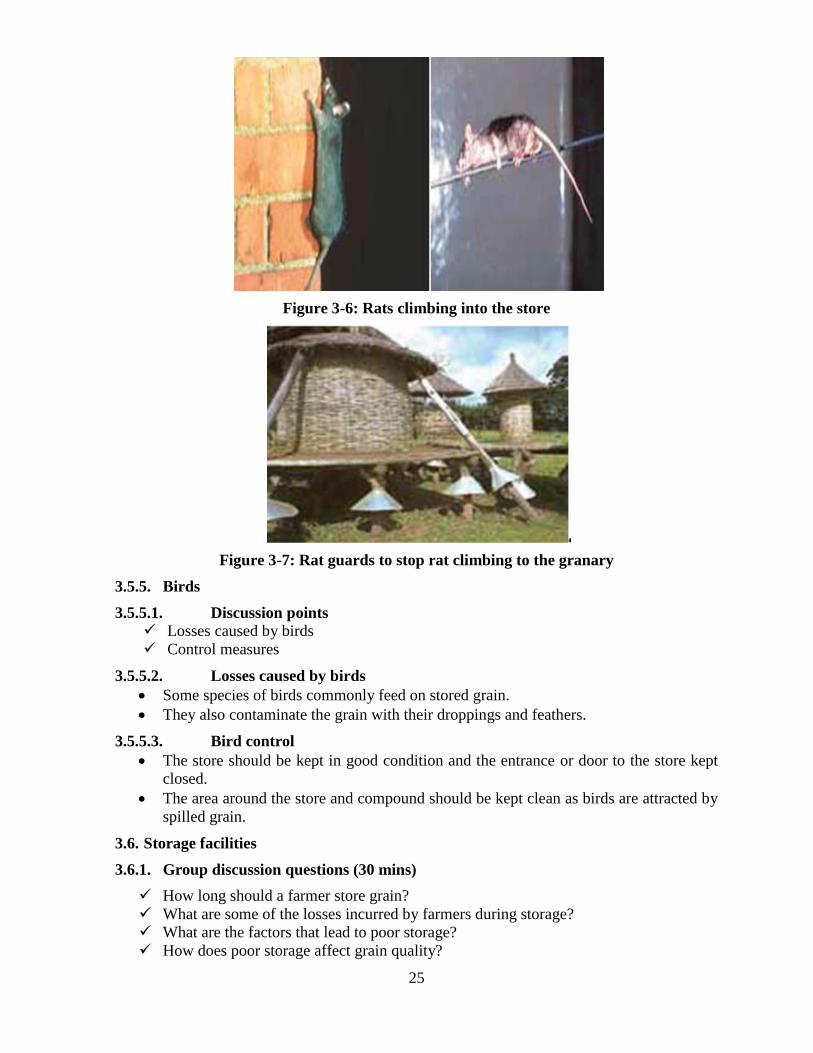
25
Figure 3-6: Rats climbing into the store
Figure 3-7: Rat guards to stop rat climbing to the granary
3.5.5. Birds
3.5.5.1. Discussion points
Losses caused by birds
Control measures
3.5.5.2. Losses caused by birds
Some species of birds commonly feed on stored grain.
They also contaminate the grain with their droppings and feathers.
3.5.5.3. Bird control
The store should be kept in good condition and the entrance or door to the store kept
closed.
The area around the store and compound should be kept clean as birds are attracted by
spilled grain.
3.6. Storage facilities
3.6.1. Group discussion questions (30 mins)
How long should a farmer store grain?
What are some of the losses incurred by farmers during storage?
What are the factors that lead to poor storage?
How does poor storage affect grain quality?

26
What are some of the common pests that affect grain during storage?
3.6.2. Types of traditional storage containers/facilities
Some of the common traditional storage facilities shown in Figure 3-8 are:
Granaries
Clay pots
Gourds
Jute bags
Metal drums and bins
Baskets
Underground pits
Bins of stone or mud plaster
Figure 3-8: Traditional containers used for seed storage
Figure 3-9: Traditional containers used for seed storage - (a) Traditional baskets; (b)
Underground pit
3.6.2.1. Factors that influence the choice of storage facilities
The quantity of produce to be stored,
The period or duration of storage,
27
Availability of construction materials,
The cost of construction.n
3.6.3. Seed storage
Grain may be stored in sealed pots or gourds, or in tins or bottles.
Plastic water containers with screw-on lids make ideal seed stores.
Larger quantities of maize seed are stored by suspending entire cobs from the roof
eaves. or overhang of the house; they may also be suspended from trees.
3.6.4. Storage practices
The Four pillars of good Storage practice include:
Ensuring that the crop going into the store is in good condition,
Keeping the store in good condition,
Practicing good store hygiene,
Maintaining the condition of crops and stores throughout the storage season.
3.6.4.1. Ensuring that the crop going into the store is in good condition
Good quality whole grain is less likely to suffer insect attack than poor quality
damaged grain,
The grain should be cleaned well and any damaged grain removed,
The grain should be well dried,
The crop should be carefully handled once it has dried to ensure that grain remains
intact.
3.6.4.2. Keeping the store in good condition
A good store will keep the grain dry and cool. It should provide protection against
rodents, birds and browsing domestic animals and poultry. It should be theft proof.
Stores should be sited in areas that are not prone to flooding; the soil should allow
water to drain away readily.
They should not be placed where high winds might damage the structure or near trees,
which might provide access points from which rodents can jump onto the store roof or
platform.
The store should have a roof to keep rain off the structure and to provide shade during
the heat of the day.
To prevent groundwater soaking into the store, the structure must be raised off the
ground.
The store must be kept in good repair to stop the roof leaking or the sides collapsing.
At the beginning of the new storage season the empty store must be cleaned.
3.6.4.3. Practicing good store hygiene
This means keeping everything as clean as is practically possible.
The store surroundings should be tidied so that there is no vegetation or rubbish to
hinder inspection or to provide breeding grounds for insects and rodents.
Livestock should be kept away from the store; they should not be allowed to browse or
sleep under the store; droppings should be cleared up as they attract rodents.
Whenever the storage containers are empty they should be cleaned. Second hand sacks
should be dipped into boiling water to kill any insects and then dried in the sun.
Grain residues should be removed from sacks by turning them inside out and
thoroughly brushing them. Holes should be stitched.

28
Grass should be burnt inside solid walled bins and mud plastered baskets to kill off
insects and mould spores.
Old grain should be stored separately from the new crop and it should be used first.
3.6.4.4. Maintaining the condition of the crop and the store throughout
the storage season
Pests can attack the store at any time so it is important to inspect the store and crop
regularly.
Store inspections should start as soon as the grain is put in store and then conducted
routinely at weekly intervals. This is because insects may be brought in with the crop.
Even if the crop is insect-free at the start of storage, regular inspection is necessary to
spot insects that might fly in from a neighbor’s store, trees and vegetation or from
grain purchased from the market.
For shelled grain and pulses stored in bags, baskets or bins, the grain should be
removed from store and adult insects removed by sun drying or sieving and
winnowing the grain.
The store should be quickly repaired if it becomes damaged.
Good storage practice is the key to maintaining grain quality.

29
PART 4
4. POST-HARVEST HANDLING AND MANAGEMNET OF RICE
(sorghum bicolar)
30
4.1. Introduction
Post-harvest management of rice includes:
Harvesting,
Threshing,
Winnowing/Cleaning,
Drying,
Storage
Protection
Milling the rice crop.
Harvesting and threshing methods of rice vary widely from farmer to farmer and also from
country to country. The levels of mechanization, from country to country also differ widely.
The methods may either be manual, animal or mechanical operated (FAO, 2007).
4.2. Harvesting (45 mins)
4.2.1. General objective
The objective of the section is to provide practical information on how and when to harvest by
using visual indicators, in order to optimise the quantity obtained and the quality of the paddy.
4.2.2. Specific objective
At the end of the training period, the farmer should be able to harvest at the appropriate time
using simple visual signs and methods and be aware of the exiting improved technologies for
harvesting that can fit their production system.
4.2.3. How to harvest
Rice harvesting is mainly carried out in Sub-Saharan Africa manually. The process involves
cutting of the rice plants at maturity stage, pre-drying, threshing, winnowing, drying and
bulking. Several of these post production activities have direct bearing on the quality of paddy
available for processing. The steps involved with rice post-harvest activities are considered
below:
The optimal stage to harvest a rice crop is when the grain moisture content is between
20 - 25% or when 80 - 85% of the grains are straw coloured and the grains in the
lower parts of the panicle are in the hard doe stage. This is about 30 days after
flowering.
If the crop is harvested too late, many grains are lost through shattering or drying out
and are cracked during threshing. Cracked grains do not germinate and they also
break during milling.
If rice is harvested too early, there will also be many immature seed grains and this
will reduce quality.
Immature rice kernels are very slender and chalky and this results in excessive
amounts of bran and broken grains during milling.
The two harvesting methods that are mostly used in SSA are Panicle and Sickle harvesting.
Panicle harvesting provides less harvesting losses when compared to sickle harvesting even
though sickle harvesting is much quicker and has the potential of saving time and labor cost.
Note: Appropriate time of harvest (avoiding early/late harvest) is very important in
controlling the quality of harvested paddy. Appropriate time of harvest therefore become a
matter for consideration in the rice post production technology.
Appropriate time for harvest is indicated by:
The period when at least 80% of the panicles have reached full maturity,

31
The moisture content of the grains should be between 20 - 22%,
The grain should have full ripened colour (mainly yellow),
When the grain husk is removed, the grain is white and hard.
4.2.4. How to observe the paddy field in order to determine an optimum
harvest time
Observe your field to notice when the panicles, not the rice plant starts getting
yellowish in appearance. Do not confuse the colour of the straw with the yellowish
colour of the panicles. Yellowish colour of the straw may result from early
senescence of the leaves.
Pay attention to the panicles and observe when individual panicles in different
parts of the field, have up to 80% maturity in the upper part of the panicle.
Harvesting should start immediately.
Waiting for the remaining 20% to mature may lead to shattering of the upper
grains which are very often better filled thus resulting in yield reduction.
Note: It is very difficult to convince farmers to harvest at the appropriate time.
Trainers are encouraged to conduct simple demonstrations through comparison in a given area
in the farmer’s field using these indicators. An area should be harvested at the optimum time
and a similar area harvested at the period decided by the farmer. These should be threshed and
milled separately for the farmer to observe the advantages in harvesting at the optimum time.
4.2.4.1. Points to remember during harvesting
Paddy is the rice grain enclosed in the husk before it is milled.
Timeliness in harvesting paddy rice is important in determining grain quality and
yield.
Harvesting should begin when 80 per cent of the grains (or 8 out of 10 grains) in the
main panicles of plants are clear, firm, and straw-coloured; the rest should be hard.
Harvest when paddy rice moisture is less than 25 per cent, about 30 -32 days after
flowering.
If harvesting by hand, grasp the plant about 15 cm-20 cm from the soil or ground
level then cut with a sickle 15 cm from ground level.
If harvested too early, there will be many immature grains which will reduce head
rice yield and quality. Immature rice kernels are very slender and chalky, and will
result in excessive amounts of bran and broken grains.
If harvesting is too late, many grains will be lost due to shattering or drying out and
cracking during threshing.
Cracked grains break during milling.
If moisture content is allowed to vary, grain fissuring (cracking), spoilage through
yellowing, and development of odours can occur
4.2.4.2. Problems of late harvesting
Lodging,
Over drying of grain,
Shattering,
Rodent/bird attack,
Contamination when panicles touch the ground.
4.2.4.3. Problems of early harvesting
Many of immature grains,

32
Discoloured grains,
Timely harvesting will ensure high paddy yield, a quality product for parboiling
or milling and high milling recovery with low kernel breakage.
4.2.4.4. Manual harvesting
The most common manual harvester is the sickle but sometimes the cutlass is used. (Manual
harvesting operation using a sickle as shown in Figure 4-1).
Figure 4-1: Harvesting rice with sickles at the plant height of 4-5 cm from the ground
When the knife is used, harvesting is panicle by panicle, making harvesting more laborious
and time consuming. This method is mainly used where traditional varieties with uneven
maturity times are grown. When sickles and cutlasses are used in harvesting, the entire plant
is cut as opposed to panicle by panicle harvesting with knives. In areas where sickle or cutlass
harvesting is unavoidable farmers are encouraged to engage as much labour as possible so as
to reduce the harvesting period. The harvested paddy should not be put on bare floor/ground
to avoid contamination with stones and mud and mould growth. Harvested paddy should be
spread on:
Plastic sheets,
Tarpaulins,
Traditional mats.
Harvesting rice with sickles at the plant height of 4-5 cm from the ground.
4.2.4.5. Mechanical harvesting Mechanical harvesting may be carried out by the use of combine harvesters shown in Error!
eference source not found. or reapers shown in Figure 4-2. They have the advantage of
threshing as they are harvesting. The problem with the combine harvester is the high initial
and maintenance costs coupled with its unavailability and lack of spare parts in most areas in
West Africa. In addition, when this method is used in fields with well-dried grains, many of
the grains fall or are broken by the tines. Generally, the use of combine harvesters is most
appropriate on farms that are relatively large with good leveling and water control. The rice
variety should be one that matures evenly and should not be of short variety. To perform
optimally the use of combine harvesters require the following:
Large farm sizes,
Good level and dried surface area (not water logged),
Erect rice plants (not lodged),
Personnel trained in the use of the equipment,
Availability of spare parts and machine repairs/maintenance.

33
Figure 4-2: The full conventional combine harvester
The reaper represents an alternative to combine and manual harvesting. However, they are
generally unavailable to most farmers in the sub-regions although some countries have tried
them. Trials need to the carried out on these in the other countries and disseminated fully in
the sub-region.
Figure 4-3: Reaper
4.3. Threshing (30 mins)
Threshing is the post-harvest operation of separating the paddy grains from the rice straw.
This is a very important operation in rice post-harvest handling, which if not handled
properly results in broken /damaged grains and mixing with other foreign matter including
sand, stones and other rice varieties which present more challenges for processing.
Threshing is usually done either manually or mechanically. Mechanical threshing can be
carried out by use of combine harvesters. In areas where the farm sizes and outputs are
small the use of combine harvesters is difficult. Although this ensures efficient threshing
the problems associated with the use of combine harvesters in harvesting as already stated
above also apply here hence the use of combine harvesters are limited.

34
In manual threshing several methods are available. In some places threshing is done using
legs to march on the straw, others beat the straw against drums, others put the straw in
bags and beat it against tree trunks, stones etc. while others use sticks to beat rice straw
heap.
4.3.1. Problems of manual threshing
This method is time consuming, laborious, slow and output is quite low. Contamination of
paddy with sand, stone, immature grain and other foreign materials is high. There is also
loss of grain leading to reduction in overall output.
Figure 4-4: Farmer threshing the rice, using wooden frame
Intermediate technology
There is however an intermediate technology for rice threshing. This involves the use of semi
motorised and completely motorised rice threshers. These are already available in several
places in sub Saharan Africa, particularly in irrigated areas or developed low lands.
There is the technology of threshing which uses a pedal thresher (Figure 4-6). The pedals are
attached to an overhead drum that is perforated to create fingers. As the machine is pedaled
and the straw placed on the drum the resulting centripetal forces loosens the grain from the
straw. The output is about 500 kg per day. This is an improvement over the manual threshing.
However the pedal thresher is very laborious, has limited output and is suited for only small
farms. It also requires the winnowing of the paddy after threshing. There is already an
improvement on the pedal thresher (Figure 4-8). This pedal is replaced with a motor, such that
the operator stands and places the straw over the exposed spike- like drum. It gives higher
output and is less drudgery but still suited for small farms.

35
Figure 4-5: Different types of manual threshing methods (a) Drum and, (b) Using sticks
Figure 4-6: Mechanical Pedal thresher (INRAB-Benin)
Figure 4-7: Mechanical motorized thresher (INRAB-Benin)
36
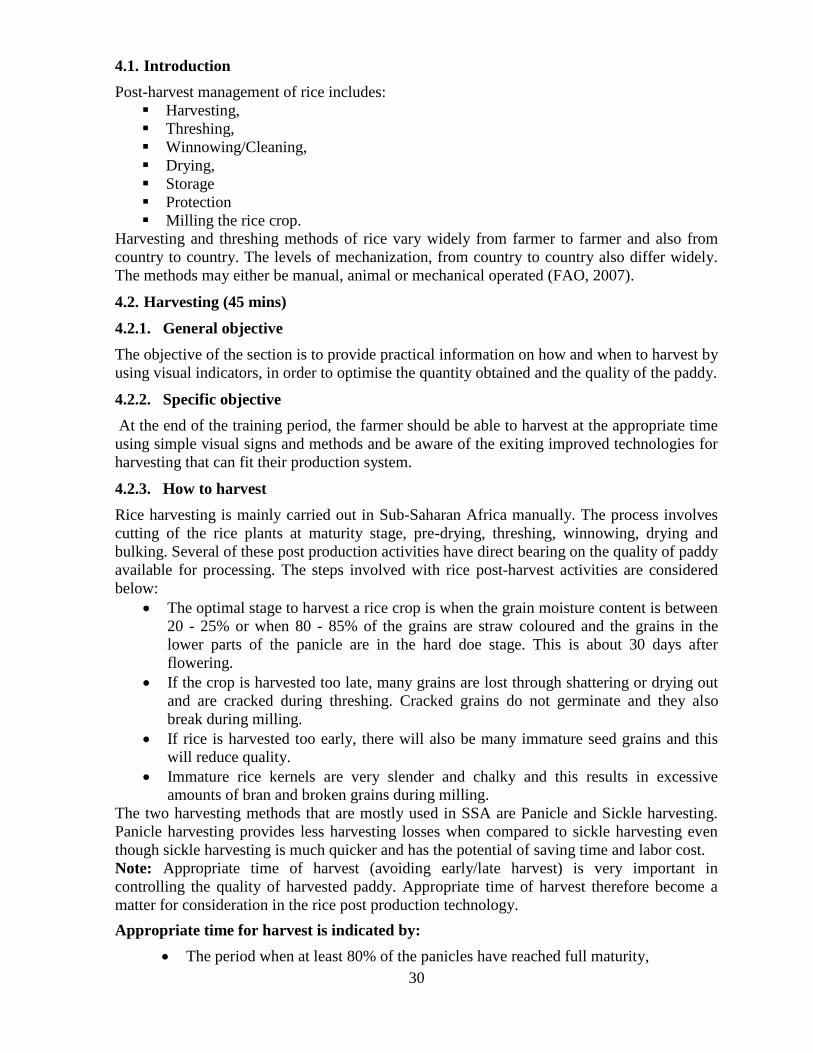
The motorized thresher is a machine linked to a motor drive device carrying a perforated
drum with metal or plastic paddles under which lies a sieve system. The drum turns the
paddles and loosens the grains from the straw by aspiration, while the straw and other dirt is
blown out through the exhaust pipe and the grains fall under the drum through the sieve
(Figure 4-8). The thresher provides clean paddy without damaging the grain because of its
axial flow system. This thresher which is an International Rice Research Institute (IRRI)
model was modified and adapted by the African Rice Centre (AfricaRice) in collaboration
with Senegalese National Agricultural Research Systems (NARS).
Figure 4-8: Improved motorized thresher/cleaner (ADRAO/SAED/ISRA, Senegal)
4.4. Winnowing/Cleaning
This is the process of removing rice straw, sand, small stones weeds, chaff and other
extraneous materials from the harvested paddy. Winnowing is an important step for obtaining
clean paddy for storage and further processing. This is necessary to avoid contamination of
the milled product with insect parts, stones, chaff etc. It also protects the machine from dust,
stones etc. thereby prolonging its life. Winnowing could be done by aspiration, manually and
mechanically. Good winnowing practice involves:
Use of plastic sheets /traditional mats (tarpaulins etc.),
A clean environment,
The operator should not re–contaminate the winnowed grains with dust, sand and other
foreign matter.
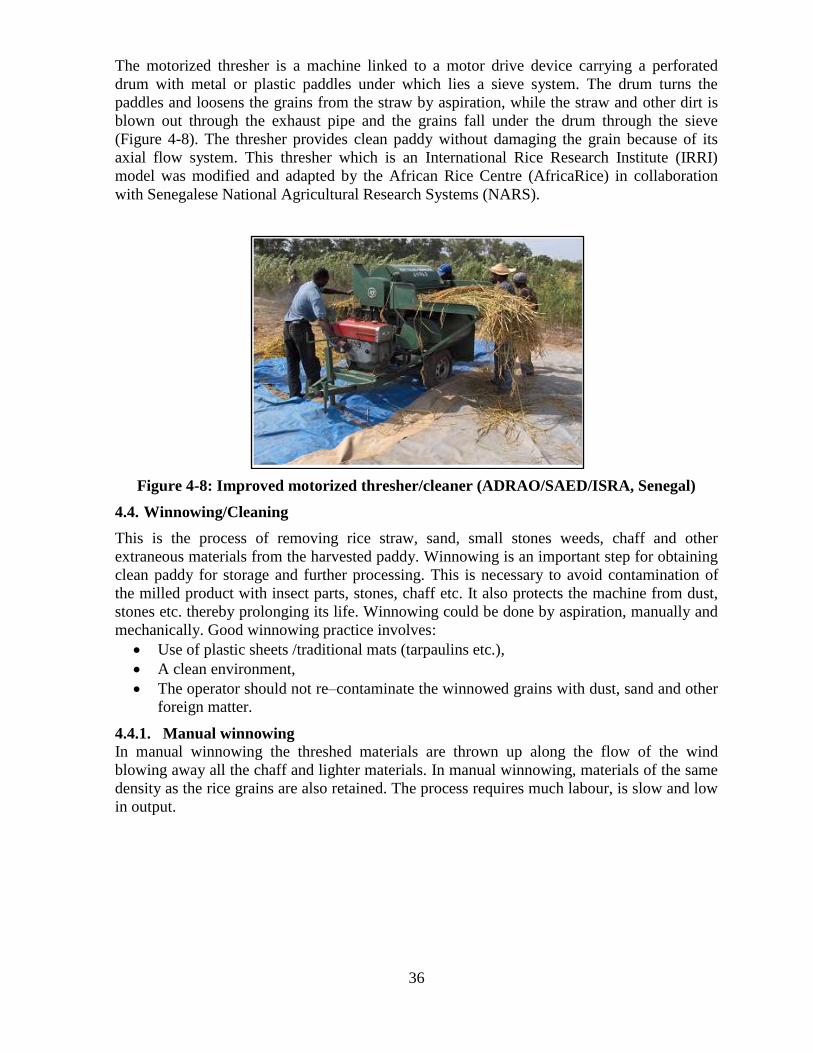
4.4.1. Manual winnowing
In manual winnowing the threshed materials are thrown up along the flow of the wind
blowing away all the chaff and lighter materials. In manual winnowing, materials of the same
density as the rice grains are also retained. The process requires much labour, is slow and low
in output.

37
Figure 4-9: Manual winnowing techniques (Source: JICA, February 2015)
4.4.2. Mechanical winnowing
In mechanical winnowing blowers and cyclones (hand operated and motorised) are available..
With hand operated blowers, the operator winds the machine to generate a centripetal force
which separates the grains from the chaff. The grains drop to the bottom while the chaff is
blown out through the exhaust. This has a larger output than the manual winnowing and the
problem of recontamination is eliminated. The motorised winnowers operate the same way
but have increased output. They are however more expensive and are limited in availability.
There is also the problem of the cost of fuel, maintenance and spare parts.
Figure 4-10: Motorized winnowers (Rep of BENIN)
Points to remember when threshing and winnowing
Thresh paddy rice immediately after cutting. The longer cut panicles remain in a stack,
the higher their chances of turning yellow and discolouring during milling.
Thresh using a drum or a wooden surface to reduce discoloration. Hit the rice panicle
on the drum or wood.
To avoid contamination, never thresh rice on the ground. Thresh on tarpaulin or
canvas.
38
Remove all kinds of dockage (impurities) from threshed grain such as insects, rice
straws, and leaves as soon as possible after harvesting, and before storage. Clean grain
has a higher value than grain contaminated with straws, chaff, weed seeds, soil,
rubbish, stones and other non-grain materials.
Winnow (remove light and chaffy material) at threshing to avoid contamination and
black rice. Modern rice mills with destoners reduce the burden of winnowing.
However, winnowing is still essential as it will increase the value of the paddy.
Maintain clean grain to improve storability, milling output and quality, and to reduce
price penalties when selling.
4.5. Drying
The important points to remember during drying are:
Dry the paddy rice immediately after threshing,
Sun-dry for four hours a day, for two to three days,
Dry on tarpaulin to reduce stones and dirt. You may dry paddy directly on concrete
only if it has been swept thoroughly,
Spread grain in thin layers (5 cm – 10 cm deep) on the tarpaulin or floor, and then turn
and stir seven to eight times a day. This distributes moisture more evenly and increases
the rate of drying (the paddy exhibits better milling quality when dried to a moisture
content of 14 per cent),
Bite between teeth to test moisture content. If it is soft, continue drying. When it breaks
into two, moisture content is around 14 –15 per cent,
Do not over-dry the paddy since it increases breakage in the rice grain during milling,
and reduces quality, and the price you will receive.
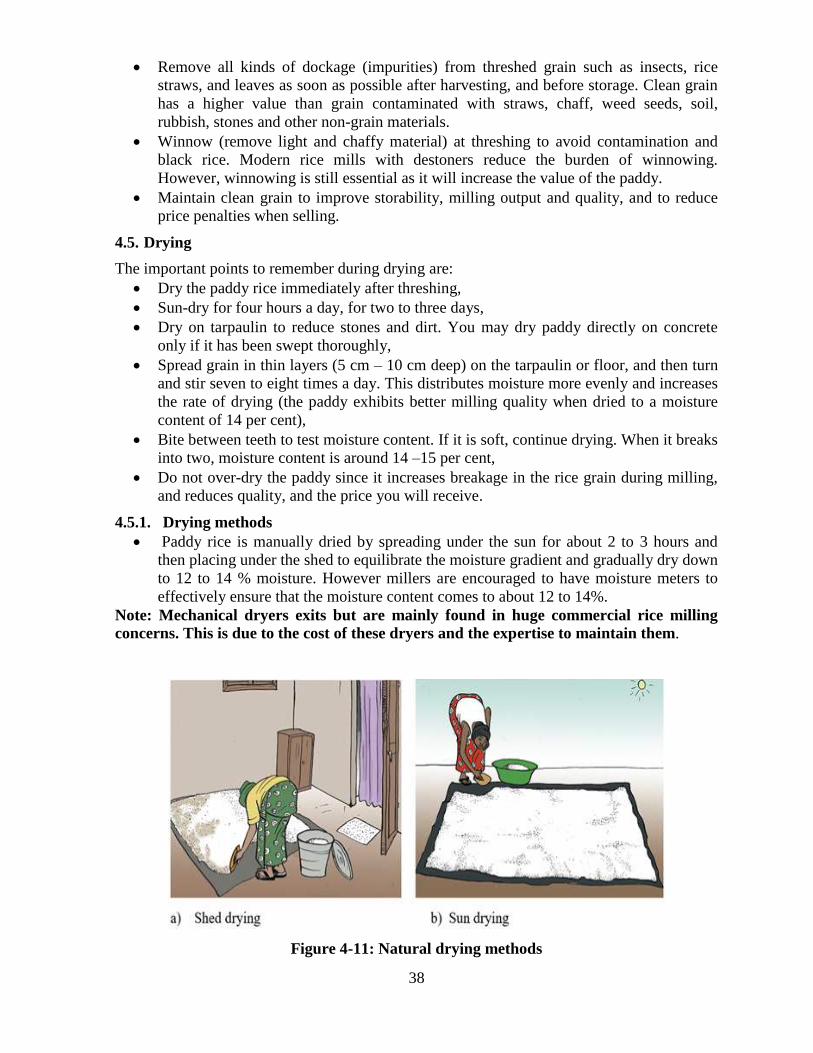
4.5.1. Drying methods
Paddy rice is manually dried by spreading under the sun for about 2 to 3 hours and
then placing under the shed to equilibrate the moisture gradient and gradually dry down
to 12 to 14 % moisture. However millers are encouraged to have moisture meters to
effectively ensure that the moisture content comes to about 12 to 14%.
Note: Mechanical dryers exits but are mainly found in huge commercial rice milling
concerns. This is due to the cost of these dryers and the expertise to maintain them.
Figure 4-11: Natural drying methods
39
4.6. Milling
This technically refers to the removal of the husk to obtain ‘brown rice’ and gently polishing
off the bran to obtain a whole milled grain. It involves hulling and polishing. While hulling
involves removing the husk from the Paddy with minimum damage to the grain and
separating the husk from the Paddy to produce brown rice .Milling combines a series of
mechanical processes that may remove the hull, the outer layers and the embryo of the rice
grain. Polishing on the other hand refer to the process of removing the ‘Subaleurone’ layer
after whitening to give the rice grains a shiny appearance. Milling is accomplished by friction
and abrasion processes that remove the bran layer from the brown rice grains; friction
between the grains breaks and peels off the bran, while with abrasion, a rough surface peels
off the bran.
4.6.1. Objectives of milling
To remove the rice husk,
To remove the rice bran and polish the rice kernel to increase appeal,
To improve packaging and storage.
4.6.2. Equipment for milling
Most varieties of milling machines currently in use in Sub Sahara African (SSA) countries
have capacities between 100kg/h to over 1 ton/h. They may either be rubber roll mills or
single pass “Eengelberg” hullers. Rubber roll mills may have pre-cleaners, destoners, graders
including rotary sifters. Rubber rolls wear out very fast and maintenance is not very easy as
compared with Engelberg mills that are easy to maintain. Engelberg hullers have no pre-
cleaner; they are single pass, with no graders. The Engelberg mills have to be redesigned to
include aspirators. If paddy has to be milled using rubber rolls it should be free of sand, stones
and other impurities that contribute to the deterioration of the rolls. The paddy should also
have a moisture content of between 12 to 14%.
There is in existence several medium and large scale milling machines. The medium types are
about 3 tons per hour capacity. They are combined with de-stoners, cleaners, de-hullers using
rubber rolls with polisher and grader (alveolar grader and rotary sifters) and automatic
weighing balance and bagging system. Some of the machines, depending on the make may
not have all these accessories but minimally, they have paddy cleaner, de-huller, polishers and
grader.
The large scale commercial millers have all the processes with all the accessories listed above
including sometimes large silo for storage and mechanical dryers. The output is more than
5tons per hour.
Intermediate technology Single pass milling machine is wide spread over West Africa. For small scale rice milling
using the single pass, improvement can be made by adding to it a paddy cleaner and a grading
system. This improvement can be locally done by artisans. The paddy cleaner can be
fabricated locally in most countries in the region.
4.7. Grading
Grading is the process of sorting the milled rice grains into categories based on the visual
observation and moisture content measurements. Visual observations will indicate whole
grains, broken grains, off-types (grains of other variety), colored grains, and presence of the

40
un-milled paddy. The following are factors used for sorting and grading milled grains into
several categories depending on the operator’s end-use:
Moisture content,
Head rice and broken percentage,
Defectives,
Impurities (Foreign matters, vain paddy and immature grains),
Presence of un-milled paddy.
It is important to take care of moisture content of milled rice. If the moisture content of milled
rice is high, the product gets mouldy. If rice is not consumed soon after milling, and rice is
requiring long shelf-life or storage would need high milling degree for removing all the bran.
4.8. Bagging and packaging
Paddy rice should be stored in bags and placed on a raised floor to avoid moisture
accumulation.
It must be stored in an environment of 13 –14 per cent moisture and protected from
insects and rodents.
Storing rice as paddy has two advantages: (a) rodents and insects struggle to gnaw through
the outer covering (husk); and (b) most customers prefer freshly milled rice.
Store paddy in 50 kg to 100 kg sacks made from jute, polypropylene or woven plastic,
stacked under a roof or in a shed.
Periodically fumigate to control insects.
For extended periods of time while maintaining its quality (13 -14 per cent moisture
content) protect paddy rice from insects and rodents using environmentally recommended
fumigants and putting it in bags even when using granaries (made of timber, mud or
cement) or large woven baskets; and from absorbing moisture from rainfall or the
surrounding moist air.
4.8.1. Group Discussion Questions
What do you understand by postharvest losses?
How long does it take to harvest your crop?
What are the components of postharvest management?
How should rice be harvested? Shelled? Dried?
What are the causes of insect infestation in maize?
What is the best way to bag and package rice for storage or transport to market?
What are the environmental conditions conducive for aflatoxin development in rice
grains?
What steps can farmers take to prevent aflatoxin infestation on rice grains?
How is rice harvested (when), threshed and winnowed, dried and bagged?
What is the recommended moisture content for rice? How is the moisture content
measured (use of traditional or modern method)?
What are some tips of using a moisture meter? Demonstrate the use of moisture
meter.
4.8.2. Storage and pest control
The purpose of grain storage facility is to provide safe storage conditions for rice grain in
order to prevent grain loss caused by adverse weather, moisture, rodents, birds, insects and
micro-organisms like fungi.
Grain moisture content should be maintained at 14% w.b. or less.
41
Don’t put rice bags directly on the floor. Those bags should be laid on the rack
above 20 cm above the floor.
The longer the grain needs to be stored, the lower the required moisture content
will need to be.
Grain and paddy seed stored at moisture contents above 14% w.b. may
experience the growth of moulds, rapid loss of viability and a reduction in eating
quality.
If the moisture content of paddy inside bag is high, open all mouths of bags to
release vapor and heat coming from the paddy itself. It’s better to spread such
paddy of high moisture content on plastic sheet for room conditions drying.
4.8.3. Factors responsible for poor grain storage
i). Poor storage structures (stores) or location.
ii). Inadequate drying resulting in moisture levels that are too high for safe storage.
iii). Pests.
iv). Inadequate knowledge on good storage practices.
v). Poor store management.
vi). Weather and other natural causes. Environmental conditions can become
unfavourable.
4.8.4. Basic requirements and recommendations for good storage
The four pillars of good storage practice include:
i. Ensuring that the crop going into store is in good condition
Good quality whole grain is less likely to suffer from insect attacks than poor
quality damaged grain,
The grain should be checked after maturity while the crop is still standing in
the field,
Grain that shows signs of infestation or damage should be separated out before
harvest and either discarded, reserved for animal feed or, depending on the
type and extent of damage, kept for immediate consumption,
The grain should be cleaned well and any that is damaged removed,
Careful winnowing will remove many live adult insects. Straw, chaff, weed
seeds, stones and dirt must be removed. These materials will hold water and
their removal will allow grain to dry faster. Any rubbish should be burnt,
The grain should be well-dried. Good drying is essential. Damp grain will
become mouldy. Insects are less likely to attack well-dried grain. If the crop is
to be dried in the field, it should not be heaped directly on the ground, to
prevent moisture from being taken up. Similarly, when grain is dried at the
homestead, it must be kept off the soil.
ii. Keeping the store in good condition
A good store will keep grain dry and cool.
It should provide protection against rodents, birds and browsing domestic
animals like poultry.
It should be theft proof.
Stores should be sited in areas that are not prone to flooding and should allow
water to drain off readily.
They should not be placed where high winds can damage the structure or near
trees, which might provide access points from which rodents can jump onto the
store roof or platform.

42
The store should have a roof to keep rain off the structure and provide shade
during the heat of the day.
Without shade, changes in temperature inside the store between day and night
may be so great that as the store cools at night condensation occurs and wets
the grain, which in turn may lead to the development of moulds.
Figure 4-12: Rice storage methods (Source: Eastern Africa Grain Institute-Farmers
training manual)
iii. Practicing good store hygiene
This means keeping everything as clean as possible.
Store surroundings should be tidied so that there is no vegetation or rubbish to
hinder inspection or to provide breeding grounds for insects and rodents.
Clearing the ground around the store will make it easy to spot termite trails.
Livestock should be kept away from the store; they should not be allowed to
browse or sleep under it. Droppings should be cleared up as they attract
rodents.
Whenever storage containers are empty, they should be cleaned. Second-hand
sacks should be dipped into boiling water to kill any insects and then dried in
the sun.
Grain residues should be removed from sacks by turning them inside out and
thoroughly brushing. Holes should be stitched.
Grass should be burnt inside solid walled bins and mud plastered baskets to
kill off insects and mould spores. It is good practice to sprinkle the inside walls
and floor of the structure with insecticide to kill remaining insect pests.
Old grain should be stored separately from the new crop and should be used
first.
iv. Maintaining the condition of the crop and store throughout the storage season
Pests can attack the store at any time, so it is important to inspect it and the
produce regularly. The earlier a problem is spotted the sooner action can be
taken to control it. Early action will prevent damage from becoming severe.
If insect pests occur regularly, treat the grain with insecticide as soon as
possible. Maize cobs can be sprayed with insecticide but it is more effective to
shell the cobs and mix with insecticide dust.

43
It is important to shell and treat pulses, especially beans and cowpeas, which
become infested very quickly.
Store inspections should start as soon as grain is stored and then conducted
weekly. This is because insects may be brought in with the produce, which
might have become infested in the field during harvesting or drying. The store
may also have harboured an infestation from the previous season.
4.8.5. Requirements of good store management
There is need for good storage management practice among farmers, if grain is to remain in
suitable and marketable condition throughout the storage period. Good storage management
requires:
a). A good storage site,
b). Produce in a suitable condition,
c). Intake of grain orderly and controlled,
d). Storage period controlled,
e). Quality maintenance ensured,
f). Security against theft and loss,
g). Any loss identifiable and accountable,
h). End use requirement is satisfied.
Consistent adherence to these requirements will help achieve the following:
a) Know the quantity in store at any given time,
b) Reduce grain loss in storage,
c) Quickly recognise causal agents of losses,
d) Control agents of losses.
4.9. Pest control
4.9.1. Common pests during storage
The main grain pest categories due to poor storage practices are insects including termites,
rodents and moulds. Other pests that cause storage losses are birds and human beings who
steal and contaminate the grain.
4.9.1.1. Primary pests
Primary insects are those that attack grain that has not been damaged, although they still feed
on damaged grain. Common primary insects are termites, Rodents and birds.
Termites, Rodents and Birds
A common name for numerous species of social insects that can damage stored grain
and wooden structures such as furniture or houses.
Rats and mice are responsible for a considerable percentage of losses throughout the
postharvest period.
Rodents are also of particular interest because not only can they cause severe damage
to the commodity but also to bagging materials, electrical wiring and store structures.
The common grain pests among birds are feral pigeons, house sparrows and starlings.
Birds are attracted to easily found loose grains. They contaminate grains with their
droppings and urine and can spread salmonella.
4.9.2. Moulds
Moulds are a group of fungi, which propagate by producing spores.

44
Once mould growth has started, each colony (mycelium) produces millions of
microscopic spores within a few days. The spores require moisture to germinate and
will grow only when the equilibrium relative humidity of the grain is favourable.
Mould growth occurs on staple agricultural products both in the field and during
storage.
4.9.3. Pest Control
Pest control involves the use of chemicals and other non-chemical pest control
methods (hygiene in warehouse, store management and rodent proofing).
Integrated Pest Management (IPM) involves the use of chemical and non-chemical
methods of pest control. All can be applied in storage management.
IPM gives priority to non-chemical control measures, use of traditional methods and
only defaults to use of chemical controls when other options are unlikely to offer
sufficient protection.
An IPM system would, therefore, supplement sanitation and good warehouse keeping
with a combination of one or more of the following practices:
i. Improved harvesting and threshing techniques.
ii. Judicious use of residual insecticides.
iii. Use of fumigants.
iv. Use of ambient aeration, and refrigerated aeration.
v. Atmospheric gas modification (hermetic, CO2, N2).
vi. Biological control (parasites, predators (such as cats) and entomopathogens,
pheromones).
vii. Use of resistant varieties if possible.
viii. Storage management.
ix. Adequate grain cleaning prior to storage.
x. Storage design (for pest (rodent and bird) exclusion.
xi. Adequate grain cleaning prior to storage.
xii. Monitoring, evaluation and inspection of stored commodities, storage
structures and their immediate surroundings.
xiii. Thermal disinfestations.
xiv. Irradiation techniques.
xv. Insect-resistant packaging.
4.9.3.1. Group discussion questions
How long should a farmer store grain?
What are some of the losses incurred by farmers during storage?
What are the factors that lead to poor storage?
How does poor storage affect grain quality?
What are some of the common pests that affect grain during storage?
What integrated pest management measures can be used to ensure stored grain
is safe from pests, rodents, aflatoxin etc.?
What are the requirements for good stores?
What the requirements of good storage management?
What are some of the equipment that a farmer will use in storage?
4.10. Grain quality and standards
4.10.1. General quality parameters
All produce intended for human consumption should be free from:
45
Foreign odours,
Moulds and live pests,
Rat droppings,
Toxic or noxious weed seed,
Other injurious contaminants.
Some of these grain characteristics can be defined as follows:
a. Moisture content: Amount of moisture contained in grain expressed as a percentage
of the weight of the grain.
b. Foreign matter: Substances that are not the actual commodity, which can include
straw, husks, stones, pieces of cob, dust, and other rubbish. Foreign matter can also be
referred to as extraneous matter.
c. Trash: Any vegetable matter other than grain, which will not pass through a grading
sieve.
d. Defective grain: Grain that is discoloured by heat, fermentation, germinated, weather-
damaged, visibly infected with fungus or virus, immature or insect damaged.
e. Discoloured: Grains which are markedly discoloured by weathering or by heating
caused by fermentation, but does not include other coloured varieties.
f. Insect damaged grain: Grain that has been attacked and damaged by insect or animal
pests.
g. Diseased: Grain visibly infected by fungus or other agents.
h. Chipped grain: Grain which has been chipped or cracked.
i. Broken grain: Grain and pieces of grain which will pass through the grading sieve
with thorough shaking.
j. Germinated grain: Sprouted grain in which the process of germination is visible
within the embryo.
k. Shrivelled grain: Grain which is shrivelled over its entire surface and embryo area.
l. Stained grain: Grain which is stained by soil or any foreign agent but does not include
discoloured grain.
m. Other coloured grain: Grain of a colour or partly coloured grain present in grain other
than the grain being analysed.
n. Undeveloped grain: Grain which is thin and papery in appearance, which is small and
wrinkled.
o. Stones: Any mineral material, which will not readily disintegrate or dissolve in water.
p. Contaminant: Foreign substances or chemicals in the grain. This includes soluble
elements which cannot be removed like excretions of pests and other animal, plant
material, pesticides, oils, pathogenic organisms and toxins from fungal infections.
4.10.2. Tips on conditions of good quality grain
To reduce the incidence of spoilage and deterioration, the grain must satisfy the following
storage conditions:
Be dry and at safe moisture levels for storage, since high-moisture grain is easily
attacked by moulds.
Be healthy with a minimum of broken or bruised kernels, since damaged grain is
readily attacked by insect pests and moulds.
Be clean and free from contamination by foreign matter, mammalian and insect
excrements and grass, since these conditions facilitate infestation by grain spoiling
moulds.
Be free from all stages of insect pests since these eat and quickly destroy grain.

46
Be cool and with temperatures within range of those of the storage environment, since
temperature determines optimum conditions for insect pests, rodents and moulds, and
uneven temperatures cause moisture migration in storage.
4.10.3. Group discussion questions
What is quality in reference to grains?
What are the general parameters of quality?
How do you carry out a rapid quality test for grains?
What characteristics affect the grade and quality of grains?
What are some of the conditions of good quality grain?
Why is quality an important factor in improving farmer incomes and access to better
markets?

47
REFERENCES
1. Africa rice center (2009). Africa holds the future for the world rice farming.
(http/www.warda.org./warda.faq/asp)
2. CORAF/WECARD Staple crops programme. Training manual for improved rice
2. EAGC Website: www.eagc.org
3. Groundnut Agronomic and Post harvest practices; Training manual (NARO, 2001)
4. Handbook on Rice Post Harvest techniques; Project promotion of small holder rice
production. (February, 2015)
5. http/www.cosmosbiomedacal.com
6. http/www.knowledgebank.irri.org
7. http/www.rkmp.co.ln
8. Msc. Thesis. Post harvest losses of rice (Oriza spp). From harvesting to milling
(Ramatoulaye guise, 2010)
9. Post Harvest losses due to harvesting operations in developing countries; An ASABE
meeting presentation paper number 152176663(July 26-29th
2015)
10. Post harvest technologies in West Africa. (May, 2011)
11. Post harvest technology of rice .Rice knowledge management portal www.rkmp.co.ln
12. Post harvest handling training manual for extension workers\ (USAID, October, 2012)
13. Rice Post Harvest operations. INPhO-Post harvest compendium (IRRI1999)
rice production (February, 2015)
14. Technical handbook for paddy rice industry in developing countries (James &
Wimberley,1983)