forensic toxicology laboratory office of … · principle solid phase ... the handling of all...
TRANSCRIPT

Page1of21
FORENSIC TOXICOLOGY LABORATORY OFFICE OF CHIEF MEDICAL EXAMINER
CITY OF NEW YORK
METOCLOPRAMIDE, TRIMETHOPRIM, TICLOPIDINE, BROMAZEPAM AND O-DESMETHYLVENLAFAXINE
BY SPE AND GC-NPD ANALYSIS
PRINCIPLE
Solid phase extraction (SPE) is used to extract the above mentioned compounds due to poor recovery by liquid-liquid extraction. Drugs are temporarily bound to a sorbent in the solid phase column as the prepared sample is poured through these columns. The columns are washed to remove interfering compounds, followed by elution of drugs. The eluent is evaporated and then reconstituted. The resulting solution is analyzed by GC-NPD. Quantitative analysis is performed using a four-point calibration curve and internal standard. O-Desmethylvenlafaxine is a qualitative assay.
SAFETY
The handling of all biological specimens and reagents is performed within the guidelines which are detailed in the Safety and Health manual.
SPECIMEN PREPARATION
The procedure is routinely applied to the following biological specimens and their aliquots unless otherwise specified:
Blood 1.0 mL of undiluted specimen
Urine 1.0 mL of undiluted specimen
Brain 1.0 mL of a 1:3 homogenate
Gastric Contents 1.0 mL of a 1:10 dilution
Liver 1.0 mL of a 1:5 homogenate
Vitreous Humor 1.0 mL of the undiluted specimen
DILUTION OF SPECIMENS
Specimens are diluted as follows:
Brain 1:3 5.0 g of brain homogenized with 10 mL of deionized water.
Liver 1:5 5.0 g of liver homogenized with 20 mL of deionized water.
Gastric 1:10 2.0 mL of liquid q.s. to 20 mL of deionized water, or 2.0 g of a solid specimen homogenized with 18 mL of deionized water.
Note: Do not use homogenates older than two weeks unless low sample size requires it.
Discuss with supervisor and note in case record.

Page2of21
Note: In preparing gastric homogenates, the entire submitted amount of gastric contents must
be homogenized prior to sampling.
REAGENTS AND MATERIALS
All chemicals should be analytical reagent grade or better.
1. Deionized water (DI H2O)
2. Negative Matrices
Certified negative matrices (blood, brain, and liver from calf or sheep) are obtained from outside source and validated in-house. These are stored frozen (-10 o C or lower).
3. Sodium acetate trihydrate. Certified ACS. Fisher Scientific or equivalent.
100mM sodium acetate buffer (pH 4.5)
Dissolve 2.93 g sodium acetate trihydrate in 400 mL DI H2O; add 1.62mL glacial acetic acid. Dilute to 500 mL using DI H2O. Mix. Adjust pH to 4.5 ± 0.1 with sodium acetate or acetic acid.
Storage: in glass; room temperature.
Stability: 6 months; inspect daily before use for contamination.
4. pH 9.0 buffer
Dissolve 20 g KHCO3 in 800 mL DI H2O; add 10 g K2CO3. Dilute to 1L using DI H2O. Mix. Adjust pH to 9.0 ± 0.1 with KHCO3 to lower the pH, or K2CO3 to raise the pH.
Storage: room temperature in glass.
Stability: 6 months. Inspect for contamination each day of use.
5. HCl, concentrated, 12.1N. Fisher Scientific or equivalent.
Hydrochloric Acid, 100mM
Add 8.4mL concentrated HCl to 800 mL Deionized water. Dilute to 1000 mL with deionized H2O.
Store at room temperature in glass or plastic.
Stability: 6 months. Inspect each day before use for contamination.
6. Methanol (Fisher Scientific - ACS Certified)
7. Ethyl Acetate, Fisher Scientific Optima or equivalent.
8. Ammonium Hydroxide, NH4OH (Fisher Scientific)
Eluting solvent: Ethyl acetate/NH4OH (98/2). Prepare fresh daily for use.

Page3of21
Note: Ammonium hydroxide will break down to ammonia and water. The ammonia will
evaporate if the container is not kept closed. This will cause a pH decrease, making the
reagent unsuitable for solid phase extraction. Use small lots of working solution (3 mL
bottles). If the solution appears old, discard and use a fresh bottle. Always keep ammonium
hydroxide refrigerated.
9. Preparation calibrators and controls
The following stock solutions are prepared to yield a final concentration of 100 mg/L:
Drug (manufacturer, or equivalent) Amount Total Volume Solvent Used
Metoclopramide HCl (Sigma Aldrich) 0.0059 g 50 mL Methanol
Trimethoprim (Sigma Aldrich) 0.0050 g 50 mL Methanol
Ticlopidine HCl(Sigma Aldrich) 0.0057 g 50 mL Methanol
O-desmethyl venlafaxine HCl (Wyeth Ayerst)
0.0057 g 50 mL Methanol
Bromazepam (Sigma Aldrich) 0.0025 g 25 mL Methanol
10. Polycrom Clin II Solid Phase Extraction Columns, CEREX
11. System 48 (or CEREX 48) Processor connected to nitrogen source.
12. Waste Rack, SPE Rack, Collection Tube Rack.
13. Concentrator (Turbovap or CEREX) connected to a nitrogen source.
14. Toluene/Heptane/Isoamyl Alcohol, 39:10:1(THI)
Add 780 mL of toluene, 200 mL of heptane and 20 mL of isoamyl alcohol to a 1000 mL graduated cylinder. Briefly swirl by hand, then transfer to a 1L repipeter.
EXTRACTION PROCEDURE
Calibrators and controls are prepared by adding validated stock solutions to 1.0 mL certified negative matrix in appropriately labeled 16 x 125 mm tubes. A four-point calibrator curve is prepared consisting of 0.05 mg/L, 0.2 mg/L, 1.0 mg/L, and 2.0 mg/L. Controls are also prepared at 0.025 mg/L, 0.5 mg/L, and 1.0 mg/L.
1. Calibrators: Using the 100mg/L validated calibrator stock solution add the following amounts to the appropriately labeled test tube
Final Concentration
(mg/L)
Stock Solution
Concentration (mg/L)
Spiking
Volume (µL)
0.05 100 0.5
0.2 100 2
1.0 100 10
2.0 100 20
2. Controls: Using the 100 mg/L validated control stock solution add the following amounts to the appropriately labeled test tube

Page4of21
Final Concentration
(mg/L)
Stock Solution
Concentration (mg/L)
Spiking
Volume (µL)
0.025 100 0.25
0.5 100 5
1.0 100 10
3. After all calibrators and controls have been prepared, aliquot the case specimens. Make
certain that the toxicology number on the specimen bottle exactly matches the number on the tube. Homogenize specimen if needed. Mix each room temperature specimen container by gentle inversion a couple of times and pipet 1.0 mL of each specimen into the appropriately labeled 16 x 125 mm culture test tube. After sampling all the cases, return cases back to storage.
4. Add 20 µL of methapyrilene internal standard (50 mg/L) to all tubes (blank, calibrators, controls, and cases) then vortex.
5. Add 6mL 100 mM sodium acetate buffer pH 4.5 to the tubes. Mix by Vortex for 30 seconds then sonicate for 15 minutes. Centrifuge sample for 15 minutes at ≈ 3000 rpm.
6. Decant the supernatant into the appropriately labeled Polychrom Clin II column and apply nitrogen at a pressure of 2-4 psi.
7. Prepare the eluting solvent by pouring 98 mL of Ethyl Acetate into a glass flask with stopper; add 2 mL of refrigerated NH4OH. Place flask on stir plate and allow eluting solvent to mix while completing the remaining steps of the extraction.
Note: Prepare fresh eluting solvent each day of use.
8. Wash Column (all wash steps are pressurized at 2-4psi).
Pour 2 mL pH 9.0 buffer onto column. Pour 2 mL 100 mM HCl onto column. Pour 2 mL CH3OH onto column. Pour 2 mL ethyl acetate onto column. Dry column for 1 minute at ≈ 25 psi (Max Flow)
9. Elute Drugs
Place labeled 10 mL conical centrifuge under each column to collect eluate. Elute with 2mL eluting solvent (ethyl acetate/NH4OH, 98/2); collect eluent at 1 to 2mL/minute. Apply pressure as necessary to achieve the desired flow rate.
10. Dry under nitrogen at room temperature to absolute dryness using a concentrator.
11. Reconstitute with 100 µL of THI. Mix by vortex and transfer to the glass insert in the appropriately labeled autosampler vial.
12. Run on GC-NPD by using the GC quantitation method; follow the “Basic Drugs Quantitation by Gas Chromatography” SOP for method and instrument set-up.
13. Process, review and report sequence using the same criteria specified in the “Basic Drugs Quantitation by Gas Chromatography” SOP.

Page5of21
INSTRUMENTATION
The instrumentations used for analysis is the Agilent 6890 gas chromatograph equipped with a 7683 Series autosampler and a Agilent 6890 Series nitrogen-phosphorous detector. A computer with Agilent Chemstation software is used to gather the data and Chemstation Enhanced Data Analysis software is used to process the data. A selection of three different capillary columns is available for analyses.
COLUMNS
The primary column used in the GC section is a 10.0 m x 0.53 mm x 2 μm HP-17 (50% phenyl methylsiloxane) megabore capillary column. This column is used for most routine work, both qualitative and quantitative.
The secondary column used in the GC section is a 10.0 m x 0.53 mm x 2.65 µm HP-5 (5 % phenyl methylsiloxane) megabore capillary column. This column is used to analyze compounds that co-elute on HP-17, or are excessively retained on HP-17.
The third column used is the Restek (RTX50) (Crossbonded 100% methyl phenyl polysiloxane) column (15m x 0.25mm x 0.25μm film thickness). This column is used as needed to analyze compounds that co-elute.
INSTRUMENT SETUP
6890 Series II Gas Chromatogram
1. Ensure that the selected GC is operational and not in need of repair. If maintenance is required, consult the appropriate manual and notify the supervisor.
2. Make sure GC power on.
3. Check that the NPD bead voltage is set to current value as listed on the instrument.
4. The Chemstation method file for quantitation is usually named GCxnQNT.M, where the x refers to the instrument number. There should be a method file with the appropriate name in each method subdirectory. (When using RTX 50, method name is GC4RQNT.M.) Load the appropriate method for the analysis. Consult supervisor if correct method is unclear.
5. On Chemstation verify that all other GC parameters are set correctly; go to Method, Edit Entire Method. Wait for “Ready”.
Method Section to Edit:
(X) Method Information
( X) Instrument/Acquisition
Method Information
(X) Save copy of method with data
(X) Data Acquisition
( ) Data analysis
Inlet and Injection Parameters

Page6of21
Sample Inlet: GC Injection Source: GC ALS
GC Injector (7683 Series Injector)
Select Single or Dual
Injector Parameters (Front or Back or Both)
Sample Washes 1
Sample Pumps 4
Injection Volume 5.0 microliters
Syringe Size 10.0 microliters
PreInj Solvent A Washes 0
PreInj Solvent B Washes 0
PostInj Solvent A Washes 5
PostInj Solvent A Washes 5
Viscosity Delay 0 seconds
Plunger Speed Fast
PreInjection Dwell 0 minutes
PostInjection Dwell 0 minutes
Inlet Parameters
Front Inlet (Split/Splitless) Back Inlet (Split/Splitless) Mode Splitless Mode Splitless Initial Temp 275 0C (on) Initial Temp 275 0C (on) Pressure 5.20 psi (on) Pressure 5.20 psi (on) Pulse pressure 10.0 psi Pulse pressure 10.0 psi Pulse time 0.60 min Pulse time 0.60 min Purge flow 30.0 mL/min Purge flow 30.0 mL/min Purge time 2.00 min Purge time 2.00 min Total Flow 42.1 mL/min Total Flow 42.1 mL/min Gas Saver off Gas Saver Off Gas type Helium Gas type Helium
Column Parameters
Capillary column
Model number 19095L-121
HP-50+ 50% Phenyl Methyl Siloxane
Max Temp 310 0C
Nominal length 10.0m
Nominal diameter 530.00 um
Nominal film thickness 2.00um
Mode Ramped
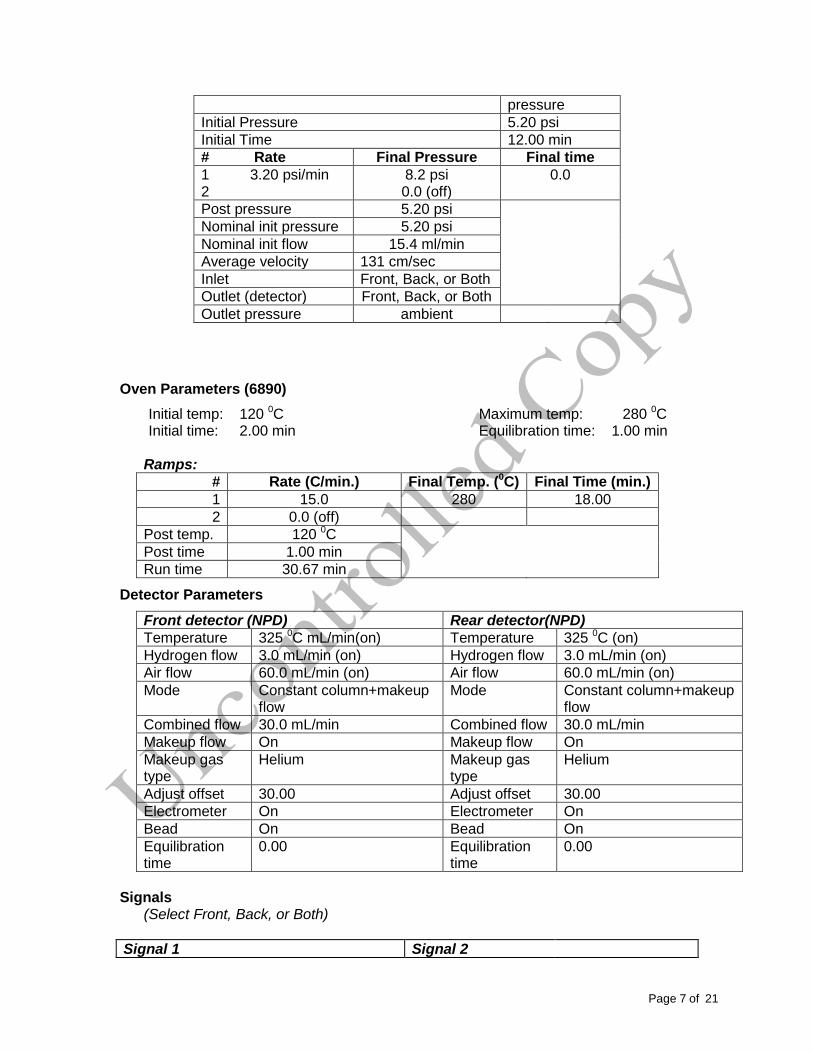
Page7of21
pressure
Initial Pressure 5.20 psi
Initial Time 12.00 min
# Rate Final Pressure Final time
1 3.20 psi/min 8.2 psi 0.0 2 0.0 (off)
Post pressure 5.20 psi
Nominal init pressure 5.20 psi
Nominal init flow 15.4 ml/min
Average velocity 131 cm/sec
Inlet Front, Back, or Both
Outlet (detector) Front, Back, or Both
Outlet pressure ambient
Oven Parameters (6890)
Initial temp: 120 0C Maximum temp: 280 0C Initial time: 2.00 min Equilibration time: 1.00 min
Ramps:
# Rate (C/min.) Final Temp. (0C) Final Time (min.)
1 15.0 280 18.00
2 0.0 (off)
Post temp. 120 0C
Post time 1.00 min
Run time 30.67 min
Detector Parameters
Front detector (NPD) Rear detector(NPD)
Temperature 325 0C mL/min(on) Temperature 325 0C (on)
Hydrogen flow 3.0 mL/min (on) Hydrogen flow 3.0 mL/min (on)
Air flow 60.0 mL/min (on) Air flow 60.0 mL/min (on)
Mode Constant column+makeup flow
Mode Constant column+makeup flow
Combined flow 30.0 mL/min Combined flow 30.0 mL/min
Makeup flow On Makeup flow On
Makeup gas type
Helium Makeup gas type
Helium
Adjust offset 30.00 Adjust offset 30.00
Electrometer On Electrometer On
Bead On Bead On
Equilibration time
0.00 Equilibration time
0.00
Signals (Select Front, Back, or Both)
Signal 1 Signal 2

Page8of21
Data rate 20 Hz Data rate 20 Hz
Type Front detector Type Rear detector
Save Data Partial Save Data Partial
Start Time 1.0 min Start Time 1.0 min
Stop 30 min 30 min
HP-5 COLUMN ( Column 2)
Capillary column
Model number HP 19095J-121
HP-5 5% Phenyl Methyl Siloxane
Max Temp 300 0C
Nominal length 10.0m
Nominal diameter 530.00 um
Nominal film thickness 2.65um
Mode Ramped pressure
Initial Pressure 5.20 psi
Initial Time 12.00 min
# Rate Final Pressure Final time
1 3.20 8.20 0.00 2 0.0 (off)
Post pressure 5.20 psi
Nominal init flow 15.2 mL/min
Average velocity 130 cm/sec
Inlet Front
Outlet (detector) Front Detector
Outlet pressure ambient
Inlet Parameters (HP-5)
Front Inlet (Split/Splitless) Back Inlet (Split/Splitless) Mode Splitless Mode Splitless Initial Temp 275 0C (on) Initial Temp 275 0C (on) Pressure 5.20 psi (on) Pressure 5.20 psi (on) Pulse time 0.60 min Pulse time 0.60 min Purge flow 30.3 mL/min Purge flow 30.3 mL/min Purge time 2.00 min Purge time 2.00 min Total Flow 47.9 mL/min Total Flow 47.9 mL/min Gas Saver off Gas Saver off Gas type Helium Gas type Helium
Column Parameters
RTX-50 COLUMN (Column 3 )
Capillary column
Model number Restek 1013174
100% Methyl Phenyl PolySiloxane
Max Temp 300 0C

Page9of21
Nominal length 15.0m
Nominal diameter 250.00 um
Nominal film thickness 25.00um
Mode Ramped flow
Initial flow 0.7 mL/min
Initial Time 20.00 min
# Rate Final Flow Final time
1 0.30 1.0 10.33 2 0.0 (off)
Post flow 0.7 mL/min
Nominal init pressure 13.21psi
Nominal init flow 15.4 ml/min
Average velocity 32 cm/sec
Inlet Front
Outlet (detector) Front detector
Outlet pressure ambient
Oven Parameters (6890)
Initial temp: 110 0C Maximum temp: 300 0C Initial time: 2.00 min Equilibration time: 1.00 min
Ramps:
# Rate (C/min.) Final Temp. (0C) Final Time (min.)
1 15.0 280 16.67
2 0.0 (off)
Post temp. 110 0C
Post time 1.00 min
Run time 30.00
Inlet Parameters (restek)
Front Inlet (Split/Splitless) Back Inlet (Split/Splitless) Mode Split Mode Splitless Initial Temp 275 0C (on) Initial Temp 275 0C (off) Pressure 13.20 psi (on) Pressure (off) Split Ratio: 5:1 Pulse time (off) Split flow: 3.5 mL/min Purge flow (off) Total Flow 7.2 mL/min Total Flow (off) Gas Saver (off) Gas Saver (off) Gas type Helium Gas type Helium
Detector Parameters
Front detector (NPD) Rear detector(NPD)
Temperature 325 0C mL/min(on) Temperature 325 0C (off)

Page10of21
Hydrogen flow 3.0 mL/min (on) Hydrogen flow 3.0 mL/min (off)
Air flow 60.0 mL/min (on) Air flow 60.0 mL/min (off)
Mode Constant column+makeup flow
Mode Constant column+makeup flow
Combined flow 30.0 mL/min Combined flow 30.0 mL/min
Makeup flow On Makeup flow On(off)
Makeup gas type Helium Makeup gas type Helium(off)
Adjust offset 30.00 Adjust offset 30.00(off)
Electrometer On Electrometer (off)
Bead On Bead (off)
Equilibration time 0.00 Equilibration time 0.00
Signals ( Front)
Signal 1 Signal 2
Data rate 20 Hz Data rate 20 Hz
Type Front detector Type Rear detector
Save Data Partial Save Data (off)
Start Time 1.0 min Start Time (off)
Stop 30 min (off)
GC Injector (7683 Series Injector)
Injector Parameters (Front)
Sample Washes 1
Sample Pumps 4
Injection Volume 3.0 microliters
Syringe Size 10.0 microliters
PreInj Solvent A Washes 0
PreInj Solvent B Washes 0
PostInj Solvent A Washes 5
PostInj Solvent B Washes 5
Viscosity Delay 0 seconds
Plunger Speed Fast
PreInjection Dwell 0 minutes
PostInjection Dwell 0 minutes
6. After reviewing instrument parameters select a “GC Real Time Plot” for viewing signal window 1 or 2 while sequence is running.
7. Make sure that under “Select Reports” all UNCHECKED.

Page11of21
8. Save the Method.
SEQUENCE
Prepare a sequence using the following steps.
1. Make sure the desired instrument session is up and running. Each GC has an instrument session, such as GC1, GC2, etc.
2. From the top menu select Sequence Load Sequence Default.S. Select Sequence again, then Edit. The Sample Log Table will open.
3. In the upper left hand corner on the Sample Log Table, select Data Path. Click on Browse to create a new folder under the Data folder of the instrument to be used.
4. In the upper right hand corner on the Sample Log Table, by clicking on Browse select the instrument Method to be used for analysis.
5. Type in all information under each column (i.e. Type, Vial, Sample, Method/Keyword, Datafile, Comments/Keywordstring, multiplier).
6. If the Sample is a calibrator, then under Comments/Keywordstring type-in the MIX or Filter it is for the batch; i.e. for all levels of CAL 1 type-in MIX [A], for levels of CAL 2 type-in MIX [B] etc. This step will be helpful during processing the data.
7. Repeat steps 5 and 6 until all calibrators, controls, and case samples have been entered. Note that there must be a QC sample run at the end of every sequence/subsequence.
8. The Datafile name should be read GCXMMDDx001 ; where “X” is the instrument’s number, “MM” is the month, “DD” is the day, and “x” is the prefix of the sequence, such as “a”, “b” etc.
9. Once all the information is typed, select OK to close the Sample Log Table. Save the sequence by selecting Sequence followed by Save Sequence As. . . . Name the sequence as follows: GCXMMDDYY ; where “YY” defines the year.
10. Select Sequence then Simulate Sequence. In the window that opens, select Full Method, Inject Anyway, and Overwrite Existing DataFiles. For Sequence Comment enter the instrument # and detector used, the date of injection, the analyst initials, and the type of batch being injected. Select Run Sequence, verify all keywords by clicking “OK”.
11. Print sequence by selecting Sequence followed by Print. . .then select Brief. Add a “Chain of Custody” and a “Vials Loaded” label to the hard copy of the sequence.
12. Empty solvent wash bottles on the instrument and replace it with fresh methanol before starting the sequence.
13. Use the printed sequence list to load the vials in the correct position on the autosampler tray. Edit the sequence as necessary to correct any errors; save the sequence. Reprint sequence if necessary.
14. Document the “Chain of Custody” and the “Vials Loaded” labels.
15. Document the “Instrument Status Logsheet” that hangs on the instrument’s oven door.
16. Start sequence by selecting Sequence Run Sequence.
17. When the batch is complete, remove all vials using the sequence list. Once again document the “Vials Loaded” label.

Page12of21
Note: Occasionally, it will be desirable to run several subsequences in one batch. Use the instructions below to accomplish this.
Setting-Up a Subsequence
On the Sample Log Table:
1. Select “Keyword” for “Type”
2. Select “DataPath” for “Method/Keyword”
3. Under “Comment/KeywordString” type in the new data path for your subsequence ie: C:\MSDCHEM\2\DATA\GCXMMDDYYx where “X” is the instrument’s number and “x” is the letter designated to the subsequence (it must be different than that of the original sequence).
4. The suffix of the data files must be different from that of the original; ie:
GCXMMDDx001; the subsequence data files must start with 1 again.
5. After typing in the entire sequence, save sequence accordingly.
6. Go to Sequence Simulate Sequence Run Sequence.
7. A dialog box will pop-up: DataPath C:\MSDCHEM\2\DATA\GCXMMDDYYx does not exist. Edit Sample Log Table? Click No if the sequence was set up correctly.
8. A 2nd dialog box will pop-up: Create C:\MSDCHEM\2\DATA\GCXMMDDYYx? Click
Yes.
9. A 3rd dialog box will pop-up: Sequence Verification Done! View it? Click Yes or No. 10. Save and Print Sequence.
11. Start sequence.
Setting-Up a Subsequence with a Different Method
On the Sample Log Table:
1. After inserting the DataPath keywords and Commands, Insert a Row.
2. Select “Keyword” for “Type”
3. Select “MethodPath” for “Method/Keyword”
4. Check that the method for each sample is changed to the new method.
5. Follow Steps 5-11 in the “Setting-Up a Subsequence” Section (see previous section).
DATA TRANSFER AND PROCESSING – exporting raw data for processing

Page13of21
Retrieving Method from Data Acquiring Instrument
1. Save the method to the batch from the acquiring instrument Chemstation.
2. Save method to batch by clicking ECM on the tool bar, then select Save Method To ECM. Locate the batch, select ok to save a copy of the method into the batch to be processed.
3. A copy of the method has now been saved to ECM and will accompany the batch when retrieved from ECM on any Data Analysis Processing Station.
4. Attach and document “ECM label”.
DATA REVIEW
There are three levels of review; the first level of review is the transference and processing of the
raw data, this may be performed by any trained analyst; the second level of review is performed
by an experienced analyst who is trained and signed off in data review, he / she will review the
processed data; the third level of review is considered the final level of review, this can only be
performed by the Laboratory Managers. He/she will review the data for the entire case ensuring
that screening, confirmatory and qualitative and / or quantitative analysis on the case have been
completed and reported accurately. As needed, he/she will also schedule additional analysis and
contact the Medical Examiner on the case to discuss any findings and / or review case history.
PROCESSING USING ENHANCED DATA ANALYSIS
On any processing station:
1. Click on the Processing Data Analysis icon on the desktop and Log-in by using: analyst’s ocme login for the username and their password.
2. From the tool bar menu select ECM Retrieve Entire Sequence From ECM. Browse to locate and select the batch. Each datafile will be retrieved along with the method to be used for processing.
3. Once the retrieval is complete the batch folder is located in the C: \msdchem\ECM\retrieve folder.
4. Select the method under the batch by right clicking on it and Load the method.
5. Select Calibrate Clear; clear all responses and all calibrator levels.
6. Select Calibrate from the tool bar, then Update, Global Update, Set Curve Fit Type, Linear Regression Force (0, 0), select OK. If a different type of curve fit is used in place of Linear regression force (0,0), this must be annotated on the front page of the master copy of calibrators and controls that is appended to each case chromatogram.
7. Set up processing Filters (Filter A = Cal 1, Filter B = Cal 2, Filter C = Cal 3, Filter D = Cal 4, Filter E = Cal 5 etc.
a. Select Calibrate again, Edit Compounds; select Name, type in compound name in the space provided, click Find Compound.

Page14of21
b. Change Compound Type from “T” to the required filter letter for that compound. All compounds for pools or Cals 1-2 are already assigned in all master methods (i.e. the compound type for meperidine is always A, doxylamine is always B etc.) and should not have to be assigned when processing each batch.
c. Click OK to save all changes to the compounds that have been made.
8. In order to ensure that only compounds that are found are printed in the report select Quantitate in the menu bar, then Report Options. In the lower right hand box labeled “All Reports” make sure that the box labeled “Omit Target Compounds that are Missed” is checked.
9. Create the filters needed to process the batch:
a. Select NYC_OCME in the menu bar, then select QDB Compound Type Filter.
b. Select Create and type-in as many filters as need for the batch one at a time (i.e. A, B, C, D etc). Filters are case sensitive.
c. Once all filters are created a “qdb filter” window automatically pop-up with a list of all the compounds in the filters needed to process the batch.
10. Load the first calibrator at the highest level (i.e. 2.0 mg/L) by selecting File Load Data File
11. Load the filter needed for the data file: a. Select NYC_OCME in the menu bar, then select Compound Type Filter b. Type the # for that filter, where 1 is the first assigned filter.
12. In the space provided type in QT 1, then click on Execute; this processes the data file.
13. Select the View from the top menu, select Easy ID (this function allows for Retention times to be assigned for the entire method and batch). Easy ID should only be used for your first calibrator level.
14. To select a compound from the list double click, use the right click to integrate a peak for the compound, use the left click to control zooming on the chromatogram.
15. Once all of the retention times have been assigned, click on Exit and click on Yes to “update retention times to the compound list”.
16. Type in QT 1, then click on Execute.
17. Again select the View from the top menu, select Q-Edit Quant Result (this function to view the response and retention times for each compound.) Cal 2.0 mg/L will not have an “x” next to each compound name because it is the first calibrator to be processed. Click Exit when all compounds have been reviewed.
18. Assign the calibrator level:
a. Select Calibrate, then Update, select Update 1 Level.
b. Select Add Level and type in the concentration of the calibrator (i.e. 3.0, 1.0 etc.).
c. Type-in the internal standard concentration (1.0).
d. On the right hand side of the window type-in the Level ID i.e. 4A, 3A, and 2A, 1A; where the # is the calibrator level and the letter is the filter.
e. Click on Do Update then select OK.

Page15of21
19. Load the next data file, Cal 1.0 mg/L. Type QT 1 then click on Execute.
20. Select the View, select Q-Edit Quant Result. Easy ID is not needed for this step, as retention times have already been set for this calibrator. Double check each of the compound’s retention time and that each compound has a response. All auto- integrated compounds should have an “x” next to their name. Click Exit once when finished.
21. Assign the calibrator level.
22. Repeat steps 15-21 for the remaining levels (0.2 and 0.05 mg/L) for the first calibrator.
23. Requant the first calibrator:
a. Go to Tools, DOLIST.
b. Remove any options that are on the right hand side of the box.
c. On the left hand menu select “Summary Quant No Report” which is QT 2, with arrows move this command to the empty space on the right then click OK.
d. Select the calibrators just processed and move them to the empty space on the right then click Process. Each file will be “requanted”.
e. Review all files through Q-Edit Quant Result to verify quant results.
24. Process the corresponding QC’s for the calibrator that was just reviewed, with the same filter on:
a. Go to Tools, DOLIST.
b. Remove any options that are on the right hand side of the box.
c. On the left hand menu select “Quant No Report” which is QT 1, with arrows move this command to the empty space on the right then click OK.
d. Select the QC’s to be processed and move them to the empty space on the right then click Process. Each file will be processed.
25. Review each QC by selecting View, select Q-Edit Quant Result.
26. With the filter still on, print the Cal’s and QC’s for that filter:
a. Go to Tools, DOLIST. b. Remove any options that are on the right hand side of the box. c. On the left hand menu select “Summary Quant w/o Calculations” which is QT 0, 1, “s”, with arrows move this command to the empty space on the right then click OK. d. Only select all Cal levels and QC’s just reviewed and quanted and move them to the empty space on the right then click Process. Each file will print.
27. Load the 3.0mg/L of the next calibrator to be processed and follow steps 10-26.
28. Once all calibrators and QC’s are printed, save the method to ECM, then set the filter # to 0, which gives a list of all the compounds for the entire method, and process the all the blank injections and cases:
a. Go to Tools, DOLIST.
b. Remove any options that are on the right hand side of the box.
c. On the left hand menu select “Quant No Report” which is QT 1, with arrows move this command to the empty space on the right then click OK.
d. Select all blanks and cases to be processed and move them to the empty space on the right then click Process. Each file will be processed.

Page16of21
29. Review each blank and case through Q-Edit Quant Result:
a. Deselect any compounds that are not needed in each blank or case by double clicking on it and clicking on QDel.
b. Check the responses and retention times of the needed compounds.
c. If a compound is needed but not integrated, double click on the compound and integrate.
d. Click Exit once when finished, click “yes” to the save changes dialog box.
30. If a compound is too low to be integrated or no peak is present include an overlay:
a. Go to Tools, Overlay Chromatogram.
b. Select the calibrator or standard to overlay on the case; multiple overlays can also be set.
c. Select Process.
d. Go to File, Print then select Chromatogram.
31. Once all blanks and cases are processed, print as directed in step # 26a-c.
32. Print an R2 report by:
a.Go to Calibrate, List then select Calibration Report and OK.
b.Right click on the list and select Print, choose the correct printer.
33. Once everything is printed, save the all the data files from the batch back to ECM:
a. Select ECM from the top tool bar, select Save Multiple Data Files to ECM.
b. Select all data files on the left and move them to the right empty space, the click Process.
c. Allow each data file to be successfully copied to ECM before exiting Data Analysis.
34. After uploading the files to ECM, delete the sequence from the C: Drive of the processing station:
a. Right click on the Start on the lower left hand corner and select Explore
b. Open the MSDCHEM folder on the C: Drive, then select 1 ECM Retrieve
c. Locate the batch processed, right click on it and delete it.
d. Document “ECM label” on sequence list.
DATA REVIEW- FIRST LEVEL REVIEW 1. Check chromatography of all injections. Examine the peak shape and note if any peaks
show non-Gaussian shape. Identify unresolved peaks and peaks with shoulders on either side. Address any noted problems before proceeding with data review. Consult a supervisor about any unusual events.
2. Check that all significant peaks in the chromatogram are integrated. If the printout allows, check if the baseline used to integrate is appropriate. The analyst should consult with a supervisor about any unusual events, such as the presence of overload peaks
3. Check that all components of each calibrator are present and that each peak is properly assigned. Correct any errors. If any calibration compounds do not extract, or if

Page17of21
unexpected multiple peaks are detected for a calibration compound, the analyst must consult with a supervisor.
4. Check the blank for significant peaks that might co-elute with a compound of interest. There is some room for judgment in this step, but the analyst should consult with a supervisor if there are ANY questions. A blank may be scheduled for mass spectrometry to discover the identity of peaks in a blank, but this step must have no bearing on the decision whether a blank is acceptable or not. If any significant peaks are present in a blank for the batch, the run must be rejected.
5. Review QC samples, determine if the controls meet all acceptance criteria and verify the concentration of the components.
6. A copy of the batch calibrators and controls are forwarded to the QC officer, who will enter the results of the QC sample in the QC database. If the batch fails, annotate sample chromatograms, listing the reason for failure.
7. Annotate the following information on the first calibrator’s chromatogram or sequence list:
a. Calibrators and blank reviewed and accepted (or not accepted). Any QC or calibrator failures are annotated on the proper chromatograms.
b. Note any deviations from the SOP or any comments in a concise manner.
c. Regression coefficient (r2) must be greater than or equal to 0.98.
8. Make sure that each control has the appropriate target concentration range label.
Note: By initialing and dating this document, the analyst certifies that a complete and accurate
review was done, to the best of the ability of the analyst.
9. A supervisor or qualified staff reviews calibrators and controls, dates and initials the results of the review before photocopying.
10. When possible, all data should be photocopied using double sided mode. A master copy of the sequence list, calibration, control and any other data is prepared. Arrange this master copy as follows (from top to bottom): Calibrators, all QC samples and blanks, r2 report, sequence list and the lot sheet form. It is the responsibility of the analyst to verify that the master copy is legible and is an accurate copy of the originals, with no information cut off at the margins. Photocopies are made from this master, one for each case in the batch. Attach a copy of the calibrator and control package to each original case chromatograph.
RE-INJECTION CRITERIA
Occasionally, samples analyzed may need to be reinjected for a variety of reasons. The criteria for reinjection, other than poor chromatography or requests made by the appropriate supervisor, are listed below.

Page18of21
1. Individual blood samples may be re-injected once if internal standard (IS) area counts show poor recovery.
2. Analytes in a calibrator or control are not present in the chromatogram.
3. Additional peaks present in the chromatogram of a calibrator or control. See TROUBLESHOOTING OF AGILENT GAS CHROMATOGRAPHS section of the SOP manual.
4. QC failure: reinject the blank, the calibrator of interest and the associated QC.
5. Examine peak shape for signs of overload. If peaks are still overloaded after reinjection, re-extract samples with overloaded peaks using appropriate dilutions. If a calibrator peak is still overloaded after re-injection, the batch must be re-extracted.
CARRYOVER
Two types of carryover are possible with the methods employed by GC. One is the “carryover” of late-eluting peaks from one injection into the next or even next two or three injections. This is usually apparent from the shape of the peak (broad).
The other possibility is “carryover” due to contamination from an excessive amount of drug in the previous sample, either through the syringe or by drug being retained in the injection port or column. This is controlled by the fact that all positive screens are repeated with a new aliquot, to quantitate. Also, the original screen results are compared with the quant results. Any discrepancy is resolved, usually by repeating the extraction. Any samples with large concentration of drug are rescheduled with dilutions, to reduce the amount to within the linear range of the method. If it appears that carryover of this type has occurred, the reviewer will reschedule the case after the overload to verify that there was no contamination.
Frequent change of the autosampler methanol wash bottles helps to control this type of potential carryover.
ACCEPTANCE CRITERIA
1. External or internal controls must be analyzed in accordance with the standard laboratory procedures to determine the target and acceptable range before being incorporated into routine analysis of the specimens.
2. None of the target analytes should be detected in the negative control (blank).
3. Retention times of target analytes should match those of the calibrator or controls within + 2%.
4. The positive controls, unless otherwise specified, should be within ± 20%, for blood batches, or ± 30%, for tissue batches, of the established target for all analytes detected in the samples. In other words, if metoclopramide is present in the samples, the respective components of the controls must meet the acceptance criteria, but it is not necessary for the other compounds in that same control to meet the acceptance criteria. If the QC fails for quantitation, but is correct qualitatively, a batch can be accepted for qualitative results only. Acceptance of controls outside of ± 20% blood or ± 30% for tissues, of the established target require authorization of the supervisor and documentation.
Page19of21
5. The analyst shall choose from the standard levels a level at their discretion. All internal standard areas/peak heights for that sequence shall be compared to the internal standard(s) in that level. The acceptance criteria for the internal standard recovery/response shall be ± 30% of the selected internal standard. If the internal standard recovery/response is outside these limits the specimen shall be repeated unless the analyte in question is not related to the internal standard that is outside the acceptable limits . If the internal standard is still unacceptable in the repeat analysis in the same way (i.e. both times too high or both times too low), then the sample shall be repeated a third time using a “blank and spike” method. The “blank and spike” run shall be viewed as acceptable if the following conditions are met: All standards and QC materials are within acceptable ranges. The “blank and spike” samples internal standards are within ± 20% of their average responses. The calculated amount of the spiked sample is ± 20% of the theoretical amount. If any of these conditions are not met than consult with a toxicology manager for further direction.
DATA REVIEW (Second level review)
The Second Level Reviewer will review the processed data in its entirety according to the
acceptance criteria section of this SOP.
1. THIRD LEVEL REVIEW (FINAL REVIEW)
2. The third and final level review can only be performed by the Laboratory Managers. He/she will review the data for the entire case according to all established criteria. They will ensure that screening, confirmatory and quantitative analysis on the case have been completed and reported accurately. As needed, they will also schedule additional analysis and contact the Medical Examiner on the case to discuss any findings and / or review case history.
Quantitative Results
1. The reviewer should review the calibration, control, and batch information received after the photocopying of the batch. Use the same criteria as listed in batch review, with the additional criteria that the r2 of the four-point calibration curve of each component present in any case in the batch must be equal to or greater than 0.98. Notify a supervisor about any errors and make sure they are corrected before proceeding.
2. Retrieve the case file for each sample in the batch and associate it with the chromatogram(s).
3. Review the case’s chromatogram. Determine if the results are consistent with all the other applicable case data to date. For quantitation, it is important to compare the first chromatogram (or the SCAN) results with the final quantitative results. The ratio of peak to internal standard for both chromatograms should be examined. If the results are consistent, report the results on the Result Summary Sheet. Date and initial both the chromatogram and the Result Summary Sheet. If the results are not consistent, the inconsistency must be resolved. Consult a supervisor about rescheduling the sample, or other appropriate corrective action.
4. If the chromatogram shows overloaded peaks, or poor recovery of the internal standard, then repeating the sample may be necessary. If the problem is an overload, re-schedule with appropriate dilutions. In cases of poor recovery, the sample, its control, blank, and a calibrator may be re-injected once. If the criteria as listed in batch review are still not met, the sample is re-scheduled and re extracted.. If any cases have an unknown or unidentified peak not observed in previous scan results, the case vials must be

Page20of21
transferred to GC/MS for identification. All chromatograms must be attached to the case file. Consult with the supervisor if there are any questions. All chromatograms must be attached to the case file. Consult with the supervisor if there is any question.
Note: Do not discard any sample paperwork.
5. Cases where an overdose is suspected are scheduled for further testing. Liver and gastric contents are the specimens of choice. Consult with the supervisor regarding tissue analysis.
REPORTING
1. All control acceptance criteria must be met.
2. Analytes detected at a concentration of 0.05 mg/L (lowest calibrator) or 0.025 mg/L (lowest control) are reported as “< (less than…)” the lowest calibrator or control (i.e. if the analytes concentration is < 0.025 mg/L, report as less than 0.025 mg/L).
a. If 0.025 mg/L control passes and the analytes concentration is greater than the 0.025 mg/L control, report the numerical value.
b. If 0.025 mg/L control fails and the lowest calibrator (0.05 mg/L) passes report the analytes concentration as less than 0.05 mg/L.
1. If the lowest calibrator and control fail the case must be repeated.”.
3. ”.
4. All other positive findings are reported to the hundredth of mg/L, (e.g., “metoclopramide 0.82 mg/L”).
5. Drugs detected at a concentration above the upper limit of quantitation must be reported as “greater than...”, unless the concentration was determined by repeat analysis using appropriate dilutions. Diluting until the sample is within the linear range of the analysis is the most desirable result, but if the sample is insufficient, or other considerations preclude dilution, report as above.
6. Drug facilitated sexual assault cases and driving under the influence cases are reported in ng/mL
REFERENCES
SPEware Corp. Cerex Applications Manual. System 48 Processor. Users Guide. Turbovap. Users Guide.
Page21of21
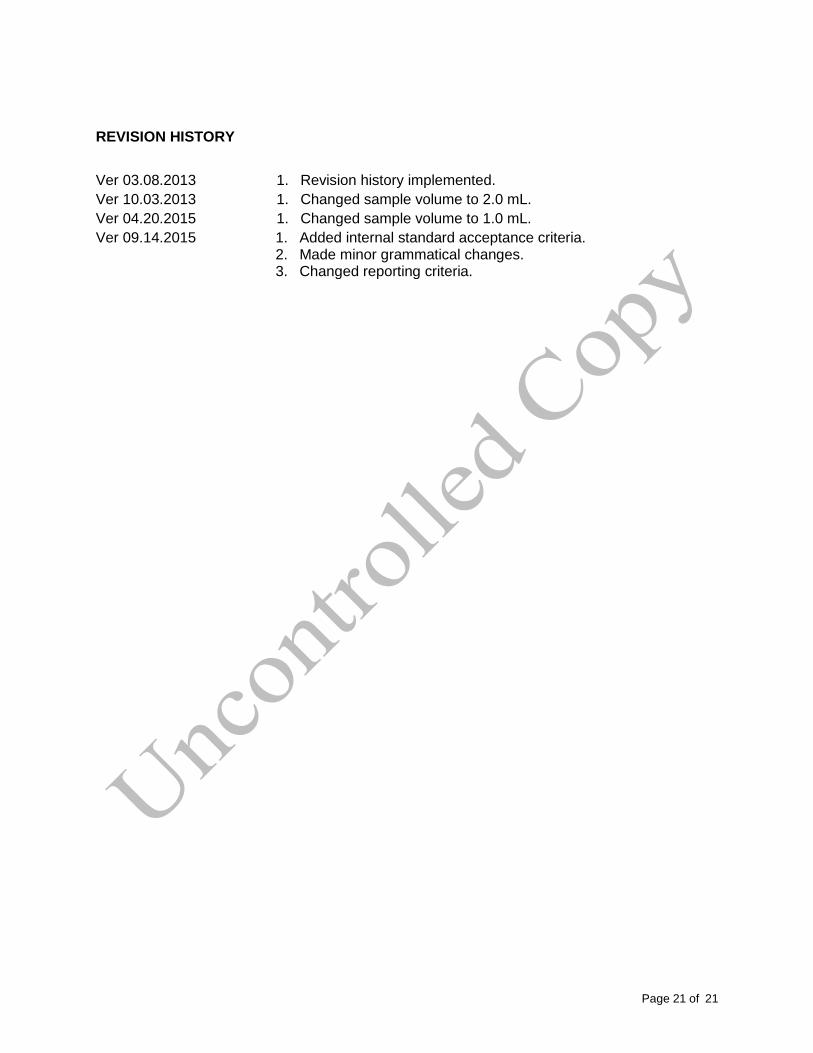
REVISION HISTORY
Ver 03.08.2013 1. Revision history implemented.
Ver 10.03.2013 1. Changed sample volume to 2.0 mL.
Ver 04.20.2015 1. Changed sample volume to 1.0 mL.
Ver 09.14.2015 1. Added internal standard acceptance criteria. 2. Made minor grammatical changes. 3. Changed reporting criteria.