for use under an emergency use authorization only · zika mac-elisa . centers for disease control...
TRANSCRIPT

Zika MAC-ELISA
Centers for Disease Control and Prevention
For Use Under an Emergency Use Authorization Only
Instructions for Use

April 16, 2018 2
Table of Contents
Introduction………………………………………………………………… 3
Purpose……………………………………………………………………… 3
Specimens…………………………………………………………………… 5
Equipment and Consumables……………………………………………… 5
Formulations…………………………………………………………………. 8
Quality Control……………………………………………………………… 8
Testing Algorithm………………………………………………………….. 10
Zika MAC-ELISA Procedure…………………………………………………….. 11
Interpreting Test Results……………………………………………………. 14
Assay Limitations……………………………………………………………. 18
Performance Characteristics ……………………………………………… 20
Contact……………………………………………………………………... 30
References…………………………………………………………………… 30
Appendix A: Dynex Agility Instructions………………………………….. 32
Appendix B: Dynex DSX Instructions……………………………………. 72

April 16, 2018 3
PURPOSE This document describes the use of an IgM antibody capture enzyme-linked immunosorbent assay (MAC-ELISA) for the presumptive detection of antibodies to Zika virus in persons meeting Centers for Disease Control and Prevention (CDC) clinical and/or epidemiological criteria for Zika virus testing.
This test is only intended for use as described in the CDC Zika diagnostic testing guidance and under the Food and Drug Administration’s (FDA) Emergency Use Authorization (EUA). Please refer to the CDC website for current laboratory guidance: http://www.cdc.gov/zika/state-labs/index.html
INTENDED USE
The CDC Zika MAC-ELISA is intended for the qualitative detection of Zika virus IgM antibodies in human sera or cerebrospinal fluid (CSF) that is submitted alongside a patient-matched serum specimen, collected from individuals meeting CDC Zika virus clinical criteria (e.g., clinical signs and symptoms associated with Zika virus infection) and/or CDC Zika virus epidemiological criteria (e.g., history of residence in or travel to a geographic region with active Zika virus transmission at the time of travel, or other epidemiologic criteria for which Zika virus testing may be indicated). The assay is intended for use in qualified laboratories designated by the CDC, as a part of a multi-test algorithm.
Assay results are for the presumptive identification of IgM antibodies to Zika virus. Positive and equivocal results are not definitive for diagnosis of Zika virus infection. False positive results are possible in patients with a history of infection with other flaviviruses. Confirmation of the presence of anti-Zika IgM antibodies in equivocal or presumptive positive specimens requires additional testing using the CDC-issued algorithm. Positive or equivocal results must be considered in conjunction with additional testing using the CDC-issued algorithm and/or considered alongside test results for other patient-matched specimens using the CDC-issued algorithm. Laboratories are required to report positive results to the appropriate public health authorities. Within the United States and its territories, equivocal and presumptive positive results must be reported to CDC by qualified laboratories designated by CDC.
Results of this test cannot be used as the sole basis of patient management decisions and must be combined with clinical observations, patient history, epidemiological information, and other laboratory evidences. Zika IgM levels over the course of illness are not well characterized. IgM levels are variable, but generally are positive starting near day four post onset of symptoms and continuing for 12 or more weeks following initial infection.
Negative results do not preclude the possibility of Zika virus infection, past or present. Negative results may be seen in specimens collected before day four post onset of symptoms or after the window of detectable IgM closes.
Introduction

April 16, 2018 4
The Zika MAC-ELISA is intended for use by trained laboratory personnel who are proficient in performing and interpreting immunoassays in qualified laboratories designated by the CDC. The Zika MAC-ELISA is only for use under the FDA’s EUA.
PROTOCOL USE LIMITATIONS The Zika MAC-ELISA assay described here has not been extensively tested with clinical specimens. Modifications to the Zika MAC-ELISA (i.e., use of platforms or chemistries other than those described) is not permitted. This assay should not be further distributed without the explicit consent of the CDC. ASSAY PRINCIPLE Assays that detect viral specific immunoglobulin M (IgM) are advantageous because they detect antibodies produced during the first few days after onset of clinical symptoms in a primary infection, obviating the need for convalescent-phase specimens in many cases. IgM capture is the optimum approach to IgM detection because it is simple, sensitive, and applicable to serum and cerebrospinal fluid (CSF) samples from a variety of animal species (e.g. human, equine, avian). MAC-ELISA assays provide a useful alternative to immunofluorescence for documentation of a serologic response. ELISA is less subjective than immunofluorescence and large numbers of samples can be processed. Anti-IgM (the capture antibody) is coated on 96-well plates. This is followed sequentially by adding the patient's serum, then known non-infectious viral antigen. The presence of antigen is detected by using enzyme-conjugated anti-viral antibody. A colorimetric result is generated by the interaction of the enzyme and a chromogenic substrate. This colorimetric change is detected by a spectrophotometer (ELISA reader). ASSAY STANDARDIZATION The Zika MAC-ELISA should be standardized and validated prior to use in the laboratory and re-standardization is required periodically. This should occur when new lot numbers of reagents are introduced, and at the very least, once a year. It is recommended that the mean optical density of the positive control serum reacted with the Zika viral antigen be set to approx. 1.0. The standardization of reagents is normally achieved via titration, always comparing the optical densities of the reagents when reacted on viral and normal antigen.
Please note that the Calibration Control Serum and Negative Control Serum should not be titrated, but rather used at the specified dilution. The product insert for the Negative Control and Calibrator Set includes results ranges observed by CDC in evaluation of the material; however, each laboratory should establish and monitor the results generated for each control, as specified in the QC recommendations on p. 14-15. The mean OD of the Calibration Control Serum reacted with the Zika viral antigen must be < 0.2, but ideally between 0.03-0.1.

April 16, 2018 5
ACCEPTABLE SPECIMENS
• Acute and convalescent human serum NOTE: Serum should be collected in a serum separator tube. Tube should be centrifuged and serum decanted prior to shipment to avoid hemolysis.
• Cerebrospinal fluid (CSF) specimens NOTE: CSF may only be tested when submitted alongside a patient-matched serum specimen
SPECIMEN HANDLING AND STORAGE Store all diagnostic serum specimens at +2-8°C prior to testing. Prolonged storage (>7 days) at +2-8°C is not recommended. Serum samples requiring storage for >7 days prior to testing should be stored at ≤-20°C and subsequently thawed and mixed thoroughly prior to testing (do not vortex). Transfer all residual specimens and aliquots to ≤ -20°C after all anticipated testing has been completed. Avoid repeated freeze-thaw cycles.
SAFETY/PRECAUTIONS As a minimum, use universal precautions when handling serum and other potentially infectious material.
It is recommended that laboratories perform a risk assessment to determine if additional safety precautions are needed. Heat treatment of serum (+56°C, 30 minutes) may adversely impact reportable values and is not recommended. Please review CDC guidance for state and local public health laboratories: http://www.cdc.gov/zika/state-labs/index.html and the Biosafety in Microbiological and Biomedical Laboratories (BMBL, 5th edition) for additional information on laboratory biosafety practices.
DISCLAIMER: Names of vendors or manufacturers are provided as examples of suitable product sources. Use of trade names is for identification purposes only and does not constitute endorsement by CDC or the Department of Health and Human Services.
MATERIALS PROVIDED BY CDC NOTE: These materials will be provided by CDC. To request these reagents, please email [email protected].
• Zika viral antigen (any of the following products is acceptable for use in the assay):
Specimens
Equipment and Consumables

April 16, 2018 6
o Zika Vero E6 Tissue Culture Antigen (CDC catalog #AV0002 or AV0003): These are antigens produced from different Zika strains; only one is required for the Zika MAC-ELISA. Lyophilized Zika antigen (inactivated).
o Zika COS-1 Recombinant Antigen (CDC catalog #AV0005): These are lyophilized non-infectious Zika virus-like particles prepared for use in the Zika MAC-ELISA.
• Normal antigen (culture source must match that of viral antigen) o Normal Vero E6 Antigen (CDC catalog #AV0001); Lyophilized normal antigen for use
with Zika Vero E6 Tissue Culture Antigen. o Normal Control COS-1 Recombinant Antigen (CDC catalog #AV0006); Lyophilized
normal antigen for use with Zika COS-1 Recombinant Antigen. • Flavivirus IgM positive control (CDC catalog #AV0004): Chimeric monoclonal antibody
specific for Flavivirus; lyophilized. • Negative Control and Calibrator Set (CDC catalog #AV0008)
o Negative Control Serum: This control sera is run alongside patient specimens on each plate as a negative control for the assay and is treated the same as a patient specimen.
o Calibration Control Serum: Normal human serum that has tested negative for Zika antibodies and is represented as (CCS) in the plate layout (see Fig. 2).
NOTE: The Negative Control and Calibration Control Sera come from different source materials and cannot be used interchangeably. Positive and negative assay controls should be run concurrently with all test samples.
MATERIALS REQUIRED BUT NOT PROVIDED NOTE: for materials requiring dilution/titration, see Formulations below. Materials listed in this section for which specific manufacturers and catalog numbers are provided have been validated for use with this assay and substitutions must not be made.
• Detecting antibody conjugate: Horseradish peroxidase conjugated monoclonal antibody 6B6C-1. Available from:
• InBios (for use with either COS-1 or Vero E6 antigens), o Item 500510: 6B6C-1/HRP Conjugate (Undiluted), 50 µL o Item 500510D: 6B6C-1/HRP Conjugate (1/100 Diluted from Stock), 1mL
NOTE: Either item number is acceptable for use. However, more volume will be required when using the diluted product (Item 500510D) than for the undiluted product (Item 500510).
• Flavivirus group-specific conjugate MAB 6B6C-1/HRP (CDC, catalog #AV0007) (For use with either Vero E6 or COS-1 antigens at CDC only, not distributed)
• Goat anti-human IgM (Kirkegaard and Perry Laboratories, catalog #01-10-03) • Deionized water • Hydrochloric acid (to adjust pH of coating buffer) • Sodium carbonate (Na2CO3); (available from multiple commercial sources, e.g. Sigma, Thermo
Fisher, etc.)

April 16, 2018 7
• Sodium bicarbonate (NaHCO3); (available from multiple commercial sources, e.g. Sigma, Thermo Fisher, etc.)
• Phosphate buffered saline (PBS); (available from multiple commercial sources, e.g. Sigma, Thermo Fisher, etc.)
• Tween 20 (available from multiple commercial sources, e.g. Sigma, Thermo Fisher, etc.) • Nonfat dry milk (available from multiple commercial sources, e.g. Sigma, Thermo Fisher, etc.) • Sulfuric acid (H2SO4); (available from multiple commercial sources, e.g. Sigma, Thermo Fisher) • Immulon II HB flat-bottomed 96 well plates, ThermoFisher Scientific catalog #3455 NOTE:
This is the only 96 well plate approved for this assay. • Enhanced K-Blue TMB substrate (3,3', 5, 5' tetramethylbenzidine base; Neogen Corp, catalog #
308175, also available in additional volumes)
EQUIPMENT AND CONSUMABLES
• Microplate washer • Microplate reader with 450 nm filter • Biosafety cabinet (BSC) • Incubator set at 37° C • Single and multi-channel pipettors (i.e., 100 µL and/or 200 µL Single Channel, 100 µL and/or
200 µL 12 channel) • Pipet tips for listed pipettors • Reagent reservoirs • Timer • Reagent mixing bottles; sterile 1L glass bottles; Gibco or alternate vendor • Microfuge tubes to dilute patient serum; purchase sterile or autoclave and cool before use;
Corning or alternate vendor • Weigh boats for measuring dry chemical components, chemical resistant • Permanent marker • OPTIONAL: Dynex Agility® automated ELISA processing system (Appendix A)
and Dynex DSX® automated ELISA processing system (Appendix B) NOTE: These instruments must not be used for coating the plates with goat anti-human IgM. The plate coating procedure should be performed manually.
Contact Dynex Technologies for additional information. 14340 Sullyfield Circle Chantilly, VA 20151-1621 800-288-2354 [email protected]

April 16, 2018 8
NOTE: Dilutions listed in individual reagent package inserts are a starting point for titration
and vary by lot. Laboratories must determine the optimum dilution for their individual laboratory. See additional information on Assay Standardization on page 4.
• Coating buffer: Carbonate/bicarbonate buffer, pH 9.6 (adjust pH with HCl if necessary)
o 1.59 g Na2CO3 + 2.93 g NaHCO3 diluted in 1 L water. • Wash buffer: Phosphate buffered saline (PBS); 0.05% Tween 20, pH 7.2.
o PBS is available in liquid or powdered form from multiple commercial sources • Blocking buffer: PBS/ 5% milk/ 0.5% Tween 20 • Stop solution: 1 N H2SO4 • Detecting antibody conjugate (diluted in blocking buffer, titration required) • Flavivirus IgM positive control (diluted in wash buffer, titration required) • Zika viral antigen (diluted in wash buffer, titration required)
o Zika Vero E6 Antigen o Zika COS-1 Recombinant Antigen
• Normal antigen (diluted in wash buffer, titration required) o Normal Vero E6 Antigen o Normal Control COS-1 Recombinant Antigen
• Goat anti-human IgM: diluted 1:2000 in coating buffer • Patient serum: diluted 1:400 in wash buffer (no titration required) • Negative Control Serum: Normal human serum diluted to 1:400 in wash buffer (no titration
required) • Calibration Control Serum: Normal human serum diluted 1:400 in wash buffer (no titration
required) NOTE: Upon receipt, new lots of Negative Control Serum and Calibration Control Serum must be tested using this protocol as if they were patient serum. Laboratories must ensure the OD of both the Negative Control and Calibration Control Sera reacted with viral antigen is < 2 times the OD of each when reacted with normal antigen.
GENERAL CONSIDERATIONS • Personnel must be familiar with the protocol and instruments used. • Wear clean, previously unworn, disposable gowns and new, powder-free gloves during assay
reagent setup and handling. Change gloves whenever you suspect they may be contaminated. • Store all reagents at appropriate temperatures (see product inserts). Do not use reagents beyond
their expiration dates.
Quality Control
Formulations

April 16, 2018 9
• Keep reagent tubes capped as much as possible. • Use aerosol barrier (filter) pipette tips only. • Empty all trash daily.
ASSAY CONTROLS Assay controls should be run concurrently with all test samples.
Antibody controls: • Positive control: Flavivirus IgM Positive Control • Negative Control Serum: normal human serum
NOTE: To comply with CLIA regulations, the Negative Control Serum must be run at least once per day. However, CDC recommends this control be run with each plate to maintain consistency of results.
• Calibration Control Serum: normal human serum (run with each plate)
Background Determination: • Specimen reacted with Normal antigen (to measure background signal generated by the
specimen).

April 16, 2018 10
Figure 1: Summary of Test Results Interpretation
Is Specimen P/N ≥ 3? No
Yes
Is Specimen P/N ≥ 2?
Testing Algorithm
Specimen is EQUIVOCAL.
Specimen Received
Specimen Diluted
Zika MAC-ELISA Performed
Check Plate Controls (see Table 1)
Run PASSES all QC checks
Run FAILS one or more criteria
(Repeat Plate)
Is Specimen Background Acceptable? (see Table 1)
No Specimen INCONCLUSIVE
Specimen PRESUMPTIVE POSITIVE for Zika virus IgM.
Follow specified reporting and action requirements in Table 2.
No
Yes
Specimen is NEGATIVE for Zika virus IgM.
Yes

April 16, 2018 11
NOTES REGARDING THE ZIKA MAC-ELISA PROCEDURE:
• Plates can be coated and kept at 2-8°C for up to a week. (See Step 2: Coating the Plates, below). • Refer to reagent package inserts for recommended storage conditions. • Reconstituted, undiluted viral and normal antigens can be stored at -20°C for up to one year. • Positive control used in this assay is not serum. Positive control should be prepared immediately
prior to testing. • Antigens and conjugate must be diluted to laboratory established working dilutions immediately
prior to use. • To keep timing of reagent addition consistent, process plates in the order they are numbered
during all steps of the procedure. • Plates should be kept in an enclosed, humidified environment during all incubation times with
the exception of the coating, blocking, and substrate steps. Adhesive film or a large Ziploc type bag containing a moist paper towel can be used to maintain humidity during incubation steps. An empty plate can also be used to cover plates, but care must be taken when removing as condensation may have formed during incubation.
NOTE: THE FOLLOWING PROCEDURE INCLUDES INFORMATION ON QUALITY CONTROL AND INTERPRETATION. EACH SERUM SPECIMEN IS TESTED IN TRIPLICATE WITH BOTH ZIKA AND NORMAL ANTIGENS. SEVEN (7) TEST SPECIMENS CAN BE ANALYZED PER PLATE. DUE TO LIMITED VOLUME, CSF SPECIMENS ARE USUALLY ONLY TESTED SINGLY.
1. PREPARING THE PLATE: • Determine the number of ELISA plates needed. Using a fine-tipped permanent marker,
number and label the 96-well plates. Identify the location of each clinical specimen (S1-S7) by using a corresponding template (see Fig. 2).
2. COATING THE PLATES: • Dilute goat anti-human IgM 1:2000 in coating buffer, pH 9.6. • Coat the inner 60 wells of the 96 well plate with 75 µL per well of diluted goat anti-
human IgM. Leave outer rows/columns empty (see Fig. 2). • Incubate at 2-8°C overnight. Plates should remain at 2-8°C until needed for testing, up
to one week. 3. BLOCKING THE PLATES:
• After overnight incubation, invert each plate over a sink or container and manually remove the coating antibody with a vigorous downward movement.
• Blot plates forcefully on paper towels or other absorbent material to remove excess liquid.
• Block plates with 200 µL blocking buffer per well. • Incubate with the top plate covered at room temperature for 30 minutes.
Zika MAC-ELISA Procedure

April 16, 2018 12
4. WASHING THE PLATES: • Wash wells 5X with wash buffer by using an automatic plate washer. • Wells should be filled with 300 µL wash buffer per cycle.
5. ADDITION OF SPECIMEN/CONTROLS: NOTE: The procedure outlined below is for the manual processing of the samples/controls. To use the Dynex Agility® or DSX® systems for automated ELISA processing, refer to the appendices included at the end of the document.
• Prepare all patient serum specimens and control dilutions prior to testing. Patient serums, Negative Control, and Calibration Control should be diluted 1:400 in wash buffer. Flavivirus IgM Positive Control should be diluted in wash buffer at a concentration previously determined through titration.
• Vortex briefly, and add 50 µL per well of the diluted patient serum specimen (S) to a block of 6 wells (see Fig. 2) or undiluted CSF to only two wells. CSF will be tested singly against the Zika viral antigen and Normal antigen. NOTE: CSF can be diluted to a maximum of 1:5 in wash buffer if necessary to obtain enough volume for testing.
• Vortex briefly, and add 50 µL of diluted Flavivirus IgM Positive Control (REF) to a block of 6 wells (see Fig. 2).
• Vortex briefly, and add 50 µL diluted Negative Control Serum control (NCS) to a block of 6 wells (see Fig. 2).
• Vortex briefly, and add 50 µL of diluted Calibration Control Serum (CCS) to a block of 6 wells (see Fig. 2).
• Incubate plates for 1 hour at 37°C in a humidified chamber. 6. PREPARE THE ZIKA AND NORMAL ANTIGENS:
• Dilute Zika viral antigen in wash buffer according to a previously determined titration. • Dilute Normal antigen in wash buffer to the same concentration as the Zika viral antigen.
7. WASHING THE PLATES: • Wash wells 5X with wash buffer by using an automatic plate washer. • Wells should be filled with 300 µL wash buffer per cycle.
8. ADDITION OF ANTIGEN: • Vortex briefly and add 50 µL per well of diluted Zika viral antigen to the left three wells
of each block (see Fig 2). • Vortex briefly and add 50 µL per well of diluted Normal antigen to the right three wells
of each block (see Fig. 2). • Incubate plates overnight at 2-8°C in a humidified chamber.
9. DILUTE CONJUGATE: • Dilute the detecting antibody conjugate in blocking buffer at a concentration previously
determined through titration. 10. WASHING THE PLATES:
• Wash wells 5X with wash buffer by using an automatic plate washer. • Wells should be filled with 300 µL wash buffer per cycle.

April 16, 2018 13
11. ADDITION OF CONJUGATE: • Add 50 µL per well of the diluted detecting antibody conjugate. • Incubate plates for 1 hour at 37°C in a humidified chamber. • Turn on plate reader to warm up. • Remove Enhanced K-Blue TMB substrate from refrigerator, and bring to room
temperature. 12. WASHING THE PLATES:
• Wash wells 5X twice with wash buffer by using an automatic plate washer. • Turn the plates 180° in the washer after the first series of 5 washes. • Wells should be filled with 300 µL wash buffer per cycle.
13. ADDITION OF SUBSTRATE: • With the plate at room temperature (20-25°C), add 75 µL per well of Enhanced K-Blue
TMB substrate to the inner 60 wells. • Immediately move plate to a dark location. Incubate uncovered at room temperature for
exactly 10 minutes. • A blue color will develop in antibody-positive wells.
14. ADDITION OF STOP SOLUTION: • Add 50 µL per well of stop solution to all wells, including the outer rows of wells on the
plate. • The wells that were blue will now change to a yellow color. • Allow plates to sit at room temperature for 1 minute. • Read plates in microtiter plate reader by using a 450 nm filter. Plates can be read up to
10 minutes after the addition of stop solution.
April 16, 2018 14
1 2 3 4 5 6 7 8 9 10 11 12
A EMPTY EMPTY EMPTY EMPTY EMPTY EMPTY EMPTY EMPTY EMPTY EMPTY EMPTY EMPTY
B EMPTY Viral
Antigen Normal Antigen
Viral Antigen
Normal Antigen
Viral Antigen
Normal Antigen
Viral Antigen
Normal Antigen
Viral Antigen
Normal Antigen EMPTY
C EMPTY
Viral Antigen Normal
Antigen Viral
Antigen
Normal Antigen Viral
Antigen Normal Antigen
Viral Antigen
Normal Antigen Viral
Antigen
Normal Antigen EMPTY
D EMPTY Viral
Antigen Normal Antigen
Viral Antigen
Normal Antigen
Viral Antigen
Normal Antigen
Viral Antigen
Normal Antigen
Viral Antigen
Normal Antigen EMPTY
E EMPTY Viral
Antigen Normal Antigen
Viral Antigen
Normal Antigen
Viral Antigen
Normal Antigen
Viral Antigen
Normal Antigen
Viral Antigen
Normal Antigen EMPTY
F EMPTY Viral
Antigen
Normal Antigen Viral
Antigen
Normal Antigen Viral
Antigen
Normal Antigen
Viral Antigen Normal
Antigen
Viral Antigen Normal
Antigen EMPTY
G EMPTY Viral
Antigen Normal Antigen
Viral Antigen
Normal Antigen
Viral Antigen
Normal Antigen
Viral Antigen
Normal Antigen
Viral Antigen
Normal Antigen EMPTY
H EMPTY EMPTY EMPTY EMPTY EMPTY EMPTY EMPTY EMPTY EMPTY EMPTY EMPTY EMPTY
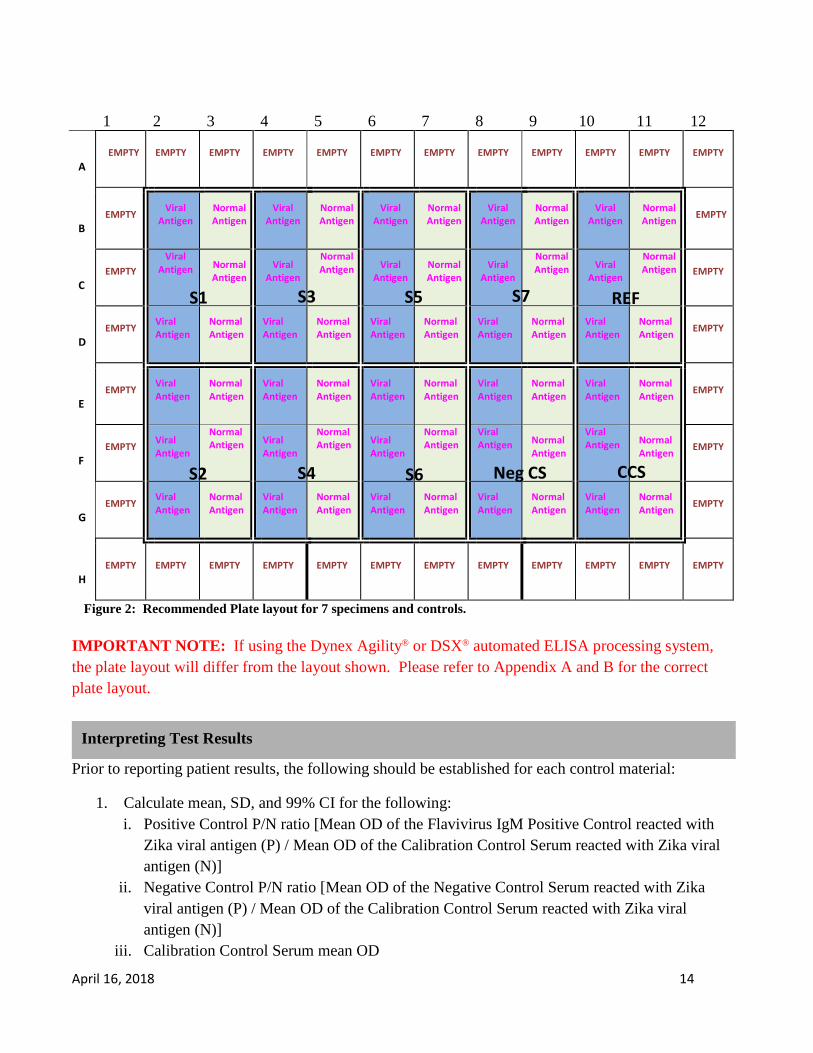
Figure 2: Recommended Plate layout for 7 specimens and controls. IMPORTANT NOTE: If using the Dynex Agility® or DSX® automated ELISA processing system, the plate layout will differ from the layout shown. Please refer to Appendix A and B for the correct plate layout.
Prior to reporting patient results, the following should be established for each control material:
1. Calculate mean, SD, and 99% CI for the following: i. Positive Control P/N ratio [Mean OD of the Flavivirus IgM Positive Control reacted with
Zika viral antigen (P) / Mean OD of the Calibration Control Serum reacted with Zika viral antigen (N)]
ii. Negative Control P/N ratio [Mean OD of the Negative Control Serum reacted with Zika viral antigen (P) / Mean OD of the Calibration Control Serum reacted with Zika viral antigen (N)]
iii. Calibration Control Serum mean OD
S1 S3 S5 S7 REF
S2 S4 S6 Neg CS CCS
Interpreting Test Results

April 16, 2018 15
2. Establish the mean, standard deviation, and QC limits for controls:
i. A minimum of 5 runs (or more depending on internal laboratory procedures) should be used to establish the mean and standard deviation (SD) of the Positive Control and Calibration Control Serum OD values used in the test validity determination. It is acceptable to either: a. Conduct 5 runs before testing patient samples or b. Use the first 5 runs with patient samples to generate the QC limits prior to releasing
patient results ii. The 99% confidence interval of the population (99% CI) is defined as 2.58 Standard
Deviations (SD) around the mean (mean ± 2.58*SD). Established limits should be updated until data from at least 30 runs (or more depending on laboratory policy) have been collected.
iii. The ODs and P/N ratios have been shown to be log-normally distributed. It is recommended to convert all ODs and P/N ratios to the log form before calculating the mean, SD, and CI for the controls. The resulting mean and OD for each control can then be back-transformed (10(Mean) or 10(QC Limit)). a. The Geometric Mean (�̅�𝑥), Geometric Standard Deviation (σ), and QC limits (based on
the interval that includes 99% of the sample population (�̅�𝑥 ± 2.58*σ)) should each be calculated separately for the Positive Control P/N ratio, Negative Control P/N ratio, and Calibration Control Serum mean OD. i. This equates to runs passing 98% of the time (0.99 * 0.99).
ii. A plate should only fail if the OD, or P/N ratio, of one of the controls is greater than (�̅�𝑥 + 2.58*σ) or less than (�̅�𝑥 - 2.58*σ).
iii. The P/N ratio of the Negative Control Serum should always be < 2, resulting in an interpretation of Negative.
iv. QC limits should be updated until there are at least 30 runs and the performance should be tracked moving forward.
b. Formulations for Calculations: NOTE: 𝑥𝑥 = 𝑙𝑙𝑙𝑙𝑙𝑙10(𝑀𝑀𝑀𝑀𝑀𝑀𝑀𝑀 𝑂𝑂𝑂𝑂) or 𝑥𝑥 = 𝑙𝑙𝑙𝑙𝑙𝑙10(𝑃𝑃/𝑁𝑁)
i. Mean: �̅�𝑥 = 1𝑛𝑛∑ 𝑥𝑥𝑖𝑖𝑛𝑛𝑖𝑖=1
ii. Back-transformed Geometric Mean = 10�̅�𝑥
iii. Standard Deviation: 𝜎𝜎 = �� (𝑥𝑥𝑖𝑖−�̅�𝑥)2𝑛𝑛𝑖𝑖=1𝑛𝑛−1
iv. Upper QC Limit (UL): UL = �̅�𝑥 + 2.58*σ a. Back-transformed Upper QC Limit = 10UL
v. Lower QC Limit (LL): LL = �̅�𝑥 - 2.58*σ a. Back-transformed Lower QC Limit = 10LL

April 16, 2018 16
TEST VALIDITY DETERMINATION
Before the results can be calculated for each clinical specimen, the test must be determined to be valid. Test validity must be determined for each plate. Results for clinical specimens may only be calculated once a test has been determined to be valid. If the test is not valid, then that plate must be repeated. If the P/N for the positive control still fails after a repeat, then one or more of the reagent or test parameters was likely in error, and troubleshooting should be performed.
1. Plate checks based on QC results i. The mean OD of the Calibration Control Serum reacted with Zika viral antigen
must be < 0.2, but ideally between 0.03-0.1. ii. The ODs of the plate outer rim background wells (36 wells per plate) should be checked for
high outliers (> upper bound 99% CI of established values). a. It is recommended that high outliers be excluded before calculating the mean for
subtraction from the test wells. A high outlier can cause the plate background subtraction to reduce the Calibration Control Serum OD and potentially lead to false-positive results.
iii. The OD values of the Calibration Control Serum reacted with Zika viral antigen should be checked for a high Coefficient of Variation (CV = SD/mean). a. If the Calibration Control Serum CV is >60%, the plate should be rejected from further
analysis. iv. The mean OD (raw values) of both the Calibration Control Serum and Positive Control
should be within the 99% CI of the pre-established upper and lower bounds. If they are not, the plate should be rejected from further analysis. a. NOTE: When addressing outliers, both low and high values should be excluded. Low
values on the Calibration Control Serum can cause false-positives and low values on the Positive Control could indicate a loss of signal that could cause false-negatives.
v. The Positive Control P/N ratio [Mean OD of the Flavivirus IgM Positive Control reacted with Zika viral antigen (P) / Mean OD of the Calibration Control Serum reacted with Zika viral antigen (N)] should be > 2 and within the 99% CI of the pre-established upper and lower bounds. If it is not, the plate should be rejected from further analysis.
vi. The Negative Control P/N ratio [Mean OD of the Negative Control Serum reacted with Zika viral antigen (P) / Mean OD of the Calibration Control Serum reacted with Zika viral antigen (N)] should be < 2 and within the 99% CI of the pre-established upper and lower bounds. If it is not, the plate should be rejected from further analysis.
DETERMINATION OF SPECIMEN P/N To determine whether the clinical specimens (S1-S7) contain IgM to the Zika virus (which would suggest recent infection) the following must be calculated:
Mean OD of the specimen reacted with Zika viral antigen (P) Mean OD of the Calibration Control Serum reacted with Zika viral antigen (N)

April 16, 2018 17
This is the P/N of the clinical specimen.
All specimens for which Specimen P/N is < 2, report as negative. See Table 1 below.
SPECIMEN BACKGROUND EVALUATION For each clinical specimen with a Specimen P/N ≥ 2, determine whether non-specific background is being generated.
The value of P (mean of the specimen reacted with Zika viral antigen) for the clinical specimen must be greater than or equal to twice (2X) the mean OD of the specimen reacted with normal antigen. If this requirement is not met, non-specific background is being generated and the result MUST be reported as inconclusive. Inconclusive specimens should be retested. If repeat testing also yields inconclusive results, forward specimen for further analysis and/or request collection of additional serum for analysis. If requirement is met, proceed with specimen result interpretation.
Table 1: Overview of Assay Calculations Calculation Ratio Result
Positive Control P/N
Mean OD of the Positive Control reacted with
__________Zika viral antigen (P)____ Mean OD of the Calibration Control serum reacted
with Zika viral antigen (N)
< 2 or outside the 99% CI
Plate IS NOT Valid ≥ 2 and within the
99% CI Plate IS Valid
Negative Control P/N
Mean OD of the Negative Control Serum reacted with __________Zika viral antigen (P)____
Mean OD of the Calibration Control serum reacted with Zika viral antigen (N)
< 2 and within the 99% CI
Plate IS Valid ≥ 2 or outside the
99% CI Plate IS NOT Valid
Specimen Background P/N
for specimens with Specimen P/N ≥2
(See Figure 1)
Mean OD of the specimen reacted with
__________Zika viral antigen (P)_________ Mean OD of the specimen reacted with Normal
antigen
< 2 Specimen is Inconclusive
≥ 2 Specimen can be
interpreted according to Testing
Algorithm
1. Clinical sample checks based on existing available data i. If the CV of triplet ODs for the clinical specimen with Zika antigen is > 30% and the
range of these ODs (ex: OD range 0.082-0.167) spans 2 times the mean OD of the Calibration Control Serum reacted with Zika viral antigen (Negative/Equivocal threshold) (ex: OD of 0.124 if the calibration control ran at 0.062), the mean clinical sample OD (i.e., OD of 0.128) may move across this threshold and cause a false-positive or false negative result. In this case, the specimen should be rejected from further analysis and be retested.

April 16, 2018 18
The combination of high CV indicating potential outliers and results on both side of the threshold are the trigger for this repeat.
ii. If the specimen interpretation is negative, but the Specimen Background P/N ratio is ≥ 2, the result should be reviewed to make sure it is not a false-negative due an outlier in the clinical specimen ODs.
ANALYSIS OF POSITIVE AND EQUIVOCAL RESULTS For valid plates, all test specimen P/N values greater than or equal to 3.0 should be reported as presumptive IgM-positive (see Table 2 below.
P/N values that lie between 2.0 and 3.0 should be considered equivocal. Further testing should be performed to determine the status of these specimens (see Table 2 below).
It should be stressed that the P/N value for a specimen at the screening dilution of 1:400 is not an indication of absolute antibody concentration, i.e., the P/N value is not quantitative.
Table 2: Zika MAC-ELISA Results Interpretation Test Specimen
P/N Interpretation Report Action
< 2 Negative No evidence of recent Zika virus infection detected.
Report results. If an early acute specimen, refer to interpretation instructions above.
2 ≤ P/N < 3 Equivocal
Zika MAC-ELISA results were equivocal for the
presence of anti-Zika virus antibodies.
Send report to CDC along with the specimen for confirmatory testing.
≥ 3 Presumptive Positive
Serological evidence of possible recent Zika virus
infection identified. Additional testing
required.
Send report to CDC along with the specimen for confirmatory testing.
All positive results should be reported to CDC via ArboNET.
For information regarding Zika testing algorithm, please refer to CDC guidance for state and local public health laboratories: http://www.cdc.gov/zika/state-labs/index.html
For specimen referral instructions, please refer to:
https://www.cdc.gov/ncezid/dvbd/specimensub/arboviral-shipping.html
Interpretation of Zika MAC-ELISA results must account for the possibility of false-negative and false-positive results. False-negative results can arise from:
• Specimen collection conducted before IgM has reached detectable levels.
Assay Limitations

April 16, 2018 19
• Specimen collection conducted after IgM levels have decreased below detectable levels. • Failure to follow the authorized assay procedures.
The most common cause of false-positive results is cross reactivity with IgM specific for other flaviviruses such as dengue virus. Only limited evaluation of cross-reactivity with flaviviruses or arboviruses has been conducted. No evaluation of cross-reactivity with Rheumatoid Factor has been conducted. Clinical data indicate cross-reactivity with anti-dengue virus antibodies is likely. Follow-up testing is necessary to rule-out a false-positive result. Confirmation of the presence of anti-Zika IgM requires testing by CDC or a CDC-designated laboratory. The gold-standard method for confirmation of the presence of anti-Zika antibodies is the plaque reduction neutralization test (PRNT).
All Zika testing must be conducted following the CDC-issued Zika laboratory guidance: https://www.cdc.gov/zika/laboratories/lab-guidance.html. Testing algorithms can be found here: https://www.cdc.gov/mmwr/volumes/66/wr/mm6629e1.htm?s_cid=mm6629e1_w
Negative results do not preclude infection with Zika virus and should not be used as the sole basis for patient treatment/management decisions. All results should be interpreted by a trained health care provider in conjunction with review of the patient’s history and clinical signs and symptoms.
This assay is for in vitro diagnostic use under FDA Emergency Use Authorization only and is limited to qualified laboratories designated by CDC.
Caution: Federal law restricts this device to sale by or on the order of a licensed practitioner.
All specimens should be handled as if they are infectious. Proper biosafety precautions, including personal protective equipment, must be used when handling specimen materials.
Proper collection, storage, and transport of specimens are essential for correct results.
Performance has only been established with the specimen types listed in the Intended Use. Other specimen types are not acceptable for use with this assay.
CONDITIONS FOR AUTHORIZATION FOR THE LABORATORY
The Zika MAC-ELISA Letter of Authorization, along with the authorized Fact Sheet for Healthcare Providers, the authorized Fact Sheet for Patients and authorized labeling are available on the FDA website: https://www.fda.gov/MedicalDevices/Safety/EmergencySituations/ucm161496.htm. Use of the Zika MAC-ELISA must follow the procedures outlined in these manufacturer’s Instructions for Use and the conditions of authorization outlined in the Letter of Authorization. Deviations from the procedures outlined are not permitted under the Emergency Use Authorization. To assist clinical laboratories running the Zika MAC-ELISA, the relevant Conditions of Authorization are listed verbatim below.
• Authorized laboratories will include with reports of the results of the Zika MAC-ELISA, the authorized Fact Sheet for Health Care Providers, the authorized Fact Sheet for Pregnant Women, and the authorized Fact Sheet for Patients, and any additional Zika MAC-ELISA Fact
April 16, 2018 20
Sheets for Health Care Providers, Pregnant Women, and Patients that OCET/OCS/OC and DMD/OIR/CDRH may authorize. Under exigent circumstances, other appropriate methods for disseminating these Fact Sheets may be used, which may include mass media.
• Within the United States and its territories, authorized laboratories will report all equivocal and presumptive positive results to CDC.
• Authorized laboratories will have a process in place to assure that positive or equivocal results are considered in conjunction with additional testing, and/or are considered alongside test results for other patient-matched specimens, using the CDC-issued algorithm.
• Authorized laboratories will have a process in place for reporting test results to health care providers and relevant public health authorities, as appropriate.9
• Authorized laboratories will collect information on the performance of the assay and report to CDC any suspected occurrence of false negative results and significant deviations from the established performance characteristics of which they become aware.
• All laboratory personnel using the assay should be appropriately trained in performing and interpreting immunoassays techniques, use appropriate laboratory and personal protective equipment when handling this kit, and use the test in accordance with the authorized labeling.
• CDC and authorized laboratories will ensure that any records associated with this EUA are maintained until notified by FDA. Such records will be made available to FDA for inspection upon request.
9For questions related to reporting Zika test results to relevant public health authorities, it is recommended that CDC and authorized laboratories consult with the applicable country, state, or territory health department(s). According to CDC, Zika is a nationally notifiable condition. https://wwwn.cdc.gov/nndss/conditions/notifiable/2016/.
Variance
To establish the variance of the Zika MAC-ELISA, three scientists in one laboratory tested each specimen in a panel of eight BARDA specimens 42 times. Variance was established using the Vero E6 antigen set and the Flavivirus group-specific conjugate MAB 6B6C-1/HRP. Result interpretations from this study were compared to the originally reported Zika MAC-ELISA and PRNT interpretations available for each sample. Coefficients of Variation were also calculated to show within-sample variance for the mean P/N and mean OD. A summary of findings is presented in Table 3 below.
Performance Characteristics

April 16, 2018 21
Table 3: Variance - Flavivirus group-specific conjugate MAB 6B6C-1/HRP reacted with Vero E6 Antigens
SAMPLE P/N Mean P/N CV
OD Mean with Zika Antigen
OD CV with Zika Antigen
INTERPRETATION
EQUIV INC NEG POS Total Original MAC-ELISA Result
Original PRNT Result
1 1.79 52.676 0.101 92.48 9 2 25 6 42 Negative flavivirus
8 15.489 32.813 0.766 57.333 0 0 0 42 42 Presumptive Positive flavivirus
7 27.201 38.124 1.256 42.467 0 0 0 42 42 Presumptive Positive flavivirus
4 2.565 36.218 0.139 78.29 16 0 14 12 42 Presumptive Positive Zika
3 2.26 30.955 0.113 59.969 22 6 11 3 42 Presumptive Positive flavivirus
6 23.47 42.076 1.095 48.135 0 0 0 42 42 Presumptive Positive Zika
2 2.605 30.838 0.134 65.009 7 16 8 11 42 Equivocal flavivirus
5 10.417 41.122 0.525 65.544 0 0 0 42 42 Presumptive Positive Zika
Negative control N/A N/A 0.053 58.348 N/A N/A N/A N/A N/A
Positive Control 14.317 72.12 0.602 49.562 N/A N/A N/A N/A N/A
Total N/A N/A N/A N/A 54 24 58 200 336

April 16, 2018 22
Performance across Authorized Reagent Combinations
Performance of the Zika MAC-ELISA was then evaluated across the three antigen set/detecting antibody conjugate combinations not employed in the variance study. The study used the same panel of eight BARDA specimens used in the variance evaluation across all antigen sets and conjugates. Each specimen was tested by each of the three remaining combinations of antigen sets and conjugates in two laboratories by three scientists per laboratory for a total of 30 replicates per specimen per reagent combination. The P/N values were assigned for 8 BARDA samples using the Vero E6 antigen set and Flavivirus group-specific conjugate MAB 6B6C-1/HRP combination and were used as a baseline to compare the other combinations against. A summary of the slope, intercept and R2 for regressions of the authorized reagent combinations versus the pre-assigned values are presented in Table 4 below. Furthermore, sample interpretations from these authorized reagent combinations were compared to the originally reported Zika MAC-ELISA and PRNT interpretations available for each BARDA specimen. Coefficients of Variation were also calculated to show within-sample variance for the mean P/N and mean OD. A summary is presented in Tables 5-7 below.
Table 4: Performance Across Authorized Reagent Combinations - Summary Reagent Combination (Conjugate/Antigen) Intercept Slope R2
Flavivirus /Vero E6 4.77E-15 1 0.8846
Flavivirus/COS-1 -0.03579 0.9086 0.8934
InBios/COS-1 0.12922 1.09344 0.872
InBios/Vero E6 0.21003 1.03235 0.8296

April 16, 2018 23
Table 5: Performance Across Authorized Reagent Combinations – Flavivirus group-specific conjugate MAB 6B6C-1/HRP reacted with COS-1 Antigens
SAMPLE P/N Mean P/N CV
OD Mean with Zika Antigen
OD CV with Zika
Antigen
INTERPRETATION
EQV INC NEG POS Total Original MAC-ELISA Result
Original PRNT Result
1 1.404 24.006 0.057 27.459 1 1 28 0 30 Negative flavivirus
8 12.384 39.379 0.495 34.492 0 0 0 30 30 Presumptive Positive flavivirus
7 23.071 31.961 0.929 27.926 0 0 0 30 30 Presumptive Positive flavivirus
4 2.301 35.575 0.093 29.185 13 3 12 2 30 Presumptive Positive Zika
3 1.95 22.689 0.079 21.941 9 2 19 0 30 Presumptive Positive flavivirus
6 13.212 41.383 0.527 36.041 0 0 0 30 30 Presumptive Positive Zika
2 2.048 21.9 0.083 21.803 1 9 20 0 30 Equivocal flavivirus
5 6.64 39.926 0.265 34.187 1 0 0 29 30 Presumptive Positive Zika
Negative control N/A N/A 0.041 21.781 N/A N/A N/A N/A N/A
Positive Control 14.737 44.938 0.579 34.018 N/A N/A N/A N/A N/A
Total N/A N/A N/A N/A 25 15 79 121 240

April 16, 2018 24
Table 6: Performance Across Authorized Reagent Combinations – InBios conjugate reacted with COS-1 Antigens
SAMPLE P/N Mean P/N CV
OD Mean with Zika Antigen
OD CV with Zika
Antigen
INTERPRETATION
EQV INC NEG POS Total Original MAC-ELISA Result
Original PRNT Result
1 2.412 24.974 0.049 35.31 3 17 9 1 30 Negative flavivirus
8 36.011 41.176 0.71 44.053 0 0 0 30 30 Presumptive Positive flavivirus
7 50.461 48.135 0.944 40.769 0 0 0 30 30 Presumptive Positive flavivirus
4 4.461 40.829 0.086 40.452 2 9 2 17 30 Presumptive Positive Zika
3 3.512 37.388 0.07 45.698 5 6 2 17 30 Presumptive Positive flavivirus
6 39.216 45.048 0.816 56.406 0 0 0 30 30 Presumptive Positive Zika
2 2.833 36.053 0.057 42.351 5 10 7 8 30 Equivocal flavivirus
5 16.187 42.542 0.329 51.395 0 0 0 30 30 Presumptive Positive Zika
Negative control N/A N/A 0.021 45.187 N/A N/A N/A N/A N/A
Positive Control 39.053 43.335 0.771 46.977 N/A N/A N/A N/A N/A
Total N/A N/A N/A N/A 15 42 20 163 240

April 16, 2018 25
Table 7: Performance Across Authorized Reagent Combinations – InBios conjugate reacted with Vero E6 Antigens
SAMPLE P/N Mean P/N CV
OD Mean with Zika Antigen
OD CV with Zika
Antigen
INTERPRETATION
EQV INC NEG POS Total Original MAC-ELISA Result
Original PRNT Result
1 3.394 47.727 0.109 87.857 2 13 6 9 30 Negative flavivirus
8 35.05 56.338 0.969 71.557 0 0 0 30 30 Presumptive Positive flavivirus
7 51.109 46.376 1.387 57.851 0 0 0 30 30 Presumptive Positive flavivirus
4 5.206 47.592 0.153 77.517 2 10 1 17 30 Presumptive Positive Zika
3 3.387 45.389 0.095 66.749 10 3 4 13 30 Presumptive Positive flavivirus
6 39.607 50.274 1.072 63.139 0 0 0 30 30 Presumptive Positive Zika
2 3.675 45.367 0.109 77.337 4 3 6 17 30 Equivocal flavivirus
5 19.058 54.979 0.582 88.639 0 0 0 30 30 Presumptive Positive Zika
Negative control N/A N/A 0.03 62.156 N/A N/A N/A N/A N/A
Positive Control 23.754 59.926 0.61 64.383 N/A N/A N/A N/A N/A
Total N/A N/A N/A N/A 18 29 17 176 240

April 16, 2018 26
Cross Reactivity
Flavivirus Cross-reactivity
Banked known sera from CDC’s repository were selected to evaluate the cross-reactivity of the Zika MAC-ELISA. Zika MAC-ELISA was performed on these samples using the Zika Vero E6 antigen set and Flavivirus group-specific conjugate MAB 6B6C-1/HRP combination. No cross-reactivity was observed between the Zika MAC-ELISA and flaviviruses other than dengue.
Table 8: Flavivirus Cross-reactivity Summary
Flavivirus Specimen description Specimens
Tested Negative by Zika
MAC-ELISA
WNV Sera from confirmed West Nile virus
cases. 4 4 (100%)
SLE Sera from confirmed St. Louis
Encephalitis cases 1 1 (100%)
YFV Sera from individuals vaccinated
against yellow fever virus 4 4 (100%)
JEV Sera from individuals vaccinated
against Japanese encephalitis virus 2* 2 (100%)
*Two sera within the YF vaccine recipient pool came from individuals who had also received the JE vaccine, thus these are a subset of the specimens in the row above.
Dengue virus was not included in the cross-reactivity evaluation. Clinical testing data presented below demonstrates significant cross-reactivity of the Zika MAC-ELISA to anti-dengue virus IgM antibodies.
Non-flavivirus Cross-reactivity
No experimental study was carried out with the Zika MAC-ELISA to determine cross-reactivity with IgM against non-flaviviruses. However, the literature (Martin, et al., 2000) indicates that only minimal cross-reactivity is expected with IgM against alphaviruses and bunyaviruses.
Arboviruses were originally delineated into three groups based on significant serological differences as characterized with early, crude serological techniques. These delineations remain: Group A viruses are now alphaviruses; Group B are now flaviviruses; Group C are now bunyaviruses. As serological methods have evolved, the serological distinctions that originally defined the groups mean that cross reactivity between groups in immunoassays is not expected.
April 16, 2018 27
Clinical Performance
Performance with U. S. Specimens Submitted to CDC, Ft. Collins, Jan 2015 to Jun 2016 In the period from January 2015 to June 8, 2016, 1,026 sera and 3 CSF specimens were tested by both the CDC Zika MAC-ELISA and by the CDC Zika PRNT assay. Zika MAC-ELISA was performed on these specimens using the Zika Vero E6 antigen set and Flavivirus group-specific conjugate MAB 6B6C-1/HRP combination. PRNT results presented in this section were interpreted based on the current Interim Guidance for Interpretation of Zika Virus Antibody Test Results (Rabe et al., 2016).
Summary of Clinical Performance with Sera
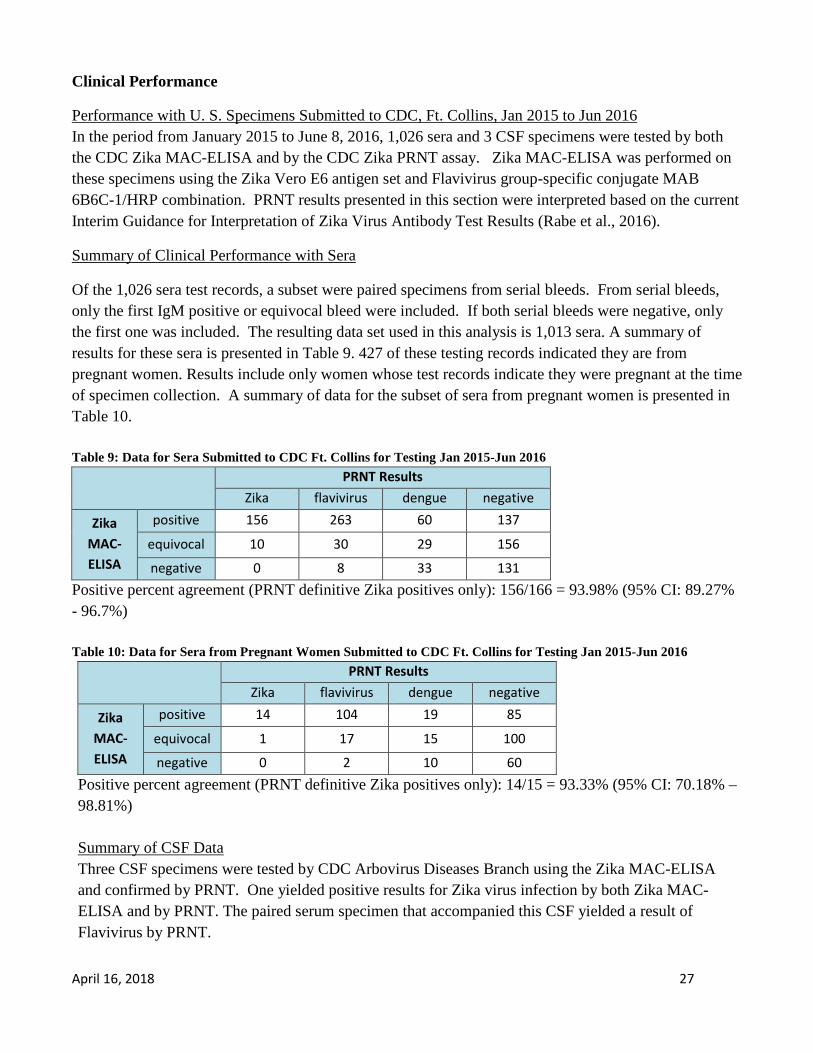
Of the 1,026 sera test records, a subset were paired specimens from serial bleeds. From serial bleeds, only the first IgM positive or equivocal bleed were included. If both serial bleeds were negative, only the first one was included. The resulting data set used in this analysis is 1,013 sera. A summary of results for these sera is presented in Table 9. 427 of these testing records indicated they are from pregnant women. Results include only women whose test records indicate they were pregnant at the time of specimen collection. A summary of data for the subset of sera from pregnant women is presented in Table 10. Table 9: Data for Sera Submitted to CDC Ft. Collins for Testing Jan 2015-Jun 2016
PRNT Results
Zika flavivirus dengue negative
Zika MAC-ELISA
positive 156 263 60 137
equivocal 10 30 29 156
negative 0 8 33 131 Positive percent agreement (PRNT definitive Zika positives only): 156/166 = 93.98% (95% CI: 89.27% - 96.7%) Table 10: Data for Sera from Pregnant Women Submitted to CDC Ft. Collins for Testing Jan 2015-Jun 2016
PRNT Results
Zika flavivirus dengue negative
Zika MAC-ELISA
positive 14 104 19 85
equivocal 1 17 15 100
negative 0 2 10 60 Positive percent agreement (PRNT definitive Zika positives only): 14/15 = 93.33% (95% CI: 70.18% – 98.81%) Summary of CSF Data Three CSF specimens were tested by CDC Arbovirus Diseases Branch using the Zika MAC-ELISA and confirmed by PRNT. One yielded positive results for Zika virus infection by both Zika MAC-ELISA and by PRNT. The paired serum specimen that accompanied this CSF yielded a result of Flavivirus by PRNT.
April 16, 2018 28
The other two CSF specimens yielded positive results for the Zika MAC-ELISA and Flavivirus results by PRNT.
Evaluation of Performance with Primary and Secondary Zika Infections, Yap State, Micronesia, 2007 The CDC Zika MAC-ELISA was included in a battery of CDC MAC-ELISA and PRNT flavivirus immunological methods for the evaluation of paired serum specimens from 11 Zika virus cases identified in a Zika outbreak in Yap State, Micronesia in 2007 (Lanciotti, et al., 2008). At the time of this outbreak, the Zika MAC-ELISA employed sucrose-acetone extracted (BPL inactivated) suckling mouse brain antigen and Flavivirus group-specific conjugate MAB 6B6C-1/HRP. Four of the 11 cases are primary flavivirus infections, while seven are probable secondary flavivirus infections.
Of the paired sera collected and evaluated in the publication, all but one patient has at least one serum specimen within our claimed window of ≥ 4 days post onset of symptoms and < 12 weeks post onset of symptoms. For each of the remaining 10 cases, the earliest collected serum specimen within our claimed window is included in our analysis.
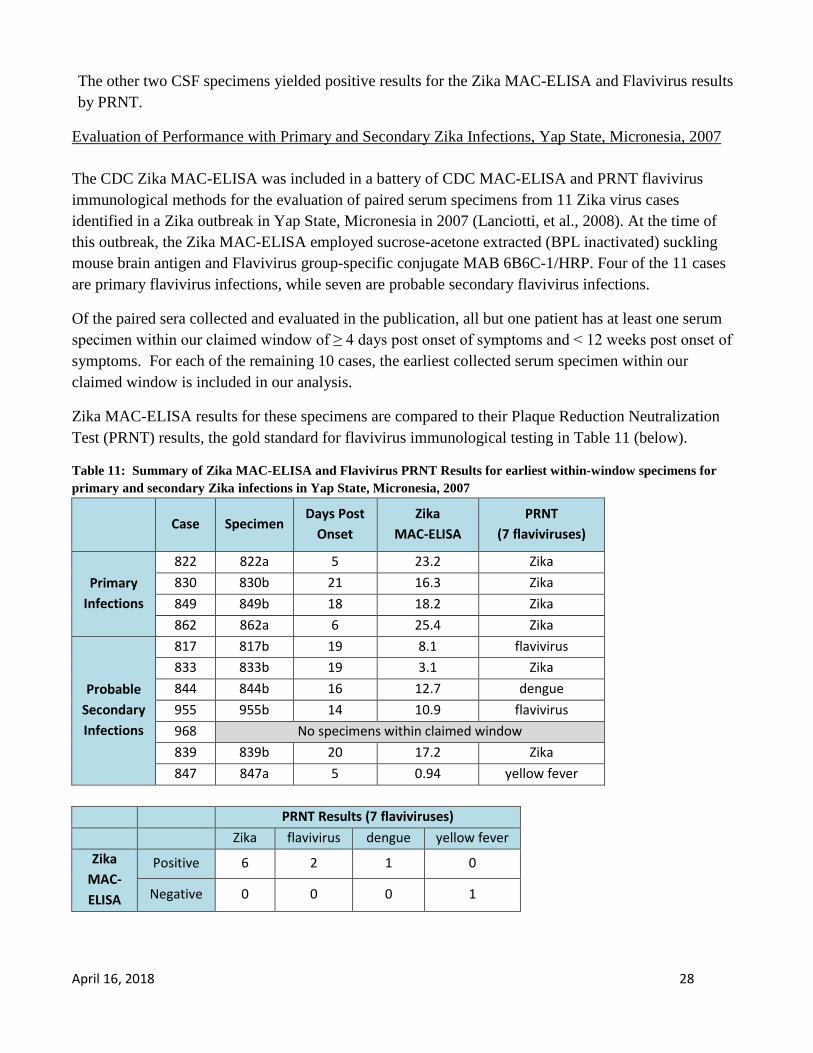
Zika MAC-ELISA results for these specimens are compared to their Plaque Reduction Neutralization Test (PRNT) results, the gold standard for flavivirus immunological testing in Table 11 (below).
Table 11: Summary of Zika MAC-ELISA and Flavivirus PRNT Results for earliest within-window specimens for primary and secondary Zika infections in Yap State, Micronesia, 2007
Case Specimen Days Post
Onset Zika
MAC-ELISA PRNT
(7 flaviviruses)
Primary Infections
822 822a 5 23.2 Zika 830 830b 21 16.3 Zika 849 849b 18 18.2 Zika 862 862a 6 25.4 Zika
Probable Secondary Infections
817 817b 19 8.1 flavivirus 833 833b 19 3.1 Zika 844 844b 16 12.7 dengue 955 955b 14 10.9 flavivirus 968 No specimens within claimed window 839 839b 20 17.2 Zika 847 847a 5 0.94 yellow fever
PRNT Results (7 flaviviruses) Zika flavivirus dengue yellow fever
Zika MAC-ELISA
Positive 6 2 1 0
Negative 0 0 0 1

April 16, 2018 29
Primary infections:
All four cases identified as primary infections yielded positive Zika MAC-ELISA results for their initial within-window serum specimen. These four specimens also yielded positive results by PRNT for Zika virus infection.
Secondary Infections (probable):
Of the six cases with within-window serum specimens, five yielded positive results for the earliest collected within-window serum specimens by Zika MAC-ELISA. Two of these (833b and 839b) yielded clearly positive results for Zika virus infection by PRNT. Two other specimens (817b and 955b) yielded greater PRNT results for Zika virus than for any of the other flaviviruses tested. However, these results were not 4-fold higher than all other results, thus were interpreted a Flavivirus positive by PRNT. The remaining specimen yielded positive results for Zika MAC-ELISA and 4-fold higher PRNT results for Dengue than for Zika, the only specimen for which the PRNT did not agree with the Zika MAC-ELISA.
Specimen 847a, a day 5 specimen, was negative by Zika MAC-ELISA and was positive for Yellow Fever Virus by PRNT. No neutralization effect was observed for Zika by PRNT. Thus, the MAC-ELISA and PRNT results for this specimen are in agreement.
Evaluation of Performance of COS-1 Recombinant Antigens in the Zika MAC-ELISA, 2016
A panel of 51 serum specimens were tested side-by-side with the Zika MAC-ELISA using the Vero E6 antigens (Zika Vero E6 Antigen and Normal Vero E6 Antigen) and the COS-1 recombinant antigens (Zika COS-1 Recombinant Antigen and Normal Control COS-1 Recombinant Antigen). Both antigen sets were tested with the Flavivirus group-specific conjugate MAB 6B6C-1/HRP. Specimens were selected for testing to represent a range of P/N values observed in diagnostic testing across positive, equivocal and negative results, with a larger proportion of specimens near the assay negative/equivocal cutoff and near the equivocal/positive cutoff. Results of testing demonstrated non-inferior performance of the COS-1 recombinant antigens and support their inclusion in the Zika MAC-ELISA as an acceptable alternative to the Vero E6 antigens.
Evaluation of Dynex Agility and DSX Automated Microplate Processors Side-by-Side with Manual Method
A panel of 56 serum specimens were tested with the Zika MAC-ELISA using the Zika Vero E6 Antigen antigen set and Flavivirus group-specific conjugate MAB 6B6C-1/HRP using the authorized manual method. These specimens were also tested using the same antigen/conjugate combination on the Dynex Agility and DSX automated microplate processors. Results of testing demonstrated non-inferior performance of the Dynex Agility and DSX automated microplate processors and support their inclusion in the Zika MAC-ELISA as acceptable alternatives to the authorized manual method.

April 16, 2018 30
Questions may be directed to [email protected]
Johnson, AJ, Martin, DA, Karabatsos, N and Roehrig, JT. Detection of anti-arboviral immunoglobulin G by using a monoclonal antibody-based capture enzyme-linked immunosorbent assay. J. Clinical Microbiology, 38:1827-1831, 2000.
Koneman EW, Allen SD, Janda WM, Schreckenberger PC, and Winn Jr. WC , (Eds). Diagnosis of Infections caused by Viruses, Chlamydia, Rickettsia, Diagnostic Microbiology, 4th Edition, JB Lippicott Co: 956-1074, 1992.
Lanciotti, RS, O.L. Kosoy, J.J. Laven, J.O. Velez, A.J. Lambert, A.J. Johnson, S.M. Stanfield, and M.R. Duffy. Genetic and Serologic Properties of Zika Virus Associated with an Epidemic, Yap State, Micronesia, 2007. Emerg Infect Dis. 2008 (Aug); 14(8): 1232-1239.
Monath, TP, Nystrom, RR, Bailey, RE, Calisher, CH, and Muth, DJ: Immunoglobulin M antibody capture enzyme-linked immunosorbent assay for diagnosis of St. Louis encephalitis. Journal of Clinical Microbiology 20:784-790, 1984.
Martin, DA., Muth, DA., Brown, T., Karabatsos, N., and Roehrig, JT. Standardization of immunoglobulin M capture enzyme-linked immunosorbent assays (MAC-ELISA) for routine diagnosis of arboviral infections. Journal of Clinical Microbiology 38:1823-1826, 2000.
Rabe IB, Staples JE, Villanueva J, et al. Interim Guidance for Interpretation of Zika Virus Antibody Test Results. Morb Mortal Wkly Rep 2016 (Jun);65.
Tsai, TH: Arboviruses, In Rose NR, Marcario EC, Fahey JL, Friedman H, and Penn GM, (Eds): Manual of Clinical Laboratory Immunology, 4th Edition, American Society for Microbiology: 606-618, 1976.
References
Contact

Page 31 of 101 Agility CDC Zika Instructions Rev 3
Smartkit and Agility are registered trademarks of Dynex Technologies
The following Instructions for Use are provided by Dynex Technologies who are solely responsible for the content. These instructions are for use with the CDC Zika MAC ELISA assay on the Dynex Agility® and Dynex DSX® instruments. Any questions regarding the use of these instruments should be directed to Dynex Technologies at 800-288-2354 or [email protected]. Please note: Plate layout for the automated systems is different from the layout described for running this assay manually. The following plate layout must be used with the Dynex Agility® and the DSX® for the software to read and interpret the samples and controls appropriately. Test samples (T#.#) are run in replicates of 6 and are loaded in a linear manner. In the figure below, test sample #1 is in row 2.
T1.1, T1.2 and T1.3 are tested against viral antigen. T1.4, T1.5 and T1.6 are tested against normal antigen.
Additional test samples, for example, T2 through T7 in the example below, are loaded into rows 3 through 8 respectively.
T1-T7 = Patient specimens run in triplicate PC1.x = Positive Control reacted with Zika antigen PC2.x = Positive Control reacted with Normal Antigen NC1.x = Negative Control Serum reacted with Zika Antigen NC2.x =Negative Control Serum reacted with Normal Antigen CO1.x = Calibration Control Serum reacted with Zika Antigen CO2.x = Calibration Control Serum reacted with Normal Antigen B1 = plate blank C1 – C33 = empty wells
Page 32 of 101 Agility CDC Zika Instructions Rev 3
Smartkit and Agility are registered trademarks of Dynex Technologies
Appendix A:
Agility CDC Zika MAC-ELISA Instructions for Use

Page 33 of 101 Agility CDC Zika Instructions Rev 3
Smartkit and Agility are registered trademarks of Dynex Technologies
Revision History
Rev Date Summary of Revision
0 2016/08/09 Initial Draft
1 2016/08/11 Regulatory comments added
2 2016/10/21 Revised labelling of reagents, and included more details on use of the instrument and performing the CDC Zika MAC-ELISA.
3 2018/04/16 Revised to include Calibration Control Serum

Page 34 of 101 Agility CDC Zika Instructions Rev 3
Smartkit and Agility are registered trademarks of Dynex Technologies
TABLE OF CONTENTS
1. Instrument Start-Up 35 2. Assay Transfer 42
2.1 Transferring from USB device……………………………………………………43
3. Assay Verification 43
4. SmartKit Creation 45 4.1 Creating SmartKit Barcode Labels………………………………………………..45 4.2 Printing Labels…………………………………………………………………….48 4.3 Stage 1 Assay Fluid Loading……………………………………………………...48 4.4 Stage 2 Assay Fluid Loading……………………………………………………...50
5. Consumable Loading 51 5.1 Reagent Tips (Dynex Technologies #67920) ………………………………….….51 5.2 Sample Tips (Dynex Technologies #67910) ……………………………………...52 5.3 Deep Well Strips (Dynex Technologies #62910) ………………………………....52
6. SmartKit Loading 53
7. Sample Loading 53
7.1 Loading Samples Zika Stage 1……………………………………………….…...55 7.2 Loading Samples Zika Stage 2…………………………………………………....56
8. Creating a Worklist 57 8.1 Worklist Filter Screen……………………………………………………………..57 8.2 Worklist Edit Screen………………………………………………………………58
9. Scheduled Assays 60
10. Zika Assay Stage 1 62
11. Zika Assay Pre-Stage 2…………………………………………………………………….63
12. Zika Assay Stage 2…………………………………………………………………………64
13. Results 64 13.1 Report Example……………………………………………………………………64
14. Agility Warnings and Safety Precautions 68 14.1 Warning Labels……………………………………………………………………70

Page 35 of 101 Agility CDC Zika Instructions Rev 3
Smartkit and Agility are registered trademarks of Dynex Technologies
1. Instrument Start-Up o Open doors manually with key – ensure all doors are down and arms can move freely. All
consumables (reagent tips, SmartKits and deep wells) should be removed daily at the end of each use. Inspect the instrument to ensure all consumables have been removed. Ensure all incubators are empty.
o Start up the instrument. o This is done by pressing the start-up button on the lower left hand side of the
instrument. o Once CTV/Agility/Desktop appears on the welcome screen select “Agility”.
o Initialize the Instrument o Select the “initialize all modules” button. o Load the wash buffer and clean fluid bottles with the fluids necessary for the assays
that are planned to be used for the planned worklist(s). Open the wash bottle drawer (located to the left of the Agility touch screen). Fill container A with wash buffer and container E with distilled water and ensure that the waste container is empty.
o Load reagent tips into an available (indicated by white light) front loading bay before starting any assays, including dispense and aspirate tests. Load a box that is “in-use” on the instrument. If there is no ‘in use’ box, load a new box. Make sure that the reagent tip box barcode is facing towards the inside of instrument. If insufficient reagent tips remain to complete the run (5 Reagent tips per plate + 10 recovery tips) load a second full box of reagent tips.
o Partial sample tip boxes can only be loaded at this time. If available, load up to four partial sample tips, deep wells, or mixing vessels in one rack. Make sure all consumable bar codes are facing towards the interior of the instrument so they can be read by the barcode scanner on the transport arm. Seat the loaded drawers by pushing them until they latch in place. The system will then determine the available consumables. Let the system prompt for any subsequent consumables that need to be loaded.
o Perform the start of day washer maintenance to ensure correct operation of the washer. o Run the dispense test
o Select the “SmartKit Tools” button on the left hand of the home screen.
o Select the “Maintenance Tests” button on the left.

Page 36 of 101 Agility CDC Zika Instructions Rev 3
Smartkit and Agility are registered trademarks of Dynex Technologies
o Select the “Maintenance Tests” button on the left.
o Select the “Reset Wash Bottle” button. o Select the “Reset Wash Bottle” button. o Select the “Wash Dispense Test” button. o The Agility will schedule a worklist for the Wash Dispense Test. You will hear a
sound alert by the Agility that will also show on the top right hand of the screen.
o Load the wash buffer by selecting the “Wash Bottle” button alert.
• From the wash buffer list, select the “Wash Buffer” button and assign to
bottle A by tapping on it. • Select the “clean fluid” button and assign to bottle E by tapping on it. • Select the “Done” button.

Page 37 of 101 Agility CDC Zika Instructions Rev 3
Smartkit and Agility are registered trademarks of Dynex Technologies
o Select the “Plate Status” button alert.
o The following screen will appear
o Type “dispense” in the plate nickname and select “Close”.
o Place a clean non-coated 96-well plate into a plate frame and load into the plate slot that has a white light on. Load the plate with the A1 corner in position marked A1 on the plate carrier with the arrows on the plate carrier facing the inside of the instrument.
o The Agility will now take the plate and perform the dispense test. Once the plate is released from the Agility, check to make sure all the wells are evenly filled.

Page 38 of 101 Agility CDC Zika Instructions Rev 3
Smartkit and Agility are registered trademarks of Dynex Technologies
o Run the aspirate test
o Select the “Dashboard” button at the bottom of the screen.
o Select the “Home Screen” button
o Select the “SmartKit Tools” button on the left hand of the home screen.
Select the “Maintenance Tests” button on the left.
o Select the “Reset Wash Bottle” button. o Select the “Wash Aspirate Test” button.

Page 39 of 101 Agility CDC Zika Instructions Rev 3
Smartkit and Agility are registered trademarks of Dynex Technologies
o You will hear a sound alert by the Agility that will also show on the top right hand of the screen.
o Load the wash buffer by selecting the “wash bottle” button alert. From the wash buffer list select the “wash buffer” button and assign to bottle
A by tapping on it. Select the “clean fluid” button and assign to bottle E by tapping on it. Select the “Done” button.
o Tap on the “plate status” button alert.

Page 40 of 101 Agility CDC Zika Instructions Rev 3
Smartkit and Agility are registered trademarks of Dynex Technologies
o The following screen will appear
o Type “aspirate” in the plate nickname and select “Close”. o Load the same plate that was used for the Wash Dispense Test in the slot that
has a white light on. The Agility will now take the plate and perform the aspirate test. Once the plate is released from the Agility, verify that all wells have less than a few droplets of fluid remaining in them and that there are no scratches from the washer on the bottom of the wells.

Page 41 of 101 Agility CDC Zika Instructions Rev 3
Smartkit and Agility are registered trademarks of Dynex Technologies
o Select the “Dashboard” button.
o Select the “Home Screen” button
o Select the “SmartKit Tools” button.
o Select the “Maintenance Tests” button on the left.
o Select the “Reset Wash Bottle” button.

Page 42 of 101 Agility CDC Zika Instructions Rev 3
Smartkit and Agility are registered trademarks of Dynex Technologies
o Go back to the home screen by selecting the “Dashboard” button and then the
“Home Screen” button.
2. Assay Transfer The assay transfer is only done the first time the assay is performed or when it is modified. Proceed to step 4 if this step was done previously. The two Zika assay files are transferred to the installed Agility system by file transfer from a USB storage device. To reach the Assay transfer screen from the main dashboard screen, select the “Home screen” button to get back to the instrument initial self-test results screen.
From the initial screen menu, select the “Transfer Assay” button.

Page 43 of 101 Agility CDC Zika Instructions Rev 3
Smartkit and Agility are registered trademarks of Dynex Technologies
2.1 Transferring From USB Device
• Insert the USB with the Zika assay files onto the Agility.
• The screen will display the list of assays found on the USB Device. Note by default that both Stage 1 and Stage 2 Zika assays will be selected. Select the desired assay files by clicking the applicable tick box next to the file filter.
• When the selection is complete, select the transfer files button to transfer the selected assays.
3. Assay Verification You may proceed to step 4 if this step was previously performed.
The Dynex Agility system is an open system so it is the responsibility of each laboratory to validate any assay programs for their application and target population. All results reported are the responsibility of the reporting Laboratory
The Agility system will not be able to transmit result to an export file or LIMS system until the laboratory selects [Assay verified] on the Agility System
All Assay reports will state the assay has not been verified until this action is completed
To declare an assay verified, the laboratory should select the “Define assay selection” option in the “Action” drop down box of the Assay transfer screen detailed in section 2.
NOTE: Data comparing the Dynex Agility System to an approved manual method (Zika MAC-ELISA) has been provided to FDA by CDC. Individual jurisdictions may require additional testing to verify this assay.
Selecting the “define assay selection” will list all the installed assays on the system. Expanding the assay bar will give options for the assay and will show if the assay is verified.
To accept the assay as verified select the “assay verified” symbol on the left of the assay detail, this will then display the assay verification dialogue.

Page 44 of 101 Agility CDC Zika Instructions Rev 3
Smartkit and Agility are registered trademarks of Dynex Technologies
Entering a date, name and title will activate the lower left “Assay Verified” button. By selecting “Assay Verified”, the assay will be declared as a verified assay protocol. This will allow results to be transmitted to an output file and LIMS as well as removing the unverified warning from any Agility reports.
Page 45 of 101 Agility CDC Zika Instructions Rev 3
Smartkit and Agility are registered trademarks of Dynex Technologies
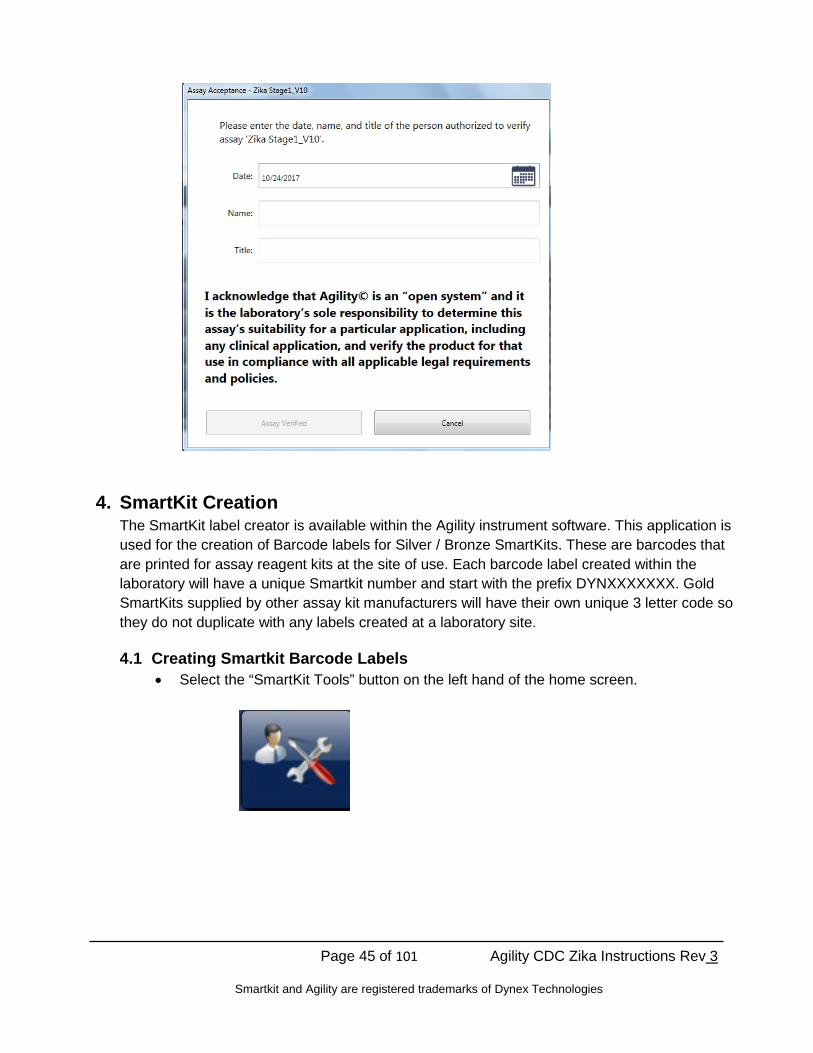
4. SmartKit Creation The SmartKit label creator is available within the Agility instrument software. This application is used for the creation of Barcode labels for Silver / Bronze SmartKits. These are barcodes that are printed for assay reagent kits at the site of use. Each barcode label created within the laboratory will have a unique Smartkit number and start with the prefix DYNXXXXXXX. Gold SmartKits supplied by other assay kit manufacturers will have their own unique 3 letter code so they do not duplicate with any labels created at a laboratory site.
4.1 Creating Smartkit Barcode Labels • Select the “SmartKit Tools” button on the left hand of the home screen.

Page 46 of 101 Agility CDC Zika Instructions Rev 3
Smartkit and Agility are registered trademarks of Dynex Technologies
• Select the “SmartKit Creation” button.
• Assay Name To create a label, you first need to select the assay for which the SmartKit will be used. Select the “[assay name]” from the drop down list of all the transferred assays that the Agility Instrument holds.

Page 47 of 101 Agility CDC Zika Instructions Rev 3
Smartkit and Agility are registered trademarks of Dynex Technologies
• Kit Lot Information On the initial “Kit Lot Information” tab, enter the main kit lot information.
4.1.1 Master kit Lot # (1) 4.1.1.1 There is no Master kit Lot# for the Zika MAC-ELISA. However, you may
want to store the IgM capture antibody lot number here. Leave this box blank if desired.
4.1.1.2 Master Kit Expiration Date (2) No expiration date is necessary. If entering the IgM capture antibody information in box 1, the corresponding expiration date can be placed here. Leave this box blank if desired.
4.1.1.3 Plate kit Lot # (3) Enter the date plates were sensitized with capture antibody or a plate lot #. This will be displayed on the system and the report.
1
2
3
4

Page 48 of 101 Agility CDC Zika Instructions Rev 3
Smartkit and Agility are registered trademarks of Dynex Technologies
4.1.1.4 Plate Kit Expiration Date (4) Plates sensitized with capture antibody are good for 1 week when left refrigerated at 4°C. Enter the date 1 week post-sensitization of plates. This will be displayed on the system and the report.
4.2 Printing Labels Printing of SmartKit barcode labels is done using the Agility connected label printer. Once the assay is selected and the Lot information has been entered, the user can print the label by selecting the print button at the top right hand corner of the screen.
If multiple labels are needed for the same lot information, additional labels can be printed by selecting the print button multiple times.
4.3 Preparation of SmartKits for Zika MAC-ELISA (Stage 1 Assay Fluid Loading) NOTE: Skip this step on the day that the Zika MAC-ELISA stage 2 will be performed. The Zika Stage 1 Assay Fluid locations can be viewed by displaying the Fluid Lot Information tab in the Smartkit Creator section of the Agility software.

Page 49 of 101 Agility CDC Zika Instructions Rev 3
Smartkit and Agility are registered trademarks of Dynex Technologies
Load the following volumes of fluid in the displayed locations.
Location Fluid Name Volume
1 Zika Vero E6 Tissue Culture Antigen or Zika COS-1 Recombinant Antigen
2.5 mL
2 Normal Vero E6 Antigen or Normal Control COS-1 Recombinant Antigen
2.5 mL
4 Blocking buffer (5% Nonfat Dry Milk) 13 ml
7 Negative Control Serum 400 µL
8 Calibration Control Serum 400 µL
9 Flavivirus IgM positive control 400 µl
17 Wash Buffer 13 mL
The Smartkit is ready for use after the SmartKit fluids containing the correct volume have been loaded into the correct bottle locations and the Smartkit has been labelled with the correctly printed Barcode label.
Select the “Dashboard” button then the “Home Screen” button to go back to the home screen.

Page 50 of 101 Agility CDC Zika Instructions Rev 3
Smartkit and Agility are registered trademarks of Dynex Technologies
4.4 Preparation of SmartKits for Zika MAC-ELISA (Stage 2 Assay Fluid Loading) NOTE: Perform this step on the day that the Zika MAC-ELISA stage 2 will be performed. The Zika Stage 2 Assay Fluid locations can be viewed by displaying the fluid lot information tab of the Smartkit Creator section of the Agility software.
Load the Following volumes of fluid in the displayed locations.
Location Fluid Name Volume
1 Detecting Antibody Conjugate (Horseradish peroxidase conjugated monoclonal antibody 6B6C-1)
4 mL
2 Enhanced K-Blue TMB Substrate 5.5 mL
3 Stop Solution (1N H2SO4) 4 mL
4 DI Water 11 mL

Page 51 of 101 Agility CDC Zika Instructions Rev 3
Smartkit and Agility are registered trademarks of Dynex Technologies
The Smartkit is ready for use after the SmartKit fluids containing the correct volume have been loaded into the correct bottle locations and the Smartkit has been labelled with the correctly printed Barcode label.
Select the “Dashboard” button then the “Home Screen” button to go back to the home screen.
5. Consumable Loading Consumable items are required to perform the Zika MAC-ELISA assay. Consumables can be preloaded prior to scheduling a worklist or as requested once a worklist is scheduled. Preloading is recommended because the user is then able to load partial tip boxes. System alert requests for consumable loading requires a complete new box of consumables loaded in the exact location requested by the alert.
5.1 Reagent Tips (Dynex Technologies # 67920) Reagent tip racks of 98 tips are loaded in a SmartKit holder in an available SmartKit load position through the front doors of the instrument.
The lid of a new box is removed and fitted to the bottom of the tip rack then loaded in a SmartKit holder.
• Partial boxes of reagent tips need to be loaded prior to scheduling a worklist. • If a Reagent tip is requested by an instrument load request after scheduling, the
Reagent tip box must be a new rack.

Page 52 of 101 Agility CDC Zika Instructions Rev 3
Smartkit and Agility are registered trademarks of Dynex Technologies
• If a reagent tip rack is requested because the currently loaded rack is running out, a new rack needs to be loaded in the flashing white load position indicated by the system request.
5.2 Sample Tips (Dynex Technologies # 67910)
Sample tips are shipped in a sleeve of 8 racks and each rack holds 112 tips. Each rack has a unique 2D barcode which the instrument reads to identify the rack as sample tips. The instrument maintains a count of tips used when the rack is unloaded before all tips are used. The Barcode also details the Lot number of tips used. The sample tips have been made to fit a narrower spigot than the Dynex DSX/DS2 to enable the spigot and tip to go into a sample tube and reach the bottom of a 100 mm high sample tube.
• Partial tip boxes may be loaded prior to scheduling a worklist. Typically there will be 2 partially used tip boxes from the end of previous days run. These should be loaded in Drawer 1 position 1 so they will start being used first. Complete tip boxes must be used in Drawer 1 positions 2-4.
• If sample tips are not preloaded prior to scheduling, the system will request sample tips be loaded and provide a location on the drawer. In this case, a new full box of tips will need to be loaded and must be in the location displayed on the individual racks.
• Any additional sample tips requested to be loaded by a system alert message will need to be new full racks and loaded in requested locations.
5.3 Deep well Strips (Dynex Technologies # 62910)
The deep well holders contain 12 deep well strips and are used for performing sample pre-dilution operations. Deep well strips are shipped in boxes of 250 and are required to be manually loaded into the holder for loading on the system. The holder has a 2D barcode label to identify to the instrument that it is a deep well holder. Because it is a refillable item

Page 53 of 101 Agility CDC Zika Instructions Rev 3
Smartkit and Agility are registered trademarks of Dynex Technologies
the barcode is not uniquely identified. It is necessary for the user to ensure that 12 unused deep well strips are loaded in the holder. Each deep well has a capacity to hold 2 mL of dilution fluid.
• If preloading consumables, it is recommended that deep well holders be loaded in the
highest drawer possible. • If not loaded before scheduling, a consumable load alert will request which items to load
and in which location. 6. SmartKit Loading
After SmartKits are created (with fluids loaded and the barcode label attached), the SmartKits can be loaded on the system like any other Smartkit. Load SmartKits in any available SmartKit position at the front of the instrument where white lights are illuminated below the SmartKit Bay. Once loaded, do not remove unless the position displays a flashing red error status light. Once loaded, the status light will change to orange. This indicates the instrument is waiting to read the barcode. Once the SmartKit Barcode has been read, the light will change to blue worklists may be created. After being read, the SmartKit may be moved to upper door positions so that more SmartKits can be loaded in the lower positions. This will be signified by the SmartKit being moved and the original position status light being set back to white.
7. Sample Loading • To reach the sample loading page from the home screen select the “Dashboard” button
then select the “Timeline” button.

Page 54 of 101 Agility CDC Zika Instructions Rev 3
Smartkit and Agility are registered trademarks of Dynex Technologies
• Select the “Samples” button.
• A screen will appear with the numbers for each barcode rack at the bottom.
• The CDC Zika MAC-ELISA is capable of performing tests on 7 samples per plate. Since
each sample rack holds 20 samples, it is recommended to load 7 samples in rack locations 1-7 and then another 7 in locations 14-20. This will make it easier to identify and assign the samples to worklists.

Page 55 of 101 Agility CDC Zika Instructions Rev 3
Smartkit and Agility are registered trademarks of Dynex Technologies
7.1 Loading Samples Zika Stage 1 Stage 1 of the Zika assay pipettes and dilutes the samples on the plate. Samples are loaded and sample ID’s assigned to the respective sample either by scanning barcodes on the sample tubes or entering the sample ID’s manually.
Place the sample tubes in the rack with the tube barcode facing the same side as the rack barcode. Touch “rack 1” on the screen and insert the tube rack into the Agility with a smooth and continuous movement to ensure that all barcodes are read. Sample barcodes that are read correctly will display a solid green dot next to their sample ID.
If a red dot appears next to the sample ID, reposition the sample tube and rescan the samples.

Page 56 of 101 Agility CDC Zika Instructions Rev 3
Smartkit and Agility are registered trademarks of Dynex Technologies
If the sample tube barcode is still not detected by the Agility, enter the sample ID manually. Samples that were entered manually will appear with a hatched green dot.
Select the “Dashboard” button at the bottom of the screen.
7.2 Loading Samples Zika Stage 2
Sample ID locations MUST match the locations loaded for stage 1
Although Stage 2 of the Zika assay does not pipette samples, the Agility system must have sample tubes loaded to create a worklist. The sample ID’s are also used to report the results. Because this assay requires the plate to be removed overnight, the sample ID locations MUST match the locations loaded for stage 1. This is necessary to ensure an incorrect result is not reported for the sample. If barcodes are not being used to enter sample ID’s for the 2nd stage and manual entry is being used, then it is not necessary to load samples in the same locations as they were loaded in stage 1. However, the correct

Page 57 of 101 Agility CDC Zika Instructions Rev 3
Smartkit and Agility are registered trademarks of Dynex Technologies
number of blank tubes must be loaded in the racks so that the sample ID’s can be assigned to the correct sample locations as were manually entered.
8. Creating a Worklist After the Agility system has SmartKits and samples loaded on the system, a worklist can be created. Select the “Create Worklist” button from left hand menu or lower task bar.
8.1 Worklist Filter Screen The Worklist Filter screen shows the assays that can be run from the loaded Smartkits and the number of samples that can be tested with the number of Smartkits loaded.
If the Agility is being used in conjunction with an LIS (Laboratory Information System), users should select “Check LIS” (1).
When list is acceptable, select the Zika stage 1 assay (2), then select the green arrow button (3) at top right of the screen to continue to the “Worklist Edit” screen.
1
2
3

Page 58 of 101 Agility CDC Zika Instructions Rev 3
Smartkit and Agility are registered trademarks of Dynex Technologies
8.2 Worklist Edit screen The Worklist edit screen displays the sample racks and allows selection of the assay protocol for each sample.
Select samples to run in the assay column. Only select the samples that will be processed on the first plate at this time. If the Agility is being used in conjunction with an LIS, users should click “Select LIS”. The samples that have been submitted to the LIS to be processed will be recognized by the instrument and appear with an asterisk on the right. Make sure that only samples from the plate being loaded are selected. Deselect any samples from other plates if they are check marked.

Page 59 of 101 Agility CDC Zika Instructions Rev 3
Smartkit and Agility are registered trademarks of Dynex Technologies
If multiple racks of samples are loaded, these can be viewed by selecting the rack buttons 1-10 along the bottom of the screen. Once the samples are selected, click the green arrow button at top right of the screen to schedule the worklist.

Page 60 of 101 Agility CDC Zika Instructions Rev 3
Smartkit and Agility are registered trademarks of Dynex Technologies
9. Scheduled Assays After the worklist has been edited and the green button selected, the instrument will calculate and display a timeline.
o Once the assays are scheduled, alerts will appear along the top of the screen containing
prompts to perform required actions.
o Load the wash buffer by selecting the “Wash Bottle” button alert.

Page 61 of 101 Agility CDC Zika Instructions Rev 3
Smartkit and Agility are registered trademarks of Dynex Technologies
o From the wash buffer list select the “Wash Buffer” button and assign to bottle A by
tapping on it. o Select the “Clean Fluid” button and assign to bottle E by tapping on it. o Select the “Done” button.
o Tap on the “Plate Status” button alert.
o The following screen will appear
o Enter the plate name and select “Close”. Do not load the plate without entering the plate name or it will not be recorded. Load any consumables if requested. Once these requests are satisfied, the instrument will perform the steps of the programmed assays.

Page 62 of 101 Agility CDC Zika Instructions Rev 3
Smartkit and Agility are registered trademarks of Dynex Technologies
o The following screen will appear to show that the assay has been scheduled for the plate entered.
o Once the first plate has been scheduled, you may continue to schedule the remaining plates one by one to avoid sample mislabeling. Repeat steps 7 and 8 for each plate to be scheduled.
Warning: If all of the plates are loaded at once, the Agility will process the plates randomly and not necessarily in the order the plates were loaded. This could potentially cause samples to be mislabeled.
10. Zika MAC-ELISA Stage 1 Steps
(Stage 1 and 2 steps are performed by the Agility Instrument after scheduling of the plate)
NOTE: Plates must be manually coated with goat anti-human IgM and incubated overnight prior to transferring to an automated system. See the Zika MAC-ELISA Assay procedure (p. 11) COATING THE PLATES
When the plates are scheduled on the timeline, the following plate processes are performed for Zika Stage 1 by the Agility instrument.

Page 63 of 101 Agility CDC Zika Instructions Rev 3
Smartkit and Agility are registered trademarks of Dynex Technologies
• Aspirates the contents of the well • Dispenses 200 µL of Blocking Buffer to inner 60 wells of plate • 30 minute ambient incubation • Washes plate with 300 µL CDC IgM Wash Buffer x 5 cycles with final aspirate • Pipettes samples (diluted 1:400 with wash buffer) to the 7 sample wells (6 replicates). • Pipettes pre-diluted Zika MAC-ELISA Flavivirus IgM Positive Control to PC1 (3 replicates)
and PC2 (3 replicates) wells. • Pipettes pre-diluted Zika MAC-ELISA Negative Control Serum to NC1 (3 replicates) and
NC2 (3 replicates) wells. • Pipettes pre-diluted Zika MAC-ELISA Calibration Control Serum to CO1 (3 replicates) and
CO2 (3 replicates) wells. NOTE: controls are loaded in SmartKit pre-diluted because the dilution factor for the controls may change from lot-to-lot.
• Incubates at 37°C for 60 minutes • Washes with 300 µL CDC IgM Wash Buffer x 5 cycles with final aspirate • Dispenses 50 µL of Viral Antigen to first 3 replicates of all samples and all 3 replicates of
PC1, NC1, and CO1 wells. • Dispenses 50 µL of Normal Antigen to last 3 replicates of all samples and all 3 replicates of
PC2, NC2, and CO2 wells. • Reads plate at 405 nm.
NOTE: This step is not required but will provide a read report that documents which sample ID’s have been pipetted to specific wells on the plate. This is beneficial since the plate needs to be removed for an overnight incubation.
11. Zika MAC-ELISA pre-Stage 2 requirements • Perform step 1 (Instrument Start-Up) prior to starting Zika Assay Stage 2. • Perform steps 2 (Assay Transfer) and 3 (Assay Verification). This only needs to be done the
first time Zika Assay Stage 2 is performed or after any modifications. • Perform step 4 (SmartKit Creation). After 4.3 (Printing Labels), go to 4.5 (Preparation of
SmartKits for Zika MAC-ELISA; Stage 2 Assay Fluid Loading). • Perform step 5 (Consumable Loading). Only 5.1 is required. • Perform step 6 (SmartKit Loading). • Perform step 7 using the sample loading instruction in 7.2. • Perform step 8 and make sure that plates are scheduled one by one in the same order as
the previous day. • Perform step 9.

Page 64 of 101 Agility CDC Zika Instructions Rev 3
Smartkit and Agility are registered trademarks of Dynex Technologies
12. Zika MAC-ELISA Stage 2 steps • Wash plate with 300 µL CDC IgM Wash Buffer x 5 cycles with final aspirate • Dispense 150 µL of DI Water to all outer wells of plate except blank wells E12, F12, G12 • Dispense 50 µL of Detection Antibody Conjugate to inner 60 wells of plate • Incubate at 37°C for 60 minutes • Wash plate with 300 µL CDC IgM Wash Buffer x 5 cycles with final aspirate • Dispense 150 µL of DI Water to all outer wells of plate except blank wells E12, F12, G12 • Dispense 75 µL of Enhanced K-Blue TMB Substrate to the inner 60 wells of plate • Incubate for 10 minutes at ambient temperature. • Dispense 50 µL of Stop Solution to the inner 60 wells of plate and the blank wells E12, F12,
G12 • Incubate for 1 minute at ambient temperature • Read Plate at 450 nm • Raw QC - PC1/CO1≥2 • Raw QC – NC1/CO1<2 • Spreadsheet calculation Row B- Average of first 3 replicates of each sample divided by the
average of CO1 wells. (P/N) • Threshold-determination of sample calculation result:
Negative samples = less than 2 Positive sample = greater than or equal to 3 Equivocal = between 2 and 3
NOTE: For interpretation/reporting of results from this assay, refer to the appropriate section of the EUA.
13. Results When the plate for Stage 2 has been completed, results are saved to the Agility Database automatically. Reports can be saved as a pdf or printed.
13.1 Report Example The report will contain the details for the Smartkit used to process the plate. It will also contain any lot information for reagents that may have been entered when creating the Barcode label for the Smartkit.
The report will also detail the validity evaluation (Raw QC) using the positive and negative control and indicate if the plate has passed or failed.
NOTE: See example of report on next page.

Page 65 of 101 Agility CDC Zika Instructions Rev 3
Smartkit and Agility are registered trademarks of Dynex Technologies

Page 66 of 101 Agility CDC Zika Instructions Rev 3
Smartkit and Agility are registered trademarks of Dynex Technologies
The report also shows a plate summary matrix with the results of each sample calculation displayed in the first replicate of each sample location on the plate. Within the calculated well location, it will display
• the Sample ID, • the blanked OD value, • The average of the sample replicates tested with viral Antigen / the average of the negative
wells run with viral antigen (P/N Calculation Row B). • The interpretation of the result (<2=Negative, ≥3=Positive and anything in between as
equivocal).

Page 67 of 101 Agility CDC Zika Instructions Rev 3
Smartkit and Agility are registered trademarks of Dynex Technologies
Interpretation of Results:
Results displayed in Row B of the summary Matrix are calculation of P/N and Results displayed in Row G are calculation of the sample Zika Antigen / Sample Normal Antigen (Background).
• If result in Row B is Negative (P/N<2) Then result is Negative • If result in Row B is Equivocal (2≤P/N<3) Then check background calculation manually to
confirm. • If result in Row B is Positive (P/N>3) Then check background calculation manually to
confirm.

Page 68 of 101 Agility CDC Zika Instructions Rev 3
Smartkit and Agility are registered trademarks of Dynex Technologies
14. Agility Warnings and Safety Precautions The following information aids in the safe and efficient use of the system.
In addition to the warning labels and other cautions previously described in this document, consider the following:
1. Appropriate precautions must be taken when working with biohazards. Technicians must be trained in the safe handling and clean-up of potential blood borne pathogens. Universal precautions, appropriate hygiene, and decontamination of surfaces are recommended. Consult the CDC Zika MAC-ELISA Emergency Use Authorization (EUA) for safety/precautions on handling potentially hazardous substances.
2. Appropriate personal safety precautions must be made when opening and closing the doors to the system cover.
3. When a door is opened and the run has started, do not encroach upon the work area unless prompted by the software for user input of materials or manual intervention.
4. Attend to error messages when the system stops and prompts. These messages indicate a need for user action.
5. Sample tubes must be pushed down as far as possible in the sample racks to prevent the pipette module from being obstructed.
6. Place the sample racks securely into the system. Push the rack firmly towards the back of the system so that the rack clicks in place.
7. Barcode quality is critical to successful sample tube barcode scanning. Scanning is in accordance with ASTM E1466-92 defining barcode quality, position, and orientation of barcode labels. The use of non-standard barcodes or barcodes with poor print quality may be problematic. Barcode labels should be applied using a vertical orientation. The barcode label should be oriented so that it faces out of the opening in the sample rack.
8. Periodic back up of assay and data files is recommended. Copy the files to a disk for storage or archive the data on a secure server. Administrative login is required.
9. Use of this instrument in a dry environment (especially if synthetic materials such as synthetic clothing or carpets, etc. are present) may cause damaging static discharges that may cause erroneous results.
10. It is the user’s responsibility to ensure that a compatible electromagnetic environment for the equipment can be maintained in order that the device will perform as intended. The electromagnetic environment should be evaluated prior to operation of Agility.
11. The sample and reagent pipette tips are defined as accessories as only the DYNEX tips have been found to meet the stated precision and accuracy specifications
12. Do not use this instrument in close proximity to sources of strong electromagnetic radiation (e.g. unshielded intentional RF sources) as these may interfere with proper operation.
13. If Agility is used in an unspecified manner, the protection provided by the equipment may be impaired.
14. Do not position Agility so that it is difficult to disconnect it from the power supply. 15. Do not use decontamination or cleaning agents that could cause a HAZARD as a result of reaction
with parts of the equipment or with material contained in it. 70% isopropyl or ethyl alcohol as well as laboratory disinfectants containing quaternary ammonium sulfates are approved for use to clean
Page 69 of 101 Agility CDC Zika Instructions Rev 3
Smartkit and Agility are registered trademarks of Dynex Technologies
and disinfect Agility. Please contact your instrument provider if there is any doubt about the compatibility of decontamination or cleaning agents with Agility.
16. Agility is tested and compliant to IEC 61326-1:2012 standard for Electrical equipment for measurement, control and laboratory use. EMC requirements. General requirements and also to IEC 61326-2-6:2012 standard for Electrical equipment for measurement, control and laboratory use. EMC requirements. Particular requirements. In-vitro diagnostic (IVD) medical equipment.
17. All parts and accessories for Agility are required to be examined or supplied only by the manufacturer or its designated agent.
18. This equipment has been designed and tested to FCC 15: Part B, ICES-003 for Class A device. In a domestic environment it may cause radio interference, in which case you may need to take measures to mitigate the interference.

Page 70 of 101 Agility CDC Zika Instructions Rev 3
Smartkit and Agility are registered trademarks of Dynex Technologies
14.1 Warning Labels The Agility Automated ELISA System and its components contain labels that warn the user of a hazard or an electrical connection. The description of the labels is described below. Potential personal injury to the operator or damage the system can result if the labels are not followed.
Label Description
Alternating current is present
Caution symbol. Refer to the Routine Maintenance chapter
Caution, motion hazard
Caution, pinching or mechanical hazard
Caution, hot surface
Laser radiation – Do not stare into beam
Protective conductor terminal

Page 71 of 101 Agility CDC Zika Instructions Rev 3
Smartkit and Agility are registered trademarks of Dynex Technologies
Earth (ground) terminal
Caution, risk of electric shock
Caution, biohazard

Page 72 of 101 DSX CDC Zika Instructions Rev 2 DSX and Revelation are registered trademarks of Dynex Technologies
Appendix B:
DSX CDC Zika MAC-ELISA Instructions for Use

Page 73 of 101 DSX CDC Zika Instructions Rev 2 DSX and Revelation are registered trademarks of Dynex Technologies
Revision History
Rev Date Summary of Revision
0 2016/08/09 Initial Draft
1 2016/12/06 Included more details on use of the instrument and performing the CDC Zika MAC-ELISA.
2 2018/04/16 Revised to include Calibration Control Serum

Page 74 of 101 DSX CDC Zika Instructions Rev 2 DSX and Revelation are registered trademarks of Dynex Technologies
TABLE OF CONTENTS
1. Instrument Start-Up 75
2. Run Start-Up Assays 75
3. Assay Transfer 80
4. Assay Validation 81
5. Daily Run for Diagnostic Assay 81 5.2 Creating a Worklist…………………………………………………………………82 5.3 Sample Loading……………………………………………………………….…....82 5.4 Edit Worklist Screen………………………………………………………….….....85 5.5 Load Wizard Lot Specific Data……………………………………………………..88 5.6 Load Wizard Plate Load……………………………………………………..……...89 5.7 Load Wizard Reagent Fluids… …….........................................................................90 5.8 Load Wizard Wash Fluids…………………………………………………..………90 5.9 Load Wizard Deep Well Strips……………………………………………….……..91 5.10 Load Wizard Sample Tips……………………………………………. …………....91 5.11 Load Wizard Reagent Tips……………………………………………. …………...92 5.12 Load Wizard Waste Reminder……………………………………………. ……….92 5.13 Worklist Start…………………………………………………………. …………...92
6. DSX Zika Assay Stage 1 93 6.1 Stage 1 assay steps ………………………………………………………………...93
7. DSX Zika Assay Stage 2 93
7.1 Stage 2 assay steps …………………………………………………………………93
8. Results 94 8.1 Report Example………………………………………………………………......94
9. DSX Warnings and Safety Precautions 98 9.1 Warning Labels…………………………………………………………………..100

Page 75 of 101 DSX CDC Zika Instructions Rev 2 DSX and Revelation are registered trademarks of Dynex Technologies
1. Instrument Start-Up o Power on the DSX o Boot PC and, when Windows is loaded, start the Revelation software.
NOTE: Select “Yes” if a window appears asking if you want to allow the Revelation to make changes to the computer.
o An initial dialogue will be displayed.
o Selecting Connect to DSX (on Port1) will start an instrument connection and a self-test of all the installed modules.
o After the self-test is completed, a self-test report detailing each of the modules installed, serial and version numbers and Pass/Fail details of the self-test is displayed and may be printed for laboratory records. As not all items are visible on the screen the user may need to scroll up and down to ensure all items pass.
o On first use, a wash test assay should be performed to ensure satisfactory washer performance before running assay worklists.
2. Run Start-up Assays A. Select “Start up 1” button on main menu screen (may have different name such as “Start up
Disp”).
B. Select “Add assays using a new batch of samples”. Make sure that “scan barcodes on new sample batch” and “use LIS on new sample batch” are unchecked, and then click “OK”.
C. Right click in the box underneath “Tests” for the Start up 1 assay and choose “Select # of samples” from here.
D. When the “Select Samples” box appears, enter “24” and click “OK”.

Page 76 of 101 DSX CDC Zika Instructions Rev 2 DSX and Revelation are registered trademarks of Dynex Technologies
E. Repeat previous steps C and D for all remaining plates.
F. Click the “Auto Assign Sample IDs” button in the bottom right of the screen, then click “OK”.

Page 77 of 101 DSX CDC Zika Instructions Rev 2 DSX and Revelation are registered trademarks of Dynex Technologies
G. G. Select the green “Play” button on the left to start the worklist.
H. Select the down blue arrow on the right to view the timeline.
I. Select the green “FastForward” button on the left to start the worklist.
J. Click the green check mark in the “Lot Specific Data and Runtime Variable Entry” window.

Page 78 of 101 DSX CDC Zika Instructions Rev 2 DSX and Revelation are registered trademarks of Dynex Technologies
K. Click the green check mark in the “load sample caddy 1” window. NOTE: No samples are required.
L. Follow the load wizard to begin the worklist. The wizard will instruct the locations in which
the plates are to be placed.

Page 79 of 101 DSX CDC Zika Instructions Rev 2 DSX and Revelation are registered trademarks of Dynex Technologies
M. The system will prompt “plate ID ‘…..’ has already been used”. Click “Yes”
N. The wizard will prompt for wash buffer to be added to each wash bottle.
O. When the assay is finished, check the plates to ensure that the wells are filled evenly in all 4
plates. If wells are not filled evenly, see the DSX Troubleshooting guide for steps to unclog the wash head.

Page 80 of 101 DSX CDC Zika Instructions Rev 2 DSX and Revelation are registered trademarks of Dynex Technologies
P. Select the “Start up 2” button (may have different name such as “Start Up Asp”) and repeat steps B-L for this assay.
Q. When the assay is finished, check the plate for complete aspiration of fluid. There should only be tiny droplets remaining in the plate and no scratching on the well bottoms. If there is excessive fluid remaining in the wells or there is scratching on the well bottoms, see the DSX troubleshooting guide.
3. Assay Transfer The two DSX Zika assay files should be copied to the current assay directory on the PC. The file directory paths are listed and can be viewed or changed by selecting from the Revelation headings menu Tools>Options. Selecting the Directories Tab will display paths for all Revelation file types. Unless changed, the standard default installation is C:\Program Files\Dynex Technologies\Revelation DSX\Assays (for a 64bit Windows OS replace Program Files with Program Files (x86)).

Page 81 of 101 DSX CDC Zika Instructions Rev 2 DSX and Revelation are registered trademarks of Dynex Technologies
4. Assay Validation
The Dynex DSX system is an open system so it is the responsibility of each laboratory to validate any assay programs for their application and target population. All results reported are the responsibility of the reporting Laboratory
NOTE: Data comparing the Dynex DSX System to an approved manual method (Zika MAC-ELISA) has been provided to FDA by CDC. Individual jurisdictions may require additional testing to validate this assay.
5. Daily Run for Diagnostic Assay 5.1.1 DSX Sample Loading for testing using the Zika MAC-ELISA
Seven patient specimens can be run per plate. Loading Samples Zika Stage 1
In Stage 1 of the Zika assay, samples are diluted and pipetted to the plate. The user should load the samples and assign Sample ID’s to the respective sample either by scanning barcodes on the sample tubes or entering the sample ID’s manually.
5.1.2 Loading Samples Zika Stage 2 Although Stage 2 of the Zika assay does not pipette samples, sample ID’s are assigned to create a worklist. As this assay requires the plate to be removed overnight, the sample ID locations MUST match the same locations as the samples loaded for stage 1 (when the sample was pipetted to the plate) to ensure the correct result is reported for the sample. If barcodes are not used to enter the sample ID’s for the Stage 2 (Sample ID’s are entered manually), then it is not necessary to load the actual samples tubes. However, the assigned sample ID’s must be loaded in the same order as the Zika Stage1 assay so that the ID’s can be assigned to the correct sample locations.
Sample ID locations MUST match the same locations as the samples loaded for Stage 1

Page 82 of 101 DSX CDC Zika Instructions Rev 2 DSX and Revelation are registered trademarks of Dynex Technologies
5.2 Creating a Worklist To create a new worklist in Revelation, select “File” then “New” from the header menu, and choose “Worklist”.
5.3 Sample Loading After selecting new worklist, the initial dialogue that will be displayed will be the Sample Batch Selection.
Select “Add assays using a new batch of samples” and,
• if using barcodes, select “Scan Barcodes on new sample batch”. Leave unchecked if sample IDs will be entered manually.
• Select to use LIS (Laboratory Information System) on sample batch if the system is connected to an LIS. Select “OK” button to display the next screen.
To Barcode Scan samples:
• Make sure the check box is checked to scan barcodes on new sample batch. • The dialogue displays a graphic of the sample rack which has 7 racks labelled A-G
and 14 positions labelled 1-14. Samples need to be loaded in the rack sequentially

Page 83 of 101 DSX CDC Zika Instructions Rev 2 DSX and Revelation are registered trademarks of Dynex Technologies
with no gaps. Select the circle representing the last sample in the sample rack and click. Select “Last Sample” from the window.
NOTE:The Zika MAC-ELISA is capable of running a maximum of 7 samples on each plate. The DSX is a 4 plate analyzer, so a maximum of 28 samples can be loaded in each created worklist.
Select the number of samples, then select the “Load Sample Caddy” button.
The next dialogue requests the samples to be loaded in the caddy on the instrument. Load the samples in the racks with the barcodes visible in the rack spaces pointing toward the back of the instrument. Select the green check mark in the pop up window..

Page 84 of 101 DSX CDC Zika Instructions Rev 2 DSX and Revelation are registered trademarks of Dynex Technologies
The user will be prompted to close the DSX blue cover. Select “OK” when the cover is closed.
Select the “Scan Sample IDs” button at bottom of rack Graphic. The DSX will scan the barcodes.
The instrument will use the pipette module to lift the racks and scan the tubes in front of the Barcode scanner module.
As the instrument is scanning the tubes, the graphic for each tube will change color. If the tube is successfully scanned, it will turn Green.
If the tube position is Red, this indicates that the tube scan was not successful and an error message will appear. If this happens:

Page 85 of 101 DSX CDC Zika Instructions Rev 2 DSX and Revelation are registered trademarks of Dynex Technologies
• Select the “Unload the Sample Caddy” button. • Either reposition the tube for rescanning or manually enter the barcode by clicking on
the red positions and typing in the barcode. • Repeat steps necessary after selecting “Load Sample Caddy” for rescanning the
barcodes.
If the tube position is Yellow, this indicates the system encountered duplicate barcodes.
• Either generate a new barcode for one of the duplicate samples or manually edit one of the duplicate barcodes by clicking on the yellow positions and editing the barcode.
Once all Sample ID’s have been correctly assigned either by scanning or entering manually, select “OK” to advance to the next Screen.
5.4 Edit Worklist Screen Once the samples have been loaded, the “Edit Worklist” screen will be displayed to create a worklist. The sample ID’s read or assigned will be listed in the sample ID column. Select the “New Plate” button at the top left of the screen.
This will open an assay file selection. Select the assay file to be run on the worklist.
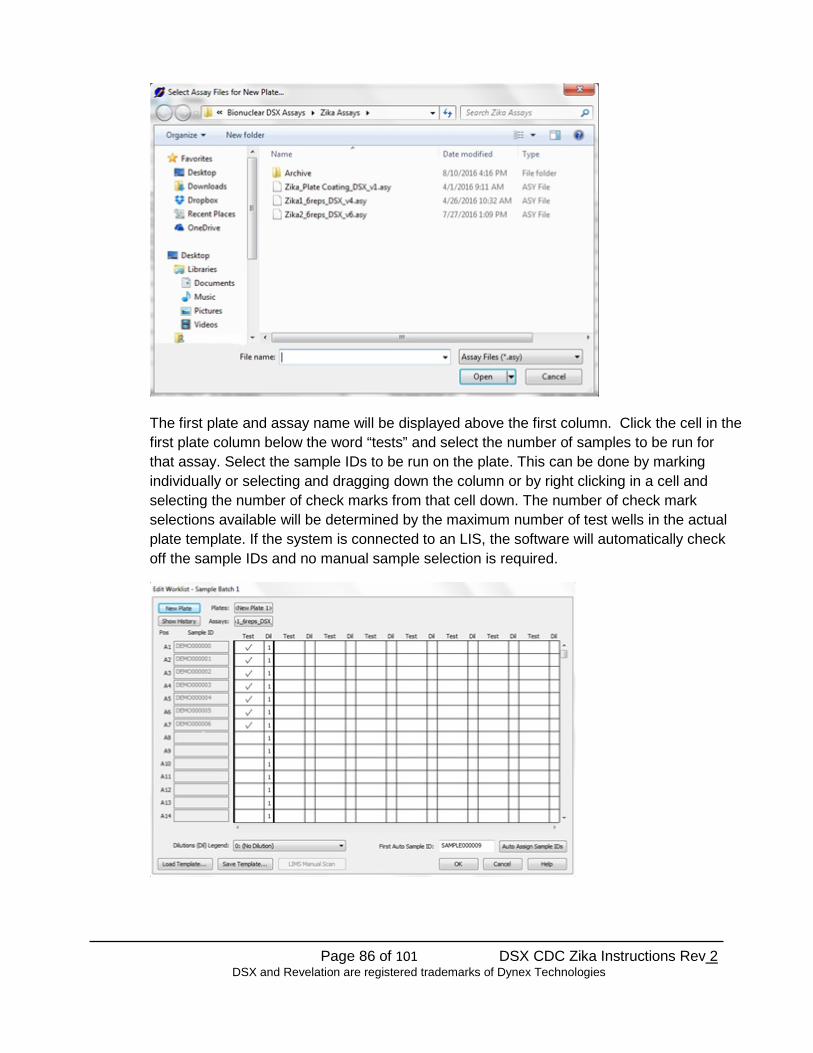
Page 86 of 101 DSX CDC Zika Instructions Rev 2 DSX and Revelation are registered trademarks of Dynex Technologies
The first plate and assay name will be displayed above the first column. Click the cell in the first plate column below the word “tests” and select the number of samples to be run for that assay. Select the sample IDs to be run on the plate. This can be done by marking individually or selecting and dragging down the column or by right clicking in a cell and selecting the number of check marks from that cell down. The number of check mark selections available will be determined by the maximum number of test wells in the actual plate template. If the system is connected to an LIS, the software will automatically check off the sample IDs and no manual sample selection is required.

Page 87 of 101 DSX CDC Zika Instructions Rev 2 DSX and Revelation are registered trademarks of Dynex Technologies
If multiple plates will be run, add another new plate and select samples to run as described above.
When the number of plates and samples have been finalized, select the “OK” button along the bottom to complete editing the worklist and to continue.
The user will be alerted in the main header of the Revelation Software when the plates are available to be started.
Start the worklist by clicking the green play button on the right.
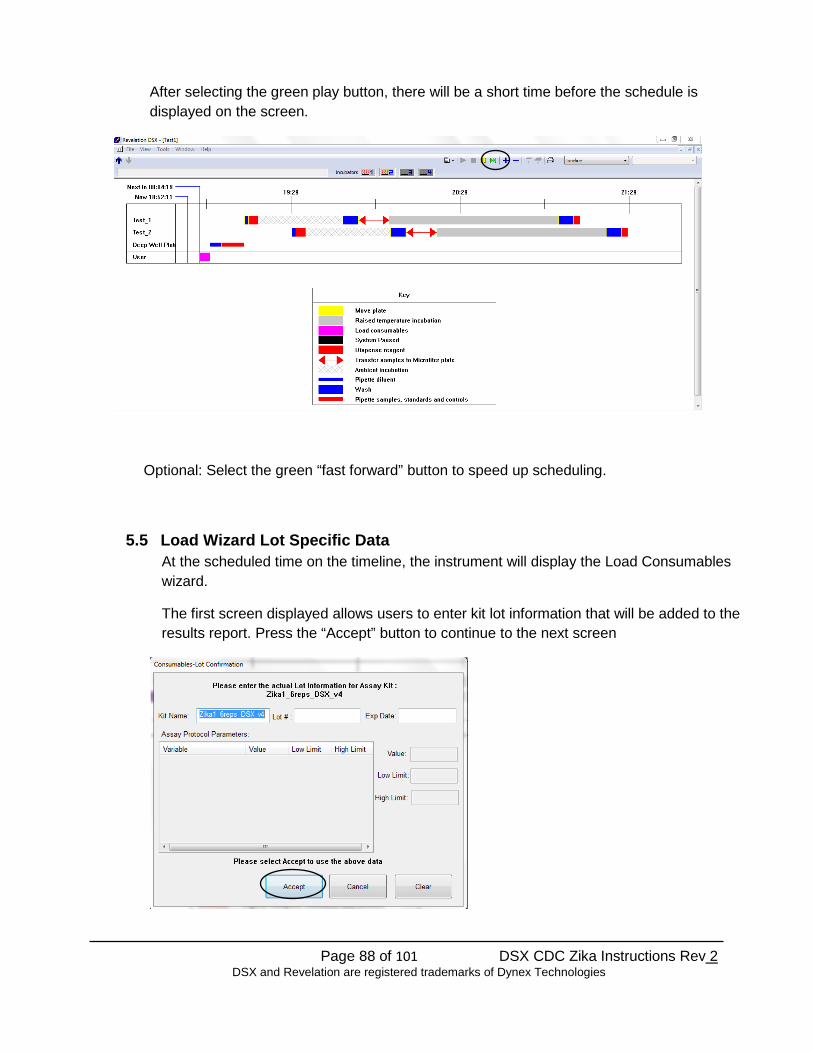
Page 88 of 101 DSX CDC Zika Instructions Rev 2 DSX and Revelation are registered trademarks of Dynex Technologies
After selecting the green play button, there will be a short time before the schedule is displayed on the screen.
Optional: Select the green “fast forward” button to speed up scheduling.
5.5 Load Wizard Lot Specific Data At the scheduled time on the timeline, the instrument will display the Load Consumables wizard.
The first screen displayed allows users to enter kit lot information that will be added to the results report. Press the “Accept” button to continue to the next screen

Page 89 of 101 DSX CDC Zika Instructions Rev 2 DSX and Revelation are registered trademarks of Dynex Technologies
The second screen allows users to enter additional data for lot specific or runtime data reduction variables for each fluid used. If this information is not necessary, selecting the “check mark” button will advance to next screen of wizard.
5.6 Load Wizard Plate Load The plate load screens require a unique user-entered plate ID (this will become the result file name) and the location and number of strips to load for the plate. Load the plate into a plate carrier then into the indicated location on the instrument. Select the “check mark” button to proceed and accept the plate load. If there are multiple plates to load, a screen will be displayed for each plate to be loaded before the software proceeds to the next item.

Page 90 of 101 DSX CDC Zika Instructions Rev 2 DSX and Revelation are registered trademarks of Dynex Technologies
5.7 Load Wizard Reagent Fluids A screen will display the volume for each fluid to be loaded and, in the lower section, the rack and position into which the fluid should be loaded. After each individual fluid is loaded to the instructed location, select the “check mark” button to acknowledge each fluid requested has been loaded.
5.8 Load Wizard Wash Fluids The next screen displays the required wash fluids to be loaded. The fluid name and volume will be displayed, along with the wash bottle location. After each individual fluid is loaded to the instructed location, select the “check mark” button to acknowledge each fluid request has been completed.

Page 91 of 101 DSX CDC Zika Instructions Rev 2 DSX and Revelation are registered trademarks of Dynex Technologies
5.9 Load Wizard Deep Well Strips (Dynex Part No. 62910) Next, the Deep Well Strips will be loaded. This screen details the number of deep well strips required and how many to load in each displayed location. Once the required number of deep well strips have been loaded, select the “check mark” button.
5.10 Load Wizard Sample Tips (Dynex Part No. 65910) The Load Sample Tips screen will show how many boxes of 108 sample tips should be loaded. There are potentially 4 load positions depending on how many tips are required. (If the instrument has already been used for a previous worklist, it is possible no tips will be requested).

Page 92 of 101 DSX CDC Zika Instructions Rev 2 DSX and Revelation are registered trademarks of Dynex Technologies
5.11 Load Wizard Reagent Tips (Dynex Part No. 65920) The Load Reagent Tips screen will show where to load the reagent tips. The instrument will request 41 tips to be loaded in the reagent tip rack as shown. (If the instrument has already been used for a previous worklist, it is possible no tips will be requested).
5.12 Load Wizard Waste reminder At the completion of the Load Wizard screen, a reminder to empty the tip waste box and washer waste bottle will be displayed.
5.13 Worklist Start Once the Load Wizard has been completed and all items requested have been acknowledged as loaded, the instrument display will switch back to the timeline display and show the progress of the running worklist.

Page 93 of 101 DSX CDC Zika Instructions Rev 2 DSX and Revelation are registered trademarks of Dynex Technologies
6 DSX Zika Assay Stage 1 NOTE: Plates must be manually coated with goat anti-human IgM and incubated
overnight prior to transferring to an automated system. See the Zika MAC-ELISA Assay procedure (p. 11) COATING THE PLATES
When the plates are scheduled on the timeline, the following plate processes are performed for Zika Stage 1 by the DSX instrument.
6.1 Stage 1 assay steps • Aspirates the contents of the well • Dispenses 200 µL of Blocking Buffer to inner 60 wells of plate • 30 minute ambient incubation • Washes with 300 µL CDC IgM Wash Buffer x 5 cycles with final aspirate • Pipettes samples (diluted 1:400 with wash buffer) to the 7 sample wells (6 replicates). • Pipettes pre-diluted Zika MAC-ELISA Flavivirus IgM Positive Control to PC1 (3
replicates) and PC2 (3 replicates) wells. • Pipettes pre-diluted Zika MAC-ELISA Negative Control Serum to NC1 (3 replicates) and
NC2 (3 replicates) wells. • Pipettes pre-diluted Zika MAC-ELISA Calibration Control Serum to CO1 (3 replicates)
and CO2 (3 replicates) wells. NOTE: Controls are loaded in the control rack pre-diluted because the dilution factor of the controls may change from lot-to-lot).
• Incubates 37ºC for 60 minutes • Washes 300 µL CDC IgM Wash Buffer x 5 cycles with final aspirate • Dispenses 50 µL of Viral Antigen to first 3 replicates of all samples and all 3 replicates
of PC1, NC1, and CO1 wells. • Dispenses 50 µL of Normal Antigen to last 3 replicates of all samples and all 3
replicates of PC2, NC2, and CO2 wells. • Reads at 405 nm.
NOTE: This step is not necessary but will give a read report of which sample IDs have been pipetted to what wells on the plate because the plate needs to be removed for an overnight incubation of the system.
7 DSX Zika Assay Stage 2 When the plates are scheduled on the timeline, the following plate processes are performed for Zika Stage 2 by the DSX instrument.
7.1 Stage 2 assay steps • Washes 300 µL CDC IgM Wash Buffer x 5 cycles with final aspirate

Page 94 of 101 DSX CDC Zika Instructions Rev 2 DSX and Revelation are registered trademarks of Dynex Technologies
• Dispenses 150 µL of DI Water to all outer wells of plate except blank wells E12, F12, G12.
• Dispenses 50 µL of Monoclonal Antibody to inner 60 wells of plate • Incubates 37° C for 60 minutes • Washes 300 µL CDC IgM Wash Buffer x 5 cycles with final aspirate • Dispenses 150 µL of DI Water to all outer wells of plate except blank wells E12, F12,
G12. • Dispenses 75 µL of Blue TMB Substrate to inner 60 wells of plate • 10 Minute Ambient incubation • Dispenses 50 µL of Stop Solution to inner 60 wells of plate and blank wells
E12,F12,G12 • 1 minute Ambient incubation • Reads Plate 450 nm • QC - PC1/CO1>2 • Spreadsheet calculation- Average of first 3 replicates of each sample divided by the
average of CO1 wells. • Threshold- determination of sample calculation result. Negative samples less than 2,
Positive sample greater or equal to 3, Equivocal -between 2 and 3.
NOTE: For interpretation/reporting of results from this assay, refer to the appropriate section of the EUA.
8 Results When the plate for Stage 2 has been completed, it will save the results to a file. The File will be stored in the format [plate ID].dat
8.1 Report Example The report will provide the following details:
• Fluids used to process the plate and any lot information for reagents that may have been entered at run time.
• Whether QC for the plate has passed or failed to evaluate the plate validity (using the calculations: PC1/CO1≥2 and NC1/CO1<2).
• Grid of the OD values with the result of each sample calculation in a Matrix. o Row B, Mean of the sample replicates reacted with viral antigen / mean of
the Calibration Control Serum wells reacted with viral antigen. (P/N) • Interpretation of the result <2=Negative, >3=Positive, and anything in between as
equivocal

Page 95 of 101 DSX CDC Zika Instructions Rev 2 DSX and Revelation are registered trademarks of Dynex Technologies
Interpretation of Results:
Results displayed in Row B of the summary Matrix are calculation of P/N.
• If result in Row B is Negative (P/N<2) Then result is Negative • If result in Row B is Equivocal (2<=P/N<3) Then check Background calculation manually. • If result in Row B is Positive (P/N>3) Then check Background calculation manually.
NOTE: See example of print out on next two pages.

Page 96 of 101 DSX CDC Zika Instructions Rev 2 DSX and Revelation are registered trademarks of Dynex Technologies

Page 97 of 101 DSX CDC Zika Instructions Rev 2 DSX and Revelation are registered trademarks of Dynex Technologies

Page 98 of 101 DSX CDC Zika Instructions Rev 2 DSX and Revelation are registered trademarks of Dynex Technologies
9 DSX Warnings and Safety Precautions The following information aids in safe and efficient use of the system.
In addition to the warning labels and other cautions previously described in this document, consider the following:
1. Appropriate precautions must be taken when working with biohazards. Technicians must be trained in the safe handling and clean-up of potential blood borne pathogens. Universal precautions, appropriate hygiene, and decontamination of surfaces are recommended. Consult the CDC Zika MAC-ELISA Emergency Use Authorization (EUA) for safety/precautions on handling potentially hazardous substances.
2. Appropriate personal safety precautions must be made when opening and closing the system cover.
3. When the cover is opened and the run has started, do not encroach upon the work area unless prompted by the software for user input of materials or manual intervention.
4. Attend to error messages when the system stops and prompts. These messages indicate a need for user action.
5. Sample tubes must be pushed down as far as possible in the sample racks to prevent the pipette module from being obstructed.
6. Barcode quality is critical to successful sample tube barcode scanning. Scanning is in accordance with ASTM E1466-92 defining barcode quality, position, and orientation of barcode labels. The use of non-standard barcodes or barcodes with poor print quality may be problematic. Barcode labels should be applied using a vertical orientation. The barcode label should be oriented so that it faces out of the opening in the sample rack.
7. Periodic back up of assay and data files is recommended. Copy the files to a disk for storage or archive the data on a secure server.
8. Use of this instrument in a dry environment (especially if synthetic materials such as synthetic clothing or carpets, etc. are present) may cause damaging static discharges that may cause erroneous results.
9. It is the user’s responsibility to ensure that a compatible electromagnetic environment for the equipment can be maintained in order that the device will perform as intended. The electromagnetic environment should be evaluated prior to operation of DSX.
10. The sample and reagent pipette tips are defined as accessories as only the DYNEX tips have been found to meet the stated precision and accuracy specifications
11. Do not use this instrument in close proximity to sources of strong electromagnetic radiation (e.g. unshielded intentional RF sources) as these may interfere with proper operation.
12. If DSX is used in an unspecified manner, the protection provided by the equipment may be impaired.
13. Do not position DSX so that it is difficult to disconnect it from the power supply.

Page 99 of 101 DSX CDC Zika Instructions Rev 2 DSX and Revelation are registered trademarks of Dynex Technologies
14. Do not use decontamination or cleaning agents that could cause a HAZARD as a result of reaction with parts of the equipment or with material contained in it. 70% isopropyl or ethyl alcohol as well as laboratory disinfectants containing quaternary ammonium sulfates are approved for use to clean and disinfect DSX. Please contact your instrument provider if there is any doubt about the compatibility of decontamination or cleaning agents with DSX.
15. DSX is tested and compliant to IEC 61326-1:2012 standard for Electrical equipment for measurement, control and laboratory use. EMC requirements. General requirements and also to IEC 61326-2-6:2012 standard for Electrical equipment for measurement, control and laboratory use. EMC requirements. Particular requirements. In-vitro diagnostic (IVD) medical equipment.
16. All parts and accessories for DSX are required to be examined or supplied only by the manufacturer or its designated agent.
17. This equipment has been designed and tested to FCC 15: Part B, ICES-003 for Class A device. In a domestic environment it may cause radio interference, in which case you may need to take measures to mitigate the interference.

Page 100 of 101 DSX CDC Zika Instructions Rev 2 DSX and Revelation are registered trademarks of Dynex Technologies
9.1 Warning Labels The DSX Automated ELISA System and its components contain labels that warn the user of a hazard or an electrical connection. The description of the labels is described below. Potential personal injury to the operator or damage the system can result if the labels are not followed.
Label Description
Alternating current is present
Caution symbol. Refer to the Routine Maintenance chapter
Caution, motion hazard
Caution, pinching or mechanical hazard
Caution, hot surface
Laser radiation – Do not stare into beam
Protective conductor terminal

Page 101 of 101 DSX CDC Zika Instructions Rev 2 DSX and Revelation are registered trademarks of Dynex Technologies
Earth (ground) terminal
Caution, risk of electric shock
Caution, biohazard