for the masonry drill bit. triton (round) top hat...
TRANSCRIPT
REM Inc.
TRITON (Round)Top Hat Series(Installation instructions for round catch basins)
Size Drawn By: C.F.
For:Round Catch Basins
Scale 1:1 DATE 5/2014 Sheet 1 of 1DIMENSIONS ARE IN INCHES UNLESS OTHERWISE STATED.
MADE IN
USA
TOOLS REQUIRED:
1) Hammer Drill, with ¼”
masonry drill bit.
2) Hammer.
3) ¼” X 2" or 3" Concrete
Anchors. i.e. (Red Head)
4) 7/16" Socket Drive.
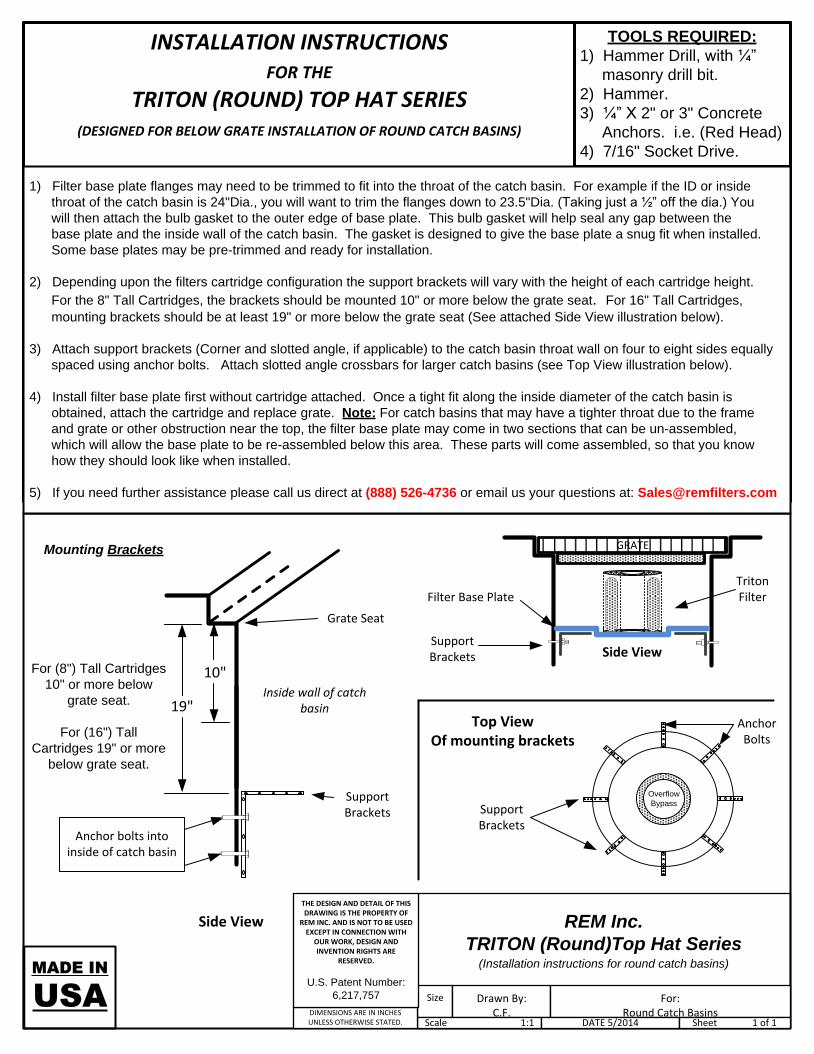
1) Filter base plate flanges may need to be trimmed to fit into the throat of the catch basin. For example if the ID or inside
throat of the catch basin is 24"Dia., you will want to trim the flanges down to 23.5"Dia. (Taking just a ½” off the dia.) You
will then attach the bulb gasket to the outer edge of base plate. This bulb gasket will help seal any gap between the
base plate and the inside wall of the catch basin. The gasket is designed to give the base plate a snug fit when installed.
Some base plates may be pre-trimmed and ready for installation.
2) Depending upon the filters cartridge configuration the support brackets will vary with the height of each cartridge height.
For the 8" Tall Cartridges, the brackets should be mounted 10" or more below the grate seat. For 16" Tall Cartridges,
mounting brackets should be at least 19" or more below the grate seat (See attached Side View illustration below).
3) Attach support brackets (Corner and slotted angle, if applicable) to the catch basin throat wall on four to eight sides equally
spaced using anchor bolts. Attach slotted angle crossbars for larger catch basins (see Top View illustration below).
4) Install filter base plate first without cartridge attached. Once a tight fit along the inside diameter of the catch basin is
obtained, attach the cartridge and replace grate. Note: For catch basins that may have a tighter throat due to the frame
and grate or other obstruction near the top, the filter base plate may come in two sections that can be un-assembled,
which will allow the base plate to be re-assembled below this area. These parts will come assembled, so that you know
how they should look like when installed.
5) If you need further assistance please call us direct at (888) 526-4736 or email us your questions at: [email protected]
GRATE
Side View
Triton FilterFilter Base Plate
Support Brackets
Side View
Inside wall of catch basin
Anchor bolts into inside of catch basin
For (8") Tall Cartridges
10" or more below
grate seat.
For (16") Tall
Cartridges 19" or more
below grate seat.
Grate Seat
10"
19"
Mounting Brackets
INSTALLATION INSTRUCTIONSFOR THE
TRITON (ROUND) TOP HAT SERIES(DESIGNED FOR BELOW GRATE INSTALLATION OF ROUND CATCH BASINS)
Top ViewOf mounting brackets
Overflow
BypassSupport Brackets
Anchor Bolts
Support Brackets
THE DESIGN AND DETAIL OF THIS DRAWING IS THE PROPERTY OF
REM INC. AND IS NOT TO BE USED EXCEPT IN CONNECTION WITH
OUR WORK, DESIGN AND INVENTION RIGHTS ARE
RESERVED.
U.S. Patent Number:
6,217,757

REM Inc.Triton (Square) Top Hat Series
(installation instructions for square catch basins)
Size Drawn By: C.F.
For:Square Catch Basins
Scale 1:1 DATE 5/2014 Sheet 1 of 1DIMENSIONS ARE IN INCHES UNLESS
OTHERWISE STATED.
MADE IN
USA
TOOLS REQUIRED:
1) Hammer Drill, with ¼”
masonry drill bit.
2) Hammer.
3) ¼” X 2" or 3" Concrete
Anchors. i.e. (Red Head)
4) 7/16" Socket Drive.
1) Filter Base Plate may need to be trimmed down to be able to fit into the throat of the catch basin. For example if the ID or
inside throat of the catch basin is 24" X 24", you will want to trim the flanges down to 23" X 23". You will then attach the bulb
gasket to the support flange. This bulb gasket will help seal the extra gap between the flange and the inside wall of the
catch basin. The gasket is designed to give the base plate a snug fit when installed. Some base plates may be pre-trimmed
and ready for installation. Some catch basins that have irregular throat sides (large gaps) may be sealed by applying a foam
sealer such as Hilti Foam.
2) Depending upon the filter cartridges configuration the support brackets position will vary depending upon what size cartridge
(height) your catch basin will be using. For the 8" Tall Cartridges, brackets should be mounted 10" or more below the grate
seat. For 16" Tall Cartridges, mounting brackets should be at least 19" or more below the grate seat (See attached drawing
below).
3) Attach support brackets (Slotted Angle) to the long sides of the catch basin, with the two Center Bars going across the catch
basin. These should be placed so that they do not block the overflow port located at the center of the cartridge housing.
This port should be unobstructed to allow for large storm events to bypass the system when needed. Hardware and anchor
bolts are included for each filter. (Hammer drill not included)
4) Install filter Base Plate first without cartridge attached. Once there is a snug tight fit on all four sides, attach cartridge, which
requires only a 1/6th turn to lock in place.
5) If you need further assistance please call us direct at (888) 526-4736 or email us: [email protected]
GRATE
Side View
Top View of mounting brackets
Overflow Port
Center Support Bars
Concrete Anchor Bolts
Position of overflow bypass
And Cartridge Base
Support Brackets
Triton FilterFilter Base Plate
Support Brackets
Side View
Inside wall of catch basin
Anchor bolts into inside of catch basin
For (8") Tall
Cartridges 10" or
more below grate
seat.
For (16") Tall
Cartridges 19" or
more below grate
seat.
Grate Seat
10"
19"
Mounting Brackets
Installation InstructionsFOR THE
TRITON (SQUARE) TOP HAT(DESIGNED FOR BELOW GRATE INSTALLATION OF SQUARE CATCH BASINS)
Support Bracket
THE DESIGN AND DETAIL OF THIS DRAWING IS THE
PROPERTY OF REM INC. AND IS NOT TO BE USED EXCEPT IN
CONNECTION WITH OUR WORK, DESIGN AND INVENTION RIGHTS
ARE RESERVED.
U.S. Patent Number:
6,217,757