fold-down outfeed table - rockler woodworking and hardware · 2015-05-18 · outfeed table that i...
TRANSCRIPT

Many new cabinet saws havea side extension table, andthey’re a big help for
supporting wide sheet materials orlong workpieces when crosscutting.But I use a table saw even moreoften for ripping lumber. No cabinetsaws that I’m aware of provide ameans of support behind the sawwhere I really need it. I’ve triedusing a worktable back there, but it’sjust one more fixture to get in theway in a small shop, and, I’ve neverfound a roller stand that provides theamount of stability I want.
So, my solution was to build anoutfeed table that I can flip
are suitable for a saw with 26" ofvertical clearance between thetabletop and the dust port. Makesure to adjust your table’sfront-to-back size, ifneeded, so it won’tinterfere with thedust port whenyou fold it down.I made my tablestretch fromone exten-sion wingto theother. Youcould make yours even wider ifyou like, but remember that the legshould be relatively centered under-neath for stability. I suggestwidening the leg to broaden itsstance if you make a substantiallywider outfeed table.
Building the TableGet this project rolling by cutting theMDF table core top and bottom(pieces 1 and 2) to size and gluingthem together. Drive a brad througheach corner to keep the pieces fromshifting during clamping. It’s essen-tial that the edges line up evenly.
Pull out your contact cement, J-roller and spacers so you can coverthe top and bottom of the core withplastic laminate (pieces 3 and 4).
up when I need it and fold downwhen I don’t. It mounts to the saw’sback fence rail and sets up with anextendable leg that props againstthe cabinet. Ordinary barrel-bolthardware locks it quickly in the “up”position, so I never have to futz withthe setting. It provides a 30"-deepplatform behind the machine —plenty of room to keep long rip cutsfrom tipping off into the nether-world — and its triangulated designis sturdy as can be. After five yearsof hard use, the prototype for thefold-down table you see here hasbecome an essential feature on mycabinet saw.
Tailoring the Table to Your SawIf you decide to build one for
your saw, first grab a tapemeasure and size up your
machine. The parts in theMaterial List on page 53
Fold-down Outfeed TableBy Chris Marshall
Cover both faces of the table’score with sheets of plasticlaminate. Use spacers to align the laminate and pull them out one at a time. Be sure to roll the surfaces thoroughly to bond the cement.
A small-shop delight, this project is a sweet upgrade to your shop’s centerpiece.
February 2009 Woodworker’s Journal
193.050 11/24/08 1:09 PM Page 50

51
193.051 11/20/08 10:43 AM Page 51
February 2009 Woodworker’s Journal52
Start with oversized sheets, andbring them to final size with a trimrouter and piloted laminate cutter.
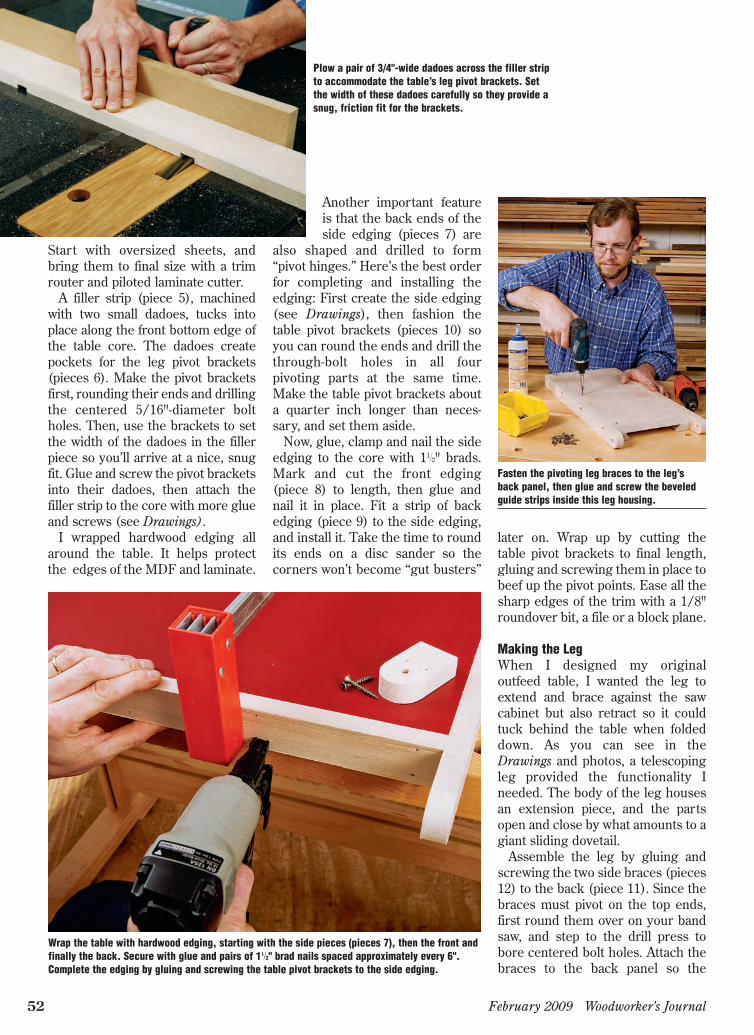
A filler strip (piece 5), machinedwith two small dadoes, tucks intoplace along the front bottom edge ofthe table core. The dadoes createpockets for the leg pivot brackets(pieces 6). Make the pivot bracketsfirst, rounding their ends and drillingthe centered 5/16"-diameter boltholes. Then, use the brackets to setthe width of the dadoes in the fillerpiece so you’ll arrive at a nice, snugfit. Glue and screw the pivot bracketsinto their dadoes, then attach thefiller strip to the core with more glueand screws (see Drawings).
I wrapped hardwood edging allaround the table. It helps protectthe edges of the MDF and laminate.
Another important featureis that the back ends of theside edging (pieces 7) are
also shaped and drilled to form“pivot hinges.” Here’s the best orderfor completing and installing theedging: First create the side edging(see Drawings), then fashion thetable pivot brackets (pieces 10) soyou can round the ends and drill thethrough-bolt holes in all fourpivoting parts at the same time.Make the table pivot brackets abouta quarter inch longer than neces-sary, and set them aside.
Now, glue, clamp and nail the sideedging to the core with 11⁄2" brads.Mark and cut the front edging(piece 8) to length, then glue andnail it in place. Fit a strip of backedging (piece 9) to the side edging,and install it. Take the time to roundits ends on a disc sander so thecorners won’t become “gut busters”
later on. Wrap up by cutting thetable pivot brackets to final length,gluing and screwing them in place tobeef up the pivot points. Ease all thesharp edges of the trim with a 1/8"roundover bit, a file or a block plane.
Making the LegWhen I designed my originaloutfeed table, I wanted the leg toextend and brace against the sawcabinet but also retract so it couldtuck behind the table when foldeddown. As you can see in theDrawings and photos, a telescopingleg provided the functionality Ineeded. The body of the leg housesan extension piece, and the partsopen and close by what amounts to agiant sliding dovetail.
Assemble the leg by gluing andscrewing the two side braces (pieces12) to the back (piece 11). Since thebraces must pivot on the top ends,first round them over on your bandsaw, and step to the drill press tobore centered bolt holes. Attach thebraces to the back panel so the
Wrap the table with hardwood edging, starting with the side pieces (pieces 7), then the front andfinally the back. Secure with glue and pairs of 11⁄2" brad nails spaced approximately every 6".Complete the edging by gluing and screwing the table pivot brackets to the side edging.
Fasten the pivoting leg braces to the leg’sback panel, then glue and screw the beveledguide strips inside this leg housing.
Plow a pair of 3/4"-wide dadoes across the filler stripto accommodate the table’s leg pivot brackets. Setthe width of these dadoes carefully so they provide asnug, friction fit for the brackets.
193.052 11/20/08 10:44 AM Page 52

Woodworker’s Journal February 2009 53
110
25
5
6
7
89
12
13
20
17
18
3/4"103/4"1/4"
3/4"1/2" space 3/4" R.
3/4" R.
19
3/4"
1113/16"
13/8"
11/2" R.
5/16" Dia.
2"
5/16" Dia.
13/16" R. 35°
5/16" Dia.
T x W x L1 Table Core, Top (1) 3/4" x 223⁄4" x 421⁄2"2 Table Core, Bottom (1) 3/4" x 193⁄4" x 421⁄2"3 Laminate, Top (1) 1/16" x 223⁄4" x 421⁄2"4 Laminate, Bottom (1) 1/16" x 193⁄4" x 421⁄2"5 Filler Strip (1) 3/4" x 3" x 421⁄2"6 Leg Pivot Brackets (2) 3/4" x 3" x 31⁄ 4"7 Side Edging (2) 3/4" x 15⁄ 8" x 261⁄4"8 Front Edging (1) 3/4" x 15⁄ 8" x 44"9 Back Edging (1) 3/4" x 15⁄ 8" x 421⁄2"
10 Table Pivot Brackets (2) 3/4" x 15⁄8" x 23⁄4"11 Leg Back Panel (1) 3/4" x 9" x 201⁄2"12 Braces (2) 3/4" x 11⁄ 2" x 22"
13 Guide Strips (2) 3/4" x 13⁄ 4" x 201⁄2"14 Extension (1) 3/4" x 69⁄ 16" x 22"15 Handle (1) 3/4" x 1" x 53⁄ 8"16 Bolts, Washers, Nuts (2) 5/16" x 2" (Nylon lock nuts)17 Spacer (1) 3/4" x 2" x 153⁄8"18 Build-up Strip (1) 5/8" x 2" x 41⁄ 2"19 Barrel Bolts (2) 6" Steel20 Mounting Plate (1) 21⁄ 4"* x 53⁄ 4" x 403⁄4"21 Lag Screws, Washers (5) 5/16" x 2"22 Lag Screws, Washers (2) 5/16" x 5"23 Leg Stop, Back (1) 3/4" x 2" x 16"24 Leg Stop, Bottom (1) 3/4" x 11⁄ 2" x 16"
MATERIAL LIST
* Adjust the thickness to suit your saw.
1
10
10
2
3
4
56
6
7
7
8
9
11
12
13
14
15
16
1718
19
19
20 21
22
23
24
12
Table Assembly(Section View)
Two barrel bolts serve three purposes. The bolt underneath the tableprevents the leg from swinging uncontrolled as the table is tipped upor down. The one on the leg keeps it retracted or extended for use.
Tableand Leg Closed
(Side View)
Side Edging and Braces(Side Views)
Guide Strip(End View)
Filler Strip(Front View)
T x W x L
A 1/2”-diameter,1”-deep hole in theleg brace receivesthe barrel bolt tokeep the legfolded closed.
193.053 11/24/08 12:37 PM Page 53

54
bottom ends of the three parts areflush. Next come the guide strips(pieces 13). Tilt your table saw bladeto 35°, bevel-rip the strips to shapeand cut them to length. Glue theminside the leg housing with thebevels facing inward. Drive counter-sunk screws through the back andinto the strips to reinforce theseimportant load-bearing joints.
Cut the leg extension (piece 14) towidth and length, and bevel-rip bothof its edges at 35° so it fits wellbetween the guide strips. Aim for aslightly tight squeeze at first, thenshave the bevels with a block planeuntil the extension slides smoothlyinto the leg housing. Glue and screwa handle (piece 15) to theextension. Now,close up theleg, and fastena barrel bolt(piece 19) near thehandle: the “male”side mounts tothe leg extension,and the “female”receiver piece goeson the guide strip.When the table isfolded down, this boltkeeps the leg retracted.
Attach the leg to the table pivotswith bolts, washers and nylon locknuts (pieces 16). Next, cut thespacer and build-up strip (pieces 17and 18) to shape, and fasten themtogether with one pair of their endsflush. They serve as a mount for asecond male barrel bolt — it locksthe leg against the table andprevents it from swinging loosewhen folded down. Slip the spacerbetween the leg and table andposition it 8" in from the backedging. Screw the spacer to the tableand the barrel bolt to the build-upstrip. Slide the bolt over against theleg brace, and give it a good rap witha hammer to mark the bolt’s location.Drill a 1/2"-diameter, 1"-deep holehere to allow the bolt to slide fullyinto the leg and secure it.
Mounting the Table to the SawTime to get this project mounted up!Laminate a thick blank of lumbertogether to form the mounting plate(piece 20) that attaches to the saw’sfence rail. Plane it down so the topface will be about 1/16" below thesaw table when it’s attached to thefence rail. Ease the front bottom
Mark centerpoints for long pivot screws on the ends of the mounting plate using a brad-point bittapped through the table pivot holes. Hold the plate and table apart with a couple of 1/2" spacers.
The leg stops here: it’s simply a wooden ledgefastened to the saw cabinet with three shortcarriage bolts set into counterbored holes.
Clamp and then bolt the mounting plate to thethe saw’s fence rail with five 2" lag screwsand washers. Keep these fasteners well clearof the miter slots you’ll need to rout later.
February 2009 Woodworker’s Journal
Hang the outfeed table from themounting plate with two 5/16" x 5"lag screws and washers.
Spacer
193.054 11/24/08 12:35 PM Page 54

edge of the plate with a 3/4"-diameter roundover bit to createswing clearance for the table. Youmay also need to knock a little offthe bottom back edge so the platefits snugly against the fence rail.
Sand all the table’s wooden partsand the mounting plate up throughthe grits, and apply a couple of coatsof wipe-on finish before proceeding.
When the finish cures, flip themounting plate and the table face-down on a flat surface, and set theparts together. Slip a couple of 1/2"-
thick spacers in between. Poke a5/16" brad-point bit into each tablepivot hole, and tap it with a hammerto mark the ends of the mountingplate for pivot screw holes. Drill the1/4"-diameter pilot holes 31⁄2" deepand as straight as you can.
Bolt the plate to the metal fencerail with five lag screws and washers
(pieces 21) spaced evenly along itslength. Keep these screws clear ofthe table saw’s miter slot locations.
With the mounting plate in place,make up the leg’s wooden stop“ledge” by gluing and screwingpieces 23 and 24 together. Attach itto your saw cabinet with three shortcarriage bolts, washers andlocknuts. (I know, I know ... this is alot of holes to put in your trusty saw,but it’s worth it!) I positioned the legstop assembly so the bottom face ofpiece 24 is 125⁄8" up from the floor.
Fasten the table assembly to themounting plate with a couple of 5"lag screws and washers (pieces 22).
Final Fine-tuning and RoutingGrab a helper to give you a hand insetting up the table with the legextended and propped against thestop. Mark and trim the bottomcorners of the leg extension so itnests completely against the legstop. Then use two clamps to holdthe leg extension and housing at thecorrect length (see photoabove). Adjust and re-clamp the leg partsas needed until
the outfeed table is flush with thesaw table. Extend the first barrelbolt and slip the remaining metalreceiver piece over it. Screw thereceiver to the guide strip to finalizethe leg’s “up and open” position.
I made a long, slotted jig and useda 1" O.D. rub collar and 3/4" straightbit to extend my saw’s miter slotsover into the outfeed table. A coupleof stops limited these cuts and keptmy bit from tangling with the saw’sgranite table. I chiseled away thewaste where the bit couldn’t reach.
Wipe finish into the miter slots,and you’re really ready to rip! Best ofall, those long rip cuts will never bea seesaw operation again!
Screw the second metal receiver next to thefirst barrel bolt to set the open length of theleg. The top receiver keeps the leg retracted.
The author used a long slotted routingjig, a rub collar on his plunge router anda 3/4"-diameter straight bit to mill a pairof miter slots into the outfeed table.
Woodworker’s Journal February 2009
Chris Marshall is Woodworker’sJournal’s field editor.
Use a pair of clamps to pinch the leg partstogether and hold the table up. Check your
table’s setting with a long straightedge, andadjust the leg a little at a time until you arrive at
a nice, flush platform.
193.055 11/24/08 12:29 PM Page 55