flowmap generator river tutorial - superposition...
TRANSCRIPT
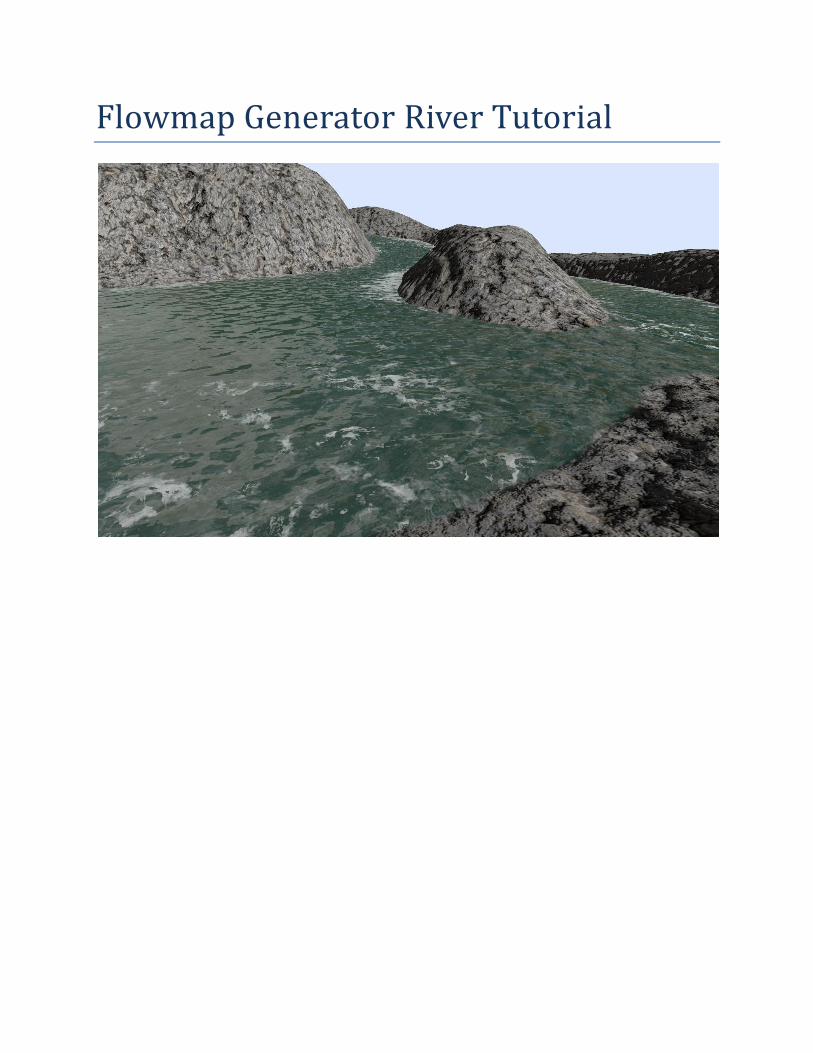
Flowmap Generator River Tutorial
Table of Contents First steps ........................................................................................................................................ 3
Preview Material Setup ................................................................................................................... 3
Creating a Generator ....................................................................................................................... 5
Assign to preview material ............................................................................................................. 9
Fields ............................................................................................................................................. 10
Simulating ..................................................................................................................................... 11
Using the baked flowmap texture ................................................................................................. 13
Material Setup ............................................................................................................................... 15
Flowmap Generator www.superpositiongames.com 3
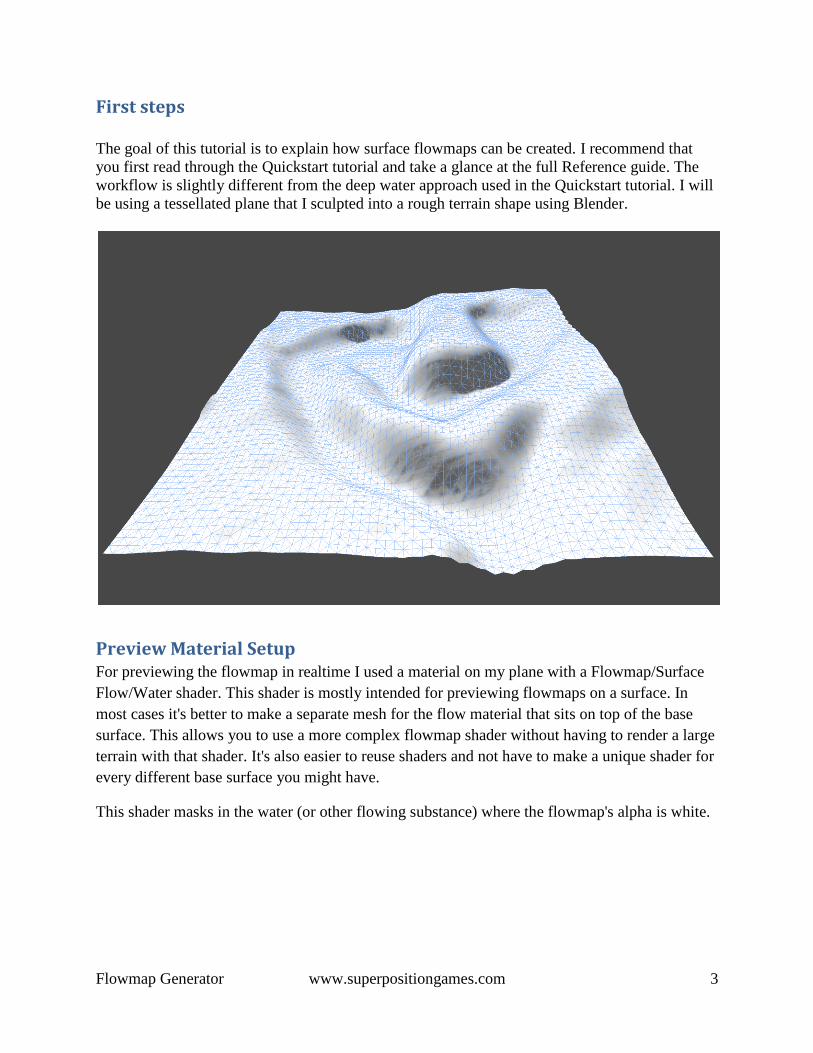
First steps
The goal of this tutorial is to explain how surface flowmaps can be created. I recommend that
you first read through the Quickstart tutorial and take a glance at the full Reference guide. The
workflow is slightly different from the deep water approach used in the Quickstart tutorial. I will
be using a tessellated plane that I sculpted into a rough terrain shape using Blender.
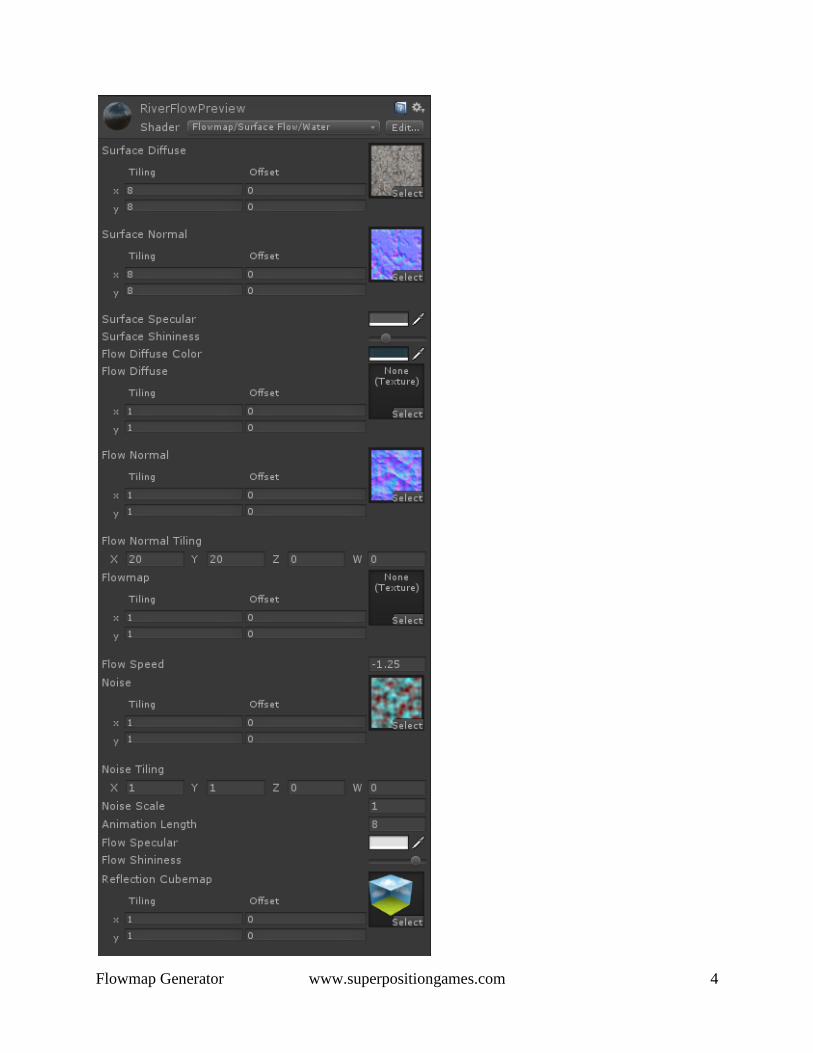
Preview Material Setup For previewing the flowmap in realtime I used a material on my plane with a Flowmap/Surface
Flow/Water shader. This shader is mostly intended for previewing flowmaps on a surface. In
most cases it's better to make a separate mesh for the flow material that sits on top of the base
surface. This allows you to use a more complex flowmap shader without having to render a large
terrain with that shader. It's also easier to reuse shaders and not have to make a unique shader for
every different base surface you might have.
This shader masks in the water (or other flowing substance) where the flowmap's alpha is white.
Flowmap Generator www.superpositiongames.com 4
Flowmap Generator www.superpositiongames.com 5
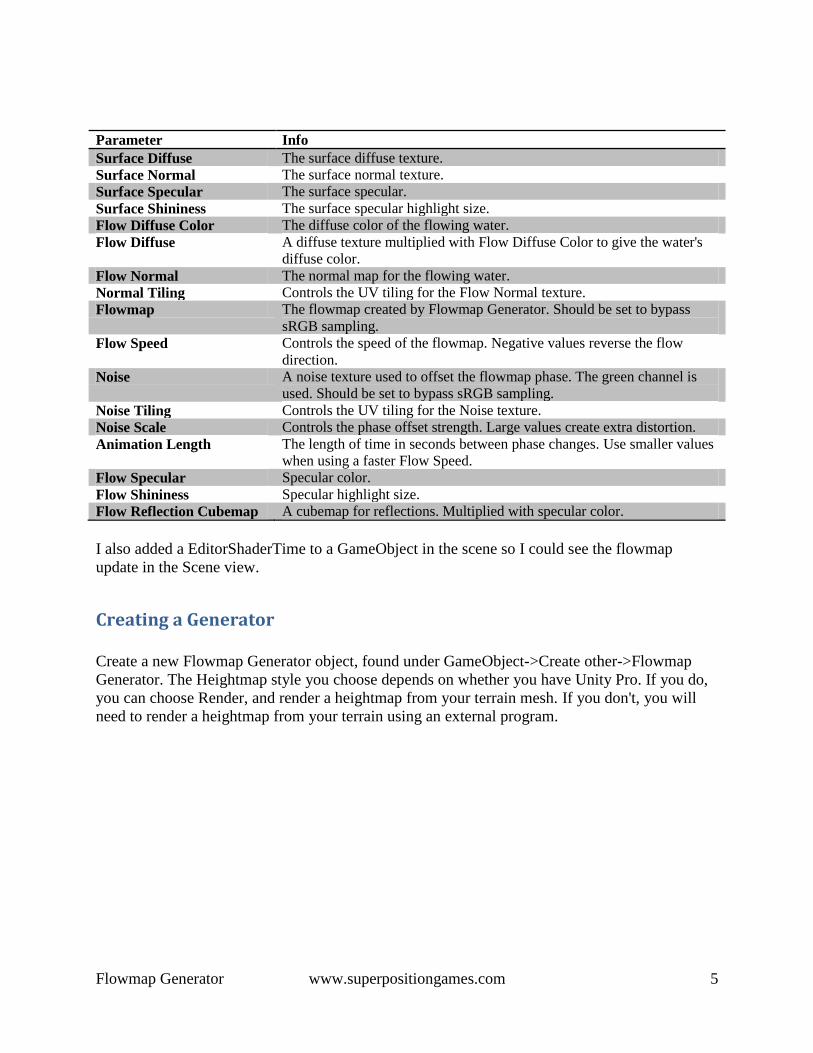
Parameter Info
Surface Diffuse The surface diffuse texture.
Surface Normal The surface normal texture.
Surface Specular The surface specular.
Surface Shininess The surface specular highlight size.
Flow Diffuse Color The diffuse color of the flowing water.
Flow Diffuse A diffuse texture multiplied with Flow Diffuse Color to give the water's
diffuse color.
Flow Normal The normal map for the flowing water.
Normal Tiling Controls the UV tiling for the Flow Normal texture.
Flowmap The flowmap created by Flowmap Generator. Should be set to bypass
sRGB sampling.
Flow Speed Controls the speed of the flowmap. Negative values reverse the flow
direction.
Noise A noise texture used to offset the flowmap phase. The green channel is
used. Should be set to bypass sRGB sampling.
Noise Tiling Controls the UV tiling for the Noise texture.
Noise Scale Controls the phase offset strength. Large values create extra distortion.
Animation Length The length of time in seconds between phase changes. Use smaller values
when using a faster Flow Speed.
Flow Specular Specular color.
Flow Shininess Specular highlight size.
Flow Reflection Cubemap A cubemap for reflections. Multiplied with specular color.
I also added a EditorShaderTime to a GameObject in the scene so I could see the flowmap
update in the Scene view.
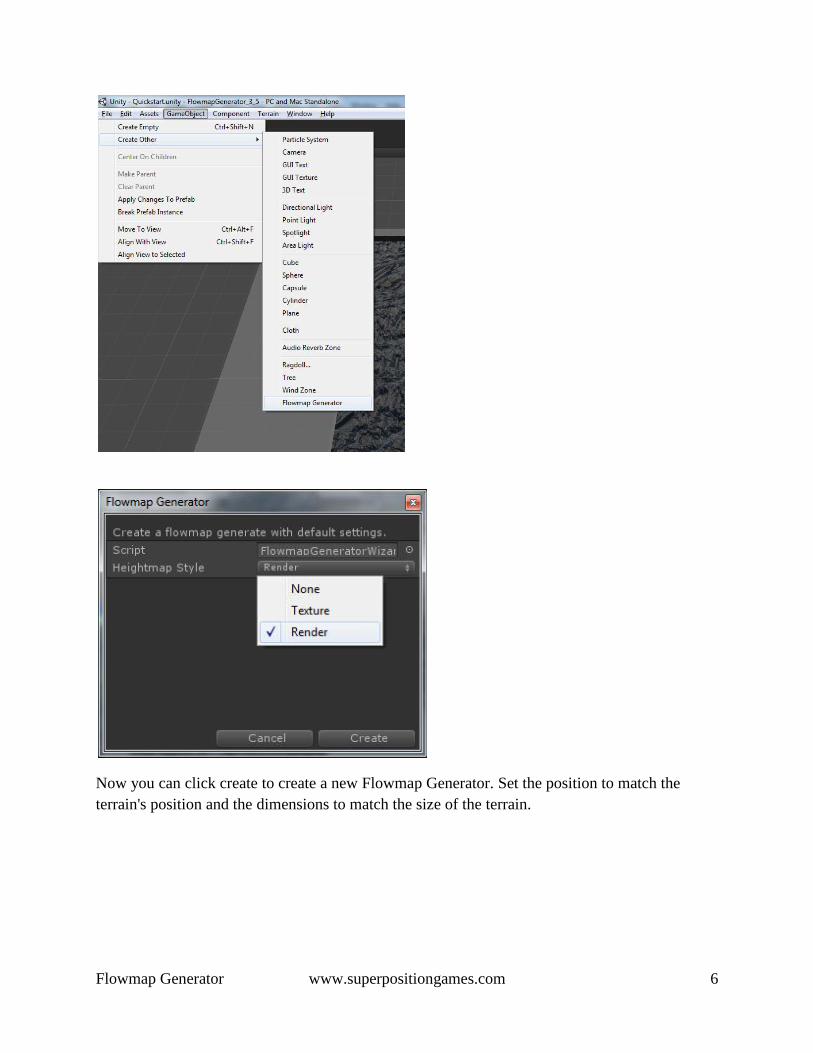
Creating a Generator
Create a new Flowmap Generator object, found under GameObject->Create other->Flowmap
Generator. The Heightmap style you choose depends on whether you have Unity Pro. If you do,
you can choose Render, and render a heightmap from your terrain mesh. If you don't, you will
need to render a heightmap from your terrain using an external program.
Flowmap Generator www.superpositiongames.com 6
Now you can click create to create a new Flowmap Generator. Set the position to match the
terrain's position and the dimensions to match the size of the terrain.

Flowmap Generator www.superpositiongames.com 7
I've also set up the Flow Render Heightmap component. I set the Fluid Depth to Surface and set
the Height Min and Height Max so that the terrain is contained within. This is represented in the
scene as a white wireframe box. The preview shows the heightmap without any parts being cut
off. If you're using a heightmap texture, you will need to set that up instead. The Quickstart and
Reference guides have more information about how that works. In most cases it's as simple as
attaching a Flow Texture Heightmap component and assigning your heightmap texture.

Flowmap Generator www.superpositiongames.com 8
Flowmap Generator www.superpositiongames.com 9
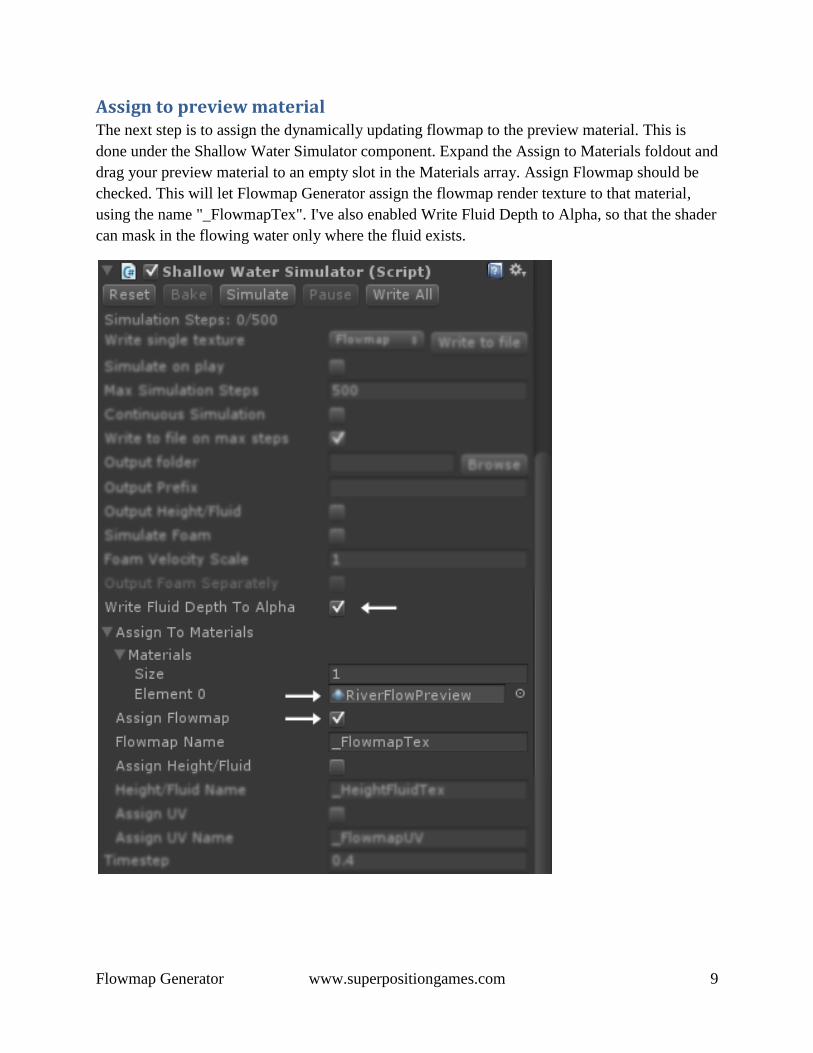
Assign to preview material The next step is to assign the dynamically updating flowmap to the preview material. This is
done under the Shallow Water Simulator component. Expand the Assign to Materials foldout and
drag your preview material to an empty slot in the Materials array. Assign Flowmap should be
checked. This will let Flowmap Generator assign the flowmap render texture to that material,
using the name "_FlowmapTex". I've also enabled Write Fluid Depth to Alpha, so that the shader
can mask in the flowing water only where the fluid exists.
Flowmap Generator www.superpositiongames.com 10
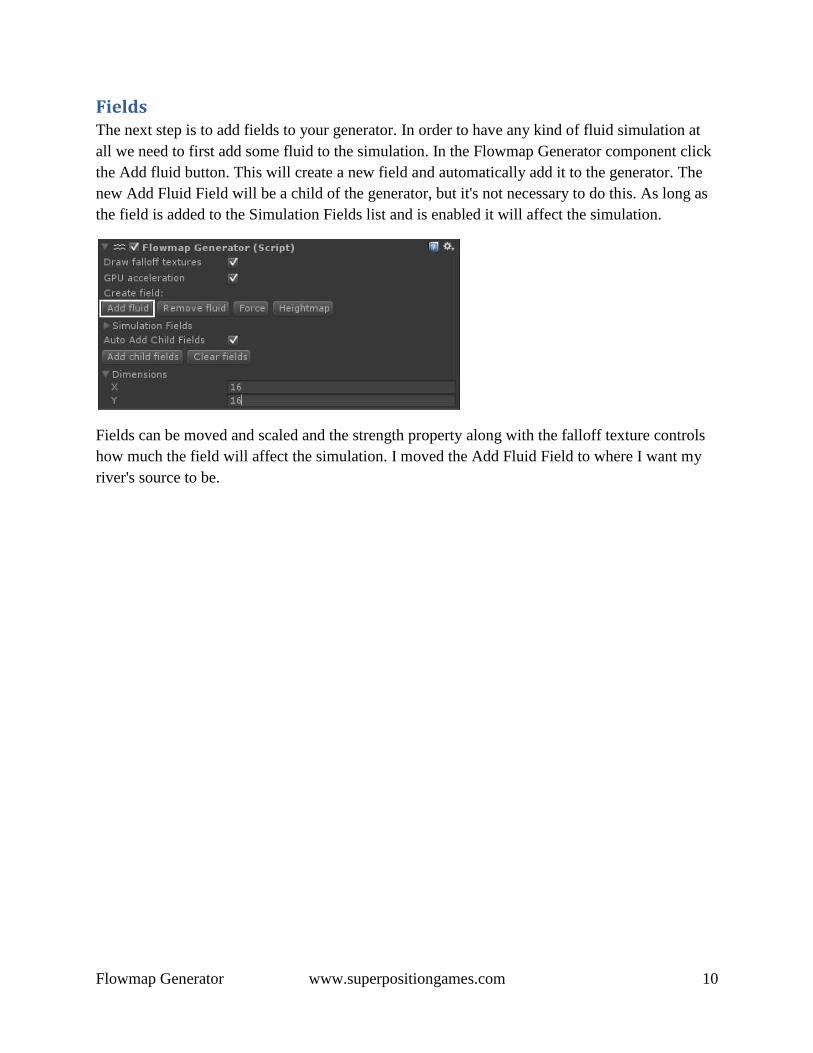
Fields The next step is to add fields to your generator. In order to have any kind of fluid simulation at
all we need to first add some fluid to the simulation. In the Flowmap Generator component click
the Add fluid button. This will create a new field and automatically add it to the generator. The
new Add Fluid Field will be a child of the generator, but it's not necessary to do this. As long as
the field is added to the Simulation Fields list and is enabled it will affect the simulation.
Fields can be moved and scaled and the strength property along with the falloff texture controls
how much the field will affect the simulation. I moved the Add Fluid Field to where I want my
river's source to be.
Flowmap Generator www.superpositiongames.com 11
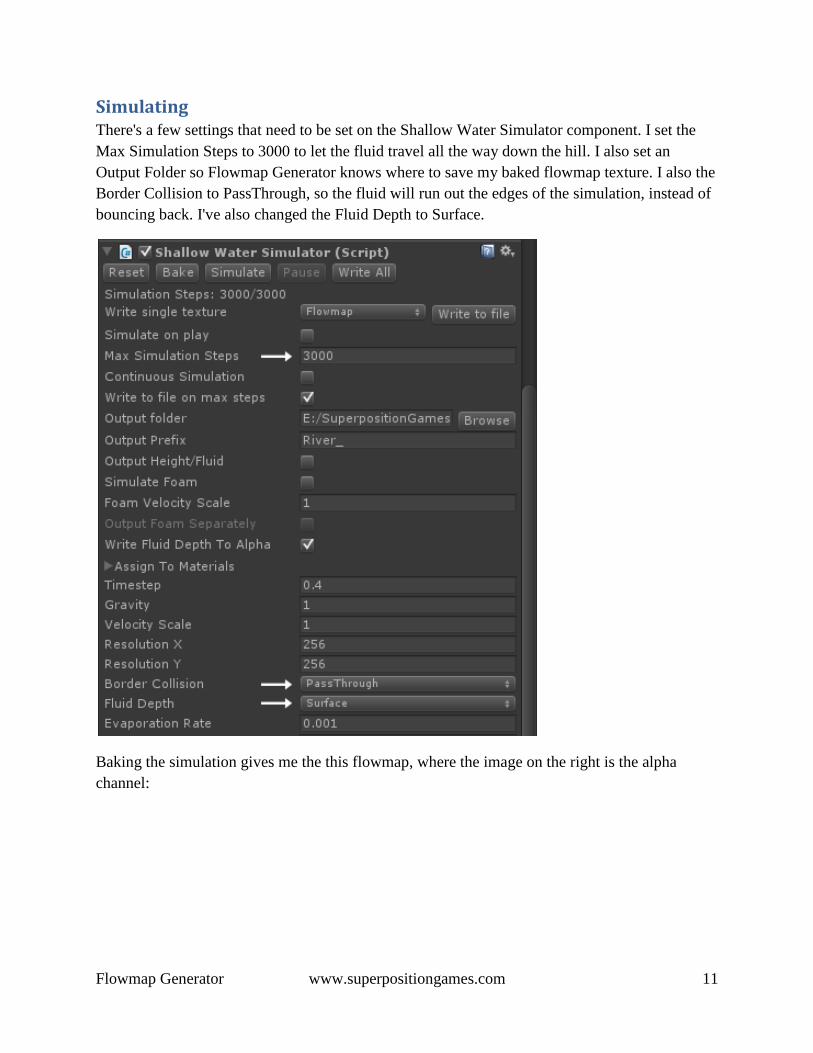
Simulating There's a few settings that need to be set on the Shallow Water Simulator component. I set the
Max Simulation Steps to 3000 to let the fluid travel all the way down the hill. I also set an
Output Folder so Flowmap Generator knows where to save my baked flowmap texture. I also the
Border Collision to PassThrough, so the fluid will run out the edges of the simulation, instead of
bouncing back. I've also changed the Fluid Depth to Surface.
Baking the simulation gives me the this flowmap, where the image on the right is the alpha
channel:

Flowmap Generator www.superpositiongames.com 12
Here's what my preview mesh looks like with that flowmap:
Flowmap Generator www.superpositiongames.com 13
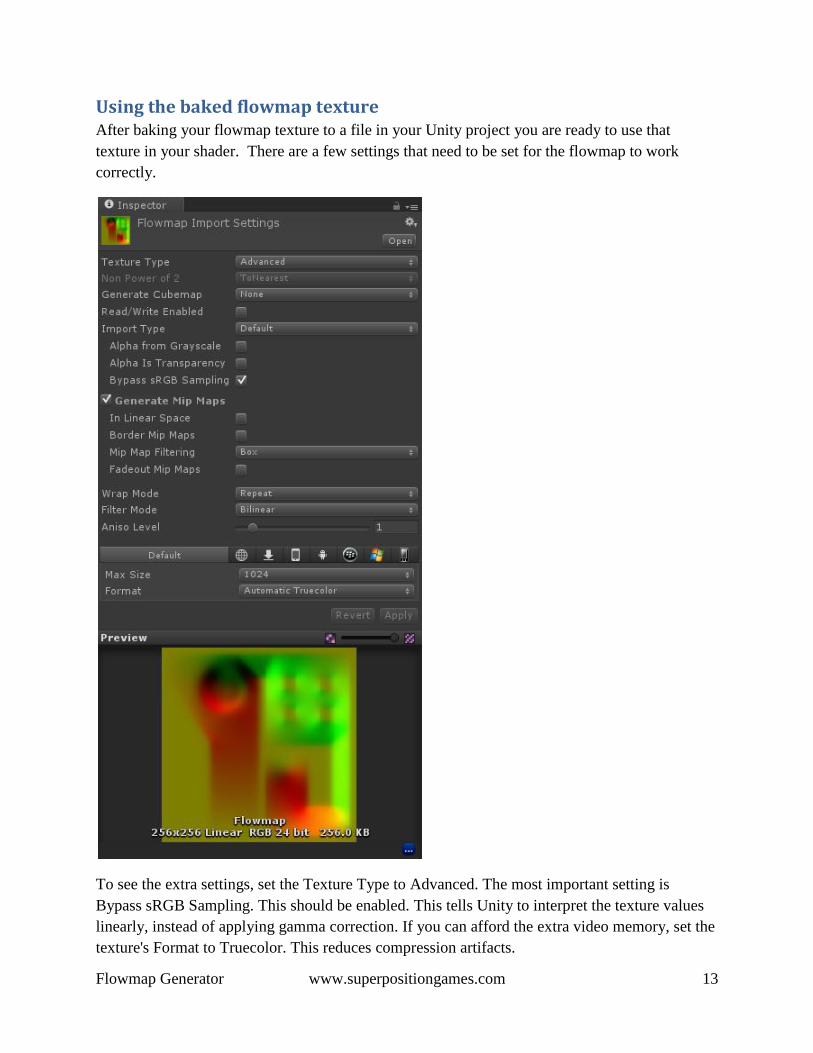
Using the baked flowmap texture After baking your flowmap texture to a file in your Unity project you are ready to use that
texture in your shader. There are a few settings that need to be set for the flowmap to work
correctly.
To see the extra settings, set the Texture Type to Advanced. The most important setting is
Bypass sRGB Sampling. This should be enabled. This tells Unity to interpret the texture values
linearly, instead of applying gamma correction. If you can afford the extra video memory, set the
texture's Format to Truecolor. This reduces compression artifacts.

Flowmap Generator www.superpositiongames.com 14
The river is a separate mesh that sits on top of the terrain. It's UV mapped from a top-down view,
making sure that the UV space matches the terrain so that the flowmap ends up in the correct
place. Here's how the mesh looks in Blender.
Flowmap Generator www.superpositiongames.com 15
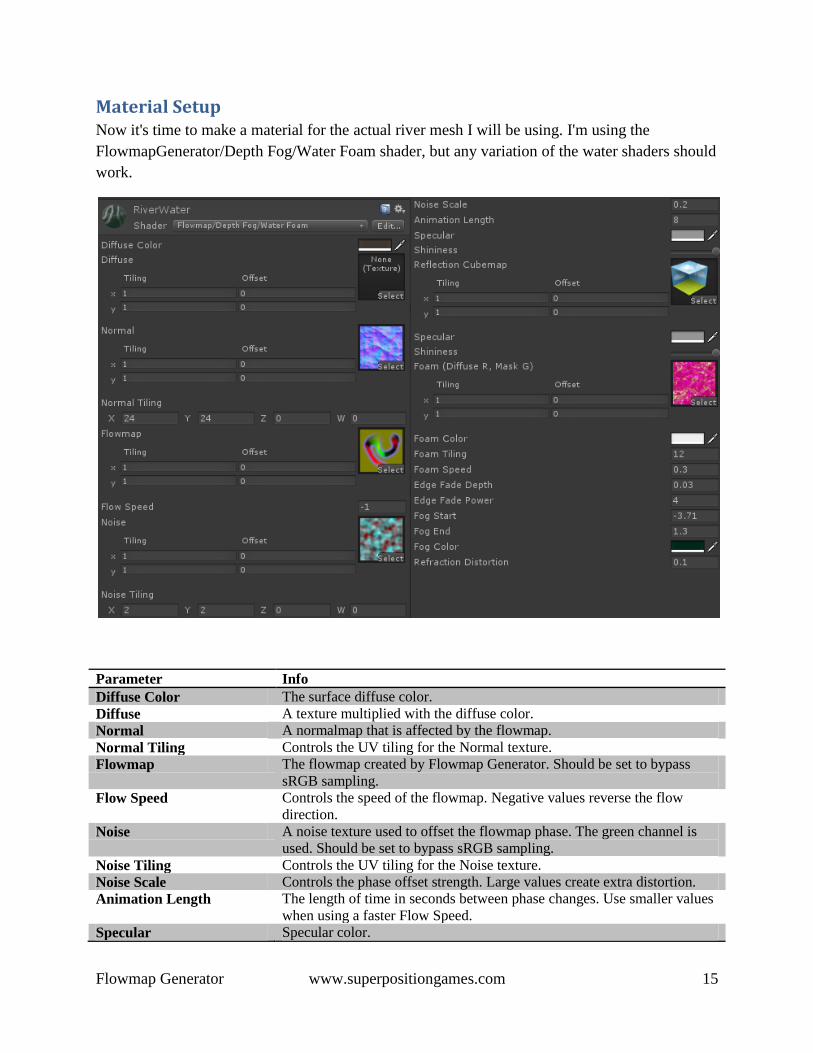
Material Setup Now it's time to make a material for the actual river mesh I will be using. I'm using the
FlowmapGenerator/Depth Fog/Water Foam shader, but any variation of the water shaders should
work.
Parameter Info
Diffuse Color The surface diffuse color.
Diffuse A texture multiplied with the diffuse color.
Normal A normalmap that is affected by the flowmap.
Normal Tiling Controls the UV tiling for the Normal texture.
Flowmap The flowmap created by Flowmap Generator. Should be set to bypass
sRGB sampling.
Flow Speed Controls the speed of the flowmap. Negative values reverse the flow
direction.
Noise A noise texture used to offset the flowmap phase. The green channel is
used. Should be set to bypass sRGB sampling.
Noise Tiling Controls the UV tiling for the Noise texture.
Noise Scale Controls the phase offset strength. Large values create extra distortion.
Animation Length The length of time in seconds between phase changes. Use smaller values
when using a faster Flow Speed.
Specular Specular color.

Flowmap Generator www.superpositiongames.com 16
Shininess Specular highlight size.
Reflection Cubemap A cubemap for reflections. Multiplied with specular color.
Foam The green channel is the mask, with the red channel adding extra detail to
the foam's diffuse.
Foam Color Controls both the foam's diffuse and alpha mask.
Foam Tiling The foam texture's UV tiling.
Foam Speed The speed that the foam mask flows, multiplied with the Flow Speed.
Edge Fade Depth Distance in world units where the material fades out to show objects
below.
Edge Fade Power Controls the edge fade's softness.
Fog Start Distance from the water surface where the fog starts. Negative values
make the fog visible even in shallow areas.
Fog End Distance from the water surface where the fog is at 100% opacity.
Fog Color The fog color.
Refraction Distortion Distorts underwater objects based on the water's normal map.
I've also enabled Foam simulation in the Shallow Water Simulator component. Here's the final
result: