flow - dt&shop
TRANSCRIPT

VITA – perfect match.
flow
Light-curing microparticle composite for fixed and removable restorations for extraoral use.
Date of issue: 2021-07
Instructions for use
VITA Farbkommunikation
VITA Farbkommunikation
VITA shade controlVITA shade reproductionVITA shade communicationVITA shade determination

2
flow
Material and indication range 3
General information/notes on preparation 4
Framework design and preparation of frameworks 5
Conditioning of the framework/adhesive bondingProcessing of PRE OPAQUE 6
Processing of OPAQUE PASTE 7
Processing of OPAQUE POWDER 8
BASIC layering 9
Finishing, polishing, cleaning, shape adjustment 11
Individual layering 13
Individualization and veneering of VITA ENAMIC® 15
Layering-over VITA CAD-Temp® 18
Inlay/veneer 20
Metal-free restorations 21
Veneering zirconia frameworks and PEEK frameworks 22
Individualization of VITA denture teeth/ reproduction of gingiva 23
Facts worth knowing about light curing 24
Polymerization information 25
Classification tables 26
Application areas of the materials 27
Liquids and accessories 30
Compositions and physical properties 31
Information and care instructions 32
– Table of contents

3
flow – Material and indication range
The VITA VM LC product range includes systematically matched components for fixed and removable restorations for extraoral use. VITA VM LC flow is the low viscosity flow material of the product family. When veneering frameworks, VITA VM LC flow materials are applied to VITA VM LC OPAQUE PASTE/OPAQUE.
VITA VM LC flowThe flow materials can be applied with a brush, an instrument or directly from the syringe. Thanks to the thixotropic consistency, the materials are stable and retain their flowability during modeling.
For details on the application areas of the individual materials, see page 27; for compositions, see page 31.
Indication: • Full and partial veneering of metal frameworks: crowns, bridges, telescopic
crowns, implant suprastructures • Inlays, veneers
Application areas: • Individualization and layering of VITA ENAMIC • Veneering partially yttrium-stabilized ZrO2 frameworks
(CTE 10.0 - 10.5 · 10-6 · K-1), such as VITA YZ SOLUTIONS • Individualization of VITA denture teeth • Reproduction of gingival areas • Veneering of removable and partially removable dentures (according to the
manufacturer’s information) made of – polyether ether ketone (PEEK) with a filler content of up to 20%, such as
BioHPP/Bredent– PEEK-OPTIMA LT1 polymer, such as Juvora, InnoBlanc Medical
Long-term temporaries: • Individualizing and layering of long-term temporaries made from
VITA CAD-Temp • Metal-free crowns and three-unit anterior bridges made from VITA VM LC
Note: In the posterior area, a minimum thickness of the veneer of 1.5 mm in the central fissure and perfect occlusion must be ensured.
Contraindication: • Occlusal dysfunctions or parafunctions, such as bruxism
• All alloys and resin framework materials may be used for frameworks, which are suitable for veneering with composite, according to the manufacturer’s instructions.

flow
4
– General information/notes on preparation
Preparation information - inlay • box-shaped preparation without sharp edges • the cavity margins must be entirely in the etchable enamel and outside
articulation points • minimum depth on the bottom of the fissure: 1.5 mm • minimum isthmus width: 2 mm • minimum width of the approximal shoulder: 1.5 mm • the entire design of the preparation is similar to ceramics
General information • VITA VM LC flow is a type 2 light-curing microparticle composite, class 2,
according to DIN EN ISO 10477. • During processing, the light-curing VITA VM LC / VITA VM LC flow materials
should not be exposed to strong artificial or strong natural light, to avoid undesired polymerization.
• Contact with water and moisture must be avoided during layering. The veneer surface may only be cleaned with water after final polymerization.
• Do not mix VITA VM LC flow materials with other composites. This may reduce the quality.
• After dispensing material, place the cap onto the syringe again and turn the plunger syringe back by at least one turn.
• During the layering process, the MODELLING LIQUID may only be used to wet the instruments and brushes slightly. Use very sparingly. The liquid must not be used to thin the materials. For more application areas, see page 31.
• Use VITA VM LC flow exclusively for the indications and application areas indicated on page 3.
• VITA VM LC/VITA VM LC flow products may only be used up to the expiration date indicated on the package.
• For information on safety, protective measures, storage conditions and cleaning, see page 33.
Preparation information - veneer • labial, anatomical reduction of the hard tooth substance by 0.7 – 1.0 mm • supragingival preparation • slightly rounded shoulder in the cervical area parallel to the gingival margin • chamfer-like approximal margins, saddle-shaped embracing • retain approximal, natural contact points • chamfer-like embracing of the incisal edge (1) or incisal reduction with
rounded edge (2), minimum incisal thickness of the veneer: 1 mm1 2
55
flow – Framework design and preparation of frameworks
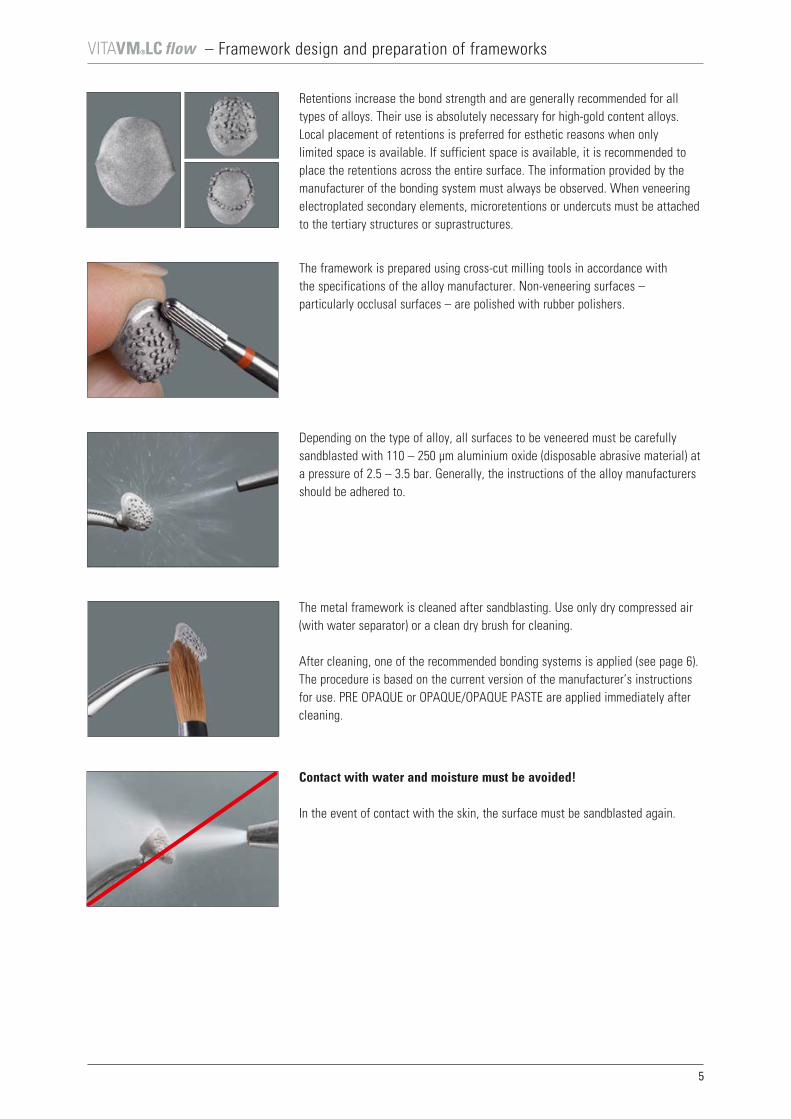
Retentions increase the bond strength and are generally recommended for all types of alloys. Their use is absolutely necessary for high-gold content alloys. Local placement of retentions is preferred for esthetic reasons when only limited space is available. If sufficient space is available, it is recommended to place the retentions across the entire surface. The information provided by the manufacturer of the bonding system must always be observed. When veneering electroplated secondary elements, microretentions or undercuts must be attached to the tertiary structures or suprastructures.
The framework is prepared using cross-cut milling tools in accordance with the specifications of the alloy manufacturer. Non-veneering surfaces – particularly occlusal surfaces – are polished with rubber polishers.
Depending on the type of alloy, all surfaces to be veneered must be carefully sandblasted with 110 – 250 μm aluminium oxide (disposable abrasive material) at a pressure of 2.5 – 3.5 bar. Generally, the instructions of the alloy manufacturers should be adhered to.
The metal framework is cleaned after sandblasting. Use only dry compressed air (with water separator) or a clean dry brush for cleaning.
After cleaning, one of the recommended bonding systems is applied (see page 6). The procedure is based on the current version of the manufacturer’s instructions for use. PRE OPAQUE or OPAQUE/OPAQUE PASTE are applied immediately after cleaning.
Contact with water and moisture must be avoided!
In the event of contact with the skin, the surface must be sandblasted again.

6
flow – Conditioning of the framework/adhesive bonding – Processing of VITA VM LC PRE OPAQUE
The following bonding systems have been tested and approved by VITA for reliable bonding between metal and composite.
– GC METAL PRIMER Z, GC METAL PRIMER II– Kuraray Alloy Primer (recommended procedure, see below)– Kulzer Signum Metal Bond I + II– Shofu M.L. Primer– Shofu MZ Primer Plus (use only in combination with VITA VM LC PRE OPAQUE)– 3M Espe Rocatec with Espesil
The procedure is based on the current version of the manufacturer’s instructions for use. VITA VM LC flow can be processed with bonding systems, which condition the framework material for subsequent application of a light curing opaque, based on methyl methacrylate.
In all cases, the suitability for processing with VITA VM LC flow must be checked before using bonding systems of other manufacturers. This applies also to the bonding systems listed above. VITA Zahnfabrik does not assume any liability for damage resulting from lack of suitability of bonding systems of other manufacturers for processing with VITA VM LC flow, and from any product modifications or quality defects of the bonding system in use. The same shall apply to damage resulting from improper handling or processing, as well as for damage resulting from inappropriate or faulty instructions for use for the bonding systems of other manufacturers.
Recommended procedure for the use of Alloy Primer, KuraraySandblast metal framework with aluminium oxide as described. Use only dry compressed air (with water separator) or a clean brush for cleaning the framework. Skin contact and contact with moisture, like steam, must be avoided. Traces of skin oil or moisture may affect the bond strength. Use a little sponge or a brush to apply Alloy Primer and allow to dry for at least one minute. The information included in the current version of the manufacturer's instructions for use must be observed. Then VITA VM LC PRE OPAQUE or OPAQUE PASTE/OPAQUE are applied.
PRE OPAQUE is a flowable additional component which leads to more reliable bonding of metal frameworks with and without retentions. Thanks to its trans-lucency, it hardens even in dark zones with a small amount of light. The use of PRE OPAQUE is particularly recommended for retentions.The material allows a uniform opaque layer to be obtained. PRE OPAQUE is applied immediately after the application of the bonding system and the necessary reaction time that follows.
PRE OPAQUE is applied onto the framework with a disposable brush. Tip: Do not apply to margin areas to avoid the formation of dark zones. A thin layer is sufficient to fill undercuts adequately.Polymerize subsequently.Polymerization information can be found on page 25!
Note: Do not remove the dispersion layer to achieve reliable bonding of PRE OPAQUE and the opaque material. Avoid skin contact and moisture. Either OPAQUE or OPAQUE PASTE must be applied immediately after polymerizing PRE OPAQUE. Both opaque materials have a layer thickness of approx. 0.2 mm each after polymerizing.
VITA VM LC PRE OPAQUE – Processing

7
flow– Conditioning of the framework/adhesive bonding – Processing of VITA VM LC PRE OPAQUE – Processing of VITA VM LC OPAQUE PASTE
Thin layers of the opaque paste are applied onto the framework using a disposable brush and each layer is polymerized. The first layer is applied in a way to avoid complete coverage – similar to a wash opaque for ceramics.
Polymerization information can be found on page 25!
Note on the application of OPAQUE PASTE without PRE OPAQUE: Frameworks that were heated up after polymerization must be cooled down. OPAQUE PASTE may become liquid and come off the retentions.
Apply as many layers of opaque paste as required (at least two), to ensure complete coverage of the metal. Thanks to its visco-elastic consistency, OPAQUE PASTE exhibits high stability at edges and retentions. OPAQUE PASTE on the mixing plate must be protected against light between the individual polymerization steps.
The opaque pastes can be mixed with one another to individualize the shade. Alternatively, PAINT materials can be applied to polymerized OPAQUE PASTE or added.
If non-mixed PAINT materials are applied to OPAQUE PASTE, they are fixed using a hand-held curing light. Then OPAQUE PASTE is cured two times.
Framework completed with VITA VM LC OPAQUE PASTE.
To achieve reliable bonding between opaque paste and dentine, processing should be continued immediately after polymerizing the opaque material, or the substructure must be protected against dust and moisture.
Note: After curing, VITA VM LC OPAQUE PASTE must exhibit a lustrous surface with a thin dispersive layer. Avoid contamination with dust and contact with moisture.
For pontics of bridge frameworks with concave design, we recommend leveling them out with adjacent crown frameworks using BASE DENTINE, and then curing the material in a final polymerization process. If a layer thickness of 2 mm is reached during layering, final polymerization must be carried out and layering is continued subsequently. Then the OPAQUE PASTE is applied in two to three thin layers and polymerized.
Note: Turn back the syringe of the light-sensitive OPAQUE PASTE by at least one turn after dispensing some material and seal it again immediately. The consistency of OPAQUE PASTE has been adjusted accordingly. OPAQUE LIQUID is exclusively suitable for use with OPAQUE powder and must not be used together with OPAQUE PASTE.

8
flow – Processing of VITA VM LC OPAQUE POWDER
First add the liquid into the depression of a black ceramic mixing plate. Then add the powder and stir with a plastic spatula for approx. 30 sec. to obtain a homogeneous, thin mixture. Mixing ratio: five drops of liquid and one measuring spoon of powder (to obtain approx. four units). The use of a metal spatula is not recommended, since it may result in color changes.
Note: The bottle of the light-sensitive liquid must be sealed immediately after dispensing any liquid. OPAQUE LIQUID is suitable for use exclusively with OPAQUE POWDER and must not be used together with OPAQUE PASTE. To avoid contamination and premature polymerization of the opaque, the use of a black mixing plate with lid is recommended.
It is recommended to wet the brush with OPAQUE LIQUID before the opaque is applied. To achieve complete polymerization, the opaque is applied in thin layers onto the framework. Polymerization is carried out after each layer. Apply as many layers of OPAQUE paste as required (at least two), to ensure complete coverage of the metal. Mixed opaque must be protected against light (dark cover) between the individual polymerization steps.
Note: The opaque layer needs to exhibit a wet-lustrous surface before the polymerization!
Polymerization information can be found on page 25!
Framework completed with VITA VM LC OPAQUE.
To achieve reliable bonding between opaque and dentine, processing should be continued immediately after polymerizing the opaque material, or the substructure must be protected against dust and moisture.
Note: After curing, VITA VM LC OPAQUE POWDER must exhibit a dry and silky matte surface. Avoid contamination with dust and contact with moisture.
For pontics of bridge frameworks with concave design, we recommend leveling them out with adjacent crown frameworks using BASE DENTINE and then curing the material in a final polymerization process. If a layer thickness of 2 mm is reached during layering, final polymerization must be carried out and layering is continued subsequently. Then OPAQUE is applied in two to three layers and polymerized.

9
VITA VM LC OPAQUE PASTE/OPAQUE
VITA VM LC flow BASE DENTINE
VITA VM LC flow ENAMEL
VITA VM LC PRE OPAQUE
flow
Note: The use of flow CHROMA PLUS materials is recommended for intensifying the shade of the cervical area or the basic shade, as well as for layering in cases of limited space.
– BASIC layering
Metal framework prepared with bonding system
After applying VITA VM LC PRE OPAQUE, OPAQUE/OPAQUE PASTE, VITA VM LC flow BASIC layering consists of the application of VITA VM LC flow BASE DENTINE and flow ENAMEL.
The color-bearing flow BASE DENTINE materials provide the perfect precondition for the preparation of veneers with intensive shades. With this two-layer alternative, VITA offers an ideal solution for shade reproduction in the case of thin walls.
The user is able to prepare a natural restoration with a lifelike appearance with only two layers.
For perfect shade reproduction, the minimum layer thickness of the veneer, including opaque material, should not be less than 0.8 mm.
Alternative layering in the incisal area is recommended to adapt the VITA VM LC veneer to VITA denture teeth.
Basic layering labial view.

10
flow – BASIC layering
A framework prepared for veneering with VITA VM LC OPAQUE PASTE or OPAQUE.
To facilitate layering, separate the plaster on the model using VITA VM LC SEPARATOR.
Use a disposable brush to apply VITA VM LC SEPARATOR to the dust-free and dry plaster model to achieve a glossy surface. Leave to dry for five minutes.
If space is at a premium, or in the case of chromatic tooth shades, the use of flow CHROMA PLUS materials is recommended. Application can be carried out cervically or across the entire surface.
For classification tables, see page 26. Then set by curing briefly.
Polymerization information can be found on page 25!
Layer with flow BASE DENTINE in a reduced tooth shape. If required, set all veneered surfaces by curing briefly.
The centric, lateral and protrusive occlusion should already be checked in the articulator during this stage.
Alternative:Perform fully anatomical layering and carry out intermediate polymerization, followed by cut-back, using a fine-cut carbide milling tool. Then clean the veneer surface (brush/pressurized air) and coat with VITA VM LC MODELLING LIQUID.
Supplement the tooth shape using flow ENAMEL and/or flow EFFECT ENAMEL. For classification tables, see page 26. Then set by curing briefly.

11
flow – BASIC layering, finishing, polishing, cleaning, shape adjustment
So that finishing is easier, we recommend the use of VITA VM LC GEL during final polymerization to prevent formation of an inhibition layer. Apply a coat of gel directly from the syringe to cover the entire veneer surface or use an instrument (do not use a brush) to apply the gel. Perform final polymerization. Then completely remove VITA VM LC GEL using running water.
Information on polymerization: Prepolymerization units may be used for the fixation of the materials during layering. If a layer thickness of 2 mm is reached during layering, final polymerization must be carried out without the use of VITA VM LC GEL. The layering process is continued immediately afterwards.
Polymerization information can be found on page 25!
Finishing is carried out using fine-cut carbide milling tools (for the maximum speed for composite, refer to the manufacturer's specifications).
... and a small goat-hair brush.
Prepolishing using a suitable silicone polisher, for example, from the VITA ENAMIC Polishing Set technical ...

12
flow
CleaningIt is recommended to clean under running water using a small amount of cleaning liquid and a soft or medium-hard toothbrush.
Please note the following when cleaning in the ultrasonic unit:Duration of time in the ultrasonic unit: approx. one min.Percentage of alkaline cleaning solution: max. 10%.
Note: Leaving the restoration in the ultrasonic unit for an excessive length of time may affect the quality of the material. Steam cleaning results in the development of extreme levels of heat and pressure and should generally be avoided.
– Finishing, polishing, cleaning, shape adjustment
The finalized veneer.
High-gloss polishing using a polishing material for veneering composites and a wool/leather buff or a felt wheel.
Avoid generating excess heat (for the maximum polisher speed, refer to the manufacturer's specifications).
Corrections of the shape • Grinding/or adjustment to the shape during layering after intermediate or final
polymerization or • Adding material after polishing or • Adding material after polymerization with VITA VM LC GEL
Roughen the surface using a fine-cut carbide milling tool and reduce the shape if required. Then use dry compressed air (with water separator) or a clean dry brush to remove any grinding dust. Wet the completely dry surface with VITA VM LC MODELLING LIQUID. Add VITA VM LC flow materials. Polymerize and complete as described.
13
flow – Individual layering
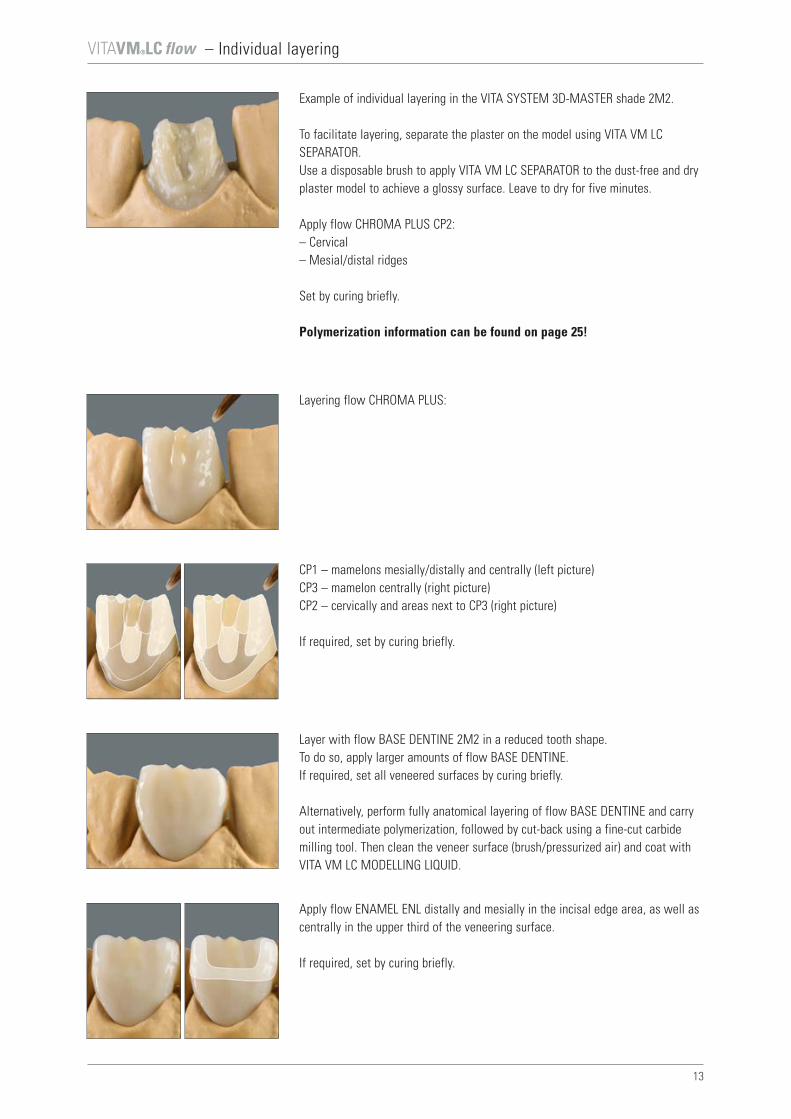
Example of individual layering in the VITA SYSTEM 3D-MASTER shade 2M2.
To facilitate layering, separate the plaster on the model using VITA VM LC SEPARATOR.Use a disposable brush to apply VITA VM LC SEPARATOR to the dust-free and dry plaster model to achieve a glossy surface. Leave to dry for five minutes.
Apply flow CHROMA PLUS CP2:– Cervical – Mesial/distal ridges
Set by curing briefly.
Polymerization information can be found on page 25!
Layering flow CHROMA PLUS:
CP1 – mamelons mesially/distally and centrally (left picture)CP3 – mamelon centrally (right picture)CP2 – cervically and areas next to CP3 (right picture)
If required, set by curing briefly.
Layer with flow BASE DENTINE 2M2 in a reduced tooth shape. To do so, apply larger amounts of flow BASE DENTINE. If required, set all veneered surfaces by curing briefly.
Alternatively, perform fully anatomical layering of flow BASE DENTINE and carry out intermediate polymerization, followed by cut-back using a fine-cut carbide milling tool. Then clean the veneer surface (brush/pressurized air) and coat with VITA VM LC MODELLING LIQUID.
Apply flow ENAMEL ENL distally and mesially in the incisal edge area, as well as centrally in the upper third of the veneering surface.
If required, set by curing briefly.

14
flow – Individual layering
Layer flow EFFECT ENAMEL EE 9 in the incisal area.
If required, set by curing briefly.
Layering flow EFFECT ENAMEL EE1 – incisalEE5 – central upper areaand EE6 – central lower area
If required, set by curing briefly.
Completion of the tooth shape using flow WINDOW.
Then set all veneered surfaces by curing briefly.
So that finishing is easier, we recommend the use of VITA VM LC GEL during final polymerization to prevent formation of an inhibition layer.
Apply a coat of gel directly from the syringe to cover the entire veneer surface or use an instrument (do not use a brush) to apply the gel. Perform final polymerization. Then completely remove VITA VM LC GEL using running water. For finishing, polishing, cleaning and shape adjustments see page 11.
Information on polymerization: Prepolymerization units may be used for the fixation of the materials during layering. If a layer thickness of 2 mm is reached during layering, final polymerization must be carried out without the use of VITA VM LC GEL. The layering process is continued immediately afterwards.
Polymerization information can be found on page 25!
The finalized individual veneer.

15
flow – Individualization and veneering of VITA ENAMIC®
To achieve an enhanced esthetic appearance, shade individualization of VITA ENAMIC restorations can be performed using VITA VM LC flow materials (layering technique), particularly in the transparent area of anterior restorations or in the vestibu-lar area of posterior restorations. Esthetically appealing results can be achieved, even with thin layers of VITA VM LC flow. The cut-back is carried out using CAD software or manually as a preparatory step for individualizing or veneering. The following minimum layer thicknesses for VITA ENAMIC must be adhered to:
Anterior crowns Posterior crowns Incisal: at least 1.5 mm Occlusal: at least 1.0 mmCircumferential: at least 0.8 mm Circumferential: at least 0.8 mm
Conditioning the surface• The surface of the VITA ENAMIC restoration to be individualized must be roughened and oil-free to ensure perfect
bonding to the composite.• Adhesion of residue, such as milling liquid or lubricant (such as Dentatec) to the surface, is not permitted. Remove these
either with ethanol or in an ultrasonic bath and dry the restoration.• The level of surface roughness immediately following CAM processing with a diamond grinding tool is sufficient for
individualization.
1. Roughening with a diamond grinding tool or2. Sandblasting using Al2O3 at max. 50 μm and a blasting pressure of max. 1 bar or3. Extraorally only (!): etching with a 5% hydrofluoric acid gel, such as
VITA ADIVA CERA-ETCH, as follows: using a small disposable brush, apply VITA ADIVA CERA-ETCH to the surfaces to be etched. Etching time: 60 seconds. Once the application time has been completed, remove the residual acid from the etched surface by rinsing off with copious amounts of water, by cleaning thoroughly using a steam jet device or by cleaning in an oil-free ultrasonic bath using distilled water. After cleaning, allow the surface to dry or dry with compressed air (with water separator). Do not brush off, as this would lead to significant surface contamination.
• Surfaces sandblasted with Al2O3 must also be cleaned thoroughly.• After cleaning, the surface should no longer be touched.
If subsequent reworking of the surface has reduced the level of roughness, one of the following three alternative methods can be used to increase roughness again:

16
flow – Individualization and veneering of VITA ENAMIC®
• Apply silane bonding agent, for example, VITA ADIVA C-PRIME, to the roughened surface.
• Apply VITA VM LC MODELLING LIQUID.
Application of VITA VM LC flow
Restoration prepared for individualization.
Incorporating incisal translucent effects with, for example, flow EFFECT ENAMEL EE9 and EE2. If required, set by curing briefly.
Layering mamelons with, for example, flow EFFECT ENAMEL EE2 and EE5.If required, set by curing briefly.
Building up the tooth shape using flow ENAMEL and/or flow EFFECT ENAMEL. Set by curing briefly.

17
flow – Individualization and veneering of VITA ENAMIC®
Option: Coating the entire crown with flow WINDOW.
All veneered surfaces are set by curing briefly.
To prevent formation of an inhibition layer and facilitate finishing, we recommend the use of VITA VM LC GEL during final polymerization. Apply a coat of gel directly from the syringe to cover the entire veneer surface or use an instrument (do not use a brush) to apply the gel.
Perform final polymerization.
Then completely remove VITA VM LC GEL using running water.
The restoration is finished and adjusted with a fine diamond instrument (marked with red ring, grit size 27 - 76 μm).
Note: VITA ENAMIC must not be milled with carbide milling tools.
Perform prepolishing using the instruments provided with the VITA ENAMIC Polishing Set technical and a goat-hair brush. A polishing material for veneering composites and a cotton/leather buff or a felt wheel are used for high-gloss polishing.Avoid generating excess heat (for the maximum polisher speed, refer to the manufacturer's specifications)
The completed ENAMIC restoration veneered with VITA VM LC flow.
For information on cleaning, see page 12.

18
VITA CAD-Temp VITA VM LC ENAMEL
flow – Layering over VITA CAD-Temp®
To achieve an enhanced esthetic appearance, the shade of long-term temporary restorations made from VITA CAD-Temp can be individualized with VITA VM LC flow, especially in the translucent incisal area of anterior restorations or in the vestibular area of posterior restorations. Even thin layers of VITA VM LC flow achieve esthetically appealing results.
When using the cut-back technique, controlled grinding or reducing of border areas using a cross-cut carbide milling tool is the precondition for a smooth transition between the VITA CAD-Temp temporary restoration and VITA VM LC flow.
To achieve reliable bonding between VITA CAD-Temp and VITA VM LC flow, the surface is sandblasted with aluminium oxide (grit size 50 μm) at a pressure of 2 bar.
Note: Maximum reduction of VITA CAD-Temp to achieve sufficient stability of the temporary restoration: translucent area of temporary anterior restoration: max. 0.5 mm. vestibular area of temporary posterior restoration: max. 0.3 mm.
To achieve reliable bonding, the sandblasted surface must be carefully cleaned with dry compressed air (with water separator) or using a dry clean brush and wetted with VITA VM LC MODELLING LIQUID. Allow MODELLING LIQUID to take effect for 30 to 60 seconds.
Note: The liquid must not be used to thin the materials.
Depending on which type of individualization is to be achieved, the suitable shade is applied: VITA VM LC flow or VITA VM LC PAINT materials are available for this purpose. They can be mixed with one another. Mixing ratio: at least two parts of VITA VM LC flow and no more than one part of PAINT.For fixation of the materials, intermediate polymerization is required.
Polymerization information can be found on page 25!
Note: VITA VM LC PAINT must not be on the surface and must be complete-ly coated with a VITA VM LC flow material. When applying the materials, air inclusions must be avoided.

19
flow – Layering over VITA CAD-Temp®
Apply a small quantity of flow ENAMEL, EFFECT ENAMEL, WINDOW or NEUTRAL in the upper third of the veneer surface (translucent or vestibular area). Intermediate polymerization can be carried out at any time during layering. Then perform final polymerization: To prevent formation of an inhibition layer and facilitate finishing, we recommend the use of VITA VM LC GEL during final poly-merization. Apply a coat of gel directly from the syringe to cover the entire veneer surface or use an instrument to apply the gel. Perform final polymerization. Then completely remove VITA VM LC GEL using running water.
Polymerization information can be found on page 25!
Fine-cut carbide burs must be used for all corrections of contours during individualization.
PolishingThen prepolishing is carried out using a suitable silicone polisher, for example, from the VITA ENAMIC Polishing Set technical, and a small goat-hair brush. A polishing material for veneering composites and a cotton/leather buff or a felt wheel are used for high-gloss polishing. Avoid generating excessive heat.
Note: Carefully performed polymerization and polishing are important requirements to obtain a good result and avoid the formation of deposits and resulting adverse effects on the shade.
Completed, individualized VITA CAD-Temp temporary bridge on the working model.
For information on cleaning, see page 12.

20
flow – Inlay/veneer
For preparation information about inlay, see page 4.
Preparation of the model:Undercuts should be blocked out first.Additionally, a thin placeholder layer can be applied.
Separating:The die of the inlay is coated with SEPARATOR beyond the preparation border. Use a disposable brush to apply VITA VM LC SEPARATOR to the dust-free and dry plaster model to achieve a glossy surface. Leave to dry for five minutes. The procedure must be repeated twice.
Layering:The inlay bottom is built up using a VITA VM LC flow material, for example, BASE DENTINE, CHROMA PLUS or ENAMEL, that matches the tooth shade. Do not coat the preparation border. Then set by curing briefly.
Polymerization information can be found on page 25!
Then use flow BASE DENTINE to build up the occlusal surface just below the preparation border. Then set by curing briefly.For characterization of fissures, mix a suitable amount of VITA VM LC PAINT material with flow WINDOW at a ratio of 1:2, apply into the fissures and set by curing briefly.Fissures can be characterized either with VITA VM LC flow CHROMA PLUS or EFFECT ENAMEL materials.
Build up the inlay to achieve the desired tooth shape using flow ENAMEL, NEUTRAL or EFFECT ENAMEL materials. For classification tables, see page 26.
Set by curing briefly.
Then apply a thin layer of flow WINDOW to seal the fissures. Set by curing briefly.
Then final polymerization is carried out. So that finishing is easier, we recommend the use of VITA VM LC GEL during final polymerization to prevent formation of an inhibition layer. Apply a coat of gel directly from the syringe to cover the entire veneer surface or use an instrument (do not use a brush) to apply the gel. Perform final polymerization. Then completely remove VITA VM LC GEL using running water.
Finishing and polishing should be carried out on a duplicate die. Prior to the integration, all inner surfaces must be sandblasted with 50 – 110 μm aluminium oxide while exerting only little pressure.
Completed inlay.
Bonding:The dual-curing luting composite VITA ADIVA® F-CEM is recommended for bonding.Please adhere to the working instructions.A veneer is built up in the same way as an inlay.For preparation information about veneers, see page 4.

21
flow – Metal-free restorations
Long-term temporary:Metal-free crowns and three-unit anterior bridges made from VITA VM LC flow
Preparation:A circumferential chamfer is required for adequate material thickness at the preparation margins.
Preparation of the model:Undercuts should be blocked out first.
Separating:The die is coated with VITA VM LC SEPARATOR beyond the preparation border. Use a disposable brush to apply VITA VM LC SEPARATOR to the dust-free and dry plaster model to achieve a glossy surface. Leave to dry for five minutes. The procedure must be repeated at least twice.
Use flow BASE DENTINE to model the copings in reduced tooth size and polymerize. Then build up the pontic between the copings step by step. Alternatively, pre-model the pontic on the ceramic mixing plate, polymerize and place it between the copings and connect with VITA VM LC flow materials. The approximal connections must have a diameter of at least 3.5 mm (10 mm2).
Polymerization information can be found on page 25!
Build up the labial side of the pontic with flow BASE DENTINE until the build-up level of the copings of the abutment teeth is reached.
Further layering and completion of the entire bridge, according to VITA VM LC flow BASIC layering (see page 9).

22
flow
Veneering partially yttrium-stabilized ZrO2 frameworks (CTE 10.0 - 10.5 · 10-6 · K-1), such as VITA YZ SOLUTIONS
Prepare framework for veneering. Sandblast surfaces to be veneered with Al2O3 (at least 50 μm) and a pressure of < 2.5 bar and then clean with compressed air (with water separator) or a dry clean brush.
Primer approved for permanent and temporary restorations: Clearfil Ceramic Primer Plus, KurarayPrimer approved only for temporary restorations: Signum zirconia bond, Heraeus Kulzer
• Apply Clearfil Ceramic Primer Plus in accordance with the manufacturer’s instructions. To achieve adequate bonding, the next layer is applied immediately afterwards: VITA VM LC PRE OPAQUE and OPAQUE PASTE or, alternatively, VITA VM LC OPAQUE PASTE directly (see page 6).
• Apply Signum zirconia bond I and II in accordance with the manufacturer’s instructions. To achieve adequate bonding, the next layer is applied immediately afterwards: VITA VM LC PRE OPAQUE and then VITA VM LC OPAQUE PASTE/ OPAQUE (see page 6).
Further layering and completion of the entire veneer is carried out according to the VITA VM LC flow BASIC layering (see page 9).
Veneering frameworks made of polyether ether ketone (PEEK)
The restoration is fabricated and the surfaces are prepared in accordance with the instructions of the corresponding PEEK manufacturer.
• To achieve reliable bonding of VITA VM LC flow to polyether ether ketone (PEEK) with a filler content of up to 20 % (such as BioHPP/Bredent) and PEEK OPTIMA® LT1 Polymer (such as Juvora, InnoBlanc Medical), the visio.link primer (Bredent) has been tested and approved by VITA.
• Subsequent use of the transparent VITA VM LC PRE OPAQUE is recommended; the viscosity of this product ensures uniform coating of the surfaces and reliable curing (see page 6).
• The subsequent application of opaque is done and the VITA VM LC flow layering is carried out as described, starting on page 7.
– Veneering zirconia frameworks and PEEK frameworks
23
flow – Individualization of VITA denture teeth/reproduction of gingiva
Individualization of VITA denture teeth
VITA denture teeth can be adapted to remaining natural teeth by using VITA VM LC flow materials. Depending on the type of individualization, the following procedure is required:
• A cross-cut carbide bur is used if the tooth shape needs to be reduced.• If the tooth shape does not need to be reduced, sandblasting is carried out immediately as described in the next step.• To achieve reliable bonding between VITA VM LC flow and the VITA denture teeth, the respective surfaces need to be
sandblasted with aluminium oxide (grit size 50 μm) and a pressure of 2 bar.• The sandblasted surface must be carefully cleaned with compressed air (with water separator) or a dry clean brush and
wetted with VITA VM LC MODELLING LIQUID to achieve reliable bonding. Allow MODELLING LIQUID to take effect for 30 to 60 seconds.
• Depending on the type of individualization to be achieved, the appropriate effect material is applied/used. There are a variety of VITA VM LC flow or paste materials available for this purpose (see page 28). To set the materials, cure them briefly.
• To prevent formation of an inhibition layer and facilitate finishing, we recommend the use of VITA VM LC GEL during final polymerization. Apply a coat of gel directly from the syringe to cover the entire veneer surface or use an instrument (do not use a brush) to apply the gel.
• Perform final polymerization and then completely remove VITA VM LC GEL using running water. • Finishing is done as described on page 11.
GINGIVAMixture of GINGIVA OPAQUE
PASTE GOL/PAINT
G1 GOL/PT13*
G4 GOL/PT19*
G5 GOL/PT15*
* Mixing ratio 2:1 (two parts GOL, one part PT) The information given is only intended to provide reference values.
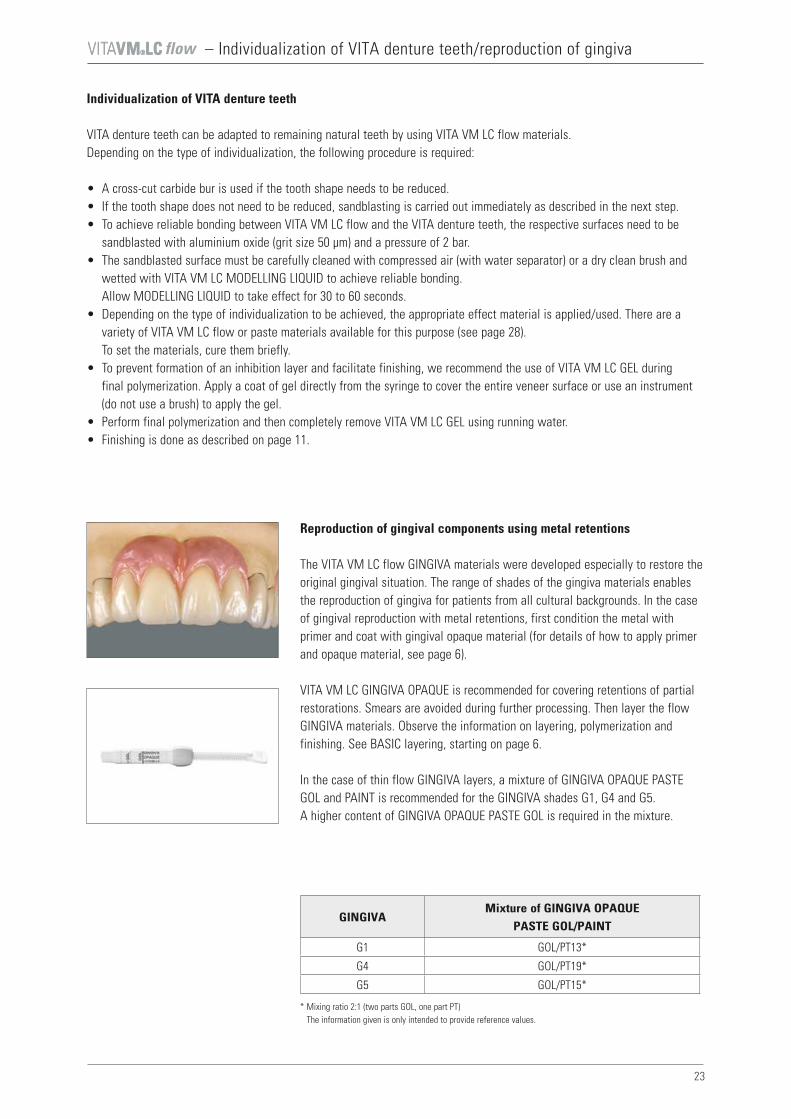
Reproduction of gingival components using metal retentions
The VITA VM LC flow GINGIVA materials were developed especially to restore the original gingival situation. The range of shades of the gingiva materials enables the reproduction of gingiva for patients from all cultural backgrounds. In the case of gingival reproduction with metal retentions, first condition the metal with primer and coat with gingival opaque material (for details of how to apply primer and opaque material, see page 6).
VITA VM LC GINGIVA OPAQUE is recommended for covering retentions of partial restorations. Smears are avoided during further processing. Then layer the flow GINGIVA materials. Observe the information on layering, polymerization and finishing. See BASIC layering, starting on page 6.
In the case of thin flow GINGIVA layers, a mixture of GINGIVA OPAQUE PASTE GOL and PAINT is recommended for the GINGIVA shades G1, G4 and G5. A higher content of GINGIVA OPAQUE PASTE GOL is required in the mixture.
24
flow – Facts worth knowing about light curing
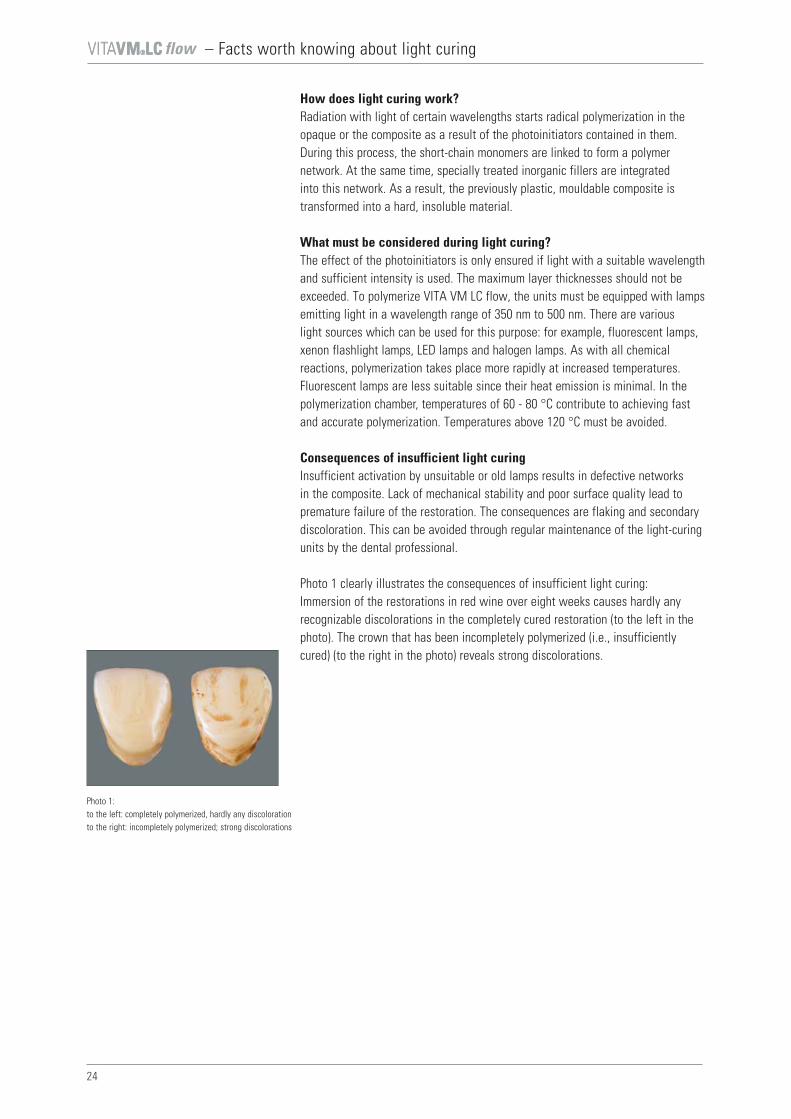
Photo 1:to the left: completely polymerized, hardly any discoloration to the right: incompletely polymerized; strong discolorations
How does light curing work?Radiation with light of certain wavelengths starts radical polymerization in the opaque or the composite as a result of the photoinitiators contained in them. During this process, the short-chain monomers are linked to form a polymer network. At the same time, specially treated inorganic fillers are integrated into this network. As a result, the previously plastic, mouldable composite is transformed into a hard, insoluble material.
What must be considered during light curing?The effect of the photoinitiators is only ensured if light with a suitable wavelength and sufficient intensity is used. The maximum layer thicknesses should not be exceeded. To polymerize VITA VM LC flow, the units must be equipped with lamps emitting light in a wavelength range of 350 nm to 500 nm. There are various light sources which can be used for this purpose: for example, fluorescent lamps, xenon flashlight lamps, LED lamps and halogen lamps. As with all chemical reactions, polymerization takes place more rapidly at increased temperatures. Fluorescent lamps are less suitable since their heat emission is minimal. In the polymerization chamber, temperatures of 60 - 80 °C contribute to achieving fast and accurate polymerization. Temperatures above 120 °C must be avoided.
Consequences of insufficient light curingInsufficient activation by unsuitable or old lamps results in defective networks in the composite. Lack of mechanical stability and poor surface quality lead to premature failure of the restoration. The consequences are flaking and secondary discoloration. This can be avoided through regular maintenance of the light-curing units by the dental professional.
Photo 1 clearly illustrates the consequences of insufficient light curing: Immersion of the restorations in red wine over eight weeks causes hardly any recognizable discolorations in the completely cured restoration (to the left in the photo). The crown that has been incompletely polymerized (i.e., insufficiently cured) (to the right in the photo) reveals strong discolorations.

– Polymerization information
25
flow
When using light-curing composites, a good polymerization result strongly depends on the power of the unit in use. To be able to provide recommendations, VITA has carried out extensive tests of the most common light curing devices in conjunction with VITA VM®LC.
Polymerization times and information can be found here:
To learn how to properly polymerize VITA VM®LC, go to:https://www.vita-zahnfabrik.com/de/Verblendmaterial/Verblendkomposite/VITAVMLC-30312,27568.html

26
flow – Classification tables
*Mixing ratio approx. 1:1When mixing flow CHROMA PLUS materials, ensure that air bubbles are not created.
The classifications are only intended to provide reference values.
VITA SYSTEM 3D-MASTER OPAQUE OPAQUE PASTE flow CHROMA PLUS flow ENAMEL
0M1 OP 0M1 – – ENL1M1 OP 1M1 OP 1M1 CP1/CP2* ENL1M2 OP 1M2 OP 1M2 CP2 ENL2L1.5 OP 2L1.5 OP 2L1.5 CP2 ENL2L2.5 OP 2L2.5 – CP2 ENL2M1 OP 2M1 OP 2M1 CP2 ENL2M2 OP 2M2 OP 2M2 CP1/CP3* ENL2M3 OP 2M3 OP 2M3 CP3 ENL2R1.5 OP 2R1.5 – CP1/CP5* ENL2R2.5 OP 2R2.5 – CP1/CP3* ENL3L1.5 OP 3L1.5 OP 3L1.5 CP2/CP5* ENL3L2.5 OP 3L2.5 – CP3 ENL3M1 OP 3M1 – CP1/CP5* ENL3M2 OP 3M2 OP 3M2 CP3/CP5* ENL3M3 OP 3M3 OP 3M3 CP3/CP4* ENL3R1.5 OP 3R1.5 – CP4/CP5* ENL3R2.5 OP 3R2.5 OP 3R2.5 CP4/CP5* ENL4L1.5 OP 4L1.5 – CP5 END4L2.5 OP 4L2.5 – CP4/CP5* END4M1 OP 4M1 – CP5 END4M2 OP 4M2 OP 4M2 CP3/CP5* END4M3 OP 4M3 – CP4/CP5* END4R1.5 OP 4R1.5 – CP5 END4R2.5 OP 4R2.5 – CP4 END5M1 OP 5M1 – – END5M2 OP 5M2 – – END5M3 OP 5M3 – – END
VITA classical A1–D4 shades OPAQUE PASTE flow CHROMA PLUS flow ENAMEL
A1 OP A1 CP1 ENLA2 OP A2 CP2 ENLA3 OP A3 CP2/CP3* ENL
A3.5 OP A3.5 CP3 ENDA4 OP A4 CP4/CP5* ENDB2 OP B2 CP2 ENLB3 OP B3 CP2/CP3* ENDB4 OP B4 CP3 ENDC1 OP C1 CP1/CP5* ENDC2 OP C2 CP1/CP5* ENLC3 OP C3 CP1/CP5* ENDC4 OP C4 CP5 ENDD2 OP D2 CP2 ENDD3 OP D3 CP2/CP5* ENDD4 OP D4 CP2/CP5* END

27
PRE
0M1
1M1
1M2
2L1.5
2M1
2M2
2M3
3L1.5
3M2
3M3
3R2.5
4M2
A1–D4
0M1
1M1 - 5M3OPAQUE
VITAVM®LC
0M
1
flow
light pinkGOL
transparent
(except B1)
GINGIVA OPAQUE PASTE– for coating the metal framework prior to the
application of the GINGIVA materials– for retentions on CoCr structures, no smears
PRE OPAQUE– first opaque layer for metal, PEEK and zirconia
frameworks– particularly recommended for retentions– flowable transparent material that ensures
reliable curing– allows a uniform opaque layer to be obtained
OPAQUE PASTE– tooth-colored opaque paste to mask the shade
of the framework– high masking capacity for thin layers
(approx. 0.2 mm)– high stability, thanks to the homogeneous
visco-elastic consistency – also for retentions
OPAQUE powder– tooth-colored opaque powder to mask the
shade of the framework– high masking capacity for thin layers
(approx. 0.2 mm)
– Application areas of the materials
VITAVM®LC opaque materials

28
flow
A1–D4
ENL
END
NT
WIN
EE1
EE2
EE5
EE6
EE7
EE9
EE11
EE12
CP1
CP2
CP3
CP4
CP5
– Application areas of the materials
whitish
pastel
yellowish-translucent
reddish-translucent
orange-translucent
bluish-translucent
greyish-translucent
grey-beige
ivory
beige-yellow
light orange-brown
orange
green-brown
light
dark
Translucent
transparent
BASE DENTINE– shade-defining BASE DENTINE materials
ENAMEL– translucent enamel materials
NEUTRAL– universal translucent material
WINDOW– transparent material, for crystal-clear effects
in the enamel area– for mixing and layering of VITA VM LC PAINT
stains on VITA VM LC flow, VITA denture teeth and VITA CAD-Temp
– for mixing the VITA VM LC flow materials– for coating the finalized veneer– for covering fissures
EFFECT ENAMEL– translucent enamel effect material for
all enamel areas– for achieving a natural effect of depth
CHROMA PLUS– shade-intensive materials; the intensity can be
controlled through the thickness of the layer– to be applied in the tooth-neck area or across
the entire surface of the opaque– stronger fluorescent effect– can also be used as a correction material,
depending on the shade
VITAVM®LC flow veneering materials*
(except B1)0M1/1M1/2M1/2M2/ 2M3/3M2/3M3/3R2.5

29
G1
G2
G3
G4
G5***
PT1
PT3
PT5
PT8
PT9
PT12
PT13
PT15
PT17
PT19
flow - Application areas of the materials
dusky pink
orange-pink
pink
brown-red
dark red
GINGIVA– for restoring the original gingival situation
*** when a layer thickness of 1 mm is reached, final polymerization is required
white
yellow
light orange-brown
almond-colored
green-brown
bordeaux
grey
chestnut brown
blue
light brown
VITA VM LC PAINT – flowable materials for shade effects and
individual characteristics, such as calcification, enamel cracks and nicotine stains
– PAINT materials should not lie on the surface, due to the low filler content
– for individualizing OPAQUE PASTE– can be mixed with all VITA VM LC flow materials
- mixing ratio: at least two parts of VITA VM LC flow and no more than one part of PAINT.
stains
* The VITA VM LC flow materials can be mixed with one another and can be shaded by combining with VITA VM LC PAINT materials.Mixing ratio: at least two parts of VITA VM LC flow and no more than one part of PAINT.To prevent bubbles when mixing, mix with an instrument rather than a brush.
Various levels of translucency - VITA VM LC flow
2.0 mm
0.5 mm
From left to right:CHROMA PLUS CP2, EFFECT ENAMEL EE2, ENAMEL LIGHT ENL, WINDOW WIN. Thickest point (top): 2.0 mm,thinnest point (bottom): 0.5 mm.

30
flow – Liquids and accessories
VITA VM LC OPAQUE LIQUIDMixing liquid for OPAQUE powder. OPAQUE LIQUID must not be used together with OPAQUE PASTE paste material.
5 ml, Prod. No. CVMLOL5
VITA VM LC SEPARATORLiquid for separating plaster models against resin.Application: Use a disposable brush to apply VITA VM LC SEPARATOR to the dust-free and dry plaster model to achieve a glossy surface. Leave to dry for five minutes.
30 ml, Prod. No. CVMLS30
VITA VM LC MODELLING LIQUIDApplication is easier if the modelling instrument or the brush is wetted with a very small quantity of liquid. Use very sparingly. The liquid must not be used to thin the powders.To be used for wetting the veneering materials after adjustments made by grinding. Ensures bonding of VITA VM LC and, for example, VITA denture teeth, VITA CAD-Temp.
10 ml, Prod. No. CVMLM1030 ml, Prod. No. CVMLM30
VITA VM LC CLEANERCleaning liquid should be used to remove non-polymerized VITA VM LC materials from instruments. Hardened material residues can be partially dissolved with VITA VM LC OPAQUE LIQUID.
50 ml, Prod. No. CVMLC50
VITA VM LC GELTo prevent formation of an inhibition layer during final polymerization and to facilitate finishing.
20 ml, Prod. No. CVMLG20
VITA ADIVA C-PRIMESingle-component silane bonding agent.
Bottle cont. 5 ml, Prod. No. FACP5
31
flow – Compositions and physical properties
VITAVM®LC – Physical properties
Compositions
VITA VM LC flow materials(BASE DENTINE, ENAMEL, CHROMA PLUS,EFFECT ENAMEL, GINGIVA, WINDOW, NEUTRAL)Dimethacrylates, multifunctional acrylates, catalysts, stabilizers and inorganic pigments.Filler content: 55 – 68 % by weight, zirconia, silicon dioxide.
VITA VM LC PRE OPAQUEDimethacrylates, multifunctional acrylates, catalyst and stabilizers.
VITA VM LC opaque paste(OPAQUE PASTE, GINGIVA OPAQUE PASTE)Dimethacrylates, multifunctional acrylates, catalysts, stabilizers and inorganic pigments. Filler content: 4 – 9 % by weight, silicon dioxide
VITA VM LC opaque powder(OPAQUE)Polymethyl methacrylate and inorganic pigments.
VITA VM LC PAINT Dimethacrylates, catalyst, stabilizers and inorganic pigments. Filler content: 30 – 40 % by weight, silicon dioxide
VITA VM LC GELGlycerin and silicon dioxide.
VITA VM LC MODELLING LIQUIDDimethacrylate, methacrylic ester, catalyst and stabilizers.
VITA VM LC CLEANEREthanol.
VITA VM LC OPAQUE LIQUIDDimethacrylates, methyl methacrylate, catalyst and stabilizers.
VITA VM LC SEPARATORPolydimethyl siloxane, solvent, silane, catalyst and stabilizers.
Product Flexural strength MPa* E-modulus MPa
VITA VM LC flow approx. 130 approx. 7000
** Measured acc. to DIN EN ISO 10477
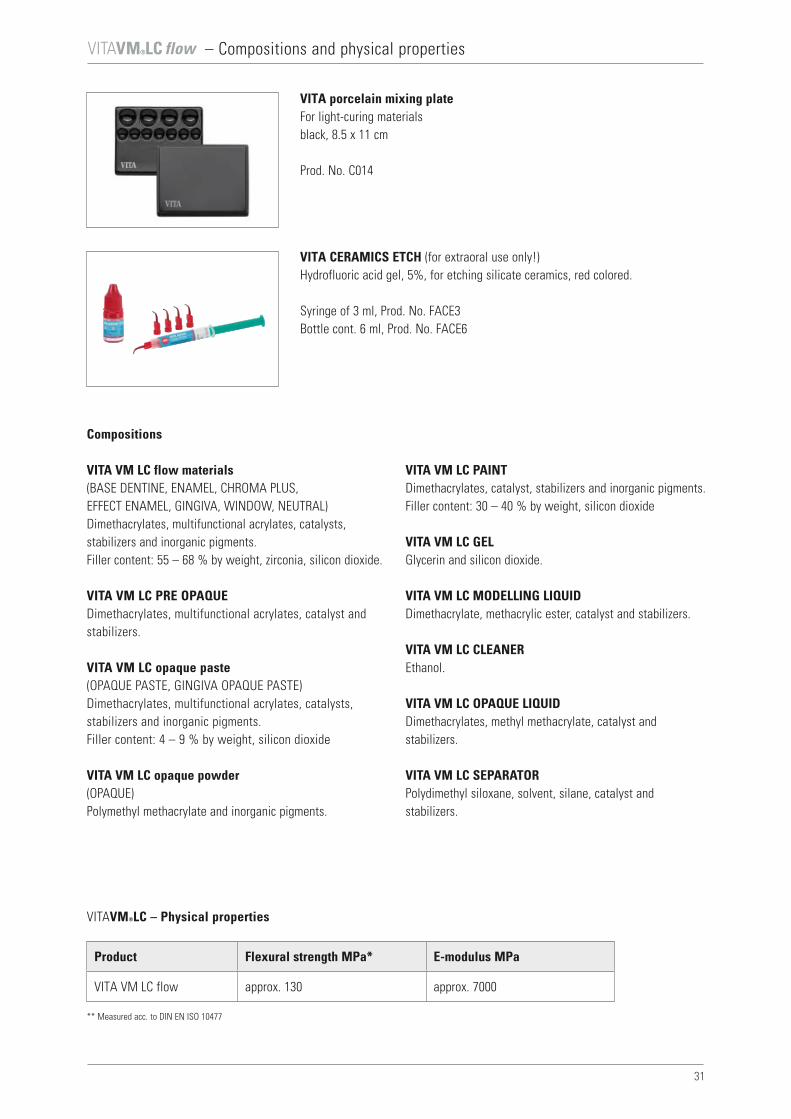
VITA porcelain mixing plateFor light-curing materials black, 8.5 x 11 cm
Prod. No. C014
VITA CERAMICS ETCH (for extraoral use only!)Hydrofluoric acid gel, 5%, for etching silicate ceramics, red colored.
Syringe of 3 ml, Prod. No. FACE3Bottle cont. 6 ml, Prod. No. FACE6

32
flow
LOT
25°C77°F
Rx Only
– Information and care instructions
When working with the product, wear suitable safety goggles/face protection, gloves and safety clothing.
Work under an extraction unit.
Avoid contact with skin.
In case of contact with eyes, rinse immediately with water and seek medical advice.
In case of contact with skin, rinse immediately with copious amount of water.
Substances hazardous to water must not be allowed to enter the sewage system/to reach the environment.
Safety at work, health protection, environmental protection
It is generally recommended to store composites under cold conditions. To ensure perfect storage of the composites in syringes, they should be stored in the firmly sealed container/syringe in a suitable refrigerator at 5 – 10 °C. To achieve proper consistency of the materials for processing, they should be kept at room temperature for about one hour. The containers should not be opened before use! Close the syringe immediately after dispensing material.
Storage informationDo not store above 25 °C/77 °F.Do not expose to direct sunlight.
Important! Observe warnings and precautions given in the accompanying documents.
Symbol for “can be used until” Do not expose to direct sunlight.
Refer to instructions for use
Medical device
For professionals onlyManufacturer VITA Zahnfabrik
Symbol for “batch number” Do not store above 25 °C/77 °F.
Explanation of the markings on the packaging
Care instructions for removable restorations made from VITA VM LC flow• The restoration should be rinsed with water after each meal and cleaned mechanically at least once a day. • Mechanical cleaning: hold the denture over a washbasin filled with water and clean from all sides. • Use a soft or medium-hard toothbrush or denture brush and a small quantity of abrasive toothpaste
for cleaning.• Frequent consumption of coffee, tea, nicotine and in some cases, medication, may cause discoloration.
In such cases, the restoration should be cleaned repeatedly. • It is strongly advised not to use cleaning tabs or cleaning solutions.
The active substances damage the material surfaces and cause discoloration and plaque deposits.

33
flow – Information
The following products require hazard identification:
VITAVM®LC MODELLING LIQUID(Contains triethylene glycol dimethacrylate, 2-dimethylaminoethyl methacrylate)
Causes skin irritation.Causes severe eye irritation.May cause respiratory irritation.May cause allergic skin reactions.
VITAVM®LC SEPARATOR(contains cyclohexane, toluene, methyltriacetoxysilane)
Highly flammable liquid and vapor.Possible risk of harm to the unborn child.May cause damage to organs through prolonged or repeated exposure.May be fatal if swallowed and enters airways.Causes serious eye damage.Very toxic to aquatic life with long lasting effectsCauses skin irritation.May cause drowsiness and dizziness.
VITAVM®LC CLEANER(Contains ethanol)
Highly flammable liquid and vapor.Causes severe eye irritation.
VITAVM®LC OPAQUE LIQUID(contains methyl methacrylate, ethylene glycol dimethacrylate, 2-dimethylaminoethyl methacrylate)
Highly flammable liquid and vapor.Causes skin irritation.May cause allergic skin reactions.May cause respiratory irritation.
VITAVM®LC OPAQUE PASTE VITAVM®LC GINGIVA OPAQUE PASTE(contains 2-dimethylaminoethyl methacrylate)
Causes skin irritation.Causes severe eye irritation.May cause allergic skin reactions.Harmful to aquatic life with long-lasting effects
VITAVM®LC PRE OPAQUE (contains 2-dimethylaminoethyl methacrylate)
Harmful to aquatic life with long-lasting effectsMay cause an allergic reaction.

34
flow – Information
The corresponding safety data sheets can be downloaded at www.vita-zahnfabrik.com/sds.
Note:• Dental treatment and the integration of dental restorations entail the general risk of iatrogenic damage to hard tooth substance,
pulp and/or oral soft tissue. The use of bonding systems and the integration of dental restorations involve the general risk of postoperative hypersensitivity.
• In the event of non-compliance with the instructions for use of the products in use, the product characteristics can not be ensured so that product failure and irreversible damage to the natural hard tooth substance, pulp and/or oral soft tissue may result.
The following products require hazard identification:
VITAVM®LC PAINT(contains 2-dimethylaminoethyl methacrylate, triethylene glycol dimethacrylate)
Causes skin irritation.Causes serious eye irritation.May cause an allergic reaction.Harmful to aquatic organisms with long-term adverse effects.
VITAVM®LC flow(Contains triethylene glycol dimethacrylate, 2-dimethylaminoethyl methacrylate)
Causes skin irritation.Causes severe eye irritation.May cause allergic skin reactions.Harmful to aquatic life with long-lasting effects
VITA ADIVA® CERA-ETCH(hydrofluoric acid ceramic etching gel)For extraoral use only!Contains hydrofluoric acid.
Caustic/ToxicFor extraoral use only!Contains hydrofluoric acid.Toxic if swallowed. Fatal in contact with skin. Causes severe skin burns and damage to eyes. Harmful by inhalation. Wear protective gloves/protective clothing/safety goggles. Keep locked up. If swallowed, call Toxicological Information Center immediately and provide safety data sheet. In case of contact with clothing/skin, remove contaminated clothing immediately and rinse with copious amount of water. Specific measures, see safety data sheet. In case of contact with eyes, rinse with water for a few minutes and consult a doctor/Toxicological Information Center.This material and its container must be disposed of as hazardous waste.
VITA ADIVA® C-PRIME(Silane bonding agent)
DangerHighly flammable liquid and vapor.Keep away from heat/sparks/open flame/hot surfaces. No smoking.

35
flow – Notes

VITA Zahnfabrik H. Rauter GmbH & Co.KGSpitalgasse 3 · D-79713 Bad Säckingen · GermanyTel. +49 (0)7761/562-0 · Fax +49 (0)7761/562-299Hotline: Tel. +49 (0)7761/562-222 · Fax +49 (0)7761/562-446www.vita-zahnfabrik.com · [email protected]
facebook.com/vita.zahnfabrik
1038
4E –
072
1 (X
.) S
– Ve
rsio
n (0
4)
Please note: Our products must be used in accordance with the instructions for use. We accept no liability for any damage resulting from incorrect handling or usage. The user is furthermore obliged to check the product before use with regard to its suitability for the intended area of applications. We cannot accept any liability if the product is used in con-junction with materials and equipment from other manufacturers that are not compatible or not authorized for use with our product and this results in damage. The VITA Modulbox is not necessarily a component of the product. Date of issue of this information: 2021-07
After the publication of this information for use any previous versions become obsolete. The current version can be found at www.vita-zahnfabrik.com
VITA Zahnfabrik has been certified and the following products bear the mark
:
VITAVM®LC · VITAVM®LC flow · VITA CAD-Temp® · VITAVM®CC · VITA ENAMIC® · VITA YZ® T · VITA YZ® HT · VITA YZ® ST · VITA YZ® XT
Harvard Dental International GmbH has been certified in accordance with the Medical Device Directive and the following product bears the CE mark
:
VITA ADIVA® C-PRIME
VITAVM®LC · VITAVM®LC flow · VITA CAD-Temp® · VITAVM®CC · VITA YZ® T · VITA YZ® HT · VITA YZ® ST · VITA YZ® XT · VITA ENAMIC® · VITA ADIVA® are regis-tered trademarks of VITA Zahnfabrik H. Rauter GmbH & Co. KG, Bad Säckingen, Germany.
PEEK-OPTIMA® is a registered trademark of INVIBIO LIMITED, FY5 4QD, Thornton Cleveleys, GB.
ESPE® SIL and Rocatec® are registered trademarks of 3M Company or 3M Deutschland GmbH.
Signum® Metal Bond I + II is a registered trademark of Heraeus Kulzer GmbH, 63450 Hanau, Germany.
BioHPP® is a registered trademark of Bredent GmbH & Co. KG, 89250 Senden, Germany.
We would like to thank Mr. Jürgen Freitag (MDT) for his kind support and for providing the photos on pages 15-17 and Mr. Kurt Reichel (MDT) for his kind support and for providing the photos on pages 18-20.
Rx Only
With the unique VITA SYSTEM 3D-MASTER, all natural tooth shades can be systematically determined and perfectly reproduced.