florida department of transportation · florida department of transportation trns*port sitemanager...
TRANSCRIPT

Florida Department of Transportation
Release 3.7b
REVISED
April 2007

Florida Department of Transportation Trns*port SiteManager User’s Manual Contract Activation Function
Page 2 April 2007
Table of Contents
TABLE OF CONTENTS........................................................................................................................................... 2
I. CONTRACT ACTIVATION FUNCTION................................................................................... 5 CONTRACT ACTIVATION GETTING STARTED .......................................................................................................... 6 DESCRIPTION TAB................................................................................................................................................... 7 LOCATION TAB ....................................................................................................................................................... 8 CRITICAL DATES TAB ............................................................................................................................................. 9 PRIMARY PERSONNEL TAB ..................................................................................................................................... 9 PRIME CONTRACTOR TAB..................................................................................................................................... 10
Contractor Address .......................................................................................................................................... 10 Prime Associates .............................................................................................................................................. 10
DBE COMMIT TAB................................................................................................................................................ 11 TRAINING PLAN TAB............................................................................................................................................. 11 ACTIVATING THE CONTRACT ................................................................................................................................ 11 ADDING ASSOCIATES TO A VENDOR ..................................................................................................................... 12 MANAGING CONTRACT AUTHORITY..................................................................................................................... 13
Granting Contract Authority ........................................................................................................................... 15 Ending Contract Authority.............................................................................................................................. 15
CONTRACTOR PAYMENT APPROVAL LEVELS........................................................................................................ 16 II. SUBCONTRACT MANAGEMENT FUNCTION..................................................................... 18
SUBCONTRACT MANAGEMENT GETTING STARTED............................................................................................... 19 DESCRIPTION TAB................................................................................................................................................. 19 ITEMS TAB ............................................................................................................................................................ 21
III. DAILY WORK REPORTS FUNCTION.................................................................................... 23 DAILY WORK REPORTS GETTING STARTED.......................................................................................................... 24 DWR INFO. TAB ................................................................................................................................................... 24 CONTRACTORS TAB .............................................................................................................................................. 25 CONTRACTORS EQUIP. TAB .................................................................................................................................. 26 DAILY STAFF TAB................................................................................................................................................. 26 WORK ITEMS TAB................................................................................................................................................. 27 FORCE ACCOUNT TAB (NOT USED BY FDOT AT THIS TIME)................................................................................. 28 DWR REPORTS WHAT YOU SHOULD KNOW ........................................................................................................ 28 MAINTAINING A MASTER LIST.............................................................................................................................. 28
Loading the Generic List to a Contract........................................................................................................... 28 VENDOR MASTER LIST LOAD UTILITY ................................................................................................................. 30
Vendor Master List Load Utility Getting Started............................................................................................ 30 Modifying the Vendor Master List .................................................................................................................. 32
DWR ON-LINE REPORTS ...................................................................................................................................... 34 IV. DIARY APPROVAL FUNCTION............................................................................................. 38
DIARY APPROVAL GETTING STARTED .................................................................................................................. 39 AUTHORIZE TAB ................................................................................................................................................... 39 CHARGE TAB (NOT USED BY FDOT AT THIS TIME) ............................................................................................... 40
V. ESTIMATES GENERATION FUNCTION ............................................................................... 42 ESTIMATES GENERATION: WHAT YOU SHOULD KNOW ........................................................................................ 43 ESTIMATE GENERATION: GETTING STARTED........................................................................................................ 43 ADJUSTING AN ESTIMATE ..................................................................................................................................... 44
Contract Level Adjustments............................................................................................................................. 45 Line Item Adjustments..................................................................................................................................... 46
PRINTING AND REVIEWING THE ESTIMATE REPORT.............................................................................................. 49 DELETING AN ESTIMATE....................................................................................................................................... 52
Florida Department of Transportation Trns*port SiteManager User’s Manual Contract Activation Function
April 2007 Page 3
PAYMENT APPROVAL LEVEL MANAGEMENT........................................................................................................ 53 ESTIMATE APPROVAL PROCESS ............................................................................................................................ 54 GENERATION OF PRINTED ESTIMATE FOR COMPTROLLER.................................................................................... 54
Method 2 Screen Prints ................................................................................................................................... 55 VI. CHANGE ORDER MANAGEMENT FUNCTION................................................................... 59
CHANGE ORDERS, WHAT YOU SHOULD KNOW .................................................................................................... 60 DEFINITIONS ......................................................................................................................................................... 60 CONTRACT CHANGE ORDERS GETTING STARTED................................................................................................. 62 CHANGE ORDERS HEADER ................................................................................................................................... 63 CHANGE ORDER ITEMS FOLDER ........................................................................................................................... 63
Change Order Item Tab .................................................................................................................................. 63 New Contract Item Tab ................................................................................................................................... 65
CHANGE ORDER TIME ADJUSTMENTS................................................................................................................... 65 CHANGE ORDER EXPLANATIONS .......................................................................................................................... 66 CHANGE ORDER TRACKING.................................................................................................................................. 67 SAVING CHANGE ORDER ...................................................................................................................................... 67 CHANGE ORDER REVIEW/APPROVE...................................................................................................................... 67 DELETING A CHANGE ORDER ............................................................................................................................... 68 SAVING A PSR...................................................................................................................................................... 68 CHANGE ORDER EXAMPLE – NO ADDITIONAL COST CHANGE ORDER ................................................................. 68
VII. STOCKPILE MATERIALS FUNCTION .................................................................................. 72 STOCKPILED MATERIALS: GETTING STARTED ...................................................................................................... 73 GETTING STARTED................................................................................................................................................ 74 REPLENISHING A STOCKPILE................................................................................................................................. 75 CLOSING OUT STOCKPILE MATERIAL BALANCES:................................................................................................ 75 PAYMENT PROCESS FOR STOCKPILED MATERIALS............................................................................................... 75
VIII. CHECKLIST SCHEDULED EVENTS AND DATES .............................................................. 78
IX. KEY DATES .............................................................................................................................. 84 KEY DATES: GETTING STARTED ........................................................................................................................... 85 TO SCHEDULE A KEY DATE: ................................................................................................................................. 86 TO ENTER THE ACTUAL DATE OF A KEY DATE:.................................................................................................... 86 TO DELETE A KEY DATE: ...................................................................................................................................... 86 TO CREATE A NEW KEY DATE: ............................................................................................................................ 87
X. CONTRACTOR EVALUATION............................................................................................... 89 CONTRACTOR EVALUATION GETTING STARTED................................................................................................... 90
XI. MASTER LIST MAINTENANCE FUNCTION........................................................................ 93 DAILY WORK REPORTS VENDOR MASTER LIST ................................................................................................... 94 FUNCTION 1 – MAINTAINING VENDOR MASTER LIST ........................................................................................... 94
Adding Supervisors.......................................................................................................................................... 95 Adding Personnel ............................................................................................................................................ 95 Adding Equipment........................................................................................................................................... 96 Adding Staff Member ...................................................................................................................................... 96 Changing an Existing Item. ............................................................................................................................ 97
FUNCTION 2 – MAINTAINING CONTRACT MASTER LIST ....................................................................................... 97 Adding a Resource to the Contract Vendor List ............................................................................................. 98 Adding all Resources to the Contract Vendor List ......................................................................................... 98 Removing a Resource from the Contract Vendor List ................................................................................... 98 Removing all Resources from the Contract Vendor List................................................................................ 98
XII. STAND-ALONE FUNCTION ................................................................................................. 100 STAND-ALONE FUNCTION GETTING STARTED.................................................................................................... 101

Florida Department of Transportation Trns*port SiteManager User’s Manual Contract Activation Function
Page 4 April 2007
DEFINITIONS ....................................................................................................................................................... 101 GETTING CONTRACT INFORMATION DOWN TO THE “PROJECT MANAGER’S” WORKSTATION............................. 101 WORKING IN “STAND-ALONE” MODE. ............................................................................................................... 105 MOVING INFORMATION BACK TO THE NETWORK SERVER.................................................................................. 106 SYNCHRONIZING DATA WITH SITEPAD ............................................................................................................... 108 GETTING INFORMATION ON WHAT HAS BEEN PIPED TO PROJECT MANAGER’S WORKSTATION ........................... 111

Florida Department of Transportation
I. Contract Activation Function
Release 3.7b
April 2007

Florida Department of Transportation Trns*port SiteManager User’s Manual Contract Activation Function
Page 6 April 2007
Contract Activation Getting Started Contract Activation must be completed before any work can be reported against a contract. When contract information is brought over from the pre-construction system (LAS) the contract status will be pending. Status must be changed to “Active” in order to complete Contract Activation. To start activation, select Contract Administration from the SiteManager Main panel.
Select Contract Records from the Contract Administration panel; then select Contracts from the Contract Records panel. Once selected, the following screen will appear. If you haven’t selected a contract in some other window prior to opening this window, all of the fields will be blank. If the screen is blank (that is, No keys have been selected), then select File from the Menu – then select Open. Locate the contract you want to work with and then press OK. You could also use the Open icon from the toolbar. Note: You will only see contracts that you have authority to access. There are 8 different “tabs” on this window and all of them will be used except the DBE Commit and Training Plan tabs at the initial implementation of

Florida Department of Transportation Trns*port SiteManager User’s Manual Contract Activation Function
April 2007 Page 7
SiteManager in FDOT. The following describes the individual “tabs” and what is required to be entered for “Activation”. These steps can be done in any order but once you have changed status to “Active” in order to save any information you will need to have all data entered that is required for “activation”. Description Tab
Required Fields: Contract ID: Primary PCN:
System(key) System
Wage Decision: System
If you are ready to activate a contract go to the Description tab and perform the following functions.
1. Verify the Fed St Project Nbr is the FA number for your contract (if there is federal funding). If the contract is 100% state funded, then this text box should be populated with N/A.
2. Leave the Status as “Pending” for right now. We will change this after we have entered all the
information required to activate the contract. Helpful Hint:
If you change the status to Active at this point, you can press the Save icon and the system will tell you if you have entered all of the information required and that it has been entered correctly for activation. If you want to save data that you have entered to this point but you don’t have all of the data entered for activation then change status back to pending and press Save. This will save the data to this point and contract as pending and you can come back later on and complete the activation process.
3. If the lead Financial Project ID is not shown in the field labeled Primary PCN then select it from the
drop-down list. 4. Make sure the Time Charges is set to “Available Working Days” 5. Wage Decision is not going be used initially by FDOT but SiteManager requires that a valid decision
be entered. We have set up a default value to enter. To enter the wage decision do the following:
♦ Place focus on the lower portion of the window by clicking the mouse in that area. ♦ Select the New icon. ♦ Search in the first test box (Wage Decision ID) by clicking the right mouse button and
selecting Search from the menu. Select the appropriate wage decision.
6. Do not edit any other editable fields. 7. Press the Save icon on the toolbar.

Florida Department of Transportation Trns*port SiteManager User’s Manual Contract Activation Function
Page 8 April 2007
Location Tab
1. Check for the proper Contract
County.
2. To add a new Contract County, place the focus in the lower portion of window by clicking the mouse in the area. Then press the New icon to insert a blank row. Use the search lens to select the desired county to add by clicking the right mouse button.
3. Make sure that at least one county has been checked as the Primary County.
4. Make sure a Location has been entered.
5. Press the Save icon on the toolbar
Payment Data Tab 1. Leave the Contract Limit Amt. blank.
2. The Contract Limit Pct. is the allowable
amount that we can overrun the existing funding sources when we add a contract change. This percent should be set to at least 100% to ensure that no additional funding sources will have to be added during the contract life. It can be higher or lower than this. This has nothing to do with our state statute that only allows for 5% overrun before a Supplemental Agreement must be done using the Change Order function.
3. Make sure Liquidated Dam Rate Amt. is blank. This would not be filled in unless you had specific Liquidated Damage Amounts specified within the contract documents.
4. Place a check in box next to Auto Liquidated Dam. The Liquidated Damage Rate Amt field will automatically be populated based on the contract amount when we activate the contract. If you entered an amount in the Liquidated Dam Rate Amt. field then you will not need to check this box.
5. If fuel adjustments are to be paid to the contractor then the Price Adjmnt Ind check box must be checked.
6. Make sure the Unlimited Escrow and Retain Stkpiled Ind under Retainage are checked.
7. The Retainage portion of the tab at the bottom should not require any changes to it.
8. Press the Save icon on the toolbar.
Required Fields: Contract ID: Liquidated Dam Rate Amt:
System(key)FDOT
Auto Liquidated Dam: FDOT Trgr Pct: Retain Stkpiled Ind: Unlimited Escrow:
FDOT FDOT FDOT

Florida Department of Transportation Trns*port SiteManager User’s Manual Contract Activation Function
April 2007 Page 9
Critical Dates Tab
Required Fields: Contract ID: Letting Date: Award Date: Execution Date:
System(key)System System System
Notice to Proceed Date: System
The Critical Dates Tab contains most of the important dates that will need to be kept during the life of the contract. Some of these dates are calculated automatically by SiteManager and will not have to be entered by any user. Two dates will be populated by the system upon contract entering SiteManager. They are Letting Date and Award Date. One date is required to “activate” a contract. This date is the Execution Date. You can enter a date for the Execution Date now. The Notice to Proceed Date can be entered at a later date. To enter the Execution Date do the following:
♦ Select Execution Date on the top portion of the window. ♦ On the lower portion, enter the Actual Occurrence Date. ♦ If you wish to inform a group of users (Distribution List) or a single user (Recipient ID) defined
to SiteManager you can select those by using the search lens on each field.
♦ If you select a group of users or a single user then you can enter the text of the message that you wish to send at the time of saving this information.
Press the Save icon on the toolbar.
Primary Personnel Tab
Required Fields: Contract ID: Project Manager:
System(key) System
Project Engineer:
System

Florida Department of Transportation Trns*port SiteManager User’s Manual Contract Activation Function
Page 10 April 2007
When contract is transferred from LAS to SiteManager the Project Manager and Project Engineer will be blank. Before you can save the contract even as pending you will need to designate the Project Manager and Project Engineer that will be responsible for managing this contract. To enter the User ID for these, you can either type the User ID in the field or use the search lens. While on the field, click the right button on the mouse and select Search from the menu. A list of users will be displayed. Select the appropriate user(s) from the list that is displayed. This list will show all users of SiteManager. If you display this list you should sort the list on User ID to get all construction users together for your district. To sort on the User ID just click your mouse on the User ID heading and the list will sort in ascending order. Locate the user you’re looking for and press OK. If you wish to send a message to a single user or a group of users when contract moves from “Pending” to “Active” then in the lower portion of the window enter a User ID or Distribution List. Again either typing the known value in the field or using the search lens while on the field can do these. The user(s) will be notified when contract status is changed. Leave the other fields blank. Press the Save icon on the toolbar. This will save the contract to pending. Prime Contractor Tab
Required Fields: Contract ID: Max Subcontract Pct:
System FDOT
Subcontractors Paid: FDOT Prime Associates: System
The awarded contractor vendor number should be showing in the Current Prime field and contractor name should be next to that. No changes should be made to this field. Make sure Payroll Required checkbox is blank. Make sure Subcontractors Paid checkbox is checked. Two things are required to be done on this screen before we can activate the contract. The first is to include the Contractor Address and the second is to associate a “Surety” and “Insurance” Associate Type to the prime contractor. Contractor Address
To add a contractor address, do the following:
1. Make sure focus is on the upper portion of the window. 2. Select Services, and then Address from the pull down menu or press the Address icon on
the toolbar. 3. Highlight the Vendor Home Address selection. 4. Press the Address icon on the toolbar to hide the address window.
Prime Associates

Florida Department of Transportation Trns*port SiteManager User’s Manual Contract Activation Function
April 2007 Page 11
To add the “Surety” and “Insurance” Associate Type do the following:
1. Place focus on the Prime Associates portion of the window. 2. Press the New icon on the toolbar. 3. In the Associate Vendor ID column use the search lens to locate the “surety” Associate
Type from the Prime Contractor Associate tab. 4. Select the appropriate firm from the list shown. Make sure Associate Type is “surety”. 5. Press OK. 6. Repeat the above steps but select “insurance” as the Associate Type.
Note: If the “Surety” and “Insurance” company is the same company, first select the vendor “Insurance and Surety are the same company” and show the “Associate Type” as “insurance” then select the vendor “Surety and Insurance are the same company” and show the “Associate Type” as “surety”.
Press the Save icon on the toolbar. Note: If no associates appear on the Prime Contractors Associate tab then you will have to follow the instructions below labeled Adding Associates to a Vendor.
DBE Commit Tab This tab will not be used by FDOT initially. Changes in the DBE rules and how they will be reported using SiteManager is still being reviewed at this time. If the contractor is designated as a DBE in the DOT Vendor file; however; the system requires us to set the DBE work type on the DBE tab before the contract can be activated. Training Plan Tab This tab will not be used by FDOT initially. Activating the Contract If you have entered all required data, you can go back to the Description tab and change the Status to Active. Press the Save icon on the toolbar to save the changes. If all required data has been entered correctly you will get the message shown on the right. Press the OK button to continue.
Note: Specialty Items can be designated before activation but are not required to activate the contract. They must be designated specialty before subcontractors are assigned to the contract or any work is done. To show a pay item as a specialty item on the contract, see the section on Subcontract Management Section – Items Tab.

Florida Department of Transportation Trns*port SiteManager User’s Manual Contract Activation Function
Page 12 April 2007
Adding Associates to a Vendor
1. Using the SiteManager
Panel icon on toolbar to go to the SiteManager Main Panel and double click on the Contract Administration icon to go to the Contract Administration Panel.
2. Double click the Reference Table (CA+) icon.
3. Double click the Vendors icon. The Vendors Description tab will be displayed.
Select Open from the File menu or press the Open icon on the toolbar to display a list of FDOT vendors.
Locate your contractor within the list of vendors. Upon highlighting it press OK.
Verify that your contractor is being displayed.
Now go to the Associates tab.
On this tab we will associate both the “surety” and “insurance” type associate to our Prime Contractor. If you know the Prime Contractor’s Surety and Insurance company by name then you have the option of locating that vendor within the vendor file or you can use the default “surety” and “insurance” that has been supplied with the vendor file. On the Associates tab, do the following to add the “surety” and “insurance” to the contractor you have selected.
Required Fields: Vendor ID: Surety:
System(key)
FDOT Insurance: FDOT
1. Make sure focus has been set on the lower portion of the screen.
2. Press the New icon on the toolbar to add a blank row.
Required Fields: Vendor ID: System(key)

Florida Department of Transportation Trns*port SiteManager User’s Manual Contract Activation Function
April 2007 Page 13
3. On the field Associate Short Name use the search lens to locate the appropriate “surety” company for this contractor.
4. After highlighting the “surety” vendor press OK.
5. Under the Associate Type, use the drop down menu to highlight “surety” as the appropriate type.
6. Repeat steps 2 through 5 but this time make the Associate Type “insurance”.
7. Press the Save icon on the toolbar.
8. Close the Vendors tab and return to the Contract – Prime Contractor tab. You can do this by using the Windows command on the menu and select this tab from the list of windows.
If the Prime Contractor tab is not available to you then either check, under the Windows menu option for the Contracts window and click on it or follow the navigation for the Contract Activation to return to the Contracts window. You should then be able to follow the instructions under Prime Associates above to add “surety” and “insurance” to this contract for the Prime Contractor. Managing Contract Authority If you are the Project Manager or Project Engineer for this contract then you will need to add additional users to Contract Security so that they will be able to access this contract to enter Daily Work Reports and Diaries. This security along with the group that the users belong to will give them the necessary authority they need to process contract information during the life of the contract. Contract security is now viewed from the user perspective instead of the contract. In previous versions of SiteManager you would identify the contract and then add the persons you wanted to grant contract authority. Under the latest version of SiteManager, you will now identify the person and then add the contracts that you want that person to have authority on. To give someone else contract authority, do the following. 1. From the Main panel double click on the Contract Administration icon.
2. Double click on the Contract Records icon to bring up the Contract Records panel.

Florida Department of Transportation Trns*port SiteManager User’s Manual Contract Activation Function
Page 14 April 2007
3. Double click on the Contract Authority Icon.
4. The screen below will be displayed. This displays a list of all SiteManager users in the top portion of the screen, User Identification. As you highlight a user in the top, the lower portion displays the contract authority that has been granted to that user in the lower portion of the screen, Contract Authority Assignment. The following fields are displayed:
a. User Identification - Top Portion of Screen
Userid – SiteManager assigned user identification
User Name – Full name of user for given Userid
CO – Indicates whether user is assigned to the Central Office
DO – Indicates the District in which the user is assigned
RO – Indicates the Resident Office in which the user is assigned
FLD – Indicates the Field Office in which the user is assigned
b. Contract Authority Assignment – Lower Portion of Screen
Group Description – User groups in which the user has been assigned
Office-Wide Access – Indicates if user has been granted Global Contract Access for that group
Contract ID – Indicates the contract for which user is being granted contract authority
Contract Description – Short description of contract work as shown on the Contracts Record
Authority Start Date – Indicates for specific contracts the date and time when contract authority began.

Florida Department of Transportation Trns*port SiteManager User’s Manual Contract Activation Function
April 2007 Page 15
Authority End Dt – Indicates for specific contracts the date and time when contract authority was ended.
Granting Contract Authority 1. To give contract authority, locate and highlight the user in the top portion of the screen for whom you wish
to grant contract authority. This will display information about current contract authority that the user has in the lower portion of the screen.
2. Place focus in the lower portion of the screen and click on the Add button (looks like a sheet of paper). The following screen will be displayed.
3. In the area labeled Group Description, use the drop-down to display all groups that the user belongs to. Click on the appropriate group under which the user will be performing their work for the authority being granted.
4. To grant specific contract authority, either enter the contract ID or use the search lens by clicking your right mouse button while in the Contract ID field. A list of contracts will be displayed, locate the contract you are granting authority for. Upon identifying the contract id, the Contract Description will be shown.
5. Click on the Save button to save the record. You will be returned to the previous screen where the new record will be added and the Authority Start Date will be included. You can click on Cancel to ignore this change.
6. Ending Contract Authority: To end contract authority from an individual who has already been granted authority at some other time just highlight the name in the User Identification (upper) portion of the window. Highlight the record(s) (hold the shift key down to highlight multiple records) that you wish to end authority for in the lower portion of the window and choose Services then End Contract Authority or press Ctrl+Shift+E.
7. Granting Contract Authority: To grant authority to an individual who at one time had authority but it had been ended at some point, just highlight the name in the User Identification (upper) portion of the window and press the new button (looks like a sheet of paper) on the toolbar. Follow steps 2 – 5 described in the text above.
Ending Contract Authority Highlight the contract and group for which you want to end contract authority in the Contract Authority Assignment (lower) portion of the window and choose Services then End Contract Authority or press Ctrl+Shift+E. You can select multiple contracts to end authority on by holding the shift key down while clicking on the desired records. Each of these methods will add the date and time into the Authority End Dt field in the lower portion of the screen.
Note: When you End someone’s contract authority they do not disappear from the list. The End Date is populated with the date that the authority ended. This is done in order that we might have an audit trail of all individuals who has ever had Contract Authority.

Florida Department of Transportation Trns*port SiteManager User’s Manual Contract Activation Function
Page 16 April 2007
Contractor Payment Approval Levels
Required Fields: Contract ID: System(key)
To ensure that proper individuals have the ability to generate estimates it is necessary to review the Contractor Payment Approval Levels under the Contractor Payments icon on the SiteManager Main Menu and from there using the Reference Tables icon for Contractor Payment Approval Levels. Contractor Payment approval Levels have now been separated into the 3 different groups. There is now a unique approval level for Progress Estimates, Final Estimates and Supplemental Estimates. Each of these different estimate types will need to have their appropriate Contractor Payment Approval Level established. There are default values that have been set and will be established for each contract. However, because our payment approvals are done differently in each District they will need to be set specifically for each of your contracts. You can define up to 5 approval levels for each contract. The following show some possible assignments for Progress Estimates (Note: position titles and descriptions may differ from district to district):
Level 1 Person charged with generating the estimate, Resident Office, Office Engineer or Project Engineer.
Level 2 Initial Approval – Project Engineer
Level 3 Resident Office Approval – Resident Engineer
Level 4 District Office Approval – District Office, Office Engineer
Level 5 Electronic Estimate Approval - EED
Each level of approval will be given to a specific group. An individual must belong to that group in order for that individual to either generate the estimate or perform any approval of the estimate. Since this approval can be customized for each contract, you can designate any individual to perform any level of approval by including the group in which that individual belongs as long as they have contract authority for the specific contract. See Estimate Generation Function on how to set up Contractor Payment Approval Levels.

Florida Department of Transportation Trns*port SiteManager User’s Manual Contract Activation Function
April 2007 Page 17
This page was left blank intentionally .

Florida Department of Transportation
II. Subcontract Management Function
Release 3.7b April 2007

Florida Department of Transportation Trns*port SiteManager User’s Manual Subcontract Management Function
April 2007 Page 19
Subcontract Management Getting Started So, you want to create a Subcontract? Here's a quick reference on what steps to take. Select Contract Administration from the SiteManager Main panel to display it and then select Contractor Management from the Contract Administration panel. From the Contractor Management panel double click on the Subcontracts icon, to display the Subcontract Description folder tab.
Description Tab
Required Fields: Contract ID: SubCont Nbr:
System(key) System
Subcontractor: System SubCont Type: System Work Type: FDOT
Remember if the Contract ID is blank or it is not the one that you wish to work with, from the Services menu select Choose Keys to locate the appropriate contract. SubCont Nbr: Use up to four digits as the subcontract number such as S100, S200,.. etc. this will put the subcontracts in logical order when looking at a list of the

Florida Department of Transportation Trns*port SiteManager User’s Manual Subcontract Management Function
Page 20 April 2007
subcontracts because of the method SM uses to sort numeric values. This number must be unique for this contract. 1. Parent Subcont Nbr: SiteManager allows for adding subcontracts to existing subcontracts. There is no
limit to the levels of subcontracting within SiteManager. If this subcontract is a subcontract to another subcontract then enter the two digits SubCont Nbr for that subcontract.
2. Supp/Hauler Ind: If this subcontract is for a Supplier or Hauler then check this flag. 3. Subcontractor: Subcontractor is picked from the vendor list by using the search lens while on the
Subcontractor field. The same sub may be listed on more than one subcontract. Select the subcontractor using the vendor number on the sublet form. If the subcontractor does not appear on the list then it must be added to the Vendor list. DO NOT ATTEMPT TO ADD A VENDOR TO THE VENDOR LIST YOURSELF. Forward a request to your district SiteManager coordinator to have this done. All vendors must enter SiteManager from the preconstruction system (LAS). Once the vendor has been added to LAS it will transfer to SiteManager overnight.
4. SubCont Type: Pick the one that most closely fits. This is only a description field and does not affect
how the subcontract is calculated. 5. DBE Type: Choose Spaces as the DBE type. This field affects the way the subcontract is calculated and
for now, DBE's will not be tracked within FDOT using SiteManager initially. 6. Work Type: Use what matches the subcontractor the closest. Sometimes work type for contractors is
not populated with real "work types" that are associated with each contractor and this causes SiteManager to produce warning statements saying that the subcontractor is not associated with the specified work type. If you receive this warning, select OK. A subcontract can still be entered after these warnings are bypassed.
7. Verified Payment Amt.: At this time there is no need to put an entry in this field. 8. Approval Date: Enter the date when this subcontract was given approval by appropriate individual. This
can be entered at a later date either by you or by the appropriate individual. 9. This Original Commitment: Leave blank , this may be used later if we track DBE's within SiteManager. 10. Save the information entered. If you receive the error "Subcontractor's uncompleted work amount
exceeds the sum of work class qualification amount" appears, select OK. 11. If your contract is Design-Build or Lump Sum you may have more to do on this screen, if you choose to
create your subcontract without referencing the pay item you will need to enter an amount directly into the This SubContract field. In order to access this field you will need to check the Supp/Hauler Ind box. When you do this the This SubContract field will become white and you can enter the total amount of the subcontract. Save when you are done and this will complete this subcontract.
NOTE: When this method is followed, you will be unable to access the Items tab.

Florida Department of Transportation Trns*port SiteManager User’s Manual Subcontract Management Function
April 2007 Page 21
Items Tab
Required Fields: Contract ID: Subcontract Nbr: Prj Nbr:
System(key)
System(key)
System Line Item: System Quantity: System Unit: System Price $: System
If no blank line appears in the upper portion of the window then with focus on this portion of the window click on the New icon from the toolbar. Once you have added a blank row in the upper portion, entry of the data will be done using the blanks in the lower portion of the window. For the following, Be sure to place the focus in the lower portion of the window. 1. Prj Nbr: This is the Financial Project ID for which this subcontract will be applied to. Select the Financial
Project ID from the drop down list. 2. Line Item: This will identify the proper Pay Item number that is to be included in this subcontract. While
on the Line Item field use the search lens and locate the appropriate Pay Item number from the list. After selecting the appropriate Line Item from the list, press OK to return to the Items tab.
3. This Subcontract, Quantity: Enter the quantity of the item that is subcontracted unless an item is
included on more than one subcontract. If it is, SiteManager requires you to calculate the quantity of the item based on the percentage of the unit price for which the subcontractor will be reimbursed. Only adjust the quantity of the item, leave the unit price the same as the original contract amount. NOTE: If your contract is a Design-Build or Lump Sum and you wish to assign a part of the lump sum item to your subcontractor you will have to skip to the Unit field first to select a different unit of measure other than LS. The most practical to use is UNITS. Then, return to the Quantity field and enter 1.000.
4. This Subcontract, Unit: The correct unit should already be displayed for the line item. If not, select from
the drop down list. See NOTE above. 5. This Subcontract, Price $: Enter the price per unit for the item. This may have to be adjusted from what
it actually is if you encounter a situation as described in 3 above. 6. Save the information entered. 7. Repeat Steps 1 - 6 of the Items Tab section for any additional items associated to this subcontract.
Focus in the upper portion of the window and select the new icon. Remember to save each additional item.
If additional subcontracts are desired, return to the Description folder tab and select the new icon.

Florida Department of Transportation Trns*port SiteManager User’s Manual Subcontract Management Function
April 2007 Page 22
This page left blank intentionally.

Florida Department of Transportation
III. Daily Work Reports Function
Release 3.7b
April 2007
Florida Department of Transportation Trns*port SiteManager User’s Handbook Diary Work Reports Function
Page 24 April 2007
Daily Work Reports Getting Started This function will eventually replace our need for the current Daily Inspection Reports we currently use. Until we have our inspectors access to their own input device to enter their information, the paper forms will still need to be used. Someone will have to enter the inspector’s report into SiteManager to ensure that information on work performed by the contractor is included in the estimate process. From the SiteManager Main panel double click the Daily Work reports icon and then double click the Daily Work Reports to display the daily work report (DWR) window.
DWR Info. Tab
Required Fields: Contract ID: DWR Date: Inspector ID:
System(key)System
System(key)High Temperature: FDOT Low Temperature: FDOT A.M. Weather Conditions: FDOT P.M. Weather Conditions: Remarks in General:
FDOT FDOT
If the Contract ID is blank then you should select Services - Choose Keys to pick your contract. To open a contract that has no DWR’s on it, use Services – Choose Keys to pick your contract. To open a contract that has DWR’s on it, you can use the open folder icon on the tool bar at the top to pick your contract. Enter the date of the DWR in the DWR Date field. You can either type the date or you can select by using the built-in calendar functions by double clicking within the DWR Date field. Press the tab or enter key to move off the DWR Date field. If this is not your first DWR for this contract, then you will be asked to copy

Florida Department of Transportation Trns*port SiteManager User’s Manual Daily Work Reports Function
April 2007 Page 25
Contractor Information. Respond with OK and this will copy the previous day’s information on the Contractor tab and Contractor Equip tab. Tab to the Temperature fields and type in the temperature or use the arrows to pick the high and low temperature for the day. Tab to the Weather Conditions and select a short descriptive phrase from the drop down list about the weather conditions. In the Remarks area include any necessary comments under any of the standard remarks labels to the left. Just highlight the appropriate remark type and type your comment in the Remark field. Once you move off of the remark type then a check mark will be displayed to indicate that you included comments. Save the information by using either the File – Save command or the Save icon on the toolbar.
Helpful Hints: The check-boxes labeled "No Work Items Installed", "No Contractors On Site", and "No Daily Staff On Site" appear as though they need to be checked by the user when recording information on the DWR Info. tab. Actually they are automatically checked based on information entered on the other DWR tabs and the user may ignore these check boxes. You can preview the DWR by clicking on the icon labeled Preview DWR located on the toolbar at the top of the screen.
Contractors Tab
Required Fields: Contractor ID: Inspector: Date: Contractor:
System(key) System(key) System(key)
System Supervisor/Foreman Name:
FDOT
Hours Worked: FDOT Personnel Type: FDOT Nbr of Persons: Hours Worked:
FDOT FDOT
1. Focus in the upper portion of the window and select the New icon. Add the Prime Contractor for this
contract from the drop down list. Occasionally the arrow, which indicates a drop down list, does not appear when selecting a contractor. If this happens, click in the field for contractors and the drop down list will appear.
2. It is not necessary to populate the fields Nbr. of Supervisors, Nbr. of Workers and Contractor Hrs.
Worked located in the "Contractor" portion of the window. These fields are automatically populated from the entries made in the Supervisor/Foreman Name and Personnel Type portions of the window.

Florida Department of Transportation Trns*port SiteManager User’s Handbook Daily Work Reports Function
Page 26 April 2007
3. A generic Master List of Equipment, Personnel, and Supervisor is available to be used for each contract. The Master List is not job specific as one might think; instead it is user specific. See section Maintaining a Master List below for managing the Master List.
4. The list of personnel for the "prime" contractor or any subcontractor can be specified either by type as we
currently do on our Daily Inspection Reports or it can be specific to a given individual. If you prefer to use type then the use the generic list. You will record the number of this type of personnel and the hours that each work. You may have some that work half day and some a full day. Make sure you select the type that represents the type position they hold as well as if they worked a partial or full day.
5. A contractor must be selected and shown here if items are to be entered on the Work Items tab. SM will
not let items be chosen when no contractor has been included on this tab. 6. Add any subcontractors to this list who are working on the project for the day of this DWR. Follow the
procedure in Step 1 of this section. Contractors Equip. Tab
Required Fields: Contract ID: Inspector: Date: Equipment ID Description:
System(key)
System(key)
System(key)
FDOT Nbr. of Pieces: FDOT Nbr. Used: FDOT Hours Used: FDOT
Click on the Contractors Equipment tab, Recording of Equipment will be done in a similar fashion as with personnel. You can record hours by specific piece of equipment by entering an Equipment ID or you can report hours to a generic piece of equipment. The number of pieces of equipment that are being used should be reported as well as the number of pieces that are idle. This will give us the actual number of pieces of equipment that contractor has on sight and the number of hours used. If a certain piece of equipment does not exist, you must modify the master list to add this equipment prior to selecting it. See below for how to manage the Master List. Daily Staff Tab It is not necessary to use the Daily Staff folder tab at this time. Employee's time and mileage reporting will still be recorded as it is now. However, SiteManager may be utilized in the future for recording this information. Even though this tab is not required, a user may use the Daily Staff tab if it is deemed beneficial.

Florida Department of Transportation Trns*port SiteManager User’s Manual Daily Work Reports Function
April 2007 Page 27
Work Items Tab
Required Fields: Contract ID: Inspector: Date: Placed Qty:
System(key) System(key) System(key)
System Contractor: System Location: System
Remember Work Items cannot be entered if there has not been a contractor chosen for the day. The list displayed here is the contract pay items that were included in the original contract or have been added through the Change Order process. Locate the pay item you wish to report work against. You will need to know the Financial Project number and category to ensure you have the correct work item. Once you have highlighted the appropriate pay item, either use Services – Record Work Item or the Record Work Item icon from the toolbar or double click the item to display the window where work will be reported. With the Work Report window displayed, make sure the middle of the window has the focus and then press the New icon on the toolbar to enter a new location to report work. Work will be reported by location in the lower portion of the window by entering the following fields. Placed Quantity – Enter the quantity of the work for the pay item to be recorded for the contractor. Contractor – From the drop down list select the contractor for which you are reporting work. Location – Enter some description about location where work is to be performed. All of the other fields are optional at this time and if you wish to enter information you can do so at this time. If you are observing another contractor working on the same pay item for this contract then you can repeat the steps above to enter another location and pick that contractor from the drop down list. Save the information recorded. Repeat this process for all items you are paying for on this DWR and for all contractors that you are observing. The big difference between our current system and SiteManager is that in SiteManager a DWR is by inspector while our current system requires you to complete a daily for each contractor being observed.

Florida Department of Transportation Trns*port SiteManager User’s Handbook Daily Work Reports Function
Page 28 April 2007
Helpful Hints: The "Qty. Installed To Date" and "Qty Paid To Date" do not update until an estimate is approved. If previous payments need to be reviewed before an estimate is approved, this will have to be done in DWR History section of SiteManager.
Force Account Tab (Not Used by FDOT at this time) The Force Account section of SiteManager will not be used by FDOT at this time. It could be used in the future to pay for work done by contractor where we have instructed work to be paid for by labor, equipment and materials. This will be documented at a later date as the need arises. DWR Reports What You Should Know The difference between our current Daily Inspection Report and this one contained within SiteManager is that currently an Inspector has to complete a Daily Inspection Report for each contractor being observed. In SiteManager the DWR is specific to an Inspector and all work being observed by an inspector will be recorded on the single DWR for the day no matter how many contractors are observed. Work reported on a DWR is not used on an estimate until it has been tied to a Diary and approved. If you find an error on a DWR, it can be unapproved and corrected as long as it has not been paid on. If an error is found after payment has been made, you must create a new DWR with the appropriate change to correct the error that was made. This correction would be reflected on the next estimate paid. Also note that weather information is not what we currently require by FDOT procedures. An enhancement to include this functionality has been proposed and is being worked on at this time. Since we will still require the paper copies of the current Daily Inspection Reports this information will be handled just as we currently do. When enhancement has been added new instructions will be provided for it at that time. Maintaining a Master List The Master List is a listing of all personnel, supervisors and equipment for the contractors working on this contract as well as Department/Consultant Staff working on this contract. A generic list of equipment, personnel, and supervisors is available for use by the inspector on this contract each day the inspector completes a Daily Work Report. If a contractor furnishes the Department with an electronic file that contains his specific equipment, etc., it can be loaded using the Vendor Master List Load Utility. See instructions for use below. Loading the Generic List to a Contract If when you attempt to add either, Contractor Personnel, Supervisors, Equipment or Staff Member to the selected contractor on the appropriate tabs and you get the screen shown at the right, then you must move the Generic List to the contract. From the SiteManager Main panel double click the Daily Work Reports icon then double click the Reference Tables (DWR+) then double click the Contract Master List as shown below.
Florida Department of Transportation Trns*port SiteManager User’s Manual Daily Work Reports Function
April 2007 Page 29
A contract selection screen will pop up as shown in the screen below.
Highlight the contract you want and press OK or double click the contract and the
Florida Department of Transportation Trns*port SiteManager User’s Handbook Daily Work Reports Function
Page 30 April 2007
list of contractor/sub contractors associated with the contract will be displayed as shown on the right. Highlight the vendor you want the master list on and press OK or double click on it. The contract master list window will be displayed as shown on the right. If you want the whole list available for use, just press the Add All button and it will transfer over to the Contract Vendor List column. If you want to select certain records, you can hold the SHIFT button down to select a range of records shown in a row or hold the CTRL button down to independently select records that are not shown in a row. After selecting the records you want, just press the Add button and the records will transfer to the Contract Vendor List shown on the right hand side of the screen. All entries moved over will have the Active box already checked. If you have some that are not going to be used for this contract, just remove the check out of the Active box. To save the data, just press the icon that looks like a disk on the tool bar or go to File then Save. The Staff Member tab is the only tab that does not contain the Active box. You are ready to start reporting on your DWR’s at this point. Vendor Master List Load Utility Vendor Master List Load Utility Getting Started The Vendor Master Resource Load Process provides a method to load contractor equipment resources for each vendor in SiteManager. The process uses the built-in function in SiteManager called “Attachments”. From the SiteManager Main Menu panel select Accessories. Select System Attachments from the Accessories Menu as shown in the screen below. This will display the screen shown below.

Florida Department of Transportation Trns*port SiteManager User’s Manual Daily Work Reports Function
April 2007 Page 31
Double click on the row labeled VendMast or highlight the row with VendMast and click on the icon for the ‘running man’. The screen shown below will appear. On this screen you will identify the vendor you wish to load resources for and the location of the file that contains the resources to be loaded. Select the method for searching the vendor list by clicking on either Vendor Name or Vendor Number. In the area underneath “Select Vendor Number” or “Select Vendor Name” (depending on which was selected above) type a portion of the number or name to go to that area of the list. Once you have found the correct vendor, highlight the name (or vendor number) and the appropriate information will be shown in the area below the list. On the right side of the screen you will select first the drive and directory where the resource file is stored. In the middle portion on the right side of the screen select the appropriate file name of the resources to be loaded. Once you have selected all information press OK to continue and the window on the right will be displayed. This is to confirm the information you selected on the previous screen and will also show the Current Master Items for the vendor as well as the Master Items to be Loaded.
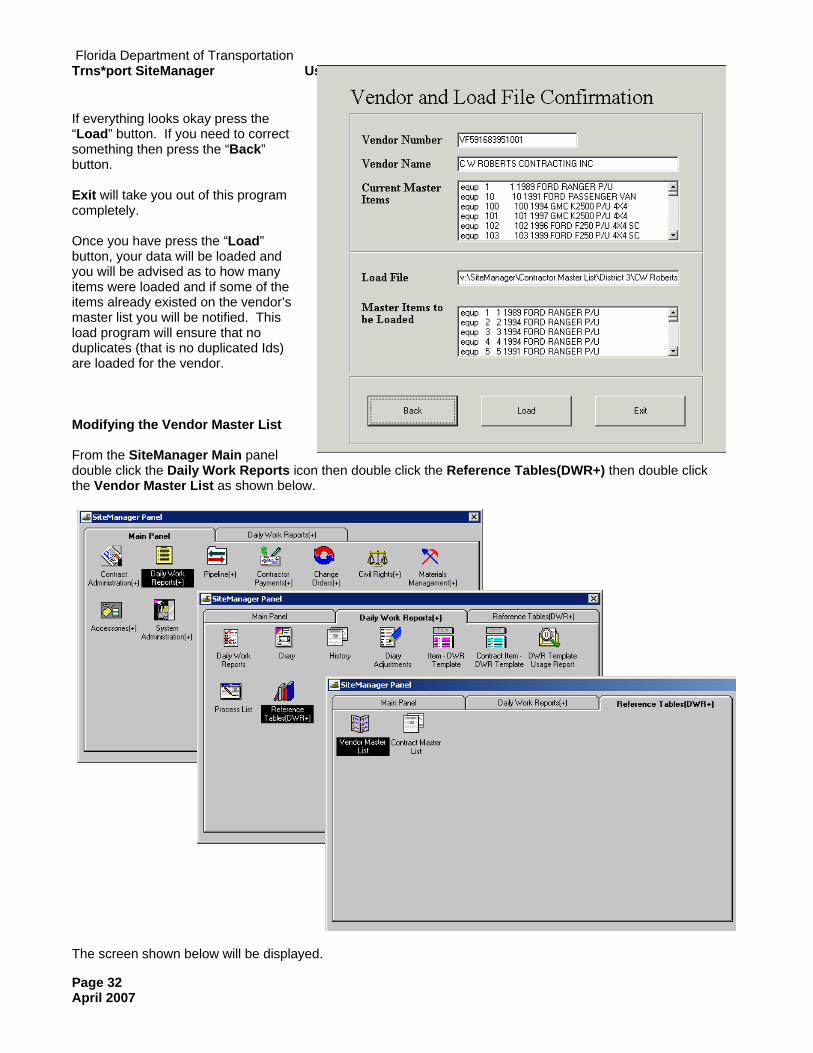
Florida Department of Transportation Trns*port SiteManager User’s Handbook Daily Work Reports Function
Page 32 April 2007
If everything looks okay press the “Load” button. If you need to correct something then press the “Back” button. Exit will take you out of this program completely. Once you have press the “Load” button, your data will be loaded and you will be advised as to how many items were loaded and if some of the items already existed on the vendor’s master list you will be notified. This load program will ensure that no duplicates (that is no duplicated Ids) are loaded for the vendor. Modifying the Vendor Master List From the SiteManager Main panel double click the Daily Work Reports icon then double click the Reference Tables(DWR+) then double click the Vendor Master List as shown below.
The screen shown below will be displayed.

Florida Department of Transportation Trns*port SiteManager User’s Manual Daily Work Reports Function
April 2007 Page 33
Select the vendor name or number for which the list needs modifying and press OK. The screen shown below will be displayed.
Note that there are 4 buttons at the top of the screen. Depending on which button is pressed changes the lower portion of the screen to indicate what information is being worked on. Information can be modified here by highlighting the area that needs updating and typing over the existing entry. The Active Indicator box can be unchecked if the entry is not valid anymore. When you remove the check from the box, the following warning screen will be displayed.

Florida Department of Transportation Trns*port SiteManager User’s Handbook Daily Work Reports Function
Page 34 April 2007
If you attempt to delete a record that is being used, you will get the following message. A new entry can be added by clicking on the New icon on the toolbar at the top of the screen (looks like a white sheet of paper). Once the blank row is added, just type in the needed data and save it. If you decide you don’t want this record after all, just press the Delete icon on the toolbar at the top of the screen (looks like a trash can with an X). You will be prompted as shown below to make sure you really want to delete the record.
Note: A generic master list can be set up after activating the contract but prior to reporting work on the job. This list could contain generic names such as Supervisor, Skilled Worker, Semi-skilled Worker, Roller, Dump Truck, etc. A dummy DWR and Diary (shown as a no charge day) must be set up to generate this list and for a date after contract activation. The DWR can later be copied (enter in new DWR date, press tab, and answer yes to copy contractor information) to a real DWR for use in generating an estimate.
DWR On-line Reports To access the DWR on-line reports, select Daily Work Reports from the SiteManager Main panel. Select History from Daily Work Reports panel by double clicking on the icon.

Florida Department of Transportation Trns*port SiteManager User’s Manual Daily Work Reports Function
April 2007 Page 35
Once selected, the following screen will be displayed. This first report is the DWR History which shows the DWR data grouped by date. As you can see at the right, the report displays the inspector ID, DWR date, whether the DWR is locked, whether the DWR is authorized, has the DWR been paid, high and low temperature, AM and PM conditions, when work was suspended or resumed, whether daily staff was on board, was work installed, and whether or not a contractor was on site. Next select the Work Item History tab to view the report shown in the screen on the right. This report displays the work item history grouped by DWR date. It displays the line item number, project number, category number, item code, description, installed quantity to date, bid quantity, final quantity, date, user ID, location installed, contractor ID, reported quantity, from station, offset, distance, and to station, offset, distance.

Florida Department of Transportation Trns*port SiteManager User’s Handbook Daily Work Reports Function
Page 36 April 2007
The last report available to you is under the Contractor History tab. This report is grouped by contractor and then by date. This report displays contractor name, DWR date, user ID, equipment description, equipment number, number of pieces, number used and hours used. Any of these reports can be printed by going to File drop down menu then by selecting the Print option.

Florida Department of Transportation Trns*port SiteManager User’s Handbook Daily Work Reports Function
April 2007 Page 37
This page left blank intentionally.

Florida Department of Transportation
IV. Diary Approval Function
Release 3.7b
April 2007

Florida Department of Transportation Trns*port SiteManager User’s Handbook Diary Approval Function
April 2007 Page 39
Diary Approval Getting Started From the SiteManager Main panel double click on the Daily Work Reports icon and then double click on the Diary icon to display the Authorize tab.
Authorize Tab
Remember, if the Contract ID is missing then you will need to use the Services menu option, Choose Keys to select the correct contract. After selecting the appropriate contract and highlighting it, press OK to return to Authorize tab.
The Appropriate Engineer or Lead Inspector is required to authorize all Daily Work Reports for each day. Only those Daily Work Reports that have been approved by this process will be included in the Estimate Generation process. This authorization is done as follows. 1. On the Diary Date field enter the date for
which you want to authorize DWRs. 2. For each of the DWRs displayed for the
date, highlight them and then using the Services menu, select Preview DWR or click on the Preview DWR icon to display the highlighted DWR. If information is correct and complete then close screen to return to Authorize tab.
3. Check the box under the field Authorized. This will enter the current date under Authorized Date. This will lock the DWR making changes impossible by the inspector. The inspector can take the approval off of a DWR and make changes as long as the DWR has not been used in an estimate. If the DWR was used in an estimate, the only way to correct changes to it is to create a new DWR and make appropriate
Required Fields: Contract ID: Diary Date:
System(key) System(key)
Florida Department of Transportation Trns*port SiteManager User’s Handbook Daily Approval Function
Page 40 April 2007
changes to compensate for the mistake made in the first DWR – it is important to make notes on why these changes are being made. This DWR should be dated the day you found the mistake but make sure you note what the date of the DWR you are making a correction to.
4. Repeat these steps for each DWR displayed. 5. Remarks: Add any additional comments for this contract for the specific areas listed under the Remarks.
This is the proper place for Engineers/Lead Inspectors to add any comments that need to be recorded for the day (i.e., Important verbal instructions to the contractor, discussions with the inspectors, significant events of the job, etc.).
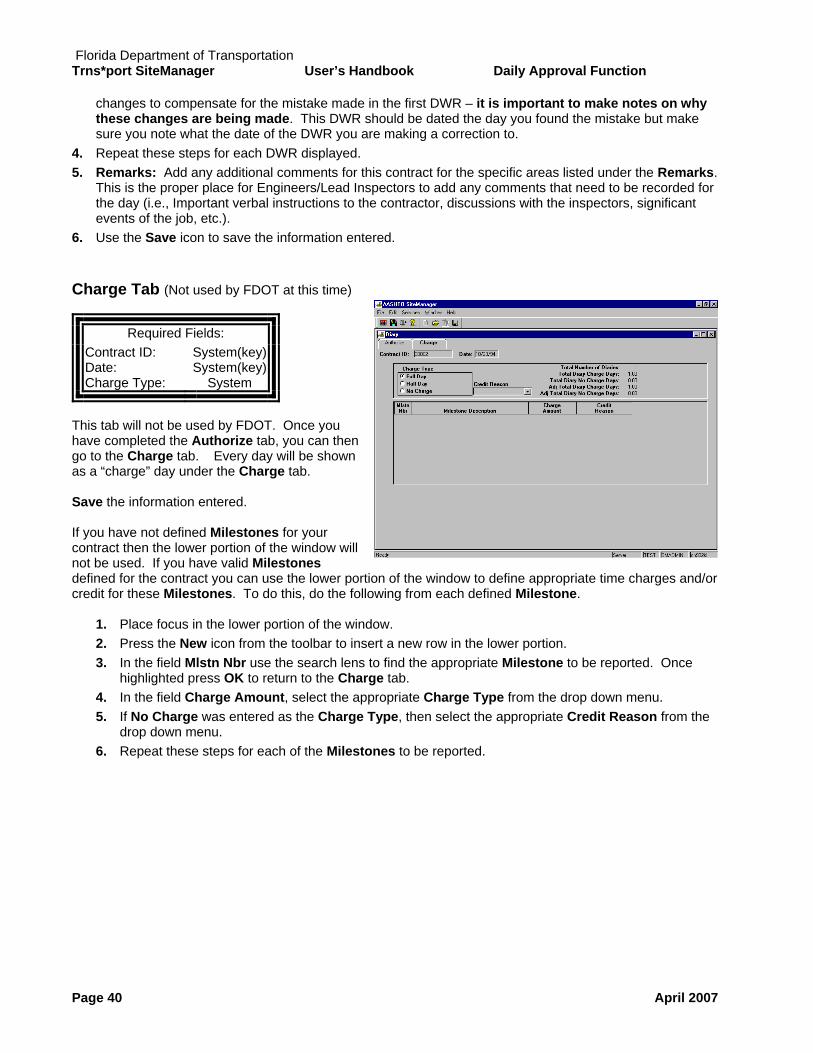
6. Use the Save icon to save the information entered. Charge Tab (Not used by FDOT at this time)
Required Fields: Contract ID: Date: Charge Type:
System(key) System(key)
System
This tab will not be used by FDOT. Once you have completed the Authorize tab, you can then go to the Charge tab. Every day will be shown as a “charge” day under the Charge tab. Save the information entered. If you have not defined Milestones for your contract then the lower portion of the window will not be used. If you have valid Milestones defined for the contract you can use the lower portion of the window to define appropriate time charges and/or credit for these Milestones. To do this, do the following from each defined Milestone.
1. Place focus in the lower portion of the window. 2. Press the New icon from the toolbar to insert a new row in the lower portion. 3. In the field Mlstn Nbr use the search lens to find the appropriate Milestone to be reported. Once
highlighted press OK to return to the Charge tab. 4. In the field Charge Amount, select the appropriate Charge Type from the drop down menu. 5. If No Charge was entered as the Charge Type, then select the appropriate Credit Reason from the
drop down menu. 6. Repeat these steps for each of the Milestones to be reported.

Florida Department of Transportation Trns*port SiteManager User’s Handbook Diary Approval Function
April 2007 Page 41
Page left blank intentionally

Florida Department of Transportation
V. Estimates Generation Function
Release 3.7b
April 2007

Florida Department of Transportation Trns*port SiteManager User’s Handbook Estimates Generation Function
April 2007 Page 43
Estimates Generation: What You Should Know In SiteManager estimates are defined as Progress Estimates, Final Estimates and Supplemental Estimates. Because in SiteManager no further charges can be made against the items in the contract once the Final Estimates has been approved, FDOT will use the Progress Estimate process to generate the various estimates we need for payment, leaving the Final Estimate to be generated only when we are sure there will be no further payments made on the contract. Supplemental Estimates are available should a situation arise where we must pay an estimate after the final has been approved. No pay items can be addressed on a Supplemental Estimate. During the Contract Activation function the Contractor Payment Approval Levels must be set so that the first level of approval is set to the group of the person that will be responsible for generating the estimates. If this was not done at that time the person will not be able to generate an estimate. Prior to generating the first estimate you should still check the Estimate Approval to ensure that it is correct. See below for how to define the approval levels for the contract. It should be noted that the Estimate Approval process provided within SiteManager can be defined specifically for a contract and can be changed during the life of the contract. For example, this would occur whenever there is a change in project personnel and when the field has completed their preparation of the Estimate package and the Final Estimates process has begun. The District Final Estimates staff should redefine the Estimate Approval process so that no other estimates can be generated by others outside the District Final Estimates Manager’s Office. In addition the Contract Authority should also be adjusted to remove all users except the appropriate Final Estimates personnel. Estimate Generation: Getting Started
To perform the Estimates Functions double click the Contractor Payments icon on the SiteManager Main panel. From the Contractor Payments panel, double click the Estimate icon.
Required Fields: Contract ID: End Date:
System(key) System
Type: System

Florida Department of Transportation Trns*port SiteManager User’s Handbook Estimates Generation Function
Page 44 April 2007
Make sure all DWR's have been compiled and approved in the diaries through the estimate period. The user can check this in the DWR.History section. If you get the message that states, “You don’t have authority to Generate Estimate” then you should check the Estimate Approval window to see what group you must be logged in as to generate an estimate. If the Contract ID is blank then you will need to use Choose Keys from the Services menu item to locate the appropriate contract. Once you have highlighted it press OK to return to the Generate Estimate window. 1. Check the Estimate Number. If this is the first estimate to be generated the Generate Estimate
Number will be 001 and the Last Estimate Number will be blank. 2. Check the Begin Date. This should either be the Notice to Proceed Date, if this is the first estimate or
the end date of the previous estimate. The End Date will default to the current system date but can be changed by either typing the correct date in the field or by selecting the date on the calendar.
3. Make sure the estimate Type is correct depending on the type of estimate you are generating.
4. The Delay Generation checkbox will not be used by FDOT.
5. Select Generate Estimate from the Services menu or
use the Generate Estimate icon on the toolbar.
Note: If you have generated this estimate before, the window at the right will be displayed. This is a warning message that means the current estimate and all adjustments will be deleted. If this is acceptable, press Yes to continue.
6. You will now receive the following notices as your estimate has been submitted and processed. The estimate has now been processed by the batch server. NOTE: This is just a process, no report is generated. See below for estimate reports. Adjusting an Estimate From time to time it is necessary to Adjust an Estimate due to failed or defective materials, behind schedule retainage, penalties, fuel adjustments, bituminous adjustments and others. Adjustments can be entered for the contract or for any pay item on the contract. All adjustments entered for an estimate will be marked as to when and who entered them. Currently SiteManager automatically calculates adjustments such as fuel adjustments, stockpile adjustments and regular retainage, if used, and these will be entered as “System” generated adjustments. To enter any adjustments to an estimate, the estimate must first be generated. The

Florida Department of Transportation Trns*port SiteManager User’s Handbook Estimates Generation Function
April 2007 Page 45
following provides information and examples as to how adjustments are entered into SiteManager. NOTE: When it is necessary to change an adjustment that has been created, DELETE the adjustment in question and re-enter it completely. Failure to do this may result in an inaccurate estimate. Contract Level Adjustments
Required Fields: Contract ID: Entered Date: Userid: Estimate Nbr: Adjustment Description:
System(key)System(key)System(key)System(key)
System Adjustment Amount: System Location: Remarks:
System FDOT
Contract Level Adjustments are those adjustments that are made at the contract level for a given estimate. To enter these types of adjustments after the estimate has been generated, from the SiteManager Main panel double click on the Contractor Payments icon to display the Contractor Payments panel. Then double click on the Contract Adjustments icon to display the Contract Adjustments panel. This will display the Contract Adjustments panel as shown below. From this panel, select the Contract Adjustments icon and if you have not already selected your contract on another window you will be presented with a list of contracts that are available to you for entry of adjustments. Just double click on the contract you wish to work with and the Contract Adjustment window shown below will be displayed. This window is divided into two parts. The upper section of the window displays the list of adjustments, if any, that have already been entered for this contract. Remember that the system automatically generates adjustments, such as liquidated damages or regular retainage (if used) and these will be shown with the User Id of “SYSTEM”. The Lower portion of the window is used to enter new adjustments. If this is the first adjustment to be added you can just go to the lower portion and begin entering the data else you will need to insert a new line. To insert a new line, you can press the New icon on the toolbar or enter File, New on the menu. Once the new line is inserted

Florida Department of Transportation Trns*port SiteManager User’s Handbook Estimates Generation Function
Page 46 April 2007
and is highlighted you can then enter the information in the lower section of the screen. The following describes the fields that are shown on this screen.
1. Adjustment Description: This is a drop down menu of standard reasons why an adjustment is being made. Select the appropriate reason.
2. Adjustment Amount: Enter the total amount for this type of adjustment. If this is to be a credit to the contractor then it should be entered as a negative number.
3. Reference Document: This field is not required and will not be used initially. 4. Remarks: You should include a descriptive phrase as to why this adjustment is being entered. This
information will be helpful to the Final Estimates process as well as documentation for any other audit later on. Use as much detail as you feel is necessary to describe the justification for the adjustment.
Once you have entered all of the information then save the Information, by pressing the Save icon on the toolbar or using File, Save on the menu. Line Item Adjustments
Required Fields: Contract ID: Estimate Nbr: Project Number:
System(key)
System(key)
System Line Item Number: System Type: Quantity: Unit Price:
System System System
From the same Contract Adjustment panel as shown above, double click the Line Item Adjustment icon to display the Line Item Adjustments window shown on the next page. As in the Contract Adjustment process above, if you have not already selected a contract number to work with you will be presented a list of contracts that possibly could have adjustments made to them. These are contracts that have pending estimates on them. Double clicking on the contract you wish to work will display the estimates that exist for that contract. Double clicking on the estimate you want to work with, this will always be the one listed on the top, which is the current estimate that is being processed. If you select an estimate that has already been approved and paid, you get the message shown on the right. Pressing OK allows you to pick either another contract or the correct estimate. Remember, you can not adjust an estimate that has already been paid. You can only adjust the estimate that is in pending status and has not been approved by the first level approver. Once you have selected the appropriate contract and estimate the Line Item Adjustments window shown here will be displayed. The upper portion of the window will display any adjustments that have already been added to this Estimate. If there were line item adjustments made automatically such as fuel or stockpile payment then these will be

Florida Department of Transportation Trns*port SiteManager User’s Handbook Estimates Generation Function
April 2007 Page 47
listed here and if you want to review them you just highlight each one and the display in the lower portion of the window will change to show details of the adjustment including who entered the adjustment. In the case where the adjustments were done automatically by the program then the Entered By field would display SYSTEM. If you wish to enter a new adjustment, then you will need to insert a new line in the upper portion of the window. To insert a new line use the New icon on the toolbar or use File New from the menu. Highlighting a blank line on the top portion of the screen will display blanks in the lower portion to be completed. The following describe the fields that are shown on the Line Item Adjustments window.
1. Project Number: The FDOT Financial Project ID on this contract where the item to be adjusted is assigned. If there is more than one Financial Project ID then the drop down menu will have all Financial Project ID’s that exist for this contract.
2. Line Item Number: This designates the item that is to be adjusted. Each pay item that exists on the contract has been assigned a Line Item Number. If you already know this you can enter it or you can use the Search Lens to display all Line Item Numbers with the appropriate pay item number and descriptions. The Line Item Numbers displayed this way will only be those for the Financial Project ID that was selected above.
3. Type: This is a drop down menu from which you can make the appropriate selection for the type of adjustment that is being made.
4. Reference Document: This field will not be used initially and can be left blank. 5. Amount: This is the total amount of the adjustment being made. It is preferred that you do not use
this field, rather, use the quantity and unit price fields below. If you enter a total here the Quantity and Unit Price fields will not be available for entering information.
6. Quantity: This is the quantity of the item that is being adjusted by the unit price entered below. Only available for entry of data if the Amount field was left blank.
7. Unit Price: This is the unit price for the item quantity entered above. Only available if Amount field was left blank.
The remaining fields on the screen are automatically entered by the system and are not changeable by the user. They are:
1. Entered By: This is the User ID of the person who entered this adjustment. If the adjustment was entered automatically by the system then the User ID would be SYSTEM.
2. Entered Date: This is the date that the adjustment was entered. 3. Stockpile Sn: If the adjustment was for Stockpiled Material then this would display the original
Stockpile Sequence number that was used to adjust this item. 4. Replenish Sn: If the adjustment was for Stockpiled Material and the Original Stockpile had been
replenished then this would display the Replenish Sequence number that used to adjust this item.

Florida Department of Transportation Trns*port SiteManager User’s Handbook Estimates Generation Function
Page 48 April 2007
A Remark entry should be made for adjustment before being saved. To enter a Remark just click on the ”Remarks” icon on the tool bar and the window on the right will be displayed. The “Remarks” icon is the “cartoon balloon” on the right end of the toolbar below the Menu line. Enter you remarks in the window and then click on the “Remarks” icon again to save them. Your remarks should include sufficient descriptive information to document just what the adjustment is and, if necessary, how it was calculated. First 3 lines of remarks will be shown on estimate as description for this adjustment. Once you have entered all of the information for an adjustment press the Save icon on the toolbar or use File Save on the menu.
Note: If there is an error in the entry of an adjustment, just delete the adjustment and re-enter it. NEVER just make a correction to an estimate as this can cause your estimate to be incorrect.

Florida Department of Transportation Trns*port SiteManager User’s Handbook Estimates Generation Function
April 2007 Page 49
Printing and Reviewing the Estimate Report There are multiple reports available, both internal and external to SiteManager, that can be used to review the estimate to determine its correctness. The preferred internal report is called the Construction Pay Estimate. To print the estimate report, double click on the Process List icon on the Contract Payment panel. Double click on the Construction Pay Report (CONSTPAY) and you will get this panel: Click on Subset to select the contract selection screen:
Select your contract, right click on the screen then click on Filter.
Set the field to ‘cont id’, the condition to ‘=’ and the value to the contract you want then click OK.

Florida Department of Transportation Trns*port SiteManager User’s Handbook Estimates Generation Function
Page 50 April 2007
The Filter Message will tell you how many rows (number of estimates) will be returned. Click OK.
From the subset list, select the estimate you wish to run then click OK.
On the Confirm Process Submission screen, click on Submit and
you will receive this message, click OK: Next click on the Services menu and select Process

Florida Department of Transportation Trns*port SiteManager User’s Handbook Estimates Generation Function
April 2007 Page 51
Status. You can continually refresh (File>Refresh) this screen or simply wait for the completion screen to pop up:
Double click on the line that represents the estimate process just completed, then double click on the Output line and the estimate will be displayed

Florida Department of Transportation Trns*port SiteManager User’s Handbook Estimates Generation Function
Page 52 April 2007
This report contains detailed information needed to determine if the estimate correctly reflects what should be due the contractor for the pay period. 1. The first page contains basic contract information as well as the current contract status. 2. The second page contains a contract summary that displays the regular work, contract adjustment and
line item adjustments for the current estimate and the previous estimates. 3. Subsequent pages detail the items paid during the period as well as detail line item adjustment
information. 4. The final page contains the project totals and contract grand totals. Once you have determined the amounts are correct, approve the estimate. A message will be sent to the next reviewer for approval. Refer to the Estimate Approval process below for instructions on how to do this. The next levels of reviewers/approvers should review the estimate and approve accordingly. If errors are found in the next level of approval, rejection should be made and the first level approver will need to correct the estimate and generate/review/approve accordingly. With the approval levels set as discussed below, last level of approval done by an individual will cause the estimate to be picked up by the Electronic Estimates Disbursement (EED) system (as discussed below). This automated system will review the system to determine if errors exist that will keep the estimate from being paid without manual intervention. If, errors are found then the system will hold the estimate until they are resolved. If the errors can be resolved then EED will automatically process the estimate for payment and return the final level of approval to SM. If errors prevent the estimate from being paid in its current configuration, control of the estimate can be returned (rejected) back to the originator for deletion or correction. Once corrected, the whole approval process must be started again. Once the EED level approves the estimate, no further changes can be made to the estimate. SiteManager updates the header information of reports each time an estimate is ran. SiteManager also does not automatically save a report when you close it. So if you generate a report on a certain date and do not save it, the next time that you generate that report the header information will be for the date that it is generated. Conclusion: If you want a Change Order, Estimate Summary to Contractor or any other SiteManager report to have the header information reflect the contract status at the time the report was first made correctly, you must save the report as a PSR (previously saved report). If this is done the header will correctly reflect the contract information at the time of the report. Deleting an Estimate An estimate that is still in ‘Pending’ status (has not had any approval done) can be deleted during the review process by following the steps below. This is only necessary where a change in the generated estimate is needed, not in the adjustments. In the case where only adjustments are going to be changed after the initial entry it is not necessary to delete the estimate just delete the adjustment and recreate it. NOTE: Do not change any adjustment, delete and recreate only. If an estimate has been approved at any level, it must first be rejected back to the originator before it can be deleted. To delete an estimate: From the SiteManager Main menu select the Contractor Payments icon. Then select the Estimates icon from the Contractor Payments menu. Finally select the Estimates History icon from the Estimates menu. The following screen will appear. Select your contract either by double clicking your mouse on the contract or by pressing OK once you have the contract number highlighted. This will display a list of estimates for your contract. The only one that you can delete is the current one that has not had any approval done on it as of yet. Highlight the estimate and then either use Edit – Delete from the menu or click on the “trash can” icon.

Florida Department of Transportation Trns*port SiteManager User’s Handbook Estimates Generation Function
April 2007 Page 53
Payment Approval Level Management
SiteManager has a very extensive payment approval process that can be set up to conform to each district’s estimates work flow process. In addition to the internal approval process there is an external approval process known as Electronic Estimates Disbursement or EED. A full description of this process is contained in a separate manual but the basic purpose of EED is to further automate the processing of estimates through the state accounting system and to acknowledge payment of those estimates by writing an approval back to SiteManager. This is accomplished by setting the last approval to EED for all estimates except those that are generated as part of the Final Estimates process. Those will be set to EEDFINLS. It is recommended that there be at least two levels of approval at the district level prior to EED. From the Contractor Payments panel double click the Reference Tables icon. Once you Double click the Contractor Payment Approval Levels icon the Approval Levels window shown below will be displayed.
Required Fields: Contract ID: User Group:
System(key) System

Florida Department of Transportation Trns*port SiteManager User’s Handbook Estimates Generation Function
Page 54 April 2007
Initially the System Default approval levels will be displayed but these should be changed, those unique to your district. Note: There is a drop down next to Estimate Type, this is because a separate approval process can be set for the progress, final or supplemental estimate types. The process for setting approval levels is the same for all types, varying only in the groups selected. Setting progress estimate approvals should be done as part of the activation process. Setting final estimate approvals can wait until the final estimate process begins. The first level should always be the User Group for the person who is to generate the estimate. Generally this is the Project Administrator or Office Engineer. The intermediate level(s) can be used for whatever groups (Resident Engineer, District Office Engineer, etc.) necessary in the approval process in your district. In any case, the next to last level should be the individual responsible for final approval of the estimate before it is submitted to EED for processing. To change any level, use the drop down menu under User Group for each and select the appropriate group from the list. You can enter a generic name, title or specific name on line above the User Group. NOTE: You cannot use the same user group at more than one level. To delete unneeded levels, set the cursor on the name line and click the delete icon on the tool bar. Make sure you save any changes you make to this screen by using either the File – Save command on the menu or the Save icon on the toolbar. To reset the approval levels to the System Defaults, just click in the checkbox for Use System Defaults. Estimate Approval Process Generally, the estimate approval process will follow these steps. The estimate will be generated, printed and reviewed and once the estimate is determined to be correct, the first level approver should indicate estimate is approved. The estimate will then be forwarded to each subsequent approver for their review and approval or rejection. Once the estimate has reached the EED level, it will be the responsibility of the last reviewer to test the estimate for errors in accordance with EED procedures. All errors that are the responsibility of the district must be resolved before the estimate is released for payment in EED. It’s important to note that, once an estimate has received final level approval, that estimate can not be changed, deleted or unapproved. For purposes of an audit trail it now stands as “paid” in SiteManager. That’s why it’s important to review and seek signoff of estimate prior to the final level of approval. Generation of Printed Estimate For Comptroller. Until we modify the SiteManager standard report “Summary to Contractor”, it will be necessary to produce a printed Estimate similar to the “green bar” estimate that has been used for both District Contract Prototype (DCP) System and Construction Reporting System (CRS). This printed estimate will be used by the Comptroller Office to do their review and edits prior to sending it being transmitted to the State Comptroller for payment. The final level of approval within SiteManager should not be done until notice is received back from the Comptroller’s Office that the estimate has been paid. If errors are found by the Comptroller’s Office then you may need to regenerate the estimate to correct the error. Errors can not be fixed or estimate rerun once the final level of approval for the estimate has been entered. The following instructions should be followed in generating this printed estimate. Instructions:

Florida Department of Transportation Trns*port SiteManager User’s Handbook Estimates Generation Function
April 2007 Page 55
Method 1 • Logon to mainframe TSO. • At TSO ready prompt type ‘TSM’. • Choose option ‘A’ – SiteManager Pay Estimate. • Follow instructions for data entry of contract and estimate number. • After all input data is entered press ‘ENTER’ or ‘PF3’ for job submission screen. • Enter job submission data and choose printing option. • Enter ‘SUB’ on command line and press ENTER. • Choose option ‘Z’ to view job.
Instructions:
Method 2 • Logon to mainframe TSO. • At Master Application Menu, choose option 6, Information Management Systems. • At Information Management Systems menu, select ‘TSM’. • Choose option ‘A’ – SiteManager Pay Estimate. • Follow instructions for data entry of contract and estimate number. • After all input data is entered press ‘ENTER’ or ‘PF3’ for job submission screen. • Enter job submission data and choose printing option. • Enter ‘SUB’ on command line and press ENTER. • Choose option ‘Z’ to view job.
Find below screen prints for method 2 . . .
Method 2 Screen Prints

Florida Department of Transportation Trns*port SiteManager User’s Handbook Estimates Generation Function
Page 56 April 2007

Florida Department of Transportation Trns*port SiteManager User’s Handbook Estimates Generation Function
April 2007 Page 57

Florida Department of Transportation Trns*port SiteManager User’s Handbook Estimates Generation Function
Page 58 April 2007
This page left blank intentionally

Florida Department of Transportation
VI. Change Order Management Function
Release 3.7b
April 2007

Florida Department of Transportation Trns*port SiteManager User’s Handbook Change Order Management Function
Page 60 April 2007
Change Orders, What You Should Know What FDOT currently calls a Supplemental Agreement or Time Extension are just types of SiteManager Change Orders. To SiteManager any contract change is called a Change Order. Each of these will be entered using the Change Order function. There are certain administrative functions that can be addressed by this function also. Definitions and uses will be described below. SiteManager allows for developing a contract change, reviewing and approval of contract changes on-line. In developing a Change Order in SiteManager you will create a header, address item changes, additions or deletions and/or address contract time issues. When completed, there is a report called the ‘Contract Change Report’ that can be printed out that represents a summary of the changes. The report, printed out and combined with the remaining portion of the document is then sent around to all parties for review and approval. As the change is reviewed each level, the reviewer can accept or reject the change from within SM. On final approval the status will change from pending, to approved. The approval of change orders can occur anytime during the estimate cycle and it will not interfere with the estimate process. Because we are required to track more information pertaining to an SA or Time Extension than what is allowed in SM, a separate system for tracking this information was developed. This parallel system is called the Contract Change Tracking System. Change Order Types And Uses A Supplemental Agreement is used to increase or decrease existing contract items, add new items and/or make adjustments to contract time under certain conditions Unilateral Supplemental Agreement: Covers the same functions as above but used to document and pay for work or time where we do not have agreement with the contractor on the value of such changes. Contingency SA: Will be used to add an additional contingency item as the contingency funds encumbered for the contract are exhausted. Recording actual payments against for work under an Contingency SA will be done as Line Item Adjustments. Tracking of work orders for actual type of work performed and reasons for work will continue to be tracked within our Contract Change Tracking System. Time Extension Agreements: Any agreement reached with the contractor for additional contract time not documented under any of the following types of extensions. Weather Days Time Granted: Time allowed for days when weather conditions prevent the contractor from effectively working on the controlling items of work. Contingency Work Order/Field SA Time Adjustments: Used to document time granted under either of these documents. Movement of Items Within Contract: This is an administrative function used when work is needed on a specific project but the pay item for that work does not exist on that project but does exist on another project within the contract. Use only when the contractor agrees to perform the additional work at the contract unit price. The basic rule of this function is to reduce the plan quantity on the donor project by one unit and add that same item with a quantity of one unit to the target project using the same unit price thereby showing a net change of $0.00. This CO type requires only one level of approval. It is anticipated that an enhancement to SiteManager will be implemented that will allow us to track and code all information in SM that we currently track within our Contract Change Tracking System. Definitions The following are definitions that are used within the Change Order function of SiteManager.
Florida Department of Transportation Trns*port SiteManager User’s Handbook Change Order Management Function
April 2007 Page 61
1. Change Order Header – This refers to the definition of the contract change. With this screen
you will associate the change to a contract, change type, reason code and link to either a dispute or force account. This linking process is not currently in use.
2. Function – These are predefined within SiteManager to establish what is to be included within a given change order. The functions defined are Over/Under Run, Extra Work, Time Extension, Force Account and Final Quantity. Any combinations of these can be done except Final Quantity can only be done alone and not include any of the other functions.
3. Change Order Type – The FDOT defined type of contract change. Examples of these might be Supplemental Agreement, Time Extension or Contingency SA.
4. Change Order Items – These are items that are included on the Change Order. Change Order Items can include items that are currently on the contract and these are called “New Change Order Item”. Change Order can also include items from the Master Pay Item list that are not currently on he contract and these are referred to as “New Contract Item”.
5. Change Order Time Adjustment – This is where you would add/delete days from the contract or possibly alter a contract milestone.
6. Change Order Explanations – This is where you would provide the various explanations for any contract changes. This information is printed on the Contract Change report to detail any special instructions or information for the contract.
7. Change Order Approval – This is the process in which a change order is distributed through SiteManager to other users who have been defined to review and approve the change order.
8. Change Order Approval Level – This refers to the different individuals that have been assigned to review and approval change orders. Different levels exist for different type of change orders and combination of functions for a change order.
9. Forward To – SiteManager allows you to forward the change order to other SiteManager users for their review while the change order is in Draft mode. This is different than the Change Order Approval in that reviews can be done concurrently while in the approval it must be done in order.

Florida Department of Transportation Trns*port SiteManager User’s Handbook Change Order Management Function
Page 62 April 2007
Contract Change Orders Getting Started To begin a Change Order double click the Change Orders icon on the SiteManager Main panel. This will display the Change Orders panel. Double click the Change Orders Maintenance icon to enter the Change Orders Maintenance panel. Double click on the Header icon to display the Change Orders Header screen.

Florida Department of Transportation Trns*port SiteManager User’s Handbook Change Order Management Function
April 2007 Page 63
Change Orders Header
1. Tentative Verbal Approval Dates: May be used if it applies. Emergency Change Orders may use these fields.
2. Status: Leave Status as Draft until all of the items and explanations are entered correctly.
3. Description: A short description of the Change Order. 4. Reason Code: Choose reason code from drop down
list. Combination is a catch all if multiple reasons apply. 5. CO Type: Choose type of change order. The type you
pick is determined by the existing rules set forth for all Change Orders.
6. Override Approval Rules: This is to be selected to override the default review/approval rules that had been created for the given type of contract, CO Type and CO Function. See section below on Change Order Rules and Overriding Them.
7. Functions: Function must be chosen for the type of items in the Change Order. Every Function that is applicable to the change order must be checked or an error will appear when entering items. Do not use the Force Account check box. If the Force Account box is checked a force account number must be associated to the Change Order. FDOT will not be using the Force Account section of SM at this time due to the fact that it does not match our specifications. For now if there is a Force Account on the Change Order just treat it as Extra Work. If it is a "no cost" Change Order, SM still needs to have a function picked. Pick the Overrun/Underrun if the Change Order is "no cost".
8. Emergency Work: Check if this applies. 9. Force Account: Not used at this time. 10. Reference Doc: Reference documents may be attached. 11. To save information entered, press the Save icon. Change Order Items Folder Change Order Item Tab
Required Fields: Contract ID: CO Nbr: Change Order Item Description: This Change Order:
System(key) System(key)
FDOT
FDOT
Required Fields: Contract ID: CO Number: Description:
System(key) System(key)
System Reason Code: System CO Type: Functions: Override APP Rules:
System System FDOT

Florida Department of Transportation Trns*port SiteManager User’s Handbook Change Order Management Function
Page 64 April 2007
With this tab you will either add or alter quantities and/or prices for existing pay items on the contract. The following steps should be followed to work with existing items.
1. Don't forget the first step is to select New Change Order Item from the Services Menu.
2. You cannot zero out an item in a change order. Therefore, if you have an item which needs to be considered a "no cost" change, you must zero out the original item and add a new change order item, using the New Contract Item folder tab, to the contract. Use the same item code, description, quantity and price for the item you are changing. You will have to include reasons for both of these items in the Line Item Explanations.
3. Change Order Item Description: This is the description that shows up on the explanations window, if you do not enter something here the explanations window will just have the item and line numbers for each change order item with no description.
4. This Change Order Quantity: The quantity of the change, not the new plan quantity as it was in the past. Enter underruns as negative amounts.
5. Click on the Save icon to save the information.

Florida Department of Transportation Trns*port SiteManager User’s Handbook Change Order Management Function
April 2007 Page 65
New Contract Item Tab
With this tab, you will be able to add items to the contract that does not already exist as part of the contract. Remember that any item added to the contract must be a valid item from the Master Pay Item List. We are not able to create pseudo numbers for contract changes as we currently do in CRS. Contingent items and other miscellaneous items will be added to the Master Pay Item list to accommodate where an existing item doesn’t work.
Select New icon from the toolbar and then select New Contract Item tab. 1. Line Item Nbr: These must be unique
numbers for the contract. You should review the existing Line Item Numbers. The sorting of the contract items on the Estimate Summary is dependent upon the Line Item Numbers used. If you wish it to be directly underneath a certain contract item then the Line Item Number should be one greater than that of the existing contract item.
2. Project Nbr: The project number that the new item applies to.
3. Item Code: If you already know the item number you want to add then you can type it in this field or you can use the search lens to locate the appropriate item from the Master Pay Item list.
4. Major Item, Specialty: Check if they apply.
5. Unit Price: Unit price for the item. 6. Related Item: This list is not populated so this field will not be used at this time. 7. Critical: Check if this is a critical item. 8. Pay Plan Qty: If this box is checked it will not be possible to overrun this item above this Change Order
amount. 9. Supplemental Descriptions: Short description for the item. 10. Category Number: This is how funding is assigned to the items added by this Change Order. Use the
drop down menu to select the proper a Category Number. 11. Now go back to the Change Order Item tab and enter this for this new item in the This Change Order
field under Quantity. 12. Press the Save icon to save the information. Change Order Time Adjustments
If the Change Order that you are entering included the Function – Time Adjustment, then you will be able to enter the Time Adjustment functions.
Time Adjustments for our Working Day contracts will be adjusted by entering the number of days that contract is to be adjusted because of extra work being added to the contract or adjustment of time for valid reasons as per the contract specifications and FDOT procedures. The number of days should be entered in the field Time Adjustment Days.
Required Fields: Contract ID: Change Order Nbr: Line Item Number:
System(key) System(key)
System Category Number: System Project Nbr: Item Code: Unit Price:
System System System
Required Fields: Contract ID: Change Order Nbr: Time Adjustment Days:
System(key) System(key)
System

Florida Department of Transportation Trns*port SiteManager User’s Handbook Change Order Management Function
Page 66 April 2007
Adjusted Completion Date will not be entered and will be calculated based on the Notice to Proceed Date and original number of contract days. If adjustments are being made for a contract milestone you should check the For Milestone button and also pick from the drop down menu the sequence number of the appropriate Milestone being adjusted. The Milestone or Contract Completion button should be checked if the adjustment is for the contract overall and not specific to a given Milestone. The Explanation field can be used to provide information as to the reason and description for this Time Adjustment. Change Order Explanations As was discussed earlier, SiteManager does not provide a means to enter all of the information related to a contract change that FDOT currently requires to be entered into our Contract Change Tracking System. Until we have these features added to SiteManager, we will continue to enter information in our Contract Change Tracking System for all contract changes done in SiteManager. However, SiteManager does provide a means to enter explanations for contract changes that can be used for documenting any information that should be included as part of the actual Contract Change documentation. These explanations can be made at the Change Order level, at the Change Order Item level or applied to all Change Order Items. Explanations can be chosen from a list of standard explanations from a menu or you can type your own code and explanation that will be saved for use on other Change Orders. The following are brief instructions on how to enter these explanations if you wish to use this function. 1. Change Order explanations should be assigned to specific line items. (Hint: from the drop down list,
select "Explanations Applied to Specific Items"). An explanation to a specific line item must be associated with an item before it can be saved with a sequence number.
2. The explanation must begin with the following: Sequence Number - Overrun or Underrun: Reason. For example: Seq. No. 1 - Overrun: Begin typing the reason....
3. If you have a new item on your change order, place the "Settlement of Costs" statement at the beginning of the reason, immediately following the item description. For example: Seq. No. 1 -Overrun: Settlement of Costs based on the agreed price of $10.00 per Linear Foot. Begin typing the reason….

Florida Department of Transportation Trns*port SiteManager User’s Handbook Change Order Management Function
April 2007 Page 67
Change Order Tracking SiteManager provides a method to have Change Orders either reviewed on line as well as approved on line by other SiteManager users. This function allows you to track the current status of any Change Order, which you have authority to see. Upon entering this screen the Change Order Header tab will be displayed. The second tab on the window will display current information related to status of either the review or approval of Change Order. On the CO Tracking List the following information is displayed. 1. Sent Date: This is the date that the
Change Order was sent for action by user.
2. Name: The name of user that was requested to take action on Change Order.
3. Action: The action either requested for the Change Order by the user or the action completed by the user. If Change Order sent for Review then action would be Review and if for approval then the action would be Approval.
4. Date: Date the user enter action taken on the Change Order.
5. Recommendation: The recommendation that user gave either after review or approval. Recommendation could be Approved or Denied.
6. Remarks: Any comments that user made during their review and/or approval.
Saving Change Order To save the change order and get it on its way in the approval cycle, return to the Header window and change status from draft to pending, then press the Save icon on the toolbar. This will display the Change Order Approval Level window. Then designate the people you want as the approval level. The first two approval levels are Contractor and Change Order Level Approval Level 1. This was done because the actual personnel that have the responsibility for the respective levels is different for different offices. Change Order Review/Approve If you had been requested to review a Change Order for approval then double clicking this icon you will be presented a list of contracts and Change Orders that are awaiting your review. Upon selecting your contract and Change Order, a screen that will allow you to record your actions and comments related to the Change Order. Upon saving your recommendations and comments, a message will be sent either to the user who requested your review or it will be sent to the next person in line for approval to let them know that they require action.
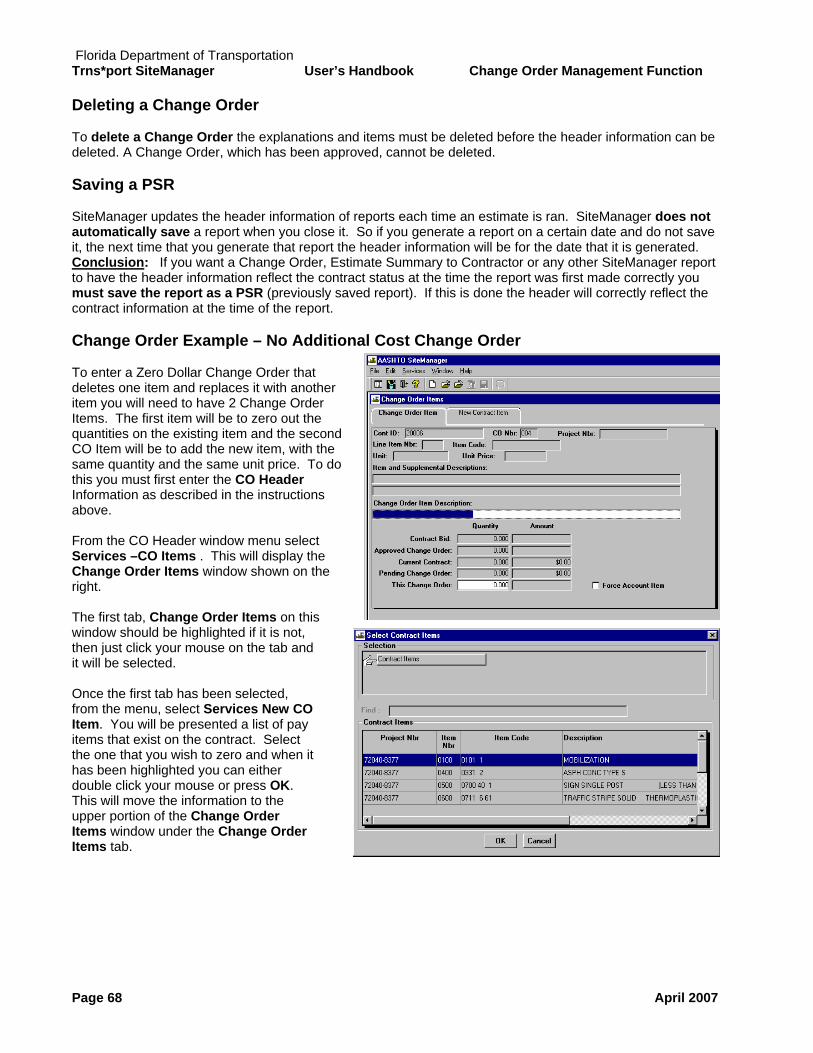
Florida Department of Transportation Trns*port SiteManager User’s Handbook Change Order Management Function
Page 68 April 2007
Deleting a Change Order To delete a Change Order the explanations and items must be deleted before the header information can be deleted. A Change Order, which has been approved, cannot be deleted. Saving a PSR SiteManager updates the header information of reports each time an estimate is ran. SiteManager does not automatically save a report when you close it. So if you generate a report on a certain date and do not save it, the next time that you generate that report the header information will be for the date that it is generated. Conclusion: If you want a Change Order, Estimate Summary to Contractor or any other SiteManager report to have the header information reflect the contract status at the time the report was first made correctly you must save the report as a PSR (previously saved report). If this is done the header will correctly reflect the contract information at the time of the report. Change Order Example – No Additional Cost Change Order To enter a Zero Dollar Change Order that deletes one item and replaces it with another item you will need to have 2 Change Order Items. The first item will be to zero out the quantities on the existing item and the second CO Item will be to add the new item, with the same quantity and the same unit price. To do this you must first enter the CO Header Information as described in the instructions above. From the CO Header window menu select Services –CO Items . This will display the Change Order Items window shown on the right. The first tab, Change Order Items on this window should be highlighted if it is not, then just click your mouse on the tab and it will be selected. Once the first tab has been selected, from the menu, select Services New CO Item. You will be presented a list of pay items that exist on the contract. Select the one that you wish to zero and when it has been highlighted you can either double click your mouse or press OK. This will move the information to the upper portion of the Change Order Items window under the Change Order Items tab.

Florida Department of Transportation Trns*port SiteManager User’s Handbook Change Order Management Function
April 2007 Page 69
Now you can enter the information on the lower portion of the screen to complete this new CO Item. 1. Enter a Change Order Item Description
such as “Item removed to reflect new specifications”.
2. Enter the quantity of the item that is represented by this change. In our example, we have 18 as the Current Contract quantity, which is the same as the Contract Bid quantity. In our example –18.000 has been entered as the This Change Order quantity. This will have the effect of zeroing out this quantity.
3. Once this has been entered click the Save icon on the toolbar or use File Save from the menu.
You’ve just entered the first of two CO items for this change order. Note: The screen displays all information related to the item that we were just working with. To add the second CO Item, the new item to replace the one we’ve just zeroed out, click on the New icon or from the menu select File New. This will blank out all information on the Change Order Item tab. When you have added this new CO item, click on the New Contract Items tab. The screen shown to the lower right will be displayed. Information you need to have on hand in order to be ready to add a new item is: 1. Project Nbr: This is the FDOT Financial
Project ID for which the item is to be added. The dropdown menu on the screen will only show those Financial Project ID’s for the contract selected on which you are adding this Change Order. In our example the project number is 72040-8377.
2. Category Nbr: This is the grouping of pay items where this item will be located. One source for this information is from the Item Quantity Report (All Statuses) from the Contract Administration Reports panel. Since the old item was in category 200 Signing and Markings we’ve selected that for our example.
3. Line Item Nbr: This is the unique number that will be assigned to the pay item that is being added. This number designates the sort order where the pay item will be displayed in the estimates report as well as other listings of pay item numbers in SiteManager. From the same report as described in item 2 above, you could find the line item number for the item that this one relates to and use a number that would make it follow that item. From this report we

Florida Department of Transportation Trns*port SiteManager User’s Handbook Change Order Management Function
Page 70 April 2007
find that the line item number for the item deleted was 0500 we’ve made ours to be 0505 so that it will always be located next to the one we deleted.
4. Item Code: This is the FDOT pay item number you wish to add. Because the Department’s standard pay item list is so large you would not want to take the time to display the entire list with Search lens while on this field. It is best to type the pay item number directly in this field. In our example we input 0700 40 2 as the Item Code.
5. Unit Price: This is the appropriate unit price for the item being added. We set our unit price the same as the item deleted which was $230.000.
All of the other fields are optional and not required to be used at this time. Now that you have entered the information for the Item Code to be added as the second Change Order Item, you now need to go back to the Change Order Item tab to enter the quantity. In our example we’ve entered 18.000 to match the item that was deleted. To save the changes click on the Save icon on the toolbar or use File Save from the menu.

Florida Department of Transportation Trns*port SiteManager User’s Handbook Change Order Management Function
April 2007 Page 71
This page left blank intentionally.

Florida Department of Transportation
VII. Stockpile Materials Function
Release 3.7b
April 2007

Florida Department of Transportation Trns*port SiteManager User’s Handbook Stockpile Materials Function
April 2007 Page 73
Stockpiled Materials: Getting Started
So, you want to create some Stockpiled Materials? Here's a quick reference on what steps to take: Note: The requirements for Partial Payment For Delivery Of Certain Materials as specified in Section 9-6 of the Standard Specifications and Chapter 3, section 1 of CPAM shall remain in effect.
Note: This function is very difficult to employ on lump sum items, as well as lump sum and design-build contracts due, primarily, to the difficulty in coming up with a proper conversion factor. It is recommended that these stockpiles be monitored outside SM and the adjustments manually entered.
From the Main Panel select Contract Administration then Contract Records then Stockpiled Materials.
Before adding any data, you must determine the following: Which Line Items in the Contract include the invoiced material. It is possible to have various material components included on the invoice that affects separate Line Items in the Contract. How much of the total invoiced material quantity to allocate to each item. What the conversion factor for each Stockpiled Material should be. It needs to be determined how many units of the stockpiled item are in one unit of the line item. If the unit for the line item and the unit for the stockpiled material are the same, the conversion factor would equal one.
Required Fields: Stockpiled Desc: Invoice Number: Quantity: Units: Unit Price:
System System System System System

Florida Department of Transportation Trns*port SiteManager User’s Handbook Stockpile Materials Function
Page 74 April 2007
If an initial payment amount is due, which Contract Line Items pay this amount? Getting Started To get started, select your contract and item for the material. From the Services menu, select Choose Keys.
1. Matl Code: Will not be used at this time.
2. Stockpiled Desc: Must be entered manually.
3. Status: Populated automatically and means
4. Open = stockpiled material has been or is being added, but an estimate including this material has not been generated.
5. Active = stockpiled material has been locked by an estimate.
6. Closed = stockpiled material has been zeroed out.
7. Invoice Date: Enter the date of Invoice. 8. Invoice Number: Enter the Invoice Number. 9. Quantity: Enter the quantity of the material for the item the invoice represents. 10. Units: Units of the Stockpiled Materials (ea, sf, cm, etc.). Select proper units from the drop down
list. 11. Unit Price: Invoice unit price, including tax. Calculate this amount: (total invoice amount of the
item) x tax rate (if applicable) = X. X / total invoice units = Unit Price. 12. Conv Factor: Must be calculated by the user. The user needs to determine how many units of
the Stockpiled Material item is in one unit of the Contract Line Item. If the unit for the line item and the unit for the stockpiled material are the same, the conversion factor would equal one.
13. Conversion Unit Price: Populated automatically and equals (Conversion Factor) x (Unit Price). 14. Invoice Amount: Populated automatically and equals (Quantity) x (Unit Price). 15. Initial Invoice Payment: This is required and must be entered by the user. Enter the calculated
initial payment for the stockpiled material. This will be the initial payment on the estimate. This payment must be equal to or less than the calculated Invoice Amount. We have seen problems when there is a difference between the two. All rules set forth in Section 9-6 governing partial payments will be complied with in calculating the initial payment.
16. Remaining Quantity: Populated automatically and equals (Quantity) - (Installed Qty to Date). 17. Installed Qty to Date: Populated automatically and equals (Paid Line Item Amount) x
(Conversion Factor). 18. Paid To Date: Appears to be the Stockpiled Materials Initial Payment. Once the estimate is
generated, the Stockpiled Materials become active and the amounts are updated. The user cannot change any of the fields at this point. Once the estimate has been approved, the Stockpiled Materials associated with the estimate cannot be changed, other than to zero the quantity. Closing out a stockpile will be discussed below.
19. Material Sn: Material sequence number assigned automatically to different materials added to the same pay item.
20. Replenish Sn: Replenishment sequence number assigned automatically when replenishments are made to an existing stockpile.

Florida Department of Transportation Trns*port SiteManager User’s Handbook Stockpile Materials Function
April 2007 Page 75
Replenishing a Stockpile When additional material is delivered for use on the project payment for this material can be made by adding to (replenishing) an already created stockpile. Follow these steps to replenish a stockpile:
1. Go to the Stockpiled Materials screen. 2. Click on the Open icon. 3. Select the stockpile where the material is to be added. 4. Select the services menu. 5. Select Replenish Material. This will allow you to add additional materials that will appear as a
new stockpile with an incremented Replenish Serial Number. Closing Out Stockpile Material Balances: If there is a remaining balance in a stockpile when the pay item is complete the stockpile must be manually closed out. When you manually close out a stockpile material balance, SiteManager zeros the remaining quantity and the remaining dollar value of the initial payment, if any. Follow these steps to manually close out a stockpile:
1. Go to the Stockpiled Materials screen. 2. Click on the Open icon. 3. Select the stockpile or stockpiles that represent the completed pay item. 4. From the Services Menu, select Close Out Balance.
Payment Process For Stockpiled Materials The stockpile created in the example below would show an Initial Payment of $100.00 under Stockpiled Materials on the estimate summary if no payment is made toward the line item for which it was created. If payment is made on the line item at the same time as the Initial Payment is made then the Stockpiled Materials payment will be reduced down by the amount of the stockpile represented by the line item. i.e.: Item quantity payment of 2 tons($200.00) + $100.00 Initial Payment for Stockpiled Materials Less pay down of stockpile of - $10.00 ( 0.5 tons of stockpile per I ton of pay item = 1 ton(stockpile) X $10.00 (Conversion Unit Price). Equals a net payment for the estimate of $290.00 All future line item payments will reduce the Initial Payment for Stockpiled Materials in accordance with the conversion factor used until pay quantities exceed the remaining balance shown for that stockpile.

Florida Department of Transportation Trns*port SiteManager User’s Handbook Stockpile Materials Function
Page 76 April 2007
SPECIAL PROBLEMS RELATED TO STOCKPILED MATERIALS There are a couple of situations where the pay down feature creates an erroneous reduction in the stockpile initial payment. Those are:
1. The contractor installs material on the job from off project sources in the same pay period without drawing from the existing stockpile. Example: There is an existing stockpile for 1,000 LF of guardrail but the contractor places 100 LF of newly ordered guardrail.
2. The contractor stockpiles material for part of a pay item then constructs other parts of the pay item in
the same pay period. Example: The contractor stockpiles mast arms for traffic signals and has his subcontractor install footings at the same time.
When these situation, occur the only option is to create an additional stockpile that represents the dollar value of the installed work that did not come from existing stockpiles. The additional stockpile should be done as a replenishment to the stockpile that you do not wish to draw from. The amount of the stockpile initial payment on the replenishment should be equal to the amount that would be drawn from the stockpile by the quantity you wish to pay for on the estimate. Consider the invoice price and the conversion factor in calculating what the reduction would be This will allow stockpiles to remain at their full value until material installed is actually drawn from any real stockpile.

Florida Department of Transportation Trns*port SiteManager User’s Handbook Stockpile Materials Function
April 2007 Page 77
This page left blank intentionally.

Florida Department of Transportation
VIII. Checklist Scheduled Events and Dates
Release 3.7b
April 2007

Florida Department of Transportation Trns*port SiteManager User’s Handbook Checklist Scheduled Events and Dates
April 2007 Page 79
Note: Currently we are using this process to track Value Added(Warranteed) project features. Future uses will follow the same basic instructions.
TRACKING CONTRACT VALUE ADDED FEATURES NOTE: The responsibility for performing the functions detailed below will be determined by the District Construction Engineer except for those specifically designated as the responsibility of the District Final Estimates Manager. NOTE: THESE INSTRUCTIONS APPLY TO ALL CONTRACTS, THOSE WHERE THE SPECIFICATIONS ARE A PART OF THE ORIGINAL CONTRACT, AS WELL AS WARRANTIES ADDED BY A FIELD SUPPLEMENTAL AGREEMENT AS THE RESULT OF SOME DEFICIENCY IN THE WORK PERFORMED BY THE CONTRACTOR. On contracts that have Value Added features, the normal processes for accepting the work will be followed. At the same time the “Final Acceptance” is entered in SiteManager, the “Under Warranty” date should be entered also. This will be done using the “Key Dates” feature. A Checklist Scheduled Event will be established for each Value Added Feature as reminder dates at the intervals appropriate for the item or items in the contract. SiteManager requires entering a recipient or a distribution list and to satisfy this requirement you should enter an appropriate person’s name of your choice. This notification is only done within SiteManager mail system and currently doesn’t interface with Lotus Notes. A separate process will be used through Lotus Notes to notify the appropriate District Value Added Coordinator as to events that require their attention. It will then be the responsibility of the Value Added Coordinator to enter the actual events dates for each of the Value Added Feature event reminders entered as “Checklist Events”. Creating a Value Added Feature Checklist Event From the SiteManager Main Menu panel select <Contract Administration> and then from the Contract Administration Menu panel select <Contract Records> then from the Contracts Record Menu panel select
<Checklist Schedule Events>.

Florida Department of Transportation Trns*port SiteManager User’s Handbook Checklist Scheduled Events and Dates
Page 80 April 2007
This will display the screen below.
The following are definitions of fields on this screen and are the only fields that are required to be entered.
Event Type Select one of the Value Added features types from the list.
Event Group Type Select the “Project Feature Warranty Event”
Frequency Type For the Value Added feature select the appropriate frequency at which some action during the Value Added period is to take place. Example: 1. Say you have a 1 year Value Added period but you want to have an inspection every 3 months. The “Frequency Type” would be Quarterly and “Nbr of Occurrences would be 4. This would then create a Value Added period of 1 year (4 occurrences times Quarterly). 2. Say you have a 5 year Value Added period and you want to have an inspection each year. The “Frequency Type” would be Yearly and “Nbr of Occurrences would be 5. This would then create a Value Added period of 5 years (1 occurrence for 5 times ).

Florida Department of Transportation Trns*port SiteManager User’s Handbook Checklist Scheduled Events and Dates
April 2007 Page 81
Next Proj Date: This is the date at which the first period identified in the
Frequency Type will conclude. Example: 1. From above, say the start of the first Quarterly period was 1/1/04 then the end of the first period would be projected as 4/1/04 (Start date plus 3 months). 2. From above, say the start of the first Yearly period was 1/1/04 then the end of the first period would be projected 1/1/05.
Nbr of Occurrences:
This is the number of periods identified for the Frequency Type entered. See examples above.
Recipient SiteManager Userid of person that “Message Text” will be sent too. Either enter the Project Manager or the District Value Added Coordinator’s Userid.
Message Text Short message to tell them what activity is to happen at end of each period. Example “Value Added Feature Inspection Required”
All of the other items on the screen are not to be used for Value Added Features. You will enter just one “Checklist Event” for each of the Value Added Features for this contract. Once you have entered the information be sure that you have saved the information before you leave the screen.

Florida Department of Transportation Trns*port SiteManager User’s Handbook Checklist Scheduled Events and Dates
Page 82 April 2007
Checklist Event Dates Recording Actions Taken for Each Value Added Feature When the Value Added Feature “Checklist Event” occurs, the actual date at which the individual period was completed and the result of the event will be entered on the “screen”. There is no need to enter anything on this screen until the “Next Proj. Date” event has occurred. From the Contract Records Menu panel, shown on previously select <Checklist Event Dates> to display the following screen for entering the actual date that an event occurred.
Please note that each time you enter an “Actual Date” when an “event” occurred the “Next Proje Date” field will be automatically calculated for you based on the “Frequency Type” and the “Nbr of Occurrences” as defined on the “Checklist Event” screen. To enter an “Actual Date” for an event that has now occurred, highlight the lower portion of the screen and then press the “New” icon from the toolbar or select File-New from the menu. This will create a blank record that has the “Projected Date” filled out for you. Enter the “Actual Date” and any “Comments” you wish to make about the event such as “Value Added Inspection Completed”, “Contractor was notified of Remedial Action”, etc. Note: Comment field is 60 characters long. Once you say the “Actual Date” and “Comments” that are entered the “Next Proj Date” and “Nbr of Occurrences” will be changed to indicate when next event is to occur and how many events remain..

Florida Department of Transportation Trns*port SiteManager User’s Handbook Checklist Scheduled Events and Dates
April 2007 Page 83
This page left blank intentionally.

Florida Department of Transportation
IX. Key Dates
Release 3.7b
April 2007

Florida Department of Transportation Trns*port SiteManager User’s Handbook Key Dates
April 2007 Page 85
Key Dates: Getting Started The Key Dates function contains additional important contract dates that are not included on the Critical Dates Tab covered in the Contracts Activation section of this manual. SiteManager will add a set of default Key Dates to each contract and others may be entered on an as-needed basis to fit the circumstances of the individual contract. Those dates that will not be needed may be deleted. The default Key Dates are as follows:
1. Time Began Date: The date of beginning of time charges.
2. Final Acceptance Date: The date of final acceptance of the contract work by FDOT.
3. Material Certification Date: The date the Materials Certification is issued by the State Materials Office.
4. Offer of Final Payment Date: Date that the offer of final payment (or request for overpayment) was sent to the contractor.
5. Receipt of Offer of Final Payment: The date the offer of final payment (or request for refund of overpayment was received by the contractor.
6. Passed Date: The date that the contract was sent to the Comptroller for closeout.
7. Paid Off Date: The date the final payment on the contract was made.
8. Under Warranty: The date the warranty period begins until the projected end date.
To access the Key Dates function select the Contracts Administration icon on the SiteManager Main Panel then select the Contract Records icon then select the Key Dates icon.
Once selected, the following screen will appear. If you haven’t selected a contract in some other window prior to opening this window, all of the fields will be blank. If the screen is blank (that is no keys have been selected) then select File from the Menu – then select Open. Locate the contract you want to work with and then press OK. You could also use the Open icon from the toolbar.

Florida Department of Transportation Trns*port SiteManager User’s Handbook Key Dates
Page 86 April 2007
Note: You will only see contracts that you have authority to access.
Required Fields: Contract ID: Key Date Type: Projected Date: Required to Activate OR Required to Finalize Distribution list OR Recipient:
System (key)
System System
FDOT
System
Message Text FDOT
To schedule a Key Date: In the Key Dates list box, select the Key Date Type desired. In the Projected Date field, type the date the key date event is expected to be completed. Press the Tab key. If this Key Date must occur before the Contract status can be changed to Active, click the Required to Activate check box. If this Key Date is to be part of the Contract finalization process, click the Required to Finalize check box. Press the Tab key. In the Distribution List field, perform a Search and select a Group ID. OR in the Recipient field, perform a Search and select a User ID. Press the Tab key. In the Message field, type a short notice that will be sent to the Distribution List or Recipient when the Actual Date is entered. Click the Save button. NOTE: When the projected date passes without the Actual Date being entered a message is sent to the Distribution List or Recipient entered when the projected date was entered. Tip: The Key Date Type field cannot be modified on a saved record. To change the Key Date Type, delete the old record and add a new one. To enter the Actual Date of a Key Date: In the Key Dates list box, scroll to and click the Key Date. In the Actual Date field, with the cursor in the first space, type the date that the event occurred. Click the Save button. To delete a Key Date: In the Key Dates list box, scroll to and click the Key Date to delete. Click the Delete button. Click the Yes button (to confirm deletion). Click the Save button.

Florida Department of Transportation Trns*port SiteManager User’s Handbook Key Dates
April 2007 Page 87
To Create A New Key Date: On the Key Dates panel, click in the top area of the screen to place the focus in that area. Click the New button to insert a blank row in the top data window for the new Key Date. In the Key Date Type drop-down list, click the expand arrow to the right of the current selection and select a Key Date Type you wish to add. Press the Tab key. In the Projected Date field, with the cursor in the first space, type the date the key date event is expected to be completed. Press the Tab key. If this Key Date must occur before the Contract status can be changed to Active, click the Required to Activate check box. If this Key Date is to be part of the Contract finalization process, click the Required to Finalize check box. Press the Tab key. In the Distribution List field, perform a Search and select a Group ID. OR in the Recipient field, perform a Search and select a User ID. Press the Tab key. In the Message field, type a short notice that will be sent to the Distribution List or Recipient when the Actual Date is entered. Click the Save button.

Florida Department of Transportation Trns*port SiteManager User’s Handbook Key Dates
Page 88 April 2007
This page left blank intentionally.

Florida Department of Transportation
X. Contractor Evaluation
Release 3.7b
April 2007

Florida Department of Transportation Trns*port SiteManager User’s Handbook Contractor Evaluation
Page 90 April 2007
Contractor Evaluation Getting Started
To enter a contractor grade from the Main Panel select the Contract Administration panel. Select the Contractor Management panel. Next select the Contractor Evaluation panel.
If the Contract ID has not been selected, the screen shown below will be displayed. Use the arrow on the right to scroll down to the contract you want to
enter a grade on. Once you highlight the contract, press the OK button. The screen to the right will be displayed. The Evaluation Date is automatically populated with the current date but can be changed to whatever the date was when the evaluation was done. As you enter in a field at the bottom of a screen and tab off of it, the information will be automatically
Required Fields: Contract ID: Evaluation Date: Contractor: Rating: Begin Date: End Date:
System(key) System System System System System

Florida Department of Transportation Trns*port SiteManager User’s Handbook Contractor Evaluation
April 2007 Page 91
displayed at the top portion of the window. Select the Contractor for whom you are doing the grade by using the drop down list. After selecting the appropriate contractor, press the tab key to go to the Rating field. Enter in the appropriate grade. Make sure the grade is a whole number and not following the decimal point. The Evaluator field will be automatically populated with the name of the person who is logged on to SiteManager. The Reference Document field will not be used by FDOT at this time. The Evaluation Period Begin Date should be entered in month day year format and the Begin Date should be less than the End Date. These are required fields. The Contract Evaluated Ind. box indicates that the evaluation is for the entire contract period (the begin and end dates are still required). The Work Description field should describe the work for which the contractor is being evaluated. Save the information by using either the File – Save command or the Save icon on the toolbar. To add another evaluation for a different period place the focus on the upper portion of the window and press the new icon to add a new row. Next place the focus back on the lower portion of the window and enter in the fields as described above.

Florida Department of Transportation Trns*port SiteManager User’s Handbook Contractor Evaluation
Page 92 April 2007
This page left blank intentionally.

Florida Department of Transportation
XI. Master List Maintenance Function
Release 3.7b
April 2007

Florida Department of Transportation Trns*port SiteManager User’s Handbook Master List Maintenance Function
Page 94 April 2007
Daily Work Reports Vendor Master List This function allows us to maintain master list for each of our vendors (contractors, subcontractors) in a way that makes them available to any contract and all inspectors reporting on that contract. No longer will an inspector have to maintain their own master list and create one each time they get a new contract or contractor. There are two separate functions for maintaining master list. The first function is maintaining a master list for a specific contractor and the second function is maintaining the master list for a specific contract. Function 1 – Maintaining Vendor Master List From the SiteManager Main panel double click the Daily Work reports icon and then double click the Reference Table (DWR) and then double click on the Vendor Master List icon.
This will display the vendor pick list as shown at right. On the vendor pick list, locate the vendor you wish to work with and double click on the highlighted row or highlight the row and click OK.

Florida Department of Transportation Trns*port SiteManager User’s Handbook Master List Maintenance Function
April 2007 Page 95
Once you have selected a vendor, the screen on the right will be displayed. Note that a “radio button” is shown for each of the following types of resources: Equipment, Personnel, Supervisor, Staff Member. Alternately clicking on each of these “radio buttons” will change the lower portion of the screen. Adding Supervisors 1. Make sure the Supervisor
“radio button” is checked. 2. Click mouse in the lower
portion of the window to ensure that it has the focus.
3. Press the New icon (looks like a sheet of paper) on the toolbar. This will add a blank line in the lower portion of the window.
4. Fill in the Supervisor Name field. This can be an actual name or generic reference to a position called supervisor.
5. Click on the Active Indicator to indicate that this supervisor is currently active and should be available to the contract.
6. Repeat steps 3 through 6 for as many supervisors you wish to add for all contractors.
Adding Personnel 1. Make sure the Personnel
button is checked. 2. Click mouse in the lower
portion of the window to ensure that it has the focus.
3. Press the New icon on the toolbar. This will add a blank line in the lower portion of the window.
4. Fill in the Personnel Type field. This can be an actual name or a generic reference to a type of personnel. Suggestions for types are Skilled, Semi-Skilled, Laborer, and Trainee. If you have some of these that work half day in addition to the full day then the types will need to be specific to these hours. In lieu of those mentioned above, you might want to include the following as your types Full Day, Skilled - Half Day, Skilled - Full Day Semi-Skilled, Half Day Semi-Skilled, etc.
5. Click on the Active Indicator to indicate that this personnel is currently active and should be available to the contract.
6. Repeat steps 3 through 5 for as many personnel you wish to add for all contractors.

Florida Department of Transportation Trns*port SiteManager User’s Handbook Master List Maintenance Function
Page 96 April 2007
Adding Equipment 1. Make sure the Equipment button is checked. 2. Click mouse in the lower portion of the window to ensure that it has the focus. 3. Press the New icon on the
toolbar. This will add a blank line in the lower portion of the window.
4. Fill in the Equipment Description field. This can be reference to an actual piece of equipment or a generic reference to a type of equipment.
5. Fill in the Equipment ID with a unique identifier for the piece of equipment.
6. Click on the Active Indicator to indicate that this equipment is currently active and should be available to the contract.
7. Repeat steps 3 through 6 for as many pieces of equipment you wish to add for all contractors.
Adding Staff Member 1. Make sure the Staff Member
button is checked. 2. Click mouse in the lower
portion of the window to ensure that it has the focus.
3. Press the New icon on the toolbar. This will add a blank line in the lower portion of the window.
4. Fill in the Staff Member Name field.
5. Fill in the SSN/SIN field to uniquely identify this individual.
6. Under the S/C field indicate whether individual is a State employee (S) or a consultant employee ©.
7. Click on the Active Indicator to indicate that this staff member is currently active and should be available to the contract.
8. Repeat steps 3 through 7 for as many pieces of equipment you wish to add for all contractors.
Note:

Florida Department of Transportation Trns*port SiteManager User’s Handbook Master List Maintenance Function
April 2007 Page 97
A generic master list can be set up after activating the contract but prior to reporting work on the job. This list could contain generic names such as Supervisor, Skilled Worker, Semi-skilled Worker, Roller, Dump Truck, etc. A dummy DWR and Diary (shown as a no charge day) must be set up to generate this list and for a date after contract activation. The DWR can later be copied (enter in new DWR date, press tab, and answer yes to copy contractor information) to a real DWR for use in generating an estimate.
Changing an Existing Item. Why would we do it?????? Function 2 – Maintaining Contract Master List From the Reference Table (DWR) panel as shown above, double click on the Contract Master List icon. This will display the Contract Pick List as shown on the right. Locate the contract you want to work with and either double click on the highlighted row or once row is highlighted, click on the OK button. This will display the next screen, shown on the right, the Vendor Pick List. This is a list of all contractors/subcontractors that have been indicated to work on the contract selected. Locate the vendor that you wish to work with and either double click on the highlighted row or press the OK button once you have highlighted the row. This will display the window shown below.

Florida Department of Transportation Trns*port SiteManager User’s Handbook Master List Maintenance Function
Page 98 April 2007
Again, you’ll see that you have the 4 resource types with a “radio button” next to each. As you click on each of the “radio buttons” the bottom portion of the screen will change. On the left side is the “Vendor Master List” as was maintained under Function 1 above and on the right side is the “Contract Vendor List” which shows all of the selected resource type that has been assigned to contract you selected earlier. Adding a Resource to the Contract Vendor List To add a resource to the Contract Vendor List, just locate the item on the left side of the screen that you wish to add and then click on the Add button. Adding all Resources to the Contract Vendor List To add for the selected type of resource, all of the vendor resources from the Vendor Master List, click on the Add All button. Removing a Resource from the Contract Vendor List To remove a resource from the Contract Vendor List, locate the resource on the right side of the screen and then click on the Remove button Removing all Resources from the Contract Vendor List To remove all resources from the Contract Vendor List, click on the Rem All button.

Florida Department of Transportation Trns*port SiteManager User’s Handbook Master List Maintenance Function
April 2007 Page 99
This page left blank intentionally.

Florida Department of Transportation
XII. Stand-Alone Function
Release 3.7b April 2007

Florida Department of Transportation Trns*port SiteManager User’s Handbook Stand-Alone Function
April 2007 Page 101
Stand-Alone Function Getting Started This function provides us the means to move contract data information from the server database to our local database in order that we might be able to work offline not connected to the network database server. This mode of operation is called “stand-alone”. “Stand-alone” operation is necessary if we are to use SitePad for completing Daily Work Reports by our project personnel. In addition to using SitePad, this offline operation allows us to enter Daily Work Reports and compile Diaries while not connected to the network database server. In order to use SiteManager in “stand-alone” mode you must move contract information from the network server database down to your local database stored on your computer’s hard drive. Once you have entered data either through the use of SitePad or directly into the “stand-alone” version, you will need to move the added (or changed) data back to the network server. This is the role of the Pipeline function. We will not be using the Zip functionality at all. Definitions The following definitions will help clarify the use of these terms throughout this document.
1. Stand-alone Mode – A mode of operation where user is accessing local database and not network
database. This is identified at time of SiteManager logon. 2. Pipeline – The process of moving data between the local database and the network database 3. Project Manager’s Workstation – A computer workstation capable of being connected to FDOT
network or running independent of the network 4. Basic Contract Data – Includes all information about a contract including all Change Orders that have
been approved. Getting Contract Information Down to the “Project Manager’s” Workstation. In order to work in the “stand-alone” mode of operation you must have been assigned to the special group “CNOFFLIN” which identifies all users who can have this authority. Before you can work on any contract, that is entering dailies, diaries or synchronize data with SitePad, you must move the basic contract data down to the local database on the Project Manager’s workstation. The following steps should be followed to do this.
1. Make sure Workstation is connected to the network and you are logged on correctly.
2. Start SiteManager using your Desktop icon.
3. At SiteManager Logon screen make sure you select “Server” in the “Connect To:” box.

Florida Department of Transportation Trns*port SiteManager User’s Handbook Stand-Alone Function
Page 102 April 2007
4. On the Main Panel, Double click on the Pipeline/Zip icon,
5. On the Pipeline and Zip Panel double click on the “Sever to PM Pipeline” icon.
6. If you haven’t selected a contract previous to entering this screen you will be presented the Contracts selection window as shown to the right. Locate the contract you wish to work with, highlight it and either double click your mouse or click on the OK button.
7. If you have previously selected a contract then the window below will open. If this isn’t the contract you wish to work with then you can use either the File Open Icon or File Open Command from the menu and select your contract using the Contract Selection window. Locate the contract you wish to work with, highlight it and either double click your mouse or click on the OK button
8. The first tab in this window is the Pipeline Summary Tab. This shows in summary fashion what items have been selected on the following tabs. The first time you pipe contract information for a contract you should ensure that the Basic Contract Button is checked. This will cause “All” to be shown in the Change Orders and Force Accounts text boxes. You can select Basic Contract Data anytime you pipe the contract data, this will ensure that all contract changes have been downloaded to the Project Manager’s workstation. You

Florida Department of Transportation Trns*port SiteManager User’s Handbook Stand-Alone Function
April 2007 Page 103
will also need to be on the Pipeline Summary Tab in order to start the download process.
9. The second tab is the Diary Select Tab. Here you will note any existing Diaries that you wish to send back down to the “Project Manager’s workstation for editing or reviewing in the “stand-alone” In the upper portion of window, select the Diaries that you want to download and then in the lower window press the “Add” button. You can use the Remove button to un-select any that you added by
mistake. You could also use the Rem All button to remove all Diaries that you had selected. These removal actions only remove them from the list of Diaries to be downloaded. They still remain in the network database.

Florida Department of Transportation Trns*port SiteManager User’s Handbook Stand-Alone Function
Page 104 April 2007
10. The third tab is the DWR Select Tab. Here you will identify any existing DWRs that you wish to send back down to the “Project Manager’s” workstation for editing or reviewing in the “stand-alone” mode. In the upper portion of the window, select the DWRs that you want to download and then in the lower window press the “Add” button. You can use the Remove button to un-select any that you added by mistake. You could also use the Rem All button to remove all DWRs that you had selected. These removal actions only remove them from the list of DWRs to be downloaded. They still remain in the network database.
11. The fourth tab is the Change Order Select Tab. Here you will identify any Contract Change Orders that need to be downloaded. If you selected the Basic Contract Data button on the Pipeline Summary Tab, then you do not need to make any selection on this tab. If you wish to only download Contract Changes Orders that have been approved since the last download then this is the tab to do that. Highlight the Change Order that you want to download and press the “Add” button. If you added one by mistake you can remove highlighting in the lower portion of the window, the one to be removed and then click on the “Remove” button. You could also click on the Rem All button to remove all from the list. This action only removes them from the list to be downloaded and not from the database.
12. The fifth tab is the Force Account Select Tab. FDOT has no current plans to utilize Force Accounts within SiteManager so this tab will not be used.

Florida Department of Transportation Trns*port SiteManager User’s Handbook Stand-Alone Function
April 2007 Page 105
13. The sixth tab is the User Select Tab. Here you will identify all users that will be needing access to the Project Engineer’s workstation or will be using SitePad that is synchronized from the Project Engineer’s workstation. This will create the necessary security file so that they can operate in the “stand-alone” mode or can have information synchronized with their Palm Computers to use SitePad. In the upper portion of the window, locate and highlight the user you want to build security files for and then click on the Add button.
14. Select the Pipeline Summary Tab and then select the Services – Pipeline Data command on the menu line at top of screen. Messages will appear on the Pipeline Status line as to current process. If any DOS windows (they show results of file delete and zip process) remain open then close them. Once this process has completed, the message “Pipeline Complete” will appear in the Pipeline Status line.
Once you have piped any Diary or Daily Work Report down to the Project Manager’s Workstation, these will be locked to changes made while on the network database. They will need to be piped back in before they’re available for editing.
Working in “Stand-Alone” Mode. Once you have performed the Pipeline function, you now can log into SiteManager and work with the contract information you downloaded from the SiteManager network database.
1. Double click on your SiteManager icon on the “Project Manager’s” workstation.
2. Enter your userid and password.
3. Before clicking on Enter, make sure that “Stand-Alone” has been selected in the “Connect to:” drop down box.
4. Click on Enter. This will take you to the SiteManager Main Panel. Note that the number of icons is less than when you were working in the “Server” mode. This is because you are limited to only working on Diaries, Dailies, SitePad Synchronization and Viewing contract information. No other functions than these work in the “stand-alone” mode. Functions here work the same as they do while in the “Server” mode of operation. For help in those functions, please see other sections within this user manual.

Florida Department of Transportation Trns*port SiteManager User’s Handbook Stand-Alone Function
Page 106 April 2007
Moving Information Back to the Network Server. While in the “stand-alone” mode you could have performed the following functions to either change data previously brought down from the network database or information that you have added since you last brought data down from the network database.
• Revised Daily Work Reports • Revised Diaries • Create Daily Work Reports • Created Diaries
You must move any revised or created Diaries or Daily Work Reports back to the network database before the next estimate is run or they will not be included in that estimate. You should also move data back when you are completed with the contract and you should move data back as often as you can in order to have it backed up. Once you have indicated that a Diary or Daily Work Report has been moved back to the network server you will not be allowed to make any more change in the “stand-alone” mode to that Diary or Daily Work Report. In the event you need to make change after you have piped them back up to the network server, you will have to make the changes there or have them piped back down to the Project Manager’s workstation. The following provide instructions on how to send this data back up to the network database so that it can be used in the generation of estimates.
1. Using the “Project Manager’s” workstation, log onto the FDOT network.
2. After successful connection, start SiteManager using the Desktop icon. Make sure you select “Server” as the “Connect To:”
3. Select the Pipeline/Zip icon, then the “PM to Sever Pipeline” icon.

Florida Department of Transportation Trns*port SiteManager User’s Handbook Stand-Alone Function
April 2007 Page 107
4. Using either the File Open Icon or File Open Command select your contract. If you don’t select the contract at this time you will be prompted to select it when you move to one of the other tabs.
5. The first tab in the PM to Server Pipeline process is the Pipeline Summary Tab. As in the Server to PM Pipeline process, this provides summary information on what is being piped back to the network database. If you have completed all work on this contract, then you will want to click on the Basic Contract Data button. This will remove the contract from the “stand-alone” database and will mark it as “checked” back in on the network server database.
6. The second tab is the Diary Select Tab. Here you will identify any Diaries that you wish to send back to the network database. In the upper window, select Diaries that you want to pipe back to the server. Once the Diary is highlighted, then in the lower window click the “Add” button. You can remove any that was added by mistake by highlighting and then clicking on the “Remove” button.
7. The third tab is the DWR Select Tab. Here you will identify any DWRs that you wish to send back to the network server database. In the upper window, select the DWRs that you want to send

Florida Department of Transportation Trns*port SiteManager User’s Handbook Stand-Alone Function
Page 108 April 2007
back to the server. Once the DWR is highlighted then in the lower window click on the “Add” button. You can remove any that was added by mistake by highlighting and then clicking on the “Remove” button.
8. The fourth tab is the Sample/Test Select Tab. Since FDOT is not using the Materials Functionality then this tab will not be used.
9. Select the Pipeline Summary Tab and then select the Services – Pipeline Data command on the menu line at top of screen. Messages will appear on the Pipeline Status line as to current process. If any DOS windows remain open then close them. Once process has completed, the message “Pipeline Complete” will appear in the Pipeline Status line.
Synchronizing Data with SitePad SitePad is a Palm Computer application for inputting Daily Work Reports. Complete instructions on its’ use and how to set it up can be found in its’ own separate user manual. In order to be able to use SitePad you will need information from the SiteManager database transferred to the Palm computer where SitePad is loaded. The process of transferring this data is called “synchronization”. The function of “synchronization” will keep data that is being used in SitePad in agreement with data that is contained in the SiteManager database. The only requirement for this “synchronization” to work is that it can only be done between the Project Manager’s workstation operating SiteManager in the “stand-alone” mode of operation and the Palm Synchronization software installed on the Project Manager’s workstation. The following instructions assume that you have already setup your Palm Software and have already “synced” the user’s Palm Computer with the Project Manager’s workstation. It also assumes that you have already piped contract and user information down to the SiteManager database on the Project Manager’s workstation. If not then see instructions above on how to do that.
1. Start SiteManager from your desktop icon. At the SiteManager logon screen make sure you have set the Connect To: drop-down to “standalone”.
2. From the SiteManager Main Panel, select Pipeline/Zip Icon.
3. From the Pipeline/Zip Panel, double click on the SitePad Synchronization icon. This will bring up

Florida Department of Transportation Trns*port SiteManager User’s Handbook Stand-Alone Function
April 2007 Page 109
the SitePad Synchronization window as shown on the next page.

Florida Department of Transportation Trns*port SiteManager User’s Handbook Stand-Alone Function
Page 110 April 2007
4. The SitePad Synchronization window has two tabs. The first tab is the Synchronization Summary. This tab will provide summary information on what is being “synced” with the SitePad database stored in the Palm Software backup directory for the user you select. To begin the synchronization process you will first need to identify a contract and a user that you wish to work with.
5. To select a contract, use either the File Open icon or File-Open menu option. This will display a list of contracts that are stored within the local database.
6. Locate and highlight the
contract for which you want to transfer data. Double click on the highlighted contract and this will display the list of users who have been granted specific access to this contract and have been piped down to the local database.
7. Locate and highlight the user’s name for whom you are transferring data and either double click your mouse or press the OK button. These actions will populate the Contract ID, Description, User ID and User Name fields on the SitePad Synchronization Summary window.

Florida Department of Transportation Trns*port SiteManager User’s Handbook Stand-Alone Function
April 2007 Page 111
8. The second screen on the SitePad Synchronization window is the DWR Select Tab. In this window you will identify any DWRs for the user that you wish to transfer to SitePad. If you do not want to identify any DWRs then just go back to the Synchronization Summary tab. In the upper box within the window titled DWRs List will be all of the DWRs that are available within the database that can be transferred to SitePad. Locate and highlight the one that you wish to transfer and then press the Add button. This will move the selected DWR to the lower box titled Selected DWRs. You can repeat this add process as many times as you wish. If you selected any by error you can remove them by clicking on the Remove button. If you want to remove them all then click on the Rem All button.
9. Return to the Synchronization Summary tab and then select Services-Synchronize from the menu. This will perform the transfer of all data that you have selected. The Sync Status line will display the progress of the synchronization process and will provide you a message when the process is complete.
Getting information on what has been Piped to Project Manager’s Workstation SiteManager provides information on what data has been transferred between the network server database and the database installed on the Project Manager’s workstation.
1. Start SiteManager by using your desktop icon. Log onto SiteManager making sure that you have “server” selected in the Connect To: drop down menu.
2. From the SiteManager Main Panel, select and double click on the Pipeline/Zip icon.
3. On the Pipeline/Zip Menu Panel select and double click the Pipeline/Zip Information icon. This will

Florida Department of Transportation Trns*port SiteManager User’s Handbook Stand-Alone Function
Page 112 April 2007
display the Pipeline And Zip information window.
4. The first tab in the Pipeline And Zip Information window is the Samples Tab. Since FDOT is not using SiteManager Materials Functionality then this tab will not be used.
5. The second tab is the Contract Tab. If you haven’t selected a Contract ID prior to opening this window you will be presented a list of contracts that you have access to. Locate and highlight the contract you want to see information on. Either double click on the highlighted contract or press the OK Button. This will populate the Contract Tab as shown. The following define the column headings on the screen.
a. Check Out User ID – the unique identifier of the user who checked out the contract selected. Check Out is the act of transferring data from the network server database down to the Project Manager’s workstation database.
b. Check Out Date – the date on which the contract information was checked out.
c. Check Out Time – the time at which the contract information was checked out.
d. Check In User ID – the unique identifier of the user who checked in the contract information from the Project Manager’s workstation database back to the network server database.
e. Check In Date – the date on which the contract information was checked in.
f. Check In Time - the time at which the contract information was checked in.
6. The third tab on the Pipeline And Zip Information window is the DWRs Tab. This will display information on what Daily Work Reports have been transferred between the network server database and the Project Manager’s workstation. That is what Daily Work Reports have been Checked Out and which have been Checked In.

Florida Department of Transportation Trns*port SiteManager User’s Handbook Stand-Alone Function
April 2007 Page 113
7. The fourth tab on the Pipeline And Zip Information window is the Diaries Tab. This will display information on what Diaries have been transferred between the network server database and the Project Manager’s workstation. That is, what Diaries have been Checked Out and which have been Checked In.
8. The fifth tab on the Pipeline And Zip Information window is the Change Order Tab. This will display information on what Change Orders have been transferred between the network server database and the Project Manager’s workstation. Since Change Orders can only be entered and edited while logged onto the network server database, Change Orders will only be transferred down to or Checked Out to the Project Manager’s workstation.
9. The sixth and last tab on the Pipeline And Zip Information window is the Force Accounts Tab. FDOT has no plans currently to utilize Force Accounts so this tab will not be used.

Florida Department of Transportation Trns*port SiteManager User’s Handbook Stand-Alone Function
Page 114 April 2007
This page left blank intentionally.

Florida Department of Transportation Trns*port SiteManager User’s Handbook Stand-Alone Function
April 2007 Page 115
The END.