florida atlantic university tidemark users guide user guide_march 2016.pdf · tidemark budgeting...
TRANSCRIPT

TIDEMARK BUDGETING
Florida Atlantic University
Tidemark Users
Guide
University Budget Office
March 2016

TIDEMARK BUDGETING
Table of Contents 1. Tidemark Overview & Navigation ……................................................................... 1
What is Tidemark ................................................................................................................................... 1
Logging In and Out ..................................................................................................................................1
Panels and Panel Layout .............................................................................................. ………………...1
Filtering Data in a Grid
Using Itemizations
Exporting Data to Excel
Navigation Basics
Security Framework …………………………………………………………………………………...6
2. Operating Budget Panels A. Position Planning ...............................................................................................................8
Position Budgeting Panels.(P1 – P2) ..........................................................................................8
Data Fields Review
Position Status
FTE
Salary
TAG
Costing Allocations
Position Budgeting Reviews (P3 – P4).......................................................... …………………13
By Fund type by position
By Fund type by Cost Center Hierarchy
B. Operating Budget Panels .................................................................................................. 16 Expense Budget Panel…………………………………………………………………………..16
FY16 Estimate Expenditures (non-E&G funds)
Enter FY17 Expense budget (All funds)
Review Panel 2016-17 Expense Budget by fund
Revenue Budget Panel.................................................................................................................. 22
FY16 Estimate Revenue (non-E&G funds)
Enter FY17 Revenue Budgets (non-E&G funds)
Review Panels and Fund Balance…………………..……………………………………………27
C. Educational & General Base Budget Summary………………………………………...29
D. Final Master Budget Summary Review Panels ............................................................ 30
Master Budget Review List (before submission)…………………………………...31
3. Security Access and Approval Process………………………………………………36
4. Collaborations and To Do List…………………………………….……..…………..45
5. Hands-on Practice………………………………………………….…………………48

1. TIDEMARK OVERVIEW AND NAVIGATION
1
What is Tidemark? Tidemark, FAU’s new budget planning application, is a cloud‐based system. Google Chrome is the only
supported browser. Please ensure you have the latest version of Chrome installed on your computer. If you use any other browser, the system will not work correctly.
Logging In and Out of Tidemark
1. You will log into Tidemark from the following URL by entering your FAU email and password (SSO – single sign on)
http://fau.tidemark.net
2. To log out of Tidemark, click your user name in the lower left corner of the screen. When the menu
opens, select “Logout of Tidemark.”
Panels and Panel Layout
Panels Tidemark panels are used for data entry, review and reporting. FAU’s Budget Planning process is made up of multiple panels that are used to complete all of the steps in the annual budget construction process. We will use step and panel interchangeably.
1. Click on the main application called “FP&A” (Financial Planning and Analysis).

1. TIDEMARK OVERVIEW AND NAVIGATION
2
2. Click Master Budget process and you will see the “Process Map” which displays all the panels that you can access as of part of the Annual budgeting process:
Navigating Between Panels: You can move between panels in two ways:
1. Click on the icon to view the process map and select desired panel; or
2. Click on the icon (paddles) to advance one panel forward or backward.

1. TIDEMARK OVERVIEW AND NAVIGATION
3
Panel Layout Panels are used to display and input data, edit data, add new budget lines, and review/report on your budget. Panels include the following areas (which will be explained in more detail below):
Slice – specifies the current cost center or cost center hierarchy being viewed. Page Edges – options for filtering data that displays in the grid on each panel.
Grid – displays rows and columns of data. Input Area – cells shaded in yellow enable you to input values.
Paddles – blue arrows located on the sides of each panel used to navigate to previous/next panel.
Data Slice in a Panel Data in the panels is displayed by cost center or cost center hierarchy. The “slice” at the top of each panel limits the data displayed to the cost center or hierarchy that is selected. As you move from panel to panel, the slice you have selected stays the same. If you have access to a hierarchy or more than one cost center, you can change the cost center that displays on a panel by using the slice and page edge.

1. TIDEMARK OVERVIEW AND NAVIGATION
4
*Note: Master Budget Panels are set up with the same FDM and HCM structure as used in Workday, such as Fund, Tag, Cost center, position number, Job family group, and the data is pulled out from Workday.
Filtering the Data Tidemark panels use page edges to limit the data that is displayed in the panel. The available page edges depend on the panel. Page edges used as part of the budget planning process include Workday worktags (SmartTag, Cost center, and fund type) and position information (position, job family group, salary and fringe).
1. TIDEMARK OVERVIEW AND NAVIGATION
5
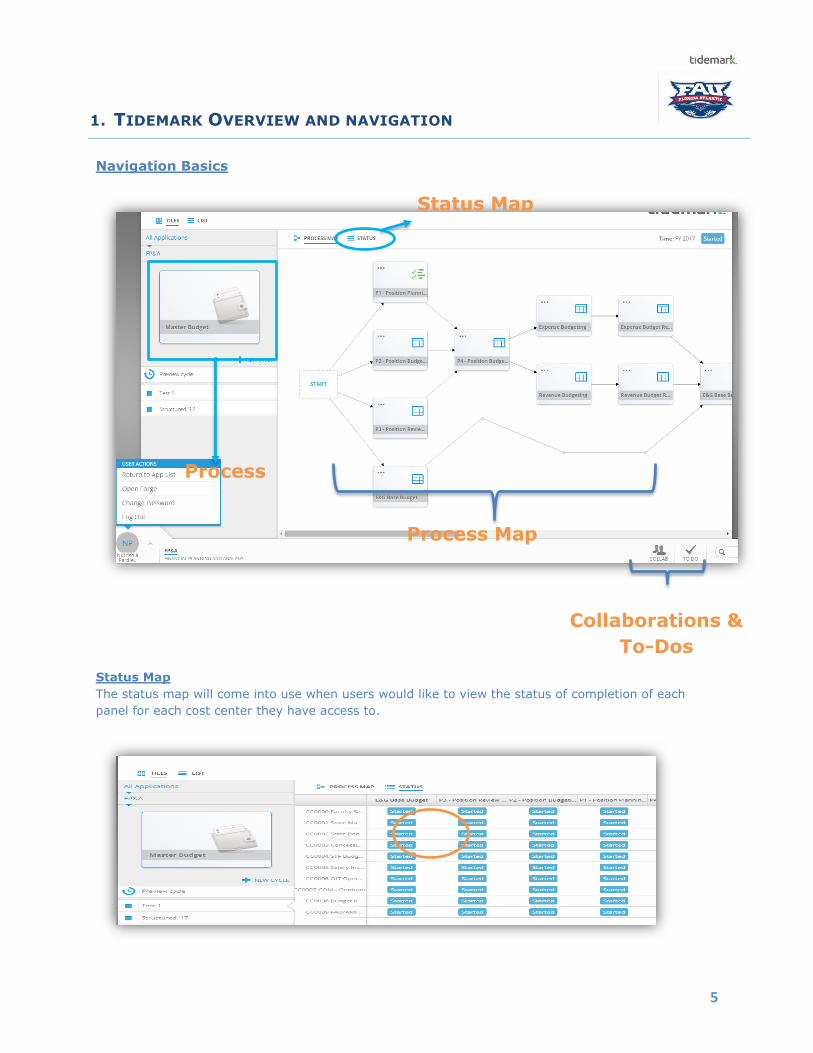
Navigation Basics
Status Map
The status map will come into use when users would like to view the status of completion of each
panel for each cost center they have access to.
Process Map
Process
Collaborations &
To-Dos
Status Map

1. TIDEMARK OVERVIEW AND NAVIGATION
6
Security Framework
Role based security assignment include:
Your role assignment will be displayed on the top right corner of any panel that you have access to.
Only managers have the responsible role and will receive To-Do notifications.

1. TIDEMARK OVERVIEW AND NAVIGATION
7
Exporting Data You can export data from any panel that displays the export icon in the top right hand corner of the
screen.
1. Click on the icon on the top of the panel to export the summary of your
proposed position budget.

2. OPERATING BUDGET PANELS
8
Process Map -
A. Position Planning The first step in preparing your budget is typically to start with position budgeting (primary positions only).
1
2
3
4
2. OPERATING BUDGET PANELS
9
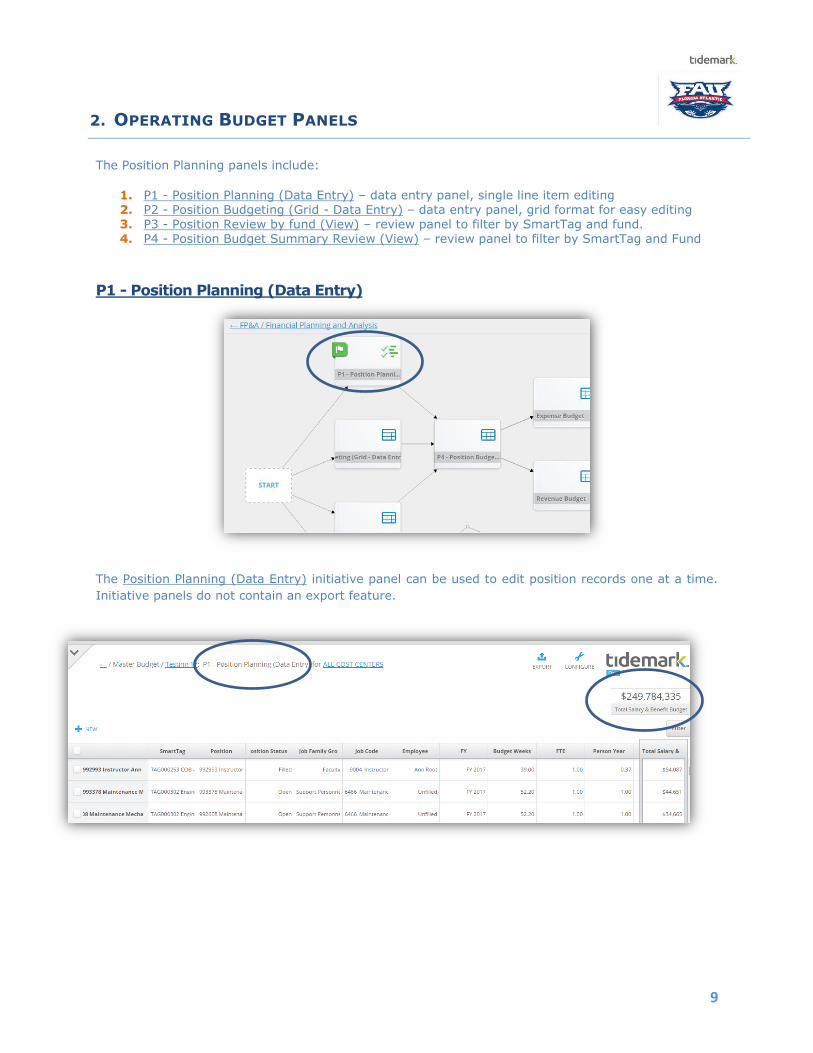
The Position Planning panels include:
1. P1 - Position Planning (Data Entry) – data entry panel, single line item editing 2. P2 - Position Budgeting (Grid - Data Entry) – data entry panel, grid format for easy editing 3. P3 - Position Review by fund (View) – review panel to filter by SmartTag and fund. 4. P4 - Position Budget Summary Review (View) – review panel to filter by SmartTag and Fund
P1 - Position Planning (Data Entry)
The Position Planning (Data Entry) initiative panel can be used to edit position records one at a time.
Initiative panels do not contain an export feature.

2. OPERATING BUDGET PANELS
10
Position Budget data fields include:
FTE – the estimated hours worked by the employee on a full-time basis.
Cost Allocation FTE – the cost allocation adjusted by the FTE; this is a calculated field.
Budget Weeks – the weeks to be budgeted for.
Person Year – the amount of work done in a year; this is a calculated field.
Salary or Hourly – whether the position is an hourly or salaried position.
Annualized Salary – the base salary rate annualized; this field is for data entry (Salary
Rate).
Cost Allocation Salary – the annualized salary adjusted by the cost allocation FTE; this
is a calculated field.
Days in Fiscal Year – the declared # of days in the upcoming fiscal year.
Salary Budget –the cost allocation salary adjusted by the days in fiscal year and the
budget weeks for the specified position; this is a calculated field.
Fringe Rate – the declared fringe rate is based on job family group.
Benefits – the amount of fringe benefits to be budgeted for; this is a calculated field.
Cost Allocation % – the distribution percentage; this field is for data entry.
Total Salary & Benefits – the total salary and benefits to be budgeted for; this is a
calculated field.
You can use the following features for position budgeting:
Slice – select cost center level
Filter – select position data fields
Edit – make position budget changes
Clone – clone a position record to change cost allocations
Delete – remove a position record

2. OPERATING BUDGET PANELS
11
To make budget changes on a position record:
1. You can select the position record and click edit or click on any field on the position record and
an edit window will appear
You can update the following data fields:
SmartTag
Position Status
Employee
FTE
Salary Rate
Cost Allocation percent
*Please DO NOT change any of the other data fields.
**New Positions: New positions must be created in Workday before the position is available to be budgeted in Tidemark. You will need to contact the Budget Office to add a new position to Position panel. Please do so after you completed all the steps to create a new position in Workday.
P2 - Position Budgeting (Grid - Data Entry)

2. OPERATING BUDGET PANELS
12
The Position Budgeting (Grid - Data Entry) panel can be used to edit position records using a grid
format similar to MS Excel. This panel contains the same information as the Position Planning initiative
and the data is directly linked to this panel. To access the grid format from this panel:
1. Click on the icon on the left of the panel to access the Itemizations.
2. A grid view of the panel should appear and you will be able to use this panel for easy
editing on position records by double click a yellow field.

2. OPERATING BUDGET PANELS
13
3. Click SAVE to save all changes
4. Ensure cost allocation for each position sums up to 100%. ***Note: You will need to update and revise your actual costing allocations for positions in Workday as needed during the year to ensure that payroll actuals are charged against the appropriate worktags.
5. If you have positions that are split between two or more departments you will need to communicate with the other departments to ensure that positions are correctly and fully
allocated. You will not be able to see budgeted costing allocations for cost centers in cost centers that do not belong to you.
6. Use P3 and P4 to view a summary of all positions by fund and by cost center level.
P3 - Position Review by fund (View) – you can export the data to Excel

2. OPERATING BUDGET PANELS
14
You can use P3_Position Review by fund (View) to view all positions by fund, TAG, and by position.
You can export the data to Excel:
1. Click on the icon on the top of the panel to export the summary of your proposed
position budget.

2. OPERATING BUDGET PANELS
15
P4 - Position Budget Summary Review (View)
You can use P4_Position Budget Summary Review (View) to see the total position budget summary by
fund type and by employee category.
You can also export the page to an Excel:
1. Click on the icon on the top of the panel to export the summary of your proposed
position budget.

2. OPERATING BUDGET PANELS
16
B. Operating Budget Panels
The operating budget panels include:
Expense Budgeting
Expense Budget Review Revenue Budgeting Revenue Budget Review
Expense Budgeting Panel
To navigate to the Expense Budgeting panel, you can either
1. Use the icon to view the process map to select Expense Budgeting or click the icon
to view the next 2 accessible panels: Revenue Budgeting and Expense Budgeting.

2. OPERATING BUDGET PANELS
17
Estimate 2015-16 Expenditures (non-E&G funds only)
FY 2016 Actual Columns: display FY 2015-16 YTD actual expenditures, obligations and commitment which was loaded from Workday (as of 1/10/2016); this data is for viewing only.
FY 2016 Estimates: use to enter the estimate expenditures for the remainder of 2015-16; these
“Estimate” fields are highlighted in yellow for data entries.
To complete this section - enter the estimated amount for S/B, OPS, EXP, Inter-Transfer In, Intra-
Transfer In, for the remaining months of the current Fiscal Year (roughly 3 months). Please save your
updates. Total Expenses (the final column for this section) will then calculate automatically, and this
subtotal represents the total estimated additional expected for the remaining months of the year.
For easy data input and editing- new feature
You can export the entire Expense Budgeting panel into Excel and enter your estimates in
the editing fields then copy and paste the values directly to the tidemark panel!

2. OPERATING BUDGET PANELS
18
FY 2016 Total Estimate: display 2015-16 Total Estimate by summing the actual and estimate.
Note that fields.
These amounts are a calculated sum of the Actuals (data that is coming from Workday) plus the
Estimates you entered. So, these amounts represent what you believe to be the end of the year
Actuals for FY 2015-16.
Before we start working on the Budget, let’s go over the new transfer types we are using in
Workday. Previously, there was one Transfer-In category and one Transfer-Out category. Those
have been divided based on whether the transfer activity is within the same fund.
a. INTER-Fund: Is the transfer activity that is between fund types
b. INTRA-Fund: Is the transfer activity that is within the same fund type
2016- 17 Budget (All Funds)
The column header for this section is Original Budget.
a. For S/B data, you do not need to enter anything. This information will come over from the
position panel.
b. As you can see the columns for OPS and EXP are highlighted in yellow which means you need
to enter the data for the upcoming year’s budgets.
c. Please save your updates as you work on your budget.
d. The Expenses column is a calculated subtotal field that will add up the amounts from S/B,
OPS, & EXP.

2. OPERATING BUDGET PANELS
19
e. For Auxiliary SmartTags, the Auxiliary Overhead Rate column will be populated for you, based
on Workday.
f. For Auxiliary SmartTags, the Overhead Budget is a calculated field, based on your budgeted
expenses subtotal and your predetermined Overhead Rate in 6d above. (Expenses *
Auxiliary Overhead Rate)
For Auxiliary overhead charge based on Revenue amount, you need to manually
calculate the overhead amount and enter the budget in”Intra-fund transfer out”
If you are paying Affordable Care Health Insurance for OPS, you need to add the cost to
OPS Budget.
g. Inter-Transfer Out & Intra-Transfer Out are data entry fields. Note that here you will want to
include any budgeted transfers that are in addition to the Overhead budgeted transfers.
Don’t duplicate overhead by adding your calculated overhead into these columns – Overhead
Budget will automatically be included in the Total Expenses Budget. Please save your
updates.
h. Total Expenses is a calculated field. This column adds your Expenses subtotal + Overhead
Budget + Inter-Transfer Out + Intra–Transfer Out). This represents your total expense
budget for this SmartTag for the upcoming fiscal year.
Budget Comparison
The next 4 columns are either calculated or pre-populated fields. The first two show the new year and
current year Transfers budgets. The next two show the new year and current year Expense budgets
(including S/B, OPS, and Expense).
Note that the current, or 2015-16, Budget columns are based on the Original Budget provided last
year during budget construction (not Adjusted Budget).

2. OPERATING BUDGET PANELS
20
Variance (Non-E&G Funds only)
The next 3 columns will provide you with the variance. The first 2 columns show the difference in the
Expenses budget by amount and percentage between the two Fiscal Years. If your variance for the
SmartTag exceeds 10%, increase or decrease, please provide an explanation. Please save your
updates.
Transfer Budget Requirements
The purpose of the final 6 columns is to document the details for your transfers. If you entered any
Transfer Out amounts when you were entering the budget information for the coming Fiscal Year, and
have saved your input, that amount should now be displayed in these columns.
a) Please enter the Inter –Transfer Out To: TAG #, and a brief explanation of the reason for
the transfer(s). Do the same for Intra-Fund Transfer Out. You can list multiple “other
side” SmartTags and their amounts, as needed, when you have transfers from one
SmartTag going to multiple destinations.
2. OPERATING BUDGET PANELS
21
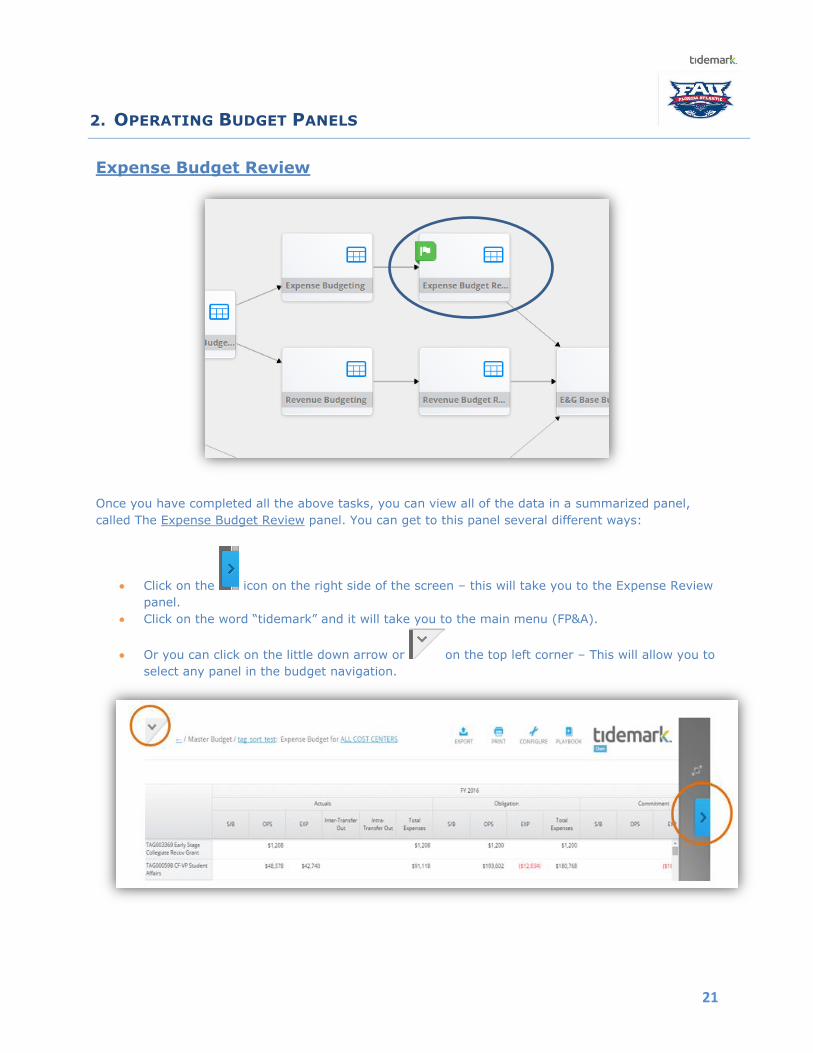
Expense Budget Review
Once you have completed all the above tasks, you can view all of the data in a summarized panel,
called The Expense Budget Review panel. You can get to this panel several different ways:
Click on the icon on the right side of the screen – this will take you to the Expense Review
panel.
Click on the word “tidemark” and it will take you to the main menu (FP&A).
Or you can click on the little down arrow or on the top left corner – This will allow you to
select any panel in the budget navigation.

2. OPERATING BUDGET PANELS
22
***Also note that you can export your data to excel using the “export” button at the top of
the screen.
The information shown on the Expense Review panel should be the same as on the Expense Budget
Panel. This information allows you to compare between the two Fiscal Years by amount and
percentage. Remember, this panel is to view data only; it is not a panel for making modifications to
the data.
Revenue Budgeting (Non-E&G Funds only)
2. OPERATING BUDGET PANELS
23
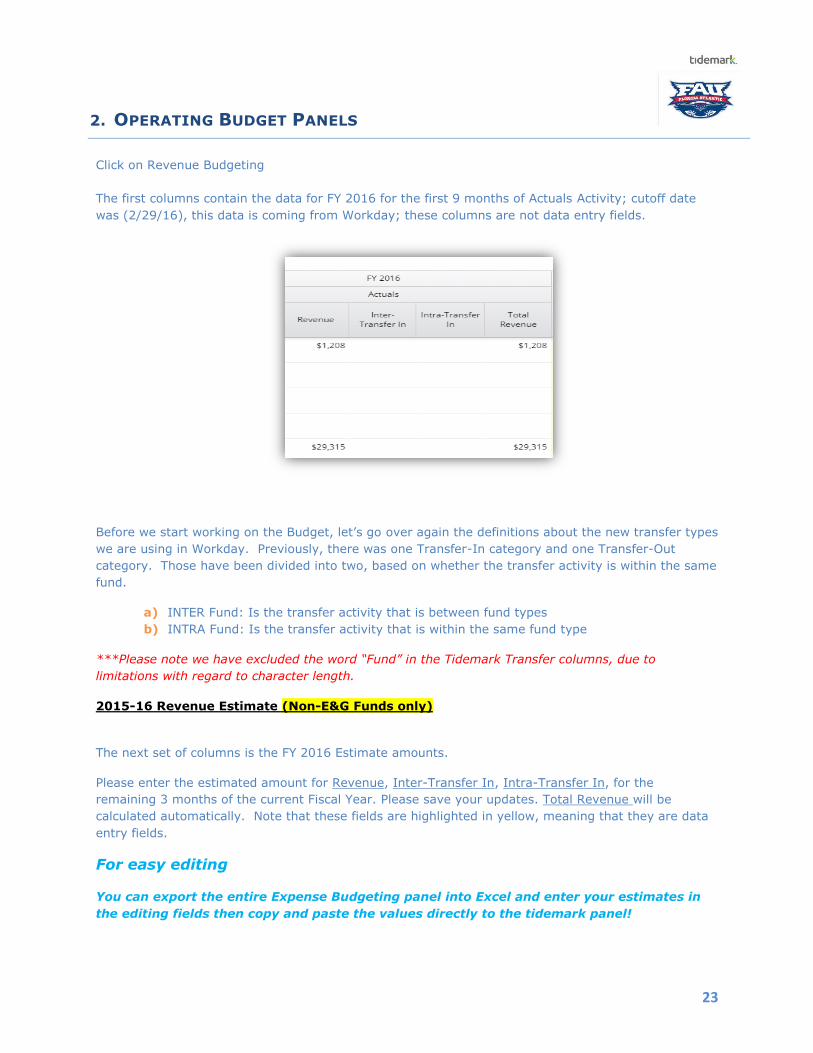
Click on Revenue Budgeting
The first columns contain the data for FY 2016 for the first 9 months of Actuals Activity; cutoff date
was (2/29/16), this data is coming from Workday; these columns are not data entry fields.
Before we start working on the Budget, let’s go over again the definitions about the new transfer types
we are using in Workday. Previously, there was one Transfer-In category and one Transfer-Out
category. Those have been divided into two, based on whether the transfer activity is within the same
fund.
a) INTER Fund: Is the transfer activity that is between fund types
b) INTRA Fund: Is the transfer activity that is within the same fund type
***Please note we have excluded the word “Fund” in the Tidemark Transfer columns, due to
limitations with regard to character length.
2015-16 Revenue Estimate (Non-E&G Funds only)
The next set of columns is the FY 2016 Estimate amounts.
Please enter the estimated amount for Revenue, Inter-Transfer In, Intra-Transfer In, for the
remaining 3 months of the current Fiscal Year. Please save your updates. Total Revenue will be
calculated automatically. Note that these fields are highlighted in yellow, meaning that they are data
entry fields.
For easy editing
You can export the entire Expense Budgeting panel into Excel and enter your estimates in
the editing fields then copy and paste the values directly to the tidemark panel!

2. OPERATING BUDGET PANELS
24
Total Estimate
Next columns will show you the Total Estimated Revenue amounts for the current fiscal year. The
columns combine current year Actuals (data from Workday) plus the estimated amounts you entered
for the remaining months of FY 2016. These totals will give you the estimated total of Revenues that
you are predicting for the current fiscal year 2015-16. Note that these are calculated fields; therefore,
they are not highlighted in yellow.
2016-17 Revenue Budget (Non-E&G Funds only)
Now let’s enter the coming Fiscal year budget. You can see that the columns are highlighted in yellow;
therefore, they are data entry fields.
Please enter your budgets for Revenue, Inter-Transfer In, and Intra-Transfer In. Please save your
updates. The Total Revenue is a calculated field which gives you your total budgeted Revenues and
Transfers-In for the 2016-17 fiscal year.

2. OPERATING BUDGET PANELS
25
Budget Comparison
The next 4 columns are either calculated or pre-populated fields. The first two show the new year and
current year Transfers-In budgets. The next two show the new year and current year Revenue
budgets.
***Note that the current, or 2015-16, Budget columns are based on the Original Budget provided last
year during budget construction (not Adjusted Budget).
Variance (Non-E&G Funds only)
The next 3 columns will provide you with the difference in Revenues budget by amount and
percentage between the two Fiscal Years.
If your variance item exceeds 10%, increase OR decrease, you need to supply an explanation.
Please save your updates.

2. OPERATING BUDGET PANELS
26
Transfer In Budget Review
The purpose for the last 6 columns is to document the details for your transfers.
If you entered an Inter- Fund Transfer In when you were entering the information for the new Fiscal
Year budget, once you have saved your input, the amount should be displayed in these columns.
For all amounts, please enter the Inter –Transfer From: TAG #, and a brief explanation of the reason
for this/these transfers. Do the same for Intra-Fund Transfer In. Note, if the “other side” of your
transfer-in amount relates to more than one SmartTag, you can document multiple Tag# and amounts
in this column.
Revenue Review
Once you have completed all the above tasks, you can view all these data in a summarized panel, the
Revenue Review Panel. You can go to this panel in several different ways:
Click on the icon on the right side of the screen – this will take you to the Expense Review
panel.

2. OPERATING BUDGET PANELS
27
Click on the word “tidemark” and it will take you to the main menu (FP&A).
Or you can click on the little down arrow or on the top left corner – This will allow you to
select any panel in the budget navigation.
***Also note that you can export your data to excel using the “export” button at the top of the
screen.
The information shown on the Revenue Review panel should be the same as on the Revenue Budget
Panel. This is a summarized version of the Revenue Budget which allows you to compare between the
two Fiscal Years, by amount and percentage. Remember, this panel is to view data only; it is not a
panel for making modifications to the data.
Fund Balance (non-E&G Funds only)
Before we go over the Review panel by TAG, we would like to explain how budget office was able to
load 2016 Beginning Fund balances from Workday.
Workday loaded these balances two ways, some were loaded at the SmartTag level and some were
loaded at the Fund level.
The data that was loaded at the TAG level in Workday was loaded into Tidemark the same way;
however, the balances that were loaded at the Fund level had to be loaded using a different approach.

2. OPERATING BUDGET PANELS
28
We chose one of the TAGs that were under that Fund to load the beginning Fund balance, For
example: Please see all the TAGs that are under Fund FAU_F0260, the beginning fund balance was
loaded into TAG003466 only.
FAU_F0260 Foundation Operations
TAG003466 Foundation Operations
TAG003467 Foundation Advancement Support
TAG003468 Foundation Development
Now let’s go over the calculations that you will find in this panel.
On the first column, you will see 2016 Beginning Fund balances that are coming from
Workday.
On the last column on the picture below, you will find the estimated ending Fund balance for
Fiscal Year 2016, which is a formula that is calculating as follow:
o 2016 Beginning Fund Balance + Revenue – Expenses
$0 + $51,232 - $39,867 = $11,365
To calculate the Estimated 2017 ending Fund balance that is displayed on the last column on this
panel, the calculation is as follows:
o 2016 Estimated Ending Fund balance + 2017 Budgeted Total Revenue – 2017
Budgeted Total Expense
$11,365 + $0 - $0 = $11,365
Please notice that Fund Balance Calculation is automatic now, no more step is needed.

2. OPERATING BUDGET PANELS
29
You can view your fund balance in Keep mind that 2016 “Estimate” changes made on your revenue
and expense budgeting panels will affect your 2017 fund balance calculation.
C. Educational and General Fund Base Budget Panel

2. OPERATING BUDGET PANELS
30
E&G Base Budget Panel provides FY2017 E&G budget target by cost center levels. The permanent budget transfer data was loaded from Workday (as of 2/29/2016). Each Vice President Area and College is required to balance your 2017 E&G Budget to the base target in the budget submissions. Please check your budget director or business manager if you are required to balance E&G base budget for your department.
D. Final Master Budget Summary Review Panels
There are two Budget Review Panels:
1. Master Budget Review by tag (Completion Required)
You can use this panel to:
Review of the summary of budget data;
Budget Completion which is required for approval process
2. OPERATING BUDGET PANELS
31
2. A1 - Final Master Budget (Approval)
You can use this panel for:
Final budget review by Cost center level and by fund level;
1st level approval of budget completion. We will discuss this more in detail in the Approval
process.
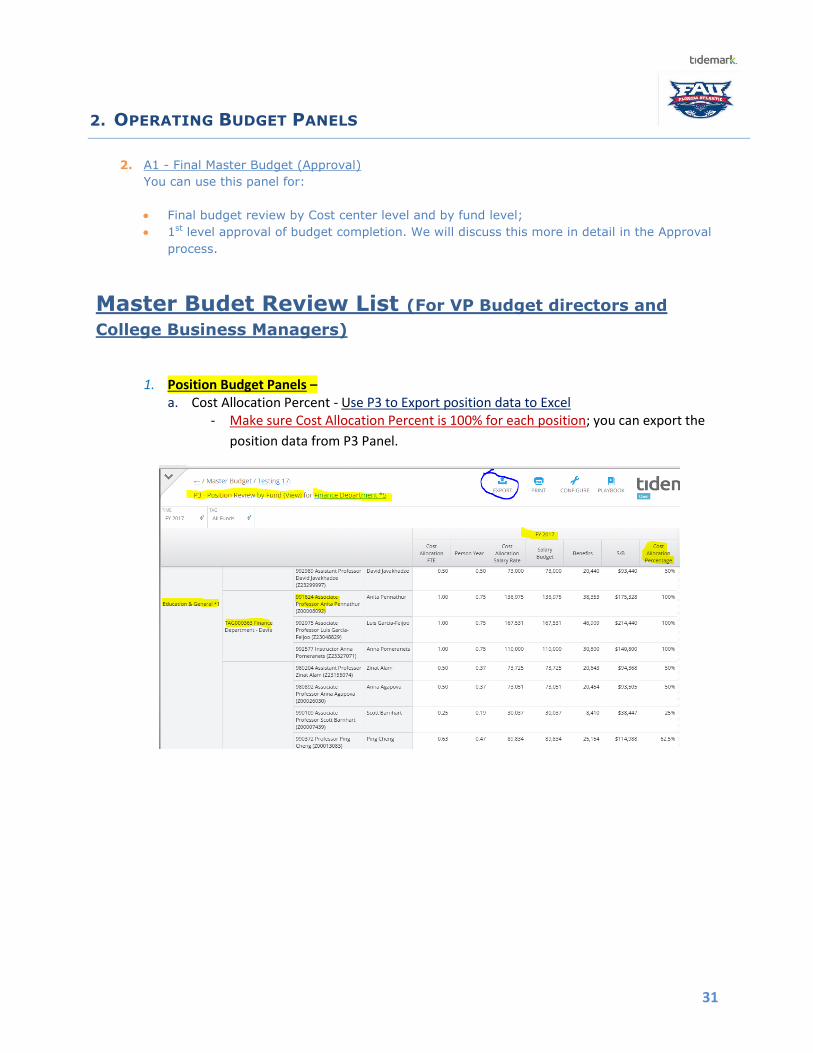
Master Budet Review List (For VP Budget directors and
College Business Managers)
1. Position Budget Panels – a. Cost Allocation Percent - Use P3 to Export position data to Excel
- Make sure Cost Allocation Percent is 100% for each position; you can export the
position data from P3 Panel.

2. OPERATING BUDGET PANELS
32
b. If a position is split with other area, please collaborate with them to make sure Cost
Allocation percent is correct.
2. E&G Base Budget Target – by VP and College Level a. Use E&G Base Budget Panel to find the total target for your VP and College b. Make sure the 2016-17 total E&G budget ties the base budget target; c. For the Colleges, check the E&G budget target allocation by campus

2. OPERATING BUDGET PANELS
33
Use A1 Master Budget Review Completion to tie E&G Base budget
3. Fund Balance (Non-E&G Funds only) -
Check “Estimate ending fund balance” by fund to make sure they have a positive ending
fund balance.
a. To verify FY 2017 Fund Balance (last column - Net Position Fund Ending”) to make sure you have a positive fund balance - Use A1 Master Budget Review Completion Required

2. OPERATING BUDGET PANELS
34
- Fund balance by TAG - Fund balance by Fund (multiple TAGs share the same fund)
Steps:
a. Select Cost center levels (slice assignment) b. Select Fund Code (Page edge) c. Check the total (Last column)
You can also Export data (entire college) to Excel –
a. Select Cost Center Level * 4 b. Select Fund level
Make sure the Panel shows “Fund code”, then Export the data to Excel –

2. OPERATING BUDGET PANELS
35
You can group TAGs by the same fund code and check the total of Net Position fund balance –
4. Transfer In and Transfer Out TAGs and Explanations (Required) – Make sure to provide TAG and Explanations for both Transfer In and Transfer Out
5. Explanations required for Variance exceed 10% (over or under 2015-16 Budget (Non-E&G Funds only)
6. Student Government and Athletics – please submit the Revenue Budget Form (save in the U drive)
7. Please do not budget Concession

3. SECURITY ACCESS AND APPROVAL PROCESS
36
Security Access The access specified in the user access form will determine your role in the budget process as well as
the cost center areas that you are able to access. There are 2 types of access, cost center access and
user role. Cost center access will simply be the data population you are allowed to view and/or make
changes to. The role access will be your role in the budget construction process.
Your Cost Center access affects the following:
1. Cost centers you are able to view and enter information for
2. Users that are available for Collaboration conversations
3. Panels you have access to.
Tidemark user roles:
Your user role access affects the following:
Panels you are allowed to approve. Approvals are done on Final Budget – 1st Approval,
Final Budget – 2nd Approval and Final Budget – Budget Office Approval.
Panels you are allowed to complete. Panels requiring completion are restricted to
Master Budget Review, Final Budget Review – 2nd Approval, Final Budget Review –
Budget Office Approval.
3. SECURITY ACCESS AND APPROVAL PROCESS
37
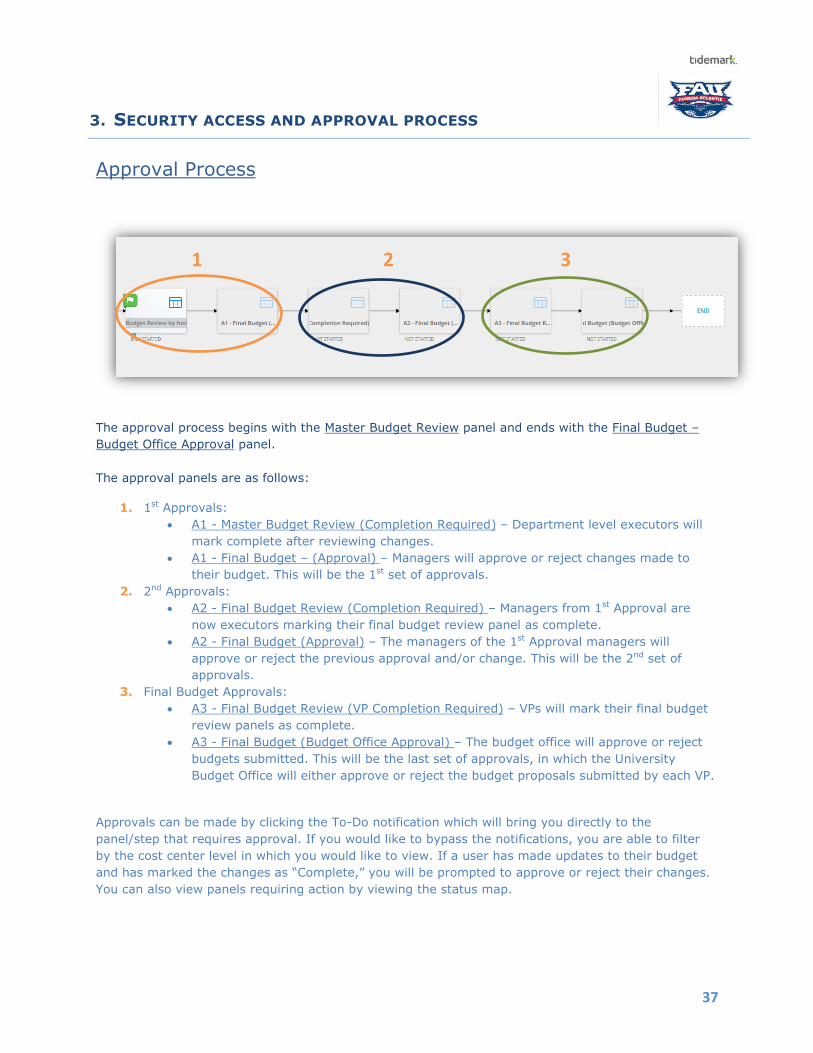
Approval Process
The approval process begins with the Master Budget Review panel and ends with the Final Budget –
Budget Office Approval panel.
The approval panels are as follows:
1. 1st Approvals:
A1 - Master Budget Review (Completion Required) – Department level executors will
mark complete after reviewing changes.
A1 - Final Budget – (Approval) – Managers will approve or reject changes made to
their budget. This will be the 1st set of approvals.
2. 2nd Approvals:
A2 - Final Budget Review (Completion Required) – Managers from 1st Approval are
now executors marking their final budget review panel as complete.
A2 - Final Budget (Approval) – The managers of the 1st Approval managers will
approve or reject the previous approval and/or change. This will be the 2nd set of
approvals.
3. Final Budget Approvals:
A3 - Final Budget Review (VP Completion Required) – VPs will mark their final budget
review panels as complete.
A3 - Final Budget (Budget Office Approval) – The budget office will approve or reject
budgets submitted. This will be the last set of approvals, in which the University
Budget Office will either approve or reject the budget proposals submitted by each VP.
Approvals can be made by clicking the To-Do notification which will bring you directly to the
panel/step that requires approval. If you would like to bypass the notifications, you are able to filter
by the cost center level in which you would like to view. If a user has made updates to their budget
and has marked the changes as “Complete,” you will be prompted to approve or reject their changes.
You can also view panels requiring action by viewing the status map.
1 2 3
3. SECURITY ACCESS AND APPROVAL PROCESS
38
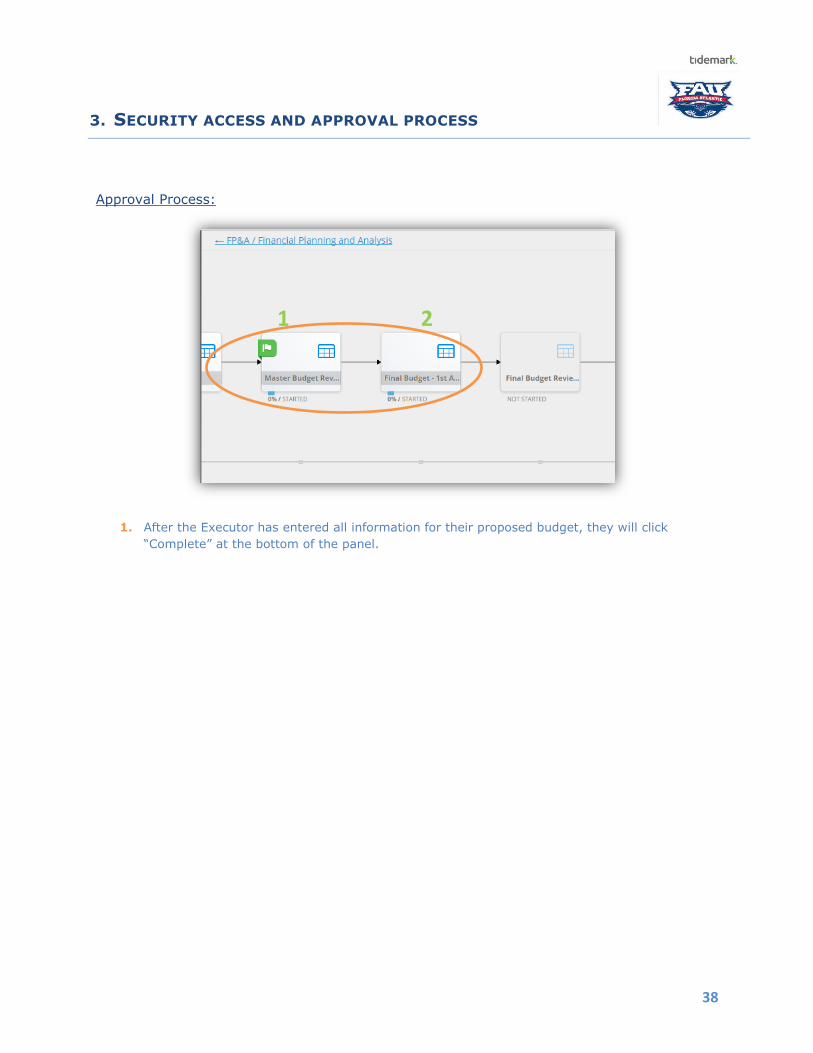
Approval Process:
1. After the Executor has entered all information for their proposed budget, they will click
“Complete” at the bottom of the panel.
1 2

3. SECURITY ACCESS AND APPROVAL PROCESS
39
2. After the user has marked their changes as “Complete,” the manager responsible for their
area will receive a To-Do notification via email as well as when they log into Tidemark.
3. The manager will receive 2 notifications when logging in, a completion required notification. If
the manager would like to enter any more information for the area, they can do so prior to
approving the budget as managers have the ability to enter information and approve. The
manager will be prompted to Approve or Reject the updates in A1 – Final Budget (Approval).

3. SECURITY ACCESS AND APPROVAL PROCESS
40
Important:
It is important to note that the approvals are strictly based on the cost center
hierarchy and chain of command of each area.
For academic areas, if the manager is approving changes for departments at
a lower level in the cost center hierarchy, they will need to first approve each
department at level *5 in the A1 – Final Budget (Approval) panel then he/she
will need to return to A1 – Master Budget (Completion Required) and select
the entire level *4 college, click “Complete” and navigate to A1 – Final Budget
(Approval) to approve the college in order to bring the entire college to the
next step in the approval process. These next steps will take place in the A2
2nd approval panels, in which case the college deans will complete their entire
colleges and the Director of Academic Budgets will approve the colleges. The
Director of Academic Budgets will then repeat the same steps outlined above,
starting in A1 – Completion, in order to bring the budget proposal up the cost
center hierarchy and to the budget office for final approvals.
For non-academic areas, if the manager is approving changes for lower
levels in the cost center hierarchy, they will need to first approve each lower
level in the A1 – Final Budget (Approval) panel then he/she will need to return
to A1 – Master Budget (Completion Required) and select their own entire level,
click “Complete” and navigate to A1 – Final Budget (Approval) to approve their
area in order to bring the entire area to the next step in the approval process.
These next steps will take place in the A2 2nd approval panels, in which case
the next user in the chain of command will “Complete” the changes and the VP
budget directors will approve the changes and will repeat the same steps

3. SECURITY ACCESS AND APPROVAL PROCESS
41
outlined above, starting in A1 – Completion, in order to bring the budget
proposal up the cost center hierarchy and to the budget office for final
approvals.
Overview
4. If the manager approves the changes and completes/approves their level in A1, he will be
prompted to navigate to the next panel or their direct supervisor will receive a notification to
complete the area in A2 – Final Budget Review (Completion Required), where they will act as
executors and mark their budget “Complete” and submit it for approval.

3. SECURITY ACCESS AND APPROVAL PROCESS
42
5. VP Budget Directors and the Director of Academic Budgets will receive the Approval
notifications in A2 – Final Budget (Approval). They will approve the area and follow the same
steps in order to work the budget proposals up the cost center hierarchy.

3. SECURITY ACCESS AND APPROVAL PROCESS
43
6. If the VP Budget Director/Director of Academic Budgets approves the changes, he or the VP
will navigate to the next panel, A3 – Final Budget Review (VP Completion Required), where
they will become executors and mark their budget “Complete” and submit it for approval by
the University Budget Office.

3. SECURITY ACCESS AND APPROVAL PROCESS
44
7. Keep in mind that users can utilize collaboration feature to communicate throughout the
budget process. We will discuss this in the next section.
8. This completes the budget construction process in Tidemark!

4. COLLABORATIONS AND TO-DO LISTS
45
Collaborations The Collaboration feature allows you to create and participate in conversations with other
users in the same panel and in the same context.
1. To start a new conversation in Collaborate, click on the icon from any grid
panel to access the Collaboration window.
2. You will see a list of users that you are able to collaborate with. Click on
to start a conversation and select the users you would like to
participate.
***Please keep in mind that participants will only be able to view data they have
access to. Some managers, those that are typically higher up in the management
chain, only have access to approval panels.
4. COLLABORATIONS AND TO-DO LISTS
46
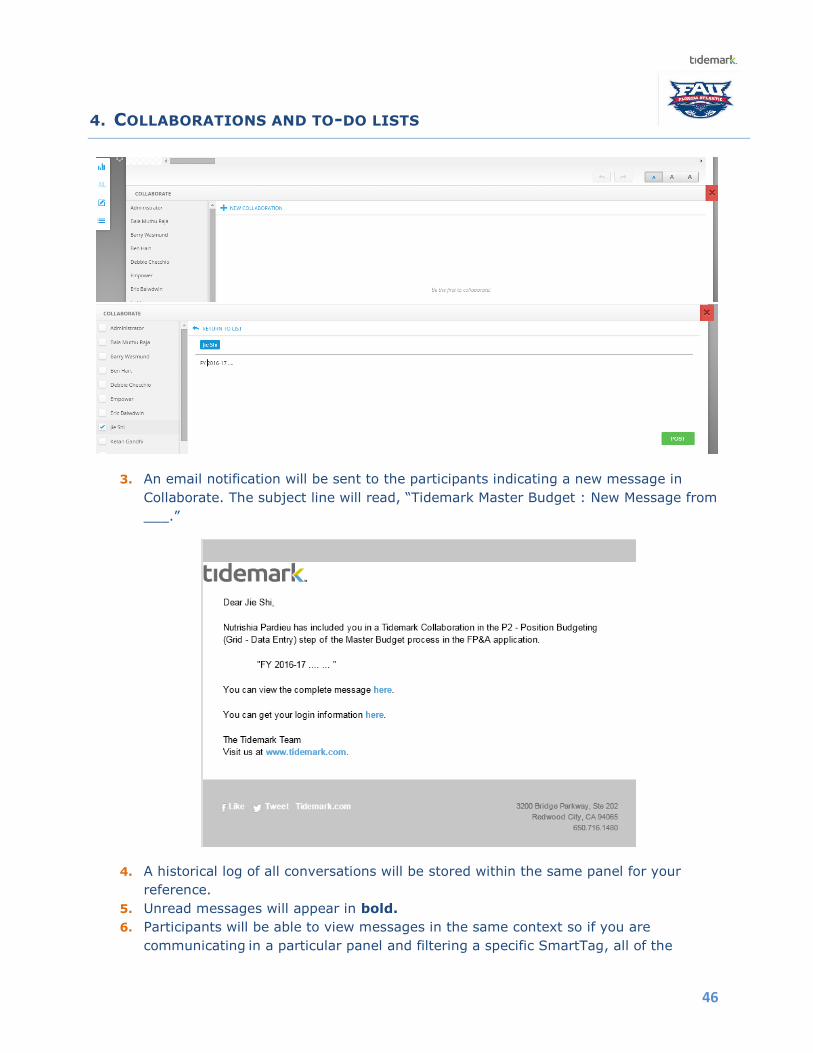
3. An email notification will be sent to the participants indicating a new message in
Collaborate. The subject line will read, “Tidemark Master Budget : New Message from
___.”
4. A historical log of all conversations will be stored within the same panel for your
reference.
5. Unread messages will appear in bold.
6. Participants will be able to view messages in the same context so if you are
communicating in a particular panel and filtering a specific SmartTag, all of the

4. COLLABORATIONS AND TO-DO LISTS
47
participants in your conversation will see the same panel and information you are
currently viewing.
7. To add users to a conversation when making a new post to tan existing conversation,
select the user from the available list, enter comment and post!
To Do Lists Tasks such as approvals arrive as To-Do notifications that you receive via email notification
as well as in Tidemark once logged in:
1. From the Application List, i.e. home screen, steps requiring completion or approvals will
appear on the right hand side of the screen:
2. You can also find these notifications by clicking the icon on the bottom right of any
Tidemark screen.
3. Clicking the desired notification will take you directly to the panel requiring action.
4. Newer notifications will appear towards the bottom of the list.

5. HANDS-ON PRACTICE
48
Position Budget
(1) P1 - Position Planning (Data Entry) – data entry panel, single line item editing
(2) P2 - Position Budgeting (Grid – Data Entry) – data entry panel, grid format for easy
editing
1. Please choose option 1 or 2 to do your position budget
2. Select a position record, update the SmartTag
3. Change the position status from Filled to Unfilled or vice versa
4. Update the Employee name
5. Update FTE
6. Update Salary Rate
7. Update Cost Allocation %
8. Select a position and select “clone” to make a copy of position selected
9. Select a position and select “delete” to delete a position record.
10. Click “apply” to save your changes
11. Once you have completed all the above tasks, you can go to the Position Review Panel that will
provided you with a summarized version of the Position Budget and will allow you to compare
current and new Fiscal Year budgets.

5. HANDS-ON PRACTICE
49
Expense Budgeting
1. Select a SmartTag and enter the estimated amount for S/B, OPS, EXP, Inter-Transfer Out, Intra-
Transfer Out for the remaining 3 months of 2015 Fiscal Year. Please save your updates. Remember
that you need to estimate the amount for NON-E&G Funds only. Note that Total Expenses is a
calculated field that is adding all these 6 columns.
2. Please review the totals for FY 2016 Total Estimate by S/B, OPS, EXP, Inter-Transfer Out, Intra-
Transfer Out, and Total Expenses. These totals should be adding up FY 2016 Actuals and FY 2016
Estimate data you inputted in the step above.
3. Next step is to enter your new Fiscal Year budget, in this case will be 2016-17 FY. Enter data only in
the fields that are highlighted in yellow, which they are OPS, EXP, Intra-Transfer Out, & Intra-Transfer
Out. Please save your updates. Total Expenses will be the total for Expenses for the new fiscal year’s
budget.
4. The totals for 2016-17 Total Transfer Out Budget, 2015-16 Total Transfers Out Budget , 2016-17
Expense Budget are calculated fields that are adding up the previous columns, 2015-16 Expense
Budget is the original budget submitted during budget construction.
5. If your variance item exceeds 10%, please enter an explanation. Please save your updates.
6. If you have entered an Inter- Fund Transfer Out when you were entering the information for the new
Fiscal Year budget, that information should be displayed in these columns. Please enter the Inter –
Transfer Out To: TAG #, and a brief explanation of the reason of this transfer. Do the same process
for Intra-Fund Transfer Out. Please save your updates.
7. Once you have completed all the above tasks, you can go to the Expense Review Panel that will
provided you with a summarized version of the Expense Budget and will allow you to compare current
and new Fiscal Year budgets.

5. HANDS-ON PRACTICE
50
Revenue Budgeting
1. Select a SmartTag and enter the estimated amount for Revenue, Inter-Transfer In, Intra-Transfer In
for the remaining 3 months of 2015 Fiscal Year. Please save your updates. Remember that you
need to estimate the amount for NON-E&G Funds only. Note that Total Revenue formula is adding
all these 3 columns.
2. Please review the totals for FY 2016 Total Estimate by Revenue, Inter-Transfer In, Intra-Transfer In,
and Total Revenue. These totals should be adding up FY 2016 Actuals and FY 2016 Estimate data you
inputted in the step above.
3. Next step is to enter your new Fiscal Year budget, in this case will be 2016 FY. Please enter the
Revenue, Inter-Transfer In, Intra-Transfer In. Please save your updates. Total Revenue will be the
sum for all these 3 columns.
4. The totals for 2016-17 Total Transfer In Budget , 2015-16 Total Transfers In Budget, 2016-17
Revenue Budget are calculated fields that are adding the data from the previous columns 2015-16
Revenue Budget is the original budget submitted during budget construction.
5. If your variance item exceeds 10%, please enter an explanation. Please save your updates.
6. If you have entered an Inter- Fund Transfer In when you were entering the information for the new
Fiscal Year budget, that information should be displayed in these columns. Please enter the Inter –
Transfer From: TAG #, and a brief explanation of the reason of this transfer. Do the same process for
Intra-Fund Transfer In. Please save your updates.
7. Once you have completed all the above tasks, let’s move to the Revenue Review Panel that will
provided you with a summarized version of the Revenue Budget and will allow you to compare current
and new Fiscal Year budgets.

5. HANDS-ON PRACTICE
51
Approval Process:
1. After the Executor has entered all information for their proposed budget, they will click
“Complete” at the bottom of the panel.
2. After the user has marked their changes as “Complete,” the manager responsible for their
area will receive a To-Do notification via email as well as when they log into Tidemark.
1 2
5. HANDS-ON PRACTICE
52
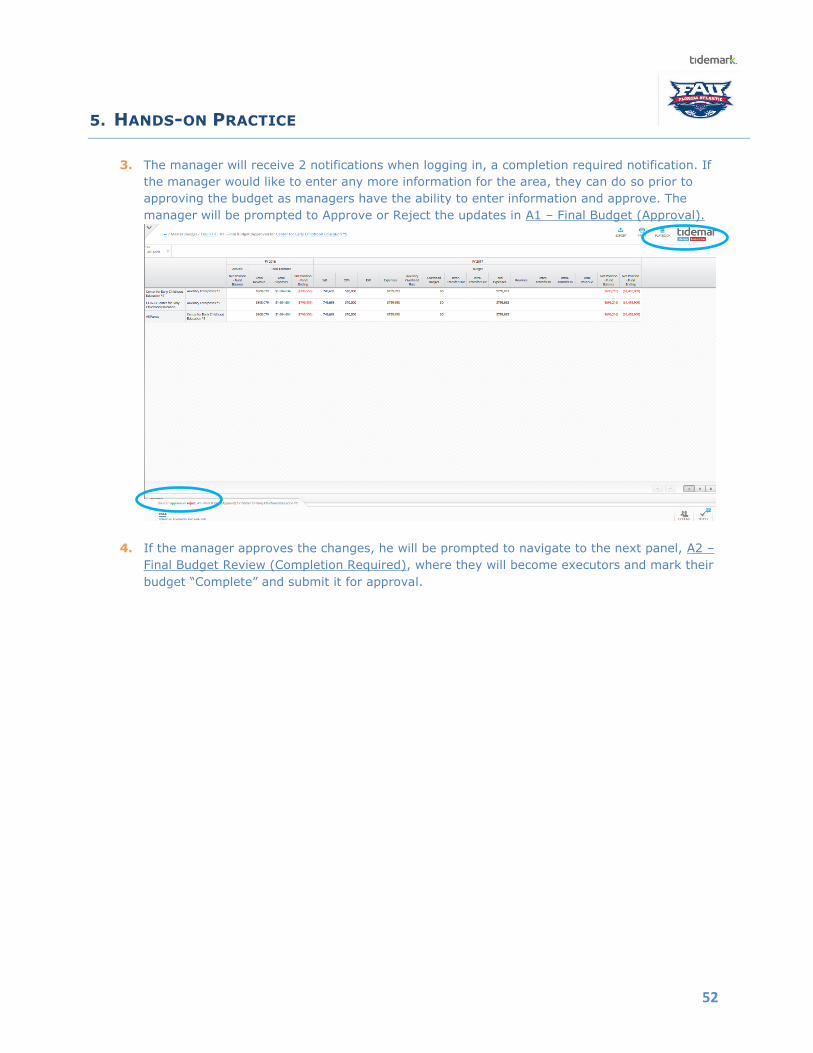
3. The manager will receive 2 notifications when logging in, a completion required notification. If
the manager would like to enter any more information for the area, they can do so prior to
approving the budget as managers have the ability to enter information and approve. The
manager will be prompted to Approve or Reject the updates in A1 – Final Budget (Approval).
4. If the manager approves the changes, he will be prompted to navigate to the next panel, A2 –
Final Budget Review (Completion Required), where they will become executors and mark their
budget “Complete” and submit it for approval.

5. HANDS-ON PRACTICE
53
5. VPs will receive the Approval notifications in A2 – Final Budget (Approval).
5. HANDS-ON PRACTICE
54
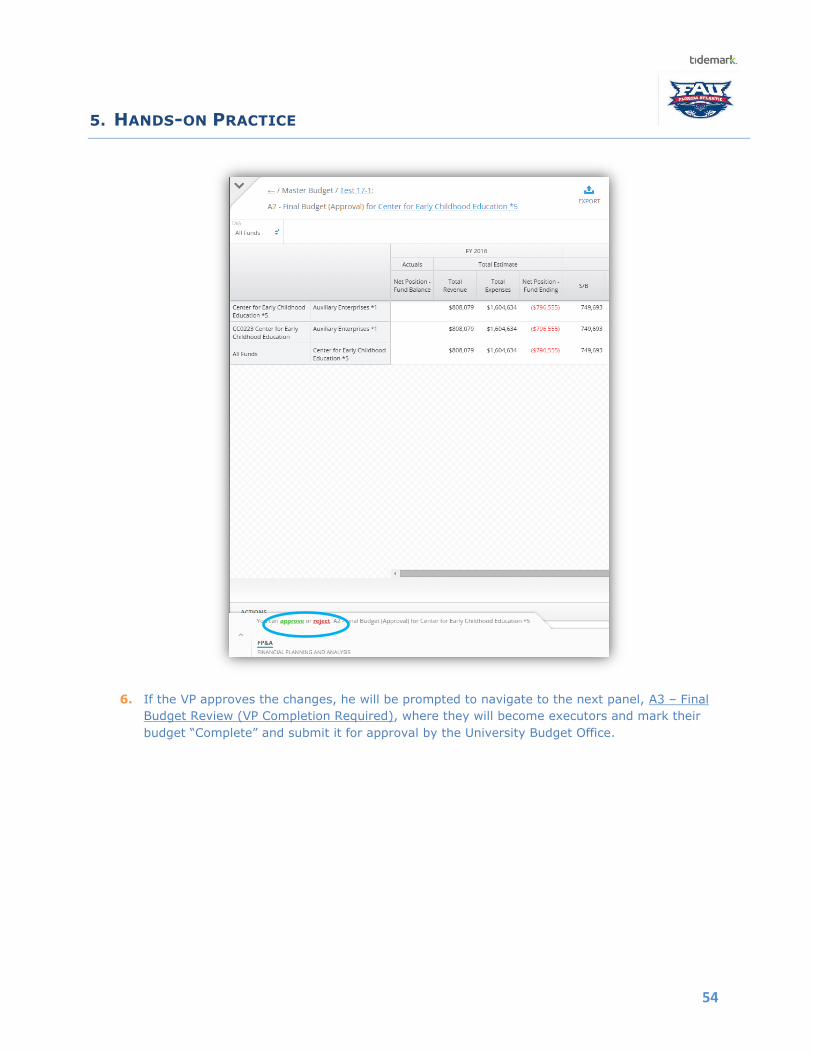
6. If the VP approves the changes, he will be prompted to navigate to the next panel, A3 – Final
Budget Review (VP Completion Required), where they will become executors and mark their
budget “Complete” and submit it for approval by the University Budget Office.
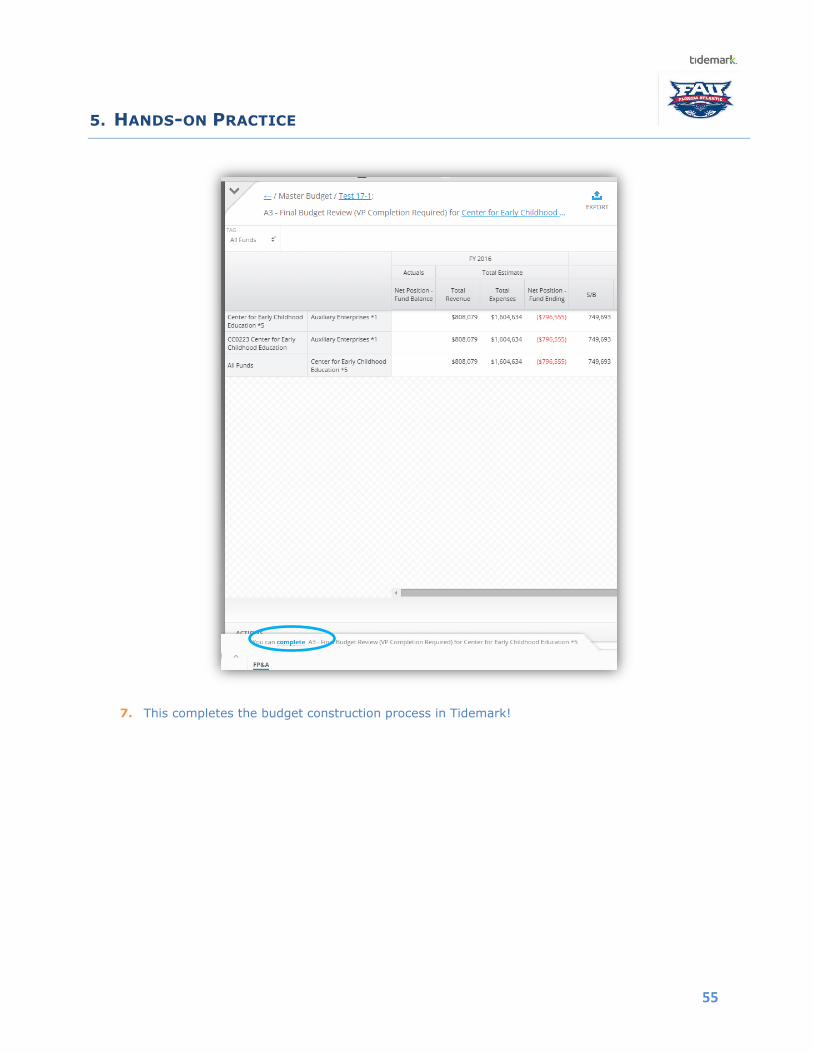
5. HANDS-ON PRACTICE
55
7. This completes the budget construction process in Tidemark!