floppy cat - j.h. winterblog.jhwinter.com/wp-content/uploads/2016/07/floppy-cat.pdf · floppy cat...
TRANSCRIPT
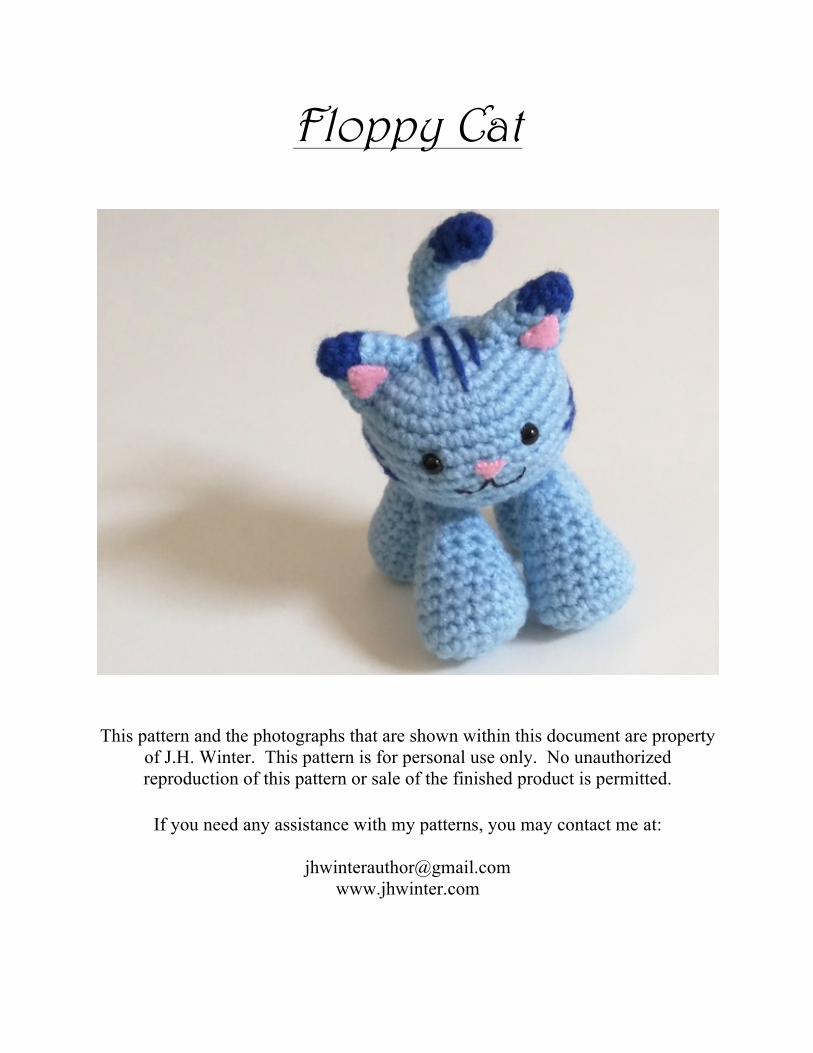
Floppy Cat
This pattern and the photographs that are shown within this document are property of J.H. Winter. This pattern is for personal use only. No unauthorized reproduction of this pattern or sale of the finished product is permitted.
If you need any assistance with my patterns, you may contact me at:
www.jhwinter.com

Page 1
Copyright © 2016 Julianne Hildebrand Winter. All Rights Reserved.
Floppy Cat
Gauge is not that important with amigurumi. Big or small they will be cute no
matter what! If your ami comes out larger or smaller, simply adjust the size of felt pieces cut out for the details on the cat’s face.
One more little suggestion I have for you before you begin crocheting:
For most of the yarn, I prefer to use Red Heart Super Saver yarn. It is an acrylic based yarn which is thicker and sturdier than many of the other yarn brands out there. I would highly recommend not mixing brands of yarn for the various colors
needed in this pattern.
**Rule of Thumb: softer, thinner yarns will make your ami smaller in size; rougher, thicker yarn will make your ami larger. Just keep this in mind and be consistent.
Hook Size: E

Page 2
Copyright © 2016 Julianne Hildebrand Winter. All Rights Reserved.
Materials Needed:
• Yarn: any two colors (I've chosen a light [lt] blue and dark [dk] blue)
• Size E Crochet Hook • Set of 6mm Safety Eyes • Stitch Marker • Yarn Needle • 2 Embroidery Needles • Embroidery Thread: black and pink • Felt: pink • 12-Gauge Jewelry Wire or Pipe Cleaner
(doesn't work as well but will in a pinch) • Stuffing (Polyester Fiberfill) • Poly-Pellets (small plastic beads that add
weight to the legs/body of amigurumi)
Skills Needed / Terms Used:
• Magic Ring Technique • Crocheting in the Round • Crocheting Two Sides Together • Color Changing • Sc - Single Crochet • Inc - Increase • Invdec - Invisible Decrease • Sl st - Slip Stitch • FO - Finish Off, Bind Off • Whipstitch • Basic Embroidery

Page 3
Copyright © 2016 Julianne Hildebrand Winter. All Rights Reserved.
Head (w/ lt blue):
R1: 6sc in magic ring – 6 R2: inc around – 12 R3: (sc, inc) around – 18 R4: (2sc, inc) around – 24 R5: (3sc, inc) around – 30 R6: (4sc, inc) around – 36 R7-12: sc around – 36 R13: (4sc, invdec) around – 30 R14: (3sc, invdec) around – 24
**Add safety eyes and embroidery details to the face. Add dark blue lines of yarn to the sides and top of head.**
R15: (2sc, invdec) around – 18
**Begin stuffing**
R16: (sc, invdec) around – 12
**Finish stuffing**
R17: invdec around – 6 sl st in next, FO, weave in end to close hole.
Ears (Make 2: w/ dk and lt blue):
R1: (w/ dk blue) 4sc in magic ring – 4 R2: (sc, inc) around (change to lt blue in last stitch) – 6 R3: (w/ lt blue) slst, sc, inc, 2sc, inc – 8 R4: (3sc, inc) around – 10 R5: (4sc, inc) around – 12 sl st, FO, leave tail to stitch ears to top of head.
Make sure to pay careful attention to any instructions within this pattern that are separated by **(Instruction)**. These are crucial to the outcome of your amigurumi.
Page 4
Copyright © 2016 Julianne Hildebrand Winter. All Rights Reserved.
Legs (Make 4: w/ lt blue):
R1: 6sc in magic ring – 6 R2: inc around – 12 R3: (sc, inc) around – 18 R4-5: sc around – 18 R6: (4sc, invdec) around – 15 R7: sc around – 15 R8: (3sc, invdec) around – 12 R9: sc around – 12 R10: (2sc, invdec) around – 9
**Stuff**
R11: sc around – 9 R12: (sc, invdec) around – 6 R13: (Flatten two sides and crochet together) 3sc across – 3 FO, leave tail to stitch legs to bottom of head.
Tail (w/ dk and lt blue):
R1: (w/ dk blue) 4sc in magic ring – 4 R2: (sc, inc) around – 6 R3: sc around (change to lt. blue in last stitch) – 6 R4-14: (w/ lt blue) sc around – 6 sl st, FO, leave tail to stitch tail to head.
Page 5
Copyright © 2016 Julianne Hildebrand Winter. All Rights Reserved.
Time to Assemble
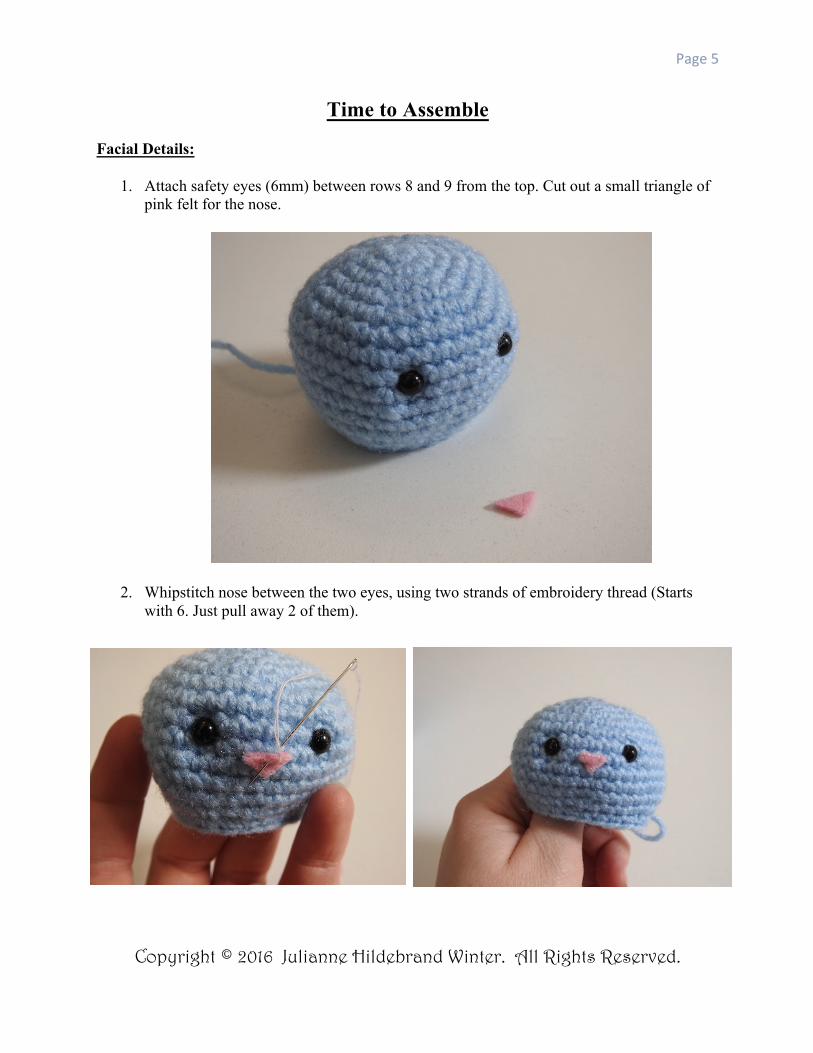
Facial Details:
1. Attach safety eyes (6mm) between rows 8 and 9 from the top. Cut out a small triangle of pink felt for the nose.
2. Whipstitch nose between the two eyes, using two strands of embroidery thread (Starts with 6. Just pull away 2 of them).

Page 6
Copyright © 2016 Julianne Hildebrand Winter. All Rights Reserved.
3. Mouth details: thread one embroidery needle with full thickness of black embroidery thread (6 strands); thread the other with 2 strands. The needle with 6 strands will be for the mouth, the 2 are used to tack down the larger thread in the shape you want the mouth to be. Come up with your needle at the bottom of the nose (locking in your knotted end inside the head) and go back into the head at the outer edge of the mouth (don't pull tight). Place needle into head off to the side and grab needle with 2 strands of thread.
4. Take your needle with 2 strands of black thread and come up through the inside of the head locking in your knotted end. You want these "tacking down" stitches to come out on one side of the mouth thread, go up and over it and then back down into the same place the thread came out of the head, locking the mouth thread in place. Mine needed about 3-4 tacking stitches on either side.

Page 7
Copyright © 2016 Julianne Hildebrand Winter. All Rights Reserved.
5. Repeat on the other side. Tie off ends of both threaded needles inside the head, hiding the knots.
6. Take your yarn needle and darker colored thread (hiding the knot inside the head), create line stitches: 3 on either side of the face and 3 on the top of the head. I made my middle lines slightly longer than the outer ones.
Page 8
Copyright © 2016 Julianne Hildebrand Winter. All Rights Reserved.
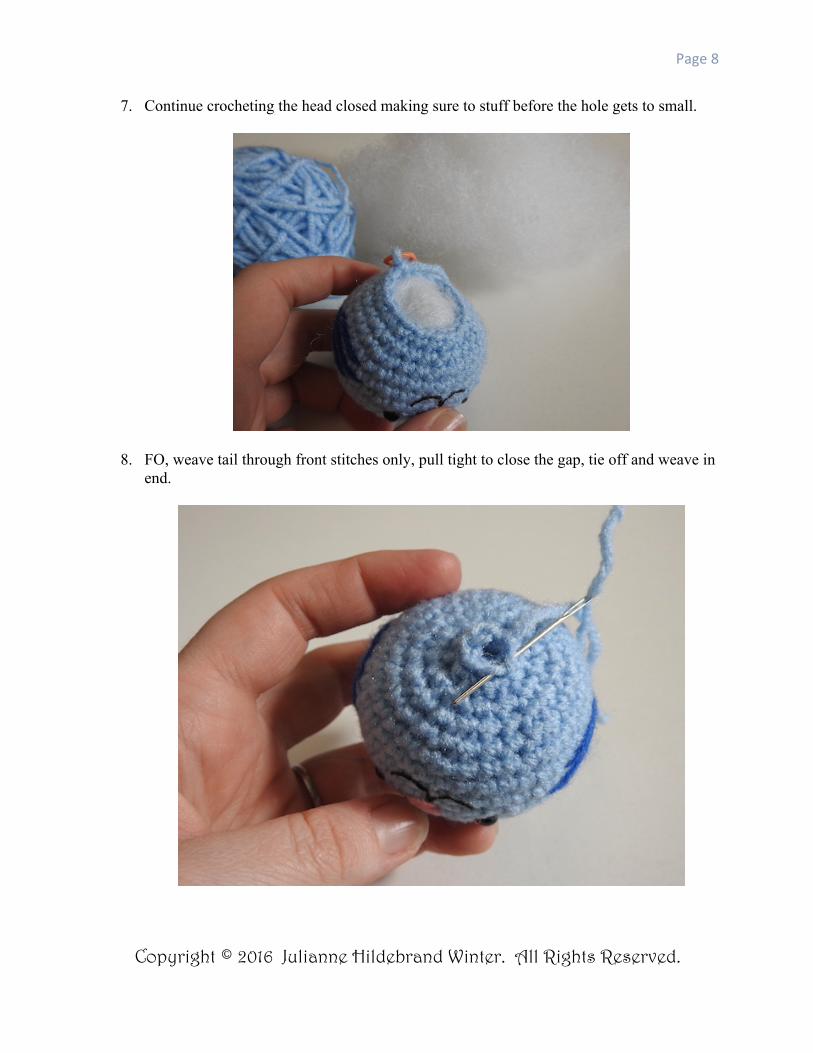
7. Continue crocheting the head closed making sure to stuff before the hole gets to small.
8. FO, weave tail through front stitches only, pull tight to close the gap, tie off and weave in end.
Page 9
Copyright © 2016 Julianne Hildebrand Winter. All Rights Reserved.
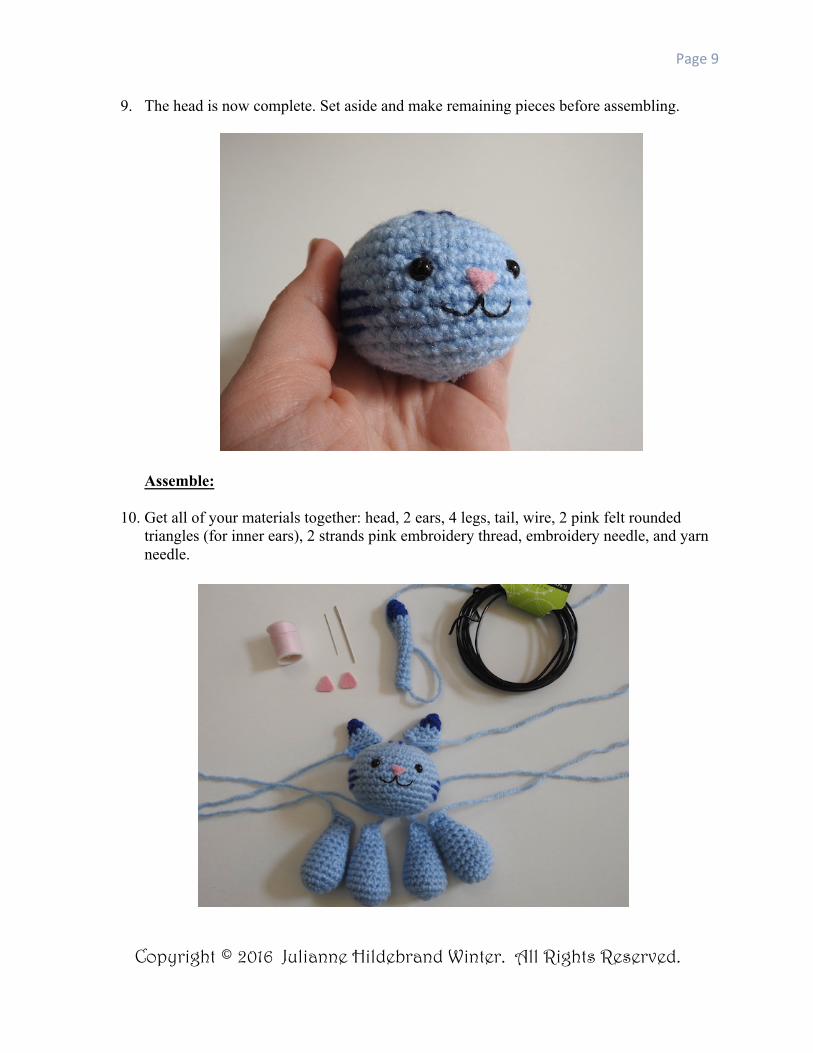
9. The head is now complete. Set aside and make remaining pieces before assembling.
Assemble:
10. Get all of your materials together: head, 2 ears, 4 legs, tail, wire, 2 pink felt rounded triangles (for inner ears), 2 strands pink embroidery thread, embroidery needle, and yarn needle.
Page 10
Copyright © 2016 Julianne Hildebrand Winter. All Rights Reserved.
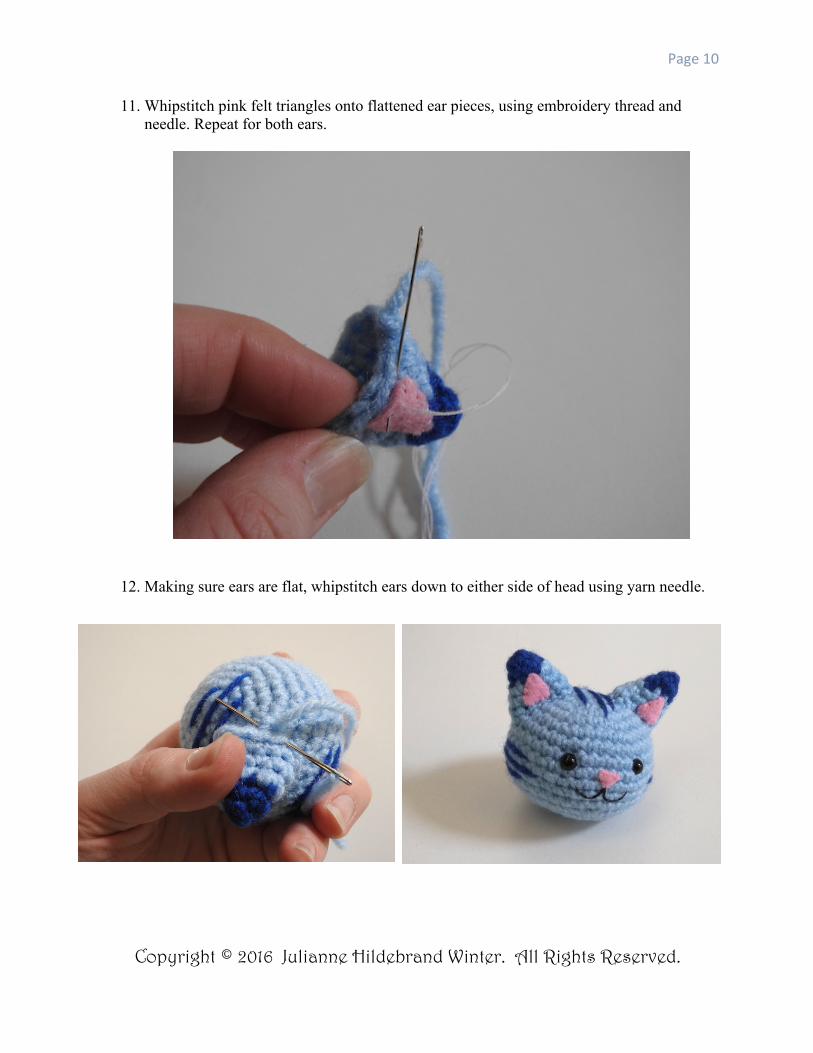
11. Whipstitch pink felt triangles onto flattened ear pieces, using embroidery thread and needle. Repeat for both ears.
12. Making sure ears are flat, whipstitch ears down to either side of head using yarn needle.

Page 11
Copyright © 2016 Julianne Hildebrand Winter. All Rights Reserved.
13. Using your jewelry wire and a pair of wire cutters, bend one end of wire in on itself, coiling the end around the base. Use the wire cutters clamping section at the front to flatten the loop at the end so the wire fits inside the cat's tail.
14. Push the wire into the tail, cutting the other end so that it is long enough to create a coil that will be twisted into the back side of the head. Gently twist the wire where you want the tail to go, into the back of the head (towards the bottom).

Page 12
Copyright © 2016 Julianne Hildebrand Winter. All Rights Reserved.
15. Whipstitch tail to head, using yarn needle.
16. Position arms where you want them, making sure the braided side of the 3 leftover stitches from R13 are facing toward the head (as shown by the arrow below). Using yarn needle, whipstitch legs to body (two in front and two in back, as shown).
Page 13
Copyright © 2016 Julianne Hildebrand Winter. All Rights Reserved.
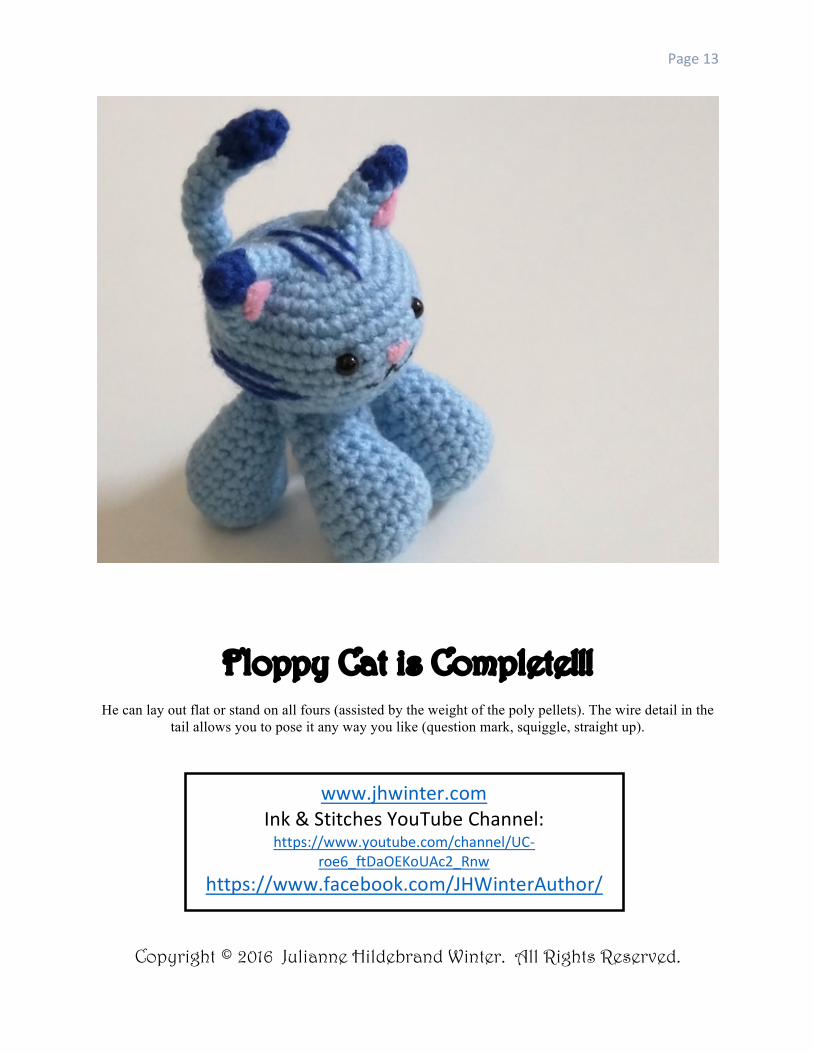
Floppy Cat is Complete!!!
He can lay out flat or stand on all fours (assisted by the weight of the poly pellets). The wire detail in the
tail allows you to pose it any way you like (question mark, squiggle, straight up).
www.jhwinter.com Ink & Stitches YouTube Channel: https://www.youtube.com/channel/UC-‐
roe6_ftDaOEKoUAc2_Rnw https://www.facebook.com/JHWinterAuthor/