flexnet operations 2020 r1.1 on premises installation and
TRANSCRIPT

FlexNet Operations 2020 R1.1 On PremisesInstallation and Implementation Guide

Legal Information
Copyright NoticeCopyright © 2020 Flexera Software
This publication contains proprietary and confidential information and creative works owned by Flexera Software and its licensors, if any. Any use, copying, publication, distribution, display, modification, or transmission of such publication in whole or in part in any form or by any means without the prior express written permission of Flexera Software is strictly prohibited. Except where expressly provided by Flexera Software in writing, possession of this publication shall not be construed to confer any license or rights under any Flexera Software intellectual property rights, whether by estoppel, implication, or otherwise.
All copies of the technology and related information, if allowed by Flexera Software, must display this notice of copyright and ownership in full.
FlexNet Operations incorporates software developed by others and redistributed according to license agreements. Copyright notices and licenses for these external libraries are provided in a supplementary document that accompanies this one.
Intellectual PropertyFor a list of trademarks and patents that are owned by Flexera Software, see https://www.flexera.com/legal/intellectual-property.html. All other brand and product names mentioned in Flexera Software products, product documentation, and marketing materials are the trademarks and registered trademarks of their respective owners.
Restricted Rights LegendThe Software is commercial computer software. If the user or licensee of the Software is an agency, department, or other entity of the United States Government, the use, duplication, reproduction, release, modification, disclosure, or transfer of the Software, or any related documentation of any kind, including technical data and manuals, is restricted by a license agreement or by the terms of this Agreement in accordance with Federal Acquisition Regulation 12.212 for civilian purposes and Defense Federal Acquisition Regulation Supplement 227.7202 for military purposes. The Software was developed fully at private expense. All other use is prohibited.
Book Name FlexNet Operations 2020 R1.1 On Premises Installation and Implementation Guide
Part Number FNO-2020R1.1-ING01
Product Release Date December 2020
Last Modified Date 24 June 2021

Contents
1 Introduction . . . . . . . . . . . . . . . . . . . . . . . . . . . . . . . . . . . . . . . . . . . . . . . . . . . . . . . . . . . . . . . . . . . . . . . . . . . 9Product Support Resources . . . . . . . . . . . . . . . . . . . . . . . . . . . . . . . . . . . . . . . . . . . . . . . . . . . . . . . . . . . . . . . . . . . . . . . . . . . . . . . . . 11
Contact Us . . . . . . . . . . . . . . . . . . . . . . . . . . . . . . . . . . . . . . . . . . . . . . . . . . . . . . . . . . . . . . . . . . . . . . . . . . . . . . . . . . . . . . . . . . . . . . . . 11
Part 1: Installing FlexNet Operations . . . . . . . . . . . . . . . . . . . . . . . . . . . . . . . . . . . 13
2 Installation Options . . . . . . . . . . . . . . . . . . . . . . . . . . . . . . . . . . . . . . . . . . . . . . . . . . . . . . . . . . . . . . . . . . . 15FlexNet Operations Components. . . . . . . . . . . . . . . . . . . . . . . . . . . . . . . . . . . . . . . . . . . . . . . . . . . . . . . . . . . . . . . . . . . . . . . . . . . . . 15
Deployment Topologies . . . . . . . . . . . . . . . . . . . . . . . . . . . . . . . . . . . . . . . . . . . . . . . . . . . . . . . . . . . . . . . . . . . . . . . . . . . . . . . . . . . . 17
3 Before Installing FlexNet Operations . . . . . . . . . . . . . . . . . . . . . . . . . . . . . . . . . . . . . . . . . . . . . . . . . . . . . 21Acquiring the FlexNet Operations Installer . . . . . . . . . . . . . . . . . . . . . . . . . . . . . . . . . . . . . . . . . . . . . . . . . . . . . . . . . . . . . . . . . . . . 22
Planning User Accounts. . . . . . . . . . . . . . . . . . . . . . . . . . . . . . . . . . . . . . . . . . . . . . . . . . . . . . . . . . . . . . . . . . . . . . . . . . . . . . . . . . . . . 22
Configuring Microsoft SQL Server for Use with FlexNet Operations . . . . . . . . . . . . . . . . . . . . . . . . . . . . . . . . . . . . . . . . . . . . . . . 23
Setting Up RabbitMQ . . . . . . . . . . . . . . . . . . . . . . . . . . . . . . . . . . . . . . . . . . . . . . . . . . . . . . . . . . . . . . . . . . . . . . . . . . . . . . . . . . . . . . . 23
Optionally Configuring an External Wildfly Instance . . . . . . . . . . . . . . . . . . . . . . . . . . . . . . . . . . . . . . . . . . . . . . . . . . . . . . . . . . . . 24
Java Development Kit (JDK) Requirement. . . . . . . . . . . . . . . . . . . . . . . . . . . . . . . . . . . . . . . . . . . . . . . . . . . . . . . . . . . . . . . . . . . . . 25
4 Installing and Configuring FlexNet Operations. . . . . . . . . . . . . . . . . . . . . . . . . . . . . . . . . . . . . . . . . . . . . 27Installing FlexNet Operations . . . . . . . . . . . . . . . . . . . . . . . . . . . . . . . . . . . . . . . . . . . . . . . . . . . . . . . . . . . . . . . . . . . . . . . . . . . . . . . 29
Setting Up the Installation with FlexNet Setup . . . . . . . . . . . . . . . . . . . . . . . . . . . . . . . . . . . . . . . . . . . . . . . . . . . . . . . . . . . . . . . . . 33About FlexNet Setup . . . . . . . . . . . . . . . . . . . . . . . . . . . . . . . . . . . . . . . . . . . . . . . . . . . . . . . . . . . . . . . . . . . . . . . . . . . . . . . . . . . . . . . . . . . . . . . . 34Starting FlexNet Setup . . . . . . . . . . . . . . . . . . . . . . . . . . . . . . . . . . . . . . . . . . . . . . . . . . . . . . . . . . . . . . . . . . . . . . . . . . . . . . . . . . . . . . . . . . . . . . 34Configuring General Settings . . . . . . . . . . . . . . . . . . . . . . . . . . . . . . . . . . . . . . . . . . . . . . . . . . . . . . . . . . . . . . . . . . . . . . . . . . . . . . . . . . . . . . . . 35Configuring Database Settings. . . . . . . . . . . . . . . . . . . . . . . . . . . . . . . . . . . . . . . . . . . . . . . . . . . . . . . . . . . . . . . . . . . . . . . . . . . . . . . . . . . . . . . 37Configuring Advanced Settings . . . . . . . . . . . . . . . . . . . . . . . . . . . . . . . . . . . . . . . . . . . . . . . . . . . . . . . . . . . . . . . . . . . . . . . . . . . . . . . . . . . . . . 39Additional Steps for Cloud Licensing Service Users . . . . . . . . . . . . . . . . . . . . . . . . . . . . . . . . . . . . . . . . . . . . . . . . . . . . . . . . . . . . . . . . . . . . 42
FlexNet Operations 2020 R1.1 On Premises Installation and Implementation Guide FNO-2020R1.1-ING01 Company Confidential 3

Contents
Viewing System Status . . . . . . . . . . . . . . . . . . . . . . . . . . . . . . . . . . . . . . . . . . . . . . . . . . . . . . . . . . . . . . . . . . . . . . . . . . . . . . . . . . . . . . . . . . . . . . 43Deploying FlexNet Operations Modules . . . . . . . . . . . . . . . . . . . . . . . . . . . . . . . . . . . . . . . . . . . . . . . . . . . . . . . . . . . . . . . . . . . . . . . . . . . . . . . 43Starting FlexNet Operations . . . . . . . . . . . . . . . . . . . . . . . . . . . . . . . . . . . . . . . . . . . . . . . . . . . . . . . . . . . . . . . . . . . . . . . . . . . . . . . . . . . . . . . . . 44Connecting Distributed Deployments . . . . . . . . . . . . . . . . . . . . . . . . . . . . . . . . . . . . . . . . . . . . . . . . . . . . . . . . . . . . . . . . . . . . . . . . . . . . . . . . 44Setting FlexNet Embedded and FlexNet Usage Management Port Numbers . . . . . . . . . . . . . . . . . . . . . . . . . . . . . . . . . . . . . . . . . . . . . . 45
Verifying Basic Functionality . . . . . . . . . . . . . . . . . . . . . . . . . . . . . . . . . . . . . . . . . . . . . . . . . . . . . . . . . . . . . . . . . . . . . . . . . . . . . . . . 46
Licensing FlexNet Operations . . . . . . . . . . . . . . . . . . . . . . . . . . . . . . . . . . . . . . . . . . . . . . . . . . . . . . . . . . . . . . . . . . . . . . . . . . . . . . . 46About Licensing . . . . . . . . . . . . . . . . . . . . . . . . . . . . . . . . . . . . . . . . . . . . . . . . . . . . . . . . . . . . . . . . . . . . . . . . . . . . . . . . . . . . . . . . . . . . . . . . . . . . 47Configuring Licensing for FlexNet Operations . . . . . . . . . . . . . . . . . . . . . . . . . . . . . . . . . . . . . . . . . . . . . . . . . . . . . . . . . . . . . . . . . . . . . . . . . 47Validating the License Server Configuration . . . . . . . . . . . . . . . . . . . . . . . . . . . . . . . . . . . . . . . . . . . . . . . . . . . . . . . . . . . . . . . . . . . . . . . . . . . 47
Next Steps . . . . . . . . . . . . . . . . . . . . . . . . . . . . . . . . . . . . . . . . . . . . . . . . . . . . . . . . . . . . . . . . . . . . . . . . . . . . . . . . . . . . . . . . . . . . . . . . 48
5 Upgrading FlexNet Operations . . . . . . . . . . . . . . . . . . . . . . . . . . . . . . . . . . . . . . . . . . . . . . . . . . . . . . . . . . 49Overview of the Upgrade Process . . . . . . . . . . . . . . . . . . . . . . . . . . . . . . . . . . . . . . . . . . . . . . . . . . . . . . . . . . . . . . . . . . . . . . . . . . . . 50
Preparing to Upgrade FlexNet Operations . . . . . . . . . . . . . . . . . . . . . . . . . . . . . . . . . . . . . . . . . . . . . . . . . . . . . . . . . . . . . . . . . . . . . 51
Obtaining the Upgrade Files. . . . . . . . . . . . . . . . . . . . . . . . . . . . . . . . . . . . . . . . . . . . . . . . . . . . . . . . . . . . . . . . . . . . . . . . . . . . . . . . . 52
Installing the Upgrade Version. . . . . . . . . . . . . . . . . . . . . . . . . . . . . . . . . . . . . . . . . . . . . . . . . . . . . . . . . . . . . . . . . . . . . . . . . . . . . . . 52
Setting Up the Installation with FlexNet Setup . . . . . . . . . . . . . . . . . . . . . . . . . . . . . . . . . . . . . . . . . . . . . . . . . . . . . . . . . . . . . . . . . 55About FlexNet Setup . . . . . . . . . . . . . . . . . . . . . . . . . . . . . . . . . . . . . . . . . . . . . . . . . . . . . . . . . . . . . . . . . . . . . . . . . . . . . . . . . . . . . . . . . . . . . . . . 55Starting FlexNet Setup . . . . . . . . . . . . . . . . . . . . . . . . . . . . . . . . . . . . . . . . . . . . . . . . . . . . . . . . . . . . . . . . . . . . . . . . . . . . . . . . . . . . . . . . . . . . . . 56Configuring General Settings . . . . . . . . . . . . . . . . . . . . . . . . . . . . . . . . . . . . . . . . . . . . . . . . . . . . . . . . . . . . . . . . . . . . . . . . . . . . . . . . . . . . . . . . 57Configuring Database Settings. . . . . . . . . . . . . . . . . . . . . . . . . . . . . . . . . . . . . . . . . . . . . . . . . . . . . . . . . . . . . . . . . . . . . . . . . . . . . . . . . . . . . . . 59Configuring Advanced Settings . . . . . . . . . . . . . . . . . . . . . . . . . . . . . . . . . . . . . . . . . . . . . . . . . . . . . . . . . . . . . . . . . . . . . . . . . . . . . . . . . . . . . . 63Applying Customizations from the Prior FlexNet Operations Installation . . . . . . . . . . . . . . . . . . . . . . . . . . . . . . . . . . . . . . . . . . . . . . . . . 65Deploying FlexNet Operations Modules . . . . . . . . . . . . . . . . . . . . . . . . . . . . . . . . . . . . . . . . . . . . . . . . . . . . . . . . . . . . . . . . . . . . . . . . . . . . . . . 66Starting FlexNet Operations . . . . . . . . . . . . . . . . . . . . . . . . . . . . . . . . . . . . . . . . . . . . . . . . . . . . . . . . . . . . . . . . . . . . . . . . . . . . . . . . . . . . . . . . . 66Connecting Distributed Deployments . . . . . . . . . . . . . . . . . . . . . . . . . . . . . . . . . . . . . . . . . . . . . . . . . . . . . . . . . . . . . . . . . . . . . . . . . . . . . . . . 67
Verifying the Upgrade . . . . . . . . . . . . . . . . . . . . . . . . . . . . . . . . . . . . . . . . . . . . . . . . . . . . . . . . . . . . . . . . . . . . . . . . . . . . . . . . . . . . . . 68
More Post-upgrade Considerations. . . . . . . . . . . . . . . . . . . . . . . . . . . . . . . . . . . . . . . . . . . . . . . . . . . . . . . . . . . . . . . . . . . . . . . . . . . 69
Additional Steps for Cloud Licensing Service Users . . . . . . . . . . . . . . . . . . . . . . . . . . . . . . . . . . . . . . . . . . . . . . . . . . . . . . . . . . . . . 69
Additional Step for Web Service Users . . . . . . . . . . . . . . . . . . . . . . . . . . . . . . . . . . . . . . . . . . . . . . . . . . . . . . . . . . . . . . . . . . . . . . . . 70
Applying Hotfixes to FlexNet Operations Components . . . . . . . . . . . . . . . . . . . . . . . . . . . . . . . . . . . . . . . . . . . . . . . . . . . . . . . . . . 70
Verifying the Hotfix . . . . . . . . . . . . . . . . . . . . . . . . . . . . . . . . . . . . . . . . . . . . . . . . . . . . . . . . . . . . . . . . . . . . . . . . . . . . . . . . . . . . . . . . 71
Adding a Read-Only User to FlexNet Operations . . . . . . . . . . . . . . . . . . . . . . . . . . . . . . . . . . . . . . . . . . . . . . . . . . . . . . . . . . . . . . . . 71
Part 2: Implementing FlexNet Operations . . . . . . . . . . . . . . . . . . . . . . . . . . . . . . . 73
6 FlexNet Operations On Premises Implementation Overview . . . . . . . . . . . . . . . . . . . . . . . . . . . . . . . . . 75Architecture . . . . . . . . . . . . . . . . . . . . . . . . . . . . . . . . . . . . . . . . . . . . . . . . . . . . . . . . . . . . . . . . . . . . . . . . . . . . . . . . . . . . . . . . . . . . . . 76
Prerequisites . . . . . . . . . . . . . . . . . . . . . . . . . . . . . . . . . . . . . . . . . . . . . . . . . . . . . . . . . . . . . . . . . . . . . . . . . . . . . . . . . . . . . . . . . . . . . 77
Implementation Issues . . . . . . . . . . . . . . . . . . . . . . . . . . . . . . . . . . . . . . . . . . . . . . . . . . . . . . . . . . . . . . . . . . . . . . . . . . . . . . . . . . . . . 77
Using FlexNet Setup . . . . . . . . . . . . . . . . . . . . . . . . . . . . . . . . . . . . . . . . . . . . . . . . . . . . . . . . . . . . . . . . . . . . . . . . . . . . . . . . . . . . . . . 79
4 Company Confidential FNO-2020R1.1-ING01 FlexNet Operations 2020 R1.1 On Premises Installation and Implementation Guide

Contents
7 Configuring FlexNet Operations . . . . . . . . . . . . . . . . . . . . . . . . . . . . . . . . . . . . . . . . . . . . . . . . . . . . . . . . . 81Custom Attributes . . . . . . . . . . . . . . . . . . . . . . . . . . . . . . . . . . . . . . . . . . . . . . . . . . . . . . . . . . . . . . . . . . . . . . . . . . . . . . . . . . . . . . . . . 81
Localizing Custom License Model Attribute Names. . . . . . . . . . . . . . . . . . . . . . . . . . . . . . . . . . . . . . . . . . . . . . . . . . . . . . . . . . . . . . . . . . . . . 82Extendable Entities . . . . . . . . . . . . . . . . . . . . . . . . . . . . . . . . . . . . . . . . . . . . . . . . . . . . . . . . . . . . . . . . . . . . . . . . . . . . . . . . . . . . . . . . . . . . . . . . . 82Using Custom Attributes . . . . . . . . . . . . . . . . . . . . . . . . . . . . . . . . . . . . . . . . . . . . . . . . . . . . . . . . . . . . . . . . . . . . . . . . . . . . . . . . . . . . . . . . . . . . 83
In Entitlements . . . . . . . . . . . . . . . . . . . . . . . . . . . . . . . . . . . . . . . . . . . . . . . . . . . . . . . . . . . . . . . . . . . . . . . . . . . . . . . . . . . . . . . . . . . . . . . . . 84In Fulfillment Records . . . . . . . . . . . . . . . . . . . . . . . . . . . . . . . . . . . . . . . . . . . . . . . . . . . . . . . . . . . . . . . . . . . . . . . . . . . . . . . . . . . . . . . . . . . 84In Online Trusted Storage Activations . . . . . . . . . . . . . . . . . . . . . . . . . . . . . . . . . . . . . . . . . . . . . . . . . . . . . . . . . . . . . . . . . . . . . . . . . . . . . 84In FlexNet License Text . . . . . . . . . . . . . . . . . . . . . . . . . . . . . . . . . . . . . . . . . . . . . . . . . . . . . . . . . . . . . . . . . . . . . . . . . . . . . . . . . . . . . . . . . . 84
In Non-FlexNet Licenses. . . . . . . . . . . . . . . . . . . . . . . . . . . . . . . . . . . . . . . . . . . . . . . . . . . . . . . . . . . . . . . . . . . . . . . . . . . . . . . . . . . . . . . . . . . . . 85Devices . . . . . . . . . . . . . . . . . . . . . . . . . . . . . . . . . . . . . . . . . . . . . . . . . . . . . . . . . . . . . . . . . . . . . . . . . . . . . . . . . . . . . . . . . . . . . . . . . . . . . . . . . . . . 85Displaying and Sorting Custom Attributes. . . . . . . . . . . . . . . . . . . . . . . . . . . . . . . . . . . . . . . . . . . . . . . . . . . . . . . . . . . . . . . . . . . . . . . . . . . . . 85
Domain Configuration . . . . . . . . . . . . . . . . . . . . . . . . . . . . . . . . . . . . . . . . . . . . . . . . . . . . . . . . . . . . . . . . . . . . . . . . . . . . . . . . . . . . . . 86Domain Configuration Settings . . . . . . . . . . . . . . . . . . . . . . . . . . . . . . . . . . . . . . . . . . . . . . . . . . . . . . . . . . . . . . . . . . . . . . . . . . . . . . . . . . . . . . 87
Customizing FlexNet Operations . . . . . . . . . . . . . . . . . . . . . . . . . . . . . . . . . . . . . . . . . . . . . . . . . . . . . . . . . . . . . . . . . . . . . . . . . . . . . 90Custom Java Classes. . . . . . . . . . . . . . . . . . . . . . . . . . . . . . . . . . . . . . . . . . . . . . . . . . . . . . . . . . . . . . . . . . . . . . . . . . . . . . . . . . . . . . . . . . . . . . . . 90
Customizable Features and Associated Java Classes . . . . . . . . . . . . . . . . . . . . . . . . . . . . . . . . . . . . . . . . . . . . . . . . . . . . . . . . . . . . . . . 91Capability Request Handler Details . . . . . . . . . . . . . . . . . . . . . . . . . . . . . . . . . . . . . . . . . . . . . . . . . . . . . . . . . . . . . . . . . . . . . . . . . . . . . . . 99Employing a Customized Java Class . . . . . . . . . . . . . . . . . . . . . . . . . . . . . . . . . . . . . . . . . . . . . . . . . . . . . . . . . . . . . . . . . . . . . . . . . . . . . 102
Using a Custom Digital Signature Algorithm. . . . . . . . . . . . . . . . . . . . . . . . . . . . . . . . . . . . . . . . . . . . . . . . . . . . . . . . . . . . . . . . . . . . . . . . . . 103Configuring and Deploying a Custom Database Connection Pool . . . . . . . . . . . . . . . . . . . . . . . . . . . . . . . . . . . . . . . . . . . . . . . . . . . . . . . 104
Customizing the Data Source XML Configuration Files . . . . . . . . . . . . . . . . . . . . . . . . . . . . . . . . . . . . . . . . . . . . . . . . . . . . . . . . . . . . . 105Verifying the Configured Connection. . . . . . . . . . . . . . . . . . . . . . . . . . . . . . . . . . . . . . . . . . . . . . . . . . . . . . . . . . . . . . . . . . . . . . . . . . . . . 106Getting a Connection. . . . . . . . . . . . . . . . . . . . . . . . . . . . . . . . . . . . . . . . . . . . . . . . . . . . . . . . . . . . . . . . . . . . . . . . . . . . . . . . . . . . . . . . . . . 106Additional Implementation Notes . . . . . . . . . . . . . . . . . . . . . . . . . . . . . . . . . . . . . . . . . . . . . . . . . . . . . . . . . . . . . . . . . . . . . . . . . . . . . . . 107
Logging to the flexnet.log File . . . . . . . . . . . . . . . . . . . . . . . . . . . . . . . . . . . . . . . . . . . . . . . . . . . . . . . . . . . . . . . . . . . . . . . . . . . . . . . . . . . . . . 107Localizing Error Messages . . . . . . . . . . . . . . . . . . . . . . . . . . . . . . . . . . . . . . . . . . . . . . . . . . . . . . . . . . . . . . . . . . . . . . . . . . . . . . . . . . . . . . . . . . 107
Configuring FlexNet Operations with a Production Vendor Certificate Generator (VCG) . . . . . . . . . . . . . . . . . . . . . . . . . . . . . 108
Customizing Headers and Trailers in License Files . . . . . . . . . . . . . . . . . . . . . . . . . . . . . . . . . . . . . . . . . . . . . . . . . . . . . . . . . . . . . 109
Multiple publisher.xml Files . . . . . . . . . . . . . . . . . . . . . . . . . . . . . . . . . . . . . . . . . . . . . . . . . . . . . . . . . . . . . . . . . . . . . . . . . . . . . . . . 110
Channel Partner Tiers . . . . . . . . . . . . . . . . . . . . . . . . . . . . . . . . . . . . . . . . . . . . . . . . . . . . . . . . . . . . . . . . . . . . . . . . . . . . . . . . . . . . . 110
Implementing Time Zone Functionality . . . . . . . . . . . . . . . . . . . . . . . . . . . . . . . . . . . . . . . . . . . . . . . . . . . . . . . . . . . . . . . . . . . . . . 111
Editing the Appearance of Producer Portal Pages . . . . . . . . . . . . . . . . . . . . . . . . . . . . . . . . . . . . . . . . . . . . . . . . . . . . . . . . . . . . . 113
8 Configuring the End-User Portal . . . . . . . . . . . . . . . . . . . . . . . . . . . . . . . . . . . . . . . . . . . . . . . . . . . . . . . . 115Logging In to the End-User Portal . . . . . . . . . . . . . . . . . . . . . . . . . . . . . . . . . . . . . . . . . . . . . . . . . . . . . . . . . . . . . . . . . . . . . . . . . . . 115
Logging In Directly to the Manage Entitlements Page . . . . . . . . . . . . . . . . . . . . . . . . . . . . . . . . . . . . . . . . . . . . . . . . . . . . . . . . . . . . . . . . . 117
End-User Portal Policies . . . . . . . . . . . . . . . . . . . . . . . . . . . . . . . . . . . . . . . . . . . . . . . . . . . . . . . . . . . . . . . . . . . . . . . . . . . . . . . . . . . 118
Customizing the End-User Portal. . . . . . . . . . . . . . . . . . . . . . . . . . . . . . . . . . . . . . . . . . . . . . . . . . . . . . . . . . . . . . . . . . . . . . . . . . . . 118Editing the Appearance of End-User Portal Pages . . . . . . . . . . . . . . . . . . . . . . . . . . . . . . . . . . . . . . . . . . . . . . . . . . . . . . . . . . . . . . . . . . . . . 119Custom Attribute Display. . . . . . . . . . . . . . . . . . . . . . . . . . . . . . . . . . . . . . . . . . . . . . . . . . . . . . . . . . . . . . . . . . . . . . . . . . . . . . . . . . . . . . . . . . . 121Help Files . . . . . . . . . . . . . . . . . . . . . . . . . . . . . . . . . . . . . . . . . . . . . . . . . . . . . . . . . . . . . . . . . . . . . . . . . . . . . . . . . . . . . . . . . . . . . . . . . . . . . . . . . 121Localizing the End-User Portal . . . . . . . . . . . . . . . . . . . . . . . . . . . . . . . . . . . . . . . . . . . . . . . . . . . . . . . . . . . . . . . . . . . . . . . . . . . . . . . . . . . . . . 122
Locale Codes . . . . . . . . . . . . . . . . . . . . . . . . . . . . . . . . . . . . . . . . . . . . . . . . . . . . . . . . . . . . . . . . . . . . . . . . . . . . . . . . . . . . . . . . . . . . . . . . . . 122
FlexNet Operations 2020 R1.1 On Premises Installation and Implementation Guide FNO-2020R1.1-ING01 Company Confidential 5

Contents
Resource Bundles. . . . . . . . . . . . . . . . . . . . . . . . . . . . . . . . . . . . . . . . . . . . . . . . . . . . . . . . . . . . . . . . . . . . . . . . . . . . . . . . . . . . . . . . . . . . . . 123FLEXnetOperationsText_en.properties Used on the End-User Portal . . . . . . . . . . . . . . . . . . . . . . . . . . . . . . . . . . . . . . . . . . . . . . . . 124
Single Sign-On . . . . . . . . . . . . . . . . . . . . . . . . . . . . . . . . . . . . . . . . . . . . . . . . . . . . . . . . . . . . . . . . . . . . . . . . . . . . . . . . . . . . . . . . . . . 129Secure Token Single Sign-On . . . . . . . . . . . . . . . . . . . . . . . . . . . . . . . . . . . . . . . . . . . . . . . . . . . . . . . . . . . . . . . . . . . . . . . . . . . . . . . . . . . . . . . 129
Configuring Secure Token Single Sign-On . . . . . . . . . . . . . . . . . . . . . . . . . . . . . . . . . . . . . . . . . . . . . . . . . . . . . . . . . . . . . . . . . . . . . . . . 129HTTP Header Single Sign-On . . . . . . . . . . . . . . . . . . . . . . . . . . . . . . . . . . . . . . . . . . . . . . . . . . . . . . . . . . . . . . . . . . . . . . . . . . . . . . . . . . . . . . . 132
Configuring HTTP Header Single Sign-On. . . . . . . . . . . . . . . . . . . . . . . . . . . . . . . . . . . . . . . . . . . . . . . . . . . . . . . . . . . . . . . . . . . . . . . . . 133Limitations . . . . . . . . . . . . . . . . . . . . . . . . . . . . . . . . . . . . . . . . . . . . . . . . . . . . . . . . . . . . . . . . . . . . . . . . . . . . . . . . . . . . . . . . . . . . . . . . . . . . 135
Link Forwarding . . . . . . . . . . . . . . . . . . . . . . . . . . . . . . . . . . . . . . . . . . . . . . . . . . . . . . . . . . . . . . . . . . . . . . . . . . . . . . . . . . . . . . . . . . . . . . . . . . . 135Backward Compatibility . . . . . . . . . . . . . . . . . . . . . . . . . . . . . . . . . . . . . . . . . . . . . . . . . . . . . . . . . . . . . . . . . . . . . . . . . . . . . . . . . . . . . . . . 136Configuring Link Forwarding . . . . . . . . . . . . . . . . . . . . . . . . . . . . . . . . . . . . . . . . . . . . . . . . . . . . . . . . . . . . . . . . . . . . . . . . . . . . . . . . . . . . 136Error Cases for SSO . . . . . . . . . . . . . . . . . . . . . . . . . . . . . . . . . . . . . . . . . . . . . . . . . . . . . . . . . . . . . . . . . . . . . . . . . . . . . . . . . . . . . . . . . . . . 136
9 Building a Vendor Certificate Generator . . . . . . . . . . . . . . . . . . . . . . . . . . . . . . . . . . . . . . . . . . . . . . . . . 137VCG Version Dependencies . . . . . . . . . . . . . . . . . . . . . . . . . . . . . . . . . . . . . . . . . . . . . . . . . . . . . . . . . . . . . . . . . . . . . . . . . . . . . . . . . 138
Prerequisites . . . . . . . . . . . . . . . . . . . . . . . . . . . . . . . . . . . . . . . . . . . . . . . . . . . . . . . . . . . . . . . . . . . . . . . . . . . . . . . . . . . . . . . . . . . . 138
Building the VCG. . . . . . . . . . . . . . . . . . . . . . . . . . . . . . . . . . . . . . . . . . . . . . . . . . . . . . . . . . . . . . . . . . . . . . . . . . . . . . . . . . . . . . . . . . 139Editing vcg_code.h . . . . . . . . . . . . . . . . . . . . . . . . . . . . . . . . . . . . . . . . . . . . . . . . . . . . . . . . . . . . . . . . . . . . . . . . . . . . . . . . . . . . . . . . . . . . . . . . 139
Encryption Strength Settings . . . . . . . . . . . . . . . . . . . . . . . . . . . . . . . . . . . . . . . . . . . . . . . . . . . . . . . . . . . . . . . . . . . . . . . . . . . . . . . . . . . 141Using LM_VER_BEHAVIOR to Force Compatibility with Early Versions of FlexNet Licensing . . . . . . . . . . . . . . . . . . . . . . . . . . . . 142
Copying lmprikey.h . . . . . . . . . . . . . . . . . . . . . . . . . . . . . . . . . . . . . . . . . . . . . . . . . . . . . . . . . . . . . . . . . . . . . . . . . . . . . . . . . . . . . . . . . . . . . . . . 143Editing vcg_vendor.c to Support Vendor-Defined Host IDs . . . . . . . . . . . . . . . . . . . . . . . . . . . . . . . . . . . . . . . . . . . . . . . . . . . . . . . . . . . . . 143Editing the Makefile . . . . . . . . . . . . . . . . . . . . . . . . . . . . . . . . . . . . . . . . . . . . . . . . . . . . . . . . . . . . . . . . . . . . . . . . . . . . . . . . . . . . . . . . . . . . . . . 145Running the VCG Build . . . . . . . . . . . . . . . . . . . . . . . . . . . . . . . . . . . . . . . . . . . . . . . . . . . . . . . . . . . . . . . . . . . . . . . . . . . . . . . . . . . . . . . . . . . . . 145
10 Recommendations for FlexNet Operations Performance Improvement. . . . . . . . . . . . . . . . . . . . . . . 147Database Index Creation. . . . . . . . . . . . . . . . . . . . . . . . . . . . . . . . . . . . . . . . . . . . . . . . . . . . . . . . . . . . . . . . . . . . . . . . . . . . . . . . . . . 147
Device Landing Page. . . . . . . . . . . . . . . . . . . . . . . . . . . . . . . . . . . . . . . . . . . . . . . . . . . . . . . . . . . . . . . . . . . . . . . . . . . . . . . . . . . . . . . . . . . . . . . 148Delete Entities in FlexNet Operations . . . . . . . . . . . . . . . . . . . . . . . . . . . . . . . . . . . . . . . . . . . . . . . . . . . . . . . . . . . . . . . . . . . . . . . . . . . . . . . . 148Recovery of Served Clients . . . . . . . . . . . . . . . . . . . . . . . . . . . . . . . . . . . . . . . . . . . . . . . . . . . . . . . . . . . . . . . . . . . . . . . . . . . . . . . . . . . . . . . . . 148
General Recommendations . . . . . . . . . . . . . . . . . . . . . . . . . . . . . . . . . . . . . . . . . . . . . . . . . . . . . . . . . . . . . . . . . . . . . . . . . . . . . . . . 149Clean Up OPS_REQUEST_TRANSACTION Table . . . . . . . . . . . . . . . . . . . . . . . . . . . . . . . . . . . . . . . . . . . . . . . . . . . . . . . . . . . . . . . . . . . . . . . 149Update Database Statistics . . . . . . . . . . . . . . . . . . . . . . . . . . . . . . . . . . . . . . . . . . . . . . . . . . . . . . . . . . . . . . . . . . . . . . . . . . . . . . . . . . . . . . . . . 149Set Appropriate Database Isolation Level . . . . . . . . . . . . . . . . . . . . . . . . . . . . . . . . . . . . . . . . . . . . . . . . . . . . . . . . . . . . . . . . . . . . . . . . . . . . 150Disable Allow Adding Redundant Server Setting . . . . . . . . . . . . . . . . . . . . . . . . . . . . . . . . . . . . . . . . . . . . . . . . . . . . . . . . . . . . . . . . . . . . . . 150
Part 3: Appendices . . . . . . . . . . . . . . . . . . . . . . . . . . . . . . . . . . . . . . . . . . . . . . . . . . 151
A Configuring for Integration with Electronic Software Delivery . . . . . . . . . . . . . . . . . . . . . . . . . . . . . . 153
B Configuring FlexNet Operations for Secure Socket Layer . . . . . . . . . . . . . . . . . . . . . . . . . . . . . . . . . . . 157Configuring Server-Side Secure Socket Layer . . . . . . . . . . . . . . . . . . . . . . . . . . . . . . . . . . . . . . . . . . . . . . . . . . . . . . . . . . . . . . . . . 157
Generating a Test Certificate . . . . . . . . . . . . . . . . . . . . . . . . . . . . . . . . . . . . . . . . . . . . . . . . . . . . . . . . . . . . . . . . . . . . . . . . . . . . . . . . . . . . . . . 158Configuring FlexNet Operations with the Test Certificate . . . . . . . . . . . . . . . . . . . . . . . . . . . . . . . . . . . . . . . . . . . . . . . . . . . . . . . . . . . . . . 159
6 Company Confidential FNO-2020R1.1-ING01 FlexNet Operations 2020 R1.1 On Premises Installation and Implementation Guide

Contents
Verifying the Test Certificate. . . . . . . . . . . . . . . . . . . . . . . . . . . . . . . . . . . . . . . . . . . . . . . . . . . . . . . . . . . . . . . . . . . . . . . . . . . . . . . . . . . . . . . . 160Obtaining a Trusted Certificate . . . . . . . . . . . . . . . . . . . . . . . . . . . . . . . . . . . . . . . . . . . . . . . . . . . . . . . . . . . . . . . . . . . . . . . . . . . . . . . . . . . . . 160Configuring FlexNet Operations with a Permanent Certificate. . . . . . . . . . . . . . . . . . . . . . . . . . . . . . . . . . . . . . . . . . . . . . . . . . . . . . . . . . 161Configuring Secure Socket Layer in FlexNet Operations to Disable Weak Ciphers . . . . . . . . . . . . . . . . . . . . . . . . . . . . . . . . . . . . . . . . 162
Configuring Client-Side Secure Socket Layer . . . . . . . . . . . . . . . . . . . . . . . . . . . . . . . . . . . . . . . . . . . . . . . . . . . . . . . . . . . . . . . . . 163Importing a Secure Socket Layer Server’s Certificate into the Truststore . . . . . . . . . . . . . . . . . . . . . . . . . . . . . . . . . . . . . . . . . . . . . . . . 163Configuring FlexNet Operations with a New Truststore . . . . . . . . . . . . . . . . . . . . . . . . . . . . . . . . . . . . . . . . . . . . . . . . . . . . . . . . . . . . . . . . 163Verifying the Trusted Connection . . . . . . . . . . . . . . . . . . . . . . . . . . . . . . . . . . . . . . . . . . . . . . . . . . . . . . . . . . . . . . . . . . . . . . . . . . . . . . . . . . . 164
C Securing REST Endpoints in the Cloud Licensing Service Component. . . . . . . . . . . . . . . . . . . . . . . . . 165Changing the Default Cloud Licensing Service Password . . . . . . . . . . . . . . . . . . . . . . . . . . . . . . . . . . . . . . . . . . . . . . . . . . . . . . . 166
Adding Allowed Hosts . . . . . . . . . . . . . . . . . . . . . . . . . . . . . . . . . . . . . . . . . . . . . . . . . . . . . . . . . . . . . . . . . . . . . . . . . . . . . . . . . . . . . 166
Error Handling . . . . . . . . . . . . . . . . . . . . . . . . . . . . . . . . . . . . . . . . . . . . . . . . . . . . . . . . . . . . . . . . . . . . . . . . . . . . . . . . . . . . . . . . . . . 167
D Configuring FlexNet Operations to Run Behind a Proxy . . . . . . . . . . . . . . . . . . . . . . . . . . . . . . . . . . . . 169Configuring Proxy Settings on Windows Systems. . . . . . . . . . . . . . . . . . . . . . . . . . . . . . . . . . . . . . . . . . . . . . . . . . . . . . . . . . . . . . 170
Configuring Proxy Settings on Linux Systems . . . . . . . . . . . . . . . . . . . . . . . . . . . . . . . . . . . . . . . . . . . . . . . . . . . . . . . . . . . . . . . . . 171
E Uninstalling FlexNet Operations . . . . . . . . . . . . . . . . . . . . . . . . . . . . . . . . . . . . . . . . . . . . . . . . . . . . . . . . 173
FlexNet Operations 2020 R1.1 On Premises Installation and Implementation Guide FNO-2020R1.1-ING01 Company Confidential 7

Contents
8 Company Confidential FNO-2020R1.1-ING01 FlexNet Operations 2020 R1.1 On Premises Installation and Implementation Guide

1
IntroductionThe following chapters cover the installation and implementation of FlexNet Operations On Premises.
Table 1-1 • FlexNet Operations 2020 R1.1 On Premises Installation and Implementation Guide
Part Topic Content
Installation Installation Options Presents FlexNet Operations components and recommended deployments.
Before Installing FlexNet Operations
Covers pre-install requirements for FlexNet Operations.
Installing and Configuring FlexNet Operations
Explains how to install FlexNet Operations components with the FlexNet Operations installer and configure those components with FlexNet Setup.
Upgrading FlexNet Operations
Explains how to upgrade FlexNet Operations from a previous version as well as how to apply a hotfix to an existing installation.
FlexNet Operations 2020 R1.1 On Premises Installation and Implementation Guide FNO-2020R1.1-ING01 Company Confidential 9

Chapter 1 Introduction
Implementation FlexNet Operations On Premises Implementation Overview
Lists the prerequisites for implementing FlexNet Operations, lists common implementation issues, and explains how to use FlexNet Setup, a web application designed to safely shut down and restart FlexNet Operations.
Configuring FlexNet Operations
Contains instructions and guidelines for customizing FlexNet Operations.
Configuring the End-User Portal
The FlexNet Operations End-User Portal allows publisher end users to generate and manage their own certificate licenses without direct publisher intervention. This chapter explains how producers can customize the End-User Portal for their own requirements.
Building a Vendor Certificate Generator
Explains how to build a vendor certificate generator (VCG), a FlexNet Operations component that generates FlexNet certificate-based or trusted licenses.
Recommendations for FlexNet Operations Performance Improvement
Provides recommendations for improving the performance of FlexNet Operations On Premises.
Appendices Configuring for Integration with Electronic Software Delivery
Describes how to integrate FlexNet Operations with FlexNet Electronic Software Delivery.
Configuring FlexNet Operations for Secure Socket Layer
Explains how to configure FlexNet Operations for secure socket layer communication.
Securing REST Endpoints in the Cloud Licensing Service Component
Shows how to secure REST endpoints for Cloud Licensing Service.
Configuring FlexNet Operations to Run Behind a Proxy
Explains how to configure FlexNet Operations to work with an HTTP or HTTPS proxy server.
Uninstalling FlexNet Operations
Discusses how to uninstall an existing installation of FlexNet Operations.
Table 1-1 • FlexNet Operations 2020 R1.1 On Premises Installation and Implementation Guide
Part Topic Content
10 Company Confidential FNO-2020R1.1-ING01 FlexNet Operations 2020 R1.1 On Premises Installation and Implementation Guide

Chapter 1 IntroductionProduct Support Resources
Product Support ResourcesThe following resources are available to assist you with using this product:
• Revenera Product Documentation
• Revenera Community
• Revenera Learning Center
• Revenera Support
Revenera Product Documentation
You can find documentation for all Revenera products on the Revenera Product Documentation site:
https://docs.revenera.com
Revenera Community
On the Revenera Community site, you can quickly find answers to your questions by searching content from other customers, product experts, and thought leaders. You can also post questions on discussion forums for experts to answer. For each of Revenera’s product solutions, you can access forums, blog posts, and knowledge base articles.
https://community.revenera.com
Revenera Learning Center
Revenera offers a variety of training courses—both instructor-led and online—to help you understand how to quickly get the most out of your Revenera products. The Revenera Learning Center offers free, self-guided, online training classes. You can also choose to participate in structured classroom training delivered as public classes. You can find a complete list of both online content and public instructor-led training in the Learning Center.
https://learning.revenera.com
Revenera Support
For customers who have purchased a maintenance contract for their product(s), you can submit a support case or check the status of an existing case by making selections on the Get Support menu of the Revenera Community.
https://community.revenera.com
Contact UsRevenera is headquartered in Itasca, Illinois, and has offices worldwide. To contact us or to learn more about our products, visit our website at:
http://www.revenera.com
You can also follow us on social media:
FlexNet Operations 2020 R1.1 On Premises Installation and Implementation Guide FNO-2020R1.1-ING01 Company Confidential 11

Chapter 1 IntroductionContact Us
• YouTube
12 Company Confidential FNO-2020R1.1-ING01 FlexNet Operations 2020 R1.1 On Premises Installation and Implementation Guide

Part 1Installing FlexNet Operations
This part of the FlexNet Operations 2020 R1.1 On Premises Installation and Implementation Guide includes the following chapters:
• Installation Options
• Before Installing FlexNet Operations
• Installing and Configuring FlexNet Operations
• Upgrading FlexNet Operations
FlexNet Operations 2020 R1.1 On Premises Installation and Implementation Guide FNO-2020R1.1-ING01 Company Confidential 13

14 Company Confidential FNO-2020R1.1-ING01 FlexNet Operations 2020 R1.1 On Premises Installation and Implementation Guide

2
Installation OptionsThis chapter discusses FlexNet Operations components and recommended deployment topologies.
FlexNet Operations ComponentsDecisions about FlexNet Operations components require an understanding of FlexNet Operations components and common configuration choices.
FlexNet Operations includes the following standard database and server components in the FlexNet Operations core component.
• FlexNet Operations server: The FlexNet Operations server provides access to your licensing, fulfillment, and entitlement data. It has two interfaces:
• An internal producer-facing interface, called the Producer Portal
• A customer-facing interface, called the End-User Portal.
You can access both the producer-facing and customer-facing interfaces from a single installation of the FlexNet Operations server.
• FlexNet Operations database: The FlexNet Operations database stores your licensing, fulfillment, and entitlement records.
• Reporting database: The reporting database contains the FlexNet Operations data that is used to build reports. This database is distinct from the FlexNet Operations database. Data is transmitted from the FlexNet Operations database to the reporting database in a process known as data transformation.
Topic Description
FlexNet Operations Components A high level look at the standard and optional components of FlexNet Operations.
Deployment Topologies Presents guidelines for deploying FlexNet Operations components in different topologies.
FlexNet Operations 2020 R1.1 On Premises Installation and Implementation Guide FNO-2020R1.1-ING01 Company Confidential 15

Chapter 2 Installation OptionsFlexNet Operations Components
Figure 2-1: FlexNet Operations components
Additional FlexNet Operations components available when purchased:
• FlexNet Usage Management: FlexNet Usage Management supports usage based license models and usage dashboards in FlexNet Operations. When the FlexNet Usage Management component is configured, FlexNet Operations includes a database for producers who purchase the FlexNet Usage Management module. This database contains usage records and can be deployed with FlexNet Setup after you run the installer.
For information about FlexNet Usage Management, see the FlexNet Operations User Guide, section Getting Started with Usage Management.
• Cloud Licensing Service: Cloud Licensing Service allows producers to host their end-users’ license servers. End-users can then connect with their license server running in the producer’s cloud environment. When the Cloud Licensing Service component is configured, FlexNet Operations includes a database for producers who purchase the FlexNet Cloud Licensing Service module. This database supports the operation of cloud license servers.
Cloud Licensing Service instances offer the same functionality as FlexNet Embedded local license servers for managing licenses, including support for the following:
• FlexNet Embedded feature partitioning. For more information refer to the FlexNet Embedded License Server Producer Guide, available from the Product and License Center.
• The Cloud Monetization API interface (a separately purchased module to provide access to FlexNet Embedded capabilities in use cases where an SDK is not the preferred implementation). For more information refer to the Cloud Monetization API User Guide, available from the Product and License Center.
16 Company Confidential FNO-2020R1.1-ING01 FlexNet Operations 2020 R1.1 On Premises Installation and Implementation Guide

Chapter 2 Installation OptionsDeployment Topologies
For information about the Cloud Licensing Service, see the FlexNet Operations User Guide, section Getting Started with Cloud Licensing Service.
Note • Refer to the FlexNet Operations Release Notes accompanying this release for information on whether it contains the Cloud Licensing Service component.
• FlexNet Electronic Software Delivery: A Revenera-hosted service rather than a locally installed component, FlexNet Electronic Software Delivery allows producers to define download packages associated with their products. End users can download software from links provided in the End-User Portal. For instructions on connecting FlexNet Operations with a FlexNet Electronic Software Delivery tenant, see Configuring for Integration with Electronic Software Delivery.
For information about FlexNet Electronic Software Delivery, see the FlexNet Operations User Guide, section Getting Started with Electronic Software Delivery.
The FlexNet Operations installer deploys all components (except for FlexNet Electronic Software Delivery). Producers then use FlexNet Setup to configure just those components they want to deploy.
Deployment TopologiesProducers can use the FlexNet Operations installer and FlexNet Setup to deploy FlexNet Operations in a way that scales appropriately for their needs. Generally, the best way to scale up FlexNet Operations is to run multiple instances of FlexNet Operations behind a load balancer—adding instances according the volume of connections and transactions your account is experiencing.
The following diagrams are intended to serve as guidelines that show recommended topologies for development teams evaluating FlexNet Operations, producer accounts setting up a production FlexNet Operations environment, and for producer accounts, due to their own workflow and end-user interactions, may require a more distributed deployment of FlexNet Operations components.
• Topology for Evaluating FlexNet Operations
• Topology for Production Environments
• Topology for Distributed Components
Topology for Evaluating FlexNet Operations
The diagram below illustrates a simple FlexNet Operations deployment and shows what a minimum system looks like for producers evaluating FlexNet Operations: one machine (physical or virtual) to host FlexNet Operations components, the database server, and RabbitMQ. The databases could be on a separate server (most often managed by an Information Technology group) or be on the same host as FlexNet Operations. If the databases are to reside on the same host as FlexNet Operations, ensure that the host has sufficient memory and disk space. (See the FlexNet Operations release notes for system requirements information.)
Note that the evaluation system includes all FlexNet Operations components, even though subsequent deployments of a production system likely include only those components your account requires. Although the installer installs files for all FlexNet Operations components, there is no need to configure those components your account will not use.
See FlexNet Operations Components for more information about optional FlexNet Operations components.
FlexNet Operations 2020 R1.1 On Premises Installation and Implementation Guide FNO-2020R1.1-ING01 Company Confidential 17

Chapter 2 Installation OptionsDeployment Topologies
Figure 2-2: A basic, evaluation deployment that includes all optional components on a single host (except for FlexNet Electronic Software Delivery, which is hosted by Revenera in all cases).
Topology for Production Environments
The diagram below shows multiple instances of FlexNet Operations running behind a load balancer, which is the recommended way for scaling up production deployments of FlexNet Operations.
In addition to production environments, this model also serves as a guideline for QA (Quality Assurance) or staging environments. In such cases (a QA environment, for example), some aspects of the depicted topology—such as database mirroring or RabbitMQ failover—may be unnecessary.
18 Company Confidential FNO-2020R1.1-ING01 FlexNet Operations 2020 R1.1 On Premises Installation and Implementation Guide

Chapter 2 Installation OptionsDeployment Topologies
Figure 2-3: A production environment deployment of FlexNet Operations.
Topology for Distributed Components
The diagram below shows a variation of the production environment illustrated in the previous section in which some FlexNet Operations components are placed on separate host machines to distribute the workload in response to producer-specific, high-volume demands. Distributing components in this way is possible, but not often necessary for most producers.
Note • In the diagram, below, the FlexNet Embedded component is located on the same host as the FlexNet Operations core component.
FlexNet Operations 2020 R1.1 On Premises Installation and Implementation Guide FNO-2020R1.1-ING01 Company Confidential 19

Chapter 2 Installation OptionsDeployment Topologies
Figure 2-4: A distributed deployment of FlexNet Operations in a production environment with application servers for FlexNet Embedded (LFS), FlexNet Cloud Licensing Service (CLS), and FlexNet Usage Management running on separate hosts behind the DMZ
Note • See Setting Up RabbitMQ for more information about how FlexNet Operations uses RabbitMQ to manage communication between FlexNet Operations components.
Note • See Optionally Configuring an External Wildfly Instance for more information about how FlexNet Operations works with Wildfly.
Tip • These diagrams show Secure Socket Layer terminating at the load balancer nodes. For information about configuring FlexNet Operations, itself, for Secure Socket Layer communication, see Appendix B, Configuring FlexNet Operations for Secure Socket Layer.
20 Company Confidential FNO-2020R1.1-ING01 FlexNet Operations 2020 R1.1 On Premises Installation and Implementation Guide

3
Before Installing FlexNet OperationsReview the guidance in this chapter before installing or upgrading FlexNet Operations. The sections in this chapter outline the pre-installation steps important for successful install and upgrade procedures.
See the FlexNet Operations release notes for detailed system requirements.
Table 3-1 •
Topic Description
Acquiring the FlexNet Operations Installer
Describes how to obtain an installer for FlexNet Operations.
Planning User Accounts Discusses common user accounts for FlexNet Operations users and how to plan for those accounts in your account.
Configuring Microsoft SQL Server for Use with FlexNet Operations
Covers the steps necessary to configure Microsoft SQL Server database management systems for use with FlexNet Operations.
Setting Up RabbitMQ Describes how to set up RabbitMQ to handle messaging for a distributed deployment of FlexNet Operations.
Optionally Configuring an External Wildfly Instance
Discusses the option of using an external Wildfly instance instead of the FlexNet Operations embedded Wildfly instance.
Java Development Kit (JDK) Requirement
States that a JDK is required for installation.
FlexNet Operations 2020 R1.1 On Premises Installation and Implementation Guide FNO-2020R1.1-ING01 Company Confidential 21

Chapter 3 Before Installing FlexNet OperationsAcquiring the FlexNet Operations Installer
Acquiring the FlexNet Operations InstallerWhen you purchase FlexNet Operations, Revenera sends a Welcome email with the links and credentials you need to log into the Product and Licensing Center. Following the instructions in the Welcome email, log in to the Product and Licensing Center and navigate to the FlexNet Operations download files. Click the links on the Download page to download the installer appropriate for the platform on which you plan to install FlexNet Operations.
Contact your Revenera representative or Revenera support if you have any trouble gaining access to your Revenera products on the Product and Licensing Center.
Planning User AccountsThe following guidelines apply to operating system user accounts used to run the installer, FlexNet Setup, and FlexNet Operations.
Note • For information about RabbitMQ user accounts, see Setting Up RabbitMQ.
Guidelines for User Accounts on Linux Systems
If you are installing FlexNet Operations on a Linux host, the user who runs the installer, and subsequently FlexNet Setup, must meet the following criteria:
• The user can be the root user or a non-root user.
When the installer is run without root privileges, follow the steps described in Special Instructions for Linux Installers to manually install FlexNet Setup as a service and start that service.
• The user must have write access to a home directory, to the selected installation directory, and to the /var/tmp directory.
• The user must have a valid DISPLAY environment variable set to a host machine that is running an X server. Note: If you are using an X server to display to a machine other than the one on which FlexNet Operations is to run, the display machine must have the required version of Java. (See the FlexNet Operations release notes for supported platform information.)
• The current directory (.) must be in the path of the user running the installer.
Additional Notes about Consistent Locale Settings
The users who start the database server (who may be the users that start its Windows service), create the FlexNet Operations database, and start FlexNet Operations must all have the same locale settings.
• On Linux, the tested locale setting is en_US.ISO8859-1. Check the locale setting for a user by logging in as the user and typing locale. Set this locale by typing the following at the command line:
setenv LC_ALL en_US.ISO8859-1
• On Windows, the tested code page is the United States code page (437). Check the active code page for a user by opening a command window and typing chcp. Set this code page by typing the following at the command line:
chcp 437
22 Company Confidential FNO-2020R1.1-ING01 FlexNet Operations 2020 R1.1 On Premises Installation and Implementation Guide

Chapter 3 Before Installing FlexNet OperationsConfiguring Microsoft SQL Server for Use with FlexNet Operations
Configuring Microsoft SQL Server for Use with FlexNet Operations
FlexNet Operations requires a Microsoft SQL Server database to run. Before installing FlexNet Operations, select, install, and configure the Microsoft SQL Server database server according to these guidelines.
Note • FlexNet Operations only supports Microsoft SQL Server databases. Oracle databases are no longer supported.
If you already have a DBMS installed, read this section to verify that it is installed and configured with the required settings.
Install the Microsoft SQL Server database server on a machine other than the one on which FlexNet Operations is installed. See the FlexNet Operations release notes for a list of supported versions of the Microsoft SQL database server.
Installing the SQL Server Database Server
Follow Microsoft’s instructions to install SQL Server. This guide states only the assumptions and requirements of the SQL Server database server installation that allow it to work correctly with FlexNet Operations.
In the database installer, accept the default settings, except:
• Select mixed authentication (Windows and SQL Server) instead of Windows-only authentication.
• Enable the TCP/IP network protocol, if this has not already been done by default during installation.
A Note on SQL Server Express Edition
For Microsoft SQL Server Express Edition, the installation instructions are available from Microsoft at http://msdn2.microsoft.com/en-us/library/ms143722.aspx. There are several additional steps you must take in the installation process to correctly configure your host for FlexNet Operations:
• You must install .NET Framework 2.0 on your host, and all previous versions of .NET should be uninstalled.
• When following the installation instructions:
• In Step 8, on the Instance Name page, select a Default instance.
• In Step 10, select SQL Server and Windows Authentication Mode.
• After installation, you must enable TCP/IP. Launch the SQL Server Configuration Manager. In the left pane, expand SQL Server Network Configuration and click Protocols for MSSQLServer. Then, in the right pane, right-click TCP/IP and enable it.
• If the host has a firewall, you should consult the document at http://msdn2.microsoft.com/en-us/library/ms143446.aspx for additional considerations.
Setting Up RabbitMQFlexNet Operations leverages RabbitMQ to manage messaging between FlexNet Operations components. Producers must install RabbitMQ on a machine reachable from the machines that host FlexNet Setup and FlexNet Operations components prior to installing FlexNet Operations.
FlexNet Operations 2020 R1.1 On Premises Installation and Implementation Guide FNO-2020R1.1-ING01 Company Confidential 23

Chapter 3 Before Installing FlexNet OperationsOptionally Configuring an External Wildfly Instance
Note • Refer to the FlexNet Operations Release Notes for information about the tested RabbitMQ version.
For simple FlexNet Operations deployments in which all FlexNet Operations components are installed on a single machine (for product evaluations, for example) it is sufficient to simply install RabbitMQ on the host machine and use the default RabbitMQ user and port values for FlexNet Operations messaging.
If RabbitMQ is installed on a machine other than a machine on which FlexNet Operations is installed—which is a common case for distributed installs—you must create a RabbitMQ account for FlexNet Operations to use for messaging. This account must exist before running the FlexNet Operations installer on each machine, and each installation must specify the same FlexNet Operations user for its RabbitMQ settings. The RabbitMQ account for use with FlexNet Operations must have sufficient privileges, including
• Configure permissions on all resources.
• Read permissions on all resources.
• Write permissions on all resources.
For example, use the following commands to create a RabbitMQ user for FlexNet Operations with the username, flexuser, and the default password, flexpass:
rabbitmqctl add_user flexuser flexpassrabbitmqctl set_user_tags flexuser administratorrabbitmqctl set_permissions -p / flexuser ".*" ".*" ".*"
These commands create the new user account, tag it as an administrative user, and sets its configure, read, and write privileges. (These commands run from the sbin directory in the RabbitMQ install directory.)
For more information about managing and installing RabbitMQ, as well as RabbitMQ system requirements, refer to instructions on the official RabbitMQ site:
http://www.rabbitmq.com
Tip • If you plan to run RabbitMQ on a separate machine and using a dedicated account for FlexNet Operations, consider enabling the RabbitMQ management plugin to help monitor and troubleshoot inter-component messaging.
Optionally Configuring an External Wildfly Instance
Note • See the FlexNet Operations release notes to check which version of Wildfly FlexNet Operations supports.
The FlexNet Operations installer includes an embedded Wildfly application server. For simple deployments, such as a single-server install for evaluation purposes, the embedded Wildfly server is sufficient for most users. For more robust deployments that require stronger security—especially those that are intended to host FlexNet Operations in a production environment—producers may prefer to use external Wildfly instances that can be updated and managed independent of FlexNet Operations.
24 Company Confidential FNO-2020R1.1-ING01 FlexNet Operations 2020 R1.1 On Premises Installation and Implementation Guide

Chapter 3 Before Installing FlexNet OperationsJava Development Kit (JDK) Requirement
Install and Setup with External Wildfly Instance
Producers planning to use external Wildfly instances with FlexNet Operations must have Wildfly already installed on each machine on which FlexNet Operations is being installed. Also, the Wildfly server must be stopped for the duration of the installation and configuration steps.
Important • When you use an external Wildfly instance, the FlexNet Operations installer modifies the standalone-full.xml file for that Wildfly instance.
Stopping and Starting the External Wildfly Instance
Even if FlexNet Operations is configured to use an external Wildfly instance, FlexNet Setup’s Stop Server and Start Server buttons are the preferred method of starting and stopping Wildfly. Producers who need to start or stop Wildfly manually must set the following variables in standalone.conf under JAVA_OPTS:
Djboss.home=<jboss_home_dir>Dflexnet.log.path=<log_storage_dir> Dbuildspace.home=”%BUILDSPACE_DIR%” Dinstall.home=<fno_install_dir>Dsite.home=”%SITE_DIR%”Djava.net.preferIPv4Stack=true
Tip • For optimal performance and reliability, limit the use of this Wildfly server to running FlexNet Operations and its components. Avoid sharing the FlexNet Operations Wildfly server with other application deployments.
Java Development Kit (JDK) RequirementFlexNet Operations requires that Oracle JDK or OpenJDK, version 8, be present. (Version 9 or later versions are not supported.) Your Java installation should conform to the setup required according to the Java documentation.
FlexNet Operations 2020 R1.1 On Premises Installation and Implementation Guide FNO-2020R1.1-ING01 Company Confidential 25

Chapter 3 Before Installing FlexNet OperationsJava Development Kit (JDK) Requirement
26 Company Confidential FNO-2020R1.1-ING01 FlexNet Operations 2020 R1.1 On Premises Installation and Implementation Guide

4
Installing and ConfiguringFlexNet Operations
This chapter walks users through installing FlexNet Operations server components and setting up those components—resulting in a running FlexNet Operations instance that is ready to be configured for your account. However, certain installation options and configuration settings, such as configuring FlexNet Operations for secure socket layer or connecting the installed instance to Revenera servers for electronic software delivery, are covered in other chapters or appendices.
Be sure to procure machines that comply with FlexNet Operations system requirements and complete any tasks indicated in Before Installing FlexNet Operations prior to running the FlexNet Operations installer.
Table 4-1 •
Topic Description
Installing FlexNet Operations Provides instructions for running the FlexNet Operations installer.
FlexNet Operations 2020 R1.1 On Premises Installation and Implementation Guide FNO-2020R1.1-ING01 Company Confidential 27

Chapter 4 Installing and Configuring FlexNet Operations
Note • The instructions in this chapter are for new FlexNet Operations installations. If you are upgrading an existing FlexNet Operations installation, see the instructions in Upgrading FlexNet Operations.
Tip • Remember to configure FlexNet Operations with your account’s license by clicking System > Configure > Licensing in the Producer Portal and then saving the FlexNet Embedded URL. The URL can be found in the acknowledgment email sent to the person on record with the subject line “FlexNet Operations License Activation”; otherwise contact technical support. Until you apply your purchased FlexNet Operations license in the Producer Portal, FlexNet Operations runs on the built-in, 60-day evaluators license.
Setting Up the Installation with FlexNet Setup
Explains how to use FlexNet Setup to set up a new installation of FlexNet Operations. FlexNet Setup is a web application where you specify configuration settings, database connection settings, and other options before you start FlexNet Operations for the first time. The following tasks are covered:
• About FlexNet Setup
• Starting FlexNet Setup
• Configuring General Settings
• Configuring Database Settings
• Configuring Advanced Settings
• Additional Steps for Cloud Licensing Service Users
• Viewing System Status
• Deploying FlexNet Operations Modules
• Starting FlexNet Operations
• Connecting Distributed Deployments
• Setting FlexNet Embedded and FlexNet Usage Management Port Numbers
Verifying Basic Functionality Describes how to confirm that the installation is working and that your configuration settings have been correctly applied.
Licensing FlexNet Operations Describes the two options for license servers, how to configure FlexNet Operations to use a license server and how to verify the configuration is correct.
Next Steps Discusses where to find information on supported installation and setup options as well as configuration settings to make your FlexNet Operations instance ready for regular use.
Table 4-1 •
Topic Description
28 Company Confidential FNO-2020R1.1-ING01 FlexNet Operations 2020 R1.1 On Premises Installation and Implementation Guide

Chapter 4 Installing and Configuring FlexNet OperationsInstalling FlexNet Operations
Installing FlexNet OperationsThe following instruction sets explain how to run the FlexNet Operations installer. In a distributed deployment, run the installer on each machine.
Follow the steps, below, to install FlexNet Operations components. Once the install process is complete, continue with the instructions in Setting Up the Installation with FlexNet Setup to perform the initial configuration steps and Verifying Basic Functionality to verify the installation.
FlexNet Operations components are installed using an InstallAnywhere installer. The installer can be run only in GUI mode; console mode is not supported.
Review the FlexNet Operations system requirements in the FlexNet Operations release notes and the prerequisites in Before Installing FlexNet Operations before you install FlexNet Operations components.
Tip • Never reinstall FlexNet Operations in the same location as a previous installation of FlexNet Operations without completely cleaning up existing files from a prior installation. Instead, either completely uninstall FlexNet Operations before reinstalling it or install the new instance in a separate directory. (For uninstall instructions see, Uninstalling FlexNet Operations.)
Task To install FlexNet Operations components
1. On the machine you want to install FlexNet Operations components, start the FlexNet Operations installer. A progress window indicates that InstallAnywhere is preparing the FlexNet Operations installer.
2. On the Welcome panel, click Next.
3. On the Choose Install Folder panel, specify the install directory for FlexNet Operations and click Next. The default install directory depends on the host operating system.
• For Windows-based systems, it is C:\Program Files\FlexNet Operations\
• For Unix-based systems, it is /home/<user>/FlexNet-Operations/
Important • Using spaces in the install directory can cause problems on Unix-based systems. If you specify an install directory other than the default value, avoid using spaces.
FlexNet Operations 2020 R1.1 On Premises Installation and Implementation Guide FNO-2020R1.1-ING01 Company Confidential 29

Chapter 4 Installing and Configuring FlexNet OperationsInstalling FlexNet Operations
4. On the Customization Options panel, choose whether to use the bundled Wildfly server or your own Wildfly server and specify a RabbitMQ URL (if different from the default). Then click Next.
5. On the Pre-installation Summary panel, review the installer settings and click Install. The installer begins installing and configuring files and shows its progress.
6. On the Install Complete panel, the installer reports the result of the install process and shows the URL to use to launch the FlexNet Operations configuration tool, FlexNet Setup (typically, http://localhost:4321/flexnetsetup).
Note • By default, the installer attempts to start FlexNet Setup on port 4321; however, if the installer detects that port 4321 is busy, it will attempt to use a different port.
7. Click Done, The installer attempts to launch FlexNet Setup in your system’s default browser.
On Windows systems, continue by configuring installed FlexNet Operations components as shown in Setting Up the Installation with FlexNet Setup.
On Linux systems, review the special instructions, below, and take any additional steps required before you configure installed components with FlexNet Setup.
Setting Description
Application Server Settings
Choose whether to use the bundled version of Wildfly or an external version of Wildfly.
• To use the bundled version of Wildfly, leave the Use Your Own Wildfly Server checkbox unchecked.
• To use your own version of Wildfly, check the Use Your Own Wildfly Server checkbox and then specify the location of your Wildfly installation.
Important • To use an external Wildfly version, you must have Wildfly already installed on the machine on which FlexNet Operations is being installed. Also, your Wildfly server must be stopped for the duration of the installation and configuration steps.
RabbitMQ URL Specify the RabbitMQ AMQP URL or retain the default. For distributed deployments of FlexNet Operations, be sure to create a RabbitMQ account for FlexNet Operations to use.
• If you set up a specific account in RabbitMQ to use for FlexNet Operations messaging, specify the username, password, hostname, port, and (optionally) virtual host using the syntax shown in the installer panel. AMQP:\\username:password@hostname:port[/vhost]
• If you install FlexNet Operations components all on a single machine, the default URL value is all that is needed for FlexNet Operations to connect with RabbitMQ. AMQP:\\guest:guest@localhost:5672
30 Company Confidential FNO-2020R1.1-ING01 FlexNet Operations 2020 R1.1 On Premises Installation and Implementation Guide

Chapter 4 Installing and Configuring FlexNet OperationsInstalling FlexNet Operations
Special Instructions for Linux Installers
Linux systems require a few extra steps after running the installer.
• Finalizing Environment Variable Settings
• Considerations for Running FlexNet Operations as a Service
• Opening Ports for FlexNet Operations, FlexNet Setup, and RabbitMQ
• Steps for Running FlexNet Setup as a Service
Finalizing Environment Variable Settings
After installing FlexNet Operations components on a Linux system, you must log out and then log in again. This allows the installer’s environment variable changes to take effect.
Considerations for Running FlexNet Operations as a Service
If you are setting up FlexNet Operations to run as a service with an Administrator user (but not root), then this user needs write permissions to the following directories:
• /etc/init.d
• /etc/rc*.d (multiple directories may match this pattern)
Opening Ports for FlexNet Operations, FlexNet Setup, and RabbitMQ
Finally, when installing on a Linux system protected by a firewall, ensure the right ports and services are available before starting FlexNet Setup or FlexNet Operations. The command line statements in this section show how to open the necessary ports and services for a default installation. Modify as necessary for your installation.
The following line shows the basic syntax to open a Linux port, where <port_number> is the number of the port you want to open:
/bin/firewall-cmd --zone=public --add-port=<port_number>/tcp --permanent
For example, to open port 80, the command line statement is
/bin/firewall-cmd --zone=public --add-port=80/tcp --permanent
Assuming that FlexNet Operations is running on port 8888 (http) or 8443 (https), the following commands open the required ports:
/bin/firewall-cmd --zone=public --add-port=8888/tcp --permanent/bin/firewall-cmd --zone=public --add-port=8443/tcp --permanent/bin/firewall-cmd --add-forward-port=port=80:proto=tcp:toport=8888/bin/firewall-cmd --add-forward-port=port=443:proto=tcp:toport=8443
The first two statements open ports 8888 and 8443. The last two statements forward the default HTTP port 80 to 8888 and default HTTPS port 443 to 8443.
If, instead of specifying port numbers for HTTP or HTTPS, you want to unblock the services in general, you can add the services with the following commands:
/bin/firewall-cmd --zone=public --add-service=http/bin/firewall-cmd --zone=public --add-service=https
If you want to be able to access FlexNet Setup from outside the host machine, you may want to unblock its port as well. The default port for FlexNet Setup is 4321.
FlexNet Operations 2020 R1.1 On Premises Installation and Implementation Guide FNO-2020R1.1-ING01 Company Confidential 31

Chapter 4 Installing and Configuring FlexNet OperationsInstalling FlexNet Operations
/bin/firewall-cmd --zone=public --add-port=4321/tcp --permanent
If RabbitMQ is installed (which is the typical case for FlexNet Operations installs), you must also unblock its port. If you have also enabled the RabbitMQ management plugin, you can unblock its port as well. The default port for RabbitMQ is 5672. The default port for the management plugin is 15672.
/bin/firewall-cmd --zone=public --add-port=5672/tcp --permanent/bin/firewall-cmd --zone=public --add-port=15672/tcp --permanent
Note • Be mindful of any installer changes to the default ports for FlexNet Setup, RabbitMQ, and so on. For example, if RabbitMQ is set to use a different port than the default, 5672, be sure to open that port.
When all the firewall settings are complete, use the following command to finalize the changes.
/bin/firewall-cmd --reload
Steps for Running FlexNet Setup as a Service
If you ran the installer as a non-root user, you must run a script (with sudo access) to install FlexNet Setup as a service and then start the service.
Task To run FlexNet Setup as a service on Linux systems
1. At the command line, type
sudo sh ops_install_dir/components/tomcat/bin/configure-flexnet-setup-as-service.sh
where ops_install_dir is the FlexNet Operations installation directory. For example, if you installed FlexNet Operations components to /usr/home/FNOuser, you would type
sudo sh /usr/home/FNOuser/components/tomcat/bin/configure-flexnet-setup-as-service.sh
This script installs FlexNet Setup as a service, but does not start it.
2. To start the service, the user needs to execute the following command.
service FlexNetSetup start
This command does not require sudo access.
The instructions, above, install the FlexNet Setup service under root context but allow FlexNet Setup and FlexNet Operations, itself, to run as a normal user (not a root user).
Continue with the instructions in Setting Up the Installation with FlexNet Setup to perform the initial configuration tasks.
32 Company Confidential FNO-2020R1.1-ING01 FlexNet Operations 2020 R1.1 On Premises Installation and Implementation Guide

Chapter 4 Installing and Configuring FlexNet OperationsSetting Up the Installation with FlexNet Setup
Setting Up the Installation with FlexNet SetupAfter the installer completes, run FlexNet Setup to configure each FlexNet Operations component you want to deploy on the current machine. It is recommended that you secure access to FlexNet Setup, to ensure that it is not exposed outside of your organization’s network.
Table 4-2 •
Topic Description
About FlexNet Setup Describes the purpose of FlexNet Setup for deploying and managing FlexNet Operations components.
Starting FlexNet Setup Explains how to start FlexNet Setup. FlexNet Setup is where you configure FlexNet Operations, deploy configured modules, and start the FlexNet Operations server.
Configuring General Settings Describes how identify the FlexNet Operations modules to deploy and specify general settings.
Configuring Database Settings Describes how to configure databases for each FlexNet Operations module to be deployed.
Configuring Advanced Settings Discusses the settings available on the Advanced configuration page.
Setting FlexNet Embedded and FlexNet Usage Management Port Numbers
Describes how to set the port number for the License Fulfillment Service and the Usage Analytics Service so they can communicate with FlexNet Operations.
Viewing System Status Describes how to view system status, FlexNet Setup logs, and so forth.
Deploying FlexNet Operations Modules
Shows how to deploy configured FlexNet Operations modules on the System Status page.
Starting FlexNet Operations Explains how to deploy and undeploy FlexNet Operations modules and how to start FlexNet Operations.
Connecting Distributed Deployments
Provides steps necessary to connect FlexNet Operations components installed on different host machines. (This section is only for producers who are installing FlexNet Operations components separate machines.)
Setting FlexNet Embedded and FlexNet Usage Management Port Numbers
Explains how to specify the URL values for the License Fulfillment Service and the Usage Analytics Service in the FlexNet Operations Producer Portal’s system configuration settings. After starting FlexNet Operations, producers who have purchased and installed the FlexNet Embedded or FlexNet Usage Management modules may need to specify the URL and port number for those services.
FlexNet Operations 2020 R1.1 On Premises Installation and Implementation Guide FNO-2020R1.1-ING01 Company Confidential 33

Chapter 4 Installing and Configuring FlexNet OperationsSetting Up the Installation with FlexNet Setup
About FlexNet SetupFlexNet Setup is a web application for post-installation setup of FlexNet Operations. The FlexNet Operations installation process installs FlexNet Setup as a service. After you install FlexNet Operations, you use FlexNet Setup to complete the initial setup tasks. Later, you can return to FlexNet Setup to check the status of FlexNet Operations server components, alter setup choices, or stop the FlexNet Operations server.
Tip • Whenever you use FlexNet Setup to alter configuration settings for FlexNet Operations components, remember to first stop the FlexNet Operations server and undeploy all FlexNet Operations components. Then, when your configuration changes are complete, redeploy all components and restart the server. Changes made to deployed components will not be applied in FlexNet Operations until the components are undeployed and redeployed.
Starting FlexNet SetupAt the completion of a successful installation, the FlexNet Operations installer attempts to launch FlexNet Setup automatically. (FlexNet Setup is started as a service on both Windows and Linux systems.) If FlexNet Setup is not already running in your web browser, you can open it manually.
Note • If you are signing in to FlexNet Setup for the first time, you must change the password for the default administrator user before you can continue to specify configuration settings.
Task To open FlexNet Setup manually
• Open the following URL in a web browser:
http://localhost:4321/flexnetsetup
The default port for FlexNet Setup is 4321. However, if port 4321 is in use when the installer runs, the FlexNet Setup port may change. On the Install Complete panel, the FlexNet Operations installer shows the FlexNet Setup port that was assigned.
Note • If Tomcat is not running, FlexNet Setup will not open.
• To start FlexNet Setup on Windows, go to the Windows Services Console, locate the FlexNet Setup service, and start that service or, at a command prompt, type net start FlexNetSetup.
• To start FlexNet Setup on Linux, type service FlexNetSetup start at a command prompt.
• If you prefer not to run FlexNet Setup as a service, navigate to ops_install_dir\components\tomcat\bin and run start-flexnet-setup.
Task To sign in to FlexNet Setup
1. On the Sign In page, provide the default administrator user credentials.
• Username: admin
34 Company Confidential FNO-2020R1.1-ING01 FlexNet Operations 2020 R1.1 On Premises Installation and Implementation Guide

Chapter 4 Installing and Configuring FlexNet OperationsSetting Up the Installation with FlexNet Setup
• Password: admin
2. Click Log In.
3. If you are logging in to FlexNet Setup for the first time, follow the instructions, below, to change the administrator password.
a. Enter the current password: admin.
b. Enter a new password.
c. Enter the same new password a second time.
d. Choose a security question from the list provided.
e. Specify an answer to the security question you chose.
f. Click Save.
After you have successfully signed in, FlexNet Setup shows the General Settings configuration page. Continue with the setup process in Configuring General Settings.
Configuring General SettingsThe General Settings configuration page is where you identify FlexNet Operations modules to deploy and optionally specify other general settings.
Important • FlexNet Operations modules must be undeployed and the FlexNet Operations server must be stopped when you change configuration settings.
Tip • Your FlexNet Operations license governs the FlexNet Operations modules that operate for your account. There is no need to configure settings for FlexNet Operations modules that are not authorized in your account’s license. For information about the FlexNet Operations core component as well as optional, purchased, components, see FlexNet Operations Components.
Task To configure general settings
1. On the General Settings configuration page, use the Select Modules to Be Configured checkboxes to select FlexNet Operations modules you want to deploy:
• FlexNet Operations includes the core FlexNet Operations component as well as the FlexNet Embedded component (to support FlexNet Embedded devices and servers for producers who purchase the Advanced Lifecycle Management module).
• FlexNet Usage Management provides support for FlexNet Usage Management features (for producers who purchase the FlexNet Usage Management module).
• Cloud Licensing Service supports cloud-hosted FlexNet Embedded license servers (for producers who purchase the FlexNet Cloud Licensing Service module).
FlexNet Operations 2020 R1.1 On Premises Installation and Implementation Guide FNO-2020R1.1-ING01 Company Confidential 35

Chapter 4 Installing and Configuring FlexNet OperationsSetting Up the Installation with FlexNet Setup
Note • Refer to the FlexNet Operations Release Notes accompanying this release for information on whether it contains the Cloud Licensing Service component.
• FlexNet Reporting deploys the reporting database for producers who want to create reports from FlexNet Operations data (separate from the other FlexNet Operations databases).
2. Optionally specify Other Configurations settings.
Settings Instructions
HTTP Port Identify the port on which FlexNet Operations listens for HTTP communication. If you require a particular port, specify the port number; otherwise, keep the default setting for the embedded Web container: 8888.
Ensure this port is open through the firewall on the machine where FlexNet Operations is installed, if the machine hosts a firewall.
Stop Port Identify the port on which FlexNet Operations listens for a stop message. This is the port on which FlexNet Operations listens for JNDI clients.
If you require a particular port, specify the port number; otherwise, keep the default setting: 1199.
Logging Threshold Set the logging threshold for FlexNet Operations. Choose from
• Errors
• Warnings
• Information Messages (Default)
• Debug Messages
The logging threshold expresses the maximum level of detail for the messages written to the FlexNet application log file before FlexNet Operations starts. Only messages at or below the selected level of detail appear in the log.
VM Heap Size Set the initial and maximum Java Virtual Machine heap size in megabytes. The default settings are
• Initial Size: 1024
• Maximum Size: 2048
The maximum application memory limit is set by adjusting the heap size. The limit should be less than 80 percent of the machine’s total RAM. If you have performance problems, you may want to increase these settings.
User Data Directory Only used for distributed deployments, set the location of the User Data Directory. The default directory is
ops_install_dir\release\flexnet-data\data.
FlexNet Operations uses this directory for any files necessary for import/export operations and other temporary files.
36 Company Confidential FNO-2020R1.1-ING01 FlexNet Operations 2020 R1.1 On Premises Installation and Implementation Guide

Chapter 4 Installing and Configuring FlexNet OperationsSetting Up the Installation with FlexNet Setup
3. Optionally specify Services Configuration settings.
4. Click Save.
FlexNet Setup saves the configuration changes to FlexNet Operations. Changes are applied when FlexNet Operations modules are deployed and the FlexNet Operations server is restarted.
Continue to Configuring Database Settings to specify database settings for the FlexNet Operations modules you are deploying.
Configuring Database SettingsThe Database configuration page is where you specify database settings for the FlexNet Operations modules you are deploying: FlexNet Operations, FlexNet Usage Management, Cloud Licensing Service, FlexNet Reporting. Here, you first configure and save the Database configuration settings and then initialize or upgrade the database schemas as necessary.
Important • Oracle databases are no longer supported for FlexNet Operations.
Note • Refer to the FlexNet Operations Release Notes accompanying this release for information on whether it contains the Cloud Licensing Service component.
Tip • Your FlexNet Operations license governs the FlexNet Operations modules that operate for your account. There is no need to configure settings for FlexNet Operations modules that are not authorized in your account’s license.
Settings Instructions
Install as a Service Sets up FlexNet Operations to run as a service.
On Windows systems, the following additional options are available:
• Run Service Using Local System
• Run Using Specified Service Username/Password/Domain
Note • Only the Install as a Service option is available for Linux systems. The ability to run the service using the local system or to run using a specified username/password/domain are not supported for Linux.
FlexNet Operations 2020 R1.1 On Premises Installation and Implementation Guide FNO-2020R1.1-ING01 Company Confidential 37

Chapter 4 Installing and Configuring FlexNet OperationsSetting Up the Installation with FlexNet Setup
Task To configure databases
1. In FlexNet Setup, click Configuration > Database to open the Database configuration page.
2. On the Database configuration page, provide settings for each FlexNet Operations module you are deploying on the current machine.
3. In the FlexNet Operations Read-Only User section, provide settings for a read-only user for use in the FlexNet Operations database.
4. Click Save.
FlexNet Setup stores the database configuration settings for each module you are deploying.
Settings Instructions
Database Type Identify the database type to be used for the current module. FlexNet Operations supports only Microsoft SQL Server.
Schema Name Specify the name of the database schema for the current module.
• New databases: For new databases, the name you provide becomes the name of the database schema FlexNet Setup creates for this module.
• Existing databases: When upgrading from a prior version of FlexNet Operations, specify the schema name of the existing database.
Tip • When configuring database settings for multiple modules, consider using the Use Database Server Host of FlexNet Operations for this Schema checkbox. If the database server host for one or more modules is the same as the FlexNet Operations module, you can use this checkbox to automatically populate the database configuration settings for these modules. However, each module still requires its own Schema Name.
Hostname Specify a hostname or IP address for the database server.
Port Specify the port on which the database server is listening. The default port value for Microsoft SQL Server is 1433.
Database Username Specify a username for FlexNet Setup to use when making changes to the database.
Database Password Type the password for the database user.
Confirm Password Re-type the password for the database user.
Settings Instructions
Database Username Specify a username for the read-only user that is used by various processes to read data from the FlexNet Operations database.
Database Password Type the password for the read-only user.
Confirm Password Re-type the password for the read-only user.
38 Company Confidential FNO-2020R1.1-ING01 FlexNet Operations 2020 R1.1 On Premises Installation and Implementation Guide

Chapter 4 Installing and Configuring FlexNet OperationsSetting Up the Installation with FlexNet Setup
Continue the deployment by managing the database schemas. Initialize the schema for each module you are deploying. Follow the instructions below to initialize the database schema for each FlexNet Operations module you are deploying on the current machine.
Task To initialize a schema
1. On the Database configuration page, click Manage Schema. This button opens the Manage Schema page in a popup window.
2. On the Manage Schema page, choose the module initialize and specify the database account credentials to use for that process.
3. Click Initialize. FlexNet Setup opens a popup window that asks you to confirm your choice.
4. In the popup window, click Initialize to confirm and start the process. FlexNet Setup shows the initialization process.
5. When the initialization process is complete, choose whether to finish schema management activities or to manage another schema.
• To finish schema management activities, click Close.
• To manage the schema of another module, click Manage Another Database.
When database configuration settings are complete and database schemas for all the modules you are deploying have been initialized, you can move to the System Status page, deploy modules, and start FlexNet Operations.
Continue with Viewing System Status.
Note • Advanced configuration settings are discussed in the next section, but uses of these settings are covered in instruction sets dedicated to advanced tasks, such as Configuring FlexNet Operations for Secure Socket Layer.
Configuring Advanced SettingsThe configuration settings on the Advanced configuration page support configuring FlexNet Operations for secure socket layer communication, server performance, and for the AJP (Apache JServ Protocol) port.
Settings Instructions
Which database do you want to initialize/upgrade?
Choose the module for which you want to initialize a schema:
• FlexNet Operations
• FlexNet Usage Management
• Cloud Licensing Service
• FlexNet Reporting
Database Username Specify the username of an account with ownership privileges on the database server for the current module.
Database Password Specify the password for the database username.
FlexNet Operations 2020 R1.1 On Premises Installation and Implementation Guide FNO-2020R1.1-ING01 Company Confidential 39

Chapter 4 Installing and Configuring FlexNet OperationsSetting Up the Installation with FlexNet Setup
This section describes the settings on the Advanced configuration page, but some of the instructions for using the Advanced configuration page are covered in dedicated sections, such as Configuring FlexNet Operations for Secure Socket Layer.
• Secure Server Settings
• Secure Client Settings
• Other Ports Settings
• Performance Settings
Secure Server Settings
The following secure server settings support configuring the FlexNet Operations server for secure socket layer communication.
Table 4-3 •
Setting Description
HTTPS Port The port on which FlexNet Operations listens for HTTPS requests. Default: 8443.
FlexNet Operations is always enabled to accept HTTPS requests, but some additional settings must be configured before using SSL. The URL to connect to FlexNet Operations with HTTPS is https://host:port/flexnet, where port is the HTTPS port number.
For information about configuring SSL for Wildfly Web container, see Configuring FlexNet Operations for Secure Socket Layer.
Note that HTTPS requests can be handled by a full-feature Web server instead of by FlexNet Operations itself.
Keystore Location The name and location of the keystore on the current machine. Default: ops_install_dir/release/flexnet-data/site/bin/keystore.
This keystore file contains the key entry for the certificate that FlexNet Operations uses to provide SSL connections to its clients (for example, browsers or activation utilities). Use the default location only if you are using the bundled keystore or another keystore for testing purposes. Otherwise, point to a keystore outside the FlexNet Operations installation.
Password The password used to secure the keystore. The same password is used to secure the certificate key.
Confirm Password The password for the keystore, for confirmation.
40 Company Confidential FNO-2020R1.1-ING01 FlexNet Operations 2020 R1.1 On Premises Installation and Implementation Guide

Chapter 4 Installing and Configuring FlexNet OperationsSetting Up the Installation with FlexNet Setup
Secure Client Settings
The following secure client settings support configuring FlexNet Operations to connect as a client to an SSL server.
Other Ports Settings
Other Port Settings includes only one setting: AJP Port.
Performance Settings
The following server performance settings are available on the FlexNet Setup’s Advanced configuration page.
Table 4-4 •
Setting Description
Truststore Location The name and location of the client-side truststore that contains the trusted certificate entry for a remote SSL server (for example, an LDAP server). Default: ops_install_dir/components/jvm/jre/lib/security/cacerts.
Use the default truststore only if you are using the bundled truststore. Otherwise, point to a truststore outside the FlexNet Operations installation.
Password The password used to secure the truststore. The same password is used to secure the certificate key.
Confirm Password The password for the truststore, for confirmation.
Table 4-5 •
Setting Description
AJP Port FlexNet Operations port for Apache JServ Protocol (AJP) connections. Default: 8009.
This is the port on which the AJP connector listens. The AJP connector integrates FlexNet Operations with a full-function proxy (such as Apache or IIS) server for security or load balancing.
Table 4-6 •
Setting Description
Connection Pool Size The number of connections permitted to the FlexNet Operations server. Default: 100.
Ensure that your database is capable of creating the designated number of connections.
Max Thread Count The number of threads allocated for the scheduler. Default: 30.
Transaction Timeout The transaction timeout time in seconds. Default: 3600.
FlexNet Operations 2020 R1.1 On Premises Installation and Implementation Guide FNO-2020R1.1-ING01 Company Confidential 41

Chapter 4 Installing and Configuring FlexNet OperationsSetting Up the Installation with FlexNet Setup
Additional Steps for Cloud Licensing Service UsersFrom release 2020 R1.1 onwards, the FlexNet Operations installer deploys the Cloud Licensing Service component by default with REST endpoint security enabled. As a consequence, if you have purchased the FlexNet Cloud Licensing Service module, you must perform the following additional steps:
• Add the License Fulfillment Service as allowed host in FlexNet Setup on the System Status page. For procedural information, see Adding Allowed Hosts.
• Connect the Cloud Licensing Service by updating the gls_endpoint_url value from localhost to its IP or DNS value. This enables the License Fulfillment Service to communicate with the Cloud Licensing Service. The following task explains how to do this.
Task To connect the Cloud Licensing Service host
1. On the machine that hosts the Cloud Licensing Service module, start FlexNet Setup.
a. On the System Status page in FlexNet Setup, stop the server and undeploy the Cloud Licensing Service module.
1. Click the Undeploy button for Cloud Licensing Service.
2. When FlexNet Setup completes the undeployment, click Stop Server.
b. In the file system of the Cloud Licensing Service host, open the following file in a text editor:
ops_install_dir\services\cls\cls.properties
c. In cls.properties, edit the value for lfs.url to http://fno_host:port/lfs/binary/request, where fno_host is the hostname for the machine that hosts the FlexNet Operations core module and port is the HTTP port for that machine.
d. Save cls.properties.
e. In FlexNet Setup, deploy the Cloud Licensing Service and start the server.
1. Click the Deploy button for Cloud Licensing Service.
2. When FlexNet Setup completes the deployment, click Start Server.
2. On the machine that hosts the FlexNet Operations core module, open the LFS Configuration Console, edit gls_endpoint_url, and save the change.
a. Open the following URL in a Web browser: http://fno_host:port/lfs/jsp/config.jsp. This URL opens the LFS Configuration Console.
b. In the LFS Configuration Console, edit the value for gls_endpoint_url.
c. Click Save.
Setting Value
gls_endpoint_url http://cls_host:port/gls/api/1.0
where cls_host is the hostname for the machine that hosts the Cloud Licensing Service module and port is the HTTP port on the same machine.
42 Company Confidential FNO-2020R1.1-ING01 FlexNet Operations 2020 R1.1 On Premises Installation and Implementation Guide

Chapter 4 Installing and Configuring FlexNet OperationsSetting Up the Installation with FlexNet Setup
Important • The configuration settings in the LFS Configuration Console are not preserved if the FlexNet Operations core module is undeployed. Each time this module is re-deployed, you must repeat the steps to set the gls_endpoint_url value.
These steps enable the License Fulfillment Service to communicate with the Cloud Licensing Service.
Viewing System StatusThe System Status page shows the status of the FlexNet Operations modules you have configured, deploys and undeploys those modules, and starts and stops the FlexNet Operations server. From this page, you can also download a log of FlexNet Setup activity.
Task To view system status
• In FlexNet Setup, click System Status.
Initially, for new installations, the status of FlexNet Operations modules indicates that the server is not running and that the modules themselves are not yet deployed. Continue with Deploying FlexNet Operations Modules.
Tip • To download a log of FlexNet Setup activity, click Download FlexNet Setup Log.
Deploying FlexNet Operations Modules
Important • For producers who run FlexNet Operations behind a proxy server, the additional configuration steps described in Configuring FlexNet Operations to Run Behind a Proxy must be performed prior to deployment.
FlexNet Operations modules, such as the core FlexNet Operations module, the FlexNet Embedded, and FlexNet Usage Management, are initially undeployed. To be available in FlexNet Operations, a module must first be deployed.
Important • When the core FlexNet Operations module is being deployed on the current machine, it must be the first module deployed.
Task To deploy a module
1. In FlexNet Setup, click System Status.
2. On the System Status page, click Deploy All. FlexNet Setup opens a popup window to show deployment progress.
3. When all modules are deployed, click Close in the popup window.
When all the modules are deployed, you can start the server. Continue with Starting FlexNet Operations.
FlexNet Operations 2020 R1.1 On Premises Installation and Implementation Guide FNO-2020R1.1-ING01 Company Confidential 43

Chapter 4 Installing and Configuring FlexNet OperationsSetting Up the Installation with FlexNet Setup
Tip • Deployed modules can be undeployed by clicking their Undeploy button or clicking Undeploy All. It is important to stop the FlexNet Operations server and undeploy all modules when making database changes in FlexNet Setup.
Starting FlexNet OperationsUse the Start Server and Stop Server buttons to start, stop, and restart the FlexNet Operations server.
The FlexNet Operations server must be stopped during configuration changes, and all modules undeployed. Then, before any configuration changes will appear in FlexNet Operations, modules must be re-deployed and the server restarted.
Task To start the server
• On the System Status page, click Start Server.
FlexNet Setup updates the status messages for each module. When all modules are deployed, the System Status page shows the build number for each module and all module status messages read, Deployed and Started, you can sign in to FlexNet Operations using the default administrator account.
Tip • Click Refresh to update the System Status information.
Tip • When the FlexNet Operations server is running, you can stop it by clicking Stop Server.
Producers who have FlexNet Operations modules installed on two or more separate hosts, continue with Connecting Distributed Deployments.
Producers who have all FlexNet Operations modules installed on a single host, continue with Verifying Basic Functionality.
Connecting Distributed Deployments
Tip • These instructions cover connecting FlexNet Operations hosts via HTTP. To use secure socket layer communication between hosts, use HTTPS ports and configure each host for secure socket layer communication. See Configuring FlexNet Operations for Secure Socket Layer.
Additional configuration steps are required when the FlexNet Usage Management module is running on a different host from the machine that hosts the core FlexNet Operations module. The following steps connect these host machines.
Task To connect the FlexNet Usage Management host
1. On the FlexNet Operations host, open the Producer Portal and change the system configuration setting: Usage Analytics Service URL:
a. Sign in to the Producer portal.
44 Company Confidential FNO-2020R1.1-ING01 FlexNet Operations 2020 R1.1 On Premises Installation and Implementation Guide

Chapter 4 Installing and Configuring FlexNet OperationsSetting Up the Installation with FlexNet Setup
b. In the Producer Portal, click System > Configure > FlexNet Operations. This opens the FlexNet Operations system configuration page.
c. On the FlexNet Operations system configuration page, click External Services Configuration to expand that group.
d. For Usage Analytics Service URL, type http://uas_host:port/uas, where uas_host is the hostname of the machine that hosts the FlexNet Usage Management module and port is the HTTP port for that host.
e. Click Save Configs.
2. On the FlexNet Operations host, open the LFS Configuration Console, edit uas_endpoint_url, and save the change.
a. Open the following URL in a Web browser: http://fno_host:port/lfs/jsp/config.jsp. This URL opens the LFS Configuration Console.
b. In the LFS Configuration Console, edit the value for uas_endpoint_url.
c. Click Save.
Important • The configuration settings in the LFS Configuration Console are not preserved if the FlexNet Operations core module is undeployed. Each time this module is re-deployed, you must repeat the steps to set the uas_endpoint_url value.
These steps connect the FlexNet Usage Management host to the machine that hosts the core FlexNet Operations module.
Setting FlexNet Embedded and FlexNet Usage Management Port Numbers
If the port number of the application server is changed, you must change the URLs for the License Fulfillment Service and the Usage Analytics Service in your FlexNet Operations system configuration settings to enable FlexNet Operations to communicate with these components. After you complete the rest of the settings with FlexNet Setup to deploy and start FlexNet Operations, use the following steps to correct the URLs.
Task To set port numbers for FlexNet Embedded or FlexNet Usage Management
1. Log into FlexNet Operations.
2. Go to System > Configure.
3. Click on the FlexNet Operations tab.
4. Expand the External Services Configuration.
5. For FlexNet Embedded, modify the License Fulfillment Service URL with the correct port number.
Setting Value
uas_endpoint_url http://uas_host:port/uas/servlet/UasServlet/api/vi/usage
where uas_host is the hostname for the machine that hosts the FlexNet Usage Management module and port is the HTTP port on the same machine.
FlexNet Operations 2020 R1.1 On Premises Installation and Implementation Guide FNO-2020R1.1-ING01 Company Confidential 45

Chapter 4 Installing and Configuring FlexNet OperationsVerifying Basic Functionality
6. For FlexNet Usage Management, modify the Usage Analytics Service URL with the correct port number.
7. Click Save Configs.
Continue with Verifying Basic Functionality.
Verifying Basic FunctionalityWith FlexNet Operations modules deployed and the server started, you can sign in to FlexNet Operations for the first time.
Task To sign in to FlexNet Operations
1. In a Web browser, open the Producer Portal using the hostname of a machine on which FlexNet Operations is running and the HTTP port you set on the General configuration page in FlexNet Setup.
http://hostname:port/flexnet/operations
1. On the Sign In page, provide the default administrator user credentials.
• Username: ADMNadmin
• Password: admin
2. Click Log In.
3. If you are logging in to FlexNet Operations for the first time, follow the instructions, below, to change the administrator password.
a. Enter the current password: admin.
b. Enter a new password.
c. Enter the same new password a second time.
d. Choose a security question from the list provided.
e. Specify an answer to the security question you chose.
f. Click Save.
After you have successfully signed in, FlexNet Operations shows the Producer Portal home page.
Licensing FlexNet OperationsThis section covers the following topics:
• About Licensing
• Configuring Licensing for FlexNet Operations
• Validating the License Server Configuration
46 Company Confidential FNO-2020R1.1-ING01 FlexNet Operations 2020 R1.1 On Premises Installation and Implementation Guide

Chapter 4 Installing and Configuring FlexNet OperationsLicensing FlexNet Operations
About LicensingUntil you apply your purchased FlexNet Operations license in the Producer Portal, FlexNet Operations runs on the built-in, 60-day evaluators license, which includes licenses for all optional FlexNet Operations modules (such as FlexNet Usage Management and FlexNet Cloud Licensing Service). The evaluators license allows producers to test drive all FlexNet Operations features. However, when you apply your account’s purchased license and restart the server, FlexNet Operations refreshes to show only those features to which your account is entitled.
Traditional activation of the license for a producer-hosted FlexNet Operations is through the Revenera cloud licensing service. This requires the FlexNet Operations server to have internet access.
However, some servers hosting FlexNet Operations may have limited or no external network connections. In this case, you can set up and administer a FlexNet Embedded license server locally, to license these offline servers.
Tip • You are not required to create a license server; refer to the FlexNet Embedded License Server Administration Guide for instructions on how to obtain and configure the FlexNet Embedded license server.
Configuring Licensing for FlexNet Operations
Task To configure licensing on FlexNet Operations
1. In the Producer Portal, click System > Configure and select the Licensing tab.
2. For cloud licensing, enter the FlexNet Embedded URL included in the acknowledgment email with the subject line “FlexNet Operations License Activation” that was sent to you from Revenera. If no URL is provided please use the following:
https://flexerasoftware.compliance.flexnetoperations.com/instances/<your instance ID>/request
Note • If you do not have this email, contact technical support.
For local licensing, enter the FlexNet Embedded license server URL: http://LicenseServerName:port/request
Your instance ID is valid for all instances you wish to configure (production, test, etc.)
3. Click Save Configs.
Validating the License Server Configuration
Task To verify the license server configuration
1. In a Web browser, open the Producer Portal.
http://hostname:port/flexnet/operations
2. On the Sign In page, provide the administrator user credentials.
FlexNet Operations 2020 R1.1 On Premises Installation and Implementation Guide FNO-2020R1.1-ING01 Company Confidential 47

Chapter 4 Installing and Configuring FlexNet OperationsNext Steps
3. Click Log In.
After you have successfully signed in, FlexNet Operations shows the Producer Portal home page. If the license server configuration is not properly functioning, you will be redirected to the licensing user interface.
Next StepsOnce FlexNet Operations is functioning, the basic installation is complete, and subsequent steps depend on the optional features, implementation details, and administrative tasks you want to employ.
• To set up FlexNet Operations for secure socket layer communication, see Configuring FlexNet Operations for Secure Socket Layer.
• To configure a Electronic Software Delivery connection, see Configuring for Integration with Electronic Software Delivery.
• For additional customizations to FlexNet Operations, see Part 2, Implementing FlexNet Operations.
• For post-installation configuration, see the FlexNet Operations User Guide, section Administrator Reference.
• To get started with entitlements or set up licensing for your account, see the FlexNet Operations User Guide, section Getting Started with Entitlement Management or the getting started section for your licensing technology.
48 Company Confidential FNO-2020R1.1-ING01 FlexNet Operations 2020 R1.1 On Premises Installation and Implementation Guide

5
Upgrading FlexNet OperationsThis chapter details the procedure for upgrading to FlexNet Operations 2020 R1.1 from a previous version of FlexNet Operations. It also describes the procedure for applying a hotfix to an existing FlexNet Operations installation.
If you are installing FlexNet Operations for the first time, Installing and Configuring FlexNet Operations.
Table 5-1 •
Topic Description
Overview of the Upgrade Process Discusses the process of upgrading an existing FlexNet Operations installation and provides additional recommendations about that process.
Preparing to Upgrade FlexNet Operations
Discusses the steps to take before upgrading, including checking the version of your existing installation and preserving customizations.
Obtaining the Upgrade Files Explains how to acquire the upgrade files from Revenera.
Installing the Upgrade Version Describes how to run the FlexNet Operations installer for an upgrade.
Setting Up the Installation with FlexNet Setup
Explains how to configure a new, upgrade installation with FlexNet Setup.
Verifying the Upgrade Shows how to quickly verify that the upgrade has been applied.
More Post-upgrade Considerations
Discusses a number of additional considerations that producers may need to address after installing and configuring the upgrade.
Additional Steps for Cloud Licensing Service Users
Describes steps that are required to enable the License Fulfillment Service to communicate with the Cloud Licensing Service.
Additional Step for Web Service Users
Describes an extra post-upgrade step only for producers who use Web Services with FlexNet Operations.
FlexNet Operations 2020 R1.1 On Premises Installation and Implementation Guide FNO-2020R1.1-ING01 Company Confidential 49

Chapter 5 Upgrading FlexNet OperationsOverview of the Upgrade Process
Tip • Remember to configure FlexNet Operations with your account’s license by clicking System > Configure > Licensing in the Producer Portal and then saving the FlexNet Embedded URL (included in the Welcome Packet email). Until you apply your purchased FlexNet Operations license in the Producer Portal, FlexNet Operations runs on the built-in, 60-day evaluators license.
Overview of the Upgrade Process
Note • These upgrade instructions presume that you are upgrading to FlexNet Operations 2020 R1.1 from FlexNet Operations 12.8 or newer. Upgrading to version 2020 R1.1 from a version earlier than 12.8 is possible but complicated. Consider engaging Revenera’s Global Consulting Services to help perform upgrades from pre-12.8 versions.
At a high level the steps for upgrading FlexNet Operations are
1. Prepare host machines to meet pre-install requirements.
2. Obtain the upgrade files.
3. Stop FlexNet Operations.
4. Backup your database and preserve any customizations from your existing FlexNet Operations installation.
5. Run the new FlexNet Operations installer.
6. Run FlexNet Setup to configure and deploy the new FlexNet Operations installation.
7. Copy preserved customizations from prior version into the new version.
8. For distributed deployments, perform manual configuration steps in the host machine’s file system.
9. In FlexNet Setup, start the FlexNet Operations server.
10. Verify the Upgrade.
Important • If you have customized your FlexNet Operations instance, pay particular attention to the instructions in Preparing to Upgrade FlexNet Operations.
Applying Hotfixes to FlexNet Operations Components
Explains how to apply hotfixes to FlexNet Operations.
Verifying the Hotfix Shows how to quickly verify that the hotfix has been applied.
Table 5-1 •
Topic Description
50 Company Confidential FNO-2020R1.1-ING01 FlexNet Operations 2020 R1.1 On Premises Installation and Implementation Guide

Chapter 5 Upgrading FlexNet OperationsPreparing to Upgrade FlexNet Operations
Preparing to Upgrade FlexNet OperationsObserve the following guideline as you prepare to upgrade FlexNet Operations.
Verify Existing FlexNet Operations Version
Before upgrading FlexNet Operations, verify the version of your existing FlexNet Operations installation.
To determine which version of FlexNet Operations you are currently running
• For pre-2016 versions, see the Administer Operations > System Information page in the Operations user interface. The installer requires that you start with FlexNet Operations 12.8 or a later version.
• For 2016 and later version, see System > About Advanced Lifecycle Management Module.
Verify that Host Machines Meet Pre-installation Requirements
Compare the system requirements expressed in the FlexNet Operations release notes with your intended host machines. These machines must meet the system requirements for the version to which you plan to upgrade.
Install any pre-requisite software that does not already exist on the intended host machines.
Review the guidance in Before Installing FlexNet Operations for more information.
Preserve Modifications and Customizations
Follow the steps, below, to preserve modifications and customizations from your existing FlexNet Operations installation before you attempt to perform an upgrade:
1. Note any modifications you made to your existing FlexNet Operations configuration. These settings are not preserved during an upgrade and must be reconfigured. In particular, note whether you altered
• Java heap size: Versions of FlexNet Operations prior to version 2016 assigned the Java heap size using the configurator. In FlexNet Operations 2016 and later, the Java VM heap size is set on the General Settings tab in FlexNet Setup.
• Session timeout: Versions of FlexNet Operations prior to version 2016 defined the session timeout on the FlexNet Platform Server configuration page (Administer Operations > System Configuration > FlexNet Platform Server). In FlexNet Operations 2016 and later, the session timeout on the same page in the FlexNet Operations Producer Portal (System > Configure > FlexNet Platform Server).
2. Note any unhandled alerts that appear on the Alerts page and process them as appropriate. All existing alerts are deleted during the upgrade process.
3. Stop FlexNet Operations.
4. Back up the following components of your earlier installation:
• Installation directory
• Database schema
5. To ensure your customizations are preserved during the upgrade process, observe the following guidelines:
• Copy your custom directory to a location outside your FlexNet Operations installation before running the version 2020 R1.1 installer. Ensure that you include files such as JSPs and resource bundles, if any. (This is required
FlexNet Operations 2020 R1.1 On Premises Installation and Implementation Guide FNO-2020R1.1-ING01 Company Confidential 51

Chapter 5 Upgrading FlexNet OperationsObtaining the Upgrade Files
because the custom directory in FlexNet Operations 2020 R1.1 may have a different structure from the earlier version, and the earlier version cannot simply be overwritten.)
• Review the version 2020 R1.1 release notes for information about changes that may affect customizations. For example, if Java package names have changed, custom Java classes may have to be recompiled or existing class-related configurations (in System Configuration pages) may have to be changed. Custom Java classes—like ID generators—written for a release built with a previous version of Java must be recompiled. Or if changes in the new release affect the public APIs, custom Java classes may have to be updated.
• New releases often include new or changed entries in FlexNet text properties files. Customizations to those properties files may have to be recreated. However, publisher-defined text properties files are not typically affected.
• When your FlexNet Operations instance has been upgraded to the new release, add customizations back in to FlexNet Operations incrementally.
6. On Linux systems, add write permissions to the flexnet and osinfo.sh files in ops_install_dir. Without write permissions, the upgrade process does not replace these files with their new versions.
Testing FlexNet Operations Prior to Upgrading
If you have a previous version of FlexNet Operations installed and in production, install the latest release into a new location for testing before deployment.
When creating a test installation, point to a different database from that which your production installation uses. When you are ready to upgrade your production systems, read this section for guidelines to back up existing data and configuration settings.
Obtaining the Upgrade FilesFlexNet Operations upgrade files are delivered via the FlexNet Operations installer for the current version and configured with FlexNet Setup (installed automatically by the installer).
When you purchase FlexNet Operations, Revenera sends a Welcome email with the links and credentials you need to log into the Product and Licensing Center. Following the instructions in the Welcome email, log in to the Product and Licensing Center and navigate to the FlexNet Operations download files. Click the links on the Download page to download the new version of the FlexNet Operations installer appropriate for the platform on which you are running FlexNet Operations.
Contact your Revenera representative or Revenera support if you have any trouble gaining access to your Revenera products on the Product and Licensing Center.
Continue with the instructions in Installing the Upgrade Version.
Installing the Upgrade VersionThe following instruction sets explain how to run the FlexNet Operations installer. In a distributed deployment, run the installer on each machine. For best results, install the upgrade version to a new directory rather than overwriting your existing FlexNet Operations installation.
Follow the steps, below, to install FlexNet Operations components. Once the install process is complete, continue with the instructions in Setting Up the Installation with FlexNet Setup to perform the initial configuration steps and Verifying the Upgrade to verify the installation.
52 Company Confidential FNO-2020R1.1-ING01 FlexNet Operations 2020 R1.1 On Premises Installation and Implementation Guide

Chapter 5 Upgrading FlexNet OperationsInstalling the Upgrade Version
Task To install FlexNet Operations components
1. On the machine you want to install FlexNet Operations components, start the FlexNet Operations installer. A progress window indicates that InstallAnywhere is preparing the FlexNet Operations installer.
2. On the Welcome panel, click Next.
3. On the Choose Install Folder panel, specify the install directory for FlexNet Operations and click Next. The default install directory depends on the host operating system.
• For Windows-based systems, it is C:\Program Files\FlexNet Operations\
• For Unix-based systems, it is /home/<user>/FlexNet-Operations/
Important • Using spaces in the install directory can cause problems on Unix-based systems. If you specify an install directory other than the default value, avoid using spaces.
4. On the Customization Options panel, choose whether to use the bundled Wildfly server or your own Wildfly server and specify a RabbitMQ URL (if different from the default). Then click Next.
Setting Description
Application Server Settings
Choose whether to use the bundled version of Wildfly or an external version of Wildfly.
• To use the bundled version of Wildfly, leave the Use Your Own Wildfly Server checkbox unchecked.
• To use your own version of Wildfly, check the Use Your Own Wildfly Server checkbox and then specify the location of your Wildfly installation.
Important • To use an external Wildfly version, you must have Wildfly already installed on the machine on which FlexNet Operations is being installed. Also, your Wildfly server must be stopped for the duration of the installation and configuration steps.
RabbitMQ URL Specify the RabbitMQ AMQP URL or retain the default. For distributed deployments of FlexNet Operations, be sure to create a RabbitMQ account for FlexNet Operations to use.
• If you set up a specific account in RabbitMQ to use for FlexNet Operations messaging, specify the username, password, hostname, port, and (optionally) virtual host using the syntax shown in the installer panel. AMQP:\\username:password@hostname:port[/vhost]
• If you install FlexNet Operations components all on a single machine, the default URL value is all that is needed for FlexNet Operations to connect with RabbitMQ. AMQP:\\guest:guest@localhost:5672
FlexNet Operations 2020 R1.1 On Premises Installation and Implementation Guide FNO-2020R1.1-ING01 Company Confidential 53

Chapter 5 Upgrading FlexNet OperationsInstalling the Upgrade Version
5. On the Pre-installation Summary panel, review the installer settings and click Install. The installer begins installing and configuring files and shows its progress.
6. On the Install Complete panel, the installer reports the result of the install process and shows the URL to use to launch the FlexNet Operations configuration tool, FlexNet Setup (typically, http://localhost:4321/flexnetsetup).
Note • By default, the installer attempts to start FlexNet Setup on port 4321; however, if the installer detects that port 4321 is busy, it will attempt to use a different port.
7. Click Done, The installer attempts to launch FlexNet Setup in your system’s default browser.
On Windows systems, continue by configuring installed FlexNet Operations components as shown in Setting Up the Installation with FlexNet Setup.
On Linux systems, review the special instructions, below, and take any additional steps required before you configure installed components with FlexNet Setup.
Special Instructions for Linux Installers
After installing FlexNet Operations components on a Linux system, you must log out and then log in again. (This allows the installer’s environment variable changes to take effect.)
Furthermore, if you ran the installer as a non-root user, you must run a script (with sudo access) to install FlexNet Setup as a service and then start the service.
Important • If you are setting up FlexNet Operations to run as a service with an Administrator user (but not root), then this user needs write permissions to the following directories:
• /etc/init.d
• /etc/rc*.d (multiple directories may match this pattern)
Note • Only the Install as a Service option is available for Linux. The ability to run the service using the local system or to run using a specified username/password/domain are not supported for Linux.
Task To complete the FlexNet Operations install on Linux systems
1. At the command line, type
sudo sh ops_install_dir/components/tomcat/bin/configure-flexnet-setup-as-service.sh
where ops_install_dir is the FlexNet Operations installation directory. For example, if you installed FlexNet Operations components to /usr/home/FNOuser, you would type
sudo sh /usr/home/FNOuser/components/tomcat/bin/configure-flexnet-setup-as-service.sh
This script installs FlexNet Setup as a service, but does not start it.
2. To start the service, the user needs to execute the following command.
service FlexNetSetup start
54 Company Confidential FNO-2020R1.1-ING01 FlexNet Operations 2020 R1.1 On Premises Installation and Implementation Guide

Chapter 5 Upgrading FlexNet OperationsSetting Up the Installation with FlexNet Setup
This command does not require sudo access.
These instructions install the FlexNet Setup service under root context but allow FlexNet Setup and FlexNet Operations, itself, to run as a normal user (not a root user).
Continue with the instructions in Setting Up the Installation with FlexNet Setup to perform the initial configuration tasks when the installer finishes.
Setting Up the Installation with FlexNet SetupAfter the installer completes, run FlexNet Setup to configure each FlexNet Operations component you want to deploy on the current machine.
About FlexNet SetupFlexNet Setup is a web application for post-installation setup of FlexNet Operations. The FlexNet Operations installation process installs FlexNet Setup as a service. After you install FlexNet Operations, you use FlexNet Setup to complete the initial setup tasks. Later, you can return to FlexNet Setup to check the status of FlexNet Operations server components, alter setup choices, or stop the FlexNet Operations server.
Table 5-2 •
Topic Description
About FlexNet Setup Describes the purpose of FlexNet Setup for deploying and managing FlexNet Operations components.
Starting FlexNet Setup Explains how to start FlexNet Setup. FlexNet Setup is where you configure FlexNet Operations, deploy configured modules, and start the FlexNet Operations server.
Configuring General Settings Describes how identify the FlexNet Operations modules to deploy and specify general settings.
Configuring Database Settings Describes how to configure databases for each FlexNet Operations module to be deployed.
Configuring Advanced Settings Discusses the settings available on the Advanced configuration page.
Deploying FlexNet Operations Modules
Shows how to deploy configured FlexNet Operations modules on the System Status page.
Starting FlexNet Operations Explains how to deploy and undeploy FlexNet Operations modules and how to start FlexNet Operations.
Connecting Distributed Deployments
Describes additional configuration steps that are required when the FlexNet Usage Management module is running on a different host from the machine that hosts the core FlexNet Operations module.
FlexNet Operations 2020 R1.1 On Premises Installation and Implementation Guide FNO-2020R1.1-ING01 Company Confidential 55

Chapter 5 Upgrading FlexNet OperationsSetting Up the Installation with FlexNet Setup
Tip • Whenever you use FlexNet Setup to alter configuration settings for FlexNet Operations components, remember to first stop the FlexNet Operations server and undeploy all FlexNet Operations components. Then, when your configuration changes are complete, redeploy all components and restart the server. Changes made to deployed components will not be applied in FlexNet Operations until the components are undeployed and redeployed.
Starting FlexNet SetupAt the completion of a successful installation, the FlexNet Operations installer attempts to launch FlexNet Setup automatically. (FlexNet Setup is started as a service on both Windows and Linux systems.) If FlexNet Setup is not running in your web browser, you can open it manually.
Note • If you are signing in to FlexNet Setup for the first time, you must change the password for the default administrator user before you can continue to specify configuration settings.
Task To open FlexNet Setup manually
• Open the following URL in a web browser:
http://localhost:4321/flexnetsetup
The default port for FlexNet Setup is 4321. However, if port 4321 is in use when the installer runs, the FlexNet Setup port may change. On the Install Complete panel, the FlexNet Operations installer shows the FlexNet Setup port that was assigned.
Note • If Tomcat is not running, FlexNet Setup will not open.
• To start FlexNet Setup on Windows, go to the Windows Services Console, locate the FlexNet Setup service, and start that service or, at a command prompt, type net start FlexNetSetup.
• To start FlexNet Setup on Linux, type service FlexNetSetup start at a command prompt.
• If you prefer not to run FlexNet Setup as a service, navigate to ops_install_dir\components\tomcat\bin and run start-flexnet-setup.
Task To sign in to FlexNet Setup
1. On the Sign In page, provide the default administrator user credentials.
• Username: admin
• Password: admin
2. Click Log In.
3. If you are logging in to FlexNet Setup for the first time, follow the instructions, below, to change the administrator password.
a. Enter the current password: admin.
56 Company Confidential FNO-2020R1.1-ING01 FlexNet Operations 2020 R1.1 On Premises Installation and Implementation Guide

Chapter 5 Upgrading FlexNet OperationsSetting Up the Installation with FlexNet Setup
b. Enter a new password.
c. Enter the same new password a second time.
d. Choose a security question from the list provided.
e. Specify an answer to the security question you chose.
f. Click Save.
After you have successfully signed in, FlexNet Setup shows the General Settings configuration page. Continue with the setup process in Configuring General Settings.
Configuring General SettingsThe General Settings configuration page is where you identify FlexNet Operations modules to deploy and optionally specify other general settings.
Important • FlexNet Operations modules must be undeployed and the FlexNet Operations server must be stopped when you change configuration settings.
Tip • Your FlexNet Operations license governs the FlexNet Operations modules that operate for your account. There is no need to configure settings for FlexNet Operations modules that are not authorized in your account’s license. For information about the FlexNet Operations core component as well as optional, purchased, components, see FlexNet Operations Components.
Task To configure general settings
1. On the General Settings configuration page, use the Select Modules to Be Configured checkboxes to select FlexNet Operations modules you want to deploy:
• FlexNet Operations includes the core FlexNet Operations component as well as the FlexNet Embedded component (to support FlexNet Embedded devices and servers for producers who purchase the Advanced Lifecycle Management module).
• FlexNet Usage Management provides support for FlexNet Usage Management features (for producers who purchase the FlexNet Usage Management module).
• Cloud Licensing Service supports cloud-hosted FlexNet Embedded license servers (for producers who purchase the FlexNet Cloud Licensing Service module).
• FlexNet Reporting deploys the reporting database for producers who want to create reports from FlexNet Operations data (separate from the other FlexNet Operations databases).
FlexNet Operations 2020 R1.1 On Premises Installation and Implementation Guide FNO-2020R1.1-ING01 Company Confidential 57

Chapter 5 Upgrading FlexNet OperationsSetting Up the Installation with FlexNet Setup
2. Optionally specify Other Configurations settings.
3. Click Save.
FlexNet Setup saves the configuration changes to FlexNet Operations. Changes are applied when FlexNet Operations modules are deployed and the FlexNet Operations server is restarted.
Continue to Configuring Database Settings to specify database settings for the FlexNet Operations modules you are deploying.
Settings Instructions
HTTP Port Identify the port on which FlexNet Operations listens for HTTP communication. If you require a particular port, specify the port number; otherwise, keep the default setting for the embedded Web container: 8888.
Ensure this port is open through the firewall on the machine where FlexNet Operations is installed, if the machine hosts a firewall.
Stop Port Identify the port on which FlexNet Operations listens for a stop message. This is the port on which FlexNet Operations listens for JNDI clients.
If you require a particular port, specify the port number; otherwise, keep the default setting: 1199.
Logging Threshold Set the logging threshold for FlexNet Operations. Choose from
• Errors
• Warnings
• Information Messages (Default)
• Debug Messages
The logging threshold expresses the maximum level of detail for the messages written to the FlexNet application log file before FlexNet Operations starts. Only messages at or below the selected level of detail appear in the log.
VM Heap Size Set the initial and maximum Java Virtual Machine heap size in megabytes. The default settings are
• Initial Size: 1024
• Maximum Size: 2048
The maximum application memory limit is set by adjusting the heap size. The limit should be less than 80 percent of the machine’s total RAM. If you have performance problems, you may want to increase these settings.
User Data Directory Only used for distributed deployments, set the location of the User Data Directory. The default directory is
ops_install_dir\release\flexnet-data\data.
FlexNet Operations uses this directory for any files necessary for import/export operations and other temporary files.
58 Company Confidential FNO-2020R1.1-ING01 FlexNet Operations 2020 R1.1 On Premises Installation and Implementation Guide

Chapter 5 Upgrading FlexNet OperationsSetting Up the Installation with FlexNet Setup
Configuring Database SettingsThe Database configuration page is where you specify database settings for the FlexNet Operations modules you are deploying: FlexNet Operations, FlexNet Usage Management, Cloud Licensing Service, FlexNet Reporting. Here, you first configure and save the Database configuration settings and then initialize or upgrade the database schemas as necessary.
Important • Oracle databases are no longer supported for FlexNet Operations.
Tip • Your FlexNet Operations license governs the FlexNet Operations modules that operate for your account. There is no need to configure settings for FlexNet Operations modules that are not authorized in your account’s license.
The database configuration is a two part process:
• Specifying Database Settings
• Managing Database Schemas
Specifying Database Settings
Follow the instructions below to set the database type, schema name, and DBMS connection options for each FlexNet Operations module to be deployed on the current machine.
Task To configure databases
1. In FlexNet Setup, click Configuration > Database to open the Database configuration page.
2. On the Database configuration page, provide settings for each FlexNet Operations module you are deploying on the current machine.
Settings Instructions
Database Type Identify the database type to be used for the current module. FlexNet Operations supports only Microsoft SQL Server.
Schema Name Specify the name of the database schema for the current module.
• New databases: For new databases, the name you provide becomes the name of the database schema FlexNet Setup creates for this module.
• Existing databases: When upgrading from a prior version of FlexNet Operations, specify the schema name of the existing database.
Tip • When configuring database settings for multiple modules, consider using the Use Database Server Host of FlexNet Operations for this Schema checkbox. If the database server host for one or more modules is the same as the FlexNet Operations module, you can use this checkbox to automatically populate the database configuration settings for these modules. However, each module still requires its own Schema Name.
FlexNet Operations 2020 R1.1 On Premises Installation and Implementation Guide FNO-2020R1.1-ING01 Company Confidential 59

Chapter 5 Upgrading FlexNet OperationsSetting Up the Installation with FlexNet Setup
3. In the FlexNet Operations Read-Only User, provide settings for a read-only user for use with the FlexNet Operations database.
Note • For producers with existing installations of FlexNet Operations, their database administrator will first need to create the read-only user in the FlexNet Operations database and then specify the details in the FlexNet Setup’s Database configuration tab.
4. Click Save.
FlexNet Setup stores the database configuration settings for each module you are deploying. Continue the deployment by managing the database schemas.
Managing Database Schemas
For each module you are deploying, you must either initialize or upgrade the schema. Producers who are upgrading FlexNet Operations from an earlier version must initialize the database schemas for new modules and upgrade the database schemas for the modules that have existing databases.
For example, a producer who purchased FlexNet Operations with the FlexNet Usage Management module and is upgrading from FlexNet Operations 12.11 Service Pack 2 would upgrade the schema for the core FlexNet Operations module (and for the FlexNet Reporting module) but initialize the schema for FlexNet Usage Management.
Follow the instructions below to upgrade the database schema for each FlexNet Operations module you are upgrading from an earlier FlexNet Operations version.
Note • The Upgrade button is enabled on the Manage Schema page only when an existing database for the chosen module is present. Otherwise, only the Initialize button is enabled.
For the reporting Datawarehouse, migrating to 2017 R1 from previous releases is not supported. Therefore if the version is pre-2017 R1, the Upgrade button is not enabled.
Hostname Specify a hostname or IP address for the database server.
Port Specify the port on which the database server is listening. The default port value for Microsoft SQL Server is 1433.
Database Username Specify a username for FlexNet Setup to use when making changes to the database.
Database Password Type the password for the database user.
Confirm Password Re-type the password for the database user.
Settings Instructions
Database Username Specify a username for the read-only user that is used by various processes to read data from the FlexNet Operations database.
Database Password Type the password for the read-only user.
Confirm Password Re-type the password for read-only user.
Settings Instructions
60 Company Confidential FNO-2020R1.1-ING01 FlexNet Operations 2020 R1.1 On Premises Installation and Implementation Guide

Chapter 5 Upgrading FlexNet OperationsSetting Up the Installation with FlexNet Setup
Important • When upgrading from a version of FlexNet Operations prior to version 2016, be sure to initialize the FlexNet Embedded database before upgrading the FlexNet Operations database. If the FlexNet Embedded database schema is not present, the FlexNet Operations database upgrade will fail.
Task To initialize a schema
1. On the Database configuration page, click Manage Schema. This button opens the Manage Schema page in a popup window.
2. On the Manage Schema page, choose the module upgrade and specify the database account credentials to use for that process.
3. Click Initialize. FlexNet Setup opens a popup window that asks you to confirm your choice.
4. In the popup window, click Initialize to confirm and start the process. FlexNet Setup shows the initialization process.
5. When the initialization process is complete, choose whether to finish schema management activities or to manage another schema.
• To finish schema management activities, click Close.
• To manage the schema of another module, click Manage Another Database.
Settings Instructions
Which database do you want to initialize/upgrade?
Choose the module for which you want to initialize a schema:
• FlexNet Operations
• FlexNet Usage Management
• Cloud Licensing Service
• FlexNet Reporting
Database Username Specify the username of an account with ownership privileges on the database server for the current module.
Database Password Specify the password for the database username.
FlexNet Operations 2020 R1.1 On Premises Installation and Implementation Guide FNO-2020R1.1-ING01 Company Confidential 61

Chapter 5 Upgrading FlexNet OperationsSetting Up the Installation with FlexNet Setup
Task To upgrade a schema
1. On the Database configuration page, click Manage Schema. This button opens the Manage Schema page in a popup window.
2. On the Manage Schema page, choose the module upgrade and specify the database account credentials to use for that process.
3. Click Upgrade. FlexNet Setup opens a popup window that asks you to confirm your choice.
Note • When upgrading the FlexNet Operations core module from FlexNet Operations versions 2016, 2016 Release 2, or 2016 Release 3, a prompt appears for special handling of existing FlexNet Embedded data: Was the FlexNet Embedded component configured in the prior release of this product?
• If so, click Yes. FlexNet Setup prompts you for the Schema Name for your existing FlexNet Embedded database. Enter the requested value, and then click Submit. FlexNet Setup then upgrades the database schema for the FlexNet Operations core database before it migrates your FlexNet Embedded data into the FlexNet Operations core database.
• If not, click No. FlexNet Setup proceeds to upgrade the database schema for the FlexNet Operations core database.
If your existing FlexNet Operations installation is configured with the FlexNet Embedded database on a separate server from the FlexNet Operations database’s server, you must move the FlexNet Embedded database to the same server (but under a different schema or tablespace) as the FlexNet Operations database before upgrading to the current version of FlexNet Operations. This move typically requires a database administrator who will use database tools provided the database server vendor.
4. In the popup window, click Upgrade to confirm and start the process. FlexNet Setup shows the upgrade process.
5. When the upgrade process is complete, choose whether to finish schema management activities or to manage another schema.
• To finish schema management activities, click Close.
• To manage the schema of another module, click Manage Another Database.
6. If your FlexNet Operations installation is configured with the Cloud Licensing Service component, manually execute the following statements in the Cloud Licensing Service database, otherwise the service fails to start:
Settings Instructions
Which database do you want to initialize/upgrade?
Choose the module for which you want to upgrade a schema:
• FlexNet Operations
• FlexNet Usage Management
• Cloud Licensing Service
• FlexNet Reporting
Database Username Specify the username of an account with ownership privileges on the database server for the current module.
Database Password Specify the password for the database username.
62 Company Confidential FNO-2020R1.1-ING01 FlexNet Operations 2020 R1.1 On Premises Installation and Implementation Guide

Chapter 5 Upgrading FlexNet OperationsSetting Up the Installation with FlexNet Setup
ALTER DATABASE <CLS DB Name> SET READ_COMMITTED_SNAPSHOT ON;GOALTER DATABASE <CLS DB Name> SET ALLOW_SNAPSHOT_ISOLATION ON;GO
When database configuration settings are complete and database schemas for all the modules you are deploying have been initialized or upgraded, you can move to the System Status page, apply previous customizations, deploy modules, and start FlexNet Operations.
• If you are upgrading from a prior version of FlexNet Operations that included customizations, continue with Applying Customizations from the Prior FlexNet Operations Installation.
• If you are upgrading from a prior version of FlexNet Operations with no customizations, continue with Deploying FlexNet Operations Modules.
Note • Advanced configuration settings are discussed, generally, in Configuring Advanced Settings, but uses of these settings are covered in instruction sets dedicated to advanced tasks, such as Configuring FlexNet Operations for Secure Socket Layer.
Task To extend time dimension for FlexNet Reporting
1. On the Database configuration page, click Manage Schema. This button opens the Manage Schema page in a popup window.
1. On the Manage Schema page, choose the FlexNet Reporting option for the database to modify.
2. Enter the database username and password.
3. Enter the new start date in the form MM/dd/yyyy.
4. Enter the new end date in the form MM/dd/yyyy.
Note • The latest end date allowed is 12/31/2199. Any date later than this will result in an Invalid format error.
5. Click the Extend Time Dimension button.
Configuring Advanced SettingsThe configuration settings on the Advanced configuration page support configuring FlexNet Operations for secure socket layer communication, server performance, and for the AJP port.
This section describes the settings on the Advanced configuration page, but some of the instructions for using the Advanced configuration page are covered in dedicated sections, such as Configuring FlexNet Operations for Secure Socket Layer.
• Secure Server Settings
• Secure Client Settings
• Other Ports Settings
• Performance Settings
FlexNet Operations 2020 R1.1 On Premises Installation and Implementation Guide FNO-2020R1.1-ING01 Company Confidential 63

Chapter 5 Upgrading FlexNet OperationsSetting Up the Installation with FlexNet Setup
Secure Server Settings
The following secure server settings support configuring the FlexNet Operations server for secure socket layer communication.
Secure Client Settings
The following secure client settings support configuring FlexNet Operations to connect as a client to an SSL server.
Table 5-3 •
Setting Description
HTTPS Port The port on which FlexNet Operations listens for HTTPS requests. Default: 8443.
FlexNet Operations is always enabled to accept HTTPS requests, but some additional settings must be configured before using SSL. The URL to connect to FlexNet Operations with HTTPS is https://host:port/flexnet, where port is the HTTPS port number.
For information about configuring SSL for Wildfly Web container, see Configuring FlexNet Operations for Secure Socket Layer.
Note that HTTPS requests can be handled by a full-feature Web server instead of by FlexNet Operations itself.
Keystore Location The name and location of the keystore on the current machine. Default: ops_install_dir/release/flexnet-data/site/bin/keystore.
This keystore file contains the key entry for the certificate that FlexNet Operations uses to provide SSL connections to its clients (for example, browsers or activation utilities). Use the default location only if you are using the bundled keystore or another keystore for testing purposes. Otherwise, point to a keystore outside the FlexNet Operations installation.
Password The password used to secure the keystore. The same password is used to secure the certificate key.
Confirm Password The password for the keystore, for confirmation.
Table 5-4 •
Setting Description
Truststore Location The name and location of the client-side truststore that contains the trusted certificate entry for a remote SSL server (for example, an LDAP server). Default: ops_install_dir/components/jvm/jre/lib/security/cacerts.
Use the default truststore only if you are using the bundled truststore. Otherwise, point to a truststore outside the FlexNet Operations installation.
Password The password used to secure the truststore. The same password is used to secure the certificate key.
Confirm Password The password for the truststore, for confirmation.
64 Company Confidential FNO-2020R1.1-ING01 FlexNet Operations 2020 R1.1 On Premises Installation and Implementation Guide

Chapter 5 Upgrading FlexNet OperationsSetting Up the Installation with FlexNet Setup
Other Ports Settings
Other Port Settings includes only one setting: AJP Port.
Performance Settings
The following server performance settings are available on the FlexNet Setup’s Advanced configuration page.
Applying Customizations from the Prior FlexNet Operations Installation
In Preparing to Upgrade FlexNet Operations, producers who had modified or customized their FlexNet Operations installation were reminded to save their custom directory. With the exception of email template localizations or customizations, FlexNet Operations 2020 R1.1 works with all supported customizations from FlexNet Operations 12.8 and later.
If you have not modified your prior FlexNet Operations installation, skip this step and continue with Deploying FlexNet Operations Modules.
The instructions, below, explain how to apply those preserved customizations to the new FlexNet Operations installation.
Tip • Be sure the server is stopped and FlexNet Operations modules are undeployed when you are making changes to the server.
Table 5-5 •
Setting Description
AJP Port FlexNet Operations port for Apache JServ Protocol (AJP) connections. Default: 8009.
This is the port on which the AJP connector listens. The AJP connector integrates FlexNet Operations with a full-function proxy (such as Apache or IIS) server for security or load balancing.
Table 5-6 •
Setting Description
Connection Pool Size The number of connections permitted to the FlexNet Operations server. Default: 100.
Ensure that your database is capable of creating the designated number of connections.
Max Thread Count The number of threads allocated for the scheduler. Default: 30.
Transaction Timeout The transaction timeout time in seconds. Default: 3600.
FlexNet Operations 2020 R1.1 On Premises Installation and Implementation Guide FNO-2020R1.1-ING01 Company Confidential 65

Chapter 5 Upgrading FlexNet OperationsSetting Up the Installation with FlexNet Setup
Task To apply prior customizations to a new FlexNet Operations installation
• Copy the contents of the custom directory you saved from your prior FlexNet Operations installation into the custom directory of your new FlexNet Operations installation.
Continue with Deploying FlexNet Operations Modules.
For more information about customizing FlexNet Operations, see Part 2, Implementing FlexNet Operations.
Deploying FlexNet Operations Modules
Important • For producers who run FlexNet Operations behind a proxy server, the additional configuration steps described in Configuring FlexNet Operations to Run Behind a Proxy must be performed prior to deployment.
FlexNet Operations modules, such as the core FlexNet Operations module, the FlexNet Embedded module, and FlexNet Usage Management, are initially undeployed. To be available in FlexNet Operations, a module must first be deployed.
Important • When the core FlexNet Operations module is being deployed on the current machine, it must be the first module deployed.
Task To deploy a module
1. In FlexNet Setup, click System Status.
2. On the System Status page, click Deploy All. FlexNet Setup opens a popup window to show deployment progress.
3. When all modules are deployed, click Close in the popup window.
When all the modules are deployed, you can start the server. Continue with Starting FlexNet Operations.
Tip • Deployed modules can be undeployed by clicking their Undeploy button or clicking Undeploy All. It is important to stop the FlexNet Operations server and undeploy all modules when making database changes in FlexNet Setup.
Starting FlexNet OperationsUse the Start Server and Stop Server buttons to start, stop, and restart the FlexNet Operations server.
The FlexNet Operations server must be stopped during configuration changes, and all modules undeployed. Then, before any configuration changes will appear in FlexNet Operations, modules must be re-deployed and the server restarted.
Task To start the server
• On the System Status page, click Start Server.
66 Company Confidential FNO-2020R1.1-ING01 FlexNet Operations 2020 R1.1 On Premises Installation and Implementation Guide

Chapter 5 Upgrading FlexNet OperationsSetting Up the Installation with FlexNet Setup
FlexNet Setup updates the status messages for each module. When all modules are deployed, the System Status page shows the build number for each module and all module status messages read, Deployed and Started, you can sign in to FlexNet Operations using the default administrator account.
Tip • Click Refresh to update the System Status information.
Tip • When the FlexNet Operations server is running, you can stop it by clicking Stop Server.
Producers who have FlexNet Operations modules installed on two or more separate hosts, continue with Connecting Distributed Deployments.
Producers who have all FlexNet Operations modules installed on a single host, continue with Verifying the Upgrade.
Connecting Distributed Deployments
Tip • These instructions cover connecting FlexNet Operations hosts via HTTP. To use secure socket layer communication between hosts, use HTTPS ports and configure each host for secure socket layer communication. See Configuring FlexNet Operations for Secure Socket Layer.
Additional configuration steps are required when the FlexNet Usage Management module is running on a different host from the machine that hosts the core FlexNet Operations module. The following steps connect these host machines.
Task To connect the FlexNet Usage Management host
1. On the FlexNet Operations host, open the Producer Portal and change the system configuration setting: Usage Analytics Service URL:
a. Sign in to the Producer portal.
b. In the Producer Portal, click System > Configure > FlexNet Operations. This opens the FlexNet Operations system configuration page.
c. On the FlexNet Operations system configuration page, click External Services Configuration to expand that group.
d. For Usage Analytics Service URL, type http://uas_host:port/uas, where uas_host is the hostname of the machine that hosts the FlexNet Usage Management module and port is the HTTP port for that host.
e. Click Save Configs.
2. On the FlexNet Operations host, open the LFS Configuration Console, edit uas_endpoint_url, and save the change.
a. Open the following URL in a Web browser: http://fno_host:port/lfs/jsp/config.jsp. This URL opens the LFS Configuration Console.
FlexNet Operations 2020 R1.1 On Premises Installation and Implementation Guide FNO-2020R1.1-ING01 Company Confidential 67

Chapter 5 Upgrading FlexNet OperationsVerifying the Upgrade
b. In the LFS Configuration Console, edit the value for uas_endpoint_url.
c. Click Save.
Important • The configuration settings in the LFS Configuration Console are not preserved if the FlexNet Operations core module is undeployed. Each time this module is re-deployed, you must repeat the steps to set the uas_endpoint_url value.
These steps connect the FlexNet Usage Management host to the machine that hosts the core FlexNet Operations module.
Verifying the UpgradeWith FlexNet Operations modules deployed and the server started, you can sign in to FlexNet Operations, verify the server is working, and check the FlexNet Operations version.
Task To sign in to FlexNet Operations
1. In a Web browser, open the Producer Portal using the hostname of a machine on which FlexNet Operations is running and the HTTP port set on the General configuration page in FlexNet Setup (typically 8888).
http://hostname:port/flexnet/operations
1. On the Sign In page, provide the your administrator user credentials.
2. Click Log In. FlexNet Operations shows the Producer Portal home page.
3. Click System > About the Advanced Lifecyle Management Module. FlexNet Operations opens the System Information page. The first table on this page shows the new version number for FlexNet Operations.
A Note about the Evaluators License and Your FlexNet Operations License
Until you apply your purchased FlexNet Operations license in the Producer Portal, FlexNet Operations runs on the built-in, 60-day evaluators license, which includes licenses for all optional FlexNet Operations modules (such as FlexNet Usage Management and FlexNet Cloud Licensing Service). The evaluators license allows producers to test drive all FlexNet Operations features. However, when you apply your account’s purchased license and restart the server, FlexNet Operations refreshes to show only those features to which your account is entitled.
FlexNet Operations servers must be connected to the Internet to acquire and renew licenses from Revenera servers.
Tip • To apply your account’s purchased license to FlexNet Operations, click System > Configure > Licensing in the Producer Portal. Then, provide the FlexNet Embedded URL included in the Welcome Packet sent to you from Revenera and click Save Configs.
Setting Value
uas_endpoint_url http://uas_host:port/uas/servlet/UasServlet/api/vi/usage
where uas_host is the hostname for the machine that hosts the FlexNet Usage Management module and port is the HTTP port on the same machine.
68 Company Confidential FNO-2020R1.1-ING01 FlexNet Operations 2020 R1.1 On Premises Installation and Implementation Guide

Chapter 5 Upgrading FlexNet OperationsMore Post-upgrade Considerations
More Post-upgrade Considerations• Note that your stop port value may be changed to a different setting from the previous version’s configurations. This
setting can be set in the General settings tab in FlexNet Setup during the upgrade process.
• After upgrading from a previous version, any bindings that you may have configured are returned to their default value in FlexNet Operations 2020 R1.1. Track zero anchoring is not enabled when upgrading to version 2020 R1.1. For a discussion of anchoring, see the FlexNet Operations User Guide.
• Receiving application updates through the Web is enabled in FlexNet Operations version 2020 R1.1. The System > Configure > Updates > Receive Updates Through Web Application and Daily Update Check configuration settings are not automatically enabled in an upgraded database. It is recommended that these flags be enabled after upgrading your database.
• After upgrading from previous releases, the Allow Upgrades, Allow Renewals, and Allow Upsells flags on maintenance entities are set to false.
Additional Steps for Cloud Licensing Service UsersFrom release 2020 R1.1 onwards, the FlexNet Operations installer deploys the Cloud Licensing Service component by default with REST endpoint security enabled. As a consequence, if you are upgrading from a previous version of FlexNet Operations and have purchased the FlexNet Cloud Licensing Service module, you must perform the following additional steps:
• Add the License Fulfillment Service as allowed host in FlexNet Setup on the System Status page. For procedural information, see Adding Allowed Hosts.
• Connect the Cloud Licensing Service by updating the gls_endpoint_url value from localhost to its IP or DNS value. This enables the License Fulfillment Service to communicate with the Cloud Licensing Service. The following task explains how to do this.
Task To connect the Cloud Licensing Service host
1. On the machine that hosts the Cloud Licensing Service module, start FlexNet Setup.
a. On the System Status page in FlexNet Setup, stop the server and undeploy the Cloud Licensing Service module.
1. Click the Undeploy button for Cloud Licensing Service.
2. When FlexNet Setup completes the undeployment, click Stop Server.
b. In the file system of the Cloud Licensing Service host, open the following file in a text editor:
ops_install_dir\services\cls\cls.properties
c. In cls.properties, edit the value for lfs.url to http://fno_host:port/lfs/binary/request, where fno_host is the hostname for the machine that hosts the FlexNet Operations core module and port is the HTTP port for that machine.
d. Save cls.properties.
e. In FlexNet Setup, deploy the Cloud Licensing Service and start the server.
1. Click the Deploy button for Cloud Licensing Service.
FlexNet Operations 2020 R1.1 On Premises Installation and Implementation Guide FNO-2020R1.1-ING01 Company Confidential 69

Chapter 5 Upgrading FlexNet OperationsAdditional Step for Web Service Users
2. When FlexNet Setup completes the deployment, click Start Server.
2. On the machine that hosts the FlexNet Operations core module, open the LFS Configuration Console, edit gls_endpoint_url, and save the change.
a. Open the following URL in a Web browser: http://fno_host:port/lfs/jsp/config.jsp. This URL opens the LFS Configuration Console.
b. In the LFS Configuration Console, edit the value for gls_endpoint_url.
c. Click Save.
Important • The configuration settings in the LFS Configuration Console are not preserved if the FlexNet Operations core module is undeployed. Each time this module is re-deployed, you must repeat the steps to set the gls_endpoint_url value.
These steps enable the License Fulfillment Service to communicate with the Cloud Licensing Service.
Additional Step for Web Service UsersIf you are upgrading from a previous version of FlexNet Operations and are using web services, you must perform the following additional step after installing and configuring the new FlexNet Operations version and before starting the FlexNet Operations server.
Regenerate your Web Service client proxies using the version 2016 WSDL files and not the HTTP URLs. These files are located in the ops_install_dir/webapp/schema directory on the FlexNet Operations server and must be copied locally. (Refer to the FlexNet Operations SOAP Web Services Reference Guide for more information.)
Applying Hotfixes to FlexNet Operations Components
Hotfix files are delivered in a different format from upgrade files, and the process for applying a hotfix is different from that of installing an upgrade. Follow the steps below to apply a hotfix to FlexNet Operations.
Task To apply a hotfix to FlexNet Operations
1. In FlexNet Setup, click System Status > Stop Server to stop FlexNet Operations. When the server has stopped, the Undeploy All button becomes active.
2. On the System Status page in FlexNet Setup, click Undeploy All. FlexNet Setup undeploys all FlexNet Operations modules.
Setting Value
gls_endpoint_url http://cls_host:port/gls/api/1.0
where cls_host is the hostname for the machine that hosts the Cloud Licensing Service module and port is the HTTP port on the same machine.
70 Company Confidential FNO-2020R1.1-ING01 FlexNet Operations 2020 R1.1 On Premises Installation and Implementation Guide

Chapter 5 Upgrading FlexNet OperationsVerifying the Hotfix
3. Copy hotfix archive into the following directory: ops_install_dir\hotfix\download.
4. Extract the contents of the archive you copied.
Tip • If multiple hotfix archives are to be applied at the same time, be sure to extract them in the order in which they were released. Extracting them in the wrong order may overwrite a newer hotfix file with an older one.
5. Copy the extracted hotfix files from ops_install_dir\hotfix\download to ops_install_dir\hotfix\installed.
6. On the System Status page in FlexNet Setup, click Deploy All. FlexNet Setup deploys all active FlexNet Operations modules.
Tip • Wait for the deploy action to complete before starting the server.
7. On the System Status page, click Start Server.
When FlexNet Setup deploys the FlexNet Operations modules, it applies the hotfix changes and then re-applies any preserved customizations to FlexNet Operations.
Verifying the HotfixWith FlexNet Operations modules deployed and the server started, you can sign in to FlexNet Operations, verify the server is working, and check the FlexNet Operations version.
Task To sign in to FlexNet Operations
1. In a Web browser, open the Producer Portal using the hostname of a machine on which FlexNet Operations is running and the HTTP port set on the General configuration page in FlexNet Setup (typically 8888).
http://hostname:port/flexnet/operations
1. On the Sign In page, provide the your administrator user credentials.
2. Click Log In. FlexNet Operations shows the Producer Portal home page.
3. Click System > About the Advanced Lifecycle Management Module. FlexNet Operations opens the System Information page. The first table on this page shows the new version number for FlexNet Operations.
Adding a Read-Only User to FlexNet OperationsFlexNet Operations will require a read-only user to be created to optimize read operations and avoid locks in the database.
FlexNet Operations 2020 R1.1 On Premises Installation and Implementation Guide FNO-2020R1.1-ING01 Company Confidential 71

Chapter 5 Upgrading FlexNet OperationsAdding a Read-Only User to FlexNet Operations
Task To add the read-only user to FlexNet Operations
1. In FlexNet Setup, click System Status > Stop Server to stop FlexNet Operations. When the server has stopped, the Undeploy All button becomes active.
2. On the System Status page in FlexNet Setup, click Undeploy All. FlexNet Setup undeploys all FlexNet Operations modules.
3. Install the upgrade.
4. Have the database administrator create a read-only user in the reporting database.
5. In FlexNet Setup, go to the Database tab and include the user information in the FlexNet Operations Read-Only User section.
6. Go to System Status and redeploy all the modules.
7. Restart the server.
72 Company Confidential FNO-2020R1.1-ING01 FlexNet Operations 2020 R1.1 On Premises Installation and Implementation Guide

Part 2Implementing FlexNet
Operations
This part of the FlexNet Operations 2020 R1.1 On Premises Installation and Implementation Guide includes the following chapters:
• FlexNet Operations On Premises Implementation Overview
• Configuring FlexNet Operations
• Configuring the End-User Portal
• Building a Vendor Certificate Generator
• Recommendations for FlexNet Operations Performance Improvement
FlexNet Operations 2020 R1.1 On Premises Installation and Implementation Guide FNO-2020R1.1-ING01 Company Confidential 73

74 Company Confidential FNO-2020R1.1-ING01 FlexNet Operations 2020 R1.1 On Premises Installation and Implementation Guide

6
FlexNet Operations On PremisesImplementation Overview
FlexNet Operations bridges the gap between pricing and packaging software on the producer side and purchasing and managing that software on the enterprise side. FlexNet Operations supports the integration of software license delivery into the business operations of software producers or device manufacturers and enables them to automate the entire entitlement and license lifecycle.
Figure 6-1: Software License Lifecycle Stages
FlexNet Operations enables a producer to:
FlexNet Operations 2020 R1.1 On Premises Installation and Implementation Guide FNO-2020R1.1-ING01 Company Confidential 75

Chapter 6 FlexNet Operations On Premises Implementation OverviewArchitecture
• Easily set up and modify product packaging to be prepared for business requirements
• Integrate license activation and producer back-office systems
• Enable end users to activate their own licenses without producer intervention
• Seamlessly integrate licensing into the end-user experience
• Track entitlement and fulfillment history
• Run detailed reports on licensing data
Information about configuring FlexNet Operations On Premises is described in the following sections:
• Prerequisites
• Implementation Issues
• Using FlexNet Setup
ArchitectureFlexNet Operations is a Web-based application built on the FlexNet Platform architecture. This diagram shows the relationship between FlexNet Operations, the Operations database, and applications that communicate with FlexNet Operations through Web services.
76 Company Confidential FNO-2020R1.1-ING01 FlexNet Operations 2020 R1.1 On Premises Installation and Implementation Guide

Chapter 6 FlexNet Operations On Premises Implementation OverviewPrerequisites
Prerequisites Before you proceed with implementation of FlexNet Operations, it is assumed that you have met these prerequisites:
• You have used the information in Part 1, Installing FlexNet Operations, to install FlexNet Operations, and its associated database. (Optionally, you can load demo data into the database.)
• You have verified, as an administrative user, that the application starts and stops.
• You have reviewed how to configure FlexNet Operations.
• You have configured basic FlexNet Operations server settings.
• You have reviewed your FlexNet Operations license certificate and know what FlexNet Operations functionality your company is enabled to use.
• Your account has developed one or more licensable applications, each of which contains a set of features.
• Your product management has considered license models and packaging of your licensable applications.
• Your development team has built or is ready to build the vendor certificate generator (VCG) corresponding to your company’s vendor name (see Appendix 9, Building a Vendor Certificate Generator). FlexNet Operations ships with a demonstration VCG that corresponds to the demo FlexNet Licensing toolkit.
• If you plan to use trusted activation, your development team has provided the Activation Settings File (publisher.xml) that is used to configure the FlexNet Licensing toolkit.
• If you plan to use trusted activation, your development team has built or is ready to build your producer-specific activation utilities.
Implementation Issues
Important • For database or file-based customizations to be applied properly, you must stop FlexNet Operations, undeploy all components, make the changes, redeploy all components, then restart FlexNet Operations.
This table summarizes some considerations before starting to use FlexNet Operations.
Table 6-1 • Implementation Checklist
Task Description
Now that I have installed FlexNet Operations, what are some basic configuration settings I must consider before starting to use FlexNet Operations?
Some of these settings, (for example, configuring FlexNet Operations to use SSL) are covered in the appendix Configuring FlexNet Operations for Secure Socket Layer. Other configuration settings specific to creating products, entitlements, and fulfillments are covered in this manual.
How are users for FlexNet Operations created and how are they given access to perform tasks?
Review the different kinds of FlexNet Operations users and the permissions they can be assigned through roles. Create additional roles and users.
FlexNet Operations 2020 R1.1 On Premises Installation and Implementation Guide FNO-2020R1.1-ING01 Company Confidential 77

Chapter 6 FlexNet Operations On Premises Implementation OverviewImplementation Issues
How can I learn how to generate a license with FlexNet Operations?
In a test environment, use demo data and test entitlements to learn about FlexNet Operations.
Now I’m ready to enter my own data. What additional settings should I configure?
If necessary, set up custom license model attributes, define the date-based version format, configure alerts to trigger the import of part numbers and web register keys. Configure FlexNet Operations with a production VCG and if you support trusted storage-based licensing, configure FlexNet Operations with a publisher.xml.
How will my products be licensed? Move to a production environment and create license models to define how, when, where, and by whom a product can be used. If you support trusted activation, also create transaction keys.
What products do I sell? Create features to correspond to the features in your licensable application. Package those features into products, package products into suites, and create maintenance products. Link products to license models, map products to part numbers, and relate products to one another.
How will I give my customers the right to fulfill licenses for my products?
Create customer accounts that can be associated with entitlements. Create simple entitlements that give a member of a particular customer account the right to fulfill licenses for one or more products, or create bulk entitlements that allow customers you haven’t yet identified the right to fulfill a license for a single product. If trusted storage-based activation must be supported without real-time communication with FlexNet Operations, create activation specification records (ASRs) to package with products.
How will my customers fulfill their licenses? Generate license certificates and email them to your customers, allow your customers to fulfill their certificate licenses through the End-User Portal, or support manual, ASR, or programmatic activation of licenses in trusted storage.
How will I manage my customers’ licenses after they are fulfilled?
Return, repair, rehost license certificates and email them to your customers, allow your customers to manage their certificate licenses through the End-User Portal, or support manual, ASR, or programmatic management of licenses in trusted storage.
Table 6-1 • Implementation Checklist
Task Description
78 Company Confidential FNO-2020R1.1-ING01 FlexNet Operations 2020 R1.1 On Premises Installation and Implementation Guide

Chapter 6 FlexNet Operations On Premises Implementation OverviewUsing FlexNet Setup
Using FlexNet SetupFlexNet Setup is a web application designed to safely shut down and restart FlexNet Operations. Whenever procedures state to stop or start FlexNet Operations use the following procedure.
Task Stop the FlexNet Operations server and undeploy all components
1. In FlexNet Setup click System Status > Stop Server. FlexNet Setup safely shuts down the FlexNet Operations server. When the server is fully stopped, the Undeploy All button becomes active.
2. On the System Status page, click Undeploy All. FlexNet Setup undeploys all FlexNet Operations components. When all components have been undeployed, it is safe to make your configuration changes.
Task Redeploy all components and restart the FlexNet Operations server
1. In FlexNet Setup, click System Status > Deploy All. When all components have been deployed, the Start Server button becomes active.
2. On the System Status page, click Start Server.
How will I track and take advantage of additional revenue opportunities?
Track license expirations and renew, upgrade, or upsell entitlements.
How can I integrate FlexNet Operations with my other back-office applications?
Consider using Web services to integrate FlexNet Operations with your CRM or ERP systems.
Table 6-1 • Implementation Checklist
Task Description
FlexNet Operations 2020 R1.1 On Premises Installation and Implementation Guide FNO-2020R1.1-ING01 Company Confidential 79

Chapter 6 FlexNet Operations On Premises Implementation OverviewUsing FlexNet Setup
80 Company Confidential FNO-2020R1.1-ING01 FlexNet Operations 2020 R1.1 On Premises Installation and Implementation Guide

7
Configuring FlexNet OperationsThis chapter contains instructions and guidelines for customizing FlexNet Operations.
• Custom Attributes
• Domain Configuration
• Customizing FlexNet Operations
• Configuring FlexNet Operations with a Production Vendor Certificate Generator (VCG)
• Customizing Headers and Trailers in License Files
• Multiple publisher.xml Files
• Channel Partner Tiers
• Implementing Time Zone Functionality
• Editing the Appearance of Producer Portal Pages
Important • Many of the customizations described in this chapter can be lost in the process of upgrading FlexNet Operations. See Upgrading FlexNet Operations for guidance on upgrading to a newer version without losing your customizations.
Important • For database or file-based customizations to be applied properly, you must stop FlexNet Operations, undeploy all components, make the changes, redeploy all components, then restart FlexNet Operations.
Custom AttributesCustom (producer-defined) attributes can be specified for several entities in FlexNet Operations. These attributes can be used to capture additional business-related information to enable richer integration with ERP systems, special workflows and reporting. In most cases, custom attributes can be of the following types:
• Number: Any integer.
FlexNet Operations 2020 R1.1 On Premises Installation and Implementation Guide FNO-2020R1.1-ING01 Company Confidential 81

Chapter 7 Configuring FlexNet OperationsCustom Attributes
• Text: One of the following text types (select Display Type of Text field or Text area):
• Free form: The end user can enter any free-form text.
• Single select: The end user can pick one value from a list of valid values.
• Multi-valued text: The end user can pick multiple values from a list of valid values. (These attributes cannot be used in reporting or searched on).
• Long Text (select Display Type of Text field or Text area)
• Boolean: Has a value of Yes or No.
• Date: A date value selected from a calendar pop-up.
When naming the attribute, do not include special characters like “, ‘, ?, etc. It is recommended that you use capital letters with underscores for attribute names.
Localizing Custom License Model Attribute NamesLocalized display names can be defined for the attributes so the end users see the attributes in a user-friendly way in their own language.
Task To localize custom attribute names
1. Create or locate the following directory: ops_install_dir/custom/webapps/flexnet/WEB-INF/classes.
2. In this directory, find or copy into it the resource bundle file named PublisherDefinedAttributesText_en.properties. For other languages, define appropriate language specific resource bundles.
3. Open the copy of the PublisherDefinedAttributesText_en.properties text file in a text editor.
4. Add resources to define the display names of the custom license model attributes you have created. Use the following syntax: attrName.label=displayName. For example:
LANGUAGE.label=Language
MAX_NODES.label=Maximum Number of Nodes
5. Save PublisherDefinedAttributesText_en.properties.
6. Use FlexNet Setup to stop the FlexNet Operations server and undeploy all components. See Using FlexNet Setup.
7. Use FlexNet Setup to redeploy all components and restart the FlexNet Operations server. See Using FlexNet Setup.
Extendable EntitiesThe following entities in FlexNet Operations can be extended by adding custom attributes.
82 Company Confidential FNO-2020R1.1-ING01 FlexNet Operations 2020 R1.1 On Premises Installation and Implementation Guide
Chapter 7 Configuring FlexNet OperationsCustom Attributes
Products, Download Packages, and Files
Custom attribute metadata can be added to products, download packages, and files to provide additional information about these entities. To add a product, download package, or file custom attribute, click Administer > Custom Attributes. On the Custom Attributes page, click Add Attribute. On the Create Custom Attribute page, type the custom attribute name, select the entitity type, whether it is required, active or inactive status, and the type. Click Save to create the custom attribute.
Entitlements and Line Items
Custom attributes can be added to entitlements and line items. These attributes can be defined by clicking Administer > Custom Attributes. On the Custom Attributes page, click Add Attribute. On the Create Custom Attribute page, type the custom attribute name, select the entitity type, whether it is required, active or inactive status, and the type. Click Save to create the custom attribute.
License Models
Custom attributes can be added to license models. These attributes can be defined for each license technology (including FlexNet license technology) under Administer > Custom License Attributes. On the Custom License Attributes page, click Add a License Model Attribute and provide the required information. While defining this attribute, specify whether this attribute is generally defined at license model, entitlement, or fulfillment time. Then, when the license model is defined, you can pick when the attribute value is defined. This provides the flexibility to define the value for the same attribute at different times in different license models.
License Generator Configurations
A license generator configuration lets a producer model any attributes that are specific to the license generation toolkit or executable. These are typically not business attributes. For example, with FlexNet technology, an example of an attribute could be the encryption strength used to generate a license.
To add a license generator attribute, click Administer > Custom License Attributes. On the Custom License Attributes page, click Add a License Generator Attribute and provide the required information.
Hosts
Custom attributes can be used to define a host based on host type. These attributes can be added under Administer > Custom Host Attributes. On the Custom Host Attributes page, click Create and provide the required information. You are prompted to provide values for these attributes when a host is created during license generation.
Accounts and Users
Custom attributes can be added to an account or user entity to capture additional information about accounts or customer and self-registered users. To add an account or user custom attribute, click Administer > Custom Attributes. On the Custom Attributes page, click Add Attribute. On the Create Custom Attribute page, type the custom attribute name, select the entity type, whether it is required, active or inactive status, and the type. Click Save to create the custom attribute.
Using Custom AttributesThis section details the use of custom attributes as they relate to different aspects of FlexNet Operations.
FlexNet Operations 2020 R1.1 On Premises Installation and Implementation Guide FNO-2020R1.1-ING01 Company Confidential 83
Chapter 7 Configuring FlexNet OperationsCustom Attributes
In EntitlementsWhen a custom attribute is defined as Specify at Entitlement Time in the license model, the user is prompted to specify a value for the attribute when the entitlement line item or bulk entitlement is created using the user interface or web services. This attribute name and value are stored on the entitlement line item or bulk entitlement. The attribute name is displayed in the user interface and can be retrieved using web services.
In Fulfillment RecordsWhen a custom attribute is defined as Specify at Fulfillment Time in the license model, the user is prompted to specify a value for the attribute when the user generates a license for an entitlement line item or web register key that uses this license model. This attribute name and value are stored on the fulfillment record. The attribute name is displayed in the user interface and can be retrieved using web services.
In Online Trusted Storage ActivationsWhen a custom attribute is defined as Specify at Fulfillment Time in the license model, for trusted storage activations, the attribute name and value can be added to the vendor-defined dictionary in the trusted storage activation request. FlexNet Operations processes this activation request and creates a fulfillment record. This attribute name is stored on the fulfillment record. The attribute name is displayed in the user interface and can be retrieved using web services.
Custom information can also be added to a trusted storage activation response in the vendor-defined dictionary. This information can then be used by the licensable application. To add custom information to the response, refer to “Vendor Dictionary” under Custom Java Classes. Note that this custom information is not stored in FlexNet Operations.
In FlexNet License TextThe fields Issuer, Notice, Serial Number, and Vendor String in the FlexNet license can be customized to include additional text. The following information can be added to these fields:
• Pre-defined substitution variables. The producer or manufacturer can add generic fields like EntitlementID, SoldTo, and ActivationID to these fields using pre-defined substitution variables. For more information on these variables, refer to the FlexNet Operations User Guide.
• Values of custom license model attributes whose values are set at license model, entitlement, or fulfillment time
• Values of custom attributes defined on products, line items, entitlements, and accounts
Task To add these custom attributes into FlexNet license text
1. Create a new license model. Choose one of the license strings (Issuer, Notice, Serial Number, or Vendor String) and select Specify Value Now.
2. In the license string text field, type a string containing the name of one of your custom attributes, and its prefix if applicable, enclosed in curly braces.
84 Company Confidential FNO-2020R1.1-ING01 FlexNet Operations 2020 R1.1 On Premises Installation and Implementation Guide

Chapter 7 Configuring FlexNet OperationsCustom Attributes
For example, you defined LANGUAGE as a custom license model attribute set at entitlement time and the Vendor String value is defined in the license model as Target Language={LANGUAGE}. The value of LANGUAGE is set to German in the entitlement line item, so the corresponding feature line would contain the following entry: VENDOR_STRING="Target Language=German"
3. Save the license model settings and click Next.
4. In the Set Up Custom Attributes page, select whether or when you want the value of the custom license model attribute LANGUAGE to be specified. In this example, it was at entitlement time.
5. If you are using a different type of custom attribute, set its value on one of the entities associated with the line item you will create.
6. Use the license model in an entitlement line item and activate it, and verify that your license string appears as you expect it to.
In Non-FlexNet LicensesLicense model, entitlement, fulfillment, license generator configuration, and host attributes are available to the custom license generator Java implementation class to generate an appropriate non-FlexNet license. The custom generator should use the public API in FlexNet Operations to retrieve these values. Refer to the FlexNet Operations Web Services Integration Guide and the section Custom Java Classes for more information.
DevicesCustom attributes can be added to hardware devices and used in device callouts. These attributes can be used as descriptors for the device. For more information on adding custom attributes to devices, consult the FlexNet Operations User Guide.
Displaying and Sorting Custom AttributesThe pages Activate Licenses and Manage Entitlements in the Producer Portal and End-User Portal can be customized to display the entitlement-time attributes. The pages Support Licenses and Manage Licenses pages in the Producer Portal and End-User Portal can be customized to display the fulfillment-time and host attributes.
Table 7-1 •
Custom Attribute Type Prefix
License Model (no prefix)
Product Product.
Line Item EntitlementLineItem.
Entitlement Entitlement.
Account SoldTo.
FlexNet Operations 2020 R1.1 On Premises Installation and Implementation Guide FNO-2020R1.1-ING01 Company Confidential 85

Chapter 7 Configuring FlexNet OperationsDomain Configuration
To customize the display of these attributes, insert records in the OPS_PORTAL_CONFIG table and set IS_CUSTOM_ATTRIBUTE or IS_CUSTOM_HOST_ATTRIBUTE columns to True. For more information on how to use OPS_PORTAL_CONFIG, refer to Editing the Appearance of End-User Portal Pages.
Note that multi-valued text attributes cannot be displayed in these pages.
Domain ConfigurationFlexNet Operations supports the configuration of external directory services, such as LDAP, for user authentication and authorization. Some producers already store customer and user information in a corporate LDAP directory. If configured, FlexNet Operations can access user information directly from the corporate LDAP directory. Administrators can avoid having to re-enter user information in FlexNet Operations.
This section describes various LDAP configuration parameters in detail, and includes an example LDAP directory structure.
Note • Before configuring a new domain with FlexNet Operations, it is strongly recommended that you thoroughly understand the domain’s existing directory structure. A complete description of LDAP directories is beyond the scope of this document. Consult with your domain administrator for more information on your account’s particular LDAP configuration and directory structure.
About LDAP
An LDAP server stores attribute-based data in a hierarchical branching structure called a Directory Information Tree (DIT). A DIT may contain a broad range of information about different types of data objects, including users, account groups, or resources such as printers or applications.
DIT data is arranged in directory levels, which include:
• Domain Component (DC) or Organization (O)
• Organizational Unit (OU)
• Common Names (CN)
Example DIT
A typical directory service can contain thousands of entries arranged in a complex structure. An example of a DIT is illustrated here. In the example, the DIT contains 4 levels of entries, including 2 domain components, 2 organizational units (accounts), and 8 common names (3 of which are groups, and 5 of which are users).
86 Company Confidential FNO-2020R1.1-ING01 FlexNet Operations 2020 R1.1 On Premises Installation and Implementation Guide

Chapter 7 Configuring FlexNet OperationsDomain Configuration
Figure 7-1: A sample DIT
Domain Configuration SettingsIn FlexNet Operations, domains are configured with the following settings. (Consult your LDAP administrator for specific details on how your own domain is currently configured. Your FlexNet Operations settings must match the existing configuration.)
Note • An external domain user (a user authenticated against an LDAP directory server) may only belong to a single organizational unit.
Table 7-2 • Domain Configuration Settings
Settings Description Req.
Name Name that uniquely identifies the domain, which is used as an identifier in cases such as Single Sign On and web services. The domain name for the domain that contains users entered manually into FlexNet Operations is FlexNet. Additional domains that are added are directory service domains.
Note • A domain name should not have any spaces.
*
FlexNet Operations 2020 R1.1 On Premises Installation and Implementation Guide FNO-2020R1.1-ING01 Company Confidential 87

Chapter 7 Configuring FlexNet OperationsDomain Configuration
Protocol LDAP and LDAPS protocols are supported.
LDAPS uses SSL connections. If LDAPS is selected, see the FlexNet Operations Installation Guide for instructions to configure secure (SSL) client settings for the FlexNet Platform Server.
Host Name of the host machine on which the directory service runs. *
Port Host machine port on which the directory service listens for requests. The default LDAP port is 389; the default LDAPS port is 636.
*
Domain Login The distinguished name (DN) of the user who connects to the directory server. If the directory server allows anonymous binding, then leave this field blank if anonymous login is used. If anonymous login is used, then ensure the directory server allows binding and searches for users and groups as an anonymous user. (Anonymous login is only supported in FlexNet Operations 11.5 or later.)
For example, in the sample DIT in Figure 7-1, you would enter the DN of the user Monty Burns as CN=Monty Burns,OU=usa,DC=acme,DC=com.
*
Domain Password
The password used when binding to the active directory domain to perform domain operations. (Password is not required if you are using anonymous login.)
*
Base Distinguished Name
The distinguished name (DN) of the node in the directory service from which to start searching for user information.
For example, in Figure 7-1, all searches will be performed below the node acme whose DN would be entered as dc=acme,dc=com.
*
User Search Filter
Used to create a list of users from this domain in the Browse Users page. The syntax (include parentheses) is (attribute_name=value), where value is the value of the directory service attribute when the object is a user.
For example, Figure 7-1, all user type entries are identified by the attribute objectclass, for which the value is person. In this case, the search for objectclass=person returns 5 users.
*
Authentication Filter
Expression used to search for a user, when the user logs in with a userId. The userId is substituted in the parameter {0}. For example, to find a user by loginID in the sample tree above, the authentication filter is set to loginId={0}.
UserID Attribute Attribute of the user entry in the LDAP directory that contains the userID by which the user can be identified. The first time an LDAP user logs into FlexNet Operations, a user record is created. The value of this attribute is copied to the userId field of the new user record.
Table 7-2 • Domain Configuration Settings
Settings Description Req.
88 Company Confidential FNO-2020R1.1-ING01 FlexNet Operations 2020 R1.1 On Premises Installation and Implementation Guide

Chapter 7 Configuring FlexNet OperationsDomain Configuration
Group Name Attribute
Directory service attribute of a user that contains the groups to which that user belongs.
For example, in Figure 7-1, the attribute memberOf in all the user type entries identifies the group.
User Display Name Attribute
The directory service attribute that contains the display name of a user. *
User Display Detail Attribute
Optional directory service attribute that contains the display detail of a user. The value of this property is displayed on the Add User page when you create a user from a directory service. If not defined, the default value is the user’s Distinguished Name in the directory service.
User Organization Unit Attribute
Optional name of the attribute in the directory service that stores the user’s account. (The corresponding organization units must already exist in FlexNet Operations before importing this user from the LDAP directory.)
The value specified in the directory service for this property must be the same as that defined by the Organization Identifier in Operations. If Operations does not find an organization unit (account) by that name, it uses the value defined in the Default Organization for External Domain property in Operations.
User Email Attribute
Optional name of the attribute in the directory service that stores the user’s email. If this is not defined, the user email is not populated.
User Locale Attribute
Optional name of the attribute in the directory service that stores the user’s locale. The Locale ID value specified by this property in the directory service must have format <language code>_<country code>. For example, en_GB for Great Britain English or en_US for United States English.
User TimeZone Attribute
Optional name of the attribute in the directory service that stores the time zone defined for that user. The value specified by this property in the directory service must take one of the following formats (these are supported by Java):
1. Time Zone ID, such as America/Dawson or America/Los_Angeles
2. GMT standard format:
• GMT <+|–> <Hours>:<Minutes>
• GMT <+|–> <Hours><Minutes>
• GMT <+|–> <Hours>
Hours is represented as either single-digit or double-digit.
Minutes is represented as double-digit.
A digit is either 0 1 2 3 4 5 6 7 8 or 9.
For example, GMT +05:30 or GMT +0500 or GMT +5.
Table 7-2 • Domain Configuration Settings
Settings Description Req.
FlexNet Operations 2020 R1.1 On Premises Installation and Implementation Guide FNO-2020R1.1-ING01 Company Confidential 89

Chapter 7 Configuring FlexNet OperationsCustomizing FlexNet Operations
Customizing FlexNet Operations You can configure FlexNet Operations to provide customized behavior for different producers, based on their specific requirements.
Custom Java ClassesFlexNet Operations can be customized by implementing and configuring a custom Java class with the specified interface. This section includes a table of customizable features and the associated Java classes as well as general instructions for how to employ customized classes.
• Customizable Features and Associated Java Classes
• Employing a Customized Java Class
Group Search Filter
The directory service filter condition that is used to identify a group. The syntax (include parentheses) is (attribute_name=value), where value is the value of the directory service attribute when the object is a group. Typically, the entry is identified by the objectclass attribute.
For example, in Figure 7-1, all group type entries in the sample LDAP hierarchy are identified by the attribute objectclass, for which the value is group. A search for objectclass=group returns 3 groups.
*
Group Display Name Attribute
Directory service attribute that contains the display name of a group. *
Group Display Detail Attribute
Optional directory service attribute that contains the display detail of a group. The value of this property is displayed on the Add Group page when you create a group from a directory service. If not defined, the default value is the Group Distinguished Name in the directory service.
Returned Page Size
If a positive number is specified, FlexNet Operations tries to use paging when searching for directory service entries. Paging means that the directory service returns no more than the specified number of entries at a time instead of all entries in one batch. Set this to a number less than or equal to the page size limit imposed by the directory service. Not all directory services support paging; if your directory service does not, set this value to 0.
Status An active domain can be used to import or authenticate a user; an inactive domain cannot. Leave the status of a new domain Active. (If you do not want to allow users from a specific domain to log into FlexNet Operations, set the value to Inactive. You can set it to Active at a later time.)
Table 7-2 • Domain Configuration Settings
Settings Description Req.
90 Company Confidential FNO-2020R1.1-ING01 FlexNet Operations 2020 R1.1 On Premises Installation and Implementation Guide

Chapter 7 Configuring FlexNet OperationsCustomizing FlexNet Operations
Note • Users of previous versions of FlexNet Operations should note that the packages listed here have been re-named to drop any reference to Macrovision. Any implementations using these packages performed in FlexNet Operations 12.0 or earlier versions must be updated and re-compiled using the current package names.
For more information on the interfaces listed in the table below, consult the API documentation, available in ops_install_dir\release\flexnet-data\site\samples\API\APIdocs.jar.
Customizable Features and Associated Java ClassesUse the following table to learn more about which features can be customized by implementing and configuring a custom Java class with the specified interface.
Caution • Do not modify or delete any source file in the release structure. Before you make any customizations, copy the files you need to customize (including samples, properties files, and so forth) to a new folder.
Table 7-3 • Features Customizable with Java Classes
Customized Feature Description
Credentials (User ID and Password) Validator
Defines custom rules for FlexNet user ID and password validations. If you are creating both a custom user ID and password validator, create one class for each. A class for validating passwords is invoked every time a user changes a password and can be used to enforce password policy: number of characters, special characters, re-use of old passwords, use of dictionary words, keyboard patterns, or trivial passwords.
Interface: com.flexnet.platform.util.Validator
Sample files: ops_install_dir\release\flexnet-data\site\samples\validators
Caution • Do not modify or delete any source file in the release structure. Before you make any customizations, copy the files you need to customize (including samples, properties files, and so forth) to a new folder.
Set in System > Configure > Validators > FlexNet User Name Validator and FlexNet User Password Validator.
FlexNet Operations 2020 R1.1 On Premises Installation and Implementation Guide FNO-2020R1.1-ING01 Company Confidential 91

Chapter 7 Configuring FlexNet OperationsCustomizing FlexNet Operations
User Authenticator Performs additional user authentication such as password expiration policies. This class is invoked whenever a user logs in to FlexNet Operations via the user interface or web services. Information can be obtained from the params object, as in
Locale locale = (Locale)params.get(“locale”);Date lastUpdated = (Date)params.get(“lastUpdated”);String changePassword = (String)params.get(“isTempPassword”);boolean isTempPassword = false; if(changePassword.equals(“true””))
isTempPassword = true; Set roleSet = (Set)params.get(“roles”);
This class can be customized to set limits for the duration temporary passwords remain valid. (The isTempPassword flag is necessary because temporary password expiration must be handled separately from actual password duration.) This class can also be used to manage passwords according to system manager policies—such as expiring every 90 days but in 30 days for sensitive data/privileged user accounts.
Interface: com.flexnet.platform.util.Authenticator
Sample files: None, but the default implementation exists in com.flexnet.platform.services.userManagement.FLEXnetuserAuthenticator.
Set in System > Configure > Validators > FlexNet User Authenticator.
Fulfillment ID Generator Generates custom fulfillment IDs.
Interface: com.flexnet.operations.publicapi.FulfillmentIDGenerator
Sample files: ops_install_dir\release\flexnet-data\site\samples\idgenerator
Caution • Do not modify or delete any source file in the release structure. Before you make any customizations, copy the files you need to customize (including samples, properties files, and so forth) to a new folder.
Set in System > Configure > FlexNet Operations > General Options: Fulfillment ID Generator Classname.
Table 7-3 • Features Customizable with Java Classes
Customized Feature Description
92 Company Confidential FNO-2020R1.1-ING01 FlexNet Operations 2020 R1.1 On Premises Installation and Implementation Guide

Chapter 7 Configuring FlexNet OperationsCustomizing FlexNet Operations
HostID Validator Performs Host ID validations for FlexNet technology hosts.
Note • The intention of a custom HostId validator is to apply rules during creation of hostids in the system. The validator is invoked only during creation of a new host. Typically, the custom hostid validator must be implemented in a system before you start using the system. If you apply new rules for hostid validation, those rules apply only after the new hostids are created. The existing hosts remain the same.
Interface: com.flexnet.operations.publicapi.HostIDValidator
Sample files: ops_install_dir\release\flexnet-data\site\samples\customvalidator
Caution • Do not modify or delete any source file in the release structure. Before you make any customizations, copy the files you need to customize (including samples, properties files, and so forth) to a new folder.
Set in System > Configure > FlexNet Operations > General Options: Host ID Validator.
ID Generator Automatically generates Web register keys and entitlement IDs.
For maintenance line items, use the method generateMaintenanceItemID(maintenance item mi).
Note • For customers migrating from previous versions of FlexNet Operations: Maintenance ID was generated using the same method as line item ID. In FlexNet Operations 12.5, use the method generateMaintenanceItemID.
Interface: com.flexnet.operations.publicapi.IDGenerator
Sample files: ops_install_dir\release\flexnet-data\site\samples\idgenerator\CustomIdGenerator.java
Caution • Do not modify or delete any source file in the release structure. Before you make any customizations, copy the files you need to customize (including samples, properties files, and so forth) to a new folder.
Set in System > Configure > FlexNet Operations > General Options: ID Generator Classname.
Table 7-3 • Features Customizable with Java Classes
Customized Feature Description
FlexNet Operations 2020 R1.1 On Premises Installation and Implementation Guide FNO-2020R1.1-ING01 Company Confidential 93

Chapter 7 Configuring FlexNet OperationsCustomizing FlexNet Operations
License Consolidator Performs license consolidation for custom license technologies.
Interface: com.flexnet.operations.publicapi.LicenseConsolidator
Sample files: ops_install_dir\release\flexnet-data\site\samples\customgenerator\CustomConsolidator.java
Caution • Do not modify or delete any source file in the release structure. Before you make any customizations, copy the files you need to customize (including samples, properties files, and so forth) to a new folder.
Set in Administer > License Technologies > Add a License Technology.
License File Name Generator These interfaces, one for FlexNet licensing and the other for non-FlexNet licensing, are used to generate a name for the license file when the license is downloaded or emailed to a user. Dynamic names can be generated that use the customer name, date, product name and other parameters.
For FlexNet license technology
Interface: com.flexnet.operations.publicapi.FlexFileNameGenerator
Set in Administer > License Technologies > FlexNet Licensing > File Name Generator.
For non-FlexNet license technology
Interface: com.flexnet.operations.publicapi.CustomTechFileNameGenerator
Set in Administer > License Technologies >Add a License Technology > File Name Generator.
Table 7-3 • Features Customizable with Java Classes
Customized Feature Description
94 Company Confidential FNO-2020R1.1-ING01 FlexNet Operations 2020 R1.1 On Premises Installation and Implementation Guide

Chapter 7 Configuring FlexNet OperationsCustomizing FlexNet Operations
License Generator Performs license generation for custom license technologies.
• The license generator class can be configured to query a database, read a file, call Web services, or access pre-built Java libraries to accomplish tasks.
• FlexNet licenses are generated using the VCG. For non-Flex licenses, a VCG is not required, as the license generator performs the same function.
Interface: com.flexnet.operations.publicapi.LicenseGeneratorService
Sample files: ops_install_dir\release\flexnet-data/site/samples/customgenerator/CustomGenerator.java ops_install_dir\release\flexnet-data/site/samples/customgenerator/CustomValidator.java
Caution • Do not modify or delete any source file in the release structure. Before you make any customizations, copy the files you need to customize (including samples, properties files, and so forth) to a new folder.
You can re-compile and configure the CustomGenerator class and use this generator to test a custom license technology. The sample generator simply prints all the license attributes into the license text.
For replacement license technologies, two samples show how public API methods can be used to generate a replacement license.
• CustomReplacementGeneratorUsingProductCountQuery.java
• CustomReplacementGeneratorUsingFulfillmentsQuery.java
Set in Administer > License Technologies >Add a License Technology.
Multiple License Filename Generator
Generates file names when using multiple license files.
Interface: com.flexnet.operations.publicapi.MultipleLicenseFilenameGenerator
Set in Administer > License Technologies > Add a License Technology > Multiple License Filename Generator.
Table 7-3 • Features Customizable with Java Classes
Customized Feature Description
FlexNet Operations 2020 R1.1 On Premises Installation and Implementation Guide FNO-2020R1.1-ING01 Company Confidential 95
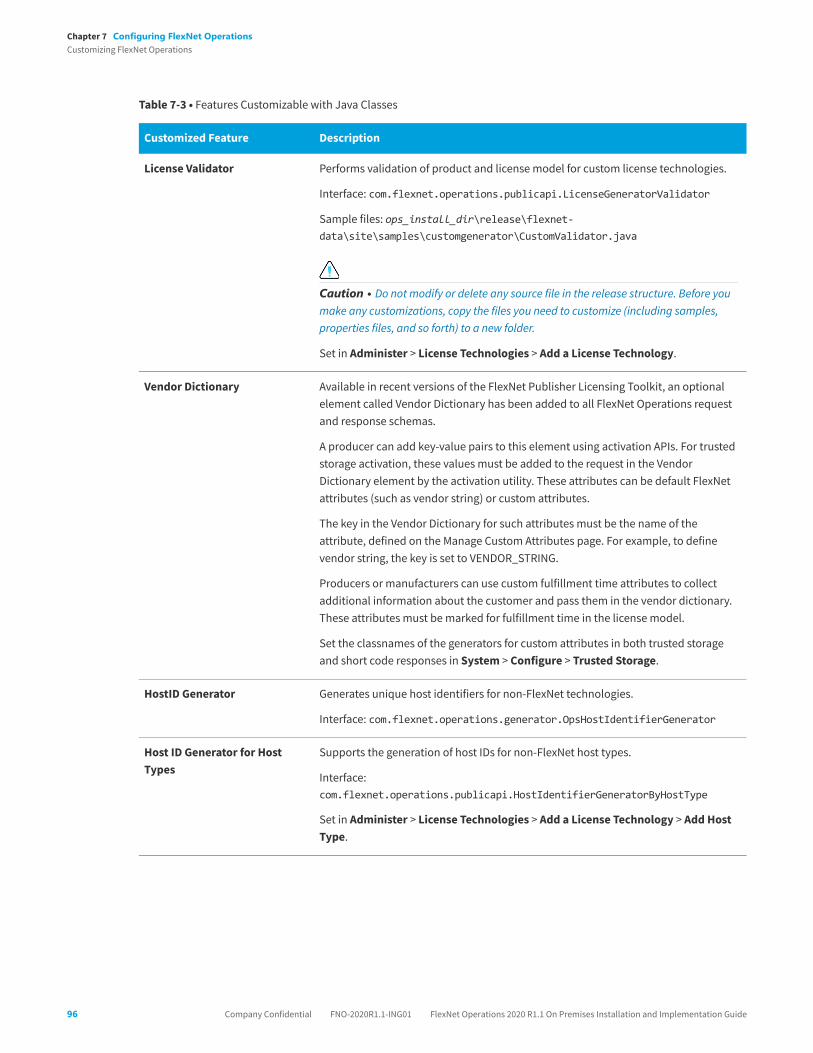
Chapter 7 Configuring FlexNet OperationsCustomizing FlexNet Operations
License Validator Performs validation of product and license model for custom license technologies.
Interface: com.flexnet.operations.publicapi.LicenseGeneratorValidator
Sample files: ops_install_dir\release\flexnet-data\site\samples\customgenerator\CustomValidator.java
Caution • Do not modify or delete any source file in the release structure. Before you make any customizations, copy the files you need to customize (including samples, properties files, and so forth) to a new folder.
Set in Administer > License Technologies > Add a License Technology.
Vendor Dictionary Available in recent versions of the FlexNet Publisher Licensing Toolkit, an optional element called Vendor Dictionary has been added to all FlexNet Operations request and response schemas.
A producer can add key-value pairs to this element using activation APIs. For trusted storage activation, these values must be added to the request in the Vendor Dictionary element by the activation utility. These attributes can be default FlexNet attributes (such as vendor string) or custom attributes.
The key in the Vendor Dictionary for such attributes must be the name of the attribute, defined on the Manage Custom Attributes page. For example, to define vendor string, the key is set to VENDOR_STRING.
Producers or manufacturers can use custom fulfillment time attributes to collect additional information about the customer and pass them in the vendor dictionary. These attributes must be marked for fulfillment time in the license model.
Set the classnames of the generators for custom attributes in both trusted storage and short code responses in System > Configure > Trusted Storage.
HostID Generator Generates unique host identifiers for non-FlexNet technologies.
Interface: com.flexnet.operations.generator.OpsHostIdentifierGenerator
Host ID Generator for Host Types
Supports the generation of host IDs for non-FlexNet host types.
Interface: com.flexnet.operations.publicapi.HostIdentifierGeneratorByHostType
Set in Administer > License Technologies > Add a License Technology > Add Host Type.
Table 7-3 • Features Customizable with Java Classes
Customized Feature Description
96 Company Confidential FNO-2020R1.1-ING01 FlexNet Operations 2020 R1.1 On Premises Installation and Implementation Guide

Chapter 7 Configuring FlexNet OperationsCustomizing FlexNet Operations
Capability Request Callout Supports customized handling of device requests.
The Capability Request Callout can be used by a producer to implement custom behavior, during capability request handling, that is not supported through standard FlexNet Operations. The callout can be implemented as a custom Java class or as an external service.
There are several trigger points (refer to Trigger Points) during capability request handling that can be enabled and there are various actions (refer to Actions) that can be taken.
Interface: ops_install_dir\release\flexnet-data\site\samples\lfs\CapabilityRequestCallout
Sample files: ops_install_dir\release\flexnet-data\site\samples\lfs\capabilityrequest, especially CustomCapabilityCallout.java and CapabilityCalloutServlet.
For details on both methods, see the Capability Request Handler Details section following this table.
System Configuration Settings Set in System > Configure > Embedded Devices > Capability Request Handling.
Capability Request Callout — Either a class name or a URL for an external REST service.
• If the value is a class name, the class must be on the LFS class path and implement the CapabilityRequestCallout interface. The request parameter is the JSON request body. The return value is the JSON response body. (Default: com.flexnet.lm.bot.service.CapabilityRequestCallout.)
• If the value is a URL (starts with http:// or https://), the JSON request body is POSTed to the URL. The response returned is expected to be the JSON response body.
Because the callout often runs without direct access to the database, all information needed by the implementer must be passed in the request and the amount of data could result in a significant performance penalty. Use the following system configuration settings to mitigate any potential performance impact by controlling when the callout is invoked and what data is included in the request body sent to it.
Table 7-3 • Features Customizable with Java Classes
Customized Feature Description
FlexNet Operations 2020 R1.1 On Premises Installation and Implementation Guide FNO-2020R1.1-ING01 Company Confidential 97

Chapter 7 Configuring FlexNet OperationsCustomizing FlexNet Operations
Capability Request Callout (continued)
Three settings specify when the callout is invoked:
Capability Request Finalize Host Callout — When selected, invokes the callout just before creating an unknown host. Additional attributes can be defined before it is persisted. It can also be used to cancel creation of the new host instance.
Capability Request Access Check Callout — When selected, invokes the callout after (optionally) creating an unknown host, but before proceeding with processing an off-line request. The return value can be used to deny access to the targeted host.
Capability Request Finalize Response Callout — When selected, invokes the callout after an incoming host request has been validated, but before the capability response has been generated.
Two settings determine how much information is required in the request:
Callout Includes Host Details — When selected, sends details about the target host in the callout request body. Otherwise, sends only the host id and id type, host class, host type, and alias.
Callout Includes Add-on Details — When selected, sends add-on details in the callout request body. Otherwise, sends only a list of activation IDs.
Renewal Requests Allows customized functionality when an end user clicks the Request button on the End-User Portal’s Expiring Entitlements page.
The Java class can be used to acquire information about the expiring entitlements and connect with a producers back-office systems or redirect users who clicked Request to a system outside of the End-User Portal.
Interface: com.flexnet.operations.publicapi.RenewalRequestHandler
Sample files: ops_install_dir\release\flexnet-data\site\samples\renewal\RenewalHandler.java and RenewalRedirectHandler.java
Caution • Do not modify or delete any source file in the release structure. Before you make any customizations, copy the files you need to customize (including samples, properties files, and so forth) to a new folder.
Set in System > Configure > FlexNet Operations > Renewals: Renewal Callout
Note • Renewal Callout can identify a Java class that implements the RenewalRequestHandler or an external SOAP endpoint that implements the RenewalService.
Table 7-3 • Features Customizable with Java Classes
Customized Feature Description
98 Company Confidential FNO-2020R1.1-ING01 FlexNet Operations 2020 R1.1 On Premises Installation and Implementation Guide

Chapter 7 Configuring FlexNet OperationsCustomizing FlexNet Operations
Capability Request Handler Details Although it would be possible to call FlexNet Operations public web services from the callout (or public web services hosted anywhere else), the performance impact on the capability request processing is significant and is strongly discouraged.
Trigger Points
The callout can be invoked at three trigger points during the capability request handling. You must configure at which of these points you want the FlexNet Operations application to call your custom handler. This configuration is set in the Configure section of the FlexNet Operations application as described in Table 7-3.
The three trigger points are:
• finalize host: just before creating an unknown host
• check access: before proceeding with processing an off-line request
• finalize response: after an incoming host request has been validated, but before the capability response has been generated
The trigger point being invoked is encoded in the URL the JSON is posted to, the configured URL will have/finalizeHost, /checkAccess, or /finalizeResponse appended to it to indicate which trigger point is active. You can look at the example servlet class to see how this is used when invoking the callout.
Actions
The supported actions, and when they are allowed, are shown in Table 7-4:
Table 7-4 • Supported Actions
ActionFinalize Host
Check Access
Finalize Response
Deny creation of an unknown host X
Set target host type on newly created host X
Set or remove vendor dictionary entries on the host instance X X
Set target host owner X X
Add status list entries to the response X X X
Deny access to target host (return error response instead) X
Add vendor dictionary entries to the response X
Override the default response lifetime X
Skip confirmation for reducing copies or removal of an add-on X
Deny mapping or inclusion of an add-on X
FlexNet Operations 2020 R1.1 On Premises Installation and Implementation Guide FNO-2020R1.1-ING01 Company Confidential 99

Chapter 7 Configuring FlexNet OperationsCustomizing FlexNet Operations
Usage
The callout can be implemented either as a Java class or as a servlet.
The build.xml file in ops_install_dir\release\flexnet-data\site\samples\lfs\capabilityrequest can be used to extract flexnet-lfs-callout.war from lfs.war in the installation.
The build.xml file from flexnet-lfs-callout.war has targets for either implementation:
• compile: Compile the custom capability request handler. This package must be available on the LFS classpath and must be set in the FlexNet Operations configuration.
• package: As above, but includes the servlet class and delivers a war file to be deployed on an application server. The URL where the servlet can be found must be set in the FlexNet Operations configuration.
Sample Implementation
Because the callout mechanism is fairly complex, a sample Java implementation is included with the FlexNet Operations kit. This consists of a servlet suitable for deployment in a servlet container like Tomcat. The sample code shows one way to parse the request and prepare the response. It demonstrates some of the most common actions, such as adding vendor dictionary entries to the response.
The class CustomCapabilityCallout.java implements the capability request handler com.flexnet.lfs.callout.CapabilityRequestCallout interface. It shows the use of the invoke method and how to discover what triggered the callout. It also shows how to set the actions that you want FlexNet Operations to take after returning from your custom callout.
The class CapabilityCalloutServlet is an example of a REST implementation.
JSON Reference
JSON Request Body
The JSON message POSTed to the callout URL (or passed to the invoke() method if class name used) contains several top level fields. The request field contains information from the capability request.
The host field contains information from the target host of the capability request; the italic fields (from ’identityName’ to ‘userId’) are only included if the capabilityService.callout.includeHostDetails setting is true.
The addOns field contains information about the add-ons mapped to the host; the italic fields (from ‘waitingForConfirmation to ‘issuer’) are only included if the capabilityService.callout.includeAddOnDetails setting is true.
The statusList field contains status list items that are pending for inclusion in the capability response.
Below is a sample request body:
{ "requestInfo" : {
Set expiration date override for an add-on ?
Table 7-4 • Supported Actions
ActionFinalize Host
Check Access
Finalize Response
100 Company Confidential FNO-2020R1.1-ING01 FlexNet Operations 2020 R1.1 On Premises Installation and Implementation Guide

Chapter 7 Configuring FlexNet OperationsCustomizing FlexNet Operations
"activationIds" : [ { "id" : "a1", "copies" : 1, "partial" : false }, { "id" : "a2", "copies" : 1000, "partial" : true } ], "vendorDictionary" : { "somekey" : 10, "anotherkey" : "anothervalue" }, "lastResponseTime", 1502906444, }
"hostInfo" : { "id" : "dev1", "idType" : "STRING", "hostClass" : "CLIENT", "hostType" : "FLX_CLIENT", "alias" : "My device", "identityName" : "id1",
"publisherName" : "demo", "status" : "ACTIVE", "vendorDictionary" : { "somekey" : 10, "anotherkey" : "anothervalue" }, "firstActivated" : "2017-08-09T12:34:56Z", "machineType" : "PHYSICAL", "vmName" : "Amazon EC2", "baseProductId" : "baseprod1",
"enterpriseId" : 101, "user" : "[email protected]", "userId" : 19 },
"addOnInfo" : [ { "activationId" : "a1", "requested" : 1, "consumed" : 2, "waitingForConfirmation" : true, "expirationOveride" : null, "licenseModel" : "Embedded Counted", "vendorString" : "some vendor string", "notice" : null, "serialNumber" : null, "issuer" : null, }, ... ],
"statusList" : [ { "code" : 1, "detail" : "a9" }, ... ]}
FlexNet Operations 2020 R1.1 On Premises Installation and Implementation Guide FNO-2020R1.1-ING01 Company Confidential 101

Chapter 7 Configuring FlexNet OperationsCustomizing FlexNet Operations
JSON Response Body
The JSON message returned from the callout can contain several top level fields.
The response field defines action to apply to the capability response, such as adding vendor dictionary entries, changing the status list entries, or the response lifetime.
The host field defines actions to apply to the target host instance, such as modifying the vendor dictionary entries, denying host creation, setting the host type, or the host owner.
The addOns fields define actions to apply to the add-ons mapped to the host, such as skipping removal confirmation, denying an add-on from being mapped or included in the response, and overriding the expiration date.
Here is a sample response body:
{ "responseActions" : { "vendorDictionary" : { "somekey" : 1, "anotherkey" : "anothervalue", }, "addToStatusList" : [ { "code" : 5, "detail" : "a2" }, ... ], "lifetime" : 0 },
"hostActions" : { "addToVendorDictionary" : { "key" : "value", ... }, "removeFromVendorDictionary" : [ "key", ... ], "denyCreate" : true, "hostType" : "CustomHostType", "enterpriseId" : 20 },
"addOnActions" : [ { "activationId" : "a1", "skipConfirmation" : true, "denied" : true, "expiration" : null }, ... ]}
Employing a Customized Java ClassFollow the instructions below to employ a customized Java class in FlexNet Operations.
Task To use Java classes to customize Operations functionality
Note • To ensure proper compilation, add the following path to the classpath: ops_install_dir\components\wildfly\standalone\deployments\flexnet.ear\flexnet.war\WEB-INF\classes
102 Company Confidential FNO-2020R1.1-ING01 FlexNet Operations 2020 R1.1 On Premises Installation and Implementation Guide

Chapter 7 Configuring FlexNet OperationsCustomizing FlexNet Operations
If you have a different WildFly installation, add the following to your classpath: <WildFly_home>\standalone\deployments\flexnet.ear\flexnet.war\WEB-INF\classes
1. Customize an Operations feature as needed, by implementing the appropriate Java interface as shown in Table 7-3.
2. Compile any customized feature against FNOPublicAPI.jar. This file is at ops_install_dir/release/flexnet-data/site/samples/API/FNOPublicAPI.jar.
Caution • Do not modify or delete any source file in the release structure. Before you make any customizations, copy the files you need to customize (including samples, properties files, and so forth) to a new folder.
3. For device-related callouts only (based on DeviceHandler or DeviceRequestHandler), compile against flxBinary.jar also. This file is at ops_install_dir/release/flexnet-data/site/webapps/flexnet/WEB-INF/lib/flxBinary.jar.
Caution • Do not modify or delete any source file in the release structure. Before you make any customizations, copy the files you need to customize (including samples, properties files, and so forth) to a new folder.
4. Place your new class in the directory: ops_install_dir/custom/webapps/flexnet/WEB-INF/classes. (If the class file package is scoped, create a directory structure that matches the package in the classes directory.)
5. In Operations, click System > Configure > FlexNet Operations > General Options.
6. Locate the name of the feature you have customized (for example, Host ID Validator). In the corresponding text box, enter the name of your custom Java class.
7. Use FlexNet Setup to stop the FlexNet Operations server and undeploy all components. See Using FlexNet Setup.
8. Use FlexNet Setup to redeploy all components and restart the FlexNet Operations server. See Using FlexNet Setup.
Your new class is now available for testing and use.
Using a Custom Digital Signature AlgorithmUsers who use FlexNet Embedded in conjunction with FlexNet Operations can use a custom digital signature algorithm (DSA) as an alternative to the license key algorithms provided in the FNE toolkit.
In addition to the license-enabled code to validate custom digital signatures, you must create a corresponding Java class to generate new publisher identity files and digitally sign licenses using your digital signature algorithm.
The Java classes must implement the Signer interface (com.flexnet.lm.signer.Signer); the required method names and signatures are provided in the javadoc documentation. The FNE toolkit provides Java classes corresponding to the example custom signature callout examples, with source files FletcherChecksumSigner.java and HmacSigner.java in the toolkit directory examples/test_backoffice_tools/src/signer.
You must also copy com/flexnet/lm/CustomResources.properties (preserving the directory structure) to the ops_install_dir/custom/webapps/flexnet/WEB-INF/classes directory before using the FlexNet Setup application. In the CustomResources.properties file, set the following values:
• customSigner.availableClassNames: Fully qualified Java class name for your each of your custom algorithms, as in signer.FletcherChecksumSigner; separate multiple class names with a comma.
FlexNet Operations 2020 R1.1 On Premises Installation and Implementation Guide FNO-2020R1.1-ING01 Company Confidential 103

Chapter 7 Configuring FlexNet OperationsCustomizing FlexNet Operations
• custom.label: Custom algorithm name to display on the Create a Publisher Identity page, as in Fletcher's Checksum; the key name is specified in the getDisplayName method you define in your signer class.
• custom.strength.label: Display name for a particular strength, as in Short (16 bit); the key name depends on the getStrengthDisplays method you define in your signer class.
The steps for deploying Java classes for a custom DSA are similar to the steps necessary for other Java class customizations to FlexNet Operations, as discussed in Employing a Customized Java Class. For deploying Java classes for your custom DSA, use the steps provided below.
Task To deploy Java classes for a custom DSA
1. Compile any customized feature against flxBinary.jar, and against FNOPublicAPI.jar (if your Signer has dependencies on FNOPublicAPI.jar).
• flxBinary.jar is at ops_install_dir/webapp/WEB-INF/lib/flxBinary.jar.
• FNOPublicAPI.jar is at ops_install_dir/release/flexnet-data/site/samples/API/FNOPublicAPI.jar.
Caution • Do not modify or delete any source file in the release structure. Before you make any customizations, copy the files you need to customize (including samples, properties files, and so forth) to a new folder.
2. Copy and edit CustomResources.properties as described above.
3. Place your new class and properties file in the ops_install_dir/custom/webapps/flexnet/WEB-INF/classes directory. (Create a directory structure that matches the package in the classes directory.)
4. Use FlexNet Setup to stop the FlexNet Operations server and undeploy all components. See Using FlexNet Setup.
5. Use FlexNet Setup to redeploy all components and restart the FlexNet Operations server. See Using FlexNet Setup.
Your new class is now available for testing and use.
Configuring and Deploying a Custom Database Connection Pool
When implementing custom license generators and validators, it may be required to read and write some data from a third party database, rather than the FlexNet Operations database. As these custom classes are used in a multi-user environment, correctly defining and using connection pools to the third party database optimizes your application performance. This section describes how to define such a custom database connection pool in FlexNet Operations and use it in your custom Java class.
Note • After this connection pool is defined, FlexNet Operations uses its included JBoss server and JDBC database drivers to read and write to the database.
The following sections cover the steps for deploying a custom database connection pool:
• Customizing the Data Source XML Configuration Files
• Verifying the Configured Connection
104 Company Confidential FNO-2020R1.1-ING01 FlexNet Operations 2020 R1.1 On Premises Installation and Implementation Guide

Chapter 7 Configuring FlexNet OperationsCustomizing FlexNet Operations
• Getting a Connection
• Additional Implementation Notes
Important • These instructions assume it is possible to get a JTA connection to the database pool. If you cannot obtain a JTA connection, it is often possible to obtain a non-JTA connection instead. To do so, follow the instructions in this section, except
• In the data source configuration XML, use <no-tx-datasource> instead of <local-tx-datasource>.
• Use the method, getNonJTADBConnection, instead of getDBConnection. (See Getting a Connection for sample code using getDBConnection.)
Customizing the Data Source XML Configuration FilesUse the instructions below to modify the WildFly configuration file.
Caution • Do not modify or delete any source file in the release structure. Before you make any customizations, copy the files you need to customize (including samples, properties files, and so forth) to a new folder. Changes to the configuration file can cause deployment of FNO and other components to fail.
Task To configure a database connection pool against a custom database
1. Use the following example to change the ops_install_dir\release\jbossConfig\standalone-full.xml.template file:
<!-- replace all $<xxxx>$ with actual values -->
<datasource jta="true" jndi-name="java:/jdbc/CustomerDBDataSource" pool-name="CustomerDBDataSource" enabled="true" use-java-context="false" use-ccm="false"> <connection-url>jdbc:sqlserver://$host$:1433;databaseName=$DatabaseName$</connection-url> <driver>mssql-jdbc-7.4.1.jre8</driver> <user-name>$dbuser$</user-name> <password>$dbpassword$</password>
<!-- pooling parameters --> <pool> <!-- The minimum connections in a pool. Pools are lazily constructed on first use --> <min-pool-size>5</min-pool-size> <!-- The maximum connections in a pool --> <max-pool-size>25</max-pool-size> </pool> <!-- sql to call on an existing pooled connection when it is obtained from pool --> <validation> <check-valid-connection-sql>select count(*) from $YOUR_TABLE$</check-valid-connection-sql>
FlexNet Operations 2020 R1.1 On Premises Installation and Implementation Guide FNO-2020R1.1-ING01 Company Confidential 105

Chapter 7 Configuring FlexNet OperationsCustomizing FlexNet Operations
</validation> <!-- This element specifies the maximum time in milliseconds to block while waiting for a connection before throwing an exception. --> <timeout> <blocking-timeout-millis>25000</blocking-timeout-millis> </timeout> </datasource>
Verifying the Configured ConnectionIf the connection is configured correctly, during server start, the following statement is displayed in the console. If you started FNO as a service, then check the log file and confirm that this statement is present.
5:24:16,659 INFO Bound ConnectionManager 'jboss.jca:service=DataSourceBinding,name=jdbc/FlexNetDataSource' to JNDI name 'java:jdbc/FlexNetDataSource'15:24:17,986 INFO JBossMQ UIL service available at : /0.0.0.0:177115:24:18,095 INFO Bound to JNDI name: queue/trustedActivationQueue15:24:18,205 INFO Bound ConnectionManager 'jboss.jca:service=DataSourceBinding,name=jdbc/CustomerDBDataSource' to JNDI name 'java:jdbc/CustomerDBDataSource'15:24:18,501 INFO Bound ConnectionManager 'jboss.jca:service=ConnectionFactoryBinding,name=JmsXA' to JNDI name 'java:JmsXA'15:24:18,611 INFO Bound ConnectionManager 'jboss.jca:service=DataSourceBinding,name=jdbc/FlexNetReportingDataSource' to JNDI name 'java:jdbc/FlexNetReportingDataSource'
Getting a ConnectionThe following code snippet explains how to get a connection from the custom database connection pool in the CustomGenerator implementation class.
/* data source name as defined in the connection pool configuration with the element <jndi-name> */private static final DATA_SOURCE_NAME = “jdbc/CustomerDBDataSource”;/* get DBConnection manager instance*/DBConnectionManager conMgr = DBConnectionManager.Factory.getInstance();Connection connection = null;try{/* get a jdbc connection from the pool for the given data source name */connection = conMgr.getDBConnection(DATA_SOURCE_NAME);} catch(Exception e ){// exception handling} finally{/* */ if(connection != null){Connection.close(); // This must be wrapped in a try/catch as well.}}
106 Company Confidential FNO-2020R1.1-ING01 FlexNet Operations 2020 R1.1 On Premises Installation and Implementation Guide

Chapter 7 Configuring FlexNet OperationsCustomizing FlexNet Operations
Additional Implementation Notes• There is no restriction on the maximum number of connections, as long as your database supports such a number. An
initial size of 100 is recommended, similar to what is configured for the FlexNet Operations internal connection pool.
• Always close the statements and connections in a final block to prevent connection leakages.
• Never call the API with a null value of data source. For null values, FlexNet Operations returns the following exception message:
java.lang.IllegalArgumentException: DBConnectionService.getDBConnection()- Null dataSourceName is provided. Please set a valid datasource name.
• Data in the FlexNet Operations database cannot be modified or queried using this approach. If the FlexNet Operations JDBC source name is used, the following error is returned:
com.flexnet.operations.publicapi.OperationsException: FNO Internal DataSource access is not allowed by this call.
Logging to the flexnet.log FileIn custom Java classes, it may sometimes be useful to log critical debugging information to the FlexNet Operations debug log file. This log file is called flexnet.log and is stored in the directory <ops_install_folder>\logs.
Use the standard log4j library to implement logging, as follows.
Task To log debugging information to the flexnet.log file:
1. Add the following static variable declaration statement to the custom implementation class:
private static org.apache.log4j.Logger log = org.apache.log4j.Logger.getLogger("flexnet");
2. Use the log reference for adding the statements as needed, for example:
log.info("$$$$ TEST $$$$ - OpsEsnGenerator.generateEntitlementID() Raw ID value : " + esn);
3. Depending on your requirements, you can add log.error(), log.debug(), log.warn(), log.info() and log.error() statements. Based on the System Configuration Log Level, the statements are written to flexnet.log.
4. Compile the class and test. For compilation, keep the log4j*.jar files in the classpath. These .jar files are available in the FNO installation in the directory ops_install_dir\webapp\WEB-INF\lib.
Caution • Do not modify or delete any source file in the release structure. Before you make any customizations, copy the files you need to customize (including samples, properties files, and so forth) to a new folder.
Localizing Error Messages In case of an error, an exception can be returned from the custom Java classes. These exception messages are displayed in the user interface and it may be useful to localize these error messages to support multi-lingual users.
FlexNet Operations 2020 R1.1 On Premises Installation and Implementation Guide FNO-2020R1.1-ING01 Company Confidential 107

Chapter 7 Configuring FlexNet OperationsConfiguring FlexNet Operations with a Production Vendor Certificate Generator (VCG)
The custom Java class should return error messages using the class com.flexnet.operations.publicapi.OperationsException. The OperationsException constructor takes 3 arguments: public OperationsException(String arg0, Object[] params, Locale locale)
• arg0 is a unique string key constant that identifies the exception. This key must be added to the PublisherDefinedAttributesText_en.properties resource bundle. Place the modified resource bundle in the directory ops_install_dir\custom\operations\webapps\flexnet\WEB-INF\classes. If you must add other languages besides English, add the appropriate language-specific resource bundles.
• InvalidLicenseHost=Invalid license host found in the generator for activationId {0} and soldTo {1}
• params is array of object values used to replace place holders in the localized message. In the above example, to replace the place holders {0} and {1} in the message, the array is set as new Object[]{"1234-11", "MYORG"}
• locale is the language in which the localized message must be generated. The logged-in user's locale can be obtained from the GeneratorRequest object.
OrgUnitUser loggedInUser = request.getLoggedInUser();
Locale locale = loggedInUser.getLocale();
Configuring FlexNet Operations with a Production Vendor Certificate Generator (VCG)
A FlexNet license for a product is generated using the Vendor Certificate Generator (VCG) associated with that product. A producer can configure multiple VCGs to define different security settings and other license characteristics. A sample VCG is included in the FlexNet Operations installation.
To build your own production VCG, refer to Appendix 9, “Building a Vendor Certificate Generator.”
Task To configure FlexNet Operations with your own production VCG:
1. Copy your platform-specific VCG into the ops_install_dir/custom/<platform>/bin directory, where <platform> corresponds to the operating system on which FlexNet Operations is running: x64_n6 (Windows) or amd64_re3 (Linux).
Note • The VCG is run from the site directory, but is preserved on an upgrade or reconfiguration of the site directory if it is located in the custom tree.
2. In the FlexNet Operations Producer Portal, click Administer > License Generators > Add a License Generator Configuration.
3. In the Create License Generator Configuration page, enter a name for the license generator in the Name field.
4. Select FlexNet Licensing as the License Technology for the VCG.
5. In Name of the VCG executable, enter the file name of the VCG executable.
6. Enter values for each of the other fields, overriding the defaults as appropriate. (Consult the online help for fields and field values.)
7. Click Save to save the VCG license generator configuration for this VCG.
108 Company Confidential FNO-2020R1.1-ING01 FlexNet Operations 2020 R1.1 On Premises Installation and Implementation Guide

Chapter 7 Configuring FlexNet OperationsCustomizing Headers and Trailers in License Files
8. Use FlexNet Setup to stop the FlexNet Operations server and undeploy all components. See Using FlexNet Setup.
9. Use FlexNet Setup to redeploy all components and restart the FlexNet Operations server. See Using FlexNet Setup.
10. Restart FlexNet Operations.
Customizing Headers and Trailers in License FilesFor FlexNet licensing technologies, static headers and trailers can be added as comments in the license file. You can customize the headers and trailers in your license files for as many products as you need.
Task To customize your license file header or trailer
1. Open the file PublisherDefinedAttributesText_en.properties in a text editor.
2. Add a key value pair for each license header and license trailer you want to customize. The key value pair must consist of a resource bundle key and a value, and must be defined for each product. Key values must be defined uniquely, and the key can contain no spaces. An example of each key value pair for the demo product Calculator would be:
• product.calculator.header.text=This is the header for Calculator product
• product.calculator.trailer.text=This is the trailer for Calculator product.
3. Save the modified file with your new key value pairs.
4. Place the saved file in the directory: ops_install_dir\custom\webapps\flexnet\WEB-INF\classes.
5. Use FlexNet Setup to stop and restart FlexNet Operations. See Using FlexNet Setup.
6. In the FlexNet Operations Producer Portal, select System > Configure > FlexNet Operations.
7. Ensure that the check box Allow License Headers and Trailers is selected. Click Save.
8. Browse to Package Products and select the product for which you want to add a header and trailer to the license file.
9. For a license file header, in Header Resource Bundle Key, enter the name of the resource bundle key you added in Step 2. Under Header Text, the actual text of the license file header is displayed. (If you enter an invalid header resource bundle key, the header text is displayed with question marks, ???.)
10. For a license file trailer, in Trailer Resource Bundle Key, enter the name of the resource bundle keys you added in Step 2 (For example, product.calculator.header.text). Under Trailer Text, the actual text of the license file trailer is displayed. (If you enter an invalid trailer resource bundle key, the trailer text is displayed with question marks, ???.)
11. Click Save. The next time a license file is generated for the product, the specified header and trailer are displayed at the start and end of the license file.
Note • When multiple license files containing headers and trailers are consolidated, the header and trailer text is added around each license in the consolidated license. The headers and trailers are not consolidated.
FlexNet Operations 2020 R1.1 On Premises Installation and Implementation Guide FNO-2020R1.1-ING01 Company Confidential 109

Chapter 7 Configuring FlexNet OperationsMultiple publisher.xml Files
Multiple publisher.xml FilesFlexNet Operations supports the use of multiple activation settings files (also called publisher.xml files) to generate trusted storage licenses. This can be useful when a publisher has multiple vendor daemons. Typically, this happens if a publisher merges with another publisher that uses a different vendor daemon name.
The default publisher is specified in the file publisher.xml, located in the ops_install_dir\release\flexnet-data\site\bin or ops_install_dir\custom\bin directories. To support multiple publishers, additional activation settings files are included in the directory ops_install_dir\release\flexnet-data\site\bin\activationsettings. These files must be valid activation settings files, formatted like the default publisher.xml file.
Caution • Do not modify or delete any source file in the release structure. Before you make any customizations, copy the files you need to customize (including samples, properties files, and so forth) to a new folder.
There is no restriction on activation settings file names. However, it is strongly suggested you use the convention publisher_<identifier>.xml, where identifier is a unique identifier. For example, for the publisher Acme, with divisions in EMEA and the US, you could use the file names publisher_acmeemea.xml and publisher_acmeus.xml.
FlexNet Operations always tries to read the default publisher.xml file under site/bin first, then it reads any additional activation settings files under site/bin/activationsettings and loads the configuration.
If FlexNet Operations cannot find any activation settings files, it logs a warning statement in the log file.
• When creating transaction keys, you are prompted to specify a publisher from a drop-down list.
• You can view all configured activation settings files on the View and Manage Trusted Storage Requests page by clicking Publisher XML Files.
Configuring Multiple Activation Settings
To configure multiple publisher activation settings files, put the main publisher.xml file in the custom/bin directory. Put any additional publisher.xml files in the custom/bin/activationsettings directory. Run FlexNet Setup to copy your files from the custom directory to the directories site/bin and site/bin/activationsettings.
Never directly copy your activation settings files to site/bin or site/bin/activationsettings. Always use the FlexNet Setup process to copy these files from the custom directory to the correct locations. If you edit any of your activation settings files, put the edited versions in the custom/bin or custom/bin/activationsettings directories and run FlexNet Setup again.
Channel Partner TiersPartner tiers are added directly in the FlexNet Operations database, in the table OPS_PARTNER_TIER_NAMES. By default, two channel partner tier names are supplied: End Customer and Distributor. (These default names cannot be changed, but different display names can be substituted for them.)
Web service operations accept and return the tier name stored in the NAME column.
Note • Creating partner accounts for the new channel partner tier or performing entitlement split/transfer to account in the new channel partner tier required purchase of Advanced Organization Management module.
110 Company Confidential FNO-2020R1.1-ING01 FlexNet Operations 2020 R1.1 On Premises Installation and Implementation Guide

Chapter 7 Configuring FlexNet OperationsImplementing Time Zone Functionality
Task To add new channel partner names
1. Use FlexNet Setup to stop the FlexNet Operations server and undeploy all components. See Using FlexNet Setup.
2. In a database editor, open the database table OPS_PARTNER_TIER_NAMES.
3. In the NAME column, add any new channel partner tier names you want to add. For example, bo.constants.partnertiernames.var.
4. Save your changes in the database editor.
5. Create or locate the following directory: ops_install_dir/custom/webapps/flexnet/WEB-INF/classes.
6. In this directory, find or copy into it the resource bundle file named PublisherDefinedAttributesText_en.properties. For other languages, define appropriate language specific resource bundles.
7. Open the copy of the PublisherDefinedAttributesText_en.properties text file in a text editor.
8. For each new channel partner name, defined in Step 3, enter a key NAME=<display name>. For example: bo.constants.partnertiernames.var=Value Added Reseller.
9. Save the PublisherDefinedAttributesText_en.properties file.
10. Use FlexNet Setup to redeploy all components and restart the FlexNet Operations server. See Using FlexNet Setup.
For more information on channel partner tiers, consult the FlexNet Operations User Guide.
Implementing Time Zone FunctionalityTime zone functionality enables publishers to bind license usage to a specified geographic location by identifying the time zone of that region. This makes it possible for the publisher to vary license model pricing based on the geographic location in which the software is used.
At run time, when a license checkout is requested, the time and time zone of the client machine is read and compared to the time zone specified in the license file. If the time zone read from the client machine matches the time zone in the license file, the checkout proceeds as usual. If, however, there is a mismatch between the time zone read from the client machine and the time zone specified in the license file, the checkout request is denied.
The time zone is expressed in a license file using the TZ keyword to define a region within which license usage is permitted. The SERVERTZ time zone setting is preloaded in FlexNet Operations and binds served license usage to the time zone of the license server. However, before Producer Portal users can select any other time zone settings for served or nodelocked certificate licenses, those settings must be configured by manually adding rows to the FlexNet Operations database table, PROD_FNP_TIMEZONE. On the Producer Portal, time zone settings are displayed in a single-select drop-down list.
Task To configure additional time zone settings in the Producer Portal
1. Use FlexNet Setup to stop the FlexNet Operations server and undeploy all components. See Using FlexNet Setup.
2. In a database editor, open the database table PROD_FNP_TIMEZONE.
3. For each time zone setting you want to add
a. In the NAME column, add a unique name for the time zone setting.
FlexNet Operations 2020 R1.1 On Premises Installation and Implementation Guide FNO-2020R1.1-ING01 Company Confidential 111

Chapter 7 Configuring FlexNet OperationsImplementing Time Zone Functionality
b. In the FNP_VALUE column, add a time zone value for the time zone setting. (See the example, below.)
c. In the DESCRIPTION column, add a short description of the time zone setting. The description is for information only; it is not displayed in the Producer Portal.
d. In the IS_SERVED column, enable or disable this time zone setting for served certificate-based license models:
• Set to 1 to enable the time zone.
• Set to 0 to disable the time zone.
e. In the IS_CLIENT column, enable or disable this time zone setting for client certificate-based license models:
• Set to 1 to enable the time zone.
• Set to 0 to disable the time zone.
Note • Set both IS_SERVED and IS_CLIENT to 1 to display the time zone setting for both served and nodelocked license models on the Producer Portal. Set both to 0 (zero) to hide the time zone setting.
4. Save your changes in the database editor.
5. Open FlexnetOperationsText.properties in a text editor.
6. For each time zone setting name, defined in Step 3a, enter a label key to define the display name of the setting.
For example, <NAME>.label=<display name>, where <NAME> is a name you added to PROD_FNP_TIMEZONE and <display name> is the time zone name as you want it to appear in the Producer Portal.
Note • If a label for <NAME> is not defined in the properties file, the Producer Portal displays it as ???<NAME>.label???
7. Save FlexnetOperationsText.properties.
8. Copy FlexnetOperationsText.properties to ops_install_dir/custom/webapps/flexnet/WEB-INF/classes on the FlexNet Operations server.
9. Use FlexNet Setup to redeploy all components and restart the FlexNet Operations server. See Using FlexNet Setup.
Time Zone Example
Time zone settings in the FNP_VALUE column are expressed as values relative to GMT. They can contain one or more time zones or time zone ranges. For example, to create a time zone setting for North America, you might edit the database to include a time zone setting with a NAME NA, an FNP_VALUE -02:-10, and set a label in the properties file with NA.label=North America. In this case, a colon is used to specify a range of GMT-02:00 through GMT-10:00. On the Producer Portal, the time zone setting appears as North America. For more information on time zone expressions, consult the FlexNet Publisher Programming Reference for License File-based Licensing.
Supported License Types
Time zone-based licensing is supported for licenses used by applications built with FlexNet Publisher version 11.7 or later, and applies to the following certificate-based licenses: floating counted, floating uncounted, and nodelocked counted. Licenses that contain the TZ keyword must be generated by a version 12.7 Vendor Certificate Generator (VCG) that has its version configured as 12.7 in its license generator configuration.
112 Company Confidential FNO-2020R1.1-ING01 FlexNet Operations 2020 R1.1 On Premises Installation and Implementation Guide

Chapter 7 Configuring FlexNet OperationsEditing the Appearance of Producer Portal Pages
Time zone-based licensing is not available for nodelocked uncounted licenses (because limiting licenses based on their geographic location is not required if an unlimited number of licenses is available).
FlexNet Publisher supports a time zone range from GMT -12:00 to GMT +12:00 (or GMT -12:00 to GMT +14:00 if using FlexNet Publisher 11.15.1 or later).
Editing the Appearance of Producer Portal PagesYou can customize the fields that appear in several Producer Portal pages, including:
• Activatable Items landing page
• Entitlements
• Create Bulk Entitlement
• Create Entitlement
• Consolidated Licenses
• Bulk Operations - Select Line Items
• Bulk Operations - Select Line Items (for a submitted job)
Customization is done by editing the columns in the table OPS_PORTAL_CONFIG in your FlexNet Operations database.
By editing these columns, you can also set pages to display custom license model attributes.
You can also edit the appearance of some End-User Portal pages. See Customizing the End-User Portal for more information.
Note • When a custom attribute is added to the OPS_PORTAL_CONFIG table to be displayed in the landing pages, it is always sortable, no matter what the value in the Sort Column is.
Table 7-5 • Editable Columns in OPS_PORTAL_CONFIG
Column Description
SCREEN_NAME Required for custom attribute display only. The name of the page you want to modify.
FIELD_NAME Required for custom attribute display only. (For predefined attributes, field_name is already available when FlexNet Operations is installed.) The name of the custom attribute you want to display. For example, VENDOR_STRING.
DISPLAY_YN Specifies if the corresponding field is displayed. 0=field not displayed, 1=field displayed.
DISPLAY_ORDER Specifies the order in which the fields are displayed. Value is an integer 0 or higher, in sequential order.
DISPLAY_SIZE Specifies the display size of the field, in characters.
FlexNet Operations 2020 R1.1 On Premises Installation and Implementation Guide FNO-2020R1.1-ING01 Company Confidential 113

Chapter 7 Configuring FlexNet OperationsEditing the Appearance of Producer Portal Pages
Caution • Do not edit any other columns besides the ones listed in Table 7-5
Task To edit the columns displayed on these pages in the Producer Portal:
1. In a database editor, open the table OPS_PORTAL_CONFIG.
2. Select the field corresponding to the column whose appearance you want to edit.
3. Edit any of the values in the columns shown in Table 7-5. (Note: Edit only the columns listed in Table 7-5.)
4. Save your changes.
TRIM_VALUE If the field length is greater than the DISPLAY_SIZE, this value indicates whether the field is trimmed from the front or the back to bring the field length under the DISPLAY_SIZE. If TRIM_VALUE is empty and the data string is larger than DISPLAY_SIZE, then the data is word-wrapped. Valid values for TRIM_VALUE are FRONT, BACK, or empty.
IS_CUSTOM_ATTRIBUTE Required for custom attribute display only. 0=not a custom attribute, 1=custom attribute. An additional column called IS_CUSTOM_HOST_ATTRIBUTE indicates whether or not this is also a custom host attribute.
Table 7-5 • Editable Columns in OPS_PORTAL_CONFIG
Column Description
114 Company Confidential FNO-2020R1.1-ING01 FlexNet Operations 2020 R1.1 On Premises Installation and Implementation Guide

8
Configuring the End-User PortalThe FlexNet Operations End-User Portal allows publisher end users to generate and manage their own certificate licenses without direct publisher intervention. This chapter explains how producers can customize the End-User Portal for their own requirements.
Important • For database or file-based customizations to be applied properly, you must stop FlexNet Operations, undeploy all components, make the changes, redeploy all components, then restart FlexNet Operations.
• Logging In to the End-User Portal
• End-User Portal Policies
• Customizing the End-User Portal
• Single Sign-On
Logging In to the End-User PortalThe URL for the login page for the End-User Portal is: http://<host>:<port>/flexnet/operationsportal/logon.do. Depending on how you have configured the Portal, a user can use several different login ID types to log in. These types are explained in further detail below.
The tasks a user can perform on a particular entitlement line item or fulfillment through the End-User Portal depend on the rights enabled by your FlexNet Operations license, the policies set on an entitlement item by its license model, and the permissions according to the user’s role.
Login ID Type Access
Publisher user ID The user belongs to the Home account.
After logging in, the user has access to deployed entitlements and fulfillments for all accounts.
FlexNet Operations 2020 R1.1 On Premises Installation and Implementation Guide FNO-2020R1.1-ING01 Company Confidential 115

Chapter 8 Configuring the End-User PortalLogging In to the End-User Portal
Publisher-provided user ID
This user belongs to one of the publisher’s Customer accounts, and has been given a username and password by the publisher.
After logging in, the user’s access to entitlements and fulfillments is based upon the accounts to which the user belongs. Depending on the account hierarchy defined and the user’s permissions, the user may be able to view entitlements and fulfillments for sub-accounts as well.
This user can redeem a web register key. After the web register key is redeemed, the resulting entitlement’s Sold To field is set to one of the user’s organization units (accounts), which the user selects when redeeming the web register key.
Portal account user ID This user has self-registered through the End-User Portal after providing one entitlement ID or activation ID.
If the user provides a company name during the registration, the portal creates a new organization unit with this name (and the user ID) and links the user to this new organization unit. The portal also sets the SoldTo field to this new organization unit for any web register keys this user redeems.
After logging in, the user has access only to the entitlements or activatable items and fulfillments generated from those activatable items that have been explicitly mapped to the user’s account. One activatable item is mapped to the account when the user self-registers. Other items can be mapped after the user logs in.
Note • A user can map additional activatable items by clicking on the Map Activation IDs link.
Entitlement ID Used when the user has the ID of a deployed entitlement.
The user’s access is restricted to activatable items on that entitlement and fulfillments generated from the activatable items on that entitlement.
Using the entitlement ID in the URL, publishers can link directly to the Manage Entitlements page—skipping the End-User Portal login page. For details, see Logging In Directly to the Manage Entitlements Page.
Activation ID Used when the user has the ID of a single activatable item (entitlement line item or Web register key) in a deployed entitlement.
The user’s access is restricted to one activatable item and fulfillments generated from that activatable item (entitlement line item or Web register key).
Using the activation ID in the URL, publishers can link directly to the Manage Entitlements page—skipping the End-User Portal login page. For details, see Logging In Directly to the Manage Entitlements Page.
Single Sign On Used when the End-User Portal is integrated with a corporate portal.
See Single Sign-On for more information.
Login ID Type Access
116 Company Confidential FNO-2020R1.1-ING01 FlexNet Operations 2020 R1.1 On Premises Installation and Implementation Guide

Chapter 8 Configuring the End-User PortalLogging In to the End-User Portal
Logging In Directly to the Manage Entitlements PageSome publishers prefer to suppress the appearance of the Start Page in the End-User Portal, or simply want users with an entitlement ID or activation ID to be able to log in directly to the Manage Entitlements page. With the correct End-User Portal configuration, publishers can create links from a corporate portal directly to this page.
End-User Portal Configuration Settings
The syntax of the links’ URLs depends in part on how the End-User Portal is configured. Two End-User Portal configuration settings affect the URL syntax:
• Enable Auto Login—Allows end users to log in to the portal by passing an Entitlement ID or an Activation ID as a parameter of autologin.do.
• Hide Start Page—Hides the Start Page on the End-User Portal. This option has the side-effect of shortening the URL necessary to log in directly to the Manage Entitlements page.
Some administrators also choose to hide the Start Page button in the End-User Portal’s menu bar in addition to hiding the Start Page on login. To do so, select the Hide Start Link check box as well. This hides all links to the Start Page in the End-User Portal.
Note • These portal configuration options can be set on the Producer Portal site on the system configuration page for the End-User Portal (System > Configure > End-User Portal Setup).
URL Syntax
The End-User Portal configuration determines how you construct a URL to make a direct link to the Manage Entitlements page. If both Enable Auto Login and Hide Start Page are set, the URL syntax follows the examples in Table 8-1.
If Enable Auto Login is set but Hide Start Page is not set, the URL syntax requires an additional goToPage parameter. See the examples in Table 8-2.
Table 8-1 • URL Syntax When Enable Auto Login and Hide Start Page Are Both Set
Login ID Type URL Syntax
Entitlement ID http://<host>:<port>/flexnet/operationsportal/autologon.do?entitlementId=<entID>
Activation ID http://<host>:<port>/flexnet/operationsportal/autologon.do?activationId=<actID>
Table 8-2 • URL Syntax When Only Enable Auto Login Is Set
Login ID Type URL Syntax
Entitlement ID http://<host>:<port>/flexnet/operationsportal/autologon.do?entitlementId=<entID>&goToPage=showEntitlements
Activation ID http://<host>:<port>/flexnet/operationsportal/autologon.do?activationId=<actID>&goToPage=showEntitlements
FlexNet Operations 2020 R1.1 On Premises Installation and Implementation Guide FNO-2020R1.1-ING01 Company Confidential 117

Chapter 8 Configuring the End-User PortalEnd-User Portal Policies
End-User Portal PoliciesPolicies can be set on a license model to govern the number of returns, repairs, rehosts, and extra activations that can be activated for any product that uses the license model. The policies are applied per entitlement line item to activations from the Producer Portal and the End-User Portal. Policies are especially useful for activations from the End-User Portal because no publisher representative approves or rejects individual activation requests from the portal.
For activations done with a Web register key, policies are applied per the entitlement line item in the simple entitlement created when the Web register key is redeemed.
All these policies can be set in one of three ways:
• Ignore Policy: Do not limit the number of rehosts, returns, or repairs with a policy. However, if the policy is ignored for extra activations, no extra activations are provided.
• Specify Value Now: Enter the number to be allowed in the specified time span. For example, specify 1 in 3 months.
• Specify Value At Entitlement Time: A prompt appears to specify the value when a line item or a bulk entitlement containing a product licensed with this model is configured.
Customizing the End-User Portal You can customize the appearance of the End-User Portal in several ways, including
• Modifying the logos on the portal pages
• Modifying copyright text on the portal pages
• Hiding or showing many of the controls on each portal page, such as links, buttons and navigation panes.
For more information on system information and configuration, refer to the Administrator Reference section of the FlexNet Operations User Guide.
Number of Rehosts The number of times a customer can rehost a license generated from a particular entitlement item
Number of Returns The number of times a customer can return a license generated from a particular entitlement item
Number of Repairs The number of times a customer can repair a license generated from a particular entitlement item
Number of Extra Activations
The number of extra activations a customer has for an entitlement line item. For example, if the number of extra activations is set to 3 and the count in the entitlement line item is 100, the customer can activate 103 licenses.
118 Company Confidential FNO-2020R1.1-ING01 FlexNet Operations 2020 R1.1 On Premises Installation and Implementation Guide

Chapter 8 Configuring the End-User PortalCustomizing the End-User Portal
Task To customize the appearance of the End-User Portal through the Producer Portal
1. Click System > Configure > End-User Portal Setup.
2. On the System Configuration page, edit the customization settings as required. If a default value exists, it is listed as the first choice. Required fields are indicated with an asterisk.
3. Make changes in the settings and click Save Configs.
4. To change the Company Logo or Login Logo, click System > Configure > End-User Portal Setup> Custom Branding. Use the Upload company logo setting of this section to browse for and select the new logo.
5. Use FlexNet Setup to stop the FlexNet Operations server and undeploy all components. See Using FlexNet Setup.
6. Use FlexNet Setup to redeploy all components and restart the FlexNet Operations server. See Using FlexNet Setup.
Note • Many of the customizations described in this chapter are lost in the process of upgrading FlexNet Operations. See Upgrading FlexNet Operations in Part 1, Installing FlexNet Operations, for guidance on upgrading to a newer version without losing your customizations.
Editing the Appearance of End-User Portal PagesYou can customize the fields that appear in several portal pages, including:
• List Entitlements
• License Activation
• License Summary (shown at the end of the license generation wizard)
• Accounts
This is done by editing the columns in the table OPS_PORTAL_CONFIG in your FlexNet Operations database.
By editing these columns, you can also set these End-User Portal pages to display custom license model attributes.
Similarly, you can edit the appearance of some Producer Portal pages as well. See Editing the Appearance of Producer Portal Pages for more information.
FlexNet Operations 2020 R1.1 On Premises Installation and Implementation Guide FNO-2020R1.1-ING01 Company Confidential 119

Chapter 8 Configuring the End-User PortalCustomizing the End-User Portal
Note • When a custom attribute is added to the OPS_PORTAL_CONFIG table to be displayed in the landing pages, it is always sortable, no matter what the value in the Sort Column is.
Caution • Do not edit any other columns besides the ones listed in Table 8-3
Table 8-3 • Editable Columns in OPS_PORTAL_CONFIG
Column Description
SCREEN_NAME Required for custom attribute display only. The name of the page you want to modify, where the page is one of the following:
• manageEntitlements.title
• manageLicenses.title
• activatableItems.title
• supportLicenses.title
• generatedConsolidatedLicenses.title
Values in this column are not editable.
FIELD_NAME Required for custom attribute display only. (For predefined attributes, field_name is already available when FlexNet Operations is installed.) The name of the custom attribute you want to display. For example, VENDOR_STRING.
Values in this column are not editable.
DISPLAY_YN Specifies if the corresponding field is displayed. 0=field is not displayed, 1=field is displayed.
DISPLAY_ORDER Specifies the order in which the fields are displayed. Value is an integer 0 or higher, in sequential order.
DISPLAY_SIZE Specifies the display size of the field, in characters.
TRIM_VALUE If the field length is greater than the DISPLAY_SIZE, this value indicates whether the field is trimmed from the front or the back to bring the field length under the DISPLAY_SIZE. If TRIM_VALUE is empty and the data string is larger than DISPLAY_SIZE, then the data is word-wrapped. Valid values for TRIM_VALUE are FRONT, BACK, or empty.
IS_CUSTOM_ATTRIBUTE Required for custom attribute display only. 0=not a custom attribute, 1=custom attribute.
120 Company Confidential FNO-2020R1.1-ING01 FlexNet Operations 2020 R1.1 On Premises Installation and Implementation Guide

Chapter 8 Configuring the End-User PortalCustomizing the End-User Portal
Task To edit the columns displayed on these pages in the Portal
1. In a database editor, open the table OPS_PORTAL_CONFIG.
2. Select the field corresponding to the column whose appearance you want to edit.
3. Edit any of the values in the columns shown in Table 8-3. (Note: Edit only the columns listed in Table 8-3.)
4. Save your changes.
Custom Attribute DisplayCustom attributes can be displayed in the Activate Licenses, Support Licenses, Manage Entitlements, and Manage Licenses pages. In the End-User Portal, only custom attributes that belong to deployed technologies are displayed.
In the Manage Entitlements and Activate Licenses pages, custom attributes whose values are defined at entitlement time can be displayed. If a custom attribute is defined at license model or fulfillment time, its value is not displayed in the Manage Entitlements or Activate Licenses pages.
Similarly, only custom attributes defined at fulfillment time are displayed in the Support Licenses and Manage Licenses pages.
Help FilesThe End-User Portal Help files are minimally branded for Revenera. The company name appears on two help pages: Legal Information (legal_info.htm) and Contacting Us (contact_us.htm). Alterations to legal_info.htm are not permitted. However, you can customize contact_us.htm in the portal help to show your account’s name and link to its web site.
Task To re-brand the End-User Portal Help
1. Use FlexNet Setup to stop the FlexNet Operations server and undeploy all components. See Using FlexNet Setup.
2. On the portal host, locate the archive, OperationsPortalOnlineHelp.zip. Typically, this file is in ops_install_dir\release\operationsportal\onlinehelp.
3. Copy the OperationsPortalOnlineHelp.zip archive and extract it in a local directory, such as your desktop.
4. Locate contact_us.htm in the contents you extracted from the .zip file:
<extracted_location>\OperationsPortal\Content\helplibrary\contact_us.htm
5. In contact_us.htm, change the link text and link target from http://www.revenera.com to http://<your_account’s_web_site>, and add the attribute target = "_blank". Example:
<a href="http://www.my_org.com" target="_blank">http://www.my_org.com</a>
6. Save your changes to contact_us.htm.
7. Re-zip all the files back into OperationsPortalOnlineHelp.zip, overwriting the .zip file in your local directory.
8. On the Portal host, in the ops_install_dir\custom folder, create the subdirectory structure webapps\flexnet\help\. The resulting structure is ops_install_dir\custom\webapps\flexnet\help.
FlexNet Operations 2020 R1.1 On Premises Installation and Implementation Guide FNO-2020R1.1-ING01 Company Confidential 121

Chapter 8 Configuring the End-User PortalCustomizing the End-User Portal
9. Extract your customized OperationsPortalOnlineHelp.zip to ops_install_dir\custom\webapps\flexnet\help\.
10. Use the FlexNet Setup web application to copy the replacement help files from the custom directory into the portal’s server. See Using FlexNet Setup.
11. Use FlexNet Setup to redeploy all components and restart the FlexNet Operations server. See Using FlexNet Setup.
12. Open the End-User Portal in a web browser, launch the help, and click the Contact Us link in the help page footer. The Contacting Us page now appears with a link to your account’s web site.
Localizing the End-User PortalBy default, the End-User Portal displays in English. However, the portal supports rendering into other languages. When localized, the following portal components appear in the language of the logged-in user’s locale:
• Labels and messages displayed in the portal page
• JavaScript, ASCII, non-ASCII, and Web services messages
• Selection list items in menus and search pages
• Emails sent by the End-User Portal
• Dates are displayed in the specified local format
• Users can type non-English characters into input fields
• Portal logins by Activation ID or Entitlement ID prompt for the user to select a supported language
FlexNet Operations does not automatically translate user interface components into the supported languages. You must engage the services of a third-party localization firm to translate some components of FlexNet Operations. In addition, End-User Portal Online Help, folder and file names, installer screens and login screens are always displayed in English.
Note • UTF-8 encoding is supported, and as a result the End-User Portal supports double-byte characters.
Locale CodesLanguage and locations are specified in FlexNet Operations by a locale code. A locale code is formatted <language identifier in lower case>_<location code in upper case>, where language identifier is taken from the ISO 639 standard, and the location is taken from the ISO 3166 standard. The default value in FlexNet Operations is en_US.
Table 3-4 shows some examples of common locale codes. Other locale codes may be constructed from the standard Java internationalization codes, which use the ISO 639 and ISO 3166 standards, and can be found at http://java.sun.com/developer/technicalArticles/Intl/IntlIntro/.
Table 8-4 • Locale Code Examples
Locale Code Language Country
en_US English US
fr_CA French Canada
122 Company Confidential FNO-2020R1.1-ING01 FlexNet Operations 2020 R1.1 On Premises Installation and Implementation Guide

Chapter 8 Configuring the End-User PortalCustomizing the End-User Portal
Resource BundlesTo configure the End-User Portal to display in the language of the logged-in user’s locale, you must translate each of the resource bundles into the desired language. The resource bundles are property files that contain the necessary interface elements and messages. The resource bundles can all be found in the ops_install_dir\webapp\WEB-INF\classes directory.
Caution • Do not modify or delete any source file in the release structure. Before you make any customizations, copy the files you need to customize (including samples, properties files, and so forth) to a new folder.
Table 3-5 shows the complete set of resource bundles that require localization.
Note • Users of previous versions of FlexNet Operations should note that resource bundles have been reconfigured to drop any reference to Macrovision. Any implementations using these bundles performed in FlexNet Operations 12.0 or earlier versions must be updated and re-compiled using the new resource bundles.
fr_FR French France
ja_JP Japanese JP
de_DE German Germany
Table 8-5 • Resource Bundles
Resource Bundle Name Contains Localizable Strings for...
FLEXnetCustomizableText_en.properties User-related emails
FLEXnetErrorMessages.properties Error messages raised by the platform back-end API calls
FLEXnetOperationPortalText_en.properties End-User Portal labels and controls
FLEXnetOperationsText_en.properties Producer Portal labels and controls
FLEXnetOpsErrorMessages.properties Error messages raised by the Operations module back-end API calls
FLEXnetText_en.properties Platform pages, such as Create and Browse Users
PublisherDefinedAttributesText_en.properties
Custom-defined license model attribute or generator configuration attributes
Table 8-4 • Locale Code Examples
Locale Code Language Country
FlexNet Operations 2020 R1.1 On Premises Installation and Implementation Guide FNO-2020R1.1-ING01 Company Confidential 123

Chapter 8 Configuring the End-User PortalCustomizing the End-User Portal
FLEXnetOperationsText_en.properties Used on the End-User PortalThe following strings occur in the FLEXnetOperationsText_en.properties file but are used in both the Producer Portal and the End-User Portal.
Table 8-6 • FLEXnetOperationsText_en.properties values necessary to localize the End-User Portal.
Key English Value
bo.constants.general.default Default
bo.constants.general.required Required
bo.constants.states.optional Optional
bo.constants.states.deployed Deployed
bo.constants.states.draft Draft
bo.constants.states.obsolete Obsolete
bo.constants.states.test Test
bo.constants.states.active Active
bo.constants.states.inactive Inactive
bo.constants.states.onhold On-Hold
bo.constants.productFeature.featureVersionFormat.fixed Fixed
bo.constants.productFeature.featureVersionFormat.dateBased Date Based
bo.constants.productComponent.licenseGenerator.any ANY
bo.constants.orderable.suite.licenseModel.default Default
bo.constants.orderable.type.licensedProduct Product
bo.constants.orderable.type.suite Suite
bo.constants.orderable.type.uniform_suite Suite
bo.constants.orderable.type.maintenance Maintenance
bo.constants.orderable.relationType.demo Demo
bo.constants.orderable.relationType.upgrade Upgrade
bo.constants.orderable.relationType.upsell Upsell
124 Company Confidential FNO-2020R1.1-ING01 FlexNet Operations 2020 R1.1 On Premises Installation and Implementation Guide

Chapter 8 Configuring the End-User PortalCustomizing the End-User Portal
bo.constants.orderable.relationType.renewal Renewal
bo.constants.orderable.orderingRule.required Required
bo.constants.orderable.orderingRule.optional Optional
bo.constants.packageProperties.packageVersionFormat.fixed Fixed
bo.constants.packageProperties.packageVersionFormat.dateBased Date Based
bo.constants.term.durationUnits.day Days
bo.constants.term.durationUnits.week Weeks
bo.constants.term.durationUnits.month Months
bo.constants.term.durationUnits.year Years
bo.constants.orderable.term.permanent Permanent
bo.constants.orderable.term.expiring Expiring
bo.constants.esn.type.simple Simple
bo.constants.esn.type.bulk Bulk
bo.constants.esn.type.webRegKey Web Reg Key
bo.constants.esn.webRegKey.uploadSuccessful Uploaded Successfully
bo.constants.esn.webRegKey.notLoaded Not Loaded
bo.constants.esn.webRegKey.loading Loading
bo.constants.esn.webRegKey.loadFailed Upload Failed
bo.constants.expr.and and
bo.constants.expr.or or
bo.constants.expr.on on
bo.constants.expr.before before
bo.constants.expr.after after
bo.constants.expr.where where
Table 8-6 • FLEXnetOperationsText_en.properties values necessary to localize the End-User Portal.
Key English Value
FlexNet Operations 2020 R1.1 On Premises Installation and Implementation Guide FNO-2020R1.1-ING01 Company Confidential 125

Chapter 8 Configuring the End-User PortalCustomizing the End-User Portal
bo.constants.expr.startsWith starts with
bo.constants.expr.endsWith ends with
bo.constants.expr.anywhere contains
bo.constants.orderable.relationType.undefinedRelation Select Relationship...
bo.constants.orderable.relationType.ProductionVersionOf Production Version Of
bo.constants.orderable.relationType.demoOf Demo of
bo.constants.orderable.relationType.upgradeFrom Upgrade From
bo.constants.orderable.relationType.upgradeTo Upgrade To
bo.constants.orderable.relationType.upsellFrom Upsell From
bo.constants.orderable.relationType.upsellTo Upsell To
bo.constants.orderable.relationType.isMaintenance Is Maintenance
bo.constants.orderable.relationType.hasMaintenance Has Maintenance
bo.constants.fulfillmentAction.activated Activated
bo.constants.fulfillmentAction.rehosted Rehosted
bo.constants.fulfillmentAction.repaired Repaired
bo.constants.fulfillmentAction.returned Returned
bo.constants.fulfillmentAction.upgraded Upgraded
bo.constants.fulfillmentAction.upsold Upsold
bo.constants.fulfillmentAction.renewed Renewed
bo.constants.fulfillmentAction.regenerated Regenerated
bo.constants.fulfillmentAction.reinstalled Reinstalled
bo.constants.fulfillmentAction.deleted Deleted
bo.constants.fulfillmentAction.reinstall_req_received Reinstall Request Received
bo.constants.fulfillmentAction.activatedOnHold On Hold Fulfillment Generated
Table 8-6 • FLEXnetOperationsText_en.properties values necessary to localize the End-User Portal.
Key English Value
126 Company Confidential FNO-2020R1.1-ING01 FlexNet Operations 2020 R1.1 On Premises Installation and Implementation Guide

Chapter 8 Configuring the End-User PortalCustomizing the End-User Portal
stopgap Stopgap
emergency Emergency
publisher_error Publisher Error
bo.constants.fulfillmentSource.legacy Legacy
bo.constants.fulfillmentSource.online Online
bo.constants.fulfillmentSource.application Application
bo.constants.entitlement.lifecycle.action.none NONE
bo.constants.entitlement.lifecycle.action.renewal RENEWAL
bo.constants.entitlement.lifecycle.action.upgrade UPGRADE
bo.constants.entitlement.lifecycle.action.upsell UPSELL
bo.constants.entitlement.lifecycle.action.renewing RENEWING
bo.constants.entitlement.lifecycle.action.upgrading UPGRADING
bo.constants.entitlement.lifecycle.action.upselling UPSELLING
bo.constants.entitlement.lifecycle.action.addMoreLineItems ADDED NEW LINE ITEMS
bo.constants.entitlement.lifecycle.action. NONE
bo.constants.hostIdTypes.any ANY
bo.constants.hostIdTypes.demo DEMO
bo.constants.hostIdTypes.ethernet Ethernet
bo.constants.hostIdTypes.long Solaris CPU ID
bo.constants.hostIdTypes.user User
bo.constants.hostIdTypes.host Host
bo.constants.hostIdTypes.display Display
bo.constants.hostIdTypes.disksn Disk SN
bo.constants.hostIdTypes.flexid FLEX id
Table 8-6 • FLEXnetOperationsText_en.properties values necessary to localize the End-User Portal.
Key English Value
FlexNet Operations 2020 R1.1 On Premises Installation and Implementation Guide FNO-2020R1.1-ING01 Company Confidential 127

Chapter 8 Configuring the End-User PortalCustomizing the End-User Portal
Task To localize FlexNet Operations
1. Select a language or languages in which you want to display the End-User Portal.
2. Browse to ops_install_dir\site\conf\localization.
3. Copy the file en_US.
4. Rename the copy of en_US to the locale code of your selected language. (For example, to specify Canadian French, rename the copy of en_US to fr_CA.)
5. Repeat Steps 3 and 4 for all other selected languages.
6. Make copies of all resource bundles and rename each as <original resource bundle name>_<locale code>.properties or <original resource bundle name>_<ISO 639 language code>.properties. (For example, to create a resource bundle for French that contains strings for End-User Portal labels, copy and then rename FLEXnetOperationsPortalText_en.properties to FLEXnetOperationsPortalText_fr_FR.properties. To specify Canadian French, the proper file name is FLEXnetOperationsPortalText_fr_CA.properties.)
7. Submit the renamed resource bundles to a third-party localization firm. The localizers must translate only the value on the right side of each key value in each resource bundle, not the keys themselves.
8. On receipt of the localized resource bundles, some additional processing is required to prepare them for use with FlexNet Operations:
a. Open each in a text editor that allows you save them with UTF-8 or Unicode encoding to preserve the native characters. Save these files with a temporary file name by, for example, adding .temp to the existing file name.
b. Use the JDK tool native2ascii to convert the native characters in the temporary files into their ASCII representations.
bo.constants.hostIdTypes.routableIP Routable IP Address
bo.constants.hostIdTypes.nonRoutableIP Non-routable IP Address
bo.constants.hostIdTypes.routableIPWildCards Routable IP Address with wildcards
bo.constants.hostIdTypes.nonRoutableIPWildCards Non-routable IP Address with wildcards
bo.constants.hostIdTypes.composite Composite
bo.constants.hostIdTypes.vendor Vendor Defined
bo.constants.hostIdTypes.idString ID String
Table 8-6 • FLEXnetOperationsText_en.properties values necessary to localize the End-User Portal.
Key English Value
128 Company Confidential FNO-2020R1.1-ING01 FlexNet Operations 2020 R1.1 On Premises Installation and Implementation Guide

Chapter 8 Configuring the End-User PortalSingle Sign-On
FlexNet Operations is a Java application that reads the values from properties files as ASCII characters. Therefore, the native characters in the temporary properties files must be converted to the ASCII representation of their Unicode values—for example, \u00e7. This is especially true for the multi-byte characters like those found in Chinese or Japanese. The Java JDK contains a utility called native2ascii that converts the native characters to their ASCII representations. Use native2ascii to process each of the temporary properties files that have been saved with UTF-8 encoding. For example:
native2ascii -encoding UTF-8 file.properties.temp file.properties
9. Put the final, translated resource bundles in ops_install_dir\custom\webapps\flexnet\WEB-INF\classes.
10. Use the FlexNet Setup web application to rebuild the site. See Using FlexNet Setup.
When a user logs in, FlexNet Operations determines the user’s locale and displays the portal in the corresponding language.
Single Sign-OnThe FlexNet Operations End-User Portal can be configured to interface with a separate application, such as a corporate portal or intranet. The single sign-on (SSO) application passes user credentials to the FlexNet Operations End-User Portal, enabling a user to have a single set of credentials for both. The user signs on to the SSO application, and gains access to both the SSO application and FlexNet Operations End-User Portal for the duration of the browser session. This section describes how to configure two types of single sign-on applications:
• Secure Token Single Sign-On
• HTTP Header Single Sign-On
Secure Token Single Sign-OnThe secure token single sign-on process includes the following steps:
1. The SSO application requests a secure token from the Operations server. The Operations server sends the secure token back to the SSO application.
2. The SSO application receives the secure token and constructs a URL, which includes various parameters that control the display and behavior of the End-User Portal.
3. The SSO application sends the URL and the secure token to the Operations server.
4. When the user logs into the SSO application, credentials are passed to the Operations server, and the user is authenticated. The Operations server displays the Portal landing page.
Configuring Secure Token Single Sign-OnSecure token single sign-on uses FlexNet Operations Web services. For an explanation of Web services, including the SSO Web service, consult the FlexNet Operations SOAP Web Services Reference Guide.
FlexNet Operations 2020 R1.1 On Premises Installation and Implementation Guide FNO-2020R1.1-ING01 Company Confidential 129

Chapter 8 Configuring the End-User PortalSingle Sign-On
Data Synchronization
Before configuring secure token single sign-on, you must synchronize SSO application user data from the SSO application with your Operations database, as shown here.
Native Authentication
If the secure token SSO application performs authentication natively, then you must pre-load all user data from the SSO application into Operations using the UserAdministration Web service. In addition, the SSO application must synchronize all subsequent changes to user information with the Operations database.
• For example, if the application allows online user registration, the UserAdministration Web service must be used to create the same user in Operations.
• Because Operations does not allow deletion of user information, if a user is deleted from the SSO application, the user’s status must be set to Inactive in Operations.
External Authentication
If the secure token SSO application is authenticating users with a directory service (such as LDAP), you must configure the directory service in Operations as follows:
1. Add the directory service as a new domain in Operations.
2. Import groups from the directory service into the Operations database.
3. Map roles to the imported directory groups. (Typically, the groups are assigned the Portal User role.)
Subsequent changes to the directory service user database must be synchronized with FlexNet Operations using the UserAdministration Web service.
For more information on roles, users, and domains, consult the FlexNet Operations User Guide.
Table 8-7 • Data Synchronization for Secure Token SSO Applications
Data Required or Optional?
User first name Required
User last name Required
User email ID Required
User locale Optional, defaults to system locale
User time zone Optional, defaults to system time zone
User Account ID Optional, ID of the account to which the user belongs
Account ID Required for all accounts
Account display name Required
130 Company Confidential FNO-2020R1.1-ING01 FlexNet Operations 2020 R1.1 On Premises Installation and Implementation Guide

Chapter 8 Configuring the End-User PortalSingle Sign-On
Token Generation
FlexNet Operations Web services are used in making, processing, and generating token requests.
1. The SSO application must request a secure token from the Operations server. This request is performed with a SOAP message using a FLEXnetAuthentication Web service call. Create a FlexNet user for a Web service client, and pass the credentials in the request for authentication so that the FLEXnetAuthentication service processes the request and serves the response with a valid, secure token. The request message has the form:
<secureTokenRequest><userId>sjoe</userId></secureTokenRequest>
2. After the request is processed by the Operations server, the response message is returned with the secure token. The response message has the form:
<secureTokenResponse><token>ras12hkflgthksgymjk</token>
</secureTokenResponse>
The token is valid for 10 seconds after creation.
URL Construction
After the SSO application receives the secure token, it must launch a URL to display the End-User Portal. The URL has the form:
http://<host>:<port>/flexnet/operationsportal/sso.do?username=<username>&token=<token>&locale=<locale>&externallogoffurl=<URL>&goToPage=<page>&hideheader=<value>&hideleftnav=<value>&domain=<domain>
Parameters are described in the following table:
Table 8-8 • SSO URL Parameters
Parameter Description
username User’s name. Must be in the FlexNet Operations database or the login fails.
token Secure token value
locale Optional. The user’s preferred locale, such as en_US.
externallogoffurl URL to display if the session times out.
goToPage Optional. Indicates which page of the FlexNet Operations End-User Portal to display initially. Possible values are:
• homePage displays the End-User Portal landing page
• showEntitlements displays the entitlements landing page
• showFulfillments displays the fulfillments landing page
• activate displays the item corresponding to the activation ID
FlexNet Operations 2020 R1.1 On Premises Installation and Implementation Guide FNO-2020R1.1-ING01 Company Confidential 131

Chapter 8 Configuring the End-User PortalSingle Sign-On
Sample Application
A sample secure token single sign-on application is included with the FlexNet Operations installation. You can use this sample application to test configuration of your own single sign-on solution. The sample also includes a readme file that contains installation and configuration instructions.
The sample is located in the Samples folder and is named portalSSODemoApp.zip.
HTTP Header Single Sign-OnThe HTTP header single sign-on process includes the following steps:
1. The user logs into the SSO application and is authenticated.
2. The SSO application adds HTTP headers to the login request, then passes it to FlexNet Operations in one of two ways:
a. If the user ID and preferred language header values are configured in the standalone-full.xml.template file (see Configuring HTTP Header Single Sign-On), the authtype=external, domain, and externalLogOffUrl values are passed:
https://internal_fno_hostname.xyzcompany.com/flexnet/operations/logon.do?authtype=external& domain=XXX&externalLogOffUrl=“https://entitlement.xyzcompany.com/GetAccess/Logout”
b. If the user ID, locale, domain, and external logoff URL header values are configured in the standalone-full.xml.template file (see Configuring HTTP Header Single Sign-On), the authtype=external value is passed:
activationID Optional. If specified, the user can access only the specified activation ID. Used in conjunction with the goToPage value "activate" to directly navigate to activation page.
entitlementID Optional. If specified, the user will only be able to access the specified entitlement ID. Used in conjunction with the goToPage value "activate" to directly navigate to activation page. Note that if the goToPage is set to activate, only non-child items can be activated from this page. Child line items are those which are derived by upgrading or renewing another line item.
An example of a URL that would load the activation page for a given entitlement ID: http://opshost:8888/flexnet/operationsportal/sso.do?username=admin&goToPage =activate&hideheader=true&hideleftnav=true&token=v9vF941Xv18xvhAY& entitlementId=SSOEnt&externallogoffurl=http://localhost:9090/externalportal/startpage.jsp&locale=en_US
hideheader Optional. Controls the display of the Portal header. Value is true or false.
hideleftnav Optional. Controls the display of the Portal left navigation bar. Value is true or false.
domain Optional. User’s domain. Default value is FlexNet, which is the default domain for users created in FlexNet Operations. Additional domains can be defined and used in this parameter.
Table 8-8 • SSO URL Parameters
Parameter Description
132 Company Confidential FNO-2020R1.1-ING01 FlexNet Operations 2020 R1.1 On Premises Installation and Implementation Guide

Chapter 8 Configuring the End-User PortalSingle Sign-On
https://internal_fno_hostname.xyzcompany.com/flexnet/operations/logon.do?authtype=external
3. FlexNet Operations evaluates the header values, authenticates the user, and creates a FlexNet Operations session. For a first-time user, FlexNet Operations passes a session ID authorizing subsequent login requests made by that user.
Configuring HTTP Header Single Sign-OnThis single sign-on application uses FlexNet Operations Web services. For an explanation of Web services, including the SSO Web service, consult the FlexNet Operations SOAP Web Services Reference Guide and the FlexNet Operations Web Services Integration Guide.
The process of configuring HTTP header single sign-on includes
• Data Synchronization
• Altering the Application Server Configuration File
Data Synchronization
Before configuring HTTP header single sign-on, synchronize user data from the SSO application with the FlexNet Operations database, as shown here.
Native Authentication
If the HTTP header SSO application performs authentication natively, then all user data from the SSO application must be pre-loaded into Operations using the UserAdministration Web service. In addition, the SSO application must synchronize all subsequent changes to user information with the Operations database.
• For example, if the application allows online user registration, the UserAdministration Web service must be used to create the same user in Operations.
• Because Operations does not allow deletion of user information, if a user is deleted from the SSO application, the user’s status must be set to Inactive in Operations.
FlexNet Operations does not support the creation of a FlexNet domain user without having a password for that user, and all FlexNet domain users must have a password in the FlexNet Operations database.
To allow an application user to be a FlexNet domain user, the user is created in FlexNet Operations with the same user ID as in the application. A FlexNet Operations password is created for the user, as usual, but the FlexNet Operations generated password is never used for authentication.
Table 8-9 • Data Synchronization for HTTP Header SSO
Data Required or Optional?
Username Required
User first name Required
User last name Required
User email ID Required
User locale Optional, defaults to system locale
FlexNet Operations 2020 R1.1 On Premises Installation and Implementation Guide FNO-2020R1.1-ING01 Company Confidential 133

Chapter 8 Configuring the End-User PortalSingle Sign-On
The application authenticates the user and, because a user with the same user ID exists in FlexNet Operations, FlexNet Operations accepts the user if the HTTP headers are valid. This is how a FlexNet domain user is created:
1. A user ID is created in the application, and the user receives a password generated by the application.
2. A user with the same user ID is created in FlexNet Operations as a FlexNet domain user. A FlexNet Operations password is created for the user, but the FlexNet Operations password is not made available to the application user; the FlexNet Operations password becomes an unused password.
When the user logs in with the application password and is authenticated, HTTP headers are added and the login request is forwarded to FlexNet Operations. Because the authenticated user is already present in FlexNet Operations, FlexNet Operations simply pulls the user’s information from the FlexNet domain.
External Authentication
If authentication is done using a directory service (such as LDAP), configure the directory service in FlexNet Operations:
1. Add the directory service as a new domain in FlexNet Operations.
2. Import users from the directory service into FlexNet Operations and assign appropriate roles to them.
3. Import groups, if any, from the directory service into the FlexNet Operations database and assign appropriate roles to them.
When domain users are imported into the FlexNet Operations database, the users’ data is pulled from the directory service; there are no FlexNet Operations passwords for these users.
Subsequent updates to the directory service user database must be synchronized with FlexNet Operations using the UserAdministration Web service.
For more information on roles, users, and domains, consult FlexNet Operations online help.
Note • To create an administrative user, the directory service user to be imported into the FlexNet Operations database must belong to a FlexNet Operations publisher account. Then the Super Administrator role (which is also assigned to the default administrative user) can be assigned to that user.
Altering the Application Server Configuration File
The FlexNet Operations standalone-full.xml.template file must be configured for HTTP header single sign-on. Initially, the code is commented out; it must be uncommented and the appropriate header information must be added.
Task To configure standalone-full.xml.template for single sign-on
1. Use FlexNet Setup to stop the FlexNet Operations server and undeploy all components. See Using FlexNet Setup.
2. With the server stopped, open standalone-full.xml.template in a text editor.
This file is at ops_install_dir\release\jbossConfig\standalone-full.xml.template.
3. In standalone-full.xml.template, find the following snippet:
<login-module code="com.flexnet.platform.web.auth.ConnectorLoginModule" flag="sufficient"> <module-option name="userParam" value="username"/> <module-option name="tokenParam" value="token"/></login-module>
134 Company Confidential FNO-2020R1.1-ING01 FlexNet Operations 2020 R1.1 On Premises Installation and Implementation Guide

Chapter 8 Configuring the End-User PortalSingle Sign-On
4. After that snippet, insert the following lines:
<login-module code="com.flexnet.platform.web.auth.HeaderLoginModule" flag = "sufficient"> <module-option name="userParam" value="myUserParam" /> <module-option name="localeParam" value="myLocaleParam" /> <module-option name="domainParam" value="myDomainParam"/> <module-option name="logoffParam" value="myLogoffParam" />
</login-module>
Replace myUserParam, myLocaleParam, myDomainParam, and myLogoffParam with appropriate values. For example,
<login-module code="com.flexnet.platform.web.auth.HeaderLoginModule" flag="sufficient"> <module-option name="userParam" value="HTTP_SCGID" /> <module-option name="localeParam" value="HTTP_SCPREFERREDLANGUAGE” /> <module-option name="domainParam" value="Flexnet" /> <module-option name="logoffParam" value="http://internal_fno_hostname.xyzcompany.com/flexnet/operations/logon.do?authtype=external&domain=XXX&externalLogOffUrl=%22https%3A%2F%2Fentitlement.xyzcompany.com%2FGetAccess%2FLogout%22%0D%0A" />
</login-module>
5. Save the changes to the standalone-full.xml.template file.
6. Set the FlexNet Operations session time-out period (see the FlexNet Operations User Guide) to be longer than the SSO session time-out period to redirect the user to the SSO application login page if the FlexNet Operations session is invalidated.
7. Use FlexNet Setup to redeploy all components and restart the FlexNet Operations server. See Using FlexNet Setup.
HTTP header single sign-on is available for testing and use.
LimitationsThe following are not supported by FlexNet Operations when HTTP header single sign-on is used.
• Self-registered user creation
• Login with entitlement ID
• Login with activation ID
Link ForwardingLink Forwarding is a feature that allows users to successfully land on a bookmarked page once a session is over. It is particularly useful for bookmarking of “view” pages such as View Entitlements, View Devices or View Fulfillments.
When a user selects a bookmark for any page, except for edit pages (which require additional parameters to be passed which is not possible with a bookmark) in either the FlexNet Operations Producer or End-User Portal, the following behavior is exhibited:
• If the user is logged in, the bookmarked page opens.
• If the user is not already logged in, the login screen appears. After the user logs in, the bookmarked page opens.
FlexNet Operations 2020 R1.1 On Premises Installation and Implementation Guide FNO-2020R1.1-ING01 Company Confidential 135

Chapter 8 Configuring the End-User PortalSingle Sign-On
• If the bookmark includes parameters, the parameters are included when the bookmarked page is loaded.
Parameters following the base URL need to be encoded using the standard rules of URL encoding.
Backward CompatibilityIn order to maintain backward compatibility, the older implementation of direct navigation to certain pages has been retained. For example:
http://<host>:<port>/flexnet/operationsportal/sso.do?username=<username>&token=<token>&locale=<locale>&externallogoffurl=<URL>&goToPage=<page>&hideheader=<value>&hideleftnav=<value>&domain=<domain>
The goToPage parameter could have values such as homePage, showEntitlements, showFulfillments or activate.
Configuring Link ForwardingTo implement link forwarding, the continuePage parameter needs to be added as the last parameter in the SSO URL. For example if the user wants to be taken to the following page:
https://server:port/flexnet/operationsportal/activatables_VIEW.do
If you are implementing SSO using a secure token, the URL should look like:
http://<host>:<port>/flexnet/operationsportal/sso.do?username=<username>&token=<token>&locale=<locale>&externallogoffurl=<URL>&hideheader=<value>&hideleftnav=<value>&domain=<domain>&continuePage=activatables_VIEW.do
If you are using an HTTP header based Single Sign-On, then the URL should look like:
http://server:port/flexnet/operationsportal/logon.do?authtype=external&continuePage=activatables_VIEW.do
Additionally, this URL can have parameters such as domain and externalLogOffUrl.
Error Cases for SSOIf an error occurs, it is likely to be one of three causes:
• The goToPage parameter consists of an invalid value.
• Both the goToPage and the continuePage parameters are specified in the same URL
• Either the goToPage or the continuePage parameters are specified but are empty.
136 Company Confidential FNO-2020R1.1-ING01 FlexNet Operations 2020 R1.1 On Premises Installation and Implementation Guide

9
Building a Vendor Certificate GeneratorA vendor certificate generator (VCG) is a FlexNet Operations component that generates FlexNet certificate-based or trusted licenses. A VCG uses a vendor’s unique information from the vendor’s FlexNet Licensing toolkit, and as a result, must be customized, built, and copied into a FlexNet Operations installation. FlexNet Operations supports the configuration of multiple VCGs.
Licenses for a product are generated by the VCG configured for that product.
A demo VCG is included in the installation for testing purposes.
Note • If FlexNet Operations is configured to perform trusted activations, transaction keys can be created only for the VCG associated with the publisher.xml files configured with FlexNet Operations. Refer to Multiple publisher.xml Files for more information.
Information about building a vendor certificate generator is presented in the following sections:
• VCG Version Dependencies
• Prerequisites
• Building the VCG
Important • For assistance with building versions of the VCG prior to 11.5, consult Revenera Technical Support.
Important • For database or file-based customizations to be applied properly, you must stop FlexNet Operations, undeploy all components, make the changes, redeploy all components, then restart FlexNet Operations.
FlexNet Operations 2020 R1.1 On Premises Installation and Implementation Guide FNO-2020R1.1-ING01 Company Confidential 137

Chapter 9 Building a Vendor Certificate GeneratorVCG Version Dependencies
VCG Version DependenciesFor best results, use the latest version of the VCG whenever possible. If you use FlexNet Operations to activate licenses, avoid implementing features in your FlexNet Licensing toolkit that are not supported by the version of the VCG that you build and vice versa. A mismatch in supported features can result in licensing and activation problems. Using the most recent version of the VCG enables you to take advantage of the latest keywords and host ID types supported by the newer versions of the FlexNet Licensing toolkit.
PrerequisitesBefore you start, ensure that the following prerequisites are satisfied:
• FlexNet Operations has been installed.
• The VCG toolkit has been downloaded and extracted. The VCG toolkit contains files for building a VCG on supported platforms. The location in which the VCG toolkit was extracted is considered the VCG install directory (<install_dir>) in these instructions.
• The FlexNet Licensing toolkit has been installed and built.
• The FlexNet Licensing technical contact person must be available to provide files and information needed when configuring the VCG toolkit. Most of the information and decisions required to build the VCG are the same as those required when the FlexNet Licensing toolkit was built.
• Note your vendor daemon name. This must be the same as the vendor daemon name used to build the FlexNet Licensing toolkit. Vendor daemon name and other required settings are defined in a file called lm_code.h. If lm_code.h still resides in the FlexNet Licensing installation, it resides in the machind directory, by default: <install_dir>/machind/lm_code.h where <install_dir> is the directory at the root of your FlexNet Licensing installation.
The lm_code.h file may or may not still reside in the FlexNet Licensing installation. It contains information that is proprietary, and many developers choose to remove lm_code.h to a secure location after the FlexNet Licensing toolkit has been built. The FlexNet Licensing technical contact for your account can provide the vendor daemon name and, if necessary, the encryption seeds.
• You must have access to a C compiler. For best results, use the same C compiler version to build the VCG as the FlexNet Licensing toolkit against which the VCG toolkit is built. For example, to build a version 12.8 VCG, see the recommended compiler listed for the platform on which you want to build in the FlexNet Publisher 11.10 release notes. For UNIX, use a C compiler that can parse the cc command. You may not be able to successfully build the VCG if you set cc to call the gcc compiler.
• Obtain a copy of lmprikey.h, which provides information needed for the VCG to generate valid licenses. This file may or may not still reside in the FlexNet Licensing toolkit installation. It contains information that is proprietary and confidential. Many publishers choose to remove lmprikey.h to a secure location after the FlexNet Licensing toolkit has been built. If lmprikey.h still resides in the FlexNet Licensing installation, the default location is <install_dir>/<platform>/lmprikey.h where <platform> is the code for the platform on which your FlexNet Licensing toolkit was built.
If lmprikey.h no longer resides in the installation, request a copy of lmprikey.h from your account’s FlexNet Licensing technical contact person.
• If you are building a VCG for a FlexNet Licensing toolkit built for DEFAULT strength without TRL (tamper-resistant licensing), obtain a copy of lmseeds.h from the licensing toolkit. The lmseeds.h file resides in the same location
138 Company Confidential FNO-2020R1.1-ING01 FlexNet Operations 2020 R1.1 On Premises Installation and Implementation Guide

Chapter 9 Building a Vendor Certificate GeneratorBuilding the VCG
as lmprikey.h, by default: <install_dir>/<platform>/. However, it may have been moved to a more secure location after the licensing toolkit was built. If lmseeds.h is not in its default location, contact your account’s FlexNet Licensing technical contact person for a copy of the file.
Building the VCGTo customize the VCG with your information, follow the instructions in the following section:
• Editing vcg_code.h
• Copying lmprikey.h
• Editing the Makefile
• Running the VCG Build
Note • If you want to support vendor-defined host IDs, additional customizations are required, as described in Editing vcg_vendor.c to Support Vendor-Defined Host IDs.
Editing vcg_code.hTo configure vcg_code.h for your VCG, first find the file in the following location:
<install_dir>/vcg/<version>/machind/vcg_code.h
• <install_dir> is the directory where you chose to unzip the VCG toolkit.
• <version> is the version of the VCG you downloaded (such as v12.8.0.1).
Task To customize vcg_code.h
1. Set your default directory to the directory where vcg_code.h resides.
2. Make a backup copy of the file with a different name (such as vcg_code.bak), then open vcg_code.h for editing.
3. In vcg_code.h, set VENDOR_NAME to your vendor daemon name. Replace “demo” with the your account’s vendor daemon name (available from lm_code.h in your FlexNet Licensing implementation or from your account’s technical contact person for FlexNet Licensing).
#define VENDOR_NAME "<your_vendor_daemon_name>"
This line defines the vendor daemon name to be used in licenses generated by the VCG. The double quotes ("") around the vendor daemon name are required.
4. (Optional) Set the VENDOR_VERSION. In the future, it may be useful to have a version number associated with your VCG if, for example, you rebuild your VCG, and particularly if you have other agents distributing licenses. Change the value of VENDOR_VERSION to any alphanumeric string. For example,
#define VENDOR_VERSION "1.0"
FlexNet Operations 2020 R1.1 On Premises Installation and Implementation Guide FNO-2020R1.1-ING01 Company Confidential 139

Chapter 9 Building a Vendor Certificate GeneratorBuilding the VCG
Note • The vendor version string, along with the vendor name and the version of the VCG toolkit, is displayed by the vcg_name version command.
myorg_vcg versionVCG version 12.8.0.1, myorg version 12.8.0.1a
5. Replace the encryption seeds with your account’s encryption seeds, if necessary.
• New FlexNet Licensing users: The action you take depends on whether your account’s FlexNet Licensing toolkit was built with or without TRL.
• If your account’s FlexNet Licensing toolkit was built with TRL, replace the encryption seed values in vcg_code.h with 0x0.
• If your account’s Flexnet Licensing toolkit was built without TRL—that is, with DEFAULT strength—replace the encryption seed values in vcg_code.h with the values of encryption seeds 1-4 from lmseeds.h from your FlexNet Licensing toolkit.
• Upgrading from prior versions of FlexNet Licensing: These steps vary depending on your backward compatibility version requirements. Replace your encryption seeds according to the following version-dependent plans:
• If you have upgraded to FlexNet Licensing 8.1 or later, with TRL, and have released applications that were built with a pre-8.1 version of FlexNet Licensing, replace all four of the ENCRYPTION_SEED values with the ENCRYPTION_SEED values in lm_code.h from your pre-8.1 TRL version of FlexNet Licensing. See LM_SIGN_LEVEL in step 6.
• If you have upgraded to FlexNet Licensing 8.1 or later, without TRL, from FlexNet Licensing 7.1 to 8.0, inclusive, and have released applications that were built with a previous version of FlexNet Licensing with which you want to maintain compatibility, replace all four of the ENCRYPTION_SEED values with the ENCRYPTION_SEED values in lm_code.h from FlexNet Licensing 7.1 to 8.0 inclusive.
• If you have upgraded to FlexNet Licensing 8.1 or later, without TRL, from pre-v7.1 FlexNet Licensing and want to maintain backward compatibility with that version, replace ENCRYPTION_SEED1 and ENCRYPTION_SEED2 with the seed values from the pre-7.1 version of lm_code.h. Change the last two ENCRYPTION_SEED values to 0x0.
6. For backward compatibility with pre-8.1, TRL-enabled versions of FlexNet Licensing, set LM_SIGN_LEVEL to LM_SIGN2. Otherwise, retain the default value: LM_SIGN. Change this value only if you have upgraded to FlexNet Licensing 8.1 or later with TRL from a previous TRL-enabled version of FlexNet Licensing and want to maintain compatibility with applications built with pre-8.1 TRL.
7. Specify the encryption strength in vcg_code.h. (See Encryption Strength Settings for options.)
8. For backward compatibility with previous, non-TRL-enabled FlexNet Licensing in which license keys were used, you can set VCG_USE_LICENSE_KEY to TRUE. This supports the use of license keys in addition to TRL-enabled digital signatures (SIGN= and SIGN2=). Otherwise, leave this value set to FALSE.
Note • If the value of LM_STRENGTH is LM_STRENGTH_LICENSE_KEY or LM_STRENGTH_DEFAULT, VCG_USE_LICENSE_KEY is ignored. LM_STRENGTH_LICENSE_KEY specifies that the VCG only generates license keys. LM_STRENGTH_DEFAULT specifies that the VCG only generates non-TRL-enabled, 12-character digital signatures.
140 Company Confidential FNO-2020R1.1-ING01 FlexNet Operations 2020 R1.1 On Premises Installation and Implementation Guide

Chapter 9 Building a Vendor Certificate GeneratorBuilding the VCG
9. If your VCG must generate license certificates in the style of earlier versions of FlexNet Licensing, set LM_VER_BEHAVIOR to a value that matches the FlexNet Licensing version. (Default: LM_BEHAVIOR_CURRENT.) See Using LM_VER_BEHAVIOR to Force Compatibility with Early Versions of FlexNet Licensing before changing the default value.
10. Save vcg_code.h as a text file with no special formatting.
Proceed to the next step in preparing to build the VCG: Copying lmprikey.h.
Encryption Strength SettingsGenerally, the encryption strength settings in vcg_code.h must match the encryption strength settings in the FlexNet Licensing toolkit. Any deviation from the encryption strength for which the licensing toolkit is configured can result in the generation of licenses that cannot be activated on the end user’s machine. Therefore, the best practice is to ensure that the encryption strength settings in the VCG (vcg_code.h) match the settings used in the licensing toolkit (lm_code.h), and that the license signature strength configured on the FlexNet Operations Producer Portal is set to Use VCG Configured Strength. For the VCG, the LM_STRENGTH setting in vcg_code.h identifies the default encryption strength for license certificates created by this VCG.
In some cases, it may be useful to use the Producer Portal to override, in a new license generator configuration, the established encryption strength in the VCG—say, for example, to force the VCG to generate licenses that comply with new license toolkit encryption strength settings without rebuilding the VCG or, perhaps, for general testing purposes.
The table, License Signature Strength settings (Producer Portal) and equivalent Encryption Strength settings (VCG), below, provides descriptions for the possible license signature/encryption strength settings.
The Producer Portal settings function to override the default encryption strength settings in vcg_code.h. To ensure that the encryption strength configured in the VCG is used in FlexNet Operations (no overrides), set the value to Use VCG Configured Strength. To override the default encryption strength configured in the VCG, set the License Signature Strength to one of the other values.
Table 9-1 • License Signature Strength settings (Producer Portal) and equivalent Encryption Strength settings (VCG)
Producer Portal License Signature Strength Settings
Corresponding vcg_code.h Encryption Strength Settings Description
Use VCG Configured Strength
none Only available on the Producer Portal, this setting causes FlexNet Operations to generate licenses with the default encryption strength settings specified in vcg_code.h.
License Key LM_STRENGTH_LICENSE_KEY Generates only a 12-character license key with no SIGN= digital signature.
Use LM_STRENGTH_LICENSE_KEY if you are generating license certificates for pre-v7.1 compatibility.
Flex Default LM_STRENGTH_DEFAULT Generates only a 12-character, non-TRL-enabled digital signature (SIGN= ).
FlexNet Operations 2020 R1.1 On Premises Installation and Implementation Guide FNO-2020R1.1-ING01 Company Confidential 141

Chapter 9 Building a Vendor Certificate GeneratorBuilding the VCG
Task To create a license generator configuration that overrides the VCG encryption strength setting
1. In the Producer Portal, click Administer > License Generators.
2. Click Add a License Generator Configuration and define a configuration that uses FlexNet Licensing technology with the License Signature Strength override.
For more information on adding a license generator configuration, see the help topic, Creating a FlexNet Publisher Licensing Toolkit License Generator (VCG) Configuration.
Using LM_VER_BEHAVIOR to Force Compatibility with Early Versions of FlexNet Licensing
If your VCG must generate license certificates in the style of earlier versions of FlexNet Licensing, set LM_VER_BEHAVIOR in vcg_code.h. (Default: LM_BEHAVIOR_CURRENT.)
Important • This is a rarely used option, and not recommended. It should only be altered if backwards compatibility with FlexNet Licensing is required. (See the FlexNet Licensing documentation for more information.) If so, LM_VER_BEHAVIOR must match the setting in lm_code.h or lm_code2.h (depending on your version of FlexNet Licensing).
If you determine that you must set a value for this variable, set LM_VER_BEHAVIOR to the value that corresponds to your version of FlexNet Licensing, as follows:
• LM_BEHAVIOR_V2
• LM_BEHAVIOR_V3
• LM_BEHAVIOR_V4
• LM_BEHAVIOR_V5
• LM_BEHAVIOR_V5_1
• LM_BEHAVIOR_V6
• LM_BEHAVIOR_V7
Low TRL Strength (113 bits) LM_STRENGTH_113BIT or LM_STRENGTH_PUBKEY
Specifies 113-bit security for the TRL-enabled digital signature. Low TRL Strength (113 bits) is the default setting on the Producer Portal.
Medium TRL Strength (163 bits)
LM_STRENGTH_163BIT Specifies 163-bit security for the TRL-enabled digital signature.
High TRL Strength (239 bits) LM_STRENGTH_239BIT or LM_STRENGTH_VERYHIGH
Specifies 239-bit security for the TRL-enabled digital signature.
Table 9-1 • License Signature Strength settings (Producer Portal) and equivalent Encryption Strength settings (VCG)
Producer Portal License Signature Strength Settings
Corresponding vcg_code.h Encryption Strength Settings Description
142 Company Confidential FNO-2020R1.1-ING01 FlexNet Operations 2020 R1.1 On Premises Installation and Implementation Guide

Chapter 9 Building a Vendor Certificate GeneratorBuilding the VCG
• LM_BEHAVIOR_V7_1
• LM_BEHAVIOR_8
• LM_BEHAVIOR_8_1
• LM_BEHAVIOR_8_2
• LM_BEHAVIOR_8_3
• LM_BEHAVIOR_V9
• LM_BEHAVIOR_V9_3
• LM_BEHAVIOR_V10
• LM_BEHAVIOR_V11
Copying lmprikey.hThe VCG kit includes a demo version of lmprikey.h. This demo file cannot be used to generate licenses from a VCG configured with your account’s unique keys. Prior to building the VCG, back up the demo lmprikey.h. Then copy the lmprikey.h file from your FlexNet Licensing 11.5 or later toolkit to your VCG’s machind directory.
Task To copy lmprikey.h from your FlexNet Licensing toolkit into the VCG
1. Rename the demo lmprikey.h to lmprikey.bak.
2. Copy lmprikey.h from your FlexNet Licensing toolkit to <install_dir>/vcg/<version>/machind.
If your VCG must support vendor-defined host IDs, continue with Editing vcg_vendor.c to Support Vendor-Defined Host IDs; otherwise, continue the configuration process with Editing the Makefile.
Editing vcg_vendor.c to Support Vendor-Defined Host IDsIf you must support vendor-defined host IDs, make the following changes in a file called vcg_vendor.c. (This file is located at <install_dir>/vcg/<version>/machind/vcg_vendor.c.) If you need not support vendor-defined host IDs, proceed to Editing the Makefile.
Support for vendor-defined host IDs requires modifications to the definition of vcgvendor_hostid_setup() in vcg_vendor.c. This is a pointer to a function that is called for vendor-defined host ID setup. It is specified as NULL in the released version of vcg_vendor.c:
/*Prototype for the hostid set up routine:void vcg_vendor_hostid_setup(LM_HANDLE *lm_job)
parameter: lm_job Job used to make lc_set_attr() calls*//* Vendor-defined hostid setup */typedef void (*PFV)();void (*vcg_vendor_hostid_setup)() = (PFV)0;
FlexNet Operations 2020 R1.1 On Premises Installation and Implementation Guide FNO-2020R1.1-ING01 Company Confidential 143

Chapter 9 Building a Vendor Certificate GeneratorBuilding the VCG
These modifications require information about your account’s FlexNet Licensing implementation. You must know the name of the vendor-defined host ID function, the VENDEF_ID_TYPE, and the VENDEF_ID_LABEL. (These values are typically defined in the vendor_hostid.c file from your account’s FlexNet Licensing implementation.)
Sample vcg_vendor.c Modified for Vendor-Defined Host ID Support
This sample assumes the following values:
• Vendor-defined host ID function: x_flexlm_newid
• VENDEF_ID_TYPE: HOSTID_VENDOR+1
• VENDEF_ID_LABEL: P
/*Prototype for the hostid set up routine:void vcg_vendor_hostid_setup(LM_HANDLE *lm_job)
parameter: lm_job Job used to make lc_set_attr() calls*//* Vendor-defined hostid setup */
#define VENDEF_ID_TYPE HOSTID_VENDOR+1#define VENDEF_ID_LABEL "P"void x_flexlm_newid(lm_job) LM_HANDLE *lm_job;{
LM_VENDOR_HOSTID h;memset(&h, 0, sizeof (h));h.label = VENDEF_ID_LABEL;h.hostid_num = VENDEF_ID_TYPE;h.case_sensitive = 0;h.get_vendor_id = 0;if (lc_set_attr(lm_job, LM_A_VENDOR_ID_DECLARE, (LM_A_VAL_TYPE) &h))lc_perror(lm_job, "LM_A_VENDOR_ID_DECLARE FAILED");
}
typedef void (*PFV)();void (*vcg_vendor_hostid_setup)() = (PFV)x_flexlm_newid;
Task To modify vcg_vendor.c for vendor-defined host id support
1. Add lm_attr.h at the top of vcg_vendor.c along with the other include statements.
#include "lm_attr.h"
2. Replace the placeholder code for vcgvendor_hostid_setup() with the code from the sample (above).
3. Replace the sample-code values for the following items with the correct values from your account’s FlexNet Licensing implementation:
• Vendor-defined host ID function: x_flexlm_newid (2 instances)
• VENDEF_ID_TYPE: HOSTID_VENDOR+1 (1 instance)
• VENDEF_ID_LABEL: P (1 instance)
Continue with Editing the Makefile to proceed with building your VCG.
144 Company Confidential FNO-2020R1.1-ING01 FlexNet Operations 2020 R1.1 On Premises Installation and Implementation Guide

Chapter 9 Building a Vendor Certificate GeneratorBuilding the VCG
Contact Revenera technical support if you need additional help integrating a vendor-defined host ID type with the VCG.
Editing the MakefileYou must edit the makefile that builds the VCG with your configuration information. Editing the makefile (and subsequently running that makefile to create a VCG) is done in a platform-specific directory.
Task To edit a makefile
1. Navigate to the platform-specific directory for the VCG you want to build: <install_dir>/vcg/<version>/<platform>, where <install_dir> is the directory in which you chose to unzip the VCG toolkit, <version> is the VCG toolkit version, and <platform> is the platform code.
2. Open the makefile in a text editor: makefile on UNIX or vcg.mak on Windows.
3. Change VENDOR = demo to VENDOR = <your_vendor_daemon_name>. This must match the VENDOR_NAME value from vcg_code.h. The vendor daemon name is used to name the VCG executable file. If your vendor daemon name is yyyd, for example, the VCG you build is named yyyd_vcg[.exe].
4. Save the makefile as a text file with no special formatting.
Proceed to Running the VCG Build to complete the process of building your VCG.
Running the VCG BuildAfter you have made the necessary edits to vcg_code.h, makefile, and (optionally) vcg_vendor.c—and copied lmprikey.h—you are ready to build the VCG. The procedure varies, depending on the platform on which you are building.
Note • Ensure that, when you build the VCG, you are logged onto a machine of the same platform as the platform-specific files you build with.
Task To build the VCG in UNIX
In the directory that contains the makefile you edited, enter make.
Task To build the VCG in Windows
1. Ensure that the Visual Studio C++ compiler is configured to run from the command line.
2. Open a command window.
3. From the same directory as vcg.mak, enter nmake -f vcg.mak.
Remember that the vcg_code.h and lmprikey.h files may contain your encryption seeds in plain text. These values are sensitive, and must be protected. After you build the VCG successfully, consider moving, hiding, or otherwise protecting vcg_code.h and lmprikey.h in the same way your account protects lm_code.h.
FlexNet Operations 2020 R1.1 On Premises Installation and Implementation Guide FNO-2020R1.1-ING01 Company Confidential 145

Chapter 9 Building a Vendor Certificate GeneratorBuilding the VCG
146 Company Confidential FNO-2020R1.1-ING01 FlexNet Operations 2020 R1.1 On Premises Installation and Implementation Guide

10
Recommendations for FlexNetOperations Performance Improvement
Over time, a FlexNet Operations Microsoft SQL Server database can grow very large, degrading performance during operations such as activating licenses and loading landing pages. While it is reasonable to expect queries to take longer when there are millions of records in the database, actions can be taken to improve FlexNet Operations performance. Most of these actions are implemented on the database side by the database administrator, while some are implemented through the FlexNet Operations Producer Portal.
Performance issues can be caused by a lack of indexing on certain tables, depending on the volume of data and the types of operations. Because each instance of FlexNet Operations is different and requirements cannot be predicted in advance, indexes cannot be created before installation. The recommendations provided in the Database Index Creation section are based on use case and volume of data.
As the volume of data increases, the database administrator must perform certain operations to maintain reasonable performance. The General Recommendations section lists actions that the database administrator can take to improve FlexNet Operations performance.
The recommendations in this document are based on the assumption that performance degradation is caused by the database, not by the FlexNet Operations instance. If the degradation is caused by the FlexNet Operations instance, then the solution is to connect a cluster of FlexNet Operations nodes to the database and apply these recommendations.
• Database Index Creation
• General Recommendations
Database Index CreationIn general, index creation improves performance in the use cases listed, but problematic queries should be analyzed case by case for other issues. For example, if an operation takes a long time, capture the SQL from the FlexNet Operations logs to get the query’s execution plan. This plan should indicate any missing indexes and provide details about recommended ones. After the indexes are created, performance should improve to the best possible, considering the volume of data involved.
The indexes listed here were captured in this manner from various use cases:
• Device Landing Page
FlexNet Operations 2020 R1.1 On Premises Installation and Implementation Guide FNO-2020R1.1-ING01 Company Confidential 147

Chapter 10 Recommendations for FlexNet Operations Performance ImprovementDatabase Index Creation
• Delete Entities in FlexNet Operations
• Recovery of Served Clients
Device Landing PageCREATE NONCLUSTERED INDEX [NonClusteredIndex-20130314-165607] ON [dbo].[OPS_HOST_TYPES] (
[ID] ASC) INCLUDE ([NAME]) WITH (PAD_INDEX = OFF, STATISTICS_NORECOMPUTE = OFF, SORT_IN_TEMPDB = OFF, IGNORE_DUP_KEY = OFF, DROP_EXISTING = OFF, ONLINE = OFF, ALLOW_ROW_LOCKS = ON, ALLOW_PAGE_LOCKS = ON) ON [PRIMARY]
Delete Entities in FlexNet OperationsCREATE NONCLUSTERED INDEX [OPS_IDX_ACT_ITEM_XFER_LI]
ON [dbo].[OPS_ACTIVATABLE_ITEM] ([TRANSFERRED_FROM_LINE_ITEM], [ACTIVATABLE_ITEM_TYPE])
INCLUDE ([ID])
GO
CREATE NONCLUSTERED INDEX [<Name of Missing Index, sysname,>] ON [dbo].[OPS_ACTIVATABLE_ITEM] ([SPLIT_FROM_LINE_ITEM], [ACTIVATABLE_ITEM_TYPE]) INCLUDE ([ID])
GO
CREATE NONCLUSTERED INDEX [<Name of Missing Index, sysname,>] ON [dbo].[OPS_ENTITLEMENT_ORDER] ([TRANSFERRED_FROM_ENT],[ENTITLEMENT_TYPE_DISCRIMINATOR]) INCLUDE ([ID])
GO
CREATE NONCLUSTERED INDEX [<Name of Missing Index, sysname,>] ON [dbo].[OPS_ACTIVATABLE_ITEM] ([SPLIT_FROM_LINE_ITEM])
GO
CREATE NONCLUSTERED INDEX [<Name of Missing Index, sysname,>] ON [dbo].[OPS_ENTITLEMENT_ORDER] ([TRANSFERRED_FROM_ENT])
G
Recovery of Served ClientsCREATE NONCLUSTERED INDEX [<Name of Missing Index, sysname,>] ON [dbo].[EMB_DEVICE] ([DEVICE_TYPE])
148 Company Confidential FNO-2020R1.1-ING01 FlexNet Operations 2020 R1.1 On Premises Installation and Implementation Guide

Chapter 10 Recommendations for FlexNet Operations Performance ImprovementGeneral Recommendations
INCLUDE ([HOST], [SERVED_STATUS])
GO
CREATE NONCLUSTERED INDEX [<Name of Missing Index, sysname,>] ON [dbo].[EMB_DEVICE_FEATURE] ([DEVICE_ID])
GO
General RecommendationsThis section describes actions that the database administrator can take to improve FlexNet Operations performance:
• Clean Up OPS_REQUEST_TRANSACTION Table
• Update Database Statistics
• Set Appropriate Database Isolation Level
• Disable Allow Adding Redundant Server Setting
Clean Up OPS_REQUEST_TRANSACTION TableAfter backing up the database, periodically clean up the OPS_REQUEST_TRANSACTION table, which holds all trusted activation transactions. This table tends to grow very large for customers who do a large number of trusted activations and contributes to FlexNet Operations startup delay. It is recommended that this table be monitored and older records removed to improve performance.
Update Database StatisticsKeep the database statistics up to date so queries work efficiently (MS SQLServer). To determine if the database is maintained in good condition for table scans and optimal performance, use the following SQL to evaluate how many days have elapsed since the last refresh for each table. It is recommended that the number of elapsed days be kept to less than a week for the most frequently used tables.
SELECT OBJECT_NAME(A.object_id) AS Object_Name, A.name AS index_name, STATS_DATE(A.OBJECT_ID, index_id) AS StatsUpdated , DATEDIFF(d,STATS_DATE(A.OBJECT_ID, index_id),getdate()) DaysOld
FROM sys.indexes A INNER JOIN sys.tables B ON A.object_id = B.object_id
WHERE A.name IS NOT NULL ORDER BY DATEDIFF(d,STATS_DATE(A.OBJECT_ID, index_id),getdate()) DESC
To update statistics on all the tables, run the following command:
EXEC sp_updatestats
FlexNet Operations 2020 R1.1 On Premises Installation and Implementation Guide FNO-2020R1.1-ING01 Company Confidential 149

Chapter 10 Recommendations for FlexNet Operations Performance ImprovementGeneral Recommendations
Set Appropriate Database Isolation LevelSet the appropriate database isolation level—the degree to which an application process is isolated from other concurrently executing application processes—to maintain optimal performance. For SQLServer, the default isolation level is READ_COMMITTED, which means that tables are locked even during READ operations. This can cause database contention, especially when there are several concurrent requests resulting in optimistic lock exceptions and operations failures. For better performance in such cases, set the FlexNet Operations database isolation level to READ_COMMITTED_SNAPSHOT with this command:
alter database <database name> set READ_COMMITTED_SNAPSHOT on
Disable Allow Adding Redundant Server SettingTo improve FlexNet Embedded device activation performance, disable the Allow Adding Redundant Server setting if it is not required. This can be done through the FlexNet Operations Producer Portal.
Task To disable the Allow Adding Redundant Server Setting
1. Log in to the Producer Portal and navigate to System Administration.
2. Click Embedded Devices in the left panel.
3. Un-check the Allow Adding Redundant Server box in the right panel.
150 Company Confidential FNO-2020R1.1-ING01 FlexNet Operations 2020 R1.1 On Premises Installation and Implementation Guide

Part 3Appendices
This part of the FlexNet Operations 2020 R1.1 On Premises Installation and Implementation Guide includes the following chapters:
• Configuring for Integration with Electronic Software Delivery
• Configuring FlexNet Operations for Secure Socket Layer
• Securing REST Endpoints in the Cloud Licensing Service Component
• Configuring FlexNet Operations to Run Behind a Proxy
• Uninstalling FlexNet Operations
FlexNet Operations 2020 R1.1 On Premises Installation and Implementation Guide FNO-2020R1.1-ING01 Company Confidential 151

152 Company Confidential FNO-2020R1.1-ING01 FlexNet Operations 2020 R1.1 On Premises Installation and Implementation Guide

A
Configuring for Integration withElectronic Software Delivery
After installing and configuring FlexNet Operations, producers who purchase FlexNet Operations with FlexNet Electronic Software Delivery must then integrate their FlexNet Operations instance with their Electronic Software Delivery (ESD) tenant in the Revenera cloud. Until that integration is accomplished, ESD features of the Producer Portal and End-User Portal will not function.
Integrating FlexNet Operations with your ESD tenant has two basic requirements:
• You must specify the URL for your ESD tenant in the FlexNet Operations Producer Portal’s system configuration settings.
• Your FlexNet Operations instance must be open for communication with the ESD tenant in the Revenera cloud.
• Working with your Revenera representative, you must tell Revenera the hostname for your FlexNet Operations instance.
Configuring External Services URLs for Electronic Software Delivery
To allow your FlexNet Operations instance to connect with your ESD tenant in the Revenera cloud, you must set three URLs on the FlexNet Operations system configuration page.
Task To configure FlexNet Operations ESD URLs
1. In the Producer Portal, click System > Configure > FlexNet Operations. This link opens the system configuration page for FlexNet Operations settings.
2. On the system configuration page for FlexNet Operations, expand the External Services Configuration group. The External Services Configuration group is where you set the ESD URLs.
FlexNet Operations 2020 R1.1 On Premises Installation and Implementation Guide FNO-2020R1.1-ING01 Company Confidential 153

Appendix A Configuring for Integration with Electronic Software Delivery
3. In the External Services Configuration group specify values for the following settings.
4. Click Save Configs.
Saving these three values completes the system configuration settings the Producer Portal requires to communicate with your Electronic Software Delivery tenant.
If your FlexNet Operations instance runs behind a firewall, you must also be sure to open the FlexNet Authentication to external connections.
Enabling Inbound Communication from the Revenera Cloud
Most producer restrict external connections to FlexNet Operations for security reasons while selectively exposing the End-User Portal and other necessary elements to the public. To integrate your FlexNet Operations instance with cloud-hosted ESD functionality, you must also expose FlexNet Authentication to inbound communication.
FlexNet Authentication can be exposed to external connections at http://hostname:port/flexnet/services/FlexnetAuthentication, where hostname is the hostname for your FlexNet Operations instance and port is the HTTP port.
Remember to contact your Revenera representative to share your FlexNet Operations hostname. Revenera needs the hostname to enable communication with your FlexNet Operations instance from your ESD tenant in the Revenera cloud.
Configuring the FlexNet Operations Server for Electronic Software Delivery
Customers who use Electronic Software Delivery must add server headers to identify the origin of the incoming request from the cloud-based Electronic Software Delivery service and allow a response. Revenera will provide you with origin information if Electronic Software Delivery service is licensed.
Setting Value
FlexNet Operations Cloud URL
https://tenantname-esd.flexnetoperations.com/flexnet/operations
where tenantname is the tenant name Revenera provides to you in the Welcome message.
For example, a producer with the tenant name, “rocinante,” would specify a FlexNet Operations Cloud URL value of https://rocinante-esd.flexnetoperations.com/flexnet/operations
Electronic Software Delivery Host Name
https://tenantname-esd.flexnetoperations.com/
where tenantname is the tenant name Revenera provides to you in the Welcome message.
For example, a producer with the tenant name, “canterbury,” would specify an Electronic Software Delivery Host Name value of https://canterbury-esd.flexnetoperations.com/
Electronic Software Delivery Service URL
https://tenantname-esd.flexnetoperations.com/esd-service/esd
where tenantname is the tenant name Revenera provides to you in the Welcome message.
For example, a producer with the tenant name, “dulcinea,” would specify a Electronic Software Delivery Service URL value of https://dulcinea-esd.flexnetoperations.com/esd-service/esd
154 Company Confidential FNO-2020R1.1-ING01 FlexNet Operations 2020 R1.1 On Premises Installation and Implementation Guide

Appendix A Configuring for Integration with Electronic Software Delivery
Important • It is recommended that you consult your server administrator for configuration assistance.
Headers for an Apache Server
# Add to support Cross-origin Resource Sharing (CORS) with the Revenera ESD service. # For more on CORS, see: https://developer.mozilla.org/en-US/docs/Web/HTTP/Access_control_CORS
# This looks for credentials from the requestor. Header set Access-Control-Allow-Credentials: true
# GET requests must be allowed for ESD functionality. Header set Access-Control-Allow-Methods: GET
# Specify the origin of the host providing ESD functionality (provided by Revenera). Header add Access-Control-Allow-Origin: {protocol}//{hostname}{port_if_any}
Headers for a Wildfly Server
<subsystem xmlns="urn:jboss:domain:undertow:3.0"> <server name="default-server"> <host name="default-host" alias="localhost"> <filter-ref name="Access-Control-Allow-Origin"/> <filter-ref name="Access-Control-Allow-Methods"/> <filter-ref name="Access-Control-Allow-Credentials"/> </host> </server> <filters> <!-- Add to support Cross-origin Resource Sharing (CORS) with the Revenera ESD service. For more on CORS, see: https://developer.mozilla.org/en-US/docs/Web/HTTP/Access_control_CORS This looks for credentials from the requestor. --> <response-header name="Access-Control-Allow-Credentials" header-name="Access-Control-Allow-Credentials" header-value="true"/> <!-- GET requests must be allowed for ESD functionality. --> <response-header name="Access-Control-Allow-Methods" header-name="Access-Control-Allow-Methods" header-value="GET"/> <!-- Specify the origin of the host providing ESD functionality (provided by Revenera). --> <response-header name="Access-Control-Allow-Origin" header-name="Access-Control-Allow-Origin" header-value="{protocol}//{hostname}{port_if_any}"/>
</filters> </subsystem>
FlexNet Operations 2020 R1.1 On Premises Installation and Implementation Guide FNO-2020R1.1-ING01 Company Confidential 155

Appendix A Configuring for Integration with Electronic Software Delivery
156 Company Confidential FNO-2020R1.1-ING01 FlexNet Operations 2020 R1.1 On Premises Installation and Implementation Guide

B
Configuring FlexNet Operations forSecure Socket Layer
Secure Socket Layer (SSL) allows Web servers and Web clients to communicate over a secured connection using the HTTPS protocol where both the server and the client encrypt data before sending it. If you choose not to have a full-featured Web server handle HTTPS requests for FlexNet Operations, FlexNet Operations itself can act as an SSL server to Web browsers or Web service client applications. FlexNet Operations can also act as an SSL client to a remote server, such as an LDAP (Lightweight Directory Assistance Protocol) server. HTTPS is always enabled in FlexNet Operations, but the secure server keystore and the secure client truststore may have to be configured.
Configuring Server-Side Secure Socket LayerWhen a Web browser or Web service client connects directly to FlexNet Operations using HTTPS, SSL authenticates the credentials of FlexNet Operations. Certificates to authenticate the FlexNet Operations SSL server can be self-signed. Trusted certificates are issued by a recognized certificate authority.
The following activities are briefly described in this section:
• Generating a Test Certificate
• Configuring FlexNet Operations with the Test Certificate
• Testing that the HTTPS connection to FlexNet Operations works (testing the SSL listener)
Table B-1 •
Topic Description
Configuring Server-Side Secure Socket Layer
Covers generating a test certificate, configuring FlexNet Operations with the test certificate, verifying the test certificate, obtaining a trusted certificate, configuring FlexNet Operations with a permanent certificate, and disabling weak ciphers.
Configuring Client-Side Secure Socket Layer
Covers importing an SSL server’s certificate into the truststore, configuring FlexNet Operations with a new truststore, and verifying the trusted connection.
FlexNet Operations 2020 R1.1 On Premises Installation and Implementation Guide FNO-2020R1.1-ING01 Company Confidential 157

Appendix B Configuring FlexNet Operations for Secure Socket LayerConfiguring Server-Side Secure Socket Layer
• Obtaining a Trusted Certificate
• Configuring FlexNet Operations with a Permanent Certificate (meaning the trusted certificate)
• Configuring Secure Socket Layer in FlexNet Operations to Disable Weak Ciphers
Generating a Test CertificateA keystore containing a public key/private key pair and an expiring, self-signed certificate for testing SSL is shipped with FlexNet Operations. If the shipped keystore has expired, another test keystore can be generated using keytool, a command-line utility provided in the Java JDK. The following instructions enable you to generate a simple key pair and certificate keystore that is valid for three months. This keystore allows you to test that the SSL listener can run, but its certificate is also self-signed and is not trusted by the browser.
Task To generate a test certificate from scratch
1. Install or locate the Java JDK. Verify that the keytool utility is accessible at the command line.
2. At a command line, generate a simple key pair and non-trusted certificate into a keystore file named keystore in the current directory by typing:
keytool -keystore keystore -alias tomcat -genkey -keyalg RSA
You are prompted to provide answers to several questions for the certificate. Press the Enter key to submit each of your answers. If you answer these questions accurately for the test certificate, the certificate that you generate can be used as the basis of your trusted certificate that you obtain from a certificate authority.
Question Description
Enter keystore password: Type the password for the keystore. The default SSL keystore password for FlexNet Operations is flexnet. The password is displayed in plain text.
Note the password that you enter. In the next section, Configuring FlexNet Operations with the Test Certificate, you will enter these passwords on the Advanced configuration page in FlexNet Setup.
What is your first and last name?
Type the fully qualified domain name of the machine on which FlexNet Operations is installed.
What is the name of your account’s unit?
Type the name of your division or group in your company.
What is the name of your account?
Type the name of your company.
What is the name of your City or Locality?
Type the name of your city.
What is the name of your State or Province?
Type the name of your state or province.
158 Company Confidential FNO-2020R1.1-ING01 FlexNet Operations 2020 R1.1 On Premises Installation and Implementation Guide

Appendix B Configuring FlexNet Operations for Secure Socket LayerConfiguring Server-Side Secure Socket Layer
Configuring FlexNet Operations with the Test Certificate Follow the instructions, below, to configure FlexNet Operations with the test certificate you just generated.
Task To configure FlexNet Operations with the test certificate
1. On the machine on which FlexNet Operations components are installed, copy the test keystore file that you just generated, keystore, to a location accessible from, but outside of, the FlexNet Operations installation.
2. In FlexNet Setup, navigate to the System Status page and click Stop Server to stop FlexNet Operations.
3. On the System Status page, click Undeploy All.
4. In FlexNet Setup, click Configure > Advanced to show the Advanced configuration page.
5. On the Advanced configuration page, specify Secure Server settings.
6. Click Save. The site directory is re-created to reflect the new configuration settings.
7. Return to the System Status page and click Deploy All.
8. On the System Status page, click Start Server to restart FlexNet Operations.
FlexNet Operations is reconfigured for Secure Socket Layer communication.
What is the two-letter country code for this unit?
Type the two-letter code for your country.
Is entry correct? Check that the entries you typed are correct, and then type yes or no. Default is no.
Enter key password for <tomcat> (RETURN if same as keystore password):
Press Enter to use the same password for the Tomcat SSL key that the keystore uses. You must use the same password.
Settings Instructions
HTTPS Port Enter a new value for HTTPS Port or retain the default setting, 8443.
Keystore Location Modify the Keystore Location setting to match the location of the test keystore.
Password Enter the keystore password for the certificate. (The default password for the bundled keystore is flexnet.)
Confirm Password Enter the keystore password again.
Question Description
FlexNet Operations 2020 R1.1 On Premises Installation and Implementation Guide FNO-2020R1.1-ING01 Company Confidential 159

Appendix B Configuring FlexNet Operations for Secure Socket LayerConfiguring Server-Side Secure Socket Layer
Verifying the Test CertificateThe previous steps configure FlexNet Operations to accept HTTPS requests. You must now verify that you can log in to FlexNet Operations using HTTPS.
Task To verify the test certificate
1. Import the trusted certificate you generated (exported from the keystore) into a browser or web service client implementation.
Because you generated the certificate yourself and you are not a known certificate authority, import the trusted certificate (exported from the keystore) into a browser or Web service client implementation.
In Internet Explorer, click Tools > Internet Options > Content > Certificates.
In Firefox, click Edit > Preferences > Advanced > Security > View Certificates > Web Sites.
2. Browse to the URL where FlexNet Operations is running.
The URL will be in the format
https://hostname:port>/flexnet
• hostname is the fully qualified domain name for the host that you specified when you generated the keystore.
• port is the HTTPS port number you configured for FlexNet Operations.
The login page for FlexNet Operations is displayed.
Note • If connections to FlexNet Operations come only from inside your account, a non-expiring, self-signed certificate that is added to each internal user’s Web browser certificate store may be adequate. See the options for keytool to generate a non-expiring, self-signed certificate.
Obtaining a Trusted CertificateFor optimal security, if users are connecting to FlexNet Operations from outside your account, it is recommended that you obtain a trusted certificate from a certificate authority. Each certificate authority has its own instructions, but all require that you submit a certificate signing request (CSR) that you can generate from the test keystore using the keytool utility.
Task To obtain a trusted certificate
1. Generate a CSR in a file named tomcat.csr for a key pair and certificate already in a keystore called keystore in the current directory by typing
keytool -certreq -keyalg RSA -alias tomcat -file tomcat.csr -keystore keystore
2. Submit this CSR as instructed by the certificate authority you chose.
3. After you receive a trusted certificate from the certificate authority, load the certificate authority’s chain (or root) certificate (in a file named rootcrt) into the keystore used to generate the CSR. If the certificate is in a format parsable by the keytool utility, type
160 Company Confidential FNO-2020R1.1-ING01 FlexNet Operations 2020 R1.1 On Premises Installation and Implementation Guide

Appendix B Configuring FlexNet Operations for Secure Socket LayerConfiguring Server-Side Secure Socket Layer
keytool -keystore keystore -import -alias root -file rootcrt -trustcacerts
If the certificate is not in a format parsable by the keytool utility, see documentation from the certificate authority for instructions on loading the root certificate.
4. After the root certificate has been loaded, load the new certificate (in a file named newcrt) into the keystore used to generate the CSR. If the certificate is in a format understood by the keytool utility, type
keytool -keystore keystore -import -alias tomcat -file newcrt -trustcacerts
If the certificate is not in a format understood by the keytool utility, see documentation from the certificate authority.
Configuring FlexNet Operations with a Permanent CertificateThis step is necessary to do the following:
• Point to a central repository of keystores or truststores maintained by your account.
• Configure the location of a permanent certificate, whether trusted or self-signed.
Task To configure FlexNet Operations with a permanent trusted or self-signed certificate
1. On the machine on which FlexNet Operations components are installed, copy the permanent keystore file that you just generated, keystore, to a location accessible from, but outside of, the FlexNet Operations installation, or point to a keystore maintained by your account.
2. In FlexNet Setup, navigate to the System Status page and click Stop Server to stop FlexNet Operations.
3. On the System Status page, click Undeploy All.
4. In FlexNet Setup, click Configure > Advanced to show the Advanced configuration page.
5. On the Advanced configuration page, specify Secure Server settings.
6. Click Save. The site directory is re-created to reflect the new configuration settings.
7. Return to the System Status page and click Deploy All.
8. On the System Status page, click Start Server to restart FlexNet Operations.
9. For producers configuring FlexNet Operations with a self-signed certificate, import the certificate into browsers as described in Verifying the Test Certificate. (For producers configuring FlexNet Operations with a trusted certificate from a known certificate authority, it is unnecessary to import the certificate.)
Settings Instructions
HTTPS Port Enter a new value for HTTPS Port or retain the default setting, 8443.
Keystore Location Modify the Keystore Location setting to match the location of the permanent keystore.
Password Enter the keystore password for the certificate.
Confirm Password Enter the keystore password again.
FlexNet Operations 2020 R1.1 On Premises Installation and Implementation Guide FNO-2020R1.1-ING01 Company Confidential 161

Appendix B Configuring FlexNet Operations for Secure Socket LayerConfiguring Server-Side Secure Socket Layer
FlexNet Operations is reconfigured for Secure Socket Layer communication using the permanent certificate.
Configuring Secure Socket Layer in FlexNet Operations to Disable Weak Ciphers
Insufficient transport layer protection allows SSL/TLS communication to be exposed to untrusted third parties, providing the opportunity to steal sensitive information. SSL/TLS support in FlexNet Operations can be configured to disable weak cipher suites like RC4-MD5, RC4-SHA, and ECDHE-RSA-RC4-SHA to prevent vulnerability.
These changes must be made to FlexNet Operations while the FlexNet Operations modules are deployed but while the FlexNet Operations server is stopped.
Task To disable weak ciphers
1. In FlexNet Setup, click System Status > Stop Server to stop the Wildfly application server on which FlexNet Operations is running.
2. With the server stopped, open standalone-full.xml in a text editor. This file is at wildfly_dir\standalone\configuration\standalone-full.xml, where wildfly_dir is the root directory for Wildfly. For example, if you chose to use the embedded Wildfly server when you installed FlexNet Operations, standalone-full.xml would be in ops_install_dir\components\wildfly\standalone\configuration\.
3. In standalone-full.xml, modify the undertow subsystem to enable only TLSv1.2 protocol and add a strong cipher list in the enabled-cipher-suites attribute.
<subsystem xmlns=”urn:jboss:domain:undertow:1.2”><server name=”default-server”>
<https-listener name="default-https" socket-binding="https" security-realm="UndertowRealm" enabled-protocols="TLSv1.2"enabled-cipher-suites="TLS_RSA_WITH_AES_128_GCM_SHA256,
TLS_DHE_RSA_WITH_AES_128_GCM_SHA256,TLS_ECDHE_RSA_WITH_AES_128_GCM_SHA256"/>...
</server>...
</subsystem>
The above setting enables 128-bit AES-based ciphers, which are stronger, to be used with SSL/TLS. Most recent browser versions support these ciphers, ensuring protection for SSL communication between browsers and FlexNet Operations.
4. In FlexNet Setup, click System Status > Start Server to restart FlexNet Operations.
Important • If the FlexNet Operations core module is undeployed and redeployed after this change, these changes will be lost. To re-enable strong ciphers, you must repeat this procedure manually.
162 Company Confidential FNO-2020R1.1-ING01 FlexNet Operations 2020 R1.1 On Premises Installation and Implementation Guide

Appendix B Configuring FlexNet Operations for Secure Socket LayerConfiguring Client-Side Secure Socket Layer
Configuring Client-Side Secure Socket LayerFlexNet Operations can also be a client on an SSL connection to a remote server, such as an LDAP server. When FlexNet Operations connects to an SSL server as a client, FlexNet Operations receives a certificate of authentication from the SSL server. FlexNet Operations then checks the certificate against the set of certificates in its truststore (client keystore) to see if it is trusted. The default truststore is located in the JRE bundled with FlexNet Operations at ops_install_dir\components\jvm\lib\security\cacerts.
If the SSL server’s certificate cannot be validated with the certificates in the default truststore, the SSL server’s certificate must be added to the FlexNet Operations truststore before the connection can be established.
Importing a Secure Socket Layer Server’s Certificate into the Truststore
This step is needed only if the SSL server’s certificate cannot be validated with certificates already in the default truststore.
Task To import an SSL server’s certificate into the FlexNet Operations truststore
1. Obtain a certificate, called servcrt in these instructions, from the SSL server administrator.
2. Copy the default truststore, called <truststore> in these instructions, from ops_install_dir\components\jvm\lib\security\cacerts to a location accessible from, but outside of, the FlexNet Operations installation.
3. Install or locate the Java JDK. Verify that the keytool utility is accessible at the command line in the new truststore location.
4. Load the SSL server certificate into the new truststore location.
If the certificate is in a format parsable by the keytool utility, type
keytool -keystore <truststore> -import -alias mykey -file servcrt -trustcacerts
If it is not in a format parsable by the keytool utility, consult the documentation from the SSL server administrator.
Configuring FlexNet Operations with a New TruststoreFollow the instructions, below, to configure FlexNet Operations with a certificate for the SSL server to which you want FlexNet Operations to connect
This step is necessary if
• You want to point to a central repository of keystores or truststores maintained by your account.
• You load a new certificate into the default truststore and have to configure its new location.
FlexNet Operations 2020 R1.1 On Premises Installation and Implementation Guide FNO-2020R1.1-ING01 Company Confidential 163

Appendix B Configuring FlexNet Operations for Secure Socket LayerConfiguring Client-Side Secure Socket Layer
Task To configure FlexNet Operations with a certificate for a different SSL server
1. In FlexNet Setup, navigate to the System Status page and click Stop Server to stop FlexNet Operations.
2. On the System Status page, click Undeploy All.
3. In FlexNet Setup, click Configure > Advanced to show the Advanced configuration page.
4. On the Advanced configuration page, specify Secure Client settings.
5. Click Save. The site directory is re-created to reflect the new configuration settings.
6. Return to the System Status page and click Deploy All.
7. On the System Status page, click Start Server to restart FlexNet Operations.
Verifying the Trusted ConnectionNow that you have reconfigured FlexNet Operations to connect to the SSL server, verify that you can connect to the SSL server using FlexNet Operations.
Settings Instructions
Truststore Location Modify the Truststore Location setting to match the location of the truststore containing the SSL server’s certificate.
Password Enter the password for the truststore. (By default, the password from the FlexNet Operations JRE is changeit.)
Confirm Password Enter the truststore password again.
164 Company Confidential FNO-2020R1.1-ING01 FlexNet Operations 2020 R1.1 On Premises Installation and Implementation Guide

C
Securing REST Endpoints in the CloudLicensing Service Component
Important • This appendix applies only to producers who install FlexNet Operations with both the Advanced Lifecycle module and the Cloud Licensing Service module.
By default, the FlexNet Operations installer deploys the Cloud Licensing Service component with REST endpoint security enabled. Securing REST endpoints is an important security enhancement for the Cloud Licensing Service component.
This secure access to the Cloud Licensing Service component allows license server administrators in the end user’s enterprise to administer their license servers using a REST API client utility. It also means that you must add the License Fulfillment Service as allowed host.
Note • Revenera-hosted Cloud Licensing Service instances have security enabled by default, and the security configuration options are set by Revenera.
This appendix includes instructions for listing the allowed hosts for the core FlexNet Operations and FlexNet Embedded components with the Cloud Licensing Service component as well as steps for changing the default password.
Tip • The steps for listing allowed hosts described here are necessary even when all components are installed on the same host. In such cases, only one IP address must be listed as allowed: 127.0.0.1.
The steps described in this section use the configuration settings available in FlexNet Setup to change the default password and add hosts to the allowed host list.
Table C-1 •
Topic Description
Changing the Default Cloud Licensing Service Password
Change the default password for the Cloud Licensing Service
Adding Allowed Hosts Add hosts to the Cloud Licensing Service allowed host list.
FlexNet Operations 2020 R1.1 On Premises Installation and Implementation Guide FNO-2020R1.1-ING01 Company Confidential 165

Appendix C Securing REST Endpoints in the Cloud Licensing Service ComponentChanging the Default Cloud Licensing Service Password
Changing the Default Cloud Licensing Service Password
A new install of the Cloud Licensing Service component has a user called, operator, with a default password of, default. These instructions describe how to change the default password to one that is more secure.
Task To change the default password
1. On the System Status page, click the Change Password button.
2. In the Change Password dialog box, enter: default into the Old Password field. Enter the new password in the New Password field and again in the Confirm Password field.
3. Click the Change Password button.
4. In the confirmation window, click Close.
Adding Allowed HostsUse the steps below to add allowed hosts.
Note • First obtain the IPv4 address for each host to be added to the allowed host list with the Cloud Licensing Service.
Task To add an allowed host
1. On the System Status page, click Allowed Host List.
2. In the Add Hosts to Allowed Host List dialog box, enter the Cloud Licensing Service password.
3. Enter a comma separated list of IP addresses to be allowed.
Note • DNS hostnames are not supported.
4. Click Change Allowed List.
5. In the confirmation window, click Close.
Error Handling Describes what to expect if errors occur due to endpoint security changes.
Table C-1 •
Topic Description
166 Company Confidential FNO-2020R1.1-ING01 FlexNet Operations 2020 R1.1 On Premises Installation and Implementation Guide

Appendix C Securing REST Endpoints in the Cloud Licensing Service ComponentError Handling
Error HandlingIf anything goes wrong for either the Change Password or Allowed Host List, a dialog box with the following error will appear:
Server responded as 401 UnauthorizedPossibly the password specified is wrong. Consult the logs for detailed exception report.
FlexNet Operations 2020 R1.1 On Premises Installation and Implementation Guide FNO-2020R1.1-ING01 Company Confidential 167

Appendix C Securing REST Endpoints in the Cloud Licensing Service ComponentError Handling
168 Company Confidential FNO-2020R1.1-ING01 FlexNet Operations 2020 R1.1 On Premises Installation and Implementation Guide

D
Configuring FlexNet Operations to RunBehind a Proxy
Important • This appendix explains how to configure FlexNet Operations to run behind a proxy server. If needed, perform these steps each machine that hosts the FlexNet Operations component.
If your account’s security standards require FlexNet Operations to operate through a proxy server to connect to the Internet, use the steps below to configure FlexNet Operations with the information it needs about your proxy server. (In most cases, FlexNet Operations must have connect to the Internet to contact a Revenera license server to verify your account’s license rights.)
These steps must be performed after installing and setting up FlexNet Operations but before deploying the servers.
Tip • These changes survive server restarts and re-deployments and persist through database version upgrades, but they must be redone for each new FlexNet Operations installation (both in new install locations and installs over existing locations).
Instructions for configuring proxy settings differ depending on the host machine’s operating system. Follow the instructions in the section, below, that matches the operating system for the machines on which FlexNet Operations is installed.
Table D-1 •
Topic Description
Configuring Proxy Settings on Windows Systems
Explains how to configure FlexNet Operations to work with an HTTP or HTTPS proxy on a Windows system.
Configuring Proxy Settings on Linux Systems
Explains how to configure FlexNet Operations to work with an HTTP or HTTPS proxy on a Linux system.
FlexNet Operations 2020 R1.1 On Premises Installation and Implementation Guide FNO-2020R1.1-ING01 Company Confidential 169

Appendix D Configuring FlexNet Operations to Run Behind a ProxyConfiguring Proxy Settings on Windows Systems
Configuring Proxy Settings on Windows SystemsFollow the steps, below, to configure FlexNet Operations to communicate with your proxy server. In these steps, you stop FlexNet Operations servers, undeploy FlexNet Operations, edit application server configuration files, and then redeploy and restart FlexNet Operations.
Task To configure proxy settings on a Windows system
1. In FlexNet Setup, stop FlexNet Operations servers and undeploy FlexNet Operations.
2. On the machine that hosts the FlexNet Operations component, navigate to ops_install_dir\release\jbossConfig.
3. Open standalone.conf.bat.template in a text editor.
4. In standalone.conf.bat.template, locate the following section:
rem # JVM memory allocation pool parameters - modify as appropriate.set "JAVA_OPTS=-Xms@{flexnet.heap.initial}@M -Xmx@{flexnet.heap.maximum}@M -XX:MaxPermSize=1024M"
rem # Prefer IPv4
5. Before rem # Prefer IPv4, insert one of the following sets of lines, depending on whether your proxy server uses HTTP or HTTPS (and replacing myproxyserver.com and port with your proxy server’s actual host and port values):
rem # Setup Http Proxy serverset "JAVA_OPTS=%JAVA_OPTS% -Dhttp.proxyHost=myproxyserver.com -Dhttp.proxyPort=port"
or
rem # Setup Https Proxy serverset "JAVA_OPTS=%JAVA_OPTS% -Dhttps.proxyHost=myproxyserver.com -Dhttps.proxyPort=port"
For example, after your edits, the section may now appear as follows for HTTPS:
rem # JVM memory allocation pool parameters - modify as appropriate.set "JAVA_OPTS=-Xms@{flexnet.heap.initial}@M -Xmx@{flexnet.heap.maximum}@M -XX:MaxPermSize=1024M"
rem # Setup Https Proxy serverset "JAVA_OPTS=%JAVA_OPTS% -Dhttps.proxyHost=myproxyserver.com -Dhttps.proxyPort=443"
rem # Prefer IPv4
Tip • The -D<string>=<value> describes a key/value pair. There should be no spaces. If there are special characters in the proxy server name (such as %, @, and so forth), these settings will fail.
6. If your account uses users and passwords for your proxy servers, also add the following line to your edits (again, before rem # Prefer IPv4) replacing myuser and mypassword with the correct username and password values for your proxy server:
set "JAVA_OPTS=%JAVA_OPTS% -Dhttp.proxyUser=myuser -Dhttp.proxyPassword=mypassword"
170 Company Confidential FNO-2020R1.1-ING01 FlexNet Operations 2020 R1.1 On Premises Installation and Implementation Guide

Appendix D Configuring FlexNet Operations to Run Behind a ProxyConfiguring Proxy Settings on Linux Systems
or
set "JAVA_OPTS=%JAVA_OPTS% -Dhttps.proxyUser=myuser -Dhttps.proxyPassword=mypassword"
Tip • Avoid spaces or special characters (such as %, @, and so forth) in the username and password values.
7. Save your changes to standalone.conf.bat.template.
8. In FlexNet Setup, deploy FlexNet Operations and any other component and start the server.
When these steps are complete, verify that FlexNet Operations is now using the http or https proxy as configured.
Configuring Proxy Settings on Linux SystemsFollow the steps, below, to configure FlexNet Operations to communicate with your proxy server. In these steps, you stop FlexNet Operations servers, undeploy FlexNet Operations, edit application server configuration files, and then redeploy and restart FlexNet Operations.
Tip • When editing text files on Linux systems, take care to preserve the correct line endings.
Task To configure proxy settings on a Linux system
1. In FlexNet Setup, stop FlexNet Operations servers and undeploy FlexNet Operations.
2. On the machine that hosts the FlexNet Operations component, navigate to ops_install_dir/release/jbossConfig.
3. Open standalone.conf.bat.template in a text editor.
4. In standalone.conf.bat.template , locate the following section:
if [ "x$JAVA_OPTS" = "x" ]; then JAVA_OPTS="-Xms@{flexnet.heap.initial}@m -Xmx@{flexnet.heap.maximum}@m -XX:MaxPermSize=256m -Djava.net.preferIPv4Stack=true" JAVA_OPTS="$JAVA_OPTS -XX:-UseCompressedOops -XX:-UseCompressedClassPointers" JAVA_OPTS="$JAVA_OPTS -Djboss.modules.system.pkgs=$JBOSS_MODULES_SYSTEM_PKGS -Dlog4j.configurationFile=flexnet-log4j.xml -Djava.awt.headless=true"else echo "JAVA_OPTS already set in environment; overriding default settings with values: $JAVA_OPTS"fi
5. Between the JAVA_OPTS lines for compressed class pointers and jboss.modules.system.packages, insert one of the following lines, depending on whether your proxy server uses HTTP or HTTPS (and replacing myproxyserver.com and port with your proxy server’s actual host and port values):
JAVA_OPTS="$JAVA_OPTS -Dhttp.proxyHost=myproxyserver.com -Dhttp.proxyPort=port"
or
JAVA_OPTS="$JAVA_OPTS -Dhttps.proxyHost=myproxyserver.com -Dhttps.proxyPort=port"
FlexNet Operations 2020 R1.1 On Premises Installation and Implementation Guide FNO-2020R1.1-ING01 Company Confidential 171

Appendix D Configuring FlexNet Operations to Run Behind a ProxyConfiguring Proxy Settings on Linux Systems
For example, after your edits, the section may now appear as follows for HTTPS:
if [ "x$JAVA_OPTS" = "x" ]; then JAVA_OPTS="-Xms@{flexnet.heap.initial}@m -Xmx@{flexnet.heap.maximum}@m -XX:MaxPermSize=256m -Djava.net.preferIPv4Stack=true" JAVA_OPTS="$JAVA_OPTS -XX:-UseCompressedOops -XX:-UseCompressedClassPointers"JAVA_OPTS="$JAVA_OPTS -Dhttps.proxyHost=myproxyserver.com -Dhttps.proxyPort=443" JAVA_OPTS="$JAVA_OPTS -Djboss.modules.system.pkgs=$JBOSS_MODULES_SYSTEM_PKGS -Dlog4j.configurationFile=flexnet-log4j.xml -Djava.awt.headless=true"else echo "JAVA_OPTS already set in environment; overriding default settings with values: $JAVA_OPTS"fi
Tip • The -D<string>=<value> describes a key/value pair. There should be no spaces. If there are special characters in the proxy server name (such as %, @, and so forth), these settings will fail.
6. If your account uses users and passwords for your proxy servers, also add the following line to your edits (following the new line for the proxy server host and before the line for jboss.modules.system.packages) replacing myuser and mypassword with the correct username and password values for your proxy server:
JAVA_OPTS="$JAVA_OPTS -Dhttp.proxyUser=myuser -Dhttp.proxyPassword=mypassword"
or
JAVA_OPTS="$JAVA_OPTS -Dhttps.proxyUser=myuser -Dhttps.proxyPassword=mypassword"
Tip • Avoid spaces or special characters (such as %, @, and so forth) in the username and password values.
7. Save your changes to standalone.conf.bat.template.
8. In FlexNet Setup, deploy FlexNet Operations and any other component and start the server.
When these steps are complete, verify that FlexNet Operations is now using the http or https proxy as configured.
172 Company Confidential FNO-2020R1.1-ING01 FlexNet Operations 2020 R1.1 On Premises Installation and Implementation Guide

E
Uninstalling FlexNet OperationsFollow the instructions, below, to uninstall FlexNet Operations.
Tip • Before you run the uninstaller, consider exporting the configuration settings and saving any customizations. For producers who plan to re-install a clean version of FlexNet Operations, retaining the configuration settings from the current installation and then importing them into the new instance may save time. Likewise, producers who save the contents of the custom directory can quickly re-apply their customizations in the new installation.
Task To uninstall FlexNet Operations
1. In FlexNet Setup, navigate to the System Status page and click Stop Server to stop FlexNet Operations.
2. Close all files and directories in the ops_install_dir tree.
3. Run the FlexNet Operations uninstaller in the ops_install_dir/_Uninstaller directory.
The uninstaller removes all files in the ops_install_dir/ tree except those in the config, custom, data, db, extension, and logs directories. If you do not want to save any of the files in these directories, completely uninstall FlexNet Operations by deleting the ops_install_dir directory after the uninstaller completes.
• If FlexNet Operations was installed to run as a Windows service, the uninstaller also stops and uninstalls the Windows service.
• If you set up FlexNet Operations to start on boot in UNIX, delete the service script from where you installed it.
Important • If you plan to reinstall FlexNet Operations, you must either completely remove the files where FlexNet Operations had been previously installed (including any files left by the uninstaller) or install FlexNet Operations into a separate directory from the previous installation.
FlexNet Operations 2020 R1.1 On Premises Installation and Implementation Guide FNO-2020R1.1-ING01 Company Confidential 173