fishfriendly innovative technologies for hydropower manual
TRANSCRIPT

Fishfriendly Innovative Technologies for Hydropower
Manual for the Data Management Platform Workbench
This project has received funding from the European Union’s Horizon 2020 research and
innovation programme under grant agreement No 727830.
Project Acronym FIThydro
Project ID 727830
Work package WP6
Coordinator Peter Rutschmann
Author Kordula Schwarzwälder, Lea Berg

Go back to: Content List 1 of 24
Content List
Content List ............................................................................................................................ 1
Important Information ............................................................................................................. 2
About this Manual ............................................................................................................... 2
The Data Management Platform “Workbench”........................................................................ 3
Purpose .............................................................................................................................. 3
Structure ............................................................................................................................. 3
Access ................................................................................................................................ 4
Getting started .................................................................................................................... 4
How to work with Workbench ................................................................................................. 6
Overview ............................................................................................................................. 6
Projects ............................................................................................................................... 7
Tasks and Subtasks ............................................................................................................ 8
Main functions ........................................................................................................................ 9
Workbench-Tasks (To-Dos) ................................................................................................ 9
How to access the Workbench-Tasks (To-Dos) ............................................................. 10
How to add Workbench-Tasks ....................................................................................... 10
Rules for adding Workbench-Tasks ............................................................................... 12
Files .................................................................................................................................. 12
Files overview ............................................................................................................... 12
File detailed view ........................................................................................................... 13
How to create a new file ................................................................................................ 13
Rules for adding a file .................................................................................................... 14
Uploading pictures ......................................................................................................... 14
Adding a file to a specific Task, Subtask or Test Case .................................................. 15
Linking a file to a Workbench-Task ................................................................................ 16
Privileges .......................................................................................................................... 18
How to edit privileges .................................................................................................... 18
Types of privileges ........................................................................................................ 19
Comments ........................................................................................................................ 20
Calendar ........................................................................................................................... 20
Calendar detailed view .................................................................................................. 21
Meetings ....................................................................................................................... 21
How to add a meeting ................................................................................................... 21
List of Figures ....................................................................................................................... 23

Go back to: Content List 2 of 24
Important Information
Please keep in mind that the following topics are mandatory:
1) Workbench is meant for data management and storage and not for collaborative
working (for that please use email or the Sync+Share platform).
2) Please note that Workbench-Tasks are not identical with FIThydro tasks. The tasks in
the sidebar are Workbench-Tasks, which are equal to To-Dos. They will be named
“Workbench-Tasks” throughout this document.
3) Always link ALL Workbench-Task and files to the Tasks, Subtasks and Test Cases,
which they are connected to.
4) When creating and naming a file, ALWAYS follow the rules for naming and adding a
file. This is absolutely mandatory to avoid that we lose track of the uploaded data!
About this Manual
This manual will guide you step by step through all procedures needed for using this data
management platform.
The different topics are interlinked. By clicking on something written in blue, you can follow the
link to the respective section in this manual.

Go back to: Content List 3 of 24
The Data Management Platform “Workbench”
Data management is an important part of each EU funded project. You can read more on data
management on the EC portal.
Based on the needs collected with the questionnaire the new data management platform for
FIThydro is Workbench, a tool provided by TUM Library.
The data on Workbench will be linked to the institutional repository of the TUM, media TUM,
allowing a long term storage and access of the project data.
Purpose
You can organize your data via Workbench, assign To-Dos (Workbench-Tasks) within your
Workpackage and interlink them with other people and tasks. Workbench is meant for data
management and storage, not collaborative working (use Sync+Share for this).
The long term purpose of data management via Workbench is to make FIThydro’s research
data and publications findable, accessible, interoperable and reusable by others.
Structure
The main Structure within the Workbench-project is based on the FIThydro structure. The
Project is divided into two main groups:
- Workpackages
- Test Cases
Each Workpackage has its Tasks and Subtasks listed as subsections.
Figure 1: Projects - Workpackages and Test Cases with FIThydro tasks and subtasks

Go back to: Content List 4 of 24
These Tasks and Subtasks should be interlinked when adding data files or Workbench-Tasks
(To-Dos).
Please be aware, that due to access authorisation you can´t see the complete structure but
only the part (Workpackage, Tasks, Subtask) you are authorised for.
Access
Workbench is only accessible to project members and not accessible to the public. Only the
repository, media TUM, to which the data on Workbench will be linked later on, will be
accessible to others.
You need an invitation to Workbench, for which your WP leader is responsible.
The link to access Workbench is the following: https://workbench.ub.tum.de/
Getting started
As a very first step for getting started you will receive an invitation to Workbench.
The sender email address is: [email protected]
The email you receive looks like this:
Figure 2: Invitation email
When you enter the page via the link https://workbench.ub.tum.de the following landing page
will open
Go back to: Content List 5 of 24
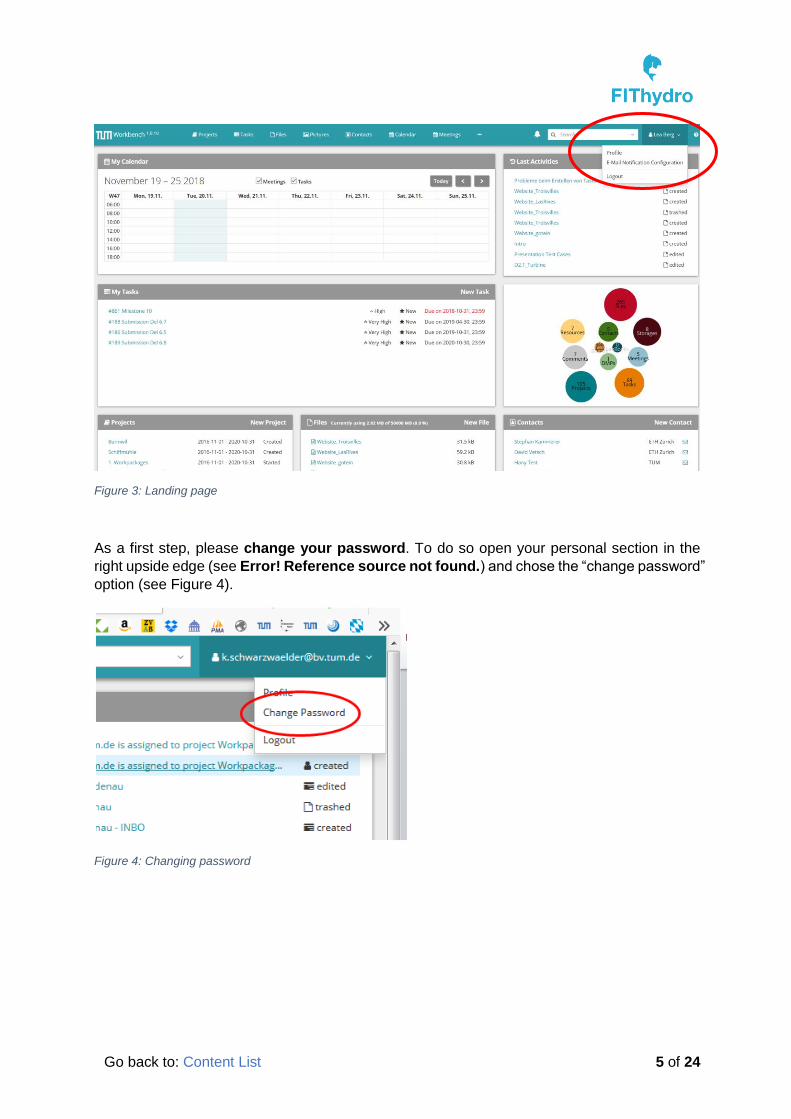
Figure 3: Landing page
As a first step, please change your password. To do so open your personal section in the
right upside edge (see Error! Reference source not found.) and chose the “change password”
option (see Figure 4).
Figure 4: Changing password

Go back to: Content List 6 of 24
How to work with Workbench
Overview
The landing page always shows the overview of all activities in projects, tasks or subtasks you
are participating in.
Figure 5: Landing page structure
1) My Calendar: Shows an overview of current meetings or other dates which are set in
the workbench
2) My Tasks: Under “My Tasks” you can organize all your to-dos. Here it shows a list of
all Workbench-Tasks (to-dos) which are assigned to you. You can assign Workbench-
Tasks to other users and manage their progress by giving them states
3) Projects: Shows a list of all Tasks or Subtasks of the Workpackages and Test Cases
you are working in
4) Files: Shows all files which are linked to your tasks and subtasks
5) Last Activities: Shows last activities in the projects
6) Contacts: Shows contacts of the project
7) Resources & DPMs: Resources and DMPs are not used in FIThydro
You can return to the landing page by clicking on the “Workbench button” in the top left.

Go back to: Content List 7 of 24
Projects
The only project you are working in is FIThydro. Here you can organize all your project related
items such as Files, Pictures, To-Dos (Workbench-Tasks) etc.
You can find the project site with the overview of all Workpackages, Tasks and Subtasks you
are working on via the two “Project buttons” marked below.
Figure 6: Projects - Access to all Tasks and Subtasks
The project page provides an overview of all Workpackages, Tasks, Subtasks and Test Cases
you are assigned to, their starting and ending date and level of completion.
These dates are based on the timeline of the different WPs and should be adapted by the WP
leaders.
Figure 7: Projects - Structure overview
Workpackages
Tasks
Subtasks
Level of completion
Start & end date

Go back to: Content List 8 of 24
Click on the respective Workpackage, Task or Subtask on the left hand side for detailed
information.
Tasks and Subtasks
The Workpackage, Task and Subtask site shows relevant information on the respective Task,
such as title, start and ending date, the project members that have access to this task, To-Dos
and linked files.
Under “Contains” and in the menu on the left hand side you can access any files, comments,
connected Tasks etc, that have been added to this Task or Subtask.
Note: Please note that Workbench-Tasks are not identical with FIThydro tasks. The tasks in
the side-bar are Workbench-Tasks and will be named like that in this document. Workbench-
Tasks are To-Dos.
Figure 8: Tasks and Subtasks overview
Contains – link to files etc.
Project members
Files
WB Tasks

Go back to: Content List 9 of 24
Main functions
Workbench-Tasks (To-Dos)
Workbench-Tasks are To-Dos / Information that can be set in relation to the different Tasks or
Subtasks of the FIThydro project. You can create Workbench-Tasks, assign them to other
users and manage their progress.
The Workbench-Task site (Figure 9) provides information on:
- Priority: low, normal, high
- State: new, in progress, done
- Start and due date
- The responsible people assigned to it
Figure 9: Workbench-Tasks (To-Dos) Overview
By clicking on one of the Workbench-Tasks you can view them in more detail (Figure 10).
Figure 10: Workbench-Tasks detailed view
Important details are:
1) Status of the Task
Go back to: Content List 10 of 24
2) Links to other FIThydro Tasks, Subtasks and Test Cases
3) Links to Data
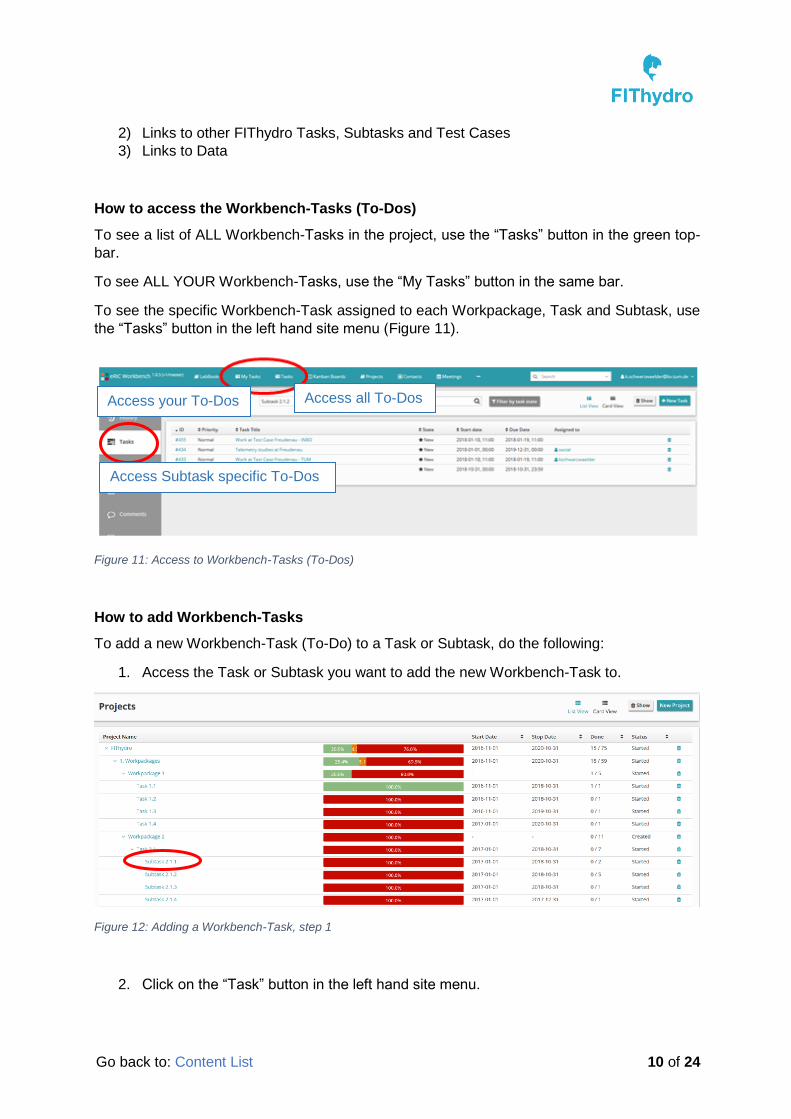
How to access the Workbench-Tasks (To-Dos)
To see a list of ALL Workbench-Tasks in the project, use the “Tasks” button in the green top-
bar.
To see ALL YOUR Workbench-Tasks, use the “My Tasks” button in the same bar.
To see the specific Workbench-Task assigned to each Workpackage, Task and Subtask, use
the “Tasks” button in the left hand site menu (Figure 11).
Figure 11: Access to Workbench-Tasks (To-Dos)
How to add Workbench-Tasks
To add a new Workbench-Task (To-Do) to a Task or Subtask, do the following:
1. Access the Task or Subtask you want to add the new Workbench-Task to.
Figure 12: Adding a Workbench-Task, step 1
2. Click on the “Task” button in the left hand site menu.
Access Subtask specific To-Dos
Access all To-Dos Access your To-Dos

Go back to: Content List 11 of 24
Figure 13: Adding a Workbench-Task, step 2
3. Click on the button “New Task” in the up-right corner.
Figure 14: Adding a Workbench-Task, step 3
4. A new window will open. Fill out the window according to the rules below.
Figure 15: Adding a Workbench-Task, step 4

Go back to: Content List 12 of 24
Rules for adding Workbench-Tasks
When adding a new Workbench-Task (To-Do), please fill the dialog box according to the
following instructions:
Title: WHAT is done, WHERE it is done and WHO is doing it
Example: Fieldwork at Test Case Freudenau - INBO
Assignee: Main responsible person(s) for this To-Do
Start / Due Date: Start and ending date, correlating with the project timeline
Priority: Decided upon by WP Leader
State: New, In Progress, Done – Adapt accordingly throughout the project
Checklist: Adding a checklist is decided by WP Leader
Description: Short information about the content of this To-Do
Project: Please link ALL Tasks, Subtasks and Test Cases, which are connected to this
Workbench-Task (to make sure that this Workbench-Task is visible easily!)
Files
Files are the key information, which this data management platform is used for.
Type of information to add to Workbench:
Data and information made available by the operators to the partners working in the
test case
Data and information made available from one WP to another WP
Any kind of results, as datasets of measurements, simulations etc. as raw files and
processed files
Resulting publications
On a later stage of the Workbench development it should be possible to easily publish data (if
needed) directly via a linked but separate platform. This is still under construction.
Note: To ensure that every file can be found if needed please make sure to follow the rules for
naming and linking files as described below!
Files overview
Under the menu item “Files” you can find an overview of all your viewable files. Per file you can
see the name, file size, creation date and creator.
Figure 16: Overview of all viewable files

Go back to: Content List 13 of 24
File detailed view
You can access the detailed view of a file by clicking on the file name. Here you can view all
the available information and meta data of a file, including information about who created/last
modified the file and when.
Figure 17: Detailed view of a file
How to create a new file
To create an new file, you can simply click on the button on the top right on the
file overview page.
A modal window opens, in which you can upload a file, insert the name, description as well as
related project. Please ALWAYS fill this out as described below. Then click on “Create” to add
a new file.
Figure 18: Adding a new file

Go back to: Content List 14 of 24
Rules for adding a file
To retain an overview over large amounts of data, it is important to follow the rules for naming
data.
Each file uploaded on Workbench will be named in the following way:
Title:
Divide the sections by using “_”.
Type of data: indicate what type of data (numerical simulation, results of measurements
etc.), make this as clear as possible
Version: indicate the version, run etc.
Related WPs: indicate all WPs the data is connected to. This can be left out, if there is
no WP directly related to the data
Related Test Case: indicate the related test case. This can be left out, if there is no test
case connected to the data
File responsible partner: the partner producing the data/file
Storage date: date of storage in the format yyyy.mm.dd
Paths: Upload the file
Description: Description the content of the file + any important information (e.g. meta data)
Project: Link ALL Tasks, Subtasks and Test Cases that are connected to this file
Uploading pictures
You add pictures in the same way as files via the button in the top right in the
overview.
A modal window will open. Please always fill this out as described below.

Go back to: Content List 15 of 24
Figure 19: Uploading pictures
Title: Pictures_What_Where
Description: Details of what the pictures are of, (c) Copyright
Project: Link to all relevant Tasks, Subtasks and Test Cases
Note: If you have several pictures to uploade, please do this as a ZIP-file.
Adding a file to a specific Task, Subtask or Test Case
You can also add a file directly to a Task, Subtask or Test Case via the respective site.
In the project overview, click on the Task/Subtask/Test Case you want to add the project to.
You will see the Subtask overview.
Figure 20: Adding a file to a Task, Subtask or Test Case
Click on the “Files” icon in the left side bar.
This opens a list of existing files linked to the specific Task, Subtask or Test Case. Click on the
“New File” button on the top right and fill out the modal window as described in Figure 21.

Go back to: Content List 16 of 24
Figure 21: Create a new file for a Task, Subtask or Test Case
Linking a file to a Workbench-Task
Linking items on Workbench is very important. You can link any type of items with others.
How can I link an item?
Open the Workbench-Task you want to add a link or file to. You can access the Workbench-
Task via the “Task” button in the green menu bar at the top of the page.
Access the Workbench-Task detailed view of the specific Workbench-Task you want to add a
link or file to.
1. To add a new link, clik on the “+New link” and select a type of element you want to add.
2. To add a file, select the “File” element in the drop down menu.
Figure 22: Adding a file to a Workbench-Task, step 1

Go back to: Content List 17 of 24
Figure 23: Adding or linking a file to a Workbench-Task, step 2
3. Clicking on the file-option opens the following box, where you can either link an existing
file to the Workbench-Task or add a new file. Select “Add” to finally link your item. When
uploading a new file, make sure to follow the rules for naming files.
Figure 24: Adding or linking a file to a Workbench Task, step 3
Note: .zip folder can also be uploaded as a file. Please to this especially for pictures.
How can I remove a link or an element?
To remove a link, click on the chain symbol at the top right of the linked element or linked items
box.
Figure 25: Removing a link or element

Go back to: Content List 18 of 24
Filter links
You can filter links of an element by clicking on the “Filter links” dropdown on the right side of
the screen in the links area.
Figure 26: How to filter links
Privileges
Privileges can be defined for every item in Workbench. With them you can allow or restrict
access of certain users to specific items, files etc. as well as define the type of access they
have. The automatic setting allows every user connected to a Task, Subtask or Test Case to
view and download the files linked to the respective Task, Subtask or Test Case.
How to edit privileges
To access and change privileges, click on the three dots at the top right of the title bar of the
item you want to edit and select “Privileges”.
Figure 27: Setting privileges for a file
Go back to: Content List 19 of 24
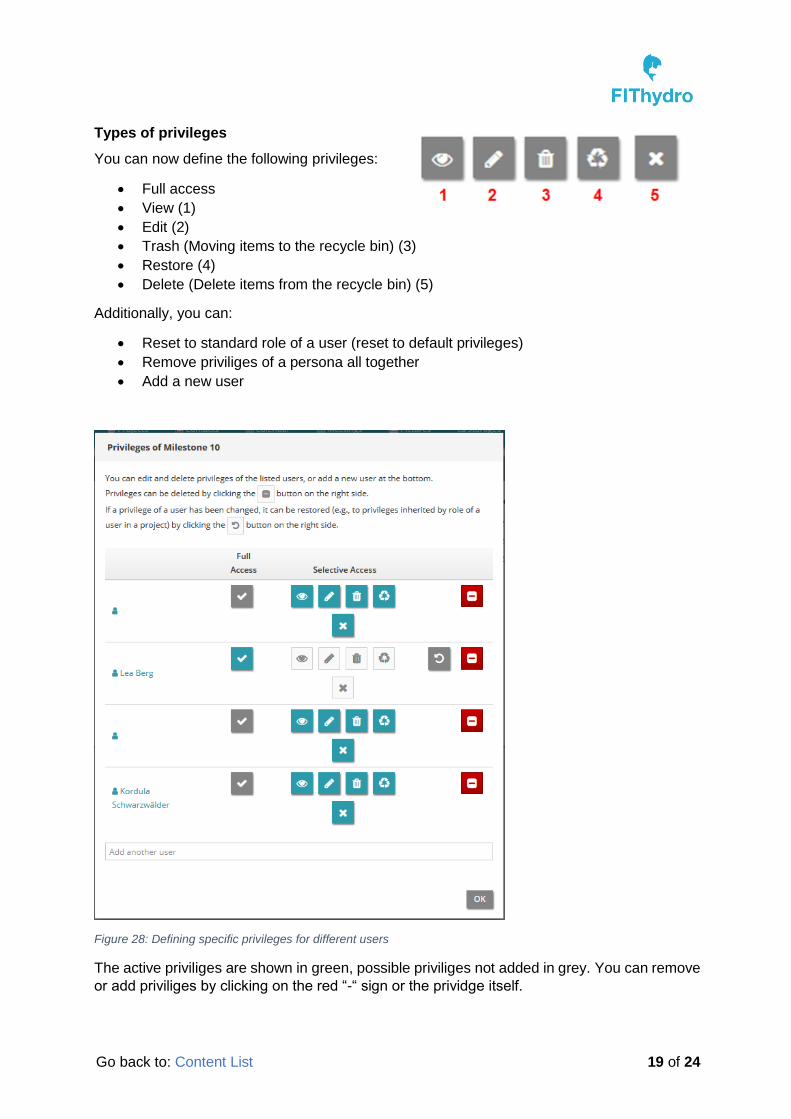
Types of privileges
You can now define the following privileges:
Full access
View (1)
Edit (2)
Trash (Moving items to the recycle bin) (3)
Restore (4)
Delete (Delete items from the recycle bin) (5)
Additionally, you can:
Reset to standard role of a user (reset to default privileges)
Remove priviliges of a persona all together
Add a new user
Figure 28: Defining specific privileges for different users
The active priviliges are shown in green, possible priviliges not added in grey. You can remove
or add priviliges by clicking on the red “-“ sign or the prividge itself.

Go back to: Content List 20 of 24
Comments
Comments can be added in the detailed view of Tasks, Subtasks and Test Cases.
Figure 29: Comment
Note: While comments contain information for all members, they can and should only be
created by WP Leaders.
Calendar
The calendar overview shows you information on upcoming meetings and Workbench-Tasks.
You can filter the calendar by project and user.
Figure 30: Calendar overview
When you create a Workbench-Task (To-Do) and set a date for it, it will automatically appear
in the calendar. How to create a Workbench-Task is explained here.

Go back to: Content List 21 of 24
Calendar detailed view
You can access the detailed view by clicking on the meeting/Workbench-Task title. Here you
can view all available information and meta data of a meeting, such as the start- and finishing
date, the priority, the responsible people and related WPs, Tasks and Subtasks. You can also
see/add any files linked to it.
Figure 31: Calendar detailed view
Meetings
The second item shown in the calendar are meetings. Each WP Leader can choose to use
this function for their WP and should communicate this clearly to all partners involved in the
process.
How to add a meeting
To add a new meeting to a Task or Subtask, access the meeting overview through the
“Meeting” icon in the left side bar.
Click on the green “New Meeting” button on the top right in the overview.

Go back to: Content List 22 of 24
Figure 32: Adding a new meeting, step 1
A modal window opens in which you can enter the title, start and end date/time, attending
users & contacts, a description as well as link all related Tasks and Subtasks. Click on
“Create” to add a new meeting.
Figure 33: Adding a new meeting, step 2

Go back to: Content List 23 of 24
List of Figures
Figure 1: Projects - Workpackages and Test Cases with FIThydro tasks and subtasks .......... 3 Figure 2: Invitation email ........................................................................................................ 4 Figure 3: Landing page ........................................................................................................... 5 Figure 4: Changing password ................................................................................................. 5 Figure 5: Landing page structure ............................................................................................ 6 Figure 6: Projects - Access to all Tasks and Subtasks ............................................................ 7 Figure 7: Projects - Structure overview ................................................................................... 7 Figure 8: Tasks and Subtasks overview ................................................................................. 8 Figure 9: Workbench-Tasks (To-Dos) Overview ..................................................................... 9 Figure 10: Workbench-Tasks detailed view ............................................................................ 9 Figure 11: Access to Workbench-Tasks (To-Dos) ................................................................ 10 Figure 12: Adding a Workbench-Task, step 1 ....................................................................... 10 Figure 13: Adding a Workbench-Task, step 2 ....................................................................... 11 Figure 14: Adding a Workbench-Task, step 3 ....................................................................... 11 Figure 15: Adding a Workbench-Task, step 4 ....................................................................... 11 Figure 16: Overview of all viewable files ............................................................................... 12 Figure 17: Detailed view of a file ........................................................................................... 13 Figure 18: Adding a new file ................................................................................................. 13 Figure 19: Uploading pictures ............................................................................................... 15 Figure 20: Adding a file to a Task, Subtask or Test Case ..................................................... 15 Figure 21: Create a new file for a Task, Subtask or Test Case ............................................. 16 Figure 22: Adding a file to a Workbench-Task, step 1........................................................... 16 Figure 23: Adding or linking a file to a Workbench-Task, step 2 ........................................... 17 Figure 24: Adding or linking a file to a Workbench Task, step 3 ............................................ 17 Figure 25: Removing a link or element ................................................................................. 17 Figure 26: How to filter links ................................................................................................. 18 Figure 27: Setting privileges for a file .................................................................................... 18 Figure 28: Defining specific privileges for different users ...................................................... 19 Figure 29: Comment ............................................................................................................. 20 Figure 30: Calendar overview ............................................................................................... 20 Figure 31: Calendar detailed view ........................................................................................ 21 Figure 32: Adding a new meeting, step 1.............................................................................. 22 Figure 33: Adding a new meeting, step 2.............................................................................. 22