fischer identity operations guide
TRANSCRIPT

FISCHER IDENTITY OPERATIONS GUIDE
Contents Creating a new user ............................................................................................................................................................... 1
Description of “User Types”: ............................................................................................................................................ 3
Viewing Status of Request ................................................................................................................................................ 8
Viewing User Information in Fischer .................................................................................................................................... 9
Requesting Access ............................................................................................................................................................... 14
Notifications ........................................................................................................................................................................ 17
Account Creation ............................................................................................................................................................. 17
Account Creation Text ................................................................................................................................................ 17
Disabling User Account ....................................................................................................................................................... 20
Requesting New Sponsors ................................................................................................................................................... 22
Request Format ............................................................................................................................................................... 22
Point of Contact ............................................................................................................................................................... 22
Creating a new user Log in to the Fischer Portal and select “Request Access” tab.

FISCHER IDENTITY OPERATIONS GUIDE
Click on the “Create New User” button
The following screen will be displayed:
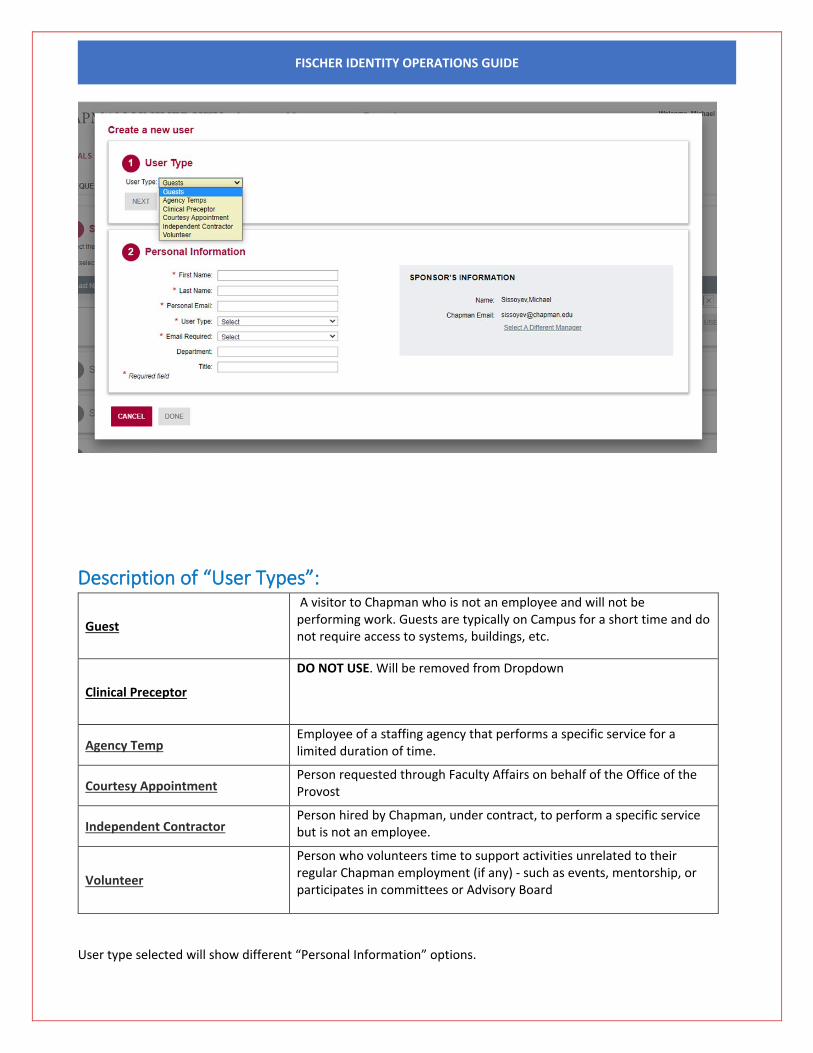
Select the “User Type” to be created. Clicking on the “v” will provide a dropdown menu from which to select the “User Type”:
FISCHER IDENTITY OPERATIONS GUIDE
Description of “User Types”:
Guest
A visitor to Chapman who is not an employee and will not be performing work. Guests are typically on Campus for a short time and do not require access to systems, buildings, etc.
Clinical Preceptor
DO NOT USE. Will be removed from Dropdown
Agency Temp Employee of a staffing agency that performs a specific service for a limited duration of time.
Courtesy Appointment Person requested through Faculty Affairs on behalf of the Office of the Provost
Independent Contractor Person hired by Chapman, under contract, to perform a specific service but is not an employee.
Volunteer
Person who volunteers time to support activities unrelated to their regular Chapman employment (if any) - such as events, mentorship, or participates in committees or Advisory Board
User type selected will show different “Personal Information” options.

FISCHER IDENTITY OPERATIONS GUIDE
Note: Each user type will require a “Sponsor” to be identified. Sponsor names can be selected by clicking on the “Select A Different Manager” option in the Sponsor box:
The options for selecting Sponsor can be expanded as needed when new Sponsor/Managers are identified.

FISCHER IDENTITY OPERATIONS GUIDE
Enter user information in the “Personal Information” section. Include as much information as available.
For “Emergency Contact”, if provided, the field is alpha-numeric and can include name and phone number of the Emergency Contact:
When Personal Information has been completed, Press “DONE”.
The following screen will then be displayed:

FISCHER IDENTITY OPERATIONS GUIDE
If additional access is requested for the user, for example email, select the following option:
Select “Active Directory Group” and the following options will be displayed:
Available options are limited but will be expanded as needed.
Select the resource required if any, select “DONE”.
The following screen will be displayed:

FISCHER IDENTITY OPERATIONS GUIDE
Note that each “User Type” will have a specific Access Period defined. Both the “Start” and “End” date can be modified if requested. Specifying a future “Start” date will delay creation of user account until the date specified. The request will stay
in the Request queue until that point and can be cancelled if requested. End date will default to 6 months from Start date for all user types except Clinical Preceptor. Clinical Preceptors will have a 1-year end date by default. When all information has been completed go to the “Submit Request” step.

FISCHER IDENTITY OPERATIONS GUIDE
Note that the “SUBMIT REQUEST” button is not yet available. Before a request is submitted, information must be entered into the comments box.
Relevant information regarding this request should be entered here. Example could be who requested the user be added, requestors department, date request was received, or any other information provided to better track request.
Once comment is entered, request is ready to be submitted:
Viewing Status of Request Once request is submitted, status of the request can be viewed by going to the “View Requests” tab:

FISCHER IDENTITY OPERATIONS GUIDE
When request is completed, the status will show “Completed”.
Viewing User Information in Fischer To view all users managed in Fischer Identity, select the “User” tab from the home screen:
Selecting the Magnifying Glass will display all users defined.
You can also specify a specific username:

FISCHER IDENTITY OPERATIONS GUIDE
You can page forward or backward
By default, only active users are shown. To display all users, including those disabled through Fischer, select this box
Note: users with an “Employee ID” beginning with “USSP“ are Fischer identity managed users and are not maintained in Peoplesoft. Others are managed through PeopleSoft.
Select the user you would like to view and click on “DONE”:

FISCHER IDENTITY OPERATIONS GUIDE
The user information will be displayed:
REPROCESS USER: if there was an error processing the request, request can be resubmitted to rerun the request
RENAME USER: Updates the user’s name if spelling errors are made or name changed
CHANGE USER: Select if you wish to view a different user’s profile
VIEW USER ACCESS: Review what access has been granted the user
The next section of the User Information allows you to determine what action is being requested:

FISCHER IDENTITY OPERATIONS GUIDE
The dropdown defaults to “Update Personal Information”. Information in boxes which are not grayed out can be updated
The next option is “Manage Accounts”:
Screen allows you to remove individual access granted to the user. By clicking on the icon to the far right of the display disables user access to a specific resource.
This option provides the ability to remove user’s account from specific Active Directory groups.

FISCHER IDENTITY OPERATIONS GUIDE
Next option is “Disable Access:
This will fully disable the user’s account when submitted.
The remaining options available in the drop down are not required for managing user access.
The “Submit request” will only appear for the “Disable Access” option. It requires text as to why the requested action is being taken. Once text is entered, the “Submit” button will become available.

FISCHER IDENTITY OPERATIONS GUIDE
Requesting Access To assign access to a user, go to the “Request Access” tab. Either enter user’s name or select the magnifying glass icon to get the full user list:
After name is selected, the screen with show the “Select resources and permissions” box. In the dropdown, select “Active Directory”

FISCHER IDENTITY OPERATIONS GUIDE
Active Directory group list will be displayed. Select the requested access, and click on “Done”:
Next you will be asked to verify the access period. Default is the scheduled end date for the user. This can be modified to a shorter period if access is only required temporarily:
When done, enter text providing reason for this request and “Submit”.

FISCHER IDENTITY OPERATIONS GUIDE
Status of request can be seen in the “View Requests” tab. In section “Select type of change”, the drop down allows for selection of access to be changed.
Select the action type and enter the Username for whom the change is being requested:
To change the Access Period for a specific Active Directory group, select the Active Directory group and click on “DONE”.
Specify when the new access period will end, enter text to document reason for this change and submit

FISCHER IDENTITY OPERATIONS GUIDE
Notifications User and Sponsor notifications will be sent for the following actions:
Account Creation Account Expiration
Account Creation When a new account is created, a notification will be sent to both the user and sponsor. User notification will be sent to the user’s personal email address. Text of the notification will include a link to Claim (Activate) the account. By default, the user will be required to
enroll in 2FA.
Account Creation Text Hi Freddie Freeloader, Freddie Freeloader - Welcome to Chapman University. To enable your account, please navigate to our self-service portal, or contact the ServiceDesk for assistance regarding claiming your account.
After navigating to the Self-Service Portal, enter your username frfr73012 and follow instructions on the screen to complete enabling of your account. Service desk can be contacted by email at [email protected]. You can also log an issue or submit a request on the Service Desk website servicedesk.chapman.edu. Best Regards, Chapman University
FISCHER IDENTITY OPERATIONS GUIDE
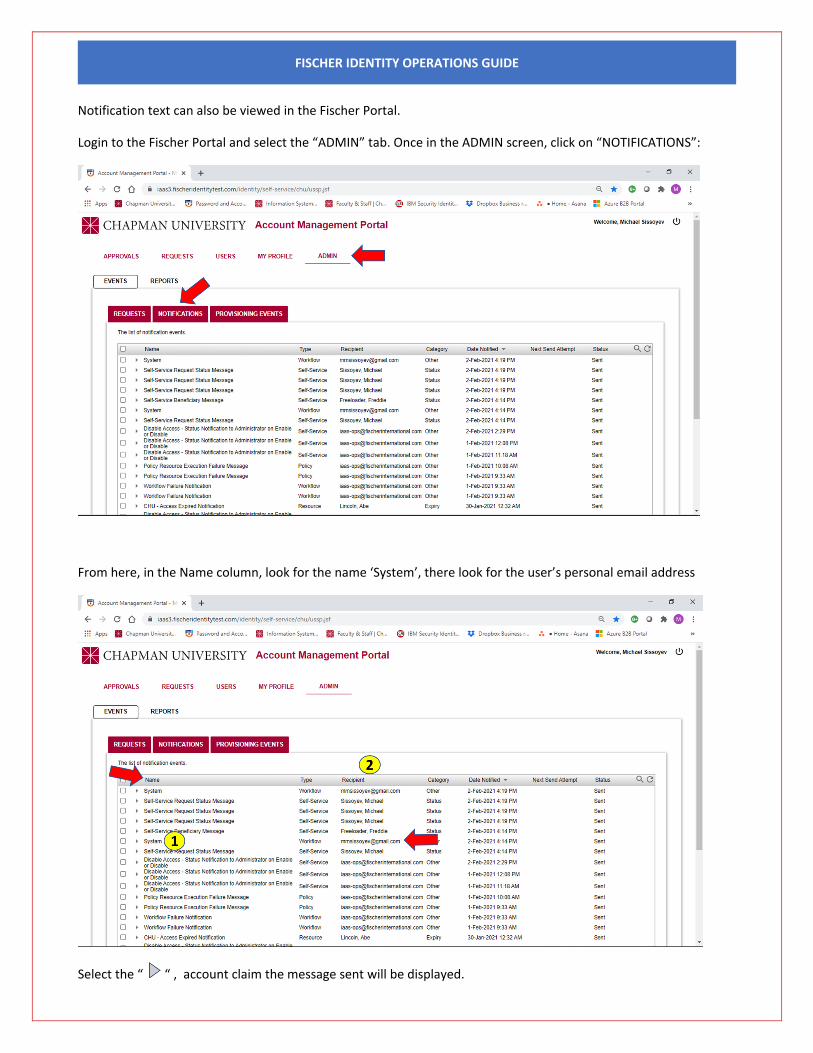
Notification text can also be viewed in the Fischer Portal.
Login to the Fischer Portal and select the “ADMIN” tab. Once in the ADMIN screen, click on “NOTIFICATIONS”:
From here, in the Name column, look for the name ‘System’, there look for the user’s personal email address
Select the “ “ , account claim the message sent will be displayed.

FISCHER IDENTITY OPERATIONS GUIDE
If the message needs to be resent, select the “RESEND” at the bottom of the message display.
Messages can also be resent by selecting the message and then clicking on the “RESEND” at the bottom of the screen.

FISCHER IDENTITY OPERATIONS GUIDE
Disabling User Account When notified that an individual is no longer with Chapman, their accounts need to be disabled to prevent unauthorized access.
If user’s end date as defined in Fischer Identity has been reached, the account will be automatically disabled.
To manually disable a user’s account, log into the Fischer Portal and select the “Requests” tab.
Select the “Change Access” tab
In “Select Type of Change” click on the “v” arrow. In the drop down select ‘Remove Access”.
Enter the name of user whose account is to be disabled.
FISCHER IDENTITY OPERATIONS GUIDE
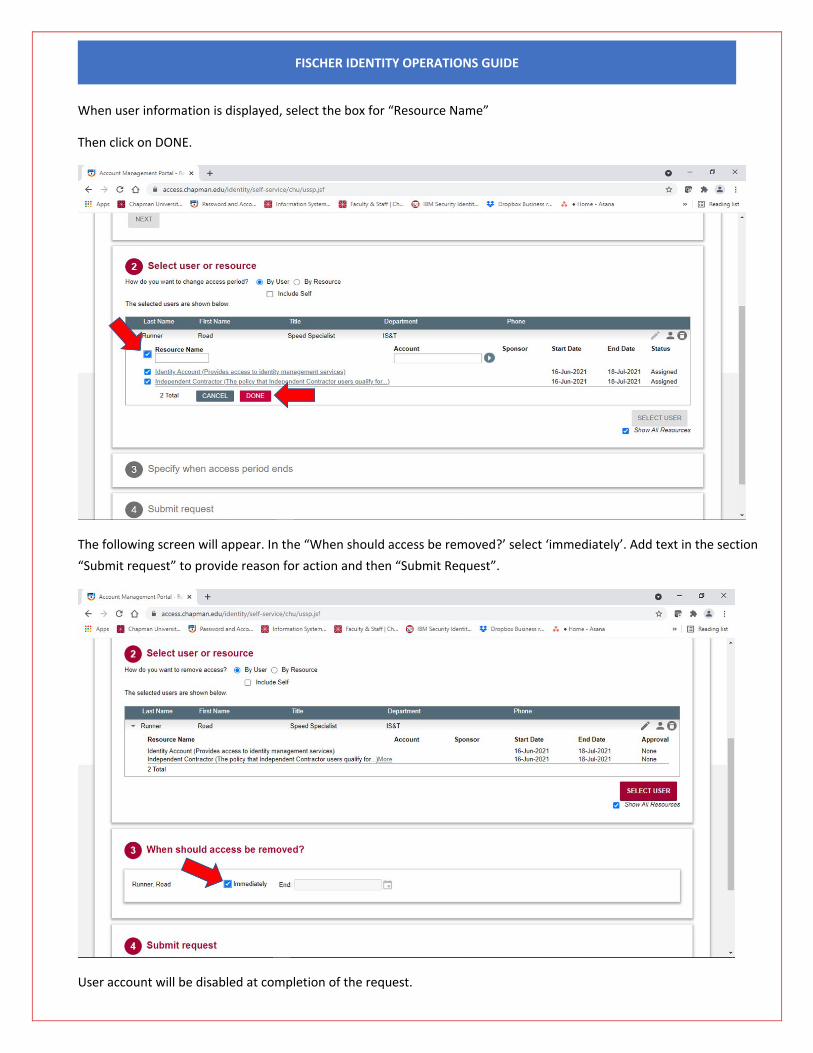
When user information is displayed, select the box for “Resource Name”
Then click on DONE.
The following screen will appear. In the “When should access be removed?’ select ‘immediately’. Add text in the section “Submit request” to provide reason for action and then “Submit Request”.
User account will be disabled at completion of the request.

FISCHER IDENTITY OPERATIONS GUIDE
Requesting New Sponsors In Fischer Identity, Sponsors are identified as individuals who whom the POI reports.
Purpose of defining a POI Sponsor is to have a point of contact to validate the POI status.
In addition to POI status validation, Chapman will have a point of contact in the event abnormal activity by a POI account is detected.
When a need to add a new Sponsor to Fischer Identity is identified, information relating to the Sponsor must be provided to Fischer Support.
Request Format
The following information must be provided to Fischer Identity in the form of a CSV:
employeeNumber UID givenName sn cn preferredname roles enddate mail preferredphone preferredtitle startdate title
Point of Contact The Chapman Point of Contact to Fischer will need to submit the change request through the Fischer Support portal.
Currently the Chapman Point of Contact is Ramiro Landeros: [email protected]
In the event Ramiro is unavailable, the secondary contact is Edward Lan: [email protected]