first issue 4/22/08 pepper mill instructions issue 4/22/08 pepper mill instructions pepper mill...
TRANSCRIPT

First Issue 4/22/08 Pepper Mill Instructions
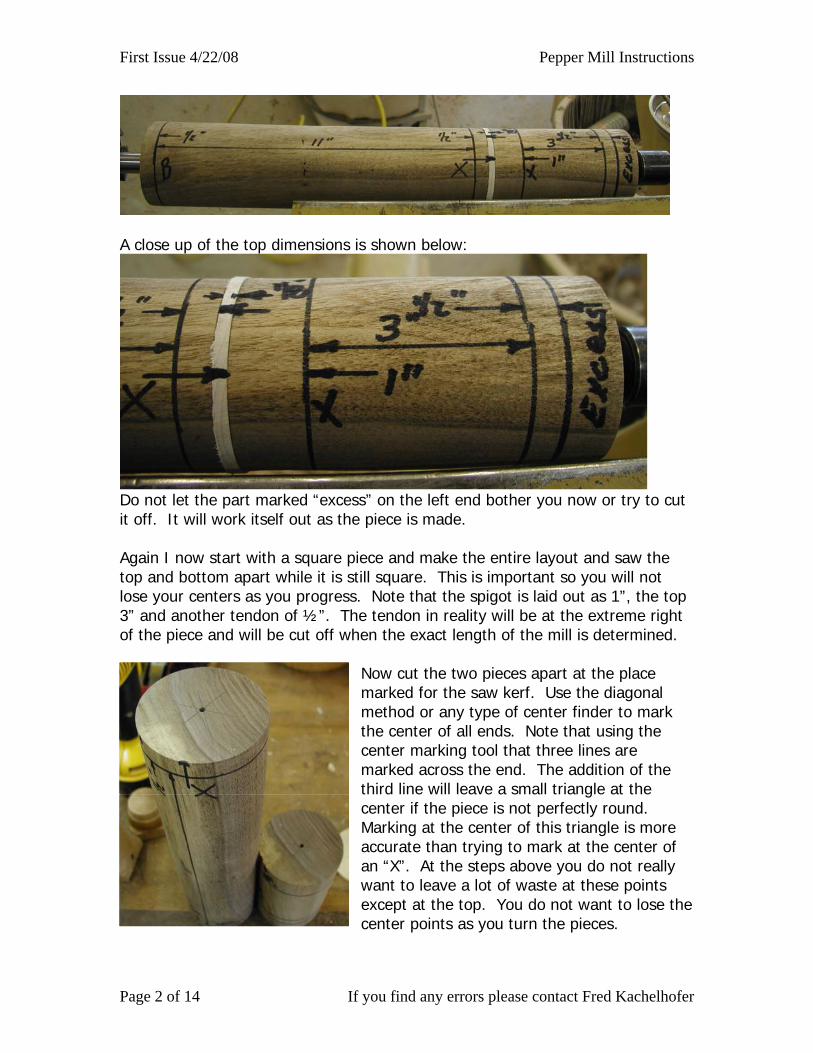
Pepper Mill Instructions by Fred Kachelhofer I have seen Nick Cook turn a pepper mill twice and read his article posted at http://www.nickcookwoodturner.com/articles.htm (follow link and then click on “Pepper Mill”). I have had problems getting the pieces to align on the four jaw chuck after turning the tendons so not to be off center when changing ends in the drilling process. After various trials I have arrived at the following method: First a little background on pepper mill mechanisms. The total length of the pepper mill wood is the same as the stated length of the mill (except for the 4” mechanism. The rod is a little shorter on this size). The mechanisms are basically 4”, 6”, 8”, 10” 12”, 14”, 18” and 24”. The most popular sizes are the 10”, 12” and 14”. The raw block of wood for the grinder needs to be about 2-1/2” longer than the mechanism to be used. At this point I will stay with making a 10” mill since it is one of the most popular sizes. On a 10” mill the base is usually 8” and the top 2”. This of course can vary according to your preferences but for now let’s establish that these are the dimensions we are going to use. For a 12” mill I usually make the base 9-1/2” and top 2-1/2”, for a 14” mill the base is 11” and the top 3” and for an 18” mill the base is 15” and the top 3”. Again there is nothing special about these dimensions. Make them to suit yourself. For an example for a 10” mill start with a block of wood about 3” to 3-1/2” square and determine which end would be best for the bottom of the mill based on the grain pattern etc. Lay the piece with the base to the left and mark going left to right these dimensions: ½” for a tendon, 8” for the base, ½” for a tendon, 1/8” for a saw kerf, ¾” for the spigot for the top to fit in the base, 2” for the top and at this point you should have a little over ½” left before the end of the piece. Don’t let this bother you. It will work out during the turning. It is important to mark each tendon/spigot location to keep up with the turning procedure. Mark at the first tendon on the left a “B” for “Bottom”. Place any mark at the next tendon (I just use an “x”) to denote the top of the bottom. At the right of the spigot place the same mark again so you will know that these are “match points”. At the tendon on the extreme right, place a “T” for “Top”. As an example with pictures I am going to show the construction of a 14” mill (since that is the only blank I have made now) that will maybe illustrate the verbiage to make the instructions easier to follow. Note that I have marked the pieces as described above plus added dimensions. This piece had all ready been “rounded” up and cut prior to starting the instructions. The white shim in between the top and bottom represents the saw kerf. I am using 11” for the base and 3” for the top.
Page 1 of 14 If you find any errors please contact Fred Kachelhofer
First Issue 4/22/08 Pepper Mill Instructions
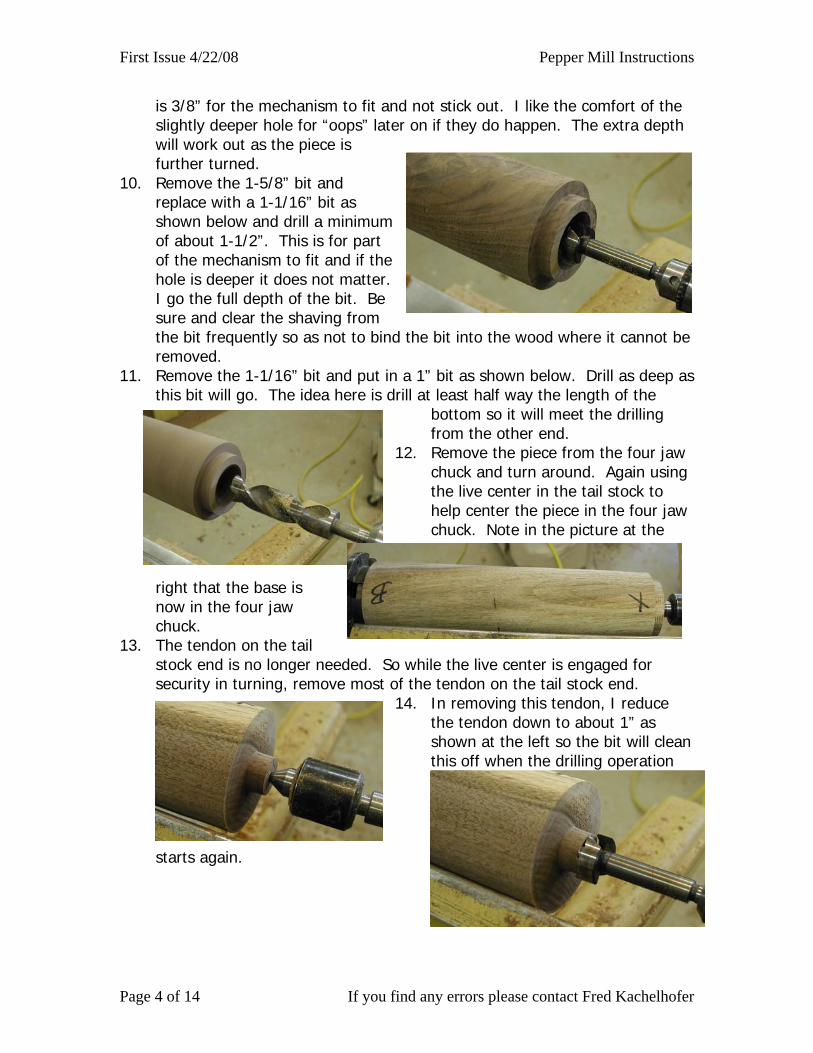
A close up of the top dimensions is shown below:
Do not let the part marked “excess” on the left end bother you now or try to cut it off. It will work itself out as the piece is made. Again I now start with a square piece and make the entire layout and saw the top and bottom apart while it is still square. This is important so you will not lose your centers as you progress. Note that the spigot is laid out as 1”, the top 3” and another tendon of ½”. The tendon in reality will be at the extreme right of the piece and will be cut off when the exact length of the mill is determined.
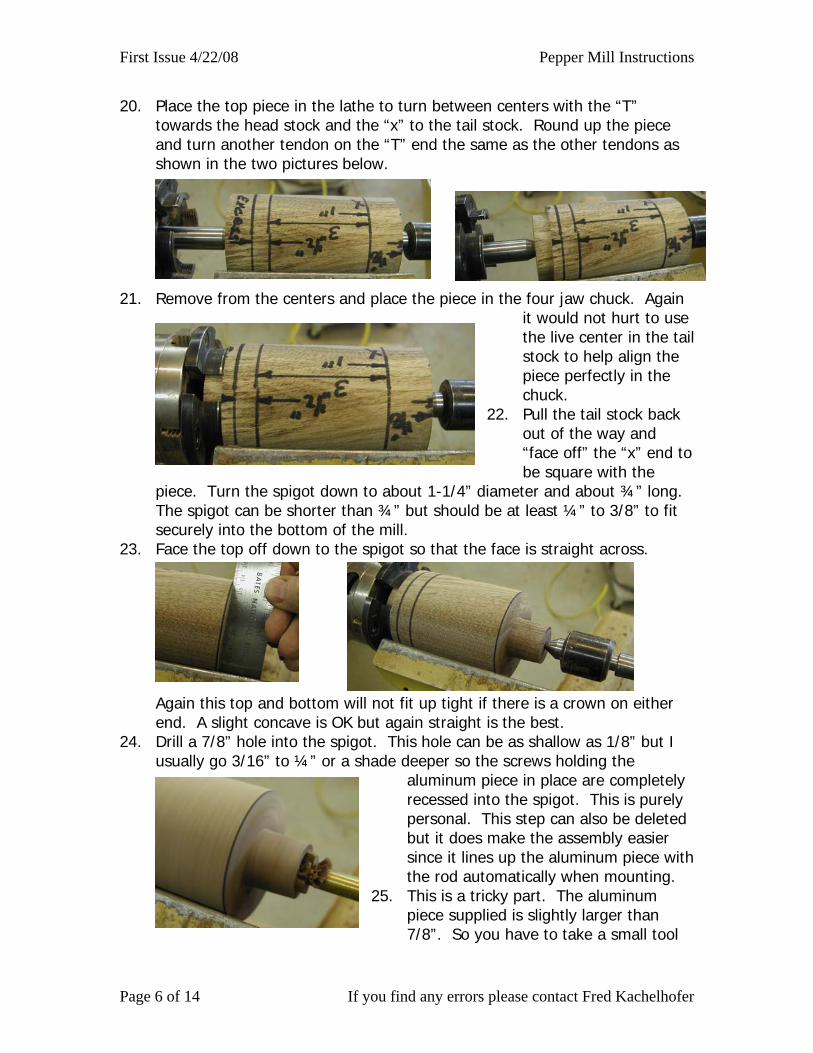
Now cut the two pieces apart at the place marked for the saw kerf. Use the diagonal method or any type of center finder to mark the center of all ends. Note that using the center marking tool that three lines are marked across the end. The addition of the third line will leave a small triangle at the center if the piece is not perfectly round. Marking at the center of this triangle is more accurate than trying to mark at the center of an “X”. At the steps above you do not really want to leave a lot of waste at these points except at the top. You do not want to lose the center points as you turn the pieces.
Page 2 of 14 If you find any errors please contact Fred Kachelhofer

First Issue 4/22/08 Pepper Mill Instructions
Lay the top part to the side for now. Be sure and follow the marking on the wood so that the orientation to keeps the centers aligned and not have misalignment when making the final turning. Following the marking also keeps the grain orientation when assembled. We will start with the bottom of the mill.
1. Place the bottom part in the lathe to
turn between centers. I am using a long drive center that will fit through the chuck so the chuck does not have to be removed to use the center.
2. Place the end marked with the “x” to the head stock and the “B” to the tail stock as shown at the left.
3. Round up the stock using normal techniques.
4. Cut a 3/8” to 7/16” tendon on each end. This should leave a piece between the two tendons 8” or a little more as shown below.
5. Note here that the tendon has to be short enough to fit in the jaws of your chuck and not bottom out. The shape of the tendon also depends on your chuck whether it is a straight tendon or dovetail.
6. Remove the drive center and replace with the four jaw chuck. 7. Loosely fit the piece in the chuck keeping the “x” end to the head stock.
Use the live center in the tail stock to hold the piece firmly in place while the four jaw chuck is securely tightened. The piece
should now be perfectly centered as shown above. 8. Replace the live center in the tail
stock with a 1-5/8” bit as shown at the right.
9. Turn the lathe on to about 300 to 600 rpm so as not to burn the drill bit. All of the large holes should be drilled at this speed. Drill the bottom end with the 1-5/8” bit to a depth of about ½” in the bottom. Remember that the tendon is about 3/8” so the total depth of the hole is about 7/8”. The minimum the hole can be
Page 3 of 14 If you find any errors please contact Fred Kachelhofer
First Issue 4/22/08 Pepper Mill Instructions
is 3/8” for the mechanism to fit and not stick out. I like the comfort of the slightly deeper hole for “oops” later on if they do happen. The extra depth will work out as the piece is further turned.
10. Remove the 1-5/8” bit and replace with a 1-1/16” bit as shown below and drill a minimum of about 1-1/2”. This is for part of the mechanism to fit and if the hole is deeper it does not matter. I go the full depth of the bit. Be sure and clear the shaving from the bit frequently so as not to bind the bit into the wood where it cannot be removed.
11. Remove the 1-1/16” bit and put in a 1” bit as shown below. Drill as deep as this bit will go. The idea here is drill at least half way the length of the
bottom so it will meet the drilling from the other end.
12. Remove the piece from the four jaw chuck and turn around. Again using the live center in the tail stock to help center the piece in the four jaw chuck. Note in the picture at the
right that the base is now in the four jaw chuck.
13. The tendon on the tail stock end is no longer needed. So while the live center is engaged for security in turning, remove most of the tendon on the tail stock end.
14. In removing this tendon, I reduce the tendon down to about 1” as shown at the left so the bit will clean this off when the drilling operation
starts again.
Page 4 of 14 If you find any errors please contact Fred Kachelhofer

First Issue 4/22/08 Pepper Mill Instructions
15. Big Note here. Make sure that the face of this end is straight when the tendon is removed. It is OK to have a slight concave shape but straight is
better 16. Remove the live center and put the 1-
1/16” bit back in the tail stock and slowly advance into the tendon cutting it off completely and then drilling as deep as the bit will go. The minimum depth for this hole is about 1” but again I use this bit to the full depth while I have it in the chuck.
17. Remove the 1-1/16” bit and replace with the 1” bit and drill until the hole meets the other end. Make sure to clear the hole all the way through of any disks pushed out from the drilling action. Use a 1” bit on an extension to complete the drill through if necessary. This is shown at the right.
18. If the face of the “x” end is not smooth this is a good time to use a disk sander on a drill to sand the face smooth as shown below.
19. Remove the bottom part of the pepper mill from the four jaw chuck and set it aside for now.
What you have done here is make the bottom part of the mill using the marked centers from the rounding up process to help align the piece for the drilling. When it is all done correctly, the piece will have the drilled holes perfectly down the center of the base of the mill. Now the top piece:
Page 5 of 14 If you find any errors please contact Fred Kachelhofer
First Issue 4/22/08 Pepper Mill Instructions
20. Place the top piece in the lathe to turn between centers with the “T” towards the head stock and the “x” to the tail stock. Round up the piece and turn another tendon on the “T” end the same as the other tendons as shown in the two pictures below.
21. Remove from the centers and place the piece in the four jaw chuck. Again it would not hurt to use the live center in the tail stock to help align the piece perfectly in the chuck.
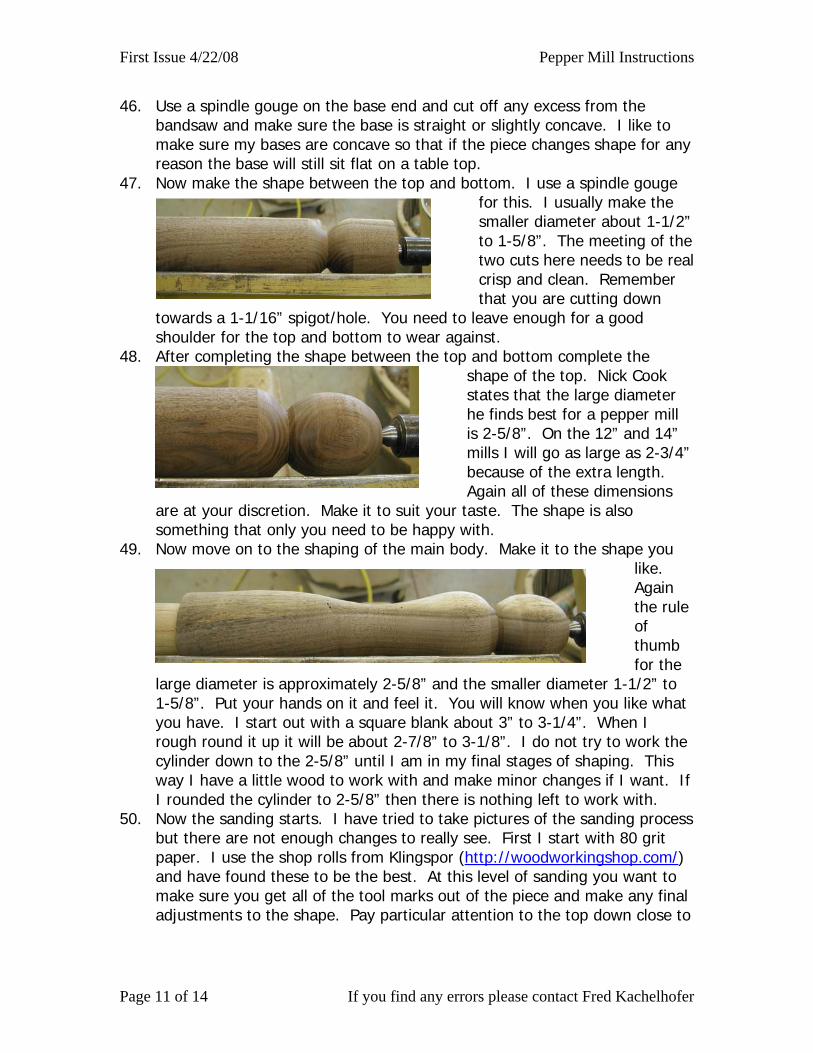
22. Pull the tail stock back out of the way and “face off” the “x” end to be square with the
piece. Turn the spigot down to about 1-1/4” diameter and about ¾” long. The spigot can be shorter than ¾” but should be at least ¼” to 3/8” to fit securely into the bottom of the mill.
23. Face the top off down to the spigot so that the face is straight across.
Again this top and bottom will not fit up tight if there is a crown on either end. A slight concave is OK but again straight is the best.
24. Drill a 7/8” hole into the spigot. This hole can be as shallow as 1/8” but I usually go 3/16” to ¼” or a shade deeper so the screws holding the
aluminum piece in place are completely recessed into the spigot. This is purely personal. This step can also be deleted but it does make the assembly easier since it lines up the aluminum piece with the rod automatically when mounting.
25. This is a tricky part. The aluminum piece supplied is slightly larger than 7/8”. So you have to take a small tool
Page 6 of 14 If you find any errors please contact Fred Kachelhofer

First Issue 4/22/08 Pepper Mill Instructions
and take out only about 3/64” diameter to make the aluminum
piece fit snugly. 26. Making sure the aluminum piece is removed, drill a 17/64” hole the rest of
the way through the top. If the drill wants to wobble when starting, place a small dimple at the center for a guide or use a drill point to mark the center. I have found it is almost always necessary to use the drill point to get the 17/64th drill centered exactly.
27. Another Big Note. If you get too aggressive in drilling this hole the drill will tend to lead off center. Only go about ½” at a time with the drill. Here if the wood is hard it is not a bad idea to go less than ½” on each penetration. Back it out and clear the chips and do another ½” or less until the hole is all the way through. To clear the chips I have taken a small glue brush and cut about half the bristle off so it will be stiff enough to clean the flutes on the drill bit. I have also found that for this hole it is best to turn the lathe up about 1,100 to 1,200 rpm for a better cut. The key here is small forward progress and keep the drill bit clean.
28. The matching hole for the spigot to fit into is the 1-1/16” hole that was drilled in the bottom. Using this bit of information turn the end of the spigot down so there is about 1/8” wood showing around the 7/8” hole and taper it back to the face of the top.
29. Now take the bottom of the mill and see if it will go up on the spigot. It is OK to have the lathe turning slowly here to help mark the high point.
Page 7 of 14 If you find any errors please contact Fred Kachelhofer

First Issue 4/22/08 Pepper Mill Instructions
30. If the spigot does not fit, turn the spigot down on the end 1/3 and check again until there is a good fit. Note in the picture that there is a shiny place on the spigot where the base of the mill rubbed the spigot.
31. Slowly turn the spigot down eliminating the shiny spots all the way to the face of the top. Check frequently for the proper fit so not to make the spigot too small. The point here is you don’t care what
the dimension of the spigot is; you just want it to fit! 32. I have a tendency to make the spigot fit too tight. Make sure the fit is
tight, but also make sure it turns freely. Sanding towards the end to make it fit is not a bad idea.
33. When you are pleased with the fit, remove the top from the lathe. The bottom part will fit up on the top to look like the picture at the right.
The top part of the mill is now ready for sizing for the exact length of the mill following the instructions below. Now to fit the wooden parts to match the length of the grinder mechanism: 34. Now place the “U” bracket in the bottom of the mill.
35. Place the “donut” part of the grinder in the bracket with the “stainless steel” lettering to the outside.
36. Place the other part of grinder mechanism on the shaft and put it in the mill. This assembly is
shown in the picture on the next page outside of the bottom. You do not need
Page 8 of 14 If you find any errors please contact Fred Kachelhofer

First Issue 4/22/08 Pepper Mill Instructions
the spring here since you are determining the length of the mill. 37. Now place the top part of the
mill next to the bottom part. You will have to have the spigot against the outside of the mill so you will be able to
see where the end of the rod is. 38. With the mechanism pushed up against the
bracket and the top of the mill in place, place a mark about where the center of the threads on the rod is onto the top piece. You can see a heavy line just to the left of the first line from the left. This is the final length of the mill. Note that this has just taken into consideration the extra depth that you drilled into the large hole in the bottom and the extra length that we had on the top when the piece was started.
39. Remove the mechanism parts from the mill. You can place the mill on the lathe at this point and turn off the tendon and use a parting tool to cut the top off at the proper place.
40. I use a band saw and cut the top off on the mark and saw off the tendon at the bottom. I leave just a little of the tendon at the bottom just so I will not put saw marks on the bottom that will later have to
be cut off or sanded off. The picture above shows the parts removed by the bandsaw.
41. You can tell if you did a good job of drilling the 17/64” hole by looking at the top after it is cut off. You can see the circle left by the drive center and the 17/64” hole is almost dead center.
42. At this point the mill is ready for the final shaping, sanding and finishing.
You have now completed marking the mill for the
exact length and ready for the final turning and finishing. Note that the “excess” marked at the top of the blank does not interfere with the final length. The
Page 9 of 14 If you find any errors please contact Fred Kachelhofer

First Issue 4/22/08 Pepper Mill Instructions
tendon is placed on the end of the blank and the excess part is removed when the actual length is determined by the insertion of the mechanism. You are now ready to place the drilled cylinders on the lathe and do the final shaping and finishing. But first if you do not have a “jam chuck” you will have to make one. The instructions are below for this:
Page 10 of 14 If you find any errors please contact Fred Kachelhofer
43. The “jam chuck” is made to fit the bottom end of the mill to hold it for final turning. So what is a jam chuck? The bottom of the mill inserts over the jam chuck and is driven by friction of the wood in the large drilled hole in the bottom piece and the chuck. If you do not have a jam chuck, take a piece of wood about 1-7/8” to 2” square and put it in your four jaw chuck and turn round as shown below. This piece started out as 2” square and is firmly seated against the back
of the chuck. The numbers correspond to the numbers on the jaws of the chuck so when it is removed it can be placed back in the same position so it will run true. The free end of the chuck is tapered back about ¾” from the end of the chuck down to a size of approximately 1-1/2”. The end has to be smaller than the 1-5/8” of the drilled bottom so the mill can be forced up on the taper. If you are re-using the jam chuck make a light cut on the taper end to “true up” the fit before reusing.
44. With the “jam chuck” in place mount the finished cylinders of the mill with the bottom of the mill towards the head stock and the top to the tail stock.
Use a live center to mount the top end. Note that the piece looks at this point almost as it did on the first layout. The big difference is you can see
the jam chuck on the left. 45. With the tail stock set firm enough
to drive the pepper mill parts, round up the cylinder again. If you have done a good job on centering everything up until now, only a light cut will be necessary.
First Issue 4/22/08 Pepper Mill Instructions
46. Use a spindle gouge on the base end and cut off any excess from the bandsaw and make sure the base is straight or slightly concave. I like to make sure my bases are concave so that if the piece changes shape for any reason the base will still sit flat on a table top.
47. Now make the shape between the top and bottom. I use a spindle gouge for this. I usually make the smaller diameter about 1-1/2” to 1-5/8”. The meeting of the two cuts here needs to be real crisp and clean. Remember that you are cutting down
towards a 1-1/16” spigot/hole. You need to leave enough for a good shoulder for the top and bottom to wear against.
48. After completing the shape between the top and bottom complete the shape of the top. Nick Cook states that the large diameter he finds best for a pepper mill is 2-5/8”. On the 12” and 14” mills I will go as large as 2-3/4” because of the extra length. Again all of these dimensions
are at your discretion. Make it to suit your taste. The shape is also something that only you need to be happy with.
49. Now move on to the shaping of the main body. Make it to the shape you like. Again the rule of thumb for the
large diameter is approximately 2-5/8” and the smaller diameter 1-1/2” to 1-5/8”. Put your hands on it and feel it. You will know when you like what you have. I start out with a square blank about 3” to 3-1/4”. When I rough round it up it will be about 2-7/8” to 3-1/8”. I do not try to work the cylinder down to the 2-5/8” until I am in my final stages of shaping. This way I have a little wood to work with and make minor changes if I want. If I rounded the cylinder to 2-5/8” then there is nothing left to work with.
50. Now the sanding starts. I have tried to take pictures of the sanding process but there are not enough changes to really see. First I start with 80 grit paper. I use the shop rolls from Klingspor (http://woodworkingshop.com/) and have found these to be the best. At this level of sanding you want to make sure you get all of the tool marks out of the piece and make any final adjustments to the shape. Pay particular attention to the top down close to
Page 11 of 14 If you find any errors please contact Fred Kachelhofer
First Issue 4/22/08 Pepper Mill Instructions
the live center. If you do not watch this area you will not have a good finish.
51. After the 80 grit sanding, I go to 120, 150, 180, 240, 320, 400 and finally 600. Some will argue that I do not need to go through so many grits and could skip some. The sanding technique is personal to the turner so I am just telling you what I do. If you get the scratch marks out from each grit this stage of sanding does not take that long.
52. After sanding down to the 600 grit I use the gray Scotchbrite pad to obtain a low luster.
53. After the gray pad, I then use a white Scotchbrite pad to obtain a fairly high luster. You have to be careful with the white pad and not leave it at any one place too long or apply too much pressure. It will melt and then that will have to be sanded off.
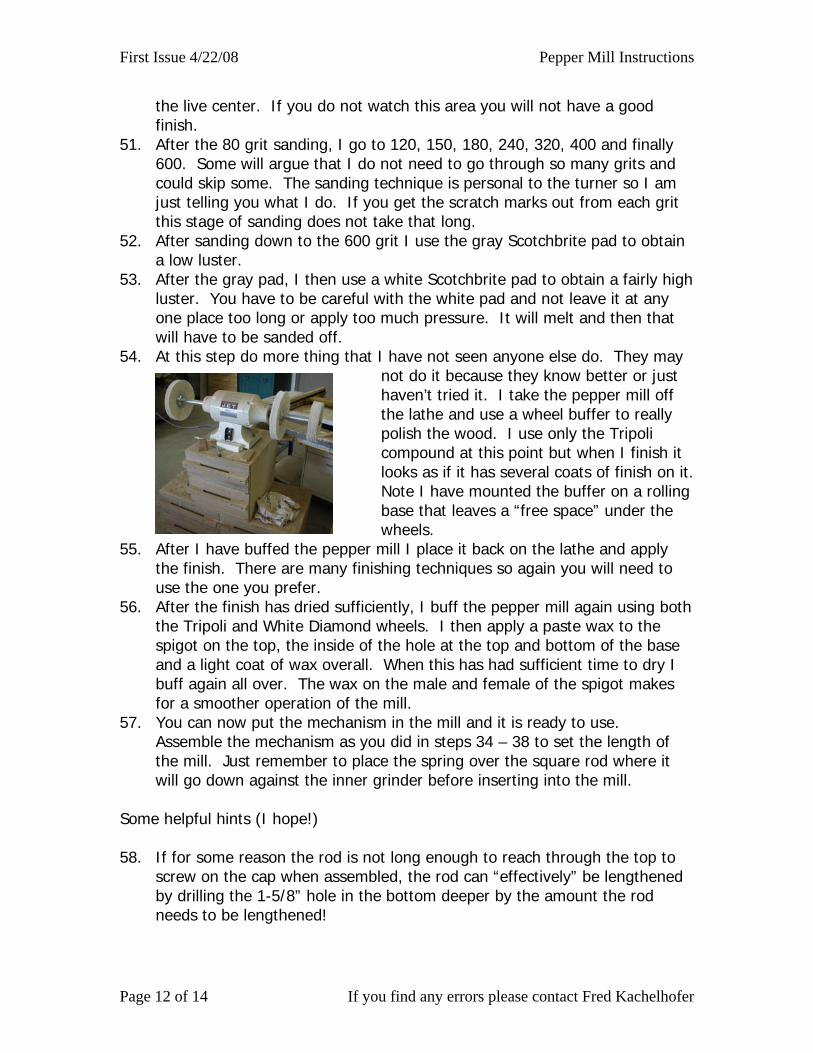
54. At this step do more thing that I have not seen anyone else do. They may not do it because they know better or just haven’t tried it. I take the pepper mill off the lathe and use a wheel buffer to really polish the wood. I use only the Tripoli compound at this point but when I finish it looks as if it has several coats of finish on it. Note I have mounted the buffer on a rolling base that leaves a “free space” under the wheels.
55. After I have buffed the pepper mill I place it back on the lathe and apply the finish. There are many finishing techniques so again you will need to use the one you prefer.
56. After the finish has dried sufficiently, I buff the pepper mill again using both the Tripoli and White Diamond wheels. I then apply a paste wax to the spigot on the top, the inside of the hole at the top and bottom of the base and a light coat of wax overall. When this has had sufficient time to dry I buff again all over. The wax on the male and female of the spigot makes for a smoother operation of the mill.
57. You can now put the mechanism in the mill and it is ready to use. Assemble the mechanism as you did in steps 34 – 38 to set the length of the mill. Just remember to place the spring over the square rod where it will go down against the inner grinder before inserting into the mill.
Some helpful hints (I hope!) 58. If for some reason the rod is not long enough to reach through the top to
screw on the cap when assembled, the rod can “effectively” be lengthened by drilling the 1-5/8” hole in the bottom deeper by the amount the rod needs to be lengthened!
Page 12 of 14 If you find any errors please contact Fred Kachelhofer

First Issue 4/22/08 Pepper Mill Instructions
59. You have a piece of wood and it is just not long enough for the mill you want to make taking into account the tendons and spigot. Say you have a square of wood that is 10” long and you want to make a 10” mill. Glue a waste block on the top and bottom to make your tendons. Note that you need a waste block on each end of the base and only a waste block at the top end on the top. (Update: after taking this picture the glue joints failed due to the type of wood in the main blocks. I just rounded up without the tendons and chucked the piece around the main block. A tendon was turned on the top piece and then incorporated into the total length for the top. This is to say that you can use the pieces without the waste blocks if you are careful in rounding up and using the tailstock center to position you
next drilling position. 60. Oops! You have a
waste block for the top tendon but what do you do for a tendon? I take a piece of scrap about 1-3/4” square to
make the tendons from. I round up the stock at about 1-1/4” to 1-3/8” diameter and put a taper on the end to lead a 1” tendon cutter onto the dowel. I cut a 1” tendon about ¾” long and then part off the piece about ¾” to 1” from the end of the tendon. I keep walking up the
dowel making these inserts until I don’t have any dowel left. This is what I am left with when I finish.
I have four inserts to use when needed.
61. OK, I have an insert, how do I use it? I drill a 1” hole in the top after it is faced off about 1” deep into the top,
making sure the insert will not bottom out in the hole. I then glue
Page 13 of 14 If you find any errors please contact Fred Kachelhofer

First Issue 4/22/08 Pepper Mill Instructions
in the insert and finish as if it were originally attached. I use pressure from tail stock against the drill bit to hold the insert in place until it dries. If you need to use the lathe you can remove the piece from the lathe to give the glue time to finish curing.
62. One last trick is to be able to use a piece of wood that does not have the quality to finish well at the entry points for the drilling. To use these pieces of
wood, I again use the “waste” block but in addition to the waste block I add another piece that will be permanent with the delicate wood for drilling. Note in the picture that on each end of the bottom is two pieces of wood. The two outside pieces are the waste blocks and will need to be turned down for the tendons. In this case they are ¾” thick and really need to be thinned down to about 3/8” when making the tendons. I turn the first ¼” down to about 1” diameter so it will fit up inside the four jaw chuck and not interfere with the fit at the shoulder of the tendon. I then turn the tendon down to meet the interface between the waste and good block.
63. You will also note in the above picture that the top is made from thin laminations of scrap that will run vertically with the pepper mill when completed. The combinations of how you use your wood in making pepper mills is unlimited.
I think this just about winds up my method of making pepper mills. I would like to point out what Lee Dale, a good friend who has been very instrumental in the developing my turning skills, has told me several times. He makes the comment that if you get ten Woodturners together you will have ten different ways of approaching the construction of the same item. After all the ten show their way to each other you will then probably have eleven or twelve different ways to do it. Someone will incorporate something someone else has done into their way. In doing so he has come up with a better way. I emphasize the above because all I have done is take what I have learned from other turners on a one on one basis or from demonstrations to develop the technique presented. I hope that you will be able to improve on what I have done and if you do that, you will not only share it with me but all the other Woodturners you know. Fred Kachelhofer, 479 Gordon Road, Forsyth, GA 31029 Home 478-992-6517; Cell 478-394-1490 (on only when I am away from home)
Page 14 of 14 If you find any errors please contact Fred Kachelhofer