first grade writing curriculum calendar 1... · first grade writing curriculum calendar ......
TRANSCRIPT

Draft Revised 7/16/10
First Grade
Writing Curriculum
Calendar
2010-2011
Brown County Schools

Draft Revised 7/16/10
Important information about the First Grade
Curriculum Calendar for Writing
o Students will be supported by teacher-made charts that reflect the current
unit of study.
o Students will have a meeting area large enough for all students to gather.
o Students will participate in daily mini-lessons related to the current unit of
study, during which the teacher models with his/her own writing.
o Students will have time to write independently each day.
o Students will have access to materials that may be needed during
independent writing time such as: paper choices, pencils, pens, date stamp,
ABC chart, word wall, mentor texts, tools for spacing, folders, stapler and
staple remover.
o Students’ narrative writing level will be determined by the results of a
narrative writing assessment.
o Students writing will be supported by whole class, weekly interactive writing
sessions.
o Students writing will be supported by daily, explicit, individualized or small
group word study instruction.
Draft Revised 7/16/10
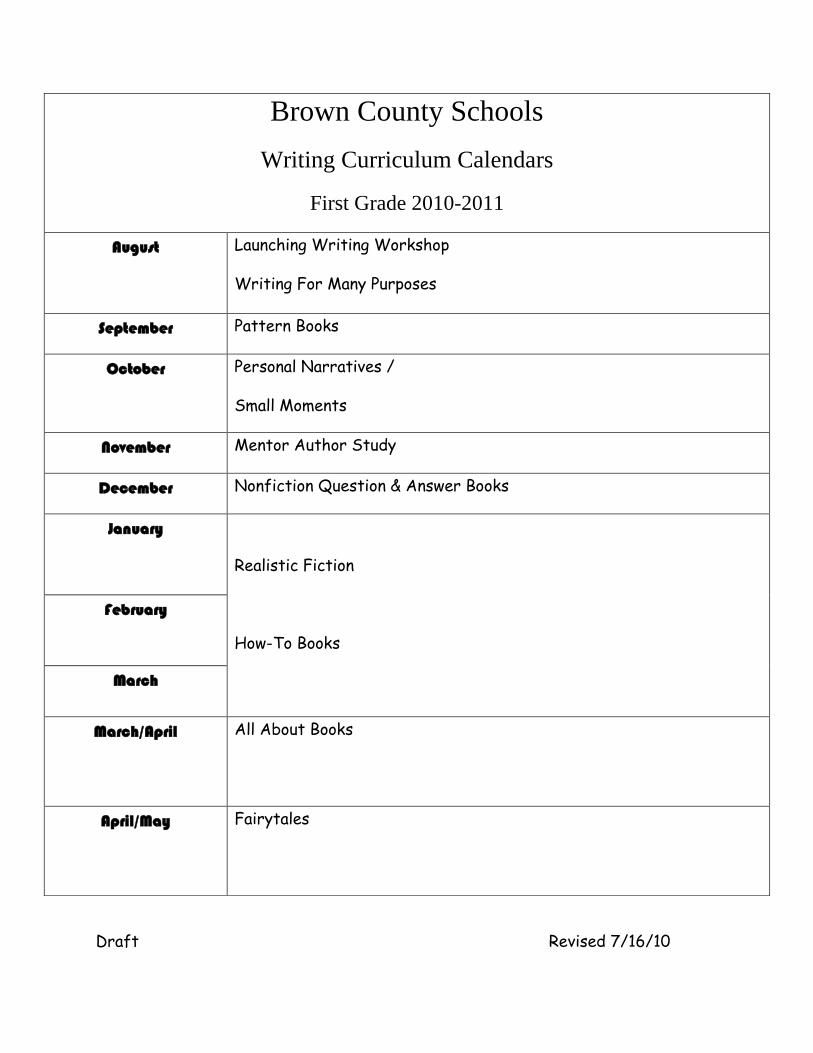
Brown County Schools
Writing Curriculum Calendars
First Grade 2010-2011
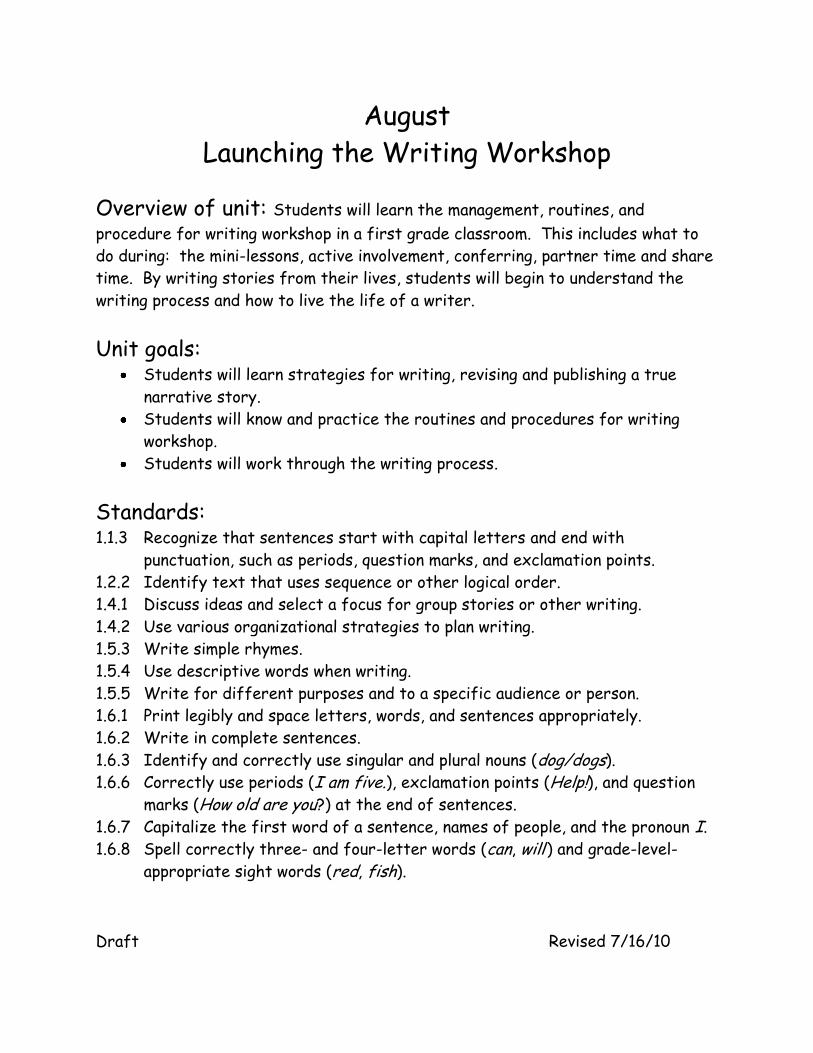
August
Launching Writing Workshop
Writing For Many Purposes
September Pattern Books
October Personal Narratives /
Small Moments
November Mentor Author Study
December Nonfiction Question & Answer Books
January
Realistic Fiction
How-To Books
February
March
March/April
All About Books
April/May Fairytales
Draft Revised 7/16/10
August
Launching the Writing Workshop
Overview of unit: Students will learn the management, routines, and
procedure for writing workshop in a first grade classroom. This includes what to
do during: the mini-lessons, active involvement, conferring, partner time and share
time. By writing stories from their lives, students will begin to understand the
writing process and how to live the life of a writer.
Unit goals: Students will learn strategies for writing, revising and publishing a true
narrative story.
Students will know and practice the routines and procedures for writing
workshop.
Students will work through the writing process.
Standards: 1.1.3 Recognize that sentences start with capital letters and end with
punctuation, such as periods, question marks, and exclamation points.
1.2.2 Identify text that uses sequence or other logical order.
1.4.1 Discuss ideas and select a focus for group stories or other writing.
1.4.2 Use various organizational strategies to plan writing.
1.5.3 Write simple rhymes.
1.5.4 Use descriptive words when writing.
1.5.5 Write for different purposes and to a specific audience or person.
1.6.1 Print legibly and space letters, words, and sentences appropriately.
1.6.2 Write in complete sentences.
1.6.3 Identify and correctly use singular and plural nouns (dog/dogs).
1.6.6 Correctly use periods (I am five.), exclamation points (Help!), and question
marks (How old are you?) at the end of sentences.
1.6.7 Capitalize the first word of a sentence, names of people, and the pronoun I.
1.6.8 Spell correctly three- and four-letter words (can, will ) and grade-level-
appropriate sight words (red, fish).

Draft Revised 7/16/10
IMMERSION Teaching Points:
o Writers get ideas for writing by thinking of something they really love or
are passionate about. They think of a one time story about that thing they
really love or are passionate about.
o Writers get ideas for writing by thinking of one time they never want to
forget.
o Writers get ideas for writing by thinking of one time with a special person.
o Writers get an idea for writing by thinking about one time when they were
happy, mad, or sad.
o Writers get ideas for writing by thinking of one time at a special place.
o Writers think about who they are writing for before they get started. (Page
163 & 164 in About the Authors by Katie Wood Ray).
DRAFTING Teaching Points:
o Writers make a special part of their writing seem really important by
repeating it (writing it again) in another place in their story (chapter 8 in
Wondrous Words by Katie Wood Ray).
o Writers make their writing feel real to their readers by using the specific
name of things in their writing (instead of candy, write Starburst / instead
of drink, write Sprite).
o Writers use quiet voices during Writing Workshop so that everyone can
work without being disrupted.
o Writers talk about their writing during Writing Workshop by asking
themselves, “Do I need help with my story right now? Do I need help with an
idea right now?” (You may want to model talking not about writing and then
model talking about writing).
o Writers have five minutes of no walk, no talk at the beginning of Writing
Workshop, so that they can reread their writing from their folder and make
writing plans for the day (it’s good to set a timer for the 5 minutes, so that
when it goes off, they know they can talk about their writing – you also don’t
have to do this mini-lesson if you feel your kids don’t need it)
o Writers put the date on the paper by using a date stamp and looking at the
chalkboard to see what the date is so that they can always remember when
they started a piece of writing.
Draft Revised 7/16/10
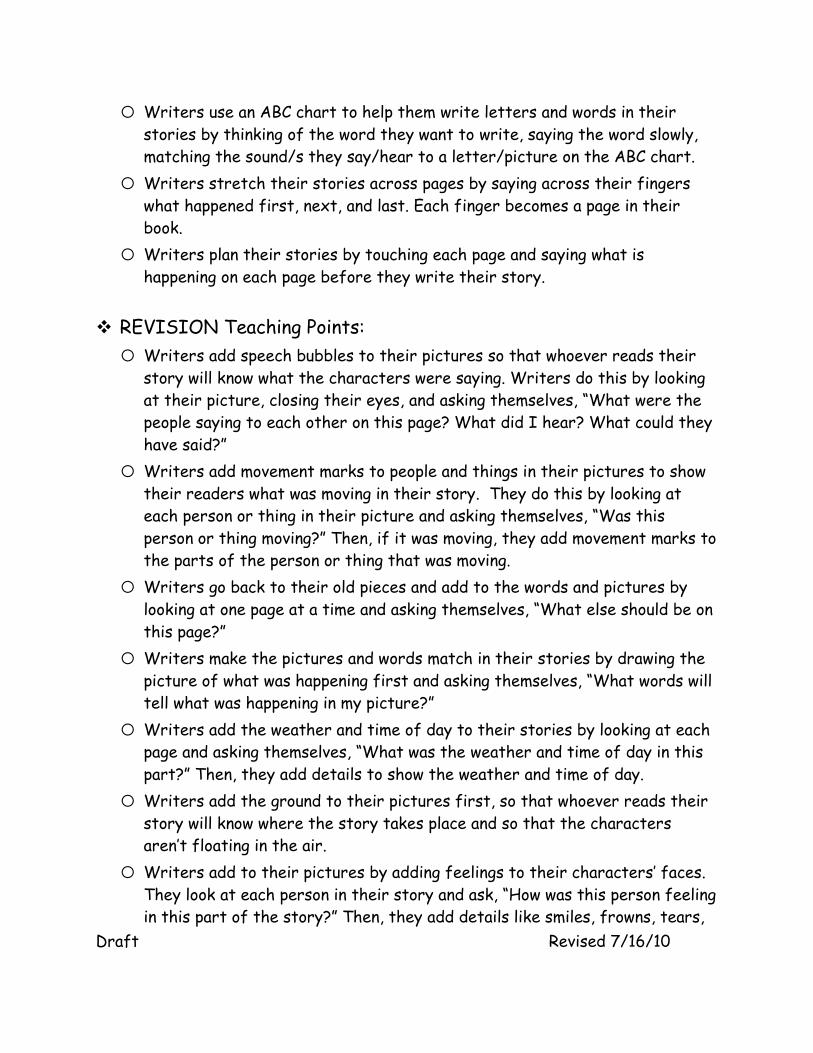
o Writers use an ABC chart to help them write letters and words in their
stories by thinking of the word they want to write, saying the word slowly,
matching the sound/s they say/hear to a letter/picture on the ABC chart.
o Writers stretch their stories across pages by saying across their fingers
what happened first, next, and last. Each finger becomes a page in their
book.
o Writers plan their stories by touching each page and saying what is
happening on each page before they write their story.
REVISION Teaching Points:
o Writers add speech bubbles to their pictures so that whoever reads their
story will know what the characters were saying. Writers do this by looking
at their picture, closing their eyes, and asking themselves, “What were the
people saying to each other on this page? What did I hear? What could they
have said?”
o Writers add movement marks to people and things in their pictures to show
their readers what was moving in their story. They do this by looking at
each person or thing in their picture and asking themselves, “Was this
person or thing moving?” Then, if it was moving, they add movement marks to
the parts of the person or thing that was moving.
o Writers go back to their old pieces and add to the words and pictures by
looking at one page at a time and asking themselves, “What else should be on
this page?”
o Writers make the pictures and words match in their stories by drawing the
picture of what was happening first and asking themselves, “What words will
tell what was happening in my picture?”
o Writers add the weather and time of day to their stories by looking at each
page and asking themselves, “What was the weather and time of day in this
part?” Then, they add details to show the weather and time of day.
o Writers add the ground to their pictures first, so that whoever reads their
story will know where the story takes place and so that the characters
aren’t floating in the air.
o Writers add to their pictures by adding feelings to their characters’ faces.
They look at each person in their story and ask, “How was this person feeling
in this part of the story?” Then, they add details like smiles, frowns, tears,

Draft Revised 7/16/10
eyes wide open, and more to let their reader know how the people were
feeling.
o Writers add thought bubbles to their pictures to let their readers know
what all of their characters were thinking in their story. Writers do this by
looking at each character in their story and asking themselves, “What was
this character thinking about in this part?”
Management Issues
o How we use our writing folders (green/red or sun/moon or any other
organizational method). It’s good for you to have a writing folder to use
for modeling, in addition to all of your writing on the charts.
o What to do when we feel finished (add to our pictures, add to our words, and
start a new story).
o How we talk to our partner.
o How we talk with the teacher during a conference.
o How we sit on the carpet in the meeting area.
o How we get our folders after the mini-lesson.
o Responsibilities during the mini-lesson (quiet during connection and teach,
but sharing during active involvement).
Charts for Launching Created During Mini-lessons
Story Ideas:
o Think of a special person and 1 time with that special person. (Pictures,
pictures, pictures of special people !!! Maybe you could have them bring in
photos of special people in their lives for the chart.)
o Think of a special place and 1 time at that special place.
o Think of a special thing and 1 time with that special thing.
o Think of a time you were happy, mad, or sad.
What to do when I feel finished:
o Add to my picture
o Add to my words
o Start a new story

Draft Revised 7/16/10
Ways to add to my story:
o What did I hear?
o What did I say?
o What did I see?
o How did I feel?
o Weather and Time of Day

Draft Revised 7/16/10
September
Pattern Books
Overview of unit: In this unit of study, students will learn to write “just
write” pattern books, just like the books they have been reading or listening to
during Read Aloud sessions.
Unit goals: Students will “read like a writer” to notice patterns in books. Students will learn at least one strategy for organizing their written work.
Students will use beginning and ending punctuation marks in their writing.
Standards: 1.1.3 Recognize that sentences start with capital letters and end with
punctuation, such as periods, question marks, and exclamation points.
1.2.2 Identify text that uses sequence or other logical order.
1.4.1 Discuss ideas and select a focus for group stories or other writing.
1.4.2 Use various organizational strategies to plan writing.
1.5.3 Write simple rhymes.
1.5.4 Use descriptive words when writing.
1.5.5 Write for different purposes and to a specific audience or person.
1.6.1 Print legibly and space letters, words, and sentences appropriately.
1.6.2 Write in complete sentences.
1.6.3 Identify and correctly use singular and plural nouns (dog/dogs).
1.6.6 Correctly use periods (I am five.), exclamation points (Help!), and question
marks (How old are you?) at the end of sentences.
1.6.7 Capitalize the first word of a sentence, names of people, and the pronoun I.
1.6.8 Spell correctly three- and four-letter words (can, will ) and grade-level-
appropriate sight words (red, fish).
IMMERSION Teaching Points:
o Writers notice patterns in books by reading books by famous authors.
o Writers notice patterns in books by looking at their own just right books.

Draft Revised 7/16/10
o Writers notice what authors do to make pattern books by putting a post it
note on a place where they want to share with their partner. (For this work,
you’ll want to use level A and B books, so that many of the students can follow the pattern.
Also, emphasize to your students that they are “reading like a writer”!)
o Writers remember how pattern books go by making a chart with all the
things they notice about pattern books.
o Writers remember what kinds of patterns can be in pattern books by making
a chart of the patterns they notice in their just right books.
Teaching Ideas to Accompany the Above Teaching Points:
Read Aloud pattern books that are above your students’ reading levels, but
also read aloud several level A and B pattern books.
Tell the students that they will be writing “just right” pattern books, like
the ones they’ve been reading in Reading Workshop or like the ones they
have been hearing read aloud.
Model how to read like a writer, noticing something that the author did to
make the pattern book. Let the students have time to read like writers in
small groups, using Post-its when they notice something in pattern books. For
this work, you’ll want to use level A and B books, so that many of the
students can follow the pattern.
Make a chart of all the things they notice about the level A and B pattern
books. You can then copy and shrink down examples from the books to go
with each noticing so that they can remember (most cannot read all of the
words you’ll put on a chart). You’ll want to refer to this chart each day
during Writing Workshop.
Make a chart listing all the patterns they are noticing in the level A and level
B pattern books (I am… / What am I? I am a…/ I love… / ....is big / I have
a…) You will have several, and this will be good when they go to write their
own “just right” pattern books. They will have several to choose from.

Draft Revised 7/16/10
This is the chart from Billie Thomas’ room from when they worked in small groups reading like writers.
COLLECTING Teaching Points:
o Writers get ideas for their pattern books by thinking of things they love
and listing those things on their topic planning paper.
o Writers make a plan for their pattern book by choosing a topic and
sketching all the things they know about that topic.
o Writers get ideas for their pattern books by using a pattern similar to a
pattern noticed during immersion.
Teaching Ideas to Accompany the Above Teaching Points:
Teach them that pattern book writers get ideas for their books by thinking
of things they love or things they do all the time. You can have them make
lists of all the things they love or all of the things they do.
Have them choose 1 thing at a time from their lists and put it in the middle
of the page (or at the top). Then, have them list out everything they can
think of that goes with that 1 thing. Hopefully, this will keep them focused
when they go to write a pattern book.
DRAFTING Teaching Points:
o Writers organize their ideas by writing a topic in the middle of their paper
and then naming five things about that topic.
o Writers get ideas for writing about a topic for their pattern books by
drawing a detailed picture of their topic.
Draft Revised 7/16/10
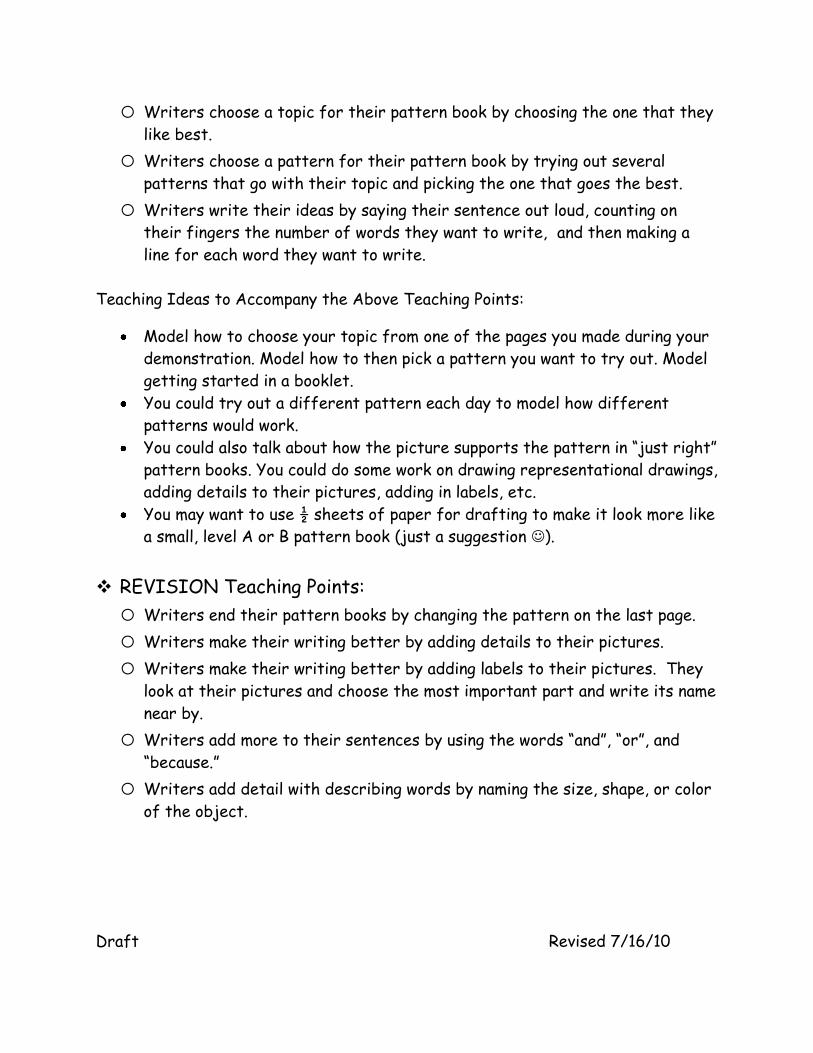
o Writers choose a topic for their pattern book by choosing the one that they
like best.
o Writers choose a pattern for their pattern book by trying out several
patterns that go with their topic and picking the one that goes the best.
o Writers write their ideas by saying their sentence out loud, counting on
their fingers the number of words they want to write, and then making a
line for each word they want to write.
Teaching Ideas to Accompany the Above Teaching Points:
Model how to choose your topic from one of the pages you made during your
demonstration. Model how to then pick a pattern you want to try out. Model
getting started in a booklet.
You could try out a different pattern each day to model how different
patterns would work.
You could also talk about how the picture supports the pattern in “just right”
pattern books. You could do some work on drawing representational drawings,
adding details to their pictures, adding in labels, etc.
You may want to use ½ sheets of paper for drafting to make it look more like
a small, level A or B pattern book (just a suggestion ).
REVISION Teaching Points:
o Writers end their pattern books by changing the pattern on the last page.
o Writers make their writing better by adding details to their pictures.
o Writers make their writing better by adding labels to their pictures. They
look at their pictures and choose the most important part and write its name
near by.
o Writers add more to their sentences by using the words “and”, “or”, and
“because.”
o Writers add detail with describing words by naming the size, shape, or color
of the object.
Draft Revised 7/16/10
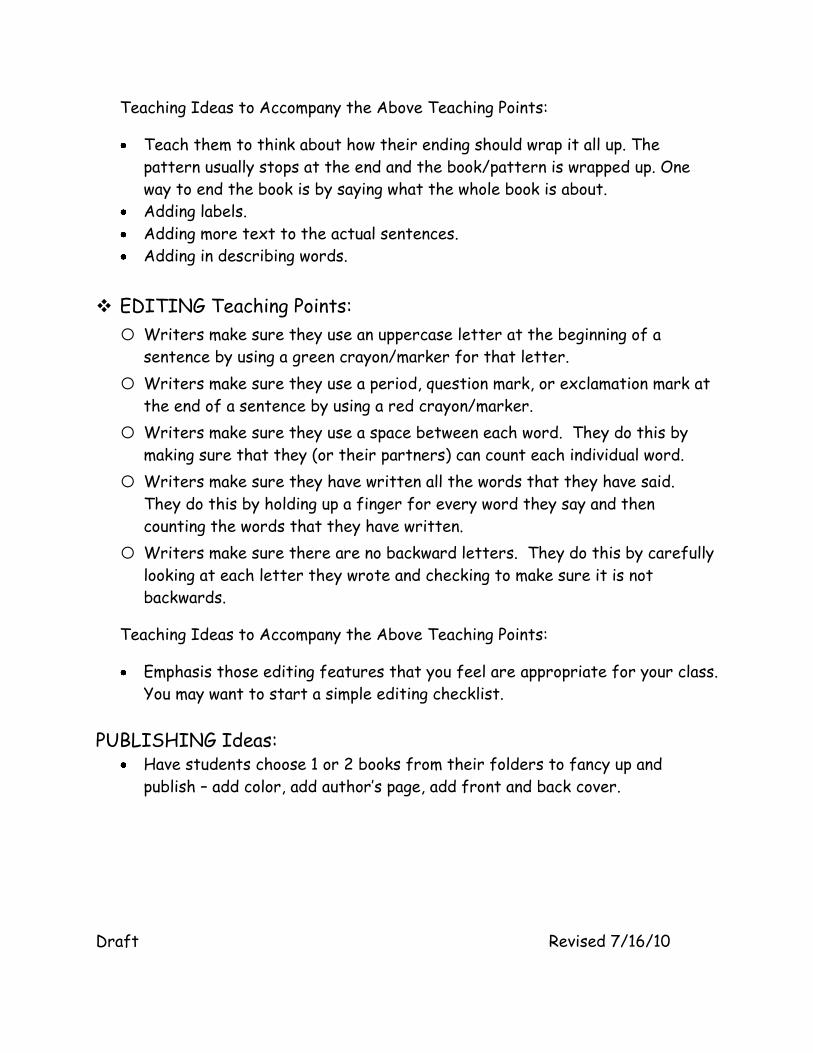
Teaching Ideas to Accompany the Above Teaching Points:
Teach them to think about how their ending should wrap it all up. The
pattern usually stops at the end and the book/pattern is wrapped up. One
way to end the book is by saying what the whole book is about.
Adding labels.
Adding more text to the actual sentences.
Adding in describing words.
EDITING Teaching Points:
o Writers make sure they use an uppercase letter at the beginning of a
sentence by using a green crayon/marker for that letter.
o Writers make sure they use a period, question mark, or exclamation mark at
the end of a sentence by using a red crayon/marker.
o Writers make sure they use a space between each word. They do this by
making sure that they (or their partners) can count each individual word.
o Writers make sure they have written all the words that they have said.
They do this by holding up a finger for every word they say and then
counting the words that they have written.
o Writers make sure there are no backward letters. They do this by carefully
looking at each letter they wrote and checking to make sure it is not
backwards.
Teaching Ideas to Accompany the Above Teaching Points:
Emphasis those editing features that you feel are appropriate for your class.
You may want to start a simple editing checklist.
PUBLISHING Ideas: Have students choose 1 or 2 books from their folders to fancy up and
publish – add color, add author’s page, add front and back cover.
Draft Revised 7/16/10
October
Personal Narratives/Small Moments
Overview of Unit: This unit of writing focuses on small moments from the
students lives. The qualities of good writing including: detail, dialogue, setting,
sequence, leads and answering the reader’s questions are all emphasized in this unit
of study. You will teach students to focus their stories into small accounts not
bed-to-bed stories. Students will learn to plan out their stories first and to use
their partner to make their writing better.
Unit goals: Students will write a true, one time, focused small moment story
Students will continue to learn and practice the routines and procedure of
writing workshop
Students will increase their writing stamina
Students will learn strategies for planning their stories
Students will learn strategies for working with a writing partner
Students will learn and use strategies for revising their story
Student will learn and use strategies for publishing their story
Standards: 1.1.3 Recognize that sentences start with capital letters and end with
punctuation, such as periods, question marks, and exclamation points.
1.2.2 Identify text that uses sequence or other logical order.
1.4.1 Discuss ideas and select a focus for group stories or other writing.
1.4.2 Use various organizational strategies to plan writing.
1.5.3 Write simple rhymes.
1.5.4 Use descriptive words when writing.
1.5.5 Write for different purposes and to a specific audience or person.
1.6.1 Print legibly and space letters, words, and sentences appropriately.
1.6.2 Write in complete sentences.
1.6.3 Identify and correctly use singular and plural nouns (dog/dogs).
1.6.6 Correctly use periods (I am five.), exclamation points (Help!), and question
marks (How old are you?) at the end of sentences.
1.6.7 Capitalize the first word of a sentence, names of people, and the pronoun I.
Draft Revised 7/16/10
1.6.8 Spell correctly three- and four-letter words (can, will ) and grade-level-
appropriate sight words (red, fish).
IMMERSION Ideas:
o Read books like Shortcut, Owl Moon, Kiss Good Night, and Roller Coaster
o Talk about what a “small moment” is vs. a bed-to-bed story
o Write a class small moment story of a shared experience
o Introduce paper choices (maybe more lines / maybe some blank pages so
writers can play with how the words will be on the pages)
o Introduce booklets with stapled pages
COLLECTING Teaching Points:
o Writers get ideas for writing small moment stories by thinking about a time
when they were happy, mad, or sad. They make a list of times they felt
happy, mad, or sad (or any other emotion). o Writers get an idea for writing small moment stories by thinking of an
important time, a time that really mattered to them. They make a list of
times in their lives that were really important to them. o Writers get an idea for writing small moment stories by rereading an old
story and picking one part to write more about. o Writers get an idea for writing a small moment story by thinking of a special
place they have been and remembering something that happened to them
there. They make a list of special places and why those places are special.
DRAFTING Teaching Points:
o Writers work with partners by sitting knee-to-knee, looking each other in
the eyes, and really listening to what each other has to say.
o Writers talk to each other by asking questions like, “What did you do today
as a writer?” “What did you try in your writing today?”
o Writers focus on a single event in their stories by making a movie in their
mind of one time something happened and only writing about that one time.
o Writers tell their story, trying to make it sound like a story, by using special
story words like “and then…”

Draft Revised 7/16/10
o Writers plan their story by touching each page and saying what will go on
each page. Then they sketch their pictures. Lastly, they write their words.
o Writers plan their stories across their fingers. As they tell their story they
touch each finger and say – First, Next, Then, and Last
o Writers begin their stories with the weather and/or time of day by thinking
about what happened in the beginning of their story and asking themselves,
“What was the weather and/or time of day in this part?”
Planning Ideas:
Use a planning paper with boxes. Have students write one times in each box.
Then cut apart each box.
Watermelon paper with big idea and small seeds
Pieces of a pie
Take a pie piece and make a paper with what your strong feeling was
REVISION Teaching Points:
o Writers show the passage of time in their stories through illustrations by
making the sun move across the page a little on each page.
o Writers use dialogue to show emotion and urgency in feelings by…
o Writers think hard about the placement of the words on each page by…
o Writers stretch their story across a booklet by saying the small actions of
the story across the pages using the words First, Next, and Last.
o Writers show don’t tell the things happening in their story by thinking what
was happening and thinking about what you looked like.
o Writers add more to their story by adding their internal thinking. Stop and
ask yourself what was I thinking of feeling and then use the words - I
thought _____ or I felt_____.
o Writers end their stories with something they’ve learned or how they’ve
changed by rereading their story and asking themselves, “What did I learn”
or “How have I changed?”
o Writers make sure they stayed focused on a single event by rereading each
page and asking themselves, “Does this page fit with all of my other pages?”
o Writers add more to their story by adding in partner sentences. They do
this by reading a sentence and then asking themselves How? Or Why? Then

Draft Revised 7/16/10
write the answer to that question as a sentence right after the one you just
read.
Special Note: At the end of this unit, teachers may want to collect the lists that students
made during the “Collecting” lessons. These lists may be used later in the year (March) during the
Author Study unit.
Draft Revised 7/16/10
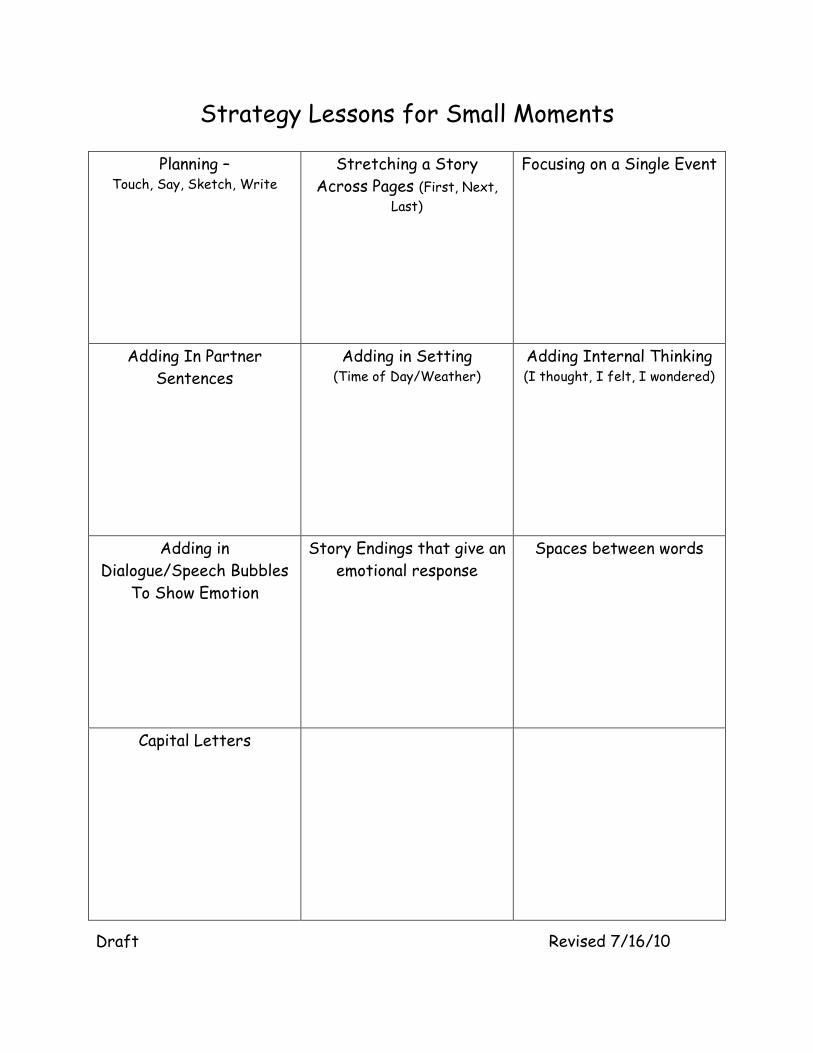
Strategy Lessons for Small Moments
Planning – Touch, Say, Sketch, Write
Stretching a Story
Across Pages (First, Next,
Last)
Focusing on a Single Event
Adding In Partner
Sentences
Adding in Setting (Time of Day/Weather)
Adding Internal Thinking (I thought, I felt, I wondered)
Adding in
Dialogue/Speech Bubbles
To Show Emotion
Story Endings that give an
emotional response
Spaces between words
Capital Letters
Draft Revised 7/16/10
November
Mentor Author
and/or
Letter Writing (including a small moment in the letter)
Overview of unit: students will learn about what a letter is and what the
features and parts of a letter are. They will learn that there is a message inside a
letter and that what they have to say is important. Students will learn that there
are many reasons to write letters and there are many people to write letters to.
Unit goals: Students will write letters to friends and or family members that includes
all parts of a letter
Students will mail or deliver at least one letter to someone
Students will begin to understand the importance of writing things for
others to read and will practice using their best handwriting, spacing,
spelling and punctuation
Standards: 1.1.3 Recognize that sentences start with capital letters and end with
punctuation, such as periods, question marks, and exclamation points.
1.2.2 Identify text that uses sequence or other logical order.
1.4.1 Discuss ideas and select a focus for group stories or other writing.
1.4.2 Use various organizational strategies to plan writing.
1.5.3 Write simple rhymes.
1.5.4 Use descriptive words when writing.
1.5.5 Write for different purposes and to a specific audience or person.
1.6.1 Print legibly and space letters, words, and sentences appropriately.
1.6.2 Write in complete sentences.
1.6.3 Identify and correctly use singular and plural nouns (dog/dogs).
Draft Revised 7/16/10
1.6.6 Correctly use periods (I am five.), exclamation points (Help!), and question
marks (How old are you?) at the end of sentences.
1.6.7 Capitalize the first word of a sentence, names of people, and the pronoun I.
1.6.8 Spell correctly three- and four-letter words (can, will ) and grade-level-
appropriate sight words (red, fish
IMMERSION Ideas:
o Begin by reading books with letters in them like, Click-Clack Moo
o Ask students to bring in a letter from home
o Make a list of all the reasons people write letters
o Make a list of all the people you could write a letter to
COLLECTING & DRAFTING Teaching Points:
o Writers get an idea for writing a letter by making a list of who they could
write to, choosing one person and then thinking about what they want to say
to that person
o Writers get an idea for writing a letter by making a list of special people
they know and then think about why they are special
o Writers make a plan for their letter by making a list of all the things they
want to include in their letter
o Writers make a plan for their letter writing by telling their partner who
they are going to write to and what they are going to say to them in the
letter
REVISION Teaching Points:
o Writers begin their letter with an opening. You can think about what are all
the ways you have seen a letter begin. You can choose one from the list we
made as a class.
o Writers have openings for their letter that grab the reader’s attention. One
way to do this is to begin the letter with a question for the reader.
o Writers have a body/message in their letter that includes reasons that you
are writing to them.

Draft Revised 7/16/10
o Writers make sure that their reader can read their writing. A writing
partner can help you decide where you may need to fix up your letter in
order to make it easier to read
o Writers close their letter before they write their name. One way to close a
letter is to think about what the reader calls you and then write that before
your name. (if you are writing to your grandpa and he calls you sweetie then
you could write, “Your Sweetie” before your name
EDITING Teaching Points:
o Writers make sure as many words as possible are spelled right for their
reader. One way to check to see if words are spelled right is to look at the
words on your page and see if they are on the word wall. If they are, check
each letter to make sure the word on your paper is spelled the same as the
word on the word wall
o Writers make sure they have spaces between each word by putting their
finger between each word and looking to see if it covers up any letters. If
you left out spaces then you could put a circle around each of the words that
are too close together
o Writers make sure as many words as possible are spelled correctly by
looking at their words and noticing which words look funny. Then you can try
a different way to spell that word and see if it looks better. If it does then
change it.
PUBLISHING Ideas:
o Put letters into envelopes and include a drawn picture or photograph
o Walk to the post-office or another place and mail or deliver your letters
o Ask for parents to send in a self-addressed and stamped envelope so
students can mail a letter to home
o Ask for addresses of students’ family member and friends that live far away
o Ask for donations of stamps and envelopes from parents

Draft Revised 7/16/10
Author Study Overview of unit: In this unit students learn that they are writers “like
writers the world over.” Students will look closely at the work of one writer
(author). They will closely study what that author has done in order to write well
and learn ways to make their own writing better.
Unit goals: Students will gain the understanding that authors revise their work
constantly before arriving at the final published book.
Students will learn to read and re-read their writing with a special eye
towards changing parts of their writing.
Students will be encouraged to add more words to each page and more pages
to their books.
Standards: 1.4.1 Discuss ideas and select a focus for group stories or other writing.
1.4.2 Use various organizational strategies to plan writing.
1.4.3 Revise writing for others to read.
1.5.1 Write brief narratives (stories) describing an experience.
1.5.2 Write brief expository (informational) descriptions of a real object, person,
place, or event, using sensory details. 1.5.4 Use descriptive words when writing.
1.5.5 Write for different purposes and to a specific audience or person.
1.6.1 Print legibly and space letters, words, and sentences appropriately.
1.6.2 Write in complete sentences.
1.6.3 Identify and correctly use singular and plural nouns (dog/dogs).
1.6.4 Identify and correctly write contractions (isn’t, aren’t, can’t).
1.6.5 Identify and correctly write possessive nouns (cat’s meow, girls’ dresses)
and possessive pronouns (my/mine, his/hers).
1.6.6 Correctly use periods, exclamation points, and question marks at the end of
sentences.
1.6.7 Capitalize the first word of a sentence, names of people, and the pronoun I.
1.6.8 Spell correctly three- and four-letter words (can, will ) and grade-level-
appropriate sight words (red, fish).
Draft Revised 7/16/10
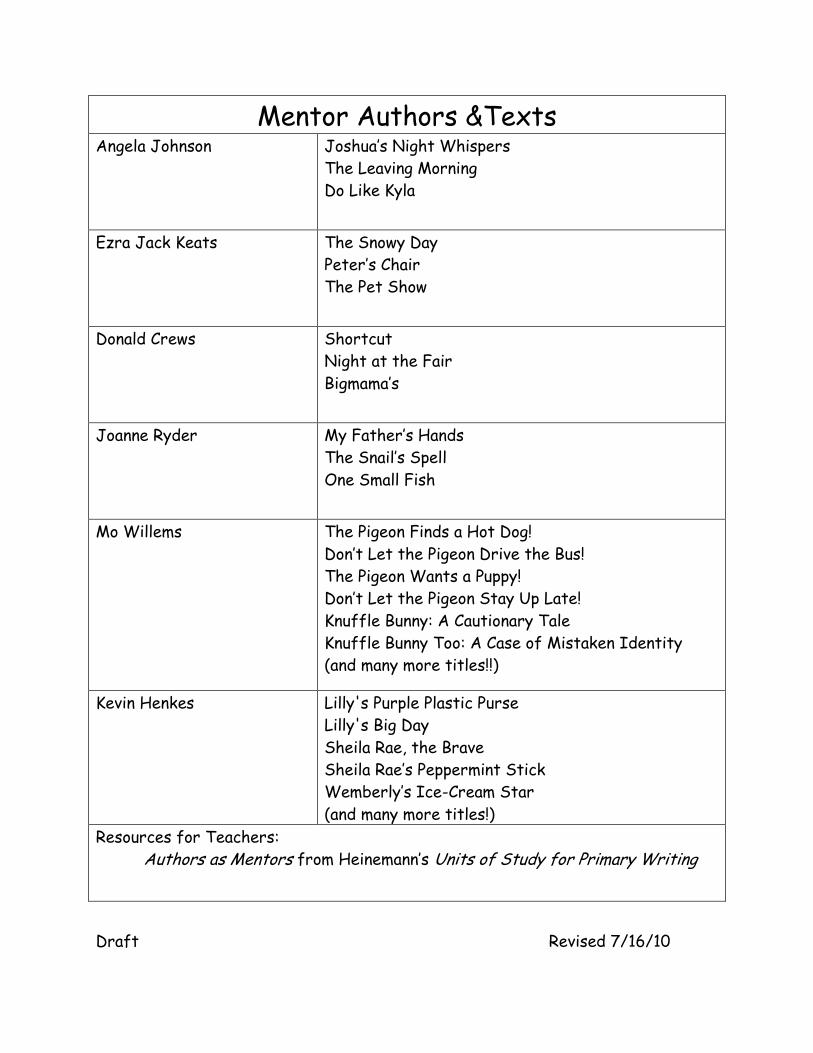
Mentor Authors &Texts Angela Johnson Joshua’s Night Whispers
The Leaving Morning
Do Like Kyla
Ezra Jack Keats The Snowy Day
Peter’s Chair
The Pet Show
Donald Crews Shortcut
Night at the Fair
Bigmama’s
Joanne Ryder My Father’s Hands
The Snail’s Spell
One Small Fish
Mo Willems The Pigeon Finds a Hot Dog!
Don’t Let the Pigeon Drive the Bus!
The Pigeon Wants a Puppy!
Don’t Let the Pigeon Stay Up Late!
Knuffle Bunny: A Cautionary Tale
Knuffle Bunny Too: A Case of Mistaken Identity
(and many more titles!!)
Kevin Henkes Lilly's Purple Plastic Purse
Lilly's Big Day
Sheila Rae, the Brave
Sheila Rae’s Peppermint Stick
Wemberly’s Ice-Cream Star
(and many more titles!)
Resources for Teachers:
Authors as Mentors from Heinemann’s Units of Study for Primary Writing

Draft Revised 7/16/10
IMMERSION Teaching Points:
o Writers read a mentor author’s books and ask themselves “How may the
author have come up with the idea for this story?”
o Writers read a mentor author’s books to notice how the author chooses and
stretches out one small moment, instead of running from moment to moment.
o Writers read a mentor author’s books and notice not only what they write,
but also HOW they write. As they look at these books they will think to
themselves, “How did the author write that and why did he do that?”
Teaching Ideas to Accompany the Above Teaching Points:
As students are reading a mentor author’s books, have them use sticky notes
to mark things that they notice the author uses when he writes. Begin a
class noticings chart that may include: use of movement marks in pictures,
speech bubbles, CRAZY lines, angry lines, big print, emotion on character’s
face, use of punctuation to grow suspense (ellipses, dash marks, commas).
COLLECTING Teaching Points:
o Writers carry their own “tiny topic” notebook to record the small moments
that happen in their lives. They take brief notes (“fell down”) and use those
notes to help them remember a moment that they will stretch out.
o Writers get ideas for their own stories by thinking of the “small moments”
in their lives.
Teaching Ideas to Accompany the Above Teaching Points:
For more collecting ideas, refer to the Collecting teaching points in the
Personal Narratives/Small Moment unit of study (October).
DRAFTING Teaching Points:
Note: The primary emphasis during drafting is for students to attempt to use in
their writing what they have noticed the mentor author has used in his/her writing.
As they are drafting their stories, they should be encouraged to think about how
they could use a special technique (ie: ellipses) in a meaningful way, in their own
writing.
o Writers try to use similar techniques in their writing that the mentor author
uses, to make their own stories come alive:

Draft Revised 7/16/10
o Writers use punctuation to grow suspense.
o Writers use detailed lists to give readers a clear picture in their
minds.
o Writers use short sentences to convey fast actions.
o As writers draft their stories, they try to get more words on a page. They
do this by adding:
o Dialogue
o Sentences that show action.
o Sentences that show or tell a thought.
o As writers draft their stories they are thinking more about spelling. They
do this by stretching out a word and saying it slowly to hear all the sounds.
REVISION Teaching Points:
Note: The above drafting teaching points could also be used during revision. As
students are revising their work, we want them to think to themselves, “How could
I use what _____ (mentor author) used to make my writing better?”
o Writers use their very own special tools to make their writing better: o Strips of paper to add sentences into the middle of their writing o Color pens to mark special parts of their story o Flaps of paper to tape over “neglected” parts of the story o Single sheets of paper to staple onto the end or the middle parts of
their stories.
o Writers make their writing better by using revision strategies: cutting,
stapling, adding into the middle of a page, re-sequencing sentences or pages.
o Writers make their writing better by finding the important part of their
story. They do this by asking themselves, “Where in my story do I have the
biggest feelings?”
o Writers make their writing better by adding detail to the important part of
their story. They do this by: o Adding in dialogue o Adding in small actions that show feelings o By using a technique that their mentor author has used.
o Writers make their writing better by adding a new beginning or ending to
their story. They do this by writing 1-2 different ways to begin or end their
story and then thinking about which version works best.

Draft Revised 7/16/10
o Writers think about new ways to begin or end their stories by studying
mentor texts. They ask themselves, “How did that author begin (or end)
their story?” Writers then try this in their own writing.
EDITING Teaching Points:
o Writers “fix” their writing by rereading and making sure every sentence
begins with a capital letter. They slowly read their story and look for every
time they see a period, question mark, or exclamation mark, and ask “Is the
next letter a capital?”
o Writers “fix” their writing by making sure the word I and all proper nouns
are capitalized. They go back and re-read their story and think what word is
naming a specific person a place. If that word is naming a specific place
then they capitalize the first letter.
o Writers “fix” their writing by rereading and making sure every sentence
ends with a period, question mark, or exclamation mark. As they reread they
listen for when they take a breath or pause for a moment.
o Writers “fix” their writing by making sure they have a space between each
word. They do this by making sure that they (or their partners) can count
each individual word.
o Writers “fix” their writing by looking at the words they wrote and asking:
o If I wrote a word more than one time, did I spell it the same way each
time?
o Did I use the word wall to spell correctly “tricky” words and words
that are used a lot?
o Did I stretch out the word slowly and listen to all the sounds in the
word?
o Writers make sure they have written all the words that they have said.
They do this by holding up a finger for every word they say and then
counting the words that they have written.
o Writers make sure there are no backward letters. They do this by carefully
looking at each letter they wrote and checking to make sure it is not
backwards.
Draft Revised 7/16/10
o Writers “fix” their writing by adding dialogue marks. They do this by re-
reading and looking for places where someone is saying something. Then,
they hug the exact words being said with quotation marks.
o Writers “fix” their writing by making sure each sentence is a complete
thought. They do this by rereading, stopping at each punctuation mark, and
asking themselves, “Does that make sense?” If it doesn’t make sense they
fix it.
o Writers “fix” their writing by using an editing checklist (or Trouble List).
PUBLISHING & CELEBRATING Ideas: Show students how to make an “About the Author” blurb. Read together
some examples from your mentor author texts. As students share their published books, have them talk about something
special they did in their writing. Or, have the audience try to notice
something special they did in their writing.
TEACHING Idea:
Here is one way that the Author Study unit might go:
1st week: YOU (the teacher) choose an author that you LOVE! You model how
one connects with an author. Put the author on display! This week is all about the
teacher and teacher’s author. Your students watch you get excited by an author!!
Things you do to fall in love:
1.) Start with 1 book written by your author. Read it and fall in love with things
other than the words. Read more books, each time show your enthusiasm for
the things that the author does in his/her books.
2.) Model for your students how you notice things about your author’s work:
different genres, different forms.
3.) Know some things about your author’s life. Have information printed from
the author’s web site. Show the web site to your students! Read the blurb
in the book about the author.
Draft Revised 7/16/10
4.) Make a really big deal about the author’s craft! As you read aloud,
demonstrate your excitement about HOW your author writes his/her
stories. Think out loud about WHY he/she writes that way. Fill out the
attached chart each day as you read books aloud.
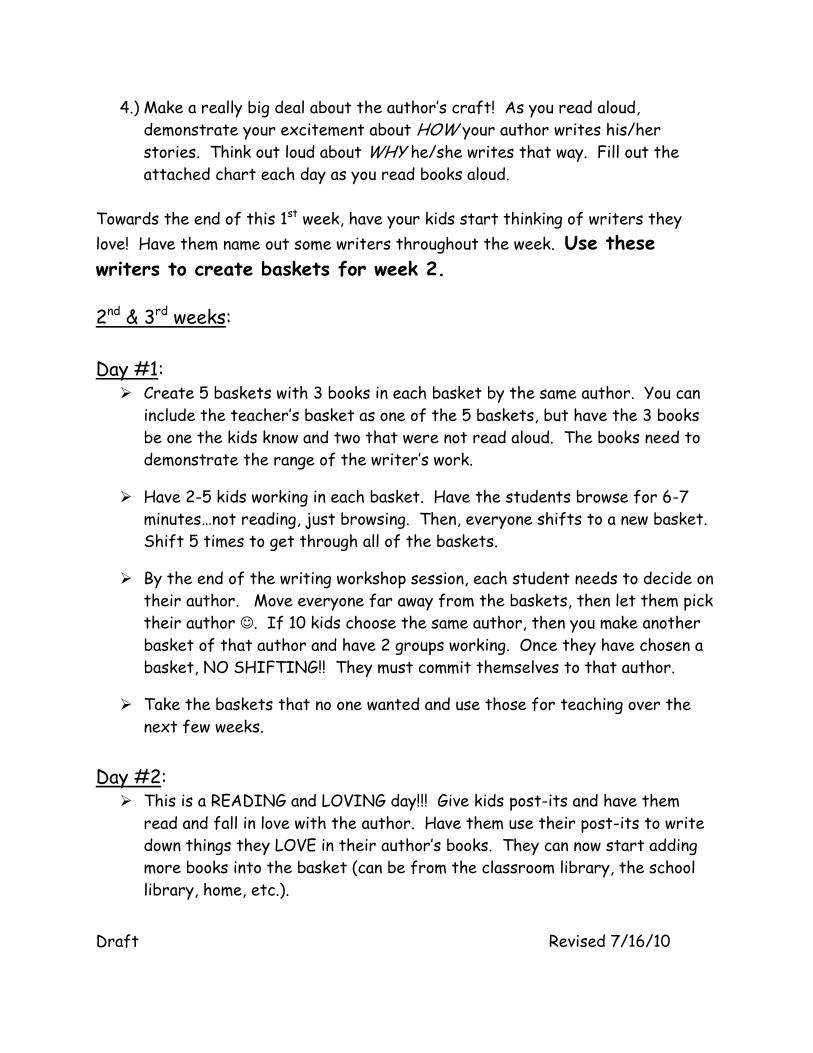
Towards the end of this 1st week, have your kids start thinking of writers they
love! Have them name out some writers throughout the week. Use these
writers to create baskets for week 2.
2nd & 3rd weeks:
Day #1: Create 5 baskets with 3 books in each basket by the same author. You can
include the teacher’s basket as one of the 5 baskets, but have the 3 books
be one the kids know and two that were not read aloud. The books need to
demonstrate the range of the writer’s work.
Have 2-5 kids working in each basket. Have the students browse for 6-7
minutes…not reading, just browsing. Then, everyone shifts to a new basket.
Shift 5 times to get through all of the baskets.
By the end of the writing workshop session, each student needs to decide on
their author. Move everyone far away from the baskets, then let them pick
their author . If 10 kids choose the same author, then you make another
basket of that author and have 2 groups working. Once they have chosen a
basket, NO SHIFTING!! They must commit themselves to that author.
Take the baskets that no one wanted and use those for teaching over the
next few weeks.
Day #2: This is a READING and LOVING day!!! Give kids post-its and have them
read and fall in love with the author. Have them use their post-its to write
down things they LOVE in their author’s books. They can now start adding
more books into the basket (can be from the classroom library, the school
library, home, etc.).

Draft Revised 7/16/10
Make a big heart with the author’s name in the middle and have kids put
their post-its of all the things they love in the heart.
Day #3: This is the About Day (from Week 1, #2). Your students will start to notice
things about the author’s work.
Day #4: Author’s Life Day--go to the author’s web site, read the blurbs on the book,
read their biography
Day #5: Read Like a Writer Craft Day…noticing all of the craft the writer uses.
Day #6:
Try It Day! Students commit to 2 -3 craft moves and try to use those
crafts in their own writing. They try to write like the writer.
Day #7:
Try It Day! Students find things the writer did like the teacher’s writer
and try those things.
Day #8:
Try It Day! Students try out new things the writer did that they have not
yet tried in their own writing.
Day #9:
Try It Day! Students try out daring/unusual things the writer did that they
have not yet tried in their own writing.
Day #10:
Today, students try to be like their writer in other ways besides just craft.
Look at the info from “about the author’s life” and other things you know

Draft Revised 7/16/10
about the writer now and be like your writer (example: writer writes about
his home…student tries to write about his home to be like the writer).
We learn things about our author’s craft (make this chart big in the
classroom. Use it during week 1 with your author. During weeks 2 & 3, each group
will be using, filling out, the chart independently).
We learn things about our author’s craft: Examples from the
text
What we noticed Why might a
writer do this?
I try to do what
my mentor has
done…
Other chart ideas:
For each group:
Members of the Group:
Mentor Author:
Titles of books we studied:
We learn things about our author’s work:
We learn things about our author’s life:
Things you do when you’re falling or already fallen in love with an author
Fall in love with stuff other than the words

Draft Revised 7/16/10
You start to know things about the writer’s work
You start to know things about their life
You start to look for things inside the writing (writer’s craft).
WE NOTICE THINGS SO THAT WE CAN BE LIKE OUR WRITER!!!

Draft Revised 7/16/10
December
Nonfiction Question and Answer Books
Overview of Unit: This unit of study introduces students to another type of
nonfiction writing. Students will have the opportunity to read question and answer
books and then create their own book.
Unit goals: Students will “read like a writer” to notice patterns in question and answer
books. Students will use an organizational strategy to write their own question and
answer book.
Students will use beginning and ending punctuation marks in their writing.
Students will use revision and editing strategies to make their writing easier
for others to read.
Standards: 1.1.12 Use phonic and context clues as self-correction strategies when reading.
1.1.15 Read aloud smoothly and easily in familiar text.
1.2.2 Identify text that uses sequence or other logical order.
1.2.5 Use context (the meaning of the surrounding text) to understand word and
sentence meanings.
1.4.1 Discuss ideas and select a focus for group stories or other writing.
1.4.2 Use various organizational strategies to plan writing.
1.4.3 Revise writing for others to read.
1.4.4 Begin asking questions to guide topic selection and ask how and why
questions about a topic of interest.
1.5.2 Write brief expository (informational) descriptions of a real object, person,
place, or event, using sensory details.
1.5.4 Use descriptive words when writing.
1.5.5 Write for different purposes and to a specific audience or person.
1.6.1 Print legibly and space letters, words, and sentences appropriately.
1.6.2 Write in complete sentences.
1.6.3 Identify and correctly use singular and plural nouns (dog/dogs).
1.6.4 Identify and correctly write contractions (isn’t, aren’t, can’t).

Draft Revised 7/16/10
1.6.6 Correctly use periods, exclamation points, and question marks at the end of
sentences.
1.6.7 Capitalize the first word of a sentence, names of people, and the pronoun I.
1.6.8 Spell correctly three- and four-letter words (can, will ) and grade-level-
appropriate sight words (red, fish).
IMMERSION Teaching Points:
o Writers read Q & A books to notice patterns in these kinds of books.
o Writers read Q & A books to notice features of those books (ie: picture
glossary, topic specific words in bold, zoom in and zoom out patterns).
o Writers read Q & A books to notice topics for these kinds of books.
Things to help your writers notice about Q & A books: (These could be included
on a chart)
Some have the same question for the whole book – same question, but
different answers
The title can be the question
Some have a different question all throughout the book, but the same
answer every time
They teach you something
Some give you some information first and then ask a question
The question and answer can be on the same page
Some have the Question, then Answer and then some extra information
Typically all about one topic
Real photos
Teaching Ideas to Accompany the Above Teaching Points:
Use all different levels of books for immersion, but definitely try to get
some level A, B, C, and D (these could even be your mentor texts) – Honor
the lower levels
Read aloud followed by discussion of what the class noticed – similarities and
differences between Q & A books
Work in small groups to put Post-its on everything they are noticing about Q
& A books

Draft Revised 7/16/10
Write a whole class Q & A book during Interactive Writing or during
Immersion in Writing Workshop
Make a chart of all the noticings (see above)
Maybe pick out 3 or 4 Q & A books that have different structures as your
mentor texts and kids get to know those very well.
COLLECTING Teaching Points:
o Writers get ideas for their Q & A books by thinking and making list of
things they know a lot about and could teach others about.
o Writers get ideas for their Q & A books by working with their partner.
Partners can ask each other questions to help each other see which topic
they have the most to say.
DRAFTING Teaching Points:
o Writers decide on a Q & A book by: o Choosing a topic o Choosing a pattern o Using planning paper
o Writers plan their writing by:
o Using the touch, say, sketch, write strategy
o Rehearsing with a partner
o Writers begin writing (or draft) their Q & A book by first making a list of
questions about their topic. As they write these questions, they think to
themselves, “What is the most important information I can teach someone
about ____?” AND/OR
o Writers begin writing (or drafting) their Q & A book by first making a list of
answers about their topic. As they write these answers, they think to
themselves, “What is the most important information I can teach someone
about ____?”
o Writers draft different kinds of Q & A books by “trying out” several
different patterns and/or topics.

Draft Revised 7/16/10
Teaching Ideas to Accompany the Above Teaching Points:
To help your students decide which structure they will use, have 3-4 (or
however many you think they can handle ) available for them to choose
from.
You will want your students to be able to say what structure they are trying
and why. Model doing this, and have your students practice this with their
partners.
Emphasize to your students that they must know and care a lot about their
topic.
REVISION Teaching Points:
o Writers make their writing better by adding describing words (adjectives).
They can do this by reading one of their sentences, asking “What am I
writing about?” and then asking “What does that look like?”
o Writers can say more about something by adding a partner sentence. They
do this by reading one of their sentences and then writing another sentence
that tells more about the first sentence.
o Writers make their writing better by adding details to the pictures,
o Writers make their writing better by adding labels to their pictures. They
look at their pictures and choose the most important part and write its name
near by.
o Writers make their writing better by adding captions to their pictures.
o Writers make sure all of the Q & A’s go with their topic. They do this by:
o Stating the topic of their book (“My book is about ___.”), then
rereading.
o Rereading their book to a partner and asking the partner, “Are all of
my Q & A about ___?”)
o Writers can make sure that their books have a good ending by:
o Adding an ending that changes the pattern
o Adding an ending that wraps up the whole book
o Writers make their writing better by reading each sentence and asking,
“Does that sentence make sense?” (They can do this by themselves or with
their partner.)
Draft Revised 7/16/10
EDITING Teaching Points:
o Writers “fix” their writing by rereading and making sure every sentence
begins with a capital letter.
o Writers “fix” their writing by making sure the word I is capitalized.
o Writers “fix” their writing by rereading and making sure every sentence
ends with a period, question mark, or exclamation mark.
o Writers “fix” their writing by making sure they have a space between each
word. They do this by making sure that they (or their partners) can count
each individual word.
o Writers “fix” their writing by looking at the words they wrote and asking:
o If I wrote a word more than one time, did I spell it the same way each
time?
o Did I use the word wall to spell correctly “tricky” words and words
that are used a lot?
o Writers make sure they have written all the words that they have said.
They do this by holding up a finger for every word they say and then
counting the words that they have written.
o Writers make sure there are no backward letters. They do this by carefully
looking at each letter they wrote and checking to make sure it is not
backwards.
PUBLISHING Ideas: Have students choose 1 or 2 books from their folders to fancy up and publish – add
color, add author’s page, add front and back cover.

Draft Revised 7/16/10
Nonfiction Question and Answer Books Rubrics
Name:_______________ Date:_______________
Total Score: ____________/100
Writing Quality Conventions
Follows consistent structure _____ Word wall words spelled correctly _____
Writes about one topic _____ Spaces between words _____
Writing makes sense _____ Uses capital letter for “I” and
at beginning of sentence _____
Adds flaps, labels, or captions _____
Uses periods and questions marks _____
Adds surprise ending or
synthesizes the whole book _____
Able to tell how 1 page connects
to the whole _____
10= More than expected
8= Most of the time
7= Sometimes
6= Rarely
5= Never

Draft Revised 7/16/10
Strategy lessons for Non-fiction Q & A books
All Pages about the same
topic
Following a consistent structure
Adding more words to each page
Taking away what doesn’t belong
Adding Flaps, Labels, or Captions
Endings (A surprise ending or an ending
that synthesizes the whole book)
Spaces between words Using the word wall to spell words correctly
Capital Letters
Punctuation

Draft Revised 7/16/10
January/February/March
Realistic Fiction
Unit Overview: In this unit students will learn that characters in stories face
problems, overcome these (with help from others or on their own), and then
develop solutions. Your students will attempt to create their own realistic fiction
stories that follow this structure.
Unit Goals: “Read like writers” by noticing types of problems and solutions in realistic
fiction books
Develop realistic characters (children their age) with realistic problems
(things that could happen to them)
Plan stories that follow the narrative structure across 3-5 pages
o 1. Set the scene and introduce the characters
o 2. Give the character a problem
o 3. Solve the problem
Develop the problem in the story by stretching it across several pages to
tell how the trouble happens
Standards: 1.4.1 Discuss ideas and select a focus for group stories or other writing.
1.4.2 Use various organizational strategies to plan writing.
1.4.3 Revise writing for others to read.
1.5.1 Write brief narratives (stories) describing an experience.
1.5.4 Use descriptive words when writing.
1.5.5 Write for different purposes and to a specific audience or person.
1.6.1 Print legibly and space letters, words, and sentences appropriately.
1.6.2 Write in complete sentences.
1.6.3 Identify and correctly use singular and plural nouns (dog/dogs).
1.6.4 Identify and correctly write contractions (isn’t, aren’t, can’t).
1.6.5 Identify and correctly write possessive nouns and possessive pronouns.
1.6.6 Correctly use periods, exclamation points, and question marks at the end of
sentences.
1.6.7 Capitalize the first word of a sentence, names of people, and the pronoun I.

Draft Revised 7/16/10
1.6.8 Spell correctly three- and four-letter words and grade-level-appropriate
sight words.
IMMERSION Ideas:
o Reading like writers (Create a chart of everyday problems found in mentor
texts)
o Retell read aloud stories across your fingers
o Shared writing- creating your own class character and story
o Tell students that they get to make up their own character, problem,
solution, but that they stories and characters need to seem real
o Give kids a bin of realistic fiction books to read and notice things in. They
can mark place and things with post-it notes
COLLECTING & DRAFTING Teaching Points:
o Writers get an idea for writing a realistic fiction story by thinking about
themselves or someone they know and then making up a character kind of
like that person.
o Writers get an idea for writing a realistic fiction story by thinking about
what their character would like or dislike.
o Writers get ideas for problems in their story from things that have
happened to them or someone they know.
o Writers get an idea for their realistic fiction story by brainstorming and
thinking of a possible character their age, problem; attempt to solve the
problem, and a solution. We can use a possible story idea planning page.
o Writers plan stories by inventing characters sort of like ourselves.
o Writers plan stories by getting the character into some sort of trouble.
o Writers practice their stories by telling them across 3-5 fingers (setting
the scene, the problem, and the solution).
o Writers draft their stories by making a wordless picture book to accompany
their retellings
o Writers draft their stories by sketching
o their oral stories within the story board boxes.
o their pictures across 3 box planning paper.(and maybe labeling,
jotting, or listing under the pictures)

Draft Revised 7/16/10
o Writers can begin their story with the weather and the time of day.
o Writers draft their stories by sketching their pictures across 3 box
planning paper. (and maybe labeling, jotting, or listing under the pictures)
o Writers show, not tell, their character’s problem by:
o Stretching out the problem of the story to tell everything that
happened (give a blow-by-blow account)
o Adding characters’ thoughts or feeling
o Including what characters see, hear, smell, taste, and feel
o Making the characters talk in the pictures with speech bubbles (add
dialogue)
o Finding the most important part of the story and saying more about it
REVISION Teaching Points:
o Writers move their characters through time by using special transition
words (the next day, later that night, 2 weeks later…).
o Writers try different beginnings (start with dialogue, setting the scene, or
right in the middle of the action).
o Writers try different endings (surprise, stay in the moment, wrap up, a
thought about what happened).
o Writers build tension before the character’s problem gets solved. We find
the most important part of the story (right before the problem gets fixed)
and say more about it. We do this by:
o Stretching out the problem of the story to tell everything that
happened (give a blow-by-blow account)
o Adding thoughts and feelings. We put ourselves in the character’s
shoes and think, “What exactly would I be thinking or feeling?” We
can use words such as: I wondered ___, I worried ___, I thought __,
I felt __.
o Including what characters see, hear, smell, taste, and feel.
o Adding Dialogue. We put ourselves in the character’s shoes and think,
“What exactly would I be saying or would somebody be saying to me?”
o Writers let their reader know where their story is taking place (the setting)
by closing their eyes and thinking about or imagining what was happening at
that place and what it looks like. What did I see and hear?

Draft Revised 7/16/10
o Writers have their character learn a lesson in the story by adding in how
they have changed or grown smarter at the end of the story
EDITING Teaching Points:
o Writers edit their story by using an editing checklist.
o Writers edit their story by having their partner read their story and look
for mistakes.
o Writers edit their stories by reading their story backwards. They can look
at each word and see if it looks spelled correctly.
o Writers add punctuation to their story by reading it out-loud, listening to
themselves read. As they read they listen for when they take a breath or
pause for a moment. They read it with expression just like they would
another author’s book.
o Writers make sure they capitalize the first letter of each sentence. They
do this by going back and slowly reading their tale and looking for every time
they see a period, question mark, or explanation mark the next letter should
be capital.

Draft Revised 7/16/10
January/February/March
How-To Books Overview of Unit: During this unit of study, students will become teachers
as well as writers. Specifically, they will write to teach others how to do
something.
Unit Goals: Students will learn to write a sequential account of how to do something.
Students will learn to write with greater clarity and explicit detail.
Students will learn strategies for planning this type of writing.
Students will use revision and editing strategies to make their writing easier
for others to read.
Standards: 1.2.2 Identify text that uses sequence or other logical order.
1.4.1 Discuss ideas and select a focus for group stories or other writing.
1.4.2 Use various organizational strategies to plan writing.
1.4.3 Revise writing for others to read.
1.4.4 Begin asking questions to guide topic selection and ask how and why
questions about a topic of interest.
1.5.2 Write brief expository (informational) descriptions of a real object, person,
place, or event, using sensory details.
1.5.4 Use descriptive words when writing.
1.5.5 Write for different purposes and to a specific audience or person.
1.6.1 Print legibly and space letters, words, and sentences appropriately.
1.6.2 Write in complete sentences.
1.6.3 Identify and correctly use singular and plural nouns.
1.6.4 Identify and correctly write contractions.
1.6.5 Identify and correctly write possessive nouns and possessive pronouns.
1.6.6 Correctly use periods, exclamation points, and question marks at the end of
sentences.
1.6.7 Capitalize the first word of a sentence, names of people, and the pronoun I.
1.6.8 Spell correctly three- and four-letter words and grade-level-appropriate
sight words.
Draft Revised 7/16/10
Mentor How-To Books “How to Carve a Pumpkin” in The Pumpkin Book by Gail Gibbons
How to Make a Bird Feeder by Liyala Tuckfield
Any “How To Draw” book
Recipes
Many All About books have a “How-To” chapter
Resources for Teachers:
Nonfiction Writing: Procedures and Reports from Heinemann’s Units of Study for Primary Writing
IMMERSION Teaching Points:
o Writers read “how-to” books to learn how to do that kind of writing.
o Writers read “how-to” books to notice special features of those books.
o Writers read “how-to” books to notice topics for these kinds of books. As
writers read these books, they begin asking themselves, “What could I teach
someone to do?”
o Writers get ready to write a how-to by telling and retelling class activities.
They use sequence words (first, then, next, finally) to organize their
thinking. (We want to give our young writers lots of opportunity to orally
practice giving sequential directions, before we ask them to do this type of
writing.)
Teaching Ideas to Accompany the Above Teaching Points:
Spend several days looking at how-to books and making a chart of what the
writers notice. Definite things to notice: a title that says this will be a how-
to book; list of things you need for each step (a materials list); pictures that
teach you what to do; numbers for each step; captions under the pictures.
For other noticing ideas, see “What We Noticed About How-to’s” at the end
of this unit of study.
Have your students practice telling and retelling class activities using words
like: first, then, next, finally.
Write a class how-to: How to Make Paper Snowflakes; How to Get Ready to
Go Home; How to Get Ready for Recess.
Draft Revised 7/16/10
Have your students bring in directions and recipes.
Do a LOT of retelling, oral rehearsal, acting it out.
COLLECTING Teaching Points:
o Writers make lists of things they know how to do or know how to make.
They say to themselves, “I know how to _____.” OR “I could teach someone
how to _____.”
o Writers make lists of simple things they do everyday (brush my teeth, make
my bed), or things they love doing.
o Writers make lists of places they go and things they know how to do in those
places (ie: In afterschool care, I know how to play Go Fish.)
o Writers think of ideas by sharing their lists with others and listening to
others share their lists. If they hear something that they know how to do,
they add that to their list.
Teaching Ideas to Accompany the Above Teaching Points:
At the end of this unit of study, are sample paper choices that students
could use for making a list.
DRAFTING Teaching Points:
o Writers decide upon (or pick) a topic for their how-to book. They choose
something from their list and “try it on.” They “try it on” by talking it out or
acting it out with a partner. If they can’t say much about their topic (or
can’t say the steps to follow), they choose another topic from their list.
o Writers get ready to write a how-to by telling and retelling class activities.
They use sequence words (first, then, next, finally) to organize their
thinking.
o Writers envision the steps they follow to complete a given task. They do
this by “making a movie in their mind” and then write each step they see in
the movie.
o Writers think of an audience by asking themselves, “Who am I writing this
for?” As the writer is making a movie in their head, they can picture that
person (or people) trying to do each of the steps. Writers can also pretend
that they are actually talking to that person.

Draft Revised 7/16/10
o Writers make a List of Things Needed (or materials list) by picturing in
their head the things they need in order to complete the task. (This could be
a Revision teaching point.)
o Writers use special How-to paper to sketch/draw out the steps of their
How-to.
o Writers use their pictures to write the steps to follow. Writers make sure
their words match with their pictures.
Teaching Ideas to Accompany the Above Teaching Points:
As students are drafting different how-to’s, have students work with their
partners to practice acting out their how-to before they begin writing. This
will help to make sure they don’t leave anything out.
REVISION Teaching Points:
o Writers revise each step of their how-to by adding a partner sentence.
They do this by reading a sentence and then asking themselves, “How could I
say more about this?” OR “Could I add a sentence that tells how to do this?”
o Writers revise their how-to by adding in cautionary notes (or warnings) that
give important advice or warning. The warning can be set apart from the
rest of the book (ie: at the end), or it can be merged into the text (maybe
added as a partner sentence). Writers use special fonts and letter sizes.
o Writers revise their How-to by looking at a published How-to and trying
something the author did, such as: o Writing an introduction that entices the reader to read on, o Writing an ending that brings everything to a conclusion, o Writing a caution or warning statement.
o Writers re-read each step of their how-to to themselves (or with a partner)
and then ask themselves, “Did I tell my reader exactly how to do that?” If
necessary they add more words to make the step clearer.
o Writers revise their pictures in their how-to to make sure that the picture
is helping to teach the reader how to do the steps. They do this by: o getting rid of unnecessary details o “zooming” in close on the part of the picture that teaches o using labels and arrows in their pictures.

Draft Revised 7/16/10
EDITING Teaching Points:
o Writers “fix” their writing by using an editing checklist. This checklist
includes:
o Rereading every sentence and asking, “Does that make sense?”
o Capitalizing every sentence, the word I, proper nouns, and the
important words in the title
o Ending every sentence with a period, question mark, or exclamation
mark
o Space between each word
o Word wall words and repeated words are spelled correctly.
o No backward letters

Draft Revised 7/16/10
What We Noticed About How-To’s o Bolded special vocabulary with a glossary.
o Transition words/Time order words – first, second, third / first, next last
o Shows the final finished product at the end.
o Numbered steps.
o Adjectives – soft batting,
o Labels
o Pictures that teach.
o Section headings
o Introduction that tells you what you’ll make.
o Stretched out over several pages.
o Pictures that show all the materials you’ll need.
o Talking to the reader – telling them what to do (Put in some hooks. Put in some
lines. Put in some sinkers.)
o Language like – “You can make a necklace, too.”
o Index
o Pictures and words that teach you how to do something.
o Text is written in steps (numbered)
o Sequence
o Text and picture match
o Picture supports the step
o Extensions at the end to show other ways to do the same kind of thing – doing
something a little different.
o Front half is about one thing and second half is about another – clear separation
in the middle.
o Title tells you it’s going to be a How-To
o Added descriptive statements – “It’s yummy!”
o Tell you how much – quantity
o Material List – very specific –list what you need
o Diagrams with labels and arrows
o A wrap-up page – “Now, you…..” “Now, it’s time to….” “Do you want to…?” “Put
on…. Did you….”
o Introduction in the beginning – a statement of what you’ll be learning – states
the purpose
o Start your book with a question… (Have you ever….?)

Draft Revised 7/16/10
NAME : ________________________________ Date: ______________
What do I know HOW to do?
At school
At home
Outside
In the kitchen
In my room
On the weekends
With my family
1.
2.
3.
4.
5.
6.
7.
8.
9.
10.

Draft Revised 7/16/10
NAME : ________________________________ Date: ______________
My List
I could teach you how to:
1. _______________________________________________
2. _______________________________________________
3. _______________________________________________
4. _______________________________________________
5. _______________________________________________
6. _______________________________________________
7. _______________________________________________
8. _______________________________________________
9. _______________________________________________
10. _______________________________________________
Draft Revised 7/16/10
March/April
All About Books
Overview of unit: In this unit of study, students have the opportunity to
learn how to write a book that is all about one topic. Teachers of this unit have
the choice of allowing students to pick a topic of which they are experts! Or,
teachers may select a general overall subject matter for their class and students
select a specific topic within that subject.
Unit Goals: Students will write information to teach all about a topic on which they are
experts.
Students will learn to develop their facts with clarity and elaboration.
Students will organize their information with like-facts going together.
Standards: 1.2.1 Identify the title, author, illustrator, and table of contents of a reading
selection.
1.4.1 Discuss ideas and select a focus for group stories or other writing.
1.4.2 Use various organizational strategies to plan writing.
1.4.3 Revise writing for others to read.
1.4.4 Begin asking questions to guide topic selection and ask how and why
questions about a topic of interest.
1.4.5 Identify a variety of sources of information.
1.5.2 Write brief expository (informational) descriptions of a real object, person,
place, or event, using sensory details.
1.5.4 Use descriptive words when writing.
1.5.5 Write for different purposes and to a specific audience or person.
1.6.1 Print legibly and space letters, words, and sentences appropriately.
1.6.2 Write in complete sentences.
1.6.3 Identify and correctly use singular and plural nouns (dog/dogs).
1.6.4 Identify and correctly write contractions (isn’t, aren’t, can’t).
1.6.5 Identify and correctly write possessive nouns (cat’s meow, girls’ dresses)
and possessive pronouns (my/mine, his/hers).

Draft Revised 7/16/10
1.6.6 Correctly use periods (I am five.), exclamation points (Help!), and question
marks (How old are you?) at the end of sentences.
1.6.7 Capitalize the first word of a sentence, names of people, and the pronoun I.
1.6.8 Spell correctly three- and four-letter words (can, will ) and grade-level-
appropriate sight words (red, fish).
IMMERSION Teaching Points:
o Writers read All About books to notice features of those books (ie: table of
contents, bolded words, real pictures and/or drawings, captions, glossary,
index, etc). As writers read these books they use post-it notes to mark the
features they notice.
o Writers read All About books to notice topics for these kinds of books.
o Writers read All About books to notice the different ways that these kinds
of books can be written.
Teaching Ideas to Accompany the Above Teaching Points:
Read aloud and discuss All-About examples throughout the unit.
Make a “Noticing Chart” that students can refer back to throughout the
unit.
COLLECTING Teaching Points:
o Writers generate a list of topics for an All About book by asking
themselves:
o “What are some things that I know a lot about?”
o “Where are some places that I like to go?”
o “What are some things that I care a lot about?”
o “What are some things that I LOVE to do?”
o Writers get ideas for an All-About by thinking of someone (or some group)
that needs to know something. They say to themselves, “I could write All
About ______ for _____.” (ie: I could write All About cats for Sarah
because she just got a cat.)
o Writers choose 2 topics from their list by asking themselves, “What do I
know the most about?”
o Writers check to see if they know enough about a topic by telling their
partner at least 5 things about that topic.

Draft Revised 7/16/10
DRAFTING Teaching Points:
o Writers plan their All About by telling their partner at least 5 things they
know about their topic.
o Writers plan their All About book by listing 5 things they know about their
topic in a web.
o Writers make a table of contents by using their web and asking themselves,
“What are the different parts of my topic?”
o Writers can plan their books by using questions and answers. They do this
by thinking of a question they could ask their reader about their topic and
then answering that question.
o Writers plan their books by talking with a partner and answering their
questions about their topic.
o Writers can use strong specific verbs by thinking, or picturing in their mind,
exactly how their topic does something. This gives the reader a mental
picture.
o Writers teach readers about their topic by answering the questions on each
page.
o Writers make a table of contents by asking themselves, “What are the
different time frames of my topic?” (For example, in a book about Soccer, chapter
titles might be “Soccer Practice,” “Soccer Games,” “After-Game Celebrations”)
o Writers can make a glossary by thinking what are my important words that
my reader might not know the meaning to and then make a separate page
that has each word with a definition.
Teaching Ideas to Accompany the Above Teaching Points:
Make a class All About book; can be used during the active involvement part
of the mini lesson.
Model the teaching point in each mini lesson by writing your own All About
book.
REVISION Teaching Points:
o Writers say more about their topic by using words like “so”, “or”, “also”,
“but”, or “because”.

Draft Revised 7/16/10
o Writers say more about a question (or chapter) by giving more information.
They do this by asking themselves, “How can I say more about ___?”)
o Writers say more about their topic by comparing something about their
topic to something everyone would know. (Ex. The dinosaur was as large as a mini-
van.)
o Writers can give the reader a clearer picture of what they are talking about
by adding a partner sentence. They do this by reading a sentence and then
writing another sentence that gives an example of the first sentence.
o Writers make their All About book better by using words (vocabulary) that
are specific to only their topic. They use words that will only be found in
their book!
o Writers make their All About book better by thinking about parts that
might be confusing to the reader. They do this by rereading their facts and
trying to picture in their head what they have written.
o Writers make their All About book better by adding their own voice to their
writing. They do this by rereading one of their facts and then responding to
that fact with a thought or opinion.
o Writers can make their pictures better by “zooming in” on specific details
and adding labels, captions, or arrows to their drawings. The pictures can
help teach the reader more about a topic.
o Writers make their All About book better by using different paper choices
for their chapters. (For example: a diagram, different kinds of ___ page, a fun fact
page, a how to page.)
o Writers make their writing better by reading each sentence and asking,
“Does that sentence make sense?” (They can do this by themselves or with
their partner.)
o Writers make sure each chapter makes sense by rereading their pages,
stopping after each sentence and thinking, “Does this go with this chapter?”
and if it doesn’t, taking it out.
o Writers revise their Table of Contents by making it match what they have
actually written.
o Writers can add a quiz at the end of their book by thinking, “What do I want
my reader to know after reading my book?”
EDITING Teaching Points:
Draft Revised 7/16/10
o Writers “fix” their writing by rereading and making sure every sentence
begins with a capital letter.
o Writers “fix” their writing by making sure the word I is capitalized.
o Writers “fix” their writing by rereading and making sure every sentence
ends with a period, question mark, or exclamation mark.
o Writers “fix” their writing by making sure they have a space between each
word. They do this by making sure that they (or their partners) can count
each individual word.
o Writers “fix” their writing by looking at the words they wrote and asking:
o If I wrote a word more than one time, did I spell it the same way each
time?
o Did I use the word wall to spell correctly “tricky” words and words
that are used a lot?
PUBLISHING Teaching Points:
o Writers fancy up their books by creating a table of contents. (if you wait
until the end)
o Writers fancy up their books by checking the noticing chart for features
they would like to include. (Colored headings, page numbers, bolded words,
etc.)
o Writers fancy up their books by adding an “about the author” page.
o Writers fancy up their books by creating a cover for the book.
o …dedication page
CELEBRATING First graders can share their books and expertise with kindergarten
students.
Kids read their books leaving out the topic and have the kids guess what the
topic is.
SPECIAL NOTE: This All About unit of study can be taught in two different
ways:
A. Students write an All-About book on a topic of their choice. Rather than
have students research a new topic, students will choose topics about

Draft Revised 7/16/10
which they are already knowledgeable. If teachers choose this method,
all of the above teaching points are applicable.
B. The teacher chooses a general “umbrella” topic (such as animals). S/he
then prepares baskets of books of categories (5-6) that fit under the
umbrella topic. After being exposed to all of the baskets, students
choose a basket to work in. All of the teaching points, except those
under Collecting, are applicable. The following pages describe how the All
About unit might look when taught this way.
Nonfiction Writing – All Abouts
Decide on an umbrella, general topic for your class (animals, transportation,
community workers, weather).
Choose more specific categories that fit under your umbrella, general topic (If you
choose animals, you could have these baskets: dogs, rabbits, sharks, cats, birds,
horses, wolves). Make baskets with about 5 books in each (multi-levels, but
definitely include low enough levels so that at least one is readable to your lowest
reader in each group) for each specific category.
Form groups of students and give each group a basket and ask them what they
notice about All About books (give them post-its). Remind them that they aren’t
trying to find out facts about their topic, but rather noticing the features of All
About books (model, model, model). Make a class list of all their noticings.
Read an All About together (big book or just read aloud) and have them notice, add
to list or confirm what is on the list.
Give students two things that you have noticed about All About books and ask them
to find these things in their All About books and post-it (can be any
feature…maybe even give different groups different features).
Make sure the kids are rotating through the baskets so they are familiar with the
topics in the room.

Draft Revised 7/16/10
Have students choose a basket to work in (based on interest). Remake groups
based on interest now (no group with more than 5 and no less than 2). Choose a
basket that no one was interest in to use as your demonstration basket (or created
on your own). Model spending the first day in this basket that you are interested
in, becoming familiar with the things in your basket and getting excited about the
information (don’t forget to be modeling every day).
Spend a day looking at the books in the baskets and identifying the many different
text features – glossary, index, bold, pictures, chapters heading, subtitles,
captions, Table of Contents (again, use Post-its).
Make a list of the big things that the kids want to know about their topics (these
things should be general enough to apply to all of the baskets…if your umbrella
topic is transportation, then one thing on this list could be “How does it move?”
Define “facts” for kids.
Model reading a book from your basket (teacher basket) and thinking aloud about
the things you are learning about your topic (model reading a page, stopping and
asking, “What did I just learn?” – can have kids jot that on post-its or just tell
someone in their group). Kids need to see the reading and thinking work that has to
happen in this unit.
Choose 4 categories (things the kids want to know from the list made previously) to
use to go on an information search. Give the kids one color of index cards (probably
5 cards) and tell them to search for all of the information that goes with 1 of the
categories from the list (put one of the colored index cards next to that category
on the chart so the kids remember the color). Remind them how we read and think
to figure out what we’re learning and that when we find something that fits in this
category, we can write it on the index card (model, model, model - 1 fact per
card).
Teach three ways to find info in books: use the pictures, look in the table of
contents, look for key words. Demonstrate how to move from book to book looking
for information.
Teach that the most important thing to remember is that we cannot copy these
books, we need to find the information, read the information, say it back to
ourselves in our own words and then write it down on the card. Teacher

Draft Revised 7/16/10
demonstrates looking for, finding, and writing down a fact on a notecard in own
words. These are first graders…it’s not going to be a big deal if they copy
something…just not everything.
Each day use a different color and do information searches for all 4 chosen
categories. Teach that you can also look at the pictures and captions to gather
information. Model writing down information that only supports the category…not
just a fun fact.
Put all of the cards (at least 3 for each category) on a metal ring (no one opens this
ring and no one takes any cards off the ring).
Now it’s time to teach 2 or 3 different structures for organizing the information.
Not all nonfiction books are chapter books.
Now, have structure baskets (2 or 3 different structures). These are books about
topics other than their own topics (typically), but have the structure you are
teaching. Have the students shift between baskets and notice how the information
is organized. You could do this also to begin as a whole class. Read aloud from a
couple different structures and notice together the differences.
Model how you would write your book in different structures. You can do one each
day and have the kids try their topic in this particular structure. During this
modeling you also need to model how to use the information from your notecards to
do your writing. Show how to weave that information into your writing. Show
various ways for the different structures.
It will take you a few days of modeling each structure for kids to understand. Have
kids try it each day…keep trying different ways. Call their blank booklets “try-it”
booklets.
You will be modeling with your own topic in the different structures so that they
can see how it changes from structure to structure but is still the same topic.
Teach specific nonfiction writing strategies for revising the actual writing. We
don’t want it to just be about the structure or the topic, but we also want to teach
3 or 4 revision strategies for making the actual writing better.

Draft Revised 7/16/10
After many days of “try its”, have kids choose the structure they want to publish.
Make sure they revise that structure, then move into a few days of editing. Then,
publishing/fancying up!
You’re done, now wasn’t that easy???
Possible nonfiction structures: question and answer / general to specific / top text,
bottom text / personification / personification plus (the character is talking to an
inanimate subject or object as if it were human) / writing as if talking directly to
the reader, implied question, story with inserted facts, numerical order, rhyme,
chapter book, following a single one of a species.

Draft Revised 7/16/10
April/May
Fairy Tales
Overview of unit: This unit allows children to study adaptations of fairy tales
in an especially intense and purposeful way-as authors who will, themselves, create
their own wild and wonderful adaptations!
Unit Goals: Students will listen to several different versions of the same fairy tale.
Children will use their imagination to adapt a fairy tale.
Children will use the original version of a fairy tale to scaffold their own
abilities to story tell and story write.
Children will learn to use literary language in their own writing.
Standards: 1.4.1 Discuss ideas and select a focus for group stories or other writing.
1.4.2 Use various organizational strategies to plan writing.
1.4.3 Revise writing for others to read.
1.5.4 Use descriptive words when writing.
1.5.5 Write for different purposes and to a specific audience or person.
1.6.1 Print legibly and space letters, words, and sentences appropriately.
1.6.2 Write in complete sentences.
1.6.3 Identify and correctly use singular and plural nouns (dog/dogs).
1.6.4 Identify and correctly write contractions (isn’t, aren’t, can’t).
1.6.5 Identify and correctly write possessive nouns and possessive pronouns.
1.6.6 Correctly use periods, exclamation points, and question marks at the end of
sentences.
1.6.7 Capitalize the first word of a sentence, names of people, and the pronoun I.
1.6.8 Spell correctly three- and four-letter words and grade-level-appropriate
sight words.
Draft Revised 7/16/10
Mentor Texts The Little Red Hen by Paul Gadone
Burro’s Tortiallas
Manana Iguana
Cinderella
Cinder Hazel by Deborah Lattimore
Cinderella Penguin by Perlman
Cinderella Skeleton
Bubba the Cowboy Prince
The Three Little Pigs by Paul Gadone
True Story of the Three Little Pigs
The Three Little Fish and the Big Bad
Shark
IMMERSION Ideas:
o Whole class adapted tale
o Read various versions of each fairy tale. Develop a chart showing:
o Good Character, Bad Character, Setting, Problem, Solution
o Choose one original tale and change it by:
o Brainstorming 4 different settings and characters that would go in
each setting. (Whole class or individual)
o Reversing the characters (Three Little Wolves and the Big Bad Pig)
o Changing the problem (Little Red Hen Makes a Pizza)
o Charts of what you would expect to still find in each fairy tale (ie: mean
step-siblings or step-parent; lost something such as a glass ____)
DRAFTING Teaching Points: After finishing the whole class adapted fairytale, choose another fairytale
for the kids to adapt. They should all adapt the same tale each in their own
way.
o Writers can plan for their fairytale by
o Touching each box and telling the story across the boxes to their
partner. Each box should have a main event or action. (After a few
minutes switch and tell another partner.)
o Writers can continue planning their tale by

Draft Revised 7/16/10
o Sketching each main event across the boxes because eventually each
box will become one page.
o Using a story map. They sketch in all the parts: setting, characters,
problem, events, and solution.
o Writers begin writing their tale by
o Cutting out each box and gluing them on different pages. Then they
can begin writing each part that goes with just that picture.
o Beginning their story with fairytale language. They can begin with
Once Upon a Time or In a faraway land…
REVISION Teaching Points:
o Writers can develop the characters by putting in actions and dialogue that
show the character’s traits (things that the characters do to make them
mean, hardworking, lazy, evil, caring, etc.).
o Writers show not tell emotion by making a movie in your mind of what the
character was doing, thinking, or saying when they felt that way. (facial
gesture, body movement, dialogue, internal thinking)
o Writers can add what the characters are saying by thinking what would they
be saying to another character.
o Writers can change the dialogue tag to make the character say something in
a different way. We re-read our fairytale and every time we see a place
where a character says something we can ask ourselves…how did my
character say that? Whisper, yelled, bellowed…
o Writers re-read to make sure their adaptations carry out through the whole
story. They read a few pages and think do these characters match the
setting, or does this problem match my character? If not they re-write
that part or add it words to make it match.
o Writers can include the setting throughout the entire story by showing it in
the pictures and also telling it in the words.
o Writers can include their characters small actions by thinking what did they
do from here to there, or how did they get from here to there.
o Writers can let the reader know how much time has passed by re-reading
their story and when something new happens or when they are at a new
place, ask yourself, how much time has passed….A few moments later, The
next day, Shortly after that…
Draft Revised 7/16/10
o Writers go back and re-read their story to their partner to make sure they
didn’t leave any important parts out of their tale.
o Writers can show the reader exactly what their character is doing. They
think about the action verbs they are using and changing them for another
verb that gives the readers a more clear mental picture (rummage instead of
look). Writers can read a sentence and ask themselves, what is the action
word in this sentence? Then they can ask themselves, “Is there a more
exact word/verb that I could use to really show my reader what my
character was doing?”
EDITING Teaching Points:
o Writers can re-read and add dialogue marks where characters are talking by
looking for places where someone says something and hug their exact words
with quotation marks.
o Writers can check to see if each sentence is a complete thought by
rereading and stopping at each punctuation mark and then asking themselves
does that make sense and if not they fix it.
o Writers add punctuation to their story be reading it out-loud, listening to
themselves read. As they read they listen for when they take a breath or
pause for a moment. They read it with expression just like they would
another author’s book.
o Writers make sure they capitalize the first letter of each sentence. They
do this by going back and slowly reading their tale and looking for every time
they see a period, question mark, or explanation mark the next letter should
be capital.
o Writers make sure they capitalize the first letter of all proper nouns. They
go back and re-read their tale and think what word is naming a specific
person a place. If that word is naming a specific place then they capitalize
the first letter.

Draft Revised 7/16/10
Poetry (ideas for throughout the year) Overview of unit: Through this unit, students practice all that they have
learned this year, while allowing their hearts and minds to soar! During this unit,
students will continue to find significance in the ordinary details of their lives,
employ strategies of revision, and learn from mentor authors of poetry. This unit
represents a culmination of a year’s learning and provides an opportunity to use
language in extraordinary ways.
Unit goals: Find significance in the ordinary details of their lives
Create clear images with precise and extravagant language
Employ strategies of revision
Learn from mentor authors
Standards: 1.4.2 Use various organizational strategies to plan writing.
1.4.3 Revise writing for others to read.
1.5.2 Write brief expository (informational) descriptions of a real object, person,
place, or event, using sensory details.
1.5.4 Use descriptive words when writing.
1.5.5 Write for different purposes and to a specific audience or person.
1.6.1 Print legibly and space letters, words, and sentences appropriately.
1.6.2 Write in complete sentences.
1.6.3 Identify and correctly use singular and plural nouns (dog/dogs).
1.6.4 Identify and correctly write contractions (isn’t, aren’t, can’t).
1.6.5 Identify and correctly write possessive nouns (cat’s meow, girls’ dresses)
and possessive pronouns (my/mine, his/hers).
1.6.6 Correctly use periods (I am five.), exclamation points (Help!), and question
marks (How old are you?) at the end of sentences.
1.6.7 Capitalize the first word of a sentence, names of people, and the pronoun I.
1.6.8 Spell correctly three- and four-letter words (can, will ) and grade-level-
appropriate sight words (red, fish).
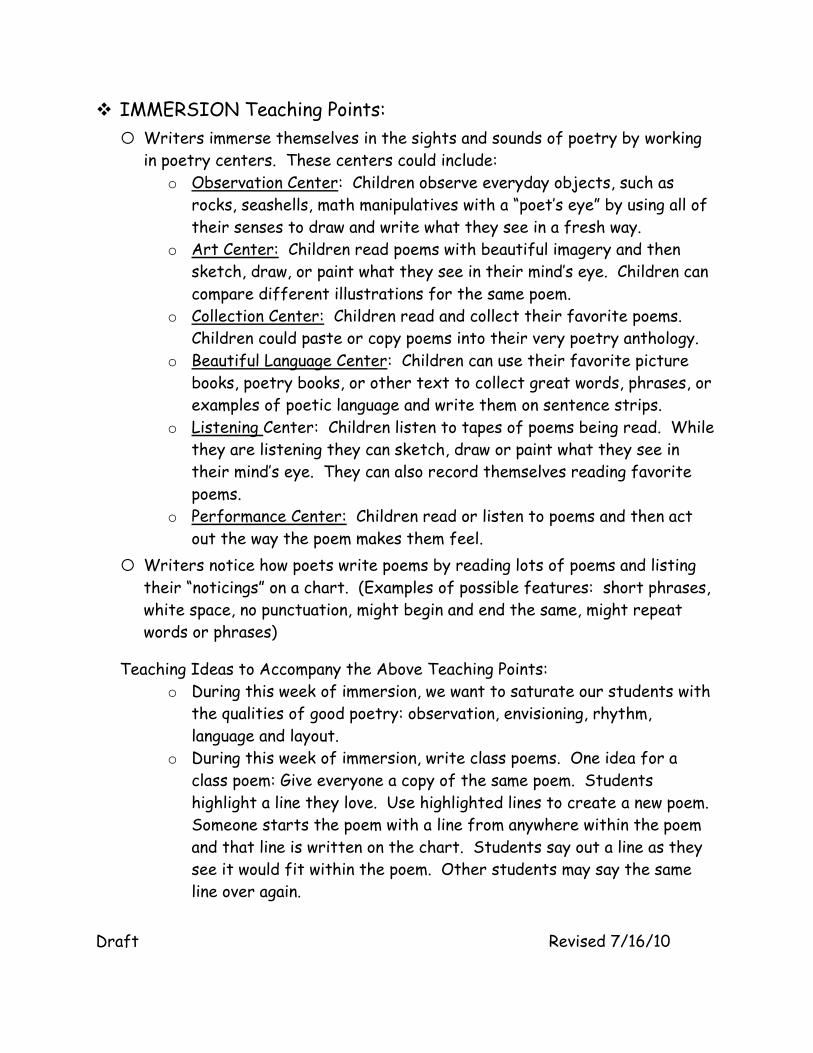
Draft Revised 7/16/10
IMMERSION Teaching Points:
o Writers immerse themselves in the sights and sounds of poetry by working
in poetry centers. These centers could include:
o Observation Center: Children observe everyday objects, such as
rocks, seashells, math manipulatives with a “poet’s eye” by using all of
their senses to draw and write what they see in a fresh way.
o Art Center: Children read poems with beautiful imagery and then
sketch, draw, or paint what they see in their mind’s eye. Children can
compare different illustrations for the same poem.
o Collection Center: Children read and collect their favorite poems.
Children could paste or copy poems into their very poetry anthology.
o Beautiful Language Center: Children can use their favorite picture
books, poetry books, or other text to collect great words, phrases, or
examples of poetic language and write them on sentence strips.
o Listening Center: Children listen to tapes of poems being read. While
they are listening they can sketch, draw or paint what they see in
their mind’s eye. They can also record themselves reading favorite
poems.
o Performance Center: Children read or listen to poems and then act
out the way the poem makes them feel.
o Writers notice how poets write poems by reading lots of poems and listing
their “noticings” on a chart. (Examples of possible features: short phrases,
white space, no punctuation, might begin and end the same, might repeat
words or phrases)
Teaching Ideas to Accompany the Above Teaching Points:
o During this week of immersion, we want to saturate our students with
the qualities of good poetry: observation, envisioning, rhythm,
language and layout.
o During this week of immersion, write class poems. One idea for a
class poem: Give everyone a copy of the same poem. Students
highlight a line they love. Use highlighted lines to create a new poem.
Someone starts the poem with a line from anywhere within the poem
and that line is written on the chart. Students say out a line as they
see it would fit within the poem. Other students may say the same
line over again.

Draft Revised 7/16/10
o While students are working in the centers, they can jot down anything
they notice about a poem on a sticky note.
o Website: http://www.kristinegeorge.com/index.html This is the
website for the poet Kristine O’Connell George. She has lots of
teacher resources for teaching poetry!
Pictures from NYC:
COLLECTING Teaching Points:
o Writers (or Poets) get ideas for meaningful poems by making a list of special
places. They do this by asking themselves, “What place makes me feel
special? Where do I love to go? Where do I hate to go? Where do I go all of
the time?”
o Writers (or Poets) get ideas for meaningful poems by making a list of special
things. They do this by remembering:
o Things special people have given them
o Things they use all the time

Draft Revised 7/16/10
o Things they have found
o Things they have gotten on a vacation
o Things they love!
o Writers (or Poets) get ideas for meaningful poems by making a list of special
people. They think of people they love, people who do things for them, and
people they things for.
o Writers (or Poets) get ideas for meaningful poems by using their senses.
They do this by:
o Thinking of their favorite smell and what that smell reminds them of
o Thinking of their favorite taste and what that taste reminds them of
o Thinking of their favorite kinds of touches (something soft,
something rough, something hard, hugs)
o Thinking of their favorite thing to hear and what that reminds them
of
o Thinking of their favorite thing to see and what that sight reminds
them of
o Writers (or poets) get ideas for meaningful poems by thinking of an emotion
and then making a list of all the times they felt that emotion. They can ask
themselves, for example, “What are all the times that I have felt really
excited?”
Teaching Ideas to Accompany the Above Teaching Points:
DRAFTING Teaching Points:
o Poets decide what their poems will be about by rereading their lists they
have collected and highlighting the ideas that they think they can say the
most about.
o Poets get started writing a poem by thinking of a special person, place or
thing from their lists and then listing out all they see, hear, smell and
remember about that topic. They do this by making a picture in their mind
and asking, “What do I see? What do I hear? What do smell? What do I
remember?”
o Poets write poems by observing an object and then using as many of their
senses as they can to write about that object.
Teaching Ideas to Accompany the Above Teaching Points:

Draft Revised 7/16/10
o Collecting and Drafting may be done simultaneously. For example, on
one day, students make a list of special things. Then, on the next day,
model how to choose something from their list to write a poem.
o Use regular lined or plain paper at first. Later, after teaching line
breaks, have the students use special poetry paper.
REVISION Teaching Points:
o Writers can make their writing look and sound like poems by using special
line breaks and white space. (OR this could be an editing teaching point)
o Poets can make a line in their poem longer by reading the line and then
asking, “What else do I see? What was it doing? How? Or Why?”
o Poets make their poems better by adding specific adjectives to their
writing. They do this by picking an important noun and then using a shape,
size, color, or number word to describe that noun.
o Poets make their poems better by using the strategy “show, don’t tell.” They
do this by using words that show an important feeling instead of just coming
out and telling us how they feel.
o Poets can begin and end their poem the same by picking an important word or
line and putting it at the beginning and ending of their poem. They do this
by rereading their poem and asking:
o “What’s the most important word or line that I have already written
that I could use to begin and end my poem?”, or
o “What’s the word or line that tells what my whole poem is about?”
o Poets make their poems better by picking out an important word or phrase
and repeating it throughout the poem. They do this by rereading their poem
and asking, ““What word or phrase is really important to my poem that I
could repeat to really make readers know it’s important?”
o Poets can make their poems better by giving thoughts and feelings to
inanimate objects. They do this by choosing an object from their poem and
asking:
o “What could I make this object do that is something a human could
do?”
o “What might this object want?”
o “What might this object think?”
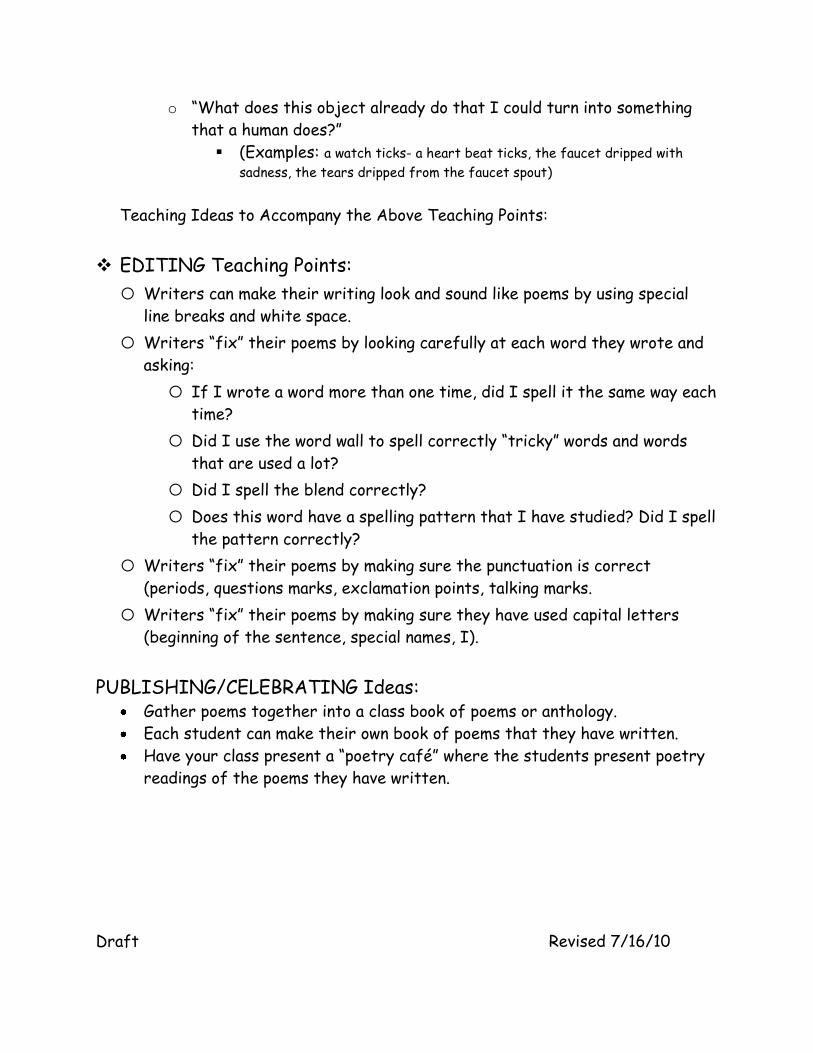
Draft Revised 7/16/10
o “What does this object already do that I could turn into something
that a human does?”
(Examples: a watch ticks- a heart beat ticks, the faucet dripped with
sadness, the tears dripped from the faucet spout)
Teaching Ideas to Accompany the Above Teaching Points:
EDITING Teaching Points:
o Writers can make their writing look and sound like poems by using special
line breaks and white space.
o Writers “fix” their poems by looking carefully at each word they wrote and
asking:
o If I wrote a word more than one time, did I spell it the same way each
time?
o Did I use the word wall to spell correctly “tricky” words and words
that are used a lot?
o Did I spell the blend correctly?
o Does this word have a spelling pattern that I have studied? Did I spell
the pattern correctly?
o Writers “fix” their poems by making sure the punctuation is correct
(periods, questions marks, exclamation points, talking marks.
o Writers “fix” their poems by making sure they have used capital letters
(beginning of the sentence, special names, I).
PUBLISHING/CELEBRATING Ideas: Gather poems together into a class book of poems or anthology.
Each student can make their own book of poems that they have written.
Have your class present a “poetry café” where the students present poetry
readings of the poems they have written.