fire a comprehensive guide to creating it in middle earth
TRANSCRIPT
7/29/2019 Fire a Comprehensive Guide to Creating It in Middle Earth
http://slidepdf.com/reader/full/fire-a-comprehensive-guide-to-creating-it-in-middle-earth 1/9
Fire: A comprehensive guide to creating it in Middle Earth
By Alex (FaramirsMumma) and James (Khazad Guard)
Fire: A comprehensive guide to creating flames in Middle Earth
Introduction:
Creating fire and painting fire is extremely simple, although there are a few tricks for preventing
your flame from burning out.
Items Needed:
Greenstuff (Brownstuff works as well, it’s probably better for the job, although it’s a lot moreexpensive)Modelling knife Assortment of toothpicksSmall dish or plastic cover from a Blister PackThin wire (1mm thick)
Super GlueMilliput (optional)Pin Vice/Dremel Rotary ToolSandpaper or file A scene ready to for ‘flaming’
Paints Needed:
Skull White (GW)Golden Yellow (GW)Blazing Orange (GW)Blood Red (GW)Chaos Black (GW)

7/29/2019 Fire a Comprehensive Guide to Creating It in Middle Earth
http://slidepdf.com/reader/full/fire-a-comprehensive-guide-to-creating-it-in-middle-earth 2/9
Note: Vallejo paints are cheaper thenGW’s and better in every respect, sousing their paints over GW’s is advisable.I would, although I’m waiting for my GWcollection to be used up, beforecompletely switching.
Step One: Preparing your Scene
Fire can be added to almost anything, be it an arrowhead or brand, even a house. Flaming modelsmake interesting display pieces, as shown with Denethor.
In this case, I needed a flaming objective marker for my Rohan force. I used Balsawood andEbob’s crate to set a scene - the Wild Men burning the Westfold. A plastic Rohan shield would addto the scene, although I found there just wasn’t the room on the base. Make sure you have glueddown your materials and let them dry for at least a few hours, as we will be building onto thescene. For those that collect 40k, you could use a closed slottabase, or alternatively fill the gap ina slottabase with Greenstuff.
Once the scene is set, you are ready to add your fire. Make a mental note of exactly where youwant your fire to go, as we have to create armatures for the larger flames. Using your Pin Vice or Dremel, and your 1mm drill-bit, drill as many holes into your objective marker as you want. Wethen add lengths of thin wire to these holes, to create an armature or skeleton for the flame. Asyou can see, I wanted the highest point of the flames to be in the corner, and close to the centre,with sporadic flame erupting around the edges. Then superglue the wire into the drilled holes, andlet it dry for a few hours.

7/29/2019 Fire a Comprehensive Guide to Creating It in Middle Earth
http://slidepdf.com/reader/full/fire-a-comprehensive-guide-to-creating-it-in-middle-earth 3/9
Step Two: The burning of the Westfold
Now that our wire skeleton won’t move, we roll up a reasonable amount of putty (I use a 60/40Yellow to Blue mix, as I find it’s more malleable and holds detail better) and make it into a cylinder shape. Proceed to jab it onto the wire, and using your modelling knife, press down the edges of the cylinder so that it is connected to the base of your scene, do not use superglue to attach theGreenstuff. Working from the centre outwards is recommended here. For lubricating your toothpicks and modelling knife, either use water or use saliva. Dip them in a small dish filled witheither water or saliva from time to time, to make sure the Greenstuff doesn’t stick to them. Irecommend saliva, for its coating properties, and stay away from Vaseline.
Once your cylinder is prepared, grab a toothpick (I find that if you lightly file one end down so it ismore circular, you will have thicker, more defined flames) and jab it into the flame. Now pull thetoothpick upwards, and make its course random, as flame isn’t always the same shapes andsizes. Keep pulling the toothpick until the Greenstuff breaks. Repeat in random places until your cylinder is looking like this:

7/29/2019 Fire a Comprehensive Guide to Creating It in Middle Earth
http://slidepdf.com/reader/full/fire-a-comprehensive-guide-to-creating-it-in-middle-earth 4/9
If you have a scene that has flames elsewhere, while you are waiting for your first flame to dry, tryworking on another wire that is not nearby. We don’t want accidental fingerprints to ruin the flame.
Keep repeating until each wire skeleton is no more, and instead you have spiralling pillars of flame. Flame is somewhat random, although as it stands, it looks silly. We need to join the pillarsof flames together and create a sense of the fire spreading.

7/29/2019 Fire a Comprehensive Guide to Creating It in Middle Earth
http://slidepdf.com/reader/full/fire-a-comprehensive-guide-to-creating-it-in-middle-earth 5/9
Mixing up some more Greenstuff, we lay it around the flame pillars, and using the modelling knife,make sure it is attached to the scene. Because the linking flames are not as big as the pillars,there is no need for wire armatures; the Greenstuff will stay upright by itself. Randomly jab your toothpick into the Greenstuff, and pull up until it breaks. Keep doing this until you have smaller flames joining the pillars together. The more malleable the Greenstuff is, the easier this step is. Trynot to have a pillar of flame sitting by itself, use some more Greenstuff and make the flamesspread around the pillar – even if they are only small flames.
Step Three: Painting your flames
Whether you undercoat your maker in white, or paint your scene and then add Greenstuff flames,
the undercoat for your Greenstuff needs to be white. For anyone who’s ever seen a flame before,they will realise that it doesn’t go from red to white; it goes from white to red, contrary to theGames Workshop colour scheme. It is advisable that you paint your scene before painting theflame, as you may wish to trial ‘source lighting’, which is described later on in the article.
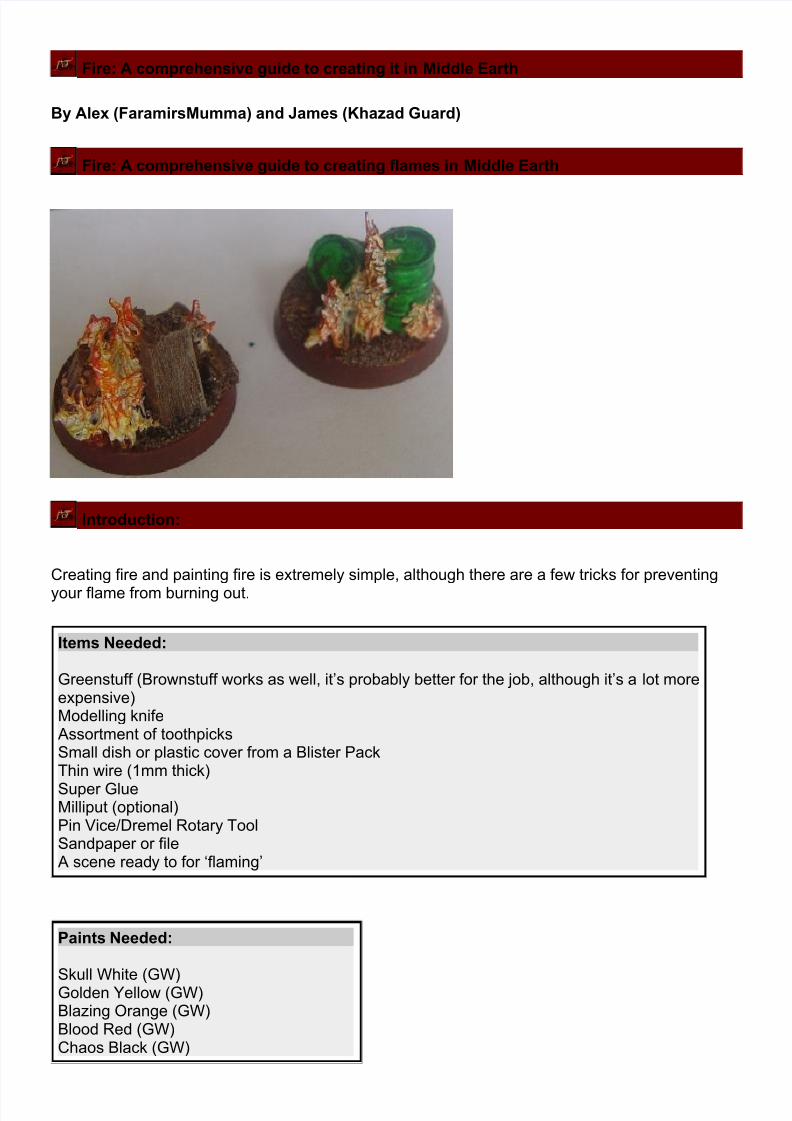
Painting the fire is the easiest stage. As you can see, I’ve shown two markers here, to show howthe fire’s fuel can change the colour of the flame. The second one was made with Ebob’s OilBarrels, but using the same technique as described above.
We start off by heavily drybrushing the flame with a watered-down Golden Yellow. Now dependentupon your fire’s fuel source, be it wood or oil, changes the colour scheme of the flame. In the OilBarrel’s case, we are going from a very hot flame, to a black burn-off in a very small area, so thedrybrush of Golden Yellow is less heavy.

7/29/2019 Fire a Comprehensive Guide to Creating It in Middle Earth
http://slidepdf.com/reader/full/fire-a-comprehensive-guide-to-creating-it-in-middle-earth 6/9
We then move onto Blazing Orange. In the Rohan scene, the fire is not as hot, so our flame ismajority colour transition, as opposed to the minimal colour in the Oil Barrels. Your watered downdrybrush of Blazing Orange should be less, and more focused around the higher area’s of the
flame, as there is less heat. For anyone who has done Chemistry, they know that the flame ishottest when yellow in colour, not dark red.
For the final highlight of the Rohan scene, we lightly drybrush the raised areas of the flame withBlood Red, this drybrush should be minimal. For the Oil Barrels, keep this to even more of aminimum.
Now, because our Oil Barrel is burning with a more flammable and crude fuel source then theRohan Marker, we need to do a final drybrush of Chaos Black to show the burn-off.

7/29/2019 Fire a Comprehensive Guide to Creating It in Middle Earth
http://slidepdf.com/reader/full/fire-a-comprehensive-guide-to-creating-it-in-middle-earth 7/9
Step Four (Optional): Source Lighting
Source Lighting – What is it? It is a way of showing an alternate source of light in the scene, andchange where the shadows would normally fall. It is also known as ASL (Alternate SourceLighting). I am as very much as new to this as the rest of you, so bear with my basic examples.
If you turn off all your lights, and then just light a candle or a lamp, you’ll see how the object’sshadow changes if you move your light source. Now try dimming your lights and light a candle or alamp. You’ll notice how the secondary light source changes the shadows, but more importantly,the object picks up the colour of the light, and almost reflects it on itself. Now picture your alternatelight source to be a giant flaming brand up against a wooden wall. The wood around the fire wouldslightly mimic the colours of the flaming brand, wouldn’t it? So you would expect to see a slightyellow/orange/red tinge in wood, but it is not on fire.
To capture these layers and the mimicked colours on our scene, we need to transfer each layer of colour to the space or objects near the flame. The key to doing this is to work backwards. Startwith a largish drybrush or stipple (stippling is a technique of applying a colour by almost jabbing
the object with your paintbrush) of Blood Red, and work backwards until you reach Golden Yellow. As you get closer and closer to the flame, make sure to leave a 1-2mm gap between the flameand your source lighting.
Your source lighting should go from Golden Yellow – Blazing Orange – Blood Red, with GoldenYellow closest to the flame.
Not being the best of painters, I decided to leave the Source Lighting step out, as it may haveruined the marker. But don’t let my inhibitions stop you – be creative and try it out yourself!
Fire: A comprehensive guide to creating it in Middle Earth – Review by Khazad Guard
Being the nice person that I am, Faramirsmumma asked me to review his ‘Comprehensive Fire-Making Guide’, and being the great person that I am, I accepted. After followingFaramirsmumma’s steps and slightly modifying them I came up with the following two pieces(more in the making).

7/29/2019 Fire a Comprehensive Guide to Creating It in Middle Earth
http://slidepdf.com/reader/full/fire-a-comprehensive-guide-to-creating-it-in-middle-earth 8/9
These pieces can represent ‘Fire Markers’ which are used in certain scenarios when the objectiveis to burn down buildings. The guide itself is quite good but when making my pieces I found thatusing the toothpick to pull up the Greenstuff made the Greenstuff split and pulled up with thetoothpick. To negate this I also used a pull down motion. Instead of using 1mm wire I chose to usea more common household item, the paperclip. Sure my pieces are not as well done asFaramirsmumma’s but the effect of fire I can still be visible. Whilst sculpting the fire it seemed thatmy piece looked nothing like fire, looked like a sculptor's expresim art, though during painting thefire side of the piece begins to emerge. My hint; don't give up even if it does look bad. Overall agood guide Faramirsmumma; and one I am enjoying. For some ideas why not try making aBurning Ringwraith, An Eye of Sauron (Somehow), a Uruk-Hai burning pit or maybe do somethinglike me and make a set of separate fire pieces on Warhammer bases, which can be freelymoveable and position to look like a trench of fire…

7/29/2019 Fire a Comprehensive Guide to Creating It in Middle Earth
http://slidepdf.com/reader/full/fire-a-comprehensive-guide-to-creating-it-in-middle-earth 9/9
Conclusion:
As you can see, sculpting/painting fire is a technique for professionals and beginners alike. Thismethod can be carried onto weapons (where you would not need a wire armature) or even burninghouses (where wire armatures would turn your scene into an echidna).
I would like to thanks Khazard Guard for his review (and blatant procrastinating), SteveFirth fromhttp://web.archive.org/web/20071213155344/http://www.wargamerau.com/ for his inspiration,pyromania and many tips, my camera for showing up the imperfections of my work and making thepictures enormous, and Games Workshop for their picture (no permission).
If you liked this article, or learned anything, don’t forget to vote, after all, it only takes once click!
Alex (FaramirsMumma) and James (Khazad Guard)