fine woodworking magazine - feb 2009 malestrom
TRANSCRIPT

TAUNTON'S

.JET.
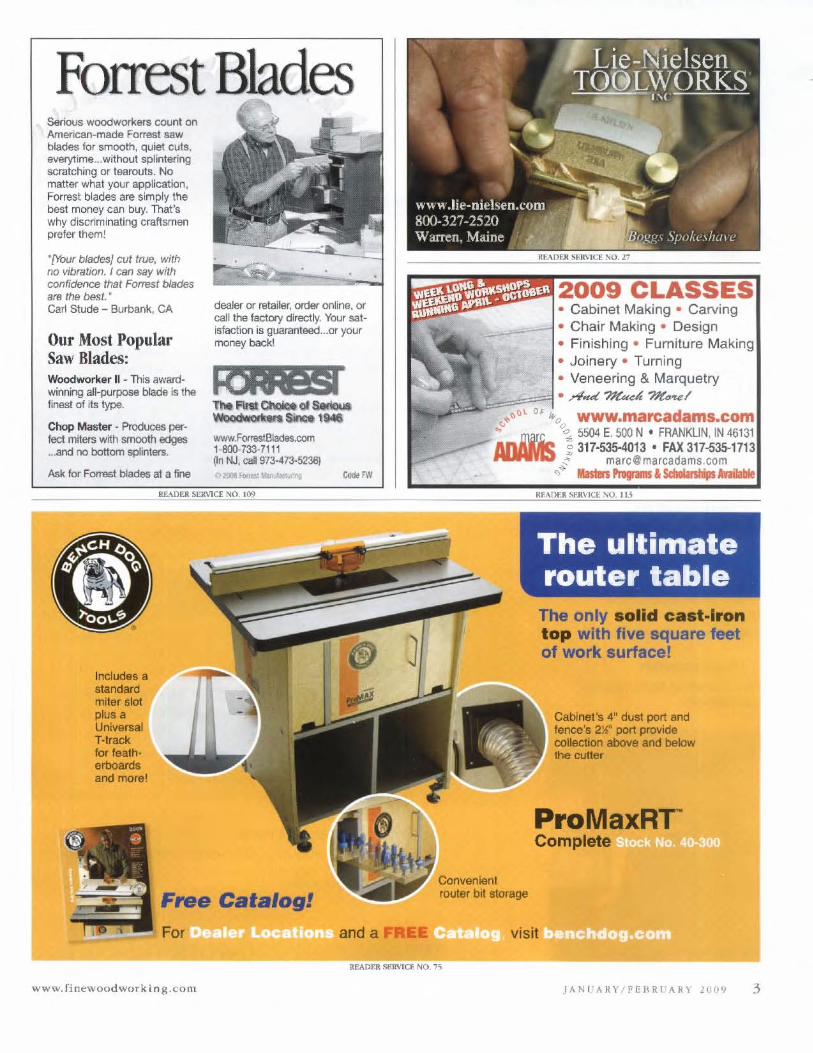
Forrest Blades SeOous woodworkers count on Arnefican-made Forrest saw blades for smooth, quiet cuts. ellerytime ... without splintering scratching or taarouls. No matter what your application, Forrest blades are simply the besl morwy can buy. That's why discriminating craftsmen prefer them!
"{Your blades} cut tflJe, with no vibration. I can say with confidence tflat Forrest blades are the best. ' Carl Stude - Burbank, CA
Our Most Popular Saw Blades: Woodworker II - This awardwinoing all-purpose blade is the linest of its type.
Chop Master - Produces perfect miters with smooth edges .. .and no bottom splinters.
Ask fa( Forrest blades at a fine
Includes a standard miter slot plus a Universal T-Irack for featherboards and more!
dealer ex retailer, order online. or call the factory directly. Your saiisfaction is guaranteed ... ar your money back!
Tho_~"'_ ~ .... sralM www.ForresIBlooes.oom 1-800-73Hl11 On NJ, caD 973-473-5238)
ao& 1'oomI.\Ion - 'i ,,"""
Free Catalog!
For and a
www.finewoodwoTking.colll
• Cabinet Making · Carving • Chair Making · Design • Finishing · Furniture Making • Jo inery · Turning • Veneering & Marquetry
..... ,,;~r.:...""~~:; . ..4-1 ??euelC ?/("''f.e/ r \)tll Of .'
EE
-AoI!Ms 5S()4 E. 500 N • FRANKLIN, IN 46131
The on Iy solid cast-Iron top with five square feet of work surface!
Cabinet's 4" dust port and fence 's 2~· port provide collection above and below the cuner
ProMaxRT" Complete • •
visit ..
JAN('ARY / FEBRl"ARY 2009 3
Fine ~Working
,
up front 6 On the Web
8 Contributors
1.0 Letters
14 Methods of Work
14 METHODS Of WORK
lighted cart stores tools and lumbe r
Rip sandpaper to size with preciSion
20 Tools & Materials 12-in. jointer/planers handle
almost any board
Rabbet plane cuts beautifully
24 Fundamentals The 7 habits of highly effect ive woodworkers
JANUARY/ FEBRUARY 2009 • ISSUE 203
features 30 A Classic Step Stool
Improve your hand-tool skills as you build this versatile piece BY TOMMY Ma c DONALD
36 Joinery Shootout We pu~h IH popular frame joints to the breaking point BY DOUGLAS MOORE AND THOMAS McKENNA
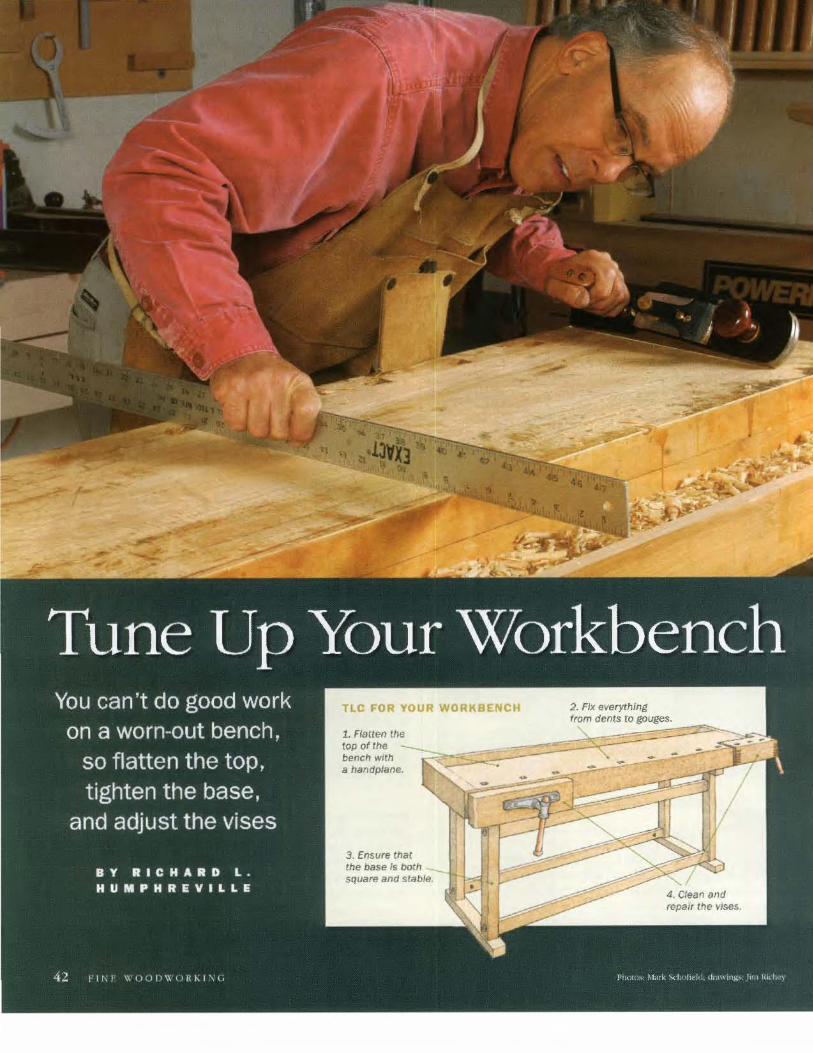
42 Tune Up Your Workbench
48
62
You L'an't do Hood work o n a worn-out bench, so flatten the top. lighten the base, a nd adjust the vises BY RICHARD l . HUMPHREVILLE
Do More With Your Dado Set ~ay safe and get better resulrs from th is VCThatilc
saw accessory
BY STEYE LATTA
Hickory and Ash Blanket Chest Floating tenons and a con:;istent angle keep joinery manageable BY PETER TURNER
Re-creating a Shaker Finish To match a ZOO-ylo'Olr-oJd fi nish, an expert uses common tools anJ wdmiques BY LINDA COlT
68 Turn a Pad-Foot Leg A graceful leg (har~ l."'.l.sy to mOlke entirely on the lathe BY JON SIEGEL
72 True Greene & Greene Learn how the el~mcnl.s work together, and then use them in your furniture BY OARY ROGOWSKI
www.finewoodworking.com Cover pI><>«>_ Mi. ..... K.poakJ

~TheTaunton Press L.J...J In.pi""ic", flK hood.·"" Imnsw
inthe back 78 Readers Gallery
82 Q&A Plywood edging that matches perfectly
Marking knift:! cuts wrong board
88 Master Class Boulle marquetry: Two panels for the price of one
94 Finish line Fin ish ing oily woods
:102 How They Did It Shaped to perfection
Back Cover Vessels from the veranda
WORKBENCH 42 REPAIR

THIS MONTH ON FineWoodworking.com
free online extras: A~allable December 17 at www.finowoodworKlng.com/eKtras
plus: READER TOOL REVIEWS
.. VIDEOS
Watch the Splinters Fly In our Jolnt~Strength Test See all the joint-$napping actio" and learn how .... e plil18 Joints
th,olieh the ultimuW test ("Joinery 5hooI01,l\" ).
A Woodworker1s Dream House Take a video IOlir of The Gamble House with Greene ond Greene
expert Darrell Peart. Also read about editor A~~ Christiana's viS it
to The Gamble House and to The Hu nt ington Library, both meccas
lor Greene and Gfeerle aficionados.
Boulle Basics l earn from master of marquetry Silas flopf (Master Class) how to
execl.lte this decoratlvtI techn ique from the late 17th century.
ONLINE GALLERY
Add Your Work to Otlr New Gallery Visit the new community gallery 10 upload your own photos. get
design Ideas, and vote for
your favorite pIIlCIIS, like this
mini chest by Scott I(ing.
THE EDITORS MAILBOX BLOG
GLUE TUBE: VIDEOS BY WOODWORKERS
online exclusives: S~ome 11 member and 8aess more than 30 years of Fine WoodWorking articles, how-to videos, and exclusive Web content.
~ VIDEO WORKSHOP
Easy-to-Make Entertainment Center ---Only on FincWOOdworl(lng.com: Willeh Marc Spagnuolo, "The Wood
WhlsJlerer,- craft It.is beginners' woodworl(lng project using 11 small
collection 01 power lools,
--Gel Step-by-5lep instruction lrom the nina-part video series,
-Download a detoilo.>d project pjon.
\Ill VIDEO
Butt Hinges 1.01 0-.--------
Web contrloutlng editor Andy R~e demonstrates how to hang
11 door perfectly using a trtm route r and chisel.
plus: • CURRENT ISSUE ONLINE
ARCHIVES OF 1,300+ ARTICLES, AND PROJECT PLANS
MORE THAN 500 SKILL-BUILDING VIDEOS
ASK THE EXPERTS: Gary Rogowski on Joinery techniques ,
6 FINE WOODWORKING
Fine Wqqc!Working'
EDITOR An Ct..lstlana
ART DIRECTOR MlchiMll Pekovlch
MANAGING EDITOR Mar1l Schofield
MANAGING EDITOR, ONLINE David Heim
SENIOR EDITOR Thomas McKenru.
ASSOCIATE COITORS Thomas Q, Begnal. Steve Scott,
AnIMa Kapsales
ASSOCIATE EDITOR, ONLINE Gina Elde
ASSISTANT EDIToo Mattil6w Kenney
SENIOR COPY/PRODUCTION COITORS Elizabeth Healy, Julie Rlslnlt
ASSOCIATE ART DIRECTOR Kelly J, Dunton
ASSISTANT ART DIRECTOR John Tetreault
SltOP MANAGER Robert Nash
ADMINISTRATIVE ASSISTANT Betsy Engel
CONTRIBUTING EDITORS Chlistian Becksvoort, Qa.y Rogow,kl,
Garrett Hack, Roland Joltnson, Steve Latta
CONSULnNG EDITOR Jonathan Blnzen
MCTHODS OF WORK Jim Richey
PUBLISHER Anatole Burl(ln
SENIOR MARKETING MANAGER Melissa RoblMon
ADMINISTRATIVE ASSISTANT Christina Glennon
CONSUMER MI\RKFTING DIRECTOR Bflth Reynolds, ProCllc
CIRCULATION MANAGER Noella Garcia, Proel",
VICE PRESIDENT. SINGLE COPY SALES Jay ArmI,
BUSINESS MANAGERS David Pond, Megan Sangster
DIRECTOR OF ADVERTISER MARKCTING Krlstlln Lacey
ADVERTISING DIRECTOR Peter BMll!311
SENIOR NATIONAL ACCOUNT MANAGER Linda Abbett
NATIONAL ACCOUNT MANAGER John L~iln
SENIOR AD SALES SUPPOIH ASSOCIATE Martorle Brown
WOODWORKINO BOOKS & VIDEOS
EXECUTIVE EDITOR Helen Albert
FIlM Woodwo,kl"" IrSSN: 0361·3453) is pu1)l19he<1
I)i~ntnly, ""t, ~ 5",,0;"1 sev<:nth iiUve;" tM .. im8(,
",. Tt>e T"""toc1 PreU, IIY: .. NCWl"..." CT 064705506 re"'""""" 203426..8171. P",iodical. PC&I<i~ paid '" NflWl<>wn, CT 004TO aoo at 3dd~iooal maili,,@.oif><l4IS , GST
PIlid retislralion 1123210931,
S~bo.crIpl;o" RltIes: U.S tr,(/ Cao&da. $34,% lor ""'" )·UI. $ S9 .<1!I fo, \",0 y<!a,s, $83.95 for tI1,,,e yes", lin U,S, "",,"ro, plUM). 0.""" ... GST in<;IOOe<i. Q\Jtsidtl U.S and canada. $41,95 (0< one year, $73.95 10< two )'Il~r'. U04.9!> lot th,e~ yea .. lin U,S, dollars. plaase),
~Ie CCPl', $7.99 , Sirlllie COI>~ WlsK\e tI1" IJ.S. nnd """""';",,,,", $$.99.
Pol tln_ ter: Send addrus eMnteS to FIOO W~ The 1.~ntOO rn ... , lhe., 63 S. Mol", St., PO Bm 55OtI, ~w.t(lWl\, r.T Cl647rHl5Ofj
car..da Pool: Ratun, ,""",Ii_'" Ca,-ooan a<I:Rs!.e1 to Flc>e 1ItdM><Jt>IrljI.C/o WoMMdIl Mailer!>, rr.c., 2835 118" Drillfl, W,\d""" ON t>l6T 3137. 0< erne' 10 mnf~ton.~om
PrtRWd 1ft III<! US ...

HOW TO CONTACT US: Fine Woodwork/nl
The Tallo!Of) Press. 63 S. Main St.. PO Box 5506, Ne .... tOYrT1. CT 0647(}.5506 20342&8171 www.finBwoodworklng.c;:om
Editorial:
To contriWe an ar1icle, give a tip, or aslI a question, contact Fine WoodworIIing at ttl!'! address aIxJo.Ie or:
Call:
Fall: EmaIl:
800-309-8955
203-27o.fi753 twOtaunton.com
Customer Sen'lce: For subscription iroquiries, you can:
. Click on the Customer Service link at:
www.finewoodworking.com
• Email us:
supporUtcu15tomerservlce.taunton.com
·Call our customer support center:
To report an address change, inquire
about an order, or sollie a problem, ca ll:
800-477-8727 To subscribe, purchase back issues,
books or viooos, or giVo a gift, call; 800-888-8286
Advertising:
To 1iM out about a!1vertising:
Call: 800-309-8954 Email: fwadstltaunton.com
Member Auclit Bureau of Circulation
Retail: If you'd like to carry Fine WoodwoHfing in your
store. call the T8UOtOrJ Trade Company at: 86&505-4674
Mallin: U1t; Occasionall~ we make our subscribers' flames an<! addresses available to responsible
companies wnose products or services we
feel may be of some interest to you. Most of
our subSCribers fll1d this to be a helpful Wi:JY to learn elOOi.lt useful resources and services.
If ~'ou don't want us to share your name with other companies, please contact our Customer Service Department at:
800-477·8727
Tno Taunton Guarantee: If at anytime you're not completely satisfied
with Fine WOOdworldng. you can cancel your
suoscription lind receive II full and immediate
refund of the entire subscription price. No questions asked.
COpyright 1009 by The T"'-"1tort Preu, Inc. No r8p/<>d<Jct"",
.. ilt>wt permisiion of The T""-"lIOn Press, Inc.
THE SOURCE fOR IANDSAW ACCESSORIES -
Ol o .s '" (J Q)
e u.
The
Iturra Design : New 2009 Catalog
• Introducing the Quick Release by Carter Products
• Our new Blade Gage band saw blada tension meter .
• Lenox Pro Master carbide-tipped and Bimeta l blades
• Bandrollers, rip and re-saw fences, improved teollion springs, tires, table inserts, circle jigs, and mLtCh more.
• History and comparison between Delta and JET bandsaws.
CALL 1-866-883-8064 or 1-904-371-3998
RU.lJlR S[J!\1l:E NO. 100
World's Router Bit
Source! Over a ,x,z,) Workshop Proven
Woodworklnlltems Online!
" Over t!,!rz,) Router Bits
• Over UjtDJ other woodworking tools!
If Request your today.
I-S00-872-2S11 I www.EagleAmerica.com
freud' '.'111." _ . )
for details go to: www.EagleAmerica.com/FW291
Now thru 3/31/09
READEJt SEIMCE l'O. 82
JANUARY/FEBRUARY 2009 7

contributors ... £ £ £ ...
, , , , ... ~ i, l ' j , , ~ ~ ,.., ...
, w '
Peter Turner (~Hickory and Ash Blanker Chest") says his hands told him he should be working wood . He set out to get some
experience before going to woodworking school, and he's been at
it ever since, working for custom shops In New England and then for himself for the last 14 years. He finally did get to woodworking school, but as a teacher. not a student. He's shown at left with his daughter, Morrlgan. For more. go to www.petersturner.com.
While working as The Stanley Works' front man at national hardware
shows, Richard Humphreville ("Tune Up Your Workbench")
produced a few videos about their products and was hooked. Since then he has created more than 600 local television shows on making
furniture, and today does a weekly show called The cabinetmaker. A historian in New london, Conn., Humphreville has moved several
historic houses. For more, go to www.humphreviliefurniture.com.
Tommy MacDonald ("ClaSSIc Step Stoo!") Is a graduate 01 the
cabinet and furniture making program at North Bennet Street School. As a student. he was profiled on Bob Vila 's Home Again television show. and he demonstrated shell carving for another episode. Since graduating, he has been designing and building custom furniture. He has a shop In Canton, Mass., where he films
The Rough Cut Show, an online VIdeo series on furniture making.
Silas Kopf (Master Class), a woodworker In Easthampton, Mass., wrote about marquetry for fW1N #38 and has been building
increasingly elaborate pieces ever since. His new book, A Marquetry
Odyssey, combines a history of the craft from a technical perspective with stories of Kopt's own Journey. You can read sample
pages at www.sllaskopf.comorareviewatFineWoodworking.com.
For more information on our contributors, I We are a reader-Written magazine. To go to FineWoodworking.comj authors. learn how to propose an article. go to
FlneWoodworking.comj submlsslons.
8 FINE WOOll\l/URKING
The Taunton Press
I NDErENDENT PUBLISHERS SINCE l~ iS
Founh, Paul and Jan Ron,an
l'miJm, Suzann. R"",o.D
H T &CFO Timothy R~hr
SVH 0,,,,,,,.,,, Thorn .. LlIIe<kr
svp C"~'h,,, 6- Fdi'ori,,[ SuU:n Edelman
SV?, T«h~."'v Jar H utky
SV? 6- G"'~f ,,,blid,,,. flem, P.ul Spring
SVP & Pltb/w", ~ Gro,,! Donald Linn
SVP Ni'~";,i"g s"[,, Karl Blken
SVP En,h~,i"'t GIV"f 0- G.>rm",'~r M.rl«:liff! Janine Scolpillo
VP. Hum.~ iYNU,"," CuQI Marotti
VI' d- (.;'m"'~·"
W'rn~ Rtynold.
VP.hlftl~m
Pa'rici .. William ... n
IT, Fi",,,,,, LthyWortlt
VI! r~"n"m 1m""",;", ] """ .. Renon
Vi; .I'i~tY Ow S .. /t" J~y Anlti,
THf. TAU NTON P R ESS
Ronlu: M"rk"i~t: Audrq I",ororondo. ''''Mkiry: Ja nel Noblin. Edi~,i"l: HelenAlk". ;h~r Char m"", Shauna O""lil1, Jc .. i<~ DiDonato, Co''''''9' ]ordln, C .. h.,itle L:ry. Carolyn M~ndauno,jenn i f", Rundl. E,K:.:. SandenFo"l;~. Sharon z.gat~. An: Ali..:>n Wilke!, Ka'Y 13;od.r. Nancy &udr<au, T"",,,. Fe",onlk,. No" Fu""...,.. Amy Grillin, ~.~d .. MahL,,«!r. Lynn. Phill ip,. Brooh R,n •. ", .. ,-,I Singer. M4."~f4<·,u'i"g. Ihom ... eroco. L.u," BlLrmn •.
Bus;"" .. Office, HoUy Smi,h.l'atr;";i~ M,rini, L~!~I:
C.,nlp' Kov.l« ki. Mag""i", !'rint l'r.,IUCliC~: Ph ilip V~n Ki rk, Niwk A"", ... , Jennirer K"1.J"."yk
Din.ibudon: Paul SOlpold, W.llor Aponto, FunlBu.ino, O.yjd OcTo"" L:.nne F",long, Deborah Greet ... Fronk Melboorne. Rcinaldo Moreno. J);,y;d ROOrigllO. Mi<h"d S",.oge. Alic~ $"",..,.,. Fin~A.;<"",n.i"g: F;",,~c,; Ilrc!t Manning , Rkh~,d Rivdlcoe, A,'<~u"'i"g; I':.tr id Lu,xlntagn<. Prj""ill. ] .nni,,!: •• l.ydia Krikorian, M iclldle Menoooca, Judi'h O'Took El.in< Yamin, ea",l 0;,,1.1'0. Dorothy BI..,I«>. Sus.n Burk~, J.mo, F""",, I~"uin. P,,,,,n.,, urI)' Ri«
Fulfi U"'~nt' Oia, .. Goulart. Ft./fiII",,,,tSptnN: JOOi Klei n. M indy KOOz, Donna C.p. loo, Andy Cor>O<1. Nan~l' Knorr, C~'/{)mn~n:i...,: /G,hlttn S"""',. Bonnie Il',ard,ley, D"b",. h Ci",;;"', Ka,hcrioc Oarko. Alfred Drchor, Paula Forron. H k.>nMoNult)", I'atr",io,l'>.rk..,

De-~"" Ma. P:uric .. pjo .. \~ IIoeny So-epncy. LW,.. En",: Mol)' Ann (".albert, Cary".-l-rn~ Oovl1, Mau_n I'ebt. l)"!>,,, S<nl><fdJc •. And ..... Shorroclc. Marylou lhompoon. Sari,.", Willi.m,.
Human ~UKe" O"i,,;n. Lin.:oln, Wwdy Til~. [}.wn l:..e.y.
I"fonnalion T«h.olop· s"rrio:csl Appf;e.IJD'" IN,,,IaP1MnI' H~ldi Wold~ir.:h, I!.c>~n Nieb.m.llnd. Roddinp<>n.john V.alRO, Daniel. W"',Jh.., ...... l:IttU"'! .... Nm ... ",s..pfMI: Adam G~rr, Pn.e eo.ofo.n~, p,cJ DdP~«. Michad Lewis..
Opnuioou.: Jo'G'h Morin. R<,t>.:ru , ... Wlre... John Ged,..,.. M= lmhimoo. }.nnife. [Jell "i. Sus.n Nc.i<h. Amy Reilly, Sandy S<;hrocdcr,Jim Sj..,morc, Deni ..
Zor. 1'11",,,, .. Mid ... ,d u,..ci,en. 'i.:.n.hJdr.cy. An""
l'ell<icfp'" Anne sm .... "". MIIi"",,,,,,,,: !..irK"ln P= ...
Promotion' Jan< Wd~f, inmOIiM C"",1I1'r. Jenni"" WhttkrConion. David Gro ..... Michrk M1l"'mi\:., SonJn Mo<yU.I'roI1U)I;o~ Op"''';''''': Kale Krcnl>O.
Taunlon era!;""': Mjd ... dAmadit" l.w:ia Coc<oli. S. .. h Opd.hl. Kat Rj.chle. Phof"P"'PI,y: $<cott Phill ip •. Vi,,":
D.riu"," Kanarek, G.ry JunkeR, Mid..-l I)"b.c:"'"gc.
l'ubli:u'i"l Sen-ku: DcbonJ, '.D<>f><" ""pm.: Rich1rd ~h. \l'iIH~m l\;vona. [)"yjd lII ... ko, Ridwd G.>,n:-.oIc. W.!li>m Godfrey. Brian lavin, ' ..... rw.m llumrru.VQnglOO. AJwrI;'j~1 r..J,.;t;',,, u.u .. Ilergnnn. Lisa Defeo. P>trici. ""'m. K.thryn $;'nwoo., Manh. Samn,c'.
TAUNTON INTER. ... CTlVI'.
Matthew Ikrg<r. Jodie Delohc'}'> l> .. id 1-1>11, Robert H.rtow. Chrls,ophnCa.cy. Ruth D<.>bscv.gr. LiN Du,..nd. ~,rib Fow">.". Mary Kue Gunt, SMhu! KodalJudan. ~ Kn.ph. Stev. Lo".!.anli, Sh.,."" s..rrir.ju. Mid .. d S,nlo.. D.w" Vit:!i<> ....
TAU NTON TR AD E
John Jl"igalupi, B~n DeMello. Alii..,,, Hall"". Sills"
O"s.k,. Vok.i. Dwuku, M.rl< S.i~~n .. n.
TAUNTON MAG AZ I N ES
F,w W"","","'i"t • F"'r H6",mi(4JJft
1/m.Js • F;..e QurJ""~t • I-i~ c:..H:/"t;
Our nl~'''' fur rropI~ who at< J>2";""'" .bom lh.i, p<l ... ui ... Wrin~" hy p'Octicillf;~'P"'" in the lid.!. Taunton p...,.. magu;"", providc.uthm'jc, t<li>.hl~ information ,upf'<'lttd by in!true,j ..... AOO irupiring vhu.aU.
TAU NTON BOOKS
Our boob Or< lilled w;,h in_dep,1\ In(","our;"'" 1nd
crco..iv. ide ... from thclir=t ""tho ... in ,heir fieW.. VI:'lktlt.er you' ... plXliciflt;. ,,:aft or cng:.ged in <I", cre;]!iOf]
of)'l)Or horne. T .. "nron "'x>lo. .... nl InIP;"')"" ",diKOYcr tIC ... Ind. of ..:oo"'pli,l>m.""
WWW.TAlJNTON. COM
Our wtUi .. is • pl..,. where y""" can ~r mun: .bou. d .. ;nfu .... rou .";0,-, CO"""", .... i,), ~U() .. <nThwiuu,
.<hop :0\ our convenienr t>n-Hn .... "re or conr~ 0,1110mer
='= EMPLOYMEN T INFORMATION
Tn inqulr •• I>oul ",or« ' opp<>rtunitl •• , pI ....... vl.ir 0",
....ro.it •• t <1I=r ..... mtan.rom. rou mar .I..,write to 'lhe "J:lunton Pr"... Hur=n Rc>Ourc ... 6.3 S. Mai" St., So. 5'5006, l'kwt<>wn. 006470.
CU STOMER SE RV I C E
\X'c...., l>ett t<> .n< ....... an)' 'I""'liom yuu mtgh\ h."" and t<o
hdp yen order au' m'~.ui","". boo .... "d .ide,,,. Ju .. a ll '" toU-freel! 8oo-477-8n7.
·Ih<T __ "" .. T_O;""'L~_.l",_·r ...... r ........ ·_ ... l • .....u...!.-; ...... ~"'·_.I-<.
IAl\lAR) F~:IIR( ... IIY 2009 9

letters ,. 1 1 1 ..
From the Publisher LETTING GO
It's fair to say I'm a bit of a control freak. Blame the
woodworker In me. What ls woodworking If not control over too/s and materials?
Just look at a typical clamp-tJp----lt's all about domination and submiSSIon. Running
a magazine also requires a 101 of control: the ability to take huge quantities of
words, photos, and drawings, and edit them down to a manageable size while
not freaking out under deadline pressure. When we're done, we deliver to you a
completed project, with all the parts (hopefully) pf'eclse and intact. and a glossy
finish to bool
A.t FlneWoodwOfklng.com, we're turning that approach inside out. We're letting
go. You can now make your own contributions and post them without our editorial
overslght If you're a regular visitor, you may already be familiar with the new
version of The Gallery, where visitors can register (free), then upload Images and
descriptions of thefr projects.
Within a few weeks of Its quiet launch, The Gallery received nearly 400 furniture
photos. The variety of work has been Incredible. I like the comment function, where
woodworkers can share tnelr opinions, ask the maker a direct question, or even ask
for advice. If you're a Web geek, you11 appreciate the ability to link your work to
other sites such as Oigg, Facebook. and StumbleUpon. and set up an RSS feed to
have new gallery Items or your favorite blog sent automatically to your computer.
Other parts of FlneWoodworking.com are being updated as well. We've invited
new contributors to share their discoveries on The Woodworking Ufe blog. other
sections also will become more accessible.
Now, some of you will say. "Hey, been there. done that" on Knots, our online
forum. Well, 501'"1 of. Knots Is the Model A
of Web interfaces. Uploading photos is
clunky at best. Our goal Is to simplify
the process of getting published, and let
your work be seen by more people in the
woodworking community. So please, show
us what you've got. Who knows. maybe
one of us old-school editors will "discover"
you and see if you want to be subjected to
the old, controlling W<t:'fS of print publishing.
-Anatole BIHkln
10 FTNF \\OODWOIII.:ING
The Gallery
Dust maskS: At and filtration matter most ,.,,,, a rtllred profe:>.-;or v.ilo Idugin
environmental technology, I v.as plt.;a~.:d to read your artide on du ... , masks :tnd re'ipil"dlors l-Prott!Ct Your;elf From WOoJ Dust,n f'U.-u:'.zon But I think it was a miliUke 10 t'(."'('ommeoci all masks v.rith an N95 raling or hertcr. The ratings, in rhi.~ ca~ N9S, N99, and NlOO, refer to the minimum percentage of respirahlc airborne particles that a mask fllters Ollt.
An N';I5 mask filters out at lea.~t 95%; N99. 99"/0; and NIOO. 99.97%. Respirabil: (bre'a.thable) airboml' partkles are the vel)' finl' (usu~llI)' invisible) partick:s that C"J.ll."C
the mosllung damage. 111~reforl' , an N9S-rated ma.'ik would theoretically :dlm'- five tllnes more of the-;e dangerous panicles than an N99. and 16"'>' time:> more than an NIOO. Th~" is JUSl as. if J1O{ mort. unportant than comfort. which }'Ou emphasi7ed rOf example, ift.lk! ~Moldex Nl00 ~ ilh I landy Strap' (labsafety.com) was onlv '>.lightly Ie ...... comfortable than one of your nfavorites- (iXl\h N95), I woukl chouse the Nl00 mask.
The most important factor, hcm'(;"\Ier. is fit AI.."COrding to ft!al-v .. orld test~, ffiOS{ of
the particles Ihal make it into our airways come from poorly fined ma.~ks Pil..k a MOLD EX Nl00
ma<.k that filS your faec li~htly anu allow~ no gaps. And, a.<; the artidc pointed OUt, you should Welr J. pov.'t:l't!d respirator if}'OU h:1\:e bcial hair.
- JOHN PETTU S, WestmInster. Calif.
Oust masks don't work for vapors 'fhe mask., III the article are ral(.'·d for dust only. Special l'L-spir.ltOIS arc required for solvent vapors and paint ~PJay. both t!fleountered in do-It-yourself adivitie~. Safety-e<Jlupmtnt Sllpply ~tores edrry tht:...e re<;pil"atOfS. One's health i.~ worth Ihl' COSl
- HEATH ER DAW N GREEN,
Cal l ary. Alta., Canada

An EnUrelv New
ROUT. Featuring an inllOvative Self'SQuaring table ~aw irY;pife<j fence. the aU new Precision Routl'f Table sets out to drastically improve the Way yOu worK With ItS !)uilt·in Precision Lens Cursor ~nd optional Micro-Adjuster, you can make pJra llel adju5tment~ down to .005' witn If)(> 5imp\e rurn of a tnumb wheel
.atcll ..... 1If _"'KI"IICU. .. _ ... ..-1 .. 1.<:_
www.finewood wor k in g .co m
www»e!JIolII.c." 1800A41.1631
, IElHIIIII IE 111111
SYSTIMTIII[ Helping yoo put it all together v"','u.~ _ .... . ••. .-
RI'.AOEII. SERVICE NO. iI9
Finest Quality Reproduction Brass and ~~~ar!)~~ h" "'" C'I ,/ "a manufactUring \he lines! qllal ity antique J ~ reproduction furnilllr6 hardware. "',\:il!V b..iildl!fS hardware, 191tiog fixtures, and tireplace accessories available. Carib 001 t OB-page catalog, <Wailable lor 57.00 (catalog cost refunded on r~ order).
.. _.-._ ......... I ... ~_-
WWW.GENERAL.CA jA'<UARYd'ERlIlJAH) 1()09 II

Sa -6a 1a
c
Add more accessones to set up your ultimate Arnencan
Style WoodworklnQ ShOpl
Ln4 SE Bandsaw ~
12- R~Hf!1Qht 2wt\p 8BIdot Motor
""""" c .......
Platinum Mortlser ~
Platinum Tablesaw CD
""""'" ~ Saw 10" Blade Capacity 3~ Leeson MaWr RIVIrlg Knife
Platinum BU Jointer ~ ,
Platinum 16" Planer~
2-t,J TFEC IVkrtof Shea'-Tee 5pwaI Cutt:effleaCI 8u11:-11 MobMv f<JI: 4-!>ided GPmliIn CarbioR"~

D
Platinum 18 ,147 Lathe C
Lns HD Bandsaw ~
lEi" Resaw HeiQhl: 4 5-I1lBaidor Motor Loguna~.
Your choice of Eumpean-Style Woodshep. with three machines. comp6ete shop-delivered for anti( (le. 2p, 6 3e )
"
methods of work ED ITE D A N D D RAWN BY J I M RIC H EY
J>. 1 01 1 1
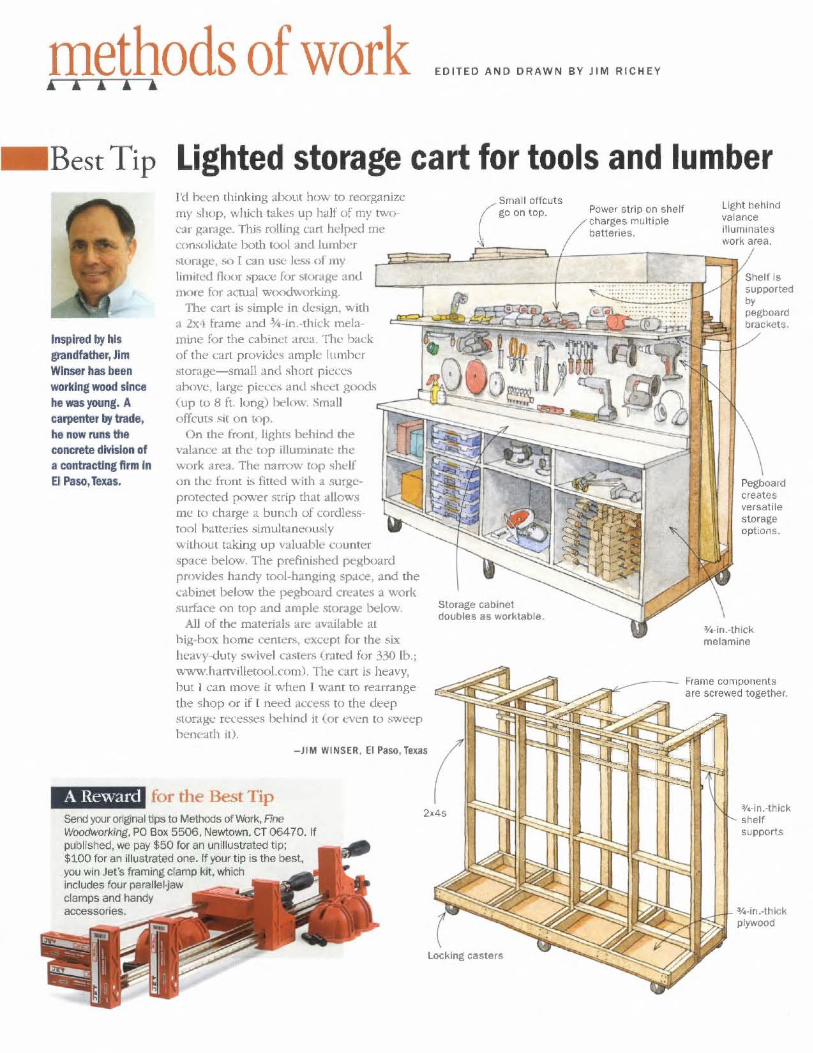
. BestTip Lighted storage cart for tools and lumber I'd heen thinking alx)ut how to reorganize my shop, which takes up half of my twoC;lr ~arage, This rolling cart helpt..-'Ci me consolidate hoth 1001 and lumher sturage, so I L-an usc less of my
/'"." .... II.Of1clJts go on top. Power strip on shelf
/ :;::;!,~::,'multiPle
Light hehind valance illuminates work area.
limitL'<.l floor spa..:e for :;torHge and l---I-@;-:::::~t--~;:=Sj}:;JDff Il)()ft' for aemal woodworking. TIle cart is ~imple in design, '" ilh
a 2x4 frAme and 3J.i-in.-thkk melamine for the cabinet Mea. The back of the cart providc~ ample l\lInher ~torage-smal1 and short pkccs above, large piece.~ and sheet ~ood~ (lip tu 8 ft. long) below, Small offcut~ sit on top.
Shelf Is supported by pegboilr(l brackets.
Inspired by his grandfather, Jim Wlnset has been WOrking wood since he was young. A carpenter by trade, he now runs the concrete division of a contracting firm In
B Paso, Texas.
On the front, Iight.~ behind the ...... .tI.lOce at the top illuminate the work area. The narrow top shelf on Ihl' front is fiued with a surgeprotected power strip that allows me to charge a bund] of cordlesstool hatteries simultanL",(lllsly without taking up valuable counter space below. TIle prefinished pegboard provides handy tool-hangin~ space, and the (,:abinel below the peghoard crC'.ttes a work surface on top and ample stordge below.
All uf the materials are available at hi~-hox home centers, except fur the ~ix 11I.:.IVy-ulIty swivel casters (ratL--d fOf 330 lb.; l>,'ww.hanvilletool.com), The cart is heavy, but I can move it when I want to rearrange the shop or if [ need access to the deep ~luraw.: recesses behind it (or even to sweep heneath it).
- JIM WI NSER. £1 Paso, Texas
A Reward for the Best Tip Send)«Jf onginal tips to Methods ofW:xk, FIne WOOdWorking, PO Bo):. 5506, Newtown. CT 06470. If published. we pay $50 for an un illustra ted tip; $100 for an illustrated one. If your tip is t he best, you win Jet 's framing clamp kit, 'Nhich includes four parallel-jaw clamps and handy
Storage cabinet (loubles as worktable.
creates versatile storage optiOM.
¥~·in.·thick
melamine
Frame components are serewed together.
¥.-inAhkk shelf supports
¥~·inAhick plywood

CHI: FIIR UHOEII $2111111 • Unlimited Design Capabilities • Carves, Cuts, Routs, and Joints
I • Easy to Use Software Included • Simple Easy to Use
-~ - ------ - -
SOMMERFELD'S TOOLS ~
DOVETAILS MADE EASY The New Katie Jig4 System!
:It.
Cut t>.rt.cr DoIffl~':i~I'~'~"~h';;;~~:J ~_KMWJi9· ""-_ ..... __ .. --.--.... - ..... ------
Htll' Blind Joinrs
~ t
fh)1I Joints
, ~
The New Katie J;~
""" $239 ....
Comblnotion Joints
J
For a FREE c:atfllog cal! today or go online ...
Sou!ce C<>do FIWKl100
Totl Free 888-228-9268 ViM <II lin !.he vre!I. _ _ .SOMMEFIFELOt'OOLS.com
www.fincwoodworking.com
RUJ:>E1I SatVICE NO. n
JA~' \JARY / F [ BRlIARY lO()9 15
methods of work 000(;0",'
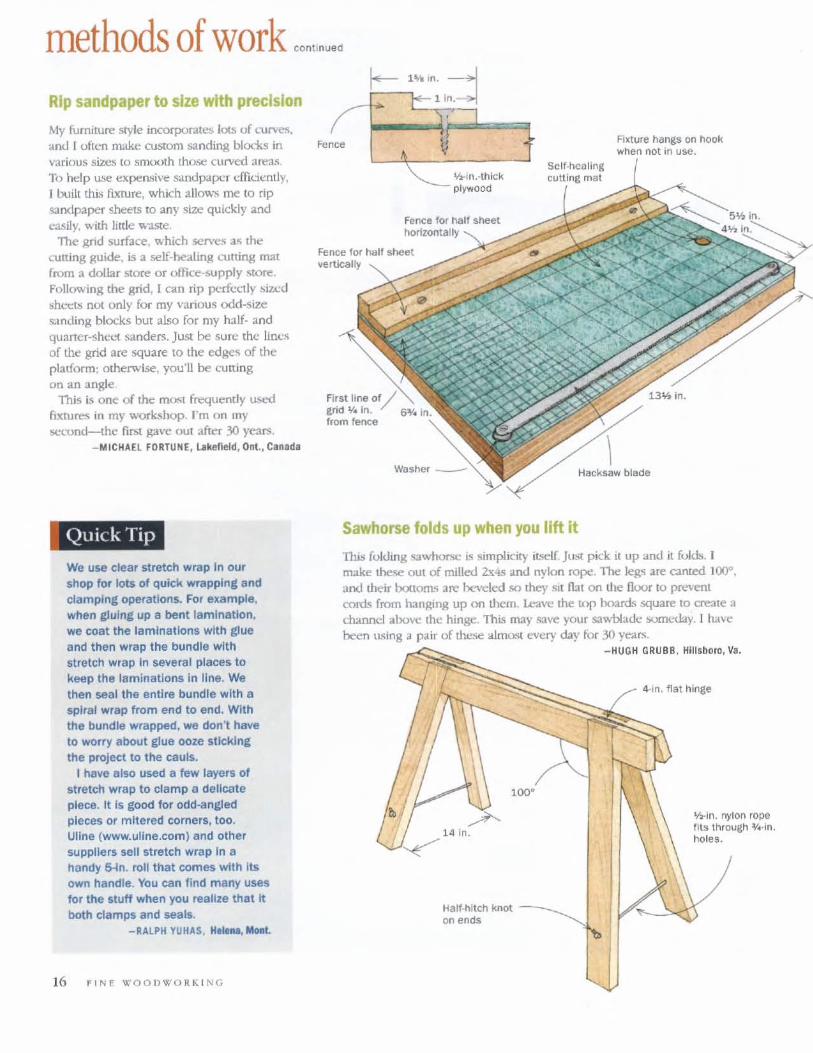
Rip sandpaper to size with precision
My furniture style incorporates lots of CU['l,/L'S.
anti I often rrutkc custom sanding blocks in various sizes to smooth those curved area.~ To hdp UM! t!x~n~ive sandpaper dTicit:ntly, I built lhlS ftxture, whiCh allov.:s me to rip 5:lndpaper sheets to any size quickly and easily. l\ ith iJltle Vt"3ste.
The gnd surface, which serve,> 3<; the cutting guide, is a self-healing uuting mal from a dollar store or office-supply Store. Following the grid, I can rip pcrfc(.1iy 1>iZCd Shl:t:ts not only for my various odd-size ~1.nding blocks but also for my half- and quaner-shcct sanders. Just be sure the lines of the grid are square to the edge .. of the platform; otherwise, you'll be cutting on an angle.
This i .. one of the m~l frequently ust:d fIxtures in my workshop. I'm on my :;(."c.:ond-the first gave out after 30 years.
_ MltMAEL FORTUNE , lIkefield, Ont., Canada
Qukk Tip
We use clear stretch wrap In our shop for lots of quick wrapping and clamping operations. For example. when gluing up a bent lamination, we coat the laminations with glue and then wrap the bundle with stretch wrap in several places to keep the laminations in line. We then seal the enUre bundle with a spiral wrap from end to end. With the bundle wrapped, we don't have to worry about glue ooze sticking the project to the cauls.
I have 0150 tlSed a few layers of stretch wrap to clamp a deUcate piece. It Is good for odd-angled pieces or mitered corners, too. Ulloe (www.uline.com) and other suppliers sell stretch wrap In a handy 5-In. roll that comes with Its own handle. You can find many uses tor the stuff when you realize that It both clamps and seals.
-RALPH YUHAS, H.Min&, Mont
J6 FINf' WOODWORIUNG
:-1-_',"'_ m_ --+I ll".~
~-t~
Fence
Fence for hall sheet vertically
First line of grtd V~ In. from fence
'iI·ln.·thlck plywood
Sclf·heoling m,'
Fixture hangs on hook when not in use.
Washer ---, Hacksaw blade
Sawhorse folds up when you 11ft It
TItis roldmg 'Qwhor..c is simplicity itself JuS{ pick It up and it rolds. make these out of milled 2x4s and nylon ropt!. The leg-; are carned 100"'. and their \xJO:OOl."; are be\.'eled so they SII flat on the floor to prevent cords fmm hanging up on them. Le-dve the top hoard.<> square to create 3 channel above the hinge. This may save your sav.ilI.adc ~.-wy. I h ..... 'e neen using 3 p.1i!" of the.e almost every day for 30 ye-.lfs.
100"
Half~ltch knot --~ on ends
-HUGH GRUBB . Hillsboro, Va.
4 in. flat hinge
'hln. nylon rope fits through :V~' If1.
holes.

Tested #1 by Fine Woodworking Magazine
In a head to head router bit test of 17 different brands.
www.fint:woodworking.cum
",,,IIIeaII.,..: • 5::icr", . 2IS ... ........." , ... - lItBS . EM:h,,"<ct.a~ ..
S;m'~ 1970, We hav~ been malinc:: m(''aSurcd reproductions of origin~J Sham furniruu - right here ill \h~
12~, 18~
000 25" w.ode l ~
Available
T:SA. Avail.bI~ os do-it-y"ursdf 1-IIII1_rt lit,; or custom finished. Large >election of ""pl.e<:menl Sh.ker ch.ir lOpe>.
Now, Jum 0 $j roouh board inlo S75.00 wont. of rnokling in Ie$\ Ix:n (l miroo.!te Make CNef
500 !runOcrd patlem\ PU! high·W' wrved moIdi"<l, tongue 8. groove, Oil)' cuslom Oe\ign. Q.YJ\l.Y C<::N\I£RTS from Molder/ Planer to Drum Sander or p::>wer-Ieed Multi-Blade Rip Saw. 5-Yl!Cr Wottt:Wj, ~ .., IJSA. FREE 6I;)-f)AY TRIAL
Call now for free C"Jtalog 1-800-840-9121 I
Whtteslde Machine Co. Cllremont, North Cl rolina
I~I [email protected] b=~~~==";;;;;;;;=~
www.scherrs.com
JANUARY/ft:IlRL"AI(Y 2009 17

methods of work ,ooti""
FRONT
BACK
Workpiece
~~ Reference pin .,
Lever arm. 'I, in. thick by 'Y. in. wide by 5 in. long
Gross adjustment slots allow for finger Siles from ¥. in . to ¥. In.
Miter·gauge attachment Mlts
18 FJI-.£ W000\11/0RKll\G
•
Gross adjustment slots
Lever arm
insert
Adjustable jig makes big and small fingers
A typical fing~r-joint jig is an auxiliary fence screwed to the face of the miter gauge with a wooden registration pin sticking OUi at the lXAtom of the f'-:oc(.:. The fence is moved back and f-Orth by trial and enor until the pin is positioned SO that the fing\;r and slur: widths art identicaL Unfortunately, adjusting thi~ kind of jig L~ tedious, and you need dedicated ji~s for different-size finger jOiots.
This unger-joint jig solves the~e problems. It features both a gross adjustment and a fine aJju.'itmcnt to produce finger joinL~ in a range of si7:es. from lA in. to Y2 in. The jig consisb of a fence attached to the mitcrgauge face by slotted holes; this is the gross adjustment.
Fine adjustment cO!n~s via the m~tal rden:ncc pin (a
standard hardwaI't-slore spring pin), which is mounted on a pivoting metal arm that's fasTened to the back of the fence with two pivot bolts, The ovenize upper hole allows the arm to be moved back and forth, thus advancing or withdmwing the rderence pin hy only a few thousands of an inch.
To u:;e the jig, set the lever arm at mid range, install a dado head, and make a ((.:st cut in a piece of ~l"Tap. Measure the resulting slot width with inside calipers, locking the setting to preserve the slot width. Now, with the calipers bctv.'een the reference pin and the dado blade, loosen the fence-attachmt:ot bolts and .'ilide the knee (u~ing the gross adjustment) .~o that the c,lliper lightly touches the pin and the blade. This will st:t the reference pin clo.'ie to the desired finger width.
Now make a second cut and measure both the finger and the slot width.;;. If unequal, loosen the pivot bolts
00 the k:ver arm and make a fine adjustment for
a correction . In just a few iteralions, you should have a r>erfecr finger-joint setup.
----1- Oversize hole, 'I. in. Oia.
-JOHN A. HAASE, Fort Collins, Col(l,
Quick Tip
::.._ --__ lower hole is sized to fit 0011.
@~--"" ~ Boll, v. in.
Pin adjustment range is plus or minus V&. in.
) Reference pin, 'h" in. dia. by 1~ in. long
I've used steel wool to remove rust from my saw table, but it's slow going. Finally, I tried a block of pumice, the
kind used to clean
grills. It works perfectly and quickly. Use only the tine grade. The
medium and coarse will scar the table.
-RANDY JOHNS,
Spencer, Tenn,

PRECISION CONTROLS AT YOUR FINGERTIPS.
ACCURACY FROM A ONE·PIECE TRUNNION.
CONVENIENCE IN A WELL·DESIGNED DRAWER.
THE NEW UNISAW. GET READY FOR THE COMPLETE PACKAGE.
www.dellaportercable.com/unisaw RF.ADFR SHVTf.1' NO. 9tI
J ANUA RY / FEIlR UA RY 2009 19

tools & materials .. :l 1 1 01
• MACHINES
12-in. jOinter/planers handle almost any board
lOT OF WOODWORKERS' WISH LISTS include a 12-in. Jointer to match their
12-in. thickness planer. But a 12-in. jointer i<; a hig expt'llse. That's why, in
[,-,cent year.s, comhination machine,'; have gained
popularity. A 12-in. combo machine gets you lxnh machines in one space-saving package for about
the same: prkc as a l2-in. joinlr.:r alone. Recently, I looked at two new one;, from Griniy ;Ind Laguna.
The machines are flioctiOMlly alikt, and both
GRIZZLY G0633 www.grinly.com
Price: $1. 795
Power: 23Ov, 5 hp
Jointer bed length: 59¥~ in.
are excellent. ! planed and jointed white oak, maple, and cherty with each macilloc and the r<.:sults weft: impn:ssivc. If forced to pick between the I\VO, I'd lean to\vard the Grizzly, mainly because of the lower prkc,
As an option on both machines. YOli can substitute a spiral cutterhe'J.d for the standard ;;traightknife(i clltterhead. It adds about $500 to the price
but requires less po~'t::r and pnxluces little tt!arout, even in very chalh:n)<;ing woods, A sent's of multisided carhide insen cutters, mounted in the head, do the cutting. These ed",es la~t mllch longer than sted blades, and should one get nicked, it's a simple matter to rotate it to a fresh edge.
-Roland juhnson is a amtributinp, editor.
• CLAMPS
LAGUNA MJP 0540 · 0175 www. lagunatools.com
Price: $2,495
Power; 23OV, 3 hp
Jointer bed length: 63'14 in.
oll'.r. After jointing (above). it takes less than a minute to raise the tables. move the dust hose. and change over to planing mode (left). By the way, dust is being col/l1cted from the Grizzly- via Its rear port.
Sturdy benchtop clamps have rapid action
Plate option. CfKlose the surface plate option and you attach the clamp to steel anchors mounted to your bench.
20 FINE WOODWORKING
LEIGH INDUSTRIES. KNOWN FOR ITS DOVETAil JIGS. has introduced a strong and simple benchtop clamp borrowed
from those same Jigs. This type of clamp Is useful because It can be positioned almost anywhere on a workbench
surface, e-ven toward the middle of the bench, where a
typical vISe and benchdogs are less likely to help.
The toggle handle rotates for height adjustments, and Its cam action Is quick and secure. Non-marring pads on both
the heel and 10e of the clamp help protect your work and
keep It from slipping. TWo mounting options are a-vailabh~. Each clamp seils for about $50. A package of four extra
anchors Is around $20. For more, go to www.leighJigs.com.
-RJ.
Hole opflon. With this option. you drill a hole In tho bl1nch and secure the clamp from underneilth.

• HAND TOOLS
Rabbet plane cuts beautifully Quicker than. router. Setup takes seconds, and then the skewea blade makes perfect cuts.
Irs NOT SUPPOSED TO BE THIS EASY.
That was my immediate impression after u.~lng the new skew rabbet plane from Verilas. I've used many rabbet planes over the year!> and, to various extents. all were less than ideal. This plane, though, seL~ a new standard for quality, usability, and value.
The plane eulS f'"J.bbtb of various depths, up to 11/2 in. wide. [t's also perfect for making long tt'nun,>, like those on breadboard end..;, or fielding a f'"J.ised pand for a door.
It was easy to set up and use. Blade alignmem--critical in rabbet planes but only done onee--was nearly t'ffurth:ss, thanks to a pair of .set<;erews in the body of the plane, It also was easy to control the (","d!met width, thank.., to a fence that gl ides effortlessly on two steel rods. You lock the fence by turning a pair of bra!>s :,crews. Setting the depth of cut is simply a matter of turning a brass knob.
vantages_ As the plane is pushed, the blade draws the plane into the cut,
making it easy to register the fence against the stock. Also with this design, the shaVings arc thrown more easily from the plane. Then, too, this configuration reduces cutting resistance, leaving a smexxher surface, e~pccially on cro .. 'i..<;-grain work.
The Verila;; Skew Rahher plane sells for $2SO and is J.vailable in either right-hand or left-hand modds. TIle: ldt-hand model is just the ticket for lefties. A case can he made for ownin~ one of each, as it allows you to choose the plane that works beSt b-J.sed on the grain din..-ction at the l·Ut. But. with care and light cuts, I h:td no real prohlems working with just one plane.
Flawless c.."TOSS-gt'Jin cuts wen: the norm, thanks to a S<.'oring cutter that slices the wood just ahead of the blade. This was the first rJbbet plane I'd seen that uses a setscrew to aJjust the cutter. A~ a result, it was a no~brJiner to get the cutter perfectly aligned with thL" blade, and once set, it stayed put. For more information. go to www.leevalley.coffi_
The bladt; is skewed in the body, a feature that has severa l 'ld- ---Chris Gochnour h-uildsfumiture and teaches woodworking in Murray, utah .
$qua,.. mlt.r p ug.. With the sawblade fully raised, the leg of the protractor butts against the body of the sawblade, ensuring i1ccurole readings when sqvflrlng the mIter gauge to the table,
www.fint:woodworking.com
• ACCESSORIES
Digital protractor is accurate and easy to read
A NEW GADGET FROM WIXEY TOOLS makes It quick and easy to measure angles. The tool Is especially useful for setting an angle on a tablesaw miter gauge or a miter saw. According to Wlxey, the tool Is accurate to plus or minus 1no of one degree. II musl be
' zeroed-out" before each use, but that lakes Just seconds, The tool is sold In two sizes: 3 In. (model WR400, $50) and 8 in .. (model WR410, 559). Go 10 www .. wlxey.com for more Information.
-Tom Begnal Is an associate editor.
Oth., tools, too. The Wlxey is also useful for settIng angles on a miter saw.
J A NI ~ Af(y f )lFHRIlAf(Y 2009 21
tools & materials CO"""""
• DUST COLLECTION
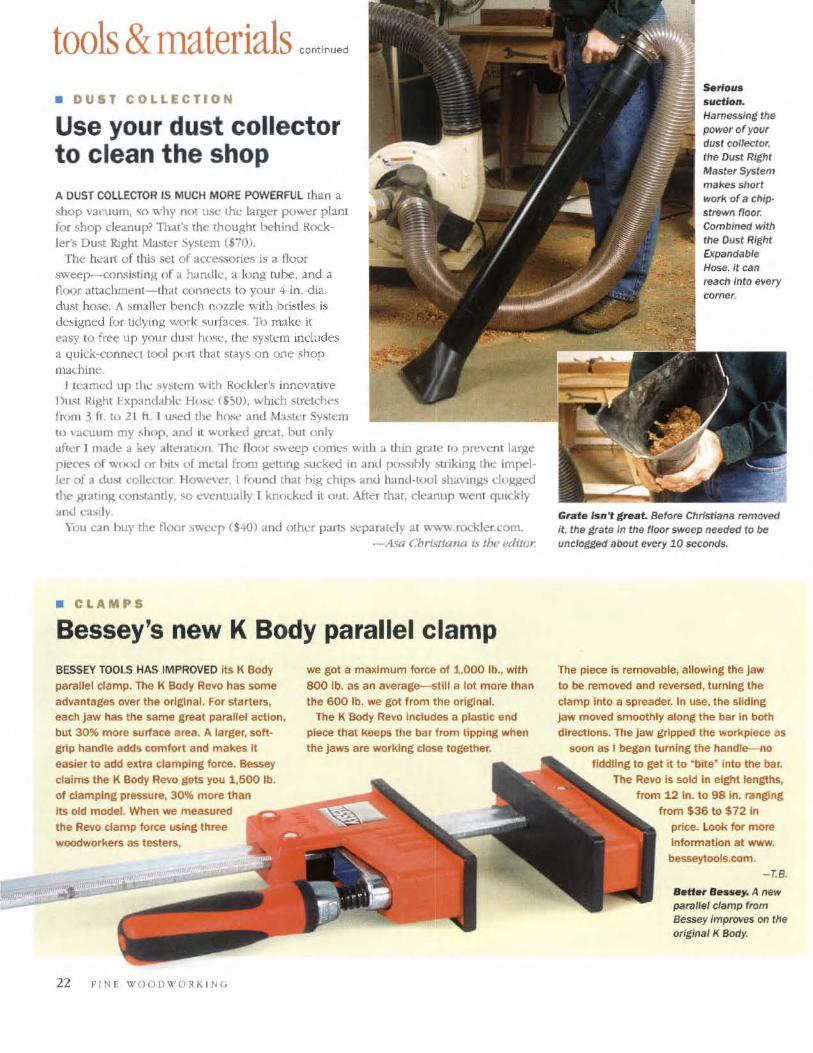
Use your dust collector to clean the shop A DUST COLLECTOR IS MUCH MORE POWERFUL than a shop vacuum, <;0 why nOl: usc the.: taq.:er power plant for shop cleanup? ThaI's the thought behind Rock~ lers Du~t RJRhl Matitcr System ($70).
The h..:art of this set of accessones is a Hoor sweep--cnns!sting of a handle, a long cube, and a floor attachment-th.H connects to your 4-in .-dia.
dust hose. A .~ malk:r b~nch nozzle with brbtles is de~igned for tidymg work "urfaces. To make it
easy to free up your dust hosc, the syskffi mdudes a quick-connt:cl 1001 port that stays on one shop machine.
I tcaml."d up the ,.,y,.,[~m with Rockier's innovative Dmt Right Expandahle H()~ ($50), which stretches from 3 fI to 21 ft I u.c;ed the h(~ and Master System to \:lCUUffi my shop. and il worked great, but o nly aftef I made a key aheratJon. The flour sweep comes with a thin gralt" to prevent large piece" of woexJ or hits o f mt:tal from geillng sucked in and pD:>Slhly .striking the impeller of a dust collecto r However, I found that hlg chips :md Imnd-iool shavmgs dogged Ihe gl"3ling (.'Qns(J.ntly, SO eventu.llIy I knocked it out. Aftt't thai, deaOllp went qUIckly and edslly.
YOII can huy the Hoor .~w""r ($40) <md other pam. sr.:pamtdy at wwwrockler.com. -Asa Christtaml Is tJl(! f!dtt01:
• CLAMPS
Bessey's new K Body parallel clamp BESSEY TOOLS HAS IMPROVED Its K Body parallel Clamp. The K Body Rovo has some
advantages over the original. For starters, each.law has the same great parallel action. but 30% more surface area. A larger, soft
grip handle adds comfort and makes It
easier to add extra clamping force. Bessey clalJT15 the K Body Revo gets you 1,500 lb.
we got a maximum force of 1,000 Ib .. with
800 lb. as an average---stlll a lot more than
the 600 lb. we got from the original. The K Body Revo Includes Il plastic end
piece that keeps the bar from tipping when the jaws are working cklse together.
of clamping pressure, 30% more than
its old model. When we measured ~",~ ...... ~~ the Revo clamp force using three
woodworkers 8S testers,
22: FINE \\:'OOD\\,ORK I NLi
Harnessing the power of your dust colh:ctOf". the Oust Right
strewn flOOT.
Combined wIth the Dust Right Expandable Hos~.lt can reach Into every
Grafe Is,," treat. Before Christiana removed It . the grate In tlte"oor sweep needed to be unclogged about e~ry 10 seconds .
The piece is removable, allowing the Jaw to be removed and reversed, turnlne: the
clamp Into a spreader. In use. the sliding jaw moved smoothly along the bar In both
directions. Tlle Jaw gripped the workpleee as soon as I began turning the Mndlll'---nO
fiddling to get it to -bite' into the bar.
The Revo Is sold In elCht lene:ths,
from 12 in. to 9B In. ranging
from $36 to $72 in price. Look for more
Infonnatlon at www. besseytools.com.
- T.8.
Better 8e..-y. A new parallel clamp from Bessey Improves on the o,;ginall< Body.

Pinnacle is defined by Webster's as
the highest point of development
or achievement. The latest offering
of router accessories that bear the
Pinnacle® name have certainly lived up
to this definition. Every detail of these
Pinnacle® tools was engineered with
one thing in mind: to provide
woodworkers with tools that empower
them. Pinnacle· tools are available
exclusively at Woodcraft.
Made In The USA
.. " Pinnacle" Premium Router Quick-lift
149078

fundamentals J.. 01 1 1 ...
7 habits of highly effective woodworkers
POWERFUL LESSONS FOR PART-TIME FURNITURE MAKING
BY MATT KENNEY
aking furniture iso't easy, especially if you do it in your spare time. When it comes to complicated tasks like dovetailing a carcase or sanding a big piece. it's chalknging to gt~t consi:>tenl results when working in short hurst.;;
I've long thought that if I could make wiser use of my limited shop time, I'd make fewer mistakes , Io":et more dooe, and build better furniture . To that cnd, I recently asked our contrib\lting editors for suggestions, Tappin!': their combined
24
PlallyoUoyork Begin each project by drafting an over
all plan. This plan should start wIth a detailed
dmwing and cutlist, but just about everyone
agreed It pays to think through the whole proj-
ect in advance and map out a 10&1eal step-by-
step sequence 10r every facet, from milling and
shaping parts to Joinery, glue-up, sanding, and
finishing. (For more, see two earlier Fundamentals:
"Making a cutUst" by Philip C. Lowe, FWW #176;
and "Develop a game plan" by Stewart Crick, FWW
US7.) Planning ahead yields a number 01 benefits. It
helps ensure that you won't forget any crucial steps.
It also breaks up the project Into a series of tasks,
each of which can be made small enough to treat as a
goal for an Individual shop session.
As you develop your plan, you'l1leam to spot natu
fal breaks In the action that affofd their own very
re .. 1 Woodworking advantages. For Instance, If you
FINE WOOOWORKIC'(G
decades of experience. ~Hrprisin).l;ly" none of them focused on technical skills; I guess these just come naturally over time. Instead, their advice deal! with things like project planning, tool maintcnancc, and basic mill ing operatiom. And there was a surprising amount of agreement among them.
In all, thdr tips boiled down to a set of good bedrock habit~ that will enhance anyones wurk and t:njoyment in the ~h()p. \'(fith apologie.~ to Dr. Stephen H. Covey (author of The 7 Habits ofHigh(v E.Oective People), here they are.
conclude 8 shop seSl:llon with a final sanding of your
project, you'll be ready to apply finish when the next
session starts-after the sanding dust has completely
settled. You'll also find that short shop sessions are
Ideal for applying a single coat of finish that can dry
during the Interval between them.
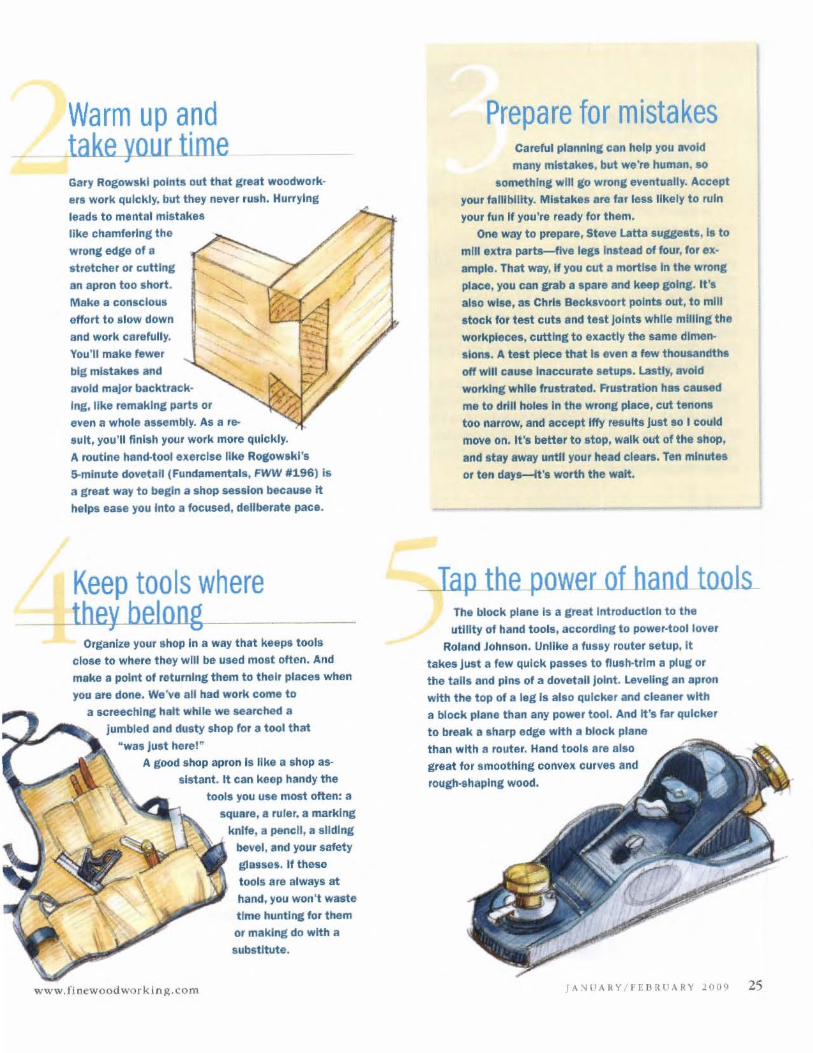
Warm up and lake yoU[1ime Gary Rogowski points out that great woodwork
er. work quickly. but they nBver rush. Hurrying
leads to mental mlstakea like chamfering the
wran, edge of 8
stretcher Of cutting
an apron too short. Make a conscious
offort to slow down
and work carefully.
You' ll make fewer
btl mistake. and ayold major backtrack
In8. like remaking part' or
even a whole assembly. As a re
sult, you'll flnl.h your work more quickly. A routine hand·tool exercise like Rocow1kl '.
5-mlnute dovetail (Fundamentals, FWW .196) Is
a great way to begin a shop session because "
helps ease you Into a focused, deliberate pace.
Keep tools where they belong
Organize your shop In a way that keep. tools
close to where they will be used most often. And
make a point of returning them to their places wltsn
you are done. We've all had work come to
a screechlnC halt while we searched 8
Jumbled and dusty shop for a tool that
~was just herel "
A good shop apron Is like a shop as·
Iistant. It can keep handy the
tools you use most often: a
square, II ruler, a marking
www.fi newo od worki n p;.com
knife, a pencil, ill sliding
bevel , and your safety
glasses. If thesa
tools are always at
hand, you won't waste
time huntlnc for them
or making do with a
substitute.
Prepare for mistakes Careful plannln, can help you avokl
many m~ake., but we',e human, to
somethlne will go wrona: eventually. Accept
your fallibility. Mistakes are far less likely to ruin
your fun If you're ready for them.
One way to prepare. Steve latta suUeats, Is to
mill extra parts-five Ie,s Instead of four, for ex·
ample. That way, H you cut • mortise In the wrong
place, you can &tab a spare and keep goln,. It's
also wise, as Chrle Beckavoo,t points out, to mill
.tock for test cuts and te.t Joint. while mllllne the
workpiece., cutting to exactly the same dimen-
sk)ns, A te.t piece that Is even It few thousandths
off will cause Inaccurate .etups. lastly, avoid
working while frustrated. Ffusturtlon h8. caused
me to drill hole. In the wrong place, cut tenon.
too narrow, and accept Iff)' rHutia Just so I could
move on. It's better to atop, walk out of the shop,
and stay away until your head clears. Ten mlnut ••
Of ten da),s-it'. worth the wait.
~ thELP-QWBI of hand tools The block plane is a great Introduction to the
utility of hand tools, according to power·toollover
Roland Johnson. Unlike a fusty router setup. It
takes Just a few quick passes to flush·trlm 8 pluc or
the tails and pins of a dovetail JOint. leveling an apron
with the top of a leg Is also quicker and cleaner with
a block plane than any power tool. And It's far quicker
to break a sharp edge with a block plane
than with (I router. Hand tools are also
great for smoothing conve)!. curve. and
rough·shaplng wood.
JA"ll1ARY F E BR U A RY 200>;) 25
fundamentals cooll""
Document _your progress Sometimes, I leave the shop
and don't get back until a week
or more has passed. The lapse of
time can make it hard to remember
details. Suppose, after measuring a
cabinet opening at the end of a previous
•
shop session, I decided to widen the stiles for the door
I'm about to build. Or did 11 With no reminder, I might go
merrily on my way at the start of the next session, milling the
pieces to the width shown on the drawing, and end up having to
remake them.
To avoid such gaffes, take detailed notes about what you are
doing and thinking before you leave the shop. A quick note
" widen stiles ~/4 In. ~-wltl put you right on track wnen you return.
In addition, a note or two made on your original drawings will help
you keep track of modifications to the design should you decide
to build the piece again.
PHASE-A-MATIC
26 Fl'<E WOODWORKING
Casebook #8 Covering all the bases: three more configurations give yet more interesting ways to work with the Wood Rat
The new MB3 MiterBox holds work at any angle, square to the WoodRat. Mitering for secret dovetails, plllling legs on tables? Easyl
visit WoodRat.com REItDH SERVICE NO. 6S
Sharpen and tune tools regularly Sharpening tools Isn't fun. Neither
is checking the accuracy and setup
of your machinery. But it's really an
Investment in the quality of your work
and the quality of your experience In
the shop. Nothing slows you down
more than dull or out-of-tune tools,
Rogowski says, Plan a shop session
specifically to sharpen and maintain
your machines. Perhaps the best time
to do this Is between proJects, so you
won't be interrupting other work. In
this way, you'lI have come full circle
and be ready again for step one, which
is planning your next project.
Trend A irshield Pro • A ~ui~·i n quiet f3n keeps a l.'Orr.:tant tl(lw
01 fiHere(! ai, ac'OSSlilC lace
• PfWI(\eS excelitlnt protectkm !rom inhalaloo 01 h<!rmllll 00:;\ With tWin fine dust liners
• Optimum center 01 Qravily tor b<lIMce al1d comlort
• ~ Ilrlu, Ni·MH hatlffi")' irdJd .. cIl.rger
Airware America GQII LlS nr VI '" "'" .. ~!)$lt~ todioyl
800-328-1792 www.airwal"eilmel"ica.cQm
Pe'oonai SetY..,., . FilS' o./'opp.1g K«:pir'\9 ",OOdw",'o;",. ""Ie lor ov" 3(l y--.

Efficiently Join Wood At Any Angle The Hoffmann DoYetaIl Joining syste.m ............ I. !he PIOYefI way 10 quickly and 0lil
efIIcienlty jOin 'MXld 1\ any eogle. ElimlMte oIIset comers. and C06Iiy repal~ •
• No need lor damps, nalls, or $aapIH. Machine. avail.bIe lor every size
-.~""'~ Hoffmann Machine Company. Inc.
Toll-free: (866) 248~0100 http://WWW.Hoffmann-USA.com
Cabinet & Millwork Shops. Cont,...ctors • Remodelers Design/Build Firms" Project Managers
Commercial & Residential Casework The quality you demand. The service you deserve .
.. Easily assembled,
frameles8 cabinet boxes .. Storage & Closet Systems
.. Custom-sized casework
.. Drawer bo)(os
.. Adjustable shelves
.. Full overlay slab-style fronts -
.. Superb customor service -_ •
.. Increased profitability
.. Highet'" productivity
.. Bottor cost control
.. Consistent quality
For ITIOfe Informallon or to aownIoad III FREE <IigiIal cat.8log.
plee.se visit our wetI$lle .
www.fin ew oodw o rkin g.co m

DEI.M«)RS[ ~INSTRUMeNTCQ=
~"'" A"""'«" '"<.0 "'.
When only the details matter.
www.delmoorat.co".
I1t:Am:M Sf.RVlCE :'>0.113
28 f'IN~ woonWORKING
o
READER SERVICE 1'>0. 13
VAKuum Pressing equipment Air-Powered Ivenlurl) & Electric Vacuum Systems
Polyurethane & Vinyl Bags I~ Slock Slnl;
Custom Bags & Frame Presses (Shippe<! YI1t1lin 2~ hr. 99%)
Flip top Frame Presses (10 Slocl! 51201)
Profes5ion;r1 Systems with .. x 8 bag from $555
FOIa hi ~'pri(»1Iat call
800547-5484 Be sure 10 ask for OUI free 40 minute
prodUC1 line cd·rom
Quality VAKuum Products. Inc. 043 Bradford St. Concord, MA 01742 P~ont: (178)36'-21148 - Fa>; (871) 36i-:lf21 - E-Mait "'"p@q .... ity ... k.com
fsarmo, TnI}s, PIaill' Bullet your own el/lulc (limping v,II., f
Th. ullim.to W<>OdwGf$clrlrJ IH,*,OI
'~~U*GIINIlMl~OI
. ~u .......... U!1 ,M REAlI. "Cu~
~ plant rovd. 00il .... i<>ot»"" .1<>voI, waIer taniI;, 1211 oOeclr>: system, ~bin"' •. !bot h6IctJ 10> ~. Sieepo 1M> inoJdol trotl r..-.!)jn .• ' x S', 900 h
"
K£ADEI\ SI'.JMCL NO. 93

Satisfy your most important client The b~1 projtcu aren't for. or about yourself And when someone .special U: Involved, safety is even more criti
cal. With an mnovadvc IOrsion mcdunism tC5ted to 25.000 cycles, our new
Lid·Smy Hinges hold lids open at almost any angle so her fi ngers .nay secure and your mind mys at casc
another Wl-y Rockler helps you C"IlU with ConfiJ~nu.
Rodder Woodworking and Hardware - Since 1954
'-'" ~ lor d .!()!( 11((1/ 1(111 or PI! i'ifrt/os //Ilf Rockler.conl 1-877-ROCKLER
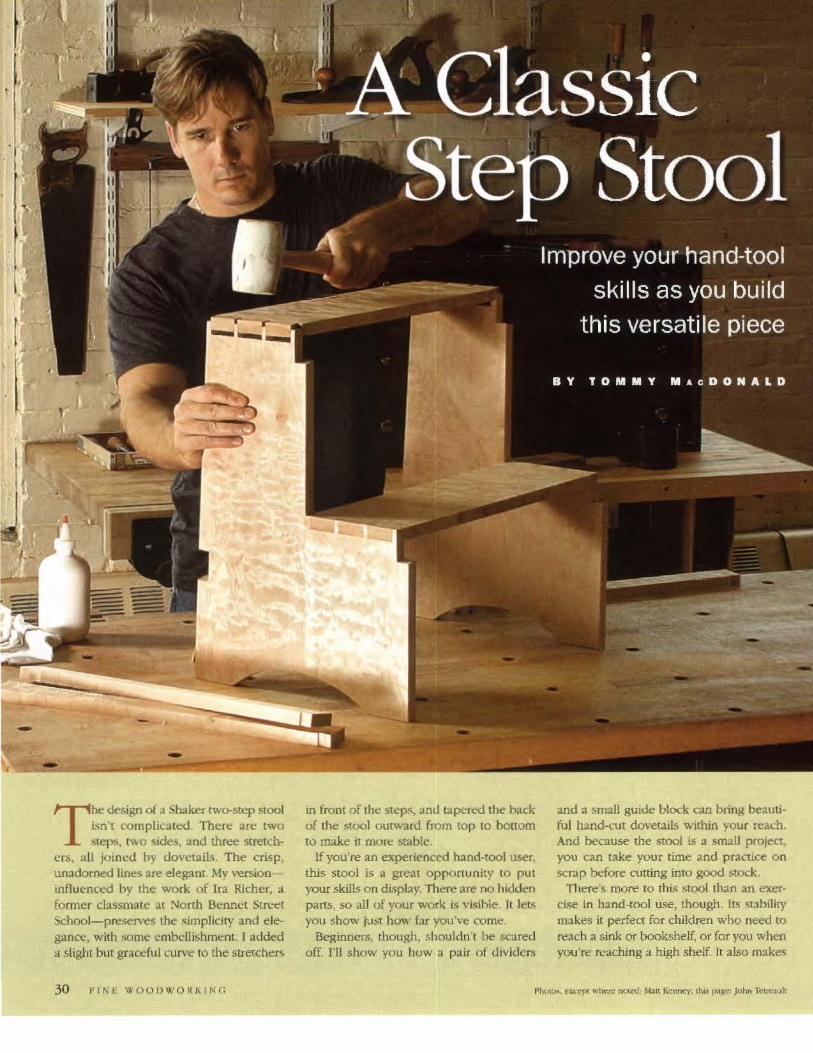
T he dt"Sigrl of a Shaker rwo-srep stool
i:m't complicated There arc two steps. two sides, aocl three strelch
ers, all jOined hy dovetails The crisp. unadorned 1i0000s are elegant My versjon~ influenC"<X:I by the work of Ira Richer, a former ciassmate 3r North Bennet StfL-et School-preserves the simplkity and elegance, with ~mc cmbclli~hmt:nt. I added <I slight but graceful wrve to the stretcher;<;
30
in front of the slep. ... anJ laper(">d the back of the stool outward from top to bouom to make it mort:: stable.
If you're an experienced hand-lOOl u5er, this stool is a great opportunity to put your skills on dL5play. There are no hidden parts, so all of your work is visible. Illet." you show just h<n. far you've come.
Beginners, though. shouldn", be scared off. I'll show you how a pair of dividers
and 3. small gUide block can b ling beautifu l hand-CUI dovetails within your reac.:h. And because the stOOl is a small project, you can take your time and practice on SCrJ.p before cuUing into good stock.
111ere's more to thi. .. slool than an exer· cLo;e in hand-tool use, though. [l~ ~t3biliry
makes it perfect for children who need to reach a sink or bookshelf, or for you when you're reaching a high shelf. It also make. ..
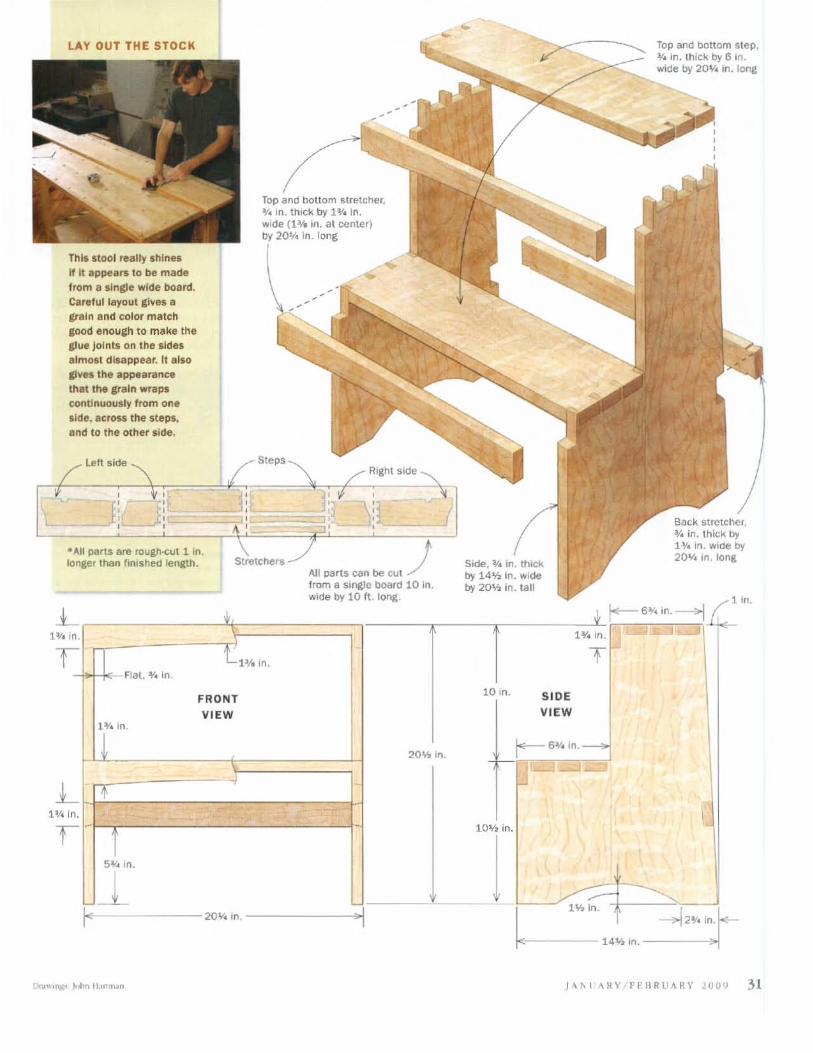
LAY OUT THE STOCK
This stool really shlnel If It appear. to be made Irom a single wide Doard. Caralullayout gives a grain and color match good enoue:h to make tha ,Iue Jolntl on the Iide. almost disappear. It allo lives the appearance that the grain wraps continuously trom one Iide. acrHS the steps. and to the other side.
left side
, ,
J ' , , , :L.-::
Top and bottom strelcher, ¥~ In. thick by 1¥~ in . ..... ,de in. al center)
In. long
Right side
, ,{
,
·AII parts are fOUgh-<:ut l in. longer than fin ished lenath. Stretchers
All parts can be cut ) trom a slnglQ board 10 In. wide by 10 ft long . ,
H', i 0-T I 'L 1111 in.
Flat. 'Y, in.
FRONT
VIEW
:T'in
20'h In.
I ~ -- .. 1'/, In - ..
51in.
..1 • 20V,'n . •
Side, ¥~ in. thick by 14'12 in. WIde by 20." in. tall
oj.
Top and bottom step, ¥~ In. thick by IS in . .... ide by 20V~ in. long
6""~ In .
Back strctcl'ltlr. ¥, In. thick by 1 'Y~ In. WIde by 20V, In. long
-
1¥~ In. I- 01- ' ..... ~ T
lO,n. SIDE
VIEW
1-'--6."0_-.. ... --.
10'h in . ~
1 1:~ ------- 2"1. In.
14¥.. ,n.
JlIl'.l ARY FEBRUARY ~OO') 31
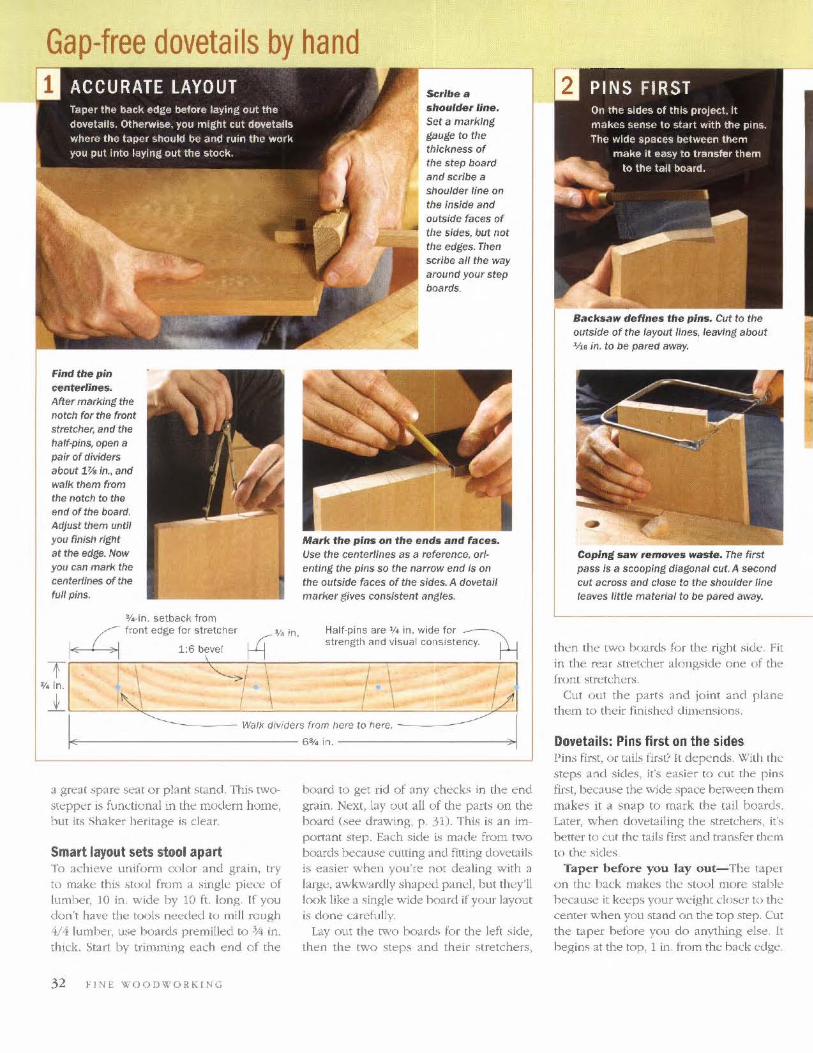
Gap-free dovetails by hand
Find the pin I:t!nterline5. After marking the notch for the front stretcher, and the half-pins, open a pair of dividers about 1%.10" and walk them from the notch to the
end of the board. Adjust them until you finish right at the edge. Now you can mark the centerllnes of the full pins,
>(~·in. setback from
Scribe a shoulder IJne. Set a marking gauge to the thickness of the step ooara and scribe a shoulder line on the inside and outside faces of the sides, but not the edges. Then scribe all tile way around your step boards.
Mark the pIns on the ends and faces. Use the centerlines as a reference, orienting the pins so the narrow end Is on the outside faces of the sides. A dovetail marker gives cons/Ment angles.
I r:7~ In. ~ front edge for stretcher " - Half-pins are '1~ in. wide for ~
I 1:6 bevel II strength <lnd visua l consistency_
a great spare seat or plant :"land. Thi~ twostepper is functional in the modern home, hut its Shaker heritage is clear.
Smart layout sets stool apart To achieve uniform color and grain, try
to make this Mool from a single piece of [umber, 10 in_ wide by 10 fr. long. If you don't have the tools needed to mill rough 4/4 [umher, use hoard~ premilled to 3A in. thick. Start by trimmlOg each end of the
32 fINE \VOOnWORKING
board to get rid of any check; in the end grain, Next, lay Ollt all of the parts on the board (see dmwing, p. 31). This is an important step. Each side is made from two boards because cutting and fitting dOvet.l ils is easier when you're not dealing with a large. awbvardly shaped pand, but they'll Irx)k like a _~ingle wide hoard ifyollf layout is done t."ard\l lly.
Layout the t\\'O hoard~ for the left side, then the two ~teps and their stretchers,
Back_w defines the pins. Cut to the outside of the layout JInes, leaving about "I .. in. to be pared away.
Coping saw removes waste. The first pass is a scooping diagonal cut. A second cut across and "lose to the shoulder !lne leaves IitUe materia! to be pared away.
then the two board:. for the right side. Fit in the rear stretcher alongside one of the fron t stretchl:[S .
Cut ouT the parts and joint and p lane them 10 Their tlnblwd dimensions.
Dovetails: Pins first on the sides Pins first, o r L.Tib nr,~t!' lL dqx'nds. With The steps and si de.~, it's ea.~ier to cut the pins fir!>t, becau~ the wide space bttween them
makes it a snap to mark the tail boards. Later, when dovetailing the stretchers, it's
better to cut the tails first and transfer them to the sides
Taper before you lay out-The taper on thl: back makes the ,stoul more stable hecausc it keeps your weight doscr to the center w hen you stand on the top .~ter. Cut the taper before you do anything else. II begin,~ at the top, 1 in. from the hack cdgl:.
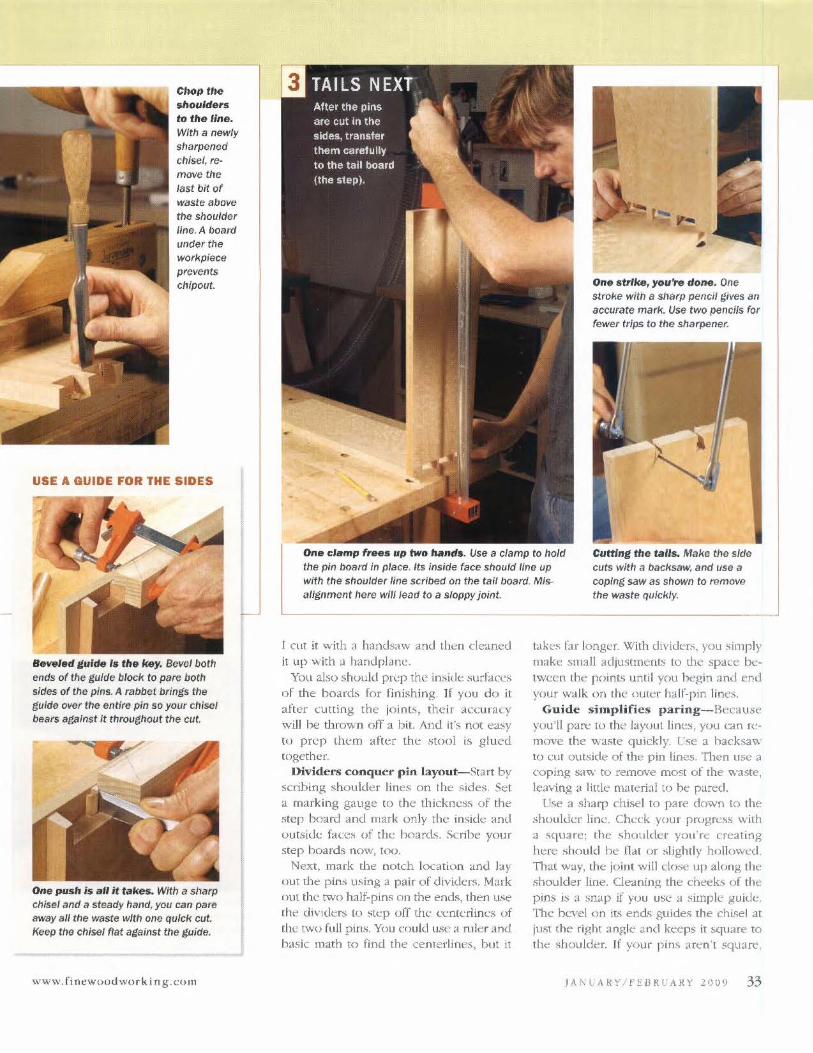
Chop tlte $houlders to the line. W/tll a newly sharpened chisel. remove the last bit of waste abo~e the shoulder IinfJ.A board unaer tile workpiaet)' pre~ents
ehipout.
USE A. GUIDE FOR THE SIDES
Beveled guide Is the key. Bevel both ends of the guide block to pare both sides of tile pins. A rabbet brings tht)' guide over the entire pin so your chisel bears against it throvgllout the cut.
One push is .11 it r.kes_ With a sharp chisel and a steady hand. you can pare away al/ the waste wfth one quick cut. Keep tIKI chisel fltIt against tile guide.
www. fillO;.wovJ wor k i ng .{;om
-
One s trIke, you're done_ One stroke with a sharp pencil gives an accurate mark. Use two pencils for fewer trips to the sharpener.
One c:lamp fr_s up two hands. Use a clamp to hold the pin board in place. Its inside face should line up with the shoulder line scribed on the tail board. Misalignment hore wll/lead to a Sloppy jOint.
Cutting the tails. Make the side cuts with a backsaw. and use a coping saw as sllown to remove the waste quickly.
r cut it with ~l handsaw and then cleaned it up with a iwndpLme.
You also should pr~p the inside surfaces of the hoard~ for finishing, If you d o it after cuning the joints, their ,t{;cufacy will he thrown ofT a bit. And it".s not easy to pr~p them after th~ stool is glued wgcrher.
Dividers conquer pin layout- Start by scribing shoulder lines on the sides. Set a marking gauge to the th ickness of the s tep bo ard and mark only the inside and o utside fac<~~ of the boards. Scribe you r step hoards now, too.
Next, mark the notch location and by out the pins tlsing a pair of dividers. Mark out the tv.'o half-pins on the ends, then use (he dividers tu step off th~ centlTlines of th~ two full pins. You could usc a m ler and bask math to find the cenTerli nes, but it
takes far longer. With dividers, you simply make small adjustments to the space between the points until you begin and end your walk on the outer ha lf-p in lines.
Guide simplifies paring-Because you'll pare to the layout lines, you cao remove the waMe quickly. Use a hacksav, to cut outside of the pin lines. Then lise a copioj.( saw to remove most of the waste, leaving a little material to be pared.
Use a sharp chisel to pare down to the shoulder line. Check your progress with a .square; the shoulder you're creating here shou ld be nat or slightly hollov.:~d. That way, the joint will close up along the should er line. deaning the cheeks of the pms is a snap if yuu us~ a simpk guide. 111C lx:vcl on its ends gUides the chisel at just the right angle and keeps it square to the shoulder. If your pins aren't square.
JAl\'U ANY ! f'EBR lI ARY 2009 33
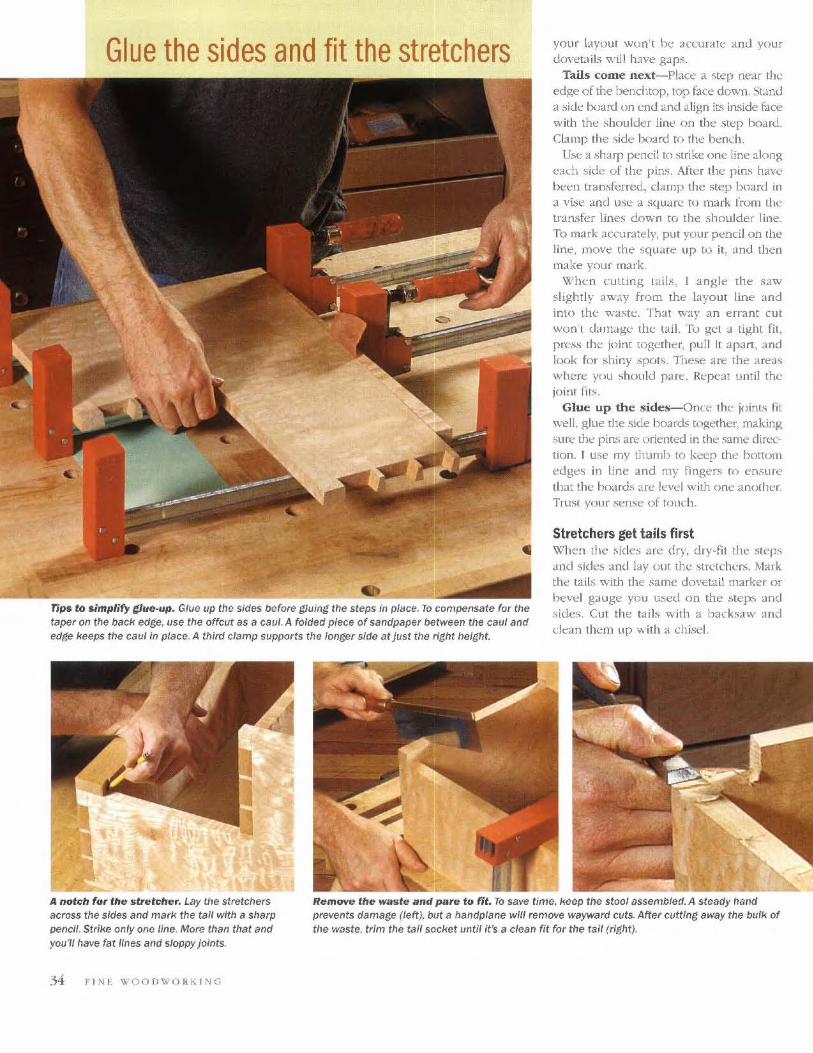
Glue the sides and fit the stretchers
rips to sintplify t lue-up. Glue up the sides !:lefors gluing the steps in p/8ce.10 compensate for the taper on the back edge, use the offcut as a caul. A foldea piece of sandpaper between fhe caul and eage keeps the ca ul In place. A third clamp supports the longer side at just the right height.
your layout wun't be accurate and your JOH.'u ils wil l hJve g:lp.~ _
Tails come next-Place a step near the edge of the benchtop, top face down, Stano a side txnlf(l on end and align its inside face
with the »houlder line on the step hoard. Clamp the ~ide ooard to tbe btnch.
Use a sharp pend! to strike one line along each side of the pins. After the rim have been tramferred, clamp the step board in a vise and use a squaT\: to mark from lhe transfer lines down to the shoulder line. To mark accurately, put yom pencil on the line, move the square up to it, ami then make your mark.
When Clilting taib, I angle the saw slightly away from the layout line and into the waste. That wayan errant cut wun t tbmage the tail. To get a tight fit , press the join[ together, pull it apart, and look for shiny spots. These are the areas where you should pare. Rq)Cat until the joint filS.
Glue up the sides-Once the joints fit welL glue the .~ide boards together, making sure the pins are oriented in the same dill...'Ction. [ use my thumb to keep the bottom edges in line and my fingers (0 ensure tbat the ooards are level with one anothef. Trust your .<;ense of tOllch.
Stretchers get tails first \'fhen lhe .~ides afe dry, dry-fit the steps and sides and hq out the stretchers. Mark the tails with the same dovetail marker or bevel gauge you u:-,ed on the steps and sides. Cut th e taib with a hacksaw and dean them up with a ..:h iscl.
A notch for the stretcher. Lay the stretchers across the sides and mark the tall with a sharp pencil. Strike only onc linc. More than that and you'll have fat lines and 5/0ppy joints.
Remove the walde and pare to fit. To S<lve time, keep the stool assembled. A steady hand prevents damage (left), but a handplane will remove wayward cuts. After cutting away the bulk of tile waste, trim the tail socket until its a clean fit for the tail (right).
34 f lNE W O ODWORKJ NG
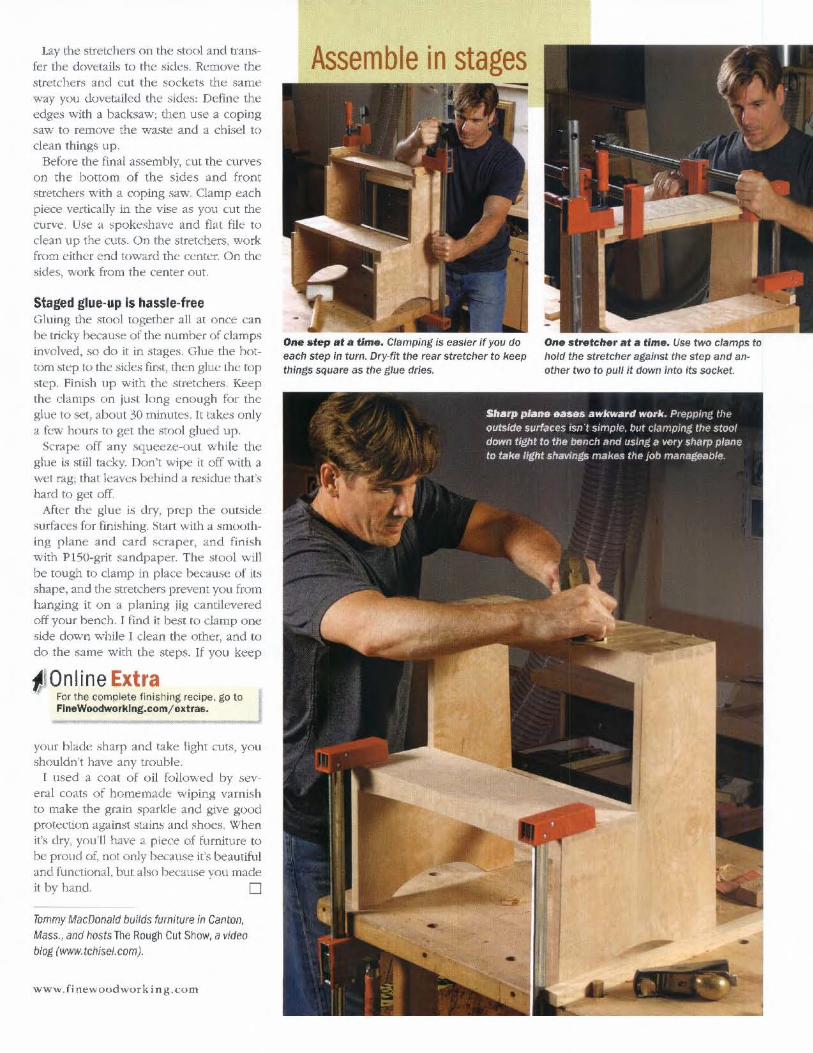
Lay the stretchers on the stOCll and transfer the dovetails to the .-;ide.-;. Remove the stretchers and cut the .-;ockets the sameway YOll dovetailed thc !Sides: Define the edges with a backsaw; then use a coping saw to remove the waste and a chisel to dean things up.
Before the final assembly, cut the curves on the bottom of the sides and front stretchers with a coping saw. Clamp each piece vertically in the vise as you cut the curve Use a ~pokeshave and tlat file: to clean up the cuts. On the stretchers, work from either end toward the center. On the sides, work from the center out.
Staged glue-up Is hassle-free Gluing the .~t()()l together all at once can be tricky because of the number of clamps involved, so do it in stages. Glue the hottom step to the sides first, then glue the top step. Finish up with the stretchers. Keep the clamps on just long enough for the glue to set, about 30 minutes, It takes only a few hours to get the stool glued up.
Scrape off any squeeZe-O\lt while the glue is still tacky. Don't wipe it off with a wet rJg; that leaves hchind a re.-;idue that's h,-lfd to get off.
After the glut b dry, prep the outside surfaces for finishing. Start with a smoothing plane and card scraper, and finish with P150-grit sandpaper. The stool will be tough to clamp in placc because of its shape. and the stretchers prevent YOLl from hanging it on :> planing jig cantilevered off your hench_ J find it best to clamp one side down while I dean the othcr, and to do the same with the steps. If you kI:ep
~Online Extra For the complete finishing reCiP€" ::Joto FlneWoodworklng.comjextras. -
your blade sharp and take light cuts, YOli
.-;houldn'l have any trouhle. J used a coat of oil follov,'ed by sev
er.!l coats of homemade wiping varni~h to make the grain sparkle and give good protection agaimt staim and shoes. When it's dry, you'll have a piece of furniture to be proud of, not only beca\lse it's beautiful and functional. but abo bc<:ause you made it by hand. 0
Tommy MacDonald builds furniture in Canton, Mass., and hosts The Rough Cut Show, a video blog (l'.oWW.tchisel.cOm).
www.finew-oudwurking.com
Assemble in stages
01Ht .rep .f a time. Clamping;s easier If you do each step in turn. Dry-fit the rear stretcher to keep fhings square as the glue dries.
One ."teher at II time. Use fwD clamps to hold the stretcher against the step and another two to pull It down Into Its s<>cket.
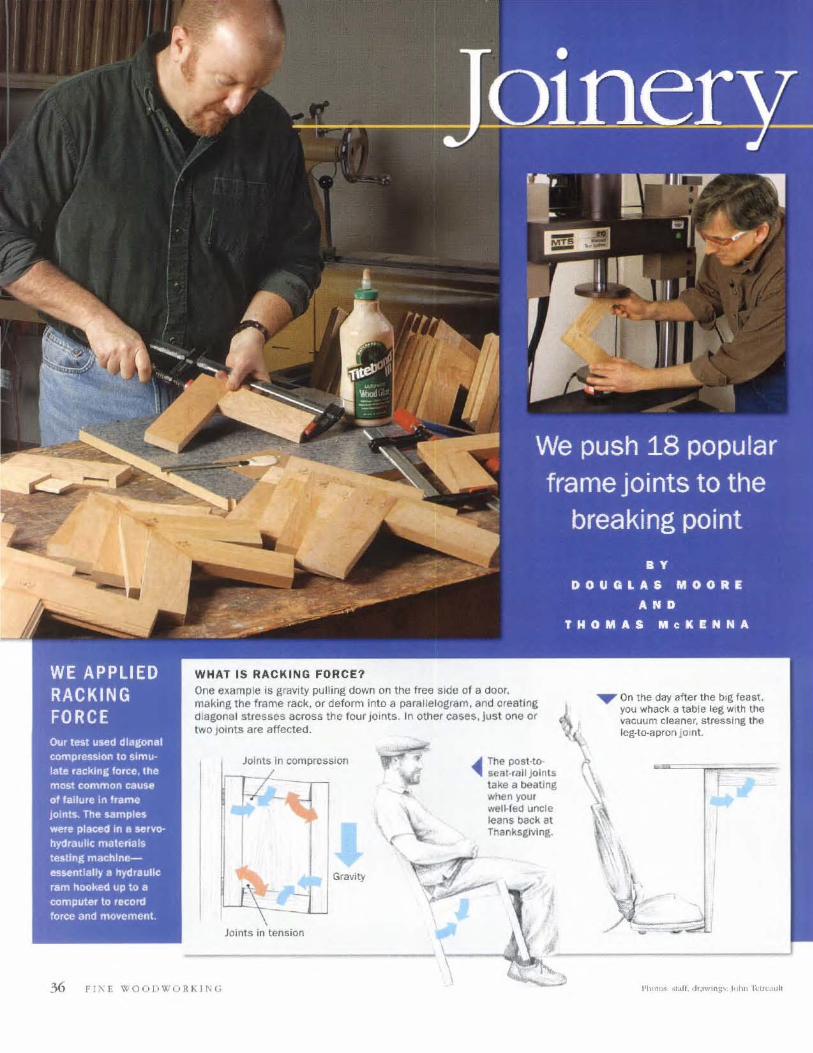
WHAT IS RACKING FORCE? One eX(lmp le is gravity pulling down on the free side 01 a door. making the frame rack. or deform into a parallelogram. and creating diagonal stresses across the four joints. In other cases, Just one or two jOints are affected.
Joints In comprcssloo
Gravity
Joint.5 in tension
FIl\E W OOD W OR "- ING
, ..II1II The POSHO-"II1II seat·rall Joints
take a beatlng when YOUI well·red uncle leans back at Thanksplng.
...... On the day after the big feast. you whack a table leg with the vacuum cleaner. stressing the leg·lo-apron jOint .
s ootout W:lcn il comel> 10 making furniture, woudworkers typi
cally ba~ their lQint::ry prer~rtn<.t::; o n ac:.thclll.::', clfi<:knc..:y, ;mu available: tools. However, joinr strenglh
al<;o is a primary roncern; aftl,:f JU, we want our furniture to lao;(
gener-.nions, wilhoul embarrassing joint failures. But how do you know which loint IS strongest?
In an attc:mpllo prov!de some Insight. Fine Woodworking lC"dmed up w ith :t group (jf re~arch ~ngint::ers at a lab in Providence, R.I., 10 break .. er ... test a hunch of (ommon woodwurking joints.
TIli:-; soun<.b strai~.\htf()rward on the surface, hut many joints have specific applications within wocxlworking. So, to simplify things and facilitate comparisons, we focused on a .~ingle applicJtion that appears In a varklY of iurnitur<.: form .... and offers maoy joinery oplioos; the frame joint. Unlike a sundi ng type of joint slJ(:h as a dowtail or box Joint, whkh L~ ml'.):o.t often used to attach (."asc o r box side..~, the frame pin! i~ a flat connection typ ically used to construct face {mnles. doors. and other fnnne-a mJ-p::md as.'>Cmhlil:s. Tahle and ~half lolnt .. v.nuld ::also fa ll roughly into this cat ... -gory.
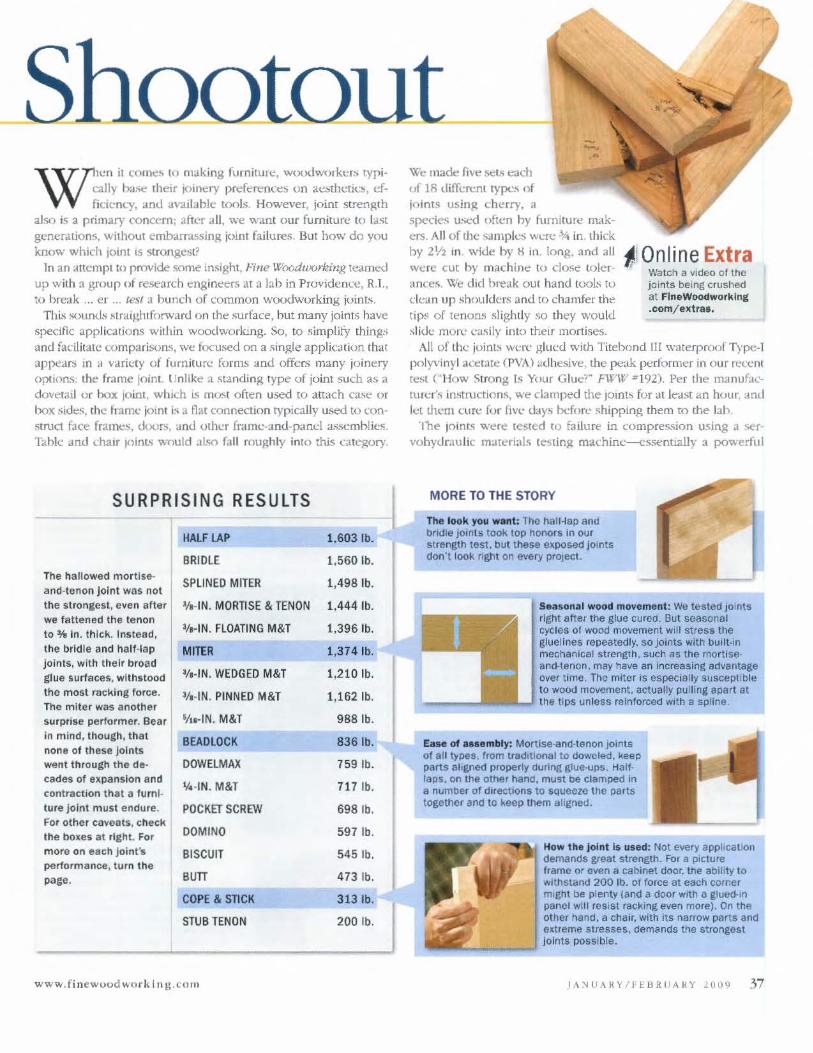
SURPRISING RES ULTS
HAlF LAP 1.603 l b.
BRIDLE 1.560 lb. The hallowed mortlse-
SPLINED MITER 1,498 lb. and-tenon Joint was not the strongest, even after 'Is_IN. MORTISE & TENON 1.444 lb. we fattened the tenon to:y, In. thick. Instead, SIt_ IN. FLOATIN G M&T 1,396 lb.
the bridle and half-lap MITER 1,374 lb. Joints. with their broad
lIt-IN. WEDGED M&T 1,210 lb. glue surfaces. withstood tho most racking force. lIt-IN . PINNEO M&T 1,162 lb. The miter was another surprise performer. Bear lilt-IN. M&T 988 lb.
In m ind, though, that none of these Joints
BEADlOCK 836 lb.
went through the de- DOWElMAX 759 lb. cades 01 ellpanslon and
'I. -IN. M&T 717 lb. contraction that a furni-ture JOint must endure. POCKET SCREW 698 lb. For other covoots, check
DOMINO 597 lb. the boles at rlght_ For more on each jolnt'$ BISCUIT 545 lb. performance, turn the page . BUrr 473 lb .
COPE & STICK 313 lb.
STUB TENON 200 lb.
www.finewoodworklng .cnrn
I
\~'e made fi.,.t! sets t!3ch of 18 different types ()f j()inls usin~ cherry. a specie~ u ...... --d otten by furnilurt! makers. All of the SJlllph.!S were ~A in. thick hy 21f2 10 w!de by H in. [ong. and all wt!re cut by machine 10 dose tokrance~. We did break out hand toob to dean up !'hollldcr,~ and to chamfer the tips of tenon.~ slightly so they would slide more ea..~ily into their mortises.
~ Online Extra Watch a ~ideo 01 the jo ints being crushed at FlneWoodworklnl .com/el'ltr •••
All of the joints wert· g lw.:d with Titehond III warerpronl Type-1 polyvinyl acetate (PVA) adhesive. the rx:;\k pt;~ rformer in our rc:~cm rest ('"!-low Stro ng L~ Your Glue''' F\VW" # l 92). Per the manufa~lurer"!! instructions, we clamped the 101Ot!; fur at Ie-dst an hour. and lei ulI.:m CUl"C fUI" five days before .. hippin~ them to (he I.Jb.
The Jo ims were tested II) failllft: in compression using a -;ervohydrau lic materials testin$( ma~him_'-CSSt!nhally a powerful
MORE TO THE STORY
The look 'ow w.nt: The hall-tap and bridle joints took top honors in our strength test. but these eKPQsod JOints clOfn look righ t on every prOJect.
5 • • son.1 wood movement : We tE-stedjolOts right after the glue cured. But scaSOIl<l! cycles of woOO OllWement will stress the gtuellnes repeatedly. so joints with built'in mechanical strength. such flS the mortise· and-tenon. may ha~e an increasing advantage o~er time. The miter is especially susceptible to wood movement. actually pulling apart at
____ ~ --'--'oJ the tips unless reinforCed With a spline
EaI.e of •••• mbly: Mortlse·and·tenon joints 01 all type!. from traditional to dowcl&d. keep parts aligned properly during glue-OJps. Hall· taps. on the other hand. must be clamped in a number of directions to squeeze the parts together and to keep them aligned.
How the ioInt Is uled: Not every application demands great strength. For a picture framo or oven a cabinet ooor. lne ability to wilnstand 200 lb. of force at each corner might be ptellt~ (and a door w,th a gtut:d-rn panel 1'1'111 roslst rackin" even more). On the other hand. a chair. with its narrow parts and eJltreme stresses. demands the strongest Joints possible.
)A:'>lUARY/FEBRlJARY 1009 37
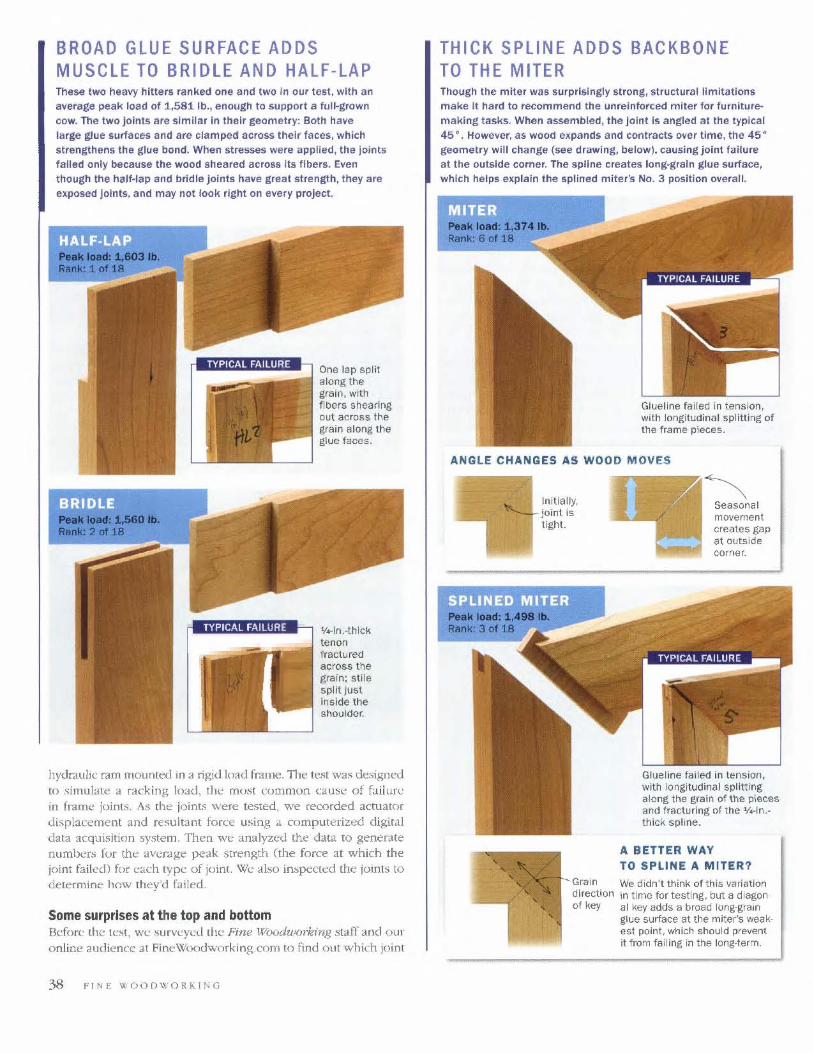
BROAD GLUE SURFACE ADDS MUSCLE TO BRIDLE AND HALF-LAP These two heavy hitters ranked one and two In our test. with an averiCIge peak 10110 of :l,58:llb., enough to support a full-grown
cow. The two Joints are similar in their geometry: Both have
large glue surfaces and are clamped across their faces, which strengthens Ihe glue bond. When stresses were applied, the joints failed only because the wood sheared across its fibers. Even though the half-lap and bridle JOints have great strength,ltley are exposed Joints. and may not look right on every project.
r'liillltilllllllElll.] One lap splil along the grain, with fiDers shearing out across the grain along the glue faces.
hydraulic ram mounted In a rigid load frame. TIle test was designed to simulate a racking load, the mo,';t common cau~e of faihm: in frame joints. As the joints were tested, we recorded acrnator displacement and resultant force using a computerized digital data acquisition system. Then we analyzed the data to generate numbers for the avcr.age peak strength (the force at which the joint failed'J for each type of joint. We also inspected the joints to determine how they'd faHed.
Some surprises at the top and bottom Before the te~t , we surveyed the Fine WtXidworking staff and our online audience at FineWoodworkinKcom to find out which join!
38 FIN E WOOO\VORII.I N G
THICK SPLINE ADDS BACKBONE TO THE MITER Though the mIter was surprisingly strong, structural limitations
make It hard to recommend the unrelnforced miter for furniture·
making tasks. When assembled, the joint is angled at the typical 45 · , However, as wood expands and contracts o~er time, the 45 · geometry witl change (see drawing, below), causing Joint failure
at the outside corner. The spline creates long·graln glue surface, whiCh helps explain the splined miter's NO. 3 position o~erall .
Glueline failed in tension, with longitudinill splitting of the frame pieces.
ANGLE CHANGES AS WOOD MOVES
lo it lally, joint is tight.
~ Seasonal movement creates gap at outSide corner.
G!ueline failed in tension, with longitudinal splitting along the grain of the pieces and fracturing 01 the 'f.·in.· thick spline.
A BETTER WAY
TO SPLINE A MITER?
We didn't think ofthi5 ~arialion in time fortesting, but a diagon al key adds a broad long·grain glue surface at the miter'S weak· est point, whiCh should prevent it from failing in the long·term.

A THICKER TENON MAKES A STRONGER JOINT The ~n. mortise and tenon did well in the test, but the performance of thinner versions wa5 surprisingly average. The results prove Ihal making tenons thicker Increases strength : The ¥t-ln. tenon was almost twice as slrong as the IradltlonallJo·ln. lenon. Adding pins or wedg" slightly compromised joint strength; however, they do provide Insurance against gluellne fallgue In decades to come. A floating lenon acted just like a traditional mortise and tenon In our testing.
grain; sti le spill just (about "" in.) Inside the
__ -' shoulder.
SIZE MATTERS
---- l.4_ln. tenon; 7:17 lb.
=--"~ 5IL.ln. tenon: 988 lb.
-;;;- -- %-In. tenon: 1,475 lb.
they'd predict to be strongl'st. Among editors, the pinned mortise and t(.!non was picked tn finish first (it was a close race). F()lk~ who took our onlim: pull prO;!dicted thO;! regular mortise and Tenon would be king. It turns out, huwever, that the half-lap jo in t provt..-d sTrongest in o ur te.~t, WIth the stub tenon bringing up the fL'ar.
Top two have lots of glue-Although we were surprised to find ' h .... half-lap and bridk' al the top of the heap, in retrospect it was predictable: Both joints have large ioog-gf"".lin glue areas and are clamped across both faces. The only way they can fa il is if one or lx)th of the ·· legs· fractu re across the grain.
Thicket'tenons are strunger-Most of OUf survey respoIldents predicted the tru"ted morti.'i<.' and tenon would be strongest, so it's no ~rpri.o;e that two ·~in. v~ions were at the TOp of the list. What's ~ignificant is the margin by which they outperfonned their lankkr iA·in. aod 5/16-io. COUSins. We noticed that reinforcing the joint with a p in or with wed~ d id not hdp the p ieces resist racking forct:s; in fatt. rin.~ and wed~es madf' the joint slightly weaker.
The lowly miter steps up--The miter has always been consider~d one of the weak links in the joinery world, :;() we were
www. fi newoodwork i n g.("om
TYPICAL FAILURE
Tenon fractured across the grain: stile spl it near glueline.
Tenon fractured across grain ; st ile split near glueline.
JAK UARy / nBR U'" " '" 39
-
TLe FOR YOUR WORKBENCH
lOp Of the bench with a handplane.
3. Ensure that Ihe base Is botll _ square and SfifblQ.
2. Fix everything from dents to gouges.
4. Clean an{1 repair rile vises.
Even .. fcce 30 years as a cabinetmaker, I st ill vividly I\!mcmher the. painstaking effon it «10k 10 hudd my
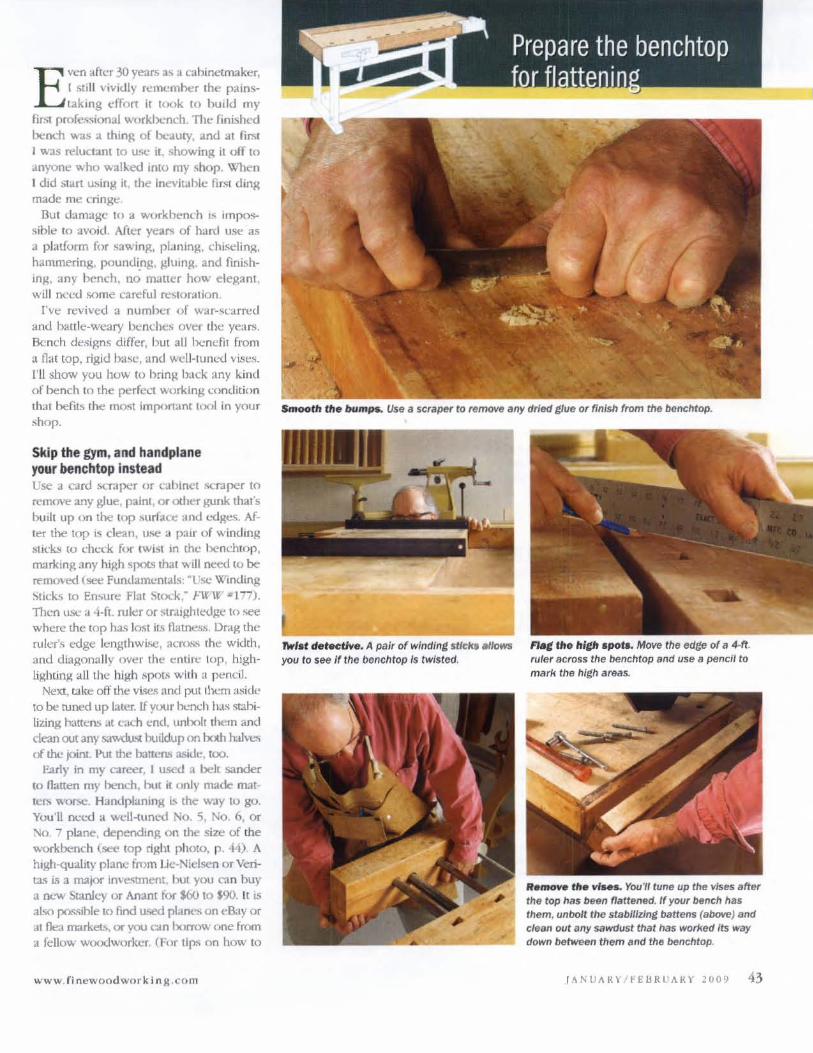
first profe.~ .. ionJI workbench. The: finished bt:1ll.:h was a lhin~ of beauty. and at fir;( I was reiucbnt to u* it. showing il off 10 .myone who walked into my shop. When I did Slar! u~into! it. the Inevltdblc firsf ding m.ll.de me cringe
But damage 10 a workbent.:h IS IIn pos
~ible to avord. Aitt'r yeaN of hard uStc' :IS a platfurm for sawjn~, p[Jnjn~, chisdinp;, hammering. poundi.ng, gluing. and finishing, any hench, no matter how elegant . ...... ill oc(.'(] some careful reslOI"'Jlion.
['VI;' revived a number of war-st;arred and battle-weary bem:hes ovt!r tht: years. I3en(:h designs differ, but all henefit from a 11m top, rigid base, and wcll-tunccl vi.~es. I'll show you 110\\ to hrin~ back nny kind of hench to the perfect working conditio n thaI befits the 1n000t import:J.nt tooi in your shop.
Skip the gym, and handplane your benchtop instead Use d cdrd SCr'.Jpcr or cabinet !iCraper to remove any glue. painl. Of" other gunk thaI's buill up on tho: lop :-urfacc: lII~d l."«~. After the lop is dean , use a P.111' of .... inding :;!id .... ~ to chc.."Ck for (wiSI in the bencillop, marking :my high ~JlCXS lhal will need to be remo\ot'd (see Fundamentals: ~l-sc Winding :-.tkks to En.,ure Flal S{ock,~ Ftr-w '-1i1).
nlt.:n uS!.: a 4·ft. ruler or ~lralghtedge to -.ee where the rop has lost Its flatlll:!ss. Drag the ruler's edge it;:ngthwL"C, acI'Os, ... the width, and diagonally over tht! I;:lltire !Op, highlighting all the h igh 1>1'01.-; with a pencil.
Next, w.ke otl' the vl~~ and put them aside to be tuned lip iall.>f. If your hench }u.~ stabilizing t:r.1!t<.-'Il!> .It <.';l.ch c:nd. unbolt them and dean out any sawdu.'iI buildup on Ixxh hah't!'i of lhc joint. t>ut the batten~ asic.le, too.
E.arly in my career, J used a belt sander to flatten m}' bench, htll rr only made mattcl'l> "'Or.iC. Handplanmg is. the way to go. You'll OI...'t:o a wcll-HtnL'd No. S, No.6, or ,"0 7 plane, depending 00 lhe sire of the workbench (see lap right photo, p. 44) A hrgh-quailtr plane from Lie-Nielsen or Veri~ ta.~ L<; a ma,ar rO\ie<itmem. but you can buy a 1lL-W Stank-y or Anam tor S60 10 $90. It is al<;() pos.<;ible to find uo;ed planes on eBay or al flea markets, or you can horrow one from a fellow woodw()rk(.!r. (For tl~ on how 10
www. flnewoodworkl n J.;.com
Smooth thelHlmps.. Use a scraper to remove any dried glue or finish from tire benchtop.
rw/., det.etlYe. A pair of winding stickS .lIowa you to see 'f the benchtop Is twisted.
n.e tlte Itielt spots_ Move the eclgt: of II 4-ft. ruler across Ihe benchlop and use a pencil to mark the high areas.
Remove tile vi ....... Yoo'II tune up the vises after the top has bun "attened. If 'fOOr bench has them. unbolt too stabilizIng battens (above) and clean out any sawdust tlrat has worked its way
down between them and the /)tJnchtop.
rANUAR'l hEllRUARY 2009 43
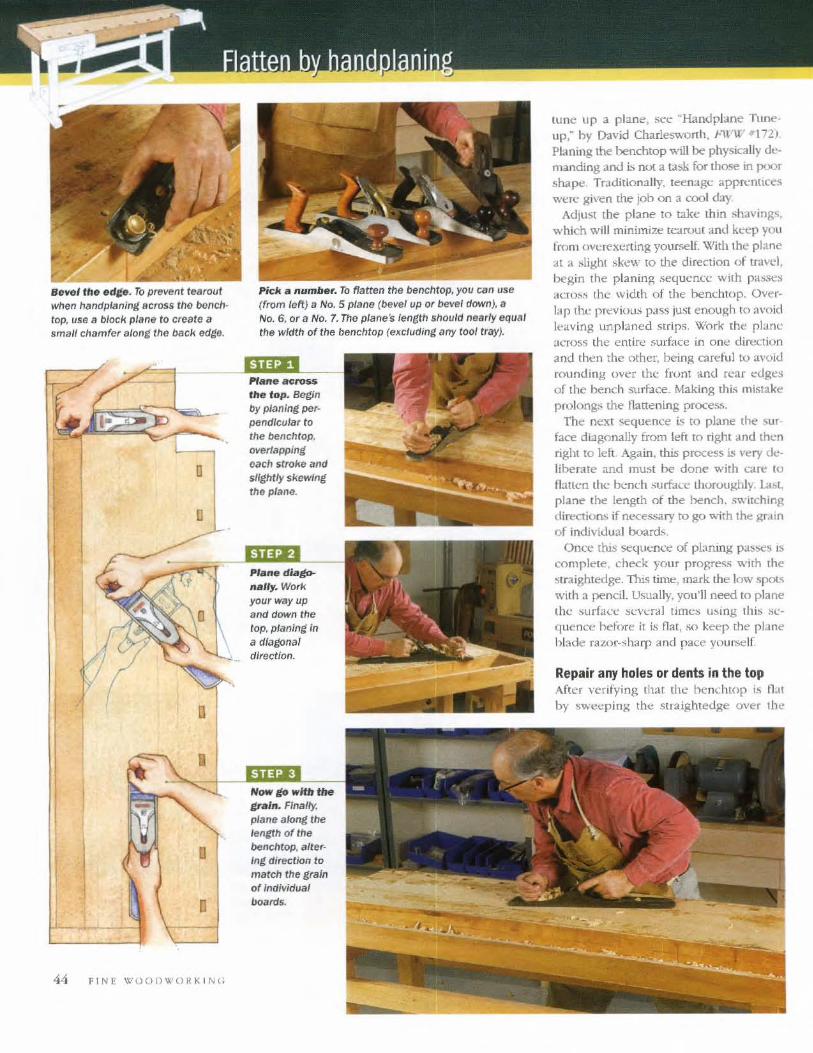
Be"el the edt_. To prevent tearout when handplaning across thO benchtop, use a block plane to create a small chamfer along the back edge,
o
o
44 FINE WOOD\l'OI!KIN(;
P/clf. ,. number. To flatten the benchtop, you can lise (from left) a No, 5 plane (bevel up or /)(Nel down), a No, 6. or a NO.7. Tho plane's length should nearly equal the width of the benchlop (eJl.cluding any tool tray).
ptane acro" 'h. 'op. Begin by pUIOing perpendicular to the t>enchlop. OlIfulapplng each stroke and slightly skewing the plane.
your way up and down the
top. planing In a diagonal direction.
length of the benchtop. alte," Ing direction to match the grain of Individual boards.
tunc up a plane, sec ~H:lI1dplane TtlOeup,~ by David Charleswollh . J-'U-'W #172)
Plan ing the benmlop will be physically demanding and i:; nut a ta~k for those in poor shape. TrJ.ditio nally. tet:nage appn.:ntlces w~re given the job on a cool day
AdJu.st the plane 10 take th in !'ihavings. which will minimi7.e tc:J.['()ut and keep you fmm overexerting yourself. With Ihe plane at a ),light ),kew to the direction of trawl. begin the p lan ing .~equence with passes acro.~1> the width of the benchlop. Overlap the previuus pass just enouRh to avoid leaving unplaned strips. Work the plane across the entire surface in one direction and then the other, being careful to avoid rounding over the front ami f!.:ar edges of the bench surface. Making thi» mi»lake plolongs the flattening proce.~.
The next sequence is to plane the 'i"ur face d iagonally from lefl lo righl and then right 10 left Aga in, this proce5S is very dcliber.lle and musl be done with I..'are 10 flatten Ihc bench ;;urfJ.(C thoroughly. US!, plane Ihe lenglh of the h .... nch. swilching dirlXtiofi.'> if nl."Cessary to go with the gr.~jn of individual board,;.
Om.'C this seqlltm:e of pl.1mng pa.sses IS complete. check your ProR~" with Ihe straightedge. This time, mark the low spots with a pencil. Usually, you'll need to plane the surface several times w~ing thb .~r.;
quence hefore it is flat, so keep rhe pl,m e blade razor-sharp and pace yom self.
Repair any holes or dents in the top After \'crirying l ila! Ihe hem:hrop i.~ tl.lt by sweeping the straightedge over the
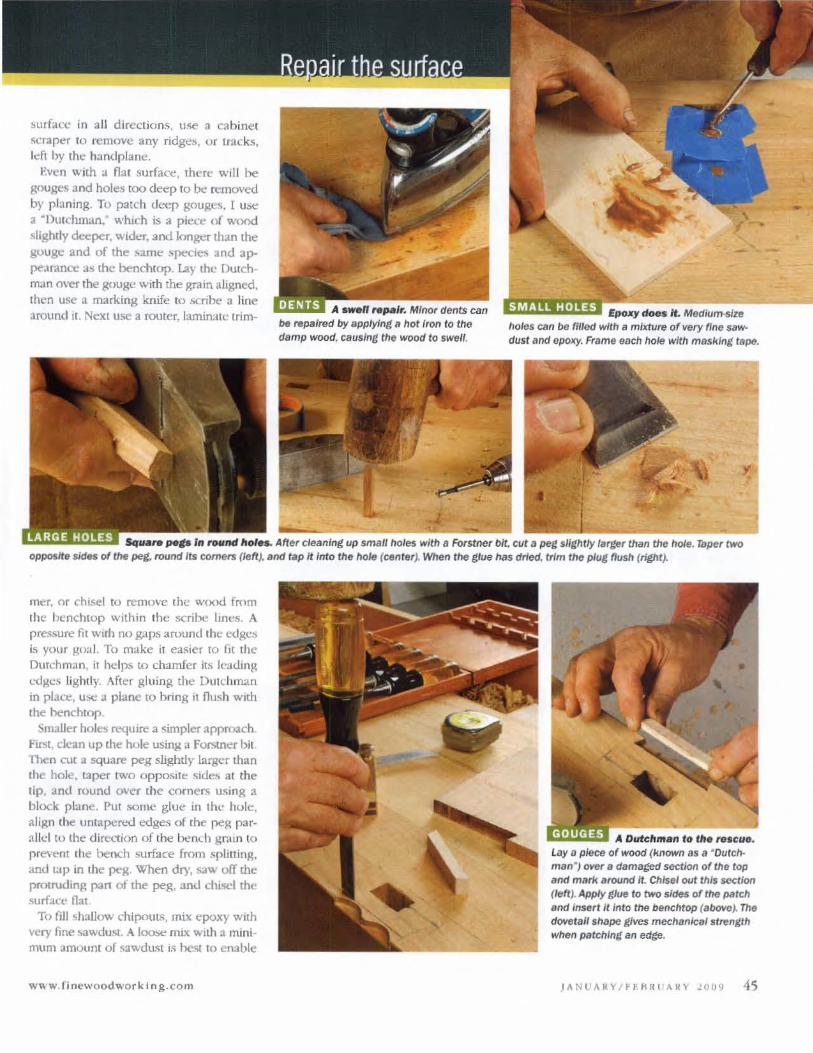
~urface in a ll directions, u~ a cllbine t scraper TO remove any ridgc~, or tracks, left by th~ handplane.
Even with a flat surface, there will be gouges and holes too deep to be removed by pbning. To patch deep gouges. I U:.t! a "Uutchm<tn." .... ·hich is a piece ()( wood slighdy deeper, wi<k1", and longer than Ihe gougl::' and of the :.ame speci~ and appearan(."\! as the benchlop. Lay me Dutchman O\'e1 lhe 8()uge with the grain aligned, then use a marking knife to scribe a line around \1. Next use a router, iaminJ.tc trim-
". \.
,, \ q -. -'" "J
A swe" ,.".1,.. Minor dents can be repaired by applyIng" hot ffOtl to the damp wood. cauSing the WOOd to swell.
~POJfy doe. It. Medlum-slze holes can be ""e<1 with a miKtufe of very fine saw· dus t and epoxy. Frame each hole with masking tB~.
LARGE HOLES Scrua,.. pets I" toll"" 1101 ... After cleaning up small holes with II Forstner bit. Cllt B peg sHgMIy 'arger than the hole. Taper two Opposltfl sides of the peg. round Its comeB (/eft), and tap it into the hole (center). When the glue has dried, trim the plug flilsh (rig.tlt).
mcr, or chisel to remove Ihe w(xKi fn)m th t: benchtop within the scribe lint:"S. A pressure fit With no gaps amund tht: edges is your goal. To make it easier to (It the Dutchman, iT helps to chamfer its leading cd8e.~ lightly. After gluing the DUllhman in place, u:.< J. plane to oring it nush with the benchtop
SnuUer holes require a simpler arproach FltSt, dean up the hole using a f<lr'itner bit Then cut a square peg slightly iargc:r than the hole. taper two opposite side-. at the tip, and round over the corners using a block plane . Put some glue in thl.' hole, align the untapert.-d edges of the reg paralic! to th~ direction of tbe ben<..h gmin to pren::nt the bench surface from splininR, and tap in the peg. When dry, saw off thl! pmtrudin~ pan of lhe peg, and ch;...",,:1 the surfaCt" flat
To fill shallow ,.:hipoUlS, mix epoxy with very fine .... wdust. A iooot' mix WIth a minimum amount or sawdust i!' he<;t to enable
www.fjnewoodworkjng.com
A Dutchman to tI •• re.cue. lay a piece 0' wood (known as a "Outen. man., over a damaged section of the top and marl( lIround It. Chlsftl out this section (left,. Apply glue to two sides of the patch and insert it into the bellChtop (abovo). The dovetail shape gives mechanical strength when patchIng an edge.
JANUANY/HfiNliANV 1009 45
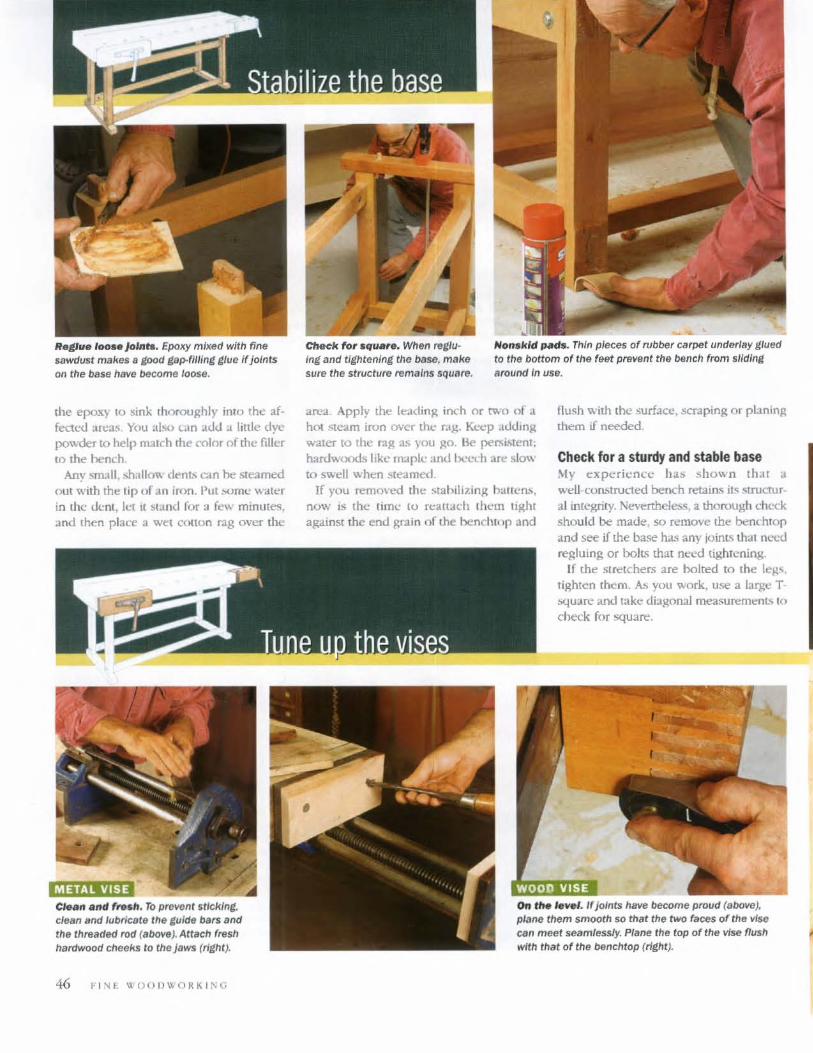
Re./ue 100 .. JoInts. Epoxy mixed with fine saWO'list makes IlltOOd ,sp-fillln, Jt/ue If joints on the b8se h8ve become/oase.
the epoxy to sink thoroughly imo the affected art:'.Is. You ,,]-,0 t.;ln add a little dye powder to help match the rotor nf the filler tn the hench
Any small, :>h;dln't>.· dents can be steamed out with the tip of .111 Iron. Put !>Orne water in the dent , Jet It ~tJ.nd ror a fe"- minutes, .md then place a wet COlton rag over the
'MiOWUiJ clean and lubmate the guide bars and the threaded rod (aboYe,. AttltCh fresh harclwood cheeks 10 thej8ws (right),
46 F I NE \\ OOI)\li'ORKII\G
Cheek fo, . qua, • • When retluIng and tightening the base. m8ke sure the structure remaIns square.
Non.kld ".d., Thin pieces of rubber c8rpet underl8Y glued to the bottom o( the feet pr6'1'enl the bench from slldlnt "round In use,
:.1rt!".1 Apply the [e;l.din~ ioch or f\Jv'() of a hot ste-.Im iron over thl" r'\~. KI."Cp illh . .hng water to the rag as you go. Be per;i. ... tenl; hardwoods like maple and Ix.'t..'t..h are slo\\ to swell wht:'fl ~te-.. med
If you remm-ed the ... tahi1izing !-lanen ... , now is the time to rcaudt"h thl..'m u~llI
against the end ~rain of the henchfop and
flush \\ ith the ",urface, .scraping or pbninll them if needed_
Check for a sturdy and stable base My experience has -; hown th .1t a well~l."On.-;rrut.1ed bench retains ire; structural Integrity, r..t!Verthele.s, a thorough check should be mad~, so remove the iktuhfOP and see if the base has any joints thaI nt.'Cd reglUIng or bolts that m:t.-d tightening.
If the stretchers are bolted to the leg'_ tighten them. A., yuu work, use a large T .-.quare aru.ltake diagonal measurem~nt:-. 10
check for square.
On r". '.'1'.'. If joints h8'i'e become proud (aoo'i'8), plane them smooth so rhat the two faces of the Vl'se can meet seBmlessJy. Plane the top of the vise flush wIth that of the benchtop (right).
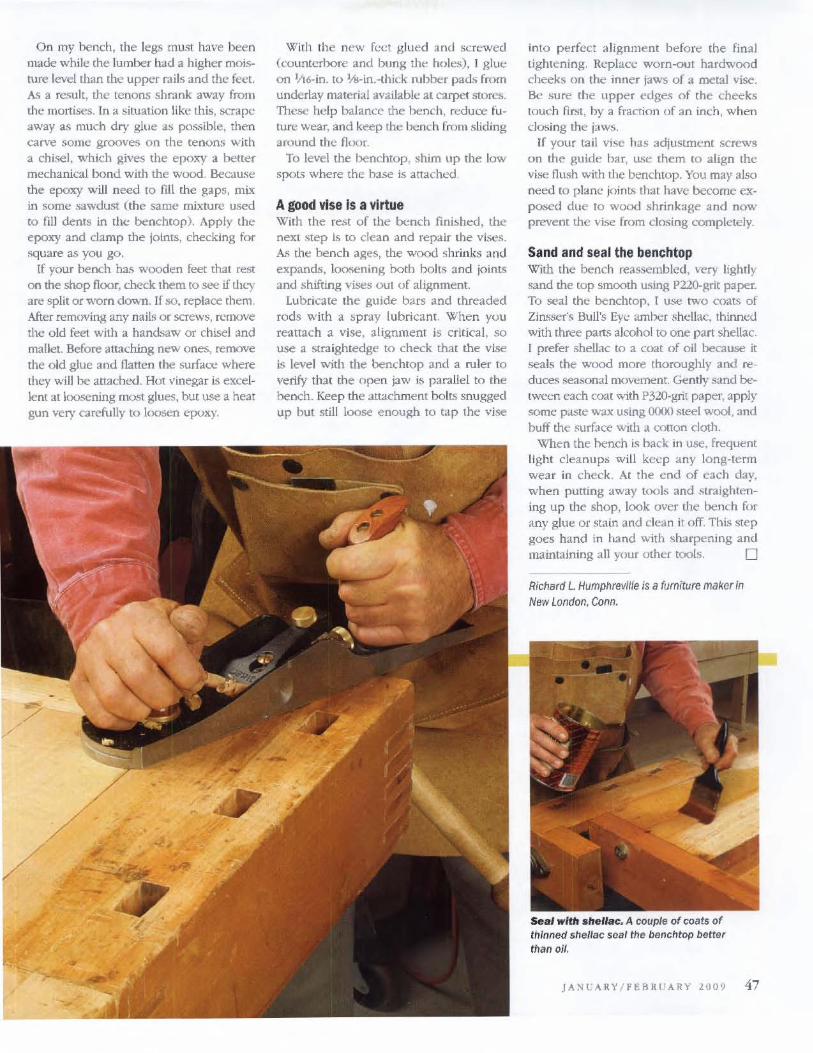
On my bench, the legs must have been made while the lumber had a higher moisture level than the upper rails and Ih~ feet. As a result, the tenons shrank away from the mortises. In a situation like this, scrape away as much dry glue a:. possible, then carve some grooves on the tenons wilh a chisel, which ~ives the epoxy a better mechanical bond with the wood. Because the epoxy will need to fill the gaps, mix in some .'I3wdllst (the same mixture used to fill dents in the benchtop). Apply the epoxy and damp the jOints, checking for foCIlIare as you go.
If your bench has wooden feet that rest
00 the shop fl(x)r, coc><:k them to SL"'e if they are split or worn dov.-n. If so, replace them. After removing any naib or scre\\'s, n.:move the old feet with a hand.,aw or chiSel and mallet. Before attaching new ones, remove the old glue and flatten the surface where they will be attachL'1l. Hot vinegar is excellent alloosening O105t glues, but use a heat gun very carefully to l(){")SCn epoxy.
With the new feet glued and screwed (counterhore and bung the holes), I glut: on 1J16-in. to %-in. -thkk fI.Ibber pads from underlay material available at carpet stOrL'S.
These help balance the hench, reduce fu ture wear, and keep the bench from sliding around the flcQr,
To level the benchtop, shim lip the low spots where (he hase is attached,
A good vise is a virtue With the rest of the bench fini~hed, the next step is to clean and repair the vise.~. A~ the bench ages, the wood ~hrinks anu expands, loosening both bolts and pints and shiftmg vi~ out of alignment.
Lubricate the guide bars and threaded rods with a :;pray lubricant. When yuu reattach a vise, alignment is critica!, so use a straightedge to check that the vise is level with the benchtop and a ruler to verify that fhe open jaw is parallel to the hench. Keep the attachment bolts snugged up but srill loose enough to tap the vise
into perfect alignment before the final tightening. Replace worn-out hardw{X)(i cheeks on the inner jaws of a metal vise. Be sure the upper edge.~ of the cheeks touch first, hy a fraction of an inch, when closing the jaws.
If your tail vise has adjustment screws on the guide bar, use them to align the vise flush with the benchtop. You may also need to plane joint~ that have become exposed due to wood shrinkage and now prevent the vise from dosing completely.
Sand and seal the benchtop With the bench reassembled, vcry lightly sand the top sm()(){h using P220-grit paper. To seal the benchtop, r use two coat.'> of Zins.'iCr"s Bull's Eye amlx:r shellac, thinned with three parts alcohol to one part shellac. I prefer shellac to a co:!! of oil because it seals the wo;xi more thoroughly and reduces .-.easonal movement. Gently sand tx.-"tween each coat with P320-grit paper, apply some p'dste wax using CXXIO steel wool, and buff the surface with a Co(lon doth.
When the hench is back in use. frequent light cleanups will keep any long-term wear in check. At Ihe end of each day, when pulting away tools and ~traightening up the shop, look over the bench for any glue or stain and clean it off. This step goes hand in hand with sharpening and maintaining all your other tools. 0
Richard L. Humphreville is a furniture maker;n New London, Conn.
Sea/with ahellac, A couple of coats of t fllnned s/lel/ac seal the benchtop better than oil.
JA!'< C ARY / Ft:.BII.I ' ARY 1 009 47


I recently met a l.denlt'd cabinetmaker who lost his thumh (0 a mbhap with a dado Sd. Amazingly, doctors were able
to put one of his toes in it:> place, and only a dooe look can dCtcl1 the differena::. Of cou~, his hand will ncwr grip the way it used to. Lesson: Medical tC'chno[ogy is ad
vandng at an amazing clip, bue you don't want to test it hy making a bad move in YOllr workshop.
The dado set is a gn.-.tt tahlesaw accessory that is unmatched at a variety 0f operations-grooving, dadoing, rabbeting. and tenoning-but it can Ix: very dangerous. Staying safe requires proper use. Good techniques will improve your results, too.
A sandwich of blades and chippers Most dado sets consist of two exterior SawbladeI'>. with chipper ... in::;erted between them \0 produce cuts of different widths. Chip(X!r.i have ju.~t (\.Vo or four teeth, and come in standard thicknesses of 1;8 in., lli6 in., and Y32 in. A typical set stacks up to about 2hz in. thick (jUST under "Ys in.). Shim~ inserted octwr • .'cn (:bippers can help fine-tune the width. Some manufa('(urers make adjustable dado set" that let you alter the cutter's width without addmg chippers or shuns. To comparr.: sets, visit the Tool GuicJc at FineW{)(x1workinKcom.
When mounting a dado s(.'t, the tooth points on (he exterior blades should
point ourward. The tips on the chippers should be staggered evenly. Make sure the teeth don't touch each other: You' ]] get a false width measurement and dam,lge the ca rhide when you tighten the arbor nut.
One of the first things you should do with a dado sct is spend a little tillle mak-
MAKE AN ARRAY OF THROAT PLATES
J Just as It does with a regular sawblade. 8 zero-<Iearance Insert enhances safety and helps elimInate tearout. A
full Inventory of Inserts will include one with a ful/· width opening and others with openings In 1/....tn. Increments. from ~ In. to ~ In. Latta makes his pla tes from %-in. plywood.
FOR GROOVE S, STOCK RIDES THE FENCE
Use It lon, push stlcle to hold down the work. Steady downward ptCssure helps ensure consistent depth. The s tub splitter helps keep the wOrkpiece from pulling away from the fence and kick ing back.
ing a set of zero-clear.mce throat plates for slamlard dado width:-.. These plates n...'liuce tearuut by {;nsurmg that the stock is supportc.!d where the cutrers exit the work. They also increase safety hy minimizing blad~> exposure and reducing areas where pi<:cl's can hang up. I 1ll3ke mine from L/2_it1. plywood with adjusnnent <;crews on the botlOm to level the insert to the table surface. (For more on making thc.~c in· scrt.~, St."e Fundamentals: "Get safer, lkaner cuts un your lablc::saw," FWW #200.)
Grooves and dadoes are easy The dado sees bread-and-butter is cutting dadoes (of course) and grooves. Both arc ."'1uare-l:x>ttomed channels with a wide variety of joinery applil:ation:,. A dado (:uts acros,~ the grain; a groove runs with it
lk-ClU.s(.' grooves typically mn with the long dimension or the stock, it's simple enou~h to guide the workpiece a~ainsl the rip fence during these cuts. Us.: a long push stick 10 hold the work flat over the cu1temead and to keep your hand" dear of the blades. If your saw's arbor flange and fence are ~h on the same side of the bla(k-, you can use a stuh spliner to reduce the chance that the stock will drift otT the fence and kick back. Whether the splitler is ;\ metal one mounted to the saw or ;1
JANUARY / FEBRUARY 2009 49
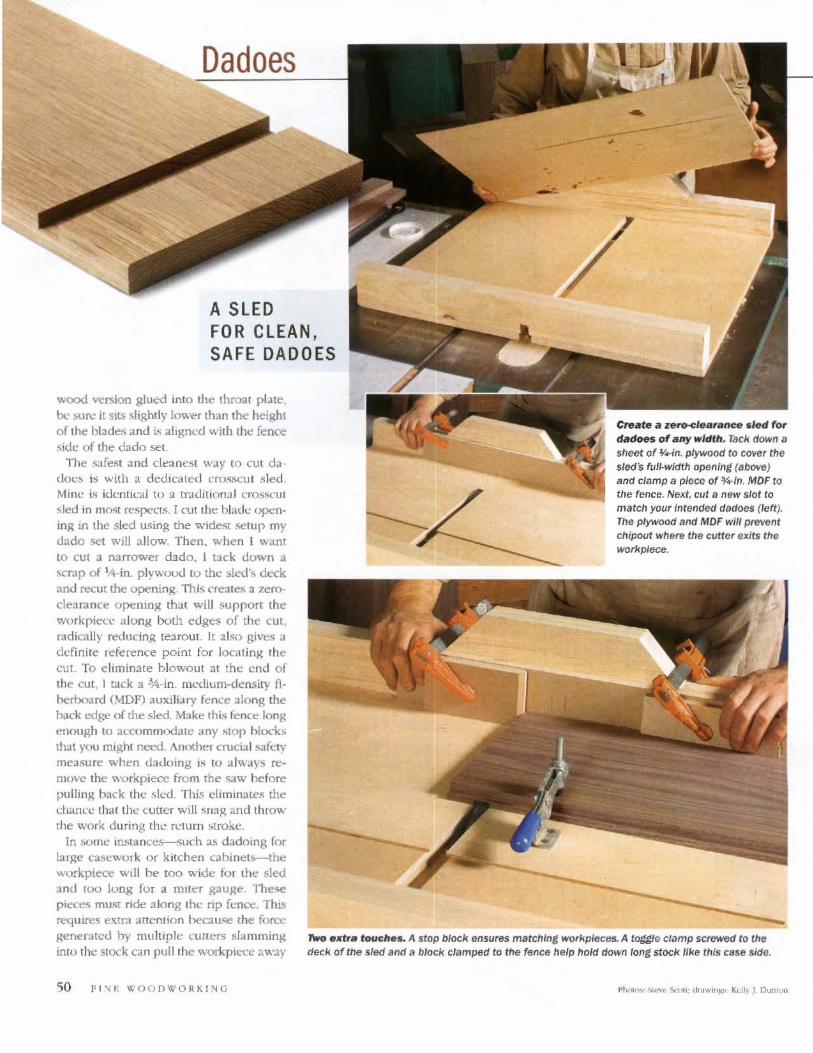
Dadoes
A SLED FOR CLEAN , SAFE DADOES
wood version glued inlo the throat pbte, be sure il sits slightly lower than the height of the blades and is aligned .... ilh Ill!! fence ,ide of the dado set.
The safest and deane,';! way to CUI da ducs is with a dedicated crosscut sled, Mine is identical to a traditional CroS~CUI sled In mO~1 respects. I cut the blade opening in the sled using [h~ wide~ .'ietup my dado set will allow. Then, when I WAnt
to cut 3 narrower dado, I lack down a scrnp of 1(.1-in. plywuud 10 the sk'-d's deck and recullhe opening. This cre3 1~ a zeroclearance opemng thai will support the workpiece <l long both edges of the cut, radically reducing learout. It al.~o gives a ddlnite rderence point for locating the Clli. To eliminate hlowout at the cnd of the cut, I tack a :lA-in. mc"(lium-densiIY fl· berboard (MDF) auxilialY fence along the hack edge of the sled Make Ihi;; fenc~ long enoug h to al.x:ommochue any :.IOp hlocks that you miWlI need. AnO!:her crucial saft.'ty mealiure when dadoing is 10 a lways remove the workpiece from the c;aw hefore pulling back the ,o;lcd. This eliminates the chane\! that the cutter will sna~ and throw the work during the return :.troke.
In some instances-such as dadning for large C'4sework or k itchen cabinets-the workpiece will be too wide lor tht' sled and too long for a mite r gauge. T he.ooe
piece .. mU<;T ride along the flp fence. ThlS requires extra attention hecause the force generated by multiple cUllers slamming into the stock can pull the workpjctt:c av.~.1y
50 I'l'lE WOODWORKING
c .... te ... zero.c:l.a,alJC'e . 1ed fo, "does of lIny wldt". Tack down D sheet of ¥ .. in. plywood to cover the sled's fulJ.wldth opening (aOove)
and clamp II ploco of ¥ .. In. MOF to the fence. Next. cut a new slot to match your Intended dadoes (left). The plywood and MDF wU/ prevent chipoot where the clilter exits (he
work~ece.
JWo •• tr. 'oue".s. A stop OJock ensures matChing workplaces. A toggle Clamp screwed to the deck of the sled and it O/ock clampea to the fence help hola down long stOCk /Ike this C3se side.
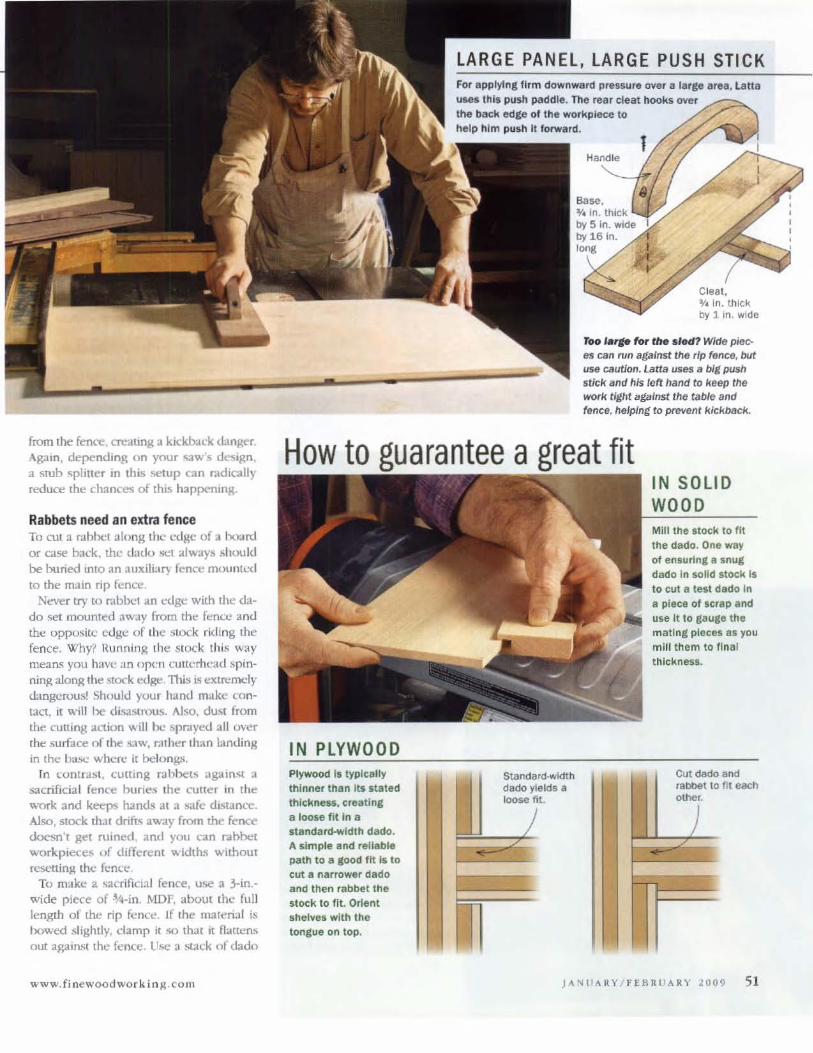
from The fence, cre-.umg a kkkb:u;k (L1.n~r.
Agam, dependin~ o n your ..aw· ... design, a sTUb splitter in this setup can r"ddically rt!duce the chances of this happening.
Rabbets need an extra fence To cut a f'Jhhct along the l.'d gc of a hoord or <."aSe back, the tlado ~I always should be buried into an auxilhuy fence mOUniL-d
to the main rip fen~. N~er try to r:.lhbcl ;,tn L-dgt: with the da
do set mounted awoly from the fem;c and tht! oppo~ilC edge of the .stock riding the fence. Why'/ Runnmg the stock this way means you have an op<:n t"utterhcHd spinnin~ alonR Ihe Mock ed~. This is exltcmdy dangerous! Sh()uld your hand make con
tact. II will be di...aSlI'OUS. Also, dust from the cutl ing action will he ~prayed all mer the surface of the s,'IW, r;u her than landing in (he ba:.c where it belo ng.-;.
In tuntra:;" cutllng rabbet" agaiOst a sacrificial fence !'>lInes Ihe cune r in Ihe ,,"'ork a nd keeps hands al a safe dlSlance. Also, stock rtul drifL'i away from the f(.'nce doesn', ~et ruined. and you can ..... bbe[ workp leces of differen t v. Idlhs without resc.."tl inM thc fcm:e
To m:. ke a ~acri ficia l fe nce, U~ a 3-in.Wide pie<'e of .i/,,_in . MDP, about the fu ll length 01 th~ rip knee If the maten:11 L~
bowed slightly, damp it .;0 that it fhmen~
out again<;t the fence. Use a stack of dado
www.finewoo dworkinp; .com
IN PLYWOOD Plywood 15 typically thinner than it5 stated thickneH. creatine: a loose fit In a standard-wldth dado. A simple a nd reliable path to a good tit Is to cut a narrower dado and thet'l rabbet the stock to fit. Orient I helYes with the tongue on top.
LARGE PANEL , LARGE PUSH STICK For applying firm downward pressure oyer a large area, latta UleS this push paddle. The rear cleat hooks oyer the back ed,e of the workpiece to help him pUl h it forward.
TOO "'rle for rhe .Jed? Wide piec· es can run agains t the rip fence, but use ClIut/on. Latla uses a big push stick lIInd his left hand to keep the work tight lIgalnst the table and fence. he/ping to prevent k.lck.back..
IN SOLID WOOD Mill the stock to fit the dado. One way of eMU"n, e Inu, dado In soUd stock Is to Cllt a test dado In a piece of scrap and use It to gauge the malin, pieces 85 you mill them 10 final thickness.
Cut dado and rabbet to fit each
jANIIA IIY / FEBRI )A R Y 2009 51
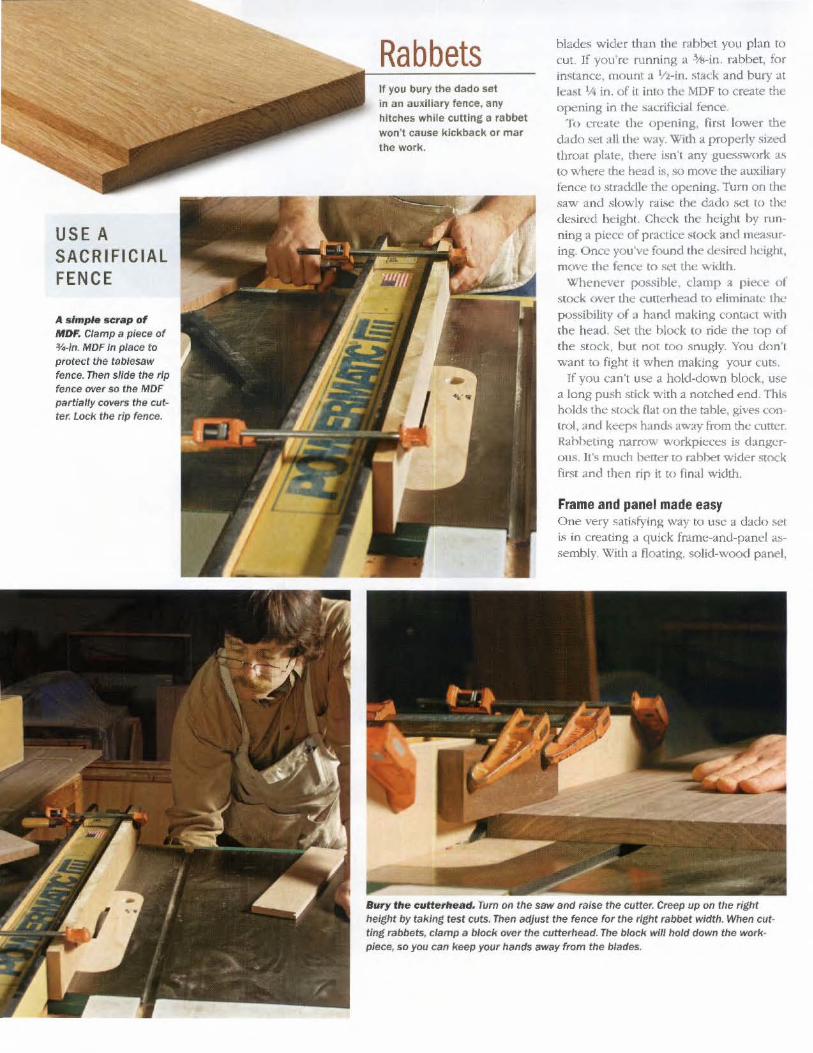
USE A SACRIFICIA L FENCE
A s imple scrap of MDF. Clamp a piece of
'I.-In. MDF In place to protect the tDblesaw fence. T1len slide the rip fence over so the MDF partially cO\'efS the cut
rer. l ocI< the rip fence.
Rabbets 11 you b~l(y the dado sel in an au~illary fence, any
hitches while cutting a rabbet won't cause kIckback or mar the work.
blades wide r than the ntbbet yuu plan 10 cut. If you're running a 3At-in . rabbe t, for instance, mount a Ill-in. stack and bury at least 1J4 in. of it into the MDF to create the opening in the :-.Acriftcial fence.
To create the opening, ti rst lower the dado set ;111 the way. With a properly sized throat plate, there iso't any guesswork as to where the head is, so move the auxiliary fe nce to straddle the opening, Turn on the saw and .~ lowly r.l ise the d ado set to the d esin.:d hdght. Check the height by running a pi(:'ce of practice stock and measuring. Once you've found the desired hdght, move the fence to set the width.
whenever possihle, damp a piece of stock over the cutterhead to eliminate thi.' possibility of a hand making contact with the head. Set the block to ride the top of the s tock, but not t()() snugly. You don' t want to fight it when making your Cllts,
If you can't use a ho[d-down block , use a long pu.sh stick with a notched end . Th is hold" the stock flat on the table, gives control, and keeps hand .. away from the cutter, Rahheting narrow workpkcts is dangerO liS. It's much better to r.abbet wider stock first and then rip it to fi nal width.
Frame and panel made easy One very satisfying way to usc a dado set i.~ in creating a quick fmme-anu-pancl assembly_ W idl :1 floating, solid-wood panel,
Bury the cuftethead. Turn on the saw and raise the cutter. Creep up on the right
height by taking fest cuts, Than adjust the fence for the rIght rabbet width. When cutting rabbets, clamp a block over the cutterhead. The block will hold (k/wn the work
piece, so you can keep your hands away 'rom the blades.
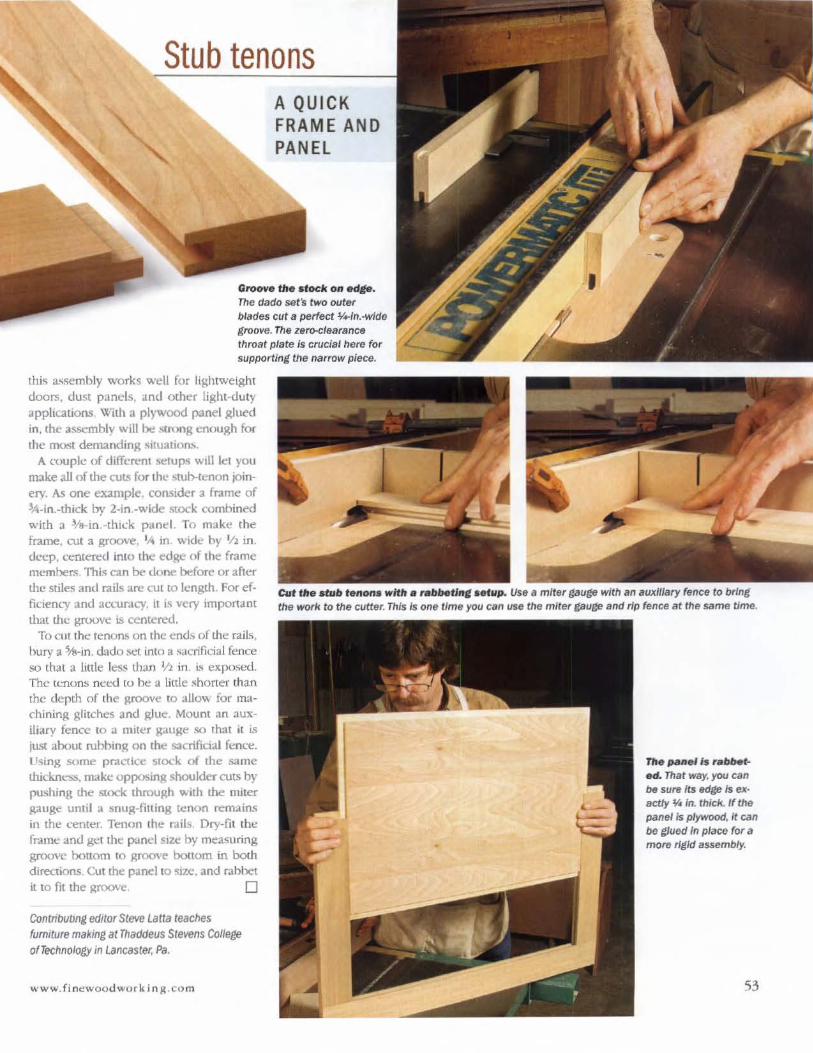
Stub tenons A QUICK FRAME AND PANEL
Groove the .todl on edp. The dado set 's !'Wo outer blitdes cut a perfect ¥ ... In.-wide groo~e. The zero-clearance throat plate Is crucia l here for supporting the narrow piece.
thi<; assembly works well for lightweight doors. dust pands. Clnd other light-duty 3pplic.Uions With a plywood panel glued in. the assembly will ~ Slroog enough for the moe.1 demanding situatioru,.
A l:OUp)C of c..IiffcfCm setups Will It! you
make all of the cuts for the Slub-It..>rlon joinery. As one example. consider a frame of 'A-ln.-thick by 2-in -wide stock combined with a J/s-in .-thi..:k p"r"Id. To make the frame, CUI a Aroove. 'A in. wide by '11 in. dt."Cp, Ltlllered into the edge of the frame members. This can be done before or aftc.'!" the stiles and rails are CUI to length. For effkiem:y and aCLumcy. it L~ very important Ihal the groove is centered.
Cut the stub tenon. with. r.bbetl", •• Cup. Use a mIter g,Jug.e with an auxiliary fence to br/nll the work to the cutter. This Is one time yoo can use the miter gauge and rip fence at the same lime.
To cut the Tenons on the ends of the '.liL", hury a ~AI-in. dado ,"Ct lnw a ,~acr!ficial fence SO that a httle less than Ifl in 1.~ I:!xpol,ed. TIle u.:nuns nt:tx1 (0 be a little ."horter than the depth of the groove to ;)110"," for machining glitches and glue. Mount an auxiliary fence [0 a mlt~r g.HI~e go thaI il is JlL<;I ahout ruhhing on the sacrifidal fence. Using some prActice stock of the same
thickne::;:;. make opp<:l!!iing shoulder CULor; by pu.<;hing the ~k through with the miter Hauge until a snuR-fining tt:non remains in the c...'enter. Ten<m Ihl: mils. Dry-fil the rr,ullC;: and gl::( tht: pand size by measuring groove bottom to groove bonom in both directions. Cut the panel to '1i1.e. and rahbet it to fit the groove. 0
Confnbutlng editor Sieve Latta reaches furniture making at Thaddeus Stevens College of Technology in lancaster, Pa.
ww ..... f i newood work in~.com
1'11. IN,.., I. r.bN'· ed. That way. you can btl sure its edge Is ex· actly ~ In. thick. If the panel Is plywood, It can be glued In place for a more rigid assembly.
53
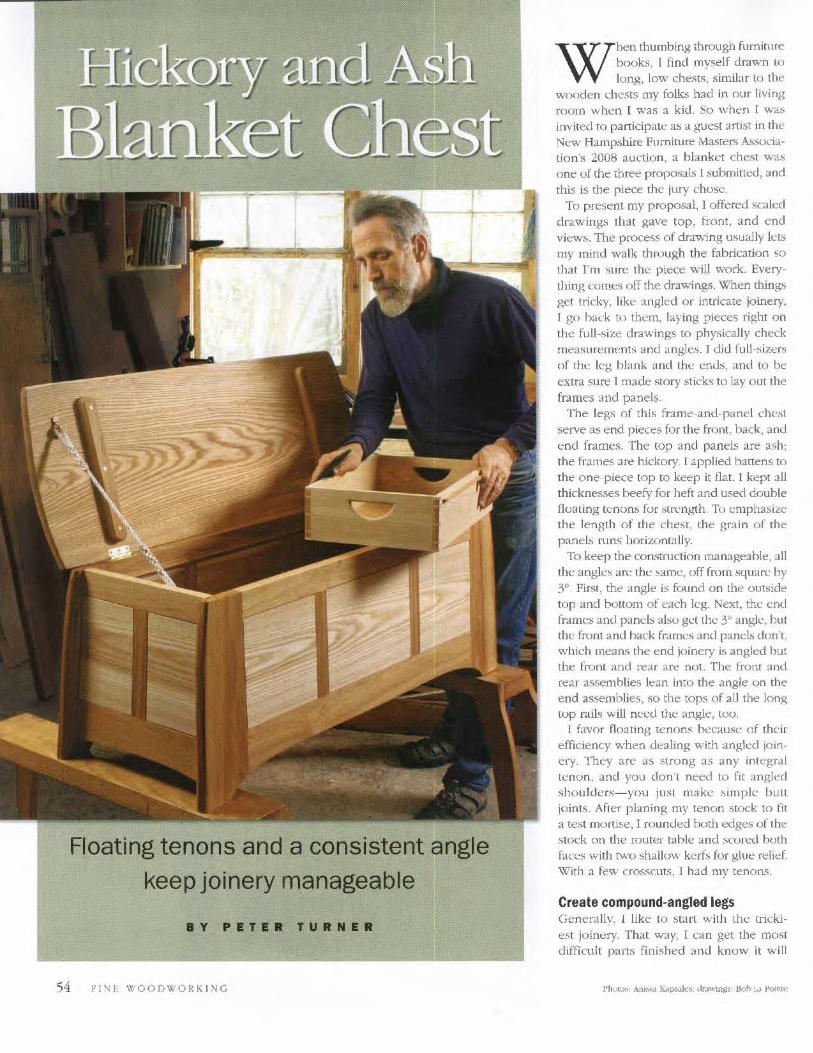
54
Floating tenons and a consistent angle
keep joinery manageable
.Y PITIR TURNra
FINE WOODWORKING
When thumbing through furniture books, I find myself drawn to long, low chests, similar to the
wooden chests my folks had in our living room when I was a kid. So when I was invited to participate a~ a guest artist in the New Hampshire Furniture Masters A<;sociation's 2008 auction, a blanket chest was one of the three proposals I submitted, and this is the piece the jury chose.
To present my proposal, I offered scaled drawing~ that gave top, front, and end views. The process of drawing u:-,ually lets my mind walk through the fabrication so that I'm sure the piece will work. Everything comes off the drawings_ When things
Ret tricky, like angkd or intricate joinery. I go back to them, laying pieces right on the full-size drawings to physically check measurements and ,mgles. J did full-sizers
of the leg blank and the cnds, and to be extra sure I made story slicks to layout the frames and panels.
The legs of this frame-and-panel chest serve as end pieces for the front, back, and end frames. The top and panels are ash; the frames are hickory. I applied hanens to the one-piece (OP to keep it nat. I kept all thicknesses beefy for heft and used double flualing tenon;. for stn:ngth. To cmphasi:.::e the length of the chest, the grain of the paneb runs horizontally.
To keep the construction manageahle, all tilt.: angles are the sarne, off fro1ll square by 3° First, the angle is found on the outside top and bottom of each kg. Next, the end frames and panel:, also get the.3° angle, but the front and back frames and panels don't, which means the end joinery is angled hut the front and rear are not. The front and rear assemblies lean into the angle on the end assemblies, so the tops of all the long top rails will need the angle, too.
I favor noating tcnons hccause of their efficiency when dealing with angled joinery. They are as strong as any integral tenon. and you don't need to fit angled shouldeL~-You just make .~impk hUll
joints. Afler ph:Jning my tenon stock 10 fit a test mortise, I rounded [x)th edges of the stock on the router tahle and scored both faC(:~ with {\.\'O ~hallow kerfs for glue rdid. \"'i7ith a few croSSCIiTS. I had my tenon.~.
Create compound-angled legs G{;ncrally, I like to Slarl with the tricki
est joinery. That way, I can get the most difficult part..'> finished and know it will
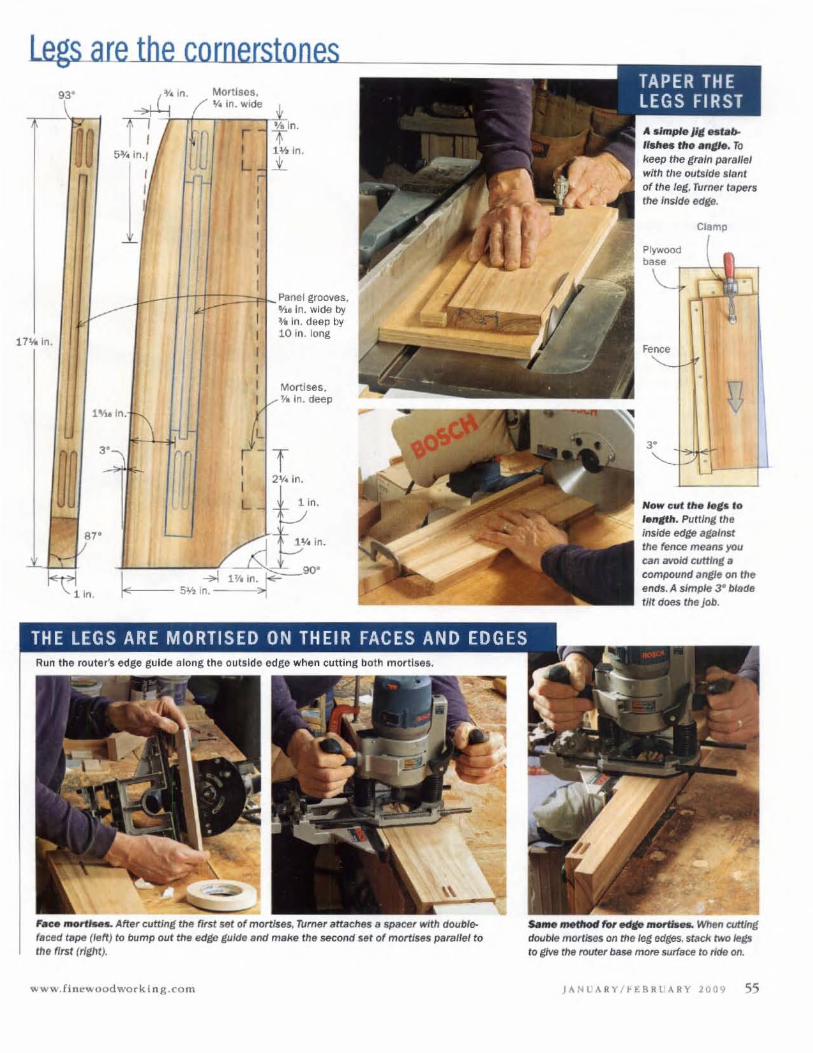
10. Mortlsos, V~ in. wide
r I L
in.
~b----ttH::::::::of.l-- ~"~;1 grooves. In. wide by
~ In. deep by 10 In. long
Mortises. In. deep
T 2V. ln.
L 1 in.
'0.
F.e. mol1,.. •. After cutlJn, the first set of mort/56$, ~m6r arraches a spacer with cIouD/efaced tape (left) to bump out the edge tulde and make the second sst of mortises parallel to the first (rleht).
w ..... w. fin~wuodwork i n g .co m
A. .'mpl. Jll •• ' • .bIIsh •• rho ."Ile, To keep the grain parallel with the outsIde slant
3'
N_ Cllt the let- to le"gtlt. Puttln, fhe Inside edetJ a{ltlnst tile fence means)lOu can avoid cutting. compound angle on the 6nds. A sJmple :J- blade tIlt does the Job.
s._ meChod for __ mot"ttsllL When cutting dOtJbIe mortises on me lOll edges. stack two lets to gtve the router base more swfllc:e to ride on.
JANIIARY/ff.BRLARY 1009 55
only get easier as I go. On this chest, the mortises on the legs and rail end<; called loudest to go first Before I L"Ut any mortises, I had to create the anglcs in the legs. By removin~ the wedge from the inskle of the leg rather than the outside, I kl:pl the grain orientation par.dld to the leg's outer slanting edge. Then r cut them to length at an angle, which establishes the only comp::rund aogb in the piece (see photos, p. 55).
Cut mortises In pairs Nearly all lhe parts of this chest are 1 in. lhil:k. The weight called for substantial joinery, so I douhk-d the tenons to create twice the glue surface. TIlere are a lot of mortises to cut in the leg edges, leg faces, and all the rail end ... I used a hasic spacer method on the euge guide of my router to give me repeatability so that all the pairs of double mortises would match.
To cut the leg tau: mortbes, transfer the h.x.-ations from dle drawing -and use a plunge rOllter with an adjustable edge guide. Though the tenons L'Ome in at an angle, r cut the morti..es perpendicular to the leg face. nll~ rime savings makes up for the bit of glue surface that must be trimmed from the tenons.
I mortised the leg edges by again using a plung!: router with an edge guide. To give the router base more surface
to ride un, I stacked two legs together, flush at the angled edge. For the rail cnd~, ( u:;cu a jig that mounts in my bench vise. For a ll of the.<;e douhled monises, lise the same spacer for the second cut.
Later, r used a dado hlade to cut groove .. in the rails and dividers chac hold the panel<;. But
BLANKET CHEST
-
Top, lAo in. th ick by 16 in. - - __ wide by 48 in. long
Battens, ¥. in.
foe other
"
thick by 1"/. in. wlde by 13 in. long: end screw holes are SIOUCO to allow for movement.
Butt hinges --... I
Groove for tray runner ~~
-
Pins, inserteO from inside alter glue--up, locate panels.
Loose tenons, 'I. in. thick by 1"" in. wide
by ... 10. loog )
r~ Cl
'llw-in. dowels locate side panels to legs .
, ,
Bottom frame stiles. \I, in. ttlick by 2% in. Wide by 11 In. long
Gf100se tenons. 'I. In. thick by 2'1. in. wide
!
"
Lower side rails. lin. thick by 1% in. long
Bottom frame rails. 'I. in. thick by 2 ..... in. wide by 41'>'01 in. long (bottom gets trimmed to fit later)
by 4 in. wide by 15% in. long
A straIghtforwa rd
approach to angled JoInery si mplifies
rilE 16 in. 311 1 IE 48 in.
the construct ion 7/ _U'
T • in. : :1 Ii - - - -, , , ,
!-l90" :1 " , ,
3" , " , , "
, , 18 in. , , " , , , ,
, ,
......
Le<lgers, screwed to oottom fr.lme and case sides
" rn ___ l,. ; ~
" , " , " , "
,
, 3 " , " ,
" ( , , , , "
ot th is trame-and
panel chest, while
th ick Pints lind dense woods (ash
and hickory) lend heft to a sleek design.
- -- , - _ ___ _ __ :;1
" , " J, ' f' " , j , , " , " " " ~6in.-J 2 in. -- u
15¥- in. T 56 FINE ,",'O O])W O RKIN G

Tray hangers, 'A. in. th ick by -- Tray Sides, 'Yu in. IiI into ~1 .. ln.-<leep groove. thick by 5 In. wide ---by 20 in. long
--- ~
Upper side rails, 110.
by 13"'/32 in. long thick by 2'% in. wide ~~=~}:-::--::-:::-:::--__ ~ ~~~q~;~:~~:;;;;;;~;;;;;;;;;?r- Tray e nds, ~ .. in. thick by !! 5 In . wide by 121111 In. long
Side panels, 1 in. thick by 7'1, (n. wide by 10 in . long
-
These tongues can't be pinned from outside, :;0 center a dowel on the longue.
Bottom panelS, :If. m. th ick by 11¥.! In. wide by 10¥. In. long
Bottom divloers, 'I. In. thick by lifo in . wide by 11 in . long
Upper rail, lin. thick by 2% in . wide by 35 trl. long
Tray hanger
~-~
"'" Tongues on panels, If .. in. thick by :vii in . long
legs. 1 in. thiCK by 5'n in. wide by 17",. in. long
Side panels. 1 in. thick by 10 in. witle by 10 In. long
Dividers, 1 in. thick by 1"" In. wide by 10'1. in. long
Stub tenon. V. in. long
Center panel, 1 in. thick by 10 in . wide by 13"'" in. long
lower rati, 1 In. thicK by 4 In. wide by 35 in. long
48 in .
---_- --------------i .: -F T I . I I I
24-in. radius I I I I 16 in. :, " 1 I I I I I I J I I
--- :::~ ::: :::='~;7~':~
www.finewoodworking.com jAKUA RY / FEllR UARY 2009 57
. hollfd.,.. Turner cutl fhe 3° anCIe on one end of the raU. ana then uses a fufj-slze drawing to marl! the length (aboVe) of the other end. He UNS a simple, vfS&-mOUnted)1t when mortising the ends. It holds the rel/s square and gfWd a surlace for the edge guide to ride on, The Jig works for the ant/ed ralls. too (right).
Cut the CfoIrYe In the 10_ rllll .. Once the mortIses are cut, TlJmor bandUW3 the curve of Ihe lower rslls close to the line. and then template-touts the flna/ curve,
58 FINE WOUDWORKING
Ihe panel grooves in the leg faces and le~ edgt's cannot go throuRh o r they will he visible, so while you're working on the legs and the router is out. prunf;e-tollt JIl of these stopped grooves W ith a s/l6--in straight bit. Squ:ue up the end'! by hand
Once all the mortises and grooves are CUI, handsaw the curves that define (he k-el and give the lower ra ils their finJI shape. After glue-up, you'll rclum 10 the spots where the feet meet the bottom rail'! and refine the curve.
Panels and dividers are tongue-and-groove After the monises, it's time to work on the dividers, rails, and panels. Using multiple pas..~t!1:i over the tablesaw blade and a sl.Op damped to the crosscut sled, cut stub tenons on both ends of the dividers. 'Ihen, u~ing a dado ~t, cut grooves for the paneb in the edges of the dividers.
Without changing the dado-bldde senjn~, run the straight grooves (for the panels and divider tenons) in the long ".lils. And while the dado set is still in the uble;.aw, make the angled grooves for the tray run· ners in the inSide fal"eS of the long upper rail'!. Finally, rip the <Ingle on the lOp ed~e of the upper rails
r like the look of uninterrupted ::.urr.lLC1; on the same plane, so rather than inserting thin panels in a groove, I u..-.ed thick pa~b :md cut a tongue m the center 10 keep the faces of the panels flush with the frame. First I cut the angle on the oulside edgl;'s of the end panels. Then r cut the tongues on the tablesaw.
Glue up In sections Start the glue-up with the from and back, each with fWD kg.~, two long raib, cwo divid· en>, and three paneb. Use angled caul~ and pipe cbmp.~ to help diStribute preS$urc
Once the from and back assemblies hJve cured, pin the panels in place from Ihe inside with toothpkks. This keeps the RJP<; even as the solid panels expand and conU"'dU. Pinrung the panels after the Rlue-up work.. .. with the front and back frames bUI doesn't work on the ends of the chest where Ihe pands fit into the face of the kg, There, I u;;ed a doWC'1 centered in the longut! and groove.
After fjnish-sandin~ the interior, It is time to add the short sides (two angled ~hon rails, one divider, and two panels per side), reusing the angled cauls to clamp the casc_
All of the p;lnel grooves are square. but the long top ralls need an angled groove tor the tray runner.
93" Groove. J/,. in. wide by'¥uln. deep
~3. RIl~bet
V~ In. by
~ 90"
1 Tray runne r, \ 1/ .. in. by ~ in.
Groove for panel, ¥U in. wide by ¥o in. deep
Angle the d.do •• t. Use a baval gauge 10 ensure Ihat the dado blade matches the 3 · angle On the rest of the blanket chest.
Take care that all top rails sit Hush with the legs, or you' ll have to take great pains to nush everything up after the glue-up.
While this assemhly is drying, glue and clamp the bottom frame (two rails, two dividers, and threl.' panels), and set it a,~ide to fit into the case later,
Hinge the lid after glue-up is complete On :l one-piece top, I like to orienl the lid's end grain sO that the ring.'! look like ~milc.s. Then, at some point in the future, if it want.<; to cup, the front edge of the lid shou!d dive into the front of the chest .. Hher than up and away.
Rout the rcar rail for it~ hinges, Place the oversize lid on the cheSi to adjust its position. Once you're sure about the placement of the lid, u.-,e the mortises in the mil to mark and then rout the corresponding mortises in the lid. Hy mounting the liu,
you can test its fit again, mark and cut its finished dimen<;ion.<;, and grab a measurement for the rope stop.
With the top cut to length, I used a template and router with a Hush-trimming bit to cut the lid to shape. I made a fu ll-size template for the end curves, but before using the template and the router to cut the shape, I wastr.:d away close to the line
11N1 .'de p.nel. ere tapered. To angle the outside edges, Turner uses the same jig that he used 10 cut the angle on the legs.
www.finewoodworking.com
Cut the QOoWt, Once the dado blade is tilted. set tlla blade height and cut a through-groove to hold the tray runner.
a.yetl the top edge .. After switching back to a rip "'ade, the top edge or tho top ralls must also be cut to tha 3 ° angle.
Cut tongu.. on the tab,. .. ",. Wrth the panelS facedown, cut around the oops on all sides. Then ride the panel on edge (above) and cut off the rest or the waste material, leaving the tongue. Keep the panel between the "'ade ana fence so the offcuts fall to the outside ofrhe blade.
JANl' ARY !F EBRUARY 1009 59
Front and NCIc n,.t, Tumer uses UnlbOnd 800 (or more open time. PIDce the center panel Into tho bot· tom rail, add the dlvlder$ and then the end panels, set the top rail on, and add the lep last (above). CeMer maries help locate the divldet$ and keep eve-rythlng tMffl/y spaced. Al)gled cauls keep the t;lamps aligned. Next, fumer uses If coplne saw to cut the curve If! the top of each let, and then uses. t)/ock plane to take It to Its final shape (rltht).
Add the ends, l ay tM front assembly f/fCe down and add the end r/JUs. Slide In tno first panel, then the divider, and ttle second panel (aboVeJ. 0necI )IOU add tile back assomO/y, gently tum the Whole
thing upside duwn and clamp securely (right). use the same anlPed clamping cauls es t:Jefore.
60 Fl"l E wo o nW O Kt...tN('
with the b-,md~aw. From tbere I used a handheld router and a l/.z_in. rnundo\,(!!" bit wilh beari ng [0 shape Ihe ends and fmnt edge to their final profile, a roundover wilh a dl~inC1 sharp edge.
Sliding tray glides on shopmade runners The carcase glue-up gives intt.'fior wme-n"ion .. for both the du\ot.'l.ailed sliding (ray :lnd the frame-and-panel hortom
CUI the mbbet for the chest mounloo troly nJO!lefS from wide .. cock on the tablcsaw Then rip the pieces to width. Chop the nlnnecs to length to exactly match the length of the upper rails. Give hoth end:. a curve, and then glue them into the front and back rails of th~ che~1. res important that the nmners be fully "eated In their grooves so Ihat they provide maximum support for the sliding hangers.
Alter hand-ctlttinjl; the dovetails, rout stopped grooves on the out:;kk top uf the tray sides to hultl the hangers, and then p:lue and damp the han~rs inco their grooves. To make the upcninw. for the tr .. y handles, I used a shopmade templa(e and a router equipped wllh a gUIde bushing and lA-in straight hit- First I. marked the cutoutS ~lnd removed the waste, Just uut!>KiI: th .... line . with a Jigsaw. l n en I clamped the remplate on the tray and rouK-d to the line. removed the template, and hIt the l..-tlgl..'S with a Vot-in. mllndover bit to soften them.
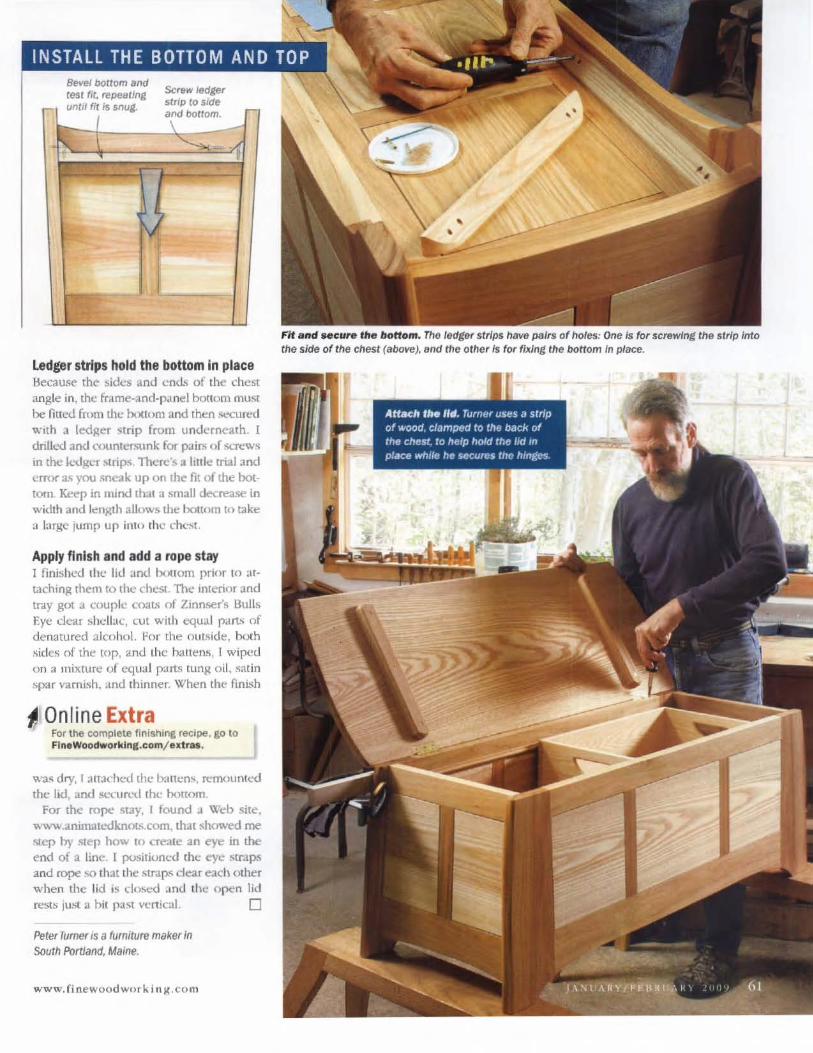
Screw ledlfjr strip to side a(l(l ballom.
ledger strips hold the bottom in place lkcause the ~ide!t and end~ of the chc~1: angle in, the frdme-and-pa nd bottom must be fiul.>d {rum the bouom and tht!o Fot'Cmed wIth a ledger Strip from underneath, I dnlkd and ('ountersl,lnk for p;!iTh or St."reW'I
in the k-cJger strips There's a hide trial and eJTOf':ll> you I>neak up on Ihe fit of the bottom Keep in mind thaI a small decreal>e in widlh and l~nR1h allows the ix>I:tom to take! :. I:.rgc lump up inln the ch<-~I,
Apply finish and add a rope stay I finishL'<i IhL' lid .. 00 IXl(t()111 prior to attaching them 10 the chest l'ht: mterior aod tray got a couple coats of Zinnser's Bulls Eye de-.u ~hdl.lL', cut with equal parts of denatured alcohol. ror the outside, both sides of the top, and the hattens, [ wiped on a mixture of equal p".ut~ lun~ oil, ,~at in spar vamish .• Lnd thinner, When the fini.~h
~ On line Extra For the complete finlshina recipe. 10 10 FlneWoodworklnl·com/ eltras.
w3~ dry, I aIT3(.'h(.."([ the Ixlltcn~. tc..·mounloo the lid. and 5(,'wrt.'(llhc txmom
For the rope <;lay, I found a \l'eb sile, www.aniJltalt.-dknoco;.com.thatshowedme 'ilep by I>lep how 10 create an eye in the end of a line:. I positionL-d the eye Mr:tps and rope.'>O that the Mraps dear each other when the lid is c1o~ .tnd the open lid resl'S JU,-;( a bit pa~1 vcnic-oll. 0
Peter Turner IS a furniture maker in South Portland, Maine,
www.rinewoodw(>rJ.iT\K ·co m
Fh ana HCU" the bottom. Tho ledger strips have pal,s of holes: One Is for screwIng the strIp Into the side o( the chest (above). lind the other Is for filling the bottom In place,
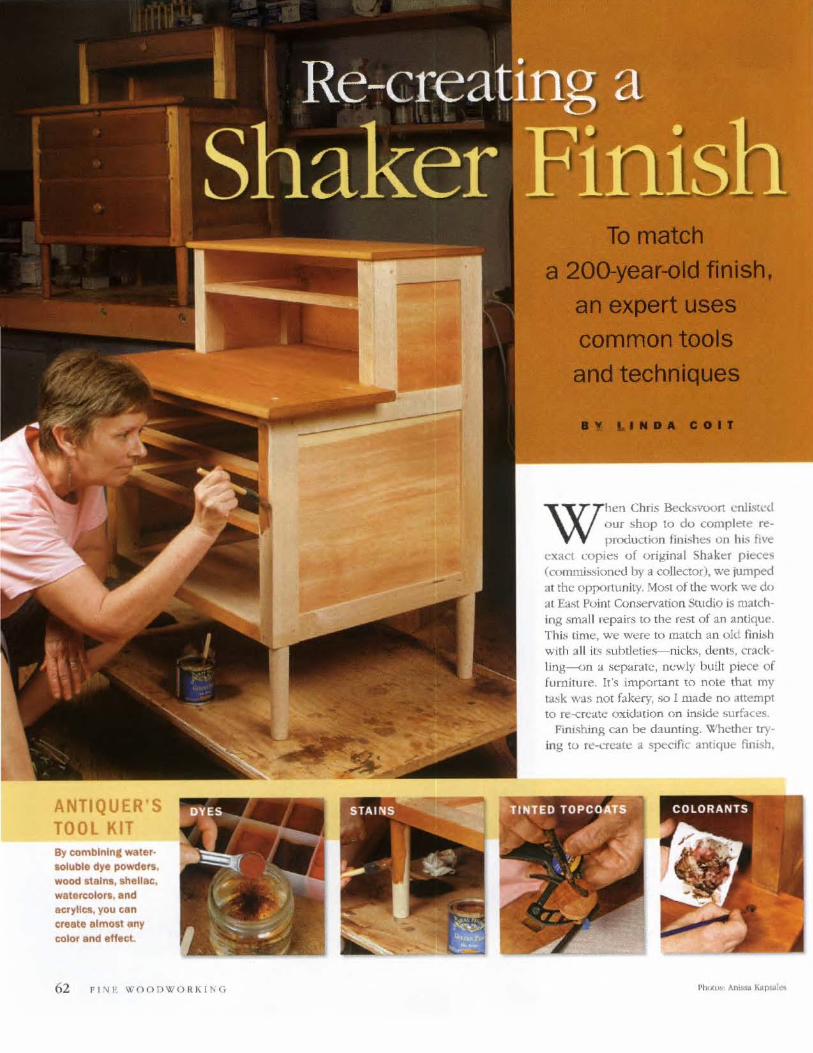
ANTIQUER'S TOOL KIT By combln'", wate,· IOIuOI. dye powdo~.
wood stalnl, Ilhellac, watercolors, and acrylics, you can create elmo!! any I;:olor and ellect.
62 PI 'H. WOODWORKlt.G
When Chris lkc.:k:...voort l.-nlis[cd our shop [0 do complete reproduction fim:;hcs on his five
exaCl (."()Plt:S uf origin .. 1 Shaker pi!!1:eS (commissiom-d by a collector), we jumped at the opportunily. Most of the work we do al East Point Conservation Studio IS matching smal l repairs to the rest of an antique. Thi::. time, we were to m.Hch an old finbh with all i t~ suhtleties---nicb, dt!'nt~. crac.:kling--on a scparak, newly built piece of furniture. It's important to note that my ta.~k was not fakery, so I made no attempt to re-cn.-dtc oxidation on inside sllrfaces.
Flfllshing can be daunting. Whethe r trying. to fe-create a specific antique finish,
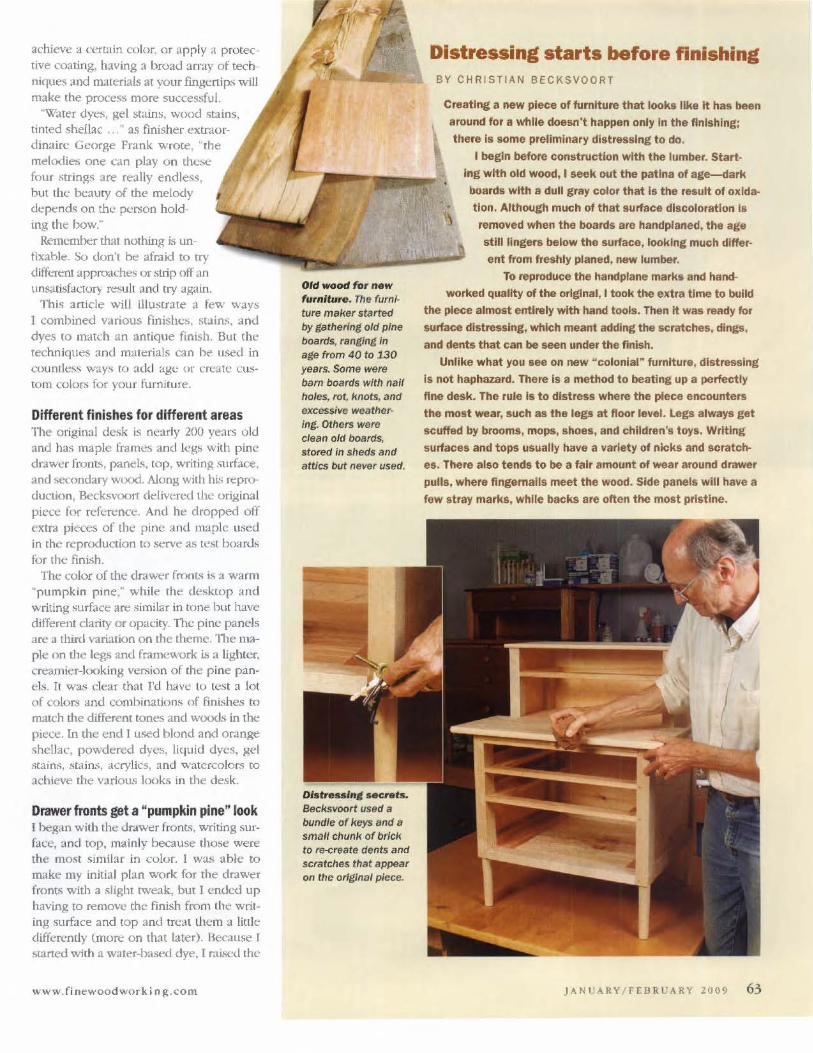
achieve a certain color, or apply a protective coating, having a broad array of techniques and materials at your fingr.:nips "'ill make the process mOfe succeS$[uL
"Water dyes, gel stains, wood stains, tinted shellac .. ," as finisher l'xtr:.lOfdinairc George Frank wrote, "the mekxli~ one can play on the:-.c four strings act: really endless, but lil!.: beauty of the melody depends on th ... person hold-ing the bow."
Remember that nothing is unfixahle. So don't he afraid to Try di!l< .. Tent apprnH:hes or strip otT an unsatisfaclur)- result and tty ap;ain.
,],hi~ article will illustrate a fev. way,.; I combined variolls finishes, stains. and dyes to match an antique finish. But the techniques and mattrials can he- used in countkss ways to add age or creatr.: CllStorn colurs for your furnifure.
Different finishes for different areas TIle original desk is nearly 200 years old and has maple frames and leg~ with pine drawer fronts, JY.aneb, top, writing ,~Ilrface, and ~ondary wood. Along with his reproduction, Becksvoort ddivcn:-d thr.: ofigi~l piece for reference. And he dropped off extra pieces of the pine and maple used in the reproduction to serve as tr.:st tx)afd~ tor tllr.: finL-;h.
The color of the drawer front.-; is a warm ~pllmpkin pine; while the desktop and writing surface are similar in tone hot have different clarity or opacity. The pin ... · panels arc a third variation on the theme. '111e maple on the legs and framework u. a lighter. creamier-looking Version of the pine panels. It was clear that I'd hav!.: tu t(:st a lot of colors and combinations of finishes to match the ditTerent tones and woods in the pien:. In the end I used blond and or.l1lge ~hellac, powdered dyes, liquid dyes, gel .'\Cains, stains, .acrylics, and watercolors to achieve the various looks in the desk.
Drawer fronts get a " pumpkin pine" look I Degan with the dr.awer front~. writing Sllr·
face, and top, mainly because those were the most .~imil:lr in color. I was able to make my initial plJll work for the drawer front~ with a slight tweak, but I ended up having to remove the finish fmm Ih", writing surface and top and treat lhr.:m a littk differently (more on that later). Because r Sl:aned with a water-based dye, I raLo;cd the
www.Cinc:woodworkin~.com
Old wood for".", furniture, Th e furnIture maker 5tartea try gathering old pIne boards, ranging In age from 40 to 130 years. Some were bam boards with nail holes, rot , knots, and
excessive weathering. Others were clean old boards. stored In sheds and attics but f1e\'er used.
DI.tre •• 'n • • .c,.' •. Beck,5YOOrt IIsed i1
bundle of keys and a small chunk of brick to re-create dents and scratche5 that appear 011 the original piece.
Distressing starts before finishing BY CHR I STIAN BECKSV OO RT
Creating a new piece of furniture that looks like It has been
around for a while doesn·t happen only In the finishing;
there Is some preliminary distressing to do,
\
I begin before construction with the lumber. Start
Ing with old wood, I seek out the patina of age-dark
boards with a dull gray color that is the rell-ult of oxida
tion. Although much of that surface discoloration 15
removed when the boards are handplaned, the age
stili lingers below the surface, looklne much differ·
ent from freshly planed, new lumber.
To reproduce the halKlplane marks alKl MAd-
worked quality of the original, I took the extra time to build
the piece almost entirely with hand tools. Then It was ready tor
surface distressing, which meant adding the acratches, dings,
and dents that can be seen under the finish.
Unlike what you see on new "colonial~ furniture, distressing
Is not haphazard, There is a method to beating up a perfectly
flne desk. The rule Is to distress where the piece encounters
the most wear, such as the legs at floor level. Legs always get
scuffed by brooms, mops. shoes, and children's toys. Writing surfaces and tops usually have a variety of nicks and scratch
es. There also tends to be a fair amount of wear around drawer
pulls. where fingernails meet the woO<! . Side panels will have a
few stray marks, while backs are often tl\e most pristine.
J ANUARY FEB R UARY 2009 63
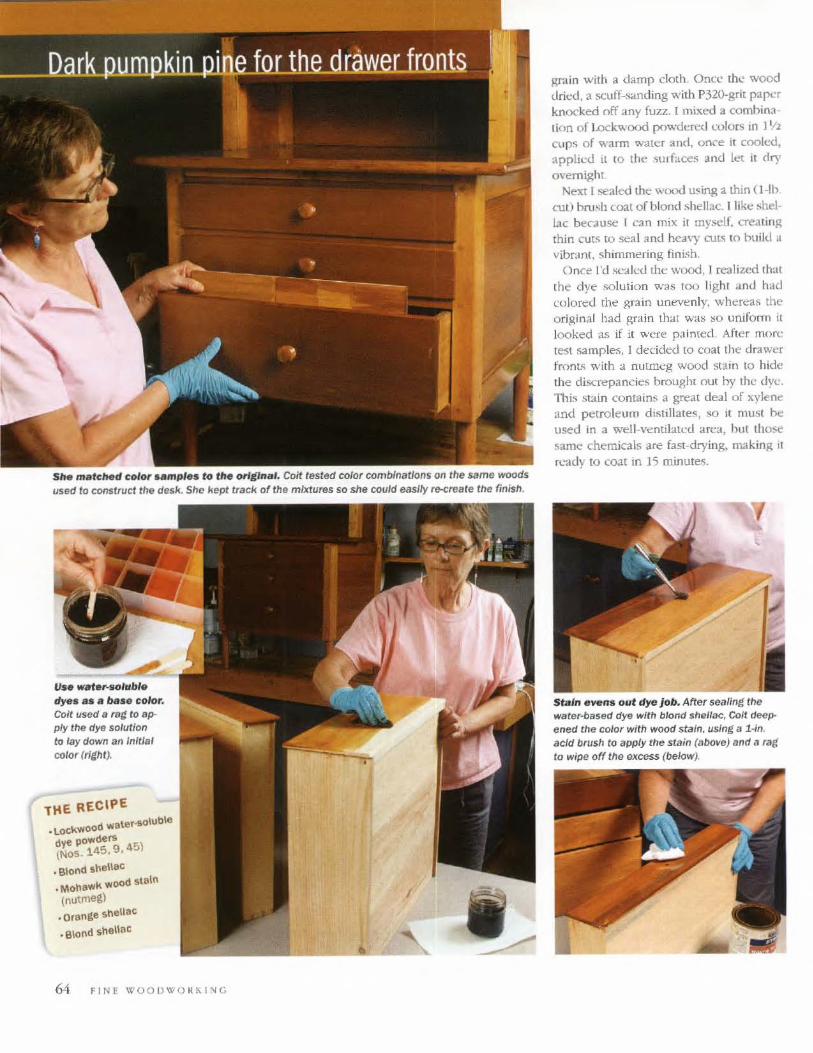
She matched colOI' samp"s to the emltln,.'. Coit tesled color combInations on the ",me woods used to cons lrllct the desk. She kept track of Ihe mixtures so she could easily r~reste the finith.
dyes a •• bas. cotor. Colt IIsed a rat: to fI/> ply the dye so/ullon to lay down all InitIal color (filM).
THE RECIPE
• LOC\(WOO • walef-solUble
dye po"",ders (NoS. 145. 9, 45)
• 810nd !"eIISC
h O k ..... ood stall' .Mo III
(nutmeg)
• orange shellaC
• elond s"e\l8C
64 FINE WQOllW()KK1NG
I
gr'din with a damp cloth Oncl' th..: wood dried, a scuff-sanding w ith P320-grit paper knocked off any fuzz. I mixed a oombin:ltion of Lockwood powdt!fcd wlors III J 1,12 CUP'> of warm water and, once it cook.>d. appli..:d it to the surfdces and let it dry overnight
Next I sealed the wood using a thin ( I-Ib cut) hru<;h coat of blond she llac. I like shellac becatL<;e I can mix it myt<elf, creating thin cut'> to seal and heavy cut.~ to build Ii
vibrant , shimmering finish, O nce I'd scakd the wood, J realized that
the dye solutio n was too light and had colortd the ,Rrain unevenly, whereas the ori,Rinal had grain Ihal was so llnifonn it looked as if it were pa inted. After more test samples, I decided to coat the drawer front.;; with a nutmeg wood stain to hide the discrepancies brought out hy the dy~. This Main contains a great deal of xylene :md petroleum d Istillates, so It must be used in a well-venlllatcd arca, hut those same chemicals are fast-drying, making It n.-.tdy to coat In J 5 minule~.
Stain evens out dye Job. After sealing the water-based dye with blond shellac, Colt dee~ ened the color with wood stain. using a 1-1n. acid brush to apply the stB;n (ab<We) and a rag to wipe off tne 9J1CC$S (below).
,........-

Start wnlt wat.Holubl. cty •• a,..ln, Wanting' to avoid staIn. whIch wou/O obscure tne grain, Coft worked hard to get the InltJal rJye concentrat/orr Just rldht,
I scuff-:<;.anded the shell.lc. appli(xJ the "".ain, let it dry, and then co.11ed the drawer fronf.!; with a I-lb. ~UI of or-lOge shdl;!('. 11)3t produced a nIce ffiiltch, 'if) I hegan buildin~ a d ear (."O'.1t v. ith blond -;hellac, mbhing OUI
between coats with 0000 'ito."cl wool.
Extra shimmer for the writing surface and top I had dyed the writing surface and top al the same time as the drawer fronts, and they also were too light. The wood wasn't as unifoml as on the drawer front~, so I did n' t want 10 Ob:.l'( lfC the grain with a stain. I removed everyt hing from ho(11 surfaces with alcohol .md COOO ~ted ..... 001 (which removed most of Ihe dye but stiJI left thl! wood lightly IInted), and 1'<..--dyl..oO thc:m with a more ('oncentrated sululton o f the same COlON. Finally, t h<ld a ha.o;e colo r, Still, it needed work, so I turned to a unted lopcoal I mixed Orasol dye lG and TransTmt Medium Brown in blond she lldc to creale the ne'<1 colo r. The shellac ba:<;e meant Ihat the look wou ld be vilx-.mt and aliw, not the dull, even look of <;fain alone.
Brushing OJ p.H.lding on timed shellac (using a piece of cotto n sh~et wf'dpped ti),tllliy around a cheesecloth interior) is trkky hec.luse you can end up with a color
www.fim:woodwor kin g.(.o m
THE RECIPE
-lockwood water-soJllble aye POWders (Nos. 145, 9, 45)
• Blond shellac (mill: in Orasol dye 2G and TransTint Medium Brown)
• Orange shellac
huildup where strokes overlap. The key to success is app lying the shellac in :;tages (a thin cut with a tim that ISn't supersaturated). A min
cut doesn 't pull up and get -ropt!y.M Although the tendency IS to spread li o n like paint, it's best to usc one nuid J1lO(lo n with as little back-and-forth as possible, moving on before it gels ~ticky When Ihe color looke d right , I I ~t It dry overnig ht .md brushed on a coat o f or-dnge she lla('.
Another approach for the pine panels and maple frames I appro ach ... ~ til..: p ine panels in a comple tely d ifferent way because the originals were very uniform and tight ~rained,
TlnfH slut/lac add. color withOut ItId/nt wood_ Not only does shellac come In a variety of its own colors (b/ond, orange, tamet, and seen/ac}, but it's itlso easy to tono with dry pigments or dyes. Colt used Ontsol dye 2G and Transnnt Medium Brown m/I(ealn bkmd slWlllac (19ft) to build color and add shlmm&r to the writing surface and top.
I didn't wan! to pop (he gr,lI n or risk ct.·u k SCI~ak.s from (he water-based dye or wood Slain , <;Q I coaled the bare wood with golden pine gel .!>1ain. It did rwo great things: It set a color on the pine and kept sub-sequent applicattons from pe netratm g the wood as deeply. Gel stain n(."eds at least eight hours of drying time before applying anything m·er it.
Wood stain renetrate~ more deeply than !-lei stain, and in some cases that's what you \"\'3nt But wood stains aL<;() tend to ohscure
JANUARY/FEBRUARY 2009 65
Gel .t.;n _If • •• • barrier, Colt used a foam bnlsh to apply tel stain (above) ana a rag to wipe off the excess (right). Gel stain kept the neAt treatment, wood stain, from penetrating too deeply and obscuring the wood's character.
f'; E REC1PE
\ ", ~cneral t='n\snes gel $taln (golden pine)
\
,Mohawk woOd stain (nutmeg)
,Btond shB\\!lC
,Oronge s\lellac
Wood st.ln k .. ". tr.'" ."d color unIform. She applied wood stain with an acla brush and wiped off the excess with a rat..
66 FINE WOODWORKING
wood's shimmering quality, so
yOll would never use a SL.1.ll if YOll wanted tbe w<XXI to make a statement on its own. While not my colorant of choice, it worked here hecause the gel stain undcrnc'lth kept it from fully pcndrJ.ting the wood.
I applied the nutmeg wood stain and then ~alcd the panels with a (hit) coat of hlond shellac. 111l'n I hegan building the finish as I had on the drawer front". I had intended to u:;c blund shellac for tilh, but orange shellac gave it more depth and w.mnth.
I had the same concerns for the maple frame as with the pine pa nels, so [ took the same
SOU RCES OF SUPPLY
LOCKWOOD POWDERED DYES
www.wdlockwood.com
MOHAWK WOOD STAIN, GENERAL ANISHES
GEl. STAIN www.woodworkingshop.com
ORASOlOYES -. museumservicescorporaUon .com
WATERCOLORS, ACRYLICS, JA.PA.N COLORS
www.dk:kblick.com
approach in tlnishing them, scaling with the Golden Pine gel stain, coating with Ihe Mohawk Nutmeg s{J.in, then sealing with blond shellac and moving to omnge shellac to nuild the finish.
Drawer pulls are quick and easy The last item was the tiger-mapk drJ.wer pull,,,;, First, I coaled them with liquid paraffin to pop thc grain. Liquid paraffin (available :II v.'WW.rockler,com) L~ an oil pressed from par:ltfin wax, and shellac ha~ no Trouble adhering to it. llikl' the way it penetrates deep into the gnlin lmd ;1 l1ows lhe light to reflect off it Next, I coated the pulls Wilh orange shellac tinted with Or3so1 dyes (2G and 4GN). The tlna] STep was to give everything a firud going over with 0000 sted wool and Kiwi Bois yellow W;1X, applicd with a rag. 0
Linda Coil is co-owner of East Point Conservation Studio in Brunswick, Maine, which specialiLes in the care and restoration of fumiture for museums and private collectors.
Sh.II • .:: ••• ,.'n color altd .dds sh •• n. Colt sealed the pine panels and maple frames with a coat of blond shellac before building up the fin· Ish with orange shellac.
WATERCOLORS FOR DISTINCT MARKS
Th ••• created rhe dark "nit and wood pIliP. Using a Yarka Sf. Petersburg watercolor kit. Colt mIxed colors to match and then painted the plugs to match the original. Using a simllar-slle plastic cup as a template anel the same watercolors . she palntea on the aistinct ring.
Add blemishes with creative coloring An important part of this type 01 finishing Is dupUcating blemishes and marks. Beck&voort had already distressed the cabInet with nicks and Krapes. but Colt needed to duplicate any discoloration that appearea In the finish. She turned to a number of products not Irequently used in furnilure IInlshing, such as watercolors, Japan colors, and acrylics. Belore beginning. she sealed all the previously linlshed surfaces with a coat of blond shellac. This protO(:ted all the prior finishing and kepi any new discoloration on the surface. $0 she could do some trial and error without JeopardizIng the overall finish. A final coat of blond shellac sealed In her work.
ACRYLICS FOR SUBTlE DISCOLORATION
Brush on and d.b tor II soft e ffect The legs haa slight a/seolorat/on along the bottom edge. nothing too distinct but enough tflat the eye could see a difference between the "new· leg and the or/glnal. To create the subtle markings. Colt used Go!den acrylics (burnt umber and carbon b!ack) with a drop of acrylic flow release mixed In. apply/ng It with the brush 8S dry as possible (left) and stlpp/lng it with a fingertip to soften (below).
Un • ffngertlp to , .. ther the palllt. Coft. combined raw umber Japan colors. blaCK powderecl pigment. and mlnaral spIrits. to the consistency of light cream. to make the V·shaped patterns. Working In small aftlas, she brushed on (above center) Bnd spread (right) the color to match the feathered discoloral/on on the original writIng surface. After lettIng It dry overnlgflt, she brushed on a coat of shellac and left It to dry for several days.
w ww.finewoodworking.com
Start with careful layout The most important step in turning a pad-foot leg Is locating the offset centers on the blank . It's easiest to begin with the offset at the loot. then mark the offset at the top_
Top offset ~: :~
Mane the pomm. '. This doflnos the Iransltlon line where the two 8l'eS in
tersect. Marking all four faces will heJp you see the line when the leg is turning.
transition point. That's usually at the hase of the rommel, the square section that receives the mortises for a tahle apmn or the carcase of a chest.
Accurate layout Is critical To produce these leg!>, you mll~t pn:cisely 10l.' lte the tv,ro sets of center points and till' transition point. That involye~ careful marking and a little arithmetic.
pom~
Transition point
Mark thtt bottom offs.t. Measure from the true center tOW<lrQ the Inside corner of the leg. Offset
a)(is
The foot is centered on the leg·s true center and should be as close a& possiblO to the blank's rough dimensions. To locate the bottom offset . subtract the radius 01 the ankle from the radius of the foot, and measure that distance on the appropriate diilgonill.
"
• ~ " " " " ': "
" " " " ,
" "
TOp of turned section
The offset at the top is 8 fraction of the bottom offset. To determine the fraction. calculate the ratio of the pommel length to me length of the turned section. It's 1:3 for a 6·in. pommel and an 18·in. turned section. So, in that e~ample, the top offset will be one·third of the bottom offset.
Turned section
True axis
Too
The length of the pommel is olle fact or in determining the location 01 the offset centers. The pommel also affects the leg·s overall proportions.
Mark th. top offs. t . Measure from the true center along tht:l diag· onal pOinting to the outside corner of the leg for this offset point.
nr.:xt stage of layout. Don't Illst connect opposite comers, because that method is not accurate enough. If you use the center square at each corner, the lines will create a tiny square in the center. Punch a hole in the center of this sqU<lre.
Next, evaluate the appearance of each of the faces, and chuo;,c thl.: outside corner where the best faces meet Make a distinct mark for reference on thr.: inside corner; that will help you orient the offset centers.
Fur the leg shown here. begin with H/4 stock, milled to about 1~ in. square. (r prefer maple, but any hardwood will doJ A blank that size will give you a well-proportioned leg for many tahles. The leg will measure I'll in. dia. at the widest part of the foot (that 's the line defining the toc), aml 3A in. dia. at the ankle, .... here the leg i" narrowest. The square pommel can be wh;ltever length !Juits your ck!Jign.
Ankle
) Bottom ~;,:;2~_1
To locate the offset centers. you need to
know two radii (for the ankle and the foot)
:lnd two lengths (for the square fXlmmel and the tllrned section).
To calculate the offset at thl.: bottom of the leg, subtract the radius of the <lnkk from the radius of the fool. MC'.l.surt" that distance from the true center alon)l: the diagonal pointing to the inside corner, and punch a hole .
To tind the true center at l.:ach end of the hlank, 1 normally u,>e a marking gauge, but for lhe~c legs I use a center square hecause it give.s me diagonal Hnes for the
offset~
Ankle __ -"~
, ,~ ,
:coot
Thr.: offset at the top of the lr.:g will he a fraction of the offset at the hottom. Th\..'
JANtARY ' FEHR U ARY 2 009 69
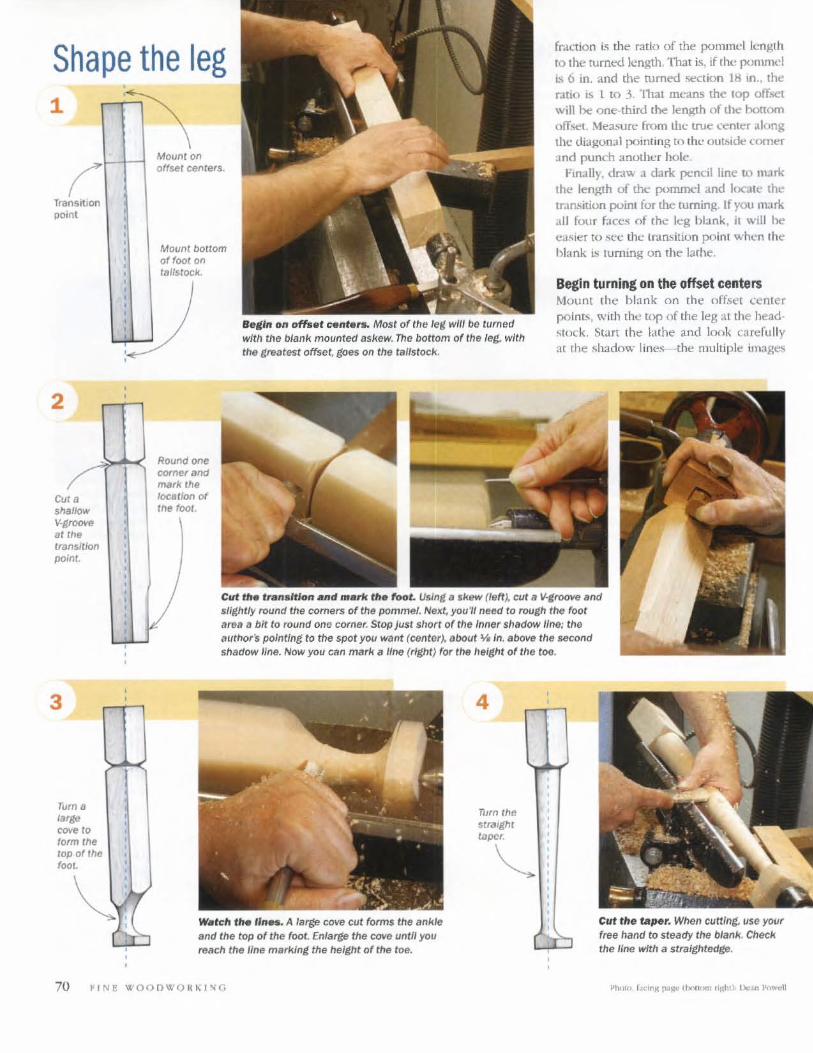
Shape the leg fr.u.:lion is the ratio of the pommel length to the turnrtllcngth. That is, if the pommel is 6 in. and the !lImed 'ieClion 16 10 .. tht: (".llio is I to ,3. '111a! mc.:'ans the tOP offset
will be on'""-third the length of the bonom offset. Measun: from the trut: ..:enler along the diagonal pointing to the o ul1.idc ~omer and punch another hole.
1
Transit!oo pOint
2
Co
" V·g " • 'Iow ~
'h. nslflon '" po int
3
Turn " large ,.,'''' form fM fOp o( the fOOt.
Moun! ()11
offset ceMars.
Maunt bottam of root on ta/lstock.
Finally, draw ;J. dark pendl line 10 uurk the length of the ponunel and locate the trdCl..,ition point for the turning If you !lurk
all fOll r faces of the kg blank , il will he ca~ler to sec the 1r'J. n.~ i tiun poinl When Ihe
blank IS turning on the lathe.
IV ,
Beilin on offset cent., .. Most of the lell will 00 turned with the blank mounted askew. The bottom of the leg, with the greatest offset, goes on Ins talistock.
Begin turning on the offset centers Mount fh e hl:lnk on the offset ~enter poi nts, with the top of the leg at the head· stock. Start the lathe and look carefu lly at the shadow lines--the multiple unagc;:$
,
, , ,
,
Round on. and he nof
,.",., mark I locatio file ~ ""' .
) Cut t'" Iranslf/on and marie Ih. foot. Using. skew (left ), cut a V-froove and slightly round the comers of the pommel. NelCt, you'll need to I'OIIgh the foot arltlt /I bit to round one corner. Stop just short of rhe Inner shadow IIn&: th& authors pointing to the spot you want (centor}. about 'Ir In. aboVe the IreCMd shadow line. Now you can mark a line (right} for th/t h/tlght of the too.
4
111m thp. strar,ht roper.
Watch tllalina •. A large cove cut forms the ankle and the top of the foot. Enlarge the cove until you reach the line marking the heltht of the toe.
Cut the tapar. When cutting, use your free lIand to steady the blank. Check the line with a straightedge.
70 f i NE WOOt)WOlo.r .... ',

you see as the blank ~pins eccentrically. Be sure theres unly one shadow line al Ihe tran.~ition point-the mark you made for the length of the pommel. To tweak the ali.w;nmcnt, shut off the lathe and tap the blank near one end to shift it slightly on ils centers. He sure to tighten the blank a)1;3in so it won·t wobble.
Use a Sis-in. skew with it~ long point down to make the transition cut. Cut about 1Js in. to 114 in. deeper than the flats on the square pommel.
J\-1ove to the foot, where you'll see rwo shadow lines. Use a 3/4-in. roughing gouge to cut down to within lJs in. of the second shadow line (see photo, facing page). Because the hlank L<; mrning off-cenrer, you·1I round off only one corner. Mark a line to locate the height of the foot.
Next. UM: a %-in. or iJ2-in. spindle gouge to shape the curve that forms the ankle and the flare at the toe. Begin these cuts well to the left of where you want the toe and wickn the curve as you make it deeper. Lse ca]jper.~ to check the diameter at the ankle.
Finally, use the roughing gouge to taper the leg from tmnsition to ankle. Steady the blank with your free hand as you cut a technique that also allow.~ you to fcd any irregularities in the taper. Use a straightedge to check that the taper is even when you make the final smoothing cuts. When this pan of the turning is completed, sand it before going on to the next step. I like to use broken PlOO- and P120-grit .~anding heiL~ for the first pass, then finish to at least P220 grit.
Finish on the true centers Mount the blank un the true centers. Use the lh-in. spindle gouge to shape the bottom of the foot, beginning at the toc. Ifs the same kind of cut you'd use to shape a bead. Round that part of the leg down so that it's between 3A in. and 1 in. dia. at the very bottom.
Lightly sand the foot, being careful not to blunt the sharp line that defines the toe.
If you've done everything correctly, that sharp line should blend smoothly into the taper at the back of the leg. If you see a bulgl:: instead of a smooth taper, you can turn or ~and it away, although that will reduce the diameter of the toe slightly. 0
Jon Siegel is a professional wood turner and toolmaker In Wilmor. N.H.
www.finewoodworkifiJ<:.com
Finish the foot
Mount on true centers.
Shape the botrom of the foot.
Complete thft fuming. Witll the leg remounted on the true centers, use a spIndle gouge to round over the bottom of the foot (a bove), leaving the diameter at the bilsa "'4 in. to l in. Sand the turning lightly (rlght), Oeing careful to avoid rounding over the sharp line acflning the toe.
VARIATIONS Sample legs from Siegel's shop ( left ) show the ra nge of design opt ions. Siegel 's porringer table (below) adapts one of those styles to a Queen Anne design. The legs are splayed slightly t o compensate for the angle of the offset .
JAN U ARY / fE.BRUARY 200 9 71
True Greene & Greene
While the Gr<Jene and Greene style arose within the Arts and Cralts mQvement, the brothers added elements from Asian
architecture and Art Nouveau. Rounded edges, sweeping curves, and elegant detail!> make their work more refined,
organic, and welcoming than the austere StlcklOY furniture that preceded It. The desIgners found surprising versatility in
a few favorite shapes. On the rocker nbove, the slepped tloudlift pattern on the crest rail is classic Greene and Greene. On the mahogany sideboard at tighl,lhe cloud lift is used in now lind uneJlpected ways. It is easy to pick out In the backsplash
and the corbels, but the !lnen·fold pulls and the fruilwooCllnlay
on the doors are wonderful variations.
72 FINE V/OO()WORKING
Learn how the elements
work together, and then
use them in your furniture
BY GARY ROGOWSKI
T ilt: marrying of .styles is a tricky business. Add the wrong elements, or too
much of one over another, and the re."ulL<; look wrong and out of place. Brothers Charles ;lod Henry Greeol:, the California architects of the early 20th century, created a marriage of style,.; that continue,.; to please the eye aod capture the imagination 100 years later, They took the plainness and exposed joinery of Art,'; and Crafts furniture , mixed it with the subtlety of Chinese furniture aod the IXlJdness of Japanese temple de'iign, and then with a final flourish threw in a taste of the sinuous lines of Art Nouveau, The result i.'i a style that has heen revered, copied, aml
redL~coV\:red. but remain:- lloi4udy Greene and Greene.
If you are attempting a faithful !1!
production of a Greene and Greene piece, you'll want to unJer~tanJ each of the essential elements in order to capture the original spirit If you are brewing your own hlcml. you'll !1l:L-d to know hoy, the Greenes combined carefully selected e1ement<; to create a single effect.
How the style was born The Greene brothers hegan their professiotl.1.1 careers steeped in the ideah of the Arts and Craft~ move
ment. Thb em in design emerged as a reaction to the cnlsh of the Industrial Revolution-with its
machine-made, often lo\v-tlualily
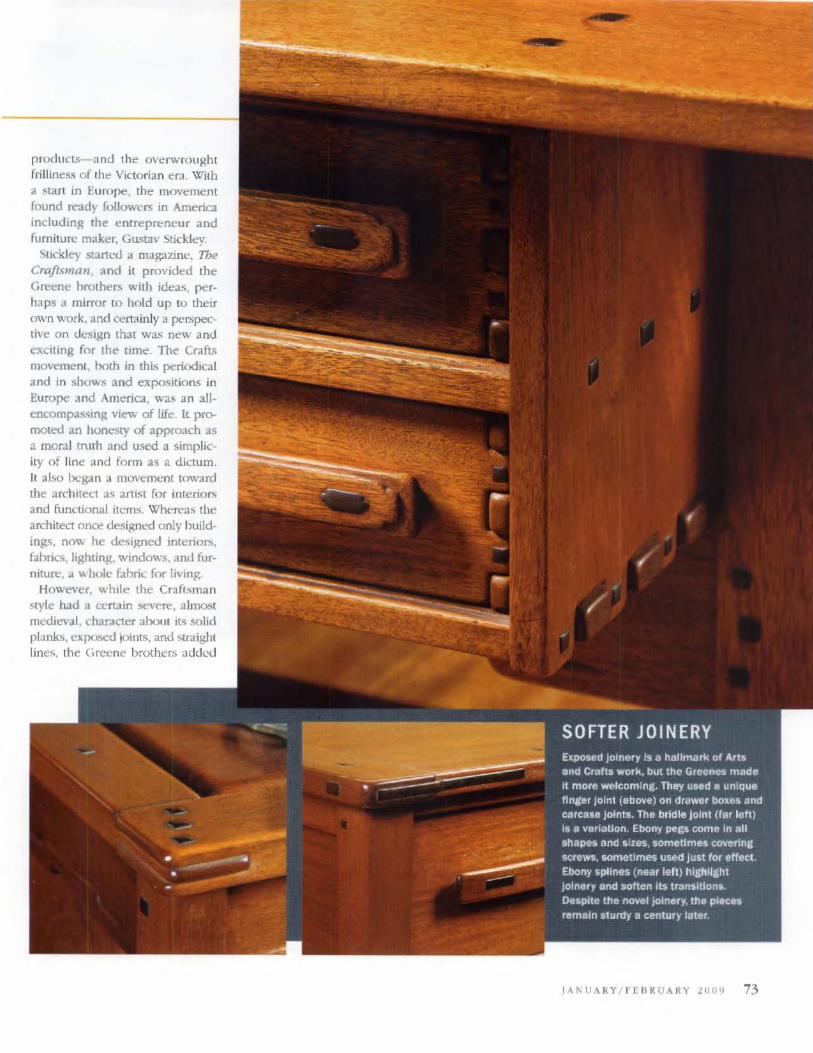
products-and the overwrought frillines.~ of fht' Victorian era, With a start in Europe:, tht' lllOVt'ment found ready followers in America indudin~ the entrepreneur and furniture maker, Gu.'itav Stlcl..ley.
StiCkley started a maga7ine. The Crtljtsmtln, and il provided the Grt!cne hnllher:\ with ideas, perhaps a mirror to hold up [0 their own work, and certainly a perspective all design that was new and exciting for the tune. The Crafts movement, hoLh in thL .. periodical and In shows and expositions in Europe and America, was an allencompa."''itng view of life, It promoted an hOOl-"Sty of approoch as a moral tnLlh aoci used a simplicity of Hne and form a~ a dictum. II alf>O began .t movement toward the arch1tect a .. artist fOf intefion; and functional items. Wlkrt:'3S the
architect once designed only huildings, nov. he de:"i,lUled interior... fabric<>, lighting, windcw.'S. and furniture, a whole fabric for living.
However, while the Cr:l ftsman 'ityle had a certain .severe, almost medieval, char:lcter about its solid planks. exposcO ,oint:o;, and str.light
line~. the Greene brotht'r~ added
JA J\U ARY fJ:ARUARY lO ll') 73
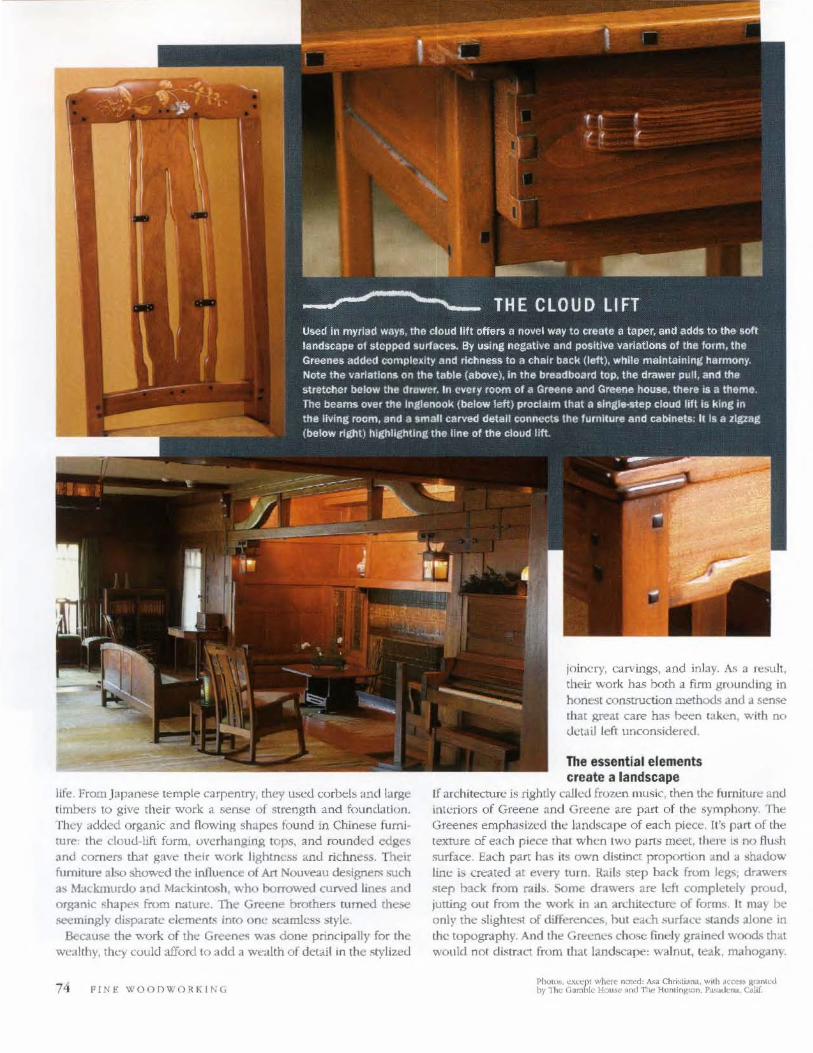
I1fe. From J3panese temple carpentry, they UM.-tl corlx:ls and !a~e timbers to give their work a sense of strength and foundation. I1lCY I:Idded organic and flowing shapes found in Chinese furniture, the cloud-lift form, overhanglflg tops, and rounded edges and comers that gave their work Jightnes:. anti richness. Their fumiturc al.-.o shuv."t..-d the intluencc of Art Nouveau designers such as M ... cklllllrdO and Mackintosh, who borrowed CUlVed lines and organic shapeo; from n:JtUIlJ. The Greene brothers turned these seemingly disparnte elemenl .. Into one SC""dmlcss style.
.Becau!;e the v.urk (If the Greenes was done principally for the wcalthy, they could afford to add a wealth of detail in the stylized
74 FINt: WOO[)WORKING
joinery, carvings, and inlay. As a result, their work has both a fiml ground ing in honest construction methods and J sen'ie that weat care ha.'i been taken, with no dl.:taiJ leff unconsidered.
The essential elements create a landscape
If architecture is rightly call1:d froZ-cn llIusiC', then the fumilure and inlt~riors of Greene and Greene are part of the symphony. The Greene ... emphasized the:: land$cape of each piece. [t's part of the texture of each piece that when two parts meet, there ill no f1u:;h surface. Each part has its own diS{inc[ proportinn and 1:1 shadow line is; created at e\'ery tUIn. Rails step back from Jegs; dr.l·wers step back from [""".l ib. Some drawers are left completely proud, jutting Oll t from the work in an architecture of forms. It may be only the slightest of differences, hut each surf3(10 :;(ands aJone in the topugT"dphy. And the Grt:cm."S chCl."oe finely grained woods that would not di.~tra(.1. from that landscape: walnut, teak, m .. hogany.
Pi ..... ,,.. C"'""'Pl where n<::I'=l, .... "" Ch",lIdna. w~h .=~ 1Ir:~"'C-J by jk Glmblc 110\)'" .",1 n.,., Hunt;nM''''' . l'" ..... ...Jcr'lll. CAlif.
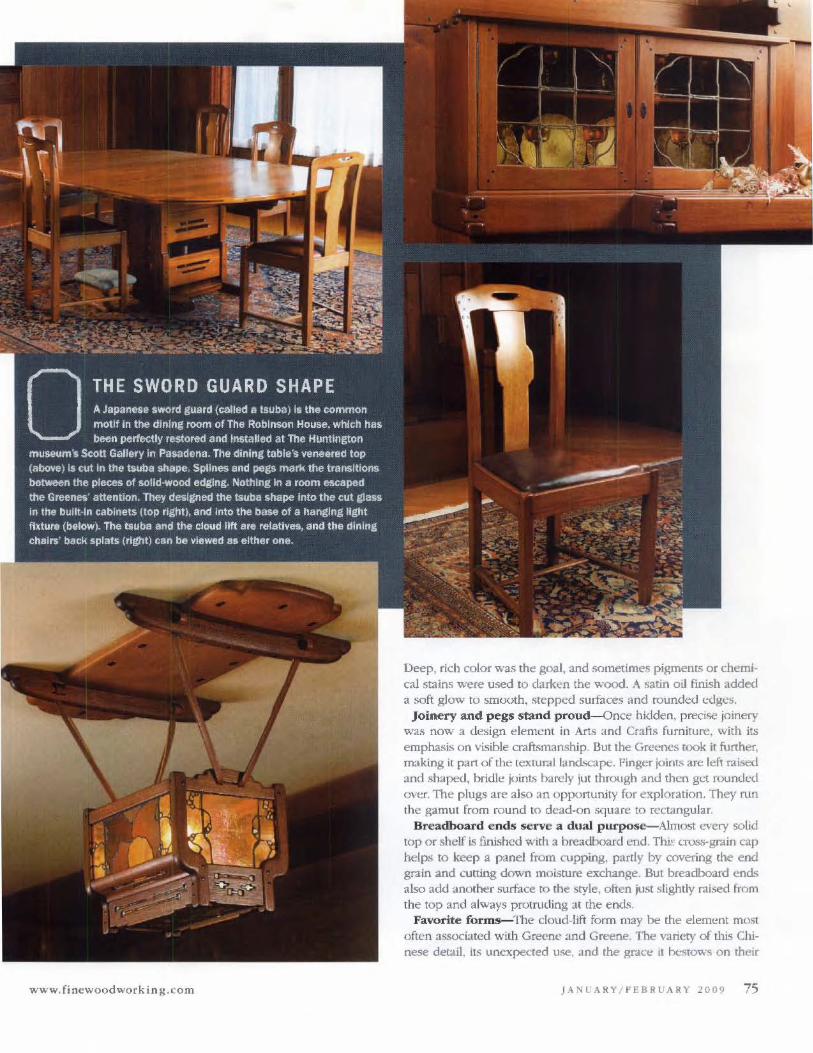
www.finewoodworking.com
Deep, rich color was the goal, and sometimes pigments or chemIcal stains wefe used to darken the wood. A satin oil finish added a ~ft glow to smooth, stepped surfaces and rounded L.uges.
Joinery and pegs stand proud-Once bidden, precise ;ninery was now a design delllclll in Arts and Crafts furniture, with its emphasis on visible craftsmanship. But the Gr(."eOes rook it further, making it part of the texwr.d landscape. Finger joints are left rai<;e(1 and shaped, bridle ~)int" barely jut through and then gct murKkd over. The plugs are also an opportunity for exploration. They ntn the f;am\l\ from round to dead-on square ro rectangular.
Breadboard ends serve a dual purpose-Almost every solid top or shelf is tlni~hcd with a hreadboard I!'nd. Thi!: cf06s-grdin C"dp helps to keep a panel from cupping, partly by covering the end grain 2nd "'lining down moisture exchange. But breadboard end .. also add anc>l:her surface to the style, often just slightly raised fmm the top and always prOlfilding at the eock
Favorite forms-'Ille cloud-lift form may be thl!' element most often associated with Gra'ne and Greene. The variety of this Chinese detail, its unexpected use, and the gI"'dCe 1\ l:estov.'s on their
JANUARY/I'EBRL:ARY 1009 75
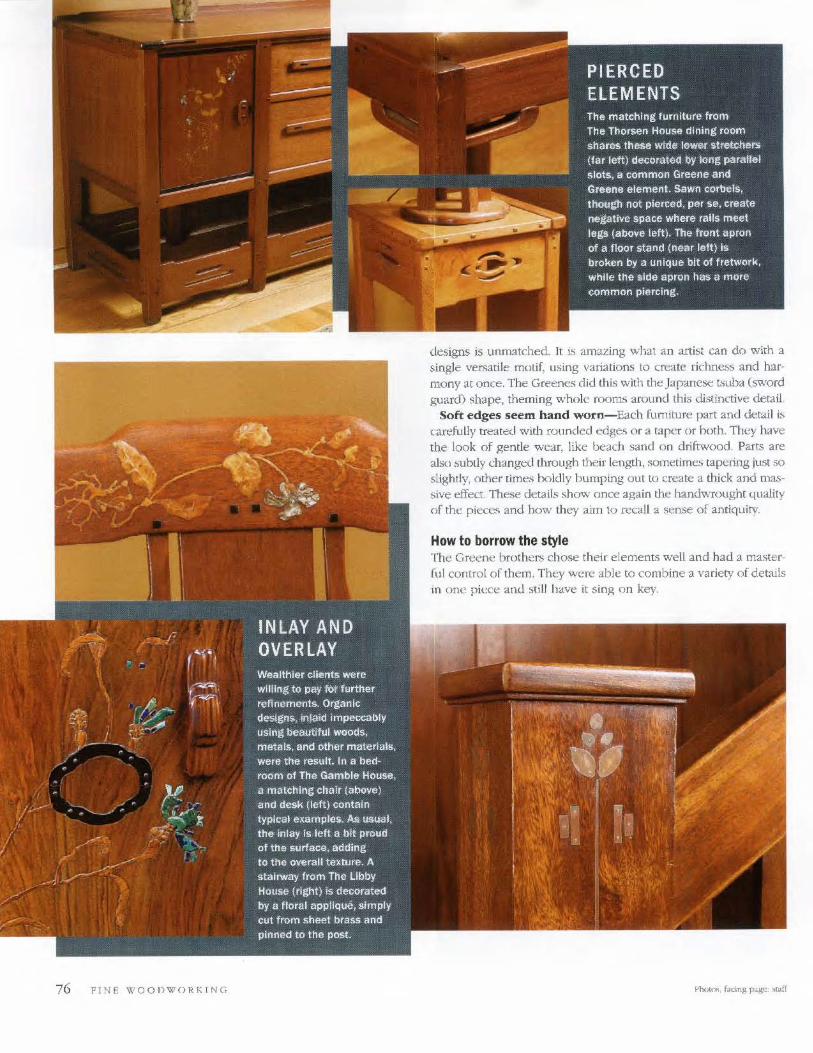
76 F IN E WOODWORKI N G
designs is unmatched. It is amazing what an artist can do with a single versatile motif, using variations to create richne~~ and harmony at once. The Greenes did this with the Japanese t~Llba (sword guard) shape, theming whole rooms around this distin<.tive detail.
Soft edges seem hand worn-Each fumiture part and detail i~ carefully treated with rounded edges or a taper or I">olh. They have the look of gentle wear, like beach sand on driftvmod. Parts are also ~ublly changed through their length, wmetime~ tapering just so slighlly, other time~ boldly humping out to create a thick and mast>ive effect. These details shmv once again the handv..-rought quality of thc pieces and how they aim to reGlll a sense of antiquity.
How to borrow the style The Greene brothen; chose their element<; well and had a ma~ter(ul control of them . They were able to combine a variety of details in one piece and st ill have it sing on key.

successfully using these elemenT!; in your own work requires the same care. You might reproduce them faithfully but combine them poorly. Remember that the Greenes usually based a piece, even a whole room, on a single detail. It would be too much to put every Greene and Greene element you've seen into a single piece, hlending dissonant details into an off-key arrangement.
When I'm dc..-igning in this :;tylc, I like to make certain element,; recall the style without trying to ah<iolutely mimic them. Cloud-rise details arc infinitely adjustable, whether it's the distance between the two lines or where you start and stop the rise.
The stepped surfaces arc also important, but be careful with how big you make the steps. A lA_in. rise between hreadboard end:; and a tabletop can be a disaster ifyou're always sening wine glas.'K'-" down on it. The same is true wid1 raised plugs and joint", A little bit of rise to a plug can be more auractive and friendlier to the touch than a large, carved, textured one. Subtle effect ... ~holild be just that, and they actually will have more impact. Remember that the purpose of these details is not only to show your craft .... manship but also to df'dW rx;oplc to a piece, to make it waffill·r
and morc inviting, 0
Gary Rog<w;ski is a contributing editor and runs The Northwest Woodwor/ring Studio, a school in Portland. Ore.
Modern makers have Interpreted the Greene and Greene style In their own furniture. While not Intended to be faIthful reproductions. these two pieces Include many of the classic elements. In author Gary Rogowski's Sideboard (left), he reInterprets the cloud Uft and long grooves. and adds a Iresh Japanese touch : III playful ginkgo-leaf Inlay. Darrell Peart also borrowed from Japan. from temple architecture In this case, tor the boUom-heavy legs of his chest of drawers {below). His stylized take on Greene and Greene drawer JoInery and hIs curved adeptatlon of the cloud 11ft afe also harmonious touches.
Where to see Greene and Greene
Any dIscussion of Greene
and Greene furniture soon
leads to The Gamble House
(www,gamblehouS8.orC)
In Pasadena. Calif. It Is the
best-preser ... ed of the ·ultl
mate bungalows' the broth
ers created at the height of their careers. The Greenes designed
everythIng insIde and outside these homes, from the architecture
and furnishings all the way down to carpets. lighting, cut glan,
millwork, and clerer mechanIcs like hidden doors.
So Fl\'W headed to Pasadena to photograph some of the
best sur ... I..-lng examples of Greene and Greene furniture--ln the
www.finewoodworklng.com
house they were dMlgned for. WhIle In town we made lIInotiler
critical stop at The HuntIngton (ll wonderful 2DO-acre comblntt
tlon of galleries, library, and botanlcel gardens: WNw.huntlngton
.org) to photograph the Greene and Greene eJlhibit In the Scott
GaUerles of American Art. There we found furniture from The
Thorsen House. a complete dIning room from The Robinson
House, II staircase rescued from ThClllbby House. lind e few
more pieces from the Gamble-togethet forming a broad sam-
piing of the brothers' best work. ~I Online Extra If)'ou are ever in the Los
Angeles area, make a point to vis
it these places. As a woodworker,
you'l never forget the experience.
To read editor Asa Christiana's blog and see a video of the Gamble HOllse. go to Rne· Woodworkln&,comj ellt,a,.
JANUARY / fEBRUARY 2009 77
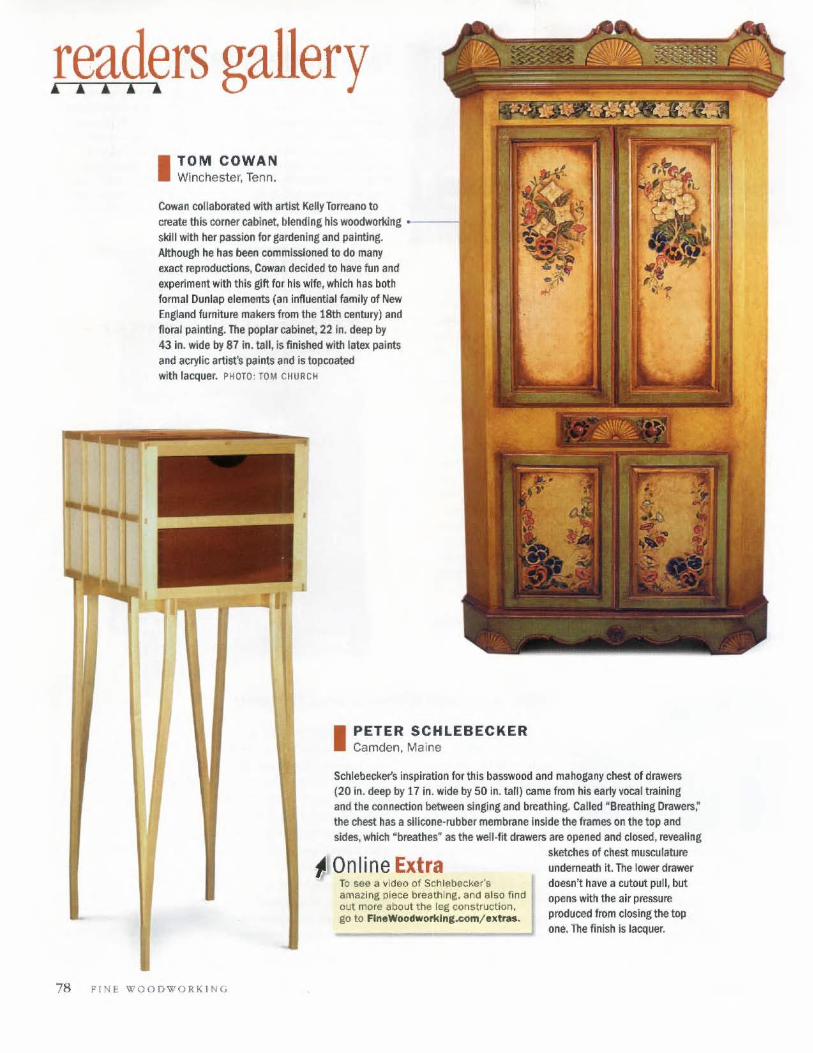
r~~g~rs gallery
I TOM COWAN Winchester, Tenn.
Cowan collaborated 'Nith artist Kelly Torreano to create tlJis corner cabinet blending his woodwooong - ---t skill with her passion for gardening and paintlng. Although he has been commissioned to do many exact reproductions, Cowan decided to have fun and experiment with this gift for his wife, which has both formal Dunlap elements (an influential family of New England furniture makers from the 18th C1lntury) and floral painting. The poplar cabinet, 22 in. deep by 43 in. wide by 87 in. tall, is finished with latex paints and acrylic artist's paints and is topcoated with lacquer. PHOTO: TOM CHUR CH
I PETER SCHLEBECKER Camden, Maine
Schlebecker's inspiration for this basswood and mahogany chest of drawers
78 FINE WOODWORKING
(20 in. deep by 17 in. wide by 50 in. tall) came from his earty vocal training and the connection between singing and breathing. Called ~Brealhing Drawers; the chest has a silicone-rubber membrane inside the frames on the top and sides, which -breathes· 35 the well-fit drawers are opened and closed, revealing
~ Online Extra To see a "'ideo of Schlabecker's amazing piece breathing. and also find out more about the leg COn!~truction .
go to FlneWoodworklnl.eom/ u tl'8$.
sketches of chest musculature underneath it. The lower drawer doesn't have a cutout pull, but opens with the air pressure produced from closing the top one. The finish Is lacquer.
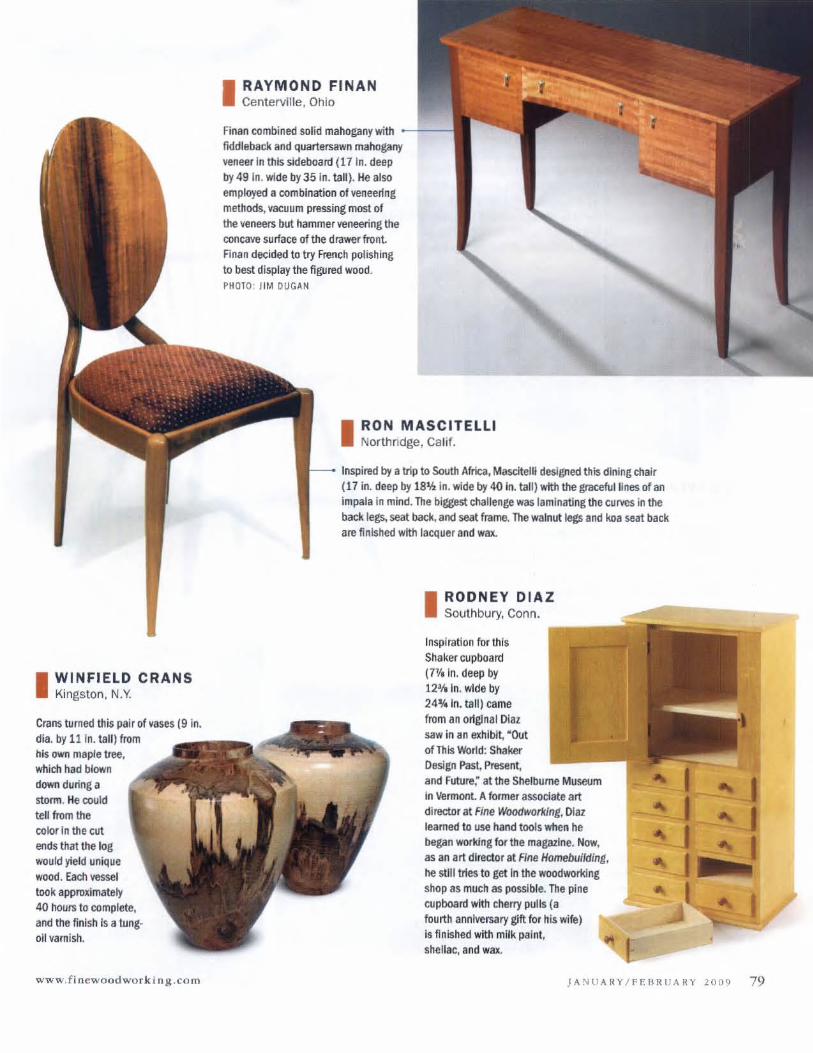
I WINFIELD CRANS Kingston, N.V.
Crans turned this pair of vases (9 in, dia. by 11 In. tall) from his own maple tree, wflich had blown down during a storm. He could
tell from the color In the cut ends that the log would yield unique wood. Each vessel took approximately 40 hours to complete. and the finish is a tungoil'o'amish.
www.finl::woodworking .com
I RAYMOND FINAN Centerville, Ohio
Finan combined solid mahogany with _ L _ fiddleback and quartersawn mahogany yeneer in this sideboard (17 In. deep
by 49 In. wide by 35 10. tall). He also employed a combination of veneering methods, vacuum pressing most of the veneers but hammer veneering the concave sulface of the drawer front. Finan decided to try French polishing to best display the figured wood. P ~ Ol O: JIM DUGA~
I RON MASCITELLI Northridge, Calif.
Inspired by a trip to South Africa, M<lSCItelii deslgnetl this dining chair (17 in. deep by 18% in. wide by 4() in. tall) wtth the graceful lines of an
impala in mind. The biggest challenge was laminating the CLlfVeS in the back legs. seat back, and seat frame. The walnut legs and koa seat back are finished with lacquer and wax.
I RODNEY DIAZ Southbury, Conn.
Inspiration tor this Shaker cupl:KJard (7'1. In. deep by 12'11 In. wide by 24% In. t811) came from an orlglnal Diaz saw in an exhibit, ·Out of This World: Shaker Design Past, Present, and future; at the Shelburne Museum in Vermont A tormer associate art director at Fine Woodworking, Dial learned to use hand tools when he began working for the magazine. Now. as an art director at Fine Homebuilding. tie stili tries to get In the woodworking shop as much as possible. The pine cupboard with cherry pulls (a fourth anniversary gift for his wife) is finished with milk paint, shellac, and wax.
I
JA NU ARY/FEBRUARY 2009 79
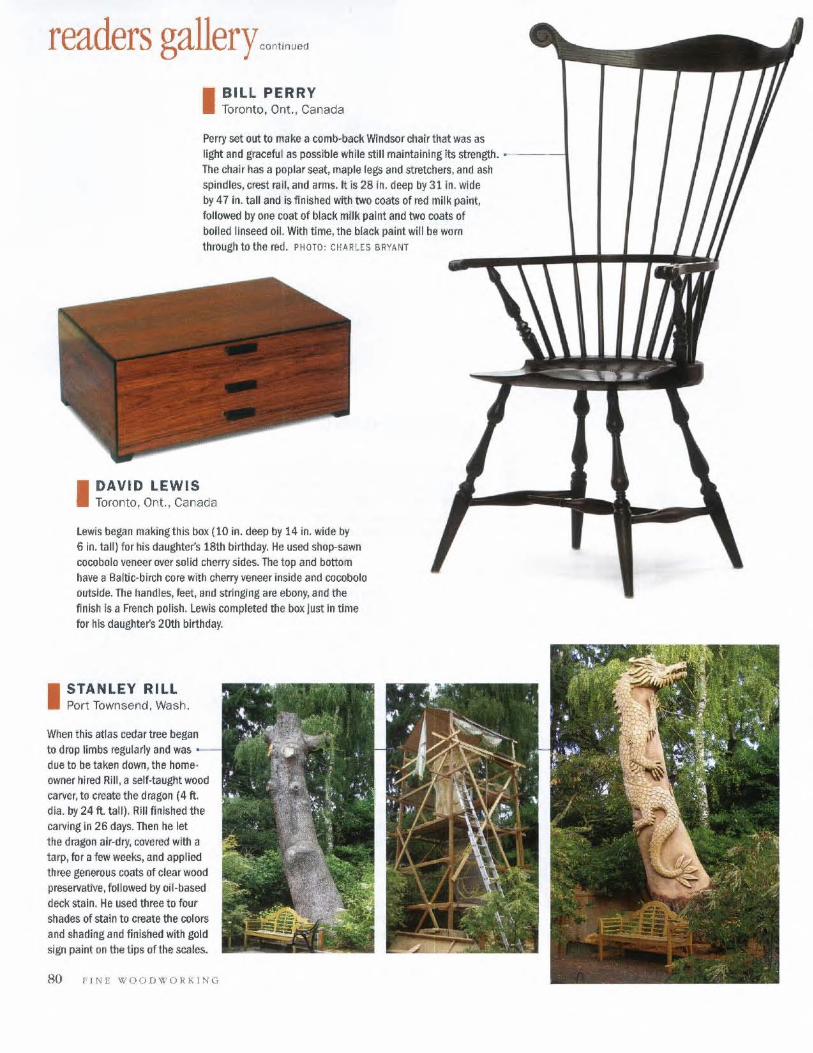
readers gallerY'""H"'" I BILL PERRY
Toronto, Ont., Canada
Perry set out to make a comb· back Windsor chair tllat was as light and gracefu l as possible while still maintaining its strength . • The chair has a poplar seat, maple legs and stretchers. and ash spindles, crest ra il, and arms. It is 281n. deep by 311n. wide by 47 in. tall and is finished with two coats of red milk paint, followed by aile coat of black milk paint and two coats of bolied linseed oiL With time, the black paint will be worn through to the red. PHOTO : CHARLES BRYANT
I DAVID LEWIS Toronto. Ont.. Canada
Lewis began making this box (10 in. deep by 14 in. wide by 6 in. tall ) for his daughter's 18th birthday. He used shop-sawn cocobolo ~enee r over solid cherry sides. The top and bottom have a Ba ltic-birCh core with cherry veneer inside and cocobolo outSIde. The handles, feet, and stringing are ebony, and the flnlsh Is a French poliSh. lewis completed the box Just In time fOr his daughter's 20th birthday.
I STANLEY RILL Port Townsend, WaSh.
When this atlas cedar tree began to drop limbs regularly and was due to be taken down, the home· owner hired Rill. a self-taught wood carver, to create the dragon (4 ft. dia. by 24 ft. tall). Rill fin ished the carving In 26 days. Then he let the dragon air-dry, covered with a tarp, fOr a few weeks, and applied three generous coats of clear wood preservatIVe, followed by oil -baSed deck stain. He used three to four shades of stain to create the colors and shading and finished with gold sign paint on the t ips of the scales.
80 fiNE WOOOWORKING
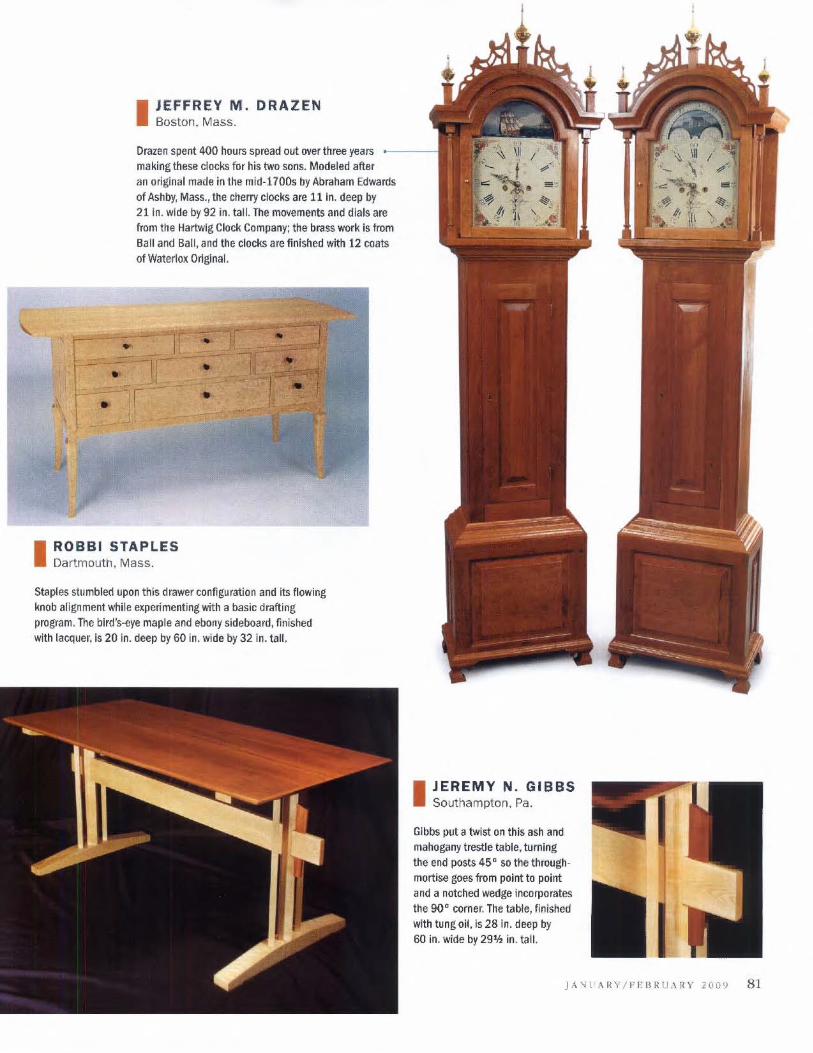
t •
I JEFFREY M. DRAZEN Boston, Mass.
Orazen spent 400 hours spread out (Wer three years making these clocks for his two sons. Modeled after an original made in the mid-1700s Ily Abraham Edwards of Ashby, Mass., tile cherry clocks are 11 In. deep by 211n. wide by92 in . tall. The movements and dials are from the Hartwig Clock Company; the brass work is from Ball and Ball, and the clockS are finished with 12 coats of Waterlox Original.
r
I ROBBI STAPLES Dartmouth, Mass.
Staples stumbled upon this drawer configuration and its flowing knob alignment while experimenting with a basic drafting program. The bird's-eye maple and ebony sideboard, finished with lacquer, is 20 in. deep by 60 in. wide by 32 in. tall.
I JEREMY N. GIBBS Southampton, Pa.
Gibbs put a twist on this ash and mahogany trestle table, turning the end posts 45" so the throughmortise goes from point to point and a notched wedge incorporates the 90 a corner. The table, finished with tung oil, is 28 in. deep by 60 in. wide by 291h in. tall.
JA'i1 ARYjPEBRU.\RY 20D9 81
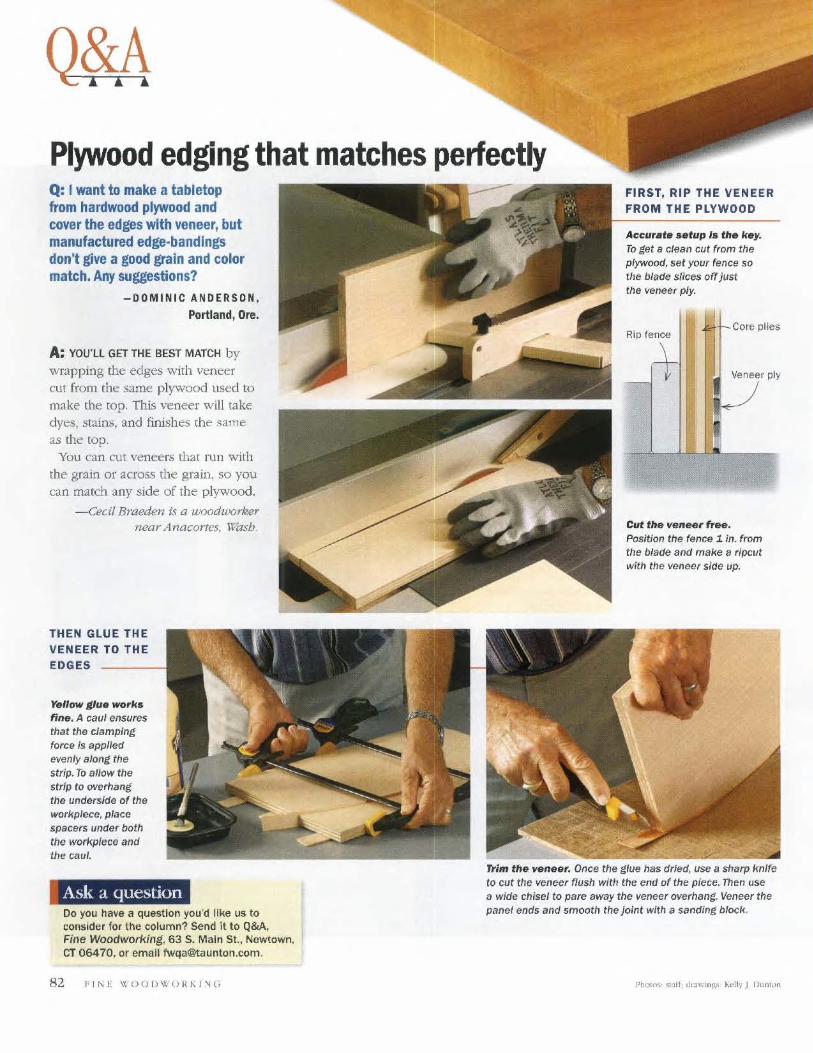
Plywood edging that matches perfectly Q: I want to make a tabletop from hardwood plywood and cover the edges with veneer, but manufactured edge-bandlngs don't give a good grain and color match. Any suggestions?
-DOMINIC ANDERSON,
Portland, Ore.
A: YOU'LL GET THE BEST MATCH by wrapping {he edges Wilh veneer cut from the same pl)'\'l"ood used to make the top. This veneer will take dyes, stains, and finishes thf' same as the top.
You can CUt veneers that run with the grain or across the grain, so you can match any side of the plywood.
-Cecil Braeden is a woodworker near Anacortes. Wasb,
THEN GLUE THE VENEER TO THE EDGES
Yellow lZIue work$ fine. A caul ensures that the clamping force is appliea evenly along the strip. To Dllow the strip to overhang the undersiae of the workpiece. place spacers under both the workpiece ana the caul.
Ask a question Do you have a question you 'd like us to consider for the column'? Send it to Q&A, Fine Woodworking, 63 S. Main 51., Newtown. CT 06470, or email [email protected] .
82 f Jr-; E WOOI)\\O/{K] 'i c;
FIRST, RIP THE VENEER FROM THE PLYWOOD
Accurat • • etup I. the key. To get a clean cut from the plywood, set your fenc e so the blaae slices off just the "Veneer ply.
Rip lence Core plies
Velleer ply
Cut the veneer fr88. Position the fence lin. from the blaae ana make it rlpcut with tne veneer side up.
Trim tho veneer. Once the glue has dried. use a sharp knife to cut the veneer flush with the end of the piece. Then use a wiae chisel to pare away the veneer overhang. Veneer the panel ends and smooth the joint with a sanaing block.

WHlTECHAPEL LTD
315 PAGE COLOR CATALOG $5.00 l-lO7-739-9478 ~,t""hapd-lld.com
www.fincw()<.ciworkiog.com
I Mortise Par J TUm your pkJnge router Into • II precision slot mortiserI ...
J ANUARY FEB K lARY 2u09 83

Q&A OOM joe"
Marking knife cuts wrong board Q: When I cut dOyetails, I do the taus first and then transfer them with a marking knife to the pin boaNi. But my knife often cuts Into my tails. What am I doing wrong and how can I correct It?
-B I LL HUYCK,
A: MY GUESS IS TH AT YOU'RE
USING a marking knife wilh
a lx-vel on each face, like an X-Acto knife.
rf the blade is tilted too much, there's nothing to guide it and it will cut into your tails. If it's too vertical. the s<:.:ribc line w ill he off.~et
Sewanee, Tonn . anu inaccurate.
THREE TYP ES OF KNI VES
DOUBLE-BEVEL
It's harder to get an accurate cut.
SINGLE-BEVEL
You need two, one for tho right side and one for the left. but the flal hack makes accuracy easy.
SPEAR·POINT
A flat back and two cutting edges make it versatile and accurate.
Tilt the knite .'>0 the bevel rides against the workpiece and guides the kn ife. It will scribe adjacent to the tail without cuttin.~ into it.
Another option i.-; to get a knife with a bevel on on ly one fa.;;c, which make.~ it easier to hold the knife flu.'ih to the tails. A .'ipcar-poinl knife is a great .~ingle-hevel knife, because it can be q ukkiy flipped for scrihing to the right or left of a workpkce, like when you're marking both .'iides of a taiL
-Michael Pekovich is tbe art directur.
Sloppy Joint from a sharp knife. Ooublc-bel'el knives, like X·Acto knives, cut cloan lines. But they will cut Into your tails if the bevel isn't flat against them, and your transfer lines won't be accurate.
WRONG TILT
Till your knife too mUCh, and the point will grab the reterence edgc (Icft ). Don't tilt it, and the cutting edge will be too far from t he reff>rl'ncc piece (r ight),
CORRECT TILT
For an accurate ami corlUolled cut. put th e bevel flat against the tail board.
SINGLE BEVEL
IS SPOT ON
The flat back of a singlebevel knile allows you t o prcss it f irmly <lgainst the t!lil board. You get nn accurate and controlled cut as a result.
Silence a whistling tablesaw blade Q: I recently replaced
the blade on my tablesaw with a 40-tooth thin-kerf carbide blade with four laser-cut openings, and made a Iero-c/earance insert for It. The blade cuts well, but It also whistles like mad. Why Is
It whistling, and can I do anything to stop It?
-BOB HICKS,
Cltitlenango, N.Y.
84 FI'IE WOODWONKING
A: THE MOST LIKELY CAliSE i~ the opening~ spinning past the saw's throat insert. But it's possible that the teeth or the ()p~ning.'i ar~ just noisy.
Remove the insert (but not the blade) and run the saw If there's no whistling. the insert is the cause. Widen its opening by ra ising a standard-kerf hlade through it.
If the hlade whiMies, it's the teeth or opening.'i. There's no fix for the teeth, hut you can fi ll the openings with silicone .~ea lant . Or just gi vl~ lip and get a new blade. -:fohn W'bite is afoYm(?r shop
mnnap,er at tW\Xr.
Whist~s while i t works_ Wh~n a blade whistles as it spins, the culprit Is often a relief cut /ike this spinning past the edge of a zero-clearance opening (left ). When It standard-kart blade was used to widen the .zer()clearance opening (right), the whistling stopped.

Drill Guide '22. • ~ ..--~~-Q.-~ \\ r 24" Hollowing TooL with 2 HSS Cutting Tips
$35.00 Hollow Form Essenti als
(ome see Gladstone Tools at ~::In The Woodworkinq Shows., •••• '~ FREE ADMISSION WlTH THIS AD! IQfOJ/09
ORDER ONLINE: Distributed b www.gladstonetools.com Y www.mannyswoodworkersplace.com or by phone 1-800-243·0713 425 Curry Av@, Lmngton, Ky 40508
www.fin ewoodwork i nK.com
Mortise & Tenon Made Easy with the Leigh FMT
See the Videos at leighjigs.com
I =I:::E-I. Lolg h RaUIO' Jc;ury JI;.
,":,,,,~~f",,'t'1l= ~\:V\.~{?'IIJ\!J~o .... .,.
JANUARY, I'EB~UARY 1009 85
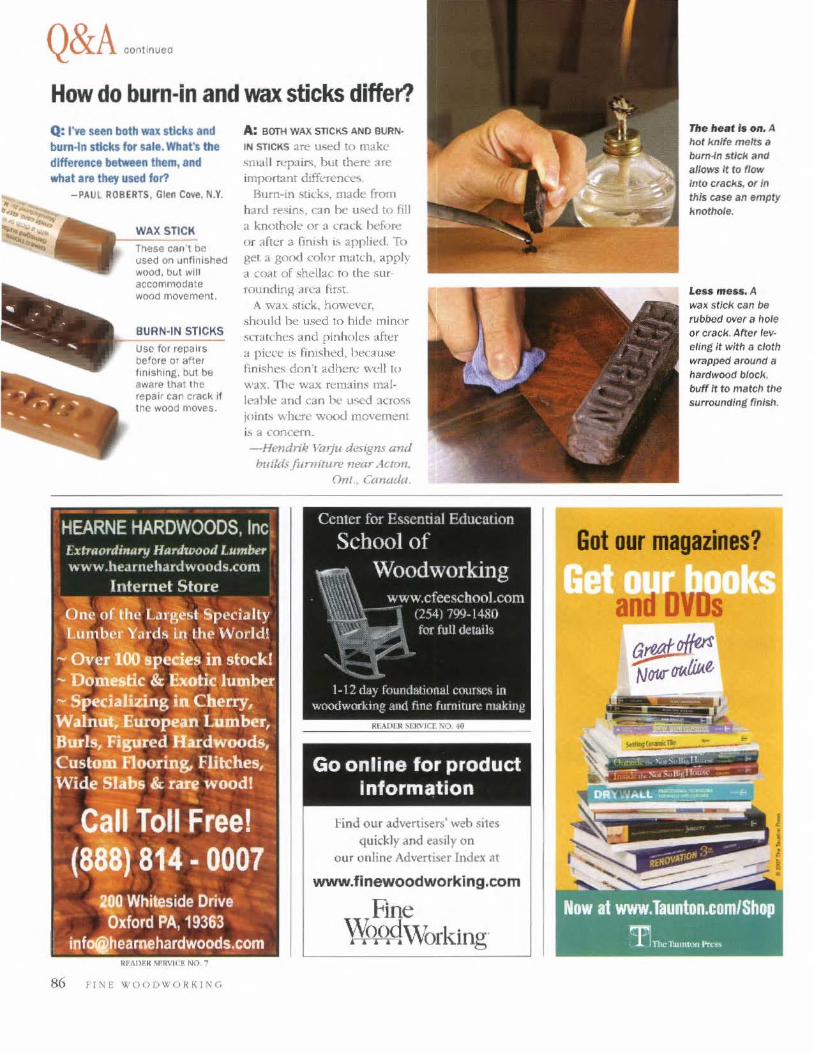
Q&A 00011000'
How do burn-in and wax sticks differ? Q: j'ye S8en both wax sUcks and bum-In sticks for sale. What's the difference between them, and what are they used for?
- PAU L ROBERTS, Glen Cove. N.Y.
WAX STICK
These can't be used on unfinished wood, but will accommodllte wood movement.
repill i r can crack if the wood mo~es.
86 FIN E WOI) DWORKlr-:C;
A: BOTll WAX STICKS AND BURN
IN STICKS are used to ma.ke
small n:pa ir<;, bUl the~ ;'I re
important dlfferen~ Bum-m Slil'ks. made from
hard resins, can he u <;ed to fill a knotho le or a cl:lck beJor<.:!
or aft!.:f a fi nish is app lied . To get a gotxi color match , apply a coat of shellac to the sur
rmmdmH area fi rst. A wax stick. however,
sh ould bl: use d 10 hide mino r scratches and pinholes after a piece IS tlnished, because fi nishes d on 't adhere wdl to
wax. 111e wax remains n'!a/' leable and can be used across jOint'> wht..-rc wood movement
b a concern_ -He,uirik nll7U designs and
bllilds[urnilure ?lear Aclml. Om. Canada.
Go online for product information
Hnd our advertisers' web sites quickly .md easily on
our online Adve"rtiser Index al
www.finewoodworking.com
Fine Wqqc!Working
TIle h •• t I. on. A hot knife melts II
bunNn stick and allows It to now inlo cracks. or in this case an empty knothole.
Leu mess. A wa)l s lick can tl6 rubbvd over a 110le or crack. After lev· eling it with a cloth wrapped around olI
l1ardwood block, buff It to match the surrOi/ndlnt finish ,
Got our magazines?

• Immediate t!eli';ery • Two year w.YTaI1ty • True 3-phaSe 0IlIpuI • wtlsper lJJi9t operalioo • No-c/larQe tecIl support. 24-7 • Regulated 0lI!ptJt tor CNC MadlirJeS • T~ most capacity at \lie least cost. gllml1teed! • Protect roor irwestment . Irrsist OIl Pilasemasterf' • ViSit lIS lOda~ at www.kayind.com --I.v Industries &>4~. tt.lSl..
, • II f •• IT II. :t~-'661i ~ ~,. ,. ,~ ••• c~~ •• ".,. S14.2ti-5m(la.;l
-~127Ba,Sl.16 n ......... CAIlo4s:s!1
51G-&56·a7ai 5,I).MH~tlDJ
The World Leader in Single to Three-Phase Power Conversion
Keep ,our Fine Woodworking back issues looking brand new.
Stare your treasured cop~ of FilII' WoodW(lrking in $l ipa.SC'!i for easy referencc
again and again! Bound in dark blue and embo:l.'Ied in gold, each Glse holds mort' th.an a year's wor th of Fine Woodworking. Only 58.95 (524.95 for 3, 549.95 for 6). 1'\,,, ""i'I""II,,,,tlw>dl,"II' Poyohlt i~ u.s. ~....u .
To place an orda usi ng your credi t card, call 1-800-888-8286. Outside the U.s.
and Canada call 1-203-426-8171.
www.finewoodworking.cum
Dovetails Made Easy with Leigh Joinery Jigs
."
Variably Spac~ Sliding Half-Sli r><!
14" Leigh Super24
See the Videos at leighjigs.com
L51~. Llig" R.ut., JDln ... y Jig.
Ifl9hj;g.s.«Im 100-661-11912
HAOFM 'ij'RVl(".f. :>.0. SS
Infinite Laser Engraving Possibilities for as little as $7,995
..
ENGRWING lid
(reate custom inlays with ease Add accents to cabinets and drawer fronts Laser cut prototypes, jigs and templates Engrave personalized designs for customers
JA'lII"'IIY/FFB~UAIIY lU09 87
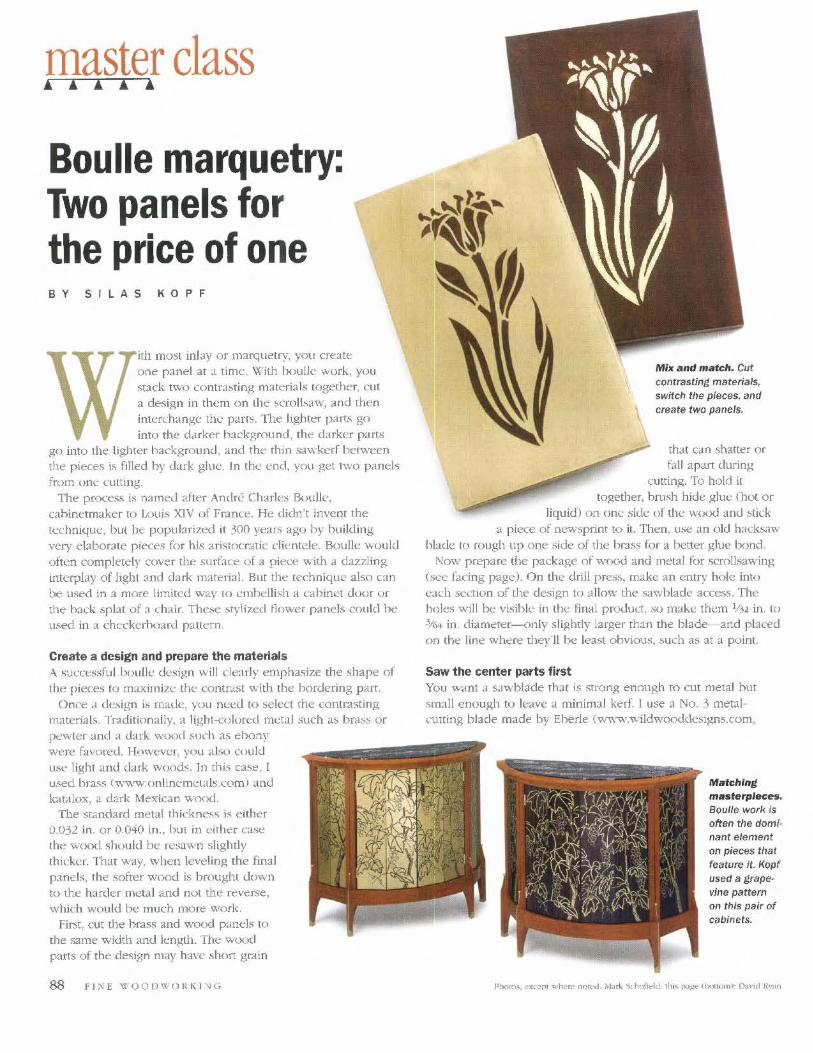
master class J>. 1 1 1 01
Boulle marquetry: Two panels for the price of one BY S I LAS KOPF
itb most inby or marquetry, you create one panel at a time. With houlJe work, you :>tack two coolrat-ling mateJials together, Clit a design in them on lht ~crolbaw, aod then inh:rchange the part~. The li)::hter parts go into the dJ.rker background, rhe darker part,.;
go into the lighter background. and the thin sawkerf ber~veen the pieces i.~ filled by dark glue. In the end, you get m'o panels
from one cutting. The process is named after Andrl' Charles Boulk.
cahinetmaker to Louis XIV of France. He didn't invent the technique, but he popularized it 300 years ago by building vcry elaborate pieces for hL~ aristocrJ.tic clientele. Boulle would often completely cover the surface of a piece with a dazzling interplay of light and clark material. But the technique also can be used in a more limited way to cmbdli.~h a cabinet door or the lY .. Kk splat of a chair. Thc",e styli7.ed tlower Ixmels cou ld be u"ed in a checkerhoard pattern.
Create a design and prepare the materials A Successful h .)ulk d,:sign will dearly empha.~ize the ~hape of the pieces to maximize till- contra~t with the Ix)rdering parr,
Onct! a design is made, you need to select the contrastinp; materiaL~. Traditionally, a light-colorcd mdal such as bnlsS or pewter ancl a dark wood such as ehony were favored. However, you also COllid
LIse light and dark woods. In tbi.~ case, I used brass ("www.onlincmdab.com)and kataiox, a dark Mexican wood.
Ule standard meta! Thickness j<; either 0.032 in. or 0,040 in., but in either case the wood should bc resawn slightly thicker. That way. when levelin,R the final panels, The .~ofter wood is hrought down to the harder metal and not the reverse, which would be much more work.
First, cut the brass and wcxxl pands to the same width and length. Th<: wood parts of the design may have short grdin
88 F];\"E \1:'OOOWOI{Kl"lG
\
Mix oIInd mllkh. Cut contrasting materials, switch the plecGs. and create two panels.
that can shatter or fall apart during
cutti11,l.l;. To hold it to,l.lether, hrush hide glue (hot or
liquid) OIl om; side of tht: wo(xl :lnd ~t ick
a piece of newsprint to it. TIlen. use an old hacksaw blade to rough up one side of the brass for a better ,I.llue bond.
Now prep:ue the package of wood and metal for scrollsawing (see facing page). On the drill p ress, make an entry hole into each section of the design to al1m"\' the sawblacle acces~. The holes will be visihk: in the final product. so makc them %2 in, to 31M in . diameter-only ~lightly larger than the blade-and placed on the line where the}'II be least obvious, sllch as at a point.
Saw the center parts first You want d s.r.;vblade That is strong enough to cut metal hur small enough to leave a minimal kerf I use a No. :3 metall'utting blade made hy Eberle (v,.,vw.wildw{xxlde~i).:05.com,
Matthlng masterpieces. Boulle work (s often the dominant element on pieces th<J1
feature It_ Kopf used a grape.. vine pattern on this pair of cabinets.
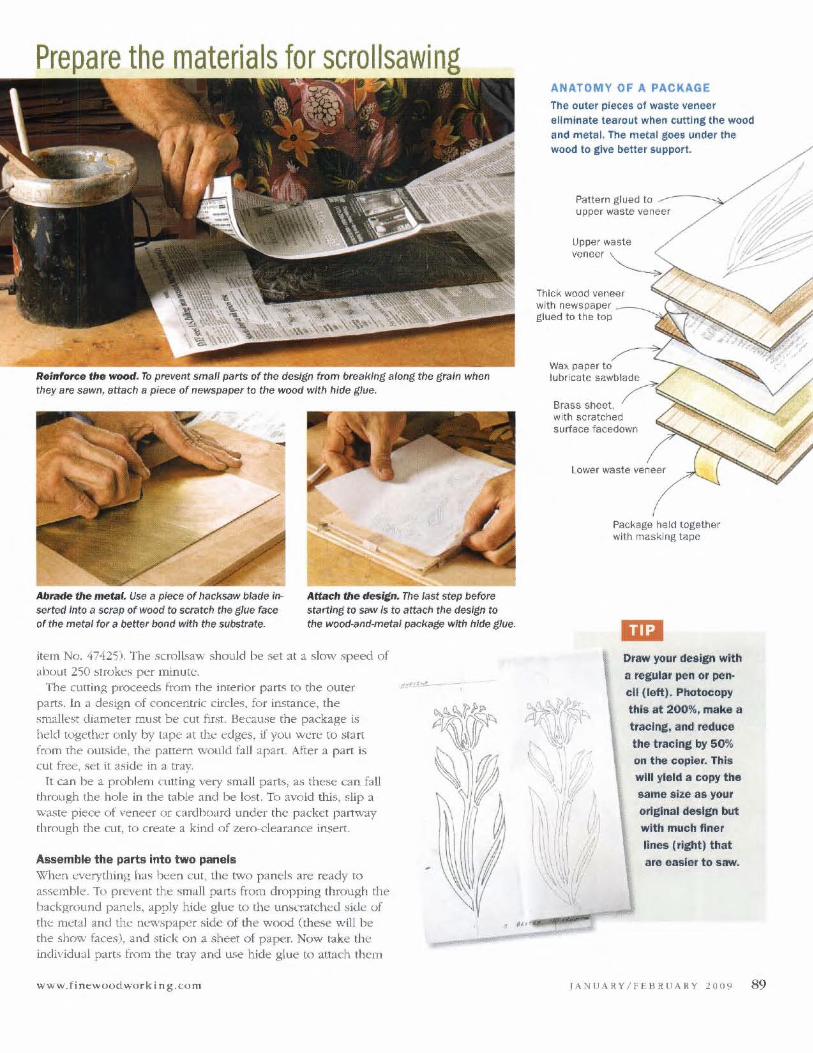
the materials for scrol\sawi
-Reinforce 'he wood. To prevent small parts of the design from breaking along the grain when tlley a re sawn, attach a piece of newspaper to the wood with hide glue.
Ab,~ the metal. Use a piece of hacksaw blade in
serted Into a scrap of wood to scratch the glue face of the metal for a better bond with the substrate.
Attach the des;tn. The last step befora starting to saw /s to attach the design to the wood-and-metal package with hide glue.
item No. 47425). The scrollsaw should he set at a slow speed of
about 250 ~trok~s p~r minlll~. "F"~
ANATOMY OF A PACKAGE
The outer pieces 01 waste veneer eliminate tearout when cutting the wooCl lind met~l. The metlll goel under the wood to give beller support.
Pattern glued to upper waste veneer
Upper waste
Thick wood veneer
with newspaper --~-.J.,...;; .... ~ glued to t he top
~ Wa~ paper to lubricate !iilwbladc
Brass sneet. ~ /,,~,,with scratched surface facedown
Package held together with milskinp; tilPC
The cutting proceeds from rhe interior parts to the outer parts. In a design of concentric circles, for instance, the smallest diameter mu~t be cut first. Because the package is held togeth~r only by tape at the edges, if you were to start from the ollL<;ide, the pattern would fall apart. After a part is cut free , set it a~ide in a tray.
~\r ~'\il/'O 0"" y; \. Ii
Draw your design with
a regular pen or pencil (lett). PtKltocopy
this at 200%, make a
tracIng, and reduce
the tracing by 50%
on the copier. This
will yield a copy the
same size as your
original design but
With much finer
lines (right) that
are easie r to saw.
It can he a prohlem cutting very small parts, as these can fall through the hole in the table and be lost . To avoid this, slip a wa.qe piece of veneer or cardlxlard under the packet pal1w<1Y through the cut, to create a kind of zero-clearance insert.
Assemble the parts into two panels \{'hen L"v\:!1"),tlling has I~en CliI. the two panels are ready to
assemble. To prevent the ~mall p-.ut5 from dropping through the background panels, apply hide glue to the umna tch~d side of tht: metal and th~ newspaper side of the wood (these will be the show face.~), and stick on a sheet of paper. Now lak\:! the individual parts from the tray and U.<.e hide glue to attach tht:m
www.finc:wuodwurking.<:um
~~~ ~rJ i#
,
I
., ,,,
'l/tJlr , ~
\ I'
~
1,1 II
\ \1 I
JAN UARY /F EBRUARY 2 00 9 89

master class ,ootioo"
Two ways to saw the design D,.m hole. first. No matter how you saw. each Individual part of the design needs to have a hole drilled In it to allow the blade to
-~ --- . -~ BY MACHINE
Always work from inside to outside. Cut the in
nermost parts first (right). As you cut out the design.
90
organize the parts in the same pattern on a nonslip surfaco (oclow).
FIN E WO O DWORK IN G
I,
)W ! I ..
into the proper spot. ll1e sawkerf should cv<:oiy surround each part. Assemble the picture.~ from the outside in so the spaces shrink until the final piece b put in place.
The pands are now ready to he glued [0 a plywood suhstrate_ Fish giue wa.s the traditiunal choil.:c, bUl I prefer epoxy for its better adherence to metaL To help the glue fi ll the sawkerf between tIl<: parts of the
~ Online Extra To watch a video of Kopf crci'lt ing a hou lle panel. go to FineWoodworklng.com/ell:1tas.
pand, mix in some sanding dust from the dark wood. Apply the epoxy liherally to the plywood and place it on top of the two panels. The~ in turn should have glossy paper under them to prevent the glue from honding with a piece of VI6-in.-tilkk neoprene rubber {www.doSl.::dcdlroam~.c()m) on the b(xl of the damping press or vacuum bag:. Thi.~ mhber gives just enough to press the thinner brass onto the substrate. I've also used sheet cardhoard (not corrugated), but this should only be used
Deep-throated saw. You can buy a deep-tllroated fretsaw or coping saw at Woodcraft or Traditional Woodworker, Once you get use d to tile actioll, it is almost as quick as " powered semI/saw. in part because tile blade stroke is much longer with tile handsaw.
Dedicated box for handsaw/ng. Mak& a plywood cube roughly a foot In all dlmons/ons but open on one side. Saw a V·notch Of birds mouth in one of the Sides. Using the saw In this aretl allows the workpiece to be supported on both sides of the cut.
[)",w inl?" Jo hn T"'",~" l'

ROUTERBITS.COM
Made in the USA
Whiteside Router Bits
Cool Gear with a personuWr alf its own
For work or play, here are some quality dolhc~ alld accessories that say so~lhing ahoot you - feat uring the Fine If'IxAAl'orking logo.
From our rugged baseball cap, T-,hin and <blim >I1irt to our shop mug, trnvel tumbler and shop apron, here's a hnnd name that's realty I'Mth OI'Ining,.
Durable, functional and fashionable, they're a gn:at way to express youT&elfwilh style.
Call 800-888-8286 montion off~..,- MW8003M
FineWoodworking.com!gear
www.finew()oUwurki ng .~·om
LEGENDARYRE;SAWlHG 8~
• CUTS SMOOTkER
• STAYS SHARP LONIi£R
• WORKS FASTER
• SOUNDS OUIETEIt • IllAXES ~HEERS
800.241-6748 "S~~~~ .... highlandwoodworking.com
Con;tru<:\ed cI ""~".,. '""''J1",umca,lir>gs.
] AN IIAIIY !FF BH UARY 200<) 91
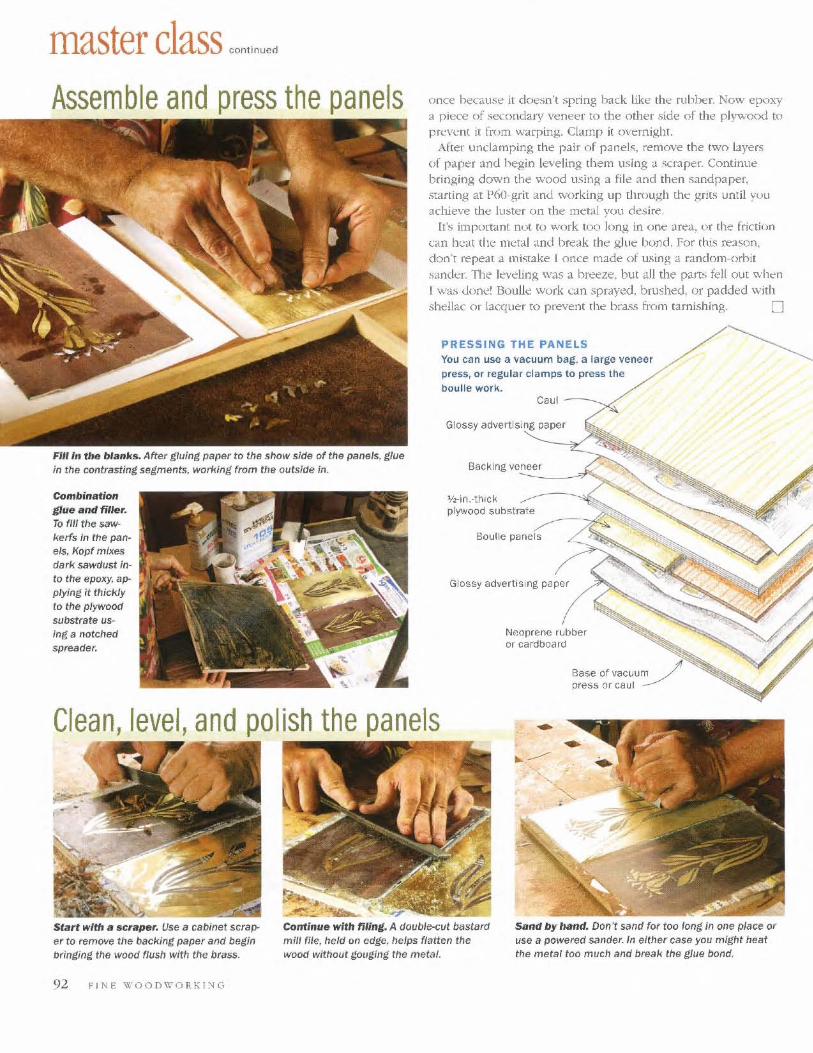
master class cooHoo, d
Assemble and press the panels
Fill In the blanks. After gluing paper to the show side of the panels. glue In the contrasting segments , working from the outside in.
Combination glue and filler. To fill the sawkerfs in the pan· els, Kopf mixes dark sawdust into the epoxy, applying it thickly to the plywoOd
substrate USing a notched
spreader.
once hecause it doesn 't sp ring back like the fu hber. Now epoxy a piece of secondary veneer to the other side of the pJywocxl to prcvl.:nl it from warp ing. Clamp it overnight.
After unc1amping the pair o f paneL~, remove the two layers of paper and hegin leveling them llsi ng a '>Crapef. Continue bringing down the ~vood using a file and then sandpaper, starting at PM-grit and working u p through the gfit~ until you achieve the luster on the metal you desire.
It's important not to work too long in o ne area, or the friction em ht:at tht: mdal and break th~ glue bond . For this reason. don '( repeat a mistake [ once made of using a mndom-orhit sando.:r. TIlt' leveling was a breeze. but aJi the parts fell out when I was done! Boulle work can sprayed. brushed. or padded with shellac o r lacquer to prevent the bra.~s fro m tarnish ing. 0
PRESSING THE PANELS You can use a vacuum bag, a large veneor press, or regular clamps to press the
boulle work. Caul--~/
Glossy advert ising paper
'I2" if'l A h,ck plywood sub strate _-- --o£.
Boulle panels
Gl ossy adverti sing paper
Neoprene rubber or cardooard
Clean, level, and polish the panels -
Start with " scraper. Use a cabinet scraper to remove the backing paper and begin bringing rne w{)Qd flush with the brilss.
92 FINE WOODWORKI;.<G
......
Continue with rfllng. A daub/IXvt bastard mill file . held on edge, helps flatten the wood without gouging the metal,
Sand by h4nd. Don't sand for too long III one place or use a powered sander. In elfher case you might heat the metal too much and break the glue bond.
•
then bu ild it Imagine precisely how you'd like your next woodworking project to look - with all the intricate details, Then find out exactly how to
make it happen with a free trial subscription to FineWoodworking.com.
Videos Discover more than 450 videos from seasoned pros demonstrating woodworking techniques.
Gallery Explore over 1.000 pieces offurniture, including tables, chairs, desks and chests in our inspirational gal lery.
Archive Find over 1,700 articles from
Fine Woodworking issues #1 through the latest, including
those out of print.
FineWoodworking.com
Find fresh ideas that click.
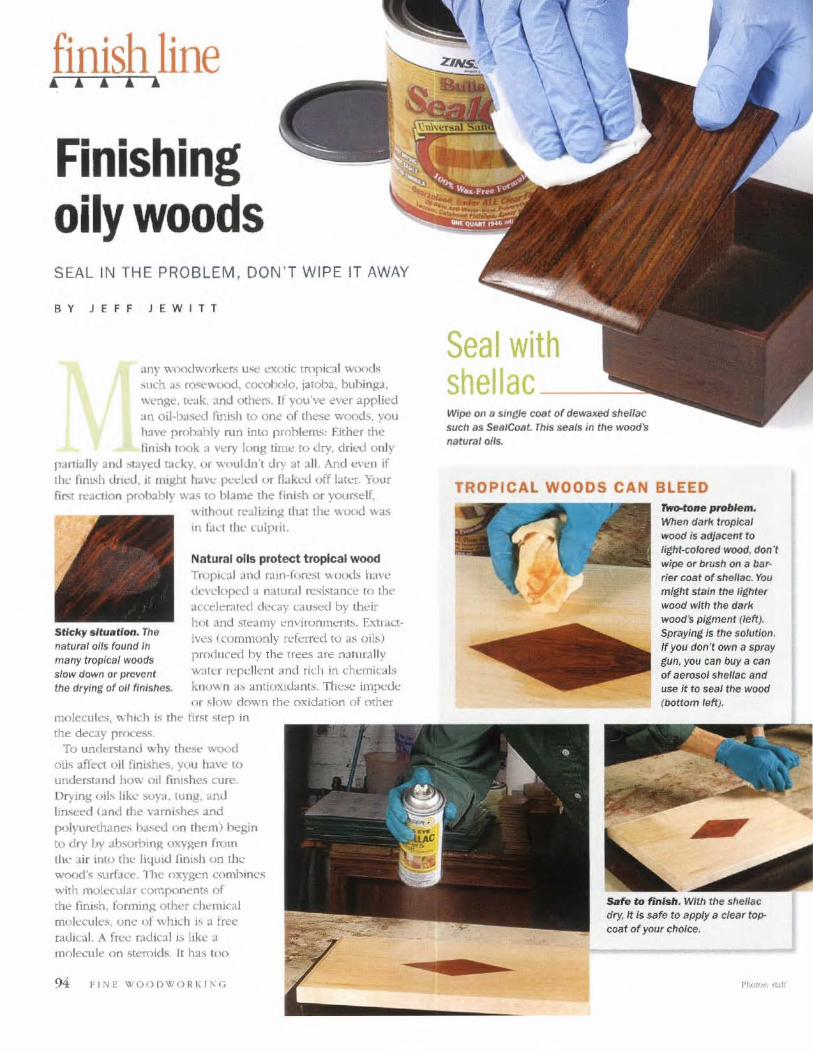
finish line i " " 1 1
Finishing oily woods SEAL IN THE PROBLEM , DON ' T WIPE IT AWAY
BY JEFF JEWITT
any woodworkers use exotic tTopical woods "uch as I"O"ewood, cocobolo, jatooa, bubing;l, 'w~e. Ie-•• k, and others. If you've ever applied ;In oil-005o;Xl finish to one of these woods, you have prnhahly nm into prohlems: Either rhe fin ish look ;l wry long time to dry. dried o nly
pania lly ,md "laved tacky. or wouldn', dry at all And t!'ven if the finL'lh dned, it nughl haV\: Pl:-t:iL>(1 or n.lkcd off laler. Your fi l""t reaction probably wac;; 10 bl.~Ole Ihe finish or you.:self,
Sticky sltuiltlon. The
natural ol/s found In many tropical woods slow down or prevent the drying of 01/ finishes.
wilhout real izing Ihl.t the w(Jod was III la~'1 the l:ulplil.
Natural oUs protect tropical wood
TropiLal and raln-furcs\ \\uuo:..b h;lVl' developed a natural rc~L~,ance to Ih,dccderaled decay caused by theil" hot and steamy l"ovironmcnts. Extra(.1:lves {commonly referred to a:-. (lib) prool1ced hy the trees are n;lTllrJ. 1Jy wat(.; r repdknt and ridl in chemicals k/lu\~ n ll~ llntiuxidants. nwse impede or !l>low down the oxidation of other
molcculc,~, w lllch Lo; the fj,~t ~ Iep in the decay pmce~~
To understand why the~t' wood oil'> affect o il finishes, you have to under~ancl how oil finishes cure. Drying oih like M>}';l, tung, amI linseed (and rhe "arn i~he<; and polyurethilne~ h.t...,nl on Iht-m) begin to dry by ab~rhlOg oxygen frQm tht..· ..I ir Into the h4U1d f1nL.,h on the wood',~ .,urface, '111e oxygen comhlnes with mok'('\Il;lr componen(.~ of the finish, formin~ other ch ... nticai mulct'uk::;, une- of whi~h i'> a free raclkaJ. A frcc f:lclical J:' like J.
molecule on ~tero(ds [t has too
94 fIN!! WO()f)WOR1"I\G
Seal with shellac _----= Wipe OIl s single coat of dewlJKed shellac such as Sea/Coat. Thh; seals in the woods natural 01/5,
TROPICAL WOODS CAN BLEED Two-C:one probklm. When dark tropkal wOO(!' Is adjacent to light-colored wood, don't wipe or brush on a barrier coat of shellac. You might stain ffJe lighter wood with the dark wood's pigment (left), Spraying /s the solution, If you don'l own a spray
gun, you can buy a can of <lerosol shellac and use it to seal the wooa' (bottom laft).
Safe to finish. With ttle shellac dry, It Is safe to apply a clear topcoat of )'{Jur choIce.

Lacquer finish _
~. Vinyl Sealer
~de F:E.:;. UALALACQ
many electrons, making it highly reactive (chemists call this unstable). The free mdical accelerates the tlnal stage, which is polymerizatiOn (curing) of the finish,
On tropical woods, this proces.~ is impeded by the antioxidants in the oily wood. Antioxidants donate a portion of their electrons to stahilize the fre e radical, thus neutralizing it. As a result, the final curing or hardr:ning of the oil-based finish is slowed down dramatically.
Shellac is the answer \Vhen 1 was learning to finish, r was told to wi]X down oily w()(Xls with lacquer thinner or acetone prior to applying oillY.l.sed stain or tinbh. lllis hel~~ with the adhesion issue (finishes doo't bond well to oily wO(xls) as lonp: a~ you apply a finish within minutes, b ut it may not help ""ith the curing problem. This is because the evaporation of the solvenT pulls more oi l to
the surface of the wood. A better strate~y is to seal the wood with a thin barrier of
a finish that isn't affected by the oib. For solvent lacquer, you can spray on a barrier of v inyl sealer, but for most finishe~, use a coat of dewaxed shellac. You should use e ither readymade, wax-free Zimser SealCoat or make the shellac from dewaxed flakes .
One CO<lt uf <I 2-lb. (lit of shdlac (Se<lIOJat comes in this concentration) does the trick. You can bmsh, spray, or wipe it on. However, on projects made with dark tropical wood as accents (like inby), color from the dark w()(xi can leach out and be smeared onto adjacent lighter woods if you brush or wipe on the shellac. Here. the be.st strategy is to spray the .~heJlac, usin~ an aerosol if you lack spray equipment.
Once the shellac is dry, li~htly .sand the surface with p600-grit (or 400-grit CAMI) s.mdpaper and then conti nue with the finish of your choice. You can safely use oils, o il-based finishes, wakr-based fini:-;hes, lacquers, or un:thanes. O r, just continue \Vilh an all-shellac finish.
www.finewoodworkin~ com
Two steps to a lacquer fI,.15h. First, spray on a coat of vinyl saa ler to shut In the tropical wood's oils. With the sealer clry and sanded, spray on topcoats of solvent lacquer.
MahOgany and veneer are the exceptions Finishing wouldn't be fun (or exasperating. depending on your ]X.!io( of view) if there weren't exceptions to the rule. Maho~any poses no problems, bcc:ausc it docsn't have thcM: types of oils. Commercial veneers al.-.o are benign , as the hot water used to prt!pare tropical lop;s for slicing chemically breaks down the oils.
Finally, on decorJtive objects not subject to much handling. YOll can simply apply wax (with or w ithollt the shellac sealer), or nothing at all. You can produce a great shine on some tropical woods just by bllffin~. 0
No finish at all A na tural fin
ish. You can e:r.plort the all In many trop/· cal woods and bring up a high shine by simply poliShing the bare wood on a buffing wheel.
J AN CARY / FEBRUARY 2009 95

WOODWORKERS MART
Ire New Generalioo of Bar CIarn~: Alpha Clamp
_ J I~ - Clamp • Hoist • Jack :taNeWI '<~"", - levels • Aulers ~J),.,p~ • Adjustable
13" Throat Lowell Thomas Tool, Inc.
(406) 595-3416 _w.A1phaClamps.com
~ Leading '"temet Distributor of
Cabinet Hardware & Accessories
Vast selection Cabinet Hardware Hinges · Drawer Slides Locks· Knobs & Pulls· Lighting Veneers· Laminates and more
96 I'[N~: WDO/)\\())lh.INl:
DJUSTABENC ~Ar5E YO\AR WORK TOA NHv LEVE.l
The Node" Adjusi-A-Bench is the ergonomic solution lor your workshop. Made of steel, II Is solid in all posi tions Need an assembly lable? Drop the Adjust-A-Bench to Its lowest poSition ROU1ing dovetails? Raise il up You're always comfortable. rPgafcliess 01 the task.
Leg sets and accessories \0 retrofit your e~lsting bench or complete workbenches aVi!llIlabie
WWW.adJustabench.com 609-882-3300
European Woodcarving
Instruction & Supplies
Visit our website for upcomin g classes, lips and specials
www.norahall.com 97° . 87° . 01 ]6
S.,.. IWllndn..., page 100 lor reader servk:e number,
GOOD HOPE HARDWOO(}S, Inc. "Where FirM.' wOO<JworJ..ln~ Bellim"
"'14 ·24/4 C""tom C"'t Wide M .. tched Sets Cl.Islum Ruuring Availab le
Spedaliling 111: Figured &> PlniH Cherry. Walnut It CIUTO Walnnt.
Ti~<'r Muple & -'i!\" Wi<.!e Rubingu PII.I' Many Olher Sp..xic~
1(;27 New Loodoll Rd .. Laoocnho:rg PA lQ<'~()
Phone 610·27~·8842JF:a" ('W .. 2S5")Ion
www.goodhope.com Wt P,..,.dd~ 1",,..;,,,,.1;, . .-.1 Srn"'.

WOODWORKERS MART
" Wt .<pt<iuliu j~ IW
f",~.r n~",pln uf
""_"",,,"'.<"'~- Groff & Groff Lumber '" '* ';;:;"'v burrio/Ml1v FiM F"miIU'" '1 • '" fnstr~mrm Grode 1I\)nd, ! PREMIUM WALr-iUT. CHERRY. CURLY CHERRY.
flJRDSEYE AND TIGER MAPL£ s"wrnill DiToc. · SlolJ, '0 4()" Wok' 7S+ U"""""l N",\vo $:
IIIlp"''I<'d .'if"'Ci .. . MOI<bill ~ ~li>c,"", ' Hurl • .Ii! T"",,~ 111<,...1 . Ottkr ?S D<>me><ll< """ Imported Sp<'i« 41~ -1 .... 4 • <'uA<:>m FIoori,,~ &. Wain"""tin~ ' ,,"oOr<l<r Too l.arf:< ", Too So,,"1
1\5~ S",,,lat!<I R.-..d. Qu'''y,'lle, PA I7S1i1i www,~rr'l"""",r.c"",
~ 1_800_342_0001 · 117·21;4~xm · Fl, 717·"4·f.jO"
l: ~ :!!!:.,,",,'o,.'" & '""m",~"",1 S"i",.in~ ~ Iii
(/Ilr(l SnwtJlh Trj-('1I1
Sb.ip AlIgn,-I" 7.//]H & 1/1." I.,ltg/h"
~xtr.,md~ ~ml>l>tb .lItting. "Ii bruk-thruu!(h
~ nd ';r ... ~w ' h:.l.q'~n;nlt
'''.1L,"",~~~
www.fincwoodwork i ng(.um
~\' Build Your Own Windsor Chair 1\ Begintlt'l' 10 a/h"alll:ed 3 Day wtek~d classes
T~wght at your local Woodcraft store ·_···-w4T258 - 1546 --
www.colonialchaircolnpilny.com
(oioniail!:iJdIf i!:omp;lIIp
OVER IO,OOOBOARDSONUNF! ~h( . ('. r(
www.nweimber.com
NORTHWEST TIMBER
N.~" r O N I .. INI~ S 'I'()II'~ Shop for Figured Hudwood Lumber at; www.PINBCItEBKWDDD.CDm
, ."",, and ExOl.c HardvlOOds !lone. 11)86 ~. Sawy ... of Figured Maple, C!aro Walnut
' ... ", , ' Pine Creek Wood Co,
Fr'end. OH. (.~-41) -4"7·2~1H1
BEST DOVETAILS
It's the truth. Order your Keller Dove[ail SYHem now!
(800) <)<)5-2456
M~dc in thr US.h inc~ 1976 • unv.1dt-o '11.95 + $21'i11
www.bestdovetails.com
See ad Ind~x OIl page 100 to!' reader se,vlcG numOOr.
Introducing our new TW chisels.
Made In Germany
F", ..... '" ... r ........ I ... " ..... tr.t. ,.111""" ,"w ... lnd;'i"""I .... o<Iw,,,k,.,. ""om·' ·800·S09·0081
INTERNATIONAL YACHT RESTORATION SCHOOL taundl a Hoalhullding CarC('r
L •• m ,,, IKlil.J, '"'w'" &. ",.im. ill d:w." .. ",><I." 1>O.11i ill (,," full -t;"'. ,~o",~",Short:",,,,,,:
Learning by Doing
s:r:<5l Pniladt-Iphia Furniture: WOf"kshop
Hands-On Instruction; All [.<!;v<!;ls
Mar Io Rodrjguez. Artist jn j;tesidence
w_ . ph ilodtlphiafumiturewarkshop .com 215·B<95IH
.I,\'UARY!FEBR'LARY 2()09 97

WOODWORKERS MART
TIMBER WOLF'M Band Saw Blades
Swedish Sili00tI Steel-1I3" - 2" www.limbuwolllliadrs.com
Free I.;atalog - HOO-234,-.7297
CI!>inet H&Jaware, Glu~ Mosaic Tile, Ceramic Sink • H._~ Q.,.hL, SI ....... _I U .. I'.I~ II;' Pull-t "...,1,,,,, I(",,~
. i C""'""'f"L""oJ10<
mo Sao" II';" Av. UM A. S<N<h ~I M",,, C,\ ~I,JJ
Order Online Of Call 626-4~Q·0560 www.concempolivingine.com
-FAST - HUGGED
\fJ THE fURNn"lJRE INSTIlUfE
of MASSACHUSETTS Stu..!)' .. ith hn~ Jrnodu"''*;'1JI alllho<
Philip C. Lowe ' ell ...... rani«' fn,m I ..... y '<l I w=x to 1 >1ki 1 yar mo.,tay ~ •
• S .. :<: flew d .... . chc<1ulc on : (978) 922{)61S www.furnt(un:;makinp;classcS.<:OOl
/ Now offering a
;',C HW.~ COMPOSITE HC _'nyc " wooden <. f)t"1I...! , ,
bo.;rt building . Port Had lock, WA
360·365-4~a VISIT OUR WEBSITE
www.nwboatsthool.org
Associates Degrea In Occupat ional studies'
Waterfront campus
·.cc'~ditrod Scllogl, ACCSCT
WI N USUf{ C HAIR WORKSHO PS
te~11t TrMlilional Wind.mr Ch~ir Te(hniqut'$, NO KITS!
C~II for Clas§ x hedules
Jim Rendi. Tel: 610-689-4717
98 F l t\E WOOD\"( ()R"'''>J(~
Trust U$ to (;Ieate a,")(! de!wer the l ines! qua'; ), cuslcm dovlltall dra ... ""s
Celi: 8OC).628-4849 EagIeDovetaIiDrawe,e.com
IIW Enoland" Largent Seloetilln of Unlq .. " L .. mbor and a .. ,ls
Specializing in Slabs up to 6' wide J WiIc1ir") .• w.h C>'l" I (XlI) bm. 01
I~~ ,",,,,,, 00"",$/", ~,><! e, or.; /vtlti;;M aM tvJm /c,)"lU Ie p</r<OfMI'y '~C1
Berkshire Products, Inc. ROIJ\e 7"" Snolt;elJ. MA 01~51
4' 3-22~j.79' 9 "'WN, Be rll:s~ ~ePro:;lucts. eM'.
- S;t:)ames Bay Tool C o.
Router Plane Kit
$24.95+~.>h
800-574-2589
~~. I...::t'
stjatnesbaytool co.conl
K LITS AS
c;t::;;;o " ,CU l PTl> R
"
When The ! Finest V .... ,n .... Will Do __ _
50> .. ad In(le~ on pace 100 fo r reader service n~mber,
BOW AR.'I1 MORRIS CHAIR
FREE CATALOG Wkb ",·. r lH ,~ ..... fUl"ni'u,..,
~l.".,!!
h"nwk.,,"I: ,0., fi" .. , vlan 01,,1>< m ... kc< ".by' p,,~o; uf~"<Cll"'" .. ,~Jti~) 4~ CAD 1'''''''''''«1 pi.".
n"ot.:",ha.""n "wonk ... " .. ,,' til<:
,u,UICA.." FIJViIrIJIE DMIGiV '0. 60X 300100 FSroNDIOO. CA 91(1~
SOW Altlo! MOUlS CHAiR $19.11 • IHIO Ill! iGc74l-(1j"lj
",ww.am.ricanfurni~ .oom
Stn ~11 to Truckload OUlntity OrdeD ' SI ~U" Qnllu and Phllne Onl l Mng. Persona l Servlee IJ Our Sptclallyl
Hand .eiected n.tr.! .nd Impmtelt Mr~ \OiOOO~. lill'1lJ;1(j stOCk. burl5. pIywoo~. WlIOOfS. llOJoring and line Irni 5h'~~ Oils
VISIT OUR STORE· ROUTE 67. BALLSTON SPA, MY
\d 1,1[" Dcll " . \ l ~l\'·,ll ldl\ l ('l\')\\ ' ~
n 1872, J. Sterling Morton gave the world a great idea. He creat€d a holiday unlike any other, Arbor Day.
This year, phmt Tl"CeS lOr America. For your free brochure, write: Tree>; ' . The Nation al
Nebraska
~The National ~Arbor Day- Foundation'"
www.~roord.'l.y.(,,)(

WOODWORKERS MART
Veneer Sheets
Rdgeha nding
Inlays
Exotic, Domestic & Dyed Veneen;
We Welcome ArchifectJ & Designers
www.S\.eneers.com 336·886-4716
THr YERMONT
WOODWORKING :,CHOOL
I TRl8;~7';~'Ai I N :~T'RijciJON IN THE MOUNTAINS
WORKSHOPS OFFERID IN OUR MODHtN SHOP
IN THE RED BARN.
ST U DfN"1
HOU SINCi
1100 · ll6 ' 5316
9
.... o o
syslp.mlshelf pin holes in 011 ma1erials wit~ _'fJII..o'9O rov! ... ~~~ 32m", Europoo'l..,..,.. .... Of n!1<litOO<ll r' ,....,!<If, ~ 1'1". ",11,,, 609·517·7117 U-~ 9JoM lffi>.Jrdl~ooo ~ HQ'rJiIIot>$qoJ", •. NJOM90
w ....... lMgptO<luclo,CO' I]
SMALL ADS YIELD BIG RETURNS
for advertisers featured in the Woodworkers Malt
ami Classified sections of Fine Woodworking.
For more information call 800-309-8954
www.(incw()odwnrk i ng.com
GILMER WOOD CO. auality Domestic & Exotic Lumber~
• logs , bIan~. 5quare:; • CN"'- 50 'pe<: Ie-l ,n srock
• Thin woo:x1s, AlIOrTm<'rltS. BooI:s • Mu,i(;allnstrumenl w<X>d1
Phone 503-274-1271 nil ~Ji~: Hf'I.-m Pd , POO'ilrid 011 971 1 () FJ.1< S03-2H-'l'SJQ W'WW_gllmerwood.<om
It.,,,,.,,,, ,,,,,, .... ,,,,,, ""_A '''',,_, .. "..t .... ,-.y ... x""' .. 'u._n' ....... \"<w"
Banner Hill School Of Fine Woodworking
Woodworking classe~ for all
, ~ .. .:so.-skilllevcls.
for further inf{)fllWionplcas.c: ~OI:Itaqt UlJI. &_ HiU ~bool of,. "~fII«
1'0. Box N11- WlfK\lIam, N\ IN"'" (!i18)9l9<-7821
www.s.nuu,l;I;lfLLCrom
CORMARK INTERNATIONA L. EXOTIC HARDWOODS
• eESTPRIC ES·DIIIECffROIiSOOf!CE • UOTIC LUMBER S, BlAHlIS, B~LS. su.as • TVI\HIIfG IIlOC ~S ...... D MORE. • H~TIOHWIm; [)fUV~1!T
541 Swans Road, N.E. ~ Ohio 4~ 1-800- 331-4718 Fax 1 -7..o-34!'5-~
Dept. fW _ .bealltool .com
16c,,/-,orH05 JIll Wotxls N
vVoodworkillg Vacations iJlllw lWlmt.lnll ,\l]e).dWllY }1<>1mt<l ill"
www.pocahontaswoode com. (304) 799-6985
(l ~ POCAtiONTAS COlJNT..:[
"' . " ' ''0 '''' N_o M""n'_ .. ..,.."' .. "' .. ""'''''-..:''''''''''''' ..... "'" ". ""'"
See ad ind,u on pago 100 for reade, ser~lce number.
GOB;, \o\1dt·Iu .. ~-414tllrotl~ 161',' .•. '"UT "O--T'" J\Jmln/!:-Canln,Sh",k ... A.... .",. ... ~ tunSI.H'!..' _ l 't • ..,r 5315 NW St. Hele", Rd. 11IStI'IIllIt1l1 Gradt J.ulllb<'r PlIrtiOlnd, OR 97120 1\0 ~Il"lrnl" OroH-r
(503)-477-67,.,. llH SM.: ,"w~'.guhy~·.lnUl.f""l
Dovetail - Tenon - Carcass Saws
71dria
FWW .183 .. M
www.AdriaTools.com
www.brandingirons.net CUSTOM BRANDING IRONS
HIGH QUALITY ENGRAVED BRASS DIES FREE BROCHURE AND SAMPLE BRANDS
Engraving Arts PO Box 787
[email protected] Phone; 800·422·4509
fAX; 707·984-804 5 La onville CA 95454
""mi"re • .n: worlshop~
"fIAl i1h .'"c/cf
S.diJ, 1>.."'_," ,10",.Al.,leif·I •• ,lrucl;'"
"" Wi"", A_", C);,"'jlo,IL ""","
77]7.' ''''
J ANLA Rl'/FEIlHl!,., RY 1009 99

94 AdrIa Toolwuru, Inc., p. W
67 Affiniry Tool \\'orlls, p. J6
42 ,\irw:ll'e ~riC3, p. 26
20 A[lmi & Associates, Inc., p. 98
3 Arntric'.In furniture Design, p 91'1
112 !WI & Ball RtprodUC1ion
Ilar!lwlm:, p. II
51 Banl\tf Bill School of
Woodllilrking, p. 99
9 'rtMo ~II Tool Co., p. 99
15 Belich nog To"Is, p. J
I\ere1. Ilardll-oods Co., p. 115
21 Berl.shlre Producll;, p.98
Ik:rksllil'l' ~'Cfll'L'I' Co., p. 97
108 C.lt Omrud. p. S5
38 CabinetparU.rom, p. 96
104 CabPans, p. r 41 CantWri!\ht, p. 15
Center for Furnilure
CNI"tsmallship. p 28
87 Cmaio~' ';rood, p. 98
37 Cbssic r~~ns tr,.. MaU!)e\II
Bimlk, p. JfJ
Cuhonial Chair f.o., p. 97
19 c'onlledicuII-'AlIe) School of
\l'oodMlrklng. p. 9~
65 Contempo thing. p. 98
119 Cook \r~. p. 9~
63 Connark International. p 99
49 Crafhman, p. JOJ
36 Craftsman Studio, p. 97
16 l:urious .... 1.lOlb. p. 98
&3 [)elmhont IlIst~l\: Co .. P. 28
U Delta ~achiner'l, p. 19
106 j) i el('!~liutler Tools, p. 99
98 llimitriao; I\lit!a$, fA 9i!
79 The DoAwood Ino.Iilllte, p. 17
78 Dura.(iriL lor_, p. 9
100 fl ''H \l O OJ)'I);"O}{"J NG
82 EllgJe Arn<'l'ica, p. "
26 Eagle \\OC<!lIor!;ing, p. 98
Engrnling Arts, p. ')9
116 t:piltJg Laser, p. 1'17
Fi!ll' 'lioOO\\urkin!t-£Olll, p. 93
109 Fn~t \1anufacturing, p . .1
1-4 TIle Fumill!rt Institute of
\!a"achu~lls, p. 98
105 Fumituremaking
\\'.m..sh'1p>, p. 9<J
84 Gl;rn>ra1 M:llluficturlng
f..o., ltd., p. II
17 Gilmer Wooi(ompany, p. 99
121 Goo)' lIalllut Prlldtlcl~, p. Y')
61 Good lIope Hardwoods, p. 96
97 Gorilla Wood Glut, p. 9
22 Groff & (;rofT Lumber. p. 97
51 Guilleonot Ka)'lW, p. /)II
70 Halt\'iIIf Tool. Woodworking. p. 9
7 Heamt lIardwoods. loc .. p. 86
15 Highland W()O(i.,\(}oong. p. 91
6 Hoffmann Machille roO., loc., p. r
Infinity Cuning Too15, p, /5
52 Inside Passage School of Hoc
\\oodworkinl;. p. 91
117 Iwrna\iOrl:ll Yacht Restoration
School, p. 97
100 lturrn Design, p. 7
76 JDS Compan~: p. 91
&0 The Japan \l'oodworl;er, p. 15
91 Jet, p. 2
59 Ka} loomtrits. Inc .. p. Ii!
111 Keller & f..ompanr, p. 97
110 Krtg Tool ComJY&I)', p. 11
115 Kuffel freek P~~ p.18
85 l.agulla Tools, p. /1'1}
!.an~k)· Sharpt'ne~, p. ftJ
56 Leigh lndmlries, p. 85
55 Li'lgh Industrits, p. 87
27 Jje-~ielr.t'll ToolllOO;s, p. J
122 ul:OOTIlal. p. 83
47 lo"'eJl1"hom~ Tool, Inc. , p. 96
8 l.uthie~ .\1ertantile hu!.. p, 97
99 MJ. COIMlml C..ompru1). p. 99
29 MEG f'roducts. p. 99
31 >,iannj''s Woodwot\ier.; Place, p. ~5
113 '.tare ALbl1l5 School of
Woodworking. p. J
.'.klr!lst Pal, p. 83
35 1'Iodcn MjUSl-A-Bt-nth, p. 96
4! /iora 11311. p. 96
118 North\((-:o;t Schoo! 0( Iroodcll
lIoathlilldiog, p. ')Ii
4 North~-esl TIml!t'r, p. 97
74 Northlle;t Woodworking
Studio, p. r 12 I-;orthv.el W~ing
Studio, p. 99
45 Old r.nglish i\cadem)' of tine
Wood\I-'rIrking. p, 99
80 Ollfida Air S)"5tems, " J'1
8! ~ Wood Produru. p. IT
90 Osborne Wood Prooucb, p. 117
88 (hoome Wood Producb, p. 91
33 I'Kk lOOI COmpan), p. 97
62 I'Iwt-A-.'.Utic. Inc., p. 16
Philadtlphia Furniture
Workshop, p. 97
24 Pine Crt'J!~ Wood ~n .. p. Y7
64j Pocahoota~ Woods, Inc., p. !19
92 Powmnatic, p. 96
23 I'Y!:ffi)' Boats, Ioc, p. ')(I
Qualit)- Y:!.[uum I'rodut1.'i, p. 28
54 Rockkr '\Voodworking and
Hardll'are, p. J9
58 Rost'II·ood Sludio, p. 9
10 Roulfi" Bits.ccm, p. 91
53 Sauers & f,o. PmCfssed
\~~r:;, p, 'J'J
71 Sall"Stop,". 15
95 Schm's f4hintl &,
Doon, Inc., p. 17
40 School of " 'oOO\\'Orting. p. 1M
71 Sc1l'l\' Products, liM:., p. 83
39 ~al;er Workshops, p. 17
30 SOlllmrrfdd's Toot.. for
U"ood, p. 15
The Stjames Bay Tool C.o., p. 98
32 ~ff"lk \1achifll'l1, p. 98
69 S~'Stem Th~ Resins, p. II
25 Talarico Hardwoods, p. 9fI
2 Timlk!'ll'Olf Tools. p. 9~
13 'ruols for- Working 'i·ooo. p. 18
34 Traditional ~oud'/,'OTbr, p r
124 Trend,". 83
5 Vac-U-ctaHlp, p. 17
\'ermonlll.oOO\\'On:ing
School. p, 'J'J
Whitechapel , Ltd. , p. 81
73 \Vhitc:;i<\e ~ochint f.o., p. r
U Wi lliarm /'( Hussty, p. 2iI
44 \\,indsor Chair 'l1'orkshops, p. 98
sa \rood Ral, p. J6
123 lI'oodcraft. p. 1.1
\\oodflnder, p. 99
120 \loodma.~er Tools, p. 17
86 WOO!:h;-orktn Sourre, p. 97
102 Woodworker's Supply. p. 16
CLASSIFIED TIle Ua5~il",d rate 15 .9.S<! per word, IS w<>rd min . Ordtors must b<: ".::companied by payn.e nt, ;u1s u" nOfi-c:onuni""'onlible. Tho: WOOD a: TOOL EXCHANGE is for prlnk .. u .... by iruU,-iduals unly; t},., ,......, i. $IS/II..." minimum ~ Ii~. Sl'tld to: foO,,., WOOdworking Clu",ifled Ad D~(If. , PO Sux S~, N"",1:<)wn, CT 0647o-SS06. FAX 20}-270--6310 , Ph . (866) 5(1S.46/17. for n><>ee inrormation On advo:rtisir1Jl go to ~',fin"w .. "d""tJrkinX.romld:lssi:roed Deadlin" few {h .. !>tarch . April, l()(19 ;"$"" is Ile~.,mb~t
19,200R.
Busine.ss Opportunities CALIFORNIA I!ARDWOOD SAW"'T!.!. lb"'()!!n~, CI~ro.
fng.lish walnut. ""'pic, myrtl~. R,,"1 eSl~le. rn~<Hn· ""y, i"",mo,y. ~ Woodfindcr, type BOIStogne \V;o lnut Larry ~i,hoJ.. (~_'l(I) &t6--1Z2l Cell (707) :IM-,'\949.
Hand Tools IlOB KAUNE-ANTIQUF. & USED TOOL~_ Sine.., 191!2 Hundreds of qualn}" hluXltools. Slanl")' planes "00 pans, V;.'w/MC. v.ww,antique-u""d-tooh,com CW) 452-2292.
PETE NIEDERBERGEJ(· L:seci and Antigu .. to<,ls and p:<n, T"" Ill" Ht,Un",k plar""., $135 coch. (~l~) n4-MO~ or pll;.,cterb<-r@"Jol.<,orn AI,,·.y, buyinlll
HIGHLANDWOODWORKING,COM, the world'" larg· est ..,1,,(1ion uf lund jll~n<'"', ph~. thousands n""",, r,,,,, h~nd tool,.
Hardwal~
HI GH QUALTlY IIEA,\"i-OUTY ~t~el extemion. table 5lide! . Many .1,.,5 in stock! T~bk: 5hdc eJ<peT( on staff. Vi", wW' .. :."""nlurd"~r~ . rom, call (~16) W3·~067~
fURNITURE HA RDWAREo drawer puJl" hing~s, h:b, e;>.".,,,, bed & ~IDk han:r..-arc, ",-w"·,POIXtonrordW'Jre.com 600--241·9741
In!'itruction RE~AISSANCE APPRENTICESHIP PROGRAM: [ksign, corving, inlay>, '1' .... ,( Tc:\:~s , (9031 769- 1017. \\'ww renai.~",oc~cu!l:ooJfurnilUte,rom/apprentkdlip,,-html, One rear, Fr.-."
WOODnlRNII'G INsnulCTloN, R",,-< Zimmerman's Pum:>. Gorda, l10rida worhhop or yeo"" (941) ,7s-1337 or w,,,,,,,le.mtotum,com
COME TO LEARN IN SCOTLAND The Chip pend. I" l "t~tnali onal ~chool of FUfllitur .. ofj'~rs a 30-week intem!ve C~ r""r 1''''IIr~m in DCSif!n, Making and Restoration For fu rther information phon.., 011-44 ·1620-810680 or visit ",",,·w.~hjpp"ndale.(:<).uk
PENLAND SCHOOL OP CRAFT:<;, in the 'pecucuL" NOM Carolina lDOO.lnlalns, offe,-" on~-, two-, ."u eight· wuk w()fkshop~ in wO<X!'>.'Orking ~nd atMr medi" (IIZH) ~6S-23'W www.pcr,laoo.o,,:;:
I:IENJAMI !'O HODBS I'urnituu Making CIa,ses, Qu .. en An n<e and Ch lppendak ~hairs. cheH-', bed,. table5. more. ~leJlford, NC. (2~.l) H6·781~,
wv-:w.hoI>hsfumitu"".mm
}:l I 'I::ACHBII.·TO-STUDENT RATIO at fine woodwork· in); ",I",,~ . NEW In>lructional w()()<\w<'>rking llyn rIOW aV'~il"b1 .. , (~19) 8~3·2027. www.jYJ"<H>nf",woou.cnm
HAN DS·O N COU RS ES in I>.:autiful Mainc, flc· '<pnner through advanc .. d, Worbhops, Twelve we~k Inten,ivc, Nin~-month Compreh .. nsi"e. c"nt .. r for Furniture CraftsnMmtup (207) W4-56 1l. www.wood..:hool, .... g
WINDSOR CH AIR CL-\ SSF.S, 1 "',,"k i nr~ n'i"~ . Ai."" rurning da""5. Lodging and rn.-als indud..ct. Mkh",-"Sl, ww",·.chai"'~ight.com
COEUR D'ALENE SCHOOL OF WOODWORKING m l",autifCll north Jdat." ;'<"0.11, l",roon.:iliud d.u. ..... , fl~tit* ,,,-!It'(~ LlinK Prl""" 1!l."""Ui<>n ~v~Uahl~ (WIl) 755-'J902 www.cd .... "(lCNjworkin&...·hool .lX"t
www. finewood work ing. com
THE ACANTHUS ~'OR KS"OP, LLC 'I r~d i li()n
al wnodworkmg education "'ith J~.d mot"'~lOr. Charles lknck., using conventional lund tool. and mOO .. rn rn~(' h i n ... )'. Call ((i10) 970·5H62 or visit ,",'WW.ac.nthu5.com
Machinery New / Used NEW W IL LIAMS It H t;SS.t:: Y Mokk r /I-lod d 206, 12,?9~,OO. Shop Fu~ W1h~3 Mold",- 567500. Cus tom mold ing knive5 at " .... ."",k un zc"'P<'m r)',<'o rTl (l r (618) 224-9636,
Miscellaneous / Al,:l,:essories EURO 32, ;o n inn,rlVa[iv~ hoI~-I)('''i',~ ,ySlem for harne· 1""" cobilX"ts utilizing Em"P"~n Ilardw~,.. Fo.- n)("~ information visit www,curcdlproduru.COfl'
WOO DSLlC /l R.COM , r~sawinJ'( hlade rated best-perfom' ing 1/2·in , tnnd",,,, b la<k' ]". Fin" Woodwo""ing, !lO(J-241-6741':1.
plans & Kits
FULL SIZE FURNITURE LAYOUTS Drawn by; Ph ilip C. J.ov;-c" Cat" log H (978) 921-«il~. 116 Water Su=!, H .. v~rl\,. MA 01915. wv.'W,hll'llLtufelm kingd. ...... ' ,com
Power Tools
LAMEJ.LO H1SCUIT JO INERS an d ,",'ce550ri~"/PallS/ I(~p.irs. Best pric .. o, moot k llowl .. dge~blc Call u. r<>r ~II y"ur woodworldng It .""lid surfacIng ne.,d" HOO-~8<)-2323 S~Jet' t M~chi " .. ry, I nc' www,,,dcctmachincryinc.cnm
CADEX &: NIKlE pin nailer.:; It pi"'" fl e:\:eel ~ir hoi;e & hUin~' at wv.w .flovdtool,com
Wood
AMF.R1CJ1N OIESTNUT, ~ir drit"d 3 ye3rs, 4/4 ."""'" 8/4 n.-" r 2000 board f<"-"t, (231) 499-1901.
NORll-f/ CF.NTRAJ_ V1RGTNJA. TiHer """pi", ",d cherry, quart~",awn oak an d 'yealIlore, otf>cl" M,,\~hed "''', whole \og$. Vi.s il oor 1>C'\' w~rehouse in Elkwood , VA off us 1~/29 , c.p, John.on luml>er. (5401 8:15-1006, (SoiO) 937·:'>(lW
FIGURED CLARO WALNl rr slah, a nd p lanh, in <limen.tions w it.blc tor sm all 10 brge project" CWO: 80J-6fi0.0203, w"'w.WOOxlnul.~",n
CLEAR ALASKAI-, YEllOW CEDAR " .. rlil~ 1 !(ram. Cle~r v~rtkal J)()u~I,,-, fir www.fa..yD; .... kLumi)t..r.com (~41) 34"-32"'~ or (~1 1 ) ~2 1- ~ 1 ()7 .. -mai L [email protected]
QUALITY NORTHERN APPALACH IAN ha rdwood . CuSiom m ill i"I!'. free dehv.,ry, llundkd .• urfaced. Sati,fa,tion guar.<nte." Niagara Lumbe., 800-274--0397. www,m.g:o .... lurnJ:,.,,-.wm
TI GER MAPLE, MAHOGANY, dl~ro)', walnut, huu~rnut, curly birdl, plain an(I IIH "T"d. Wi<1e h<Y .. nb, m~ [ched :let" 4/4 to 24/4 . ISO-If. minimum , (~70) 724-1895 , w"iw.id onlumh"r.com
LARGE CLARO WALNI1r hook-matct:>ed slo bs, tUrIling stod;;, r.'" and p.p"T·backed ven.,.,r of hurl and nOlche", wwt;·.walllum,oods.net on lin ~ .lOre. N~wton Woods. (559) 2'T)-*l'i6 . ~'r""no, CA
S!\WMILL D1RECi' 100 Sf""'ie .• of exotic., turning, lumhe., log" 5lab.. mu,k~J in"'rumcm, TROPICAL EXOTIC !IAR!)WOODS Of LATIN AMtlUCA, LLC, Toll ~"' .. (8SS1 4.~.·30]1 w",w.a""~otid\,;lrdwnod.com
l::!SE NBRJo.ND EXOTIC Hardwc:>ocb. O,·"r 100 spe· c le.'. Highe,t qualitr. \lnl u me disa)unts . llrochu~ .
800-258-2%, Fax 310-542·2l:\~7 , "L""'>Pr~nconl
QUILTED, CUKlY, SPALTED It hurled maple, marNcd. (urly & uatd' dam w~ l nu t, fi8urrd my rlkwood, "u~ ill ..... m ory of lumber, b illets & b locks. 10.000 item, ph<>lOi(rapheu ;tnd pric~d. Visit OUr online store at www " wllmb,," . ...,1 D" ".11 (tilll)) 23H-1II1,76
CL Ano WALNUT SLABS 4 to 20 ft long , (4t!8) ",.ww.b~ke.l \:lrdwnnd.,.com
24 to 60 · inches wid",; 847-8433. Gilroy. CA.
DOMESTiC AN!) IMPO RTED EXOTICS. Por muSIcal instrument •. pu<J1 nleS, k"if~ i~,,){I"', ~nd ~,",SlO1n
furniture. Price Ii~. Exotic Wood" 1-800--H3-9264 , ,,"'WW.exot;cwoods,lum
CAI'EHAI{ DWOODS. COM Teak, mapl" , o:ok, bird}, '_'1""1c, <I",.,"", pl;'Wood.< I$: ",Or ... ('i08) 548-0017, We'" PJlmumh, MA,
BIRD'S-EYE AND CURLY MAPLE. -i/4 10 12/4 tumocr, Ilitd .... , turning oquare< and hkx:h, Bl.ck ",ainu!. ~hcr' ry/qu.n"","wn. ~nd curly oo.k luml", •. Dunlap woodcr~ft" Chantillv, VA. P03) 6 :H-~14? ,
APPALACHI AN HARDWOODS dir .. "t r",m , """mil l. Quartcrsawn, flitchc5, crotch lumb~ r. I J ~rbine H.,dwooct.. Lc~sI:>urg, VA (703) 771·3(167 ww'.,.herbi ..... hard~.com
LONG LEAf' HEART PINE (3nt;qU<"). Floorlng-Iumr..rmllJ"·or\r. Red ~",6r lun \t- It I)'andln); . lee Ydton' 0(6) 541-1039
WOOD AND TOO L EXCHANGE
For Sale
OAK Jlt! I)RAW~R CARD CA1AL(XJ: br~" hard,",~re well--u.'.td hut soIkl. 71lh by ~~ w by 18 d 1297') , ~, Il",-Y>rd 4~ multi-plane, WiIh 24 ~uUcrs. !';I(lO. Stanley :rrt dowd-rrnk .. r with 6 "1\1~" SS;5, Chrl' }\'-<:""")(>I'[, U(7) 926-4600. (ME)
ROSEWOOD DALDERGIA SIS50 12,()()(}+ board r~et: I",n hlank to sbh. 4/4 from jft, to 12ft. San~mento, CA (916) i 12·3IH3. Email: ~an;L1\\'~g<'fllii hotmaiLmm
Fine Wn<:td~;o,*i"R is,u~s: [-202, ~d"'Cl condition. B~.OO plus "hipping. (400) ~95-18l3- AZ. D~vid,
h'lf Sa le: A comrMte ,<;o:: t OIl' Am! Woodworki"g maS"<ines. Call (Stil) WS--7273 for dct~ik (Ft)
DIMENSION LUMBER H1~ck Ch<:rry; 1614, FAS, KD, 9 p iece" J -in, to 14-in.W by "'-ft, to 12-ft. L. 26?-1xVft. Black Wa lnut; 16/4 FAS, KD. 1 p'. 16-;n, W by 6·[( L Honduran Mahogany; I I/ I>-in Cl .. ar, KD, 7 pi~c· ~, 22·; n. to 17-i". W hI' IO-fr '" l1-fl I., 1t.!J.-hd/ft ( ,'104) 2%-8198, (WV)
Fitl~ \I'/oodtlJOrAri"R i .. uc" 1-201 ExeelienI condition, $400 plu. shIpping, (\172) ~62·6447 or maudi~allyen,hitrilt~.rr, com, (TX)
Fine %l'N\\brking
Keep bael< Issues loo king ne w in sJipc .. s~,,Bound in dark blue ~ embo~"",d fn ooId , " a<;h c ...... e h~ds more tha~ a yeal's worth OIl Fine Woodworking.
$8,95 .. a .. plus 5 1H. Produo:;:t *011050 To orde r cali ; 1-800-888--8286
or go \e FineWoodrNOri<lng.cr;m
JANUARY / FERR tJA RY 2009 101
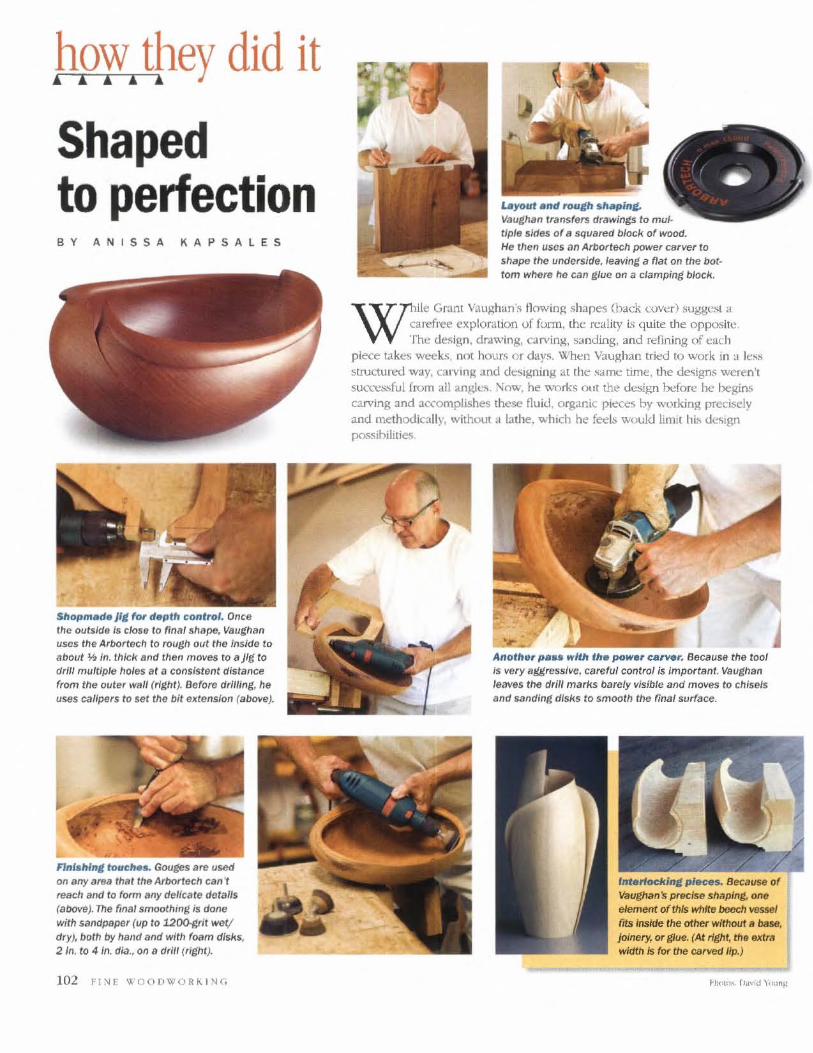
Shaped to perfection BY ANISSA KAPSALES
$hopm.d.ll, fOI' depth control. Once the outs/de Is close to rimtl shape. Vaughan usos the Arbortecl! to rough out the Inside to
about * In. thick Bnd then moves to a JIg to drill multiple holes at .. cons/sliM! distance 'rom the ollter wall (right ). Before drilling, he uses cal/pers to set the bit extenSion (above).
on any area that tha Arbortech can 't reach and to form any delicate details (aoove). The fina! smoothing' is done
with sandpaper (up to 1200.grit wat! dry), both by hand and with foam disks, 21n. to 4 In. di;)., on a drill (right).
102 FINE \'fOODWORKJ~G
Vaughan transfers drawings to multiple sides of /J squared bi()(!K of wooer. He Ihen uses an Aroortech power carver fO shape the underside, leaving a flat on tile bot
tom where he can glue on it clamping block.
W 1i!e Gr:lnt V<.lughun's /lO'wing shapes (back cowr) suggest a carefree exploration of form. the reali ty is quite the optx>sitc, The design. drawing, carving, s:m ding, and refining of each
piece takes weeks, not h01.\f5 or days. Wht::n Vaughan trkd to work in a kM structured way, carving and deSigning at tht; ,.;amc time, the de'iigns weren't suux:s."fui from all anglt.'S. Now, he \>'urks out th~ design tJt!fore he begins C'J.rving and a<X'Otnplishes these flu id. organic p ieces by working precisely and methodically. without;! lathe. which he feell> would limit hi:. d""si~n posslniilties
Anotller pa .. with fhe powe, carver, Because the tool is very aggressive, careful control is Important. Vaughan leiWes the drill marks barcly viSible and moves to cl'tlse/s and sanding disks to smooth the final surface.
'nterlocklnlt pI.c.-.. Because of Vaughan\\: precise shaping, one element of this White booeh vessel fits Inside the other without It base, joinery, or glue. (At right, th lt axtra width Is for the carved lip.)

