financials cloud and planning and budgeting cloud service white paper
TRANSCRIPT

An Oracle White Paper
March 2015
Financials Cloud and Planning and Budgeting
Cloud Service

Oracle Financials Cloud and Planning and Budgeting Cloud Service
Table of Contents
Introduction ....................................................................................... 2
Transfer General Ledger Balances to Planning ................................. 3
Process Description ....................................................................... 3
Save a General Ledger Trial Balance Report ................................ 4
Register General Ledger as a Source System ............................... 8
Create an Import Format ............................................................. 11
Create a Location ........................................................................ 18
Create a Period Mapping ............................................................. 20
Create a Category Mappings ....................................................... 21
Create a Data Load Rule ............................................................. 22
Create a Data Load Mapping ....................................................... 24
Transfer from General Ledger ..................................................... 26
View Transfer Results ................................................................. 30
Transfer Planning Budgets to General Ledger ................................. 32
Process Description ..................................................................... 32
Gather General Ledger Information ............................................. 33
Create a Target Application for General Ledger .......................... 42
Update the Application Options ................................................... 44
Create an Import Format ............................................................. 45
Create a Location ........................................................................ 47
Create a Period Mapping ............................................................. 48
Create a Data Load Rule ............................................................. 50
Create a Data Load Mapping ....................................................... 51
Transfer to General Ledger ......................................................... 55
View Transfer Status ................................................................... 58
View Transfer Results ................................................................. 60
Oracle Financials Cloud and Planning and Budgeting Cloud Service
2
Introduction
This white paper describes how to use Oracle Financials Cloud Service with Oracle
Hyperion Planning and Budgeting Cloud Service.
Using Oracle Financials Cloud plus Oracle Hyperion Planning and Budgeting Cloud
Service facilitates sharing and reusing actual balances and budget information to reduce
the cost of ownership and to ensure financial results are reliable for audits.
Throughout this document:
General Ledger refers to the General Ledger capabilities within Oracle Financials
Cloud.
Planning refers to Oracle Hyperion Planning and Budgeting Cloud Service.
You can transfer actual balances from General Ledger to Planning. You can also transfer
budget amounts from Planning to General Ledger.
This white paper describes how the General Ledger and Planning Cloud offerings work
together. It does not apply to the on-premises offerings for these applications.
For information on using the on-premise versions of General Ledger with Planning see
the white paper Oracle Financials Cloud and Hyperion Performance Management
Applications.
Oracle Financials Cloud and Planning and Budgeting Cloud Service
3
Transfer General Ledger Balances to Planning
You can transfer account balances from General Ledger to Planning. The balances can be used as inputs for budgeting.
Process Description
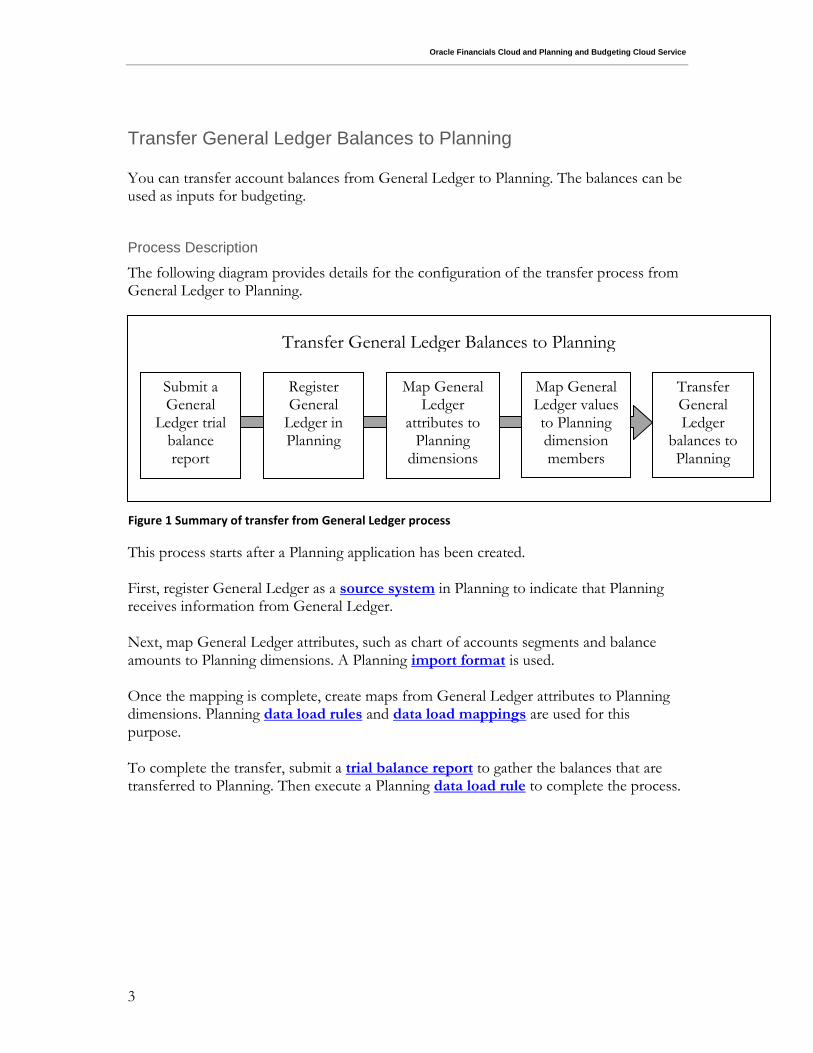
The following diagram provides details for the configuration of the transfer process from General Ledger to Planning.
This process starts after a Planning application has been created. First, register General Ledger as a source system in Planning to indicate that Planning receives information from General Ledger. Next, map General Ledger attributes, such as chart of accounts segments and balance amounts to Planning dimensions. A Planning import format is used. Once the mapping is complete, create maps from General Ledger attributes to Planning dimensions. Planning data load rules and data load mappings are used for this purpose. To complete the transfer, submit a trial balance report to gather the balances that are transferred to Planning. Then execute a Planning data load rule to complete the process.
Transfer General Ledger Balances to Planning
Figure 1 Summary of transfer from General Ledger process
Register General
Ledger in Planning
Map General Ledger
attributes to Planning
dimensions
Map General Ledger values to Planning dimension members
Transfer General Ledger
balances to Planning
Submit a General
Ledger trial balance report

Oracle Financials Cloud and Planning and Budgeting Cloud Service
4
Save a General Ledger Trial Balance Report
The General Ledger Trial Balance Report provides descriptions of the information that are sent to Planning. This information is used to map General Ledger to Planning. Submit the Trial Balance Report process to create, and then save, a comma separated file (CSV) which is later used to map from General Ledger to Planning. Navigation: Log into General Ledger Toolbar Navigator Scheduled Processes After the Scheduled Processes page opens, you can select the Schedule New Process button to select the Trial Balance Report process.
Figure 2 Navigate to scheduled processes to submit a trial balance report.
Select Scheduled Processes.
Figure 3 Schedule the Trial Balance Report.
Select schedule new process.

Oracle Financials Cloud and Planning and Budgeting Cloud Service
5
After you select the Schedule New Process button a window appears that allows you to select the process name. Use the Name option to search for Trial Balance Report. Select the OK button and the Process Details page opens to allows you to specify the ledger, period, and chart of accounts information for the report. Determine how much detail you would like to send from General Ledger. If you would like to send balances broken out by complete account combinations, you use the Account option for Summarize By. Often, you only need to map a chart of accounts segment to the entity Planning dimension. In this case, use the value Natural Account and Additional Segment option for the Summarize By parameter. For the additional segment, select the segment you would like to map to entity in Planning. This is typically a segment such as company or department.
Figure 5 Complete the Trial Balance Report options.
Figure 4 Search for the Trial Balance Report process.
Select the option that matches to the detail you want to transfer.
Select the segment you would like to map to the Planning entity.
Oracle Financials Cloud and Planning and Budgeting Cloud Service
6
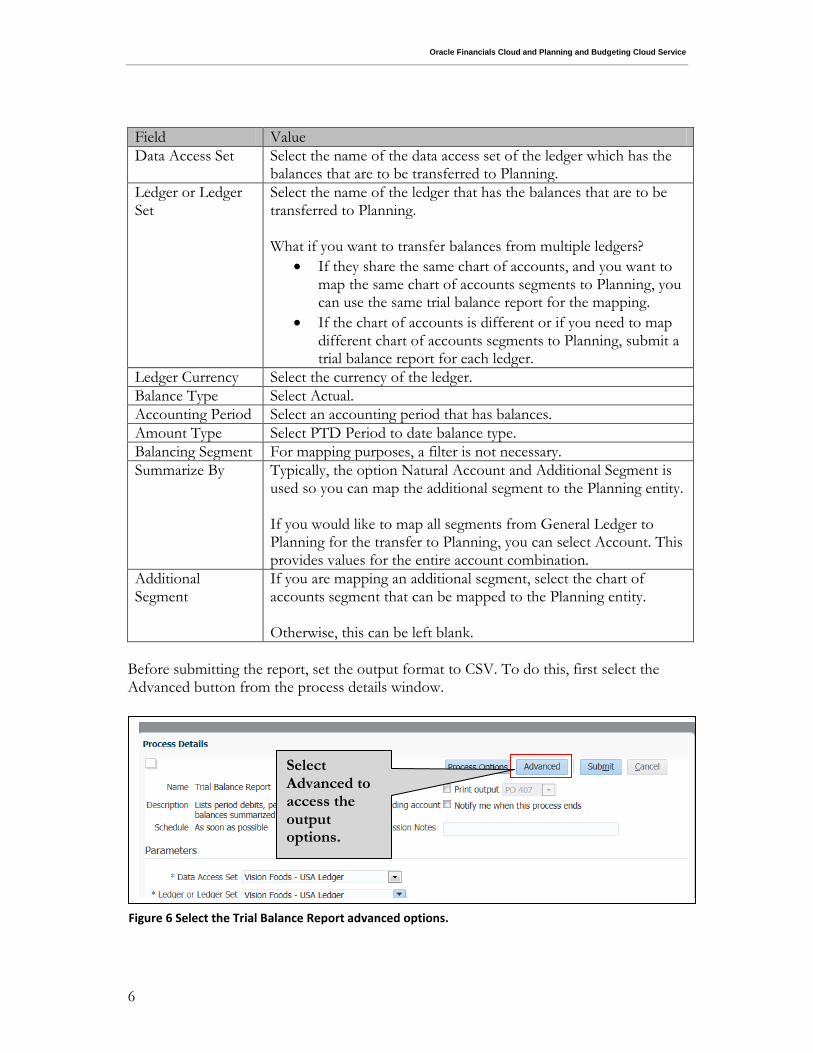
Field Value
Data Access Set Select the name of the data access set of the ledger which has the balances that are to be transferred to Planning.
Ledger or Ledger Set
Select the name of the ledger that has the balances that are to be transferred to Planning. What if you want to transfer balances from multiple ledgers?
If they share the same chart of accounts, and you want to map the same chart of accounts segments to Planning, you can use the same trial balance report for the mapping.
If the chart of accounts is different or if you need to map different chart of accounts segments to Planning, submit a trial balance report for each ledger.
Ledger Currency Select the currency of the ledger.
Balance Type Select Actual.
Accounting Period Select an accounting period that has balances.
Amount Type Select PTD Period to date balance type.
Balancing Segment For mapping purposes, a filter is not necessary.
Summarize By Typically, the option Natural Account and Additional Segment is used so you can map the additional segment to the Planning entity. If you would like to map all segments from General Ledger to Planning for the transfer to Planning, you can select Account. This provides values for the entire account combination.
Additional Segment
If you are mapping an additional segment, select the chart of accounts segment that can be mapped to the Planning entity. Otherwise, this can be left blank.
Before submitting the report, set the output format to CSV. To do this, first select the Advanced button from the process details window. Figure 6 Select the Trial Balance Report advanced options.
Select Advanced to access the output options.
Oracle Financials Cloud and Planning and Budgeting Cloud Service
7
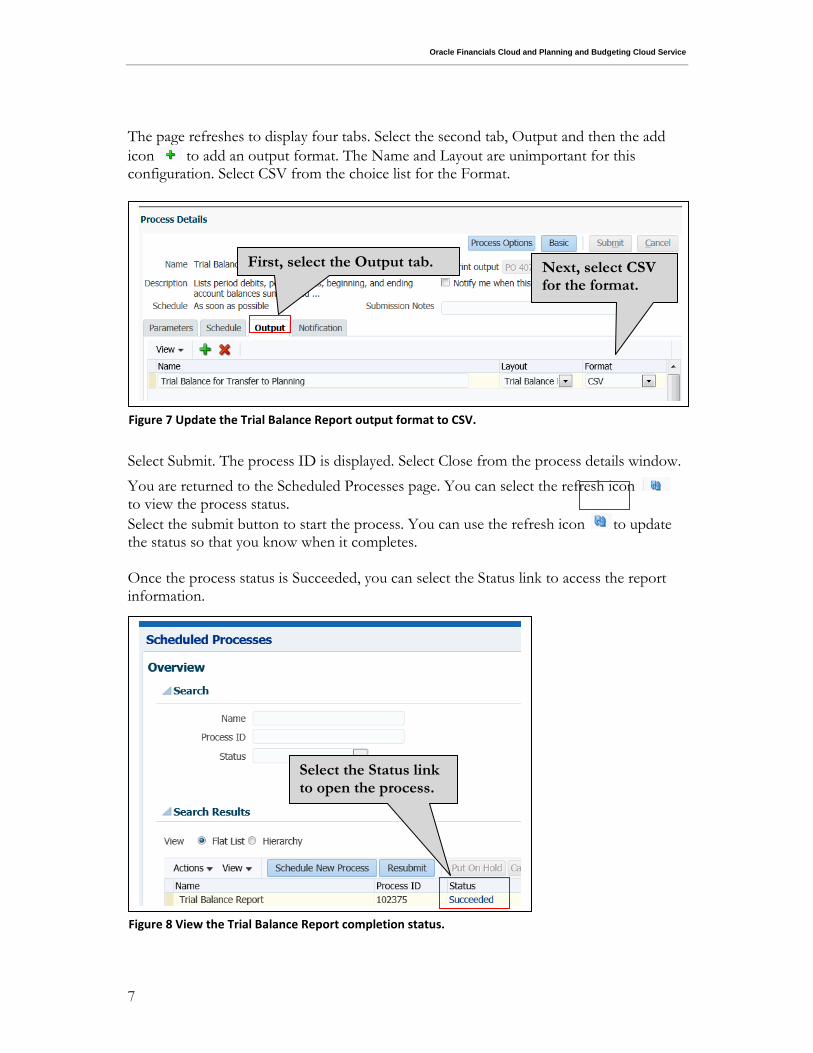
The page refreshes to display four tabs. Select the second tab, Output and then the add
icon to add an output format. The Name and Layout are unimportant for this configuration. Select CSV from the choice list for the Format. Select Submit. The process ID is displayed. Select Close from the process details window.
You are returned to the Scheduled Processes page. You can select the refresh icon to view the process status.
Select the submit button to start the process. You can use the refresh icon to update the status so that you know when it completes. Once the process status is Succeeded, you can select the Status link to access the report information.
Figure 7 Update the Trial Balance Report output format to CSV.
First, select the Output tab. Next, select CSV for the format.
Select the Status link to open the process. details.
Figure 8 View the Trial Balance Report completion status.

Oracle Financials Cloud and Planning and Budgeting Cloud Service
8
The page refreshes to display the details. Select the Output Name link. In this example, the name is GLTRBAL Document1. The actual output name may vary based upon your configuration. You are prompted to save the file. Save it to a location such as your desktop. Later, you need to upload this file to Planning.
Register General Ledger as a Source System
You must register General Ledger as a source system in Planning to complete the mapping configurations and execute the transfer of balances. Log in as a user who has the access to data management features. Navigation: Log into the Planning and Budgeting Cloud Service Workspace Navigate
(from toolbar) Data Management Setup (tab) Register Source System
Figure 9 Save the Trial Balance report results.
Select the Output Name link to save the trial balance file.

Oracle Financials Cloud and Planning and Budgeting Cloud Service
9
Once the page opens, select the Add icon to register General Ledger as a source system. The lower region refreshes to display the detail options. Use this region to register the source system. Complete the information as specified in the table below this diagram.
Figure 10 Navigate to source system to register General Ledger.
First, select the Data Management tab.
Next, select source system to register General Ledger.
Figure 11 Add the General Ledger as a source system.
Select the Add link to add General Ledger as a source system.
Figure 12 Complete source system details for General Ledger.
Oracle Financials Cloud and Planning and Budgeting Cloud Service
10
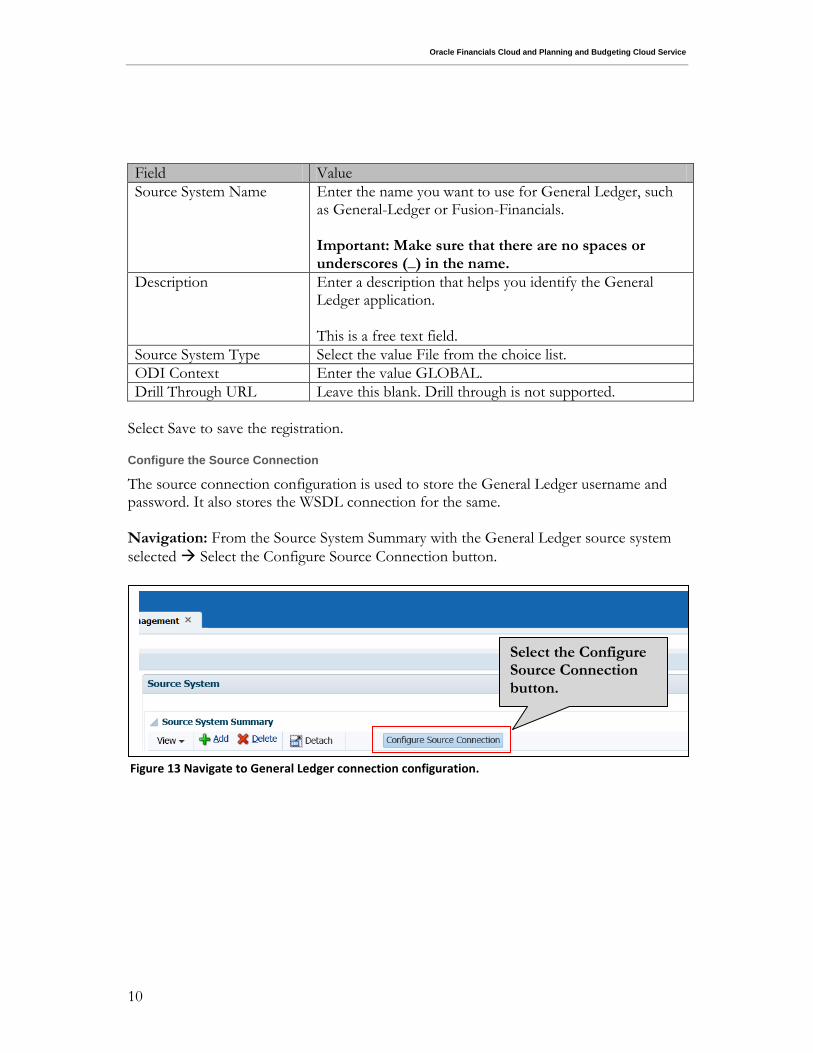
Field Value
Source System Name Enter the name you want to use for General Ledger, such as General-Ledger or Fusion-Financials. Important: Make sure that there are no spaces or underscores (_) in the name.
Description Enter a description that helps you identify the General Ledger application. This is a free text field.
Source System Type Select the value File from the choice list.
ODI Context Enter the value GLOBAL.
Drill Through URL Leave this blank. Drill through is not supported.
Select Save to save the registration.
Configure the Source Connection
The source connection configuration is used to store the General Ledger username and password. It also stores the WSDL connection for the same. Navigation: From the Source System Summary with the General Ledger source system
selected Select the Configure Source Connection button.
Select the Configure Source Connection button.
Figure 13 Navigate to General Ledger connection configuration.
Oracle Financials Cloud and Planning and Budgeting Cloud Service
11
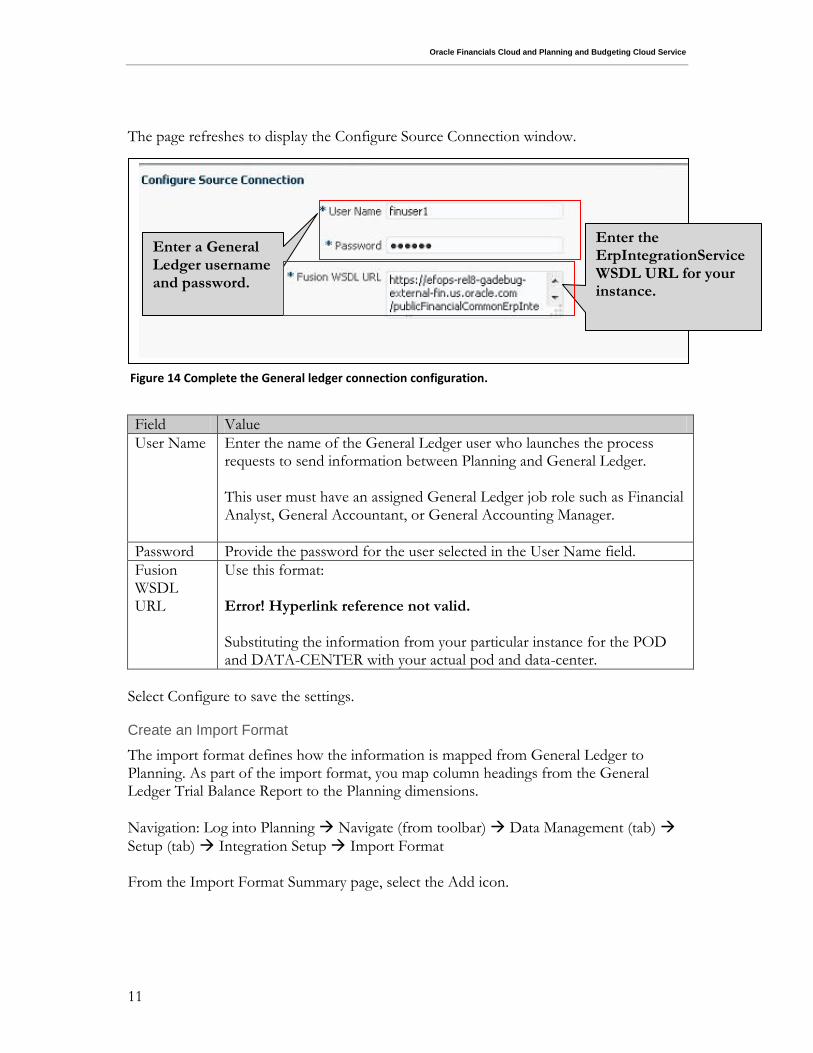
The page refreshes to display the Configure Source Connection window.
Field Value
User Name Enter the name of the General Ledger user who launches the process requests to send information between Planning and General Ledger. This user must have an assigned General Ledger job role such as Financial Analyst, General Accountant, or General Accounting Manager.
Password Provide the password for the user selected in the User Name field.
Fusion WSDL URL
Use this format: Error! Hyperlink reference not valid. Substituting the information from your particular instance for the POD and DATA-CENTER with your actual pod and data-center.
Select Configure to save the settings.
Create an Import Format
The import format defines how the information is mapped from General Ledger to Planning. As part of the import format, you map column headings from the General Ledger Trial Balance Report to the Planning dimensions.
Navigation: Log into Planning Navigate (from toolbar) Data Management (tab)
Setup (tab) Integration Setup Import Format From the Import Format Summary page, select the Add icon.
Enter a General Ledger username and password.
Enter the ErpIntegrationService WSDL URL for your instance.
Figure 14 Complete the General ledger connection configuration.
Oracle Financials Cloud and Planning and Budgeting Cloud Service
12
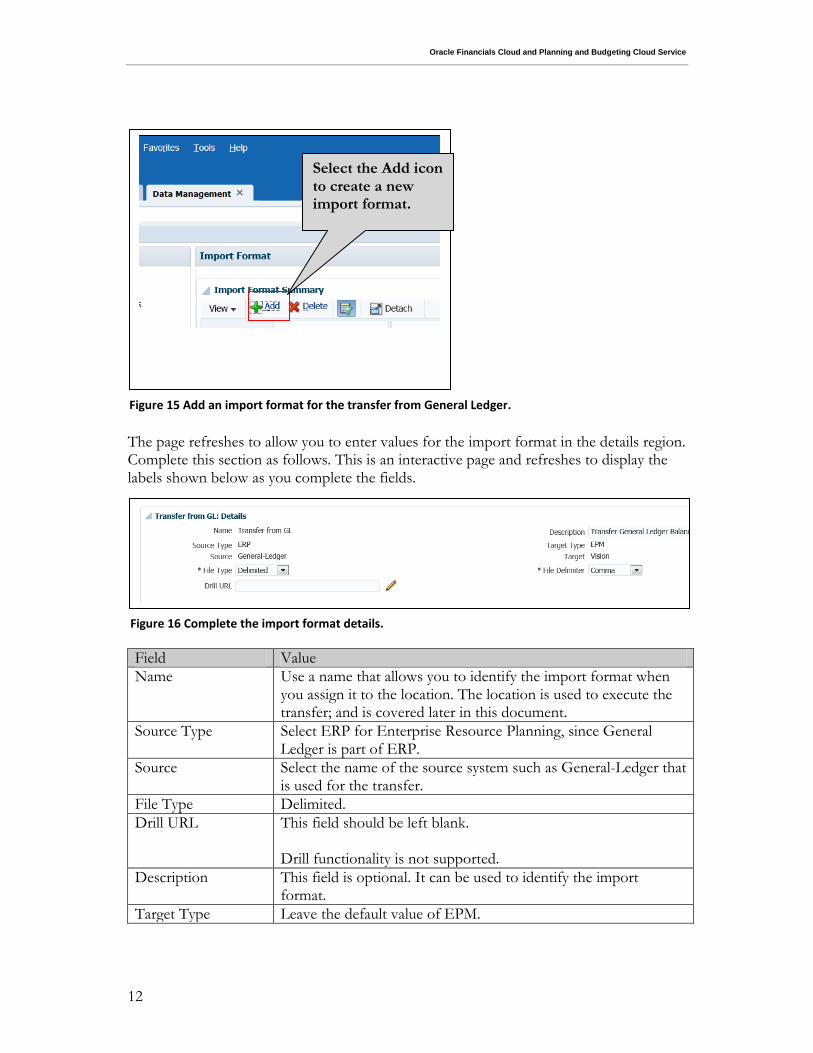
The page refreshes to allow you to enter values for the import format in the details region. Complete this section as follows. This is an interactive page and refreshes to display the labels shown below as you complete the fields.
Field Value
Name Use a name that allows you to identify the import format when you assign it to the location. The location is used to execute the transfer; and is covered later in this document.
Source Type Select ERP for Enterprise Resource Planning, since General Ledger is part of ERP.
Source Select the name of the source system such as General-Ledger that is used for the transfer.
File Type Delimited.
Drill URL This field should be left blank. Drill functionality is not supported.
Description This field is optional. It can be used to identify the import format.
Target Type Leave the default value of EPM.
Figure 15 Add an import format for the transfer from General Ledger.
Select the Add icon to create a new import format.
Figure 16 Complete the import format details.
Oracle Financials Cloud and Planning and Budgeting Cloud Service
13
Field Value
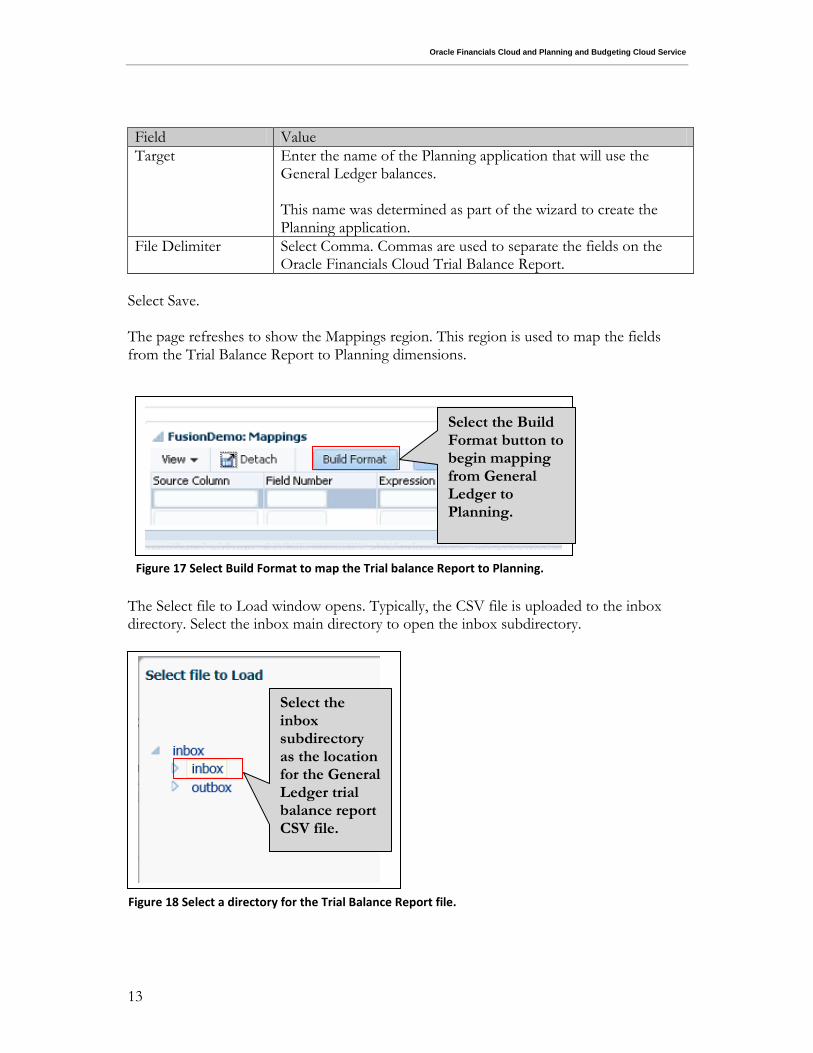
Target Enter the name of the Planning application that will use the General Ledger balances. This name was determined as part of the wizard to create the Planning application.
File Delimiter Select Comma. Commas are used to separate the fields on the Oracle Financials Cloud Trial Balance Report.
Select Save. The page refreshes to show the Mappings region. This region is used to map the fields from the Trial Balance Report to Planning dimensions. The Select file to Load window opens. Typically, the CSV file is uploaded to the inbox directory. Select the inbox main directory to open the inbox subdirectory.
Select the inbox subdirectory as the location for the General Ledger trial balance report CSV file.
Figure 18 Select a directory for the Trial Balance Report file.
Figure 17 Select Build Format to map the Trial balance Report to Planning.
Select the Build Format button to begin mapping from General Ledger to Planning.
Oracle Financials Cloud and Planning and Budgeting Cloud Service
14
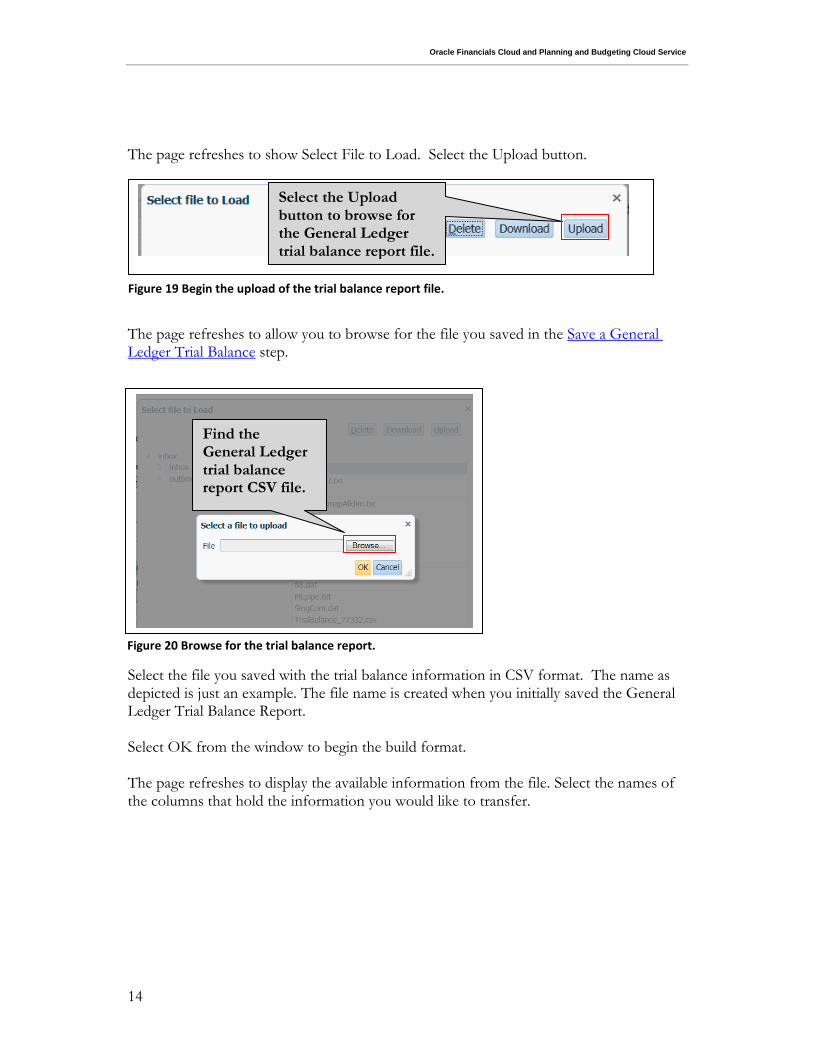
The page refreshes to show Select File to Load. Select the Upload button. The page refreshes to allow you to browse for the file you saved in the Save a General Ledger Trial Balance step. Select the file you saved with the trial balance information in CSV format. The name as depicted is just an example. The file name is created when you initially saved the General Ledger Trial Balance Report. Select OK from the window to begin the build format. The page refreshes to display the available information from the file. Select the names of the columns that hold the information you would like to transfer.
Figure 19 Begin the upload of the trial balance report file.
Select the Upload button to browse for the General Ledger trial balance report file.
Figure 20 Browse for the trial balance report.
Find the General Ledger trial balance report CSV file.
Oracle Financials Cloud and Planning and Budgeting Cloud Service
15
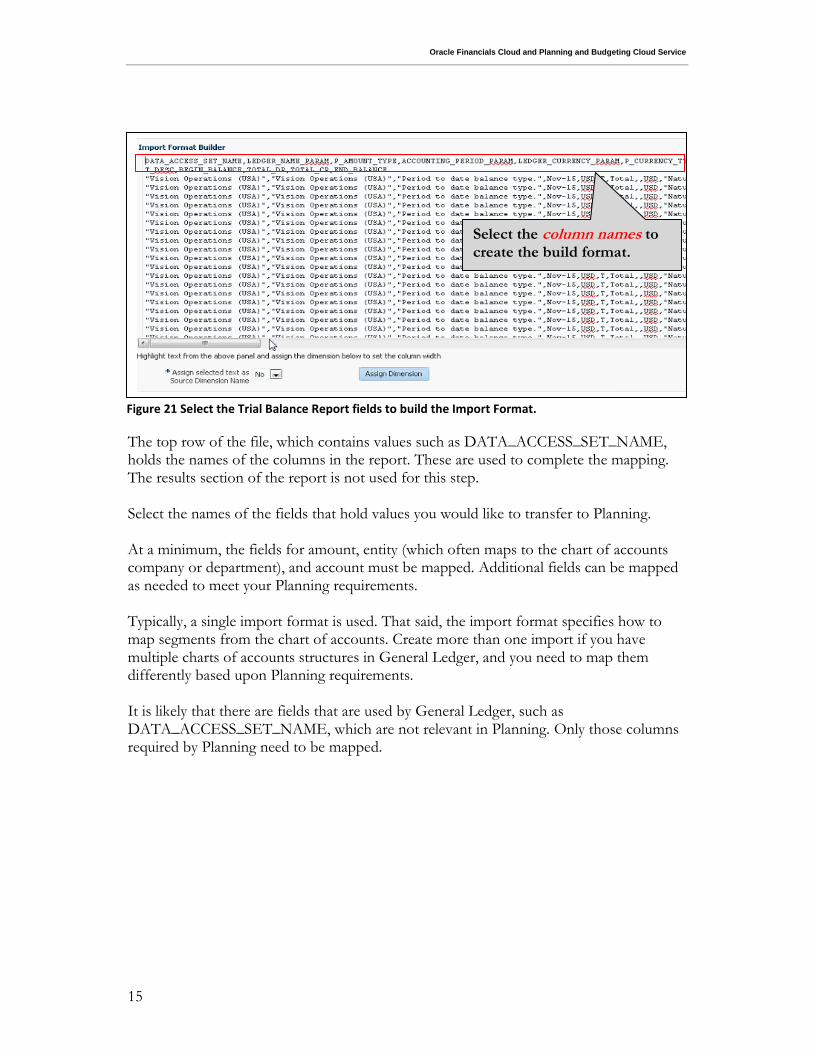
The top row of the file, which contains values such as DATA_ACCESS_SET_NAME, holds the names of the columns in the report. These are used to complete the mapping. The results section of the report is not used for this step. Select the names of the fields that hold values you would like to transfer to Planning. At a minimum, the fields for amount, entity (which often maps to the chart of accounts company or department), and account must be mapped. Additional fields can be mapped as needed to meet your Planning requirements. Typically, a single import format is used. That said, the import format specifies how to map segments from the chart of accounts. Create more than one import if you have multiple charts of accounts structures in General Ledger, and you need to map them differently based upon Planning requirements. It is likely that there are fields that are used by General Ledger, such as DATA_ACCESS_SET_NAME, which are not relevant in Planning. Only those columns required by Planning need to be mapped.
Figure 21 Select the Trial Balance Report fields to build the Import Format.
Select the column names to create the build format.

Oracle Financials Cloud and Planning and Budgeting Cloud Service
16
To map a column, highlight it with the cursor. Then select the Assign Dimension button. This opens the Enter Dimension Mapping Details dialog box. In this example, the ledger currency parameter is mapped to the currency Planning dimension.
Field Value
Source Dimension Name
If you set the Assign selected text as Source Dimension Name option to Yes the name automatically populates from the Trial Balance Report. Otherwise, you can either leave it blank or put in a descriptive value as desired.
Figure 22 Assign the Trial Balance Report fields to Planning dimensions.
Highlight the field you are mapping.
Next, select Assign Dimension to map the highlighted field.
Based upon the column position in trial balance report.
Figure 23 Complete dimension mapping details.

Oracle Financials Cloud and Planning and Budgeting Cloud Service
17
Field Value
This value appears when you are reviewing the transfer results. As a best practice, use a name that is readily understood when reviewing transfer results.
Select Target Dimension (known as Target on the Import Format page)
This maps the General Ledger column to the Planning target dimension. For example, the Acct dimension from the General Ledger Trial Balance can be mapped to the Planning dimension Account.
Selection Field Number (known as Field Number on the Import Format page)
This populates automatically, based upon the position of the field in the General Ledger trial balance. It shouldn’t be necessary to update this field.
There are additional fields such as Expression that are not needed here. Repeat this process until all the fields that are to be mapped from General Ledger to Planning have an assigned dimension in Planning. The fields that are typically mapped are as follows. The actual field numbers may vary. Use your particular Trial Balance Report as the final authority for determining the source columns and field numbers.
General Ledger Field Field Number Planning Dimension
Known as: Source column on the Import Format page.
From the example report (actual values may be different).
Known as: Target on the Import Format page.
Natural Account NATURAL_ACCT_SEGMENT_VALUE
28 Account
Natural Account Description ACCT_DESC
26 Description 1
Currency P_CURRENCY_TYPE
6 Currency
Amount END_BALANCE
33 Amount
Additional Segment ADDITIONAL_SEGMENT_VALUE
23 Entity
After the build format is complete, select OK. You are returned to the Import Format page. The mappings now display in the lower region of the page.

Oracle Financials Cloud and Planning and Budgeting Cloud Service
18
In this example, the source column names were updated to facilitate understanding of the transfer results. The source column name is for display purposes only. You can use any names that you would like. These names appear on the Planning data load workbench, which is used to review the transfer results. Os, select save to complete the import format. Create a Location The location is used to execute the transfer of General Ledger balances to Planning. The import format is assigned to the location. If you are using multiple import formats, you need to define multiple locations. Navigation: Planning and Budgeting Cloud Service Workspace Navigate (from
toolbar) Data Management (tab) Setup (tab) Integration Setup Location When you first navigate to the location page, you see a summary of previously created locations. Select the Add icon to create a new location for the transfer from General Ledger.
Figure 24 Review the Import Format Mappings.

Oracle Financials Cloud and Planning and Budgeting Cloud Service
19
The lower region of the page refreshes to allow you to enter details for the location.
Field Value
Name Provide a name for the location. Use a name that you can easily identify in later configurations. This is displayed when you initiate the transfer from General Ledger to Planning.
Import Format Select the name of the import format that you created for the transfer from General Ledger to Planning.
Source Select the source that you defined. In this example, it is General Ledger.
Accounting Entity This can be left blank. The mapping of entity is via the import format.
Select the Add icon to create a location for the General Ledger to Planning transfer.
Figure 25 Add a location for the transfer from General Ledger.
Figure 26 Complete Location Details for the transfer from General Ledger.
Oracle Financials Cloud and Planning and Budgeting Cloud Service
20
Functional Currency This can be left blank. The mapping of the currency is via the import format.
Target This is the target application which receives the General Ledger results. It is name of the Planning application that you created using the Planning wizard. It automatically displays. No data entry is needed.
It is not necessary to populate the other fields such as the Parent Location, Data Value, or the Check Group fields. Save the location.
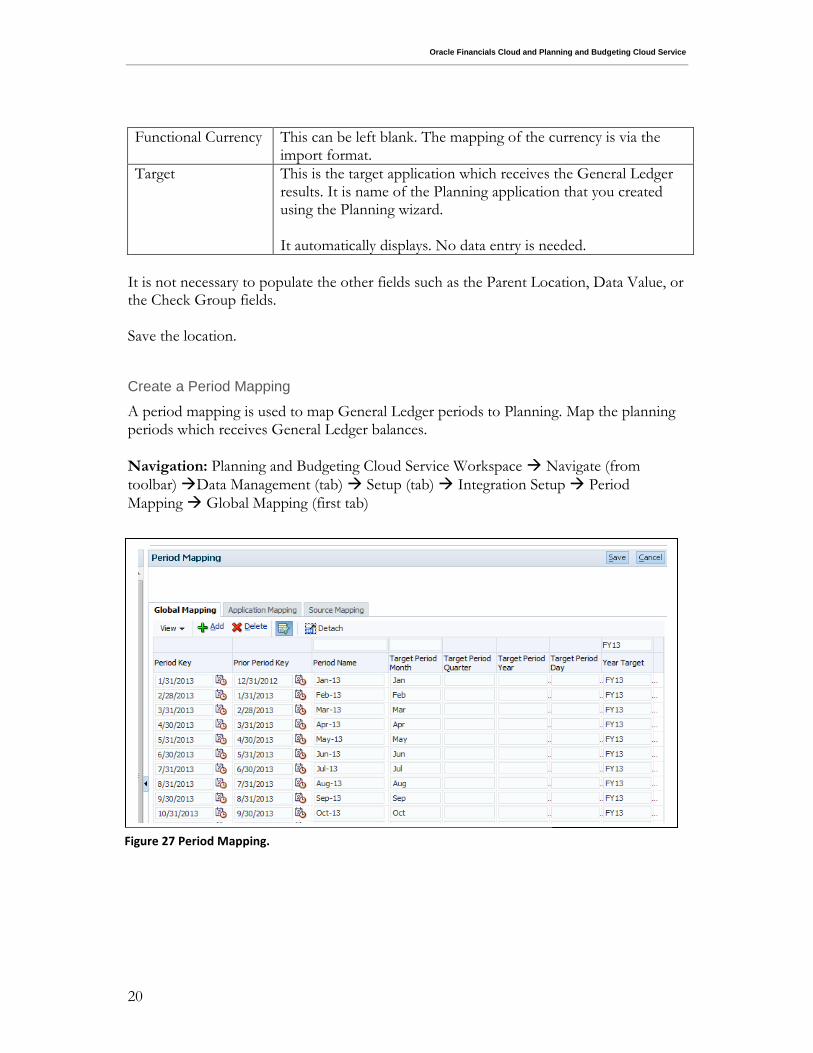
Create a Period Mapping
A period mapping is used to map General Ledger periods to Planning. Map the planning periods which receives General Ledger balances.
Navigation: Planning and Budgeting Cloud Service Workspace Navigate (from
toolbar) Data Management (tab) Setup (tab) Integration Setup Period
Mapping Global Mapping (first tab)
Figure 27 Period Mapping.
Oracle Financials Cloud and Planning and Budgeting Cloud Service
21
Field Value
Period Key Typically the last date of a period, such as a month.
Prior Period Key Specify the period key represents the previous period.
Period Name The name of the Planning period.
Target Period Month
This field is optional.
Target Period Quarter
This field is optional.
Target Period Year This field is optional.
Target Period Day This field is optional.
Year Target Enter the name of the Planning year dimension member name.
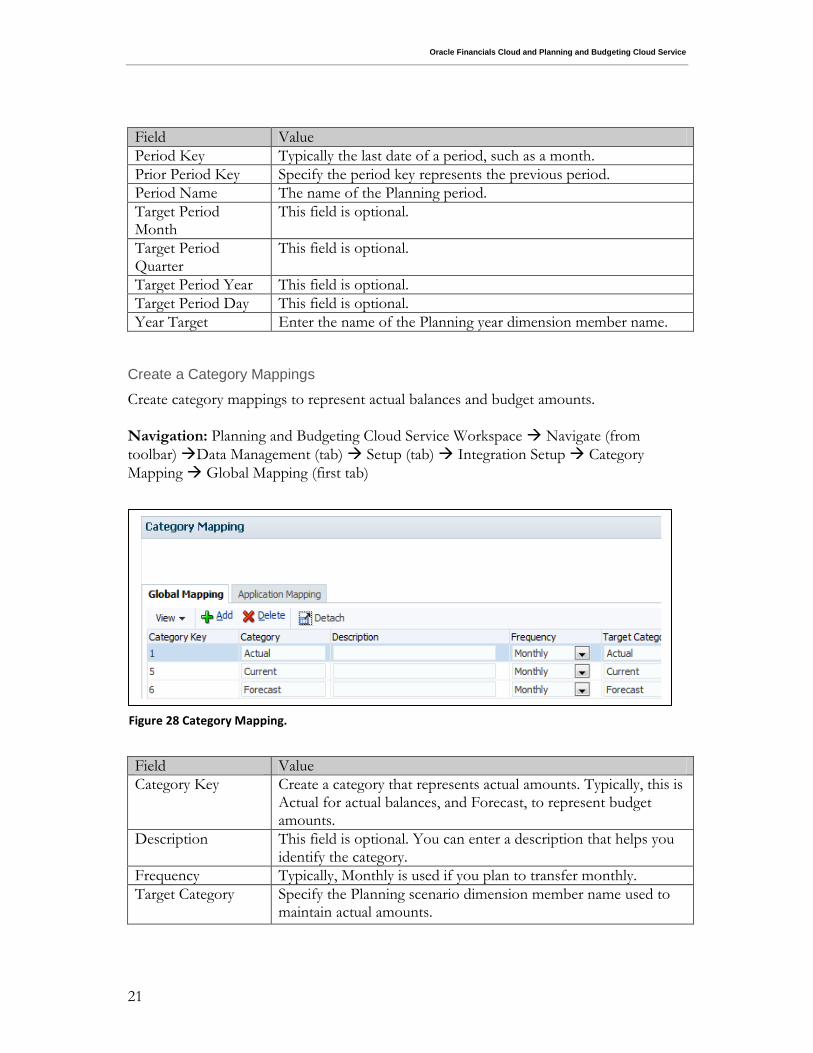
Create a Category Mappings
Create category mappings to represent actual balances and budget amounts.
Navigation: Planning and Budgeting Cloud Service Workspace Navigate (from
toolbar) Data Management (tab) Setup (tab) Integration Setup Category
Mapping Global Mapping (first tab)
Field Value
Category Key Create a category that represents actual amounts. Typically, this is Actual for actual balances, and Forecast, to represent budget amounts.
Description This field is optional. You can enter a description that helps you identify the category.
Frequency Typically, Monthly is used if you plan to transfer monthly.
Target Category Specify the Planning scenario dimension member name used to maintain actual amounts.
Figure 28 Category Mapping.

Oracle Financials Cloud and Planning and Budgeting Cloud Service
22
Create a Data Load Rule
A data load rule is used to submit the process to transfer balances from General Ledger to Planning. The data load rule is created once, but used each time there is a transfer. The data load rule is created from the Workflow tab under Data Management in Planning.
Navigation: Planning and Budgeting Cloud Service Workspace Navigate (from
toolbar) Data Management (tab) Workflow (tab) Data Load Rule Make sure that the point of view is set to the location that you use for the transfer. If you need to change it, select the location name link. Data load rules are within the context of a point of view. The default point of view is automatically be selected. The information for the point of view is at the bottom of the page.
Figure 29 Navigate to the Data Load Rule for the transfer to General Ledger.
Select Data Load Rule from the Workflow tab.
Figure 30 Verify the point of view is for the correct location.
This should be the location that is used for the transfer from General Ledger to Planning.

Oracle Financials Cloud and Planning and Budgeting Cloud Service
23
If necessary, you can change the point of view by selecting the location link at the bottom of the page. The page refreshes to display point of view options. In this example, the point of view is already set to the desired values so it isn’t necessary to change the point of view.
Field Value
Location Select the name of the location you created for the transfer.
Period This field is only used when you execute the transfer. The value is unimportant for creating the data rule itself.
Category Actual is typically used to transfer actual balances from General Ledger.
Set as Default This option saves the selections as the default point of view so that when you access the location or other forms that use the point of view, such as the data load rule, or data load mapping you are already within the context of your point of view.
Select OK and the selection page closes and the Data Load Rule page displays. Select the Add icon . The page refreshes to display the details region. Complete the fields in this region.
Actual
Figure 32 Complete the Data Load Rule Details for transfer from General Ledger.
Figure 31 Update the point of view if needed.
Select the location that is used for the transfer.
Oracle Financials Cloud and Planning and Budgeting Cloud Service
24
Field Value
Name Enter a name to identify the data load rule when you launch the request to transfer General Ledger balances.
Category Typically, Actual is suggested for transferring actual balances.
File Type Use Single Period Load.
Description Enter a description to identify the data load rule when you launch the request to transfer General Ledger balances.
Target Plan Type Enter the target plan type, based upon your Planning requirements. The plan type is the Essbase cube you are loading. Examples of plan types are profit and loss plan, asset plan, and revenue plan.
Import Format Select the name of the import format you created for the transfer.
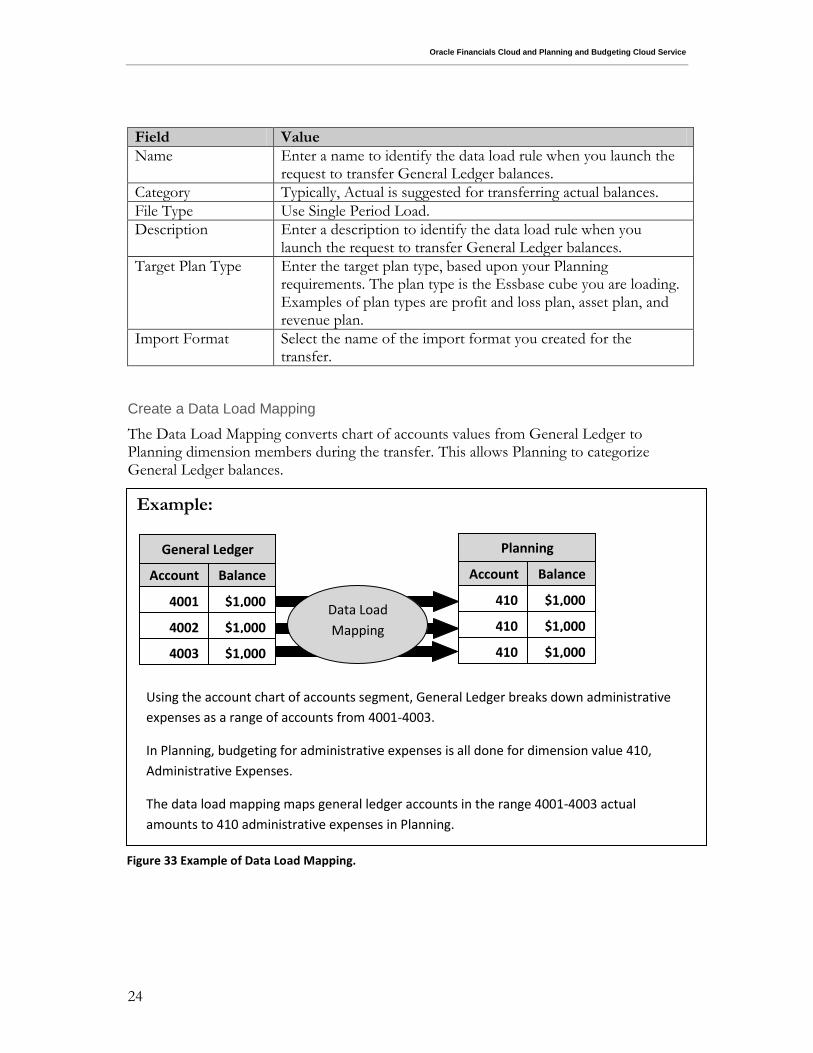
Create a Data Load Mapping
The Data Load Mapping converts chart of accounts values from General Ledger to Planning dimension members during the transfer. This allows Planning to categorize General Ledger balances.
Example:
Account Balance
General Ledger
4001 $1,000
4002 $1,000
4003 $1,000
Account Balance
Planning
410 $1,000
410 $1,000
410 $1,000
Data Load
Mapping
Using the account chart of accounts segment, General Ledger breaks down administrative
expenses as a range of accounts from 4001-4003.
In Planning, budgeting for administrative expenses is all done for dimension value 410,
Administrative Expenses.
The data load mapping maps general ledger accounts in the range 4001-4003 actual
amounts to 410 administrative expenses in Planning.
Figure 33 Example of Data Load Mapping.
Oracle Financials Cloud and Planning and Budgeting Cloud Service
25
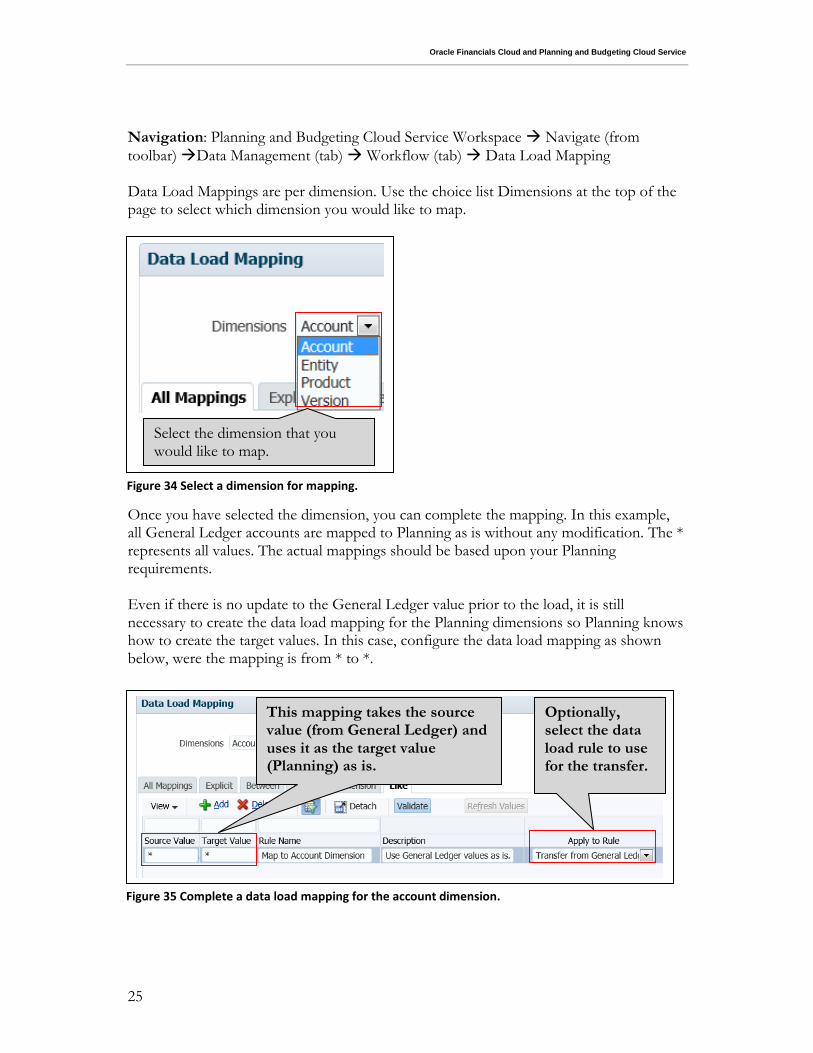
Navigation: Planning and Budgeting Cloud Service Workspace Navigate (from
toolbar) Data Management (tab) Workflow (tab) Data Load Mapping Data Load Mappings are per dimension. Use the choice list Dimensions at the top of the page to select which dimension you would like to map. Once you have selected the dimension, you can complete the mapping. In this example, all General Ledger accounts are mapped to Planning as is without any modification. The * represents all values. The actual mappings should be based upon your Planning requirements. Even if there is no update to the General Ledger value prior to the load, it is still necessary to create the data load mapping for the Planning dimensions so Planning knows how to create the target values. In this case, configure the data load mapping as shown below, were the mapping is from * to *. Figure 35 Complete a data load mapping for the account dimension.
This mapping takes the source value (from General Ledger) and uses it as the target value (Planning) as is.
Optionally, select the data load rule to use for the transfer.
Figure 34 Select a dimension for mapping.
Select the dimension that you would like to map.

Oracle Financials Cloud and Planning and Budgeting Cloud Service
26
Field Value
Dimensions At a minimum, map values for the account and entity dimensions since those are transferred from General Ledger. If you are transferring additional chart segments you must provide a mapping for each destination dimension.
Source Value These are the values from the General Ledger chart of accounts. Enter the values directly. A predefined list is not provided.
Target Value Enter the values that should be used in Planning to store the General Ledger actual balances that are transferred.
Description This is for information purposes only. It is a free text field.
Apply to Rule Select the data rule that is used for the transfer from General Ledger to Planning. This is optional. You can also leave it blank.
Create mappings for each dimension that you would like to map. Once you are done, save the data load mapping.
Transfer from General Ledger
Once configurations are complete, you can transfer balances from General Ledger to Planning. First, schedule the Trial Balance Report process for the period that holds the balances you would like to transfer. You must use the output format CSV. A description of how to schedule the Trial Balance Report and save it in CSV format is in the Save a Trial Balance Report section. Make sure that you submit the same type of trial balance report that you used for the configurations. For example, if you used the Trial Balance Report (and not the General Ledger Trial Balance Report) to complete the import format and data load mappings, use the Trial Balance Report to execute the transfer. You must also use the same value for Summarize By so that the import format configuration matches the trial balance. Make note of the process ID, from the Enterprise Scheduler in General Ledger that is used to create the trial balance. The process ID used to do the transfer.

Oracle Financials Cloud and Planning and Budgeting Cloud Service
27
Once you have the process ID for the trial balance, you can submit the transfer request from Planning. Navigation: Planning and Budgeting Cloud Service Workspace Navigate (from
toolbar) Data Management (tab) Integration Setup Workflow Data Load Data Load Rule Make sure that the point of view is set to the location that you used when you created the data load rule for the transfer from General Ledger to Planning. Once the point of view is set, highlight the data load rule that you could like to use for the transfer. The page refreshes to display details for your data load rule. Enter the process ID from the Trial Balance Report that includes the results you would like to transfer under the File Name field displayed in the Source Options region of the data load rule.
This should be the location that was used to create the data load rule used for the transfer.
Figure 37 Verify the point of view for the data load mapping.
Figure 36 Find the process ID for the Trial Balance Report.
The process ID is used to execute the Planning data load rule.
Oracle Financials Cloud and Planning and Budgeting Cloud Service
28
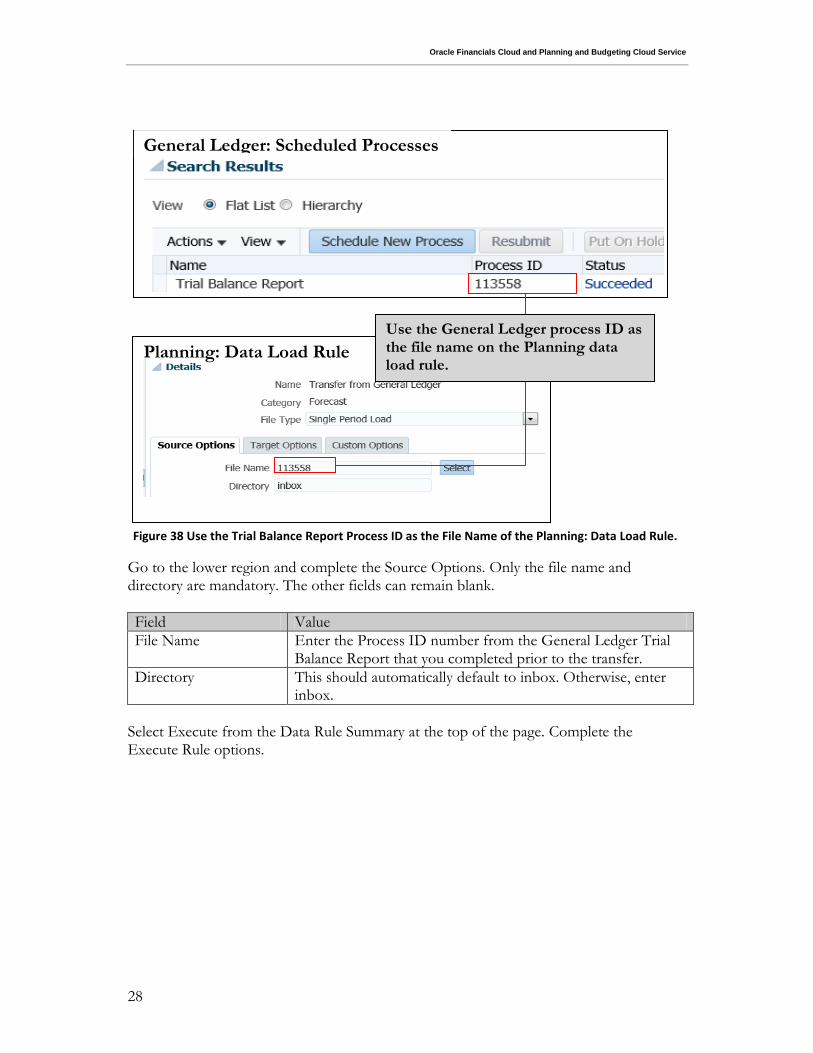
Go to the lower region and complete the Source Options. Only the file name and directory are mandatory. The other fields can remain blank.
Field Value
File Name Enter the Process ID number from the General Ledger Trial Balance Report that you completed prior to the transfer.
Directory This should automatically default to inbox. Otherwise, enter inbox.
Select Execute from the Data Rule Summary at the top of the page. Complete the Execute Rule options.
Figure 38 Use the Trial Balance Report Process ID as the File Name of the Planning: Data Load Rule.
Use the General Ledger process ID as the file name on the Planning data load rule.
Planning: Data Load Rule
General Ledger: Scheduled Processes

Oracle Financials Cloud and Planning and Budgeting Cloud Service
29
Field Value
Import from Source Select this option. It indicates that the balances from the General Ledger Trial Balance Report should be imported into Planning.
Recalculate This option does not impact the transfer from General Ledger.
Export to Target Select this option. It indicates that the balances from the General Ledger Trial Balance Report should be exported to the Planning application.
Execute Check This option can be left blank.
Start Period and End Period
This specifies the Planning period that is used to record the results of the transfer. These values should be the same. The period of the Trial Balance Report is not automatically used to determine the period used to book the transfer in Planning. Indicate what Planning period should be used.
Import Mode Select Replace.
Export Mode Use the value Store Data. Other export modes are not expected to be used for the transfer.
Select Run. A confirmation window appears indicating that the request was submitted.
The start period and end period should be the same.
Figure 39 Execute the data load rule to transfer from General Ledger.
Oracle Financials Cloud and Planning and Budgeting Cloud Service
30
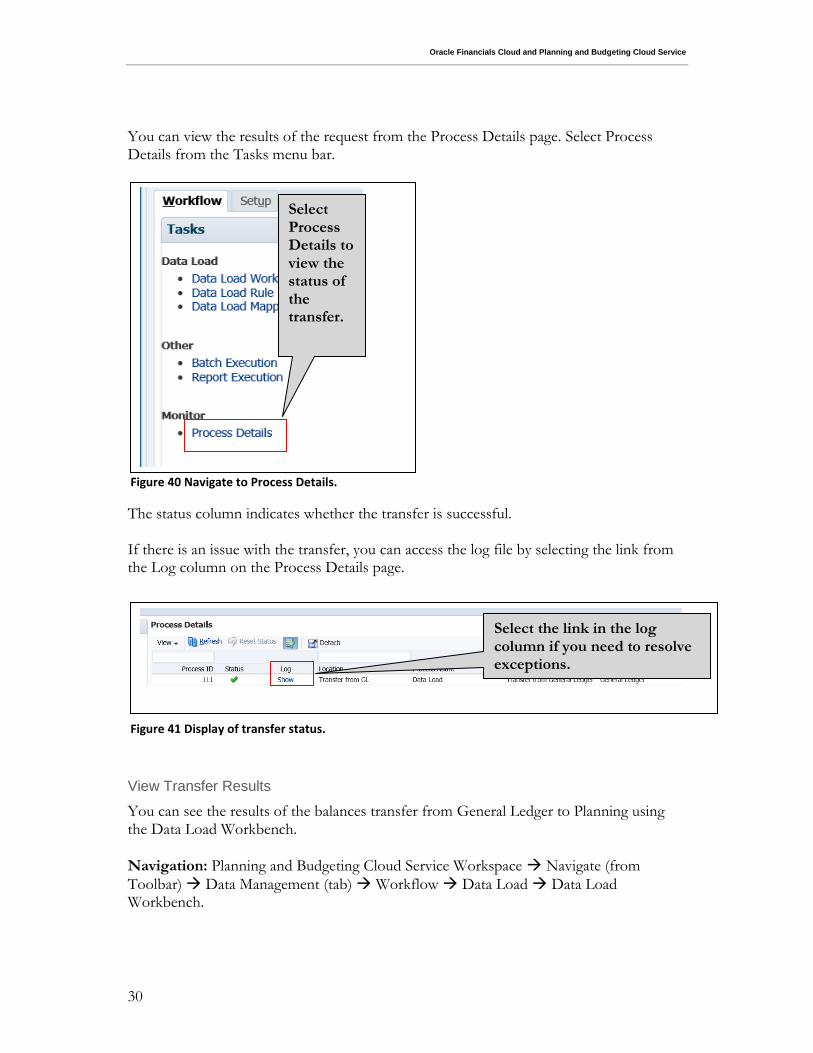
You can view the results of the request from the Process Details page. Select Process Details from the Tasks menu bar. The status column indicates whether the transfer is successful. If there is an issue with the transfer, you can access the log file by selecting the link from the Log column on the Process Details page.
View Transfer Results
You can see the results of the balances transfer from General Ledger to Planning using the Data Load Workbench. Navigation: Planning and Budgeting Cloud Service Workspace Navigate (from
Toolbar) Data Management (tab) Workflow Data Load Data Load Workbench.
Figure 41 Display of transfer status.
Select the link in the log column if you need to resolve exceptions.
Select Process Details to view the status of the transfer.
Figure 40 Navigate to Process Details.
Oracle Financials Cloud and Planning and Budgeting Cloud Service
31
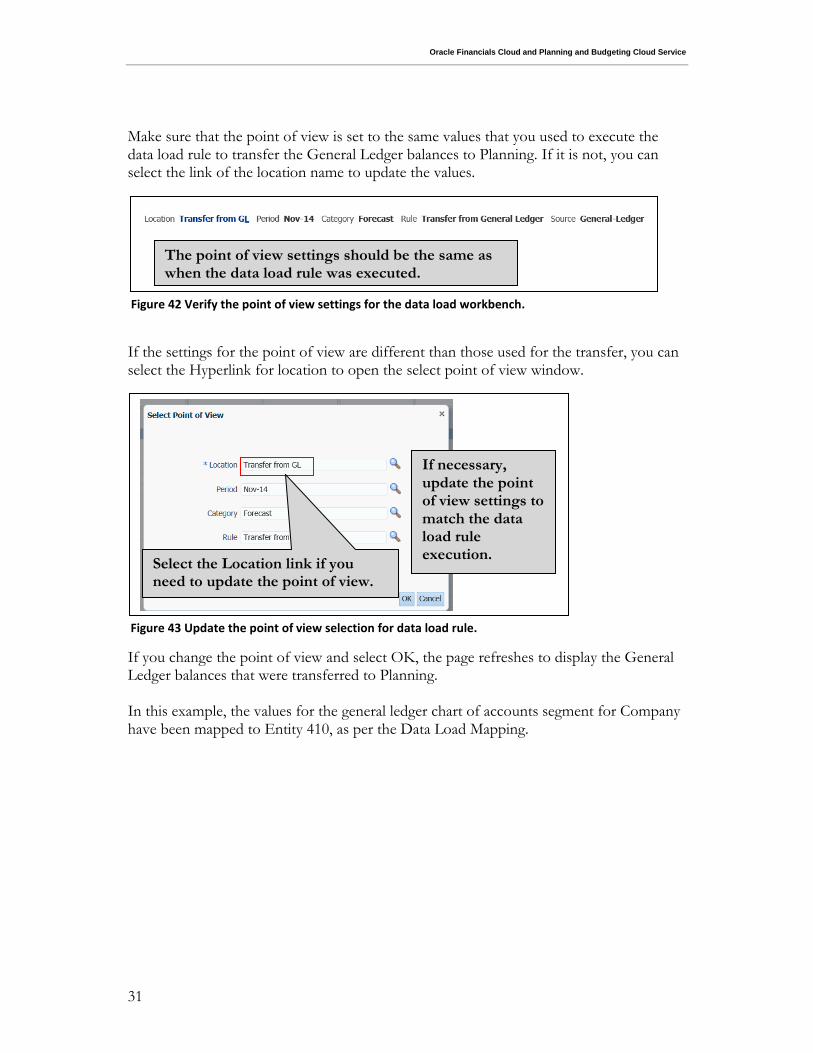
Make sure that the point of view is set to the same values that you used to execute the data load rule to transfer the General Ledger balances to Planning. If it is not, you can select the link of the location name to update the values. If the settings for the point of view are different than those used for the transfer, you can select the Hyperlink for location to open the select point of view window. If you change the point of view and select OK, the page refreshes to display the General Ledger balances that were transferred to Planning. In this example, the values for the general ledger chart of accounts segment for Company have been mapped to Entity 410, as per the Data Load Mapping.
If necessary, update the point of view settings to match the data load rule execution.
Figure 43 Update the point of view selection for data load rule.
Figure 42 Verify the point of view settings for the data load workbench.
The point of view settings should be the same as when the data load rule was executed.
Select the Location link if you need to update the point of view.

Oracle Financials Cloud and Planning and Budgeting Cloud Service
32
Transfer Planning Budgets to General Ledger
Budget information can be sent to General Ledger so it can be used in financial reports that compare budget and actual amounts. Many of the configurations are similar to those used for the transfer from General Ledger to Planning. However, there is already a source application defined for Planning. You do not define a source system for Planning.
Process Description
The following diagram provides details for the configuration of the transfer process from Planning to General Ledger.
Figure 44 Review transfer from General Ledger results.
The values in these columns are now in
Planning.
The values in these columns are from General Ledger.
Transfer Planning Budgets to General Ledger
Register General Ledger as a
target application
Map Planning dimensions to
General Ledger
Map Planning dimension values to
General Ledger
Transfer General Ledger balances
to Planning
Figure 45 Transfer from Planning to General Ledger process.

Oracle Financials Cloud and Planning and Budgeting Cloud Service
33
Before beginning the configuration process, gather information about the ledger that receives the Planning budget amounts. Complete this process for each ledger that is to receive budget information from Planning. Once you have this information you can begin the Planning configuration. First, register General Ledger as a target application. This is different from the transfer from General Ledger, where General Ledger was the source system. Similar to the transfer from General Ledger, you need to define an import format, a location, and a data load rule. Additionally, you need a period mapping to map Planning periods to General Ledger. Execute your data load rules to transfer the Planning amounts. This automatically submits the General Ledger requests to import and validate budgets.
Gather General Ledger Information
To complete the Planning configurations, you need some information from General Ledger. Once you find this information, make note of it so that you can enter it in Planning to complete the configurations.
The ledger identifier is used by the data load mapping to route budget amounts to
the appropriate ledger.
The accounting calendar is used to find period names for the Ledger. These are
used to complete a period mapping in Planning.
The chart of accounts is used to define General Ledger as a target application in
Planning.
The ledger currency maps to the Planning location used for the transfer.
Ledger Information
Navigation from General Ledger: Navigation toolbar Navigator Icon Tools Setup and Maintenance Search for the task from the bottom left corner for Manage Primary Ledgers. Select the search icon and the page refresh to display the task Manage Primary Ledgers.
Oracle Financials Cloud and Planning and Budgeting Cloud Service
34
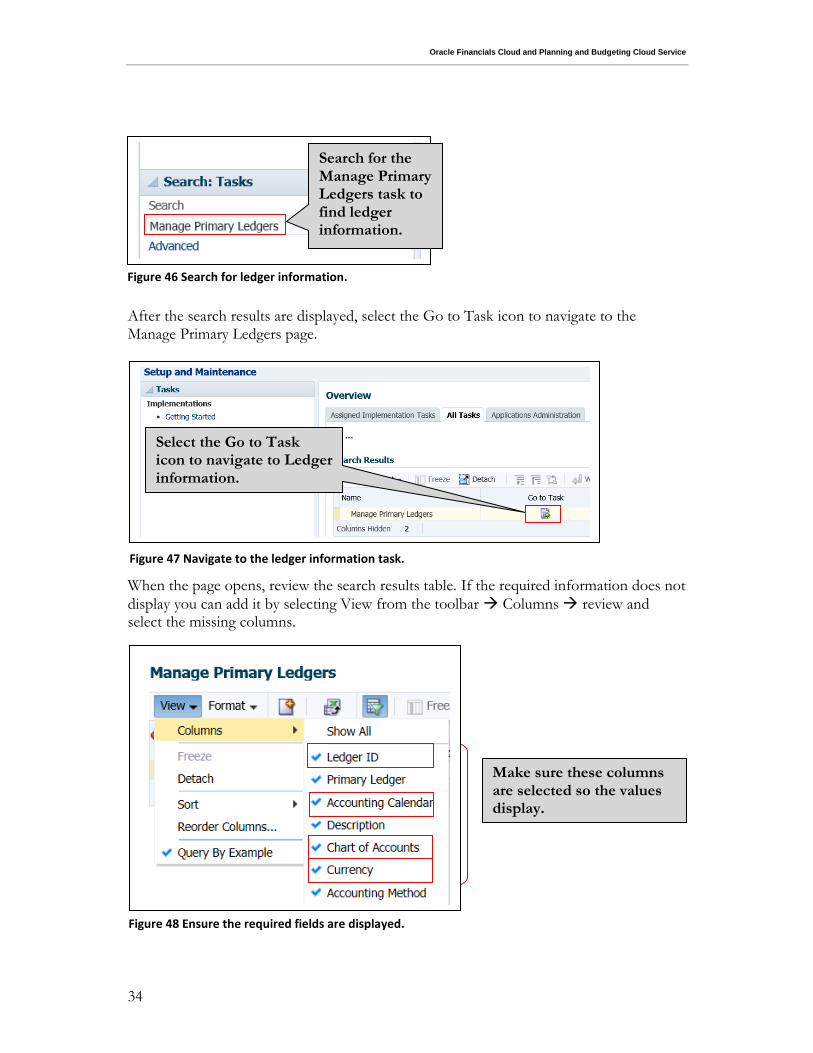
After the search results are displayed, select the Go to Task icon to navigate to the Manage Primary Ledgers page. When the page opens, review the search results table. If the required information does not
display you can add it by selecting View from the toolbar Columns review and select the missing columns.
Figure 47 Navigate to the ledger information task.
Select the Go to Task icon to navigate to Ledger information.
Search for the Manage Primary Ledgers task to find ledger information.
Figure 46 Search for ledger information.
Figure 48 Ensure the required fields are displayed.
Make sure these columns are selected so the values display.

Oracle Financials Cloud and Planning and Budgeting Cloud Service
35
Search for the ledgers which receive the transfer results. Take note of the information you need from the ledger. Note on Ledger ID: The value is assigned automatically by General Ledger. In this example, the value is 1. Typically, it is a multi-digit number.
Accounting Periods
General Ledger uses accounting periods to load budget information. You map from Planning periods to General Ledger accounting periods in the Period Load Mapping. You use the accounting calendar name from the ledger, as described in the previous section to find the period names. Figure 50 Process to find period names.
Find Accounting Period Values
Find the Accounting
Calendar name used by the
Ledger.
Search for the Accounting
Calendar task.
Search for the Accounting
Calendar used by the Ledger.
View the accounting
periods.
Figure 49 Ledger information for configurations.
Ledger ID is used by Planning data load mapping.
Accounting Calendar is used to find General Ledger period names for the period mapping.
Currency is used by Planning location.
Chart of accounts is used to find the order of the segments for the Planning target application definition.

Oracle Financials Cloud and Planning and Budgeting Cloud Service
36
Navigation from General Ledger: Navigation toolbar Navigator Icon Tools
Setup and Maintenance Search for the task for Manage Accounting Calendars Once the page refreshes, select the Go to Task icon. Once the task page displays, use the search window to find the calendar that is used by the ledger which use the budget amounts from Planning. In this example, it is the calendar AccountingMon1.
The page refreshes to display the accounting calendar details. This includes the period names, which are mapped in Planning. If desired, you can use the export to Excel feature to save the period names to make it easier to complete the mapping.
Select the accounting calendar Name link to find the period names.
Figure 52 Select the accounting calendar.
Figure 51 Navigate to the accounting calendar.
Select the Go to Task to navigate to the accounting calendar.

Oracle Financials Cloud and Planning and Budgeting Cloud Service
37
Chart of Accounts
You need to know the order of the chart of accounts segments to complete the Planning target application definition. If you do not know the segment order of your chart of accounts, you can find it using tasks from General Ledger setup and maintenance. If you already know the order, skip this section. First, go to the Manage Chart of Accounts Structure task.
Navigation from Oracle Fusion Financials: Navigation toolbar Navigator Icon
Tools Setup and Maintenance Search for the task Manage Chart of Accounts Structures.
The period names are used by the Period Mapping in Planning.
Figure 53 Find the accounting period names.
You can optionally export period names to Excel for reference to complete the Planning configurations.
Oracle Financials Cloud and Planning and Budgeting Cloud Service
38
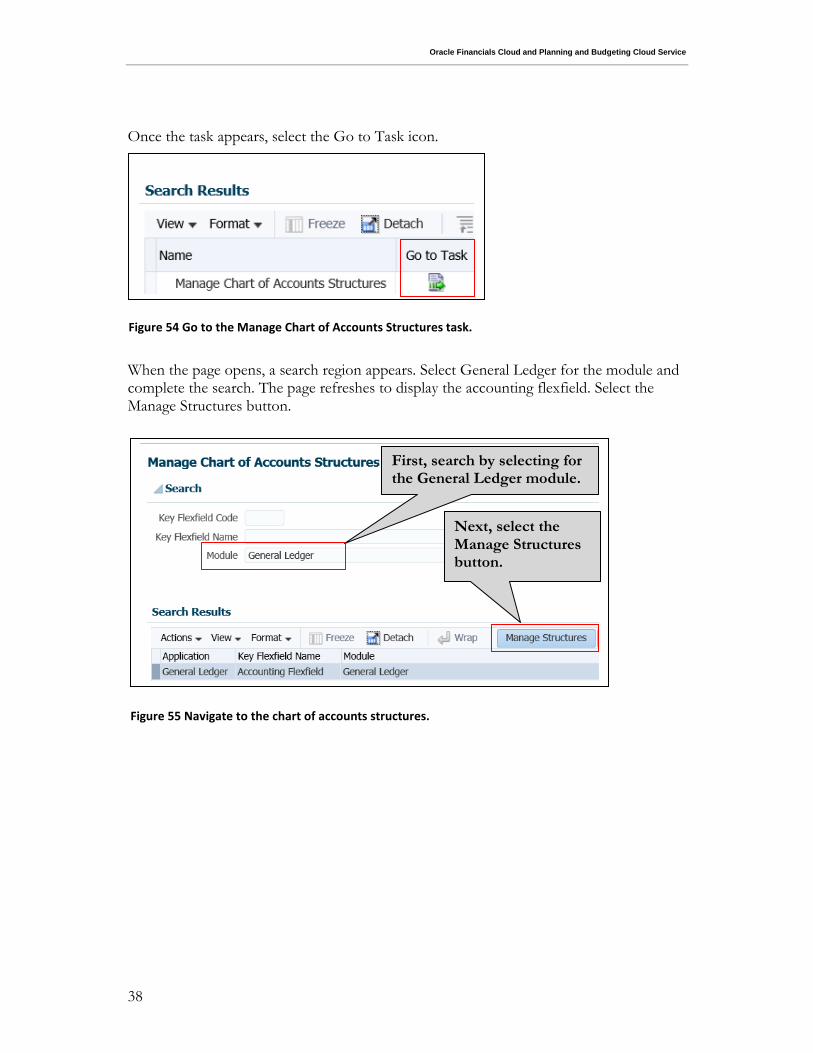
Once the task appears, select the Go to Task icon. When the page opens, a search region appears. Select General Ledger for the module and complete the search. The page refreshes to display the accounting flexfield. Select the Manage Structures button.
Figure 54 Go to the Manage Chart of Accounts Structures task.
First, search by selecting for the General Ledger module.
Next, select the Manage Structures button.
Figure 55 Navigate to the chart of accounts structures.
Oracle Financials Cloud and Planning and Budgeting Cloud Service
39
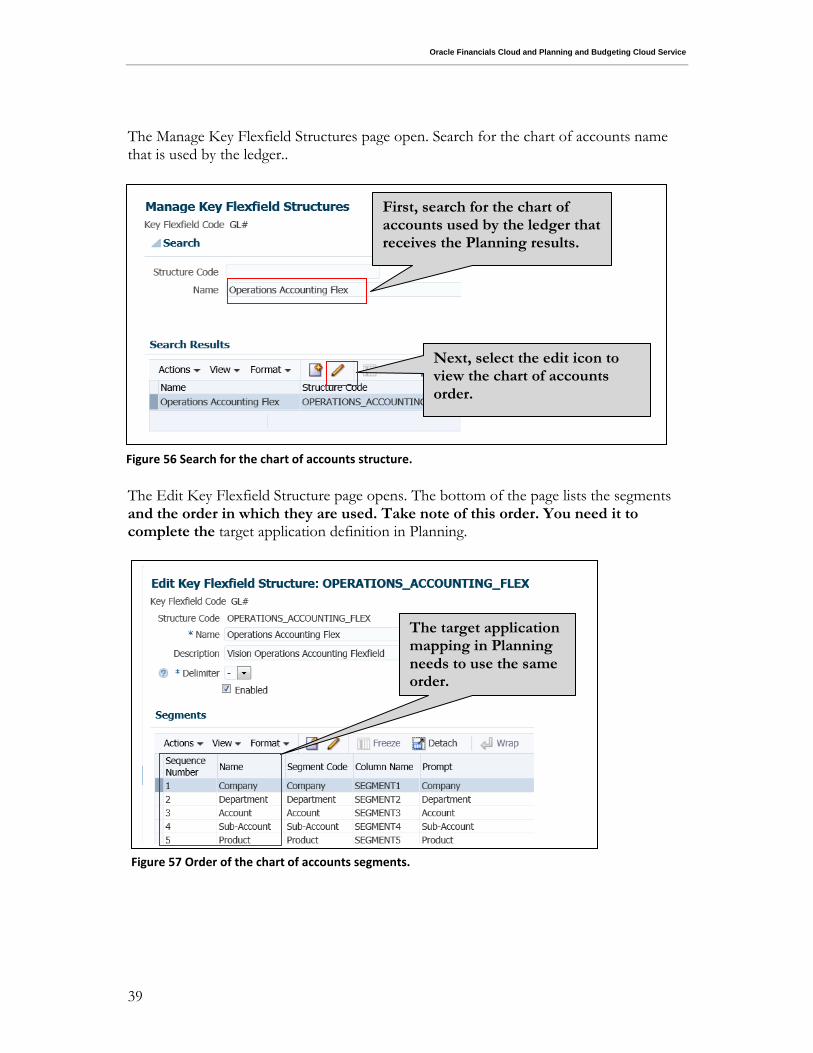
The Manage Key Flexfield Structures page open. Search for the chart of accounts name that is used by the ledger.. The Edit Key Flexfield Structure page opens. The bottom of the page lists the segments and the order in which they are used. Take note of this order. You need it to complete the target application definition in Planning.
First, search for the chart of accounts used by the ledger that receives the Planning results.
Next, select the edit icon to view the chart of accounts order.
Figure 56 Search for the chart of accounts structure.
Figure 57 Order of the chart of accounts segments.
The target application mapping in Planning needs to use the same order.
Oracle Financials Cloud and Planning and Budgeting Cloud Service
40
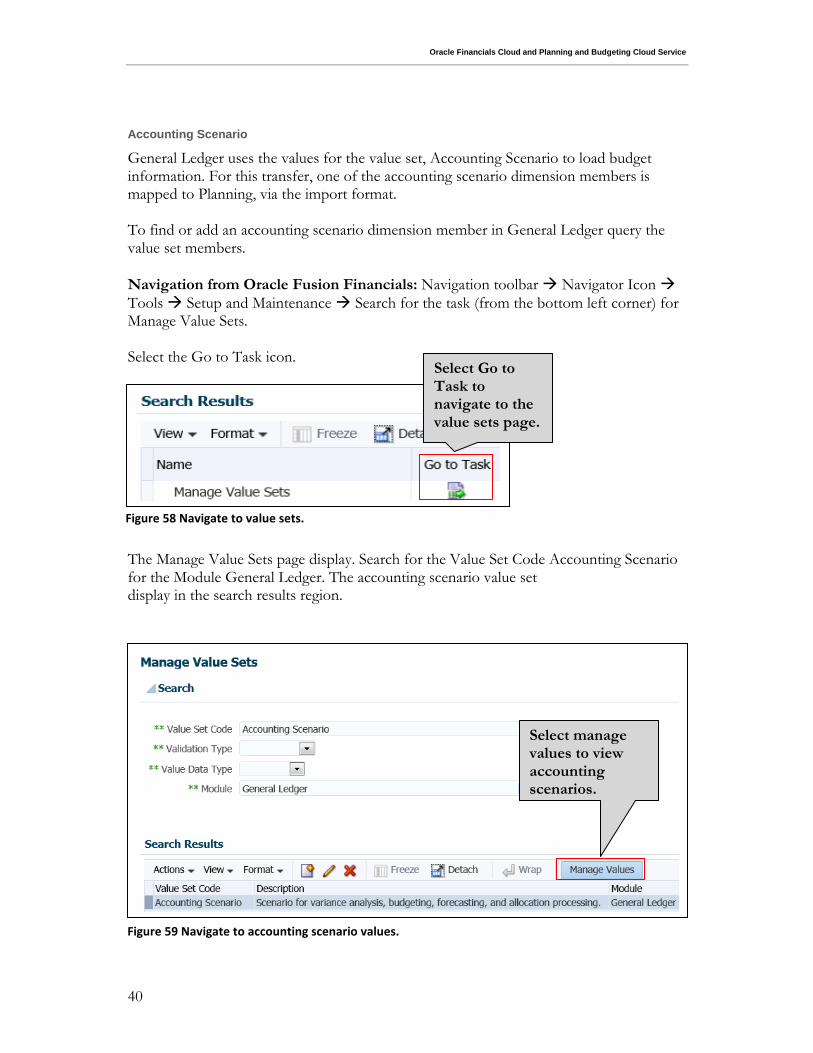
Accounting Scenario
General Ledger uses the values for the value set, Accounting Scenario to load budget information. For this transfer, one of the accounting scenario dimension members is mapped to Planning, via the import format. To find or add an accounting scenario dimension member in General Ledger query the value set members.
Navigation from Oracle Fusion Financials: Navigation toolbar Navigator Icon
Tools Setup and Maintenance Search for the task (from the bottom left corner) for Manage Value Sets. Select the Go to Task icon.
The Manage Value Sets page display. Search for the Value Set Code Accounting Scenario for the Module General Ledger. The accounting scenario value set display in the search results region. \
Select manage values to view accounting scenarios.
Figure 59 Navigate to accounting scenario values.
Figure 58 Navigate to value sets.
Select Go to Task to navigate to the value sets page.

Oracle Financials Cloud and Planning and Budgeting Cloud Service
41
Select the Manage Values option. The Manage Values page display. There are typically only a few values for the accounting scenario. You can select the Search button without entering any search criteria. The search results display valid values for accounting scenario. If none of the accounting scenarios match your needs, you can add new values by
selecting the Create icon . Note the value that you would like to use so that you can enter it in Planning. This value can be used when you query the budget amounts in General Ledger, such as from Smart View.
Decide which one of the accounting scenario values be used by the Planning import format and data load mapping.
Figure 60 Find accounting scenario values.
Oracle Financials Cloud and Planning and Budgeting Cloud Service
42
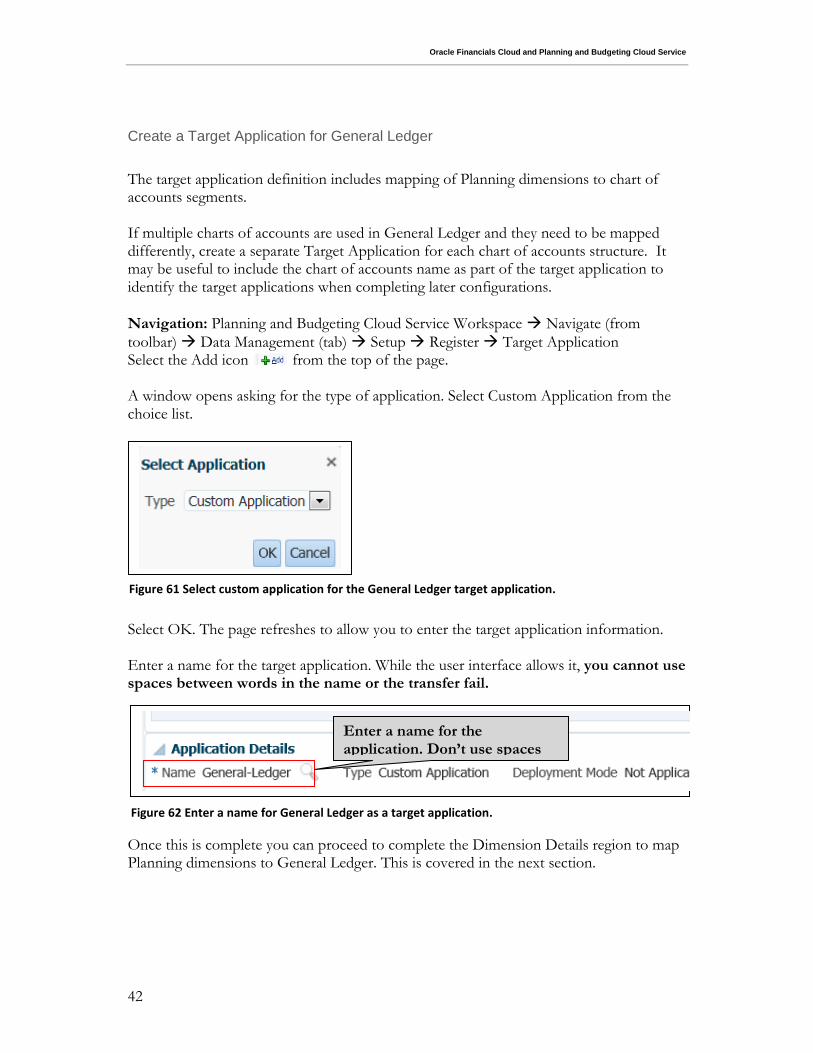
Create a Target Application for General Ledger
The target application definition includes mapping of Planning dimensions to chart of accounts segments. If multiple charts of accounts are used in General Ledger and they need to be mapped differently, create a separate Target Application for each chart of accounts structure. It may be useful to include the chart of accounts name as part of the target application to identify the target applications when completing later configurations.
Navigation: Planning and Budgeting Cloud Service Workspace Navigate (from
toolbar) Data Management (tab) Setup Register Target Application Select the Add icon from the top of the page. A window opens asking for the type of application. Select Custom Application from the choice list. Select OK. The page refreshes to allow you to enter the target application information. Enter a name for the target application. While the user interface allows it, you cannot use spaces between words in the name or the transfer fail. Once this is complete you can proceed to complete the Dimension Details region to map Planning dimensions to General Ledger. This is covered in the next section.
Enter a name for the application. Don’t use spaces between words.
Figure 62 Enter a name for General Ledger as a target application.
Figure 61 Select custom application for the General Ledger target application.
Oracle Financials Cloud and Planning and Budgeting Cloud Service
43
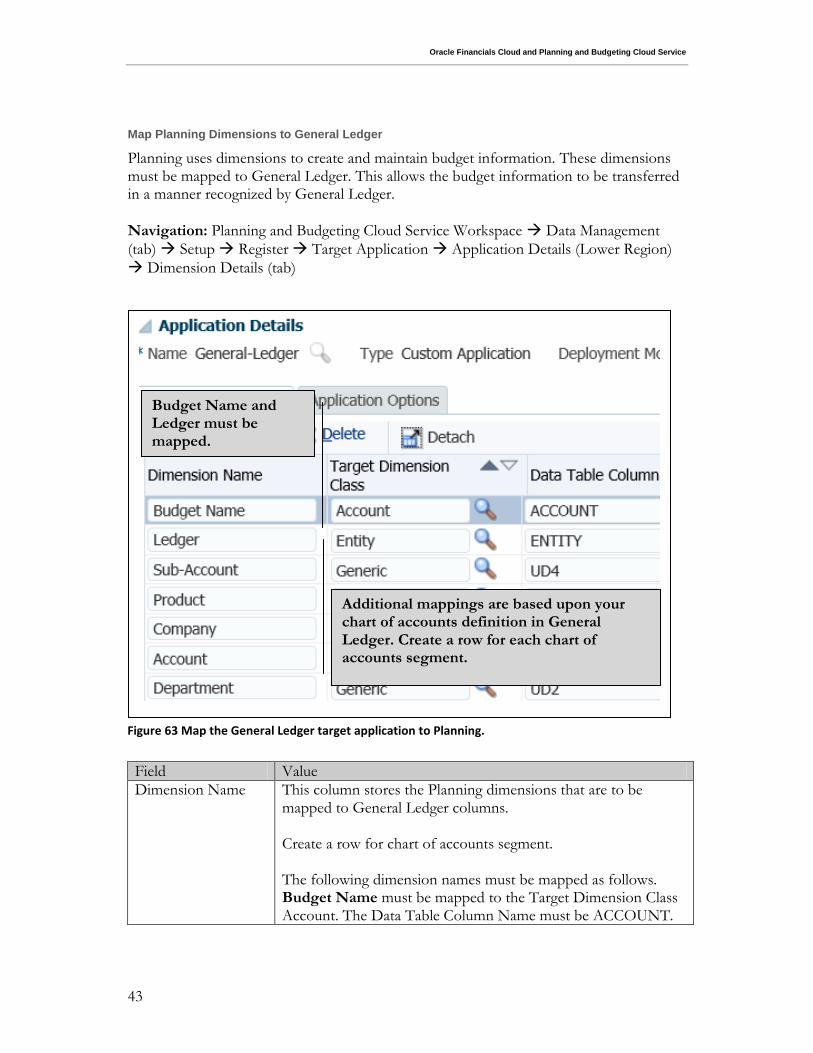
Map Planning Dimensions to General Ledger
Planning uses dimensions to create and maintain budget information. These dimensions must be mapped to General Ledger. This allows the budget information to be transferred in a manner recognized by General Ledger.
Navigation: Planning and Budgeting Cloud Service Workspace Data Management
(tab) Setup Register Target Application Application Details (Lower Region)
Dimension Details (tab)
Field Value
Dimension Name This column stores the Planning dimensions that are to be mapped to General Ledger columns. Create a row for chart of accounts segment. The following dimension names must be mapped as follows. Budget Name must be mapped to the Target Dimension Class Account. The Data Table Column Name must be ACCOUNT.
Figure 63 Map the General Ledger target application to Planning.
Additional mappings are based upon your chart of accounts definition in General Ledger. Create a row for each chart of accounts segment.
Budget Name and Ledger must be mapped.
Oracle Financials Cloud and Planning and Budgeting Cloud Service
44
Field Value
This is distinct from mapping the account field of the chart of accounts, which must be done separately. Ledger must be mapped to the Target Dimension Class Entity. The data table column name must be ENTITY. Additionally, there should be a mapping from Planning for each segment of the chart of accounts.
Target Dimension Class
Use the value Generic for all rows except Account and Entity, as described under Dimension Name.
Data Table Column Name
Use the values UD1, UD2, UD3, based upon the order of the segments from the chart of accounts definition. UD stands for User Defined. Example: A chart of accounts structure has three segments defined in this order: Company, Cost Center, and Account. The values for the data table column names would be:
Company uses data table column name UD1
Cost Center uses data table column name UD2
Account uses data table column name UD3. If there were a forth segment of the chart such as subaccount, it would map to UD4.
Sequence Leave this field blank.
Save the mapping.
Update the Application Options
As part of the transfer, the General Ledger Validate and Upload Budgets processes are submitted. To enable this feature, the Enable export to file Property must be set to Yes. Select the Applications Options tab for your target application to update it.

Oracle Financials Cloud and Planning and Budgeting Cloud Service
45
\\\\\
Create an Import Format
The import format maps Planning dimensions to General Ledger attributes.
Navigation: Navigate (from toolbar) Data Management (tab) Setup (tab)
Integration Setup Import Format Select the Add icon .
Field Value
Name Provide a name that is used to identify the import format.
Source Type Use the value EPM.
Source Enter the name of the Planning application.
Description Provide a description that can is used to identify the import format.
Target Type Use the value EPM.
Target Enter the name of the target application you defined for the transfer.
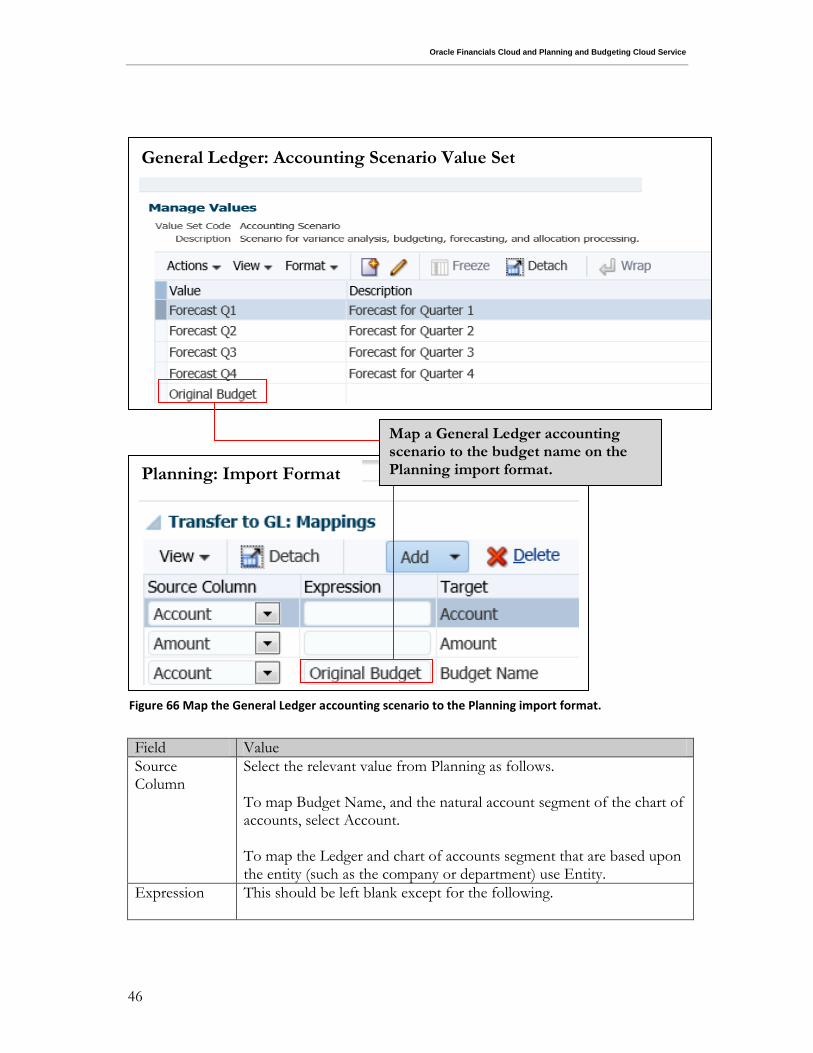
Use the lower region of the Import Format page to map Planning dimensions to General Ledger. Make sure to map a valid accounting scenario from General Ledger to the Budget Name.
The Enable export to file option must be set to yes.
Figure 64 Update the enable export to file application option.
Figure 65 Complete import format details for the transfer to General Ledger.
Oracle Financials Cloud and Planning and Budgeting Cloud Service
46
Field Value
Source Column
Select the relevant value from Planning as follows. To map Budget Name, and the natural account segment of the chart of accounts, select Account. To map the Ledger and chart of accounts segment that are based upon the entity (such as the company or department) use Entity.
Expression This should be left blank except for the following.
Planning: Import Format
General Ledger: Accounting Scenario Value Set
Figure 66 Map the General Ledger accounting scenario to the Planning import format.
Map a General Ledger accounting scenario to the budget name on the Planning import format.

Oracle Financials Cloud and Planning and Budgeting Cloud Service
47
Field Value
If the target is the budget name, enter the value of the accounting scenario you plan to use. (See the Accounting Scenario Information section.)
Target The values are based upon the target application. There is a separate row for each chart of accounts segment mapped on the import format.
Create a Location
The location is used to execute the transfer of Planning budget amounts to General Ledger. The import format is assigned to the location. If you are using multiple import formats, you also define multiple locations.
Navigation: Planning and Budgeting Cloud Service Workspace Navigate (from
toolbar) Data Management (tab) Setup (tab) Integration Setup Location Select the Add icon from the top of the page. The page refresh to display the Location details. Complete the required fields. For the functional currency field, use the currency of the ledger which has the balances that are to be transferred.
Enter the currency of the ledger which receives the budget amounts from Planning.
Figure 68 Complete the location for transfer to General Ledger.
Figure 67 Add a location.
Select the Add icon to create a new location.

Oracle Financials Cloud and Planning and Budgeting Cloud Service
48
Field Value
Name Provide a name for the location. This is displayed when you initiate the transfer from General Ledger to Planning.
Import Format Select the name of the import format you would like to use during the transfer. If you are using more than one import format (such as due to different charts of accounts being used by different ledgers) you need to create more than one location.
Source Select the name of the Planning application that holds the budget amounts for transfer to General Ledger.
Accounting Entity This can be left blank. The mapping of entity is via the import format.
Functional Currency
Enter the currency of the ledger.
Target This is the target application which receives the General Ledger results. It is name of the Planning application that you created using the Planning wizard. It is automatically completed.
It is not necessary to populate the other fields such as the Parent Location, Data Value, or the Check Group fields. Save the location.
Create a Period Mapping
The period mapping is used to convert Planning periods to General Ledger accounting calendar periods for the transfer. Use the Global Mapping to create additional period keys in Planning and Budgeting Cloud Service for your budget and map them to the planning application’s Year and Period dimension members. Use the Source Mapping to map to these periods to the General Ledger periods.
Navigation: Planning and Budgeting Cloud Service Workspace Navigate (from
toolbar) Data Management (tab) Setup (tab) Integration Setup Period
Mapping Global Mapping (first tab)

Oracle Financials Cloud and Planning and Budgeting Cloud Service
49
Select the Add icon to create a new period mapping. Add a separate row for each period that is to receive budget amounts from Planning.
Figure 69 Select General Ledger as the target application.
Select the target application you have defined for General Ledger.
Planning: Period Mapping
General Ledger: Accounting Calendar
Figure 70 Map General Ledger periods to Planning.
The General Ledger period names must match the target period months in Planning.
Oracle Financials Cloud and Planning and Budgeting Cloud Service
50
Create a Data Load Rule
A data load rule is used to submit the process to transfer balances from Planning to General Ledger. The data load rule is created once, but used each time there is a transfer.
Navigation: Planning and Budgeting Cloud Service Workspace Navigate (from
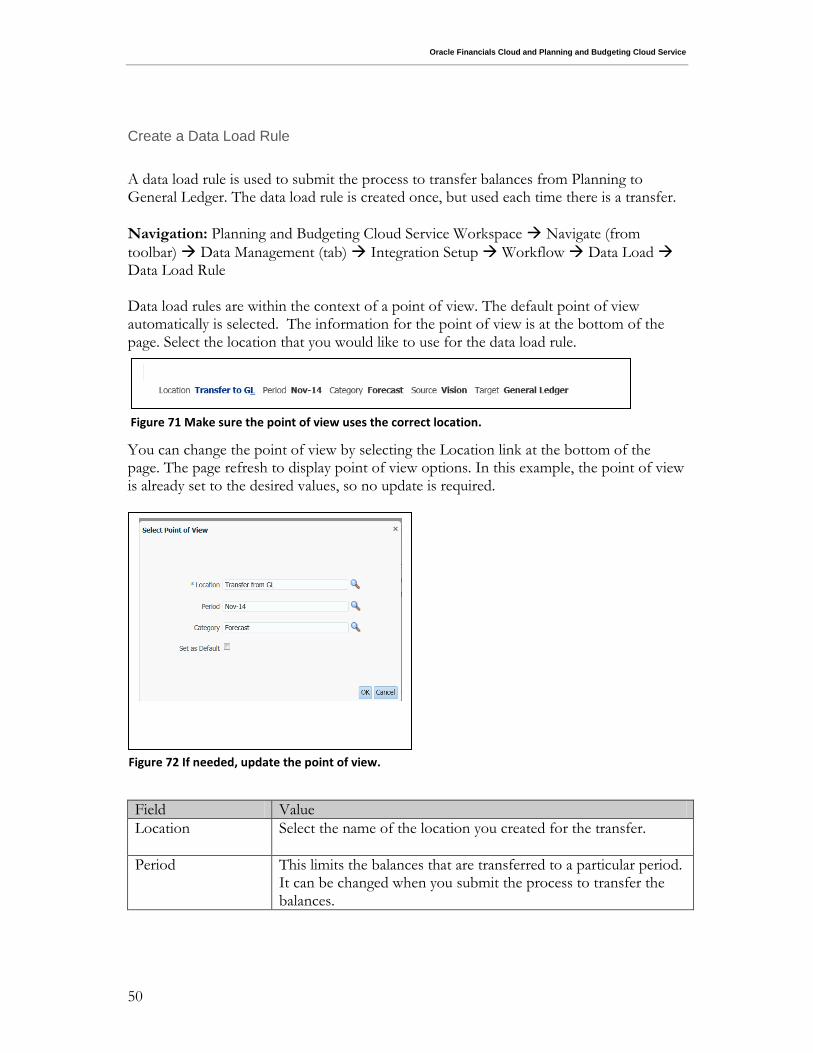
toolbar) Data Management (tab) Integration Setup Workflow Data Load Data Load Rule Data load rules are within the context of a point of view. The default point of view automatically is selected. The information for the point of view is at the bottom of the page. Select the location that you would like to use for the data load rule. You can change the point of view by selecting the Location link at the bottom of the page. The page refresh to display point of view options. In this example, the point of view is already set to the desired values, so no update is required.
Field Value
Location Select the name of the location you created for the transfer.
Period This limits the balances that are transferred to a particular period. It can be changed when you submit the process to transfer the balances.
Figure 72 If needed, update the point of view.
Figure 71 Make sure the point of view uses the correct location.

Oracle Financials Cloud and Planning and Budgeting Cloud Service
51
Field Value
Category Forecast is typically used to transfer budgets to General Ledger.
Set as Default This option saves the selections as the default point of view.
Select OK and the selection page close and the Data Load Rule page display. Select the Add icon . The page refresh to display the details region.
Field Value
Name Enter a name to identify the data load rule when you launch the request to transfer Planning budgets to General Ledger.
Category This automatically defaults from the point of view selected in the previous step.
Period Mapping Type
Select Default.
Description Enter a description to identify the data load rule when you launch the request to transfer General Ledger balances.
Target Plan Type Select the name of the source plan type of the budget you want to transfer.
Import Format Select the name of the import format you created for the transfer.
Save the data load rule. Create a Data Load Mapping There may be differences in Planning dimension values and General Ledger chart of accounts values. There may also be General Ledger segments of the chart of accounts that are not used when budgeting. Use a data load mapping to indicate how Planning budget information should be transformed prior to the transfer to General Ledger.
Figure 73 Complete data load rule details for the transfer to General Ledger.

Oracle Financials Cloud and Planning and Budgeting Cloud Service
52
For example, the data load mapping can use zero values (e.g. 0000 for subaccount) for chart of accounts segments that are not used for budgeting, but which are required in General Ledger. The data load mapping also provides the destination ledger and accounting scenario for General Ledger. The list of dimensions available for mapping is based upon the configuration of the Target Application for General Ledger. Navigation: Navigate (from toolbar) Data Management (tab) Workflow (tab)
Data Load Data Load Mapping First, select the Point of View that is used by the location for the transfer. The page refreshes to display the dimensions that are relevant for the transfer. You must create a mapping for each of these dimensions.
Budget Name Mapping
Select the dimension Budget Name from the dimensions choice list at the top of the data
load mapping page. Select the Add icon to add a mapping for the budget. Enter the name of the accounting scenario that you want to map to the Planning budget name.
Figure 74 Select a dimension for the data load mapping.
Oracle Financials Cloud and Planning and Budgeting Cloud Service
53
Field Value
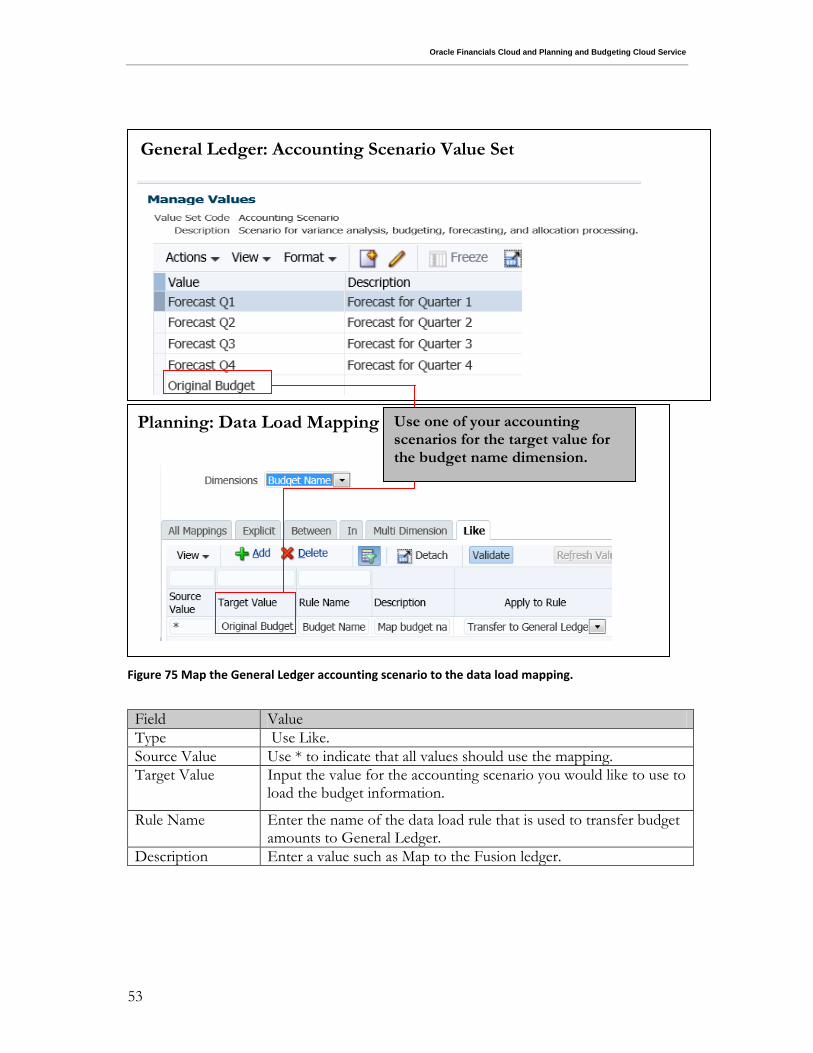
Type Use Like.
Source Value Use * to indicate that all values should use the mapping.
Target Value Input the value for the accounting scenario you would like to use to load the budget information.
Rule Name Enter the name of the data load rule that is used to transfer budget amounts to General Ledger.
Description Enter a value such as Map to the Fusion ledger.
Planning: Data Load Mapping
General Ledger: Accounting Scenario Value Set
Figure 75 Map the General Ledger accounting scenario to the data load mapping.
Use one of your accounting scenarios for the target value for the budget name dimension.
Oracle Financials Cloud and Planning and Budgeting Cloud Service
54
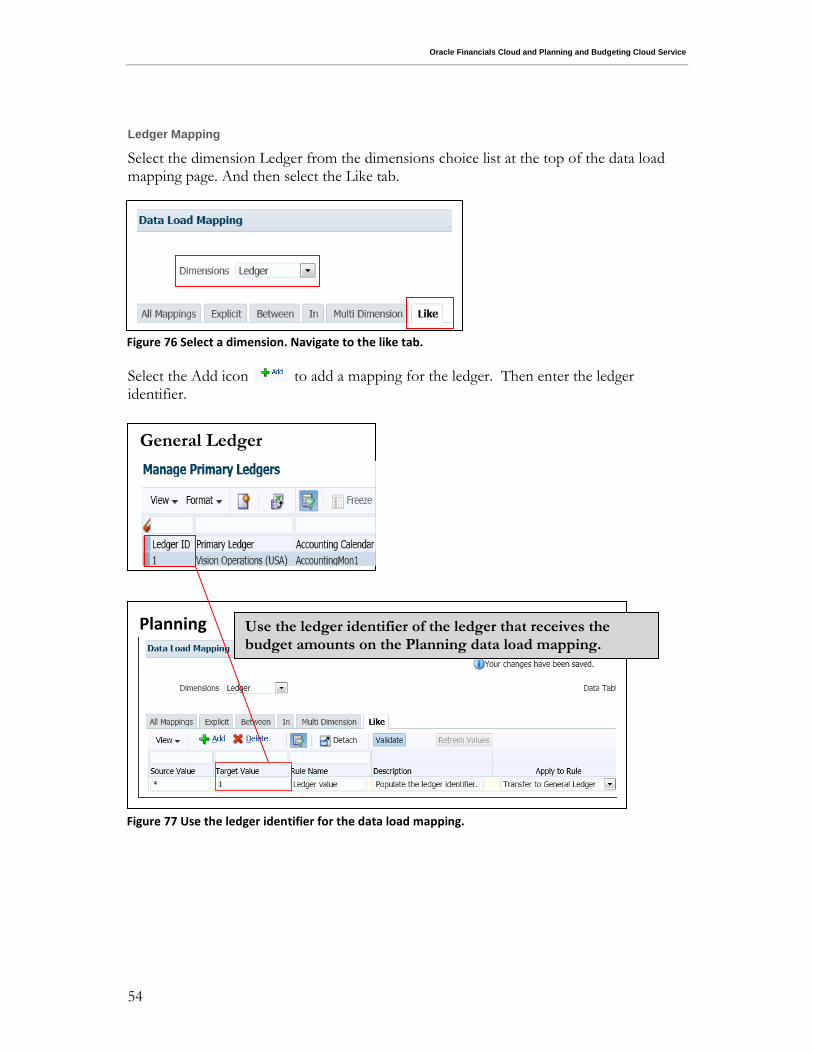
Ledger Mapping
Select the dimension Ledger from the dimensions choice list at the top of the data load mapping page. And then select the Like tab.
Select the Add icon to add a mapping for the ledger. Then enter the ledger identifier.
Planning
Use the ledger identifier of the ledger that receives the budget amounts on the Planning data load mapping.
General Ledger
Figure 77 Use the ledger identifier for the data load mapping.
Figure 76 Select a dimension. Navigate to the like tab.
Oracle Financials Cloud and Planning and Budgeting Cloud Service
55
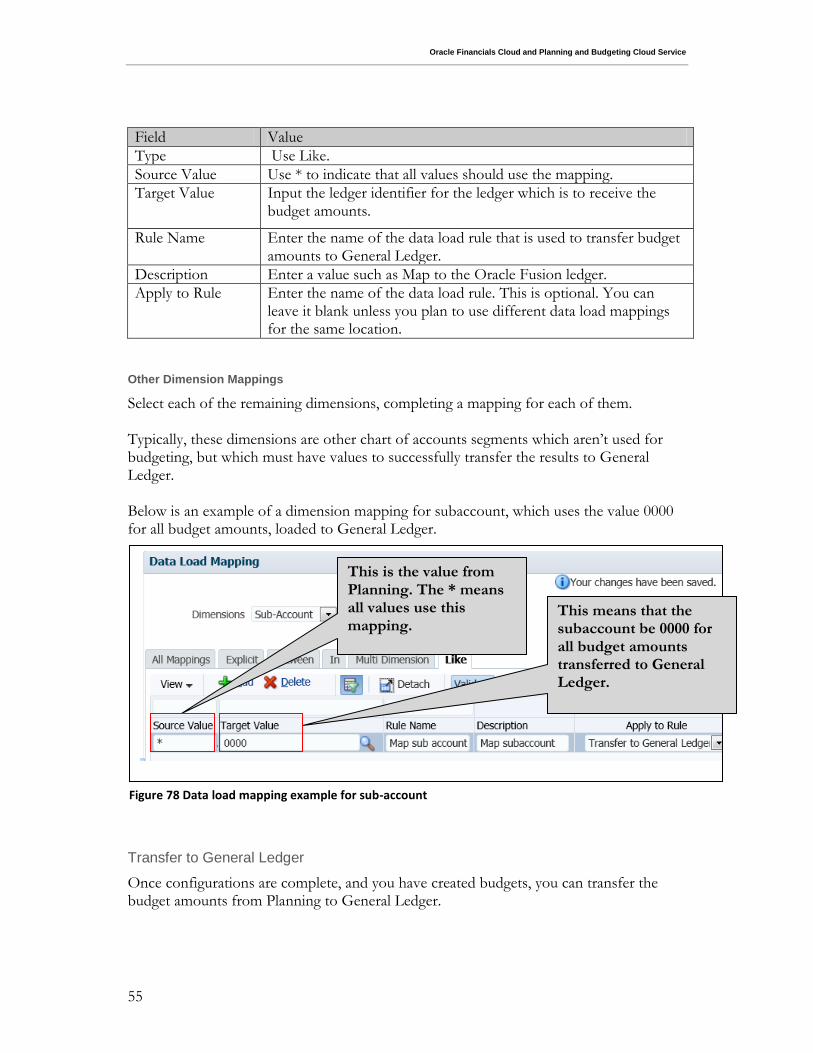
Field Value
Type Use Like.
Source Value Use * to indicate that all values should use the mapping.
Target Value Input the ledger identifier for the ledger which is to receive the budget amounts.
Rule Name Enter the name of the data load rule that is used to transfer budget amounts to General Ledger.
Description Enter a value such as Map to the Oracle Fusion ledger.
Apply to Rule Enter the name of the data load rule. This is optional. You can leave it blank unless you plan to use different data load mappings for the same location.
Other Dimension Mappings
Select each of the remaining dimensions, completing a mapping for each of them. Typically, these dimensions are other chart of accounts segments which aren’t used for budgeting, but which must have values to successfully transfer the results to General Ledger. Below is an example of a dimension mapping for subaccount, which uses the value 0000 for all budget amounts, loaded to General Ledger.
Transfer to General Ledger
Once configurations are complete, and you have created budgets, you can transfer the budget amounts from Planning to General Ledger.
Figure 78 Data load mapping example for sub-account
This is the value from Planning. The * means all values use this mapping.
This means that the subaccount be 0000 for all budget amounts transferred to General Ledger.

Oracle Financials Cloud and Planning and Budgeting Cloud Service
56
Navigation: Planning and Budgeting Cloud Service Workspace Navigate (from
toolbar) Data Management (tab) Integration Setup Workflow Data Load Data Load Rule From the bottom of the page, review the point of view to make sure it is for the location and period that you would like to transfer. In this example, the point of view is already set to the Transfer to GL location that is to be used for the transfer, so it is not necessary to update the point of view. After you have verified your point of view, you can select the Execute option to submit a request to transfer budget amounts to General Ledger.
Figure 79 Review the point of view for the transfer to General Ledger.
Select the location link if you need to update the point of view.
Figure 80 Execute the data load rule to transfer budgets to General Ledger.
Select Execute to submit the transfer request.
Oracle Financials Cloud and Planning and Budgeting Cloud Service
57
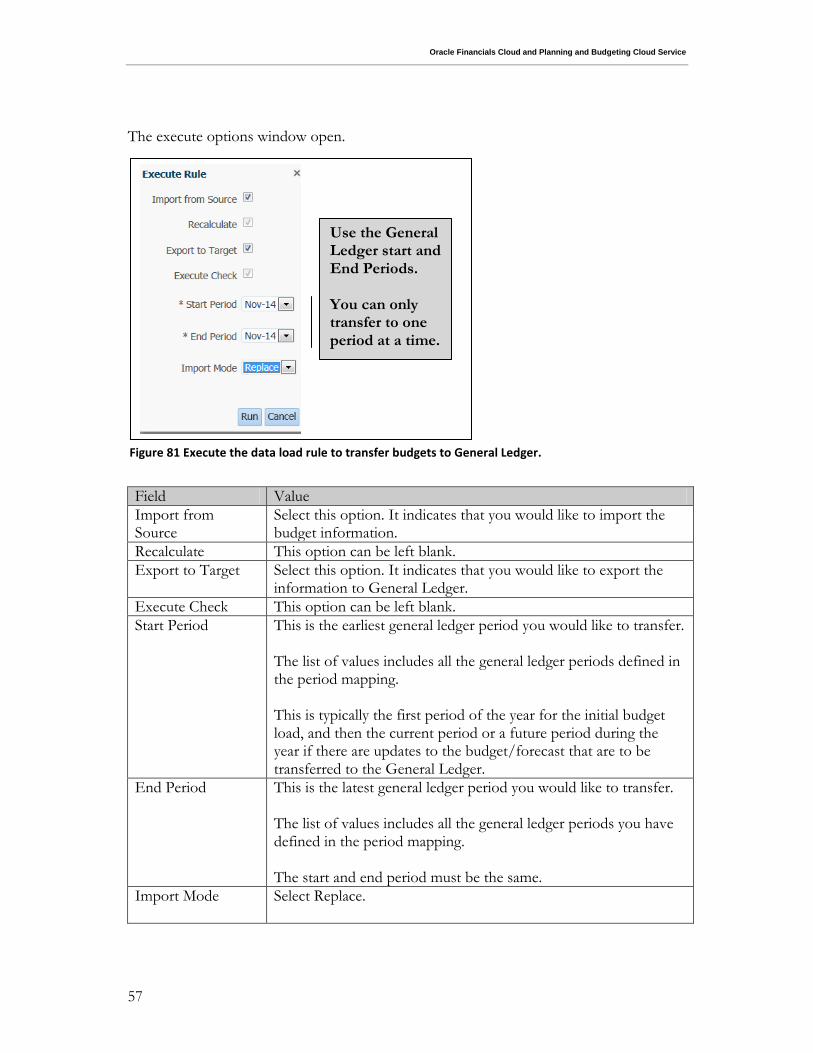
The execute options window open.
Field Value
Import from Source
Select this option. It indicates that you would like to import the budget information.
Recalculate This option can be left blank.
Export to Target Select this option. It indicates that you would like to export the information to General Ledger.
Execute Check This option can be left blank.
Start Period This is the earliest general ledger period you would like to transfer. The list of values includes all the general ledger periods defined in the period mapping. This is typically the first period of the year for the initial budget load, and then the current period or a future period during the year if there are updates to the budget/forecast that are to be transferred to the General Ledger.
End Period This is the latest general ledger period you would like to transfer. The list of values includes all the general ledger periods you have defined in the period mapping. The start and end period must be the same.
Import Mode Select Replace.
Use the General Ledger start and End Periods. You can only transfer to one period at a time.
Figure 81 Execute the data load rule to transfer budgets to General Ledger.
Oracle Financials Cloud and Planning and Budgeting Cloud Service
58
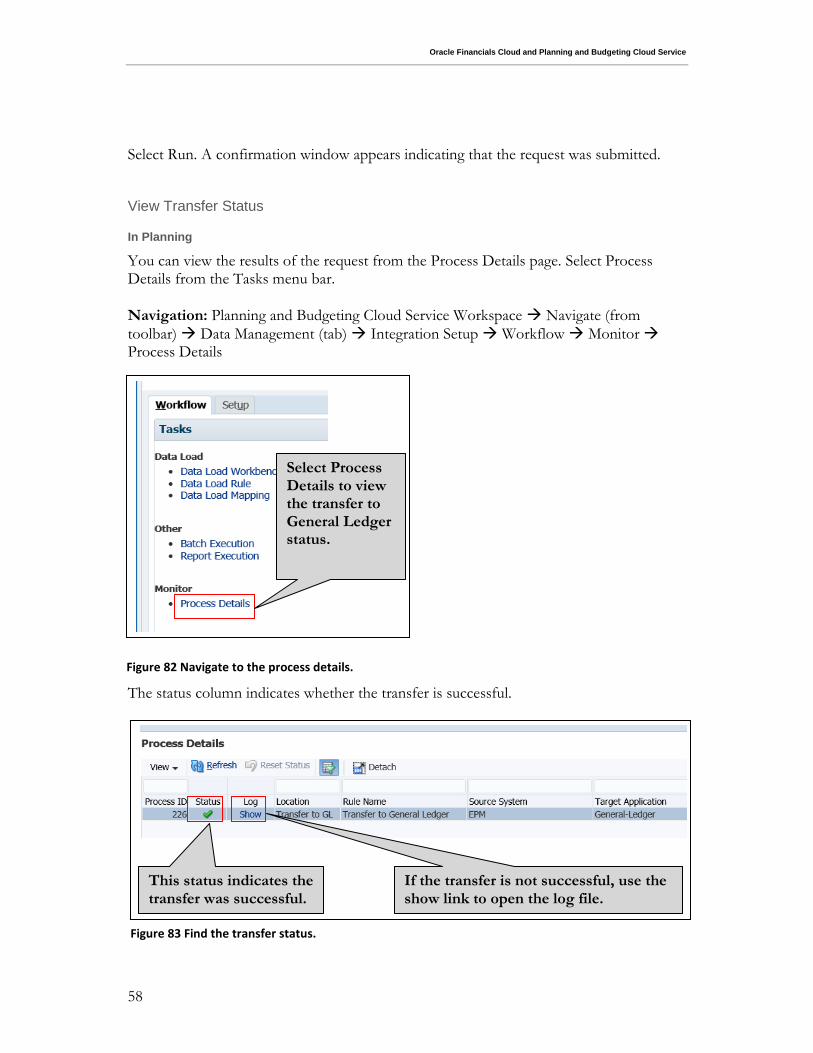
Select Run. A confirmation window appears indicating that the request was submitted.
View Transfer Status
In Planning
You can view the results of the request from the Process Details page. Select Process Details from the Tasks menu bar.
Navigation: Planning and Budgeting Cloud Service Workspace Navigate (from
toolbar) Data Management (tab) Integration Setup Workflow Monitor Process Details The status column indicates whether the transfer is successful.
Select Process Details to view the transfer to General Ledger status.
Figure 82 Navigate to the process details.
Figure 83 Find the transfer status.
This status indicates the transfer was successful.
If the transfer is not successful, use the show link to open the log file.
Oracle Financials Cloud and Planning and Budgeting Cloud Service
59
If there is an issue with the transfer, you can access the log file by selecting the link from the Log column on the process details page.
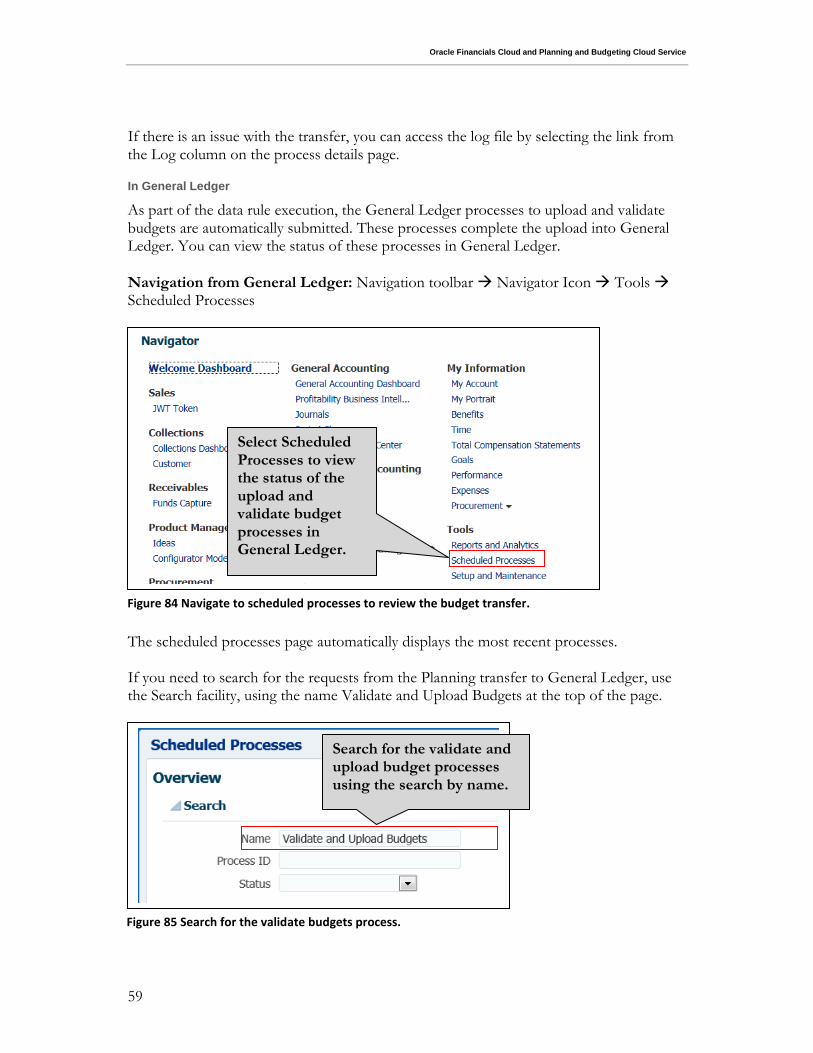
In General Ledger
As part of the data rule execution, the General Ledger processes to upload and validate budgets are automatically submitted. These processes complete the upload into General Ledger. You can view the status of these processes in General Ledger.
Navigation from General Ledger: Navigation toolbar Navigator Icon Tools Scheduled Processes The scheduled processes page automatically displays the most recent processes. If you need to search for the requests from the Planning transfer to General Ledger, use the Search facility, using the name Validate and Upload Budgets at the top of the page.
Figure 84 Navigate to scheduled processes to review the budget transfer.
Select Scheduled Processes to view the status of the upload and validate budget processes in General Ledger.
Search for the validate and upload budget processes using the search by name.
Figure 85 Search for the validate budgets process.
Oracle Financials Cloud and Planning and Budgeting Cloud Service
60
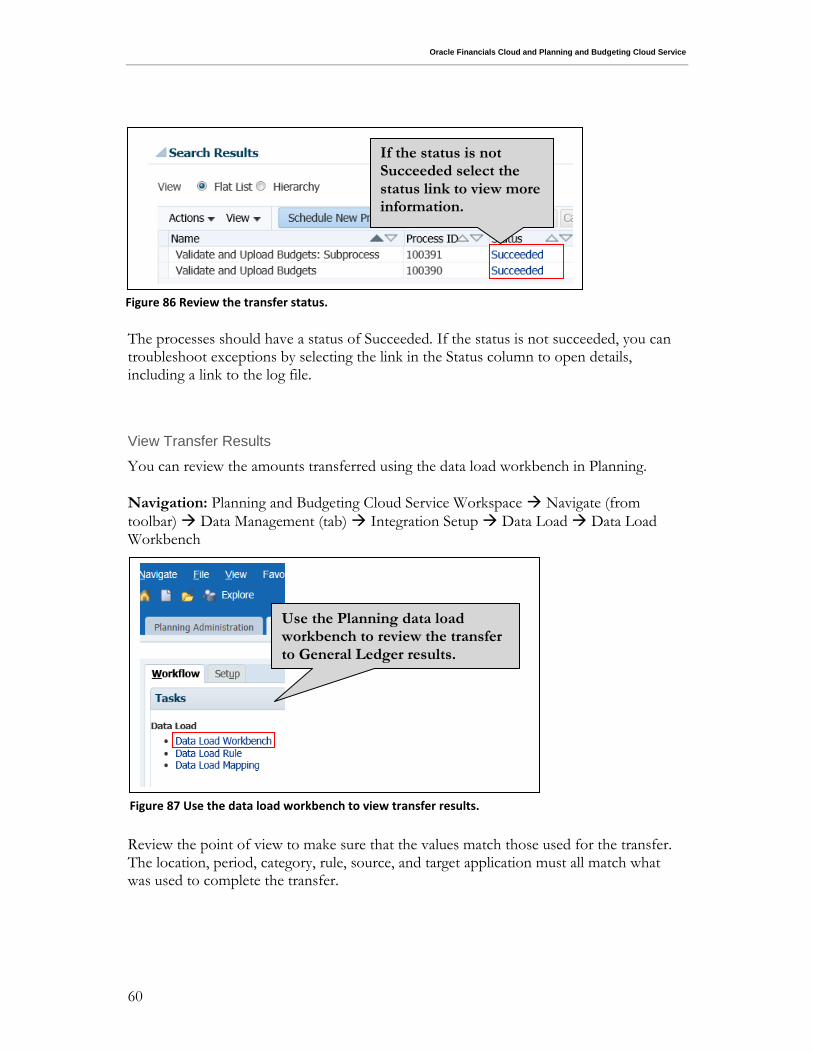
The processes should have a status of Succeeded. If the status is not succeeded, you can troubleshoot exceptions by selecting the link in the Status column to open details, including a link to the log file.
View Transfer Results
You can review the amounts transferred using the data load workbench in Planning.
Navigation: Planning and Budgeting Cloud Service Workspace Navigate (from
toolbar) Data Management (tab) Integration Setup Data Load Data Load Workbench Review the point of view to make sure that the values match those used for the transfer. The location, period, category, rule, source, and target application must all match what was used to complete the transfer.
Use the Planning data load workbench to review the transfer to General Ledger results.
Figure 87 Use the data load workbench to view transfer results.
If the status is not Succeeded select the status link to view more information.
Figure 86 Review the transfer status.

Oracle Financials Cloud and Planning and Budgeting Cloud Service
61
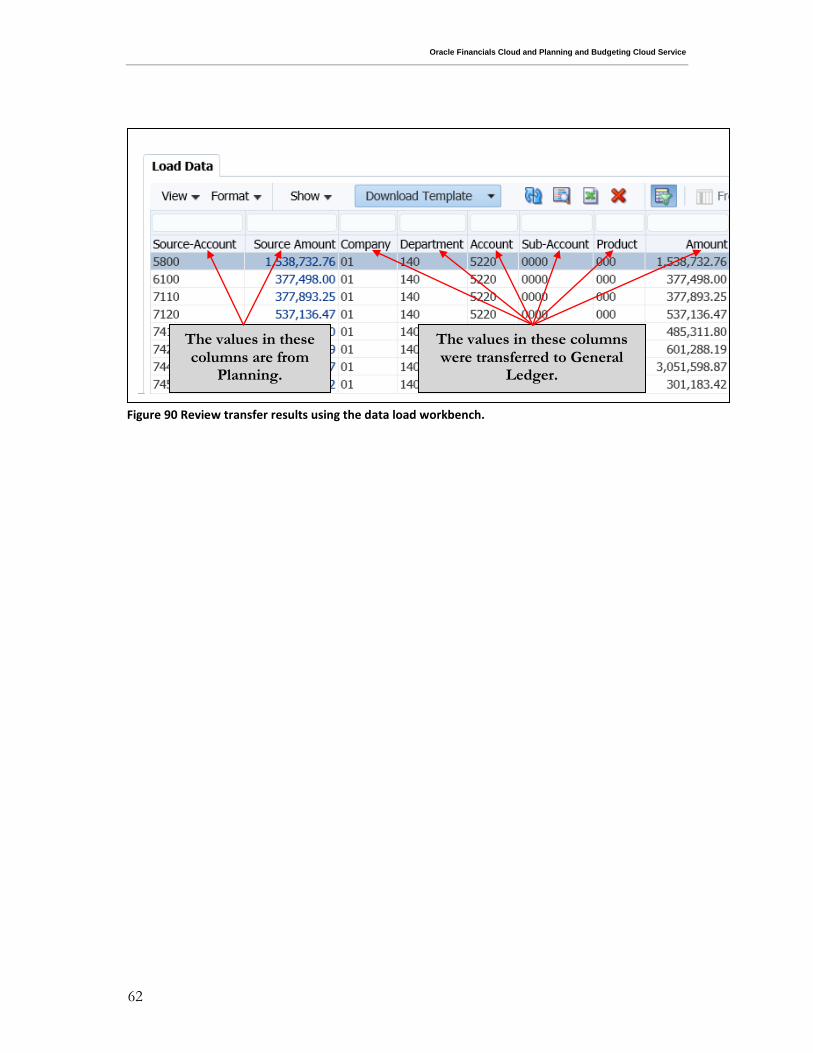
When the page opens it uses the settings from the last time it was used to determine what information to display and also the order in which it is displayed.
You can change this order by navigating to the View Columns Manage Columns option from the view option in the load data table region of the page. From the Manage Columns dialog box you can select or deselect columns and rearrange their order. The page automatically refreshes to display the results. If you want to verify that your data load mappings were successful, you can include information such as segments from the chart of accounts; even if they don’t have values in Planning.
Figure 88 Review point of view options on the data load workbench.
Review the point of view options to make sure they match those used when you submitted the transfer request.
Figure 89 Use the manage columns feature to update the transfer results display.
Use the Manage Columns feature to update the display and order of the transfer to General Ledger information.
Oracle Financials Cloud and Planning and Budgeting Cloud Service
62
Figure 90 Review transfer results using the data load workbench.
The values in these columns are from
Planning.
The values in these columns were transferred to General
Ledger.

Budgeting and Forecasting with Oracle
Financials Cloud Service
March 2015
Oracle Corporation
World Headquarters
500 Oracle Parkway
Redwood Shores, CA 94065
U.S.A.
Worldwide Inquiries:
Phone: +1.650.506.7000
Fax: +1.650.506.7200
oracle.com
Copyright © 2014, Oracle and/or its affiliates. All rights reserved.
This document is provided for information purposes only, and the contents hereof are subject to change without notice. This
document is not warranted to be error-free, nor subject to any other warranties or conditions, whether expressed orally or implied in
law, including implied warranties and conditions of merchantability or fitness for a particular purpose. We specifically disclaim any
liability with respect to this document, and no contractual obligations are formed either directly or indirectly by this document. This
document may not be reproduced or transmitted in any form or by any means, electronic or mechanical, for any purpose, without our
prior written permission.
Oracle and Java are registered trademarks of Oracle and/or its affiliates. Other names may be trademarks of their respective owners.
Intel and Intel Xeon are trademarks or registered trademarks of Intel Corporation. All SPARC trademarks are used under license and
are trademarks or registered trademarks of SPARC International, Inc. AMD, Opteron, the AMD logo, and the AMD Opteron logo are
trademarks or registered trademarks of Advanced Micro Devices. UNIX is a registered trademark of The Open Group. 0114