financial edge configuration guide for fixed assets
TRANSCRIPT
TheFinancialEdge™
Configuration Guide for Fixed Assets
101811
©2011 Blackbaud, Inc. This publication, or any part thereof, may not be reproduced or transmitted in any form or by any means, electronic, or mechanical, including photocopying, recording, storage in an information retrieval system, or otherwise, without the prior written permission of Blackbaud, Inc.
The information in this manual has been carefully checked and is believed to be accurate. Blackbaud, Inc., assumes no responsibility for any inaccuracies, errors, or omissions in this manual. In no event will Blackbaud, Inc., be liable for direct, indirect, special, incidental, or consequential damages resulting from any defect or omission in this manual, even if advised of the possibility of damages.
In the interest of continuing product development, Blackbaud, Inc., reserves the right to make improvements in this manual and the products it describes at any time, without notice or obligation.
All Blackbaud product names appearing herein are trademarks or registered trademarks of Blackbaud, Inc.
All other products and company names mentioned herein are trademarks of their respective holder.
FE-ConfigurationGuideforFixedAssets-101811
Contents
FIXED ASSETS CONFIGURATION . . . . . . . . . . . . . . . . . . . . . . . . . . . . . . . . . . . . . . . . . . 1
Configuration Links . . . . . . . . . . . . . . . . . . . . . . . . . . . . . . . . . . . . . . . . . . . . . . . . . . . . . . . . . . . . . . . . . . . 2General Configuration . . . . . . . . . . . . . . . . . . . . . . . . . . . . . . . . . . . . . . . . . . . . . . . . . . . . . . . . . . . . . . . . 4Depreciation Years Configuration . . . . . . . . . . . . . . . . . . . . . . . . . . . . . . . . . . . . . . . . . . . . . . . . . . . . . . . 5Custom Depreciation Schedules Configuration . . . . . . . . . . . . . . . . . . . . . . . . . . . . . . . . . . . . . . . . . . . . 7Asset Classes Configuration . . . . . . . . . . . . . . . . . . . . . . . . . . . . . . . . . . . . . . . . . . . . . . . . . . . . . . . . . . . . 8Attribute Configuration . . . . . . . . . . . . . . . . . . . . . . . . . . . . . . . . . . . . . . . . . . . . . . . . . . . . . . . . . . . . . . 12Business Rule Configuration . . . . . . . . . . . . . . . . . . . . . . . . . . . . . . . . . . . . . . . . . . . . . . . . . . . . . . . . . . . 14Table Configuration . . . . . . . . . . . . . . . . . . . . . . . . . . . . . . . . . . . . . . . . . . . . . . . . . . . . . . . . . . . . . . . . . . 19Field Configuration . . . . . . . . . . . . . . . . . . . . . . . . . . . . . . . . . . . . . . . . . . . . . . . . . . . . . . . . . . . . . . . . . . 26Distribution Configuration . . . . . . . . . . . . . . . . . . . . . . . . . . . . . . . . . . . . . . . . . . . . . . . . . . . . . . . . . . . . 27Interfund Configuration . . . . . . . . . . . . . . . . . . . . . . . . . . . . . . . . . . . . . . . . . . . . . . . . . . . . . . . . . . . . . . 40Posting Information . . . . . . . . . . . . . . . . . . . . . . . . . . . . . . . . . . . . . . . . . . . . . . . . . . . . . . . . . . . . . . . . . 44Default Accounts Configuration . . . . . . . . . . . . . . . . . . . . . . . . . . . . . . . . . . . . . . . . . . . . . . . . . . . . . . . . 45
DEPRECIATION METHODS . . . . . . . . . . . . . . . . . . . . . . . . . . . . . . . . . . . . . . . . . . . . . 53
Depreciation Overview . . . . . . . . . . . . . . . . . . . . . . . . . . . . . . . . . . . . . . . . . . . . . . . . . . . . . . . . . . . . . . . 54Depreciation Methods and Requirements . . . . . . . . . . . . . . . . . . . . . . . . . . . . . . . . . . . . . . . . . . . . . . . 54
INDEX . . . . . . . . . . . . . . . . . . . . . . . . . . . . . . . . . . . . . . . . . . . . . . . . . . . . . . . . . . . 63


1chapter
Fixed Assets Configuration
Fixed Asset Configuration Links . . . . . . . . . . . . . . . . . . . . . . . . . . . . . . . . . . . . . . . . . . . . . . . . . . . . . . . . . . . . . . . . . 2General Configuration . . . . . . . . . . . . . . . . . . . . . . . . . . . . . . . . . . . . . . . . . . . . . . . . . . . . . . . . . . . . . . . . . . . . . . . . . 4Depreciation Years Configuration. . . . . . . . . . . . . . . . . . . . . . . . . . . . . . . . . . . . . . . . . . . . . . . . . . . . . . . . . . . . . . . . 5Custom Depreciation Schedules Configuration . . . . . . . . . . . . . . . . . . . . . . . . . . . . . . . . . . . . . . . . . . . . . . . . . . . . . 7Asset Classes Configuration . . . . . . . . . . . . . . . . . . . . . . . . . . . . . . . . . . . . . . . . . . . . . . . . . . . . . . . . . . . . . . . . . . . . 8Attribute Configuration . . . . . . . . . . . . . . . . . . . . . . . . . . . . . . . . . . . . . . . . . . . . . . . . . . . . . . . . . . . . . . . . . . . . . . . 12Business Rule Configuration . . . . . . . . . . . . . . . . . . . . . . . . . . . . . . . . . . . . . . . . . . . . . . . . . . . . . . . . . . . . . . . . . . . 14General Business Rules . . . . . . . . . . . . . . . . . . . . . . . . . . . . . . . . . . . . . . . . . . . . . . . . . . . . . . . . . . . . . . . . . . . . . . . . . . 15Depreciation Methods Business Rules . . . . . . . . . . . . . . . . . . . . . . . . . . . . . . . . . . . . . . . . . . . . . . . . . . . . . . . . . . . . . 16Asset Business Rules . . . . . . . . . . . . . . . . . . . . . . . . . . . . . . . . . . . . . . . . . . . . . . . . . . . . . . . . . . . . . . . . . . . . . . . . . . . . 17Transaction Business Rules. . . . . . . . . . . . . . . . . . . . . . . . . . . . . . . . . . . . . . . . . . . . . . . . . . . . . . . . . . . . . . . . . . . . . . . 18Queue Business Rules . . . . . . . . . . . . . . . . . . . . . . . . . . . . . . . . . . . . . . . . . . . . . . . . . . . . . . . . . . . . . . . . . . . . . . . . . . . 18Table Configuration . . . . . . . . . . . . . . . . . . . . . . . . . . . . . . . . . . . . . . . . . . . . . . . . . . . . . . . . . . . . . . . . . . . . . . . . . . 19Field Configuration . . . . . . . . . . . . . . . . . . . . . . . . . . . . . . . . . . . . . . . . . . . . . . . . . . . . . . . . . . . . . . . . . . . . . . . . . . 26Distribution Configuration . . . . . . . . . . . . . . . . . . . . . . . . . . . . . . . . . . . . . . . . . . . . . . . . . . . . . . . . . . . . . . . . . . . . 27Account Distributions . . . . . . . . . . . . . . . . . . . . . . . . . . . . . . . . . . . . . . . . . . . . . . . . . . . . . . . . . . . . . . . . . . . . . . . . . . . 27Cash Management Distributions . . . . . . . . . . . . . . . . . . . . . . . . . . . . . . . . . . . . . . . . . . . . . . . . . . . . . . . . . . . . . . . . . . 32Transaction Distributions . . . . . . . . . . . . . . . . . . . . . . . . . . . . . . . . . . . . . . . . . . . . . . . . . . . . . . . . . . . . . . . . . . . . . . . . 37Interfund Configuration. . . . . . . . . . . . . . . . . . . . . . . . . . . . . . . . . . . . . . . . . . . . . . . . . . . . . . . . . . . . . . . . . . . . . . . 40Account Masking. . . . . . . . . . . . . . . . . . . . . . . . . . . . . . . . . . . . . . . . . . . . . . . . . . . . . . . . . . . . . . . . . . . . . . . . . . . . . . . 40Managing Interfund Entries and Sets . . . . . . . . . . . . . . . . . . . . . . . . . . . . . . . . . . . . . . . . . . . . . . . . . . . . . . . . . . . . . . 41Posting Information . . . . . . . . . . . . . . . . . . . . . . . . . . . . . . . . . . . . . . . . . . . . . . . . . . . . . . . . . . . . . . . . . . . . . . . . . . 44Default Accounts Configuration . . . . . . . . . . . . . . . . . . . . . . . . . . . . . . . . . . . . . . . . . . . . . . . . . . . . . . . . . . . . . . . . 45

2 CH A PT E R
Configuration is an important area in which you make decisions and define settings that affect the overall success of The Financial Edge programs. Configuration contains utilities your organization should address when setting up Fixed Assets, and useful features you can use to customize the program. If you have just installed or converted to Fixed Assets, be sure to follow the procedures outlined in the Setting Up Fixed Assets chapter of the Getting Started Guide before you begin entering data.In Fixed Assets, Configuration contains features and settings to effectively track your organization’s fixed assets and their depreciation. These settings affect functions and details that can increase the efficiency of your record keeping, speed data entry, provide security checks-and-balances, and generally optimize the performance of The Financial Edge programs. For example, you can define business rules in Configuration to control a wide variety of functions, including allowing Do Not Post as a post status, checking for duplicate assets automatically, and allowing or disallowing various depreciation methods. With other Configuration features, you can create tables and distribution templates to speed data entry. You can rename fields to reflect your organization’s terminology, then hide them or make them required on certain types of records. You can also customize the program by creating special categories of information called attributes and attaching them to your records to aid in tracking and reporting.
Because Configuration impacts the entire program, it is closely linked to Security. Only users with supervisor rights should have access to Configuration. With table entries in particular, it is important you limit access to adding and editing rights to maintain consistency in your database. The Business Rules link is accessible only to users with Supervisor rights.
Configuration LinksThe Configuration page contains links to help you define settings for Fixed Assets. Configuration options are grouped into categories which appear as links. Simply click a link to view options for that particular category.
Warning: The program administrator can hide the Configuration link so only users with the proper security rights can access Configuration.
Warning: Only those users with supervisor rights should have access to Configuration. With table entries in particular, it is important you limit access to adding and editing rights to maintain consistency in your database.
F I XED A S S E T S CO N F I G U RA T I O N 3
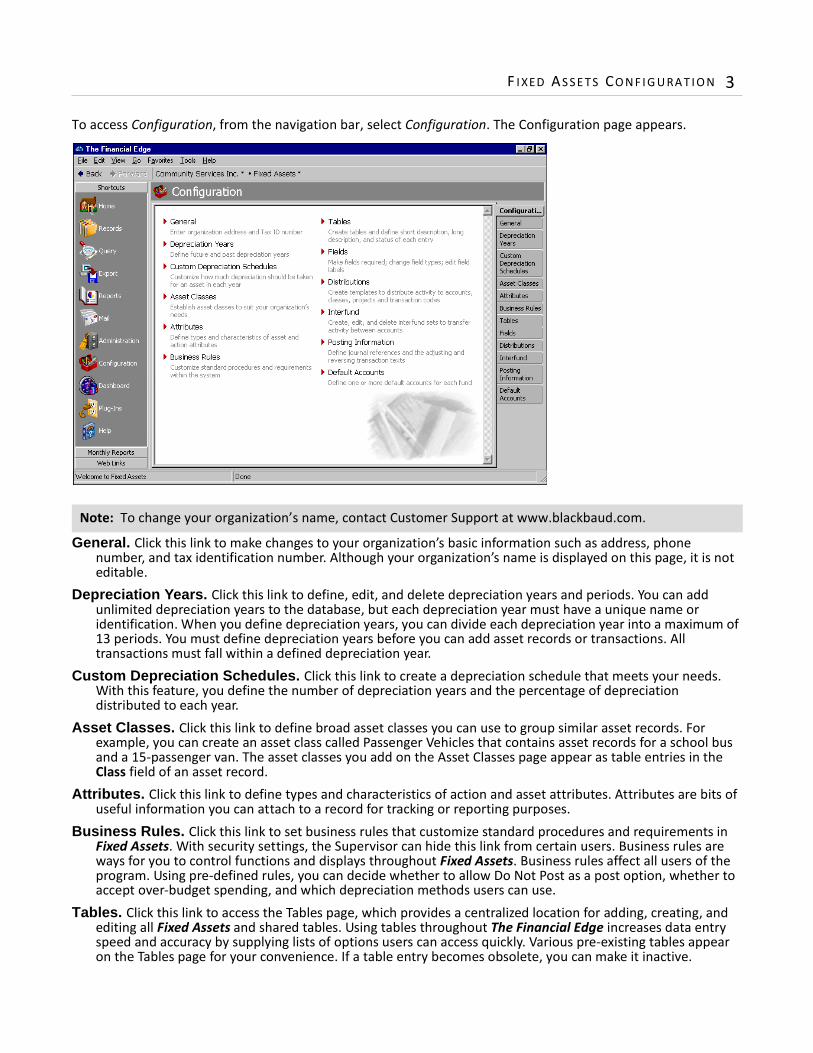
To access Configuration, from the navigation bar, select Configuration. The Configuration page appears.
General. Click this link to make changes to your organization’s basic information such as address, phone number, and tax identification number. Although your organization’s name is displayed on this page, it is not editable.
Depreciation Years. Click this link to define, edit, and delete depreciation years and periods. You can add unlimited depreciation years to the database, but each depreciation year must have a unique name or identification. When you define depreciation years, you can divide each depreciation year into a maximum of 13 periods. You must define depreciation years before you can add asset records or transactions. All transactions must fall within a defined depreciation year.
Custom Depreciation Schedules. Click this link to create a depreciation schedule that meets your needs. With this feature, you define the number of depreciation years and the percentage of depreciation distributed to each year.
Asset Classes. Click this link to define broad asset classes you can use to group similar asset records. For example, you can create an asset class called Passenger Vehicles that contains asset records for a school bus and a 15-passenger van. The asset classes you add on the Asset Classes page appear as table entries in the Class field of an asset record.
Attributes. Click this link to define types and characteristics of action and asset attributes. Attributes are bits of useful information you can attach to a record for tracking or reporting purposes.
Business Rules. Click this link to set business rules that customize standard procedures and requirements in Fixed Assets. With security settings, the Supervisor can hide this link from certain users. Business rules are ways for you to control functions and displays throughout Fixed Assets. Business rules affect all users of the program. Using pre-defined rules, you can decide whether to allow Do Not Post as a post option, whether to accept over-budget spending, and which depreciation methods users can use.
Tables. Click this link to access the Tables page, which provides a centralized location for adding, creating, and editing all Fixed Assets and shared tables. Using tables throughout The Financial Edge increases data entry speed and accuracy by supplying lists of options users can access quickly. Various pre-existing tables appear on the Tables page for your convenience. If a table entry becomes obsolete, you can make it inactive.
Note: To change your organization’s name, contact Customer Support at www.blackbaud.com.
4 CH A PT E R
Fields. Click this link to make fields required, change field types, and edit field labels. Fields are used throughout The Financial Edge as a faster means of data entry. Although all The Financial Edge programs have a Fields link, the fields available vary depending on the particular program. You can use this link to change field status from optional to required, so the field must contain an entry before you can save the record. You can also hide fields you do not use to make them invisible to your users, and you can view the field’s lookup status. A lookup field displays a list of entries from which to select the field value.
Distributions. Click this link to create account and transaction distribution templates. Creating and using distributions in Fixed Assets is an efficient way to distribute activity to accounts, projects, classes, and transaction codes when entering new assets. Projects are available only with the optional module Projects and Grants.
Interfund. Click this link to create, edit, and delete interfund sets to transfer activity between accounts in different funds.
Posting Information. Click this link to build journal references for posting to General Ledger, and to define journal values for asset acquisitions, asset improvements, accumulated depreciation, year to date depreciation, period depreciation, annual depreciation, asset disposals, and interfund entries. Journal references help you identify transactions after posting.
Default Accounts. Click this link to establish default accounts for accumulated depreciation, depreciation expense, disposal gain, disposal loss, disposal proceeds, fixed assets credit, and reclassification accounts. Reclassification accounts are similar to interfund entries and are used to balance debit and credit accounts by class, or project.
Depreciation Methods. Click this link to select a depreciation method. The fields and possible field entries that appear vary depending on the method you select. Using depreciation method business rules, the program administrator can hide a depreciation method to prevent its use.
General ConfigurationOn the General page, you can define default information for your organization, such as address, phone number, and tax identification number. This information appears on printed documents and correspondence. The name of your organization at the top of the page is for informational purposes and cannot be changed. To change the name of your organization, contact Customer Support. Other information on the General page can be edited any time.
Adding information to the General page
Note: To change your organization’s name, contact Customer Support at www.blackbaud.com.

F I XED A S S E T S CO N F I G U RA T I O N 5
1. From the Configuration page, click General. The General page appears, with your organization’s name listed at the top of the page.
2. In the Address field, enter your organization’s address information.3. In the Phone field, enter your organization’s telephone number.4. In the Tax ID field, enter your organization’s federal tax identification number.5. When you exit the General page, your general settings are saved automatically.
Depreciation Years ConfigurationA depreciation year is an accounting cycle that is divided into periods and used to expense asset cost over the useful life of the asset. You should define past and present depreciation years during the initial Fixed Assets setup process, but you can also add unlimited depreciation years later, as long as you assign each depreciation year a unique name or ID. When you define a depreciation year, you can divide it into a maximum of 13 periods you use to track depreciation. When you post a fixed asset transaction, the post date determines the depreciation year in which the entry appears. All transactions must fall within a defined depreciation year.By defining future depreciation years, you can create depreciation transactions for future periods. Using past depreciation years, you can enter historic information to include in reports that compare one year against another.
Warning: You cannot delete depreciation years after you add transactions!

6 CH A PT E R
Adding a new depreciation year1. From the Configuration page, click Depreciation Years. The Depreciation Years page appears.
2. In the Year Type field, select “New Depreciation Year (Past)” to create a past depreciation year, or “New Depreciation Year (Future)” to create a future depreciation year.
3. Click New Depreciation Year. The <Type> Depreciation Year(s) screen appears.
4. In the Depreciation Year ID and Description fields, enter an identification and description for the year.5. In the There are [ ] depreciation periods in this depreciation year field, select a number of periods for
the depreciation year. 6. To copy periods from an existing depreciation year, click Copy From, then select a depreciation year and
click Select. To automatically complete the periods based on the previous depreciation year, click Auto-Complete. To delete all rows from the grid, click Clear All.
7. Define starting and ending dates for each period in the Start Date and End Date columns.
F I XED A S S E T S CO N F I G U RA T I O N 7
8. In the Create [ ] <type> depreciation years following this period format field, select the number of depreciation years to create using this format. The default field entry is “1”.
9. To save the depreciation year and return to the Depreciation Years page, click Save and Close.10. To sort the information in the grid in ascending or descending order by depreciation year ID, description,
start date, or end date, click the Depreciation Year ID, Description, Start Date, or End Date heading.
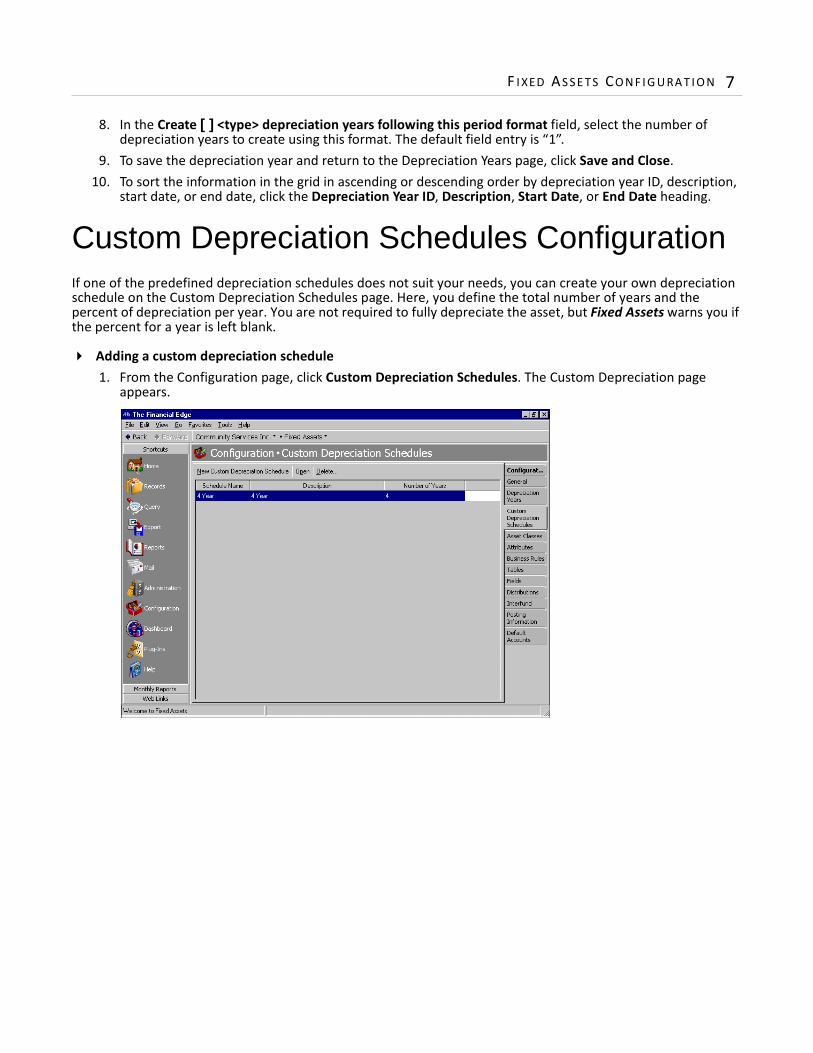
Custom Depreciation Schedules ConfigurationIf one of the predefined depreciation schedules does not suit your needs, you can create your own depreciation schedule on the Custom Depreciation Schedules page. Here, you define the total number of years and the percent of depreciation per year. You are not required to fully depreciate the asset, but Fixed Assets warns you if the percent for a year is left blank.
Adding a custom depreciation schedule1. From the Configuration page, click Custom Depreciation Schedules. The Custom Depreciation page
appears.

8 CH A PT E R
2. Click New Custom Depreciation Schedule. The Add Custom Depreciation Schedule page appears.
3. In the Schedule Name field, enter a name for the schedule.4. In the Description field, enter a description.5. In the Number of years field, enter the number of years to track depreciation for the asset.6. The Year column is for informational purposes only and displays the number of years selected in the
Number of years field.7. In the Depreciation % column, enter a percent depreciation for the desired years.8. To copy another depreciation schedule, click Copy From and select a year to copy. Click OK. The
information from the original schedule appears in the new grid.9. To divide the distribution evenly among all years, click Distribute Evenly.
10. To delete all years from the grid, click Clear All. 11. To save the new depreciation schedule and return to the Custom Depreciation page, click OK.
Asset Classes ConfigurationAsset classes help you organize fixed assets by providing a broad heading under which you can place groups of similar asset records. Then you can easily sort, query, or run reports on those records based on the asset class. You can use the classes predefined in Fixed Assets, create new asset classes from scratch, or you can use the Copy from button to create a new asset class based on an existing class. When you create an asset class, the fields available vary based on the depreciation method you select. To save time when entering new asset records, class defaults appear automatically when you select an asset class.

F I XED A S S E T S CO N F I G U RA T I O N 9
Creating a new asset class1. From the Configuration page, click Asset Classes. The Asset Classes page appears.
2. Click New Asset Class. The New Asset Class page appears.
3. On the General tab, in the Class description field, enter a description.
4. In the Depreciation method field, select a depreciation method to use for this class of assets. Additional fields appear based on the method you select.
Note: The fields you see on the General tab vary depending on the depreciation method you select. Valid entries for each field also depend on the depreciation method. For more information about depreciation methods, see “Depreciation Methods” on page 53.

10 CH A PT E R
5. In the Recovery period, Convention, Method, Useful life, Salvage value, Property class, and Rate fields, enter required information for the depreciation method. For more information about depreciation methods and valid field entries, see the Depreciation Methods chapter.
6. In the Default Accounts for Asset Acquisition and Improvement Transactions frame, in the Debit account field, enter the asset account to debit when acquiring or improving assets in this class. When you create new acquisition and improvement transactions, this number appears by default on the Distribution tab.
7. In the Credit account field, enter the account to credit when acquiring or improving assets in this class. When you create new acquisition and improvement transactions, this number appears by default on the Distribution tab.
8. Select the Distribution tab.
9. If the debit and credit accounts are in different funds, Fixed Assets automatically inserts an existing interfund entry in the Interfund field to balance the accounts. If you have not created a balancing interfund entry for those accounts on the Interfund page, you cannot save the distribution. For more information about interfund entries and entry sets, see “Interfund Configuration” on page 40.
10. In the DR Account Number column, enter a debit account for the distribution. When you enter a debit account number, the description appears automatically in the DR Account Description column.
11. In the Percent column, enter the percentage of the distribution for that row. 12. In the CR Account Number column, enter a credit account for the distribution. When you enter a credit
account number, the description appears automatically in the CR Account Description column.
13. If you have the optional module Projects and Grants, enter a project ID number in the Project ID column. When you enter a valid project ID number, the description appears automatically in the Project Description column.
Note: When the binoculars appear in an account field, you can use the small binoculars to search for an account segment or use the large binoculars to search for an account number.
Note: If you enter debit and credit account numbers on the Distribution tab, they appear by default in the distribution grid of any new records you add within the same class.
Note: When the binoculars appear in the Project ID column, you can use them to search for a project ID number.

F I XED A S S E T S CO N F I G U RA T I O N 11
14. In the Class column, select a class for the distribution.15. If you have the optional module Projects and Grants and have defined transaction codes, additional
columns appear, based on the number of transaction codes you have defined. In the grid, select a value for each transaction code.
16. To enter different debit and credit transaction distributions, select a row by clicking the gray button to the left of the line, then click Distribution. To enter a debit transaction distribution, select DR Distribution. To enter a credit transaction distribution, select CR Distribution. To use a default distribution, click Load Distribution. From the box, select a distribution or click Add New to add a new distribution.To divide the distribution evenly among all accounts entered in the distribution grid, click Distribute Evenly. To view attribute information, click Attributes.To delete all rows of the grid, click Delete All.
17. To save the asset and return to the Asset Classes page, click Save and Close.
Creating an asset class using a template1. From the Configuration page, click Asset Classes. The Asset Classes page appears.
2. In the grid, select the asset class you want to copy.

12 CH A PT E R
3. From the action bar, click Copy from. The New Asset Class page appears with the same depreciation method, default accounts, and distributions as the original asset class.
4. On the General tab, in the Class description field, enter a description.5. Make changes to the depreciation method, default accounts, and distributions as needed.6. To save the asset and return to the Asset Classes page, click Save and Close.
Attribute ConfigurationAttributes add flexibility to your record keeping by defining and storing special information about a wide variety of record types for reporting purposes. You can identify a category for the attribute, make the attribute required or unique, and store entries specific to that category.
Use attributes to define specialized information for your records, such as information you want to track, but for which no field exists. You can define new attributes using a variety of data types, including text, date, yes/no, number, currency, or table. When you create attribute tables, you can enter table entries from the Tables page of Configuration or directly on the Attributes tab of asset records. By enabling Security settings, the Supervisor can lock table entries to prevent users from adding, changing, or deleting table entries. For more information about tables and table entries, see “Table Configuration” on page 19.
On the Attributes page, you can add, edit, move, and delete asset and action attributes, and you can print attribute reports.
Note: You can enter attribute table entries on the Tables page of Configuration or on the Attributes tab of an asset record.
Warning: Before you can delete an attribute from Configuration, you must first delete it from all records.

F I XED A S S E T S CO N F I G U RA T I O N 13
Adding an attribute1. From the Configuration page, click Attributes. The Attributes page appears.
2. In the box on the left, select Action or Asset. The attributes grid appears on the right.3. In the Attribute Type column, enter a name for the attribute, for example, “Approved By” or “Warranty
Expiration Date”.
4. In the Data Type column, select a type to define the field’s format. Several data types are available, including Text, Date, Number, Currency, Table, and Yes/No. If you select Table as the data type, enter a table name in the Table Name column.
5. To make the attribute required or unique on each record, mark the checkbox in the Required? or Unique? columns.
6. When you exit the Attributes screen, your attributes are saved automatically.
Moving an attribute
1. From the Attributes page, select an attribute type from the box on the left. The attribute grid appears on the right.
Note: If you define the data type as a table, you can select an existing table or create a new one.
Note: If you select Unique, each record must contain a different attribute.
Tip: The order you set here determines the order the attributes appear when you click the down arrow in an Attributes type field on a record. You can place your most popular entries at the top to save time scrolling through less used entries during data entry.

14 CH A PT E R
2. In the attribute grid, select the row you want to move.
3. On the action bar, click Up to move the selected attribute up one line in the grid. Click Down to move the selected attribute down one line in the grid.
4. When you exit the Attributes screen, your changes are saved automatically.
Business Rule ConfigurationBusiness rules help you customize standard procedures and requirements to suit your organization. With security settings, the Supervisor can hide the Business Rules link from certain users. Business rules affect all users and are usually defined by the system administrator.

F I XED A S S E T S CO N F I G U RA T I O N 15
General Business Rules
By setting General business rules, you can control how Fixed Assets handles your budgets and distributions. You can designate how to treat over-budget projects and whether to allow expenditures for accounts without budgets. To change business rules, from the Configuration page, click Business Rules. The Business Rules page appears. In the box on the left, select General.
Only check budgets for income statement accounts. If marked, this business rule limits the budget-checking process to revenue and expense accounts.
Use this scenario when checking budgets. With this business rule, you can select a budget scenario to determine whether you are within your budget. You create budget scenarios on the Budgets page of General Ledger Records.
Allow non-bank transactions to use cash accounts. We recommend that you never allow non-bank transactions to use cash accounts. However, we do offer the option to allow non-bank transactions with this business rule. You can select Never (Strongly Recommended), Ask each time, or Always.
Budget checking for accounts. With this business rule, you set budgeting requirements for accounts. You can automatically allow or disallow over-budget transactions, or you can have Fixed Assets warn if you exceed the account budget for the period or fiscal year.
Transactions for accounts without budgets. With this business rule, you designate action for adding transactions to accounts that have no budget. You can select to always allow or disallow the transaction, or you can have Fixed Assets warn when you make a transaction to such an account.
Budget checking for Projects. With this business rule, you set budgeting requirements for projects. You can automatically allow or disallow over-budget transactions, or you can have Fixed Assets warn if you exceed the project budget for the period or fiscal year.
Transactions for Projects without budgets. With this business rule, you designate action for processing payments against projects that have no budget. You can select to always allow or disallow the expenditure, or you can have Fixed Assets warn when you make an expenditure to such a project.
16 CH A PT E R
Budget checking for Grants. With this business rule, you set budgeting requirements for grants. You can automatically allow or disallow over-budget grant expenditures, or you can have Fixed Assets warn if you exceed the budget for the period or fiscal year.
Expenditures for Grants without budgets. With this business rule, you designate action for processing payments against grants that have no budget. You can select to always allow or disallow the expenditure, or you can have Fixed Assets warn when you make an expenditure to such a grant.
Do not allow a General Ledger account number to be used for more than one Configuration Default Account. With this business rule, you can prevent users from mixing transactions in General Ledger
accounts, for example, using the same default account for unpaid payables and encumbrances. When this rule is marked, you cannot change a default account number to one that is already in use as another default account.
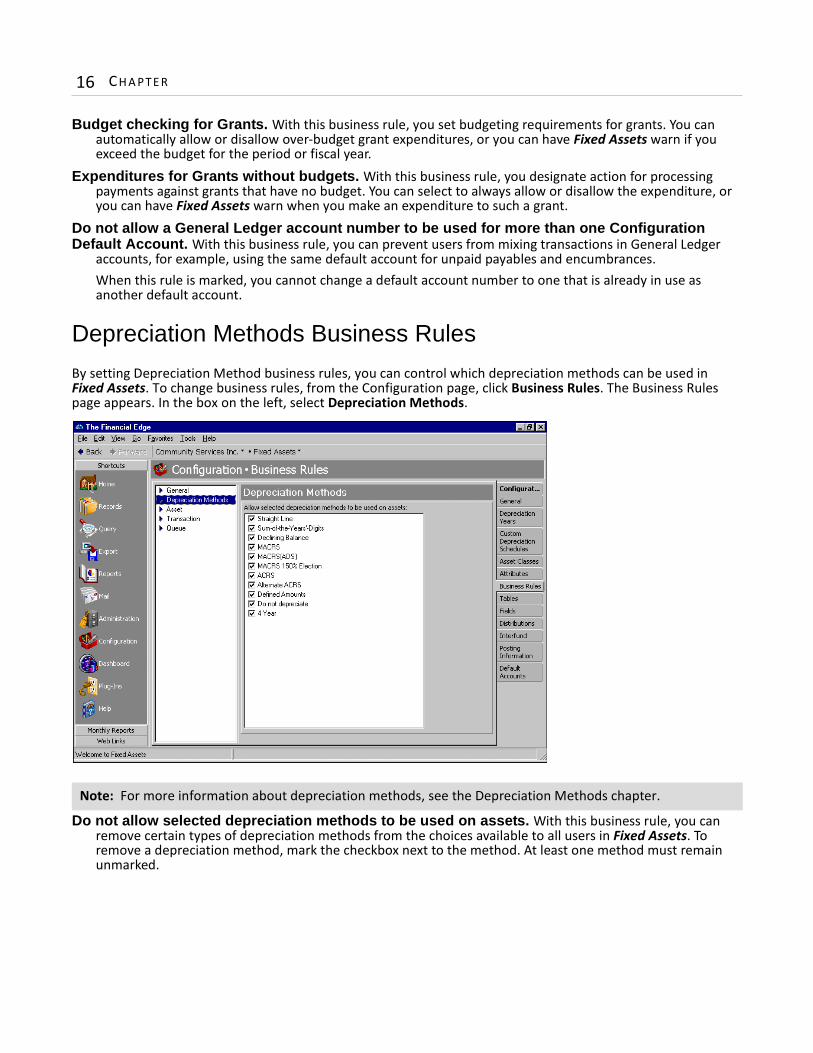
Depreciation Methods Business Rules
By setting Depreciation Method business rules, you can control which depreciation methods can be used in Fixed Assets. To change business rules, from the Configuration page, click Business Rules. The Business Rules page appears. In the box on the left, select Depreciation Methods.
Do not allow selected depreciation methods to be used on assets. With this business rule, you can remove certain types of depreciation methods from the choices available to all users in Fixed Assets. To remove a depreciation method, mark the checkbox next to the method. At least one method must remain unmarked.
Note: For more information about depreciation methods, see the Depreciation Methods chapter.

F I XED A S S E T S CO N F I G U RA T I O N 17
Asset Business Rules
With Asset business rules, Fixed Assets can generate new asset IDs automatically and prevent data entry in the Asset ID field. You can also set duplicate asset criteria to determine if duplicate assets exist. To change business rules, from the Configuration page, click Business Rules. The Business Rules page appears. In the box on the left, select Asset.
Automatically generate asset IDs starting with [ ]. With this business rule marked, Fixed Assets automatically generates new asset ID numbers when you add assets to the database. You also designate the first number to use when creating asset ID numbers.
Asset IDs are [ ] characters long. With this business rule, you designate how many characters to use when creating new asset ID numbers.
Prevent data entry to the asset ID field. With this business rule, you can lock asset ID numbers so they cannot be edited. This feature prevents missing or duplicate asset IDs.
Duplicate asset criteria. In this grid, you select field names for finding duplicate records in queries and duplicate asset reports.
Automatically check for duplicate assets. With this business rule marked, Fixed Assets automatically searches for duplicates when you save a new asset.

18 CH A PT E R
Transaction Business Rules
By setting the transaction business rule, Fixed Assets can exclude Do not post as a post status. To change business rules, from the Configuration page, click Business Rules. The Business Rules page appears. In the box on the left, select Transaction.
Exclude “Do Not Post” as a post status. With this business rule marked, the post status of a transaction defaults to Not yet posted. This feature ensures that all transaction debit and credit distributions post to the general ledger.
Queue Business Rules
By setting Accounting Queue business rules, Fixed Assets can add and remove queues from a schedule of tasks. To change business rules, from the Configuration page, click Business Rules. The Business Rules page appears. In the box on the left, select Queue.
Note: With the optional module Accounting Queue, you can schedule a sequence of tasks to run automatically and unattended. For more information about Accounting Queue, see the Accounting Queue Guide.

F I XED A S S E T S CO N F I G U RA T I O N 19
Add recurring queues to the schedule list [ ] days BEFORE the scheduled start date. With this business rule, you can select the number of days before the scheduled start date to add recurring queues.
Remove queues from the schedule list [ ] days AFTER they have been processed. With this business rule, you can remove queues from the schedule after they have been processed.
When generating emails from queue, use [ ] to send emails. With this business rule, you can select the email format. Your choices include “MIME” and “UUEncode.” We recommend you use the MIME format because most email client programs support this format. Select “UUEncode” if you are having trouble with attachments, or if you communicate with a domain that continues to use UUEncode.
“From” address for Queue emails. With this business rule, you enter a correctly formatted email address from which the Queue emails will be sent. Please note, if you enter the “Mail from” address on the Miscellaneous tab of a Queue, the address you enter here will be overridden.If you are on the Windows Server 2008 operating system and want to send scheduled Queue emails, this field is required.
Table ConfigurationTables increase data entry speed and accuracy by providing a list of standard field entries you can access quickly. When entering information into a field with a table, you can quickly access the list of possible entries for that field, select an entry, and place it directly into the field rather than entering it manually.Some tables, such as State, contain predefined values. For others, you define the entries. For example, Asset Descriptions does not include Laptop Computers as a default entry. If you want a Laptop Computers table entry, you must add it. Some table entries require you to enter only a description, while other table entries request more detail. For example, Phone Type requires a type and a phone number format, and Journal provides fields for short and long descriptions. When adding table entries, you must enter a long description, but the short description defaults to the first two characters of the long description unless you specify otherwise.
You can click the down arrow on the right side of a field or press F4 to view a list of entries for a table. You can also place the cursor in the field and click the down arrow on your keyboard to scroll through the entries. You can usually enter text directly in the field, and if the program does not recognize it as a valid entry, you get a message asking if you want to add the text as a new entry. Finally, you can place the cursor in a table field and press F7 to access a screen on which you can view, add, edit, and delete entries. This section contains procedures for adding, printing, and rearranging tables and table entries.
Note: Before you can delete a table defining attribute types, you must first delete all related table entries. Then, delete the attribute from the Attributes page of Configuration before deleting the table.
Note: To keep entries uniform, it is extremely important that you limit rights for adding and editing table entries. These rights are controlled though the Set up system security page of Administration. Allowing only a few key users to add, edit, or delete table entries ensures the validity of your data.

20 CH A PT E R
Adding a table1. From the Configuration page, click Tables. The Tables page appears.
2. At the bottom of the box on the left, click Add new table. The New Code Table screen appears.
3. In the Table Name field, enter a name, such as “Departments”, “Budgets”, “Managers”, or “Programs”.4. To give the table a short description of up to six characters, mark Use Short Description of. In the [ ]
characters field, enter a number of one to six. If you use this table as a segment in your account numbers, you must give it a short description.
5. To save the table and return to the Tables page, click OK.
Printing a table1. From the Tables page, on the menu bar, select File, Print.

F I XED A S S E T S CO N F I G U RA T I O N 21
2. Select Code Tables Report. The Code Table Report screen appears.
3. To print specific tables, leave the Include Selected Code Tables Only checkbox marked. To print all tables, remove the check mark.
4. If you left the Include Selected Code Tables Only checkbox marked, in the Code tables box, highlight the tables you want to print. Click the right arrow to move your selections to the Code tables to include box.
5. To include inactive table entries on the report, mark Include inactive table entries.6. To include empty code tables on the report, mark Include empty code tables.7. To print each table on a separate page, mark Print one table per page. 8. To view the print layout, click Preview. 9. To print the report and return to the Tables page, click Print.

22 CH A PT E R
Adding a table entry1. From the Configuration page, click Tables. The Tables page appears.
2. In the box on the left, select the table to which you want to add a new table entry. Table entries appear in a grid on the right.
3. Select New Table Entry. The New Table Entry screen appears.
4. In the Description field, enter a description for the new table entry. Depending on the field you are adding, you may be asked to enter other fields, such as Short Description or Phone Number Type.
5. To make the new table entry inactive, mark Inactive.6. To save the new table entry and return to the Tables page, click OK.

F I XED A S S E T S CO N F I G U RA T I O N 23
Inserting a table entry1. On the Tables page, select the table in which you want to insert a new entry. Table entries appear in a
box on the right.
2. In the table entry box, select the entry below the point where you want to insert the new entry.
3. Click Insert. The New Table Entry screen appears.
4. In the Description field, enter a description for the new entry.5. To make the new table entry inactive, mark Inactive.

24 CH A PT E R
6. To save the new table entry and return to the Tables page, click OK. The new entry appears above the entry you selected.
Sorting table entries
1. On the Tables page, select the table you want to sort. Table entries appear in a box on the right.
2. In the box on the left, select a table and click Sort. The Sort Table Options screen appears.
3. To sort the table in ascending order alphabetically or numerically, in the Sort Order frame, mark Ascending. To sort the table in descending order, mark Descending.
4. To sort table entries by descriptions, in the Sort By frame, mark Description. To sort table entries by short descriptions, mark Short Description.
5. To sort your table entries and return to the Tables page, click OK.
Cleaning up table entries
Note: Tables with numbers are sorted by the first digit of the entry. For example, 2,000 would come before 40.00 (in ascending order). Therefore, you should avoid sorting currency tables or tables that contain dollar amounts.
Warning: Before editing table entries, make sure no other users are in the program.

F I XED A S S E T S CO N F I G U RA T I O N 25
To ensure consistent data entry and accurate queries and reports, we recommend limiting rights to tables to key users. Otherwise, you may have duplicate table entries within a table, for example, “Call”, “Phone Call”, and “Telephone Call” in the Action Type table. However, if you find duplicate table entries, you can use Table Cleanup to replace duplicate entries with one entry. Before editing table entries, make sure no other users are in the program.1. On the Configuration page, click Tables. The Tables page appears.2. In the box on the left, select the table to clean up. Existing table entries appear in a grid on the right.3. On the action bar, click Table Cleanup. The <Table Name> Table Cleanup screen for the selected table
appears. A list of areas in the program that can use the selected table appear in the box on the right.
4. In the <Table name> table entries to be replaced grid, select a table entry to replace. The program will replace these entries on all records on which they appear.
5. To replace the selected entry, in the Replace with field, select a table entry.6. To delete the entries you are replacing so they cannot be used again on records, mark Delete table
entries that are being replaced.7. Continue making selections in the grid and Replace with field. Once you finish making selections, click
Replace Now to replace the entries used in the program.8. The program replaces the table entries you selected. A message appears telling you that the table
cleanup finished successfully. Click OK. You return to the <Table Name> Table Cleanup screen.9. To return the Tables page, click close the screen. If you marked Delete table entries that are being
replaced, the entries you replaced no longer appear on the Tables page.
Moving a table entry1. On the Tables page, select the table in which you want to move an entry. Table entries appear in a box on
the right.
2. In the table entry box, select the entry you want to move.
Note: If you add a new table entry in the Replace with field, a message appears asking if you want to add the new entry to the table. Click Yes to add the entry; click No not to add the entry.
26 CH A PT E R
3. To move the entry up, click Up.4. To move the entry down, click Down.5. When you select another table or exit the Tables page, your changes are saved automatically.
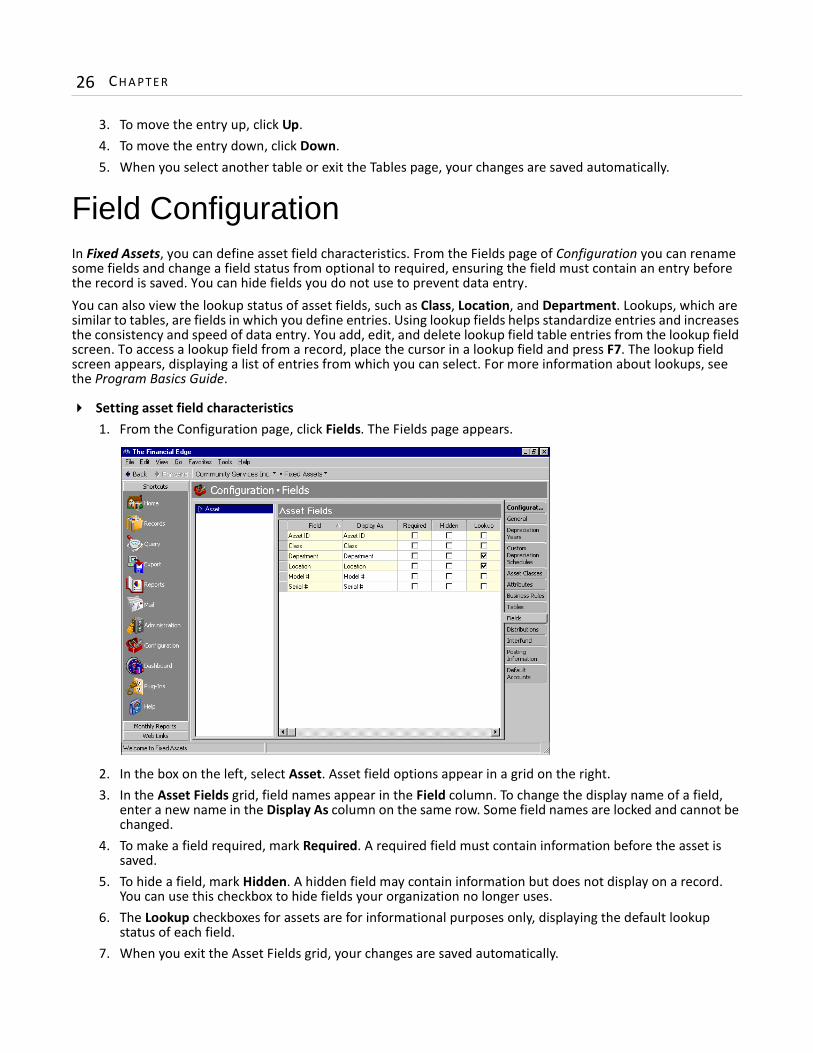
Field ConfigurationIn Fixed Assets, you can define asset field characteristics. From the Fields page of Configuration you can rename some fields and change a field status from optional to required, ensuring the field must contain an entry before the record is saved. You can hide fields you do not use to prevent data entry.You can also view the lookup status of asset fields, such as Class, Location, and Department. Lookups, which are similar to tables, are fields in which you define entries. Using lookup fields helps standardize entries and increases the consistency and speed of data entry. You add, edit, and delete lookup field table entries from the lookup field screen. To access a lookup field from a record, place the cursor in a lookup field and press F7. The lookup field screen appears, displaying a list of entries from which you can select. For more information about lookups, see the Program Basics Guide.
Setting asset field characteristics1. From the Configuration page, click Fields. The Fields page appears.
2. In the box on the left, select Asset. Asset field options appear in a grid on the right. 3. In the Asset Fields grid, field names appear in the Field column. To change the display name of a field,
enter a new name in the Display As column on the same row. Some field names are locked and cannot be changed.
4. To make a field required, mark Required. A required field must contain information before the asset is saved.
5. To hide a field, mark Hidden. A hidden field may contain information but does not display on a record. You can use this checkbox to hide fields your organization no longer uses.
6. The Lookup checkboxes for assets are for informational purposes only, displaying the default lookup status of each field.
7. When you exit the Asset Fields grid, your changes are saved automatically.

F I XED A S S E T S CO N F I G U RA T I O N 27
Distribution ConfigurationDistributions are templates you create in Configuration and reuse elsewhere in Fixed Assets to speed the process of entering account or transaction distributions. You can create new distribution templates manually by entering the information from scratch, or you can use an existing distribution as a starting point for your new distribution by clicking Load Distribution. After the original distribution information loads into the grid, you can edit information as needed and then save the new template with a different name. After you create distribution templates in Configuration, you can open and use them to quickly and easily assign activity within any distribution grid. This section contains procedures for adding, editing, and deleting distributions.
Account Distributions
Creating and using account distribution templates in Fixed Assets is an efficient way to distribute activity to accounts, projects, classes, and transaction codes. The distribution templates you create in Configuration can be used in any Fixed Assets account distribution grid.
Distribution name. In this field, enter a unique name for the distribution template.Account Number. In this field, enter an account number for the distribution. This number appears in the DR
Account Number column of transaction distributions. Account Description. When you enter a valid account number, the description appears automatically in the
Account Description column. The Account Description column is for informational purposes only, and cannot be changed.
Note: When you enter distributions by percent and use Distribute Evenly, Fixed Assets rounds the distribution. For example, if you have four rows of distributions and the transaction amount is $33.33, the amount cannot be evenly divided into four. Therefore, the distribution would be 24.992% ($8.33), 24.992% ($8.33), 24.992% ($8.33), and 25.023% ($8.34).

28 CH A PT E R
Percent. In the Percent column, enter the percentage of the distribution for each row.Project ID. If you have the optional module Projects and Grants, you can enter a project ID number in the
Project ID column. Project Description. When you enter a valid project ID number, the description appears automatically in the
Project Description column.Class. In the Class column, select a class for the distribution.Transaction Codes. If you have the optional module Projects and Grants and have defined transaction codes,
additional columns appear, based on the number of transaction codes you defined in General Ledger. In each transaction code column, you can select a transaction code.
Distribution. To display previously created debit or credit transaction distributions, select a row in the grid and click Distribution.
Load Distribution. To display a list of all existing account distribution templates defined in Configuration, click Load Distribution.
Distribute Evenly. To divide the distribution evenly among all accounts entered in the distribution grid, click Distribute Evenly.
Attributes. To add an attribute to the distribution, click Attributes.Delete All. To delete all the rows in the grid, click Delete All.Remaining. The Remaining display shows you how much of the payment has not been distributed.
Manually creating an account distribution template1. From the Configuration page, click Distributions. The Distributions page appears.
Note: If you have the optional module Projects and Grants and have defined transaction codes, additional columns appear, based on the number of transaction codes you defined in General Ledger.

F I XED A S S E T S CO N F I G U RA T I O N 29
2. In the box on the left, select Account and click New Account Distribution. The New Account Distribution screen appears.
3. In the Distribution name field, enter a name for the distribution.
4. In the Account Number column, enter the account for your distribution. When you enter a valid account number, the description appears automatically in the Account Description column.
5. In the Percent column, enter the percentage of the distribution. You can enter more than one distribution row, but the distribution total must be 100 percent unless you marked the General Ledger general business rule allowing distributions less than 100 percent.
6. If you have the optional module Projects and Grants, enter a project ID number in the Project ID column or use the binoculars to search for a project number. When you enter a valid project ID number, the description appears automatically in the Project Description column.
7. In the Class column, select a class for the distribution.8. If you have the optional module Projects and Grants and have defined transaction codes, additional
columns appear, based on the number of transaction codes you defined in General Ledger. In the grid, select a value for each transaction code.
9. To load an existing account distribution from a template, click Load Distribution.For more information about loading distribution templates, see “Creating an account distribution template from another template” on page 30.
10. To divide the distribution evenly among all accounts entered in the distribution grid, click Distribute Evenly.
11. To delete all rows of the grid, click Delete All.12. To save the distribution and return to the Distribution page, click Save and Close.
Note: Use the small binoculars to search for an account segment, or use the large binoculars to search for an account number.

30 CH A PT E R
Creating an account distribution template from another template1. From the Configuration page, click Distributions. The Distributions page appears.
2. In the box on the left, select Account and click New Account Distribution. The New Account Distribution screen appears.
3. In the Distribution name field, enter a name for your distribution.
Note: Default distributions are created on the Distributions page of Configuration.

F I XED A S S E T S CO N F I G U RA T I O N 31
4. Click Load Distribution. The Select a Default Distribution screen appears.
5. Select the distribution you want to load and click Select. The distribution appears in the new distribution grid.
6. To divide the distribution evenly among all accounts entered in the distribution grid, click Distribute Evenly.
7. To delete all rows of the grid, click Delete All.8. To save the distribution and return to the Distribution page, click Save and Close.
Note: You can click Add New to create a new default distribution. For more information about default distributions see “Distribution Configuration” on page 27.

32 CH A PT E R
Cash Management Distributions
If you have the optional module Cash Management, you can create Cash Management distribution templates in Fixed Assets to distribute adjustment activity to projects, classes, and transaction codes. The distribution templates you create in Configuration can be used in any Fixed Assets adjustment distribution grid.
Distribution name. In this field, enter a unique name for the distribution template.Account Number. In this field, enter an account number for the distribution. Depending on the nature of the
transaction (whether the adjustment is a deposit or payment/transfer), this number appears in the DR or CR Account Number column when a distribution is loaded on a transaction record. We recommend using the cash account as the debit account number for deposit adjustments or as the credit account number for payment adjustments. Using a different account will cause the bank register and General Ledger cash account to be out of balance.
Account Description. When you enter a valid account number, the description appears automatically in the Account Description column. The Account Description column is for informational purposes only, and cannot be changed.
Percent. In the Percent column, enter the percentage of the distribution for each row. The total percent for all rows must equal 100 percent.
Project ID. If you have the optional module Projects and Grants, you can enter or search for a project ID number in the Project ID column.
Project Description. When you enter a valid project ID number, the description appears automatically in the Project Description column.
Class. In the Class column, you can select a class for the distribution.
Note: When you enter distributions by percent and use Distribute Evenly, Payroll rounds the distribution. For example, if you have four rows of distributions and the transaction amount is $33.33, the amount cannot be evenly divided into four. Therefore, the distribution would be 24.992% ($8.33), 24.992% ($8.33), 24.992% ($8.33), and 25.023% ($8.34).

F I XED A S S E T S CO N F I G U RA T I O N 33
Transaction Codes. If you have the optional module Projects and Grants and have defined transaction codes, additional columns appear, based on the number of transaction codes you entered on the Transaction Codes page of Configuration in General Ledger. In each transaction code column, you can select a transaction code.
Distribution. To display saved debit or credit transaction distributions, select a row in the grid and click Distribution.
Load Distribution. To display a list of all existing Cash Management distribution templates defined in Configuration, click Load Distribution. You can load the templates and edit the account, percentage, or transaction information.
Distribute Evenly. To divide the distribution evenly among all account rows entered in the distribution grid, click Distribute Evenly.
Attributes. To add an attribute to the distribution, click Attributes.Delete All. To delete all the rows in the grid, click Delete All.Remaining. The Remaining display at the bottom of the screen shows you how much of the adjustment has not
been distributed.
Manually creating a Cash Management distribution1. From the Configuration page, click Distributions. The Distributions page appears.

34 CH A PT E R
2. In the box on the left, select Cash Management and click New Cash Management Distribution. The New Cash Management Distribution screen appears.
3. In the Distribution name field, enter a name for the distribution.
4. In the Account Number column, enter an account for the distribution. When you enter a valid account number, the description appears automatically in the Account Description column.
5. In the Percent column, enter the percentage of the distribution. You can enter more than one distribution row, but the distribution total must be 100 percent unless you marked the General Ledger general business rule allowing distributions less than 100 percent.
6. If you have the optional module Projects and Grants, in the Project ID column, enter a project ID number or use the binoculars to search for a project number. When you enter a valid project ID number, the description appears automatically in the Project Description column.
7. In the Class column, select a class for the distribution.
8. If you have the optional module Projects and Grants and have defined transaction codes, additional columns appear. These columns are based on the number of transaction codes you entered on the Transaction Codes page of Configuration in General Ledger. In the grid, select a value for each transaction code.
9. To load an existing Cash Management distribution from a template, click Load Distribution. For more information about loading distribution templates, see “Creating a Cash Management distribution using templates” on page 35.
10. To divide the distribution evenly among all accounts entered in the distribution grid, click Distribute Evenly.
11. To delete all rows of the grid, click Delete All.
Note: We recommend using the cash account as the debit account number for deposit adjustments or as the credit account number for payment adjustments. Using a different account will cause the bank register and General Ledger cash account to be out of balance.
Warning: Distributions can be edited or deleted at any time. Just remember that deleted distributions cannot be recovered!

F I XED A S S E T S CO N F I G U RA T I O N 35
12. To save the distribution and return to the Distributions page, click Save and Close.
Creating a Cash Management distribution using templates1. From the Configuration page, click Distributions. The Distributions page appears.
2. In the box on the left, select Cash Management and click New Cash Management Distribution. The New Cash Management Distribution screen appears.
3. In the Distribution name field, enter a name for your distribution.
Note: Default distributions are created on the Distributions page of Configuration.

36 CH A PT E R
4. Click Load Distribution. The Select a Default Distribution screen appears.
5. Select the distribution to load and click Select. The distribution appears in the distribution grid.
6. To divide the distribution evenly among all accounts entered in the distribution grid, click Distribute Evenly.
7. To delete all rows of the grid, click Delete All.8. To save the distribution and return to the Distributions page, click Save and Close.
Note: You can click Add New to create a new default distribution. For more information about default distributions see “Distribution Configuration” on page 27.
Warning: Distributions can be edited or deleted at any time. Just remember that deleted distributions cannot be recovered!

F I XED A S S E T S CO N F I G U RA T I O N 37
Transaction Distributions
Creating and using transaction distribution templates in Fixed Assets is an efficient way to distribute activity to projects, classes, and transaction codes. The distribution templates you create in Configuration can be used in any Fixed Assets transaction distribution grid.
Distribution name. In this field, enter a unique name for the distribution template.Project ID. If you have the optional module Projects and Grants, you can enter a project ID number in the
Project ID column. Project Description. When you enter a valid project ID number, the description appears automatically in the
Project Description column.Class. In the Class column, select a class for the distribution.Transaction Codes. If you have the optional module Projects and Grants and have defined transaction codes,
additional columns appear, based on the number of transaction codes you defined in General Ledger. In each transaction code column, you can select a transaction code.
Percent. In the Percent column, enter the percentage of the distribution for each row.Load Distribution. To display a list of all existing account distribution templates defined in Configuration, click
Load Distribution.Distribute Evenly. To divide the distribution evenly among all accounts entered in the distribution grid, click
Distribute Evenly.Attributes. To add an attribute to the distribution, click Attributes.Delete All. To delete all the rows in the grid, click Delete All.
Note: When you enter distributions by percent and use Distribute Evenly, Fixed Assets rounds the distribution. For example, if you have four rows of distributions and the transaction amount is $33.33, the amount cannot be evenly divided into four. Therefore, the distribution would be 24.992% ($8.33), 24.992% ($8.33), 24.992% ($8.33), and 25.023% ($8.34).
38 CH A PT E R
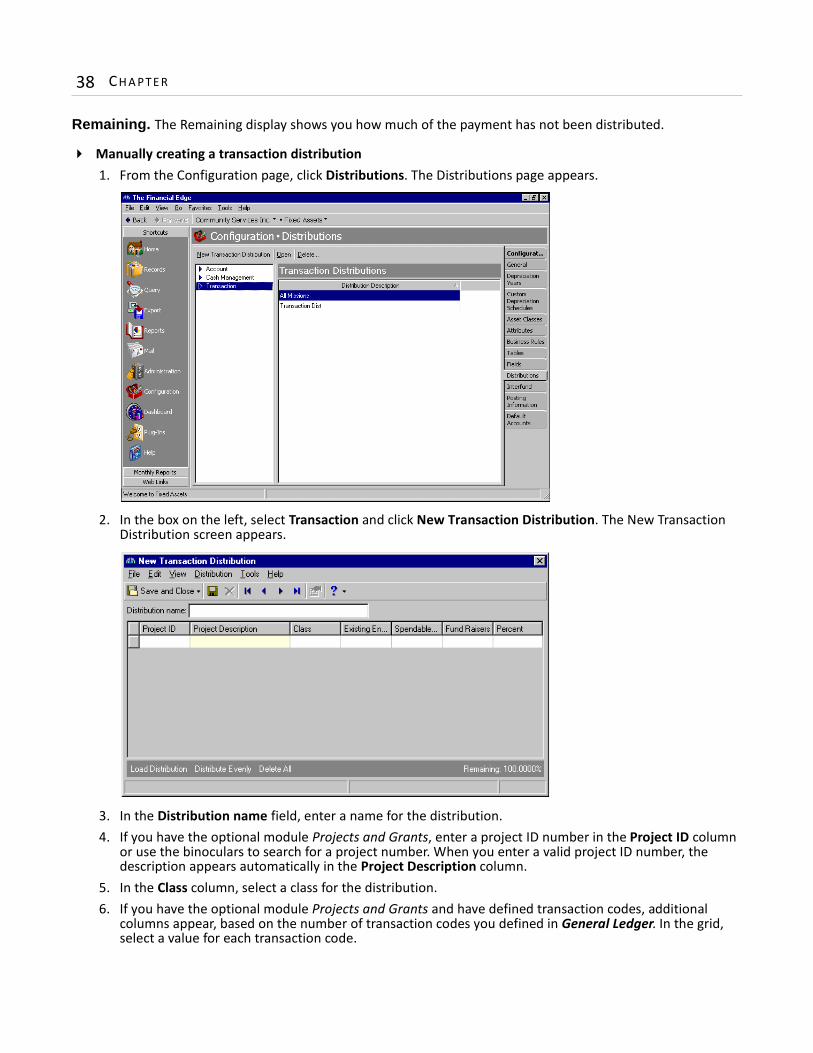
Remaining. The Remaining display shows you how much of the payment has not been distributed.
Manually creating a transaction distribution1. From the Configuration page, click Distributions. The Distributions page appears.
2. In the box on the left, select Transaction and click New Transaction Distribution. The New Transaction Distribution screen appears.
3. In the Distribution name field, enter a name for the distribution. 4. If you have the optional module Projects and Grants, enter a project ID number in the Project ID column
or use the binoculars to search for a project number. When you enter a valid project ID number, the description appears automatically in the Project Description column.
5. In the Class column, select a class for the distribution.6. If you have the optional module Projects and Grants and have defined transaction codes, additional
columns appear, based on the number of transaction codes you defined in General Ledger. In the grid, select a value for each transaction code.

F I XED A S S E T S CO N F I G U RA T I O N 39
7. To load an existing account distribution from a template, click Load Distribution.For more information about loading distribution templates, see “Creating a transaction distribution using templates” on page 39.
8. To divide the distribution evenly among all accounts entered in the distribution grid, click Distribute Evenly.
9. To delete all rows of the grid, click Delete All.10. To save the distribution and return to the Distributions page, click Save and Close.
Creating a transaction distribution using templates1. From the Configuration page, click Distributions. The Distributions page appears.
2. In the box on the left, select Transaction and click New Transaction Distribution. The New Transaction Distribution screen appears.
3. In the Distribution name field, enter a name for your distribution.
Note: Default distributions are created on the Distributions page of Configuration.

40 CH A PT E R
4. Click Load Distribution. The Select a Default Transaction Distribution screen appears.
5. Select the distribution you want to load and click Select. The distribution appears in the new distribution grid.
6. To divide the distribution evenly among all rows of the distribution grid, click Distribute Evenly.7. To delete all rows of the grid, click Delete All.8. To save the distribution and return to the Distribution page, click Save and Close.
Interfund ConfigurationIn Interfund, you can use interfund sets to enter and access transfers between funds. They also ensure distributions balance. When you save an interfund set, Fixed Assets verifies the interfund entries in the set produce a balanced post batch. You can create reversing entries and copy other distributions using the Reverse Entry and Copy From buttons, but interfund entries cannot be changed after the transaction is posted.
Account Masking
When you create an interfund set, you define source account numbers for the interfund entry. When selecting source account numbers, you can use account masks to quickly select ranges of accounts without having to enter specific numbers. By masking accounts, you use asterisks in place of numbers in a segment or segments of a General Ledger account to designate source account ranges.

F I XED A S S E T S CO N F I G U RA T I O N 41
You can use asterisks as wildcard characters to represent any digit from zero to nine and simplify selecting source accounts. To indicate accounts in a single fund, you can enter the fund segment and mask the rest of the account number. For example, if you enter 01-*****-**, all accounts in Fund 01 will be used in the interfund set. To indicate all accounts within all funds, you can mask the entire account number. For example, you can enter **-*****-**.
Managing Interfund Entries and Sets
You use interfund sets to transfer activity between accounts in different funds. On the Interfund page, you can add, edit, and delete interfund entries and sets.
Adding an interfund set
1. From the Configuration page, click Interfund. The Interfund page appears.
Note: To use an interfund set as the default when creating transactions, you must select an interfund set in the Use this interfund set by default when creating new transactions field on the Interfund page of Configuration.

42 CH A PT E R
2. Click New Interfund Set. The Add an Interfund Entry Set screen appears.
3. In the Interfund set ID field, enter an ID number for the interfund set. 4. In the Description field, enter a description.5. On the General tab, click New Interfund Entry. The Add an Interfund Entry screen appears.
6. In the When creating a transaction that will post a DEBIT to... this fund or account [ ] and that will post a CREDIT to... this fund or account [ ] fields, enter non-balancing debit and credit funds or accounts from a distribution.
Note: Use the small binoculars to search for an account segment, or use the large binoculars to search for an account number.

F I XED A S S E T S CO N F I G U RA T I O N 43
7. In the Automatically create these balancing interfund entries: create a CREDIT to [ ] to balance within and a DEBIT to [ ] to balance within fields, enter debit and credit funds or accounts that balance the non-balancing funds or accounts. These are interfund entries.
8. To save the interfund entries and return to the Add an Interfund Set screen, click Save and Close. If the funds or accounts you entered are not valid debit or credit accounts, or if the interfund entries do not balance, Fixed Assets asks you to enter valid accounts.
9. On the Blackbaud Systems tab of the Interfund Entry Set screen, mark the Blackbaud programs in which to use the interfund entry.
10. When you are finished adding the interfund set, click OK to save the interfund set and return to the Interfund page.
11. In the Use this interfund set by default when creating new transactions field, you can select an interfund set to use as a default when creating transactions.
Adding an interfund entry1. From an open interfund set, click New Interfund Entry. The Add an Interfund Entry screen appears.
2. In the When creating a transaction that will post a DEBIT to... this fund or account [ ] and that will post a CREDIT to... this fund or account [ ] fields, enter non-balancing debit and credit funds or accounts from a distribution.
3. In the Automatically create these balancing interfund entries: create a CREDIT to [ ] to balance within and a DEBIT to [ ] to balance within fields, enter debit and credit funds or accounts that balance the non-balancing funds or accounts. These are interfund entries.
Note: Interfund sets can also be edited or deleted at any time. Just remember that a deleted interfund set cannot be recovered!
Note: Use the small binoculars to search for an account segment, or use the large binoculars to search for an account number.
Note: Interfund entries can also be edited or deleted at any time. Just remember that a deleted interfund entry cannot be recovered!

44 CH A PT E R
4. To save the interfund entry and return to the Interfund Entry Set screen, click Save and Close. If the funds or accounts you entered are not valid debit or credit accounts, or if the interfund entries do not balance, Fixed Assets asks you to enter valid accounts.
Posting InformationOn the Posting Information page, you can add and define custom journal references to use when posting in detail to General Ledger. You can specify the fields to export and their lengths, and designate text to label adjustments and reversing transactions. You can also define journal values for asset acquisitions, asset improvements, accumulated depreciation, year to date depreciation, period depreciation, annual depreciation, asset disposals, and interfund entries. You cannot save asset records until you specify journal values for posting. This section contains procedures for adding journal references to the Posting Information page of Configuration.
Setting journal reference fields1. From the Configuration page, click Posting Information. The Posting Information page appears.
2. In the box on the left, select a journal reference. The journal reference fields appear in a grid on the right.
3. To change journal references for debit accounts, mark Debit. To change journal references for credit accounts, mark Credit.
4. To change journal reference fields, in the Field Name column, click in an existing field and select a new field.
5. To insert more reference fields, click in the empty row at the bottom of the grid and select the fields you want to add.
6. To add extra custom journal references, click Fields and enter new fields. 7. To restore the original default field settings, click Restore Defaults.
Note: To add a new field to the drop-down list, click Fields.
Warning: You cannot save asset records until you specify journal values for posting.

F I XED A S S E T S CO N F I G U RA T I O N 45
8. To define custom text for adjustments, mark Preface the journal reference for each adjustment with this text and select a field entry.
9. To define custom text for reversals, mark Preface the journal reference for each reversal with this text and select a field entry.
10. In the Post Fixed Assets transactions with this Journal value field, select the source application for Fixed Assets transactions you post to General Ledger.
11. When you exit the Posting Information page, your settings are saved automatically.
Default Accounts Configuration
The Default Accounts page of Configuration gives you flexibility in designating accounts for particular transactions. You can set default accounts that automatically balance by fund and segment when you enter debit accounts, or you can specify an account hierarchy with a primary default account and several secondary default accounts to use in certain circumstances.In Fixed Assets, you can set up default accounts for accumulated depreciation, disposal gain, disposal loss, disposal proceeds, fixed asset credit, and reclassification accounts for balancing assets by segment, transaction codes, or projects. You set fund balancing requirements in Configuration in General Ledger.When you mark Build the default <type> Account by combining the Fund with these segment values and enter an account number, Fixed Assets uses that account as the default for transactions in the same fund. For example, you designate account **-1870-00 as the default accumulated depreciation account, with the asterisks (**) representing any fund used in data entry and 00 representing the segment. If you enter a depreciation transaction for an asset that debits account 01-5800-00, Fixed Assets automatically inserts default accumulated depreciation account 01-1870-00 in the transaction credit account column.
If the fixed asset debits account is 05-1800-20, then Fixed Assets debits depreciation expense account 05-5800-20, and credits accumulated depreciation account 05-1870-20 to ensure the transaction balances by fund and segment (if required to balance by segment). The fund segment of the field automatically defaults to ** and cannot be edited.
When you mark Unless a Fund has its own Account defined in the table below, use this account as the default <type> Account, creating interfund entries as needed and enter an account, that account becomes the default for all transactions unless you specify other default accounts to use when certain conditions are met. For example, you designate account 01-1870-00 as the default accumulated depreciation account, with 01 representing the fund and 00 representing the segment. In the grid, you enter secondary account 02-1870-00 to use with fund 02 transactions. If you enter an asset that debits account 01-5800-00, the program inserts default credit account 01-1870-00 automatically. If you enter an asset that debits account 03-5800-00, then Fixed Assets again enters default account 01-1870-00 and uses an interfund entry to balance the funds. However, if your asset debits an account in fund 02, such as 02-5800-30, the program inserts the secondary account code, and the segment changes to balance the transaction. As a result, Fixed Assets inserts default credit account 02-1870-30.
Note: Posting information can also be edited or deleted at any time. Just remember that deleted information cannot be recovered!
Warning: Enter default accounts carefully. Fixed Assets does not verify account numbers exist until you use them in a distribution. Then, based on your business rules, the program creates the account automatically, prevents creating the account, or asks if you want to add the account.
Note: You set fund balancing requirements in General Ledger Configuration.
Note: You should add interfund entries before entering records to ensure that debits and credits in different funds remain in balance. If no appropriate interfund entry exists for non-balancing accounts, you cannot save the distribution.

46 CH A PT E R
With Reclassification accounts, you enter a single default account the program uses to ensure fixed asset accounts balance.
Setting default accumulated depreciation accounts
1. From the Configuration page, click Default Accounts. The Default Accounts page appears.2. In the box on the left, select Accumulated Depreciation.
3. To set a single default account that automatically balances by fund and segment (if required), mark Build the default Accumulated Depreciation Account using the fund of each Fixed Assets Debit Account with these segment values.
4. In the Account field, enter an account number. 5. To define a primary default account and one or more secondary accounts, mark Unless a Fund has its
own Accumulated Depreciation Account defined in the table below, use this account as the default Accumulated Depreciation Account, creating interfund entries as needed.
6. In the Account field, enter an account number. 7. In the grid, in the Accumulated Depreciation column, enter secondary default account numbers. The
account descriptions and fund descriptions appear automatically, based on the accounts you enter.
8. When you exit the Default Accounts page or select another type of account, your changes are saved automatically.
Setting default disposal gain accounts 1. From the Configuration page, click Default Accounts. The Default Accounts page appears.
Glossary: An accumulated depreciation account is a contra asset account to which accumulated depreciation is expensed.
Note: When using Build the default Account by combining the Fund of each Fixed Asset Credit Account with these segment values, you cannot enter a fund. The fund segment defaults to “**” and cannot be edited.
Note: Default accounts can be changed at any time. When you delete an account number from the Default Accounts Information page, it does not delete the account record.

F I XED A S S E T S CO N F I G U RA T I O N 47
2. In the box on the left, select Disposal Gain.
3. To set a single default account that automatically balances by fund and segment (if required), mark Build the default Disposal Loss Account by combining the Fund of each Disposal Gain Account with these segment values.
4. In the Account field, enter an account number. 5. To define a primary default account and one or more secondary accounts, mark Unless a Fund has its
own Disposal Gain Account defined in the table below, use this account as the default Disposal Gain Account, creating interfund entries as needed.
6. In the Account field, enter an account number. 7. In the grid, in the Disposal Gain column, enter secondary default account numbers. The account
descriptions and fund descriptions appear automatically, based on the accounts you enter.8. When you exit the Default Account page or select another type of account, your changes are saved
automatically.
Setting default disposal loss accounts 1. From the Configuration page, click Default Accounts. The Default Accounts page appears.

48 CH A PT E R
2. In the box on the left, select Disposal Loss.
3. To set a single default account that automatically balances by fund and segment (if required), mark Build the default Disposal Loss Account using the fund of each Fixed Assets Debit Account with these segment values.
4. In the Account field, enter an account number. 5. To define a primary default account and one or more secondary accounts, mark Unless a Fund has its
own Disposal Loss Account defined in the table below, use this account as the default Disposal Loss Account, creating interfund entries as needed.
6. In the Account field, enter an account number. 7. In the grid, in the Disposal Loss column, enter secondary default account numbers. The account
descriptions and fund descriptions appear automatically, based on the accounts you enter.8. When you exit the Default Account page or select another type of account, your changes are saved
automatically.
Setting default disposal proceeds accounts 1. From the Configuration page, click Default Accounts. The Default Accounts page appears.

F I XED A S S E T S CO N F I G U RA T I O N 49
2. In the box on the left, select Disposal Proceeds.
3. To set a single default account that automatically balances by fund and segment (if required), mark Build the default Disposal Proceeds Account by combining the Fund of each Fixed Assets Debit Account with these segment values.
4. In the Account field, enter an account number. 5. To define a primary default account and one or more secondary accounts, mark Unless a Fund has its
own Disposal Proceeds Account defined in the table below, use this account as the default Disposal Proceeds Account, creating interfund entries as needed.
6. In the Account field, enter an account number. 7. In the grid, in the Disposal Proceeds column, enter secondary default account numbers. The account
descriptions and fund descriptions appear automatically, based on the accounts you enter.8. When you exit the Default Account page or select another type of account, your changes are saved
automatically.
Setting default fixed assets credit accounts 1. From the Configuration page, click Default Accounts. The Default Accounts page appears.

50 CH A PT E R
2. In the box on the left, select Fixed Assets Credit.
3. To set a single default account that automatically balances by fund and segment (if required), mark Build the default Fixed Assets Credit Account using the fund of each Fixed Assets Debit Account with these segment values.
4. In the Account field, enter an account number. 5. To define a primary default account and one or more secondary accounts, mark Unless a Fund has its
own Fixed Assets Credit Account defined in the table below, use this account as the default Fixed Assets Credit Account, creating interfund entries as needed.
6. In the Account field, enter an account number. 7. In the grid, in the Fixed Assets Credit column, enter secondary default account numbers. The account
descriptions and fund descriptions appear automatically, based on the accounts you enter.
8. When you exit the Default Account page or select another type of account, your changes are saved automatically.
Setting a default reclassification account 1. From the Configuration page, click Default Accounts. The Default Accounts page appears.2. In the box on the left, select Reclassification.
3. In the Account field, enter an account number.
Note: Default accounts can be changed at any time. When you delete an account number from the Default Accounts Information page, it does not delete the account record.

F I XED A S S E T S CO N F I G U RA T I O N 51
4. When you exit the Default Account page or select another type of account, your changes are saved automatically.

52 CH A PT E R
2chapter
Depreciation Methods
Depreciation Overview . . . . . . . . . . . . . . . . . . . . . . . . . . . . . . . . . . . . . . . . . . . . . . . . . . . . . . . . . . . . . . . . . . . . . . . 58Depreciation Methods and Requirements. . . . . . . . . . . . . . . . . . . . . . . . . . . . . . . . . . . . . . . . . . . . . . . . . . . . . . . . 59Straight Line. . . . . . . . . . . . . . . . . . . . . . . . . . . . . . . . . . . . . . . . . . . . . . . . . . . . . . . . . . . . . . . . . . . . . . . . . . . . . . . . . . . 59Sum-of-the-Years’-Digits . . . . . . . . . . . . . . . . . . . . . . . . . . . . . . . . . . . . . . . . . . . . . . . . . . . . . . . . . . . . . . . . . . . . . . . . . 60Declining Balance . . . . . . . . . . . . . . . . . . . . . . . . . . . . . . . . . . . . . . . . . . . . . . . . . . . . . . . . . . . . . . . . . . . . . . . . . . . . . . 61MACRS . . . . . . . . . . . . . . . . . . . . . . . . . . . . . . . . . . . . . . . . . . . . . . . . . . . . . . . . . . . . . . . . . . . . . . . . . . . . . . . . . . . . . . . 62MACRS (ADS) . . . . . . . . . . . . . . . . . . . . . . . . . . . . . . . . . . . . . . . . . . . . . . . . . . . . . . . . . . . . . . . . . . . . . . . . . . . . . . . . . . 62MACRS 150% Election. . . . . . . . . . . . . . . . . . . . . . . . . . . . . . . . . . . . . . . . . . . . . . . . . . . . . . . . . . . . . . . . . . . . . . . . . . . 63ACRS . . . . . . . . . . . . . . . . . . . . . . . . . . . . . . . . . . . . . . . . . . . . . . . . . . . . . . . . . . . . . . . . . . . . . . . . . . . . . . . . . . . . . . . . . 64Alternate ACRS . . . . . . . . . . . . . . . . . . . . . . . . . . . . . . . . . . . . . . . . . . . . . . . . . . . . . . . . . . . . . . . . . . . . . . . . . . . . . . . . 64Defined Amounts . . . . . . . . . . . . . . . . . . . . . . . . . . . . . . . . . . . . . . . . . . . . . . . . . . . . . . . . . . . . . . . . . . . . . . . . . . . . . . 64Do Not Depreciate . . . . . . . . . . . . . . . . . . . . . . . . . . . . . . . . . . . . . . . . . . . . . . . . . . . . . . . . . . . . . . . . . . . . . . . . . . . . . 65

54 CH A PT E R
In Fixed Assets, you must select depreciation methods when creating new asset records and asset classes. When you select a depreciation method, the fields and possible field entries that appear vary depending on the method you select. This chapter provides an overview of Fixed Assets depreciation methods and the available field entries for each. Using depreciation method business rules, the program administrator can hide a depreciation method to prevent its use.
Depreciation OverviewTo simplify the process of depreciating assets, Fixed Assets automatically calculates depreciation according to the depreciation methods you select. All you have to do is enter information in the depreciation method fields and click Calculate Now. Fixed Assets calculates the depreciation automatically without you having to worry about complex formulas.You can depreciate many kinds of property, including machinery, buildings, vehicles, patents, copyrights, furniture, and equipment. Generally, property is depreciable if it meets these requirements:
• It must be used in business or held for the production of income.• It must have a determinable life longer than one year.• It must be something that wears out, decays, gets used up, becomes obsolete, or loses value.
In Fixed Assets, when you acquire an asset, you define a depreciation method on the New Asset General tab, then you record the acquisition transaction on the Activity tab. When you post depreciation for a period, Fixed Assets automatically creates a double entry transaction that credits an accumulated depreciation account on a balance sheet and debits a depreciation expense account. Note that accumulated depreciation is a contra asset account. With this system, you can calculate the true net worth of the asset at any time by subtracting the accumulated depreciation to date from the original purchase price. Also, you see your adjusted cost of doing business because a portion of the original cost of the asset is expensed or “written off” for the depreciation period.Several factors determine how much depreciation you may deduct:
• The cost or basis of the asset.• The date the asset was placed in service.• The class life or useful life of the asset.• The salvage value at the end of the asset’s useful life.• The method of depreciation you use.
Although Fixed Assets offers nine depreciation methods, the three most commonly used by non-profit organizations are: Straight Line, Declining Balance, and Sum-of-the-Years’-Digits. These depreciation methods are all based on useful life and expected salvage value.
Depreciation Methods and Requirements
Glossary: Depreciation is the amount charged against an organization’s earnings to recognize the cost of an asset over its estimated useful life, giving consideration to wear and tear, obsolescence, and salvage value. Depreciation is calculated on assets for a certain period of time to reflect their decreased value.
Note: The depreciation methods most often used by nonprofit organizations are Straight Line, Sum-of-the-Years’-Digits, and Declining Balance.
Note: You can select only one depreciation method for each asset.

DE P R E C I A T I O N ME T H O D S 55
Based on the depreciation method you select, you must enter specific information Fixed Assets uses to calculate the depreciation. Due to the specific requirements of each depreciation method, different fields appear for each method.
Straight Line
Straight Line depreciation is a depreciation method that expenses an asset value in equal amounts over its useful life.
Useful Life. Useful life is the period of time that an asset is determined to have commercial value for depreciation purposes. Valid field values for useful life are any value between 2 and 99 years.
Salvage Value. Salvage value is the estimated value of the property at the end of its useful life. The salvage value must be less than the depreciation basis.
Convention. The convention determines how much depreciation you can take in either the year the asset is placed in service, or the last year depreciated. Valid field entries are: Full-year, Half-year, Zero in first year, Full-month, Mid-month, and Zero in first month.Straight Line Conventions:
• Full-month: Fixed Assets calculates a full month’s depreciation for each month of the asset’s first year in service.
• Full-year: Fixed Assets calculates a full year’s depreciation the first year the asset is placed in service, regardless of the actual time in service.
• Half-year: Fixed Assets calculates 1⁄2 year’s depreciation for the first year of the asset’s useful life or for the disposal year.
• Mid-month: If the asset is placed in service during the first half of the month, Fixed Assets calculates a full month’s depreciation for the first month. If the asset is placed in service during the second half of the month, Fixed Assets does not calculate any depreciation for the first month.
• Zero in first month: Fixed Assets does not calculate any depreciation the first month the asset is placed in service. Afterward, the program calculates regular depreciation for the remaining periods.
• Zero in first year: Fixed Assets does not calculate any depreciation the first year the asset is placed in service.
Glossary: Straight Line depreciation is a depreciation method that expenses an asset value in equal amounts over its useful life.

56 CH A PT E R
Sum-of-the-Years’-Digits
Sum-of-the-Years’-Digits is an accelerated depreciation method. Under this method, depreciation for each year is determined by multiplying the asset’s cost less salvage value by a fraction in which the number of years remaining in the asset’s life is the numerator, and the sum-of-the-years’-digits, or n(n+1)/2, is the denominator. In the formula, n is the asset’s useful life in years.
Useful Life. Useful life is the period of time that an asset is determined to have commercial value for depreciation purposes. Valid field values for Useful Life are any value between 2 and 99 years.
Salvage Value. Salvage value is the estimated value of the property at the end of its useful life. The salvage value must be less than the depreciation basis.
Convention. The convention determines how much depreciation you can take in either the year the asset is placed in service, or the last year depreciated. Valid field entries are: Full-year, Half-year, Zero in first year, Full-month, Mid-month, and Zero in first month.Sum-of-the-Years’-Digits Conventions:
• Full-month: Fixed Assets calculates a full month’s depreciation for each month of the asset’s first year in service.
• Full-year: Fixed Assets calculates a full year’s depreciation the first year the asset is placed in service, regardless of the actual time in service.
• Half-year: Fixed Assets calculates 1⁄2 year’s depreciation for the first year of the asset’s useful life or for the disposal year.
• Mid-month: If the asset is placed in service during the first half of the month, Fixed Assets calculates a full month’s depreciation for the first month. If the asset is placed in service during the second half of the month, Fixed Assets does not calculate any depreciation for the first month.
• Zero in first month: Fixed Assets does not calculate any depreciation the first month the asset is placed in service. Afterward, the program calculates regular depreciation for the remaining periods.
• Zero in first year: Fixed Assets does not calculate any depreciation the first year the asset is placed in service.

DE P R E C I A T I O N ME T H O D S 57
Declining Balance
With the Declining balance method, you apply the same depreciation rate each year to the adjusted basis of your property using the applicable convention. If you use the Declining Balance method, Fixed Assets switches you to the Straight Line method in the first year in which it gives an equal or greater deduction. The entry in the Depreciation method field does not change.
Useful Life. Useful life is the period of time that an asset is determined to have commercial value for depreciation purposes. Valid field values for Useful Life are any value between 2 and 99 years.
Salvage Value. Salvage value is the estimated value of the property at the end of its useful life. The salvage value must be less than the depreciation basis.
Convention. The convention determines how much depreciation you can take in either the year the asset is placed in service, or the last year depreciated. Valid field values are: Full-month, Full-year, Half-year, Mid-month, Zero in first month, and Zero in first year.Declining Balance Conventions:
• Full-month: Fixed Assets calculates a full month’s depreciation for each month of the asset’s first year in service.
• Full-year: Fixed Assets calculates a full year’s depreciation the first year the asset is placed in service, regardless of the actual time in service.
• Half-year: Fixed Assets calculates 1⁄2 year’s depreciation for the first year of the asset’s useful life or for the disposal year.
• Mid-month: If the asset is placed in service during the first half of the month, Fixed Assets calculates a full month’s depreciation for the first month. If the asset is placed in service during the second half of the month, Fixed Assets does not calculate any depreciation for the first month.
• Zero in first month: Fixed Assets does not calculate any depreciation the first month the asset is placed in service. Afterward, the program calculates regular depreciation for the remaining periods.
• Zero in first year: Fixed Assets does not calculate any depreciation the first year the asset is placed in service.
Rate. Rate is the declining balance percentage. Valid field values are: 125%, 150%, 175%, 200%.
MACRS
Warning: MACRS is an IRS depreciation method not commonly used by non-profit organizations.

58 CH A PT E R
MACRS, or Modified Accelerated Cost Recovery System, is a depreciation method used for assets placed in service after 1986.
Recovery Period. A recovery period is the number of years allowed by the IRS to depreciate an asset. Valid field entries for MACRS recovery period are: 3, 5, 7, 10, 15, 20, 27.5, 31.5, and 39 years.
Convention. The convention determines how much depreciation you can take in either the year the asset is placed in service, or the last year depreciated. Valid field entries for MACRS convention are: “Half-year”, “Mid-quarter”, and “Mid-month”. If you select 27.5, 31.5, or 39 years, you must use the “Mid-month” convention.MACRS Conventions:• Half-year: Fixed Assets calculates 1⁄2 year’s depreciation for the first year of the asset’s useful life or for
the disposal year. • Mid-quarter: Fixed Assets calculates 1 1⁄2 months of depreciation for the quarter the asset is placed in
service or disposed. • Mid-month: Fixed Assets calculates half a period’s depreciation for the first month of the useful life or the
disposal month.
MACRS (ADS)
MACRS (ADS), or Modified Accelerated Cost Recovery System – Alternative Depreciation System, is a Straight Line depreciation method used for the following: tangible property used outside the United States, tax-exempt property, tax-exempt bond-financed property, imported property covered by executive order, farming property under some circumstances, and listed property used 50% or less for business.
Note: If the system administrator has marked the business rule selected to not allow use of a depreciation method, that method will not appear in the Depreciation Method field.
Warning: MACRS (ADS) is an IRS depreciation method not commonly used by non-profit organizations.
Glossary: Straight Line depreciation is a depreciation method that expenses an asset value in equal amounts over its useful life.

DE P R E C I A T I O N ME T H O D S 59
Recovery Period. A recovery period is the number of years allowed by the IRS to depreciate an asset. Valid field values for MACRS (ADS) recovery period are 0.5 year increments from 3 to 49.5 years. If your recovery period is “40”, the Convention field value defaults automatically to “Mid-month”. For any other recovery period, you must use “Half-year” or “Mid-quarter” for the convention value.
Convention. The convention determines how much depreciation you can take in either the year the asset is placed in service, or the last year depreciated. Valid field values for the MACRS (ADS) convention are: “Half-year”, “Mid-quarter”, and “Mid-month”.MACRS (ADS) Conventions:
• Half-year: Fixed Assets calculates 1⁄2 year’s depreciation for the first year of the asset’s useful life or for the disposal year.
• Mid-quarter: Fixed Assets calculates 1 1⁄2 months of depreciation for the quarter the asset is placed in service or disposed.
• Mid-month: Fixed Assets calculates half a period’s depreciation for the first month of the useful life or the disposal month.
MACRS 150% Election
MACRS 150% Election is a Declining Balance method that provides greater deduction during the earlier recovery years.
Recovery Period. A recovery period is the number of years allowed by the IRS to depreciate an asset. Valid field values for the MACRS 150% Election recovery period are: any 0.5 year increments from 3 to 49.5 years.
Convention. The convention determines how much depreciation you can take in either the year the asset is placed in service, or the year in which it is disposed. Valid field values for the MACRS 150% election convention are: “Half-year” or “Mid-quarter”.MACRS 150% Election Conventions:
• Half-year: Fixed Assets calculates 1⁄2 year’s depreciation for the first year of the asset’s useful life or for the disposal year.
• Mid-quarter: Fixed Assets calculates 1 1⁄2 months of depreciation for the quarter the asset is placed in service or disposed.
ACRS
Warning: MACRS 150% Election is an IRS depreciation method not commonly used by non-profit organizations.
Warning: ACRS is an IRS depreciation method not commonly used by non-profit organizations.

60 CH A PT E R
ACRS, or Accelerated Cost Recovery System, is a depreciation method used for assets placed in service after 1980, but before 1987.
Property Class Values. Valid field values for ACRS property class are: 03 Year Property, 05 Year Property, 10 Year Property, 15 Year Property, Low-Income Housing, 18 Year Property, 19 Year Property.
Alternate ACRS
Alternate ACRS is a depreciation method that uses a modified Straight Line depreciation calculation. This method should be used only for assets placed in service after 1980, but before 1987.
Property Class Values. Property class is a category for Alternate ACRS property that affects the recovery periods you can use:
Defined Amounts
With Defined Amounts depreciation, you can designate specific amounts of depreciation for each period.
Do Not Depreciate
If you select “Do not depreciate”, no depreciation is calculated for the asset.
Warning: Alternate ACRS is an IRS depreciation method not commonly used by non-profit organizations.
Property Values Recovery Periods
03 Year Property 3, 5, or 12 Years05 Year Property: 5, 12, or 25 Years10 Year Property 10, 25, or 35 Years15 Year Property 15, 35, or 45 YearsLow-Income Housing 15, 35, or 45 Years18 Year Property 18, 35, or 45 Years19 Year Property 19, 35, or 45 Years

DE P R E C I A T I O N ME T H O D S 61

62 CH A PT E R

Index
Aaccelerated cost recovery system depreciation
method 59account distribution
adding using a template 35account distribution template, adding 28, 30account masking 40account, defaults 45Accounting Queue, business rules 18accumulated depreciation
calculating 54ACRS, see accelerated cost recovery systemadding
account distribution templates 28, 30account distributions
manually 33using templates 35
asset classes 9, 11attributes 13custom depreciation schedules 7defaults
disposal gain accounts 46disposal proceeds accounts 48fixed assets credit accounts 49reclassification account 50
depreciation years 6field characteristics 26general information 4interfund entries 43interfund sets 41journal reference fields 44posting information 44table entries 22tables 20
alternate ACRS depreciation method 60asset class
adding 9, 11defined 3overview 8
asset, business rules 17attribute
adding 13defined 3overview 12
Bbusiness rule, Fixed Assets
asset records 17depreciation methods 16
business rulesAccounting Queue 18defined 3general rules 15overview 14transactions 18
Ccleaning up table entries 24Configuration, overview 2creating, see addingcustom depreciation schedule
adding 7defined 3overview 7
Ddeclining balance depreciation method 57default account
addingdisposal gain accounts 46disposal proceeds accounts 48fixed assets credit accounts 49reclassification account 50
defined 4overview 45
default accumulated depreciation accountsetting 46
defined amounts depreciation method 60depreciation
methods 54, 55overview 54requirements 54years 5
depreciation methodACRS 59alternate ACRS 60business rules 16declining balance 57defined amounts 60

64
do not depreciate 60MACRS 57MACRS (ADS) 58MACRS 150% election 59overview 54straight line 55sum-of-the-years’-digits 56
depreciation schedule, custom 7defined 3overview 7
depreciation yearadding 6defined 3overview 5
disposal gain account, adding 46disposal proceeds accounts, adding 48distribution
Cash Management 32Cash Management, adding using a template 35defined 4overview 27
distribution, transaction 37adding 38, 39
do not depreciate 60
Eediting tables, cleaning up entries 24
Ffield
adding characteristics 26adding journal reference fields 44defined 4overview 26
fixed assets credit account, adding 49
Ggeneral business rules 15general configuration
defined 3overview 4
general information, adding 4
Iinserting table entries 23interfund
account masking 40defined 4entries 41overview 40
sets 41interfund entry
adding 43managing 41
interfund setadding 41managing 41
Jjournal reference field, adding 44
MMACRS (ADS), see modified accelerated cost
recovery system-alternative depreciation systemMACRS 150% election depreciation method 59MACRS, see modified accelerated cost recovery
systemmanaging
interfund entries 41interfund sets 41
manually addingaccount distributions 33
masking 40modified accelerated cost recovery system
depreciation method 57modified accelerated cost recovery
system-alternative depreciation system method 58
moving table entries 25
Pposting information
adding journal reference fields 44defined 4overview 44
printing tables 20
QQueue, see Accounting Queue
Rreclassification account, adding 50
Ssorting table entries 24straight line depreciation 55

I N D EX 65
sum-of-the-years’-digits depreciation method 56
Ttable
adding 20defined 3editing 22overview 19printing 20
table entryadding 22cleaning up 24inserting 23moving 25sorting 24
templateaccount distribution 28, 30adding asset classes 11adding transaction distributions 39
transaction distributionadding 38, 39overview 37
transaction, business rules 18
Wwildcard 40
Yyear, see depreciation year

66