field dressing your deer - ohio department of natural resources
TRANSCRIPT

Field Dressing Your Deer
R egardless of whether you are hunting with a bow or firearm, your patience and effort have
finally paid off. You’ve harvested a white-tailed deer. Ensuring that you have tasty venison from the deer is no accident, however. — It is a long process that begins with proper shot placement in the field and culminates with selection of the appropriate cooking method in the kitchen or on the outdoor grill.

�
Field Dressing Your Deer It begins with the shot.
Heat and contamination are the primary culprits responsible for meat deterioration and the “gamey” flavor that many associate with venison. Ensure that your shot is true and on the mark. By avoiding a prolonged chase of a wounded deer, you reduce the chances of chemical contamination caused by adrenaline and lactic acid buildup within the muscles. Additionally, a speedy recovery of the deer permits prompt field dressing, which helps reduce body heat. My deer is down, so what comes next?
Make sure that your deer is dead. Cautiously approach the animal from the back side. Using a small stick or weed from arm’s length distance, gently touch the corner of your deer’s eye. If the deer blinks, it is still alive and may require a final shot to ensure its humane death and your personal safety. More than one hunter has been injured by flailing hooves or antlers when a deer has been approached carelessly. After ensuring that your deer is dead, attach your temporary tag using string, wire, tape, or some other appropriate material that you will need to provide. Until this is done, your deer is not properly tagged, and you are subject to a citation. Game Care 101
Regardless of its size, your deer is a trophy and should be treated as one. Locating and harvesting your quarry has been a challenge, but that effort is just the beginning of what you owe this prized game animal. Your efforts must now be directed toward preserving the quality of the meat by ensuring that your deer is properly field dressed.

�
Two popular misconceptions about field dressing deer involve sticking or cutting the animal’s throat to ensure a complete bleed and removal of the tarsal glands from the deer’s back legs. Provided that you field dress your deer promptly, a five-minute job after a little practice, removal of the heart and lungs will do a better job than cutting the throat. Besides, your taxider-mist, assuming that you are planning to have your trophy mounted, will have a difficult time repairing the damage from unnecessary holes. Removal of the tarsal glands is also unnecessary. Should you decide to remove the glands, however, use special care as contamination from the gland onto either your knife or hands can be easily transferred to the meat. Wearing protective rubber or disposable gloves as you field dress your deer will make your own clean-up quicker and easier and will reduce the possibility of exposure to disease.
Location of tarsal glands on insides of back legs

�
Start by rolling the deer onto its back. Using a sharp knife (most pocket knives will work fine), carefully cut a small opening at the base, or pelvis side, of the breast bone. This initial cut should only be large enough to permit you to insert your fingers into the incision. Using your free hand, either lift the skin or shove down on the stomach as you continue the cut along the deer’s midline to a point approximately three inches beyond the navel. Avoid cutting into the stomach or intestines as doing so may contaminate the meat.
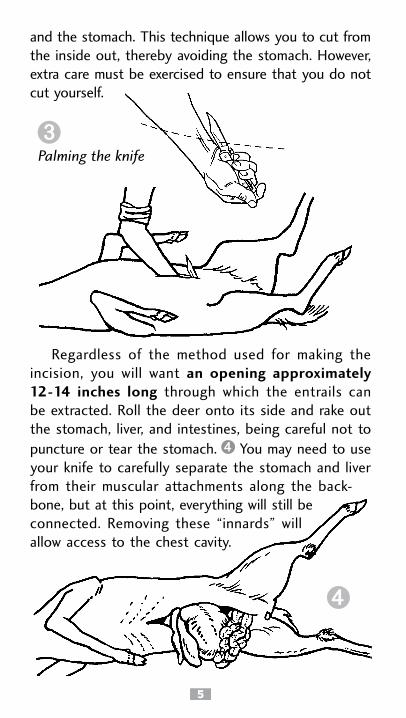
Another technique involves “palming” the knife so that the back side of the blade lies on top of the inside of your wrist and points back towards your forearm. Grip the knife firmly and, through the initial incision, force your fist into the abdominal cavity between the skin
Roll the deer onto its back; hand position for making the midline cut
�
and the stomach. This technique allows you to cut from the inside out, thereby avoiding the stomach. However, extra care must be exercised to ensure that you do not cut yourself.
Regardless of the method used for making the incision, you will want an opening approximately 12-14 inches long through which the entrails can be extracted. Roll the deer onto its side and rake out the stomach, liver, and intestines, being careful not to puncture or tear the stomach. You may need to use your knife to carefully separate the stomach and liver from their muscular attachments along the back-bone, but at this point, everything will still be connected. Removing these “innards” will allow access to the chest cavity.
Palming the knife

�
Cut through the diaphragm, completely encircling the inside of the chest cavity. Reach into the chest with both hands and grab hold of the lungs with your free hand. Cut through the windpipe and esophagus, or as far forward as you can reach. This allows you to completely clean the chest cavity while achieving a thorough bleed. Use caution when sticking your hands into your deer, however, as there may be a broadhead from an earlier archery shot, a broken rib bone, or some other sharp projection that can cut or puncture your hand. Save the heart and liver as these make for delicious eating.
➎Midline cut and location of internal organs
gullet (esophagus)
windpipe
lungs
heart
liver
diaphragm
paunch (stomach)
intestines
bladder

�
The only task left to field dressing your deer is removal of the bladder and remaining intestine. At this point, you might want to tie a string around the bladder and large intestine to prevent urine and manure contamination of the meat. Make a shallow cut around the anus. Insert your finger into the incision and lift the large intestine out of the way as you use the knife to free the intestine and bladder from their connective tissue. A gentle pull on the bladder and intestine from inside the body cavity should allow you to remove these tissues, thus completing the field dressing procedure.
The biggest advantage of field dressing your deer through a small incision as opposed to a cut which extends from the base of the tail through the breast bone as some recommend is that the meat remains much cleaner because it has not been exposed to dirt, leaves, sticks, and other debris during the process of removing the deer from the field. Additionally, any cuts forward of the sternum make the job of mounting your trophy more difficult and expensive.
Cut around anus and tie off intestine

�
Back at the Barn
Cooling your deer is the next big challenge. If clean, cold water is available, rinse the body cavity well. This will remove any remaining blood as well as help reduce the deer’s body heat. Prop the body cavity open with clean sticks and hang your deer in a shady spot until you can transport it to an official check station for permanent tagging. During transport, try to ensure that air is able to circulate around the deer rather than having it in a closed space that encourages heat build-up. Use bags of ice in the body cavity to help cool your deer if you are not able to process it in a timely manner. If you plan to take your deer to a commercial processor, your field dressing of the deer stops here. For those who intend to complete the butchering and processing of the deer themselves, the next step is skinning. Skinning
Remember that a deer’s hide is a tremendous insu-lator as evidenced by the fact that deer do not freeze to death during the winter despite bone chilling cold weather. Removing the hide as soon as possible will permit the meat to cool more rapidly. Make a cut from below the hock on each back leg to the mid-line between the legs. Skin and peel the hide from around the lower legs until the hock, with tendon intact, is exposed.
Once the deer is hung by its back legs, slit the hide on the front legs to the point at the base of the breast bone where you first inserted the knife during field dressing. Once this is done, the hide can, with a little help from your knife, be removed by pulling it free

�
Skinning cuts
from the carcass. Finish the skinning job by removing the head and lower front legs using a knife at joints or with a saw. Wipe the carcass with a damp cloth and you are ready to start butchering your deer for the table.

10
Gettin’ It Ready for the FreezerYour deer’s age is going to have a big impact on
tenderness, so take that into consideration when decid-ing upon how it will be processed and cooked. Yearlings make excellent steaks and roasts without further efforts to tenderize the meat. The palatability of older animals can be improved either mechanically by cubing or chemically with tenderizers, but are often better suited for canning, stews, grinding, and jerky. The best steaks and roasts will be obtained from the tenderloin (located inside the body cavity along the back, forward of the pelvis), ribeye (on either side of the backbone on the outside of the carcass – often times called “back straps” or “outside tenderloins”), and the rounds or upper back legs. Steaks from these cuts are delicious when grilled or fried. The secret to their preparation is to avoid overcooking them. They should be served while still pink on the inside.
Removing tenderloins Removing ribeyes
shown with shoulder removed

11
The shoulders and neck can also be converted to steaks and roasts, but should be prepared using a moist, slow cooking method until tender. However, because these are lower quality cuts, they are best suited for cutting into chunks for stew or ground for burger. The lower legs should be reserved for grinding into burger.
When cutting steaks and roasts, separate the muscle bundles so that you can remove as much of the tough, fibrous sheathing as possible. It takes a few minutes, but is well worth the time. Excess fat should also be trimmed off. Cut steaks one half to three-quarters-inch thick. Roasts should be at least two inches thick. Meat for stew should be chunked into one inch size pieces while meat destined for the grinder should be double ground to improve tenderness. Wrap the meat in clear plastic wrap to exclude air, then in a good quality, waxed freezer paper. Individual packages should be sized according to your anticipated needs. Label packages and freeze. Whole meat can be frozen for about a year while ground meat is best if used within six months.
Deer carcass and cuts of meat➓HINDQUARTERS round steaks, roasts
HOCK stew meat or ground
FLANK stew meat, ground, ribs
back straps (boneless ribeye)
bRISKET stew or ground
shoulder steaks
shoulder roast or ground stew
meat
NECK rolled roast, ground or mince meat
stew meat
loin chops or rib roasts

1�
Above all, don’t be intimidated by the thought of processing your own venison. As long as you are cutting the meat the way you want to use it, you can’t cut it wrong. About all it takes is a couple of sharp knives, a sharpening stone, a knife sharpener or a butcher steel to hone your knives, freezer wrap and tape, a small manual meat grinder, and some time and patience. In return for your small investment, you receive a tremendous feeling of satisfaction in knowing that you did the entire job yourself. It will make the delicious venison that you will enjoy during the next year taste that much better. Fixin’ Vittles
With just a few cooking modifications, venison can be prepared the same as any similar cut of pork or beef. Remember that venison is a lean meat that can become dry and tough when using dry cooking methods. Serve grilled steaks and open-roasted roasts while the meat is still juicy and pink on the inside and your dinner guests and family will rave about dinner. A pinch of salt after cooking (salt before cooking causes toughness) is all one needs to highlight venison’s delicate flavor. Serve with baked potatoes, your favorite vegetable, and hot rolls for a sure-fire hit.
Add a slightly thinned can of cream of mushroom soup to steaks and roasts wrapped in foil, bake until the meat falls apart, and you have an epicurean’s delight. Not only will the meat be delicious, you will have a gravy for mashed or fried potatoes that will make your mouth water.
Substitute ground venison for hamburger in your favorite chili or beef vegetable soup recipe. When using ground venison in meat loaf, replace one third of the venison with plain pork sausage for added juiciness.

1�
Ground venison is extremely versatile. The list of possi-bilities is endless and includes spaghetti, lasagna, tacos, and burgers. Let your imagination run wild as it’s hard to go wrong with ground venison.
Cook a neck roast or stew meat in a pot of water with a bay leaf and clove of garlic until the meat is tender and falling off the bone. Remove the bay leaf, garlic clove, and bones. Add three carrots sliced into one-inch pieces, six medium to large potatoes cut into one and a half inch pieces, and half an onion which has been diced into quarter inch pieces. Cook until nearly done. Add one can corn and one of green beans. Cook until the potatoes and carrots are tender. Thicken as desired with flour or cornstarch, and season with salt and black pepper. This makes a meal by itself.
blue Cheese Venison bake1 pound ground venison2 tablespoons olive oil for browning1/2 tablespoon minced garlic2 tablespoons Worcestershire sauce1 package dry French onion soup mix1 cup sliced mushrooms1 cup blue cheese (crumbled)blue cheese salad dressingDough for crust:2 cups baking mixwater as indicated on baking boxBrown ground venison in olive oil. Add garlic, Worcestershire sauce, dry soup
mix, and mushrooms, simmer for a few minutes. In a separate bowl, mix baking mix with water to form dough. Spread dough over bottom of a pie pan. Pour venison mixture over dough and sprinkle on crumbled blue cheese. Bake 30 minutes in 350 degree oven. Serve with blue cheese salad dressing on top of pie as desired. Serves 4 – 6.
Venison is a delicious and nutritious meat, low in fat and cholesterol. It is rich in riboflavin, B6, and thiamin. It is the number one wild game served by hunters in Ohio.
For more great wild game recipes, go to www.wildohiocookbook.com
Try this ground venison recipe:

1�
Suggested Tools for Field Dressing and butchering Your Deer
• String for attaching temporary tag and tying intestines
• Rubber gloves or disposable gloves• Plastic bag for heart and liver• Sharp knife, either a pocket or sheath-knife
will work fine• Hoist system for raising deer off the ground• Boning knives• Sharpening stones• Butcher’s steel• Meat saw (optional, as bones can be easily
separated at joints)• Meat grinder• Clear plastic wrap• Freezer paper, high-quality waxed• Freezer or masking tape for sealing packages• Marker for labeling packages• Bleach solution for cleaning equipment afterwardsProperly cared for and prepared venison makes for
delicious eating which you can share with family and friends. Additionally, each time you enjoy one of those fine meals, you are reminded of exciting days afield with your hunting companions.
11 Field dressing and butchering tools and materials
Knives for field dressing
sharpening stone

1�
protective gloves
commercial combination hoist and gambrel
skinning knife
butchering / boning knives
curved flexible boning knife
butcher’s steel
electric meat grinder

Division of Wildlife • Ohio Department of Natural Resources Publication 111 ( Sep06)
Field Dressing Your Deer