fiber to waveguide couplers for silicon photonics
TRANSCRIPT

Fiber to Waveguide Couplers for Silicon Photonics
by
Trisha M. Montalbo
Submitted to the Department of Materials Science and Engineeringin partial fulfillment of the requirements for the degree of
Master of Science in Materials Science and Engineering
at the
MASSACHUSETTS INSTITUTE OF TECHNOLOGY
September 2004
c© Massachusetts Institute of Technology 2004. All rights reserved.
Author . . . . . . . . . . . . . . . . . . . . . . . . . . . . . . . . . . . . . . . . . . . . . . . . . . . . . . . . . . . . . .Department of Materials Science and Engineering
August 13, 2004
Certified by. . . . . . . . . . . . . . . . . . . . . . . . . . . . . . . . . . . . . . . . . . . . . . . . . . . . . . . . . .Lionel C. Kimerling
Thomas Lord Professor of Materials Science and EngineeringThesis Supervisor
Accepted by . . . . . . . . . . . . . . . . . . . . . . . . . . . . . . . . . . . . . . . . . . . . . . . . . . . . . . . . .Carl V. Thompson
Chair, Departmental Committee on Graduate Students

2

Fiber to Waveguide Couplers for Silicon Photonics
by
Trisha M. Montalbo
Submitted to the Department of Materials Science and Engineeringon August 13, 2004, in partial fulfillment of the
requirements for the degree ofMaster of Science in Materials Science and Engineering
Abstract
As silicon photonics enters mainstream technology, we find ourselves in need of meth-ods to seamlessly transfer light between the optical fibers of global scale telecommuni-cations networks and the on-chip waveguides used for signal routing and processing inlocal computing networks. Connecting these components directly results in high lossfrom their unequal sizes. Therefore, we employ a coupler, which acts as an interme-diary device to reduce loss through mode and index matching, and provide alignmenttolerance.
This thesis presents a potential fiber-to-waveguide coupler design for use in inte-grating such networks. A quadratic index stack focuses incident light from a fiberin one plane, while a planar lens and linear taper do likewise in the perpendicularplane. Once the mode is sufficiently compressed, the light then enters and propa-gates through the waveguide. We performed simulations using the beam propagationmethod and finite difference time domain, among other modeling techniques, to opti-mize coupling efficiency and gain an understanding of how varying certain parametersaffects coupler performance. The simulation results were then incorporated into amask layout for fabrication and measurement.
Thesis Supervisor: Lionel C. KimerlingTitle: Thomas Lord Professor of Materials Science and Engineering
3

4

Acknowledgments
Many thanks to those who have helped me survive the past two years. It wasn’t easy,
but I couldn’t have done it without their support. First and foremost is Kim, for
always making time for me. His insight and support, both in research and in how
to keep me motivated, were there when I needed them most. Anu and Kazumi were
wonderful for discussions, technical and otherwise. Anu is so easy to talk to and has
been incredible for hashing out ideas and how things work. And without Jurgen’s
practical knowledge on our labs, I don’t think I could have accomplished anything,
much less cleaned up HF spills. Finally, I’m grateful to Mindy for letting me go
shopping at VWR as often as I wanted.
A big thank you goes to the students in EMAT for their friendship early on and
making me feel welcome even when I was in my own little world of silicon electro-
chemistry. However, there are some I have to mention in particular, starting with
Victor for teaching me all about the coupler. I’ll not easily forget the weekend hours
we spent with LayoutPlus, putting the mask together although without Ching-Yin,
the two of us would have been working at it for many more weekends. Jeff—not an
EMAT member, but this past year he’s come close—has been incredibly patient with
all my questions about simulations. To all those with porous silicon—Luca, Yasha,
David, and Tongyan—thanks for letting me abandon that project so I would have
time to finish this thesis. All in all, I couldn’t have asked for a better group.
Finally, I want to thank my parents for their support from afar and my friends
here in Cambridge, in particular Justin who provided hugs, motivation, and sympathy
work, and Jeremy for distraction breaks with bridge and MarioKart.
5

6

Contents
1 Introduction 15
1.1 Defining of Problem . . . . . . . . . . . . . . . . . . . . . . . . . . . . 16
1.2 Thesis Outline . . . . . . . . . . . . . . . . . . . . . . . . . . . . . . . 17
2 Theory 19
2.1 Waveguides . . . . . . . . . . . . . . . . . . . . . . . . . . . . . . . . 19
2.1.1 Coupling Waveguides . . . . . . . . . . . . . . . . . . . . . . . 20
2.1.2 Index Grading . . . . . . . . . . . . . . . . . . . . . . . . . . . 21
2.2 Couplers . . . . . . . . . . . . . . . . . . . . . . . . . . . . . . . . . . 22
2.2.1 Mode Matching and Transformation . . . . . . . . . . . . . . 22
2.2.2 Index Difference . . . . . . . . . . . . . . . . . . . . . . . . . . 23
2.2.3 Optical Alignment . . . . . . . . . . . . . . . . . . . . . . . . 23
2.3 Summary . . . . . . . . . . . . . . . . . . . . . . . . . . . . . . . . . 24
3 Simulation Methods 25
3.1 Finite Difference Time Domain . . . . . . . . . . . . . . . . . . . . . 26
3.1.1 Maxwell’s Equations . . . . . . . . . . . . . . . . . . . . . . . 26
3.1.2 The Yee Algorithm . . . . . . . . . . . . . . . . . . . . . . . . 27
3.1.3 Coupler-Specific Considerations . . . . . . . . . . . . . . . . . 29
3.2 Beam Propagation Method . . . . . . . . . . . . . . . . . . . . . . . . 30
3.2.1 The Helmholtz Wave Equation . . . . . . . . . . . . . . . . . 31
3.2.2 BPM Approximations . . . . . . . . . . . . . . . . . . . . . . 31
3.2.3 Coupler-Specific Considerations . . . . . . . . . . . . . . . . . 33
7

3.3 Ray Transfer Matrices . . . . . . . . . . . . . . . . . . . . . . . . . . 34
3.4 Effective Index Method . . . . . . . . . . . . . . . . . . . . . . . . . . 35
3.5 Summary . . . . . . . . . . . . . . . . . . . . . . . . . . . . . . . . . 38
4 Device Design 39
4.1 Variable Design Parameters . . . . . . . . . . . . . . . . . . . . . . . 41
4.1.1 Length . . . . . . . . . . . . . . . . . . . . . . . . . . . . . . . 41
4.1.2 Facet Width . . . . . . . . . . . . . . . . . . . . . . . . . . . . 45
4.1.3 Planar Lens . . . . . . . . . . . . . . . . . . . . . . . . . . . . 47
4.2 Fixed Design Parameters . . . . . . . . . . . . . . . . . . . . . . . . . 50
4.2.1 Design Wavelength . . . . . . . . . . . . . . . . . . . . . . . . 50
4.2.2 Stack Parameters . . . . . . . . . . . . . . . . . . . . . . . . . 50
4.2.3 Material Selection . . . . . . . . . . . . . . . . . . . . . . . . . 51
4.3 Summary . . . . . . . . . . . . . . . . . . . . . . . . . . . . . . . . . 52
5 Fabrication 55
5.1 Process Flow . . . . . . . . . . . . . . . . . . . . . . . . . . . . . . . 56
5.2 Mask Layout . . . . . . . . . . . . . . . . . . . . . . . . . . . . . . . 57
5.3 Deviations From Ideal . . . . . . . . . . . . . . . . . . . . . . . . . . 57
5.3.1 Cladding Thickness . . . . . . . . . . . . . . . . . . . . . . . . 57
5.3.2 Fabrication Misalignment . . . . . . . . . . . . . . . . . . . . 58
5.3.3 Packaging Misalignment . . . . . . . . . . . . . . . . . . . . . 59
5.3.4 Grading Profile . . . . . . . . . . . . . . . . . . . . . . . . . . 60
5.3.5 Sidewall Angle . . . . . . . . . . . . . . . . . . . . . . . . . . 62
5.3.6 Material and Interface Loss . . . . . . . . . . . . . . . . . . . 62
5.4 Summary . . . . . . . . . . . . . . . . . . . . . . . . . . . . . . . . . 63
6 Design Comparisons and Discussion 65
6.1 Fiber-to-Waveguide Couplers in Literature . . . . . . . . . . . . . . . 65
6.1.1 Fiber End Couplers . . . . . . . . . . . . . . . . . . . . . . . . 66
6.1.2 Waveguide End Couplers . . . . . . . . . . . . . . . . . . . . . 66
8

6.1.3 Comparison . . . . . . . . . . . . . . . . . . . . . . . . . . . . 69
6.2 Design Constraints . . . . . . . . . . . . . . . . . . . . . . . . . . . . 70
7 Conclusions 71
7.1 Future Work . . . . . . . . . . . . . . . . . . . . . . . . . . . . . . . . 72
7.2 Looking Ahead . . . . . . . . . . . . . . . . . . . . . . . . . . . . . . 73
9

10

List of Figures
1-1 Signal delay for different transistor generations [1, 2, 3]. . . . . . . . . 16
2-1 Sample parabolic profile of a graded index fiber. . . . . . . . . . . . . 22
3-1 Electric and magnetic field components on a FDTD unit cell. . . . . . 28
3-2 Two dimensional FDTD unit cells for TE and TM polarization. . . . 30
4-1 Coupler design parameters. . . . . . . . . . . . . . . . . . . . . . . . . 40
4-2 Parabolic stack index profile for the coupler. . . . . . . . . . . . . . . 41
4-3 Ez distribution in a 2D GRIN structure used in FDTD coupler length
simulations. . . . . . . . . . . . . . . . . . . . . . . . . . . . . . . . . 42
4-4 FDTD coupling efficiency versus coupler length. . . . . . . . . . . . . 43
4-5 BPM overlap of box coupler field with waveguide and fiber fundamental
modes. . . . . . . . . . . . . . . . . . . . . . . . . . . . . . . . . . . . 44
4-6 Path of rays after entering a quadratic GRIN structure (centered at
y = 0). . . . . . . . . . . . . . . . . . . . . . . . . . . . . . . . . . . . 44
4-7 BPM coupling efficiency versus input and output facet width. . . . . 46
4-8 Output facet E distributions for a taper without a lens. Facet is 0.9-µm
(left) and 2.3-µm (right) wide; waveguide fundamental mode is show
in the center. . . . . . . . . . . . . . . . . . . . . . . . . . . . . . . . 47
4-9 Plot of 3D effective index from BeamPROP’s mode solver and 2D core
index of a tapered coupler. . . . . . . . . . . . . . . . . . . . . . . . . 48
4-10 Optimization of lens radius of curvature using FDTD and BPM for
box and tapered couplers. . . . . . . . . . . . . . . . . . . . . . . . . 49
11

4-11 Efficiency dependence on wavelength for the optimized 1550 nm coupler. 51
5-1 Effect of coupler-waveguide misalignment on coupling efficiency for dis-
placement along the x and z axes. . . . . . . . . . . . . . . . . . . . . 58
5-2 Effect of fiber-coupler misalignment on coupling efficiency for displace-
ment along the x and y axes. . . . . . . . . . . . . . . . . . . . . . . 60
5-3 Vertical focal point shift of rays propagating through a parabolic GRIN
structure centered at y = 0. . . . . . . . . . . . . . . . . . . . . . . . 61
5-4 Horizontal focal point shift of rays propagating across an interface with
a 5 µm radius of curvature (left) and 5, 10, and 30 µm lenses (right). 61
5-5 Coupler with sloped sidewalls. . . . . . . . . . . . . . . . . . . . . . . 63
6-1 Examples of an inverse-tapered coupler (foreground) and a tapered
coupler. Light from the fiber enters at the left end. . . . . . . . . . . 67
12

List of Tables
4.1 Design parameters . . . . . . . . . . . . . . . . . . . . . . . . . . . . 53
5.1 Potential sources of loss that can decrease coupling efficiency and their
relative importance to our design. . . . . . . . . . . . . . . . . . . . . 64
13

14

Chapter 1
Introduction
To date, engineering has done a remarkable job of maintaining the exponential growth
of the solid-state circuit industry, both in increasing the number of transistors per
circuit and in decreasing the cost per transistor [4]. This rate of growth conforms
to Moore’s original observation, noted almost 40 years ago, that the number of in-
tegrated circuit components per chip, based on the minimum manufacturing cost
per component, will approximately double every one to two years [5]. Each time
we believe we are approaching the barrier to improving performance, the industry
manages to creatively sidestep the obstacle. For example, switching over from use
of aluminum and silicon dioxide as interconnect and gate materials, respectively, to
copper and low κ-materials has allowed us to lower RC delays and continue with the
current method of reducing transistor gate length to improve performance [1]. How-
ever, it’s clear we are nearing the limits of microelectronics technology—this time for
real. As gate length decreases, interconnect length and complexity increase so that,
by some future technology generation, interconnects are expected to dominate delay
time (Figure 1-1).
Silicon microphotonics offers a potential solution to sidestepping this so-called
“red brick wall” and continuing the increase of data density. In photonics, pho-
tons rather than electrons transmit information; this significantly increases the max-
imum transmission capacity. Additionally, the approach eliminates cross-talk and
has negligible heat dissipation, thus doing away with problems that plague current
15

500 350 250 180 130 900
5
10
15
20
25
30
35
40
45
Technology Node [nm]
Sig
nal D
elay
[ps]
Al / SiO2
Cu / low κOptical
1992 1995 1997 1999 2001 2002
Figure 1-1: Signal delay for different transistor generations [1, 2, 3].
microelectronics technology [3]. Furthermore, a silicon-based platform permits use
of well-characterized materials and existing processing techniques, as well as allow-
ing for monolithic integration with control and drive electronics [6]. Already, the
telecommunications industry relies on fiber optic cables to accommodate its need for
large bandwidth information transfer on a global scale. Smaller scale microphotonics
for computing technology is still under development so this market continues to rely
on microelectronics although at present, nearly all necessary components have been
demonstrated in research labs [1]. However, in order to attain the all optical network
of the future, work remains for us in the interconnection and integration of those
components within the constraints of silicon microphotonics [7].
1.1 Defining of Problem
Optical fibers that transmit data over long distances will form the backbone of our
future all optical network and connect computer boards and chips containing waveg-
uides, detectors, filters, and other devices for signal processing and routing. From an
interconnection standpoint, we need to pass data not only between on-chip devices,
but also from fiber-to-chip and vice versa. Doing this efficiently requires that we
16

consider optical alignment and mode mismatch between devices, and general losses
from interconnection [7]. For fiber-to-chip coupling, this is not an easy task owing to
the differing sizes of the two cores. Typical single mode fibers have a core diameter of
8 µm; high index contrast waveguides (∆n ≥ 0.5) have cores ≤ 1 µm. Consequently,
transferring light directly between these two components results in high power loss.
The standard solution to this problem is to insert an intermediary component
between the fiber and the waveguide, known as an optical coupler, which receives
light from the fiber and efficiently transmits it to the waveguide. Different variations
of this component exist [8]. Our particular design is composed of a graded index
stack of silicon oxynitride layers and a lateral, linear taper with a planar lens. The
graded index stack vertically focuses light into the waveguide while the taper and
planar lens do likewise in the horizontal plane. Thus the fiber mode is reshaped into
the waveguide mode by the end of the coupler.
1.2 Thesis Outline
This thesis focuses on optimizing the coupler design described above through vari-
ous simulation methods. These methods, along with the theoretical background of
couplers and requirements we need to meet to attain a high coupling efficiency, are
described in Chapters 2 and 3. We detail our approach to device optimization in
Chapter 4 and briefly discuss some of the constraints under which we are working.
These simulation results are then used in the mask layout so we can confirm our
understanding of how controlled changes to the optimized design affect coupler per-
formance. Chapter 5 covers the mask layout as well as the fabrication process and
additional variations that arise in fabrication but that we did not account for in the
initial simulations of Chapter 4. Our design is contrasted with other coupler designs in
Chapter 6 and we discuss if our coupler meets the requirements laid out in Chapter 2.
Finally, the conclusions in Chapter 7 wrap up the thesis by discussing future work in
coupler fabrication and measurement, and the role silicon photonics may eventually
play in our future.
17

18

Chapter 2
Theory
We start off this thesis with the theory of waveguides and couplers before discussing
the simulation techniques used to study these devices. Although simulations may
be sufficient to intuitively understand how a device functions, they cannot always
explain why it behaves as it does. Some knowledge of theory is necessary to do this,
as well as to develop the initial design in the first place. This same knowledge is also
useful in interpreting simulation results because we will be able to determine if the
results fundamentally make sense or if there is a potential problem in our design or
modeling approach.
2.1 Waveguides
Waveguides are optical components that direct the flow of light. They consist of
a dielectric core and a lower refractive index cladding; light is confined to the core
by total internal reflection. Typically waveguides are thought of as on-chip devices
fabricated from pure silicon, silicon nitride, or other such materials, but optical fibers
also fall under this general category because they rely on the same principles to
perform similar functions.
When light is coupled to a waveguide, it can excite a particular electromagnetic
field distribution that propagates unchanged through the structure. This field distri-
bution is called a mode. Depending on cross-sectional geometry, core-cladding index
19

contrast, and the wavelength of the propagating field, a waveguide can support any-
where from one to ten or more modes. In the latter case, the waveguide is said to
be multimoded and will typically have some combination of its modes excited upon
the coupling of light to its core. The resulting field will change as it propagates
due to phase differences between superposed modes and to modal dispersion, or the
difference in group velocities of the modes. Ideally, we want to limit the waveguide
to the first or fundamental mode; this simplifies our simulations and removes modal
dispersion from the picture so our field is unchanging in space and time.
Since modes are simply electromagnetic field distributions propagating through
media, they carry energy, determined by E×H integrated over a plane perpendicular
to the propagation axis, where E and H are the electric and magnetic field strengths
respectively. Higher order modes are more energetic. By limiting the integration to
the core area, we can calculate Pcore, the power in the core; likewise, we can also
find the power in the cladding, Pclad by restricting the integration to the cladding
region. Pcore + Pclad should yield the total power (or energy) of the mode. The
power distribution of the mode can be used to calculate its effective index, neff ,
approximated by
neff =Pcorencore + Pcladnclad
Ptotal
(2.1)
The effective index arises because energy travels in both the waveguide core and
adjacent cladding. Cross-section boundary conditions dictate that E and H in the
cladding decay exponentially as we move away from the core, perpendicular to the
propagation axis.
2.1.1 Coupling Waveguides
For waveguides to be useful, we have to connect them to devices such as detectors
and filters, to each other, or to the off-chip world. If the waveguides are physically
different and therefore support different fundamental modes, this can present prob-
lems, particularly when butt-coupling the waveguides. For instance, the input fiber
we use for our simulations has a 6 µm core and a low index contrast to limit it to
20

a single mode; in comparison, the on-chip waveguide we want to connect it to has
a high index contrast and a 0.9 µm core. Assuming the two are perfectly joined
end-to-end, we find that the loss is around 6.8 dB [9]. Thus, we need to place a
fiber-to-waveguide coupler between the two to efficiently transfer light from one to
the other. The requirements for such a coupler are reviewed in Section 2.2 and the
remainder of this thesis focuses on the design of one of these devices.
2.1.2 Index Grading
Waveguides with graded index cores are useful for dealing with modal dispersion in
multimode waveguides. Elimination of dispersion is accomplished with a quadratic
index profile (Figure 2-1) waveguide to control group velocity and phase differences
between modes. The index profile is typically described by the equation
n(r) = no
(
1 − αr2)
(2.2)
Lower order modes, which have higher group velocities and are concentrated near
the waveguide center, are slowed down by the higher index material. On the other
hand, higher order modes, which are more spread out with a larger fraction of power
in the lower index material, are able to move faster. In the end, all modes have the
same group velocity and dispersion is eliminated. Also, the energy difference between
consecutive modes is constant for this particular profile, frequency increases by 2π for
each increase in mode number. (This can be proved analytically in the 2D case, but
the derivation will not be presented here [10, 11].) Therefore, when multiple modes
propagate through the waveguide, they simultaneously move in and out of phase.
This leads to the self-imaging phenomenon in which light focuses in the highest index
region of the core before diverging to recreate the initial field distribution (composed
of all excited modes). The process is then repeated periodically along the length of
the waveguide as light focuses and diverges at regularly-spaced intervals. Our coupler
uses a graded index stack that relies on this self-imaging effect to vertically focus light
into the waveguide.
21

−8 −6 −4 −2 0 2 4 6 81.45
1.455
1.46
1.465
1.47
1.475
1.48
Distance from Fiber Center [µm]
Re
fra
ctive
In
de
xCoreCladding
Figure 2-1: Sample parabolic profile of a graded index fiber.
2.2 Couplers
Optical couplers are devices used to interconnect photonic networks by connecting the
components of one network to those of another. In the context of this thesis, couplers
connect single mode optical fibers to on-chip single mode waveguides. Despite the
fact that both these components only support one mode, their differing geometry
causes a large mismatch between the two, which the coupler has to resolve. To do
this, the coupler will have to address three primary issues:
• Mode matching and transformation
• Index difference
• Optical alignment
High coupling efficiency—the transferring light between disparate waveguides—is
achieved if the coupler performs in all three areas.
2.2.1 Mode Matching and Transformation
As stated in Section 2.1.1, butt-coupling of a fiber directly to a waveguide will result
in large losses from power coupled into to the cladding or to radiation modes (poorly
22

confined modes that eventually leak into the cladding). Thus, the ideal coupler should
be able to match the mode of the fiber and losslessly transform it to an allowed
propagation mode of the waveguide, while simultaneously collecting and transmitting
as much of that light as possible. Mode matching avoids the excitation of radiation
modes and light collection prevents losses to the cladding. Implementing this in a
coupler is done in a variety of ways, either by adiabatic reshaping of the mode or with
lenses or coupled resonators, among other approaches (see Section 6.1). Our coupler
employs a graded index stack to change the mode vertically, and a taper and lens for
horizontal reshaping.
2.2.2 Index Difference
In addition to matching and reshaping modes, a coupler also has to match effective
indices with both components it connects. Failure to do this causes Fresnel reflections,
which occur because the wave has to satisfy boundary conditions at the interface. For
light at normal incidence, the ratios of reflected (R) and transmitted (T ) power to
incident power are given by
R =(
n2 − n1
n2 + n1
)2
(2.3)
T =4n2n1
(n2 + n1)2(2.4)
Reflections result in power loss and potential interference with the incident wave. For
instance, if a fiber fundamental mode with an effective index of n(f)eff ≈ 1.47 encounters
a coupler input facet with n(c)eff ≈ 1.67, 0.5% of the power is reflected, which amounts
to a 0.02 dB loss.
2.2.3 Optical Alignment
All devices—not just couplers—have to be aligned with the path of the data signal in
order to read or manipulate it. Given component dimensions, even a one micron offset
can significantly impact transmission efficiency. Ultimately, alignment depends on
23

fabrication and packaging equipment accuracy: in simulation, we can easily suppose
everything is perfectly aligned, but accomplishing this is too difficult in fabrication.
Simulation, though, can be used to assess the affect of misalignment on performance.
2.3 Summary
Some knowledge of theory is essential when developing the initial concept and design
of a device, and later on when running simulations to better understand the device’s
behavior. For instance, to create a waveguide coupler, one has to be aware of require-
ments like mode and index matching, as well as ways to translate those requirements
into a physical design. Our coupler design requires additional knowledge of graded
index waveguides and how quadratic grading in particular affects the flow of light.
Afterwards, simulations can be used to impart an intuitive feel for how the coupler
functions and how changing design parameters affect its performance. This can also
be a check on the theoretical concepts behind the coupler: do the simulations match
theory or were some of the initial assumptions fallacious? Finally, the fabrication
of the device can be used to confirm both simulations and theory, and serve as the
ultimate proof the coupler works.
24

Chapter 3
Simulation Methods
Simulations of the interaction of light with matter are an inexpensive and rapid
method to gain an intuitive understanding of how various structures affect the trans-
mission of light. With simulations, evaluating performance is far more rapid because
fabrication time is no longer a factor. More importantly, they provide a starting point
for fabrication by allowing us to dissect a device and its behavior so that the first
trip to the cleanroom is not a shot in the dark. Furthermore, we have greater control
over the important design parameters within a regulated environment.
However, simulations also have their limits: in an idealized environment, it is
difficult, if not impossible, to account for everything that will affect the performance
of an actual device. Therefore, despite their apparent usefulness, simulations provide
only a partial insight into device’s performance. Prototyping and testing are the
best method for proving that the design indeed works. Secondly, most, if not all,
simulations methods have drawbacks, whether in approximations assumed or in time
limits owing to computational intensity. As a result, they can only provide us with
an accurate picture of what will happen in limited ideal cases and are unable to take
into account every potential parameter variation that may arise in experiment. But
in combination with experiments, simulations are a powerful tool in device design.
Depending on the complexity of the simulated device, we can work on the initial design
and subsequent refinements iteratively, using simulations and device fabrication.
In this chapter, we review the simulation methods we use to evaluate device be-
25

havior. Both finite difference time domain (FDTD) and beam propagation method
(BPM) allow us to study the propagation of light through our coupler and into a
waveguide. From this, we can determine the optimal device dimensions—later used
as the starting point for mask layout and fabrication. Ray matrices offer us another
look at individual components of our structure, specifically the graded index stack
and the lens. We use them either as a tool for quick verification of the more complex
simulation methods, or as a simple technique to study the light paths through the
graded index stack or lens. Finally, we use the effective index method to collapse a
3D structure into a 2D one so that we can reduce the number of dimensions we work
with as well as simulation time.
3.1 Finite Difference Time Domain
3.1.1 Maxwell’s Equations
Maxwell’s equations are a set of four equations that describe the behavior of electro-
magnetic radiation. These equations were first presented by James Maxwell in 1864
and today are commonly written in differential form as
∇× H =∂
∂tD + J (3.1)
∇× E = − ∂
∂tB (3.2)
∇ · D = ρ (3.3)
∇ · B = 0 (3.4)
E and H are the electric and magnetic field strengths respectively, D the electric
displacement, B the magnetic flux density, and J and ρ the current and charge den-
sity [12]. Since we are working in photonics, we are only interested in source-free
situations so ρ = 0 and J = 0. The equations simplify further if our material system
26
is isotropic:
D = ǫE (3.5)
B = µH (3.6)
where ǫ, the material permittivity and µ, the permeability, are scalars. In the end,
we are left with
∇× E =∂
∂tµH (3.7)
∇× H =∂
∂tǫE (3.8)
∇ · E = 0 (3.9)
∇ · H = 0 (3.10)
which the finite difference time domain (FDTD) method solves, following the Yee
algorithm, to determine the behavior of E and H in a region of space over time.
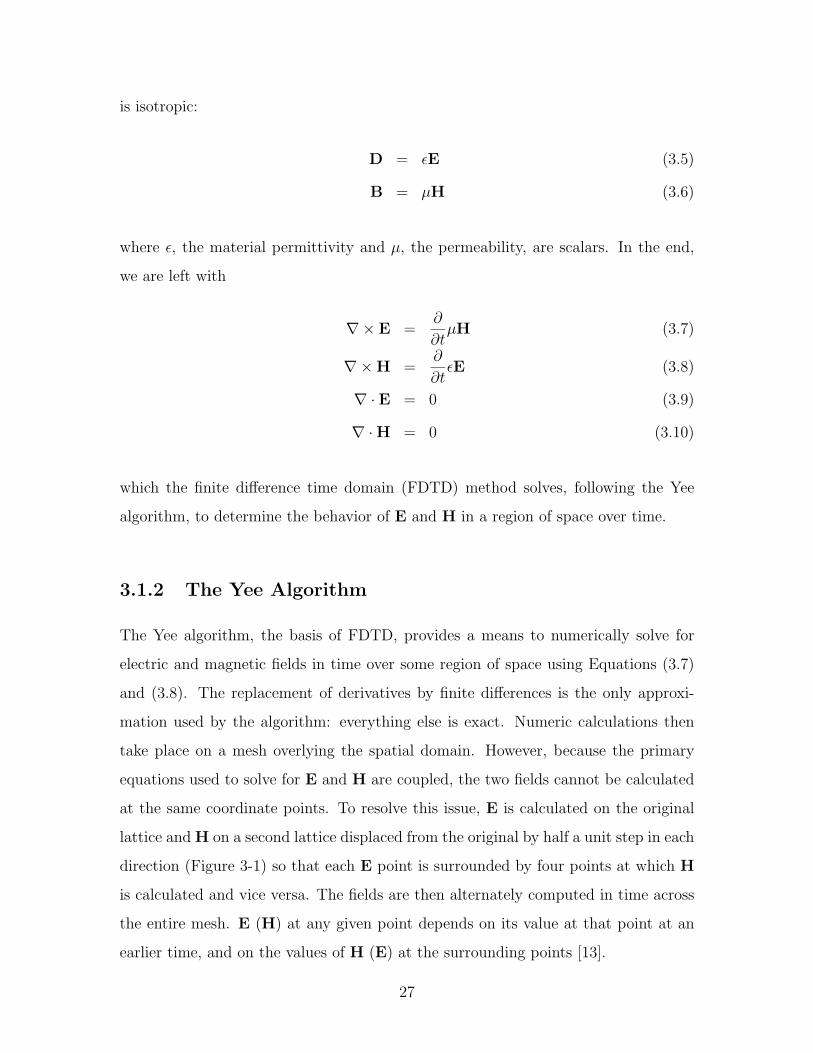
3.1.2 The Yee Algorithm
The Yee algorithm, the basis of FDTD, provides a means to numerically solve for
electric and magnetic fields in time over some region of space using Equations (3.7)
and (3.8). The replacement of derivatives by finite differences is the only approxi-
mation used by the algorithm: everything else is exact. Numeric calculations then
take place on a mesh overlying the spatial domain. However, because the primary
equations used to solve for E and H are coupled, the two fields cannot be calculated
at the same coordinate points. To resolve this issue, E is calculated on the original
lattice and H on a second lattice displaced from the original by half a unit step in each
direction (Figure 3-1) so that each E point is surrounded by four points at which H
is calculated and vice versa. The fields are then alternately computed in time across
the entire mesh. E (H) at any given point depends on its value at that point at an
earlier time, and on the values of H (E) at the surrounding points [13].
27

Ey
Ez
Ex
x
y
z
Hx
H y
Hz
Figure 3-1: Electric and magnetic field components on a FDTD unit cell.
In order to accurately simulate electromagnetic fields with FDTD, the grid spacing
has to be sufficiently small so that field strength does not appreciably change between
adjacent grid points and that the finite difference approximation holds. This implies
that for computational stability,
c∆t ≤(
1
(∆x)2+
1
(∆y)2+
1
(∆z)2
)
(3.11)
has to be satisfied for spatial steps ∆x, ∆y, and ∆z, and temporal step ∆t. Also
appropriate boundary conditions are needed or else extraneous reflections will be
introduced at the edges of the computational domain and affect the simulation. Typ-
ically, perfectly matched layers are used. Developed by J.P. Berenger, this technique
implements layers that absorb radiation without creating reflections at the simulation
boundaries [14].
28

3.1.3 Coupler-Specific Considerations
The FDTD method is one of our two primary approaches—the other being BPM—to
simulating our coupler structure. Because FDTD calculates E and H at numerous
points in space over a period of time, it can produce accurate results, but is also com-
putationally intensive, it’s primary drawback. Consequently, we are able to handle
only 2D simulations on our standard personal computers; evaluating 3D structures
requires access to a supercomputer.
When working in 2D, we can separate the light into two polarizations: transverse
electric (TE) and transverse magnetic (TM), as shown in Figure 3-2. If light propa-
gates along the z-axis and the structure is defined in the xz-plane, then for TE polar-
ization, E is perpendicular to the plane of incidence so E = yEy and H = xHx + zHz
with all other components set to zero. The situation is similar for TM polarization
except E and H trade places. Equations (3.7) and (3.8), when broken down into
component vectors, become
∂
∂zEy = µ
∂
∂tHx
∂
∂xEy = −µ
∂
∂tHz (3.12)
∂
∂zHx −
∂
∂xHz = ǫ
∂
∂tEy
for TE polarization and
− ∂
∂zHy = ǫ
∂
∂tEx
∂
∂xHy = ǫ
∂
∂tEz (3.13)
∂
∂zEx −
∂
∂xEz = −µ
∂
∂tHy
for TM polarization. If the grid spacings are equal so that ∆x = ∆z = ∆, the
stability criterion, Equation (3.11), simplifies to
c∆t ≤ ∆√2
(3.14)
29

H yEz
Hx
x
y
z
Ex
EyHz
x
y
z
Figure 3-2: Two dimensional FDTD unit cells for TE and TM polarization.
To perform these simulations, we used FullWAVETM, a commercial FDTD simula-
tion package produced by the RSoft Design Group. This software comes with a CAD
(Computer Aided Design) layout program, which simplifies construction of devices for
simulations. Simulations are run by defining a device through its dielectric structure
and specifying parameters like wavelength, grid spacing, time step, and field profile
of the radiation source. FullWAVE components, known as time monitors, calculate
power, E × H, as a function of time across a user-specified line segment.
All our simulations used a Gaussian source of an appropriate width to represent the
input fiber mode. We used time monitors to evaluate power present in the waveguide
relative to coupler input power so we could assess coupling efficiency and optimize
this ratio through appropriate design modification. To meet the stability condition,
we chose a grid size of ∆x = ∆z = 0.05 and c∆t = 0.024. Finally, we chose TE
polarization for our simulations because this is the more lossy of the two polarizations
and therefore gives us the upper limit on loss.
3.2 Beam Propagation Method
Our other simulation approach is the beam propagation method (BPM), which uses
the Helmholtz wave equation to calculate how light propagates in media. Like FDTD,
BPM calculates the electric field at points on a mesh overlying some spatial domain.
However, instead of computing E and H at all possible points for each time step, it
calculates the field on a plane perpendicular to the propagation axis then steps forward
30

in space to the next plane and repeats the calculation, continuing until the field along
the length of the structure is known. In order to do this with the Helmholtz equation,
BPM makes some assumptions about the propagating waves, as will be detailed in
the following sections.
3.2.1 The Helmholtz Wave Equation
The Helmholtz equation is derived from the source-free Maxwell equations in isotropic
media, Equations (3.7) to (3.10). By separating the fields into their components to
obtain scalar partial differential equations, we can solve for Ex through elimination
of Hx, Hy, and Hz:
0 =
(
∂2
∂x2+
∂2
∂y2+
∂2
∂z2− µǫ
∂2
∂t2
)
Ex
=
(
∇2 − µǫ∂2
∂t2
)
Ex (3.15)
Doing likewise with Ey and Ez leaves us with three equations of the same form as
Equation (3.15), which can be combined to give
0 =
(
∇2 − µǫ∂2
∂t2
)
E (3.16)
The resulting wave equation signifies that E behaves as a wave with velocity v =
(µǫ)−1/2 = c/n. The same equation can be derived for H and shows the quantity to
be a wave with the same properties as E.
3.2.2 BPM Approximations
BPM uses Equation (3.16) to calculate light propagation; however it first makes
assumptions so that the equation easier to work with. First off, by taking E to be a
scalar, the vector field can be replaced with E(x, y, z, t) = φ(x, y, z)eiωt and the time
derivative eliminated, leaving
0 =(
∇2 + k2)
φ (3.17)
31

where k = ω√
µǫ. The next approximation is to factor out rapid phase variations
along the propagation axis. In doing this, we also assume that the wave predomi-
nantly travels along this axis, the z-axis, and so impose a paraxiality condition on
simulations. Introducing a slowly varying field, u, to φ and removing phase variations
gives us
φ(x, y, z) = u(x, y, z)eikz. (3.18)
where k is a constant representing the average phase variation of φ. Substituting
Equation (3.18) into Equation (3.17),
0 =
(
∂2
∂x2+
∂2
∂y2+
∂2
∂z2
)
u +(
k2 − k2)
u + 2ik∂
∂zu (3.19)
If we next assume that u varies very slowly with z, we can eliminate ∂2u∂z2 because the
second order change will be much smaller than the first. Under this slowly varying
envelope approximation, we finally arrive at
∂
∂zu =
i
2k
[
∂2
∂x2u +
∂2
∂y2u +
(
k2 − k2)
u
]
(3.20)
which is a first order initial value problem rather than a second order boundary
value problem. To further reduce simulation calculations, only forward propagating
solutions to Equation (3.20) are considered: backwards-traveling waves, including
reflections, are assumed negligible. More advanced BPM approaches relax these ap-
proximations, but we will not cover them here.
As is typically the case, simplifying assumptions can be both beneficial and re-
strictive. Since the field is defined on a mesh, derivatives in Equation (3.20) become
finite differences. With the revised Helmholtz equation, we can solve for the field
in a structure by starting with an initial field distribution at one end and integrat-
ing Equation (3.20) on planes perpendicular to the propagation axis until the other
end is reached. Factoring out rapid phase variations from the problem permits a
coarser mesh along the propagation direction, thereby further decreasing calculation
time. However, devices that depend on phase changes may not be suited for BPM
32

simulations because of the averaging of the phase variations. Also, the paraxial ap-
proximation excludes structures that allow waves to deviate at large angles from the
axis, such as propagation from a waveguide into free space. Finally, the elimination
of the second derivative in the slowly varying envelope approximation prevents Equa-
tion (3.20) from simultaneously dealing with forwards- and backwards-propagating
solutions and only forward are considered to reduce computational intensity. The
disregard for backwards-propagating waves means that BPM cannot accurately sim-
ulate structures with high index contrast along the propagation direction because it
cannot account for the effect of reflected waves on the field distribution [15].
3.2.3 Coupler-Specific Considerations
Despite all the restrictions of BPM, it is still one of the more commonly used sim-
ulation methods. We rely on it for some aspects of our coupler and believe it to be
reasonably accurate because its results are comparable to those of FDTD. Also, un-
like FDTD, it can handle 3D simulations on a personal computer within reasonable
amounts of time.
For our simulations, we used another RSoft software package, BeamPROPTM,
designed for BPM modeling. The package includes the same CAD layout program as
FullWAVE, but we constructed different structures since all our FDTD simulations
were run in 2D but BPM were done in 3D. As before, simulations are run by defining
the dielectric structure of a device and specifying wavelength, grid spacing, field source
profile, and so forth. However, instead of time monitors, BeamPROP evaluates power
through mode overlap as a function of propagation distance using the equation
P =∫ ∫
ψref (x, y)ψsim(x, y)dA (3.21)
where ψref and ψsim are the normalized field distributions of a reference mode and
the field within the simulated structure, respectively.
When running simulations, we relied on two reference modes (ψref ), the fiber
fundamental mode and the waveguide fundamental mode, and plotted their overlap
33

with the field in our coupler. Optimizing coupling efficiency is equivalent to optimiz-
ing mode matching conditions—and therefore mode overlap—so that the maximum
amount of power is transmitted through the coupler and into the waveguide. The same
fiber fundamental mode, represented by a Gaussian, was used as the input source.
Finally, we used a mesh with ∆x = ∆y = 0.03 and ∆z = 0.2 to take advantage of
the coarser grid spacing along z.
3.3 Ray Transfer Matrices
FDTD and BPM, even with restrictions, provide reasonably complete pictures of light
propagation in media. They are able to simulate a number of devices from waveg-
uides to ring resonators. However, they can also be time consuming—particularly 3D
FDTD—and even with commercial simulation software, can still be confusing for the
novice user.
Ray optics presents a simpler picture of light. Instead of oscillating waves, light
is represented by rays that can reflect off surfaces or refract upon passing through an
interface, but do not interfere with each other or create resonances. This picture is
valid if the light wavelength is much larger than the structure dimensions.
A ray is defined as the normal to an optical wavefront and is represented by a
vector containing its displacement from the propagation (z) axis and its angle with
respect to that axis:
r(z)
θ
(3.22)
Typically θ is sufficiently small so that sin θ ∼ θ and the paraxial approximation
applies.
The interaction of rays with various optical elements can be described with trans-
form matrices, that is, [rout] = [T ][rin]. For instance, when a ray travels a distance of
d through free space, its displacement with respect to the z-axis changes, but not its
angle so rout = rin + d tan θin ≈ rin + dθin and θout = θin. The resulting matrix is
34

1 d
0 1
(3.23)
Matrices for more complex optical elements can be derived, but we will not do so
here (see [16] for details). Among the elements we are most interested in are spherical
dielectric interfaces,
1 0
n2−n1
n2Rn1
n2
(3.24)
where R, the radius of curvature, is positive if the interface is concave towards the
incident ray and negative if convex. We will also employ the matrix for propagation
in a medium with a quadratic index profile, defined by
n = no
(
1 − k2
2kr2
)
(3.25)
The medium has the same effect as a lens on ray propagation:
cos(√
k2
kz) √
kk2
sin(√
k2
kz)
−√
k2
ksin
(√
k2
kz)
cos(√
k2
kz)
(3.26)
Ray matrices fall far short of BPM and FDTD when it comes to understanding the
interactions light with a device and evaluating performance. However, once derived,
they are quick and easy to use to comprehend the direction of light flow. Also,
they provide a means to concentrate on a single aspect or parameter of a device and
investigate how a second parameter is affected by the first without having to worry
about the larger picture.
3.4 Effective Index Method
Between BPM and FDTD, the latter is the better method to evaluate the effect of
the lens on coupling efficiency. However, our FDTD software can only handle 2D
simulations so it is unable to account for the effect of the graded index stack on mode
35

shape and effective index. To get around this, we used the effective index method
(EIM) to collapse the 3D coupler into a 2D structure which FDTD can handle (see
Section 4.1.3).
The effective index method translates the index a mode in a 3D structure sees
to the core index of a slab waveguide in a 2D structure. The index depends on the
mode number, wavelength, and device cross-section. We can only consider one mode
at a time and that mode will vary with propagation distance because of the taper’s
changing cross-section. Although this approach doesn’t provide us with an exact
answer, it can still assist in creating an approximate picture of light interactions with
a collapsed structure. The following derivation follows the one presented in [10].
EIM views the 2D slab waveguide as a finite potential well of width 2a centered
at x = 0 and potential function
n =
ncore |x| ≤ a
nclad |x| > a(3.27)
where ncore and nclad are the core and cladding indices of the slab waveguide, re-
spectively. Electromagnetic fields propagating in the waveguide are subject to the
boundary conditions imposed by the potential function. Specifically, the longitudinal
component of the field—in this case, the z component if the waveguide lies in the
xz-plane—must be continuous across the core/cladding interface. (The transverse
component also has to satisfy the same boundary condition for the slab waveguide,
but we ignore it since it can be written in terms of the longitudinal component through
Maxwell’s equations.) Thus, the longitudinal component of a field propagating along
the z-axis can be written as
Hz = hz(x)e−iβzeiωt (3.28)
where hz(x) is the field amplitude and the exponentials show that Hz oscillates in
both space and time.
We chose Hz because we are assuming TE polarized light in the waveguide; there-
fore Ey is the transverse component and a function of Hz. Since Hz represents a
36

propagating magnetic field, it must also satisfy the Helmholtz equation. Substituting
Equation (3.28) into Equation (3.16) gives us
0 =∂2
∂x2hz(x) + γ2hz(x) (3.29)
γ2 = n2k2o − β2 (3.30)
ko is the free space wave number and is equal to 2π/λ = ω/c. All that remains is to
choose hz(x) such that the boundary conditions are satisfied. For a bound state (or
mode),
hz(x) =
A cos(ux) + B sin(ux) |x| ≤ a
Ce−w|x| |x| > a(3.31)
so that it oscillates within the core, but decays in the cladding. If we ignore the sine
term in Equation (3.31) and consider only cosine or even functions, we can solve for
constants u and w by substituting Equation (3.31) into Equation (3.29):
u2 = n2corek
2o − β2 (3.32)
w2 = β2 − n2cladk
2o (3.33)
Together, u and w form a transcendental equation,
tan(ua) =w
u(3.34)
The number of solutions to this equation determines how many even TE modes exist
in the waveguide. For the odd modes, we ignore the cosine term in Equation (3.31)
instead and solve for u and w as before. Further math shows that a 2D waveguide
will always support at least one even mode and zero or more odd modes.
The propagation constant, β, is determined by the effective index of the 3D mode:
β = neffko (3.35)
In this manner, we can relate 3D structures to 2D ones and control how Hz propagates
37
along the z-axis and its spatial frequency (see Equation (3.28)). If we know β, nclad,
ko, and a, we can calculate ncore, the core index of the collapsed 2D waveguide.
3.5 Summary
For our simulations, we primarily rely on FDTD and BPM to provide us with op-
timal dimensions for our coupler design as well as an intuitive picture of how light
interacts with the structure. Although FDTD is limited to 2D simulations and BPM
makes assumptions which may or may not be valid given our coupler, we believe a
combination of these two techniques is sufficient for us to understand how varying
design parameters affects coupling efficiency. In a few situations, ray matrices serve
us better because they allow us to focus on how changing a single parameter affects a
second parameter and eliminate the larger picture. They also have their restrictions
but on the whole are a useful “quick and dirty” method to understanding the problem.
Finally, EIM provides a means for us to collapse a 3D structure into two dimensions
so that we can use FDTD. Even though it itself is an approximation and can only
deal with a one mode even in multimoded structures, EIM opens the door to using
both FDTD and BPM to study the same parameter so we can confirm our results. Of
course, all simulations are performed in an idealized environment because it is nearly
impossible to take every possible parameter into account without overly complicating
the problem. Thus, the ultimate check will be whether experiment matches with the
design simulations.
38

Chapter 4
Device Design
To optimize the coupler design and evaluate the effect of changing parameters on
design performance, we relied on the combination of the simulation methods detailed
in the preceding chapter. However, it is difficult for us to account for every design
parameter in our simulations and optimize each one. Therefore, we limited ourselves
to parameters essential to mask layout—specifically, coupler dimensions—and fixed
the remaining parameters at appropriate values, chosen to satisfy fabrication or mea-
surement preconditions. The parameters to be optimized include
• Coupler length
• Input facet width
• Output facet width
• Lens radius
They are illustrated in Figure 4-1. In Section 4.1, we outline our approach to opti-
mizing each one. Fixed parameters include
Wavelength 1550 nm, one of the telecommunications wavelengths
Input fiber SMF28 (single mode fiber) with a 6 µm core diameter; from our calcu-
lations, this corresponds to a 6.2 µm mode field diameter.
39

Figure 4-1: Coupler design parameters.
Stack grading profile defined as a seven-layer half-parabolic step profile starting
at the waveguide index to the cladding index (Figure 4-2). We chose this profile
to simplify the simulation layout and under the assumption that we will be able
to grow all seven layers in the dielectric chemical vapor deposition (DCVD)
chamber.
Stack height 6 µm, the height we have been working with in developing the fabri-
cation process, particularly the stack etch step.
Stack taper linear, lateral taper for horizontal focusing
Waveguide index set to 1.7, the index of stoichiometric silicon oxynitride. The
lower index contrast allows for BPM calculations and reduces N–H bond ab-
sorption at 1510 nm.
Waveguide dimensions 0.9 µm square cross-section to limit polarization depen-
dence and admit only one mode.
40

1.45 1.5 1.55 1.6 1.65 1.7−1
0
1
2
3
4
5
6
7
Refractive Index
Sta
ck H
eigh
t [µm
]
Figure 4-2: Parabolic stack index profile for the coupler.
Section 4.2 reviews some of these parameters in greater detail, including qualitatively
discussing what may happen should the parameter value change.
4.1 Variable Design Parameters
The four variable parameters are the coupler dimensions needed for mask layout,
specifically coupler length, input and output facet width, and lens radius of curvature.
Through simulations, we found their optimal values and how deviation from these
values affects coupler performance. Two or three dimensional structures were used,
depending on the simulation technique (FDTD or BPM, respectively). Also, all
simulations assumed infinite cladding surrounding the structures.
4.1.1 Length
The optimal coupler length is determined by the coupler’s parabolic grading profile,
which vertically focuses incident light into the highest index bottom layer. For our
purposes, we concentrate on the first focal point of the periodic self-imaging phe-
nomenon. Thus, the optimal length of the coupler equals the focal length of the
graded index (GRIN) structure, which is halfway between the coupler input facet
and the first self-image. The horizontal focal length, determined by the lens and
41

Figure 4-3: Ez distribution in a 2D GRIN structure used in FDTD coupler lengthsimulations.
taper, is then adjusted so that it matches the vertical focal length.
We started our simulations by computing the optimal coupler length with FDTD
without the influence of lenses and tapers. Simulations were run for different GRIN
stack lengths for the coupler yz cross-section with the index profile seen in Figure 4-2.
Ez distribution in a simulated structure is shown in Figure 4-3; most of the power
enters the waveguide, but some leaks from the output facet or directly from fiber
to cladding. The waveguide power is averaged across three points to remove slight
fluctuations due to the presence of a second mode in the 2D slab waveguide. Because
of the differing geometry in three dimensions, we expect this will not be a problem;
simulations with Apollo confirm that a 3D square cross-section waveguide with similar
dimensions only supports a single mode. Results are plotted in Figure 4-4 and show
an optimum length of 19.5 µm. If the coupler is shorter or longer than ideal, light is
no longer focused in the bottom layer where it connects to the waveguide and power
leaks into the cladding.
With BPM, coupler length is calculated from peaks in mode overlap between
the electric field of a 3D box coupler (i.e. no taper) and either the fiber or the
42

12 14 16 18 20 22 24 26 280.2
0.3
0.4
0.5
0.6
0.7
0.8
0.9
1
Coupler Length [µm]
Co
up
ling
Effic
ien
cy
Figure 4-4: FDTD coupling efficiency versus coupler length.
waveguide fundamental mode, as defined by Equation (3.21). Only one simulation
run is necessary, compared with the multiple runs—one for each data point—FDTD
requires. Figure 4-5 shows how both overlaps change with propagation distance.
For overlap with the waveguide mode, the peak at 20.6 µm denotes optimal length;
for the fiber mode, the self-imaging peak occurs at 40.8 µm, approximately twice
the coupling length. The optimal length calculated by BPM is slightly larger than
that calculated by FDTD because of the approximations—most notably the paraxial
approximation—made by the former method.
Ray transfer matrices provide a sanity check estimate for coupling length, defined
as the convergence point of parallel rays entering a quadratic-index medium at normal
incidence. When we use Equation (3.26) to calculate the vertical position of a ray
as a function of propagation distance, we find that our coupler would have to be
17.4 µm long. Despite use of the same paraxial approximation as BPM, the result
from ray matrix calculations is shorter than that from FDTD. We suspect this is due
to the difference in grading profile. FDTD and BPM use an step parabolic, whereas
ray matrices are derived based on a continuous function so rays always see an index
gradient, which forces them to converge faster.
43

0 5 10 15 20 25 30 35 40 45 500
0.1
0.2
0.3
0.4
0.5
0.6
0.7
0.8
0.9
1
Propagation Distance [µm]
Fu
nd
am
en
tal M
od
e O
verla
p
Self−ImagingLength
LengthCoupling
FiberWaveguide
Figure 4-5: BPM overlap of box coupler field with waveguide and fiber fundamentalmodes.
0 5 10 15 20 25
0
1
2
3
4
5
6
Coupler Length [µm]
Co
up
ler
He
igh
t [µ
m]
Figure 4-6: Path of rays after entering a quadratic GRIN structure (centered aty = 0).
44

Of our three approaches to calculating the vertical focal length, FDTD is probably
the most accurate because it makes the fewest assumptions, and BPM the second best.
This leads us to choose a length of 19.5 to 20 µm as the optimal value for our coupler
and the value we will use for mask layout.
4.1.2 Facet Width
To find the optimal coupler width, we used BPM to minimize mode mismatch between
the fiber and the coupler input facet, and again between the coupler output facet and
the waveguide. We did not take index matching into account because our coupler
design depends on a graded stack. Consequently, its performance may suffer from
Fresnel reflections due to the index difference across the interface (see Equations (2.3)
and (2.4)). If necessary we can later remedy this by use of an anti-reflection coating
on the input facet.
For the input facet, the fiber mode is sent through a 3D box coupler and peak
height at the self-imaging length plotted as a function of box width (Figure 4-7, left).
We omitted the lens for this simulation because, as we later see, the optimal lens
assumes the minimum possible radius of curvature allowed by the coupler width.
Also, from a processing standpoint, we prefer to keep width and lens optimizations
separate should the lens prove difficult to fabricate. The optimal input facet width
is 7.7 µm. Loss at small widths is due to a combination of power leaking into the
cladding from a wider fiber core and mode mismatch because the coupler fundamental
mode is more tightly confined than that of the fiber. At larger widths, cladding loss
to the left and right of the coupler decreases but mode mismatch remains, as the
coupler mode is horizontally elongated. Eventually, the coupler becomes so wide that
light from the fiber no longer interacts with the sidewalls and loss plateaus.
The output facet width is determined by propagating light through a 20.6 µm-
long, linearly tapered coupler—both with and without a lens—and optimizing for
overlap once the light has entered the waveguide. When waveguide and facet width
are equal, mode mismatch decreases as width increases. In this case, the output width
is restricted by the waveguide single mode condition. If instead we fix the waveguide
45

0 5 10 15 200.7
0.75
0.8
0.85
0.9
Input Facet Width [µm]
Fib
er M
ode
Ove
rlap
0 0.5 1 1.5 2 2.5 30.7
0.75
0.8
0.85
0.9
Output Facet Width [µm]
Wav
egui
de M
ode
Ove
rlap
No Lens5 µm Lens
Figure 4-7: BPM coupling efficiency versus input and output facet width.
dimensions to 0.9-µm and vary the facet width, overlap with the waveguide mode
peaks between 1.6 and 2.3 µm (Figure 4-7, right), depending on whether a lens is
present and its radius of curvature. This result is verified through FDTD simulations.
Figure 4-8 shows the electric field distribution at output facet widths of 0.9 and 2.3 µm
for a taper without a lens, compared to the waveguide fundamental mode. From this,
we hypothesize that the change in taper angle affects reflection off coupler sidewalls
to produce an interference pattern with a single peak for the wider output facet,
compared to the three peaks when taper output facet width matches that of the
waveguide. This clearly indicates that the taper supports multiple modes and that a
number of these are excited by the incoming light from the fiber.
In summary, optimization of mode overlap gives us 7.7 µm for the input facet
width and 1.6 to 2.3 µm for the output facet width. For subsequent simulations, we
set the output facet width to 0.9 µm—the waveguide width—by default because the
optimal output width depends on the lens radius of curvature. The fact that the
coupler supports multiple modes, a number of which are excited, implies that there
will be loss from modal conversion and the inability of the waveguide to support higher
order modes. Given our design and choice of fiber, modal conversion loss is inherent
to the coupler, although in the future, it may be worth investigating whether different
fibers excite different superpositions of modes and if some lead to lower conversion
46

Figure 4-8: Output facet E distributions for a taper without a lens. Facet is 0.9-µm(left) and 2.3-µm (right) wide; waveguide fundamental mode is show in the center.
loss than others.
4.1.3 Planar Lens
The lens and taper are used to change the horizontal focal length so that it matches
the vertical focal length. Between our two simulation methods, FDTD is the better
method for assessing the effect of the lens on coupling efficiency because it doesn’t
assume paraxial propagation. Since only 2D simulations are possible, we collapsed the
3D structure to a two dimensional one by EIM; from here, the effect of lens radius
of curvature on coupling efficiency was calculated. In these simulations, the total
coupler length, which includes the taper and the lens, remains constant so that the
vertical focal length is preserved. Also, we chose to fix the widths of the input and
output facets and leave the taper angle to change based on the taper length.
2D Core Index
To calculate the 2D core index with the effective index method (EIM), we first have
to find the effective index of the 3D field. This was accomplished with BeamPROP’s
mode solver, which propagates a field through a structure with z-invariant geometry
47

until the desired mode is either amplified or extracted using a correlation function.
Because of the coupler’s tapered geometry, the effective index varies with propagation
distance so we have to repeat the mode solving process for the different widths.
Since EIM can only deal with a single mode, we chose to work with the cou-
pler’s fundamental mode because it is the dominant mode excited in the collapsed 2D
structure. Using BeamPROP, we determined the effective index and entered these
values into a Matlab script, written to solve the EIM transcendental equation (Equa-
tion (3.34)) and calculate ncore. Both index values are plotted in Figure 4-9 for the
taper and waveguide. Initially, the effective index of the fundamental mode is almost
constant, provided most of the mode is in the core. As width decreases, the mode is
squeezed out into the cladding, which causes effective index to drop. From an index
matching standpoint, this is beneficial because it brings the coupler effective index
closer to that of the waveguide so reflection loss is at most 0.004 dB. To place an
anti-reflection coating at this facet to attain 100% transmission would likely be too
difficult and the small increase in efficiency not worth the effort.
0 5 10 15 201.52
1.54
1.56
1.58
1.6
1.62
1.64
1.66
1.68
Propagation Distance [µm]
Ref
ract
ive
Inde
x
3D Effective Index2D Core Index
Figure 4-9: Plot of 3D effective index from BeamPROP’s mode solver and 2D coreindex of a tapered coupler.
48

0 10 20 30 40 50 60 700.3
0.4
0.5
0.6
0.7
0.8
0.9
1
Radius of Curvature [µm]
Cou
plin
g E
ffici
ency
FDTD TaperBPM TaperBPM Box
Figure 4-10: Optimization of lens radius of curvature using FDTD and BPM for boxand tapered couplers.
Optimization
Once we obtained the 2D core indices, we entered them into a FullWAVE CAD file for
2D FDTD simulations to determine the optimal radius of curvature for the lens. For
simplicity, the lens was assumed to have a constant core index equal to that at the
taper input even though its cross-section rapidly changes with propagation distance.
FDTD coupling efficiency peaks at the minimum radius of curvature—around 4 µm—
before asymptotically decreasing to 0.92 as the radius approaches infinity (Figure 4-
10, stars). The basic trend is verified in by 3D BPM simulations with both box and
tapered couplers, as well as by ray transfer matrices. Ultimately, we chose a 5 µm
radius lens so the curvature would not be as tight as a 4 µm lens, but lose in coupling
efficiency would be minimal.
If the lens and the taper are considered separately, BPM simulations show that the
lens alone focuses light into a waveguide more efficiently than a simple box structure,
but less so than the taper without a lens. As can be seen from Figure 4-10, tapered
couplers produce consistently higher overlap—and therefore coupling efficiency—with
the waveguide mode for all lens radii compared to box couplers. The lens improves the
performance of a tapered coupler by 0.5%, but that of a box coupler by 3.8%. Once
49

the taper and lens are in place, performance can be further improved by optimizing
the output facet width, as was done in Section 4.1.2.
4.2 Fixed Design Parameters
In addition to dimensions, there are several other parameters that influence the prop-
agation of light through the coupler. Due to fabrication or measurement limitations
though, we have chosen to fix these parameters at appropriate values. We reviewed
them at the beginning of the chapter but in this section have selected a few to discuss
in greater detail.
4.2.1 Design Wavelength
In telecommunications, 1310 and 1550 nm are the wavelengths of interest because
of their high transmission through silicon dioxide. We chose to optimize the coupler
structure for 1550 nm light. BPM simulations indicate that vertical focal length
changes minimally with wavelength (20.5 µm for 1310 nm compared to 20.6 µm for
1550 nm) and neither does coupling efficiency (Figure 4-11). Therefore, we expect
that our coupler will perform reasonably well at 1310 nm even though it was not
optimized for that wavelength. One benefit of wavelength insensitivity is that the
same coupler can be used in triplexors for fiber to the home (FTTH) applications.
These devices rely on 1310, 1540, and 1560 nm light. If an even broader range of
wavelengths is desired, coupler and waveguide dimensions may require modification,
but the same GRIN stack can still be used so the fabrication process change is limited
to the mask layout and all devices can be fabricated on a single substrate.
4.2.2 Stack Parameters
Process design has also played a role in our decision to fix certain parameters. For
instance, we chose a half-parabolic profile instead of a full profile centered on the
waveguide to simplify fabrication. The half-profile has roughly the same effect on light
50

1250 1300 1350 1400 1450 1500 1550 1600 1650 17000.8
0.81
0.82
0.83
0.84
0.85
0.86
0.87
0.88
0.89
0.9
Wavelength [nm]
Wa
veg
uid
e M
od
e O
verla
p
Figure 4-11: Efficiency dependence on wavelength for the optimized 1550 nm coupler.
propagation as described in Section 2.1.2, but we can avoid growing and patterning
an additional graded stack under the waveguide. Since our fabrication experiments
focused on etching a 6-µm stack (above the waveguide) with a poly-silicon hard mask,
we chose this height for our simulations. Increasing the GRIN stack height would
decrease mode mismatch and increase coupling efficiency (to some extent); however,
we would also have to develop a new fabrication process to accommodate the film
stress and sloped sidewalls (see Section 5.3.5) that accompany use of a thicker stack.
4.2.3 Material Selection
To grow the stack, we rely on dielectric chemical vapor deposition (DCVD) equip-
ment, which is capable of depositing fully dense, uniform silicon oxynitride films. We
selected this material for a few reasons, one being that the coupler is designed for
telecommunication wavelengths and therefore should not absorb light in that range.
The fact that we are working towards a silicon platform for microphotonics also limits
our choices to CMOS compatible materials. Finally, varying the ratio of oxygen to
nitrogen allows us to deposit material with refractive indices between 1.46 (oxide) and
2.2 (nitride); we need this for the graded stack which uses indices from 1.46 to 1.7.
51

The bottom layer for the waveguide has an index of 1.7, the value for stoichiometric
silicon oxynitride. We chose this value because of the difficulty in accurately growing
a graded stack with a low index contrast between its top and bottom layers. On the
other hand, higher indices correspond to a nitrogen-rich oxynitride, which inherently
contains more N–H bonds that absorb light at 1510 nm. If we were to switch to
higher index waveguides, we would have to adjust the grading profile and therefore
coupler length, as well as use smaller waveguide dimensions to satisfy the single mode
condition. High index contrast stacks also have very short focal lengths which the
planar lens and taper may not be able to match.
4.3 Summary
Using FDTD and BPM, we optimized coupler dimensions under fabrication and mea-
surement restrictions imposed on other parameters. These dimensions, important for
mask layout, included length, input and output facet width, and lens radius of curva-
ture. Optimized values, along with those for fixed design parameters are summarized
in Table 4.1. The couplers on our mask layout are designed based on these values.
We can also use our simulation results to estimate coupling efficiency of the opti-
mized device. With BPM, this simply amounts to propagating a mode through the
optimized lensed taper; coupling efficiency is around 87% (0.58 dB loss). For FDTD,
we have to run two simulations—one in each plane—and multiply the results. The
GRIN stack alone has an efficiency of 96%, and the planar lens and taper of 98%
which, combined, gives us 94% (0.27 dB loss). This represents overall loss of a single
device, which includes loss due to mode conversion, radiation, and reflection, but not
to material absorption or interface scattering. We believe FDTD efficiency is higher
because it does not fully account for 3D mode conversion or mismatch. In our EIM
calculations to collapse the structure into two dimensions, we only considered the
fundamental mode; however, BPM simulations have shown that multiple modes are
excited, which leads to mode mismatch and mode conversion loss, and thus a lower
BPM coupling efficiency.
52

VariableLength 19.5 µmInput Facet Width 7.7 µmOutput Facet Width 2.3 µmLens 5 µm
MaterialCladding SiO2
Stack Core SiO1−xNx
Waveguide SiON
FixedWavelength 1550 nmFiber Core 6 µmCladding Index 1.46Stack Height 6 µmStack Index 1.46 to 1.7Taper linearWaveguide Dimensions 0.9 µmWaveguide Index 1.7
Table 4.1: Design parameters
From the effective index of the fundamental mode, we can also estimate the re-
flection loss from each interface with Equation (2.3). At the fiber/coupler interface,
loss amounts to 0.02 dB, assuming a mode propagating from an index-matching fluid
(n = 1.47) to the coupler with neff = 1.67. Coupling from air increases the reflection
loss to 0.28 dB. Loss at the coupler/waveguide interface is much smaller at 0.004 dB,
so total reflection loss is approximately 0.024 dB. This loss is still less than 10% of
the overall [FDTD] loss, which indicates that loss from mode mismatch and mode
conversion are the more important concerns. On the other hand, because of the cou-
pler’s multimode nature, completely eliminating mode conversion loss will be difficult
and as we have already optimized for mode mismatch, 0.58 dB may represent the
fundamental performance limit for our design. It will take more work—perhaps 3D
FDTD—to confirm this hypothesis.
53

54

Chapter 5
Fabrication
Although simulations are extremely useful in understanding the basics of how light
interacts with different structures, they are limited to ideal cases and “perfectly fab-
ricated” devices. Considering every design parameter and minute consequence of
varying each would be too complex and time-consuming. Secondly, a simulation re-
lies on basic principles to produce results, but if certain a phenomenon is unaccounted
for (and unexpected), it cannot be a factor in the results. Consequently, fabricating
a device is the best way to understand its behavior and ascertain that all effects are
accounted for in the simulation. Doing so also provides a way to assess simulation
limitations once measurements are compared with theory. We can then go back and
conduct more refined simulations given knowledge gained from fabrication to bet-
ter understand the device. In the end, simulation and fabrication form an iterative
process through which a device is developed and refined.
At our current stage, simulations serve as an adequate starting point for fabri-
cation, especially for device dimensions for mask layout. This chapter first covers
the fabrication process of the coupler and how simulations and design optimization
come into play for mask layout. Afterwards, the ideal device used in simulations is
contrasted with the fabricated device, and potential differences and their effect on
coupling efficiency discussed.
55

5.1 Process Flow
We plan to fabricate the coupler in MIT’s Microsystems Technology Laboratories,
a cleanroom facility located on campus. The Integrated Circuits Laboratory offers
a class 10 environment and access to the equipment needed for the coupler process,
outlined as follows:
1. Deposit oxide under-cladding on a blank n-type silicon wafer
2. Deposit a 0.9-µm thick waveguide layer and 1 µm of poly-silicon on top to serve
as a hard mask
3. Pattern poly-silicon with photolithography to define waveguides
4. Deposit remainder of graded oxynitride stack and poly-silicon hard mask
5. Pattern poly-silicon to define couplers, excluding input facet
6. Dry etch into the lower cladding so couplers and waveguides are completely
defined
7. Deposit of oxide over-cladding and poly-silicon hard mask
8. Pattern poly-silicon to define input facet and lenses
9. Dry etch stack to form input facet
10. Deep etch 200 µm into the silicon substrate
As mentioned in Section 4.2.3, silicon oxynitride is used for the coupler. The Applied
Materials DCVD permits us to do the deposition in a single run and adjust the gas
flow to account for the changes in composition. We chose a poly-silicon hard mask
for the dry etches in order to minimize mask erosion, which causes sloped sidewalls.
The final deep etch step serves to remove silicon substrate between the coupler input
facet and the edge of the die so that during measurement, the fiber can be brought
to within a couple microns of the facet.
56

5.2 Mask Layout
Simulation results aided in the layout of a test mask for the above fabrication process.
The mask contains 150 structures, the majority of which are variations on the opti-
mal coupler design. We also included straight waveguides for measurement system
alignment and paperclips to evaluate material and bending loss. Devices are spaced
50 µm apart and will be measured with a Newport Auto-Align station that employs a
fiber-to-fiber measurement technique so that insertion loss can be obtained. Our ulti-
mate goals are to determine if the device functions as predicted and whether varying
design parameters produces the same trends in coupling efficiency as our simulations
indicate. We also hope to identify sources of loss and ways to improve performance.
5.3 Deviations From Ideal
Since we know that the fabricated device structure will deviate from the ideal struc-
ture used in simulations, we varied coupler dimensions on the mask so that we will be
able to identify optimal parameter values and assess trends, even if they don’t match
those from simulations, and form a hypothesis why the difference exists. Many as-
pects of the ideal coupler can change in fabrication; here, we discuss, qualitatively
and quantitatively, some of those that we consider important.
5.3.1 Cladding Thickness
Although infinitely thick cladding is assumed for the simulations, we determined that
a 3-µm oxide layer is adequate to prevent light from leaking into the substrate. Our
calculations are based on the method described in [17]. Loss exponentially decays as
thickness is increased. At 3 µm, loss is around 10−3 dB, which is sufficiently low for
our purposes. Cladding thickness of 2 µm corresponds to 0.1 dB loss.
57

5.3.2 Fabrication Misalignment
Because the waveguide and the coupler are defined in separate lithographic steps, their
alignment in the wafer plane depends on the accuracy of the stepper. To investigate
how this will effect coupling efficiency, we used BPM to displace the two components
and calculate the field overlap in the waveguide (Figure 5-1). The structure simulated
did not have a lens. Offset of the waveguide along the x-axis results in power loss to
the cladding and in mode mismatch. Misalignment along the propagation axis creates
either a gap between the coupler and the waveguide, or could trap the poly-silicon
mask between the coupler layers. We only consider the gap in our simulations, but
we can assume that the presence of the poly-silicon will alter the mode shape. In
this case, we started with BPM and checked our results with FDTD, because BPM is
unable to account for reflected waves at the additional interfaces. If stepper alignment
accuracy is no worse than ±0.25 µm in either direction, additional loss should not
exceed 0.50 dB for x-axis displacement (with the wide output face) and 0.08 dB for
the gap, relative to optimal coupling efficiency.
−1 −0.5 0 0.5 10
0.1
0.2
0.3
0.4
0.5
0.6
0.7
0.8
0.9
1
x−Misalignment [µm]
Wav
egui
de M
ode
Ove
rlap
0 0.5 1 1.5 20.5
0.55
0.6
0.65
0.7
0.75
0.8
0.85
0.9
0.95
1
z−Misalignment [µm]
Wav
egui
de M
ode
Ove
rlap
BPM: 0.9µm FacetBPM: 2.3µm FacetFDTD: 0.9µm Facet
0.9 µm Output Facet2.3 µm Output Facet
Figure 5-1: Effect of coupler-waveguide misalignment on coupling efficiency for dis-placement along the x and z axes.
The lens, defined in the third lithographic step, may also be offset from the coupler.
An offset along the x-axis will slightly shift the focal point and some light will also
enter unfocused. For a 0.25-µm displacement, this effect is minimal—no more that
58

0.02 dB additional loss—because if the fiber is aligned properly, light still enters the
coupler rather than leaking into the cladding. Displacement along the propagation
axis effectively changes the length of the coupler and should have approximately
the same effect on coupling efficiency as described in Section 4.1.1, resulting in a
7 × 10⁻³ dB loss for a ±0.25 µm shift.
5.3.3 Packaging Misalignment
In addition to fabrication alignment of coupler components, we also have to align
the fiber to the coupler during packaging. Between fabrication and packaging mis-
alignment, the latter is more critical because low alignment tolerance leads to high
packaging costs. Coupling efficiency is optimized when both coupler and fiber cen-
ters are aligned. Horizontal and vertical displacements result in power loss to the
cladding, with maximum loss determined by the packaging tool’s accuracy. We used
BPM to simulate the effect of displacing the fiber with respect to the coupler’s input
facet and plot overlap once the propagating field entered the waveguide (Figure 5-2).
The plots indicate that a box structure is less sensitive than tapered couplers to fiber
misalignment, but of course, coupling efficiency is lower overall. If we want to limit
additional loss to ≤ 1 dB, we have to limit misalignment to no more than ±1.36 µm
in the horizontal plane, and ±1.13 µm in the vertical plane for the tapered couplers.
Because of our coupler design, neither horizontal nor vertical offset should affect focal
length, assuming normal incidence of light from the fiber on the coupler facet.
To study the effect of off-normal incidence from a tilted fiber, we relied on ray
transfer matrices. Because these matrices are derived under the paraxial approxima-
tion and Equation (3.26) uses a continuous function for the graded profile (rather than
a step function), calculated coupling lengths do not precisely match those from simu-
lations. However, the results can still help us understand how the structure responds
to fiber angle. Focal points are approximated as the points of ray convergence.
We used Equations (3.24) and (3.26) to look at horizontal and vertical focal point
shift. Focal points were calculated for incoming rays normal to the surface, θ = 0, and
at a slight angle, θ = 0.25 to 4◦. If the fiber is tilted in the vertical plane, the parabolic
59

−4 −2 0 2 40
0.1
0.2
0.3
0.4
0.5
0.6
0.7
0.8
0.9
1
x−Misalignment [µm]
Wa
veg
uid
e M
od
e O
verla
p
−3 −2 −1 0 1 2 30
0.1
0.2
0.3
0.4
0.5
0.6
0.7
0.8
0.9
1
y−Misalignment [µm]
Wa
veg
uid
e M
od
e O
verla
p
Lensed TaperTaperBox
Figure 5-2: Effect of fiber-coupler misalignment on coupling efficiency for displace-ment along the x and y axes.
GRIN medium behaves like a lens in that its focal length remains constant but the
focal point shifts vertically, as depicted by the path of rays in Figure 5-3; refraction
at the cladding-coupler interface was not taken into account. For a sufficiently large
angle, light will focus in the GRIN stack above the waveguide layer by the time
it reaches the coupler output facet, thus reducing coupling efficiency. Fiber tilt in
the horizontal plane also causes the focal point to shift without change to the focal
length. However, we expect that the horizontal shift will have a smaller impact on
coupling efficiency because the taper also aids in transforming the mode. The effect
of horizontal (compared to vertical) fiber tilt will have to be verified with experiment
because we do not have the means to easily model this situation. Figure 5-4 illustrates
how the focal point of rays passing through a spherical interface changes with fiber
angle.
5.3.4 Grading Profile
We consider this fabrication issue qualitatively, because we cannot predict exactly
how the fabricated GRIN profile will deviate from our designed parabolic profile. As
previously stated, our simulations use a parabolic profile defined in seven discrete
steps, each representing a film of oxygen-rich oxynitride, with indices varying from
60

0 5 10 15 200
0.5
1
1.5
2
2.5
3
3.5
4
4.5
5
Propagation Distance [µm]
Ver
tical
Pat
h [µ
m]
0 1 2 3 4 50
0.1
0.2
0.3
0.4
0.5
0.6
0.7
0.8
0.9
1
Vertical Incident Angle [deg]
Foc
al P
oint
Shi
ft [µ
m]
0° incidence
2.5° incidence
Figure 5-3: Vertical focal point shift of rays propagating through a parabolic GRINstructure centered at y = 0.
0 10 20 30 400
0.1
0.2
0.3
0.4
0.5
0.6
0.7
0.8
Propagation Distance [µm]
Hor
izon
tal P
ath
[µm
]
0° incidence
1° incidence
0 0.5 1 1.5 2 2.5 30
1
2
3
4
5
6
Horizontal Incident Angle [deg]
Foc
al P
oint
Shi
ft [µ
m]
5µm Radius10µm Radius30µm Radius
Figure 5-4: Horizontal focal point shift of rays propagating across an interface witha 5 µm radius of curvature (left) and 5, 10, and 30 µm lenses (right).
61

1.46 to 1.7 (c.f. Figure 4-2). If the index difference between the top and the bottom
layers remains the same, the focal length also stays constant. Increasing this difference
results in a shorter focal length because light sees a steeper index gradient and is
refracted more strongly; likewise, decreasing the index difference results in a longer
focal length. Deviations from a parabolic profile will result in a less defined focal
point, in addition to possibly changing the focal length.
5.3.5 Sidewall Angle
Sidewall angle is also evaluated qualitatively due to the difficulty in laying out appro-
priate structures within the limits of the RSoft CAD program. Sloped sidewalls occur
in deep etch processes when the protecting mask layer erodes around the edges. This
allows variable amounts of lateral etching to occur down the sidewalls so that the
top has dimensions smaller than the original mask but the base is nearly unaffected
(Figure 5-5).
The presence of the slope not only changes the mode shape, but also affects light
entering and exiting the coupler. Mode shape variations cause modal mismatch and
can change the effective index, leading to less efficient coupling. More serious however
are the slopes of the input and output facets. A slanted input facet is equivalent to
tilting the fiber downward, thus causing the focal point to shift vertically. For the
output facet, a sloped sidewall may result in a triangular gap between the coupler and
the waveguide, even if the lithographic alignment is perfect. We could compensate
for this in the mask layout by adding a predetermined overlap between the coupler
and the waveguide, based on the severity of the sidewall angle. Our current mask
layout does this in a few structures, but based on our simulations in Section 5.3.2,
the problem may be relatively minor.
5.3.6 Material and Interface Loss
Material absorption and scattering due to core-cladding interface roughness represent
other sources of loss our simulations do not account for. Although at 1550 nm loss
62

Figure 5-5: Coupler with sloped sidewalls.
reaches a minimum for silicon oxide, a small amount of absorption and [Rayleigh]
scattering still occur. Also, adding nitrogen to the material not only raises its re-
fractive index, but also increases absorption at 1510 nm due to a greater number of
N–H bonds. However, given the short length of our coupler, material loss should be
a minor problem: only for the waveguide might it become an issue.
Interface roughness will most likely play a larger role in reducing coupling ef-
ficiency. After the dry etch process, sidewalls may be both sloped and textured.
Therefore, when light interacts with these walls, it will be randomly scattered or ab-
sorbed by electrons in interface states. If field is concentrated in the structure center
and barely touches with the sidewalls (e.g. near the coupler input facet), scattering
will not be a problem. But as the coupler tapers, the field is forced into the cladding
and interaction with the interface increases.
5.4 Summary
The fabrication of a device is of particular importance if we want to determine whether
or not it behaves as our simulations predict. Given the coupler structure and simu-
lations, we have developed a fabrication process and designed a mask for use in that
63

Loss Source Importance
Mode mismatch Very importantMode transformation ImportantReflection loss UnimportantFabrication misalignment ImportantPackaging misalignment Very importantChanges to grading profile UnimportantSidewall angle ImportantMaterial absorption UnimportantInterface scattering Important
Table 5.1: Potential sources of loss that can decrease coupling efficiency and theirrelative importance to our design.
process. We then tried to evaluate how deviations from the ideal structure will affect
the coupling efficiency of the fabricated device and how tolerant the structure is of
these deviations. These possible sources of loss in coupling efficiency, along with mode
mismatch and transformation, and reflection loss from Chapter 4, are summarized in
Table 5.1. We have attempted to impart a sense of which concerns are most relevant
to our design and have the potential to substantially decrease coupling efficiency if not
carefully dealt with. In some cases, our sense is based on speculation and intuition
because simulations would be too complex. For misalignment tolerance, we expect
that fabrication misalignment loss should not exceed 0.6 dB if stepper accuracy is
±0.25 µm. Fiber misalignment with the coupler can be no more than ±1.13 µm
overall if loss is to remain below 1 dB. As for the effect of the sidewall angle, interface
roughness, and material absorption, we will have to wait for measurements of the
fabricated coupler but can anticipate that the coupler is too short to cause significant
loss through absorption or scattering.
64

Chapter 6
Design Comparisons and
Discussion
There are three key requirements for a coupler: mode matching, index matching, and
alignment tolerance. Other factors, however, also come into play, including the cou-
pler’s polarization dependence, the complexity of its design and fabrication process,
and whether or not that process can be integrated with that of other optical compo-
nents. Therefore, while a good coupler design should not only be able to perform in
the first three areas, but also be feasible to fabricate.
Numerous coupler designs have been presented in literature; some of these, we
review below before comparing them with our design. We also discuss our design in
the context of the primary requirements of a coupler.
6.1 Fiber-to-Waveguide Couplers in Literature
The basic concept of using a coupler to transfer light between devices is not new. Sev-
eral examples of fiber-to-waveguide couplers can be found in literature and present
different approaches to meeting the mode transformation and index matching require-
ments. A number of these devices are designed for the quaternary system InGaAsP
with InP cladding because of the need to couple light from laser diodes to waveguides
and fibers, but the basic principles remain. We include some of the III-V compound
65

devices in our review to present a broader picture of coupler design.
6.1.1 Fiber End Couplers
Fiber-to-waveguide couplers can either be fabricated as part of the waveguide, such
as our coupler design, or as part of the fiber. Microlenses [18] and graded index fiber
tips [19] belong to the latter category. These components are either micromachined
or spliced onto the end of a fiber and serve to reduce the mode spot-size. However,
reducing mode size is not equivalent to mode transformation: the Gaussian mode is
radially contracted rather than reshaped to the elliptical waveguide mode so loss from
modal mismatch persists. Sometimes, this is considered an acceptable trade-off [20].
Also, fiber side couplers cannot account for index mismatch between their output
facet and the waveguide input facet because they are typically the same material as
the fiber itself. Finally, alignment tolerance becomes more critical because of the
small output mode [9].
6.1.2 Waveguide End Couplers
Couplers on the waveguide end don’t suffer from the same tight alignment tolerances
and can potentially be designed for mode and index matching with both the fiber
and the waveguide. For these reasons, the on-chip coupler is preferable. On the other
hand, these devices have other drawbacks in that they are very long or difficult to
fabricate.
One class of waveguide end couplers is grating couplers, which use square gratings
to diffract light into a waveguide from an out-of-plane fiber in the superstrate [21, 22].
This has the benefit of being able to couple fibers to thin silicon-on-insulator (SOI)
waveguides. Typically these couplers rely on long, shallow gratings, but Taillaert et
al present a design with short, deep gratings to allow coupling perpendicular to the
wafer surface [23]. The vertical fiber configuration reduces the coupler footprint, but
at the same time complicates simulation and fabrication of the device. Taillaert’s
coupler has a theoretical efficiency of 74% but only 19% (7.2 dB) was measured;
66

Figure 6-1: Examples of an inverse-tapered coupler (foreground) and a tapered cou-pler. Light from the fiber enters at the left end.
however, experimental coupling efficiency as high as 70% (1.5 dB coupling loss) has
been realized [22]. Because of their small period, grating couplers described in litera-
ture were fabricated using electron-beam lithography, a time-intensive technique not
suited for mass production.
Tapered couplers can potentially perform better than grating couplers, but in some
cases at the expense of chip real estate or design simplicity. Most of these couplers
have linear tapers, but a few rely on exponential or parabolic tapers [24, 25]. We can
group these devices into two broad categories: inverse tapers, which increase from a
small point at the fiber end to the waveguide dimensions, and [standard] tapers, which
decrease from fiber to waveguide dimensions (Figure 6-1). More complex structures
may employ combinations of the two [8].
Inverse-tapered couplers rely on a small core tip to lightly perturb the incident
fiber mode; they then gradually increase to adiabatically reshape the fiber mode to
that of the waveguide. The tip cross-section is optimized for mode and index matching
and, for the basic inverse taper, can accommodate a misalignment up to ±2.5 µm with
no more than 1 dB additional loss [26]. Although fabrication of a lateral taper is the
easiest approach, vertical tapers have been realized through processes such as shadow
masking, diffusion-limited etching, and selective area growth techniques, particularly
67

for the InGaAsP materials system [20, 27]. Measured coupling efficiency, or loss from
mode conversion, is around 0.9 dB for the basic device design [26], but can be as low
as 0.4 dB [28]. The primary disadvantages of these couplers are their length, which
can be anywhere from 500 to 1500 µm because of the adiabatic constraint, and their
need for electron-beam lithography to define the lateral taper tip; vertical tapers also
have other non-trivial fabrication requirements.
Recently, Almeida et al proposed and demonstrated a nanotaper which is able to
couple light over 40 µm using a parabolic taper fabricated from SOI [24]. With a
coupling efficiency of 0.5 dB and ±1.5 µm alignment tolerance, this compact design
is clearly an improvement over the long adiabatic tapers with minimal sacrifice in
performance.
The remaining tapered couplers confine—rather than perturb—the incident fiber
mode through total internal reflection, and force the mode to adiabatically reshape
with the changing coupler dimensions. The input facet cross-section commonly has di-
mensions similar to those of the fiber core and the output facet, dimensions similar to
those of the waveguide. Both lateral and vertical tapers are used, the latter typically
fabricated with graytone lithography. Measured coupling efficiency is slightly higher
than that of inverse-tapered couplers, with losses around 0.6 dB [29] or as low as
0.15 dB [30]. However, because of the SOI materials system (versus InGaAsP/InP),
overall loss can significantly higher owing to interface scattering [29, 31]. Another
drawback to tapered couplers is high reflection at the input facet, which arises be-
cause the coupler itself is typically fabricated from the same [high index] material as
the waveguide core and the fiber from doped silica. In some cases, this can be re-
solved by adding an anti-reflection coating [30, 32], but such a layer may be difficult
to apply. Finally, the adiabatic constraints of these couplers require that they be
around 500 to 1500 µm [29, 30] in length, on par with the inverse-tapered couplers.
To reduce coupling length, Manolatou and Haus developed a tapered coupler
designed to decrease beam spot-size over a few microns [9, 32]. They accomplished
this with a quadratic GRIN stack for vertical, and a planar lens and lateral taper for
horizontal mode-size reduction—effectively amounting to a 3D lens on the waveguide
68

end. Although performance is slightly compromised compared to adiabatic tapers—
simulations indicate that coupling loss is around 1 dB—the advantage lies in the
design’s small footprint, which allows for dense optical integration. The coupler
presented in this thesis is actually a variant on Manolatou’s design. The differences
lie in our use of lower index contrast material (oxynitride instead of silicon) for the
waveguide core, and in our asymmetric GRIN stack to simplify fabrication, compared
to the full, symmetric quadratic profile.
6.1.3 Comparison
As with many devices, coupler design and fabrication involve trade-offs. In some
ways, such as fabrication process complexity, our coupler design has improved upon
its predecessor, but potentially at the expense of coupling efficiency. Likewise, these
two couplers are very short (5.5 and 20 µm) compared to the aforementioned adiabatic
tapers, which can be upwards of 1 mm long. But while the compact couplers lend
themselves very well to dense optical integration, they act more as lenses to shrink
the mode—ours even introduces some asymmetry—rather than reshaping it to that of
the waveguide. Adiabatic couplers, depending on their design, also have advantages
and drawbacks. Compared to inverse tapers, standard tapers don’t require a very
fine tip or tight lithography specifications, but they typically need anti-reflection
coatings, which can be difficult to deposit on vertical input facets. In some cases,
coupler fabrication is just too complicated or expensive. Electron beam writing,
for example, is a time-consuming and costly process so couplers that rely on this
cannot be scaled for mass production (albeit today, steppers in industrial fabrication
facilities could probably handle the small dimensions these couplers require). The
ultimate goal in fabrication is a CMOS (complimentary metal-oxide-semiconductor)
compatible process for the silicon microphotonics platform so use of III-V compounds
is undesirable. Ultimately, numerous trade-offs have to be considered for the design
and fabrication of a coupler—or any optical device—so in the end, performance may
have to be sacrificed for a gain elsewhere.
69

6.2 Design Constraints
Regardless of the advantages and drawbacks of a coupler design, at the most basic
level, it should be able to match and transform modes for the two components it
connects, match index difference at each facet, and be tolerant of misalignment. We
tried to account for the first of these criteria by varying input and output facet width
to minimize mode mismatch with both the fiber and the waveguide. The mismatch
was calculated based on BPM mode overlap with the fiber and the waveguide fun-
damental modes, respectively. Overall coupling loss is shown to be 0.58 dB for BPM
and 0.27 dB for FDTD. Because FDTD cannot handle 3D mode transformation, we
hypothesize the difference in these two values is due to mode conversion loss and
therefore can estimate this to be around 0.3 dB. Because of our use of a GRIN stack,
we consciously chose not to optimize for index matching at the input and output
facets—the second criteria listed above. This results in a 0.024 dB reflection loss
from both facets, based on our 3D effective index calculations of the coupler funda-
mental mode and incident light from an index-matching fluid. Misalignment between
the fiber, coupler, and waveguide causes additional loss. Our simulations indicate
that fabrication loss (offset of the waveguide from the coupler) should be less than
0.6 dB and that our design allows a packaging misalignment of ±1.13 µm if loss is to
be limited to 1 dB.
As for further design and fabrication considerations, our fabrication process relies
on standard lithography and deposition techniques. Defining the lens may prove to
be the most difficult task, but as simulations have shown, it may not be essential to
the coupler as long as we use a lateral taper.
70

Chapter 7
Conclusions
Fiber-to-waveguide couplers are essential components in the emerging field of silicon
photonics. They serve to efficiently transfer light from fibers to chips for on-chip
signal routing and processing. In order to do this, they have to reduce loss through
mode and index matching with each waveguide on either end. Additionally, couplers
have to be tolerant of misalignment, especially for packaging.
This thesis presents a coupler design that relies on a graded index stack to trans-
form the mode in one plane, and a planar lens and linear taper for transformation
in the perpendicular plane. With BPM and FDTD simulation techniques, we opti-
mized the coupler and investigated how varying design parameters affect its coupling
efficiency. The results were then used to design a mask layout for device fabrica-
tion. Once processing and measurement are complete, we will be able to demonstrate
whether our coupler functions as predicted and affirm (or invalidate) our simulation
approach.
To simplify the simulations for coupler optimization, we chose to fix certain param-
eters based on fabrication or measurement preconditions. We first determined length
with FDTD by propagating the fiber mode through a 2D structure and evaluating
waveguide power relative to input power. Coupling efficiency reaches a maximum
at 19.5 µm when light is focused in the lowest stack layer. For width, we relied on
BPM to optimize mode matching between the fiber and the coupler, and again be-
tween the coupler and the waveguide. This led to an input facet width of 7.7 µm and
71

an output facet width of 2.3 µm without a lens. If a 5-µm lens is included, output
width decreases to 1.6 µm. Finally, we used FDTD to find the optimal lens radius
of curvature, but not before calculating the effective index of the mode to collapse
the 3D structure into a 2D one with EIM. As it turns out, the optimal lens has the
maximum possible curvature, which is limited by the input facet width. This was
confirmed with BPM and ray matrix methods.
Simulations can impart an intuitive understanding on how varying design param-
eters affects device performance, and provide a starting point for fabrication (e.g.
mask layout). However, they cannot tell us for certain whether the device will func-
tion as we expect; fabrication and measurement are the best ways to proving this.
On the other hand, all fabrication processes introduce irregularities to the idealized
simulation structure. We tried to account for some of these, including simulations of
fiber-coupler offset and qualitative discussions on grading profile and sidewall angle.
Simulations showed that photolithographic offset loss should < 0.6 dB given step-
per accuracy and that fiber-coupler misalignment tolerance is ±1.13 µm if additional
loss is not to exceed 1 dB. Additionally, we expect loss from material absorption
and scattering due to by core-cladding interface roughness. Other sources of loss
which we have not accounted may exist, but we will have to determine this from our
measurement results.
BPM and FDTD predict total loss to be around 0.58 and 0.27 dB, respectively,
including reflection loss of 0.024 dB. Our coupler design is based on Manolatou’s
coupler [9] and has the advantage of a simpler fabrication procedure and size for dense
optical integration. However, the GRIN stack and lens make it more complicated to
fabricate than some adiabatic couplers.
7.1 Future Work
There still remains a good deal of work to be done with our coupler, most notably
fabrication and measurement. Doing so will definitively prove whether our design
functions as we predict and how well it performs. And by merging fabrication and
72

simulation, we can gradually optimize the device through iteration. We can also look
into adding an anti-reflection coating to reduce loss; simulation for this should be
fairly straightforward since we can determine the index of the layer with√
n1 · neff
and the layer in our CAD file. However, fabricating this layer on a curved facet may
prove difficult. Additionally, we can consider non-linear tapers to better transform
the mode and through theory and simulation, study which geometry will work best.
Finally, further analysis of our coupler would be useful, possibly with 3D FDTD if
supercomputer time can be attained. This calculation-intensive method would be
another means to confirm (or disprove) our initial findings and possibly assess the
reliability of 3D BPM in simulating our structure.
7.2 Looking Ahead
As we approach the limit to electronics technology, we increasingly look towards pho-
tonics to carry us forward along our current path. At present, optical fiber networks
transverse the globe and transmit enormous quantities of information, but this is
only the beginning. For our future, we envision an all optical network for informa-
tion processing and transfer, from computer boards and chips to fiber optic cables,
all connected by photons. Naturally, this network will be based on silicon because
almost all the knowledge about the material and processing technology is already
in place from the microelectronics industry. Secondly, if we challenge ourselves to
design CMOS-compatible optical components, we will be able to monolithically inte-
grate both photonics and drive electronics on the same chip. Already we are moving
in this direction. The majority of devices a silicon photonic network requires have
been demonstrated, with one exception: the silicon laser [1]. Now the task remains
to prove that we can integrate these all individual components on a single die.
Within this all optical network, couplers will play an integral role because of the
need to connect disparate components. Light has to be routed from lasers or other
sources by fibers or waveguides, through filters, and into detectors; but to transfer it
from one chip to another or from one board to another or from a board to a fiber, we
73

need couplers to match modes and indices. Our fiber-to-waveguide coupler is simply
a piece of a wider vision and a step towards the future photonic network.
74

Bibliography
[1] L. Pavesi. Will silicon be the photonic material of the third millennium? Journal
of Physics: Condensed Matter, 15(26):R1169, July 2003.
[2] ITRS. International Techology Roadmap for Semiconductors Executive Sum-
mary, 2001. http://pubic.itrs.net.
[3] L.C. Kimerling, L. Dal Negro, S. Saini, Y. Yi, D. Ahn, S. Akiyama, D. Cannon,
J. Liu, J.G. Sandland, D. Sparacin, J. Michel, K. Wada, and M.R. Watts. Mono-
lithic silicon microphotonics. In L. Pavesi and D.J. Lockwood, editors, Silicon
Photonics, volume 94 of Topics in Applied Physics, page 89. Springer-Verlag,
2004.
[4] Gordon E. Moore. No exponential is forever: But ”forever” can be delayed!
In IEEE International Solid-State Circuits Conference, volume 1 of Digest of
Technical Papers, page 20. IEEE, 2003.
[5] Gordon E. Moore. Cramming more components onto integrated circuits. Elec-
tronics, 38(8), April 1965.
[6] G. Masini, L. Colace, and G. Assanto. Si based optoelectronics for communica-
tions. Materials Science and Engineering B, B89:2, 2002.
[7] El-Hang Lee, Seung-Gol Lee, and Beom Hoan. VLSI microphotonics. In Louay A.
Eldada, Randy A. Heyler, and John R. Rowlette, editors, Optoelectronic In-
terconnects, Integrated Circuits, and Packaging, volume 4652 of Proceedings of
SPIE, page 1. SPIE, 2002.
75

[8] I. Moerman, P.P. van Daele, and P.M. Demeester. A review on fabrication
technologies for the monolithic integration of tapers with III-V semiconductor
devices. IEEE Journal of Selected Topics in Quantum Electronics, 3(6):1308–
1319, December 1997.
[9] Christina Manolatou. Passive Components for Dense Optical Integration Based
on High Index-Contrast. PhD thesis, Massachusetts Institute of Technology,
2001.
[10] P.-A. Belanger. Optical Fiber Theory, volume 5 of Series in Optics and Photonics.
World Scientific, JNew Jersey, 34.
[11] D.J. Griffiths. Introduction to Quantum Mechanics. Prentice Hall, Englewood
Cliffs, NJ, 1995.
[12] J.A. Kong. Electromagnetic Wave Theory. EMW Publishing, Cambridge, MA,
2000.
[13] K.S. Yee. Numerical solution of initial boundary value problems involving
maxwell’s equations in isotropic media. IEEE Transactions on Antennas and
Propagation, AP-14(3):302, 1966.
[14] J.P. Berenger. A perfectly matched layer for the absorption of electromagnetic
waves. Journal of Computational Physics, 114:185, 1994.
[15] RSoft, Inc., Ossining, NY. BeamPROP, 2000.
[16] A. Yariv. Quantum Electronics. Wiley, New York, 1989.
[17] R.A. Soref. Compound optical crosspoint with low crosstalk. Applied Optics,
16(12):3223, 1977.
[18] H.M. Presby and C.A. Edwards. Near 100% efficient fibre microlenses. Electronic
Letters, 28(6):582, March 1992.
76

[19] K. Shiraishi, A. Ogura, and K. Matsuura. Spotsize contraction in standard
single-mode fibers by use of a GI-fiber tip with a high focusing parameter. IEEE
Photonics Technology Letters, 10(12):1757, December 1998.
[20] G. Muller, B. Stegmuller, H. Westermeier, and G. Wenger. Tapered
InP/InGaAsP waveguide structure for efficient fibre-chip coupling. Electronic
Letters, 27(20):1836, September 1991.
[21] N. Eriksson, M. Hagberg, and A. Larsson. Highly directional grating outcouplers
with tailorable radiation characteristics. IEEE Journal of Quantum Electronics,
32(6):1038, June 1996.
[22] T.W.Ang, G.T. Reed, A. Vonsovici, A.G.R. Evans, P.R. Routley, T. Blackburn,
and M.R. Josey. Grating couplers using silicon-on-insulator. In G.C. Righini and
S.I. Najafi, editors, Integrated Optics Devices III, volume 3620 of Proceedings of
SPIE, page 79, San Jose, CA, March 1999. SPIE.
[23] D. Taillaert, W. Bogaerts, P. Bienstman, T.F. Krauss, I. Moerman, P. van Daele,
and R. Baets. A high-efficiency out-of-plane fibre coupler for coupling to high
index contrast waveguides. In Proceedings of the 27th European Conference on
Optical Communications, volume 6 of ECOC, page 30. IEEE, 2001.
[24] V.R. Almeida, R.R. Panepucci, and M. Lipson. Nanotaper for compact mode
conversion. Optics Letters, 28(15):1302–1304, August 2003.
[25] V. Vusirikala, S.S. Saini, R.E. Bartolo, S. Agarwala, R.D. Whaley, F.G. John-
son, D.R. Stone, and M. Dagenais. 1.55-µm InGaAsP-InP laser arrays with
integrated-mode expanders fabricated using a single epitaxial growth. IEEE
Journal of selected topics in quantum electronics, 3(6):1332–1343, December
1997.
[26] K. Kasaya, O. Mitomi, M. Naganuma, Y. Kondo, and Y. Noguchi. A simple
laterally tapered waveguide for low-loss coupling to single-mode fibers. IEEE
Photonics Technology Letters, 5(3):345, March 1993.
77

[27] T. Brenner and H. Melchior. Integrated optical modeshape adapters in In-
GaAsP/InP for efficient fiber-to-waveguide coupling. IEEE Photonics Technology
Letters, 5(9):1053–1056, September 1993.
[28] N. Yoshimoto, K. Kawano, H. Takeuchi, S. Kondo, and Y. Noguchi. Spot size
convertors using InP/InAlAs multiquantum well waveguides for low-loss single
mode fibre coupling. Electronic Letters, 28(17):1610–1611, August 1992.
[29] M. Fritze, J. Knecht, C. Bozier, C. Keast, J. Fijol, S. Jacobson, P. Keating,
J. LeBlanc, E. Fike, B. Kessler, M. Frish, and C. Manolatou. Fabrication of
three-dimensional mode converters for silicon-based integrated optics. Journal
of Vacuum Science and Technology B, B21(6):2897–2902, Nov/Dec 2003.
[30] J.J. Fijol, E.E. Fike, P.B. Keating, D. Gilbody, J. LeBlanc, S.A. Jacobson, W.J.
Kessler, and M.B. Frish. Fabrication of silicon-on-insulator adiabatic tapers
for low loss optical interconnection of photonic devices. In R.A. Heyler, D.J.
Robbins, and G.E. Jabbour, editors, Photonics Packaging and Integration III,
volume 4997 of Proceedings of SPIE, pages 157–170. SPIE, 2003.
[31] A. Sure, T. Dillon, J. Murakowski, C. Lin, D. Pustai, and D.W. Prather. Fabri-
cation and characterization of three-dimensional silicon tapers. Optics Express,
11(26):3555–3561, December 2003.
[32] C. Manolatou and H.A. Haus. Compact mode-size converters for efficient cou-
pling between fibers and integrated optical waveguides. In Advanced Semiconduc-
tor Lasers and Applications, 2001 Digest of the LEOS Summer Topical Meetings,
pages 31–32, Copper Mountain, CO, 2001. IEEE, LEOS.
78