fertilizer management software - smart-fertilizer.com · fertilizer management software ... smart!...
TRANSCRIPT
Smart! PRO Version 2.1.0
Smart!
www.smart-fertilizer.com
All rights reserved 2009 ©
Fertilizer Management Software
User Manual
2
Table of Contents
The Mix Fertilizers Menu .......................................................................................................... 3
Fertilizer Calculations by Water Content ................................................................................ 4
Mixing Fertilizers by Water Content – Method 1 ................................................................ 5
Mixing Fertilizers by Water Content – Method 2 .............................................................. 21
Mixing Fertilizers by Water Content – Method 3 .............................................................. 31
Fertilizer Calculations by Amount per Area (Amount/Area) ................................................. 45
Mixing Fertilizers by Amount per Area (Amount/Area) – Method 1 ................................. 46
Mixing Fertilizers by Amount per Area (Amount/Area) – Method 2 ................................. 63
Mixing Fertilizers by Amount per Area (Amount/Area) – Method 3 ................................. 71
The File Menu .......................................................................................................................... 82
The Fertilizers Menu ............................................................................................................... 83
New Fertilizer ....................................................................................................................... 83
Edit Fertilizer ........................................................................................................................ 84
Fertilizer Data ....................................................................................................................... 86
The Tools Menu ...................................................................................................................... 87
Calculate Target Values ....................................................................................................... 87
Soil Test ............................................................................................................................... 88
Soil Test Interpretation ..................................................................................................... 88
Add/Edit Soil Test Interpretation ...................................................................................... 89
Add/Edit Nutrient Application Rules ................................................................................. 90
The Reports Menu .................................................................................................................. 92
Open Report ......................................................................................................................... 92
Compare Recipes ................................................................................................................ 92
Consumption and Costs ....................................................................................................... 94
Compare Fertilizer Costs ..................................................................................................... 96
The Lab Test Results Menu ................................................................................................... 97
Water Analysis ................................................................................................................. 97
Soil Analysis ..................................................................................................................... 98
The Database Menu .............................................................................................................. 101

3
The Mix Fertilizers Menu
Smart! has six options for mixing fertilizers: three calculation methods are according to Water
Content, and three are according to the amount of fertilizer to be applied per area.
Water Content is often used for soil-less media, while Amount/Area is usually applied to
open fields.
Calculation by Water Content is described below, and calculation by Amount per Area is
described on p.45.
4
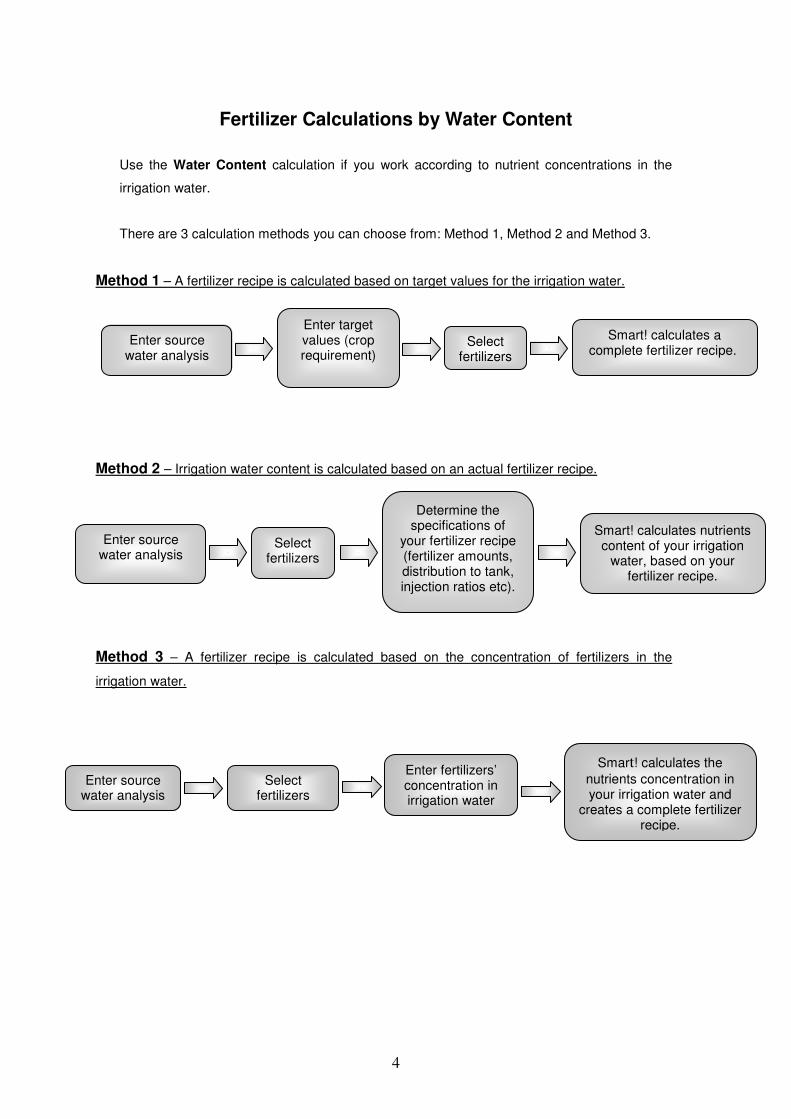
Fertilizer Calculations by Water Content
Use the Water Content calculation if you work according to nutrient concentrations in the
irrigation water.
There are 3 calculation methods you can choose from: Method 1, Method 2 and Method 3.
Method 1 – A fertilizer recipe is calculated based on target values for the irrigation water.
Method 2 – Irrigation water content is calculated based on an actual fertilizer recipe.
Method 3 – A fertilizer recipe is calculated based on the concentration of fertilizers in the
irrigation water.
Enter source water analysis
Determine the specifications of
your fertilizer recipe (fertilizer amounts, distribution to tank, injection ratios etc).
Select fertilizers
Smart! calculates nutrients content of your irrigation
water, based on your fertilizer recipe.
Enter source water analysis
Enter target values (crop requirement)
Select fertilizers
Smart! calculates a complete fertilizer recipe.
Select fertilizers
Enter fertilizers’ concentration in irrigation water
Smart! calculates the
nutrients concentration in your irrigation water and
creates a complete fertilizer recipe.
Enter source water analysis
5
Mixing Fertilizers by Water Content – Method 1
Using Method 1, a fertilizer recipe is calculated based on your required target values for
irrigation water.
In this section you will learn how to find the optimal combination and quantities of fertilizers to
match your target values for irrigation water.
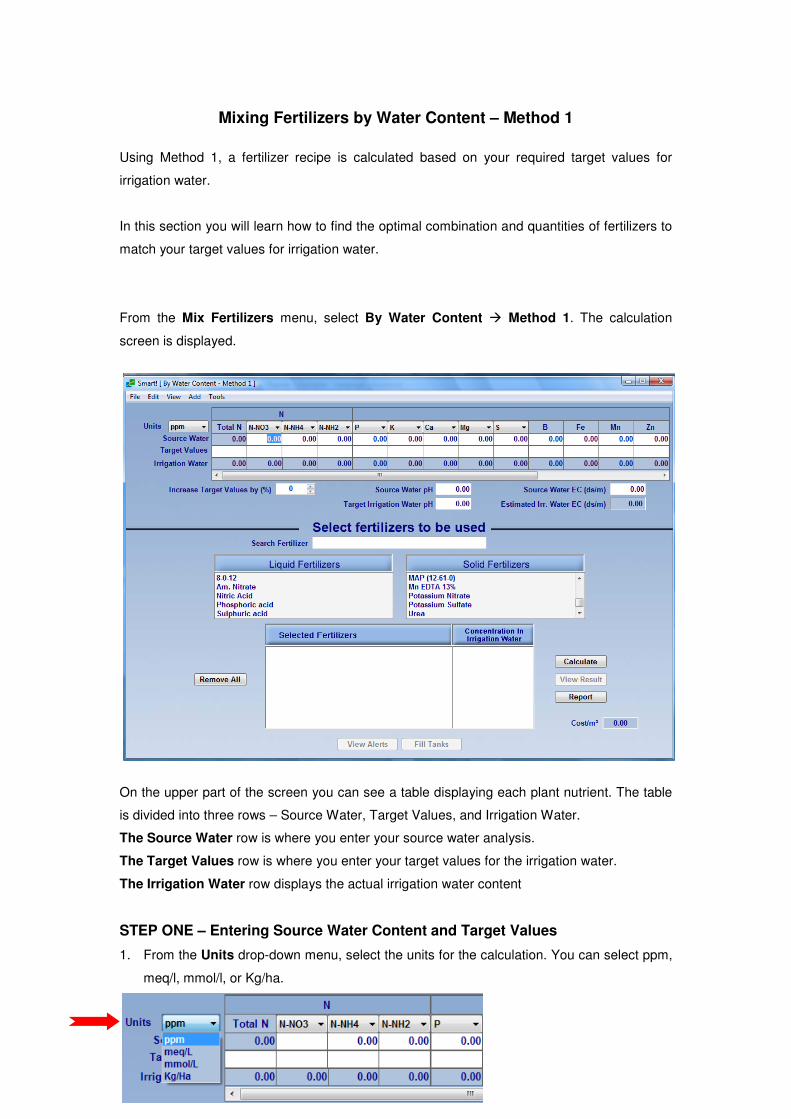
From the Mix Fertilizers menu, select By Water Content � Method 1. The calculation
screen is displayed.
On the upper part of the screen you can see a table displaying each plant nutrient. The table
is divided into three rows – Source Water, Target Values, and Irrigation Water.
The Source Water row is where you enter your source water analysis.
The Target Values row is where you enter your target values for the irrigation water.
The Irrigation Water row displays the actual irrigation water content
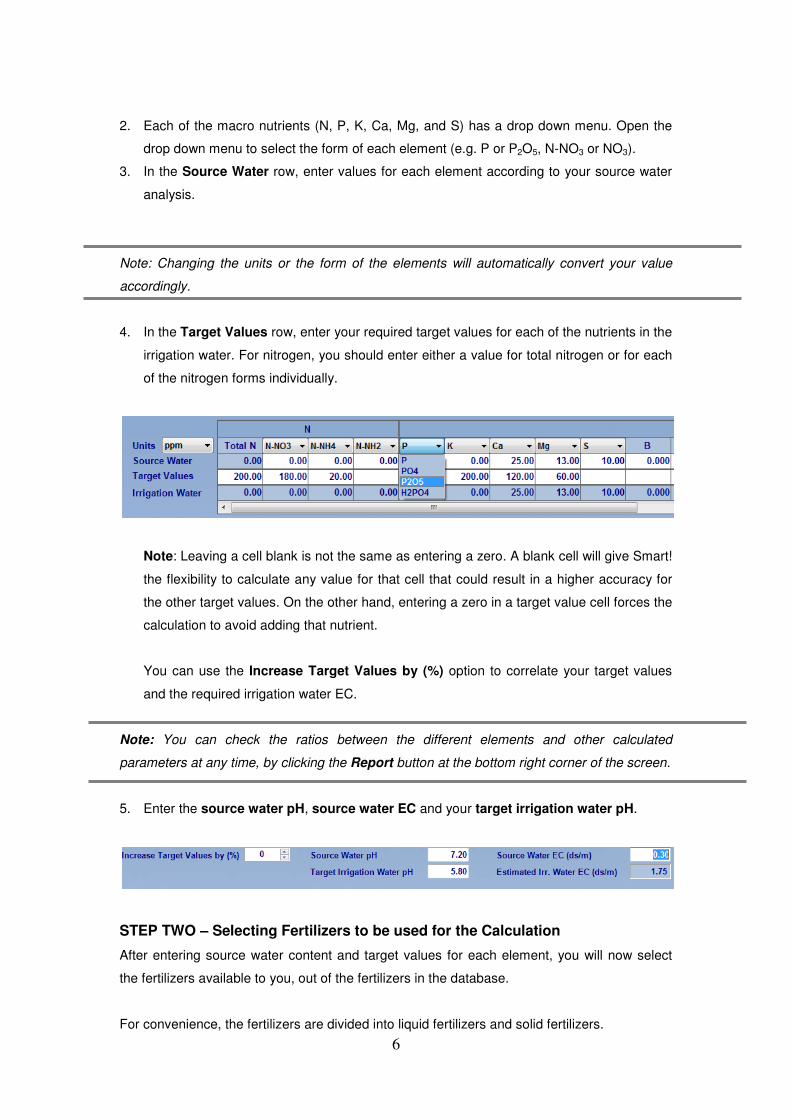
STEP ONE – Entering Source Water Content and Target Values
1. From the Units drop-down menu, select the units for the calculation. You can select ppm,
meq/l, mmol/l, or Kg/ha.
6
2. Each of the macro nutrients (N, P, K, Ca, Mg, and S) has a drop down menu. Open the
drop down menu to select the form of each element (e.g. P or P2O5, N-NO3 or NO3).
3. In the Source Water row, enter values for each element according to your source water
analysis.
Note: Changing the units or the form of the elements will automatically convert your value
accordingly.
4. In the Target Values row, enter your required target values for each of the nutrients in the
irrigation water. For nitrogen, you should enter either a value for total nitrogen or for each
of the nitrogen forms individually.
Note: Leaving a cell blank is not the same as entering a zero. A blank cell will give Smart!
the flexibility to calculate any value for that cell that could result in a higher accuracy for
the other target values. On the other hand, entering a zero in a target value cell forces the
calculation to avoid adding that nutrient.
You can use the Increase Target Values by (%) option to correlate your target values
and the required irrigation water EC.
Note: You can check the ratios between the different elements and other calculated
parameters at any time, by clicking the Report button at the bottom right corner of the screen.
5. Enter the source water pH, source water EC and your target irrigation water pH.
STEP TWO – Selecting Fertilizers to be used for the Calculation
After entering source water content and target values for each element, you will now select
the fertilizers available to you, out of the fertilizers in the database.
For convenience, the fertilizers are divided into liquid fertilizers and solid fertilizers.
7
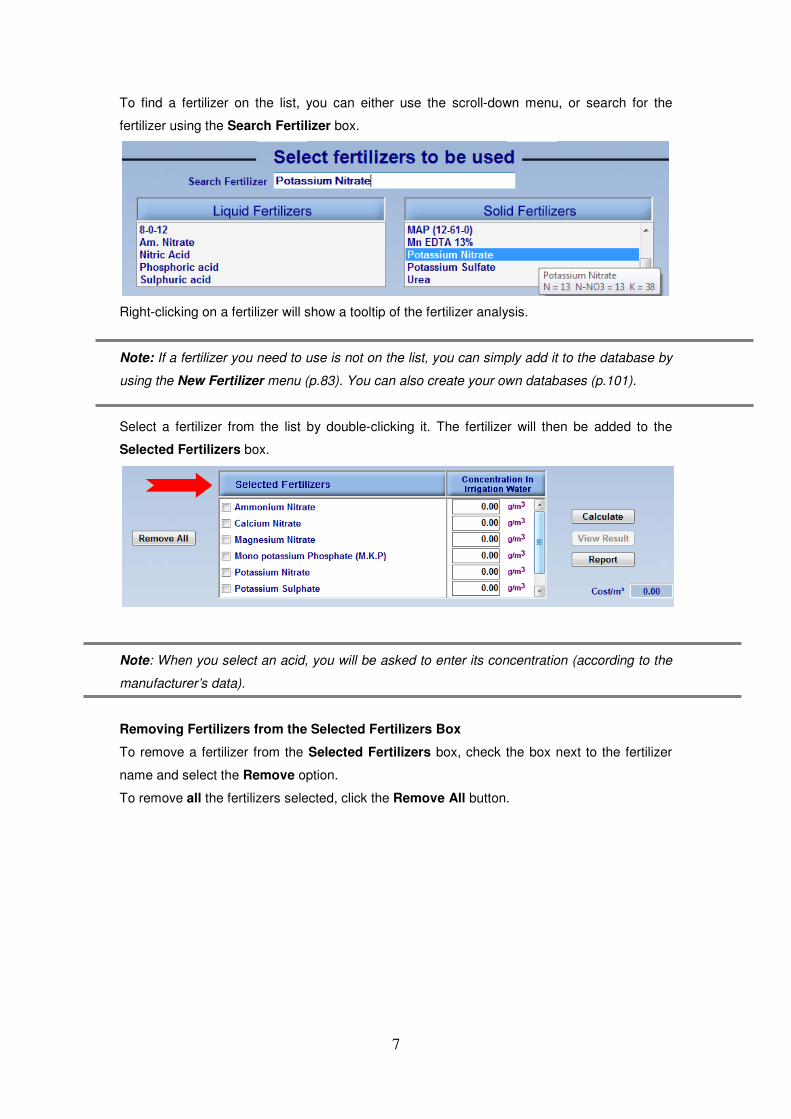
To find a fertilizer on the list, you can either use the scroll-down menu, or search for the
fertilizer using the Search Fertilizer box.
Right-clicking on a fertilizer will show a tooltip of the fertilizer analysis.
Note: If a fertilizer you need to use is not on the list, you can simply add it to the database by
using the New Fertilizer menu (p.83). You can also create your own databases (p.101).
Select a fertilizer from the list by double-clicking it. The fertilizer will then be added to the
Selected Fertilizers box.
Note: When you select an acid, you will be asked to enter its concentration (according to the
manufacturer’s data).
Removing Fertilizers from the Selected Fertilizers Box
To remove a fertilizer from the Selected Fertilizers box, check the box next to the fertilizer
name and select the Remove option.
To remove all the fertilizers selected, click the Remove All button.
8
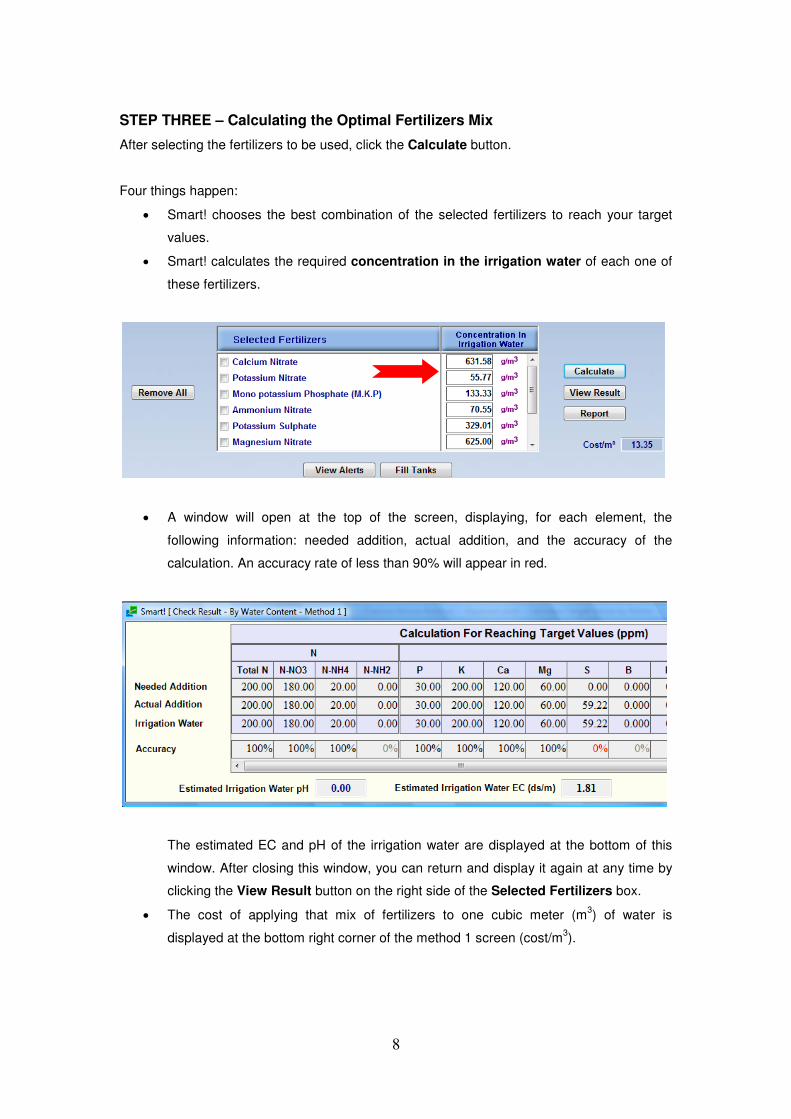
STEP THREE – Calculating the Optimal Fertilizers Mix
After selecting the fertilizers to be used, click the Calculate button.
Four things happen:
• Smart! chooses the best combination of the selected fertilizers to reach your target
values.
• Smart! calculates the required concentration in the irrigation water of each one of
these fertilizers.
• A window will open at the top of the screen, displaying, for each element, the
following information: needed addition, actual addition, and the accuracy of the
calculation. An accuracy rate of less than 90% will appear in red.
The estimated EC and pH of the irrigation water are displayed at the bottom of this
window. After closing this window, you can return and display it again at any time by
clicking the View Result button on the right side of the Selected Fertilizers box.
• The cost of applying that mix of fertilizers to one cubic meter (m3) of water is
displayed at the bottom right corner of the method 1 screen (cost/m3).
9
Note: Smart! uses a unique optimization algorithm that takes into consideration both your
target values and fertilizer prices, so that you always reach the highest accuracy at the lowest
cost.
After clicking the Calculate button, you can still manually adjust the Concentration in
Irrigation Water for each fertilizer, as well as remove fertilizers from the Selected Fertilizers
box or add fertilizers to the list. The displayed results will change accordingly.
Congratulations!
You've successfully completed the first step of preparing your fertilizer recipe.
You now know which fertilizers you have to use and how to meet your crop’s requirements at
the lowest cost.
You can proceed to the Fill Tanks Screen by clicking the Fill Tanks button at the bottom of
the screen. Go to p.14.
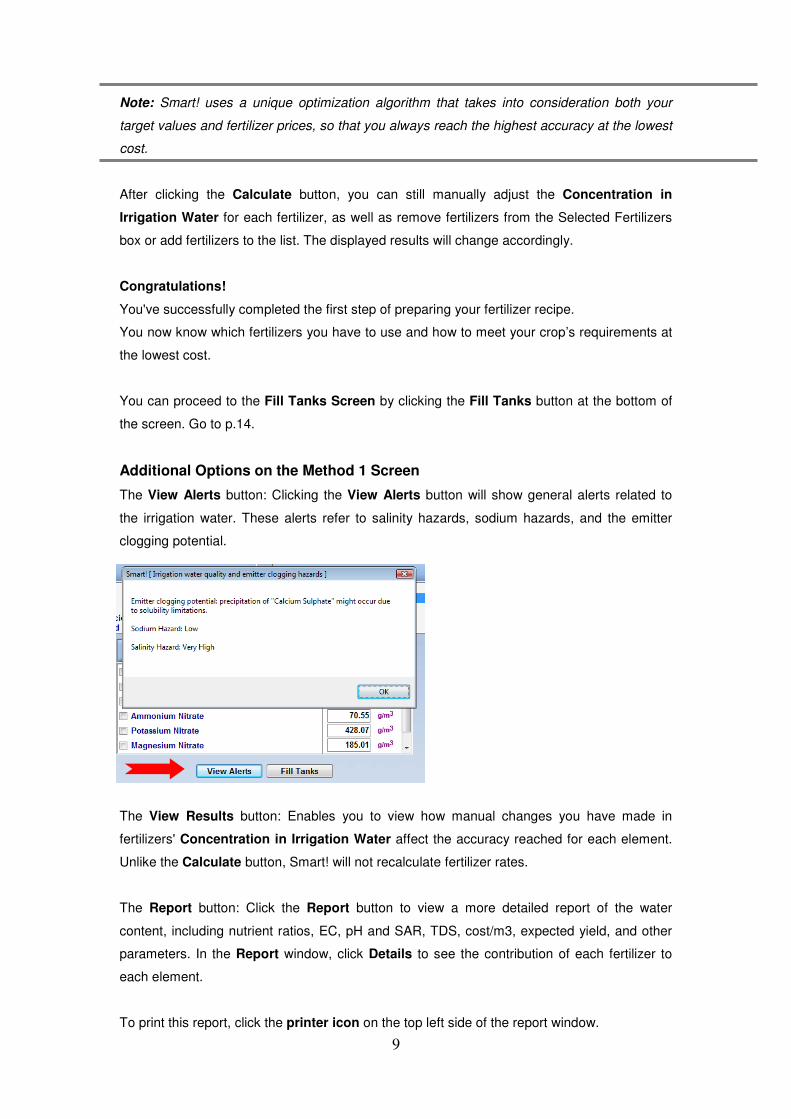
Additional Options on the Method 1 Screen
The View Alerts button: Clicking the View Alerts button will show general alerts related to
the irrigation water. These alerts refer to salinity hazards, sodium hazards, and the emitter
clogging potential.
The View Results button: Enables you to view how manual changes you have made in
fertilizers' Concentration in Irrigation Water affect the accuracy reached for each element.
Unlike the Calculate button, Smart! will not recalculate fertilizer rates.
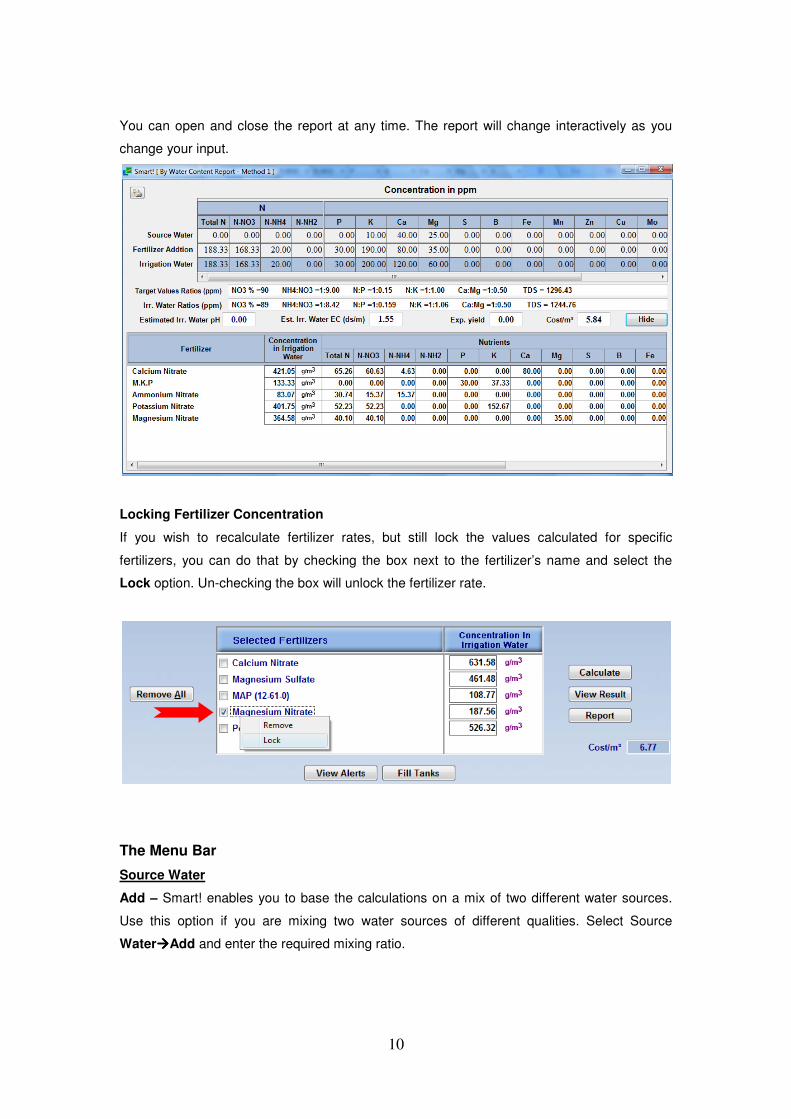
The Report button: Click the Report button to view a more detailed report of the water
content, including nutrient ratios, EC, pH and SAR, TDS, cost/m3, expected yield, and other
parameters. In the Report window, click Details to see the contribution of each fertilizer to
each element.
To print this report, click the printer icon on the top left side of the report window.
10
You can open and close the report at any time. The report will change interactively as you
change your input.
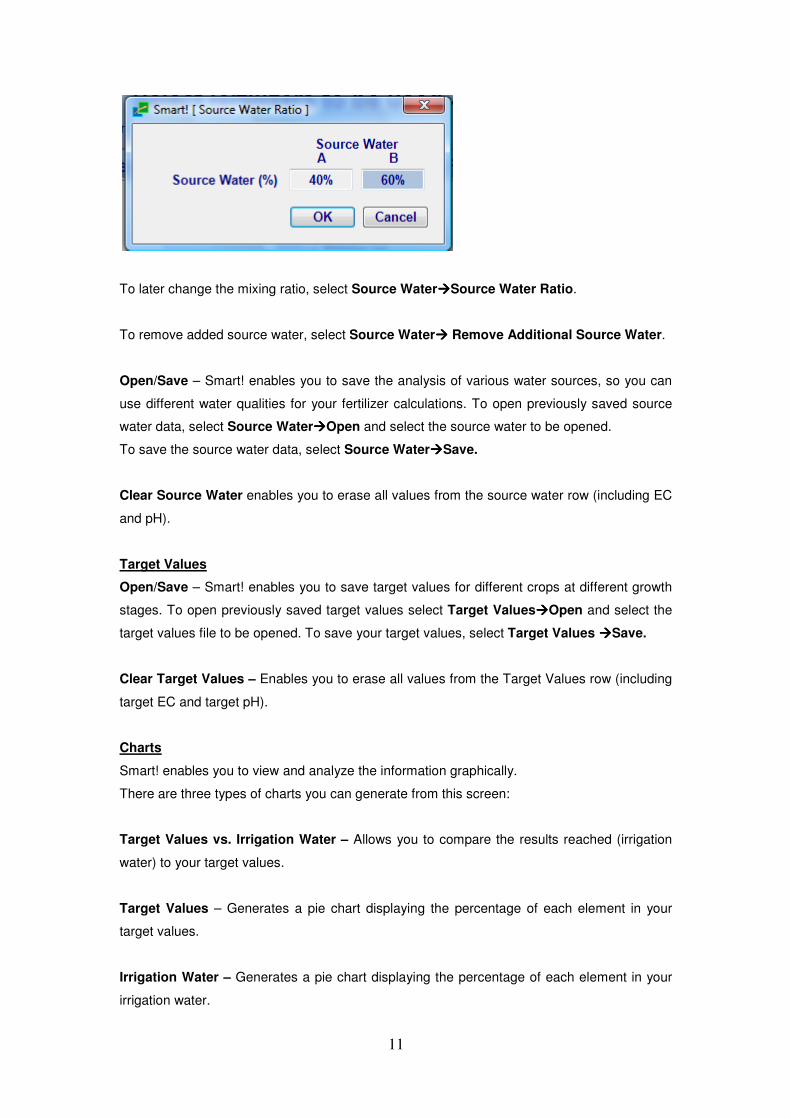
Locking Fertilizer Concentration
If you wish to recalculate fertilizer rates, but still lock the values calculated for specific
fertilizers, you can do that by checking the box next to the fertilizer’s name and select the
Lock option. Un-checking the box will unlock the fertilizer rate.
The Menu Bar
Source Water
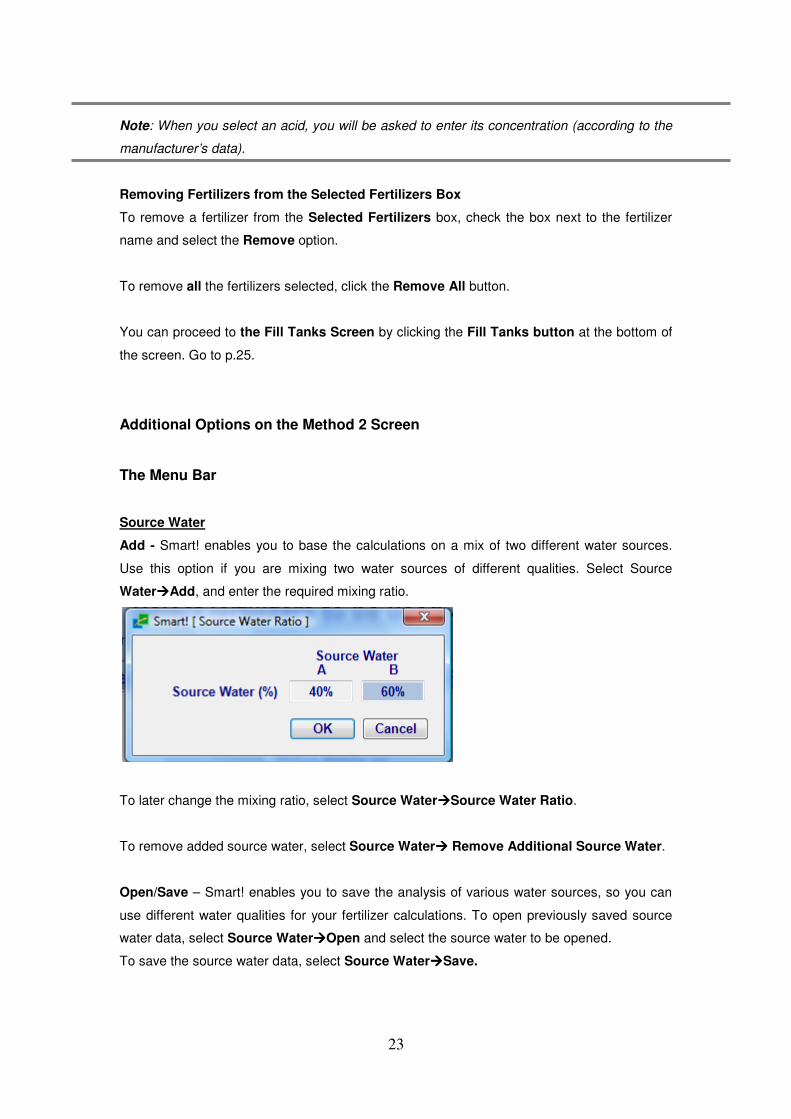
Add – Smart! enables you to base the calculations on a mix of two different water sources.
Use this option if you are mixing two water sources of different qualities. Select Source
Water����Add and enter the required mixing ratio.
11
To later change the mixing ratio, select Source Water����Source Water Ratio.
To remove added source water, select Source Water���� Remove Additional Source Water.
Open/Save – Smart! enables you to save the analysis of various water sources, so you can
use different water qualities for your fertilizer calculations. To open previously saved source
water data, select Source Water����Open and select the source water to be opened.
To save the source water data, select Source Water����Save.
Clear Source Water enables you to erase all values from the source water row (including EC
and pH).
Target Values
Open/Save – Smart! enables you to save target values for different crops at different growth
stages. To open previously saved target values select Target Values����Open and select the
target values file to be opened. To save your target values, select Target Values ����Save.
Clear Target Values – Enables you to erase all values from the Target Values row (including
target EC and target pH).
Charts
Smart! enables you to view and analyze the information graphically.
There are three types of charts you can generate from this screen:
Target Values vs. Irrigation Water – Allows you to compare the results reached (irrigation
water) to your target values.
Target Values – Generates a pie chart displaying the percentage of each element in your
target values.
Irrigation Water – Generates a pie chart displaying the percentage of each element in your
irrigation water.

12
NPK formula
Smart! enables you to view the NPK formula (N- P2O5-K2O) for your target values and
irrigation water. NPK formulas for both your target values and the irrigation water will be
displayed in a new window.
The default ratio displayed is only one option of many, and you can adjust it using the spin
button. For example, a ratio of 5:3:8 is equivalent to 17:10:27.
Cations / Anions Balance
Water content and the addition of fertilizers must be chemically balanced. This option allows
you to view the cations / anions balance in:
• The fertilizers
• The source water
• The target values
The balance is presented as % of meq/l.
Expected Yield
For your own records, you can add an expected yield value to each fertilizer recipe.
13
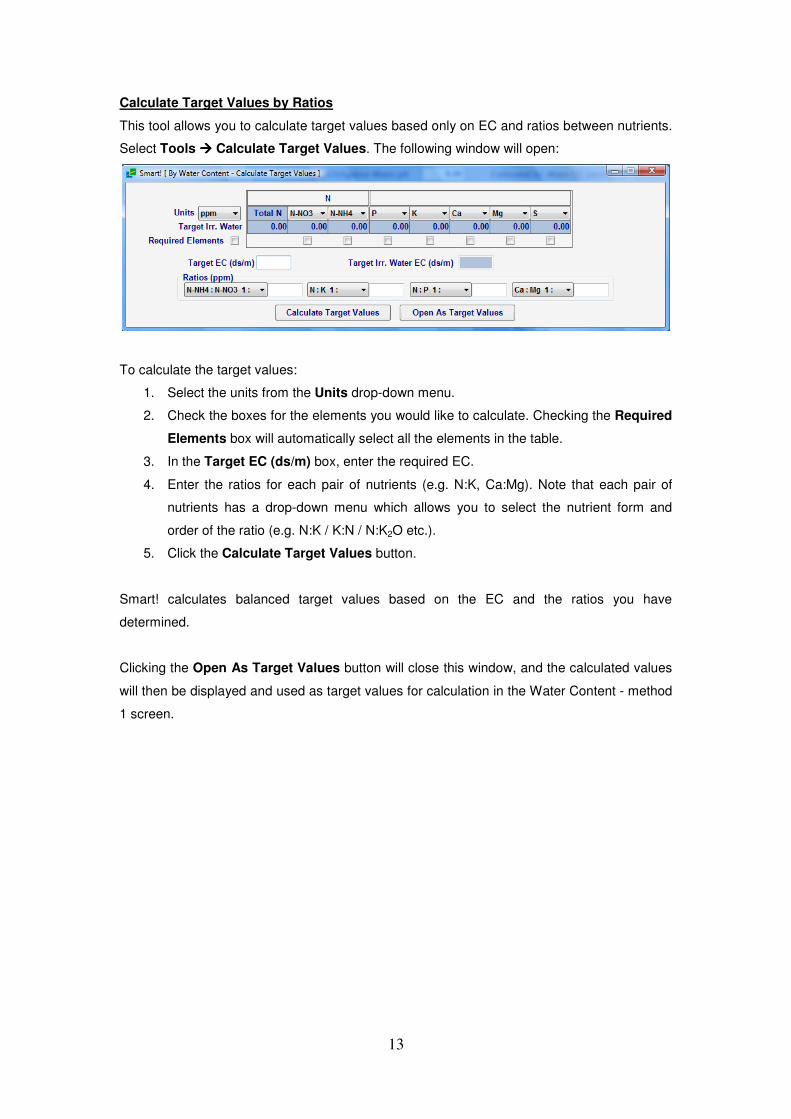
Calculate Target Values by Ratios
This tool allows you to calculate target values based only on EC and ratios between nutrients.
Select Tools ���� Calculate Target Values. The following window will open:
To calculate the target values:
1. Select the units from the Units drop-down menu.
2. Check the boxes for the elements you would like to calculate. Checking the Required
Elements box will automatically select all the elements in the table.
3. In the Target EC (ds/m) box, enter the required EC.
4. Enter the ratios for each pair of nutrients (e.g. N:K, Ca:Mg). Note that each pair of
nutrients has a drop-down menu which allows you to select the nutrient form and
order of the ratio (e.g. N:K / K:N / N:K2O etc.).
5. Click the Calculate Target Values button.
Smart! calculates balanced target values based on the EC and the ratios you have
determined.
Clicking the Open As Target Values button will close this window, and the calculated values
will then be displayed and used as target values for calculation in the Water Content - method
1 screen.
14
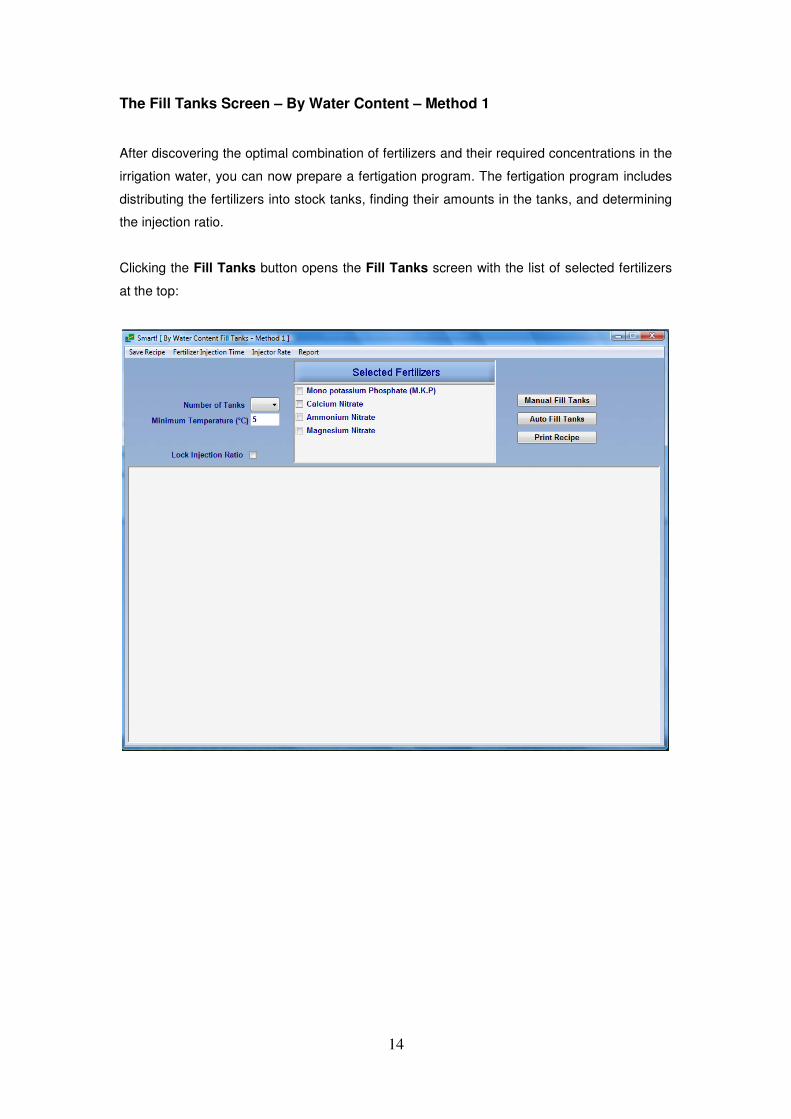
The Fill Tanks Screen – By Water Content – Method 1
After discovering the optimal combination of fertilizers and their required concentrations in the
irrigation water, you can now prepare a fertigation program. The fertigation program includes
distributing the fertilizers into stock tanks, finding their amounts in the tanks, and determining
the injection ratio.
Clicking the Fill Tanks button opens the Fill Tanks screen with the list of selected fertilizers
at the top:
15
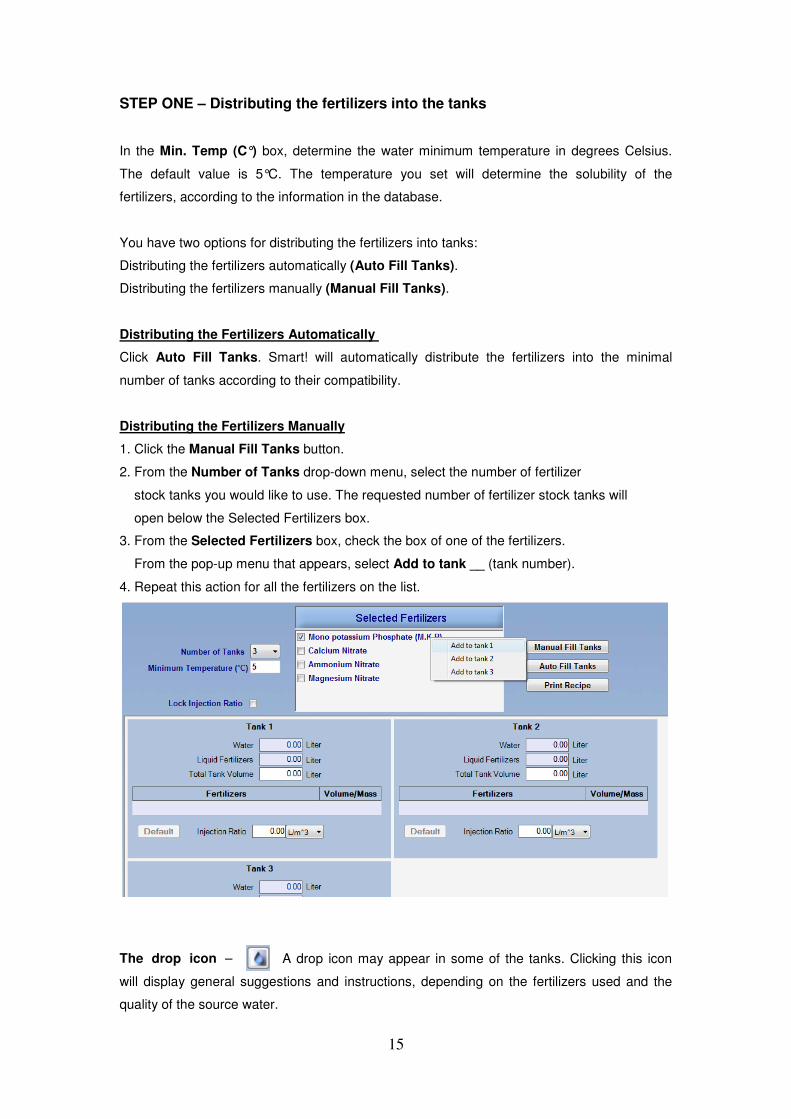
STEP ONE – Distributing the fertilizers into the tanks
In the Min. Temp (C°) box, determine the water minimum temperature in degrees Celsius.
The default value is 5°C. The temperature you set will determine the solubility of the
fertilizers, according to the information in the database.
You have two options for distributing the fertilizers into tanks:
Distributing the fertilizers automatically (Auto Fill Tanks).
Distributing the fertilizers manually (Manual Fill Tanks).
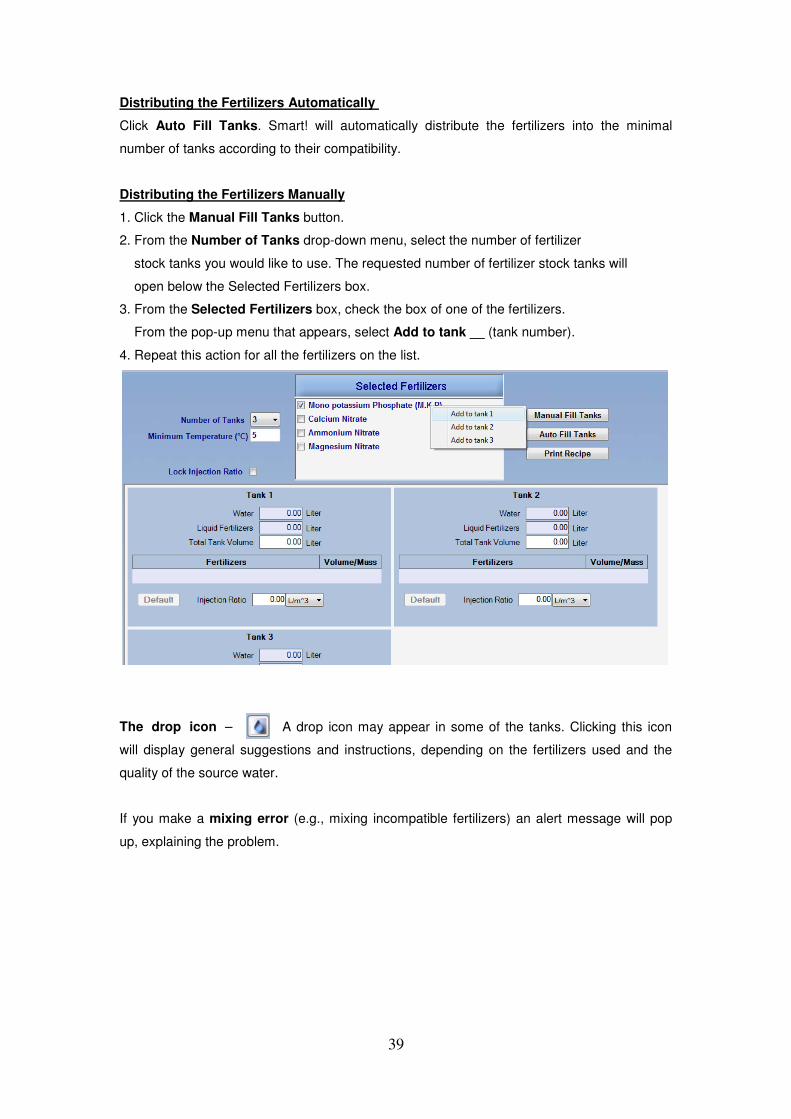
Distributing the Fertilizers Automatically
Click Auto Fill Tanks. Smart! will automatically distribute the fertilizers into the minimal
number of tanks according to their compatibility.
Distributing the Fertilizers Manually
1. Click the Manual Fill Tanks button.
2. From the Number of Tanks drop-down menu, select the number of fertilizer
stock tanks you would like to use. The requested number of fertilizer stock tanks will
open below the Selected Fertilizers box.
3. From the Selected Fertilizers box, check the box of one of the fertilizers.
From the pop-up menu that appears, select Add to tank __ (tank number).
4. Repeat this action for all the fertilizers on the list.
The drop icon – A drop icon may appear in some of the tanks. Clicking this icon
will display general suggestions and instructions, depending on the fertilizers used and the
quality of the source water.
16
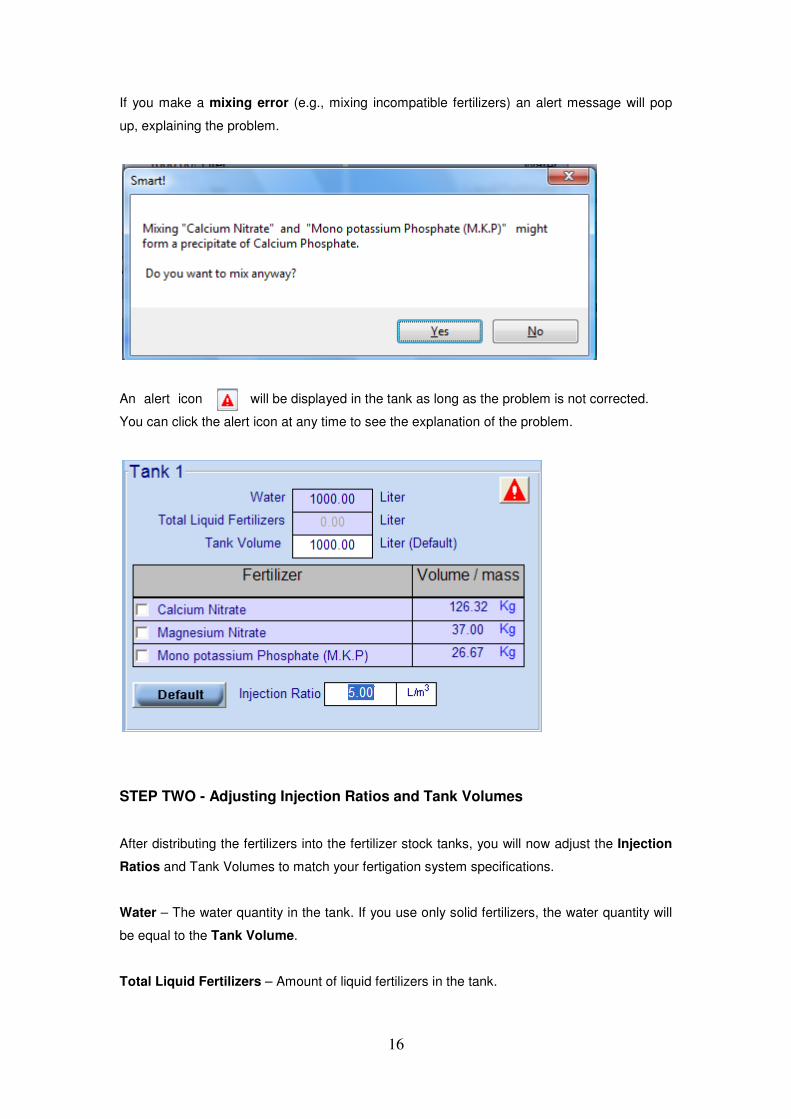
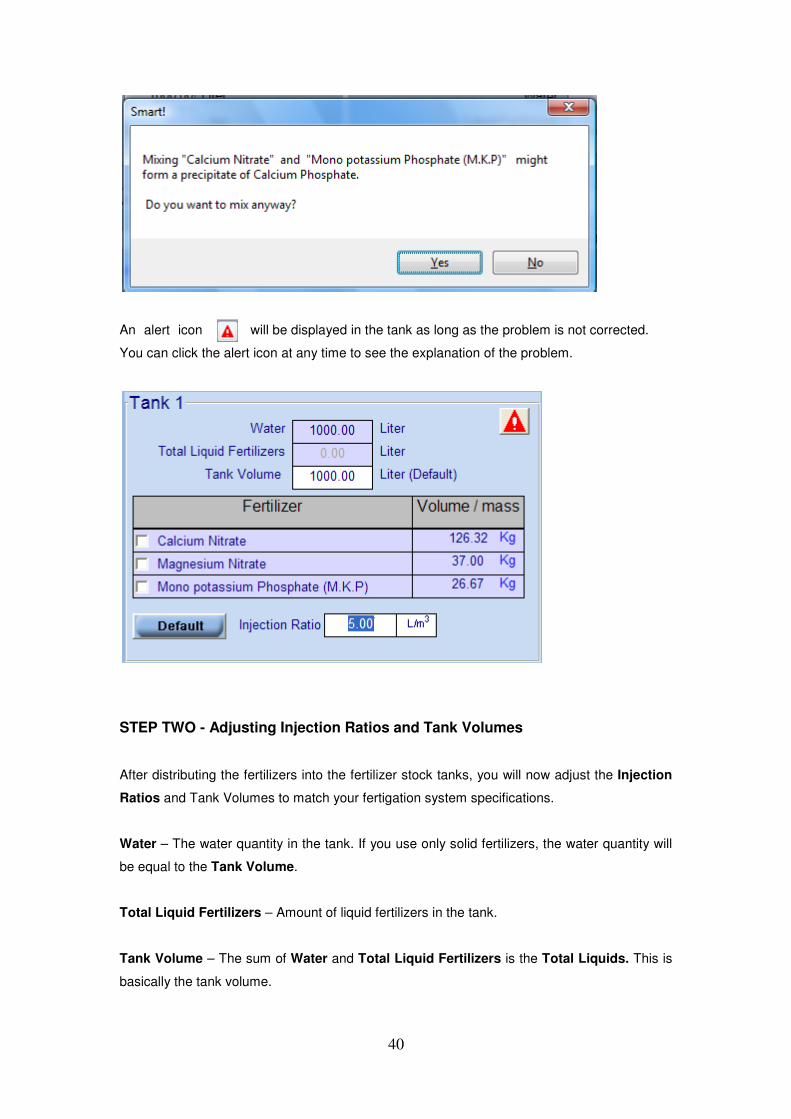
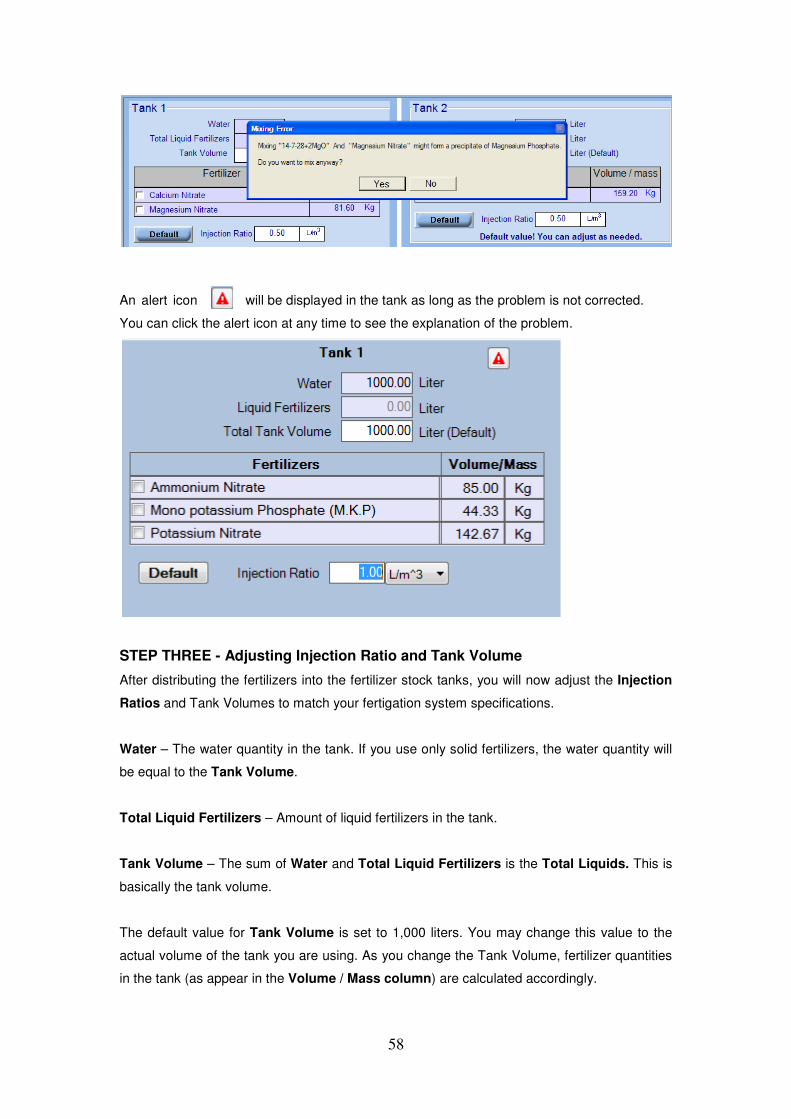
If you make a mixing error (e.g., mixing incompatible fertilizers) an alert message will pop
up, explaining the problem.
An alert icon will be displayed in the tank as long as the problem is not corrected.
You can click the alert icon at any time to see the explanation of the problem.
STEP TWO - Adjusting Injection Ratios and Tank Volumes
After distributing the fertilizers into the fertilizer stock tanks, you will now adjust the Injection
Ratios and Tank Volumes to match your fertigation system specifications.
Water – The water quantity in the tank. If you use only solid fertilizers, the water quantity will
be equal to the Tank Volume.
Total Liquid Fertilizers – Amount of liquid fertilizers in the tank.

17
Tank Volume – The sum of Water and Total Liquid Fertilizers is the Total Liquids. This is
basically the tank volume.
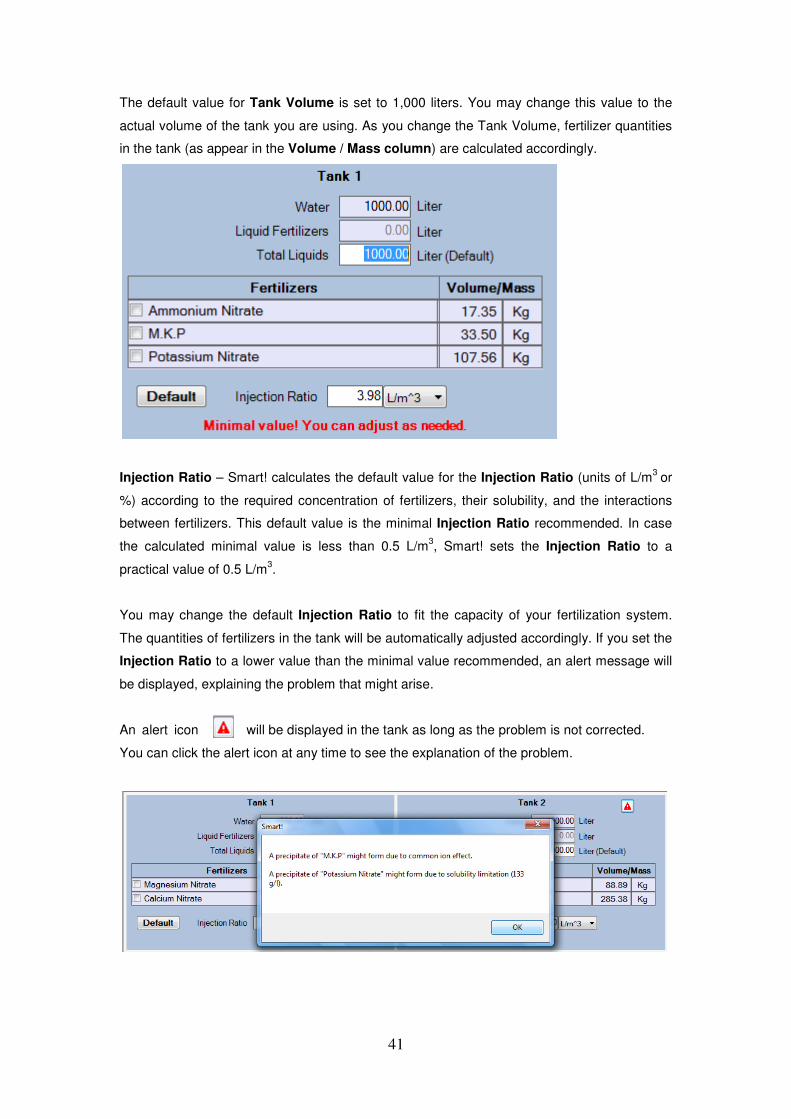
The default value for Tank Volume is set to 1,000 liters. You may change this value to the
actual volume of the tank you are using. As you change the Tank Volume, fertilizer quantities
in the tank (as appear in the Volume / Mass column) are calculated accordingly.
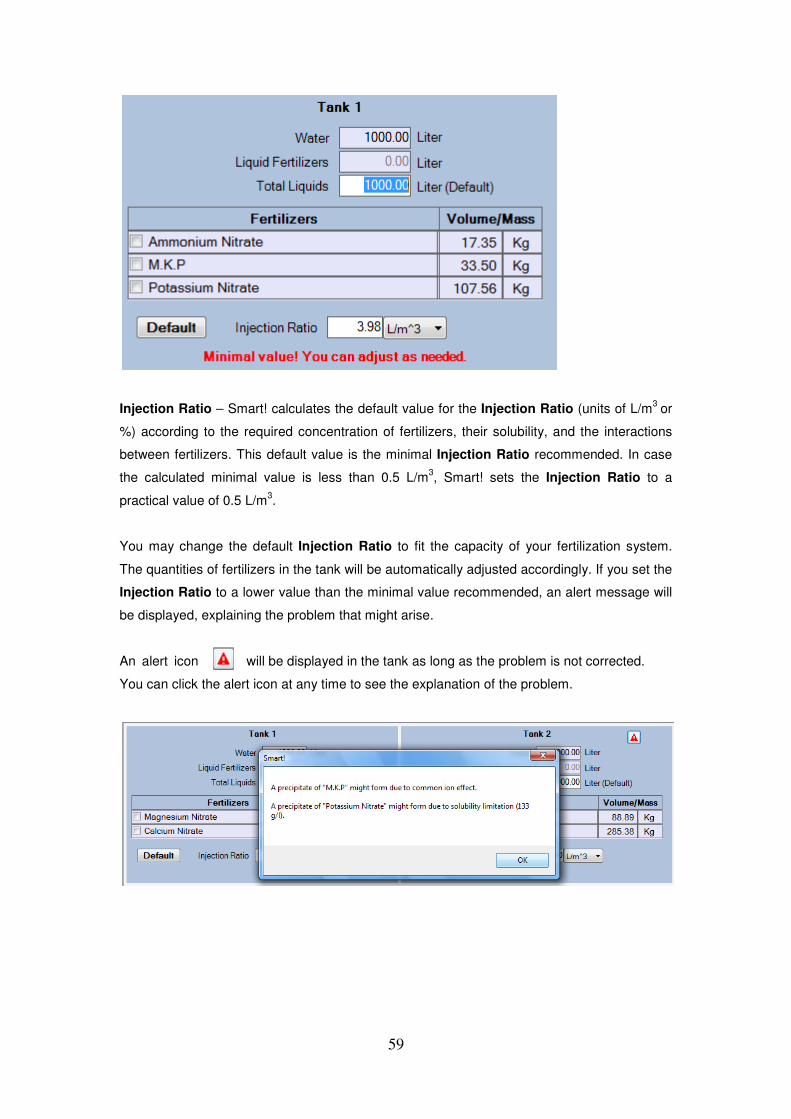
Injection Ratio – Smart! calculates the default value for the Injection Ratio (units of L/m3
or
%) according to the required concentration of fertilizers, their solubility, and the interactions
between fertilizers. This default value is the minimal Injection Ratio recommended. In case
the calculated minimal value is less than 0.5 L/m3, Smart! sets the Injection Ratio to a
practical value of 0.5 L/m3.
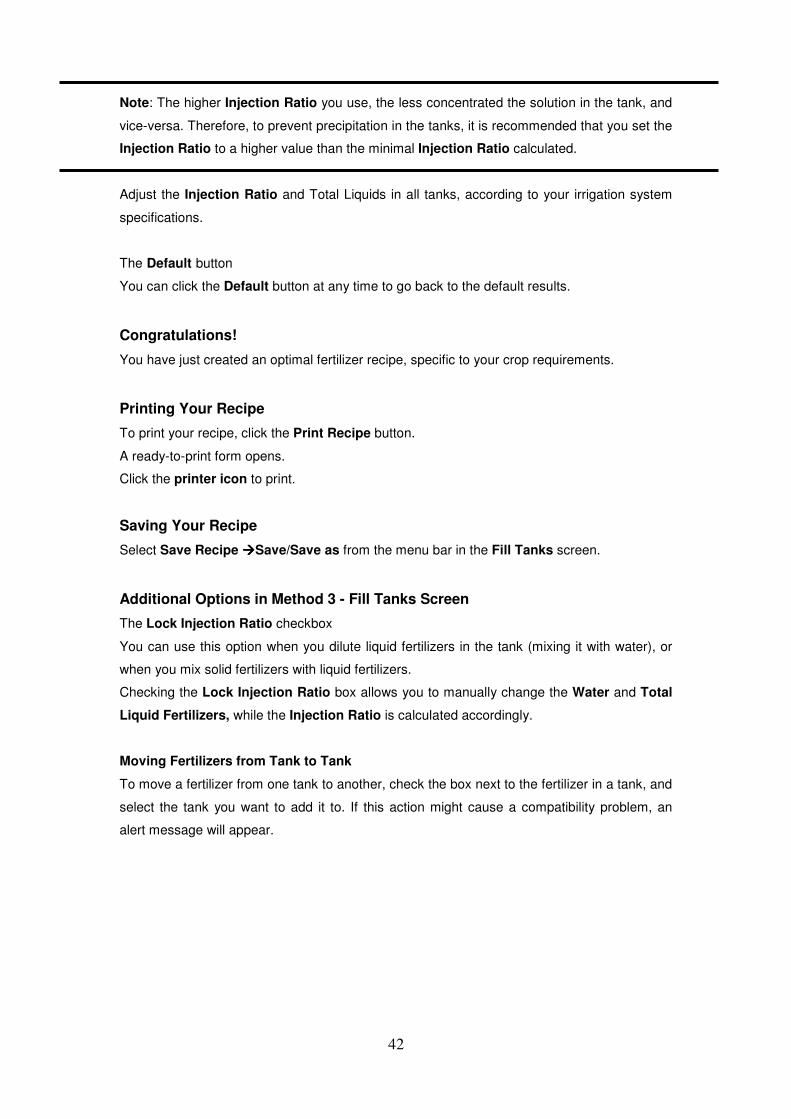
You may change the default Injection Ratio to fit the capacity of your fertilization system.
The quantities of fertilizers in the tank will be automatically adjusted accordingly. If you set the
Injection Ratio to a lower value than the minimal value recommended, an alert message will
be displayed, explaining the problem that might arise.
An alert icon will be displayed in the tank as long as the problem is not corrected.
You can click the alert icon at any time to see the explanation of the problem.
18
Note: The higher Injection Ratio you use, the less concentrated the solution in the tank, and
vice-versa. Therefore, to prevent precipitation in the tanks, it is recommended that you set the
Injection Ratio to a higher value than the minimal Injection Ratio calculated.
Adjust the Injection Ratio and Total Liquids in all tanks, according to your irrigation system
specifications.
The Default button
You can click the Default button at any time to go back to the default results.
Congratulations!
You have just created an optimal fertilizer recipe, specific to your crop requirements.
Printing Your Recipe
To print your recipe, click the Print Recipe button.
A ready-to-print form opens.
Click the printer icon to print.
Saving Your Recipe
Select Save Recipe ����Save/Save as from the menu bar in the Fill Tanks screen.
Additional Options in Method 1 - Fill Tanks Screen
The Lock Injection Ratio checkbox
You can use this option when you dilute liquid fertilizers in the tank (mixing it with water), or
when you mix solid fertilizers with liquid fertilizers.
Checking the Lock Injection Ratio box allows you to manually change the Water and Total
Liquid Fertilizers, while the Injection Ratio is calculated accordingly.
Moving Fertilizers from Tank to Tank
To move a fertilizer from one tank to another, check the box next to the fertilizer in a tank, and
select the tank you want to add it to. If this action might cause a compatibility problem, an
alert message will appear.

19
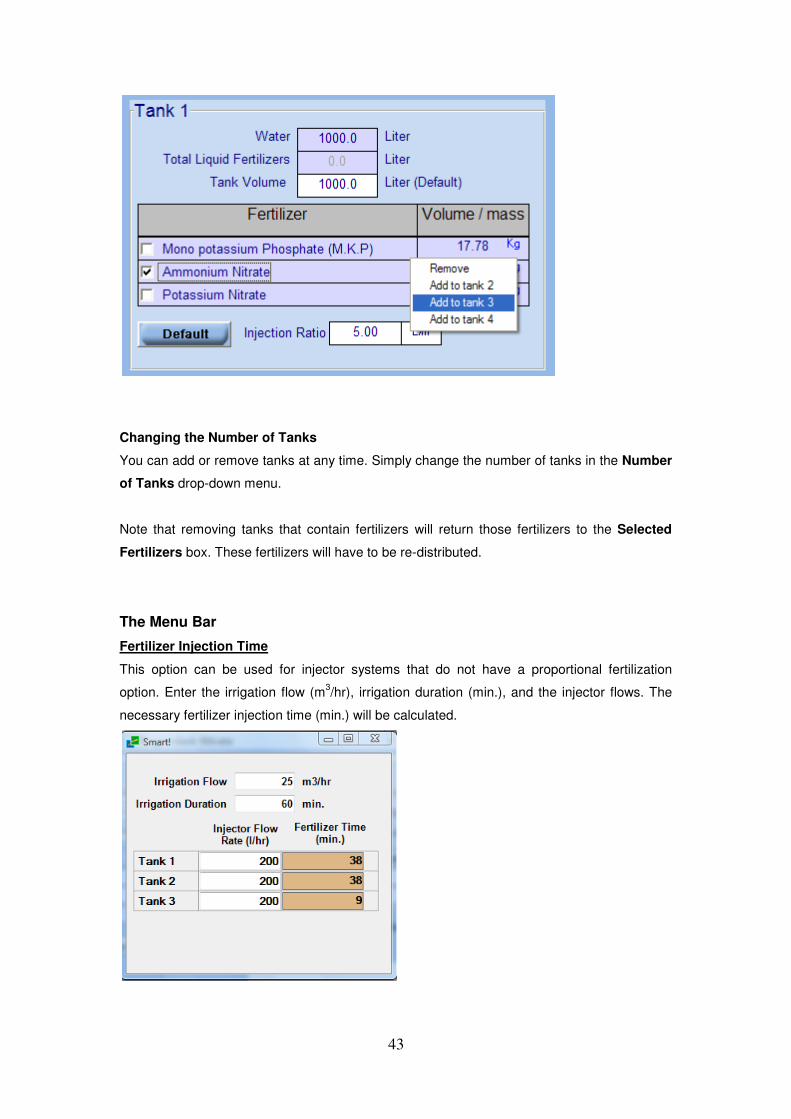
Changing the Number of Tanks
You can add or remove tanks at any time. Simply change the number of tanks in the Number
of Tanks drop-down menu.
Note that removing tanks that contain fertilizers will return those fertilizers to the Selected
Fertilizers box. These fertilizers will have to be re-distributed.
The Menu Bar
Fertilizer Injection Time
This option can be used for injector systems that do not have a proportional fertilization
option. Enter the irrigation flow (m3/hr), irrigation duration (min.), and the injector flows. The
necessary fertilizer injection time (min.) will
be calculated.
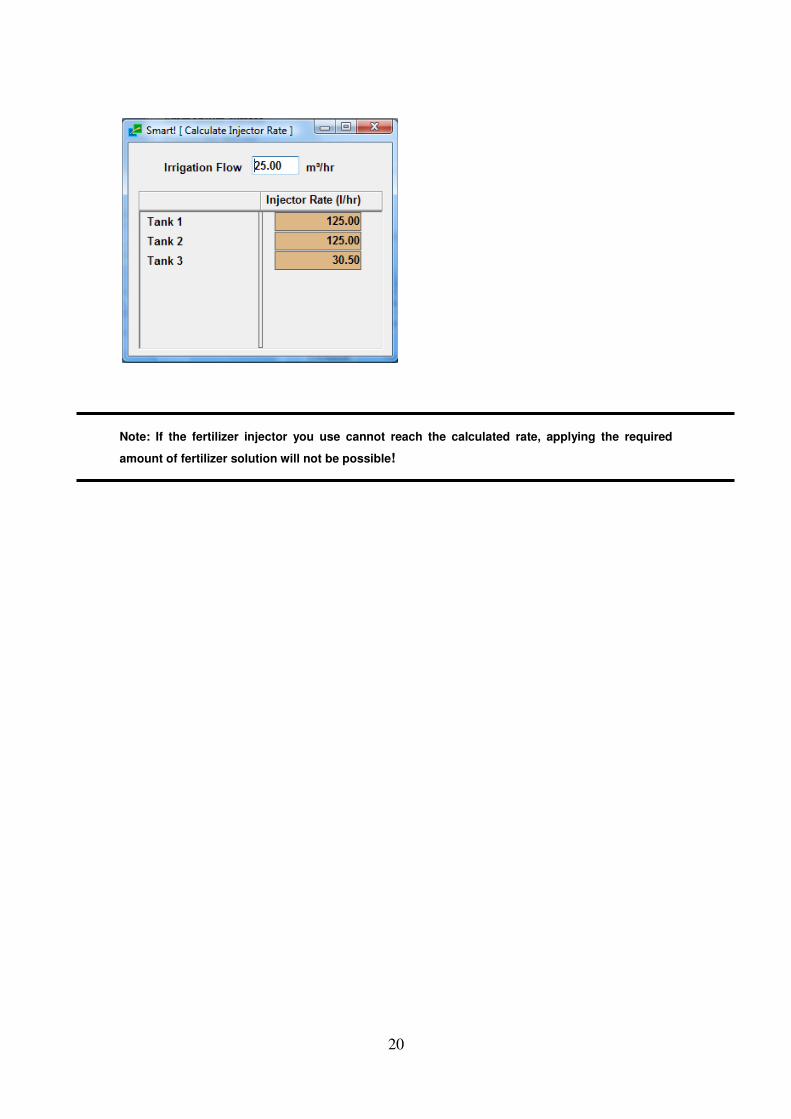
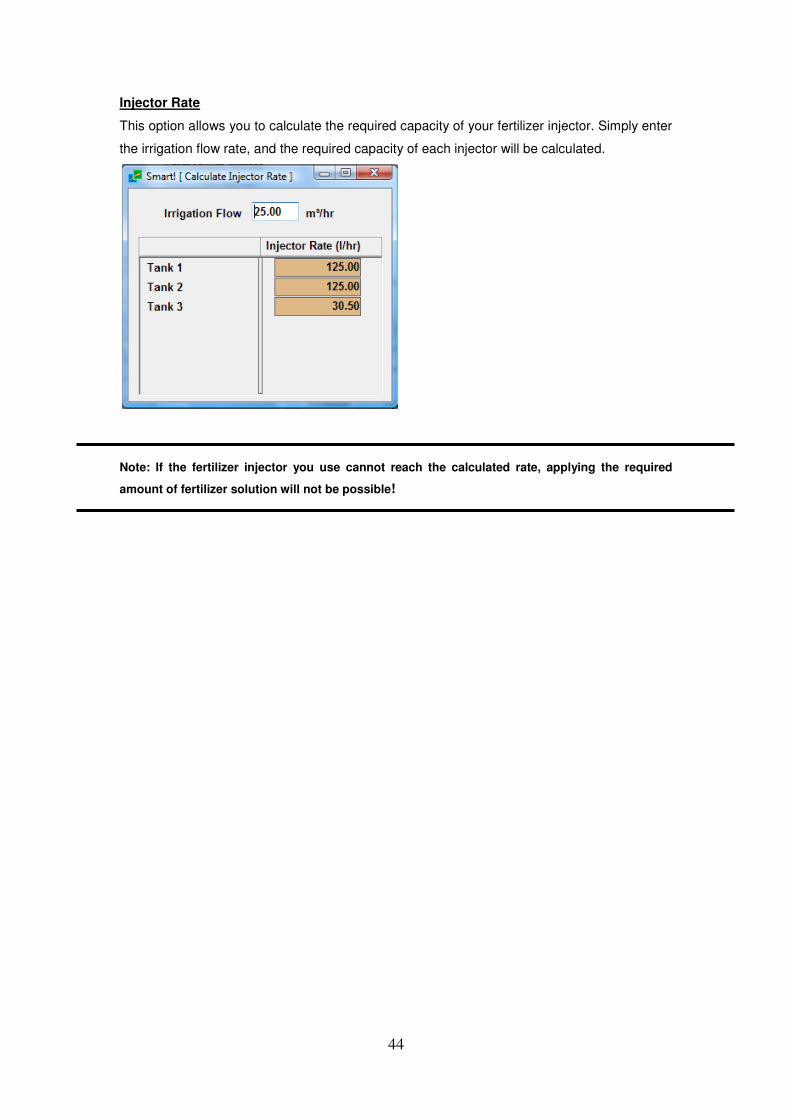
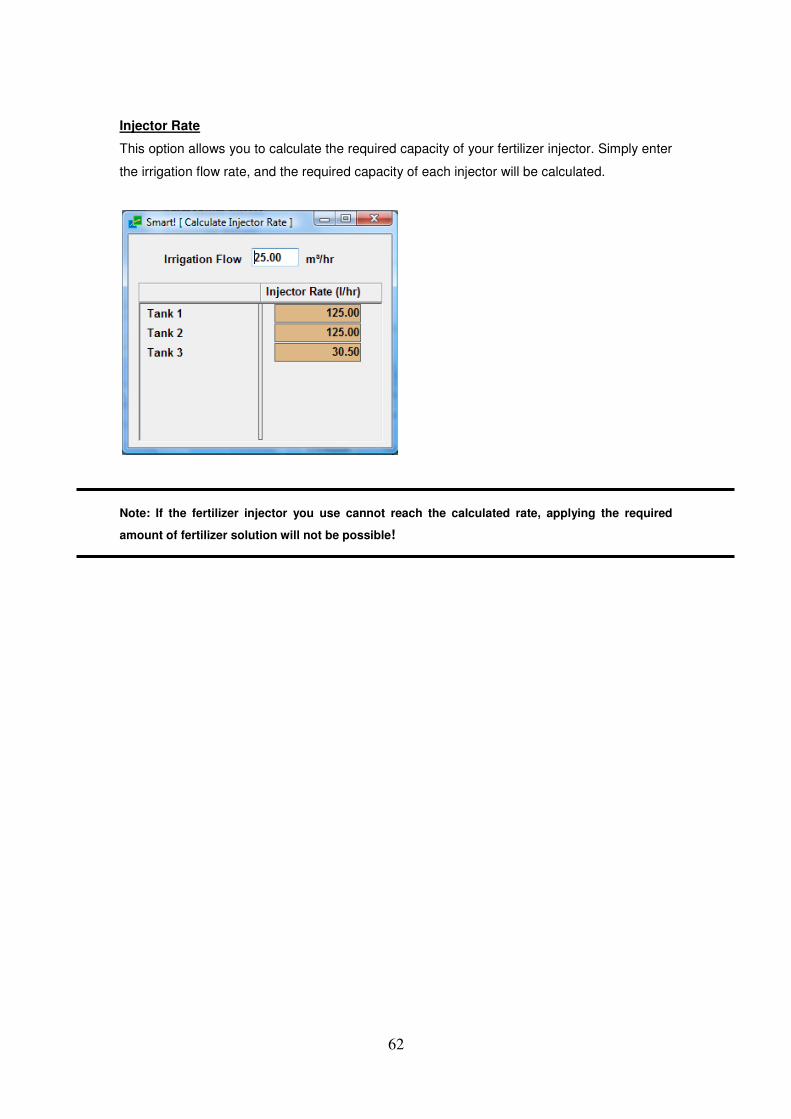
Injector Rate
This option allows you to calculate the required capacity of your fertilizer injector. Simply enter
the irrigation flow rate, and the required capacity of each injector will be calculated.
20
Note: If the fertilizer injector you use cannot reach the calculated rate, applying the required
amount of fertilizer solution will not be possible!

21
Mixing Fertilizers by Water Content – Method 2
In this section you will learn how to use your actual application of fertilizers in order to find out
your irrigation water content.
From the Mix Fertilizers menu, select By Water Content � Method 2. The calculation
screen is displayed.
STEP ONE – Entering Source Water Content
1. From the Units drop-down menu, select the units for the calculation. You can select ppm,
meq/l, mmol/l, or Kg/ha.
2. Each of the macronutrients (N, P, K, Ca, Mg, and S) has a drop-down menu. Open the
drop-down menu to select the form of each element (e.g. P or P2O5, N-NO3, or NO3).

22
3. In the Source Water row, enter values for each element according to your source water
analysis.
Note: Changing the units or the form of the elements will automatically convert the value you
entered.
4. Enter Source Water pH and Source Water EC. Note that Smart! also estimates the EC of
the Source Water based on the water analysis you have entered. If you do not enter a
Source Water EC value, Smart! will use the Estimated Source Water EC.
STEP TWO – Selecting Fertilizers to be used for the Calculation
After entering your source water content, you will now select the fertilizers available to you,
from the fertilizers in the database.
For convenience, the fertilizers are divided into liquid fertilizers and solid fertilizers.
Right-clicking on a fertilizer will show a tooltip of the fertilizer analysis.
To find a fertilizer on the list, you can either use the scroll-down menu or search the fertilizer
through the Search Fertilizer box.
Note: If a fertilizer you need to use is not on the list, you can simply add it to the database
through the New Fertilizer menu (p.83). You can also create your own databases (p.101).
Select a fertilizer from the list by double-clicking it. The fertilizer will then be added to the
Selected Fertilizers box.
23
Note: When you select an acid, you will be asked to enter its concentration (according to the
manufacturer’s data).
Removing Fertilizers from the Selected Fertilizers Box
To remove a fertilizer from the Selected Fertilizers box, check the box next to the fertilizer
name and select the Remove option.
To remove all the fertilizers selected, click the Remove All button.
You can proceed to the Fill Tanks Screen by clicking the Fill Tanks button at the bottom of
the screen. Go to p.25.
Additional Options on the Method 2 Screen
The Menu Bar
Source Water
Add - Smart! enables you to base the calculations on a mix of two different water sources.
Use this option if you are mixing two water sources of different qualities. Select Source
Water����Add, and enter the required mixing ratio.
To later change the mixing ratio, select Source Water����Source Water Ratio.
To remove added source water, select Source Water���� Remove Additional Source Water.
Open/Save – Smart! enables you to save the analysis of various water sources, so you can
use different water qualities for your fertilizer calculations. To open previously saved source
water data, select Source Water����Open and select the source water to be opened.
To save the source water data, select Source Water����Save.
24
Clear Source Water – Allows you to erase all values from the source water row (including EC
and ph).
Source Water Chart
Allows you to view a chart displaying the percentage of each element in your source water.
Expected Yield
For your own records, you can add an expected yield value to each fertilizer recipe.
25
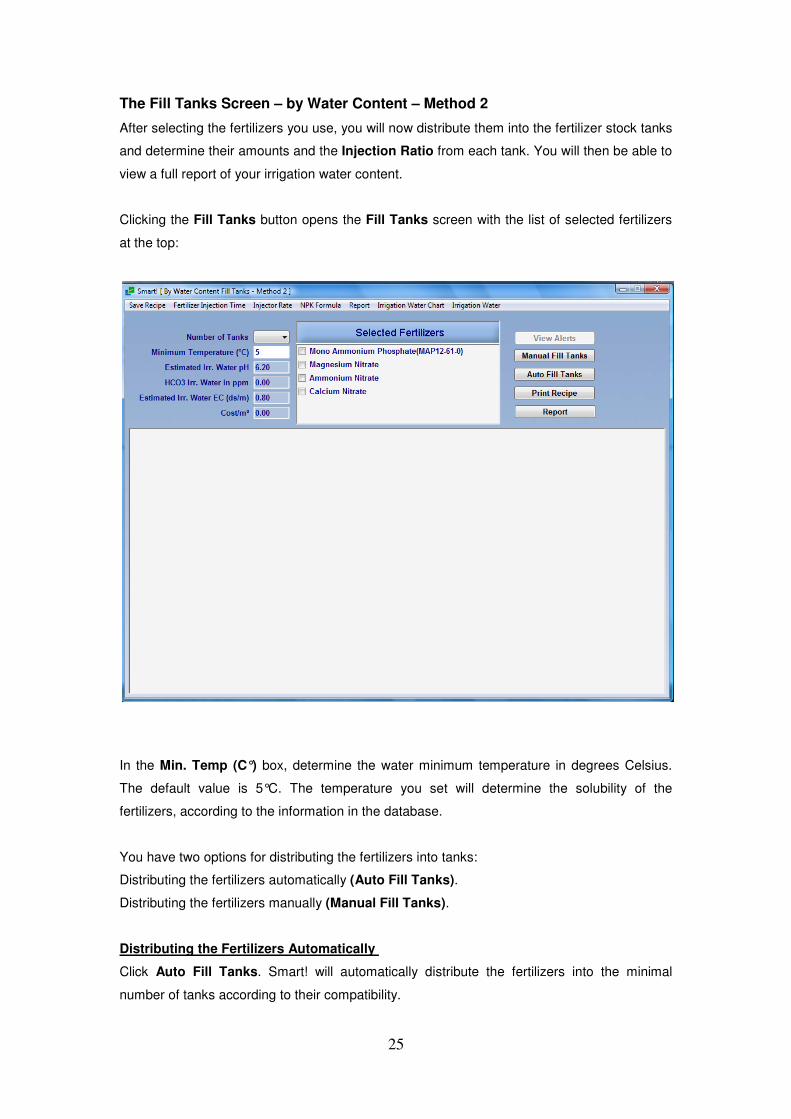
The Fill Tanks Screen – by Water Content – Method 2
After selecting the fertilizers you use, you will now distribute them into the fertilizer stock tanks
and determine their amounts and the Injection Ratio from each tank. You will then be able to
view a full report of your irrigation water content.
Clicking the Fill Tanks button opens the Fill Tanks screen with the list of selected fertilizers
at the top:
In the Min. Temp (C°) box, determine the water minimum temperature in degrees Celsius.
The default value is 5°C. The temperature you set will determine the solubility of the
fertilizers, according to the information in the database.
You have two options for distributing the fertilizers into tanks:
Distributing the fertilizers automatically (Auto Fill Tanks).
Distributing the fertilizers manually (Manual Fill Tanks).
Distributing the Fertilizers Automatically
Click Auto Fill Tanks. Smart! will automatically distribute the fertilizers into the minimal
number of tanks according to their compatibility.

26
Distributing the Fertilizers Manually
1. Click the Manual Fill Tanks button.
2. From the Number of Tanks drop-down menu, select the number of fertilizer
stock tanks you would like to use. The requested number of fertilizer stock tanks will
open below the Selected Fertilizers box.
3. From the Selected Fertilizers box, check the box of one of the fertilizers.
From the pop-up menu that appears, select Add to tank __ (tank number).
4. Repeat this action for all the fertilizers on the list.
The drop icon – A drop icon may appear in some of the tanks. Clicking this icon
will display general suggestions and instructions, depending on the fertilizers used and the
quality of the source water.
If you make a mixing error (e.g., mixing incompatible fertilizers) an alert message will pop
up, explaining the problem.
An alert icon will be displayed in the tank as long as the problem is not corrected.
You can click the alert icon at any time to see the explanation of the problem.
STEP TWO – Adjusting Fertilizer Amounts, Tank Volumes and Injection Ratio,
After distributing the fertilizers into the fertilizer stock tanks, you will now enter fertilizer
quantities, injection ratios and tank volumes, to match your actual application of fertilizers.
27
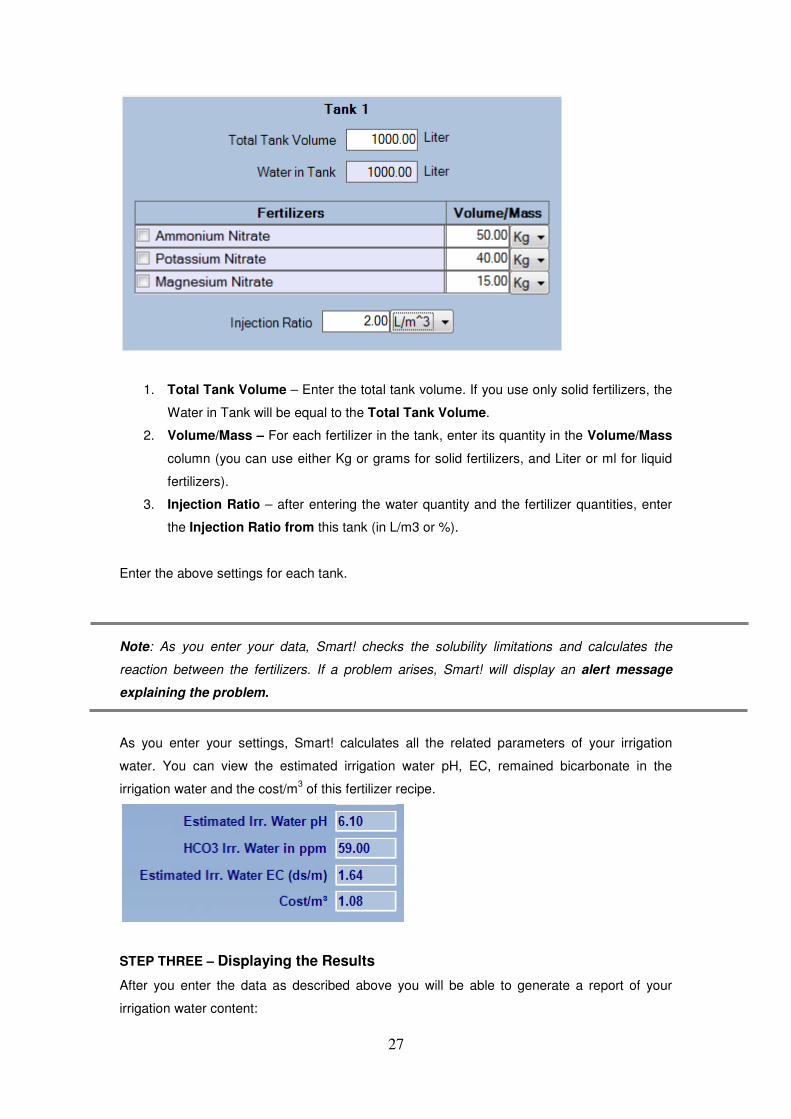
1. Total Tank Volume – Enter the total tank volume. If you use only solid fertilizers, the
Water in Tank will be equal to the Total Tank Volume.
2. Volume/Mass – For each fertilizer in the tank, enter its quantity in the Volume/Mass
column (you can use either Kg or grams for solid fertilizers, and Liter or ml for liquid
fertilizers).
3. Injection Ratio – after entering the water quantity and the fertilizer quantities, enter
the Injection Ratio from this tank (in L/m3 or %).
Enter the above settings for each tank.
Note: As you enter your data, Smart! checks the solubility limitations and calculates the
reaction between the fertilizers. If a problem arises, Smart! will display an alert message
explaining the problem.
As you enter your settings, Smart! calculates all the related parameters of your irrigation
water. You can view the estimated irrigation water pH, EC, remained bicarbonate in the
irrigation water and the cost/m3 of this fertilizer recipe.
STEP THREE – Displaying the Results
After you enter the data as described above you will be able to generate a report of your
irrigation water content:

28
The Report button: click the Report button to view a detailed report of your irrigation water
content, including nutrient ratios, EC, pH, TDS, SAR and cost/m3.
The report will change interactively upon adjusting your inputs. In the Report window, click
Details to see the contribution of each fertilizer to each element.
To print this report, click the printer icon on the top left side of the report window.
You can open and close the report at any time. The report will change interactively as you
change your input.
Printing Your Recipe
To print your recipe, click the Print Recipe button.
A ready-to-print form opens.
Click the printer icon to print.

29
Saving Your Recipe
Select Save Recipe ����Save/Save as from the menu bar in the Fill Tanks screen.
Additional Options in Method 2 – Fill Tanks Screen
The View Alerts button: The View Alerts button: Clicking the View Alerts button will show
general alerts related to the irrigation water. These alerts refer to salinity hazards, sodium
hazards, and the emitter clogging potential.
The Menu Bar
Fertilizer Injection Time
This option can be used for injector systems that do not have a proportional fertilization
option. Enter the irrigation flow (m3/hr), irrigation duration (min.), and the injector flows. The
necessary fertilizer injection time (min.) will be calculated.
Injector Rate
This option allows you to calculate the required capacity of your fertilizer injector. Simply enter
the irrigation flow rate, and the required capacity of each injector will be calculated.
30
Note: If the fertilizer injector you use cannot reach the calculated rate, applying the required
amount of fertilizer solution will not be possible!
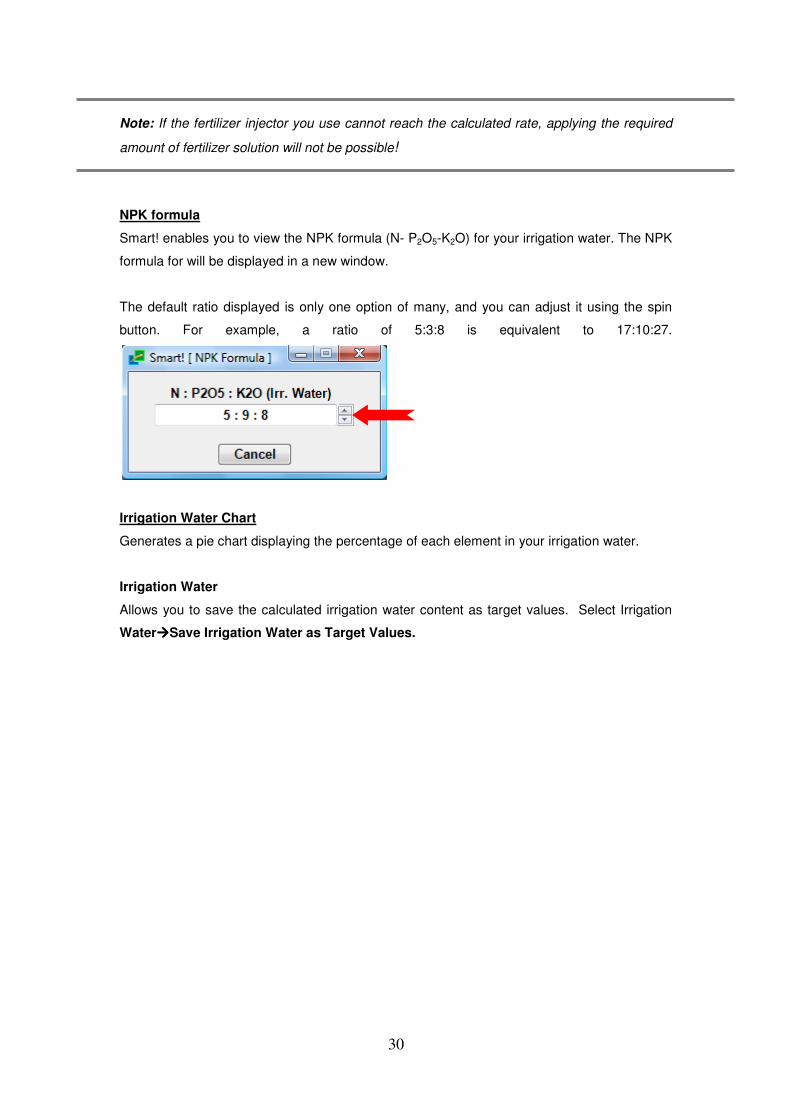
NPK formula
Smart! enables you to view the NPK formula (N- P2O5-K2O) for your irrigation water. The NPK
formula for will be displayed in a new window.
The default ratio displayed is only one option of many, and you can adjust it using the spin
button. For example, a ratio of 5:3:8 is equivalent to 17:10:27.
Irrigation Water Chart
Generates a pie chart displaying the percentage of each element in your irrigation water.
Irrigation Water
Allows you to save the calculated irrigation water content as target values. Select Irrigation
Water����Save Irrigation Water as Target Values.
31
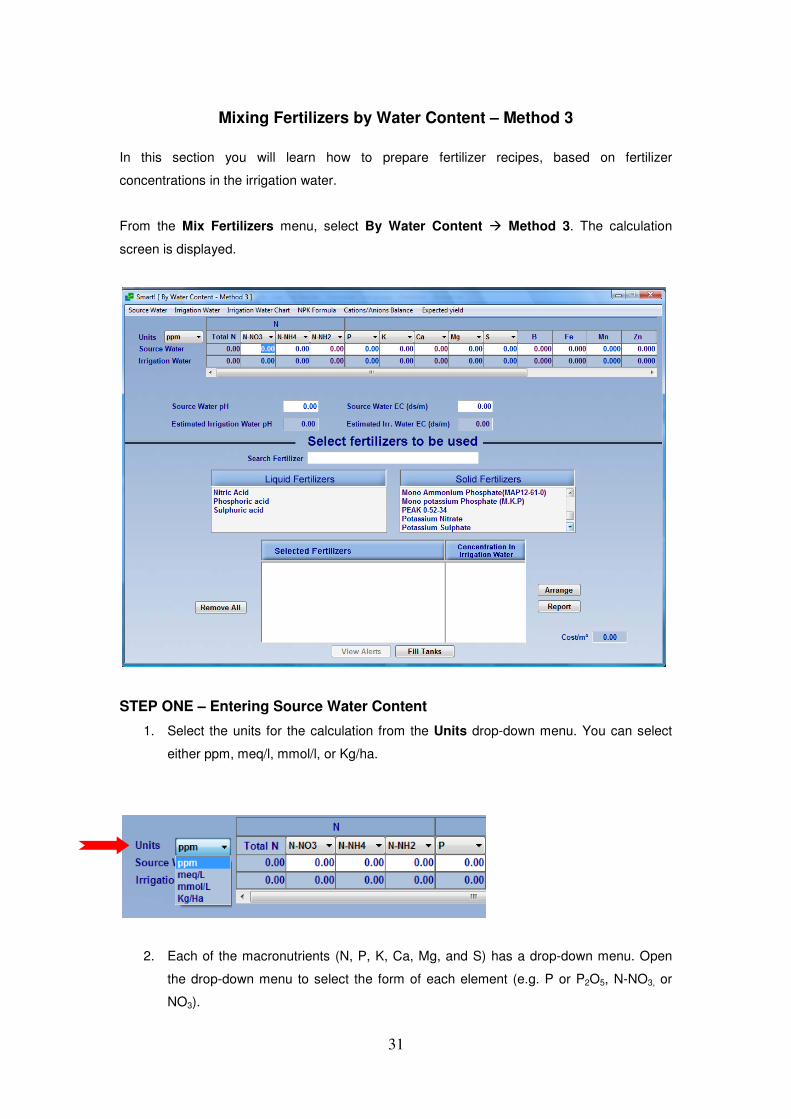
Mixing Fertilizers by Water Content – Method 3
In this section you will learn how to prepare fertilizer recipes, based on fertilizer
concentrations in the irrigation water.
From the Mix Fertilizers menu, select By Water Content � Method 3. The calculation
screen is displayed.
STEP ONE – Entering Source Water Content
1. Select the units for the calculation from the Units drop-down menu. You can select
either ppm, meq/l, mmol/l, or Kg/ha.
2. Each of the macronutrients (N, P, K, Ca, Mg, and S) has a drop-down menu. Open
the drop-down menu to select the form of each element (e.g. P or P2O5, N-NO3, or
NO3).
32
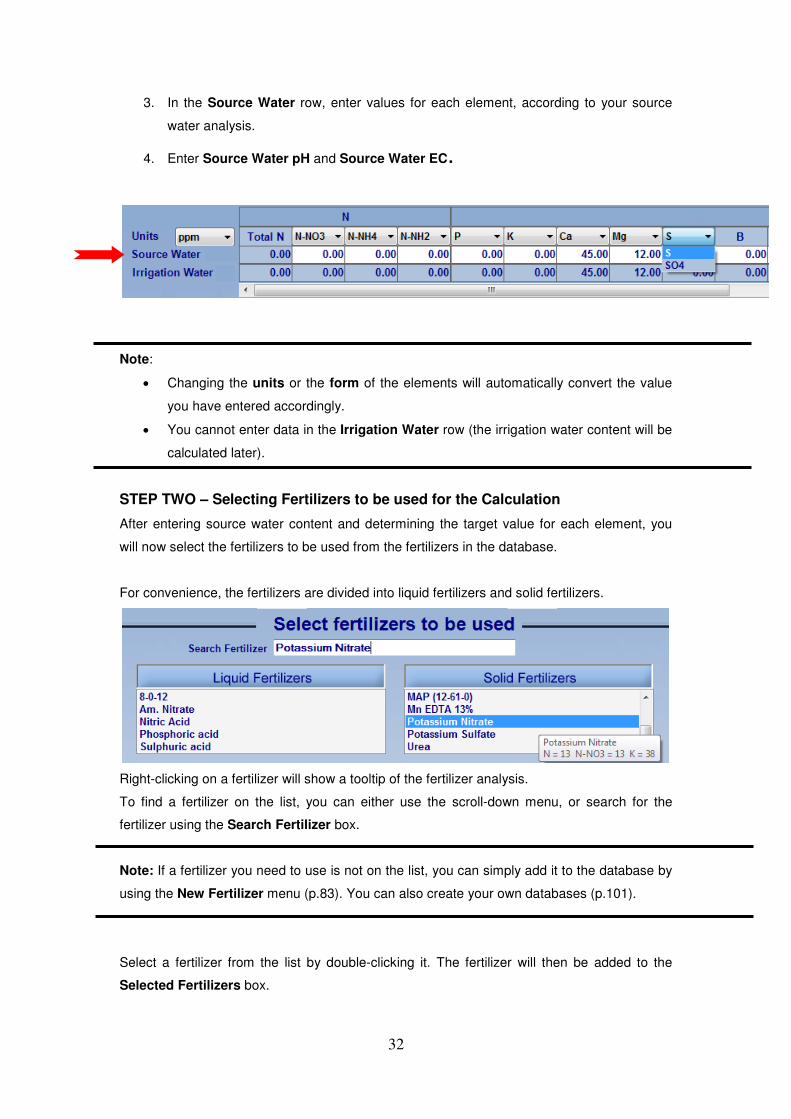
3. In the Source Water row, enter values for each element, according to your source
water analysis.
4. Enter Source Water pH and Source Water EC.
Note:
• Changing the units or the form of the elements will automatically convert the value
you have entered accordingly.
• You cannot enter data in the Irrigation Water row (the irrigation water content will be
calculated later).
STEP TWO – Selecting Fertilizers to be used for the Calculation
After entering source water content and determining the target value for each element, you
will now select the fertilizers to be used from the fertilizers in the database.
For convenience, the fertilizers are divided into liquid fertilizers and solid fertilizers.
Right-clicking on a fertilizer will show a tooltip of the fertilizer analysis.
To find a fertilizer on the list, you can either use the scroll-down menu, or search for the
fertilizer using the Search Fertilizer box.
Note: If a fertilizer you need to use is not on the list, you can simply add it to the database by
using the New Fertilizer menu (p.83). You can also create your own databases (p.101).
Select a fertilizer from the list by double-clicking it. The fertilizer will then be added to the
Selected Fertilizers box.
33
Note: When you select an acid, you will be asked to enter its concentration (according to the
manufacturer’s data).
Removing Fertilizers from the Selected Fertilizers Box
To remove a fertilizer from the Selected Fertilizers box, check the box next to the fertilizer
name and click the Remove button on the left.
To remove all the fertilizers selected, click the Remove All button.
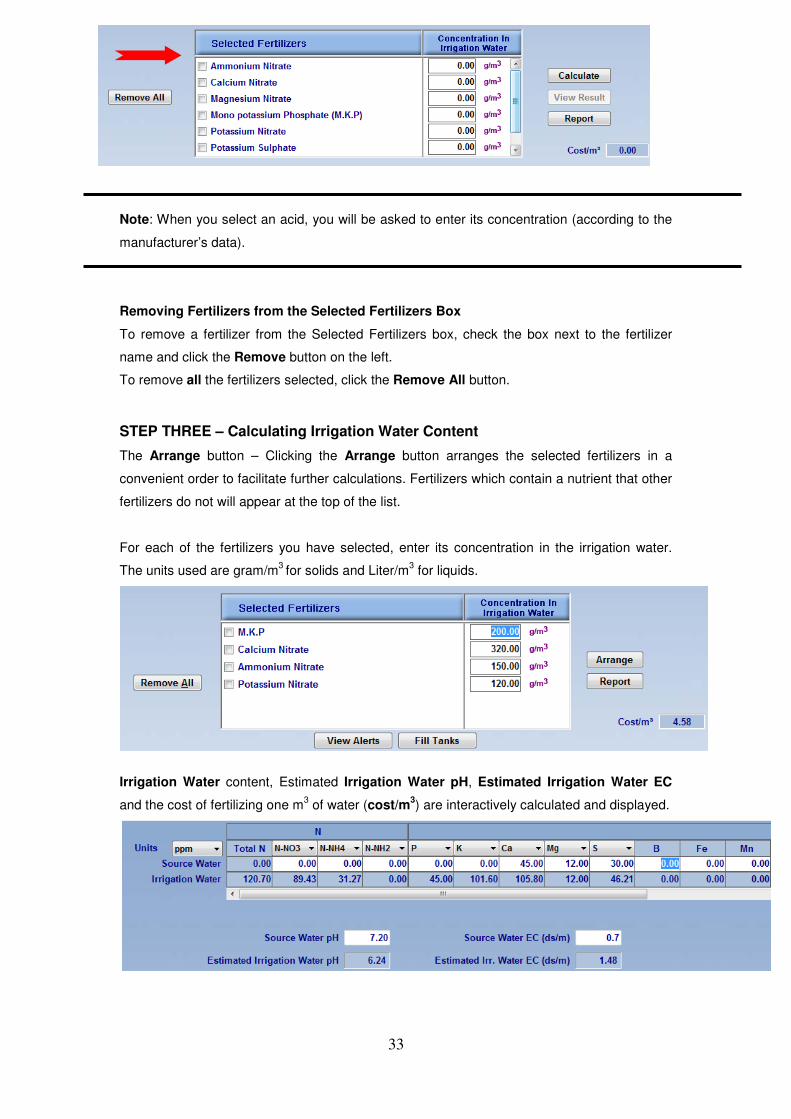
STEP THREE – Calculating Irrigation Water Content
The Arrange button – Clicking the Arrange button arranges the selected fertilizers in a
convenient order to facilitate further calculations. Fertilizers which contain a nutrient that other
fertilizers do not will appear at the top of the list.
For each of the fertilizers you have selected, enter its concentration in the irrigation water.
The units used are gram/m3 for solids and Liter/m
3 for liquids.
Irrigation Water content, Estimated Irrigation Water pH, Estimated Irrigation Water EC
and the cost of fertilizing one m3 of water (cost/m
3) are interactively calculated and displayed.
34
After entering concentrations in irrigation water for all of the selected fertilizers, you are now
ready to distribute the fertilizers into the fertilizer stock tanks.
You can proceed to the Fill Tanks Screen by clicking the Fill Tanks button at the bottom of
the screen. Go to p.38.
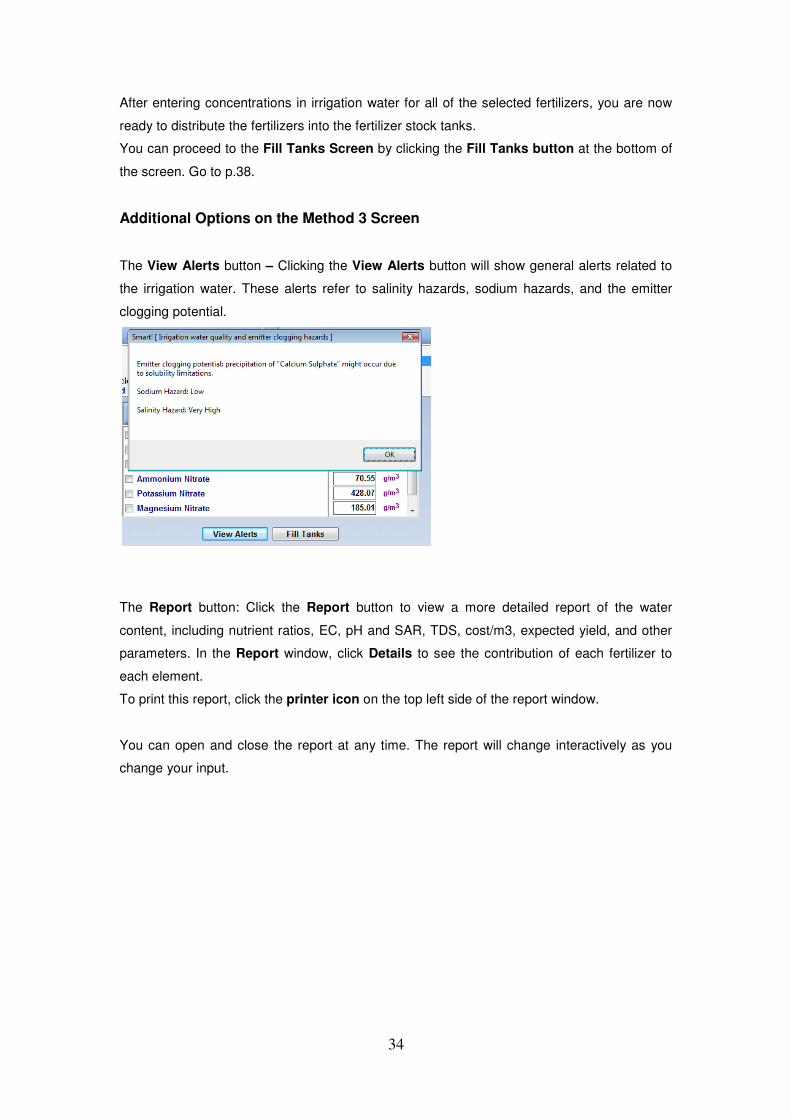
Additional Options on the Method 3 Screen
The View Alerts button – Clicking the View Alerts button will show general alerts related to
the irrigation water. These alerts refer to salinity hazards, sodium hazards, and the emitter
clogging potential.
The Report button: Click the Report button to view a more detailed report of the water
content, including nutrient ratios, EC, pH and SAR, TDS, cost/m3, expected yield, and other
parameters. In the Report window, click Details to see the contribution of each fertilizer to
each element.
To print this report, click the printer icon on the top left side of the report window.
You can open and close the report at any time. The report will change interactively as you
change your input.
35
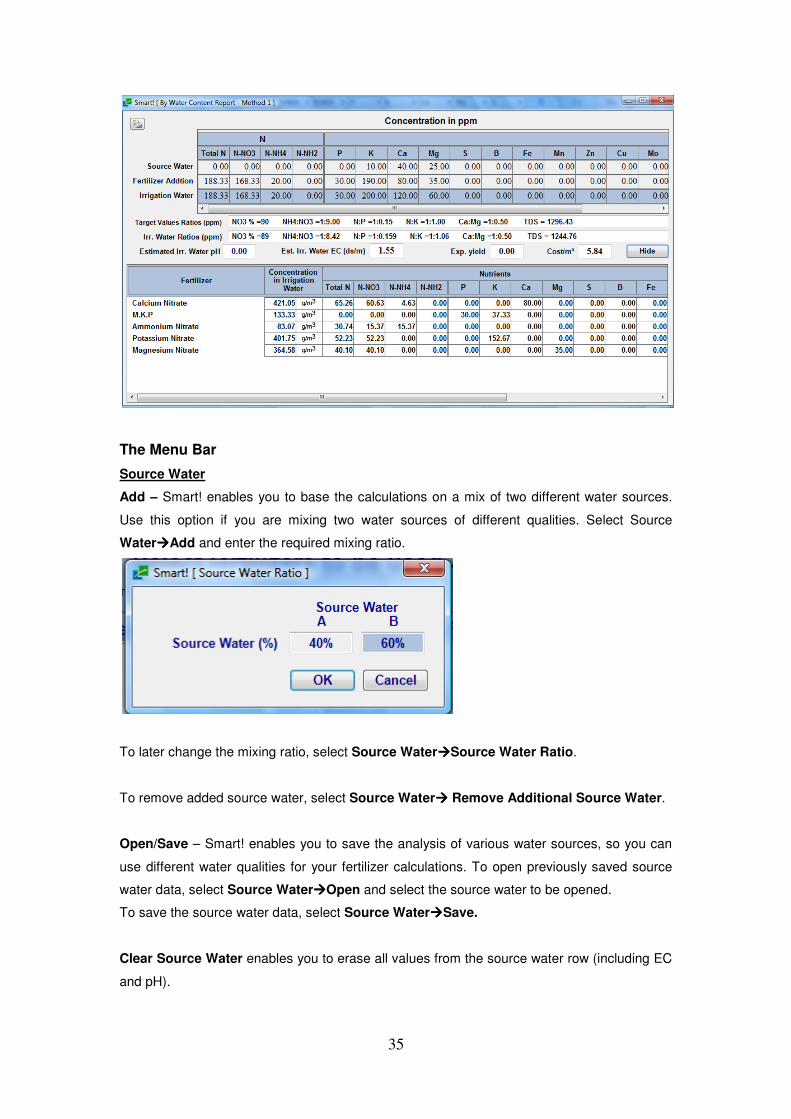
The Menu Bar
Source Water
Add – Smart! enables you to base the calculations on a mix of two different water sources.
Use this option if you are mixing two water sources of different qualities. Select Source
Water����Add and enter the required mixing ratio.
To later change the mixing ratio, select Source Water����Source Water Ratio.
To remove added source water, select Source Water���� Remove Additional Source Water.
Open/Save – Smart! enables you to save the analysis of various water sources, so you can
use different water qualities for your fertilizer calculations. To open previously saved source
water data, select Source Water����Open and select the source water to be opened.
To save the source water data, select Source Water����Save.
Clear Source Water enables you to erase all values from the source water row (including EC
and pH).
36
Irrigation Water
Smart! enables you to save the calculated irrigation water as target values. Select
Irrigation Water�Save Irrigation Water as Target Values. This will save your calculated
irrigation water content, including EC and pH. You will be able to use these saved values in
Method 1.
Irrigation Water Chart
Generates a chart displaying the percentage of each element in your irrigation water.
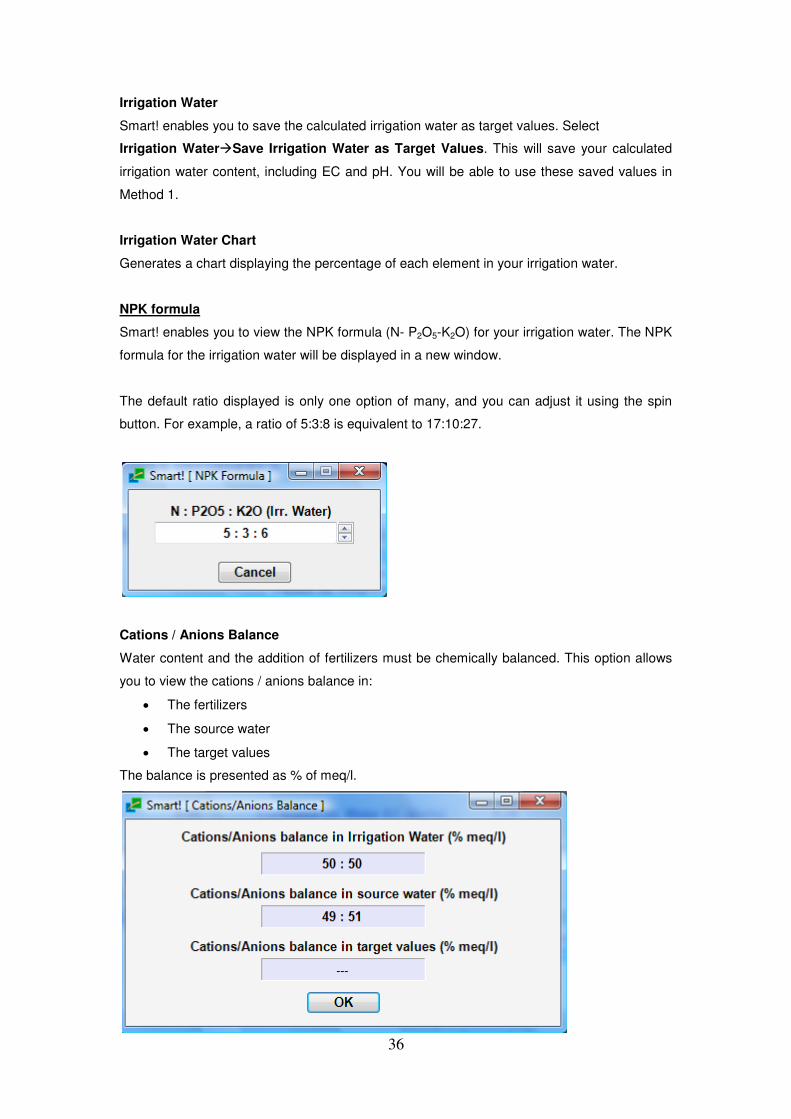
NPK formula
Smart! enables you to view the NPK formula (N- P2O5-K2O) for your irrigation water. The NPK
formula for the irrigation water will be displayed in a new window.
The default ratio displayed is only one option of many, and you can adjust it using the spin
button. For example, a ratio of 5:3:8 is equivalent to 17:10:27.
Cations / Anions Balance
Water content and the addition of fertilizers must be chemically balanced. This option allows
you to view the cations / anions balance in:
• The fertilizers
• The source water
• The target values
The balance is presented as % of meq/l.

37
Expected Yield
For your own records, you can add an expected yield value to each fertilizer recipe.
38
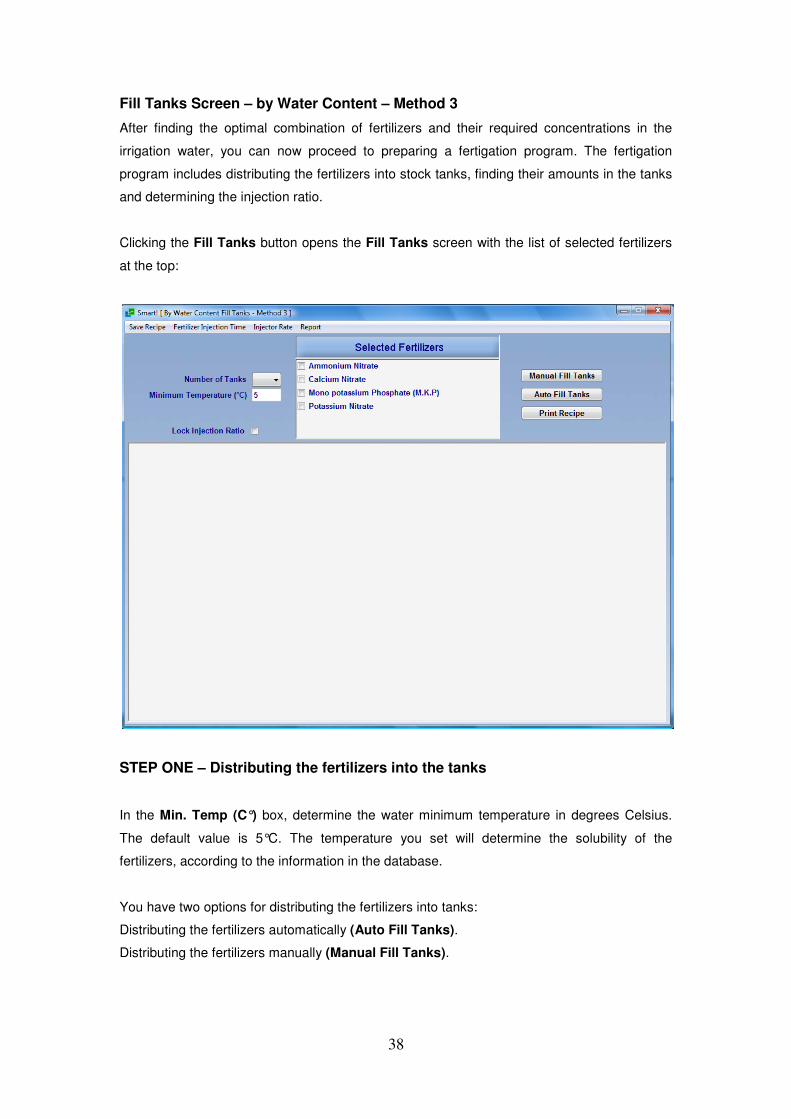
Fill Tanks Screen – by Water Content – Method 3
After finding the optimal combination of fertilizers and their required concentrations in the
irrigation water, you can now proceed to preparing a fertigation program. The fertigation
program includes distributing the fertilizers into stock tanks, finding their amounts in the tanks
and determining the injection ratio.
Clicking the Fill Tanks button opens the Fill Tanks screen with the list of selected fertilizers
at the top:
STEP ONE – Distributing the fertilizers into the tanks
In the Min. Temp (C°) box, determine the water minimum temperature in degrees Celsius.
The default value is 5°C. The temperature you set will determine the solubility of the
fertilizers, according to the information in the database.
You have two options for distributing the fertilizers into tanks:
Distributing the fertilizers automatically (Auto Fill Tanks).
Distributing the fertilizers manually (Manual Fill Tanks).
39
Distributing the Fertilizers Automatically
Click Auto Fill Tanks. Smart! will automatically distribute the fertilizers into the minimal
number of tanks according to their compatibility.
Distributing the Fertilizers Manually
1. Click the Manual Fill Tanks button.
2. From the Number of Tanks drop-down menu, select the number of fertilizer
stock tanks you would like to use. The requested number of fertilizer stock tanks will
open below the Selected Fertilizers box.
3. From the Selected Fertilizers box, check the box of one of the fertilizers.
From the pop-up menu that appears, select Add to tank __ (tank number).
4. Repeat this action for all the fertilizers on the list.
The drop icon – A drop icon may appear in some of the tanks. Clicking this icon
will display general suggestions and instructions, depending on the fertilizers used and the
quality of the source water.
If you make a mixing error (e.g., mixing incompatible fertilizers) an alert message will pop
up, explaining the problem.
40
An alert icon will be displayed in the tank as long as the problem is not corrected.
You can click the alert icon at any time to see the explanation of the problem.
STEP TWO - Adjusting Injection Ratios and Tank Volumes
After distributing the fertilizers into the fertilizer stock tanks, you will now adjust the Injection
Ratios and Tank Volumes to match your fertigation system specifications.
Water – The water quantity in the tank. If you use only solid fertilizers, the water quantity will
be equal to the Tank Volume.
Total Liquid Fertilizers – Amount of liquid fertilizers in the tank.
Tank Volume – The sum of Water and Total Liquid Fertilizers is the Total Liquids. This is
basically the tank volume.
41
The default value for Tank Volume is set to 1,000 liters. You may change this value to the
actual volume of the tank you are using. As you change the Tank Volume, fertilizer quantities
in the tank (as appear in the Volume / Mass column) are calculated accordingly.
Injection Ratio – Smart! calculates the default value for the Injection Ratio (units of L/m3
or
%) according to the required concentration of fertilizers, their solubility, and the interactions
between fertilizers. This default value is the minimal Injection Ratio recommended. In case
the calculated minimal value is less than 0.5 L/m3, Smart! sets the Injection Ratio to a
practical value of 0.5 L/m3.
You may change the default Injection Ratio to fit the capacity of your fertilization system.
The quantities of fertilizers in the tank will be automatically adjusted accordingly. If you set the
Injection Ratio to a lower value than the minimal value recommended, an alert message will
be displayed, explaining the problem that might arise.
An alert icon will be displayed in the tank as long as the problem is not corrected.
You can click the alert icon at any time to see the explanation of the problem.
42
Note: The higher Injection Ratio you use, the less concentrated the solution in the tank, and
vice-versa. Therefore, to prevent precipitation in the tanks, it is recommended that you set the
Injection Ratio to a higher value than the minimal Injection Ratio calculated.
Adjust the Injection Ratio and Total Liquids in all tanks, according to your irrigation system
specifications.
The Default button
You can click the Default button at any time to go back to the default results.
Congratulations!
You have just created an optimal fertilizer recipe, specific to your crop requirements.
Printing Your Recipe
To print your recipe, click the Print Recipe button.
A ready-to-print form opens.
Click the printer icon to print.
Saving Your Recipe
Select Save Recipe ����Save/Save as from the menu bar in the Fill Tanks screen.
Additional Options in Method 3 - Fill Tanks Screen
The Lock Injection Ratio checkbox
You can use this option when you dilute liquid fertilizers in the tank (mixing it with water), or
when you mix solid fertilizers with liquid fertilizers.
Checking the Lock Injection Ratio box allows you to manually change the Water and Total
Liquid Fertilizers, while the Injection Ratio is calculated accordingly.
Moving Fertilizers from Tank to Tank
To move a fertilizer from one tank to another, check the box next to the fertilizer in a tank, and
select the tank you want to add it to. If this action might cause a compatibility problem, an
alert message will appear.
43
Changing the Number of Tanks
You can add or remove tanks at any time. Simply change the number of tanks in the Number
of Tanks drop-down menu.
Note that removing tanks that contain fertilizers will return those fertilizers to the Selected
Fertilizers box. These fertilizers will have to be re-distributed.
The Menu Bar
Fertilizer Injection Time
This option can be used for injector systems that do not have a proportional fertilization
option. Enter the irrigation flow (m3/hr), irrigation duration (min.), and the injector flows. The
necessary fertilizer injection time (min.) will be calculated.
44
Injector Rate
This option allows you to calculate the required capacity of your fertilizer injector. Simply enter
the irrigation flow rate, and the required capacity of each injector will be calculated.
Note: If the fertilizer injector you use cannot reach the calculated rate, applying the required
amount of fertilizer solution will not be possible!
45
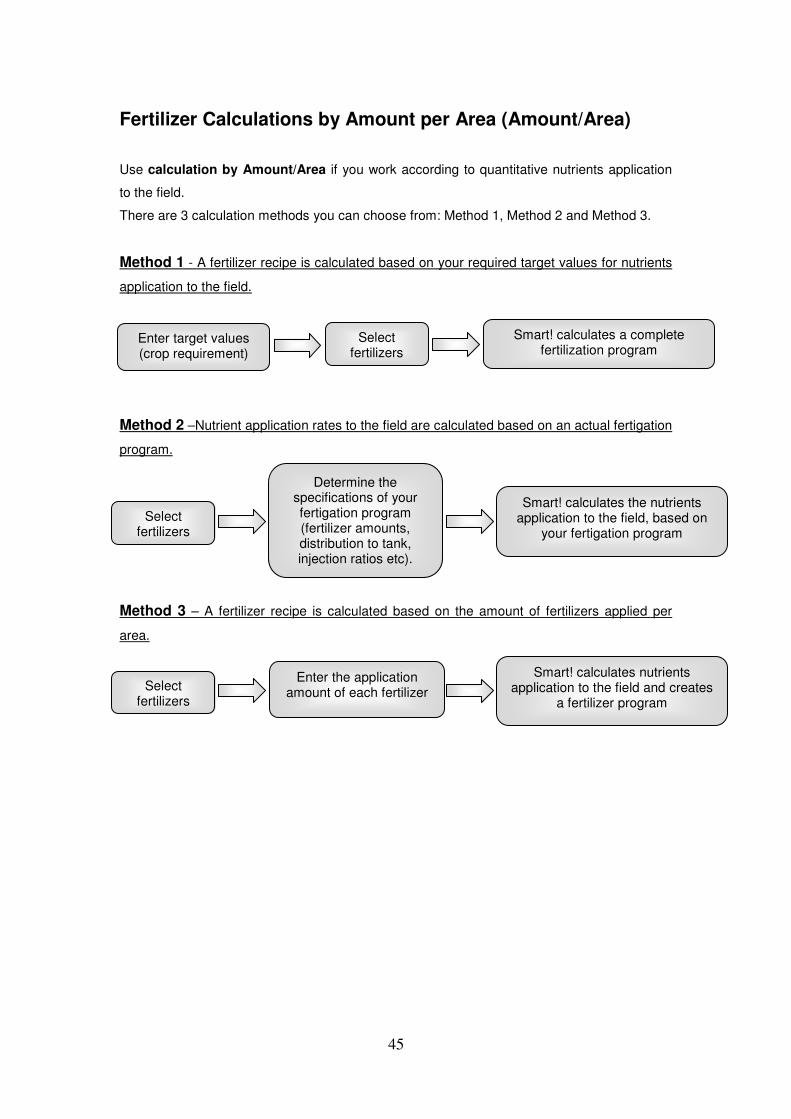
Fertilizer Calculations by Amount per Area (Amount/Area)
Use calculation by Amount/Area if you work according to quantitative nutrients application
to the field.
There are 3 calculation methods you can choose from: Method 1, Method 2 and Method 3.
Method 1 - A fertilizer recipe is calculated based on your required target values for nutrients
application to the field.
Method 2 –Nutrient application rates to the field are calculated based on an actual fertigation
program.
Method 3 – A fertilizer recipe is calculated based on the amount of fertilizers applied per
area.
Enter target values (crop requirement)
Select fertilizers
Smart! calculates a complete fertilization program
Determine the specifications of your fertigation program (fertilizer amounts, distribution to tank, injection ratios etc).
Select fertilizers
Smart! calculates the nutrients application to the field, based on
your fertigation program
Enter the application amount of each fertilizer
Select fertilizers
Smart! calculates nutrients application to the field and creates
a fertilizer program
46
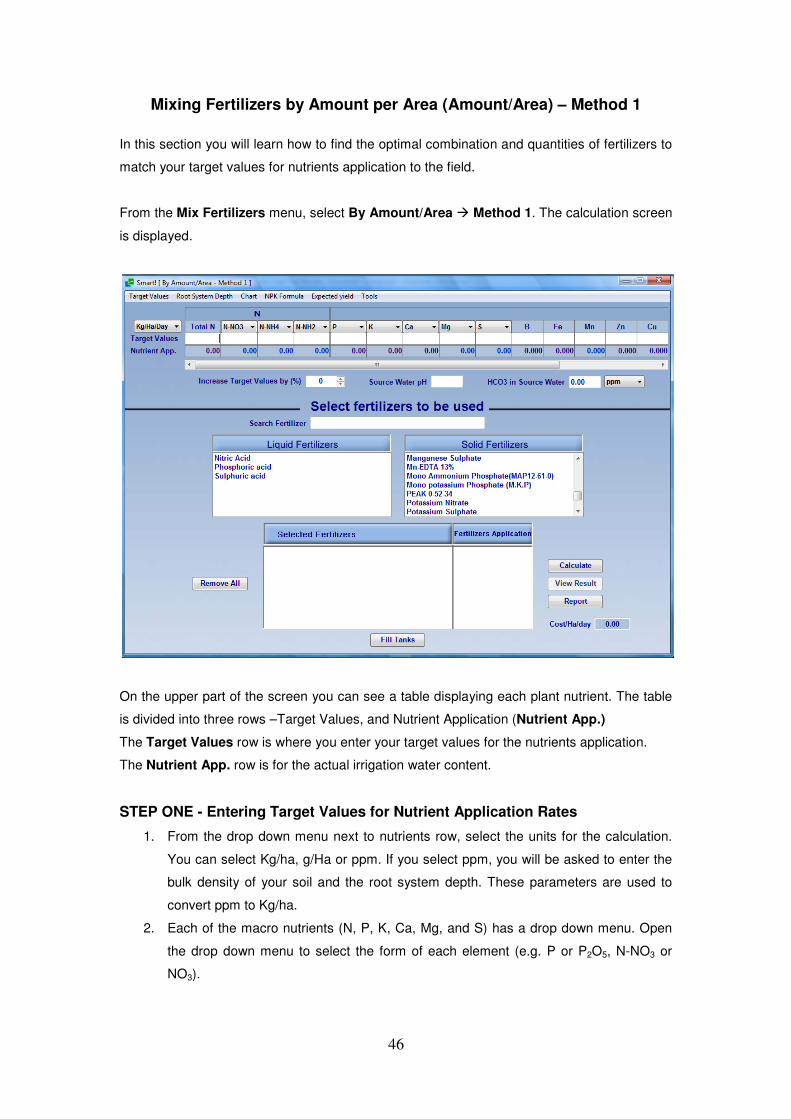
Mixing Fertilizers by Amount per Area (Amount/Area) – Method 1
In this section you will learn how to find the optimal combination and quantities of fertilizers to
match your target values for nutrients application to the field.
From the Mix Fertilizers menu, select By Amount/Area � Method 1. The calculation screen
is displayed.
On the upper part of the screen you can see a table displaying each plant nutrient. The table
is divided into three rows –Target Values, and Nutrient Application (Nutrient App.)
The Target Values row is where you enter your target values for the nutrients application.
The Nutrient App. row is for the actual irrigation water content.
STEP ONE - Entering Target Values for Nutrient Application Rates
1. From the drop down menu next to nutrients row, select the units for the calculation.
You can select Kg/ha, g/Ha or ppm. If you select ppm, you will be asked to enter the
bulk density of your soil and the root system depth. These parameters are used to
convert ppm to Kg/ha.
2. Each of the macro nutrients (N, P, K, Ca, Mg, and S) has a drop down menu. Open
the drop down menu to select the form of each element (e.g. P or P2O5, N-NO3 or
NO3).
47
Note: Changing the units or the form of the elements will automatically convert your value
accordingly.
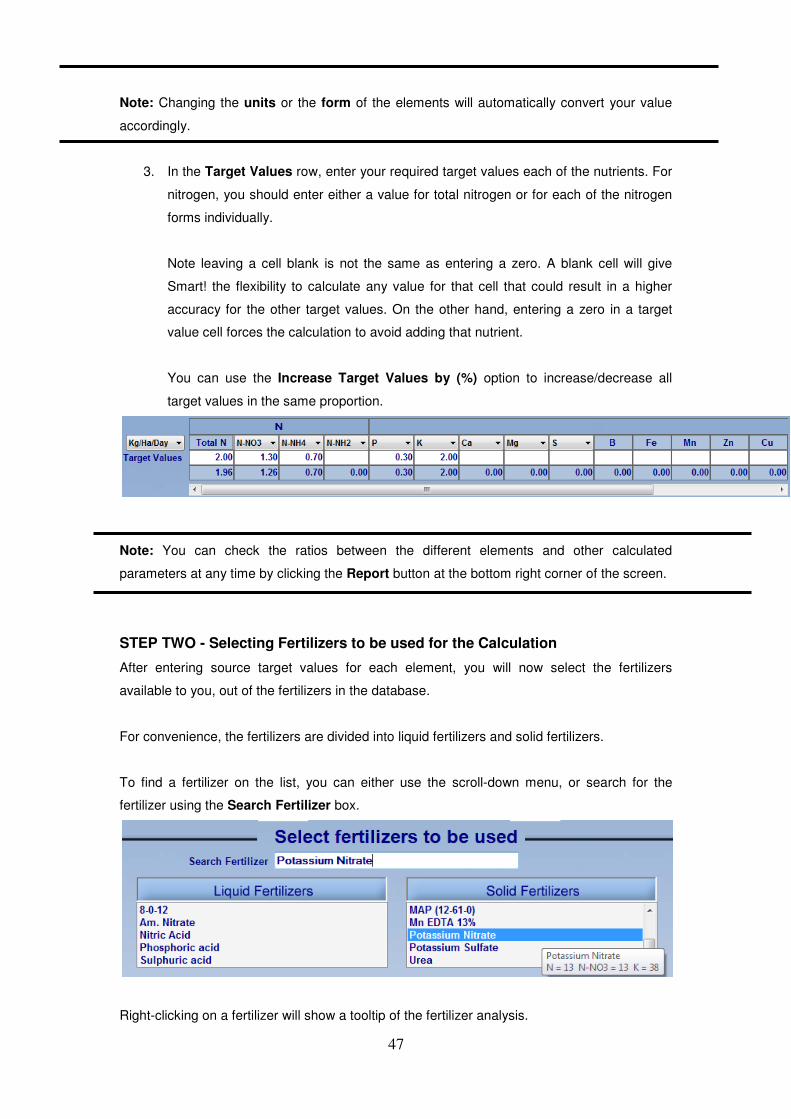
3. In the Target Values row, enter your required target values each of the nutrients. For
nitrogen, you should enter either a value for total nitrogen or for each of the nitrogen
forms individually.
Note leaving a cell blank is not the same as entering a zero. A blank cell will give
Smart! the flexibility to calculate any value for that cell that could result in a higher
accuracy for the other target values. On the other hand, entering a zero in a target
value cell forces the calculation to avoid adding that nutrient.
You can use the Increase Target Values by (%) option to increase/decrease all
target values in the same proportion.
Note: You can check the ratios between the different elements and other calculated
parameters at any time by clicking the Report button at the bottom right corner of the screen.
STEP TWO - Selecting Fertilizers to be used for the Calculation
After entering source target values for each element, you will now select the fertilizers
available to you, out of the fertilizers in the database.
For convenience, the fertilizers are divided into liquid fertilizers and solid fertilizers.
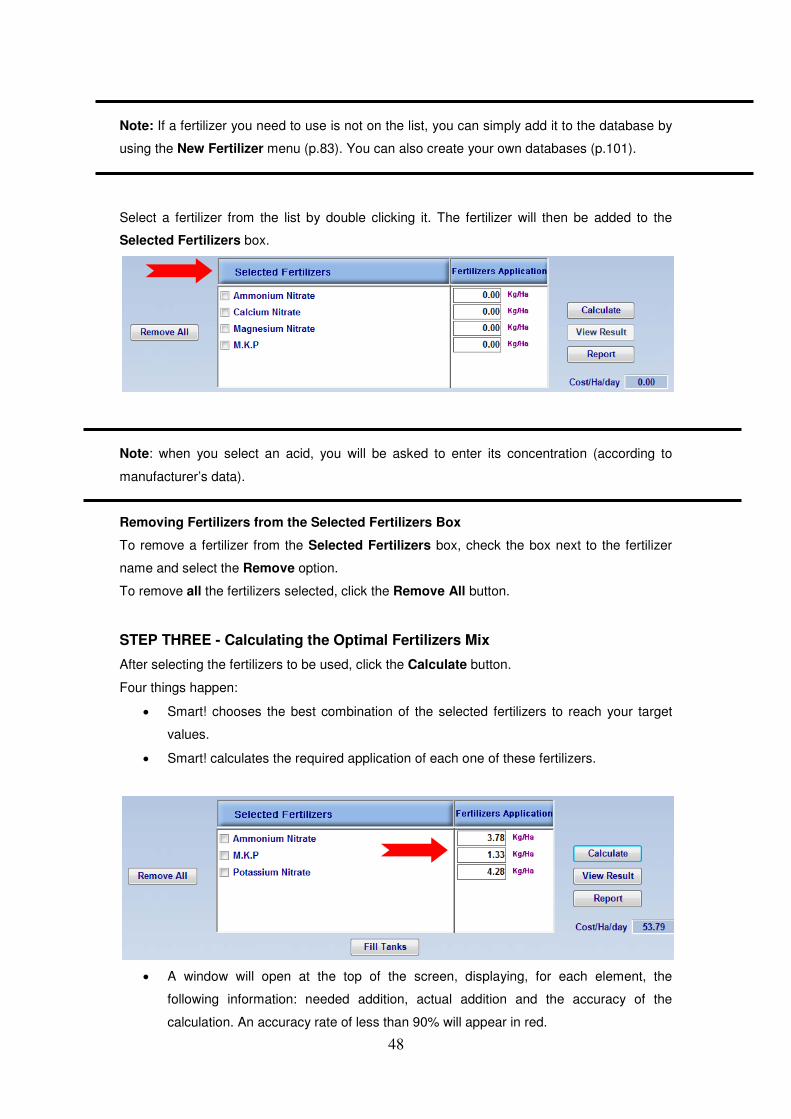
To find a fertilizer on the list, you can either use the scroll-down menu, or search for the
fertilizer using the Search Fertilizer box.
Right-clicking on a fertilizer will show a tooltip of the fertilizer analysis.
48
Note: If a fertilizer you need to use is not on the list, you can simply add it to the database by
using the New Fertilizer menu (p.83). You can also create your own databases (p.101).
Select a fertilizer from the list by double clicking it. The fertilizer will then be added to the
Selected Fertilizers box.
Note: when you select an acid, you will be asked to enter its concentration (according to
manufacturer’s data).
Removing Fertilizers from the Selected Fertilizers Box
To remove a fertilizer from the Selected Fertilizers box, check the box next to the fertilizer
name and select the Remove option.
To remove all the fertilizers selected, click the Remove All button.
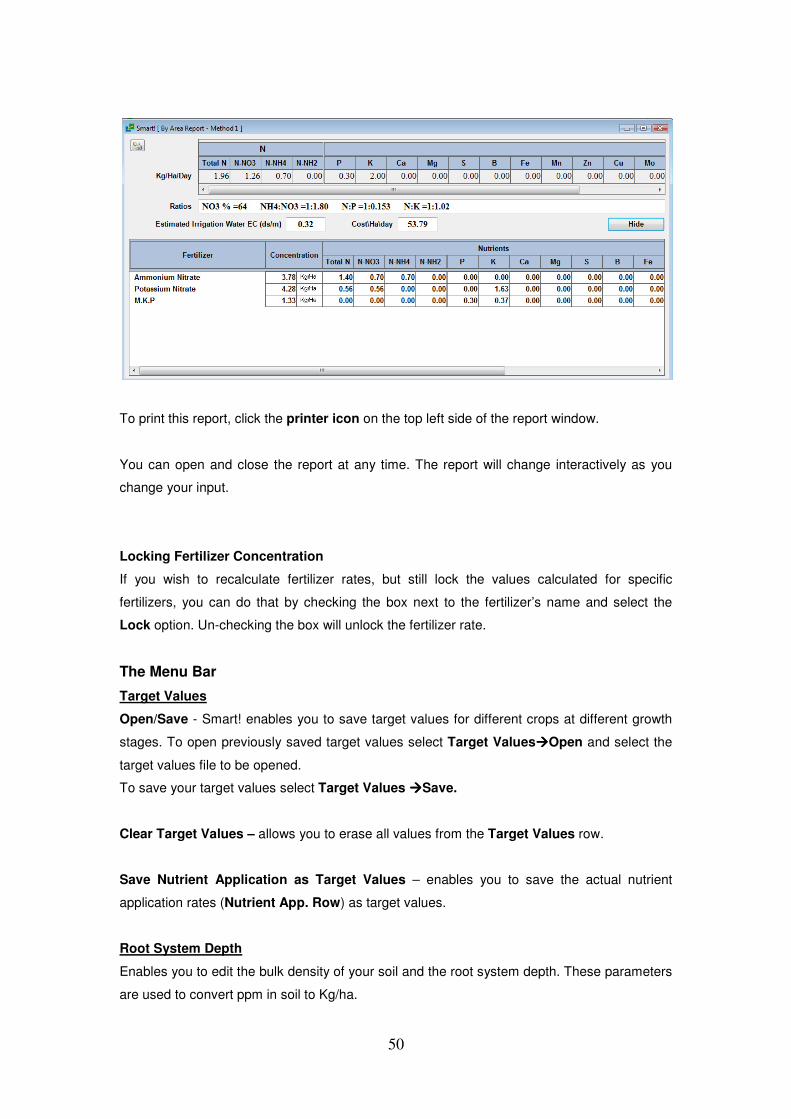
STEP THREE - Calculating the Optimal Fertilizers Mix
After selecting the fertilizers to be used, click the Calculate button.
Four things happen:
• Smart! chooses the best combination of the selected fertilizers to reach your target
values.
• Smart! calculates the required application of each one of these fertilizers.
• A window will open at the top of the screen, displaying, for each element, the
following information: needed addition, actual addition and the accuracy of the
calculation. An accuracy rate of less than 90% will appear in red.

49
After closing this window, you can return and display it again at any time by clicking
the View Result button on the right side of the Selected Fertilizers box.
• The cost of applying that mix of fertilizers is displayed at the bottom right corner of the
method 1 screen (cost/ha).
Note: Smart! uses a unique optimization algorithm that takes into consideration both your
target values and fertilizer prices, so that you always reach the highest accuracy at the lowest
cost.
.
After clicking the Calculate button, you can still manually adjust the Fertilizers Application,
for each fertilizer, as well as remove fertilizers from the Selected Fertilizers box or add
fertilizers to the list. The displayed results will change accordingly.
Congratulations!
You've successfully completed the first step of preparing your fertilizer recipe.
You now know which fertilizers you have to use and how to meet your crop’s requirements at
the lowest cost.
You can proceed to the Fill Tanks Screen by clicking the Fill Tanks button at the bottom of
the screen. Go to p.56.
Additional Options in Method 1 Screen
Enables you to view how manual changes you have made in the Fertilizers Application
affect the accuracy reached for each element. Unlike the Calculate button, Smart! will not
recalculate fertilizer rates.
The Report button: Click the Report button to view a more detailed report, including nutrient
ratios, cost/ha, expected yield and other parameters. In the Report window, click Details to
see the contribution of each fertilizer to each element.
50
To print this report, click the printer icon on the top left side of the report window.
You can open and close the report at any time. The report will change interactively as you
change your input.
Locking Fertilizer Concentration
If you wish to recalculate fertilizer rates, but still lock the values calculated for specific
fertilizers, you can do that by checking the box next to the fertilizer’s name and select the
Lock option. Un-checking the box will unlock the fertilizer rate.
The Menu Bar
Target Values
Open/Save - Smart! enables you to save target values for different crops at different growth
stages. To open previously saved target values select Target Values����Open and select the
target values file to be opened.
To save your target values select Target Values ����Save.
Clear Target Values – allows you to erase all values from the Target Values row.
Save Nutrient Application as Target Values – enables you to save the actual nutrient
application rates (Nutrient App. Row) as target values.
Root System Depth
Enables you to edit the bulk density of your soil and the root system depth. These parameters
are used to convert ppm in soil to Kg/ha.
51
Chart
Smart! enables you to view and analyze the information graphically.
There are two types of charts you can generate from this screen:
Target Values chart - generates a pie chart displaying the percentage of each element in
your target values.
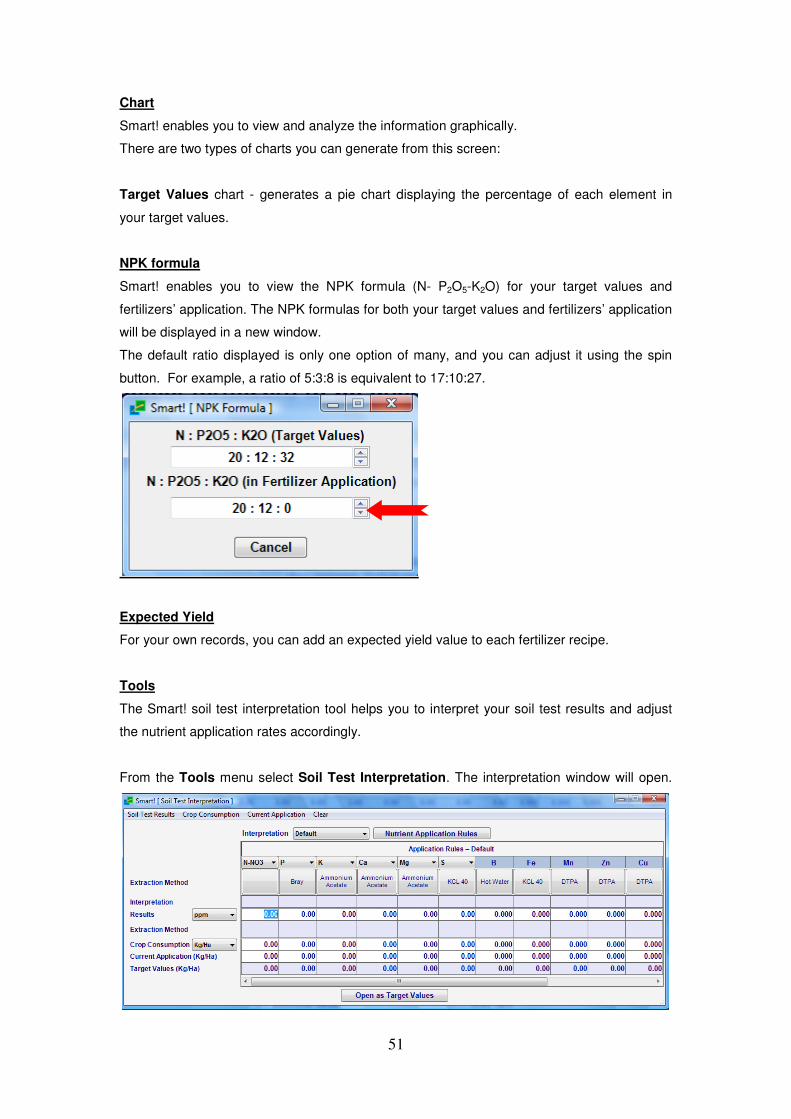
NPK formula
Smart! enables you to view the NPK formula (N- P2O5-K2O) for your target values and
fertilizers’ application. The NPK formulas for both your target values and fertilizers’ application
will be displayed in a new window.
The default ratio displayed is only one option of many, and you can adjust it using the spin
button. For example, a ratio of 5:3:8 is equivalent to 17:10:27.
Expected Yield
For your own records, you can add an expected yield value to each fertilizer recipe.
Tools
The Smart! soil test interpretation tool helps you to interpret your soil test results and adjust
the nutrient application rates accordingly.
From the Tools menu select Soil Test Interpretation. The interpretation window will open.
52
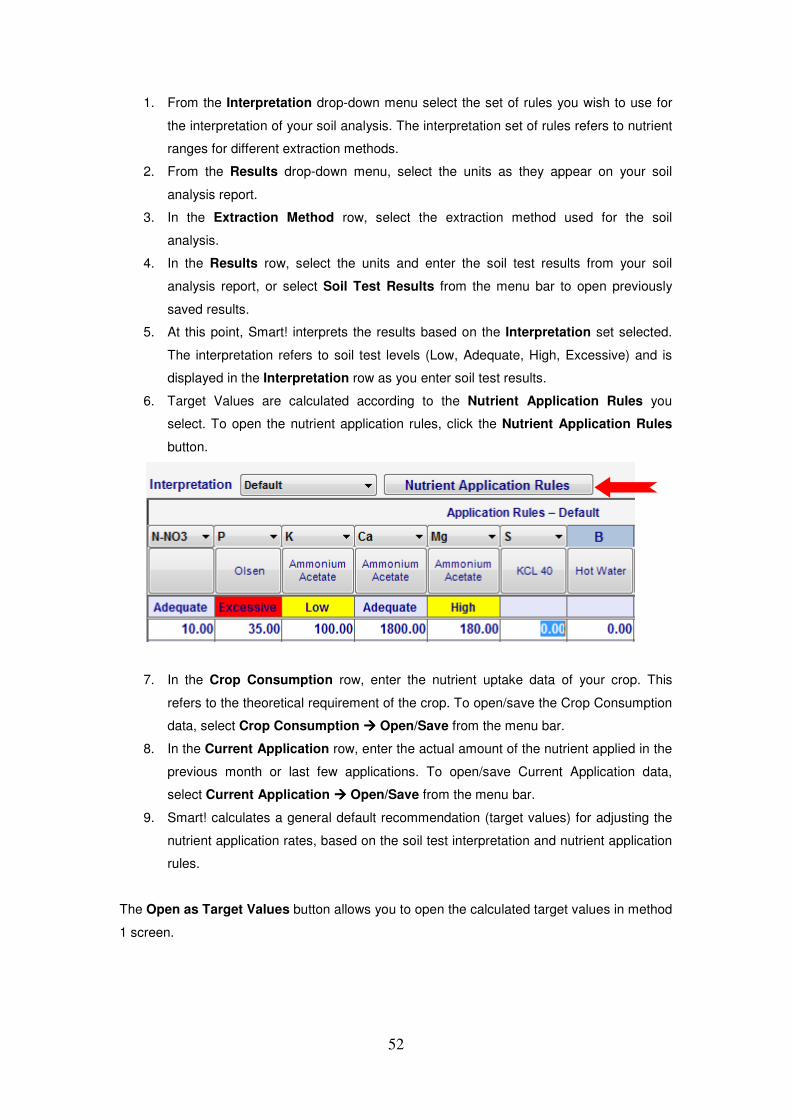
1. From the Interpretation drop-down menu select the set of rules you wish to use for
the interpretation of your soil analysis. The interpretation set of rules refers to nutrient
ranges for different extraction methods.
2. From the Results drop-down menu, select the units as they appear on your soil
analysis report.
3. In the Extraction Method row, select the extraction method used for the soil
analysis.
4. In the Results row, select the units and enter the soil test results from your soil
analysis report, or select Soil Test Results from the menu bar to open previously
saved results.
5. At this point, Smart! interprets the results based on the Interpretation set selected.
The interpretation refers to soil test levels (Low, Adequate, High, Excessive) and is
displayed in the Interpretation row as you enter soil test results.
6. Target Values are calculated according to the Nutrient Application Rules you
select. To open the nutrient application rules, click the Nutrient Application Rules
button.
7. In the Crop Consumption row, enter the nutrient uptake data of your crop. This
refers to the theoretical requirement of the crop. To open/save the Crop Consumption
data, select Crop Consumption ���� Open/Save from the menu bar.
8. In the Current Application row, enter the actual amount of the nutrient applied in the
previous month or last few applications. To open/save Current Application data,
select Current Application ���� Open/Save from the menu bar.
9. Smart! calculates a general default recommendation (target values) for adjusting the
nutrient application rates, based on the soil test interpretation and nutrient application
rules.
The Open as Target Values button allows you to open the calculated target values in method
1 screen.
53
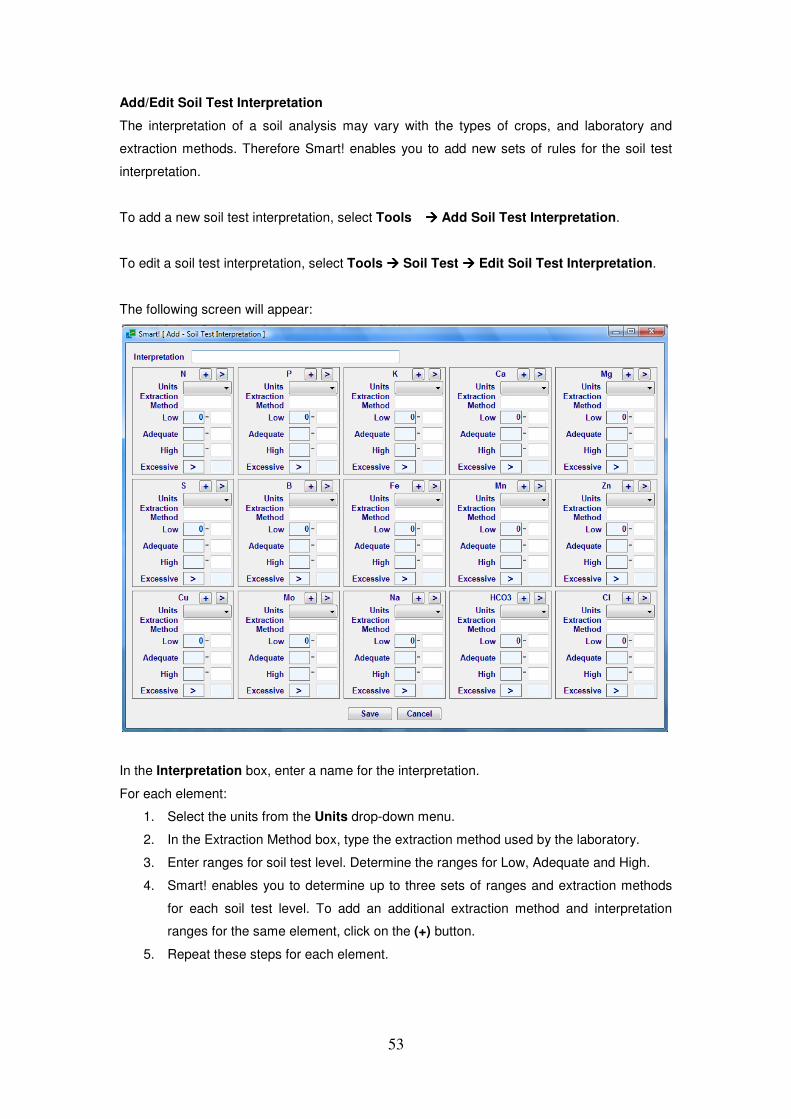
Add/Edit Soil Test Interpretation
The interpretation of a soil analysis may vary with the types of crops, and laboratory and
extraction methods. Therefore Smart! enables you to add new sets of rules for the soil test
interpretation.
To add a new soil test interpretation, select Tools � � � � Add Soil Test Interpretation.
To edit a soil test interpretation, select Tools ���� Soil Test ���� Edit Soil Test Interpretation.
The following screen will appear:
In the Interpretation box, enter a name for the interpretation.
For each element:
1. Select the units from the Units drop-down menu.
2. In the Extraction Method box, type the extraction method used by the laboratory.
3. Enter ranges for soil test level. Determine the ranges for Low, Adequate and High.
4. Smart! enables you to determine up to three sets of ranges and extraction methods
for each soil test level. To add an additional extraction method and interpretation
ranges for the same element, click on the (+) button.
5. Repeat these steps for each element.
54
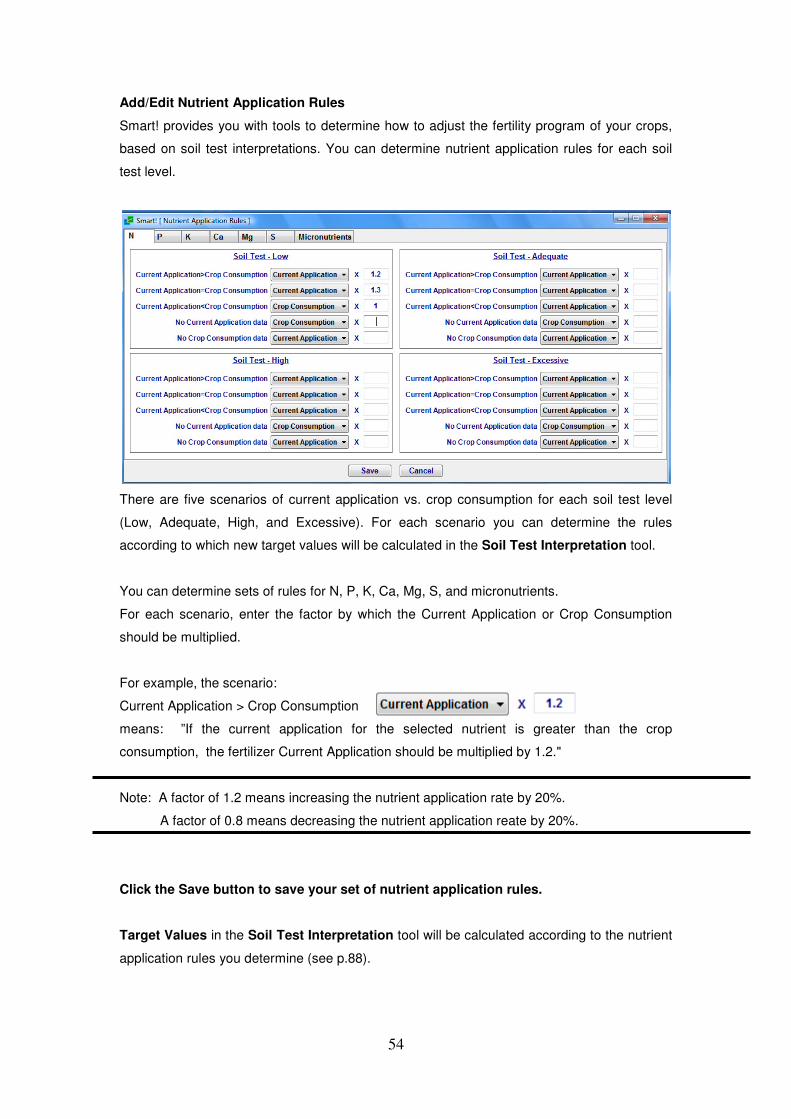
Add/Edit Nutrient Application Rules
Smart! provides you with tools to determine how to adjust the fertility program of your crops,
based on soil test interpretations. You can determine nutrient application rules for each soil
test level.
There are five scenarios of current application vs. crop consumption for each soil test level
(Low, Adequate, High, and Excessive). For each scenario you can determine the rules
according to which new target values will be calculated in the Soil Test Interpretation tool.
You can determine sets of rules for N, P, K, Ca, Mg, S, and micronutrients.
For each scenario, enter the factor by which the Current Application or Crop Consumption
should be multiplied.
For example, the scenario:
Current Application > Crop Consumption
means: ”If the current application for the selected nutrient is greater than the crop
consumption, the fertilizer Current Application should be multiplied by 1.2."
Note: A factor of 1.2 means increasing the nutrient application rate by 20%.
A factor of 0.8 means decreasing the nutrient application reate by 20%.
Click the Save button to save your set of nutrient application rules.
Target Values in the Soil Test Interpretation tool will be calculated according to the nutrient
application rules you determine (see p.88).

55
The Open as Target Values button – allows you to use the calculated target values in
method 1. Clicking this button will close the interpretation window and the calculated target
values will appear in the Target Values row of method 1.

56
Fill Tanks Screen –by Amount/Area – Method 1
After discovering the optimal combination of fertilizers and their required amounts to be
applied, you can now prepare a fertigation program. The fertigation program includes
distributing the fertilizers into stock tanks, finding their amounts in the tanks, and determining
the injection ratio.
Clicking the Fill Tanks button opens the Fill Tanks screen with the list of selected fertilizers
at the top:
STEP ONE – Entering Basic Data
In the Min. Temp (C°) box, determine the water minimum temperature in degrees Celsius.
The default value is 5°C. The temperature you set will determine the solubility of the
fertilizers, according to the information in the database.
In the Water (m3/Ha) box, enter the irrigation water amount in cubic meter per hectare
(m3/Ha).
In the Source Water EC box, enter your source water EC.
STEP TWO - Distributing the fertilizers into the tanks
You have two options for distributing the fertilizers into tanks:
57
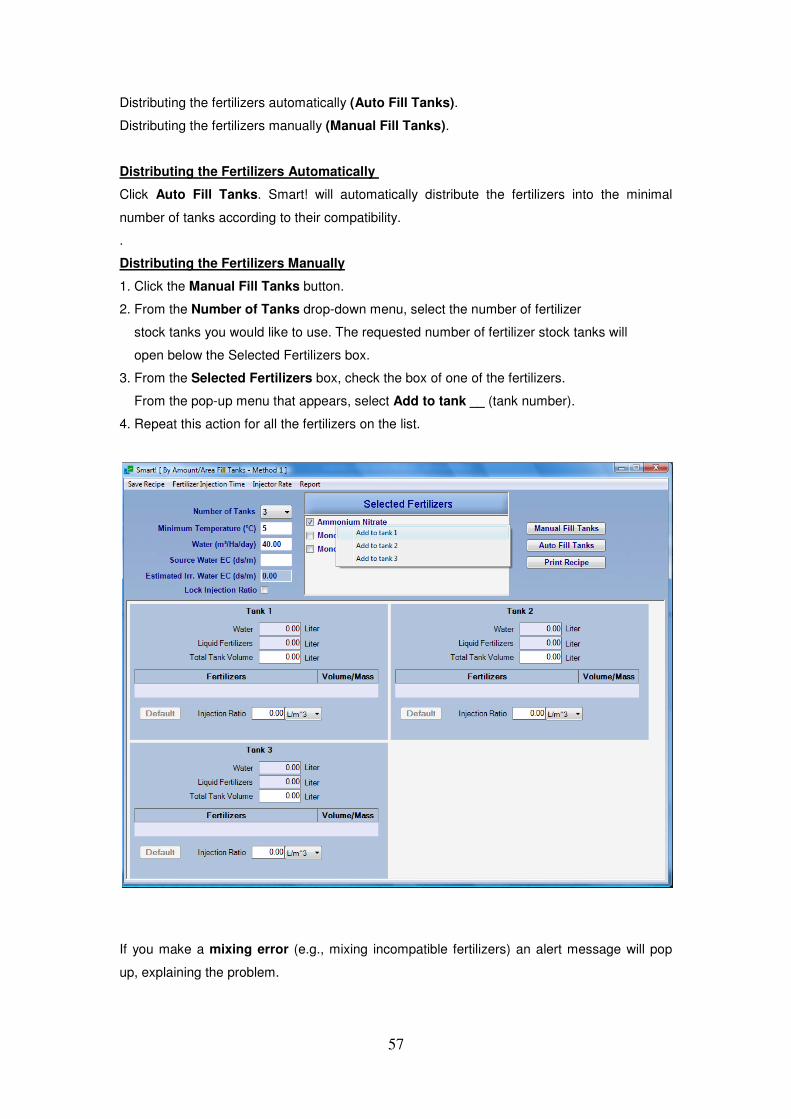
Distributing the fertilizers automatically (Auto Fill Tanks).
Distributing the fertilizers manually (Manual Fill Tanks).
Distributing the Fertilizers Automatically
Click Auto Fill Tanks. Smart! will automatically distribute the fertilizers into the minimal
number of tanks according to their compatibility.
.
Distributing the Fertilizers Manually
1. Click the Manual Fill Tanks button.
2. From the Number of Tanks drop-down menu, select the number of fertilizer
stock tanks you would like to use. The requested number of fertilizer stock tanks will
open below the Selected Fertilizers box.
3. From the Selected Fertilizers box, check the box of one of the fertilizers.
From the pop-up menu that appears, select Add to tank __ (tank number).
4. Repeat this action for all the fertilizers on the list.
If you make a mixing error (e.g., mixing incompatible fertilizers) an alert message will pop
up, explaining the problem.
58
An alert icon will be displayed in the tank as long as the problem is not corrected.
You can click the alert icon at any time to see the explanation of the problem.
STEP THREE - Adjusting Injection Ratio and Tank Volume
After distributing the fertilizers into the fertilizer stock tanks, you will now adjust the Injection
Ratios and Tank Volumes to match your fertigation system specifications.
Water – The water quantity in the tank. If you use only solid fertilizers, the water quantity will
be equal to the Tank Volume.
Total Liquid Fertilizers – Amount of liquid fertilizers in the tank.
Tank Volume – The sum of Water and Total Liquid Fertilizers is the Total Liquids. This is
basically the tank volume.
The default value for Tank Volume is set to 1,000 liters. You may change this value to the
actual volume of the tank you are using. As you change the Tank Volume, fertilizer quantities
in the tank (as appear in the Volume / Mass column) are calculated accordingly.
59
Injection Ratio – Smart! calculates the default value for the Injection Ratio (units of L/m3
or
%) according to the required concentration of fertilizers, their solubility, and the interactions
between fertilizers. This default value is the minimal Injection Ratio recommended. In case
the calculated minimal value is less than 0.5 L/m3, Smart! sets the Injection Ratio to a
practical value of 0.5 L/m3.
You may change the default Injection Ratio to fit the capacity of your fertilization system.
The quantities of fertilizers in the tank will be automatically adjusted accordingly. If you set the
Injection Ratio to a lower value than the minimal value recommended, an alert message will
be displayed, explaining the problem that might arise.
An alert icon will be displayed in the tank as long as the problem is not corrected.
You can click the alert icon at any time to see the explanation of the problem.
60
Note:
• The higher Injection Ratio you use, the less concentrated the solution in the tank,
and vice-versa. Therefore, to prevent precipitation in the tanks, it is recommended
that you set the Injection Ratio to a higher value than the minimal Injection Ratio
calculated.
• Smart! automatically calculates the estimated EC of the irrigation water.
• Changing the Injection Ratio affects the amounts of fertilizers in the tanks, but does
NOT affect the EC.
• Changing the irrigation Water amount (m3/Ha) affects BOTH EC and Injection
Ratio, while keeping the amounts of fertilizers in the tank constant.
Adjust the Injection Ratio and Total Liquids in all tanks, according to your irrigation system
specifications.
The Default button
You can click the Default button at any time to go back to the default results.
Congratulations!
You have just created an optimal fertilizer recipe, specific to your crop requirements.
Printing Your Recipe
To print your recipe, click the Print Recipe button.
A ready-to-print form opens.
Click the printer icon to print.
Saving Your Recipe
Select Save Recipe ����Save/Save as from the menu bar in the Fill Tanks screen.
Additional Options in Method 1 - Fill Tanks Screen
The Lock Injection Ratio checkbox
You can use this option when you dilute liquid fertilizers in the tank (mixing it with water), or
when you mix solid fertilizers with liquid fertilizers.
Checking the Lock Injection Ratio box allows you to manually change the Water and Total
Liquid Fertilizers, while the Injection Ratio is calculated accordingly.

61
Moving Fertilizers from Tank to Tank
To move a fertilizer from one tank to another, check the box next to the fertilizer in a tank, and
select the tank you want to add it to. If this action might cause a compatibility problem, an
alert message will appear.
Changing the Number of Tanks
You can add or remove tanks at any time. Simply change the number of tanks in the Number
of Tanks drop-down menu.
Note that removing tanks that contain fertilizers will return those fertilizers to the Selected
Fertilizers box. These fertilizers will have to be re-distributed.
The Menu Bar
Fertilizer Injection Time
This option can be used for injector systems that do not have a proportional fertilization
option. Enter the irrigation flow (m3/hr), irrigation duration (min.), and the injector flows. The
necessary fertilizer injection time (min.) will be calculated.
62
Injector Rate
This option allows you to calculate the required capacity of your fertilizer injector. Simply enter
the irrigation flow rate, and the required capacity of each injector will be calculated.
Note: If the fertilizer injector you use cannot reach the calculated rate, applying the required
amount of fertilizer solution will not be possible!
63
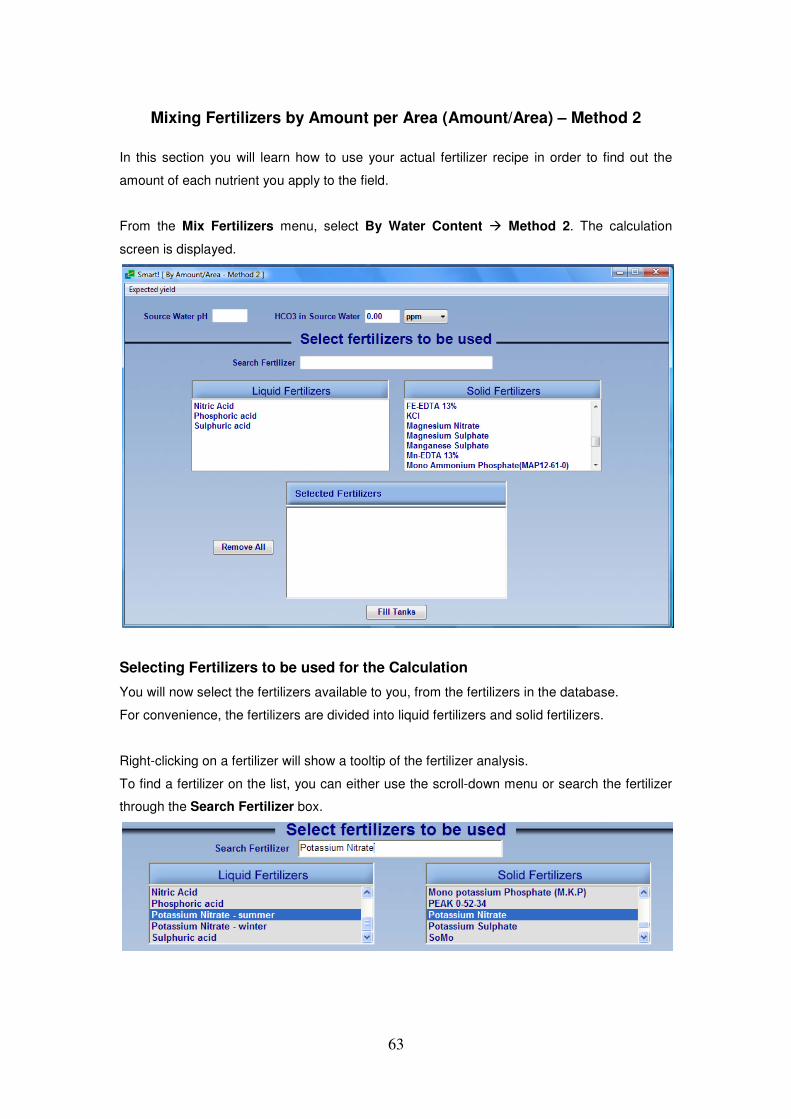
Mixing Fertilizers by Amount per Area (Amount/Area) – Method 2
In this section you will learn how to use your actual fertilizer recipe in order to find out the
amount of each nutrient you apply to the field.
From the Mix Fertilizers menu, select By Water Content � Method 2. The calculation
screen is displayed.
Selecting Fertilizers to be used for the Calculation
You will now select the fertilizers available to you, from the fertilizers in the database.
For convenience, the fertilizers are divided into liquid fertilizers and solid fertilizers.
Right-clicking on a fertilizer will show a tooltip of the fertilizer analysis.
To find a fertilizer on the list, you can either use the scroll-down menu or search the fertilizer
through the Search Fertilizer box.
64
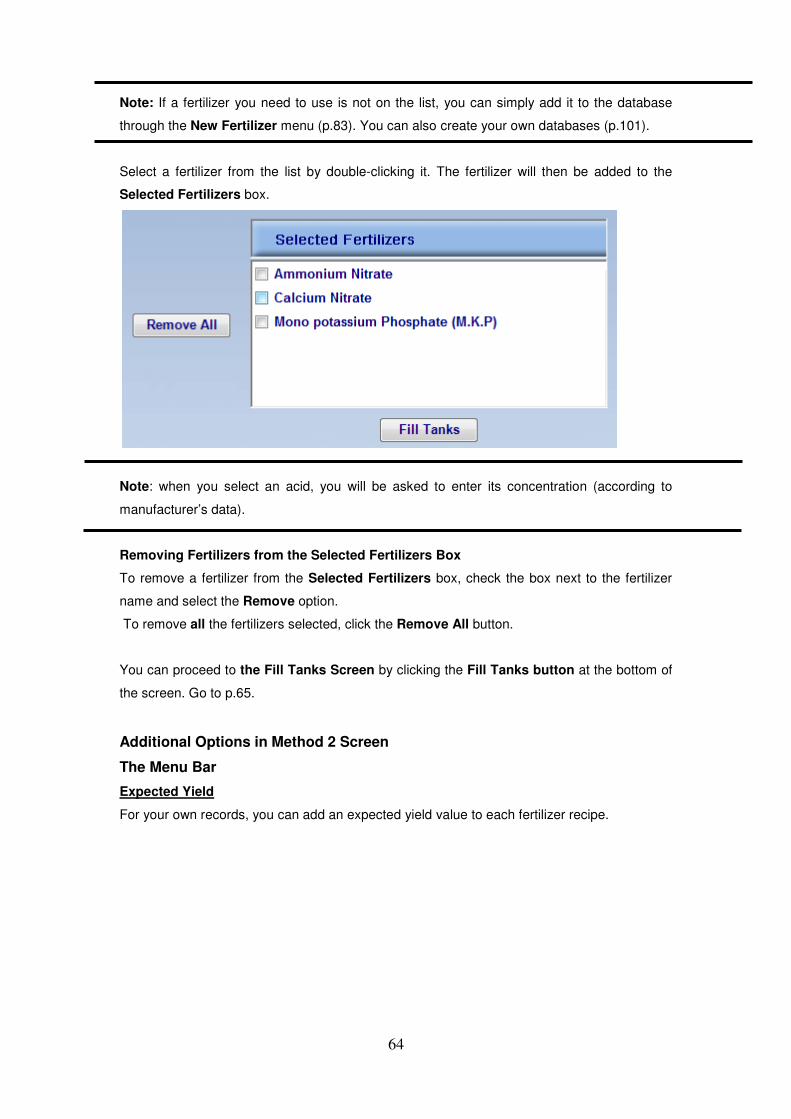
Note: If a fertilizer you need to use is not on the list, you can simply add it to the database
through the New Fertilizer menu (p.83). You can also create your own databases (p.101).
Select a fertilizer from the list by double-clicking it. The fertilizer will then be added to the
Selected Fertilizers box.
Note: when you select an acid, you will be asked to enter its concentration (according to
manufacturer’s data).
Removing Fertilizers from the Selected Fertilizers Box
To remove a fertilizer from the Selected Fertilizers box, check the box next to the fertilizer
name and select the Remove option.
To remove all the fertilizers selected, click the Remove All button.
You can proceed to the Fill Tanks Screen by clicking the Fill Tanks button at the bottom of
the screen. Go to p.65.
Additional Options in Method 2 Screen
The Menu Bar
Expected Yield
For your own records, you can add an expected yield value to each fertilizer recipe.
65
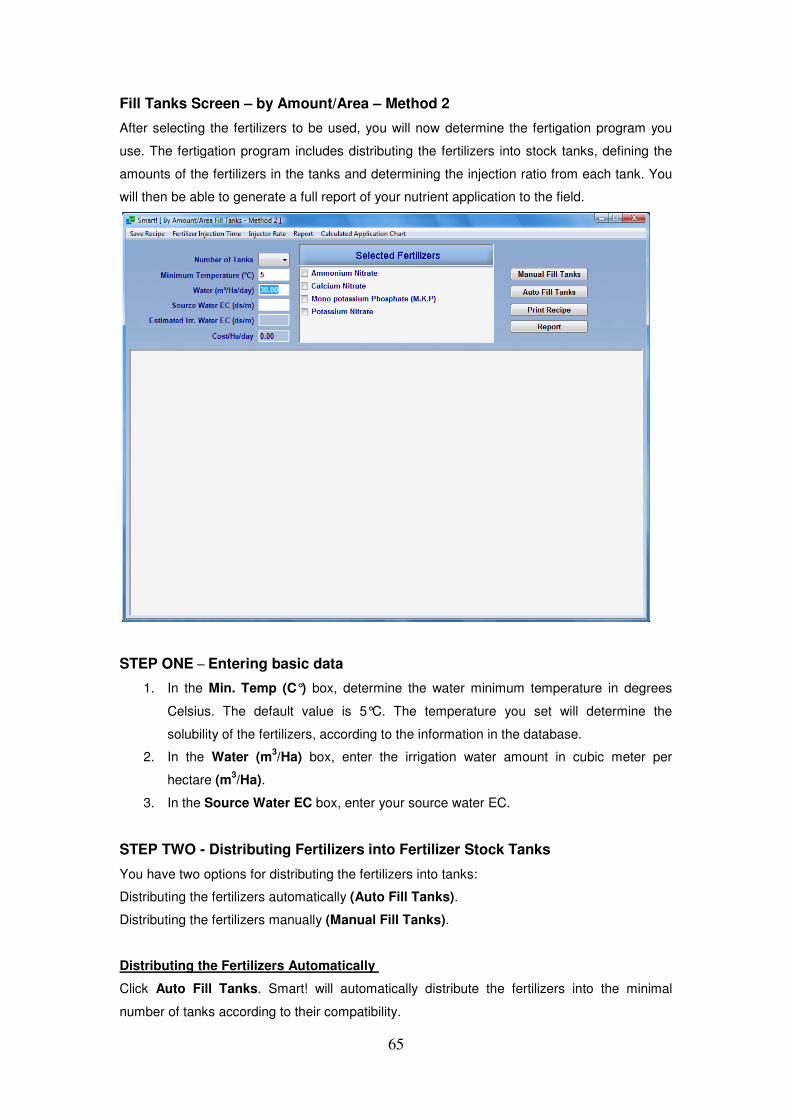
Fill Tanks Screen – by Amount/Area – Method 2
After selecting the fertilizers to be used, you will now determine the fertigation program you
use. The fertigation program includes distributing the fertilizers into stock tanks, defining the
amounts of the fertilizers in the tanks and determining the injection ratio from each tank. You
will then be able to generate a full report of your nutrient application to the field.
STEP ONE – Entering basic data
1. In the Min. Temp (C°) box, determine the water minimum temperature in degrees
Celsius. The default value is 5°C. The temperature you set will determine the
solubility of the fertilizers, according to the information in the database.
2. In the Water (m3/Ha) box, enter the irrigation water amount in cubic meter per
hectare (m3/Ha).
3. In the Source Water EC box, enter your source water EC.
STEP TWO - Distributing Fertilizers into Fertilizer Stock Tanks
You have two options for distributing the fertilizers into tanks:
Distributing the fertilizers automatically (Auto Fill Tanks).
Distributing the fertilizers manually (Manual Fill Tanks).
Distributing the Fertilizers Automatically
Click Auto Fill Tanks. Smart! will automatically distribute the fertilizers into the minimal
number of tanks according to their compatibility.
66
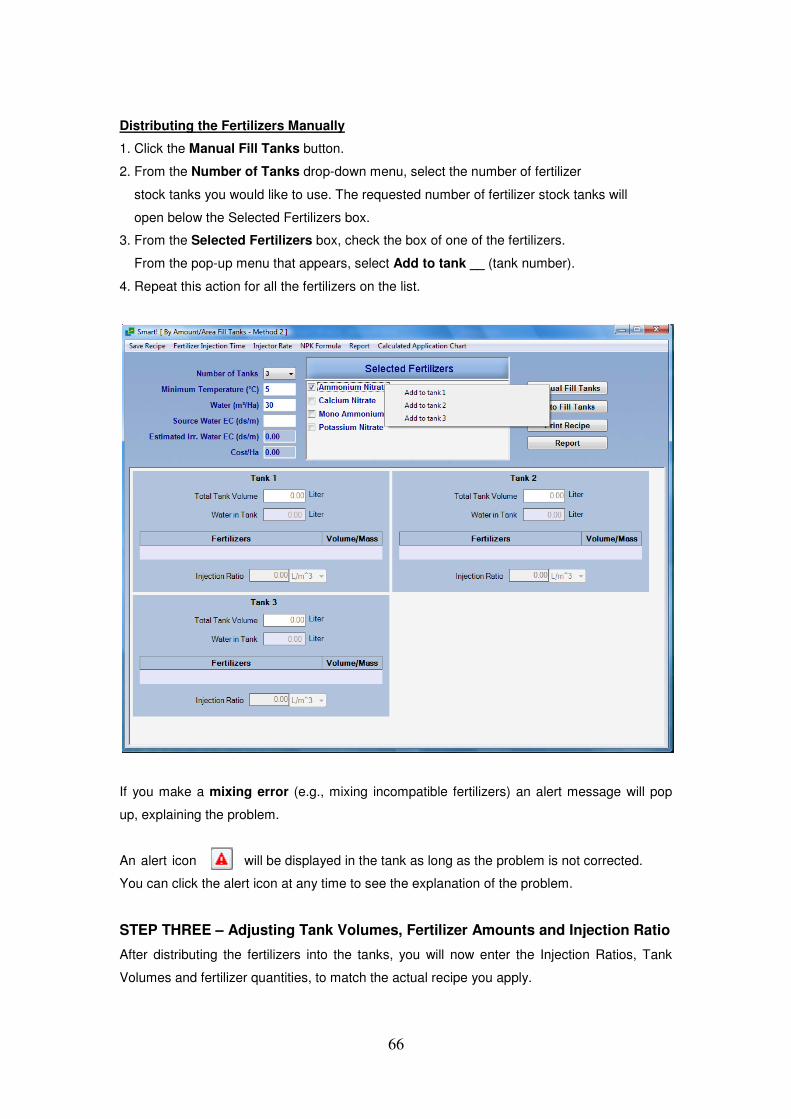
Distributing the Fertilizers Manually
1. Click the Manual Fill Tanks button.
2. From the Number of Tanks drop-down menu, select the number of fertilizer
stock tanks you would like to use. The requested number of fertilizer stock tanks will
open below the Selected Fertilizers box.
3. From the Selected Fertilizers box, check the box of one of the fertilizers.
From the pop-up menu that appears, select Add to tank __ (tank number).
4. Repeat this action for all the fertilizers on the list.
If you make a mixing error (e.g., mixing incompatible fertilizers) an alert message will pop
up, explaining the problem.
An alert icon will be displayed in the tank as long as the problem is not corrected.
You can click the alert icon at any time to see the explanation of the problem.
STEP THREE – Adjusting Tank Volumes, Fertilizer Amounts and Injection Ratio
After distributing the fertilizers into the tanks, you will now enter the Injection Ratios, Tank
Volumes and fertilizer quantities, to match the actual recipe you apply.

67
• Total Tank Volume – Enter the tank volume.
• Water in Tank - If you use only solid fertilizers, the water quantity will be equal to the
Tank Volume.
• Fertilizers Volume/Mass – For each fertilizer in the tank, enter its quantity in the
Volume/Mass column (you can use either Kg or grams for solid fertilizers, and Liter
or ml for liquid fertilizers).
• Injection Ratio – Enter the Injection Ratio from the tank.
Note: As you enter your data, Smart! checks the solubility limitations and calculates the
reaction between the fertilizers. If a problem arises, Smart! will display an appropriate alert
message.
Enter the above specifications for each tank.
As you enter your specifications, Smart! also calculates the Estimated Irrigation Water EC.
The Report button: Click the Report button to view a more detailed report of the nutrients
application, including nutrient ratios, cost/ha, expected yield, and other parameters. In the
Report window, click Details to see the contribution of each fertilizer to each element.
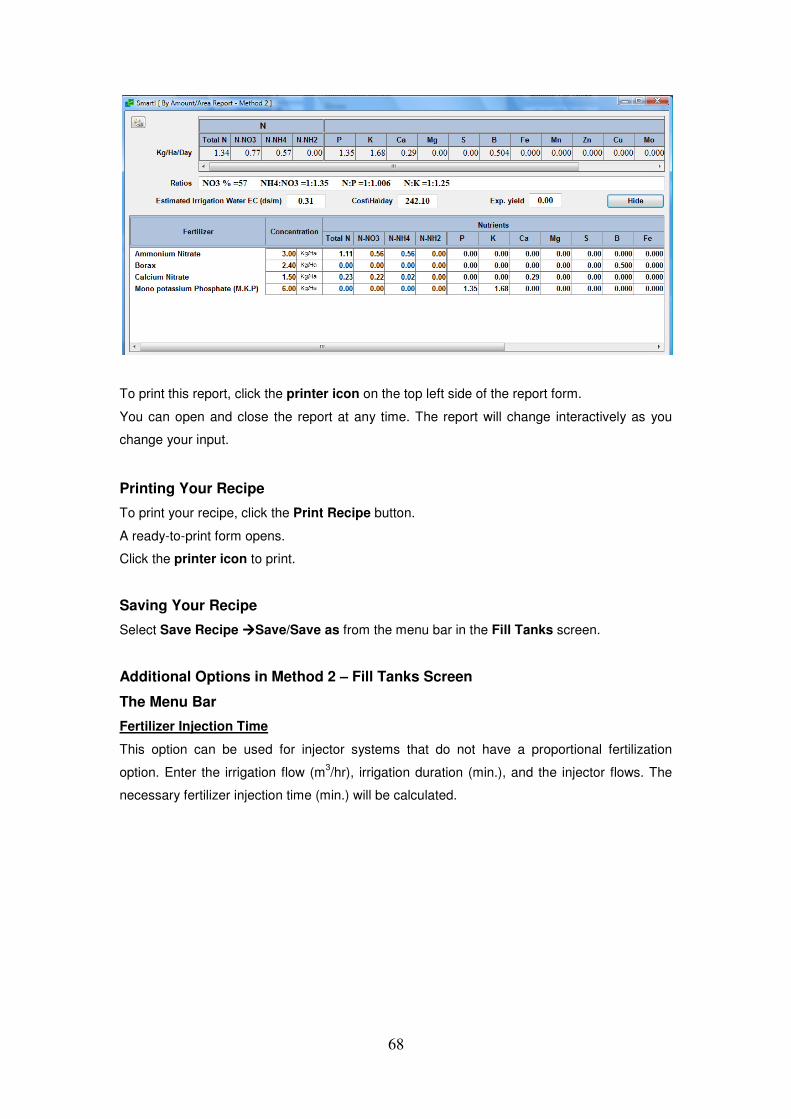
68
To print this report, click the printer icon on the top left side of the report form.
You can open and close the report at any time. The report will change interactively as you
change your input.
Printing Your Recipe
To print your recipe, click the Print Recipe button.
A ready-to-print form opens.
Click the printer icon to print.
Saving Your Recipe
Select Save Recipe ����Save/Save as from the menu bar in the Fill Tanks screen.
Additional Options in Method 2 – Fill Tanks Screen
The Menu Bar
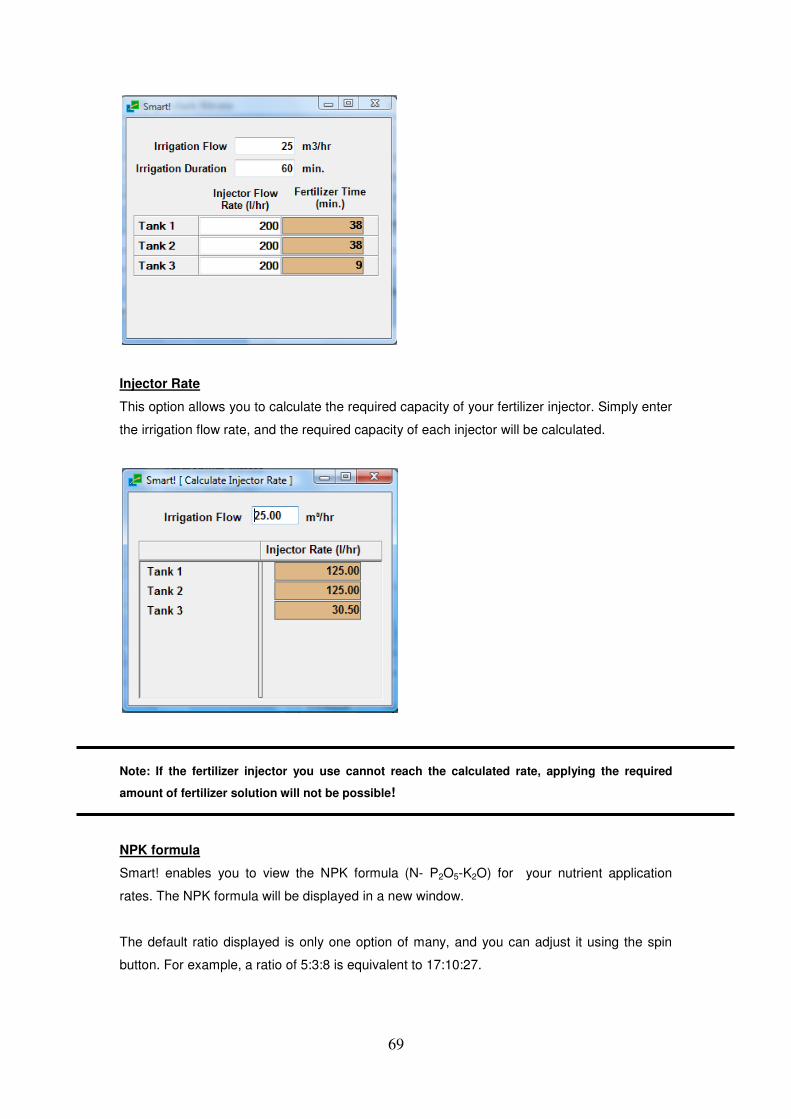
Fertilizer Injection Time
This option can be used for injector systems that do not have a proportional fertilization
option. Enter the irrigation flow (m3/hr), irrigation duration (min.), and the injector flows. The
necessary fertilizer injection time (min.) will be calculated.
69
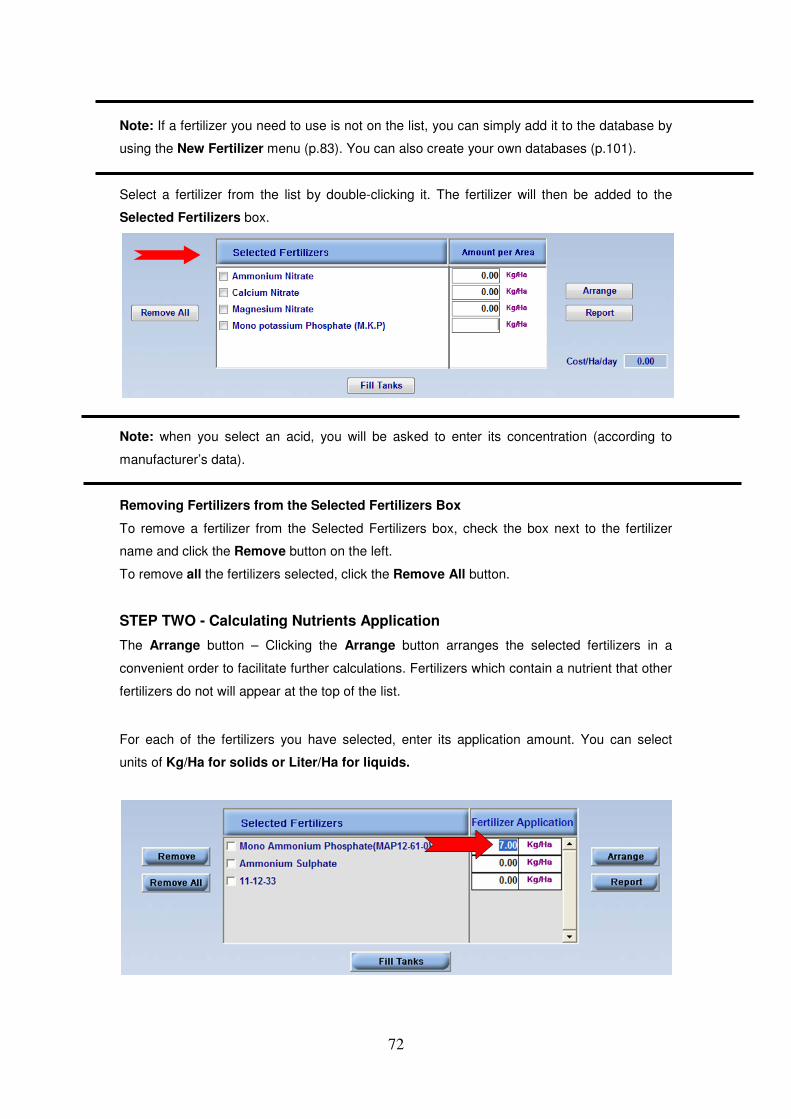
Injector Rate
This option allows you to calculate the required capacity of your fertilizer injector. Simply enter
the irrigation flow rate, and the required capacity of each injector will be calculated.
Note: If the fertilizer injector you use cannot reach the calculated rate, applying the required
amount of fertilizer solution will not be possible!
NPK formula
Smart! enables you to view the NPK formula (N- P2O5-K2O) for your nutrient application
rates. The NPK formula will be displayed in a new window.
The default ratio displayed is only one option of many, and you can adjust it using the spin
button. For example, a ratio of 5:3:8 is equivalent to 17:10:27.

70
Report Report – Same function as the Report button. Water Content – shows the irrigation water content, based on your fertigation program. Calculated Application Chart Generates a pie chart displaying the percentage of each element applied by your fertigation program.

71
Mixing Fertilizers by Amount per Area (Amount/Area) – Method 3
In this section you will learn how to prepare fertilizer recipes, based on fertilizers application to
the field.
From the Mix Fertilizers menu, select By Amount � Method 3. The calculation screen is
displayed.
STEP ONE - Selecting Fertilizers to be used for the Calculation
Select the fertilizers available to you, out of the fertilizers in the database. The fertilizers are
divided to liquid fertilizers and solid fertilizers, for convenience purposes.
Right-clicking on a fertilizer will show a tooltip of the fertilizer analysis.
To find a fertilizer on the list, you can either use the scroll-down menu or search the fertilizer
through the Search Fertilizer box.
72
Note: If a fertilizer you need to use is not on the list, you can simply add it to the database by
using the New Fertilizer menu (p.83). You can also create your own databases (p.101).
Select a fertilizer from the list by double-clicking it. The fertilizer will then be added to the
Selected Fertilizers box.
Note: when you select an acid, you will be asked to enter its concentration (according to
manufacturer’s data).
Removing Fertilizers from the Selected Fertilizers Box
To remove a fertilizer from the Selected Fertilizers box, check the box next to the fertilizer
name and click the Remove button on the left.
To remove all the fertilizers selected, click the Remove All button.
STEP TWO - Calculating Nutrients Application
The Arrange button – Clicking the Arrange button arranges the selected fertilizers in a
convenient order to facilitate further calculations. Fertilizers which contain a nutrient that other
fertilizers do not will appear at the top of the list.
For each of the fertilizers you have selected, enter its application amount. You can select
units of Kg/Ha for solids or Liter/Ha for liquids.
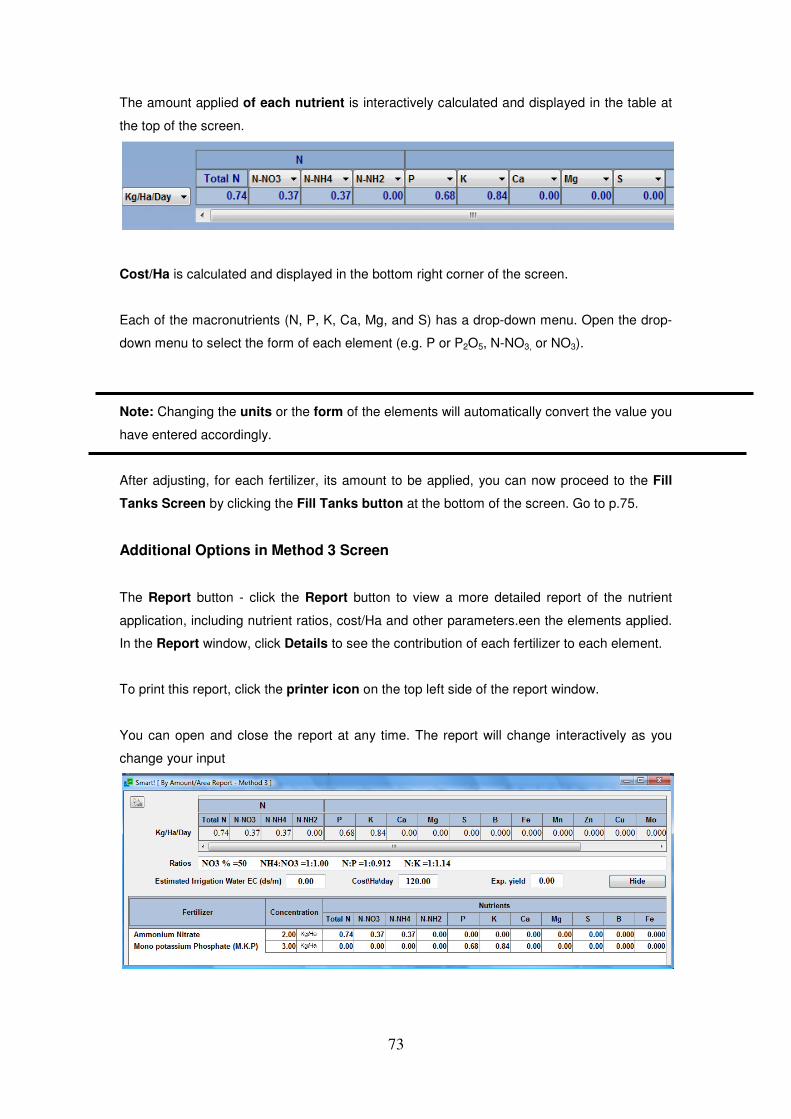
73
The amount applied of each nutrient is interactively calculated and displayed in the table at
the top of the screen.
Cost/Ha is calculated and displayed in the bottom right corner of the screen.
Each of the macronutrients (N, P, K, Ca, Mg, and S) has a drop-down menu. Open the drop-
down menu to select the form of each element (e.g. P or P2O5, N-NO3, or NO3).
Note: Changing the units or the form of the elements will automatically convert the value you
have entered accordingly.
After adjusting, for each fertilizer, its amount to be applied, you can now proceed to the Fill
Tanks Screen by clicking the Fill Tanks button at the bottom of the screen. Go to p.75.
Additional Options in Method 3 Screen
The Report button - click the Report button to view a more detailed report of the nutrient
application, including nutrient ratios, cost/Ha and other parameters.een the elements applied.
In the Report window, click Details to see the contribution of each fertilizer to each element.
To print this report, click the printer icon on the top left side of the report window.
You can open and close the report at any time. The report will change interactively as you
change your input
74
The Menu Bar
Save Application as Target Values
Enables you to save the nutrient application rates as target values and use them in method 1.
Root System Depth
Enables you to edit the bulk density of your soil and the root system depth.
Actual Application Chart
Enables you to view a chart of the nutrient application rates.
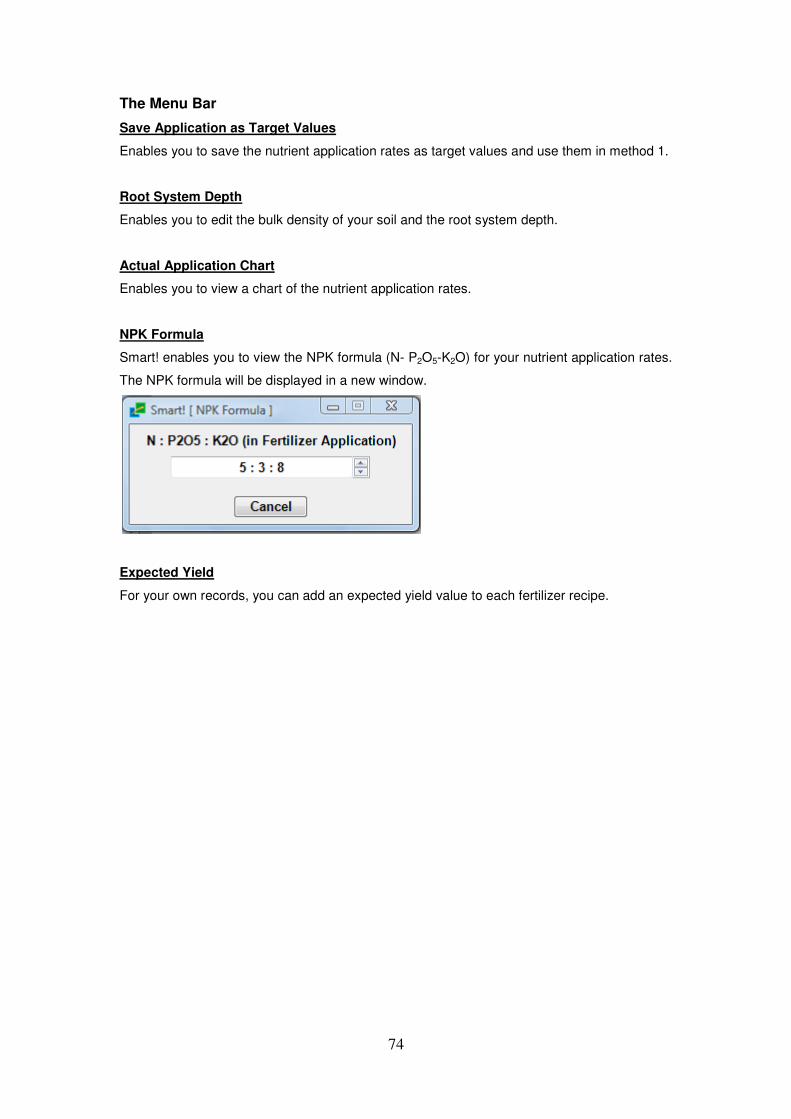
NPK Formula
Smart! enables you to view the NPK formula (N- P2O5-K2O) for your nutrient application rates.
The NPK formula will be displayed in a new window.
Expected Yield
For your own records, you can add an expected yield value to each fertilizer recipe.
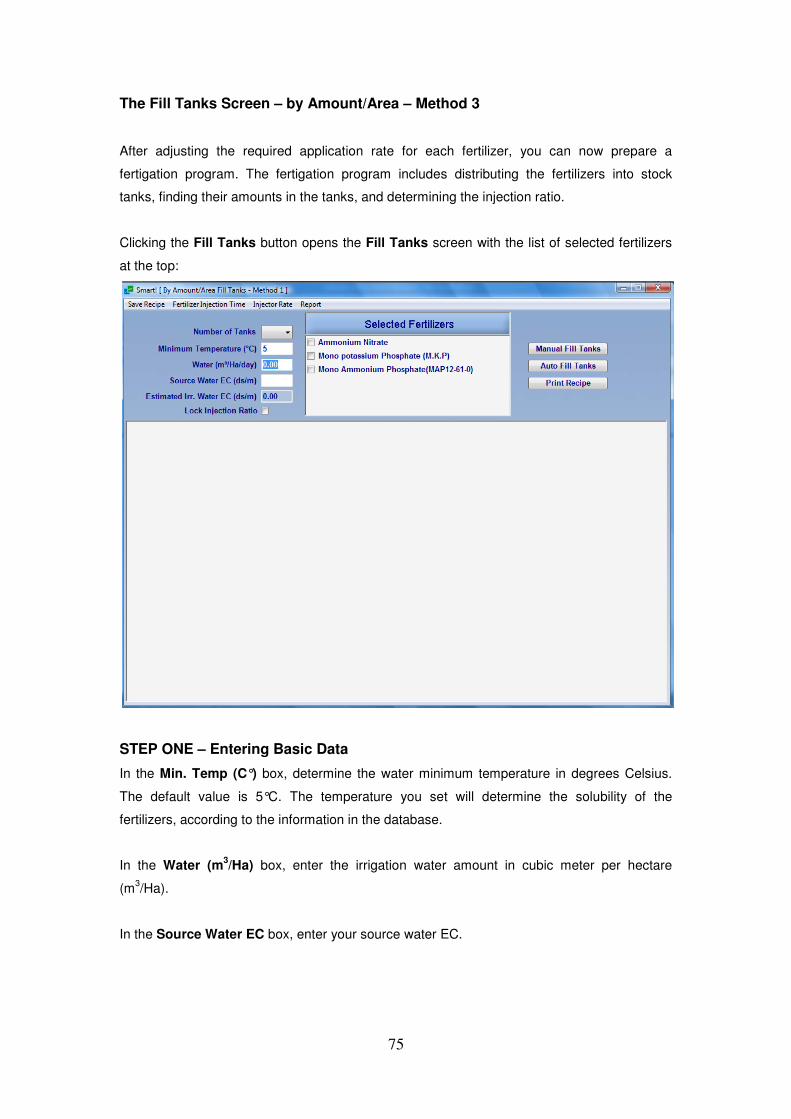
75
The Fill Tanks Screen – by Amount/Area – Method 3
After adjusting the required application rate for each fertilizer, you can now prepare a
fertigation program. The fertigation program includes distributing the fertilizers into stock
tanks, finding their amounts in the tanks, and determining the injection ratio.
Clicking the Fill Tanks button opens the Fill Tanks screen with the list of selected fertilizers
at the top:
STEP ONE – Entering Basic Data
In the Min. Temp (C°) box, determine the water minimum temperature in degrees Celsius.
The default value is 5°C. The temperature you set will determine the solubility of the
fertilizers, according to the information in the database.
In the Water (m3/Ha) box, enter the irrigation water amount in cubic meter per hectare
(m3/Ha).
In the Source Water EC box, enter your source water EC.
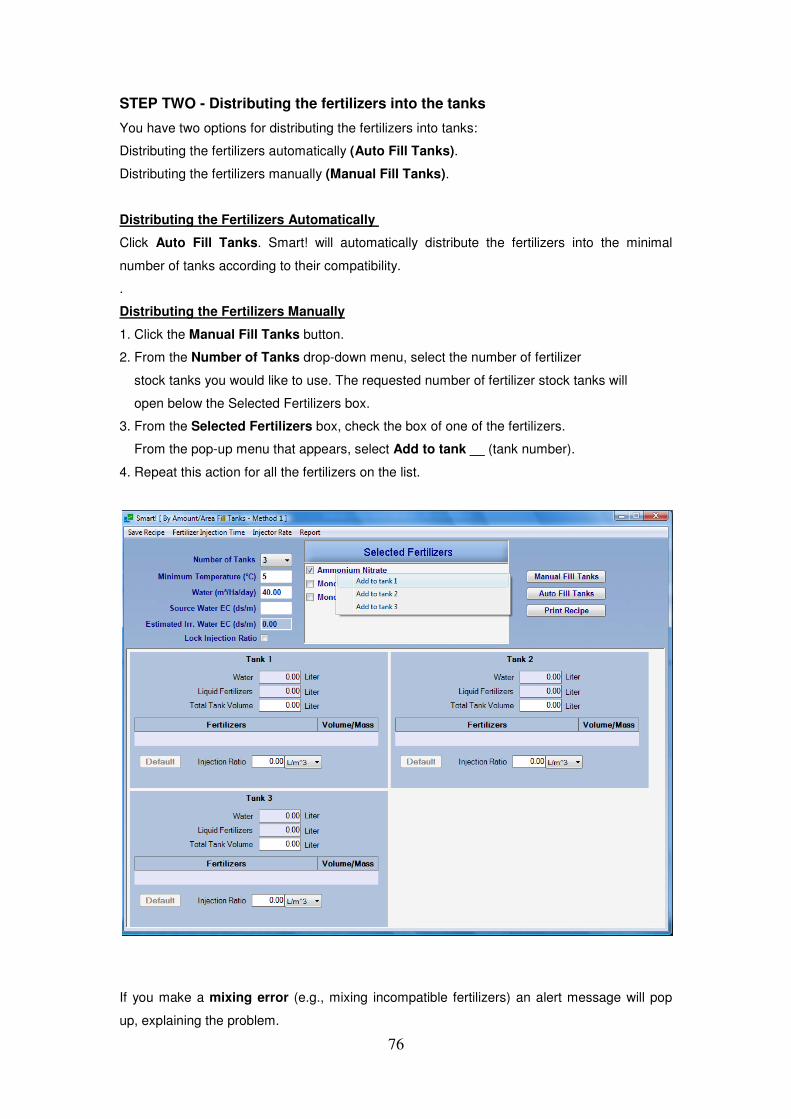
76
STEP TWO - Distributing the fertilizers into the tanks
You have two options for distributing the fertilizers into tanks:
Distributing the fertilizers automatically (Auto Fill Tanks).
Distributing the fertilizers manually (Manual Fill Tanks).
Distributing the Fertilizers Automatically
Click Auto Fill Tanks. Smart! will automatically distribute the fertilizers into the minimal
number of tanks according to their compatibility.
.
Distributing the Fertilizers Manually
1. Click the Manual Fill Tanks button.
2. From the Number of Tanks drop-down menu, select the number of fertilizer
stock tanks you would like to use. The requested number of fertilizer stock tanks will
open below the Selected Fertilizers box.
3. From the Selected Fertilizers box, check the box of one of the fertilizers.
From the pop-up menu that appears, select Add to tank __ (tank number).
4. Repeat this action for all the fertilizers on the list.
If you make a mixing error (e.g., mixing incompatible fertilizers) an alert message will pop
up, explaining the problem.

77
An alert icon will be displayed in the tank as long as the problem is not corrected.
You can click the alert icon at any time to see the explanation of the problem.
STEP THREE - Adjusting Injection Ratio and Tank Volume
After distributing the fertilizers into the fertilizer stock tanks, you will now adjust the Injection
Ratios and Tank Volumes to match your fertigation system specifications.
Water – The water quantity in the tank. If you use only solid fertilizers, the water quantity will
be equal to the Tank Volume.
Total Liquid Fertilizers – Amount of liquid fertilizers in the tank.
Tank Volume – The sum of Water and Total Liquid Fertilizers is the Total Liquids. This is
basically the tank volume.
The default value for Tank Volume is set to 1,000 liters. You may change this value to the
actual volume of the tank you are using. As you change the Tank Volume, fertilizer quantities
in the tank (as appear in the Volume / Mass column) are calculated accordingly.

78
Injection Ratio – Smart! calculates the default value for the Injection Ratio (units of L/m3
or
%) according to the required concentration of fertilizers, their solubility, and the interactions
between fertilizers. This default value is the minimal Injection Ratio recommended. In case
the calculated minimal value is less than 0.5 L/m3, Smart! sets the Injection Ratio to a
practical value of 0.5 L/m3.
You may change the default Injection Ratio to fit the capacity of your fertilization system.
The quantities of fertilizers in the tank will be automatically adjusted accordingly. If you set the
Injection Ratio to a lower value than the minimal value recommended, an alert message will
be displayed, explaining the problem that might arise.
An alert icon will be displayed in the tank as long as the problem is not corrected.
You can click the alert icon at any time to see the explanation of the problem.

79
Note:
• The higher Injection Ratio you use, the less concentrated the solution in the tank,
and vice-versa. Therefore, to prevent precipitation in the tanks, it is recommended
that you set the Injection Ratio to a higher value than the minimal Injection Ratio
calculated.
• Smart! automatically calculates the estimated EC of the irrigation water.
• Changing the Injection Ratio affects the amounts of fertilizers in the tanks, but does
NOT affect the EC.
• Changing the irrigation Water amount (m3/Ha) affects BOTH EC and Injection
Ratio, while keeping the amounts of fertilizers in the tank constant.
Adjust the Injection Ratio and Total Liquids in all tanks, according to your irrigation system
specifications.
The Default button
You can click the Default button at any time to go back to the default results.
Congratulations!
You have just created an optimal fertilizer recipe, specific to your crop requirements.
Printing Your Recipe
To print your recipe, click the Print Recipe button.
A ready-to-print form opens.
Click the printer icon to print.
Saving Your Recipe
Select Save Recipe ����Save/Save as from the menu bar in the Fill Tanks screen.
Additional Options in Method 3 - Fill Tanks Screen
The Lock Injection Ratio checkbox
You can use this option when you dilute liquid fertilizers in the tank (mixing it with water), or
when you mix solid fertilizers with liquid fertilizers.
Checking the Lock Injection Ratio box allows you to manually change the Water and Total
Liquid Fertilizers, while the Injection Ratio is calculated accordingly.
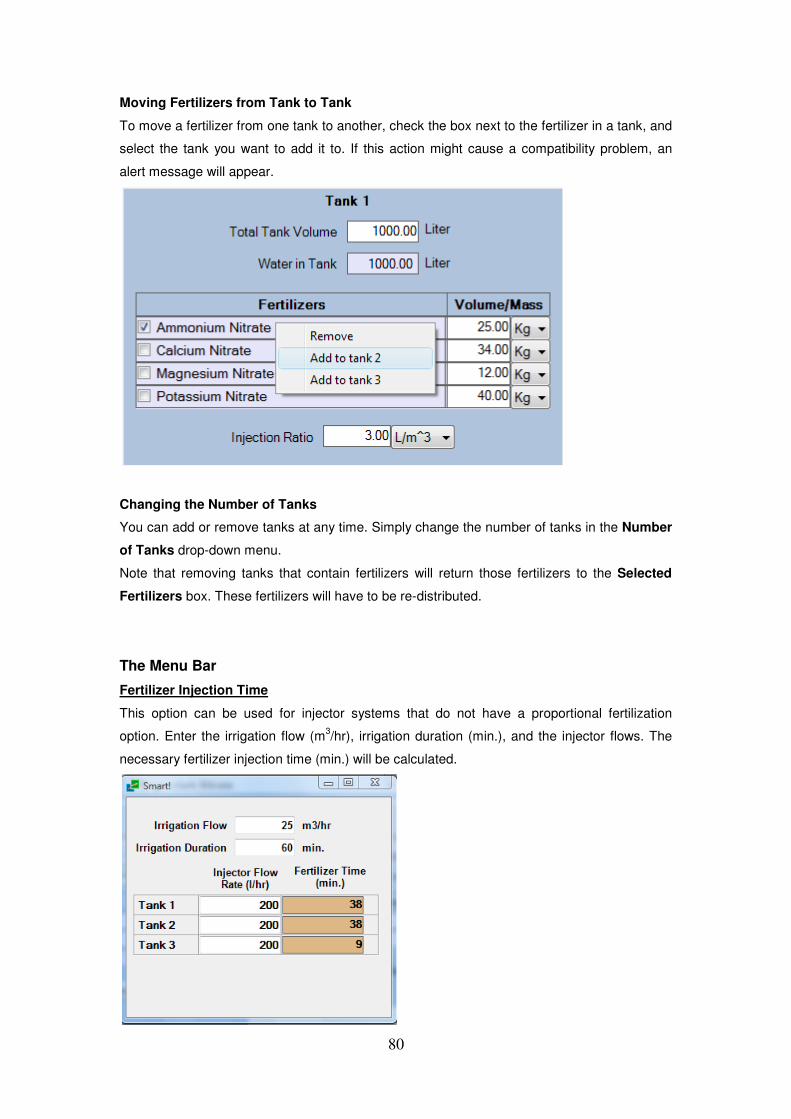
80
Moving Fertilizers from Tank to Tank
To move a fertilizer from one tank to another, check the box next to the fertilizer in a tank, and
select the tank you want to add it to. If this action might cause a compatibility problem, an
alert message will appear.
Changing the Number of Tanks
You can add or remove tanks at any time. Simply change the number of tanks in the Number
of Tanks drop-down menu.
Note that removing tanks that contain fertilizers will return those fertilizers to the Selected
Fertilizers box. These fertilizers will have to be re-distributed.
The Menu Bar
Fertilizer Injection Time
This option can be used for injector systems that do not have a proportional fertilization
option. Enter the irrigation flow (m3/hr), irrigation duration (min.), and the injector flows. The
necessary fertilizer injection time (min.) will be calculated.

81
Injector Rate
This option allows you to calculate the required capacity of your fertilizer injector. Simply enter
the irrigation flow rate, and the required capacity of each injector will be calculated.
Note: If the fertilizer injector you use cannot reach the calculated rate, applying the required
amount of fertilizer solution will not be possible!
82
The File Menu
Open Recipe
From this menu you can open or delete saved fertilizer recipes.
1. From the File menu, select Open Recipe.
2. Select the file you wish to open.
3. From the Open with drop-down menu, select the method with which you want to
open the recipe (e.g., a fertilizer recipe that was created in method 1 can be opened
using method 2).
4. Your previously saved recipe opens using the method you have selected.
Delete a Fertilizer Recipe
1. From the File menu select Open Recipe.
2. Open the folder in which the fertilizer recipe is saved.
3. Right-click on the fertilizer recipe name and select Delete.

83
The Fertilizers Menu
The Fertilizers menu enables you to manage your fertilizers.
New Fertilizer You can easily add new fertilizers to the database. The fertilizers you add will feature in all the
calculations. The data is usually available on the fertilizer label or on the manufacturer's
website. For optimal performance and accuracy of calculations, it is recommended that you
enter all the required data.
• From the Fertilizers menu select New Fertilizer. The New Fertilizer window will
open.
• In the Name of Fertilizer box, enter the name of the new fertilizer you want to add.
• From the State drop-down menu, select Solid or Liquid.
• For a Solid fertilizer, enter the solubility data at different temperatures.
• For a Liquid fertilizer:
1. Enter the Specific Weight of the fertilizer in (Kg/l).
2. Enter the Crystallization Temperature (in OC).
• Enter the pH of the fertilizer (optional).
84
• In the Cost/Kg enter the price of 1 Kg of fertilizer (To quickly adjust the fertilizer price
later see Fertilizer Prices (p.85).
• Enter the fertilizer analysis – for each element, enter its percentage in the fertilizer
according to the fertilizer’s label or manufacturer’s data. Remember to enter the value
in the correct form (e.g., you can enter either a value for P or for P2O5).
• For liquid fertilizers with acidifying properties, you can use the L/m3 Neutralizes
1meq/l HCO3 box to determine the acidifying power of the fertilizer.
• For solid fertilizers with acidifying properties, you can use the g/m3 Neutralizes
1meq/l HCO3 box to determine the acidifying power of the fertilizer.
• The concentration of microelements (Fe, Mn, Zn, Cu, Mo, B) can be entered in either
in mg/Kg (=ppm), or in percentage. Liquid fertilizers also have the option of g/l. If
microelements are in a chelated form, check the box above the Micro Element’s
Concentrations table.
• To save the fertilizer’s data you have entered, click the Save button. If all the
necessary information has been entered, a confirmation message will be displayed.
Edit Fertilizer Smart! enables you to edit and update the data of a previously added fertilizer.
• From the Fertilizers menu, select Edit Fertilizer.
• Select the state of the fertilizer you want to edit (solid or liquid).
• Data can be entered, deleted or modified in the same way as in Add New Fertilizers
(p.83).
• To save the updated fertilizer data, click the Update button. A confirmation message
will be displayed.
Delete a Fertilizer from the Database
1. Select Edit Fertilizer from the Fertilizers menu.
2. Select the state of the fertilizer you want to delete (solid/liquid)
3. The Edit Fertilizer screen opens. Click the Delete button.
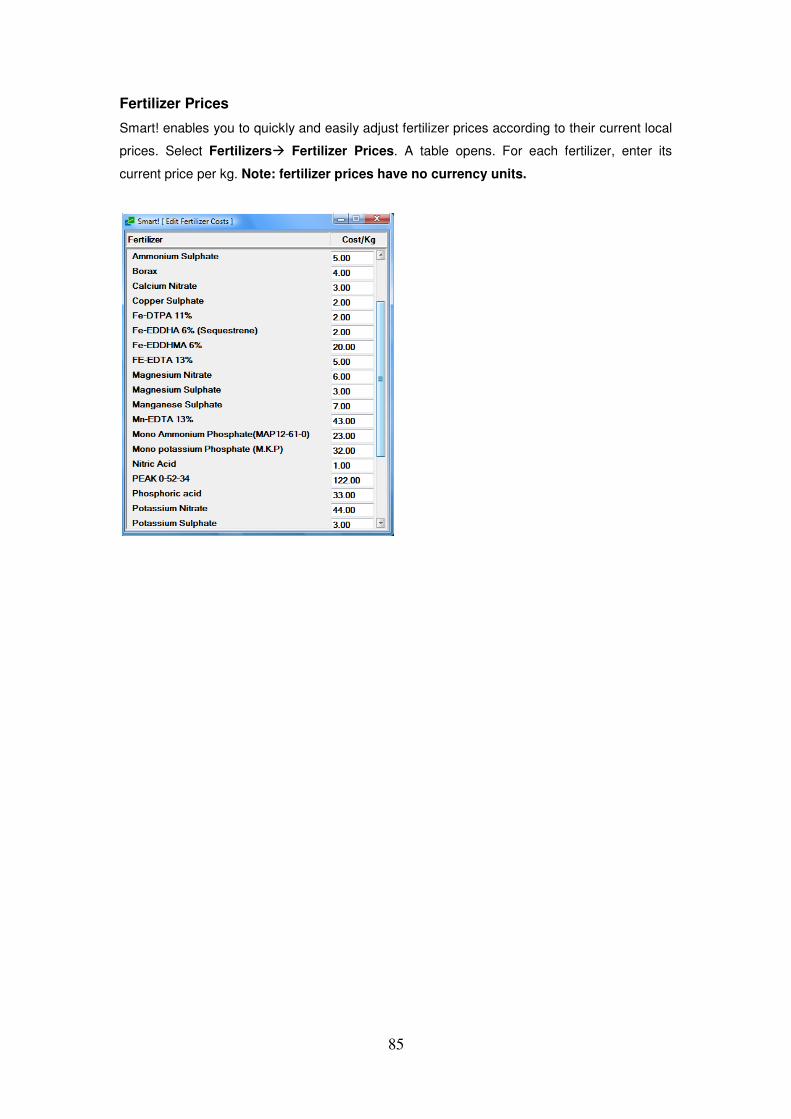
85
Fertilizer Prices
Smart! enables you to quickly and easily adjust fertilizer prices according to their current local
prices. Select Fertilizers� Fertilizer Prices. A table opens. For each fertilizer, enter its
current price per kg. Note: fertilizer prices have no currency units.
86
Fertilizer Data
Allows you to view data regarding fertilizers in the database.
1. From the Fertilizers menu select Fertilizer Data. A new window will open.
2. From the State drop-down menu, select the state and type of the fertilizer you want to
view.
3. From the Search Fertilizer by Name drop-down menu, select the fertilizer you want
to view.
The full data for the selected fertilizer is displayed.
You can change the form of each element (e.g., N-NO3, or NO3) and the units of micro
elements (percentage, mg/Kg, and g/l).
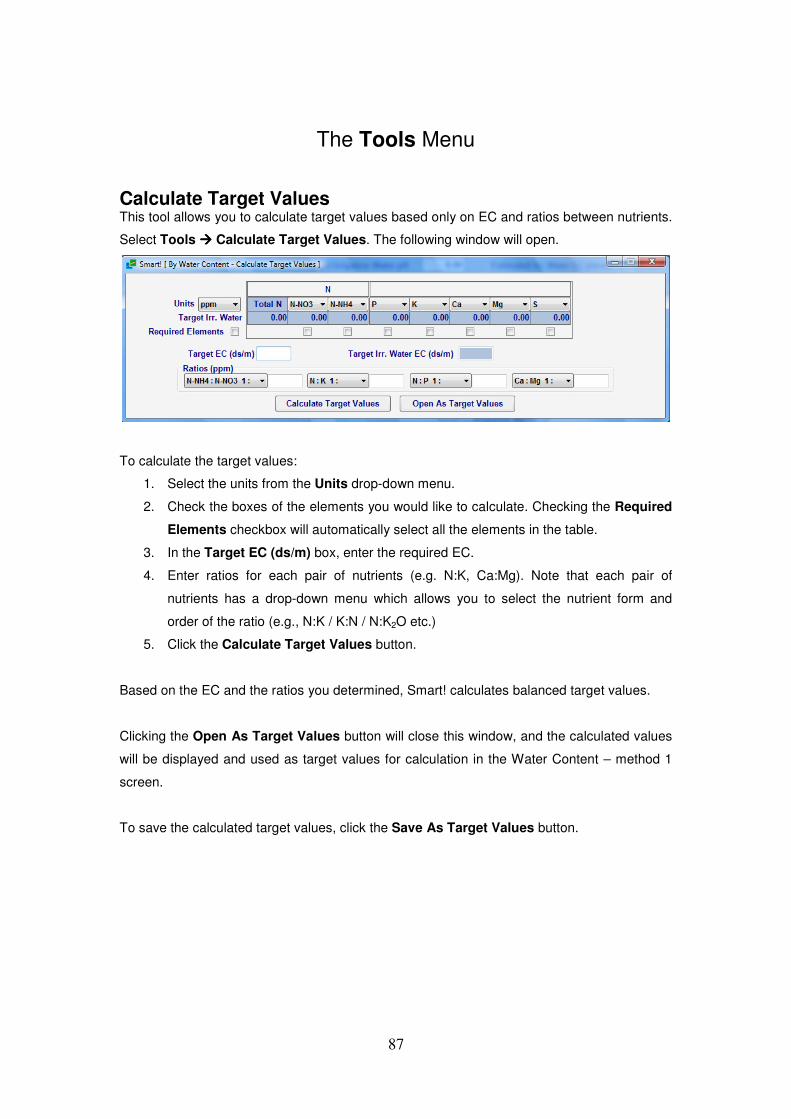
87
The Tools Menu
Calculate Target Values This tool allows you to calculate target values based only on EC and ratios between nutrients.
Select Tools ���� Calculate Target Values. The following window will open.
To calculate the target values:
1. Select the units from the Units drop-down menu.
2. Check the boxes of the elements you would like to calculate. Checking the Required
Elements checkbox will automatically select all the elements in the table.
3. In the Target EC (ds/m) box, enter the required EC.
4. Enter ratios for each pair of nutrients (e.g. N:K, Ca:Mg). Note that each pair of
nutrients has a drop-down menu which allows you to select the nutrient form and
order of the ratio (e.g., N:K / K:N / N:K2O etc.)
5. Click the Calculate Target Values button.
Based on the EC and the ratios you determined, Smart! calculates balanced target values.
Clicking the Open As Target Values button will close this window, and the calculated values
will be displayed and used as target values for calculation in the Water Content – method 1
screen.
To save the calculated target values, click the Save As Target Values button.
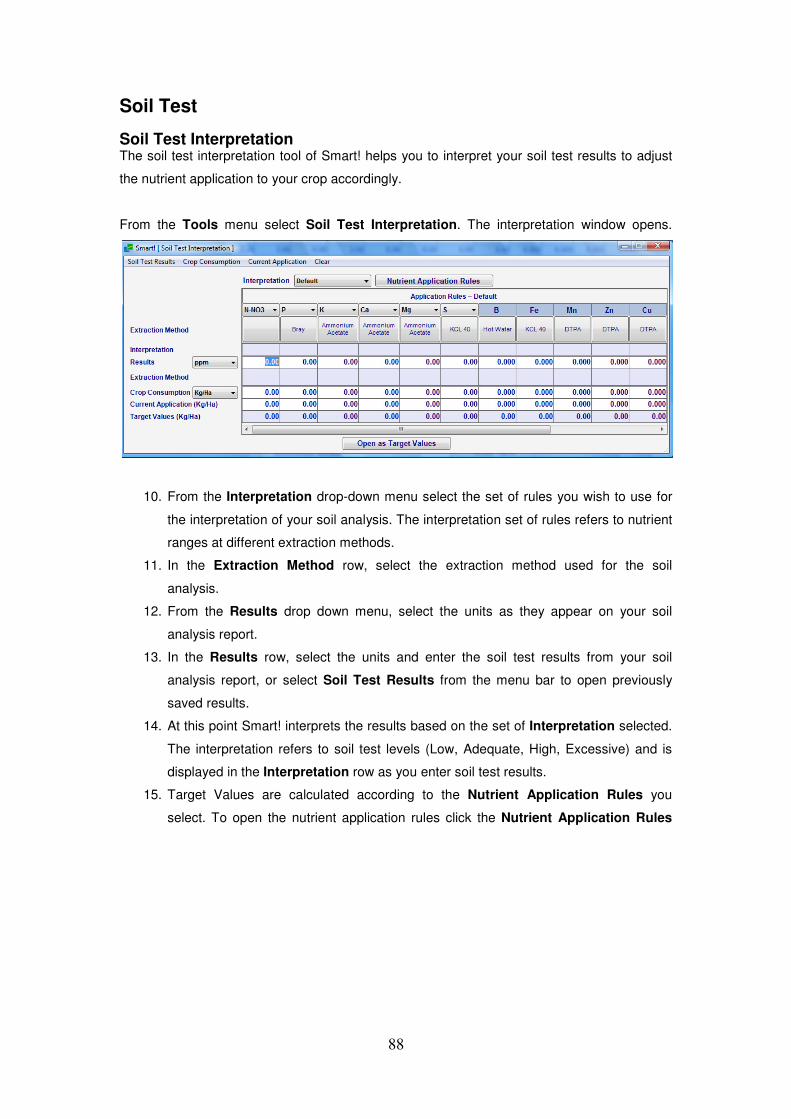
88
Soil Test
Soil Test Interpretation The soil test interpretation tool of Smart! helps you to interpret your soil test results to adjust
the nutrient application to your crop accordingly.
From the Tools menu select Soil Test Interpretation. The interpretation window opens.
10. From the Interpretation drop-down menu select the set of rules you wish to use for
the interpretation of your soil analysis. The interpretation set of rules refers to nutrient
ranges at different extraction methods.
11. In the Extraction Method row, select the extraction method used for the soil
analysis.
12. From the Results drop down menu, select the units as they appear on your soil
analysis report.
13. In the Results row, select the units and enter the soil test results from your soil
analysis report, or select Soil Test Results from the menu bar to open previously
saved results.
14. At this point Smart! interprets the results based on the set of Interpretation selected.
The interpretation refers to soil test levels (Low, Adequate, High, Excessive) and is
displayed in the Interpretation row as you enter soil test results.
15. Target Values are calculated according to the Nutrient Application Rules you
select. To open the nutrient application rules click the Nutrient Application Rules

89
button.
16. In the Crop Consumption row, enter the nutrient uptake data of your crop. This
refers to the theoretical requirement the crop. To open/save Crop Consumption data,
select Crop Consumption����Open/Save from the menu bar.
17. In the Current Application row, enter the actual amount of the nutrient applied in the
previous month or last few applications. To open/save Current Application data,
select Current Application����Open/Save from the menu bar.
18. Smart! calculates a general default recommendation (target values) for adjusting the
nutrient application, based on the soil test interpretation and nutrient application rules.
The Save as Target Values button – allows you to save the calculated target values.
Add/Edit Soil Test Interpretation The interpretation of a soil analysis may vary with the types of crops, laboratory and
extraction methods. Therefore Smart! allows you to add new sets of rules for the soil test
interpretation.
To add a new soil test interpretation, select Tools���� Add Soil Test Interpretation.
To edit a soil test interpretation, select Tools���� Soil Test���� Edit Soil Test Interpretation.
The following screen opens:
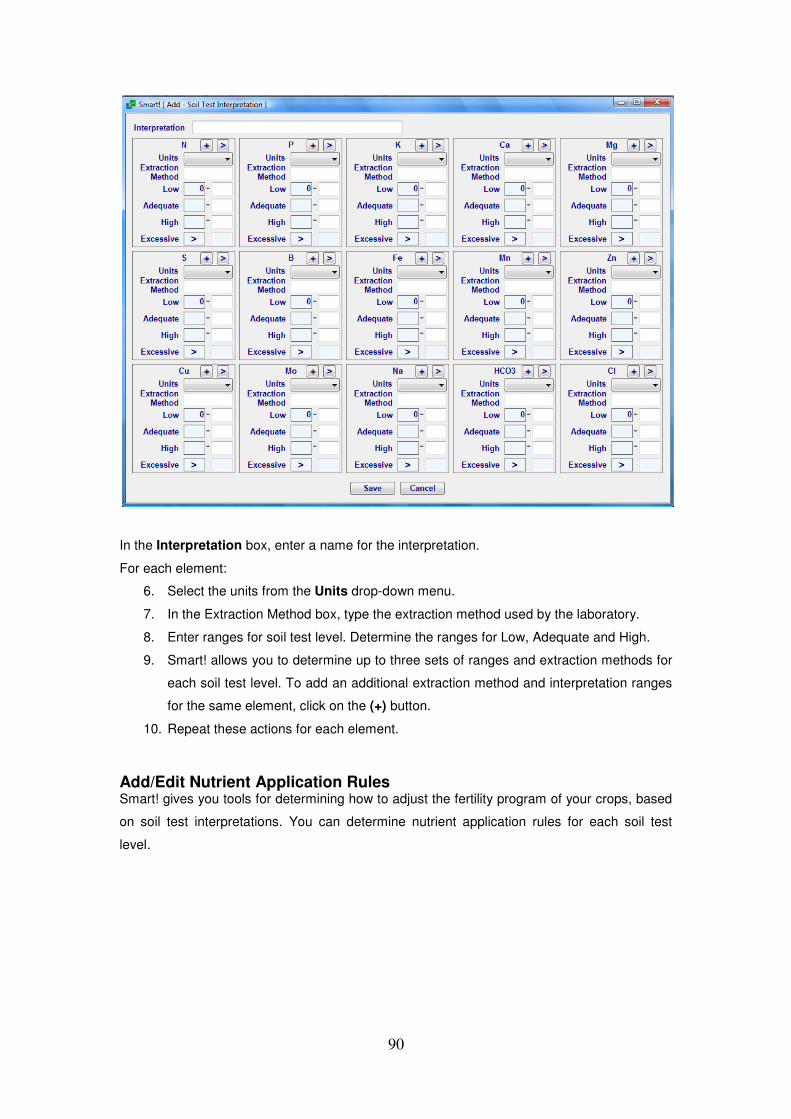
90
In the Interpretation box, enter a name for the interpretation.
For each element:
6. Select the units from the Units drop-down menu.
7. In the Extraction Method box, type the extraction method used by the laboratory.
8. Enter ranges for soil test level. Determine the ranges for Low, Adequate and High.
9. Smart! allows you to determine up to three sets of ranges and extraction methods for
each soil test level. To add an additional extraction method and interpretation ranges
for the same element, click on the (+) button.
10. Repeat these actions for each element.
Add/Edit Nutrient Application Rules Smart! gives you tools for determining how to adjust the fertility program of your crops, based
on soil test interpretations. You can determine nutrient application rules for each soil test
level.
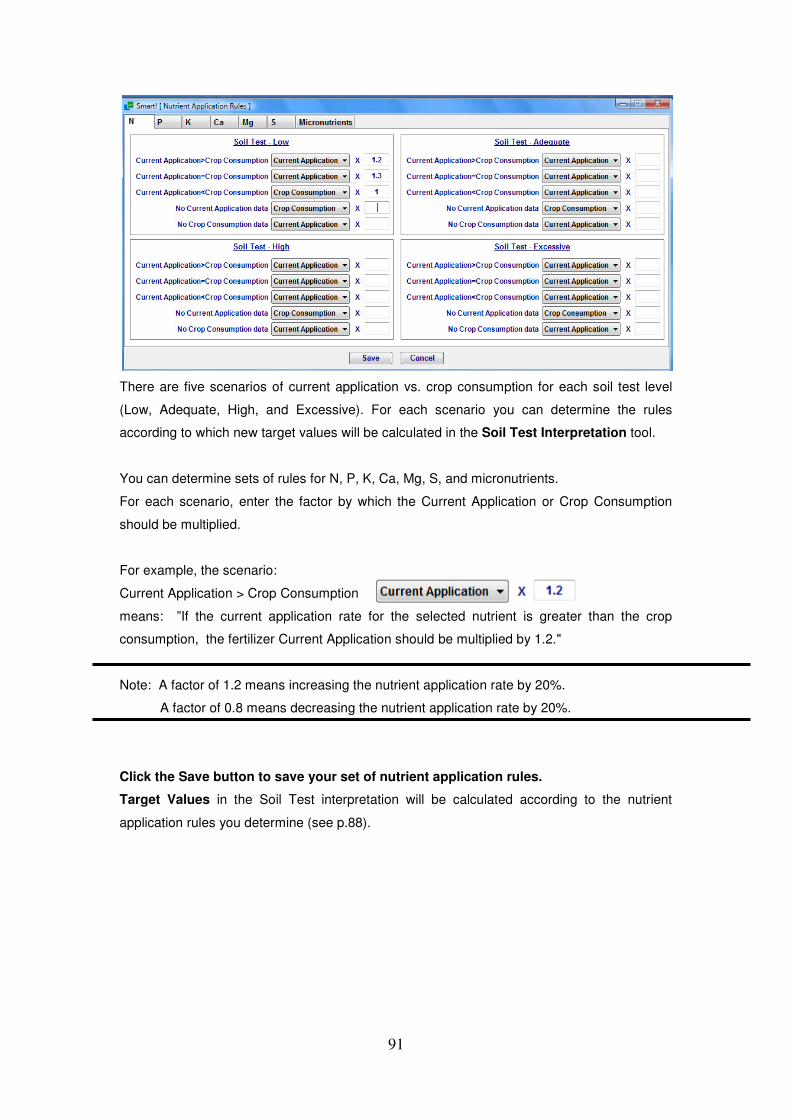
91
There are five scenarios of current application vs. crop consumption for each soil test level
(Low, Adequate, High, and Excessive). For each scenario you can determine the rules
according to which new target values will be calculated in the Soil Test Interpretation tool.
You can determine sets of rules for N, P, K, Ca, Mg, S, and micronutrients.
For each scenario, enter the factor by which the Current Application or Crop Consumption
should be multiplied.
For example, the scenario:
Current Application > Crop Consumption
means: ”If the current application rate for the selected nutrient is greater than the crop
consumption, the fertilizer Current Application should be multiplied by 1.2."
Note: A factor of 1.2 means increasing the nutrient application rate by 20%.
A factor of 0.8 means decreasing the nutrient application rate by 20%.
Click the Save button to save your set of nutrient application rules.
Target Values in the Soil Test interpretation will be calculated according to the nutrient
application rules you determine (see p.88).
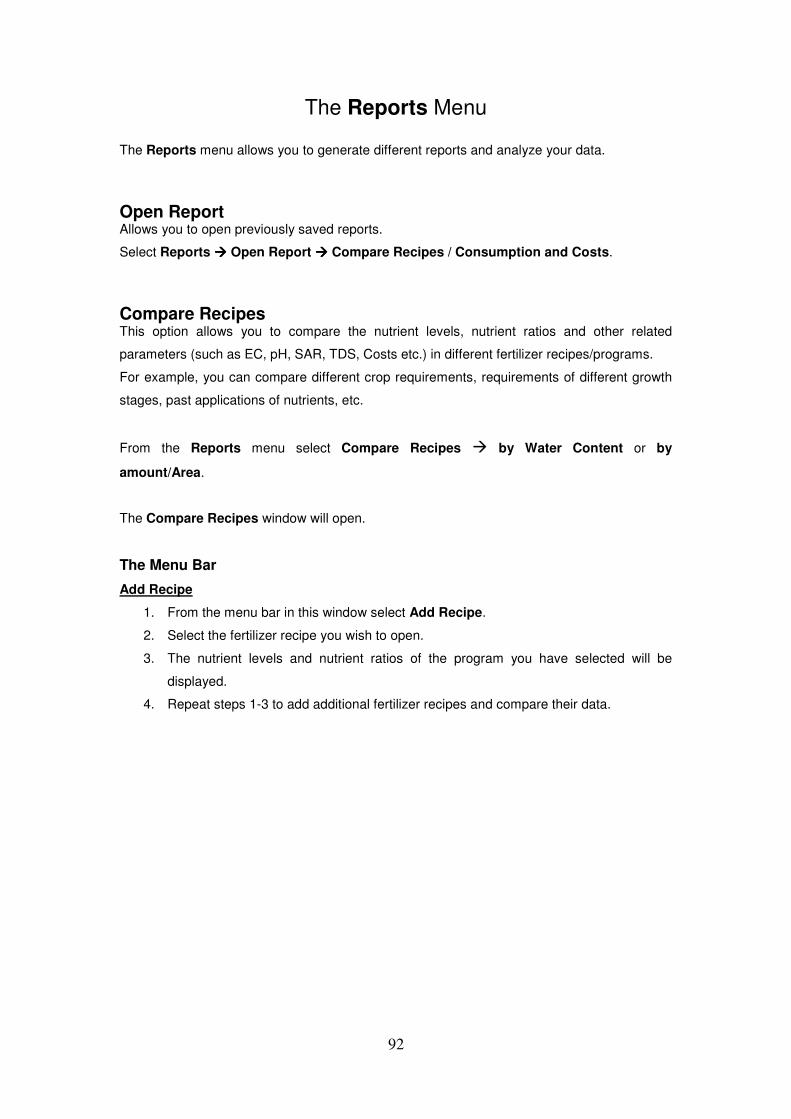
92
The Reports Menu
The Reports menu allows you to generate different reports and analyze your data.
Open Report Allows you to open previously saved reports.
Select Reports ���� Open Report ���� Compare Recipes / Consumption and Costs.
Compare Recipes This option allows you to compare the nutrient levels, nutrient ratios and other related
parameters (such as EC, pH, SAR, TDS, Costs etc.) in different fertilizer recipes/programs.
For example, you can compare different crop requirements, requirements of different growth
stages, past applications of nutrients, etc.
From the Reports menu select Compare Recipes � by Water Content or by
amount/Area.
The Compare Recipes window will open.
The Menu Bar
Add Recipe
1. From the menu bar in this window select Add Recipe.
2. Select the fertilizer recipe you wish to open.
3. The nutrient levels and nutrient ratios of the program you have selected will be
displayed.
4. Repeat steps 1-3 to add additional fertilizer recipes and compare their data.
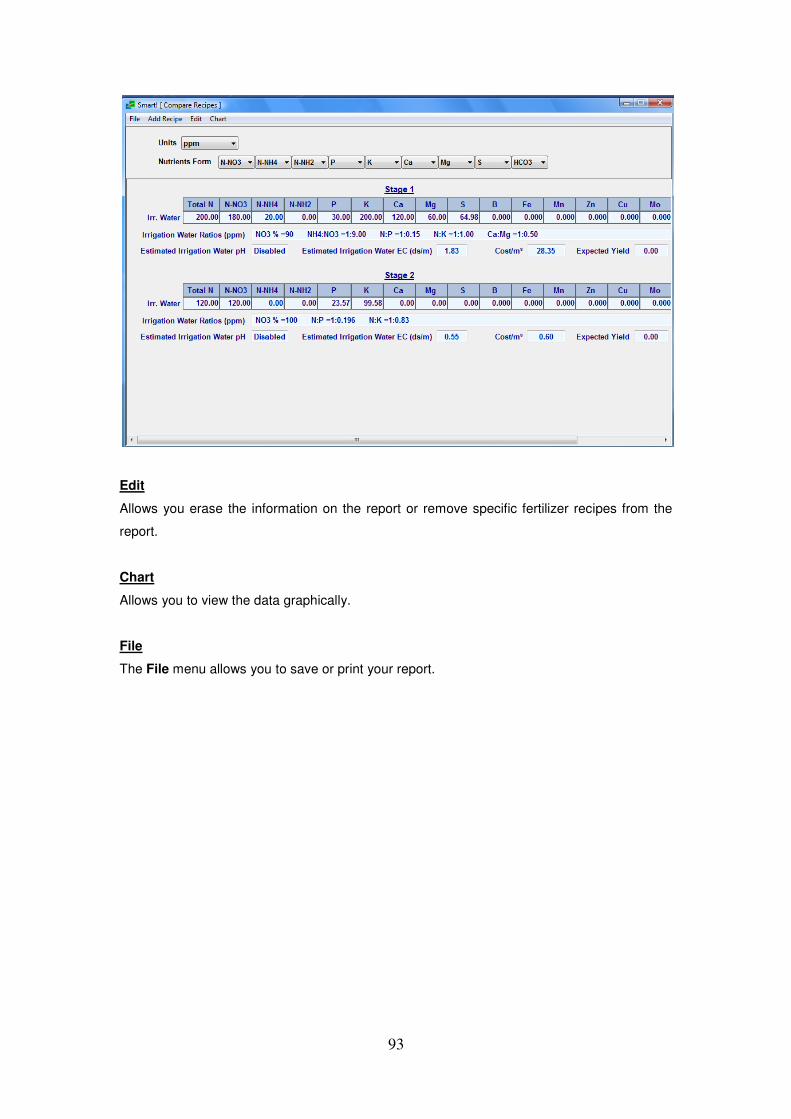
93
Edit
Allows you erase the information on the report or remove specific fertilizer recipes from the
report.
Chart
Allows you to view the data graphically.
File
The File menu allows you to save or print your report.
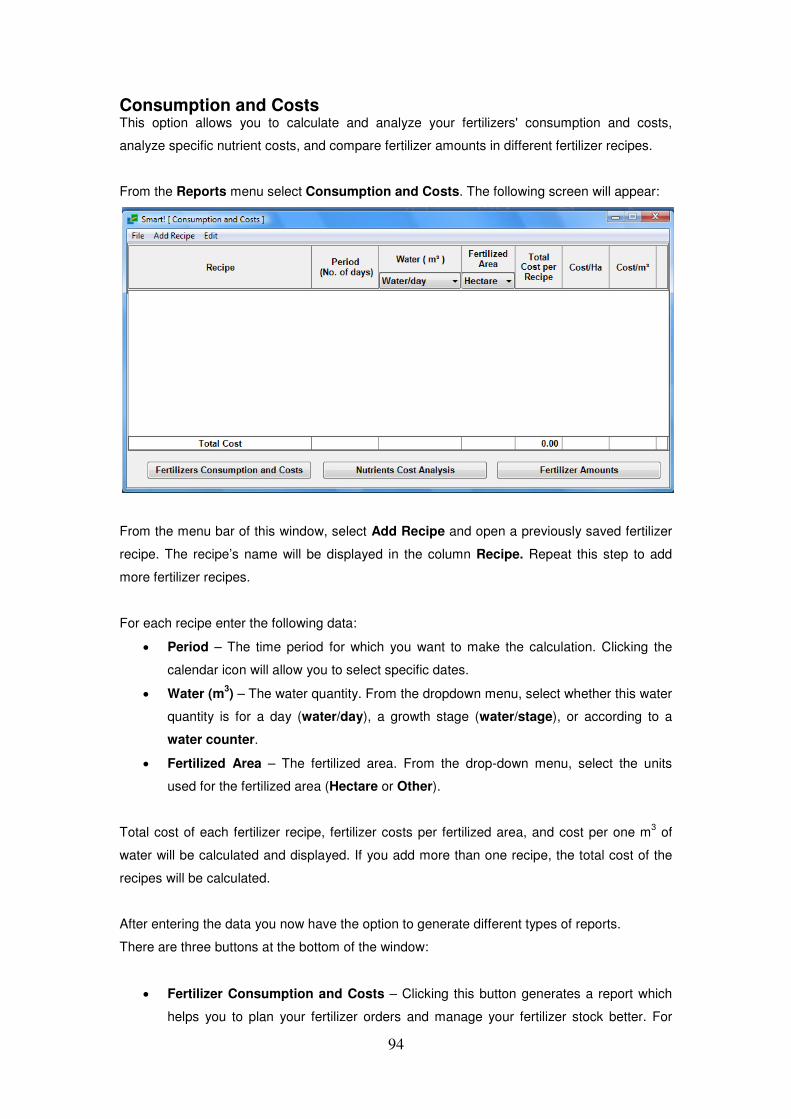
94
Consumption and Costs This option allows you to calculate and analyze your fertilizers' consumption and costs,
analyze specific nutrient costs, and compare fertilizer amounts in different fertilizer recipes.
From the Reports menu select Consumption and Costs. The following screen will appear:
From the menu bar of this window, select Add Recipe and open a previously saved fertilizer
recipe. The recipe’s name will be displayed in the column Recipe. Repeat this step to add
more fertilizer recipes.
For each recipe enter the following data:
• Period – The time period for which you want to make the calculation. Clicking the
calendar icon will allow you to select specific dates.
• Water (m3) – The water quantity. From the dropdown menu, select whether this water
quantity is for a day (water/day), a growth stage (water/stage), or according to a
water counter.
• Fertilized Area – The fertilized area. From the drop-down menu, select the units
used for the fertilized area (Hectare or Other).
Total cost of each fertilizer recipe, fertilizer costs per fertilized area, and cost per one m3 of
water will be calculated and displayed. If you add more than one recipe, the total cost of the
recipes will be calculated.
After entering the data you now have the option to generate different types of reports.
There are three buttons at the bottom of the window:
• Fertilizer Consumption and Costs – Clicking this button generates a report which
helps you to plan your fertilizer orders and manage your fertilizer stock better. For
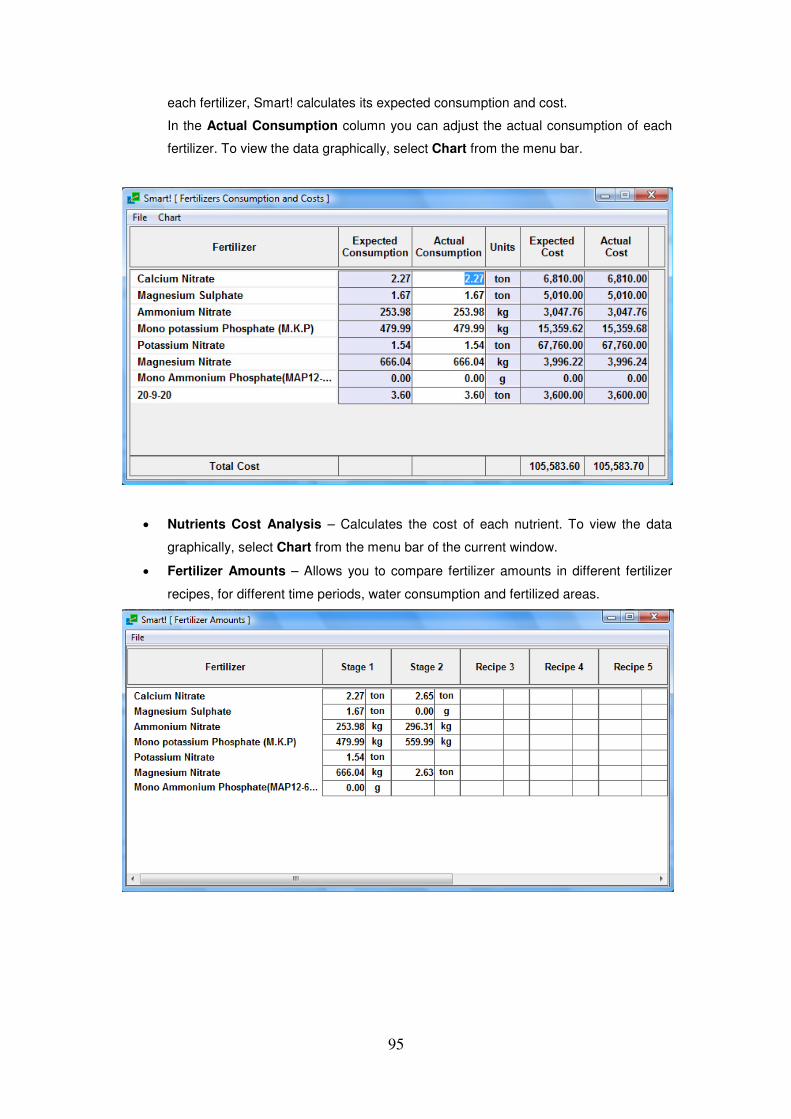
95
each fertilizer, Smart! calculates its expected consumption and cost.
In the Actual Consumption column you can adjust the actual consumption of each
fertilizer. To view the data graphically, select Chart from the menu bar.
• Nutrients Cost Analysis – Calculates the cost of each nutrient. To view the data
graphically, select Chart from the menu bar of the current window.
• Fertilizer Amounts – Allows you to compare fertilizer amounts in different fertilizer
recipes, for different time periods, water consumption and fertilized areas.

96
Compare Fertilizer Costs This option allows you to compare fertilizer costs and nutrient costs.
From the Reports menu, select Compare Fertilizer Costs.
To add a fertilizer, select Add Fertilizer. The fertilizer price (Cost/Kg) is displayed, as well as
the cost of 1 Kg of each nutrient in the fertilizer.

97
The Lab Test Results Menu
Smart! enables you to enter and analyze your lab test results.
Water Analysis From the Lab Test Results menu, select Water Analysis
A blank screen opens.
To add a water analysis, select Add Test.
The following table will appear:
1. In the Plot field, enter a name for the test.
2. From the Date calendar box, select the date of the sample.
3. Select the units from the Units drop-down menu (ppm, meq/l, mmol/l)
4. Enter values for each of the elements. Note the Units and element forms. Each of the
macronutrients (N, P, K, Ca, Mg, and S) has a drop-down menu. Open the drop-down
menu to select the form of each element (e.g. P or P2O5, N-NO3 or NO3).
5. To add the results of additional samples, select Add Test and repeat steps 1-4 as
described above.
The Open button allows you to open a previously saved water analysis. You can open results
that were previously saved as water sources or target values.
The Save as Source Water button allows you to save results that represent your source
water, and use them later to prepare fertilizer recipes.
The File Menu
Save a report – To save your report, select File ���� Save or Save As.
Print a report – To print a report, select File ���� Print.
The Edit Menu
Clear – Clears all the data from the report.
Remove – Removes a specific lab test result.
Check All – Checks the checkboxes next to all lab test results.
Uncheck All – Unchecks the checkboxes next to all lab test results.
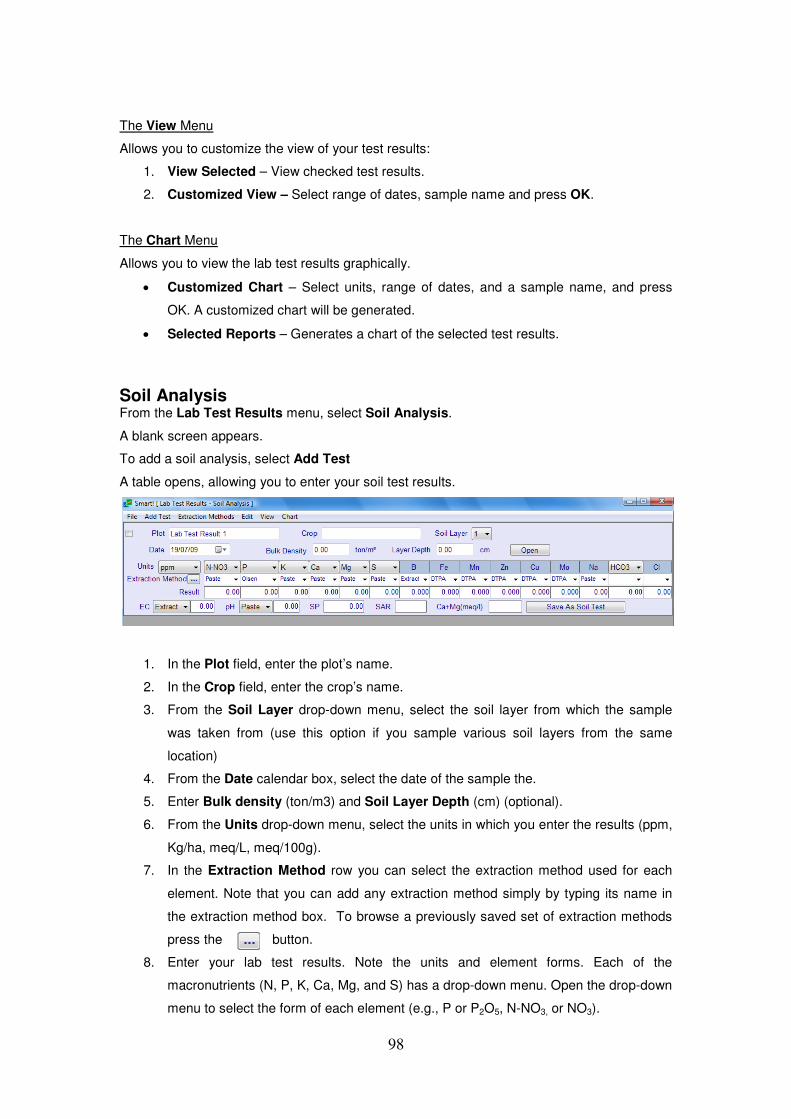
98
The View Menu
Allows you to customize the view of your test results:
1. View Selected – View checked test results.
2. Customized View – Select range of dates, sample name and press OK.
The Chart Menu
Allows you to view the lab test results graphically.
• Customized Chart – Select units, range of dates, and a sample name, and press
OK. A customized chart will be generated.
• Selected Reports – Generates a chart of the selected test results.
Soil Analysis From the Lab Test Results menu, select Soil Analysis.
A blank screen appears.
To add a soil analysis, select Add Test
A table opens, allowing you to enter your soil test results.
1. In the Plot field, enter the plot’s name.
2. In the Crop field, enter the crop’s name.
3. From the Soil Layer drop-down menu, select the soil layer from which the sample
was taken from (use this option if you sample various soil layers from the same
location)
4. From the Date calendar box, select the date of the sample the.
5. Enter Bulk density (ton/m3) and Soil Layer Depth (cm) (optional).
6. From the Units drop-down menu, select the units in which you enter the results (ppm,
Kg/ha, meq/L, meq/100g).
7. In the Extraction Method row you can select the extraction method used for each
element. Note that you can add any extraction method simply by typing its name in
the extraction method box. To browse a previously saved set of extraction methods
press the button.
8. Enter your lab test results. Note the units and element forms. Each of the
macronutrients (N, P, K, Ca, Mg, and S) has a drop-down menu. Open the drop-down
menu to select the form of each element (e.g., P or P2O5, N-NO3, or NO3).
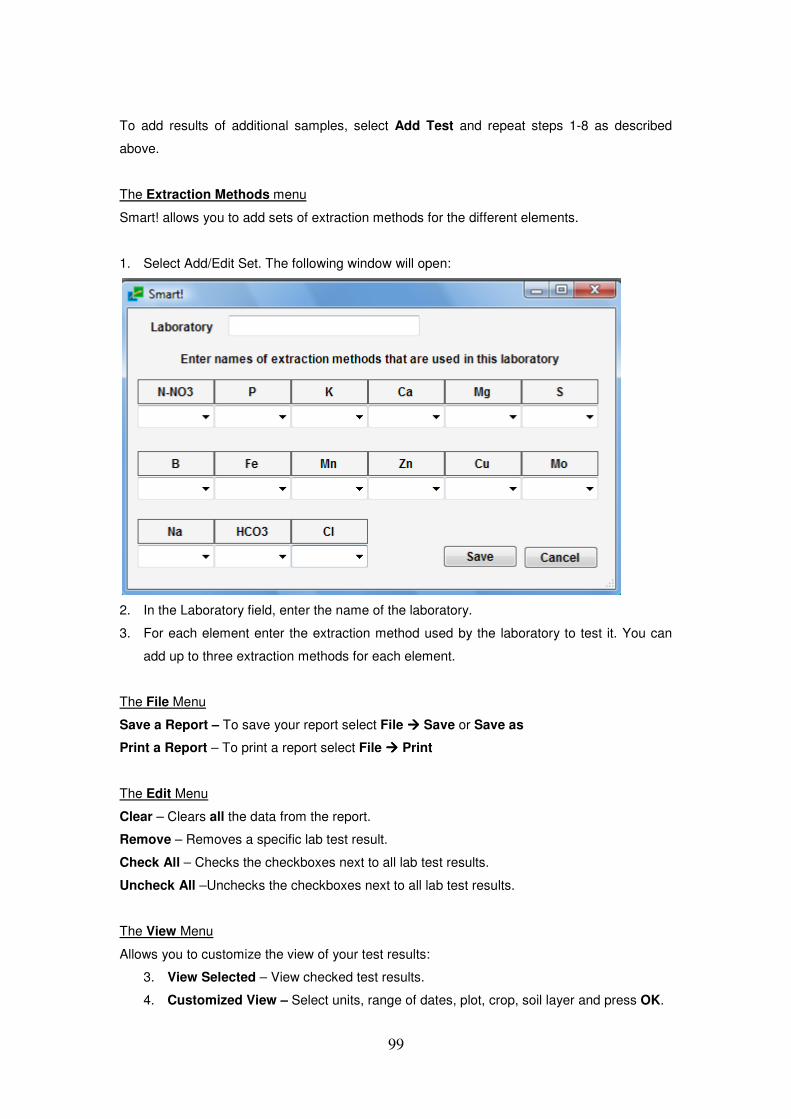
99
To add results of additional samples, select Add Test and repeat steps 1-8 as described
above.
The Extraction Methods menu
Smart! allows you to add sets of extraction methods for the different elements.
1. Select Add/Edit Set. The following window will open:
2. In the Laboratory field, enter the name of the laboratory.
3. For each element enter the extraction method used by the laboratory to test it. You can
add up to three extraction methods for each element.
The File Menu
Save a Report – To save your report select File ���� Save or Save as
Print a Report – To print a report select File ���� Print
The Edit Menu
Clear – Clears all the data from the report.
Remove – Removes a specific lab test result.
Check All – Checks the checkboxes next to all lab test results.
Uncheck All –Unchecks the checkboxes next to all lab test results.
The View Menu
Allows you to customize the view of your test results:
3. View Selected – View checked test results.
4. Customized View – Select units, range of dates, plot, crop, soil layer and press OK.

100
The Chart Menu
Allows you to view lab test results graphically.
• Customized Chart – Select units, range of dates, plot, crop, soil layer and press OK.
A customized chart will be generated.
• Selected Reports – Generates a chart of the selected test results.
The Interpretation button – This option enables you to interpret your soil test results, using
the Soil Test Interpretation tool (see p.88)
101
The Database Menu
A database refers to the types of fertilizers and all the information you save, such as fertilizer
prices, fertilizer recipes, laboratory test results, etc. Smart! allows you to manage various
databases.
Create a New Database
1. From the Database menu, select Create New Database. A dialog box opens.
2. In the Database Name box, enter the name of your new database.
3. To start working with your new database, check the Change Working Database
checkbox.
4. Click the Save button to save your database.
Open a Database
1. From the Database menu, select Open. A dialog box opens.
2. Select the database you want to open.
3. Click the Open button.
Delete a Database
1. From the Database menu, select Delete. A dialog box appears.
2. Select the database to be deleted.
3. Click the Delete button.
Note: You cannot delete the default database.