fallout 2 modding guide
TRANSCRIPT

P a g e | 1
FALLOUT 2 MODDING GUIDE V1.01
By Ray
P a g e | 2
Table of Contents
Getting Started ............................................................................................... 3
Installing Patches and Updating Fallout 2 ................................................................................... 3
Extracting and Exploring Files For Modding ................................................................................ 7
Fallout 2 Programming .................................................................................... 8
Using the Script Source Files ....................................................................................................... 8
Layout .......................................................................................................................................... 8
Variables .................................................................................................................................... 12
Booleans and Operators ............................................................................................................ 13
Macros and Commands ............................................................................................................. 14
Compiling ................................................................................................................................... 15
Creating an NPC ........................................................................................... 16
Mary (Part 1) ............................................................................................................................. 16
Consistent Dialog ....................................................................................................................... 18
Dialog .msg Files ........................................................................................................................ 19
Dialog .int Files .......................................................................................................................... 20
Customizing Dialog Files and Procedures .................................................................................. 21
Mary (Part 2) ............................................................................................................................. 22
Quests on the Pip-Boy ............................................................................................................... 30
Mary (Part 3) ............................................................................................................................. 31
NPC Checklist ............................................................................................... 40
Credits ......................................................................................................... 44

P a g e | 3
Getting Started
This guide is everything that I’ve found helpful on the internet from many people and places. Most of this information is found in the Fallout 2 Scripts Source documents. I’ve compiled this information into one easy reference so beginners can get started. This document was last updated on 27 September, 2020.
Installing Patches and Updating Fallout 2 When you first install Fallout 2, it may be missing some content due to your region or version of game. To begin creating your own mods, an amazing programmer named Killap developed a Restoration Project to add back missing content and fix bugs. He included source script files so that we may modify and use the scripts as templates. In addition to the Restoration Project files, we will also be downloading a few more updates from other developers. At the time I’m writing this guide, these files are the most up to date. Download the following patches and programs to begin modding Fallout 2:
Fallout 2 Restoration Project (RP) 2.3.3 (Download the Windows Installer and Script Sources) https://www.nma-fallout.com/threads/fallout-2-restoration-project-2-3-3-
unofficial-expansion.202265/
Restoration Project Update (RPU) v16 (Download the rpu_v16.exe and the Source code (zip)) https://github.com/BGforgeNet/Fallout2_Restoration_Project/releases/tag/
v16
sfall 4.2.7 (Download sfall_4.2.7.7z)
https://sourceforge.net/projects/sfall/files/sfall/
P a g e | 4
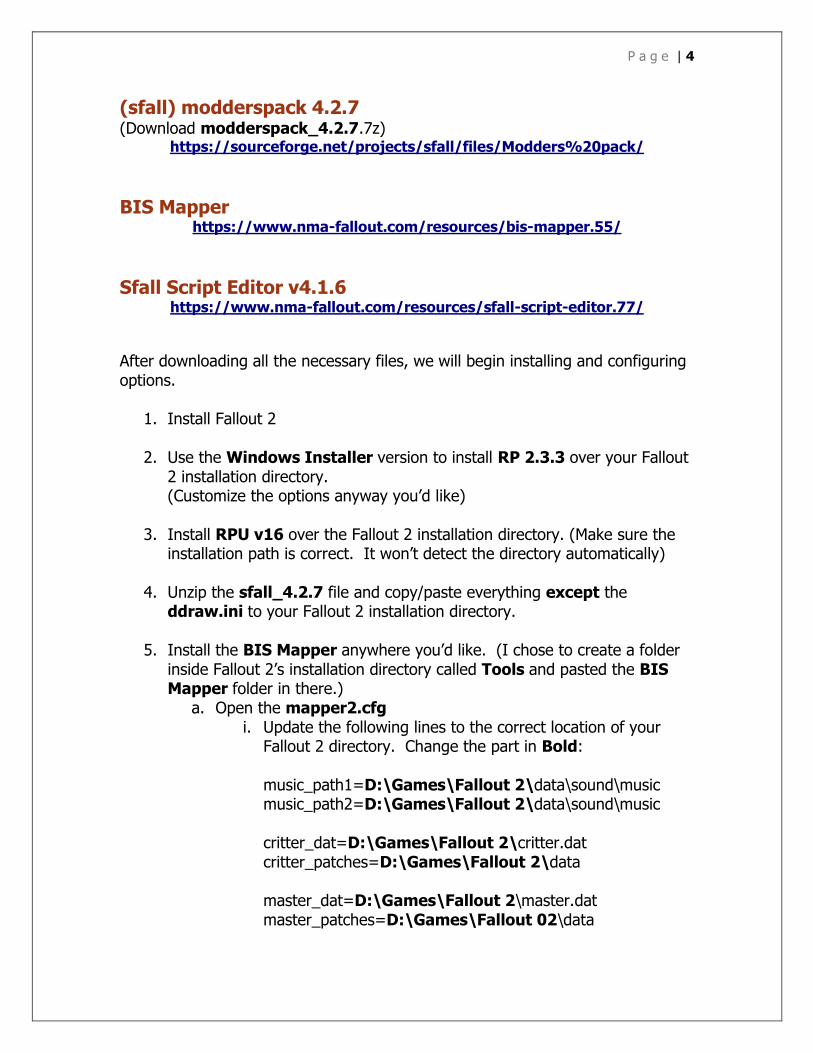
(sfall) modderspack 4.2.7 (Download modderspack_4.2.7.7z)
https://sourceforge.net/projects/sfall/files/Modders%20pack/
BIS Mapper
https://www.nma-fallout.com/resources/bis-mapper.55/
Sfall Script Editor v4.1.6
https://www.nma-fallout.com/resources/sfall-script-editor.77/
After downloading all the necessary files, we will begin installing and configuring options.
1. Install Fallout 2
2. Use the Windows Installer version to install RP 2.3.3 over your Fallout 2 installation directory. (Customize the options anyway you’d like)
3. Install RPU v16 over the Fallout 2 installation directory. (Make sure the installation path is correct. It won’t detect the directory automatically)
4. Unzip the sfall_4.2.7 file and copy/paste everything except the ddraw.ini to your Fallout 2 installation directory.
5. Install the BIS Mapper anywhere you’d like. (I chose to create a folder inside Fallout 2’s installation directory called Tools and pasted the BIS Mapper folder in there.)
a. Open the mapper2.cfg i. Update the following lines to the correct location of your
Fallout 2 directory. Change the part in Bold: music_path1=D:\Games\Fallout 2\data\sound\music music_path2=D:\Games\Fallout 2\data\sound\music critter_dat=D:\Games\Fallout 2\critter.dat critter_patches=D:\Games\Fallout 2\data master_dat=D:\Games\Fallout 2\master.dat master_patches=D:\Games\Fallout 02\data
P a g e | 5
b. Open the Updated source codes folder and copy/paste everything inside the RP 2.3.3 source codes by Killap to the inside of the 1.02d source codes by Haenlomal folder.
c. Copy these new files from the 1.02d source codes by Haenlomal into the BIS mapper\scripts folder. (This folder will be where all your scripts and programming files go)
6. Open the RP 2.3.3 Source folder and copy/paste everything over the
files in the BIS mapper\scripts.
7. Open the RPU v16 Source 7z file and navigate to the Fallout2_Restoration_Project-16\scripts_src folder. Copy/paste all these files over to the BIS mapper\scripts too.
8. Open your modderspack_4.2.7 7z file and navigate to the modderspack_4.2.7\scripting_docs\headers folder. Copy/paste all those file to the BIS mapper\scripts\headers\ folder.
9. Install the Sfall Script Editor v4.1.6 ( (Install it anywhere, but I installed mine to the Fallout 2 installation directory inside a Tools folder)
a. Navigate inside your Sfall Script Editor installation to the sfall_headers folder. Copy/paste all the files from this folder to the BIS mapper\scripts\headers folder.
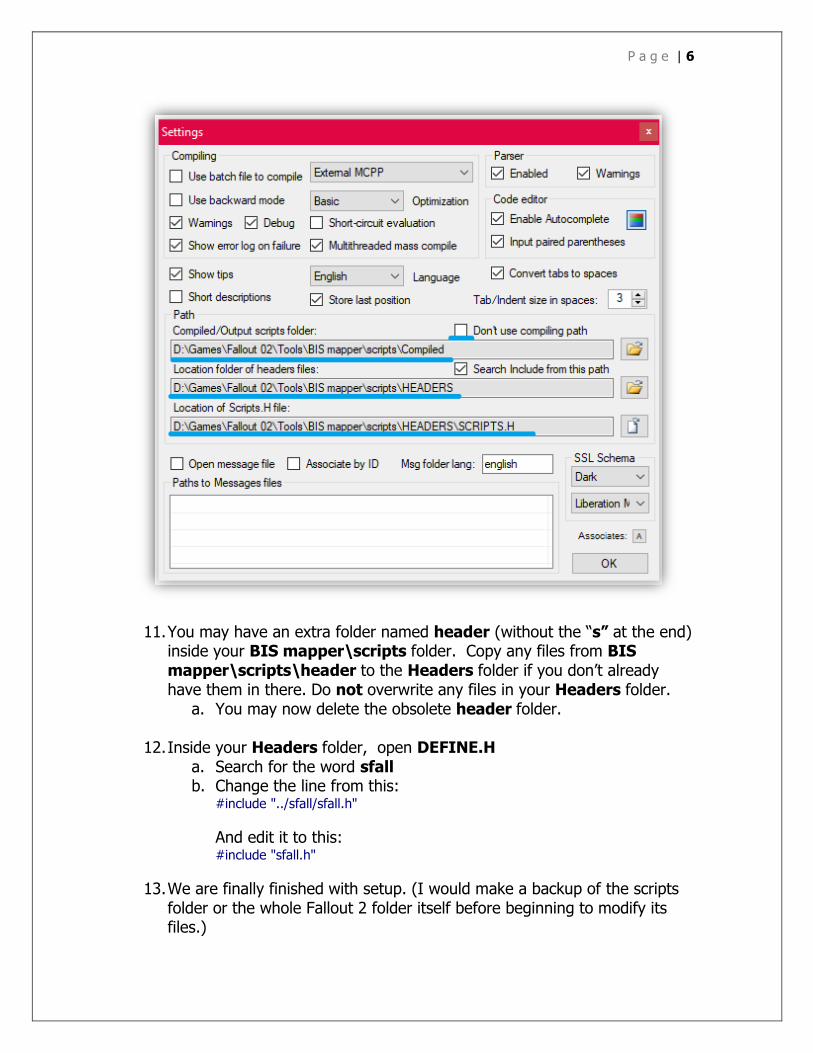
10. Open your Sfall Script Editor and edit your settings.
(Settings can be found in the Options menu if yours didn’t pop up) Update your file path to your BIS mapper\scripts\Headers folder. Headers with an “s”. I also created a folder named Compiled to manage the scripts I’ve created. Below is an example of what mine looks like:
P a g e | 6
11. You may have an extra folder named header (without the “s” at the end) inside your BIS mapper\scripts folder. Copy any files from BIS mapper\scripts\header to the Headers folder if you don’t already have them in there. Do not overwrite any files in your Headers folder.
a. You may now delete the obsolete header folder.
12. Inside your Headers folder, open DEFINE.H a. Search for the word sfall b. Change the line from this:
#include "../sfall/sfall.h"
And edit it to this: #include "sfall.h"
13. We are finally finished with setup. (I would make a backup of the scripts folder or the whole Fallout 2 folder itself before beginning to modify its files.)
P a g e | 7
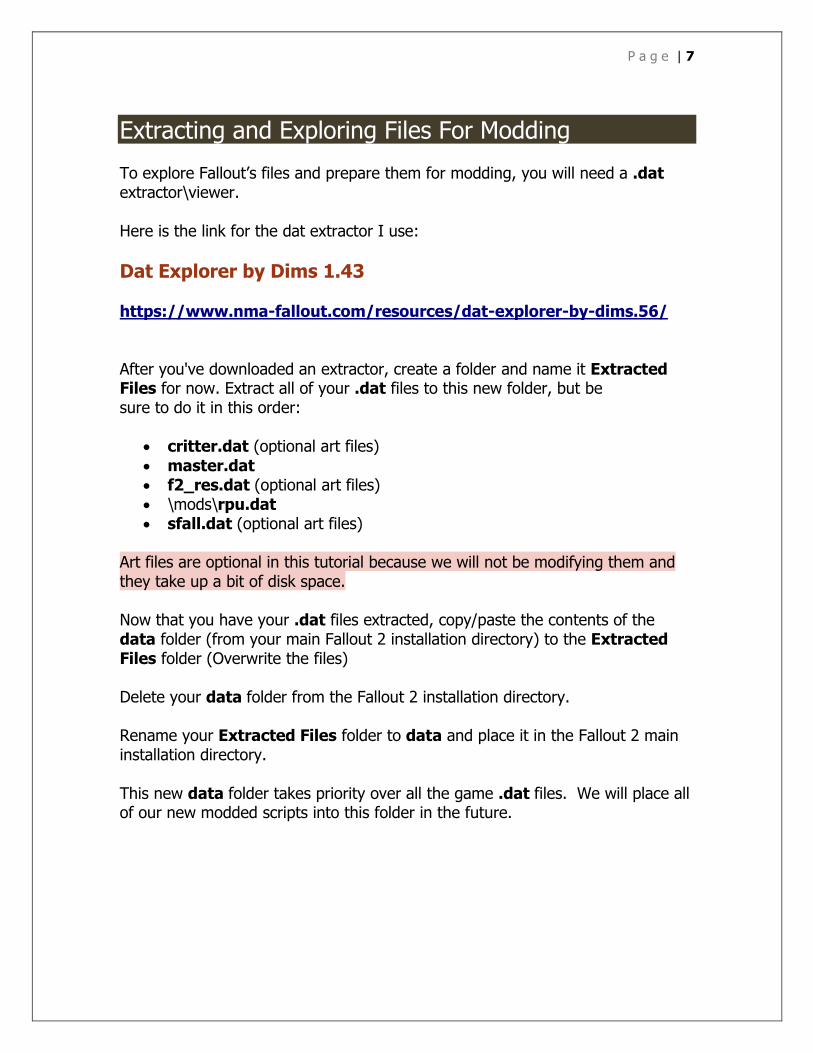
Extracting and Exploring Files For Modding To explore Fallout’s files and prepare them for modding, you will need a .dat extractor\viewer. Here is the link for the dat extractor I use:
Dat Explorer by Dims 1.43 https://www.nma-fallout.com/resources/dat-explorer-by-dims.56/ After you've downloaded an extractor, create a folder and name it Extracted Files for now. Extract all of your .dat files to this new folder, but be sure to do it in this order:
critter.dat (optional art files)
master.dat f2_res.dat (optional art files) \mods\rpu.dat sfall.dat (optional art files)
Art files are optional in this tutorial because we will not be modifying them and they take up a bit of disk space. Now that you have your .dat files extracted, copy/paste the contents of the data folder (from your main Fallout 2 installation directory) to the Extracted Files folder (Overwrite the files) Delete your data folder from the Fallout 2 installation directory. Rename your Extracted Files folder to data and place it in the Fallout 2 main installation directory. This new data folder takes priority over all the game .dat files. We will place all of our new modded scripts into this folder in the future.
P a g e | 8
Fallout 2 Programming
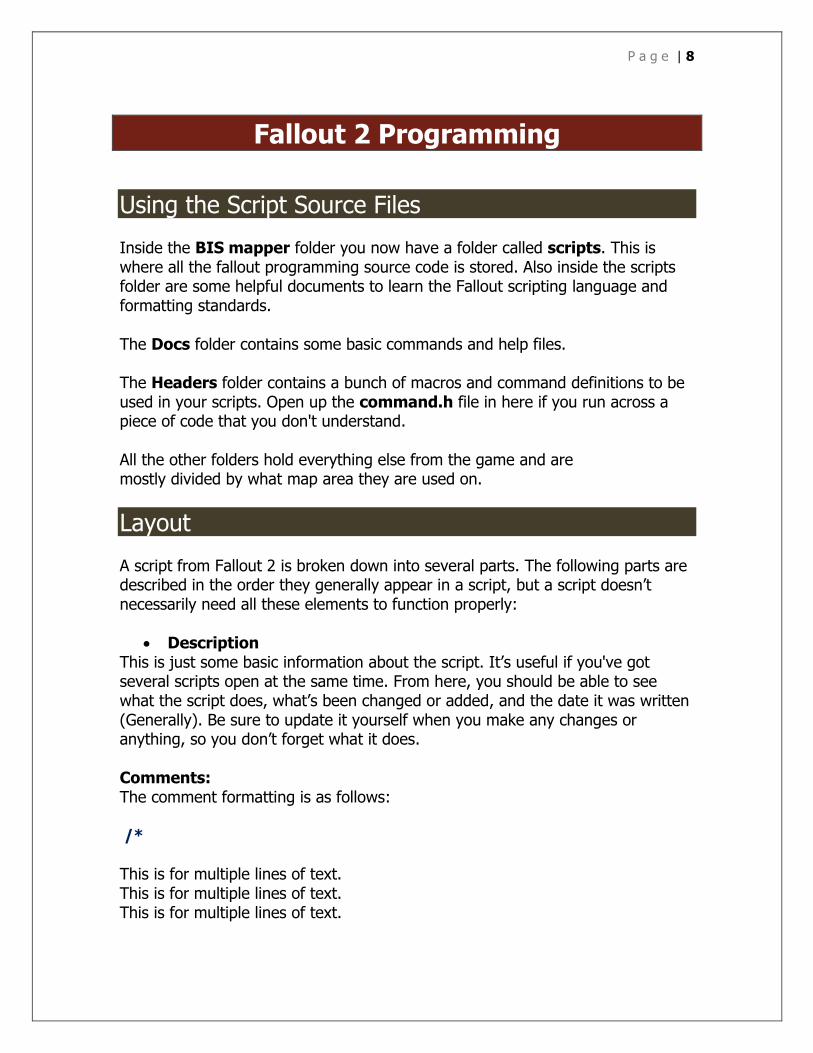
Using the Script Source Files Inside the BIS mapper folder you now have a folder called scripts. This is where all the fallout programming source code is stored. Also inside the scripts folder are some helpful documents to learn the Fallout scripting language and formatting standards. The Docs folder contains some basic commands and help files. The Headers folder contains a bunch of macros and command definitions to be used in your scripts. Open up the command.h file in here if you run across a piece of code that you don't understand. All the other folders hold everything else from the game and are mostly divided by what map area they are used on.
Layout A script from Fallout 2 is broken down into several parts. The following parts are described in the order they generally appear in a script, but a script doesn’t necessarily need all these elements to function properly:
Description This is just some basic information about the script. It’s useful if you've got several scripts open at the same time. From here, you should be able to see what the script does, what’s been changed or added, and the date it was written (Generally). Be sure to update it yourself when you make any changes or anything, so you don’t forget what it does. Comments: The comment formatting is as follows: /* This is for multiple lines of text. This is for multiple lines of text. This is for multiple lines of text.

P a g e | 9
*/ // This is for a single line of text. The comments above will work in .ssl files but to add comments to a .msg file you will use a # symbol at the beginning of the line. These are not commenting symbols in .ssl files.
#Include This part of the script is to keep your .ssl from being too complicated to read. Include copies/pastes large blocks of code into your script from other definition files during compiling. Macros (mentioned below) are defined in these included files. If your script isn’t working the way it should, be sure that you’ve included the all the right files. Example: #include "..\headers\command.h"
This would add everything from command.h to your file so that you may use any macro from that file. For your scripts to compile successfully, your #include lines must be placed in the correct order in your script. The compiler that converts your code to Fallout 2 .int files will read your code from top to bottom. If the compiler comes across a macro it hasn’t seen yet, it will immediately stop and let you know there was an error.
#Define Macro A macro is an abbreviated set of commands. The #Define command is used to create an abbreviated piece of code. If you have a formula you’re using a lot and you want to make a change to it, you would only have to edit the coding next to your definition. It can also keep your scripts easier to read. Example: #define money (item_caps_total(dude_obj))
Instead of writing “(item_caps_total(dude_obj))” multiple times when you need to know how much money the player has, you can see the amount by using your defined macro: money
#Define Variable These are similar to the macros, but variables are given their own section to keep the script more organized. This part of the script will let the compiler know
P a g e | 10
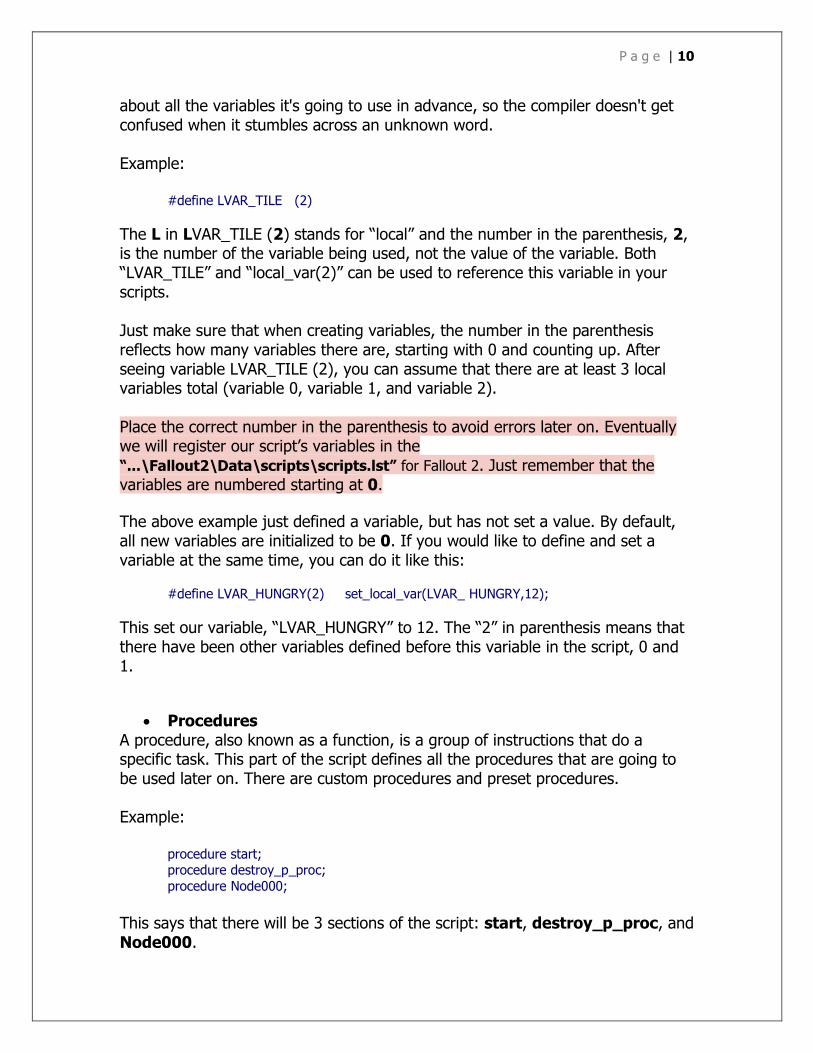
about all the variables it's going to use in advance, so the compiler doesn't get confused when it stumbles across an unknown word. Example:
#define LVAR_TILE (2)
The L in LVAR_TILE (2) stands for “local” and the number in the parenthesis, 2, is the number of the variable being used, not the value of the variable. Both “LVAR_TILE” and “local_var(2)” can be used to reference this variable in your scripts. Just make sure that when creating variables, the number in the parenthesis reflects how many variables there are, starting with 0 and counting up. After seeing variable LVAR_TILE (2), you can assume that there are at least 3 local variables total (variable 0, variable 1, and variable 2). Place the correct number in the parenthesis to avoid errors later on. Eventually we will register our script’s variables in the “...\Fallout2\Data\scripts\scripts.lst” for Fallout 2. Just remember that the variables are numbered starting at 0.
The above example just defined a variable, but has not set a value. By default, all new variables are initialized to be 0. If you would like to define and set a variable at the same time, you can do it like this:
#define LVAR_HUNGRY(2) set_local_var(LVAR_ HUNGRY,12);
This set our variable, “LVAR_HUNGRY” to 12. The “2” in parenthesis means that there have been other variables defined before this variable in the script, 0 and 1.
Procedures A procedure, also known as a function, is a group of instructions that do a specific task. This part of the script defines all the procedures that are going to be used later on. There are custom procedures and preset procedures. Example: procedure start; procedure destroy_p_proc;
procedure Node000;
This says that there will be 3 sections of the script: start, destroy_p_proc, and Node000.
P a g e | 11
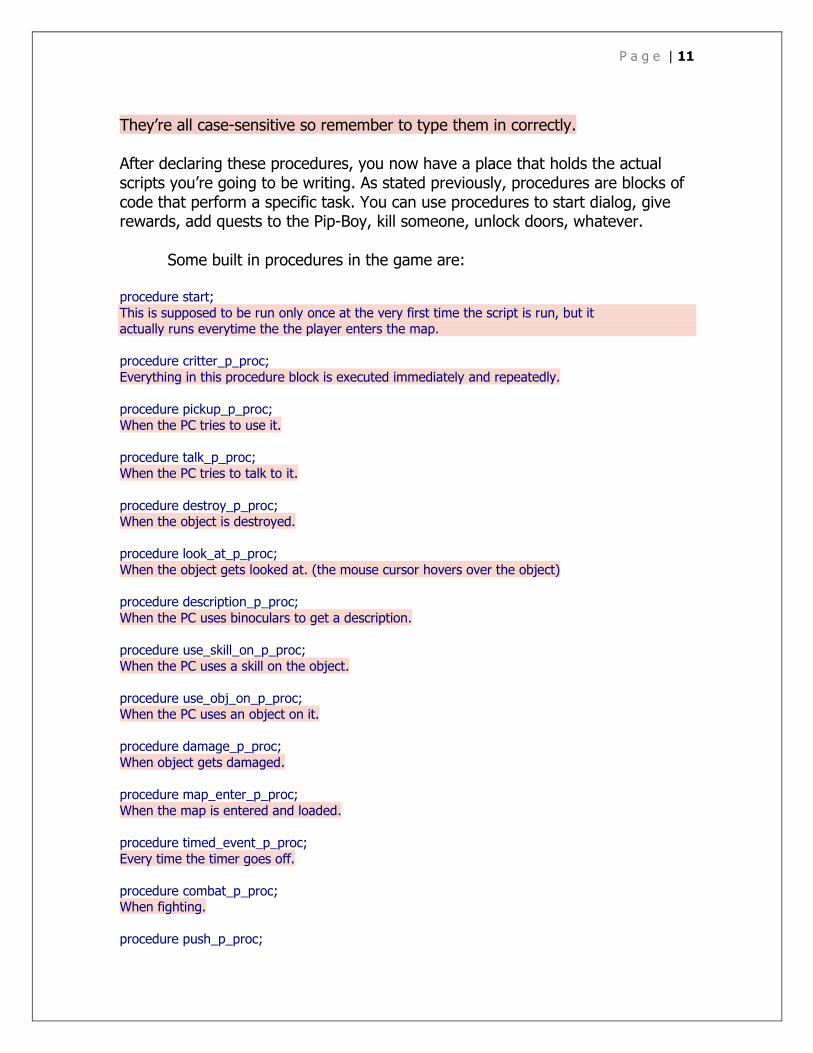
They’re all case-sensitive so remember to type them in correctly. After declaring these procedures, you now have a place that holds the actual scripts you’re going to be writing. As stated previously, procedures are blocks of code that perform a specific task. You can use procedures to start dialog, give rewards, add quests to the Pip-Boy, kill someone, unlock doors, whatever. Some built in procedures in the game are: procedure start;
This is supposed to be run only once at the very first time the script is run, but it actually runs everytime the the player enters the map.
procedure critter_p_proc;
Everything in this procedure block is executed immediately and repeatedly.
procedure pickup_p_proc;
When the PC tries to use it.
procedure talk_p_proc; When the PC tries to talk to it.
procedure destroy_p_proc; When the object is destroyed.
procedure look_at_p_proc;
When the object gets looked at. (the mouse cursor hovers over the object)
procedure description_p_proc;
When the PC uses binoculars to get a description.
procedure use_skill_on_p_proc;
When the PC uses a skill on the object.
procedure use_obj_on_p_proc; When the PC uses an object on it.
procedure damage_p_proc;
When object gets damaged.
procedure map_enter_p_proc;
When the map is entered and loaded.
procedure timed_event_p_proc;
Every time the timer goes off.
procedure combat_p_proc; When fighting.
procedure push_p_proc;

P a g e | 12
When object gets pushed.
Dialog uses custom procedures so technically they can be named anything you’d like, but to be consistent with the rest of the scripts, just call them “Nodes”.
Example:
procedure Node000; procedure Node026;
A common practice in Fallout 2 to end conversations is to use Node999 to exit dialog. You may continue this practice but any empty procedure in your dialog nodes/procedures will work as well.
Variables Variables are containers that store data. Variables can hold data like numbers or strings of characters. These variables can then be accessed, changed, or used in comparisons. Temporary Variables are defined within a script and are often used to make a couple quick calculations. Since these are only temporary, these variables aren't saved. Local Variables can be used to keep track of calculations and store information only locally within the script. For example, an NPC using a local variable could remember if they’ve met the player before. Map Variables are numbers that are stored on a single map instead of locally within an NPC’s script. For example: An NPC standing nearby could ask you to unlock a door for them. If you open it, the map variable reserved for that door would change its value. The NPC could access that variable to know if you completed your task. Map variables are accessible to any script running on the same map. Global variables are values that are stored and can be accessed at any time and place in the game. In the example given in the map variable section, if we used a global variable to check on the door’s status, our NPC could check on that door from a different map location.

P a g e | 13
Global variables are always in the memory and can be accessed at any time but they take up a little bit of running memory. Use the right variable for the right situation. An example of a global variable is a quest status on the Pip-Boy. Players can check at any time if a quest has been completed without having to be on the same map.
Booleans and Operators Booleans, or Boolean values, are obtained by checking whether an expression is true or false. In programming logic, 0 is always false and anything that isn’t 0 is true. You can obtain these values with the following operators: > Greater than
< Lesser than >= Greater than or equal to
<= Lesser than or equal to == Equals
!= Not Equal to && And || Or ! Not
Example: procedure start begin
if (local_var(1) == 0) then begin set_local_var(1,5);
end end
This block of code is using a Boolean to see whether the statement is true or false. If it’s true, then it performs the next block or line of code immediately preceding it. So, this above example is asking, “Is it true that variable(1) has a value equal to 0? If that is true, then set variable(1)’s value to 5.” You can also check multiple conditions by using && and ||. Example:
P a g e | 14
procedure start begin
If ((local_var(1) == 0) && (local_var(2) > 5)) then begin call talk_p_proc;
end end
This example asks, “Is it true that variable(1) equals 0, and is it also true that variable(2) is greater than 5? If so, then start “talk_p_procedure”. With Booleans, you can check to see if a player has completed a specific quest, has an item, or if they have been there before.
Macros and Commands All the commands used are listed inside of the Headers and Docs folder. Like we explained above, a macro is an abbreviation for a set of commands, saved as a keyword. They are “defined” at the beginning of the script or in header files. If you’ve added all the necessary #include statements at the beginning of your script, then you will have access to many time-saving macros. Instead of writing everything in this procedure like this:
procedure look_at_p_proc begin
if ((Current_Distance_From_Dude < 8) or (self_can_see_dude)) then begin
flee_from_tile(dude_tile); end
end
Instead, everything in bold can be written like this:
procedure look_at_p_proc begin
Flee_From_Dude;
end
The Flee_From_Dude command is the same as that line of code in the first example. Fortunately for us, Flee_From_Dude was defined in command.h as a macro shortcut we can use. The command.h file has many macro shortcuts available, but you can make you own as well. Just look at the examples in the header files to get comfortable with their syntax.
P a g e | 15
Compiling
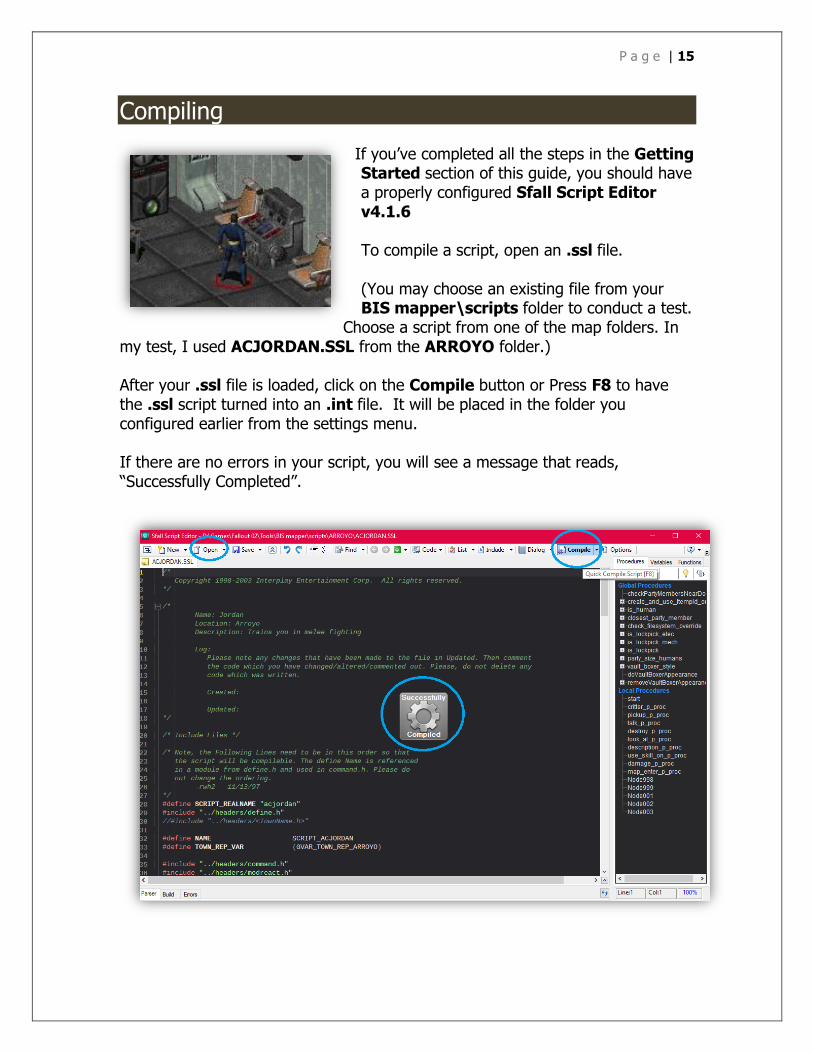
If you’ve completed all the steps in the Getting Started section of this guide, you should have a properly configured Sfall Script Editor v4.1.6 To compile a script, open an .ssl file. (You may choose an existing file from your BIS mapper\scripts folder to conduct a test.
Choose a script from one of the map folders. In my test, I used ACJORDAN.SSL from the ARROYO folder.) After your .ssl file is loaded, click on the Compile button or Press F8 to have the .ssl script turned into an .int file. It will be placed in the folder you configured earlier from the settings menu. If there are no errors in your script, you will see a message that reads, “Successfully Completed”.
P a g e | 16
Creating an NPC For a script to run, it has to be attached to prototype person, place, or thing inside Fallout 2. We will create a female NPC to use as an example. I’m going to name her Mary.
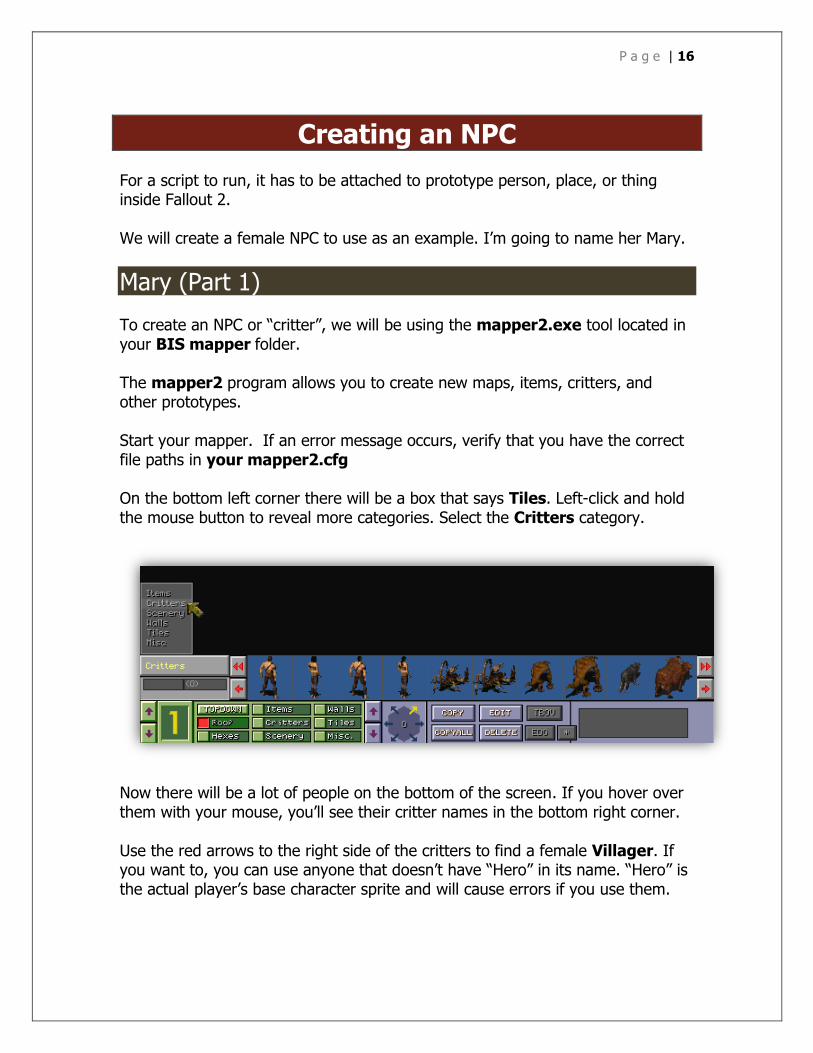
Mary (Part 1) To create an NPC or “critter”, we will be using the mapper2.exe tool located in your BIS mapper folder. The mapper2 program allows you to create new maps, items, critters, and other prototypes. Start your mapper. If an error message occurs, verify that you have the correct file paths in your mapper2.cfg On the bottom left corner there will be a box that says Tiles. Left-click and hold the mouse button to reveal more categories. Select the Critters category.
Now there will be a lot of people on the bottom of the screen. If you hover over them with your mouse, you’ll see their critter names in the bottom right corner. Use the red arrows to the right side of the critters to find a female Villager. If you want to, you can use anyone that doesn’t have “Hero” in its name. “Hero” is the actual player’s base character sprite and will cause errors if you use them.
P a g e | 17
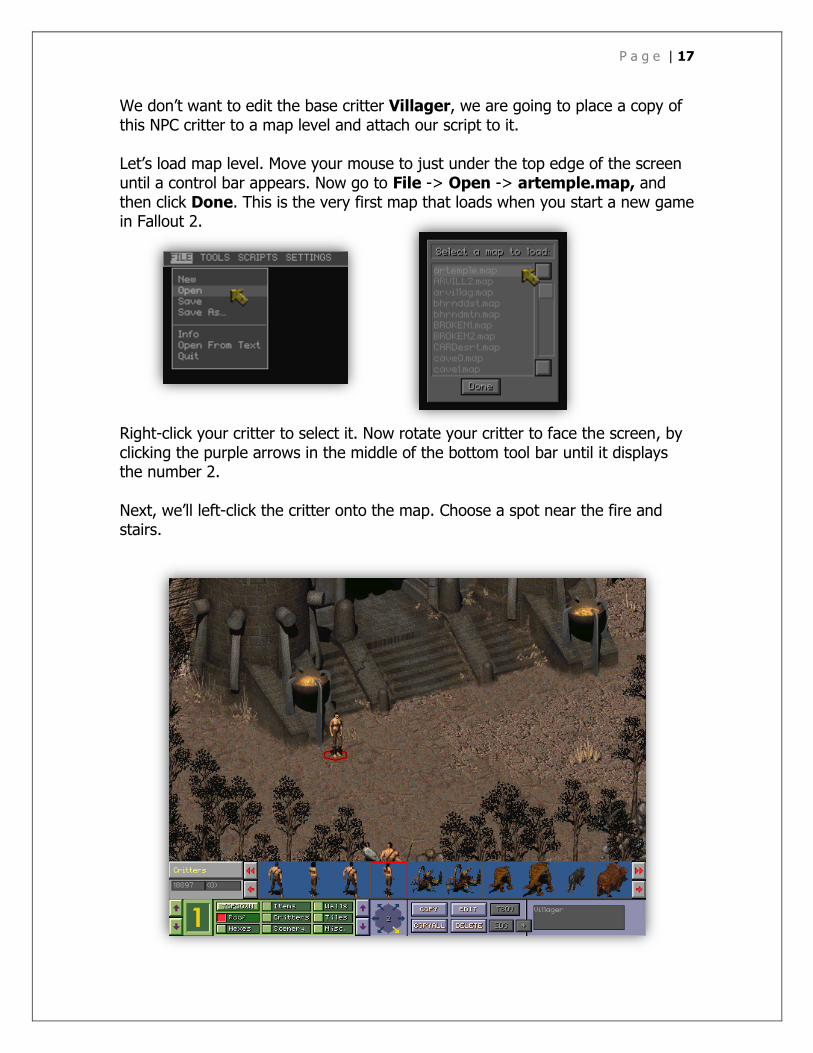
We don’t want to edit the base critter Villager, we are going to place a copy of this NPC critter to a map level and attach our script to it. Let’s load map level. Move your mouse to just under the top edge of the screen until a control bar appears. Now go to File -> Open -> artemple.map, and then click Done. This is the very first map that loads when you start a new game in Fallout 2. Right-click your critter to select it. Now rotate your critter to face the screen, by clicking the purple arrows in the middle of the bottom tool bar until it displays the number 2. Next, we’ll left-click the critter onto the map. Choose a spot near the fire and stairs.
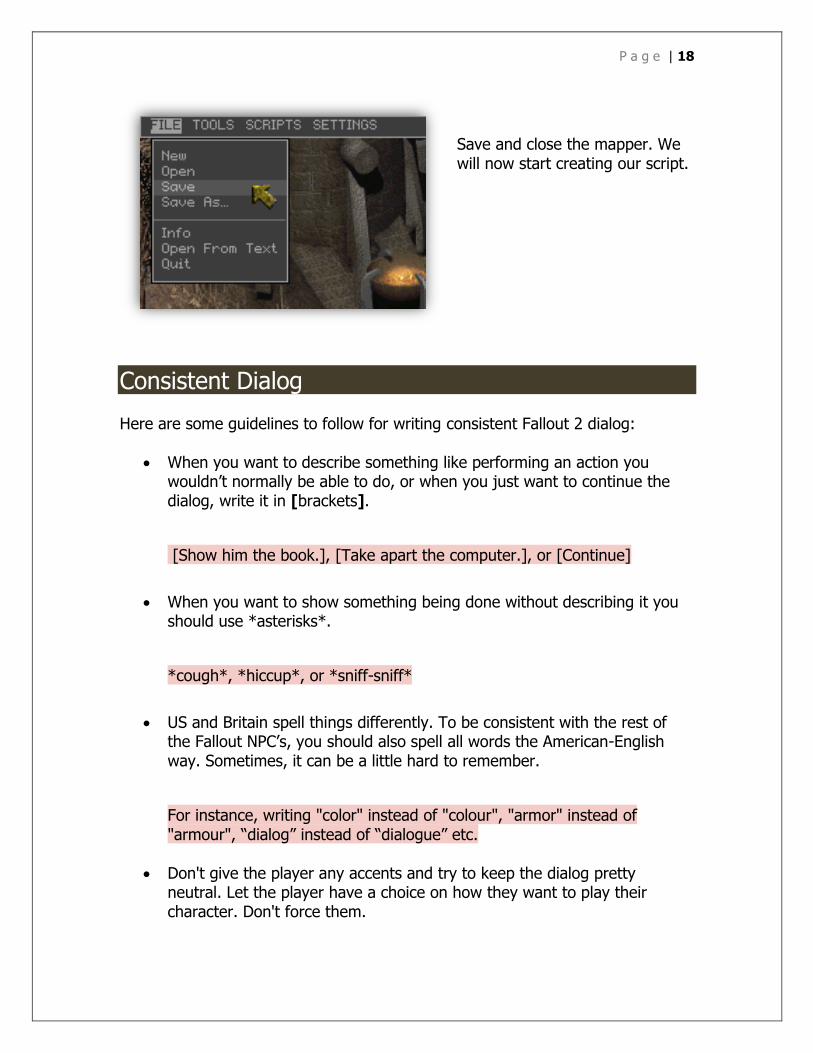
P a g e | 18
Save and close the mapper. We will now start creating our script.
Consistent Dialog Here are some guidelines to follow for writing consistent Fallout 2 dialog:
When you want to describe something like performing an action you wouldn’t normally be able to do, or when you just want to continue the dialog, write it in [brackets].
[Show him the book.], [Take apart the computer.], or [Continue]
When you want to show something being done without describing it you should use *asterisks*.
*cough*, *hiccup*, or *sniff-sniff*
US and Britain spell things differently. To be consistent with the rest of the Fallout NPC’s, you should also spell all words the American-English way. Sometimes, it can be a little hard to remember.
For instance, writing "color" instead of "colour", "armor" instead of "armour", “dialog” instead of “dialogue” etc.
Don't give the player any accents and try to keep the dialog pretty neutral. Let the player have a choice on how they want to play their character. Don't force them.
P a g e | 19
Remember to give the player some “dumb” dialog choices too, for a low intelligence score.
OK, ok, O.K., okay or O-kay? It's been decided that "okay", will be the correct spelling in Fallout 2.
No player or NPC dialog should end by trailing off into dots “...”. You can use a fade transition in your scripts to show time has passed, if that’s what you’re after.
No fighting or action options you would normally be able to do without
dialog. [You punch the guy in the nose.] , [You pick up the armor.]
Dialog .msg Files To write dialog for a character you will need two files, the actual script controlling everything and a file holding the all the dialog text. Both the script and the dialog text file will be editable in Notepad and must have the same name, but they’ll end with the different extensions. The script controlling the actual dialog will end with an “.ssl” (if it hasn’t been compiled) or an “.int” extension (if it has been compiled). The dialog text file, containing all dialog displayed, will end with an “.msg” extension. Here is an example of what can be found inside of a dialog “.msg” file:
{100}{}{Good morning!}
{101}{}{Good morning, to you!} {102}{}{Goodbye!}
{103}{}{My name’s Ray.} {104}{}{Nice to meet you.}
It doesn't matter in what order the lines are, or what numbers are used, but the numbers must be unique for each line of dialogue. Using these numbers, the script will determine which line(s) of dialogue to show at any given moment. You can make your dialog file easy to read if you keep everything in groups and sections. For example, keep all floating dialog in the 100’s, regular dialog in the 200’s, all the quest dialog in the 300’s, etc. It doesn’t matter what numbers you use. It’s just easier to keep track of everything.
P a g e | 20
Dialog .int Files The first thing you'll need in the script for dialog, besides the #include and #define sections, is the talk_p_proc procedure. This procedure will get called when the player tries to initiate dialog with the critter.
Here are a couple different talk procedures:
Example 1 with just commands:
procedure talk_p_proc begin
start_gdialog(NAME,self_obj,4,-1,-1); gSay_Start;
call Node001;
gSay_End; end_dialogue;
end
Example 2 with a macro:
Procedure talk_p_proc begin
start_dialog_at_node(Node001);
end
The second talk procedure macro has been defined in the command.h file, in the Headers folder. It does the same thing as example 1. As soon as the dialog procedure is activated in these examples, the script sends us to “Node001”. Let’s see the procedure called “Node001”:
procedure Node001 begin
Reply(100); NOption(101,Node999,004);
NOption(102,Node999,006); end
The line Reply(100) means that the NPC will speak this line in the text file that is numbered 100. The lines, NOption(101, Node999, 004) and NOption(102, Node999, 006) mean that the player has the option to speak the line that is numbered 101 or 102 from the .msg file. That’s if he or she has an intelligence equal or greater than 004 and/or 006. If either option is chosen, it will send the dialog to the next procedure, “Node999”. Here is an example Node999 procedure that ends dialog:
procedure Node999 begin end

P a g e | 21
Node999 doesn’t have any code inside its procedure. If a dialog node/procedure is empty, then the dialog will exit. You can name your dialog exiting procedure anything you’d like, but Fallout 2 uses Node999 for consistency. Now that we’ve learned how it works, let’s expand:
procedure Node001 begin
Reply(100); NOption(101,Node002,006);
NOption(102,Node999,004); end
Here we’ve changed the first dialog option to go to Node002 instead of just ending a conversation. Now let’s create Node002:
procedure Node002 begin Reply(103);
NOption(104, Node999, 004); end
Now, Node001 gives the player the option to say line 101 if his intelligence is equal or greater than 6. If he or she speaks that line, Node002 will be called, which will result in the NPC speaking line 103. After that, the player can only choose to say line 104 from Node002. If that option is selected, it will go to Node999, ending the conversation. Writing dialog is all about connecting the different procedures or nodes in a dialog tree.
Customizing Dialog Files and Procedures As mentioned in previous sections, not all of your dialog procedures have to be named like “Node001”. You can also make your own custom procedure groups, but when naming them, they have to follow some rules:
The first character can't be a number. There can't be any spaces in the name. Instead, use an underscore “_”. Besides the underscore, No special characters like: “$ & #”, etc.
Examples:
“A_B_C_8234” is a valid node name.

P a g e | 22
“1_ABC” is not.
Usually for writing generic dialog it's best to use something like “Node000”, with the “000” part being any number you want, but for special dialog procedures, name it something like “Node_give_reward”. This helps you better organize and understand your script if you come back to it at a later date. In addition to customizing procedures, if you don’t want your script to use an .msg file with a matching file name, you don’t have to. If you are planning to have multiple scripts using the same dialog file and you don’t want to make a bunch of duplicates for each script, there is a way to define what .msg file will be used for the script. To define the .msg file to be used, you need to insert these lines into your procedure script:
script_overrides; message_str(SCRIPT_X,Y);
In the above lines of code, X is the name of your .msg file (without the extension) and Y is the line number. Here is an example of it being used:
procedure Node002 begin
script_overrides; Reply(message_str(SCRIPT_GENERIC,103));
NOption(message_str(SCRIPT_GENERIC, 104), Node999, 004); end
This would take the dialog lines out of the generic.msg file, instead of a file matching the script’s .ssl name.
Mary (Part 2) Now let us create some dialog for Mary. Open up a text editing program such as Notepad and create 2 new files. Save them as:
acmary.ssl acmary.msg
Don’t worry about copying bits and pieces of the following code to your files as I explain. At the end of each section I will provide the current .ssl script and .msg dialog code. For now, follow along and learn about the process of writing the script.
P a g e | 23
For the first file, acmary.ssl, we start with a description at the top using a comment block. /*
Name: Mary
Location: Arroyo (artemple.map) Description: Our tutorial NPC
*/
Next, we will include some header files to gain access to some time saving macros and to successfully compile our script. #define SCRIPT_REALNAME "acmary"
#include "..\headers\define.h" #define NAME SCRIPT_ACMARY
#include "..\headers\command.h"
Then we list all the procedures we’re going to use in Mary’s script. We’re adding the ability to get a description of Mary when we hover our mouse or use the binoculars thing on her. We’re also going to give Mary the ability to speak to the player. procedure start; //This procedure is required to compile correctly
procedure look_at_p_proc; //Activates when the player hovers over Mary with the cursor
procedure description_p_proc; //Activates when the player tries getting a description of Mary
procedure talk_p_proc; //Activates when the player attempts to talk to Mary
procedure Dialogue_start; //Initializes dialog screen procedure Node001; //Actual Dialog
procedure Node999; //Ends Dialog
In our acmary.msg file, we add some text for the description of Mary: {10}{}{You see an attractive young woman.}
{20}{}{You see Mary.}
Back in the acmary.ssl file, I add the following under the procedures that have been defined so far. I will begin to write the actual procedure code: //when the script starts
procedure start begin end

P a g e | 24
//hovered description
procedure look_at_p_proc begin script_overrides;
display_msg(mstr(10)); end
//binocular description procedure description_p_proc begin
script_overrides; display_msg(mstr(20));
end
Now Mary won’t show up as Villager when we look at her. She also has a detailed description when we use our search skill. Let’s continue by adding some dialog options. //Player uses dialog option on NPC procedure talk_p_proc begin
call Dialogue_start; //Go to the “Dialogue_start” procedure end
//Initialize the dialog box procedure Dialogue_start begin
start_gdialog(NAME,self_obj,4,-1,-1); gSay_Start;
call Node001; //Display Actual Dialog
gSay_End; end_dialogue;
end
//Actual Dialog Displayed
procedure Node001 begin Reply(100);
NOption(200,Node999,001); //Ends Dialog NOption(201,Node999,001); //Ends Dialog
end
//Ends dialog
procedure Node999 begin end
As you can see, when the player attempts to talk to Mary, the script initializes and brings up the dialog screen. Node001 controls the text spoken. We Switch back to acmary.msg and add some more lines of dialog: {100}{}{Hi, how's it going? I’m Mary.}
{200}{}{It’s going great!}
{201}{}{Nice to meet you Mary. See you later.}
P a g e | 25
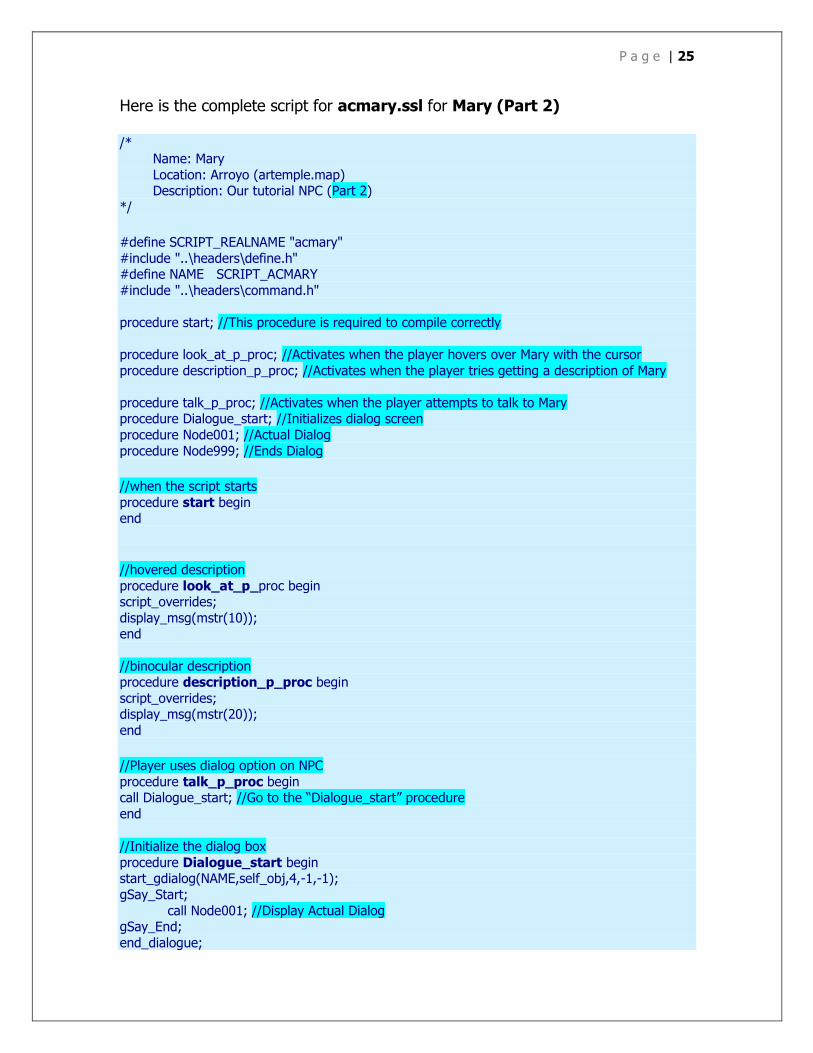
Here is the complete script for acmary.ssl for Mary (Part 2) /*
Name: Mary
Location: Arroyo (artemple.map) Description: Our tutorial NPC (Part 2)
*/
#define SCRIPT_REALNAME "acmary"
#include "..\headers\define.h" #define NAME SCRIPT_ACMARY
#include "..\headers\command.h"
procedure start; //This procedure is required to compile correctly
procedure look_at_p_proc; //Activates when the player hovers over Mary with the cursor
procedure description_p_proc; //Activates when the player tries getting a description of Mary
procedure talk_p_proc; //Activates when the player attempts to talk to Mary procedure Dialogue_start; //Initializes dialog screen
procedure Node001; //Actual Dialog
procedure Node999; //Ends Dialog
//when the script starts
procedure start begin end
//hovered description
procedure look_at_p_proc begin script_overrides;
display_msg(mstr(10)); end
//binocular description procedure description_p_proc begin
script_overrides; display_msg(mstr(20));
end
//Player uses dialog option on NPC
procedure talk_p_proc begin call Dialogue_start; //Go to the “Dialogue_start” procedure
end
//Initialize the dialog box
procedure Dialogue_start begin start_gdialog(NAME,self_obj,4,-1,-1);
gSay_Start;
call Node001; //Display Actual Dialog gSay_End;
end_dialogue;
P a g e | 26
end
//Actual Dialog Displayed
procedure Node001 begin Reply(100);
NOption(200,Node999,001); //Ends Dialog
NOption(201,Node999,001); //Ends Dialog end
//Ends dialog
procedure Node999 begin end
Here is the complete dialog for acmary.msg for Mary (Part 2)
#Description when you look at Mary {10}{}{You see an attractive young woman.}
{20}{}{You see Mary.}
#Dialog
{100}{}{Hi, how's it going? I'm Mary.}
{200}{}{It's going great!} {201}{}{Nice to meet you Mary. See you later.}
These next steps will seem a little overwhelming at first, but I’ll do my best to walk you along. For future reference, I’ve created an NPC Checklist section at the end of this guide to speed up the process. Take a glance at it to preview what we’re going to be doing. To compile acmary.ssl, we now have to add this file to a list in the …\Scripts\Headers\scripts.h file. Open it up and scroll down to the end of the list. Under the last entry, add one for Mary. For me, my last entry was 1558, so I’m going to put my script underneath and increment the number to 1559: #define SCRIPT_ACMARY (1559) // acmary.int ; Mary
The next step is to actually compile acmary.ssl, following the directions on page 15 of this guide. After successfully compiling acmary.ssl, find acmary.int where your configured your compiled scripts to go.
P a g e | 27
Copy and paste acmary.int into your …\Fallout2\Data\Scripts\ folder. There is a text file in this folder called scripts.lst. Add an entry to the very bottom of this file. My entry looks like this: acmary.int ; Mary # local_vars=0
“Mary” is the script description/comment for us. We’ll see it in the mapper2 program. We didn’t use any variables in this script, so we set the number of used local_vars to 0. Next, we’re going to go to the …\Fallout 2\Data\Text\English\Game\scrname.msg file and add one last entry to the bottom. This is so Mary’s name displays correctly during combat. Mine looks like this: {1412}{}{Mary} # acmary.int ; Mary
The “Mary” in bold is the name of the critter. The “Mary” after the semi-colon is a comment for programmers. Next, copy the acmary.msg from the Testing folder to the …\Fallout 2\Data\Text\English\Dialog\ folder. Alright, now to start up mapper2 load up our artemple.map. Select the critters category again to gain access to Mary. Once you’ve done that, select her by clicking her. You’ll know she’s selected when she has a red hexagon around her feet. After that, click the edit button on the bottom bar to bring up a menu. We’re finally going to attach our script to her by clicking New Script -> acmary.int -> Done.

P a g e | 28
Click Done, Save the map, and Exit the mapper.
P a g e | 29
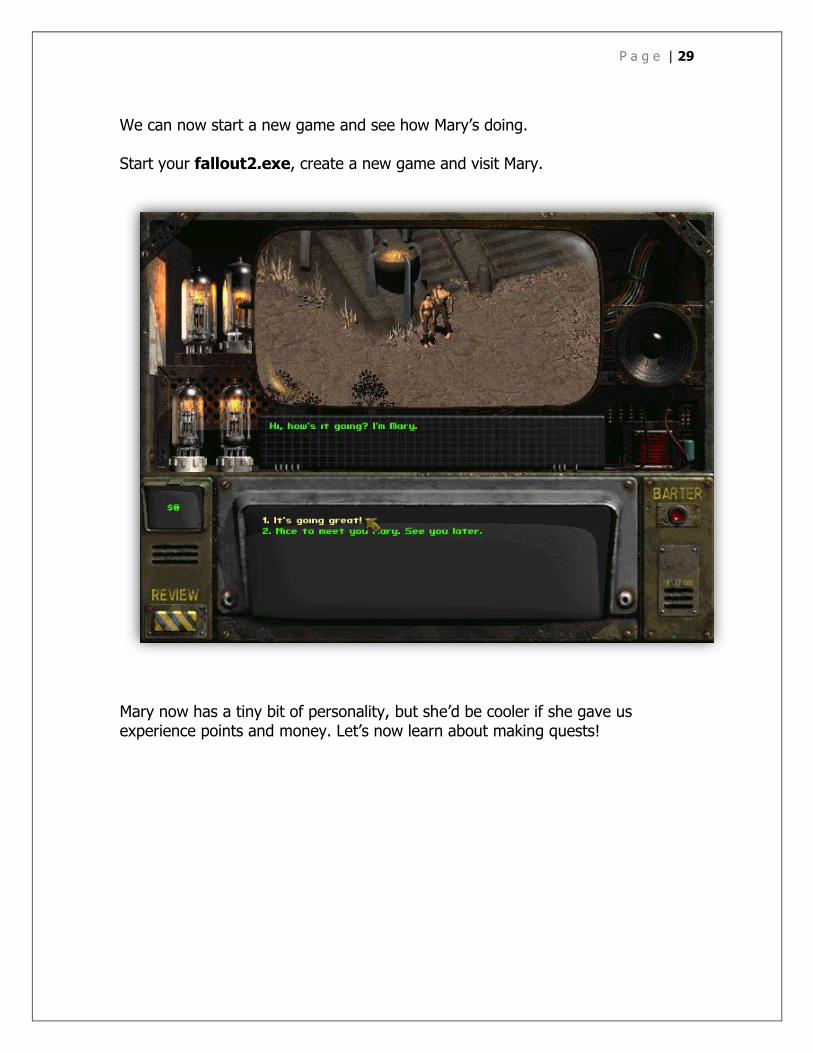
We can now start a new game and see how Mary’s doing. Start your fallout2.exe, create a new game and visit Mary.
Mary now has a tiny bit of personality, but she’d be cooler if she gave us experience points and money. Let’s now learn about making quests!

P a g e | 30
Quests on the Pip-Boy
Placing quest stats onto the Pip-Boy involves 3 files.
...\Fallout 2\Data\Data\vault13.gam
(This file registers new global variables)
...\Fallout 2\Data\Data\quests.txt
(This file contains all quests in the game.) Example: # Kill Augustus, the town drunk
1500, 160, 791, 1, 3 # is the line containing a description of the quest. This isn’t shown to the player. 1500 is the town number. The town numbers are in: ...\Fallout 2\Data\Text\English\Game\map.msg It's Arroyo, in this case. 160 is the quest number. It references this file: ...\Fallout 2\Data\Text\English\Game\quests.msg 791 is the global variable number from this file: ...\Fallout 2\Data\Data\vault13.gam
1 is the minimum value you must set the global variable in order to have the quest displayed on the Pip-Boy. 3 is the minimum value you must set the global variable in order to have the quest completed. If it’s completed, its name will get crossed off on the Pip-Boy
...\Fallout 2\Data\Text\English\Game\quests.msg
This file has the Pip-Boy description that’s going to be shown to the player. It will look something like this:
{160}{}{Kill Augustus, the town drunk.}
160 is the number of the quest, the rest is the quest description.
P a g e | 31
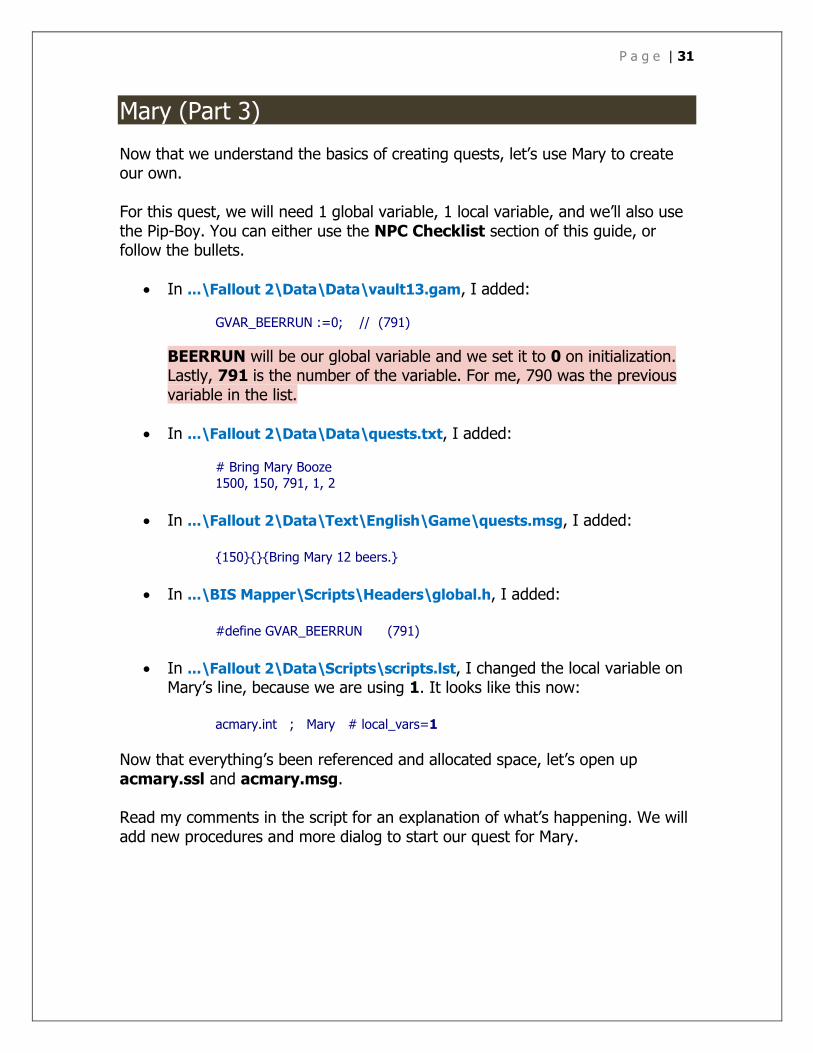
Mary (Part 3) Now that we understand the basics of creating quests, let’s use Mary to create our own. For this quest, we will need 1 global variable, 1 local variable, and we’ll also use the Pip-Boy. You can either use the NPC Checklist section of this guide, or follow the bullets.
In ...\Fallout 2\Data\Data\vault13.gam, I added:
GVAR_BEERRUN :=0; // (791)
BEERRUN will be our global variable and we set it to 0 on initialization. Lastly, 791 is the number of the variable. For me, 790 was the previous variable in the list.
In ...\Fallout 2\Data\Data\quests.txt, I added:
# Bring Mary Booze
1500, 150, 791, 1, 2
In ...\Fallout 2\Data\Text\English\Game\quests.msg, I added:
{150}{}{Bring Mary 12 beers.}
In ...\BIS Mapper\Scripts\Headers\global.h, I added:
#define GVAR_BEERRUN (791)
In ...\Fallout 2\Data\Scripts\scripts.lst, I changed the local variable on
Mary’s line, because we are using 1. It looks like this now:
acmary.int ; Mary # local_vars=1
Now that everything’s been referenced and allocated space, let’s open up acmary.ssl and acmary.msg. Read my comments in the script for an explanation of what’s happening. We will add new procedures and more dialog to start our quest for Mary.
P a g e | 32
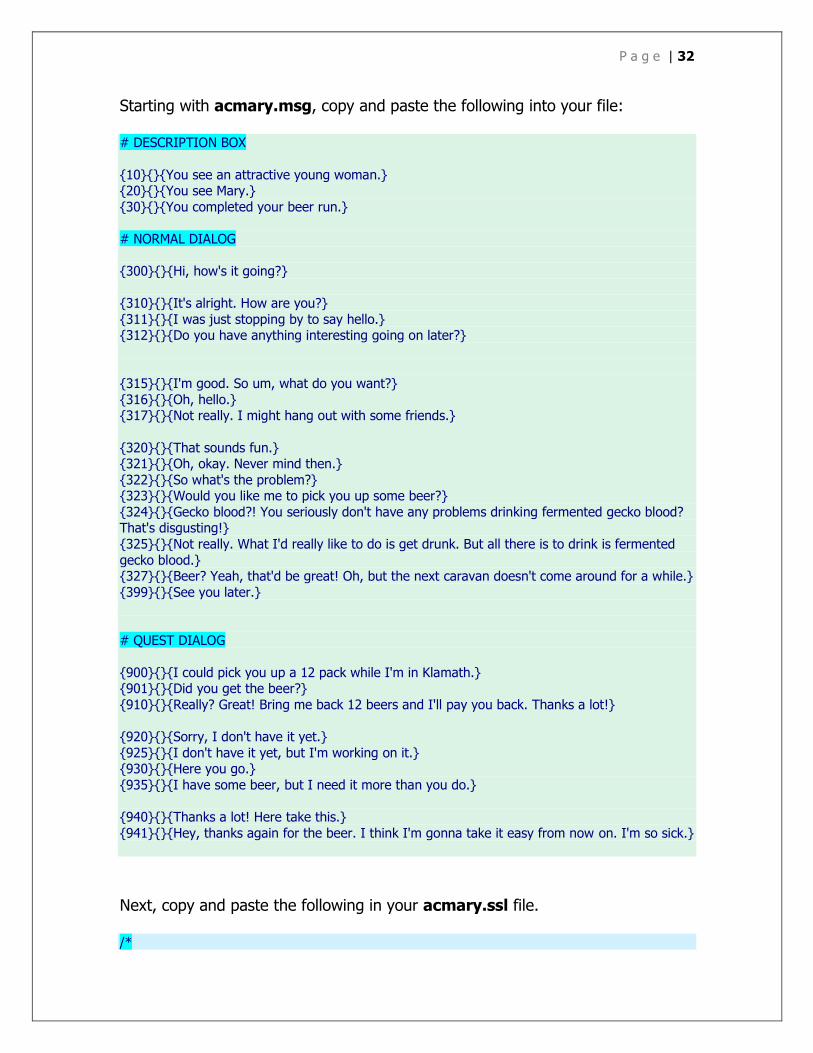
Starting with acmary.msg, copy and paste the following into your file: # DESCRIPTION BOX
{10}{}{You see an attractive young woman.} {20}{}{You see Mary.}
{30}{}{You completed your beer run.}
# NORMAL DIALOG
{300}{}{Hi, how's it going?}
{310}{}{It's alright. How are you?}
{311}{}{I was just stopping by to say hello.} {312}{}{Do you have anything interesting going on later?}
{315}{}{I'm good. So um, what do you want?}
{316}{}{Oh, hello.} {317}{}{Not really. I might hang out with some friends.}
{320}{}{That sounds fun.} {321}{}{Oh, okay. Never mind then.}
{322}{}{So what's the problem?} {323}{}{Would you like me to pick you up some beer?}
{324}{}{Gecko blood?! You seriously don't have any problems drinking fermented gecko blood? That's disgusting!}
{325}{}{Not really. What I'd really like to do is get drunk. But all there is to drink is fermented
gecko blood.} {327}{}{Beer? Yeah, that'd be great! Oh, but the next caravan doesn't come around for a while.}
{399}{}{See you later.}
# QUEST DIALOG
{900}{}{I could pick you up a 12 pack while I'm in Klamath.} {901}{}{Did you get the beer?}
{910}{}{Really? Great! Bring me back 12 beers and I'll pay you back. Thanks a lot!}
{920}{}{Sorry, I don't have it yet.}
{925}{}{I don't have it yet, but I'm working on it.} {930}{}{Here you go.}
{935}{}{I have some beer, but I need it more than you do.}
{940}{}{Thanks a lot! Here take this.}
{941}{}{Hey, thanks again for the beer. I think I'm gonna take it easy from now on. I'm so sick.}
Next, copy and paste the following in your acmary.ssl file. /*
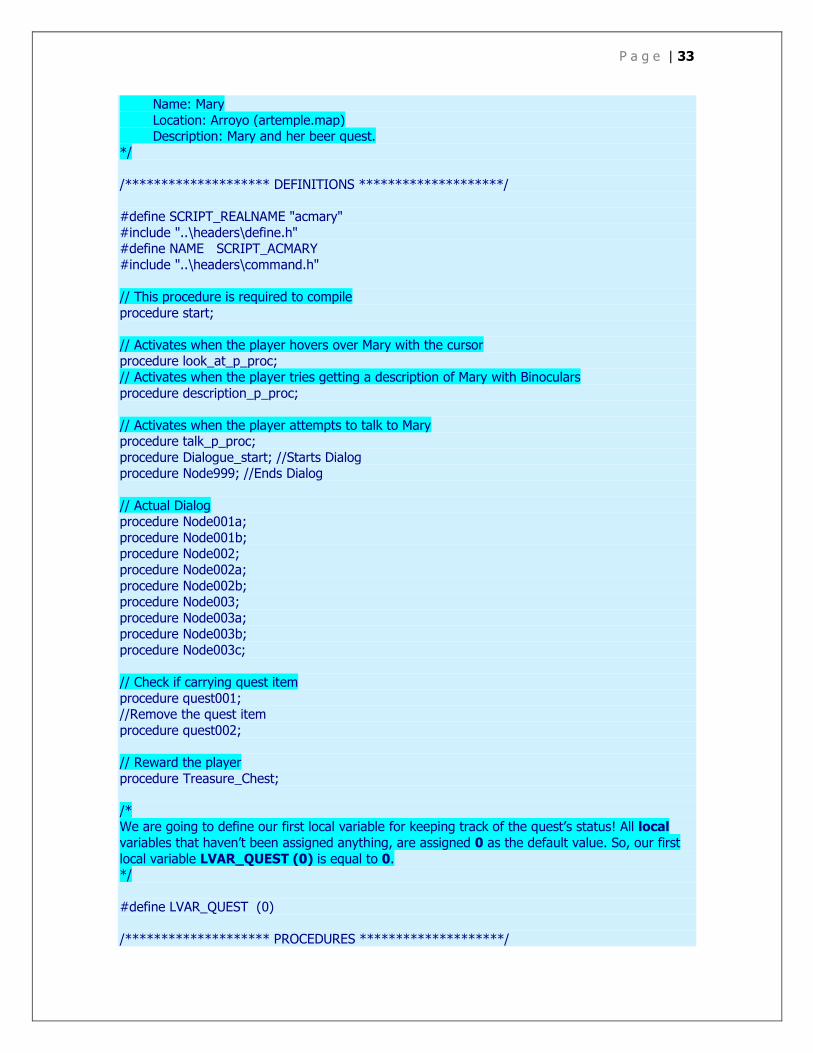
P a g e | 33
Name: Mary
Location: Arroyo (artemple.map) Description: Mary and her beer quest.
*/
/******************** DEFINITIONS ********************/
#define SCRIPT_REALNAME "acmary"
#include "..\headers\define.h" #define NAME SCRIPT_ACMARY
#include "..\headers\command.h"
// This procedure is required to compile
procedure start;
// Activates when the player hovers over Mary with the cursor procedure look_at_p_proc;
// Activates when the player tries getting a description of Mary with Binoculars
procedure description_p_proc;
// Activates when the player attempts to talk to Mary procedure talk_p_proc;
procedure Dialogue_start; //Starts Dialog procedure Node999; //Ends Dialog
// Actual Dialog procedure Node001a;
procedure Node001b; procedure Node002;
procedure Node002a;
procedure Node002b; procedure Node003;
procedure Node003a; procedure Node003b;
procedure Node003c;
// Check if carrying quest item
procedure quest001; //Remove the quest item
procedure quest002;
// Reward the player
procedure Treasure_Chest;
/* We are going to define our first local variable for keeping track of the quest’s status! All local
variables that haven’t been assigned anything, are assigned 0 as the default value. So, our first
local variable LVAR_QUEST (0) is equal to 0. */
#define LVAR_QUEST (0)
/******************** PROCEDURES ********************/
P a g e | 34
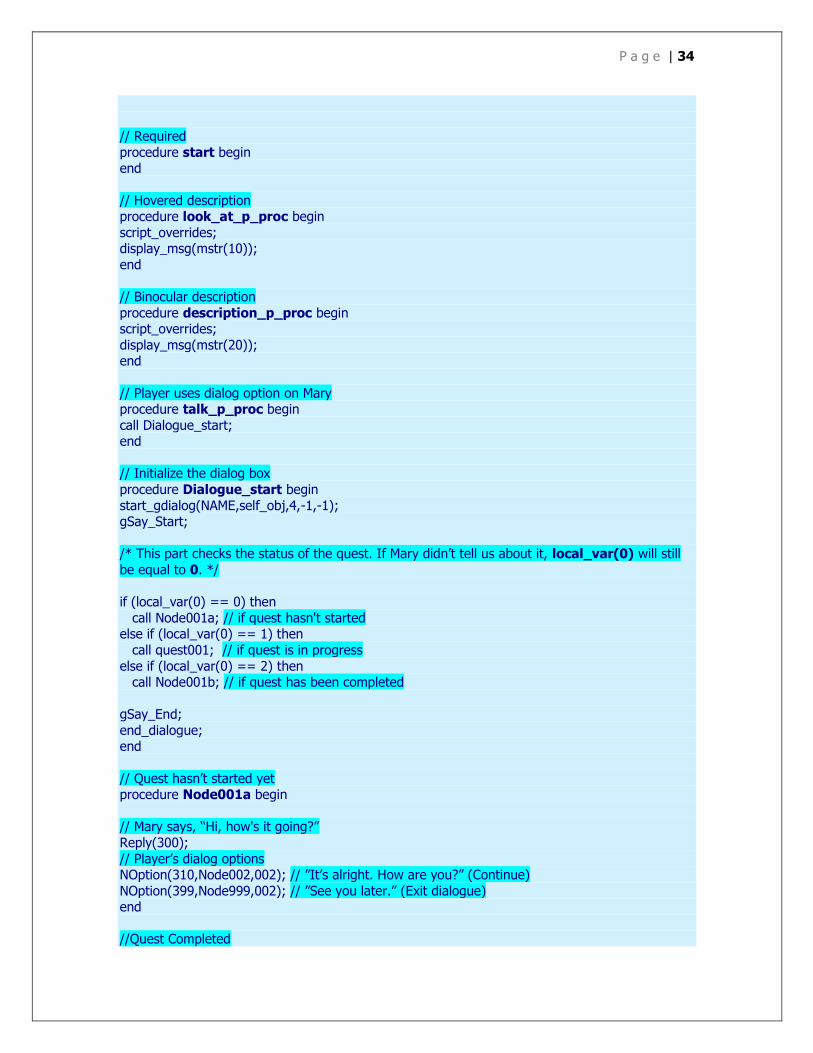
// Required
procedure start begin end
// Hovered description procedure look_at_p_proc begin
script_overrides; display_msg(mstr(10));
end
// Binocular description
procedure description_p_proc begin script_overrides;
display_msg(mstr(20)); end
// Player uses dialog option on Mary procedure talk_p_proc begin
call Dialogue_start; end
// Initialize the dialog box
procedure Dialogue_start begin
start_gdialog(NAME,self_obj,4,-1,-1); gSay_Start;
/* This part checks the status of the quest. If Mary didn’t tell us about it, local_var(0) will still
be equal to 0. */
if (local_var(0) == 0) then
call Node001a; // if quest hasn't started else if (local_var(0) == 1) then
call quest001; // if quest is in progress
else if (local_var(0) == 2) then call Node001b; // if quest has been completed
gSay_End;
end_dialogue; end
// Quest hasn’t started yet procedure Node001a begin
// Mary says, “Hi, how's it going?”
Reply(300);
// Player’s dialog options NOption(310,Node002,002); // ”It’s alright. How are you?” (Continue)
NOption(399,Node999,002); // ”See you later.” (Exit dialogue) end
//Quest Completed
P a g e | 35
procedure Node001b begin
// Mary says, “Hey, thanks again for the beer…” Reply(941);
// Player’s dialog options NOption(399,Node999,002); // ”See you later.” (Exit dialogue)
end
procedure Node002 begin
// Mary says, “That's good. So um, what do you want?” Reply(315);
// Player’s dialog options NOption(311,Node002a,002); // “I was just stopping bye to say hello.”
NOption(312,Node002b,002); // “Do you have anything interesting going on later?”
NOption(399,Node999,002); // “See you later.” end
procedure Node002a begin
// Mary says, “Oh, Hello.”
Reply(316); // Player’s dialog options
NOption(399,Node999,002); // “See you later.” end
procedure Node002b begin
// Mary says, “Not really. I might hang out with some friends.”
Reply(317); // Player’s dialog options
NOption(320,Node003,002); // ”That sounds fun.” NOption(321,Node999,002); // ”Oh, okay never mind then.” (Exit dialog)
end
procedure Node003 begin
// Mary says, “Not really. What I'd really like to do is get drunk…” Reply(325);
// Player’s dialog options
NOption(322,Node003c,002); // “So what's the problem?” end
procedure Node003a begin
// Mary says, “Beer? Yeah, that'd be great!...” Reply(327);
// We are now going to change the global variable "791" to 1,
// to make it show up on the Pip-Boy. set_global_var(791,1);
// Set our local variable to let Mary remember that our quest is currently in progress. set_local_var(0,1);
// Player’s dialog options
NOption(900,Node003b,002); // “I could pick you up a 12 pack while I'm in Klamath.” end
procedure Node003b begin
// Mary says, “Really? Great! Bring me back 12 beers…” Reply(910);

P a g e | 36
// Player’s dialog options
NOption(399,Node999,002); // “See you later.” end
procedure Node003c begin
// Mary says, “Gecko blood?!...”
Reply(324); // Player’s dialog options
NOption(323,Node003a,002); // “Would you like me to pick you up some beer?” end
// Check if quest can be completed
procedure quest001 begin
// Mary says, “Did you get the beer?” Reply(901);
/* Check if player has enough beer.
In the …\Fallout 2\Scripts\Headers\ folder, ItemPid.txt has a reference number for each item. In this case, beer is numbered 124. */
if (obj_is_carrying_obj_pid(dude_obj, 124) >=12) then // If there are at least 12 beers, then…
begin // Player’s dialog options
NOption(930,quest002,002); // Give beer and continue
NOption(935,Node999,002); // Exit dialog end
else // If the player doesn’t have enough beer, show alternate dialog choices begin
NOption(920,Node999,002);
NOption(925,Node999,002); end
end
// Complete the quest
procedure quest002 begin
set_local_var(0,2); // Set our local variable to show the quest is complete set_global_var(791,2); // Cross the quest out on the Pip-Boy
// Remove 12 beers from the player. I’m not sure why, but this line must
// not end with a semi-colon
remove_pid_qty(dude_obj, 124, 12)
call Treasure_Chest; //Give the player a reward
// Fade in and out to show time has passed
gfade_out(1); game_time_advance_hour(12); // Advance the clock 12 hours
gfade_in(1);
// Mary says, “Thanks a lot! Here take this.” Reply(940);
P a g e | 37
NOption(399,Node999,002); // “See you later.”
end
procedure Treasure_Chest begin /*
In this procedure, you can set the amount of experience and change what rewards the NPC gives
you for solving tasks. */
script_overrides; give_xp(100); // Player gets 100 experience points
item_caps_adjust(dude_obj,100); // Player gets 100 money display_msg(mstr(30)); //Show message in description box
end
// End dialog
procedure Node999 begin end
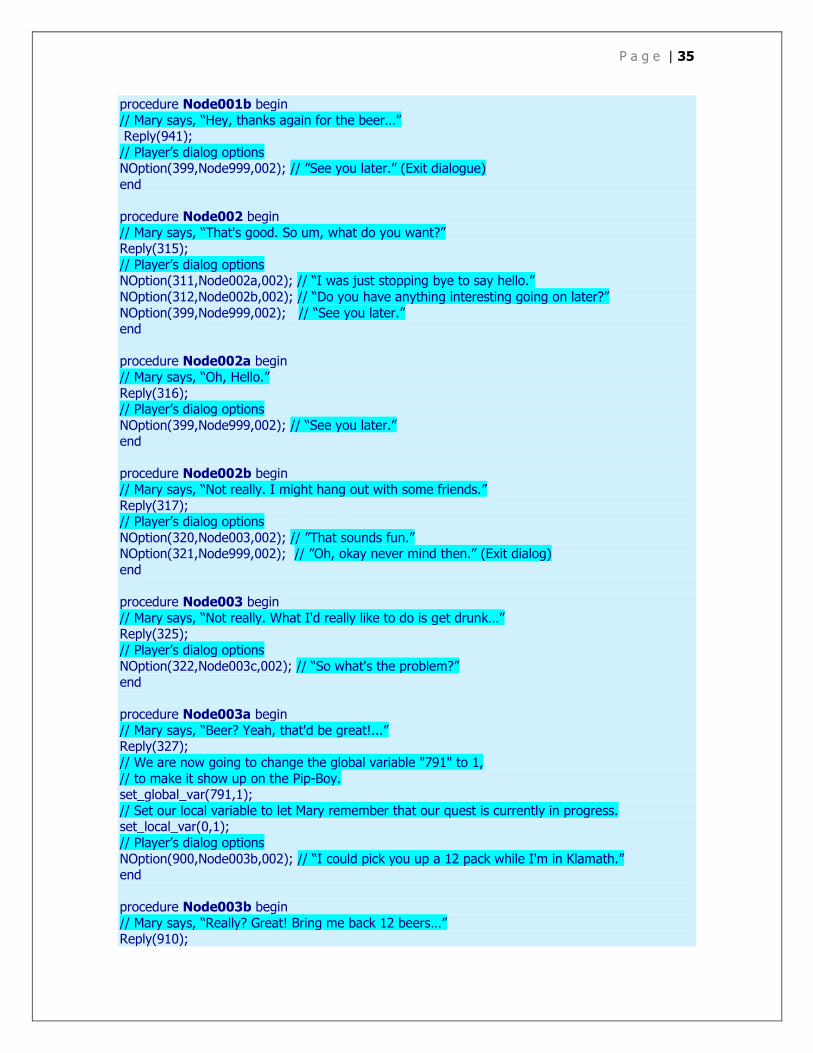
To test out if our quest works correctly we need to have some beer available to our player. Start mapper2 and load up artemple.map. Select the “Items” category and search for a Footlocker.
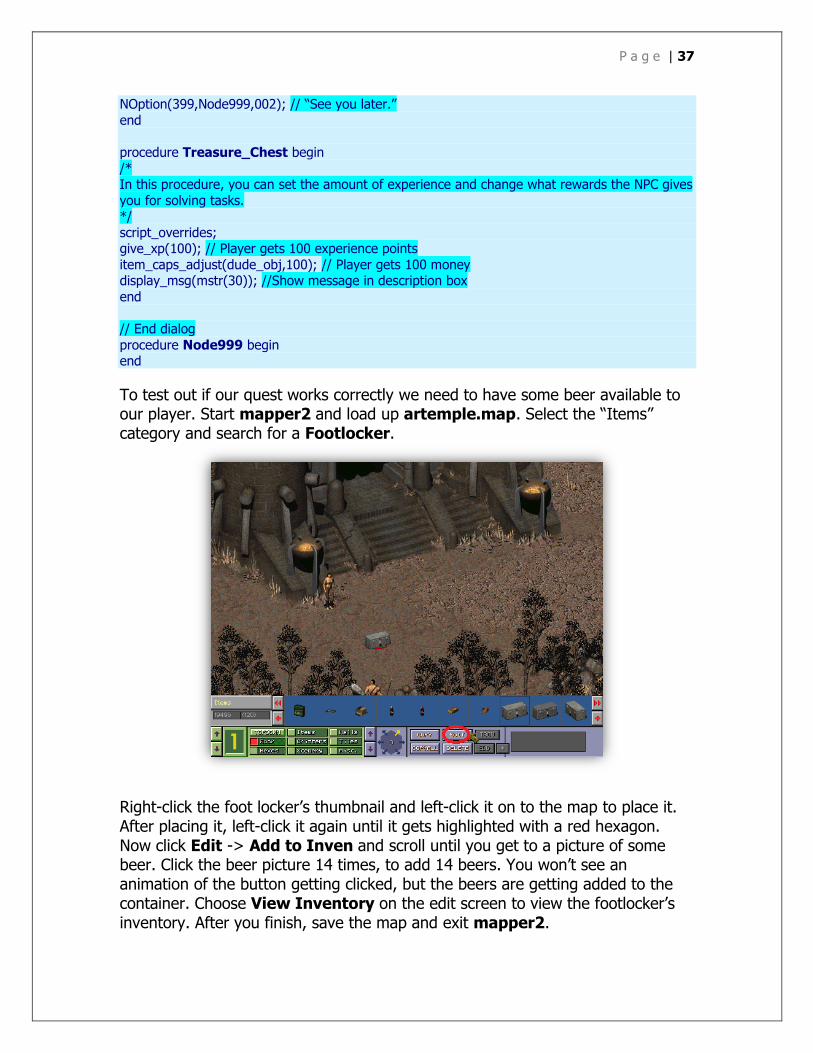
Right-click the foot locker’s thumbnail and left-click it on to the map to place it. After placing it, left-click it again until it gets highlighted with a red hexagon. Now click Edit -> Add to Inven and scroll until you get to a picture of some beer. Click the beer picture 14 times, to add 14 beers. You won’t see an animation of the button getting clicked, but the beers are getting added to the container. Choose View Inventory on the edit screen to view the footlocker’s inventory. After you finish, save the map and exit mapper2.
P a g e | 38
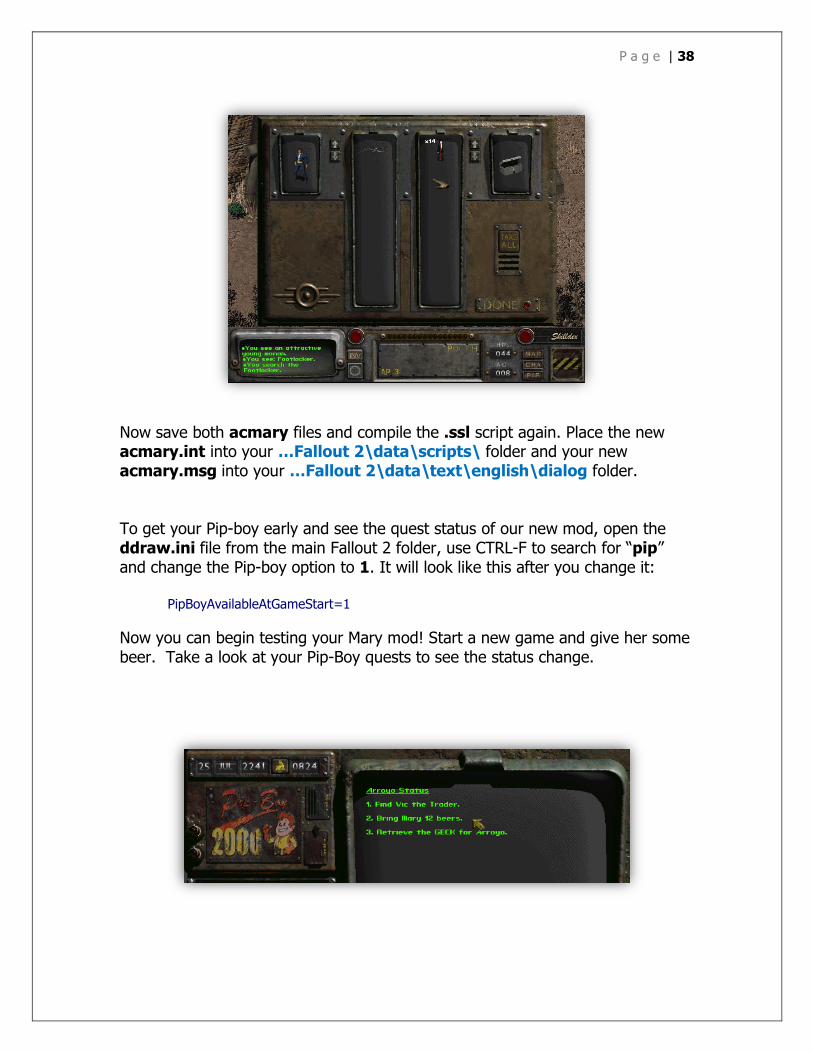
Now save both acmary files and compile the .ssl script again. Place the new acmary.int into your …Fallout 2\data\scripts\ folder and your new acmary.msg into your …Fallout 2\data\text\english\dialog folder. To get your Pip-boy early and see the quest status of our new mod, open the ddraw.ini file from the main Fallout 2 folder, use CTRL-F to search for “pip” and change the Pip-boy option to 1. It will look like this after you change it:
PipBoyAvailableAtGameStart=1
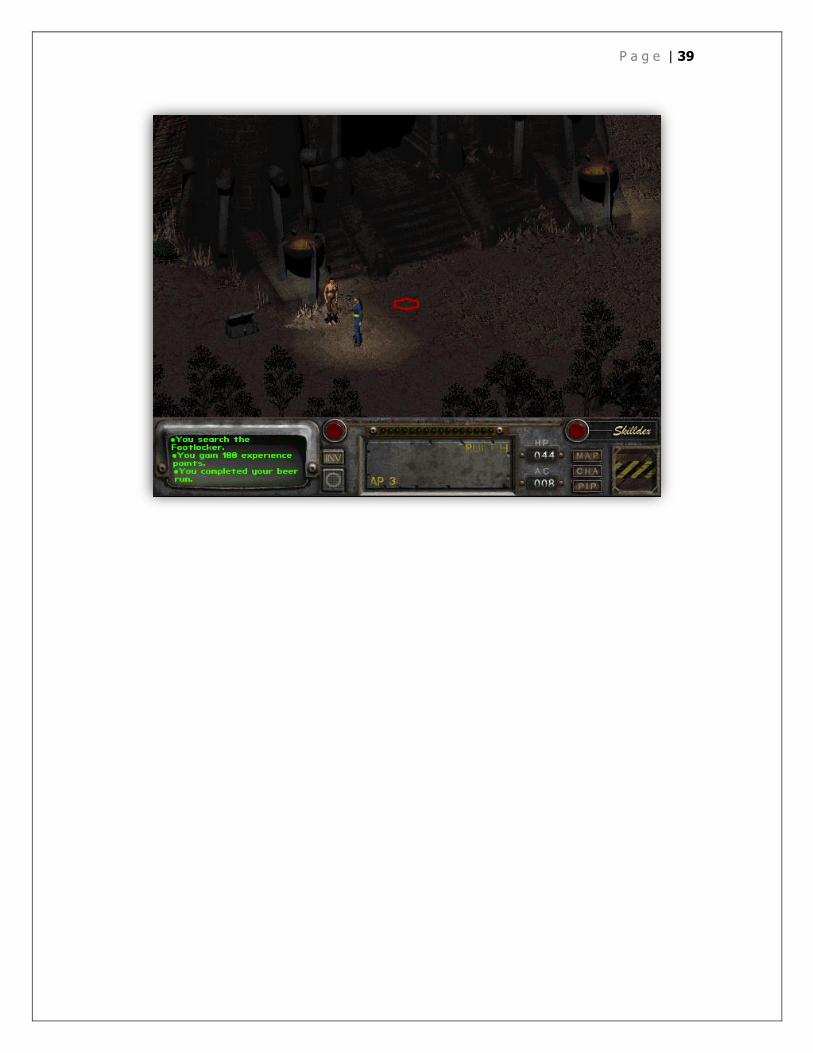
Now you can begin testing your Mary mod! Start a new game and give her some beer. Take a look at your Pip-Boy quests to see the status change.
P a g e | 39
P a g e | 40
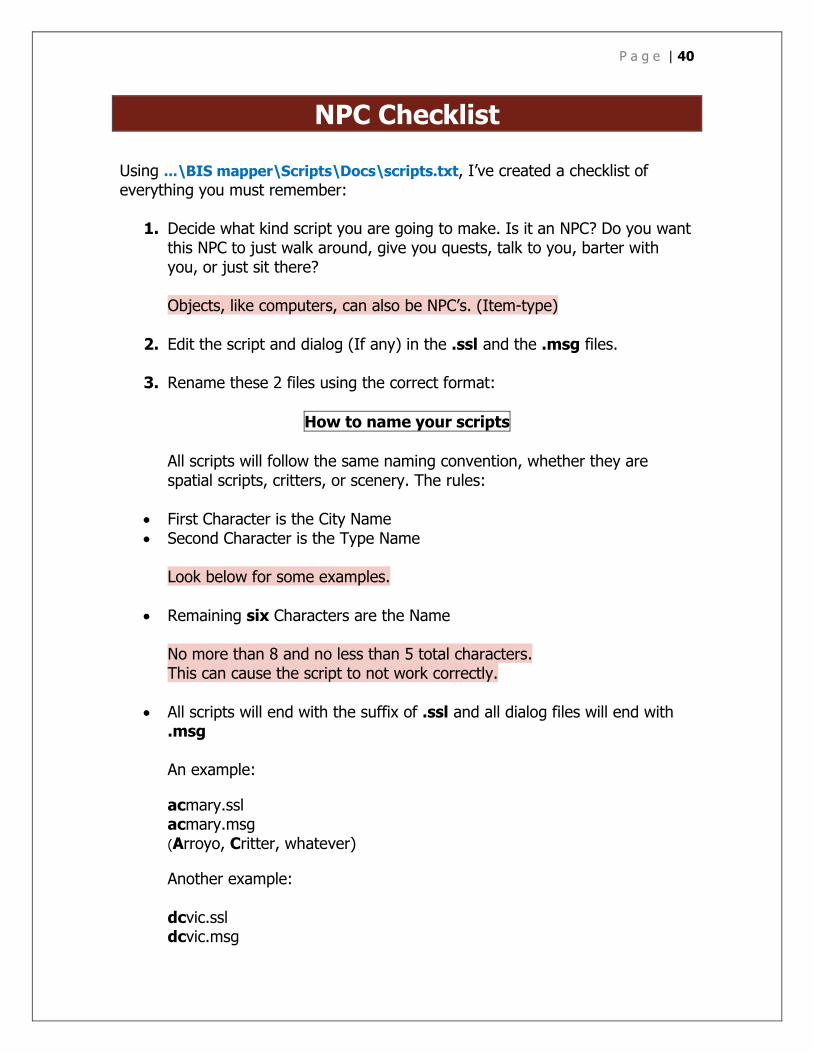
NPC Checklist Using ...\BIS mapper\Scripts\Docs\scripts.txt, I’ve created a checklist of everything you must remember:
1. Decide what kind script you are going to make. Is it an NPC? Do you want this NPC to just walk around, give you quests, talk to you, barter with you, or just sit there? Objects, like computers, can also be NPC’s. (Item-type)
2. Edit the script and dialog (If any) in the .ssl and the .msg files.
3. Rename these 2 files using the correct format:
How to name your scripts
All scripts will follow the same naming convention, whether they are spatial scripts, critters, or scenery. The rules:
First Character is the City Name Second Character is the Type Name
Look below for some examples.
Remaining six Characters are the Name No more than 8 and no less than 5 total characters. This can cause the script to not work correctly.
All scripts will end with the suffix of .ssl and all dialog files will end with .msg An example:
acmary.ssl acmary.msg
(Arroyo, Critter, whatever)
Another example: dcvic.ssl dcvic.msg
P a g e | 41
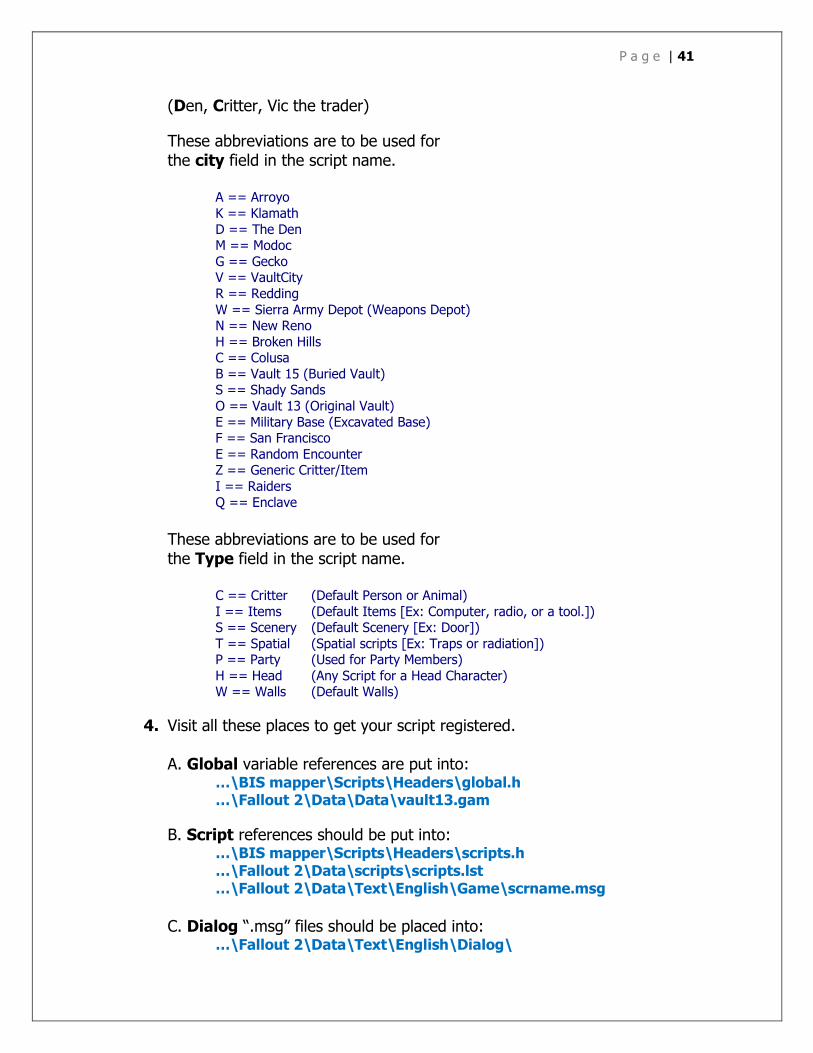
(Den, Critter, Vic the trader)
These abbreviations are to be used for the city field in the script name.
A == Arroyo
K == Klamath
D == The Den M == Modoc
G == Gecko V == VaultCity
R == Redding
W == Sierra Army Depot (Weapons Depot) N == New Reno
H == Broken Hills C == Colusa
B == Vault 15 (Buried Vault) S == Shady Sands
O == Vault 13 (Original Vault)
E == Military Base (Excavated Base) F == San Francisco
E == Random Encounter Z == Generic Critter/Item
I == Raiders
Q == Enclave
These abbreviations are to be used for the Type field in the script name.
C == Critter (Default Person or Animal)
I == Items (Default Items [Ex: Computer, radio, or a tool.]) S == Scenery (Default Scenery [Ex: Door])
T == Spatial (Spatial scripts [Ex: Traps or radiation]) P == Party (Used for Party Members)
H == Head (Any Script for a Head Character) W == Walls (Default Walls)
4. Visit all these places to get your script registered. A. Global variable references are put into:
…\BIS mapper\Scripts\Headers\global.h …\Fallout 2\Data\Data\vault13.gam
B. Script references should be put into: …\BIS mapper\Scripts\Headers\scripts.h …\Fallout 2\Data\scripts\scripts.lst …\Fallout 2\Data\Text\English\Game\scrname.msg
C. Dialog “.msg” files should be placed into:
…\Fallout 2\Data\Text\English\Dialog\
P a g e | 42
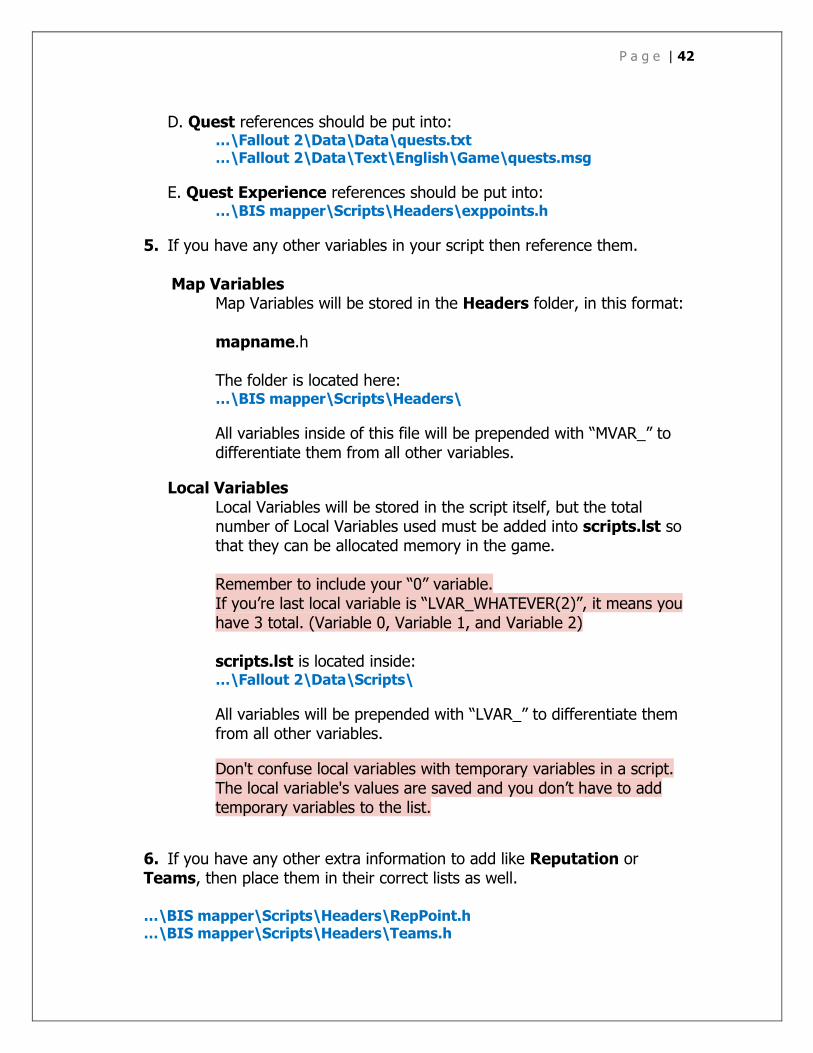
D. Quest references should be put into: …\Fallout 2\Data\Data\quests.txt …\Fallout 2\Data\Text\English\Game\quests.msg
E. Quest Experience references should be put into: …\BIS mapper\Scripts\Headers\exppoints.h
5. If you have any other variables in your script then reference them.
Map Variables Map Variables will be stored in the Headers folder, in this format:
mapname.h
The folder is located here: …\BIS mapper\Scripts\Headers\
All variables inside of this file will be prepended with “MVAR_” to differentiate them from all other variables.
Local Variables
Local Variables will be stored in the script itself, but the total number of Local Variables used must be added into scripts.lst so that they can be allocated memory in the game. Remember to include your “0” variable. If you’re last local variable is “LVAR_WHATEVER(2)”, it means you have 3 total. (Variable 0, Variable 1, and Variable 2) scripts.lst is located inside: …\Fallout 2\Data\Scripts\
All variables will be prepended with “LVAR_” to differentiate them from all other variables.
Don't confuse local variables with temporary variables in a script. The local variable's values are saved and you don’t have to add temporary variables to the list.
6. If you have any other extra information to add like Reputation or Teams, then place them in their correct lists as well. …\BIS mapper\Scripts\Headers\RepPoint.h …\BIS mapper\Scripts\Headers\Teams.h
P a g e | 43
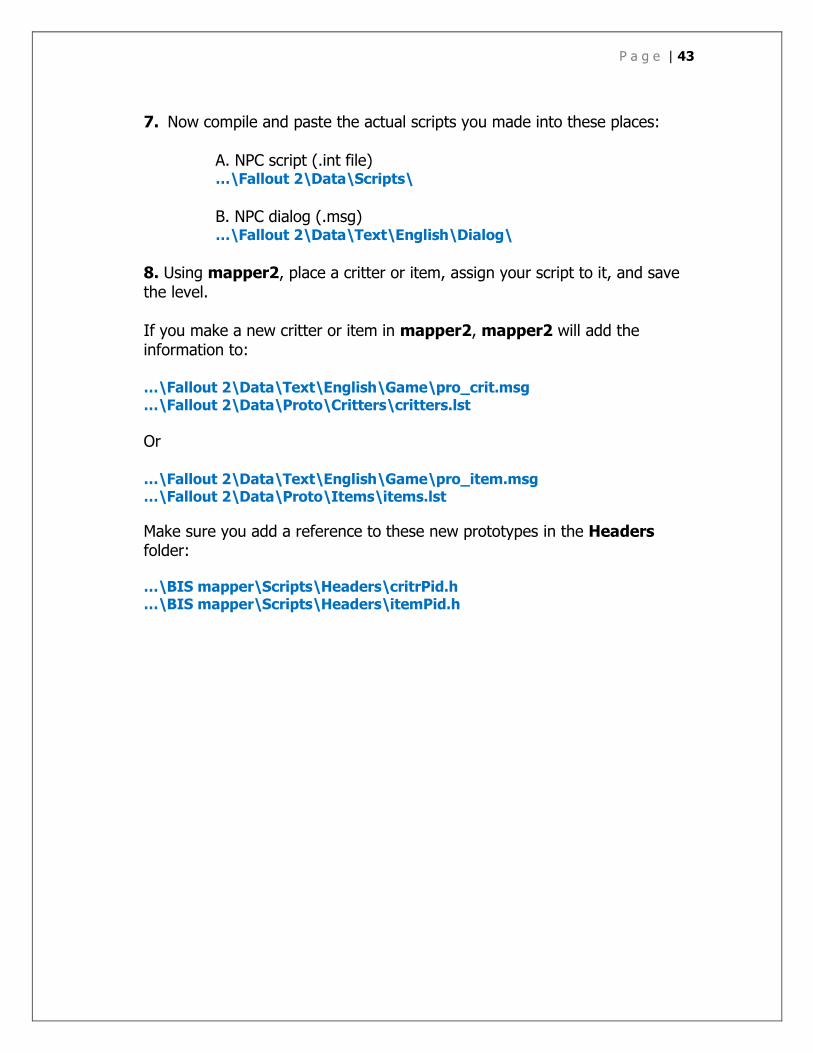
7. Now compile and paste the actual scripts you made into these places: A. NPC script (.int file)
…\Fallout 2\Data\Scripts\
B. NPC dialog (.msg)
…\Fallout 2\Data\Text\English\Dialog\
8. Using mapper2, place a critter or item, assign your script to it, and save the level. If you make a new critter or item in mapper2, mapper2 will add the information to: …\Fallout 2\Data\Text\English\Game\pro_crit.msg …\Fallout 2\Data\Proto\Critters\critters.lst
Or …\Fallout 2\Data\Text\English\Game\pro_item.msg …\Fallout 2\Data\Proto\Items\items.lst
Make sure you add a reference to these new prototypes in the Headers folder:
…\BIS mapper\Scripts\Headers\critrPid.h …\BIS mapper\Scripts\Headers\itemPid.h

P a g e | 44
Credits (I apologize to anyone that didn’t receive credit deserved)
Killap Burn Lexx NovaRain Horusxav TeamX Fallout BGE Risewild Mr.Stalin Horusxav Cpt. Corpse Odin Dude101 Pjnt De Dood Agrajag Jargo Stone-D Grandson of Sam [email protected] http://teamx.ru/ http://www.nma-fallout.com/ http://falloutmods.wikia.com/ http://www.towerofcreation.com/ http://blacksteel.nma-fallout.com/
Thank you too, Interplay and BlackIsle!