f100 financials: basic training guide - acumatica...• providing consulting services to customers....
TRANSCRIPT

F100 Financials: Basic Training Guide
Acumatica ERP 5.0
Last Revision: 12/15/2014

| Contents | 2
Contents
Introduction................................................................................................. 5
How to Use This Course...............................................................................6
Course Prerequisites.................................................................................... 7
Part 1: General Ledger and Cash Management............................................ 8Company Story: Foundation.............................................................................................. 9Lesson 1: Introduction to General Ledger......................................................................... 10
Step 1.1: Configuring the Company........................................................................ 11Step 1.2: Defining the Chart of Accounts.................................................................15Step 1.3: Configuring the General Ledger Module..................................................... 19Step 1.4: Setting Up the Financial Year................................................................... 20Step 1.5: Generating Financial Periods for a Year......................................................22Step 1.6: Activating Financial Periods......................................................................23Additional Information........................................................................................... 24Lesson Summary.................................................................................................. 25
Lesson 2: General Ledger Transactions and Release and Posting Processes............................ 26Step 2.1: Creating a Transaction Batch................................................................... 27Step 2.2: Releasing and Posting Batches................................................................. 29Step 2.3: Reversing a Batch.................................................................................. 33Step 2.4: Making an Auto-Reversing Batch.............................................................. 35Step 2.5: Searching for a Batch............................................................................. 37Step 2.6: Creating a Recurring Batch......................................................................39Additional Information........................................................................................... 42Lesson Summary.................................................................................................. 43
Lesson 3: Financial Period Closing....................................................................................44Closing of Accounts and Period Closing Procedure..................................................... 45Step 3.1: Reviewing the Trial Balance and History of Transactions............................... 48Step 3.2: Closing a Financial Period........................................................................ 52Step 3.3: Posting a Transaction to a Closed Period....................................................54Additional Information........................................................................................... 56Lesson Summary.................................................................................................. 57
Lesson 4: Introduction to Cash Management.....................................................................58Step 4.1: Adding General Ledger Accounts.............................................................. 59Step 4.2: Configuring the Cash Management Module.................................................61Step 4.3: Creating a Cash Account......................................................................... 62Step 4.4: Making a Funds Transfer......................................................................... 64Step 4.5: Creating a Cash Entry Type..................................................................... 67Step 4.6: Creating a Cash Entry.............................................................................69Step 4.7: Creating a Payment Method.....................................................................75Additional Information........................................................................................... 78Lesson Summary.................................................................................................. 79
Part 2: Accounts Payable........................................................................... 80Company Story: Vendors................................................................................................ 81Lesson 5: Introduction to Accounts Payable...................................................................... 82
Step 5.1: Adding General Ledger Accounts.............................................................. 83Step 5.2: Defining Credit Terms............................................................................. 84Step 5.3: Creating a Vendor Class.......................................................................... 87Step 5.4: Configuring the Accounts Payable Module.................................................. 88

| Contents | 3
Step 5.5: Configuring Vendor IDs........................................................................... 92Step 5.6: Creating a Vendor.................................................................................. 94Step 5.7: Creating a Non-Stock Item...................................................................... 96Additional Information........................................................................................... 99Lesson Summary.................................................................................................100
Lesson 6: Accounts Payable Process............................................................................... 101Accounts Payable Process.....................................................................................102Step 6.1: Creating a Bill...................................................................................... 106Step 6.2: Releasing a Bill.....................................................................................111Step 6.3: Creating an AP Check........................................................................... 114Step 6.4: Processing an AP Check........................................................................ 116Step 6.5: Releasing an AP Check.......................................................................... 118Step 6.6: Reconciling Vendor Balances With GL Accounts......................................... 120Step 6.7: Closing the Financial Period................................................................... 123Additional Information......................................................................................... 125Lesson Summary.................................................................................................126
Lesson 7: Payments in the Cash Discount Period..............................................................127Step 7.1: Making a Funds Transfer........................................................................128Step 7.2: Creating Bills........................................................................................129Step 7.3: Making an Early Payment for a Bill......................................................... 133Step 7.4: Reviewing the Vendor Balance and Documents......................................... 138Step 7.5: Making a Payment for Multiple Bills.........................................................142Step 7.6: Reviewing Outstanding Balances by Aging Periods.....................................147Additional Information......................................................................................... 149Lesson Summary.................................................................................................150
Lesson 8: Adjustments, Vendor Refunds, and Voided Checks............................................. 151Step 8.1: Making a Credit Adjustment...................................................................152Step 8.2: Making a Debit Adjustment....................................................................157Step 8.3: Reversing a Bill.................................................................................... 162Step 8.4: Processing a Vendor Refund................................................................... 164Step 8.5: Voiding an AP Check............................................................................. 166Additional Information......................................................................................... 169Lesson Summary.................................................................................................170
Lesson 9: Prepayments.................................................................................................171Step 9.1: Creating a Prepayment Request..............................................................172Step 9.2: Making a Prepayment............................................................................174Step 9.3: Applying a Prepayment to a Bill..............................................................177Step 9.4: Processing a Refund for a Prepayment.....................................................182Additional Information......................................................................................... 183Lesson Summary.................................................................................................184
Part 3: Accounts Receivable.....................................................................185Company Story: Customers........................................................................................... 186Lesson 10: Introduction to Accounts Receivable............................................................... 187
Step 10.1: Adding General Ledger Accounts........................................................... 188Step 10.2: Defining a Statement Cycle.................................................................. 189Step 10.3: Creating a Customer Class................................................................... 190Step 10.4: Configuring the Accounts Receivable Module........................................... 191Step 10.5: Creating a Customer........................................................................... 194Step 10.6: Defining the Default Price of a Non-Stock Item....................................... 196Additional Information......................................................................................... 197Lesson Summary.................................................................................................198
Lesson 11: Accounts Receivable Process......................................................................... 199Accounts Receivable Process.................................................................................200Step 11.1: Creating an Invoice.............................................................................206Step 11.2: Releasing an Invoice........................................................................... 210Step 11.3: Printing an Invoice..............................................................................213Step 11.4: Entering a Payment.............................................................................216Step 11.5: Releasing a Payment........................................................................... 221Step 11.6: Applying a Payment to an Invoice......................................................... 223Step 11.7: Reconciling Customer Balances with GL Accounts.................................... 226
| Contents | 4
Step 11.8: Closing the Financial Period..................................................................229Step 11.9: Preparing a Statement.........................................................................230Step 11.10: Printing a Statement......................................................................... 233Additional Information......................................................................................... 237Lesson Summary.................................................................................................238
Lesson 12: Early Payments, Prepayments, and Memos......................................................239Step 12.1: Processing a Payment in a Cash Discount Period..................................... 240Step 12.2: Reviewing the Customer Balance and Documents.................................... 242Step 12.3: Processing a Prepayment..................................................................... 245Step 12.4: Processing a Debit Memo.....................................................................250Step 12.5: Processing a Credit Memo....................................................................254Step 12.6: Processing a Refund to the Customer.................................................... 256Additional Information......................................................................................... 258Lesson Summary.................................................................................................259
Lesson 13: Credit Verification and Overdue Charges......................................................... 260Step 13.1: Analyzing the Customer's Credit Status and Preparing Dunning Letters....... 261Step 13.2: Reviewing Outstanding Balances by Aging Periods................................... 267Step 13.3: Configuring Overdue Charges............................................................... 269Step 13.4: Processing Overdue Charges................................................................ 271Additional Information......................................................................................... 277Lesson Summary.................................................................................................278
Lesson 14: Direct Write-Offs..........................................................................................279Step 14.1: Configuring Write-Offs......................................................................... 280Step 14.2: Processing a Credit Write-Off................................................................282Step 14.3: Processing a Balance Write-Off............................................................. 285Additional Information......................................................................................... 290Lesson Summary.................................................................................................291

| Introduction | 5
Introduction
This course introduces the basic functionality of the Acumatica ERP financial modules: General Ledger,Cash Management, Accounts Payable, and Accounts Receivable. The course is based on a set ofexamples that demonstrate the use of these modules for a small company. The course consists oflessons that guide you step by step through the basics of the configuration and use of Acumatica ERP:You will start by posting transactions to the ledger, and then move to working with financial documents,such as invoices and bills.
After you complete the course, you will have an understanding of how to work with financial data byusing Acumatica ERP.

| How to Use This Course | 6
How to Use This Course
You will start learning how to use Acumatica ERP with very simple business processes and then move tomore advanced processes as you go through this course.
To complete the course, complete the lessons from each part of the course in the order they arepresented and pass the assessment tests:
1. Complete the Course Prerequisites.
2. Start with Part 1, and complete Lessons 1–3, which are dedicated to General Ledger.
3. On Acumatica University, take Test 1: General Ledger.
4. Complete Lesson 4, which is dedicated to Cash Management.
5. On Acumatica University, take Test 2: Cash Management.
6. From Part 2, complete Lessons 5–9, which are dedicated to Accounts Payable.
7. On Acumatica University, take Test 3: Accounts Payable.
8. From Part 3, complete Lessons 10–14, which are dedicated to Accounts Receivable.
9. On Acumatica University, take Test 4: Accounts Receivable.
After you pass all four assessment tests, you will get the Acumatica University certificate, which reflectscompletion of the course.
What Is in a Part?
Each of the three parts of the course is dedicated to a particular Acumatica ERP module (or a groupof related modules) and consists of lessons you are supposed to complete. Each part begins with aCompany Story topic that explains the situation in which you are going to use Acumatica ERP in thelessons of the part.
What Is in a Lesson?
The lessons consist of steps that outline the procedures you're completing and describe the relatedconcepts you are learning. At the end of each step, under the Related Links section, you can find linksto detailed information about the concepts and forms used in the step. At the end of each lesson, theAdditional Information topic provides links to additional concepts that you might be interested in butthat are outside of the scope of the course.
What Are the Documentation Resources?
All the links refer to the documentation available on our Partner Portal http://partner.acumatica.com/(login required). The same documentation is included in the Acumatica ERP instance, which you canfind under the Help menu.
| Course Prerequisites | 7
Course Prerequisites
An understanding of generally accepted accounting principles (GAAP) is required for this course. Also,you should be familiar with the main concepts of financial accounting, including the chart of accounts,general ledger, financial documents (such as invoices and bills), and financial reports. To go throughthis course, you need an out-of-the-box instance of Acumatica ERP that is deployed for use by a singlecompany (see the deployment parameters below).
Parameters to Deploy an Acumatica ERP Instance for the Training Course
The course requires an Acumatica ERP instance, version 5, build 1830 or later. On the Company Setupscreen of the Acumatica ERP Configuration Wizard, specify only one tenant without the insertion of anydemo data into the database by setting the following parameters:
• Login Company Name: MyCompany
• New: Selected
• Insert Data: Empty
• Parent Company ID: 1
• Visible: Selected

| Part 1: General Ledger and Cash Management | 8
Part 1: General Ledger and Cash Management
In this part, you will learn the basics of using the General Ledger and Cash Management modules inAcumatica ERP. In particular, you will learn about the following tasks:
• Configuring the initial settings of the system: the branch, the ledger, and the General Ledgermodule preferences
• Creating, releasing, and posting General Ledger batches
• Reversing and scheduling batches
• Closing financial periods
• Reviewing General Ledger reports
• Configuring cash accounts
• Configuring entry types for cash transactions and payment methods
• Processing cash transactions

| Part 1: General Ledger and Cash Management | 9
Company Story: FoundationIn this course, you will simulate the operations of a small service company, MyCompany. This companyis a single business entity that has no branches or subsidiaries and is located in one city in the UnitedStates.
In the first part of the course, MyCompany is starting to operate and has the following businessprocesses:
• Providing consulting services to customers.
• Collecting fees from customers and paying for all company needs in cash. These amounts arerecorded directly to general ledger accounts.
Chart of Accounts
You will upload the chart of accounts to Acumatica ERP from a Microsoft Excel file in Step 1.2: Definingthe Chart of Accounts.
Financial Periods
MyCompany's financial year matches the calendar year. The financial year starts on January 1 and isdivided into 12 financial periods that correspond to calendar months. We will assume that the companystarted its financial activity and use of Acumatica ERP in December 2013. In Lesson 1: Introduction toGeneral Ledger, you will define financial periods for the first two years, including the following periods:
• December 2013 (current period, active)
• January 2014 (next period, active)
• February 2014 (future period, not yet active)
In Lesson 3: Financial Period Closing, you will close the periods of the 2013 year; in subsequentlessons, you will then continue working in January 2014.
General Ledger Transactions
MyCompany uses one currency, the U.S. dollar. In December 2013, the company started to recordgeneral ledger transactions. The company processed a bank loan, investments obtained from theowner, and operating expenses. You will update the balances of general ledger accounts by postingtransactions 1–7 in Lesson 2: General Ledger Transactions and Release and Posting Processes. InLesson 3: Financial Period Closing, you will see how a transaction can be posted to a closed periodthrough the example of transaction 8.
Cash Operations
In January 2014, MyCompany started to use separate cash accounts and made operations with cash.To record the cash operations, you will use the Cash Management module in Lesson 4: Introduction toCash Management.

| Part 1: General Ledger and Cash Management | 10
Lesson 1: Introduction to General LedgerIn this lesson, you will specify the initial settings of the General Ledger module for MyCompany inAcumatica ERP. You will start by configuring the company and then specify the preferences of theGeneral Ledger module. To be able to post transactions to the General Ledger, you will configure thefinancial year and financial periods in the system. Once you complete this lesson, the General Ledgermodule will be ready for the posting of transactions.
Lesson Objectives
In this lesson, you will learn the basic procedures performed during the initial configuration ofAcumatica ERP for financial accounting:
• Defining the chart of accounts in Acumatica ERP
• Specifying the initial settings of the General Ledger module
• Defining the financial year and activate financial periods in Acumatica ERP

| Part 1: General Ledger and Cash Management | 11
Step 1.1: Configuring the CompanyA company should have at least one logical branch in the system. If the company operates as a singleentity that has no organizational branches, you should create the only branch in the system (as is donein this course). For the branch, you should create the actual ledger, which accumulates transactionsfrom all modules of Acumatica ERP.
To start using Acumatica ERP for a new company, you have to specify the initial settings of the companyby completing the following tasks:
1. Activate the default features of the Acumatica ERP instance for the new company. The activatedfeatures determine the functionality enabled in the system for the new company.
2. Create a branch of the company.
3. Create a ledger for the branch.
The detailed instructions for these tasks are described below.
1. Activate Features
On the Enable/Disable Features (CS100000; Configuration > Common Settings > Licensing) form, clickthe Enable button on the toolbar to activate the default set of features. (You don't have to select anyadditional features.)
For educational purposes, you will use Acumatica ERP with all features available under the trial license. Forproduction, each particular feature might be subject to additional licensing; please consult the AcumaticaERP sales policy for details.
In the default feature set, with the basic functionality of Acumatica ERPenabled, the following groups offeatures are selected:
• Organization: A group of organization management features. By enabling the group, you enablethe basic functionality of the modules of the Organization group, such as Organization Structure.
• Finance: A group of financial accounting features. By enabling the group, you enable the basicfunctionality of the modules of the Finance group: General Ledger, Cash Management, AccountsPayable, Accounts Receivable, and Taxes.
• Misc.: A group of additional configuration features. By enabling the group, you enable the basicfunctionality of the modules of the Configuration group, which includes the Common Settings andUser Security modules.
This group also includes the Scheduled Processing feature, which has become optional in AcumaticaERP 5.0. By default, this feature is enabled.
After the feature set is activated, its status changes from Pending Activation to Validated (as shownin the following screenshot). Now you can use the functionality of each selected group of applicationmodules. The features that are available for selection in each group represent additional modules (aswith Project Management under Organization) or additional functionality (as with Multi-BranchSupport under Finance) that can be enabled in the application. For this course, however, you will startwith only the default features.

| Part 1: General Ledger and Cash Management | 12
Figure: Activation of the default feature set for the company

| Part 1: General Ledger and Cash Management | 13
2. Create the Branch
On the Branches (CS102000; Organization > Organization Structure > Configure) form, create a branchwith the following parameters (as shown in the screenshot below) and save the new branch:
• Branch ID: MYCOMPANY
• Branch Name: MyCompany
• General Settings tab, Base Currency ID: USD (type manually)
• General Settings tab, Description: United States Dollar
• General Settings tab, Currency Symbol: $
• General Settings tab, Country: US
The branch specifies the base currency for the company. Once you have set the currency ID and savedthe branch, the currency ID cannot be changed. In this course, you will use the U.S. dollar as the base(and only) currency for operations.
Figure: Creation of the company branch
3. Create the Ledger
On the Ledgers (GL201500; Finance > General Ledger > Configuration > Setup) form, click (AddRow) on the form toolbar to create a new ledger, specify the following parameters for it (see thescreenshot below), and save the new record:
• Ledger ID: ACTUAL
• Description: Actual
• Balance Type: Actual
• Is Consolidation Source: Cleared
The actual ledger collects transactions posted to general ledger accounts from all modules of AcumaticaERP. Every branch should be assigned to an actual ledger. If you use only one branch in the system, it

| Part 1: General Ledger and Cash Management | 14
is automatically assigned to the actual ledger. (Ledgers of other types are optional, and we don't needthem in this course.)
Figure: Creation of the actual ledger for the company
You have activated the Acumatica ERP features to be used for the course and have created the branchand the posting (actual) ledger for the branch. Now you can create the chart of accounts and specifyyour company's preferences for the General Ledger module.
Related LinksEnable/Disable Features (CS100000)Branches (CS102000)Ledgers (GL201500)

| Part 1: General Ledger and Cash Management | 15
Step 1.2: Defining the Chart of AccountsAfter you have configured the company and before you begin using Acumatica ERP for financialaccounting, you have to define the chart of accounts in the system. In this step, you will complete thefollowing tasks, which are described in greater detail below:
1. Prepare the chart of accounts for the company.
2. Upload the chart of accounts to the system.
3. Add two specific accounts to the chart: Year-to-Date (YTD) Net Income and Retained Earnings.
1. Prepare the Chart of Accounts
You can upload the chart of accounts to the system from a Microsoft Excel file. For MyCompany, thechart of accounts has been prepared for you in the Fin_Basic_COA.xlsx file. The first worksheet liststhe accounts that are used in the first three lessons of the course. The file is prepared according to theinstructions on how to prepare the chart of accounts in the Microsoft Excel file to upload to AcumaticaERP, which are given below:
1. Use the first worksheet of the Microsoft Excel file for the chart of accounts.
2. In the first row of the worksheet, specify the column captions:
• Account (the account identifier, which can be up to 10 alphanumeric characters)
• Account Class
• Description
3. In the next rows, list the accounts to upload (see Fin_Basic_COA.xlsx).
The chart of accounts holds the general ledger (GL) accounts defined in the system. AcumaticaERP supports four types of GL accounts: asset, liability, income, and expense. In each type, theaccounts are also divided into classes.
When you upload the chart of accounts (as described in the next step), you have to specify theaccount class for each account. Account classes are used for convenient grouping and sortingof data in reports and inquires. By default, the system provides predefined account classes thataccommodate most reporting needs, although you can define additional account classes. If youhave correctly specified the account class in the chart of accounts, the system will automaticallydetermine the account type (Asset, Liability, Income, or Expense). You can view the list ofpredefined account classes and add new ones on the Account Classes (GL202000; Finance >General Ledger > Configuration > Setup) form. (For the purposes of this course, you don't needto define additional account classes.)
After you have listed the accounts in the Excel file, you can upload them to the system.
2. Upload the Chart of Accounts to the System
Before you upload the chart of accounts, on the Segmented Keys (CS202000; Configuration > CommonSettings > Segmented Keys) form, select the ACCOUNT segmented key in the Segmented Key IDbox and set the Length of the GL Account segment to 6 (see the screenshot below), because we use6-digit account identifiers in this course. You can use account identifiers that are no longer than thespecified length. Once any transaction has been posted to an account, the segment length should notbe decreased, because a decrease could result in the duplication of existing identifiers. (You will learnmore about segmented keys later in this course.)

| Part 1: General Ledger and Cash Management | 16
Figure: The segmented key for account identifiers
To upload the chart of accounts, open the Chart of Accounts (GL202500; Finance > General Ledger >Configuration > Manage) form and do the following:
1. Click the Load Records from File button on the form toolbar.
Figure: The Load Records from File button
2. Select the Fin_Basic_COA.xlsx file and click Upload.
3. Leave Null Value empty and click OK.
4. In the Columns window, make sure the columns are mapped to account parameters as shownin the screenshot below.

| Part 1: General Ledger and Cash Management | 17
Figure: Excel columns mapped to the parameters of an account
5. Click OK to upload the records, and then click Save to save them to the database.
The initial chart of accounts is uploaded to Acumatica ERP. Later in this course, you will add more GLaccounts as you need them in lessons.
At any time, on the Chart of Accounts (GL202500) form, you can change the identifier of a GL account,even if there are transactions posted to the account. After you have changed the account number, thetransactions remain in the account history.
3. Add the YTD Net Income and Retained Earnings Accounts
To complete the chart of accounts, you have to add to the chart two accounts that are required forAcumatica ERP: YTD Net Income and Retained Earnings. Open the Chart of Accounts (GL202500) form,and add these accounts as follows:
1. Click Add Row, and in the new row, add the YTD Net Income account with the followingparameters:
• Account: 302000
• Account Class: NETINCOME
• Description: Year-to-Date Net Income
Year-To-Date (YTD) Net Income is a liability account that accumulates the net income from thebeginning of every financial year. Transactions cannot be posted directly to the YTD Net Incomeaccount. In the General Ledger preferences, you have to specify which account to use as the YTDNet Income account, and the specified account cannot be changed in the preferences after anytransaction has been posted to an income or expense account.
2. Add a row, and add the Retained Earnings account with the following parameters:
• Account: 303000
• Account Class: RETEARN
• Description: Retained Earnings

| Part 1: General Ledger and Cash Management | 18
Retained Earnings is a liability account that accumulates the company's net income (or loss)that is retained by the company. Retained earnings are summarized over the years starting withthe first year of company operations. You can post direct transactions to the Retained Earningsaccount, such as dividends paid to shareholders. In the General Ledger preferences, you have tospecify which account to use as the Retained Earnings account.
If a GL account is no longer used, you can deactivate the account—that is, clear the Active checkbox for the account in the table. Transactions cannot be posted to inactive accounts.
3. Click Save.
Now the chart of accounts is complete (as the screenshot below illustrates; the new accounts arehighlighted) and you can specify your company's General Ledger preferences in Acumatica ERPto start using the module.
Figure: YTD Net Income and Retained Earnings accounts added to the chart
In a production environment, you wouldn't necessarily have to add the YTD Net Income and RetainedEarnings accounts to the chart of accounts manually; you could upload them from a file along with otheraccounts. In this step, you have manually entered these accounts just for training purposes.
Related LinksYTD Net Income and Retained Earnings AccountsChart of Accounts (GL202500)General Ledger Preferences (GL102000)Identifier Segmentation
| Part 1: General Ledger and Cash Management | 19
Step 1.3: Configuring the General Ledger ModuleGeneral Ledger is the core financial module in Acumatica ERP, where all financial information iscollected for analyzing, summarizing, and reporting. The General Ledger module is tightly integratedwith other modules in Acumatica ERP. Transactions, which are generated when documents are releasedin any other module, are collected in the General Ledger module. The preferences you specify for thismodule affect transaction processing and the financial reports generated by the system.
In this step, you will specify your preferences for the General Ledger module as follows so you can startusing the module:
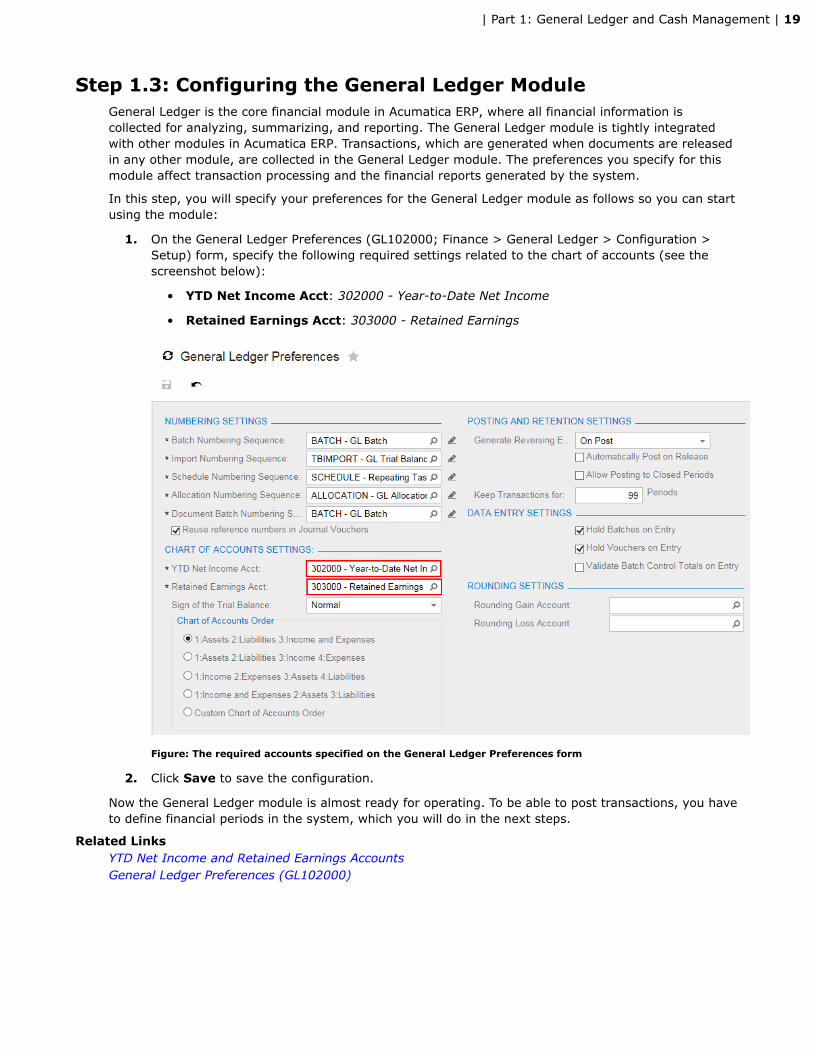
1. On the General Ledger Preferences (GL102000; Finance > General Ledger > Configuration >Setup) form, specify the following required settings related to the chart of accounts (see thescreenshot below):
• YTD Net Income Acct: 302000 - Year-to-Date Net Income
• Retained Earnings Acct: 303000 - Retained Earnings
Figure: The required accounts specified on the General Ledger Preferences form
2. Click Save to save the configuration.
Now the General Ledger module is almost ready for operating. To be able to post transactions, you haveto define financial periods in the system, which you will do in the next steps.
Related LinksYTD Net Income and Retained Earnings AccountsGeneral Ledger Preferences (GL102000)

| Part 1: General Ledger and Cash Management | 20
Step 1.4: Setting Up the Financial YearTransactions are posted to a financial period defined in the system. To define a financial period, youhave to define the financial (fiscal) year structure and then generate periods for the needed year.You cannot post anything to a date before the start date of the first financial year. Therefore, werecommend that you define the first financial year so that it includes the last period before the companystarted to use Acumatica ERP. You can then post financial data to the last period before ERP use; inparticular, you can upload the ending balances of accounts to that period.
To set up the financial year structure, open the Financial Year (GL101000; Finance > General Ledger >Configuration > Setup) form, and complete the following instructions:
1. Set up a financial year that matches the calendar year and make 2013 the first financial year byspecifying the following parameters (see the screenshot below):
• Financial Year Starts On: 1/1/2013
• Period Type: Month
The number of periods in a financial year is defined automatically by the selected period type,and Month defines 12 financial periods in a year. The first financial year is defined automaticallyby the Financial Year Starts On date.
2. Click Generate periods, and then click Save.
You have defined 12 periods in a financial year, each of which matches the calendar month, andhave established the first financial year as 2013. The listed periods aren't financial periods; theyare templates for the financial periods to be generated. The table shows what the periods will bewhen they're generated.

| Part 1: General Ledger and Cash Management | 21
Figure: The structure of the financial year
Now you have to generate the needed financial periods.
Related LinksFinancial Year and Financial PeriodsFinancial Year (GL101000)

| Part 1: General Ledger and Cash Management | 22
Step 1.5: Generating Financial Periods for a YearMyCompany starts its financial activity and use of Acumatica ERP in December 2013. In this part of thecourse, you will start posting transactions to December 2013 and January 2014. So in the system, youhave to define financial periods for two years, 2013 and 2014.
To define financial periods in the system, open the Financial Periods (GL201000; Finance > GeneralLedger > Work Area > Manage) form and do the following:
1. Set the Financial Year to 2013, click Generate Periods, and then click Save to save thefinancial periods generated for 2013.
2. On the form toolbar, click Add New Record, and then click Generate Periods. Click Save tosave the financial periods generated for 2014 (as shown in the following screenshot).
Figure: The financial periods generated for 2014
You have defined the financial periods for two years, 2013 and 2014. However, these financial periodsare not yet active; in the next step, you activate the needed periods.
Related LinksFinancial Year and Financial PeriodsFinancial Periods (GL201000)

| Part 1: General Ledger and Cash Management | 23
Step 1.6: Activating Financial PeriodsIn the General Ledger module, you need to activate the financial periods that you have generated. Onceactivated, a financial period can be used in the General Ledger module and other modules of AcumaticaERP. Transactions can be entered and posted to only active financial periods. Although you will posttransactions to only the 12-2013 period, you have to activate all the periods of 2013 to be able to closethe financial year later. (The closing of a financial year will be described later in this course.) To activateall periods of 2013, do the following:
1. On the Financial Periods (GL201000; Finance > General Ledger > Work Area > Manage) form,select the year 2013.
2. In the table, for all financial periods of the year, select the Active check box (see the screenshotbelow).
3. Click Save.
Figure: The financial periods activated in the system
At any time, you can have multiple active periods; activating one period doesn’t require closing aprevious one. Now all the periods of 2013 are active and open (that is, not closed), and you can enterand post transactions to any financial period of the year 2013.
Related LinksFinancial Year and Financial PeriodsFinancial Periods (GL201000)Step 3.2: Closing a Financial Period

| Part 1: General Ledger and Cash Management | 24
Additional InformationYou can use the following information for additional reading, but these concepts are outside of thescope of this course.
Companies
Multiple companies, or tenants, can work independently from one another in the same instance ofAcumatica ERP, or they can be organized into a hierarchy and have shared data access. In this course,you have deployed the Acumatica ERP instance for use by only one company, and therefore havedefined only one company in the instance configuration. For more information about companies andmulti-company configurations, see Support of Multiple Companies in the Acumatica ERP User Guide.
Branches
If a company has a hierarchical structure, you can enable multi-branch support in the system andcreate multiple branches for company headquarters, subsidiaries, and locations, depending on thereporting needs. All branches share some financial data—that is, they share the chart of accountsand use the same base currency and financial periods. The branches can operate independentlyor be involved in cross-branch transactions. Multi-branch support is allowed in Acumatica ERP ifthe corresponding feature is enabled. In this course, the company has only one branch. For moreinformation on the use of multiple branches, see Multiple Branch Support in the Acumatica ERP UserGuide.
Ledgers
There are four types of ledgers in Acumatica ERP: Actual, Budget, Reporting, and Statistical. An actualledger is the core of financial records, because it collects transactions generated by all modules ofAcumatica ERP. Other types of ledgers are optional. For more information about different types ofledgers, see Multiple Ledger Support in the Acumatica ERP User Guide.
An actual ledger must be specified for each branch. In a multi-branch company, different branches mayuse the same actual ledger or they may use separate actual ledgers. For more information, see BasicModels for Multi-Branch Organization in the Acumatica ERP User Guide.

| Part 1: General Ledger and Cash Management | 25
Lesson SummaryIn this lesson, you have been introduced to the concepts of the company, branches, ledgers, the chartof accounts, and financial periods in Acumatica ERP.
You have prepared the initial organizational structure and set up the General Ledger module to startthe use of Acumatica ERP for financial accounting in MyCompany. The Year-To-Date Net Income andRetained Earnings accounts are required parameters of the General Ledger module, and the systemhandles these accounts in a special way. You have defined the structure of the financial year andfinancial periods for the first two years of the company's activity, 2013 and 2014. The structure of thefinancial year is configured on the Financial Year (GL101000) form. Finally, you have activated all theperiods of the financial year 2013 to be able to record transactions to these periods in the system. Youuse the Financial Periods (GL201000) form to maintain financial periods—that is, to generate financialperiods, and to activate and deactivate them as needed.
Now the General Ledger module is ready for the processing of transactions and the update of accountbalances that occurred in the 12-2013 financial period.
Review Questions
• In which module of Acumatica ERP do you configure the chart of accounts and financial periods?
• What is the easiest way to define the chart of accounts?

| Part 1: General Ledger and Cash Management | 26
Lesson 2: General Ledger Transactions and Release andPosting Processes
In this lesson, you will learn how to work with transactions in the General Ledger module of AcumaticaERP.
Transactions are organized into batches, which are posted to general ledger accounts. In this lesson,you will create, release, and post batches and become familiar with the statuses of batches. You willsee how to reverse a batch that has been incorrectly posted. Also, you will create a batch for an accrualtransaction, which is automatically reversed in the next financial period. At the end of the lesson, youwill create a recurring transaction for paying the interest on the bank loan.
Lesson Objectives
In this lesson, you will learn the following typical operations with transaction batches in the GeneralLedger module:
• Creating a batch
• Releasing a batch
• Posting transactions
• Reversing a batch
• Creating an auto-reversing batch
• Searching for a batch that has updated an account
• Creating a recurring batch

| Part 1: General Ledger and Cash Management | 27
Step 2.1: Creating a Transaction BatchIn the General Ledger module of Acumatica ERP, transactions are organized into batches. A batchis a group of journal entries that together represent one transaction or multiple transactions thatcan be posted to the General Ledger module. The batch must include at least two journal entries.For each journal entry, the account and the debit or credit amount must be specified. Batches aremanually entered very rarely. Usually, you work with documents (such as invoices) in other modules,and Acumatica ERP automatically generates the appropriate batches in the General Ledger module.
Because you have not yet configured the modules in which you can create documents, you willmanually create a few batches to understand the process of posting transactions. Proceed as follows tocreate batches for transactions of the 12-2013 financial period (the first five transactions listed on theTransactions worksheet in the Fin_Basic_COA.xlsx file):
1. On the Journal Transactions (GL301000; Finance > General Ledger > Work Area > Enter) form,create a batch for a $10,000 investment transaction, as described below:
a. In the Module box, leave GL, which means that the batch is created from the GeneralLedger module.
b. In the Transaction Date box, select 12/5/2013, which is within the 12-2013 financialperiod.
Notice that in the Post Period box, the financial period, 12-2013, is selectedautomatically once you specify the date. After you have selected the transaction date, youcan change the post period of the transaction. The transaction date does not necessarilyhave to belong to the post period.
c. In the Description box, type The owner invests $10,000.
d. In the table at the bottom of the form, add the debit journal entry for the transaction withthe following parameters:
• Account: 102000 (Checking Account)
• Debit Amount: 10,000.00
e. Also in the table, add the credit entry for the transaction with the following parameters:
• Account: 301000 (Capital)
• Credit Amount: 10,000.00
f. Save the batch, and notice that the batch now has the On Hold status (see the screenshotbelow).
The batch gets the On Hold status if the Hold check box is selected. By default, a newmanually entered batch is usually assigned the On Hold status. This status means thatthe batch is draft; it is being edited and may not be balanced yet.
On the General Ledger Preferences (GL102000; Finance > General Ledger > Configuration> Setup) form, you can select whether a new manually entered batch is saved with the OnHold or Balanced status (by selecting or clearing, respectively, the Hold Batches on Entrycheck box).
Acumatica ERP generates the batch number automatically according to the numberingsequence applied to General Ledger batches; each new batch gets the next sequentialnumber. The numbering sequence for General Ledger batches is specified on the GeneralLedger Preferences (GL102000) form. In this course, you use the predefined BATCHnumbering sequence with default parameters.

| Part 1: General Ledger and Cash Management | 28
Figure: The first batch in the system
g. Since the batch is ready and you won't edit it further, clear the Hold check box; the batchnow has the Balanced status. Save the batch.
As soon you clear the Hold check box, the system checks whether the batch is balanced—that is, whether the total debit amount (Debit Total) is equal to the total creditamount (Credit Total) over all journal entries in the batch. You can save a batch with theBalanced status only if the totals are equal. If the totals aren't equal, you can correct theamounts or save the batch with the On Hold status to edit it later.
Also, you can enable the Control Total box by selecting the Validate Batch ControlTotals on Entry check box on the General Ledger Preferences (GL102000) form. IfControl Total is enabled, the user must enter this total, and the system checks that boththe debit total and the credit total are equal to the control amount.
2. Create individual batches for transactions 2 to 5 listed on the Transactions worksheet in theFin_Basic_COA.xlsx file; you already entered the first listed transaction. For each batch, clear theHold check box and then save the batch with the Balanced status.
When you are creating a batch, the transaction date is set to the business date by default. You canchange the business date to a day in December 2013 to make the system insert the needed dateinto the batch by default. To change the business date, click the date in the top right corner of thescreen and select the needed date (see the screenshot below). The business date is inserted intoany new document that you create and is used in the default selection parameters that appear onprocessing and inquiry screens. The business date resets to the current date of your computer afteryou again log in.
Figure: The business date, which can be changed
Now the transactions are entered and you can continue processing them.
Related LinksGL BatchesMultiple Numbering SequencesJournal Transactions (GL301000)General Ledger Preferences (GL102000)

| Part 1: General Ledger and Cash Management | 29
Step 2.2: Releasing and Posting BatchesThe status of a batch reflects the current processing state of the transactions. A batch has one of thefollowing statuses:
• On Hold: The batch is being edited and can be saved without being balanced.
• Balanced: The batch is being edited and can be saved only if it is balanced.
• Unposted: The batch has been released but has not yet been posted. The unposted batch is read-only.
• Posted: The batch has been posted, and the account balances have been updated with transactionamounts. The posted batch is read-only.
• Scheduled: The batch is a template for generating recurring batches according to the definedschedule. Based on the template, the system generates new batches, which can be edited,released, and then posted. The scheduled batch itself isn't released and posted and can be editedas a template.
• Voided: The scheduled batch has been canceled (that is, removed from the schedule). The voidedbatch is read-only.
The diagram below shows the processes of creating, releasing, and posting batches. Once a batch isbalanced, it can be processed further. A balanced batch means that the total debit amount is equal tothe total credit amount over all the batch's journal entries. The balanced batch can be released andthen posted to general ledger accounts.
When you release the batch in the General Ledger module, Acumatica ERP makes the batch read-only (that is, it cannot be modified). A released batch is ready for posting. As the batch is posted, thesystem updates the account balances with the amounts specified in the journal entries of the batch. Aposted batch means that all transactions of the batch have been posted.

| Part 1: General Ledger and Cash Management | 30
Figure: GL batch processing
In this step, you will learn how to release and post transactions in the General Ledger module byworking with the transactions that you entered during the previous step. Specifically, you will do thefollowing:
1. Release and post the first transaction in two stages: first release the batch, and then post it.
2. Release and post the rest of the transactions in one stage.
The detailed instructions to complete these tasks are given below.

| Part 1: General Ledger and Cash Management | 31
1. Release and Post a Transaction in Two Stages
You release and post batch 000001 in two stages by performing the following instructions:
1. Open the Release Transactions (GL501000; Finance > General Ledger > Processes > Daily)form, which lists batches with the Balanced status.
2. In the table, select batch 000001 and click Release (see the screenshot below).
Figure: The batch selected for release
When you release the batch, the system processes it and gives it the Unposted status. Onthe Account Summary (GL401000; Finance > General Ledger > Work Area > Explore) form,which lists the balances of GL accounts for the specified period, the table is empty because allaccount balances are currently 0.00; batch 000001 hasn't been posted yet. Now you can postthe transaction.
3. Open the Post Transactions (GL502000; Finance > General Ledger > Processes > Daily) form,which lists batches that have the Unposted status.
4. Select the batch from the table and click Post.
This causes the batch to update the account balances and gives the batch the Posted status.On the Account Summary form (GL401000), you can see that the ending balances of the twoaccounts used in the transaction have been updated (see the screenshot below).
Figure: Account balances updated by the posted transaction
2. Release and Post Transactions in One Stage
To release and post the rest of the transactions in one stage, do the following:
1. On the General Ledger Preferences (GL102000; Finance > General Ledger > Configuration >Setup) form, select the Automatically Post on Release check box and click Save.
By selecting the Automatically Post on Release check box, you enable batches to beimmediately posted after they are released.
2. On the Release Transactions (GL501000; Finance > General Ledger > Processes > Daily) form,click Release All to release and post all the listed transactions.

| Part 1: General Ledger and Cash Management | 32
After the transactions have been successfully released and posted, the batches get the Postedstatus. On the Account Summary (GL401000; Finance > General Ledger > Work Area > Explore)form, you can see the updated account balances. If you have entered all the needed transactionscorrectly, the ending balance of the Checking Account (102000) should be $16,250.
If an error occurs during release, the batch won't be released and will retain the Balanced status.If an error occurs during posting, the batch won't be posted and will get the Unposted status. Onthe Post Transactions (GL502000) form, you can review the batches that have been released butnot yet posted.
Now you have posted the first transactions, resulting in some non-zero account balances.
Related LinksGL BatchesGeneral Ledger Preferences (GL102000)Release Transactions (GL501000)Post Transactions (GL502000)Account Summary (GL401000)
| Part 1: General Ledger and Cash Management | 33
Step 2.3: Reversing a BatchOnce a batch has been released, it cannot be deleted. If a batch is incorrect, the easiest way to reversethe changes made by it is to generate a reversing batch from the incorrect one. When you generate areversing batch, the system creates a batch that has the same amounts in the opposite columns and alink it to the original batch.
In this step, you will learn how to reverse the changes made by a batch that has already been posted.Suppose that you have determined that batch 000005 is incorrect. In the example below, you willcreate a reversing batch for that transaction. Complete the following steps:
1. On the Journal Transactions (GL301000; Finance > General Ledger > Work Area > Enter) form,select 000005 in the Batch Number box.
The batch opens. The Posted status indicates that the transaction from the batch has alreadybeen posted to the general ledger accounts.
2. On the form toolbar, select Actions > Reverse Batch.
The system generates the reversing batch, which has an original batch number of 000005and the Reversing Entry check box selected. The reversing batch consists of debit and creditentries that are opposite those of the original batch.
3. Click Release. The reversing batch will be released; it will then be posted immediately becauseyou have selected the Automatically Post on Release check box on the General LedgerPreferences (GL102000; Finance > General Ledger > Configuration > Setup) form.
On the Account Summary (GL401000; Finance > General Ledger > Work Area > Explore)form, you can make sure that the 000005 batch has been reversed. If the reversing batch isposted correctly, the balance of Checking Account should decrease from $16,250 to $10,250,because you have reversed the transaction that increased the account balance by $6,000. Oncea reversing batch is posted, it reverses the changes of account balances made by the originalbatch.
4. Redo the batch that you have just reversed. To do this, open the 000005 batch and copy it into anew one.
Alternatively, you can create this new batch by reversing batch 000006, which is the reversingbatch for the 000005 batch.
5. Save the new batch, and release it to return the balance of Checking Account to $16,250.
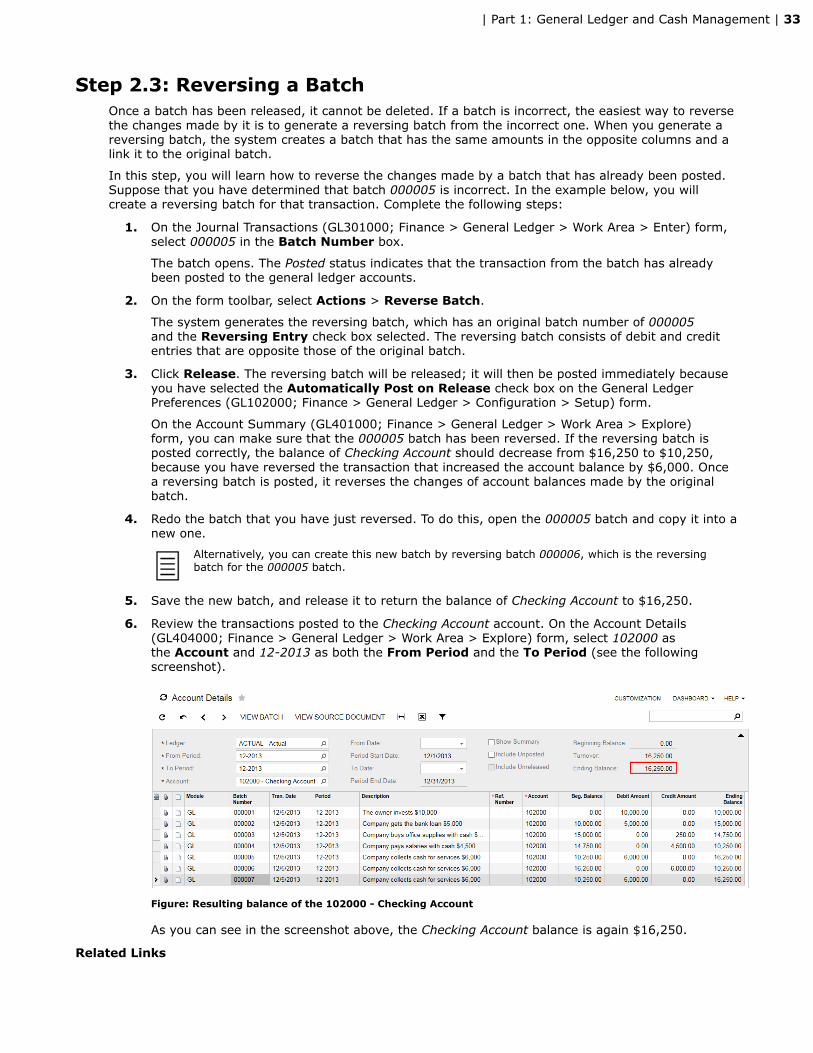
6. Review the transactions posted to the Checking Account account. On the Account Details(GL404000; Finance > General Ledger > Work Area > Explore) form, select 102000 asthe Account and 12-2013 as both the From Period and the To Period (see the followingscreenshot).
Figure: Resulting balance of the 102000 - Checking Account
As you can see in the screenshot above, the Checking Account balance is again $16,250.
Related Links

| Part 1: General Ledger and Cash Management | 34
Journal Transactions (GL301000)General Ledger Preferences (GL102000)

| Part 1: General Ledger and Cash Management | 35
Step 2.4: Making an Auto-Reversing BatchIn this step, you will learn how to make an auto-reversing batch. An auto-reversing batch is a wayto post a transaction that should be reversed at the beginning of the next period. For example, auto-reversing batches are helpful when you record accrual adjusting entries. Once you have created anauto-reversing batch for an accrued expense, when you receive the bill, you just have to record theactual amount to the needed period and you don't need to manually reverse the accrual batch. Thesystem automatically makes the reversing entry.
In the example below, you will record an accrued rent expense that was incurred in the 12-2013financial period. Your company will receive the bill for this expense in January 2014. To make thesystem automatically reverse the accrued expense at the beginning of the 01-2014 financial period, youwill record the accrual expense as an auto-reversing batch and set up the system so that the reversingbatch is automatically posted to the next financial period when the original batch is posted. Perform thefollowing instructions:
1. By using the Financial Periods (GL201000; Finance > General Ledger > Work Area > Manage)form, activate the 01-2014 financial period, so that a reversing batch can be posted to theperiod after 12-2013.
2. On the Journal Transactions (GL301000; Finance > General Ledger > Work Area > Enter) form,create and then save a new batch that has the following parameters:
• Transaction Date: 12/31/2013 (a date within the financial period to which the originaltransaction will be posted)
• Post Period: 12-2013
• Description: The company accrues rent expenses of $1000
• Auto Reversing: Selected
• Hold: Cleared
• Credit entry: 230000 (Accrued Expenses); $1000
• Debit entry: 740000 (Rent Expense); $1000
3. Click Release to release and post the accrual transaction.
This causes the original batch to be posted. The system has also generated a new batch withthe next sequential number and posted the batch to the first day of the next financial period. Onthe Account Details (GL404000; Finance > General Ledger > Work Area > Explore) form, select230000 (the Accrued Expenses account) as the Account, 12-2013 as the From Period, and01-2014 as the To Period. You can see that the original batch increased the account by $1000in the 12-2013 financial period and then the reversing batch returned the account balance tozero in the next period (see the screenshot below).
By default, once an auto-reversing batch is posted, the system creates and posts thecorresponding reversing batch to the next financial period. On the General Ledger Preferences(GL102000; Finance > General Ledger > Configuration > Setup) form, you can make the systemgenerate reversing entries on period closing by selecting On Period Closing in the GenerateReversing Entries box. Regardless of this option, the transaction date of the reversing batch is setto the first date of the next financial period.
Figure: The account balance updated by the auto-reversing transaction

| Part 1: General Ledger and Cash Management | 36
The first transaction has been posted to the expense account in the year 2014. During transactionposting, the system has also updated the beginning balance of the Retained Earnings account in theyear 2014 by the net income amount of the year 2013. Since that, the system keeps the beginningbalance of the Retained Earnings account for 2014 actual.
Related LinksAuto-Reversing TransactionsJournal Transactions (GL301000)Account Details (GL404000)General Ledger Preferences (GL102000)

| Part 1: General Ledger and Cash Management | 37
Step 2.5: Searching for a BatchIn this step, you will learn how to search for a specific batch in the system. As examples, you will seehow to find the following batches:
1. The last batch that updated the cash account Checking Account in December 2013
2. The batch that credited this cash account by $250
1. Searching for the Last Batch
To find the last batch that updated Checking Account in 12-2013, do the following:
1. On the Account Summary (GL401000; Finance > General Ledger > Work Area > Explore) form,select the 12-2013 period, and in the table, click 102000 - Checking Account.
2. Click Account Details to open the Account Details (GL404000; Finance > General Ledger >Work Area > Explore) form, which shows the list of transactions within the specified period(12-2013) posted to the account. (You can also select a range of financial periods or specificdates.)
3. On the Account Details (GL404000) form, sort batches by batch number in descending order:Click the Batch Number column, and select Sort Descending from the menu that appears(see the screenshot below). Then select the first batch in the sorted list. This is the last batchposted to 12-2013. The batch was created from the General Ledger module.
Figure: Sorting records by batch number in descending order
4. On the form toolbar, click View Batch (see the following screenshot) to view the details of thebatch.

| Part 1: General Ledger and Cash Management | 38
Figure: The last batch that updated the Checking Account in December 2013
2. Searching for a Transaction by Its Amount
By using the Account Details (GL404000) form, you can find a transaction with a specific amount. Inthis example, you will find the batch for $250 that credited 102000 Checking Account in the 12-2013 or01-2014 period as follows:
1. On the Account Details (GL404000) form, select 102000 Checking Account as the Account,12-2013 as the From Period, and 01-2014 as the To Period.
2. In the Credit Amount column of the table, click the column header to open the filter menu, andselect Is Between in the filter menu. Then enter 200 in the From box and 300 in the To box, asshown in the screenshot below, and click OK to apply the filter.
Figure: Record filtering by the specified range of values in the column
The only batch with an amount that meets the specified range, the batch with the $250 credit amount,is displayed in the table. To view the details of the batch, click View Batch on the form toolbar.
Related LinksAccount Summary (GL401000)Account Details (GL404000)

| Part 1: General Ledger and Cash Management | 39
Step 2.6: Creating a Recurring BatchSome transactions, such as loan payments, repeat regularly. To automate the entry of recurringtransactions in the General Ledger module, you can schedule the generation of batches. To do this, youhave to create a schedule and assign batches to the schedule. To assign a batch to a schedule, youcreate a batch with the Balanced status and add the batch to the schedule. After you have assigned thebatch to the schedule, the batch gets the Scheduled status. The scheduled batch is used as a templatefor the generation of recurring batches according to the schedule; the scheduled batch itself cannot beposted. Batches to be posted are generated when you run the schedule—for example, while you arepreparing to close a financial period.
Suppose your company has to pay $15 interest for a bank loan every month, for a year starting from12-2013. To create a recurring batch for the payment and generate the batch to be posted to 12-2013,you will perform the following actions, which are described below in more detail:
1. Create the recurring batch for the $15 interest payment.
2. Create the schedule and assign the recurring batch to the schedule.
3. Run the schedule to generate the batch to be posted to 12-2013.
4. Release and post the generated batch.
1. Create the Recurring Batch
To create the recurring batch, on the Journal Transactions (GL301000; Finance > General Ledger >Work Area > Enter) form, create a new batch with the following parameters:
• Hold: Cleared (sets the Balanced status for the batch)
• Transaction Date: 12/25/2013
• Post Period: 12-2013
• Description: Interest payment for the bank loan
• Credit entry: 102000 (Checking Account), $15
• Debit entry: 675000 (Interest Expense), $15
Save the batch you have created.
2. Create the Schedule for the Batch
To schedule a single batch, while you are still on the Journal Transactions (GL301000) form, select Addto Schedule on the Actions menu on the form toolbar. This action opens the Recurring Transactions(GL203500; Finance > General Ledger > Work Area > Manage) form and automatically assign thebatch to the new schedule. Configure a schedule to repeat the batch 12 times, on the 25th day of eachmonth, by specifying the following settings:
• Start Date: 12/1/2013 (or any date that is earlier than the needed first execution date)
• Execution Limit (times): 12
• Schedule Type: Monthly
• Every 1 Month(s)
• On Day: 25
• Description: Interest payment for the bank loan
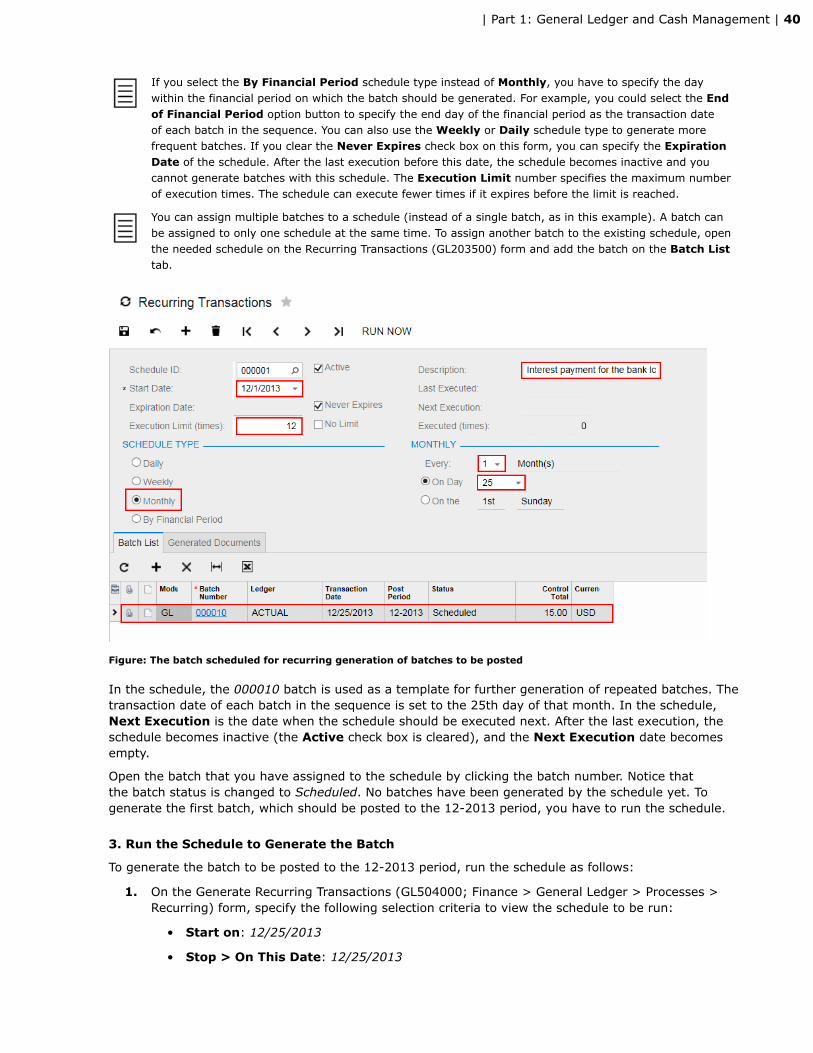
These settings, which are shown on the screenshot below, specify that each batch will be generatedwith the transaction date set to the 25th day of the month, starting from December (because the StartDate is in December and is before December 25). Save the schedule.
| Part 1: General Ledger and Cash Management | 40
If you select the By Financial Period schedule type instead of Monthly, you have to specify the daywithin the financial period on which the batch should be generated. For example, you could select the Endof Financial Period option button to specify the end day of the financial period as the transaction dateof each batch in the sequence. You can also use the Weekly or Daily schedule type to generate morefrequent batches. If you clear the Never Expires check box on this form, you can specify the ExpirationDate of the schedule. After the last execution before this date, the schedule becomes inactive and youcannot generate batches with this schedule. The Execution Limit number specifies the maximum numberof execution times. The schedule can execute fewer times if it expires before the limit is reached.
You can assign multiple batches to a schedule (instead of a single batch, as in this example). A batch canbe assigned to only one schedule at the same time. To assign another batch to the existing schedule, openthe needed schedule on the Recurring Transactions (GL203500) form and add the batch on the Batch Listtab.
Figure: The batch scheduled for recurring generation of batches to be posted
In the schedule, the 000010 batch is used as a template for further generation of repeated batches. Thetransaction date of each batch in the sequence is set to the 25th day of that month. In the schedule,Next Execution is the date when the schedule should be executed next. After the last execution, theschedule becomes inactive (the Active check box is cleared), and the Next Execution date becomesempty.
Open the batch that you have assigned to the schedule by clicking the batch number. Notice thatthe batch status is changed to Scheduled. No batches have been generated by the schedule yet. Togenerate the first batch, which should be posted to the 12-2013 period, you have to run the schedule.
3. Run the Schedule to Generate the Batch
To generate the batch to be posted to the 12-2013 period, run the schedule as follows:
1. On the Generate Recurring Transactions (GL504000; Finance > General Ledger > Processes >Recurring) form, specify the following selection criteria to view the schedule to be run:
• Start on: 12/25/2013
• Stop > On This Date: 12/25/2013

| Part 1: General Ledger and Cash Management | 41
The table lists only active schedules that have a Next Execution date within the specified dates(see the screenshot below). If no Start On date is selected, the table includes all schedules thathave a Next Execution date not later than the stop date.
Figure: Selection of schedules to run
2. Select the After running this number of schedules option button and set the number to 1.
You have to select a Stop condition before running the schedule. The After running thisnumber of schedules option button specifies the number of times the system should executethe schedule. With the number set to 1, the system will process one iteration of the scheduleand generate the only batch in the 12-2013 period. If you select the On this date option button,the system will continue generating batches until the next execution date is later than thespecified stop date.
3. Select the schedule (that is, select the check box for it) and click Run Selected on the formtoolbar to generate the batch according to the schedule.
When you run the schedule, the system generates a batch with the Balanced status and thetransaction date set according to the schedule. After the generation of each batch, the systemupdates the Next Execution date of the schedule.
4. After the processing is complete, click the schedule with ID 000001.
The Recurring Transactions (GL203500) form appears. On the Generated Documents tab, youcan find the batch that has been generated from the recurring batch. In the schedule summary,you can see that the Next Execution date has been updated to 1/25/2014.
4. Release and Post the Batch
You now have one balanced batch in the General Ledger module—that is, the batch generated for the12-2013 period, which hasn't been posted yet. Before you close the 12-2013 period in the GeneralLedger module, which you will do in the next lesson, you have to release and post all batches. Sorelease and post the generated batch by using the Release Transactions (GL501000; Finance > GeneralLedger > Processes > Daily) form.
Related LinksRecurring Journal TransactionsJournal Transactions (GL301000)Recurring Transactions (GL203500)Generate Recurring Transactions (GL504000)Release Transactions (GL501000)

| Part 1: General Ledger and Cash Management | 42
Additional InformationYou can use the following information for additional reading, but these concepts are outside of thescope of this course.
Currencies
You can use multiple currencies in the system. The branch specifies the base currency for the company.For more information about the use of multiple currencies in the system, see Currency Management inthe Acumatica ERP User Guide.
In a batch, all journal entries use the same currency, but not necessary the base currency (see ForeignCurrency Transactions for details).
Subaccounts
In addition to accounts, you can use subaccounts in the system, although we don't use them in thiscourse. For more information on subaccounts, see Example of Subaccount Definition and Account andSubaccount Identifiers in the Acumatica ERP User Guide.

| Part 1: General Ledger and Cash Management | 43
Lesson SummaryIn this lesson, you have learned how to work with batches in the General Ledger module. You havelearned how to enter a batch manually in the module, how to reverse a batch, and how to set up anduse an auto-reversing batch.
A batch contains transactions that are posted to the General Ledger module. By using the JournalTransactions (GL301000) form, users can enter batches manually; they can also use this form toview the batches that have been generated from all modules of the system. Each batch needs to bereleased and posted: The release process makes the batch ready for posting, and the posting processupdates general ledger accounts with transaction amounts. Once a batch has been released, it cannotbe modified or deleted. To reverse the impact of the transactions of a batch on general ledger accounts,you can reverse the batch by using the Reverse action on the Journal Transactions (GL301000) form.You can also make auto-reversing batches that are reversed automatically on the first day of the nextperiod. Also, you can automate the generation of recurring transactions by scheduling them.
Now you also know how to view the batches that have updated certain accounts. On the AccountDetails (GL404000) form, you can view all batches posted to the account. You can filter the tablecontents on the form to search for individual batches that match the specified criteria.
Review Questions
• How do you process general ledger transactions in the system?
• What are the conditions that must exist for you to be able to delete a batch?
• How do you schedule recurring transactions?
| Part 1: General Ledger and Cash Management | 44
Lesson 3: Financial Period ClosingIn this lesson, you will learn how to close financial periods in Acumatica ERP.
In this lesson, you will review the trial balance for the last financial period of 2013 and then close allthe periods of the year 2013. After that, you will learn how to post a transaction to a closed period byposting a utilities bill to the closed period 12-2013.
Lesson Objectives
In this lesson, you will learn how to perform the following tasks in the General Ledger module:
• Generating the trial balance
• Closing a financial period
• Posting a transaction to a closed financial period

| Part 1: General Ledger and Cash Management | 45
Closing of Accounts and Period Closing ProcedureIn Acumatica ERP, the temporary accounts (income, expenses, and Year-to-Date Net Income) areclosed at the end of a financial year. A financial year consists of periods, which you can close to preventnew transactions from being posted to the periods. The following processes are described in greaterdetail below:
• Closing of Accounts
• Period Closing Procedure
Closing of Accounts
At the beginning of every financial year, the balances of the temporary accounts (income, expense, andYear-To-Date Net Income) are always equal to zero. During the year, the company's net income (orloss) amount is accumulated in the Year-to-Date (YTD) Net Income account. The system updates theYTD Net Income balance during the posting of every transaction to an income or expense account.
At the end of the financial year, the temporary accounts must be closed and the net income amountmust be transferred to the Retained Earnings account. You do not have to take any action to closethe accounts in the system. For every financial year, the beginning balance of the Retained Earningsaccount is always actual and includes the net income of the previous year (if any). When the systemupdates the balance of the YTD Net Income account, it also updates the beginning balance of theRetained Earnings account in the next financial years for which the financial periods are defined.
The system doesn't generate any update entries to the YTD Net Income and Retained Earnings accounts.
Closing a financial period doesn't affect the account balances. If you post a transaction to an income orexpense account in a closed year (a year in which the last financial period is closed), the system alsoupdates the YTD Net Income account balance in the financial year of the transaction and the RetainedEarnings account in the next financial years.
Period Closing Procedure
After all the needed transactions have been posted to a financial period and all figures have beenverified, you can close the financial period in the system to prevent users from posting new transactionsto this period.
Financial periods can be closed starting from the first one of the first financial year. You can closemultiple periods at once (for instance, all periods of a year). You cannot close a financial period if theprevious one hasn't been closed yet. Once closed, the period cannot be opened again, although youcan allow users to enter documents and post transactions to the period by selecting the Allow Postingto Closed Periods check box on the General Ledger Preferences (GL102000; Finance > GeneralLedger > Configuration > Setup) form, as the following diagram shows. To prevent new documentsand transactions from being posted to the period, you can deactivate the period. At any time, you canactivate or deactivate any financial period in the system.
To close a financial period in the system (process 4 on the diagram below), you have to close the periodin the financial modules as follows:
1. Close the financial period in the subledger modules (Cash Management, Accounts Receivable,Accounts Payable, Inventory, and Fixed Assets) you are using in any order.
Once the period is closed in a subledger module, you cannot create documents for this period inthe module unless the Allow Posting to Closed Periods check box is selected on the GeneralLedger Preferences (GL102000) form.
Period closing in the Cash Management, Accounts Payable, and Accounts Receivable modules isdescribed later in this course. In this lesson, you are not using any of the subledger modules yet, sothere is nothing to close in them and you can skip this step.
2. Close the financial period in the General Ledger module.

| Part 1: General Ledger and Cash Management | 46
Once the period is closed in the General Ledger module, you cannot create batches to be postedto the period unless the Allow Posting to Closed Periods check box is selected on the GeneralLedger Preferences (GL102000) form.
You can make the system generate auto-reversing batches when you close a financial period in the GeneralLedger module. To do this, set the Generate Reversing Entries option to On Period Closing on theGeneral Ledger Preferences (GL102000) form.

| Part 1: General Ledger and Cash Management | 47
Figure: Posting transactions to financial periods
Related LinksPeriod-End Closing ProceduresYTD Net Income and Retained Earnings Accounts

| Part 1: General Ledger and Cash Management | 48
Step 3.1: Reviewing the Trial Balance and History ofTransactions
In this step, you will generate and review the following reports in preparation for closing the period:
1. The trial balance summary for 12-2013
2. The list of transactions by all accounts for the 2013 year
3. The list of transactions for the specified account (Checking Account) for the 2013 year
The following sections describe the tasks you need to perform to gather needed period-closinginformation.
1. Generate the Trial Balance Summary Report
Acumatica ERP provides two representations of the trial balance. The representation is set in the Signof the Trial Balance box on the General Ledger Preferences (GL102000; Finance > General Ledger >Configuration > Setup) form:
• Normal balance (default): With this representation, all accounts are listed in the report groupedby account type. It includes the Year-to-Date Net Income account, which accumulates thecompany's net income for the start of the current financial year. The Year-to-Date Net Incomeamount is included in the liability total, and the asset total is equal to the liability total in thereport. The report shows the account balances with their normal sign—that is, for income andliability accounts, the sign of the beginning or ending balance is positive if the account has apositive credit balance; for asset and expense accounts, the sign of the beginning or endingbalance is positive if the account has a positive debit balance.
• Reversed balance: With this representation, all accounts are listed in the report except for theYear-to-Date Net Income account. In this representation, the signs of the beginning and endingbalances of liability and income accounts are reversed. The total balance of the accounts is equalto zero in the report.
The Sign of the Trial Balance option also affects the data displayed on inquiry forms, such as theAccount Summary (GL401000; Finance > General Ledger > Work Area > Explore) form.
Complete the following steps to prepare the trial balance for the 12-2013 financial period (the lastfinancial period of 2013):
1. Open the Trial Balance Summary (GL632000; Finance > General Ledger > Report > Balance)report form, and set Financial Period to 12-2013.
2. Click Run Report to generate the report for the specified period.
By default, the system generates the trial balance that lists the account balances according tothe normal balance representation (see the screenshot below). The accounts that have beginningand ending balances of zero are not listed, because the Suppress Zero Balances check boxwas selected by default on the report form.

| Part 1: General Ledger and Cash Management | 49
Figure: The trial balance summary for 12-2013
You can print the report in PDF or Microsoft Excel format by clicking the appropriate button onthe report toolbar.
You can change the order of account types in the report by selecting a different Chart ofAccounts Order option on the General Ledger Preferences (GL102000) form.
2. Generate the Transactions for Period Report
To review the transactions that have updated GL accounts within the specified financial periods, youwill use the Transactions for Period (GL633000; Finance > General Ledger > Reports > Balance) reportform. Complete the following instructions to view the list of transactions for the year 2013:
1. On this report form, select 12-2013 in the Start Period and End Period boxes, because it is theonly period of 2013 that has transactions.
If you needed to select transactions for all periods of 2013, you would set Start Period to the firstfinancial period of 2013 (01-2013) and the End Period to the last financial period (12-2013).
2. Leave the default values for the other parameters, and click Run Report to generate the reportfor the specified period.
The system generates the list of transactions that occurred in 12-2013. The transactions aregrouped by GL account (as shown in the screenshot below).

| Part 1: General Ledger and Cash Management | 50
Figure: The list of transactions for 12-2013
3. Generate the Transactions for Account Report
To get the list of transactions for a specified account, you can use the Transactions for Account(GL633500; Finance > General Ledger > Reports > Balance) report form. Complete the following stepsto view the list of transactions posted to Checking Account in 12-2013:
1. On this report form, specify the following report parameters:
• Start Period: 12-2013
• End Period: 12-2013
• Account: Checking Account (102000)
2. Leave the default values for the other parameters, and click Run Report to generate the report.
The system generates the list of transactions that have updated Checking Account during the12-2013 financial period (see the screenshot below).

| Part 1: General Ledger and Cash Management | 51
Figure: The list of transactions for the Checking Account in 12-2013
Related LinksTrial Balance Summary (GL102000)Transactions for Period (GL633000)Transactions for Account (GL633500)General Ledger Preferences (GL102000)

| Part 1: General Ledger and Cash Management | 52
Step 3.2: Closing a Financial PeriodIn this step, you will review and analyze the trial balance of the 01-2014 period, which is the firstperiod of the next financial year. After that, you will learn how to close financial periods in the GeneralLedger module by closing all periods of the year 2013. You will perform the following tasks:
1. Review the trial balance
2. Close the financial periods
The tasks are described in greater detail in the following sections.
1. Review the Trial Balance
You will first review the trial balance of the 01-2014 period. To complete this task, do the following:
1. On the Trial Balance Summary (GL632000; Finance > General Ledger > Reports > Balance)report form, select the 01-2014 financial period.
2. Clear the Suppress Zero Balances check box to include in the report the accounts that havebalances of zero.
3. Leave the default values for the other parameters, and click Run Report to generate the report.
The asset total is equal to the liability total because the YTD Net Income from the 2013 yearhas been transferred to Retained Earnings for 01-2014. The Retained Earnings account holdsthe net income accumulated on the YTD Net Income account over the year 2013 (see thefollowing screenshot). The beginning balances of the income and expense accounts are zero; theending balances of the balance sheet accounts are carried down from the 12-2013 period as thebeginning balances of the accounts in the 01-2014 period.
Figure: The trial balance for 01-2014
You can generate the year-end trial balance, by selecting the 12-2013 financial period on the reportform, and compare it with the trial balance for 01-2014.
2. Close the Financial Periods
Complete the following steps to close the financial periods of the year 2013:
1. On the Close Financial Periods (GL503000; Finance > General Ledger > Processes > Closing)form, select all periods from the list. (You can select only the check box for 12-2013; the othercheck boxes will become selected automatically.)
The form lists all open financial periods of the year 2013. You cannot close a financial period if aprevious period is open.

| Part 1: General Ledger and Cash Management | 53
2. Before closing the periods, on the form toolbar, click Print Open Documents. This brings up theOpen GL Documents (GL656000; Finance > General Ledger > Reports > Audit) report form in anew tab. Run the report to view the list of GL batches that haven't been posted in the selectedperiods. The list should be empty.
You cannot close a financial period until there are no batches with statuses of On Hold, Balanced,or Unposted in the period.
3. Return to the Close Financial Periods (GL503000) form, and click Close Periods (as shown inthe following screenshot) to initiate the closing of the selected financial periods in the GeneralLedger module.
Figure: The financial periods to be closed in the General Ledger module
After all financial periods have been successfully closed, the list of financial periods of the next yearappears. The periods that you have closed are now unavailable for posting new batches. You can usethe period closing process to prevent users from posting to a period after all the needed transactionsare posted and all figures are verified.
Related LinksPeriod-End Closing ProceduresGeneral Ledger Preferences (GL102000)Close Financial Periods (GL503000)YTD Net Income and Retained Earnings AccountsTrial Balance Summary (GL102000)

| Part 1: General Ledger and Cash Management | 54
Step 3.3: Posting a Transaction to a Closed PeriodIn this step, you will learn how to enter and post a transaction to a closed period. Complete thefollowing steps to record the utilities expenses to the closed period, 12-2013:
1. On the General Ledger Preferences (GL102000; Finance > General Ledger > Configuration >Setup) form, select the Allow Posting to Closed Periods check box.
2. On the Journal Transactions (GL301000); Finance > General Ledger > Work Area > Enter) form,create a batch that records the payment for the utilities bill to the 12-2013 period by specifyingthe following settings and clicking Save:
• Transaction Date: 12/29/2013
• Post Period: 12-2013
• Description: Payment for the utilities bill
• Credit Amount: 102000 (Checking Account), $200
• Debit Amount: 780000 (Utilities Expense); $200
The system displays a warning message that you are entering the transaction to a closedperiod but allows further processing of the transaction because the Allow Posting to ClosedPeriods check box is selected on the General Ledger Preferences (GL102000) form. (If thecheck box were cleared, the system would display an error message and not allow users to entertransactions to closed periods.)
In Post Period, you cannot select a closed period from the list, but you can type it manually.
3. Release and post the batch.
After the batch is posted, you can make sure that the recorded expense decreased the balanceof the YTD Net Income account for 2013. To do this, review the account balances in the 12-2013period by using the Account Summary (GL401000; Finance > General Ledger > Work Area >Explore) form. In the 01-2014 period, the Retained Earnings account balance has also beenupdated and decreased by $200. (Now the account balance is $35, as you can see in thefollowing screenshot.)
Figure: The Retained Earnings account balance has been decreased
If you want to allow posting only to a specific closed period, activate only this period and make otherclosed periods inactive.
Related Links
| Part 1: General Ledger and Cash Management | 55
General Ledger Preferences (GL102000)Journal Transactions (GL301000)Account Summary (GL401000)

| Part 1: General Ledger and Cash Management | 56
Additional InformationYou can use the following information for additional reading, but these concepts are outside of thescope of this course.
Financial Statements
You can prepare the financial statements, which include the balance sheet, the income statement (profitand loss), and the statement of cash flows. You can also customize these reports by using the web-based Analytical Report Manager tool. For more information, see Analytical Report Manager in theAcumatica ERP User Guide.

| Part 1: General Ledger and Cash Management | 57
Lesson SummaryIn this lesson, you have learned about the procedures for closing a financial period in Acumatica ERP.You have also learned how to review the trial balance and how to post a transaction to a closed financialperiod.
The system handles the Year-To-Date Net Income and Retained Earnings accounts in a specific way.The Year-To-Date Net Income account automatically accumulates the net income since the beginningof every financial year. The system doesn't generate any transactions to the Year-To-Date Net Incomeaccount. The net income amount over a financial year is automatically transferred to the RetainedEarnings account in the next financial years for which the periods are defined in the system. Thebeginning balances of the income and expense accounts are always equal to zero in the first financialperiod of every year.
You can use the functionality of the period closing in the financial modules to prevent users fromentering new documents and transactions to a period after all figures have been verified and disclosedin the financial reports. The closing of the period is complete in the system after the period is closed inthe General Ledger module. To close financial periods in the General Ledger module, you use the CloseFinancial Periods (GL503000) form of this module. If you need to post a transaction to a closed periodfor some reason, you can select the Allow Posting to Closed Periods check box in the preferencesof the General Ledger module. To prevent posting to a financial period, you can deactivate the period inthe system.
Review Questions
• Do you have to close all financial periods of a year to close the temporary accounts (income,expense, and YTD Net Income) at the end of the financial year?
• Can you post a transaction to a closed financial period?
• How do you prevent posting transactions to a financial period?
• Does the system generate any transactions when it transfers the YTD-Net Income amount to theRetained Earnings account?

| Part 1: General Ledger and Cash Management | 58
Lesson 4: Introduction to Cash ManagementIn this lesson, you will learn how to record cash operations by using the Cash Management moduleof Acumatica ERP. You will create cash accounts for MyCompany and record a funds transfer fromthe checking account to the savings account. Then you will record two cash entries: the bank servicecharge for the checking account, and the interest earned on the savings account. At the end of thelesson, you will create payment methods that will be used further in the Accounts Receivable andAccounts Payable modules.
Lesson Objectives
In this lesson, you will learn how to make funds transfers and cash transactions by using the CashManagement module, including determining how to do the following:
• Specify the initial settings of the module
• Create a cash account
• Transfer funds between cash accounts
• Make a cash entry
• Create a payment method

| Part 1: General Ledger and Cash Management | 59
Step 4.1: Adding General Ledger AccountsIn this step, you will add to the chart of accounts new accounts that will be used in the CashManagement module. On the Chart of Accounts (GL202500; Finance > General Ledger > Configuration> Manage) form, add each of the following accounts to the list by clicking Add Row and specifying theappropriate settings for each account:
1. Cash in Transit Account: This account will be used for funds transfers, which you can make in theCash Management module. For the account, specify the following settings:
• Account: 105000
• Account Class: CASHASSET
• Description: Cash in Transit Account
2. Cash on Hand USD: This account will be used for the cash payment method that you define inthe Cash Management module. For the account, specify the following settings:
• Account: 101000
• Account Class: CASHASSET
• Description: Cash on Hand
3. Savings Account USD: This account will be used for a funds transfer and a cash transaction thatrecords interest earned on the account. Specify the following settings for the account:
• Account: 104000
• Account Class: CASHASSET
• Description: Savings Account
4. Interest Income: This offset account (contra account) will be credited when interest earned isdebited to a cash account. For the account, specify the settings as follows:
• Account: 405000
• Account Class: ININTEREST
• Description: Interest Income
5. Bank Service Charges: This offset account is debited when a cash account is credited for a bankfee. Specify the following settings for the account:
• Account: 620000
• Account Class: EXBANK
• Description: Bank Service Charges
After you add these accounts, the chart of accounts will look like the one shown in the followingscreenshot.
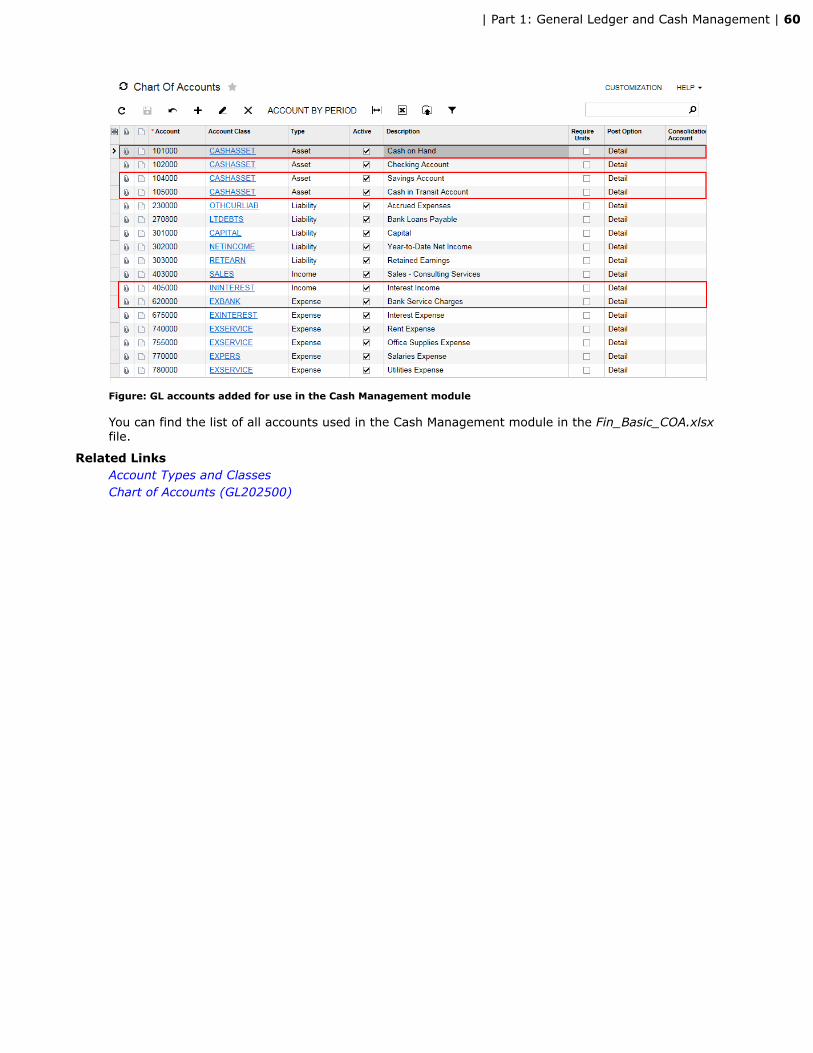
| Part 1: General Ledger and Cash Management | 60
Figure: GL accounts added for use in the Cash Management module
You can find the list of all accounts used in the Cash Management module in the Fin_Basic_COA.xlsxfile.
Related LinksAccount Types and ClassesChart of Accounts (GL202500)

| Part 1: General Ledger and Cash Management | 61
Step 4.2: Configuring the Cash Management ModuleThe Cash Management module is dedicated to operations that involve cash. In this module, you can:
• Maintain cash accounts.
• Enter cash transactions as cash entry documents from which the system automatically generatesthe appropriate general ledger batches.
• Enter funds transfers through documents from which the system automatically generates theappropriate GL batches.
• Manage payment methods used in the Accounts Receivable and Accounts Payable modules.
• Perform many other cash management tasks, which include obtaining cash flow forecasts,performing reconciliation of bank statements, managing bank deposits, and reclassifying unknownpayments. (All of these tasks are outside of the scope of this course.)
In this step, you will specify the initial settings the system will use when you start using the CashManagement module to record cash operations. Complete the following instructions:
1. On the Cash Management Preferences (CA101000; Finance > Cash Management > Configuration> Setup) form (in the Reconciliation Settings section), set Cash-in-Transit Account to Cashin Transit Account (105000).
The Cash-in-Transit Account setting specifies the intermediate account for funds transfers.For example, if the post period of the transfer-out and transfer-in are different (for example,because of a processing delay
at the bank), the funds will be moved first to the cash-in-transit account, and then from thisaccount to the destination account.
2. In the Posting and Release Settings section, select the Automatically Post to GL onRelease check box.
As soon as you release a document from the Cash Management module, the systemautomatically generates and releases the batch in the General Ledger module. The releasedbatch has the Unposted status until you post the batch in the General Ledger module. If theAutomatically Post to GL on Release check box is selected, the system immediately posts thegenerated GL batch when you release the document from the Cash Management module.
3. In the Cash Transactions Approval section, clear the Require Approval check box.
Cash transactions can be configured to require approval before release, but we won't use theapproval scheme in this course.
4. Click Save to save your changes.
Now the Cash Management module is ready for use.
In the Cash Management module, you can create documents dated to active periods, including closedones if the Allow Posting to Closed Periods check box is selected on the General Ledger Preferences(GL102000; Finance > General Ledger > Configuration > Setup) form. If this check box is cleared,you can create documents that are dated to only periods that are open in the Cash Managementmodule. After you start using the Cash Management module, a financial period should be closed inCash Management before it can be closed in General Ledger. An example of period closing in CashManagement is described in Lesson 6.7, Closing the Financial Period.
Related LinksOverview (Cash Management)Types of Cash TransactionsCash Management Preferences (CA101000)
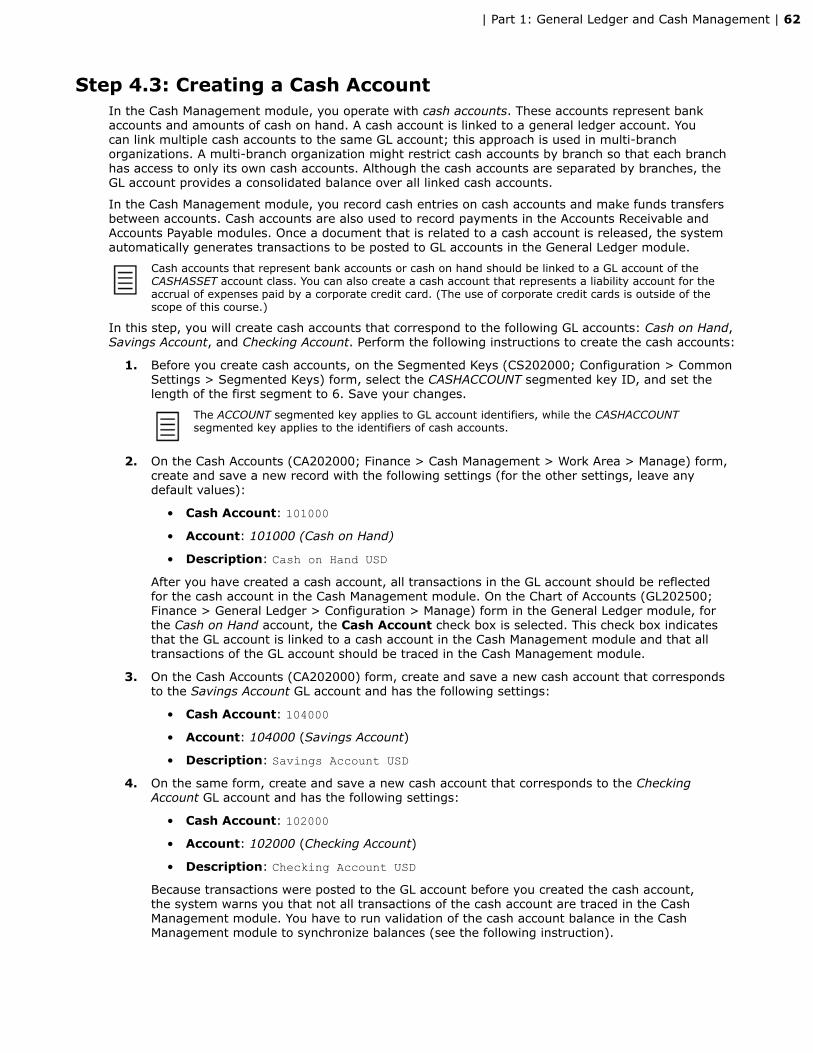
| Part 1: General Ledger and Cash Management | 62
Step 4.3: Creating a Cash AccountIn the Cash Management module, you operate with cash accounts. These accounts represent bankaccounts and amounts of cash on hand. A cash account is linked to a general ledger account. Youcan link multiple cash accounts to the same GL account; this approach is used in multi-branchorganizations. A multi-branch organization might restrict cash accounts by branch so that each branchhas access to only its own cash accounts. Although the cash accounts are separated by branches, theGL account provides a consolidated balance over all linked cash accounts.
In the Cash Management module, you record cash entries on cash accounts and make funds transfersbetween accounts. Cash accounts are also used to record payments in the Accounts Receivable andAccounts Payable modules. Once a document that is related to a cash account is released, the systemautomatically generates transactions to be posted to GL accounts in the General Ledger module.
Cash accounts that represent bank accounts or cash on hand should be linked to a GL account of theCASHASSET account class. You can also create a cash account that represents a liability account for theaccrual of expenses paid by a corporate credit card. (The use of corporate credit cards is outside of thescope of this course.)
In this step, you will create cash accounts that correspond to the following GL accounts: Cash on Hand,Savings Account, and Checking Account. Perform the following instructions to create the cash accounts:
1. Before you create cash accounts, on the Segmented Keys (CS202000; Configuration > CommonSettings > Segmented Keys) form, select the CASHACCOUNT segmented key ID, and set thelength of the first segment to 6. Save your changes.
The ACCOUNT segmented key applies to GL account identifiers, while the CASHACCOUNTsegmented key applies to the identifiers of cash accounts.
2. On the Cash Accounts (CA202000; Finance > Cash Management > Work Area > Manage) form,create and save a new record with the following settings (for the other settings, leave anydefault values):
• Cash Account: 101000
• Account: 101000 (Cash on Hand)
• Description: Cash on Hand USD
After you have created a cash account, all transactions in the GL account should be reflectedfor the cash account in the Cash Management module. On the Chart of Accounts (GL202500;Finance > General Ledger > Configuration > Manage) form in the General Ledger module, forthe Cash on Hand account, the Cash Account check box is selected. This check box indicatesthat the GL account is linked to a cash account in the Cash Management module and that alltransactions of the GL account should be traced in the Cash Management module.
3. On the Cash Accounts (CA202000) form, create and save a new cash account that correspondsto the Savings Account GL account and has the following settings:
• Cash Account: 104000
• Account: 104000 (Savings Account)
• Description: Savings Account USD
4. On the same form, create and save a new cash account that corresponds to the CheckingAccount GL account and has the following settings:
• Cash Account: 102000
• Account: 102000 (Checking Account)
• Description: Checking Account USD
Because transactions were posted to the GL account before you created the cash account,the system warns you that not all transactions of the cash account are traced in the CashManagement module. You have to run validation of the cash account balance in the CashManagement module to synchronize balances (see the following instruction).
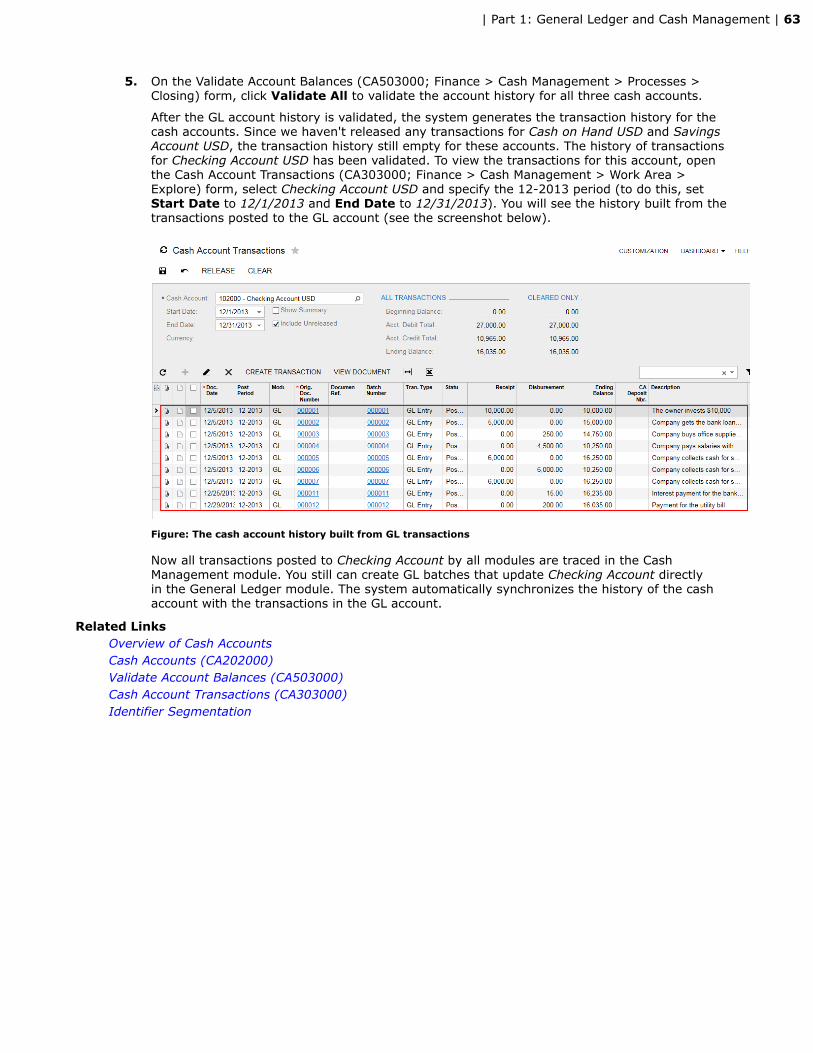
| Part 1: General Ledger and Cash Management | 63
5. On the Validate Account Balances (CA503000; Finance > Cash Management > Processes >Closing) form, click Validate All to validate the account history for all three cash accounts.
After the GL account history is validated, the system generates the transaction history for thecash accounts. Since we haven't released any transactions for Cash on Hand USD and SavingsAccount USD, the transaction history still empty for these accounts. The history of transactionsfor Checking Account USD has been validated. To view the transactions for this account, openthe Cash Account Transactions (CA303000; Finance > Cash Management > Work Area >Explore) form, select Checking Account USD and specify the 12-2013 period (to do this, setStart Date to 12/1/2013 and End Date to 12/31/2013). You will see the history built from thetransactions posted to the GL account (see the screenshot below).
Figure: The cash account history built from GL transactions
Now all transactions posted to Checking Account by all modules are traced in the CashManagement module. You still can create GL batches that update Checking Account directlyin the General Ledger module. The system automatically synchronizes the history of the cashaccount with the transactions in the GL account.
Related LinksOverview of Cash AccountsCash Accounts (CA202000)Validate Account Balances (CA503000)Cash Account Transactions (CA303000)Identifier Segmentation

| Part 1: General Ledger and Cash Management | 64
Step 4.4: Making a Funds TransferTo record a funds transfer, you create a corresponding document in the Cash Management module. Youcan make fund transfers between cash accounts maintained in different currencies if multi-currencysupport is enabled in your system. In a funds transfer document, you can record transfer expenses andtransferred amounts. During processing, the fund transfer has the following statuses:
• On Hold: The funds transfer is being edited and cannot be released.
• Balanced: The funds transfer has all needed information and can be released.
• Released: The funds transfer has been released, and the transactions were generated to beposted to general ledger accounts in the General Ledger module.
In this step, you will transfer funds from the checking cash account to the saving cash account. You willtransfer $1000 from Checking Account USD to Savings Account USD as described below:
1. On the Funds Transfers (CA301000; Finance > Cash Management > Work Area > Enter) form,create and save a new record with the following settings (for the other settings, leave anydefault values):
• Description: Savings Account Replenishment for $1000
• Hold: Cleared (to save the document with the Balanced status)
• Source Account section, Account: 102000 (Checking Account USD)
• Source Account section, Transfer Date: 1/1/2014
• Source Account section, Document Ref.: 20140101 (just for an example)
• Source Account section, Amount: 1000.00
• Destination Account section, Account: 104000 (Savings Account USD)
• Destination Account section, Receipt Date: 1/1/2014
If document reference numbers are not required in your company, you can make them optionalin the system by clearing the Require Document Ref. Nbr. on Entry check box on the CashManagement Preferences (CA101000; Finance > Cash Management > Configuration > Setup) form.
As soon as you save the funds transfer, the system automatically assigns the transfer numberbased on the CATRANSFER numbering sequence, which is specified by default for funds transferson the Cash Management Preferences (CA101000) form.
2. Click Release to release the document.
After you release the document, the system generates transactions to be posted to the GLaccounts. In the Batch Number boxes, you can see the number of the GL batch that has beengenerated in the General Ledger module. The system can generate separate transfer-in andtransfer-out GL batches for a multi-currency transfer. In this case, the system created only onebatch for the transfer, as shown in the screenshot below.

| Part 1: General Ledger and Cash Management | 65
Figure: The released funds transfer document
You can click the batch number to view the GL batch; you can also open the batch from the JournalTransactions (GL301000) form. In the Module box (see the following screenshot), CA means thatthe batch was generated from the Cash Management module. The batch contains the credit entryfor Checking Account and the debit entry for Savings Account. The system has already posted thetransaction to the GL accounts because the Automatically Post to GL on Release check box isselected on the Cash Management Preferences (CA101000) form. In the table, the Ref. Numbercolumn displays the reference number of the source document the generation of the batch was basedon. Because this batch was generated from the funds transfer, this is the number of the funds transferdocument. You can open the funds transfer by clicking View Source Document on the table toolbar.

| Part 1: General Ledger and Cash Management | 66
Figure: The GL batch created for the funds transfer
The funds transfer is reflected for the cash account, as you can see on the Cash Account Transactions(CA303000; Finance > Cash Management > Work Area > Explore) form. In the Tran. Type column,Transfer Out denotes the decrease in the cash account balance for the amount displayed in theDisbursement column (see the last row in the following screenshot).
Figure: The funds transfer document in the history of cash account transactions
If you also view the list of transactions for the destination cash account, Savings Account USD, on thisform, you can see the Transfer In transaction for the amount recorded in the Receipt column.
If you have released an incorrect transfer and want to correct the transactions, you can first create andrelease a reversing transfer, and then create the correct transfer.
Related LinksTypes of Cash TransactionsFunds Transfers (CA301000)Journal Transactions (GL301000)Cash Account Transactions (CA303000)

| Part 1: General Ledger and Cash Management | 67
Step 4.5: Creating a Cash Entry TypeTo be able to record cash transactions other than funds transfers, you have to define cash entry typesthat categorize cash operations. You then associate the cash entry types with the cash accounts towhich the cash entries can be recorded. For each entry type, you have to specify the offset accountfrom the chart of accounts. An entry type can be used for receipts or disbursements. A Receipt entrytype, which is linked to an income offset account, is used to record transactions that increase the cashaccount balance. A Disbursement entry type, which is linked to an expense offset account, is used torecord transactions that decrease the cash account balance. You can also create an entry type to recordunknown payments that require reclassification.
When you define an entry type, you have to specify the type of transactions and documents for whichthe entry type can be used:
• CA: The entry types that are used to create receipt and disbursement cash transactions, such ascharges for transfers, bank service charges, or amounts earned on interest-bearing bank accountsor other investments. CA entry types can be used in the Cash Management, Accounts Payable,and Accounts Receivable modules.
• AP: The entry types that are used to create payments and vendor refunds in the AccountsPayable module from the Cash Management module—for example, while users perform a bankreconciliation. AP entry types are used only in the Cash Management module. (These entry typesare outside of the scope of this course.)
• AR: The entry types that are used to create customer payments and refunds in the AccountsReceivable module from the Cash Management module—for example, while users perform a bankreconciliation. AR entry types are used only in the Cash Management module. (These entry typesare outside of the scope of this course.)
In this step, you will define cash entry types and assign them to cash accounts so that you can entercash transactions. Perform the following instructions:
1. On the Entry Types (CA203000; Finance > Cash Management > Configuration > Setup) form,proceed as follows to create the cash entry types to be used to record bank service charges andinterest earned:
a. Create an entry type for recording bank service charges, specify its settings as follows,and save the entry type:
• Entry Type ID: BANKCHARGE
• Disb./Receipt: Disbursement
• Entry Type Description: Bank Service Charges
• Module: CA
• Default Offset Account: 620000 (Bank Service Charges)
In the Module column, you specify the module in which the document will be generated.Thus, CA specifies that the BANKCHARGE entry type is used to create cash transactions.
b. Create an entry type for recording interest earned, specifying the following settings for it,and save the entry type:
• Entry Type ID: INTEREST
• Disb./Receipt: Receipt
• Entry Type Description: Interest Earned
• Module: CA
• Default Offset Account: 405000 (Interest Income)
You have defined two entry types for entering cash transactions in the Cash Management module(as shown in the following screenshot). .

| Part 1: General Ledger and Cash Management | 68
Figure: The entry types defined for use in the Cash Management module
2. On the Cash Accounts (CA202000; Finance > Cash Management > Work Area > Manage)form, specify the entry types that are allowed for cash accounts as follows, so you can entertransactions to the cash accounts:
a. In the Cash Account box, select 102000 - Checking Account USD. On the Entry Typestab, add the BANKCHARGE entry type to the list of entry types allowed for the account, asshown in the screenshot below. Click Save.
Figure: The entry type allowed for the cash account
For the cash account, you can override the default offset account specified for the entrytype. To do this, specify the needed general ledger account in the Offset AccountOverride column for the entry type in the table. If an account is specified in this column, itis used for cash transactions for the cash account. Otherwise, the default offset account isused.
b. Select the other cash account, 104000 - Savings Account USD, and add the INTERESTentry type to the list of entry types allowed for the account. Click Save.
Now the cash accounts are ready to use.
Related LinksEntry TypesEntry Types (CA203000)Cash Accounts (CA202000)

| Part 1: General Ledger and Cash Management | 69
Step 4.6: Creating a Cash EntryCash entry is a document that you create to record cash operations, such as bank charges and interestincome, in the Cash Management module. Once a new cash entry is created, it can be processedfurther. As it is processed, the cash entry can have the following statuses:
1. On Hold: The cash entry is being edited and cannot be released.
2. Pending Approval (applicable only if an approval map is configured for cash transactions): Thecash entry requires approval.
3. Rejected (applicable only if an approval map is configured for cash transactions): The cash entryhas been rejected by an employee who handles the approval.
4. Balanced: The cash entry is ready and can be released.
5. Released: The cash entry has been released, and the general ledger transactions have beengenerated for later posting to the General Ledger module.
The diagram below shows the processing of a cash entry in Acumatica ERP, which proceeds differentlydepending on whether approval is required:
•
•
If the cash entry requires approval, when the entry is ready, its status changes from On Hold toPending Approval. The employee who handles the approval can approve or reject the cash entry. If theemployee approves the cash entry, it gets the Balanced status and can be released. If the employeerejects the cash entry, it can be edited and assigned for approval again. (In this course, you won't usethe approval scheme or configure the approval settings in the Cash Management module.) If approvalis not required in the system, a cash entry can be created with the On Hold status or directly with theBalanced status and then immediately released. To make the default setting Balanced instead of OnHold when users create cash entries, clear the Hold Transactions on Entry check box on the CashManagement Preferences (CA101000; Finance > Cash Management > Configuration > Setup) form.
When the cash entry is released, the system generates and releases the batch of correspondingtransactions in the General Ledger module. The GL batch generally has the Unposted status until youpost the batch to the General Ledger module; you can see the list of not-yet-posted batches on the PostTransactions (GL502000; Finance > General Ledger > Processes > Daily) form. If the AutomaticallyPost to GL on Release check box is selected on the Cash Management Preferences (CA101000) form,the system immediately posts the generated GL batch when you release the cash entry. When thebatch is posted, it updates the balance of the GL account that corresponds to the cash account and thebalance of the offset GL account used in the cash entry.

| Part 1: General Ledger and Cash Management | 70
Figure: Cash entry processing
In this step, you will create and release two cash entries, as described in detail in the followingsections:
1. A receipt type of cash entry for $25 in bank interest earned on Savings Account USD.
2. A disbursement type of cash entry for a $15 bank service fee paid for Checking Account USD.
1. Create a Receipt Cash Entry for Interest Earned
Proceed as follows to create and release a receipt cash entry for $25 interest earned on the SavingsAccount USD account on January 31:
1. On the Transactions (CA304000; Finance > Cash Management > Work Area > Enter) form,create and save a new document with the following settings (see the screenshot below):

| Part 1: General Ledger and Cash Management | 71
• Hold: Cleared
• Cash Account: 104000 (Savings Account USD)
• Entry Type: INTEREST (Interest Earned)
• Document Ref.: 20140131
• Tran. Date: 1/31/2014
• Fin. Period: 01-2014
• Description: $25 Interest Earned on the Savings Account USD in January
• Transaction Details tab, Amount: 25.00
• Transaction Details tab, Offset Account: 405000 (Interest Income)
The Offset Account specifies the account to be credited on release of the cash transaction.The default value is automatically inserted from the cash entry type (the default value forthe INTEREST entry type is 405000). You can override the default offset account for the cashaccount, if needed.
Figure: The cash transaction for interest earned on the savings account
In the optional Inventory ID column of the cash transaction, you can specify a non-stock itemthat contains information that can be used in the cash entry. If you specify an item, by default, thesystem inserts the tax category and offset account of the non-stock item into the transaction detail.(Non-stock items are configured in the Accounts Payable, Accounts Receivable, or Inventory moduleand will be described later in this course). In a cash entry, on the Tax Details tab, you can specifythe taxes on the earned amount if taxes are configured in the system. (However, tax managementis outside of the scope of this course.)
2. Release the cash entry by selecting Actions > Release on the form toolbar.
When the document is released, the system creates a batch to be posted to the General Ledgermodule.
You can release cash entries and funds transfers in any of the following ways:
• By selecting the Release action on the applicable data entry form for the selected entity.
• By using the Release Cash Transactions (CA502000; Finance > Cash Management >Processes > Daily) form; here you can process multiple documents at once.

| Part 1: General Ledger and Cash Management | 72
• By using the Cash Account Transactions (CA303000; Finance > Cash Management > WorkArea > Explore) form. On this form, too, you can process multiple documents at once.
3. On the Financial Details tab, click the batch number (as shown in the screenshot below) toopen the Journal Transactions (GL301000; Finance > General Ledger > Work Area > Enter)form, where you can view the batch that the system has created in the General Ledger modulefor the transaction.
Figure: The link to the GL batch
The batch contains two journal entries that update GL accounts, as the following screenshotshows: Savings Account is debited for $25, and Interest Income is credited for the sameamount. The batch was posted immediately on release of the cash entry document and now hasthe Posted status. From the GL batch, you can navigate to the cash entry document from whichthe batch was generated by clicking View Source Document on the table toolbar.
Figure: The batch created in the General Ledger module for the cash entry

| Part 1: General Ledger and Cash Management | 73
You can find the transaction in the history of either GL account by using the Account Details(GL404000; Finance > General Ledger > Work Area > Explore) form. In this case, you willinstead find the transaction on the Cash Account Transactions (CA303000) form.
4. On the Cash Account Transactions (CA303000) form, select the Savings Account USD cashaccount, and find the cash entry document for the interest earned (see the screenshot below).
The cash entry document has the Cash Entry transaction type in the Tran. Type column; theincrease to Savings Account USD is displayed in the Receipt column. You can open the cashentry document by clicking the transaction and then clicking View Document on the tabletoolbar, or by clicking the link in the Orig. Doc. Number column.
Figure: The cash entry document in the history of cash account transactions
On this form, you can create (by clicking Create Transaction on the table toolbar), release,and clear cash transactions. Clearing a cash transaction makes the Cleared check box selectedfor the cash transaction. (By default, this column is hidden; you can add it to the table by usingthe Column Configuration dialog box.) You can clear cash transactions independently fromthe release of the transactions. Your company's business processes determine whether or not ituses the optional clearing step in cash transaction processing. For example, the clearing of cashtransactions may be used as a preliminary step in bank reconciliation.
2. Create a Disbursement Cash Entry for Bank Service Charge
To create and release a disbursement cash entry for a $15 bank service fee paid for the CheckingAccount USD account on January 31, perform the following instructions:
1. On the Transactions (CA304000) form, create and save a new document with the followingsettings:
• Hold: Cleared
• Cash Account: 102000 (Checking Account USD)
• Entry Type: BANKCHARGE (Bank Service Charges)
• Document Ref.: 20140131
• Tran. Date: 1/31/2014
• Fin. Period: 01-2014
• Description: $15 Bank Service Fee Paid for Checking Account USD in January
• Transaction Details tab, Amount: 15.00

| Part 1: General Ledger and Cash Management | 74
• Transaction Details tab, Offset Account: 620000 (Bank Service Charges)
2. Release the cash entry and open the GL batch that the system generated.
The batch, shown on the Journal Transactions (GL301000) form, contains the credit entry forthe Checking Account GL account and the debit entry for Bank Service Charges (as shown in thefollowing screenshot).
Figure: The batch created in the General Ledger module for the cash entry
3. On the Account Details (GL404000) form, find the batch in the history of transactions posted toChecking Account, as shown in the following screenshot.
From the list of GL transactions, you can navigate to either the GL batch or the source documentby clicking the appropriate button on the form toolbar.
Figure: The batch in the history of GL account transactions
If you have released an incorrect cash transaction, you have to create a reversing cash transaction withnegative amounts, release it, and then create and release the correct transaction.
Related LinksCash Transaction MonitoringTransactions (CA304000)Journal Transactions (GL301000)Cash Account Transactions (CA303000)Account Details (GL404000)

| Part 1: General Ledger and Cash Management | 75
Step 4.7: Creating a Payment MethodCash accounts keep records of incoming and outgoing cash, including the money received fromcustomers and paid by the organization to vendors and others outside the organization. To configurethe ways the money is transferred into and out of the organization, you have to define paymentmethods in the Cash Management module. Once configured, a payment method can be used inincoming payment documents managed in the Accounts Receivable module, outgoing paymentdocuments managed in the Accounts Payable module, or both types of documents.
A payment method can include the following details, as you will see in the examples below:
• All information that the system uses to process a payment. For instance, a payment method thatrepresents wire transfer may require additional bank codes. For payment information, you canspecify input masks and regular expressions that validate the entered data.
• The use of the method—that is, whether the method can be used for customer payments,payments to vendors, or both types of payments.
• The cash accounts that can be used with the payment method. Multiple cash accounts can beused with the same payment method, and multiple payment methods can be used with the samecash account.
• Any additional settings, such as the check printing form to be used and the default cash accountfor the payment method.
• The numbering settings for printed checks created in the Accounts Payable module and paymentsentered in the Accounts Receivable modules. If the payment method represents a payment bya printed check, you can specify the last payment reference number and enable the automaticgeneration of the next numbers individually for each cash account associated with the paymentmethod.
In this step, you will define the following payment methods:
1. CASH: The CASH payment method will be used for customer payments and payments to vendorsin cash. This method links to the Cash on Hand USD cash account and doesn't require anyremittance information.
2. CHECK: The CHECK payment method will be used for payments to and from Checking AccountUSD. For this method, the system will print checks in the Accounts Payable module in thepredefined format.
1. Define the CASH Payment Method
To create the CASH payment method, for use with the Cash on Hand USD cash account in the AccountsReceivable and Accounts Payable modules, perform the following instructions:
1. On the Payment Methods (CA204000; Finance > Cash Management > Configuration > Setup)form, update the existing CASH record to have the following settings:
• Payment Method ID: CASH
• Active: Selected
• Means of Payment: Cash/Check
• Description: Cash Payment
• Use in AP: Selected
• Use in AR: Selected
• Require Remittance Information for Cash Account: Cleared
The selected Means of Payment option determines the additional settings that may beautomatically configured for the payment method. Cash/Check doesn't involve any additionalsettings; you can use Cash/Check for payment methods that represent cash, bank checks, andwire transfers. The Credit Card means of payment, which is used for card payments, adds theappropriate elements to the Settings for Use in AR tab. For this type of payment method, you

| Part 1: General Ledger and Cash Management | 76
have to configure the card processing center. (Card processing is outside of the scope of thiscourse.) The Direct Deposit value isn't currently used.
Because the Use in AP and Use in AR check boxes are selected, the payment method can beused in the Accounts Payable and Accounts Receivable modules, respectively.
2. On the Allowed Cash Accounts tab, add the 101000 (Cash on Hand USD) account to the listof cash accounts allowed for the payment method. For this account, select the Use in AP, Usein AR, AP Default, and AR Default check boxes to allow the use of this cash account with thepayment method in the Accounts Payable and Accounts Receivable modules and make the cashaccount the default account for the payment method for both modules.
3. Save the changes.
Now the payment method for payments in cash (shown in the following screenshot) can be used.Because only one cash account is listed as allowed, the amounts paid in cash can be recorded to onlythe Cash on Hand USD cash account. The CASH payment method has no specific requirements forincoming or outgoing payments, and you don't have to specify any settings on the Settings for Use inAR and Settings for Use in AP tabs.
Figure: The CASH payment method configured for use in AP and AR
2. Define the CHECK Payment Method
Next, you will create the CHECK payment method for use in the Accounts Receivable and AccountsPayable modules with Checking Account USD. Perform the following instructions:
1. On the Payment Methods (CA204000) form, update the existing CHECK record to have thefollowing settings:
• Payment Method ID: CHECK
• Active: Selected
• Means of Payment: Cash/Check
• Description: Check Payment
• Use in AP: Selected
• Use in AR: Selected
• Require Remittance Information for Cash Account: Cleared
2. On the Allowed Cash Accounts tab, add 102000 - Checking Account USD to the list of cashaccounts allowed for the payment method. For this account, select the Use in AP, AP Default,Use in AR, and AR Default check boxes; then select the AP-Suggest Next Number check boxand type 000000 in the AP Last Reference Number box.

| Part 1: General Ledger and Cash Management | 77
3. The AP-Suggest Next Number and AP Last Reference Number settings enable auto-numbering of printed checks in the Accounts Payable module. The first check number will be000001, which is 000000 (the last payment reference number you specified) incremented by1. Each new printed check gets the next number in the sequence: 000002, 000003, and so on.If needed, you could also use prefixes, and the system would increment only the numeric partof the number. The number of the printed check is inserted in the Payment Ref. box of the APcheck; you will learn more about AP checks in the next lessons. The AP Last Reference Numbervalue is updated every time you print a bank check. Therefore, in this column, you can view thelast payment reference number that the system assigned to a printed check. For different cashaccounts, you can use similar or different numbering sequences of printed checks. At any time, youcan disable auto-numeration and then enable it again. Regardless of auto-numbering, the user canmanually specify the payment reference number before printing the check.
4. On the Settings for Use in AP tab, specify the following settings:
• Print Checks: Selected (to require checks to be printed for outgoing payments)
• Report: AP641000
• Lines per Stub: 10
The Report parameter specifies the printable template for checks. You can view the specifiedtemplate by running the Check Form with Remittance (AP641000; Finance >Accounts Payable> Reports > Forms) report. The Lines per Stub parameter specifies the maximum number ofdetail lines that can be printed on the check stub. You specify this number depending on theprintable template. The default Check Form with Remittance (AP641000) printable templatecontains 10 lines that can be printed on the check stub, so you specify 10 in the Lines perStub parameter. If an AP check that you create in the system contains 13 documents to apply,the printed check will contain the first 10 documents listed on the stub, and the remaining3 documents will be printed on the stub of the next check paper, on which the check will bevoided.
Depending on the check paper size, you might need more or fewer than 10 lines on a stub. In thiscase, you have to customize the printable template of the check—that is, remove extra lines or addmore lines to the Check Form with Remittance (AP641000) report and specify the new number oflines in the Lines Per Stub box of the payment method. Customization of reports is outside of thescope of this course.
Now the payment method for outgoing printed checks can be used. For incoming payments, theCHECK payment method has no specific requirements, so you don't need to specify any settings on theSettings for Use in AR tab. The payment method specifies that the amounts paid by check can berecorded to only the Checking Account USD cash account, because it is the only account allowed for thepayment method.
Now both payment methods—CASH and CHECK—are configured and ready for use in the paymentdocuments that you will create in subsequent lessons.
Related LinksCustomer Payment MethodsPayment Methods for VendorsPayment Methods (CA204000)

| Part 1: General Ledger and Cash Management | 78
Additional InformationYou can use the following information for additional reading, but these concepts are outside of thescope of this course.
Multi-Currency Support
You can maintain cash accounts, perform cash transactions, and transfer funds in currencies other thanthe base currency. For more information on currency management, see Currency Management in theAcumatica ERP User Guide.
Bank Reconciliation
In the Cash Management module, you can automate the processing of bank statements to reconcilethe amounts in bank accounts in the system with the amounts on the bank statements. You can alsoreconcile the balances of cash-on-hand accounts with cash receipts and disbursements. For moreinformation on processing bank statements and reconciliation, see Import and Processing of BankStatements and Reconciliation Statements in the Acumatica ERP User Guide.
Reclassification of Payments
In the Cash Management module, you can record cash transactions for unknown payments that willbe reclassified later. For more information, see Reclassification of Payments in the Acumatica ERP UserGuide.
Finance Charges Applied to Payments
In the Cash Management module, you can define cash entry types for recording finance charges appliedto payments that you enter in the Accounts Receivable and Accounts Payable modules. For moreinformation, see Accounting for Financial Charges Applied to Payments in the Acumatica ERP UserGuide.
Cash Transaction Approval
A cash transaction can be automatically assigned to an employee for approval before the transactioncan be released. For more information, see Cash Transaction Approval in the Acumatica ERP UserGuide.
Tax Management
You can specify taxes that are applied to cash transactions, if taxes have been configured in the system.For more information, see Overview (Taxes) in the Acumatica ERP User Guide.

| Part 1: General Ledger and Cash Management | 79
Lesson SummaryIn this lesson, you have learned how to perform cash operations by using the Cash Managementmodule. You create cash accounts on the Cash Accounts (CA202000) form. Each cash account islinked to a general ledger account. Cash accounts are used for recording cash transactions in theCash Management module and to record payments in the Accounts Receivable and Accounts Payablemodules. You can also make funds transfers between cash accounts.
To be able to create cash transactions other than funds transfers, you have to define cash entry typeson the Entry Types (CA203000) form and associate them with cash accounts. Entry types specifywhether a cash transaction is a receipt or disbursement, and they also define the default offset accountfor the cash transaction. You can process cash transactions with only entry types that are allowed for acash account.
The lesson also explains how to create payment methods that will be used for incoming paymentsfrom customers and outgoing payments to vendors. Payment methods contain information the systemuses to process payments. You create them on the Payment Methods (CA204000) form in the CashManagement module and then use in documents managed in the Accounts Receivable and AccountsPayable modules.
Review Questions
• How do you process cash transactions?
• How do you process funds transfers?
• Why do you need to define payment methods?
• Can you configure the use of different cash accounts with the same payment method?

| Part 2: Accounts Payable | 80
Part 2: Accounts Payable
In this part of the course, you will learn how to manage bills and payment documents in the AccountsPayable module of Acumatica ERP. In particular, you will learn how to complete the following tasks:
• Configuring the initial settings of the Accounts Payable module
• Configuring credit terms
• Creating non-stock items
• Creating vendor classes and vendor accounts
• Creating and releasing bills and AP checks
• Reversing bills and voiding AP checks
• Making early payments
• Reviewing vendor balances and reconciling them with general ledger accounts
• Entering and processing debit and credit adjustments and vendor refunds
• Creating and applying prepayments

| Part 2: Accounts Payable | 81
Company Story: VendorsIn this part of the course, MyCompany starts using the Accounts Payable module to work with vendors:OfficeSuppliesCo, UtilitiesCo, AdvertisingCo, and ServiceCo. You will process MyCompany's incomingvendor invoices, credit and debit memos, and refunds in Acumatica ERP. MyCompany purchases officesupplies, advertising, and services and pays for them; it also pays for utilities and rent on differentcredit terms. For some documents, you will take the cash discount offered by the vendor for an earlypayment.
General Ledger Accounts
To record the amounts that you owe to vendors, you will add a new general ledger account to chart ofaccounts, 200000 - Accounts Payable (also referred to as the AP account). You will also add expenseaccounts that will be used to record expenses for goods and services purchased from vendors.
Financial Periods
In this part of the course, you will activate the next two periods, 02-2014 and 03-2014, so that you cancreate documents in and post transactions to these periods. At the end of Lesson 6: Accounts PayableProcess, you will close the 01-2014 period in the Accounts Payable module.
Accounts Payable Documents and Payments
You will start entering sample documents in Lesson 6: Accounts Payable Process. In this lesson, youwill learn all the steps of processing a vendor invoice in the accounts payable process. You will start byentering a bill, and then prepare the payment for it, reconcile the vendor balance with the GL account,and close the financial period. Then, in Lesson 7: Payments in the Cash Discount Period, you will makeearly payments to vendors and take the applicable cash discounts. You will review vendor balances andprepare different reports that show outstanding balances.
In Lesson 8: Adjustments, Vendor Refunds, and Voided Checks, you will process a debit memo receivedfrom a vendor, make a debit adjustment to a bill, reverse a bill, and see how to process a vendorrefund. At the end of this lesson, you will void one of payments in the system because the printed checkwas not accepted by the bank.
In Lesson 9: Prepayments, you will make a prepayment to the AdvertisingCo vendor and see how topay documents by using the prepayment balance. You will then process a refund received from thevendor for the unused amount of the prepayment.

| Part 2: Accounts Payable | 82
Lesson 5: Introduction to Accounts PayableIn this lesson, you will configure the initial settings of the Accounts Payable module, to make themodule ready for use. You will learn how to define single-installment credit terms by setting up the net30 days credit terms and credit terms with a discount period. At the end of the lesson, you will createrecords for vendors MyCompany works with and for non-stock items that help users quickly createAccounts Payable documents. Additionally, you will learn how to define and use numbering sequencesand segmented keys in Acumatica ERP.
Lesson Objectives
In this lesson, you will learn the basic concepts of Accounts Payable configuration and use, includinghow to:
• Specify the initial settings of the Accounts Payable module
• Define and use a numbering sequence
• Modify a segmented key
• Define single-installment credit terms
• Create a vendor
• Create a non-stock item

| Part 2: Accounts Payable | 83
Step 5.1: Adding General Ledger AccountsIn this preliminary step, you will add to Acumatica ERP new general ledger accounts that you will use inthis part of the course. Additionally, you will activate the next financial periods, so that you can createdocuments dated to them. Do the following:
1. Add the following GL accounts to the chart of accounts by using the Chart Of Accounts(GL202500; Finance > General Ledger > Configuration > Manage) form:
a. Accounts Payable: This account will be used to record amounts owed to vendors for itemsand services purchased on credit. For the account, specify the following settings:
• Account: 200000
• Account Class: AP
• Description: Accounts Payable
b. Prepaid Expenses: You will use this account to record amounts prepaid to vendors. For it,specify the following settings:
• Account: 140000
• Account Class: PREPEXP
• Description: Prepaid Expenses
c. Cash Discount Received: This account accumulates the cash discount received fromvendors for early payments (payments made during the discount period of credit terms).For the account, specify the following settings:
• Account: 490000
• Account Class: OTHINCOME
• Description: Cash Discount Received
d. Advertising Expenses: For this account, which accumulates expenses for advertisingpurchased from the AdvertisingCo vendor, specify the following settings:
• Account: 610000
• Account Class: EXADVERT
• Description: Advertising Expense
e. Services Expenses: This account accumulates expenses for services purchased fromthe ServiceCo vendor. To attribute the cost of these services to the cost of revenue ofMyCompany, you specify the COGS account class for the GL account. The COGS accountsare listed in the Cost of Revenue section of the income statement; financial statementsare outside of the scope of this course. For this account, specify the following settings:
• Account: 790000
• Account Class: COGS
• Description: Services Expense
f. Overdue Charges Expenses: For this account, which accumulates charges paid to vendorsfor overdue documents, specify the following settings:
• Account: 760000
• Account Class: EXOTHER
• Description: Overdue Charges Expense
2. On the Financial Periods (GL201000; Finance > General Ledger > Work Area > Manage) form,activate the 02-2014 and 03-2014 financial periods in the system, so that you can createdocuments dated within these periods and post transactions to the periods.
Now you can proceed to defining credit terms and a vendor class, which you will use further in theAccounts Payable module.

| Part 2: Accounts Payable | 84
Step 5.2: Defining Credit TermsYou can configure credit terms that indicate when a payment is due and which cash discount ispermitted for purchases or sales made on credit. When you specify credit terms in a document, thecredit terms provide automatic calculation of the due date and the end date of the cash discount period,as well as the cash discount amount in the document. (You can, however, override this information inthe document.) Credit terms can be defined and used in the Accounts Payable and Accounts Receivablemodules. You can define credit terms for payments as a single installment or multiple installments; thecash discount period can be specified only for single-installment credit terms.
In this step, you will define the following credit terms:
1. Single-installment credit terms of net 30 days (that is, the full amount should be paid in 30days) without a cash discount.
2. Single-installment credit terms of 3/7, net 30 days (that is, if the buyer pays the invoice in 7days, they are given a 3% discount: otherwise, the total amount is due within 30 days).
1. Define Credit Terms of Net 30 Days Without a Discount
Here you will define credit terms of net 30 days that do not include a cash discount. To define thesecredit terms, create a new record on the Credit Terms (CS206500; Finance > Accounts Payable >Configuration > Setup) form with the following settings and save the record:
• Terms ID: 30D
• Description: Net 30 days
• Installment Type: Single
• Due Date Type: Fixed Number of Days
• Due Day 1: 30
Due Date Type specifies the way the system calculates the due date. Fixed Number of Days indicatesthat the due date is a fixed number of days after the document date; this number of days is specifiedin the Due Day 1 box (see the screenshot below). By these credit terms, the payment is due within 30days after a purchase or sale. For example, if you enter a bill with the document date February 1, 2014and with the 30D credit terms specified, the payment for the bill is due 30 days after the documentdate, or March 3, 2014. These terms include no discount settings.
You could instead configure the due date to be set to a certain day of the current or next month, or youcould specify two time intervals of a document date on which the due date depends. For more information,see the links at the end of the topic.
Figure: The due date settings specified for the net 30 days credit terms
Because Visible To is set to All (the default setting) for the 30D credit terms, as the followingscreenshot illustrates, you can use these credit terms in documents that you create in the AccountsPayable and Accounts Receivable modules. The complete configuration of the credit terms is shown inthe following screenshot.

| Part 2: Accounts Payable | 85
Figure: The net 30 days credit terms
2. Define Credit Terms of Net 30 Days with a Discount
Next, you will define 3/7 credit terms of net 30 days. To do this, create a new record on the CreditTerms (CS206500) form with the following settings and save the record:
• Terms ID: 30D7D3
• Description: 3/7, net 30 days
• Installment Type: Single
• Due Date Type: Fixed Number of Days
• Due Day 1: 30
• Discount Day: 7
• Discount %: 3.00
Discount Day is the last day (after the purchase or sale) the buyer can make a payment and receivethe discount. Discount Type (shown in the following screenshot) specifies the way the cash discountdate is calculated; the system fills in this setting automatically based on the due date type that youhave specified in the Due Date Type box. Because you have selected Fixed Number of Days as theDue Date Type, you must use a fixed number of days as the discount period; this number of days isspecified in the Discount Day box. Discount % is the discount percent of the document amount (seethe screenshot below).
With these terms, you have specified that a 3% discount can be applied to payments made within7 days after a purchase or sale. (Payment is not due until 30 days after the purchase or sale.) Forexample, suppose that you have entered a bill for $100 dated on February 1, 2014 with these creditterms. In the bill, you have to specify the amount before any cash discount is applied, which is $100.The system automatically calculates the cash discount date, which is February 8 (7 days after February1), and the cash discount amount, which is $3 (3 percent of $100). When the bill is released, thesystem records $100 to the accounts payable and expense GL accounts. If you pay $97 for the bill onor before February 8, on release of the payment document, the system will credit the cash account for$97, credit the income account that accumulates cash discounts received for $3, and debit the accountspayable account for $100. If you pay the bill after the cash discount date, you have to pay the netamount, $100, and the system will credit the cash account for $100 and debit the accounts payableaccount for $100.

| Part 2: Accounts Payable | 86
Figure: The cash discount settings specified for the 3/7 net 30 days credit terms
Now the credit terms are complete and you can proceed to create other entities in the Accounts Payablemodule.
Related LinksCredit TermsCredit Terms (CS206500)

| Part 2: Accounts Payable | 87
Step 5.3: Creating a Vendor ClassA vendor class is a group of vendors that have similar properties. With vendor classes defined, userscan more easily create vendor accounts in the system by using the vendor classes as templates withsettings of vendors of the class. When a user creates a vendor account, the user specifies the class, andthe system inserts the information from the specified vendor class into the appropriate boxes for thenew vendor account.
In Acumatica ERP, you have to define at least one vendor class, which will be used by default and thusshould have the most general settings. You can define any number of vendor classes, based on thetypes of vendors your company works with. For instance, you might find it useful to have separatevendor classes for tax agencies and for 1099 vendors.
In this step, you will define the default vendor class, from which you will create all vendor accounts inthis course.
To define this vendor class, create a new record on the Vendor Classes (AP201000; Finance > AccountsPayable > Configuration > Setup) form and specify the following settings:
• Class ID: DEFAULT
• Description: Default
• General Settings tab, Country: US (United States)
• General Settings tab, Terms: 30D (Net 30 days)
• General Settings tab, Payment Method: CHECK
• General Settings tab, Cash Account: 102000 (Checking Account USD)
• GL Accounts tab, AP Account: 200000 (Accounts Payable)
• GL Accounts tab, Cash Discount Account: 490000 (Cash Discount Received)
• GL Accounts tab, Prepayment Account: 140000 (Prepaid Expenses)
Save the vendor class you have added. Now the default vendor class is ready and you can configure theAccounts Payable module.
Related LinksVendor Defaults and OverridesVendor Classes (AP201000)
| Part 2: Accounts Payable | 88
Step 5.4: Configuring the Accounts Payable ModuleThe Accounts Payable module is dedicated to the management of your company's liabilities to vendors.In the Accounts Payable module, you can:
• Maintain vendor accounts.
• Enter bills that correspond to vendor invoices, and record payments for the bills.
• Process payments that are made by using different payment methods.
• Make debit and credit adjustments to bills.
• Void printed checks and record vendor refunds.
• Record all amounts that are prepaid to vendors.
• Reconcile the balances of vendor accounts with the balances of general ledger accounts byreviewing the Accounts Payable reports.
• Perform additional tasks related to accounts payable: generate recurring bills, approve documentsfor payment, track 1099-MISC payments, email documents to vendors, and revalue vendoraccounts maintained in a foreign currency; all of these concepts are outside of the scope of thiscourse.
In this step, you will specify the initial configuration of the Accounts Payable module, to make it readyfor use. After that, you will configure a separate numbering sequence to start the auto-numberingfrom 000001 for batches created from Accounts Payable documents. Thus, in this step, you will do thefollowing:
1. Configure the Accounts Payable module to make it ready for use.
2. Define a numbering sequence for batches created from Accounts Payable documents.
1. Configure the Accounts Payable Module
You specify the configuration settings of the Accounts Payable module by using the Accounts PayablePreferences (AP101000; Finance > Accounts Payable > Configuration > Setup) form as follows:
1. Set the Default Vendor Class ID to DEFAULT.
When a new vendor class is created, the class that you specify here will provide the defaultsettings for the new class. (You can change these settings for the class being created.) Also,when a new vendor account is created, it will be assigned to the DEFAULT vendor class bydefault.
2. Clear the Require Approval of Bills Prior to Payment check box.
If selected, this check box makes the approval of a bill, credit adjustment, or prepaymentrequest required before the document can be paid. (Approval of documents for payment isoutside of the scope of this course.)
3. Select the Automatically Post on Release check box.
As soon as you release a document from the Accounts Payable module, the system automaticallygenerates and releases the batch in the General Ledger module. The released batch has theUnposted status until you post the batch from the General Ledger module. Because you areselecting the Automatically Post on Release check box, the system will immediately post thegenerated batches when you release a document from the Accounts Payable module.
4. Make sure that the Require Vendor Reference check box is selected.
Selecting this check box makes the Vendor Ref. number required on the Bills And Adjustments(AP301000; Finance > Accounts Payable > Work Area > Enter) form.
5. Select the Raise an Error on Duplicate Vendor Reference Number check box.

| Part 2: Accounts Payable | 89
If you select this check box, the system will prevent a user from saving an AP document ifanother document with the reference number specified in the Vendor Ref. box already exists.(If this check box is cleared, the system instead displays a warning when the user specifies aduplicate number in the Vendor Ref. box, but allows the user to save the document.)
6. Click Save to save the configuration.
After you save the configuration settings, the Accounts Payable module is ready for use. However, youwill also define a numbering sequence for batches generated by the module.
2. Define a Numbering Sequence for Batches
On the Accounts Payable Preferences (AP101000) form, the numbering sequence that applies tobatches generated by Accounts Payable is also specified (in the Batch Numbering Sequence box). Ifyou leave the default sequence, the batches created from AP documents will use the BATCH sequence,which is also used in the General Ledger and Cash Management modules. To start the batch numbersfrom 000001 for Accounts Payable, you have to define a separate numbering sequence and specify it forbatches on the Accounts Payable Preferences (AP101000) form. Perform the following instructions:
1. On the Accounts Payable Preferences (AP101000) form, click the Edit button, which is locatedright of the Batch Numbering Sequence box (as shown in the following screenshot).
Figure: The Edit button for the Batch Numbering Sequence box
This opens the Numbering Sequences (CS201010; Configuration > Common Settings > CommonSettings) form so that you can create a new record.
2. On the Numbering Sequences (CS201010) form, enter the following settings for the new record,as shown in the following screenshot:
• Numbering ID: APBATCH
• Description: Batches created from AP documents
• New Number Symbol: <NEW> (defines the placeholder the system displays in the box ifauto-numbering is used)
• Start Number: 000001
• Numbering Step: 1

| Part 2: Accounts Payable | 90
Figure: A numbering sequence that starts from 000001 with step 1
3. Click Save and Close on the form toolbar to save the numbering sequence.
You can add to a numbering sequence a subsequence (or multiple subsequences) that will beused for documents. According to the first subsequence, the start number is 000001, the nextnumber is 000002 (because the numbering step is 1), and so on. The maximum symbol lengthof a number in a subsequence is 15 symbols; we use 6 symbols in the number (000001). Thesubsequence applies to documents created starting from 1/1/1900 and will be used until the endnumber is reached. After the end number of the subsequence is used, the system cannot createa new record and displays an error message.
In the case of this numbering sequence, which applies to Accounts Payable batches, the errormessage will appear on release of the Accounts Payable document from which the batch shouldbe generated. Once the end number has been reached, you have to add a new subsequenceto the numbering sequence in the table, or define a new numbering sequence and assign it toAccounts Payable batches in the module preferences.
If you need to change the numbering sequence starting on a specific date, you can add one moresubsequence to the table with a new start number and the needed starting date in the Start Datebox.
On the Numbering Sequences (CS201010) form, you can also select an existing numberingsequence and view the last number that was assigned to the document. For example, you couldselect the BATCH numbering sequence, which applies to batches created from the General Ledgerand Cash Management modules. If you've posted only the transactions described in this course, thelast batch number should be 000015 (see the Last Number column in the table).
4. Notice that the Batch Numbering Sequence is now set to APBATCH on the Accounts PayablePreferences (AP101000) form; and save the change to this form.
Now batches created from an AP document be numbered according to the APBATCH sequence.Notice that on this form, numbering sequences are also specified for the identification of bills,debit adjustments, credit adjustments, and payments (AP checks). In this course, the sameAPBILL numbering sequence is shared among bills and debit and credit adjustment documents.Alternatively, you can define separate numbering sequences for documents of different types byusing the Numbering Sequences (CS201010) form, and specify these sequences on the AccountsPayable Preferences (AP101000) form.
The Accounts Payable module is now configured and you can proceed to configuring vendor IDs.
Related LinksOverview (Accounts Payable)Multiple Numbering SequencesIdentifier SegmentationBusiness Accounts

| Part 2: Accounts Payable | 91
Numbering Sequences (CS.20.10.00)Segmented Keys (CS202000)Segment Values (CS203000)Accounts Payable Preferences (AP101000)

| Part 2: Accounts Payable | 92
Step 5.5: Configuring Vendor IDsIn this step, you will learn how to define and use numbering sequences and segmented keys in thesystem, and you will configure the format of vendor IDs.
The structure and format of vendor IDs is defined by the VENDOR segmented key; that is, the systemallows users to create a vendor account only if its ID matches the VENDOR segmented key. By default,this segmented key consists of a single segment of 10 symbols—that is, the vendor ID can be anystring of up to 10 symbols that the user specifies.
Suppose that you have decided to make the vendor ID auto-numbered, with the V prefix before thenumerical part. On a data entry form where auto-numbering is used, the system doesn't allow the userto type the number while creating a new record. Instead, the system generates and inserts the ID whenthe user saves the new record to the database. Thus, in this case, the first vendor account will have theID V000000001.
To define the desired structure for vendor IDs, you have to create a numbering sequence and thenspecify it for the VENDOR segmented key. Perform the following instructions:
1. On the Numbering Sequences (CS201010; Configuration > Common Settings > CommonSettings) form, create a new numbering sequence to be used for vendor IDs by specifying thefollowing settings:
• Numbering ID: VENDORNUM
• Description: Vendor account numbers
• New Number Symbol: <NEW>
• Start Number: V000000001
• Numbering Step: 1
You cannot specify the letter after the numeric part in the Start Number column (that is, a startnumber of 000000001V would be incorrect).
The Start Number of the sequence specifies the first number that will be assigned, and theNumbering Step defines the value the system adds to the numerical portion to get the nextnumber. (The alphabetical prefix stays the same for all numbers of the sequence.) Thus, the firstnumber will be V000000001, the next one will be V000000002, and so on.
2. Click Save on the form toolbar to save the numbering sequence.
When you create a new numbering sequence, it isn't yet applied to any objects, because it is notspecified for any segmented keys. To use the VENDORNUM numbering sequence for vendor IDs,you have to specify the sequence in the VENDOR segmented key, which applies to vendor IDs.
3. Open the Segmented Keys (CS202000; Configuration > Common Settings > Segmented Keys)form, and select the VENDOR segmented key.
In the Numbering ID box, select the VENDORNUM numbering sequence.
In the VENDOR segmented key, you can apply a numbering sequence to a segment to make itauto-numbered (as you have done here) and specify a list of allowed values for other segments(which you have not done here). However, you cannot modify the structure and format of thesegmented key, because the number, format, and length of segments of the VENDOR segmentedkey is defined in the BIZACCT segmented key, from which VENDOR inherits these settings. BIZACCTdefines the structure of branch IDs and business account IDs (vendor, customer, and employeeaccounts). In a production environment, you have to plan the unified structure of branch IDs andbusiness account IDs before you start to configure the system and create the first branch. Bydefault, BIZACCT consists of one 10-symbol segment. You can define multiple segments, but youshould not shorten the total length of the segmented key if any record to which the segment keyapplies already exists. The total length of segments (Length) cannot be greater than the maximumlength of the segmented key (Max Length).
4. Select the Auto Number check box in the table (which contains one row for the only segment)to enable auto-numbering in the segment. The length of the numbering sequence specified inthe Numbering ID box must be equal to the segment length, which is 10 in this case.
The Edit Mask and Case Conversion settings specify the format of segment values. TheUnicode edit mask (the default setting) means that the segment value can be a string of any

| Part 2: Accounts Payable | 93
symbols, including digits, language symbols, and special characters, such as & and %. TheUppercase case conversion makes (the default setting) the system automatically convert eachvalue entered by the user to uppercase. Validation isn't needed in our case because the AutoNumber check box is selected for the segment, so the Validate check box is cleared.
Figure: The VENDOR segmented key, which defines auto-numbered vendor IDs
With these settings, when a new vendor account is saved, the system will automatically insert asthe vendor ID sequential numbers calculated based on VENDORNUM.
5. Save your changes.
Now you can create vendor accounts, and the system will automatically insert the appropriatevendor ID when you save each account.
| Part 2: Accounts Payable | 94
Step 5.6: Creating a VendorEach vendor account contains the information about a vendor with whom the company works. Ina vendor account, you specify the vendor's contact information, the default payment settings, andthe general ledger accounts that are used to record amounts related to goods and services thatMyCompany purchases from the vendor.
In this step, you will create the vendor accounts that will be used in this course: OfficeSuppliesCo,UtilitiesCo, AdvertisingCo, and ServiceCo. Perform the following instructions:
1. On the Vendors (AP303000; Finance > Accounts Payable > Work Area > Manage) form, createthe OfficeSuppliesCo vendor with the following settings:
• Vendor ID: V000000001 (inserted automatically)
• Vendor Name: OfficeSuppliesCo
• GL Accounts, Expense Account: 755000 (Office Supplies Expense)
• Payment Settings, Payment Lead Time (days): 3
The required settings for each vendor are Vendor ID, Vendor Name, Country, CashDiscount Account, and Vendor Class. The system automatically assigns the DEFAULT vendorclass to each new vendor, because you have specified this class in Default Vendor Class ID onthe Accounts Payable Preferences (AP101000) form. The system adds the vendor informationdefined for the vendor class, so you can quickly create new vendors in the system.
When you create or edit a vendor, you can change the vendor class, and the system will insert thesettings from the specified class for the vendor. You can change any of the default settings insertedfrom the vendor class.
The expense account, which you have specified for OfficeSuppliesCo, is optional. You might findit useful to specify an expense account for a vendor if most of the purchases from the particularvendor are recorded to the same expense account. If you do, when you specify the vendor in abill, the vendor's expense account is automatically inserted into the bill.
In Payment Lead Time, you have specified 3 days as the lead time needed before the paymentreaches the vendor. This time will be included in calculations of the pay date on the vendor'sdocuments.
2. Create the UtilitiesCo vendor with the following settings:
• Vendor ID: V000000002 (inserted automatically)
• Vendor Name: UtilitiesCo
MyCompany pays this vendor for utilities and rent, each of which is recorded to different expenseGL accounts. Later in this lesson, you will create non-stock items for utilities and rent and specifythe expense accounts for them. When you specify a non-stock item in a bill, the item's expenseaccount is inserted into the bill and overrides the vendor's expense account, if any.
3. Create the AdvertisingCo vendor with the following settings:
• Vendor ID: V000000003 (inserted automatically)
• Vendor Name: AdvertisingCo
• Payment Settings tab, Payment Method: CASH
• Payment Settings tab, Cash Account: 101000 (Cash on Hand USD)
This vendor accepts payments by cash, and you have changed the default payment method forthis account. You will specify the expense account in a non-stock item that you will create later.
4. Create the ServiceCo vendor with the following settings:
• Vendor ID: V000000004 (inserted automatically)
• Vendor Name: ServiceCo
• General Info tab, Terms: 30D7D3
• Payment Settings tab, Payment Method: CASH
| Part 2: Accounts Payable | 95
• Payment Settings tab, Cash Account: 101000 (Cash on Hand USD)
• Payment Settings tab, Payment By: Discount Date
This vendor accepts payments by cash and delivers services on 3/7, n/30 credit terms, whichmeans that the due date of the bill is in 30 days from the document date, and the buyer cantake the 3% cash discount for the payment within 7 days of the document date. You havespecified Discount Date in the Payment By box because you want to pay the bills of this vendorduring the discount period. You will specify the expense account in a non-stock item that you willcreate later.
Now you can create Accounts Payable documents. As soon as you specify a vendor in a document, thesystem will automatically fill the document with the information specified for the vendor.
If the Business Account Locations feature is enabled on the Enable/Disable Features (CS100000) form,a vendor can have one location or multiple locations that you can create by using the Vendor Locations(AP303010; Finance > Accounts Payable > Work Area > Manage) form. For each location, you can specifythe contact information, payment settings, and GL accounts to use for the vendor at this location. In thiscourse, you don't need to enable the Business Account Locations feature.
Related LinksVendor Defaults and OverridesVendors (AP303000)
| Part 2: Accounts Payable | 96
Step 5.7: Creating a Non-Stock ItemFor goods that you purchase from vendors or sell to customers but do not want to reflect in yourcompany's inventory, you can define non-stock items in the system. A non-stock item can be a service,labor hour, charge, or physical entity for which you have decided not to track the quantity in thewarehouse. For each non-stock item, you can specify and periodically update purchase prices and salesprices. The current price of an item is automatically inserted into any document for which you selectthe item, which results in quicker and more accurate data entry. If the item price has changed, you canautomatically recalculate the document amounts based on the updated price. Also, you can specify thestandard cost of a non-stock item, which can be used in documents if the vendor price is not specified.You can use the same non-stock items in the Accounts Payable, Accounts Receivable, and Inventorymodules.
In this step, you will create the non-stock items for utilities, rent, advertising, and services purchasedfrom vendors. You will also define standard costs for the advertising and service items. The dataspecified for non-stock items is automatically inserted into any document where you select the item,which helps you to quickly create documents. Before you create the non-stock items, you have todefine the tax category that applies to them. You will define and use a tax-exempt category; taxmanagement is outside of the scope of this course. You will also define the new ITEM unit of measure tolater specify it for utilities and rent.
Complete the following instructions:
1. On the Tax Categories (TX205500; Finance > Taxes > Work Area > Manage) form, add a recordand specify the following settings for the new tax category:
• Tax Category: EXEMPT
• Description: Exempt
2. On the Units Of Measure (CS203100; Configuration > Common Settings > Common Settings)form, add a new row with the following information and then click Save:
• From Unit: ITEM
• To Unit: ITEM
• Multiply/Divide: Multiply
• Conversion Factor: 1.00
By adding this row and specifying the conversion of the new unit to itself, you have definedthe new ITEM unit of measure. (You can use this form to define the conversion rules betweendifferent units of measure in situations when such conversions are needed.)
3. Create the non-stock item for the utilities as follows:
a. On the Non-Stock Items (IN202000; Finance > Accounts Payable > Work Area > Manage)form, create a non-stock item with the following settings:
• Inventory ID: UTILITIES
• Description: Utilities
• General Settings tab, Type: Charge
• General Settings tab, Tax Category: EXEMPT
• General Settings tab, Base Unit: ITEM
• GL Accounts tab, Expense Account: 780000 (Utilities Expense)
b. Click Save to save the non-stock item to the database.
4. Create the non-stock item for the rent as follows:
a. While still on the Non-Stock Items (IN202000) form, click Add New Record, and createa non-stock item with the following settings:
• Inventory ID: RENT
• Description: Rent

| Part 2: Accounts Payable | 97
• General Settings tab, Type: Charge
• General Settings tab, Tax Category: EXEMPT
• General Settings tab, Base Unit: ITEM
• GL Accounts tab, Expense Account: 740000 (Rent Expense)
b. Click Save to save the non-stock item to the database.
5. Create the advertising non-stock item and specify the current vendor price of the item asfollows:
a. Click Add New Record, and create a non-stock item with the following settings:
• Inventory ID: ADVERT
• Description: Advertising
• General Settings tab, Type: Service
• General Settings tab, Tax Category: EXEMPT
• General Settings tab, Base Unit: HOUR
• GL Accounts tab, Expense Account: 610000 (Advertising Expense)
b. On the Price/Cost Information tab, specify the $20 cost, which will be used in thedocuments created for all vendors by default, by specifying the following settings (see thescreenshot below):
• Pending Cost: 20.00
• Pending Cost Date: 1/1/2014
Figure: The $20 pending cost specified for the advertising non-stock item
c. On the form toolbar, click Actions > Update Cost.
These actions cause the system to set the current cost to the pending cost starting on thepending cost date.
The current cost is now set to $20 per hour of service (see the screenshot below).When you add this non-stock item to a document, the standard cost is inserted intothe document by default if the vendor price is not specified for the non-stock item. Youcould instead set the vendor-specific price of a non-stock item by using the Vendor Prices(AP202000; Finance > Accounts Payable > Work Area > Manage) form. (Vendor pricemaintenance is outside of the scope of this course.)

| Part 2: Accounts Payable | 98
Figure: The $20 current cost set for the advertising non-stock item
If you have set an incorrect current cost, you should specify the correct one in PendingCost, set Pending Cost Date to the same date, and click Actions > Update Cost again.The current cost will be set to the new value.
6. Create the service non-stock item and specify the current cost of the item as follows:
a. Click Add New Record, and create a non-stock item with the following settings:
• Inventory ID: SERVICE
• Description: Service
• Type: Service
• Tax Category: EXEMPT
• Base Unit: HOUR
• GL Accounts tab, Expense Account: 790000 (Services Expense)
b. On the Price/Cost Information tab, set the current cost to $40 per hour of service,effective starting on 01/01/2014, and update the cost (as described in Instruction 5.2above).
As soon as you select one of these non-stock items in an Accounts Payable document, the system willautomatically fill the elements of the document with the information defined for the non-stock item.
Related LinksNon-Stock Item SupportVendor PricesNon-Stock Items (IN202000)Tax Categories (TX205500)Units of Measure (CS203100)

| Part 2: Accounts Payable | 99
Additional InformationYou can use the following information for additional reading, but these concepts are outside of thescope of this course.
Foreign Currencies
You can maintain vendor accounts and process vendor documents and payments in foreign currencies.For more information, see Overview (Currency Management) and AP and AR Revaluations in theAcumatica ERP User Guide.
Vendor-Specific Prices
You can maintain item prices that are specific for vendors. For more information, see Vendor Prices inthe Acumatica ERP User Guide.
Bill Approval for Payment
You can configure approval to be required for bills, credit adjustments, and prepayment requests beforethese documents can be paid. For more information, see Bill Approval for Payment in the AcumaticaERP User Guide.
ACH Payments
You can export batch payments to be processed in the Automated Clearing House (ACH) paymentsystem. For more information, see ACH Payment Support in the Acumatica ERP User Guide.
Independent Contractors
You can track the compensation paid to independent contractors and fill out Form 1099-MISC for eachcontractor. For more information, see Support for U.S. 1099-MISC Form in the Acumatica ERP UserGuide.
Rounded Document Amounts
You can configure the rounding and precision rules that apply to document amounts in AccountsPayable. See Rounding of Document Amounts in the Acumatica ERP User Guide for details.
Documents Sent to Vendors by Email
You can configure the ability to send documents to vendors by email. For more information, seePredefined Mailings for Customers and Vendors in the Acumatica ERP User Guide.

| Part 2: Accounts Payable | 100
Lesson SummaryIn this lesson, you have specified the initial configuration of the Accounts Payable module. You haveadd general ledger accounts to be used in the Accounts Payable module. You have also learned howto specify an individual numbering sequence to be used for numbering batches created from theAccounts Payable module. Also, you have learned how to define credit terms in the system. Creditterms, specified on the Credit Terms (CS206500) form, indicate when a payment is due and specify thecash discount to be given.
You have also learned how to create vendors in the system. To more easily create vendors with similarproperties, you define a vendor class, which is used as a template when users create new vendoraccounts. The system inserts information from the vendor class into the appropriate boxes for the newvendor account. You have also defined a numbering sequence and applied it to the VENDOR segmentedkey to make vendor IDs auto-numbered.
The lesson also has explained how to create non-stock items and how to specify the standard cost forthe non-stock item, which will be used if a vendor-specific price is not set. You have created severalnon-stock items to be used in Accounts Payable documents later.
Now the Accounts Payable module is ready for use—that is, you can enter the bills received fromvendors and record the payments for these bills.
Review Questions
• What do you need to configure to start using the Accounts Payable module?
• What do you have to do to create a vendor account?
• How do you use vendor classes?
• Can you use the non-stock items created in the Accounts Payable module in other financialmodules of Acumatica ERP?
• Can you override information from the vendor class in a vendor account?

| Part 2: Accounts Payable | 101
Lesson 6: Accounts Payable ProcessIn this lesson, you will learn how to use Acumatica ERP in the accounts payable process. You will createsample bills and pay the bills. After that, you will see the reports that you can use to reconcile theoutstanding document balances with the balances of general ledger accounts. Finally, you will see howto close the financial period in the system after all the legitimate and accurate documents have beenprocessed for the period.
Lesson Objectives
In this lesson, you will use Acumatica ERP (and primarily the Accounts Payable module) to complete theaccounts payable process, which consists of the following operations:
• How to create a bill
• How to release a bill
• How to create an AP check and apply the AP check to a bill
• How to process an AP check
• How to release an AP check
• How to reconcile the outstanding document balances with the balances of GL accounts
• How to close the financial period in the Accounts Payable module and the General Ledger module

| Part 2: Accounts Payable | 102
Accounts Payable ProcessThis topic provides an overview of how the accounts payable process unfolds in Acumatica ERP,including users processing vendor invoices and performing other key operations. This topic includes thefollowing sections:
• Overview of Accounts Payable Process
• Vendor Invoice Processing
• Supplementary Operations
Overview of the Accounts Payable Process
The accounts payable process is performed in the Accounts Payable module of Acumatica ERP, whereyou mainly process vendor invoices that you have received and payments made for them. On receivinga vendor invoice, you create a bill document in the system (see 1 in the following diagram). In thebill, you specify the vendor account and the document details. The vendor invoice total is the initialoutstanding balance of the bill. When you release the bill (2), the system changes the document statusto Open and generates a batch to be posted to the liability and expense general ledger accounts. Afterrelease, the bill is approved for payment (3) if such approval is required in your system. Then you canapply a payment to the bill.
To pay the bill, you create an AP check document in the system (4). In the AP check, you specify thevendor account, the payment method, the reference to the bill, and the payment amount. Dependingon the settings of the specified payment method, you might need to process the payment (5)—forinstance, by printing a check. After you process the payment, you can release the AP check. On releaseof the AP check (6), the system updates the balance of the bill and generates the batch to be posted toliability and cash asset GL accounts. The bill remains open until the full amount is paid. You can makecorrections to the open bill, if necessary. Periodically, you review the Accounts Payable reports andreconcile the total of open documents with the balances of GL accounts (7). After all the documents fora period are posted and the balances are reconciled, you close the financial period (8).
Figure: The accounts payable process
This processing of vendor invoices is described in greater detail below.
Processing of Vendor Invoices
To process a vendor invoice that you have received in the system, you have to create and process thebill and the related AP check document.
Creating a Bill
You create a bill (see 1 on the diagram below) by using the Bills And Adjustments (AP301000) form.In the bill, you specify the vendor account that corresponds to the invoice, the invoice date, the creditterms, and any other details. Based on the credit terms, the system calculates the cash discountamount and the pay date of the bill. The balance of the bill is the detail total plus taxes (if any). The

| Part 2: Accounts Payable | 103
pay date is calculated based on the due date or the cash discount date, depending on the Payment Bysetting of the vendor account.
Processing the Bill
During processing, the bill can have the following statuses:
• On Hold: The bill is being edited and cannot be released.
• Balanced: The bill is ready and can be released.
• Open: The bill has been released. A bill with this status has a non-zero outstanding balance to bepaid. If a bill is partially paid, it retains the Open status until the full amount is paid.
• Closed: The bill has been paid in the full amount; the document balance is zero.
• Scheduled: The bill is a template for generating recurring bills according to a schedule. Basedon the template, the system generates recurring bills that can be edited and then released. (Thescheduled bill itself cannot be released and can be edited as a template.)
If the Hold Documents on Entry check box is selected on the Accounts Payable Preferences(AP101000) form, by default, the system assigns the On Hold status to each bill you create. Before youcan release the bill, you have to set the status of the bill to Balanced (see 2 on the diagram below).
When you release the bill, the system assigns the bill the Open status and generates the batch to creditthe accounts payable (AP) account and debit the expense accounts in the General Ledger module (3).The system also updates the vendor balance by the amount of the bill. You cannot edit the amount ofthe bill once it is open. To correct the balance of the bill, you can make a debit or credit adjustment(5). You can also reverse the open bill, create a new corrected one, and release it. Once released, thebill is pending a payment. Before a payment can be made, the bill may require approval if the approvalsettings are configured in the module (4). (Approval of bills is outside of the scope of this course.)
Creating an AP Check
To pay the bill, you have to create an AP check (see 6 on the diagram below): a document thatrepresents the payment in the system. You can create the AP check manually by using the Checksand Payments (AP302000) form, or generate the AP check from one bill or multiple bills by using thePrepare Payments (AP503000) form. You can pay one bill or multiple bills with one AP check.
In the AP check, you specify the vendor account, the payment method, the cash account, and theamount to be paid. (The payment method denotes the actual means of payment: cash, a printed check,or a wire transfer.) For each bill, you can pay the full balance or a partial one.
Processing the AP Check
During processing, the AP check can have the following statuses:
• On Hold: The AP check is being edited and cannot be released.
• Printed: The AP check is ready and can be released. The payment has been processed (ifprocessing was required).
• Closed: The AP check has been released.
• Voided: The AP check has been voided.
If the Hold Documents on Entry check box is selected on the Accounts Payable Preferences(AP101000) form, the system assigns each new AP check the On Hold status by default. After youspecify the payment method for the AP check, the system will automatically change the status ofthe document to Printed if the payment method doesn't require payment processing (see 7 on thediagram below). If the payment method is configured for printing checks or for exporting payments toAutomated Clearing House (ACH) or another electronic funds-transfer system, you have to process thepayment— that is, print a check or generate a batch of ACH payments to export.
After the payment is processed, the system gives the AP check the Printed status (8), and you canrelease the document. When you release the AP check (9), the system generates the GL batch to debit

| Part 2: Accounts Payable | 104
the AP account and credit the cash account in General Ledger for the amount paid. The system alsoupdates the vendor balance with the amount paid. For each bill, the system subtracts the amount paidfrom the balance of the bill and updates the balance. After the full balance of the bill is paid, the systemchanges the document balance to zero and gives the bill the Closed status. The AP check also gets theClosed status after release. You cannot edit the AP check once it is closed. You can void the AP check toreverse the payment in the system (10) or to process a vendor refund, if needed.
Figure: Bill and AP check processing in Acumatica ERP

| Part 2: Accounts Payable | 105
This lesson presents an example of processing bills and AP checks.
Supplementary Operations
Along with processing vendor invoices, you might need to perform the following operations in AccountsPayable:
• Process a debit memo received from a vendor.
When you receive a vendor's debit memo, you process a credit adjustment in the system:You create the credit adjustment document and release it by using the Bills And Adjustments(AP301000) form. When the credit adjustment is released, the system generates a batch toincrease the balance of the liability and expense GL accounts. The credit adjustment does notchange the balance of any bill and should be paid as a separate document. The credit adjustmentmay require approval for payment, if this approval is configured in the Accounts Payable module.
• Process a credit memo received from a vendor.
When you receive a vendor's credit memo, you should process a debit adjustment in the system:You create the debit adjustment document and release it by using the Bills And Adjustments(AP301000) form. On release of the document, the system generates a batch to decrease thebalance of the liability and expense GL accounts. Then you have to apply the debit adjustmentto the corresponding bill. To do this, you have to select the debit adjustment on the ChecksAnd Payments (AP302000) form and specify the open bill to which you want to apply the debitadjustment. When the application is released, the system subtracts the document amount fromthe balance of the specified bill and updates the balance of the bill. To reverse a bill, you shouldprocess the debit adjustment for the full amount of the bill.
• Process a vendor refund.
When you receive a vendor refund, you should process the vendor refund in the system: Youcreate a vendor refund document by using the Checks And Payments (AP302000) form. In thevendor refund, you have to select the debit adjustment or prepayment to which the vendor refundapplies. On release of the vendor refund, the system generates a batch to increase the balance ofthe liability and cash asset GL accounts.
• Process a prepayment made to a vendor.
To process a prepayment, you create and release a prepayment request document by usingthe Bills And Adjustments (AP301000) form. On release of the document, the system doesn'tgenerate any batch but allows you to approve the request before making a payment. Theprepayment request should be paid as a separate document, and you have to create and releasean AP check to make the payment for it. Once the AP check is released, the prepayment requestbecomes open and can be applied to bills. To apply the prepayment to a bill, you have to selectthe prepayment on the Checks And Payments (AP302000) form and specify the bill to which theprepayment applies. You can apply a part of the prepayment balance to the bill. Once you haveapplied the prepayment, the balance of the bill and the prepayment is reduced by the prepaidamount. After the prepayment balance becomes zero, the prepayment request gets closed.
• Void an AP check.
To void an AP check, you should find the AP check on the Checks And Payments (AP302000) formand void it. When you void the AP check, the system generates a voided check document with thesame reference number and amount as the original AP check has. When you release the voidedcheck, the system generates a batch to increase the balance of the liability and cash asset GLaccounts so that the payment is reversed in the system.
For examples of these operations, see the next steps of this lesson.

| Part 2: Accounts Payable | 106
Step 6.1: Creating a BillIn Acumatica ERP, users create a bill for each vendor invoice that is received. In this step, you will dothe following:
1. Create a bill to pay the OfficeSuppliesCo vendor for $30 of office supplies purchased in 01-2014.
2. Create a bill to pay the AdvertisingCo vendor for $100 of an advertisement run for 5 hours in01-2014.
3. Create a bill to pay the UtilitiesCo vendor for $1000 rent for 12-2013, $1000 rent for 01-2014,and $200 in utilities used in 01-2014.
In one of the previous lessons, you have accrued the rent expense incurred in 12-2013 (Step 2.4:Making an Auto-Reversing Batch). Now you have received the bill with the actual amount to be paidfor rent for 12-2013.
1. Create the Office Supplies Bill
Create the bill for $30 of office supplies by performing the following instructions:
1. Open the Bills And Adjustments (AP301000; Finance > Accounts Payable > Work Area > Enter)form, and create a new document with the following information:
• Type: Bill
• Hold: Cleared (to make the document ready for release)
• Date: 1/1/2014
• Post Period: 01-2014
• Vendor Ref.: 01012014OS (in this box, you specify the number the vendor has assigned tothe incoming document)
• Description: Office supplies 01-2014
• Vendor: V000000001 (OfficeSuppliesCo)
The Post Period of the document is the period to which the document is posted—that is, theperiod to which the transactions generated on release of the document are posted.
As soon as you specify the vendor, the system inserts into the bill the n/30 credit terms (thedefault terms for the vendor account); you can change these default terms in the document. Thedue date of payment for the bill is set to 1/31/2014, based on the credit terms (see the followingscreenshot).
Figure: The credit terms inserted into the office supplies bill

| Part 2: Accounts Payable | 107
On the Financial Details tab, you can find the pay date of the bill (shown in the screenshotbelow): the date when you want to pay the bill. For a particular vendor, the pay date can becalculated based on the due date or the discount date of the bill. The calculation method is setin the Payment By box of the vendor account. Because Payment By is set to Due Date for theOfficeSuppliesCo vendor, the bill's pay date is based on the due date. For this bill, the vendoroffers the n/30 credit terms without any cash discount, and you will pay by the due date. Thepay date is three days earlier than the due date because of the Payment Lead Time setting ofthe vendor account. It usually takes three days for the payment to reach the OfficeSuppliesCovendor; that's why you have to pay earlier to avoid missing the due date. Therefore, the paydate equals the due date minus the number of payment lead days specified for the vendoraccount: 1/31/2014 – 3 days = 1/28/2014. In the bill, if you select other credit terms or directlychange the due date, the pay date will be recalculated. Also, you can edit the pay date in thebill.
Figure: The pay date of the bill
The default AP Account, Payment Method, and Cash Account from the vendor account areinserted into the document. The AP Accountis the accounts payable GL account that is creditedon release of the bill. The payment information, which includes the payment method and cashaccount, is inserted into the AP check if you generate the payment from the bill.
2. On the Document Details tab, add a line and enter 30.00 in the Ext. Cost (extended cost)box.
You can add one detail line or multiple lines to the bill. In each line, you have to specify theamount (in the Ext. Cost box) and an expense account that is debited for the amount whenyou release the bill, as shown in the screenshot below. The Amount box contains the Ext.Cost value minus the trade discount given by the vendor. In this case, trade discounts are notspecified for vendors, so the Ext. Cost box and the Amount box display the same value. TheAccount box contains the expense GL account that will be debited for the specified amount.By default, the system inserts the expense account that is specified for the vendor, but you canchange it, if needed.
You can specify trade discounts given by vendors if the Finance > Vendor Discounts feature isenabled on the Enable/Disable Features (CS100000; Configuration > Common Settings > Licensing)form. This feature is outside of the scope of this course.

| Part 2: Accounts Payable | 108
Figure: The amount and expense GL account in the detail of the bill
To each line of the document, you can also add a note by clicking Attach Note ( ), and you can
attach a file with a supporting document by clicking Attach File ( ) in the line.
3. In the Amount box of the Summary area, enter 30.00.
The document balance, displayed in the Balance box, is the amount that should be paidaccording to the vendor invoice. The document balance is the sum of Detail Total and TaxTotal, minus trade and document discounts, if any. (Tax management and trade discounts areoutside of the scope of this course.) Detail Total is the total amount in the Amount columnin the table on the Document Details tab. In the Amount box of the bill (see the screenshotbelow), you have to specify the control amount of the document, which should be equal to thedocument balance. When you save the document, the system makes sure these amounts areequal. If the amounts differ, you will get an error saying that the document is out of balance. Youcan disable the checking of the control amount by clearing the Validate Document Totals onEntry check box on the Accounts Payable Preferences (AP101000) form.
Figure: The control amount of the bill
You can also attach to the document a scan of the original vendor invoice by using the Files buttonon the form title bar (see the following screenshot). You can use this button to attach files to anydocuments that you create in Acumatica ERP.
Figure: The Files button on the form title bar
4. Click Save to save the bill to the database.
When you save the bill to the database, the system generates the reference number of the billby using the numbering sequence applied to bills. In this course, you use the default numberingsequence (APBILL); see the Bill Numbering Sequence option on the Accounts PayablePreferences (AP101000) form.
Now you can create the next bill.
2. Create the Advertising Bill
Create the $100 bill for 5 hours of running an advertisement as follows:
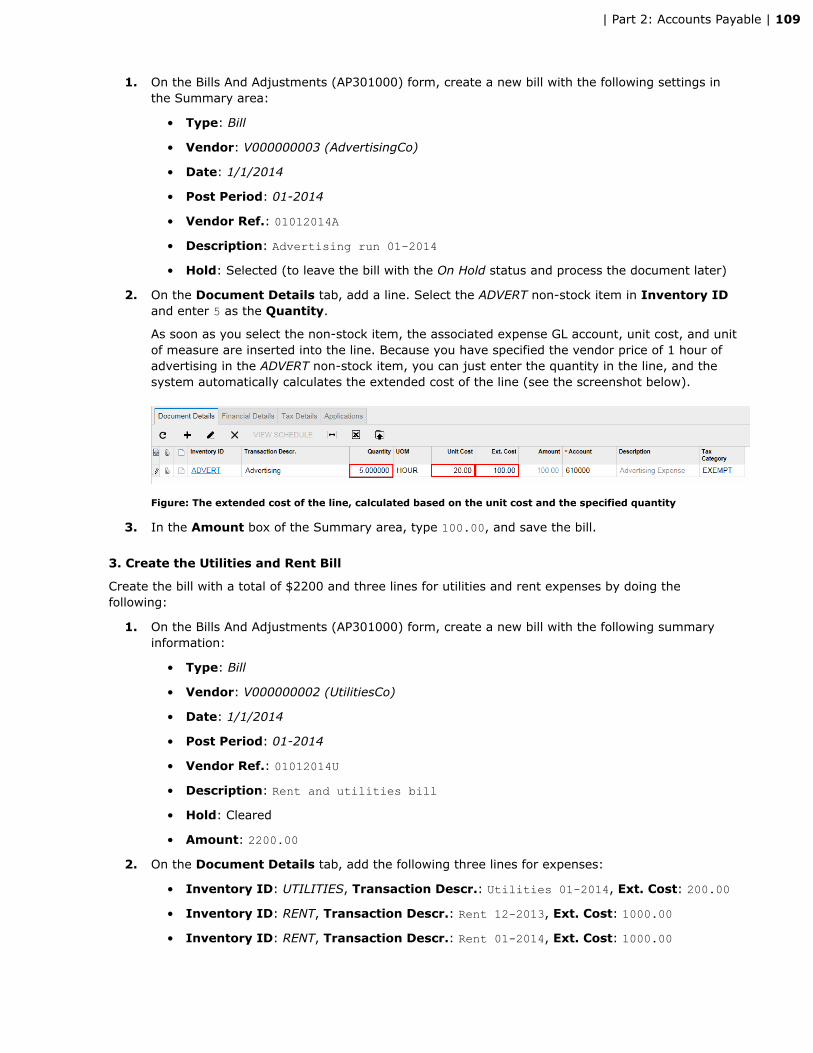
| Part 2: Accounts Payable | 109
1. On the Bills And Adjustments (AP301000) form, create a new bill with the following settings inthe Summary area:
• Type: Bill
• Vendor: V000000003 (AdvertisingCo)
• Date: 1/1/2014
• Post Period: 01-2014
• Vendor Ref.: 01012014A
• Description: Advertising run 01-2014
• Hold: Selected (to leave the bill with the On Hold status and process the document later)
2. On the Document Details tab, add a line. Select the ADVERT non-stock item in Inventory IDand enter 5 as the Quantity.
As soon as you select the non-stock item, the associated expense GL account, unit cost, and unitof measure are inserted into the line. Because you have specified the vendor price of 1 hour ofadvertising in the ADVERT non-stock item, you can just enter the quantity in the line, and thesystem automatically calculates the extended cost of the line (see the screenshot below).
Figure: The extended cost of the line, calculated based on the unit cost and the specified quantity
3. In the Amount box of the Summary area, type 100.00, and save the bill.
3. Create the Utilities and Rent Bill
Create the bill with a total of $2200 and three lines for utilities and rent expenses by doing thefollowing:
1. On the Bills And Adjustments (AP301000) form, create a new bill with the following summaryinformation:
• Type: Bill
• Vendor: V000000002 (UtilitiesCo)
• Date: 1/1/2014
• Post Period: 01-2014
• Vendor Ref.: 01012014U
• Description: Rent and utilities bill
• Hold: Cleared
• Amount: 2200.00
2. On the Document Details tab, add the following three lines for expenses:
• Inventory ID: UTILITIES, Transaction Descr.: Utilities 01-2014, Ext. Cost: 200.00
• Inventory ID: RENT, Transaction Descr.: Rent 12-2013, Ext. Cost: 1000.00
• Inventory ID: RENT, Transaction Descr.: Rent 01-2014, Ext. Cost: 1000.00

| Part 2: Accounts Payable | 110
The bill balance should be $2200, which is equal to the control amount, as the followingscreenshot shows. You can also see in the screenshot that the expense GL accounts specified inthe non-stock items have been automatically inserted into the document. The rent and utilitiesexpenses will be recorded to different GL accounts.
Figure: The details of the utilities and rent bill
3. Save the bill.
Now you can release the bills that have the Balanced status.
Related LinksBill ProcessingBills and Adjustments (AP301000)

| Part 2: Accounts Payable | 111
Step 6.2: Releasing a BillIn this step, you will release the bills that you created and review the balances of documents afterrelease. When a bill is released, the system generates a batch to update the accounts payable andexpense general ledger accounts. To release a bill, you can select the bill on the Bills And Adjustments(AP501000) form and click the Release button. To release multiple bills, you can use the Release APDocuments (AP501000) form, as you will see in this step. Do the following:
1. On the Release AP Documents (AP501000; Finance > Accounts Payable > Processes > Daily)form, select all bills listed on the page by clicking the Selected check box in the column header,as shown below.
Figure: The bills selected for release
You can release only bills that have the Balanced status. Because the advertising bill has the OnHold status, it is not listed in the table. You can process it later.
2. Click Release to process the selected bills.
The system releases the bills.
3. in the Reference Nbr. column, click the ID of the UtilitiesCo bill (000003) to view the bill.
When the bill is released, it gets the Open status (as shown in the following screenshot) andappears in the report of outstanding balances. In the open bill, you can edit the default paymentinformation—which includes the pay date, payment method, and cash account—until the bill isclosed.
When you released the bill, the system generated the batch in the General Ledger module andreleased the batch. To view the batch, click the reference number in the Batch Nbr. box on theFinancial Details tab of the bill (also shown in the following screenshot).
Figure: The utilities and rent bill after release
When you view the batch that the system generated, you can see that it was created fromthe AP module and assigned the 000002 batch number, based on the APBATCH numberingsequence, which you specified on the Accounts Payable Preferences (AP101000) form. Thetransaction date in the batch is set to the date of the source document. The batch wasimmediately posted to general ledger accounts after release because the Automatically Poston Release check box is selected on the Accounts Payable Preferences (AP101000) form.Otherwise, the batch would have been saved with the Unposted status.
In the batch, the 200000 - Accounts Payable account is credited for the amount of the bill,$2200. The accounts payable GL account is the account specified in the AP Account box on the

| Part 2: Accounts Payable | 112
Financial Details tab of the bill. The batch contains two debit journal entries of $1000 each tobe posted to the 740000 - Rent Expense account and a debit entry of $200 to be posted to the780000 - Utilities Expense account (see the screenshot below); these entries correspond to thedetails of the bill.
Figure: The batch generated on release of the utilities and rent bill
By default, the Post Summary on Updating GL check box is cleared on the Accounts PayablePreferences (AP101000) form, and the generated batch contains a journal entry for each detailline from the source document (bill or debit or credit adjustment). If this check box is selected,the system generates journal entries with total amounts summarized by GL account. Thus, if thePost Summary on Updating GL check box had been selected before the utilities bill was released,the generated batch would contain one journal entry with a total of $2000 over two lines of rentexpense from the bill to be posted to the 740000 - Rent Expense account, instead of two $1000journal entries (see the screenshot below).
Figure: The batch that would be generated if the Post Summary on Updating GL check box had been selected
Because the document details are summarized, the description of the journal entry is empty.
4. On the AP Balance by GL Account (AP632000; Finance > Accounts Payable > Reports > Balance)form, specify the following report parameters and click Run Report:
• Report Format: Open Documents
• Financial Period: 01-2014
In the report, you can review the balances of open Accounts Payable documents grouped byaccounts payable account and vendor. Account Documents Total, the total amount over allopen documents posted to the account, must be equal to the ending balance of the GL account.In this case, you have only one AP account, which is 200000 - Accounts Payable.
Figure: Open Accounts Payable documents by GL account and vendor for 01-2014

| Part 2: Accounts Payable | 113
5. On the Trial Balance Summary (GL632000; Finance > General Ledger > Reports > Balance)report form, select the 01-2014 financial period and click Run Report to generate the trialbalance report.
Figure: Trial Balance Summary report for 01-2014
6. Make sure that Account Documents Total in the AP Balance by GL Account (AP632000) reportis equal to the ending balance of 200000 - Accounts Payable for 01-2014 in the Trial BalanceSummary (GL632000) report, which should be $2230 if you have posted documents only asinstructed in this course.
Related LinksBill ProcessingRelease AP Documents (AP501000)AP Balance by GL Account (AP632000)

| Part 2: Accounts Payable | 114
Step 6.3: Creating an AP CheckIn Acumatica ERP, to pay a bill, you have to create an AP check document. You can enter the AP checkmanually or run a process that generates AP checks for multiple bills at once. In this step, you willmanually create two AP checks: an AP check to record a partial payment of $1000 for the utilities andrent bill, and an AP check to pay for $30 of office supplies. Do the following:
1. Create an AP check for the utilities and rent payment of $1000 as follows:
a. On the Checks And Payments (AP302000; Finance > Accounts Payable > Work Area >Enter) form, create a new document with the following settings:
• Type: Check (denotes an AP check document)
• Vendor: V000000002 (UtilitiesCo)
• Application Date: 1/31/2014
• Application Period: 01-2014
• Payment Amount: 1000.00
• Description: Partial payment for the utilities and rent bill
• Documents to Apply tab, Document Type: Bill
• Documents to Apply tab, Reference Nbr.: 000003 (utilities and rent bill of$2200)
As soon as you select the vendor, the system inserts the default payment settings fromthe vendor account, which include the payment method and cash account, into theappropriate elements of the form. You can change any of these default settings. On theDocuments to Apply tab, you can add multiple documents (one per row) of the vendorthat you need to pay. You can select only open documents.
In the Payment Amount box (in the Summary area), you have to specify the totalamount you are going to pay for the documents, while the Application Amount boxdisplays the total amount to be paid for the selected documents (which the systemcalculates as the sum of the amounts in the Amount Paid column). The systemcompares the amounts to ensure that the document is entered correctly. If PaymentAmount and Application Amount differ, the Unapplied Balance box shows thedifference, which is the payment amount minus the application amount, and the systemshows an error message saying that the document is out of balance. You can make full orpartial payments for bills, but the payment and application amounts must be equal. (Thesystem always checks for the control amount in payment documents.)
In the Balance column of the table on the Documents to Apply tab, you can seethe amount that will remain on the document balance after the payment is made. Inthis example, after you pay $1000 for the bill, the bill balance will be $1200 (see thescreenshot below).

| Part 2: Accounts Payable | 115
Figure: The AP check for $1000 toward the bill
Because the CHECK payment method (which is specified for the document) is configuredto require check printing, processing of the payment—that is, printing of the check—isrequired for the document. The warning by the Hold box indicates that you have to printthe check before the payment document can be released.
b. Click Save to save the AP check.
The system assigns the reference number to the AP check according to the APPAYMENTnumbering sequence, which is specified in the Payment Numbering Sequence box onthe Accounts Payable Preferences (AP101000) form.
Do not confuse the numbers of AP check documents with the numbers on the printedchecks. Payment Numbering Sequence defines the internal reference numbers ofdocuments that you create on the Checks and Payments (AP302000) form. Auto-generationof the numbers on printed checks, which are outgoing payment documents, is configuredfor the payment method and cash account on the Payment Methods (CA204000) form.
2. On the Checks And Payments (AP302000) form, create one more AP check to make a $30payment for office supplies used in 01-2014. Specify the following settings for the check:
• Type: Check
• Vendor: V000000001 (OfficeSuppliesCo)
• Application Date: 1/31/2014
• Application Period: 01-2014
• Payment Amount: 30.00
• Description: Payment for office supplies 01-2014
• Documents to Apply tab, Document Type: Bill
• Documents to Apply tab, Reference Nbr.: 000001 (Office supplies 01-2014)
Now you have to process the payments for these AP checks—that is, print the checks.
Related LinksAccounts Payable Check ProcessingPayment Methods for VendorsChecks and Payments (AP302000)

| Part 2: Accounts Payable | 116
Step 6.4: Processing an AP CheckAn AP check may require processing, depending on the settings of the payment method selected forthe document. You can review the settings of the payment method by using the Payment Methods(CA204000; Finance > Cash Management > Configuration > Setup) form. If the payment methodhas the Print Checks or Create Batch Payment option button selected on the Settings for Use inAP tab, the AP check requires payment processing. You have created AP checks that use the CHECKpayment method, which has Print Checks selected (see the screenshot)—that is, the payment methodis configured for check printing and denotes payments that must be made with a printed check.
Figure: The payment method, which is configured to require printing of checks
In this step, you will actually print the checks. Do the following:
1. On the Checks and Payments (AP302000; Finance > Accounts Payable > Work Area > Enter)form, open the 000002 AP check and click Actions > Print Check.
This action opens the Process Payments / Print Checks (AP505000; Finance > Accounts Payable> Processes > Payment Processing) form, which you can use to print the checks.
The payment method and cash account specified at the top of this form provide the selectioncriteria of the AP checks listed in the table. As soon as you select the payment method, thesystem inserts the default cash account into the Cash Account box. The Next Check Numberbox displays the reference number that the system will assign to the next printed check, but youcan change this value to make it match the number of the next blank check in the printer. (Thesystem suggests the next check reference number because the AP - Suggest Next Numbercheck box is selected for the CHECK payment method with the default cash account on theAllowed Cash Accounts tab of the Payment Methods (CA204000) form; see the settings of theCHECK payment method.)
2. Select both AP checks in the table, 000001 and 000002, by using the check boxes in the table,as the following screenshot shows.
3. Click Process (see the screenshot below) to print the checks for the selected paymentdocuments.

| Part 2: Accounts Payable | 117
Figure: The documents selected for check printing
The system displays the checks in a separate window so you can preview them and send themto the printer. The printed check number is inserted into the Payment Ref. box of the Checksand Payments (AP302000; Finance > Accounts Payable > Work Area > Enter) form. The firstprinted check gets the 000001 reference number, which is the last assigned reference numberincremented by 1. The AP check gets the Printed status and is ready for release.
You can reprint a check with the same check number or a new number. For more information, seethe link below.
Related LinksAccounts Payable Check ProcessingHow to Print ChecksProcess Payments/Print Checks (AP505000)

| Part 2: Accounts Payable | 118
Step 6.5: Releasing an AP CheckOn the release of an AP check, the system updates the balance of the documents specified in the APcheck and generates a batch to update the accounts payable and cash GL accounts. You can release anAP check if it has the Printed status. Perform the following instructions to release AP checks:
1. On the Release Payments (AP505200; Finance > Accounts Payable > Processes > ReleasePayments) form, select the CHECK payment method.
2. Make sure that Release is selected in the Action box.
3. Select both AP checks in the table (by selecting the check boxes in their rows), and clickProcess.
On the Checks And Payments (AP302000) form, open the 000001 AP check (UtilitiesCo). Noticethat the check has the Closed status.
4. On the Application History tab, select the bill to which the document has been applied. On thetable toolbar, click View Application Document to review the bill. The bill has been partiallypaid and now has a balance of $1200. Because the bill has a nonzero balance, it retains theOpen status.
5. On the Financial Details tab, click the batch number to view the batch that has been generatedto update the GL accounts.
Notice that the 102000 - Checking Account account is credited for the amount paid for the bill,while the 200000 - Accounts Payable account is debited for the same amount. The creditedaccount is the one specified in the AP check, while the AP account is the one specified in thebill. If you pay multiple bills with one AP check, the AP account specified for each document isdebited for the amount paid for the bill plus the cash discount taken, if any. (Early payments aredescribed later in this course.) The batch has the date 1/31/2014, which is the payment date ofthe AP check.
6. On the AP Balance by GL Account (AP632000; Finance > Accounts Payable > Reports > Balance)report form, specify the following report parameters and click Run Report:
• Report Format: Open + Current Period (includes closed documents in the report)
• Financial Period: 01-2014
• Include Applications: Cleared (makes the report display one record per document;excludes the list of applications for each document)
The report, shown in the following screenshot, shows the documents posted to the 01-2014period and includes the documents that are open at the end of the period. The vendor balanceshown in the report is the total outstanding balance of vendor documents. When you release anAP check, the payment reduces the vendor balance. After all documents are closed, the vendorbalance becomes zero. Thus, the OfficeSuppliesCo vendor balance is zero because all documentsof this vendor have been paid. Now that the AP check with the amount of $1000 has been paidto UtilitiesCo, you still owe $1200 to the vendor. (The Closed column shows the period in whichthe document acquired the Closed status.)

| Part 2: Accounts Payable | 119
Figure: Documents listed by AP account and vendor for 01-2014
Related LinksAccounts Payable Check ProcessingRelease Payments (AP505200)AP Balance by GL Account (AP632000)

| Part 2: Accounts Payable | 120
Step 6.6: Reconciling Vendor Balances With GL AccountsTo perform reconciliation, for each AP account used in Accounts Payable documents, you have tocompare the total balance of open documents with the balance of the general ledger account accordingto the transactions posted to the account. The balances must be equal.
In this step, you will compare the total balance of open Accounts Payable documents with the balanceof the 200000 - Accounts Payable account for 01-2014. Before you reconcile the balances, you willreview the unreleased Accounts Payable documents and release the needed ones and delete or edit theother ones, if there are any, because you are going to close the 01-2014 period. You cannot close theperiod in the Accounts Payable module if there are unreleased documents that need to be posted to theperiod. If you perform the reconciliation in the middle of the financial period, you don't necessarily haveto release all documents. Do the following:
1. Review the unreleased Accounts Payable documents for 01-2014 and release any documentsthat need to be released, as described below:
a. On the AP Edit (AP610700; Finance > Accounts Payable > Reports > Audit) report form,specify the following report parameters and click Run Report:
• From Period: 01-2014
• To Period: 01-2014
• Include Transactions on Hold: Selected
For the specified period, the report shows Accounts Payable documents that haven't yetbeen released—that is, documents that have the On Hold or Balanced status. The reportshows the $100 AdvertisingCo bill that is on hold (see the following screenshot). Supposethat you have forgotten to release the document before, and now you have to release it.
Figure: Unreleased Accounts Payable documents for 01-2014
b. To view the bill, click the reference number of the bill in the report.
c. On the Bills and Adjustments (AP301000) form that opens for the bill, clear the Holdcheck box and click Release to release the document.
Now all Accounts Payable documents are released.
2. Reconcile the total of open Accounts Payable documents with the balance of the AP account(200000 - Accounts Payable) as follows:
a. On the AP Balance by GL Account (AP632000; Finance > Accounts Payable > Reports >Balance) report form, specify the following report parameters and click Run Report:
• Report Format: Open Documents
• Financial Period: 01-2014
• Include Applications: Cleared
For the specified period, the report shows the AP accounts used in Accounts Payabledocuments and the list of documents that have been posted to these accounts and thatare open by the end of the period. In the report, you can see the only AP account usedin Accounts Payable documents, which is 200000 - Accounts Payable. Based on openAccounts Payable documents, the balance of 200000 - Accounts Payable by the end of the01-2014 period is $1300.

| Part 2: Accounts Payable | 121
Figure: The open Accounts Payable documents posted to the 200000 - Accounts Payable for 01-2014
b. Get the trial balance for 01-2014 by using the Trial Balance Summary (GL632000;Finance > General Ledger > Reports > Balance) report.
In the trial balance, the balance of an AP account is the total amount of the transactionsposted to this account in the General Ledger module by the end of the specified period.By general ledger transactions, the balance of 200000 - Accounts Payable is $1300 by theend of the 01-2014 period.
Figure: The trial balance for 01-2014
c. Compare the balance of the 200000 - Accounts Payable account according to the APBalance by GL Account (AP632000) and Trial Balance Summary (GL632000) reports.
Both reports show the $1300 balance of 200000 - Accounts Payable for 01-2014;therefore, the balances are reconciled. During the reconciliation, you might find adiscrepancy between the total balance of open Accounts Payable documents by APaccount and the balance of this account according to the trial balance. The discrepancymay be caused by transactions being posted to the AP account directly from the GeneralLedger module without a document being processed in Accounts Payable. Anotherpossible cause of the discrepancy is the presence of unposted batches generated fromAccounts Payable documents. To review the batches that have been released but notyet posted, you can use the Post Transactions (GL502000; Finance > General Ledger >Processes > Daily) form. (More information on how to find and eliminate discrepancieswill be given in other training courses.)
Related LinksAP Edit (AP610700)AP Balance by GL Account (AP632000)

| Part 2: Accounts Payable | 122
Trial Balance Summary (GL102000)

| Part 2: Accounts Payable | 123
Step 6.7: Closing the Financial PeriodTo close a financial period in General Ledger, you first have to close the period in the subledger modulesyou are using (which in this case are Accounts Payable and Cash Management). By closing the periodin the Accounts Payable module, you can prevent posting to the period by mistake after all figures havebeen verified and disclosed in reports. Before you close the period in Accounts Payable, you have toreview the documents that haven't been released in the module and release the apropriate documents.(You have already done this during the previous step of this lesson.)
In this step, you will close the 01-2014 period in the Accounts Payable and Cash Management modules,and then close the financial period in the General Ledger module. Then you will deactivate the period inthe system to prevent the creation of any documents in that period. Perform the following instructions:
1. Close the 01-2014 period in Accounts Payable as follows:
a. Open the Close Financial Periods (AP506000; Finance > Accounts Payable > Processes >Closing) form.
The form lists all open financial periods of the last non-closed year, which is 2014. In asubledger module (such as Accounts Payable), you can close one period or you can closemultiple periods at once after the previous period has been closed in the module.
b. Select the 01-2014 period in the table, and click Print Open Documents to review theunreleased documents for this period.
The system navigates to the Open AP Documents (AP656000; Finance > AccountsPayable > Reports > Audit) report, which lists the unreleased documents for 01-2014.Because there are no unreleased documents in Accounts Payable for this period, thereport is empty, and you can close the period in the module.
You don't necessarily have to view the report every time you are going to close a financialperiod. If you try to close a period that has unreleased documents in the module, thesystem will display an error message.
c. On the Close Financial Periods (AP506000) form, click Close Periods to close thefinancial period in the module.
After the period is closed in the Accounts Payable module, it no longer appears in thelist of available periods on data entry forms. However, the period remains active in thesystem, and users can manually type 01-2014 in the Post Period box (see the followingscreenshot) to save a document dated to the closed period. Documents can be entered toclosed periods because the Allow Posting to Closed Periods check box is selected onthe General Ledger Preferences (GL102000) form.
Figure: Manual typing of a closed period in the Post Period box
2. Close the 01-2014 period in the Cash Management module:
a. On the Close Financial Periods (CA506000; Finance > Cash Management > Processes >Closing) form, select the 01-2014 period.
b. On the form toolbar, click Close Periods to close the financial period in the module.
3. To close and deactivate the 01-2014 period in the General Ledger module, do the following:
a. On the Close Financial Periods (GL503000; Finance > General Ledger > Processes >Closing) form, select the 01-2014 period.
b. On the form toolbar, click Close Periods to close the financial period in the module.

| Part 2: Accounts Payable | 124
c. To deactivate the 01-2014 period, on the Financial Periods (GL201000; Finance > GeneralLedger > Work Area > Manage) form, clear the Active check box for the 01-2014 period,and save your changes.
Now the 01-2014 period is inactive in the system. Users aren't able to create newdocuments dated to 01-2014.
Related LinksPeriod-End Closing ProceduresHow to Close a Financial Period in APClose Financial Periods (AP506000, Accounts Payable)Close Financial Periods (CA506000, Cash Management)Close Financial Periods (GL503000, General Ledger)Financial Periods (GL201000)
| Part 2: Accounts Payable | 125
Additional InformationYou can use the following information for additional reading, but these concepts are outside of thescope of this course.
Recurring Bills
You can automate the creation of recurring bills by using schedules, much like you generate recurringbatches in the General Ledger module. For more information, see Recurring Bills in the Acumatica ERPUser Guide.
Vendor Discounts
You can define vendor discounts for each vendor and periodically update them. For more information,see Maintaining Vendor Discounts and Vendor Prices.

| Part 2: Accounts Payable | 126
Lesson SummaryIn this lesson, you have learned how to process vendor invoices you have received and how to reconcilevendor balances with general ledger accounts in Acumatica ERP.
To process a vendor invoice in the system, you have to create and release a bill by using the Bills andAdjustments (AP301000) form. To record a payment for the bill that covers a full or partial balance, youhave to create and release an AP check on the Checks and Payments (AP302000) form. Depending onthe payment method specified in the AP check, you might have to process the AP check (for example,print the check) before you can release it. Until the payment is processed, the payment keeps the OnHold status. After you have released the AP check, the system reduces the vendor balance by the paidamount. Once the bill is fully paid, it becomes closed.
You have also learned how to close a financial period in the system and prevent the creation of newdocuments dated to the closed period. To close a financial period, you have to close the period in allsubledger modules and then in the General Ledger module. To prevent posting any documents to thefinancial period, you can make the period inactive in the system.
Review Questions
• Which Accounts Payable documents can you process in the system?
• How do you process a bill received from a vendor?
• How do you process a payment to a vendor?
• In what situations do you need to enable check printing for a payment method?

| Part 2: Accounts Payable | 127
Lesson 7: Payments in the Cash Discount PeriodIn this lesson, you will learn how to make early payments for bills. You will learn how to enter billsthat can be paid within a cash discount period and how to generate AP checks from bills by using thePrepare Payments (AP503000) form. You will learn how the cash discount received from vendors isprocessed in the system and which GL accounts are used. You will also learn how to review outstandingbalances and vendor documents.
Lesson Objectives
In this lesson, you will learn how to perform the following operations in the Accounts Payable module:
• Enter a bill for which the applicable credit terms have a cash discount period
• Use the Prepare Payments (AP503000) form to generate AP checks to pay bills
• Pay a bill and take a cash discount for the early payment
• Pay multiple bills with one AP check
• Review vendor balances and documents

| Part 2: Accounts Payable | 128
Step 7.1: Making a Funds TransferSuppose that you have decided to transfer $5000 to the 101000 - Cash on Hand USD account to beable to pay bills from this account, which by default is used with the CASH payment method. Currently,the balance of this account is zero (if you have made only the transactions described in this course). Ifa cash account has a zero or negative balance, you can still make and process an AP check that usesthe account as the source of funds in the system. To make the funds transfer, perform the followinginstructions:
1. On the Funds Transfers (CA301000; Finance > Cash Management > Work Area > Enter) form,create a new document with the following information:
• Description: Cash on Hand USD Replenishment for $5000
• Hold: Cleared
• Source Account section, Account: 102000 (Checking Account USD)
• Source Account section, Transfer Date: 2/1/2014
• Source Account section, Document Ref.: 02012014
• Source Account section, Amount: 5000.00
• Destination Account section, Account: 101000 (Cash on Hand USD)
• Destination Account section, Receipt Date: 2/1/2014
2. Release the document.
On the Cash Account Transactions (CA303000; Finance > Cash Management > Work Area >Explore) form, make sure that the ending balance of the 101000 - Cash on Hand account is$5000 for the 02-0214 period.
For detailed instructions on how to transfer funds between cash accounts, see the link below.
Related LinksStep 4.4: Making a Funds Transfer

| Part 2: Accounts Payable | 129
Step 7.2: Creating BillsYou can create bills for which the applicable credit terms specify the cash discount offered by thevendor for an early payment. In the bill amount, you have to enter the net amount of the documentbefore the cash discount. By applying the credit terms, the system automatically calculates the cashdiscount amount. If you pay the bill no later than the cash discount date—that is, if you create andprocess the AP check with an application date no later than the cash discount date—the cash discountamount is recorded to the income GL account that accumulates the cash discount received, while thecash account is credited for the payment amount. If you pay the document later than the cash discountdate, you have to pay the net amount and the system will credit the cash account for the net amount.
In this step, you will create bills to be paid by different dates. Then you will release the bills and reviewthe batch that is generated on release of the first bill. You will complete the following tasks, which aredescribed in greater detail below:
1. Create the $40 ServiceCo bill dated 02/01/2014, offered on credit terms of 3/7, net 30 days. Youwant to take the cash discount for this bill.
2. Create the $60 ServiceCo bill dated 02/02/2014, offered on credit terms of 3/7, net 30 days. Youwill pay this bill by the due date and not take the cash discount.
3. Create the $80 ServiceCo bill dated 02/25/2014, offered on credit terms of 3/7, net 30 days. Youwill take the cash discount for this bill.
4. Create the $20 AdvertisingCo bill dated 02/15/2014, offered on credit terms of 3/7, net 30 days.For this bill, you will take the cash discount.
5. Release the bills and review the batch that was generated on release of the $40 ServiceCo bill.
1. Create the $40 ServiceCo Bill
First, you will create the $40 bill for 1 hour of service purchased from ServiceCo on 02/01/2014. Thevendor offers the credit terms of 3/7, net 30 days in the document. That is, if you pay the invoice in 7days, a 3 percent discount will be assessed, and you have to pay the full amount in 30 days. You wantto take the cash discount. To create the bill:
1. On the Bills And Adjustments (AP301000; Finance > Accounts Payable > Work Area > Enter)form, create and save a new document with the following information:
• Vendor: V000000004 (ServiceCo)
• Terms: 30D7D3 (3/7, n/30)
• Date: 2/1/2014
• Vendor Ref.: 02012014S
• Description: Service $40, take discount
• Amount: 40.00
• Document Details tab, Inventory ID: SERVICE
• Document Details tab, Quantity: 1.00
• Hold: Cleared
The Cash Discount Date, in the Summary area of this form, is the end date of the cashdiscount period, which the system calculates by using the specified credit terms. On theFinancial Details tab, you can find the pay date, which is 2/8/2014; this date is calculatedbased on the cash discount date because for ServiceCo, Payment By is set to Discount Date.
The number of payment lead days specified for the vendor, which is the number of days thepayment is delayed before it reaches the vendor, is subtracted from the Payment By date to get

| Part 2: Accounts Payable | 130
the pay date. Because ServiceCo has 0 payment lead days, the pay date is 2/8/2014 – 0 days =2/8/2014.
In the Cash Discount box, also in the Summary area of the form, the system calculates (basedon the credit terms) the amount of the discount that you can take for paying off the bill early.The cash discount amount is $1.20, which is 3% of $40.00. In the Amount box, you have toenter the net amount of the bill before the cash discount. If you pay the bill in the discountperiod, the system will record the cash discount amount to the income GL account specified inthe Cash Discount Account box for the vendor, while the cash account will be credited for thepayment amount. If you pay the bill later than the cash discount date, you have to pay the fullamount; otherwise, the bill remains open.
In the system, you can define multiple types of credit terms offered by vendors on the CreditTerms (CS206500; Finance > Accounts Payable > Configuration > Setup) form. You can decrease orincrease the cash discount amount in the bill, if needed. You can also change the due date and cashdiscount date directly in the document.
If you specify taxes in a bill, the settings of each tax define whether the cash discount reduces thetaxable amount. (Tax management is outside of the scope of this course.)
2. Create the $60 ServiceCo Bill
Next, you will create the $60 bill for 1.5 hours of service purchased from ServiceCo on 02/02/2014, andyou will specify the credit terms of 3/7, net 30 days. You have decided to pay the bill by the due date(no cash discount will be taken). To create the bill, do the following:
1. On the Bills And Adjustments (AP.30.10.00) form, create a new document with the followinginformation:
• Vendor: V000000004 (ServiceCo)
• Terms: 30D7D3 (3/7, n/30)
• Date: 2/2/2014
• Vendor Ref.: 02022014S
• Description: Service $60, not take discount
• Amount: 60.00
• Document Details, Inventory ID: SERVICE
• Document Details, Quantity: 1.50
• Hold: Cleared
2. Save the document.
3. On the Financial Details tab, in the Pay Date box, select 3/4/2014, which is the due date ofthe document, and again save the document.
By default, the pay date is calculated by the cash discount date, because the vendor's PaymentBy is set to Discount Date. However, in this case, you want to instead pay the bill by the duedate.
3. Create the $80 ServiceCo Bill
You will now create the $80 bill for 2 hours of service purchased from ServiceCo on 02/25/2014, andyou will specify the credit terms of 3/7, net 30 days. For this bill, you want to take the cash discount. Tocreate the bill, on the Bills And Adjustments (AP301000) form, create and save a new document withthe following information
• Vendor: V000000004 (ServiceCo)

| Part 2: Accounts Payable | 131
• Terms: 30D7D3 (3/7, n/30)
• Date: 2/25/2014
• Vendor Ref.: 02252014S
• Description: Service $80, take discount
• Amount: 80.00
• Document Details tab, Inventory ID: SERVICE
• Document Details tab, Quantity: 2.00
• Hold: Cleared
Make sure the pay date (on the Financial Details tab) is set to 3/4/2014, which is the cash discountdate of the document.
4. Create the $20 AdvertisingCo Bill
You will now create the $20 advertising bill for a one-hour advertising run purchased fromAdvertisingCo on 02/15/2014, and you will specify the credit terms of 3/7, net 30 days. You want totake the cash discount. To create the bill, proceed as follows:
1. On the Bills And Adjustments (AP301000) form, create a new document with the followinginformation:
• Vendor: V000000003 (AdvertisingCo)
• Terms: 30D7D3 (3/7, n/30)
• Date: 2/15/2014
• Vendor Ref.: 02152014A
• Description: Ads $20, take discount
• Amount: 20.00
• Document Details tab, Inventory ID: ADVERT
• Document Details tab, Quantity: 1.00
• Hold: Cleared
Notice that in the Terms box, you have changed the default terms for the vendor, which are 30D(net 30 days), to the needed credit terms of 30D7D3 (3/7, net 30 days).
2. On the Financial Details tab, in the Pay Date box, you can see that the pay date is calculatedbased on the due date because the vendor's Payment By is set to Due Date. However, in thiscase, you want to pay the bill by the discount date. Set the pay date to 2/22/2014, which is thecash discount date of the document, and again save the document.
Now the pay date is set to the date when you want to pay the bill.
5. Release the Bills and Review One of the Generated Batches
To release the bills that you have created and review the batch that will be generated for the $40ServiceCo bill, perform the following instructions:
1. On the Release AP Documents (AP501000; Finance > Accounts Payable > Processes > Daily)form, release all four bills that you have created.
2. After the bills are released, find and open the batch that has been generated from the $40ServiceCo bill. (For detailed instructions on viewing a batch that has been generated, see Step6.2: Releasing a Bill.)

| Part 2: Accounts Payable | 132
Once the bill has been released and the generated batch has been posted, the net amount isrecorded to the accounts payable and expense GL accounts (see the following screenshot).
Figure: The batch generated on release of the $40 service bill
Now you can prepare payments for the bills.
Related LinksBill ProcessingCredit TermsBills and Adjustments (AP301000)Release AP Documents (AP501000)

| Part 2: Accounts Payable | 133
Step 7.3: Making an Early Payment for a BillIn this step, you will make an early payment for the $40 ServiceCo bill. To do this, you will generatean AP check by using the Prepare Payments (AP503000) form. On this form, which you will explore indetail as you go through this step, you can select documents by their pay date, cash discount date, anddue date to make payments for them. You will learn which information is displayed on the form and howto select documents by different dates.
In this step, you will complete the following tasks, which are described in detail in the followingsections:
1. On the Prepare Payments (AP503000) form, select (by their pay date) the bills to be paid withcash on 2/8/2014.
2. Analyze the difference between preparing early payments and payments after the cash discountdate.
3. Prepare the AP check to make an early cash payment for the $40 ServiceCo bill.
4. On the Release Payments (AP505200) form, release the AP check and review the batch that wasgenerated for posting the payment and cash discount amounts to general ledger accounts.
1. Select the Bills to be Paid on 2/8/2014
First, you will analyze the information displayed on the Prepare Payments (AP503000) form and select(by their pay date) the bills to be paid on 2/8/2014. Perform the following instructions:
1. Open the Prepare Payments (AP503000; Finance > Accounts Payable > Processes > PaymentProcessing) form and become familiar with it.
On this form, you can select the bills to be paid by the specified default payment method,cash account, and payment date. You can add to the displayed list a bill that has other defaultpayment information and prepare the payment for it. (You will see an example later.) On thisform, you can select only bills that haven't yet been selected for payment in an AP check withthe On Hold or Printed status.
To view the list of all outstanding documents, you can use the AP Balance by GL Account(AP632000) report.
2. In the Payment Method box, select CASH, and set the Payment Date to 2/8/2014.
As soon as you specify the payment method, the default cash account of this method is insertedinto the Cash Account box, but you can select another cash account that is allowed for thepayment method. After you specify the payment method, the cash account, and the paymentdate, the system loads the outstanding bills with the specified information. Thus, the bills shownin the table have the default CASH payment method and 101000 - Cash on Hand USD cashaccount specified, and have a pay date that matches the selection criteria.
The cash accounts allowed for a payment method are configured on the Payment Methods(CA204000; Finance > Cash Management > Configuration > Setup) form.
Because you specify three dates in a bill—the due date, cash discount date, and pay date—you can flexibly select documents on the Prepare Payments (AP503000) form. Payment Date,the date when the AP checks will be generated, also works as a filter. Because the Pay DateWithin check box is selected by default, the bills are filtered by the pay date. Thus, the twolisted bills (for AdvertisingCo and ServiceCo) have a pay date of no later than 2/8/2014 + 7 days= 2/15/2014.

| Part 2: Accounts Payable | 134
Figure: The bills selected by the payment method, cash account, and pay date
The Payment Lead Time setting on the Accounts Payable Preferences (AP101000) formdetermines the default number of days that is inserted into Pay Date Within, Due Date Within,and Cash Discount Expires Within boxes.
2. Analyze the Difference Between Payments Before and After the Cash Discount Date
Now you will compare the amounts to be paid for the $40 ServiceCo bill within the discount period andafter the cash discount date as follows:
1. In the table, for the ServiceCo bill, make sure the Payment Date is 2/8/2014, the AmountPaid is $38.80 and the Cash Discount Taken is $1.20.
Because 2/8/2014 is the cash discount date of the document, if you generate the AP check onthis date, the system will create the reduced payment of $38.80, and the cash discount takenwill be $1.20 for the bill (see the screenshot below). Bills displayed in the table are filtered bypay date.
Figure: The amounts inserted into an AP check created for an early payment
2. In the Payment Date box, select 2/9/2014.

| Part 2: Accounts Payable | 135
Because 2/9/2014 is greater than the cash discount date, on 2/9/2014, you have to pay the netamount of the service bill, which is $40 (as shown in the following screenshot).
Figure: The amounts inserted into an AP check for a payment after the cash discount date
You can also prepare a single AP check for a bill by using the Bills and Adjustments (AP301000)form and selecting Pay Bill/Apply Adjustment from the Actions menu on the form toolbar.
3. Prepare the AP Check for the $40 ServiceCo Bill
Now you will select the bills to be paid on 2/8/2014 by their cash discount date, and generate the APcheck to pay $38.80 and take the $1.20 cash discount for the $40 ServiceCo bill:
1. In Payment Date, select 2/8/2014 again.
2. Select the Cash Discount Expires Within check box.
The 000005 service bill appears in the table, because now the documents are selected byeither a pay date or a cash discount date that expires within 7 days of 2/8/2014. You can take$1.80 cash discount for the $60 service bill if you pay it on 2/8/2014, but the pay date of thedocument is 3/4/2014. Earlier you had decided to pay this bill by (but closer to) the due dateand not take the cash discount.
3. Select the 000004 service bill in the table. (You've decided to pay the other bills later.)
The Selection Total box displays the total amount that will be paid for the documents you haveselected (see the following screenshot). Selection Total is the total amount in the AmountPaid column of the table for all selected lines. GL Balance displays the $5000 ending balance ofthe 101000 - Cash on Hand USD account for 02-2014. The GL balance is the balance calculatedby all transactions posted to the cash account by the end of the selected post period. Theamount displayed in the Available Balance box includes posted transactions and transactionsthat have been created for the cash account in the system but have not yet been posted. Thus,the available balance sometimes differs from the GL balance. You have sufficient funds in thecash account if Available Balance is greater than Selection Total.
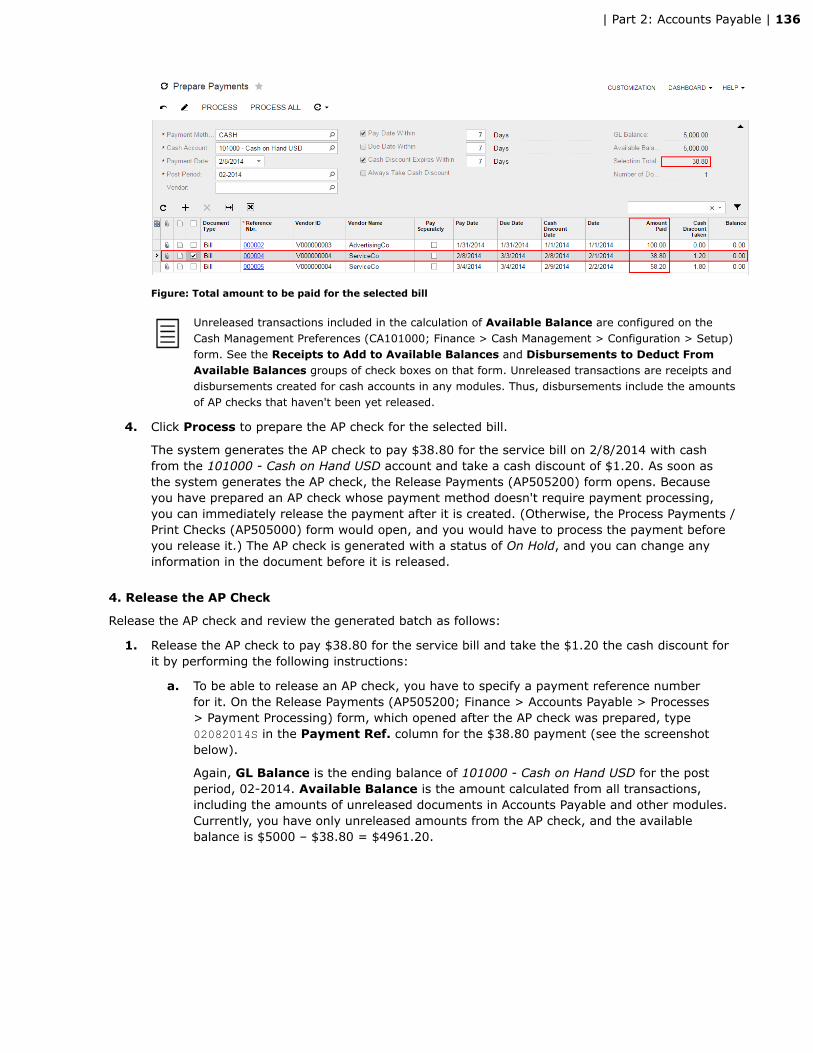
| Part 2: Accounts Payable | 136
Figure: Total amount to be paid for the selected bill
Unreleased transactions included in the calculation of Available Balance are configured on theCash Management Preferences (CA101000; Finance > Cash Management > Configuration > Setup)form. See the Receipts to Add to Available Balances and Disbursements to Deduct FromAvailable Balances groups of check boxes on that form. Unreleased transactions are receipts anddisbursements created for cash accounts in any modules. Thus, disbursements include the amountsof AP checks that haven't been yet released.
4. Click Process to prepare the AP check for the selected bill.
The system generates the AP check to pay $38.80 for the service bill on 2/8/2014 with cashfrom the 101000 - Cash on Hand USD account and take a cash discount of $1.20. As soon asthe system generates the AP check, the Release Payments (AP505200) form opens. Becauseyou have prepared an AP check whose payment method doesn't require payment processing,you can immediately release the payment after it is created. (Otherwise, the Process Payments /Print Checks (AP505000) form would open, and you would have to process the payment beforeyou release it.) The AP check is generated with a status of On Hold, and you can change anyinformation in the document before it is released.
4. Release the AP Check
Release the AP check and review the generated batch as follows:
1. Release the AP check to pay $38.80 for the service bill and take the $1.20 the cash discount forit by performing the following instructions:
a. To be able to release an AP check, you have to specify a payment reference numberfor it. On the Release Payments (AP505200; Finance > Accounts Payable > Processes> Payment Processing) form, which opened after the AP check was prepared, type02082014S in the Payment Ref. column for the $38.80 payment (see the screenshotbelow).
Again, GL Balance is the ending balance of 101000 - Cash on Hand USD for the postperiod, 02-2014. Available Balance is the amount calculated from all transactions,including the amounts of unreleased documents in Accounts Payable and other modules.Currently, you have only unreleased amounts from the AP check, and the availablebalance is $5000 – $38.80 = $4961.20.

| Part 2: Accounts Payable | 137
Figure: The Payment Ref. number, which you must enter to release the AP check
b. Click Process to release the AP check.
c. After the document is processed, open the AP check on the Checks and Payments(AP302000; Finance > Accounts Payable > Work Area > Enter) form.
On the Application History tab, you can see (in the Balance column) that the balanceof the bill is $0. The bill has been fully paid and closed in the system. From the AP check,the system has generated the batch to be posted to GL accounts.
2. Review the batch that has been generated from the AP check as follows:
a. On the Financial Details tab of the Checks and Payments (AP302000) form, click thebatch number in the Batch Nbr. box to open the batch generated for the AP check on theJournal Transactions (GL301000) form.
The batch records to GL accounts the early payment and cash discount taken for thebill. The first journal entry credits 101000 - Cash on Hand USD for the payment amount,$38.80. The cash account is the one specified in the AP check. The second journal entrydebits 200000 - Accounts Payable for the bill amount, which is $40. The AP account is theone specified in the bill. The last journal entry credits 490000 - Cash Discount Receivedfor the amount of cash discount taken, $1.20. This is the income account specified for thevendor account; see the Cash Discount Account box on the GL Accounts tab of theVendors (AP303000) form. Thus, the total credit amount is equal to the amount debitedto the AP account, $38.80 + $1.20 = $40 (see the screenshot below).
Figure: The batch that posts the payment and cash discount taken for the bill
Next, you will see how the payment is reflected on the vendor balance.
Related LinksAccounts Payable Check ProcessingPrepare Payments (AP503000)
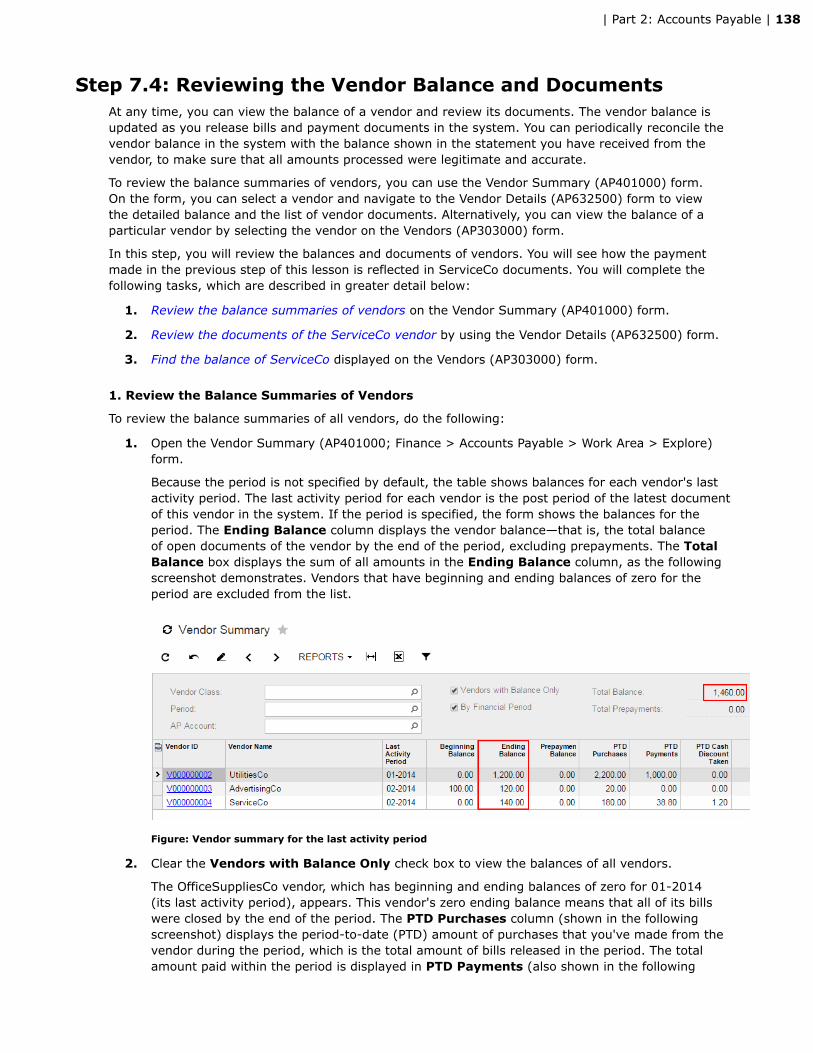
| Part 2: Accounts Payable | 138
Step 7.4: Reviewing the Vendor Balance and DocumentsAt any time, you can view the balance of a vendor and review its documents. The vendor balance isupdated as you release bills and payment documents in the system. You can periodically reconcile thevendor balance in the system with the balance shown in the statement you have received from thevendor, to make sure that all amounts processed were legitimate and accurate.
To review the balance summaries of vendors, you can use the Vendor Summary (AP401000) form.On the form, you can select a vendor and navigate to the Vendor Details (AP632500) form to viewthe detailed balance and the list of vendor documents. Alternatively, you can view the balance of aparticular vendor by selecting the vendor on the Vendors (AP303000) form.
In this step, you will review the balances and documents of vendors. You will see how the paymentmade in the previous step of this lesson is reflected in ServiceCo documents. You will complete thefollowing tasks, which are described in greater detail below:
1. Review the balance summaries of vendors on the Vendor Summary (AP401000) form.
2. Review the documents of the ServiceCo vendor by using the Vendor Details (AP632500) form.
3. Find the balance of ServiceCo displayed on the Vendors (AP303000) form.
1. Review the Balance Summaries of Vendors
To review the balance summaries of all vendors, do the following:
1. Open the Vendor Summary (AP401000; Finance > Accounts Payable > Work Area > Explore)form.
Because the period is not specified by default, the table shows balances for each vendor's lastactivity period. The last activity period for each vendor is the post period of the latest documentof this vendor in the system. If the period is specified, the form shows the balances for theperiod. The Ending Balance column displays the vendor balance—that is, the total balanceof open documents of the vendor by the end of the period, excluding prepayments. The TotalBalance box displays the sum of all amounts in the Ending Balance column, as the followingscreenshot demonstrates. Vendors that have beginning and ending balances of zero for theperiod are excluded from the list.
Figure: Vendor summary for the last activity period
2. Clear the Vendors with Balance Only check box to view the balances of all vendors.
The OfficeSuppliesCo vendor, which has beginning and ending balances of zero for 01-2014(its last activity period), appears. This vendor's zero ending balance means that all of its billswere closed by the end of the period. The PTD Purchases column (shown in the followingscreenshot) displays the period-to-date (PTD) amount of purchases that you've made from thevendor during the period, which is the total amount of bills released in the period. The totalamount paid within the period is displayed in PTD Payments (also shown in the following

| Part 2: Accounts Payable | 139
screenshot), which is the total amount of AP checks posted in the period. Thus, you'vepurchased $30 of office supplies in 01-2014 and paid $30 for them in the same period. Separatecolumns show the period-to-date amounts of cash discounts taken, taxes withheld, creditadjustments, debit adjustments, and prepayments.
Figure: Period-to-date purchases and payments to the vendor
2. Review the Documents for the ServiceCo Vendor
To review the documents and the detailed vendor balance of ServiceCo, do the following:
1. On the Vendor Details (AP402000; Finance > Accounts Payable > Work Area > Explore) form,select the ServiceCo vendor.
The form shows the selected vendor's documents and the balance calculated based on thedocuments. By default, the form shows all of the vendor's open documents. Current Balanceis the total balance of the vendor's open documents, excluding prepayments. The total balanceof open prepayments is shown separately in the Prepayments Balance box. The outstandingbalance of documents is displayed in the Balance column of the table. The form shows twoServiceCo bills totaling $140, and the current balance of the vendor is $140. (See the followingscreenshot.)
Balance by Documents is the total in the Balance column over all documents shown in thetable. If you select the Include Unreleased Documents check box, the documents that havethe On Hold or Balanced status will also appear, and the balance by documents may differ fromthe current balance. By viewing the balance by documents, you can foresee the total amountyou will owe to the vendor after all documents are released.
Figure: The amount currently owed to the vendor
2. To view both open and closed documents, select the Show All Documents check box.
The Origin. Amount column displays the amount of each document: for bills, the net amountthat should be paid; and for AP checks, the payment amount. The Cash Discount Takenamount appears in the table for a bill after you have made an early payment and taken thecash discount for the bill—that is, after release of the AP check that was paid early. The currentbalance is the sum of totals in the Origin. Amount column minus the sum of totals in the CashDiscount Taken column, which in this instance is ($80 – $38.80 + $60 + $40) – $1.20 = $140.

| Part 2: Accounts Payable | 140
3. To see which AP check has been applied to the closed (or partially paid) bill, click the referencenumber of the bill in the table. This brings up the Bills and Adjustments (AP301000; Finance >Accounts Payable > Work Area > Enter) form with the bill selected.
On the Applications tab of the form, you can see the list of AP checks that have been appliedto the bill. In this case, the bill with the original amount of $40 was closed by the AP check of$38.80 paid to the vendor, as the following screenshot illustrates. To view the details of this APcheck, select the document in the table and click View Payment.
Figure: AP checks that were paid for the bill
You can also see the list of document applications by using the AP Balance by GL Account(AP632000) or AP Balance by Vendor (AP632500) report. To see this with the first report, run theAP Balance by Vendor (AP632500; Finance > Accounts Payable > Processes > Balance) report forServiceCo with the Include Applications check box selected (Report Format: Open + CurrentPeriod; Financial Period: 02-2014; Vendor ID: V000000004). Under each document in thereport, the applications are listed. For application entries, the Entered and Balance columns areempty. In the report, you can see that the 000004 bill has been paid by the 000003 AP check, withthe cash discount of $1.20 taken. For the 000003 AP check, you can also see that it was used topay the 000004 bill (see the screenshot below).
Figure: The 000003 AP check paid for the 000004 bill
3. Find the Balance of ServiceCo
You can quickly see a vendor's balance by using the Vendors (AP303000) form. On the Vendors(AP303000; Finance > Accounts Payable > Work Area > Manage) form, find the ServiceCo vendor.The Balance box (see the following screenshot) shows the total of all open documents of the vendor,excluding prepayments. The total of open prepayments is shown in the Prepayment Balance box.

| Part 2: Accounts Payable | 141
Figure: The vendor balance displayed on the Vendors (AP303000) form
Related LinksHow to Track Payments to VendorsHow to View Vendor BalancesVendor Summary (AP401000)Vendor Details (AP402000)Vendors (AP303000)AP Balance by Vendor (AP632500)

| Part 2: Accounts Payable | 142
Step 7.5: Making a Payment for Multiple BillsIn this step, you will prepare an AP check to pay two ServiceCo bills at once. Also, you will prepare apartial ($1000 of $1200) payment with cash for the remaining balance of the UtilitiesCo bill that youhave partially paid in Step 7.4 with a printed check. You will also see how to make the system generateconsolidated batches by using the Consolidated Posting to GL feature. In this step, you will completethe following tasks, which are described in greater detail below:
1. Enable the Consolidated Posting to GL feature to see how it affects generated batches.
2. On the Prepare Payments (AP503000) form, select by their due date the bills to be paid withcash on 3/1/2014.
3. Add the UtilitiesCo bill to the list of documents to prepare the cash payment for the bill.
4. Prepare the AP checks to pay the ServiceCo bills and the UtilitiesCo bill with cash.
5. Release the AP checks. Review the generated batch and see how the transactions areconsolidated with the Consolidated Posting to GL feature enabled.
1. Enable the Consolidated Posting to GL Feature
Before you create new documents, enable the Consolidated Posting to GL feature in the system asfollows:
1. On the Enable/Disable Features (CS100000; Configuration > Common Settings > Licensing)form, click Modify and select the Consolidated Posting to GL check box.
When you enable the Consolidated Posting to GL feature, the system generates batchesconsolidated by currency and period. When documents are released from any module, thesystem consolidates into a single batch all transactions in the same currency posted to thesame period for all documents being released. Because you use only one currency in thesystem and all transactions generated from documents are in the same currency and postedto the same period, the system will generate a single batch for all documents that are releasedsimultaneously. (By default, with this feature disabled, the system generates an individual batchfor each released document.)
2. Click Enable to apply and save the updated configuration.
Now you can prepare the AP checks.
2. Select the Bills to be Paid on 3/1/2014
To select by due date the bills to be paid by cash on 3/1/2014, perform the following instructions:
1. On the Prepare Payments (AP503000; Finance > Accounts Payable > Processes > PaymentProcessing) form, specify the following settings:
• Payment Method: CASH
• Cash Account: 101000 (Cash on Hand USD)
• Payment Date: 3/1/2014
• Pay Date Within 7 Days: Selected
Notice that the GL Balance of the 101000 - Cash on Hand USD account has been reduced to$5000 – $38.80 = $4961.20. In the Available Balance box, the system displays the cashaccount balance minus the total amount of unreleased AP checks, to help you estimate theavailable funds before you make a payment from the account.
2. To see how to select documents by only their due date, clear the Pay Date Within check boxand select the Due Date Within check box.

| Part 2: Accounts Payable | 143
Only two bills that have a due date no later than 3/8/2014 (3/1/2014 + 7 days) are displayed inthe list, as the following screenshot shows.
Figure: The bills selected by their due date
3. Select the Pay Date Within check box again.
Now the table lists four bills that have either the pay date or the due date within 7 days of3/1/2014. In each of these bills, the CASH payment method and the 101000 - Cash on HandUSD cash account are specified as the default payment information.
3. Add the UtilitiesCo Bill to Prepare the Cash Payment for It
You have decided to pay the UtilitiesCo bill, which remains open from the previous lesson, with cash.Although the bill is not listed in the table (because it has the CHECK default payment method specified),you can add the bill to the table to process it along with the other bills to be paid with cash. Completethe following instructions:
1. Click Add Row on the table toolbar (or double-click within the table).
2. In the Reference Nbr. column of the new row, select the rent and utilities bill with the $1200balance remaining (as shown in the following screenshot) after you have partially paid the bill inthe previous lesson.
Figure: The rent and utilities bill being added to the table
3. Press Ctrl+Enter to insert the document details into the row.
Although the utilities and rent bill has the CHECK default payment method specified, you cancreate a cash AP check for it by manually selecting the bill for payment.
Now you can select the needed bills and prepare payments for them.

| Part 2: Accounts Payable | 144
4. Prepare the AP Checks
Suppose that you have decided to pay AdvertisingCo's bills later. Now you will prepare the AP checks topay the ServiceCo bills (000005 and 000006) and the UtilitiesCo bill (000003) with cash. Perform thefollowing instructions:
1. In the table, select the bills to be paid to ServiceCo and UtilitiesCo (as shown in the followingscreenshot).
The Selection Total amount should be $1337.60. The available balance of the 101000 accountis $4961.20, so you have sufficient funds to pay the selected bills. For one of the ServiceCo bills(000006), you are going to pay $77.60 and take the cash discount of $2.40.
Figure: The bills selected for payment on 3/1/2014
2. In the Amount Paid column for the 000003 UtilitiesCo bill, change the amount to 1000.00.
By default, the table shows the full balance of outstanding documents, but you can preparepartial payments by changing the amount to be paid for any document, as you have done withthe UtilitiesCo bill. In the Balance column, you can see that $200 will remain on the documentbalance after you pay $1000 for it. Now Selection Total is equal to $1137.60, and you canprepare the AP checks.
3. Click Process to prepare the selected AP checks.
The system will generate two documents—that is, one AP check for each vendor—and open theRelease Payments (AP505200) form. If needed, you can generate a separate AP check for acertain bill by selecting the Pay Separately check box for the bill. (You will see an example ofmaking separate AP checks later in the course.)
5. Release the Payments and Review the Batch
After the AP checks appear on the Release Payments (AP505200; Finance > Accounts Payable >Processes > Payment Processing) form, perform the following instructions to release the payments:
1. Enter 03012014U in the Payment Ref. column for the UtilitiesCo AP check.
If needed, you can make the payment reference numbers optional. To do this for the CASHpayment method, you would open the Payment Methods (CA204000; Finance > Cash Management> Configuration > Payment Methods) form, select the CASH method in the Payment Method IDbox, and on the Settings for Use in AP tab, clear the Require Unique Payment Ref. check box.
2. Enter 03012014S in the Payment Ref. column for the ServiceCo AP check.
3. Select the two AP checks and click Process to release the documents (see the screenshotbelow).

| Part 2: Accounts Payable | 145
Figure: Two AP checks to be processed
4. After the AP checks have been released, click the link in the Reference Nbr. column of the APcheck to ServiceCo to open the Checks and Payments (AP302000) form.
On the Financial Details tab of this form, in the Batch Nbr. box, find the batch number of theconsolidated batch the system has generated for the released documents. (On the ApplicationHistory tab on the Checks and Payments (AP 302000) form, you can see the same batchnumber for each paid bill. The $1000 payment to UtilitiesCo also refers to this batch.) Click thebatch number to open the batch on the Journal Transactions form.
Because the Consolidated Posting to GL feature is enabled, the consolidated batch contains alltransactions generated from the simultaneously released AP checks, which in this case includesthe following transactions:
• The $1000 partial payment for the $1200 UtilitiesCo bill
• The $137.60 payment to ServiceCo for two bills, with the $2.40 discount taken for one ofthese bills
With the Consolidated Posting to GL feature enabled, the batch consolidates transactions bycurrency and period. If you release documents that have transactions in a foreign currency orposted to different periods, the system will record each group of transactions to a separate batch. Ifthe Consolidated Posting to GL feature is disabled, the system generates a separate batch for eachsource document.
In the Ref. Number column, you can see the reference number of the source document ofeach journal entry. The first two journal entries have been generated from the AP check withreference number 000004, and the other three entries have been generated from AP check000005.
If you select an entry and click View Source Document, the system opens the source documentof the selected journal entry.
For AP check 000005, which was paid to ServiceCo, the 101000 - Cash on Hand account iscredited for the total amount paid for two bills, which is $77.60 + $60 = $137.60. Another creditentry records the $2.40 cash discount taken for one of the ServiceCo bills to the 490000 - CashDiscount Received income account. The 200000 - Accounts Payable account is debited for thetotal amount of the bills, which is $80 + $60 = $140.

| Part 2: Accounts Payable | 146
Figure: Consolidated batch generated on simultaneous release of AP checks
Related LinksAccounts Payable Check ProcessingEnable/Disable Features (CS100000)Prepare Payments (AP503000)

| Part 2: Accounts Payable | 147
Step 7.6: Reviewing Outstanding Balances by Aging PeriodsIn this step, you will review the outstanding balances of documents by aging periods. To do this, youcan use the AP Aged Past Due (AP631000) and AP Aged Outstanding (AP631500) reports. Beforeyou use the reports, you have to specify the length of the three aging periods. Perform the followinginstructions:
1. On the Accounts Payable Preferences (AP101000; Finance > Accounts Payable > Configuration >Setup) form, configure the aging periods as follows:
• Aging Period 1: 7 Days
• Aging Period 2: 14 Days
• Aging Period 3: 30 Days
2. Click Save to save the updated configuration of the module.
3. To begin preparing the reports that show outstanding balances by the aging periods, open the APAged Past Due (AP631000; Finance > Accounts Payable > Reports > Balance) report form andspecify the following parameters:
• Report Format: Detailed
• Aging Date: 3/1/2014 (the start date for calculation of aging periods)
4. Click Run Report to prepare and view the report.
The AP Aged Past Due (AP631000) report shows the outstanding documents by vendor witha breakdown by aging periods. The overdue balances are grouped by aging periods, while thebalances that aren't overdue are displayed in the Current column.
The outstanding balances are broken down by the number of days past the due date, countingup to the Aged On date. You have two overdue bills on 3/1/2014: the UtilitiesCo bill with $200remaining after the second payment, and the AdvertisingCo bill of $100. The due date of eachdocument is 1/31/2014. Because the documents are a month past due aged on 3/1/2014, theirbalances are displayed in the 14 To 30 column. Balances that aren't overdue on the aging dateare displayed in the Current column. Thus, you can see the AdvertisingCo bill of $20, which isdue on 3/17/2014. Because the due date of this bill is greater (later) than the aging date, thedocument balance is displayed in the Current column.
In the AP Aged Past Due (AP631000) report, the balances of open prepayments and debitadjustments are aged by periods. These amounts are broken down by the number of days pastthe document date, counting up to the Aged On date.
Figure: The outstanding balances aged by the number of days they are past due
5. Prepare the AP Aged Outstanding (AP631500; Finance > Accounts Receivable > Reports >Balance) report with the same report parameters, and compare the results of two reports.

| Part 2: Accounts Payable | 148
This report shows the same outstanding documents by vendor with a breakdown by agingperiods. The overdue balances are displayed in the Current column, while the balances thataren't overdue are grouped by aging periods.
The outstanding balances are broken down by the number of days before the due date, countingfrom the Aged On date. The $20 Advertising bill that is due on 3/17/2014 is displayed in the 14To 30 column, because 16 days remain before its due date, counting from 3/1/2014. Overduebalances, as well as the balances of open prepayments and debit adjustments, are displayed inthe Current column of the report.
Figure: The outstanding balances aged by the number of days before the due date
Related LinksAccounts Payable Preferences (AP101000)AP Aged Past Due (AP631000)AP Aged Outstanding (AP631500)

| Part 2: Accounts Payable | 149
Additional InformationYou can use the following information for additional reading, but these concepts are outside of thescope of this course.
Quick Checks
You can use quick checks in the system, which are documents for non-stock goods or servicespurchased and immediately paid for by cash. For more information, see Quick Check Processing in theuser guide.

| Part 2: Accounts Payable | 150
Lesson SummaryIn this lesson, you have learned how to take cash discounts by making early payments for bills. On thePrepare Payments (AP503000) form, you can prepare payments for the bills selected by different dates:the pay date, the cash discount date, and the due date. After you have selected the needed bills, yougenerate and release the AP checks to pay for them. You can pay one bill or multiple bills of the samevendor with one AP check.
You have learned how to review vendor balances and documents by using the Vendor Summary(AP401000) and Vendor Details (AP402000) forms. You have also learned how to review outstandingbalances broken down by aging periods. You can view balances aged by the number of past due dayson the AP Aged Past Due (AP631000) form, and balances aged by the number of days before the duedate on the AP Aged Outstanding (AP631500) form.
Review Questions
• How do you process early payments to vendors?
• How does the Consolidating Posting to GL feature affect the processing of batches in the system?
• Which reports can you use to review the document balances by aging periods?

| Part 2: Accounts Payable | 151
Lesson 8: Adjustments, Vendor Refunds, and Voided ChecksIn this lesson, you will learn how to make debit and credit adjustments to bills, process vendor refunds,and void payments in the system.
Lesson Objectives
In this lesson, you will learn the following operations in the Accounts Payable module:
• How to create a credit adjustment based on a debit memo received from a vendor
• How to create a debit adjustment based on a credit memo received from a vendor
• How to reverse an open bill
• How to process a vendor refund
• How to void an AP check

| Part 2: Accounts Payable | 152
Step 8.1: Making a Credit AdjustmentWhen you receive a vendor's debit memo, which requires an additional payment related to a particularbill (if, for instance, a late fee has been added or you were undercharged in the bill), you have to createand process a credit adjustment in the system. The credit adjustment increases the amount that youowe to the vendor. It is paid as a separate document and may require approval for payment if approvalis configured in your system. Although you do not directly link the credit adjustment to the bill in thesystem, you can pay the bill and the corresponding credit adjustment with the same AP check.
Suppose that on 3/2/2014, MyCompany has received a debit memo from UtilitiesCo. The documentcharges MyCompany an additional $20 for the delayed payment of the utilities and rent bill (bill000003, which is a month past due on 3/2/2014). Suppose further that you have decided to pay thebill with the additional charge on 3/2/2014. To process the vendor's debit memo, you will create andprocess a credit adjustment document in the system. In this step, you will pay the bill along with thecredit adjustment with one AP check by performing the following tasks, which are described in greaterdetail below:
1. Create and release the $20 UtilitiesCo credit adjustment document by using the Bills andAdjustments (AP301000) form.
2. Prepare the AP check to pay the bill and the credit adjustment on the Checks and Payments(AP302000) form.
3. Release the AP check.
4. Review the UtilitiesCo balance and vendor documents.
1. Create the Credit Adjustment Document
Based on the $20 debit memo that MyCompany received from UtilitiesCo on 3/2/2014, create a creditadjustment as described below:
1. On the Bills and Adjustments (AP301000; Finance > Accounts Payable > Work Area > Enter)form, create a new document with the following information, as shown in the followingscreenshot:
• Type: Credit Adj.
• Vendor: V000000002 (UtilitiesCo)
• Date: 3/2/2014
• Vendor Ref.: 03022014CrAdj
• Description: The charge for the delayed payment for the 000003 bill
• Amount: 20.00
• Document Details tab, Ext. Cost: 20.00
• Document Details tab, Account: 760000 (Overdue Charges Expense)
• Hold: Cleared

| Part 2: Accounts Payable | 153
Figure: The $20 credit adjustment to be paid to UtilitiesCo
2. Save the document.
3. On the form toolbar, click Release to release the credit adjustment.
After the credit adjustment has been released, it gets the Open status until it is paid.
4. On the Financial Details tab, click the number of the batch that has been generated from thecredit adjustment. This opens the batch on the Journal Transactions (GL301000) form for review.
The batch has been posted to the GL accounts specified in the credit adjustment. Notice that thebatch credits the 200000 - Accounts Payable account for $20 and debits the 760000 - OverdueCharges Expense account for the same amount (see the screenshot below).
Figure: The batch generated on release of the credit adjustment
5. On the Vendor Details (AP402000; Finance > Accounts Payable > Work Area > Explore) form,select the UtilitiesCo vendor.
Notice that the current balance that you owe to the UtilitiesCo vendor has increased by theoutstanding $20 balance of the credit adjustment and now is $220. The table at the bottom ofthe form shows the open documents of this vendor.
Now you can pay the credit adjustment and the original bill.
2. Prepare the AP Check
Starting on the Vendor Details (AP402000) form (from which you are viewing the documents to be paidto UtilitiesCo), prepare the AP check to pay the $200 bill and the $20 credit adjustment as follows:
1. Select the bill in the table, and click Actions > Pay Bill.
You could instead create an AP check from the Bills and Adjustments (AP301000) form (byselecting the Pay Bill/Apply Adjustment command on the Actions menu on the form toolbar), orby using the Prepare Payments (AP503000) form.

| Part 2: Accounts Payable | 154
The Checks and Payments (AP302000) form opens, with a new AP check created that includesthe information from the selected bill.
2. In the Document Summary area, change Payment Amount to 220.00 (the total amount of thebill and credit adjustment).
3. On the toolbar of the Documents to Apply tab, click Add Row, and in the new row, add the$20 credit adjustment to the details of the AP check, as shown in the following screenshot.
Figure: The credit adjustment being added to the details of the AP check
By default, on the Documents to Apply tab of the AP check, you can select any open documentsregardless of their date because the Enable Early Checks check box is selected on the AccountsPayable Preferences (AP101000; Finance > Accounts Payable > Configuration > Setup) form. Ifyou clear this check box, users can select only open documents that have a date no later than theApplication Date of the AP check.
4. Set Application Date to 3/2/2014, and save the document.
5. Because the CHECK payment method requires check printing, select Actions > Print Check onthe toolbar, and print the check by using the Process Payments / Print Checks (AP505000) form,as you did earlier in this course. (For detailed instructions on how to process payments and printchecks, see the link in the Related Links section of this step.)
After the payment is processed, the Release Payments (AP505200) form opens so that you can releasethe AP check.
3. Release the AP Check
Release the AP check by performing the following instructions:
1. On the Release Payments (AP505200; Finance > Accounts Payable > Processes > PaymentProcessing) form (which the system opened when you processed the payment), select the APcheck in the table.
2. Click Process to release the document.
3. Click the link in the Reference Nbr. column to open the released AP check on the Checks andPayments (AP302000) form. On the Application History tab, you can see that the bill and thecredit adjustment have been paid by the AP check.
4. Click the batch number in the Batch Number column to open the batch on the JournalTransactions (GL301000) form for review.
Both the bill and credit adjustment have credited the 200000 - Accounts Payable GL account;that is why the AP check debits the account for the total amount of the two documents, $200 +$20 = $220 (see the screenshot below.)

| Part 2: Accounts Payable | 155
Figure: The batch generated on release of the AP check
If the bill and credit adjustment had been posted to different AP accounts, the batch would containa debit entry for each AP account.
4. Review the Vendor Balance
After you have paid the bill and the credit adjustment, review the UtilitiesCo balance and documents for03-2014 as follows:
1. Run the AP Balance by Vendor (AP632500; Finance > Accounts Payable > Reports > Balance)report with the following parameters:
• Report Format: All Documents (Vendor Required)
• Financial Period: 03-2014
• Include Applications: Selected
• Vendor ID: V000000002 (UtilitiesCo)
The report shows the documents posted through the end of 03-2014 period. For 03-2014, thevendor balance is zero, so you owe nothing to the vendor. From the applications listed for eachdocument, you can see that the 000008 credit adjustment was paid with the 000006 AP check,which was used to pay the credit adjustment along with the 000003 bill (see the screenshotbelow).
Figure: The credit adjustment and the bill paid with the 000006 AP check
On the AP Balance by Vendor (AP632500) report, unrealized gains and losses might appearas a result of revaluation of open Accounts Payable documents in a foreign currency. Currencymanagement and revaluation is outside of the scope of this course.
Related LinksCredit Adjustment Processing

| Part 2: Accounts Payable | 156
Bills and Adjustments (AP301000)Vendor Details (AP402000)Checks and Payments (AP302000)Step 6.4: Processing an AP Check

| Part 2: Accounts Payable | 157
Step 8.2: Making a Debit AdjustmentWhen you receive a vendor's credit memo, which reduces the amount that you owe to the vendor, youhave to create and process a debit adjustment in the system. You then apply this debit adjustment to abill to reduce the outstanding balance of the document.
Suppose that on 3/2/2014, you have received a credit memo from the AdvertisingCo vendor, whichgave you a $5 discount for the bill of $100. In this step, you will process the vendor's credit memo as adebit adjustment that reduces the outstanding balance of the bill. You will complete the following tasks,which are described in greater detail below:
1. Create and release the $5 AdvertisingCo debit adjustment document by using the Bills andAdjustments (AP301000) form.
2. Apply the adjustment to the bill by using the Checks and Payments (AP302000) form.
1. Create the Debit Adjustment
To reflect in the system the credit memo received from AdvertisingCo on 3/2/2014 for $5, create adebit adjustment as follows:
1. On the Bills and Adjustments (AP301000; Finance > Accounts Payable > Work Area > Enter)form, create and save a new document with the following information:
• Type: Debit Adj.
• Vendor: V000000003 (AdvertisingCo)
• Date: 3/2/2014
• Vendor Ref.: 03022014A
• Description: Discount from vendor for bill 000002
• Amount: 5.00
• Document Details, Ext. Cost: 5.00
• Document Details, Account: 610000 (Advertising Expense)
• Hold: Cleared
2. On the form toolbar, click Release to release the debit adjustment.
When you release the debit adjustment, the system gives it a status of Open. The $5 balance ofthe debit adjustment can now be applied to a bill.
3. After the document is processed, click the batch number on the Financial Details tab to reviewthe batch that the system has generated.
Notice that the debit journal entry reduces the balance of the 200000 - Accounts Payableaccount by $5, as illustrated in the following screenshot.
Figure: The batch generated on release of the debit adjustment
4. On the Vendor Details (AP402000; Finance > Accounts Payable > Work Area > Explore) form,select the V000000003 (AdvertisingCo) vendor.
Notice that the balance of the open debit adjustment reduces the total balance of opendocuments by $5, so that you owe $115 to the vendor, as shown in the following screenshot.

| Part 2: Accounts Payable | 158
Figure: The total outstanding balance that you owe to the vendor, including the open debit adjustment
Now you have to apply the debit adjustment to the bill.
2. Apply the Debit Adjustment to the Bill
To apply the debit adjustment to the bill, open the debit adjustment on the Bills and Adjustments(AP301000) form, and do the following:
1. On the form toolbar, select Actions > Pay Bill/Apply Adjustment.
The Checks and Payments (AP302000) form opens, and you can apply the debit adjustment tothe bill.
2. On the Checks and Payments (AP302000) form, set the Application Date to 3/2/2014.
3. On the table toolbar of the Documents to Apply tab, click Add Row, and select the 000002 bill($100).
On the Documents to Apply tab, you can select only documents that have dates no later than thespecified Application Date.
By default, the system applies the full amount of the debit adjustment ($5) to the bill. Afteryou apply the debit adjustment, $95 ($100 – $5) remains on the balance of the bill, whichis displayed in the Balance column. (See the following screenshot.) You can apply a debitadjustment to one bill or to multiple bills. You don't necessarily have to apply the debitadjustment fully; you can leave the amount unapplied.

| Part 2: Accounts Payable | 159
Figure: The bill selected for the application of the debit adjustment
4. Click Release to release the application.
On release of the application, the system doesn't generate any batch; it reduces the balanceof the bill by the specified amount paid, which is why the batch number is empty on theApplication History tab. The debit adjustment gets the Closed status because the full balanceof the debit adjustment has been applied.
If you have applied the debit adjustment to the wrong bill, you can reverse the incorrectapplication and then reapply the debit adjustment to the correct bill. To reverse the application,open the debit adjustment on the Checks and Payments (AP302000) form, select the needed bill onthe Application History tab and click Reverse Application. To increase the balance of the bill,the system generates a reversing entry that appears on the Documents to Apply tab. Release theapplication that you reversed. After that, you can select the right bill on the Documents to Applytab and release the application.
5. On the Vendor Details (AP402000; Finance > Accounts Payable > Work Area > Explore) form,select the V000000003 (AdvertisingCo) vendor, and select the Show All Documents check boxto make the closed documents appear in the table.
You still owe $115 to the vendor, but the balances of documents have changed. On release of theapplication of the debit adjustment to the bill, the balance of the bill has been reduced to $95,while the balance of the debit adjustment become equal to 0 (see the screenshot below).

| Part 2: Accounts Payable | 160
Figure: The total outstanding balance that you owe to the vendor after the debit adjustment is closed
6. Select the $95 bill in the table and click the link in the Reference Nbr. column. In theapplication history of the bill (as shown in the following screenshot), you can find the debitadjustment that was applied to the document and that reduced its balance to $95.
Figure: The debit adjustment applied to the bill
Alternatively, you can apply a debit adjustment to a bill when you make a payment for the bill.Suppose that you have created and released a $5 debit adjustment but have not yet applied theadjustment to the bill, which still has a $100 balance. To close the bill, you can create an AP checkfor $95 and select the debit adjustment along with the bill on the Documents to Apply tab. Thedebit adjustment amount reduces the total amount that was paid (the total of amounts in theAmount Paid column) for the selected bills and credit adjustments, which is displayed in theApplication Amount box (see the screenshot below).

| Part 2: Accounts Payable | 161
Figure: The debit adjustment applied when you make a payment for the bill
Related LinksDebit Adjustment ProcessingBills and Adjustments (AP301000)Checks and Payments (AP302000)Vendor Details (AP402000)

| Part 2: Accounts Payable | 162
Step 8.3: Reversing a BillYou can edit the document details, amounts, and specified GL accounts of a bill until it is released. Afteryou release the bill, this information becomes read-only. While the bill is open, you can make a creditor debit adjustment, or reverse the full balance of the bill. To reverse the bill in the system, you have tomake the debit adjustment for the full balance of the bill. To easily create the needed debit adjustment,you can select the bill that you want to reverse on the Bills and Adjustments (AP301000) form, andthen select Actions > Reverse on the form toolbar.
Suppose that on 3/2/2014, you have received the account statement from AdvertisingCo anddiscovered that you entered the bill for $20 by mistake. To reverse the bill, proceed as follows:
1. On the Bills and Adjustments (AP301000; Finance > Accounts Payable > Work Area > Enter)form, select the $20 AdvertisingCo bill (reference number 000007).
2. On the form toolbar, select Actions > Reverse.
The system creates a debit adjustment for the full balance of the 000007 bill.
3. In the Vendor Ref. box, type 02152014ARev, and in the Description box, type Bill 000007reversal.
You needed to change the Vendor Ref. number because the Raise an Error on DuplicateVendor Reference Number check box is selected on the Accounts Payable Preferences(AP101000) form, which means that you cannot save the document with a duplicate vendorreference number.
4. Release the debit adjustment, and open the generated batch for review.
The batch reverses the amounts that were posted to GL accounts from the batch created onrelease of the bill. Now the debit adjustment has a status of Open, and you have to apply itsamount to the bill you are reversing to close the balance of the bill.
Figure: The batch generated on release of the debit adjustment that reverses the $20 AdvertisingCo bill
5. On the form toolbar of the Bills and Adjustments (AP301000) form, select Actions > Pay Bill/Apply Adjustment.
The Checks and Payments (AP302000) form opens, on which you can apply the debit adjustmentto the bill.
6. On the Checks and Payments (AP302000) form, set the Application Date to 2/15/2014.
7. On the Documents to Apply tab, select the 000007 bill ($20) in the Reference Nbr. box.
Leave the full $20 amount of the bill in the Amount Paid column. In the Balance column of thetable, you can see that the bill will have a balance of zero after the debit adjustment is applied.
8. Click Release to apply the debit adjustment to the bill.
After the application is processed, review the AdvertisingCo documents by using the VendorDetails (AP402000) form. Select the Show All Documents check box on the form to viewthe closed documents. In the list of closed documents, you can see that the 000010 debitadjustment and the 000007 bill are now closed.

| Part 2: Accounts Payable | 163
Figure: The 000007 bill reversed by the 000010 debit adjustment
In the same way, you can reverse a credit adjustment once it is open. When you select Actions >Reverse for a credit adjustment, the system creates a debit adjustment, which is processed in thesame way as a debit adjustment that reverses a bill.
Related LinksDebit Adjustment ProcessingBills and Adjustments (AP301000)Checks and Payments (AP302000)Vendor Details (AP402000)

| Part 2: Accounts Payable | 164
Step 8.4: Processing a Vendor RefundWhen you receive a vendor refund, you have to create and process the vendor refund document in thesystem. The vendor refund increases the balance of the cash account. In the system, you should havean open debit adjustment or prepayment for which you are receiving the refund. Then you can createthe vendor refund document and apply it to the open debit adjustment or prepayment. In this step, youwill process a refund applied to a debit adjustment. (Later in this course, you will see how to process arefund for a prepayment.)
Suppose that on 3/2/2014, MyCompany received a $10 cash refund from OfficeSuppliesCo for a portionof damaged office supplies that you have returned to the vendor. In this step, you will process thevendor refund in the system by performing the following tasks, which are described in greater detailbelow:
1. By using the Bills and Adjustments (AP301000) form, create and release the debit adjustmentfor the damaged goods that were returned.
2. By using the Checks and Payments (AP302000) form, create and release the vendor refunddocument applied to the debit adjustment.
1. Create the Debit Adjustment for the Damaged Goods That Were Returned
Create and release the $10 debit adjustment for goods returned to OfficeSuppliesCo by performing thefollowing instructions:
1. On the Bills and Adjustments (AP301000; Finance > Accounts Payable > Work Area > Enter)form, create a new document with the following information:
• Type: Debit Adj.
• Vendor: V000000001 (OfficeSuppliesCo)
• Date: 3/2/2014
• Vendor Ref.: 03022014Refund
• Description: Damaged office supplies returned
• Amount: 10.00
• Document Details tab, Ext. Cost: 10.00 (the expense account from the vendor account,755000 - Office Supplies Expense, is automatically inserted by default)
• Hold: Cleared
2. Save the debit adjustment, and then release it.
2. Create the Vendor Refund Document
To create the vendor refund document, open the debit adjustment that you have created on the Billsand Adjustments (AP301000) form, and do the following:
1. On the form toolbar, select Actions > Vendor Refund.
The Checks and Payments (AP302000) form opens so that you can create the vendor refunddocument from the information specified in the debit adjustment. On the Documents to Applytab, you can see the debit adjustment, which has been automatically specified in the vendorrefund.
If you have more than one debit adjustment to be refunded, you can start directly from the Checksand Payments (AP302000) form.
2. Because the vendor made the refund by cash, change Payment Method to CASH.
3. In the Payment Ref. box, type 03022014Refund.

| Part 2: Accounts Payable | 165
4. Set the Application Date to 3/2/2014, clear the Hold check box, and click Release to releasethe vendor refund.
When you release the refund, the system updates the current balance of the vendor andgenerates the batch that posts the refund amount to the specified cash account. The systemcloses the vendor refund and debit adjustment documents.
5. On the Financial Details tab, click the number of the generated batch to open the batch forreview.
The first journal entry debits the 101000 - Cash on Hand USD account specified in the vendorrefund for $10. The 200000 - Accounts Payable account is credited for the same amount. (Seethe following screenshot.)
Figure: The batch generated on release of the vendor refund document applied to the debit adjustment
Now you can review the balance of the OfficeSuppliesCo vendor by using the Vendor Details(AP402000; Finance > Accounts Payable > Work Area > Explore) form. Notice that the vendor balanceis 0. Select the Show All Documents check box on the form to see the closed documents. In the listof closed documents, you can see that the 000011 debit adjustment and the 000007 vendor refund areclosed.
Related LinksDebit Adjustment ProcessingBills and Adjustments (AP301000)Checks and Payments (AP302000)Vendor Details (AP402000)
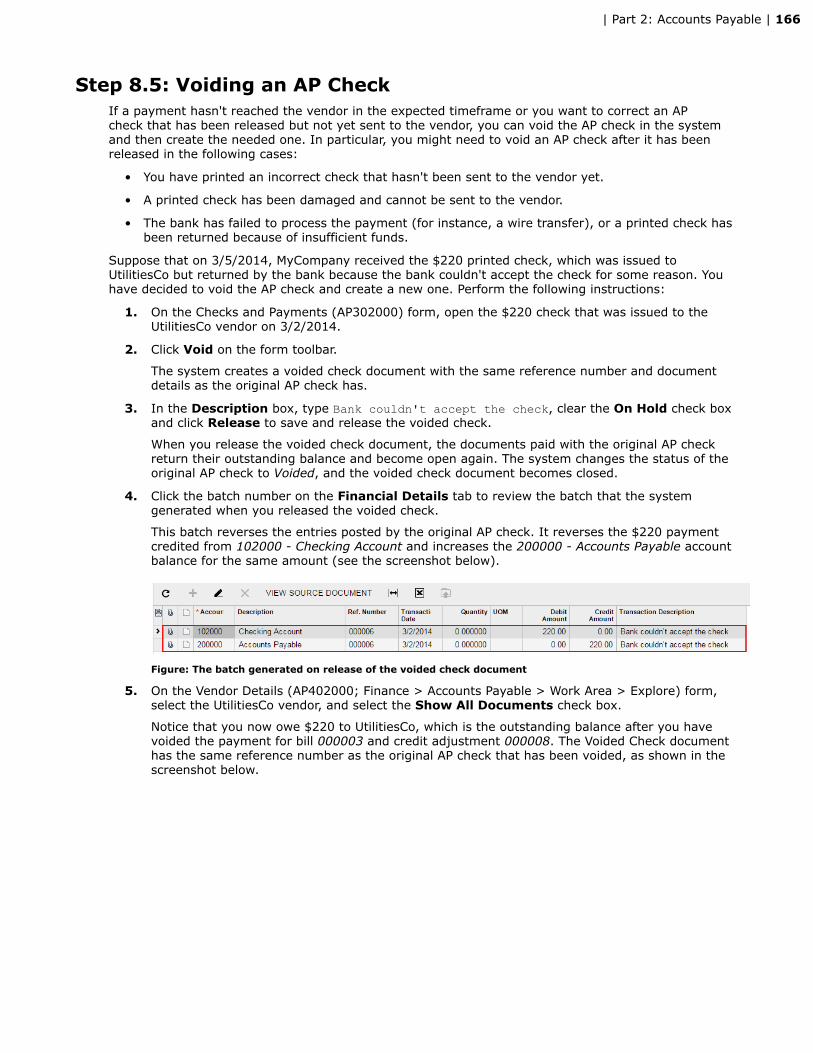
| Part 2: Accounts Payable | 166
Step 8.5: Voiding an AP CheckIf a payment hasn't reached the vendor in the expected timeframe or you want to correct an APcheck that has been released but not yet sent to the vendor, you can void the AP check in the systemand then create the needed one. In particular, you might need to void an AP check after it has beenreleased in the following cases:
• You have printed an incorrect check that hasn't been sent to the vendor yet.
• A printed check has been damaged and cannot be sent to the vendor.
• The bank has failed to process the payment (for instance, a wire transfer), or a printed check hasbeen returned because of insufficient funds.
Suppose that on 3/5/2014, MyCompany received the $220 printed check, which was issued toUtilitiesCo but returned by the bank because the bank couldn't accept the check for some reason. Youhave decided to void the AP check and create a new one. Perform the following instructions:
1. On the Checks and Payments (AP302000) form, open the $220 check that was issued to theUtilitiesCo vendor on 3/2/2014.
2. Click Void on the form toolbar.
The system creates a voided check document with the same reference number and documentdetails as the original AP check has.
3. In the Description box, type Bank couldn't accept the check, clear the On Hold check boxand click Release to save and release the voided check.
When you release the voided check document, the documents paid with the original AP checkreturn their outstanding balance and become open again. The system changes the status of theoriginal AP check to Voided, and the voided check document becomes closed.
4. Click the batch number on the Financial Details tab to review the batch that the systemgenerated when you released the voided check.
This batch reverses the entries posted by the original AP check. It reverses the $220 paymentcredited from 102000 - Checking Account and increases the 200000 - Accounts Payable accountbalance for the same amount (see the screenshot below).
Figure: The batch generated on release of the voided check document
5. On the Vendor Details (AP402000; Finance > Accounts Payable > Work Area > Explore) form,select the UtilitiesCo vendor, and select the Show All Documents check box.
Notice that you now owe $220 to UtilitiesCo, which is the outstanding balance after you havevoided the payment for bill 000003 and credit adjustment 000008. The Voided Check documenthas the same reference number as the original AP check that has been voided, as shown in thescreenshot below.

| Part 2: Accounts Payable | 167
Figure: The voided AP check in the list of vendor documents
Now you can create a new AP check to pay $220 to the UtilitiesCo vendor.
6. To pay $220 to UtilitiesCo by cash, on the Checks and Payments (AP302000) form, create an APcheck with the following information:
• Vendor: V000000002 (UtilitiesCo)
• Payment Method: CASH
• Application Date: 3/5/2014
• Payment Ref.: 03052014U
• Description: Rent and utilities bill
• Payment Amount: 220.00
7. To quickly add the documents to be paid, on the table toolbar of the Documents to Apply tab,click Load Documents.
The system automatically adds the bill and credit adjustment to the AP check with the fullamount to be paid for each document.
8. Clear the Hold check box, and release the AP check.
9. After the document is processed, click the Edit ( ) button in the Vendor box to view thevendor balance.
On the Vendors (AP303000; Finance > Accounts Payable > Work Area > Manage) form thatopens for the vendor account, you can see that the UtilitiesCo vendor now has a balance of zero(see the screenshot below).

| Part 2: Accounts Payable | 168
Figure: The vendor balance displayed on the Vendors (AP303000) form
You can also review the vendor balance and documents by selecting Inquiries > Vendor Detailson the form toolbar of the Bills and Adjustments (AP301000) or Checks and Payments (AP302000)form, which opens the Vendor Details (AP402000) form for the vendor.
Related LinksAccounts Payable Check ProcessingChecks and Payments (AP302000)Vendor Details (AP402000)

| Part 2: Accounts Payable | 169
Additional InformationYou can use the following information for additional reading, but these concepts are outside of thescope of this course.
Approval of Credit Adjustments for Payment
Credit adjustments, like bills, might require approval before the payment can be made. For moreinformation, see Bill Approval for Payment in the User Guide.

| Part 2: Accounts Payable | 170
Lesson SummaryIn this lesson, you have learned how to enter and process credit adjustments that increase theamount that you owe to the vendor. You can create a credit adjustment on the Bills and Adjustments(AP301000) form and pay it as a separate document or along with the bill. You have also learned howto enter a debit adjustment and apply it to the bill to reduce or completely reverse the outstandingbalance of a bill. To create debit adjustments you use the Bills and Adjustments (AP301000) form aswell.
You have also learned how to create and process vendor refunds on the Checks and Payments(AP302000) form. You can create a vendor refund if you have an open debit adjustment or prepaymentto which you can apply the vendor refund. The lesson also explains how to void a released AP check ifit hasn't reached the vendor or if you want to correct it. You can do this on the Checks and Payments(AP302000) form.
Review Questions
• How do you process a credit adjustment?
• How do you process a debit adjustment?
• How do you process a vendor refund?
• In what situations do you need to to void an AP check?

| Part 2: Accounts Payable | 171
Lesson 9: PrepaymentsIn this lesson, you will learn how to process a prepayment made to a vendor in the system. You willalso learn how to apply the prepaid amount to bills.
Lesson Objectives
In this lesson, you will learn the following operations in the Accounts Payable module:
• How to create a prepayment in the system
• How to apply the prepayment to a bill
• How to process a refund for a prepayment

| Part 2: Accounts Payable | 172
Step 9.1: Creating a Prepayment RequestTo process a prepayment in the system, you have to first create and release the prepayment request.A prepayment request is not a financial document; it is an internal document that can be approved (ifrequired in your system) before the prepayment is actually paid to the vendor. The prepayment createdthrough the request can be then applied to outstanding bills and credit adjustments.
In this step, you will create the prepayment request of $200 to make the prepayment to AdvertisingCo.Complete the following instructions:
1. On the Bills And Adjustments (AP301000) form, create and save a prepayment request with thefollowing information:
• Type: Prepayment (this type on this form denotes a prepayment request)
• Vendor: V000000003 (AdvertisingCo)
• Date: 3/6/2014
• Vendor Ref.: 03062014A
• Description: $200 prepayment
• Amount: 200.00
• Document Details tab, Inventory ID: ADVERT (Advertising)
• Document Details tab, Ext. Cost: 200.00
• Document Details tab, Quantity: 10
• Hold: Cleared
The Inventory ID, Unit Price, and Quantity values are specified in a prepayment request forinformational purposes only.
Notice that by default, the system inserts the 140000 - Prepaid Expenses prepayment accountspecified for the vendor into the document (see the screenshot below). On release of the APcheck for the prepayment, the system debits this account for the prepayment amount.
Figure: The prepayment account specified in the prepayment request

| Part 2: Accounts Payable | 173
If no prepayment account is specified for the vendor, the vendor's AP account is inserted into thedocument by default. You can change the prepayment account for the document.
2. Click Release to release the prepayment request.
On release of the prepayment request, the system doesn't generate any transactions or updatethe vendor balance; instead, it changes the status of the prepayment request to Open so thatyou can create the actual prepayment. (If approval is required in the Accounts Payable module,the prepayment request must be approved before you can make the payment. Approval ofdocuments is outside of the scope of this course.)
If you have released an incorrect prepayment request but haven't paid it yet, you can cancel theprepayment in the system. To cancel the prepayment, select Actions > Void Prepayment on theform toolbar (see the link in the Related Links section of a topic for details).
Related LinksPrepayment ProcessingHow to Void a Prepayment RequestBills and Adjustments (AP301000)

| Part 2: Accounts Payable | 174
Step 9.2: Making a PrepaymentNow you will make a payment, by using an AP check, based on the prepayment request that you havereleased in Step 9.1. After you make this payment, you can apply the prepayment to bills and creditadjustments.
In this step, you will pay $200 to the AdvertisingCo vendor by using the prepayment request. Proceedas follows:
1. On the Bills and Adjustments (AP301000; Finance > Accounts Payable > Work Area > Enter)form, open the $200 prepayment request.
2. To make a payment based on the request, select Actions > Pay Bill/Apply Adjustment on theform toolbar.
The Checks and Payments (AP302000) form opens so you can make a payment. The system fillsappropriate elements of the AP check with the information from the prepayment request. Theprepayment request appears on the Documents to Apply tab.
3. Set the Application Date to 3/6/2014 and clear the Hold check box so that you can release theAP check. (The CASH payment method doesn't require payment processing, so you can directlyrelease the AP check after it is created.)
4. In the Payment Ref. box, type 03062014Prep.
5. Click Release to release the payment.
6. Click the number of the generated batch on the Financial Details tab to open the batch forreview; the batch is shown in the following screenshot.
On release of the AP check, the system updates the prepayment balance of the vendor. Thebalance of the AP account of the vendor does not change. The system generates a batch thatcredits the cash account specified in the AP check and debits the prepayment account specifiedin the prepayment request for the prepayment amount. The AP check gets closed after yourelease it, while the prepayment request remains open and now can be applied to bills or creditadjustments.
Figure: The batch generated on release of the AP check paid for the prepayment request
If you have released an incorrect AP check when making the prepayment, you can void the APcheck by using the Checks and Payments (AP302000) form. Once the AP check is voided, thesystem reverses the payment. Then you can create the correct AP check (or void the prepaymentrequest if you have decided not to make the prepayment).
7. On the Vendor Details (AP402000) form, select the AdvertisingCo vendor.
The table shows the open prepayment, and the total balance of all open prepayments isdisplayed in the Prepayments Balance box (see the screenshot below). The total balance overall documents listed in the table is displayed in the Balance by Documents box.

| Part 2: Accounts Payable | 175
Figure: The prepayment balance of the vendor
To view the prepayment request, click the link in the Reference Nbr. box in the table.
8. To review the balances by GL accounts, run the AP Balance by GL Account (AP632000; Finance >Accounts Payable > Reports > Balance) report with the following parameters:
• Report Format: Open Documents
• Financial Period: 03-2014
• Include Applications: Cleared
The report shows the amounts posted to GL accounts from Accounts Payable documents. Inthe report, you can see the $200 prepaid to AdvertisingCo recorded to the 140000 - PrepaidExpenses account (see the screenshot below).
Figure: $200 prepayment on the prepayment account
Now you can apply the prepayment to any number of bills and credit adjustments.
Related Links

| Part 2: Accounts Payable | 176
Prepayment ProcessingHow to Track Prepayments to VendorsChecks and Payments (AP302000)Vendor Details (AP402000)

| Part 2: Accounts Payable | 177
Step 9.3: Applying a Prepayment to a BillIn this step, you will create two bills, apply a prepayment to them, and then pay all the remainingAdvertisingCo bills. Complete the following tasks, which are described in greater detail below:
1. Create and release two new AdvertisingCo bills.
2. Apply the prepayment to the bills.
3. Pay all the remaining AdvertisingCo bills to close the vendor balance.
1. Create the Bills
Create two AdvertisingCo bills for 2 and 3 hours, respectively, of advertising that was run in 03-2014.The bills were issued on 3/7/2014 and 3/8/2014, respectively. Perform the following instructions:
1. On the Bills And Adjustments (AP301000) form, create and save the bill for 2 hours ofadvertising, and specify the following settings:
• Type: Bill
• Vendor: V000000003 (AdvertisingCo)
• Date: 3/7/2014
• Vendor Ref.: 03072014A
• Description: 2 hours of advertising run
• Amount: 40.00
• Document Details tab, Inventory ID: ADVERT (the ID that corresponds to an hourof advertising; when you select this item, the 610000 - Advertising Expense account isinserted automatically in the Account box)
• Document Details tab, Quantity: 2.00
• Hold: Cleared
2. On the Bills And Adjustments (AP301000) form, create and save the bill for 3 hours ofadvertising, and specify the following settings:
• Type: Bill
• Vendor: V000000003 (AdvertisingCo)
• Date: 3/8/2014
• Vendor Ref.: 03082014A
• Description: 3 hours of advertising run
• Amount: 60.00
• Document Details tab, Inventory ID: ADVERT
• Document Details tab, Quantity: 3.00
• Hold: Cleared
3. Release both bills so that you can apply a prepayment to them. You can release the bills one ata time on the current form, or simultaneously by processing them on the Release AP Documents(AP501000; Finance > Accounts Payable > Processes > Daily) form.
4. On the Vendor Details (AP402000) form, review the balance of the AdvertisingCo vendor.
Notice that the current balance of the vendor is $195. The prepayments balance, accumulatedseparately, equals $200.

| Part 2: Accounts Payable | 178
2. Apply the Prepayment to the Bills
Suppose that you have decided to use $25 of the prepayment amount to partially pay the twoAdvertisingCo bills you just created. Suppose you have decided to apply $10 to the $40 bill and $15 tothe $60 bill. Apply the prepayment funds to the bills as described below:
1. On the Checks and Payments (AP302000) form, set Type to Prepayment and select the numberof the prepayment in the Reference Nbr. box, as shown in the following screenshot.
By using this form, you can apply the prepayment to a certain document or to multipledocuments.
Figure: The prepayment selected to be applied to the bills
To find the AP check that was made for the prepayment, select the prepayment request on the Billsand Adjustments (AP301000) form and find the AP check on the Applications tab.
Alternatively, you can create a prepayment document directly on the Checks and Payments(AP302000) form instead of using a prepayment request. However, a prepayment created in such away has some limitations, so we recommend that you use the prepayment request that you createdon the Bills and Adjustments (AP301000) form, as described in this lesson.
2. Set the Application Date to 3/8/2014. You have decided to apply the prepayment and pay thebills on this date.
3. On the Documents to Apply tab, add a new row. In the new row, select the number of the $40bill in the Reference Nbr. column, and in the Amount Paid column, enter 10.00.
In the selector box of the Reference Nbr. column, you can select only documents that have adate no later than the specified Application Date.
4. On the Documents to Apply tab, add another new row. In the new row, select the number ofthe $60 bill in the Reference Nbr. column, and in the Amount Paid column, enter 15.00. Savethe prepayment application (which is shown in the screenshot below).
Payment Amount displays the original amount of the prepayment, while Unapplied Balanceshows the prepayment balance. Application Amount is the total in the Amount Paid column.

| Part 2: Accounts Payable | 179
Figure: The bills to which the prepayment will be applied
Instead of manually selecting each document to apply, you can click Load Documents and thendelete the $95 bill and correct the amount paid for each of two other bills.
Now you can release the application to reduce the balance of the bills.
5. Click Release on the form toolbar to release the prepayment application to the selected bills.
On release of the prepayment application, the system updates the current balance and theprepayment balance of the vendor, generates the batch that debits the AP account for theapplication amount, and credits the prepayment account for the same amount. The systemalso reduces the balance of each bill and credit adjustment to which the prepayment has beenapplied.
After the application is processed, the prepayment retains the Open status and the outstandingbalance of $175. The records about documents to which the prepayment has been applied aremoved to the Application History tab. In the Batch Number column on this tab, you can seethe number of the batch that has been generated on release of the prepayment application toeach of the listed bills. Until the prepayment has a balance of zero, you can apply it to otheroutstanding bills and credit adjustments by selecting them on the Documents to Apply tab andreleasing the application of the prepayment to them, as you have just done for the two bills.
In the Payment Date box on the Financial Details tab, you can find the date when theprepayment was made. You made the prepayment on 3/6/2014, which is the date of the APcheck paid to AdvertisingCo.
If you have applied the prepayment to the wrong bill by mistake, you can reverse the applicationand reapply the prepayment to the needed bill. To reverse the application, select the bill onthe Application History tab and click Reverse Application. The system creates a reversingapplication that appears on the Documents to Apply tab. Release the application. After that, youcan select the needed bill on the Documents to Apply tab and release the prepayment applicationagain. For the detailed instructions, see the link in the Related Links section of the topic below.
6. Open the generated batch for review.
In the batch, the amount of $25 has been debited to the 200000 - Accounts Payable account andcredited to the 140000 - Prepaid Expenses account, as you can see in the following screenshot.

| Part 2: Accounts Payable | 180
Figure: The batch generated on release of the prepayment application to the bills
7. Navigate to the Vendor Details (AP402000; Finance > Accounts Payable > Work Area > Explore)form, and notice that the current balance of the AdvertisingCo vendor has been reduced by $25and is now $170. The prepayments balance has also been reduced by $25. The bills to which youhave applied the partial prepayment remain open and pending a payment.
3. Pay the Bills
You will now pay all of the open AdvertisingCo bills. All AdvertisingCo bills have the CASH defaultpayment method specified. However, in this case, you will pay the bills by check—that is, by using theCHECK payment method. Perform the following instructions:
1. On the Prepare Payments (AP503000) form, specify the following settings:
• Payment Method: CHECK
• Payment Date: 3/8/2014
2. Add each of the three AdvertisingCo bills you previously created to the table by clicking AddRow on the table toolbar and selecting each bill in the Reference Nbr. column (see thescreenshot below).
Figure: Bills added manually to the table on the Prepare Payments (AP503000) form
3. By using the check boxes in the unlabeled column, select all bills in the table.
On the form, you can see that the Available Balance ($3413.60) is greater than the SelectionTotal ($170), so you have sufficient funds to pay the documents.
4. Select the Pay Separately check box for the $95 bill (reference number 000002). You mighttake this action if, for instance, the vendor asked you to pay the $95 bill separately from otherbills because it is overdue.
If you had not selected Pay Separately for any bill, the system would generate a single AP checkwith three detail lines.
You can enable the Pay Separately box for the vendor so that all documents for this vendorare paid separately by default. To do this, select the Pay Separately check box on the PaymentSettings tab of the Vendors (AP303000; Finance > Accounts Payable > Work Area > Manage)form.
5. Click Process so that the system will create the AP checks.
The system has generated two AP checks from the information specified in the processed bills.One of the AP checks is the total $75 payment for the two partially prepaid bills, and the otherAP check is the $95 payment for the third bill (the one for which Pay Separately was selected).
6. On the Process Payments / Print Checks (AP505000) form, which the system then opens, clickProcess to print the checks.

| Part 2: Accounts Payable | 181
After the checks are printed, the Release Payments (AP505200) form appears.
7. On the Release Payments (AP505200) form, click Process to release the documents (see thescreenshot below).
Figure: The AP checks to be released
8. Navigate to the Vendor Summary (AP401000; Finance > Accounts Payable > Work Area >Explore) form, and notice that AdvertisingCo has a zero ending balance and that $175 remainsits the prepayments balance. Other vendors have zero ending and prepayment balances and arenot listed in the table, because the Vendors with Balance Only check box is selected.
Related LinksPrepayment ProcessingHow to Unapply a PrepaymentBills and Adjustments (AP301000)Checks and Payments (AP302000)Vendor Details (AP402000)

| Part 2: Accounts Payable | 182
Step 9.4: Processing a Refund for a PrepaymentSuppose that on 3/10/2014, you have received a refund of $175 from AdvertisingCo for the unusedamount of the prepayment. In this step, you will process the refund for the prepayment. Complete thefollowing instructions:
1. On the Checks and Payments (AP302000) form, create and save a new document with thefollowing settings:
• Type: Vendor Refund
• Vendor: V000000003 (AdvertisingCo)
• Date: 3/10/2014
• Payment Ref.: 03102014PrepRef
• Description: $175 refund for unused prepayment
• Payment Amount: 175.00
• Documents to Apply tab, Document Type: Prepayment, Reference Nbr.: 000012($200 prepayment), Amount Paid: 175.00
• Hold: Cleared
2. Click Release to release the refund.
On the Application History tab, you can find the number of the batch that has been generatedto record the refund amount to GL accounts. In the batch, you can see that the cash accountis debited for $175, while the prepaid expense account is credited for the same amount. Whenyou released the refund for the prepayment, the system updated the prepayment balance of thevendor.
3. On the Vendor Summary (AP401000) form, clear the Vendors with Balance Only check box toview the list of all vendors and their balances.
In the Prepayments Balance column, you can see that the prepayments balance of theAdvertisingCo vendor is equal to 0.
Related LinksPrepayment ProcessingHow to Enter a Refund for a PrepaymentChecks and Payments (AP302000)

| Part 2: Accounts Payable | 183
Additional InformationYou can use the following information for additional reading, but these concepts are outside of thescope of this course.
Approval of Prepayment Requests
As is the case with bills and credit adjustments, prepayment requests might require approval before thepayment can be made. For more information, see Bill Approval for Payment in the User Guide.

| Part 2: Accounts Payable | 184
Lesson SummaryIn this lesson, you have learned how to process prepayments in the system. To make a prepaymentto vendor, you first have to create the prepayment request in the system by using the Bills andAdjustments (AP301000) form. Then you need to create and process an AP check on the Checksand Payments (AP302000) form to make the prepayment. After you have released the AP check, theprepayment is ready, and you can apply it to bills and credit adjustments. You have also learned how toprocess the refund from vendors for the unused amount of the prepayment.
Review Questions
• How can you process a prepayment to a vendor?
• Can you apply a prepayment to multiple bills?
• Can you apply a prepayment partially?
• How can you process an unused amount of the prepayment?

| Part 3: Accounts Receivable | 185
Part 3: Accounts Receivable
In this part, you will learn how to manage invoices and customer payments in the Accounts Receivablemodule of Acumatica ERP. You will learn how to perform the following tasks:
• Configuring the initial settings of the Accounts Receivable module
• Creating customer classes and customer accounts
• Creating, releasing, and printing invoices
• Entering and releasing payments
• Applying payments to invoices
• Preparing and printing statements
• Reconciling customer balances
• Processing prepayments, debit and credit memos, and refunds
• Configuring and processing overdue charges
• Configuring and processing write-offs

| Part 3: Accounts Receivable | 186
Company Story: CustomersIn this part of the course, MyCompany starts working with the following customers: RegularCo,GoodCo, EarlyCo, and LateCo. MyCompany delivers to the customers a particular type of service, whichis represented by the SERVICE non-stock item in the system. You will create invoices and memosfor customers, process payments and prepayments in the system, and apply them to outstandingdocuments. At the end of each financial period, you will generate and review the customer statements.
General Ledger AccountsTo record the customer debt amounts, you will add a new GL account to the chart of accounts, 110000 -Accounts Receivable (also referred to as the AR account).
Financial Periods
In this part of the course, you will activate the next financial period, 04-2014, so that you can createdocuments dated in this period and post transactions to the period. At the end of Lesson 11: AccountsReceivable Process, you will close the 02-2014 period in the Accounts Receivable module.
Accounts Receivable Documents and Payments
You will start entering sample documents in Lesson 11: Accounts Receivable Process. In this lesson, youwill see all the steps of processing an invoice issued for a customer, entering and applying a paymentto the invoice, and preparing customer statements. In Lesson 12: Early Payments, Prepayments,and Memos, you will give a cash discount to a customer for an early payment, process a customerprepayment, and issue a debit memo and a credit memo to a customer. You will also make a refund toa customer.
In Lesson 13: Credit Verification and Overdue Charges, you will see how to use automatic creditverification of customer accounts in the system. You will prepare a sequence of dunning letters for acustomer who hasn't paid for a long time. Also, you will configure the calculation of additional chargeson overdue documents and generate the overdue charge documents so they can be shown in thecustomer statements.
In Lesson 14: Direct Write-Offs, you will configure the write-off functionality in the module and write offthe small overpaid and underpaid balances by using the direct write-off method.

| Part 3: Accounts Receivable | 187
Lesson 10: Introduction to Accounts ReceivableIn this lesson, you will set up the initial settings of the Accounts Receivable module for MyCompany inAcumatica ERP and make the module ready for use. At the end of the lesson, you will create accountsfor customers to whom MyCompany delivers services.
Lesson Objectives
In this lesson, you will learn the basic concepts of the configuration and use of the Accounts Receivablemodule:
• How to specify the initial settings of the Accounts Receivable module
• How to define a statement cycle
• How to create a customer
• How to define the default price of a non-stock item
| Part 3: Accounts Receivable | 188
Step 10.1: Adding General Ledger AccountsDuring this preliminary step, you will add to the system the general ledger accounts that are used inthis part of the course. Additionally, you will activate the next financial period so that you can createdocuments dated to the period. Do the following:
1. Add the following GL accounts to the chart of accounts by using the Chart Of Accounts(GL202500; Finance > General Ledger > Configuration > Manage > Chart of Accounts) form:
a. Accounts Receivable: You will use this account to record amounts owed by customers forservices provided to them on credit. For the account, specify the following settings:
• Account: 110000
• Account Class: AR
• Description: Accounts Receivable
b. Customer Deposits: You will use this account to record amounts prepaid by customers.For the account, specify the following settings:
• Account: 244000
• Account Class: OTHCURLIAB
• Description: Customer Deposits
c. Cash Discount Given: This account accumulates cash discount amounts given tocustomers for early payments. Specify the following account settings:
• Account: 595000
• Account Class: COGS
• Description: Cash Discount Given
d. Overdue Charges Income: This account accumulates additional amounts taken fromcustomers for late payments. Specify the following account settings:
• Account: 410000
• Account Class: OTHINCOME
• Description: Overdue Charges Income
e. Small Balances Write-Off Expense: This account accumulates write-off amounts of smallunderpaid and overpaid balances. Specify the following account settings:
• Account: 615000
• Account Class: EXOTHER
• Description: Small Balances Write-Off Expense
2. By using the Financial Periods (GL201000; Finance > General Ledger > Work Area > Manage> Financial Periods) form, activate the 04-2014 financial period in the system, so that you cancreate documents and post transactions to the periods.
Now you can proceed to defining a statement cycle and a customer class, both of which will be used inthe Accounts Receivable module.

| Part 3: Accounts Receivable | 189
Step 10.2: Defining a Statement CycleSuppose that you have decided to inform your customers about their current balance and outstandingdocuments by sending them statements at the end of every month. You can prepare statements of thefollowing types:
• Open Item (default): This statement lists all outstanding documents that haven't yet been paid bythe customer and includes unapplied credit memos and payments.
• Balance Brought Forward: This statement lists all documents that have been created since the laststatement (if any). The total outstanding amount from the previous statement is shown at thebeginning of the statement.
To configure customer statements in the system, you have to define the statement cycle, whichdetermines how the statements are generated, and then assign the statement cycle to customeraccounts. The statement cycle defines the schedule for statements and the aging periods by which thecustomer's balance is broken down in the statement. You have to define at least one statement cyclethat will be used in the module by default, but you can define multiple statement cycles, so that youcan send statements to different groups of customers on different dates.
You specify the statement cycle and statement type for each customer class, which defines the defaultsettings for the group of customers. Then you can change the statement cycle and the statement typefor an individual customer of the class, if needed. Any statement can be expressed in a foreign currencyif you use multiple currencies in the system.
In this step, you will define a statement cycle to generate statements at the end of each month. Basedon the aging settings of the statement cycle, the outstanding customer documents will be broken downby the following periods: 0 to 10 days, 11 to 30 days, 31 to 60 days, and more than 60 days.
On the Statement Cycles (AR202800; Finance > Accounts Receivable > Configuration > Setup) form,create a new record with the following information:
• Cycle ID: EOM
• Description: End of Month
• Prepare On: End of Month
• Aging Period 1, Days Due: 10, Message Description: 0 to 10
• Aging Period 2, Days Due: 30, Message Description: 11 to 30
• Aging Period 3, Days Due: 60, Message Description: 31 to 60
• Aging Period 4, Over Days, Message Description: More than 60
In a statement cycle, you could also specify a fixed day of the month to generate the statements on,or specify two days if you wanted to generate the statements twice a month. To specify two days, in thePrepare On box, you would select Custom, and you would specify Day of Month and Day of Month 1,the days on which the statements should be generated.
Now the statement cycle is complete, and you can create a customer class.
Related LinksStatement CyclesStatement Cycles (AR202800)

| Part 3: Accounts Receivable | 190
Step 10.3: Creating a Customer ClassA customer class is a group of customers that have similar properties. As is true of vendor classes,customer classes make it easier to create customer accounts in the system by functioning as templateswith settings of accounts of the class. When a user creates a customer account, the user specifies theclass, and the system inserts the information from the specified customer class into the appropriateboxes for the new customer account. (The user can change this information, if needed, for the newcustomer.)
You have to define at least one customer class in the system, which will be used by default and thusshould have the most general settings. You can define any number of customer classes, based on thegroups of customers your company works with.
In this step, you will define the DEFAULT customer class, from which you will create all customeraccounts in this course.
To define the DEFAULT customer class, create a new record on the Customer Classes (AR201000;Finance > Accounts Receivable > Configuration > Setup) form, and specify the following settings:
• Class ID: DEFAULT
• Description: Default
• General Settings tab, Country: US (United States)
• General Settings tab, Credit Verification: Disabled
• General Settings tab, Terms: 30D
• General Settings tab, Statement Cycle ID: EOM (End of Month)
• General Settings tab, Payment Method: CHECK
• GL Accounts tab, AR Account: 110000 (Accounts Receivable)
• GL Accounts tab, Sales Account: 403000 (Sales - Consulting Services)
• GL Accounts tab, Cash Discount Account: 595000 (Cash Discount Given)
• GL Accounts tab, Prepayment Account: 244000 (Customer Deposits)
To disable the automatic credit check for each new customer account by default, you have selectedDisabled in the Credit Verification box for the customer class. (Credit verification will be described indetail further in this course).
Save the class you have added. Now that the default customer class is ready, you can configure theAccounts Receivable module.
Related LinksCustomer ClassesManaging Credit PolicyCustomer Classes (AR201000)

| Part 3: Accounts Receivable | 191
Step 10.4: Configuring the Accounts Receivable ModuleAccounts Receivable is a dedicated module for management of your company's receivables fromcustomers. In the Accounts Receivable module, you can:
• Maintain customer accounts.
• Create invoices, and issue debit and credit memos for customers.
• Enter payments and prepayments received from customers, and apply them to outstandingdocuments.
• Prepare customer statements.
• Give cash discounts for early payments and take overdue charges.
• Process balance and credit write-offs.
• Reconcile the balances of customer accounts with the balances of GL accounts by reviewing theAccounts Receivable reports.
• Use the automatic credit verification of customer accounts.
• Prepare and send dunning letters to customers and manage their credit status.
• Perform additional tasks with accounts receivable: manage bad debts, generate recurringinvoices, maintain price lists and discounts, manage customer contracts, collect customerpayments made by a credit card, automate the calculation of commission paid to salespersons,and revalue customer accounts maintained in a foreign currency; all of these concepts are outsideof the scope of this course.
In this step, you will specify the initial configuration of the Accounts Receivable module to make themodule ready for use. You will also define a separate numbering sequence for batches generatedfrom Accounts Receivable documents and cause the system to automatically number customer IDs(C000000001, C000000002, and so on), as it does vendor IDs.
A separate numbering sequence for batches isn't required for each application module you use; also, youdon't necessarily have to modify the segmented key for customer IDs and vendor IDs. We have addedthese additional tasks to the course for training purposes.
In the step, you will do the following:
1. Configure the Accounts Receivable module
2. Define a numbering sequence for batches
3. Configure the segmented key that defines the format of customer IDs
1. Configure the Accounts Receivable Module
To configure the Accounts Receivable module by using the Accounts Receivable Preferences (AR101000;Finance > Accounts Receivable > Configuration > Setup) form, do the following:
1. Set Default Customer Class ID to DEFAULT.
When a user creates a new customer class, the class that you specify here will provide thedefault settings for the new class. (The user can change these settings for the class beingcreated.) Also, when a new customer account is created, it will be assigned to the DEFAULTcustomer class by default; the user can assign the customer account to a different customerclass.
2. Select the Automatically Post on Release check box.
This option works in the same way in all modules of Acumatica ERP. If this check box iscleared, as soon as you release a document from the Accounts Receivable module, thesystem automatically generates and releases the batch in the General Ledger module, and the

| Part 3: Accounts Receivable | 192
released batch has the Unposted status until you post the batch. Because you are selecting theAutomatically Post on Release option, the system will immediately post the generated batchwhen you release a document from the Accounts Receivable module.
3. Make sure the Hold Document on Failed Credit Check check box is selected.
This option defines whether new documents can be processed for customers who have failed acredit check. If the Hold Document on Failed Credit Check check box is selected, users cancreate new invoices and memos with only the On Hold status for customers that have failed thecredit check. (Thus, new documents can be created but not processed for these customers.)If the Hold Document on Failed Credit Check check box is cleared, new documents can beprocessed regardless of the results of the credit check, although a warning appears if a customerfails the credit check.
4. Save your changes to the form.
Now the Accounts Receivable module is ready for use. However, you will also define a numberingsequence for batches generated only by this module and modify the segmented key that appliesto customer IDs, as described in the following sections.
2. Define a Numbering Sequence for Batches
Nerxt, you will define a numbering sequence for batches generated from Accounts Receivabledocuments. Perform the following instructions:
1.While you are still on the Accounts Receivable Preferences (AR101000) form, click the Edit ( )button that is located right of the GL Batch Numbering Sequence box.
This opens the Numbering Sequences (CS201010; Configuration > Common Settings > CommonSettings) form so that you can create a new record.
2. Enter the following settings for the new record:
• Numbering ID: ARBATCH
• Description: Batches created from AR documents
• New Number Symbol: <NEW>
• Start Number: 000001
3. Click Save & Close on the form toolbar to save the numbering sequence, close the NumberingSequences (CS201010) form, and return to the Accounts Receivable Preferences (AR101000)form.
4. Notice that the GL Batch Numbering Sequence is now set to ARBATCH, and again save yourchanges to the form.
3. Configure the Segmented Key for Customer IDs
Finally, you will configure the segmented key that applies to customer IDs so that the customer IDs(which will be C000000001, C000000002, and so on) look similar to vendor IDs, except that customerIDs start with the prefix C and vendor IDs start with the prefix V. Perform the following instructions:
1. On the Numbering Sequences (CS201010; Configuration > Common Settings > CommonSettings) form, create a new numbering sequence with the following settings:
• Numbering ID: CUSTNUM
• Description: Customer account numbers
• New Number Symbol: <NEW>
• Start Number: C000000001

| Part 3: Accounts Receivable | 193
2. On the Segmented Keys (CS202000; Configuration > Common Settings > Segmented Keys)form, select the CUSTOMER segmented key.
The CUSTOMER segmented key applies to customer account IDs. CUSTOMER inherits thenumber of segments, as well as the segment length and format, from the BIZACCT segmentedkey.
3. In the Numbering ID box, select the CUSTNUM numbering sequence.
4. In the table (where one row exists for the only segment), select the Auto Number check box.
5. Save your changes.
Now you can create customer accounts, and the system will automatically assign the customer ID tothem.
Related LinksOverview (Accounts Receivable)Multiple Numbering SequencesIdentifier SegmentationBusiness AccountsNumbering Sequences (CS201000)Segmented Keys (CS202000)Segment Values (CS203000)Accounts Receivable Preferences (AR101000)

| Part 3: Accounts Receivable | 194
Step 10.5: Creating a CustomerA customer account contains the information about the customer to whom your company providesservices or goods. In a customer account, you specify the company contact information, the GLaccounts used to record amounts related to sales to the customer, the credit verification policy, and thebilling settings that apply to the customer.
In this step, you will create the customer accounts that will be used in this course: RegularCo, GoodCo,EarlyCo, and LateCo. Perform the following instructions:
1. On the Customers (AR303000; Finance > Accounts Receivable > Work Area > Manage) form,create the RegularCo customer with the following settings:
• Customer ID: C000000001 (inserted automatically)
• Customer Name: RegularCo
• Billing Settings tab, Print Statements: Selected
The required information for a customer is the customer ID, customer name, country, statementcycle, sales and cash discount GL accounts, and customer class. The system automaticallyassigns the DEFAULT customer class to each new customer (in the Customer Class box)because you have specified this class in the Default Customer Class ID box on the AccountsReceivable Preferences (AR101000) form. The system also inserts the settings from thecustomer class (including, in this case, the required statement cycle and the sales and cashdiscount GL accounts) into each new customer account to speed the process of creatingcustomers in the system. When you are creating or editing a customer, if you change thecustomer class, the system will update the information in the customer account to the settings ofthe specified customer class. For the customer, you can override any information that the systeminserted when you selected the customer class.
For the RegularCo customer, you will prepare statements of the Open Item type, which isspecified in the Statement Type box by default (because it is a setting of the customer class).You have selected the Print Statements check box, which by default marks the customer'sstatements as intended for printing. (However, even if the check box were not selected, youwould be able to print RegularCo statements, if needed.)
2. Create the GoodCo customer, for which we will assume you have been asked to send printeddocuments, and specify the following settings:
• Customer ID: C000000002 (inserted automatically)
• Customer Name: GoodCo
• Billing Settings tab, Print Invoices: Selected
• Billing Settings tab, Print Statements: Selected
• Billing Settings tab, Statement Type: Balance Brought Forward
Because you are going to print invoices and memos for GoodCo, you have selected the PrintInvoices check box for the customer. This check box marks the invoices and memos of thiscustomer as intended for printing by default; however, even if the check box were not selected,you would be able to print GoodCo invoices and memos, if needed.
Suppose also that GoodCo representatives prefer statements that bring forward the outstandingbalance, which is why you have selected the Balance Brought Forward statement type for thecustomer.
3. Create the EarlyCo customer. Suppose that you frequently offer cash discounts to this customer,which usually makes early payments Specify the following settings:
• Customer ID: C000000003 (inserted automatically)
• Customer Name: EarlyCo
• General Info tab, Terms: 30D7D3 (3/7, n/30)
4. Create the LateCo customer and specify the following settings for it:
• Customer ID: C000000004 (inserted automatically)

| Part 3: Accounts Receivable | 195
• Customer Name: LateCo
• General Info tab, Credit Verification: Credit Limit
• General Info tab, Credit Limit: 1000.00
• Billing Settings tab, Statement Type: Balance Brought Forward
Suppose that this customer often is late sending payments, so you have enabled creditverification for it. You have set the credit limit to $1000, so the system holds the processing ofany new invoices for the customer once it exceeds that limit. When the limit is exceeded, thecustomer fails the credit check, and you see a warning when you create a new document for thecustomer. Because you have selected the Hold Document on Failed Credit Check check boxon the Accounts Receivable Preferences (AR101000) form, when a customer fails a credit check,new invoices, debit memos, and overdue charges for the customer can be created only with theOn Hold status and cannot be released. (An example is described later in this course.)
Now you can create Accounts Receivable documents. As soon as you specify a customer in a document,the system automatically fills the document with settings based on the settings of the customeraccount.
If the Business Account Locations feature is enabled on the Enable/Disable Features (CS100000) form,a customer can have one location or multiple locations (of offices or warehouses) in the system. You cancreate customer locations by using the Customer Locations (CR303010; Finance > Accounts Receivable >Work Area > Manage) form. For each location, you can specify the contact information and GL accounts touse with it. For this course, you don't need to enable the Business Account Locations feature.
Related LinksCustomer ClassesManaging Credit PolicyCustomer Classes (AR201000)

| Part 3: Accounts Receivable | 196
Step 10.6: Defining the Default Price of a Non-Stock ItemIn this step, you will specify the default price and the sales account of the SERVICE non-stock item,which can be inserted into customer documents to represent an hour of service.
A default price is not required for an item; instead of specifying a default price, you could specify the priceevery time you create a new invoice or memo. Alternatively, you could maintain various price lists anddiscounts offered to customers. These tasks are outside of the scope of this course.
Complete the following steps to specify the item settings:
1. On the Non-Stock Items (IN202000; Finance > Accounts Receivable > Work Area > Manage)form, select the SERVICE non-stock item.
The Non-Stock Items (IN202000) form is available in both modules (Accounts Receivable andAccounts Payable), and you can create, view, and edit any item by using the form in either module.
2. On the Price/Cost Information tab, type 50.00 in the Default Price box (as shown in thescreenshot below) to specify the $50-per-hour default price of the item. Click Save.
3. On the GL Accounts tab, set Sales Account to 403000 - Sales - Consulting Services. This isthe sales account that is inserted into a customer document for the item.
4. Save your changes.
Now if a user creates an Accounts Receivable document and adds the SERVICE item as a documentdetail, the specified $50 default price will be automatically inserted for the SERVICE item. Along withthe price, the 403000 - Sales - Consulting Services account will be inserted into the document detail forthe item.
Figure: The default price of the SERVICE item
Related LinksBase PricesNon-Stock Item SupportNon-Stock Items (IN202000)

| Part 3: Accounts Receivable | 197
Additional InformationYou can use the following information for additional reading, but these concepts are outside of thescope of this course.
Foreign Currencies
You can process customer documents and payments entered in foreign currencies. For moreinformation, see Overview (Currency Management) and AP and AR Revaluations in the Acumatica ERPUser Guide.
Customer-Specific Prices
You can maintain item prices that are specific to customers and customer groups, and you can definethe discounts that apply to these prices. For more information, see Multiple Price Lists and Overview ofDiscounts in the Acumatica ERP User Guide.
Rounding of Document Amounts
You can configure rounding rules and precision that apply to document amounts in Accounts Receivable.See Rounding of Document Amounts in the Acumatica ERP User Guide for details.

| Part 3: Accounts Receivable | 198
Lesson SummaryIn this lesson, you have specified the initial configuration of the Accounts Receivable module. You haveadded general ledger accounts to be used in the Accounts Receivable module. You have learned how tospecify an individual numbering sequence to be used for numbering batches created from the AccountsReceivable module. You have also learned how to define a statement cycle on the Statement Cycles(AR202800) form.
You have also learned how to create customers on the Customers (AR303000) form. To create a groupof customers with similar properties, you define a customer class, which is used as a template whenusers create new customer accounts for which the class is specified. The system inserts informationfrom the customer class in the appropriate boxes for the created customer account. You have alsodefined a numbering sequence and applied it to the CUSTOMER segmented key to make customer IDsauto-numbered.
The lesson also explains how to specify the default price for the non-stock item. This price will be usedif a price for the specific customer is not set.
Now the Accounts Receivable module is ready for use—that is, you can create invoices, enter paymentsreceived from customers, and apply the payments to the invoices.

| Part 3: Accounts Receivable | 199
Lesson 11: Accounts Receivable ProcessIn this lesson, you will learn how to create and process invoices and customer payments in AcumaticaERP. You will learn how to generate statements, which are then sent to customers. After that, youwill generate the reports that you can use to reconcile the outstanding document balances with thebalances of general ledger accounts. Finally, you will see how to close a financial period in the systemafter all legitimate and accurate documents are processed for the period.
Lesson Objectives
In this lesson, you will learn the following operations in Acumatica ERP, including how to:
• Create an invoice
• Release an invoice
• Print an invoice
• Enter a payment received from a customer
• Release a payment
• Apply a payment to an invoice
• Reconcile the outstanding document balances with the balances of GL accounts
• Close a financial period in the Accounts Receivable and General Ledger modules
• Prepare a customer statement
• Print a customer statement

| Part 3: Accounts Receivable | 200
Accounts Receivable ProcessThis article provides an overview of how the accounts receivable process unfolds in Acumatica ERP,including how users process invoices and customer payments and perform other operations. The articleincludes the following sections:
• Overview of the Accounts Receivable Process
• Processing of Invoices and Customer Payments
• Supplementary Operations
Overview of the Accounts Receivable Process
The accounts receivable process, which consists mainly of the creation and processing of customerinvoices and payments, is performed in the Accounts Receivable module of Acumatica ERP. When acustomer purchases services or goods, you create an invoice for the purchase in the system (see 1 inthe following diagram). In the invoice, you specify the customer account, the document details, andthe credit terms. When the invoice is ready, you release the document (2). On release, the invoicebecomes open, and the system generates the batch to be posted to the accounts receivable and incomeGL accounts. Then you can print out the invoice for sending it to the customer, or send the document byemail (3). (You can also print or email the document before it has been released.)
When you receive a payment from the customer, you create a corresponding payment document in thesystem (4). In the payment document, you specify the customer account, the payment method andcash account used by the customer, and the payment amount. When you release the payment (4), thedocument becomes open, and the system generates a batch to be posted to the accounts receivableand cash asset GL accounts. Then you can apply the payment to an invoice.
To apply the payment to the invoice (5), you have to specify the reference number of the invoice andthe amount to be applied. Then you have to release the payment application to the invoice. When youdo, the outstanding payment balance is decreased by the amount applied to the invoice. The balance ofthe invoice is also decreased by the application amount. The invoice remains open until the full amountis paid; it then becomes closed. The payment remains open until the full amount is applied. After that,the payment is automatically closed in the system. You can make corrections to open documents andpayment applications, if necessary (as described later in this course).
On a regular basis, you should review the Accounts Receivable reports and reconcile the total balance ofopen documents with the balances of GL accounts (6). After all documents for a period are posted andthe balances are reconciled, you close the financial period (7).
Periodically, you prepare a statement to inform the customer about its current balance in your systemand the documents to be paid to your company. To prepare the statement (8), you run the statementpreparation process for the needed statement cycle, which you have configured in the system. Duringthe process, the system generates statements for customers to whom this statement cycle is assigned.After the statements are ready, you can print them or send them to customers by email (9).
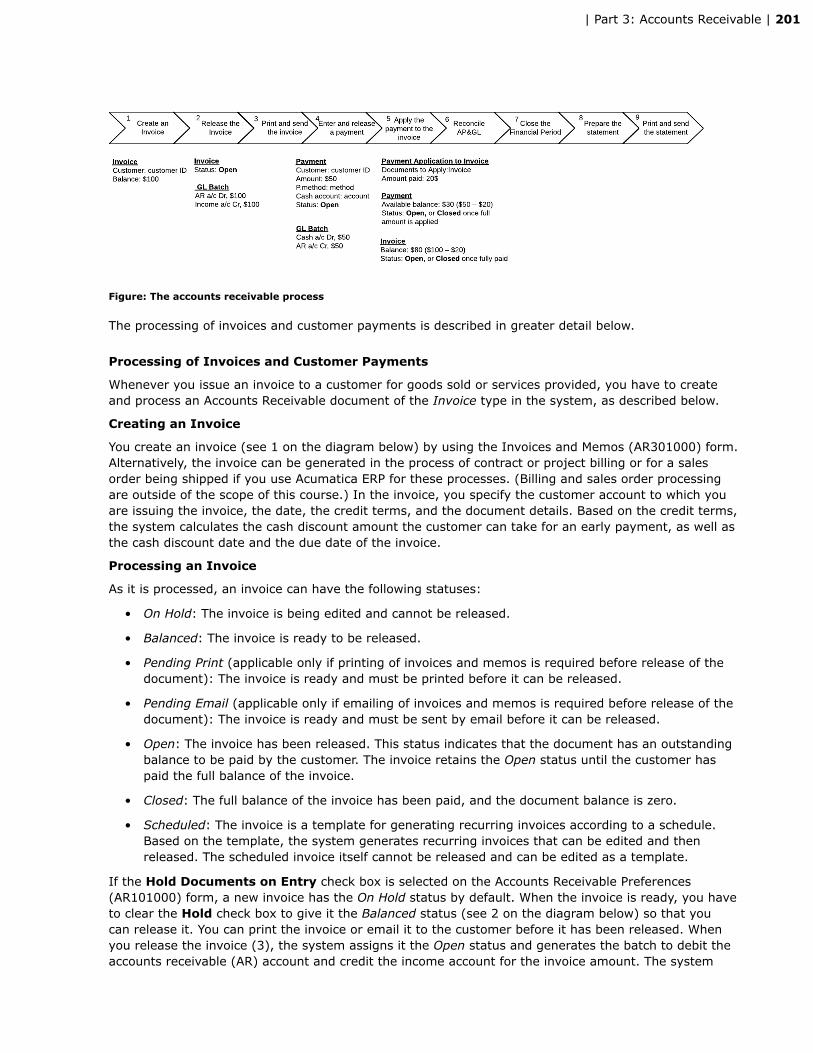
| Part 3: Accounts Receivable | 201
Figure: The accounts receivable process
The processing of invoices and customer payments is described in greater detail below.
Processing of Invoices and Customer Payments
Whenever you issue an invoice to a customer for goods sold or services provided, you have to createand process an Accounts Receivable document of the Invoice type in the system, as described below.
Creating an Invoice
You create an invoice (see 1 on the diagram below) by using the Invoices and Memos (AR301000) form.Alternatively, the invoice can be generated in the process of contract or project billing or for a salesorder being shipped if you use Acumatica ERP for these processes. (Billing and sales order processingare outside of the scope of this course.) In the invoice, you specify the customer account to which youare issuing the invoice, the date, the credit terms, and the document details. Based on the credit terms,the system calculates the cash discount amount the customer can take for an early payment, as well asthe cash discount date and the due date of the invoice.
Processing an Invoice
As it is processed, an invoice can have the following statuses:
• On Hold: The invoice is being edited and cannot be released.
• Balanced: The invoice is ready to be released.
• Pending Print (applicable only if printing of invoices and memos is required before release of thedocument): The invoice is ready and must be printed before it can be released.
• Pending Email (applicable only if emailing of invoices and memos is required before release of thedocument): The invoice is ready and must be sent by email before it can be released.
• Open: The invoice has been released. This status indicates that the document has an outstandingbalance to be paid by the customer. The invoice retains the Open status until the customer haspaid the full balance of the invoice.
• Closed: The full balance of the invoice has been paid, and the document balance is zero.
• Scheduled: The invoice is a template for generating recurring invoices according to a schedule.Based on the template, the system generates recurring invoices that can be edited and thenreleased. The scheduled invoice itself cannot be released and can be edited as a template.
If the Hold Documents on Entry check box is selected on the Accounts Receivable Preferences(AR101000) form, a new invoice has the On Hold status by default. When the invoice is ready, you haveto clear the Hold check box to give it the Balanced status (see 2 on the diagram below) so that youcan release it. You can print the invoice or email it to the customer before it has been released. Whenyou release the invoice (3), the system assigns it the Open status and generates the batch to debit theaccounts receivable (AR) account and credit the income account for the invoice amount. The system

| Part 3: Accounts Receivable | 202
also updates the customer balance by this amount. Once released, the invoice becomes open, pendinga customer payment. You can print out the open document (4), and you can send it to the customer byemail (5) if the customer has requested electronic versions of documents and emails are configured inyour system. (Sending documents by email is outside of the scope of this course.) You cannot edit theamount of the invoice once it is open. If you need to correct the balance of the open invoice, you cancreate a memo (6) or reverse the invoice.
Entering a Payment
When you receive a customer payment for the invoice, you create the payment document (see 7 onthe diagram below) by using the Payments and Applications (AR302000) form. In the payment, youspecify the customer account from which you have received the payment, the cash account to whichthe payment amount should be recorded, the payment method, and the payment amount. The paymentmethod denotes the actual means of payment: cash, printed check, or wire transfer. You can processcustomer payments made by a credit card. (Card payments are outside of the scope of this course,however.)
When you are entering the payment, you can specify the documents to which the payment applies andthen release the payment and the application at once.
Processing a Payment
As it is processed, a payment can have the following statuses:
• On Hold: The payment is being edited and cannot be released.
• Balanced: The payment is ready to be released.
• Open: The payment has been released and can be applied to documents, such as invoices anddebit memos.
• Closed: The full amount of the payment has been applied to a document (or to multipledocuments).
• Voided: The payment has been voided.
If the Hold Documents on Entry check box is selected on the Accounts Receivable Preferences(AR101000) form, a new payment has the On Hold status by default. When the payment is ready, youhave to clear the Hold check box to give it the Balanced status (see 8 on the diagram below) so thatyou can release it. When you release the payment (9), the system assigns it the Open status (whichindicates that the payment can be applied to customer documents) and generates the batch to creditthe AR account and debit the cash account for the amount of the payment. The system also updates thecustomer balance by this amount. You cannot edit the payment after it has been released, although youcan void the payment if it is wrong and enter the correct one (10).
Applying a Payment to an Invoice
An open payment can be applied to customer documents, such as invoices and debit memos. To applythe payment to an invoice (see 11 on the diagram below), you specify the invoice and the amount toapply by using the Payments and Applications (AR302000) form. After that, you release the paymentapplication (12), and the system decreases the balances of the invoice and the payment by theapplication amount. If the payment has been applied within the cash discount period of the invoice, thesystem also generates the batch to debit the Cash Discount Given expense account and to credit the ARaccount. The invoice appears in the application history of the payment. Once the invoice is settled, ithas a balance of zero and becomes closed. The payment becomes closed once the full payment amountis applied to documents. If you have applied the payment to an invoice incorrectly, you can reverse theapplication (13) and reapply the payment to the appropriate invoice.
Instead of applying the payment to the invoice and releasing the payment application (11-12), you can useauto-application of payments to customer documents. (Auto-application of payments is outside of the scopeof this course.)

| Part 3: Accounts Receivable | 203
Figure: Invoice and payment processing in Acumatica ERP
Supplementary Operations
Along with processing invoices and customer payments, you might need to perform the followingoperations in Accounts Receivable:
| Part 3: Accounts Receivable | 204
• Processing a debit memo issued for a customer.
To process a debit memo issued for a customer, create the debit memo document and release itby using the Invoices and Memos (AR301000) form. On release of the debit memo, the systemgenerates a batch to increase the balances of the accounts receivable and income GL accounts.The debit memo does not change the balance of any invoice and should be paid as a separatedocument. (An example of debit memo processing is described later in this course.)
• Processing a credit memo issued for a customer.
To process a credit memo issued for a customer, create the credit memo document and release itby using the Invoices and Memos (AR301000) form. On release of the credit memo, the systemgenerates a batch to decrease the balances of the accounts receivable and income GL accounts.Then you have to apply the credit memo to the corresponding invoice. To do this, you select thecredit memo on the Payments and Applications (AR302000) form and specify the open invoice towhich the credit memo applies. On release of the application, the system decreases the balance ofthe invoice by the amount of the credit memo. You can reverse an invoice by processing a creditmemo for the full balance of the invoice. (An example of credit memo processing is describedlater in this course.)
• Processing a refund to a customer.
You can process a refund for damaged goods returned by a customer, an overpayment by acustomer, or an unused prepayment made by a customer. To process the refund, create therefund document by using the Payments and Applications (AR302000) form. In the customerrefund, you have to select the credit memo, payment, or prepayment to which the refund applies.On release of the customer refund, the system generates a batch to decrease the balance ofthe cash asset GL account and increase the balance of the accounts receivable GL account. (Anexample of refund processing is described later in this course.)
• Processing a customer prepayment.
To process a prepayment made by a customer, create and release the prepayment documentby using the Payments and Applications (AR302000) form. On release of the prepayment, thesystem generates a batch to increase the balances of the cash account and the prepaymentaccount specified in the document. The prepayment account can be a liability GL account that iscredited by prepayment amounts. To apply the prepayment to an invoice, you have to select theprepayment on the Payments and Applications (AR302000) form and then specify the invoice towhich the prepayment applies. You can apply a part of the prepayment amount to the invoice. Theapplied amount reduces the balance of the invoice and the unapplied amount of the prepayment.On release of the prepayment application, the system generates a batch to decrease the balancesof the AR account and the prepayment account. The system closes the prepayment after the fullprepayment amount is applied to customer documents. (An example of prepayment processing isdescribed later in this course.)
• Processing an overdue charge.
If a customer delays a payment, you can calculate overdue charges and show them in thecustomer statement. To do this, you have to configure the way the overdue charges are calculatedand run the calculation process for overdue invoices and debit memos. During the process, thesystem generates overdue charge documents that you can review by using the Invoices andMemos (AR301000) form. On release of an overdue charge document, the system generates abatch to increase the balances of the accounts receivable and income GL accounts. (An exampleof overdue charge processing is described later in this course.)
• Writing off a small balance.
To write off small overpaid or underpaid balances of customer accounts by using the direct write-off method, you have to create the appropriate expense or income GL accounts, define the write-off reason codes, and then run the write-off processing in the system. During the processing,the system generates the write-off documents, which you can review by using the Invoices andMemos (AR301000) form (for credit write-offs) and the Payments and Applications (AR302000)

| Part 3: Accounts Receivable | 205
form (for balance write-offs). (An example of a write-off of a small balance is described later inthis course.)
• Writing off a bad debt.
To write off noncollectable amounts under the allowance method, you can regularly credit apotential loss to the Bad Debts Allowance contra asset account and use this account for thebalance write-off of the actual noncollectable amounts once they are discovered. (Write-offs underthe allowance method are outside of the scope of this course.)

| Part 3: Accounts Receivable | 206
Step 11.1: Creating an InvoiceIn this step, you will create the following invoices, as described in detail in the following sections:
1. An invoice for the GoodCo customer in the amount of $300 to pay for 6 hours of servicepurchased on 2/1/2014
2. An invoice for the LateCo customer in the amount of $800 to pay for 16 hours of servicepurchased on 2/1/2014
3. An invoice for the RegularCo customer in the amount of $1000 to pay for 20 hours of servicepurchased on 2/1/2014
4. An invoice for the EarlyCo customer in the amount of $500—with the credit terms of 3/7, n/30—for 10 hours of service purchased on 2/25/2014
1. Create the GoodCo Invoice
Create the $300 invoice for the GoodCo customer as described below:
1. On the Invoices and Memos (AR301000; Finance > Accounts Receivable > Work Area > Enter)form, create a new document with the following settings:
• Type: Invoice
• Customer: C000000002 (GoodCo)
• Date: 2/1/2014
• Post Period: 02-2014
• Description: 6 hours of service 02-2014
• Hold: Cleared (to give the document the Balanced status and make it ready for release)
As soon as you specify the customer, the system inserts the default n/30 credit terms that arespecified for the customer account. Based on the invoice date and the credit terms, the systemcalculates the due date and cash discount date of the document (see the following screenshot).You can select other credit terms and change the calculated dates in the document, if needed.
Figure: The due date and cash discount date of the invoice, calculated based on the credit terms
2. Open the Financial Details tab.
Notice that the default AR Account is inserted into the document from the customer account;if needed, you can change it in the invoice. The specified 110000 - Accounts Receivable accountis debited on release of the invoice. The default payment information—which includes thePayment Method and Cash Account settings—is also inserted into the document from thecustomer account. If you begin entering a payment for the invoice by selecting Actions >

| Part 3: Accounts Receivable | 207
Enter Payment/Apply Memo on the form toolbar, this information will be used as the defaultinformation for the payment.
3. On the Document Details tab, add a row, and select the SERVICE non-stock item in theInventory ID column. In the Quantity column, type 6.0 (see the screenshot below).
You can add one line or multiple lines to an invoice. In each line, the Ext. Price and Accountsettings must be specified.
If you select a non-stock item in the Inventory ID column, the system inserts the defaultprice of the item into Unit Price for the line. Based on the unit price and quantity, the systemcalculates the extended price (see the Ext. Price column) of the line, which is $300. The systemcalculates the Amount of the line as the extended price minus the amount of any trade discountthat you have given for the item selected in the line. (Trade discounts are outside of the scope ofthis course.)
The Account column, which is a required setting, holds the income account that is credited forthe line amount on release of the invoice. If you select an item in the Inventory ID column, thesystem inserts the sales account of the item into the line by default. If you leave Inventory IDblank, the customer's sales account is inserted into the line. (The tax category is also insertedinto the document from the specified item. If needed, you can change any of the default settingsin the line.)
Figure: The quantity specified for the SERVICE non-stock item
To any line of the document, you can add a note by clicking Attach Note ( ), and you can attach
a file by clicking Attach File ( ) in the line.
4. In the Amount box in the invoice summary area, type 300.00.
The invoice balance, displayed in the Balance box, is the amount that should be paid by thecustomer. The balance is calculated as the sum of Detail Total and Tax Total minus DiscountTotal. (Tax management and trade discounts are outside of the scope of this course.) TheDetail Total is the total amount in the Amount column of the table on the Document Detailstab. In the Amount box of the invoice (see the screenshot below), you have specified thecontrol amount of the document, which should be equal to the document balance. When yousave the document with the Balanced status, the system ensures that the document balance isequal to the specified control amount. If the amounts differ, you get an error message sayingthat the document is out of balance. You can save an unbalanced document with the On Holdstatus.
You can disable checking of the control amount by clearing the Validate Document Totals onEntry check box on the Accounts Receivable Preferences (AR101000) form.
Figure: The control amount of the invoice

| Part 3: Accounts Receivable | 208
5. Save the document.
When you save the invoice, the system generates the invoice's reference number based on thenumbering sequence applied to invoices. The numbering sequence for invoices is specified in theInvoice Numbering Sequence box on the Accounts Receivable Preferences (AR101000) form.In this course, you use the default numbering sequence that applies to invoices.
2. Create the LateCo Invoice
Create the $800 invoice for the LateCo customer with the following settings:
• Type: Invoice
• Customer: C000000004 (LateCo)
• Date: 2/1/2014
• Post Period: 02-2014
• Description: 16 hours of service 02-2014
• Hold: Selected (to leave the invoice on hold for later processing)
• Amount: 800.00
• Document Details tab, Inventory ID: SERVICE, Quantity: 16.00
3. Create the RegularCo Invoice
Create the $1000 invoice for the RegularCo customer with the following settings:
• Type: Invoice
• Customer: C000000001 (RegularCo)
• Date: 2/1/2014
• Post Period: 02-2014
• Description: 20 hours of service 02-2014
• Hold: Cleared
• Amount: 1000.00
• Document Details tab, Inventory ID: SERVICE, Quantity: 10.00
• Document Details tab, Inventory ID: SERVICE, Quantity: 10.00
4. Create the EarlyCo Invoice
Create the $500 invoice for the EarlyCo customer with the following settings:
• Type: Invoice
• Customer: C000000003 (EarlyCo)
• Date: 2/25/2014
• Post Period: 02-2014
• Description: 10 hours of service 02-2014
• Hold: Selected (to leave the invoice on hold for later processing)
• Amount: 500.00
• Document Details tab, Inventory ID: SERVICE, Quantity: 10.00

| Part 3: Accounts Receivable | 209
Based on the credit terms (which the system inserted based on the customer), the system hascalculated the cash discount amount the customer can take for the early payment ($15, which isdisplayed in the Cash Discount box) and the end date of the discount period (3/4/2014, which isdisplayed in the Cash Discount Date box).
In the next step, you will release the invoices that have the Balanced status.
Related LinksInvoices and MemosInvoices and Memos (AR301000)

| Part 3: Accounts Receivable | 210
Step 11.2: Releasing an InvoiceIn this step, you will release the invoices and review the customer balances after release. When yourelease an invoice, the system generates a batch to update the accounts receivable (AR) and incomeaccounts. You can release a single invoice by clicking Release on the toolbar of the Invoices andMemos (AR301000) form, or release multiple invoices at the same time by processing them on theRelease AR Documents (AR501000) form. To release multiple invoices, do the following:
1. On the Release AR Documents (AR501000; Finance > Accounts Receivable > Processes > Daily)form, select the two invoices that appear in the table (that is, select the unlabeled check boxesin their rows), as the following screenshot shows.
You can release only invoices that have the Balanced status. Invoices 000002 and 000004 areOn Hold and therefore do not appear in the table; they can be processed later.
Figure: Invoices selected for release
2. Click Release to process the selected invoices.
The invoices are released.
If you have mistakenly created and released an invoice, you can reverse the invoice in the system.To reverse the invoice, open the invoice on the Invoices and Memos (AR301000) form and thenselect Actions > Reverse. The system creates a credit memo in the full amount of the invoicebeing reversed, and you have to release the credit memo and apply it to the invoice to close bothdocuments. An example of credit memo processing is described further in this course.
3. For invoice 000001 in the table, click the link in the Reference Nbr. column to open thedocument on the Invoices and Memos (AR301000) form.
When it is released, the invoice gets the Open status, so it appears in the list of outstandingdocuments of the customer. In the open invoice, you can edit the cash discount date and the duedate until the document is settled.
Figure: The cash discount date and the due date in the open invoice
4. Open the Financial Details tab, and click the number in the Batch Nbr. box, as shown in thefollowing screenshot.
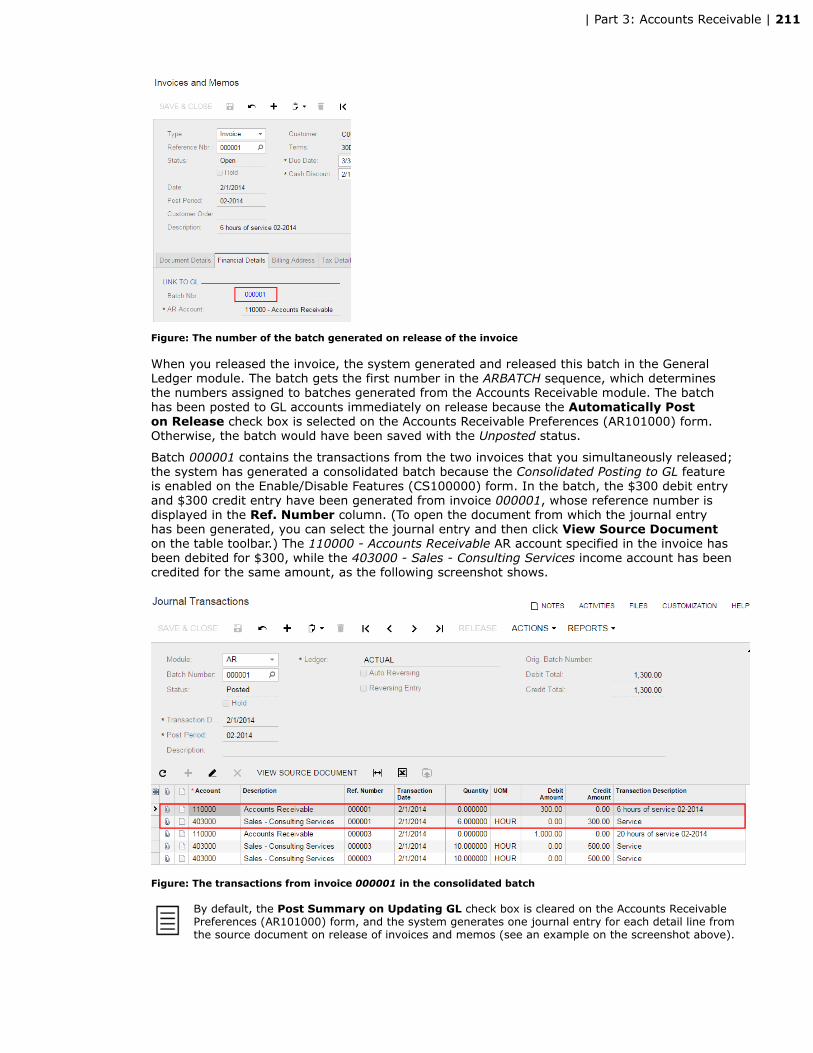
| Part 3: Accounts Receivable | 211
Figure: The number of the batch generated on release of the invoice
When you released the invoice, the system generated and released this batch in the GeneralLedger module. The batch gets the first number in the ARBATCH sequence, which determinesthe numbers assigned to batches generated from the Accounts Receivable module. The batchhas been posted to GL accounts immediately on release because the Automatically Poston Release check box is selected on the Accounts Receivable Preferences (AR101000) form.Otherwise, the batch would have been saved with the Unposted status.
Batch 000001 contains the transactions from the two invoices that you simultaneously released;the system has generated a consolidated batch because the Consolidated Posting to GL featureis enabled on the Enable/Disable Features (CS100000) form. In the batch, the $300 debit entryand $300 credit entry have been generated from invoice 000001, whose reference number isdisplayed in the Ref. Number column. (To open the document from which the journal entryhas been generated, you can select the journal entry and then click View Source Documenton the table toolbar.) The 110000 - Accounts Receivable AR account specified in the invoice hasbeen debited for $300, while the 403000 - Sales - Consulting Services income account has beencredited for the same amount, as the following screenshot shows.
Figure: The transactions from invoice 000001 in the consolidated batch
By default, the Post Summary on Updating GL check box is cleared on the Accounts ReceivablePreferences (AR101000) form, and the system generates one journal entry for each detail line fromthe source document on release of invoices and memos (see an example on the screenshot above).
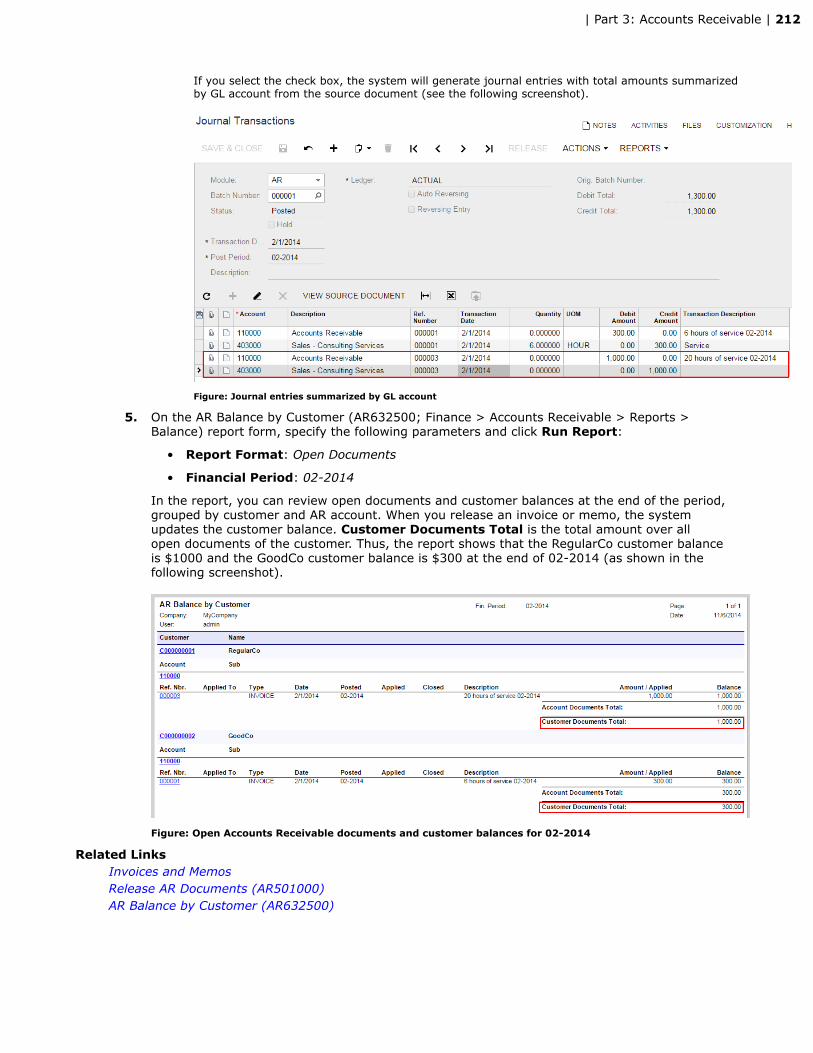
| Part 3: Accounts Receivable | 212
If you select the check box, the system will generate journal entries with total amounts summarizedby GL account from the source document (see the following screenshot).
Figure: Journal entries summarized by GL account
5. On the AR Balance by Customer (AR632500; Finance > Accounts Receivable > Reports >Balance) report form, specify the following parameters and click Run Report:
• Report Format: Open Documents
• Financial Period: 02-2014
In the report, you can review open documents and customer balances at the end of the period,grouped by customer and AR account. When you release an invoice or memo, the systemupdates the customer balance. Customer Documents Total is the total amount over allopen documents of the customer. Thus, the report shows that the RegularCo customer balanceis $1000 and the GoodCo customer balance is $300 at the end of 02-2014 (as shown in thefollowing screenshot).
Figure: Open Accounts Receivable documents and customer balances for 02-2014
Related LinksInvoices and MemosRelease AR Documents (AR501000)AR Balance by Customer (AR632500)
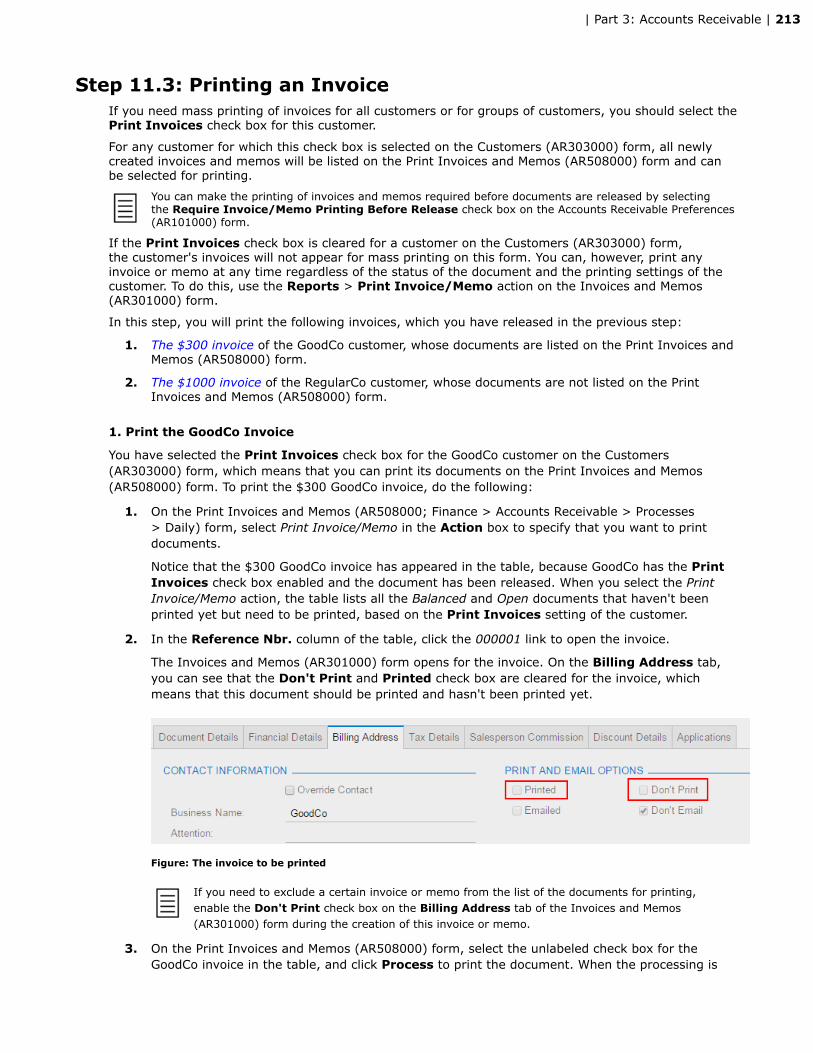
| Part 3: Accounts Receivable | 213
Step 11.3: Printing an InvoiceIf you need mass printing of invoices for all customers or for groups of customers, you should select thePrint Invoices check box for this customer.
For any customer for which this check box is selected on the Customers (AR303000) form, all newlycreated invoices and memos will be listed on the Print Invoices and Memos (AR508000) form and canbe selected for printing.
You can make the printing of invoices and memos required before documents are released by selectingthe Require Invoice/Memo Printing Before Release check box on the Accounts Receivable Preferences(AR101000) form.
If the Print Invoices check box is cleared for a customer on the Customers (AR303000) form,the customer's invoices will not appear for mass printing on this form. You can, however, print anyinvoice or memo at any time regardless of the status of the document and the printing settings of thecustomer. To do this, use the Reports > Print Invoice/Memo action on the Invoices and Memos(AR301000) form.
In this step, you will print the following invoices, which you have released in the previous step:
1. The $300 invoice of the GoodCo customer, whose documents are listed on the Print Invoices andMemos (AR508000) form.
2. The $1000 invoice of the RegularCo customer, whose documents are not listed on the PrintInvoices and Memos (AR508000) form.
1. Print the GoodCo Invoice
You have selected the Print Invoices check box for the GoodCo customer on the Customers(AR303000) form, which means that you can print its documents on the Print Invoices and Memos(AR508000) form. To print the $300 GoodCo invoice, do the following:
1. On the Print Invoices and Memos (AR508000; Finance > Accounts Receivable > Processes> Daily) form, select Print Invoice/Memo in the Action box to specify that you want to printdocuments.
Notice that the $300 GoodCo invoice has appeared in the table, because GoodCo has the PrintInvoices check box enabled and the document has been released. When you select the PrintInvoice/Memo action, the table lists all the Balanced and Open documents that haven't beenprinted yet but need to be printed, based on the Print Invoices setting of the customer.
2. In the Reference Nbr. column of the table, click the 000001 link to open the invoice.
The Invoices and Memos (AR301000) form opens for the invoice. On the Billing Address tab,you can see that the Don't Print and Printed check box are cleared for the invoice, whichmeans that this document should be printed and hasn't been printed yet.
Figure: The invoice to be printed
If you need to exclude a certain invoice or memo from the list of the documents for printing,enable the Don't Print check box on the Billing Address tab of the Invoices and Memos(AR301000) form during the creation of this invoice or memo.
3. On the Print Invoices and Memos (AR508000) form, select the unlabeled check box for theGoodCo invoice in the table, and click Process to print the document. When the processing is

| Part 3: Accounts Receivable | 214
complete, the system outputs the printable page or pages of the invoice for preview and forsending to the printer.
Figure: The printable page of the invoice
You can modify the printed layout of the invoice by customizing the Invoice/Memo (AR641000;Finance > Accounts Receivable > Reports > Balance) report. Customization of reports is outside ofthe scope of this course, however.
4. On the Invoices and Memos (AR301000) form, open the 000001 invoice.
On the Billing Address tab, notice that the Printed check box is now selected for the invoice(as shown in the following screenshot), which means that the invoice has been printed. At anytime, you can reprint the invoice by using the Reports > Print Invoice/Memo action on theInvoices and Memos (AR301000) form, in the way that is described in the next example.
Figure: The check box showing that the invoice has been printed
2. Print the RegularCo Invoice
Because the Print Invoices check box is cleared for the RegularCo customer, its invoices do not appearon the Print Invoices and Memos (AR508000) form for mass printing. However, suppose that you needto print out the $1000 invoice for this customer. To do this, perform the following instructions:
1. On the Invoices and Memos (AR301000) form, open the 000003 RegularCo invoice.

| Part 3: Accounts Receivable | 215
2. To print the invoice, click Reports > Print Invoice/Memo on the form toolbar.
The system outputs the printable page of the invoice for preview and for sending to the printer.Print the invoice.
Related LinksInvoices and MemosPrint Invoices and Memos (AR508000)Invoices and Memos (AR301000)

| Part 3: Accounts Receivable | 216
Step 11.4: Entering a PaymentSuppose that on 2/28/2014, you received two checks: $500 from RegularCo, and $300 from GoodCo.The payment from RegularCo is a regular payment to be applied to open documents, while the GoodCopayment is for the $300 invoice. In this step, you will enter the payments that you have received intothe system. Also, you will learn how the default payment information is configured for a customer. Youwill perform the following tasks, which are described in detail in the following sections:
1. Enter the $500 RegularCo payment.
2. Review the default payment information of the RegularCo customer.
3. Enter the $300 GoodCo payment for the invoice.
1. Enter the RegularCo Payment
Enter the $500 payment that you received from RegularCo on 2/28/2014 by doing the following:
1. On the Payments and Applications (AR302000; Finance > Accounts Receivable > Work Area >Enter) form, create a new document with the following settings:
• Type: Payment
• Customer ID: C000000001 (RegularCo)
• Payment Method: CHECK
• Cash Account: 102000 (Checking Account USD)
• Application Date: 2/28/2014
• Application Period: 02-2014
• Payment Ref.: 02282014R
• Description: Payment 02-2014 for services
As soon as you specify the customer, the system inserts the default payment information ofthis customer (the payment method and the cash account to record the received funds) intothe payment, as the following screenshot illustrates. You can change this information in thisdocument, however.
The Card/Account No setting is used for customer payments made by a credit card, which areoutside of the scope of this course.
Figure: The default payment information inserted into the payment
2. Review the payment information on the Financial Details tab (as shown in the followingscreenshot):
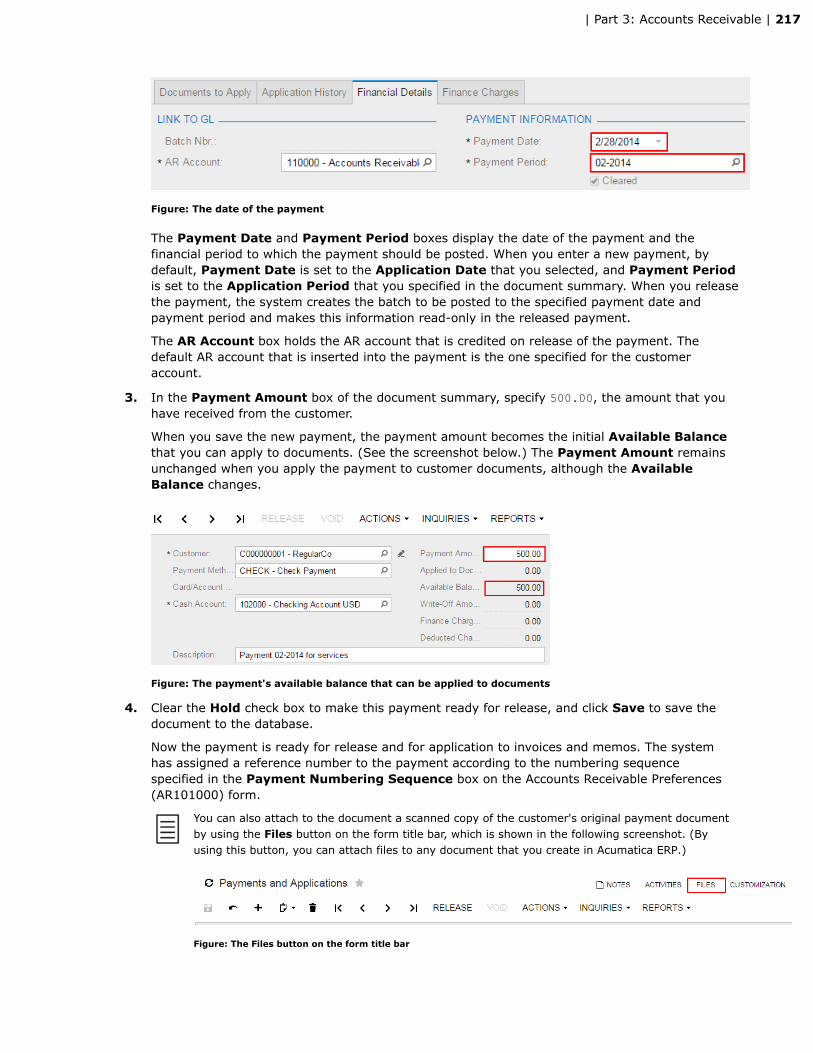
| Part 3: Accounts Receivable | 217
Figure: The date of the payment
The Payment Date and Payment Period boxes display the date of the payment and thefinancial period to which the payment should be posted. When you enter a new payment, bydefault, Payment Date is set to the Application Date that you selected, and Payment Periodis set to the Application Period that you specified in the document summary. When you releasethe payment, the system creates the batch to be posted to the specified payment date andpayment period and makes this information read-only in the released payment.
The AR Account box holds the AR account that is credited on release of the payment. Thedefault AR account that is inserted into the payment is the one specified for the customeraccount.
3. In the Payment Amount box of the document summary, specify 500.00, the amount that youhave received from the customer.
When you save the new payment, the payment amount becomes the initial Available Balancethat you can apply to documents. (See the screenshot below.) The Payment Amount remainsunchanged when you apply the payment to customer documents, although the AvailableBalance changes.
Figure: The payment's available balance that can be applied to documents
4. Clear the Hold check box to make this payment ready for release, and click Save to save thedocument to the database.
Now the payment is ready for release and for application to invoices and memos. The systemhas assigned a reference number to the payment according to the numbering sequencespecified in the Payment Numbering Sequence box on the Accounts Receivable Preferences(AR101000) form.
You can also attach to the document a scanned copy of the customer's original payment documentby using the Files button on the form title bar, which is shown in the following screenshot. (Byusing this button, you can attach files to any document that you create in Acumatica ERP.)
Figure: The Files button on the form title bar
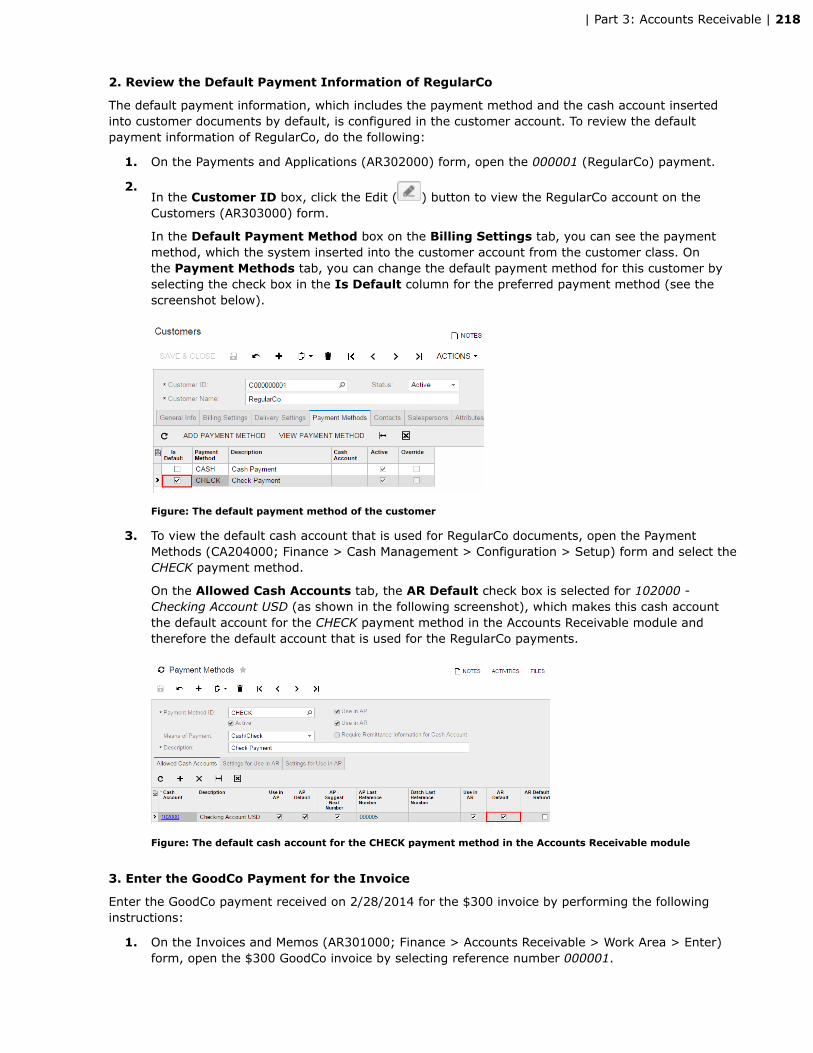
| Part 3: Accounts Receivable | 218
2. Review the Default Payment Information of RegularCo
The default payment information, which includes the payment method and the cash account insertedinto customer documents by default, is configured in the customer account. To review the defaultpayment information of RegularCo, do the following:
1. On the Payments and Applications (AR302000) form, open the 000001 (RegularCo) payment.
2.In the Customer ID box, click the Edit ( ) button to view the RegularCo account on theCustomers (AR303000) form.
In the Default Payment Method box on the Billing Settings tab, you can see the paymentmethod, which the system inserted into the customer account from the customer class. Onthe Payment Methods tab, you can change the default payment method for this customer byselecting the check box in the Is Default column for the preferred payment method (see thescreenshot below).
Figure: The default payment method of the customer
3. To view the default cash account that is used for RegularCo documents, open the PaymentMethods (CA204000; Finance > Cash Management > Configuration > Setup) form and select theCHECK payment method.
On the Allowed Cash Accounts tab, the AR Default check box is selected for 102000 -Checking Account USD (as shown in the following screenshot), which makes this cash accountthe default account for the CHECK payment method in the Accounts Receivable module andtherefore the default account that is used for the RegularCo payments.
Figure: The default cash account for the CHECK payment method in the Accounts Receivable module
3. Enter the GoodCo Payment for the Invoice
Enter the GoodCo payment received on 2/28/2014 for the $300 invoice by performing the followinginstructions:
1. On the Invoices and Memos (AR301000; Finance > Accounts Receivable > Work Area > Enter)form, open the $300 GoodCo invoice by selecting reference number 000001.

| Part 3: Accounts Receivable | 219
2. To enter the payment for the invoice, select Actions > Enter Payment/Apply Memo on theform toolbar.
The system opens the Payments and Applications (AR302000) form so that you can enter thepayment for the invoice.
To ease data entry, the system inserts the information from the invoice into the payment, includingthe payment information that is specified in the invoice: the CHECK payment method, and the102000 cash account (see the following screenshot). This default payment information was insertedinto the invoice from the customer account and can be changed in the document before release.
Figure: The invoice default payment information
3. In the payment, specify the following settings:
• Application Date: 2/28/2014
• Application Period: 02-2014
• Payment Ref.: 02282014G
• Description: Payment 02-2014 for services
• Payment Amount: 300.00
• Hold: Cleared
4. On the Documents to Apply tab, in the Amount Paid column for the invoice, leave the fullamount to be applied, $300 (see the following screenshot), and save the document.

| Part 3: Accounts Receivable | 220
Figure: The payment entered for the invoice
In the next step, you will release the GoodCo payment, along with its application to the invoice.
Related LinksTypes of AR PaymentsCustomer Payment MethodsPayments and Applications (AR302000)Customers (AR303000)

| Part 3: Accounts Receivable | 221
Step 11.5: Releasing a PaymentIn this step, you will release the payments you created in the previous step and then review thecustomer balances. You will release the $500 RegularCo payment, which can later be applied to opendocuments. (You have one open $1000 invoice for this customer.) Because you knew which documentthe GoodCo payment applies to, you had specified the $300 invoice in the payment; in this step, youwill release the payment, along with its application to the invoice.
In general, you can release a single payment by clicking the Release button on the toolbar of thePayments and Applications (AR302000) form, or you can release multiple payments at once byprocessing them on the Release AR Documents (AR501000) form. In this step, you will release bothpayments at once by doing the following:
1. On the Release AR Documents (AR501000; Finance > Accounts Receivable > Processes > Daily)form, select the unlabeled check boxes for both payments, and click Release.
After the documents are processed, click the 000001 link of the first payment to open it on thePayments and Applications (AR302000) form.
Notice that the payment has the Open status and can be applied to customer documents inthe total amount of $500, which is the Available Balance of the payment (see the screenshotbelow).
Figure: The open payment, which can be applied to customer documents in the amount of $500
If you have entered a payment incorrectly or released a payment by mistake, you can void thepayment in the system. To void the payment, you would click Void on the form toolbar. The systemwould generate a new voided payment document, with the same reference number as the originalpayment, that you would then release. On release of the voided payment, the system wouldgenerate a batch that reverses the transaction posted from the original payment, and assign theoriginal payment the Voided status. For more information, see the link in the Related Links sectionof the topic.
2. On the Financial Details tab of the Payments and Applications (AR302000) form for thepayment, click the 000002 link in the Batch Nbr. box. This will open the Journal Transaction(GL301000) form, where you can view the batch that has been generated on release of thepayment.
The system has generated a consolidated batch with transactions from two simultaneouslyreleased documents because the Consolidated Posting to GL feature is enabled for the company.The first two journal entries in the table were generated from the 000001 payment (see thefollowing screenshot). The transaction has been posted to 02-2014, which is the PaymentPeriod, and dated (see Transaction Date) to 2/28/2014, which is the Payment Datedisplayed on the Financial Details tab of the Payments and Applications (AR302000) form.

| Part 3: Accounts Receivable | 222
Figure: The batch generated on release of the payment
The other two journal entries in the table were generated on release of the 000002 payment; itsapplication to the invoice was also released.
3. To review the RegularCo balance, on the AR Balance by GL Account (AR632000; Finance >Accounts Receivable > Reports > Balance) form, specify the following report parameters andclick Run Report:
• Report Format: Open + Current Period
• Financial Period: 02-2014
• Include Applications: Selected
The report shows the documents posted to 02-2014, the open documents by the end of theperiod, and the applications.
For RegularCo, the report shows the open payment posted to 02-2014 (see the followingscreenshot). The amount of the open payment decreased the RegularCo customer balance to$500.
For GoodCo, the report shows the 000002 payment applied to the 000001 invoice in 02-2014(also shown in the screenshot below). The Closed column displays the period in which thedocument was closed. (For open documents, the Closed column is empty.) Thus, both theinvoice and the payment were closed in 02-2014.
Figure: The AR Balance by GL Account report generated for 02-2014
Document applications are listed under each document in the report; the Posted and Balancecolumns are always empty for application entries. The Applied column shows the period to whichthe application was posted. In the report, you can see that the 000002 payment was applied to the000001 invoice in 02-2014. For the 000001 invoice, the report also lists the only payment that wasapplied to the invoice. The GoodCo customer has a balance of zero at the end of 02-2014 becauseall documents are closed.
Related LinksTypes of AR PaymentsRelease AR Documents (AR501000)Payments and Applications (AR302000)AR Balance by Customer (AR632500)To Void a Customer Payment or Prepayment

| Part 3: Accounts Receivable | 223
Step 11.6: Applying a Payment to an InvoiceOnce a payment has been released, you can apply it to customer documents. You can apply paymentsmanually by using the Payments and Applications (AR302000) form.
Alternatively, you can enable auto-application of payments in the system. During auto-application, thesystem automatically applies a customer's open payments and credit memos to the customer's outstandinginvoices, debit memos, and overdue charges; the system then releases the applications. Auto-application ofpayments is outside of the scope of this course.
In this step, you will manually apply the $500 RegularCo payment to the 000003 invoice and seehow the application is reflected in customer documents. Although you have received the paymenton 2/28/2014, you are going to apply it to the invoice on 3/3/2014, which is the due date of thedocument. Perform the following instructions:
1. On the Payments and Applications (AR302000) form, open the $500 RegularCo payment.
2. In the Application Date box, select 3/3/2014, and make sure that Application Period is03-2014.
3. On the Documents to Apply tab, add a row and select the 000003 invoice in the ReferenceNbr. column. Leave 500.00 in the Amount Paid column— that is, apply the full amount of thepayment to the invoice.
When you add documents on this tab, you can select only open documents that have a date nolater that the specified Application Date and aren't selected in another payment. When you adda document to apply, the system displays in the Amount Paid column the maximum possibleamount of the selected document, but you can enter a different amount. You can apply full orpartial payments to documents. The Balance column shows the balance of the invoice after youapply $500 of the payment to the invoice. You can see that the invoice will have a balance of$500 after application (as shown in the following screenshot ).
Figure: The invoice to which the payment will be applied
In the summary area of the form, the Applied to Documents box displays the total amount tobe applied to documents listed on the Documents to Apply tab. The Available Balance boxshows the amount that still can be applied to documents—Payment Amount minus Applied toDocuments.(See the following screenshot.)
Figure: The available balance of the payment after the documents are selected for application
4. On the form toolbar, click Release to release the application of the payment to the invoice.
After the application has been released, the invoice appears on the Application History tabof the payment. Note that the Application Period is the financial period in which the invoicebalance has been updated by the applied amount (03-2014), while the payment was postedto the period that is displayed in the Payment Period box on the Financial Details tab(02-2014).

| Part 3: Accounts Receivable | 224
The payment has the Closed status because the full amount has been applied to the invoice,resulting in an available balance of zero (see the screenshot below).
Figure: The closed payment
If the application causes an additional transaction, the system generates the needed batch onrelease of the application. For example, an additional transaction is generated when you applyan early payment and give a cash discount for the invoice, or write off a small balance of theinvoice "on the fly". (You will see examples of early payment application and small balancewrite-off later in this course.) Otherwise, the system doesn't generate any batch, and the BatchNumber column remains empty for the application (as you can see in the screenshot below). Toview the document to which the payment has been applied, you can click the document link inthe Reference Nbr. column.
Figure: The invoice to which the payment has been applied
If you have mistakenly applied the payment to an invoice or memo, you can reverse the incorrectapplication and reapply the payment to the needed document. To reverse the application, selectthe wrong invoice or memo on the Application History tab, and click Reverse Application. Thesystem generates a reversing entry, which appears on the Documents to Apply tab and shouldbe released. You can then add the correct invoice or memo to the Documents to Apply tab andrelease the application. For more information, see the link in the Related Links section of the topic.
5. To review the RegularCo customer documents and applications for the 03-2014 period, on theAR Balance by Customer (AR632500; Finance > Accounts Receivable > Reports > Balance) form,specify the following report parameters, and click Run Report:
• Report Format: All Documents (Customer Required)
• Financial Period: 03-2014
• Include Applications: Selected
• Customer ID: C000000001 (RegularCo)
For the specified customer, the report shows all the documents posted to 03-2014 or earlier,and the applications. In the report, you can see that the 000001 payment was applied to the000003 invoice in 03-2014, and the application period is displayed in the Applied column. Forthe payment itself, you can see that it was closed in 03-2014; the period is displayed in theClosed column (see the screenshot below). The customer balance does not change on release ofdocument applications; RegularCo still has a $500 balance.
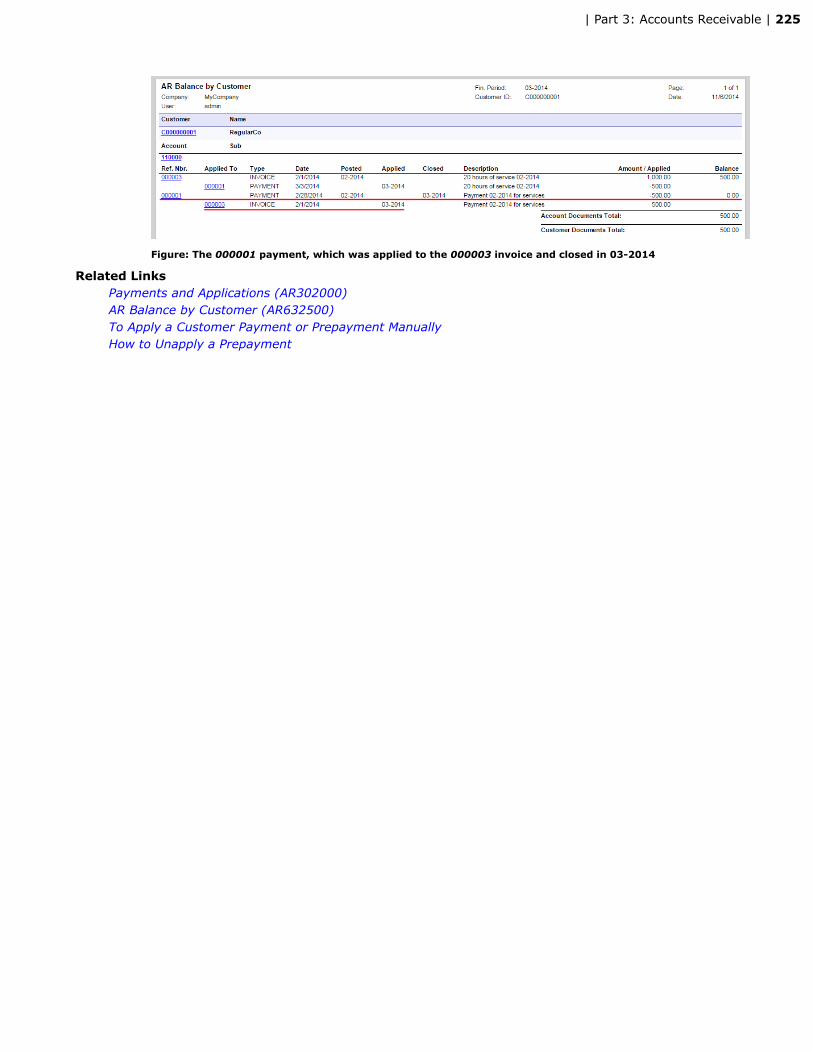
| Part 3: Accounts Receivable | 225
Figure: The 000001 payment, which was applied to the 000003 invoice and closed in 03-2014
Related LinksPayments and Applications (AR302000)AR Balance by Customer (AR632500)To Apply a Customer Payment or Prepayment ManuallyHow to Unapply a Prepayment

| Part 3: Accounts Receivable | 226
Step 11.7: Reconciling Customer Balances with GL AccountsTo perform reconciliation, for each AR account used in Accounts Receivable documents, you haveto compare the total balance of open documents with the balance of the account according to thetransactions posted to the General Ledger. The balances must be equal.
In this step, you will compare the total balance of open Accounts Receivable documents with thebalance of the 110000 - Accounts Receivable account for 02-2014. Before you reconcile the balances,you need to review and release (or delete) the unreleased Accounts Receivable documents, if thereare any, because you are going to close the 02-2014 period. You cannot close the period in AccountsReceivable if there are unreleased documents that need to be posted to the period. If you perform areconciliation in the middle of the financial period, you don't necessarily have to release all documents.
To perform reconciliation, do the following:
1. Review and release the unreleased Accounts Receivable documents for 02-2014, if there are any,as described below:
a. On the AR Edit (AR611000; Finance > Accounts Receivable > Reports > Audit) reportform, specify the following report parameters, and click Run Report:
• From Period: 02-2014
• To Period: 02-2014
• Include Transactions on Hold: Selected
For the specified period, the report shows Accounts Receivable documents that haven'tyet been released—that is, the documents that have the On Hold or Balanced status.The report shows two invoices with the On Hold status (see the following screenshot).Suppose that you have forgotten to release these documents before, and now you haveto release them.
Figure: Unreleased Accounts Receivable documents for 02-2014
b. Release both invoices shown in the report. To release each invoice, open the documenton the Invoices and Memos (AR301000) form by clicking the reference number link in thereport, clear the Hold check box, and then click Release on the form toolbar.
Now all Accounts Receivable documents are released.
2. Reconcile the total of open Accounts Receivable documents with the balance of the accountsreceivable GL account (110000 - Accounts Receivable) as follows:
a. On the AR Balance by GL Account (AR632000; Finance > Accounts Receivable > Reports> Balance) report form, specify the following report parameters, and click Run Report:
• Report Format: Open Documents
• Financial Period: 02-2014
• Include Applications: Cleared
For the specified period, the report shows the AR accounts used in Accounts Receivabledocuments and the list of documents that have been posted to these accounts and thatare open at the end of the period. In the report, you can see the only AR account used inAccounts Receivable documents, which is 110000 - Accounts Receivable. According to theopen Accounts Receivable documents, the balance of 110000 - Accounts Receivable at theend of the 02-2014 period is $1800 (see the following screenshot).

| Part 3: Accounts Receivable | 227
Figure: Total customer balances by GL accounts for 02-2014
b. Obtain the trial balance for 02-2014 by using the Trial Balance Summary (GL632000;Finance > General Ledger > Reports > Balance) report.
In the trial balance, the balance of an AR account is the total amount of the transactionsposted to this account in General Ledger through the end of the specified period. Basedon General Ledger transactions, the balance of 110000 - Accounts Receivable is $1800 atthe end of 02-2014, as illustrated in the following screenshot.
Figure: The trial balance for 02-2014
c. Compare the balance of the 110000 - Accounts Receivable account according to the ARBalance by GL Account (AR632000) and Trial Balance Summary (GL632000) reports.
Both reports show that 110000 - Accounts Receivable has an $1800 balance for 02-2014;therefore, the balances are reconciled. During the reconciliation, you might find adiscrepancy between the total balance of open Accounts Receivable documents by GLaccount and the balance of this account according to the trial balance. The discrepancycould be caused by transactions being posted to the AR account directly from the GeneralLedger module without a document being processed in the Accounts Receivable module.Another possible cause of the discrepancy is the presence of unposted batches generatedfrom Accounts Receivable documents. To review the batches that have been released butnot yet posted, you can use the Post Transactions (GL502000; Finance > General Ledger> Processes > Daily) form.
Related LinksAR Edit (AR611000)

| Part 3: Accounts Receivable | 228
AR Balance by GL Account (AR632000)Trial Balance Summary (GL102000)

| Part 3: Accounts Receivable | 229
Step 11.8: Closing the Financial PeriodTo close a financial period in the General Ledger module, you first have to close the period in thesubledger modules you are using. Accounts Receivable is one of the subledger modules; therefore,you have to close the financial period in the Accounts Receivable module. By closing the period inthe module, you can prevent posting to the period by mistake after all figures have been verifiedand disclosed in reports. Before you close the period in Accounts Receivable, you have to review thedocuments that haven't been released in the module and release the needed documents. (You havealready done this during the previous step of this lesson.)
In this step, you will close the 02-2014 period in the subledger modules that are now in use—AccountsReceivable, Accounts Payable, and Cash Management—and then close the financial period in theGeneral Ledger module. Then you will deactivate the period in the system to prevent the creation of anydocuments in that period. Perform the following instructions:
1. Close the 02-2014 period in Accounts Receivable:
a. Open the Close Financial Periods (AR509000; Finance > Accounts Receivable > Processes> Closing) form.
The form lists all open financial periods of the last non-closed year, which is 2014. In asubledger module, you can close one period or you can close multiple periods at onceafter the previous period has been closed in the module.
b. Select the 02-2014 period in the table, and click Print Open Documents to view theunreleased documents for this period.
The system navigates to the Open AR Documents (AR656000; Finance > AccountsReceivable > Reports > Audit) report, which lists the unreleased documents for 02-2014.Because there are no unreleased documents in Accounts Receivable for 02-2014, thereport is empty, and you can close the period in the module.
You don't necessarily have to view the report every time you are going to close a financialperiod. If you try to close a period that has unreleased documents in the module, thesystem will display an error message.
c. On the Close Financial Periods (AP506000) form, click Close Periods to close the02-2014 period in the module.
After the period is closed in Accounts Receivable, it no longer appears in the list ofavailable periods on data entry forms. However, the period remains active in the system,and users can manually type 02-2014 in the Post Period box to save a document datedto the closed period. Documents can be entered to closed periods because the AllowPosting to Closed Periods check box is selected on the General Ledger Preferences(GL102000) form.
2. Close the 02-2014 period in the Accounts Payable and Cash Management modules. (For detailedinstructions on closing a financial period in the Accounts Payable and Cash Managementmodules, see the link to step 6.7 below.)
3. Close and deactivate the 02-2014 period in the General Ledger module. (For the detailedinstructions on closing and deactivating a financial period in the General Ledger module, see thelink to Step 6.7 below.)
After you close and deactivate the 02-2014 period in the General Ledger module, users aren'table to create any documents dated to 02-2014.
Related LinksStep 6.7: Closing the Financial PeriodPeriod-End Closing ProceduresClose Financial Periods (AR509000)

| Part 3: Accounts Receivable | 230
Step 11.9: Preparing a StatementIn this step, you will prepare the customer statements according to the end-of-month (EOM) cyclefor the first period when the Accounts Receivable module was used, which is 02-2014. Perform thefollowing instructions:
1. On the Prepare Statements (AR503000; Finance > Accounts Receivable > Processes >Statement Cycle) form, set the business date for your current user session to 2/28/2014 (thestatement date for the 02-2014 period). The system sets the 2/28/2014 date in the NextStatement Date box. This is the date on which the statements will be generated when you runthe statement preparation process.
Figure: The first statement date, which the system sets when you select the needed business date
If you wanted to generate statements for the next statement cycle, you have to set the businessdate to the last day of the statement period (or any day within the next statement period). Thus,you could set the business date to 3/31/2014 to generate the statements for March. (You don'thave to do this right now; you will generate the statements for March later in this course.)
2. In the table, select the EOM statement cycle, and on the form toolbar, click Process.
When you click Process, the system generates statements for those customer accounts (suchas RegularCo, as illustrated in the following screenshot) that have the EOM statement cyclespecified.
To see which statement cycles apply to customer accounts, you can use the Customer Summary(AR650500; Finance > Accounts Receivable > Reports > Audit ) report. (If you wanted to view allcustomers regardless of their balance, you would clear the Suppress Zero Balances check boxbefore running the report.)
After the statement preparation process is complete, you can review the generated statements.
3. To view the list of generated statements, open the Statement History Summary (AR404000;Finance > Accounts Receivable > Work Area > Explore) form.
For the selected statement cycle and the period of time from the Start Date through theEnd Date, the Statement History Summary (AR404000) form shows the dates on which thestatement cycle has been processed and the number of statements that have been generated onthose dates in the system. You can see that four statements were generated for the EOM cycleon 2/28/2014 (see the screenshot below).
Figure: The number of statements generated on 2/28/2014

| Part 3: Accounts Receivable | 231
For a statement cycle, in the Last Statement Date box on the Statement Cycles (AR202800)form, you can view the date when the statements were generated most recently.
4. To view the list of statements generated on 2/28/2014, in the table, click the link in theStatement Cycle ID box in the table row that corresponds to this date.
This opens the Statement History Details (AR404300; Finance > Accounts Receivable > WorkArea > Explore) form, which lists the customer statements that were generated on 2/28/2014for the EOM cycle.
The statements cover the period of time from the start of the use of the system to 2/28/2014.The system generates the first statement for a customer after the first document for thecustomer has been posted. Starting from the first statement, the system generates eachstatement regardless of the customer balance, customer status, and customer activity in thestatement period.
The system has prepared the first statements for all customers (as shown in the followingscreenshot). The GoodCo customer has documents posted to 02-2014; therefore, the firststatement has been generated for the customer. Now that the first statement has beengenerated for these customers, the system will generate statements for them each time. Inthe table, the Statement Balance column shows the customer balance on the 2/28/2014.The statement balance is the amount due shown in the customer statement. In the RegularCostatement, the amount due is $500. The Overdue Balance column shows the total balance ofoverdue documents, which is the total of aging periods shown in the statement. The Currentbalance shown in the statement is the statement balance (amount due) minus the overduebalance of the statement.
Figure: The statements generated on 2/28/2014
5. Select the RegularCo customer in the table, and on the form toolbar, click Customer StatementHistory.
The Customer Statement History (AR404600) form appears, which shows a list of all statementsthat were ever generated for the customer. For each statement, you can see whether it has beenprinted or sent by email. The cleared Printed check box means that the statement hasn't yetbeen printed (see the screenshot below).
You can view the history of generated statements for each of the other customers similarly.
Figure: The check box showing that the statement hasn't yet been printed
If you realize that some documents have not been entered after the customer statements havebeen generated, you can create and release these documents and then regenerate the statements.You can regenerate only the last statement for a customer (or for multiple customers at once).

| Part 3: Accounts Receivable | 232
To regenerate statements, you can use the Print Statements (AR503500) form and select theRegenerate Statement action, or use the Statement Cycles (AR202800) form and click theRegenerate Last Statement button. When you regenerate the statement or statements, thesystem again prepares the statements and updates the last statement in the customer statementhistory. After the processing is complete, the statements include documents posted after theprevious version of the statement was prepared.
In the next step, you will print the statements to view them and to be able to send them to thecustomers.
Related LinksStatement CyclesPrepare Statements (AR503000)Statement History Summary (AR404000)Statement History Details (AR404300)Customer Statement History (AR404600)

| Part 3: Accounts Receivable | 233
Step 11.10: Printing a StatementOnce a statement has been generated, it is saved in the statement history of the customer in its stateat the moment it was generated or regenerated. If you later create and release documents dated to theperiod covered by an already generated statement, the new documents will not appear in the already-generated statement unless; you need to regenerate the statement.
A generated statement can be printed at any time. To make a customer's statements available for massprinting, select the Print Statements check box for this customer. Once you do, each newly generatedstatement for the customer will be listed on the Print Statements (AR503500) form and can be selectedfor printing. If the Print Statements check box is cleared for a particular customer, the customer'sstatements will not appear for mass printing on the Print Statements (AR503500) form. When youcreate a customer, the Print Statements value (selected or cleared) for the specified customer class isused for the customer account; however, you can override this default value.
You can print any statement at any time regardless of its printing settings. To do this, select the ShowAll check box on the Print Statements (AR503500) form. All the customer statements generated on thespecified date will be displayed on the form and you can process the needed statements.
In this step, you will print two statements at once and then review their structure. More specifically, youwill complete the following tasks, described in detail in the following sections:
1. Print the EOM statements generated on 2/28/2014.
2. Review the RegularCo statement, which has the Open Item type.
3. Review the GoodCo statement, which has the Balance Brought Forward type.
1. Print the Statements
Print the EOM statements that were generated on 2/28/2014, as described below:
1. Open the Print Statements (AR503500; Finance > Accounts Receivable > Processes > StatementCycle) form, and specify the following settings:
• Actions: Print Statement
• Statement Cycle: EOM (End of Month)
• Statement Date: 2/28/2014
The RegularCo and GoodCo statements appear on the form (as shown in the followingscreenshot) because they haven't been printed yet; notice that the Printed check boxes arecleared for both.
Figure: Customer statements to be printed
2. In the table, select both statements by selecting the unlabeled check boxes for them, and clickProcess to print them.
When the process is complete, the system displays the printable pages of the RegularCo andGoodCo statements to the browser for preview; you can then send them to the printer.
You can modify the printable layout of the statement by customizing the Customer Statement(AR641500; Finance > Accounts Receivable > Reports > Forms) report. Customization of reports isoutside of the scope of this course, however.

| Part 3: Accounts Receivable | 234
3. On the Customer Statement History (AR404600; Finance > Accounts Receivable > Work Area >Explore) form, select the C000000001 (RegularCo) customer to view this customer's statements.The statement is always printed as it was generated during the statement preparation process.
You can also send customer statements by email, regardless of whether you print them. If you need tosend statements by email, in the customer account, you have to select the Send Statements by Emailcheck box. Once you enable this check box, all newly generated statements for this customer will appearon the Print Statements (AR503500) form for emailing. To be able to send emails to customers, you shouldhave the email accounts configured in the system. Configuring emails and sending documents by email areoutside of the scope of this course.
2. Review the RegularCo Statement (Open Item)
Review the RegularCo statement by performing the following instructions:
1. On the Customers (AR303000; Finance > Accounts Receivable > Work Area > Manage) form,select the C000000001 (RegularCo) customer.
For RegularCo, the system prepares statements of the Open Item type, as specified in thecustomer account.
2. To view this customer's statements, click Inquiries > Statement for Customer on the formtoolbar.
The Customer Statement History (AR404600) form opens for the RegularCo customer.
3. In the table, select the 2/28/2014 statement, and on the table toolbar, click Print Statement toview the statement.
An Open Item statement shows the open documents of the customer on the statement date,which in this case is 2/28/2014. Open documents include open invoices, memos, payments,prepayments, and overdue charges. In the statement footer, the total balances of documentsare displayed with a breakdown by aging periods configured in the statement cycle. The Currentamount is the total outstanding balance of documents that aren't overdue on 2/28/2014—thatis, of documents with a due date later than 2/28/2014. The other balances are broken down bythe number of days the documents are past due. The Amount Due, which is displayed in thestatement footer, is the total customer debt on 2/28/2014. The total Amount Due is the totalbalance over all documents listed in the statement, and it is equal to the sum of the current andaging period totals displayed in the statement footer.
The balance of open payments, credit memos, and prepayments is broken down by aging periodsif the Age Credits check box is selected on the Accounts Receivable Preferences (AR101000) form;otherwise, these amounts are included in the Current amount. By default, the check box is cleared,so the credits are included in the Current amount.
The RegularCo statement shows that on 2/28/2014, $500 was due, which is the remainingbalance of the 000003 invoice that was partially paid by the customer (see the screenshotbelow).

| Part 3: Accounts Receivable | 235
Figure: The Open Item statement
3. Review the GoodCo Statement (Balance Brought Forward)
For GoodCo, the system prepares statements of the Balance Brought Forward type. Review the GoodCostatement as follows:
1. On the Customer Statement History (AR404600) form, select the GoodCo customer.
2. In the table, select the 2/28/2014 statement, and on the table toolbar, click Print Statement toview the statement.
In the first line of the statement, the Balance Forward line shows the amount due on 1/31/2014.Under the balance forward amount, the statement lists all documents that were not includedin the previous statement and were posted earlier than 2/28/2014. Write-offs, refunds, voidedpayments, and prepayments (if any) are also listed in Balance Brought Forward statements. TheAmount column shows the original amount of each document. In the statement footer, the totalopen balances are displayed with a breakdown by aging periods, in the same way as in OpenItem statements. Amount Due is the total customer debt on 2/28/2014.
The GoodCo statement shows $0 due on 2/28/2014. The balance forward is 0 on 1/31/2014.Within the period, one invoice was issued and fully paid (see the screenshot below).

| Part 3: Accounts Receivable | 236
Figure: The Balance Brought Forward statement
Related LinksPrint Statements (AR503500)Statement History Summary (AR404000)Statement History Details (AR404300)Customer Statement History (AR404600)

| Part 3: Accounts Receivable | 237
Additional InformationYou can use the following information for additional reading, but these concepts are outside of thescope of this course.
Recurring Invoices
You can automate the creation of recurring invoices by using schedules, as recurring batches weregenerated in the General Ledger module. For more information, see Recurring Invoices in the AcumaticaERP User Guide.
Bad Debts Write-Off
You can write off bad debts under the allowance method. For more information, see Write-OffTransactions in the Acumatica ERP User Guide.
Auto-Application of Payments
You can enable auto-application of payments in the system or run the process of payment auto-application to customer documents. For more information, see Rules of Payment Auto-Application in theAcumatica ERP User Guide.
Sending of Documents to Customers by Email
You can send documents and reports to customers by email. For more information, see ManagingMailings in the Acumatica ERP User Guide.
Card Payments
You can configure a payment method based on credit cards and accept card payments in the AccountsReceivable module. If a customer prefers to pay by credit card, you can initiate the card paymentmanually or process automatic collection of payments. For more information, see Card Payments in theUser Guide.
Contracts
You can configure customer contracts in the system and bill customers according to the contract terms.For more information, see Managing Contracts in the Acumatica ERP User Guide.
Calculation of Commissions to Be Paid to Salespersons
You can automate the calculation of commissions that can be paid to salespersons who work withcustomers. For more information, see Commission Configuring and Calculation in the Acumatica ERPUser Guide.
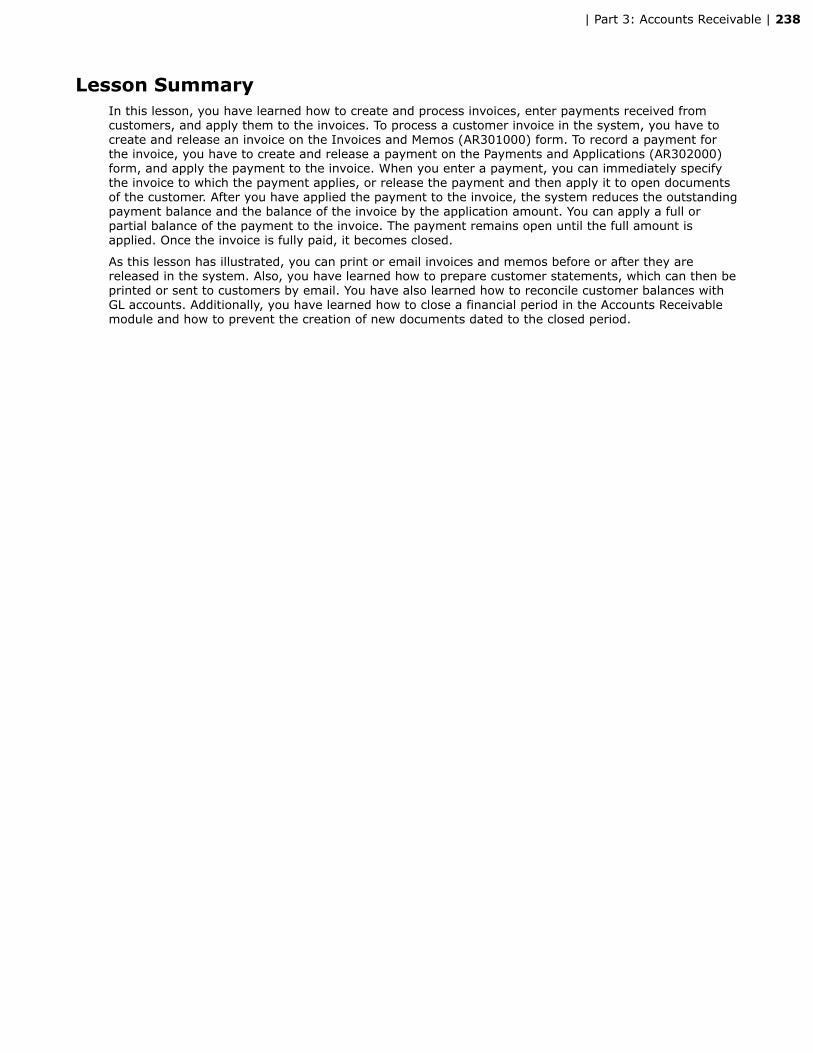
| Part 3: Accounts Receivable | 238
Lesson SummaryIn this lesson, you have learned how to create and process invoices, enter payments received fromcustomers, and apply them to the invoices. To process a customer invoice in the system, you have tocreate and release an invoice on the Invoices and Memos (AR301000) form. To record a payment forthe invoice, you have to create and release a payment on the Payments and Applications (AR302000)form, and apply the payment to the invoice. When you enter a payment, you can immediately specifythe invoice to which the payment applies, or release the payment and then apply it to open documentsof the customer. After you have applied the payment to the invoice, the system reduces the outstandingpayment balance and the balance of the invoice by the application amount. You can apply a full orpartial balance of the payment to the invoice. The payment remains open until the full amount isapplied. Once the invoice is fully paid, it becomes closed.
As this lesson has illustrated, you can print or email invoices and memos before or after they arereleased in the system. Also, you have learned how to prepare customer statements, which can then beprinted or sent to customers by email. You have also learned how to reconcile customer balances withGL accounts. Additionally, you have learned how to close a financial period in the Accounts Receivablemodule and how to prevent the creation of new documents dated to the closed period.

| Part 3: Accounts Receivable | 239
Lesson 12: Early Payments, Prepayments, and MemosIn this lesson, you will learn how to process early payments received from customers and how to givecustomers cash discounts for payments. In addition, you will learn how to process prepayments anddebit and credit memos in the system. After that, you will learn how to make a refund of an unusedprepayment to a customer. You will also learn how to review outstanding balances and customerdocuments.
Lesson Objectives
In this lesson, you will learn how to process the following documents in the Accounts Receivablemodule:
• Customer payments made in a cash discount period
• Customer prepayments
• Debit memos
• Credit memos
• Refunds to a customer

| Part 3: Accounts Receivable | 240
Step 12.1: Processing a Payment in a Cash Discount PeriodWhen you apply an early payment to an invoice, the system automatically calculates any cash discountamount that should be granted to the customer. The system also generates the appropriate batch torecord the cash discount that was given to GL accounts.
Suppose that on 3/4/2014, you received an early payment of $490 from EarlyCo for the 000004 invoice(which had an original amount of $500). In this step, you will enter the payment, apply the payment tothe invoice, and see how the cash discount is processed. Do the following:
1. On the Payments and Applications (AR302000; Finance > Accounts Receivable > Work Area >Enter) form, create a new document for the $490 EarlyCo payment with the following settings:
• Type: Payment
• Customer ID: C000000003 (EarlyCo)
• Payment Method: CHECK
• Cash Account: 102000 (Checking Account USD)
• Application Date: 3/4/2014
• Application Period: 03-2014
• Payment Ref.: 03042014E
• Description: Early payment 03-2014
• Payment Amount: 490.00
2. On the Documents to Apply tab, add a row and select the 000004 invoice in the row, to applythe early payment to the document and give the cash discount to the customer.
In the Cash Discount Taken box, the system displays the maximum cash discount you can giveto the customer according to the credit terms of the invoice. You can change the Cash DiscountTaken amount and the Amount Paid for the invoice. If you change the cash discount taken, theCash Discount Balance column will display the difference between the maximum cash discountamount and the specified amount. Leave the $485 amount paid and the maximum $15 cashdiscount given for the invoice (as shown in the following screenshot).
Figure: The invoice to which you applied the early payment with the cash discount given
3. Clear the Hold check box for the payment, and click Release on the form toolbar to release thepayment and its application to the invoice.
The applied invoice now appears on the Application History tab. Because you have releasedthe payment and the payment application at once, the system has generated one batch for bothtransactions.
4. To open the batch for review, in the Batch Number box on the Application History tab for theinvoice, click the batch number. This opens the Journal Transactions (GL301000) form with thebatch in a new window.
The batch contains the transactions generated on release of the payment and the paymentapplication to the invoice. (See the screenshot below.) In the batch, 102000 - Checking AccountUSD is debited for the payment amount of $490. The 110000 - Accounts Receivable account iscredited for the sum of the payment amount and the amount of the cash discount given to thecustomer: $490 + $15 = $505. The 595000 - Cash Discount Given account is debited for theexpense amount of $15. Close the window with the Journal Transactions (GL301000) form.
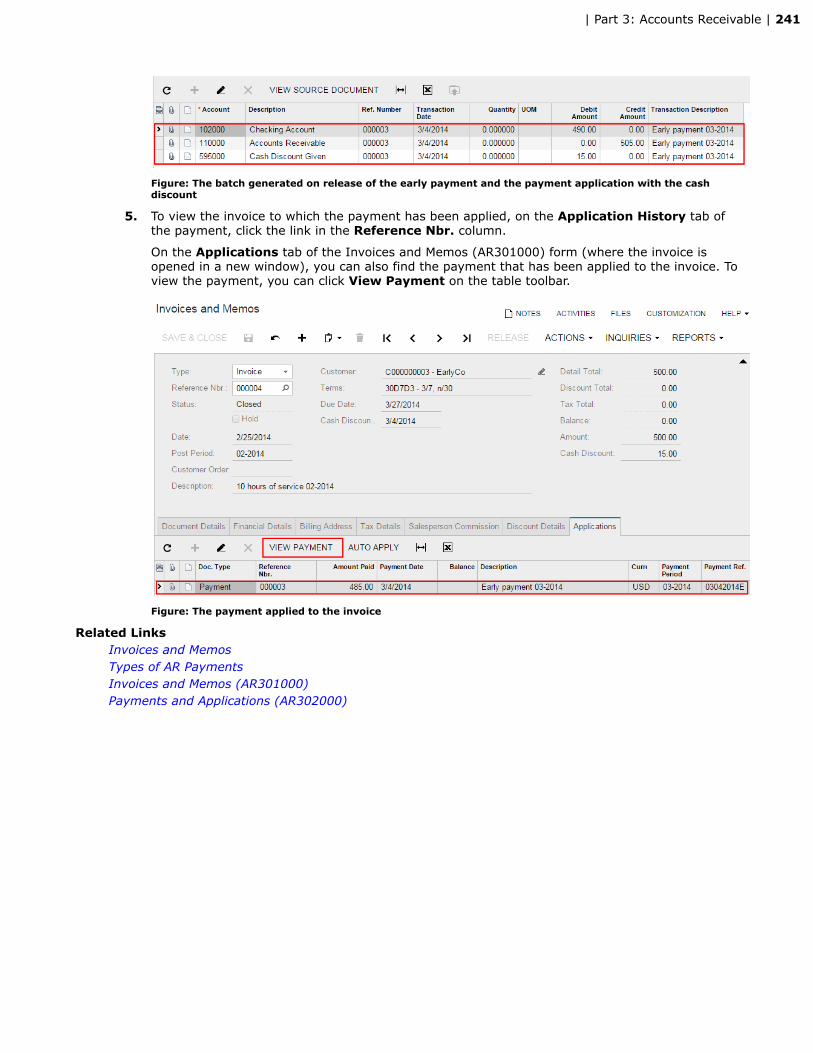
| Part 3: Accounts Receivable | 241
Figure: The batch generated on release of the early payment and the payment application with the cashdiscount
5. To view the invoice to which the payment has been applied, on the Application History tab ofthe payment, click the link in the Reference Nbr. column.
On the Applications tab of the Invoices and Memos (AR301000) form (where the invoice isopened in a new window), you can also find the payment that has been applied to the invoice. Toview the payment, you can click View Payment on the table toolbar.
Figure: The payment applied to the invoice
Related LinksInvoices and MemosTypes of AR PaymentsInvoices and Memos (AR301000)Payments and Applications (AR302000)

| Part 3: Accounts Receivable | 242
Step 12.2: Reviewing the Customer Balance and DocumentsAt any time, you can view a customer's balance and review its documents. The customer's balance isconstantly updated as you release invoices and customer payments in the system.
To review the balance summary of all customers, you can use the Customer Summary (AR401000)form. On the form, you can select a customer and click Customer Details, which brings up theCustomer Details (AR402000) form, where for the selected customer, you can view the detailed balanceand the list of customer documents. Also, you can view a customer's balance by selecting the customeron the Customers (AR303000) form.
In this step, you will review the balances and documents of customers. You will see how the earlypayment that you processed in the previous step of this lesson is reflected in EarlyCo documents. Youwill complete the following tasks, which are described in detail in the sections below:
1. Review the balance summary of customers on the Customer Summary (AR401000) form.
2. Review the documents of the EarlyCo customer by using the Customer Details (AR402000) form.
3. Find the balance of EarlyCo, which is displayed on the Customers (AR303000) form.
1. Review the Balance Summary of Customers
To view the balance summary of all customers, do the following:
1. Open the Customer Summary (AR401000; Finance > Accounts Receivable > Work Area >Explore) form.
Because the period is initially not specified, the table shows balances for the last activity period(the post period of each customer's most recent document in the system). The Ending Balancecolumn (see the following screenshot) shows the customer balance—that is, the total balanceof open documents of the customer at the end of the period, excluding prepayments. The TotalBalance box (also shown in the screenshot below) displays the sum of amounts in the EndingBalance column for all customers. Customers that have beginning and ending balances of zerofor the period don't appear in the list because the Customers with Balance Only check box isselected by default.
Figure: The customer summary for the last activity period
2. To view the balances of all customers, clear the Customers with Balance Only check box.
The GoodCo customer, which has a beginning and ending balance of zero for the 02-2014 period,now appears in the table. The ending balance of zero means that all customer invoices andmemos were closed during the period. The PTD Sales column (see the following screenshot)displays the period-to-date (PTD) amount of sales made to the customer within the period,which is the total amount of the invoices posted to the period. The total amount of paymentsreceived from the customer is displayed in the PTD Payments column (also shown in thefollowing screenshot), which is the total amount of payment documents posted to the period.Thus, you have delivered $300 worth of services to the GoodCo customer in 02-2014, andthe customer paid $300 for them in the same period. The period-to-date amounts of the cash
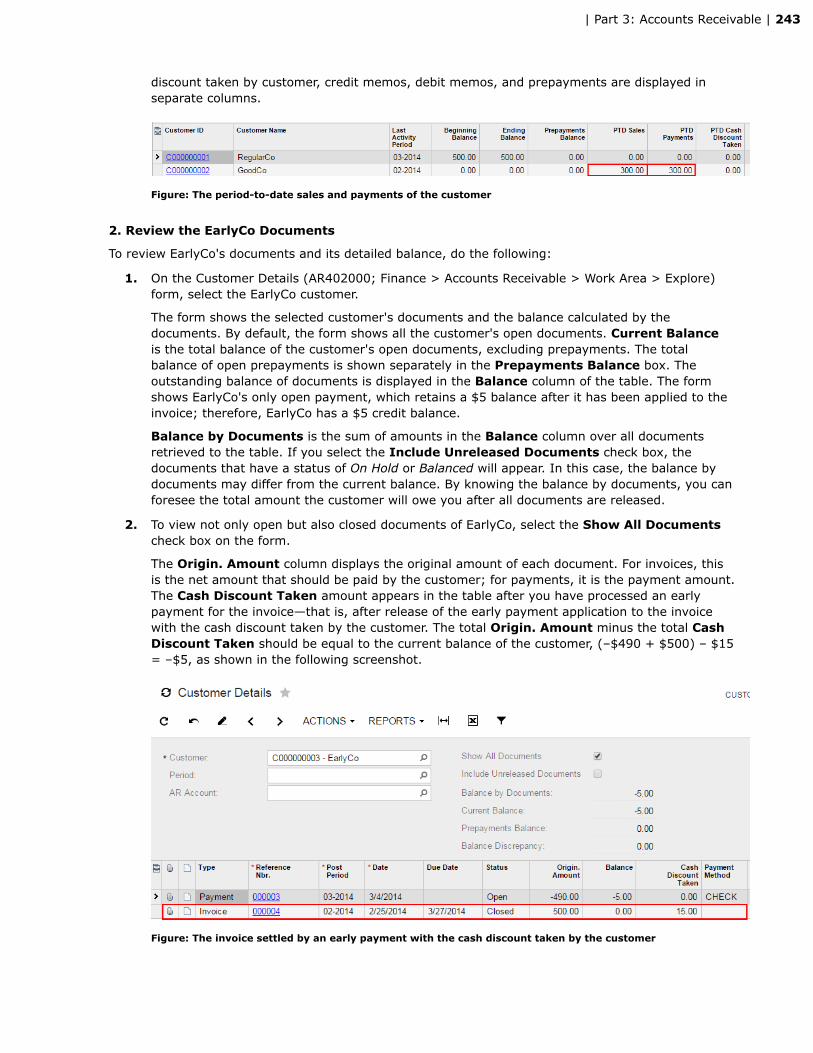
| Part 3: Accounts Receivable | 243
discount taken by customer, credit memos, debit memos, and prepayments are displayed inseparate columns.
Figure: The period-to-date sales and payments of the customer
2. Review the EarlyCo Documents
To review EarlyCo's documents and its detailed balance, do the following:
1. On the Customer Details (AR402000; Finance > Accounts Receivable > Work Area > Explore)form, select the EarlyCo customer.
The form shows the selected customer's documents and the balance calculated by thedocuments. By default, the form shows all the customer's open documents. Current Balanceis the total balance of the customer's open documents, excluding prepayments. The totalbalance of open prepayments is shown separately in the Prepayments Balance box. Theoutstanding balance of documents is displayed in the Balance column of the table. The formshows EarlyCo's only open payment, which retains a $5 balance after it has been applied to theinvoice; therefore, EarlyCo has a $5 credit balance.
Balance by Documents is the sum of amounts in the Balance column over all documentsretrieved to the table. If you select the Include Unreleased Documents check box, thedocuments that have a status of On Hold or Balanced will appear. In this case, the balance bydocuments may differ from the current balance. By knowing the balance by documents, you canforesee the total amount the customer will owe you after all documents are released.
2. To view not only open but also closed documents of EarlyCo, select the Show All Documentscheck box on the form.
The Origin. Amount column displays the original amount of each document. For invoices, thisis the net amount that should be paid by the customer; for payments, it is the payment amount.The Cash Discount Taken amount appears in the table after you have processed an earlypayment for the invoice—that is, after release of the early payment application to the invoicewith the cash discount taken by the customer. The total Origin. Amount minus the total CashDiscount Taken should be equal to the current balance of the customer, (–$490 + $500) – $15= –$5, as shown in the following screenshot.
Figure: The invoice settled by an early payment with the cash discount taken by the customer

| Part 3: Accounts Receivable | 244
3. Find the Balance of EarlyCo
You can quickly see the customer balance by using the Customers (AR303000) form. Select EarlyCoon the Customers (AR303000; Finance > Accounts Receivable > Work Area > Manage) form. TheBalance box shows the total of all open documents of the customer, including the prepayments (seethe screenshot below). Also, the total of open prepayments is shown in the Prepayments Balancebox.
Figure: The customer balance displayed on the Customers (AR303000) form
Related LinksCustomer Summary (AR401000)Customer Details (AR402000)Customers (AR303000)

| Part 3: Accounts Receivable | 245
Step 12.3: Processing a PrepaymentYou can enter and release a customer prepayment in the system and then apply the prepayment to thecustomer's open documents. The prepaid amount can be recorded to a separate prepayment account ifsuch an account is specified in the customer account.
In this step, you will enter a prepayment received from GoodCo and apply the prepayment to a newGoodCo invoice. After that, you will see how the prepayment is reflected on the customer balance.Complete the following tasks, which are described in detail in the sections below:
1. Enter and release the $100 prepayment from GoodCo.
2. Create and release a GoodCo invoice in the amount of $50.
3. Apply the prepayment to the full amount of the invoice and review the customer balance.
1. Enter the GoodCo Prepayment
Enter and release the $100 GoodCo prepayment received on 3/1/2014, as described below:
1. On the Payments and Applications (AR302000; Finance > Accounts Receivable > Work Area >Enter) form, create a new document for the $100 prepayment from GoodCo with the followingsettings:
• Type: Prepayment
• Customer ID: C000000002 (GoodCo)
• Payment Method: CHECK
• Cash Account: 102000 (Checking Account USD)
• Application Date: 3/1/2014
• Application Period: 03-2014
• Payment Ref.: 03012014G
• Description: $100 prepayment 03-2014
• Payment Amount: 100.00
• Hold: Cleared (to give the document the Balanced status, so it is ready for release)
Earlier you created the 244000 - Customer Deposits liability GL account to record customerprepayments to this account. (This account was inserted from the customer class when youcreated the customer record. See the following screenshot.) When you create a prepayment,the system inserts the customer's prepayment account into the document, and the account isdisplayed in the AR Account box on the Financial Details tab (also shown in the followingscreenshot). The AR Account of the prepayment is the account that is credited for the prepaidamount on release of the prepayment. If no prepayment account is specified for the customer,the customer's AR Account is inserted into the prepayment and this account is credited for theprepaid amount.
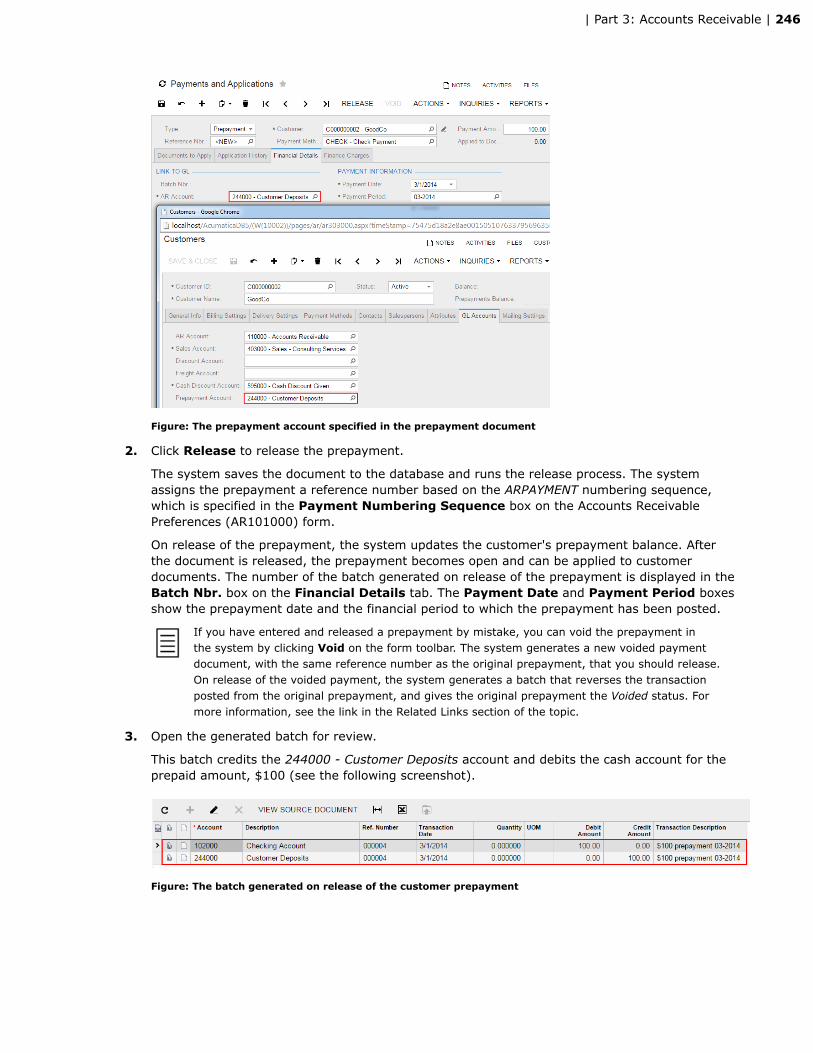
| Part 3: Accounts Receivable | 246
Figure: The prepayment account specified in the prepayment document
2. Click Release to release the prepayment.
The system saves the document to the database and runs the release process. The systemassigns the prepayment a reference number based on the ARPAYMENT numbering sequence,which is specified in the Payment Numbering Sequence box on the Accounts ReceivablePreferences (AR101000) form.
On release of the prepayment, the system updates the customer's prepayment balance. Afterthe document is released, the prepayment becomes open and can be applied to customerdocuments. The number of the batch generated on release of the prepayment is displayed in theBatch Nbr. box on the Financial Details tab. The Payment Date and Payment Period boxesshow the prepayment date and the financial period to which the prepayment has been posted.
If you have entered and released a prepayment by mistake, you can void the prepayment inthe system by clicking Void on the form toolbar. The system generates a new voided paymentdocument, with the same reference number as the original prepayment, that you should release.On release of the voided payment, the system generates a batch that reverses the transactionposted from the original prepayment, and gives the original prepayment the Voided status. Formore information, see the link in the Related Links section of the topic.
3. Open the generated batch for review.
This batch credits the 244000 - Customer Deposits account and debits the cash account for theprepaid amount, $100 (see the following screenshot).
Figure: The batch generated on release of the customer prepayment

| Part 3: Accounts Receivable | 247
2. Create the GoodCo Invoice
You will now create and release the $50 GoodCo invoice, for one hour of service delivered on 3/15/2014with the net 30 days credit terms, as described below:
1. On the Invoices and Memos (AR301000; Finance > Accounts Receivable > Work Area > Enter)form, create and save an invoice with the following settings:
• Type: Invoice
• Customer: C000000002 (GoodCo)
• Date: 3/15/2014
• Post Period: 03-2014
• Description: 1 hour of service 03-2014
• Amount: 50.00
• Document Details tab, Inventory ID: SERVICE, Quantity: 1.0
• Hold: Cleared
2. Release the invoice.
After you have released the invoice, the GoodCo balance becomes –$50 (–c $100 + $50). To
view the customer balance, you can click Edit ( ) in the Customer ID box, which brings upthe Customers (AR303000) form with GoodCo selected.
3. Apply the Prepayment to the Invoice
You will now apply the prepayment to the invoice and review the customer balance by doing thefollowing:
1. On the Payments and Applications (AR302000) form, select the GoodCo prepayment.
2. Apply the prepayment to the $50 invoice as follows:
a. Select 3/15/2014 in the Application Date box and 03-2014 in the Application Periodbox.
These are the date of the application of the prepayment to the invoice and the period towhich the application will be posted.
In the Payment Date and Payment Period boxes on the Financial Details tab, you cansee the date and the period to which the prepayment itself was posted.
b. On the Documents to Apply tab, add a row, select the 000005 invoice in the ReferenceNbr. column, and leave 50.00 as the Amount Paid to apply the full amount of thedocument.
c. On the form toolbar, click Release to release the prepayment application to the invoice.
The invoice to which the prepayment has been applied is listed on the ApplicationHistory tab. The invoice is closed because the full amount has been paid. In the BatchNumber column for the invoice, you can see the number of the batch that has beengenerated on release of the prepayment application.
If you have applied the prepayment to an invoice or debit memo by mistake, you canreverse the incorrect application and reapply the prepayment to the needed document. Toreverse the application, select the wrong invoice or memo on the Application History taband click Reverse Application on the table toolbar. The system generates the reversingentry, which appears on the Documents to Apply tab and should be released.

| Part 3: Accounts Receivable | 248
Then you can select the right invoice or memo on the Documents to Apply tab andrelease the application.
d. Open the generated batch for review.
In the batch, the 244000 - Customer Deposits account has been debited for the appliedamount, while the 110000 - Accounts Receivable account has been credited for the sameamount (see the following screenshot).
Figure: The batch generated on release of the prepayment application to the invoice
3. On the Customer Details (AR402000; Finance > Accounts Receivable > Work Area > Explore)form, select the GoodCo customer to review its balance.
The Prepayments Balance box displays the total balance of open prepayments, which is –$50(as shown in the following screenshot). You still can apply the open prepayment to customerdocuments up to the amount of $50. The Balance by Documents box shows the total amountin the Balance column of the table. Because there are no open documents other than theprepayment, the Current Balance of GoodCo is $0.
Figure: The prepayment balance of the customer
4. Review the customer balances by GL accounts by running the AR Balance by GL Account(AR632000) report with the following parameters:
• Report Format: Open Documents
• Financial Period: 03-2014
• Include Applications: Cleared
The report shows the amounts posted to AR and prepayment accounts from Accounts Receivabledocuments. In the report, you can see the $100 GoodCo prepayment that has been posted tothe 244000 - Customer Deposits GL account and applied to documents; the prepayment balanceis now –$50 (as shown in the screenshot below).

| Part 3: Accounts Receivable | 249
Figure: The prepayment amount on the GL account
Related LinksTypes of AR PaymentsPayments and Applications (AR302000)Customer Details (AR402000)AR Balance by GL Account (AR632000)To Void a Customer Payment or Prepayment

| Part 3: Accounts Receivable | 250
Step 12.4: Processing a Debit MemoYou can issue a debit memo to a customer, which is processed in the same way as an invoice is. Thedebit memo increases the customer debt in the system and should be paid as a separate document.
Suppose that on 3/1/2014, you issue the $70 debit memo for RegularCo. On 3/20/2014, you receivethe payment for the 000003 invoice in the amount of $500, and RegularCo also pays for the debitmemo in the amount of $70. In this step, you will create the debit memo and apply the payment to theinvoice, along with the debit memo. Complete the following tasks, which are described in detail in thesections below:
1. Create and release the $70 RegularCo debit memo on the Invoices and Memos (AR301000)form.
2. Enter the $570 RegularCo payment and apply it to the 000003 invoice and the debit memo byusing the Payments and Applications (AR302000) form.
1. Create the Debit Memo
You will first create and release the $70 debit memo, which is issued to RegularCo on 3/1/2014 with thenet 30 days credit terms, as described below:
1. On the Invoices and Memos (AR301000; Finance > Accounts Receivable > Work Area > Enter)form, create a new document and specify the following settings:
• Type: Debit Memo
• Customer: C000000001 (RegularCo)
• Date: 3/1/2014
• Post Period: 03-2014
• Description: Additional charges
• Amount: 70.00
• Document Details tab, Ext. Price: 70.00 (the default sales account of the customer,403000 - Sales - Consulting Services, is automatically inserted into the row you added)
2. Clear the Hold check box, and click Release to release the debit memo.
The system saves and releases the debit memo. The system assigns the debit memo a referencenumber based on the ARINVOICE numbering sequence, which is specified in the Debit MemoNumbering Sequence box on the Accounts Receivable Preferences (AR101000) form.
After the document is released, the debit memo becomes open; you can apply a payment toit. On release of the debit memo, the system updates the current balance of the customer andgenerates a batch. The number of the batch generated on release of the debit memo is displayedin the Batch Nbr. box on the Financial Details tab.
If you have created and released a debit memo by mistake, you can reverse the memo in thesystem. To reverse the debit memo, select it on the Invoices and Memos (AR301000) form andselect Actions > Reverse on the form toolbar. The system creates a credit memo in the fullamount of the debit memo being reversed; you have to release the credit memo and apply it to thedebit memo to close both documents. An example of credit memo processing is described in thenext step of the lesson.
3. Click the batch number to open for review the Journal Transactions (GL301000) form, showingthe batch generated by the system.
This batch debits the AR account and credits the sales account for the amount of the document(see the screenshot below).

| Part 3: Accounts Receivable | 251
Figure: The batch generated on release of the debit memo
4. Open the Customer Details (AR402000) form, and select the RegularCo customer in theCustomer box. Notice that the debit memo has increased the RegularCo customer balance to$570 (as shown in the screenshot below).
Figure: The debit memo of the customer
2. Apply the Payment to the Debit Memo
Now you will enter the $570 payment received from RegularCo on 3/20/2014 for the invoice and debitmemo. Perform the following instructions:
1. On the Invoices and Memos (AR301000) form, select the debit memo you have created, andthen select Actions > Enter Payment/Apply Memo on the form toolbar.
The Payments and Applications (AR302000) form opens so you can create a new payment. Thecustomer ID and the default payment information have been automatically inserted into thepayment from the debit memo. A row with the debit memo has been automatically added to theDocuments to Apply tab, as the screenshot below illustrates.
2. Select 3/20/2014 in the Application Date box, make sure 03-2014 is selected in theApplication Period box, and enter 03202014R in the Payment Ref. box.
3. In the Description box, type Payment for inv. 000003 and d.m. 000006.
4. In the Payment Amount box, enter 570.00.
5. On the Documents to Apply tab, add another row to the table with the 000003 invoice, andleave the suggested 500.00 in the Amount Paid column for the invoice. (See the followingscreenshot.)
6. Clear the Hold check box to make the payment ready for release.

| Part 3: Accounts Receivable | 252
Figure: The payment to be applied to the invoice and the debit memo
7. Release the payment and the payment application to the documents by clicking Release.
After release, the invoice and debit memo appear on the Application History tab. The systemdecreases the balance of the debit memo by the amount paid for the document. Because the fullamount of the debit memo has been applied, the document is closed.
8. On the Customer Details (AR402000) form, select RegularCo and select the Show AllDocuments check box.
All documents of RegularCo have been closed, and the current balance of the customer is $0. Toview the payment that has been applied to the debit memo, click the link in the Reference Nbr.column of the debit memo in the table. The system brings up the debit memo on the Invoicesand Memos (AR301000) form, and you can see the payment on the Applications tab of theform, as the following screenshot shows.
Figure: The payment applied to the debit memo
You can also review the document applications by using the AR Balance by Customer (AR632500)and AR Balance by GL Account (AR632500) reports.
Related Links

| Part 3: Accounts Receivable | 253
Invoices and MemosInvoices and Memos (AR301000)Payments and Applications (AR302000)Customer Details (AR402000)

| Part 3: Accounts Receivable | 254
Step 12.5: Processing a Credit MemoYou can issue a credit memo to a customer, which decreases the customer's debt in the system. Thecredit memo can be applied to an invoice or a debit memo to reduce the balance of the document.
Suppose that on 3/1/2014, you issue the $80 credit memo for LateCo. In this step, you will create thecredit memo and apply it to the invoice. Complete the following tasks, which are described in detail inthe sections below:
1. Create and release the $80 LateCo credit memo by using the Invoices and Memos (AR301000)form.
2. Apply the $80 credit memo to the 000002 invoice by using the Payments and Applications(AR302000) form.
1. Create the Credit Memo
To create and release the $80 credit memo issued to LateCo on 3/1/2014, perform the followinginstructions:
1. On the Invoices and Memos (AR301000; Finance > Accounts Receivable > Work Area > Enter)form, create a new document with the following settings:
• Type: Credit Memo
• Customer: C000000004 (LateCo)
• Date: 3/1/2014
• Post Period: 03-2014
• Description: Service undelivered by invoice 000002
• Amount: 80.00
• Hold: Cleared
• Document Details tab, Ext. Price: 80.00
2. Click Release to release the credit memo.
The system saves and releases the credit memo. The system gives the credit memo a referencenumber based on the ARINVOICE numbering sequence, which is specified in the Credit MemoNumbering Sequence box on the Accounts Receivable Preferences (AR101000) form.
After the document is released, the credit memo becomes open; you can apply the credit memoto an invoice or debit memo. On release of the credit memo, the system updates the currentbalance of the customer and generates a batch.
If you have created and released a credit memo by mistake, you can reverse the memo in thesystem. To reverse the credit memo, select it on the Invoices and Memos (AR301000) form andselect Actions > Reverse on the form toolbar. The system creates a debit memo in the full amountof the credit memo being reversed; you have to release the debit memo and apply it to the creditmemo to close both documents.
3. To review the generated batch on the Journal Transactions (GL301000) form, click the batchnumber in the Batch Nbr. box on the Financial Details tab.
This batch credits the AR account and debits the sales account for the amount of the document,as the following screenshot shows.
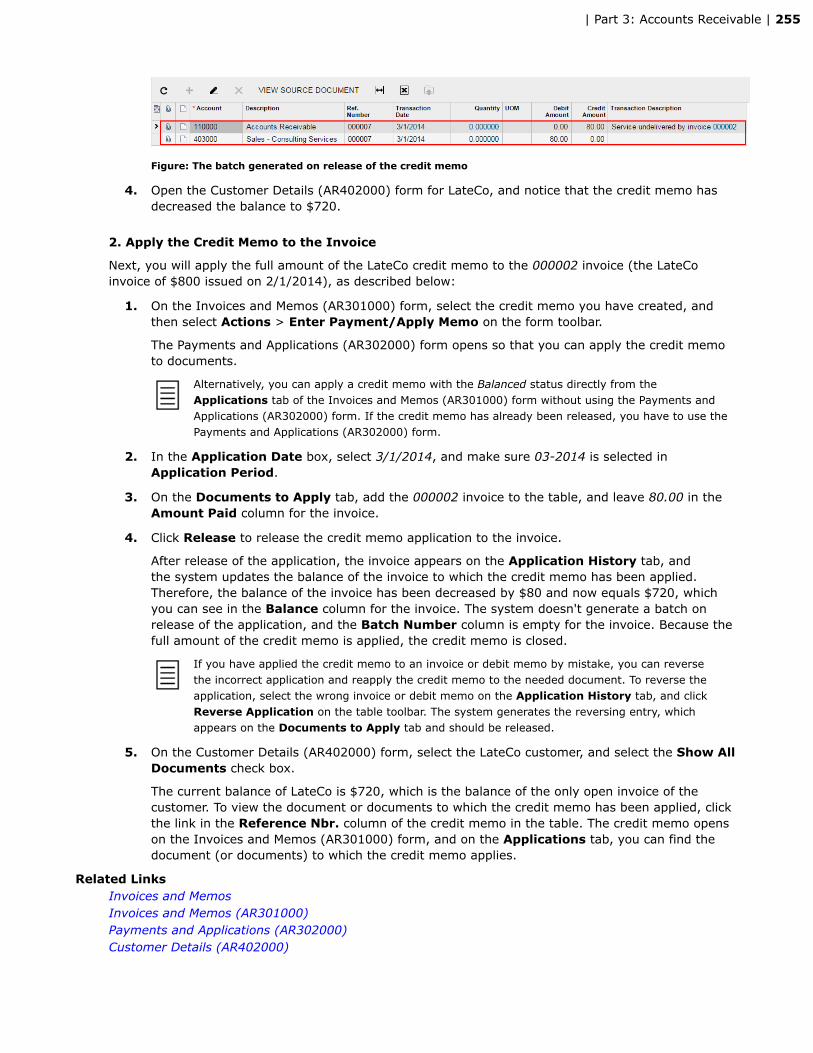
| Part 3: Accounts Receivable | 255
Figure: The batch generated on release of the credit memo
4. Open the Customer Details (AR402000) form for LateCo, and notice that the credit memo hasdecreased the balance to $720.
2. Apply the Credit Memo to the Invoice
Next, you will apply the full amount of the LateCo credit memo to the 000002 invoice (the LateCoinvoice of $800 issued on 2/1/2014), as described below:
1. On the Invoices and Memos (AR301000) form, select the credit memo you have created, andthen select Actions > Enter Payment/Apply Memo on the form toolbar.
The Payments and Applications (AR302000) form opens so that you can apply the credit memoto documents.
Alternatively, you can apply a credit memo with the Balanced status directly from theApplications tab of the Invoices and Memos (AR301000) form without using the Payments andApplications (AR302000) form. If the credit memo has already been released, you have to use thePayments and Applications (AR302000) form.
2. In the Application Date box, select 3/1/2014, and make sure 03-2014 is selected inApplication Period.
3. On the Documents to Apply tab, add the 000002 invoice to the table, and leave 80.00 in theAmount Paid column for the invoice.
4. Click Release to release the credit memo application to the invoice.
After release of the application, the invoice appears on the Application History tab, andthe system updates the balance of the invoice to which the credit memo has been applied.Therefore, the balance of the invoice has been decreased by $80 and now equals $720, whichyou can see in the Balance column for the invoice. The system doesn't generate a batch onrelease of the application, and the Batch Number column is empty for the invoice. Because thefull amount of the credit memo is applied, the credit memo is closed.
If you have applied the credit memo to an invoice or debit memo by mistake, you can reversethe incorrect application and reapply the credit memo to the needed document. To reverse theapplication, select the wrong invoice or debit memo on the Application History tab, and clickReverse Application on the table toolbar. The system generates the reversing entry, whichappears on the Documents to Apply tab and should be released.
5. On the Customer Details (AR402000) form, select the LateCo customer, and select the Show AllDocuments check box.
The current balance of LateCo is $720, which is the balance of the only open invoice of thecustomer. To view the document or documents to which the credit memo has been applied, clickthe link in the Reference Nbr. column of the credit memo in the table. The credit memo openson the Invoices and Memos (AR301000) form, and on the Applications tab, you can find thedocument (or documents) to which the credit memo applies.
Related LinksInvoices and MemosInvoices and Memos (AR301000)Payments and Applications (AR302000)Customer Details (AR402000)

| Part 3: Accounts Receivable | 256
Step 12.6: Processing a Refund to the CustomerYou can make a refund to the customer for returned goods, for an overpaid amount, and for an unusedamount of a prepayment. To process a refund in the system, you must have defined in the system theopen document you are making the refund for, which can be a credit memo, payment, or prepayment.On the Payments and Applications (AR302000) form, you create the customer refund document andapply it to the document for which you are making the refund.
In this step, you will make a refund of a $50 unused prepayment to GoodCo on 3/31/2014. The GoodCoprepayment is open and has a $50 balance on 3/31/2014. Complete the following instructions:
1. On the Payments and Applications (AR302000; Finance > Accounts Receivable > Work Area >Enter) form, create a new document with the following settings:
• Type: Customer Refund
• Customer ID: C000000002 (GoodCo)
• Payment Method: CHECK
• Application Date: 3/31/2014
• Application Period: 03-2014
• Payment Ref.: 03312014G
• Description: Refund for unused prepayment
• Payment Amount: 50.00
• Documents to Apply tab, Document Type: Prepayment, Reference Nbr.: 000004,Amount Paid: 50.00
Notice that the default cash account for the CHECK payment method hasn't yet been insertedinto the refund.
2. In the Cash Account box, select 102000 - Checking Account USD.
For customer refund documents, you can specify the default cash account for the paymentmethod by selecting the AR Default for Refund check box for a cash account on the PaymentMethods (CA204000; Finance > Cash Management > Configuration > Setup) form. For example,you can select this check box for 102000 - Checking Account USD to make this account used bydefault in customer refund documents with the CHECK payment method.
Figure: The AR Default for Refund check box
3. On the Payments and Applications (AR302000) form, clear the Hold check box and clickRelease to release the customer refund document.
The system saves and releases the customer refund. The system assigns the customer refunda reference number based on the ARPAYMENT numbering sequence, which is specified in thePayment Numbering Sequence box on the Accounts Receivable Preferences (AR101000)form.

| Part 3: Accounts Receivable | 257
On release of the refund for the prepayment, the system decreases the prepayment balanceof the customer and generates the batch to credit the cash account and debit the prepaymentaccount. After release, the customer refund document becomes closed. The prepayment towhich the customer refund has been applied is listed on the Application History tab.
When you make a refund, the account to be debited for the amount of the refund is always takenfrom the document that you have selected on the Documents to Apply tab to make the refundfor. When you make a refund for a payment or credit memo, on release of the refund, the systemdecreases the current balance of the customer; it also generates the batch to credit the cashaccount and debit the AR account of the document.
4. On the Financial Details tab, click the number of the generated batch to open the batch forreview on the Journal Transactions (GL301000) form.
In the batch, the 102000 - Checking Account is credited for the refund amount of $50, andthe 244000 - Customer Deposits account is debited for this amount, as shown in the followingscreenshot.
Figure: The batch generated on release of the customer refund document
5. On the Customer Details (AR402000) form, select the GoodCo customer, and select the ShowAll Documents check box.
The prepayment balance of GoodCo is $0, and the customer has no open documents. To viewthe document to which the refund has been applied, click the link in the Reference Nbr. box ofthe customer refund document in the table. The customer refund opens on the Payments andApplications (AR301000) form, and on the Application History tab, you can find the documentto which the refund applies.
Related LinksTypes of AR PaymentsPayments and Applications (AR302000)Customer Details (AR402000)
| Part 3: Accounts Receivable | 258
Additional InformationYou can use these paragraphs for additional reading, but these concepts are outside of the scope of thiscourse.
Cash Sales
You can enter cash sale documents, which are invoices that are immediately paid at the moment oftheir creation. For more information, see Invoices and Memos in the Acumatica ERP User Guide.

| Part 3: Accounts Receivable | 259
Lesson SummaryIn this lesson, you have learned how to process early payments and cash discounts given to customers.When you apply a payment to the invoice within a cash discount period, the system automaticallycalculates the cash discount amount to be given to the customer. You have also learned how to review acustomer's balance and the customer's documents on the Customer Details (AR402000) form.
Also, you have learned how to enter and process prepayments. You enter a prepayment on thePayments and Applications (AR302000) form. After you have released it, you can apply the prepaymentto the needed invoice. If the prepayment was applied partially, you can refund the unused amount ofthe prepayment to the customer.
The lesson also explains how to process debit and credit memos for a customer. You create debit andcredit memos on the Invoices and Memos (AR301000) form. After you have released a debit memo,you can apply a payment to it. A credit memo can be applied to an open invoice or a debit memo.

| Part 3: Accounts Receivable | 260
Lesson 13: Credit Verification and Overdue ChargesIn this lesson, you will learn how to use automatic credit verification of customer accounts and how togenerate overdue charge documents in the system.
Lesson Objectives
In this lesson, you will learn the following operations in the Accounts Receivable module:
• How to configure and use automatic credit verification of customer accounts
• How to generate and print dunning letters
• How to review outstanding balances by aging periods
• How to configure overdue charges
• How to calculate overdue charges and show them in the customer statements

| Part 3: Accounts Receivable | 261
Step 13.1: Analyzing the Customer's Credit Status andPreparing Dunning Letters
In this step, you will see how automatic credit verification of a customer account is performed in thesystem. Also, for a customer who hasn't paid for a long time, you will configure and prepare dunningletters, which are used to remind the customer about the debt. After you send a series of dunningletters, you will put the customer account on credit hold, which means that users cannot create newinvoices or debit memos for the customer. Then you will release the customer account from credit hold,so that you can again create documents for the customer. Thus, you will perform the following tasks,which are described in detail in the following sections:
1. Analyze the result of automatic credit verification for the LateCo customer.
2. Prepare two dunning letters for LateCo.
3. Manage the credit status of the LateCo customer.
1. Analyze the Result of the Credit Verification
Based on the credit verification rules specified for the customer account, the system checks thecustomer's credit every time you attempt to create a new document for the customer. If the customerfails the credit check, the system shows a warning notifying you about the unreliable debtor. To analyzethe credit verification rules and the result of the credit verification of LateCo, perform the followinginstructions:
1. Navigate to the Customers (AR303000; Finance > Accounts Receivable > Work Area > Manage)form and select LateCo so that you can check its settings (in the Credit Verification Rulessection on the General Info tab).
In the Credit Verification box, you have specified the Credit Limit rule, and in the Credit Limitbox, you have set the limit to $1000. Credit Limit means that the maximum total balance ofopen documents of the customer in the system should not exceed the credit limit ($1000). TheRemaining Credit Limit box shows the difference between the limit and the customer balancedisplayed on the form, which in this case is $1000 – $720 = $280 (see the screenshot below).
In a customer class, you can also specify an Over-Limit Amount for the group of customers towhich the customer class is assigned. If you do, the amount of open documents of the customercannot exceed the sum of the Credit Limit and the Over-Limit Amount. The DEFAULT class weuse in this course has an over-limit amount of $0.

| Part 3: Accounts Receivable | 262
Figure: The remaining credit limit and the credit verification rules
Instead of the Credit Limit rule of credit verification, you can use the Days Past Due rule, for whichyou specify the maximum number of days past due (Credit Days Past Due) of any customerdocument before the customer fails the credit check in the system. The number of days past dueis calculated based on the current business date of the user session. You can also apply both rulesby using the Limit and Days Past Due rule: If either condition is violated, the customer account failsthe credit check in the system and a warning message appears. The Disabled rule means that creditverification is not used for the customer account. In the settings specified for this course, creditverification is disabled for all customer accounts except LateCo.
2. On the Invoices and Memos (AR301000) form, create a $300 invoice for LateCo, dated3/15/2014, with the On Hold status, and try to clear the Hold check box.
The warning message (shown in the following screenshot) appears because the customer failedthe credit check on this invoice. The $300 invoice amount is greater than the $280 remainingcredit limit of the customer. You cannot set the Balanced status for this invoice (or any invoice,debit memo, or overdue charge with an amount greater than $280) and you cannot release thisdocument because the Hold Document on Failed Credit Check check box is selected on theAccounts Receivable Preferences (AR101000) form. (If the check box was cleared, you couldrelease any document of the customer despite the warning.)

| Part 3: Accounts Receivable | 263
Figure: A failed credit check because the invoice amount exceeds the customer's remaining credit limit
The credit verification rules specified for the customer account are also used for the automaticcredit check of the customer when you create a sales order in the Sales Orders module of theDistribution suite. (The functionality of the Distribution suite is outside of the scope of this course.)
3. Save the invoice with the On Hold status.
2. Prepare the Dunning Letters
Because the LateCo customer hasn't settled the 000002 invoice on time (the $800 invoice issuedon 2/1/2014), you will send it a dunning letter to remind customer personnel about the outstandingdocument. To send a series of dunning letters to a customer, you have to configure the time intervals ofdunning letters and prepare the letters; then you can schedule the automatic preparation and sendingof dunning letters to customers whose overdue documents match a dunning letter level. (The actualscheduling of dunning letters is outside of the scope of this course.) Do the following:
1. Configure the time intervals for generating dunning letters as described below:
a. On the Accounts Receivable Preferences (AR101000) form, on the Dunning Settingstab, add the two levels of dunning letters by specifying the following settings, and saveyour changes:
• Dunning Letter Level: 1, Days Past Due: 10, Days to Settle: 3, Description:First
• Dunning Letter Level: 2, Days Past Due: 20, Days to Settle: 3, Description:Last
Dunning letter levels specify the time intervals after which you can prepare each dunningletter for a customer. You can configure as many levels of dunning letters as you need.Dunning letters are prepared successively: You cannot prepare a dunning letter of thenext level until you have prepared the dunning letter of previous level. You also cannotprepare the next-level dunning letter for the customer until an outstanding document thatmatches the next level appears.

| Part 3: Accounts Receivable | 264
For each dunning letter, the time interval is specified in the Days Past Due box. Inthis case, you can prepare a dunning letter of level 1 for a customer if at least oneoutstanding document (invoice, debit memo, or overdue charge) is more than 10 dayspast due on the date of preparation, and if the dunning letter of level 1 (or a higher level)hasn't already been prepared for the customer. You can prepare a dunning letter of level2 if at least one outstanding document is more than 20 days past due on the date ofpreparation, and the dunning letter of level 1 has already been prepared, and the dunningletter of level 2 hasn't been prepared yet.
b. Prepare and review the first dunning letter for LateCo as follows:
a. On the Prepare Dunning Letters (AR521000; Finance > Accounts Receivable >Processes > Statement Cycle) form, select 3/14/2014 in the Dunning LetterDate box.
The LateCo customer appears in the table because an overdue invoice matchesthe level 1 settings and because no dunning letters have already been preparedfor the customer. The earliest due date among the customer's outstandingdocuments (3/3/2014, which is the due date of the 000002 invoice) is displayedin the Earliest Due Date column. The invoice is 11 days past due on 3/14/2014,which is more than the 10 days past due specified for level 1 of dunning letters.Therefore, in the Dunning Letter Level column, you can see the level of thedunning letter to be generated, which is 1.
b. Select the check box (in the unlabeled column) that precedes the LateCo row inthe table, and click Process to generate the dunning letter for LateCo.
c. After the process is complete, on the Print Dunning Letters (AR522000; Finance >Accounts Receivable > Processes > Statement Cycle) form, select Print DunningLetter in the Action box, and select 3/14/2014 as the Start Date and 3/14/2014as the End Date.
By using this form, you can preview and print out the generated dunning letters, aswell as email them to customers if the email accounts are configured in the system.By default, when you select Print Dunning Letter in the Action box, for the timeinterval between Start Date and End Date, the system shows the dunning lettersthat haven't yet been printed. To view all generated letters for the interval, selectthe Show All check box.
d. Select the check box that precedes the LateCo row in the table, and click Processto view a printable preview of the dunning letter.
The system displays the preview of the dunning letter, which you can then print.
The dunning letter lists all of the customer's outstanding documents. The TotalDue amount, which is displayed in the letter's footer in the base currency, is thetotal balance of the listed documents (see the screenshot below). The balance ofeach document in the currency of the document is displayed in the Outstandingcolumn and in the base currency in the Outstanding USD column. The documentswith a due date (displayed in the Falling due column) earlier than the dunningletter date are overdue. The Overdue Amount, which is also displayed in theletter's footer in the base currency, is the total balance of the overdue documents.(For documents that aren't overdue, Current is displayed in the Falling duecolumn of the letter.) Open payments, prepayments, and credit memos aren'tlisted in the letter, and their balances aren't counted in the total balances shownin the letter. Therefore, you have to apply all open payments and credit memos tooverdue documents before you prepare the dunning letters.
The letter in the screenshot shows the overdue 000002 invoice and asks thecustomer to settle the document by 3/17/2014, which is the dunning letter date

| Part 3: Accounts Receivable | 265
of 3/14/2014 plus 3 days; the 3 days to settle is specified for level 1 of dunningletters on the Accounts Receivable Preferences (AR101000) form.
Figure: The overdue invoice and the total amount overdue in the dunning letter
You can modify the text and the layout of a dunning letter by customizing theDunning Letter (AR661000; Finance > Accounts Receivable > Reports > Forms)report.
c. To prepare the second dunning letter (which is the last one) for LateCo, on the PrepareDunning Letters (AR521000) form, select the 3/24/2014 dunning letter date. To view thedunning letter, use the Print Dunning Letters (AR522000) form.
You can prepare the next dunning letter for LateCo no sooner than 3/24/2014. On thisday, the 000002 invoice becomes 21 days past due, thus qualifying for the seconddunning letter level.
3. Manage the Customer's Credit Status
On a regular basis, you can view a list of the customers that haven't paid for a long time and haveignored the dunning letters. You can put these customers on credit hold in the system. If a customeraccount is on credit hold, users cannot create invoices, debit memos, and overdue charges for thecustomer. To manage the status of the LateCo customer, do the following:
1. On the Manage Credit Holds (AR523000; Finance > Accounts Receivable > Processes >Recurring) form, select Apply Credit Hold as the Action, 3/1/2014 as the Start Date, and
| Part 3: Accounts Receivable | 266
3/31/2014 as the End Date. With these settings, the system displays the customers that havean overdue balance on 3/31/2014 and to which the last-level dunning letter has been sent inMarch.
When you select the Apply Credit Hold action, for the specified date, by default the form showscustomers with the Active status that have an overdue balance and for which the last-leveldunning letter has been prepared. The other customers don't show up on the form. Therefore,the active LateCo customer appears in the table because it had a $720 overdue balance on3/31/2014, and the last-level dunning letter has been prepared for LateCo on 3/24/2014.
To view the customers regardless of their status, you can select the Show All check box.
2. Select the check box that precedes the LateCo customer in the row, and click Process to put thecustomer account on credit hold.
Because you'd selected the Apply Credit Hold action, the system assigns the Credit Hold statusto the customer selected on the form.
3. After the process is complete, navigate to the Customers (AR303000) form and select theLateCo customer.
Now the customer account has Credit Hold displayed in the Status box. Because of this status,users cannot create new invoices and debit memos for this customer. On the Invoices andMemos (AR301000) form, the customer account doesn't appear in the lookup table of theCustomer box.
To release the customer from credit hold, you can manually change the status on the Customers(AR303000) form or process the customer account by using the Release Credit Hold action onthe Manage Credit Holds (AR523000) form.
The credit verification that executes automatically every time you create or edit a customerdocument (described earlier in this topic) doesn't affect the customer status in any way. Therefore,based on the results of the credit verification, the system doesn't assign the Credit Hold status tothe customer if it fails the credit check, and the system doesn't release the customer from credithold by restoring the Active status once the customer pays the debt. You can set the Credit Holdor Active status only by processing the customer account on the Manage Credit Holds (AR523000)form or by manually changing the customer status on the Customers (AR303000) form.
4. Release the LateCo customer from credit hold as follows:
a. On the Manage Credit Holds (AR523000) form, select the Release Credit Hold action.
The form shows all customer accounts that have the Credit Hold status.
b. Select the check box that precedes LateCo, and click Process.
After the process is complete, on the Customers (AR303000) form, you can verify that theLateCo customer has the Active status.
To view the status of all customer accounts in the system, you can use the Customer Summary(AR650500; Finance > Accounts Receivable > Reports > Audit) report.
Related LinksCredit VerificationCredit HoldDunning LettersCustomers (AR303000)Prepare Dunning Letters (AR521000)Print Dunning Letters (AR522000)Manage Credit Holds (AR523000)

| Part 3: Accounts Receivable | 267
Step 13.2: Reviewing Outstanding Balances by Aging PeriodsIn this step, you will review the outstanding balances of documents with a breakdown by aging periods.To do this, you can use the AR Aged Past Due (AR631000) and AR Aged Outstanding (AR631500)reports as follows:
1. On the Invoices and Memos (AR301000) form, create and release a new RegularCo invoice forservices issued on 3/15/2014:
• Type: Invoice
• Customer: C000000001 (RegularCo)
• Date: 3/15/2014
• Post Period: 03-2014
• Description: Services 03-2014
• Amount: 60.00
• Document Details tab, Ext. Price: 60.00
2. On the AR Aged Past Due (AR631000; Finance > Accounts Receivable > Reports > Balance)report form, specify the following parameters:
• Report Format: Detailed
• Aging Date: 3/31/2014 (the start date for calculation of aging periods)
3. Click Run Report to prepare and view the report.
The AR Aged Past Due (AR631000) report shows the outstanding documents by statement cycleand by customer, broken down by aging periods. The overdue balances are grouped by agingperiods taken from the statement cycle, while the balances that aren't overdue are displayed inthe Current column.
The outstanding balances are broken down by the number of days from the due date throughthe Aged On date. You have one overdue invoice on 3/31/2014: the $720 LateCo invoice thathas the 3/3/2014 due date. The invoice is 28 days past due (3/31/2014 – 3/3/2014), andtherefore its balance is shown in the 10 To 30 column (as shown in the following screenshot).Balances that aren't overdue on the Aged On date are displayed in the Current column. Thus,the $60 RegularCo invoice isn't overdue on 3/31/2014, and the invoice balance is displayed inthe Current column (also shown in the screenshot below).
In the AR Aged Past Due (AR631000) report, the amounts of open payments, prepayments,and credit memos are aged by periods if the Age Credits check box is selected on the AccountsReceivable Preferences (AR101000) form. If the credit amounts are aged, they are broken downby the number of days that have passed from the document date through the Aged On date.By default, the check box is cleared and the credit amounts show up in the Current column.Therefore, in the Current column for EarlyCo, you can see the $5 balance of its open payment.

| Part 3: Accounts Receivable | 268
Figure: The outstanding balances aged by the number of days they are past due
4. Prepare the AR Aged Outstanding (AR631500) report with the same report parameters, andcompare the results of the two reports.
The AR Aged Outstanding (AR631500) report shows the same outstanding documents bystatement cycle and by customer with a breakdown by aging periods. The overdue balances aredisplayed in the Current column, while the balances that aren't overdue are grouped by agingperiods taken from the statement cycle.
The outstanding balances are broken down by the number of days from the Aged On datethrough the due date. The $60 RegularCo invoice that is due on 4/14/2014 is shown in the10 To 30 column (because 14 days remain from 3/31/2014 through the due date). Overduebalances—as well as the balances of open payments, prepayments, and credit memos—aredisplayed in the Current column of the report.
Figure: The outstanding balances aged by the number of days before the due date
Related LinksAR Aged Past Due (AR631000)AR Aged Outstanding (AR631500)

| Part 3: Accounts Receivable | 269
Step 13.3: Configuring Overdue ChargesYou can calculate additional charges on overdue documents and show them in customer statements.Overdue charges are calculated on documents that are overdue on the calculation date. Overduecharges can be calculated only for customer accounts that have the Active status.
In this step, you will configure the calculation of overdue charges. To configure the calculation ofoverdue charges, you have to define at least one appropriate overdue charge code and enable thecalculation of overdue charges for the applicable customer accounts. Overdue charges can be calculatedfor groups of customers, based on their statement cycle or customer class; in this step, you willspecify the calculation of charges for customers that are assigned to the EOM statement cycle. Do thefollowing:
1. Create an overdue charge code that defines how the overdue charges are calculated. On theOverdue Charges (AR204500; Finance > Accounts Receivable > Configuration > Setup) form,add a new code for the 25 percent annual rate with the following settings:
• Overdue Charge ID: OVERDU25
• Terms: 30D
• Overdue Charge Description: Overdue charges of 25% annually
• By Percent: Selected
• Charge Percent: 25.00
• Overdue Charges Account: 410000 (Overdue Charges Income)
• Tax Category: EXEMPT
When this code is used, the system will calculate overdue charges on the outstanding balance ofa document by using an annual percentage rate of 25 percent. Terms denote the credit termsthat are inserted into the overdue charge documents when they are generated.
For an overdue charge code, you can also specify the minimum amount that will be inserted intothe overdue charge document if the calculated charge is less than the minimum amount. For moreinformation, see the link in the Related links section of the topic.
2. Because you are generating overdue charges by statement cycle, specify the overdue chargesettings for the EOM statement cycle by performing the following instructions:
a. On the Statement Cycles (AR204500; Finance > Accounts Receivable > Configuration >Setup) form, select the EOM statement cycle.
b. Select the Apply Overdue Charges check box to enable the use of overdue charges forthe statement cycle.
c. In the Overdue Charge ID box, select the OVERDU25 code.
The system will use this code when calculating overdue charges for customers that usethe EOM statement cycle.
d. Select the Require Overdue Charges Calculation Before Statement check box tomake the system show a warning message on the Prepare Statements (AR503000)form if there are overdue documents for which no overdue charge documents have beengenerated.
e. Save your changes to the statement cycle.
3. Specify the source of the overdue charge settings that apply to customer accounts in theAccounts Receivable module as follows:
a. On the Accounts Receivable Preferences (AR101000; Finance > Accounts Receivable >Configuration > Setup) form, select the Set Default Overdue Charges by StatementCycle check box.
If the check box is selected, the system applies the overdue charge settings that arespecified in the statement cycle used for the customer. If the check box is cleared, thesystem uses the overdue charge settings of the customer class.
4. Enable the calculation of overdue charges for the LateCo customer as follows:

| Part 3: Accounts Receivable | 270
a. On the Customers (AR303000; Finance > Accounts Receivable > Work Area > Manage)form, select the LateCo customer.
b. On the General Info tab, select the Apply Overdue Charges check box.
The system calculates overdue charges on documents of only customers for which thischeck box is selected.
c. Save your changes to the customer account.
Now you have specified the appropriate settings for the calculation of overdue charges on LateCodocuments.
Related LinksOverdue ChargesOverdue Charges (AR204500)Statement Cycles (AR202800)Customers (AR303000)Accounts Receivable Preferences (AR101000)

| Part 3: Accounts Receivable | 271
Step 13.4: Processing Overdue ChargesIn this step, you will calculate the overdue charges for LateCo, and generate and release the overduecharge documents to show these documents in the customer statement. After that, you will enterthe $730 payment received from LateCo on 3/31/2014 and apply the payment to the customer'soutstanding documents. At the end of this step, you will prepare the customer statements for3/31/2014, which is the next statement date according to the EOM statement cycle. You will performthe following tasks, which are described in detail in the following sections:
1. Calculate the overdue charges for 3/31/2014.
2. Based on the calculated overdue charge amounts, generate and release the overdue chargedocuments.
3. Enter the $730 LateCo payment that was received on 3/31/2014.
4. Prepare the customer statements for 3/31/2014, and review the LateCo and EarlyCo statements.
1. Calculate Overdue Charges
In this task, we will suppose that you have forgotten to generate overdue charges before preparing thecustomer statements. You will calculate overdue charges for 3/31/2014 as follows:
1. Open the Prepare Statements (AR503000; Finance > Accounts Receivable > Processes >Statement Cycle) form, and specify the 3/31/2014 business date.
The EOM statement cycle appears on the form. Because there is one overdue invoice, the systemshows the warning message that suggests that you run the overdue calculation process beforepreparing the customer statements. This warning appears because the Require OverdueCharges Calculation Before Statement check box is selected for the EOM statement cycle onthe Statement Cycles (AR202800) form.
You have decided to calculate overdue charges before preparing the statements. (Alternatively,you could ignore the warning and run the statement preparation process.)
2. Calculate the overdue charges for 3/31/2014 as follows:
a. On the Calculate Overdue Charges (AR507000; Finance > Accounts Receivable >Processes > Recurring) form, specify the following settings and then click Calculate:
• Overdue Charge Date: 3/31/2014
• Fin. Period: 03-2014 (selected automatically)
• Statement Cycle: EOM
When you run the calculation process, the system searches for overdue invoices and debitmemos among the documents of the customers of the selected statement cycle. For eachoverdue document, the system calculates the overdue amount on the specified OverdueCharge Date.
If the Calculate on Overdue Charges Documents check box is selected on the AccountsReceivable Preferences (AR101000) form, the system also calculates overdue charges onpreviously generated overdue charge documents if they are overdue. By default (basedon the settings you are using in this course), the check box is cleared and the systemcalculates overdue charges on only invoices and debit memos.
b. Review the $720 LateCo invoice that appears in the table.
On 3/31/2014, there is one overdue invoice, which is the LateCo invoice that has a $720balance past due for 28 days (see the screenshot below). According to the OVERDU25rate, which defines 25 percent annual interest on overdue documents, the calculatedamount of the overdue charge is $13.81 ([720 * 0.25 * 28] / 365 ≈ 13.81), which isdisplayed in the Charge Amount column.

| Part 3: Accounts Receivable | 272
Figure: The charges calculated for the overdue invoice
The amount of the subsequent overdue charge is calculated based on the number of daysthat have passed since the previous overdue charge has been generated. Thus, if youwould calculate the subsequent overdue charge for the 000002 LateCo invoice for the nextstatement cycle on 4/30/2014, the overdue charge amount would equal (720 * 0.25 * 30) /365 ≈ 14.79. (Here, 30 days is the period from 4/1/2014 to 4/30/2014 that passed afterthe document date of the first overdue charge on 3/31/2014.)
2. Generate and Release the Overdue Charge Document
Now you will generate and release the overdue charge document for the calculated $13.81 overduecharge for invoice 000002 by performing the following instructions:
1. While remaining on the Calculate Overdue Charges (AR507000) form, click the check box (in theunlabeled column) that precedes the $720 LateCo invoice, and click Process to generate theoverdue charge documents.
During the processing, the system generates one overdue charge document for each customer,which includes overdue charge amounts calculated from all customer documents that arepast due on the specified date. You can view the generated overdue charge documents on theInvoices and Memos (AR301000) form.
2. After the processing is complete, review and release the overdue charge document that wasgenerated by doing the following:
a. On the Invoices and Memos (AR301000; Finance > Accounts Receivable > Work Area >Enter) form, select Overdue Charge in the Type box, and select the document with the000010 reference number.
The system has inserted the calculated overdue charge amount into the document; youcan change the amount if needed. In the Transaction Descr. box on the DocumentDetails tab, the reference number of the overdue document is displayed, which is the000002 reference number of the LateCo invoice from which the overdue charge documenthas been generated. The 30D credit terms and the 410000 - Overdue Charges Incomeincome account have been inserted into the document from the OVERDU25 overduecharge code, which is specified for the EOM statement cycle and used for the calculationof overdue charges. (See the following screenshot.)
The system generates overdue charge documents and saves them with the On Holdor Balanced status, depending on whether the Hold Documents on Entry andHold Document on Failed Credit Check check boxes are selected on the AccountsReceivable Preferences (AR101000) form:
• Because the Hold Documents on Entry check box is selected, the 000010 overduecharge document has been saved with the On Hold status. You can make thesystem generate overdue charge documents with the Balanced status by clearingthis check box; in this case, the overdue charge documents appear on the ReleaseAR Documents (AR501000) form immediately after they have been generated.

| Part 3: Accounts Receivable | 273
• Because the Hold Document on Failed Credit Check check box is selected, if thecustomer fails the credit check that is performed while the system generates theoverdue charge document, the document will be saved with the On Hold status.
The system assigns the overdue charge document the next reference number, based onthe ARINVOICE numbering sequence specified in the Overdue Charges NumberingSequence box on the Accounts Receivable Preferences (AR101000) form.
Figure: The overdue charge document generated for the overdue 000002 invoice
b. Clear the Hold check box, and click Release to release the overdue charge document.
On release of the overdue charge document, the system updates the current balance ofthe customer and generates a batch (shown in the following screenshot) to debit the ARaccount specified in the document and credit the specified income account.
Figure: The batch generated on release of the overdue charge document
c. On the Customer Details (AR402000; Finance > Accounts Receivable > Work Area >Manage) form, select LateCo and notice that its current balance has increased to $733.81($720 + $13.81).
The overdue charge document is displayed in the list of open documents of the customerand should be paid in the same way as an invoice or debit memo is paid.
3. Enter the LateCo Payment
Now you will enter the $730 LateCo payment, which was received on 3/31/2014, and apply it to theopen documents of the customer, as described below:
1. On the Payments and Applications (AR302000; Finance > Accounts Receivable > Work Area >Enter) form, enter the $730 LateCo payment with the following settings:
• Type: Payment
• Customer ID: C000000004 (LateCo)
• Payment Method: CHECK
• Cash Account: 102000 (Checking Account USD)

| Part 3: Accounts Receivable | 274
• Application Date: 3/31/2014
• Application Period: 03-2014
• Payment Ref.: 03312014L
• Description: Payment 03-2014
• Payment Amount: 730.00
2. On the Documents to Apply tab, click the Load Documents button on the table toolbar to usethe automatic selection of the customer's open documents to which the payment can be applied.
3. In the Load Options dialog box, leave From Date empty, select 3/31/2014 as the Till Date,and click Load.
In this dialog box, you specify the criteria the system uses to select documents to be listed in thetable. The documents that have a document date within the interval from the From Date to theTill Date will be selected for the payment.
4. Make sure that the 000010 overdue charge (to which you will apply $10) and the 000002 invoice(to which you will apply $720) have been listed in the table.
By default, the documents are selected by their due date, starting from the earliest one. (Youcan specify another selection order in the Load Options dialog box.) The system inserts into theAmount Paid column default amounts to distribute the payment amount between the selecteddocuments to settle them, starting from the oldest ones, but you can change the amounts. Theinvoice has an earlier due date than the overdue charge has; therefore, the system by defaultinserts an amount paid of $720 for the invoice and applies the rest of the payment amount, $10,to the overdue charge document (see the screenshot below). After the application, the overduecharge document will have a balance of $3.81.
If the Apply Payments to Overdue Charges First check box is selected on the AccountsReceivable Preferences (AR101000) form, according to the order selected in the Load Optionsdialog box, the system inserts amounts to apply the payment first to overdue charge documentsand then to other documents. Based on the default settings you have used in this course, thecheck box is cleared, and the payment amount is distributed among all documents, regardless oftheir type.
Figure: The documents to which the payment will be applied

| Part 3: Accounts Receivable | 275
Regardless of the selection order, in the table, you can display the list of documents sorted asyou need. By default, the documents are sorted by document type and then by reference number.You can sort the documents in the table by any parameters, such as reference number, due date,document date, and amount paid, and save the preferred display order. (You can configure andsave the needed sorting by clicking the column headers, selecting the needed order, and thensaving the preferred configuration by clicking Save in the Columns Configuration dialog box. Formore information, see the links in the Related Links section below.)
5. Clear the Hold check box, and click Release to release the payment and the paymentapplication to the selected documents.
Releasing the documents changes the current balance of the LateCo customer to $3.81.
4. Prepare and Review the Customer Statements
Prepare the customer statements for 3/31/2014 by doing the following:
1. Generate the customer statements as follows:
a. Open the Prepare Statements (AR503000; Finance > Accounts Receivable > Processes> Statement Cycle) form, and set the business date to 3/31/2014 and notice that thesystem has changed the Next Statement Date is 3/31/2014.
b. Select the unlabeled check box for the EOM statement cycle row in the table, and clickProcess to generate customer statements.
2. Review the LateCo statement by doing the following:
a. On the Customer Statement History (AR404600; Finance > Accounts Receivable > WorkArea > Explore) form, select the LateCo customer.
b. Click the 3/31/2014 statement to select it in the table, and click Print Statement to viewthe document.
The Balance Brought Forward statement shows the $800 due on 2/28/2014 and thecustomer documents posted from 3/1/2014 through 3/31/2014. The total amount due on3/31/2014 equals the small outstanding amount of the overdue charge document, $3.81(as shown in the screenshot below).

| Part 3: Accounts Receivable | 276
Figure: The overdue charge document and the total amount due
3. Review the EarlyCo statement as follows:
a. On the Customer Statement History (AR404600) form, select the EarlyCo customer.
b. Click the 3/31/2014 statement to select it in the table, and click Print Statement to viewthe document.
The Open Item statement shows the $5 credit balance of EarlyCo on 3/31/2014. Thecustomer has overpaid a small amount for one of its invoices.
Related LinksOverdue ChargesCalculate Overdue Charges (AR507000)Invoices and Memos (AR301000)Column Filters and SortingChanging the Table Layout
| Part 3: Accounts Receivable | 277
Additional InformationYou can use these paragraphs for additional reading, but these concepts are outside of the scope of thiscourse.
Rounding of Document Amounts
You can configure the rounding rules and precision that apply to document amounts in AccountsReceivable. See Rounding of Document Amounts in the Acumatica ERP User Guide for details.
Scheduled Processing
You can schedule the preparation and processing of documents, as well as the sending of documentsby email. For example, you can schedule the preparation of customer statements, the generationof overdue charge documents, and the preparation and sending of dunning letters. See ScheduledProcessing in the Acumatica ERP User Guide for details.

| Part 3: Accounts Receivable | 278
Lesson SummaryIn this lesson, you have learned how to use automatic credit verification of customer accounts. You canspecify credit verification rules for a customer or for the customer class. If the customer fails the creditcheck, you can put this customer on credit hold to prevent users from creating new invoices and debitmemos for this customer. To manage a customer's credit status (put the customer on credit hold orrelease it from credit hold), you use the Manage Credit Holds (AR523000) form. For a customer thathas overdue documents, you can generate dunning letters to remind customer personnel about thedebt. You prepare dunning letters on the Prepare Dunning Letters (AR521000) form and then printthem on the Print Dunning Letters (AR522000) form.
The lesson also explains how to generate additional charges on overdue documents, and how thecharges are reflected in customer reports. Before generating overdue charges, you need to definethe needed overdue charge codes on the Overdue Charges (AR204500) form, specify the use of theoverdue charges for each statement cycle, and enable the calculation of overdue charges for theneeded customers. Then you calculate overdue charges on the Calculate Overdue Charges (AR507000)form. After the overdue charges are calculated, you need to generate and release the overdue chargedocuments. You can later review these documents in the customer statements.

| Part 3: Accounts Receivable | 279
Lesson 14: Direct Write-OffsIn this lesson, you will learn how to configure and process write-offs in the Accounts Receivable moduleby using the direct write-off method.
Lesson Objectives
In this lesson, you will learn the following operations in the Accounts Receivable module:
• How to configure write-offs
• How to process a credit write-off
• How to process a balance write-off

| Part 3: Accounts Receivable | 280
Step 14.1: Configuring Write-OffsBy using the write-off functionality described in this lesson, you can write off small balances ofcustomer documents, as well as write off bad debts once they are recognized. (Debt write-off is outsideof the scope of this course, however.)
In this step, you will configure write-offs in the module and enable the write-off process for EarlyCo,LateCo, and RegularCo. To configure write-offs, you have to define the write-off reason codes, enablethe write-off process, and specify the write-off amount limit for a customer account. Additionally, youwill specify the default reason codes for the write-off processes in the Accounts Receivable module.
You have to define one reason code for the balance write-off process and another for the credit write-off process. Each reason code specifies the GL account to which the written-off amount is posted. Youcan use one expense, income, or contra asset GL account for both types of write-off processes or useseparate GL accounts for balance and credit write-offs. On the other hand, for the same type of write-off process, you can define multiple reason codes with different GL accounts and descriptions. Forexample, you might have a small balance write-off reason code for a direct write-off, and a bad debtbalance write-off reason code for a write-off under the allowance method.
In this step, you will configure the reason codes to write off small balances and credits under the directwrite-off method. Both reason codes will use the 615000 - Small Balances Write-Off Expense account.Do the following:
1. To define the credit write-off reason code, on the Reason Codes (CS211000; Finance > AccountsReceivable > Configuration > Setup) form, create and save a reason code with the followingsettings:
• Reason Code: CREDITWO
• Description: Credit write-off
• Usage: Credit Write-Off
• Account: 615000 (Small Balances Write-Off Expense)
The Credit Write-Off usage means that the reason code is for the Credit WO type of process.
2. To define the balance write-off reason code, while staying on the Reason Codes (CS211000)form, create and save a reason code with the following settings:
• Reason Code: BALANCEWO
• Description: Balance write-off
• Usage: Balance Write-Off
• Account: 615000 (Small Balances Write-Off Expense)
The Balance Write-Off usage means that the reason code is for the Balance WO type of process.
3. Perform the following instructions to enable the write-off process for EarlyCo, LateCo, andRegularCo, and specify the write-off amount limit ($5) for these customer accounts:
a. Open the Customers (AR303000; Finance > Accounts Receivable > Work Area > Manage)form, select EarlyCo, specify the following settings, and save your changes to thecustomer account:
• General Info tab, Enable Write-Offs: Selected
• General Info tab, Write-Off Limit: 5.00
You can write off a balance or credit for only customers that have the Enable Write-Offscheck box selected. The write-off limit that you specify is the default limit that is used onthe Write Off Balances and Credits (AR505000) form; it is also the maximum limit thatusers may write off on the fly by using the Payments and Applications (AR302000) form.
b. For the LateCo and RegularCo, enable the write-off process and set the $5 write-off limit,as described in Instruction 3.1.
4. On the Accounts Receivable Preferences (AR101000) form, specify the default reason codes forthe write-off processes as follows and save your changes:

| Part 3: Accounts Receivable | 281
• Balance Write-Off Reason Code: BALANCEWO
• Credit Write-Off Reason Code: CREDITWO
These settings are optional. The appropriate default reason code is inserted by the system whenyou select the credit or balance type of write-off process on the Write Off Balances and Credits(AR505000) form or when you select a document to apply on the Payments and Applications(AR302000) form. A user can, however, override the default reason code.
Now the settings are ready and you can process write-offs for EarlyCo, LateCo, and RegularCo in thesystem.
Related LinksWrite-Off SetupReason Codes (CS211000)Customers (AR303000)Accounts Receivable Preferences (AR101000)

| Part 3: Accounts Receivable | 282
Step 14.2: Processing a Credit Write-OffSuppose that after you prepared the customer statements for 3/31/2014, you noticed that EarlyCo hasa small credit balance of $5, which you have decided to write off.
You have created the reason code for the credit write-off process in the Accounts Receivable moduleand enabled this process for the customer account; therefore, you can write off the customer credit. Towrite off credits, you can use the Write Off Balances and Credits (AR505000) form. Do the following:
1. On the Write Off Balances and Credits (AR505000; Finance > Accounts Receivable > Processes >Recurring) form, select the following settings:
• Type: Credit WO
• Customer: C000000003 (EarlyCo)
• Doc. Date: 3/31/2014
• Post Period: 03-2014 (selected automatically)
• Reason Code: CREDITWO
You use the Credit WO type of process to write off the balances of payments, prepayments, andcredit memos. The form shows the documents of this customer that have a balance no greaterthan the amount specified in the Limit box, which by default contains the Write-Off Limitamount specified for the customer account. The payment that has the $5 balance appears intable.
To write off credits for multiple customers at once, you can clear the Customer box and specifythe needed Limit to see the document balances of all customers that are no greater than the limitand therefore can be written off.
When you select the Credit WO type of process, the system inserts into the Reason Code boxthe default reason code specified in the Credit Write-Off Reason Code box on the AccountsReceivable Preferences (AR101000) form. The reason code defines the GL account to which thewrite-off amount will be posted. You can select another reason code, if needed.
2. In the table, select the unlabeled check box for the payment.
The Selection Total box shows the total amount of the selected documents that will be writtenoff during the process, which in this case is $5 for the only payment that you have selected.
3. Click Process to write off the customer credit and generate the write-off transaction to beposted to the specified date and period.
The system generates and releases a Credit WO type of document for each document selected inthe table, which you can then view on the Invoices and Memos (AR301000) form.
4. Find and review the generated Credit WO document as follows:
a. On the Invoices and Memos (AR301000; Finance > Accounts Receivable > Work Area >Enter) form, select Credit WO in the Type box, and select the document with the 000011reference number.
Notice that the system has inserted the amount, the document date, and the post periodinto the Credit WO document, based on the settings you have specified on the WriteOff Balances and Credits (AR505000) form. The system has automatically released andclosed the Credit WO document. The payment whose amount has been written off isdisplayed on the Applications tab (see the screenshot below). In the Amount Paidcolumn, you can see the written-off amount of the payment.
The system has assigned a reference number to this Credit WO document based onthe ARINVOICE numbering sequence that was specified in the Write Off NumberingSequence box on the Accounts Receivable Preferences (AR101000) form.
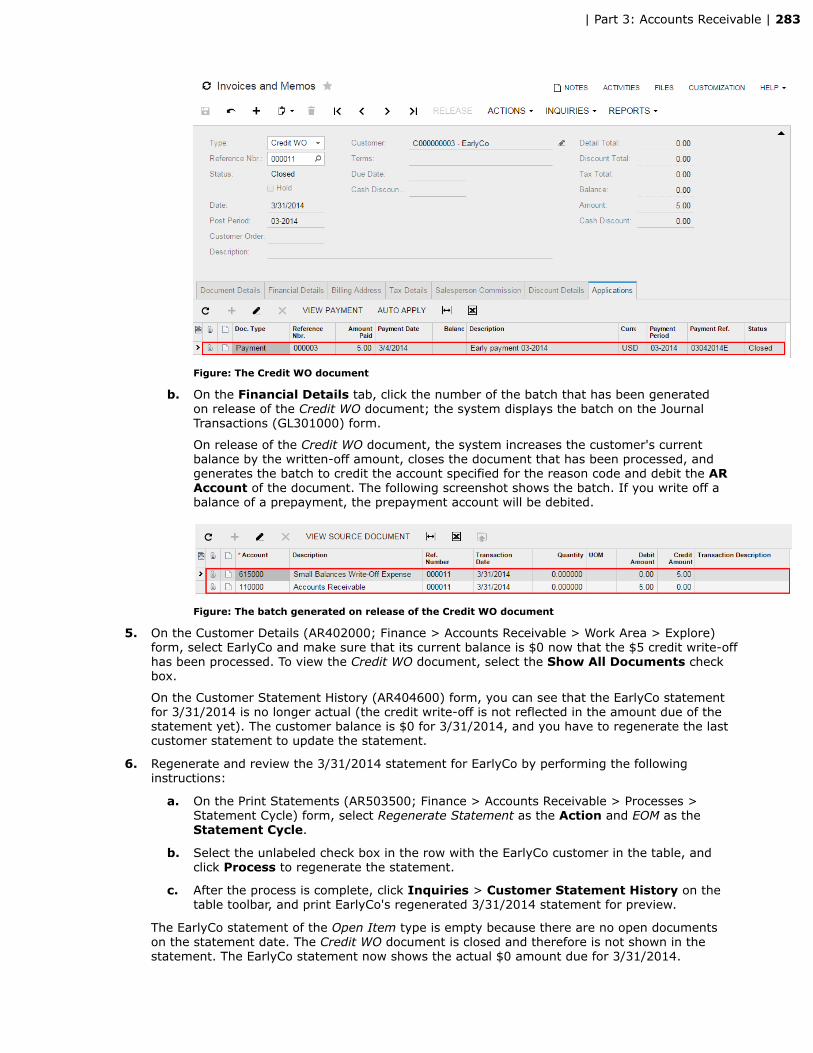
| Part 3: Accounts Receivable | 283
Figure: The Credit WO document
b. On the Financial Details tab, click the number of the batch that has been generatedon release of the Credit WO document; the system displays the batch on the JournalTransactions (GL301000) form.
On release of the Credit WO document, the system increases the customer's currentbalance by the written-off amount, closes the document that has been processed, andgenerates the batch to credit the account specified for the reason code and debit the ARAccount of the document. The following screenshot shows the batch. If you write off abalance of a prepayment, the prepayment account will be debited.
Figure: The batch generated on release of the Credit WO document
5. On the Customer Details (AR402000; Finance > Accounts Receivable > Work Area > Explore)form, select EarlyCo and make sure that its current balance is $0 now that the $5 credit write-offhas been processed. To view the Credit WO document, select the Show All Documents checkbox.
On the Customer Statement History (AR404600) form, you can see that the EarlyCo statementfor 3/31/2014 is no longer actual (the credit write-off is not reflected in the amount due of thestatement yet). The customer balance is $0 for 3/31/2014, and you have to regenerate the lastcustomer statement to update the statement.
6. Regenerate and review the 3/31/2014 statement for EarlyCo by performing the followinginstructions:
a. On the Print Statements (AR503500; Finance > Accounts Receivable > Processes >Statement Cycle) form, select Regenerate Statement as the Action and EOM as theStatement Cycle.
b. Select the unlabeled check box in the row with the EarlyCo customer in the table, andclick Process to regenerate the statement.
c. After the process is complete, click Inquiries > Customer Statement History on thetable toolbar, and print EarlyCo's regenerated 3/31/2014 statement for preview.
The EarlyCo statement of the Open Item type is empty because there are no open documentson the statement date. The Credit WO document is closed and therefore is not shown in thestatement. The EarlyCo statement now shows the actual $0 amount due for 3/31/2014.

| Part 3: Accounts Receivable | 284
Related LinksWrite-Off TransactionsWrite Off Balances and Credits (AR505000)
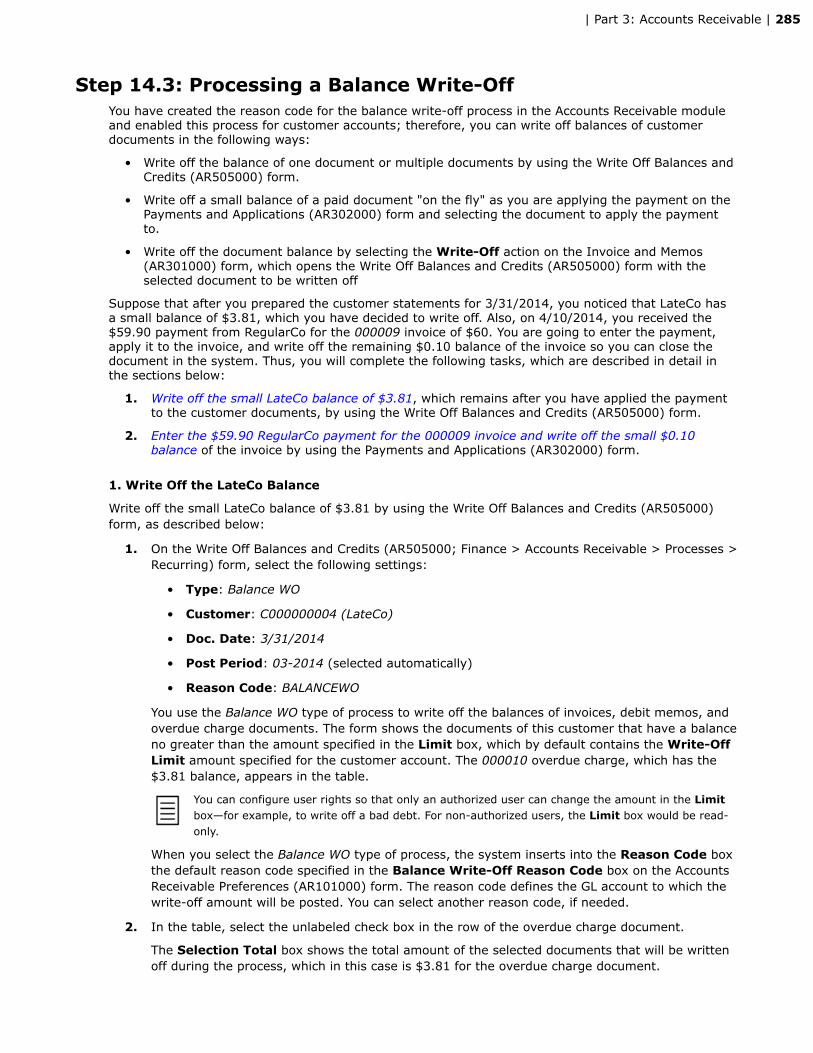
| Part 3: Accounts Receivable | 285
Step 14.3: Processing a Balance Write-OffYou have created the reason code for the balance write-off process in the Accounts Receivable moduleand enabled this process for customer accounts; therefore, you can write off balances of customerdocuments in the following ways:
• Write off the balance of one document or multiple documents by using the Write Off Balances andCredits (AR505000) form.
• Write off a small balance of a paid document "on the fly" as you are applying the payment on thePayments and Applications (AR302000) form and selecting the document to apply the paymentto.
• Write off the document balance by selecting the Write-Off action on the Invoice and Memos(AR301000) form, which opens the Write Off Balances and Credits (AR505000) form with theselected document to be written off
Suppose that after you prepared the customer statements for 3/31/2014, you noticed that LateCo hasa small balance of $3.81, which you have decided to write off. Also, on 4/10/2014, you received the$59.90 payment from RegularCo for the 000009 invoice of $60. You are going to enter the payment,apply it to the invoice, and write off the remaining $0.10 balance of the invoice so you can close thedocument in the system. Thus, you will complete the following tasks, which are described in detail inthe sections below:
1. Write off the small LateCo balance of $3.81, which remains after you have applied the paymentto the customer documents, by using the Write Off Balances and Credits (AR505000) form.
2. Enter the $59.90 RegularCo payment for the 000009 invoice and write off the small $0.10balance of the invoice by using the Payments and Applications (AR302000) form.
1. Write Off the LateCo Balance
Write off the small LateCo balance of $3.81 by using the Write Off Balances and Credits (AR505000)form, as described below:
1. On the Write Off Balances and Credits (AR505000; Finance > Accounts Receivable > Processes >Recurring) form, select the following settings:
• Type: Balance WO
• Customer: C000000004 (LateCo)
• Doc. Date: 3/31/2014
• Post Period: 03-2014 (selected automatically)
• Reason Code: BALANCEWO
You use the Balance WO type of process to write off the balances of invoices, debit memos, andoverdue charge documents. The form shows the documents of this customer that have a balanceno greater than the amount specified in the Limit box, which by default contains the Write-OffLimit amount specified for the customer account. The 000010 overdue charge, which has the$3.81 balance, appears in the table.
You can configure user rights so that only an authorized user can change the amount in the Limitbox—for example, to write off a bad debt. For non-authorized users, the Limit box would be read-only.
When you select the Balance WO type of process, the system inserts into the Reason Code boxthe default reason code specified in the Balance Write-Off Reason Code box on the AccountsReceivable Preferences (AR101000) form. The reason code defines the GL account to which thewrite-off amount will be posted. You can select another reason code, if needed.
2. In the table, select the unlabeled check box in the row of the overdue charge document.
The Selection Total box shows the total amount of the selected documents that will be writtenoff during the process, which in this case is $3.81 for the overdue charge document.
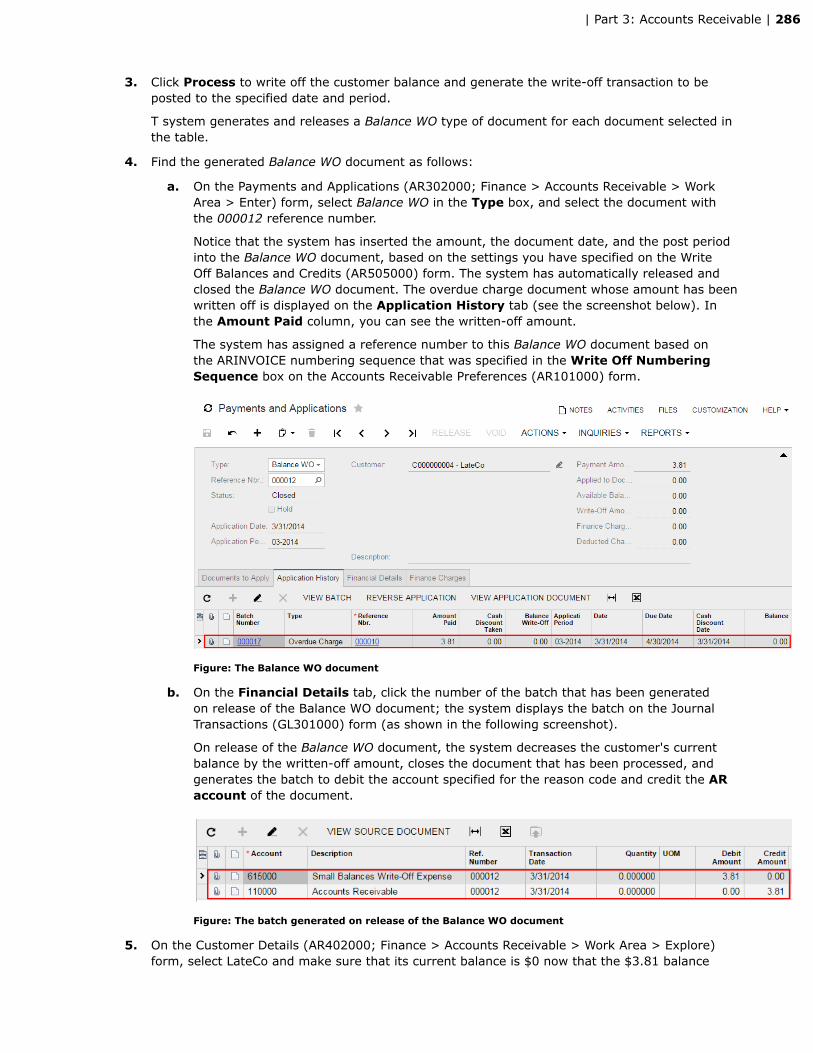
| Part 3: Accounts Receivable | 286
3. Click Process to write off the customer balance and generate the write-off transaction to beposted to the specified date and period.
T system generates and releases a Balance WO type of document for each document selected inthe table.
4. Find the generated Balance WO document as follows:
a. On the Payments and Applications (AR302000; Finance > Accounts Receivable > WorkArea > Enter) form, select Balance WO in the Type box, and select the document withthe 000012 reference number.
Notice that the system has inserted the amount, the document date, and the post periodinto the Balance WO document, based on the settings you have specified on the WriteOff Balances and Credits (AR505000) form. The system has automatically released andclosed the Balance WO document. The overdue charge document whose amount has beenwritten off is displayed on the Application History tab (see the screenshot below). Inthe Amount Paid column, you can see the written-off amount.
The system has assigned a reference number to this Balance WO document based onthe ARINVOICE numbering sequence that was specified in the Write Off NumberingSequence box on the Accounts Receivable Preferences (AR101000) form.
Figure: The Balance WO document
b. On the Financial Details tab, click the number of the batch that has been generatedon release of the Balance WO document; the system displays the batch on the JournalTransactions (GL301000) form (as shown in the following screenshot).
On release of the Balance WO document, the system decreases the customer's currentbalance by the written-off amount, closes the document that has been processed, andgenerates the batch to debit the account specified for the reason code and credit the ARaccount of the document.
Figure: The batch generated on release of the Balance WO document
5. On the Customer Details (AR402000; Finance > Accounts Receivable > Work Area > Explore)form, select LateCo and make sure that its current balance is $0 now that the $3.81 balance

| Part 3: Accounts Receivable | 287
write-off has been processed. To view the Balance WO document, select the Show AllDocuments check box.
On the Customer Statement History (AR404600) form, you can see that the LateCo statementfor 3/31/2014 is no longer actual (the balance write-off is not reflected in the amount due of thestatement yet). The customer balance is $0 for 3/31/2014, and you have to regenerate the lastcustomer statement to update the statement.
6. Regenerate and review the 3/31/2014 statement for LateCo by performing the followinginstructions:
a. On the Print Statements (AR503500; Finance > Accounts Receivable > Processes >Statement Cycle) form, select Regenerate Statement as the Action and EOM as theStatement Cycle.
b. Select the unlabeled check box in the row with the LateCo customer in the table, and clickProcess to regenerate the statement.
c. After the process is complete, press ESC to refresh the form, and select Print Statementin the Action box. Print the regenerated 3/31/2014 LateCo statement for preview.
The regenerated LateCo statement of the Balance Brought Forward type shows the actual $0amount due on 3/31/2014. The $3.81 balance write-off is shown in the statement along with theother documents that have been posted within the statement period of 3/1/2014–3/31/2014.
2. Enter the RegularCo Payment and Write Off the Balance of the Invoice
Now you will enter the $59.90 RegularCo payment received on 4/10/2014 for the 000009 invoice andwrite off the small $0.10 balance of the invoice in the process. Perform the following instructions:
1. On the Payments and Applications (AR302000; Finance > Accounts Receivable > Work Area >Enter) form, enter the $59.90 RegularCo payment that you received on 4/10/2014, specifyingthe following settings:
• Type: Payment
• Customer ID: C000000001 (RegularCo)
• Payment Method: CHECK
• Cash Account: 102000 (Checking Account USD)
• Application Date: 4/10/2014
• Application Period: 04-2014
• Payment Ref.: 04102014R
• Description: Payment 04-2014
• Payment Amount: 59.90
2. On the Documents to Apply tab, select the 000009 invoice to apply $59.90, which the systeminserts by default into the Amount Paid column.
3. To write off the remaining $0.10 balance of the invoice, enter 0.10 in the Balance Write-Offcolumn for the invoice (see the screenshot below).
You can specify a write-off amount no greater than the write-off amount limit specified for thecustomer, which is $5 for RegularCo. The total write-off amount over the documents listed on theDocuments to Apply tab is displayed in the Write-Off Amount box in the payment summaryarea.
Into the Write-Off Reason Code column for the invoice, the system inserts the default balancewrite-off reason code, which you specified in the Balance Write-Off Reason Code box on theAccounts Receivable Preferences (AR101000) form. You can change the reason code, if needed.

| Part 3: Accounts Receivable | 288
Figure: The balance write-off amount specified in the payment application to the invoice
4. Clear the Hold check box, and release the document.
When you make a write-off by using the Payments and Applications (AR302000) form, thesystem doesn't generate a Balance WO document. Instead, on release of a payment applicationwith a write-off, the system decreases the customer balance by the write-off amount andgenerates a write-off transaction to debit the account associated with the reason code and creditthe AR account of the applied document.
5. On the Application History tab, click the number of the batch in the Batch Number columnfor the invoice. This opens the Journal Transactions (GL301000) form with the batch generatedon release of the payment application to the invoice for review (see the following screenshot).
Figure: The batch with the write-off transaction generated on release of the payment application
In this example, the batch contains the transactions generated on release of the payment andthe payment application to the invoice. In the batch, the 102000 - Checking Account is debitedfor the payment amount, $59.90. The 110000 - Accounts Receivable account is credited for thesum of the payment amount and the write-off amount ($59.90 + $0.10 = $60). The 615000 -Small Balances Write-Off Expense account is debited for the write-off amount, $0.10. (You cansee these transactions in the screenshot below.)
Figure: The batch generated on release of the payment and its application with the write-off
The current balance of RegularCo is now $0.
Related Links

| Part 3: Accounts Receivable | 289
Write-Off TransactionsWrite Off Balances and Credits (AR505000)

| Part 3: Accounts Receivable | 290
Additional InformationYou can use this information for additional reading, but these concepts are outside of the scope of thiscourse.
Write-Offs Under the Allowance Method
You can write off bad debts under the allowance method. For more information, see Write-OffTransactions in the Acumatica ERP User Guide for details.

| Part 3: Accounts Receivable | 291
Lesson SummaryIn this lesson, you have learned how to configure write-offs in the Accounts Receivable module and howto process small balance and credit write-offs. Before you can process write-offs, you need to define thewrite-off reason codes on the Reason Codes (CS211000) form. Also, you need to enable the write-offprocess and specify the write-off amount limit for a customer account.
You can write off balances of payments, prepayments, and credit memos by using the Credit WO typeof process. You can write off balances of invoices, debit memos, and overdue charge documents byusing the Balance WO type of process. You can process credit and balance write-offs on the Write OffBalances and Credits (AR505000) form. You can also write off a small balance of a paid document "onthe fly" by using the Payments and Applications (AR302000) form.