external data connector for sharepoint · external data connector for sharepoint imports data from...
TRANSCRIPT
External Data Connector for
SharePoint
Last Updated: July 2017
Copyright © 2014 - 2017 Vyapin Software Systems Private Limited. All rights reserved.
This document is being furnished by Vyapin Software Systems Private Ltd for information purposes only to licensed users of the External Data Connector for SharePoint software product and is furnished on an “AS IS” basis, that is, without any warranties, whatsoever, express or implied. External Data Connector is a trademark of Vyapin Software Systems Private Ltd. Information in this document is subject to change without notice and does not represent any commitment on the part of Vyapin Software Systems Private Ltd. The software described in this document is furnished under a license agreement. The software may be used only in accordance with the terms of that license agreement. It is against the law to copy or use the software except as specifically allowed in that license. No part of this document may be reproduced or retransmitted in any form or by any means, whether electronically or mechanically, including, but not limited to the way of: photocopying, recording, or information recording and retrieval systems, without the express written permission of Vyapin Software Systems Private Ltd.
Vyapin Software Systems Private Limited
Website: http://www.vyapin.com/ Sales Contact: [email protected] Technical Support: [email protected]

EXTERNAL DATA CONNECTOR INTRODUCTION ................................................................................ 1
About External Data Connector ...................................................................................................................................... 2
How to purchase? ........................................................................................................................................................... 3
Technical support ........................................................................................................................................................... 4
System Requirements ..................................................................................................................................................... 5
How to activate the software? ........................................................................................................................................ 6
EXTERNAL DATA CONNECTOR FEATURES ......................................................................................... 8
Connection Manager - Introduction ................................................................................................................................ 9
Change Application Data folder location ....................................................................................................................... 14
Create a New Connection ............................................................................................................................................. 17
Edit An Existing Connection .......................................................................................................................................... 18
Delete an Existing Connection ...................................................................................................................................... 19
Run a Connection ......................................................................................................................................................... 20
Copy an Existing Connection ......................................................................................................................................... 22
External Data Connector Tools ..................................................................................................................................... 23 Query Builder .................................................................................................................................................................. 24 Profile Manager .............................................................................................................................................................. 34 View Activity Log ............................................................................................................................................................. 37
External Data Source to SharePoint .............................................................................................................................. 39 Create a Connection ....................................................................................................................................................... 40 Edit Connection .............................................................................................................................................................. 59
SharePoint to External Data Source .............................................................................................................................. 61 Create a Connection ....................................................................................................................................................... 62 Edit Connection .............................................................................................................................................................. 75
Apply External metadata to SharePoint Library ............................................................................................................. 77 Create a Connection ....................................................................................................................................................... 78 Edit Connection .............................................................................................................................................................. 93
Message Folders to SharePoint ..................................................................................................................................... 95 Create a Connection ....................................................................................................................................................... 96 Edit a connection .......................................................................................................................................................... 124

Public Folders to SharePoint ....................................................................................................................................... 126 Create a Connection ..................................................................................................................................................... 127 Edit a connection .......................................................................................................................................................... 152
Configuring impersonation rights ............................................................................................................................... 154
REFERENCES ................................................................................................................................ 160
Frequently Asked Questions ....................................................................................................................................... 161
Error Messages and Resolution Tips ........................................................................................................................... 162
Troubleshooting ......................................................................................................................................................... 164
How to uninstall External Data Connector? ................................................................................................................ 165
INDEX ........................................................................................................................................... 169

1
External Data Connector Introduction ________________________________________
About External Data Connector
How to purchase?
Technical support
System Requirements
How to activate the software?

2
About External Data Connector ________________________________________
External Data Connector for SharePoint imports data from multiple external data sources, including
Databases, SharePoint, CSV and Excel files, and integrates them into SharePoint Lists and Document
Libraries. It supports databases such as SQL Server, MS Access, Oracle and any ODBC compliant database
and file sources such as XLSX and CSV. The product can integrate data into all versions of SharePoint
including Office 365. The product can also be used to sync/update lists in two different versions of
SharePoint, for example, updating lists from SharePoint on-premises to SharePoint Office 365.
The External Data Connector for SharePoint facilitates:
1. Integration of external data from multiple sources into SharePoint Lists / Libraries and vice versa.
2. Apply metadata from external data sources to documents in SharePoint library.
3. Synchronization of SharePoint and external data through field/column mappings.
4. Automatic creation of new columns and mappings while creating new lists using imported data.
5. Creation of scheduled connections for automatic import and synchronization of external data into
SharePoint Lists and Libraries.

3
How to purchase? ________________________________________
You can purchase External Data Connector for SharePoint from our website http://www.vyapin.com/.
Please contact our Sales department at [email protected] for sales and price related queries.
For your purchase convenience, we have signed up with resellers in USA & Europe. You may contact one
of our resellers listed below:
USA Europe
FastSpring BTSoftware BV
Please visit our website Purchase section to view the updated list of software resellers.

4
Technical support ________________________________________
Technical support is available through e-mail. Send your questions to [email protected].
We make every effort to respond to your request on the same day you send in your e-mail. Please allow up
to 24 hours for our technical support team to revert to you.

5
System Requirements ________________________________________
Software:
Windows 10 / 8.1 / 8 / 7 / Vista / XP (or) Windows Server 2012 / 2012 R2 / 2008 / 2008 R2 / 2003 with the
latest service packs and .NET Framework 4.0 or higher.

6
How to activate the software? ________________________________________
Once you purchase the software online or through any one of our resellers, you will receive a sale
notification through e-mail from our sales department. We will send you an e-mail with the necessary
instructions to activate the software.
In case you do not receive an e-mail from our sales team after you purchase the software, please send the
following information to our sales department at [email protected] with the sales order number:
Company Name : End-user Company Name
Location : City & Country for the Company Name given above
Please allow 12 to 24 hours from the time of purchase for our sales department to process your orders.
Image 1 - Activate screen
Perform the following steps to activate the software:
1. Download evaluation/trial copy of software from the respective product page available in our
website at http://www.vyapin.com/
2. Install the software on the desired computer.
3. You will receive a license key through e-mail as soon as the purchase process is complete.
4. Click 'Activate' in Help -> About -> Activate menu to see the Activate dialog (as shown in Image 1).

7
5. Copy the license key sent to you through email and paste it in the 'License Key' textbox. For help
on how to copy the license key, click 'Click here to see how to copy and paste the license key' link
in the Activate dialog (as shown in Image 2).
Image 2 - How to copy license key screen

8
External Data Connector Features ________________________________________
Connection Manager
Change Application Data Folder Location
Create a New Connection
Edit an Existing Connection
Delete an Existing Connection
Run a Connection
Copy an Existing Connection
External Data Connector Tools
External Data to SharePoint
SharePoint to External Data
External Data to SharePoint Library

9
Connection Manager - Introduction ________________________________________
External Data Connector for SharePoint uses a connection oriented interface to manage synchronization
between data source and SharePoint. External Data Connector Connection Manager is the main application
window which will help you manage connection and their corresponding history. It also provides menus
and tools to work with the connections in a simple and elegant manner.
Standard menu bar:
Standard menu bar contain all the actions to work with a External Data Connector connection.
10
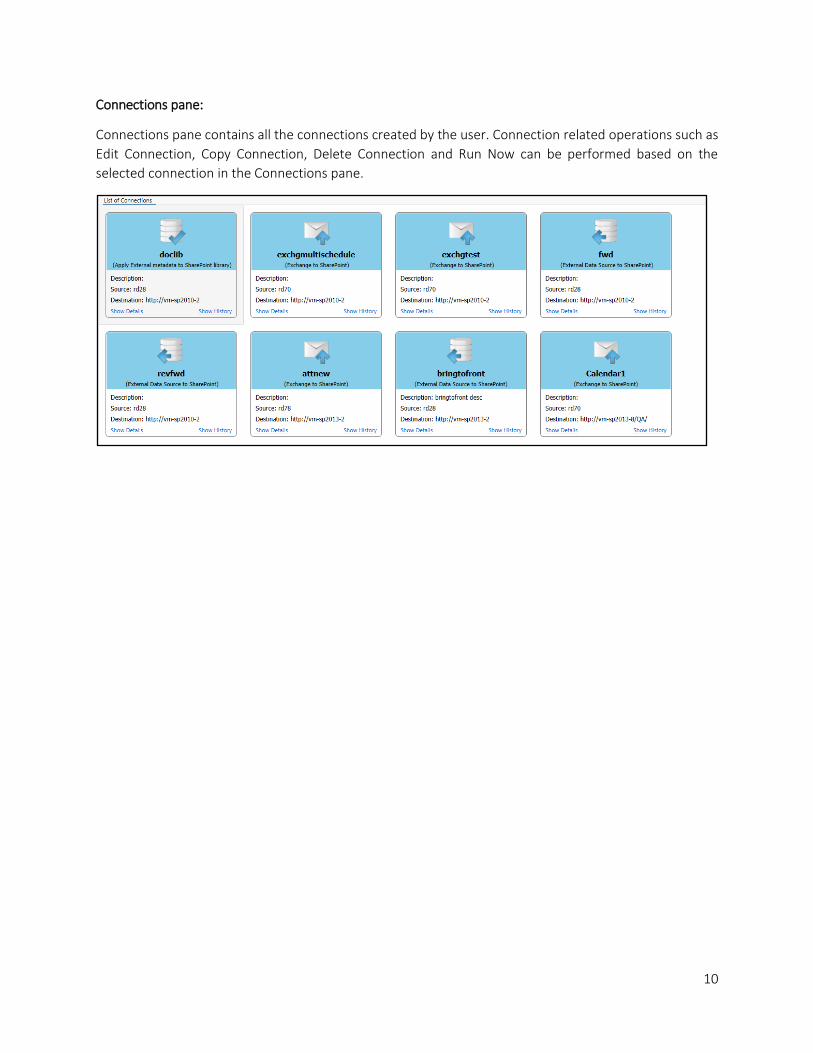
Connections pane:
Connections pane contains all the connections created by the user. Connection related operations such as
Edit Connection, Copy Connection, Delete Connection and Run Now can be performed based on the
selected connection in the Connections pane.

11
Connection details pane:
Connection Details pane will be displayed on clicking the Show Details on the selected connection. It
displays the details about the currently selected Connection in Connections pane.
Connection history pane:
Connection History pane will be displayed on clicking the Show History on the selected connection. It
maintains every Connection run information. It displays the required information about Connection result,
start time, end time, elapsed time, error log and activity log.

12
On selecting the View Activity Log link in Connection history pane, a window will appear which displays
the statistics summary of the corresponding instance like shown below.

13

14
Change Application Data folder location ________________________________________
External Data Connector allows you to change Application Data folder location, where External Data
Connector connections and related settings, and error logs are stored, at any time after installing External
Data Connector software. To change the Application Data folder location, perform the following steps given
below:
1. Select About EDC... from File menu

15
2. The About EDC dialog appears as shown below:
3. Click Change... button to change Application Data folder location of External Data Connector
application. The Browse For Folder location dialog will appear as shown below:

16
4. Select a desired folder location and Click OK. The folder location can be local drives or mapped
network drives.
5. External Data Connector provides an option to copy the existing application settings (External Data
Connector integration connection settings, histories, error logs etc.) to the new location once you
change the Application Data Folder. Once you specify the new Application Data folder location,
External Data Connector will prompt you to copy existing application settings to the new location
as shown below:
6. Click the desired action (Yes/No) to proceed. External Data Connector will use the new Application
Data folder location henceforth.
17
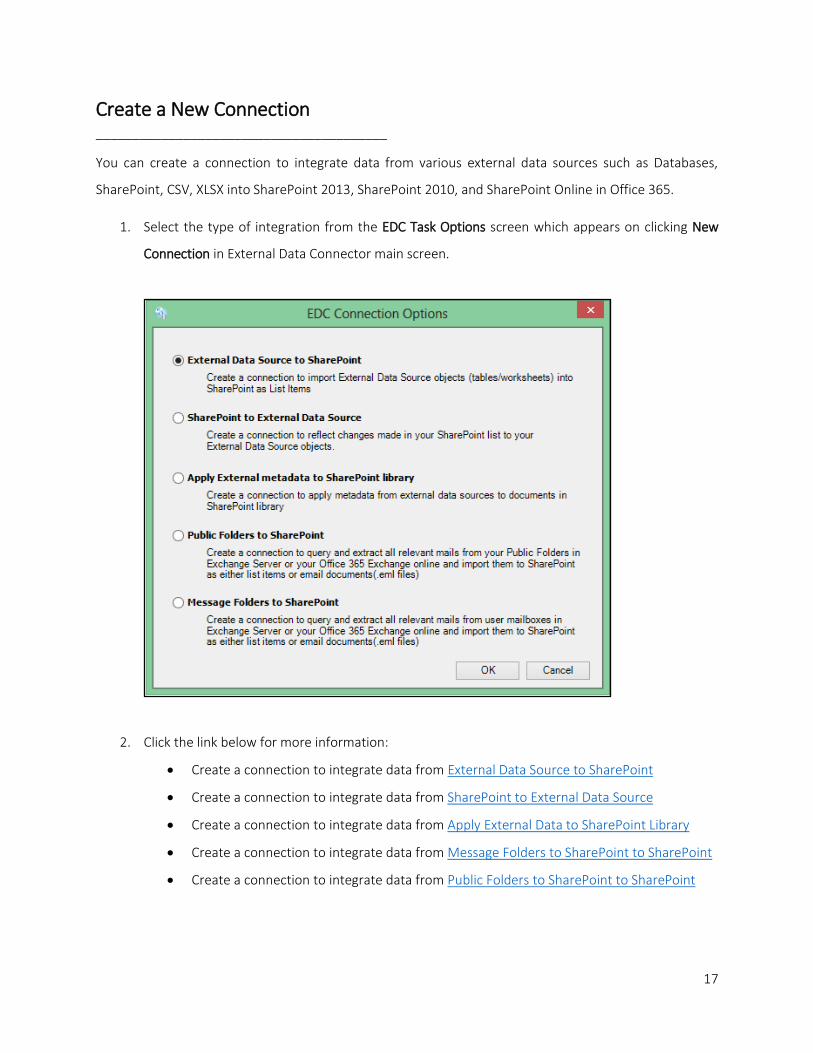
Create a New Connection ________________________________________
You can create a connection to integrate data from various external data sources such as Databases,
SharePoint, CSV, XLSX into SharePoint 2013, SharePoint 2010, and SharePoint Online in Office 365.
1. Select the type of integration from the EDC Task Options screen which appears on clicking New
Connection in External Data Connector main screen.
2. Click the link below for more information:
Create a connection to integrate data from External Data Source to SharePoint
Create a connection to integrate data from SharePoint to External Data Source
Create a connection to integrate data from Apply External Data to SharePoint Library
Create a connection to integrate data from Message Folders to SharePoint to SharePoint
Create a connection to integrate data from Public Folders to SharePoint to SharePoint

18
Edit An Existing Connection ________________________________________
To edit an existing connection:
1. Select a connection from Connections pane
2. Click Edit Connection from main screen
3. External Data Connector Connection Wizard will load the selected connection settings and appears
as seen in Create New Connection wizard. However, some of the options may be disabled when
editing a connection.
4. Click the link below for more information:
Edit a connection to integrate data from External Data Source to SharePoint
Edit a connection to integrate data from SharePoint to External Data Source
Edit a connection to integrate data from Apply External metadata to SharePoint Library
Edit a connection to integrate data from Message Folders to SharePoint
Edit a connection to integrate data from Public Folders to SharePoint
19
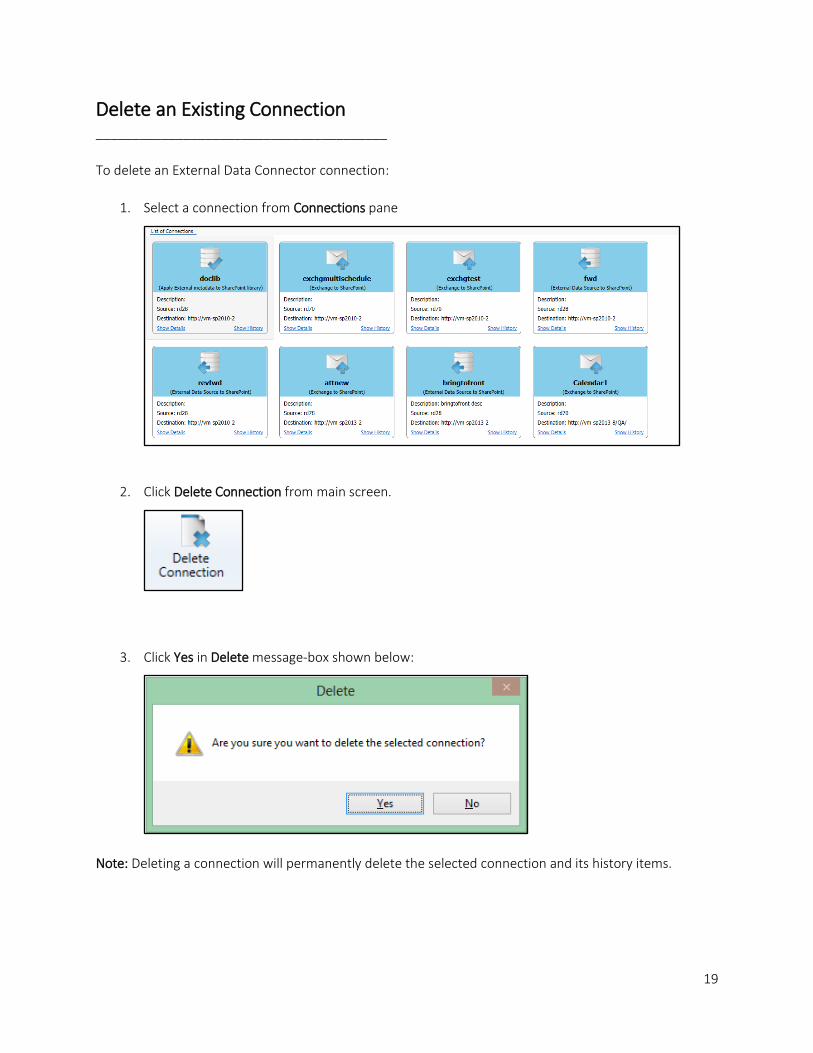
Delete an Existing Connection ________________________________________
To delete an External Data Connector connection:
1. Select a connection from Connections pane
2. Click Delete Connection from main screen.
3. Click Yes in Delete message-box shown below:
Note: Deleting a connection will permanently delete the selected connection and its history items.

20
Run a Connection ________________________________________
External Data Connector 'Run Now' feature allows the user to instantiate a connection any time after the
connection has been created. To run a connection:
1. Select a connection from Connections pane
2. Click Run Now from main screen.
3. Click Yes in Run Now confirmation message box shown below:
4. The current process of connection will be reported in a new dialog as shown below:

21
5. Once the sync is complete, a new entry will be added in Connection History section, where you can
view the integration activity performed when the connection ran last.

22
Copy an Existing Connection ________________________________________
To copy or create a new connection from an existing External Data Connector connection:
1. Select a connection from Connections pane
2. Click Copy Connection from main screen.
3. In Copy Connection dialog, enter a new connection name in Save As text-box, specify a Run As
account and password (if applicable) and Click OK to create a new connection with the same
integration settings specified in the selected connection.

Chapter 2 – External Data Connector Features – External Data Connector Tools
23
External Data Connector Tools ________________________________________
Query Builder
Profile Manager
View Error Log
Chapter 2 – External Data Connector Features – External Data Connector Tools
24
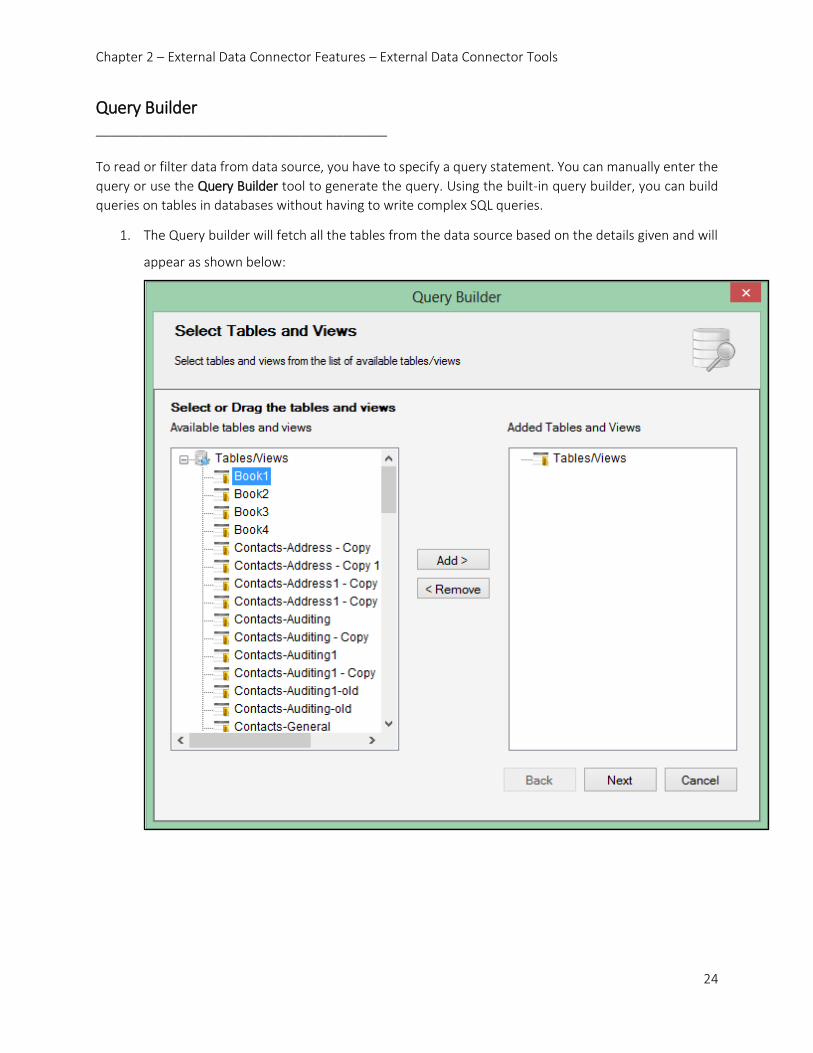
Query Builder ________________________________________
To read or filter data from data source, you have to specify a query statement. You can manually enter the
query or use the Query Builder tool to generate the query. Using the built-in query builder, you can build
queries on tables in databases without having to write complex SQL queries.
1. The Query builder will fetch all the tables from the data source based on the details given and will
appear as shown below:
Chapter 2 – External Data Connector Features – External Data Connector Tools
25
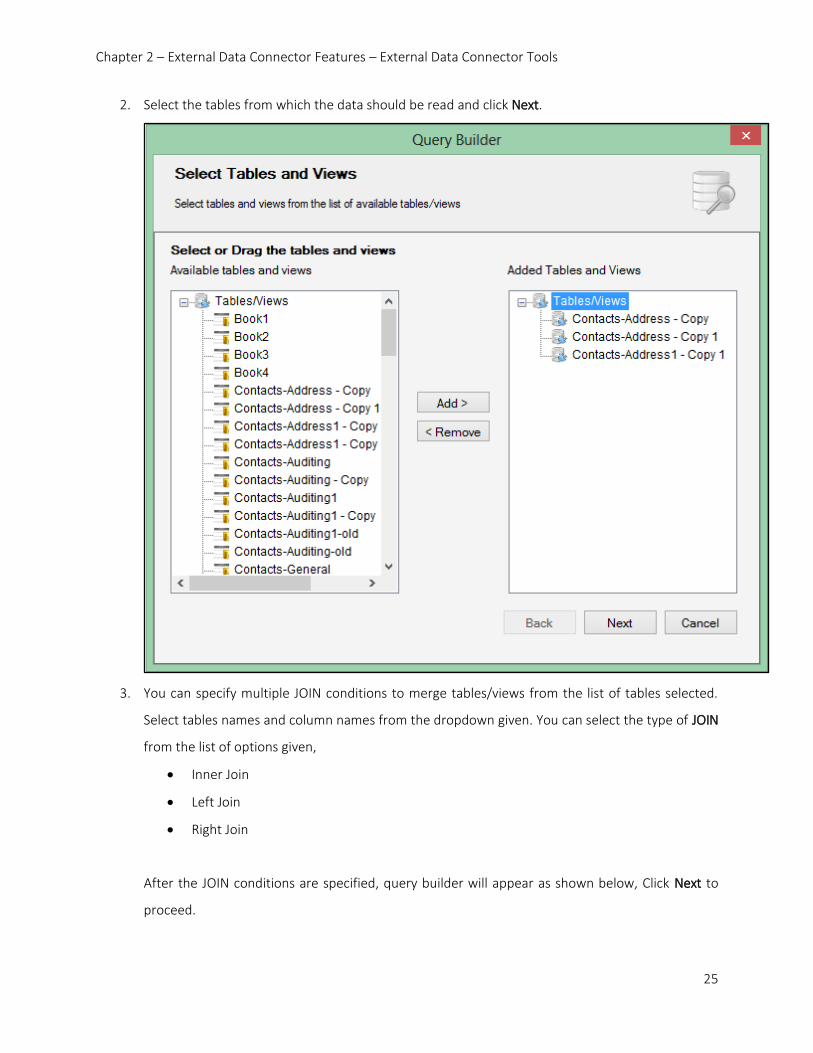
2. Select the tables from which the data should be read and click Next.
3. You can specify multiple JOIN conditions to merge tables/views from the list of tables selected.
Select tables names and column names from the dropdown given. You can select the type of JOIN
from the list of options given,
Inner Join
Left Join
Right Join
After the JOIN conditions are specified, query builder will appear as shown below, Click Next to
proceed.

Chapter 2 – External Data Connector Features – External Data Connector Tools
26

Chapter 2 – External Data Connector Features – External Data Connector Tools
27
4. Specify filter conditions if needed, based on the column name and column value. Click Next to
proceed.

Chapter 2 – External Data Connector Features – External Data Connector Tools
28
5. Select the columns which should be included in the query. External Data Connector will fetch values
only from the selected columns. By default, all column values will be fetched from data source.

Chapter 2 – External Data Connector Features – External Data Connector Tools
29
6. To retrieve aggregated results from multiple tables, you can specify aggregate conditions, for the
selected columns like shown below. This is an optional step, skip if not required.
Chapter 2 – External Data Connector Features – External Data Connector Tools
30
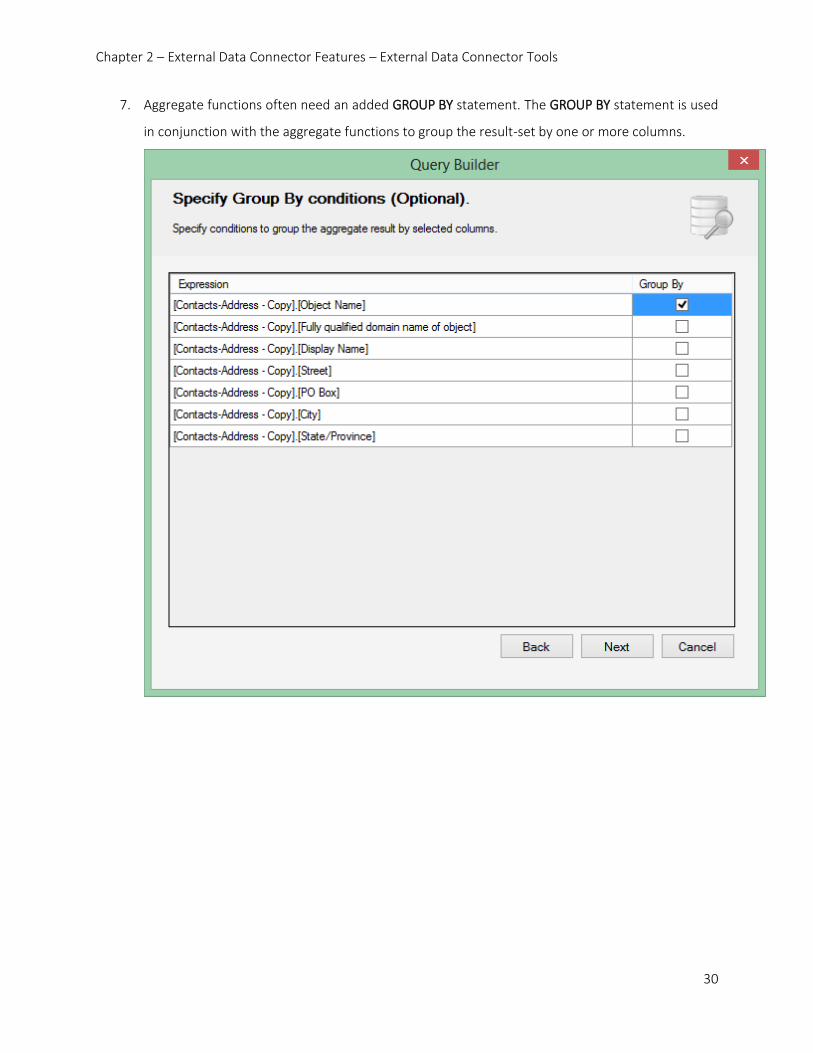
7. Aggregate functions often need an added GROUP BY statement. The GROUP BY statement is used
in conjunction with the aggregate functions to group the result-set by one or more columns.

Chapter 2 – External Data Connector Features – External Data Connector Tools
31
8. You can also specify ORDER BY conditions to sort the result-set by one or more columns. Click Next
to proceed.

Chapter 2 – External Data Connector Features – External Data Connector Tools
32
9. The Summary step shows all the conditions specified so far. Click Next to generate query for the
specified conditions, or click Back to edit the conditions.

Chapter 2 – External Data Connector Features – External Data Connector Tools
33
10. The Final Query step display the generated query from the specified conditions. Click Close to use
the generated query for integration, or click Back to edit the conditions.

Chapter 2 – External Data Connector Features – External Data Connector Tools
34
Profile Manager ________________________________________
You can create a user profile in Windows Stored User Names and Passwords applet, in order to specify the
user context to run External Data Connector integration connections.
The stored user profile persists for all subsequent logon sessions on the same computer where External
Data Connector is installed. The stored user profiles are visible to other logon sessions on the same
computer.
The stored user profile created by using External Data Connector Profile Manager is restricted to the
Windows User Profile context. If the Windows User Profile is maintained locally, External Data Connector
stored user profile is accessible only by the same user in the same computer. If the user who creates
External Data Connector stored user profile, has a Roaming user account in the enterprise, the External
Data Connector stored user profile can be accessed by the same user in any computer in the Windows
enterprise.
The stored user profile is a generic credential of Windows Stored User Names and Passwords applet and
can be used by External Data Connector application only. The credential information is stored securely in
an 256 bit encrypted format in Windows Stored User Names and Passwords applet.
1. In order to create a External Data Connector stored user profile, Click on ... button while specifying
authentication details for SharePoint or external data source in connection creation.

Chapter 2 – External Data Connector Features – External Data Connector Tools
35
2. The Profile Manager dialog will be shown as below:
3. In order to add user profile, click Add button and provide user information in the New User Profile
as shown below:

Chapter 2 – External Data Connector Features – External Data Connector Tools
36
4. The newly added user profile will be shown in the Profile Manager as below:
Henceforth, the stored user profile can be used as credential input in External Data Connector
application in order to connect to the SharePoint or Data Source environment.
5. Click Close button to close the Profile Manager dialog.
6. Additional References:
Behavior of stored user names and passwords
http://support.microsoft.com/kb/281660
Stored User Name and Password Best practices
http://technet.microsoft.com/en-us/library/cc784749(WS.10).aspx

Chapter 2 – External Data Connector Features – External Data Connector Tools
37
View Activity Log ________________________________________
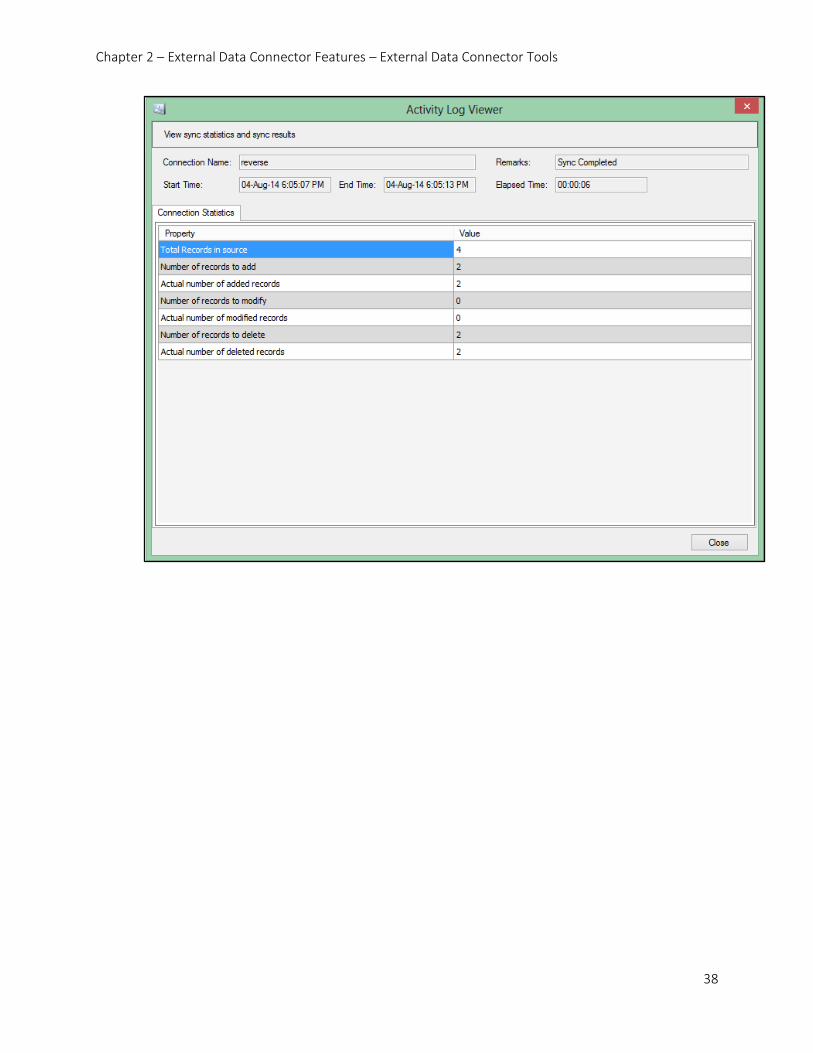
To view the activity log of External Data Connector perform the steps given below:
1. Click View Activity Log from the connection history pane.
2. On selecting the View Activity Log link in Connection history pane, a window will appear which
displays the statistics summary of the corresponding instance like shown below.
Chapter 2 – External Data Connector Features – External Data Connector Tools
38

Chapter 2 – External Data Connector Features – External Data to SharePoint
39
External Data Source to SharePoint ________________________________________
Create a Connection
Edit a Connection

Chapter 2 – External Data Connector Features – External Data to SharePoint
40
Create a Connection ________________________________________
Step 1 : Source SharePoint Location
Step 2 : Destination SharePoint Location
Step 3 : List Details
Step 4 : Data Source Summary
Step 5 : File Contents
Step 6 : Column Mapping
Step 7 : Configure Connection Startup

Chapter 2 – External Data Connector Features – External Data to SharePoint
41
External Data Source ________________________________________
To specify an External Data Source, from which you wish to integrate with a SharePoint site, perform the
steps given below:
1. The External Data Source step appears as shown below:

Chapter 2 – External Data Connector Features – External Data to SharePoint
42
2. Select a data source from the list of available data sources in the dropdown:
3. The login and other details will be displayed according to data source selected.
4. If the selected data source is a database, specify the login and other database details like shown
below:
5. If the selected data source is a file like XLSX, CSV etc, specify the location of a file. The location can
also be from a network shared drive.
Chapter 2 – External Data Connector Features – External Data to SharePoint
43
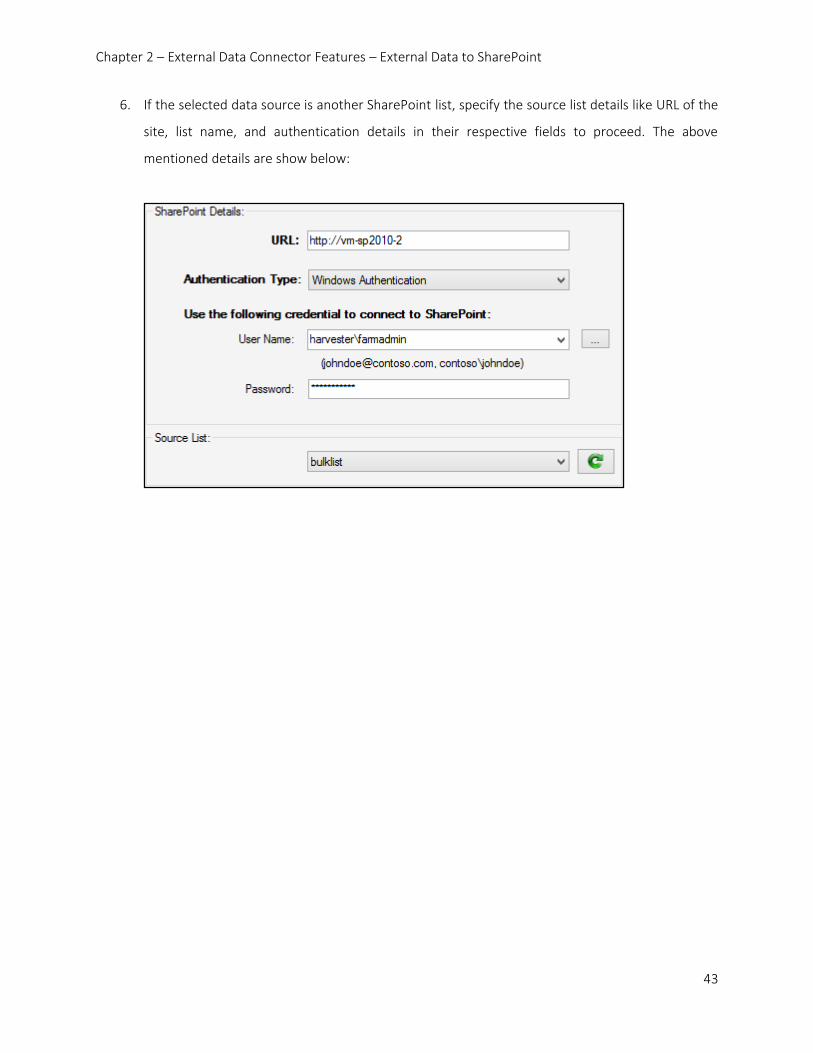
6. If the selected data source is another SharePoint list, specify the source list details like URL of the
site, list name, and authentication details in their respective fields to proceed. The above
mentioned details are show below:

Chapter 2 – External Data Connector Features – External Data to SharePoint
44
Destination SharePoint location ________________________________________
To specify a SharePoint URL of a site, in which you wish to integrate data from an external data source,
perform the steps given below:
1. The Destination SharePoint location step appears as shown below:
2. Specify a valid SharePoint URL in the URL textbox. External Data Connector will load all the lists
from the specified SharePoint site, if the site URL and authentication is valid.
3. Specify the Authentication type and user credentials to connect to the SharePoint URL using the
options given below :

Chapter 2 – External Data Connector Features – External Data to SharePoint
45
a. Specify the Authentication Type
Windows Authentication
Forms Authentication
Office 365 Cloud based identity
Federated Authentication
b. Specify the user credentials
Specify the user context stored in the user profile (OR) Enter the user name in any ONE of the
following formats: \,UserName@DomainName, UserName and its corresponding password.
External Data Connector will initiate Windows authentication or Forms authentication depending
on configuration in the destination SharePoint site. Click Next button to proceed.
External Data Connector will store the user credential to connect to SharePoint in the Microsoft
Windows Stored User Names and Passwords applet / Credential Manager for security reasons. The
stored user profile is tied to the user context (currently logged on user account) in which the profile
is created.
Click ... button to create new user profile. Click here to view the details about Profile Manager
dialog.
Select Federated Identity in Authentication Type combo to connect to a SharePoint site (SharePoint
On-premise or SharePoint Online) using federated identity configured using ADFS. Also, select this
option to connect to Office 365 SharePoint Online configured using federated identity provider.
To connect to Office 365's SharePoint Online environment, you can use Web Single Sign-on option
for both Cloud Identity (Office 365 Online User Credential e.g., [email protected])
and Federated Identity (configured via ADFS e.g., [email protected]).

Chapter 2 – External Data Connector Features – External Data to SharePoint
46
Upon clicking Next button to proceed, you will be prompted for credential (username and
password) as shown below:

Chapter 2 – External Data Connector Features – External Data to SharePoint
47
Provide ID and Password in the respective textboxes and click Sign in button to proceed.
List details ________________________________________

Chapter 2 – External Data Connector Features – External Data to SharePoint
48
To specify the list to add list items from data source, or publish the data to a document library or export
to a drive, perform the steps given below:
1. The List details step appears as shown below:
2. If the data from external data source has to be published in a list as list items, select the Publish to
list option. Specify the list in which the items has to be added and also specify the action which has
to be performed, if the list item already exists in the list. Also, select the option given if the External

Chapter 2 – External Data Connector Features – External Data to SharePoint
49
Data Connector has to synchronize automatically, if the data doesn't exist in data source in
subsequent runs. The above mentioned settings are shown below:
3. If the data from the data source has to be published to a document library as a metadata file, select
the Publish to library option. Specify the other details like URL of the site to publish, library name,
list item settings to avoid redundant items, file name and file format. The file can be published in
XLSX, CSV and HTML formats. The above settings mentioned are shown below:
4. If the data from the data source has to be exported to any networked storage including local drive
or web folders as a metadata file, select the Export to drive option. Specify the location and format
of the file to export by clicking on Save As button. The above settings are shown below:

Chapter 2 – External Data Connector Features – External Data to SharePoint
50

Chapter 2 – External Data Connector Features – External Data to SharePoint
51
External Data Source Summary ________________________________________
If the selected data source is a database, data source summary step will be displayed which shows the
Connection string to use with the Database and the SELECT statement to query against the Database.
1. The External Data Source summary step appears as shown below:
2. Use the Manual query textbox, if the SELECT statement to filter the data source is known.
3. Or use Using Query builder option by clicking on the Query Builder button to form the SELECT
statement based on the requirement.
Refer Query Builder for more information.

Chapter 2 – External Data Connector Features – External Data to SharePoint
52
4. The entered Connection string and SELECT statement can be verified by clicking on the Verify
button. The result will be shown as below:

Chapter 2 – External Data Connector Features – External Data to SharePoint
53
File Contents ________________________________________
If the selected data source is a XLSX, CSV or a HTML file, the File Contents step will appear, which show the
contents of the file to be imported.
1. File Contents step will appear as shown below:
Chapter 2 – External Data Connector Features – External Data to SharePoint
54
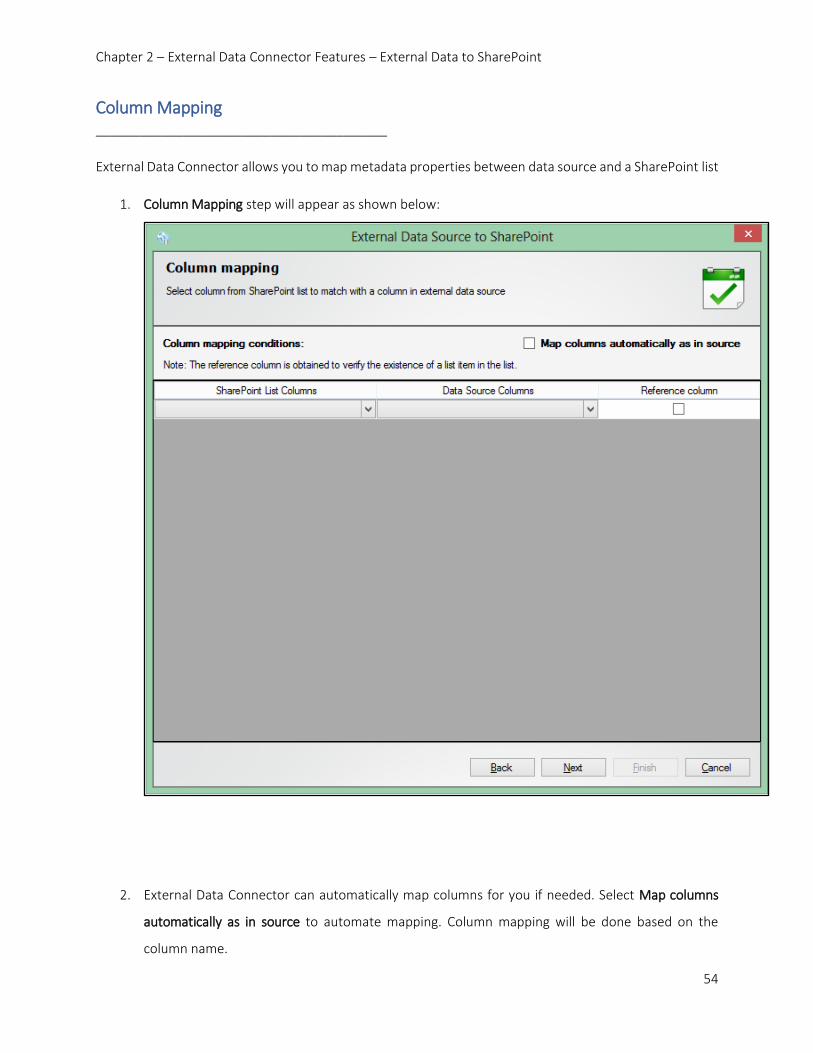
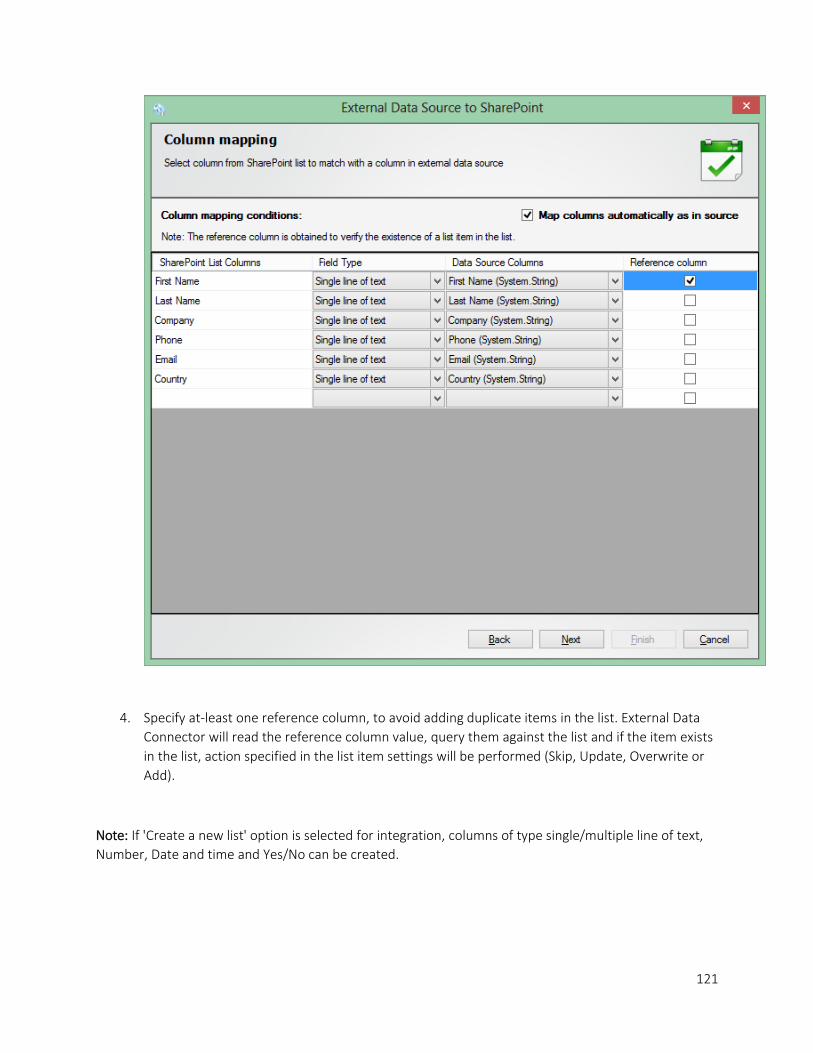
Column Mapping ________________________________________
External Data Connector allows you to map metadata properties between data source and a SharePoint list
1. Column Mapping step will appear as shown below:
2. External Data Connector can automatically map columns for you if needed. Select Map columns
automatically as in source to automate mapping. Column mapping will be done based on the
column name.

Chapter 2 – External Data Connector Features – External Data to SharePoint
55
3. If the selected list to add items is a new list, new columns will be created in the list if auto-mapping
option is selected. You can also select the type of column to be created in the list.

Chapter 2 – External Data Connector Features – External Data to SharePoint
56
4. Specify at-least one reference column, to avoid adding duplicate items in the list. External Data
Connector will read the reference column value, query them against the list and if the item exists
in the list, action specified in the list item settings will be performed (Skip, Update, Overwrite or
Add).
Note: If 'Create a new list' option is selected for integration, columns of type single/multiple line of text,
Number, Date and time and Yes/No can be created.
Configure Connection Startup ________________________________________
Chapter 2 – External Data Connector Features – External Data to SharePoint
57
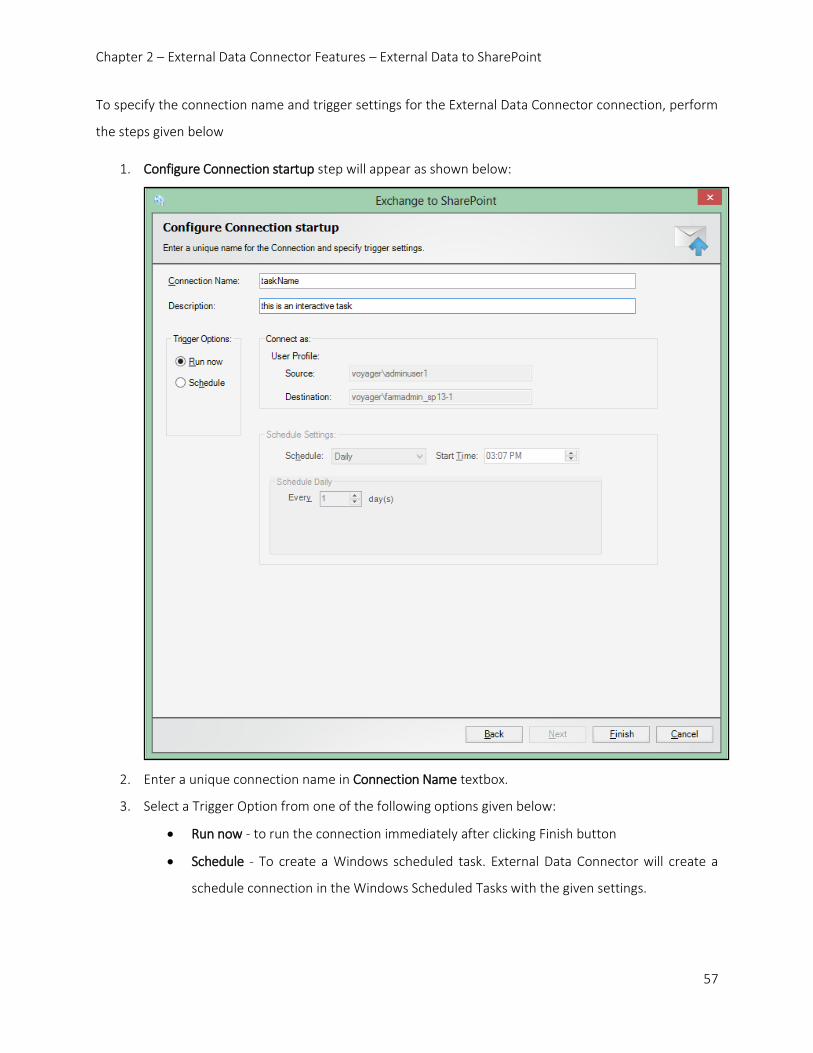
To specify the connection name and trigger settings for the External Data Connector connection, perform
the steps given below
1. Configure Connection startup step will appear as shown below:
2. Enter a unique connection name in Connection Name textbox.
3. Select a Trigger Option from one of the following options given below:
Run now - to run the connection immediately after clicking Finish button
Schedule - To create a Windows scheduled task. External Data Connector will create a
schedule connection in the Windows Scheduled Tasks with the given settings.

Chapter 2 – External Data Connector Features – External Data to SharePoint
58
4. You can also specify location to an executable or a script to execute once the sync gets completed,
if needed.

Chapter 2 – External Data Connector Features – External Data to SharePoint
59
Edit Connection ________________________________________
Edit connection is similar to creating a connection, except that a few settings cannot be altered as stated
below.
1. The External Data Connector Connection Wizard appears as shown below:
2. Specify the URL of the SharePoint site and authentication details in Destination SharePoint location
3. Specify External Data source details.
4. Specify List Details to add/publish items.

Chapter 2 – External Data Connector Features – External Data to SharePoint
60
5. In Data Source summary you can edit the query statement to read data from Data Source.
6. File Contents will display the content to be imported if the selected data source is a XLSX, CSV or a
HTML file.
7. Specify Column Mapping conditions.
8. In Configure Connection startup edit mode, the connection name cannot be altered.
9. Click Finish button to save the connection settings, or click Back button to go to the previous step.

Chapter 2 – External Data Connector Features – SharePoint to External Data
61
SharePoint to External Data Source ________________________________________
Create a Connection
Edit a Connection

Chapter 2 – External Data Connector Features – SharePoint to External Data
62
Create a Connection ________________________________________
Step 1 : Source SharePoint Location
Step 2 : External Data Source
Step 3 : Column Mapping
Step 4 : Configure Connection Startup
Chapter 2 – External Data Connector Features – SharePoint to External Data
63
Source SharePoint location ________________________________________
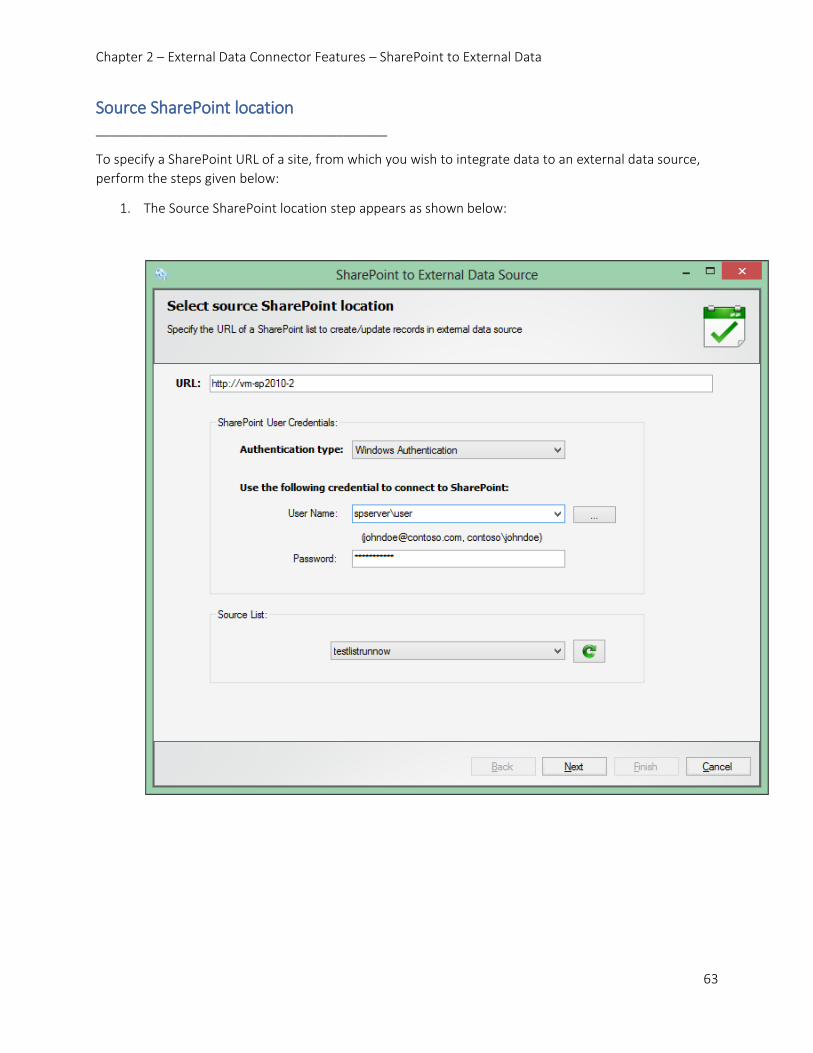
To specify a SharePoint URL of a site, from which you wish to integrate data to an external data source,
perform the steps given below:
1. The Source SharePoint location step appears as shown below:

Chapter 2 – External Data Connector Features – SharePoint to External Data
64
2. Specify a valid SharePoint URL and authentication details in the given fields. On clicking the
refresh button, External Data Connector will load all the lists from the specified SharePoint site.
Select a desired list and proceed.

Chapter 2 – External Data Connector Features – SharePoint to External Data
65
3. Specify the Authentication type and user credentials to connect to the SharePoint URL using the
options given below :
a. Specify the Authentication Type
Windows Authentication
Forms Authentication
Office 365 Cloud based identity
Federated Authentication
b. Specify the user credentials
Specify the user context stored in the user profile (OR) Enter the user name in any ONE of the
following formats: \,UserName@DomainName, UserName and its corresponding password.
External Data Connector will initiate Windows authentication or Forms authentication depending
on configuration in the destination SharePoint site. Click Next button to proceed.
External Data Connector will store the user credential to connect to SharePoint in the Microsoft
Windows Stored User Names and Passwords applet / Credential Manager for security reasons.
The stored user profile is tied to the user context (currently logged on user account) in which the
profile is created.
Click ... button to create new user profile. Click here to view the details about Profile Manager
dialog.
Select Federated Identity in Authentication Type combo to connect to a SharePoint site
(SharePoint On-premise or SharePoint Online) using federated identity configured using ADFS.
Also, select this option to connect to Office 365 SharePoint Online configured using federated
identity provider.
To connect to Office 365's SharePoint Online environment, you can use Web Single Sign-on
option for both Cloud Identity (Office 365 Online User Credential e.g.,
[email protected]) and Federated Identity (configured via ADFS e.g.,

Chapter 2 – External Data Connector Features – SharePoint to External Data
66

Chapter 2 – External Data Connector Features – SharePoint to External Data
67
Upon clicking Next button to proceed, you will be prompted for credential (username and
password) as shown below:
Provide ID and Password in the respective textboxes and click Sign in button to proceed.
Chapter 2 – External Data Connector Features – SharePoint to External Data
68
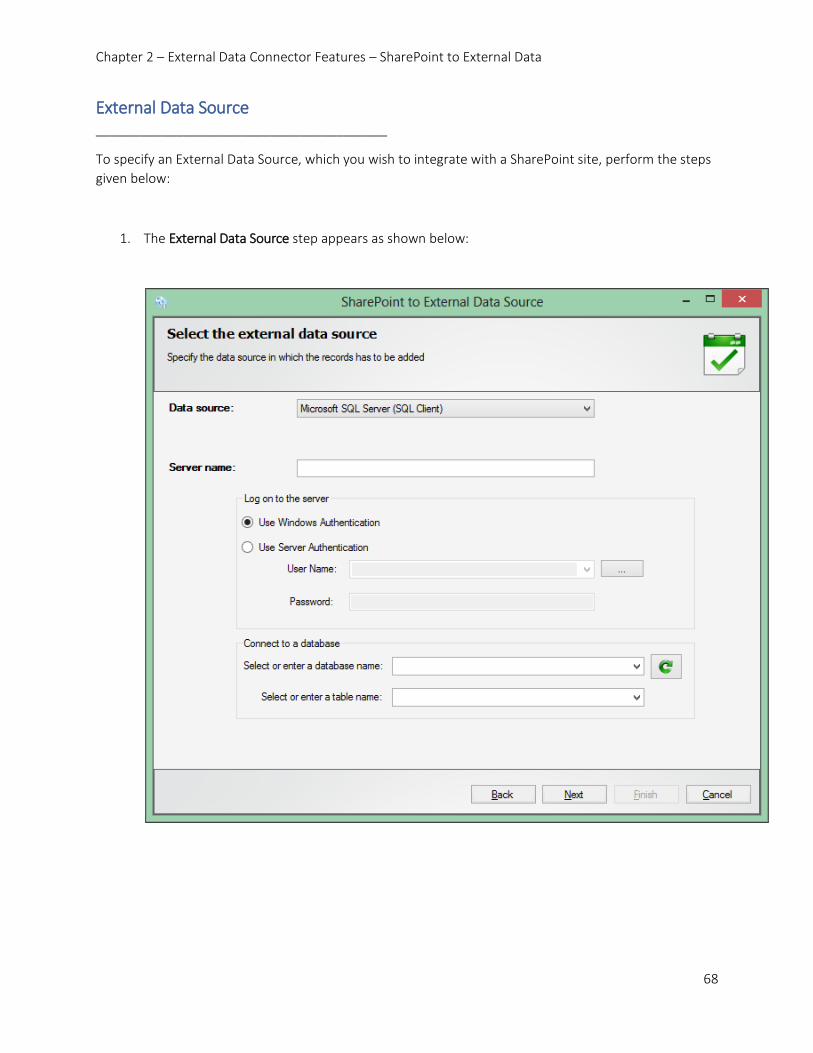
External Data Source ________________________________________
To specify an External Data Source, which you wish to integrate with a SharePoint site, perform the steps
given below:
1. The External Data Source step appears as shown below:

Chapter 2 – External Data Connector Features – SharePoint to External Data
69
2. Select a data source from the list of available data sources in the dropdown:
3. The login and other details will be displayed according to data source selected.
4. If the selected data source is a database, specify the login and other database details like shown
below:
5. If the selected data source is a file like XLSX, CSV etc, specify the location of a file. The location
can also be from a network shared drive.

Chapter 2 – External Data Connector Features – SharePoint to External Data
70
Column Mapping ________________________________________
External Data Connector allows you to map metadata properties between data source and a SharePoint
list.
1. Column Mapping step will appear as shown below:

Chapter 2 – External Data Connector Features – SharePoint to External Data
71
2. External Data Connector can automatically map columns for you if needed. Select Map columns
automatically as in source to automate mapping. Column mapping will be done based on the
column name.
3. Specify at-least one reference column, to proceed the operation. External Data Connector will
use this column value to find the records to be added or deleted from data source.
4. On clicking the Preview button, External Data Connector shows the list of records to be added,
deleted and modified in the data source.

Chapter 2 – External Data Connector Features – SharePoint to External Data
72

Chapter 2 – External Data Connector Features – SharePoint to External Data
73
Operations to perform ________________________________________
Using this window, you can disable certain options like Add / Update / Delete on moving records from
SharePoint to External Data Source.
1. Operations to perform step will appear as shown below:
2. Select the options which you want to perform or unselect the options which you don't want to,
and then click Next.

Chapter 2 – External Data Connector Features – SharePoint to External Data
74
Configure Connection Startup ________________________________________
To specify the connection name and schedule settings for the External Data Connector connection,
perform the steps given below
1. Configure Connection startup step will appear as shown below:
2. Enter a unique connection name in Connection Name textbox.
3. Select a Trigger Option from one of the following options given below:
Run now - to run the connection immediately after clicking Finish button
Schedule - To create a Windows scheduled task. External Data Connector will create a
schedule connection in the Windows Scheduled Tasks with the given settings.
Chapter 2 – External Data Connector Features – SharePoint to External Data
75
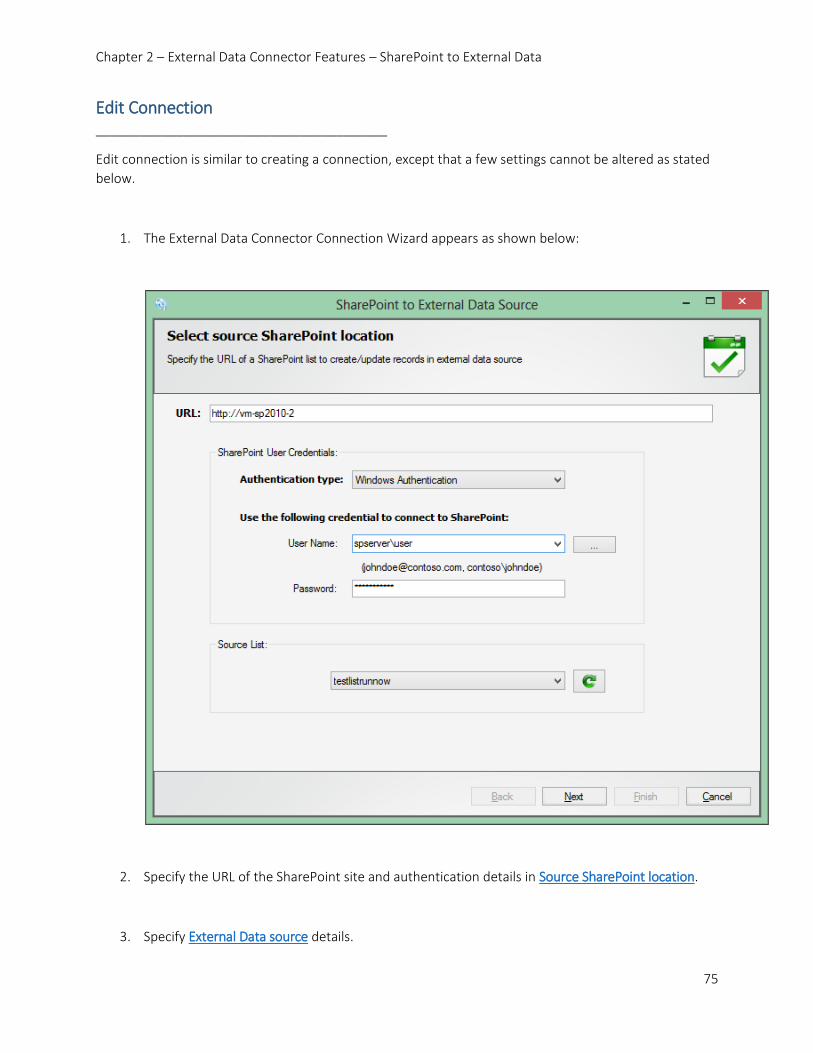
Edit Connection ________________________________________
Edit connection is similar to creating a connection, except that a few settings cannot be altered as stated
below.
1. The External Data Connector Connection Wizard appears as shown below:
2. Specify the URL of the SharePoint site and authentication details in Source SharePoint location.
3. Specify External Data source details.

Chapter 2 – External Data Connector Features – SharePoint to External Data
76
4. Specify Column Mapping conditions.
5. In Configure Connection startup edit mode, the connection name cannot be altered.
6. Click Finish button to save the connection settings, or click Back button to go to the previous step.

Chapter 2 – External Data Connector Features – External Data to SharePoint Library
77
Apply External metadata to SharePoint Library ________________________________________
Create a Connection
Edit a Connection

Chapter 2 – External Data Connector Features – External Data to SharePoint Library
78
Create a Connection ________________________________________
Step 1 : External Data Source
Step 2 : Destination SharePoint Location
Step 3 : Data source summary
Step 4 : File Contents
Step 5 : Column Mapping
Step 6 : Create new columns
Step 7 : Configure Connection Startup

79
External Data Source ________________________________________
To specify an External Data Source, from which you wish to integrate with a SharePoint site, perform the
steps given below:
1. The External Data Source step appears as shown below:

80
2. Select a data source from the list of available data sources in the dropdown:
3. The login and other details will be displayed according to data source selected.
4. If the selected data source is a database, specify the login and other database details like shown
below:
5. If the selected data source is a file like XLSX, CSV etc, specify the location of a file. The location
can also be from a network shared drive.

81
Destination SharePoint location ________________________________________
To specify a SharePoint URL of a site, in which you wish to integrate data from an external data source,
perform the steps given below:
1. The Destination SharePoint Location step appears as shown below:

82
2. Specify a valid SharePoint URL in the URL textbox. On clicking the Refresh button, External Data
Connector will load all the lists from the specified SharePoint site, if the site URL and
authentication is valid.
3. Specify the Authentication type and user credentials to connect to the SharePoint URL using the
options given below:
a. Specify the Authentication Type
Windows Authentication
Forms Authentication
Office 365 Cloud based identity
Federated Authentication
b. Specify the user credentials
Specify the user context stored in the user profile (OR) Enter the user name in any ONE of the
following formats: \,UserName@DomainName, UserName and its corresponding password.
External Data Connector will initiate Windows authentication or Forms authentication depending
on configuration in the destination SharePoint site. Click Next button to proceed.
External Data Connector will store the user credential to connect to SharePoint in the Microsoft
Windows Stored User Names and Passwords applet / Credential Manager for security reasons.
The stored user profile is tied to the user context (currently logged on user account) in which the
profile is created.
Click ... button to create new user profile. Click here to view the details about Profile Manager
dialog.
Select Federated Identity in Authentication Type combo to connect to a SharePoint site
(SharePoint On-premise or SharePoint Online) using federated identity configured using ADFS.
Also, select this option to connect to Office 365 SharePoint Online configured using federated
identity provider.
To connect to Office 365's SharePoint Online environment, you can use Web Single Sign-on
option for both Cloud Identity (Office 365 Online User Credential e.g.,
[email protected]) and Federated Identity (configured via ADFS e.g.,

83
84
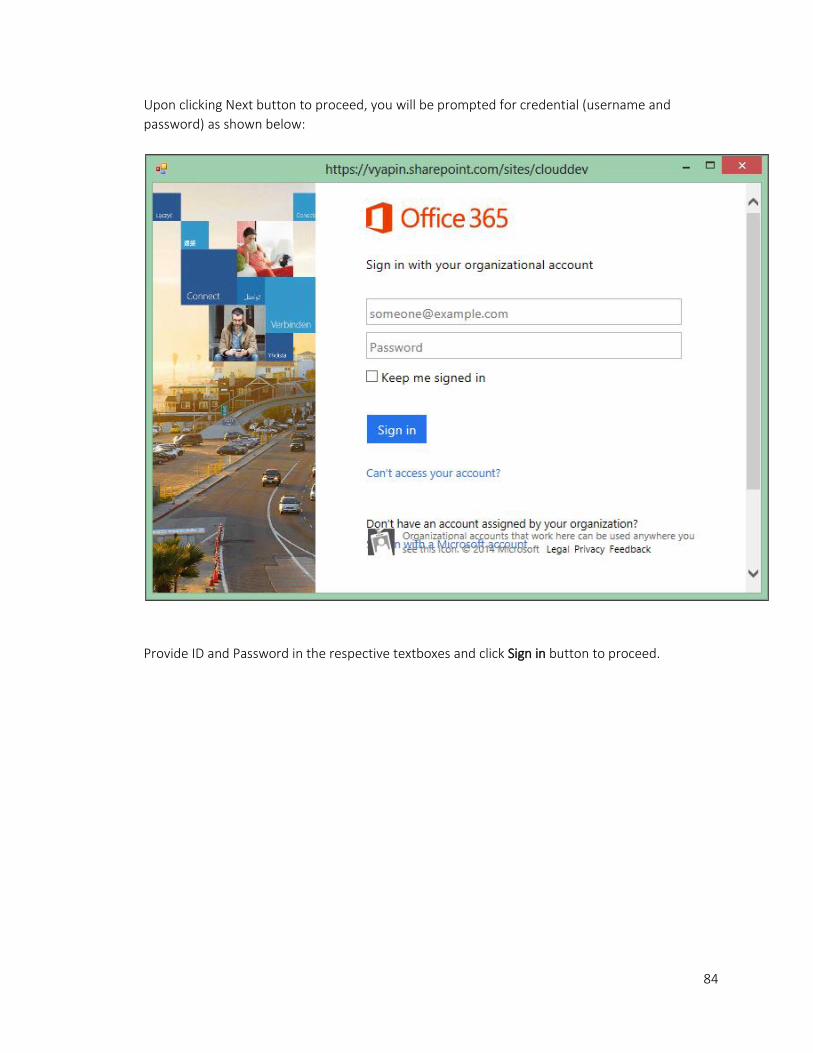
Upon clicking Next button to proceed, you will be prompted for credential (username and
password) as shown below:
Provide ID and Password in the respective textboxes and click Sign in button to proceed.

85
Data Source summary ________________________________________
If the selected data source is a database, data source summary step will be displayed which shows the
Connection string to use with the Database and the SELECT statement to query against the Database.
1. The External Data Source Summary step appears as shown below:
2. Use the Manual query textbox, if the SELECT statement to filter the data source is known.
86
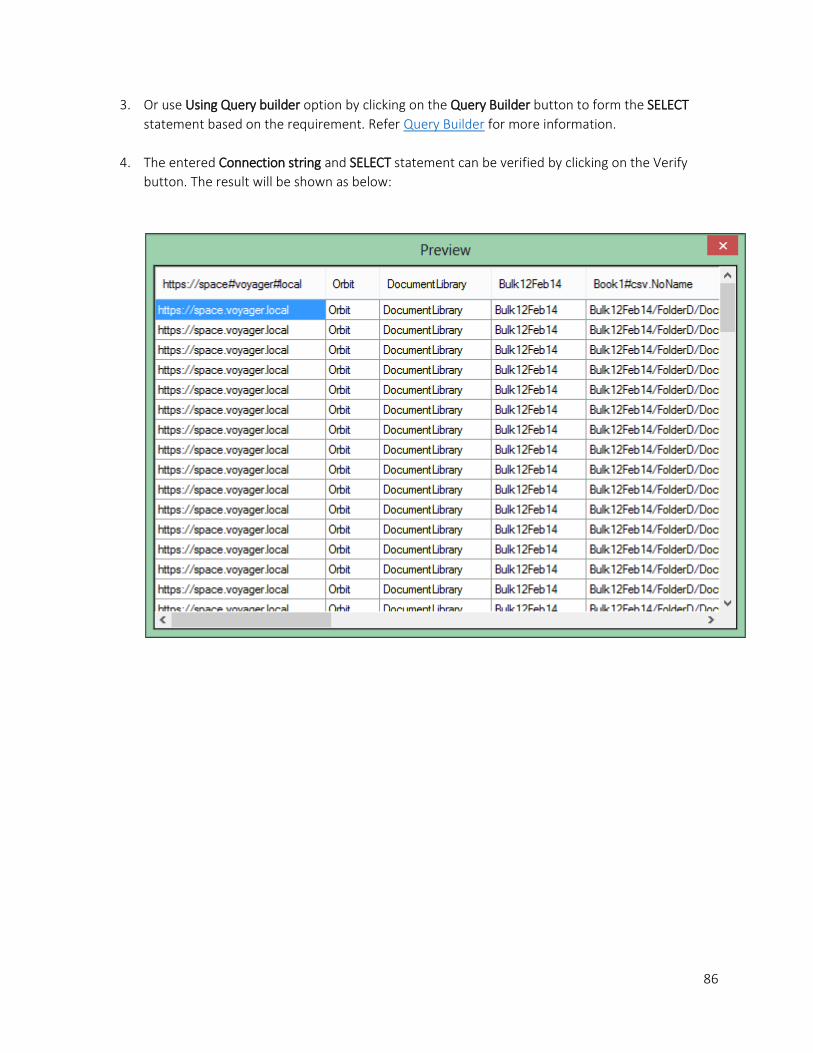
3. Or use Using Query builder option by clicking on the Query Builder button to form the SELECT
statement based on the requirement. Refer Query Builder for more information.
4. The entered Connection string and SELECT statement can be verified by clicking on the Verify
button. The result will be shown as below:
87
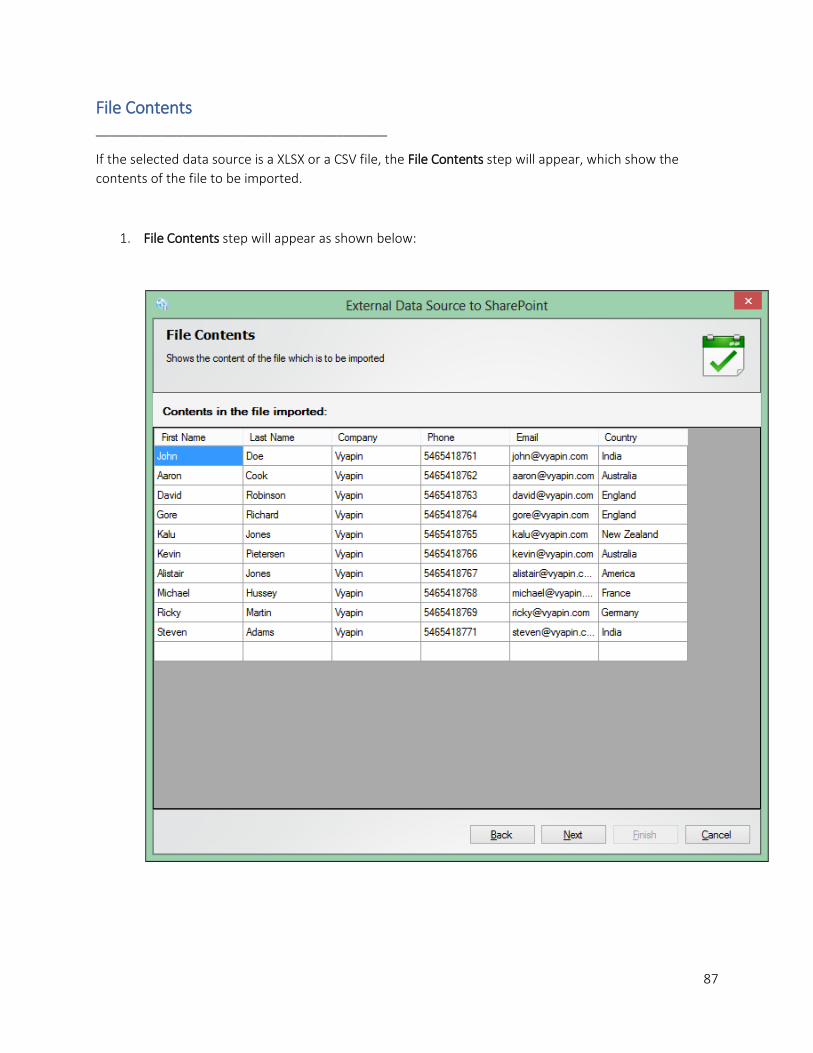
File Contents ________________________________________
If the selected data source is a XLSX or a CSV file, the File Contents step will appear, which show the
contents of the file to be imported.
1. File Contents step will appear as shown below:
88
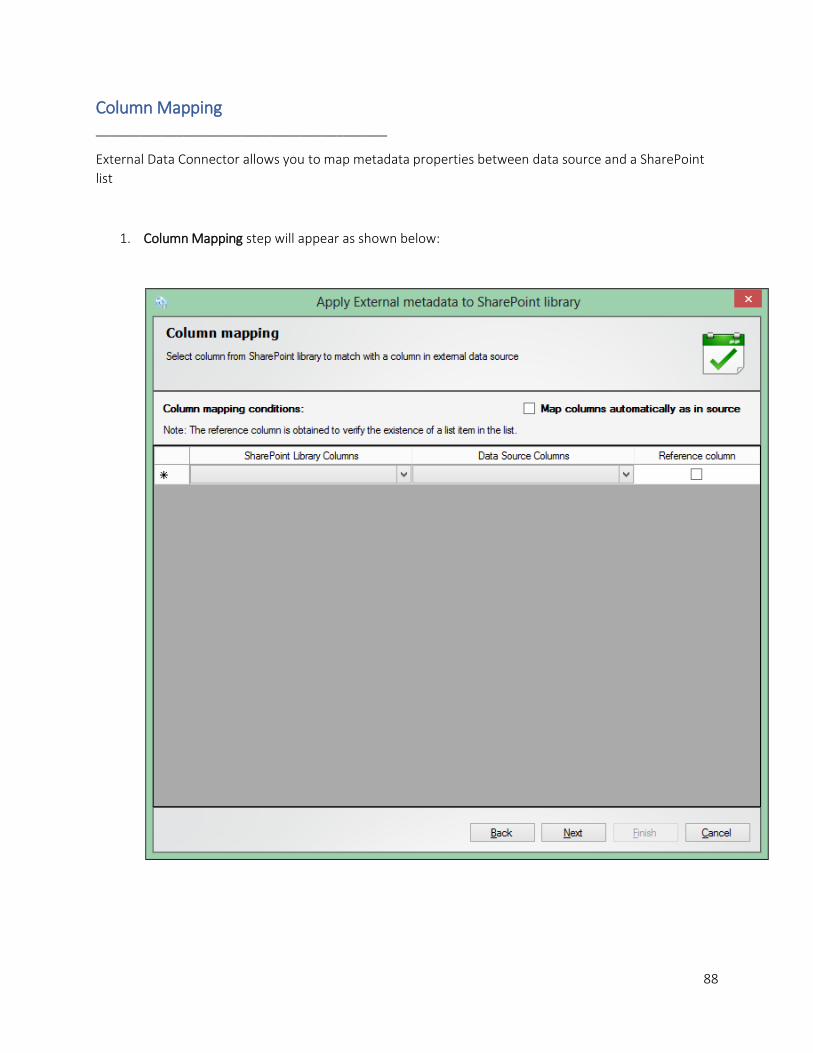
Column Mapping ________________________________________
External Data Connector allows you to map metadata properties between data source and a SharePoint
list
1. Column Mapping step will appear as shown below:

89
2. External Data Connector can automatically map columns for you if needed. Select Map columns
automatically as in source to automate mapping. Column mapping will be done based on the
column name.
3. Specify at-least one reference column, to fetch the corresponding document from SharePoint
library. External Data Connector will read the reference column value, query them against the list
and if the item exists in the list, the metadata of that document will be modified.

90
Create new columns ________________________________________
To specify the details of the columns to create during integration, perform the steps given below.
1. The Create new columns window will appear as shown below.
2. Specify the column details like column name and column type to create columns in SharePoint
library.
3. Data source field in this step will display the columns which are not mapped in the previous step.
Note: Columns of type single/multiple line of text, Number, Date and time and Yes/No can be created.

91
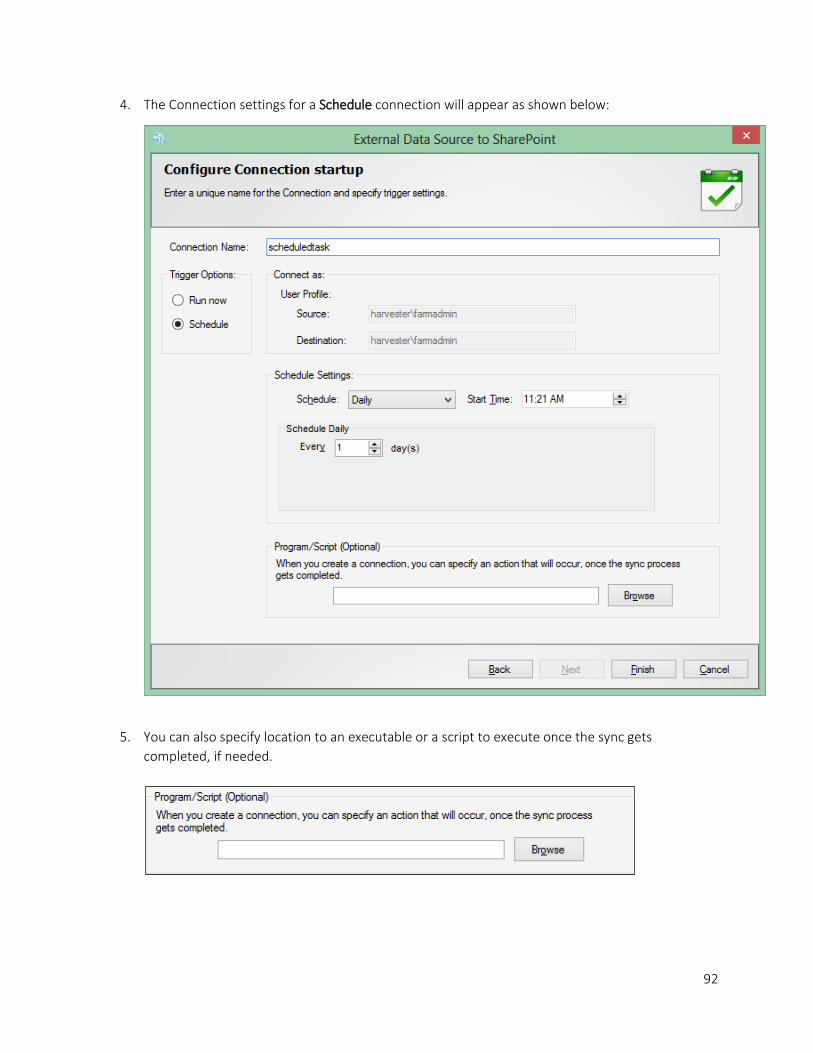
Configure Connection Startup ________________________________________
To specify the connection name and trigger settings for the External Data Connector connection, perform
the steps given below
1. Configure Connection startup step will appear as shown below:
2. Enter a unique connection name in Connection Name textbox.
3. Select a Connection Option from one of the following options given below:
Run now - to run the connection immediately after clicking Finish button
Schedule - To create a Windows scheduled task. External Data Connector will create a
schedule connection in the Windows Scheduled Tasks with the given settings.
92
4. The Connection settings for a Schedule connection will appear as shown below:
5. You can also specify location to an executable or a script to execute once the sync gets
completed, if needed.

Chapter 2 – External Data Connector Features – External Data to SharePoint Library
93
Edit Connection ________________________________________
Edit connection is similar to creating a connection, except that a few settings cannot be altered as stated
below.
1. The External Data Connector Connection Wizard appears as shown below:

Chapter 2 – External Data Connector Features – External Data to SharePoint Library
94
2. Specify External Data source details.
3. Specify the URL of the SharePoint site and authentication details in Destination SharePoint
location.
4. In Data Source summary you can edit the query statement to read data from Data Source.
5. File Contents will display the content to be imported if the selected data source is a XLSX, CSV or a
HTML file.
6. Specify Column Mapping conditions.
7. In Configure Connection startup edit mode, the connection name cannot be altered.
8. Click Finish button to save the connection settings, or click Back button to go to the previous step.

Chapter 2 – External Data Connector Features – External Data to SharePoint Library
95
Message Folders to SharePoint ________________________________________
Create a Connection
Edit a Connection

Chapter 2 – External Data Connector Features – External Data to SharePoint Library
96
Create a Connection ________________________________________
Step 1 : Exchange and Directory Server Details
Step 2 : Recipient Mailboxes
Step 3 : Folder Search
Step 4 : Item Attributes
Step 5 : Item Search
Step 6 : Mail Item Search
Step 7 : Destination SharePoint Location
Step 8: List Details
Step 9: Multi List Mapping
Step 10: Column Mapping
Step 11: Configure Connection Startup

97
Exchange and Directory Server details ________________________________________
In this window, you can specify details like Exchange server name, version and credentials to access the
Exchange server.
1. Exchange server details step will appear as shown below:
2. The user account specified, should have impersonation rights to impersonate mailboxes and to
access its mail items. For more details on configuring impersonation for a specified user, read
Configuring impersonation rights to a mailbox user

98
3. Specify the directory server details like server name and credentials, to fetch the mailboxes
corresponding to the specified exchange server.

99
Recipient Mailboxes ________________________________________
From this window, you can select multiple mailboxes to fetch mail items.
1. Recipient mailboxes step will appear as shown below:
2. On clicking Add button, a window will appear which contains all the mailboxes in the specified
directory server like shown below.

100
3. From this window, you can select multiple mailboxes to fetch mail items.

101
4. On selecting All Mailboxes option you can fetch mail items from all the mailboxes.

102
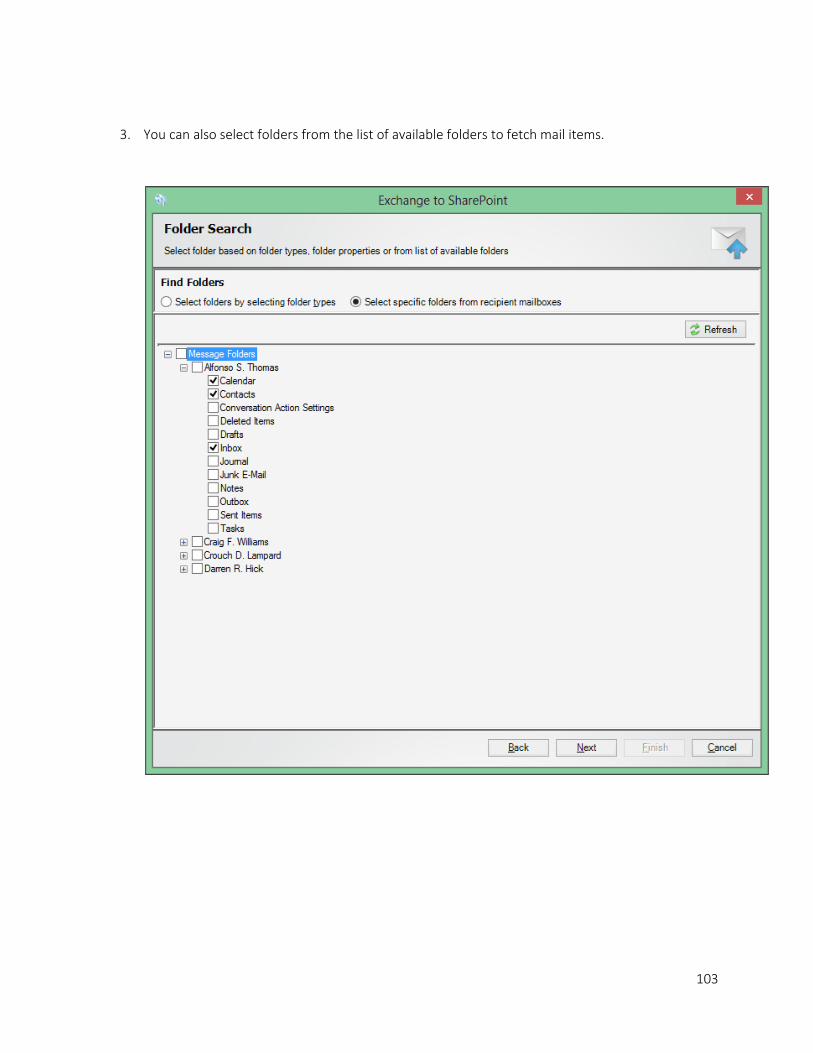
Folder Search ________________________________________
From this window, you can refine folder results by folder types, filter conditions or by selecting from the
list of available folders.
1. Folder Search step will appear as shown below:
2. The default option to filter folders is based on its folder types. You can select the types of folders
to filter from the entire folder collection available in the server
103
3. You can also select folders from the list of available folders to fetch mail items.

104
Item Attributes ________________________________________
From this window, the user can select item attributes for all the folder types.
1. Item Attributes window will appear as shown below:
2. From this window, the user can select the item attributes to fetch from the Exchange server.
3. Only the selected attributes, will be allowed for mapping in Column Mapping step. If none of the
columns are selected, the column mapping will be based on the destination list.

105
Item Search ________________________________________
Using this window, you can refine the item results by specifying item search conditons and also you can
save the specified search conditions as a template.
1. Item Search step will appear as shown below:
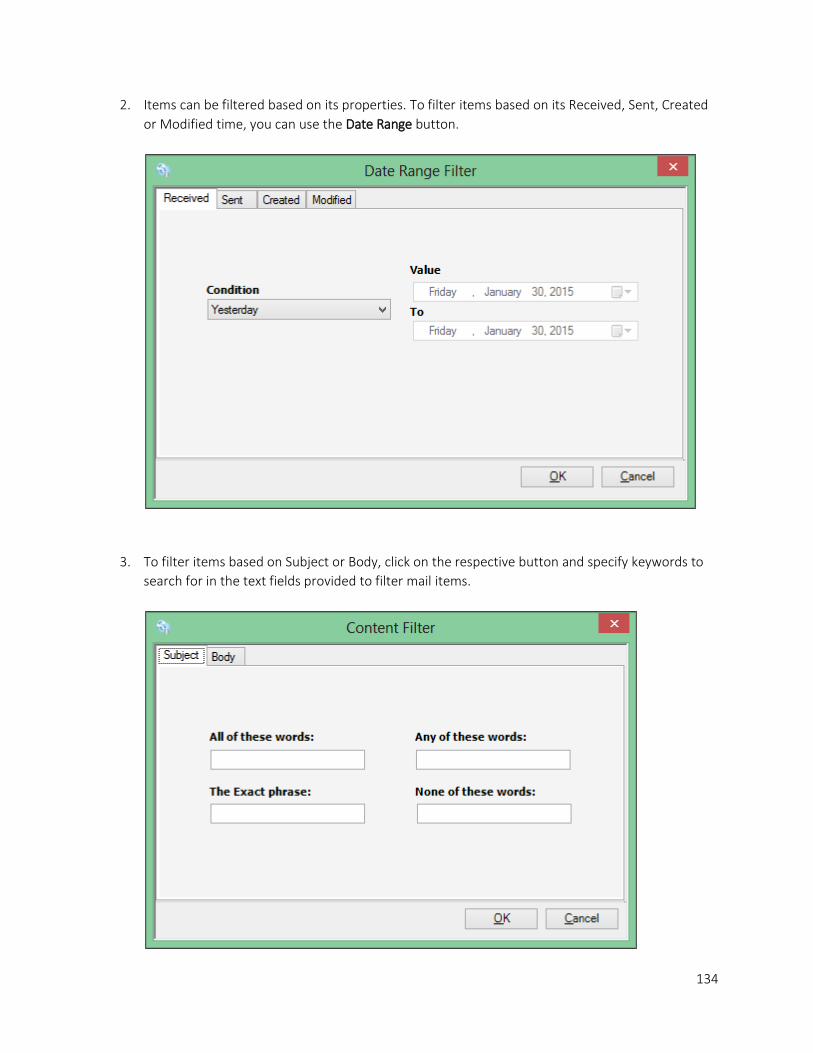
2. Items can be filtered based on its properties. To filter items based on its Received, Sent, Created
or Modified time, you can use the Date Range button.

106
3. To filter items based on Subject or Body, click on the respective button and specify keywords to
search for in the text fields provided to filter mail items.
4. To filter items based on the recipients, click on the respective button and select the users to filter
mail items corresponding to the selected users.
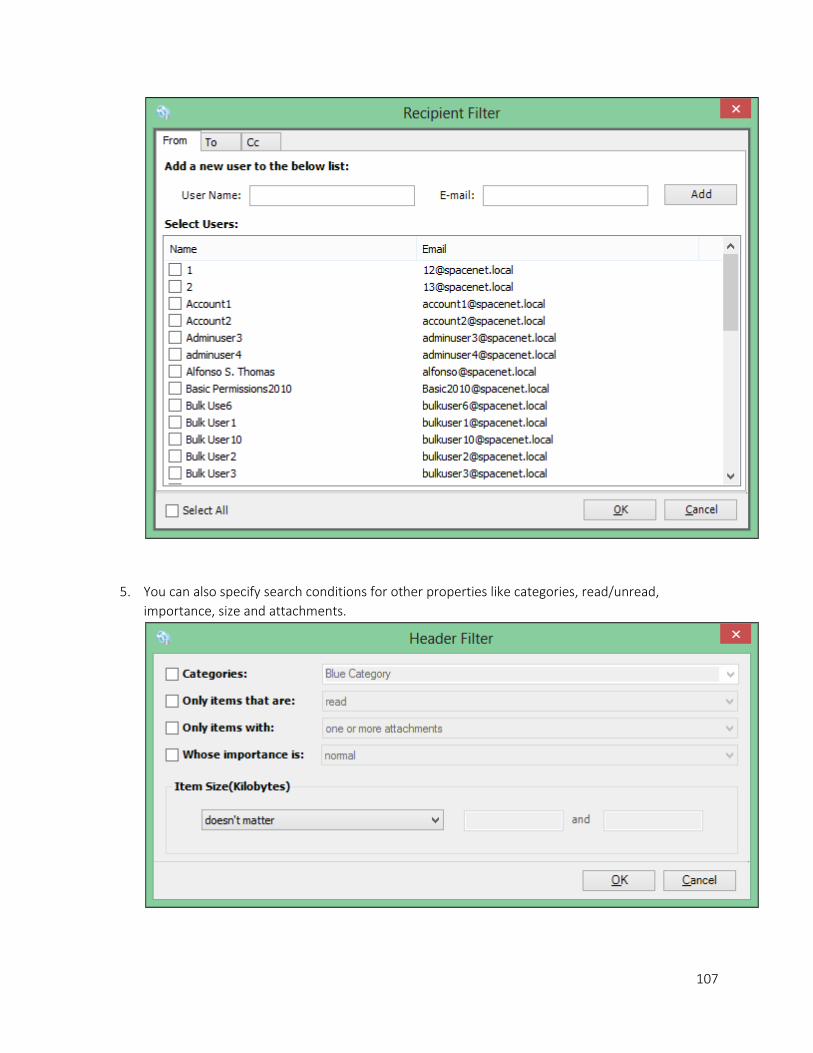
107
5. You can also specify search conditions for other properties like categories, read/unread,
importance, size and attachments.

108
6. If you want to save the search conditions as a search query, you can select the New Search Query
option and specify a name for the search query by clicking the Save this Search Query button. You
can also load item search conditions from Saved Search Queries.

109
Mail Item Settings ________________________________________
Using this window, you can specify additional options to bring in mail items from Exchange to SharePoint
list.
1. Mail Item Settings step will appear as shown below:
2. The additional options available in mail item settings are:

110
Fetch Attachments Only - Allows you to bring all the attachments from the filtered items to a
SharePoint library.
Fetch data from all the filtered items - Allows you to bring all the mail item properties to a
SharePoint list without attachments.
Fetch data and attachments from the filtered items - Allows you to bring both properties and
attachments from all the filtered items to a SharePoint list / library.

111
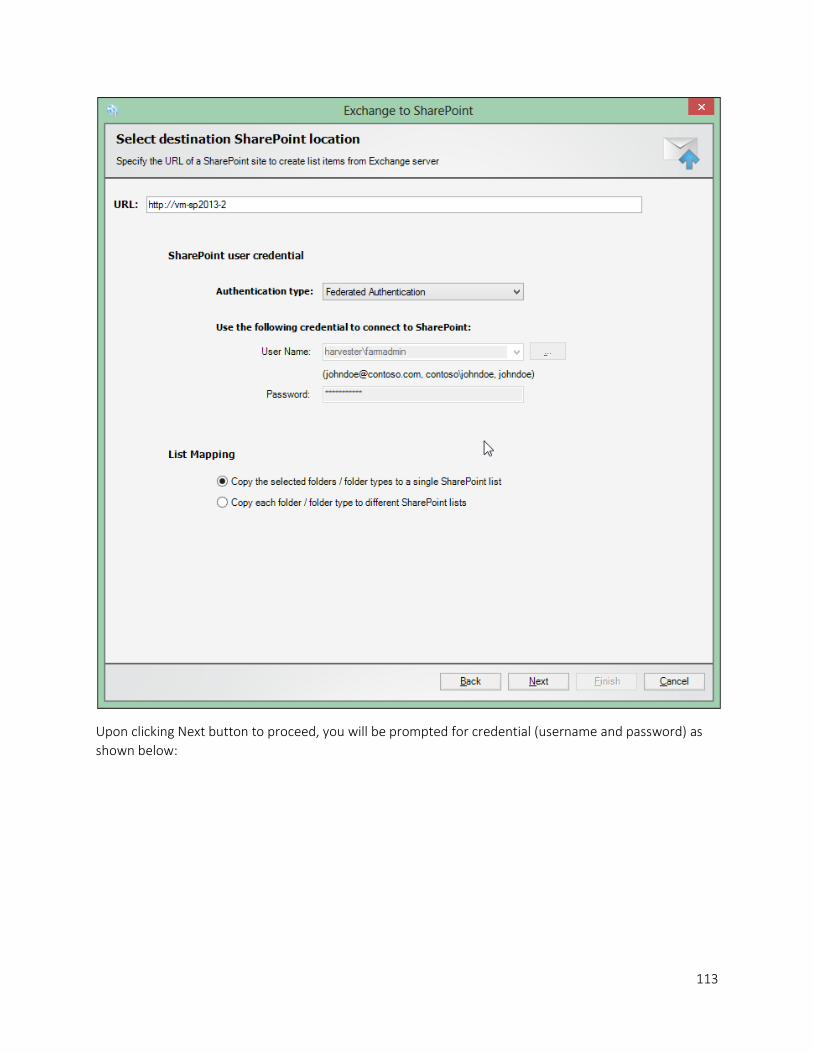
Destination SharePoint Location ________________________________________
To specify a SharePoint URL of a site, in which you wish to integrate data from an external data source,
perform the steps given below:
1. The Destination SharePoint location step appears as shown below:
2. Specify a valid SharePoint URL in the URL textbox. External Data Connector will load all the lists
from the specified SharePoint site, if the site URL and authentication is valid.
3. Specify the Authentication type and user credentials to connect to the SharePoint URL using the
options given below:

112
a. Specify the Authentication Type
Windows Authentication
Forms Authentication
Office 365 Cloud based identity
Federated Authentication
b. Specify the user credentials
Specify the user context stored in the user profile (OR) Enter the user name in any ONE of the
following formats: \,UserName@DomainName, UserName and its corresponding password.
External Data Connector will initiate Windows authentication or Forms authentication depending
on configuration in the destination SharePoint site. Click Next button to proceed.
External Data Connector will store the user credential to connect to SharePoint in the Microsoft
Windows Stored User Names and Passwords applet / Credential Manager for security reasons.
The stored user profile is tied to the user context (currently logged on user account) in which the
profile is created.
Click ... button to create new user profile.
Select Federated Identity in Authentication Type combo to connect to a SharePoint site
(SharePoint On-premise or SharePoint Online) using federated identity configured using ADFS.
Also, select this option to connect to Office 365 SharePoint Online configured using federated
identity provider.
To connect to Office 365's SharePoint Online environment, you can use Web Single Sign-on
option for both Cloud Identity (Office 365 Online User Credential e.g.,
[email protected]) and Federated Identity (configured via ADFS e.g.,
113
Upon clicking Next button to proceed, you will be prompted for credential (username and password) as
shown below:

114
Provide ID and Password in the respective textboxes and click Sign in button to proceed.

115
List Details ________________________________________
To specify the list to add list items from data source perform the steps given below:
1. The List details step appears as shown below:
2. Specify the list in which the items has to be added and also specify the action which has to be
performed, if the list item already exists in the list.
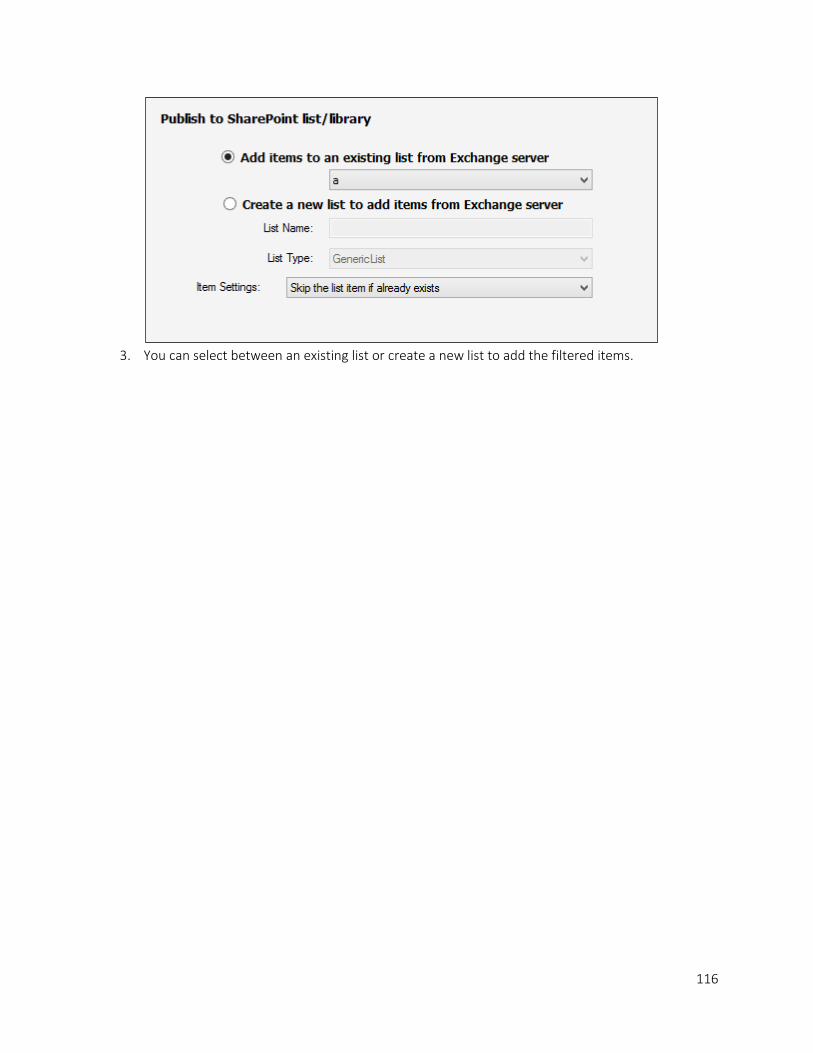
116
3. You can select between an existing list or create a new list to add the filtered items.
117
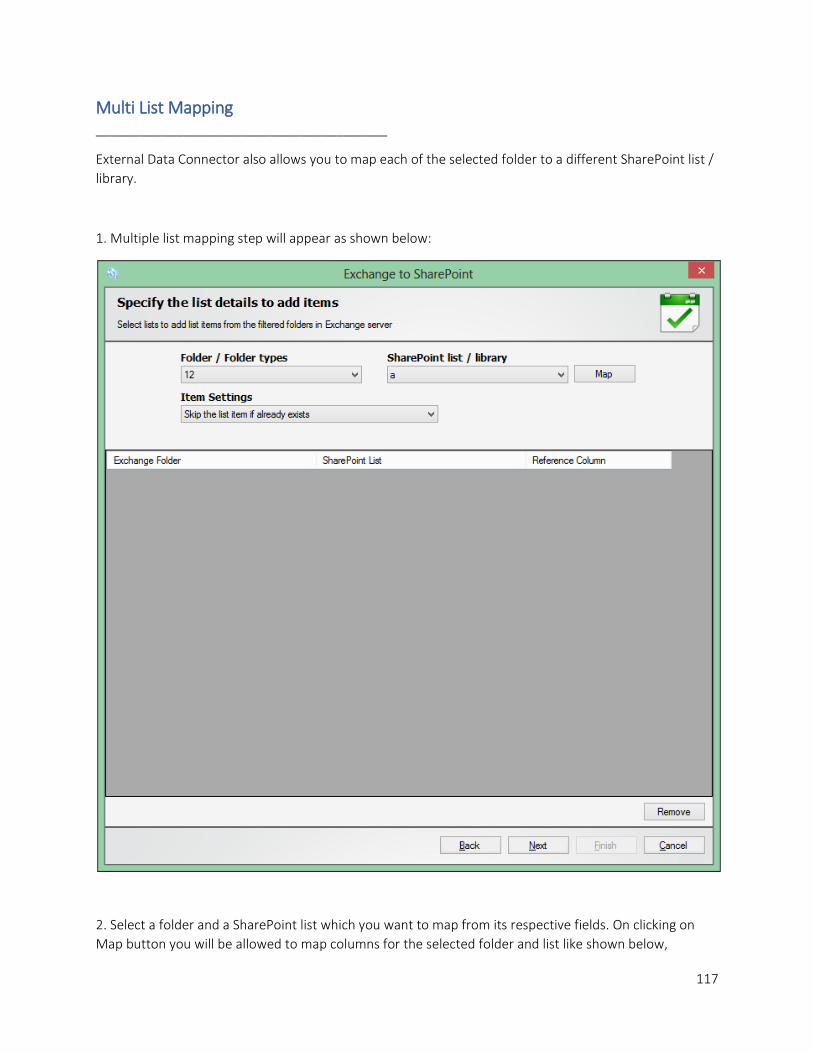
Multi List Mapping ________________________________________
External Data Connector also allows you to map each of the selected folder to a different SharePoint list /
library.
1. Multiple list mapping step will appear as shown below:
2. Select a folder and a SharePoint list which you want to map from its respective fields. On clicking on
Map button you will be allowed to map columns for the selected folder and list like shown below,

118
3. After mapping all the selected folders with columns, select the desired option in Item Settings to skip,
update, overwrite or add as new item, if the item already exists in the SharePoint list. Click Next to
proceed the operation.

119
Column Mapping ________________________________________
External Data Connector allows you to map metadata properties between data source and a SharePoint
list
1. Column Mapping step will appear as shown below:
2. External Data Connector can automatically map columns for you if needed. Select Map columns
automatically as in source to automate mapping. Column mapping will be done based on the
column name.

120
3. If the selected list to add items is a new list, new columns will be created in the list if auto-
mapping option is selected. You can also select the type of column to be created in the list.
121
4. Specify at-least one reference column, to avoid adding duplicate items in the list. External Data
Connector will read the reference column value, query them against the list and if the item exists
in the list, action specified in the list item settings will be performed (Skip, Update, Overwrite or
Add).
Note: If 'Create a new list' option is selected for integration, columns of type single/multiple line of text,
Number, Date and time and Yes/No can be created.

122
Configure Connection Startup ________________________________________
To specify the connection name and trigger settings for the External Data Connector connection, perform
the steps given below
1. Configure Connection startup step will appear as shown below:

123
2. Enter a unique connection name in Connection Name textbox.
3. Select a Trigger Option from one of the following options given below:
Run now - to run the connection immediately after clicking Finish button
Schedule - To create a Windows scheduled task. External Data Connector will create a schedule
connection in the Windows Scheduled Tasks with the given settings.

124
Edit a connection ________________________________________
Edit Connection is similar to creating a connection, except that a few settings cannot be altered as stated
below.
1. The External Data Connector Connection Wizard appears as shown below:
2. Specify Exchange and Directory server details
3. Select the Recipient mailboxes to fetch its mail items.
125
4. Specify Folder Search and Item Search conditions to refine folder and item results.
5. Specify Mail Item Settings to bring the data and attachments from Exchange server.
6. In Destination SharePoint location specify the URL of the site and other necessary details.
7. Specify list and column mapping details based on the option selected in Destination SharePoint
Location.
8. In Configure Connection startup edit mode, the connection name cannot be altered.
9. Click Finish button to save the connection settings, or click Back button to go to the previous step.

126
Public Folders to SharePoint ________________________________________
Create a Connection
Edit a Connection
127
Create a Connection ________________________________________
Step 1 : Exchange and Directory Server Details
Step 2 : Folder Search
Step 3 : Item Attributes
Step 4 : Item Search
Step 5 : Mail Item Settings
Step 6 : Destination SharePoint Location
Step 7 : List Details
Step 8 : Multi List Mapping
Step 9 : Column Mapping
Step 10 : Configure Connection Startup

128
Exchange server details ________________________________________
In this window, you can specify details like Exchange server name, version and credentials to access the
Exchange server.
1. Exchange server details step will appear as shown below:

129
2. The user account specified, should have impersonation rights to impersonate mailboxes and to
access its mail items. For more details on configuring impersonation for a specified user, read
Configuring impersonation rights to a mailbox user
3. Specify the directory server details like server name and credentials, to fetch the mailboxes
corresponding to the specified exchange server.

130
Folder Search ________________________________________
From this window, you can refine folder results by folder types, filter conditions or by selecting from the
list of available folders.
1. Folder Search step will appear as shown below:

131
2. The default option to filter folders is based on its folder types. You can select the types of folders
to filter from the entire folder collection available in the server
3. You can also select folders from the list of available folders to fetch mail items.

132
Item Attributes ________________________________________
From this window, the user can select item attributes for all the folder types.
1. Item Attributes window will appear as shown below:
2. From this window, the user can select the item attributes to fetch from the Exchange server.
3. Only the selected attributes, will be allowed for mapping in Column Mapping step. If none of the
columns are selected, the column mapping will be based on the destination list.

133
Item Search ________________________________________
Using this window, you can refine the item results by specifying item search conditions and also you can
save the specified search conditions as a template.
1. Item Search step will appear as shown below:
134
2. Items can be filtered based on its properties. To filter items based on its Received, Sent, Created
or Modified time, you can use the Date Range button.
3. To filter items based on Subject or Body, click on the respective button and specify keywords to
search for in the text fields provided to filter mail items.

135
4. To filter items based on the recipients, click on the respective button and select the users to filter
mail items corresponding to the selected users.
5. You can also specify search conditions for other properties like categories, read/unread,
importance, size and attachments.

136
6. If you want to save the search conditions as a search query, you can select the New Search Query
option and specify a name for the search query by clicking the Save this Search Query button. You
can also load item search conditions from Saved Search Queries.

137
Mail Item Settings ________________________________________
Using this window, you can specify additional options to bring in mail items from Exchange to SharePoint
list.
1. Mail Item Settings step will appear as shown below:
138
2. The additional options available in mail item settings are,
Fetch Attachments Only - Allows you to bring all the attachments from the filtered items to a
SharePoint library.
Fetch data from all the filtered items - Allows you to bring all the mail item properties to a
SharePoint list without attachments.
Fetch data and attachments from the filtered items - Allows you to bring both properties and
attachments from all the filtered items to a SharePoint list / library.

139
Destination SharePoint Location ________________________________________
To specify a SharePoint URL of a site, in which you wish to integrate data from an external data source,
perform the steps given below:
1. The Destination SharePoint location step appears as shown below:

140
2. Specify a valid SharePoint URL in the URL textbox. External Data Connector will load all the lists
from the specified SharePoint site, if the site URL and authentication is valid.
3. Specify the Authentication type and user credentials to connect to the SharePoint URL using the
options given below:
a. Specify the Authentication Type
Windows Authentication
Forms Authentication
Office 365 Cloud based identity
Federated Authentication
b. Specify the user credentials
Specify the user context stored in the user profile (OR) Enter the user name in any ONE of the
following formats: \,UserName@DomainName, UserName and its corresponding password.
External Data Connector will initiate Windows authentication or Forms authentication depending
on configuration in the destination SharePoint site. Click Next button to proceed.
External Data Connector will store the user credential to connect to SharePoint in the Microsoft
Windows Stored User Names and Passwords applet / Credential Manager for security reasons.
The stored user profile is tied to the user context (currently logged on user account) in which the
profile is created.
Click ... button to create new user profile. Click here to view the details about Profile Manager
dialog.
Select Federated Identity in Authentication Type combo to connect to a SharePoint site
(SharePoint On-premise or SharePoint Online) using federated identity configured using ADFS.
Also, select this option to connect to Office 365 SharePoint Online configured using federated
identity provider.
To connect to Office 365's SharePoint Online environment, you can use Web Single Sign-on
option for both Cloud Identity (Office 365 Online User Credential e.g.,
[email protected]) and Federated Identity (configured via ADFS e.g.,

141
Upon clicking Next button to proceed, you will be prompted for credential (username and
password) as shown below:

142
Provide ID and Password in the respective textboxes and click Sign in button to proceed.

143
List Details ________________________________________
To specify the list to add list items from data source perform the steps given below:
1. The List details step appears as shown below:

144
2. Specify the list in which the items has to be added and also specify the action which has to be
performed, if the list item already exists in the list.
3. You can select between an existing list or create a new list to add the filtered items.

145
Multi List Mapping ________________________________________
External Data Connector also allows you to map each of the selected folder to a different SharePoint list /
library.
1. Multiple list mapping step will appear as shown below:
146
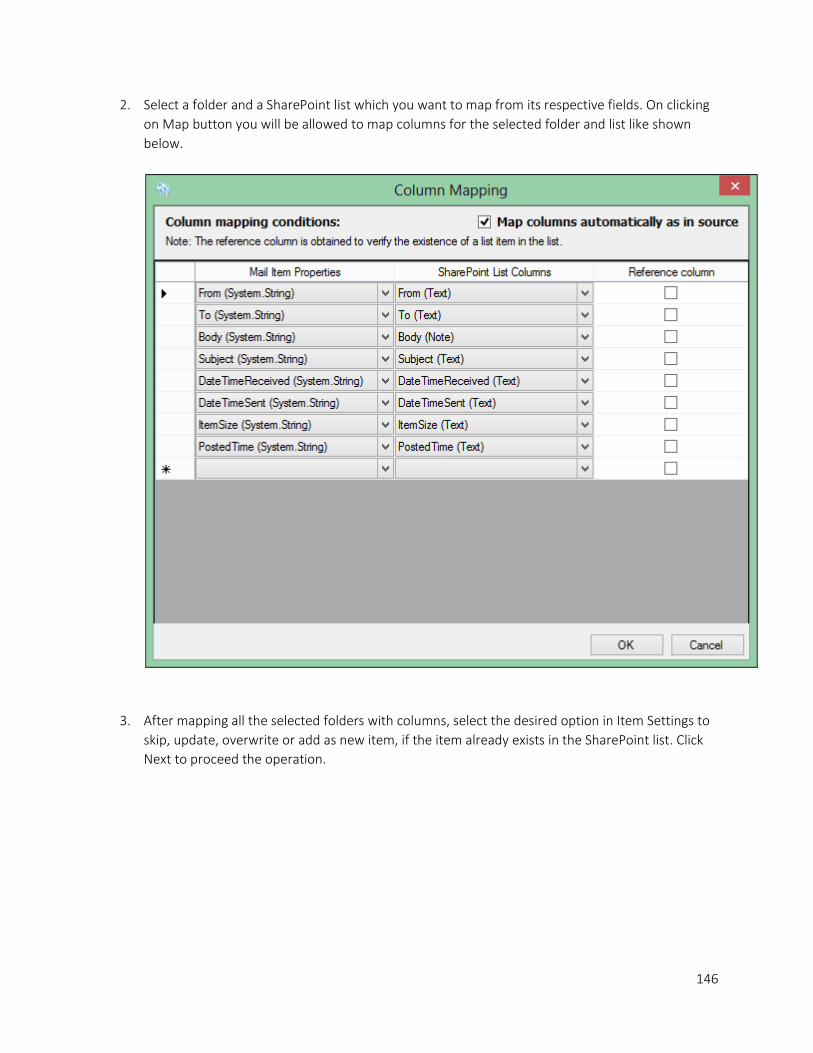
2. Select a folder and a SharePoint list which you want to map from its respective fields. On clicking
on Map button you will be allowed to map columns for the selected folder and list like shown
below.
3. After mapping all the selected folders with columns, select the desired option in Item Settings to
skip, update, overwrite or add as new item, if the item already exists in the SharePoint list. Click
Next to proceed the operation.

147
Column Mapping ________________________________________
External Data Connector allows you to map metadata properties between data source and a SharePoint
list
1. Column Mapping step will appear as shown below:

148
2. External Data Connector can automatically map columns for you if needed. Select Map columns
automatically as in source to automate mapping. Column mapping will be done based on the
column name.
3. If the selected list to add items is a new list, new columns will be created in the list if auto-
mapping option is selected. You can also select the type of column to be created in the list.
149
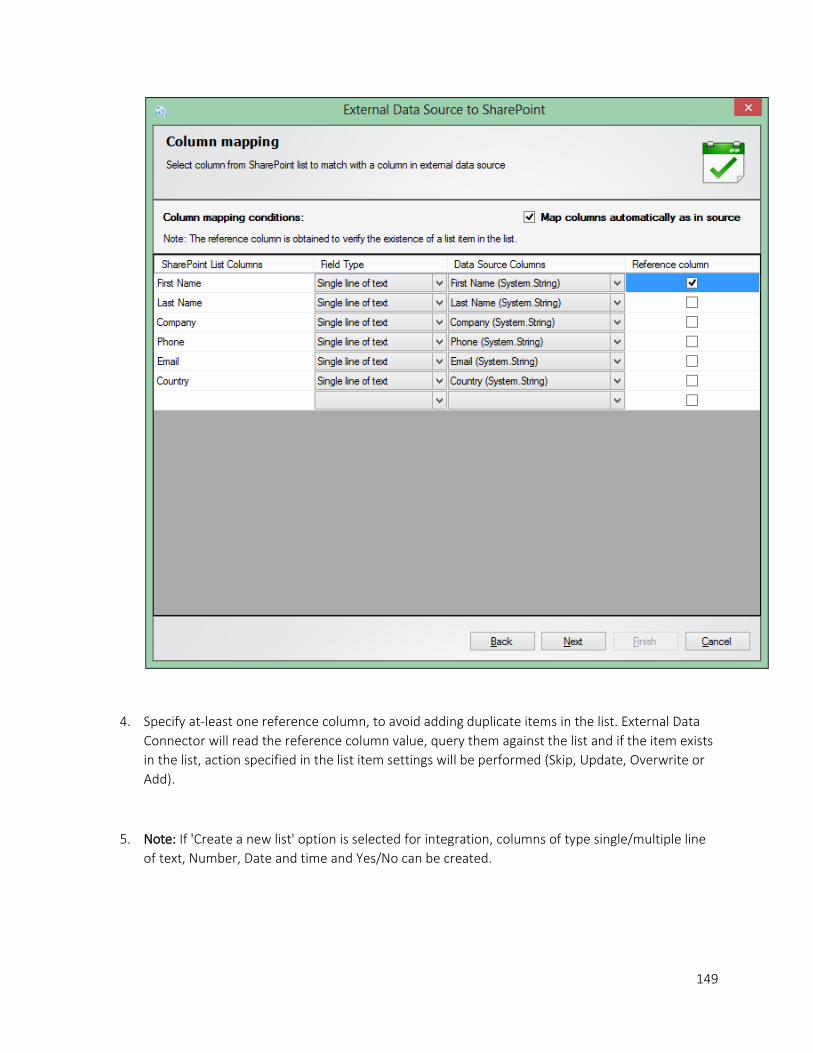
4. Specify at-least one reference column, to avoid adding duplicate items in the list. External Data
Connector will read the reference column value, query them against the list and if the item exists
in the list, action specified in the list item settings will be performed (Skip, Update, Overwrite or
Add).
5. Note: If 'Create a new list' option is selected for integration, columns of type single/multiple line
of text, Number, Date and time and Yes/No can be created.
150
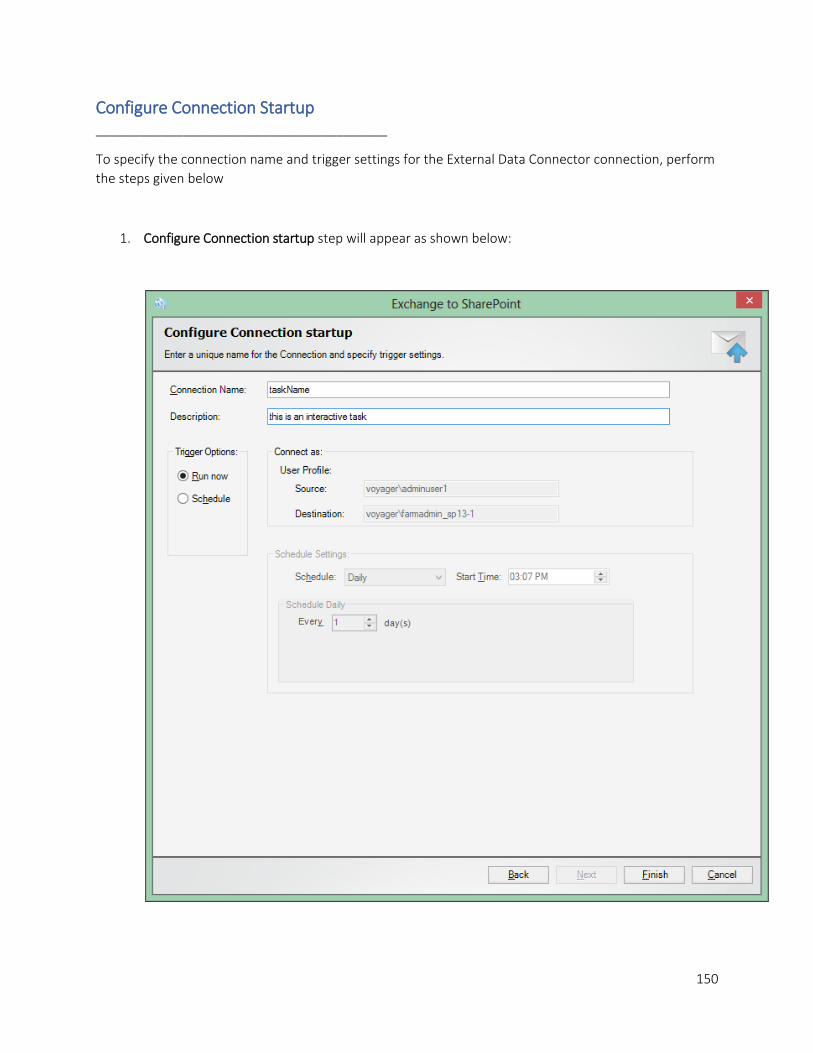
Configure Connection Startup ________________________________________
To specify the connection name and trigger settings for the External Data Connector connection, perform
the steps given below
1. Configure Connection startup step will appear as shown below:

151
2. Enter a unique connection name in Connection Name textbox.
3. Select a Trigger Option from one of the following options given below:
Run now - to run the connection immediately after clicking Finish button
Schedule - To create a Windows scheduled task. External Data Connector will create a schedule
connection in the Windows Scheduled Tasks with the given settings.
152
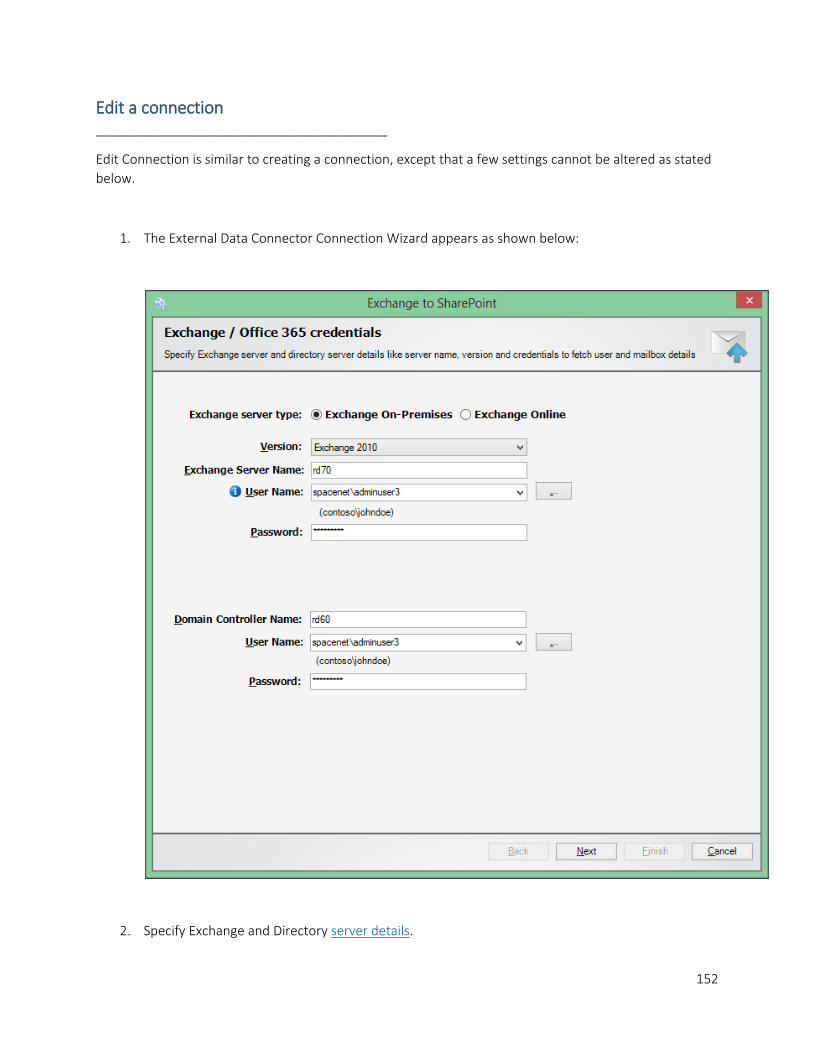
Edit a connection ________________________________________
Edit Connection is similar to creating a connection, except that a few settings cannot be altered as stated
below.
1. The External Data Connector Connection Wizard appears as shown below:
2. Specify Exchange and Directory server details.

153
3. Specify Folder Search and Item Search conditions to refine folder and item results.
4. Specify Mail Item Settings to bring the data and attachments from Exchange server.
5. In Destination SharePoint location specify the URL of the site and other necessary details.
6. Specify list and column mapping details based on the option selected in Destination SharePoint
Location.
7. In Configure Connection startup edit mode, the connection name cannot be altered.
8. Click Finish button to save the connection settings, or click Back button to go to the previous step.

154
Configuring impersonation rights ________________________________________
To assign Impersonation rights for a user, walk through the respective Exchange Server sections.
For Exchange Online
Please refer the following article:
https://msdn.microsoft.com/en-us/library/office/dn722376%28v=exchg.150%29.aspx
For Exchange 2013
Prerequisites:
Administrative credential for the server running Exchange 2013 to assign role for a user in EAC.
Using EAC:
o Create a mailbox enabled account, say ARKES Service Account in Exchange Server organization.
o Launch the Exchange Admin Center (EAC) and browse to Permissions -> Admin roles. Click the “+”
sign to add a new role.
To access the EAC by going to http://serverFQDN/ecp/default.aspx page

155
o Create a role with the following specifications.
Name: User Impersonate.
Description: User role with impersonation rights for EDC.
Write Scope: Default.
Roles: Add the Role name “ApplicationImpersonation”.
Members: Add the User “EDC Service Account”.

156
o Save the changes and wait for few minutes for the settings to replicate.
157
For Exchange 2010
Prerequisites:
I. Administrative credentials for the server running Exchange 2010 that has Client Access server
role installed.
II. Domain Administrator credentials, or a credential with permission to create and assign roles and
scopes.
III. Remote PowerShell installed on the computer from which you will run the command.
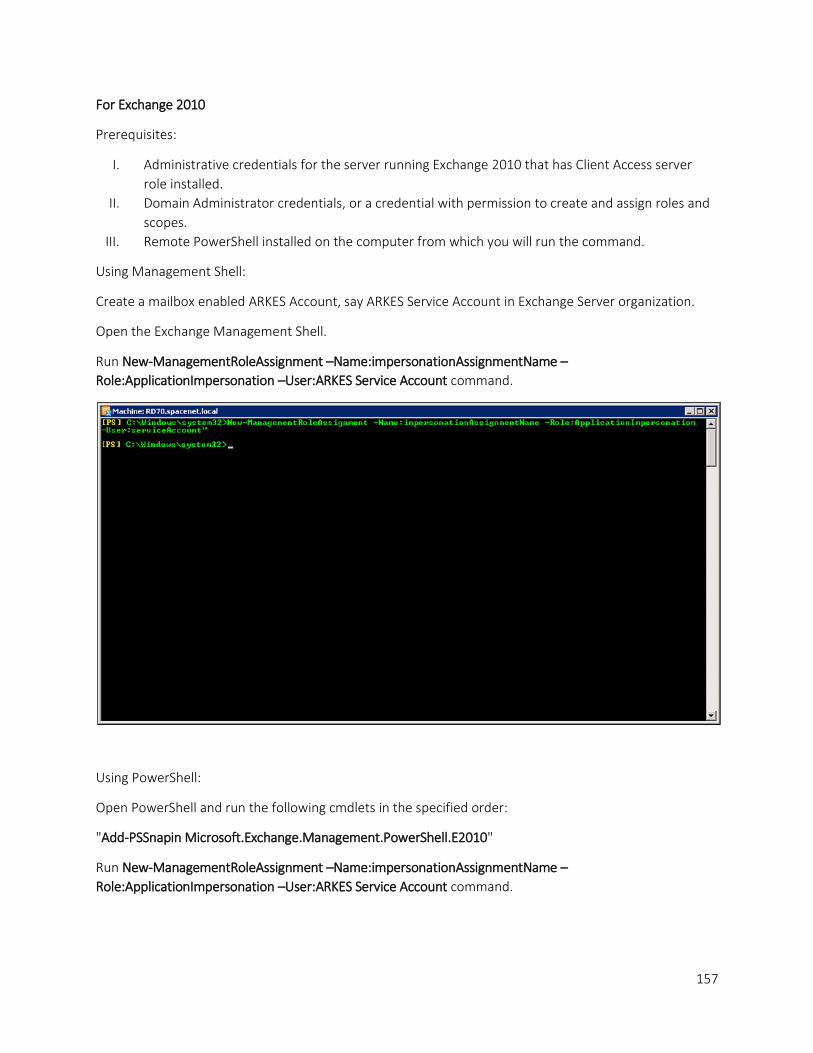
Using Management Shell:
Create a mailbox enabled ARKES Account, say ARKES Service Account in Exchange Server organization.
Open the Exchange Management Shell.
Run New-ManagementRoleAssignment –Name:impersonationAssignmentName –
Role:ApplicationImpersonation –User:ARKES Service Account command.
Using PowerShell:
Open PowerShell and run the following cmdlets in the specified order:
"Add-PSSnapin Microsoft.Exchange.Management.PowerShell.E2010"
Run New-ManagementRoleAssignment –Name:impersonationAssignmentName –
Role:ApplicationImpersonation –User:ARKES Service Account command.

158
For Exchange 2007
Prerequisites:
I. Administrative credentials for the server running Exchange 2007 that has Client Access server
role installed.
II. Domain Administrator credentials, or a credential with permission to create and assign roles and
scopes.
Using Management Shell:
o Create a mailbox enabled ARKES Account, say ARKES Service Account in Exchange Server
organization.
o Open the Exchange Management Shell.
Run Get-ExchangeServer | where {$_.IsClientAccessServer -eq $TRUE} | ForEach-Object
{Add-ADPermission -Identity $_.distinguishedname -User (Get-User -Identity ARKES Service
Account | select-object).identity -extendedRight ms-Exch-EPI-Impersonation} command.

159
Using PowerShell:
o Open PowerShell and run the following cmdlets in the specified order:
"Add-PSSnapin Microsoft.Exchange.Management.PowerShell.E2010"
Run Get-ExchangeServer | where {$_.IsClientAccessServer -eq $TRUE} | ForEach-Object
{Add-ADPermission -Identity $_.distinguishedname -User (Get-User -Identity ARKES Service
Account | select-object).identity -extendedRight ms-Exch-EPI-Impersonation} command.

160
References ________________________________________
Frequently Asked Questions
Error Messages and Resolution
Troubleshooting
How to uninstall External Data Connector?

161
Frequently Asked Questions ________________________________________
For frequently asked questions about the product, please refer to the Frequently Asked Questions section
in the website.
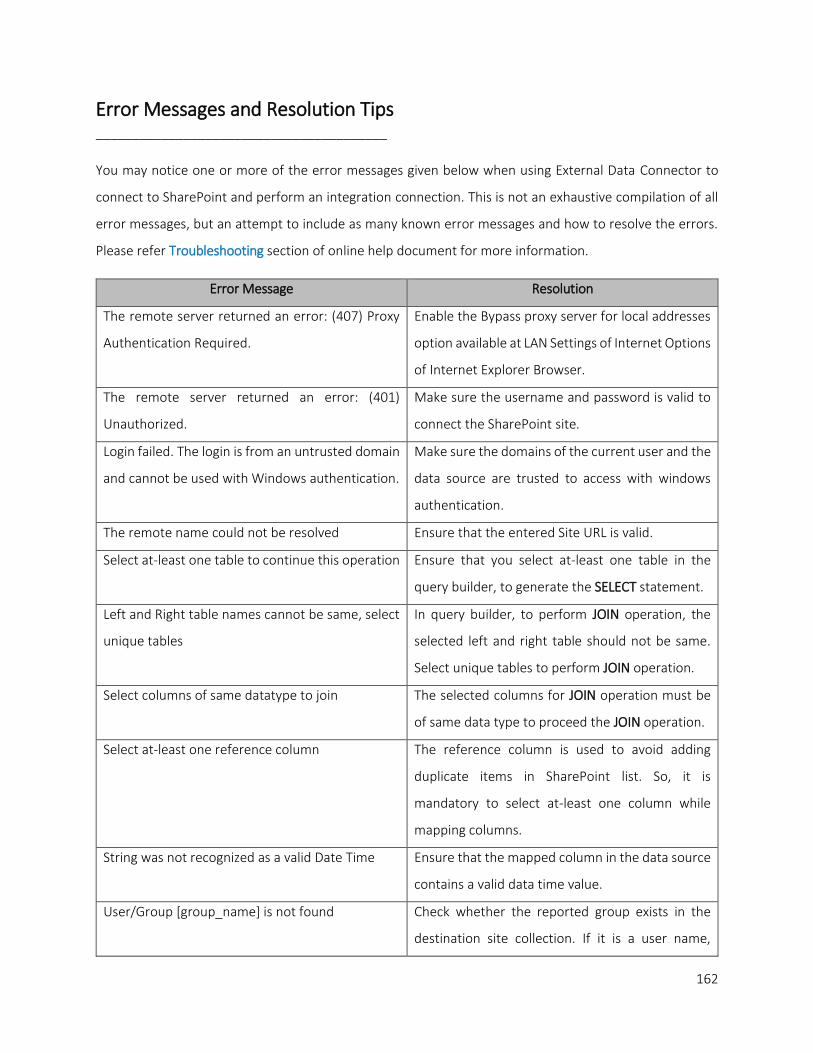
162
Error Messages and Resolution Tips ________________________________________
You may notice one or more of the error messages given below when using External Data Connector to
connect to SharePoint and perform an integration connection. This is not an exhaustive compilation of all
error messages, but an attempt to include as many known error messages and how to resolve the errors.
Please refer Troubleshooting section of online help document for more information.
Error Message Resolution
The remote server returned an error: (407) Proxy
Authentication Required.
Enable the Bypass proxy server for local addresses
option available at LAN Settings of Internet Options
of Internet Explorer Browser.
The remote server returned an error: (401)
Unauthorized.
Make sure the username and password is valid to
connect the SharePoint site.
Login failed. The login is from an untrusted domain
and cannot be used with Windows authentication.
Make sure the domains of the current user and the
data source are trusted to access with windows
authentication.
The remote name could not be resolved Ensure that the entered Site URL is valid.
Select at-least one table to continue this operation Ensure that you select at-least one table in the
query builder, to generate the SELECT statement.
Left and Right table names cannot be same, select
unique tables
In query builder, to perform JOIN operation, the
selected left and right table should not be same.
Select unique tables to perform JOIN operation.
Select columns of same datatype to join The selected columns for JOIN operation must be
of same data type to proceed the JOIN operation.
Select at-least one reference column The reference column is used to avoid adding
duplicate items in SharePoint list. So, it is
mandatory to select at-least one column while
mapping columns.
String was not recognized as a valid Date Time Ensure that the mapped column in the data source
contains a valid data time value.
User/Group [group_name] is not found Check whether the reported group exists in the
destination site collection. If it is a user name,

163
ensure that the given user name exists in the
corresponding SharePoint site or Active Directory
domain.

164
Troubleshooting ________________________________________
If and when a problem arises, please forward the following files to [email protected] to provide you
with the solution.
1. Error log file - e.g., \ExternalDataConnector1x\ErrorLog\ExternalDataConnectorErrorLog.txt
2. For issues while running a connection, the Error Log file will be generated in a date and time-stamp
folder within the connection folder name under 'TaskHistory' for scheduled connection and
'RunnowTasks' for interactive connection folders.
Error Log for Scheduled Connection: Error Log for Scheduled Connection: <Application Data
Folder>\ExternalDataConnector1x\TaskHistory\runnowtest\20140526024832\ErrorLog\Exter
nalDataConnectorErrorLog.txt
Error Log for Interactive Connection: <Application Data
Folder>\ExternalDataConnector1x\RunnowTasks\runnowtest\TaskHistory\20140526024750\
ErrorLog\ExternalDataConnectorErrorLog.txt
3. The <Application Data Folder> is the common location where External Data Connector connection
and their history will be stored in the computer running External Data Connector application. The
<Application Data Folder> can be found from Help -> About screen. The default path of
<Application Data Folder> is as follows:
Windows XP, Windows 2003 - C:\Documents and Settings\All Users\Documents
Windows 8.1, Windows 8, Windows 7, Windows 2012, Windows 2008, Windows Vista -
C:\Users\Public\Documents

165
How to uninstall External Data Connector? ________________________________________
When you create integration connections in External Data Connector, the application creates Windows
Scheduled Connections (to run the integration connections at the specified time interval) and Stored User
Profiles in the computer where External Data Connector is installed. Integration connection results for
every connection run instance is also maintained in the computer as application files.
When you uninstall External Data Connector through Control Panel - Add / Remove Programs applet,
Windows Installer program will remove only the application files from your machine. But, the application
related files created by External Data Connector remain in the computer. In order to remove External Data
Connector worker files completely, the uninstall wizard provides a set of cleanup options to perform the
cleanup operation based your selection.
Use this wizard to cleanup the files / profiles that are created by External Data Connector for SharePoint
application selectively and uninstall External Data Connector completely from the machine.

166
1. Launch the uninstall wizard by clicking Start -> Programs -> External Data Connector for SharePoint
-> External Data Connector Uninstall Wizard. External Data Connector uninstall wizard will be
shown as below:

167
2. Select required cleanup options as shown below:

168
3. Confirm the cleanup and/or uninstall process.
Click Finish to run cleanup and/or uninstall process. Click Cancel to close the wizard.
4. Once the file cleanup process is complete, the uninstall wizard will automatically run Windows
Installer program to remove External Data Connector application from the machine, if you have
selected the cleanup option Uninstall External Data Connector application in the wizard.

Chapter 4 – Index
169
Index ________________________________________
Database .................................................................................................................................................. 51
Exchange .......................................... 97, 104, 109, 124, 125, 128, 132, 137, 152, 153, 154, 157, 158, 159
External Data1, 2, 3, 8, 19, 23, 28, 34, 36, 39, 41, 44, 45, 49, 51, 54, 55, 56, 59, 160, 162, 165, 166, 168
Mailboxes ..................................................................................................... 97, 98, 99, 100, 101, 124, 129
SharePoint .................................. 1, 3, 8, 17, 18, 34, 36, 39, 40, 41, 43, 44, 45, 54, 59, 162, 163, 165, 166